

Page 1
MimioBoard ME-77 | ME-87
User Guide
mimio.com
Page 2

© 2013 Mimio. All rights reserved. Revised 7/18/2013.
No part of this document or the software may be reproduced or transmitted in any form
or by any means or translated into another language without the prior written consent
of Mimio.
Mimio, MimioClassroom, MimioTeach, MimioCapture, MimioVote, MimioView,
MimioHub, MimioBoard, MimioPad, MimioMobile, MimioProjector, and MimioStudio
are registered marks in the United States and other countries. All other trademarks are
the property of their respective holders.
Page 3

Contents
MimioBoard
What's Included 1
About MimioBoard 3
Status Lights 4
About MimioStudio 4
Getting Started
Setting Up MimioBoard 5
Installing MimioBoard 5
Connecting MimioBoard 11
Setting Up the Stylus 13
Setting Up Interactive Mode 13
Projecting Your Desktop 14
Calibrating Interactive Mode 14
Using MimioBoard
Using the Stylus 17
Using MimioStudio Tools 17
Caring for MimioBoard
17
19
1
5
Cleaning MimioBoard 19
Cleaning the MimioBoard Dry-Erase Surface 19
Cleaning the MimioBoard Frame and Stylus 19
Replacing the MimioTeach Bar 20
Technical and Environmental Information
Environmental Information 21
Safety Precautions for Lithium-Ion Rechargeable Batteries 21
Contacting Mimio 22
Documentation Feedback 22
21
iii
Page 4

This page intentionally left blank for double-sided printing.
iv
Page 5
MimioBoard is a dry-erasable, interactive whiteboard system. The board includes an
integrated MimioTeach bar, using MimioTeach technology to turn the MimioBoard surface
into an interactive whiteboard. Using MimioBoard with a projector and MimioStudio
classroom software, you can create and deliver lessons and presentations directly from your
MimioBoard. Using the included stylus, you can control the movement of your computer
cursor, much like you would with a mouse at your computer.
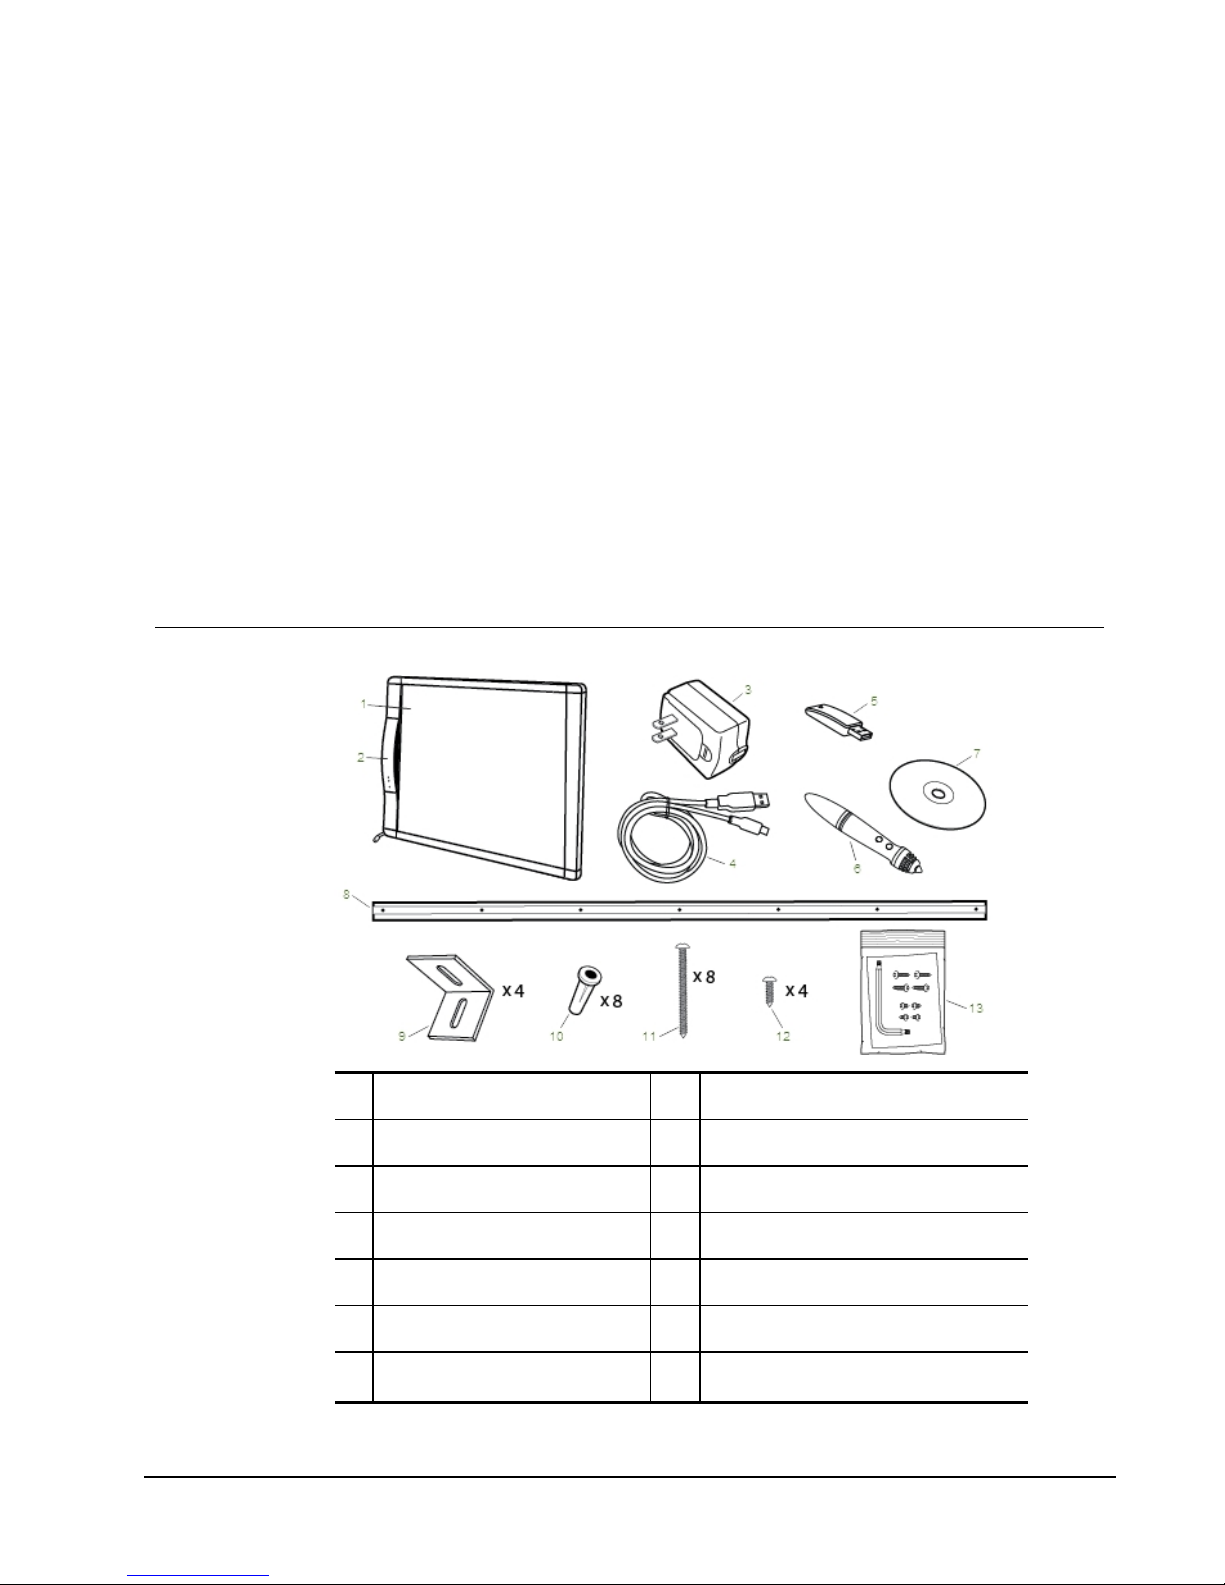
What's Included
The MimioBoard package contains the following items:
Chapter 1
MimioBoard
1 MimioBoard 8 Mounting bar
2 MimioTeach 9 L-brackets
3 USB power adapter 10 Drywall anchors
4 USB cable 11 #10x2½ in (M5x60mm) screws
5 MimioHub 12 #6x⅜ in (M3x8.5mm) screws
6 Stylus 13 MimioTeach removal tools
7
MimioStudio DVD
1
Page 6

MimioBoard
If you are missing any of the items above, contact Customer Support.
2
Page 7
About MimioBoard
MimioBoard has a highly durable, magnetic, and erasable surface with heavy-duty gray
strips to focus attention and make it easy to center your projection. MimioBoard interactive
whiteboard is powered by the MimioTeach bar.
Two models of MimioBoard are available.
n ME-77
Aspect ratio: 4:3
Board size: 48.2 in x 71.2 in (1225 mm x 1809 mm)
Active view size: 45.9 in x 61.2 in (1167 mm x 1555 mm)
n ME-87
Aspect ratio: 16:10
Board size: 48.2 in x 83.5 in (1225 mm x 2120 mm)
Active view size: 45.9 in x 73.5 in (1167 mm x 1867 mm)
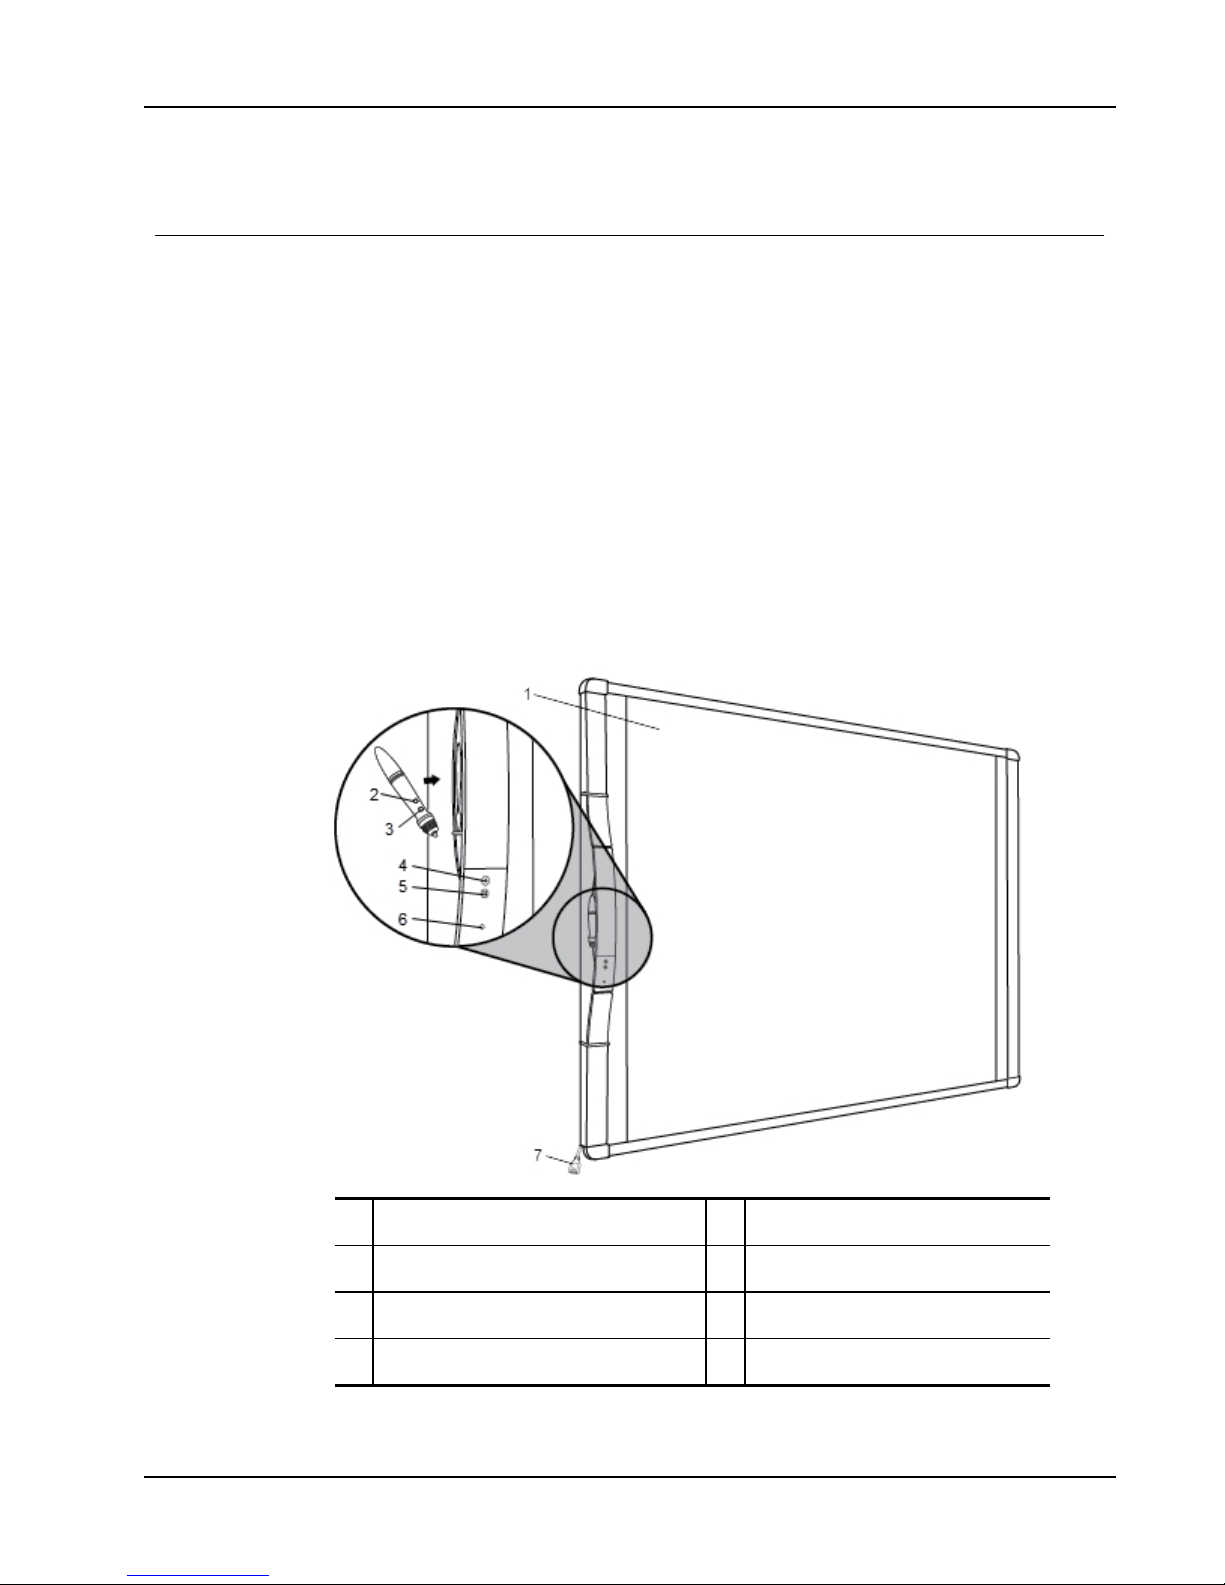
The following figure shows the major components of the MimioBoard.
About MimioBoard
1 Dry-erase, magnetic, projection surface 5 Calibrate Interactive mode
2 Tools (button B) 6 Power/Status light
3 Hover/Right-click (button A) 7 MimioBoard cable
4 Launch
3
Page 8

MimioBoard
Status Lights
The status light visually shows the status of the MimioBoard.
Off Not receiving power; USB/powercable is not connected or MimioBoard is turned
off.
Solid Green MimioBoard is connected and receiving power; MimioStudio software is running.
Flashing Green
Solid Amber MimioBoard cannot find an available MimioHub.
Flashing Amber MimioBoard is searching for an available MimioHub.
About MimioStudio
MimioStudio provides multiple authoring and editing tools for creating almost any type of
content. You can use MimioStudio Notebook with MimioStudio Tools to create a variety of
objects including text boxes, freehand writing and drawing, lines, arrows, and many basic
shapes. Images can be imported into a Notebook, both as objects and as background images.
See Using MimioStudio Tools for information about using MimioStudio software.
MimioBoard is connected or connecting, and receiving power; MimioStudio
software is not running.
4
Page 9
Review the following topics to install and start using your MimioBoard.
n Setting Up MimioBoard
n Setting Up the Stylus
n Setting Up Interactive Mode
Setting Up MimioBoard
MimioBoard mounts securely to the wall using the included hardware.
Two people are required to safely lift and install your MimioBoard.
Review the following topics for information about installing and connecting your
MimioBoard.
n Installing MimioBoard
n Connecting MimioBoard
Chapter 2
Getting Started
Installing MimioBoard
Only a qualified technician should install MimioBoard. The technician must be familiar
with the structure of the room and the procedures for mounting objects to the wall.
Two people are required to safely lift and install MimioBoard.
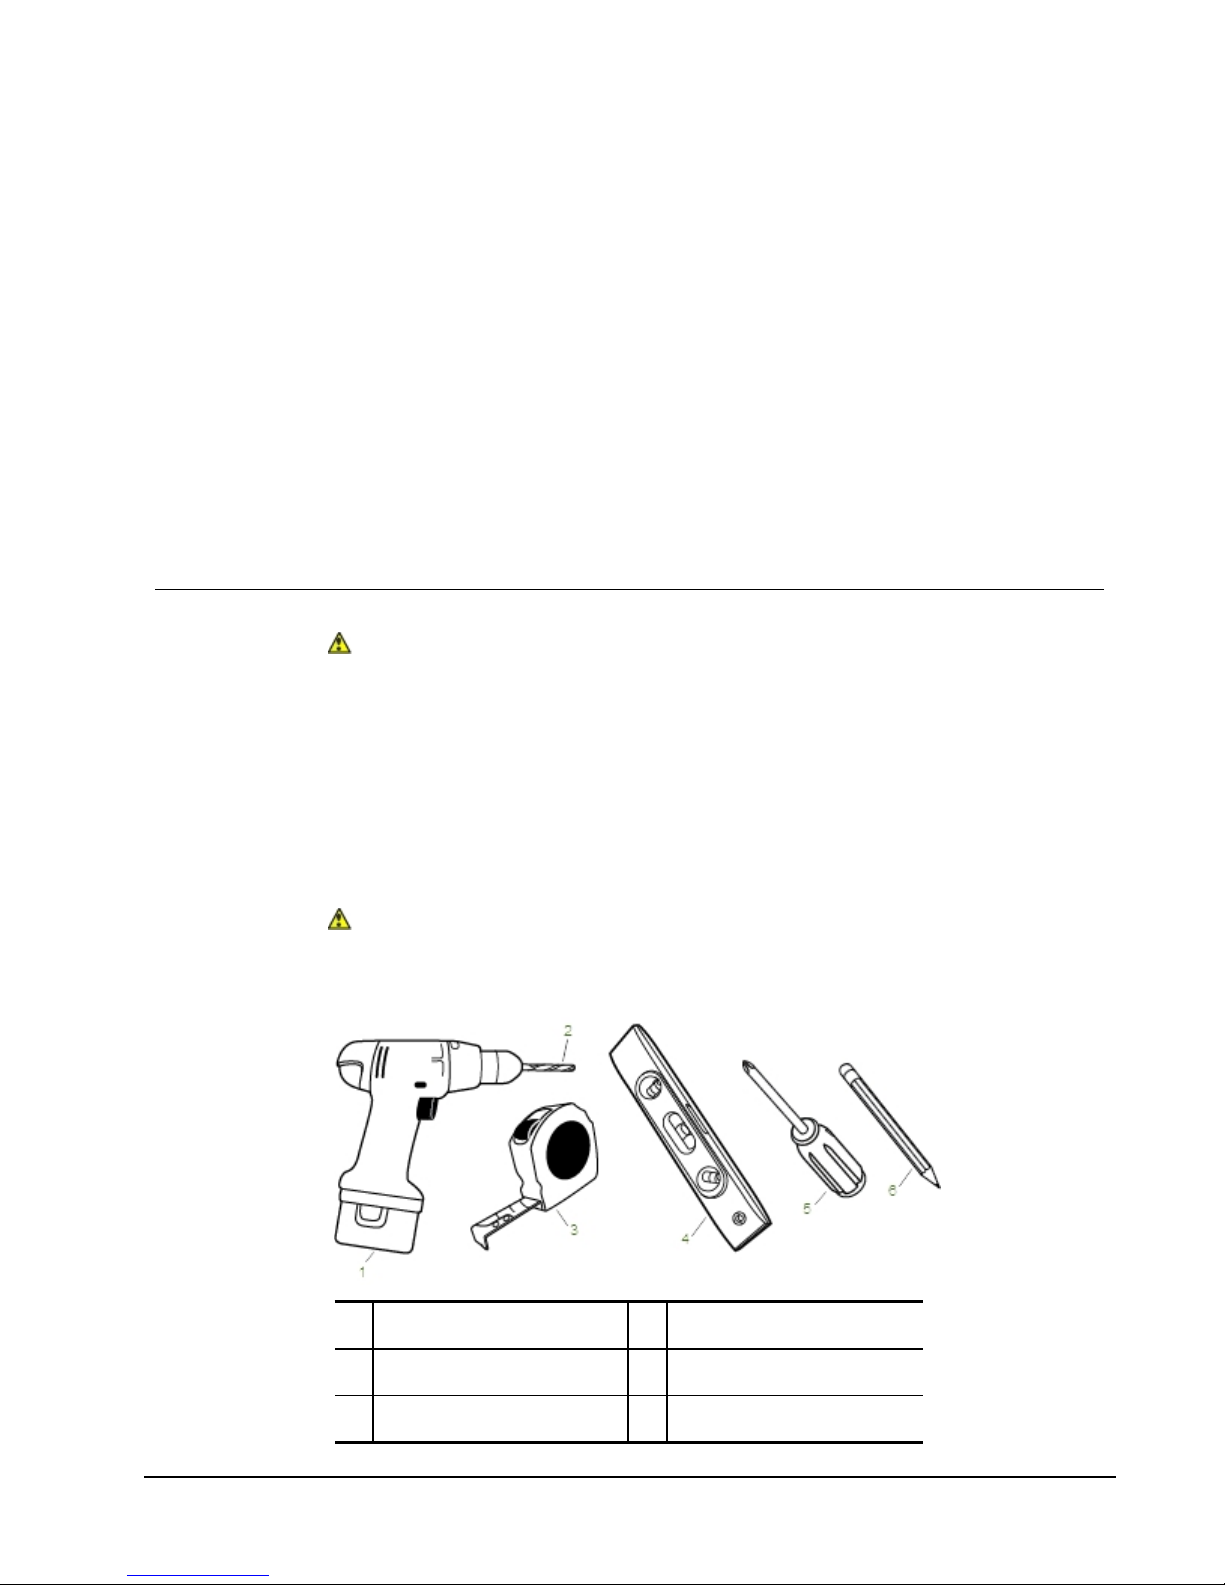
To mount your MimioBoard to the wall, you will need the included hardware along with
the following tools.
1 Drill 4 Level
2 ¼ in (6.35 mm) drill bit 5 Screwdriver
3 Tape measure 6 Pencil
5
Page 10
Getting Started
To install MimioBoard
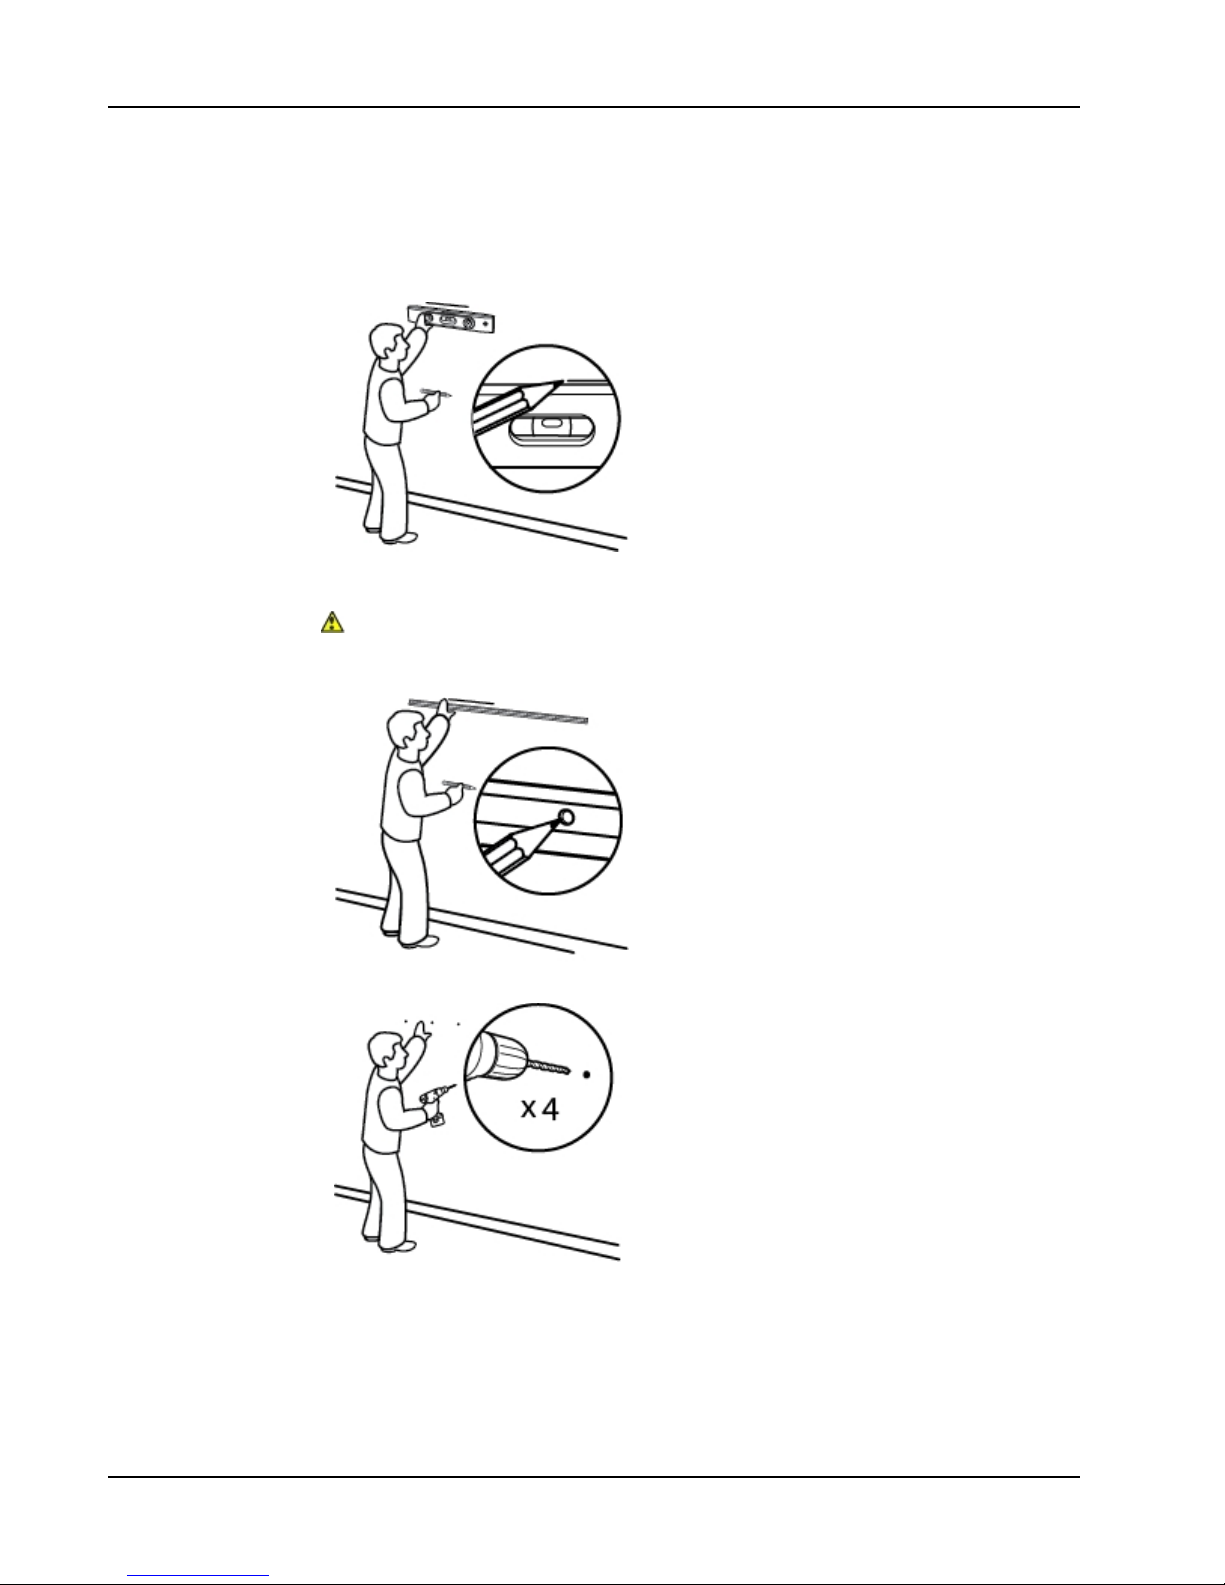
1. Make a mark on the wall at the height you want the top of the MimioBoard to be
located.
2. Using a level, draw a horizontal line starting at the mark.
3. Align the mounting bar with the horizontal line and make a mark on the wall in the
center of four of the holes in the mounting bar.
The mounting bar must be securely attached to studs or other solid support. The
mounting bar supports the full weight of the MimioBoard. Extra care must be taken
to ensure that the full weight of the board can be supported.
4. Drill a hole at each mark using a ¼ in (6.35 mm) drill bit.
6
Page 11
Setting Up MimioBoard
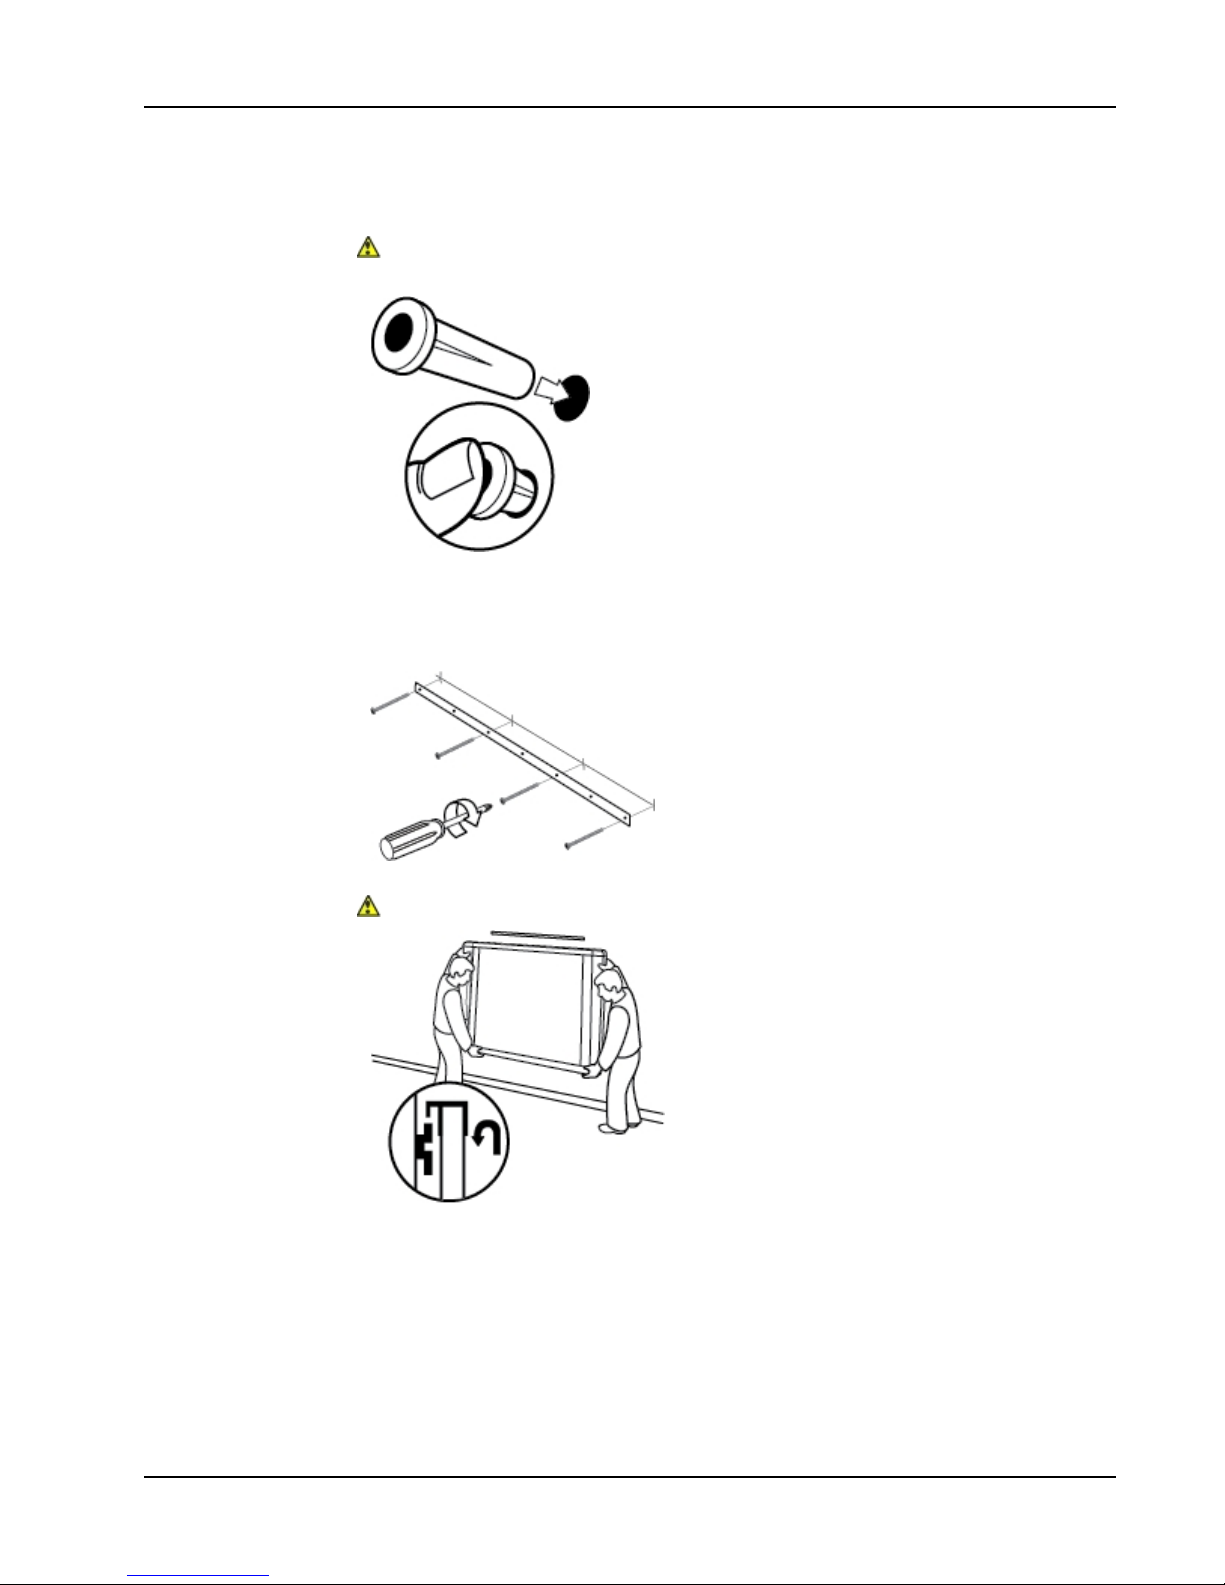
5. Insert a drywall anchor into each of the four holes so that each anchor is flush with the
surface of the wall.
The included anchors are for use with drywall only. For concrete walls, use concrete
anchors (not included).
6. Place the mounting bar against the wall so that the holes in the bar align with the four
drywall anchors.
7. Using a screw driver and four #10x2½ in (M5x60mm) screws, securely fasten the
mounting bar to the wall.
8. Hang the MimioBoard from the mounting bar.
Two people are required to safely lift and position the MimioBoard.
9. Ensure that the MimioBoard is securely attached to the wall and that all screws and
anchors are stable.
7
Page 12
Getting Started
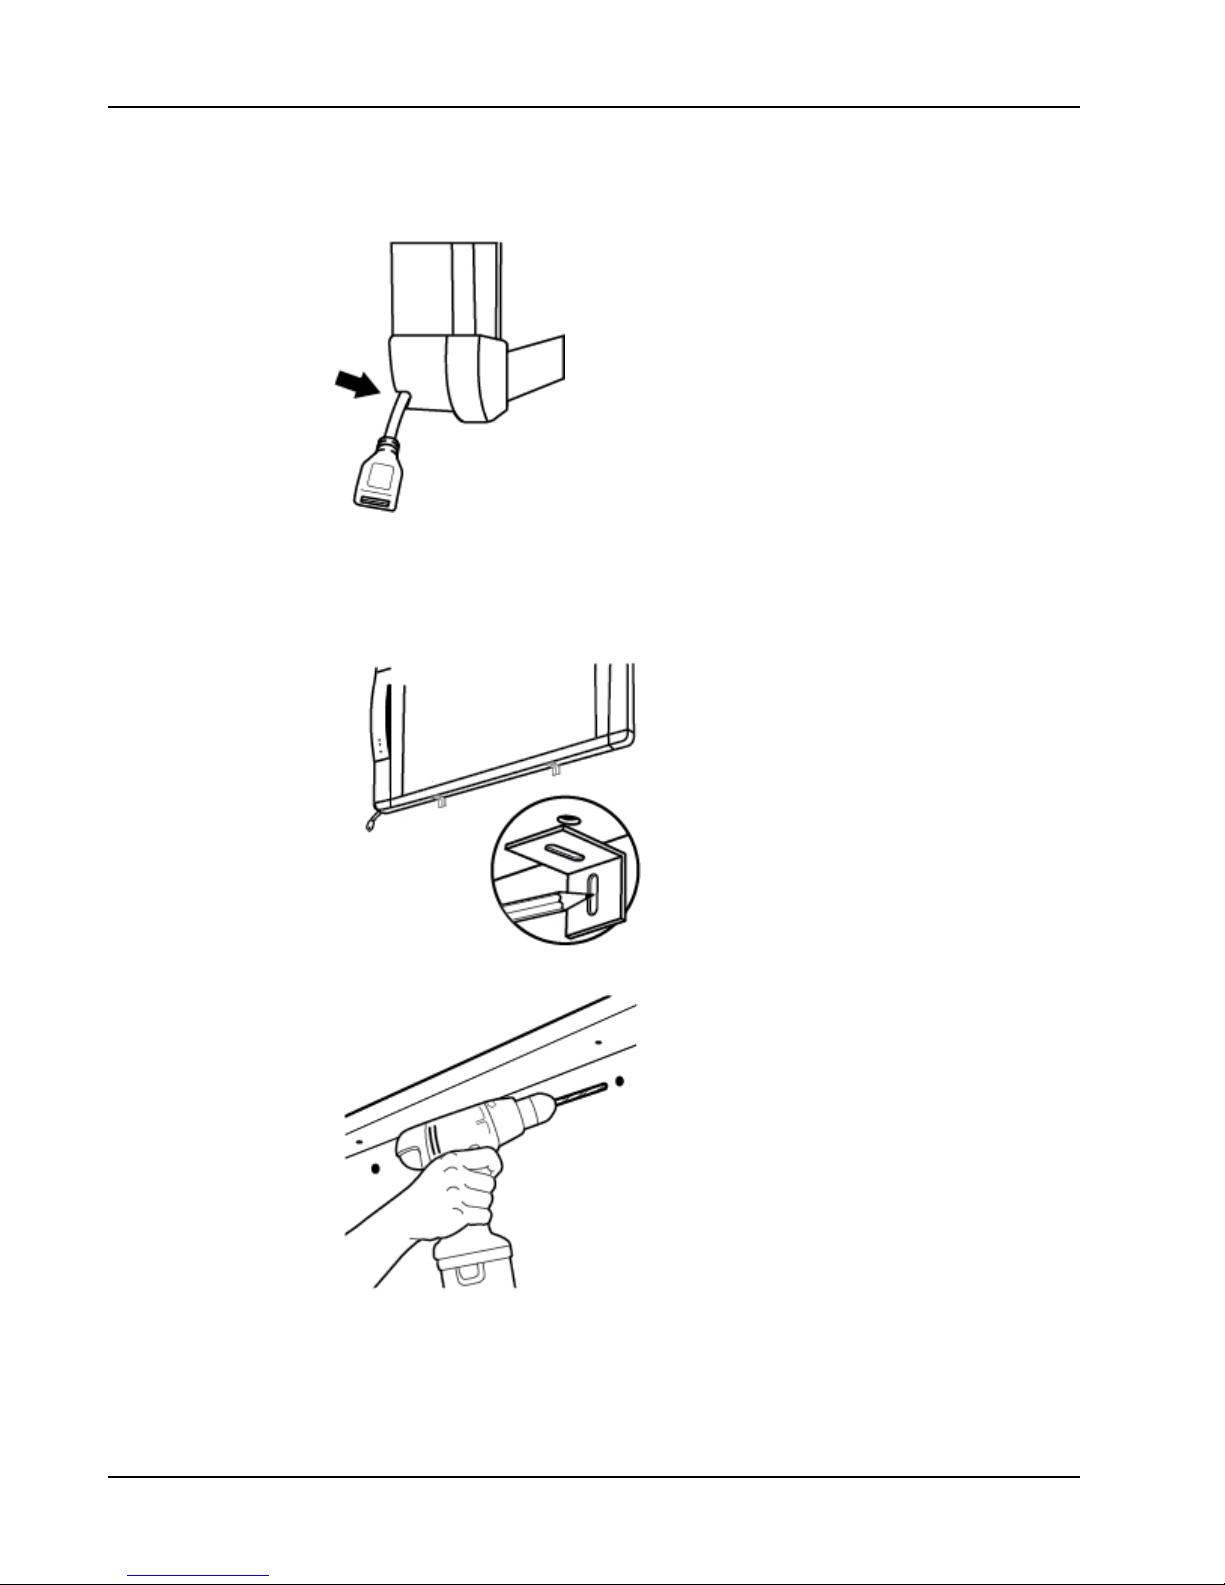
10. Make sure the MimioBoard cable goes through the cable channel and that the
MimioBoard is flush against the wall.
11. Locate the two holes on the bottom of the MimioBoard and do the following for each
of the two holes:
a. Align the slot in the L-bracket with the hole on the bottom of the MimioBoard.
b. Make a mark on the wall in the center of the slot in the L-bracket that is touching
the wall.
12. Remove the L-brackets and drill a hole at each mark using a ¼ in (6.35 mm) drill bit.
8
Page 13
Setting Up MimioBoard
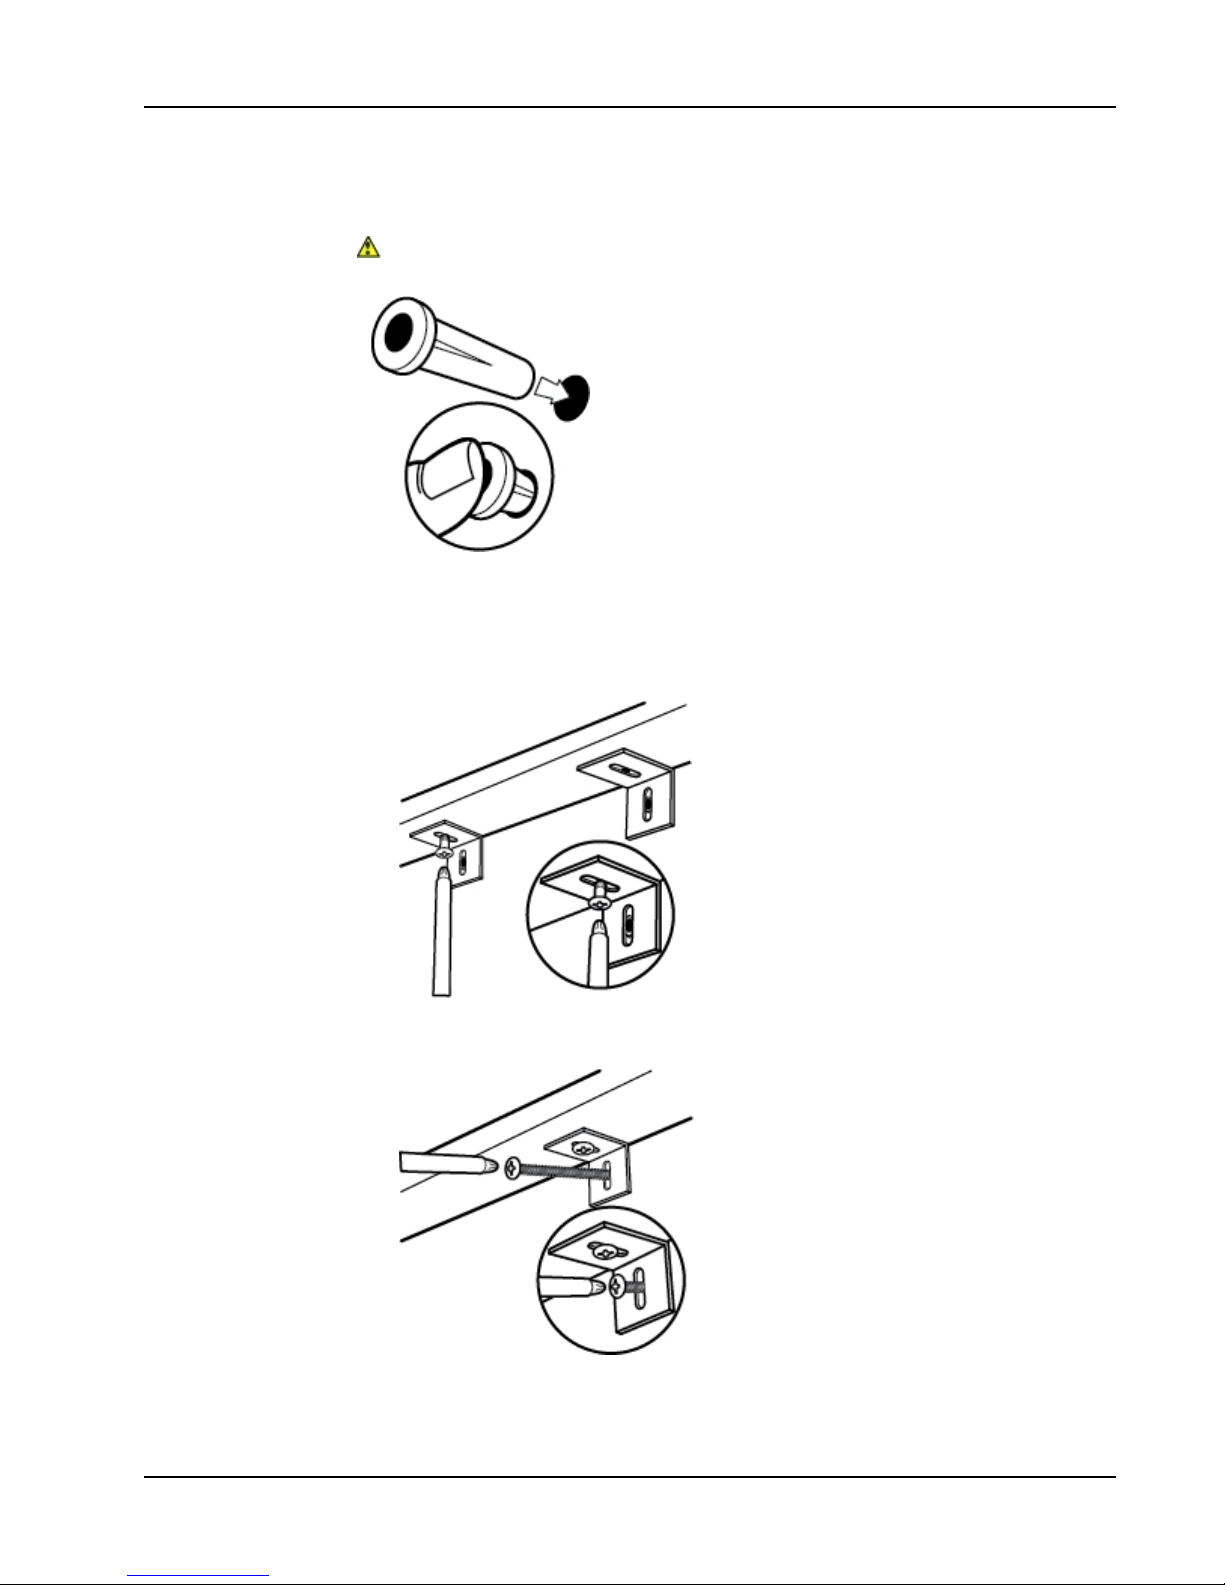
13. Insert a drywall anchor into each of the two holes so that each anchor is flush with the
surface of the wall.
The included anchors are for use with drywall only. For concrete walls, use concrete
anchors (not included).
14. For each of the brackets, do the following:
a. Align the slot in the bracket with the hole on the bottom of the MimioBoard and
the drywall anchor.
b. Using a screw driver and an #6x⅜ in (M3x8.5mm) screw, securely fasten the bracket
to the bottom of the MimioBoard.
c. Using a screw driver and a #10x2½ in (M5x60mm) screw, securely fasten each
bracket to the wall.
9
Page 14
Getting Started
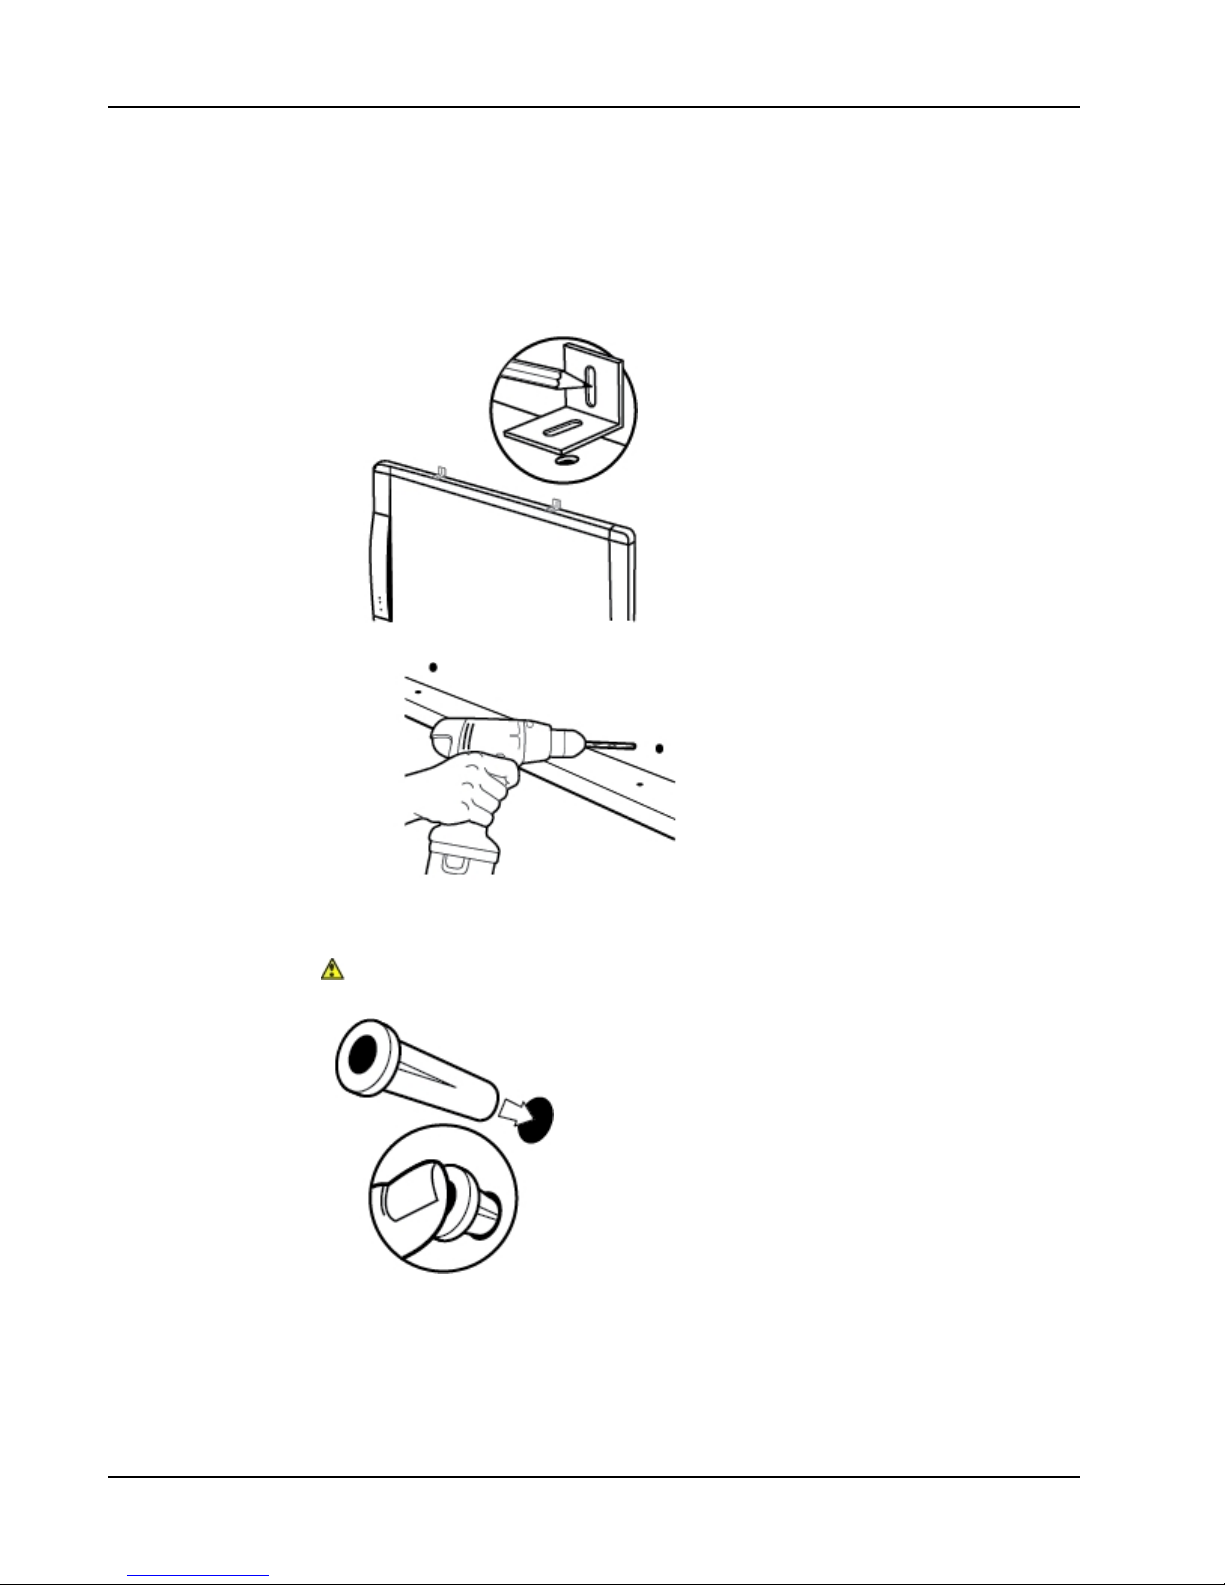
15. Locate the two holes on the top of the MimioBoard and do the following for each of
the two holes:
a. Align the slot in the L-bracket with the hole on the top of the MimioBoard.
b. Make a mark on the wall in the center of the slot in the L-bracket that is touching
the wall.
16. Remove the L-brackets and drill a hole at each mark using a ¼ in (6.35 mm) drill bit.
10
17. Insert a drywall anchor into each of the two holes so that each anchor is flush with the
surface of the wall.
The included anchors are for use with drywall only. For concrete walls, use concrete
anchors (not included).
Page 15
Setting Up MimioBoard
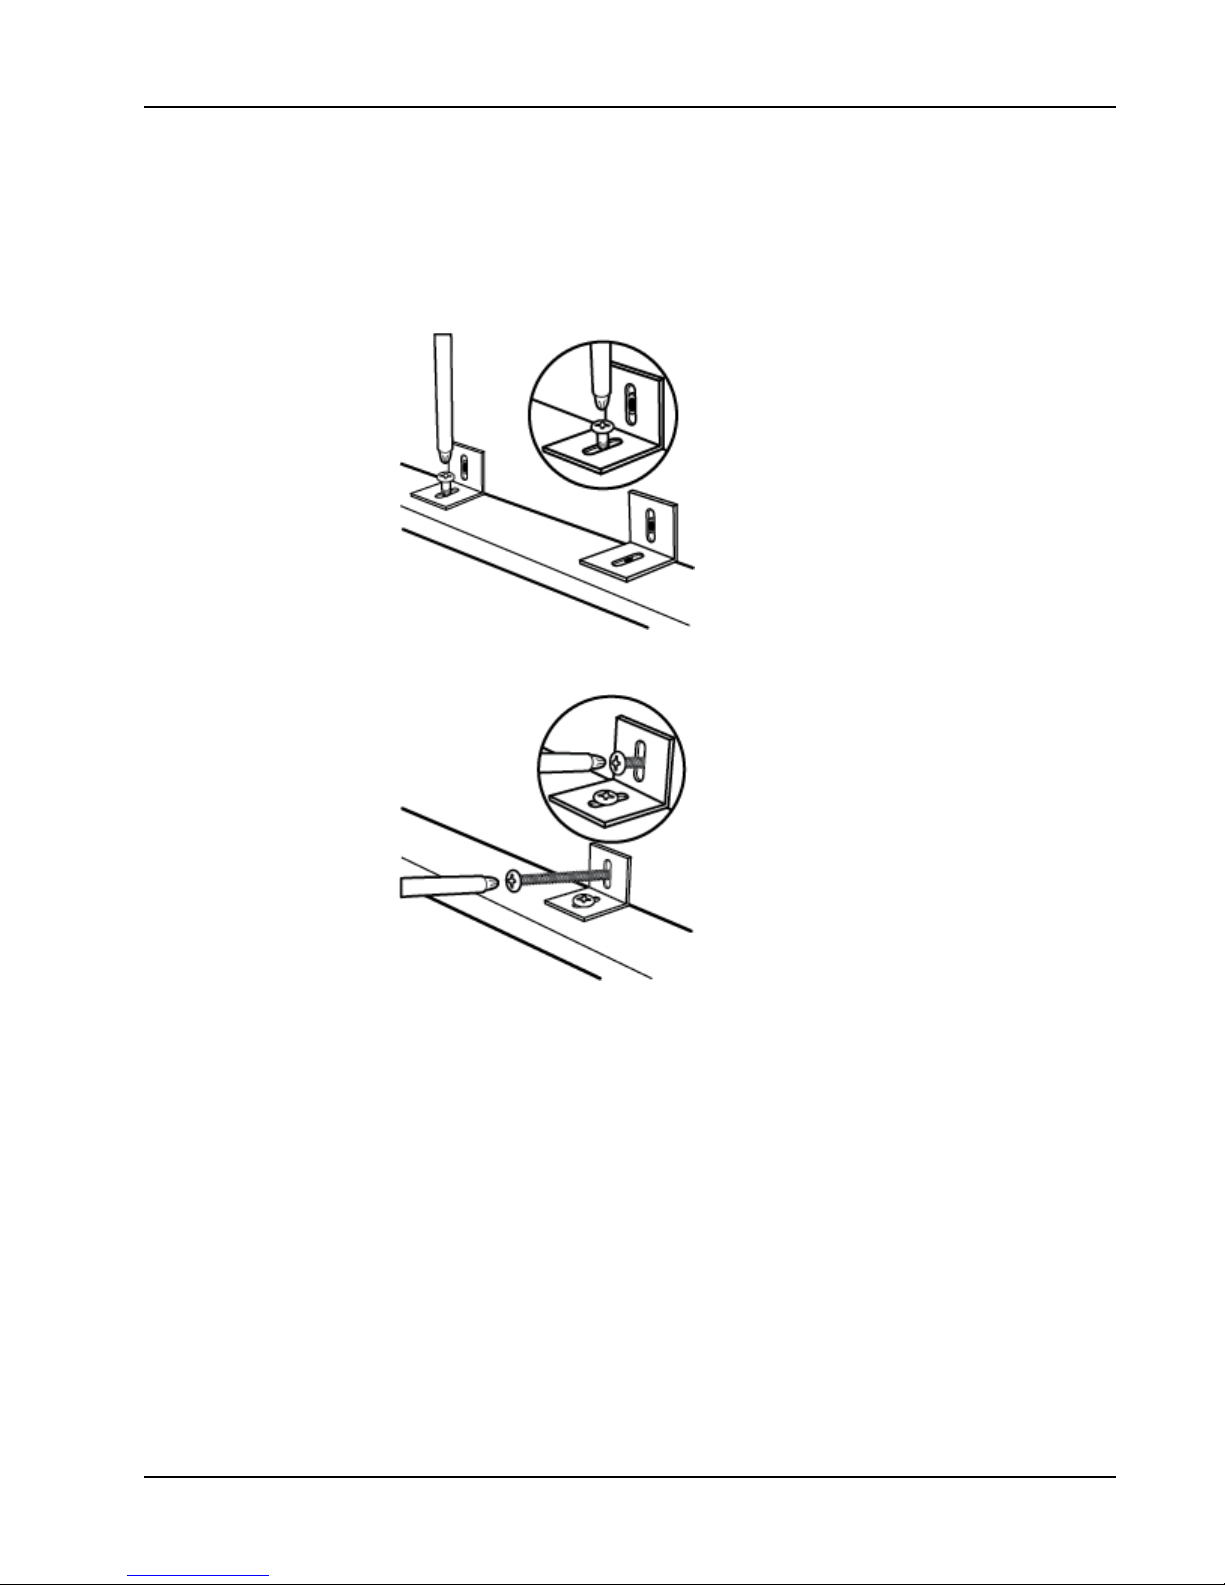
18. For each of the brackets, do the following:
a. Align the slot in the bracket with the hole on the top of the MimioBoard and the
drywall anchor.
b. Using a screw driver and an #6x⅜ in (M3x8.5mm) screw, securely fasten the bracket
to the top of the MimioBoard.
c. Using a screw driver and a #10x2½ in (M5x60mm) screw, securely fasten each
bracket to the wall.
Connecting MimioBoard
MimioBoard is powered using the included USB cable and power adapter.
Your MimioBoard comes pre-linked to the included MimioHub. You can also use this
MimioHub to connect other MimioClassroom devices to your computer, such as
MimioVote.
11
Page 16
Getting Started
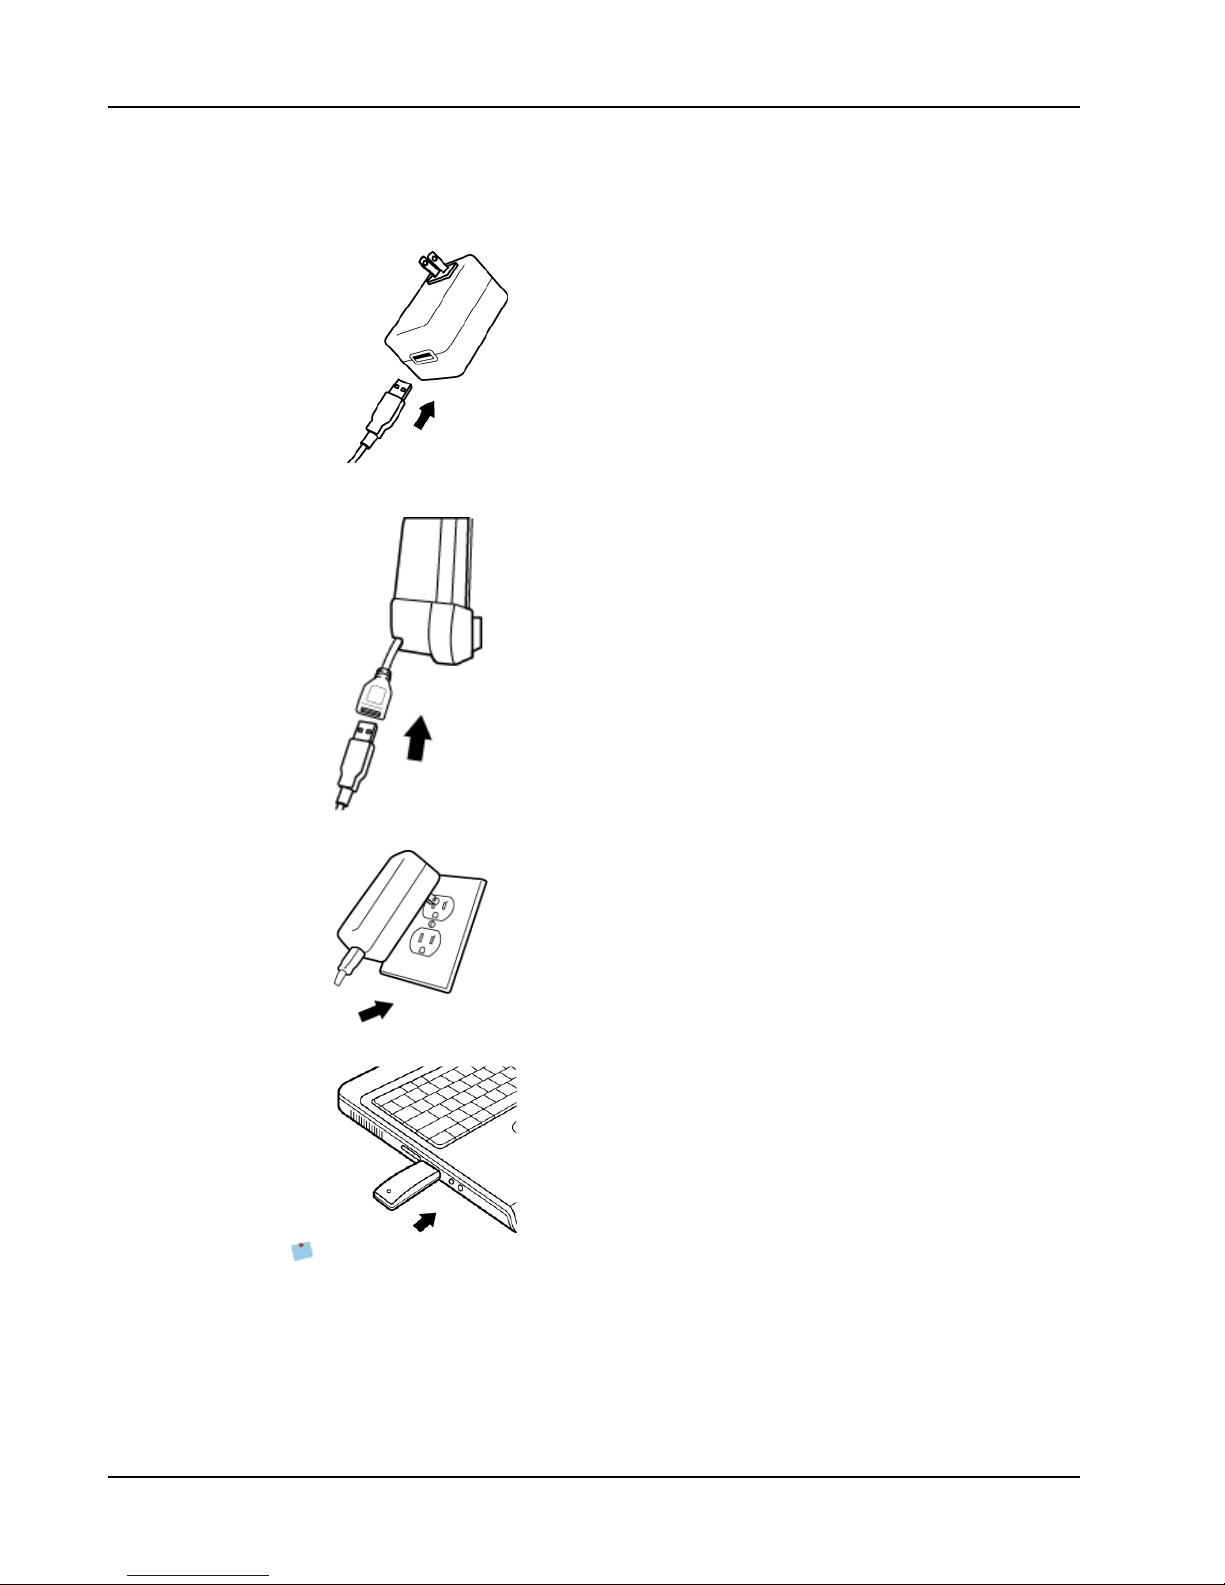
To set up the MimioBoard
1. Plug the USB cable into the USB port on the power adapter.
2. Plug the other end of the USB cable into the MimioBoard cable.
3. Plug the power adapter into a power outlet.
4. Plug the MimioHub into an available USBport on your computer.
If you do not want to connect your MimioBoard to your computer wirelessly, you can
link the board to your computer using the included USB cable without the power
adapter. MimioBoard will be powered by USB through your computer.
12
Page 17
Setting Up the Stylus
The stylus is powered by a rechargeable lithium-ion battery. The battery recharges whenever
the stylus is docked on the MimioBoard.
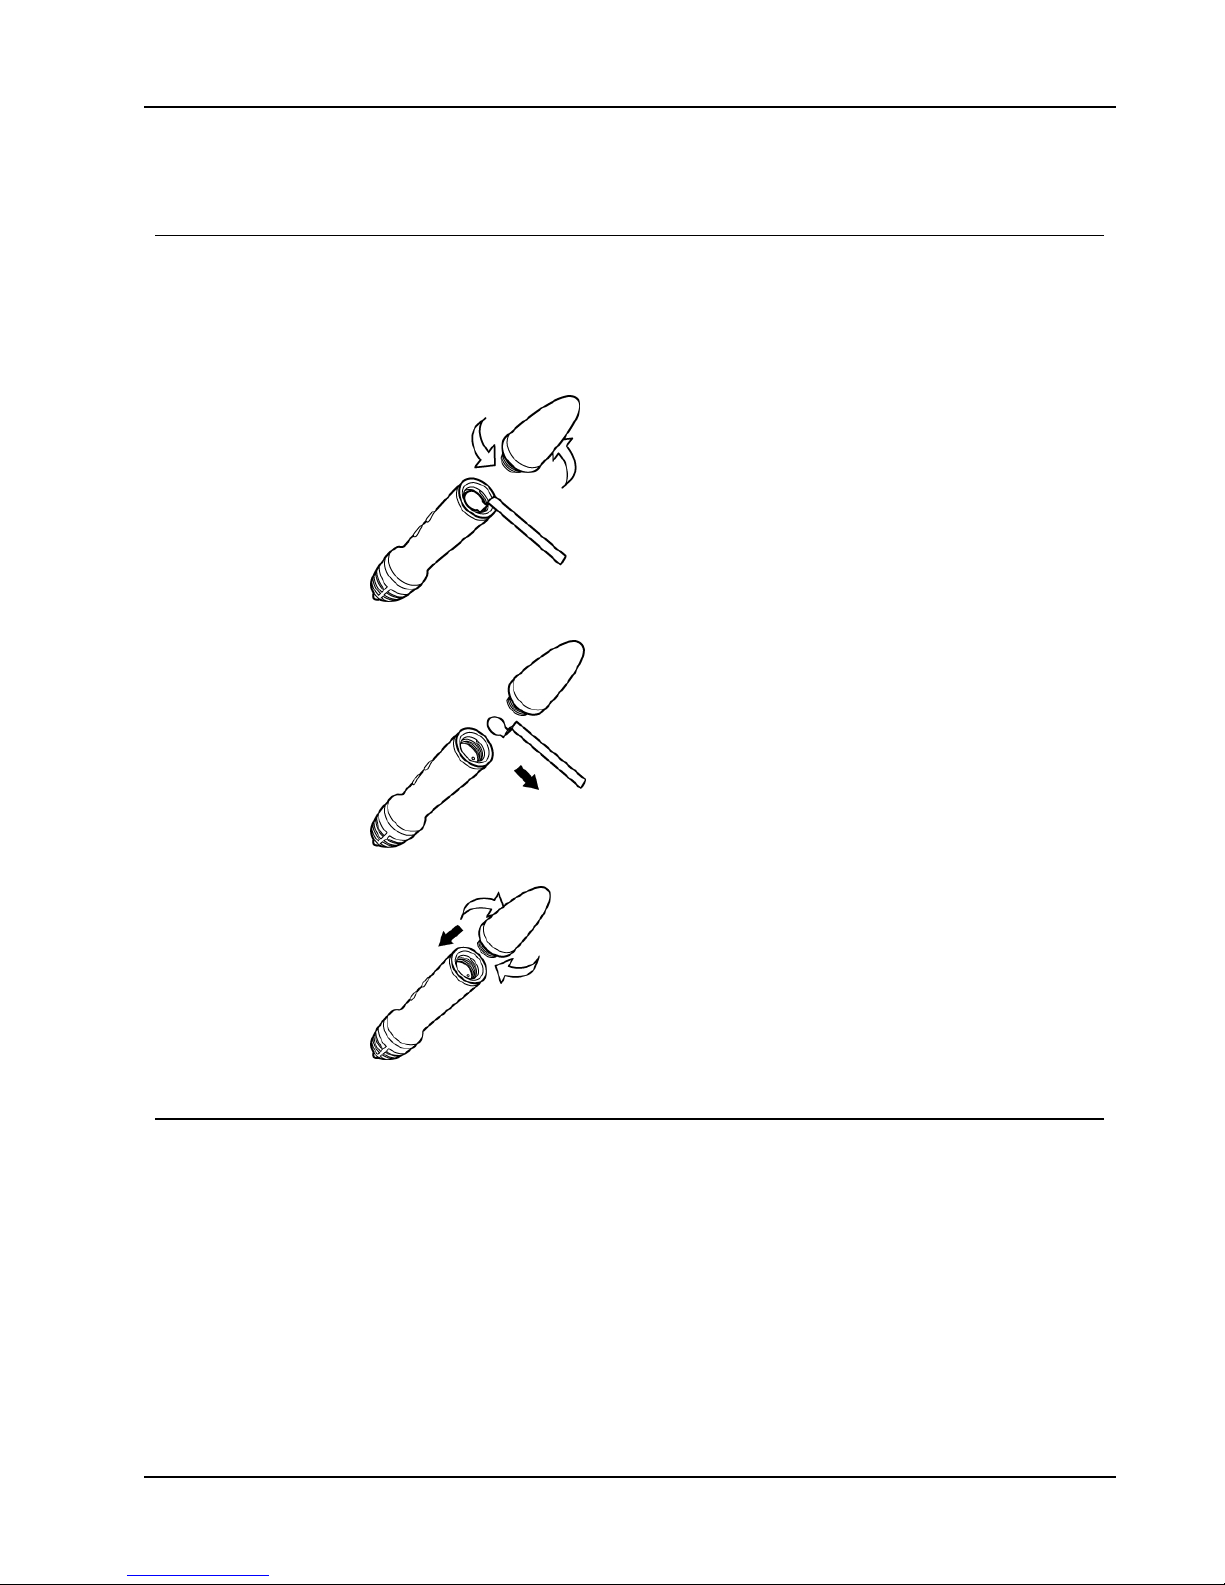
To set up the stylus
1. Turn the top of the stylus counter-clockwise to separate the top from the body of the
stylus.
2. Remove the plastic strip from the stylus.
Setting Up the Stylus
3. Replace the top onto the body of the stylus and turn clockwise to attach.
Setting Up Interactive Mode
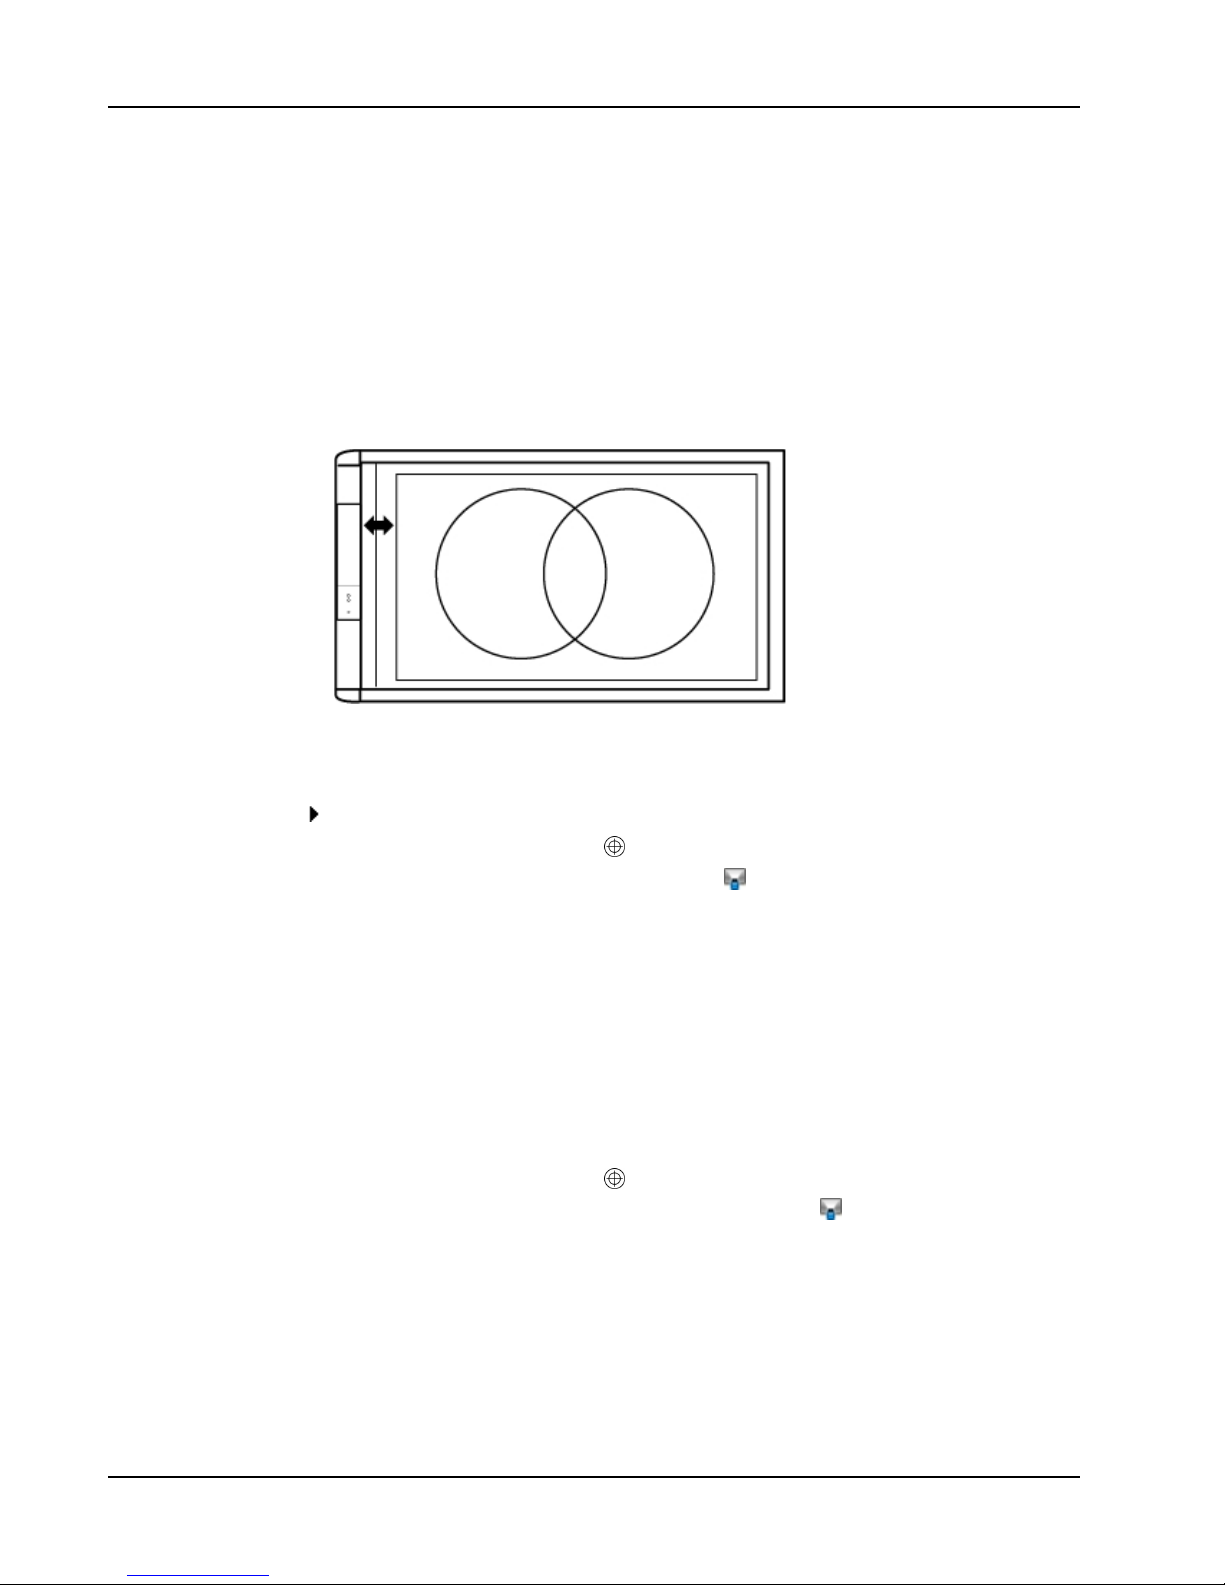
Using MimioStudio Interactive mode, you can create and deliver lessons and presentations
directly from your MimioBoard.
To use Interactive mode you need a projector, a MimioBoard, and a stylus. Combined, these
devices make for a powerful tool for creating and delivering lessons and presentations.
13
Page 18
Getting Started
Projecting Your Desktop
If you are presenting from a MimioStudio Notebook or another application, such as a
PowerPoint presentation, you can open the application before or after Interactive mode is
enabled and calibrated.
To start Interactive mode
1. Project your desktop image onto your MimioBoard surface.
Refer to your projector’s documentation for instructions on how to project your desktop
image.
2. Click the stylus anywhere on the MimioBoard surface.
Interactive mode starts and the calibration screen appears.
To exit Interactive mode
Do one of the following:
l
Press the Interactive button, , twice on the MimioBoard.
Start MimioStudio Tools, click Interactive , and then click Exit.
l
l Start MimioStudio Settings, select Interactive, and then click Disable.
Calibrating Interactive Mode
Each time Interactive mode is enabled, you are prompted to calibrate using the stylus.
When using MimioBoard with a permanently installed projector, you do not need to
recalibrate Interactive mode after the first session.
To calibrate Interactive mode
1. If the calibration screen does not appear when you start Interactive mode, do one of the
following:
l
Press the Interactive button, , on your MimioBoard.
l
Start MimioStudio Tools, click the Interactive button, , and then click
Recalibrate.
l Start MimioStudio Settings, select Interactive, and then click Calibrate.
2. Press the stylus down on the MimioBoard surface at the center of each of the nine
calibration targets.
Make sure to hold the stylus perpendicular to the writing surface as you click.
14
Page 19

Setting Up Interactive Mode
The calibration target disappears and the next calibration target appears.
When the calibration screen disappears, Interactive mode is enabled.
15
Page 20

This page intentionally left blank for double-sided printing.
16
Page 21

You can use the MimioBoard and stylus in MimioStudio Interactive mode to create and
deliver lessons and presentations. In MimioStudio Interactive mode, you control the
movement of the cursor on your screen with the stylus, much like you would with a mouse
at your computer.
You can also use the various presentation tools found in MimioStudio Tools to focus your
audience on a specific area of the screen by displaying only certain parts of the screen. And,
you can annotate the screen with the drawing tools available in MimioStudio Tools using
the Screen Annotation feature.
Using the Stylus
In Interactive mode, the stylus can be used to control your desktop and interact with
applications on your computer from your MimioBoard.
The following table describes how to use the stylus to control your desktop from the
MimioBoard.
Chapter 3
Using MimioBoard
To execute Do this
Left mouse click Click in the projected area at the desired location with the tip of the stylus.
Double left mouse
click
Right mouse click
Hover
Using MimioStudio Tools
With the various presentation tools found in MimioStudio Tools you can focus your
audience on a specific area of the screen by displaying only certain parts of the screen. You
can also annotate the screen with the drawing tools available in MimioStudio Tools using
the Screen Annotation feature.
Quickly click twice in the projected area at the desired location with the tip of
the stylus.
Press the B button on the stylus, and then click in the projected area at the
desired location with the tip of the stylus.
1. Hold the stylus at the desired location, staying as close to the
MimioBoard surface as possible without touching it.
2. Press the B button on the stylus.
3. Move the stylus to the desired location.
4. Release the B button on the stylus.
17
Page 22
Using MimioBoard
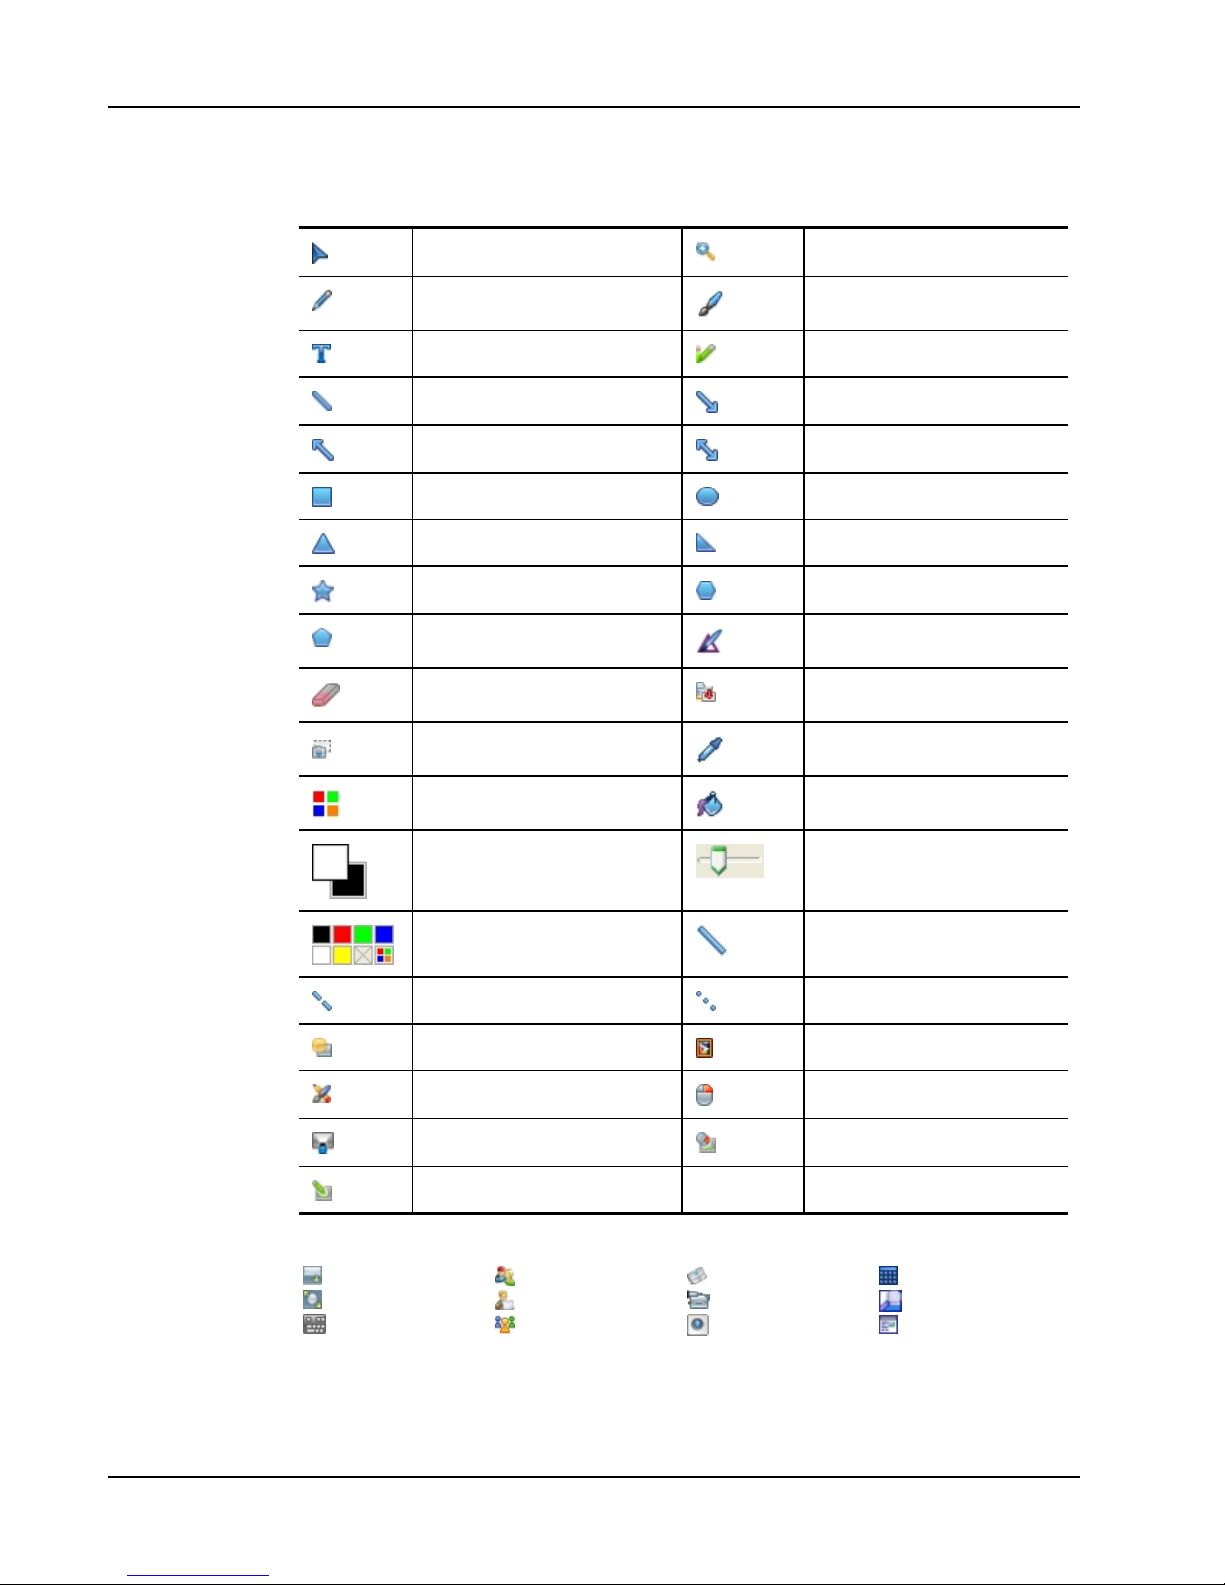
The following table describes the major components of MimioStudio Tools.
Selection tool Zoom
Pen Brush
Text Highlighter
Line Arrow End
Arrow Start Arrow Both
Rectangle Ellipse
Triangle Right Triangle
Five Pointed Star Hexagon
Pentagon Shape Recognition
Eraser Insert file
Screen clipping Color picker
More colors Object Fill
Outline and Fill color Thickness slider
Color palette Solid Line
Dash Line Square Dot Line
Transparency Gallery
Applications (see below) Right-click
Interactive Mouse
Screen Annotation
From the Applications tool, you can access the following:
Reveal
Spotlight
Text Tools
18
Class Manager
Control
Quick Collaborate
Quick Vote
Recorder
View
Calculator
Magnify
Web Browser
Page 23

Caring for MimioBoard
Properly maintaining the MimioBoard surface will keep your board looking like new and
never compromise performance.
Cleaning MimioBoard
MimioBoard is designed to give you long and trouble-free service while requiring very little
maintenance.
Solvent-based dry-erase markers, rather than water-based or low-odor dry-erase markers, are
recommended for use with MimioBoard. Low-odor markers take longer to dry and the ink
clings more aggressively to the surface, leaving behind a residue.
Cleaning the MimioBoard Dry-Erase Surface
If the MimioBoard is used daily, cleaning should be performed two to three times per week.
Repeated cleaning may be required for writing left on the board for more than two days.
You can easily clean the dry-erase surface using the following items:
Chapter 4
n Whiteboard eraser
n Liquid whiteboard cleaner
n Lint-free cloth
To clean the dry-erase surface
1. Using the eraser, clear all writing from the dry-erase surface.
2. Wipe the surface with a clean cloth moistened with liquid whiteboard cleanser.
3. Rinse the surface with warm, clear water to remove any cleanser residue.
4. Dry the surface with a clean, lint-free cloth.
Cleaning the MimioBoard Frame and Stylus
You can easily clean the frame of the MimioBoard and the stylus using the following items:
n Lint-free cloth.
n Isopropyl alcohol, diluted dishwashing detergent, or diluted glass cleaner.
If you use glass cleaner, make sure it does not contain ammonia.
To clean the MimioBoard components and frame
1. Disconnect the USB cable from the MimioBoardcable.
2. Use the lint-free cloth to wipe the MimioBoard frame.
19
Page 24

Caring for MimioBoard
3. Remove dirt and smudges with one of the cleaning solutions mentioned above.
Avoid using liquids on any exposed charging contacts. Do not allow liquid into
any openings on the equipment.
4. Reconnect the USB cable.
To clean the stylus
1. Use the lint-free cloth to wipe the exterior of the stylus.
2. Remove dirt and smudges with one of the cleaning solutions mentioned above.
Avoid using liquids on any exposed charging contacts. Do not allow liquid into
any openings on the equipment.
Replacing the MimioTeach Bar
If necessary, you can remove the integrated MimioTeach bar from the MimioBoard and
replace with a new MimioTeach bar.
You will need the included MimioTeach replacement tools and a screwdriver.
To remove the MimioTeach bar
1. Remove the MimioBoard frame pieces from above and below the MimioTeach bar.
2. Unplug the cable from the MimioTeach bar.
3. Using the included allen wrench, do the following:
a. Remove the screw below the MimioTeach bar.
b. Remove the screw above the MimioTeach bar.
4. Remove the MimioTeach bar from the MimioBoard.
There are two metal plates on the back of the MimioTeach bar.
5. Using a screw driver, remove the two screws that hold each of the metal plates in place.
6. Remove the metal plates from the MimioTeach bar.
To replace the MimioTeach bar
1. Place the metal plates against the back of the MimioTeach bar.
Make sure that the recess on each plate is inserted into the recess on the back of the
MimioTeach bar.
2. Using a screw driver and two screws per plate, attach the plates to the MimioTeach bar.
3. Plug the MimioBoard cable into the MimioTeach bar.
4. Place the MimioTeach bar on the MimioBoard.
5. Using the included allen wrench, do the following:
a. Insert one screw in the hole above the MimioTeach bar.
b. Insert one screw in the hole below the MimioTeach bar.
6. Replace the MimioBoard frame pieces above and below the MimioTeach bar.
20
Page 25

Environmental Information
This chapter contains technical information for the MimioClassroom products.
For product specifications and compliance information, visit the Documentation section of
the Support area of our Web site at www.mimio.com.
Environmental Information
The equipment that you bought has required the extraction and use of natural resources for
its production. It may contain hazardous substances for the health and the environment.
In order to avoid the dissemination of those substances in our environment and to diminish
the pressure on the natural resources, we encourage you to use the appropriate take-back
systems.
Those systems will reuse or recycle most of the materials of your end life equipment in a
sound way.
Chapter 5
Technical and
The crossed-bin symbol marked in your device invites you to use those systems.
If you need more information on the collection, reuse and recycling systems, please contact
your local or regional waste administration.
You can also contact Mimio for more information on the environmental performances of our
products.
Safety Precautions for Lithium-Ion Rechargeable Batteries
Inaccurate handling of a Lithium-ion rechargeable battery may cause leakage, heat, smoke,
an explosion, or fire. This could cause deterioration of performance or failure. This may also
damage the protection device installed in the battery pack. This could damage equipment or
injure users. Thoroughly follow the instructions below.
21
Page 26

Technical and Environmental Information
While Charging
Danger
l When charging the battery, use dedicated chargers and follow the specified
conditions.
l Do not connect directly to an electric outlet or cigarette lighter charger.
l Do not use or store battery close to fire or inside the car where temperature may be
over 60°C.
Warning
l Stop charging the battery if charging is not completed within the specified time.
Caution
l Thoroughly read this user guide before charging the battery.
l Do not charge in a place that generates static electricity.
l Battery can only be charged within 0°C~45°C temperature range.
When Discharging the Battery
Danger
l Use the battery only in the specified equipment.
l Do not use or store battery close to fire or inside the car where temperature may be
over 60°C.
Caution
l Do not charge in a place that generates static electricity.
l Battery can only be used within -20°C~60°C temperature range.
Contacting Mimio
Mimio maintains an Internet Web site that offers support for MimioClassroom products. In
addition, Mimio’s Technical Support department is available by phone.
Web site: www.mimio.com
Phone: (877) 846-3721
Visit the Support section of our Web site at www.mimio.com to contact us by email.
Documentation Feedback
We are constantly working to produce the highest quality documentation for our products.
We welcome your feedback. Send us your comments or suggestions about our online Help,
printed, or PDF manuals.
Please include the following information with your feedback:
n Product name and version number
n Type of document: printed manual, PDF, or online Help
n Topic title (for online Help) or page number (for printed or PDF manuals)
22
Page 27

Documentation Feedback
n Brief description of content (for example, step-by-step instructions that are inaccurate,
information that requires clarification, areas where more detail is needed, and so on)
n Suggestions for how to correct or improve the documentation
We also welcome your suggestions for additional topics you would like to see covered in
the documentation.
Send email feedback to:
Please keep in mind that this email address is only for documentation feedback. If you have
a technical question, please contact Customer Service.
23
Page 28

This page intentionally left blank for double-sided printing.
24
 Loading...