

Page 1
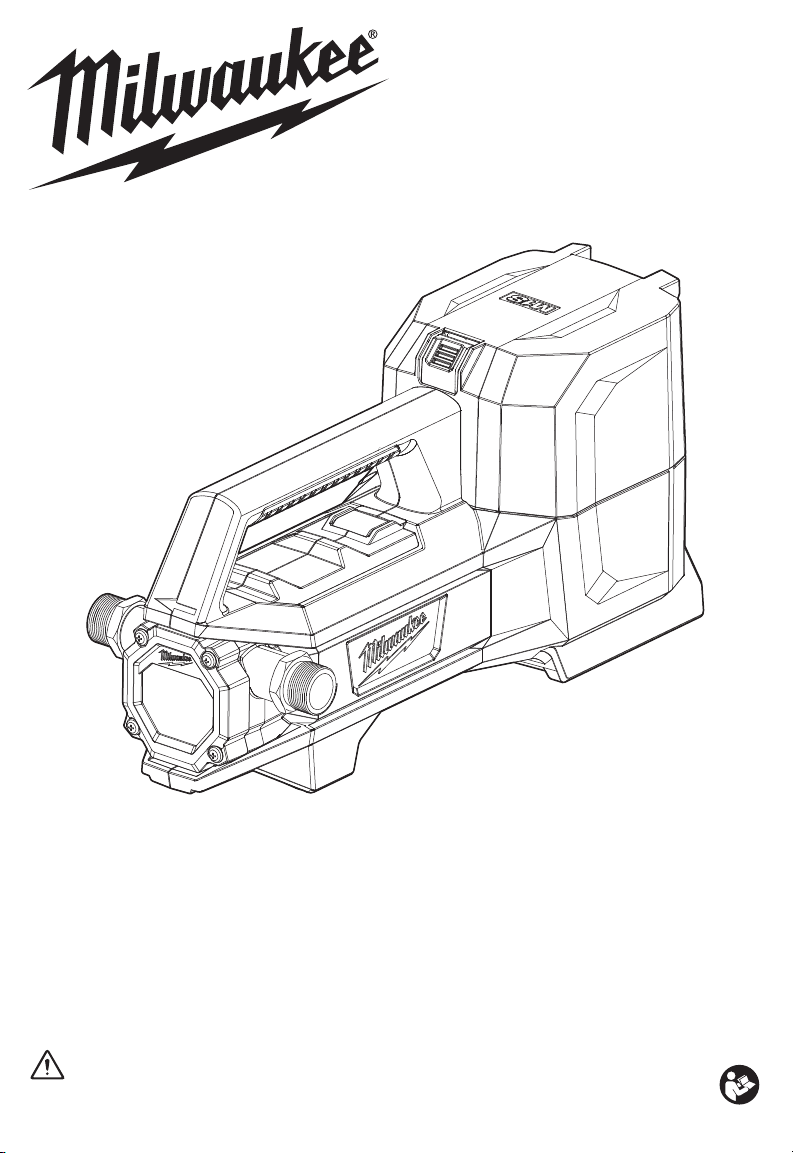
OPERATOR'S MANUAL
Cat. No.
M18 TP
M18™ TRANSFER PUMP
WARNING
To reduce the risk of injury, user must read and understand operator's manual.
Page 2

GENERAL PUMP SAFETY WARNINGS
WARNING
tions provided with the pump. Failure to follow all
instructions listed below may result in electric shock,
re and/or serious injury. Save all warnings and
instructions for future reference.
Read all safety warnings, instructions, illustrations and specica-
PUMP USE AND CARE
• Do not place pump under water or in wet areas.
Place pump in dry locations only.
• Risk of Electric Shock. Do NOT connect conduit
to pump.
• This pump has been evaluated for use with clear
water only. It is not designated to handle salt
water, brine, laundry discharge, or any other
application which may contain caustic chemicals
and/or foreign material. This pump is not suitable
for use with aquatic life. Pump damage or failure
could occur if used in these applications and will
void the warranty.
• Do not pump ammable or explosive uids such
as gasoline, fuel oil, kerosene, etc. Do not use
in a ammable and/or explosive atmosphere.
Personal injury and/or death could result.
• Not for potable water or other potable liquids.
• Do not pump water with a temperature over 60°C
(140°F). Do not pump sand, particulate, or large
debris. Damage to the pump will occur.
• Do not allow pump to run dry for more than
10 seconds. Turn off pump quickly when job is
complete. Damage to the pump could occur.
• Do not allow this pump to operate unattended.
Failure to follow this warning could result in personal
injury and/or death.
•Do not pump water from a creek, pond, or source
where foreign objects may be sucked into the
pump. Solids may enter the inlet hose.
•Always remove battery pack before attempting
to install or service the pump. Never handle pump
with wet hands or when standing on a wet or damp
surface or in water. Fatal electrical shock could occur.
•Secure the discharge hose before starting the
pump. An unsecured discharge hose may whip.
Personal injury and/or death could result.
• Do not use the pump if the switch does not turn
it on and off. Any pump that cannot be controlled
with the switch is dangerous and must be repaired.
•Always remove battery pack from the pump
before making any adjustments, changing ac-
cessories, or storing appliance. Such preventive
safety measures reduce the risk of starting the
appliance accidentally.
• Maintain pump and accessories. Check for mis-
alignment or binding of moving parts, breakage
of parts and any other condition that may affect
the pump’s operation. If damaged, have the pump
repaired before use. Accidents can be caused by
a poorly maintained pump.
• Keep handles and grasping surfaces dry, clean
and free from oil and grease. Slippery handles and
grasping surfaces do not allow for safe handling and
control of the tool in unexpected situations.
WORK AREA SAFETY
• Keep work area clean and well lit. Cluttered or
dark areas invite accidents.
• Do not operate pump in explosive atmospheres,
such as in the presence of ammable liquids,
gases or dust. Motors create sparks which will
ignite the dust or fumes.
• Keep bystanders, children, and visitors away
while operating pump. Distractions will result in
mistakes.
• Indoor use only.
PERSONAL SAFETY
• Stay alert, watch what you are doing and use
common sense when operating this pump. Do
not attempt to operate this pump while you are
tired or under the inuence of drugs, alcohol or
medication. A moment of inattention may result in
serious personal injury.
• Dress properly. Do not wear loose clothing
or jewelry. Contain long hair. Keep your hair,
clothing, and gloves away from moving parts.
Loose clothes, jewelry, or long hair could be caught
in moving parts.
• Do not overreach. Keep proper footing and
balance at all times. Proper footing and balance
enables better control in unexpected situations.
• Use safety equipment. Always wear eye protection. Dust mask, non-skid safety shoes and hard
hat must be used for appropriate conditions.
• Do not let familiarity gained from frequent use
of tools allow you to become complacent and
ignore tool safety principles. A careless action can
cause severe injury within a fraction of a second.
BATTERY TOOL USE AND CARE
• Recharge only with the charger specied by the
manufacturer. A charger that is suitable for one type
of battery pack may create a risk of re when used
with another battery pack.
• Use pumps only with specically designated
battery packs. Use of any other battery packs may
create a risk of injury and re.
• When battery pack is not in use, keep it away
from other metal objects, like paper clips, coins,
keys, nails, screws or other small metal objects,
that can make a connection from one terminal
to another. Shorting the battery terminals together
may cause burns or a re.
• Under abusive conditions, liquid may be ejected
from the battery; avoid contact. If contact accidentally occurs, ush with water. If liquid contacts
eyes, additionally seek medical help. Liquid
ejected from the battery may cause irritation or burns.
• Do not use a battery pack or tool that is damaged or modied. Damaged or modied batteries
may exhibit unpredictable behavior resulting in re,
explosion or risk of injury.
• Do not expose a battery pack or tool to re or
excessive temperature. Exposure to re or tem-
perature above 130°C (265°F) may cause explosion.
• Follow all charging instructions and do not charge
the battery pack or tool outside the temperature
range specied in the instructions. Charging im-
properly or at temperatures outside the specied range
may damage the battery and increase the risk of re.
SERVICE
• Disconnect the battery pack from pump. Release
all pressure within the system before servicing
any component.
• Drain all liquids from system before servicing.
• Periodically inspect pump and system components, checking for weak and/or worn hoses.
Check impeller for wear or blockage. Ensure all
connections are secure.
2
Page 3
• When servicing a pump, use only identical
replacement parts. Follow instructions in the
Maintenance section of this manual. Use of
unauthorised parts or failure to follow maintenance
instructions may create a risk of electrical shock or
injury and may void the warranty.
• Do not modify or attempt to repair the pump
or the battery pack except as indicated in the
instructions for use and care.
• Never service damaged battery packs. Service
of battery packs should only be performed by the
manufacturer or authorised service providers.
ADDITIONAL SAFETY RULES
•
Maintain labels and nameplates. These carry
important information. If unreadable or missing,
contact a MILWAUKEE
replacement.
•
WARNING
construction activities contains chemicals known to
cause cancer, birth defects or other reproductive
harm. Some examples of these chemicals are:
• lead from lead-based paint
• crystalline silica from bricks and cement and other
masonry products, and
• arsenic and chromium from chemically-treated
lumber.
Your risk from these exposures varies, depending on
•
how often you do this type of work. To reduce your
exposure to these chemicals: work in a well ventilated
area, and work with approved safety equipment, such
as those dust masks that are specially designed to
This appliance can be used by children aged from 8
•
years and above and persons with reduced
physical, sensory or mental capabilities or lack of
experience and knowledge if they have been given
supervision or instruction concerning use of the
appliance in a safe way and understand the
hazards involved.
•
Children shall not play with the appliance.
Cleaning and user maintenance shall not be made
•
by children without supervision.
Some dust created by power sanding,
sawing, grinding, drilling, and other
®
service facility for a
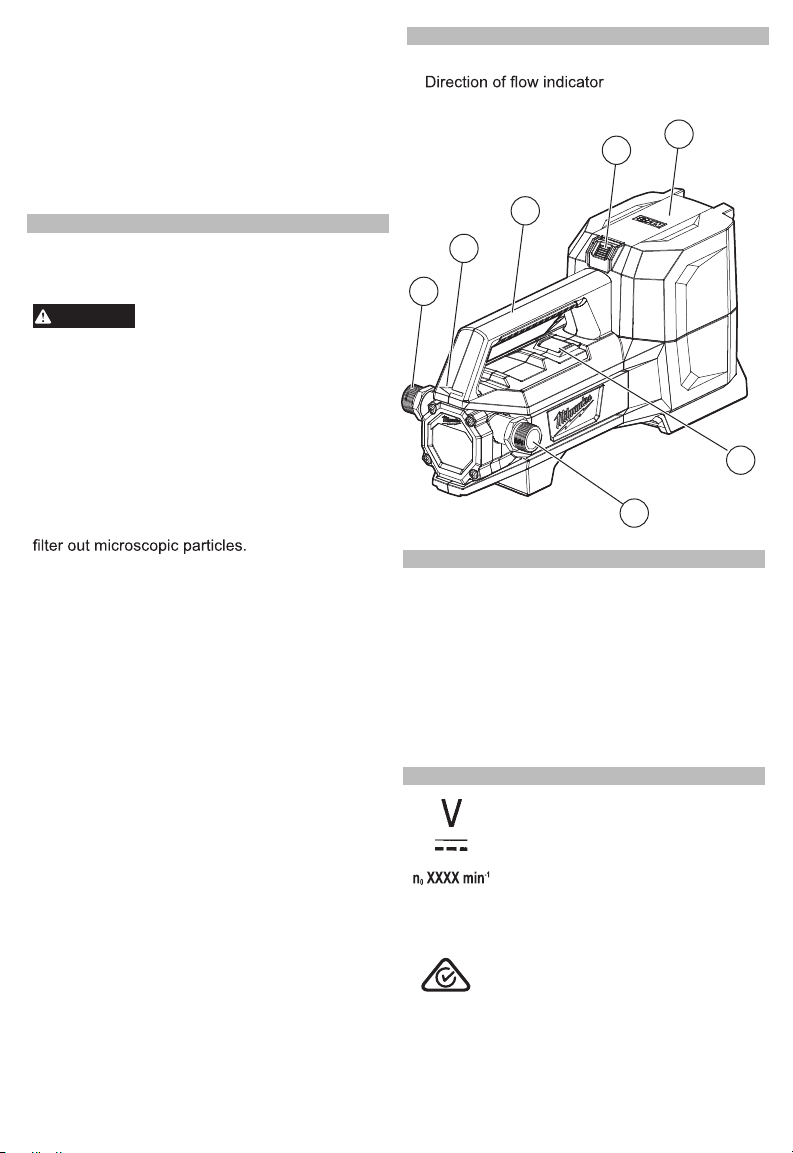
FUNCTIONAL DESCRIPTION
1. Outlet
2.
3. Handle
4. Battery compartment button
5. Battery compartment
6. On/Off button
7. Inlet
3
2
1
4
5
6
7
SPECIFICATIONS
Cat. No. .......................................................M18 TP
Volts.............................................................. 18 DC
Battery Type .................................................M18™
Charger Type................................................M18™
Max Flow Rate....................................... 30.3 L/min
Fittings ..........................
Max Lift ....................................................5.5 m (18')
Max Head Height ......................................23 m (75')
Application
Max Water Temperature ................. 60°C (140°F)
Max Air Temperature ...................... 40°C (104°F)
13 mm (1/2") NPT male to
19 mm (3/4") BSPT Male
SYMBOLOGY
Volts
Direct Current
No Load Revolutions per Minute (RPM)
L/min
3
Litres per Minute
Regulatory Compliance Mark (RCM).
Product meets applicable regulatory
requirements.
Page 4
WARNING
ASSEMBLY
WARNING
manual supplied with your charger and battery.
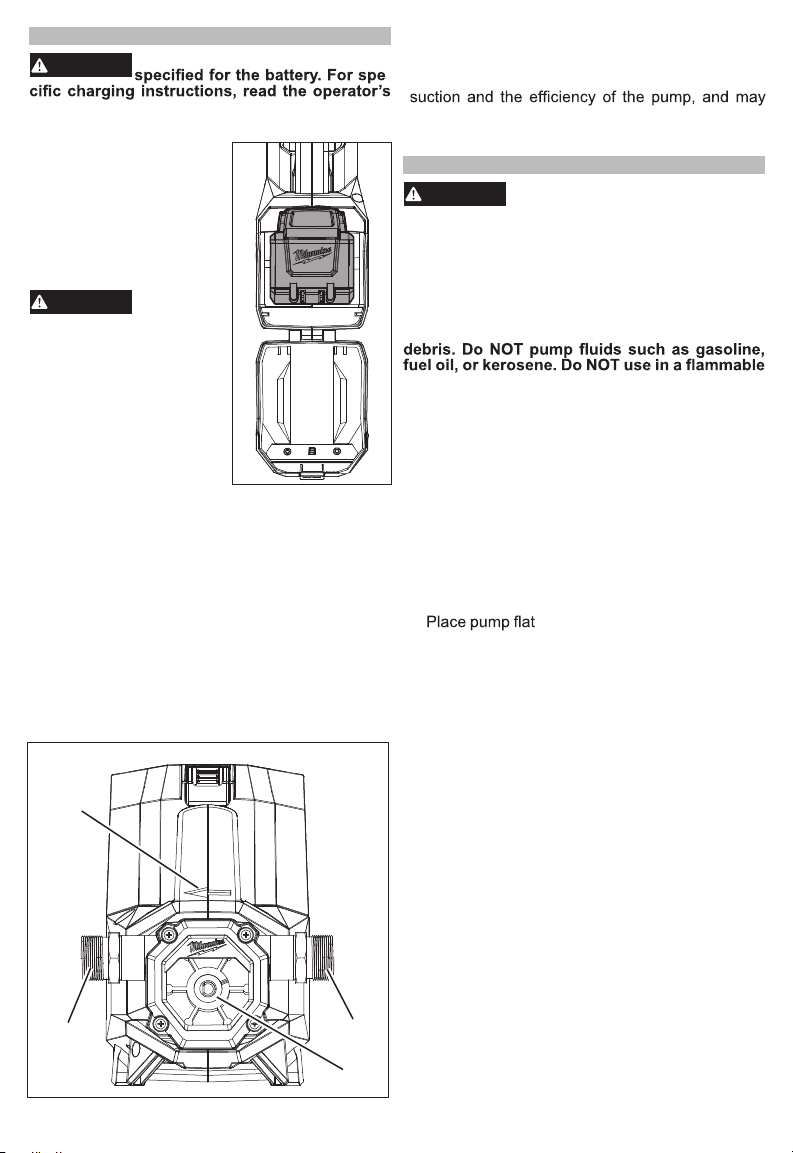
To remove the battery:
1. Press battery compartment button and open the
battery compartment.
2. Push in the release buttons and pull the battery
pack out of the tool.
3. Close the battery compartment securely.
WARNING
tery before attempting to
install, service, or maintain
the pump. Never handle a
pump with wet hands or
when standing on wet or
damp surface or in water.
To insert the battery:
1. Press the battery compartment button and open the
battery compartment.
2. Slide the pack into the tool.
Make sure it latches securely into place.
3. Close the battery compartment securely.
•
Use hoses with 19mm (3/4") BSPT brass female
fitting.
•
A heavy duty hose should be used for the inlet
hose to prevent the hose from collapsing. For best
results, use a short length, large diameter hose,
such as a 183cm (6') long, 19mm (3/4") inner
diameter garden hose. Longer or thinner hoses
may reduce performance and flow rate.
• A regular garden hose may be used as an outlet
hose.
Direction
of Flow
Outlet
Recharge only with the charger
Removing/Inserting the Battery
Al wa ys remove bat -
Inlet/Outlet Hoses
Inlet
Impeller
• Use thread seal tape or a gasket on the inlet to create
an airtight connection ensure the pump will prime.
• Make sure connections are tight.
-
• Small leaks in the inlet hose will greatly reduce
prevent priming.
• Thread the inlet and outlet hoses onto the pump.
OPERATION
To reduce the risk of injury, always
with side shields.
Always remove battery before attempting to
install, service, or maintain the pump.
Pump should only be used to pump clear wa-
ter. Do NOT pump salt water, brine, laundry
discharge, or any other application which may
contain caustic chemicals and/or foreign material. Do NOT pump sand particulate, or large
or explosive atmosphere.
Do not place pump under water or in wet areas.
Place pump in dry locations only.
This pump is designed for applications such as
emptying water heaters, tanks, etc. The pump is not
waterproof or weatherproof and is not intended to be
used outdoors or inside showers, saunas or other
potentially wet locations.
1. Attach inlet and outlet hoses.
2. Place inlet hose below water surface, aiming as
near as possible to the middle of the water source.
3. Lay out inlet and outlet hoses to ensure there are
no blockages, kinks or bends.
4. Secure outlet hose to ensure it does not whip around
or move unexpectedly when pumping begins.
5.
6. Insert battery pack.
7. Turn on pump.
8. Keep pump inlet clean and free of all foreign
objects. Inspect inlet at beginning of each use.
9. As soon as the pump begins to take in air, turn
off pump.
10. Do NOT allow pump to run dry. Damage to the
pump could occur. To prevent pump damage, a
dry pump may shut off automatically within 60
seconds. Turn pump off to reset.
11.
For best results, the pump should be no more
than 5.5 m (18’) above the inlet source. The
maximum discharge height is 23 m (75’).
NOTE: If anything but clear water is accidentally
pumped, flush with clear water for at least 30
seconds.
12. Do not block air vents. If overload occurs, due to
overheating, a jammed impeller, etc, turn off the
pump immediately. Pump may shut off automatically. Clear the jam and allow the tool to cool before restarting. Turn pump off and back on to reset.
13. Do not run the pump for more than 1 hour continu-
ously.
14. When done, remove inlet and outlet hoses and
pour any excess water from the pump. To remove
remaini
more than 5 seconds. In cold situations, freezing
temperatures can cause remaining water in the
pump to freeze and damage the pump.
wear safety goggles or glasses
on it's feet for maximum stability.
ng water from pump, run pump for no
4
Page 5
Troubleshooting
WARNING
WARNING
WARNING
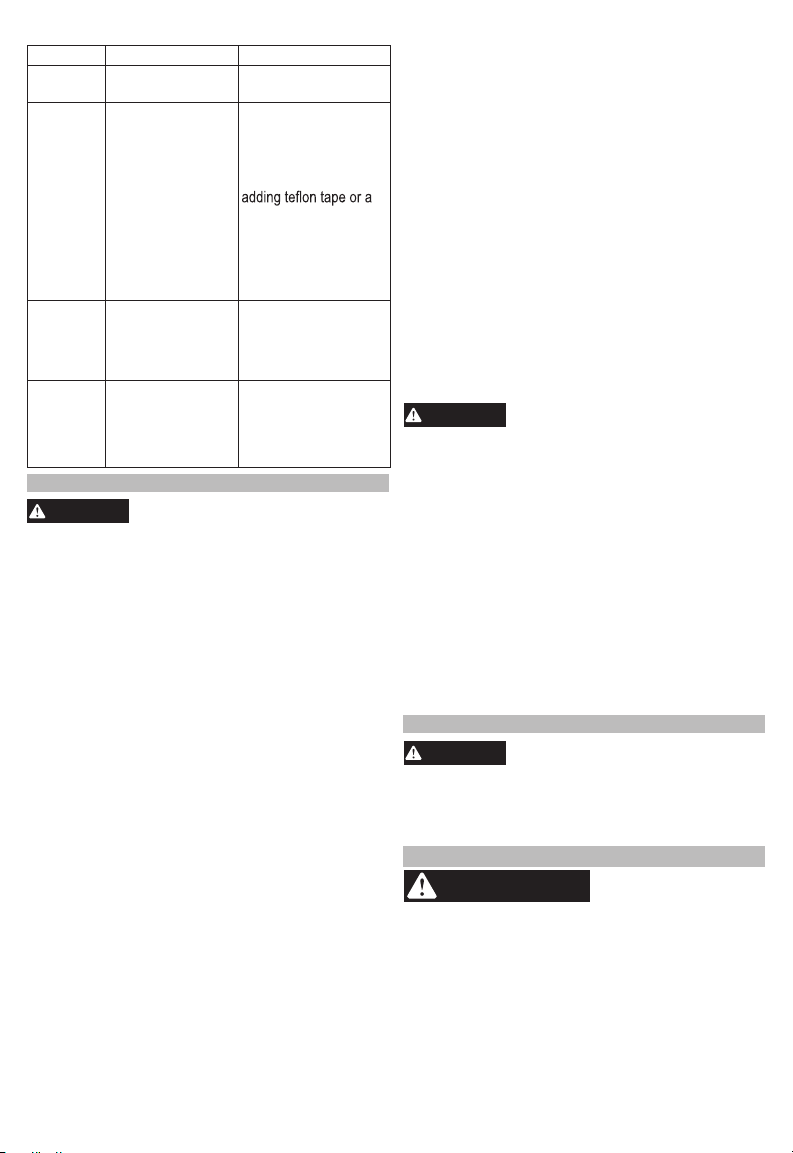
Problem Cause Correction
Pump will
not run
Flow rate is
too low
Pump
shutdown
Over
temperature
shutdown
Impeller blockage. See "Impeller
Inlet/Outlet line is
clogged or damaged.
Inlet connection is not
airtight.
Impeller cover is not
secured tightly.
Impeller worn out.
Dry pump shutdown
Locked impeller.
Battery installed when
pump turned on.
Blocked outlet line.
Outlet line too high.
Outlet line too long.
Pump ON for too long.
Replacement/Clearing"
Replace Inlet/Outlet
line. Check lines for
blockages, kinks or
bends. Clear blockages.
Tighten inlet connection,
gasket if necessary.
Hand tighten four (4)
cover screws.
See "Impeller
Replacement/Clearing"
Correct situation, then
turn tool off, then back
on to reset.
Allow pump to cool.
Correct situation, then
turn tool off, then back
on to reset.
MAINTENANCE
To reduce the risk of injury, always
tempting to install, service, or maintain the pump.
Never disassemble the pump, battery pack or
charger. Contact a MILWAUKEE® service facility
for ALL repairs.
Keep your tool, battery pack and charger in good
repair by adopting a regular maintenance program.
Inspect your tool for issues such as undue noise,
misalignment or binding of moving parts, breakage
of parts, or any other condition that may affect the
tool operation. Return the tool, battery pack, and
charger to a MILWAUKEE
repair. After six months to one year, depending on
use, return the tool, battery pack and charger to a
MILWAUKEE
If the tool does not start or operate at full power
witha fully charged battery pack, clean the contacts
on the battery pack. If the tool still does not work
properly, return the tool, charger and battery pack,
to a MILWAUKEE
remove battery pack before at-
Maintaining Tool
®
service facility for
®
service facility for inspection.
®
service facility for repairs.
Impeller Replacement/Clearing
Check the impeller for wear before each use. Clear
or replace impeller if blocked or damaged.
1. Remove the four cover screws holding motor hous-
ing and pump housing together. Cover is now free
and can be removed.
2. Inspect gasket and impeller for wear and damage.
If there is any evidence of wear or damage, replace
the parts.
3. Clear any debris from the gasket and impeller.
4. Reassemble gasket, cover, and cover screws.
5. Hand tighten cover screws. Do not use power tools
or over tighten.
6. After extended use or when replacing the impel-
ler, apply a small amount of silicone grease to the
impeller blades for best performance.
Never store with liquid inside the pump. To store
the tool:
1. Remove inlet and outlet hoses.
2. Pour excess water from pump.
3. Run pump for no more than 5 seconds.
4. Remove battery pack.
your tool, battery pack or charger in liquid or
allow a liquid to flow inside them.
Storage
To reduce the risk of personal injury and damage, never immerse
Cleaning
Clean dust and debris from vents. Keep handles
clean, dry and free of oil or grease. Use only mild
soap and a damp cloth to clean, since certain
cleaning agents and solvents are harmful to
plastics and other insulated parts. Some of these
include gasoline, turpentine, lacquer thinner, paint
thinner, chlorinated cleaning solvents, ammonia,
acetone, and household detergents containing
ammonia. Never use flammable or combustible
solvents around tools.
For repairs, return the tool, battery pack and charger
to the nearest service centre.
Repairs
ACCESSORIES
Use only recommended accesso-
For a complete listing of accessories, go online to
www.milwaukeetools.com.au/
www.milwaukeetools.co.nz or contact a distributor.
ADDITIONAL BATTERY SAFETY RULES
WARNING
product damage due to a short circuit, never
immerse your tool, battery pack or charger in fluid
or allow a fluid to flow inside them. Corrosive or
conductive fluids, such as seawater, certain
industrial chemicals, and bleach or
bleach-containing products, etc., can cause a short
circuit.
ries. Others may be hazardous.
To reduce the risk of
fire, personal injury, and
5
Page 6

Page 7

Page 8

WARRANTY - AUSTRALIA and NEW ZEALAND
Please refer to Australian and New Zealand warranty supplied with tool. This warranty applies only to
product sold in Australia and New Zealand.
SERVICE - AUSTRALIA and NEW ZEALAND
MILWAUKEE®prides itself in producing a premium quality product that is Nothing But Heavy Duty®.
Your satisfaction with our products is very important to us! If you encounter any problems with the
operation of this tool, please contact your authorised MILWAUKEE® dealer.
For a list of MILWAUKEE® dealers, guarantee or service agents please contact MILWAUKEE
Customer Service or visit our website.
(Australia Toll Free Telephone Number 1300 645 928)
(New Zealand Toll Free Telephone Number 0800 279 624)
or visit www.milwaukeetools.com.au / www.milwaukeetools.co.nz.
Milwaukee Electric Tool Corporation
13135 West Lisbon Road, Brookfield, Wisconsin U.S.A. 53005
®
Milwaukee Tool (Australia)
21 Kelletts Road, Rowville, VIC 3178
Melbourne, Australia
Milwaukee Tool (New Zealand)
2 Landing Drive, Mangere
Auckland, 2022, New Zealand
Professionally Made in China for Milwaukee Tool (Australia) / Milwaukee Tool (New Zealand)
Designed by Milwaukee Electric Tool Corp.
Printed in China
 Loading...