

Milwaukee M18 FUEL FTS210 Operator's Manual
Cat. No.
M18 FTS210
M18™ FUEL™ 210mm (8 1/4") TABLE SAW W/ ONE-KEY™
OPERATOR'S MANUAL
To reduce the risk of injury, user must read and understand operator's manual.
WARNING
2
GENERAL POWER TOOL
SAFETY WARNINGS
WARNING
Read all safety warnings, instruc-
-
tions provided with this power tool. Failure to
follow all instructions listed below may result in
Save all
warnings and instructions for future reference.
The term "power tool" in the warnings refers to your
mains-operated (corded) power tool or battery-operated (cordless) power tool.
WORK AREA SAFETY
Keep work area clean and well lit. Cluttered or
dark areas invite accidents.
Do not operate power tools in explosive atmo-
liquids, gases or dust. Power tools create sparks
which may ignite the dust or fumes.
Keep children and bystanders away while operat-
ing a power tool. Distractions can cause you to lose
control.
ELECTRICAL SAFETY
Power tool plugs must match the outlet. Never
modify the plug in any way. Do not use any
adapter plugs with earthed (grounded) power
tools.
reduce risk of electric shock.
Avoid body contact with earthed or grounded
surfaces, such as pipes, radiators, ranges and
refrigerators. There is an increased risk of electric
shock if your body is earthed or grounded.
Do not expose power tools to rain or wet condi-
tions. Water entering a power tool will increase the
risk of electric shock.
Do not abuse the cord. Never use the cord for
carrying, pulling or unplugging the power tool.
Keep cord away from heat, oil, sharp edges or
moving parts. Damaged or entangled cords increase
the risk of electric shock.
When operating a power tool outdoors, use an
extension cord suitable for outdoor use. Use of
a cord suitable for outdoor use reduces the risk of
electric shock.
PERSONAL SAFETY
Stay alert, watch what you are doing and use
common sense when operating a power tool. Do
not use a power tool while you are tired or under
A
moment of inattention while operating power tools
may result in serious personal injury.
Use personal protective equipment. Always
wear eye protection. Protective equipment such
as a dust mask, non-skid safety shoes, hard hat or
hearing protection used for appropriate conditions
will reduce personal injuries.
Prevent unintentional starting. Ensure the switch
source and/or battery pack, picking up or carrying
the tool.
the switch or energising power tools that have the
switch on invites accidents.
Remove any adjusting key or wrench before
turning the power tool on. A wrench or a key left
attached to a rotating part of the power tool may
result in personal injury.
Do not overreach. Keep proper footing and
balance at all times. This enables better control
of the power tool in unexpected situations.
Dress properly. Do not wear loose clothing or
jewelry. Keep your hair and clothing away from
moving parts. Loose clothes, jewelry or long hair
can be caught in moving parts.
If devices are provided for the connection of
dust extraction and collection facilities, ensure
these are connected and properly used. Use of
dust collection can reduce dust-related hazards.
Do not let familiarity gained from frequent use
of tools allow you to become complacent and
ignore tool safety principles. A careless action can
cause severe injury within a fraction of a second.
POWER TOOL USE AND CARE
Do not force the power tool. Use the correct power
tool for your application. The correct power tool
will do the job better and safer at the rate for which
it was designed.
Do not use the power tool if the switch does not
Any power tool that cannot be
controlled with the switch is dangerous and must be
repaired.
Disconnect the plug from the power source and/
or remove the battery pack, if detachable, from
the power tool before making any adjustments,
changing accessories, or storing power tools.
Such preventive safety measures reduce the risk of
starting the power tool accidentally.
Store idle power tools out of the reach of children
and do not allow persons unfamiliar with the
power tool or these instructions to operate the
power tool. Power tools are dangerous in the hands
of untrained users.
Maintain power tools and accessories. Check
for misalignment or binding of moving parts,
breakage of parts and any other condition that
have the power tool repaired before use. Many
accidents are caused by poorly maintained power
tools.
Keep cutting tools sharp and clean. Properly
maintained cutting tools with sharp cutting edges
are less likely to bind and are easier to control.
Use the power tool, accessories and tool bits
etc. in accordance with these instructions,
taking into account the working conditions and
the work to be performed. Use of the power tool
result in a hazardous situation.
Keep handles and grasping surfaces dry, clean
and free from oil and grease. Slippery handles and
grasping surfaces do not allow for safe handling and
control of the tool in unexpected situations.
BATTERY TOOL USE AND CARE
Recharge
manufacturer. A charger that is suitable for one type
with another battery pack.
battery packs. Use of any other battery packs may
If operating a power tool in a damp location is
unavoidable, use a residual current device
(RCD) protected supply. Use of a RCD reduces
the risk of electric shock.
3
When battery pack is not in use, keep it away
from other metal objects, like paper clips, coins,
keys, nails, screws or other small metal objects,
that can make a connection from one terminal
to another. Shorting the battery terminals together
Under abusive conditions, liquid may be ejected
from the battery; avoid contact. If contact accidentally occurs, flush with water. If liquid
contacts eyes, additionally seek medical help.
Liquid ejected from the battery may cause irritation
or burns.
Do not use a battery pack or tool that is dam-
explosion or risk of injury.
excessive temperature. -
perature above 130°C (265°F) may cause explosion.
Follow all charging instructions and do not charge
the battery pack or tool outside the temperature
Charging
range may damage the battery and increase the risk
SERVICE
Have
repair person using only identical replacement
parts. This will ensure that the safety of the power
tool is maintained.
Never service damaged battery packs. Service
of battery packs should only be performed by the
manufacturer or authorised service providers.
SPECIFIC SAFETY RULES FOR
TABLE SAWS
Guarding related warnings
Keep guards in place. Guards must be in working
order and be properly mounted. A guard that is
loose, damaged, or is not functioning correctly must
be repaired or replaced.
Always use saw blade guard, riving knife and
anti-kickback device for every through–cutting
operation. For through-cutting operations where the
saw blade cuts completely through the thickness of
the workpiece, the guard and other safety devices
help reduce the risk of injury.
Immediately reattach the guarding system after
completing an operation (such as rabbeting,
dadoing or resawing cuts) which requires removal
of the guard, riving knife and/or anti-kickback
device. The guard, riving knife, and anti-kickback
device help to reduce the risk of injury.
Make sure the saw blade is not contacting the
guard, riving knife or the workpiece before the
switch is turned on. Inadvertent contact of these
items with the saw blade could cause a hazardous
condition.
Adjust the ri
ving
knife as described in this
instruction manual. Incorrect spacing, positioning
in reducing the likelihood of kickback.
For the riving knife and anti-kickback device to
work, they must be engaged in the workpiece.
The riving knife and anti-kickback device are ineffective when cutting workpieces that are too short to
be engaged with the riving knife and anti-kickback
device. Under these conditions a kickback cannot be
prevented by the riving knife and antikickback device.
Use the appropriate saw blade for the riving
knife. For the riving knife to function properly, the
saw blade diameter must match the appropriate
riving knife and the body of the saw blade must be
thinner than the thickness of the riving knife and the
cutting width of the saw blade must be wider than
the thickness of the riving knife.
Cutting procedures warnings
DANGER
in the vicinity or in line with the
saw blade. A moment of inattention or a slip could
direct your hand towards the saw blade and result
in serious personal injury.
Feed the workpiece into the saw blade or cutter
only against the direction of rotation. Feeding the
workpiece in the same direction that the saw blade is
rotating above the table may result in the workpiece,
and your hand, being pulled into the saw blade.
Never use the mitre gauge to feed the workpiece
when ripping and do not use the rip fence as a
length stop when cross cutting with the mitre
gauge. Guiding the workpiece with the rip fence
and the mitre gauge at the same time increases the
likelihood of saw blade binding and kickback.
When ripping, always apply the workpiece feed-
ing force between the fence and the saw blade.
Use a push stick when the distance between the
fence and the saw blade is less than 150 mm,
and use a push block when this distance is less
than 50 mm. “Work helping” devices will keep
your
hand at a safe distance from the saw blade.
Use only the push stick provided by the manu-
facturer or constructed in accordance with the
instructions.
distance of the hand from the saw blade.
Never use a damaged or cut push stick. A damaged
push stick may break causing your hand to slip into
the saw blade.
Do not perform any operation “freehand”. Always
use either the rip fence or the mitre gauge to
position and guide the workpiece. “Freehand”
means using your hands to support or guide the
workpiece, in lieu of a rip fence or mitre gauge.
Freehand sawing leads to misalignment, binding
and kickback.
Never reach around or over a rotating saw blade.
Reaching for a workpiece may lead to accidental
contact with the moving saw blade.
Provide auxiliary workpiece support to the rear
and/or sides of the saw table for long and/or
wide workpieces to keep them level. A long and/
or wide workpiece has a tendency to pivot on the
table’s edge, causing loss of control, saw blade
binding and kickback.
Feed workpiece at an even pace. Do not bend or
twist the workpiece. If jamming occurs, turn the
the jam. Jamming the saw blade by the workpiece
can cause kickback or stall the motor.
Do
the saw is running. The material may become
trapped between the fence or inside the saw blade
blade stops before removing material.
Use an auxiliary fence in contact with the table
top when ripping workpieces less than 2 mm
thick. A thin workpiece may wedge under the rip
fence and create a kickback.
4
Never leave the table saw running unattended.
to a complete stop. An unattended running saw is
an uncontrolled hazard.
Locate the table saw in a well-lit and level area
where you can maintain good footing and balance.
It should be installed in an area that provides
enough room to easily handle the size of your
workpiece. Cramped, dark areas, and uneven
Frequently clean and remove sawdust from
under the saw table and/or the dust collection
device. Accumulated sawdust is combustible and
may self-ignite.
The table saw must be secured. A table saw that
is not properly secured may move or tip over.
Remove tools, wood scraps, etc. from the table
before the table saw is turned on. Distraction or
a potential jam can be dangerous.
Always use saw blades with correct size and
shape (diamond versus round) of arbour holes.
Saw blades that do not match the mounting hardware
of the saw will run
Never use damaged or incorrect saw blade
washers, bolts or nuts. These mounting means were
specially designed for your saw, for safe operation
and optimum performance.
Never stand on the table saw, do not use it as
a stepping stool. Serious injury could occur if the
tool is tipped or if the cutting tool is accidentally
contacted.
Make sure that the saw blade is installed to rotate
in the proper direction. Do not use grinding
wheels, wire brushes, or abrasive wheels on a
table saw. Improper saw blade installation or use of
accessories not recommended may cause serious
injury.
Always use common sense and be cautious when
using tools. It is not possible to anticipate every
situation that could result in a dangerous outcome.
Do not use this tool if you do not understand these
operating instructions or you feel the work is beyond
your capability; contact Milwaukee Tool or a trained
professional for additional information or training.
WARNING
Some dust created by power sanding,
sawing, grinding, drilling, and other
construction activities contains chemicals known to
cause cancer, birth defects or other reproductive
harm. Some examples of these chemicals are:
lead from lead-based paint
crystalline silica from bricks and cement and other
masonry products, and
arsenic and chromium from chemically-treated
lumber.
Your risk from these exposures varies, depending on
how often you do this type of work. To reduce your
exposure to these chemicals: work in a well ventilated
area, and work with approved safety equipment, such
as those dust masks that are specially designed to
Kickback causes and related warnings
Kickback is a sudden reaction of the workpiece due
to a pinched, jammed saw blade or misaligned line of
cut in the workpiece with respect to the saw blade or
when a part of the workpiece binds between the saw
frequently during kickback, the workpiece is lifted from
the table by the rear portion of the saw blade and is
propelled towards the operator. Kickback is the result
of saw misuse and/or incorrect operating procedures
or conditions and can be avoided by taking proper
precautions as given below.
Never stand directly in line with the saw blade.
Always position your body on the same side of
the saw blade as the fence. Kickback may propel
the workpiece at high velocity towards anyone
standing in front and in line with the saw blade.
Never reach over or in back of the saw blade
to pull or to support the workpiece. Accidental
contact with the saw blade may occur or kickback
Never hold and press the workpiece that is being
Pressing
will create a binding condition and kickback.
Align the fence to be parallel with the saw blade.
A misaligned fence will pinch the workpiece against
the saw blade and create kickback.
Use a featherboard to guide the workpiece against
the table and fence when making non-through
cuts such as rabbeting, dadoing or resawing
cuts. A featherboard helps to control the workpiece
in the event of a kickback.
Use extra caution when making a cut into blind
areas of assembled workpieces. The protruding
saw blade may cut objects that can cause kickback.
Support large panels to minimise the risk of saw
blade pinching and kickback. Large panels tend
to sag under their own weight. Support(s) must be
placed under all portions of the panel overhanging
the table top.
Use extra caution when cutting a workpiece that
is twisted, knotted, warped or does not have a
straight edge to guide it with a mitre gauge or
along the fence. A warped, knotted, or twisted
workpiece is unstable and causes misalignment of
the kerf with the saw blade, binding and kickback.
Never cut more than one workpiece, stacked
vertically or horizontally. The saw blade could
pick up one or more pieces and cause kickback.
When restarting the saw with the saw blade in
the workpiece, centre the saw blade in the kerf so
that the saw teeth are not engaged in the material.
If the saw blade binds, it may lift up the workpiece
and cause kickback when the saw is restarted.
Keep
set. Never use warped saw blades or saw blades
with cracked or broken teeth. Sharp and properly set
saw blades minimise binding, stalling and kickback.
Table saw operating procedure warnings
T
cord when removing the table insert, changing
the saw blade or making adjustments to the
riving knife, antikickback device or saw blade
guard, and when the machine is left unattended.
Precautionary measures will avoid accidents.
Maintain labels and nameplates. These carry
important information. If unreadable or missing,
contact a MILWAUKEE
®
service facility for a
replacement.

5
SYMBOLOGY
Volts
Direct Current
No Load Revolutions per Minute (RPM)
Read operator’s manual
Wear eye protection. Use hearing
and respiratory protection.
Keep hands and body out of the path
of the saw blade.
Match kerf width of blade (>1.8 mm)
and blade body thickness (<1.55 mm)
with the marking on the riving knife to
reduce the risk of kickback.
Only use 210 mm (8 1/4") saw blades
Match the arrow direction on the saw
blade with the arrow direction on the
riving knife.
SPECIFICATIONS
Cat. No. ..............................................M18 FTS210
Volts............................................................18V DC
Battery Type .................................................M18™
Charger Type................................................M18™
Recommended Ambient
Operating Temperature ......................-17°C to 51°C
No Load RPM ..................................................6300
Blade Arbour.................................................30 mm
Blade Diameter ...............................210 mm (8-1/4")
Blade Tilt .................................................. -3° to 47°
Mitre gauge angle.........................60° Right or Left
Cutting Depth, 0° Bevel .......................63 mm (2.5")
Cutting Depth, 45° Bevel ...................44 mm (1.75")
Blade Kerf ................................ ..>1.8 mm minimum
.................................<2.2 mm maximum
Blade body thickness..............<1.55 mm maximum
Riving knife thickness ....................1.6 mm (0.063")
ADDITIONAL BATTERY SAFETY RULES
WARNING
To reduce the risk of fire, personal
injury, and product damage due to a short circuit,
never immerse your inflator, battery pack or
charger in fluid or allow a fluid to flow inside them.
Corrosive or conductive fluids, such as seawater,
certain industrial chemicals, and bleach or
bleach-containing products, etc., can cause a short
circuit.
Regulatory Compliance mark (RCM).
This product meets applicable
regulatory requirements.
6
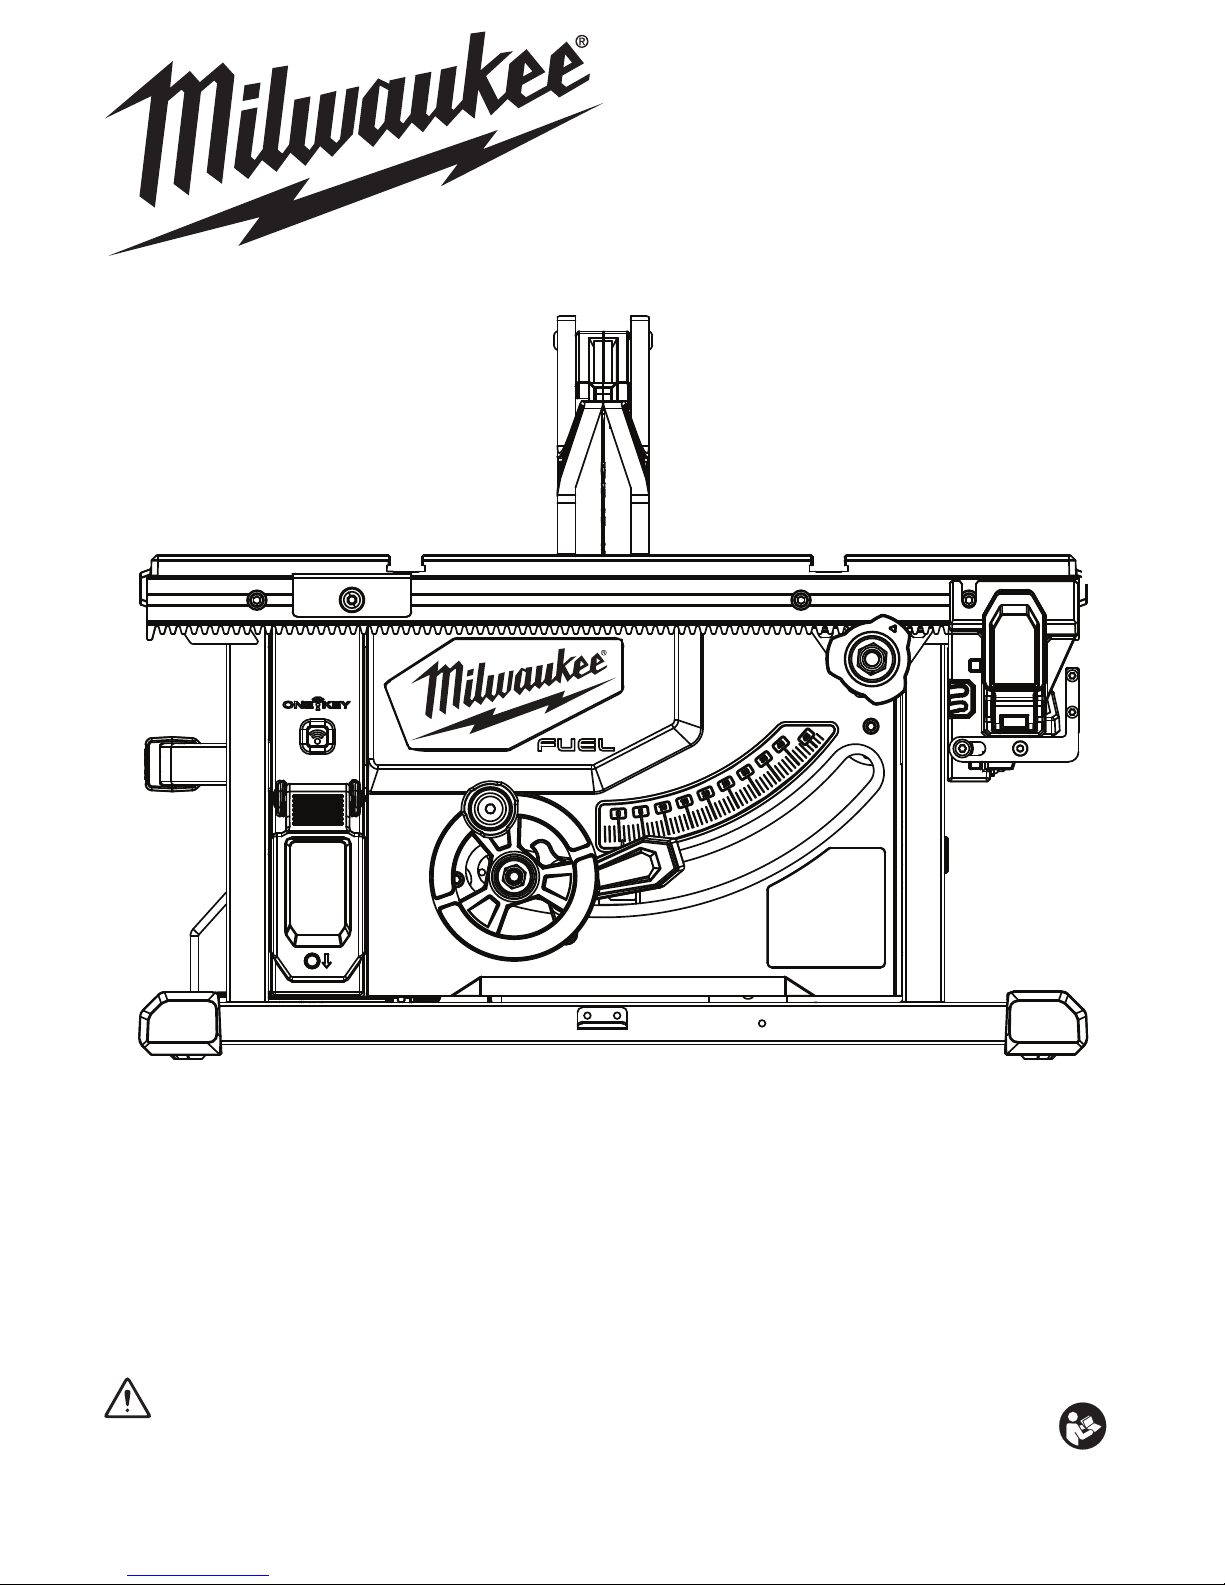
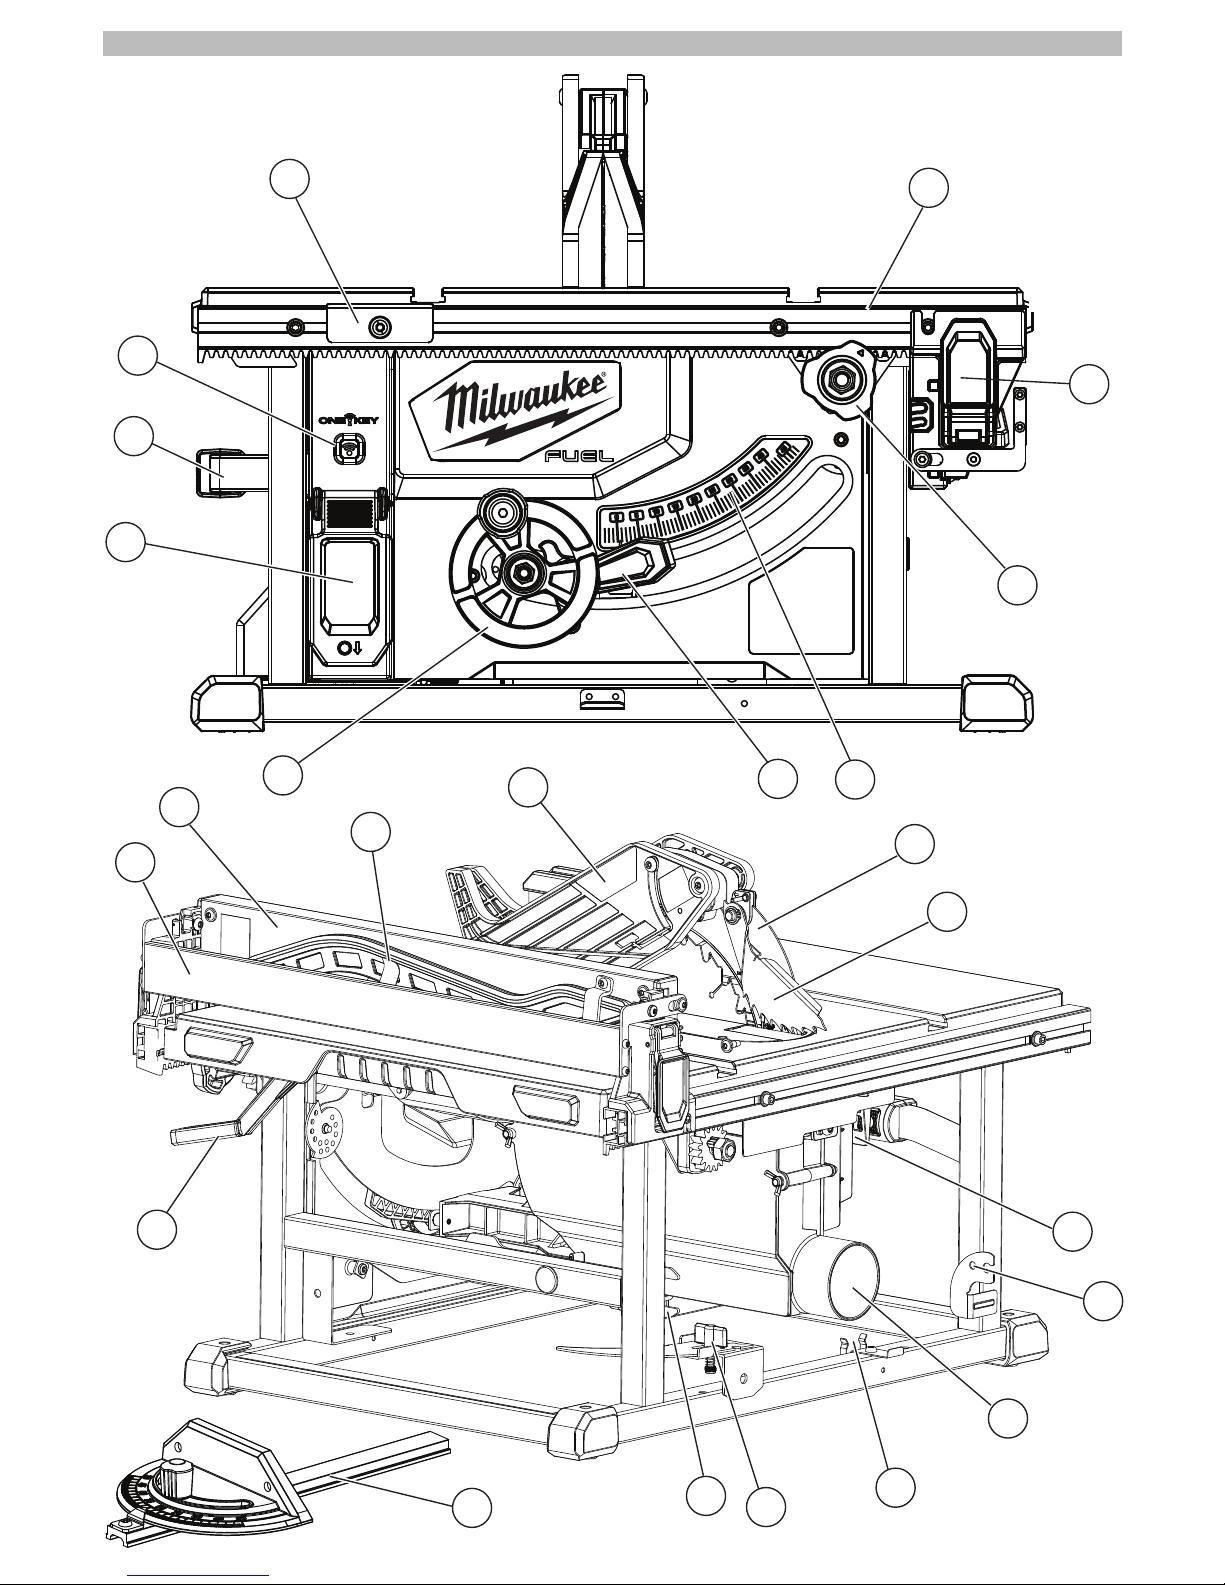
FUNCTIONAL DESCRIPTION
13
9
3
11
2
10
5
4
6
7
8
1
12
14
15
16
18
17
21
20
22
23
19
24
7
1. Rip scale indicator
2. Rip scale
3. Fence latch
4. Fence adjusting knob
5. Bevel scale
6. Bevel locking lever
7. Height adjusting wheel
8. Switch cover
9. Carrying handle
10. ONE-KEY
TM
indicator
11. Extending rip fence
12. Rip fence
13. Push stick
14. Blade guard
15. Riving knife and blade guard assembly
16. Anti-kickback pawls
17. Riving knife release lever
18. Anti-kickback pawl storage
19. Dust chute
20. Mitre gauge storage
21. Riving knife without guard / riving knife storage
22. Blade wrench / blade wrench storage
23. Mitre gauge
24. Fence lock
WARNING
recommended for this tool. Others
may be hazardous.
Unpacking
This product requires assembly.
Carefully lift saw from the carton and place it on a
level work surface.
NOTE: This tool is heavy. To avoid back injury, keep
your knees bent and lift with your legs, not your back,
and get help when needed.
If tool is shipped with a battery installed, remove
the battery pack.
Remove any packaging and zip ties.
Inspect the tool carefully to make sure no breakage
or damage occurred during shipping.
Mounting the Table Saw
WARNING
Ensure the saw is on a stable,
level surface before use.
For extra stability, mount the table saw to workbench
using the mounting holes in the in the frame. Insert
screws at an angle through the table saw frame.
Understanding the Table Saw
Before adjusting or operating the saw, have a basic
understanding of table saw use and terminology.
The upper portion of the blade projects up through the
table and is surrounded by an insert called the throat
plate. The height of the blade is set with a wheel on
the front of the cabinet. The rip fence is used to position work for lengthwise cuts. A rip fence scale on the
front rail shows the distance between the rip fence
and the blade. It is very important to use the riving
knife with blade guard and anti-kickback pawls for
all through-sawing operations. Use the mitre gauge
for all cross-cut operations.
Detailed instructions are provided in this manual
for making adjustments and basic cuts: cross cuts,
mitre cuts, bevel cuts, and compound cuts. This table
saw is designed to cut wood and wood composition
products only. Do not cut metal. Do not cut plastics.
Understand these instructions before continuing.
ASSEMBLY
WARNING
Recharge only with the charger
-
manual supplied with your charger and battery.
Removing/Inserting the Battery
To remove the battery, push in the release buttons
and pull the battery pack away from the tool.
WARNING
Always remove battery pack before
changing or removing accessories.
To insert the battery, slide the pack into the body
of the tool. Make sure it latches securely into place.
If any parts are damaged or missing, do not
operate this tool until the parts are replaced.
Use of this product with damaged or missing
parts could result in serious personal injury.
Do not attempt to modify this tool or create
accessories not recommended for use with this
tool.
Any such alteration or modification is misuse
and could result in a hazardous condition
leading to possible serious personal injury.
Do not insert to battery pack until assembly is
complete. Failure to comply could result in
accidental starting and possible serious
personal injury
.
Do not lift the saw without help. Hold it close to
your body. Keep your knees bent and lift with
your legs, not your back. Ignoring these precautions can result in back injury.
Do not discard the packing material until you have
carefully inspected the tool, identified all loose
parts, and satisfactorily operated the tool.
The MILWAUKEE
®
Table Saw Stand can also be
used.
8
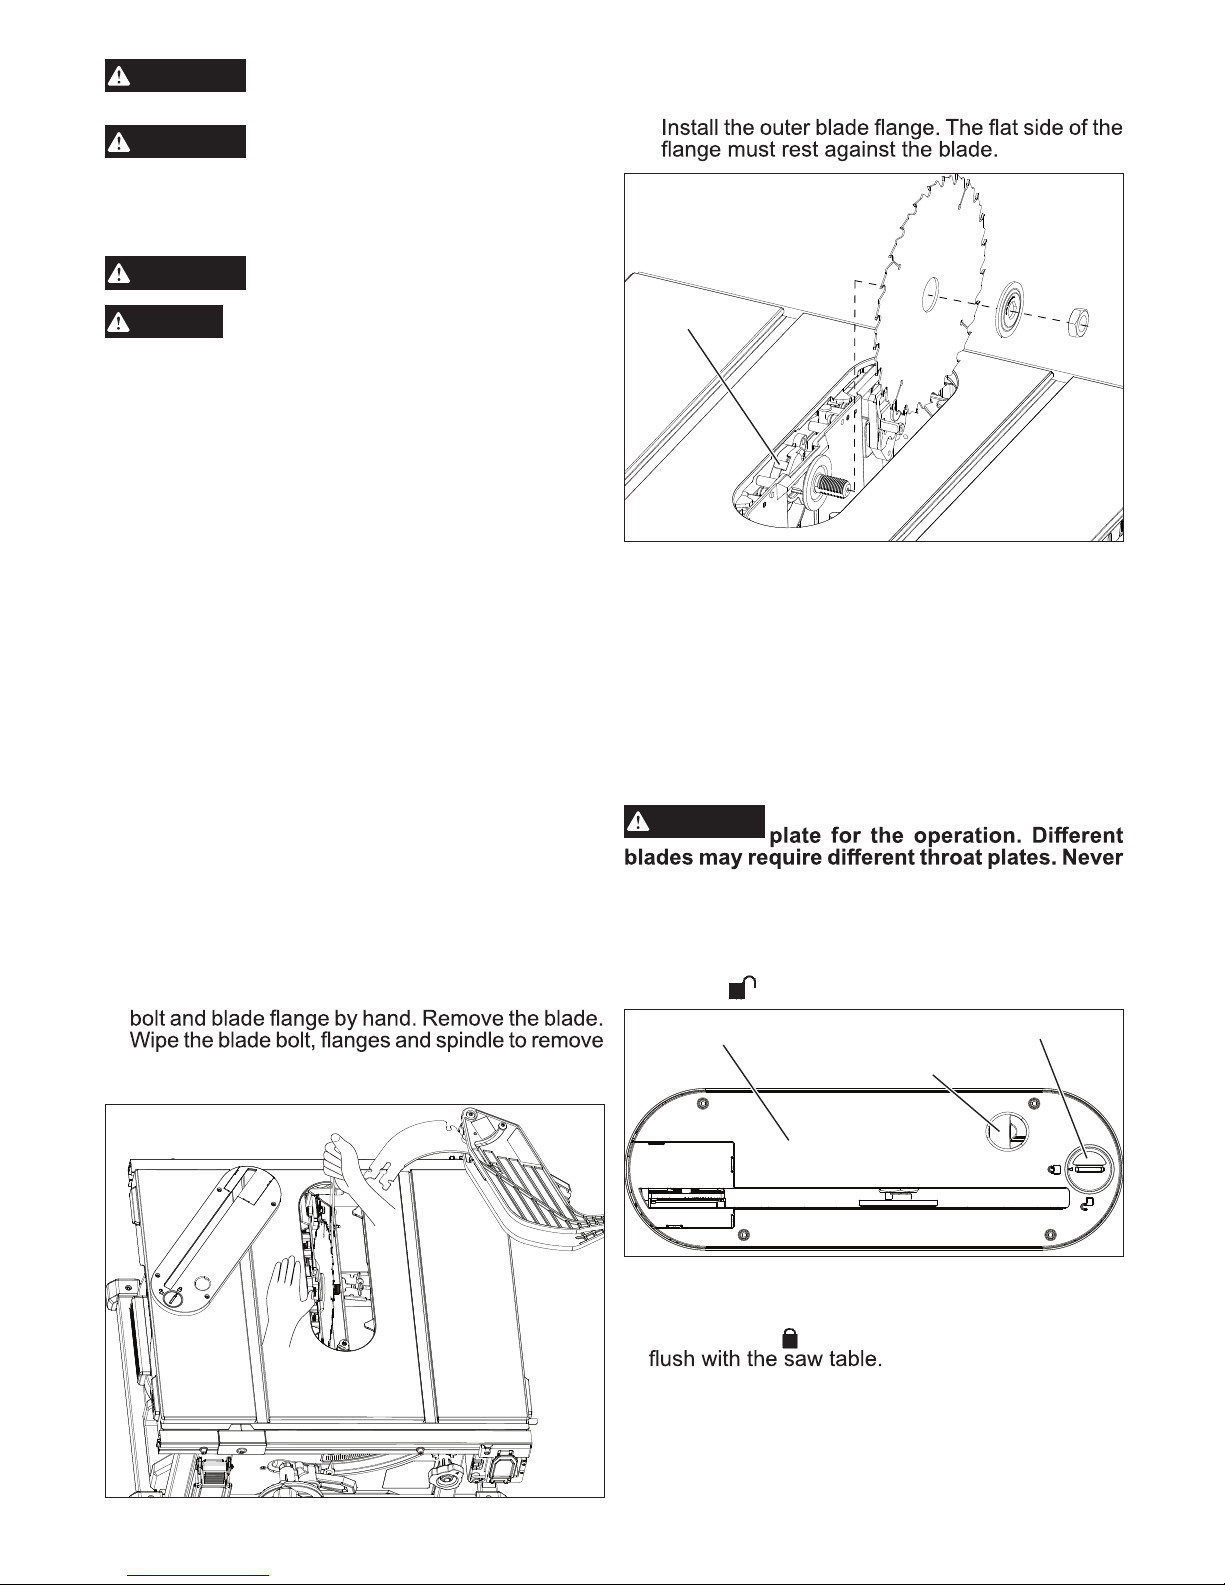
Selecting, Installing, and Changing Blades
WARNING
Do not use blades rated less than
the speed of this tool. Failure to
heed this warning could result in personal injury.
WARNING
Use the appropriate saw blade for
the riving knife. Match kerf width
of blade (>1.8 mm) and blade body thickness
(<1.55 mm) with the marking on the riving knife
to reduce the risk of kickback. Failure to heed
this warning could result in personal injury.
WARNING
Blades are sharp. Wear work gloves
when handling blades.
NOTICE
To work properly, the saw blade teeth
must point down toward the front of
the saw. Failure to heed this warning could cause
damage to the saw blade, the saw, or the workpiece.
Blade kerf width and blade body thickness must be
within the limits stamped on the riving knife. Do not
use metal-cutting blades. Do not cut plastics.
The blade wrench should be stored on the table
saw frame (see "Functional Description" for storage
location).
NOTE: To replace the blade with an accessory blade,
follow the instructions provided with the accessory.
To change the saw blade:
1. Remove the battery pack.
2. Set the blade angle (bevel) to 0° and lock it in
place.
3. Raise the blade by turning the height adjusting
wheel clockwise.
4. Remove the riving knife.
5. Remove the throat plate.
6. Press in the spindle lock and rotate the spindle/
blade until the lock engages.
7. Use the blade wrench to loosen the blade bolt
counterclockwise. Carefully remove the blade
dust and debris. Inspect the parts for damage.
Replace if needed.
8. Match the arrow direction on the replacement saw
blade with the arrow direction on the riving knife.
The teeth should point toward the front of the table
saw. Slide the blade onto the spindle.
9.
Spindle lock
10. Hand-thread the blade bolt. Once the spindle
starts to spin, press in the spindle lock and rotate
the blade until the lock engages. Securely tighten
clockwise with the blade wrench.
11. Reinstall the appropriate throat plate, riving knife,
and anti-kickback pawls for the application.
12. Check blade guard and anti-kickback pawls move
freely before starting the saw. Ensure the blade
teeth match the direction of rotation indicated on
the riving knife.
Changing the Throat Plate
WARNING
Always use the appropriate throat
operate the saw without a throat plate in place.
1. Remove the battery pack.
2. Lower the blade by turning the height adjusting
wheel counterclockwise.
3. To remove a throat plate, turn the throat plate
latch to
unlocked.
Throat plate
Lift hole
Throat plate latch
4. Use the hole to lift the throat plate out.
5. To install a throat plate, slide the back end into the
slot and drop the front into place. Turn the throat
plate latch to
locked. The throat plate must be
Always use clean, sharp blades. Dull blades tend
to overload the tool, bind, and cause pinching. Use
only 210mm (8-1/4") table saw blades rated at
least 6300 RPM.
The blade provided with the saw is a high-quality
combination blade suitable for ripping and cross
cut operations.
 Loading...