

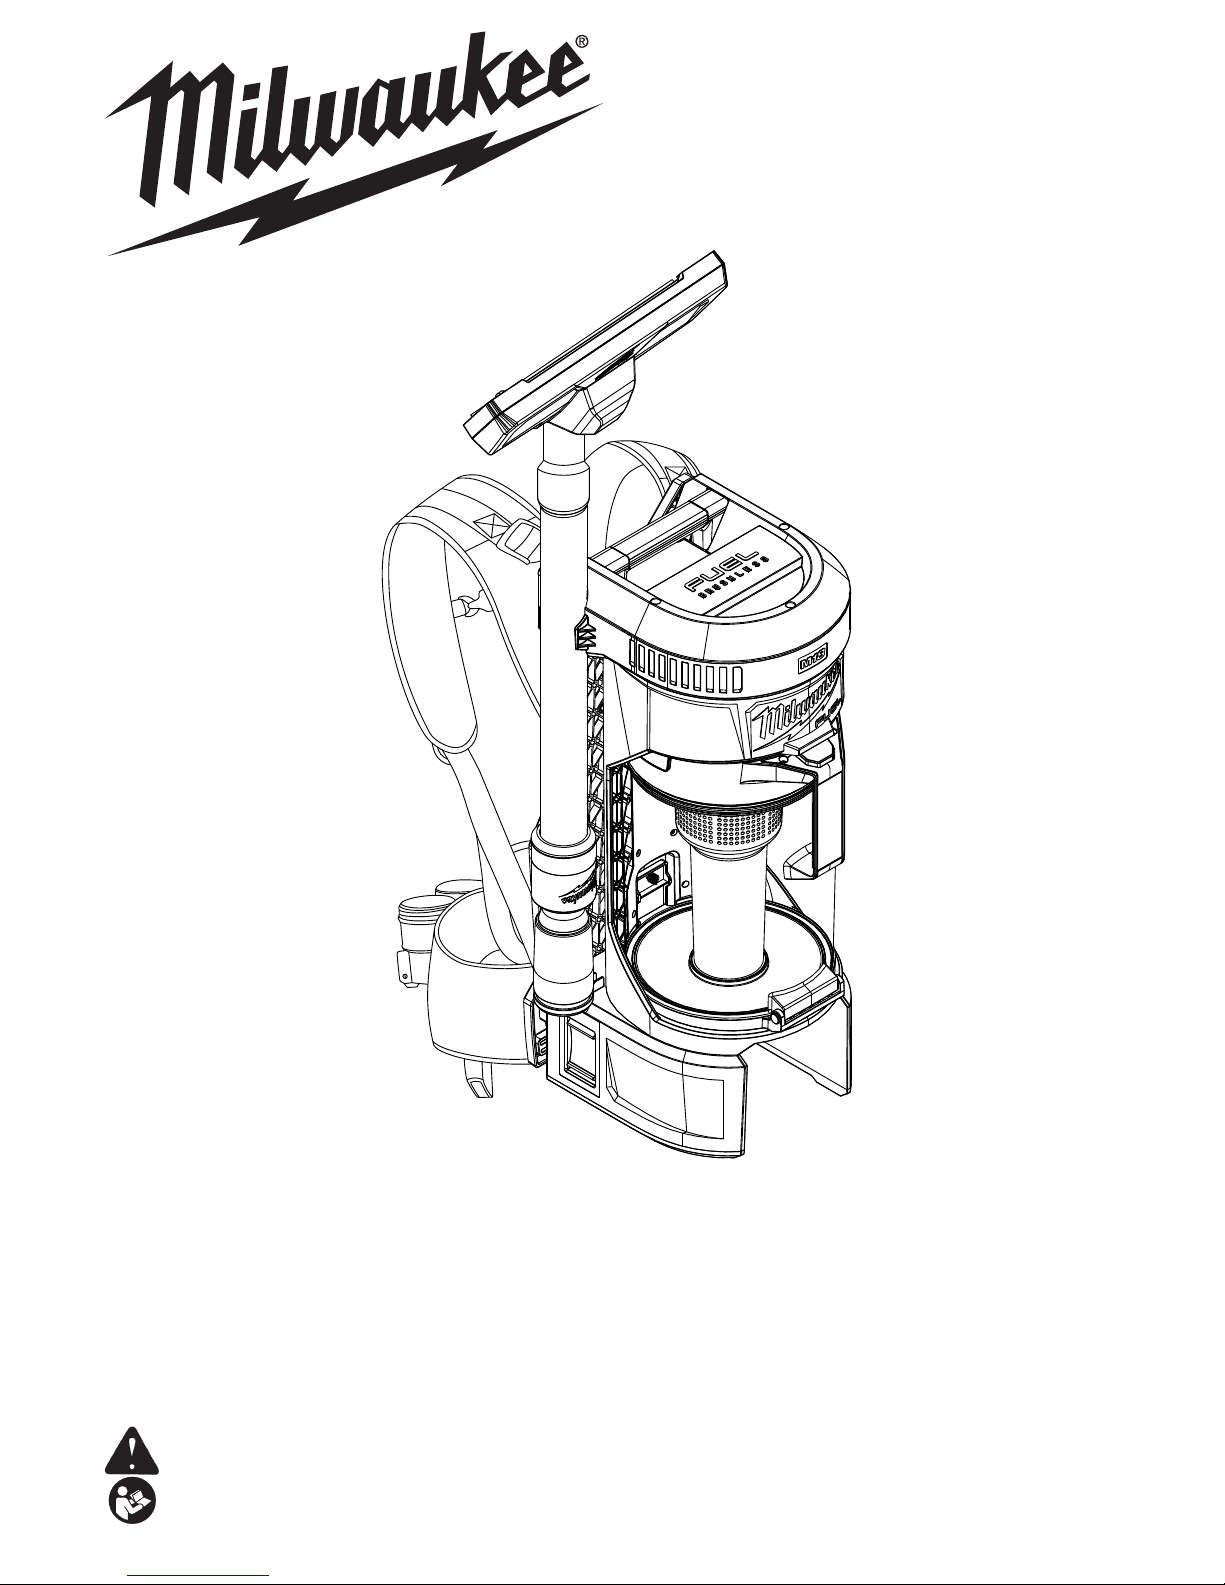
Milwaukee M18 FUEl 0885-20 Operator's Manual
Cat. No. / No de cat.
0885-20
M18™ FUEL™ 3-in-1 BACKPACK VACUUM
ASPIRATEUR DORSAL 3-en-1 M18™ FUEL™
ASPIRADORA DE MOCHILA 3-en-1 M18™ FUEL™
OPERATOR'S MANUAL
MANUEL de L'UTILISATEUR
MANUAL del OPERADOR
WARNING To reduce the risk of injury, user must read and understand operator's manual.
AVERTISSEMENT An de réduire le risque de blessures, l'utilisateur doit lire et bien
comprendre le manuel.
ADVERTENCIA Para reducir el riesgo de lesiones, el usuario debe leer y entender el manual.

2
3
SYMBOLOGY
Volts
Direct Current
Read operator's manual
Wear eye protection
C
US
UL Listing for Canada and U.S.
SPECIFICATIONS
Cat. No. ..................................................... 0885-20
Volts.............................................................. 18 DC
Battery Type .................................................M18™
Charger Type................................................M18™
Air Volume ..................................................55 CFM
Sealed Suction ...........................................76inH20
Air Performance.................................. 159 air watts
Capacity..............................................1 Gal. (3.8 L)
Recommended Ambient
Operating Temperature ...................... 0°F to 125°F
Telescoping Extension Wand ............... 14-37-0005
Flexible Hose ........................................ 31-01-0305
Crevice Tool .......................................... 31-01-0310
Floor Tool .............................................. 31-01-0315
Dust Extraction Adapter ........................ 31-01-0320
HEPA Filter ........................................... 49-90-1963
9 Foot Accessory Hose.........................49-90-1964
WORK AREA SAFETY
• Keep work area clean and well lit. Cluttered or
dark areas invite accidents.
• Do not use in the presence of explosive dust,
liquids or vapors.
• Do not use where oxygen or anesthetics are
used.
• Do not allow to be used as a toy. Close attention
is necessary when used by or near children.
• Use extra care when using on stairs.
ELECTRICAL SAFETY
• Do not pick up wet material. Do not use water to
settle dust.
• Do not handle battery pack or vacuum with wet
hands.
• Store indoors. Do not expose to rain.
PERSONAL SAFETY
• STAY ALERT. Watch what you are doing and use
common sense. Do not use vacuum when you are
tired, distracted or under the inuence of drugs,
alcohol or medication causing diminished control.
• The operation of a vacuum can result in foreign
objects being blown into eyes, which can result in
eye damage. Always wear safety goggles or glasses
with side shields when operating vacuum.
• Wear a dust mask or use an OSHA compliant
dust extraction solution when working in dusty
situations. Dust particles can harm your lungs.
• Avoid accidental starting. Ensure the switch is
in the off-position before inserting battery pack.
Inserting battery pack in vacuum that has the switch
on invites accidents.
• Do not overreach. Keep proper footing and bal-
ance at all times. This enables better control of the
vacuum in unexpected situations.
• Never stand on vacuum or use as a step stool.
• Keep hair, loose clothing, ngers, and all parts
of body away from openings and moving parts.
• Use only as described in this manual. Use only
manufacturer’s recommended attachments.
USE AND CARE
• Do not use without tank and/or lter properly
installed.
• Do not use to pick up ammable or combustible
liquids such as gasoline or use in areas where they
may be present.
• Do not pick up anything that is burning or smok-
ing such as cigarettes, matches, or hot ashes.
• Do not pick up soot, cement, plaster or drywall
dust without lter in place. These are very ne
particles that may affect the performance of the
motor or be exhausted back into the air.
• To reduce risk, do not use to vacuum hazard-
ous, toxic or carcinogenic materials, such as
asbestos or pesticide.
• Use special care when emptying heavily loaded
tanks.
• To avoid spontaneous combustion, empty tank
after each use.
• Do not leave vacuum unattended when battery
pack is installed. Remove battery pack when not
in use and before servicing.
• Do not put any object into openings. Do not use
with any opening blocked; keep free of dust, lint,
hair, and anything else that may reduce air ow.
• Static shocks are possible in dry areas or when
the relative humidity of the air is low. This is
only temporary and does not affect the use of the
vacuum. To reduce the frequency of static shocks,
add moisture to the air with a console or installed
humidier.
• Some wood contains preservatives and can be
toxic. Take extra care to prevent inhalation and
skin contact when working with these materials.
Request and follow any safety information available
from your material supplier.
• Maintain vacuum. Check for misalignment or
binding of moving parts, breakage of parts and
any other condition that may affect the vacuum's
operation. If damaged, have the vacuum repaired
before use. Many accidents are caused by poorly
maintained tools.
• Always use common sense and be cautious
when using tools. It is not possible to anticipate
every situation that could result in a dangerous outcome. Do not use this tool if you do not understand
these operating instructions or you feel the work is
beyond your capability; contact Milwaukee Tool or
a trained professional for additional information or
training.
• Maintain labels and nameplates. These carry
important information. If unreadable or missing,
contact a MILWAUKEE service facility for a free
replacement.
•This product is suitable for collection of silica
dust when used in accordance with these instructions. To reduce the risk of health hazards
from other vapors or dust, do not vacuum
carcinogenic, toxic or hazardous materials
such as asbestos, arsenic, barium, beryllium, lead,
pesticides or other health endangered materials.
•
WARNING
Some dust created by
power sanding, sawing,
grinding, drilling, and other construction activities
contains chemicals known to cause cancer, birth
defects or other reproductive harm. Some examples
of these chemicals are:
• lead from lead-based paint
• crystalline silica from bricks and cement and other
masonry products, and
• arsenic and chromium from chemically-treated lumber.
Your risk from these exposures varies, depending
on how often you do this type of work. To reduce
your exposure to these chemicals: work in a well
ventilated area, and work with approved safety
equipment, such as those dust masks that are spe-
cially designed to lter out microscopic particles.
• The unit is compliant as an objective data
solution of OSHA Standard 29CRF 1926.1153,
assuming it is used in accordance with
MILWAUKEE instructions. Please reference
https://www.osha.gov for further details on compliance methods. Visit https://www.milwaukeetool.
com for an objective data sheet.
BATTERY PACK USE AND CARE
• Use vacuum only with specically designated
battery packs. Use of any other battery packs may
create a risk of injury and re.
• Turn off all controls before removing battery pack.
• Before using the battery pack or charger read
the operator’s manuals, and any labels on the
battery pack, charger and vacuum.
• Recharge only with the charger specied by the
manufacturer. A charger that is suitable for one type
of battery pack may create a risk of re when used
with another battery pack.
• When battery pack is not in use, keep it away
from other metal objects like paper clips, coins,
keys, nails, screws, or other small metal objects
that can make a connection from one terminal
to another. Shorting the battery terminals together
may cause burns or a re.
• Do not use damaged battery pack or vacuum.
If battery pack or vacuum are not working as
they should, have been dropped, damaged, left
outdoors,or dropped into water, return them to a
service center.
SERVICE
• Have your power tool serviced by a qualied
repair person using only identical replacement
parts. This will ensure that the safety of the power
tool is maintained.
• Never service damaged battery packs. Service
of battery packs should only be performed by the
manufacturer or authorized service providers.
SPECIFIC SAFETY RULES
•Before using the vacuum, read this operator’s
manual, your battery pack and charger operator’s manuals, and all labels on the vacuum,
battery pack, and charger.
• Never use vacuum without tank and lter properly
installed. Vacuum will throw dust and debris into the
air.
• Never use water to clean lter. Tap clean or blow
dirt off with compressed air. Water will cause lter
to fail.
• Wear ear protectors. Exposure to noise can cause
hearing loss.
READ AND SAVE
ALL
INSTRUCTIONS
FOR FUTURE USE
IMPORTANT SAFETY INSTRUCTIONS
WARNING
WHEN USING AN ELECTRICAL VACUUM, TO REDUCE THE
RISK OF FIRE OR INJURY, BASIC PRECAUTIONS SHOULD
ALWAYS BE FOLLOWED, INCLUDING THE FOLLOWING: READ ALL INSTRUCTIONS BEFORE USING VACUUM. FOR HOUSEHOLD OR COMMERCIAL USE.
BEFORE USING THE VACUUM, READ THIS OPERATOR’S MANUAL, BATTERY
PACK AND CHARGER OPERATOR’S MANUALS, AND ALL LABELS ON THE
VACUUM, BATTERY PACK, AND CHARGER.
4
5
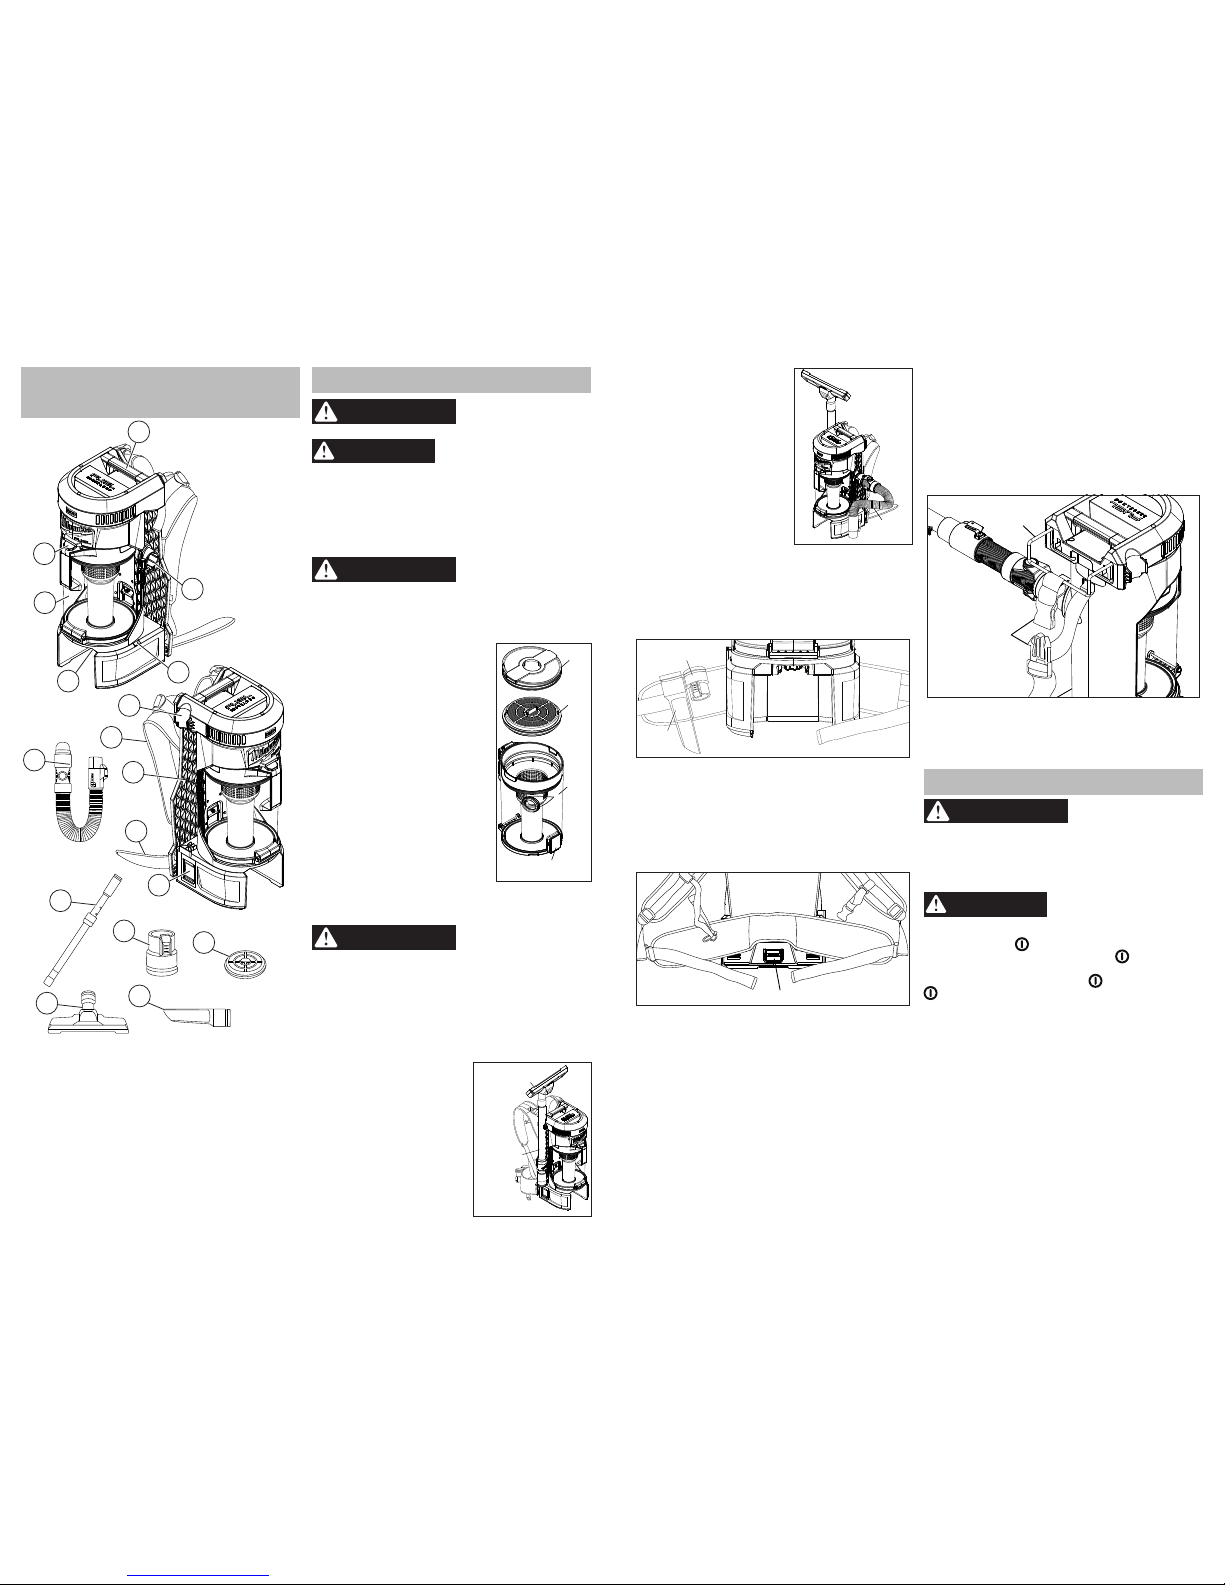
ASSEMBLY
WARNING
To reduce the risk of
injury, always remove
the battery pack before removing the tank.
CAUTION
Keep lter clean. Efciency
of the vacuum is largely
dependent on the lter. A dirty lter will reduce
the air ow and overall efciency of the system.
Do not clean with water. Remove from tank and
tap clean or blow off with compressed air.
Removing/Inserting the Battery
To remove the battery, push in the release buttons
and pull the battery pack away from the tool.
WARNING
Always remove battery
pack before changing
or removing accessories.
To insert the battery, slide the pack into the body
of the tool. Make sure it latches securely into place.
Removing/Installing the Filter
To remove the lter:
Tank release
button
Tank
Filter
Tank
cap
1. Remove the battery pack.
2. Press the tank handle button
and remove the tank from the
vacuum.
3. Pull out tank cap to expose the
lter. Pull the lter out of the
tank.
4. Lift the tank release button and
empty all the dust and debris
from the tank.
5. To clean the lter, tap clean or
blow dirt off with compressed
air. Replace the lter if damaged or suction decreases
(single pack, Cat. No. 49-90-
1963).
NOTE: Never use water to
clean lter.
To install the lter:
1. Place the lter into the top of the tank.
2. Line up the tank cap guides and secure it to the
tank. Place the tank back into the vacuum.
WARNING
Only use accessories
specifically recom-
mended for this tool. Others may be hazardous.
Removing/Installing the Accessories
To install the hose, push the accessory onto the
vacuum inlet. To install the nozzles and extensions,
push the accessory onto the hose end.
To remove, press the accessory clip and pull out.
Storing the Accessories
Each of the accessories can be stored on the
vacuum.
Floor
tool
Telescoping
extension
wand
• Telescoping extension
wand:Clip the accessory
onto the extension wand
holder.
• Floor tool: Insert the
accessory onto the top of the
telescoping extension wand.
• Flexible hose: Insert the
Flexible
hose
accessory onto the vacuum
inlet. Clip onto the hose clip
to secure.
• Crevice tool: Hook the accessory onto the crevice
tool rungs located on the lower backpack strap.
Push the nose of the accessory through the lower
rung and strap the top to the upper rung.
• Dust extraction adapter: Hook the accessory
onto the dust extraction adapter rung located on
the lower backpack strap.
Crevice
tool
Dust extraction
adapter
Removing/Installing the Backpack Plate
The backpack plate can be removed when mounting the vacuum on a surface or carrying by hand.
To remove the plate, hold down the backpack plate
release button. Pull the bottom end of the plate
away from the vacuum to remove the lower tabs.
Pull down on the plate and away from the vacuum
to remove the upper tabs.
Backpack plate release button
To install the plate, line up and insert the upper
plate tabs into the vacuum. Lift the plate up to align
and insert the lower plate tabs into the vacuum.
Push the tabs in to lock.
FUNCTIONAL
DESCRIPTION
1
2
6
8
11
7
4
10
3
9
12
13
14
16
15
17
5
1. Carrying handle
2. Tank handle button
3. Tank
4. Battery bay
5. Hose clip
6. Vacuum inlet
7. Extension wand holder
8. Top backpack straps
9. Backpack plate
10. Lower backpack strap
Mounting the Vacuum
The vacuum can be hung and mounted to a surface
for ease of use.
To mount the vacuum, remove the backpack plate
according to the "Removing/Installing the Backpack
Plate" instructions. This will expose the mounting
hanger. Pull hanger away from the vacuum, unclip
the hanger straps and hook vacuum onto surface.
Secure by clipping the hanger straps and tightening
to the surface.
Mounting
hanger
Hanger
straps
To unmount the vacuum, unhook the hanger straps.
Pull hanger from the surface and push hanger back
into the vacuum. Reinstall the backpack plate according to the "Removing/Installing the Backpack
Plate" instructions.
OPERATION
WARNING
To reduce the risk of re
and injury, do not use
to pick up ammable or combustible materials.
To reduce the risk of injury, wear safety goggles
or glasses with side shields. Empty tank before
use.
Before use, ensure the lter is installed.
CAUTION
Do not carry vacuum by the
tank handle.
Starting, Stopping, and Controlling Speed
Press the Power switch up to 2 to run the vacuum
on High power. Press the Power switch down
to 1 to run the vacuum on Low power. To turn the
vacuum Off, return the Power switch to its home
position.
Using the Vacuum
There are multiple ways to use the vacuum to best
suit your job.
• Wearing the vacuum as a backpack. Place
vacuum on body. Secure the tool by strapping in
the top and bottom backpack straps.
• Mounting the vacuum on a surface. Remove
the backpack plate according to the "Removing/
Installing the Backpack Plate" instructions. Then
mount the vacuum to the surface according to the
"Mounting the Vacuum" instructions.
• Carrying the vacuum in hand. If desired, remove
the backpack plate according to the "Removing/
Installing the Backpack Plate" instructions.
11. Switch
12. Flexible hose
13. Telescoping
extension wand
14. Floor tool
15. Dust extraction
adapter
16. Crevice tool
17. HEPA lter

6
7
Operation
1. Remove ALL dirt and debris found in the tank.
2. Insert battery pack and attach accessories.
3. Press the Power switch to the desired speed.
Begin pick-up.
4. Turn off the vacuum immediately upon completing
a job or when tank is full and ready to be emptied.
NOTE: If suction shuts off, turn off the vacuum
immediately and empty the tank.
5. Remove battery pack.
6. Clean the interior of the tank and accessories
periodically.
Storage
Before storing your vacuum, empty and clean the
tank, lter, and accessories. Remove the battery
pack.
MAINTENANCE
WARNING
To reduce the risk of
injury, always unplug
the charger and remove the battery pack from
the charger or tool before performing any maintenance. Never disassemble the tool, battery
pack or charger. Contact a MILWAUKEE service
facility for ALL repairs.
Maintaining Tool
Keep your tool, battery pack and charger in good
repair by adopting a regular maintenance program.
Inspect your tool for issues such as undue noise,
misalignment or binding of moving parts, breakage of
parts, or any other condition that may affect the tool
operation. Return the tool, battery pack, and charger
to a MILWAUKEE service facility for repair. After six
months to one year, depending on use, return the
tool, battery pack and charger to a MILWAUKEE
service facility for inspection.
If the tool does not start or operate at full power with
a fully charged battery pack, clean the contacts on
the battery pack. If the tool still does not work properly, return the tool, charger and battery pack, to a
MILWAUKEE service facility for repairs.
WARNING
To reduce the risk of
personal injury and
damage, never immerse your tool, battery pack
or charger in liquid or allow a liquid to ow inside
them.
Cleaning
Clean dust and debris from vents. Keep handles
clean, dry and free of oil or grease. Use only mild
soap and a damp cloth to clean, since certain cleaning agents and solvents are harmful to plastics and
other insulated parts. Some of these include gasoline,
turpentine, lacquer thinner, paint thinner, chlorinated
cleaning solvents, ammonia and household deter-
gents containing ammonia. Never use ammable or
combustible solvents around tools.
Repairs
For repairs, return the tool, battery pack and charger
to the nearest service center.
ACCESSORIES
WARNING
Use only recommended
accessories. Others
may be hazardous.
For a complete listing of accessories, go online to
www.milwaukeetool.com or contact a distributor.
SERVICE - UNITED STATES
1-800-SAWDUST (1.800.729.3878)
Monday-Friday, 7:00 AM - 6:30 PM CST
or visit www.milwaukeetool.com
Contact Corporate After Sales Service Technical
Support with technical, service/repair, or warranty
questions.
Email: metproductsupport@milwaukeetool.com
Become a Heavy Duty Club Member at
www.milwaukeetool.com to receive important
notications regarding your tool purchases.
SERVICE - CANADA
Milwaukee Tool (Canada) Ltd
1.800.268.4015
Monday-Friday, 7:00 AM - 4:30 PM CST
or visit www.milwaukeetool.ca
LIMITED WARRANTY
USA & CANADA
Every MILWAUKEE power tool* (see exceptions below) is warranted
to the original purchaser only to be free from defects in material and
workmanship. Subject to certain exceptions, MILWAUKEE will repair
or replace any part on an electric power tool which, after examination,
is determined by MILWAUKEE to be defective in material or workman-
ship for a period of ve (5) years** after the date of purchase unless
otherwise noted. Return of the power tool to a MILWAUKEE factory
Service Center location or MILWAUKEE Authorized Service Station,
freight prepaid and insured, is required. A copy of the proof of purchase
should be included with the return product. This warranty does not
apply to damage that MILWAUKEE determines to be from repairs
made or attempted by anyone other than MILWAUKEE authorized
personnel, misuse, alterations, abuse, normal wear and tear, lack of
maintenance, or accidents.
Normal Wear: Many power tools need periodic parts replacement and
service to achieve best performance. This warranty does not cover
repair when normal use has exhausted the life of a part including,
but not limited to, chucks, brushes, cords, saw shoes, blade clamps,
o-rings, seals, bumpers, driver blades, pistons, strikers, lifters, and
bumper cover washers.
*This warranty does not cover Air Nailers & Staplers; Airless Paint
Sprayer; Cordless Battery Packs; Gasoline Driven Portable Power
Generators; Hand Tools; Hoist – Electric, Lever & Hand Chain; M12™
Heated Gear; Reconditioned Product; and Test & Measurement
Products. There are separate and distinct warranties available for
these products.
**The warranty period for Job Site Radios, M12™ Power Port, M18™
Power Source, Jobsite Fan and Trade Titan™ Industrial Work Carts is
one (1) year from the date of purchase. The warranty period for the
Drain Cleaning Cables is two (2) years from the date of purchase. The
warranty period for the M18™ Compact Heat Gun and the 8 Gallon
Dust Extractor is three (3) years from the date of purchase. The warranty period for the LED in the LED Work Light and the LED Upgrade
Bulb for the Work Light is the lifetime of the product subject to the
limitations above. If during normal use the LED or LED Bulb fails, the
part will be replaced free of charge.
Warranty Registration is not necessary to obtain the applicable warranty on a MILWAUKEE power tool product. The manufacturing date
of the product will be used to determine the warranty period if no proof
of purchase is provided at the time warranty service is requested.
ACCEPTANCE OF THE EXCLUSIVE REPAIR AND REPLACEMENT
REMEDIES DESCRIBED HEREIN IS A CONDITION OF THE CONTRACT FOR THE PURCHASE OF EVERY MILWAUKEE PRODUCT.
IF YOU DO NOT AGREE TO THIS CONDITION, YOU SHOULD NOT
PURCHASE THE PRODUCT. IN NO EVENT SHALL MILWAUKEE
BE LIABLE FOR ANY INCIDENTAL, SPECIAL, CONSEQUENTIAL
OR PUNITIVE DAMAGES, OR FOR ANY COSTS, ATTORNEY FEES,
EXPENSES, LOSSES OR DELAYS ALLEGED TO BE AS A CONSEQUENCE OF ANY DAMAGE TO, FAILURE OF, OR DEFECT IN ANY
PRODUCT INCLUDING, BUT NOT LIMITED TO, ANY CLAIMS FOR
LOSS OF PROFITS. SOME STATES DO NOT ALLOW THE EXCLUSION OR LIMITATION OF INCIDENTAL OR CONSEQUENTIAL
DAMAGES, SO THE ABOVE LIMITATION OR EXCLUSION MAY NOT
APPLY TO YOU. THIS WARRANTY IS EXCLUSIVE AND IN LIEU
OF ALL OTHER EXPRESS WARRANTIES, WRITTEN OR ORAL.
TO THE EXTENT PERMITTED BY LAW, MILWAUKEE DISCLAIMS
ANY IMPLIED WARRANTIES, INCLUDING WITHOUT LIMITATION
ANY IMPLIED WARRANTY OF MERCHANTABILITY OR FITNESS
FOR A PARTICULAR USE OR PURPOSE; TO THE EXTENT SUCH
DISCLAIMER IS NOT PERMITTED BY LAW, SUCH IMPLIED WARRANTIES ARE LIMITED TO THE DURATION OF THE APPLICABLE
EXPRESS WARRANTY AS DESCRIBED ABOVE. SOME STATES
DO NOT ALLOW LIMITATIONS ON HOW LONG AN IMPLIED WARRANTY LASTS, SO THE ABOVE LIMITATION MAY NOT APPLY TO
YOU, THIS WARRANTY GIVES YOU SPECIFIC LEGAL RIGHTS,
AND YOU MAY ALSO HAVE OTHER RIGHTS WHICH VARY FROM
STATE TO STATE.
This warranty applies to product sold in the U.S.A. and Canada only.
Please consult the ‘Service Center Search’ in the Parts & Service section of MILWAUKEE’s website www.milwaukeetool.com or call 1.800.
SAWDUST (1.800.729.3878) to locate your nearest service facility for
warranty and non-warranty service on a Milwaukee electric power tool.
LIMITED WARRANTY - MEXICO,
CENTRAL AMERICA & CARIBBEAN
TECHTRONIC INDUSTRIES' warranty is for 5 years since the original
purchase date.
This warranty card covers any defect in material and workmanship
on this Product.
To make this warranty valid, present this warranty card, sealed/
stamped by the distributor or store where you purchased the product,
to the Authorized Service Center (ASC). Or, if this card has not been
sealed/stamped, present the original proof of purchase to the ASC.
Call toll-free1 01 (800) 030-7777 to nd the nearest ASC, for service,
parts, accessories or components.
Procedure to make this warranty valid
Take the product to the ASC, along with the warranty card sealed/
stamped by the distributor or store where you purchased the product,
and any faulty piece or component will be replaced without cost for
you. We will cover all freight costs relative with this warranty process.
Exceptions
This warranty is not valid in the following situations
a) When the product is used in a different manner from the end-user
guide or instruction manual.
b) When the conditions of use are not normal.
c) When the product was modied or repaired by people not authorized
by TECHTRONIC INDUSTRIES.
Note: If cord set is damaged, it should be replaced by an Authorized
Service Center to avoid electric risks.
SERVICE AND ATTENTION CENTER
Call to 01 (800) 030-7777
IMPORTED AND COMMERCIALIZED BY
TECHTRONIC INDUSTRIES MEXICO, SA DE CV
Av President Masarik #29 piso 7, Col. Polanco V Sección
CP 11560, Deleg. Miguel Hidalgo, CDMX
Model:
Date of Purchase:
Distributor or Store Stamp:
RÈGLES
GÉNÉRALES DE
SÉCURITÉ
AVERTISSEMENT
LORS
D E
L’UTILISATION D’UN ASPIRATEUR
ELECTRIQUE ET AFIN DE MINIMISER
LE RISQUE D’INCENDIE OU
BLESSURES, IL FAUT TOUJOURS
PRENDRE DES PRECAUTIONS
ELEMENTAIRES, Y COMPRIS CELLES
PRESENTEES CI-DESSOUS : LIRE
TOUTES LES INSTRUCTIONS AVANT
D'UTILISER L’ASPIRATEUR. POUR DES
APPLICATIONS COMMERCIALES OU
RESIDENTIELLES. AVANT D’UTILISER
L’ASPIRATEUR, LIRE LE PRÉSENT
MANUEL D’UTILISATION, LE MANUEL
D’UTILISATION DU BLOC-PILES ET DU
CHARGEUR, AINSI QUE TOUTES LES
ÉTIQUETTES SE TROUVANT SUR
L’ASPIRATEUR, LE BLOC-PILES, ET LE
CHARGEUR.
SÉCURITÉ DU LIEU DE TRAVAIL
• Veillez à ce que l’aire de travail soit propre et
bien éclairée. Le désordre et le manque de lumière
favorisent les accidents.
• Ne pas utiliser en présence de liquides explosifs
ou de poussière ou vapeurs explosives.
• Ne pas utiliser où l'oxygène ou les agents anes-
thésiques sont utilisés.
• Cet appareil n’est pas un jouet. Une surveillance
étroite est impérative lorsqu’il est utilisé par des
enfants ou à leur proximité.
• Redoubler de prudence lors de l'utilisation dans
des escaliers.
SÉCURITÉ ÉLECTRIQUE
• Ne pas aspirer de matériaux humides. Ne pas
utiliser d’eau pour déposer la poussière.
• Ne pas manipuler le bloc-pile ou l’aspirateur
avec les mains mouillées.
•Entreposer à l’intérieur. Ne pas exposer à la
pluie.
SÉCURITÉ INDIVIDUELLE
• RESTER VIGILANT. Se montrer attentif et faire
preuve de bon sens. Ne pas utiliser l’aspirateur en
cas de fatigue, distraction ou sous l’inuence de
l’alcool, de drogues ou de médicaments causant la
perte de contrôle.
• L’utilisation d'un aspirateur peut causer la
projection d’objets en direction du visage et
entraîner des lésions oculaires. Toujours porter
des lunettes de sécurité ou des lunettes avec écrans
latéraux lors de l’utilisation de l’aspirateur.
• Porter un masque anti-poussière ou utiliser une
solution d'extraction de poussière conforme aux
normes de l'OSHA pendant que vous travaillez
dans des circonstances poussièreuses. Les particules de poussière peuvent nuire vos poumons.
 Loading...