

Milwaukee 8960-20 Operator's Manual

Cat. No. / No de cat.
8960-20
8 GALLON DUST EXTRACTOR
DÉPOUSSIÉREUR DE 8 GALLONS
EXTRACTOR DE POLVO DE 8 GALONES
OPERATOR'S MANUAL
MANUEL de L'UTILISATEUR
MANUAL del OPERADOR
WARNING To reduce the risk of injury, user must read and understand operator's manual.
AVERTISSEMENT An de réduire le risque de blessures, l'utilisateur doit lire et bien
comprendre le manuel.
ADVERTENCIA Para reducir el riesgo de lesiones, el usuario debe leer y entender el manual.

2
WARNING
TO REDUCE THE RISK
OF FIRE, ELECTRIC SHOCK OR INJURY:
• Do not leave appliance when plugged in. Unplug
from outlet when not in use and before servicing.
Connect to a properly grounded outlet only. See
Grounding Instructions.
• Do not expose to rain – store indoors.
• Do not allow to be used as a toy. Close attention
is necessary when used by or near children.
• Not intended for use by persons (including chil
-
dren) with reduced physical, sensory or mental
capabilities, or lack of experience and knowl
-
edge. For use only by persons who have been
instructed in its correct usage. Supervision is
required.
• Use only as described in this manual. Use only
manufacturer’s recommended attachments.
• Do not use with damaged cord or plug. If ap
-
pliance is not working as it should, has been
dropped, damaged, left outdoors, or dropped into
water, return it to a service center.
• Do not pull or carry by cord, use cord as a handle,
close a door on cord, or pull cord around sharp
edges or corners. Do not run appliance over cord.
• Keep cord away from heated surfaces.
• Do not unplug by pulling on cord. To unplug grasp
the plug not the cord.
• Do not handle plug or appliance with wet hands.
Do not wrap cord around hand or ngers.
• Do not put any object into openings. Do not use
with any opening blocked; keep free of dust, lint,
hair, and anything else that may reduce air ow.
• Keep hair, loose clothing, ngers, and all parts
of body away from openings and moving parts.
• Do not pick up anything that is burning or smok
-
ing such as cigarettes, matches, or hot ashes.
• Do not use without lters in place.
• Turn off all controls before plugging in or unplug
-
ging tool.
• Ensure all latches are secured before transport
-
ing. Do not transport with liquid in the tank.
• Use extra care when cleaning on stairs.
• Do not use tool as a step or ladder.
• Do not use to pick up ammable or combustible
liquids such as gasoline or use in areas where
they may be present.
• Dust extractors have motors and other parts that
can produce arcs or sparks during normal use. Do
not use within 20 feet of areas where explosive
gases may be present (such as gasoline pumps
and places where liquids like paint thinners,
cleaners, solvents, etc. are stored).
• Do not use as a water pump. Dust extractor is
intended to vacuum water/air mixture.
• Unplug power cord whenever motor head is
removed from tank.
• Do not use in the presence of explosive liquids
or vapors.
• To reduce the risk of health hazards from vapors
or dust, do not vacuum toxic, carcinogenic or
other hazardous materials such as asbestos,
arsenic, barium, berylium, lead, pesticides or
other health endangering materials.
• Do not use where oxygen or anesthetics are used.
• Wear electrically insulated footwear, such as
rubber boots, when vacuuming wet material.
• Maintain labels and nameplates. These carry im
portant information. If unreadable or missing, contact
a MILWAUKEE service facility for a free replacement.
• WARNING! Do NOT use this dust extractor to
vacuum lead paint debris because this may disperse
ne lead particles into the air. This dust extractor is
not intended for use under EPA Regulation 40 CFR
Part 745 for lead paint material cleanup.
• WARNING: Some dust created by power sanding,
sawing, grinding, drilling, and other construction
activities contains chemicals known to cause can
cer, birth defects or other reproductive harm. Some
examples of these chemicals are:
• lead from lead-based paint
• crystalline silica from bricks and cement and other
masonry products, and
• arsenic and chromium from chemically-treated lumber.
Your risk from these exposures varies, depending on
how often you do this type of work. To reduce your
exposure to these chemicals: work in a well ventilated
area, and work with approved safety equipment, such
as those dust masks that are specially designed to
lter out microscopic particles.
•Before using the dust extractor, read this opera
-
tor’s manual, your tool's manual, and all labels
on the dust extractor and tool. This tool is for
commercial use.
•The dust extractor is compliant with Table 1 of OSHA
Standard 29CRF 1926.1153 assuming it is used in
accordance with MILWAUKEE instructions. Please
reference https://www.osha.gov for further details on
compliance methods.
READ AND SAVE
ALL INSTRUCTIONS
FOR FUTURE USE
IMPORTANT SAFETY INSTRUCTIONS
WARNING
Failure to follow the warnings and instructions may result in
electric shock, re and/or serious injury. When using an electrical
appliance, basic precautions should always be followed, including the following:
READ ALL INSTRUCTIONS BEFORE USING THIS APPLIANCE.
3
SYMBOLOGY
Hertz
Amps
Volts
Alternating Current
Warning - Consult the operator's
manual for additional safety
information.
Read Operator's Manual
Power Tool Outlet
Intertek Standard
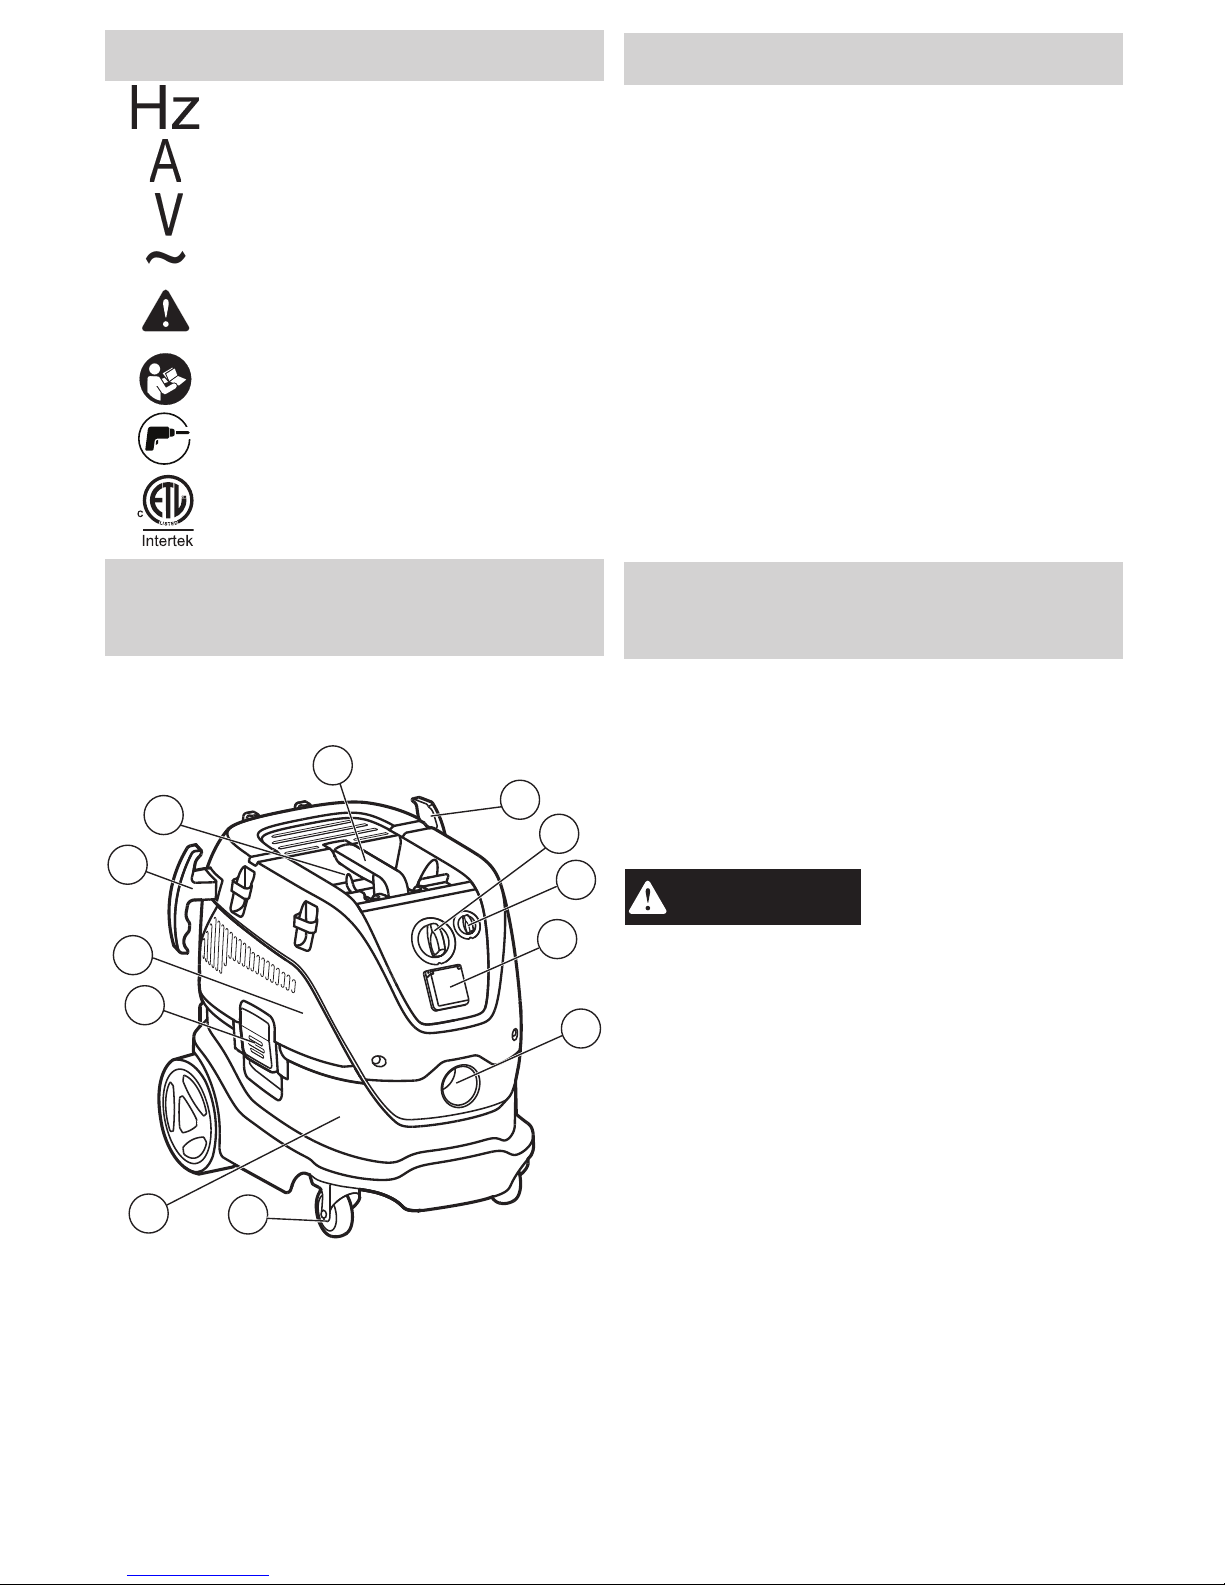
FUNCTIONAL
DESCRIPTION
7
5
4
3
6
2
1. Handle
2. Hose hook
3. Power switch
4. Speed control
5. Power tool socket
6. Inlet tting
9
7. Castors
8. Tank
9. Latches
10. Head
11. Accessory positions
10
11
8
2
1
SPECIFICATIONS
Cat. No. ..................................................... 8960-20
Input Volts ....................................................120 AC
Input Amps...........................................................12
Input Hertz ......................................................50/60
Input Watts ......................................................1440
Vacuum Power .................................. 890 W / 7.4 A
Ingress Protection............................................IPX4
Max Output Watts ..............................................550
Max Output Amps ...............................................4.6
Tank Capacity gallons............................................8
Weight ..............................................36 lb (16.3 kg)
Air Flow cubic feet per minute ...........................148
Hose Diameter..............................................36 mm
HEPA Filter ...........................................49-90-1952
Main Filter ............................................. 49-90-1953
Plastic Dust Bag - 5PK ......................... 49-90-1954
Fleece Dust Bag - 5PK ......................... 49-90-1955
Power Tool Adapter .............................. 49-90-1957
Hose Sleeve ......................................... 49-90-1958
Hose Clip Adapter................................. 49-90-1959
Dust Extractor Adapter ......................... 49-90-1960
GROUNDING
INSTRUCTIONS
This appliance must be grounded. If it should malfunction or breakdown, grounding provides a path
of least resistance for electric current to reduce the
risk of electric shock. This appliance is equipped with
a cord having an equipment-grounding conductor
and grounding plug. The plug must be inserted into
an appropriate outlet that is properly installed and
grounded in accordance with all local codes and
ordinances.
WARNING
Improper connec-
tion of the equipment-grounding conductor can result in
a risk of electric shock. Check with a
qualied electrician or service person if
you are in doubt as to whether the outlet
is properly grounded. Do not modify the
plug provided with the appliance - If it
will not t the outlet, have a proper outlet installed by a qualied electrician.
This appliance is for use on a nominal 120-volt circuit,
and has a grounded plug that looks like the plug illustrated in sketch A. A temporary adapter that looks
like the adapter illustrated in sketches B and C may
be used to connect this plug to a 2-pole receptacle
as shown in sketch B if a properly grounded outlet
is not available. The temporary adapter should be
used only until a properly grounded outlet (sketch A)
can be installed by a qualied electrician. The green
colored rigid ear, lug or the like extending from the
adapter must be connected to a permanent ground
such as a properly grounded outlet box cover. Whenever the adapter is used, it must be held in place by
a metal screw.
4
ASSEMBLY
Unpack accessories and parts from the tank by unlatching the head and pulling it up and off the base.
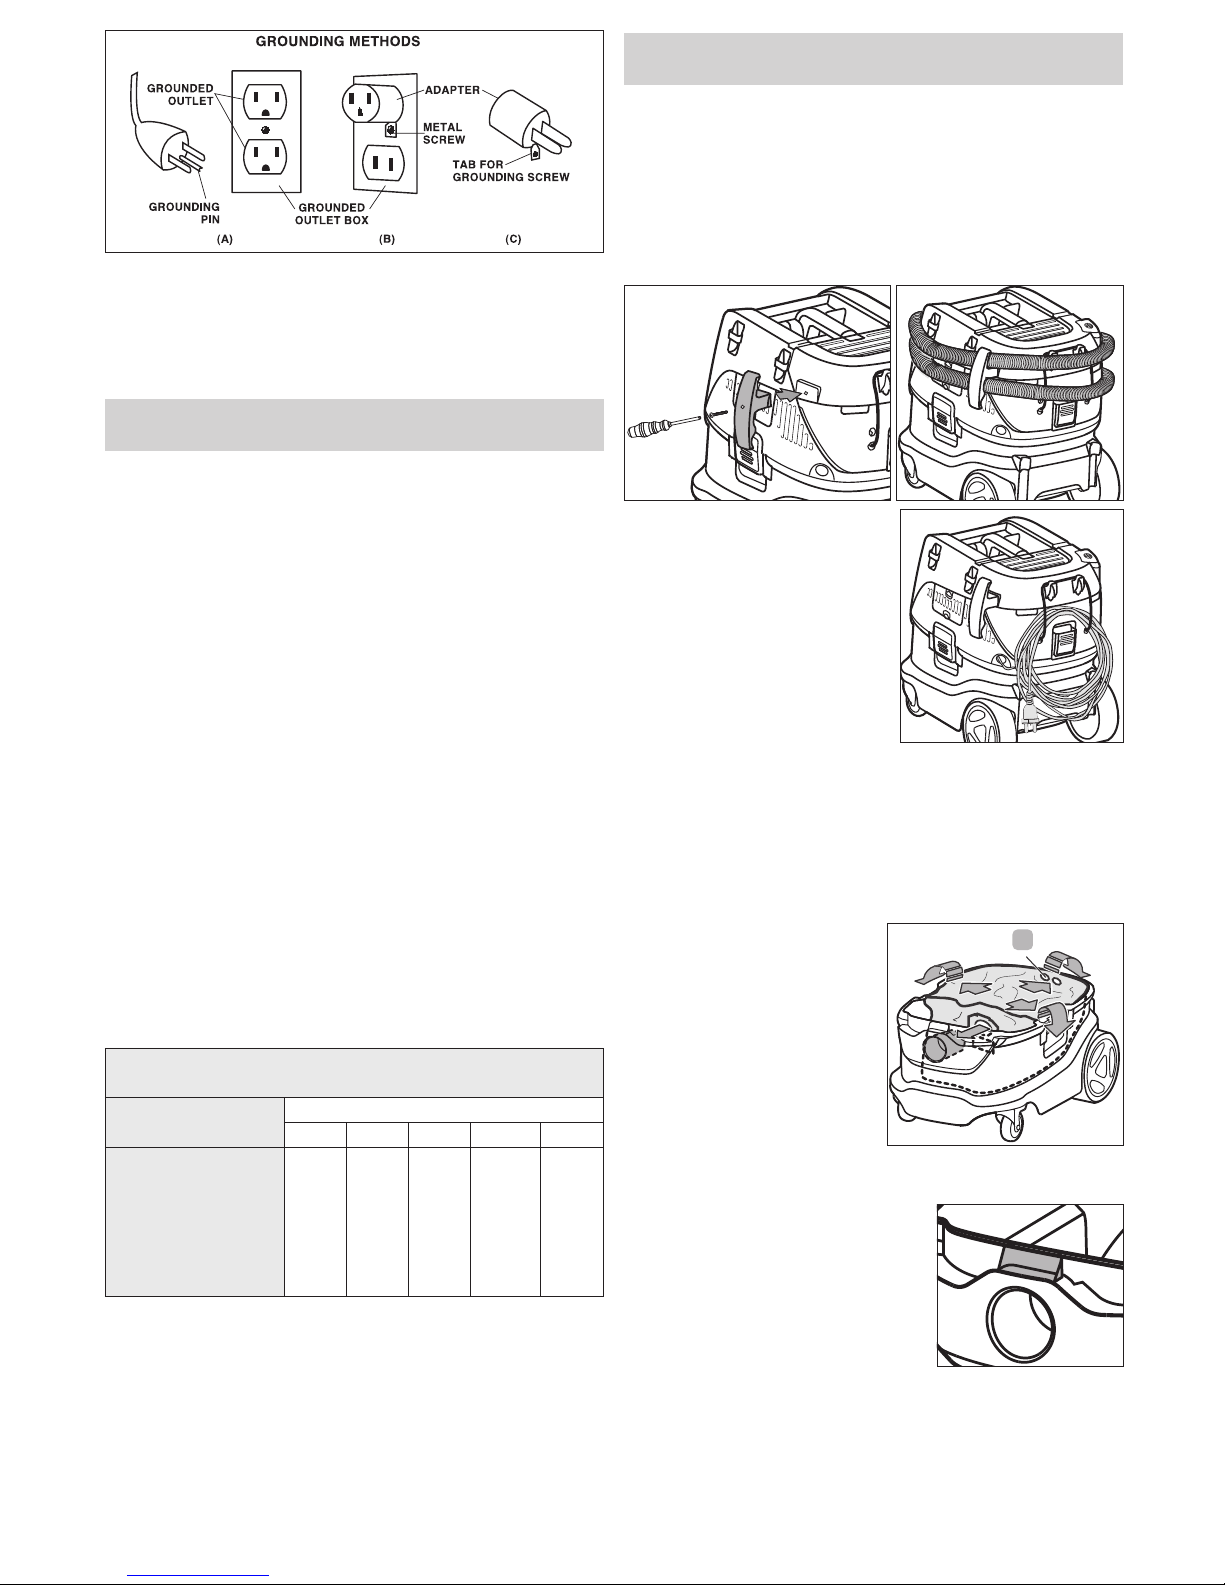
Installing the Hose Hooks
1. Remove the screws from the hose hook locations.
2. Fit hose hooks to the brackets.
3. Insert screws and tighten securely.
4. Wrap hose around head, looping above and below
the hose hooks to secure.
Securing the
Power Cord
1. Loop the power cord and
secure in the rear bungee,
as shown.
Filters can become clogged during heavy use.
To maintain the efciency of the dust extractor,
empty/change the lter bag and clean all of the
lters periodically. Milwaukee suggests cleaning
the lters after 200 holes (at 5/8” diameter, 4”
deep) or an equivalent amount of produced dust.
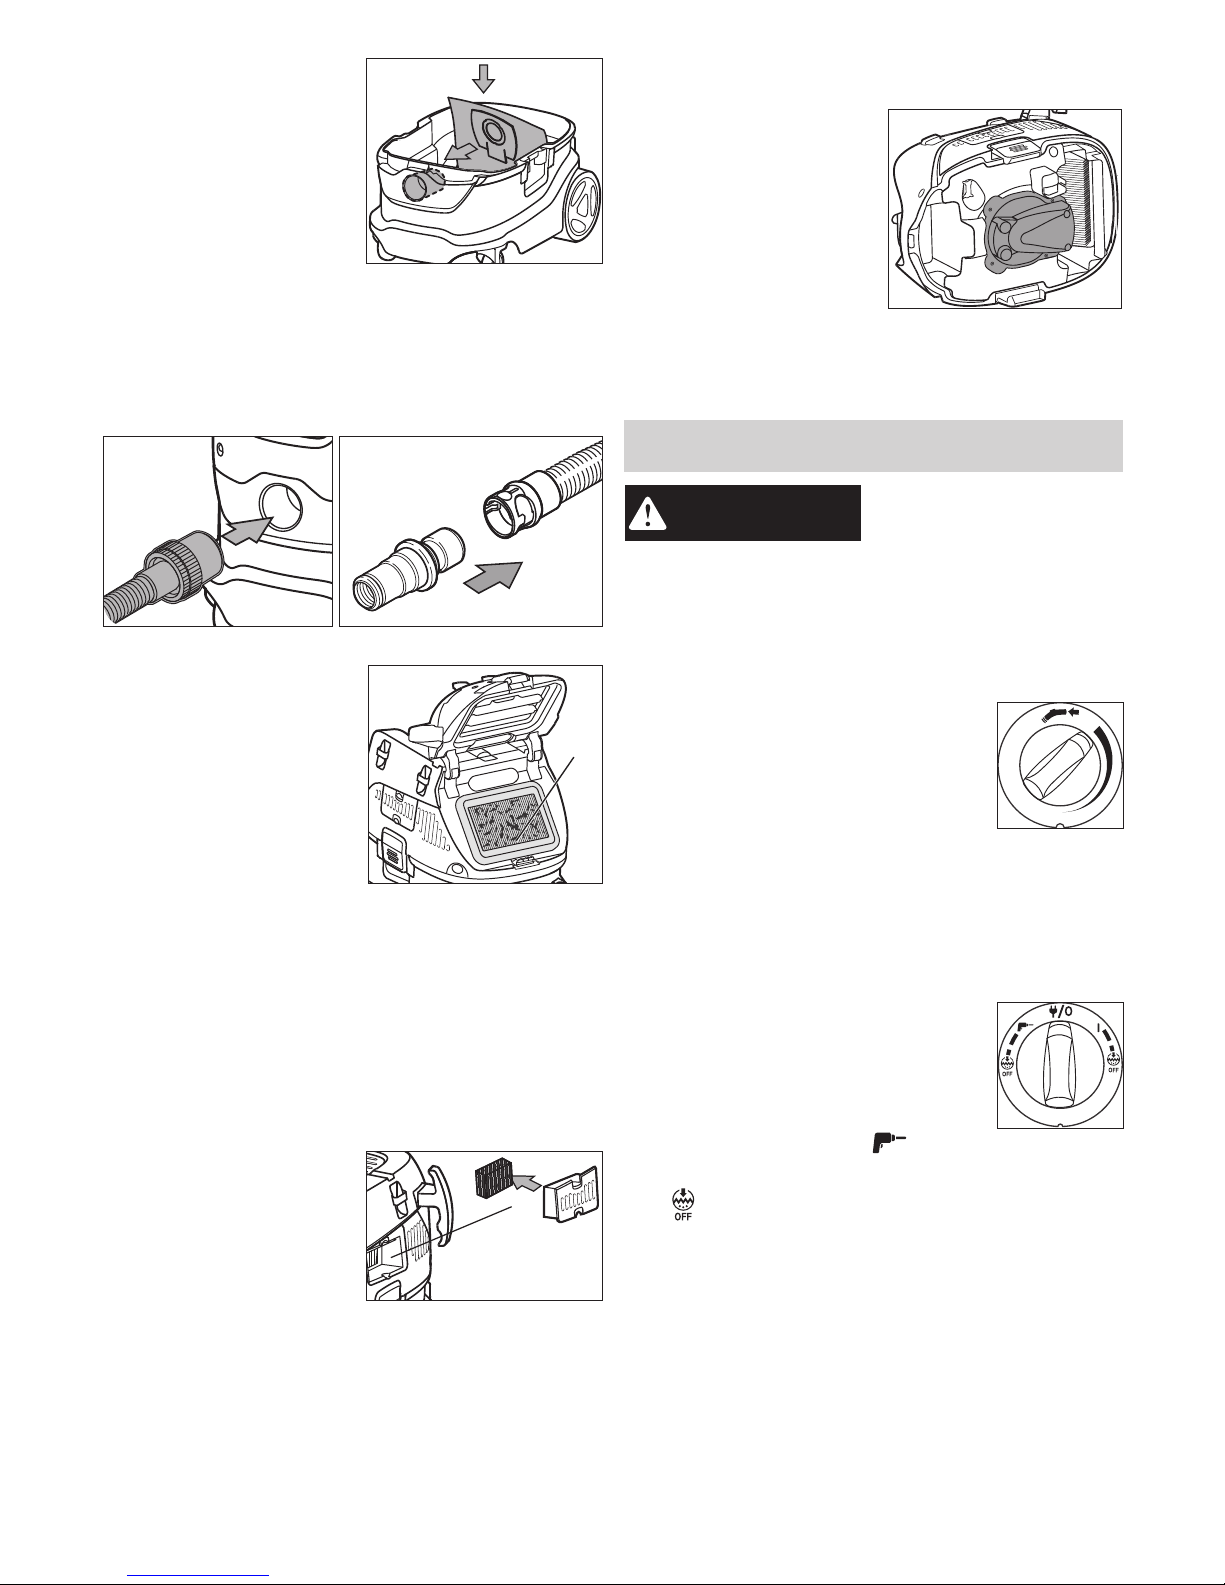
Installing/Changing the Plastic Dust Bag
1. Unplug tool.
!!
2. Unlatch and remove
head.
3. Remove old bag and
discard according to
regulations.
4. Open the bag fully and t
the cardboard inlet over
the inlet tube.
5. Pull the bag over the
edges of the tank. Ensure the small holes around the edge of the bag
are pulled to the outside of the tank.
6. Tuck the bag inside the black
tab over the hose inlet. This
ensures the bag does not
come between the head and
tank connection, allowing the
antistatic system to discharge
properly during use.
7. Replace the head and latch it
in place.
IN CANADA, THE USE OF A TEMPORARY
ADAPTER IS NOT PERMITTED BY THE CANADIAN
ELECTRICAL CODE. Make sure that the appliance
is connected to an outlet having the same conguration as the plug. No adapter should be used with
this appliance.
EXTENSION CORDS
Grounded tools require a three wire extension cord.
As the distance from the supply outlet increases,
you must use a heavier gauge extension cord. Using
extension cords with inadequately sized wire causes
a serious drop in voltage, resulting in loss of power
and possible tool damage. Refer to the table shown
to determine the required minimum wire size.
The smaller the gauge number of the wire, the greater
the capacity of the cord. For example, a 14 gauge
cord can carry a higher current than a 16 gauge cord.
When using more than one extension cord to make
up the total length, be sure each cord contains at
least the minimum wire size required. If you are using
one extension cord for more than one tool, add the
nameplate amperes and use the sum to determine
the required minimum wire size.
Guidelines for Using Extension Cords
• If you are using an extension cord outdoors, be sure
it is marked with the sufx “W-A” (“W” in Canada) to
indicate that it is acceptable for outdoor use.
• Be sure your extension cord is properly wired and in
good electrical condition. Always replace a damaged
extension cord or have it repaired by a qualied
person before using it.
• Protect your extension cords from sharp objects,
excessive heat and damp or wet areas.
Recommended Minimum Wire Gauge
For Extension Cords*
Nameplate Amps
Extension Cord Length
25' 50' 75' 100' 150'
0 - 2.0
2.1 - 3.4
3.5 - 5.0
5.1 - 7.0
7.1 - 12.0
12.1 - 16.0
16.1 - 20.0
18
18
18
18
16
14
12
18
18
18
16
14
12
10
18
18
16
14
12
10
--
18
16
14
12
10
--
--
16
14
12
12
--
--
--
* Based on limiting the line voltage drop to ve volts at 150%
of the rated amperes.
5
Installing/Changing the Fleece Dust Bag
1. Unplug tool.
2. Unlatch and remove
head.
3. Remove old bag and
discard.
4. Fit the cardboard inlet
over the inlet tube.
5. Ensure the bag is contained fully in the tank.
6. Replace the head and
latch it in place.
Installing the Hose and Accessories
Refer to "Accessories" for a list of adapters and dust
collection attachments.
1. Fit the hose into the inlet and twist to secure.
2. Choose the appropriate accessory and insert it
onto the hose. Twist to secure.
Cleaning/Changing the Main Filter
The dust extractor has an
Filter
automatic filter cleaning
system. During extremely
heavy or long uses, manual cleaning may be necessary. If manual cleaning
does not restore full suc-
tion, replace the lter. See
"Specications" for replace-
ment part number.
1. Turn on dust extractor.
2. To manually clean the lter, place palm of your
hand over the nozzle for 10 seconds.
3. Turn off the dust extractor.
4. Unplug tool.
5. Unlatch and open the lter compartment.
6. Remove the lter and shake or tap the edge over
trash can.
7. Replace the clean lter. If lter does not clean with
tapping, replace with a new lter.
8. Close and latch lter compartment.
Cleaning the Motor Intake Filter
1. Unplug tool.
2. Press in the lock tabs
and pull the cover away
from the head.
3. Pull out the sponge lter.
4. Clean the lter and replace.
5. Insert the cover into the
head until the lock tabs snap in place.
After particularly dusty applications, the motor intake
lter may become clogged and cause the tool to
overload. If overload occurs, unplug the tool for 5
minutes and clean the lters.
Changing the HEPA Filter
Periodically inspect the HEPA lter and replace if
necessary. See "Specications" for replacement part
number.
1. Unplug tool.
2. Unlatch and remove
head.
3. Place the head upside
down on a level surface.
4. Remove the 4 screws
holding the orange cover
in place.
5. Carefully remove the
HEPA lter. Note, there is a ring gasket below the
lter - do not discard the ring gasket.
6. Inspect and replace the lter and ring.
7. Replace the cover and tighten the 4 screws securely.
OPERATION
WARNING
To reduce the risk of injury, always unplug tool
before changing or re-
moving accessories. Only use accessories spe-
cically recommended for this tool. Others may
be hazardous.
To reduce the risk of injury, wear safety goggles
or glasses with side shields.
Selecting Air Speed
To increase or decrease the air ow
speed, use the speed control dial. Turn
the dial clockwise to decrease the air
ow speed, and counter clockwise to
increase the airow speed.
Filters can become clogged during heavy use.
To maintain the efciency of the dust extractor,
empty/change the lter bag and clean all of the
lters periodically. Milwaukee suggests cleaning
the lters after 200 holes (at 5/8” diameter, 4”
deep) or an equivalent amount of produced dust.
Starting and Stopping Dust Extractor
To turn on the dust extractor, set the
power switch to the ON position ( I ).
To turn off the dust extractor, set the
power switch to the OFF position (O).
To automatically start the dust extrac
tor using a power tool's switch, set the
power switch to the TOOL
position.
To use the tool without the automatic lter cleaning
function, set the power switch to the lter cleaning
OFF
symbol below the TOOL or ON positions. It is
recommended to turn off the automatic lter cleaning
when using the dust extractor for wet pickup.
Picking Up Dry Materials
Make sure that the tank is dry before using the dust
extractor to pick up dry materials. If the extractor tank
is wet, run the dust extractor for about 5 minutes (without picking up anything) to dry the inside of the tank.

6
Using the Dust Extractor with a Power Tool
WARNING
To reduce the risk of re,
electric shock, injury,
and damage to the tool:
Do not plug any tool or appliance rated over
4.6 A / 550 W into the outlet on the dust extractor.
Check nameplate on the tool for the amp rating.
Many tools (such as sanders) are designed to be used
with dust extractors. The dust extractors collect the
dust that these tools create before it gets into the air
or onto the oor. Dust extractors with the AUTO setting are ideal for collecting dust because they can be
set up to turn on and off automatically using the tool’s
AUTO/ON/OFF switch.
1. Connect hose to the
tool.
2. Plug the tool into the
outlet on the dust
extractor’s head.
3. Set the AUTO/ON/
OFF switch to the
AUTO position.
4. Turn on the tool and
the dust extractor
will start automatically within a few seconds.
5. When done, turn off the tool and the dust extractor
will stop automatically.
6. Unplug the tool and turn the dust extractor OFF (O)
when the job is complete.
Picking Up Wet Materials
WARNING
To reduce the risk of
electric shock, DO NOT
pick up wet materials
unless tank has been cleaned of dust and the lter
bag has been removed. Turn off and unplug tool
if foam or liquid escapes from the tool.
A oat valve shuts off suc-
Float
tion when the tank is full.
Be sure the oat is clean
and moves freely before
use.
1. Unplug tool and remove head.
2. Remove lter bags and
clean tank.
3. Ensure the oat moves
freely.
4. Replace head and latch in place.
5. Turn the power switch to ON (I) and lter cleaning
OFF on the dust extractor.
6. Suction wet materials.
7. When nished, turn the power switch to OFF (O).
8. Unplug tool and remove head.
9. To drain liquid, block wheels and carefully dump
contents. Do not store dust extractor with liquid
in tank.
10. Rinse and dry tank. Run dust extractor for 5 minutes
to ensure tank is thoroughly dry before picking up
dry materials.
MAINTENANCE
WARNING
To reduce the risk of injury, always unplug the
tool before performing
any maintenance. Never disassemble the tool.
Contact a MILWAUKEE service facility for ALL
repairs.
Maintaining Tools
Keep your tool in good repair by adopting a regular
maintenance program. Inspect your tool for issues
such as undue noise, misalignment or binding of
moving parts, breakage of parts, or any other condition that may affect the tool operation. Return the tool
to a MILWAUKEE service facility for repair. After six
months to one year, depending on use, return the
tool to a MILWAUKEE service facility for inspection.
WARNING
To reduce the risk of
personal injury, electric
shock and damage, nev-
er immerse your tool in liquid or allow a liquid to
ow inside it.
Cleaning
Clean dust and debris from vents. Keep handles
clean, dry and free of oil or grease. Use only mild
soap and a damp cloth to clean, since certain cleaning agents and solvents are harmful to plastics and
other insulated parts. Some of these include gasoline,
turpentine, lacquer thinner, paint thinner, chlorinated
cleaning solvents, ammonia and household deter-
gents containing ammonia. Never use ammable or
combustible solvents around tools.
Storage
Before storing the dust extractor, always empty and
clean the tank. Never allow debris to sit in the tank
for any extended period of time. The dust extrac-
tor should be stored indoors.
Repairs
For repairs, return the tool to the nearest service
center.
ACCESSORIES
WARNING
To reduce the risk of injury, always unplug the
tool before attaching or
removing accessories. Use only specically recommended accessories. Others may be hazardous.
Adapter Connection Chart
For Dust Extraction
Attachment: Use Hose Adapter:
49-40-6101 49-90-1959 &
49-90-1960
SDS Plus and
SDS Max Vacuum Bits
49-90-1957
49-40-6105 49-90-1958
5261-DE 49-90-1958
49-40-6110 49-90-1959
5317-DE 49-90-1959
5318-DE 49-90-1959
For a complete listing of accessories, go online to
www.milwaukeetool.com or contact a distributor.
 Loading...