

Milwaukee 8934 Operator's Manual

OPERATOR'S MANUAL
MANUEL de L'UTILISATEUR
MANUAL del OPERADOR
Catalog No.
No de Cat.
Catálogo No.
8934
HEAVY-DUTY COMMERCIAL VACUUM
EXTRA ROBUSTE ASPIRATEUR COMMERCIAL
HEAVY-DUTY ASPIRADORA COMMERCIAL
TO REDUCE THE RISK OF INJURY, USER MUST READ AND UNDERSTAND OPERATOR'S MANUAL.
AFIN DE RÉDUIRE LE RISQUE DE BLESSURES, L'UTILISATEUR DOIT LIRE ET BIEN COMPRENDRE LE
MANUEL DE L'UTILISATEUR.
PARA REDUCIR EL RIESGO DE LESIONES, EL USUARIO DEBE LEER Y ENTENDER EL MANUAL DEL
OPERADOR.
GENERAL SAFETY RULES
WARNING!
READ AND UNDERSTAND ALL INSTRUCTIONS
Failure to follow all instructions listed below, may result
in electric shock, fire and/or serious personal injury.
SAVE THESE INSTRUCTIONS
To reduce the risk of fire, electric shock or injury:
1. Do not leave appliance when plugged in. Unplug from outlet when not in use and before servicing.
2. Do not use outdoors or on wet surfaces.
3. Do not allow to be used as a toy. Close attention is necessary when used by or near children.
4. Use only as described in this manual. Use only manufacturer’s recommended attachments.
5. Do not use with damaged cord or plug. If appliance is not working as it should, has been dropped, damaged, left outdoors, or dropped into water, return
it to a service center.
6. Do not pull or carry by cord, use cord as a handle, close a door on cord, or pull cord around sharp edges or corners. Do not run appliance over cord.
Keep cord away from heated surfaces.
7. Do not unplug by pulling on cord. To unplug grasp the plug not the cord.
8. Do not handle plug or appliance with wet hands.
9. Do not put any object into openings. Do not use with any opening blocked; keep free of dust, lint, hair, and anything else that may reduce air flow.
10. Keep hair, loose clothing, fingers, and all parts of body away from openings and moving parts.
11. Do not pick up anything that is burning or smoking such as cigarettes, matches, or hot ashes.
12. Do not use without dust bag and filter in place.
13. Turn off all controls before unplugging.
14. Use extra care when cleaning on stairs.
15. Do not use to pick up flammable or combustible liquids such as gasoline or use in areas where they may be present.
16. Connect to a properly grounded outlet only. See grounding instructions.
17. WARNING! Some dust created by power sanding, sawing, grinding, drilling, and other construction activities contains chemicals known to cause
cancer, birth defects or other reproductive harm. Some examples of these chemicals are:
• lead from lead-based paint
• crystalline silica from bricks and cement and other masonry products, and
• arsenic and chromium from chemically-treated lumber.
Your risk from these exposures varies, depending on how often you do this type of work. To reduce your exposure to these chemicals: work in a well
ventilated area, and work with approved safety equipment, such as those dust masks that are specifically designed to filter out microscopic particles.
Page 2
READ AND SAVE ALL INSTRUCTIONS
FOR FUTURE USE.
Symbology
Underwriters Laboratories, Inc.
Canadian Standards Association
Hertz
Specifications
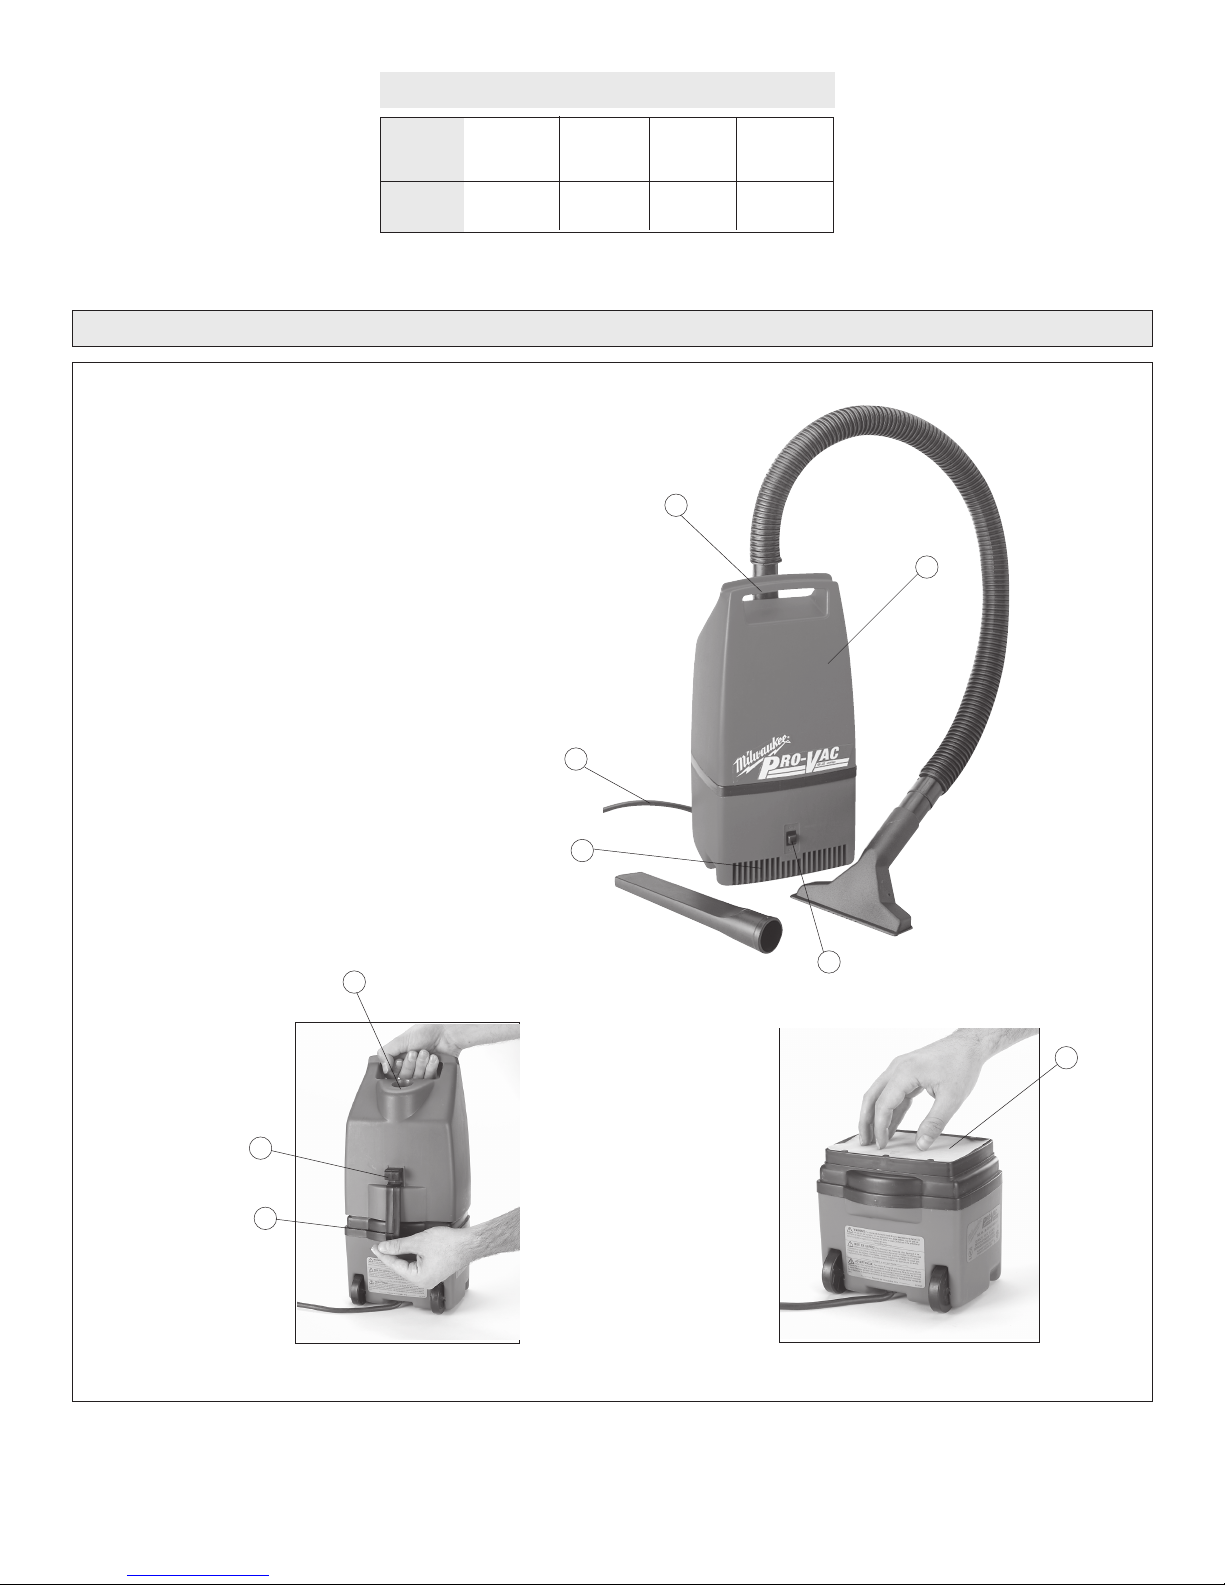
1. Carrying handle
2. Intake port
3. Tank
4. Hook
5. Tank latch
6. Switch
7. Exhaust vents
8. Cord
9. Secondary filter
Cat.
No.
8934
Volts
AC
120
Amps
6.2
Hertz
60
FUNCTIONAL DESCRIPTION
1
Intake
Opening
1-1/4"
3
8
7
6
2
9
4
5
Page 3
GROUNDING EXTENSION CORDS
WARNING!
Improperly connecting the grounding wire can
result in the risk of electric shock. Check with a
qualified electrician if you are in doubt as to
whether the outlet is properly grounded. Do not
modify the plug provided with the tool. Never
remove the grounding prong from the plug. Do
not use the tool if the cord or plug is damaged. If
damaged, have it repaired by a MILWAUKEE
service facility before use. If the plug will not fit
the outlet, have a proper outlet installed by a
qualified electrician.
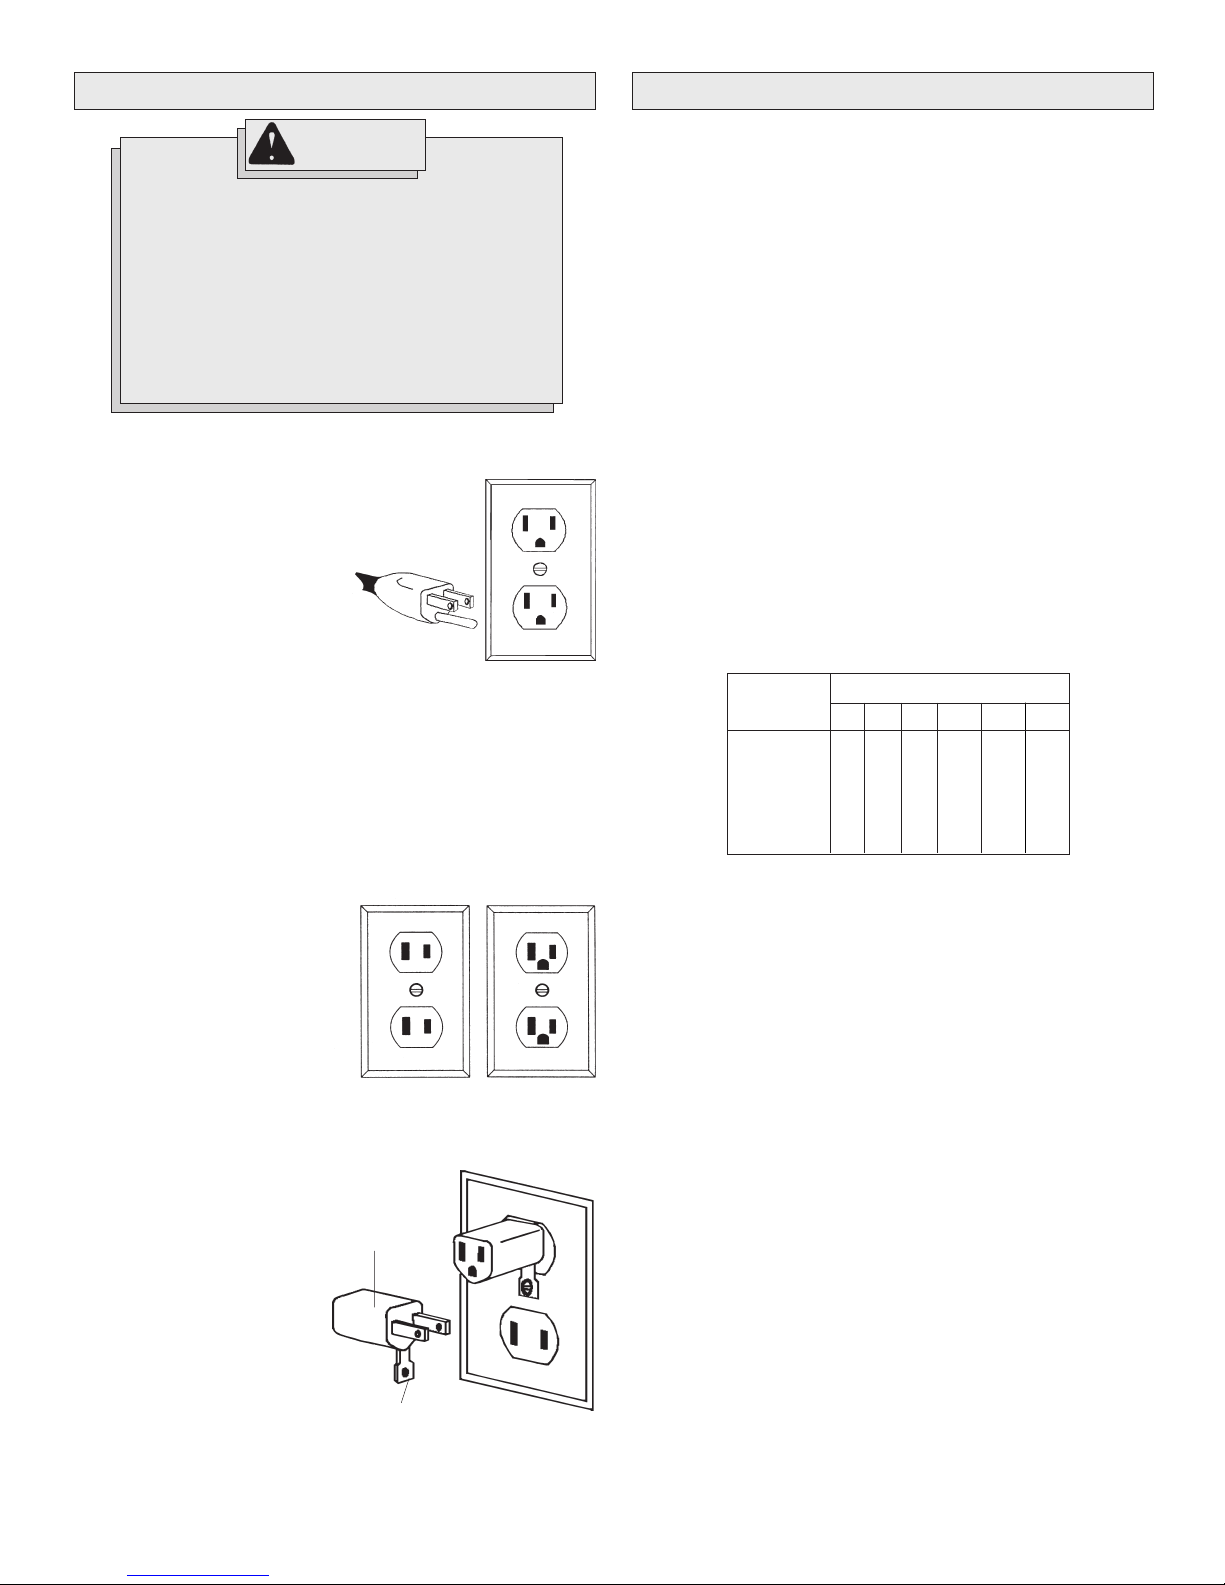
Grounded Tools:
Tools with Three Prong Plugs
Tools marked “Grounding Required”
have a three wire cord and three
prong grounding plug. The plug must
be connected to a properly grounded
outlet (See Figure A). If the tool should
electrically malfunction or break
down, grounding provides a low resistance path to carry electricity
away from the user, reducing the risk
of electric shock.
The grounding prong in the plug is connected through the green wire
inside the cord to the grounding system in the tool. The green wire in the
cord must be the only wire connected to the tool's grounding system and
must never be attached to an electrically “live” terminal.
Your tool must be plugged into an appropriate outlet, properly installed
and grounded in accordance with all codes and ordinances. The plug
and outlet should look like those in Figure A.
Double Insulated Tools:
Tools with Two Prong Plugs
Tools marked “Double Insulated” do
not require grounding. They have a
special double insulation system
which satisfies OSHA requirements
and complies with the applicable
standards of Underwriters Laboratories, Inc., the Canadian Standard Association and the National
Electrical Code. Double Insulated
tools may be used in either of the
120 volt outlets shown in Figures B
and C.
Figure D illustrates a temporary
adapter available for connecting
grounded plugs (Figure A) to two
prong outlets. The green rigid ear
or lug extending from the adapter
must be connected to a permanent
ground such as a properly
grounded outlet box or receptacle.
Simply remove the center screw
from the outlet, insert the adapter
and reattach the screw through the
green grounding ear to the outlet. If
in doubt of proper grounding, call a
qualified electrician. A temporary
adapter should only be used until a
properly grounded outlet can be
installed by a qualified electrician.
The Canadian Electrical Code prohibits the use of temporary adapters.
Page 4
Temporary
Adapter
Fig. A
Fig. B
Green Grounding Ear
Fig. C
Fig. D
Grounded tools require a three wire extension cord. Double insulated
tools can use either a two or three wire extension cord. As the distance
from the supply outlet increases, you must use a heavier gauge extension cord. Using extension cords with inadequately sized wire causes a
serious drop in voltage, resulting in loss of power and possible tool
damage. Refer to the table shown to determine the required minimum
wire size.
The smaller the gauge number of the wire, the greater the capacity of the
cord. For example, a 14 gauge cord can carry a higher current than a 16
gauge cord. When using more than one extension cord to make up the
total length, be sure each cord contains at least the minimum wire size
required. If you are using one extension cord for more than one tool, add
the nameplate amperes and use the sum to determine the required minimum wire size.
Guidelines for Using Extension Cords
• If you are using an extension cord outdoors, be sure it is marked with
the suffix “W-A” (“W” in Canada) to indicate that it is acceptable for
outdoor use.
• Be sure your extension cord is properly wired and in good electrical
condition. Always replace a damaged extension cord or have it repaired by a qualified person before using it.
• Protect your extension cords from sharp objects, excessive heat and
damp or wet areas.
Recommended Minimum Wire Gauge
Nameplate
Amperes
12.1 - 15
15.1 - 20
* Based on limiting the line voltage drop to five
volts at 150% of the rated amperes.
0 - 5
5.1 - 8
8.1 - 12
for Extension Cords*
Extension Cord Length
100'
50'
16
16
14
12
10
75'
16
14
12
10
10
14
12
10
10
--
25'
16
16
14
12
10
150'
12
10
--
--
--
200'
12
--
--
--
--
READ AND SAVE ALL INSTRUCTIONS
FOR FUTURE USE.
OPERATION
WARNING!
To reduce the risk of injury, wear safety goggles
or glasses with side shields. Unplug the tool
before changing accessories or making
adjustments.
WARNING!
Never use this vacuum to pick up wet material.
Never operate vacuum
• without filter bag in place.
• without secondary filter in place.
• when the filter bag is full.
The vacuum comes fully assembled and ready for use.
Starting and Stopping Vacuum
To turn vacuum on, push the switch to the ON position.
To turn vacuum off, push the switch to the OFF position.
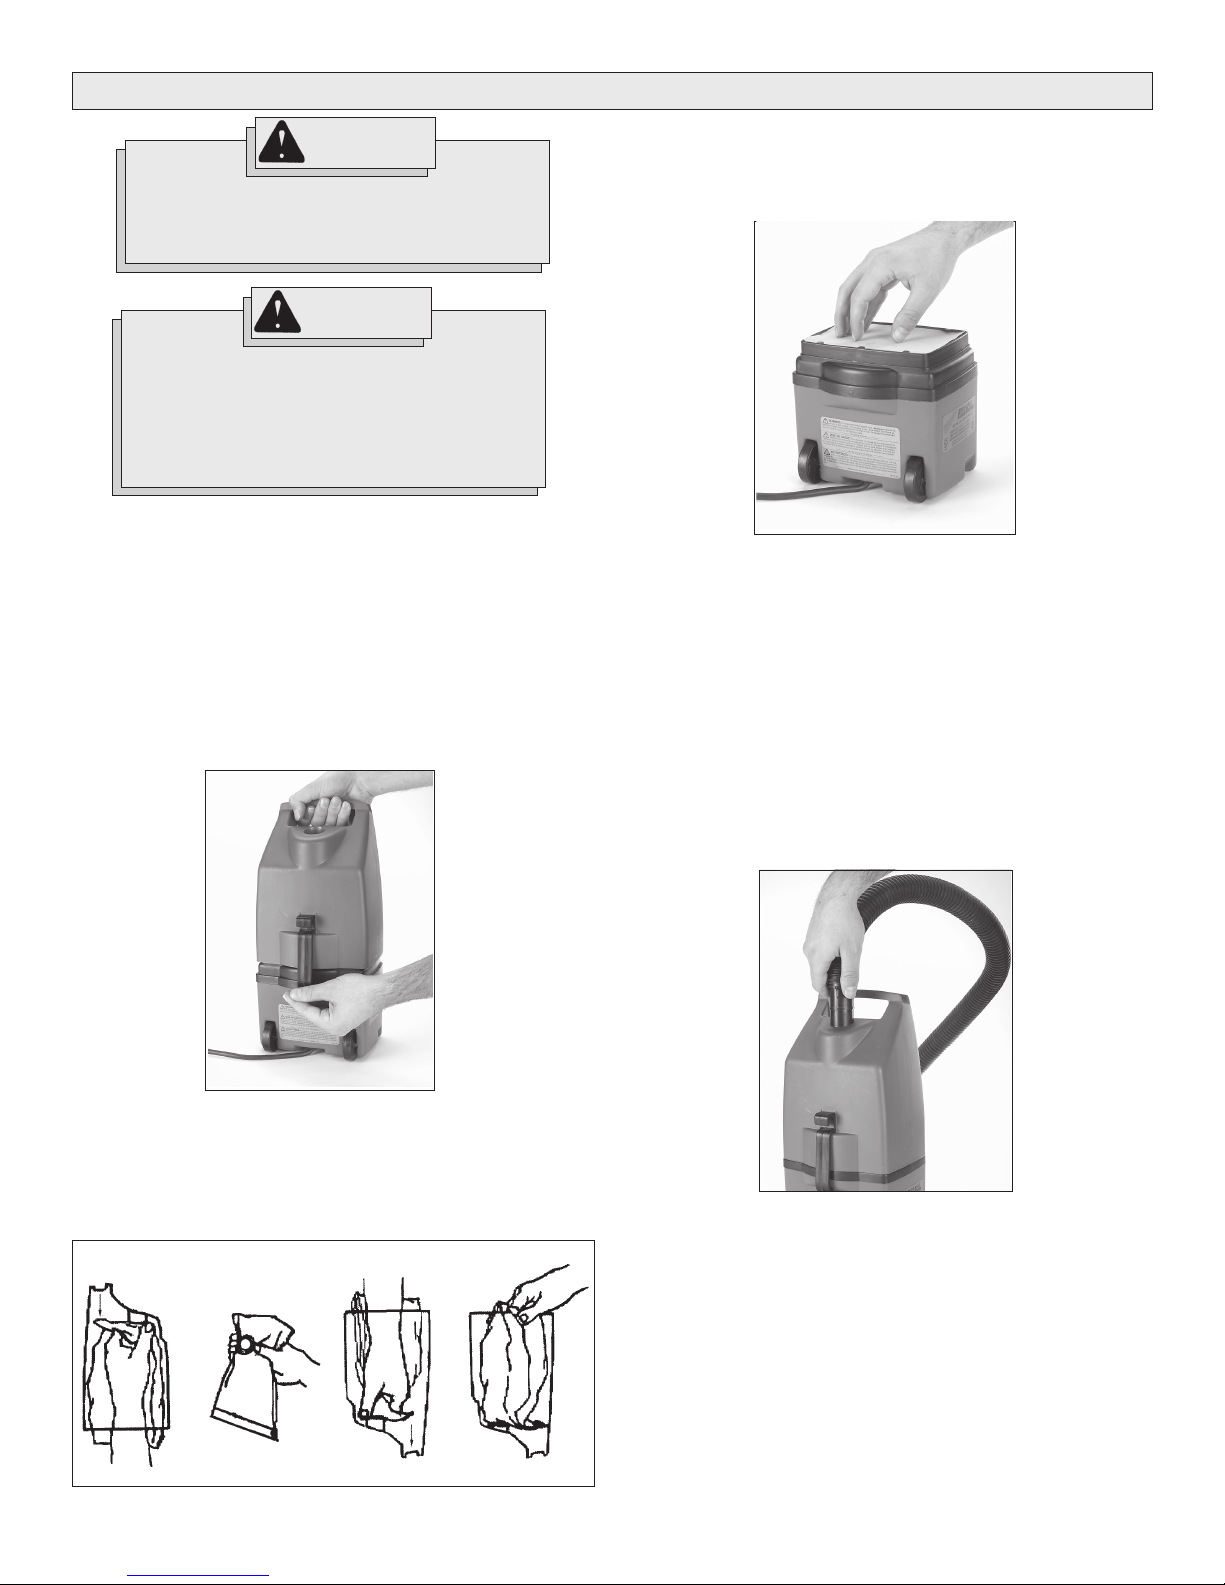
Changing Dust Bags (Figs. 1, 2 & 3)
1. Unplug vacuum cleaner.
2. Stand vacuum cleaner upright.
3. Remove tank by pulling up on the tank latch (Fig. 1).
Fig. 1
6. Inspect secondary filter (shake or brush dirt from filter if necessary and
replace filter) (Fig. 3).
See "Secondary Filter" below.
Fig. 3
7. Reattach tank to lower half of the vacuum and snap the tank latch into
place.
Secondary Filter
Periodically brush or shake the secondary filter clean. If the filter is
excessively dirty, replace filter. If the secondary filter is excessively
dirty, there is either hole in the filter bag or the filter bag not being
securely attached to the intake port.
Attaching Accessories (Fig. 4)
1. Firmly push hose end into intake port
2. Twist the hose slightly to lock it in place
3. Firmly push the other end of the hose into accessory (wand, nozzle, or
other accessory) and twist it slightly to lock the hose and accessory
together.
4. Remove filter bag by removing the cardboard collar from the intake port
(hold the bag upright to avoid spilling the contents) and discard.
If you are using the reusable cloth bag, shake the bag clean and
reattach.
5. Attach new filter bag to the intake port on the inside of the tank (Fig. 2).
Fig. 2
Fig. 4
ABC
D
Page 5
Trouble shooting
If you have any problems with your Pro-Vac use the trouble shooting
guide below.
Problem
vacuum will not start
Possible Cause
no electric power
defective switch
defective motor
Solution
• check wall outlet
with another appliance (such as a
lamp) or try
another wall outlet.
• check wall switch
• check home fuse
or circuit breaker
• replace switch
• replace motor
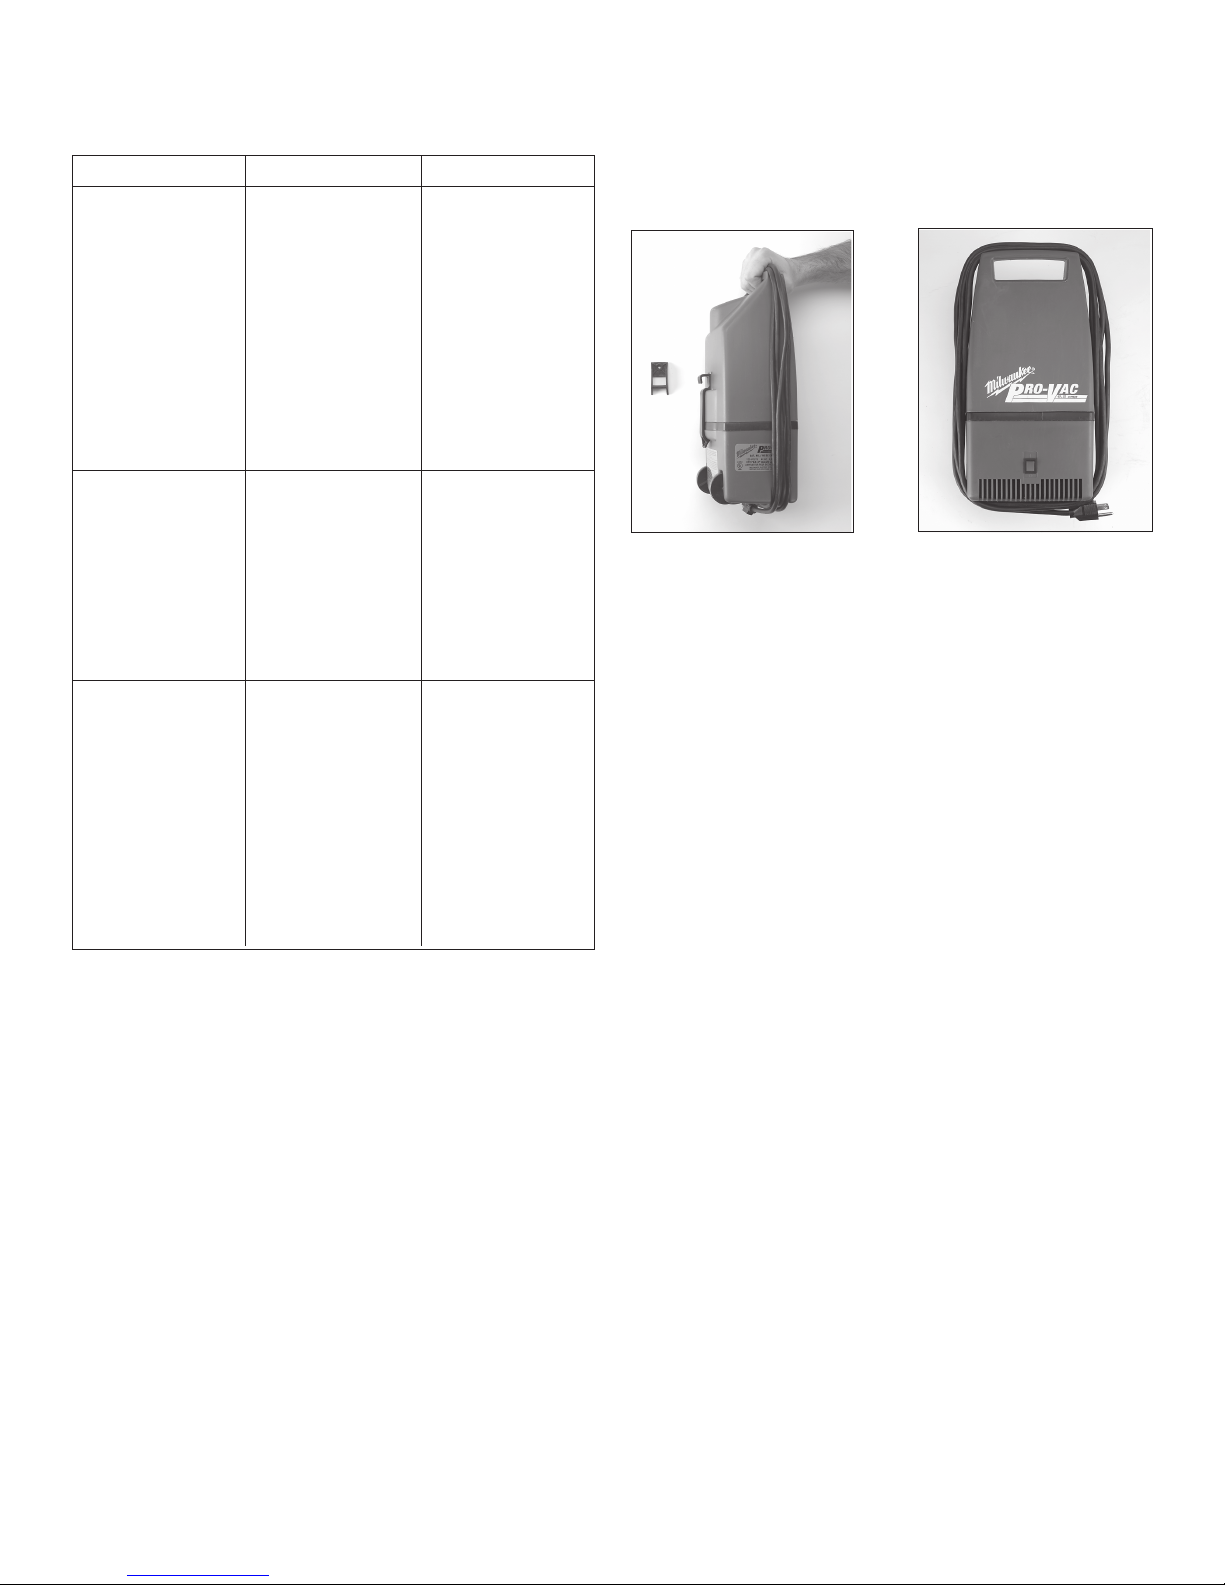
Storage (Figs. 5 & 6)
1. Mount the wall bracket to the wall.
2. Wrap the cord around the bottom of the vacuum and around the handle
and clip the plug to the cord.
3. Hang the vacuum from the wall bracket by the hook on the back of the
vacuum.
Fig. 5
Fig. 6
dust blowing out
exhaust vents
loss of vacuum
filters not functional
loose hose connection
filter clogged
full bag
hole in the hose
• replace full bag
• make sure bag is
fully attached
• make sure that
bag isn't ripped
• clean secondary
filter
• replace secondary filter
• tighten hose
connections
• clean secondary
filter
• replace secondary filter
• replace full bag
• replace hose
Page 6
 Loading...