

Milwaukee 6230, 6232, 6236, 6238 Operating Instructions

Blades and Blade Selection (Fig. 1)
Every MILWAUKEE Portable Bandsaw is furnished with a
14-teeth-per-inch Bi-metal blade which is suitable for most
applications. The blade dimensions required for the band saws
are: .020” thickness, 1/2” width and 44-7/8” in length. The
special .020” thickness reduces flexure fatigue and provides
maximum tooth life. To maximize cutting life, use a blade with
the correct pitch (teeth per inch) for the specific cutting job.
Blades are available in several pitches. To select the proper
blade, three factors should be considered: The size, shape, and
type of material to be cut.
The following suggestions are for selecting the right blade for
various cutting operations. Keep in mind that these are broad
guidelines and that blade requirements may vary depending
upon the specific size, shape and type of material to be cut.
Generally, soft materials require coarse pitch blades and hard
materials require fine pitch blades. Use coarse pitch blades for
thick work and fine pitch blades for thin work. It is important
to keep at least three teeth in the cut. See “Typical
Application” on pages 16 and 17.
Changing Blades
1. UNPLUG THE TOOL BEFORE REMOVING OR
INSTALLING BLADES.
2. Turn the tension lock handle located on the front of the saw
180-degrees counterclockwise. This releases the tension on the
blade for easy removal.
(Continued on next page)
Milwaukee Tool
Deep Cut Band Saw
Model Numbers: 6230, 6232, 6236, 6238
Operating Instructions
Page 1
RenTrain INC
RenTrain INC
To reduce the risk of injury, always unplug tool
before attaching or removing accessories. Use
only specifically recommended accessories.
Others may be hazardous.
WARNING!
OPERATION
Fig. 1
1.
2.
2. 8 Teeth per inch
1. 6 Teeth per inch
For tough stock 1/2” to 3-3/8”
in dimater or width (available in
carbon steel only).
For tough stock 3/8” to 1” in
diamter or width (available in
carbon steel only.
For tough stock 3/16” to up to
43/4” in diamter or width.
For tough stock 5/32” to 3/4”
in diamter or width.
For thin wall tubing and thin
sheets heavier than 21 gauge.
For thin wall tubing and thin
sheets heavier than 21 gauge.
3. 10 Teeth per inch
4. 14 Teeth per inch
5. 18 Teeth per inch
6. 24 Teeth per inch
3.
4.
5.
6.
3. Remove the blades from the pulley first and then from the
guides.
4. To install a new blade, with the pulleys facing up, insert the
blade between the rollers and the faces of the guides, making
sure that the teeth on the left side of the tool point towards the
rear of the tool.
5. With one hand, hold the blade in place between the rollers
and the guides and use the other hand to position the blade
around the pulleys. Be sure that the blade lies freely within the
guard channel before starting the tool motor.
6. Turn the tension lock handle 180-degrees clockwise to
lock the position. This will secure the blade on the pulleys.
BE SURE THAT THE BLADE IS PROPERLY SEATED
ON THE PULLEYS BEFORE STARTING THE CUT.
Two Speed Switch
for Cat. Nos. 6223, 6224, 6225, 6226, 6236, 6238
MILWAUKEE Two-Speed Band Saws are equipped with a
speed change switch located below the trigger on the handle.
To change speeds, stop the motor and slide the speed change
switch to “HI” or “LO” as indicated on the tool. For cutting
problem materials, use “LO” speed. Never change from one
speed to the other while the motor is running.
Starting, Stopping, and Controlling Speed for Cat. No.
6227, 6230, 6232, 6234
1. To start the tool, grasp the handle firmly and pull trigger.
2. To vary the speed, simply increase or decrease pressure on
the trigger. The further trigger is pulled, the greater the speed.
3. To select a maximum preset speed at any point within the
speed range, rotate the red knurled knob located on the trigger
to the desired position.
4. To stop the tool, release the trigger. Allow the tool to come
to a complete stop before removing the blade from a partial cut
or laying the tool down.
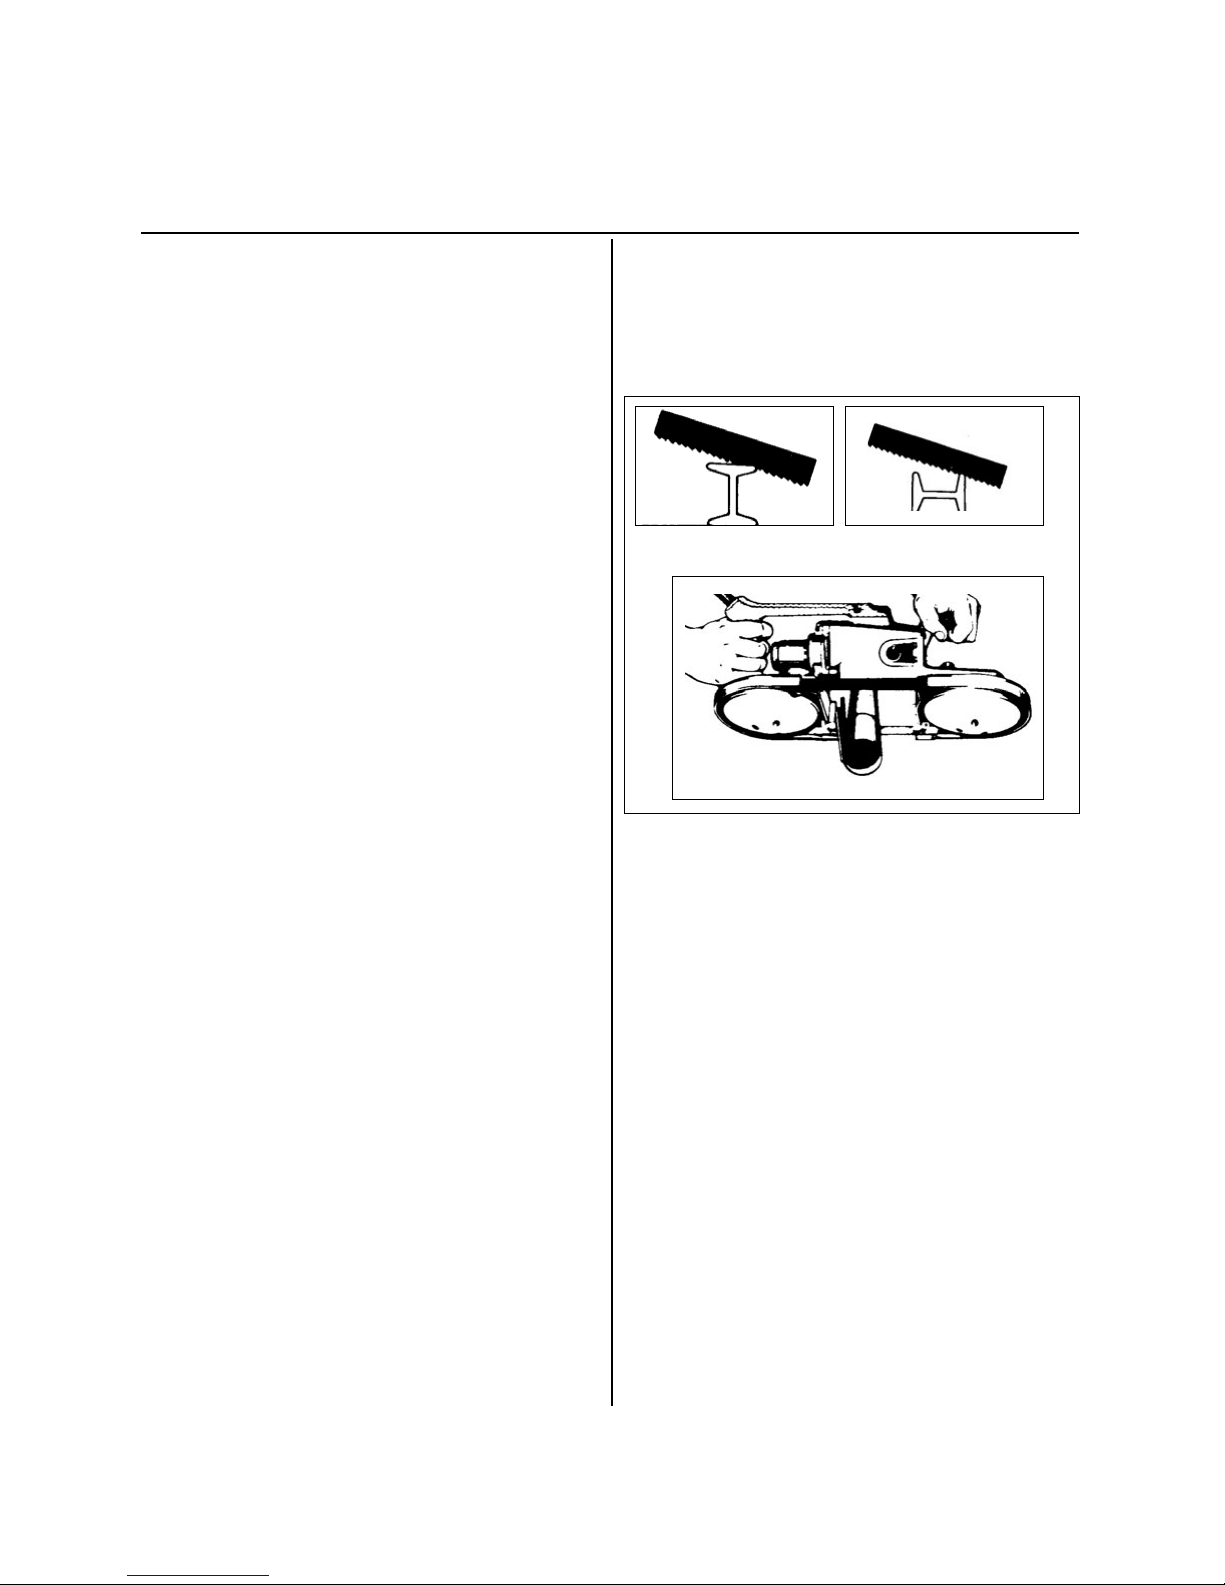
Typical Application (Fig. 2 & Fig. 3)
1. Keep the blade off the workpiece until the motor has
reached the selected speed.
2. Start cutting on a surface where the greatest number of
teeth will be in contact with the workpiece at one time.
3. Place the work steady rest against the workpiece and lower
the moving saw blade into the cut.
4. Do not bear down while cutting. The weight of the tool
will supply adequate pressure for the fastest cutting.
5. When completing a cut, hold the tool firmly so it will not
fall against the workpiece.
Operating Instructions (continued)
Page 2
RenTrain INC
RenTrain INC
1. Correct
1. Incorrect
 Loading...