

Milwaukee 49-40-6110 Operator's Manual
Cat. No. / No de cat.
49-40-6110
CUTTING DUST SHROUD
DÉFLECTEUR DE POUSSIÈRE DE COUPE
CUBIERTA PARA CORTE PROTECTORA DEL POLVO
OPERATOR'S MANUAL
MANUEL de L'UTILISATEUR
MANUAL del OPERADOR
WARNING To reduce the risk of injury, user must read and understand operator's manual.
AVERTISSEMENT An de réduire le risque de blessures, l'utilisateur doit lire et bien
comprendre le manuel.
ADVERTENCIA Para reducir el riesgo de lesiones, el usuario debe leer y entender el manual.

2

3
GENERAL SAFETY WARNINGS
WARNING
WHEN USING THE CUTTING
DUST SHROUD, BASIC
PRECAUTIONS SHOULD ALWAYS BE FOLLOWED, INCLUDING THE FOLLOWING: READ
THIS OPERATOR’S MANUAL, AS WELL AS
YOUR TOOL AND VACUUM OPERATOR’S
MANUALS, AND ALL LABELS ON THE
SHROUD, TOOL, AND VACUUM. FOR HOUSEHOLD OR COMMERCIAL USE.
WORK AREA SAFETY
• Keep work area clean and well lit. Cluttered or dark
areas invite accidents.
• Do not use in the presence of explosive dust,
liquids or vapors.
• Do not use where oxygen or anesthetics are used.
• Do not allow to be used as a toy. Close attention is
necessary when used by or near children.
• Use extra care when using on stairs.
ELECTRICAL SAFETY
• Do not pick up wet material. Do not use water to
settle dust.
PERSONAL SAFETY
• STAY ALERT. Watch what you are doing and use
common sense. Do not use dust extractor when you
are tired, distracted or under the inuence of drugs,
alcohol or medication causing diminished control.
• The operation of a dust extractor can result in for
-
eign objects being blown into eyes, which can result
in eye damage. Always wear safety goggles or glasses
with side shields when operating dust extractor.
• Wear a dust mask or use an OSHA compliant dust
extraction solution when working in dusty situations.
Dust particles can harm your lungs.
• Do not overreach. Keep proper footing and balance
at all times. This enables better control of the dust
extractor in unexpected situations.
• Keep hair, loose clothing, ngers, and all parts of
body away from openings and moving parts.
• Use only as described in this manual. Use only
manufacturer’s recommended attachments.
USE AND CARE
• Do not use to pick up ammable or combustible
liquids such as gasoline or use in areas where they
may be present.
• Do not pick up anything that is burning or smoking
such as cigarettes, matches, or hot ashes.
• Do not pick up soot, cement, plaster or drywall
dust without lter in place. These are very ne
particles that may aect the performance of the motor
or be exhausted back into the air.
•This product is suitable for collection of silica dust
when used in accordance with these instructions.
To reduce the risk of health hazards from other
vapors or dust, do not vacuum carcinogenic, toxic
or hazardous materials such as asbestos, arsenic,
barium, beryllium, lead, pesticides or other health
endangered materials.
•
WARNING
Some dust created by power sanding,
sawing, grinding, drilling, and other
construction activities contains chemicals known to
cause cancer, birth defects or other reproductive harm.
Some examples of these chemicals are:
• lead from lead-based paint
• crystalline silica from bricks and cement and other
masonry products, and
• arsenic and chromium from chemically-treated lumber.
Your risk from these exposures varies, depending on
how often you do this type of work. To reduce your
exposure to these chemicals: work in a well ventilated
area, and work with approved safety equipment, such
as those dust masks that are specially designed to
lter out microscopic particles.
• Do not put any object into openings. Do not use
with any opening blocked; keep free of dust, lint, hair,
and anything else that may reduce air ow.
• Maintain dust extractor. Check for misalignment
or binding of moving parts, breakage of parts
and any other condition that may aect the dust
extractor's operation. If damaged, have the dust
extractor repaired before use. Many accidents are
caused by poorly maintained tools.
• Maintain labels and nameplates. These carry im
portant information. If unreadable or missing, contact
a MILWAUKEE service facility for a free replacement.
SERVICE
• Have your power tool serviced by a qualied repair
person using only identical replacement parts.
This will ensure that the safety of the power tool is
maintained.
SPECIFIC SAFETY RULES
•The cutting dust shroud is compliant with Table 1 of
OSHA Standard 29CRF 1926.1153 assuming (1) it is
used in accordance with MILWAUKEE instructions;
(2) it is attached to a dust collector that has a lter
with 99% or greater eciency and a lter-cleaning
mechanism; and (3) the dust collector has above
125 CFM. Please reference https://www.osha.gov
for further details on compliance methods.
•Before using the cutting dust shroud, read this
operator’s manual, your tool and vacuum manuals,
and all labels on the shroud, tool, and vacuum.
• Wear ear protectors. Exposure to noise can cause
hearing loss.
• Hold power tool by insulated gripping surfaces,
when performing an operation where the cutting
accessory may contact hidden wiring. Cutting ac
-
cessories contacting a “live” wire may make exposed
metal parts of the power tool “live” and could give the
operator an electric shock.
• Only install diamond abrasive wheels according to
instructions. Flap discs and resin bonded grinding
wheels are not acceptable for this shroud.
READ AND SAVE ALL
INSTRUCTIONS
FOR FUTURE USE
SPECIFICATIONS
Cat. No. ................................................ 49-40-6110
Vacuum Port Outer Diameter ...................... 1-7/16"
Vacuum Port Inner Diameter ......................... 1-1/8"
Adaptor Outer Diameter ................................ 1-3/4"
Adaptor Inner Diameter ................................. 1-1/2"
Cutting Wheel Capacity .........................4-1/2" or 5"
NOTE:
For grinder model compatibility, see Assembly
instructions regarding the collar design. The shroud
will not work on grinders that do not have the same
spindle collar design.
4
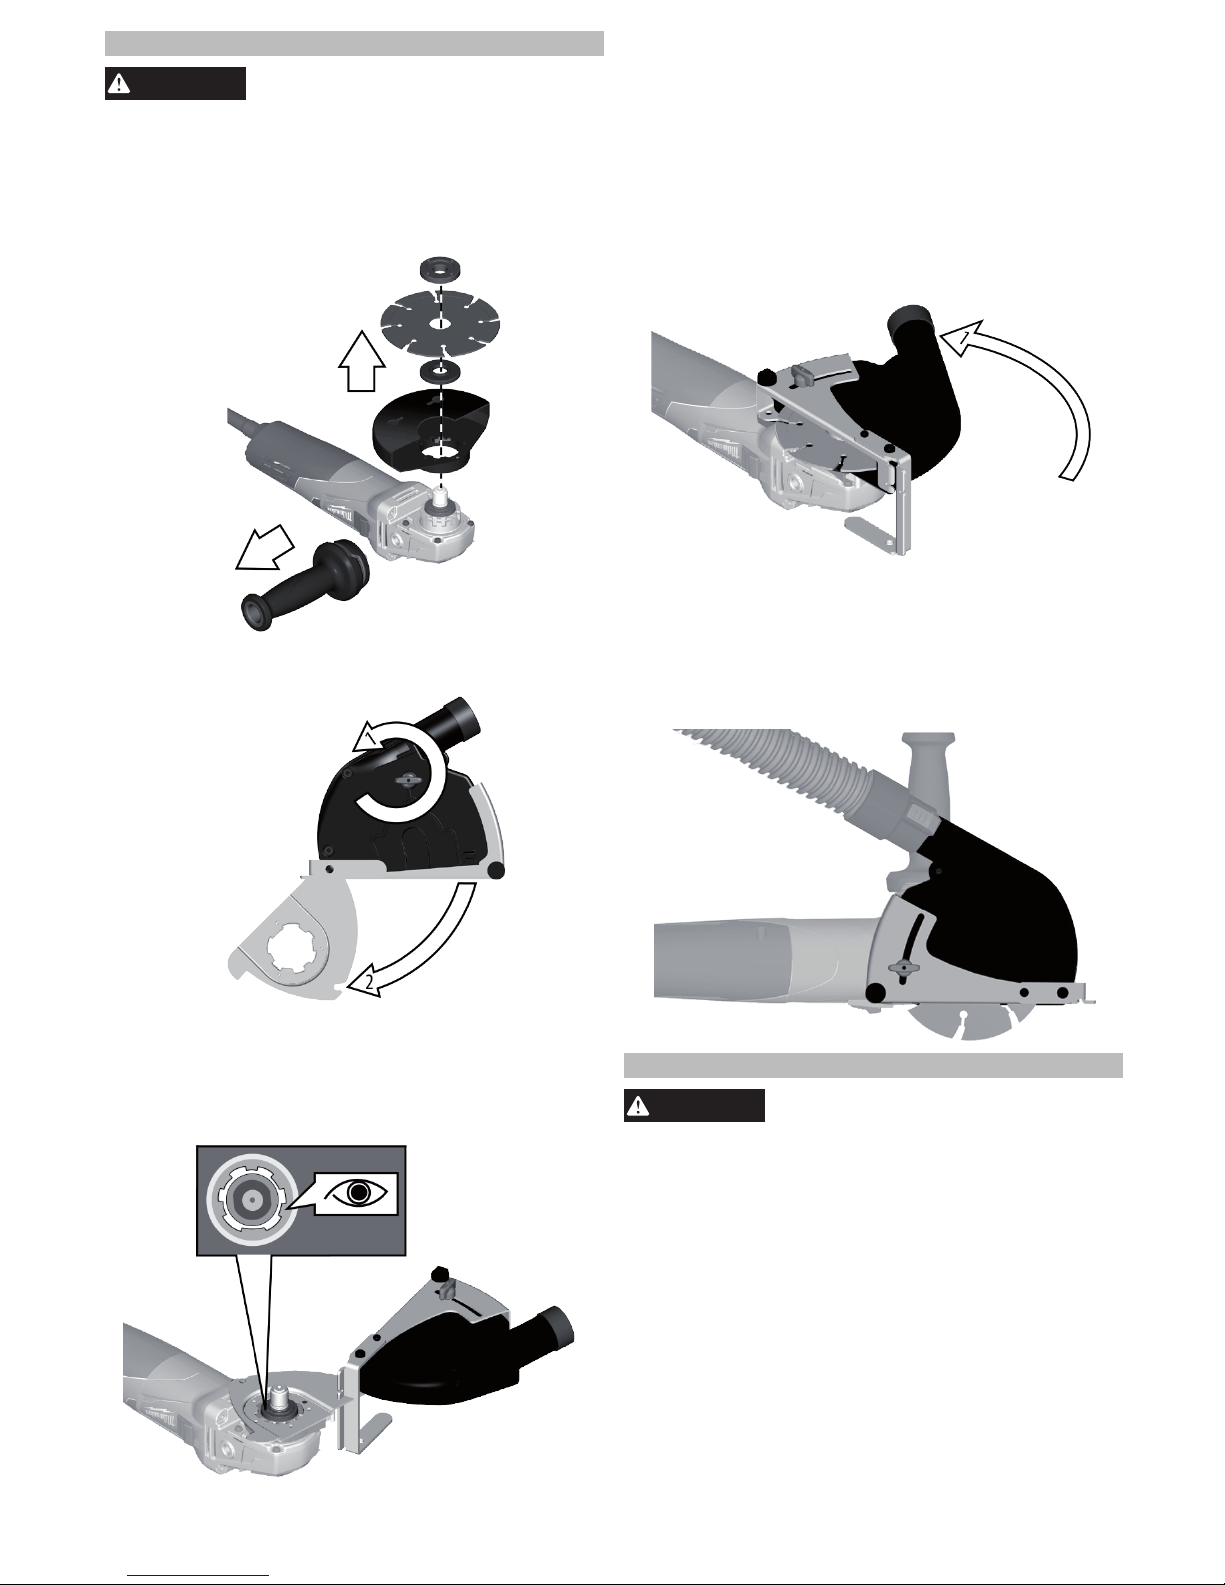
ASSEMBLY
WARNING
Use only recommended diamond
abrasive wheels. Other accesso-
ries may be hazardous.
Attaching the Shroud
1. Unplug or remove the battery pack from the
grinder.
2. Remove the side handle, all accessories and the
grinder guard.
3. Turn the shroud knob to open the shroud and
expose the collar.
4. Place the collar on the grinder spindle. Make sure
it aligns properly. Install according to the guard
assembly instructions in the tool manual.
NOTE: The shroud will not work on grinders that do
not have the same spindle collar design.
5. WARNING! Always adjust the guard to provide
the operator with maximum protection while
operating. See tool manual for reference. Select
the proper cutting angle for the application.
6. WARNING! Only install diamond abrasive wheels
according to instructions. Flap discs and resin
bonded grinding wheels are not acceptable for
this shroud. Install the applicable diamond abra-
sive wheel according to the instructions in the tool
manual.
7. Close the wheel cover and tighten the shroud
knob securely.
8. Adjust the depth gauge for the chosen depth of
cut.
9. Reinstall the grinder side handle. WARNING!
Do not use the grinder without the side handle
installed.
10. Attach the hose clip adaptor and dust extractor
hose to the shroud.
OPERATION
WARNING
To reduce the risk of re and in-
jury, do not use to pick up ammable or combustible materials. Empty dust box
completely before use.
To reduce the risk of injury, wear safety goggles
or glasses with side shields.
To reduce the risk of injury, wear a dust mask or
use an OSHA compliant dust extraction solution.
Before using the cutting dust shroud, read
this operator’s manual, your tool and vacuum
manuals, and all labels on the shroud, tool, and
vacuum.
1. Turn the dust extractor to "automatic-cleaning"
mode.
2. Align the shroud so that it is ush with the material
and begin the cut.
NOTE: Operate on concrete, brick, or tile surfaces
only. Do not operate on wood or metal surfaces.
 Loading...