

Milwaukee 48-59-0260 Operator's Manual
Catalog No.
No de Catalogue
Catálogo No.
48-59-0260
OPERATOR'S MANUAL
MANUEL de L'UTILISATEUR
MANUAL del OPERADOR
MULTI-BAY CHARGER
CHARGEUR MULTIPLE
CARGADOR DE MÚLTIPLES SEGMENTOS
TO REDUCE THE RISK OF INJURY, USER MUST READ AND UNDERSTAND OPERATOR'S MANUAL.
AFIN DE RÉDUIRE LE RISQUE DE BLESSURES, L'UTILISATEUR DOIT LIRE ET BIEN COMPRENDRE LE MANUEL DE
L'UTILISATEUR.
PARA REDUCIR EL RIESGO DE LESIONES, EL USUARIO DEBE LEER Y ENTENDER EL MANUAL DEL OPERADOR.

Page 2

IMPORTANT SAFETY INSTRUCTIONS
SAVE THESE INSTRUCTIONS
This manual contains important safety and operating instructions for battery chargers. Before using the battery charger, read this manual as well as any
labels on the charger, battery pack and tool.
1. CAUTION! To reduce the risk of injury, charge only MILWAUKEE 12,
14.4 and 18 Volt battery packs in this charger. Other types of batteries
may explode, causing personal injury or damage.
2. AVOID DANGEROUS ENVIRONMENTS. Do not use charger in rain,
snow, damp or wet locations. Do not use battery pack or charger in
the presence of explosive atmospheres (gaseous fumes, dust or
flammable materials) because sparks may be generated when inserting or removing battery pack, possibly causing fire.
3. CHARGE IN A WELL VENTILATED AREA. Do not block charger vents.
Keep them clear to allow proper ventilation. Do not allow smoking or
open flames near a charging battery pack. Vented gases may explode.
4. MAINTAIN CHARGER CORD. When unplugging charger, pull plug
rather than cord to reduce the risk of damage to the electrical plug and
cord. Never carry charger by its cord. Keep cord from heat, oil and
sharp edges. Make sure cord will not be stepped on, tripped over or
subjected to damage or stress. Do not use charger with damaged
cord or plug. Have a damaged cord replaced immediately with identical replacement parts (see Maintenance).
5. DO NOT USE CHARGER OR BATTERY PACK IF it has received a
sharp blow, been dropped or damaged in any way. Do not disassemble. Incorrect reassembly may result in the risk of electric shock,
fire or exposure to battery fluids. If it is damaged, take it to a
MILWAUKEE service facility.
6. CHARGER IS RATED FOR 120 VOLT
AC ONLY. Charger must be plugged
into an appropriate receptacle, shown
in Figures A and B.
Fig. A Fig. B
7. USE ONLY RECOMMENDED ATTACHMENTS. Use of an attachment
not recommended or sold by the battery charger manufacturer may
result in a risk of fire, electric shock or personal injury.
8. DO NOT USE AN EXTENSION CORD UNLESS IT IS ABSOLUTELY
NECESSARY. Using the wrong, damaged or improperly wired extension cord could result in the risk of fire and electrical shock. If an
extension cord must be used:
If you are using an extension cord outdoors, be sure it is marked with
the suffix W-A (W in Canada) to indicate that it is acceptable for
outdoor use.
Be sure your extension cord is properly wired and in good electrical
condition. Always replace a damaged extension cord or have it repaired by a qualified person before using it.
Protect your extension cords from sharp objects, excessive heat and
damp or wet areas.
Unplug all cords during lightning storms or when unused for long
periods of time.
Double insulated tools can use either a two or three wire extension cord.
As the distance from the supply outlet increases, you must use a heavier
gauge extension cord. Using extension cords with inadequately sized wire
causes a serious drop in voltage, resulting in loss of power and possible
tool damage. Refer to the table shown to determine the required minimum
wire size.
The smaller the gauge number of the wire, the greater the capacity of the
cord. For example, a 14 gauge cord can carry a higher current than a 16
gauge cord. When using more than one extension cord to make up the total
length, be sure each cord contains at least the minimum wire size required.
If you are using one extension cord for more than one tool, add the nameplate
amperes and use the sum to determine the required minimum wire size.
Recommended Minimum Wire Gauge
Nameplate
Amperes
0 - 5 **
8.1 - 12
12.1 - 15
15.1 - 20
* Based on limiting the line voltage drop to five volts at
150% of the rated amperes.
** Indicates amps and cord gauge for Multi-Bay Charger.
9. DO NOT BURN, MUTILATE OR DISASSEMBLE BATTERY PACK. Th e
battery pack can explode in a fire. Mutilation may expose battery
fluids, causing burns.
10. BATTERY FLUIDS CAUSE SERIOUS CHEMICAL BURNS. Never al-
low contact with skin or eyes. If a damaged battery pack leaks battery
fluids, use rubber or neoprene gloves to dispose of it. If skin is exposed to battery fluids, wash with soap and water and rinse with
vinegar. Remove and dispose of contaminated clothing. If eyes are
affected, immediately flush with water for 15 minutes and seek medical attention.
11. DO NOT SHORT CIRCUIT. A battery pack will short circuit if a metal
object makes a connection between the positive and negative contacts on the battery pack. Do not place a battery pack near anything
that may cause a short circuit, such as coins or keys in your pocket.
A short circuited battery pack may cause fire and personal injury.
12. UNPLUG CHARGER when not in use.
13. TO REDUCE THE RISK OF ELECTRIC SHOCK, always unplug charger
before cleaning or maintenance, turning off controls will not reduce
this risk. Use a Ground Fault Circuit Interrupter (GFCI) to reduce shock
hazards.
14. STORE YOUR BATTERY PACK AND CHARGER in a cool, dry place.
Do not store battery pack where temperatures may exceed 120°F
(50°C) such as in a vehicle or metal building during the summer. Charger
will charge the battery when the temperature is between 41°F (5°C)
and 113°F (45°C). When the battery temperature is outside that range,
charging will not occur.
for Extension Cords*
25'
5.1 - 8
16
16
14
12
10
Extension Cord Length
100'
50'
16
16
14
12
10
75'
16
14
12
10
10
14
12
10
10
150'
12
10
--
--
--
--
200'
12
--
--
--
--
READ AND SAVE ALL INSTRUCTIONS FOR
FUTURE REFERENCE.
Page 3

1. Light indicators
Light off indicates: Port is ready
Red light
Continuous: Charging
Flashing: Battery pack is too hot or too cold
(Charging will begin automatically when
battery reaches correct charging temperature)
Green light
Continuous: Charging is complete
Flashing: Battery pack is in the
"Top-Off" mode
2. Label
3. Electrical contacts
4. Battery pack bay
5. Vents
6. Cord wrap: Stores excess cord
(on back of charger)
7. Cord (with pass-through plug)
FUNCTIONAL DESCRIPTION
1
2
3
4
5
6
Faster, Higher Power Charging
The Multi-Bay Charger is faster than standard single bay chargers, charging
a 2.4 Amp-Hour battery in approximately 45 minutes instead of the hour
needed by many single bay chargers. The independent bays can each
charge a different voltage battery (12, 14.4, or 18V).
Cord Wrap/Pass-Through Plug
A convenient cord wrap stores the 9-foot cord. A pass-through plug keeps
an outlet available for other uses.
Page 4
7
TOOL USE AND FEATURES
Job Site Built
The rugged housing of the Multi-Bay Charger is well suited for the harsh
environment of job sites. Roll bars and blow-molded plastic protect the
charger during falls and bumps.
The high visibility bright indicator lights are mounted on top of the charger
for 360° viewing.
Dust covers on the electrical contacts help keep the dust and debris of job
sites out of the charger. When a battery pack is inserted, the dust covers
automatically retract to allow charging.
Battery packs can be stored on the bays and carried on the charger from
job to job. When the charger is plugged in, charging begins for the packs
on the bays.
OPERATION
WARNING!
Charge only MILWAUKEE 12, 14.4 and 18 Volt battery packs in this charger. Other types
of batteries may explode causing personal injury and damage.
When to Charge the Battery Pack
Charge your battery pack before you use your tool for the first time and when
your tool no longer performs with the power and torque needed for the job.
Never completely discharge the battery pack.
New battery packs reach full loading capacity after 4-5 chargings and
dischargings. Battery packs which have not been used for some time should
be recharged before use.
Standard Charging Times
Standard charging time of a 2.4 Amp-hour battery pack is approximately 45
minutes. Three battery packs can be charged simultaneously with no
change in charging times. Charging time does vary depending on the battery
temperature, the battery's remaining charge, and the Amp-Hour capacity of
the battery pack being charged. For example, if a 2.4 Amp-hour battery pack
does not require a full charge, the charging time will be much less than one
hour.
Enhanced Charging ("Top-Off" Mode)
After the battery is completely charged, the green light may start flashing.
This indicates that the charger is conditioning ("topping-off") the battery to
hold a stronger charge. Over time, batteries begin to hold less and less
charge. The "top-off" mode helps renew the charge-life of the battery. This
process can take from 1 to 4 hours, depending on the battery temperature.
The battery may be removed at any point during this cycle with no harm done.
Maintenance Charge
Batteries discharge at a rate of about 1% per day. The Maintenance Charge
feature keeps the battery pack fully charged when the battery pack is stored
in a charger that is plugged in. The Maintenance Charge automatically begins
after the battery pack is fully charged. During Maintenance Charge,
the green light will be continuous.
Effects of Temperature on Charging
Battery packs are affected by temperature. The charger will sense battery
temperature and will charge the battery at the most rapid rate when its
temperature ideal (between 41°F (5°C) and 113°F (45°C) for NiCd, between
41°F (5°C) and 95°F (35°C) for NiMH). When the battery temperature is
outside of this range, the charger will supply enough current to keep the
battery pack in its current state to prevent damage to battery. If the
temperature changes during a charging cycle, the charger will automatically
adjust to give the most rapid charge that is safe for the temperature.
Hot and Cold Pack Automatic Start
When a battery pack is too hot (over 113°F (45°C)) or too cold (under 41°F
(5°C)), the red indicator light for the bay will begin to flash. Leave the battery
pack on the bay. If an appropriate temperature is reached, charging will
begin automatically.
Charging on an Inverter (DC to AC Converter)
An inverter of sufficient power capability will be required to operate the
Multi-Bay Charger. An inverter rated 660 Watts minimum will be needed to
charge three batteries simultaneously. The power required is at least 220
Watts per bay.
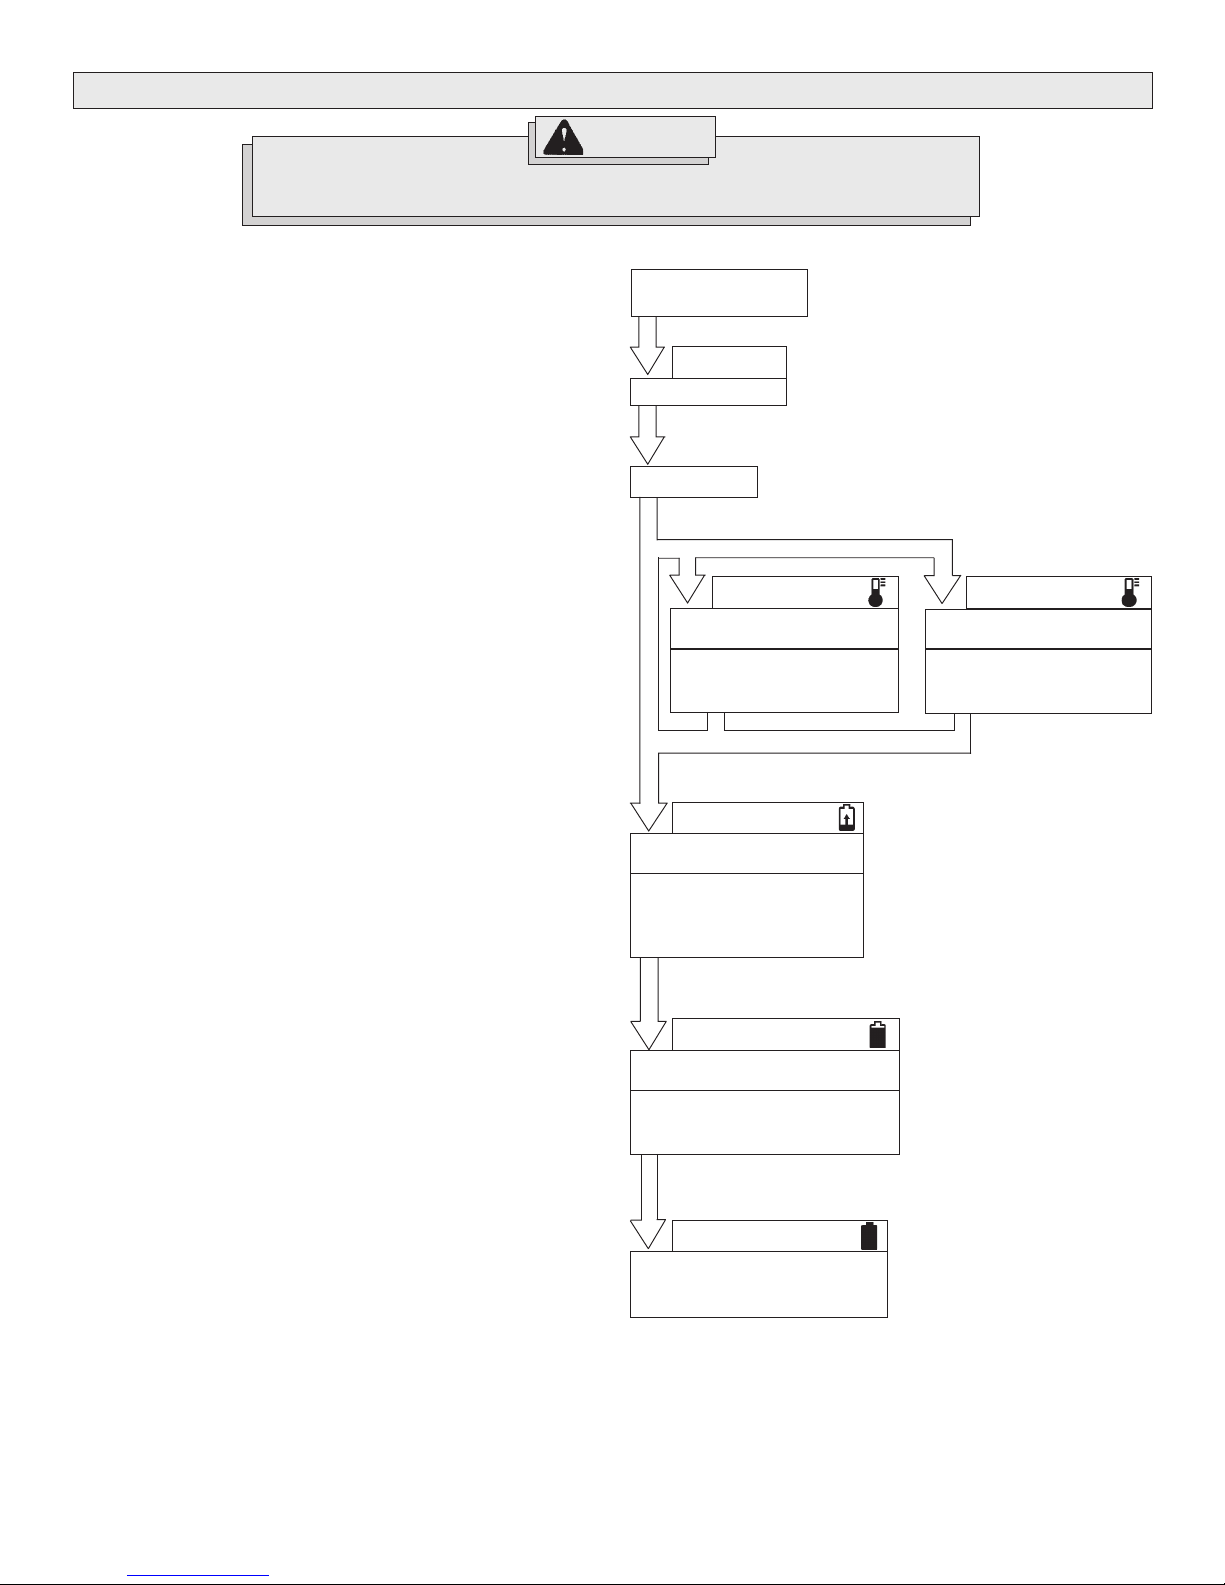
Charging the Battery Pack
Connect Charger to
AC Power Source
Light Off
Charger Port Ready
Insert Battery
Red Flashing Light
Battery too hot - over 113°F
(45°C)
Charge pending until battery
temperature is below 113°F
(45°C).
Red Continuous Light
Charging
NiCd Battery temperature
41°F - 113°F (5°C - 45°C)
NiMH Battery temperature
41°F - 95°F (5°C - 35°C)
Green Flashing Light
"Top-Off" Mode
Battery is charged and being
conditioned to hold a longer charge.
Pack can be removed at any time.
Green Continuous Light
Battery is charged.
Maintenance charging.
Pack can be removed at any time.
Red Flashing Light
Battery too cold - less than
41°F (5°C)
Charge pending until battery
temperature is above 41°F
(5°C).
Page 5
 Loading...