

Page 1

Cat. No. / No de cat.
48-22-9802, 48-22-9803
LASER DISTANCE METERS
APPAREIL DE MESURE DE LA DISTANCE AU LASER
TELÉMETRO LÁSER
OPERATOR'S MANUAL
MANUEL de L'UTILISATEUR
MANUAL del OPERADOR
WARNING To reduce the risk of injury, user must read and understand operator's manual.
AVERTISSEMENT An de réduire le risque de blessures, l'utilisateur doit lire et bien
comprendre le manuel.
ADVERTENCIA Para reducir el riesgo de lesiones, el usuario debe leer y entender el manual.
Page 2

2
IMPORTANT SAFETY
INSTRUCTIONS
WARNING
READ AND UNDERSTAND ALL
INSTRUCTIONS.
Failure to follow
all instructions listed below, may result in electric
shock, re and/or serious personal injury.
SAVE THESE
INSTRUCTIONS.
1. SAVE THESE INSTRUCTIONS - THIS OPERA-
TOR’S MANUAL CONTAINS IMPORTANT SAFETY
AND OPERATING INSTRUCTIONS.
2. DO NOT ALLOW PERSONS UNFAMILIAR WITH
THE APPLIANCE, THESE SAFETY INSTRUC
TIONS, AND THE TOOL'S OPERATORS MANUAL
TO OPERATE THE TOOL. This appliance can be
dangerous in the hands of untrained users.
3. DO NOT OVERREACH. KEEP PROPER FOOTING
AND BALANCE AT ALL TIMES. This enables better
control of the appliance in unexpected situations.
4. ENSURE ADEQUATE SAFEGUARDS AT THE
WORK SITE (e.g. surveying site when measuring
on roads, construction sites, etc.)
5.
WARNING
THE DEVISE PRODUCES VISIBLE
LASER BEAMS, WHICH ARE
EMITTED FROM THE APPLIANCE. THIS DEVICE
IS A CLASS 2 LASER PRODUCT IN ACCORD
-
ANCE WITH IEC 60825-1:2007.
6. LASER LIGHT - DO NOT STARE INTO BEAMS OR
VIEW DIRECTLY WITH OPTICAL INSTRUMENTS.
Do not point laser light at others. Laser light can
cause eye damage.
7. AVOID DANGEROUS ENVIRONMENTS. Do not
use in rain, snow, damp or wet locations. Do not use
in the presence of explosive atmospheres (gaseous
fumes, dust or flammable materials).
8. MAINTAIN TOOLS. IF DAMAGED, HAVE THE
TOOL REPAIRED BEFORE USE. Accidents may
be caused by poorly maintained tools.
9. USE TOOLS ONLY WITH SPECIFICALLY DESIG
-
NATED ACCESSORIES. Use of any other acces-
sories may create risk of injury.
10. THIS TOOL IS DESIGNED TO BE POWERED BY
2 -AAA BATTERIES PROPERLY INSERTED INTO
THE TOOL. Do not attempt to use with any other
voltage or power supply.
11. DO NOT LEAVE BATTERIES WITHIN THE REACH
OF CHILDREN.
12. DO NOT MIX NEW AND USED BATTERIES.
13. DO NOT MIX BRANDS (OR TYPES WITHIN
BRANDS) OF BATTERIES.
14. DO NOT MIX RECHARGEABLE AND NON-
RECHARGEABLE BATTERIES.
15. INSTALL BATTERIES ACCORDING TO POLAR
-
ITY (= / -) DIAGRAMS.
16. PROPERLY DISPOSE OF USED BATTERIES IM
-
MEDIATELY.
17. DO NO INCINERATE OR DISMANTLE BATTERIES.
18. UNDER ABUSIVE CONDITIONS, LIQUID MAY BE
EJECTED FROM THE BATTERY, AVOID CONTACT.
IF CONTACT ACCIDENTALLY OCCURS, FLUSH
WITH WATER. IF LIQUID CONTACTS EYES, AD
-
DITIONALLY SEEK MEDICAL HELP. Liquid ejected
from the battery may cause irritation or burns.
19. KEEP HANDS AWAY FROM ALL MOVING PARTS.
20. WATCH OUT FOR ERRONEOUS MEASUREMENTS IF THE TOOL IS DEFECTIVE OR IF IT
HAS BEEN DROPPED, MISUSED OR MODIFIED.
21. CARRY OUT PERIODIC TESTS MEASURE
-
MENTS. Particularly after the tool has been subject
to abnormal use, and before, during and after im
-
portant measurements.
22. DO NOT DISPOSE OF TOOL OR BATTERIES TO
-
GETHER WITH HOUSEHOLD WATER MATERIAL!
Appliance and batteries that have reached the end of
their life must be collected separately and returned
to an environmentally compatible recycling facility.
23. HAVE YOUR TOOL SERVICED BY A QUALIFIED
REPAIR PERSON USING ONLY IDENTICAL
REPLACEMENT PARTS. This will ensure that the
safety of the tool is maintained.
24. MAINTAIN LABELS AND NAMEPLATES. These
carry important information. If unreadable or miss
-
ing, contact a MILWAUKEE service facility for a free
replacement.
25. THE DEVICE CONFORMS TO THE MOST STRIN
GENT REQUIREMENTS OF THE RELEVANT
ELECTROMAGNETIC COMPATIBILITY (EMC)
STANDARDS AND REGULATIONS. Yet, the possi
-
bility of causing interference in other devices cannot
be totally excluded.
READ AND SAVE ALL
INSTRUCTIONS FOR
FUTURE REFERENCE.
SYMBOLOGY
Volts
Direct Current
WARNING
Laser Light - Do Not
Stare Into Beam
Read Operator's Manual
Laser product - Avoid Exposure:
Laser Radiation Is Emitted From
This Aperture
LASER 2 Class 2 Laser Product
European Conformity Mark
SPECIFICATIONS
Cat. No. ................................................ 48-22-9802
Range ................................................ 150' (45.7 m)
Cat. No. ................................................ 48-22-9803
Range .............................................. 330' (100.6 m)
Volts................................................ 3 DC (2 x AAA)
Laser Class............................................................2
Laser Type ..................................... 635nm, < 1 mW
Storage Temperature .......................-13°F to 158°F
Operating Temperature ....................14°F to 122°F
Distance Measurement:
Typical tolerance* ................... ± 1.5 mm / 0.06 in **
Maximum tolerance* ...............± 2.5 mm / 0.10 in **
Smallest unit displayed ...................1 mm / 0.001 m
* Applies for 100 % target reectivity (white painted wall), low
background illumination, 25 ºC
** Tolerances apply from 0.05 m to 10 m with a condence
level of 95%. The maximum tolerance may deteriorate to
0.05 mm/m between 10 m to 30 m and to 0.05 mm/m for
distances above 30 m
Page 3

3
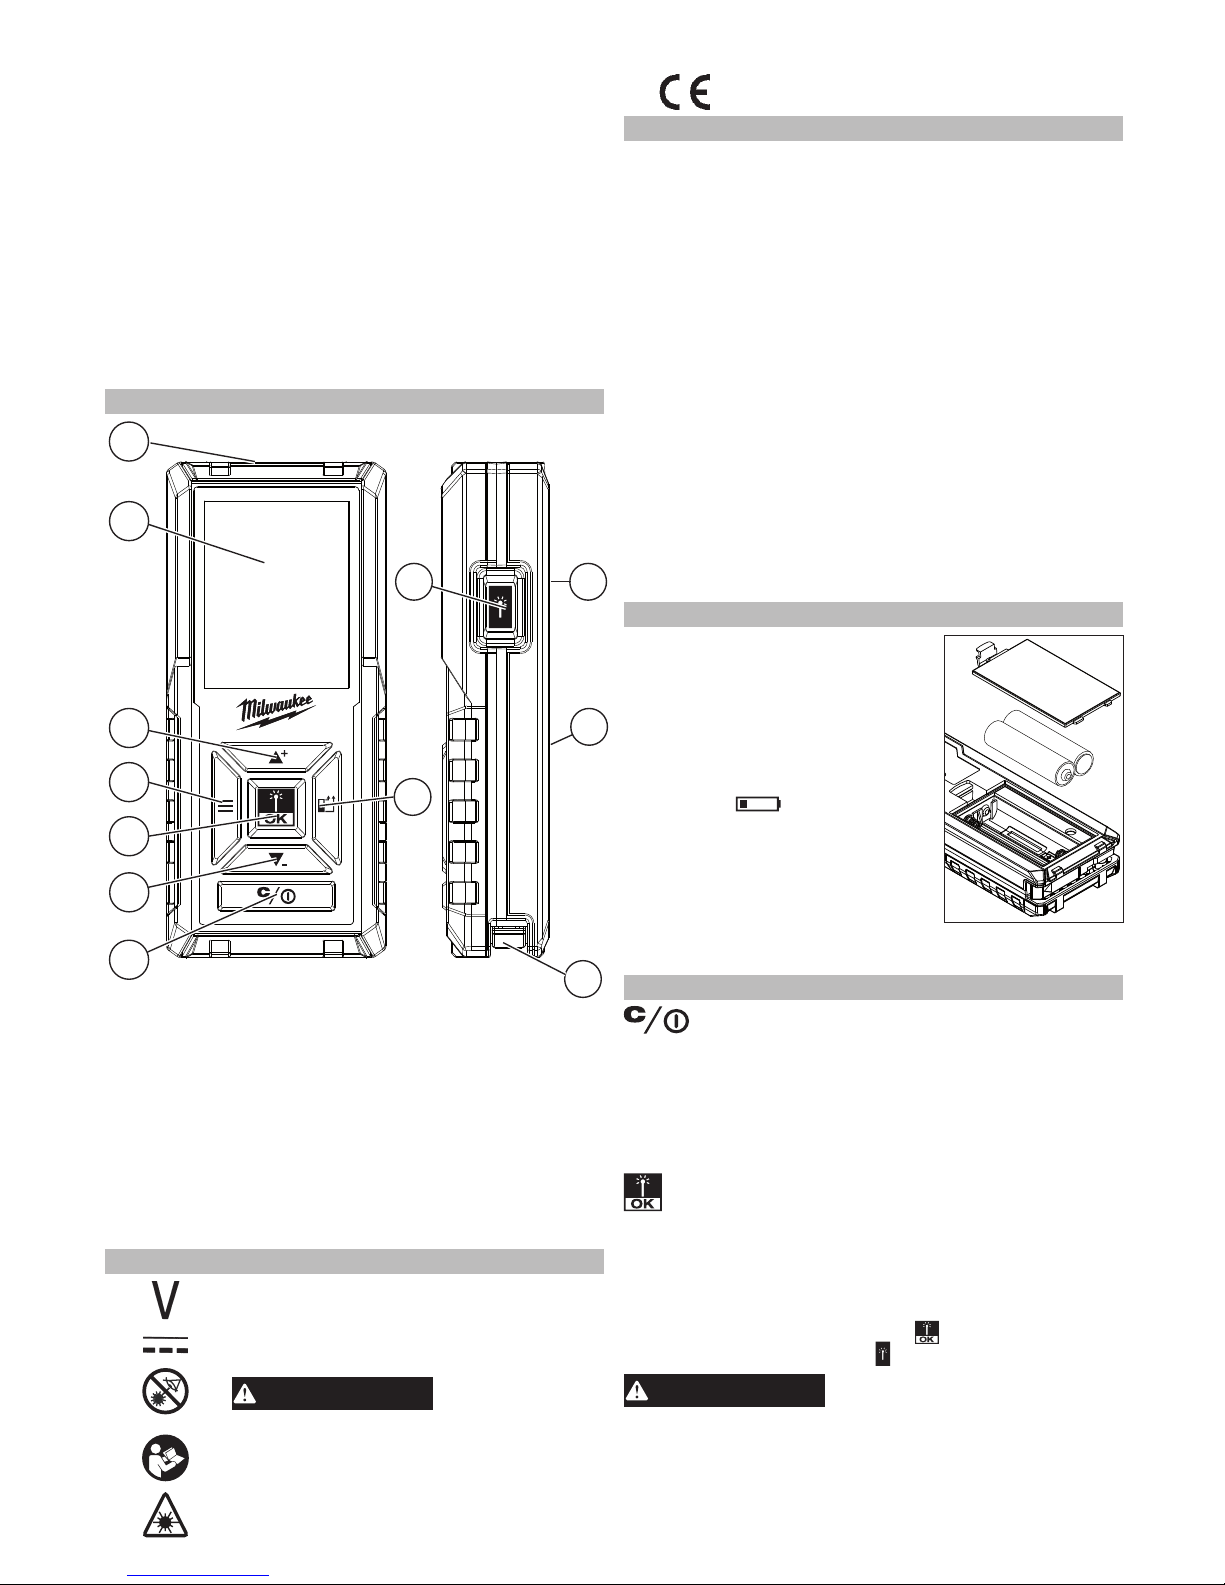
FUNCTIONAL DESCRIPTION
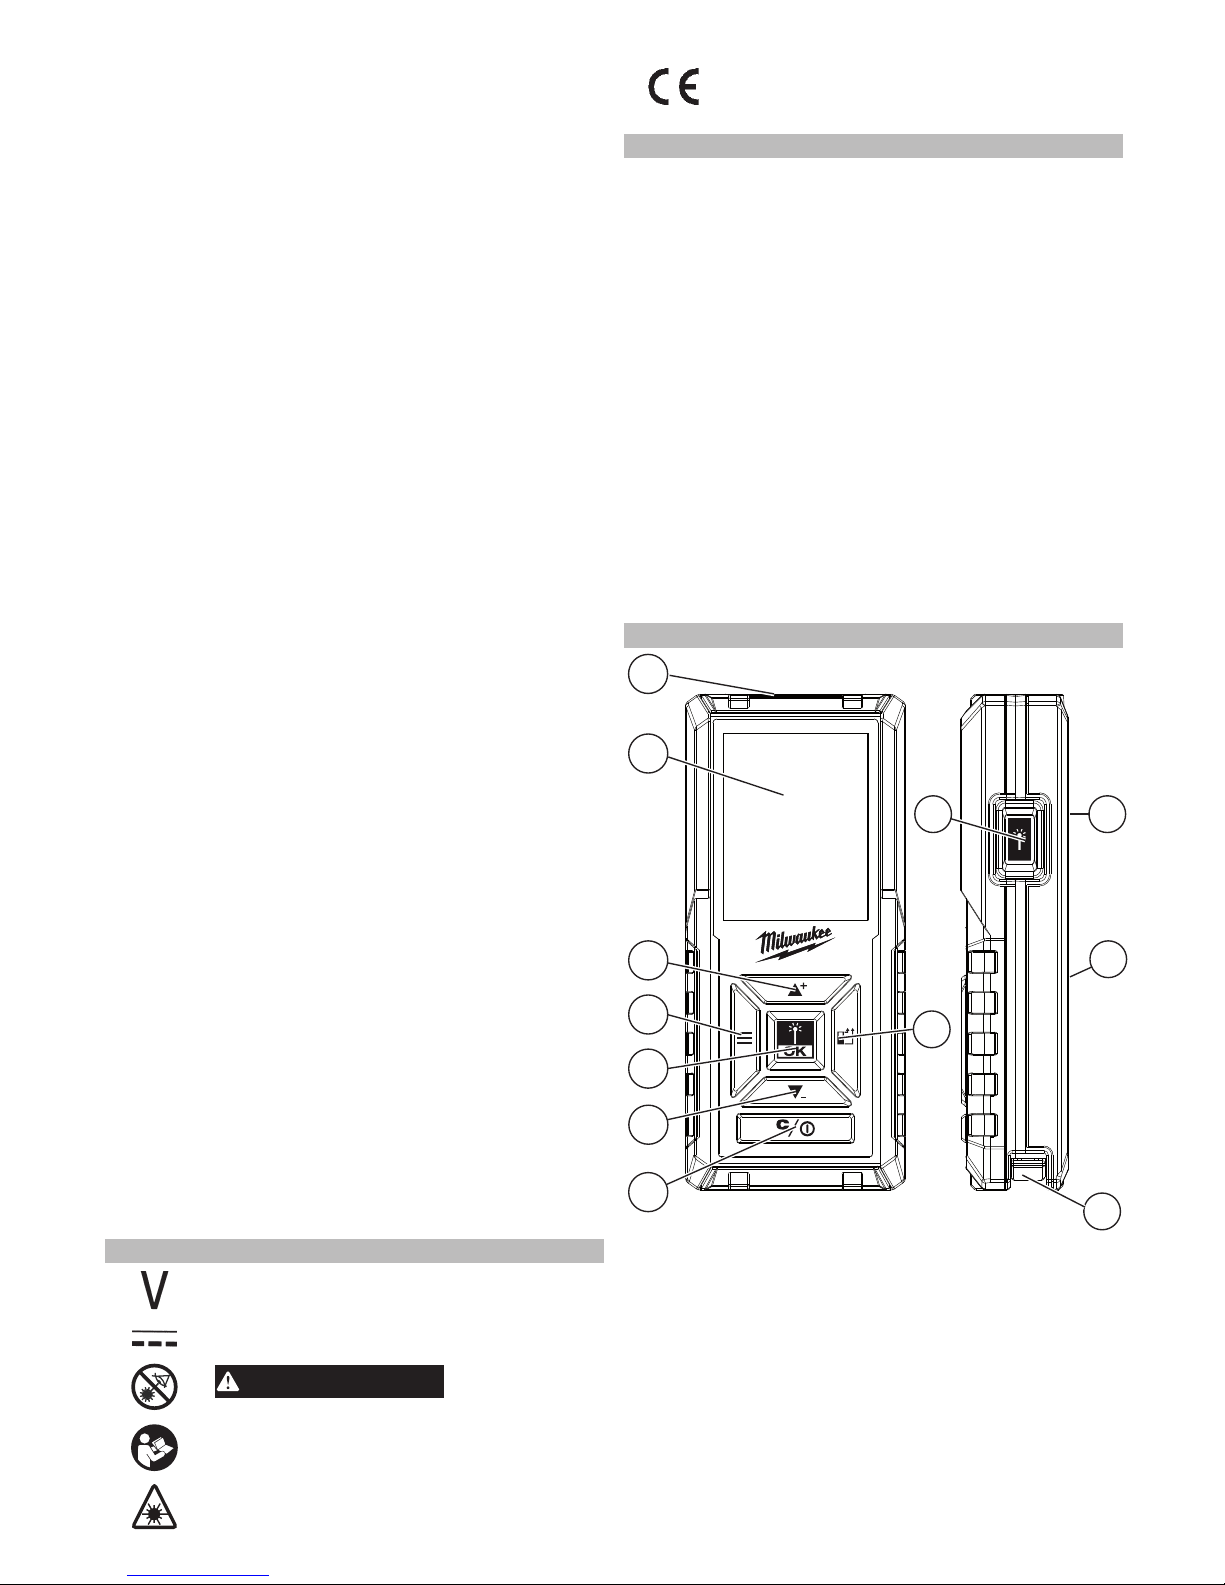
11
2
3
1
4
5
6
7
8
9
1. Optics
2. Display
3. Up / Add button
4. Menu button
5. Laser/OK button
6. Down/Subtract button
7. Clear/Power button
8. Reference Location
button
9. Laser button
10. Threaded mount
11. Battery door
12. Lever
12
10
ASSEMBLY
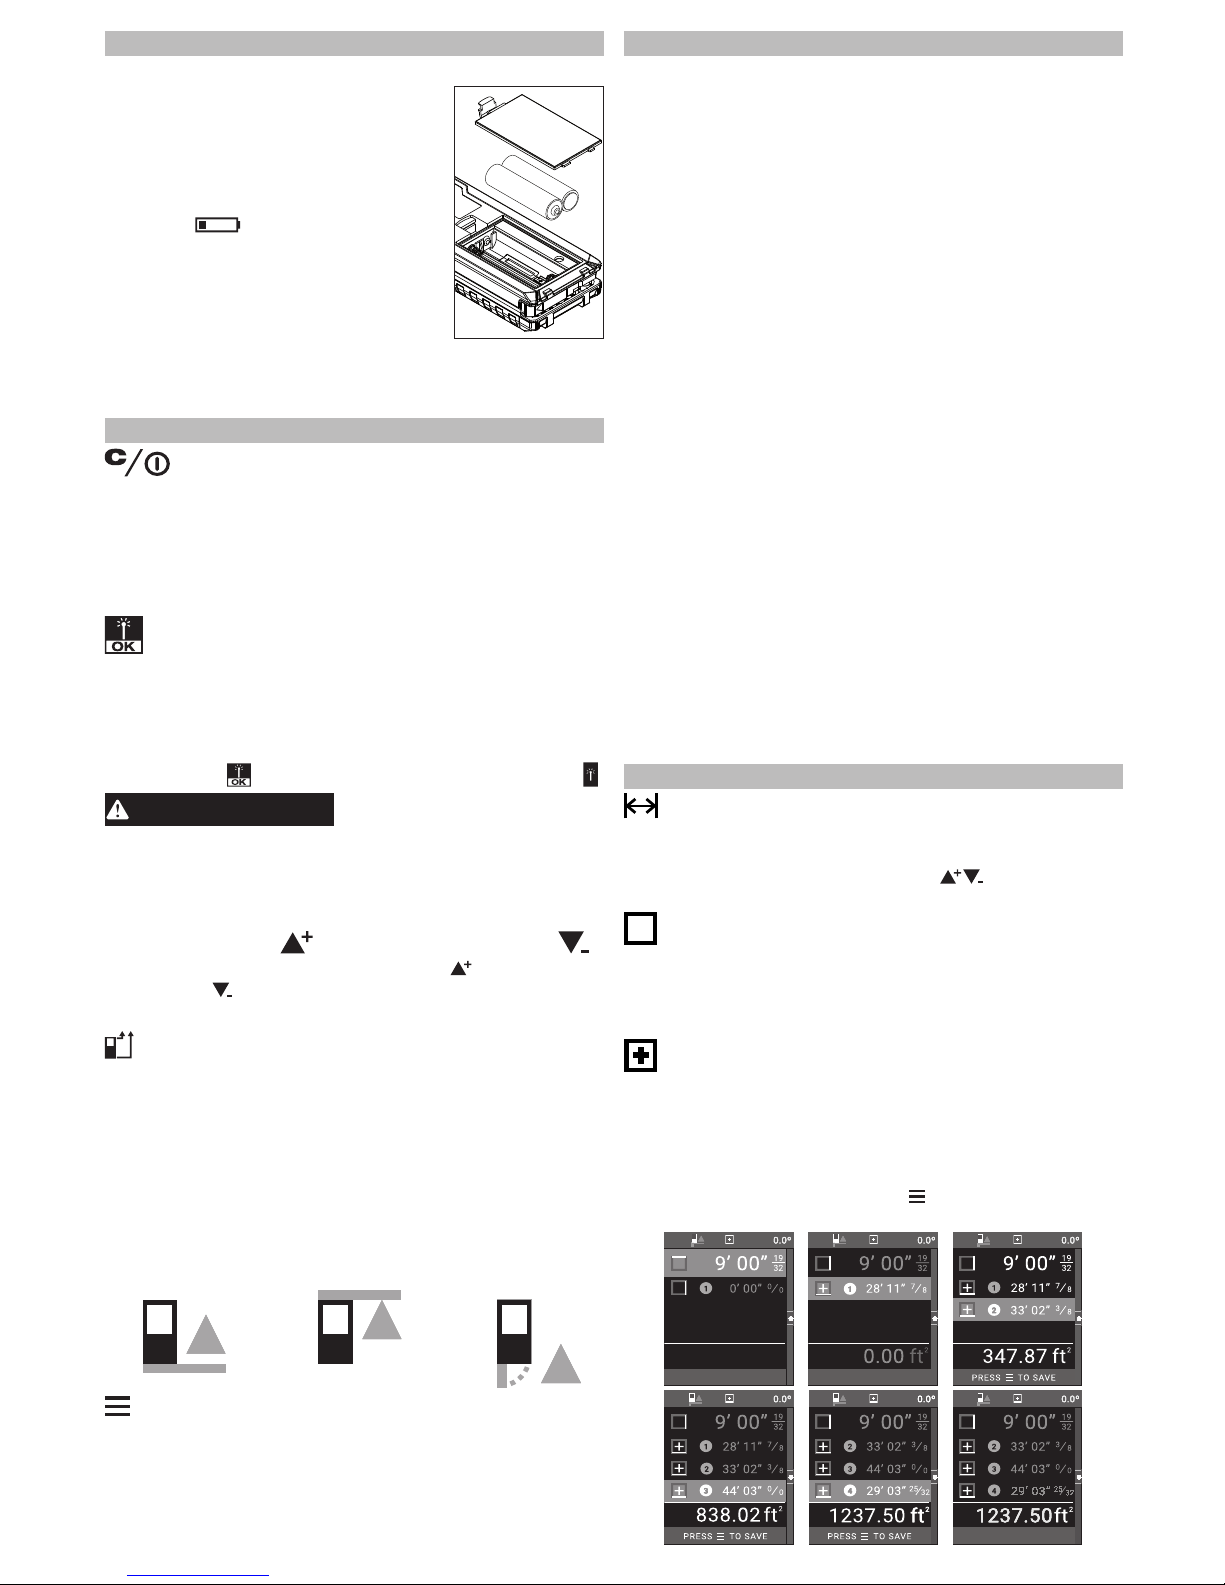
Changing Batteries
Only use alkaline batteries. Do not use
zinc-carbon batteries. If the meter will
not be used for a long time, remove
the batteries as a protection against
corrosion. Change batteries when the
battery symbol begins ashing
in upper bar. To change the batteries:
1. Press in the tab and lift out the
battery door.
2. Insert two AAA batteries according to the polarity marked in the
compartment.
3. Install the battery door.
BUTTONS
Clear/Power
To turn the meter on and off, press and hold the
Clear/Power button until the unit beeps. The Length
measurement mode is active.
To clear a measurement, press the Clear/Power
button quickly.
Laser/OK
Press the Laser/OK button to:
• Turn the laser ON
• Store the measurement
• Select OK in the Menu
The Laser/OK button is available below the screen
in the center of the buttons
, as well as on the side
of the meter
.
WARNING
Laser Light - Do Not Stare Into
Beam or view directly with optical
instruments.
Do not point laser light at others.
Laser light can cause eye damage.
Up/Add and Down/Subtract
Use the Up/Add and Down/Subtract buttons to
navigate through menus and perform calculations.
Reference Location
The reference location indicates to the meter whether
the measurement should take place from the top
of the meter, the bottom of the meter, or the tip of
the lever.
Press the Reference Location button to toggle
between the Top and Bottom reference locations.
Extend the lever to automatically select the Lever
reference location.
The reference icon of the selected location is shown
on the upper bar of the display.
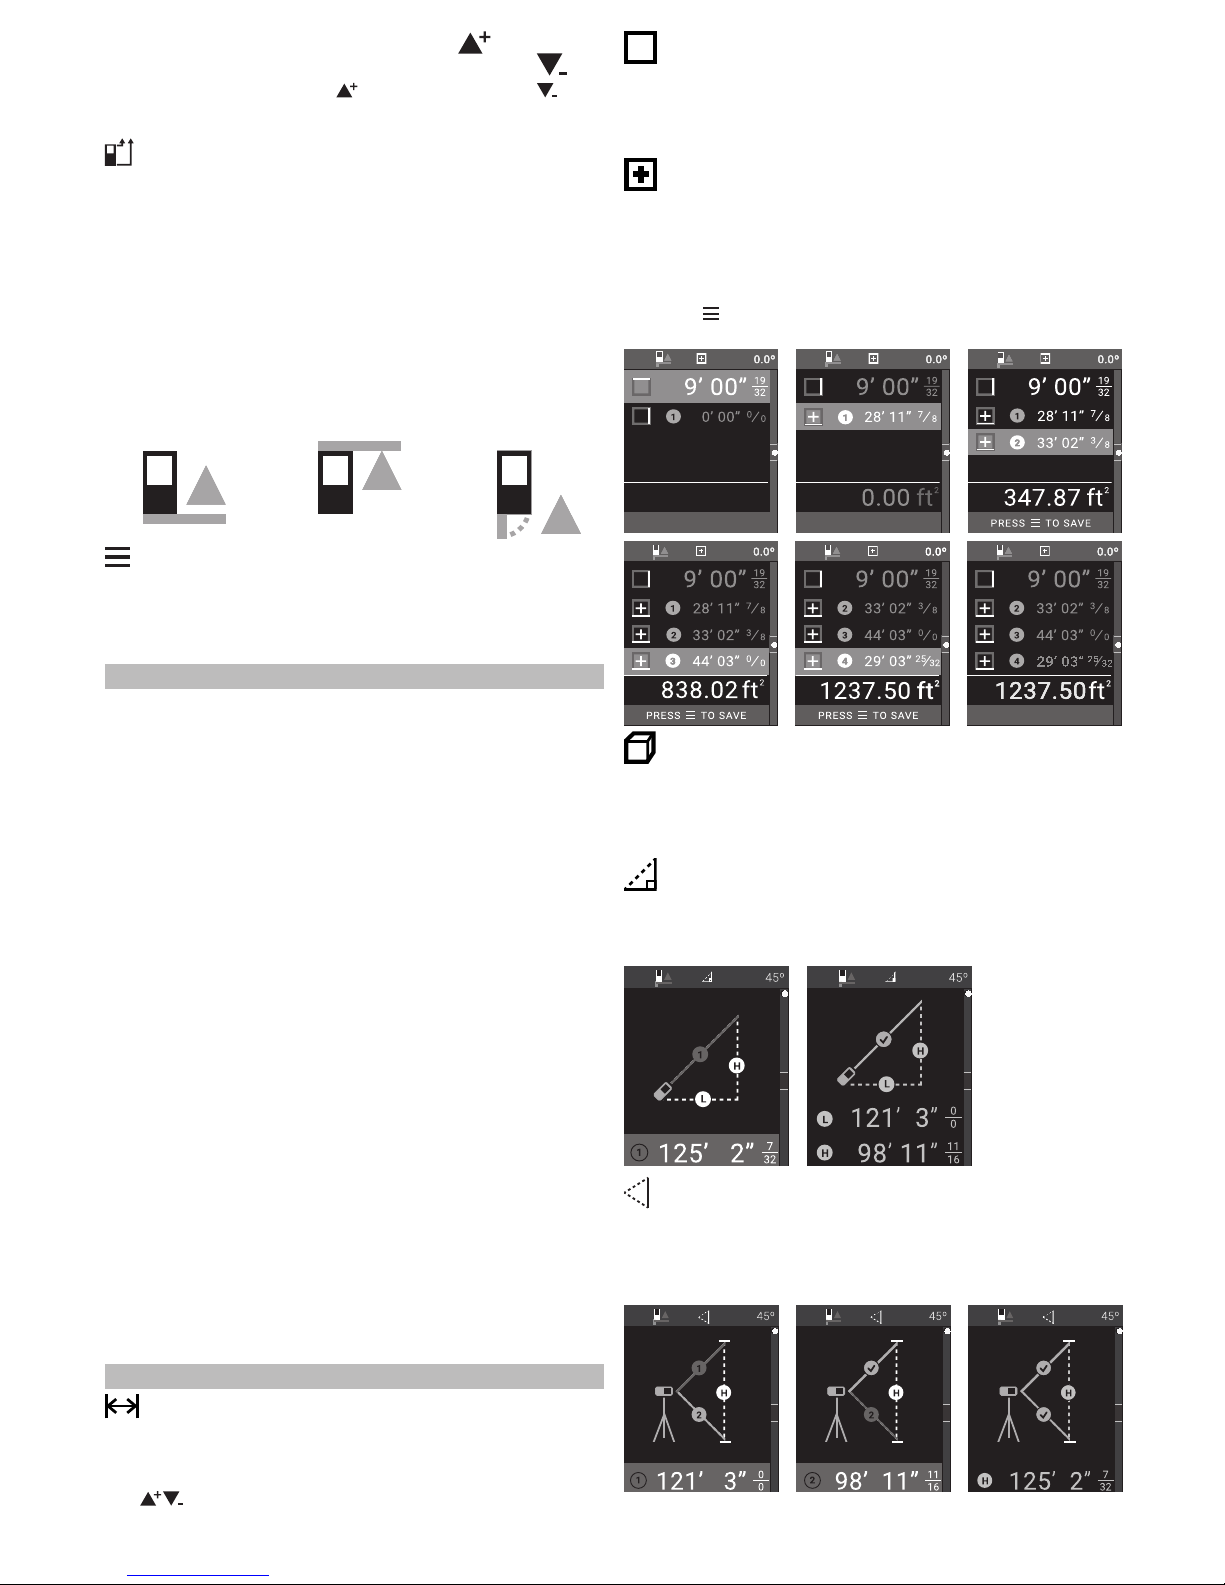
Bottom Top Lever
Menu
Press the Menu button to display HISTORY, MEASUREMENT options, and SETTINGS options.
NOTE: The Menu button is used to save certain
calculations.
USE
Making a Measurement
Each measurement requires pressing the Laser/OK
button twice, rst to lock in the measurement, and
second to save the measurement.
1. Select the measurement type from the Menu
(LENGTH defaults). See Menu Options for more
detail regarding the measurement types.
2. Aim the laser at the target.
3. Press Laser/OK to lock in the measurement.
4. Press Laser/OK again to save the measurement
into the history.
5. Continue taking measurements to complete the
requirements for the measurement type.
6. If a measurement is incorrect, press Clear/Power
to cancel the measurement and turn off the laser.
Press Laser/OK again to turn on the laser and
begin the next measurement.
Using the Level (48-22-9803 only)
The level bar is shown along the side of the display,
and the degree of angle is shown in the upper bar.
The level also is used during Indirect calculations to
determine angles.
Auto Level (48-22-9803 only)
Auto level will lock in the measurement when the
meter reaches level (0°). To use, press and hold
the Laser/OK button while tilting the meter to reach
level. Press the Laser/OK button again to store the
measurement.
MENU OPTIONS
LENGTH
Make a simple, single length measurement. The
length measurement is stored in HISTORY.
While in the Length mode, use the buttons to
add and subtract subsequent measurements.
Page 4
4
HISTORY
Press the Menu button and use the buttons to
select HISTORY. Press OK. The last 20 measurements/calculations are displayed. Note, the measure-
ments made to calculate surface area, total area,
volume, etc, are not stored in HISTORY. Only the
resulting calculation is stored.
Press the Clear/Power button to delete an entry.
Press the Menu button to return to the menu screen.
Additional measurements/calculations can be added
or subtracted from entries stored in HISTORY. Only
calculations of the same type (length, area, volume,
etc.) can be made.
To perform a calculation:
1. Use the buttons to highlight an individual
measurement from the HISTORY.
2. Press the OK button.
3. Make the measurement(s) to be used in the
calculation.
4. Press the OK button to save the new calculation
to HISTORY.
SETTINGS
UNITS -
Use the buttons to select the desired
unit display.
AUDIO - Use the buttons to turn the audio beep
on and off. The meter will retain the on/off setting until
it is changed again.
LANGUAGE - Use the buttons to select the
display language. The meter will retain the language
setting until it is changed again.
MAINTENANCE
Care
• Clean the tool with a damp, soft cloth.
• Never immerse the device in water.
• Never use aggressive cleaning agents or solvents.
Error Message
If the error code 500 appears on the display, turn the
meter off and back on. If the problem continues, return
the tool to the nearest service center for inspection.
Repairs
For repairs, return the tool to the nearest service center.
ACCESSORIES
WARNING
Use only recommended accesso-
ries. Others may be hazardous.
For a complete listing of accessories, go online to
www.milwaukeetool.com or contact a distributor.
SERVICE - UNITED STATES
1-800-SAWDUST (1.800.729.3878)
Monday-Friday, 7:00 AM - 6:30 PM CST
or visit www.milwaukeetool.com
Contact Corporate After Sales Service Technical
Support with technical, service/repair, or warranty
questions.
Email: [email protected]
Become a Heavy Duty Club Member at
www.milwaukeetool.com to receive important
notications regarding your tool purchases.
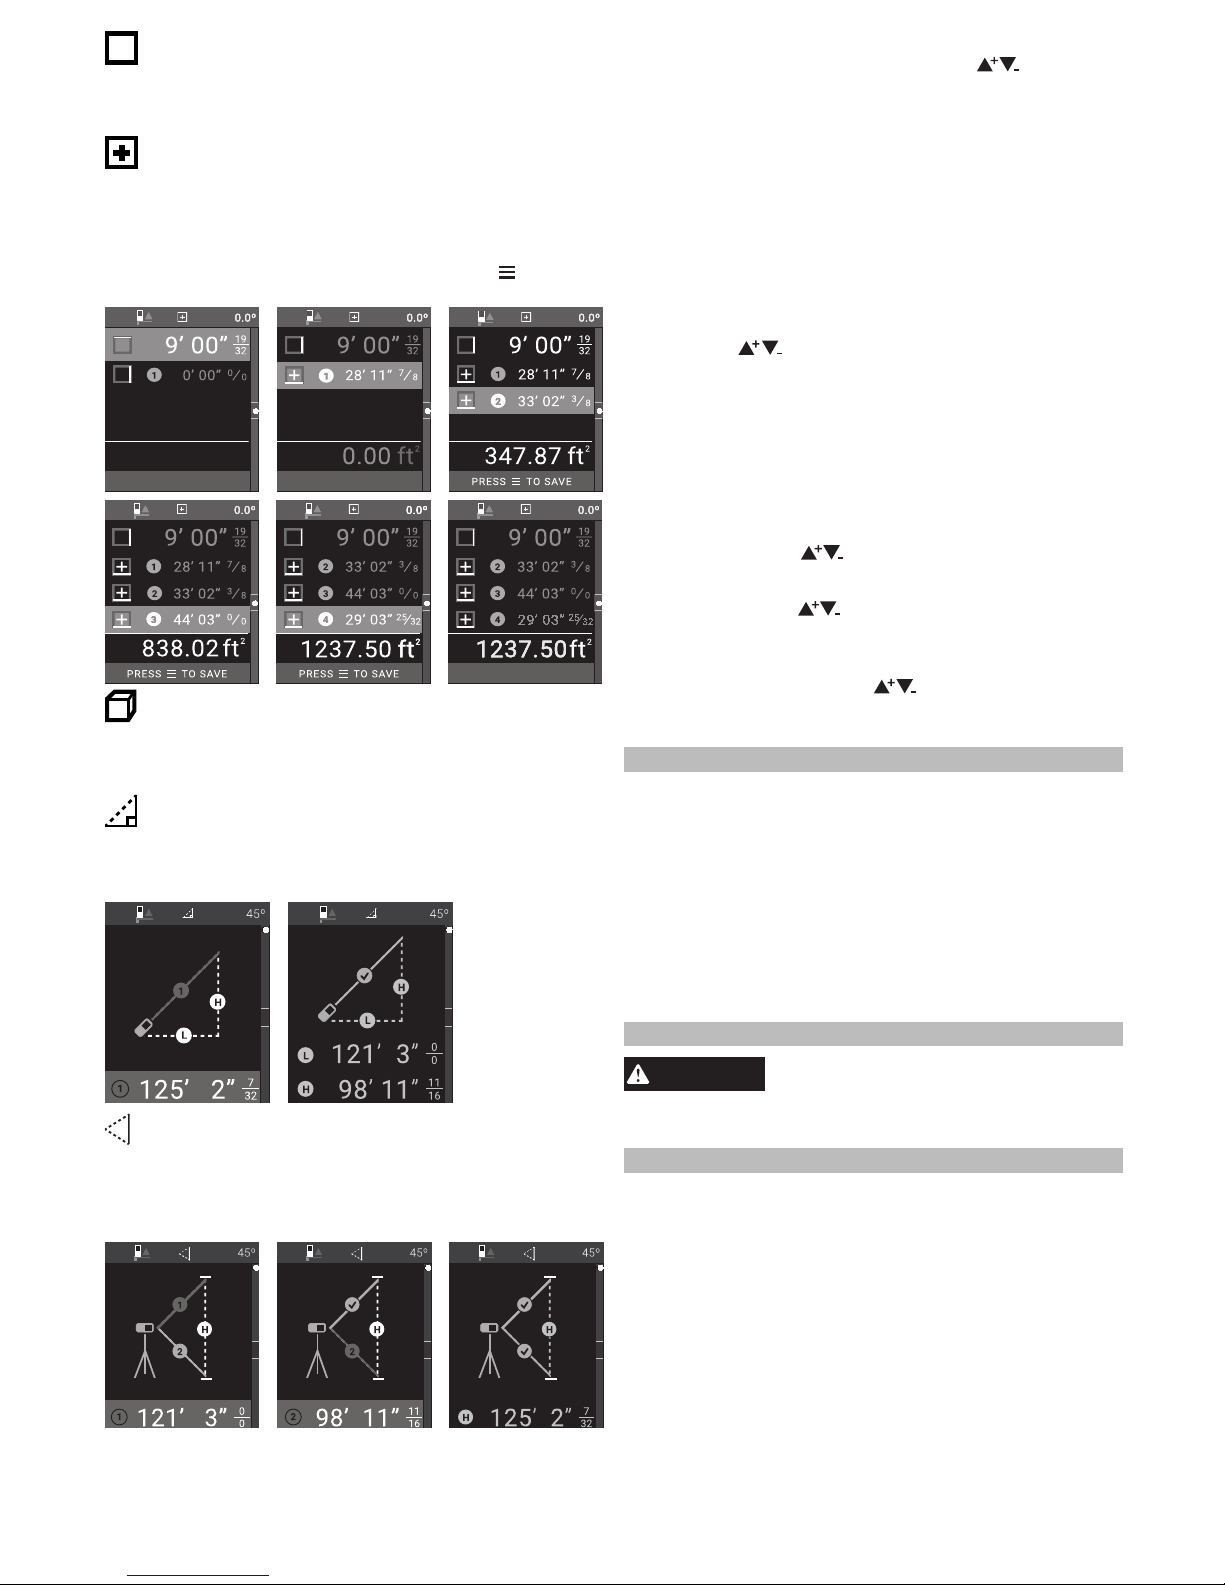
SURFACE AREA
Height x Length
Make a height and a length measurement to calculate
surface area. The surface area is stored in HISTORY.
TOTAL AREA
(Height x Length 1) + (Height x Length 2) ...
Make a height measurement and multiple length
measurements to calculate total area. Continue to
make length measurements. When all length measurements are complete, press MENU
to save.
The surface area is stored in HISTORY.
VOLUME
Length x Height x Depth
Make a length, height and depth measurement to
calculate volume. The volume is stored in HISTORY.
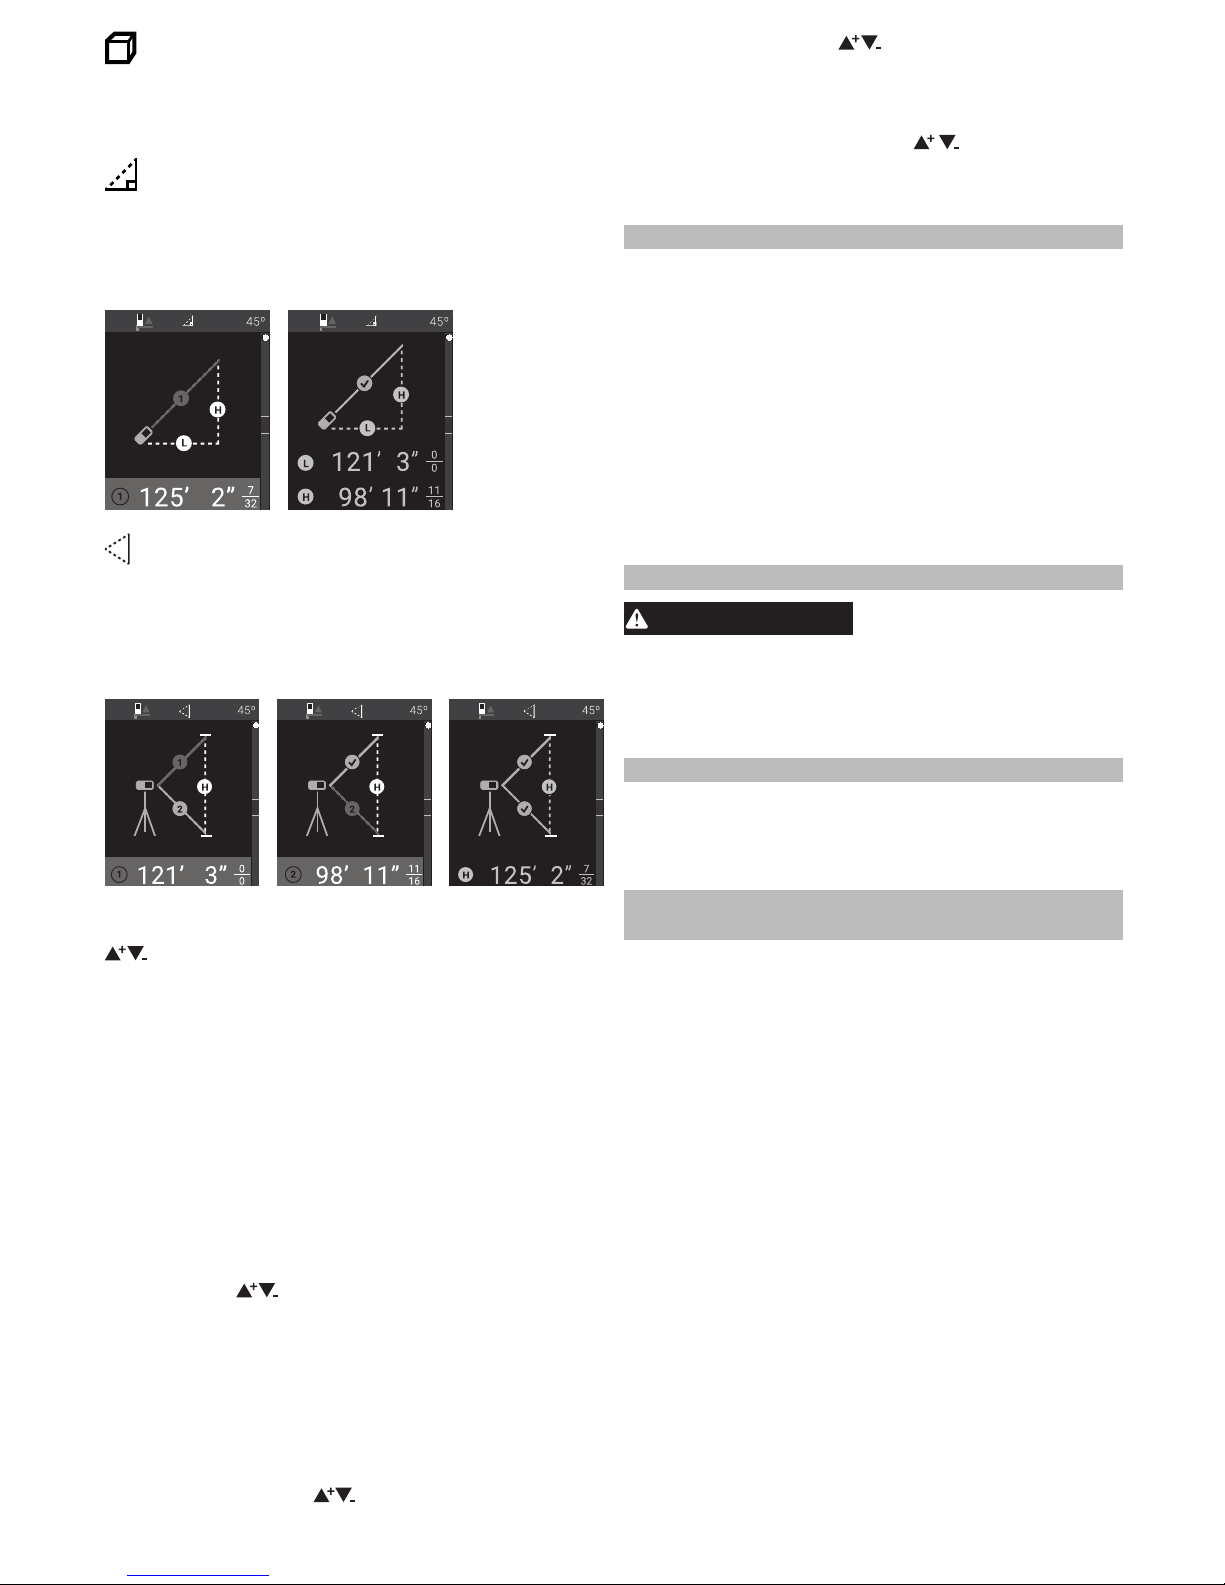
INDIRECT H/L (48-22-9803 only)
Determine the height and length using an angled
(hypotenuse) measurement and the level. The height
and length are stored in HISTORY.
!
INDIRECT HEIGHT (48-22-9803 only)
Determine the height using two angled length
measurements and the level. Use a tripod or other
stable surface to make two length measurements.
The height is stored in HISTORY.
Page 5

5
SERVICE - CANADA
Milwaukee Tool (Canada) Ltd
1.800.268.4015
Monday-Friday, 7:00 AM - 4:30 PM CST
or visit www.milwaukeetool.ca
LIMITED WARRANTY
Every MILWAUKEE Laser Distance Meter (model nos. 48-22-9801, -9802,
and -9803) is warranted to the original purchaser only to be free from defects
in material and workmanship. Subject to certain exceptions, MILWAUKEE will
repair or replace any part on this meter which, after examination, is determined
by MILWAUKEE to be defective in material or workmanship for a period of
three (3) years* after the date of purchase unless otherwise notes. Return
of the meter to a MILWAUKEE factory Service Center, freight prepaid and
insured, is required. A copy of the proof of purchase should be included with
the return product. This warranty does not apply to damage that MILWAUKEE
determines to be from repairs made or attempted by anyone other than
MILWAUKEE authorized personnel, misuse, alterations, abuse, normal wear
and tear, lack of maintenance, or accidents.
*Alkaline batteries that ship with the Laser Distance Meter is not warranted
by MILWAUKEE.
ACCEPTANCE OF THE EXCLUSIVE REPAIR AND REPLACEMENT
REMEDIES DESCRIBED HEREIN IS A CONDITION OF THE CONTRACT
FOR THE PURCHASE OF EVERY MILWAUKEE PRODUCT. IF YOU DO
NOT AGREE TO THIS CONDITION, YOU SHOULD NOT PURCHASE THE
PRODUCT. IN NO EVENT SHALL MILWAUKEE BE LIABLE FOR ANY
INCIDENTAL, SPECIAL, CONSEQUENTIAL OR PUNITIVE DAMAGES, OR
FOR ANY COSTS, ATTORNEY FEES, EXPENSES, LOSSES OR DELAYS
ALLEGED TO BE AS A CONSEQUENCE OF ANY DAMAGE TO, FAILURE
OF, OR DEFECT IN ANY PRODUCT INCLUDING, BUT NOT LIMITED TO,
ANY CLAIMS FOR LOSS OF PROFITS. SOME STATES DO NOT ALLOW
THE EXCLUSION OR LIMITATION OF INCIDENTAL OR CONSEQUENTIAL
DAMAGES, SO THE ABOVE LIMITATION OR EXCLUSION MAY NOT APPLY
TO YOU. THIS WARRANTY IS EXCLUSIVE AND IN LIEU OF ALL OTHER
WARRANTIES, WRITTEN OR ORAL. TO THE EXTENT PERMITTED BY
LAW, MILWAUKEE DISCLAIMS ANY IMPLIED WARRANTIES, INCLUDING
WITHOUT LIMITATION ANY IMPLIED WARRANTY OF MERCHANTABILITY
OR FITNESS FOR A PARTICULAR USE OR PURPOSE; TO THE EXTENT
SUCH DISCLAIMER IS NOT PERMITTED BY LAW, SUCH IMPLIED
WARRANTIES ARE LIMITED TO THE DURATION OF THE APPLICABLE
EXPRESS WARRANTY AS DESCRIBED ABOVE. SOME STATES DO NOT
ALLOW LIMITATIONS ON HOW LONG AN IMPLIED WARRANTY LASTS,
SO THE ABOVE LIMITATION MAY NOT APPLY TO YOU, THIS WARRANTY
GIVES YOU SPECIFIC LEGAL RIGHTS, AND YOU MAY ALSO HAVE OTHER
RIGHTS WHICH VARY FROM STATE TO STATE.
This warranty applies to product sold in the U.S.A. and Canada only.
LIMITED WARRANTY - MEXICO,
CENTRAL AMERICA & CARIBBEAN
TECHTRONIC INDUSTRIES' warranty is for 3 years since the original
purchase date.
This warranty card covers any defect in material and workmanship on this Product.
To make this warranty valid, present this warranty card, sealed/stamped by
the distributor or store where you purchased the product, to the Authorized
Service Center (ASC). Or, if this card has not been sealed/stamped, present
the original proof of purchase to the ASC.
Call toll-free1 01 (800) 030-7777 to nd the nearest ASC, for service, parts,
accessories or components.
Procedure to make this warranty valid
Take the product to the ASC, along with the warranty card sealed/stamped
by the distributor or store where you purchased the product, and any faulty
piece or component will be replaced without cost for you. We will cover all
freight costs relative with this warranty process.
Exceptions
This warranty is not valid in the following situations
a) When the product is used in a different manner from the end-user guide or
instruction manual.
b) When the conditions of use are not normal.
c) When the product was modied or repaired by people not authorized by
TECHTRONIC INDUSTRIES.
Note: If cord set is damaged, it should be replaced by an Authorized Service
Center to avoid electric risks.
SERVICE AND ATTENTION CENTER
Call to 01 (800) 030-7777
IMPORTED AND COMMERCIALIZED BY TECHTRONIC INDUSTRIES
MEXICO, SA DE CV
Av President Masarik #29 piso 7, Col. Polanco V Sección
CP 11560, Deleg. Miguel Hidalgo, CDMX
Model:
Date of Purchase:
Distributor or Store Stamp:
INSTRUCTIONS
IMPORTANTES
CONCERNANT LA
SÉCURITÉ
AVERTISSEMENT
LIRE ET VEILLER À
BIEN COMPRENDRE
TOUTES LES INSTRUCTIONS.
Le non-respect
des instructions ci-dessous peut entraîner un choc
électrique, un incendie et des blessures graves.
CONSERVER CES
INSTRUCTIONS.
1. CONSERVER CES INSTRUCTIONS – CE MANUEL
D’UTILISATION CONTIENT DES INSTRUCTIONS
IMPORTANTES DE SÉCURITÉ ET DE FONC
-
TIONNEMENT.
2. NE PAS PERMETTRE AUX PERSONNES NON
FAMILIARISÉES AVEC L'APPAREIL, AVEC CES
INSTRUCTIONS DE SÉCURITÉ ET LE MANUEL
D'UTILISATEUR DE FAIRE FONCTIONNER
L'APPAREIL. L'appareil peut être dangereux dans
les mains d’utilisateurs novices.
3. NE PAS TRAVAILLER HORS DE PORTÉE. TOUJO
-
URS SE TENIR BIEN CAMPÉ ET EN ÉQUILIBRE.
Une bonne stabilité procure un meilleur contrôle de
l’appareil en cas d’imprévus.
4.
S'ASSURER QUE TOUS LES MÉCANISMES DE
PROTECTION ADÉQUATS SONT APPLIQUÉS AU
SITE DE TRAVAIL (par ex. la surveillance du site en
mesurant les routes, les sites de construction, etc.).
5.
AVERTISSEMENT
LE DISPOSITIF PRODUIT
DES FAISCEAUX DE LA
SER VISIBLES, QUI SONT ÉMIS DE L'APPAREIL.
CE DISPOSITIF EST UN PRODUIT AU LASER DE
CLASSE 2 CONFORMÉMENT À LA NORME CEI
60825-1:2007.
6. LAMPE LASER – NE PAS FIXER DIRECTEMENT
LE FAISCEAU OU L’EXAMINER DIRECTEMENT
AU MOYEN D’INSTRUMENTS D’OPTIQUE. Ne pas
diriger la lampe laser vers les autres personnes. La
lampe laser peut provoquer des lésions oculaires.
7. ÉVITER LES ENVIRONNEMENTS DANGEREUX.
Ne pas exposer l’appareil à la pluie ou à la neige et
ne pas l’utiliser dans un endroit humide ou mouillé.
Ne pas utiliser l’appareil dans un endroit propice
aux explosifs (fumées gazeuses, poussières ou
matériaux inflammables).
8.
Entretien des outils. EN CAS DE DOMMAGES, FAIRE
RÉPARER L’OUTIL AVANT L'UTILISATION. Des acci
-
dents peuvent être causés par des outils mal entretenus.
9. UTILISER LES OUTILS UNIQUEMENT AVEC LES
ACCESSOIRES RECOMMANDÉS. L'usage de tout
autre accessoire peut créer un risque de blessure.
10. CET OUTIL FONCTIONNE AVEC 2 PILES AAA
QUI DOIVENT ÊTRE INSTALLÉES CORRECTE
-
MENT DANS L’OUTIL. Ne pas tenter d’utiliser cet
outil avec une autre tension ou avec un autre type
d’alimentation.
11. NE PAS LAISSER LES PILES À LA PORTÉE DES
ENFANTS.
12. NE PAS MÉLANGER DES PILES NEUVES ET
USÉES.
Page 6
6
13. NE PAS MÉLANGER DES PILES DE MARQUES
DIFFÉRENTES (OU DES PILES DE MÊME
MARQUE MAIS DE TYPES DIFFÉRENTS).
14. NE PAS MÉLANGER DES PILES RECHARGEA
-
BLES ET NON RECHARGEABLES.
15. INSTALLER LES PILES EN RESPECTANT LA
POLARITÉ (+ / -) INDIQUÉE.
16. SE DÉBARRASSER ADÉQUATEMENT ET IM
-
MÉDIATEMENT DES PILES USÉES.
17. NE PAS BRÛLER OU DÉMONTER LES PILES.
18. ÉVITER TOUT CONTACT AVEC LE LIQUIDE POU
VANT ÊTRE ÉJECTÉ DE LA BATTERIE EN CAS
DE MANUTENTION ABUSIVE. EN CAS DE CON
TACT ACCIDENTEL, RINCER IMMÉDIATEMENT
LES PARTIES ATTEINTES AVEC DE L’EAU. SI LE
LIQUIDE ENTRE EN CONTACT AVEC LES YEUX,
CONSULTER UN MÉDECIN. Le liquide éjecté des
piles peut causer des irritations ou des brûlures.
19. GARDER LES MAINS À L’ÉCART DE TOUTES
LES PIÈCES EN MOUVEMENT.
20. FAIRE ATTENTION AUX MESURES ERRONÉES
SI L'APPAREIL EST DÉFECTUEUX OU S'IL EST
TOMBÉ, MAL UTILISÉ OU MODIFIÉ.
21. EFFECTUER DES MESURES D'ESSAI DE FAÇON
PÉRIODIQUE. Particulièrement après une utilisation
anormale, et avant, pendant et après avoir effectués
des mesures importantes.
22. NE PAS JETER L'APPAREIL OU LES BATTER
-
IES AVEC LES DÉCHETS DE VOTRE FOYER!
L'appareil et les piles qui ont atteint la fin de leur du
-
rée de vie utile doivent être ramassés séparément et
retournés à une installation de recyclage écologique.
23. LA RÉPARATION DE L’OUTIL DOIT ÊTRE CON
FIÉE À UN TECHNICIEN QUALIFIÉ, UTILISANT
EXCLUSIVEMENT DES PIÈCES IDENTIQUES À
CELLES D’ORIGINE. Le maintien de la sûreté de
l’outil sera ainsi assuré.
24. MAI
NTENIR EN ÉTAT LES ÉTIQUETTES ET LES
PLAQUES SIGNALÉTIQUES. Des informations
importantes y figurent. Si elles deviennent illisibles
ou manquantes, contacter un centre de services et
d’entretien MILWAUKEE pour un remplacement gratuit.
25. LE DISPOSITIF SE CONFORME AUX EXIGENCES STRICTES DES RÉGLEMENTATIONS ET DES
NORMES RELATIVES À LA COMPATIBILITÉ
ÉLECTROMAGNÉTIQUE. Cependant, la possibilité
de causer des interférences avec d'autres dispositifs
ne peut pas être totalement exclue.
LIRE ET CONSERVER
TOUTES LES INSTRUCTIONS
POUR RÉFÉRENCE
ULTÉRIEURE.
PICTOGRAPHIE
Volts
Courant direct
AVERTISSEMENT
Lampe laser -
Ne pas xer le
faisceau
Mode d'emploi
Produit laser - Éviter toute exposition :
Le rayonnement laser est émis de cette
ouverture
LASER 2 Produit laser de classe 2
Marque de conformité aux normes
européennes
SPECIFICATIONS
No de Cat.. ........................................... 48-22-9802
Plage .............................................. 150 pi (45,7 m)
No de Cat.. ........................................... 48-22-9803
Plage ............................................ 330 pi (100,6 m)
Tension ........................................... 3 CC (2 x AAA)
Classe de laser ....................................................2
Type de laser ................................635nm, < 1 mW
Température d’entreposage ...............
-25 à 70 °C /
-13 à 158 °F
Température de fonctionnement ....... -10 à 50 °C /
14 à 122 °F
Mesure de la distance :
Tolérance typique* .................± 1,5 mm / 0,06 po **
Tolérance maximale* .............± 2,5 mm / 0,10 po **
Smallest unit displayed ...................1 mm / 0,001 m
* S’applique à une réectivité de la cible de 100 % (mur peint
en blanc), faible illumination de fond, 25 ºC
** Les tolérances s’appliquent de 0,05 m à 10 m avec un niveau
de conance de 95 %. La tolérance maximale peut se détériorer de 0,05 mm/m entre 10 m et 30 m et de 0,05 mm/m pour
les distances plus grandes que 30 m.
DESCRIPTION FONCTIONNELLE
11
2
3
1
4
5
6
7
8
9
12
10
1. Optique
2. Écran
3. Bouton Haut / Ajouter
4. Bouton Menu
5. Bouton Laser / OK
6. Bouton Bas/Soustraire
7. Bouton Effacer /
Alimentation
8. Bouton
Emplacement
de référence
9. Bouton Laser
10. Montage leté
11. Porte du
compartiment
des piles
12. Levier
Page 7
7
ASSEMBLAGE
Remplacement des piles
Utiliser uniquement des piles alcalines.
Ne pas utiliser des piles au zinc-carbone. En cas d’entreposage pour une
longue durée, retirer les piles en vue
de protéger l'appareil contre la corrosion. Remplacer les piles dès que le
symbole de piles dans la barre
supérieure commence à clignoter.
Pour remplacer les piles :
1. Appuyer sur la languette et soulever la porte du compartiment
des piles.
2. Insérer deux piles AAA, en respectant la polarité
indiquée sur le compartiment des piles.
3. Installer la porte du compartiment des piles.
BOUTONS
Effacer / Alimentation
Pour mettre le dispositif de mesure en marche ou
à l’arrêt, appuyer et maintenir enfoncé le bouton
Effacer /Alimentation jusqu’à ce que l’unité émette
des bips. Le mode de mesure de longueur est actif.
Pour effacer une mesure, appuyer rapidement sur
le bouton Effacer / Alimentation.
Laser / OK
Appuyer sur le bouton Laser / OK pour :
• Mettre le laser en Marche
• Stocker une mesure
• Choisir OK du Menu
Le bouton Laser / OK se trouve sous l’écran au centre
des boutons
, , ainsi que sur le côté du dispositif .
AVERTISSEMENT
Lampe laser – Ne pas xer
directement le faisceau ou
l’examiner directement au moyen d’instruments
d’optique. Ne pas diriger la lampe laser vers les
autres personnes. La lampe laser peut provoquer
des lésions oculaires
.
Haut / Ajouter et Bas / Soustraire
Utiliser les boutons Haut / Ajouter and et Bas /
Soustraire
pour naviguer à travers les menus et
effectuer des calculs.
Emplacement de référence
L’emplacement de référence indique au dispositif
de mesure si la mesure sera prise par le haut du
dispositif, le bas du dispositif ou l’embout du levier.
Appuyer sur le bouton Emplacement de référence
pour basculer entre les emplacements de référence
Haut et Bas. Étendre le levier pour choisir automatiquement l'emplacement de référence du levier.
L’icône de l’emplacement de référence choisi apparaît dans la barre supérieure de l'écran.
Bas Haut Levier
Menu
Appuyer sur le bouton Menu pour afcher les options HISTORIQUE, MESURE et RÉGLAGES.
REMARQUE : Le bouton Menu est utilisé pour
enregistrer certains calculs.
UTILISATION
Effectuer une mesure
Il faut appuyer sur le bouton Laser / Ok deux fois
four prendre chaque mesure, appuyer la première
fois pour verrouiller la mesure et la deuxième fois
pour l’enregistrer.
1. Choisir le type de mesure à partir du Menu (LONGUEUR par défaut). Voir les options du Menu
pour plus de détails sur les types de mesures
2. Pointer l’appareil vers la cible.
3. Appuyer sur Laser / OK pour verrouiller la mesure.
4. Appuyer sur Laser / OK de nouveau pour enregistrer la mesure dans l’historique.
5. Continuer à prendre des mesures pour satisfaire
aux exigences du type de mesure.
6. En cas de mesure erronée, appuyer sur Effacer /
Alimentation pour annuler la mesure et éteindre
le laser. Appuyer sur Laser / OK de nouveau
pour mettre le dispositif en marche et prendre la
mesure suivante.
Utilisation du niveau (48-22-9803 uniquement)
La barre de niveau se situe le long de l’écran, et le
degré de l’angle apparaît dans la barre supérieure.
Le niveau est également utilisé pendant les calculs
indirects pour déterminer les angles.
Niveau automatique (48-22-9803 uniquement)
Le niveau automatique verrouille la mesure une fois
que le niveau atteint (0°). Pour l’utiliser, appuyer
et maintenir enfoncé le bouton Laser / OK tout en
inclinant le dispositif de mesure pour atteindre un
niveau. Appuyer sur le bouton Laser / OK de nouveau pour enregistrer la mesure.
OPTIONS DU MENU
LONGUEUR
Faire une simple, unique mesure de longueur. La
mesure de longueur est stockée dans HISTORIQUE.
En mode Longueur, utiliser les
boutons pour
ajouter et soustraire des mesures subséquentes.
SURFACE
Hauteur x Longueur
Effectuer une mesure de longueur et hauteur pour
calculer la surface. La surface est stockée dans
HISTORIQUE.
SURFACE TOTALE
(Hauteur × Longueur 1) + (Hauteur × Longueur 2)
Effectuer une mesure de hauteur et plusieurs
mesures de longueur pour calculer la surface totale.
Continuer à prendre des mesures de longueur. Une
fois que toutes les mesures de longueur sont terminées, appuyer sur MENU
pour enregistrer. La
surface est stockée dans HISTORIQUE.
Page 8
8
VOLUME
Longueur x Hauteur x Profondeur
Effectuer une mesure de longueur, hauteur et profondeur pour calculer le volume. Le volume est stocké
dans HISTORIQUE..
H/L INDIRECTES
(48-22-9803 uniquement)
Déterminer la longueur et la hauteur à l’aide d’une
mesure angulaire (hypoténuse) et le niveau. La
longueur et la hauteur sont stockées dans HISTORIQUE.
!
HAUTEUR INDIRECTE
(48-22-9803 uniquement)
Déterminer la hauteur à l’aide de deux mesures de
longueur angulaires et le niveau. Utiliser un trépied
ou une autre surface équilibrée pour effectuer deux
mesures de longueur. La hauteur est stockée dans
HISTORIQUE.
HISTORIQUE
Appuyer sur le bouton Menu et utiliser les boutons
pour sélectionner HISTORIQUE. Appuyer sur
OK. Les 20 dernières mesures/derniers calculs seront afché(e)s. Noter que les mesures effectuées
pour calculer une surface, surface totale, volume,
etc., ne sont pas enregistrées dans HISTORIQUE.
Seulement les calculs des résultats sont stockés
Appuyer sur le bouton Effacer / Alimentation pour
supprimer une mesure saisie. Appuyer sur le bouton
Menu pour retourner à l’écran du menu.
Des mesures / calculs supplémentaires peuvent être
ajouté(e)s ou soustrait(e)s des mesures stockées
dans HISTORIQUE. Uniquement les calculs de
même type (longueur, surface, volume, etc.) peuvent
être effectués.
Pour effectuer un calcul :
1. Utiliser les boutons pour mettre en évidence
une mesure individuelle dans HISTORIQUE.
2. Appuyer sur le bouton OK.
3. Effectuer une/des mesure(s) à utiliser dans le
calcul.
4. Appuyer sur le bouton OK pour enregistrer le
nouveau calcul dans HISTORIQUE.
RÉGLAGES
UNITÉS -
Utiliser les boutons pour sélectionner
l’unité d’afchage désirée.
AUDIO - Utiliser les boutons pour allumer et
éteindre le signal sonore. Le dispositif de mesure
maintiendra le réglage allumer/éteindre jusqu’à ce
qu’il soit changé de nouveau.
LANGUE - Utiliser les boutons pour
sélectionner la langue d’afchage. Le dispositif de
mesure maintiendra le réglage de la langue jusqu’à
ce qu’il soit changé de nouveau.
ENTRETIEN
Entretien
• Nettoyer l’appareil avec un chiffon humide.
• Ne jamais immerger l’appareil dans l’eau.
• Ne jamais utiliser des agents de nettoyage ou des
solvants agressifs.
Message d’erreur
Si l’écran afche le code d’erreur 500, tourner le
compteur et rallumez-le. Si le problème persiste,
renvoyez l’outil au centre de service le plus proche
pour inspection.
Réparations
Pour toute réparation, retourner l’appareil au centre
de service le plus proche.
ACCESOIRES
AVERTISSEMENT
L’utilisation d’autres ac-
cessoires que ceux qui
sont spécifiquement recommandés pour cet
outil peut comporter des risques.
Pour une liste complète des accessoires, visiter le
site internet www.milwaukeetool.com ou contactez
un distributeur.
SERVICE - CANADA
Milwaukee Tool (Canada) Ltd
1.800.268.4015
Monday-Friday, 7:00 AM - 4:30 PM CST
www.milwaukeetool.ca
GARANTIE LIMITÉE -
AUX ÉTATS-UNIS ET AU CANADA
Chaque appareil de mesure de la distance MILWAUKEE (voir
les
numéros de modèles 48-22-9801, -9802, et -9803) est garanti à l’acheteur
d’origine uniquement pour être exempt de vices de matériaux et de fab
-
rication. Sous réserve de certaines exceptions, MILWAUKEE réparera ou
remplacera toute pièce de l’appareil qui, après examen par MILWAUKEE,
s’est avéré être affecté d’un vice de matériau ou de fabrication et ce pendant
une période de trois (3) ans* à compter de la date d’achat, sauf indication
contraire. Retourner l’appareil de mesure à un centre de réparations en
usine MILWAUKEE, en port prépayé et assuré. Une copie de la preuve
d’achat doit être présentée avec le produit retourné. Cette garantie ne
couvre pas les dommages que MILWAUKEE détermine être causés par
des réparations ou des tentatives de réparation par quiconque autre que
le personnel agréé par MILWAUKEE, ou par des utilisations incorrectes,
des altérations, des utilisations abusives, une usure normale, une carence
d’entretien ou des accidents
*Les piles alcalines expédiées avec l’appareil de mesure ne sont pas
garanties par MILWAUKEE.
L’ACCEPTATION DES RECOURS EXCLUSIFS DE RÉPARATION ET DE
REMPLACEMENT DÉCRITS DANS LA PRÉSENTE EST UNE CONDI
-
TION DU CONTRAT D’ACHAT DE TOUT PRODUIT MILWAUKEE. SI
VOUS N’ACCEPTEZ PAS CETTE CONDITION, VOUS NE DEVEZ PAS
ACHETER LE PRODUIT. EN AUCUN CAS, MILWAUKEE NE SAURAIT
ÊTRE RESPONSABLE DE TOUT DOMMAGE ACCESSOIRE, SPÉCIAL
OU INDIRECT, DE DOMMAGES-INTÉRÊTS PUNITIFS OU DE TOUTE
DÉPENSE, D’HONORAIRES D’AVOCATS, DE FRAIS, DE PERTE OU
DE DÉLAIS ACCESSOIRES À TOUT DOMMAGE, DÉFAILLANCE OU
DÉFAUT DE TOUT PRODUIT, Y COMPRIS NOTAMMENT LES PERTES
DE PROFIT. CERTAINS ÉTATS ET PROVINCES NE PERMETTANT
L'EXCLUSION OU LA LIMITATION DES DOMMAGES DIRECTS OU IN
-
DIRECTS, LES RESTRICTIONS CI-DESSOUS PEUVENT NE PAS ÊTRE
APPLICABLES. CETTE GARANTIE EST EXCLUSIVE ET REMPLACE
TOUTE AUTRE GARANTIE, QU’ELLE SOIT VERBALE OU ÉCRITE.
DANS LA MESURE PERMISE PAR LA LOI. MILWAUKEE RENONCE À
TOUTE GARANTIE IMPLICITE, Y COMPRIS, SANS S’Y LIMITER, TOUTE
GARANTIE IMPLICITE DE QUALITÉ MARCHANDE OU D’ADAPTATION
À UNE UTILISATION OU À UNE FIN PARTICULIÈRE. DANS LA MESURE
OÙ UNE TELLE STIPULATION D’EXONÉRATION N’EST PAS PERMISE
PAR LA LOI, LA DURÉE DE CES GARANTIES IMPLICITES EST LIMITÉE
Page 9

9
À LA PÉRIODE APPLICABLE DE LA GARANTIE EXPRESSE, TELLE QUE
CELA EST DÉCRIT PRÉCÉDEMMENT. CERTAINS ÉTATS ET PROV
-
INCES NE PERMETTANT PAS DE LIMITATION DE DURÉE DES GARANTIES IMPLICITES, LES RESTRICTIONS CI- DESSUS PEUVENT DONC
NE PAS VOUS ÊTRE APPLICABLES. LA PRÉSENTE VOUS CONFÈRE
DES DROITS LÉGAUX PARTICULIERS; VOUS BÉNÉFICIEZ ÉGALE
-
MENT D’AUTRES DROITS QUI VARIENT D’UN ÉTAT À UN AUTRE.
Cette garantie s’applique aux produits vendus aux États-Unis et au
Canada uniquement.
GARANTIE LIMITÉE – MEXIQUE,
AMÉRIQUE CENTRALE ET CARAÏBES
TECHTRONIC INDUSTRIES' garantit le produit pendant 3 ans à partir de
la date d’achat d’origine. Le présent bon de garantie couvre tous les vices
de matériau et de fabrication que peut afcher ce produit.
Pour assurer la validité de la présente garantie, veuillez présenter ce
bon de garantie, estampillé du sceau du distributeur ou du magasin où le
produit a été acheté, au centre de réparations agréé. Si le bon de garantie
n’a pas été estampillé, veuillez fournir la preuve d’achat d’origine au centre
de réparations agréé.
Pour un entretien des pièces, des accessoires ou des composants,
composer sans frais le 1-800-030-7777 an d’obtenir les coordonnées du
centre de réparations agréé le plus près
Procédure pour assurer la validité de la garantie
Présenter le produit au centre de réparations agréé, accompagné du bon
de garantie estampillé du sceau du distributeur ou du magasin où le produit
a été acheté. Toute pièce défectueuse ou tout composant défectueux sera
remplacé(e) sans frais. Milwaukee assume tous les frais de transport liés
à ce processus de garantie.
Exceptions
Cette garantie ne s’applique pas dans les situations suivantes :
a) Si le produit a été utilisé pour une n autre que celle indiquée dans le
guide de l’utilisateur nal ou le manuel d’instructions.
b) Si les conditions d’utilisations ne sont pas habituelles.
c) Si le produit a été modié ou réparé par une personne non autorisée par
TECHTRONIC INDUSTRIES.
Remarque : Si le cordon électrique est endommagé, il doit être remplacé
par un centre de réparations agréé pour éviter les risques d’électrocution.
CENTRE DE RÉPARATIONS ET DE SERVICE
Composer le 01 (800) 030-7777
IMPORTÉ ET COMMERCIALISÉ PAR TECHTRONIC INDUSTRIES
MEXIQUE, SA DE CV
Av President Masarik #29 piso 7, Col. Polanco V Sección
CP 11560, Deleg. Miguel Hidalgo, CDMX
Modèle :
Date d’achat :
Sceau du distributeur ou du magasin :
INSTRUCCIONES
DE SEGURIDAD
IMPORTANTES
ADVERTENCIA
LEA Y COMPRENDA TODAS LAS INSTRUC-
CIONES.
No seguir todas las instrucciones que se
enumeran a continuación podría provocar una
descarga eléctrica, incendio y/o lesiones graves.
CONSERVE ESTAS
INSTRUCCIONES.
1. GUARDE ESTAS INSTRUCCIONES - ESTE MANU-
AL DEL OPERADOR CONTIENE INSTRUCCIONES
IMPORTANTES DE SEGURIDAD Y OPERACIÓN.
2. NO PERMITA QUE OPEREN ESTA HERRAMIENTA
PERSONAS QUE NO ESTÉN FAMILIARIZADAS
CON EL APARATO, ESTAS INSTRUCCIONES DE
SEGURIDAD Y EL MANUAL DEL OPERADOR
DE LA HERRAMIENTA. Este aparato puede ser
peligroso en manos de usuarios sin capacitación.
3. NO ADOPTE UNA POSTURA FORZADA. MAN-
TENGA UNA POSICIÓN SEGURA Y EQUILIBRADA
ADECUADA EN TODO MOMENTO. Esto permite un
mejor control del aparato en situaciones inesperadas
4. ASEGÚRESE DE QUE HAYA PROTECCIONES
ADECUADAS EN EL SITIO DE TRABAJO (por ej.,
revisión del sitio al realizar mediciones en carreteras,
obras de construcción, etc.).
5.
ADVERTENCIA
EL DISPOSITIVO PRODUCE
RAYOS LÁSER VISIBLES,
LOS CUALES SON EMITIDOS DESDE EL APARATO. ESTE DISPOSITIVO ES UN PRODUCTO
LÁSER CLASE 2 DE ACUERDO CON IEC 608251:2007.
6. LUZ LÁSER - NO MIRE FIJAMENTE AL RAYO NI
LO VEA DIRECTAMENTE CON INSTRUMENTOS
ÓPTICOS. No dirija la luz láser a otras personas. La
luz láser puede causar daño a los ojos.
7. EVITE AMBIENTES PELIGROSOS. No lo use en la
lluvia, nieve o lugares húmedos o mojados. No se
use en presencia de atmósferas explosivas (vapores
gaseosos, polvo o materiales inflamables).
8. DELE MANTENIMIENTO A LAS HERRAMIENTAS.
SI SE DAÑA, ASEGÚRESE DE QUE LA HERRAMIENTA SEA REPARADA ANTES DE UTILIZARSE.
La falta de mantenimiento de las herramientas puede
ocasionar accidentes.
9. USE LAS HERRAMIENTAS ÚNICAMENTE CON
ACCESORIOS ESPECÍFICAMENTE DESIGNADOS. El uso de cualquier otro accesorio puede
ocasionar un riesgo de lesiones.
10.
ESTA HERRAMIENTA ESTÁ DISEÑADA PARA
FUNCIONAR CON 2 BATERÍAS AAA INSERTADAS
CORRECTAMENTE EN LA HERRAMIENTA. No in-
tente utilizarla con otro voltaje o fuente de alimentación.
11. NO DEJE LAS BATERÍAS AL ALCANCE DE LOS
NIÑOS.
12. NO MEZCLE BATERÍAS NUEVAS Y USADAS.
13. NO MEZCLE MARCAS (O DIFERENTES TIPOS
DE LAS MISMAS MARCAS) DE BATERÍAS.
14. NO MEZCLE BATERÍAS RECARGABLES CON
NO RECARGABLES.
15.INSTALE LAS BATERÍAS DE ACUERDO CON
LOS DIAGRAMAS DE POLARIDAD (= / -).
16. DE INMEDIATO, DESECHE CORRECTAMENTE
LAS BATERÍAS USADAS.
17. NO INCINERE NI DESMANTELE LAS BATERÍAS..
18. BAJO CONDICIONES DE MALTRATO, EL LÍQUI-
DO PUEDE SER EXPULSADO DE LA BATERÍA,
EVITE EL CONTACTO. SI OCURRE UN CONTACTO ACCIDENTAL, ENJUAGUE CON AGUA.
SI EL LÍQUIDO ENTRA A LOS OJOS, BUSQUE
TAMBIÉN AYUDA MÉDICA. El líquido expulsado
de la batería puede causar irritación o quemaduras.
19. MANTENGA LAS MANOS ALEJADAS DE TODAS
LAS PIEZAS MÓVILES.
20. ESTÉ ALERTA A MEDICIONES ERRÓNEAS SI EL
APARATO ESTÁ DEFECTUOSO O SI HA CAÍDO
AL SUELO, SE HA UTILIZADO INCORRECTAMENTE O SE HA MODIFICADO.
21. LLEVE A CABO MEDICIONES PERIÓDICAS DE
PRUEBA. En particular después de que la her-
ramienta haya estado sujeta a uso anormal, y antes,
durante y después de mediciones importantes.
22. ¡NO DESECHE LAS HERRAMIENTAS NI LAS
BATERÍAS JUNTO CON DESECHOS LÍQUIDOS
DOMÉSTICOS! Los aparatos y las baterías que
hayan llegado al final de su vida deben recolectarse
por separado y devolverse a un centro de reciclado
ambientalmente compatible.
23. LLEVE SU APARATO A SERVICIO CON UN
TÉCNICO CALIFICADO QUE USE ÚNICAMENTE
PIEZAS DE REEMPLAZO IDÉNTICAS. Esto asegu-
Page 10
10
rará que se mantenga la seguridad de la herramienta.
24. CONSERVE LAS ETIQUETAS Y PLACAS. Incluyen
información importante. Si son ilegibles o no están
presentes, comuníquese con un centro de servicio
MILWAUKEE para obtener un reemplazo gratuito.
25. EL DISPOSITIVO CUMPLE CON LOS REQUISITOS MÁS EXIGENTES DE LAS NORMAS Y
REGLAMENTOS RELEVANTES DE COMPATIBILIDAD ELECTROMAGNÉTICA (EMC). Sin embargo,
no puede excluirse por completo la posibilidad de
que se ocasione interferencia en otros dispositivos.
LEA Y GUARDE TODAS LAS
INSTRUCCIONES PARA
REFERENCIA FUTURA.
DESCRIPCION FUNCIONAL
11
2
3
1
4
5
6
7
8
9
12
10
1. Óptica
2. Pantalla
3. Botón Add/Up para
agregar y subir
4. Botón del menú
5. Botón de Láser/OK
6. Botón Down/Substract
para bajar y restar
7. Botón Clear/Power
para borrar y encender
8. Botón de ubicación
de referencia
9. Botón de láser
10. Montaje roscado
11. Puerta de la
batería
12. Palanca
SIMBOLOGÍA
Volts
Corriente continua
ADVERTENCIA
Luz de láser: no
mire jamente el
rayo
Leer el manual del operador
Producto láser - evite exposición:
la radiación del láser se emite desde
esta abertura
LASER 2 Producto láser de clase 2
Marca de conformidad Europea
ESPECIFICACIONES
Cat. No. ................................................ 48-22-9802
Rango ................................................ 45,7 m (150')
Cat. No. ................................................ 48-22-9803
Rango .............................................. 100,6 m (330')
Voltios ............................................. 3 CD (2 x AAA)
Láser clase ............................................................2
Láser tipo .......................................635nm, < 1 mW
Temperatura de almacenamiento ....... -25 a 70 °C /
-13 a 158 °F
Temperatura de operación ................
-10 a 50 °C /
14 a 122 °F
Medida a distancia:
Tolerancia típica* ....................± 1,5 mm / 0,06 in **
Tolerancia máxima* ................± 2,5 mm / 0,10 in **
Unidad más pequeña desplegada . . 1 mm / 0,001 m
* Aplica para 100 % de reectividad del blanco (pared pintada
de blanco), poca iluminación del fondo, 25 ºC
** Aplican tolerancias de 0,05 m a 10 m con un nivel de conanza
del 95 %. La tolerancia máxima puede deteriorar a 0,05 mm/m
entre 10 m a 30 m y a 0,05 mm/m para distancias superiores
a los 30 m
ENSAMBLADO
Cambio de baterías
Use solamente baterías alcalinas.
No utilice baterías de zinc-carbón.
Si no se usará el distanciómetro
durante mucho tiempo, retire las
baterías como protección anticorrosiva. Cambie las baterías cuando
el símbolo de baterías empiece a parpadear en la barra superior. Para cambiar las baterías.
1. Oprima la pestaña y levante la
puerta de la batería.
2. Inserte dos baterías AAA de acu-
erdo con la polaridad marcada en el compartimiento.
3. Instale la puerta de la batería.
BOTONES
Clear/Power para borrar y encender
Para encender y apagar el distanciómetro, oprima
y mantenga el botón de Clear/Power hasta que la
unidad haga un pitido. El modo de medición de
Distancia está activo.
Para borrar una medición, oprima rápidamente el
botón de Clear/Power.
Láser/OK
Oprima el botón de Láser/OK para:
• Encender el láser en ON
• Almacenar la medida
• Seleccionar OK en el Menú
El botón Láser/OK se encuentra abajo de la pantalla
en el centro de los botones
, además del lado
lateral del distanciómetro
.
ADVERTENCIA
Luz láser: no mire jamente
al rayo ni lo vea directamente
con instrumentos ópticos. No dirija la luz láser a
otras personas. La luz láser puede causar daño
a los ojos
.
Page 11
11
Up/Add para subir y agregar, , y
Down/Substract para bajar y restar
Use los botones Up/Add y Down/Substract para
navegar por los menús y realizar cálculos.
Ubicación de referencia
La ubicación de referencia le indica al distanciómetro
si la medición debe realizarse desde la parte superior
del distanciómetro, la parte inferior del distanciómetro o la punta de la palanca.
Presione el botón de Ubicación de referencia para
cambiar entre las ubicaciones de referencia Superiores e Inferiores. Extienda la palanca para seleccionar automáticamente la ubicación de referencia
de la Palanca.
El ícono de referencia de la ubicación seleccionada
se muestra en la barra superior de la pantalla.
Inferior Superior Palanca
Menú
Oprima el botón de Menú para desplegar las opciones de historial (HISTORY), medición (MEASUREMENT) y conguración (SETTINGS). NOTA: el botón
de Menú se usa para guardar algunos cálculos.
USO
Hacer una medición
Cada medición requiere que se oprima el botón
Láser/OK dos veces, primero para bloquear la
medición y después para guardarla.
1. Seleccione el tipo de medición del Menú (valores
predeterminados de longitud en LENGTH). Vea
las opciones del menú en Menu Options para
conocer más detalles sobre los tipos de medición.
2. Apunte el láser al blanco.
3. Oprima Láser/OK para bloquear la medición.
4. Oprima Láser/OK de nuevo para guardar la
medición en el historial.
5. Siga tomando medidas para llenar los requisitos
del tipo de medición.
6. Si la medición es incorrecta, presione el botón
Clear/Power para cancelar la medición y apagar
el láser. Oprima de nuevo Láser/OK para encender
el láser e iniciar la siguiente medición.
Usar el nivel (48-22-9803 solamente)
La barra del nivel se muestra en la parte lateral de la
pantalla y el grado de ángulo se muestra en la barra
superior. También se usa el nivel durante cálculos
indirectos para determinar los ángulos.
Autonivel (48-22-9803 solamente)
El autonivel se bloqueará en la medición cuando el distanciómetro alcance el nivel (0°). Para usar, oprima y
mantenga oprimido el botón Láser/OK mientras parpa
-
dea el distanciómetro para alcanzar el nivel. Oprima el
botón Láser/OK de nuevo para almacenar la medición.
OPCIONES DEL MENÚ
LONGITUD
Haga una medición de longitud simple y sencilla. La
medición de la distancia se almacena en HISTORY.
Cuando esté en modo distancia en Length, use
los
botones para agregar y restar mediciones
futuras.
ÁREA DE LA SUPERFICIE
Altura x longitud
Haga una medición de altura y longitud para calcular
el área de la supercie. El área de la supercie se
almacena en HISTORY.
ÁREA TOTAL
(Altura x longitud 1) + (altura x longitud 2)
Haga una medición de la altura y varias mediciones
de longitud para calcular el área total. Continúe
con las mediciones de longitud. Cuando todas las
mediciones de longitud estén completas, oprima el
MENÚ para guardar. El área de la supercie se
almacena en HISTORY.
VOLUMEN
Longitud x altura x profundidad
Haga una medición de longitud, altura y profundidad
para calcular el volumen. El volumen se almacena
en HISTORY.
A/L INDIRECTA (48-22-9803 solamente)
Determine la altura y longitud usando una medición
angular (hipotenusa) y el nivel. La altura y longitud
se almacenan en HISTORY
!
ALTURA INDIRECTA (48-22-9803 solamente)
Determine la altura usando dos mediciones angula-
res y el nivel. Use un tripié u otra supercie estable
para hacer dos mediciones de longitud. La altura se
almacena en HISTORY.
Page 12

HISTORIAL
Oprima el botón de Menú y use los botones
para seleccionar el historial en HISTORY. Oprima
OK. Aparecen las últimas 20 mediciones/cálculos.
NOTA: las mediciones realizadas para calcular el
área de la supercie, área total, volumen, etc., no
se almacenan en HISTORY. Solo se almacena el
resultado del cálculo.
Oprima el botón Clear/Power para borrar esta entrada. Oprima el botón del Menú para regresar a la
pantalla del menú.
Pueden agregarse o restarse mediciones/cálculos
adicionales de las entradas almacenadas en HISTORY. Solo pueden realizarse cálculos del mismo
tipo (longitud, área, volumen, etc.).
Para realizar un cálculo:
1. Use los botones para resaltar una medición
individual del historial en HISTORY.
2. Oprima el botón de Láser/OK.
3. Haga la(s) medición(es) que se usará(n) en el cálculo.
4. Oprima el botón OK para guardar el nuevo cálculo
en HISTORY.
CONFIGURACIÓN
UNIDADES:
use los botones para seleccionar
la unidad desplegada que desee.
AUDIO: use los botones para encender y
apagar el pitido de audio. El distanciómetro guardará
la conguración de encendido/apagado hasta que se
vuelva a cambiar.
IDIOMA: use los los botones para seleccionar
el idioma en la pantalla. El distanciómetro guardará la
conguración del idioma hasta que se vuelva a cambiar.
MANTENIMIENTO
Cuidado
• Limpie la herramienta con un trapo húmedo y suave.
• Nunca sumerja el aparato en agua.
• Nunca use agentes de limpieza agresivos o solventes.
Mensaje de error
Si en la pantalla aparece el código de error 500, apague
el medidor y vuelva a. Si el problema continúa, envíe
su herramienta al centro de servicio más cercano para
su inspección.
Reparaciones
Para reparaciones, devuelva la herramienta a su
centro de servicio más cercano.
ACCESORIOS
ADVERTENCIA
Utilice sólo los accesorios
especícamente recomenda-
dos. Otros accesorios puede ser peligroso.
Para una lista completa de accessorios, visite
nuestro sitio en Internet: www.milwaukeetool.com o
póngase en contacto con un distribuidor.
SOPORTE DE SERVICIO - MEXICO
CENTRO DE ATENCION A CLIENTES
Techtronic Industries Mexico, S.A. de C.V.
Av. Presidente Masarik 29 Piso 7
11560 Polanco V Seccion
Miguel Hidalgo, Distrito Federal, México
01 (800) 030-7777 o (55) 4160-3540
Lunes a Viernes (9am a 6pm)
O contáctanos en www.milwaukeetool.com.mx
GARANTÍA LIMITADA - E.U.A. Y CANADÁ
Cada Distanciómetro láser MILWAUKEE (modelos No. 48-22-9801, -9802, y
-9803) están garantizados únicamente para el comprador original por defectos
en materiales y mano de obra. Sujeto a ciertas excepciones, MILWAUKEE repa
-
rará o reemplazará cualquier parte en este distanciómetro que tenga defectos de
material o mano de obra según lo determine MILWAUKEE mediante una revisión,
por un periodo de tres (3) años* después de la fecha de compra a menos que
se indique lo contrario. Se solicita la devolución del distanciómetro al Centro de
Servicio de la fábrica de MILWAUKEE con el ete prepagado y asegurado. Se
debe incluir una copia del comprobante de compra con el producto devuelto. Esta
garantía no aplica a daños que MILWAUKEE determine que son ocasionados
por reparaciones o intentos de reparaciones realizados por una persona que no
sea personal autorizado de MILWAUKEE, uso indebido, alteraciones, maltrato,
desgaste normal, falta de mantenimiento o accidentes.
*Las baterías alcalinas incluidas con el Distanciómetro láser no están garan
-
tizadas por MILWAUKEE.
LA ACEPTACIÓN DE LOS REMEDIOS EXCLUSIVOS DE REPARACIÓN Y
REEMPLAZO AQUÍ DESCRITOS ES UNA CONDICIÓN DEL CONTRATO PARA
LA COMPRA DE TODO PRODUCTO DE MILWAUKEE. SI USTED NO ACEPTA
ESTA CONDICIÓN, NO DEBE COMPRAR EL PRODUCTO. MILWAUKEE
NO SERÁ RESPONSABLE EN NINGÚN CASO DE DAÑOS INCIDENTALES,
ESPECIALES, EMERGENTES O PUNITIVOS NI DE NINGÚN COSTO,
HONORARIOS LEGALES, GASTOS, PÉRDIDAS O DEMORAS ALEGADOS
COMO CONSECUENCIA DE ALGÚN DAÑO, FALLA O DEFECTO EN NINGÚN
PRODUCTO, INCLUYENDO, ENTRE OTROS, RECLAMACIONES POR PÉR
-
DIDA DE UTILIDADES. ALGUNOS ESTADOS NO PERMITEN LA EXCLUSIÓN
O LIMITACIÓN DE RESPONSABILIDAD POR DAÑOS INCIDENTALES O
EMERGENTES, POR LO QUE LA ANTERIOR LIMITACIÓN O EXCLUSIÓN
PODRÍA NO APLICARSE EN SU CASO. ESTA GARANTÍA ES EXCLUSIVA Y
REEMPLAZA TODAS LAS DEMÁS GARANTÍAS, ESCRITAS U ORALES. EN
LA MEDIDA EN QUE LO PERMITA LA LEY, MILWAUKEE DESCONOCE CUAL
-
QUIER GARANTÍA IMPLÍCITA, INCLUYENDO SIN LIMITACIÓN CUALQUIER
GARANTÍA IMPLÍCITA DE COMERCIABILIDAD O IDONEIDAD PARA UN FIN O
USO ESPECÍFICO; EN LA MEDIDA EN QUE DICHO DESCONOCIMIENTO NO
SEA PERMITIDO POR LA LEY, DICHAS GARANTÍAS IMPLÍCITAS SE LIMITAN
A LA DURACIÓN DE LA GARANTÍA EXPRESA CORRESPONDIENTE SEGÚN
SE DESCRIBIÓ ANTERIORMENTE. ALGUNOS ESTADOS NO PERMITEN
LIMITACIONES SOBRE LA DURACIÓN DE UNA GARANTÍA IMPLÍCITA, POR
LO QUE LA ANTERIOR LIMITACIÓN PUDIERA NO APLICARSE A USTED. ESTA
GARANTÍA LE DA DERECHOS LEGALES ESPECÍFICOS Y USTED PODRÍA
ADEMÁS TENER OTROS DERECHOS QUE VARÍAN DE UN ESTADO A OTRO.
Esta garantía aplica a productos vendidos en los Estados Unidos y Canadá
solamente.
PÓLIZA DE GARANTÍA - VALIDA
SOLO PARA MÉXICO, AMÉRICA
CENTRAL Y EL CARIBE
La garantía de TECHTRONIC INDUSTRIES es por 3 años a partir de la fecha
original de compra. Esta tarjeta de garantía cubre cualquier defecto de material
y mano de obra en ese Producto.
Para hacer válida esta garantía, presente esta tarjeta de garantía, cerrada/
sellada por el distribuidor o la tienda donde compró el producto, al Centro de
Servicio Autorizado (ASC). O, si esta tarjeta no se ha cerrado/sellado, presente
la prueba original de compra a ASC.
Llame gratis al 01 (800) 030-7777 para encontrar el ASC más cercano, para
servicio, partes, accesorios o componentes.
Procedimiento para hacer válida esta garantía
Lleve el producto a ASC, junto con la tarjeta de garantía cerrada/sellada por el
distribuidor o la tienda donde compró el producto, y cualquier pieza o componente
defectuoso se reemplazará sin costo para usted. Cubriremos todos los costos
de ete con relación a este proceso de garantía
Excepciones
Esta garantía no tendrá validez en las siguientes situaciones:
a) Cuando el producto se use de manera distinta a la que indica el manual del
usuario nal o de instrucciones.
b) Cuando las condiciones de uso no sean normales.
c) Cuando otras personas no autorizadas por TECHTRONIC INDUSTRIES
modiquen o reparen el producto.
Nota: si el juego de cables está dañado, tiene que reemplazarse en un Centro
de Servicio Autorizado para evitar riesgos eléctricos.
CENTRO DE SERVICIO Y ATENCIÓN
Llame al 01 (800) 030-7777
IMPORTADO Y COMERCIALIZADO POR TECHTRONIC INDUSTRIES
MÉXICO, SA DE CV
Av. President Masarik #29 piso 7, Col. Polanco V Sección
CP 11560, Deleg. Miguel Hidalgo, CDMX
Modelo:
Fecha de compra:
Sello del distribuidor o de la tienda:
58140858d1 00658140858Q0-01(A)
11/16 Printed in China
MILWAUKEE TOOL
13135 West Lisbon Road
Brookeld, WI 53005 USA
 Loading...