

Page 1
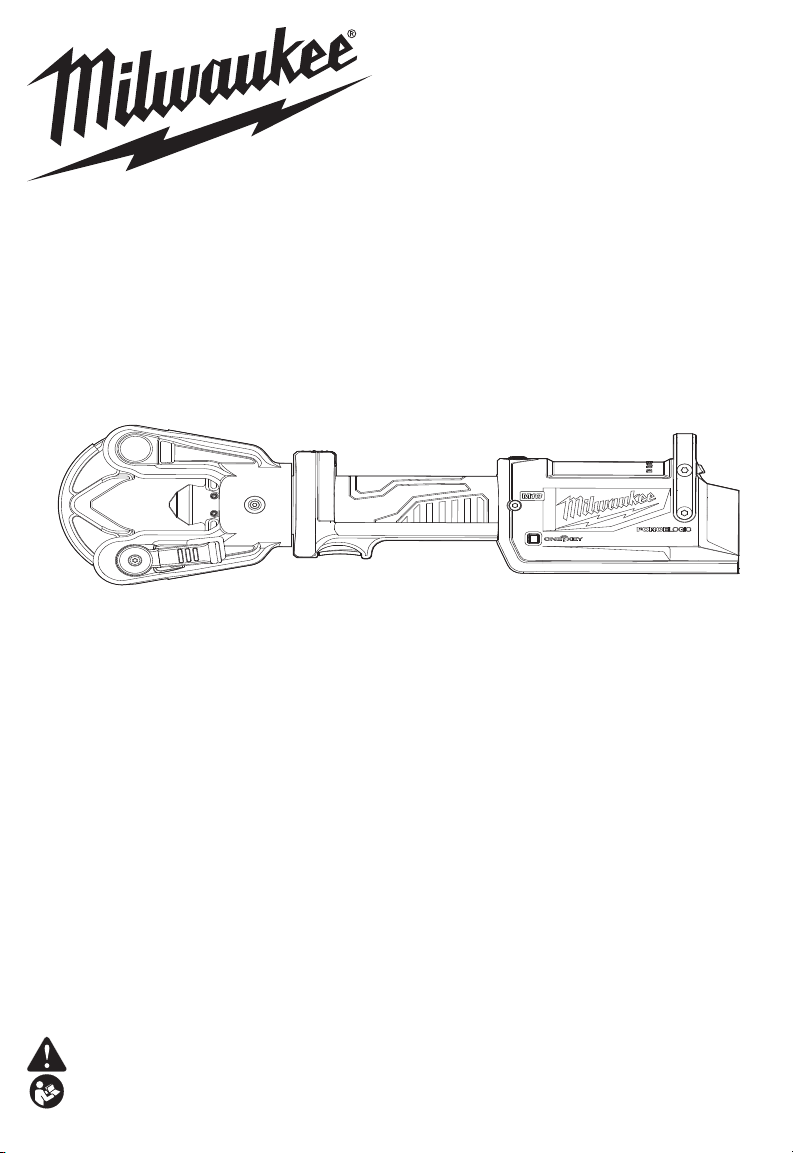
OPERATOR'S MANUAL
018536_2876
MANUEL de L'UTILISATEUR
MANUAL del OPERADOR
Cat. No. / No de cat.
2876-20
M18™ FORCE LOGIC™ 11T DIELESS LATCHED
LINEAR UTILITY CRIMPER
11T SANS FIL SERTISSEUR UTILITAIRE LINÉAIRE
DE M18™ FORCE LOGIC™
11T SIN ATADURAS CRIMPADORA DE UTILIDAD LINEAL
DE M18™ FORCE LOGIC™
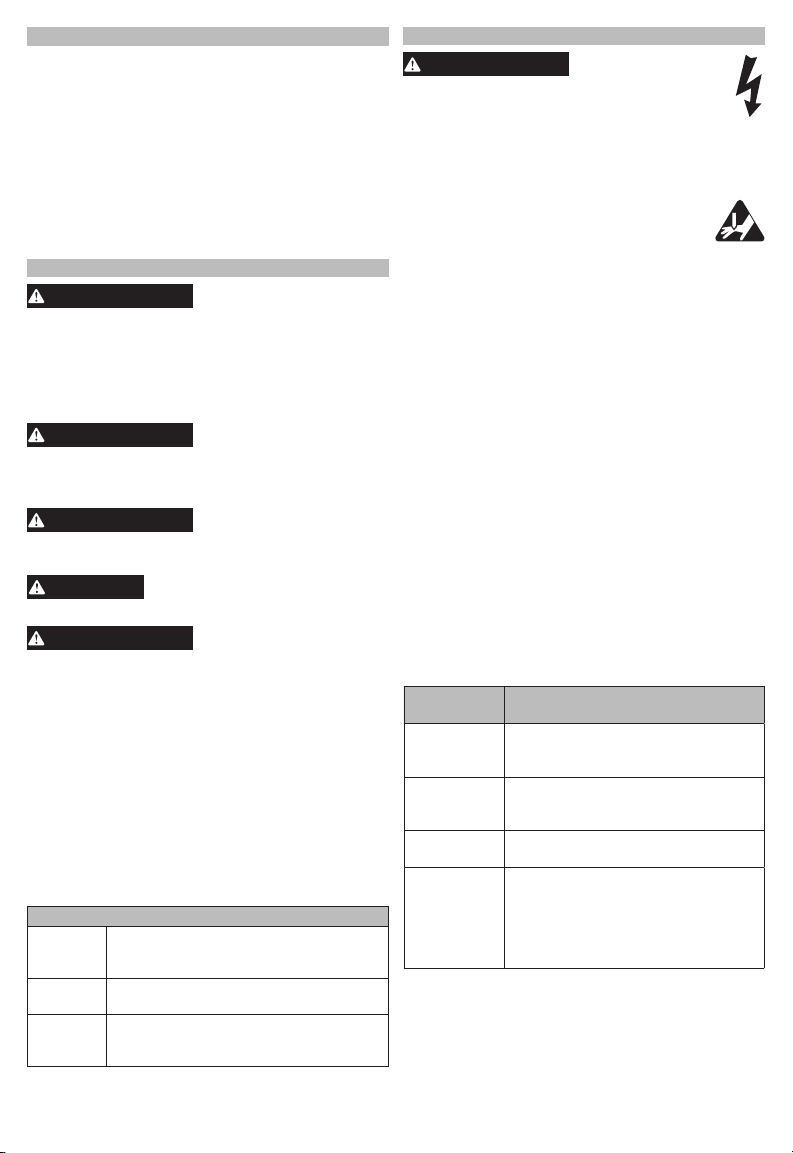
WARNING To reduce the risk of injury, user must read and understand operator's manual.
WARNING To reduce the risk of injury, user must read and understand operator's manual.
AVERTISSEMENT
AVERTISSEMENT
comprendre le manuel.
comprendre le manuel.
ADVERTENCIA
ADVERTENCIA
Page 2

GENERAL POWER TOOL
WARNING
SAFETY WARNINGS
Read all safety warnings, instruc-
tions provided with this power tool. Failure to
follow all instructions listed below may result in
electric shock, re and/or serious injury. Save all
warnings and instructions for future reference.
The term "power tool" in the warnings refers to your
mains-operated (corded) power tool or battery-oper-
ated (cordless) power tool.
-
WORK AREA SAFETY
• Keep work area clean and well lit. Cluttered or
dark areas invite accidents.
• Do not operate power tools in explosive atmo-
Power tools create sparks
which may ignite the dust or fumes.
-
ing a power tool. Distractions can cause you to lose
control.
ELECTRICAL SAFETY
• Power tool plugs must match the outlet. Never
modify the plug in any way. Do not use any
adapter plugs with earthed (grounded) power
tools. Unmodied plugs and matching outlets will
reduce risk of electric shock.
surfaces, such as pipes, radiators, ranges and
refrigerators. There is an increased risk of electric
shock if your body is earthed or grounded.
• Do not expose power tools to rain or wet conditions. Water entering a power tool will increase the
risk of electric shock.
carrying, pulling or unplugging the power tool.
Keep cord away from heat, oil, sharp edges or
moving parts. Damaged or entangled cords increase
the risk of electric shock.
• When operating a power tool outdoors, use an
Use of
a cord suitable for outdoor use reduces the risk of
electric shock.
• If operating a power tool in a damp location is
(GFCI) protected supply. Use of an GFCI reduces
the risk of electric shock.
PERSONAL SAFETY
• Stay alert, watch what you are doing and use
common sense when operating a power tool. Do
not use a power tool while you are tired or under
A
moment of inattention while operating power tools
may result in serious personal injury.
wear eye protection. Protective equipment such
as a dust mask, non-skid safety shoes, hard hat or
hearing protection used for appropriate conditions
will reduce personal injuries.
• Prevent unintentional starting. Ensure the switch
the tool. Carrying power tools with your nger on
the switch or energizing power tools that have the
switch on invites accidents.
turning the power tool on. A wrench or a key left
attached to a rotating part of the power tool may
result in personal injury.
• Do not overreach. Keep proper footing and
This enables better control
of the power tool in unexpected situations.
• Dress properly. Do not wear loose clothing or
jewelry. Keep your hair and clothing away from
moving parts. Loose clothes, jewelry or long hair
can be caught in moving parts.
• If devices are provided for the connection of
dust extraction and collection facilities, ensure
these are connected and properly used. Use of
dust collection can reduce dust-related hazards.
ignore tool safety principles. A careless action can
cause severe injury within a fraction of a second.
POWER TOOL USE AND CARE
• Do not force the power tool. Use the correct power
tool for your application. The correct power tool
will do the job better and safer at the rate for which
it was designed.
• Do not use the power tool if the switch does not
Any power tool that cannot be
controlled with the switch is dangerous and must be
repaired.
• Disconnect the plug from the power source and/
changing accessories, or storing power tools.
Such preventive safety measures reduce the risk of
starting the power tool accidentally.
• Store idle power tools out of the reach of children
and do not allow persons unfamiliar with the
power tool or these instructions to operate the
power tool. Power tools are dangerous in the hands
of untrained users.
• Maintain power tools and accessories. Check
Many
accidents are caused by poorly maintained power
tools.
• Keep cutting tools sharp and clean. Properly
maintained cutting tools with sharp cutting edges
are less likely to bind and are easier to control.
etc. in accordance with these instructions,
taking into account the working conditions and
Use of the power tool
for operations dierent from those intended could
result in a hazardous situation.
• Keep handles and grasping surfaces dry, clean
and free from oil and grease. Slippery handles and
grasping surfaces do not allow for safe handling and
control of the tool in unexpected situations.
BATTERY TOOL USE AND CARE
manufacturer. A charger that is suitable for one type
of battery pack may create a risk of re when used
with another battery pack.
Use of any other battery packs may
create a risk of injury and re.
2
Page 3
WARNING
WARNING
WARNING
WARNING
WARNING
that can make a connection from one terminal
to another. Shorting the battery terminals together
may cause burns or a re.
contacts eyes, additionally seek medical help.
Liquid ejected from the battery may cause irritation
or burns.
-
Damaged or modied batteries
may exhibit unpredictable behavior resulting in re,
explosion or risk of injury.
excessive temperature. Exposure to re or temperature above 265°F (130°C) may cause explosion.
• Follow all charging instructions and do not charge
Charging im-
properly or at temperatures outside the specied range
may damage the battery and increase the risk of re.
SERVICE
repair person using only identical replacement
parts. This will ensure that the safety of the power
tool is maintained.
Service
of battery packs should only be performed by the
manufacturer or authorized service providers.
SPECIFIC SAFETY RULES FOR
CRIMPERS
• Use tool only as directed. Only trained personnel
should operate tool.
•
damage, work on deenergized lines when
proper precautions, including those contained
• Use tool only with connectors for which they are
APPROVED COMBINATION to achieve a successful operation. Improper combinations can result
in a faulty crimp. Electric shock, re, explosion, and
property damage could occur.
• Do not use tool without nest properly latched.
Fingers could be crushed.
• Keep hands away from crimping jaws while tool
is in use. Fingers could be crushed.
•To reduce the risk of injury, wear safety goggles
or glasses with side shields when operating or
servicing the tool.
• Inspect and discard workpieces with cracks or
Other uses may
cause damage to the tool, accessories, and workpiece.
away from children.
and cause failure. Do not use with lanyards at
full tension.
electric shock and property
•
appropriate respiratory protection or use an
OSHA compliant dust extraction solution.
using tools. It is not possible to anticipate every
situation that could result in a dangerous outcome.
Do not use this tool if you do not understand these
operating instructions or you feel the work is beyond
your capability; contact Milwaukee Tool or a trained
professional for additional information or training.
• These carry
important information. If unreadable or missing,
contact a MILWAUKEE service facility for a free
replacement.
•
construction activities contains chemicals known to
cause cancer, birth defects or other reproductive
harm. Some examples of these chemicals are:
• lead from lead-based paint
• crystalline silica from bricks and cement and other
masonry products, and
• arsenic and chromium from chemically-treated lumber.
Your risk from these exposures varies, depending on
how often you do this type of work. To reduce your
exposure to these chemicals: work in a well ventilated
area, and work with approved safety equipment, such
as those dust masks that are specially designed to
lter out microscopic particles.
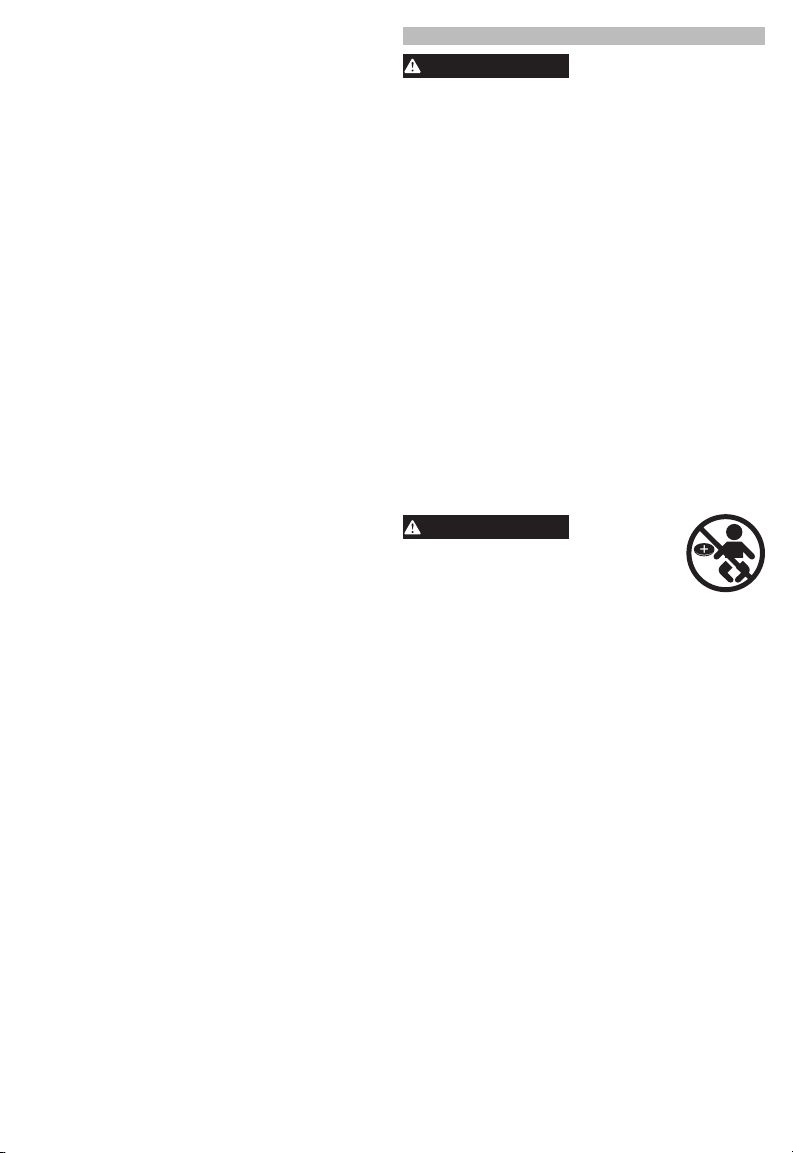
To reduce the risk of injury, when
working in dusty situations, wear
Some dust created by power sanding,
sawing, grinding, drilling, and other
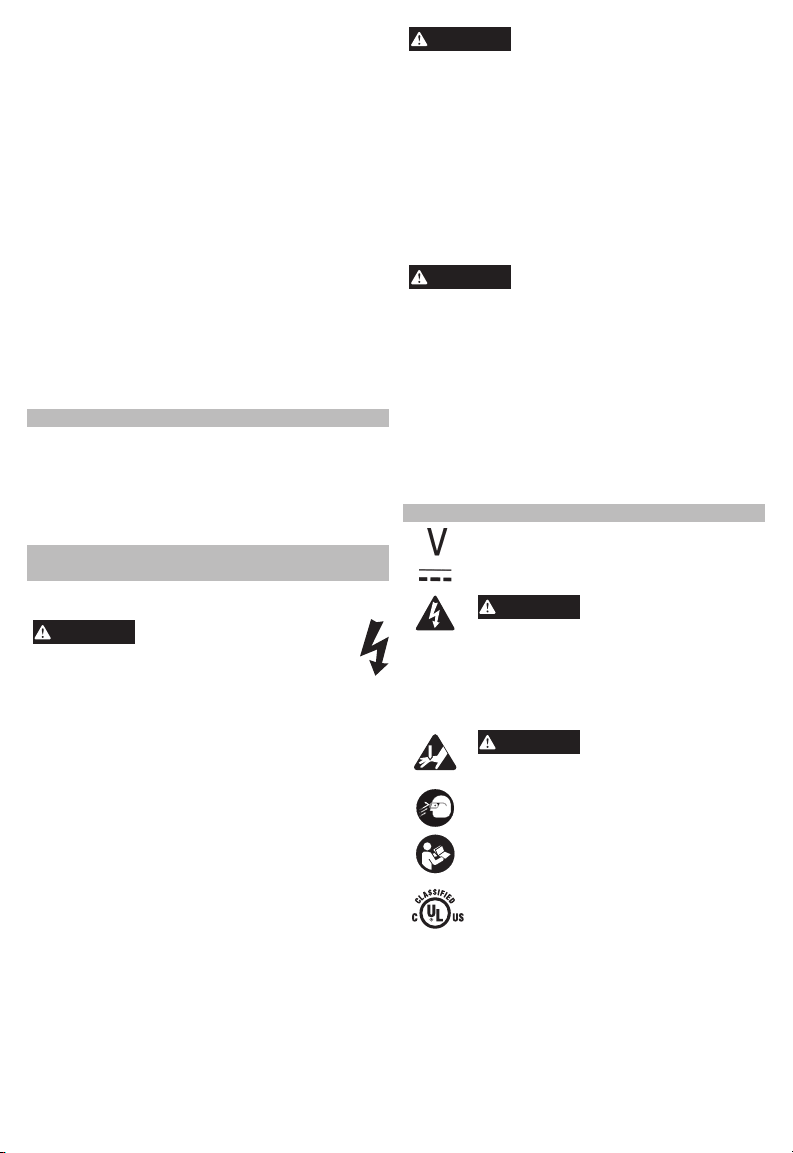
SYMBOLOGY
Volts
Direct Current
3
property damage, work on deenergized
lines when possible. Tool is not
insulated. Should work on energized
lines be required, ensure all proper
precautions, including those contained
in NFPA 70E, have been taken rst.
in use. Fingers could be crushed.
To reduce the risk of injury, wear safety
goggles or glasses with side shields when
operating or servicing the tool.
Read operator's manual.
Underwriters Laboratories, Inc.
United States and Canada
To reduce the risk of arc
ash, electric shock and
Keep hands away from
crimping jaws while tool is
Page 4
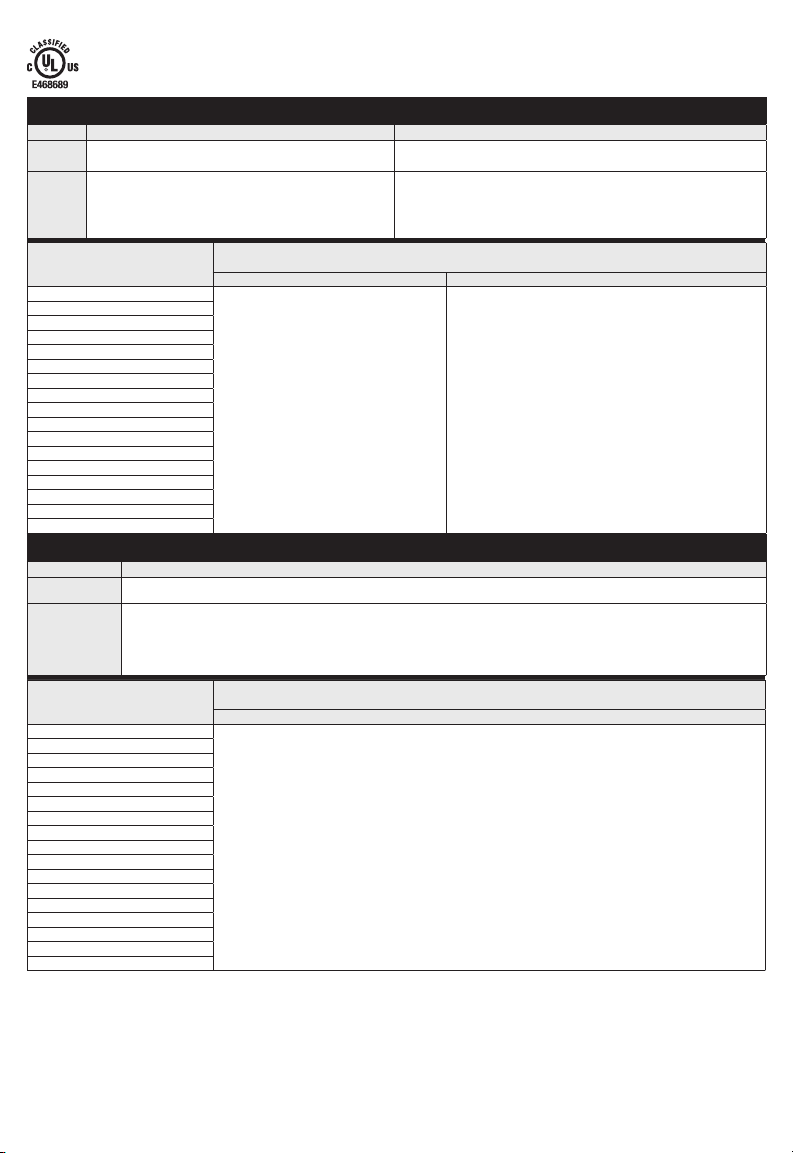
-
duce UL
Copper Short & Long Barrel Lugs & Splices
Burndy Richards
Splice
Model #'s
Lug
Model #'s
YS-L, YS, YS-T
YA-L, YA-2L, YA-2LN, YA-2N, YA, YA-4N, YA-L-TC, YA-L-2TC,
YAB-4N, YAV, YAZ, YBA, YAG
SCC, CC, OCC, OTCC, TCC
--
Str Wire
Size Range
(Code only)
4 AWG
2 AWG
1 AWG
1/0AWG
2/0AWG
3/0AWG
4/0AWG
250 kcmil
300 kcmil 1 1
350 kcmil
400 kcmil
500 kcmil
600 kcmil
700 kcmil
750 kcmil
800 kcmil
1000 kcmil
Burndy Richards
Lugs: Total # of Crimps
Splices: # of Crimps per Side
Dual Rated Lugs & Splices
Splice
Model #'s
Lug
Model #'s
Str Wire
Size Range
(Code only)
4 AWG
2 AWG
1 AWG
1/0AWG
2/0AWG
3/0AWG
4/0AWG
250 kcmil
300 kcmil 1
350 kcmil
400 kcmil
500 kcmil
600 kcmil
700 kcmil
750 kcmil
800 kcmil
1000 kcmil
Burndy
YS-A
YA-A, YA-A-TN
Lugs: Total # of Crimps
Splices: # of Crimps per Side
Burndy
4
Page 5
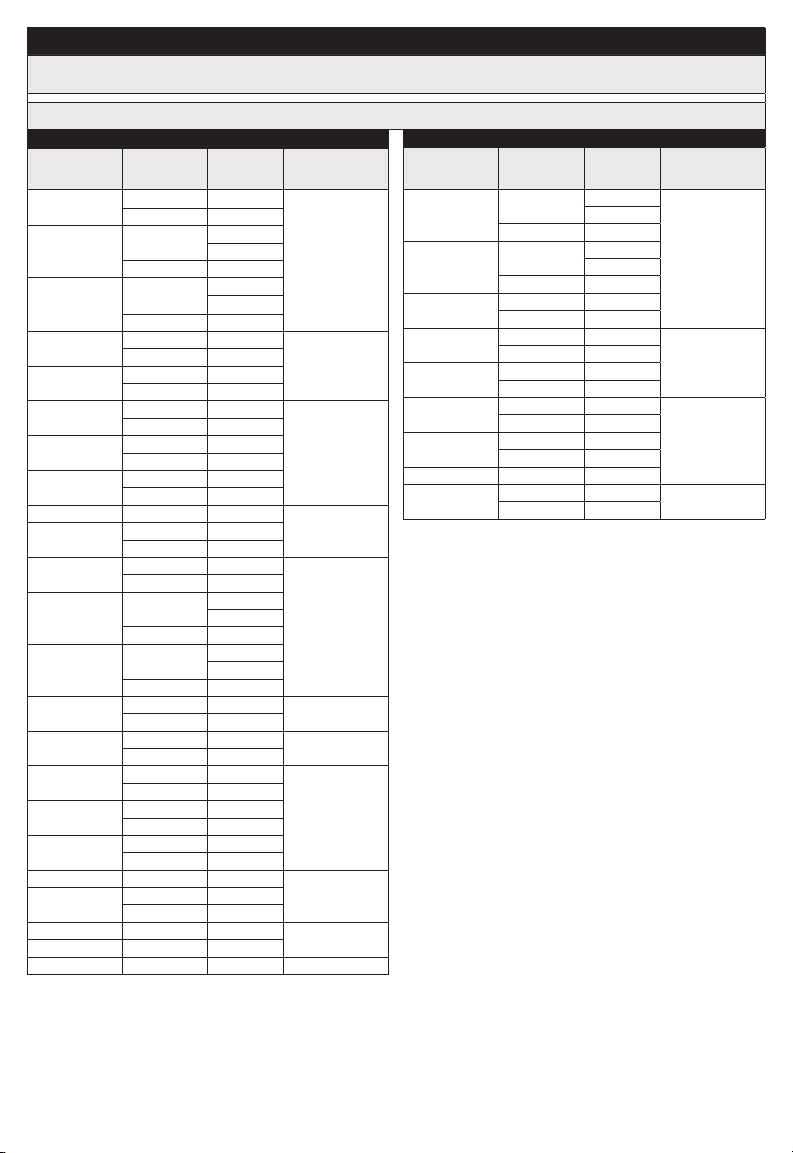
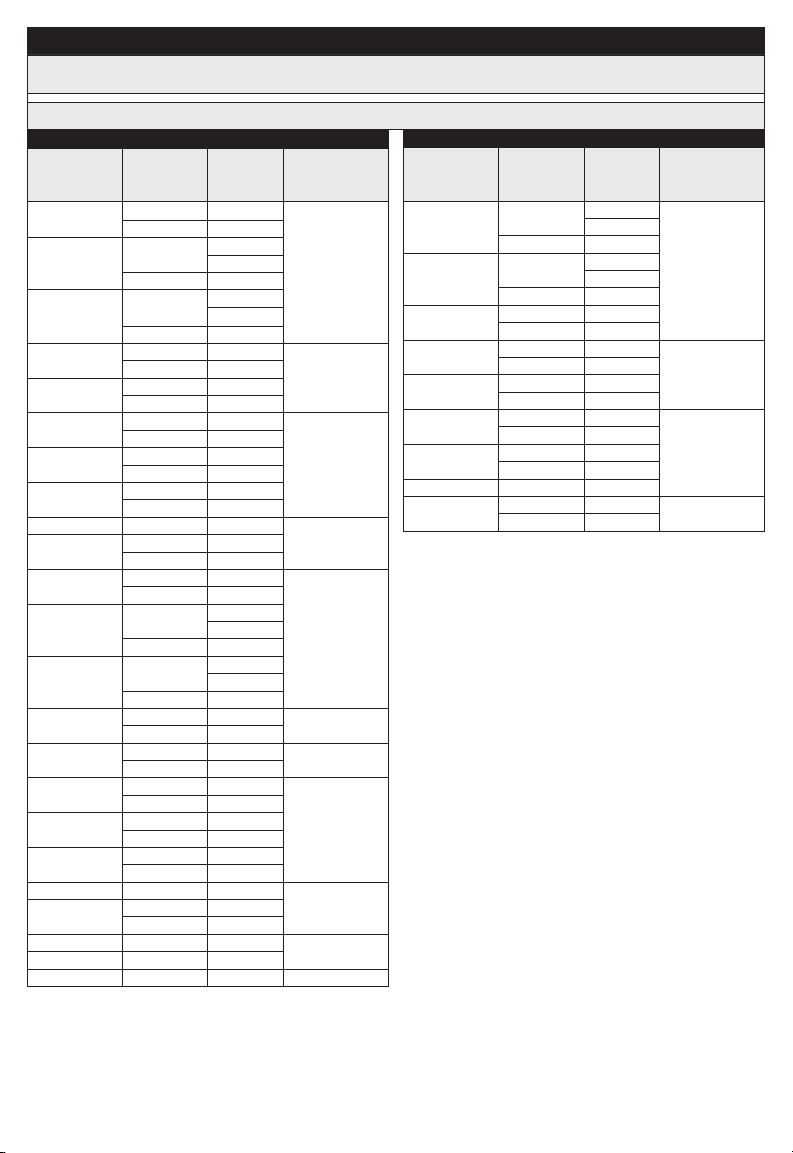
The following connector-conductor combinations are able to be installed using the M18™ FORCE LOGIC™ 11T Dieless Latched Linear
Utility Crimper (Cat. No. 2876-20) and meet the test standard/class specied below. Crimps should be made starting from the center of the
connector. No crimp should be made on the very end of the connector.
Class 1 - Full Tension
Conductor
Connector #
YDS4RL
YDS2RL
YDS021RL
YDS25RL
YDS26RL
YDS27RL
YDS28RL
YDS321RL
YDS341RL 397.5 ACSR 18/1
YDS361RL
YDS4RLNI
YDS2RLNI
YDS021RLNI
YDS25RLNI
YDS26RLNI
YDS27RLNI
YDS28RLNI
YDS321RLNI
YDS341RLNI 397.5 ACSR 18/1
YDS361RLNI
YDS28RLY * 4/0 ACSR 6/1
YDS321RLY * 336.4 ACSR 18/1
YDS361RLY * 477 ACSR 18/1 9
connector to middle.
Size/Type
#4 ACSR 7/1
#4 AAC 7
#2 ACSR
#2 AAC 7
#2 ACSR
#2 AAC 7
1/0 ACSR 6/1
1/0 AAC 7
2/0 ACSR 6/1
2/0 AAC 7
3/0 ACSR 6/1
3/0 AAC 7
4/0 ACSR 6/1
4/0 AAC 7
336.4 ACSR 18/1
336.4 ACC 19
477 ACSR 18/1
556.5 ACSR 18/1
#4 ACSR 7/1
#4 AAC 7
#2 ACSR
#2 AAC 7
#2 ACSR
#2 AAC 7
1/0 ACSR 6/1
1/0 AAC 7
2/0 ACSR 6/1
2/0 AAC 7
3/0 ACSR 6/1
3/0 AAC 7
4/0 ACSR 6/1
4/0 AAC 7
336.4 ACSR 18/1
336.4 AAC 19
477 ACSR 18/1
556.5 ACSR 18/1
Conductor
Stranding
YDS-RL, YDS-RLNI, YDS-RLY, YDSR-RL
# of Crimps
for Installation
(per end)
6/1
7/1
6/1
7/1
6/1
7/1
6/1
7/1
Burndy
Class 1A - Normal Tension
Connector #
YDSR4RL
4
5
7
9
4
5
5
7
9
7
YDSR2RL
YDSR25RL
YDSR26RL
YDSR27RL
YDSR28RL
YDSR321RL
YDSR341RL 397.5 ACSR 18/1
YDSR361RL
Conductor
Size/Type
#4 ACSR
#4 AAC 7
#2 ACSR
#2 AAC 7
1/0 ACSR 6/1
1/0 AAC 7
2/0 ACSR 6/1
2/0 AAC 7
3/0 ACSR 6/1
3/0 AAC 7
4/0 ACSR 6/1
4/0 AAC 7
336.4 ACSR 6/1
336.4 AAC 19
477 ACSR 18/1
556.5 ACSR 18/1
Conductor
Stranding
6/1
7/1
6/1
7/1
# of Crimps
for Installation
(per end)
4
5
7
9
5
Page 6
Cat. No. ..................................................... 2876-20
018536_2876
WARNING
WARNING
WARNING
CAUTION
WARNING
WARNING
Volts.............................................................. 18 DC
Battery Type .................................................M18™
Charger Type................................................M18™
Force ..........................................................11 Tons
Capacity..................................#4-1000 MCM Cu/Al
Module/FCC ID ............................ BGM11S/QOQ11
Weight ...........................................................14 lbs
(Tool-Only)
Weight ...........................................................16 lbs
Recommended Ambient
Operating Temperature ......................0°F to 125°F
(With heaviest compatible battery pack)
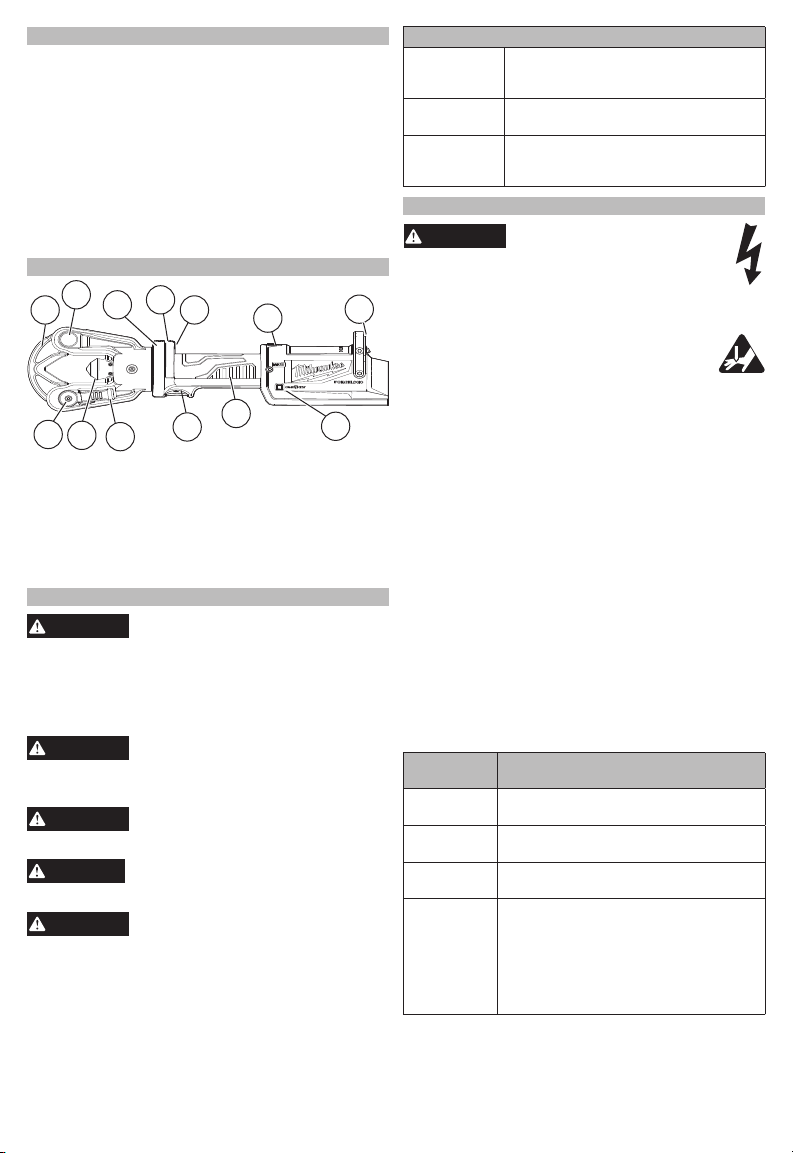
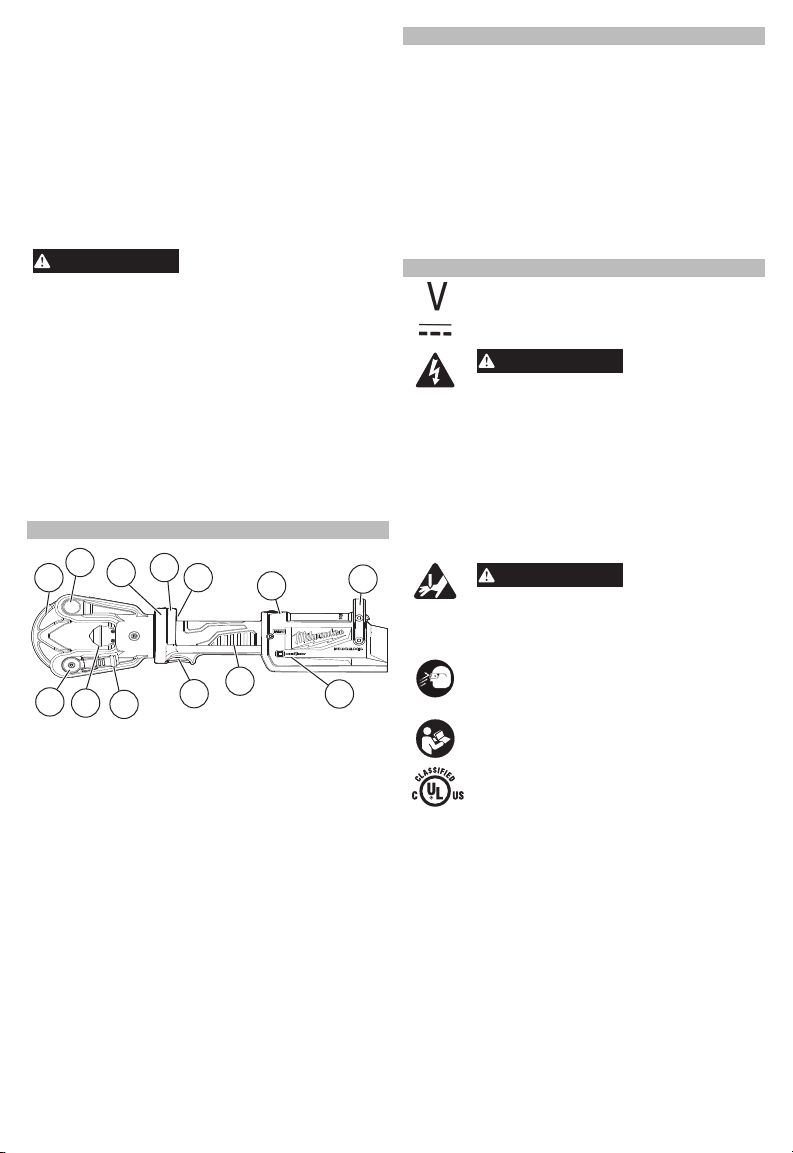
FUNCTIONAL DESCRIPTION
SPECIFICATIONS
2
1
13
12
1. Nest
2. Crimping clevis
3. Worklight LED's
4. LED indicator
5. Electronic reverse
trigger
6. Manual release button
11
4
3
5
10
6
9
7. Hanger
8. ONE-KEY™ indicator
9. Handle
10. Trigger
11. Nest release lever
12. Indenter
13. Nest lock pin
7
8
ASSEMBLY
Recharge only with the charger
To remove the battery, push in the release buttons
and pull the battery pack away from the tool.
To insert the battery, slide the pack into the body
of the tool. Make sure it latches securely into place.
fully latched.
connectors for which they are rated. Tool and
Electric shock, fire, explosion, and property
damage could occur.
To learn more about the ONE-KEY™ functionality
for this tool, go to milwaukeetool.com/One-Key. To
download the ONE-KEY™ app, visit the App Store
or Google Play™ from your smart device.
-
Removing/Inserting the Battery
any time the tool is not in use.
recommended for this tool. Others
To avoid damage to the tool, do not
operate the tool without the nest
An incomplete or faulty crimp could
ONE-KEY™
ONE-KEY™ Indicator
Solid Blue Wireless mode is active and
Blinking Blue Tool is actively communicating with
Blinking Red Tool is in security lockout and can
ready to be congured via the
ONE-KEY™ app.
the ONE-KEY™ app.
be unlocked by the owner via the
ONE-KEY™ app.
OPERATION
damage, work on deenergized lines when
precautions, including those contained in NFPA
Keep hands away from crimping jaws while
Always wear proper eye protection marked to
comply with ANSI Z87.1.
Before crimping:
• Inspect the crimping ram, nest and clevis for cracks
or other damage. Do not use damaged parts. Contact a
• Ensure the nest is properly latched.
• Connectors and cables must
PROVED COMBINATION
can result in a faulty crimp.
• Inspect and discard workpieces with cracks or wear
before use. Materials may crack or shatter.
• Follow installation specications as specied in Table
A and ANSI Table using an Approved Combination of
connectors and cables as indicated. Other uses may
cause damage to the tool and workpiece.
1. Insert battery pack.
2. Place the ram and nest around the connector.
3. Hold tool securely. Press and hold the trigger.
4. When the cycle is complete the tool will auto
retract and the indicator will light. Release the
trigger.
LED
Indicator
Solid Green Tool completed the operation and
Solid Red Tool completed the operation but did NOT
Flashing Red Tool did NOT complete the operation.
Flashing
Red/Green
(after Solid
Green or
Solid Red)
®
6
electric shock and property
Crimping
MILWAUKEE
service facility.
be used in an AP-
. Improper combinations
reached full crimping pressure.
reach full crimping pressure.
Tool has reached its service interval. Red/
Green ashing will begin after the solid
Red or Green indicator for the operation
is displayed.
that the tool be inspected and preventative
maintenance completed. Return tool to a
MILWAUKEE service facility.
MILWAUKEE
recommends
Page 7
5. Continue crimping according to the instructions in
WARNING
WARNING
WARNING
WARNING
Table A and ANSI Table or the connector manu-
facturer's installation instructions.
• Crimps should be uniformly placed on the barrel
of the connector with a single crimp placed in the
center.
• Crimps should be reasonably placed within the
color bands or knurled area of the connector.
• For splices, begin crimping in the center, working
outward while alternating sides.
• For lugs, begin crimping near the pad, working
towards the barrel.
• The orientation of the crimp is not critical on
seamless barrel connectors, but for best results
rotate the tool 180° between crimps.
6. Two LEDs will light the workpiece when the trig-
ger is pulled.
If the ram needs to be opened without completing the
cycle, press and hold the backup release valve. Hold
tool securely until the cylinder retracts fully.
Use MILWAUKEE Lanyards to help reduce the risks
associated with dropped tools. Complies with ANSI/
ISEA 121:2018.
1. Follow instructions provided with tool lanyard.
2. The lanyard will create a secure anchor point
for use. WARNING! Do not exceed maximum
capacity marked on the lanyard label. Exceeding
maximum capacity may result in serious injury or
death.
Backup Release Valve
Lanyard Attachments
MAINTENANCE
To reduce the risk of injury, always
-
vided in these instructions. Contact a MILWAUKEE
service facility for all other repairs.
Keep your tool, battery pack and charger in good
repair by adopting a regular maintenance program.
Inspect your tool for issues such as undue noise,
misalignment or binding of moving parts, breakage of
parts, or any other condition that may aect the tool
operation. Return the tool, battery pack, and charger
to a MILWAUKEE service facility for repair. After six
months to one year, depending on use, return the
tool, battery pack and charger to a MILWAUKEE
service facility for inspection.
If the tool does not start or operate at full power with
a fully charged battery pack, clean the contacts on
the battery pack. If the tool still does not work properly, return the tool, charger and battery pack, to a
MILWAUKEE service facility for repairs.
unplug the charger and remove the
Maintaining Tool
ONE-KEY™
Chemical Burn Hazard.
close securely, stop using the device, remove the
.
An internal coin cell battery is used to facilitate full
ONE-KEY™ functionality.
To replace the coin cell battery:
1. WARNING! Remove tool's battery to avoid start-
ing the tool.
2. Remove the screw(s) and open the coin cell bat-
tery door.
3. Remove the old coin cell battery, keep it away from
children, and dispose of it properly.
4. Insert the new coin cell battery (3V CR2032), with
the positive side facing up.
5. Close the battery door and tighten the screw(s)
securely.
Clean dust and debris from any vents. Keep tool
clean, dry and free of oil or grease. Use only mild
soap and a damp cloth to clean, since certain cleaning agents and solvents are harmful to plastics and
other insulated parts. Some of these include gasoline,
turpentine, lacquer thinner, paint thinner, chlorinated
cleaning solvents, ammonia and household deter-
gents containing ammonia. Never use ammable or
combustible solvents around tools.
For repairs, return the tool, battery pack and charger
to the nearest authorized service center.
This device contains a
-
Internal Coin Cell Battery
To reduce the risk of personal injury and damage, never immerse
Cleaning
Repairs
ACCESSORIES
Use only recommended accesso-
For a complete listing of accessories, go online to
www.milwaukeetool.com or contact a distributor.
WIRELESS COMMUNICATION
For products provided with wireless communication
features, including ONE-KEY™:
Pursuant to part 15.21 of the FCC Rules, do not
modify this product. Modication could void your
authority to operate the product. This device complies
with part 15 of the FCC Rules and ISED-Canada's
license exempt RSS standards. Operation is subject
to the following two conditions: 1) This device may
not cause harmful interference, and 2) This device
must accept any interference received, including
interference that may cause undesired operation.
-
7
Page 8

SERVICE - UNITED STATES
AVERTISSEMENT
1-800-SAWDUST (1.800.729.3878)
Monday-Friday, 7:00 AM - 6:30 PM CST
or visit www.milwaukeetool.com
Contact Corporate After Sales Service Technical
Support with technical, service/repair, or warranty
questions.
Email: [email protected]
Become a Heavy Duty Club Member at
www.milwaukeetool.com to receive important
notications regarding your tool purchases.
SERVICE - CANADA
Milwaukee Tool (Canada) Ltd
Monday-Friday, 7:00 AM - 4:30 PM CST
This MILWAUKEE power tool* is warranted to the original purchaser
from an authorized MILWAUKEE distributor only to be free from
defects in material and workmanship. Subject to certain exceptions,
MILWAUKEE will repair or replace any part on this power tool which,
after examination, is determined by MILWAUKEE to be defective
in material or workmanship for a period of ve (5) years after the
date of purchase unless otherwise noted. Return of the power tool
to a MILWAUKEE factory Service Center location or MILWAUKEE
Authorized Service Station, freight prepaid and insured, is required.
A copy of the proof of purchase should be included with the return
product. This warranty does not apply to damage that MILWAUKEE
determines to be from repairs made or attempted by anyone other
than MILWAUKEE authorized personnel, misuse, alterations, abuse,
normal wear and tear, lack of maintenance, or accidents.
Normal Wear: Many power tools need periodic parts replacement and
service to achieve best performance. This warranty does not cover
repair when normal use has exhausted the life of a part including,
but not limited to, chucks, brushes, cords, saw shoes, blade clamps,
o-rings, seals, bumpers, driver blades, pistons, strikers, lifters, and
bumper cover washers.
*This warranty does not cover battery packs or all power tools. Refer
to the separate and distinct warranties available for those products.
The warranty period for the LED in the LED Work Light (49-24-0171)
and the LED Upgrade Bulb (49-81-0090) is the lifetime of the product
subject to the limitations above. If during normal use the LED or LED
Upgrade Bulb fails, the part will be replaced free of charge.
Warranty Registration is not necessary to obtain the applicable war-
ranty on a MILWAUKEE power tool product. The manufacturing date
of the product will be used to determine the warranty period if no proof
of purchase is provided at the time warranty service is requested.
ACCEPTANCE OF THE EXCLUSIVE REPAIR AND REPLACEMENT
REMEDIES DESCRIBED HEREIN IS A CONDITION OF THE CON-
TRACT FOR THE PURCHASE OF EVERY MILWAUKEE PRODUCT.
IF YOU DO NOT AGREE TO THIS CONDITION, YOU SHOULD NOT
PURCHASE THE PRODUCT. IN NO EVENT SHALL MILWAUKEE BE
LIABLE FOR ANY INCIDENTAL, SPECIAL, CONSEQUENTIAL, OR
PUNITIVE DAMAGES, OR FOR ANY COSTS, ATTORNEY FEES,
EXPENSES, LOSSES OR DELAYS ALLEGED TO BE AS A CON-
SEQUENCE OF ANY DAMAGE TO, FAILURE OF, OR DEFECT IN
ANY PRODUCT INCLUDING, BUT NOT LIMITED TO, ANY CLAIMS
FOR LOSS OF PROFITS. SOME STATES DO NOT ALLOW THE EXCLUSION OR LIMITATION OF INCIDENTAL OR CONSEQUENTIAL
DAMAGES, SO THE ABOVE LIMITATION OR EXCLUSION MAY NOT
APPLY TO YOU. THIS WARRANTY IS EXCLUSIVE AND IN LIEU
OF ALL OTHER EXPRESS WARRANTIES, WRITTEN OR ORAL.
TO THE EXTENT PERMITTED BY LAW, MILWAUKEE DISCLAIMS
ANY IMPLIED WARRANTIES, INCLUDING WITHOUT LIMITATION
ANY IMPLIED WARRANTY OF MERCHANTABILITY OR FITNESS
FOR A PARTICULAR USE OR PURPOSE; TO THE EXTENT SUCH
DISCLAIMER IS NOT PERMITTED BY LAW, SUCH IMPLIED WARRANTIES ARE LIMITED TO THE DURATION OF THE APPLICABLE
EXPRESS WARRANTY AS DESCRIBED ABOVE. SOME STATES
DO NOT ALLOW LIMITATIONS ON HOW LONG AN IMPLIED WARRANTY LASTS, SO THE ABOVE LIMITATION MAY NOT APPLY TO
YOU, THIS WARRANTY GIVES YOU SPECIFIC LEGAL RIGHTS,
AND YOU MAY ALSO HAVE OTHER RIGHTS WHICH VARY FROM
STATE TO STATE.
This warranty applies to product sold in the U.S.A. and Canada only.
Please consult the 'Service Center Search' in the Parts & Service sec-
tion of MILWAUKEE's website www.milwaukeetool.com or call 1.800.
SAWDUST (1.800.729.3878) to locate your nearest service facility
for warranty and non-warranty service on a MILWAUKEE power tool.
or visit www.milwaukeetool.ca
LIMITED WARRANTY
USA & CANADA
RÈGLES DE SÉCURITÉ GÉNÉRALES
RELATIVES AUX OUTILS ÉLECTRIQUES
Lire toutes les consignes
Ne pas suivre l'ensemble des règles
et instructions peut entraîner une électrocution, un
incendie ou des blessures graves. Conserver les
Le terme «outil électrique» gurant dans
les avertissements ci-dessous renvoie à l'outil électrique à alimentation par le réseau (à cordon) ou par
batterie (sans l).
SÉCURITÉ DU LIEU DE TRAVAIL
Le désordre et le manque de lumière
favorisent les accidents.
-
Les
outils électriques produisent des étincelles risquant
d'enammer les poussières ou vapeurs.
-
Les distractions peuvent causer
une perte de contrôle.
SÉCURITÉ ÉLECTRIQUE
-
des outils mis à la terre. Les ches et prises non
modiées réduisent le risque de choc électrique.
• Éviter tout contact avec des surfaces mises à
la terre comme des tuyaux, des radiateurs, des
Le risque de
choc électrique est accru lorsque le corps est mis
à la terre.
La pénétration d'eau dans ces outils
accroît le risque de choc électrique.
• Ne pas maltraiter le cordon d'alimentation.
Ne jamais utiliser le cordon d'alimentation
mouvement. Un cordon endommagé ou emmêlé
accroît le risque de choc électrique.
Utiliser un cordon
conçu pour l'usage extérieur réduit les risques de
choc électrique.
dans un endroit humide, utiliser une source
d'alimentation munie d'un disjoncteur de fuite
de terre. L'utilisation d'un disjoncteur de fuite de
terre réduit le risque de choc électrique.
SÉCURITÉ INDIVIDUELLE
• Rester attentif, prêter attention au travail et faire
Un moment
d'inattention pendant l'utilisation d'un outil électrique
peut entraîner des blessures graves.
8
Page 9

Selon les conditions, porter aussi un masque antipoussières, des bottes de sécurité antidérapantes,
un casque protecteur ou une protection auditive an
de réduire les blessures.
Le fait de transporter un outil électrique en gardant
le doigt sur la gâchette ou de mettre sous tension
un outil électrique lorsque la gâchette est en position
de marche favorise les accidents.
en marche. Une clé laissée sur une pièce rotative
de l'outil peut causer des blessures.
Une bonne stabilité
procure un meilleur contrôle de l'outil électrique en
cas d'imprévus.
-
Les vêtements ottants, les bijoux ou les cheveux
longs risquent d'être happés par les pièces en
mouvement.
L'utilisation d'un collecteur
de poussière permet de réduire les dangers liés à
la poussière.
Une utilisation négligée peut causer une blessure
grave en une fraction de seconde.
UTILISATION ET ENTRETIEN
DE L'OUTIL ÉLECTRIQUE
Un outil
électrique approprié exécutera le travail mieux et
de façon moins dangereuse s'il est utilisé dans les
limites prévues.
ne permet pas de le mettre en marche ou de
l'arrêter. Tout outil électrique qui ne peut pas être
contrôlé par son commutateur est dangereux et doit
être réparé.
changer d'accessoire ou de remiser l'outil. Ces
mesures de sécurité préventives réduisent les risques
de démarrage accidentel de l'outil.
instructions. Les outils électriques sont dangereux
dans les mains d'utilisateurs novices.
-
l'utiliser. Plusieurs accidents sont causés par des
produits mal entretenus.
Des
outils correctement entretenus et dont les tranchants
sont bien aûtés risquent moins de se bloquer et
sont plus faciles à contrôler.
en tenant compte des conditions de travail et de
L'usage d'un outil électrique
pour des applications pour lesquelles il n'est pas
conçu peut être dangereux.
-
sion sèches, propres et exemptes d'huile ou de
graisse. Des poignées et des surfaces de préhension
glissantes ne permettent pas de manipuler et de
contrôler l'outil en toute sécurité en cas de situation
imprévue.
UTILISATION ET ENTRETIEN
DE LA BATTERIE
Un chargeur
pouvant convenir à un type de bloc-piles peut
entraîner un risque d'incendie lorsqu'il est utilisé
avec un autre type de bloc-piles.
L'utilisation de tout autre bloc-piles
peut créer un risque de blessures et d'incendie.
Le court-circuitage
des bornes d'une pile peut entraîner des brûlures
ou un incendie.
entre en contact avec les yeux, consulter un
Le liquide éjecté des piles peut causer
des irritations ou des brûlures.
Des piles endommagées
ou modiées peuvent adopter un comportement
imprévisible pouvant causer un incendie, une
explosion ou le risque de blessures.
Une exposition
aux ammes ou à une température supérieure à
130°C (265°F) peut causer une explosion.
• Suivre toutes les instructions de charge et ne
Une charge
incorrecte ou à des températures en dehors de la
plage spéciée peut endommager la pile et augmenter
le risque d'incendie.
ENTRETIEN
d'origine. Le maintien de la sûreté de l'outil électrique
sera ainsi assuré.
La réparation du bloc-piles doit être
réalisée par le fabricant ou les fournisseurs de service
agréés uniquement.
9
Page 10
RÈGLES DE SÉCURITÉ
AVERTISSEMENT
AVERTISSEMENT
AVERTISSEMENT
AVERTISSEMENT
AVERTISSEMENT
018536_2876
SPÉCIFIQUES
POUR LES SERTISSEURS
• Utiliser l'outil seulement comme indiqué. Seulement
le personnel qualié devra utiliser l'outil.
•
-
. Une
décharge électrique, un incendie, une explosion et
des dommages matériels pourraient se produire.
•
•
D'autres utilisations peu-
vent endommager l'outil, les accessoires et la pièce.
Les cordons, les sangles et les chaînes pour-
l'utiliser avec de longes totalement tendues.
•
reuses, porter une protection respiratoire ou
poussière conforme aux normes OSHA.
avec prudence lors de l'utilisation d'outils. C'est
impossible de prévoir toutes les situations dont le
résultat est dangereux. Ne pas utiliser cet outil si vous
ne comprenez pas ces instructions d'opération ou si
vous pensez que le travail dépasse votre capacité ;
veuillez contacter Milwaukee Tool ou un professionnel
formé pour recevoir plus d'information ou formation.
•
Des informations importantes y
gurent. Si elles sont illisibles ou manquantes,
contacter un centre de services et d'entretien
MILWAUKEE pour un remplacement gratuit.
•
ponçage, de coupe, de rectication, de perforage
et d'autres activités de construction contiennent des
substances considérées être la cause de malformations congénitales et de troubles de l'appareil repro-
ducteur. Parmi ces substances gurent:
• le plomb contenu dans les peintures à base de
plomb;
Pour minimiser le
-
Certaines poussières générées par les activités de
• la silice cristalline des briques, du ciment et d'autres
matériaux de maçonnerie, ainsi que
• l'arsenic et le chrome des sciages traités chimique-
ment.
Les risques encourus par l'opérateur envers ces
expositions varient en fonction de la fréquence de
ce type de travail. Pour réduire l'exposition à ces
substances chimiques, l'opérateur doit: travailler
dans une zone bien ventilée et porter l'équipement de
sécurité approprié, tel qu'un masque anti-poussière
spécialement conçu pour filtrer les particules
microscopiques.
PICTOGRAPHIE
Volts
Courant direct
électrique, de choc électrique et
d'accidents matériels, travailler sur de
lignes sans tension si possible. L'outil
n'est pas isolé. S'il faut faire de travaux
sur de lignes sous tension, veuillez
s'assurer que toutes les précautions
correspondantes, y compris celles dans
NFPA 70E, ont été prises à l'avance.
mâchoires de sertissage lorsque vous
utilisez l'outil. Vos doigts risquent d'être
écrasés.
Pour réduire le risque de blessure, porter
des lunettes de sécurité ou des lunettes
avec écrans latéraux pendant l'utilisation
ou l'entretien de l'outil.
Lire le manuel d'utilisation.
Underwriters Laboratories, Inc.
États-unis et Canada
Pour minimiser
le risque d'arc
Gardez vos
mains loin des
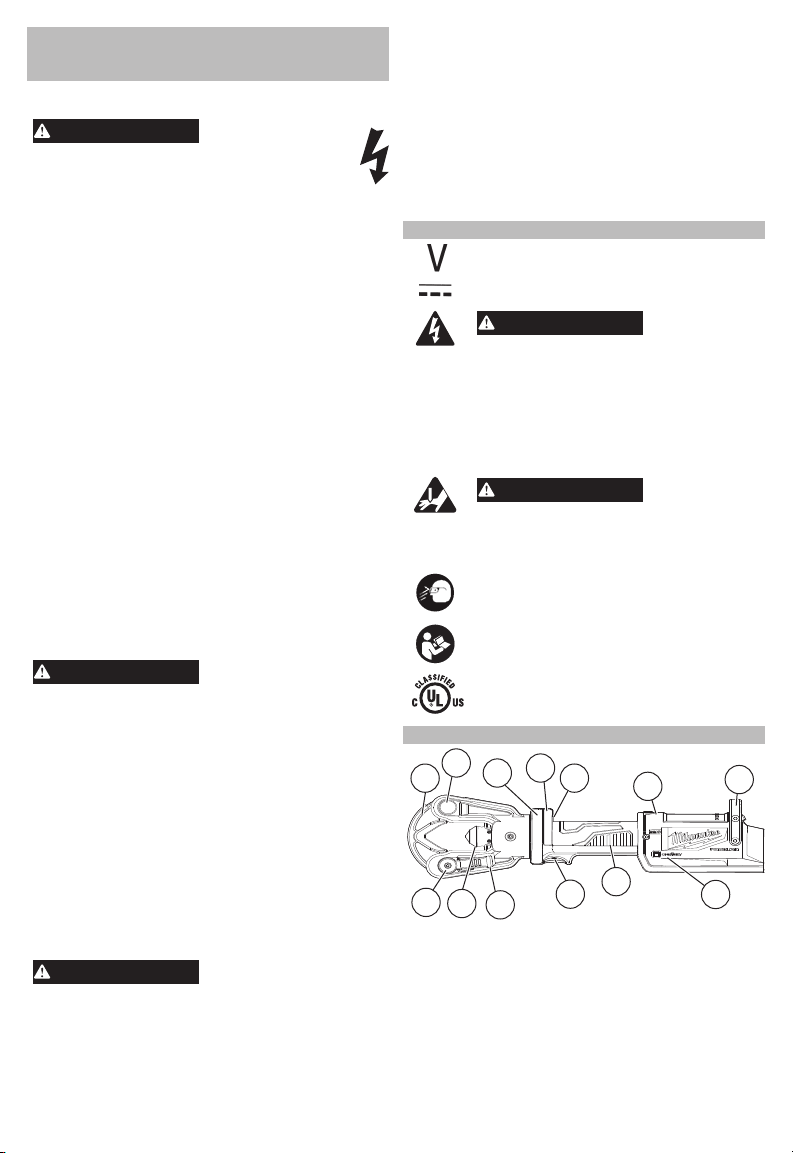
DESCRIPTION FONCTIONNELLE
2
1
13
12
1. Matrice
2. Chape de sertissage
3. Voyant à DEL de
travail
4. Témoin à DEL
5. Gâchette de retour
électronique
6. Touche de libération
manuelle
7. Support
11
4
3
5
10
6
9
8. Avertisseur
ONE-KEY™
9. Poignée
10. Gâchette
11. Levier de blocage
de matrice
12. Vérin
13. Goupille de
verrouillage pour
matrice
7
8
10
Page 11
Modèles
Modèles de
cosses
Burndy Richards
YS-L, YS, YS-T
YA-L, YA-2L, YA-2LN, YA-2N, YA, YA-4N, YA-L-TC, YA-L-2TC, YAB-
4N, YAV, YAZ, YBA, YAG
SCC, CC, OCC, OTCC, TCC
--
Fil Str
Gamme de taille
4 AWG
2 AWG
1 AWG
1/0AWG
2/0AWG
3/0AWG
4/0AWG
250 kcmil
300 kcmil 1 1
350 kcmil
400 kcmil
500 kcmil
600 kcmil
700 kcmil
750 kcmil
800 kcmil
1 000 kcmil
Burndy Richards
Modèles
Modèles de
cosses
Fil Str
Gamme de taille
4 AWG
2 AWG
1 AWG
1/0AWG
2/0AWG
3/0AWG
4/0AWG
250 kcmil
300 kcmil 1
350 kcmil
400 kcmil
500 kcmil
600 kcmil
700 kcmil
750 kcmil
800 kcmil
1 000 kcmil
Burndy
YS-A
YA-A, YA-A-TN
Burndy
11
Page 12
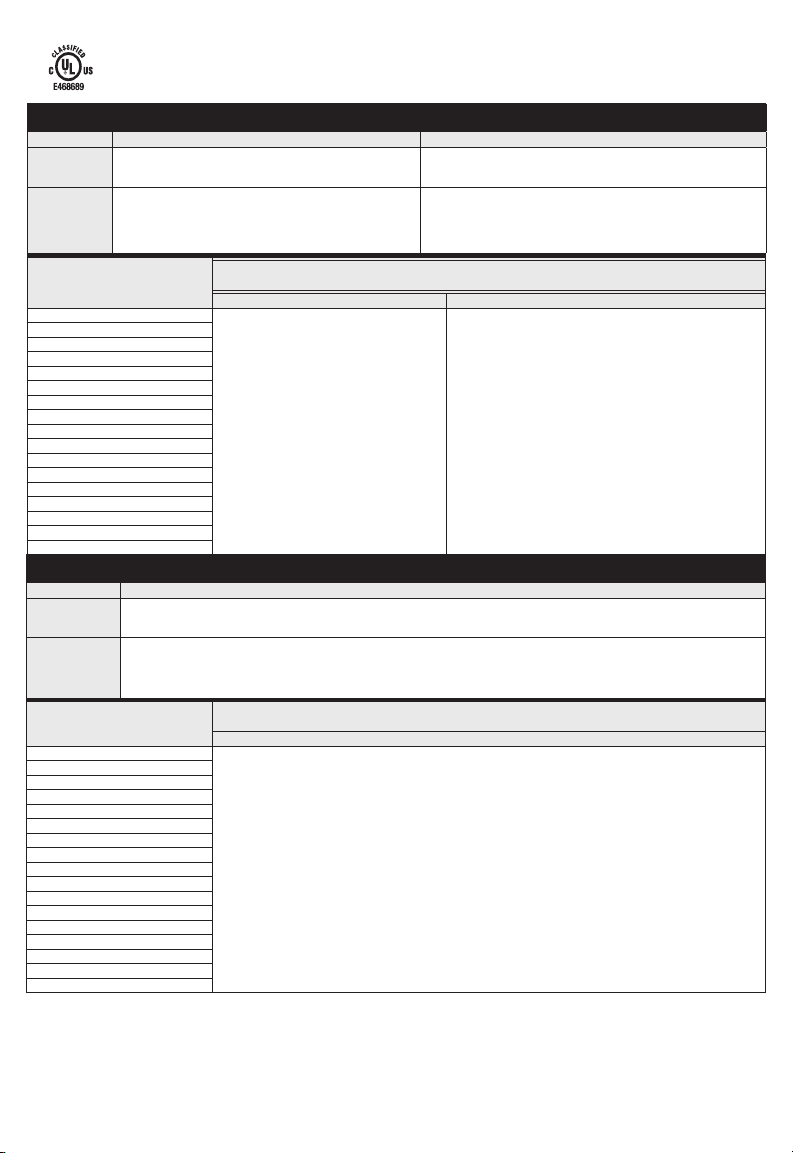
Les combinaisons connecteur-conducteur ci-dessous peuvent être installées à l'aide du sertisseur utilitaire linéaire à loquet sans matrices
11T M18™ FORCE LOGIC™ (No de cat. 2876-20) étant conforme à la norme des essais/la classe nominale spéciée ci-dessous. Les
sertissages devront être eectués à partir du centre du connecteur. Les sertissages ne devront pas être eectués au bout du connecteur.
4
5
7
9
4
5
5
7
9
7
Burndy
Classe 1A - Tension normale
connecteur
YDSR4RL
YDSR2RL
YDSR25RL
YDSR26RL
YDSR27RL
YDSR28RL
YDSR321RL
YDSR341RL 397,5 ACSR 18/1
YDSR361RL
Taille/type du
conducteur
#4 ACSR
#4 AAC 7
#2 ACSR
#2 AAC 7
1/0 ACSR 6/1
1/0 AAC 7
2/0 ACSR 6/1
2/0 AAC 7
3/0 ACSR 6/1
3/0 AAC 7
4/0 ACSR 6/1
4/0 AAC 7
336,4 ACSR 6/1
336,4 AAC 19
477 ACSR 18/1
556,5 ACSR 18/1
Toronnage
du
conducteur
6/1
7/1
6/1
7/1
sertissages par
installation (par
4
5
7
9
Classe 1 - Pleine tension
connecteur
YDS4RL
YDS2RL
YDS021RL
YDS25RL
YDS26RL
YDS27RL
YDS28RL
YDS321RL
YDS341RL 397,5 ACSR 18/1
YDS361RL
YDS4RLNI
YDS2RLNI
YDS021RLNI
YDS25RLNI
YDS26RLNI
YDS27RLNI
YDS28RLNI
YDS321RLNI
YDS341RLNI 397,5 ACSR 18/1
YDS361RLNI
YDS28RLY * 4/0 ACSR 6/1
YDS321RLY * 336,4 ACSR 18/1
YDS361RLY * 477 ACSR 18/1 9
Taille/type du
conducteur
#4 ACSR 7/1
#4 AAC 7
#2 ACSR
#2 AAC 7
#2 ACSR
#2 AAC 7
1/0 ACSR 6/1
1/0 AAC 7
2/0 ACSR 6/1
2/0 AAC 7
3/0 ACSR 6/1
3/0 AAC 7
4/0 ACSR 6/1
4/0 AAC 7
336,4 ACSR 18/1
336,4 ACC 19
477 ACSR 18/1
556,5 ACSR 18/1
#4 ACSR 7/1
#4 AAC 7
#2 ACSR
#2 AAC 7
#2 ACSR
#2 AAC 7
1/0 ACSR 6/1
1/0 AAC 7
2/0 ACSR 6/1
2/0 AAC 7
3/0 ACSR 6/1
3/0 AAC 7
4/0 ACSR 6/1
4/0 AAC 7
336,4 ACSR 18/1
336,4 AAC 19
477 ACSR 18/1
556,5 ACSR 18/1
Toronnage
conducteur
YDS-RL, YDS-RLNI, YDS-RLY, YDSR-RL
sertissages par
du
installation (par
6/1
7/1
6/1
7/1
6/1
7/1
6/1
7/1
12
Page 13
No de Cat. ................................................. 2876-20
AVERTISSEMENT
AVERTISSEMENT
AVERTISSEMENT
ATTENTION
AVERTISSEMENT
AVERTISSEMENT
Volts.............................................................. 18 CD
Type de batterie ...........................................M18™
Type de chargeur ........................................M18™
Force ........................................ 107,9 kN (11 Tons)
Capacité ................................#4-1 000 MCM Cu/Al
Module/ID de FCC ....................... BGM11S/QOQ11
Poids....................................................6 kg (14 lbs)
(outil uniquement)
Poids....................................................7 kg (16 lbs)
(avec le bloc-piles le plus lourd compatible)
Température ambiante de fonctionnement
recommandée ........... -18°C
à
50°C (0°F à 125°F)
MONTAGE DE L'OUTIL
SPÉCIFICATIONS
lire le manuel d'utilisation fourni avec le chargeur
Pour retirer la batterie, enfoncer les boutons de
déverrouillage et la tirer hors de l'outil.
Pour la batterie, la glisser dans le corps de
l'outil. S'assurer qu'elle est xée solidement.
survenir.
Pour en apprendre plus long sur la fonctionnalité
ONE-KEY™ de cet outil, visitez le milwaukeetool.
com/One-Key. Pour télécharger l’application
ONE-KEY™, visitez l’App Store
Play™ à l’aide de votre appareil intelligent.
Indicateur ONE-KEY™
Bleu uni Le mode sans l est engagé et prêt
Bleu
clignotant
Rouge
clignotant
pour le congurer à l'aide de l'appli
ONE-KEY™.
L'outil établit une communication
active avec l'appli ONE-KEY™.
L'outil a un blocage sécuritaire et ne
pourra être débloqué que par le
propriétaire à l'aide de l'appli ONE-KEY™.
-
-
L'emploi d'accessoires
Un sertissage incomplet
ONE-KEY™
®
d’Apple ou Google
MANIEMENT
Pour minimiser le
faire de travaux sur de lignes sous tension,
correspondantes, y compris celles dans NFPA
conforme à la norme ANSI Z87.1.
• Examiner le vérin sertissage, la matrice et la clevis
pour détecter toutes ssures ou d'autres dommages.
Ne pas utiliser de pièces endommagées. Contacter
un centre de réparations MILWAUKEE.
• S'assurer que la matrice est bien saisie.
• Les connecteurs et les câbles devront être utilisés
dans le cadre d'une COMBINAISON CORRECTE.
Des combinaisons incorrectes peuvent entraîner un
sertissage défectueux.
• Inspectez et jetez les pièces présentant des ssures
ou usées avant l'utilisation. Les matériaux peuvent
se ssurer ou se briser.
• Suivez les spécications d’installation spéciées
dans le tableau A et le tableau ANSI en utilisant
une combinaison approuvée de connecteurs et de
câbles, comme indiqué. D'autres utilisations peuvent
endommager l'outil et la pièce.
1. Insérez le bloc-piles.
2. Mettre le vérin et la matrice autour du connecteur.
3. Tenez l'outil fermement. Appuyez et maintenez
la gâchette.
4. Une fois le cycle terminé, l'outil s'arrête et le voyant
vert s'allume. Relâcher la gâchette.
Voyant
Indicateur
Vert xe L'outil a terminé l'opération et a
Rouge xe L'outil a terminé l'opération, mais
Rouge
clignotant
Clignotant
Rouge/vert
(après Vert
et Rouge
xe)
atteint la pression de sertissage
complet.
N'A PAS atteint la pression de
sertissage complet.
L'outil N'A PAS terminé l'opération.
L'outil a atteint son intervalle de ser-
vice. Le clignotement en rouge/vert
commencera après que l'indicateur
de fonctionnement s'ache. Renvoyez l'outil à un centre de réparations MILWAUKEE.
-
Sertissage
13
Page 14
5. Poursuivez le sertissage conformément aux in-
AVERTISSEMENT
AVERTISSEMENT
structions du tableau A et du tableau ANSI ou aux in-
structions d’installation du fabricant du connecteur.
• Les pointes doivent être placées uniformément
sur le canon du connecteur.
• Les frisures doivent être raisonnablement placées dans les bandes de couleur ou la zone
moletée du connecteur.
• Pour les épissures, commencez à sertir au centre, en travaillant vers l'extérieur tout en alternant
les côtés.
• Pour les cosses, commencez à sertir près du
tampon, en travaillant vers le canon.
• L'orientation du sertissage n'est pas critique sur
les connecteurs à fût sans soudure, mais pour de
meilleurs résultats, faites pivoter l'outil de 180°
entre les pointes.
6. Deux voyants éclaireront la pièce lorsque la
gâchette est appuyée.
Soupape de vidange de secours
S'il faut ouvrir le vérin sans avoir terminé le cycle,
appuyer et maintenir la valve de blocage de secours.
Tenir fermement l'outil jusqu'à ce que le cylindre se
rétracte complètement.
Attaches de Lanière
Utiliser les longes MILWAUKEE an de minimiser
les risques liés à des outils tombés. Conforme à la
norme ANSI/ISEA 121:2018.
1. Suivez les instructions fournies avec le cordon
de l'outil.
2. La longe créera un point d'ancrage sécurisé à
utiliser. AVERTISSEMENT! Ne pas dépasser
la capacité maximale indiquée sur l'étiquette
de la longes. Surpasser les capacité de poids
maximal peut entraîner des lésions graves et
même, la mort.
ENTRETIEN
piles, le chargeur ou la outil, sauf si ces instruc-
de MILWAUKEE.
Gardez l'outil en bon état en adoptant un programme
d'entretien ponctuel. Inspectez votre outil pour des
questions telles que le bruit excessif, de grippage
des pièces mobiles, de pièces cassées ou toute
autre condition qui peut aecter le fonctionnement
de l'outil. Retournez votre outil à un centre de service
MILWAUKEE accrédité pour obtenir le service. Après
une période pouvant aller de 6 mois à un an, selon
l'usage, retournez votre outil à un centre de service
MILWAUKEE accrédité pour d'inspection.
Si l'outil ne démarre pas ou ne fonctionne pas à
pleine puissance alors qu'il est branché sur une
batterie complètement chargée, nettoyez les points
de contact entre la batterie et l'outil. Si l'outil ne
fonctionne toujours pas correctement, renvoyez
l'outil, le chargeur et la batterie à un centre de service
MILWAUKEE accrédité.
graves entraînant la mort en seulement 2 heures
le couvercle du compartiment des piles. Si le
le dispositif, retirer les piles et les garder hors
Une pile bouton interne est utilisée pour faciliter la
fonctionnalité ONE-KEY™ complète.
Pour remplacer la pile bouton :
1. AVERTISSEMENT! Retirez la batterie de l'outil
pour éviter de démarrer l'outil.
2. Retirer les vis et ouvrir la porte du compartiment
de la pile bouton.
3. Retirer la vieille pile bouton, la tenir hors de
la portée des enfants et se débarrasser d'elle
comme il faut.
4. Mettre la nouvelle pile bouton (3V CR2032), en
mettant le pôle positif vers le haut.
5. Fermer la porte du compartiment de la pile et ser-
rer la vis fermement.
Entretien de l'outil
ONE-KEY™
14
Page 15

AVERTISSEMENT
AVERTISSEMENT
Débarrassez les tous évents des débris et de la
poussière. Gardez les outil propres, à sec et exemptes d'huile ou de graisse. Le nettoyage doit
se faire avec un linge humide et un savon doux.
Certains nettoyants tels l'essence, la térébenthine,
les diluants à laque ou à peinture, les solvants
chlorés, l'ammoniaque et les détergents d'usage
domestique qui en contiennent pourraient détériorer
le plastique et l'isolation des pièces. Ne laissez
jamais de solvants inammables ou combustibles
auprès des outils.
Pour les réparations, retournez outil, batterie et chargeur
en entier au centre-service autorisé le plus près.
Nettoyage
ACCESOIRES
L'utilisation d'autres ac-
Pour une liste complète des accessoires, visiter le
site internet www.milwaukeetool.com ou contactez
un distributeur.
COMMUNICATION SANS FIL
Pour les produits comportant des fonctions de com-
munication sans l, ONE-KEY™ y compris :
Conformément à la part 15.21 du Règlement de la
FCC, ne pas modier ce produit-ci. Une telle modication pourra annuler votre autorisation à utiliser
le produit. Cet appareil est conforme à la part 15 du
Règlement de la FCC et les normes RSS d'exemption
de licence de l'ISED-Canada. Son fonctionnement
est soumis aux conditions suivantes : 1) Cet appareil
ne doit produire aucun brouillage préjudiciable ; et 2)
cet appareil doit fonctionner en dépit de tout brouillage capté, y compris le brouillage pouvant mener à
un fonctionnement non désiré.
SERVICE - CANADA
Milwaukee Tool (Canada) Ltd
Monday-Friday, 7:00 AM - 4:30 PM CST
www.milwaukeetool.ca
AUX ÉTATS-UNIS ET AU CANADA
GARANTIE LIMITÉE -
Cet outil électrique MILWAUKEE* est garanti à l'acheteur d'origine
uniquement par un distributeur agréé de MILWAUKEE d'être exempt
de vice du matériau et de fabrication. Sous réserve de certaines
exceptions, MILWAUKEE réparera ou remplacera toute pièce de cet
outil électrique qui, après examen par MILWAUKEE, est aectée d'un
vice de matériau ou de fabrication pendant une période de cinq (5) ans
après la date d'achat, sauf indication contraire. Il faudra retourner l'outil
électrique à un centre de service en usine MILWAUKEE ou à un poste
d'entretien agréé MILWAUKEE, en port prépayé et assuré. Une copie
de la preuve d'achat doit être présentée lors du retour du produit. Cette
garantie ne couvre pas les dommages que MILWAUKEE détermine
d'être causés par des réparations ou des tentatives de réparation
par quiconque d'autre que le personnel agréé par MILWAUKEE, des
utilisations incorrectes, des altérations, des utilisations abusives, une
usure normale, une carence d'entretien ou les accidents.
Usure normale : Par rapport à plusieurs outils électriques, il faut
remplacer et entretenir leurs pièces an de jouir de leur rendement
optimal. Cette garantie ne couvre pas les cas de réparation lorsque la
vie utile normale de la pièce s'est terminée, incluant, sans s'y limiter, les
mandrins, les balais, les câbles, les patins de scie, les brides de lame,
les joints toriques, les embouts, les butoirs, les lames d'entraînement,
les pistons, les percuteurs, les poussoirs et les rondelles de protec-
tion de butoir.
*Cette garantie ne couvre ni les blocs-piles ni tous les outils électriques.
Veuillez vous reporter aux autres garanties diérentes disponibles
pour ces produits.
La période durant lequel la garantie est valable pour la lumière à DEL
de la lampe de travail à DEL (49-24-0171) et l'ampoule transformée
à DEL (49-81-0090) est d'une durée égale à la vie utile du produit
en raison des limites au-dessus. Si la lumière à DEL ou l'ampoule
transformée à DEL tombent en panne durant l'utilisation normale, la
pièce sera remplacée gratuitement.
L'inscription de la garantie n'est pas nécessaire pour bénécier de
la garantie en vigueur d'un outil électrique MILWAUKEE. La date
de fabrication du produit servira à établir la période de garantie si
aucune preuve d'achat n'est fournie lorsqu'une demande de service
sous garantie est faite.
L'ACCEPTATION DES RECOURS EXCLUSIFS DE RÉPARATION ET
DE REMPLACEMENT DÉCRITS PAR LA PRÉSENTE EST UNE CON-
DITION DU CONTRAT D'ACHAT DE TOUT PRODUIT MILWAUKEE.
SI VOUS N'ACCEPTEZ PAS CETTE CONDITION, VOUS NE DEVEZ
PAS ACHETER LE PRODUIT. EN AUCUN CAS MILWAUKEE NE
SAURAIT ÊTRE RESPONSABLE DE TOUT DOMMAGE ACCESSOIRE, SPÉCIAL OU INDIRECT, DE DOMMAGES-INTÉRÊTS
PUNITIFS OU DE TOUTE DÉPENSE, D'HONORAIRES D'AVOCATS,
DE FRAIS, DE PERTE OU DE DÉLAIS ACCESSOIRES À TOUT
DOMMAGE, DÉFAILLANCE OU DÉFAUT DE TOUT PRODUIT, Y
COMPRIS NOTAMMENT LES PERTES DE PROFIT. CERTAINS
ÉTATS ET PROVINCES NE PERMETTANT L'EXCLUSION OU LA
LIMITATION DES DOMMAGES DIRECTS OU INDIRECTS, LES
RESTRICTIONS CI-DESSOUS PEUVENT NE PAS ÊTRE APPLI-
CABLES. CETTE GARANTIE EST EXCLUSIVE ET REMPLACE
TOUTE AUTRE GARANTIE EXPRESSE, QU'ELLE SOIT VERBALE
OU ÉCRITE. DANS LA MESURE PERMISE PAR LA LOI, MILWAUKEE
RENONCE À TOUTE GARANTIE IMPLICITE, Y COMPRIS, SANS
S'Y LIMITER, TOUTE GARANTIE IMPLICITE DE COMMERCIABILITÉ OU D'ADAPTATION À UNE UTILISATION OU À UNE FIN
PARTICULIÈRE. DANS LA MESURE OÙ UNE TELLE STIPULATION
D'EXONÉRATION N'EST PAS PERMISE PAR LA LOI, LA DURÉE
DE CES GARANTIES IMPLICITES EST LIMITÉE À LA PÉRIODE
APPLICABLE DE LA GARANTIE EXPRESSE, TELLE QUE CELA
EST DÉCRIT PRÉCÉDEMMENT. CERTAINES PROVINCES NE
PERMETTANT PAS DE LIMITATION DE DURÉE DES GARANTIES
IMPLICITES, LES RESTRICTIONS CI-DESSUS PEUVENT NE PAS
ÊTRE APPLICABLES. LA PRÉSENTE CONFÈRE À L'UTILISATEUR
DES DROITS LÉGAUX PARTICULIERS ; IL BÉNÉFICIE ÉGALEMENT
D'AUTRES DROITS QUI VARIENT D'UNE PROVINCE À L'AUTRE.
Cette garantie s'applique uniquement aux produits vendus aux États-
Unis et au Canada.
Veuillez consulter l'onglet « Trouver un centre Service », dans
la section « Pièces et service » du site web de MILWAUKEE, à
l'adresse www.milwaukeetool.com, ou composer le 1.800.SAWDUST
(1.800.729.3878) an de trouver le centre de service le plus proche
dans votre région pour l'entretien, sous garantie ou non, de votre outil
électrique MILWAUKEE.
15
Page 16

ADVERTENCIAS DE SEGURIDAD
ADVERTENCIA
GENERALES PARA LA
HERRAMIENTA ELÉCTRICA
Lea todas las advertencias
Si no sigue todas las adverten-
cias e instrucciones, se pueden provocar una des-
carga eléctrica, un incendio o lesiones graves. Guarde
todas las advertencias e instrucciones para
consultarlas en el futuro. El término "herramienta
eléctrica" en todas las advertencias incluidas más
abajo se reere a su herramienta operada por conexión (cable) a la red eléctrica o por medio de una
batería (inalámbrica).
de seguridad, instrucciones,
SEGURIDAD EN EL ÁREA
DE TRABAJO
-
minada. Las áreas desordenadas u oscuras son
propicias para los accidentes.
Las herramientas
eléctricas generan chispas que pueden encender
el polvo o los vapores.
• Mantenga a los niños y a los espectadores ale-
Las distracciones pueden ocasionar la pérdida de
control.
SEGURIDAD ELÉCTRICA
el enchufe de ninguna manera. No utilice adap-
aterrizadas. Los enchufes y tomacorrientes cor-
respondientes sin modicar reducirán el riesgo de
descarga eléctrica.
• Evite el contacto corporal con superficies
estufas y refrigeradores. Existe un riesgo mayor
de descarga eléctrica si su cuerpo está aterrizado.
ni a condiciones húmedas. Si se introduce agua
en una herramienta eléctrica, aumentará el riesgo
de descarga eléctrica.
para cargar, jalar o desconectar la herramienta
movimiento. Los cables dañados o enredados
aumentan el riesgo de descarga eléctrica.
-
ores. El uso de una extensión adecuada para el uso en
exteriores disminuye el riesgo de descarga eléctrica.
en un lugar húmedo, utilice un alimentador de
corriente protegido con un interruptor de circuito
El uso de
un GFCI reduce el riesgo de descarga eléctrica.
SEGURIDAD PERSONAL
utilice el sentido común al utilizar una herramienta
drogas, alcohol o medicamentos. Un momento de
distracción al utilizar herramientas eléctricas puede
ocasionar lesiones personales graves.
El equipo de protec-
ción, tal como una máscara contra polvo, calzado
antideslizante, casco o protección auditiva, utilizado
para condiciones adecuadas disminuirá las lesiones
personales.
antes de conectarlo a una fuente de poder y/o
Trasladar herramientas con el dedo en el interruptor
o energizar herramientas eléctricas que tienen el
interruptor encendido propicia accidentes.
la herramienta. Una llave que se deje insertada en
una parte giratoria de la herramienta eléctrica puede
ocasionar lesiones personales.
contacto entre los pies y el suelo y mantenga el
Esto permite un mejor
control de la herramienta eléctrica en situaciones
inesperadas.
• Vístase adecuadamente. No utilice ropa o joyería
La ropa holgada, las alhajas
o el cabello largo pueden quedarse atrapados en
las partes móviles.
se utilicen correctamente. El uso de dispositivos
recolectores de polvo puede disminuir los riesgos
relacionados con el polvo.
de las herramientas lo hagan sentirse seguro e
ignorar los principios de seguridad de las herramientas. Un descuido puede provocar lesiones
graves en una fracción de segundo.
USO Y CUIDADO DE LAS
HERRAMIENTAS ELÉCTRICAS
-
La herramienta eléctrica correcta realizará el trabajo
mejor y con mayor seguridad a la velocidad para la
que fue diseñada.
no la enciende y la apaga. Cualquier herramienta
eléctrica que no pueda controlarse con el interruptor
es peligrosa y debe repararse.
•Desconecte el enchufe de la fuente de energía
Tales medidas preventivas de seguridad
disminuyen el riesgo de que la herramienta eléctrica
se encienda accidentalmente.
16
Page 17

ADVERTENCIA
estas instrucciones la utilicen. Las herramientas
eléctricas son peligrosas en manos de usuarios sin
capacitación.
Muchos
accidentes son ocasionados por herramientas
eléctricas con mantenimiento deciente.
limpias. Las herramientas de corte correctamente
mantenidas con bordes de corte alados son menos
propensas a atorarse y son más fáciles de controlar.
y las puntas, etc. de acuerdo con estas instrucciones, tomando en cuenta las condiciones
El uso de la
herramienta eléctrica para operaciones diferentes a
las previstas podría generar una situación peligrosa.
grasa. Las empuñaduras y supercies de sujeción
resbalosas no permiten el manejo y control seguros
de la herramienta en situaciones inesperadas.
USO Y CUIDADO DE LAS
HERRAMIENTAS CON BATERÍA
• Recargue únicamente con el cargador espe-
Un cargador que es
adecuado para un tipo de batería puede crear un
riesgo de incendio si se utiliza con otra batería.
El uso
de cualquier otra batería puede producir un riesgo
de lesiones e incendio.
-
jetapapeles, monedas, llaves, clavos, tornillos
Crear
un corto entre las terminales de la batería puede
ocasionar quemaduras o un incendio.
caso de contacto accidental, lave con agua. Si el
El líquido expulsado de la
batería puede causar irritación o quemaduras.
Las baterías dañadas o
modicadas pueden mostrar un comportamiento
impredecible, causando incendios, explosión o
riesgo de lesión.
o a temperatura excesiva. La exposición a fuego
o temperatura a más de 130° C (265° F) puede
causar explosiones.
• Siga todas las instrucciones de carga y no cargue
La carga incorrecta o a temperaturas fuera del rango
especicado puede dañar la batería y aumentar el
riesgo de incendio.
Esto asegurará que la
seguridad de la herramienta eléctrica se mantenga.
Únicamente
el fabricante o proveedores de servicio autorizados
deben dar servicio a las baterías.
REGLAS ESPECIFICAS
DE SEGURIDAD PARA
CRIMPADORAS
• Use la herramienta únicamente como se indica.
ramienta.
-
La herramienta no cuenta con aislamiento.
En caso de que sea necesario trabajar en líneas
energizadas, asegúrese de que se hayan tomado
todas las debidas precauciones, incluidas aquellas
que guran en NFPA 70E, con anticipación.
• Use la herramienta únicamente con conectores
para los cuales está diseñada. La herramienta y
conectores deben usarse en una COMBINACIÓN
APROBADA para lograr una operación exitosa.
Las combinaciones inadecuadas pueden producir
un crimpado con fallas. Puede presentarse una
descarga eléctrica, incendio, explosión y daño a la
propiedad.
• Mantenga las manos alejadas de las mordazas
de crimpado mientras la herramienta está en
uso. Los dedos podrían aplastarse.
• Para disminuir el riesgo de lesiones, utilice
gafas o lentes de seguridad con protectores
de mantenimiento en la herramienta.
•
como se indica. Otros usos pueden causar daños a
la herramienta, los accesorios y la pieza de trabajo.
• . Mantenga la
niños.
la energía. Las cuerdas, correas o cadenas
pueden romperse y provocar una falla. No utilice
MANTENIMIENTO
•
la OSHA.
17
Para reducir el riesgo de
lesiones, al momento de
Page 18
• Válgase siempre de su sentido común y sea
ADVERTENCIA
018536_2876
ADVERTENCIA
ADVERTENCIA
cuidadoso cuando utilice herramientas. No es
posible anticipar todas las situaciones que podrían
tener un desenlace peligroso. No utilice esta herramienta si no entiende estas instrucciones de uso
o si considera que el trabajo a realizar supera sus
capacidades, comuníquese con Milwaukee Tool o con
un profesional capacitado para recibir capacitación
o información adicional.
Contienen información importante. Si son ilegibles
o no están presentes, comuníquese con un centro
de servicio MILWAUKEE para obtener un reemplazo
gratuito.
•
pulido, taladrado y otras actividades de construcción
contienen químicos identicados como causantes
de cáncer, defectos congénitos u otros daños repro
ductivos. Algunos ejemplos de estos químicos son:
• plomo de pintura basada en plomo
• dióxido de silicio de los ladrillos y el cemento y otros
productos de albañilería y
• arsénico y cromo de madera con tratamiento químico.
Su riesgo por estas exposiciones varía, dependiendo
de la frecuencia con que realice este tipo de trabajo.
Para reducir su exposición a estos químicos: trabaje
en un área bien ventilada y trabaje con equipo de
seguridad aprobado, como mascarillas protectoras
contra polvo especialmente diseñadas para ltrar
partículas microscópicas.
Algunos polvos generados por
el lijado eléctrico, aserrado,
DESCRIPCION FUNCIONAL
2
1
13
12
1. Nido
2. Grillete de crimpado
3. Luces LED de trabajo
4. Indicador LED
5. Gatillo de reversa
eléctrico
6. Botón de liberación
manual
7. Colgador
11
4
3
5
10
6
9
8. Indicador ONE-KEY™
9. Empuñadura
10. Gatillo
11. Palanca de liberación
del nido
12. Cilindro hidráulico
13. Pasador de bloqueo
de nido
7
8
No de Cat. ................................................. 2876-20
Volts.............................................................. 18 CD
Tipo de batería .............................................M18™
Tipo de cargador .........................................M18™
Fuerza ...................................... 107,9 kN (11 Tons)
Capacité ................................#4-1 000 MCM Cu/Al
Módulo/ID de FCC ....................... BGM11S/QOQ11
Peso ....................................................6 kg (14 lbs)
(solo herramienta)
Peso ....................................................7 kg (16 lbs)
(con la batería compatible más pesada)
Température ambiante de fonctionnement
para operar ................ -18°C
à
50°C (0°F à 125°F)
SIMBOLOGÍA
Volts
Corriente directa
ESPECIFICACIONES
que se presenten riesgos de arco
eléctrico, choque eléctrico o daños a la
propiedad, trabaja en líneas
desenergizadas cuando resulte posible.
La herramienta no cuenta con
aislamiento. En caso de que sea
necesario trabajar en líneas energizadas,
asegúrese de que se hayan tomado
todas las debidas precauciones,
incluidas aquellas que guran en NFPA
70E, con anticipación.
las mordazas crimpadoras mientras se
esté usando la herramienta. Los dedos
podrían aplastarse.
Para reducir el riesgo de lesiones,
utilice gafas o lentes de seguridad con
protectores laterales al operar o dar
servicio a la herramienta.
Lea el manual del operador.
Underwriters Laboratories, Inc.
Estados Unidos y Canadá
Para reducir las
posibili-dades de
Mantenga las
manos alejadas de
18
Page 19
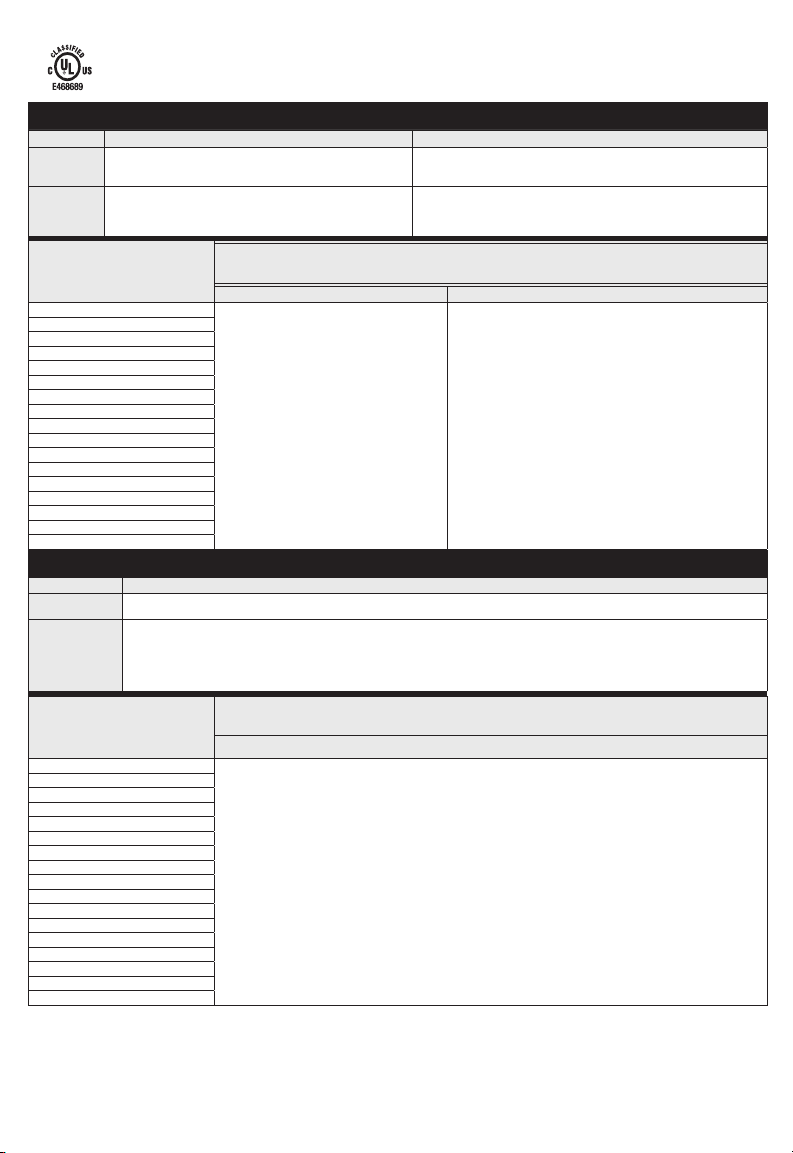
No. de
modelo de
empalme
No. de
modelo de
orejetas
Rango de tamaños
4 AWG
2 AWG
1 AWG
1/0AWG
2/0AWG
3/0AWG
4/0AWG
250 kcmil
300 kcmil 1 1
350 kcmil
400 kcmil
500 kcmil
600 kcmil
700 kcmil
750 kcmil
800 kcmil
1 000 kcmil
No. de modelo
de empalme
No. de modelo
de orejetas
Las conexiones realizadas con la herramienta 2876-20 y los números de pieza del
Burndy Richards
YS-L, YS, YS-T
YA-L, YA-2L, YA-2LN, YA-2N, YA, YA-4N, YA-L-TC, YA-L-2TC, YAB-
4N, YAV, YAZ, YBA, YAG
Empalmes: No. de crimpados por lado
Burndy Richards
Orejetas: No. total de crimpados
SCC, CC, OCC, OTCC, TCC
--
Burndy
YS-A
YA-A, YA-A-TN
Rango de tamaños
4 AWG
2 AWG
1 AWG
1/0AWG
2/0AWG
3/0AWG
4/0AWG
250 kcmil
300 kcmil 1
350 kcmil
400 kcmil
500 kcmil
600 kcmil
700 kcmil
750 kcmil
800 kcmil
1 000 kcmil
Orejetas: No. total de crimpados
Empalmes: No. de crimpados por lado
19
Burndy
Page 20
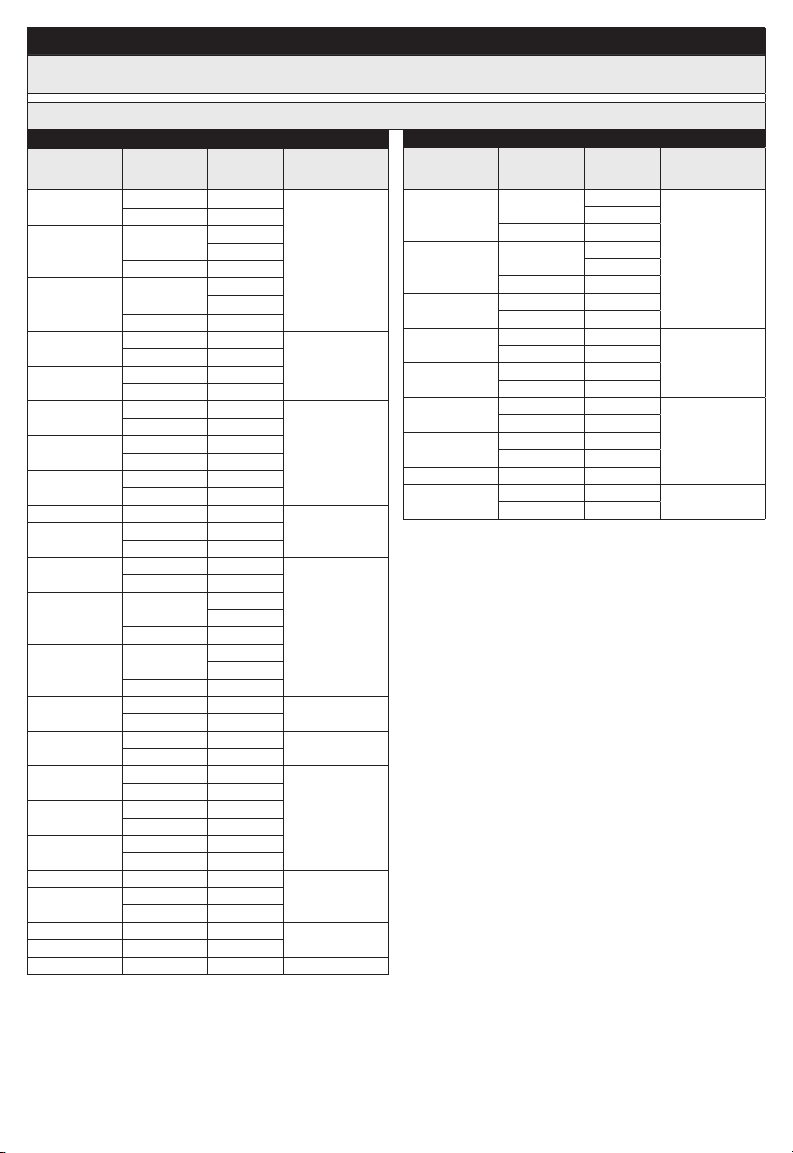
Las siguientes combinaciones de conector-conductor pueden instalarse con la crimpadora utilitaria lineal con pestillos sin dados
11T M18™ FORCE LOGIC™ (No. de Cat. 2876-20) y cumplen la norma de pruebas/clase nominal que se especica a continuación. Los
crimpados deben realizarse desde el centro del conector. Los crimpados no deben realizarse al nal del conector.
No. de
conector
YDS4RL
YDS2RL
YDS021RL
YDS25RL
YDS26RL
YDS27RL
YDS28RL
YDS321RL
YDS341RL 397,5 ACSR 18/1
YDS361RL
YDS4RLNI
YDS2RLNI
YDS021RLNI
YDS25RLNI
YDS26RLNI
YDS27RLNI
YDS28RLNI
YDS321RLNI
YDS341RLNI 397,5 ACSR 18/1
YDS361RLNI
YDS28RLY * 4/0 ACSR 6/1
YDS321RLY * 336,4 ACSR 18/1
YDS361RLY * 477 ACSR 18/1 9
* La secuencia de crimpado en los conectores RLY es a partir del
extremo del conector hacia el centro.
Tamaño/tipo
de conductor
#4 ACSR 7/1
#4 AAC 7
#2 ACSR
#2 AAC 7
#2 ACSR
#2 AAC 7
1/0 ACSR 6/1
1/0 AAC 7
2/0 ACSR 6/1
2/0 AAC 7
3/0 ACSR 6/1
3/0 AAC 7
4/0 ACSR 6/1
4/0 AAC 7
336,4 ACSR 18/1
336,4 ACC 19
477 ACSR 18/1
556,5 ACSR 18/1
#4 ACSR 7/1
#4 AAC 7
#2 ACSR
#2 AAC 7
#2 ACSR
#2 AAC 7
1/0 ACSR 6/1
1/0 AAC 7
2/0 ACSR 6/1
2/0 AAC 7
3/0 ACSR 6/1
3/0 AAC 7
4/0 ACSR 6/1
4/0 AAC 7
336,4 ACSR 18/1
336,4 AAC 19
477 ACSR 18/1
556,5 ACSR 18/1
Trenzado
conductor
YDS-RL, YDS-RLNI, YDS-RLY, YDSR-RL
No. de crimpados
del
(por extremo)
6/1
7/1
6/1
7/1
6/1
7/1
6/1
7/1
Burndy
No. de
conector
YDSR4RL
4
5
7
9
4
5
5
7
9
7
YDSR2RL
YDSR25RL
YDSR26RL
YDSR27RL
YDSR28RL
YDSR321RL
YDSR341RL 397,5 ACSR 18/1
YDSR361RL
Tamaño/tipo
de conductor
#4 ACSR
#4 AAC 7
#2 ACSR
#2 AAC 7
1/0 ACSR 6/1
1/0 AAC 7
2/0 ACSR 6/1
2/0 AAC 7
3/0 ACSR 6/1
3/0 AAC 7
4/0 ACSR 6/1
4/0 AAC 7
336,4 ACSR 6/1
336,4 AAC 19
477 ACSR 18/1
556,5 ACSR 18/1
Trenzado
del
conductor
6/1
7/1
6/1
7/1
No. de crimpados
(por extremo)
4
5
7
9
Page 21
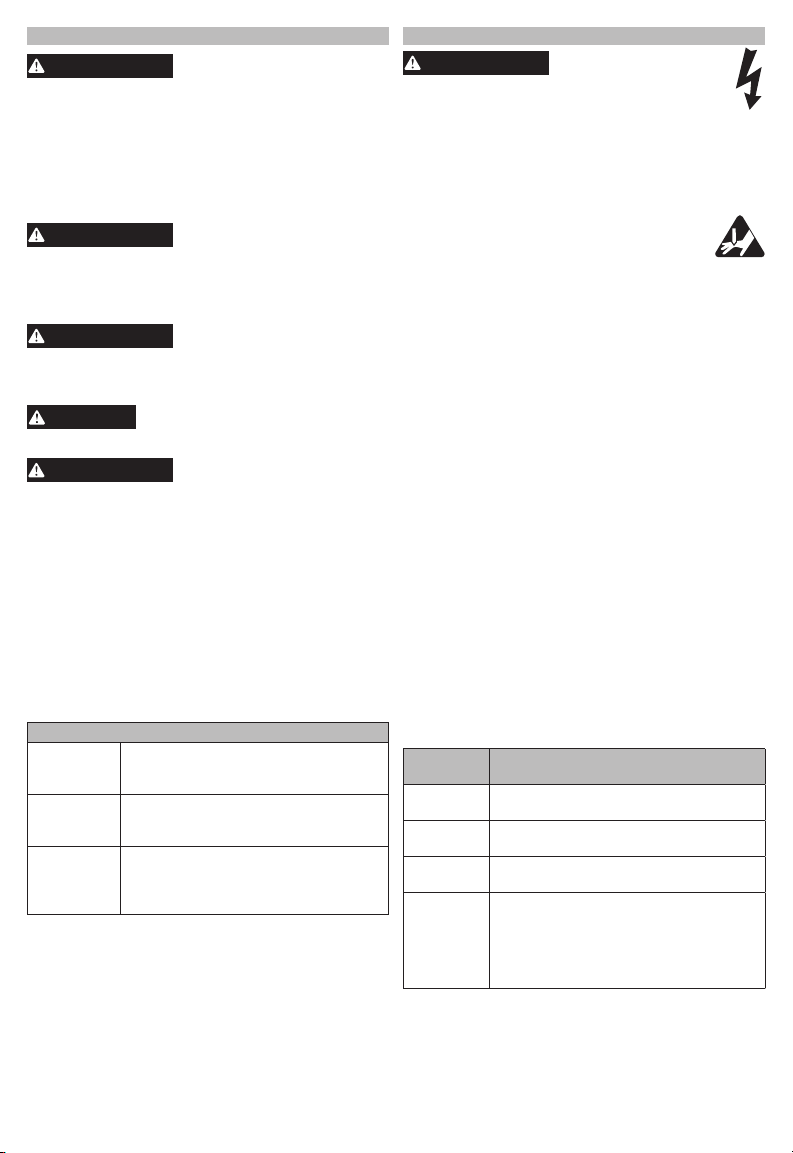
ENSAMBLAJE
ADVERTENCIA
ADVERTENCIA
ADVERTENCIA
ATENCIÓN
ADVERTENCIA
ADVERTENCIA
Para retirar la batería, presione los botones de
liberación y jale de la batería para sacarla de la
herramienta.
Para introducir la batería, deslícela en el cuerpo de
la herramienta. Asegúrese de que quede bien rme
en su posición.
mendados para esta herramienta. El uso de accesorios no recomendados podría resultar
peligroso.
nido completamente cerrado.
incendio. Use la herramienta solo con conectores
resultar en un engarce defectuoso. Podrían
siones y daños a la propiedad.
Para obtener más información acerca de la funcionalidad de ONE-KEY™ para esta herramienta, visite
milwaukeetool.com/One-Key. Para descargar la
aplicación ONE-KEY™, visite la App Store
Play™ desde su dispositivo inteligente.
Azul jo El modo inalámbrico está activo y
Azul
intermitente
Rojo
intermitente
el cargador especificado
herramienta
Utilice únicamente acceso -
Para evitar daños a la herramienta, no opere la herramienta sin el
Un engarce incompleto o
defectuoso podría causar un
ONE-KEY™
®
o Google
Indicador ONE-KEY™
listo para congurar a través de la
aplicación ONE-KEY™.
La herramienta tiene una
comunicación activa con la
aplicación ONE-KEY™.
La herramienta tiene activo el
bloqueo de seguridad y sólo podrá
desbloquearla el dueño a través de
la aplicación ONE-KEY™.
OPERACIÓN
La herramienta no cuenta con aislamiento. En
Mantenga las manos alejadas de las
usando la herramienta. Los dedos podrían aplastarse.
indicada para cumplir con lo dispuesto en la
norma ANSI Z87.1.
• Revise la cilindro hidráulico crimpadora, el cuna
y la clevis para detectar suras u otros daños. No
utilice piezas dañadas. Comuníquese con un centro
de servicio MILWAUKEE.
• Asegúrese de que la cuna esté sujetada correctamente.
• Los conectores y cables deben usarse en una
COMBINACIÓN APROBADA. Las combinaciones
inadecuadas pueden producir un crimpado con
fallas.
•Inspeccione y descarte las piezas de trabajo con
suras o desgaste antes de usarlas. Los materiales
pueden surarse o quebrarse.
• Siga las especicaciones de instalación especica-
das en la Tabla A y la Tabla ANSI utilizando una
combinación aprobada de conectores y cables como
se indica. Otros usos pueden dañar la herramienta
y la pieza de trabajo.
1. Inserte la batería.
2. Coloque el cilindro hidráulico y la matriz alrededor
del conector.
3. Sostenga la herramienta rmemente. Presione sin
soltar el gatillo.
4. Cuando el ciclo haya nalizado, la herramienta se
apagará y el indicador se iluminará. Suelte el gatillo.
LED
Indicador
Verde jo La herramienta terminó la operación y
Rojo jo La herramienta terminó la operación pero
Rojo
destellando
Destellando
Rojo/Verde
(después
Verde y
Rojo jo)
alcanzó la presión total de crimpado.
NO alcanzó la presión total de crimpado.
La herramienta NO realizó la operación.
La herramienta llegó a su intervalo de
servicio. El color verde/rojo empezará
a destellar después de que se muestre
el indicador de la operación. Devuelva
la herramienta a un centro de servicio
MILWAUKEE.
-
Crimpado
21
Page 22
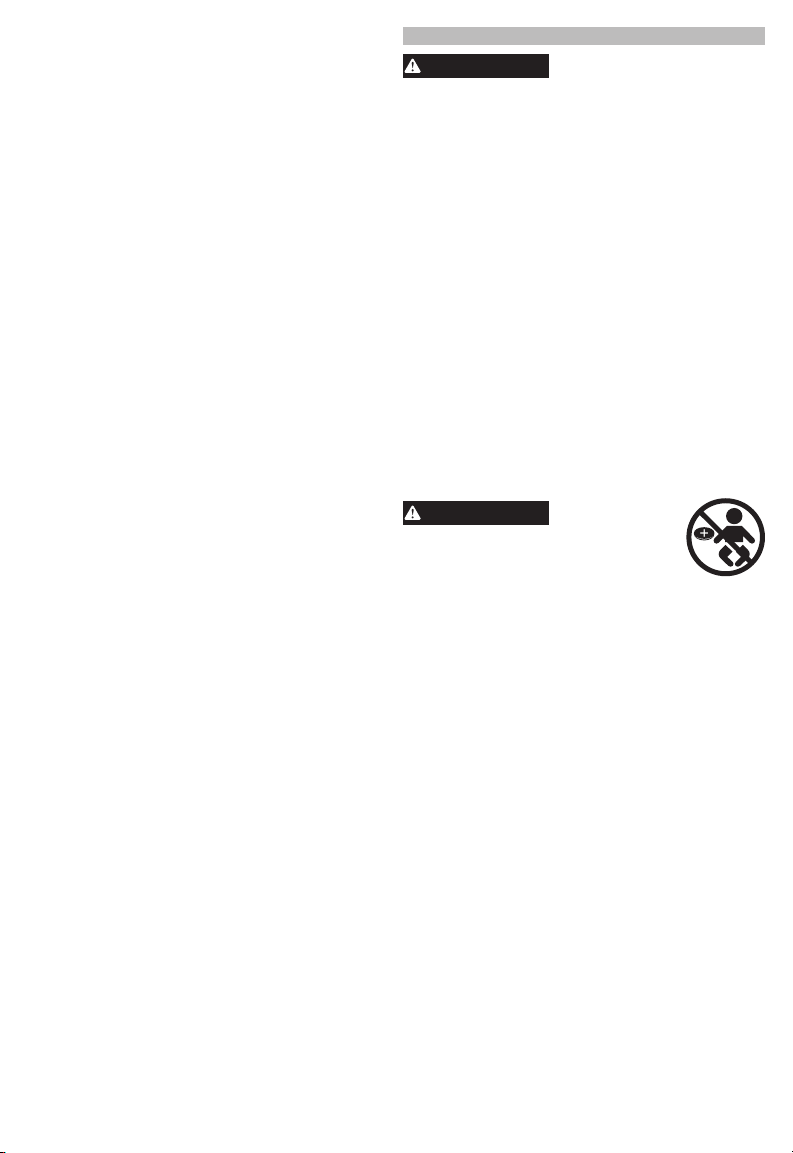
5. Continúe engarzando de acuerdo con las instruc-
ADVERTENCIA
ADVERTENCIA
ciones de la Tabla A y la Tabla ANSI o las instruc-
ciones de instalación del fabricante del conector.
• Los engarces deben colocarse uniformemente
en el cañón del conector.
• Los engarces deben colocarse razonablemente
dentro de las bandas de color o área moleteada
del conector.
• Para empalmes, comience a apretar en el centro,
trabajando hacia afuera mientras alterna los lados.
• Para las orejetas, comience a apretar cerca de
la almohadilla, trabajando hacia el cañón.
• La orientación del engarzado no es crítica en los
conectores de barril sin costura, pero para ob-
tener los mejores resultados, gire la herramienta
180 ° entre los pliegues.
6. Dos focos LED iluminarán la pieza de trabajo al
jalar el gatillo.
Si el cilindro hidráulico necesita abrirse sin nalizar
el ciclo, presione sin soltar la válvula de liberación de
respaldo. Sostenga la herramienta rmemente hasta
que el cilindro se retraiga por completo.
Use los acolladores MILWAUKEE para ayudar a
reducir los riesgos asociados con las herramientas
caídas.Cumple con ANSI/ISEA 121:2018.
1. Siga las instrucciones proporcionadas con el
cordón para herramientas.
2. El cordón creará un punto de anclaje seguro para
su uso. ADVERTENCIA! No exceda la capacidad
máxima marcada en la etiqueta de la lanzadera.
Exceder la capacidad máxima puede resultar en
lesiones graves o la muerte.
MANTENIMIENTO
Para reducir el riesgo de una
servicio de MILWAUKEE para todas las demás
reparaciones.
Mantenimiento de las herramientas
Adopte un programa regular de mantenimiento y
mantenga su herramienta en buenas condiciones.
Inspeccione la herramienta para problemas como
ruidos indebidos, desalineadas o agarrotadas
de partes móviles, piezas rotas o cualquier otra
condición que pueda afectar el funcionamiento de
la herramienta. Envíe su herramienta al Centro de
Servicio MILWAUKEE para reparación. Después
de 6 meses a un año, dependiendo del uso
dado, envíe su herramienta al Centro de Servicio
MILWAUKEE más cercano para la inspección.
Si la herramienta no arranca u opera a toda su
potencia con una batería completamente cargada,
limpie, con una goma o borrador, los contactos de la
batería y de la herramienta. Si aun asi la herramienta
no trabaja correctamente, regrésela, con el cargador
y la batería, a un centro de servicio MILWAUKEE.
tan solo en 2 horas si se ingiere o entra al cu-
Se usa una batería interna tipo moneda para facilitar
la funcionalidad completa de ONE-KEY™.
Para cambiar la batería tipo moneda:
1. ¡ADVERTENCIA! Retire la batería de la herra-
2. Retire los tornillos y abra la puerta del compar-
3. Retire la batería tipo moneda anterior, manténgala
4. Inserte la nueva batería tipo moneda (3V CR2032),
5. Cierre la tapa de la batería y apriete el tornillo(s)
Batería interna tipo moneda
mienta para evitar arrancar la herramienta.
timiento de la batería tipo moneda.
fuera del alcance de los niños y deshágase de ella
de la manera correcta.
con el lado positivo hacia arriba.
con rmeza.
ONE-KEY™
22
Page 23

ADVERTENCIA
Para reducir el riesgo de le-
ADVERTENCIA
daño a la herramienta, nunca la sumerja en
misma.
Limpie el polvo y suciedad de las cualquier ventilas.
Mantenga los herramienta, limpios, secos y libres
de aceite o grasa. Use solo jabón neutro y un trapo
húmedo para limpiar, ya que algunos substancias y
solventes limpiadores son dañinos a los plásticos y
partes aislantes. Algunos de estos incluyen: gasolina,
turpentina,thíner, lacas, thíner para pinturas, solventes para limpieza con cloro, amoníaco y detergentes
caseros que tengan amonia. Nunca usa solventes inamables o combustibles cerca de una herramienta.
Si su herramienta, batería o cargador están dañados,
envíela al centro de servicio autorizado más cercano.
Limpieza
Reparaciones
ACCESORIOS
-
dos. Otros accesorios puede ser peligroso.
Para una lista completa de accessorios, visite
nuestro sitio en Internet: www.milwaukeetool.com o
póngase en contacto con un distribuidor.
COMUNICACIÓN INALÁMBRICA
Para productos que cuentan con funciones de comu-
nicación inalámbrica, incluida ONE-KEY™:
De conformidad con la parte 15.21 del Reglamento
de FCC, no modique este producto. La modicación
podría ocasionar que se anule su autorización para
operar el producto. Este dispositivo cumple con lo
dispuesto en la parte 15 del Reglamento de la FCC
así como las normas RSS de exención de licencia
de ISED-Canada. La operación está sujeta a las
siguientes dos condiciones: 1) Este dispositivo no
debe ocasionar interferencia nociva y 2) este dispositivo debe aceptar cualquier interferencia que
se reciba, incluyendo la interferencia que pueda
ocasionar operación no deseada.
SOPORTE DE SERVICIO - MEXICO
CENTRO DE ATENCION A CLIENTES
Techtronic Industries Mexico, S.A. de C.V.
Av. Presidente Masarik 29 Piso 7
11560 Polanco V Seccion
Miguel Hidalgo, Distrito Federal, México
01 (800) 030-7777 o (55) 4160-3540
O contáctanos en www.milwaukeetool.com.mx
Lunes a Viernes (9am a 6pm)
GARANTÍA LIMITADA - E.U.A. Y CANADÁ
Esta herramienta eléctrica de MILWAUKEE* está garantizada, ante el
comprador original únicamente, por parte de un distribuidor autorizado
MILWAUKEE, de que no tenga material y mano de obra defectuosos.
Sujeto a ciertas excepciones, MILWAUKEE reparará o sustituirá
cualquier pieza de esta herramienta eléctrica que tenga defectos de
material o mano de obra según lo determine MILWAUKEE mediante
una revisión, por un periodo de cinco (5) años después de la fecha de
compra a menos que se indique lo contrario. Al devolver la herramienta
eléctrica a un centro de servicio de fábrica de MILWAUKEE o a una
estación de servicio autorizada de MILWAUKEE, es necesario que la
devolución se haga con ete pagado por adelantado y asegurado. Se
debe incluir una copia del comprobante de compra con el producto
devuelto. Esta garantía no aplica a daños que MILWAUKEE determine
que son ocasionados por reparaciones o intentos de reparaciones
realizados por una persona que no sea personal autorizado de
MILWAUKEE, uso indebido, alteraciones, maltrato, desgaste normal,
falta de mantenimiento o accidentes.
Desgaste normal: Muchas herramientas eléctricas necesitan cambios
de piezas y mantenimiento periódicos para alcanzar su máximo rendimiento Esta garantía no cubre la reparación cuando el uso normal ha
agotado la vida útil de una pieza, incluyendo, entre otros, mandriles,
cepillos, cables, zapatas de la sierra, abrazaderas de la hoja, juntas
tóricas, sellos, protectores, hojas de accionamiento, pistones, herrajes,
levantadores y arandelas de cubierta de los protectores.
*La presente garantía no cubre ni las baterías ni todas las herramientas
eléctricas. Consulte las distintas garantías independientes que están
disponibles para estos productos.
La vigencia de la garantía de la luz LED en la lámpara LED de trabajo
(49-24-0171) y el foco mejorado de LED (49-81-0090) es la misma
que la vida útil del producto sujeto a las limitaciones anteriores. Si
la luz LED o el foco mejorado LED presentan fallas durante su suso
normal, se cambiará la pieza sin costo.
No es necesario realizar el registro de la garantía para recibir la
garantía correspondiente a un producto de herramienta eléctrica
de MILWAUKEE. La fecha de fabricación del producto servirá para
determinar la vigencia de la garantía en caso de que no presente
ningún comprobante de compra al solicitar el servicio en garantía.
LA ACEPTACIÓN DE LOS RESARCIMIENTOS EXCLUSIVOS
DE REPARACIÓN Y SUSTITUCIÓN AQUÍ DESCRITOS ES UNA
CONDICIÓN DEL CONTRATO EN CUANTO A LA COMPRA DE
TODO PRODUCTO DE MILWAUKEE. SI USTED NO ACEPTA ESTA
CONDICIÓN, NO DEBE COMPRAR EL PRODUCTO. MILWAUKEE
NO SERÁ RESPONSABLE EN NINGÚN CASO DE DAÑOS INCIDENTALES, ESPECIALES, EMERGENTES O PUNITIVOS NI DE NINGÚN
COSTO, HONORARIOS DE ABOGADOS, GASTOS, PÉRDIDAS O
DEMORAS QUE SUPUESTAMENTE SEAN CONSECUENCIA DE
ALGÚN DAÑO, FALLA O DEFECTO DE ALGUNO DE LOS PRODUCTOS, INCLUYENDO, ENTRE OTROS, RECLAMACIONES POR
PÉRDIDA DE UTILIDADES. ALGUNOS ESTADOS NO PERMITEN LA
EXCLUSIÓN O LIMITACIÓN DE RESPONSABILIDAD POR DAÑOS
INCIDENTALES O EMERGENTES, POR LO QUE LA ANTERIOR
LIMITACIÓN O EXCLUSIÓN PODRÍA NO APLICARSE EN SU
CASO. ESTA GARANTÍA ES EXCLUSIVA Y SUSTITUYE TODAS
LAS DEMÁS GARANTÍAS EXPRESAS, SEAN ESTAS ESCRITAS U
ORALES. HASTA DONDE PERMITA LA LEY, MILWAUKEE DESCONOCE CUALQUIER GARANTÍA IMPLÍCITA, INCLUYENDO, SIN LIMITACIÓN, CUALQUIER GARANTÍA IMPLÍCITA DE COMERCIABILIDAD
O IDONEIDAD PARA UN FIN O USO ESPECÍFICO; HASTA EN QUE
DICHO DESCONOCIMIENTO NO SEA PERMITIDO POR LA LEY,
DICHAS GARANTÍAS IMPLÍCITAS SE LIMITAN A LA DURACIÓN DE
LA GARANTÍA EXPRESA CORRESPONDIENTE SEGÚN LO ARRIBA
DESCRITO. ALGUNOS ESTADOS NO PERMITEN LIMITACIONES
EN LA VIGENCIA DE UNA GARANTÍA IMPLÍCITA, POR LO QUE LA
ANTERIOR LIMITACIÓN PUDIERA NO APLICAR A USTED. ESTA
GARANTÍA LE CONFIERE DERECHOS JURÍDICOS ESPECÍFICOS
Y USTED PODRÍA, ADEMÁS, TENER OTROS DERECHOS QUE
VARÍAN SEGÚN EL ESTADO.
Esta garantía aplica únicamente a los productos vendidos en EE.
UU. y Canadá.
Consulte la pestaña “Búsqueda de centro de servicio” en la sección de
Partes y servicio del sitio web de MILWAUKEE en www.milwaukeetool.
com o llame al 1.800.SAWDUST (1.800.729.3878) para localizar su
centro de servicio más cercano para darle servicio, con y sin garantía,
a una herramienta de MILWAUKEE.
Esta garantía aplica únicamente a los productos vendidos en EE.
UU. y Canadá.
Consulte la pestaña "Búsqueda de centro de servicio" en la sec-
ción de "Piezas y servicio" del sitio web de MILWAUKEE en www.
milwaukeetool.com o llame al 1.800.SAWDUST (1.800.729.3878) para
localizar su centro de servicio más cercano para darle servicio con y
sin garantía a una herramienta eléctrica de Milwaukee.
23
Page 24
PÓLIZA DE GARANTÍA - VALIDA
SOLO PARA MÉXICO, AMÉRICA
La garantía de TECHTRONIC INDUSTRIES es por 5 años a partir de
la fecha original de compra.
Esta tarjeta de garantía cubre cualquier defecto de material y mano
de obra en ese Producto.
Para hacer válida esta garantía, presente esta tarjeta de garantía,
cerrada/sellada por el distribuidor o la tienda donde compró el producto, al Centro de Servicio Autorizado (ASC). O, si esta tarjeta no
se ha cerrado/sellado, presente la prueba original de compra a ASC.
Llame 55 4160-3547 para encontrar el ASC más cercano, para ser-
vicio, partes, accesorios o componentes.
Procedimiento para hacer válida esta garantía
Lleve el producto a ASC, junto con la tarjeta de garantía cerrada/
sellada por el distribuidor o la tienda donde compró el producto, y
cualquier pieza o componente defectuoso se reemplazará sin costo
para usted. Cubriremos todos los costos de ete con relación a este
proceso de garantía.
Excepciones
Esta garantía no tendrá validez en las siguientes situaciones:
a) Cuando el producto se use de manera distinta a la que indica el
b) Cuando las condiciones de uso no sean normales.
c)
Nota: si el juego de cables está dañado, tiene que reemplazarse
en un Centro de Servicio Autorizado para evitar riesgos eléctricos.
CENTRO DE SERVICIO Y ATENCIÓN
Llame al 55 4160-3547
IMPORTADO Y COMERCIALIZADO POR
TECHTRONIC INDUSTRIES, MÉXICO, S.A. DE C.V.
Miguel de Cervantes Saavedra No.301 Piso 5, Torre Norte
11520 Colonia Ampliación Granada
Miguel Hidalgo, Ciudad de Mexico, Mexico
CENTRAL Y EL CARIBE
manual del usuario nal o de instrucciones.
Cuando otras personas no autorizadas por TECHTRONIC INDUSTRIES
modiquen o reparen el producto.
Modelo:
Fecha de Compra:
MILWAUKEE TOOL
58140456d2 961014762-02(A)
05/23 Printed in China
 Loading...