

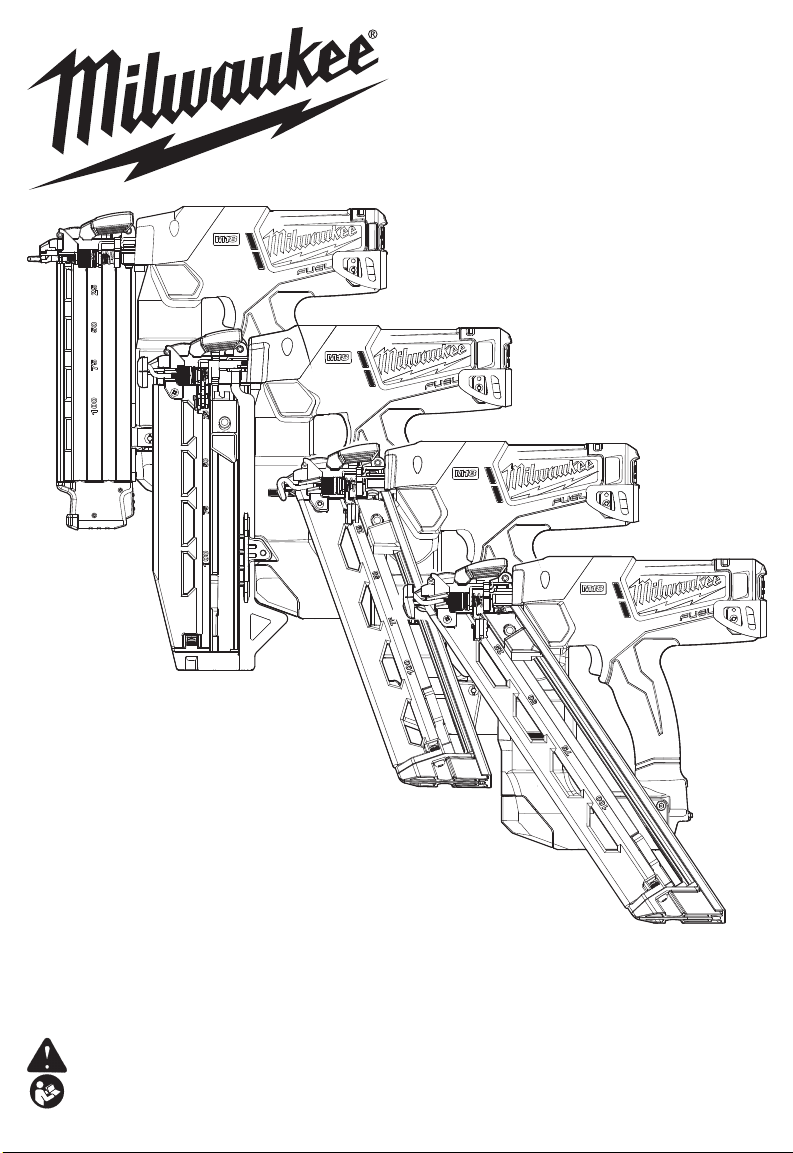
Milwaukee 2740-20, 2741-20, 2742-20, 2743-20 Operator's Manual
OPERATOR'S MANUAL
MANUEL de L'UTILISATEUR
MANUAL del OPERADOR
Cat. No. / No de cat.
2740-20, 2741-20, 2742-20, 2743-20
M18 FUEL™ FINISH NAILERS
CLOUEUSES DE FINITION M18 FUEL™
CLAVADORAS DE ACABADOS M18 FUEL™
WARNING To reduce the risk of injury, user must read and understand operator's manual.
AVERTISSEMENT An de réduire le risque de blessures, l'utilisateur doit lire et bien
comprendre le manuel.
ADVERTENCIA Para reducir el riesgo de lesiones, el usuario debe leer y entender el manual.

GENERAL POWER TOOL
WARNING
SAFETY WARNINGS
Read all safety warnings, instruc-
tions provided with this power tool. Failure to follow
all instructions listed below may result in electric shock,
re and/or serious injury. Save all warnings and in
structions for future reference. The term "power tool"
in the warnings refers to your mains-operated (corded)
power tool or battery-operated (cordless) power tool.
tions, illustrations and specifica-
WORK AREA SAFETY
• Keep work area clean and well lit. Cluttered or dark
areas invite accidents.
• Do not operate power tools in explosive atmo
spheres, such as in the presence of ammable
liquids, gases or dust. Power tools create sparks
which may ignite the dust or fumes.
• Keep children and bystanders away while operating
a power tool. Distractions can cause you to lose control.
ELECTRICAL SAFETY
• Power tool plugs must match the outlet. Never modify
the plug in any way. Do not use any adapter plugs with
earthed (grounded) power tools. Unmodied plugs
and matching outlets will reduce risk of electric shock.
• Avoid body contact with earthed or grounded
surfaces, such as pipes, radiators, ranges and
refrigerators. There is an increased risk of electric
shock if your body is earthed or grounded.
• Do not expose power tools to rain or wet conditions.
Water entering a power tool will increase the risk of
electric shock.
• Do not abuse the cord. Never use the cord for car
rying, pulling or unplugging the power tool. Keep
cord away from heat, oil, sharp edges or moving
parts. Damaged or entangled cords increase the risk
of electric shock.
• When operating a power tool outdoors, use an
extension cord suitable for outdoor use. Use of a cord
suitable for outdoor use reduces the risk of electric shock.
• If operating a power tool in a damp location is
unavoidable, use a ground fault circuit interrupter
(GFCI) protected supply. Use of an GFCI reduces
the risk of electric shock.
PERSONAL SAFETY
• Stay alert, watch what you are doing and use
common sense when operating a power tool. Do
not use a power tool while you are tired or under
the inuence of drugs, alcohol or medication. A
moment of inattention while operating power tools may
result in serious personal injury.
• Use personal protective equipment. Always wear
eye protection. Protective equipment such as a dust
mask, non-skid safety shoes, hard hat or hearing
protection used for appropriate conditions will reduce
personal injuries.
• Prevent unintentional starting. Ensure the switch
is in the off-position before connecting to power
source and/or battery pack, picking up or carrying
the tool. Carrying power tools with your nger on the
switch or energizing power tools that have the switch
on invites accidents.
• Remove any adjusting key or wrench before turning
the power tool on. A wrench or a key left attached to a
rotating part of the power tool may result in personal injury.
• Do not overreach. Keep proper footing and balance
at all times. This enables better control of the power
tool in unexpected situations.
• Dress properly. Do not wear loose clothing or
jewelry. Keep your hair and clothing away from
moving parts. Loose clothes, jewelry or long hair can
be caught in moving parts.
• If devices are provided for the connection of dust
extraction and collection facilities, ensure these are
connected and properly used. Use of dust collection
can reduce dust-related hazards.
• Do not let familiarity gained from frequent use of
-
tools allow you to become complacent and ignore
tool safety principles. A careless action can cause
severe injury within a fraction of a second.
POWER TOOL USE AND CARE
• Do not force the power tool. Use the correct power tool
for your application. The correct power tool will do the
job better and safer at the rate for which it was designed.
-
• Do not use the power tool if the switch does not turn
it on and off. Any power tool that cannot be controlled
with the switch is dangerous and must be repaired.
• Disconnect the plug from the power source and/
or remove the battery pack, if detachable, from
the power tool before making any adjustments,
changing accessories, or storing power tools. Such
preventive safety measures reduce the risk of starting
the power tool accidentally.
• Store idle power tools out of the reach of children and
do not allow persons unfamiliar with the power tool
or these instructions to operate the power tool. Power
tools are dangerous in the hands of untrained users.
• Maintain power tools and accessories. Check for
misalignment or binding of moving parts, breakage
of parts and any other condition that may affect
the power tool’s operation. If damaged, have the
power tool repaired before use. Many accidents are
caused by poorly maintained power tools.
-
• Keep cutting tools sharp and clean. Properly
maintained cutting tools with sharp cutting edges are
less likely to bind and are easier to control.
• Use the power tool, accessories and tool bits etc.
in accordance with these instructions, taking into
account the working conditions and the work to be
performed. Use of the power tool for operations different
from those intended could result in a hazardous situation.
• Keep handles and grasping surfaces dry, clean
and free from oil and grease. Slippery handles and
grasping surfaces do not allow for safe handling and
control of the tool in unexpected situations.
BATTERY TOOL USE AND CARE
• Recharge only with the charger specied by the
manufacturer. A charger that is suitable for one type
of battery pack may create a risk of re when used with
another battery pack.
• Use power tools only with specically designated
battery packs. Use of any other battery packs may
create a risk of injury and re.
• When battery pack is not in use, keep it away from
other metal objects, like paper clips, coins, keys,
nails, screws or other small metal objects, that can
make a connection from one terminal to another.
Shorting the battery terminals together may cause
burns or a re.
• Under abusive conditions, liquid may be ejected from
the battery; avoid contact. If contact accidentally
occurs, ush with water. If liquid contacts eyes,
additionally seek medical help. Liquid ejected from
the battery may cause irritation or burns.
• Do not use a battery pack or tool that is damaged or
modied. Damaged or modied batteries may exhibit
unpredictable behavior resulting in re, explosion or
risk of injury.
• Do not expose a battery pack or tool to re or
excessive temperature. Exposure to re or temperature
2
above 265°F (130°C) may cause explosion.
WARNING
C
US
• Follow all charging instructions and do not charge
the battery pack or tool outside the temperature
range specied in the instructions. Charging im
properly or at temperatures outside the specied range
may damage the battery and increase the risk of re.
SERVICE
• Have your power tool serviced by a qualied repair
person using only identical replacement parts.
This will ensure that the safety of the power tool is
maintained.
• Never service damaged battery packs. Service
of battery packs should only be performed by the
manufacturer or authorized service providers.
NAILER SAFETY WARNINGS
• Always assume that the tool contains fasteners.
Careless handling of the nailer can result in unexpected
ring of fasteners and personal injury.
• Do not point the tool towards yourself or anyone
nearby. Unexpected triggering will discharge the fas
tener causing an injury.
• Do not actuate the tool unless the tool is placed
rmly against the workpiece. If the tool is not in con
tact with the workpiece, the fastener may be deflected
away from your target.
• Disconnect the tool from the power source when
the fastener jams in the tool. While removing a
jammed fastener, the nailer may be accidentally acti
vated if it is plugged in.
• Use caution while removing a jammed fastener.
The mechanism may be under compression and the
fastener may be forcefully discharged while attempting
to free a jammed condition.
• Do not use this nailer for fastening electrical
cables. It is not designed for electric cable installa
tion and may damage the insulation of electric cables
thereby causing electric shock or re hazards.
•Prior to each use, check workpiece contact and
trigger for correct operation. Do not disassemble or
clamp parts of the workpiece contact, trigger, or driv
ing mechanism. This will cause unexpected actuation,
resulting in serious injury.
•Do not engage in horseplay. The discharged fasten
ers are projectiles capable of causing serious injury.
•Do not remove, tamper with, or otherwise cause
the tool operating controls to become inoperable.
This will cause unexpected actuation, resulting in
serious injury.
•Do not operate a tool if any portion of the tool oper
ating controls is inoperable, disconnected, altered,
or not working properly. This will cause unexpected
actuation, resulting in serious injury.
•Always keep hands and body away from discharge
area of the tool. Never attempt to clear a jammed
workpiece contact by grasping the discharge area of
the tool. Fasteners discharged from tool can cause
serious injury if they contact hands or body.
•Do not drive fasteners close to the edge of the
workpiece. Fasteners can slip off corners and edges
or penetrate through thin material, making them pro
jectiles capable of causing serious injury.
•Use the tool only for the intended purpose. Do not
abuse the tool. Do not use as a hammer, stamp or en
grave information onto parts, drop or impact the tool or
otherwise apply excess force to the tool in use. Do not
mount the tool to stands or modify it for stationary use.
• Maintain labels and nameplates. These carry
important information. If unreadable or missing, contact
a MILWAUKEE service facility for a free replacement.
•
construction activities contains chemicals known to
-
cause cancer, birth defects or other reproductive harm.
Some examples of these chemicals are:
• lead from lead-based paint
• crystalline silica from bricks and cement and other
masonry products, and
• arsenic and chromium from chemically-treated lumber.
Your risk from these exposures varies, depending on
how often you do this type of work. To reduce your
exposure to these chemicals: work in a well ventilated
area, and work with approved safety equipment, such
as those dust masks that are specially designed to
lter out microscopic particles.
Some dust created by power sanding,
sawing, grinding, drilling, and other
SYMBOLOGY
Volts
-
-
Flashing Light -
Read Operator's Manual
Wear Eye Protection
-
Keep Hands Away
-
Volts.............................................................. 18 DC
Battery Type .................................................M18™
-
Charger Type................................................M18™
Cat. No. ...................... 2740-20 18 Ga Brad Nailer
Fastener Length ............... min 0.625" / max 2.125"
Collation Angle.....................................................
Fastener Size (Diameter) ...................18 Ga / 1.2 mm
-
Magazine Capacity ........................................110 nails
Cat. No. ..... 2741-20 16 Ga Straight Finish Nailer
Fastener Length ..................... min 0.75" / max 2.5"
Collation Angle.....................................................
Fastener Size (Diameter) ...................16 Ga / 1.6 mm
Magazine Capacity ........................................110 nails
Cat. No. .......2742-20 16 Ga Angled Finish Nailer
Fastener Length ..................... min 1.25" / max 2.5"
Collation Angle...................................................
-
Fastener Size (Diameter) ...................16 Ga / 1.6 mm
Magazine Capacity ........................................110 nails
Cat. No. .................... 2743-20 15 Ga Finish Nailer
-
Fastener Length ..................... min 1.25" / max 2.5"
Collation Angle...................................................
Fastener Size (Diameter) ...................15 Ga / 1.8 mm
Magazine Capacity ........................................110 nails
3
Direct Current
Solid Light -
Single Sequential Actuation
Contact (Bump) Actuation
UL Listing for Canada and U.S.
SPECIFICATIONS
0°
0°
20°
34°
FUNCTIONAL DESCRIPTION
WARNING
WARNING
WARNING
WARNING
WARNING
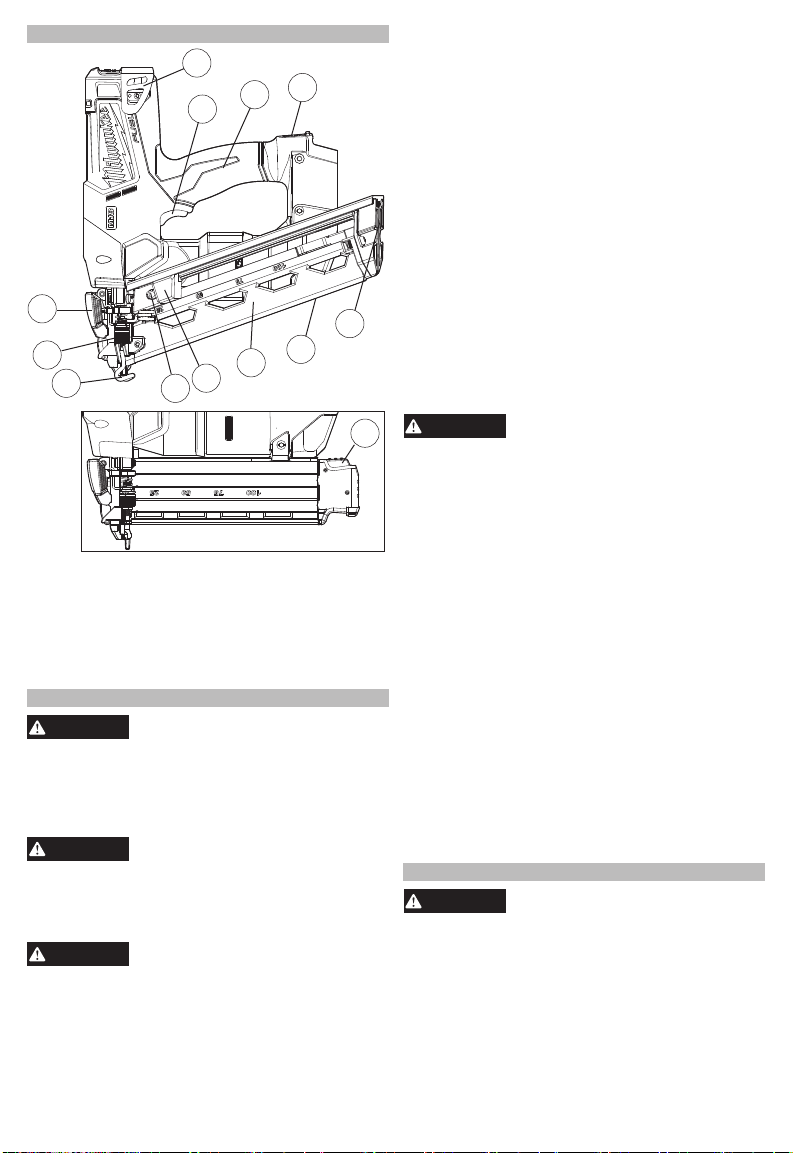
1
4
3
2
12
11
10
7
8
9
5
6
9
1. Hook
2. Trigger
3. Handle
4. Power/Actuation
selection
5. Nail slot
6. LED
7. Magazine
8. Pusher
9. Pusher release
button
10. Workpiece contact
11. Depth adjustment
12. Jam latch
ASSEMBLY
Recharge only with the charger
cic charging instructions, read the operator’s
manual supplied with your charger and battery.
To remove the battery, push in the release buttons
and pull the battery pack away from the tool.
To insert the battery, slide the pack into the body
of the tool. Make sure it latches securely into place.
Installing/Removing Fastener Strips
(Cat. No. 2741-20, 2742-20, 2743-20)
Always wear safety goggles or glasses with side
shields.
Keep ngers clear of fastener track of magazine.
Pusher could pinch ngers, causing injury.
To install fastener strips:
1. Remove battery pack.
2. WARNING! Always point the tool away from yourself
and others when installing fasteners. Failure to do
so could result in injury.
specied for the battery. For spe-
Removing/Inserting the Battery
Always remove battery pack before
changing or removing accessories.
Always remove battery pack before
changing or removing fasteners.
3. Slide the fastener strip into the nail slot and down
toward the front of the tool. Be sure the point of the
fasteners is pointed downward. WARNING! Use only
recommended fasteners of the correct size, length,
collation angle and head type as indicated on the
tool's nameplate. Other fasteners could result in tool
malfunction, leading to injury.
4. Press and hold the pusher release button and slide
the pusher back past the end of the fastener strips.
5. Continue to hold the pusher, but release the button.
Slowly slide the pusher forward until it rests against
the fastener strip.
To remove fastener strips:
1. Remove battery pack.
2. WARNING! Always point the tool away from yourself
and others when installing fasteners. Failure to do
so could result in injury.
3. Press and hold the pusher release button and slide
the pusher towards the front of the tool. Release the
pusher.
4. Slide the nails back and out of the nail slot.
Installing/Removing Fastener Strips
Always wear safety goggles or glasses with side
shields.
To install fastener strips:
1. Remove battery pack.
2. WARNING! Always point the tool away from yourself
and others when installing fasteners. Failure to do
so could result in injury.
3. Press the pusher release button and slide the
magazine open. Place the tip of the fasteners into the
bottom slot of the magazine; then lay the fasteners
flat against the magazine. The heads must t into
the grooves. WARNING! Use only recommended
fasteners of the correct size, length, collation angle
and head type as indicated on the tool's nameplate.
Other fasteners could result in tool malfunction, lead
ing to injury.
4. Slide the magazine closed.
To remove fastener strips:
1. Remove battery pack.
2. WARNING! Always point the tool away from yourself
and others when installing fasteners. Failure to do
so could result in injury.
3. Press the pusher release button and slide the maga
zine open.
4. Remove the fasteners.
with side shields.
in the work area must wear eye protection in accordance with ANSI Z87.1. Eye protection does not
t all operators in the same way. Make sure the eye
protection chosen has side shields or provides
protection from ying debris both from the front
and sides. The employer is responsible for enforcing the use of eye protection by the operator and
other people in the work area. When required, wear
head protection in accordance with ANSI Z89.1.
To reduce the risk of injury to yourself and others,
test the tool before beginning work each day ac
cording to the "Required Daily Testing" section.
4
(Cat. No. 2740-20)
Always remove battery pack before
changing or removing fasteners.
OPERATION
To reduce the risk of injury, always
wear safety goggles or glasses
The operator and other people
-
-
-
Do not use the tool unless you thoroughly under-
WARNING
WARNING
stand the actuation mode selected.
Remove battery pack and fasteners before leaving
the work area, moving the tool to another location,
or handing the tool to another person. Failure to do
so could result in serious injury.
Do not use this tool for fastening electrical
cables. It is not designed for electric cable
installation and may damage the insulation of
electric cables thereby causing electric shock
or re hazards.
NEVER wedge or hold back the workpiece contact
mechanism during operation of the tool. Never
attempt to clear a jammed workpiece contact by
grasping the discharge area of the tool. Doing so
could result in serious injury.
To avoid serious injury, do not attempt to prevent
the recoil by holding the tool too rmly against
the work. Keep face and body away from the tool.
During normal use, the tool will recoil immediately
after driving a fastener. This is a normal function
of the tool. Restriction to the recoil can result in a
second fastener being driven when the tool is in
Contact Actuation mode. Grip the handle rmly,
let the tool do the work, and do not place a second
hand on top of the tool.
1. Install battery pack.
2. Press and hold the Power/Actuation button to
Power/Actuation Button
3. Press the Power/Actuation button again to toggle
4. Press and hold the Power/Actuation button to
1. Grip the handle rmly.
2. Push the tool against the work surface, compressing
3. Pull the trigger to drive the fastener. WARNING! To
4. Remove your nger from the trigger and remove the
Power/Actuation Selection
turn on the tool.
Power
Indicator
between single sequential actuation mode and
contact (bump) actuation mode.
WARNING! Understand actuation process before use.
turn off the tool.
Single Sequential Actuation Solid Light then the trigger must be activated in a
specic sequence to drive a fastener.
Contact (Bump) Actuation -
Flashing Light and the trigger can be activated in any
sequence to drive a fastener.
The workpiece contact and
The workpiece contact
Actuation
Indicator
Single Sequential Actuation Operation
the workpiece contact.
avoid serious injury, do not attempt to prevent the
recoil by holding the tool too rmly against the work.
tool from
the workpiece.
Contact (Bump) Actuation Operation
Contact Actua
depending on your use.
Multiple actuations:
1. Grip the handle rmly.
2. Pull and hold the trigger.
3. Push the tool against the work surface, compress
ing the workpiece contact to drive the fastener.
WARNING! To avoid serious injury, do not attempt
to prevent the recoil by holding the tool too rmly
against the work.
4. Continue to hold the trigger and repeat workpiece
contact.
Single actuation:
1. Grip the handle rmly.
2. Push the tool against the work surface, compressing
the workpiece contact.
3. Pull the trigger to drive the fastener. WARNING! To
avoid serious injury, do not attempt to prevent the
recoil by holding the tool too rmly against the work.
4. Remove your nger from the trigger and remove the
tool from the workpiece.
To indicate that the magazine is almost empty of fasteners (about 4-5 left), the workpiece contact will not
compress, preventing operation under usual pressure.
Install more fasteners to continue working.
ing operation of the tool. Never attempt to clear a
jammed workpiece contact by grasping the discharge area of the tool. Doing so could result in
serious injury.
To avoid serious injury, do not attempt to prevent
the recoil by holding the tool too rmly against
the work. Keep face and body away from the tool.
During normal use, the tool will recoil immediately
after driving a fastener. This is a normal function
of the tool. Restriction to the recoil can result in a
second fastener being driven when the tool is in
Contact Actuation mode. Grip the handle rmly,
let the tool do the work, and do not place a second
hand on top of the tool.
tion can follow two different sequences,
-
Reload Indicator
NEVER wedge or hold back the
workpiece contact mechanism dur-
Setting the Depth of Drive
The depth of drive can be adjusted to account for the
size of the fastener and the workpiece material.
workpiece and out the other side, striking a
bystander and causing serious injury. Lower the
depth of drive to prevent the fastener from being
pushed all the way through the workpiece.
1. Drive a test fastener.
2. Remove battery pack.
3. WARNING! Always point
the tool away from yourself
and others when making
adjustments. Failure to do
so could result in injury.
4. Turn the depth selector left
or right to increase or de
crease the driving depth.
5. Repeat until desired depth
is reached.
Know what is behind your workpiece.
A fastener could travel through the
-
5

Most jams are caused by a fastener or part of a fastener
WARNING
WARNING
WARNING
WARNING
wedging between the driver blade and the nail guide.
Fastener strips with an incorrect collation angle or the
wrong fastener gauge may cause continuous jamming.
To clear the jam:
1. Remove battery pack.
2. WARNING! Always point the tool away from yourself
3. Remove fastener strip from magazine.
4. Pull down on the jam latch and pull away from the tool.
5. Remove the fastener and other debris (use needle-
6. Close jam latch.
7. Follow the steps under "Required Daily Testing"
Clearing a Jammed Fastener
and others when installing or removing fasteners.
Failure to do so could result in injury.
nose pliers if necessary).
before restarting the work.
REQUIRED DAILY TESTING
To reduce the risk of injury to your-
beginning work each day or if the tool is dropped,
received a sharp blow, been run over, etc. Complete
the following checklist IN ORDER. If the tool does
not work as it should, contact a MILWAUKEE service
facility immediately.
Always point tool away from yourself and others.
1. Remove battery pack.
2. WARNING! Always point the tool away from
yourself and others when installing fasteners.
Failure to do so could result in injury.
3. Check all screws, bolts, nuts, and pins on the tool.
Any loose fasteners must be tightened.
4. Pull back the fastener pusher on the magazine
(to override the Reload Indicator) and press the
workpiece contact against a workpiece. It must
move smoothly.
5. With the workpiece contact pressed against the
workpiece, pull the trigger. It must move smoothly.
6. Insert battery pack.
7. Select the Single Sequential Actuation Operation.
Without pulling the trigger, pull back the fastener
pusher on the magazine (to override the Reload
Indicator) and press the workpiece contact
against a workpiece. The tool must not operate.
Holding the workpiece contact away from
the workpiece, pull back the fastener
pusher on the magazine (to override the
Reload Indicator). Pull and hold the trigger
for 5 seconds. The tool must not operate.
Continue to pull and hold the trigger and push the
workpiece contact against a workpiece. The tool
must not operate.
Without pulling the trigger, pull back the fastener
pusher on the magazine (to override the Reload
Indicator) and press the workpiece contact
against a workpiece. Pull the trigger. The tool
must operate.
Release the trigger. The driver must move up.
8. Select the Contact Actuation Operation.
Holding the workpiece contact away from the
workpiece, pull back the fastener pusher on the
magazine (to override the Reload Indicator) and
pull the trigger. The tool must not operate.
Continue to pull and hold the trigger and push the
workpiece contact against a workpiece. The tool
must operate.
9. If all previous tests work properly, set the tool for your
work. Select the operation and load fastener strips.
self and others, test the tool before
10. Set the depth of drive according to the "Setting the
Depth of Drive" section.
11. If all tests operate properly, the tool is ready for use.
Repeat these tests before use each day or if the tool
is dropped, received a sharp blow, been run over,
jammed, etc.
MAINTENANCE
To reduce the risk of injury, always
battery pack from the charger or tool before
performing any maintenance. Never disassemble
the tool, battery pack or charger. Contact a
MILWAUKEE service facility for ALL repairs.
Keep your tool, battery pack and charger in good
repair by adopting a regular maintenance program.
Inspect your tool for issues such as undue noise,
misalignment or binding of moving parts, breakage of
parts, or any other condition that may affect the tool
operation. Return the tool, battery pack, and charger
to a MILWAUKEE service facility for repair. After six
months to one year, depending on use, return the
tool, battery pack and charger to a MILWAUKEE
service facility for inspection.
If the tool does not start or operate at full power with
a fully charged battery pack, clean the contacts on
the battery pack. If the tool still does not work properly, return the tool, charger and battery pack, to a
MILWAUKEE service facility for repairs.
your tool, battery pack or charger in liquid or
allow a liquid to ow inside them.
Clean dust and debris from vents. Keep handles
clean, dry and free of oil or grease. Use only mild
soap and a damp cloth to clean, since certain cleaning agents and solvents are harmful to plastics and
other insulated parts. Some of these include gasoline,
turpentine, lacquer thinner, paint thinner, chlorinated
cleaning solvents, ammonia and household deter-
gents containing ammonia. Never use flammable or
combustible solvents around tools.
For repairs, return the tool, battery pack and charger
to the nearest service center.
unplug the charger and remove the
Maintaining Tool
To reduce the risk of personal injury and damage, never immerse
Cleaning
Repairs
ACCESSORIES
Use only recommended accesso-
For a complete listing of accessories, go online to
www.milwaukeetool.com or contact a distributor.
ries. Others may be hazardous.
SERVICE - UNITED STATES
1-800-SAWDUST (1.800.729.3878)
Monday-Friday, 7:00 AM - 6:30 PM CST
or visit www.milwaukeetool.com
Contact Corporate After Sales Service Technical
Support with technical, service/repair, or warranty
questions.
Email: metproductsupport@milwaukeetool.com
Become a Heavy Duty Club Member at
www.milwaukeetool.com to receive important
notications regarding your tool purchases.
6
 Loading...