

Page 1
PLUMBING, FIRE SAFETY,
AND RADIANT HEATING
AND COOLING SYSTEMS
INSTRUCTIONAL GUIDE
Making ProPEX® Connections
Page 2
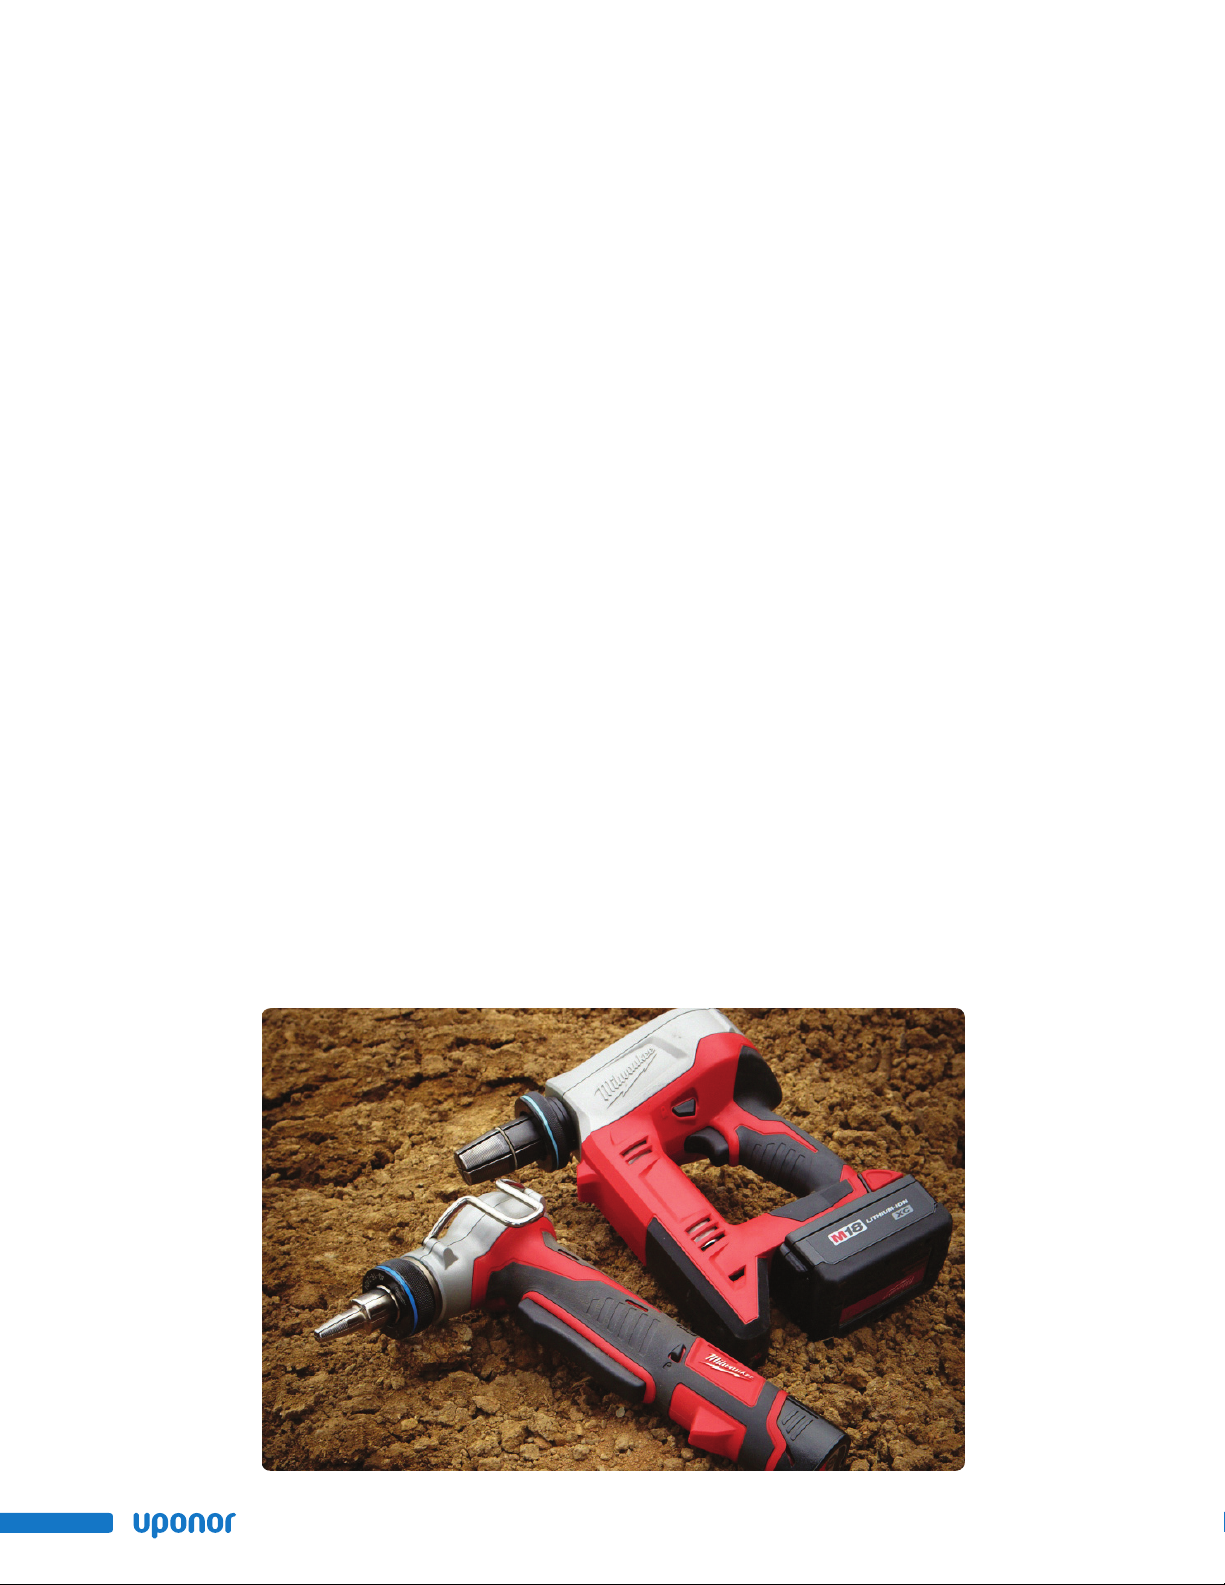
Table of Contents
Making ProPEX® Connections . . . . . . . . . . . . . . . . . . . . . . . 1
General ProPEX Connection Tips. . . . . . . . . . . . . . . . . . . . . . . . . 1
Milwaukee® ProPEX Expansion Tools . . . . . . . . . . . . . . . . . . . 2
With Auto Rotation (Standard Milwaukee Heads) . . . . . . . . . . . . . . . . . . 2
Without Auto Rotation (Standard Uponor Heads) . . . . . . . . . . . . . . . . . . 2
ProPEX 201 Corded Expander Tool. . . . . . . . . . . . . . . . . . . . . 4
ProPEX Hand Expander Tool . . . . . . . . . . . . . . . . . . . . . . . . 6
Without Auto Rotation . . . . . . . . . . . . . . . . . . . . . . . . . . . . 6
With Auto Rotation . . . . . . . . . . . . . . . . . . . . . . . . . . . . . . 7
Making 3⁄8" ProPEX Connections. . . . . . . . . . . . . . . . . . . . . . 8
Important Tips for a Proper 3⁄8" ProPEX Connection . . . . . . . . . . . 8
Disconnecting a ProPEX Brass Fitting . . . . . . . . . . . . . . . . . . . 8
Troubleshooting ProPEX Connections . . . . . . . . . . . . . . . . . . . 9
Fittings Won’t Seal . . . . . . . . . . . . . . . . . . . . . . . . . . . . . . 9
Expansion is Difficult . . . . . . . . . . . . . . . . . . . . . . . . . . . . . 9
Expansion Head Slips Out of Tubing When Making Expansions . . . . . . . . . . . . . 9
ProPEX Ring Slides Down Tubing During Expansion . . . . . . . . . . . . . . . . . 9
More Than the Recommended Number of Expansions are Needed to Make a Connection . . . 9
Cold-weather Expansions . . . . . . . . . . . . . . . . . . . . . . . . . . . 9
ii
www.uponorpro.com
Page 3
Making ProPEX® Connections
Uponor ProPEX® F1960 cold-expansion fittings make solid, permanent, manufactured connections without
the need for torches, glues, solder, flux or gauges. The unique shape memory of Uponor crosslinked
polyethylene (PEX-a) tubing forms a tight seal around the fitting, creating a strong, reliable connection.
This document shows how to make proper ProPEX connections using one of the following tools.
• Milwaukee® M12™ or M18™ Expansion Tools
• ProPEX 201 Corded Expander Tool
• ProPEX Hand Expander Tool
General ProPEX
Connection Tips
• If the fitting does not slide into
the tubing all the way to the stop,
immediately remove it from the
tubing and expand the tubing
one final time.
Note: To avoid over-expanding
the tubing, do not hold the tubing
in the expanded position.
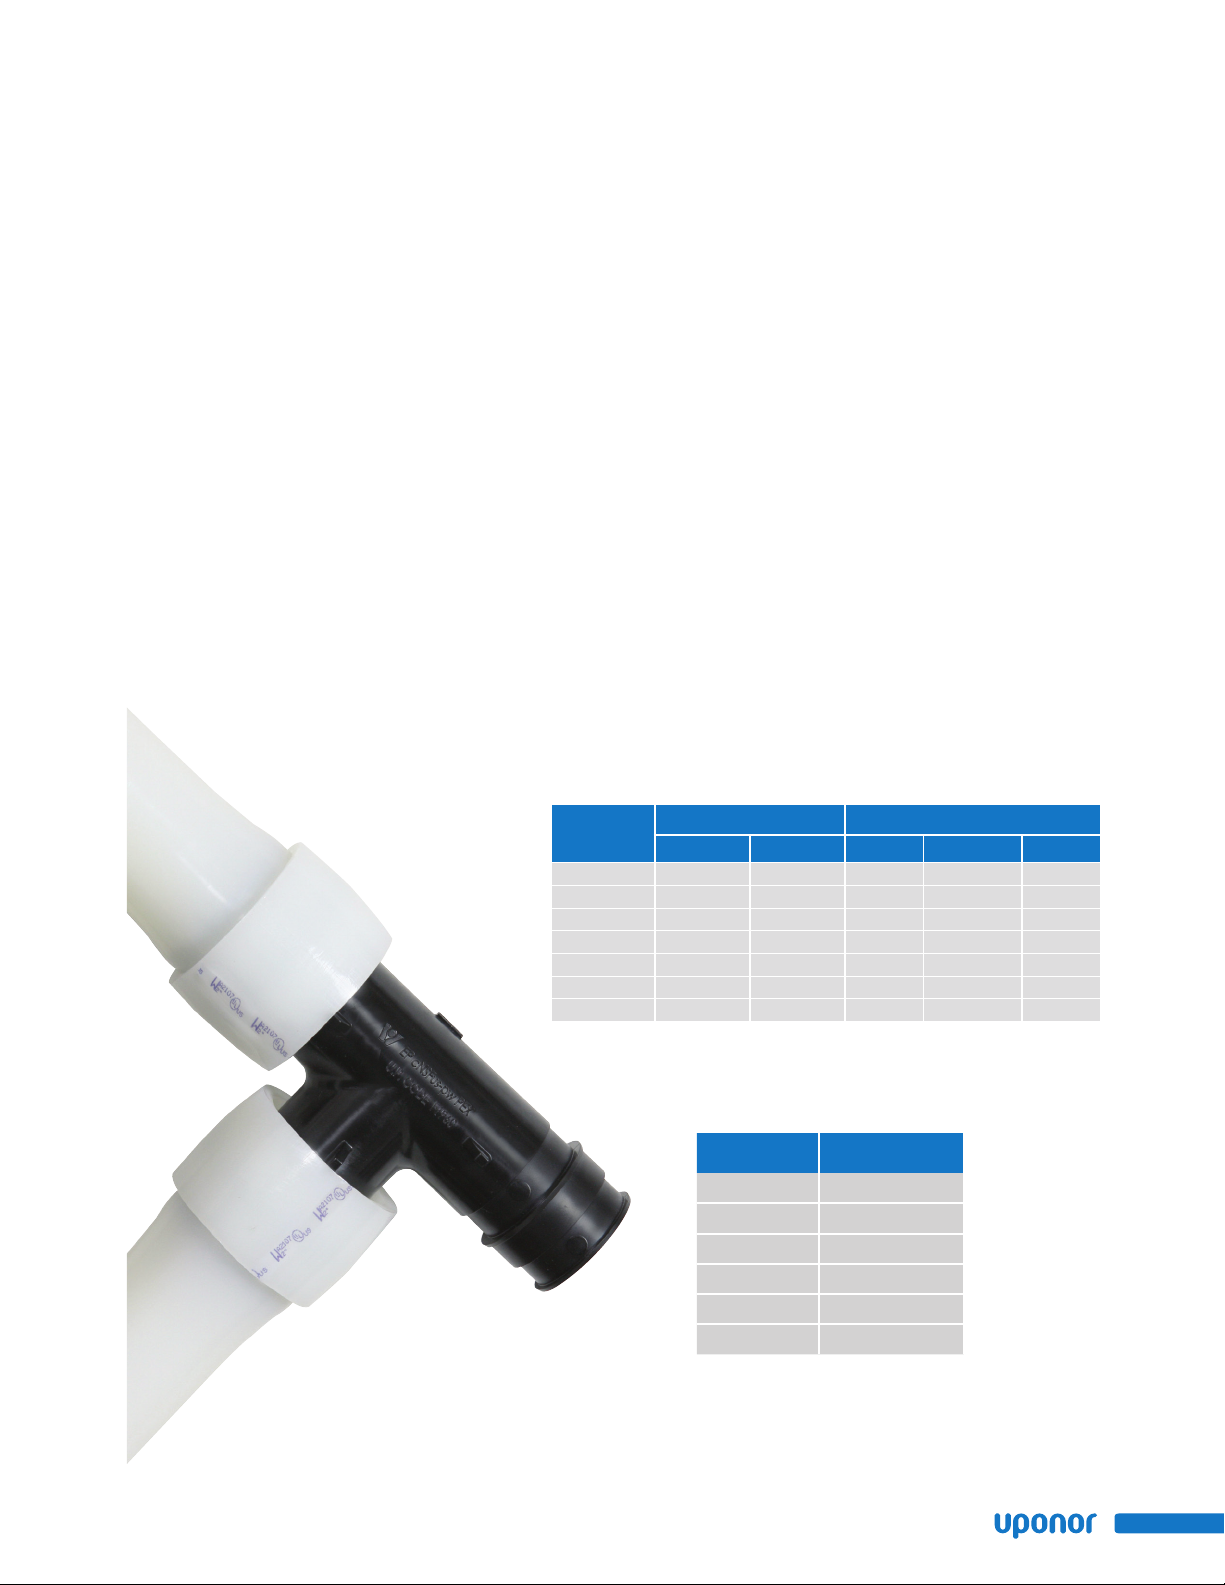
• The number of expansions in
Table 1 is the recommended
number of expansions. Experience,
technique and weather conditions
influence the actual number of
expansions. Fewer expansions
may be necessary under certain
conditions. The correct number
of expansions is the amount
necessary for the tubing and
the shoulder of the fitting to
fit snugly together.
Tubing Size
3
/8" 8 9 5 7 —
1
/2" 5 6 4 4 —
3
/4" 9 8 9 9H —
1" 13 5 14 7H —
11/4" — 7 — 7H —
11/2" — 6 — 8H —
2" — — — — 5H
Table 1: Recommended Number of Expansions for 3⁄8" to 2" Tubing at 73.4ºF (23ºC)
• Ensure the ProPEX Ring rests
snugly against the fitting shoulder.
If there is more than 1⁄16" (1mm)
between the ring and the shoulder
of the fitting, square cut the
tubing 2" away from the fitting,
and make another connection
using a new ProPEX Ring and
fitting. Brass ProPEX fittings can
be disconnected and reused.
Engineered polymer (EP) fittings
must be discarded. Be sure to
follow the recommended minimum
distance between ProPEX fittings
chart in Table 2.
Milwaukee ProPEX Tool Uponor ProPEX Tool
M12 M18 Manual 100 & 150 201
Making ProPEX® Connections Instructional Guide
Note: “H” in the table refers to Uponor H-series expander heads.
Nominal
Fitting Size
1
⁄2" 21⁄2"
3
⁄4" 31⁄2"
Cut Length
of Pipe
1" 41⁄2"
11⁄4" 51⁄2"
11⁄2" 61⁄2"
2" 71⁄2"
Table 2: Minimum Distance Between ProPEX Fittings
1
Page 4
Making ProPEX Connections with
Milwaukee ProPEX Expansion Tools
Note: All standard Uponor Expander Heads are compatible with the M12 and M18 tools.
Uponor expander heads will not auto-rotate on the Milwaukee tools (only Milwaukee
expansion heads will auto-rotate on the M12 and M18). H-heads are not compatible
with Milwaukee tools and Milwaukee heads are not compatible with Uponor tools.
Milwaukee heads are easily distinguished by color coding and the Milwaukee logo.
Important! Making expansions
are slightly different when using
a tool that features auto rotation.
When making a ProPEX
connection, be sure to follow
the guidelines for the tool you
are using in your application.
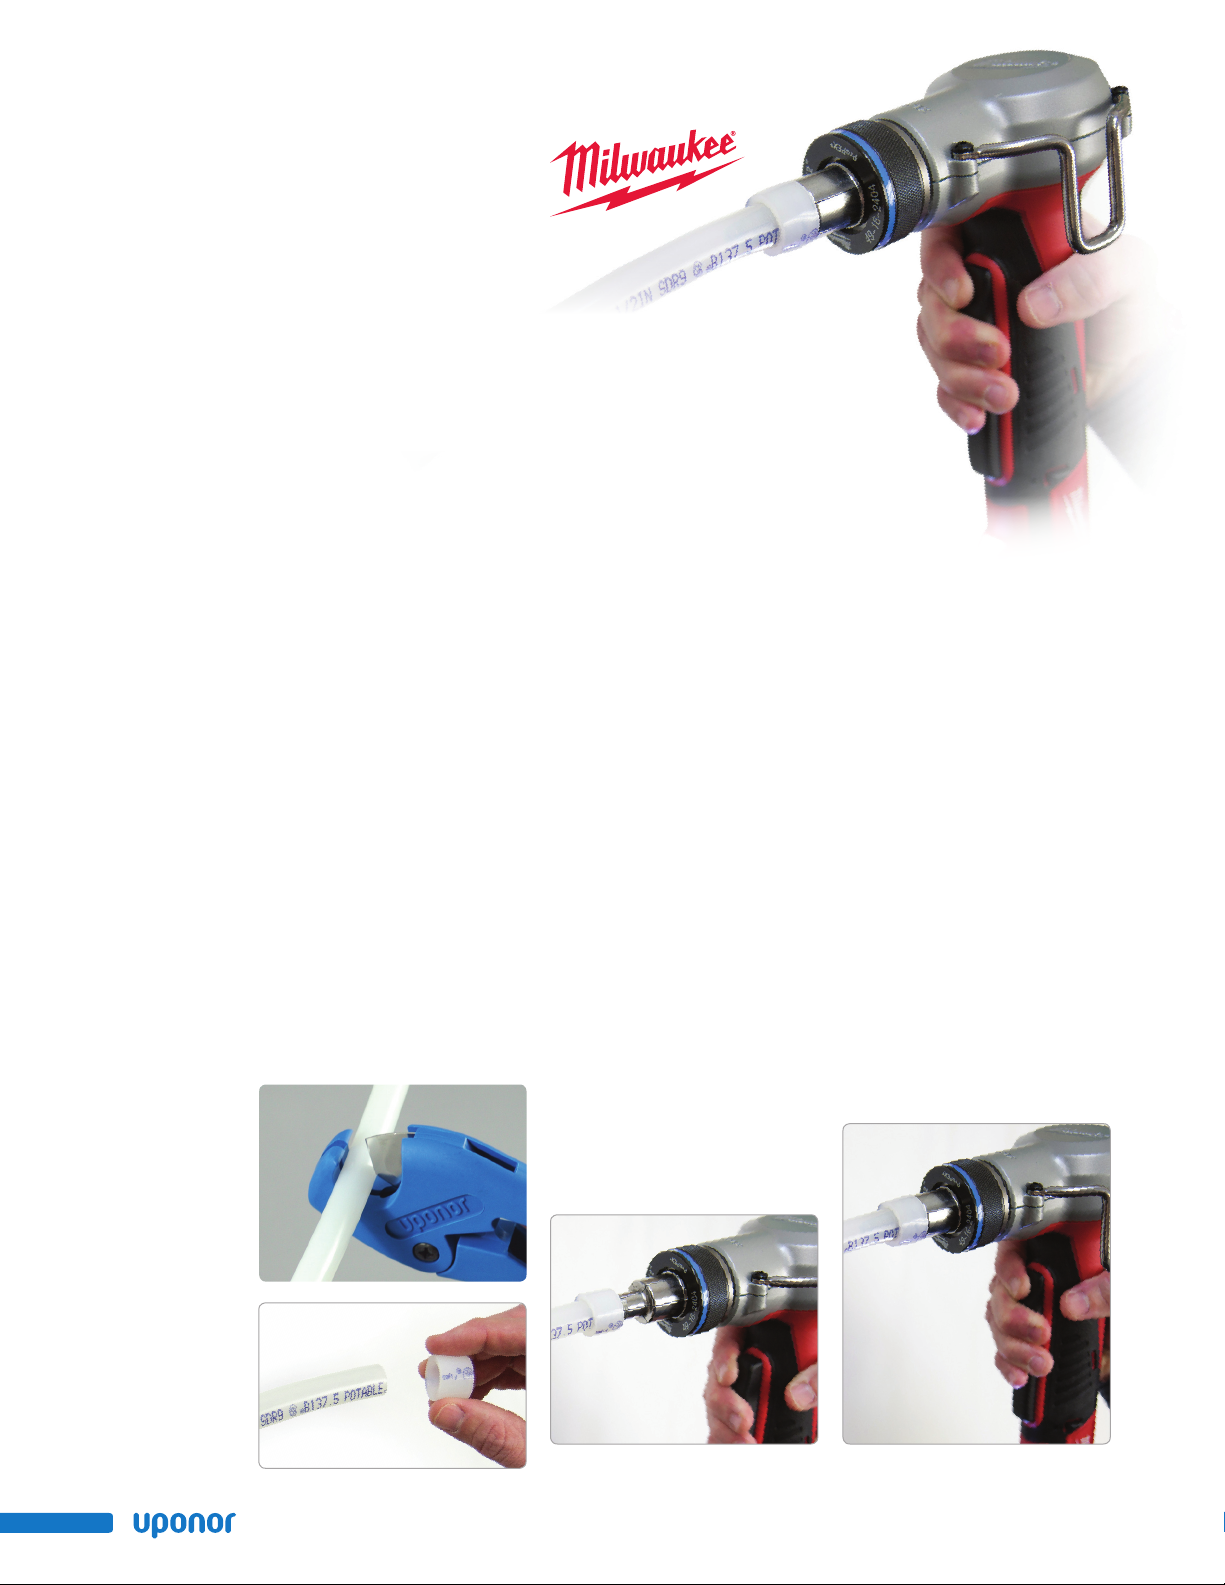
1. Square cut the PEX tubing
perpendicular to the length of
the tubing. Remove all excess
material or burrs that might
affect the fitting connection.
2. Slide the ProPEX Ring over
the end of the tubing until it
reaches the stop edge. If using a
ProPEX Ring without a stop edge,
extend
the ring over the end of the
tubing
no more than 1⁄16" (1mm).
1
Important! If making a 3⁄8"
ProPEX Connection, you must
first expand each side of the ring
before placing it on the tubing.
Refer to the “Making 3⁄8" ProPEX
Connections” instructions on
page 8 for further information.
With Auto Rotation
(Standard Milwaukee Heads)
3. Milwaukee ProPEX Expansion
Tools come with built-in auto
rotation. If using a Milwaukee
expansion head, simply hold the
tubing and tool in place while
holding the trigger to expand
the tubing. The head will
automatically rotate to ensure
the tubing is evenly expanded.
Continue expanding until the
tubing and ring are snug against
the shoulder on the expander
head. See Table 1 on page 1
for the recommended number of
expansions for each tubing size.
Without Auto Rotation
(Standard Uponor Heads)
4. Press the trigger to expand
the tubing.
5. Release the trigger, remove the
head from the tubing, rotate it 1⁄8
turn and slide the head back into
the tubing. Continue expanding
and rotating until the tubing and
ring are snug against the shoulder
on the expander head. See Table 1
on page 1 for the recommended
number of expansions.
Important! Rotating the tool
between expansions will provide
smooth, even expansion of the
tubing. Failure to rotate the
tool will cause deep grooves
in the tubing which can result
in potential leak paths.
4
3, 5
2
Expansion with Milwaukee M12 ProPEX Expansion Tool
2
www.uponorpro.com
Page 5
6a
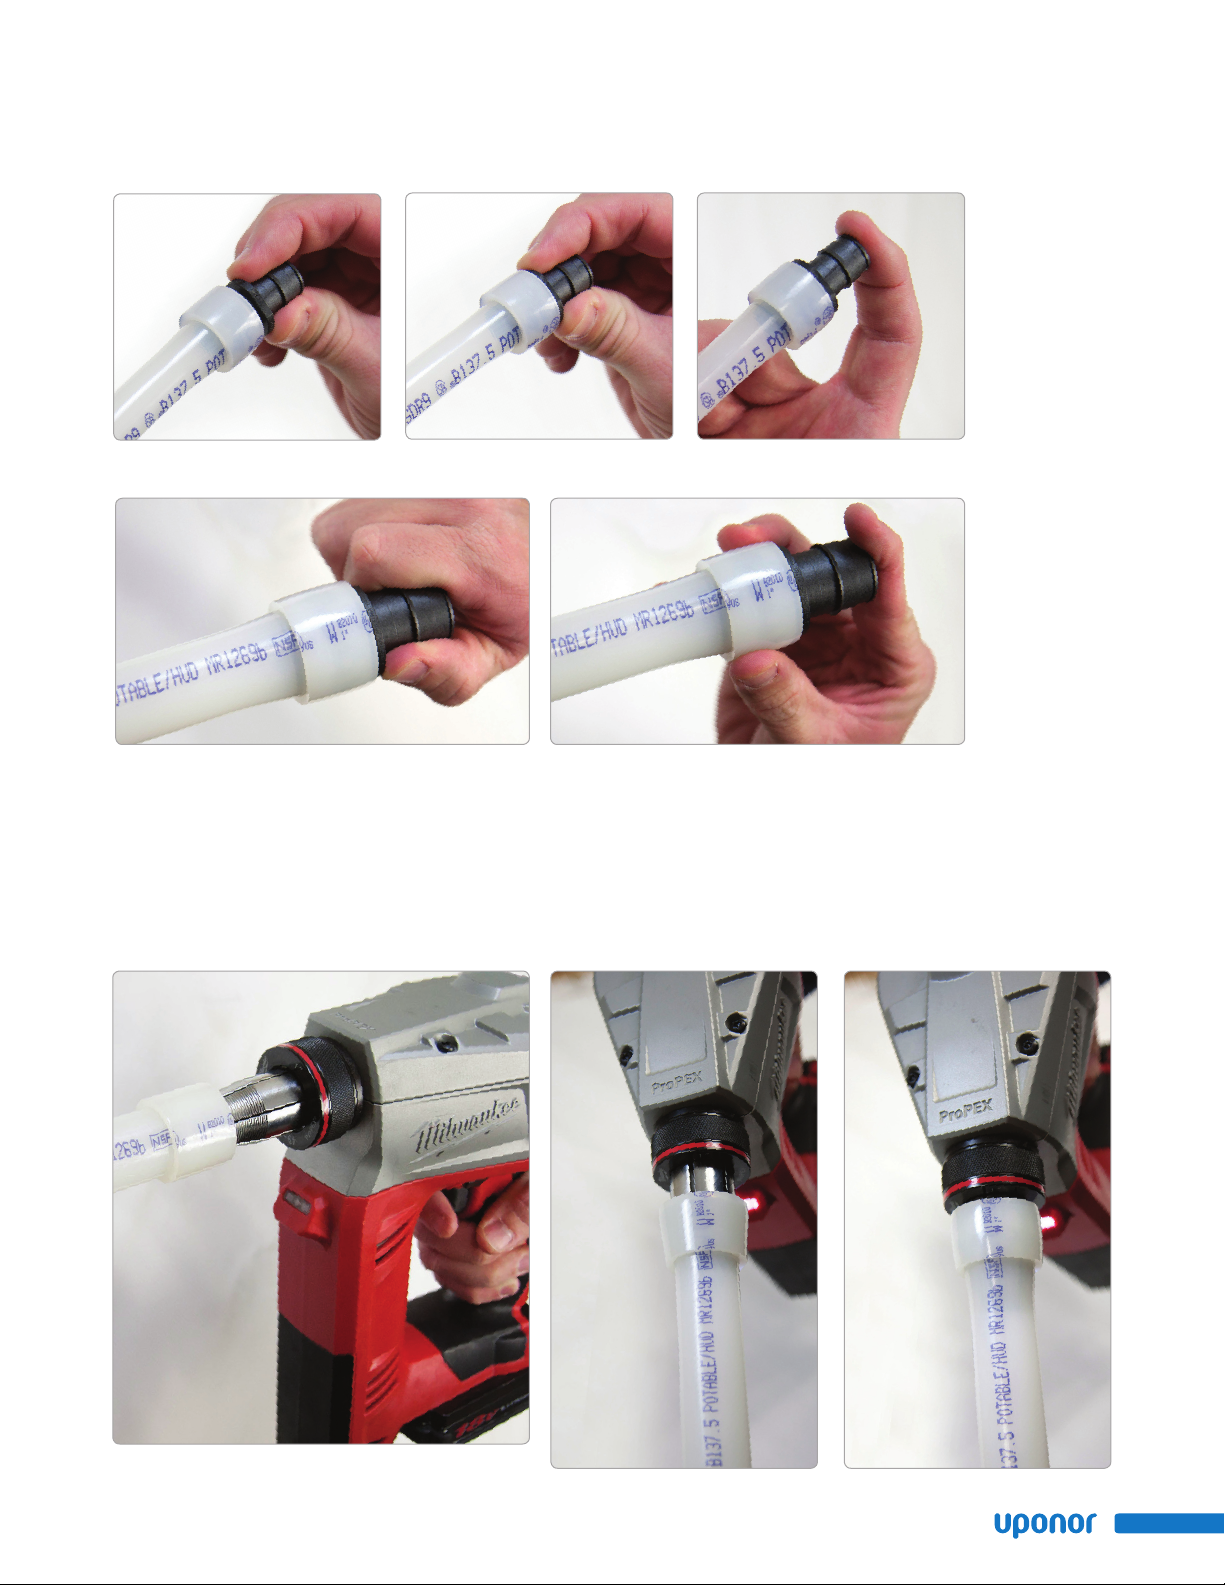
ProPEX Fitting Inserted into 1⁄2" Uponor PEX Tubing. Make the Fitting with a Milwaukee M12 ProPEX Expansion Tool.
6b
6c
6d
ProPEX Fitting Inserted into 1" Uponor PEX Tubing. Make the Fitting with a Milwaukee M18 ProPEX Expansion Tool.
6. After the final expansion,
immediately remove the tool
and insert the fitting. Ensure
the tubing and ring seat against
the shoulder of the fitting.
Important! You should feel
some resistance as the fitting
goes into the tubing. If you
do not feel any resistance, the
tubing may be over expanded
6e
and will require additional time to
shrink over the fitting.
3, 5 4 4
Expansion with Milwaukee M18 ProPEX Expansion Tool
Making ProPEX® Connections Instructional Guide
3
Page 6
Making ProPEX
Connections with
the ProPEX 201
Corded Expander Tool
1. Square cut the PEX tubing
perpendicular to the length of
the tubing. Remove all excess
material or burrs that might
affect the fitting connection.
2. Slide the ProPEX Ring over the
end of the tubing until it reaches
the stop edge. If using a ProPEX
Ring without a stop edge, extend
the ring over the end of the tubing
no more than 1⁄16" (1mm).
1
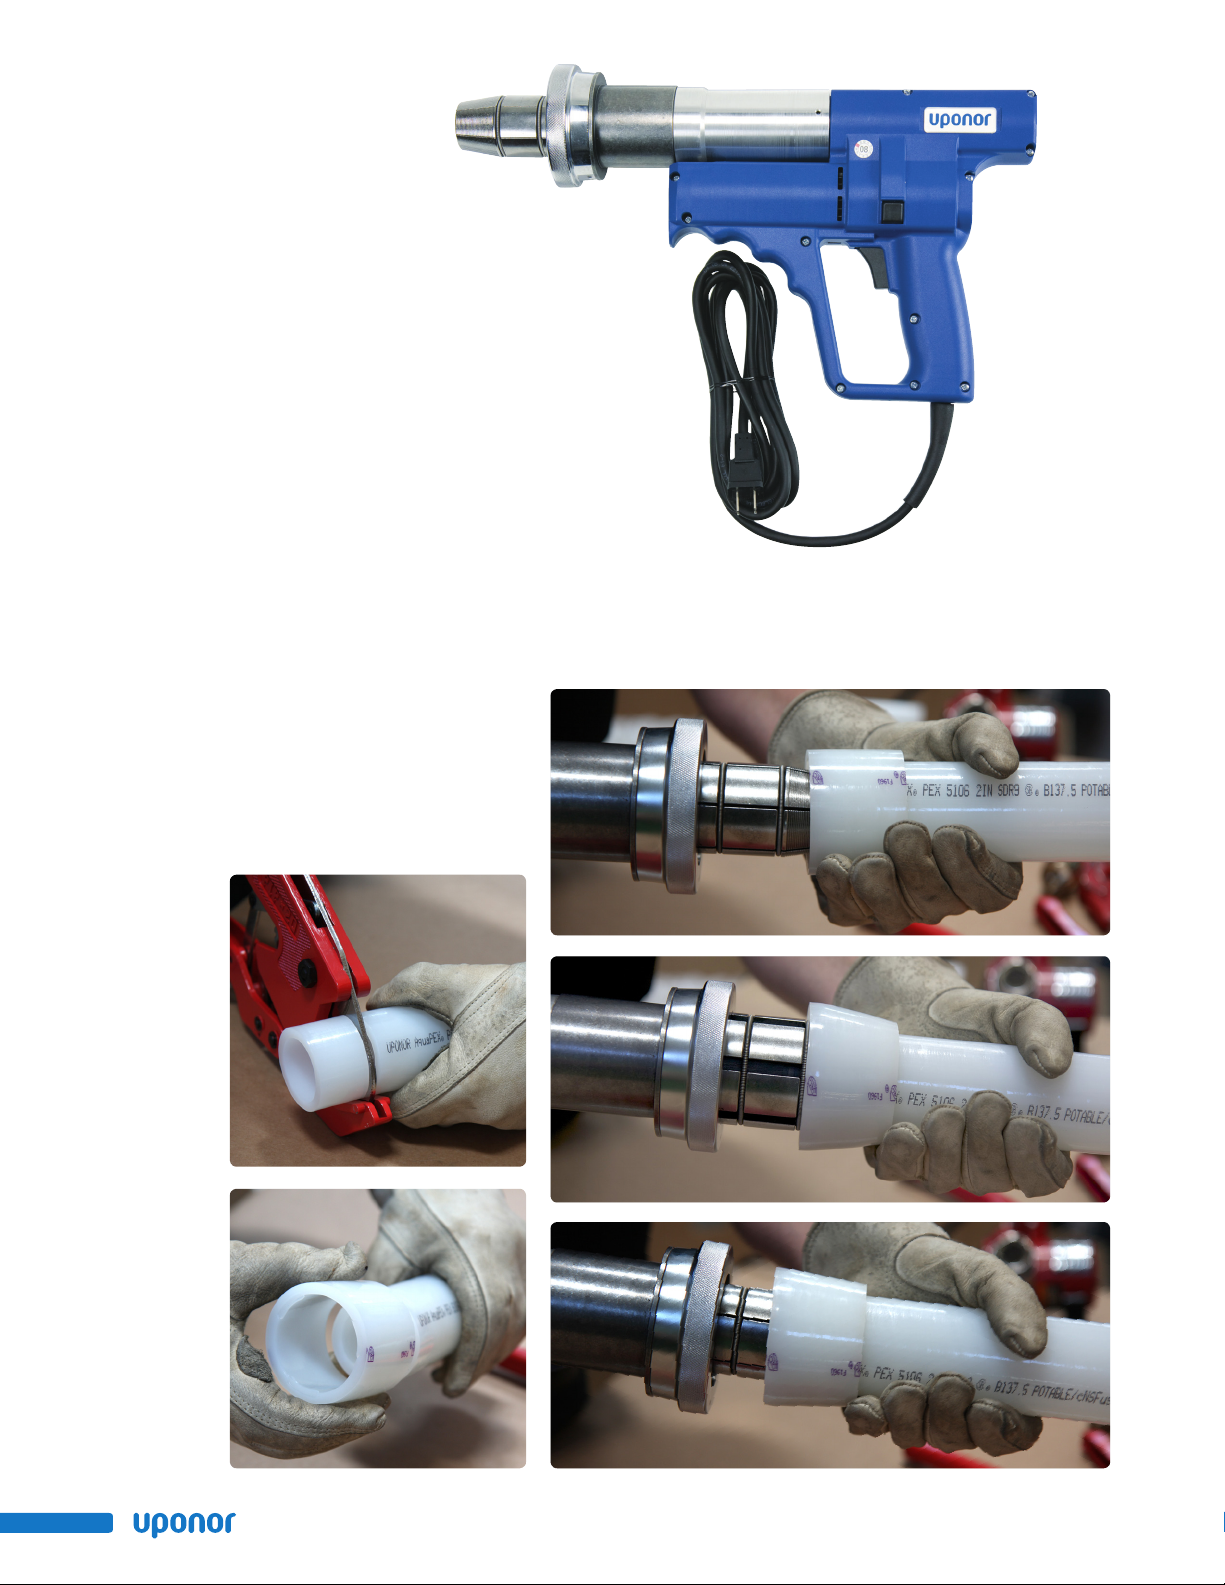
3. Slide the expander head into
the tubing until it stops. Full
expansions are necessary to
make a proper connection.
3
4
4. Press the trigger to expand
the tubing.
2
5a
4
www.uponorpro.com
Page 7
5. Release the trigger, remove the
head from the tubing, rotate it
1
⁄8 turn and slide the head back
into the tubing. Continue
expanding and rotating until the
tubing and ring are snug against
the shoulder on the expander
head. See Table 1 on page 1
for the recommended number
of expansions.
Important! Rotating the tool
between expansions will provide
smooth, even expansion of the
tubing. Failure to rotate the tool
will cause deep grooves in the
tubing which can result in
potential leak paths.
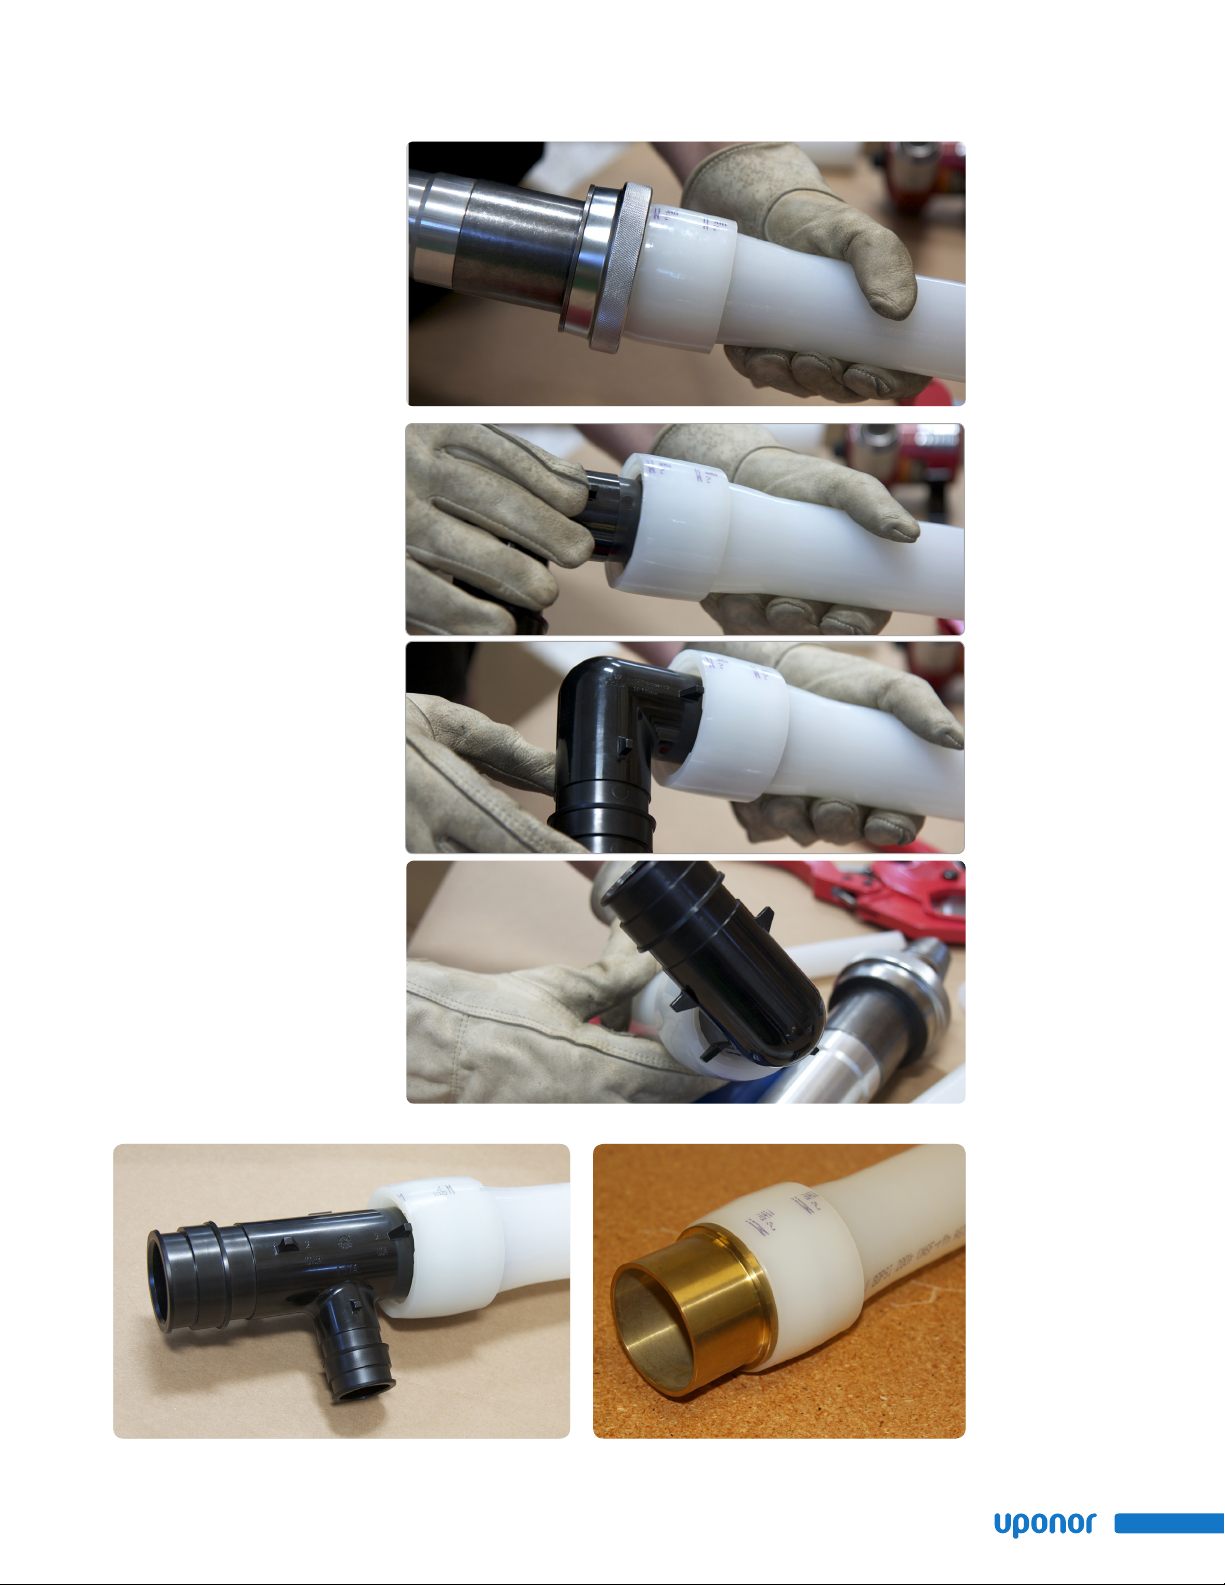
6. After the final expansion,
immediately remove the tool
and insert the fitting. Ensure
the tubing and ring seat against
the shoulder of the fitting.
5b
6a
6b
6c
ProPEX Fitting Inserted into 2" Uponor PEX Tubing
ProPEX Tee Inserted into 2" Uponor PEX Tubing ProPEX Brass Fitting Inserted into 2" Uponor PEX Tubing
Making ProPEX® Connections Instructional Guide
5
Page 8
Making ProPEX Connections with
the ProPEX Hand Expander Tool
1. Square cut the PEX tubing
perpendicular to the length of
the tubing. Remove all excess
material or burrs that might
affect the fitting connection.
2. Slide the ProPEX Ring over the
end of the tubing until it reaches
the stop edge. If using a ProPEX
Ring without a stop edge, extend
the ring over the end of the tubing
no more than 1⁄16" (1mm).
Important! If making a 3⁄8"
ProPEX Connection, you must
first expand each side of the ring
before placing it on the tubing.
Refer to the “Making 3⁄8" ProPEX
Connections” instructions on
page 8 for further information.
1
Without Auto Rotation
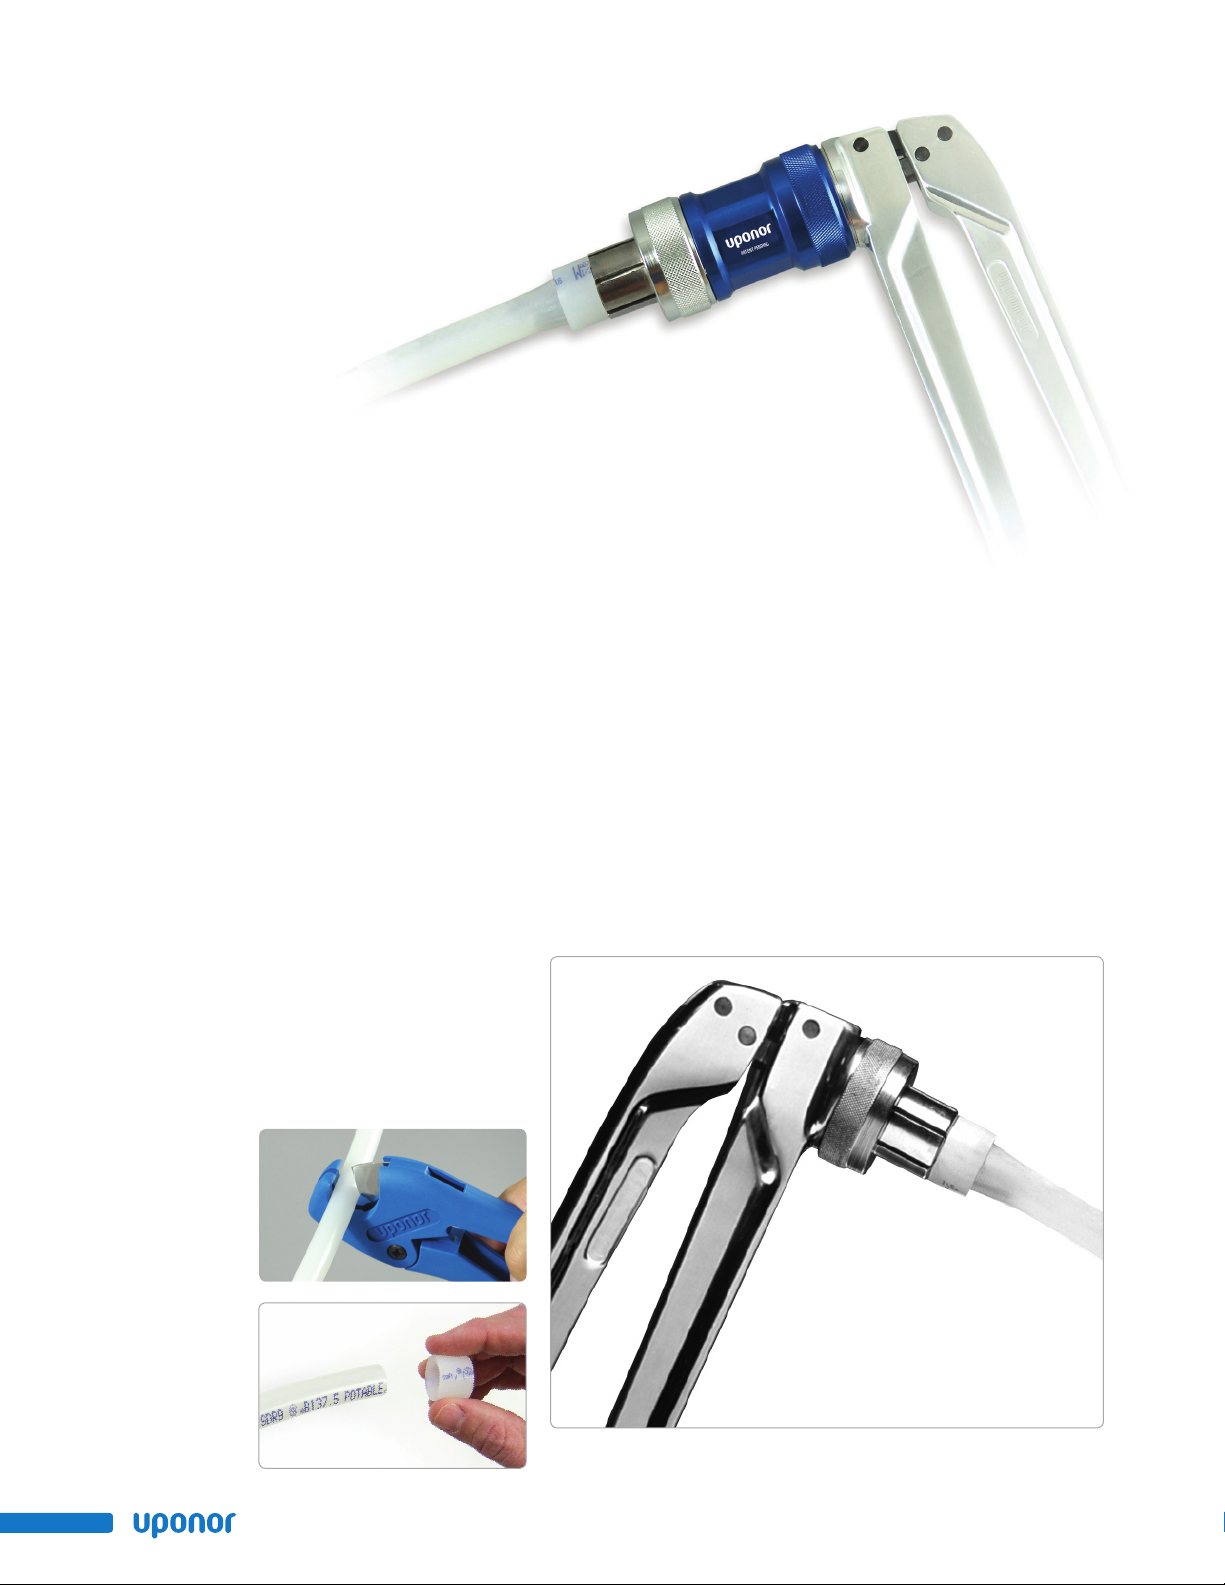
3. When using a ProPEX Hand
Expander Tool without the ProPEX
Auto Rotation Adapter, brace the
free handle of the tool against
your hip, or place one hand on
each handle. Fully separate the
handles and slide the expander
head into the tubing until it stops.
Full expansions are necessary to
make a proper connection. Bring
the handles together to expand.
Separate the handles, remove
the head from the tubing, rotate
it 1⁄8 turn and slide the head back
3
into the tubing. Continue
expanding and rotating until the
tubing and ring are snug against
the shoulder on the expander
head. See Table 1 on page 1
for the recommended number of
expansions for each tubing size.
Important! Rotating the tool
between expansions will provide
smooth, even expansion of the
tubing. Failure to rotate the
tool will cause deep grooves in
the tubing which can result in
potential leak paths.
2
ProPEX Hand Expander Tool without Auto Rotation Adapter
6
www.uponorpro.com
Page 9
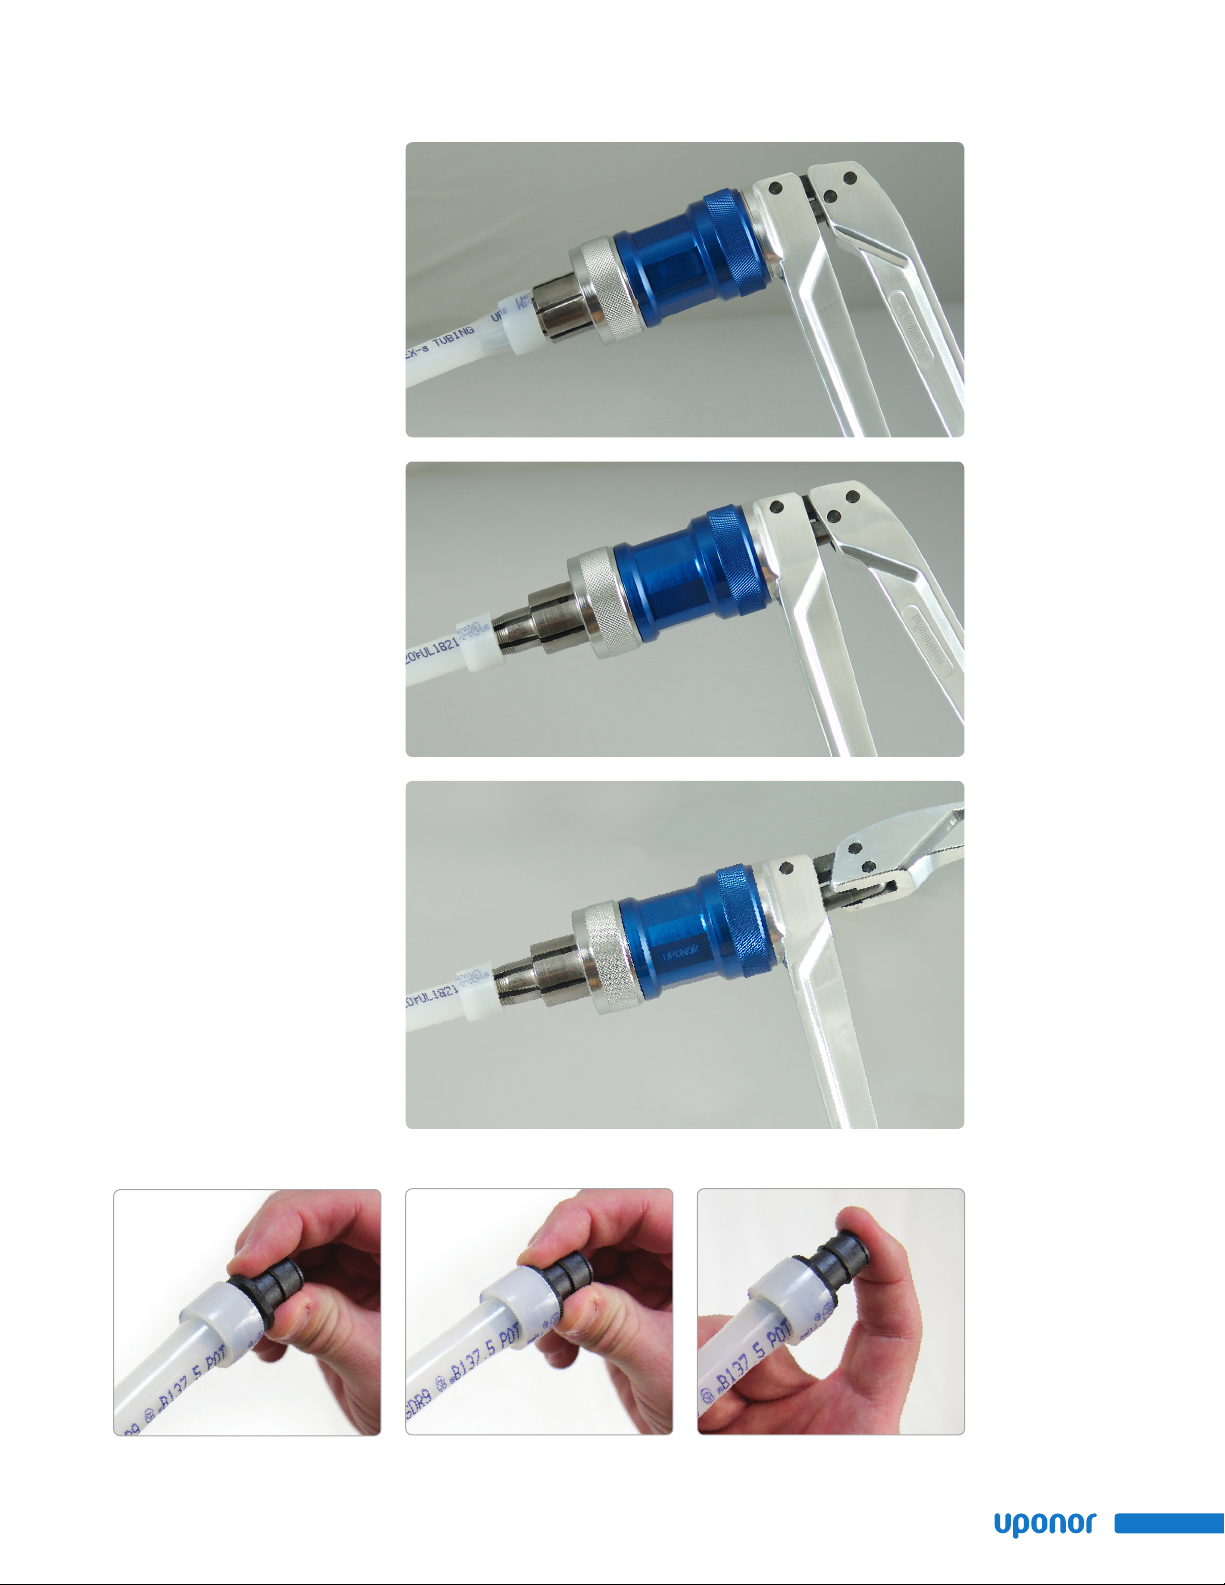
With Auto Rotation
4. When using a ProPEX Hand
Expander Tool with the ProPEX
Auto Rotation Adapter, simply
hold the tubing and tool in place
while separating and closing the
handles to expand the tubing.
The Auto Rotation Adapter will
automatically rotate to ensure
the tubing is evenly expanded.
Continue expanding until the
tubing and ring are snug against
the shoulder on the expander
head. See Table 1 on page 1
for the recommended number of
expansions for each tubing size.
5. After the final expansion,
immediately remove the tool
and insert the fitting. Ensure
the tubing and ring seat against
the shoulder of the fitting.
Important! You should feel
some resistance as the fitting
goes into the tubing. If you do
not feel any resistance, the tubing
may be over expanded and will
require additional time to shrink
over the fitting.
4a
4b
4c
ProPEX Hand Expander Tool with Auto Rotation Adapter
5a
ProPEX Fitting Inserted into 1⁄2" Uponor PEX Tubing. Make the Fitting with a ProPEX Hand Expander Tool.
Making ProPEX® Connections Instructional Guide
5b 5c
7
Page 10
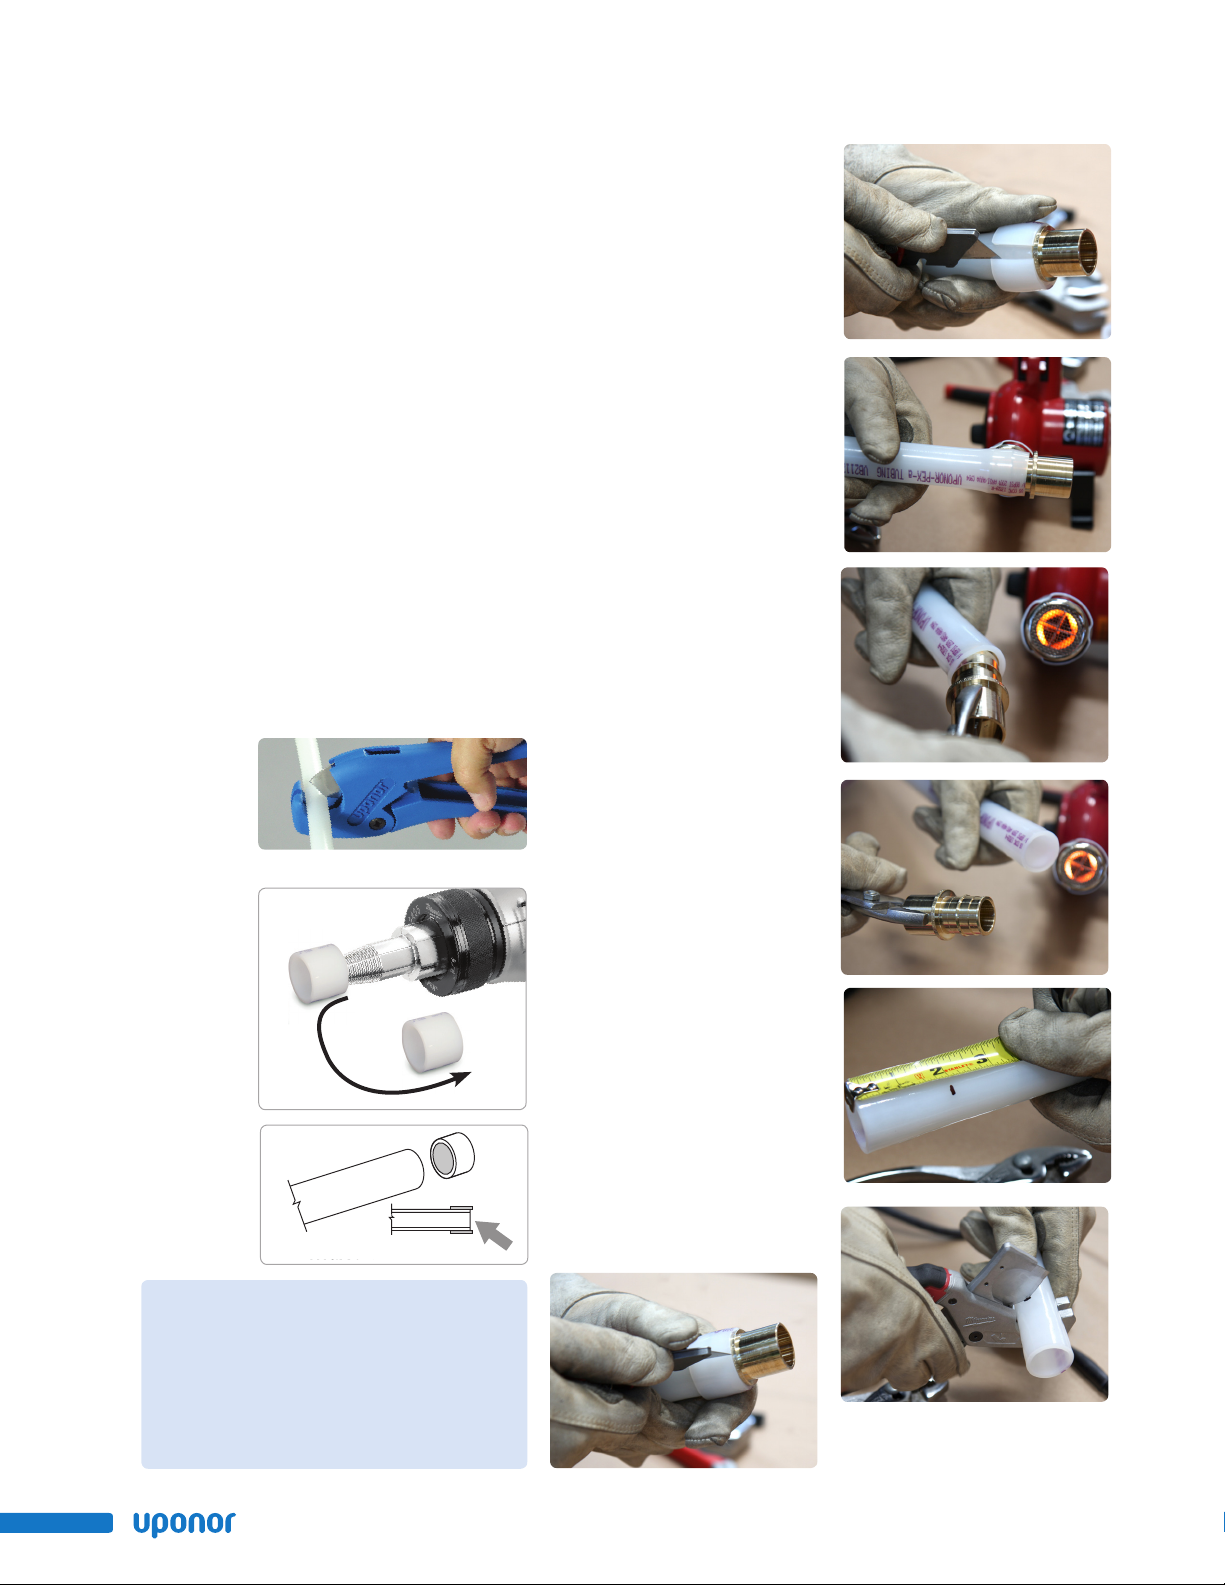
Making 3⁄8" ProPEX
Connections
The 3⁄8" ProPEX Ring must be
expanded once on each side to
properly fit over the tubing. Refer
to the following instructions to
make a 3⁄8" ProPEX connection.
Disconnecting a ProPEX
Brass Fitting
ProPEX brass and EP fittings are
manufactured connections that
can be concealed in walls, ceilings
and floors. When necessary, ProPEX
brass fittings can be disconnected.
3
1. Square cut the PEX tubing
perpendicular to the length of
the tubing. Remove all excess
material or burrs that might
affect the fitting connection.
2. Expand each side of the 3⁄8"
ProPEX Ring once.
3. Slide the expanded ring over the
end of the tubing. Extend the end
of the ring over the end of the
tubing no more than 1⁄16" (1mm).
4. After the ring is on the tubing,
continue with the regular steps
for making a proper connection
with your specific tool.
1
E6081128 Tube Cutter (plastic)
2
B
A
Important! EP fittings cannot
be reclaimed.
Refer to the following guidelines for
disconnecting a ProPEX brass fitting.
1. Ensure the system is not
pressurized.
2. Use a utility knife to carefully
cut through the ProPEX Ring.
Important! Do not heat the ring
prior to cutting it. Take care to
cut only the ring and not the
tubing or fitting. Gouges in the
fitting may result in leaks. If you
accidentally damage the fitting,
you must discard it.
3. Remove the ProPEX Ring from
the tubing.
4. After removing the ring, apply heat
directly around the fitting and
tubing connection. Gently work
the tubing back and forth while
pulling slightly away from the
fitting until the tubing separates
from the fitting.
4a
4b
4c
A
B
3
Max. 1⁄16"
5. After removing the fitting,
measure 2" (minimum) from the
end of the tubing.
6. Square cut the tubing at the
2" marking.
7. Allow the fitting to cool before
making the new connection.
8. Use a new ProPEX Ring and
follow the steps to make a
new connection.
2
5
6
Important Tips for a
Proper 3⁄8" ProPEX Connection
• The thicker 3⁄8" ProPEX Ring shrinks over the
fitting faster than larger-sized rings.
• When the temperature is below 40°F (4.4°C),
fewer expansions are required.
8
www.uponorpro.com
Page 11
Troubleshooting
ProPEX Connections
Trouble-free ProPEX installations
begin with a tool that is maintained
in proper working condition. If the
tool or segment fingers are damaged,
it is very difficult to make a proper
connection. Refer to the following
guidelines to assist with challenges
in the field.
Fittings Won’t Seal
• Make sure the expander head is
securely tightened onto the tool.
• Ensure the segment fingers are
not bent. If the head does not
completely close when the drive
unit is fully retracted or the
handles of the manual tool are
open, replace the head.
• Examine the tool for excess
grease on the segment fingers.
Remove excess grease prior to
making connections.
• Check the fitting for damage.
Nicks and gouges will cause the
fitting to leak.
• Make sure the internal driver
cone is not damaged or bent.
• Make sure the last expansion is
not held in the expanded position
before the fitting is inserted.
You should feel some resistance
as the fitting goes into the tubing.
If you do not feel any resistance,
the tubing may be over expanded
and will require additional time to
shrink over the fitting.
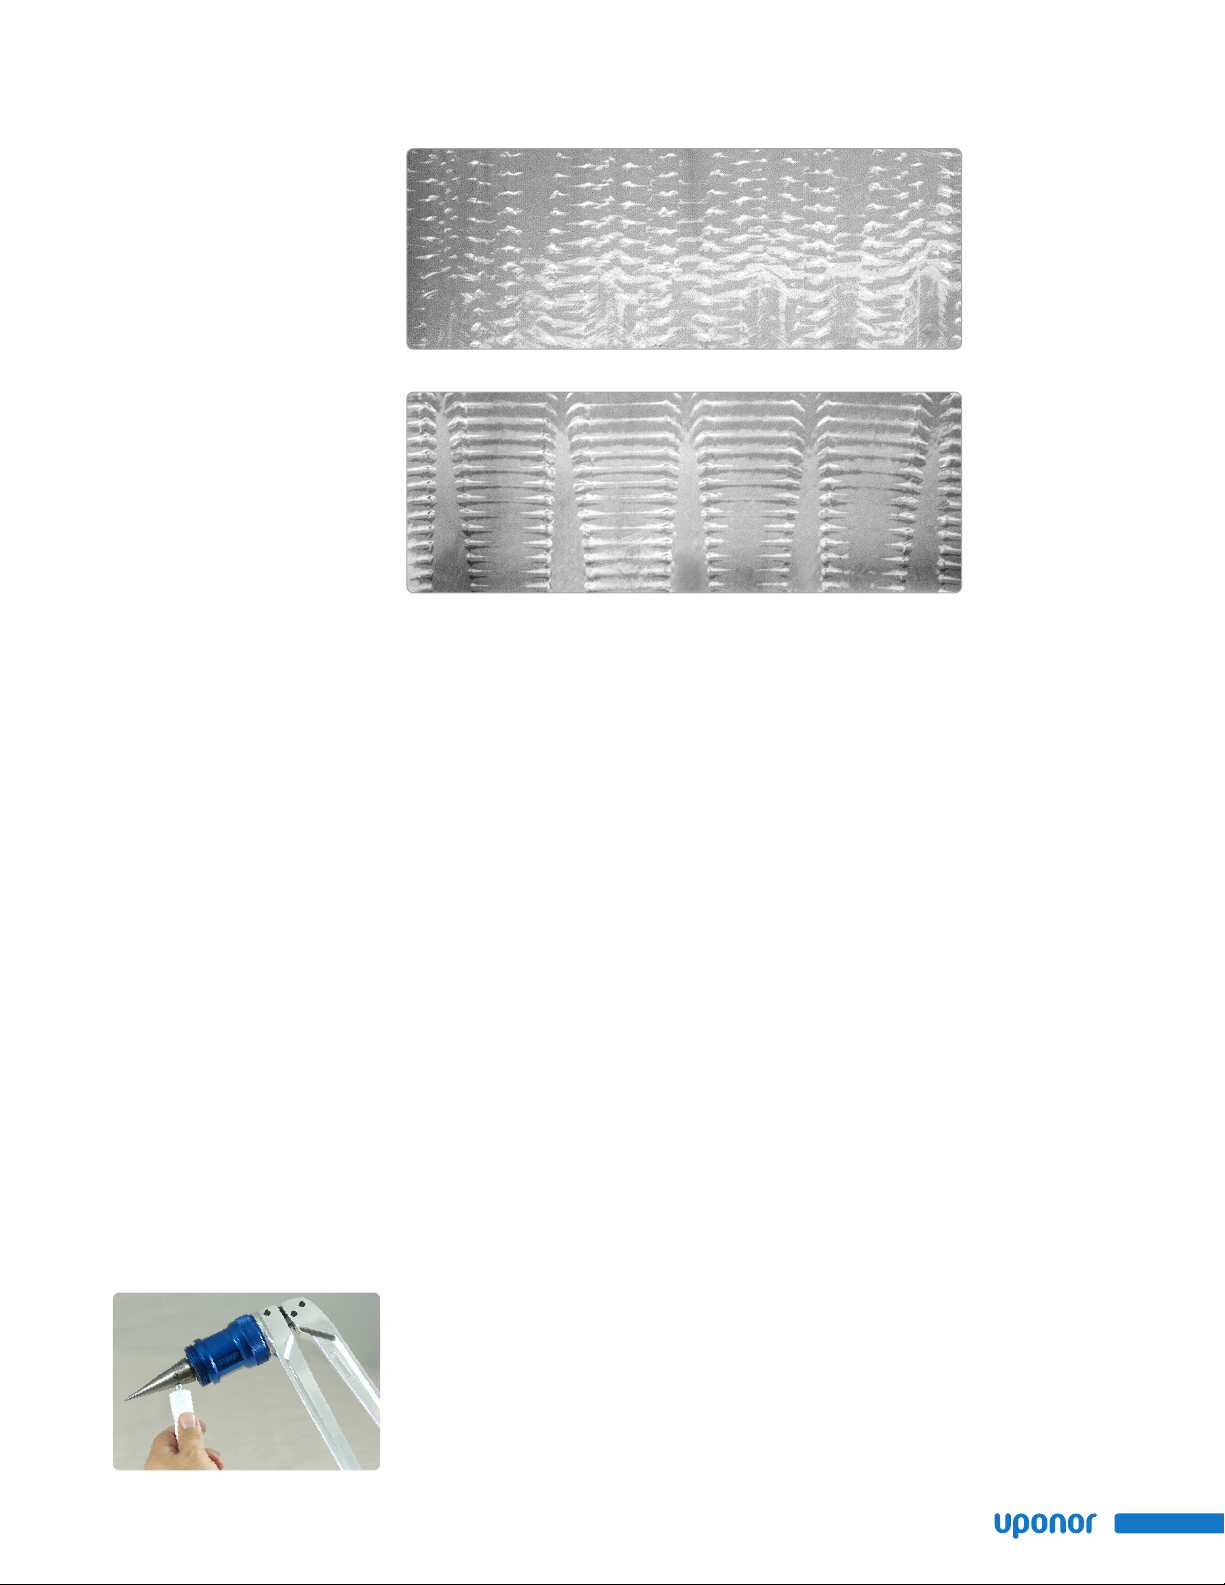
• Be sure to rotate the tool 1⁄8 turn
after each expansion to avoid deep
grooves in the tubing which can
result in potential leak paths.
Expansion is Difficult
• Make sure the internal cone is
properly greased.
Expansion with Proper Rotation
Expansion without Proper Rotation
Expansion Head Slips
Out of Tubing When
Making Expansions
• Ensure the tubing and ProPEX
Ring are dry.
• Make sure that grease is not
getting into the tubing.
• Examine the segment fingers
to ensure they are not damaged
or bent.
ProPEX Ring Slides Down
Tubing During Expansion
• Ensure your hands are clean w
hile handling the tubing. Any sweat
or oils on your hands can act as a
lubricant. Due to the smoothness
of PEX, any form of lubricant can
cause the ProPEX Ring to slide
down the tubing during expansion.
• If you anticipate the ProPEX Ring
may possibly slide down, position
the ring slightly farther over the
end of the tubing and make the
first couple of expansions slowly.
Once the ring and the tubing
begin to expand together,
continue with the normal
number and type of expansions.
• Place your thumb against the
ProPEX Ring to help support
it and feel for any movement.
If caught early, you can slide the
ring up the tubing and expand
as described in the previous
bullet point.
More Than the
Recommended Number
of Expansions are Needed to
Make a Connection
• Ensure the head is hand-tightened
to the expander tool.
• Examine the segment fingers
for damage.
• Be sure to completely cycle
the tool on each expansion
(i.e., close the manual tool handle
or release the trigger).
Cold-weather Expansions
• Temperatures affect the time
required for the tubing and ring
to shrink onto the fitting. The
colder the temperature, the slower
the contraction time.
• Warming ProPEX fittings and
ProPEX Rings reduces contraction
time. Put fittings and rings in your
pockets prior to installation to
keep them warm.
• Make ProPEX connections at
temperatures above 5°F (-15°C).
• Fewer expansions are necessary in
temperatures below 40ºF (4.4°C).
Making ProPEX® Connections Instructional Guide
9
Page 12
PPEXConnect_InsG_P451_0712, Copyright © 2012 Uponor, Inc. Printed in the United States
Uponor, Inc.
5925 148th Street West
Apple Valley, MN 55124 USA
Tel: 800.321.4739
Fax: 952.891.2008
www.uponorpro.com
Uponor Ltd.
2000 Argentia Rd., Plaza 1, Ste. 200
Mississauga, ON L5N 1W1 CANADA
Tel: 888.994.7726
Fax: 800.638.9517
www.uponorpro.com
 Loading...