

Page 1
TK SERIES USER GUIDE
1. Product Image
Content of the packaging
a. Tracking device
b. Micro USB charging cable
c. Screwdriver and screws
d. User Guide
2. Installation Manual
2.1 SIM Card Pre-installation, specification note
a. GSM Normal SIM Only
b. SIM card should have its GPRS function enabled.
d. SMS request will function only if Caller ID function is enabled.
2.2 SIM Card Installations and Removal
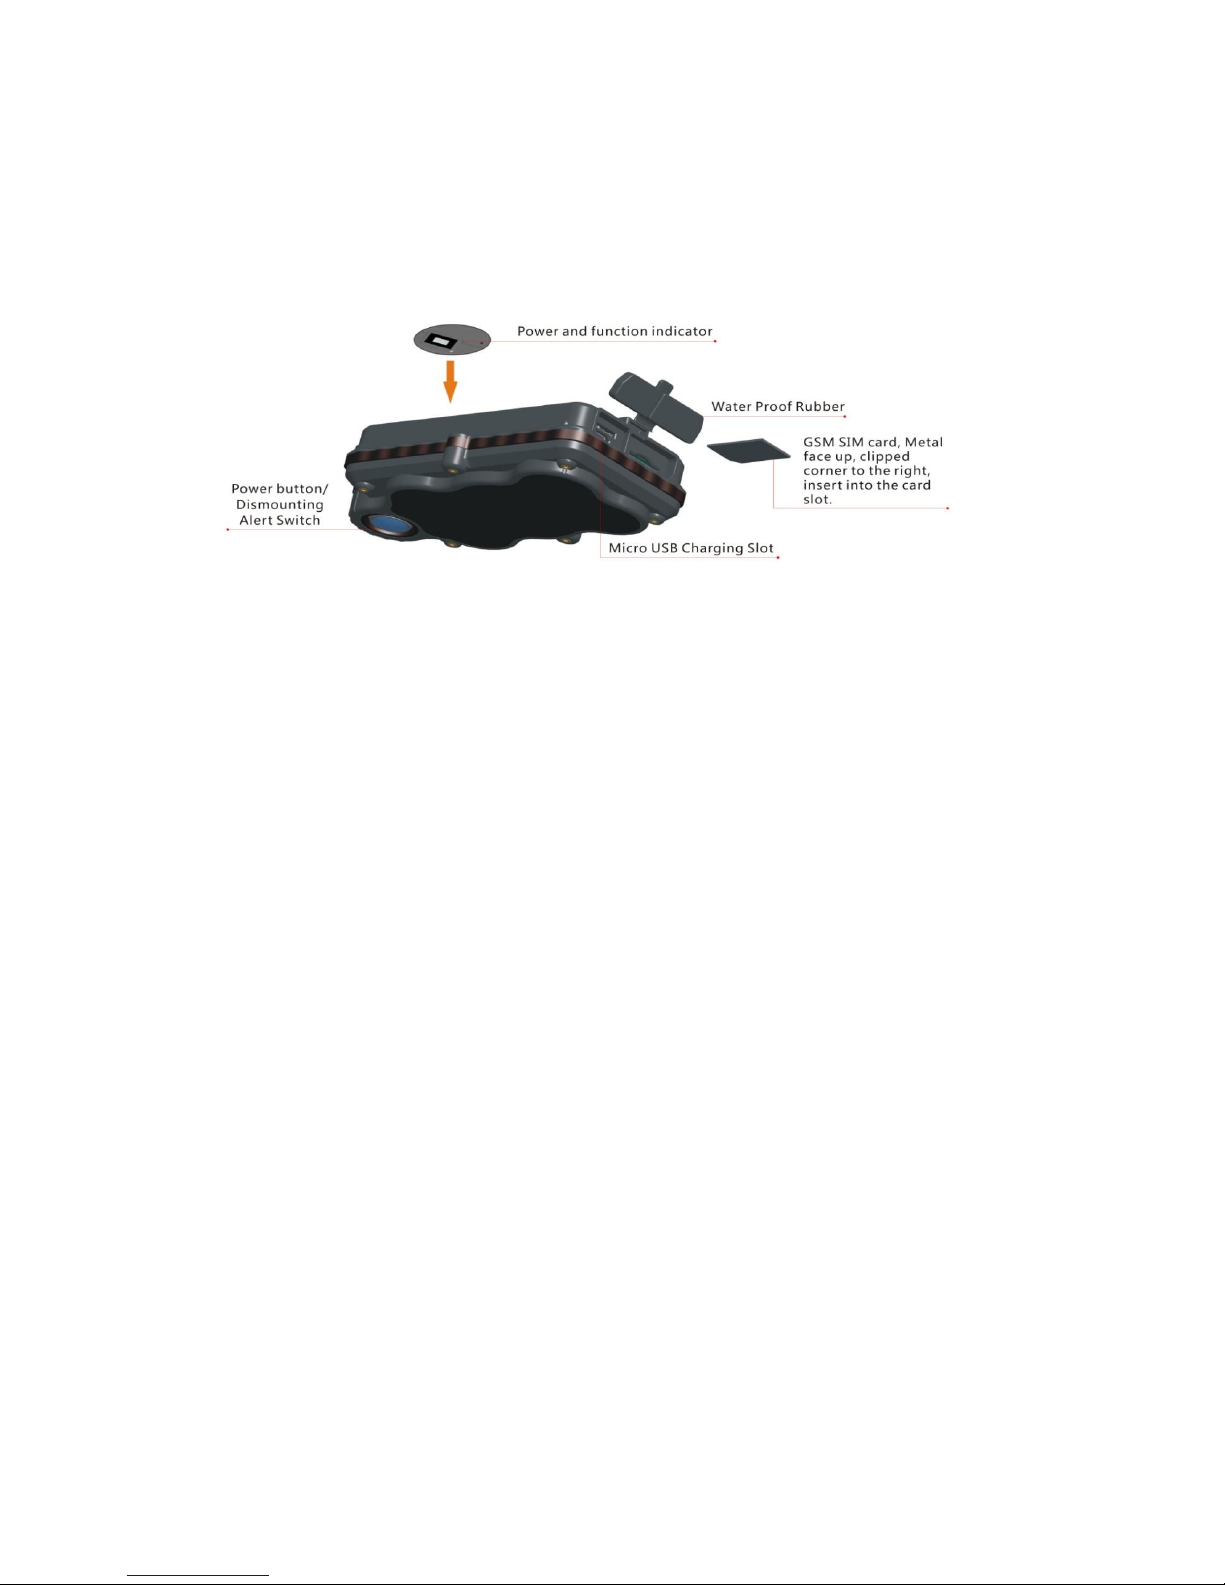
a. Open waterproof rubber
b. Insert SIM card into the SIM slot, metal face up, clipped corner to the right.
c. Green light flashes once and turns to steadily on for 10 seconds, and then turns
off.
d. Call the device SIM number and it is supposed to get through without answer. (if you are
using a data SIM which is not supporting call function, ignore this step.)
e. Ensure the waterproof rubber is closed after SIM installation
2.3 Device Installations
a. Avoid all metal environment to make sure device is able to receive GSM and GPS
signal.
b. Avoid high temperature environment like above the car engine
Page 2
3. Button Operation
We strongly recommend you to charge the product before using it the first time.
And device will be automatically on once SIM is inserted. Please DO NOT PRESS
ANY BUTTON when you use it for the first time.
3.1 Button Operation for GPS function
NOTE: “button” presses must be less than 2 seconds each in all uses
This blue control button is at the bottom of the device
a. Power On: Press control button 5 times. Green light flashes once and turns to steadily
on for 10 seconds, and then turns off.
b. Power Off: Press control button 10 times. The blue indicating light will flash for 5 times
c. Reset: Press control button 15 times to reset all settings. The blue indicating light will
flash for 3 times. Insert the SIM again and system will be on.
d. Charge: A red light is steadily on during charging and turns off when it is fully charged.
3.2 Panic Button
2 short presses and 1 long press on the control button will trigger a SOS alert to registered
master number and will be uploaded to the server.
3.3 Drop Alert
System has equipped with a Drop Alert button. When device is mounted on metal surface
over 1 minute, drop alert will be triggered. Master number will receive a SMS alert when
device is removed. System default as On.
App User Guide
1. Tracking via website and applications
Tracking Website: www.miitown.com
QR Codes of IOS and Android app are at the bottom
of the front page, please scan and download.
Username: Registered Master phone number.
Password: Default as 123456.
Page 3
2.1 Register an Account
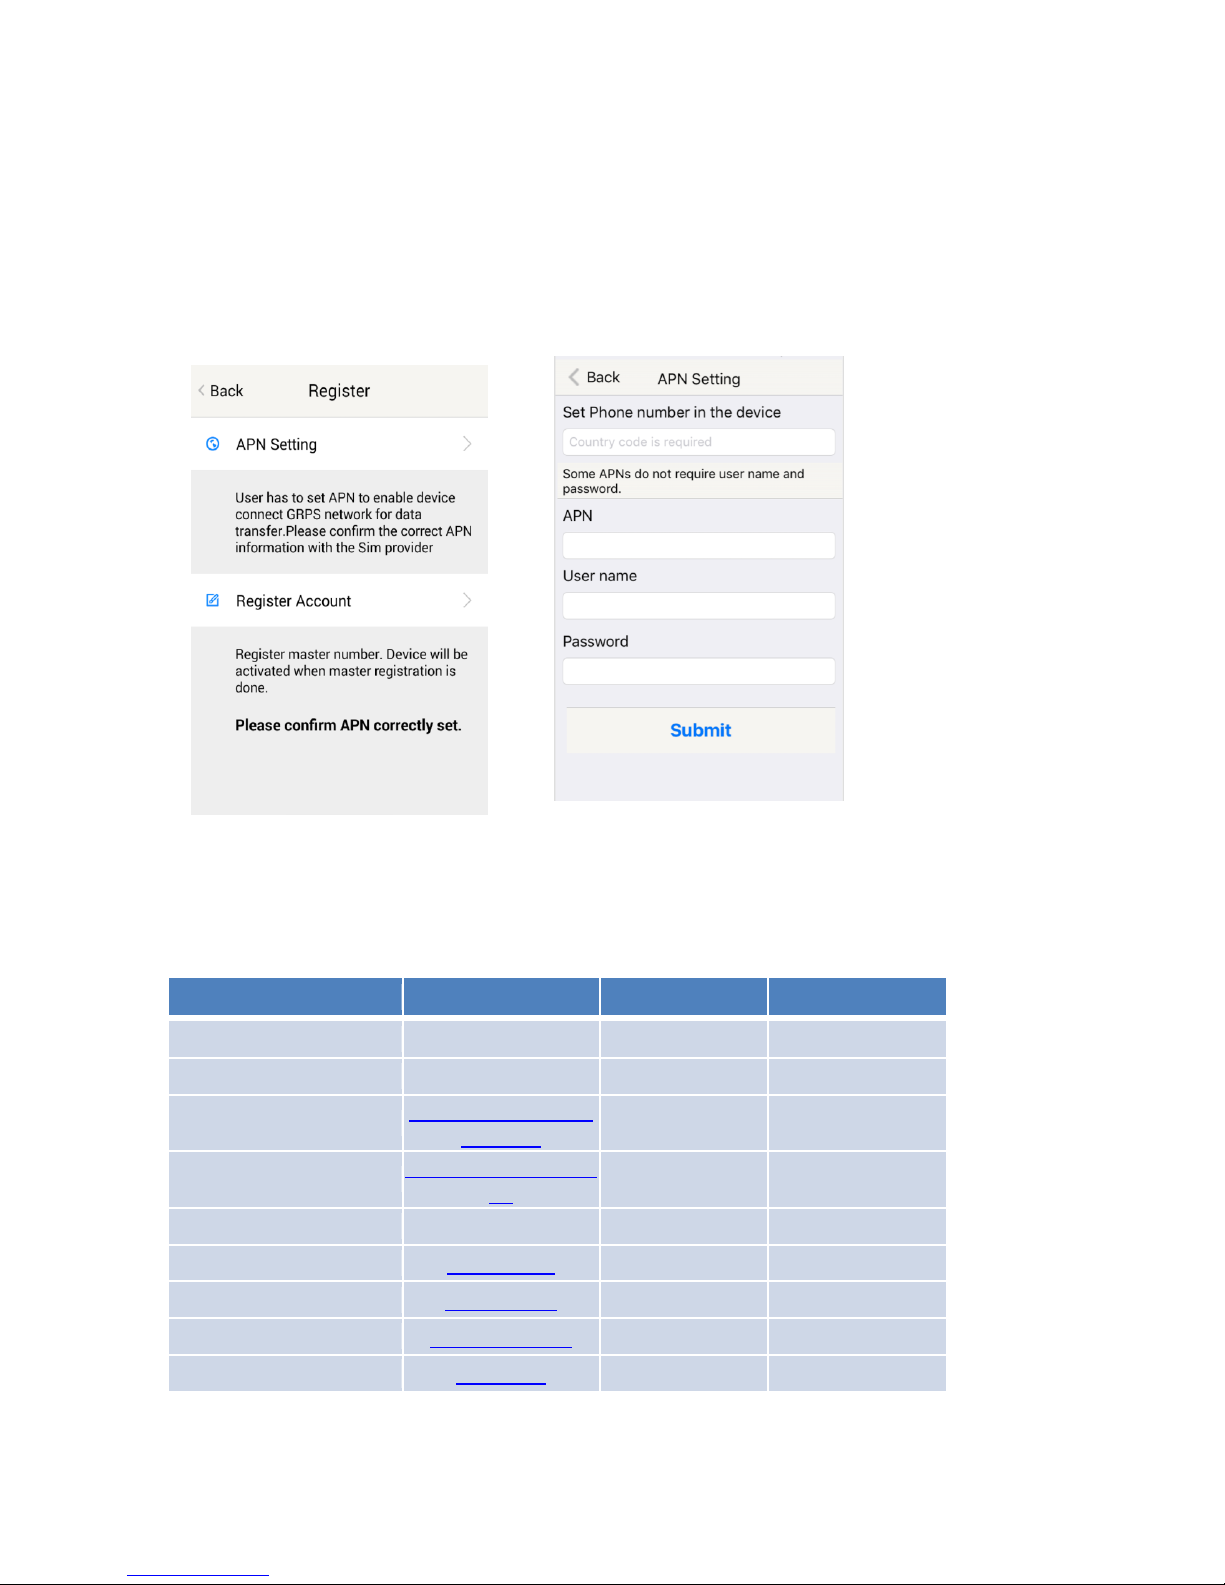
2.1.1 Set APN
APN is Access Point Name. The correct APN must be set to enable the device to send
data to the server. Different SIM has different APN, make sure you have confirmed the
correct APN information with the SIM provider when you purchase the SIM
Table underneath is sample of the popular operator data. Please consult the website of
your operator to find the APN settings of your SIM.
Operator
APN
Username
Password
KPN (NL)
internet
-
-
Orange (PL)
internet
internet
internet
T-Mobile (US)
internet2.vociestre
am.com
-
-
Vodafone (NZ)
www.vodafone.net.
nz
-
-
O2 (DE)
internet
-
-
TIM (IT)
inbox.tim.it
-
-
Mobister (BE)
web.pro.be
mobistar
mobistar
AirTel (IN)
airtelgprs.com
-
-
Orange(FR)
orange.fr
orange
orange
Page 4
2.1.2 Registering Account
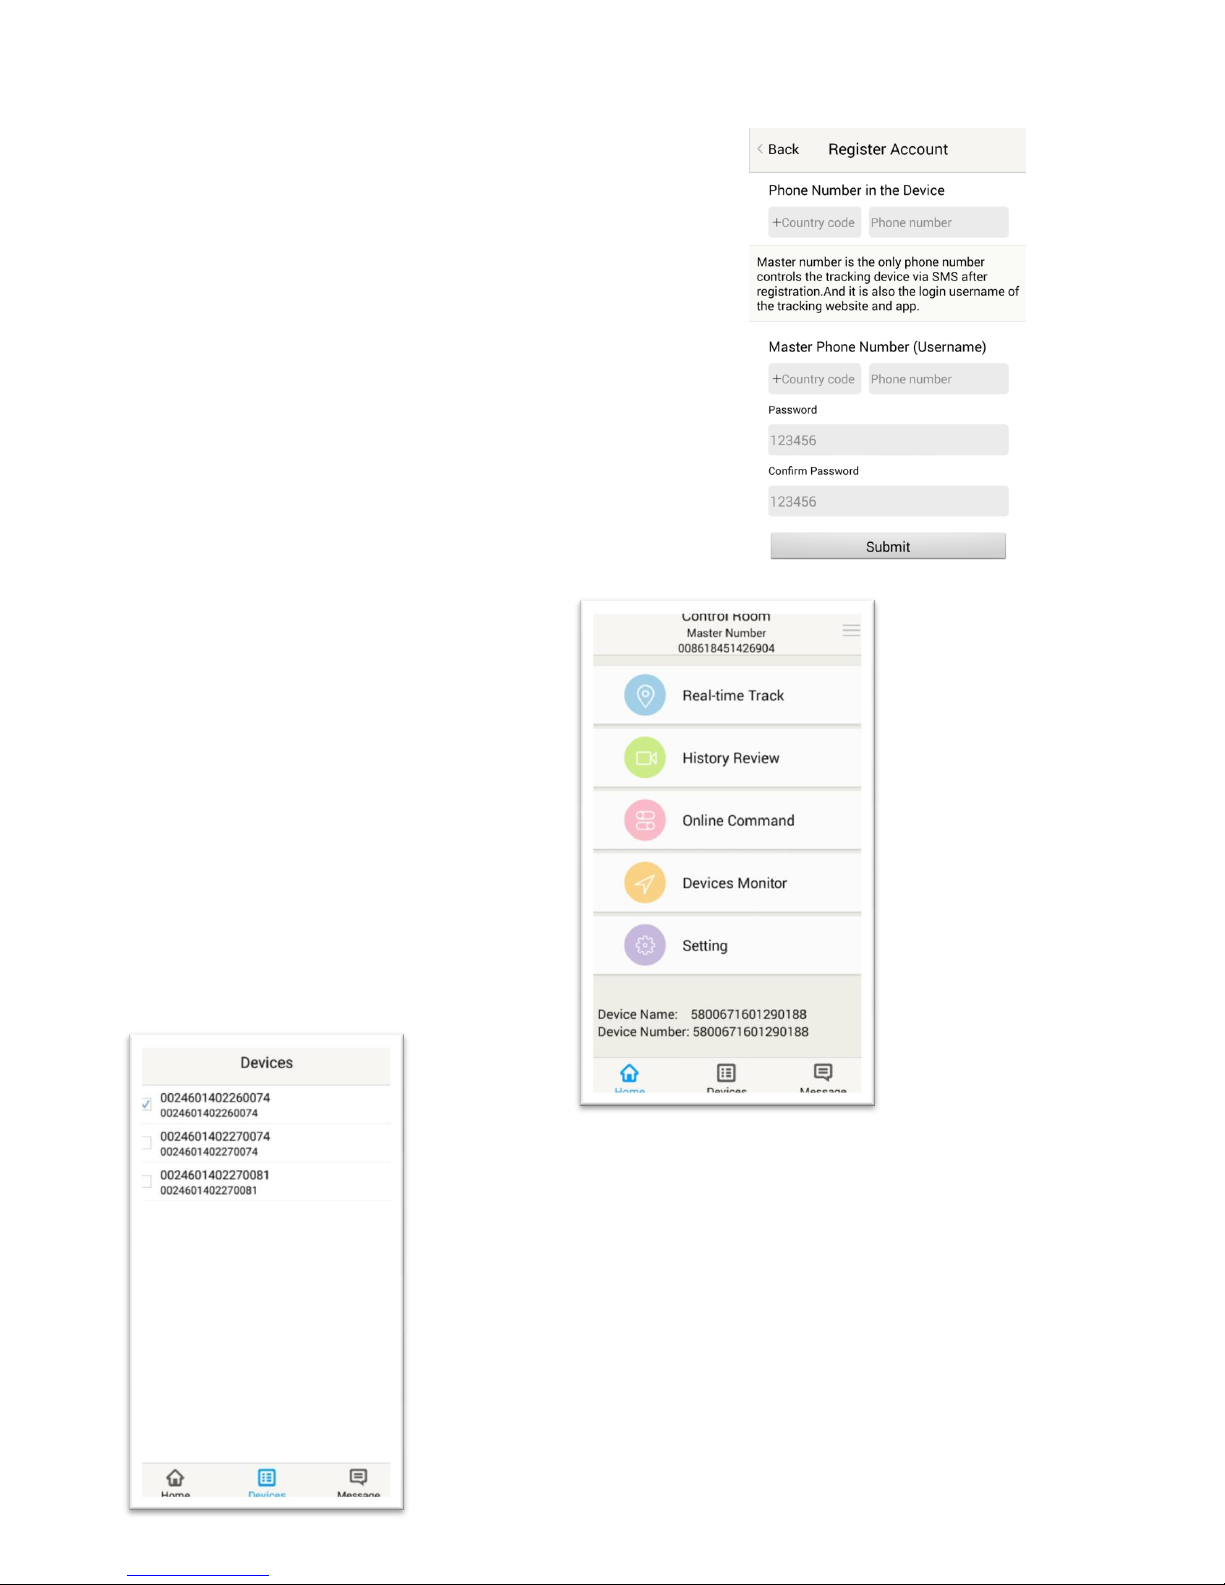
A. Make sure you put the land code before your phone
number and you let out the first 0 of your number.
e.g.: +31612345676 for NL an +32475123456 for
Belgium
B. 123456 is the default login password. And it can be
changed in the tracking website at
www.miitown.com
3. Control Room
Home
Function list of the app
Devices
Show all number devices under the same account.
Tap the device’s serial number to select the one you
need to control.
Page 5
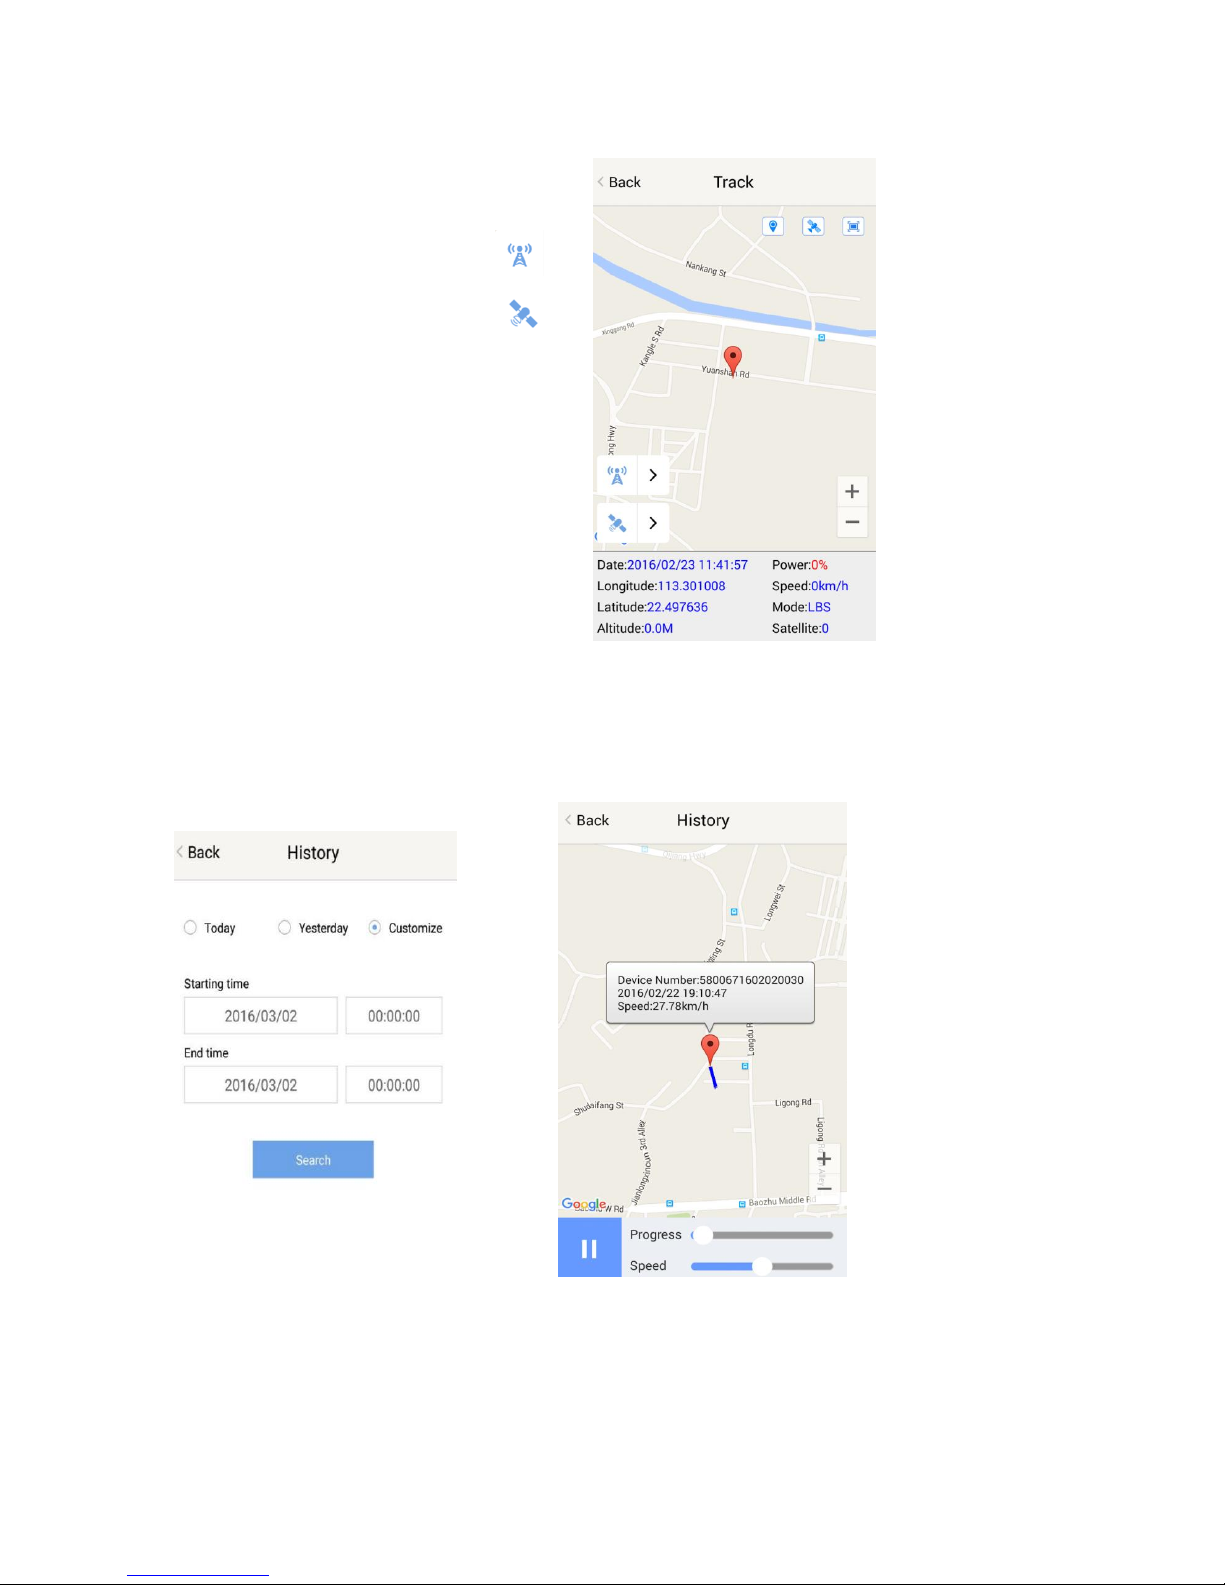
3.1 Real-time Tracking
To get latest location of the device.
Tap to get GSM location
Tap to get GPS location
3.2 History Review
To view the previous location record of the selected device.
Page 6
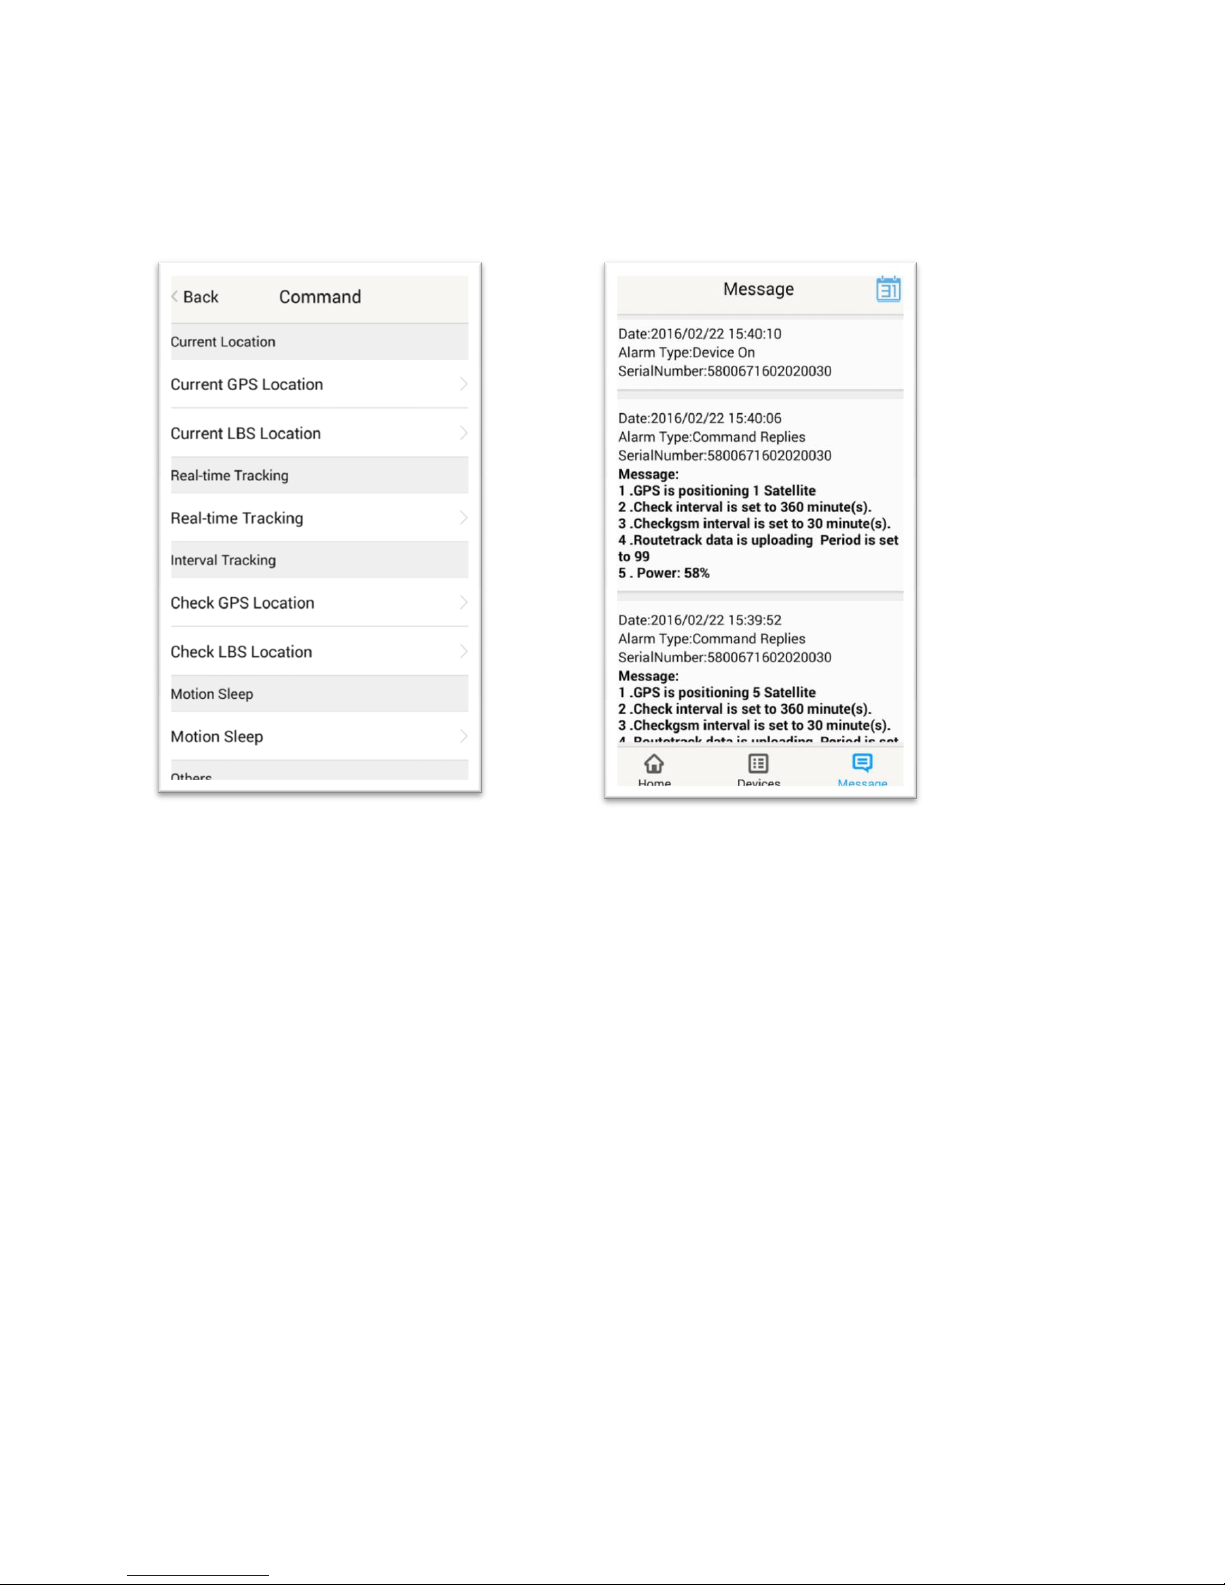
3.3 Online Command
Online Command can control device from APP via SMS, so SMS cost will be
charged by the SIM provider of your smartphone, when you send these commands.
And all replies from the device will be sent back to app via GPRS data, so replies will be
shown as push notification, and all records can be checked in the message section.
3.3.1 Current GPS Location
To update the latest GPS location of the device. The latest location will be uploaded to
website and app map.
3.3.2 Current LBS Location
To update the latest GSM location of the device. The latest location will be uploaded to
website and app map.
3.3.3 Real-time Tracking
Enables device to upload 6 locations to server every minute when device is in motion.
3.3.4 Check GPS Location
Device will upload GPS location in appointed interval. Only when device is in motion.
Default as 1GPS location uploads every 72 hours.
3.3.5 Check LBS Location
Device will upload GSM location in appointed interval. No matter device is in motion or
not. Default as 1GSM location every 30 minutes.
Check LBS function is the best power saving tracking function, but distance
inaccuracy could up to 1KM
3.3.6 Deep Sleep
Device will go to deep sleep mode and wake up after appointed interval, and will be stay
Page 7

awake for 12 minutes. If there is no new commands received in 12 minutes, device will go
back to deep sleep mode for the next set interval.
The phone function will be off during deep sleep, and no call or SMS can be replied
until device wakes up.
3.3.7 Motion Sleep
Device will go to deep sleep mode and wake up when motion is detected, and will be stay
awake for 12 minutes.. If there is no new commands received in 12 minutes, device will go
back to deep sleep mode until the next motion is detected.
The phone function will be off during deep sleep, and no call or SMS can be replied
until device wakes up.
3.3.8 Others
3.3.8.1 Status Query
Check system status, replies will be shown in the message section
3.3.8.2 Device Information
Check software edition information and device’s serial number. Replies will be shown in
the message section.
3.4 Device Monitor
All devices will be shown in the latest location.
4. Panic Button
Power button is the panic button. If there is a SIM card inserted, 2 short presses and 1
long press to trigger SOS alert. Preset numbers will receive the following SOS SMS
“SOS! HELP! SOS!! HELP!! SOS!!! HELP!!!” System default as off.
Note:
1. Interface of the App you download could be different from the screenshot in the
user manual since it is kept updated.
2. Certain functions in APP might not support the models you purchase. Please
check the following SMS Command Operation Guide to confirm detail functions
list of your tracker.
SMS Commands Operating Guide
SMS commands are for non-smartphone user or who would like to control the
device through SMS commands only, without using the App.
1. Registration
1.1 Set APN
APN is Access Point Name. The correct APN must be set to enable the device to send
data to the server. Different SIMs have different APN, make sure you have confirmed the
correct APN information with the SIM provider when you purchase the SIM.
Page 8
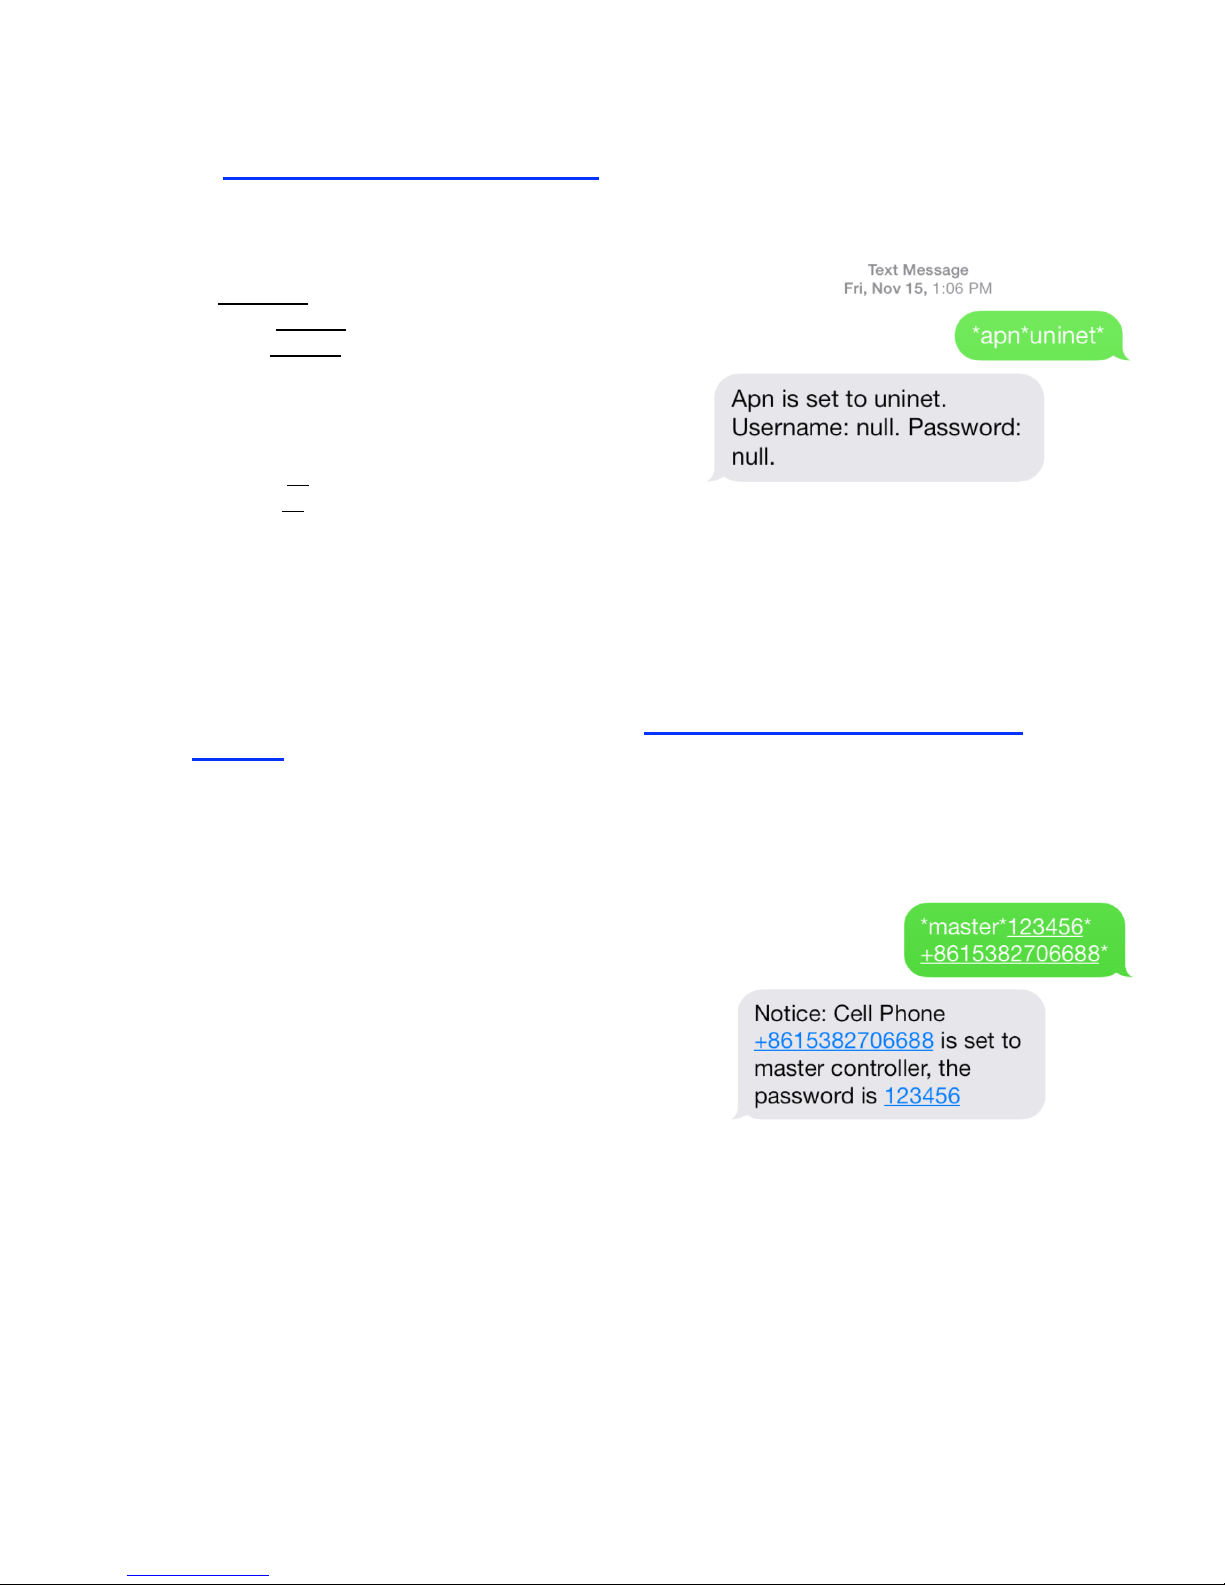
Command
*apn* APN’s name*username* password*
Some APN goes without username and password, you can just leave them blank.
Example: Orange France
APN: orange.fr
Username: orange
Password: orange
Correct command format *apn*orange.fr*
orange*orange*
Example: China Union
APN : uninet
Username: null
Password: null
Correct command format *apn*uninet*
Your cell phone will receive confirmation saying that the appointed APN is set (See
screenshot).
1.2 Registering the “Master” Controller
A. Use cellphone to send SMS *master*123456*+country code plus your cellphone
number*to the device SIM number. 123456 is the default password, it can be changed
by changing password command as showed on 1.3.
Example
*master*123456*+319876543210* (+31 refers to Netherlands country code, 9876543210
refers to the cell phone number)
B. Once your cellphone receives the confirmation
sms, it will become the only master phone to the
tracker (See screenshot).
NOTE: The device will ONLY listen and respond
commands from this number unless you choose to
turn on the multi controller function and open the
device to any cell phone number.
1.3 Changing the Password
SMS: *password*654321* (654321 refers to new password)
Changing password command has to be sent only from the master number. And new
password has to be applied to when you need to register the device with a new master
number.
2. Motion Alert
The motion alert enables device triggered a call/sms alert when motion is detected.
2.1 Set vibration sensitivity
Page 9

There are 5 levels of the motion sensitivity. 1 being the most sensitive, 5 the least, default
setting is 1.
SMS: *sensitive*1-5*
2.2 Set SMS/CALL Alert
There will be a Call/SMS alert send to master number when any motion is detected, after 3
minutes of non-movement. The system default setting is call alert, and can be turned
off by command.
SMS: *alertoff*
To turn off motion alert function.
SMS: *smsalert*
To enable motion sms alert function.
SMS: *callalert*
To enable motion call alert function.
2.3 Period Continuous Motion Alert
System will enable the continuous motion alert function at appointed time periods, up to 3
time periods per day.
That means master number will receive the call/sms alerts continuously when device
detects on continuous motion.
Time format need to be in military time.
System default set UTC time, if you are not in this timezone, please set your
timezone before using this function.
SMS:*continuousalert*(2 digits start time)*(2 digits end time)*
Example
*continuousalert*08*14* means system will enable continuous motion alert function from
8am to 2pm.
SMS:*continuousalertoff*
To turn off period motion alert function.
3. Tracking via SMS
3.1 SMS: *locateaddress*
Master number will receive the GPS address of the device via SMS. If GPS location is
invalid, device will reply the WiFi location, or the closest cell tower location instead.
3.2 SMS: *locatemap*
Master number will receive a Google map link. Click the link to view the map via cellphone
browser. If GPS location is invalid, device will reply the map link of the WiFi location, or
the closest cell tower location instead.
And this function is suitable for smart phone user only.
4. Tracking via website and applications
Tracking Website: www.miitown.com
Page 10

ID: Registered Master phone number.
Password: Default as 123456.
It can be changed on the tracking website.
Recommended Web browsers are Chrome, Firefox or cell phone default browser.
4.1 Real-time Tracking (High Power Consumption)
Routetrack function enables device to upload 6 locations to server every minute when
device is in motion.
4.1.1 Routetrack
SMS: *routetrack*1-99*
1-98 represents the number of hours that the routerack function works. 99 represents to
turn the routetrack function always on.
Example
*routetrack*1* means uploading 6 location GPS data every minutes for 1 hour
4.1.1.1 Rsampling
Rsampling is to set routetrack data collecting interval.
The smaller interval, the higher accuracy, but the higher power consumption.
SMS *rsampling*1-999*
1-999 represents seconds of data collecting interval, default as 10 seconds
4.1.1.2 Rupload
Rupload is to set routetrack data upload interval.
The smaller interval, the higher accuracy, but the higher power consumption.
SMS *rupload*1-999*
60-999 represents seconds of data uploading interval, default as 60 seconds, minimum
rate should not be less than 60
Example
*rsampling*30* plus *ruplaod*120* means 4 location data will be uploaded to server every
2 minutes when routetrack function is on.
SMS:*routetrackoff*
To turn off route track function.
4.2 Check GPS Location (Medium Power Consumption)
Check function enables device to upload GPS location in an appointed interval. If GPS
location is invalid, system will upload the WiFi location, or the closest cell tower location
instead.
SMS: *checkm*5-1800*
5-1800 represents the number of minutes that the device Check’s data upload interval,
minimum rate should not be less than 5.
Example
Page 11

*checkm*360* means uploading WiFi/GPS data every 6 hours.
Noted:
1. Check function is able to work with routetrack and Checkgsm functions at the same
time.
2. System is default as *checkm*4320*. 1 location will be uploaded to server every 72
hours.
3. Location will be uploaded to server only when device is in motion.
4.3 Check WiFi/GSM Location (Low Power Consumption)
Checkgsm function enables device to upload ONLY the WIFI/GSM location in appointed
interval of time. Data will be uploaded to server on both occasions, i.e, if the device is in
motion or not in motion. If WiFi location is invalid, system will update the closest cell
tower location instead.
And this function can be used with routetrack and Check function at the same time.
SMS: *checkgsm*5-1800*
5-1800 represents the the number of minutes of Checkgsm’s data upload interval, default
as off; rate should not be less than 5.
Example
*checkgsm*30* means uploading GSM data every 30 minutes.
4.4 Advanced Tracking
Advanced Tracking including appointed time tracking and appointed period tracking.
System default as UTC time, timezone has to be set to use advanced tracking functions if
device is not using in UTC timezone.
4.4.1 Timezone
SMS: *timezone*0-24*
Example
Italy= *timezone*2*
UK= *timezone*0*
Australia Perth = *timezone*8*
4.4.2 Appointed Time Tracking
To Check map location at appointed time, up to 3 time points per day.
Device will stay in deep sleep mode except the appointed tracking time.
Time format need to be in military time and can be set to every half hour.
SMS:*timinglocatemap*(appointed locating time)*
Example:
*timinglocatemap*0830*1400*1830* means master number will receive a text message
with a google map link at 8:30am 2:00pm and 6:30pm, click the link to view the device
Page 12

location on goole map through your cellphone browser. It is suitable for smart phone user
only.
SMS:*timinglocateoff*
To end timing locate function.
4.4.3 Period Tracking
Period Tracking is to enable the preset tracking function in appointed periods only,up to 3
time periods.
Device will stay in deep sleep mode except the appointed tracking period.
Time format need to be in military time and can be set to every half hour.
SMS:*periodlocate*(8 digits locating period 1)*(8 digits locating period 2)*
Example
*periodlocate*08301100*14001830* means system will enable the tracking function during
8:30am-11:00am and 2:00pm-6:30pm of the day. 0830 and 1400 refers to the start time of
the tracking period, 1100 and 1830 refers to the end time of the tracking period.
SMS:*periodlocateoff*
To end period locate function.
3.4 Track Off
Track off will end all the tracking functions, including routetrack, checkm, checkgsm, timing
locate and period locate.
SMS:*trackoff*
To turn off all tracking functions, including routetrack, check, checkgsm, timing locate and
period locate.
5 Upload Alert
The upload alert function enables device upload alert status to the server including motion
alert, low battery alert and wire cut alert, drop alert etc. User can check alert status on
the tracking website or message section in app.
This function is default as ON.
SMS:*uploadalert*on*
To enable upload alert function.
SMS:*uploadalert*off*
To disable upload alert function.
6 Online Control
The online command function enables device to connect with server for 15 minutes, and
user will be able to send online command from the tracking website.
SMS:*onlineon*
Page 13

To enable online control function.
SMS:*onlineoff*
To end online control function.
7. Sleep Function (Lowest Power Consumption)
7.1 Interval Sleep
Device will go to deep sleep mode and wake up after appointed interval, and stay awake
for 12 mintues. If there is no new commands received in 12 minutes, device will go back to
deep sleep mode for the next set interval.
Note: System will shut down GPS and GSM module during deep sleep period, so no call
or SMS can be received or responded.
SMS:*sleep*1-99*
1-99 refers to the hours of appointed sleep interval.
Example
*sleep*6* means to enable device to go to deep sleep mode and wake up in every 6 hours.
7.2 Motion Sleep
Motion Sleep function enables device to stay in deep sleep mode and wakes up
once motion is detected. System will upload the current location of the device. If
motion continues, system will stay on and operate the previous tracking settings. If
there is no further motion detected, device will go back to deep sleep in 12 minutes.
And the circle repeats.
Note: System will shut down GPS and GSM module during deep sleep period, so
no call or SMS can be received or responded.
SMS: *sleepv*
To enable motion sleep function.
SMS: * sleepoff*
To turn off motion sleep function.
8. WiFi Functions
WiFi function suitable for models support WiFi only. Please check your models number in
Hardware Specification to confirm.
8.1 WiFi Fence
8.1.1 Set WiFi Fence
WiFi fence function enables device recognising the appointed WiFi router signal as a
fence, similar to Geofence. Alerts will be triggered when device enters or exits fence.
There are a few steps to setup a WiFi fence.
Step 1 SMS *wifilist*
Device will detect WiFi signal nearby and reply a list with wifi router names in orders.
Page 14

Example 1. Apple’s home. 2. Ken’s office 3. Bear’s Cafe
Step 2 SMS *wififence*#*
# refers to the WiFi number in the WiFi list reply. And master number will receive a notice
to confirm the appoint WiFi is set as the WiFi fence.
Example *wififence*2* means WiFi router in the name of Ken’s Office will be set as a WiFi
fence.
Step 3 SMS *wificheck*5-99*
5-99 refers to WiFi fence checking interval in minutes. System will check the set WiFi fences in
appointed time interval. And corresponding alerts will be generated when device enters or exits the
set WiFi fences.
Example *wificheck*5* means system will check set wifi fences in every 5 minutes.
8.1.2 Check WiFi Fence
SMS *wififencelist*
You will receive a list of the WiFi fences you have set. There are up to 3 fences can be set.
SMS *removefence*#*
If the set WiFi fence number has up to 3, you have to remove at least 1 of them in order to add the
new fence. # refers to the WiFi number in the WiFi fence list reply.
Example *removefence*2* means WiFi router in the name of Ken’s Office will be removed
from the WiFi fence list.
8.2 WiFi Find Me
WiFi find me is an indoor tracking technology. It enables device sending out WiFi signal as a WiFi
router via hotspot. And through the app on your smartphone, you are able to get close to the
device by detecting device’s WiFi signal.
This function is suitable for Android smartphone user only.
SMS *wifispoton*
Device will turn on hotspot function for 10 minutes once receiving the command.
SMS *wifispotoff*
To turn off WiFi find me function.
Please be sure this function is off before using other WiFi function.
Page 15

8.3 WiFi Data Upload
WiFi Data Upload enables device to upload all location data to the server via WiFi channel
instead of GPRS channel.
8.3.1 Set Data Upload WiFi
There are 2 steps to setup a WiFi data upload channel.
Step 1 SMS *wifilist*
Device will detect WiFi signal nearby and reply a list with wifi router names in order.
eg. 1. Apple’s home. 2. Ken’s office 3. Bear’s Cafe
Step 2 SMS *wifibind*#*WiFi Password*
Example
# refers to the WiFi number in the WiFi list reply.
In the above WiFi list, if 3. WiFi Bear’s Cafe is the WiFi you would like to setup for data
load, and you know the WiFi password is 654321. The correct command format is
*wifibind*3*654321*. And you will receive a confirmation notice through SMS.
8.3.2 Set Data Upload Channel
System supports 3 types of data upload channels:
GPRS only, WiFi only, WiFi+GPRS. GPRS is the default data upload channel.
After setting the data upload WiFi, you can send a command to switch upload channel to
WiFi only or WiFi+GPRS as follows:
SMS *up*gprs*
System default data upload is via GPRS.
SMS *up*wifi*
It enables device upload data via WiFi only, if WiFi is not able to be connected, data will be
saved in SD (for models support SD storage), and upload again when WiFi is connected.
SMS *up*mix*
It enables device upload data via WiFi as priority. If the WiFi is not able to be connected,
system will turn back to GPRS channel for data upload.
Since WiFi Find Me and WiFi Data Upload can not be used at the same time. Please
send *up*gprs* to switch device back to GPRS upload mode, and then send
command 88888888 to reboot the system, before using WiFi Find Me function.
9. SD Offline Storage
Page 16

SD offline storage function suitable for models support SD card only. Please check your
models number in Hardware Specification to confirm.
Big Buffer
Offline storage enables device to save location data into the SD card when GPRS
connection invalid and data will be automatically uploaded to server when connection gets
back. This process will be done automatically, no extra command operation is needed.
Logger
Office storage is able to switch the tracking device into a logger for data saving.
Please operate as follows:
a. Insert a Micro SD card in the SD slot.
b. Insert a activated SIM into the SIM slot, set all needed function as usual.
c. Send command *sdon* to enable to the offline storage function.
d. All location data will be saved in the SD card instead of uploading to the server.
e. Take the SD out of the device, copy the .bin files to your PC.
f. visit http://offline.miitown.com/
g. Select the data file and click Submit
h. Click Report to view saved data report. Click Start to view history playback.
i. Send command *sdoff* to end offline storage function.
Note
If you want to take the SIM out of the device after setting all commands, please use an
invalid SIM or artificial SIM to replace. Since SIM slot connection is the power switch of the
device, a SIM is required to be inserted anyway.
10. Remote Listening
This remote listening function enable master number to call-in and listen to the
environmental sound of the device, and device also able to call back when receiving the
callback command from master number.
10.1 SMS: *callin*
Master number is able to call the device phone number and start listening within 30
minutes after the command is sent.
10.2 SMS: *callback*
The device will call the master number when command is received.
11. Status query
SMS: *status*
To check device setting status and performance. GPS ranking data will shows up only
when routetrack function is on.
12. SOS Alert
SOS Alert function enables device to send SOS alert to preset number when the panic
button is triggered.
Up to 3 SOS numbers can be preset.
Page 17

The registered master number is the default SOS alert number.
12.1 Register the SOS alert number
SMS: *master*123456*cellphone number 1*cellphone number 2*cellphone number 3*
NOTE: Please make sure country code is included in the cellphone number.
12.2 Panic Button
Power button is the panic button. If there is a SIM card inserted, 2 short presses and 1
long press to trigger SOS alert. Preset numbers will receive the following SOS SMS
“SOS! HELP! SOS!! HELP!! SOS!!! HELP!!!” System default as off.
SMS: *soson*
To enable SOS alert function.
SMS: *sosoff*
To turn off SOS alert function.
13. Low battery Alert
There will be a low battery SMS alert sent to master number when battery drops to 20% of
it’s capacity, and the routetrack function will be turned off for power saving. And it will
resume working when battery is charged. The alert number can be appointed to any other
cellphone number if needed.
Appoint low battery alert number
SMS:*lowbat*alert cellphone number*
Note: Please make sure country code is included in the cellphone number.
Example
*lowbat*+319876543210*
14. Reboot
SMS: 88888888
Reboot system, previous settings will not be cleared.
15. Master query
SMS: 999999
To check registered master number, password and device’s serial number.
16. Default
SMS: default
To operate factory default, previous settings will be cleared.
17. Multi Controller
Allows any cellphone number to check the device location and status besides the master
number.
Page 18

17. 1 SMS: *multiquery*
To enable multi controller function.
17. 2 SMS: *multiqueryoff*
To turn off the multi controller function.
18. Device Information
SMS:*about*
To check device information including software edition and serial number.
Command Setting List
Function
Command
Description
APN Settings
*apn*APN’s name
*username*password*
Enable device to access
internet.
Master Setting
*master*123456*country
code (plus) cellphone
number*
Register master number.
Page 19

Function
Command
Description
Password Changing
*password*654321*
Original password is
default as 123456.
654321 refers to new
password.
Vibration Sensitivity
*sensitive*1-5*
Set motion alert
sensitivity, 1 is the most
sensitive, 5 is the least
Motion Alert
*alertoff*
End motion alert
*smsalert*
Motion alert via SMS
*callalert*
Motion alert via Call
Period Motion Alert
*continuousalert*(2 digits
start time)*(2 digits end
time)
Set period motion alert.
The first 2 digitals refers
to start time and second
2 digits refers to end
time in hour.
*continuousalertoff*
End period motion alert
function.
Address Query
*locateaddress*
Address information of
current location.
Google Map Search
*locatemap*
Google Map link with
current location.
Real-time Tracking
*routetrack*1-99*
Device will upload 6
locations every
minute.1-98 represents
routetrack data upload
interval in hours. 99
represents always on.
Real-time Tracking
sampling interval
*rsampling*1-999*
1-999 represents
seconds of routetrack
sampling interval
Real-time Tracking
upload interval
*rupload*1-999*
1-999 represents
seconds of routetrack
upload interval
Real-time Tracking
Off
*routetrackoff*
End routetrack function.
Page 20

Function
Command
Description
Check Location
*checkm*5-1800*
5-1800 represents
minutes of check
function
data upload interval
*checkoff*
End check function
*checkgsm*5-1800*
5-1800 represents
minutes of check gsm
function
data upload interval
Time Zone
*timezone*0-24*
0-24 represents the
timezone number for
each country.
Appointed Time
Tracking
*timinglocatemap*(appoi
nted locating time)*
Set appointed time
tracking. 4 digitals refers
to start time and end
time in hour. 0830 refers
to 08:30am
*timinglocateoff*
End appointed time
tracking function
Appointed Period
Tracking
*periodlocate*(8 digits
locating period)
Set appointed period
tracking. 8 digitals refers
to start time and end
time of the
period.08001100
represents 8am-11am
*periodlocateoff*
End period locate
function
Track Off
*trackoff*
End all the tracking
functions.
Upload Alert
*uploadalert*on*
Enable upload alert
function
*uploadalert*off*
End upload alert
function
Online Control
*onlineon*
Enable online control
function
Page 21

Function
Command
Description
*onlineoff*
End online control
function
Deep Sleep
* sleep*1-99*
1-99 represents device
wake up interval in
hours.
Motion Sleep
* sleepv*
Motion Sleep function
with motion alert.
Sleep Off
*sleepoff*
End Deep Sleep
function.
Status query
*status*
Check system status.
Multi Controller
*multiquery*
Enable multi controller
function.
*multiqueryoff*
End multi controller
function.
Set WiFi Fence
*wifilist*
Check nearby wifi list.
*wififence*#*
Set WiFi fence.
Check WiFi Fence
*wififencelist*
Check WiFi fence list.
*removefence*#*
Remove WiFi fence.
WiFi Find Me
*wifispoton*
Enable hotspot.
*wifispotoff*
Disable hotspot.
WiFi Data Upload
*wifilist*
Check nearby wifi list.
*wifibind*#*WiFi
Password*
Bind data upload WiFi
Page 22

Function
Command
Description
WiFi Upload Channel
*up*gprs*
Data upload via GPRS
*up*wifi*
Data upload via WiFi
*up*mix*
Data upload via
WiFi+GPRS
Offline Storge
*sdon*
Enable offline storage
function
*sdoff*
End offline storage
function.
Remote Listening
*callin*
Enable call-in listening
function for 30 minutes
*callback*
Enable call back
listening function
SOS Alert
*soson*
Enable SOS alert
function.
*sosoff*
Disable SOS alert
function.
Device Information
*about*
Software edition
information and device’s
serial number.
Reboot
88888888
Reboot the system,
previous settings will
NOT be cleared.
Master Query
999999
Registered master
number information,
password and device’s
serial number.
Low Battery Alert
Number
*lowbat*country code
(plus) cellphone number*
To set low battery alert
number.
Factory Default
default
Default system, previous
settings will be cleared.
Page 23

Function
Command
Description
Power Off
*poweroff*
Power off the device.
Hardware Specifications:
TK SERIES MODEL AND FUNCTION LIST
Model
Size
Weight
Battery
Capacity
SD
WiFi
Remote
Listening
Solar
TK053
123mm x 62mm x 31mm
210g
3000mA
N N Y
N
TK05
123mm x 62mm x 31mm
227g
5000mA
N N Y
N
TK05S
160mm x64mm x 35mm
369g
5000mA
N N N
Y
TK10
160mm x64mm x 35mm
369g
10000mA
N N Y
N
TK10S
160mm x64mm x 35mm
369g
10000mA
N N N
Y
TK15
160mm x64mm x 41mm
465g
15000mA
N N Y
N
TK15S
160mm x64mm x 41mm
465g
15000mA
N N N
Y
Page 24

TK20
160mm x64mm x 47mm
569g
20000mA
N N Y
N
TK20S
160mm x64mm x 47mm
575g
20000mA
N N N
Y
TK05SD
123mm x 62mm x 31mm
227g
5000mA
Y N Y
N
TK05SSD
160mm x64mm x 35mm
369g
5000mA
Y N N
Y
TK10SD
160mm x64mm x 35mm
369g
10000mA
Y N Y
N
TK10SSD
160mm x64mm x 35mm
369g
10000mA
Y N N
Y
TK15SD
160mm x64mm x 41mm
465g
15000mA
Y N Y
N
TK15SSD
160mm x64mm x 41mm
465g
15000mA
Y N N
Y
TK20SD
160mm x64mm x 47mm
569g
20000mA
Y N Y
N
TK20SSD
160mm x64mm x 47mm
575g
20000mA
Y N N
Y
TK05W
123mm x 62mm x 31mm
227g
5000mA
N Y Y
N
Page 25

TK10W
160mm x64mm x 35mm
369g
10000mA
N Y Y
N
TK15W
160mm x64mm x 41mm
465g
15000mA
N Y Y
N
TK20W
160mm x64mm x 47mm
569g
20000mA
N Y Y
N
TK05SDW
123mm x 62mm x 31mm
227g
5000mA
Y Y Y
N
TK05SSDW
160mm x64mm x 35mm
369g
5000mA
Y Y N
Y
TK10SDW
160mm x64mm x 35mm
369g
10000mA
Y Y Y
N
TK10SSDW
160mm x64mm x 35mm
369g
10000mA
Y Y N
Y
TK15SDW
160mm x64mm x 41mm
465g
15000mA
Y Y Y
N
TK15SSDW
160mm x64mm x 41mm
465g
15000mA
Y Y N
Y
TK20SDW
160mm x64mm x 47mm
569g
20000mA
Y Y Y
N
TK20SSDW
160mm x64mm x 47mm
569g
20000mA
Y Y N
Y
Page 26

GPRS:MTK 6260D
Quad band; GSM 850/900/1800/1900 MHzAntennae: Internal, GPRS Class 12
Power: Rechargeable, Lithium-Polymer Battery
Built-in Vibration/motion sensing
GPS: U-BLOX G7020-ST, 50 channel
Antennae: Internal
Position Accuracy: >=5m
Sensitivity: Tracking: (R)C161 dB, Cold starts: (R)C148 dB, Hot starts: (R)C156
dB
Cold start:<27s, Warm Start: <5s, Hot Start: 1s
A-GPS: AssistNow Online and AssistNow Offline services.
 Loading...