

Page 1
MILROYAL® B and C Disc
Diaphragm Liquid End
Instruction Manual
Manual No : 54145
Rev. : 00
Rev. Date : 12/2015
Page 2
PRECAUTIONS
The following precautions should be taken when working with metering pumps.
Please read this section carefully prior to installation.
Protective Clothing
ALWAYS wear protective clothing, face shield, safety glasses and gloves when working on or
near your metering pump. Additional precautions should be taken depending on the solution
being pumped. Refer to Safety Data Sheets for the solution being pumped.
Hearing Protection
It is recommended that hearing protection be used if the pump is in an environment where the
time - weighted average sound level (TWA) of 85 decibels is exceeded. (as measured on the
A scale - slow response)
Electrical Safety
• Remove power and ensure that it remains OFF while maintaining pump.
• DO NOT FORGET TO CONNECT THE PUMP TO EARTH / GROUND.
• Electric protection of the motor (Thermal protection or by means of fuses) is to correspond
to the rated current indicated on the motor data plate.
Liquid Compatibility
Verify if the materials of construction of the wetted components of your pump are
recommended for the solution (chemical) to be pumped.
Pumps Water “Primed”
All pumps are tested with water at the factory. If your process solution is not compatible with
water, ush the Pump Head Assembly with an appropriate solution before introducing the
process solution.
Plumbing and Electrical Connections
Always adhere to your local plumbing and electrical codes.
Line Depressurization
To reduce the risk of chemical contact during disassembly or maintenance, the suction and
discharge lines should be depressurized before servicing.
Over Pressure Protection
To ensure safe operation of the system it is recommended that some type of safety /
pressure- relief valve be installed to protect the piping and other system components from
damage due to over-pressure.
Lifting
This manual should be used as a guide only - Follow your company’s recommended lifting
procedures. It is not intended to replace or take precedence over recommendations, policies
and procedures judged as safe due to the local environment than what is contained herein.
Use lifting equipment that is rated for the weight of the equipment to be lifted.
i Instruction Manual
Page 3

TABLE OF CONTENTS
SECTION 1 - DESCRIPTION................................................................. 2
1.1 GENERAL ...................................................................... 2
1.2 PRINCIPLES OF OPERATION ......................................................2
1.3 SAFETY PRECAUTIONS...........................................................2
SECTION 2 - INSTALLATION ................................................................ 3
2.1 UNPACKING .................................................................... 3
2.2 CONVERSION PROCEDURES .....................................................3
2.2.1 MILROYAL® A & B...............................................................3
2.2.2 MILROYAL® C .................................................................. 4
2.3 PIPING ....................................................................... 4
2.3.1 Piping Concentrated Sulfuric Acid .................................................. 5
2.3.2 Suction Lift Conditions ...........................................................5
SECTION 3 - OPERATION .................................................................. 6
3.1 INITIAL START-UP................................................................ 6
3.2 INITIAL ADJUSTMENT ............................................................ 6
3.2.1 Rell Valve .................................................................... 6
3.2.2 Rell Valve .................................................................... 6
3.3 MAINTENANCE ................................................................. 7
3.3.1 Hydraulic Oil ................................................................... 7
3.3.2 Check Valves .................................................................. 7
3.3.3 Plastic Check Valves............................................................. 7
3.3.3.1 Disassembly .................................................................7
3.3.3.2 Reassembly.................................................................. 7
3.3.4 Diaphragm .................................................................... 7
3.3.4.1 Disassembly .................................................................7
3.3.4.2 Reassembly.................................................................. 8
3.4 SPARE PARTS .................................................................. 8
SECTION 4 - TROUBLESHOOTING ........................................................... 9
LIST OF ILLUSTRATIONS
FIGURE 1. MILROYAL® Disc Diaphragm ........................................................ 1
FIGURE 2. Milton Roy Sludge Trap ............................................................ 5
FIGURE 3. Typical Sludge Trap Installation ......................................................5
FIGURE 4. MILROYAL® B Disc Diaphragm Liquid End Assembly Drawing (C-102-2095-0006) ............. 12
FIGURE 4. MILROYAL® B Disc Diaphragm Liquid End Assembly Drawing Continued (C-102-2095-0006) ..... 13
FIGURE 5. MILROYAL® C Disc Diaphragm Liquid End Assembly Drawing (C-102-2285-0006) ............. 15
FIGURE 5. MILROYAL® C Disc Diaphragm Liquid End Assembly Drawing Continued (C-102-2285-0006) ..... 16
iiInstruction Manual
Page 4
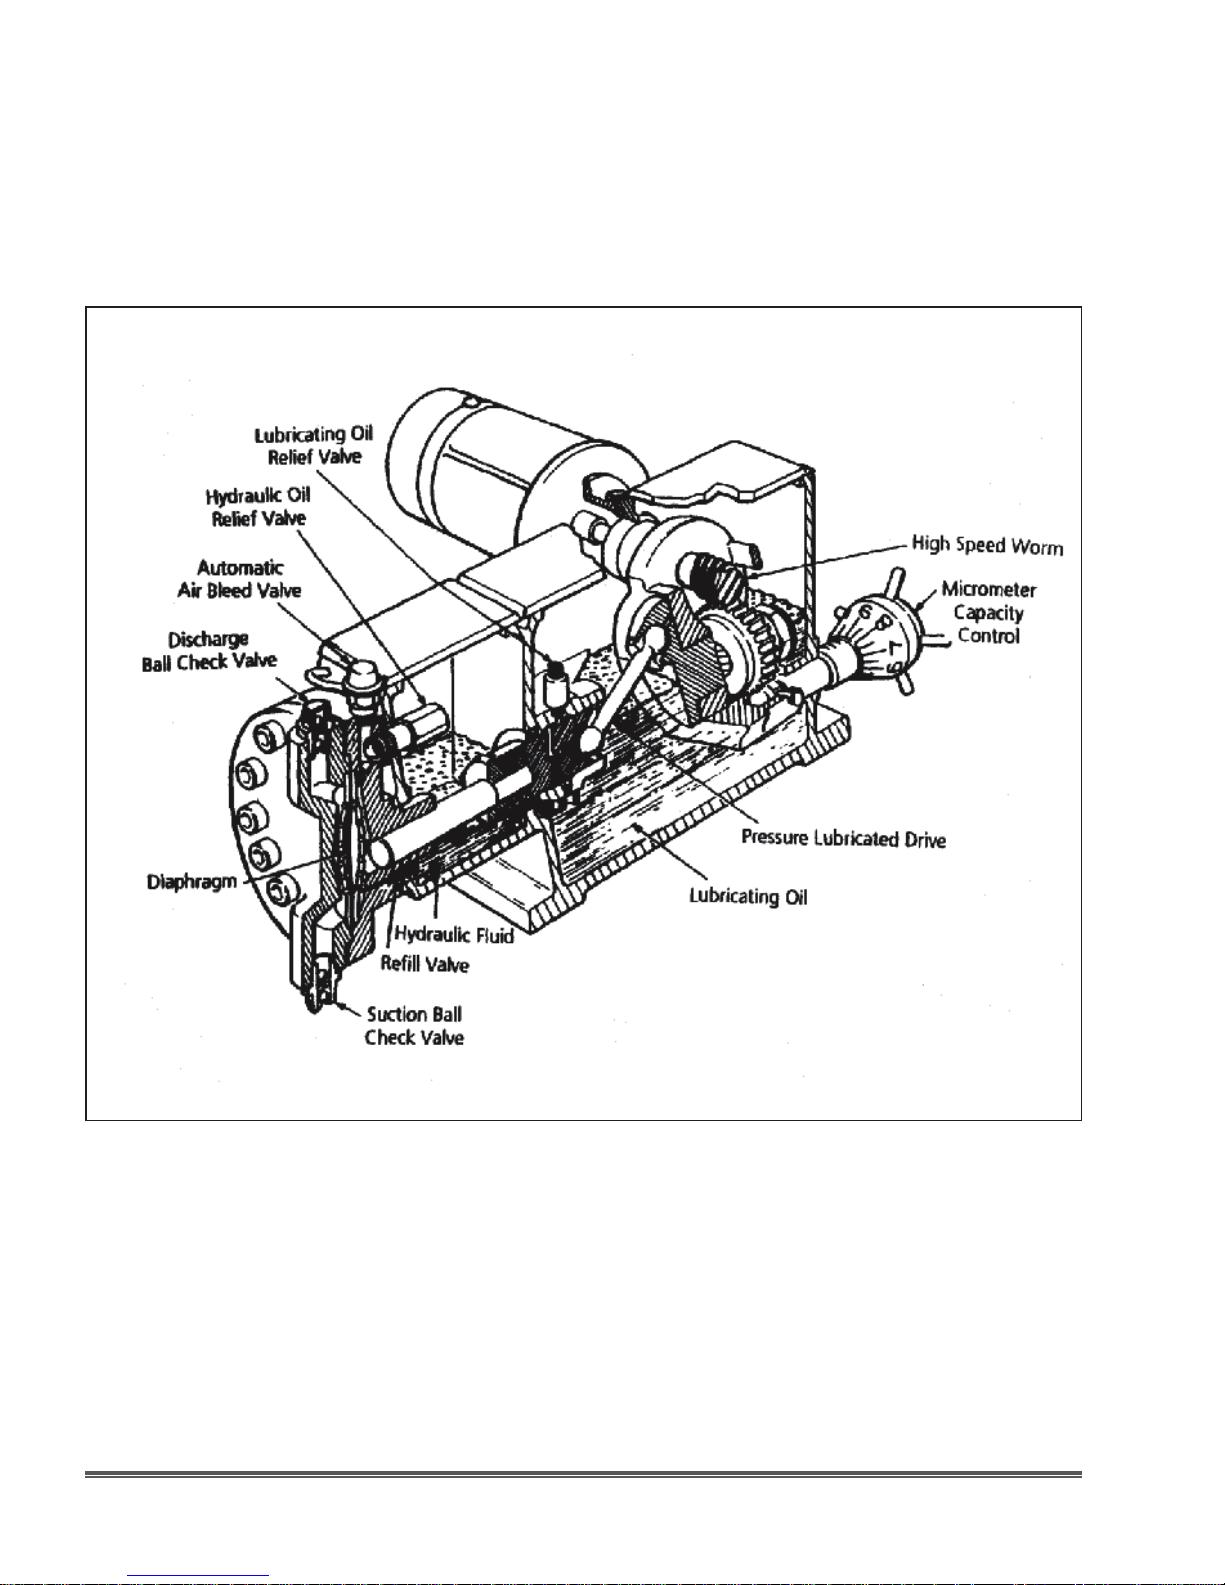
Figure 1. MILROYAL® B and C Disc Diaphragm
1 Instruction Manual
Page 5

SECTION 1 - DESCRIPTION
This Instruction Manual is designed to serve as
a supplement to Instruction Manuals 53943 and
53939, which provide both general information
and specic instructions for installing, operating,
and maintaining MILROYAL® pumps. This manual
covers only the optional Disc Diaphragm Liquids
Ends which may be tted to these pumps in place of
the standard Packed Plunger Liquid Ends. Do not
rely on this manual alone in installing, maintaining,
and operating MILROYAL® pumps.
1.1 GENERAL
The Disc Diaphragm Liquid End is particularly
suitable for pumping costly, aggressive, or
hazardous liquids without leaking. The diaphragm
is hydraulically balanced between the process
liquid on one side and the hydraulic oil on the
other side. The hydraulic oil takes the place of a
mechanical connection between pump plunger
and diaphragm.
1.2 PRINCIPLE OF OPERATION
In a Disc Diaphragm Liquid End, the reciprocating
pump plunger alternately forces hydraulic oil
against the diaphragm and then draws the oil
back into the plunger bore. This action causes the
diaphragm to ex between the limiting contour
plates.
Each suction stroke of the plunger pulls the
diaphragm towards the oil side contour plate so
that process liquid ows into the displacement
chamber through the suction ball-check valve.
Each discharge stroke of the plunger pushes the
diaphragm towards the process side contour plate
to expel the process liquid from the displacement
chamber through the discharge ball-check valve.
On each suction stroke, the discharge ball-checks
are seated, and on each discharge stroke, the
suction ball-checks are seated (pressure in
pump head is greater than suction line pressure).
This mode of operation prevents back ow and
ensures liquid movement from the suction port,
through the displacement chamber, and out the
discharge port. Precise hydraulic oil volume is
maintained by an automatic air-bleed valve and
a rell valve.
1.3 SAFETY PRECAUTIONS
When installing, operating, and maintaining the Disc
Diaphragm Liquid End, keep safety considerations
foremost. Use proper tools, protective clothing, and
eye protection when working on the equipment
and install the equipment with a view toward
ensuring safe operation. Follow the instructions in
this manual and take additional safety measures
appropriate to liquid being pumped. Be extremely
careful in the presence of hazardous substances
(e.g. corrosives, toxins, solvents, acids, caustics,
ammables etc.).
2Instruction Manual
Page 6

SECTION 2 - INSTALLATION
2.1 UNPACKING
Units are shipped Free on Board (FOB) factory
and title passes to customer when carrier signs for
receipt of pump. The customer, therefore, must le
any damage claims with the carrier.
Carefully examine the shipping crate upon
receipt from the carrier to be sure there is no
obvious damage to contents. Open the crate
carefully, so that accessory items fastened to the
inside of the crate will not be lost or damaged.
Examine all materials inside the crate and check
against packing list to be sure that all items are
accounted for and undamaged.
2.2 CONVERSION PROCEDURES
To convert a pump from standard Packed Plunger
Liquid End to Disc Diaphragm Liquid End, study
drawings at the back of this manual and then mount
the liquid end to the pump as follows (numbers in
parentheses are part numbers).
2.2.1 MILROYAL® A & B (See Figure 4)
1. Remove Packed Plunger Liquid End assembly
from pump (see pump drive disassembly
instructions in Instruction Manual 53943).
Remove plunger adapter, gland cap, gland studs
or bolts, and funnel.
2. Place lip-type seal over crosshead and position
seal flush with original seal in crosshead
bore. Be careful not to damage seal lip during
installation. Also, note that seal is installed with
lip extending towards pump liquid end.
3. Place a length of 2 1/2” (64 mm) o.d. schedule
40 pipe over crosshead and against seal Using
a soft mallet, strike the pipe to drive seal into
crosshead bore until new seal is ush with
casing face.
4. Drill a 1/4” (6 mm) diameter hole OFF the
vertical center line 2 1/2” (64 mm) below the
top machined edge of the pump casing wall in
which seals are installed. (Lay a cloth in casing
to catch chips from drilling.)
5. Flush out all dirt, chips, and debris from pump
casing. Clean liquid end mounting face on pump
casing.
6. Loosely install plunger adapter in crosshead.
7. Place liquid end gasket on mounting face of
displacement chamber. Position relief valve
gasket between pump casing and displacement
chamber. This is best done by threading a pipe
nipple into the relief valve port and pushing
the gasket onto the pipe. Insert plunger
assembly in bore of displacement chamber.
Carefully t liquid end assembly to casing bore
while guiding plunger assembly into hole in
plunger adapter.
8. Thread bolts into displacement chamber from
inside pump catchall and tighten securely.
Remove gasket-positioning pipe and install relief
valve in displacement chamber so valve port
faces bottom of pump casing. Bottom plunger
rmly in plunger adapter against crosshead and
then tighten adapter securely.
9. Install air-bleed valve in top of displacement
chamber. Install hose connection and tubing for
oil return from valve to pump casing.
10. Install relief valve assembly and adapter to
displacement chamber from inside pump
catchall.
11. Install and tighten drain plug in bottom of pump
catchall.
12. Proceed to start-up instructions in Section 3.
3
Instruction Manual
Page 7

SECTION 2 - INSTALLATION
2.2.2 MILROYAL® C (See Figure 5)
1. Remove Packed Plunger Liquid End assembly
from pump (see pump drive disassembly
instructions in Instruction Manuals 53939).
Remove plunger adapter, cap, gland studs, and
funnel.
2. Place lip-type seal over crosshead and position
seal flush with original seal in crosshead
bore. Be careful not to damage seal lip during
installation. Also, note that seal is installed with
lip extended towards pump liquid end.
3. Place a length of 4” (102 mm) o.d. Schedule
40 pipe over the crosshead and against seal.
Using a soft mallet, strike the pipe to drive seal
into crosshead bore until new seal is ush with
casing face.
4. Drill a 1/4” (6 mm) diameter hole OFF the
vertical center line 4 3/8” (111 mm) below the
top machined edge of the pump casing wall in
which seals are installed. (Lay a cloth in casing
to catch chips from drilling).
5. Flush out all dirt, chips, and debris from pump
casing. Clean liquid end mounting face on pump
casing.
6. Loosely install plunger adapter in crosshead.
7. Place liquid end gasket against mounting face of
displacement chamber. Insert plunger assembly
in bore of displacement chamber. Carefully
t liquid end assembly to casing bore while
guiding plunger assembly into hole in plunger
adapter.
8. Thread bolts into displacement chamber from
inside pump catchall. Tighten securely. Bottom
plunger firmly in plunger adapter against
crosshead. Tighten securely.
9. Install air-bleed valve in top of displacement
chamber. Install hose connection (402-10
and tubing for on return from valve to pump
casing.
10. Install rell valve and adapter to displacement
chamber from inside pump catchall. Note the
two different locations of rell valve shown on
Figure 5 for different size plunger pumps.
11. Install relief valve in top of displacement
chamber. On 2 1/2” and 3 1/2” diameter
plunger pumps, install relief valve between
side port of displacement chamber and pump
catchall chamber drain hole with pipe ttings
as shown on Figure 5.
12. If relief valve has been installed, install
and tighten drain plug in bottom of pump
catchall.
2.3 PIPING
General piping instructions are given in
pump drive Instruction Manuals 53943 and
53939. No reciprocating plunger pump can be
expected to perform satisfactorily unless those
recommendations are followed. Pay particular
attention to plastic liquid ends, as these units are
relatively fragile and can be damaged by careless
installation. For best results, install a very short
section of exible tubing between rigid, xed piping
and suction and discharge cartridges on plastic
liquid ends.
NOTE:
Maximum reliability may be ensured by
protecting plastic liquid ends and plastic piping
with an external relief valve installed in the
system discharge line.
4Instruction Manual
Page 8

SECTION 2 - INSTALLATION
2.3.1 Piping Concentrated Sulfuric Acid
The liquid ends of pumps with plungers less than
5/6” in diameter, designed for 20 gph delivery
or less, are too small to tolerate the sludge in
commercial concentrated sulfuric acid. However,
even these pumps will serve in such applications
if the piping system is modied as follows:
1. Install a sulfuric acid tank, tted with a heel
(unused portion below the tank outlet), in the
suction line to collect sludge from the system.
(Maximum pressure / sludge trap is 20 psig.)
2. Ensure pump suction is ooded.
3. Use piping material identical to liquid end
material: install steel pipe to steel liquid end.
Never connect iron to steel or serious galvanic
corrosion will occur.
4. Filter sludge by installing a glass wool lter or
Milton Roy Sludge Trap in the suction line.
The rst and last of these precautions will benet
any size pump by removing the high proportion of
sludge in this acid, which can foul or clog pump
check valves. Figures 2 and 3 illustrate sludge trap
and installation.
2.3.2 Suction Lift Conditions
Disc Diaphragm Liquid End pumps are designed to
operate with process liquid supplied at or above at
atmospheric pressure. Although these pumps can
move liquids supplied at less than atmospheric
pressure, the resulting suction lift must remains
constant and the hydraulic & rell valve must be
adjusted to compensate for the specic conditions.
Refer to Bulletin 220, the practical Handbook
of NPSH for metering pumps before start-up to
determine the minimum operating suction pressure
for the application.
Discharge
Metering
Pump
Inlet from
Main Tank
Relief
Valve
Return Line
to Main Tank
Sludge
Trap
Figure 2. Milton Roy Sludge Trap.
5
Figure 3. Typical Sludge Trap Installation.
Instruction Manual
Page 9

SECTION 3 - OPERATION
3.1 INITIAL START-UP
After installing the pump and the Disc Diaphragm
Liquid End, perform the following operations before
placing the pump in routine service. (Numbers in
parentheses are part numbers-see Figures 4 & 5.)
1. Disconnect tubing from air-bleed valve and
remove air-bleed valve from top of liquid end.
2. Fill displacement chamber through air-bleed
valve port with hydraulic oil furnished with pump
or conversion liquid end (or ll with good quality
anti-foaming Type A automatic transmission
uid). Allow air bubbles to surface and add oil
as required to maintain level at top of liquid end
until all air has escaped.
3. Fill pump catchall chamber to top of crosshead
oil seal with the same type of on as used in
step 2.
4. Install air-bleed valve and tubing.
5. Prepare pump drive for initial start-up as outlined
in Instruction Manuals 53943 and 35939.
3.2 INITIAL ADJUSTMENT (Figure 4 & 5)
MILROYAL® rell and relief valves must be adjusted
to operating conditions by the following procedures.
Adjust these valves after rst installing pump and
after any corrective maintenance.
3.2.1RellValve
1. Start pump and run at normal operating
pressures of suction and discharge and at
normal operating capacity; e.g., if a pump
rated for 20 gph will be operated at 12 gph, set
capacity adjustment at 60% (12/20) capacity.
KEEP HANDS AWAY FROM
RECIPROCATING PLUNGER
AND CROSSHEAD.
2. Turn rell valve adjusting nuts clock wise to
reduce loading on spring until valve stem,
and nut move very slightly with each suction
stroke of the pump plunger. Now each stroke
will replenish the hydraulic system through the
rell valve and discharge the excess through
the relief valve.
3. Gradually turn adjusting nuts counter clock wise
to increase spring loading against stem nut until
stem and nut stop moving.
4. Back OFF adjusting nut 1/4 turn. When properly
adjusted, rell valve stem nut will move very
slightly with each stroke to allow just enough
hydraulic oil into the displacement chamber to
replace any lost through plunger bore and airbleed valve. Movement can be detected with a
light ngertip on the bottom of relief valve.
3.2.2RellValve
THE PRESSURE RELIEF VALVE
IS FACTORY SET TO OPEN AT A
PRESSURE SLIGHTLY ABOVE THE PUMP MAXIMUM
OPERATING DISCHARGE PRESSURE; NEVER SET THE VALVE
AT ANY GREATER PRESSURE.
1. To adjust relief valve, rst operate pump against
a system operating pressure.
2. Stop pump.
3. Install a pressure gauge, with a range higher
than desired relief pressure, at the pump
discharge connection.
4. Install a shut OFF valve downstream from the
pressure gauge.
5. Open shut OFF valve. Start pump; pump
process liquid to drain or other safe point to
establish proper pumping action.
6. Set capacity control at 30%.
7. Close shut OFF valve (“dead head” the pump)
and closely watch pressure increase on
pressure gauge. If pressure exceeds desired
value, quickly open shut OFF valve to relieve
pressure in line.
6Instruction Manual
Page 10

SECTION 3 - OPERATION
KEEP HANDS AWAY FROM
RECIPROCATING PLUNGER
AND CROSSHEAD.
8. Loosen relief valve adjusting screw and repeat
step 7 until the maximum pressure gauge
reading equals the relief valve pressure setting
desired.
9. After setting relief valve, ensure shut OFF valve
is fully open. Remove pressure gauge from line
or leave in place, as desired, and place pump
in routine service.
3.3 MAINTENANCE
3.3.1 Hydraulic Oil
Inspect and replace hydraulic oil on the schedule
as gear drive lubricants.
3.3.2 Check Valves
Except for plastic construction, check valve
assemblies are of identical design with those
described in MILROYAL® Instruction Manuals
53943 and 53939. Maintain and service metallic
ball-check valves according to those instructions.
3.3.3 Plastic Check Valves
Plastic ball check cartridges for MILROYAL® A and
B pumps are serviced in the same manner as the
metallic cartridges; however, plastic components
are more fragile than metallic parts. Handle plastic
parts with care and do not overtighten during
assembly.
Plastic ball check valves furnished on 2 1/2” and 3
1/2” diameter plunger MILROYAL® C pumps should
be serviced as described below.
PLASTIC COMPONENTS ARE
MORE FRAGILE THAN
METALLIC PARTS. HANDLE PLASTIC PARTS WITH CARE AND
DO NOT OVERTIGHTEN DURING ASSEMBLY.
3.3.3.1 Disassembly
Remove and disassemble plastic check valves as
follows (See Figure 5).
1. Unscrew check valve assembly from diaphragm
head.
2. Remove O-ring from assembly.
3. Remove cartridge assembly nuts from cartridge
assembly bolts to release compression plates,
straight ange adapter, guide stop, seat , pipe
ange adapter, gaskets, and ball-checks.
3.3.3.2 Reassembly
Reassemble check valves in reverse order from
disassembly. During reassembly, tighten cartridge
assembly nuts carefully to avoid deforming plastic
components.
TURN CHECK VALVE
ASSEMBLIES INTO PLASTIC
LIQUID END BY HAND. DO NOT USE A WRENCH. SEAL
THREADS WITH PIPE DOPE; DO NOT USE THREAD TAPE.
3.3.4 Diaphragm
3.3.4.1 Disassembly
Remove diaphragm head as follows (see Figures
4 and 5).
1. Flush process liquid from liquid end.
2. Disconnect piping from suction and discharge
ball-check cartridges.
3. Remove bolts from diaphragm head and remove
head from displacement chamber.
PROCESS SIDE CONTOUR
PLATE OR BOTH CONTOUR
PLATES MAY COME AWAY WITH DIAPHRAGM HEAD.
4. Remove process side contour plate and
diaphragm from displacement chamber,
nothing any indication of a top side on the plate
(i.e., either closer hole spacing or a stamped
arrow).
7
Instruction Manual
Page 11

SECTION 3 - OPERATION
3.3.4.2 Reassembly
Clean all parts for reassembly, then proceed as
follows.
1. Set oil side contour plate in displacement
chamber, oriented as in step 4 above. Set
Process side contour plate in diaphragm head
rabbet (oriented as in step 4 above). Set new
diaphragm in head over contour plate. Mount
diaphragm head assembly to displacement
chamber with bolts. If necessary, hold diaphragm
and contour plate in place in head with a thin,
at, smooth strip of metal (e.g., a knife blade)
until head, diaphragm and contour plate are
positioned on displacement chamber; then
withdraw metal strip and install bolts. Tighten
bolts evenly and securely to ensure proper
seating of diaphragm and contour plates.
2. Reconnect suction and discharge lines.
3. Test pump for leaks and then return to normal
service.
Plastic diaphragm heads are serviced as for the
metallic construction except that the mounting
bolts secure the head with a reinforcement plate
(back-up plate) and the process side contour plate
manufactured integral with the diaphragm head,
rather than as a separate part.
HAND-TIGHTEN PLASTIC COM-
PONENTS DURING ASSEMBLY
AS THESE PARTS ARE MORE FRAGILE THAN METALLIC
PARTS AND MAY DISTORT UNDER EXCESSIVE TORQUE.
3.4 SPARE PARTS
A minimal stock of spares should generally include
the parts listed in the appropriate charts below.
For parts ordering information and factory repair
procedures, see the appropriate pump drive
Instruction Manual.
The parts below are needed for all sizes & material
Disc Diaphragm liquid ends.
Drawing
Location
Reference
2090 Air Bleed Valve Assy 1
2070 Rell Valve Assembly 1
2080 Relief Valve Assembly 1
2030 Plunger Assembly 1
2430 Ring Insert 2
30 Air Bleed Valve Ball Chk 1
330 Crosshead Oil Seal 2
80 Air Bleed Valve Plug 6
70 Air Bleed Valve O-Ring 2
Description Qty
The parts below are needed in addition to the parts
above for all sizes & material Disc Diaphragm liquid
ends except 2 1/2” & 3 1/2” plastic.
Drawing
Location
Reference
2242 Check Valve Seat 4
2250 O-Ring 4
2920 Limit Pin 2
1920 Diaphragm 2
1992 Ball Check 4
Description Qty
The parts below are needed in addition to the
parts listed in the rst chart for 2 1/2” & 3 1/2” Disc
Diaphragm liquid ends only.
Drawing
Location
Reference
1995 Check Valve Seat 2
2040 Check Valve Gasket 6
1920 Diaphragm 2
4074 Ball Check 6
70 O-Ring 6
Description Qty
8Instruction Manual
Page 12

SECTION 4 - TROUBLESHOOTING
Pump drive Instruction Manuals list most possible
malfunctions, their causes and cures. The following
problems peculiar to Disc Diaphragm Liquid Ends
may be remedied as indicated below.
Excessive delivery
Insufcient delivery
Erratic delivery • Leaky relief valve. Repair or replace valve.
• Low discharge line pressure. Increase line pressure
(e.g., install a back pressure valve).
• Incorrect rell valve setting. Adjust valve to operating conditions.
• Blocked discharge line. Clear line.
• Relief Valve set too low. Adjust valve to operating conditions.
• Air in hydraulic system. Stop pump at end of suction stroke.
Remove air bleed valve and allow air to escape. Fill displacement
chamber with hydraulic oil and reinstall valve.
9
Instruction Manual
Page 13

PARTS LIST FOR FIGURE 4.
Drawing Location Reference Description Qty
2090 Air Bleed Valve Assy 1
2070 Rell Valve Assy 1
2080 Relief Valve Assy 1
590 Base 2
2074 Rell Valve Stem Nut 1
2071 Rell Valve Adjusting Nut 2
2030 Plunger Assy 1
1900 Displacement Chamber 1
2076 Rell Valve Body 1
2000 Check Valve Assy 2
2212 Check Valve Body 2
1950 Diaphragm Head 1
1990 Check Valve Body 2
10 Relief Valve Body 1
2242 Check Valve Seat 4
1995 Check Valve Seat 2
1991 Check Valve Seat 2
2430 Ring Insert 2
2250 O-Ring 4
2040 Relief Valve Gasket 1
2010 Liquid End Gasket 1
1970 Caution Sticker 1
50 Relief Valve Adjusting Screw 1
2073 Rell Valve Stem 1
40 Air Bleed Valve Stem 1
2020 Plunger Adapter 1
2060 Rell Valve Adapter 1
2072 Rell Valve Spring 1
2920 Check Valve Limit Pin 4
1920 Diaphragm 1
1930 Contour Plate (Oil) 1
1930 Contour Plate (Process) 1
50 Retainer (Air Bleed Valve) 1
10Instruction Manual
Page 14

Drawing Location Reference Description Qty
340 Pipe Plug 1
60 Hose Connection 1
2050 Mounting Bolt 4
1990 Diaphragm Head Bolt Var.
1960 Dia Head Bolt Var.
1992 Ball Check 4
30 Air Bleed Valve Ball Check 1
20 Relief Valve Ball Check 1
3000 Tubing 1
330 Shaft Seal 1
80 Air Bleed Valve Plug 1
70 Air Bleed Valve O-Ring Seal 1
11 Instruction Manual
Page 15

2000
2000
19501970
2000
Plastic Diaphragm Head
2090
1950
1930
1930
1920
2000
1900
2010
340
2040
330
2080
2030
2020
Figure 4. MILROYAL® B Disc Diaphragm Liquid End Assembly Drawing (C-102-2095-0006)
METALLIC DIAPHRAGM HEAD
12Instruction Manual
Page 16

1990
1960
Top View
3000
2060
(REFILL VALVE ASSY)
2070
(SEE DETAIL NO. 4)
2050
1990
Detail No. 1
Check Valve Assy.
21/2” Dia. Metallic Plgr.
2210712002
050
040
030
020
Detail No. 3*
Relief Valve Assy.
101001300X
2920
1995
1992
1991
Detail No. 2
Check Valve
All Plgr. Dia. Except 2
2430
2920
2242
2250
4074
1/2”
2212
2920
2212
4070
2242
Detail No.6
Check Valve
21/2” Dia. Plastic Plgr.
2210264102
2074
070
010
010
050
020
Detail No. 5*
Air Bleed Valve Assy.
060
080
040
APPLY LOCTITE HERE
030
2072
2071
2073
2076
2060
Detail No. 4*
Refill Valve Assy.
1010017100
1010018000
Figure 4. MILROYAL® B Disc Diaphragm Liquid End Assembly Drawing Continued
13 Instruction Manual
(C-102-2095-0006)
Page 17

PARTS LIST FOR FIGURE 5.
Drawing Location Reference Description Qty
2090 Air Bleed Valve Assembly 1
2070 Rell Valve Assembly 1
2040 Relief Valve Assembly 1
590 Base 2
1996 Ball Guide 1
2074 Rell Valve Stem Nut 1
2171 Relief Valve Adjusting Nut 2
2025 Plunger Assembly 1
1900 Displacement Chamber 1
10
2076 Rell Valve Body 1
1990 Check Valve Body 2
20
1995 Check Valve Seat 2
1991 Check Valve Seat 2
2010 Displacement Chamber Gasket 1
30 Check Valve O-Ring Seal 4
40
2073 Rell Valve Stem 1
2020 Plunger Adapter 1
2072 Rell Valve Spring 1
1998 Check Valve Limit Pin 4
50 Air Bleed Valve Retainer 1
60 Hose Connection 1
1992 Check Valve Ball Check 4
30 Air Bleed Valve Ball Check 1
480 Shaft Seal 1
80 Air Bleed Valve Plug 1
70 Dekoron Tubing 1
1920 Diaphragm 1
Air Bleed Valve Body 1
Check Valve Body 2
Check Valve Seat 4
Air Bleed Valve O-Ring 1
Ring Insert 1
Air Bleed Valve Stem 1
14Instruction Manual
Page 18

1960
3010
3000
2990
2060
1990
1930
REQD FOR METALLIC
DIAPHRAGM HEAD ONLY
1920
2070
2090
2040
2042
480
2020
1930
1950
Metallic Diaphragm Head
(SEE DETAIL No. 1 OR 2)
Figure 5. MILROYAL® C Disc Diaphragm Liquid End Assembly Drawing (C-102-2285-0006)
15 Instruction Manual
2000
1900
2010
2025
340
Page 19

1998
1996
PLGR
40
50
1990
Detail No. 1
Check Valve
1/2”, 2”, 21/2” and 31/2” Dia. Plgr.
1
2074
2171
2076
2073
Detail No. 3
Refill Valve
1010017X00
1995
1992
1991
2072
(FOR 1
1/2 DIA ONLY)
10
Detail No. 2
Check Valve
5/8”, 7/8” and 1/8” Dia. Plgr.
2210263XXY
10
50
20
Detail No. 4
Air Bleed Valve Assy.
1010018000
30
60
20
60
80
40
APPLY LOCTITE HERE
30
Figure 5. MILROYAL® C Disc Diaphragm Liquid End Assembly Drawing Continued
Detail No. 5
Relief Valve
4070177XXY
Purchased and No Spare Parts
(C-102-2285-0006)
16Instruction Manual
Page 20

We are a proud member of Accudyne Industries, a leading
global provider of precision-engineered, process-critical,
and technologically advanced ow control systems and
industrial compressors. Delivering consistently high levels
of performance, we enable customers in the most important
industries and harshest environments around the world
to accomplish their missions.
Info@miltonroy.com
www.miltonroy.com
MILROYAL® is a registered trademark of Milton Roy, LLC.
© 2015 Milton Roy, LLC.
 Loading...