

Page 1
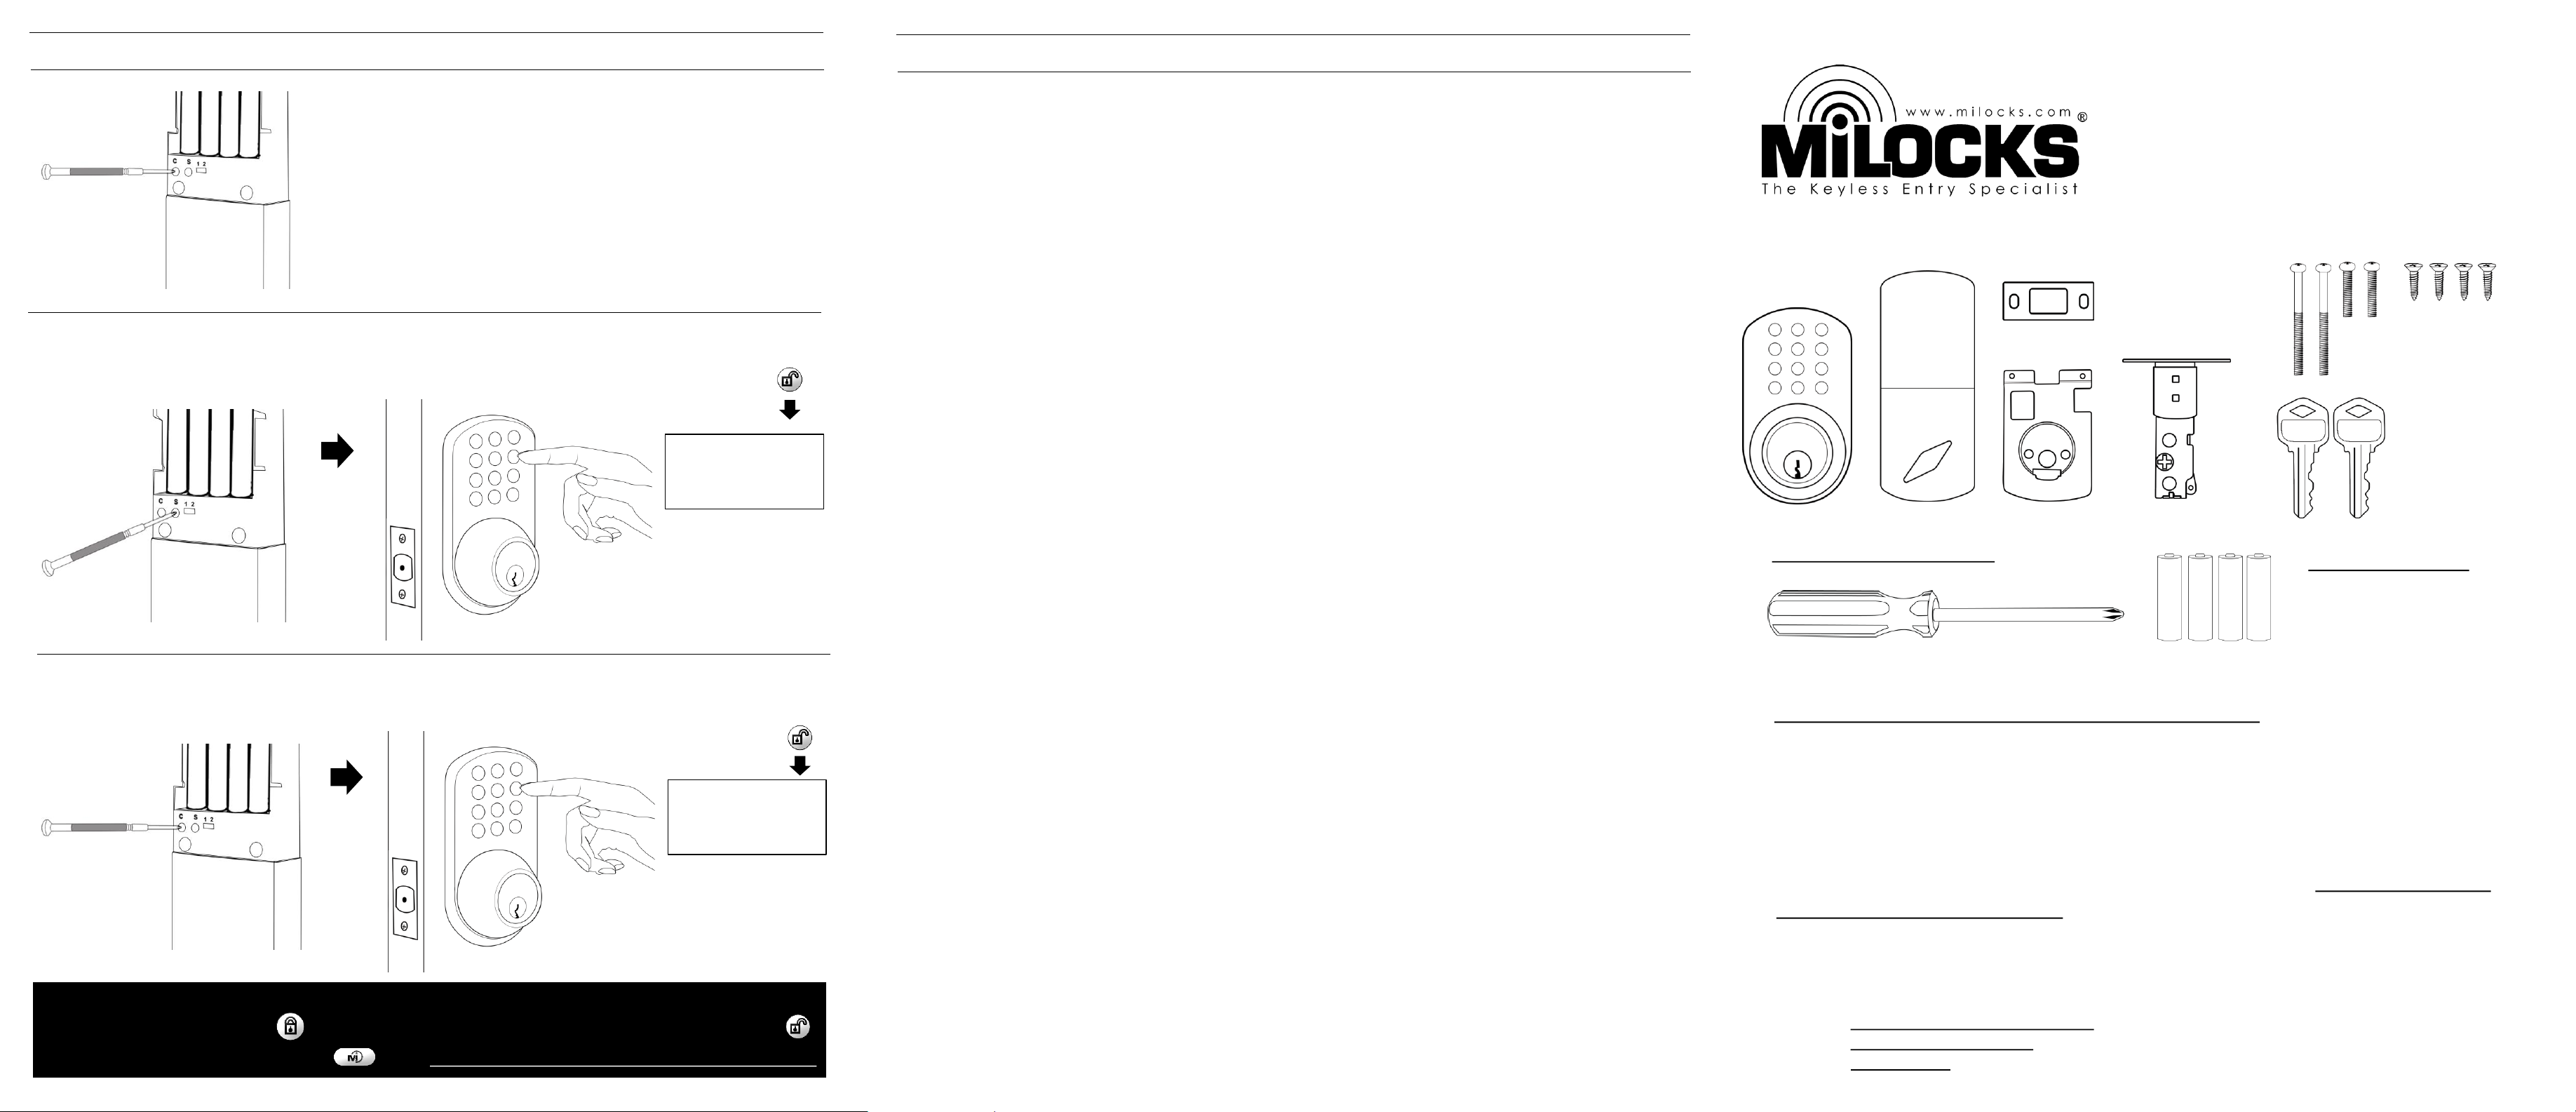
Press the S button once
Add a Code
Enter a 2-8 digit passcode followed by the unlock button
Press and hold C button and wait for a series of confirmation
beeps. You will have to hold the C button for about 10-15 seconds.
Delete All Codes (Recommended for initial set up):
KEYPAD PROGRAMMING
Model TF
2 Beeps = Success
3 Beeps = Try Again
0 Beeps = Go to
Troubleshooting
Within 5 sec.
A.
TO LIGHT KEYPAD: Press the “Mi” button once
TO LOCK: Press the LOCK button once TO UNLOCK: Enter code followed by the UNLOCK button
OPERATING INSTRUCTIONS:
1-2 Switch: 1 = Right Hand Door 2 = Left Hand Door
Tools Required (not included):
?
For assistance with assembly or installation, parts and customer
service, call:
1-800-355-0157 (English & Spanish)
9am – 5pm PST Mon. – Fri.
North America
GENERAL WARNINGS & CAUTIONS:
The back module (part B) needs to be protected from weather.
(1-2 Switch on Part B.) Left Handed & Right Handed Setting:
On the back module (part B), there is a switch labeled “1-2” which
controls the left handed and right handed setting.
1 = Right Hand Doors (most common)
2 = Left Hand Doors
When entering the doorway, if the hinges are on the left, you have a left handed
door. If the hinges are on the right, you have a right handed door.
X4 AA Batteries
X1 Phillips Screwdriver
B.
C.
D.
E.
F.
G.
F1. F2. F3.
Delete a Code
Press the C button once Enter the code you wish to delete followed by the unlock button
Within 5 sec.
2 Beeps = Success
3 Beeps = Try Again
0 Beeps = Go to
Troubleshooting
Battery Precautions
• Do not mix old with new batteries.
• Do not use rechargeable batteries.
• Remove batteries from product when
storing for extended periods of time.
• Do not dispose of batteries in fire as
they may explode. Please follow your
local battery disposal procedure.
• Do not puncture batteries. Electrolyte
leakage from the batteries is corrosive
and can cause serious harm to the
eyes or skin. If swallowed, the
electrolyte can be toxic.
• Do not allow conductive materials
such as jewelry or metal tools to make
contact with the batteries which may
cause a short circuit. With a short
circuit, the batteries and conductive
material can become extremely hot
and cause burns.
Register Your Product
• Although we hope you never
have to deal with a warranty
claim during the use of our
product, you should submit a
product registration to validate
the warranty. This keeps it on
record with us so you don’t have
to save a receipt or record of any
kind. Just give us a call and we
will take care of you.
• Register at www.milocks.com
Low Batteries (Most Common Issue): If the lock produces a longer set of rapid beeps and either locks or does not lock the door, you
have low batteries. To avoid any difficulties during set up, make sure you are using brand new AA alkaline batteries. Using a battery
tester is not recommended.
Door Jam Alignment: Make sure the deadbolt and the hole in the door jam line up so that there is minimal resistance on the
deadbolt as it extends and retracts from the door.
Driver Bar Position: In step 3 of the installation, you are instructed to position the driver bar in the vertical position while the
deadbolt is retracted. In step 5 of the installation, you are instructed to position the thumb turn according to which side the door
latch faces. If these parts are not positioned according to the instructions, you will encounter issues such as the lock only working
with the key in the cylinder, a jammed thumb turn, or a key that will not release from the cylinder. The best thing to do is remove
the lock from the door and install the lock according to the instructions provided.
Loose Keypad Connection: If not connected securely, the keypad wire harness connection may come loose and cause some of the
numbers to operate inconsistently. To confirm your door lock issue is not being cause by a loose keypad connection, press every
number on the keypad and confirm every button beeps when pressed.
If some of the numbers are not beeping, remove the back module (part B) and inspect the wires for any pinches or tears. Make sure
to check the wires coming from the keypad as well. Disconnect the wire harness and make sure the pins in the male connection are
not bent out of alignment. Reconnect your wires and confirm every button on the keypad beeps when pressed.
If you are still having keypad issues after following our troubleshooting guide, call us for a replacement under warranty.
Function Test: If a passcode has not been successfully programmed, the lock will not operate using the keypad. Lets check if a
passcode has been successfully programmed in the memory:
1. Unlock the door lock and open the door. Make sure you keep the door open while troubleshooting.
2. Press the LOCK button on the keypad 1 time and listen to the beeps:
- If the lock beeps 3 times and does not lock, it does not have a passcode set in its memory. Refer to the programming page for
instructions on adding a passcode.
- If the lock produces a longer set of rapid beeps and either locks or does not lock the door, you have low batteries. Replace the
batteries with a set of 4 premium “AA” alkaline batteries.
- If the lock beeps 2 times and locks successfully, it has at least 1 passcode stored in its memory and is operating correctly.
TROUBLESHOOTING
If you are unable to get your lock to work
please give us a call during business hours.
US Live Tech Support: 1-800-355-0157 M-F 9am - 5pm PST (English & Spanish)
Warranty shipments are always shipped promptly.
WARRANTY
MiProducts Corporation warrants to the original residential user of this product that it will be free from defects in materials and
workmanship, under normal use, for 1 year from the date of purchase. User must provide a copy of original purchase receipt. This
warranty does not cover abuse or misused products or products used in commercial applications. All mechanical components carry a
limited warranty, for a period of 25 years from the date of purchase. The finish of the exterior of this lock carries a limited warranty of
the lifetime of the unit against deterioration due to normal weather conditions. This warranty does not apply to locks that have been
improperly installed, modified, put to a use other than designed, or subjected to acts of God (such as floods, lightning, earthquakes,
etc.) This warranty is limited to repairing or replacing of this lock only at MiProducts Corporation’s sole discretion. MiProducts
Corporation will NOT be liable for the cost of installing, removing, nor reinstalling this product, nor direct, indirect, or consequential
damages to persons or property resulting from the use of this product. This warranty only covers the cost of replacement parts, it does
not cover shipping & handling fees.
To implement this warranty please give us a call during business hours at 1-800-355-0157, or visit www.milocks.com.
MiProducts Corp. La Puente, CA 91746 1-800-355-0157 MADE IN TAIWAN
Page 2
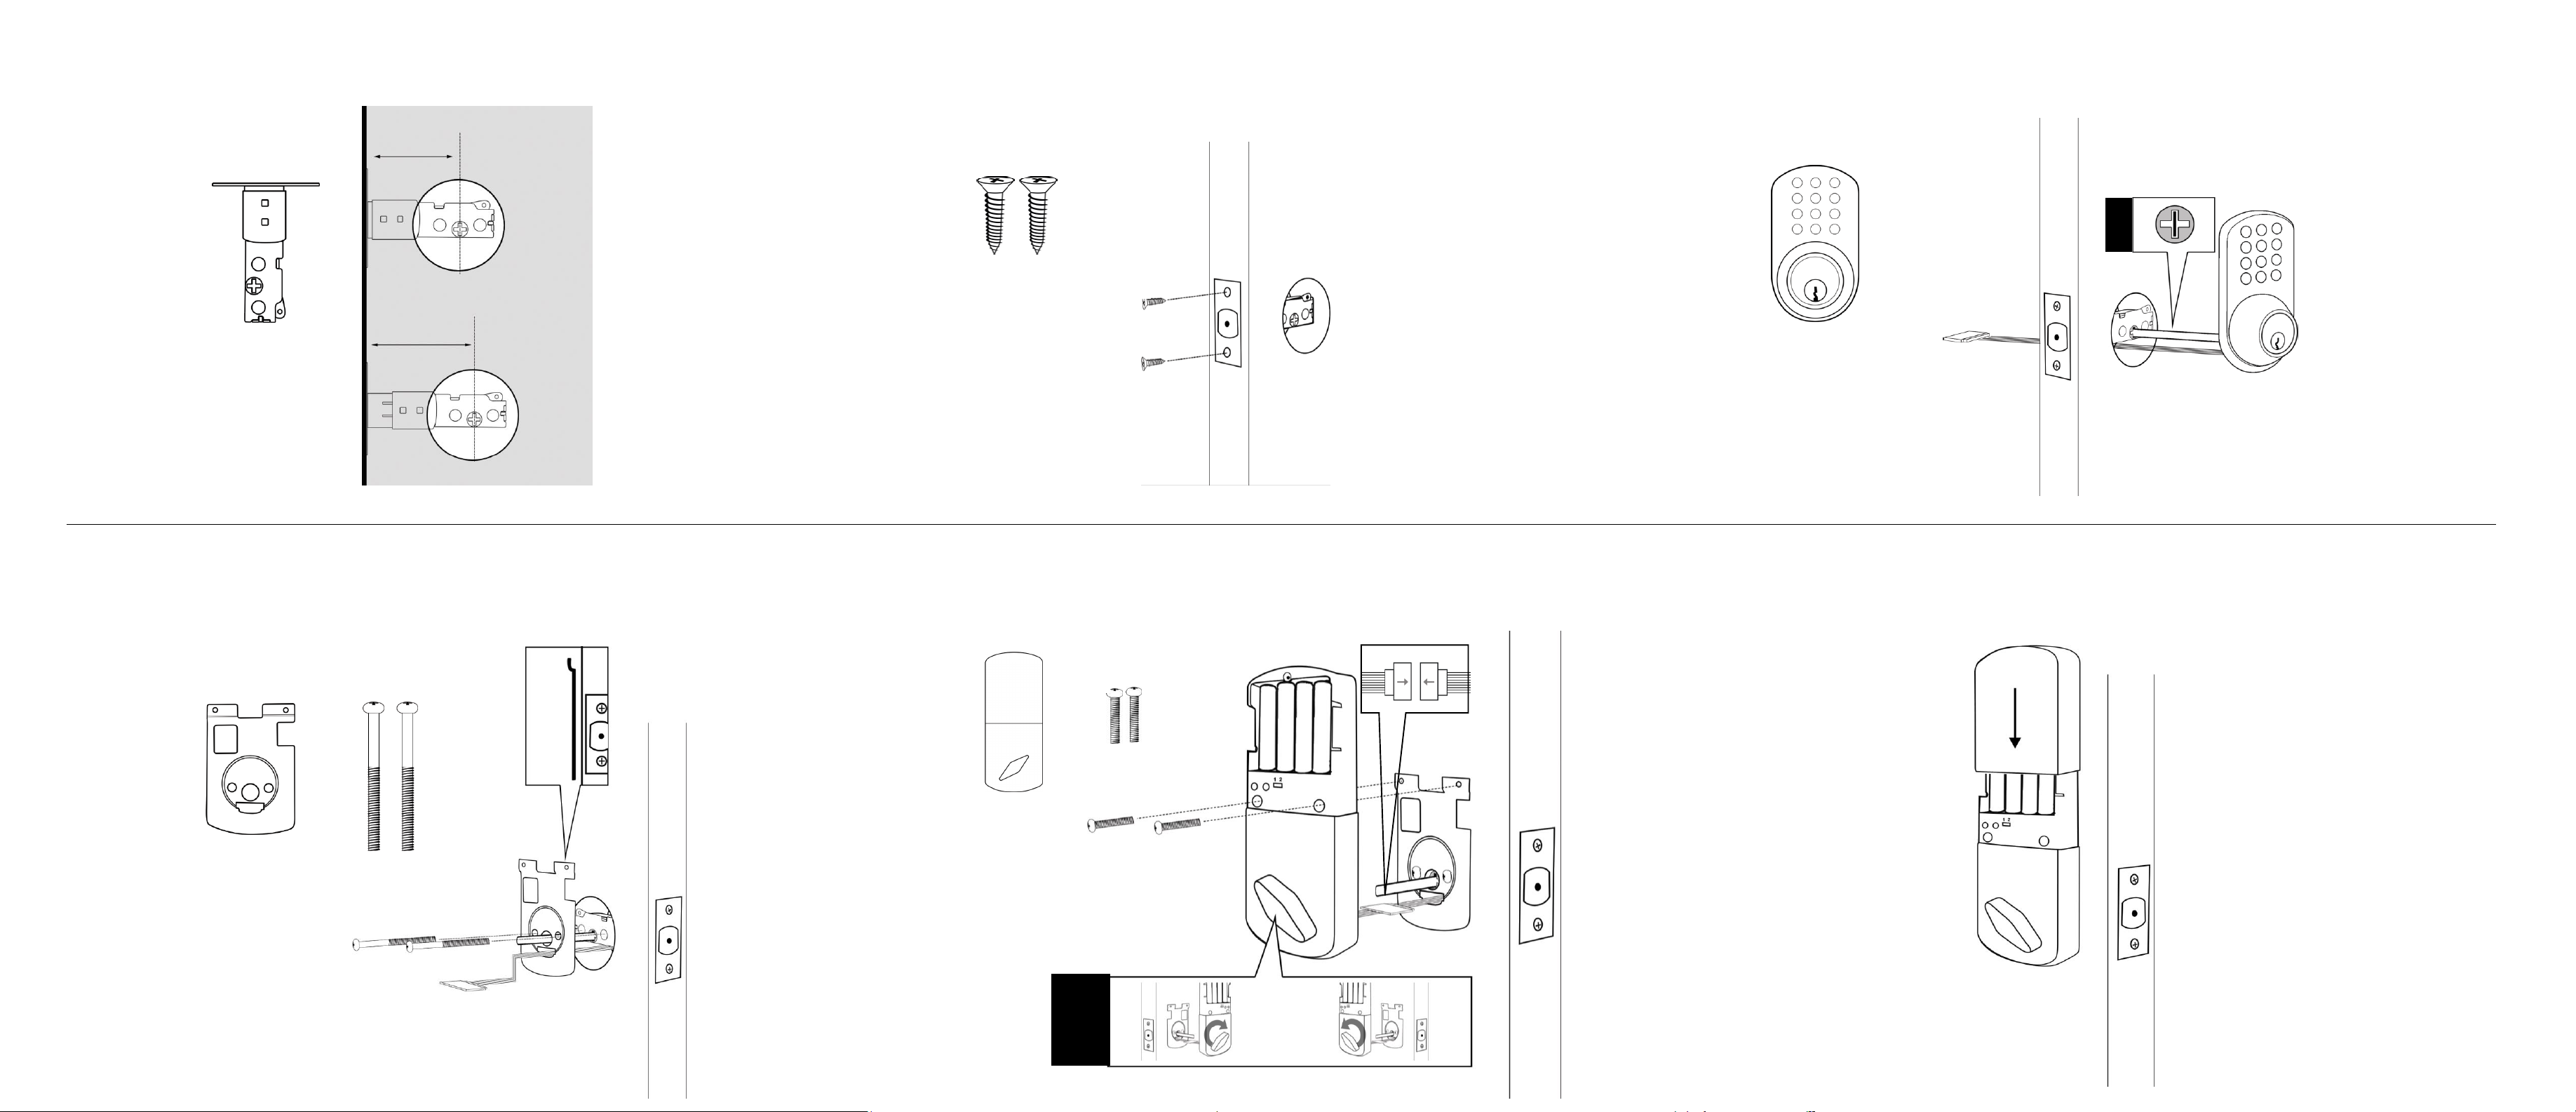
1. Adjust Latch Backset 3. Mount Front Module
4. Fasten Back Mounting Plate
6. Install Battery Cover
F3.E.
A.
F1.D.
60mm (2 3/8”)
70mm (2 3/4”)
2. Install Door Latch
(w/ Bolt Retracted)
!
D.
F1.
F3.
A.
5. Connect, Mount & Fasten Back Module
F2.
B.
F2.
B.
!
 Loading...