

Page 1
PL
INSTRUKCJA OBSŁUGI / OPERATIONAL MANUAL
NORM: PN-EN 16232:2014-02; EN 16232:2013; PN-EN 12790:2011; EN 12790:2009
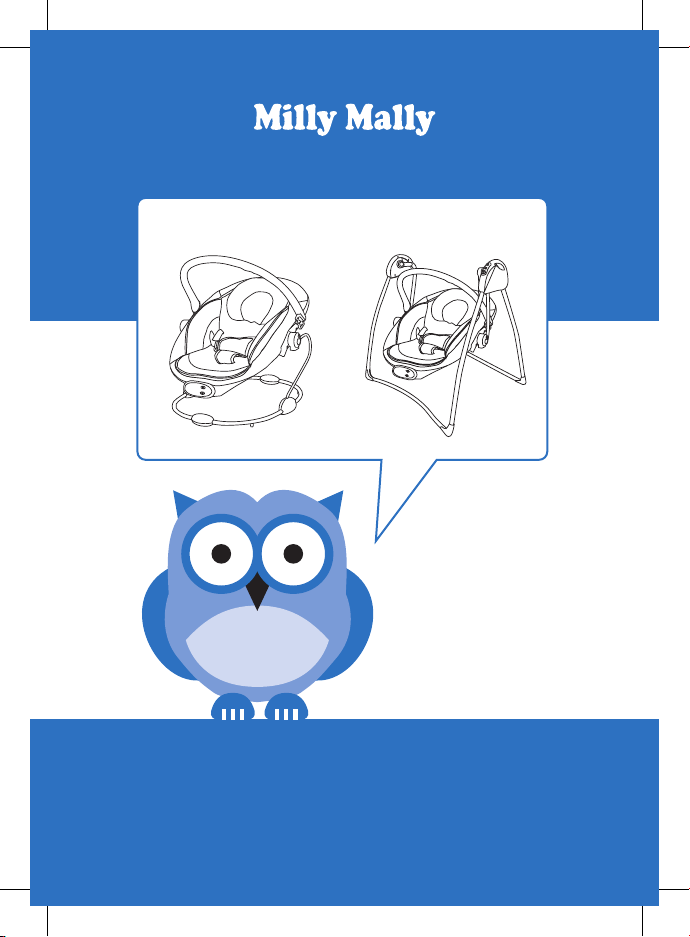
HUŚTAWKA - BUJACZEK / SWINGS-BoUNCEr
SWEET DrEAMS
Page 2

A1
C1
E1
F1
G1
H1
B1
D1
HUŚTAWK A
SWINGS
SWEET DrEAMS
8
5
11
1
3
9
7
4
2
10
6
12
Page 3

A1
C1
E1
B1
D1
F1
G1
H1
Page 4
A2
C2
E2
F2
D2
B2
2
BUJACZEK
BoUNCEr
SWEET DrEAMS
13
14
8
6
9
12
7
11
Page 5

A2
B2
C2
E2
D2
F2
Page 6

PL
A3
B3
D3
C3
E3
F3
H3
WAŻNE! ZACHOWAĆ
DO PÓŹNIEJSZEGO STOSOWANIA!
Proszę pr zeczy tać instru kcję przed uż yciem tego pr oduktu. Pr zedstawio ne obrazk i mogą się różnić
od zakupionego produktu w zależności od modelu.
HUŚTAWK A
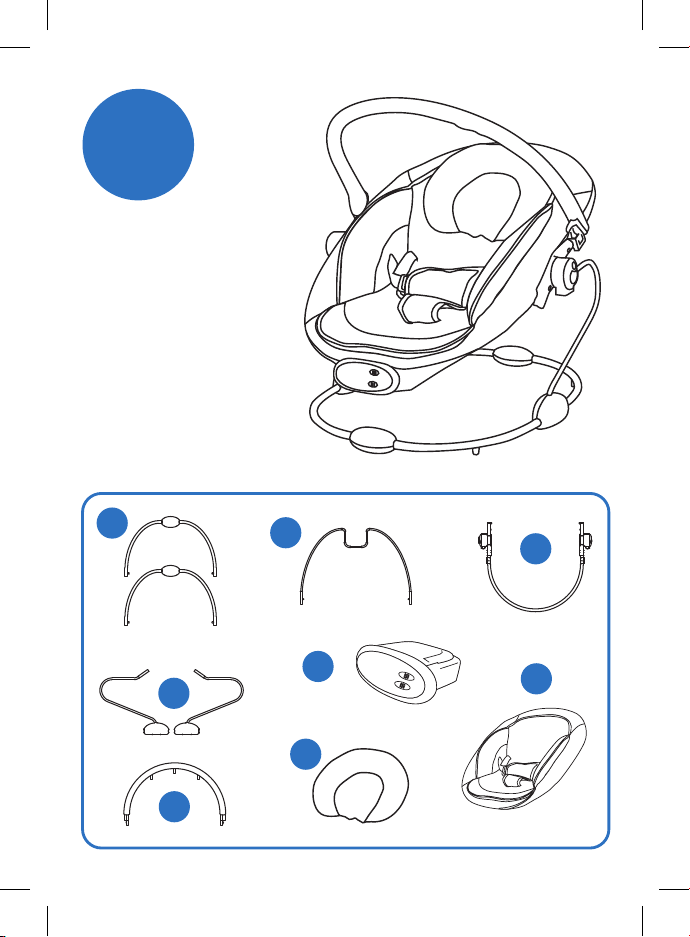
LISTA C ZĘŚC I
1 rurki podstawy przednia i tylna
2 rurka poprzeczna wsparcie fotelika
3 rurki do stelaża huśtawki (x2)
4 elementy do podwieszenia leżaczka
do huśtawki (x2)
5 Lewa i prawa noga stelaża z modułem
6 przednia rurka fotelika
(RYSUNKI)
7 rurka oparcia fotelika
8 pałąk z zabawkami
9 moduł grająco-wibrujący
10 zasilacz
11 fotelik
12 zagłówek
MONTAŻ HUŚTAWKI (RYSUNKI)
A1 Włożyć n ogi do stelaża , dociśnij aż usł yszysz „kl iknięcie”, proszę p ociągnąć za rur kę,
aby upewn ić się, że zainsta lowane są prawi dłowo.
UWAGA! Proszę zwróci ć uwagę na kierunek krzywizny rury.
B1 Włóż prze dnią i tylną rurkę p odstawy wcis kając w część gó rną stelaża, aż u słyszys z
’”klikn ięcie’’ (prze dnia rura wsparc ie zakrzy wione jest do we wnątrz, tyl na rura podstaw y
wykr zywiona n a zewnątrz)..
C1 Zainstaluj element y do podwiesz enia wkładając j e do części plast ikowych stela ża oraz
dokręć ś rubokrętem d o tych otworów (p atrz rysunek ).
D1 Zainstaluj do eleme ntów podwiesze nia rurkę popr zeczną wsparc ia fotelika
z dwóch str on, aż usłysz ysz kliknię cie.
E1 Włoż yć przednią ru rkę fotelika do rur y oparcia, aż us łyszysz k liknięcie.
F1 Od góry z amontuj stelaż f otelika do elem entu wsparcia,
wsuwając plastikowe do usłyszenia kliknięca.
G1 Umieścić pod si edzeniem na ram ie fotela moduł
UWAGA! Komo ra baterii musi być s kierowana w dół .
H Pasek z zabaw kami zamontuj d o stelaża leża czka do otwor ów plastikowyc h,
aż do klik nięcia, aby zdjąć p rzyciśnij gu ziki z boków.
H1 Wtyc zka zasilacza.
Page 7

INSTRUKCJA OBSŁUGI MODUŁU (RYSUNKI)
A3 Przycis k prędkości (5 BIEGO WA, naciśnij prz ycisk, aby prze jść do następnej p rędkości)
B3 Pr zycisk czas owy (3 funkcje: 15 min, 30 mi n i 60 minut. Naciśni j przycisk,
aby prze jść do następnej f unkcji czasowej )
C3 Pr zycisk muzy ki (12 melodi i. Naciśnij prz ycisk, aby prz ejść do następnej m elodii.
Przy trzymując p rzycisk prz ez 2 sekundy, wył ączasz muz ykę)
D3 Zmniejszanie głośności muzyk i
E3 Zwiększanie głośności muzyki
H3
A3
B3
C3
D3
BUJAK
LISTA C ZĘŚC I
6 przednia rurka fotelika
7 rurka oparcia fotelika
8 pałąk z zabawkami
9 moduł grająco-wibrujący
11 fotelik
E3
(RYSUNKI)
F3 Pokrywa baterii
H3 Przycisk składający huśtawkę.
12 zagłówek
13 rurki podstawy leżaczka
14 elementy do podwieszenia
leżaczka do bujaka
MONTAŻ BUJACZKA (RYSUN KI)
A2 Zamo ntuj spód bujaka , p ołącz rurk i aż usłysz ysz kliknięci e.
UWAGA! Rurki z po dkładem ant y poślizgowy m muszą być od spo du.
B2 Obie r urki mogą obra cać się do środka .
C2 W łożyć przedn ią rurkę fotelika d o rury oparcia , aż usłysz ysz kliknięci e.
UWAGA! Wygięci e przedniej ru rki powinno być sk ierowane w dół.
F3
Page 8

D2 Zamontu j szkielet buja czka do eleme ntów podwiesz enia, aż usłys zysz klikn iecie.
E2 Umieś cić pod siedzen iem na ramie fotel a moduł, a następ nie zapnij pas be zpieczeńst wa
UWAGA! Komora ba terii musi być skie rowana w dół.
F2 Pałą k z zabawkami wł óż w plastikowe otw ory z każdej st rony ramy,
a następn ie ustaw jak chcesz .
BEZPIECZNE KORZYSTANIE Z BATERII
1. Baterie powinny być wymieniane przez osoby dorosłe i niedostępne dla dzieci.
2. Tylko zalecany rodzaj baterii można używać
3. Baterie należy zakładać zgodnie z odpowiednią biegunowością.
4. Kiedy moc baterii jest niska dźwięki mogą być zniekształcone, wtedy należy
wymienić baterie na nowe.
5. Nie wolno stykać zacisków zasilania
6. Akumulatorki przed doładowaniem należy wyjąć z produktu.
7. Baterie nadające się do doładowania można doładowywać wyłącznie pod nadzorem
osoby dorosłej.
8. Nie należy mieszać ze sobą baterii różnego typu, ani baterii nowych z używanymi.
9. Bateria z której wycieka płyn elektrolitowy nie może być używana ani ładowana.
10. Baterie nienadające się do ponownego naładowania nie mogą być doładowywane.
11. Natychmiast usuń wyciekające, nieszczelne baterie ponieważ mogą spowodować poparzenia
skóry lub inne obrażenia.
12. Zużyte baterie należy usunąć z zabawki, lub jeżeli jest ona nieużywana przez dłuższy
czas, aby uniknąć korozji wycieku.
13. Nie zwieraj styków przedziałów ani zacisków baterii. Nie wrzucać do ognia i nie podgrzewać.
14. Transformatory używane z huśtawka dla niemowląt należy regularnie sprawdzać pod kątem
uszkodzenia karty, wtyczki, obudowy i inne części, w przypadku takiego uszkodzenia,
nie należy stosować.
OSTRZEŻENIA
Przec zytaj uważ nie niniejszą ins trukcję przed u życiem i zachow ać ją na przyszł ość.
Nieprzestrzeganie tych ostrzeżeń oraz montażu instrukcji może spowodować
poważne obrażenia lub śmierć.
UWAGA ! Nie wolno uży wać produkt u, jeśli jakieko lwiek części s ą uszkodzone lub j ej brakuje.
UWAGA ! Z awsze należy używać szelek bezpieczeństwa.
UWAGA ! Nigd y nie zostawiaj dziecka bez opieki
UWAGA ! N ie używaj te go leżaczka g dy twoje dziec ko może samodzie lnie siadać
UWAGA ! R yzyko upad ku! Aktyw ność dziecka m oże spowodować pr zesuniecie si ę bujaka. Nie
UWAGA ! N ie stawiaj leża czka w pobliż u źródeł ciep ła i ognia.
Nie uży waj akcesoriów a ni części zami ennych innych niż te, k tóre mają aprobatę
producenta.
lub masa je go ciała przek racza wagę 9 kg .
wolno st awiać go na płasz czyznach z najdujących się n a pewnej wyso kości np. stole.
Zawsze stawiaj na równym podłożu na podłodze.
Page 9

UWAGA ! Ten pr odukt nie jest p rzeznaczo ny do długiego ok resu spania. Je żeli Twoje dziecko
UWAGA ! N igdy nie uży waj tego produk tu jako nosideł ka, a także ni e podnoś go, gdy w śro dku
UWAGA ! N ie używać pr oduktu bez za główka dołą czonej do prod uktu.
UWAGA ! Zawsze korz ystaj z części p odtrzymuj ącej fotelik.
UWAGA ! Aby uniknąć obr ażeń, nigdy nie d opuszczaj ab y dzieci bawił y się tym produk tem lub
UWAGA ! Aby uniknąć obr ażeń upewnij się , że dziecko jest z da la od rozkładan ego
potrze buje snu, to powin no być umieszczo ne w odpowiedn im łóżeczku dz iecięcym
lub łóżku.
siedzi d ziecko. Nigdy nie u żywaj pał ąka na zabawki d o przenoszeni a leżaczka
w jego pobliżu.
lub składanego produktu
KONSERWACJA
1. Produkt wymaga regularnej konserwacji.
2. Sprawdzaj systematycznie czy elementy są prawidłowo zamontowane i nieuszkodzone.
W przypadku stwierdzenia uszkodzenia należy zaprzestać użytkowania.
5. Tapicerkę można prać tylko ręcznie w temperaturze 30 stopni, przy pomocy łagodnych
środków piorących. Nie chlorować. Nie wirować, nie suszyć w suszarce
3. Elementy metalowe i z tworzyw sztucznych należy przecierać wilgotną ściereczką.
4. Nie wystawiaj produktu na dłuższe działanie promieni słonecznych, mogłoby to spowodować
utratę kolorów oraz przyspieszyć proces zniszczenia(degradacji).
HUśTAWK A pOSIADA E UROpEJ SKą NORm ą BEzpIE CzEńST WA EN 16232:2013
Chroń środowisko! Nie wyrzucaj tego produkt razem z odpadami z gospodarstwa
domowego(2002/96/EC). Zasięgnij informacji na temat metod recyklingu w lokalnych
instytucjach.
Page 10

A3
B3
D3
C3
E3
F3
H3
EN
IMPORTANT! PLEASE KEEP
FOR FUTURE REFERENCE!
Please rea d these instru ctions befo re use of this prod uct. The ima ges can differ fro m your produc t.
SWINGS
CONFIGURATION PARTS
1 Front and rear support tube
2 Cross support tube
3 Rear support tube (x2)
4 Support wireframe swing (x2)
5 Left and right driving part group
with module
6 Seat support tube
(DR AWINGS)
7 Backrest tube
8 Toy bar
9 Music and vibration
10 Adapter
11 Seat pad
12 Head support
ASSEMBLY SWINGS (DRAWI NGS)
A1 Insert t he support fe et into driving pa rt group separ ately until a „Click ”,
please p ull the tubes to make su re they are install ed to position.
WARNING: Please pay at tention to the dir ection of the cur vature of the tub es.
B1 In sert front and r ear support tu be into upper par t tube until a ‚’click ’’.(Ps: Front sup port
tube curved inward, rear support tube carved outward).
C1 In stall the hangin g tubes: Inser t the 2 hanging tube s into the plastic p art holes until t he
shrapne l pop-up, the m twist the screw w ith a screwdriver i nto the hole.
D1 Install t he cross suppor t tube: Install th e cross tube by click o nto the 2 hanging tub es until
the shrap nel pop-up.
E1 Inser t the seat suppo rt tube into the ba ckrest tube unt il the shrapnel p op-up.
F1 Insert su pport tube gro up into the hanging t ube plastic unti l a ‚’click’’.
G1 Inser t the seat pad onto t he seat frame and t hen inserted th e vibrator
WARNING: Batter y compartme nt face down.
H1 Toy bar and toys: In sert the toy bar by c lick in the 2 ends to the h ole in each side, you c an
also rele ase the toy bar by pres s the 2 plastic spri ng buttons in the e nd of toy bar.
H1 AC/DC Adaptor connector.
CONTROL PLATE INSTRUCTIONS (DRAWINGS)
A3 Speed bu tton (5 speed, pr ess the button to mo ve to the next spe ed)
B3 T imer button (3 tim ers, 15mins, 30mins an d 60mins.
Press but ton to move to the nex t timer functi on)
C3 Mu sic button (12 melodie s, press the butt on to move to the next o ne;
press for 2 s econds to turn off )
Page 11

D3 Song volum e increase
E3 Song vo lume decrease
H3
A3
B3
F3
C3
D3
BoUNCEr
CONFIGURATION PARTS
6 Seat support tube
7 Backrest tube
8 Toy bar
9 Music and vibration
E3
(DR AWINGS)
F3 Battery door
H3 Swing frame folding button
11 Seat pad
12 Head support
13 Chassis tube
14 Support wire frame bouncer (x2)
ASSEMBLY (DRAWINGS)
A2 inser t chassis tube into p lastic hole of su pport tube unt il a “click’’.
ATTENTION: chassis tube w ith anti-slip pad f ace to floor
B2 support wire frames can rotate inward.
C2 b ackrest tube an d seat wire assemb ly, insert seat wir e into backrest tu be until the shrap nel
pop-up.
ATTENTION: Intermedia te folding sec tion of seat wire fa ce downside
D2 insert s upport wiref rame into seat joi nt hole until a ‚click ’ ,.
E2 put se at pad on seat fram e ,insert music a nd vibration and t hen fasten the se at belt.
ATTENTION: Battery c ompartment f ace downside
F2 toy bar a ssembly inser t the toy bar frame i nto plastic hole s each side ,then adju st the toy
bar to suit able degree as you l ike.
Page 12

FOR SAFE BATTERY USE
1. Keep the batteries out of children’s reach
2. Only the recommended batteries or equivalent are to be used, volts and size
3. Batteries are inserted with the correct polarity
4. Remove exhausted batteries from the product
5. Do not short-circuit supply terminals
6. Rechargeable batteries are to be removed before being charged
7. Rechargeable batteries are only to be charged under adult supervision
8. Any battery may leak battery acid if mixed with a different battery type, if inserted
incorrectly(put in back-wards) or if all batteries are not replaced or recharged at the same
time. Do not mix old and new batteries. Do not mix alkaline, standard (carbon-zinc)
or rechargeable(nickel-cadmium) batteries
9. Any battery may leak battery acid or explode if disposed of in fire or an attempt is made to
charge a battery not intended to be recharged
10. Never recharge a cell of one type in a recharger made for a cell of another type
11. Discard leaky batteries immediately. Leaky batteries can cause skin burns or other personal
injury. When discarding batteries, be sure to dispore of them in the proper manner, according
to your state and local regulations
12. Always remove batteries if the product is not going to be used for a month or more. Batteries
left in the unit may leak and cause damage
13. Recommended type batteries-alkaline disposables, size d(lr20-1.5V)
Never mix battery types. Change batteries when product ceases to operate satisfactorily
14. Transformers used with the infant swing are to be regularly examined for damage to the card,
plug,enclosure and other parts, and in the event of such damage, they shall not be used
WARNING
Avoid seri ous injury from f alling or sliding o ut always use seat be lt.
Read thes e instruction s carefully bef ore use and keep the m for future refer ence.
Failure to fol low these warning s and the assembly i nstructions co uld result
in seriou s injury or death
WARNI NG Do not use t he product if any p arts are broken ,
WARNI NG Always use harness
WARNI NG Never leave ch ild unattende d
WARNI NG Stop using pro duct when chil d attempts to clim b out or reaches 9kg
WARNI NG It is danger ous to place this prod uct on an elevate d surface.
WARNI NG Be aware of the r isk of open fire and ot her sources of str ong heat,
WARNI NG This product is not intended for prolonged period of sleep.
WARNI NG Do not use the p roduct witho ut the seat cushio n
WARNI NG Do not move or li ft this produc t with the baby insi de it.
WARNI NG Do not use the to y bar as a handle.
torn or miss ing and use only sp are parts appr oved by the manufac turer
Always use o n a flat, level floor
such as ele ctric bar fires , gas fires, etc. In the v icinity of the p roduct
Should yo ur child need to sle ep, then place the ch ild in a suitable cot o r bed
Page 13

WARNI NG Do not let chi ldren play with this p roduct.
WARNI NG To avoid injury en sure that children a re kept away when unfo lding
or foldin g this product .
CLEANING GUIDELINES
1. To prolong the life of this product keep it clean.
2. Exposing the bed to direct sunlight for long period of time may result.
3. Do not store your product in moist places in order to prevent it from mildew
formation on parts of upholstery or finish.
4. Wash the detachable parts of upholstery in water with soap or other mild
washing agent. The rest of the product shall be cleaned with wet cloth only.
5. Never wash the upholstery in washing machine or whirl and trumble dry
6. Do not iron the upholstery parts. Do not dry clean. Never apply bleaching agents.
7. Dry the washed upholstery before you put it back on the bouncer. Do not dry it into direct
sunlight
8. Periodically check technical condition of the elements of swing / bouncer
Protect the environment by not disposing of this product with household waste
(2002/96/EC). Check your local authority for recycling advice and facilities.
Page 14

PL
Milly Mally s.c
Marcin Napert,
Paweł Soszyński
Łukówiec 98
05-480 Karczew
Poland
Tel. 00 48 22 394 09 94
info@millymally.pl
www.millymally.pl
 Loading...