

Page 1

XRS-5/XRS-5C TRANSDUCER
Instruction Manual PL-590 January 2001
33455900
Rev. 2.0
Page 2

Safety Guidelines
Warning notices must be observed to ensure personal safety as well as that of others, and to
protect the product and the connected eq uip m ent . These w ar ning notices are accompanied
by a clarification of the level of caution to be observed.
Qualified Personnel
This device/system may only be set up and operated in conjunction with this manual.
Qualified personnel are on ly authorized to install and operate this equipment in accordance
with established safety practices and standards.
Warning: This product can only function properly and safely if it is correctly transported,
stored, installed, set up, oper at ed, and maintained.
Note: Always use product in accordance with specifications.
Copyright Siemens Milltronics Process
Disclaimer of Liability
Instruments Inc. 2000. All Rights Reserved
This document is available in bound version and in
electronic version. We encourage users to
purchase authorized bound manuals, or t o view
electronic versions as designed and authored by
Siemens Milltronics Process Instruments Inc.
Siemens Milltronics Process Instruments Inc. will
not be responsible for the content s of partial or
whole reproductions of either bound or electronic
versions.
MILLTRONICS®is a registered t rademark of Siemens Milltronics Proc ess Inst ruments Inc.
Contact SMPI Technical Publications at the following address:
Technical Publications
Siemens Milltronics Process Instruments Inc.
1954 Technology Drive, P.O. Box 4225
Peterborough, Ontario, Ca nad a, K9J 7B1
Email: techpubs@milltronics.com
While we have verified the contents of
this manual for agreement with t he
instrumentation described, variations
remain possible. Thus we cannot
guarantee full agreement. The
contents of this manual are regularly
reviewed and corrections are included
in subsequent editions. We welc ome
all suggestions for improvement.
Technical data subject to change.
For the library of SMPI instruction manuals, visit our Web site: www.milltronics.com
© Siemens Milltronics Process Instruments Inc. 2001
Page 3

Table of Contents
Table of Contents ....................................................................................3
Specifications .........................................................................................5
About the Transducer..............................................................................7
General Guidelines.............................................................................8
Installation...............................................................................................9
Outline and Dimensions ......................................................................9
Mounting................................................................................................11
Recommendations............................................................................11
Applications...........................................................................................13
Open Channel Meter......................................................................... 13
Standpipes and Stilling Wells.............................................................14
Water / Wastewater...........................................................................15
Transducer Placement......................................................................16
Locations..........................................................................................16
Interconnection .....................................................................................19
Direct Connection ............................................................................. 19
Coaxial Connection ...........................................................................20
2-Wir e Extension (for EnviroRanger ERS 500 only)............................20
Maintenance ..........................................................................................20
Installation Diagram for XRS-5..............................................................21
Installation Diagram for XRS-5C............................................................22
PL-590 XRS-5 Transducer Page 3
Page 4

Page 4 XRS-5 Transducer PL-590
Page 5

Specifications
Process Application:
{
Measurement Range
{
Vessel Pressure
Operation:
{
Beam Angle
{
Frequency
{
Temperature Sensor
{
Supply Source
Environmental:
{
Location
{
Ambient temper at ur es
{
Altitude
{
Pollutio n degree
{
liquids a nd slurr ies
{
0.3 to 8m (1 - 26 ft) typical (ap p li cation variables ap pl y )
{
vented to at mospher e
{
10°
{
43 KHz
{
internal
{
transduc er shall only be supplied by Milltronics certi fied
controller
{
indoor / outdoor
{
-20 to 65 °C (-4 to 149 °F)
{
2000 m max i mu m
{
4
Specifications
Construction:
{
Housing
{
Mounting
{
Kynar Flex®1 body and Hypalon
{
XRS-5C has SS conduit connection
{
XRS-5: 1” NPT or BSP conduit connection
{
XRS-5C: 1” NPT
2
face
Cable:
{
2 wire shielded / twisted, 0.5 mm2 (18 AWG) PVC jacket
Ingress protection:
{
IP-68
Weight
3
:
{
1.2 Kg (2.6 lb)
Options:
{
factory flanged to suit ANSI , DIN or JIS standard
{
split fl an ge (fiel d mo un t ) to su it AN SI, DIN or JIS stan dard
{
submergence shield (flooding applications)
Cabling (maximum run):
{
365 m (1200 ft) usin g RG-62 A/U coaxial c ab le
{
365 m (1200 ft) usin g 2-w ire twiste d pa ir / brai de d and f oil shielded 20 AWG ( 0. 5
2
mm
), PVC jacket (EnviroRanger ERS 500 only)
Approvals:
{
XRS-5: CE4, CSA, FM, CENELEC/ATEX, SAA, see device nameplate
O
XRS-5C: CSA
O
Please verify against the device nameplate
1
Kynar Flex® is registered trademark of ELF Atoche m.
2
Hypalon® is a registered trademar k of Du Pont
3
approximate weight of transducer with standard cable length
4
EMC perfo rmance available upon request
PL-590 XRS-5 Transducer Page 5
Page 6

Specifications
Page 6 XRS-5 Transducer PL-590
Page 7
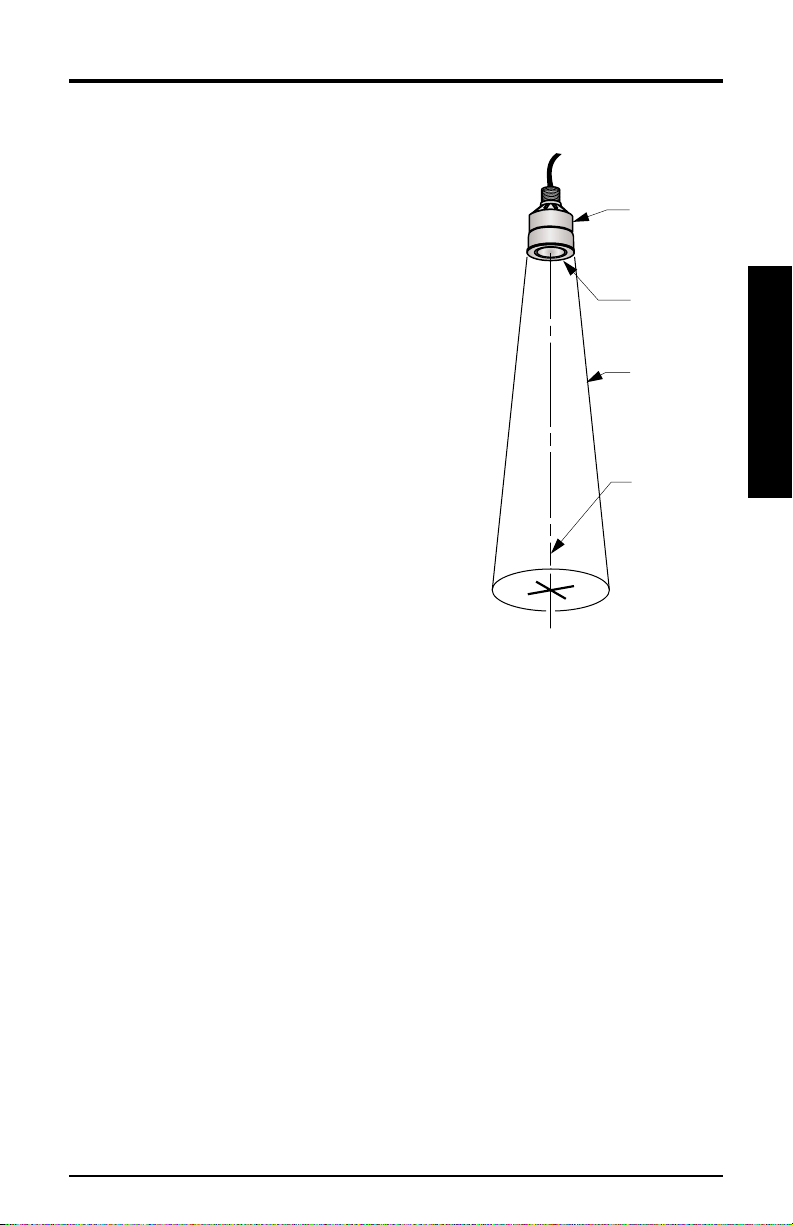
About the Transducer
The Echomax XRS-5 transducer works with Milltronics transceivers and
provides the ultrasonic pulse and echo reception
that these devices require.
The transducer converts electrical pulses
provided by the transceiver to ultrasonic pulses
used for measurement and then converts the
ultrasonic echoes back to an electrical signal.
This signal is interpreted by the Milltronics
tranceiver using the patented Sonic
Intelligence™ algorithms. The ultrasonic pulse
reduces in power by 3dB in a 10° cone from the
transducer face. It is important to keep objects
out of this cone to reduce the chance of false
echos being recorded.
The XRS-5 transducer incorporates an
integral temperature sensor that reports the
ambient temperature to the transceiver. The
connection is transparent in that both the
ultrasonic and temperature components of
the transducer use the same leads. This
ensures that the Milltronics transceiver can
automatically compensate the speed of
sound constant for varying temperatures.
transducer
transducer
face
-3db
boundary
axis of
transmission,
perpendicular
to transducer
face
About this …
PL-590 XRS-5 Transducer Page 7
Page 8

General Guidelines
The equipment may be used in all hazardous zones with all gases with
temperature classes T1, T2, T3, T4, T5 and T6. The equipment is only
certified for use in ambient temperatures in the range of -20°C to +65°C and
should not be used outside this range.
• Installation shall be carried out in accordance with the applicable code of
practice by suitably trained personnel.
• The apparatus shall only be supplied from a circuit containing a suitablyrated fuse having a breaking capacity of 4000A. This fuse is included in
Milltronics’ transceivers.
• Repair of this equipment shall be carried out in accordance with the
applicable code of practice.
• The certification of this equipment relies on the following materials used in its
About this …
construction:
Enclosure: Kynar Flex 2800-02 (former designation 2820) /
Chlorosulfonated polyethylene / Nitrile / Ethylene propylene
/ Chloroprene
Encapsulant: LA-9823-76
• Manual override can be accomplished by using the disconnect switch
provided in the building installation of the associated controller.
Page 8 XRS-5 Transducer PL-590
Page 9

Installation
Outline and Dimensions
Standard Flange (optional)
127mm
(5.0”)
89mm
(3.5”)
ANSI, DIN or JIS
standards
Submergence Shield Split Flange (optional)
155mm
(6.1”)
ANSI, DIN or JIS
standards
124mm
(4.9”)
127mm
(5.0”)
Installation
133mm
(5.2”)
nominal
Refer to Milltronics
instruction manual PL-530.
PL-590 XRS-5 Transducer Page 9
Page 10

Installation
Page 10 XRS-5 Transducer PL-590
Page 11

Mounting
Recommendations
• Mount the transducer so that it is above the maximum material level by more
than the blanking value to ensure that accurate results are achieved. Refer
to the associated transceiver manual for information on setting the blanking
value.
• The transducer must be mounted so that the axis of transmission is
perpendicular to the liquid’s surface.
• Do not over tighten mounting. Hand tightening of the mounting hardware is
sufficient.
• Consider the optional temperature sensor when mounting the transducer.
Suspended Conduit Bracket
rigid metal
conduit
coupling
flexible conduit
steel channel
coupling
transducer
Flexible conduit transducer should not be
subjected to wind, vibration or jarring.
Submersible Plywood
rigid metal
conduit
coupling
submergence
shield
coupling
Submersible transducer, used in
applications where flooding is possible.
Plywood mounting provides excellent
isolation, but must be rigid enough to
avoid flexing if subjected to loading.
PL-590 XRS-5 Transducer Page 11
Mounting
Page 12

Blind Flange
nipple welded
to bind flange
coupling
Mounting
Face Flange
coupling
factory flanged
transducer
bolt
gasket
customer flanged,
flat face only
nut
Note:
Tighten the flange bolts evenly in order to ensure a good seal between the
mating flanges.
Caution: Over tightening can cause performance degradation.
Page 12 XRS-5 Transducer PL-590
Page 13

Applications
Notes:
• The transducer is to be used only in the manner outlined in this
instruction manual.
• This transducer requires no maintenance, and is recommended for use
with liquids only.
• The OCM III requires the use of the TS-2 external temperat u re s en so r.
The internal temperature sensor in the XRS-5 cannot be used.
Open Channel Meter
refer to Milltronics
transceiver manual for
minimu m dis tance above
maximum head.
typical fl ume or weir
Refer to OCM manufacturer specification for proper point of head
measurement.
The OCM III requires the use of the TS-2 external temperat u re sen s or
instead of the XRS-5 internal temperature sensor. The use of an external
temperature sensor provides better temperature tracking in applications
where the temperature can change quickly.
PL-590 XRS-5 Transducer Page 13
Applications
Page 14

Standpi pes and Stilli ng Wells
In many applications, access must be made via a standpipe. In such cases,
Milltronics can provide factory flanged transducers or split flange k it that will
readily mate to the flanged standpipe. Another option is to hang the
transducer from a blind flange.
The standpipe length should be as short and the diameter as large as
possible. As a rule of thumb, the -3 dB cone of the sound beam should not
intersect the standpipe wall in applications opening into a vessel or lar ger
area. Otherwise, additional blanking will be required to compensate for the
interference zone created by the opening.
Note: When using a stilling well, make sure there is no build-up, welds, couplings,
or other debris on the inside of the well wall. This can affect reliability of level
measurement.
flanged
transducer
vent
no
intersection
vessel
no additi on al bl ank ing re qu ired no additi on al bl ank ing re qu ired
blind fl ange
mounting
transducer
can read
level inside
or below
standpipe
standpipe
end cut on a
45° angle
typically
vessel
no
vessel
Applications
no additi on al bl ank ing re qu ired
near blank ing extens ion of 150 mm (6”)
past end of stan dp ip e may be requir e d.
Page 14 XRS-5 Transducer PL-590
blind fl ange
mounting
transducer
sound be am
intersects
reflecti on at
interference
zone cr ea t e d
by opening
Page 15

Water / Wastewater
Differential Level
Pump Control
Sewage Lift
PL-590 XRS-5 Transducer Page 15
Applications
Page 16

Transducer Placement
y
y
r
w
r
The following graphic shows the best placement of the XRS-5 transducer.
‘B’
Maintain full fluid
level for full o
offset calibration.
Do not allo
material to ente
blanking zone.
‘A’
‘C’
span:
distance between
Empty and Full
levels in the
measured process
tank
manufacturer’s
empty level
Empt
level for ‘B’
location. Below this
level, echo would
reflect awa
the transducer.
from
may require target to
obtain empty reading
beam
angle
rise
run
discharge
Locations
A. Primary location. This is the preferred location and should be used
whenever possible. The centre of the tank generally gives the most reliable
readings because there are fewer obstructions to provide false echos.
B. Alternate location. This location is used if the centre of the tank is already
in use or if the tank roof is too weak to hold the transducer safely.
C. Poor location. This is a poor installation location. The echos are shown
reflecting away from the transducer face.
Applications
Page 16 XRS-5 Transducer PL-590
Page 17

Notes
1. Beam should not detect bin bottom.
If this occurs, use range extension parameters (on
transceivers where available) to omit false echoes.
The XRS-5 transducer operates with a beam
angle of 10° and has a rise:run ratio of
approximately 12:1. This means that for every 1m
(3.3’) of tank height, the transducer projects a
circular area over the material surface with a
radius of 83mm (32.7”). In most tanks the
transducer should be centred as much as
possible (without interference from inlet) for
optimum reading range.
1m
2. Sound beam must be perpendicular to
liquid surface.
When mounting the standpipe and flange you must ensure that the
transducer face will be parallel with the liquid’s surface.
3. Echo has missed an improperly levelled transducer.
As 2, ensure that the standpipe and flange are mounted to set the
transducer face level with the measured liquid.
4. Calibrate under normal conditions.
When performing an empty or full calibration, the tank must contain its
normal vapour and be at its normal temperature.
83mm
PL-590 XRS-5 Transducer Page 17
Applications
Page 18

Applications
Page 18 XRS-5 Transducer PL-590
Page 19

Interconnection
Note:
Installation shall only be performed by qualified personnel and in
accordance with local governing regulations.
Dos and Don’ts
For best results follow these installation rules:
• Do not route cable openly, instead run cable separately in a grounded metal
conduit to protect it from ambient electrical noise.
• Seal all thread connections to prevent the ingress of moisture.
• Do not run cable near high voltage or current runs, contactors or SCR
control drives.
In all of the following examples the terminal blocks on the transceiver are
described in the transceiver manual.
Direct Connection
Connect the transducer directly to the Milltronics transceiver via the 2
conductor shielded cable.
Interconnection
blk
Note:
When connecting to an EnviroRanger ERS 500, the white, black, and
shield wires are all connected separately. Do not tie the white and shield
wires together.
PL-590 XRS-5 Transducer Page 19
wht
drain / shield
Page 20

Coaxial Connection
Connect the transducer to the Milltronics transceiver via a junction box and
RG–62 A/U coaxial cable. This setup is effective for combined runs up to
365m (1200’).
Interconnection
Note:
When connecting to an EnviroRanger ERS 500, do NOT use coaxial
cable, see diagram below for proper procedure.
extend cable using
RG – 62 A/U coax
2-Wire Extension (for EnviroRanger ERS 500 only)
wht
blk
junction box
drain / shield
extend cable using 18 AWG
shielded / twisted pair
Maintenance
Normally, no maintenance is required on the transducer.
However, if performance changes are observed, immediately shut down the
level measurement system and perform a thorough inspection, especially on
the transducer.
Page 20 XRS-5 T ransducer PL-590
Page 21

Installation Diagram for XRS-5
Installation Diagram
PL-590 XRS-5 Transducer Page 21
Page 22

Installation Diagram for XRS-5C
Installation Diagram
Page 22 XRS-5 Transducer PL-590
Page 23

*7ml19981bj01*
 Loading...