

Page 1
Instruction Manual January 2003
pointek
ULS 200
Page 2

Safety Guidelines
Warning notices must be observed to ensure personal safety as well as that of others, and to
protect the product and the connected equipment. These warning notices are accompanied
by a clarification of the level of caution to be observed.
Qualified Personne l
This device/system may only be set up and operated in conjunction with this manual.
Qualified personnel are only authorized to install and operate this equipment in accordance
with established safety practices and standards.
Warning: This product can only function properly and safely if it is correctly transported,
stored, installed, set up, operated, and maintained.
Note: Always use product in accordance with specifications.
Copyright Siemens Milltronics Process
Disclaimer of Liability
Instruments Inc. 2003. All Rights Reserved
This document is available in bound version and in
electronic version. We encourage users to
purchase authorized bound manuals, or to view
electronic versions as designed and authored by
Siemens Milltronics Process Instruments Inc.
Siemens Milltronics Process Instruments Inc. will
not be responsible for the contents of partial or
whole reproductions of either bound or electronic
versions.
MILLTRONICS®is a registered trademark of Siemens Milltronics Process Instruments Inc.
Contact SMPI Tech nical Publications at t he following address:
Technical Publications
Siemens Milltronics Process Instruments Inc.
1954 Technology Drive, P.O. Box 4225
Peterborough, Ontario, Canada, K9J 7B1
Email: techpubs@siemens-milltronics.com
While we have verified the contents of
this manual for agreement with the
instrumentation described, variations
remain possible. Thus we cannot
guarantee full agreement. The
contents of this manual are regularly
reviewed and corrections are included
in subsequent editions. We welcome
all suggestions for improvement.
Technical data subject to change.
For the library of SMPI instruction manuals, visit our Web site: www.siemens-milltronics.com
© Siemens Milltronics Process Instruments Inc. 2003
Page 3

Table of Contents
Pointek ULS 200 ...................................................................................................................2
Specifications ............................................................................................................. .........3
Installation ...........................................................................................................................5
Location .....................................................................................................................................................5
Mounting and Dimensions ................................................................................................6
Threaded ....................................................................................................................................................6
Sanitary ......................................................................................................................................................7
Interface ...............................................................................................................................9
Interconnection ..... .................... ..................... ..................... ....................... .................... ...10
Operation .......... ................................. ............................... ............................... ...................11
Start Up ....................................................................................................................................................11
Quick Start ..............................................................................................................................................11
Display / Operation Status ..................................................................................................................13
Applications ..... .................... ..................... ..................... ...................... ..................... .........14
Adjustments ............................... ........................................................................................20
Troubleshooting .................................................................................................................28
Maintenance . ..... .... .... ...... .... .... ..... .... .... .... ...... .... .... ..... .... .... ...... .... .... ..... .... .... .... ...... .... .....29
Certifications .....................................................................................................................30
7ML19981AS01 ULS 200 – INSTRUCTION MANUAL Page 1
Page 4

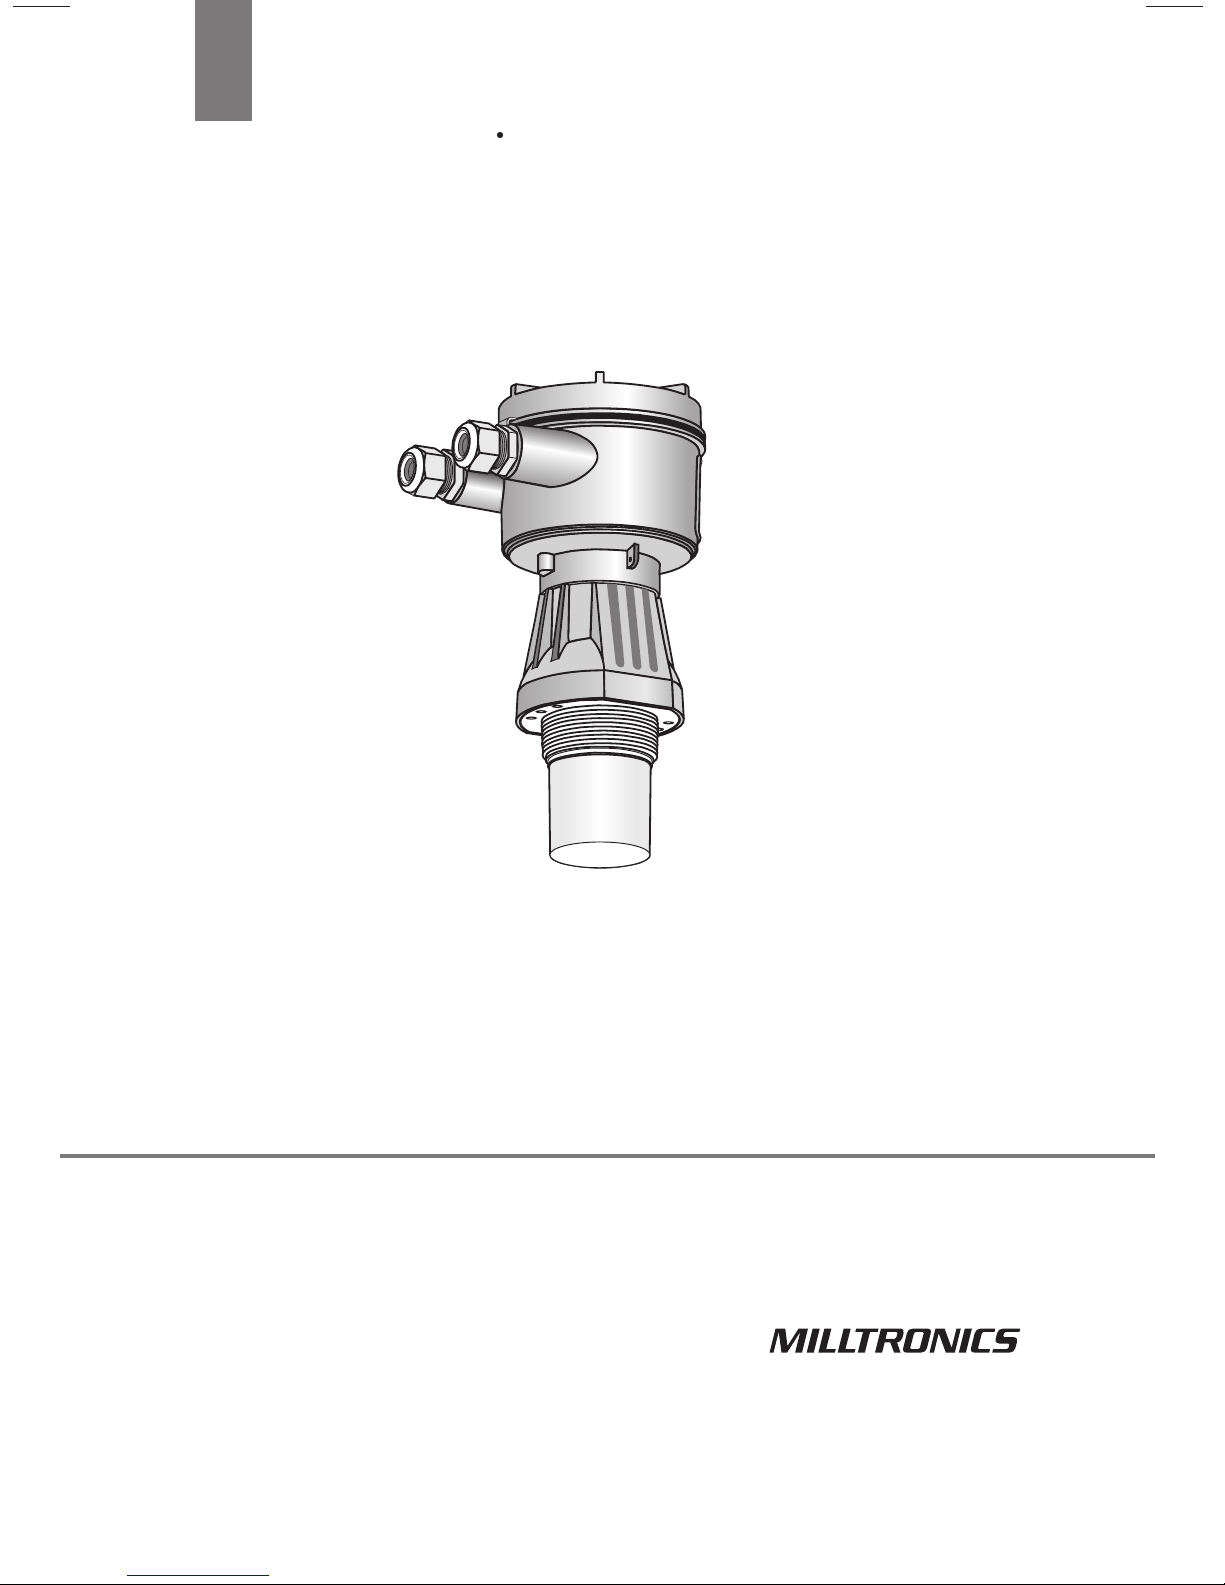
Pointek ULS 200
Note: Pointek ULS 200 is to be used only in the manner outlined in this instruction
manual.
Pointek ULS 200 is an ultrasonic based process level switch providing high or low switch
action on liquids or solids. The process part (sensor) is Tefzel®or Kynar Flex®, allowing it
to be used in a wide variety of industries.
Pointek ULS 200 contains an ultrasonic transducer and temperature sensing element. The
transducer emits a series of ultrasonic pulses. Each pulse is reflected as an echo from
the material and sensed by the transducer. Pointek ULS 200 processes the echo using
Milltronic's proven Sonic Intelligence®techniques. Filtering is applied to help
discriminate between the true echo from the material and the false echoes from
acoustical and electrical noises and agitator blades in motion. The time for the pulse to
travel to the material and back is temperature compensated and then converted into
distance for display and relay actuation.
The Pointek ULS 200 is an excellent primary detection device, but should not be used as
a backup device. For backup devices use a contacting technology such as the Pointek
CLS 200. The optional sanitary version affords quick removal and ease of cleaning as
demanded by the food, beverage, and pharmaceutical industries.
Pointek ULS 200 Outputs
• switch outputs programmable for high-high, high, low, and low-low level actions
• fail-safe programmable
Pointek ULS 200 Features
• 2" NPT, 2" BSP or PF2 or 4" 3A approved Tri-clamp process connection
• 2 conduit connections, 1/2 “NPT or PG 13.5
• non-corrosive enclosure and wetted parts
• 2 button programming
• level run/program LCD display
Pointek ULS 200 Applications
• liquids, slurries, and fluid materials
• foods and pharmaceuticals
• chemicals
Page 2 ULS 200 – INSTRUCTION MANUAL 7ML19981AS01
Page 5

Specifications
ac V ersion
Power
• 100 - 230 V ac, + 15%, 50/60 Hz, 12 VA (5W) max.
Fuse
• Slow-Blow, 0.25 A, 250 V ac
Output:
• repeatability: 0.25 % of full range
• resolution: 3 mm (0.1")
•relay: 2 form C (SPDT) contacts, rated 5A at 250 V ac, non-
inductive
dc Version
Power
• 18 to 30 V dc, 3 W
Output:
• repeatability: 0.25 % of full range
• resolution: 3mm (0.1")
• relay: 2 form C (SPDT) contacts, rated 5 A at 48 V DC
OR
• transistor: 2 transistor switches, rated 100 mA maximum at 48 V DC
Environmental
• location: indoor/outdoor
• altitude: 2000m max
• ambient temperature: - 40° to 60° C (- 40° to 140° F)
* - 20° C (-5° F) if metal mounting
• relative humidity: suitable for outdoor (Type 6 / NEMA 6 / IP67 enclosure)
• installation category: II
• pollution degree: 4
Process Pressure:
• vented to atmosphere
7ML19981AS01 ULS 200 – INSTRUCTION MANUAL Page 3
Page 6

Switching Range
• liquids: 0.25 to 5m (0.8 to16.4 ft)
• solids: 0.25 to 3m (0.8 to 9.8 ft)
Memory
• non-volatile EEPROM
Programming
•2 keys
Temperature Compensation
• built-in to compensate over the operating range
Display
• liquid crystal
• three 9mm (0.35") digits for reading of distance between sensor face and material,
multi-segment graphic for operation status
Electronics/Enclosure
• termination: terminal block, 2.5mm2 (14 ga) solid1.5 mm2 (16 ga)
stranded, maximum
•material: plastic
OR
epoxy coated aluminum with gasket
• ingress protection: Type 6 / NEMA 6 / IP67
• conduit: aluminum, 2 connections 1/2” NPT
plastic, 2 connections PG 13.5
1
Sensor
• material: Tefzel2®or Kynar Flex3®
• mounting: threaded:
• 2" NPT, 2" BSP or PF2
• optional flange adapter, to 3" ANSI, DIN 65PN10,
and JIS 10K3B
sanitary:
• 4" 3A compliant Tri-clamp fitting
Approvals
• CE (EMC performance available upon request.), CSA
• CSA/FM Class 1, Division 1, Group A, B, C, D; Class II, Group E, F, G; Class III
• Europe: ATEX II 2G, EEx md IIC T5
(see product nameplate for approval details)
1.
Use only approved, suitable size hubs for watertight applications.
2.
Tefzel ® is a registered trademark of Dupont.
3.
Kynar Flex® is a registered trademark of Elf Atochem North America.
Page 4 ULS 200 – INSTRUCTION MANUAL 7ML19981AS01
NRTL/C
, FM, 3A
Page 7
Installation
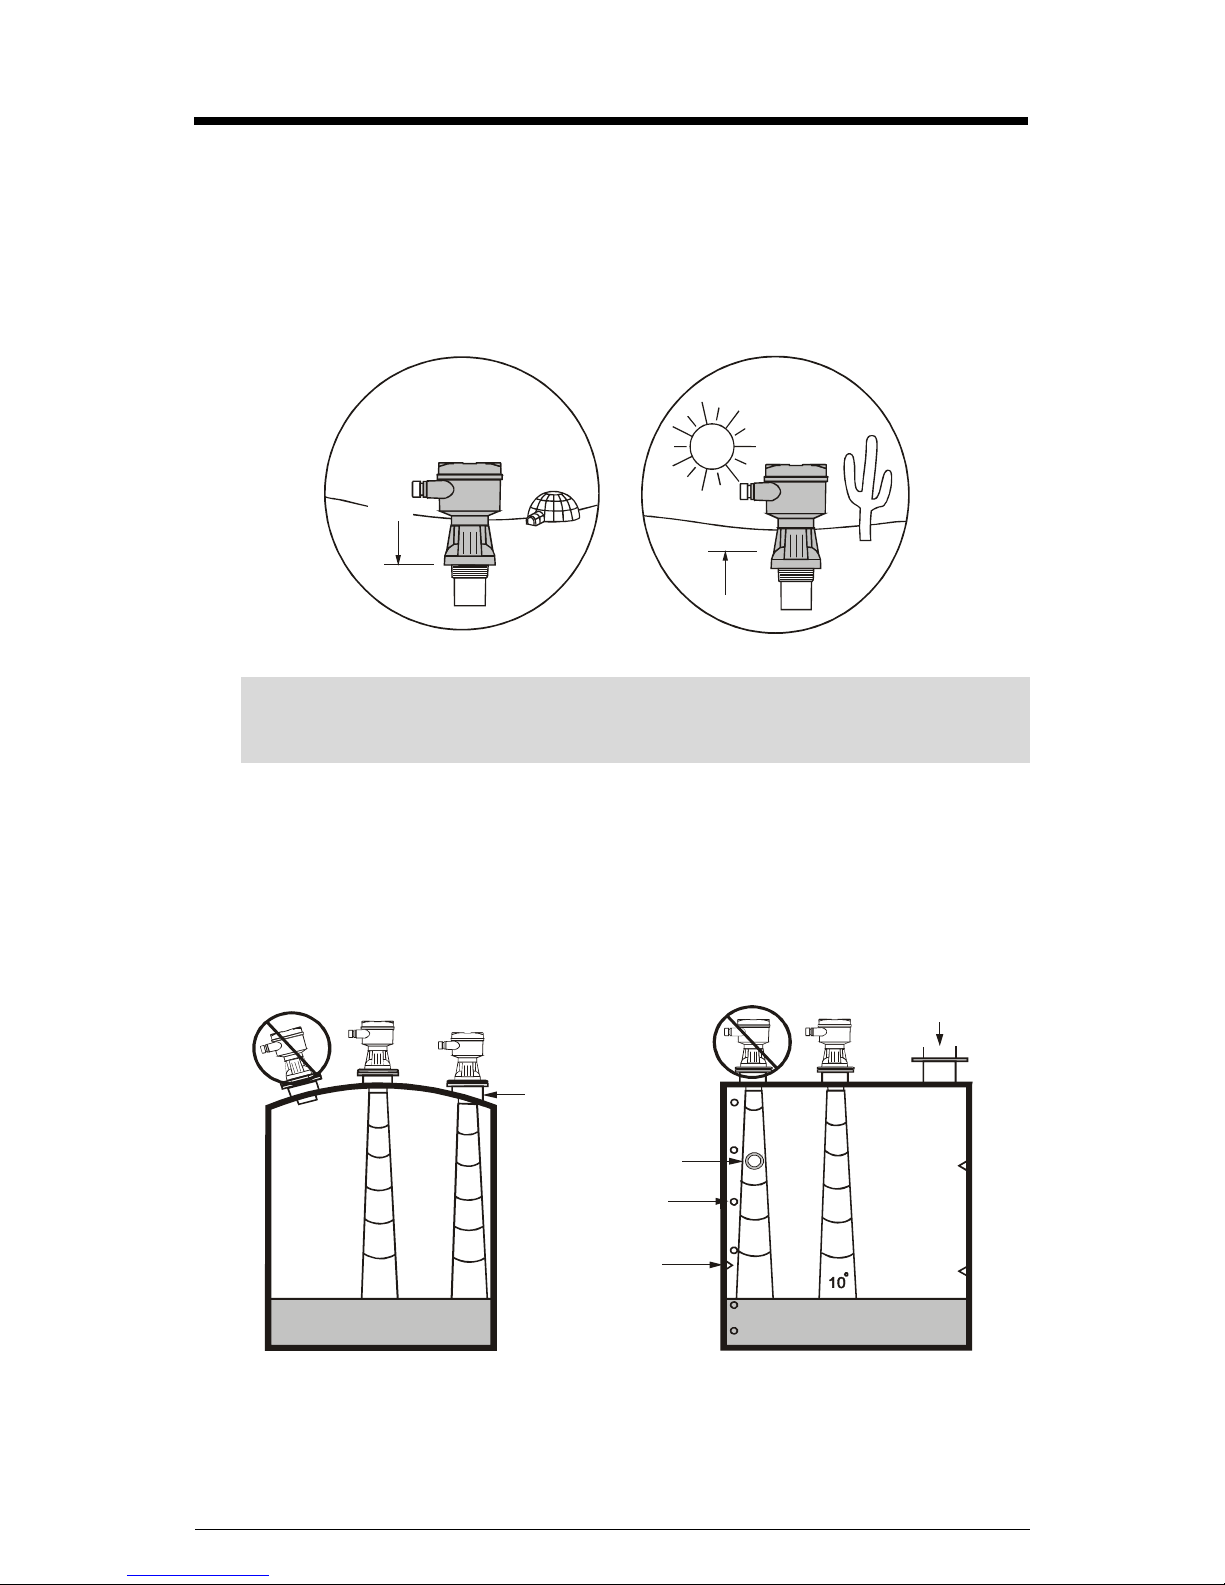
The Pointek ULS 200 should be mounted in an area within the temperature range
specified and suitable to the housing rating and materials of construction. Make sure the
cover is accessible to allow programming, wiring, and access to the display.
Keep the Pointek ULS 200 away from high voltage or current runs, contactors, and SCR
control drives.
-40°C
60°C
Warning: Explosion Hazard. Substitution of components may impair
suitability for Class 1, Division 2 applications.
Location
Locate the Pointek ULS 200 so that it has a clear sound path perpendicular to the
material surface.
The Pointek ULS 200 sound path should not intersect the fill path, rough walls, seams,
rungs, or any other obstruction.
fill
7ML19981AS01 ULS 200 – INSTRUCTION MANUAL Page 5
sanitary ferrule
pipe
rungs
seams
Page 8

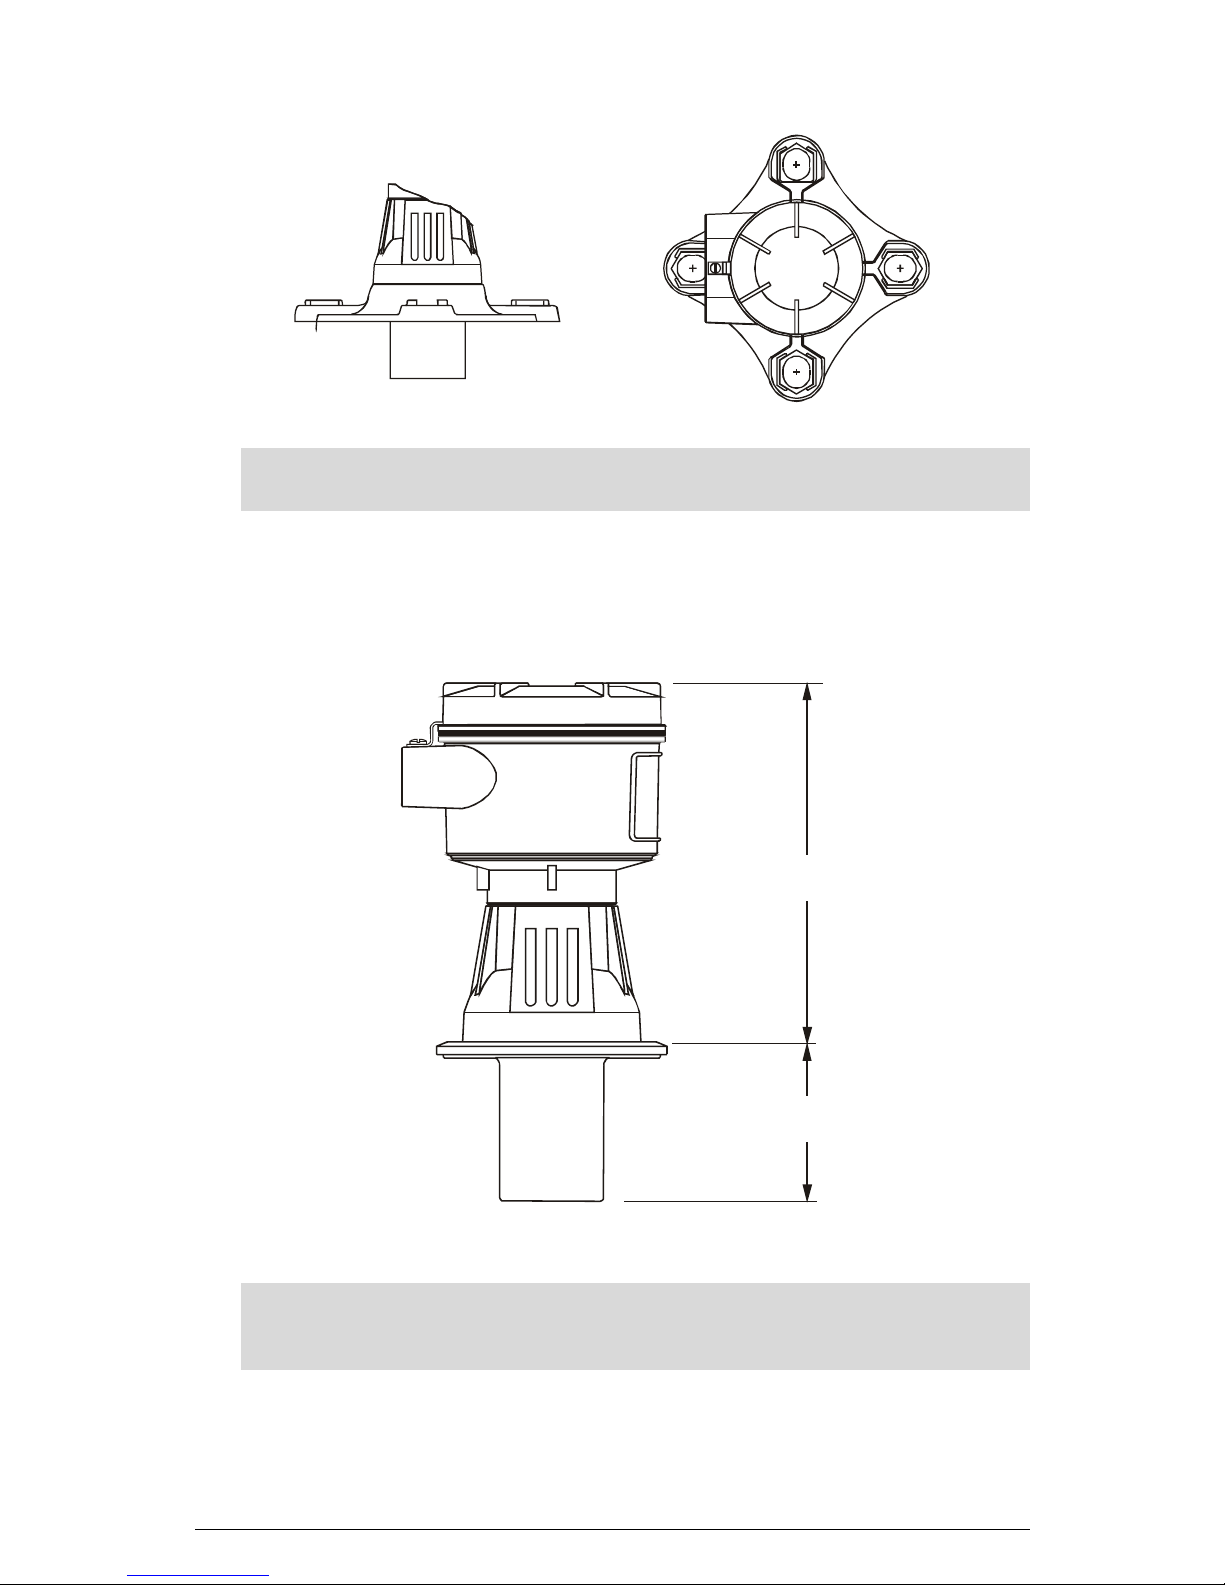
Mounting and Dimensions
Mount the ULS 200 with sensor face at least 25cm above the highest anticipated level.
Threaded
The Pointek ULS 200 is available in three thread types: 2" NPT, 2" BSP, or PF2.
Before mounting the Pointek ULS 200, ensure that the mating threads are of the same
type, otherwise the threads can be damaged.
74 mm
(2.9”)
120 mm
(4.7”)
conduit
connection
½” NPT
or
PG13.5
lid clip
#8-32x3/8”
machine screw
lid
2” NPT
2” BSP
or
PF 2
57 mm
(2.25”)
180 mm
(7.1”)
74 m m
(2.9”)
electronics /
enclosure
sensor /
transducer
Notes:
• Dimensions are nominal and may vary with material types.
• Non-metallic enclosure does not provide grounding between connections.
• Use grounding type bushings and jumpers.
Page 6 ULS 200 – INSTRUCTION MANUAL 7ML19981AS01
Page 9
The Pointek ULS 200 can be fitted with the optional 75 mm (3") flange adapter for mating
to 3" ANSI, DIN 65PN10 and JIS 10K 3B flanges.
Note: For CSA/FM approved Hazardous Location Models, see Siemens Milltronics
drawing 0-9440026Z-DI-A.
Sanitary
The Pointek ULS 200 also comes in a sanitary version for use in the food and
pharmaceutical industries.
Notes:
• Dimensions are nominal and may vary with material types.
• Refer to threaded for other dimensions.
178 mm
(7.0”)
79 mm
(3.1”)
7ML19981AS01 ULS 200 – INSTRUCTION MANUAL Page 7
Page 10
Mount the Pointek ULS 200
onto the top of the tank's
sanitary ferrule.
Secure mating by surrounding
the joint with the optional clamp.
Tighten the adjusting nut
with your hand. Do not
use a wrench.
Point ek
ULS 200
optional
clamp
adjusting
nut
ferrule
tank
Sanitary Ferrule, 4" FDA Approved
(U.S. Food and Drug Administration)
119 mm
(4.68”)
97 mm
(3.83”)
*dimensions are approximate
Page 8 ULS 200 – INSTRUCTION MANUAL 7ML19981AS01
Page 11
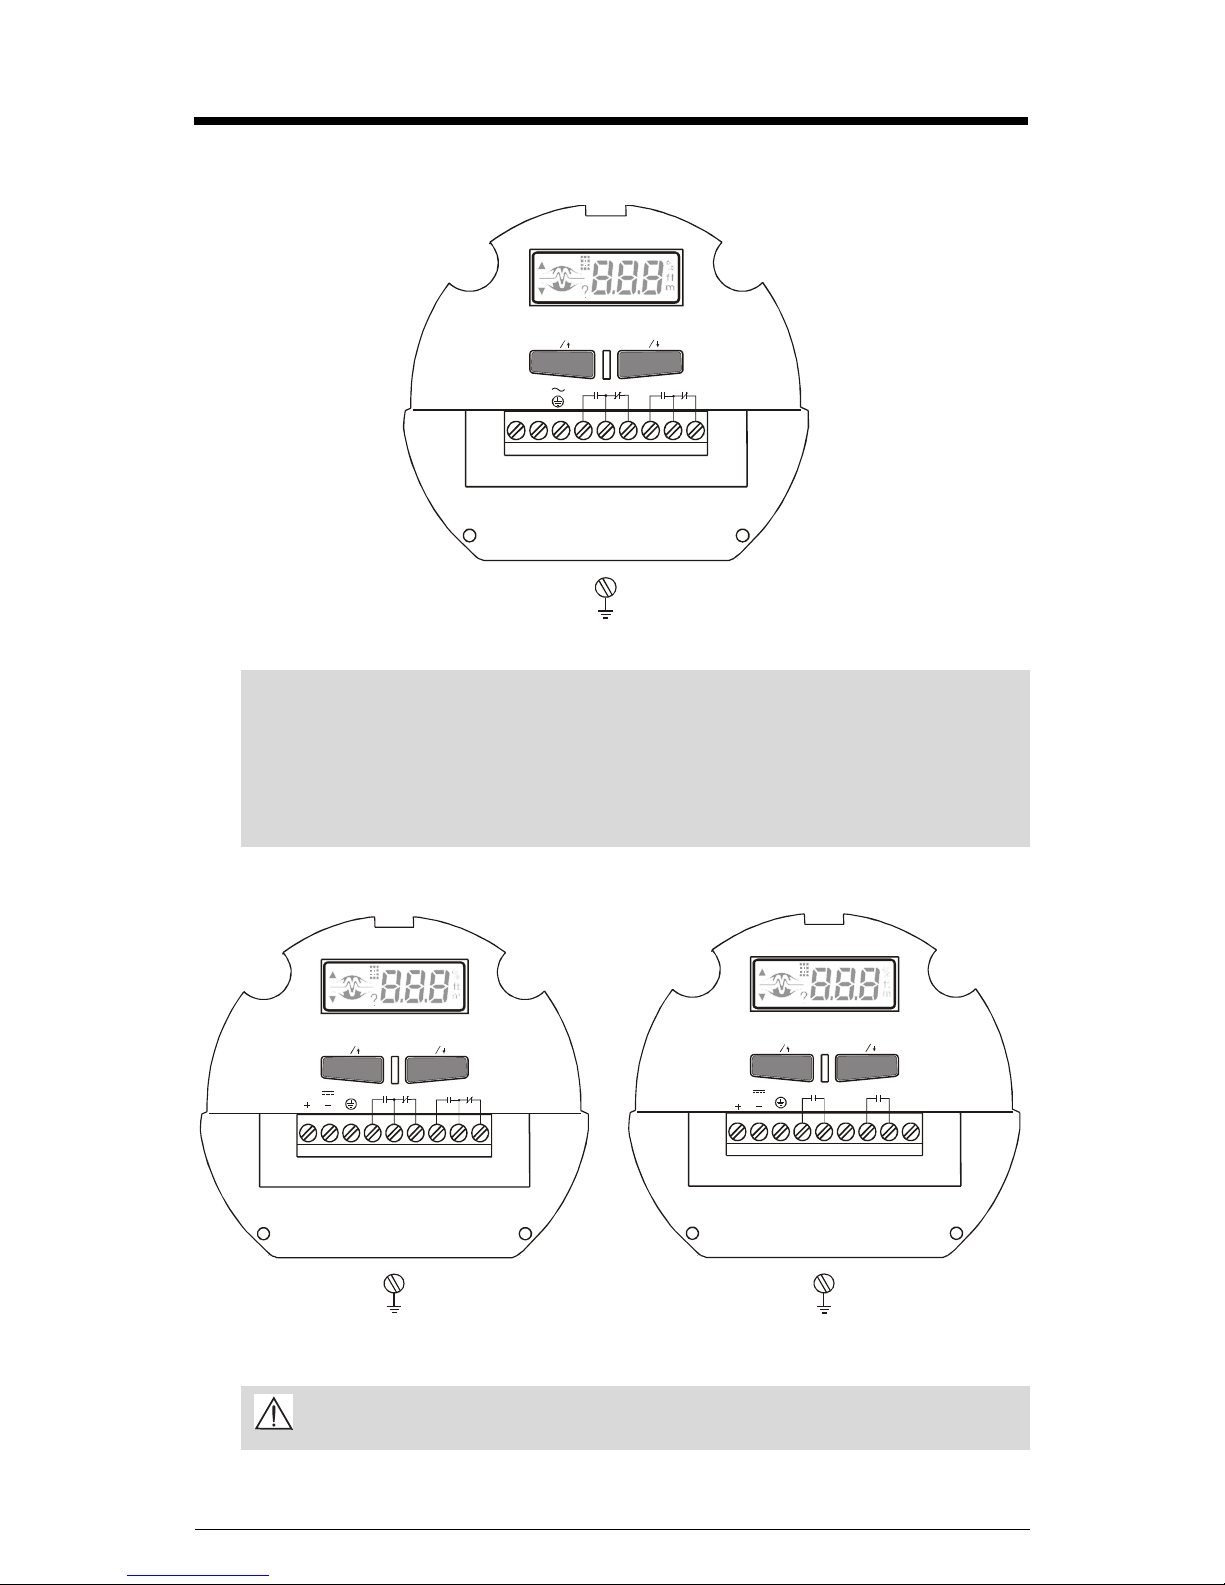
Interface
ac Version
1
2
1
2
100 - 230 V
NL
213456789
12
Notes:
• A circuit breaker or switch in the building installation, marked as the
disconnect switch, shall be in close proximity to the equipment and within
easy reach of the operator.
• Relay contact terminals are for use with equipment having no accessible live
parts and wiring having insulation suitable for at least 250 V.
dc Version - Relay Output dc Version - Transistor Output
1
1
2
1
24V
21 3 456789
12
Note: dc terminals shall be supplied from an SELV source in accordance with
IEC 1010-1 Annex H.
7ML19981AS01 ULS 200 – INSTRUCTION MANUAL Page 9
2
2
1
24V
213456789
2
12
Page 12

Interconnection
Notes:
• Installation shall only be performed by qualified personnel and in
accordance with local governing regulations.
• This product is susceptible to electrostatic shock. Follow proper grounding
procedures.
Separate cables and conduits may be required to conform to standard instrumentation
wiring or electrical codes.
Relay Output
12
relay 1
56789
4
relay 2
n/o
comn/c
n/ocom
n/c
All relays are shown in their de-energized (unpowered) state.
Optional Transistor Output – dc Version only
relay 1
12
18 to 30 V
24-30 V
213456789
relay 2
Power
ac Version
100 - 230 V
N
L
dc Version
18 to 30 V
1
100 to 230 V ac supply
Page 10 ULS 200 – INSTRUCTION MANUAL 7ML19981AS01
2
3
21
18 - 30 V dc supply
Page 13

Operation
Start Up
With the Pointek ULS 200 correctly installed (or aimed at a wall 0.25 to 5 m away), apply
power and observe the Pointek ULS 200 start up sequence. The unit will cycle through the
following screens:
1. Lighting of all possible LED values
2. Product revision number
3. Product model number
4. Run mode
The display and operation sequence arrives within a few seconds at the run mode, which
is the measurement of the distance from the transducer face to the material level in the
units indicated. Full instructions on setting up the unit are found at Applications on page
13 and Adjustments on page 19.
Quick Start
Use this setup method if you have a basic high/low application and you are setting up the
unit in a place where you can easily adjust the measured distance.
The Pointek ULS 200 relays are preset as: relay 1 = alarm 1, high alarm at 0.25 m
relay 2 = alarm 2, low alarm at 5.00 m
To change the setpoints by reference method, set the material or target to the distance as
displayed. Press the ` 1 /
setpoint function and value. By pressing the alarm key a second time, the Pointek ULS
200 changes the setpoint to the value currently being measured.
After viewing or changing the setpoint, the Pointek ULS 200 reverts to the run mode.
↑‘or ` 2 / ↓ ' key. The display responds by displaying the current
7ML19981AS01 ULS 200 – INSTRUCTION MANUAL Page 11
Page 14

relay 1
1. Position the unit so that it reads 0.75 m.
2.
1/↑
3.
1/↑
relay 2
1. Position the unit so that it reads 3.50 m.
2.
2/↓
function display:
function display:
high alarm
high alarm
current setpoint,
0.5 m
m
m
0.75 m
4. Once installed, the unit
will register a high alarm
at 0.75 m from the
sensor face.
Loss of Echo
if
retry
function display:
pump up control
m
3.
2/↓
4. Once installed, the
3.5 m
unit will register a low
alarm at 3.50 m from the
m
sensor face.
Loss of Echo
if
retry
Page 12 ULS 200 – INSTRUCTION MANUAL 7ML19981AS01
Page 15

Display / Operation Status
reading
output 1
ft
m
output 2
operation
status
Operation Status - Run Mode
- echoes are valid and within range.
-echoes are lost due to poor conditions or out of range.
This may be typical in applications where there are deep
vessels and the material level is normally out of range.
Refer to Troubleshooting.
-extended loss of echo period. Operation has gone into fail-safe.
Refer to Troubleshooting.
↑ key
units
↓ key
program
mode
adjustment
value
m
ft
units
7ML19981AS01 ULS 200 – INSTRUCTION MANUAL Page 13
Page 16

Applications
Pointek ULS 200 is designed for use as a process level switch. The local display is used
only as an aid during start up. The instrumentation interface is comprised solely of the
two relay outputs. Switching applications are based on the relay functions adjustment.
The outputs can be set to function in the desired mode.
Application Function Relay 1 Relay 2
High / Low level switch *1 High Alarm Low Alarm
High level switch with two height alarms 2 High Alarm High Alarm
Low level switch with two height alarms 3 Low Alarm Low Alarm
High level switch with loss of echo alarm 4 High Alarm LOE Alarm
Low level switch with loss of echo alarm 5 Low Alarm LOE Alarm
Pump down control with low level alarm 6 Pump Down Low Alarm
Pump down control with high level alarm 7 Pump Down High Alarm
Pump up control with low level alarm 8 Pump Up Low Alarm
Pump up control with high level alarm 9 Pump Up High Alarm
Pump down control with loss of echo alarm 10 Pump Down LOE Alarm
Pump up control with loss of echo alarm 11 Pump Up LOE Alarm
Pump up control and Pump down control 12 Pump Down Pump Up
Dual pump down control 13 Pump Down Pump Down
Dual pump up control 14 Pump Up Pump Up
* Factory setting
Alarm: the relay de-energizes to set the alarm ‘ON’
Control or Pump: the relay energizes to set the device ‘ON’
Page 14 ULS 200 – INSTRUCTION MANUAL 7ML19981AS01
Page 17

High Level Alarm Switch
This application uses Pointek ULS 200 to provide an alarm output, high and/or high-high
alarm, when the process material rises to a high level. The device range applies to its
switching capability, and not the process range of the material.
It is therefore common to apply the switch on vessels where the material is normally
below the unit's range. Under such a condition the Pointek ULS 200 loses echo, and if
prolonged, defaults to fail-safe operation. As this would be a normal occurrence, it is not
advisable to select the fail-safe high option.
If the high level switch is being applied to a vessel within the 3 / 5 m range, a loss of echo
and ensuing fail-safe condition would not be a common occurrence. The fail-safe default
would then be at the user's discretion.
Application Adjustments
alarm function 2 - high / high-high alarm
4 - high / Loss of Echo (LOE)
alarm setpoint set the high and / or high– high alarms to the desired values
fail-safe mode 1 - high, except if the process range is beyond the Pointek ULS 200
operating range (3 / 5 metres)
2 - low
3 - hold
fail-safe = 1, 2 or 3
high-high,
eg. 0.75 m
high,
eg. 1 m
blanking
e.g. 0.5 m
range limit
e.g. 5.5 m
fail-safe = 2 or 3
high-high,
eg. 0.75 m
blanking
e.g. 0.5 m
high,
eg. 1 m
range limit
e.g. 5.5 m
7ML19981AS01 ULS 200 – INSTRUCTION MANUAL Page 15
Page 18

High / Low Level Alarm Switch
This application uses Pointek ULS 200 to provide high and low level alarms. The device
range applies to its switching capability, and not the process range of the material. As
such the low and/or low-low level setpoints must be within the device's range (3 / 5
metres).
If the material can fall below the unit's range, the Pointek ULS 200 loses the echo, and if
prolonged, defaults to fail-safe operation. The fail-safe default should be set to suit the
application.
Application Adjustments
alarm function 1 - high / low alarm
alarm setpoint set the high and/or low alarms to the desired values
fail-safe mode 1 - high
2 - low
3 - hold
fail-safe = 1, 2 or 3
high,
eg. 1 m
low,
low,
e.g. 4.5 m
e.g. 4.5 m
range limit
e.g. 5.5 m
blanking
e.g. 0.5 m
high,
eg. 1 m
low,
e.g. 4.5 m
fail-safe = 2 or 3
blanking
e.g. 0.5 m
range limit
e.g. 5.5 m
Page 16 ULS 200 – INSTRUCTION MANUAL 7ML19981AS01
Page 19

Low Level Alarm Switch
This application uses the Pointek ULS 200 to provide one or two low level alarms. The
device range applies to its switching capability, and not the process range of the material.
As such the low and / or low-low level setpoints must be within the device's range (3 / 5
metres).
If the material can fall below the unit's range, the Pointek ULS 200 loses the echo,
and if prolonged, defaults to fail-safe operation. The fail-safe default should be set to
suit the application.
Application Adjustments
alarm function 3 - low / low-low alarm
5 - low / LOE alarm
alarm setpoint set the low and / or low-low alarms to the desired values
fail-safe mode 1 - high
2 - low
3 - hold
low,
eg. 3.5 m
lo w, l ow,
e.g. 4.5 m
fail-safe = 1, 2 or 3
blanking
e.g. 0.5 m
range limit
e.g. 5.5 m
low,
eg. 3.5 m
low, low,
e.g. 4.5 m
fail-safe = 2 or 3
blanking
e.g. 0.5 m
range limit
e.g. 5.5 m
7ML19981AS01 ULS 200 – INSTRUCTION MANUAL Page 17
Page 20

Dual Pump Control
This application uses Pointek ULS 200 to provide a control output when the process
material rises to a high level. The device range applies to its switching capabilities, and
not to the process range of the material. As such, the level setpoints must be within the
device’s range (3 / 5metres).
Typically, wet wells are used to temporarily hold storm and/or waste water. When the
water surface reaches a high level setpoint, the wet well is pumped down. The process
material will be pumped down by the deadband value to another setpoint where the
control will turn off.
Application Adjustments
relay function 6 - high control / low alarm
7 - high control / high alarm
10 - high control / LOE alarm
13 - high control / high control
relay setpoints: set to desired values
deadband values: referenced from relay setpoints
(distance from Pump Start setpoint to Pump Stop setpoint)
Relay Function 13: Dual Pump Down
relay 2
e.g. 0.75 m
relay 1
e.g. 1 m
4 m
deadband 1
e.g. 3 m
deadband 2
e.g. 3.25 m
pump 2 start
pump 1 start
both pumps stop
blanking
e.g. 0.5 m
Page 18 ULS 200 – INSTRUCTION MANUAL 7ML19981AS01
Page 21

Pump Control with Level Alarm
This application uses the Pointek ULS 200 to provide pump control and one level alarm.
The device range applies to its switching capability, and not the process range of the
material. As such the low level setpoints must be within the device's range (3 / 5 metres).
If the material reaches a control setpoint, the well is pumped down or up respectively. If
the material reaches an alarm setpoint, the alarm will sound until the material moves
beyond the deadband value.
Application Adjustments
relay function 6 - high control / low alarm
7 - high control / high alarm
8 - low control / low alarm
9 - low control / high alarm
10 - high control / LOE alarm
11 - low control / LOE alarm
alarm setpoint set the low alarm to the desired values
Relay Function 8: Pump Up Control with Low Alarm
relay 1
(pump up)
e.g. 3m
relay 2
(low alarm)
e.g. 3.5 m
deadband 1
e.g. 2 m
deadband 2
e.g. 1 m
pump off
alarm off
pump on
alarm on
blanking
e.g. 0.5 m
7ML19981AS01 ULS 200 – INSTRUCTION MANUAL Page 19
Page 22

Adjustments
There are several operating adjustments that can be made to the Pointek ULS 200.
To access the operating adjustments, simultaneously press both keys repeatedly until the
desired adjustment is obtained. A viewing period of the adjustment value is initiated.
During this time the value can be changed by pressing either the `up' or `down' key. After
viewing or changing, operation automatically reverts to the run mode.
Deadband 2
Blanking
Deadband 1
Delay
Relay 2
Range Limit
Speed of Response
Fail-safe
Fail-safe timer
Relay 1
Units
Page 20 ULS 200 – INSTRUCTION MANUAL 7ML19981AS01
Relay Function
Page 23

To adjust a value:
1/↑
select adjustment
current value
change value
new value
m
m
m
6 s delay
return to run
m
For faster scrolling, hold the key depressed and
release when the desired value is obtained.
e.g.relay 1
e.g. 0.5 m
e.g. increase to 0.75 m
e.g. new setpoint 0.75 m
7ML19981AS01 ULS 200 – INSTRUCTION MANUAL Page 21
Page 24

Output Function
The alarms can be set to function in the desired mode.
Function Relay 1 Relay 2
1 * high alarm low alarm
2 high alarm high alarm
3 low alarm low alarm
4 high alarm LOE alarm
5 low alarm LOE alarm
6 pump down low alarm
7 pump down high alarm
8 pump up low alarm
9 pump up high alarm
10 pump down LOE alarm
11 pump up LOE alarm
12 pump down pump up
13 pump down pump down
14 pump up pump up
* Factory setting
Function display:
high alarm H
high-high alarm HH
low alarm L
low-low alarm LL
loss of echo alarm LOE
pump up control PU
pump down control PD
high-high
high
low
low-low
Page 22 ULS 200 – INSTRUCTION MANUAL 7ML19981AS01
Page 25

Setpoints
The setpoints can be set where reference levels, either from the material in the vessel or
from a target, cannot be provided. This method can also be used to trim the output levels
obtained by the Reference Method (Quick Start).
The setpoints are referenced from the face of the sensor. They should not be set at or
above the blanking value, or at or below the range limit.
Point ek ULS 200
blanking
setpoint
range
limit
Factory Setting: Relay 1 = 0.5 m (1.64 ft)
Relay 2 = 4.50 m (14.76 ft)
Relay Delay
Adjust the time delay, in seconds, from when the material reaches the relay level and the
relay is actuated. If the material level withdraws from the setpoint level, the delay is reset
to 0.
The set time delay applies to both relays and all functions except `Loss OF Echo'.
Factory setting: 0 seconds.
7ML19981AS01 ULS 200 – INSTRUCTION MANUAL Page 23
Page 26

Relay Deadband (Reset)
Deadband (sometimes referred to as hysteresis) prevents relay chatter due to material
level fluctuations at the set point. These fluctuations are often waves or turbulence on a
fluid's surface caused by agitators in the tank.
Once a relay is tripped the detection level must move beyond the deadband value before
it is reset. The direction in which the deadband is measured depends on the application
of the relay. If the relay is for a high state then the deadband is measured below the set
point. If the relay is for a low state then the deadband is measured above the set point.
Refer to the diagram below.
Deadband 1 is used for Relay 1 and Deadband 2 is used for Relay 2.
high / high-high alarm
on setpoint
deadband
off
low / low-low alarm
off
deadband
on setpoint
The deadband value is entered in the units selected, and applies to both relays and all
alarm or control functions except `Loss Of Echo'.
Factory setting: 0.05 m (0.16 ft)
Page 24 ULS 200 – INSTRUCTION MANUAL 7ML19981AS01
Page 27

Blanking
Blanking is used to ignore the zone in front of the transducer where false echoes are at a
level that interfere with the processing of the true echo. It is measured outward from the
sensor face. The minimum recommended blanking value is 0.25 m (0.82 ft) but can be
increased in order to extend the blanking.
Point ek ULS 200
blanking
Factory setting: 0.20 m (0.66 ft)
Range Limit
The range limit is the distance at which measurements are ignored. Generally this refers
to the bottom of the container being measured. If a measurement is detected beyond the
range limit it results in a Loss Of Echo (LOE) reading. The result of this reading is
determined by the Fail-Safe Mode, see page 25 for more information.
Pointek ULS 200
range
limit
0 to 3 / 5 m* vessels
Pointek ULS 200
range
limit
greater than 3 / 5 m* vessels
Factory setting: 5.50 m (18.0 ft)
7ML19981AS01 ULS 200 – INSTRUCTION MANUAL Page 25
* solids range 3 m maximum
liquids range 5 m maximum
Page 28

Speed of Response
The speed of response adjustment allows the user to collectively set a number of
operating parameters.
measurement is the limit to which the Pointek ULS 200 is able to keep up with
response: rates of change.
If the Pointek ULS 200 measurement cannot keep up with the
rate of level change, set the adjustment from `1' to `2'.
If the Pointek ULS 200 still cannot keep up with the rate of
level change, set the adjustment option to `3'. Avoid
choosing an option that is too fast for your application.
agitator discriminates between agitator blades in motion
discrimination: and the material (target) surface.
filter: discriminates between false echoes from acoustical
and electrical noise and the material (target) surface.
fail-safe timer: establishes the `Waiting' period from the time a loss
of echo or operating fault condition starts until the
fail-safe default is effected.
SP
1
2*
3
4 immediate off off 3 min
* Factory setting
measurement
response
0.3 m / min
(0.1 ft / min)
1 m / min
(3.3. ft / min)
5 m / min
(16.4 ft / min)
agitator
discrimination
on on 10 min
on on 10 min
on on 3 min
filter FLS timer
Page 26 ULS 200 – INSTRUCTION MANUAL 7ML19981AS01
Page 29

Fail-Safe Mode
In the event that a loss of echo condition exceeds the fail-safe timer (speed of response
variable), `?' appears in the display; and if a relay is assigned to `LOE' (alarm function
option), it is engaged. This function must be used with the Output Function on page 22.
fail-safe mode function reading
high and high-high low and low-low
1 high on off hold
2 low off on hold
3* hold hold hold hold
* Factory setting
Fail-Safe Timer
The fail-safe timer allows the user to vary the waiting period from the time of a loss of
echo or operating fault condition begins, until the fail-safe default is effected. The waiting
period is adjustable from 1 to 15 minutes, in 1 minute increments.
Note: The fail-safe timer will default to settings determined by the speed of response
(see page 26). If a different value is desired, the fail-safe timer should be adjusted after
the speed of response is set.
Units
The units of the measurement reading can be selected as follows:
1 = metres, m
2 = feet, ft
The selected units are also applicable to the `Blanking' and `Relay' adjustments.
(Factory setting)
7ML19981AS01 ULS 200 – INSTRUCTION MANUAL Page 27
Page 30

Troubleshooting
The echo is not reliable and Pointek ULS 200 is waiting for a
valid echo before updating the measurement.
Probable causes are: Remedy
material or object in contact with
sensor face
Pointek ULS 200 is not perpendicular to
the material surface
change in level too fast adjust speed of response
material out of range
foam on liquid surface
too much dust or interference from
material filling
high level of vibration in the
mounting structure
material inside blanking zone or
below range limit
lower material level or raise Pointek
ULS 200
check Pointek ULS 200 mounting
if angle of repose is too steep, angle
Pointek ULS 200 mounting
acceptable on some high level switch
applications
mount Pointek ULS 200 via stilling well
or pipe
relocate Pointek ULS 200
relocate Pointek ULS 200 or limit
vibration
adjust blanking or range limit
Fail-safe default after prolonged Loss Of Echo.
Investigate the probable causes listed above.
Page 28 ULS 200 – INSTRUCTION MANUAL 7ML19981AS01
Page 31

Maintenance
The Pointek ULS 200 requires no maintenance or cleaning.
7ML19981AS01 ULS 200 – INSTRUCTION MANUAL Page 29
Page 32

Certifications
The following instructions apply to equipment covered by certificate number SIRA
00ATEX1205:
1. The equipment may be used with flammable gases and vapours with apparatus
group IIC and temperature class T5.
2. The equipment is certified for use in an ambient temperature range of -20 to 60°C
(-4 to 140°C).
3. The equipment has not been assessed as a safety related device (as referred to by
Directive 94/9/EC Annex II, clause 1.5).
4. Installation and inspection of this equipment shall be carried out by suitably trained
personnel in accordance with the applicable code of practice (EN 60079-14 and EN
60079-17 in Europe).
5. Repair of this equipment shall be carried out by suitably trained personnel in
accordance with the applicable code of practice (e.g. EN 60079-19 within Europe).
6. Components to be incorporated into or used as replacements in the equipment shall
be fitted by suitably trained personnel in accordance with the manufacturer’s
documentation.
7. The certification of this equipment relies upon the following materials used in its
construction:
Aluminum alloy T356 T6 (main enclosure) and A356 T6 (lid)
GE Lexan 943A polycarbonate
Two-part epoxy encapsulant
Silicon based coating
Santophrene 111-55 gasket
Polysulphide encapsulant (transducer)
Dupont Tefzel 210 (transducer)
Epoxy syntactic foam (transducer)
If the equipment is likely to come in contact with aggressive substances, then it is
the responsibility of the user to take suitable precautions that prevent it from being
adversely affected, thus ensuring that the type of protection is not compromised.
Aggressive substances: e.g. acidic liquids or gases that may attack metals, or
solvents that may affect polymeric materials
Suitable precautions: e.g. regular checks as part of routine inspections or
establishing from the material’s data sheet that it is
resistant to specific chemicals.
Page 30 ULS 200 – INSTRUCTION MANUAL 7ML19981AS01
Page 33

8. Equipment Marking: The equipment marking contains at least the following
information:
PART #:
12345670 89
SERIAL No.:
POWER: 1 8 – 30 V , 3W
RELAY CON TACTS: 5A @, 48 V , N ON – INDUCT IVE
ENCL.: TYPE 6/NEMA 6/IP67
PART #:
SERIAL No.:
POWER: 100 – 230 V ,±
RELAY CONTACTS: 5A @ 250 V , NON – INDUCTIVE
ENCL.: TYPE 6/NEMA 6/IP67
2001 / 12345 6078
1234567089
2001 / 123456078
SIRA certificate 00ATEX1205X
15%, 50–60 Hz, 12VA
SIRA certificate 00ATEX1205X
1234567089
PART #:
SERIAL No. 2001 /
POWER: 18 – 30 V , 3W
ENCL.: TYPE 6/NEMA 6/IP67
TRANSISTOR O/P: 100 mA, 48 V , NON – INDUCTIVE
123456078
SIRA certificate 00ATEX1205X
9. Special Condition for Safe Use: The apparatus must only be supplied from a circuit
containing a suitable rate fuse having a breaking capacity of at least 4000 A.
7ML19981AS01 ULS 200 – INSTRUCTION MANUAL Page 31
Page 34

Page 35

Page 36

www.siemens-milltronics.com
Siemens Milltronics Process Instruments Inc.
1954Technology Drive, P.O. Box 4225
Peterborough, ON, Canada K9J 7B1
Tel: (705) 745-2431 Fax: (705) 741-0466
Email: techpubs@siemens-milltronics.com
Siemens Milltronics Process Instruments Inc. 2003
Subject to change without prior notice
Rev. 1.2
*7ml19981AS01*
Printed in Canada
 Loading...