

Milli-Q IQ 7000 User Manual
User Manual
Milli-Q® IQ 7000

Table of contents
INTRODUCTION 1
System overview 2
QUICK START 4
Exit screensaver 4
Dispense ultrapure water 4
Dispense report 6
View & manage Alerts and Alarms 7
Navigate the screen interface 8
CONSUMABLE MENU 10
INFORMATION MENU 11
System 11
History 11
Flow schematic 12
Troubleshooting 12
Contacts 12
SETTINGS MENU 13
Manager access & password 14
System conguration 15
Q-POD conguration 16
Accessories 16
Alarm set points 17
Connectivity 18
MAINTENANCE MENU 20
Consumable installation wizards 20
Cleaning & Sanitization 22
Depressurization 22
ech2o UV lamps - mercury free 22
SELF HELP GUIDE 23
Depressurize system 23
Turn system off 23
Inaccurate volumetric dispensing 23
High TOC values 23
Low owrate 24
IPAK & other cartridges installation 24
REQUIREMENTS AND SPECIFICATIONS 26
Water specications 26
System specications 27
Dimensions and weight 28
Recycling 29
Ordering Information 30
LEGAL INFORMATION & WARRANTY 31

INTRODUCTION
Congratulations!
Thank you for buying a Milli-Q® water purication system.
Milli-Q® IQ 7000 produces ultrapure water from a puried water source. Installation of this
product should be performed by a qualied service representative with access to qualied
installation documentation.
This user manual is a guide for use during the normal operation and maintenance of a
Milli-Q IQ 7000 water purication system. It is highly recommended to fully read this manual
and comprehend its contents before handling the water purication system.
System identication
System Catalog number Voltage Frequency
Milli-Q® IQ 7000 ZIQ7000T0 100-240 V 50-60 Hz
Manufacturing site:
Millipore SAS, 67120 Molsheim, France
For more information on your Milli-Q system, please call your local representative or visit our
website www.emdmillipore.com (North America) or www.merckmillipore.com (Rest of the World).
Intended use
The Milli-Q IQ 7000 is intended to produce ultrapure water from a puried water source
primarily for use in research and quality control in a variety of laboratories worldwide.
The product is designed to produce ultrapure water with specic characteristics (refer to the
requirements and specications section) when it leaves the water purication system, provided that
it is fed with water quality within specications and properly maintained as required by the supplier.
Merck KGaA does not warrant the product for any specic application. It is up to the user to
determine if the quality of the water produced by the product matches their expectations, ts
with norms/legal requirements and to bear responsibility resulting from the usage of the water.
The product is not intended to produce: water for injection, water for dialysis, sterile water for
irrigation or injection, bacteriostatic water for injection, sterile puried water in containers, and
sterile water for injection in container or ingestion. The product is not intended to be used in
explosive environments according to ATEX Directive – equipment & protective systems intended
for use in potentially explosive atmospheres. In addition the product is not intended as a Medical
Device, including In-Vitro Devices.
1
System overview
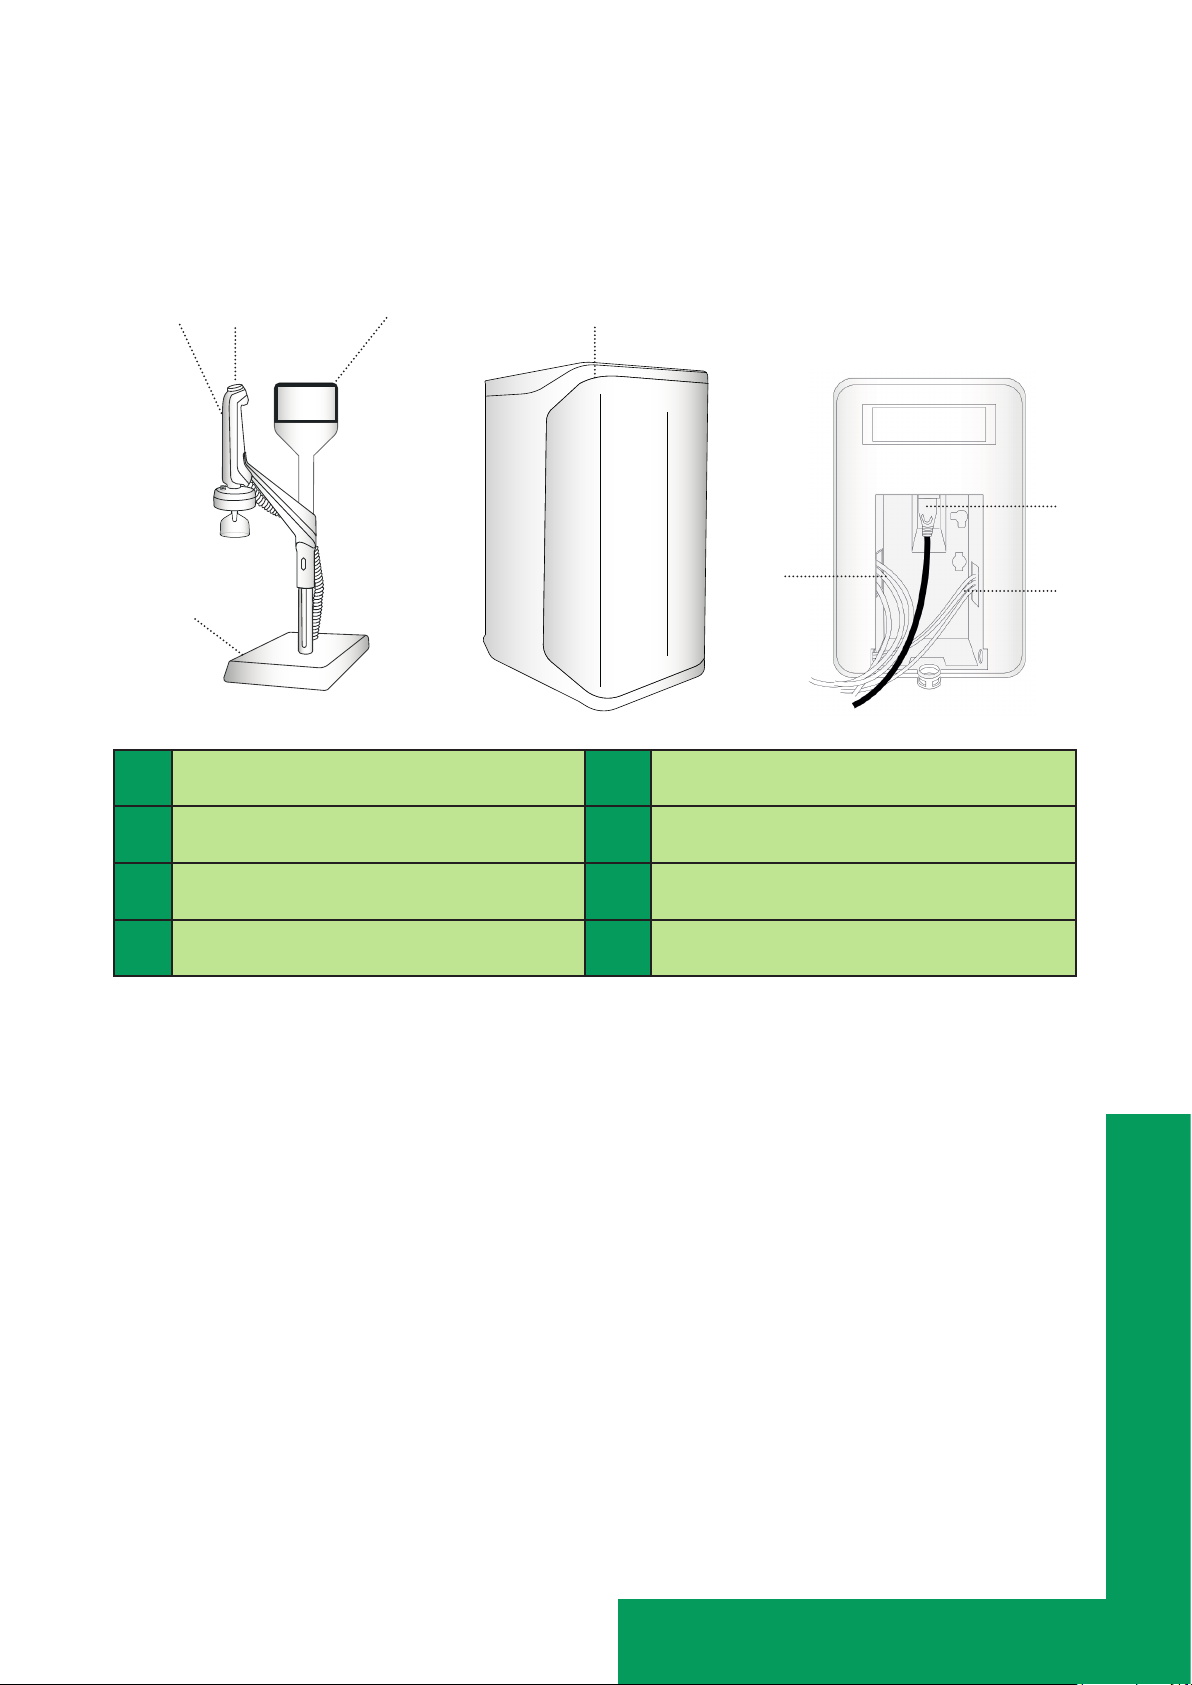
Milli-Q IQ 7000 consists of 2 main units:
Q-POD® unit (Point Of Dispense) Water purication unit
2
4
1
5
8
6
3
1 Q-POD with screen interface 5 Water purication unit
2 Q-POD dispenser 6 Hydraulic connections
3 Q-POD base 7 Electrical connections
4 Dispensing wheel 8 Main power cord
Description of the system
The Milli-Q IQ 7000 manages the production and the distribution of ultrapure water from a
puried water source. It consists of two main units:
7
• The water purication unit manages the production of ultrapure water.
• The Q-POD unit (at least 1, up to 4) integrates the screen interface and manages the
dispensing.
Puried water either from a pressurized loop or a storage tank enters the purication unit. It is
rst puried by the IPAK Meta® polishing cartridge composed of ion-exchange resins, removing
the bulk of the ions. The puried water then ows to the mercury-free ech2o™ 172 nm oxidation
lamp. Organic molecules are partially oxidized, resulting in ions. These can then be captured in
the next stage when the puried water enters the IPAK Quanta® polishing cartridge, composed of
ion-exchange resins and synthetic activated carbon. The IPAK Meta and IPAK Quanta cartridges
always need to be replaced together to ensure optimal purication down to traces. Throughout
the purication steps, quality parameters are monitored with resistivity sensors and the A10®
TOC (total oxidizable carbon) monitor. The A10 TOC Monitor uses a small lamp during its TOC
analysis mode. This is called the ech2o A10 Lamp.
Introduction
2
The Q-POD is the main interface with the user. They are congured with 2 or 5 meter connectors
to the main production unit depending on the laboratory setting. The Q-POD dispenser is
detachable from its support. The arm holding the dispenser on the mast can be moved up and
down to adapt to laboratory glassware. Its dispensing ‘wheel’ delivers water from precise dropby-drop up to fast 2 L/min ow rate. The Q-POD’s large 5” touchscreen offers a wide range of
applications for users. It also has a USB port to easily export data. At the outlet of the dispenser,
the nal purication is performed by the application-specic POD-Pak.
When not in active use, the water within the units will recirculate three minutes every hour. This
is to maintain a clean environment and avoid contamination. The system should not be turned
off as this will stop the periodic recirculation taking place.
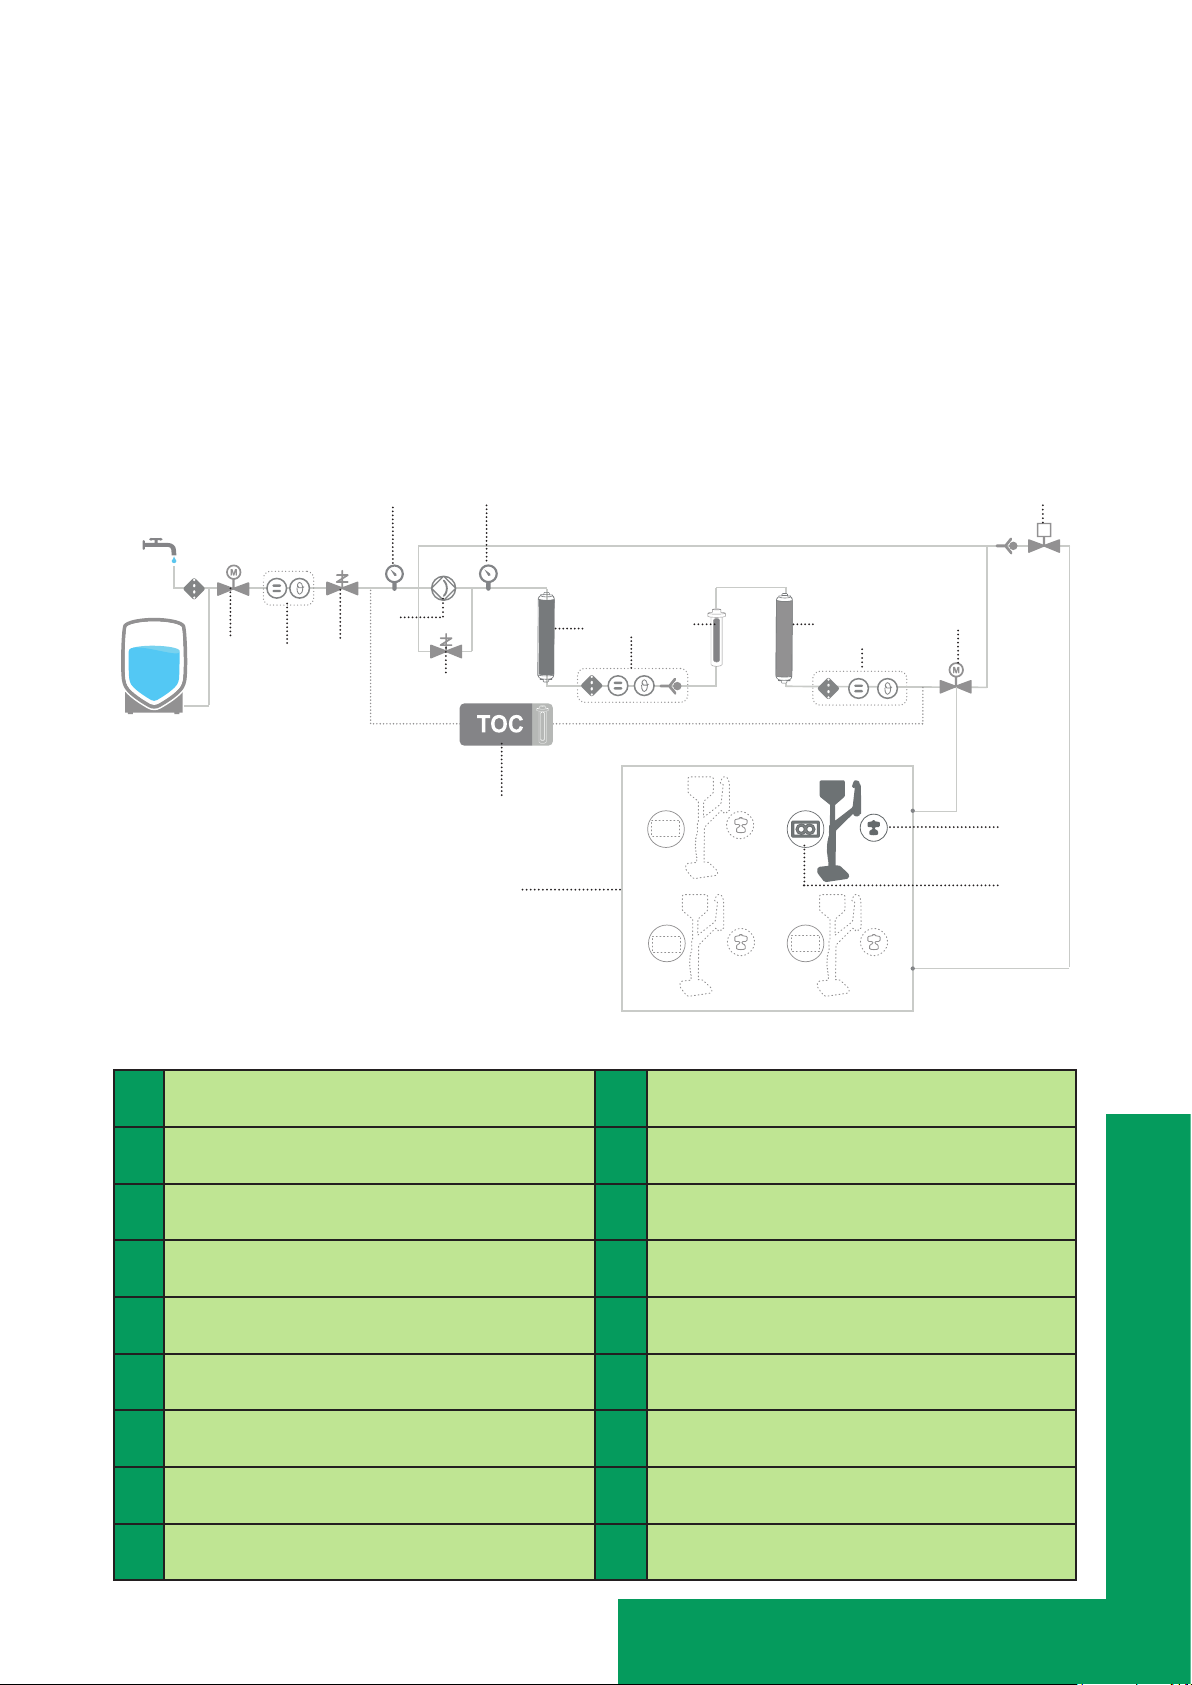
System ow schematics
The system can be fed either by a pressurized loop or a storage tank relying on gravity.
4
5
1
3
2
7
9
8
6
15
16
10
11
12
13
14
18
17
1 Inlet valve 10 Excimer UV Lamp
2 Feed conductivity cell (optional) 11 IPAK Quanta polishing cartridge
3 Pressure regulator 12 Product resistivity cell
4 Pressure sensor 13 Motorized valve
5 Pump 14 Recirculation valve
6 Pump bypass 15 A10 TOC monitor
7 Pressure sensor 16 Q-POD (1 to 4)
8 IPAK Meta polishing cartridge 17 Flowmeter
9 Intermediate resistivity cell 18 POD-Pak
Introduction
3
QUICK START
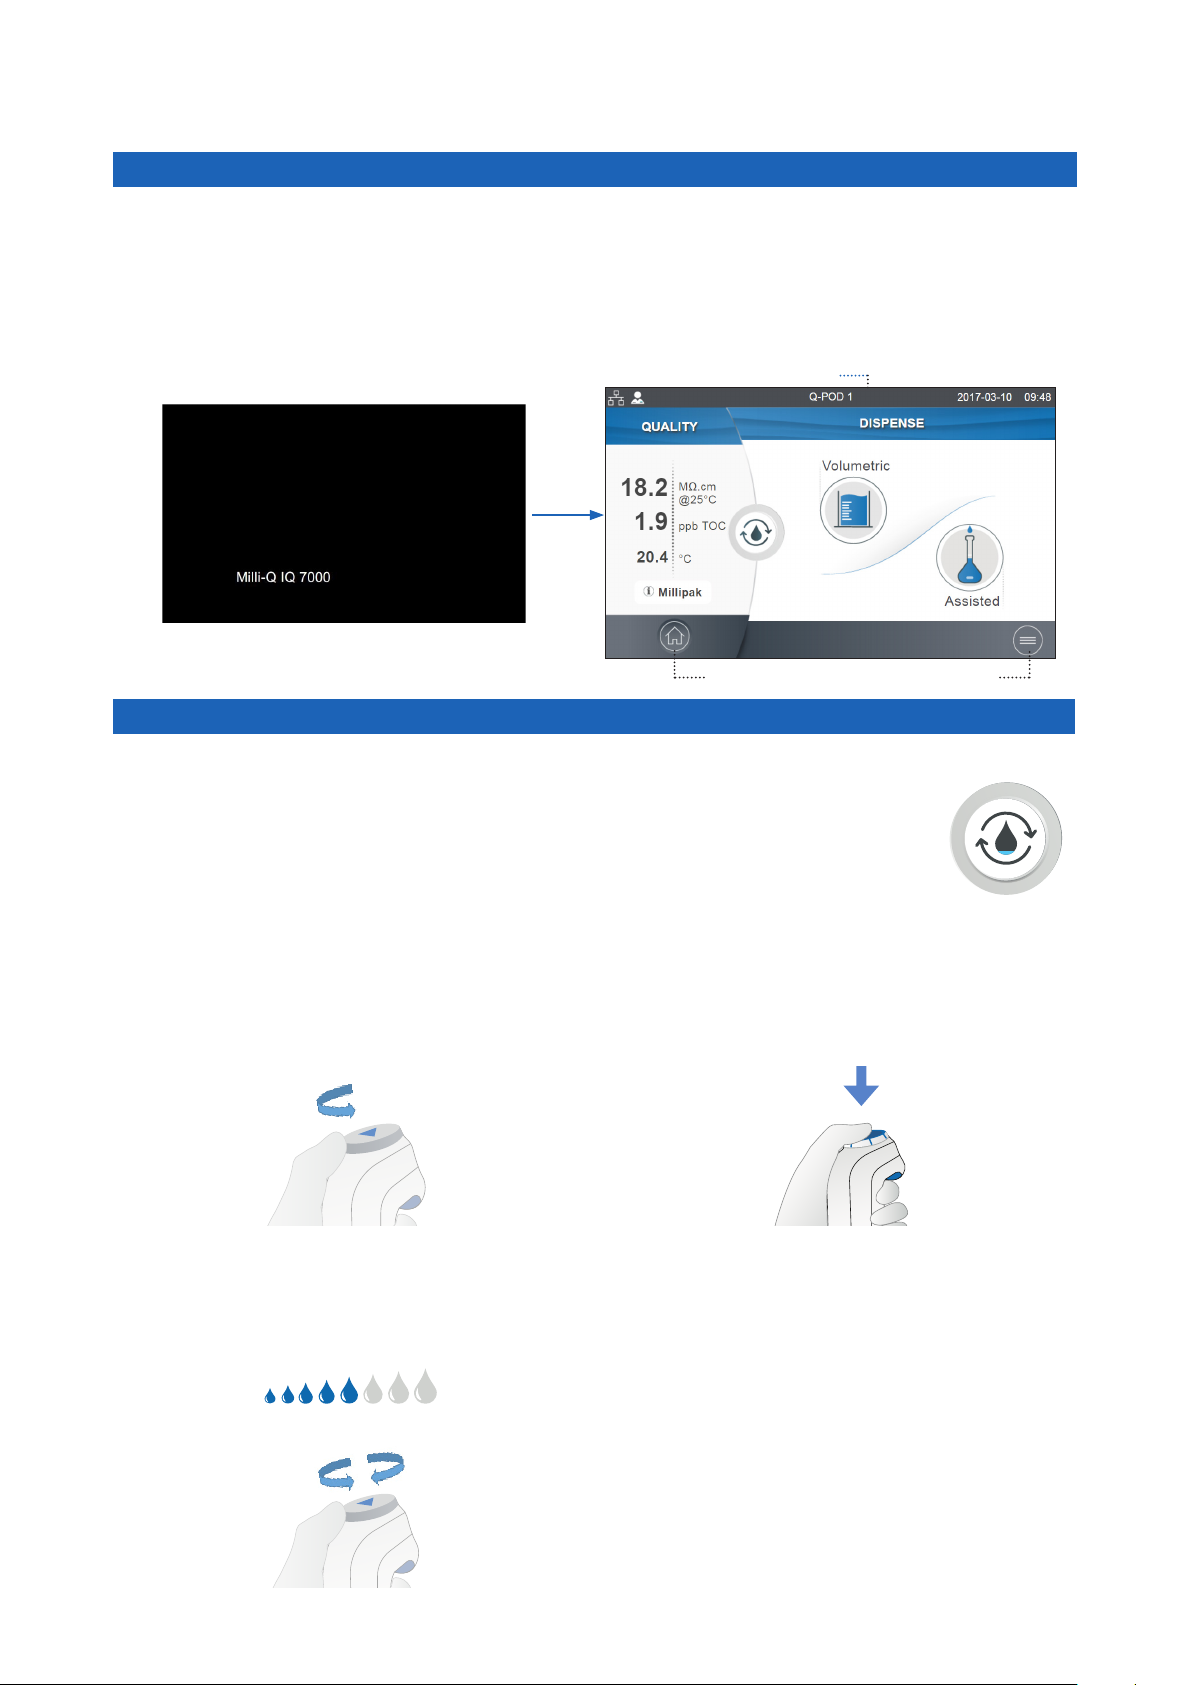
Exit screensaver
If the setting is active and there has been a certain time of user inactivity, the screensaver will
be displayed on the Q-POD touchscreen.
Screensaver
Tap anywhere on the screen or initiate a manual dispense by pressing the dispenser wheel to
exit the screensaver.
Home screen
Home Menu
Status bar
Dispense ultrapure water
It is a good practice to always recirculate water before dispensing.
To do this, press on the recirculation icon, this also refreshes the water quality
parameters:
• Product resistivity
• TOC
• Temperature
There are several options to dispense ultrapure water:
Manual Dispensing
To start dispensing in drop-by-drop, turn the
dispense wheel one notch counter-clockwise.
To start dispensing at full ow, press down on
the wheel.
+
Adjust owrate Stop
To increase the ow rate keep turning the
wheel counter-clockwise until full ow is
reached. To decrease the ow rate, turn the
wheel clockwise.
Drop-by-drop Full ow
To stop any ongoing dispensing, press down
on the wheel or rotate the wheel clockwise
until no more water ows from the dispenser.
Recirculate
+
_
4
Volumetric Dispensing (20mL to 100L)
Enables a user to auto dispense a pre-selected volume.
Note: When connected to a storage tank, always make sure there is enough water present
before dispensing. This information is always displayed in the status bar:
44/120L44/120L
1- Select unit and input volume to
dispense, press ok to validate.
The system will automatically stop once the inputted volume is reached.
Note: The system keeps in memory the last volume dispensed. To repeat a volumetric
dispense, click on the start icon or the dispenser wheel.
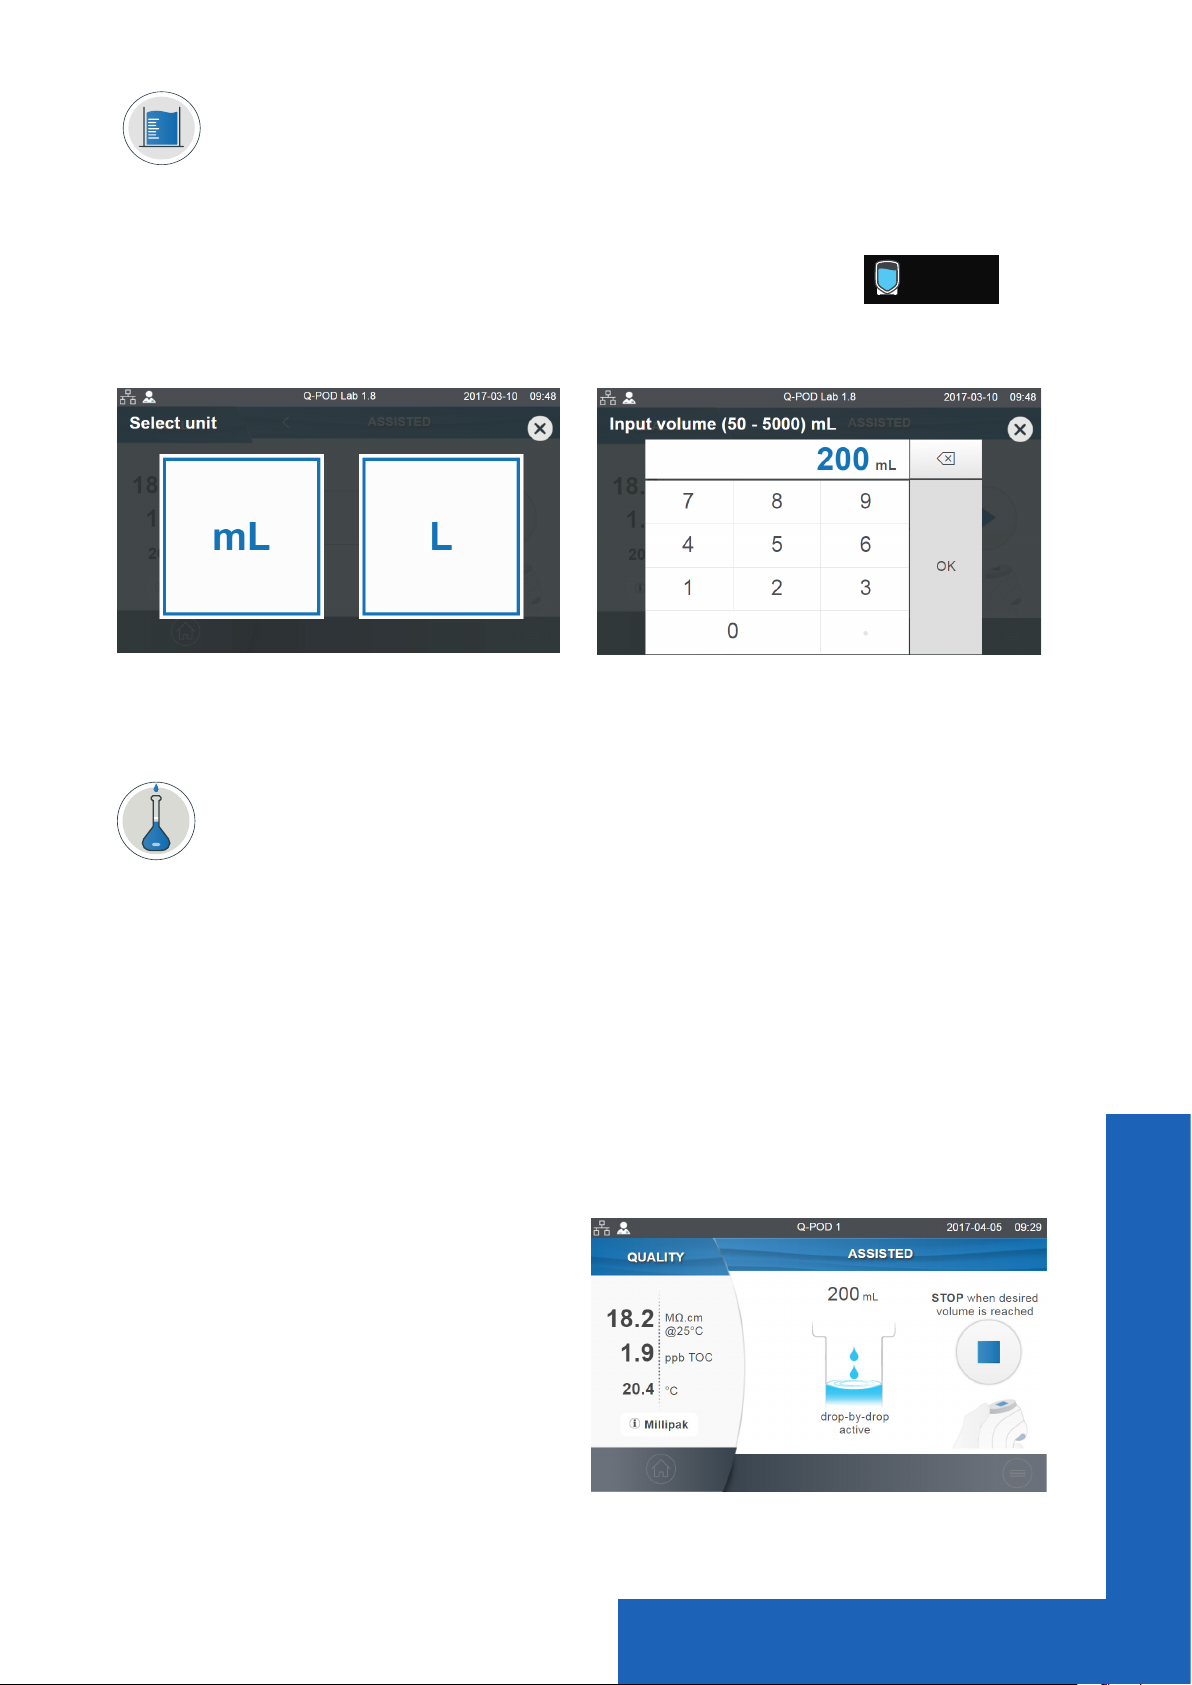
Assisted Dispensing (50mL to 5L)
Like volumetric dispensing, a pre-selected volume is auto-dispensed and the last milliliters
are distributed drop-by-drop for the user to manually stop the ow when the calibration mark
is reached. The assisted dispensing function brings more precision, avoiding the use of an
intermediary container and possible source of contamination.
1- Select unit and input volume to dispense, press ok to validate.
2- Press the start icon on the screen or the
dispenser wheel to initiate the dispense.
2- Press the start icon on the screen or the dispenser wheel to initiate the dispense.
The system dispenses in high-ow 96% of the required volume and automatically switches
to drop-by-drop to enable a user to manually and precisely reach the calibration mark of a
volumetric ask.
3- User must manually stop the drop-by-
drop dispensing.
Important! The dispensing must be stopped by the user by either pressing on the dispenser
wheel or the stop dispense icon on the touchscreen.
Quick start
5
Note: When multiple Q-PODs are installed and dispensing is taking place on a Q-POD, the
Dispense
report
other Q-PODs will display the following information:
Species the Q-POD on which the dispensing
is taking place.
Dispensing ongoing
Q-POD 1
During this time, only the Information menu is accessible. Dispensing functions will become
available again as soon as the dispensing operation is nished on the initial Q-POD.
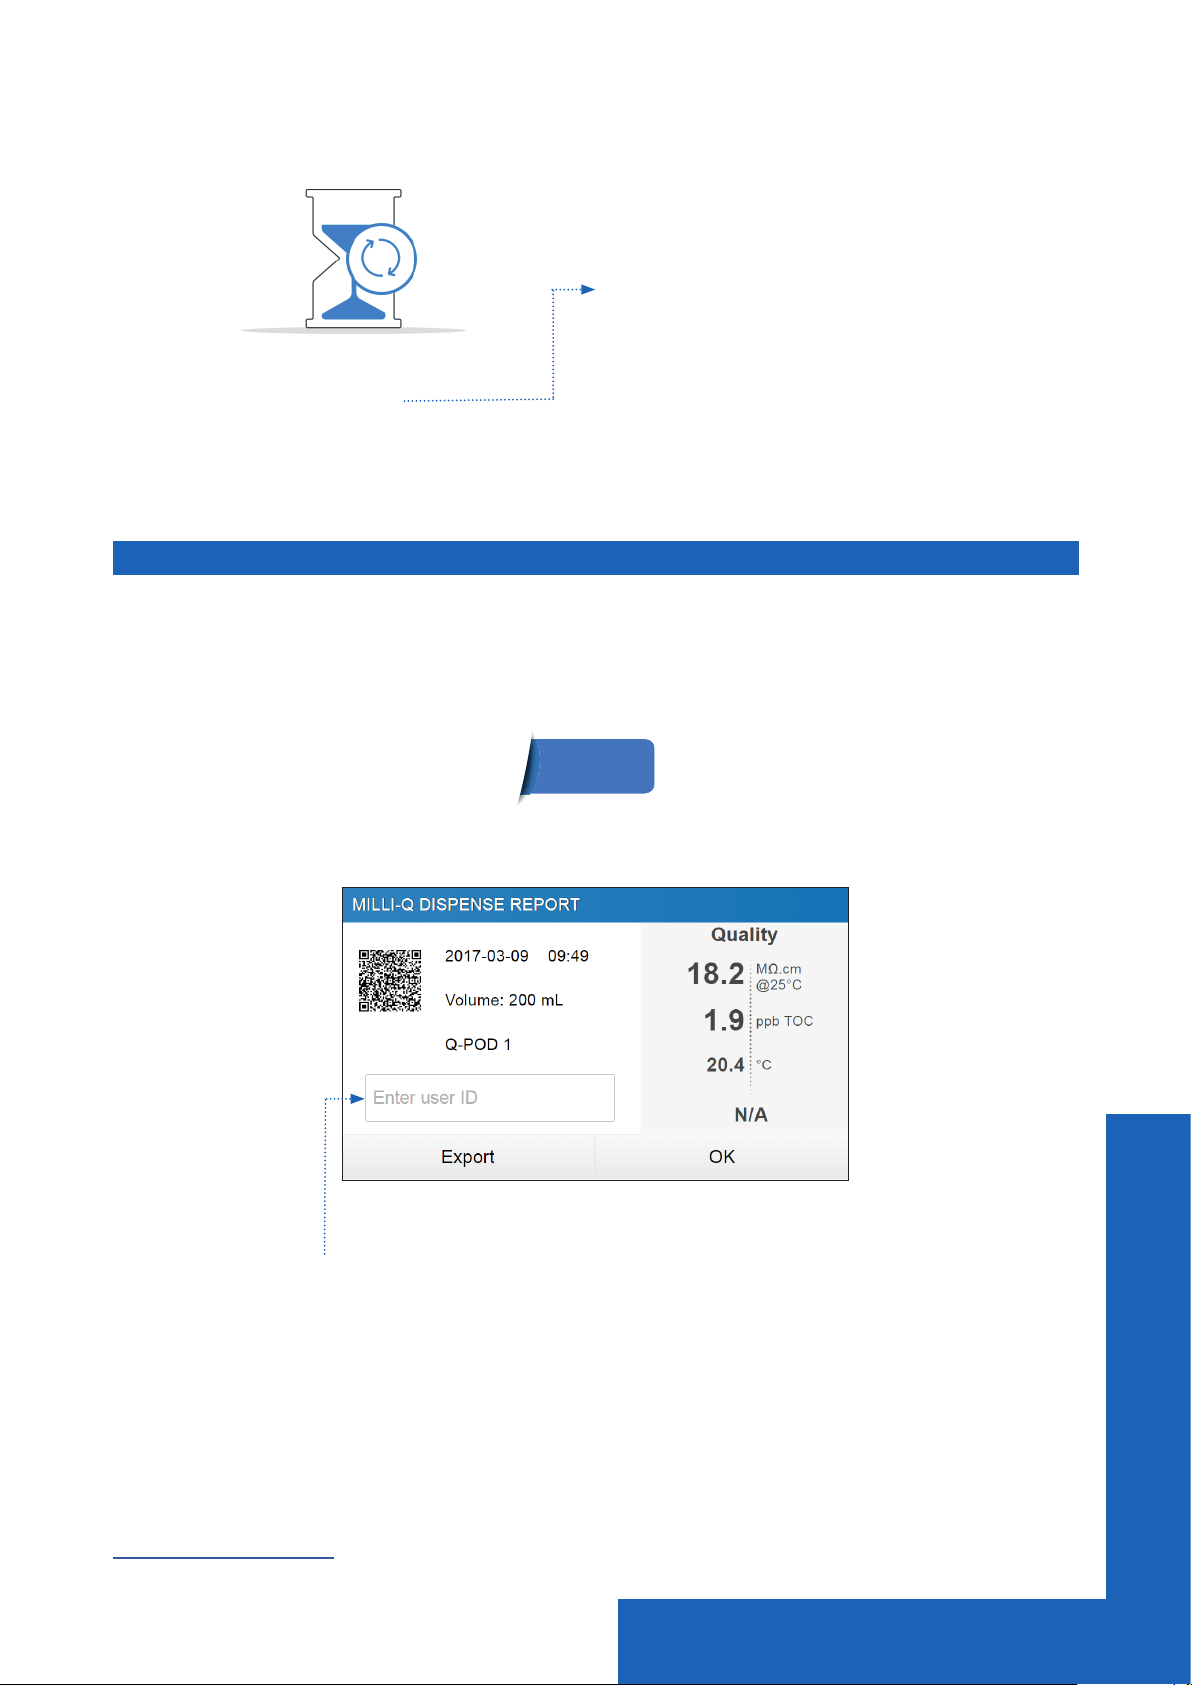
Dispense report
A dispense report is automatically produced after each dispensing operation. A dispensing
operation is considered to be all dispenses with less than 10 second intervals between them. This
can be interrupted at any time by pressing on the dispense report icon that becomes available
on the home screen as soon as a dispense is initiated.
1. Visualize
Click on the dispense report icon:
2. Personalize (assign a name or experiment number)
In the user ID eld, enter the content of your choice (max 15 characters)
3. Export
- Scan the QR code from a mobile device to instantly retrieve the report.
- Click on the export button to save the report on a USB key.
4. Automatic archiving
The dispense report icon on the home screen will automatically disappear after 5 mins of inactivity.
Each dispense report, whether consulted or not, is automatically archived and can be retrieved
anytime by going in the history report section available in the information menu. Go to page 11
Information > History for further information.
Quick start
6
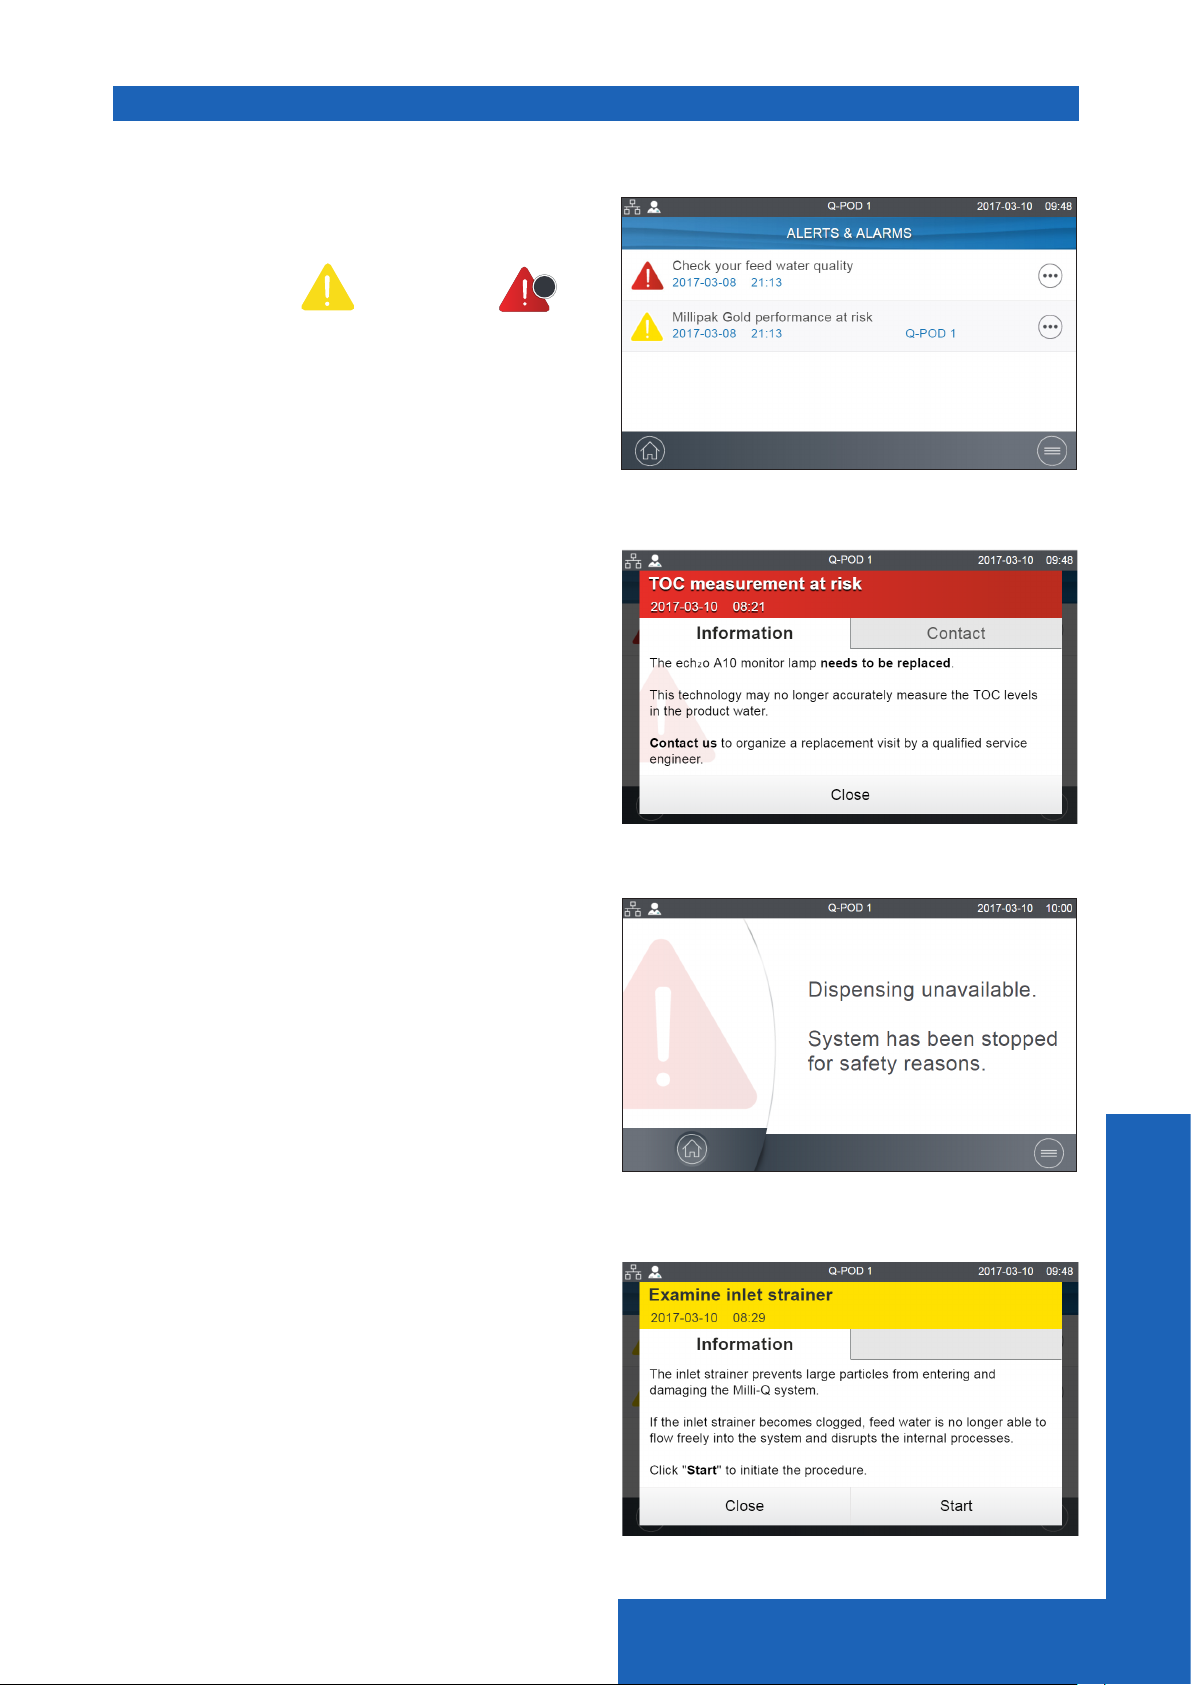
View & manage Alerts and Alarms
Alerts give you advanced warning when maintenance is required and Alarms notify you when
the system has encountered a technical issue.
Press on the alert or the alarm
present in the bottom bar to display the alert(s)
or/and alarm(s) which are active.
Note: The notication number indicates how many active alarms are present. When there are
no active alerts or alarms, the icon disappears.
Select a specic alert or alarm to get further
information and better understand the root cause.
Advice is provided in the information section to
help the user troubleshoot.
If the issue is not resolved, select the Contact
tab to nd the technical support hotline number
for further assistance.
To protect the system and user applications,
alarms of a serious nature will automatically stop
the system from dispensing water.
Note: These are displayed on the screensaver to
alert the user when the system is not in active
use.
Alerts provide advanced warning of any
maintenance actions that will be required. These
can be “closed” to be reminded again in 24h or
can be “cleared” permanently.
An Order tab will be present containing ordering
information when applicable.
1
icon
Quick start
7
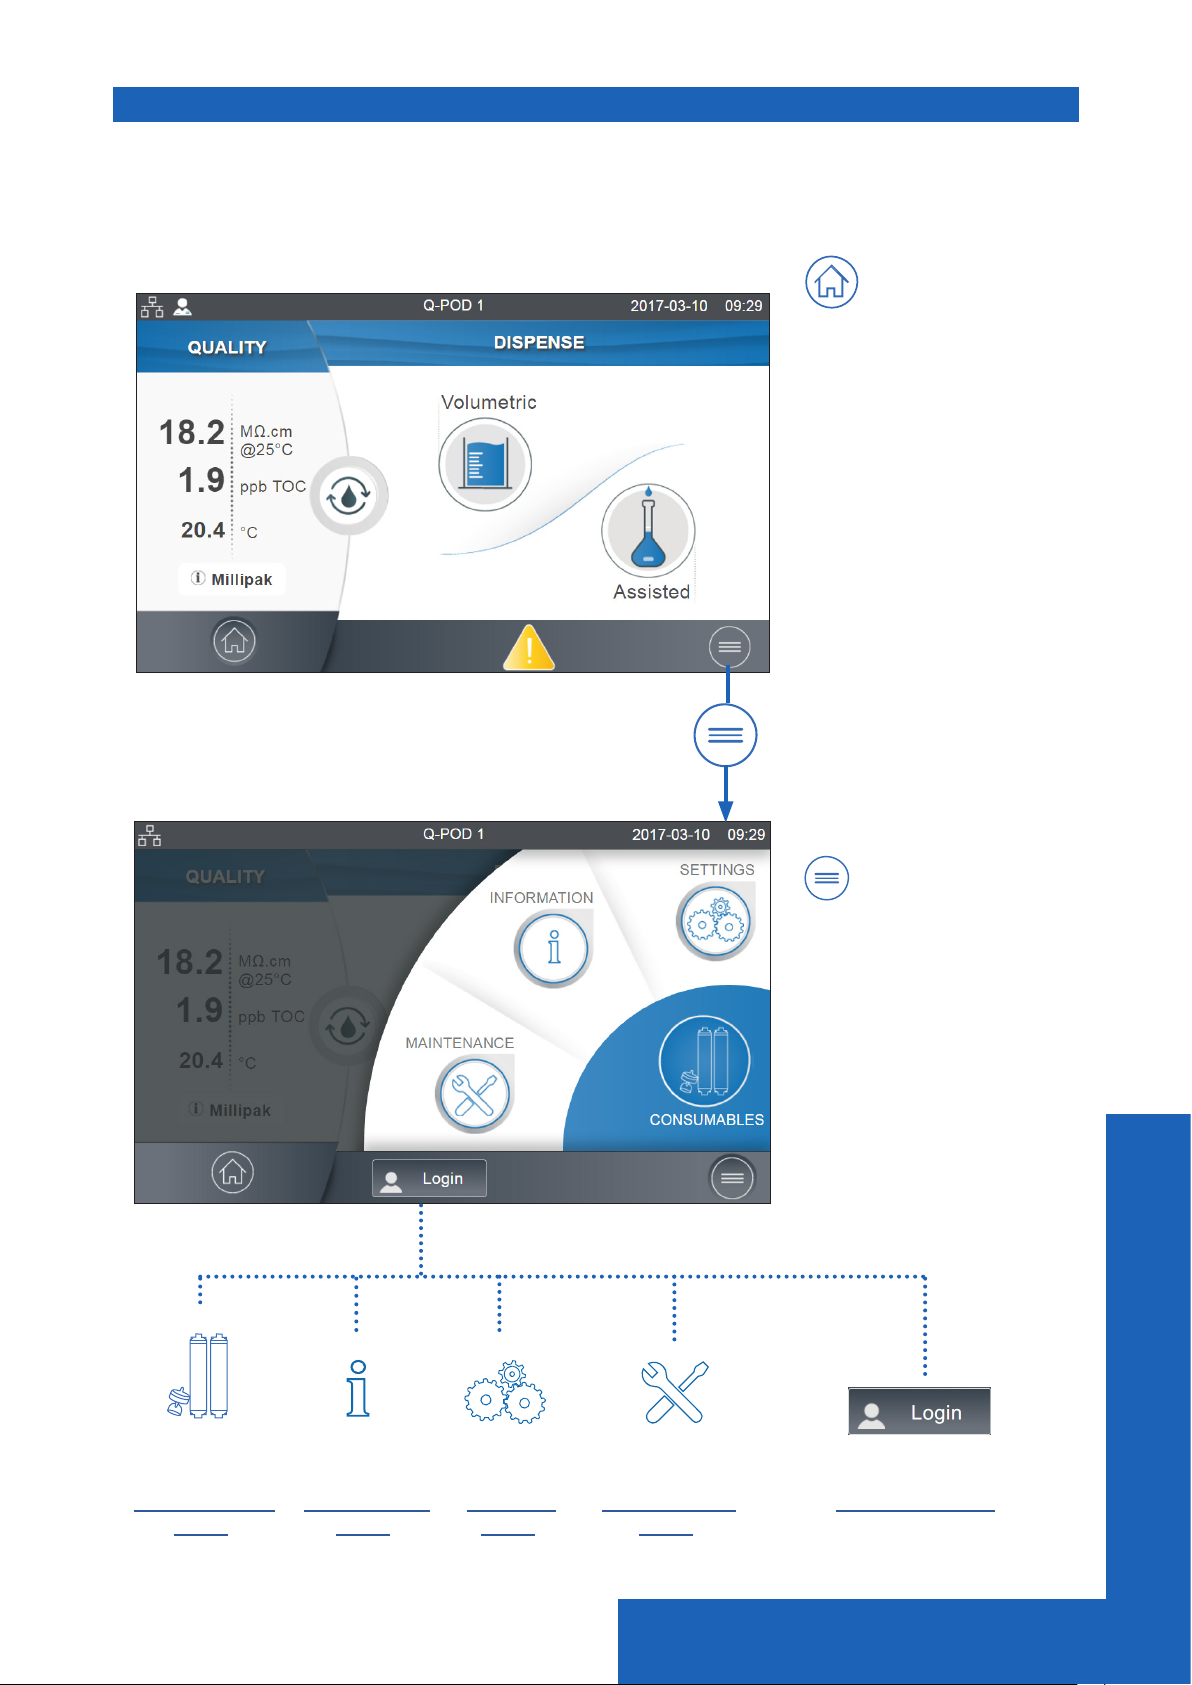
Navigate the screen interface
Each Q-POD has a 5” touchscreen that allows a user to control and monitor the water system.
All sub-menus and applications can easily be reached in a few clicks or swipes, as on a smart-
phone.
HOME SCREEN
Home
- Water quality
information
- Dispensing functions
- Alerts & Alarms
(when applicable)
- Dispense report
(when applicable)
MAIN MENUS
Menu
- Consumables
- Information
- Settings
- Maintenance
- Login
Go to
Consumables
Menu
Go to
Information
Menu
Go to
Settings
Menu
Go to
Maintenance
Menu
Quick start
Go to
Manager access
8
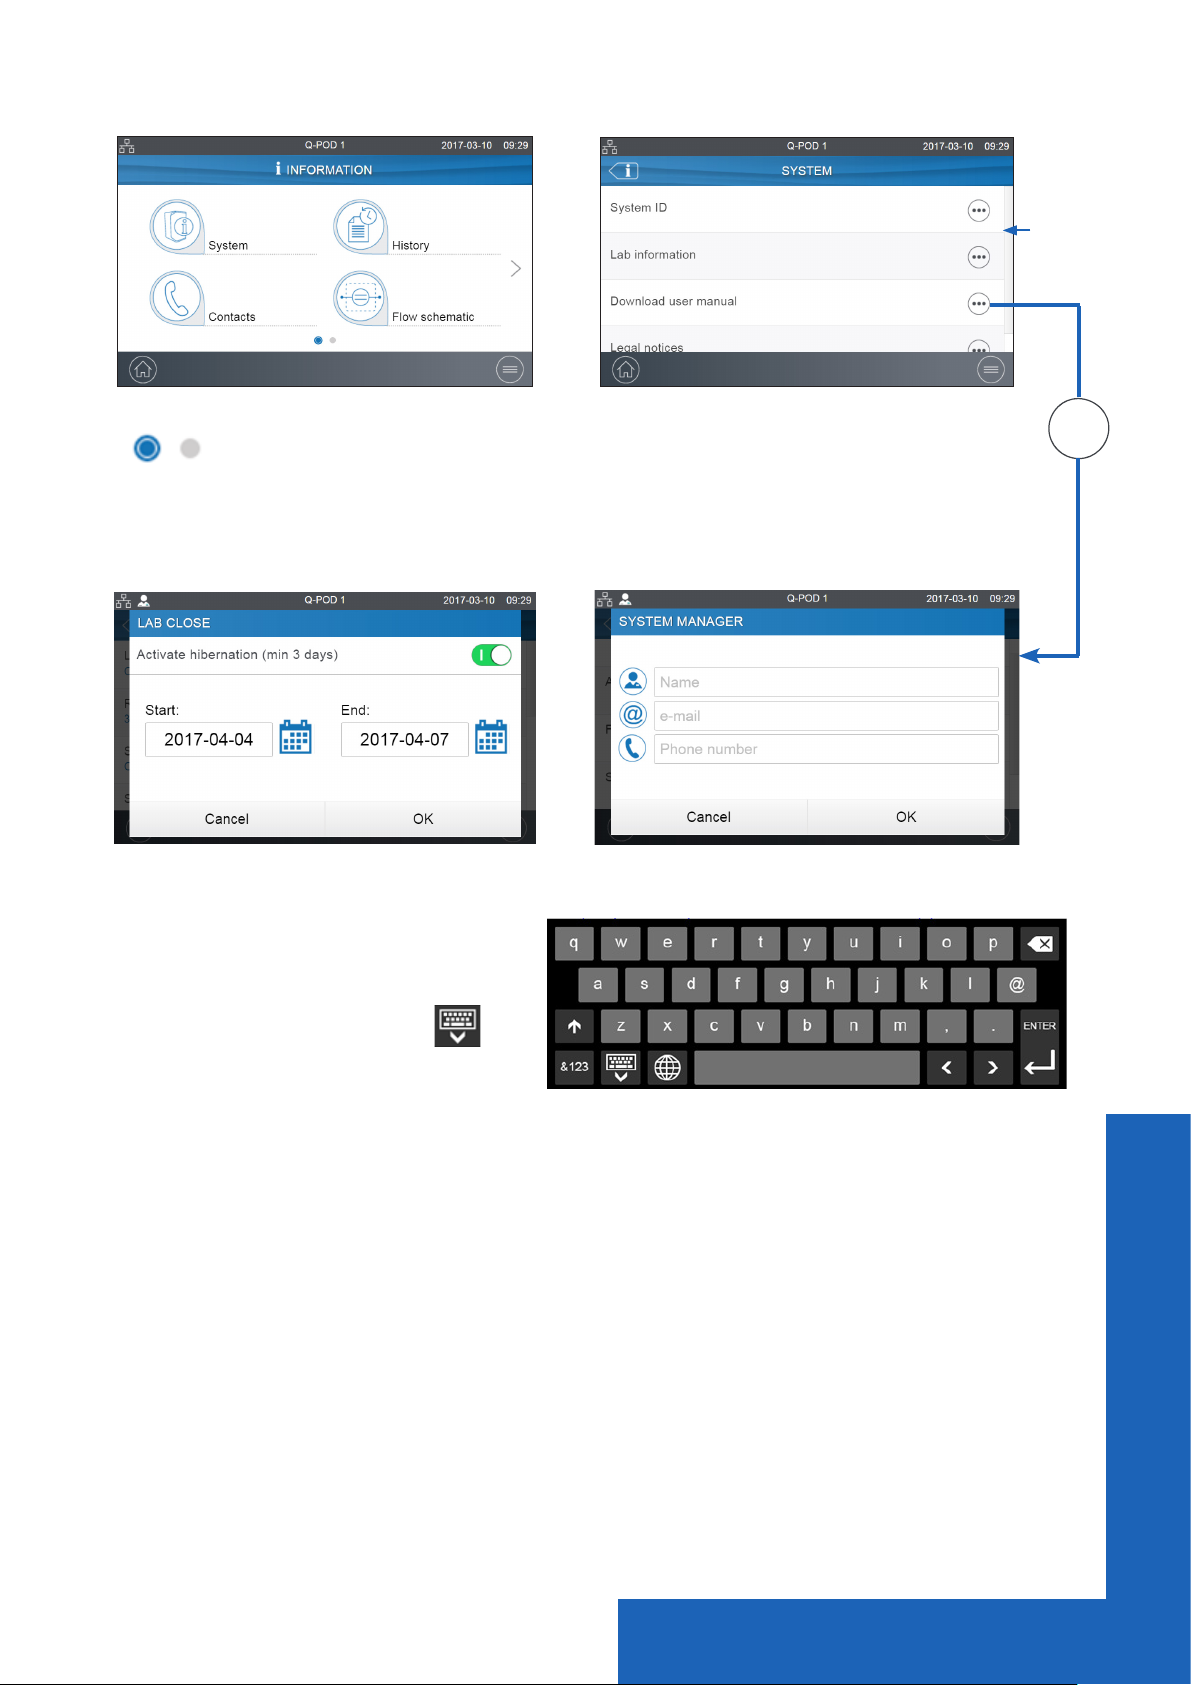
Apps
•••
Indicates how many screens are present and where you are.
Swipe left & right anywhere on screen to switch between screens.
Pops-up
When there
are multiple
lines, a
scroll bar is
present to
swipe up &
down
When you click in a zone of text, the
keypad will automatically appear.
To remove the keypad click on or
on any zone outside the keypad.
Note: When in a menu or app level screen, 1 minute of inactivity generates a timeout back
to the home screen.
When in a pop-up level screen, there is no timeout, therefore the user remains on this screen
until the pop-up is manually closed.
Important! If multiple Q-PODs are installed and a pop-up in the settings or maintenance
menus is not closed, dispensing will remain unavailable on all Q-PODs until the pop-up is
manually closed.
Quick start
9
 Loading...