

Page 1

F3
Spectroquant
®
Multy
Operating manual
en
Page 2

4
Table of contents
1 Getting started . . . . . . . . . . . . . . . . . . . . . . . . . . . . . . . .7
1.1 Package contents . . . . . . . . . . . . . . . . . . . . . . . . . . . . . . . . . . . . . . . . .7
1.2 Inserting the rechargeable batteries/lithium powerpack. . . . . . . . .8
1.2.1 Lithium powerpack – Important information . . . . . . . . . . . . . .9
1.2.2 Charging the battery pack . . . . . . . . . . . . . . . . . . . . . . . . . . . . .9
1.2.3 Using non-rechargeable batteries . . . . . . . . . . . . . . . . . . . . . .10
1.2.4 Using the protective caps . . . . . . . . . . . . . . . . . . . . . . . . . . . . .10
1.3 Overview of the key functions . . . . . . . . . . . . . . . . . . . . . . . . . . . . .11
1.4 Starting the colorimeter the first time . . . . . . . . . . . . . . . . . . . . . .12
1.5 Overview of the mode menu. . . . . . . . . . . . . . . . . . . . . . . . . . . . . . .12
1.6 Setting the language . . . . . . . . . . . . . . . . . . . . . . . . . . . . . . . . . . . . .14
1.7 Deleting data . . . . . . . . . . . . . . . . . . . . . . . . . . . . . . . . . . . . . . . . . . . .14
1.8 Setting the date and time . . . . . . . . . . . . . . . . . . . . . . . . . . . . . . . . .15
1.9 Time and date display . . . . . . . . . . . . . . . . . . . . . . . . . . . . . . . . . . . .15
1.10 Automatic switch-off. . . . . . . . . . . . . . . . . . . . . . . . . . . . . . . . . . . . .15
2 Operating mode. . . . . . . . . . . . . . . . . . . . . . . . . . . . . .16
2.1 Selecting the method . . . . . . . . . . . . . . . . . . . . . . . . . . . . . . . . . . . . .16
2.2 Measuring with test kits . . . . . . . . . . . . . . . . . . . . . . . . . . . . . . . . . .17
2.3 Differentiation. . . . . . . . . . . . . . . . . . . . . . . . . . . . . . . . . . . . . . . . . . .21
2.4 Altering the citation form. . . . . . . . . . . . . . . . . . . . . . . . . . . . . . . . .22
2.5 Measuring absorbances . . . . . . . . . . . . . . . . . . . . . . . . . . . . . . . . . . .23
2.6 User countdown (timer function). . . . . . . . . . . . . . . . . . . . . . . . . . .24
2.7 Saving measurement results . . . . . . . . . . . . . . . . . . . . . . . . . . . . . . .25
2.8 Retrieving saved measurement results. . . . . . . . . . . . . . . . . . . . . . .26
2.8.1 Retrieving all saved measurement results . . . . . . . . . . . . . . . .26
2.8.2 Retrieving saved measurement results
from a defined date range . . . . . . . . . . . . . . . . . . . . . . . . . . . .27
2.8.3 Retrieving saved measurement results
from a defined code-No. range . . . . . . . . . . . . . . . . . . . . . . . .28
2.8.4 Retrieving saved measurement results
from a defined method . . . . . . . . . . . . . . . . . . . . . . . . . . . . . . .30
2.9 Deleting saved measurement results . . . . . . . . . . . . . . . . . . . . 31
en
Page 3

en
5
3 Other functions. . . . . . . . . . . . . . . . . . . . . . . . . . . . . . .32
3.1 User-specific method list. . . . . . . . . . . . . . . . . . . . . . . . . . . . . . . . . .32
3.1.1 Processing the user-specific method list . . . . . . . . . . . . . . . . .32
3.1.2 User-specific method list: Activate all methods. . . . . . . . . . .34
3.1.3 User-specific method list: Deactivate all methods. . . . . . . . .34
3.2 Profi mode . . . . . . . . . . . . . . . . . . . . . . . . . . . . . . . . . . . . . . . . . . . . . .35
3.3 Acoustic signals. . . . . . . . . . . . . . . . . . . . . . . . . . . . . . . . . . . . . . . . . .36
3.3.1 Activating/deactivating the key beep . . . . . . . . . . . . . . . . . . .36
3.3.2 Activating/deactivating the signal beep . . . . . . . . . . . . . . . . .36
3.3.3 Activating/deactivating the countdown function
(observance of reaction times) . . . . . . . . . . . . . . . . . . . . . . . . .37
3.4 Setting the display contrast . . . . . . . . . . . . . . . . . . . . . . . . . . . . . . .38
3.5 System info . . . . . . . . . . . . . . . . . . . . . . . . . . . . . . . . . . . . . . . . . . . . .38
4 Trouble-shooting . . . . . . . . . . . . . . . . . . . . . . . . . . . .39
4.1 User messages on the display / Error messages . . . . . . . . . . . . . . .39
4.2 Other potential sources of error. . . . . . . . . . . . . . . . . . . . . . . . . . . .42
4.3 Avoiding errors in photometric measurements . . . . . . . . . . . . . . .43
Important Information . . . . . . . . . . . . . . . . . . . . . . . . . . . . . . . . . . . . . . . . .44
Declaration of CE-Confirmity . . . . . . . . . . . . . . . . . . . . . . . . . . . . . . . . . . .45
Page 4

5 Contents of CD-ROM see enclosed CD
5.1 Overview of preprogrammed methods and analytical procedures
5.2 Standard solutions
5.2.1 Use of Spectroquant® CombiCheck and ready-to-use
standard solutions
5.2.2 Preparation of standard solutions
5.3 Printing measurement results
5.3.1 Setting the print parameters
5.3.2 Printing all measurement results
5.3.3 Printing measurement results from a defined date range
5.3.4 Printing measurement results from a defined code-No. range
5.3.5 Printing measurement results from a defined method
5.4 Transferring data to a PC
5.5 Software update via the internet
5.6 User methods
5.6.1 User concentration method
5.6.2 User polynomials
5.6.3 Deleting a user method
5.6.4 Printing data for a user method
5.6.5 Initializing the user-method system
5.7 User-specific calibration
5.7.1 Saving the user-specific calibration
5.7.2 Deleting the user-specific calibration
5.8 Calculating the Langelier saturation index
5.9 Technical specifications
en
6
Page 5
7
Getting started
h
c
i
k
f
b
g
d
e
a
en
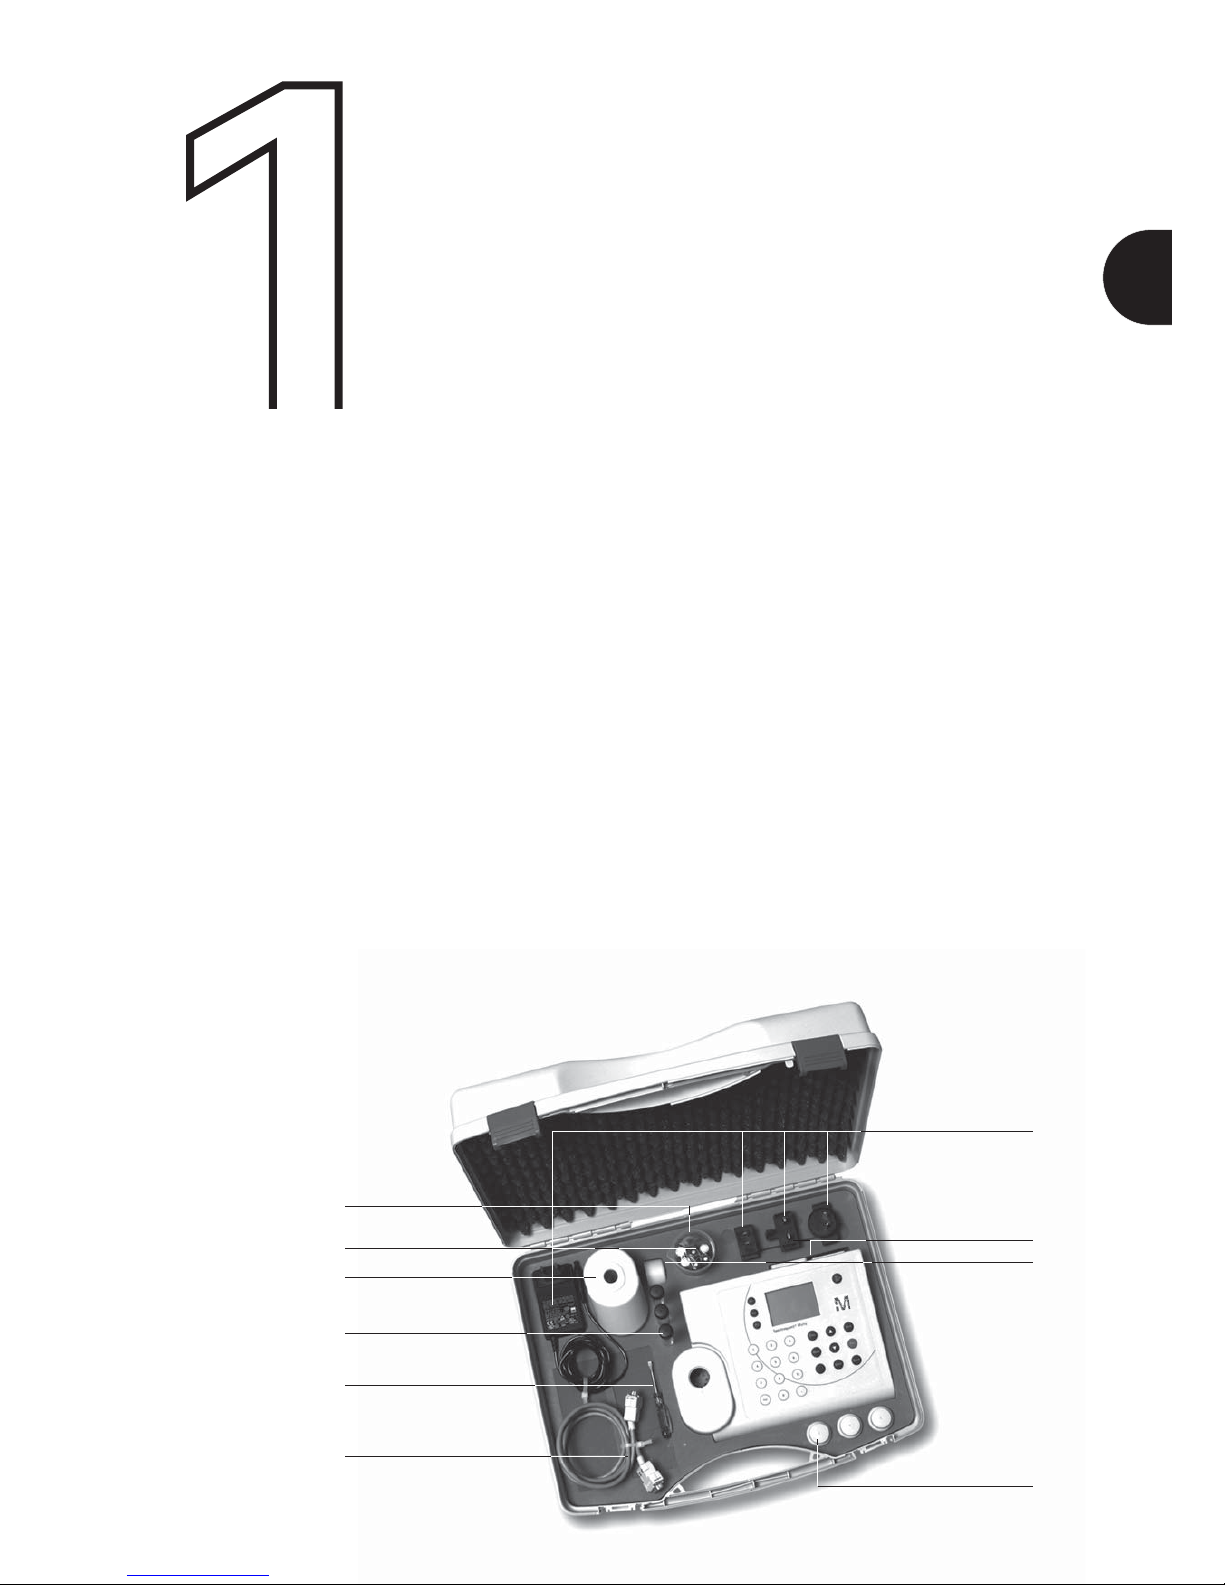
1.1 Package contents
The standard contents of the Spectroquant® Multy Colorimeter
package comprise the following items:
1 colorimeter in a plastic carrying case
1 beaker (plastic) 100 ml (a)
1
set of rechargeable batteries (7 nickel-cadmium batteries; type AA) (b
)
1
adapter for 16-mm ø round cells (c
)
3
round cells with lids, ø 16 mm (d
)
1 screwdriver (e)
1
cable for connection with a PC or printer (f
)
1
mains adapter, 100 - 240 V, 50 - 60 Hz
with 4 wall-socket adapters (EU, UK, USA, AUS) (g
)
2
protective caps for connection terminals on the back (h)
1
lid for adapter (i
)
1 lithium battery (CR 2032; 3V)
3 round cells with lids, ø 24 mm (k
)
1 operating-instructions
manual
1 certificate of compliance
Page 6
8
1.2 Inserting the rechargeable
batteries/lithium powerpack
Before operating the system for the first time, the rechargeable
batteries and the lithium powerpack included in the package
must be installed.
The batteries enclosed in the package are not charged.
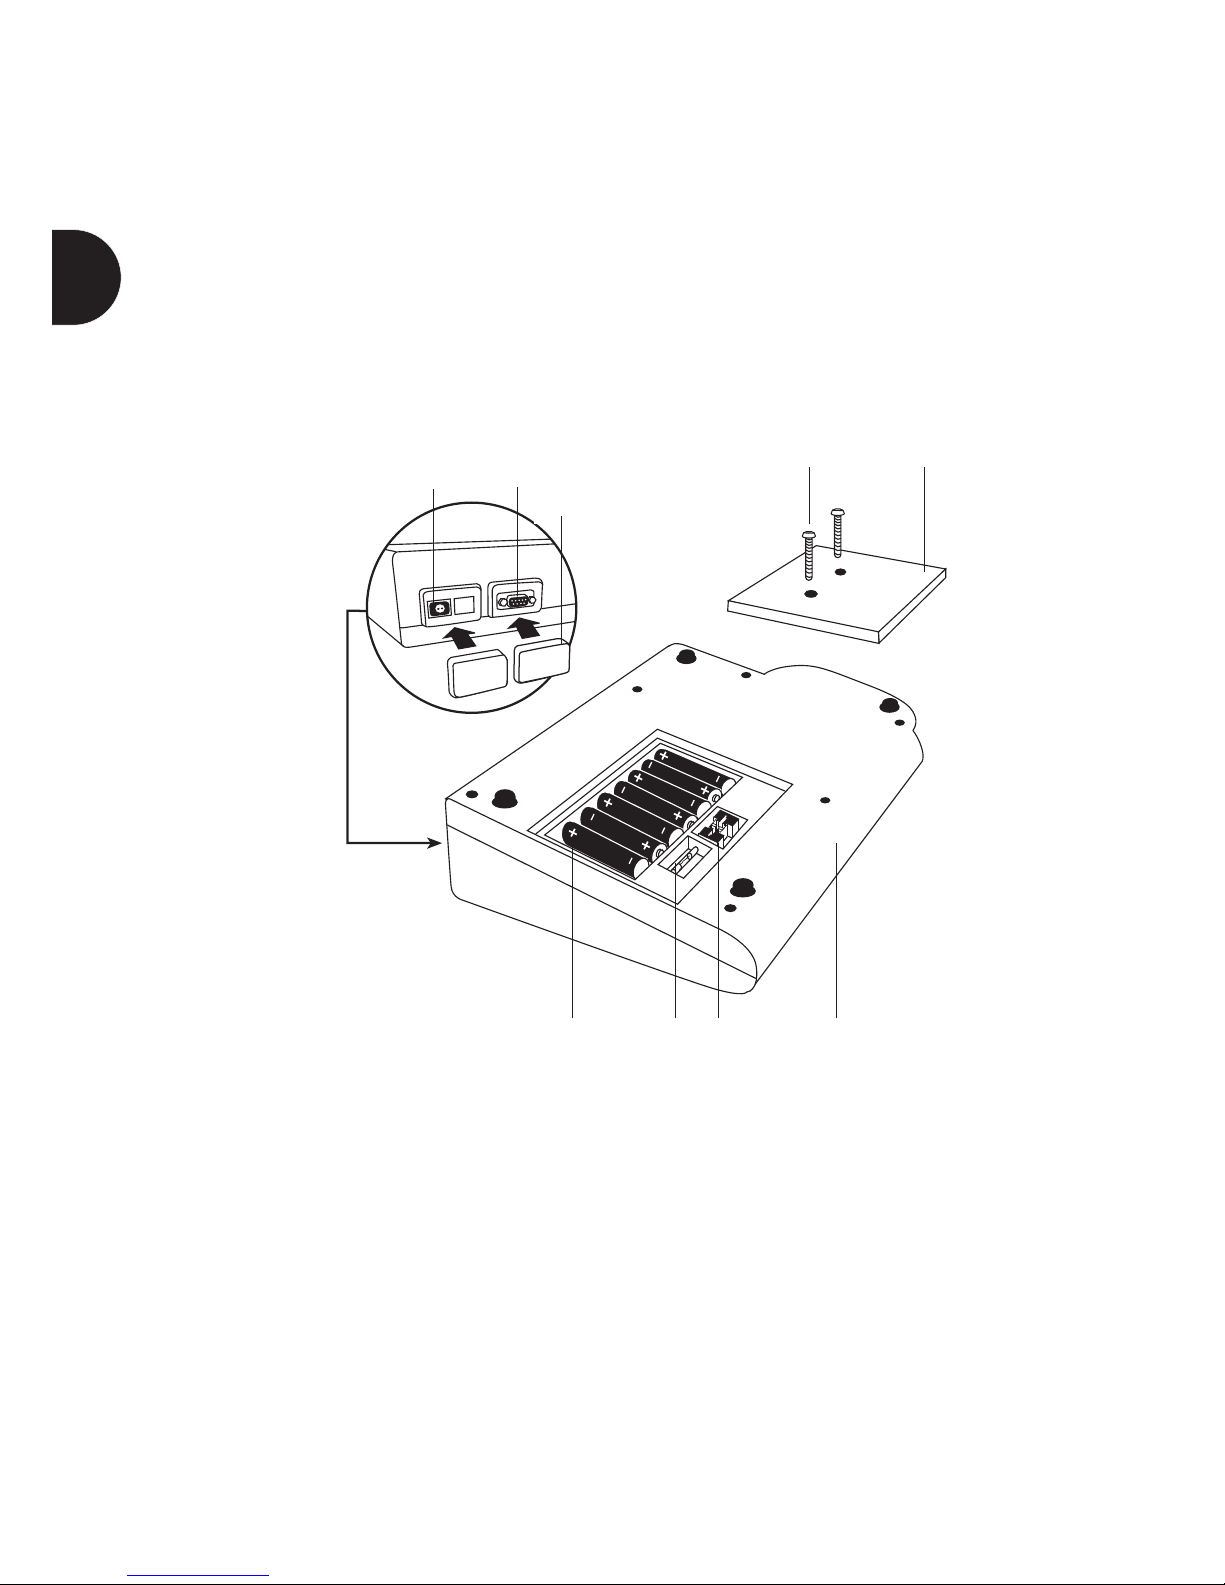
A Battery pack: 7 nickel-cadmium batteries (type AA, 750 mAh)
B Battery: lithium battery (type CR 2032, 3V)
C Fuse: 1 A, delayed-action, 20 mm
1. Ensure that the Spectroquant® Multy Colorimeter is switched off.
2. Remove, where applicable, the cell from the measurement
compartment.
3. Place the unit on its front on a clean, flat surface.
4. Remove the two screws (E) on the battery-compartment cover
(F) on the bottom of the unit.
5.
Remove the batteries cover (F).
6. Remove any old batteries (A
) and/or the lithium powerpack (B).
7. Insert 7 new rechargeable batteries and/or the lithium
powerpack
.
Make sure that the batteries are inserted correctly!
8.
Attach the battery-compartment cover.
9. Replace the screws and tighten with moderate pressure.
Mains
connector
D Serial interface
(printer, PC)
Protective cap
E Screws
A Battery pack C Fuse B Battery Back of unit
F Battery-compartment cover
Dispose of used batteries and/or
the lithium powerpack in accordance
with the local regulations.
en
Page 7

9
1.2.1 Lithium powerpack –
Important information
The lithium powerpack (B) serves to save all important data
(saved measurement results, settings) for approx. ½ year when
the unit is not being supplied with power by the battery pack
or the mains supply.
As long as the colorimeter is being supplied with mains or
battery power, it does not draw any power from the lithium
powerpack. Since lithium powerpacks have a very long life,
it will in all probability not be necessary to exchange the
one supplied. All the same, to ensure proper functioning it is
recom mended to replace the lithium powerpack every five years.
Note
When neither the mains adapter nor the battery pack are
supplying power, removal of the lithium powerpack will result
in a complete loss of data (saved measurement results and
settings). For this reason we strongly recommend that the unit
is connected to the mains power supply while replacing the
lithium powerpack.
1.2.2 Charging the battery pack
The rechargeable batteries (A) remain in place in the photo m eter for recharging. Once the mains power supply is established,
the batteries start to be charged.
Charge the rechargeable batteries in the instrument for 5 days
(working with power from mains is possible). Now use the
instrument without mains until the first battery warning comes
up. Charge again, 4 days this time. Repeat usage to battery
warning and charging four times.
Approximately 10 charging/discharging cycles are required until
the batteries reach their full capacity.
The unit can be operated with mains power supply with or
without the batteries in place. For this you must attach the
country-specific wall-socket adapter to the mains adapter.
en
Page 8

10
1.2.3 Using non-rechargeable batteries
In principle it is also possible to operate the unit using conventional batteries – in this case, however, they must never be
used in combination with the mains adapter. The charging
process would start automatically as soon as the colorimeter is
connected to the mains power supply. Conventional batteries
are destroyed by the charging current, resulting in severe damage to the unit. This also involves the risk of fire and explosion.
1.2.4 Using the protective caps
To protect the connection terminals on the unit from damage
(e.g. corrosion) due to environmental influences such as e.g.
dust or water splashes, the supplied protective caps should be
attached over the connection points (D) when these are not
being used.
en
Page 9
en
11
1.3 Overview of the key functions
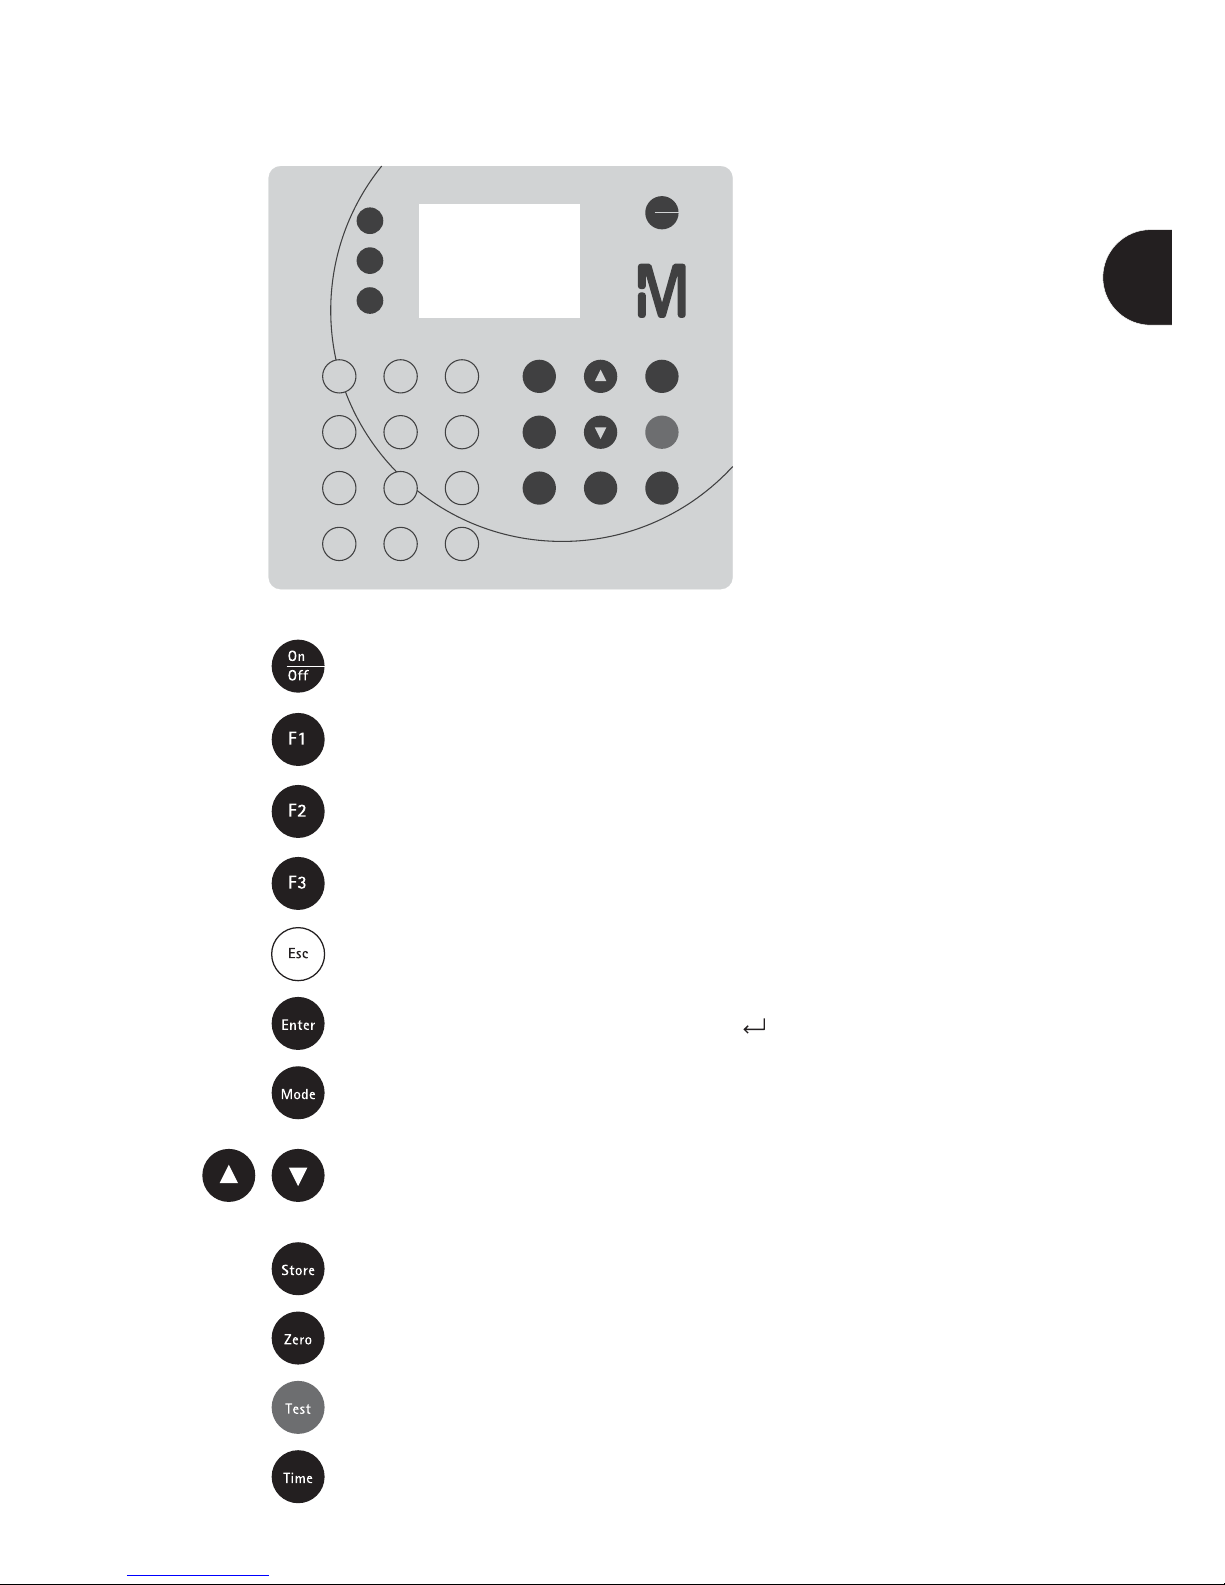
Switching the unit on and off
Function key: Function explained at the corresponding place in the text
Function key: Function explained at the corresponding place in the text
Function key: Function explained at the corresponding place in the text
Back to method selection / to parent menu
Confirmation of selections (visible on the display as the “ ” symbol)
Menu for settings and other functions
Moves cursor (visible on the display as the “>>” symbol) up or down
Save a displayed result
Zero-calibration function
Run a measurement
Display of date and time / user countdown
On
O
F1
F2
F3
tseTedoM
Store
Zero
654
321
987
,0
Spectroquant® Multy
Enter
Esc
Time
Page 10
12
1.5 Overview of the mode menu
Mode No. Mode function Brief description Section
10 Language Setting the language 1.6
11 Key-beep Activating the acoustic key-acknowledgment tone 3.3.1
12 Clock Setting the date and time 1.8
13 Countdown Activating/deactivating the countdown for reaction times 3.3.3
14 Signal-beep Activating/deactivating the acoustic signal at the end of a measurement 3.3.2
20 Print Printing all saved measurement results 5.3.2
21 Print, date Printing measurement results from a defined date range 5.3.3
22 Print, code No. Printing measurement results from a defined code-No. range 5.3.4
1.4 Starting the colorimeter
the first time
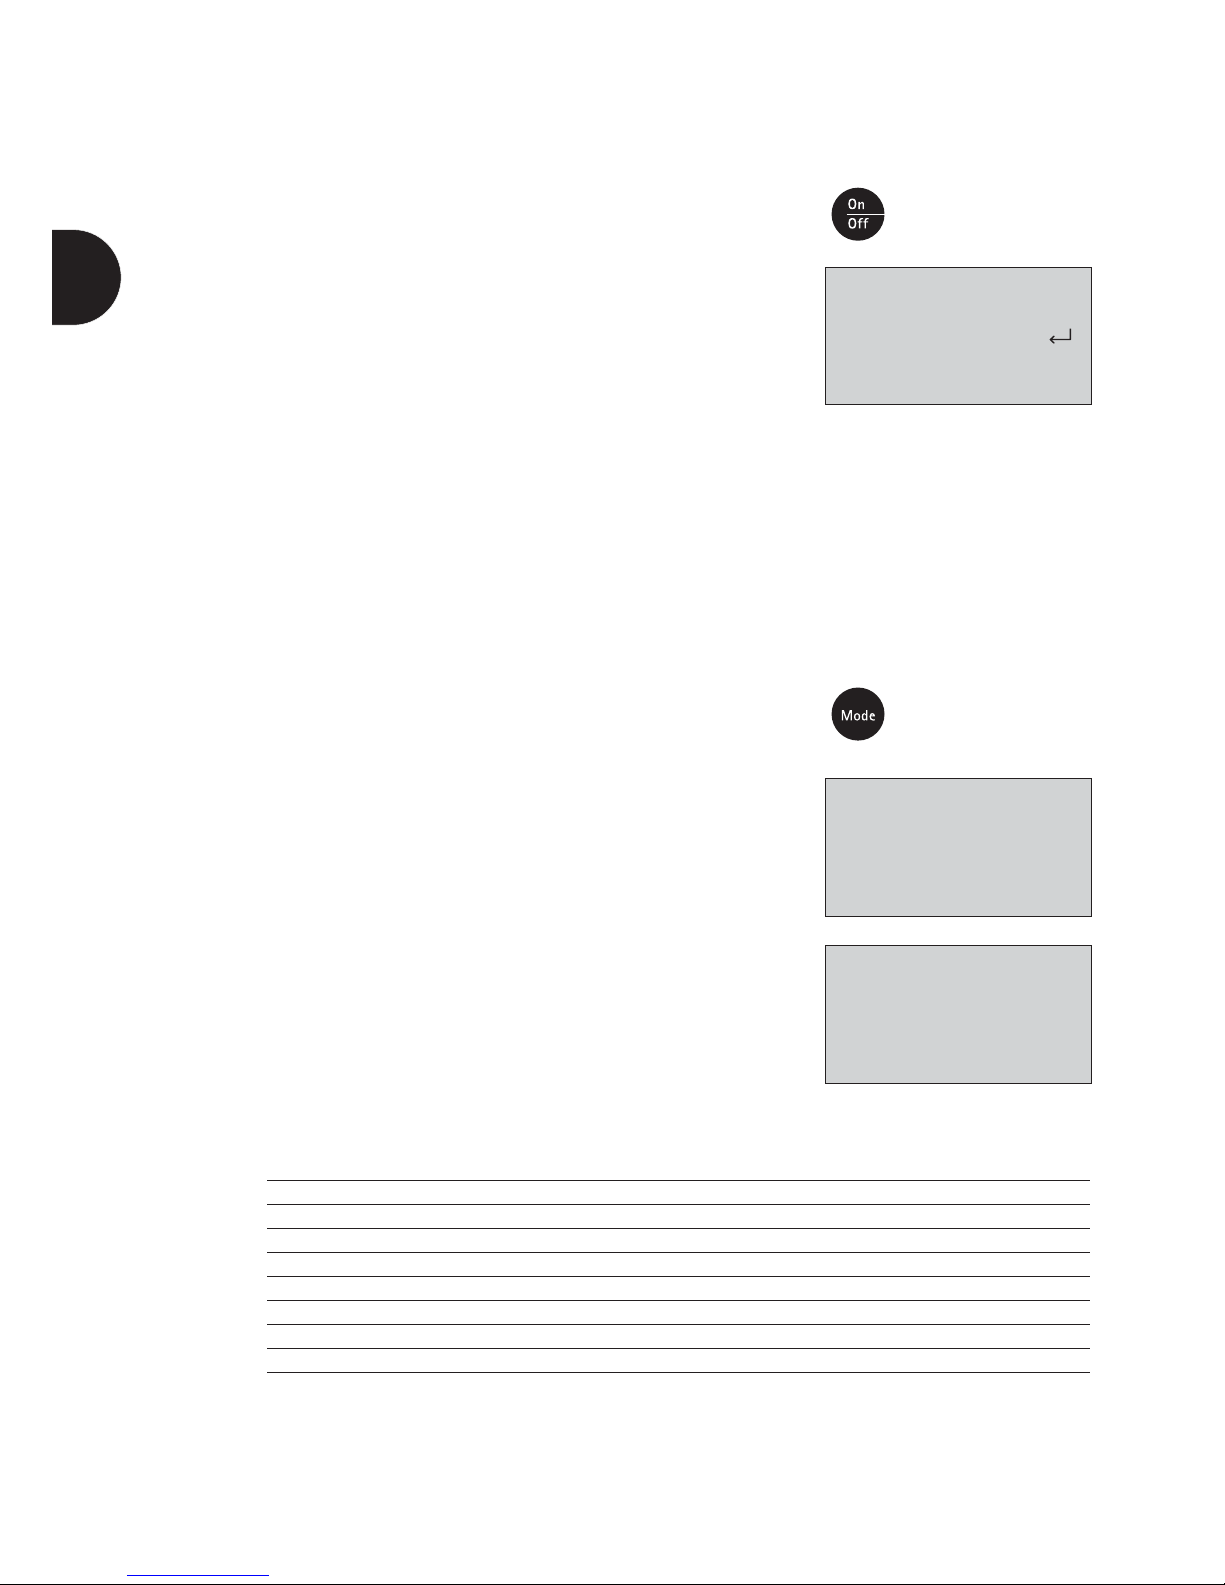
Switch on the colorimeter by pressing the [On/Off] button.
The unit runs an electronic self-check test.
The display then shows:
Pressing the [Enter] key takes the colorimeter to method
selection.
Any data already saved in the unit must be deleted (mode 34,
see chapter 1.7, "Delete data"), the user-method system must
be initialized (mode 69, see section 5.6.5, "Initializing the
user-method system (concentration and polynomials)"), and
the date and time should be reset. (See below for details.)
The Spectroquant® Multy is supplied with English preset as the
standard language setting. Before making the first measurement
you should therefore reset the unit to the language of your
choice. To do this go from the method list and change to the
mode menu by pressing the [Mode] key.
The display shows:
After a short time the selection list appears:
Please initialize
the storagesystem
with MODE 34
MODE Menu
cancel: ESC
>> 10:Language
11:Key-beep
12:Clock
... ...
... ...
en
Page 11

13
Mode No. Mode function Brief description Section
23 Print, method Printing measurement results from a defined method 5.3.5
29 Print params. Setting the printer options 5.3.1
30 Storage Viewing all saved measurement results 2.8.1
31 Stor., date Viewing measurement results from a defined date range 2.8.2
32 Stor., code No. Viewing measurement results from a defined code-No. range 2.8.3
33 Stor., method Viewing measurement results from a defined method 2.8.4
34 Delete data Deleting saved measurement results 2.9
45 User calibration Saving user-specific calibration 5.7.1
46 Clear calibr. Deleting user-specific calibration 5.7.2
50 Profi-Mode Activating the expert-user function (laboratory function) 3.2
60 Method list Processing the method list 3.1.1
61 Mlist all on User-specific method list, activate all methods 3.1.2
62 Mlist all off User-specific method list, deactivate all methods 3.1.3
64 User concentr. User methods, Entry of a concentration method 5.6.1
65 User polynoms User methods, Entry of a user polynomial 5.6.2
66 User m. clear User methods, Deleting a user method 5.6.3
67 User m. print User methods, Printing data for a user method 5.6.4
69 User m. init. User methods, Initializing the user-method system 5.6.5
70 Langelier Calculation of the Langelier saturation index 5.8
71 Temperature Setting the temperature (°C or °F) for Langelier mode 70 5.8
80 LCD contrast Setting the display contrast 3.4
91 System-Info Information on the Spectroquant® Multy, e.g. current unit configuration 3.5
The individual mode functions are selected in the
following manner:
Enter the digits for the desired function, e.g.: [1] [0]
for setting the language, or
press the [] or [] arrow keys to select the desired function
from the display list.
Confirm your selection by pressing [Enter].
Make your settings as described in the respective sections
of this manual.
Press the [Esc] key to exit the mode menu.
en
Page 12
14
1.6 Setting the language
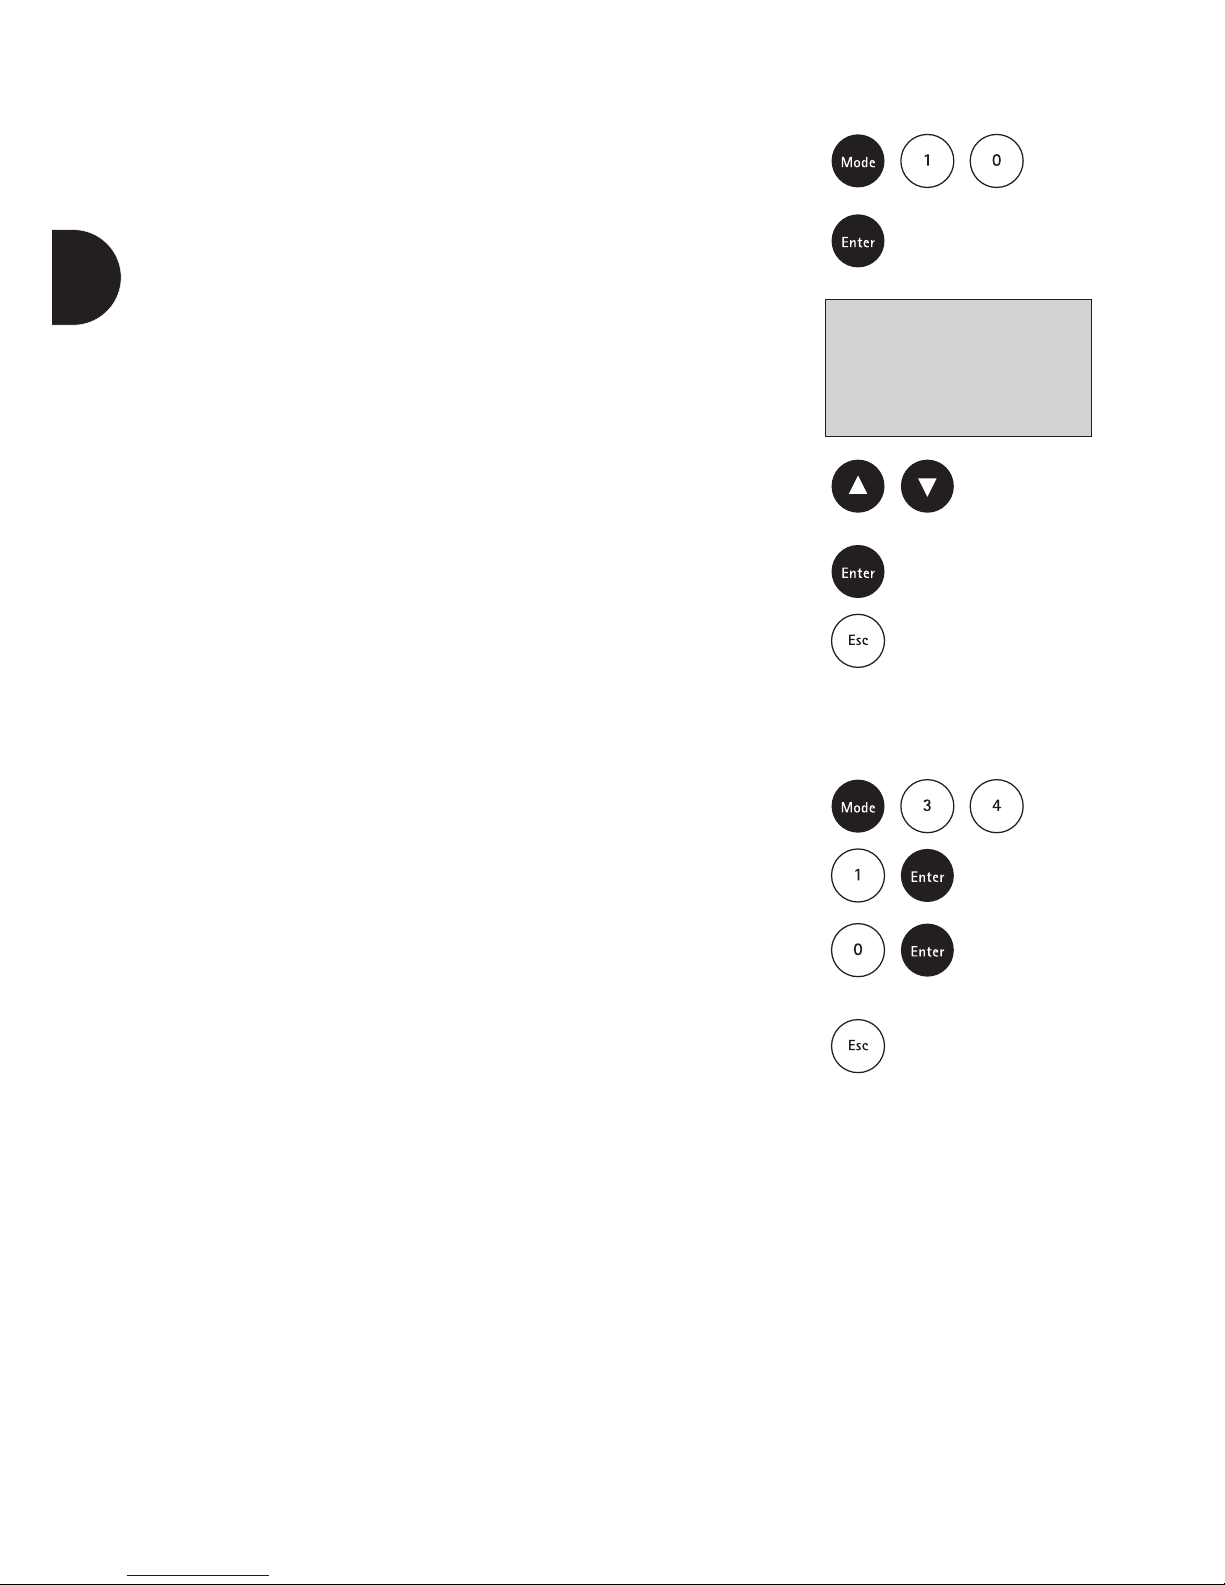
Press the keys [Mode] [1] [0] in succession.
Confirm your selection by pressing [Enter].
The display now shows:
Select the desired language using the arrow keys [] or [].
Confirm your selection by pressing [Enter].
(Pressing the [Esc] key takes you back to the methodselection menu.)
1.7 Deleting data
Press the keys [Mode] [3] [4] in succession to delete
any stored data.
Confirm by pressing [1] and [Enter].
Press the [0] and [Enter] keys to abort the process.
In the event that you press the [1] key by mistake, you can exit
the menu by pressing the [Esc] key if you wish to save the data
from deletion.
<Language>
Deutsch
>> English
Français
...
en
Page 13
15
1.8 Setting the date and time
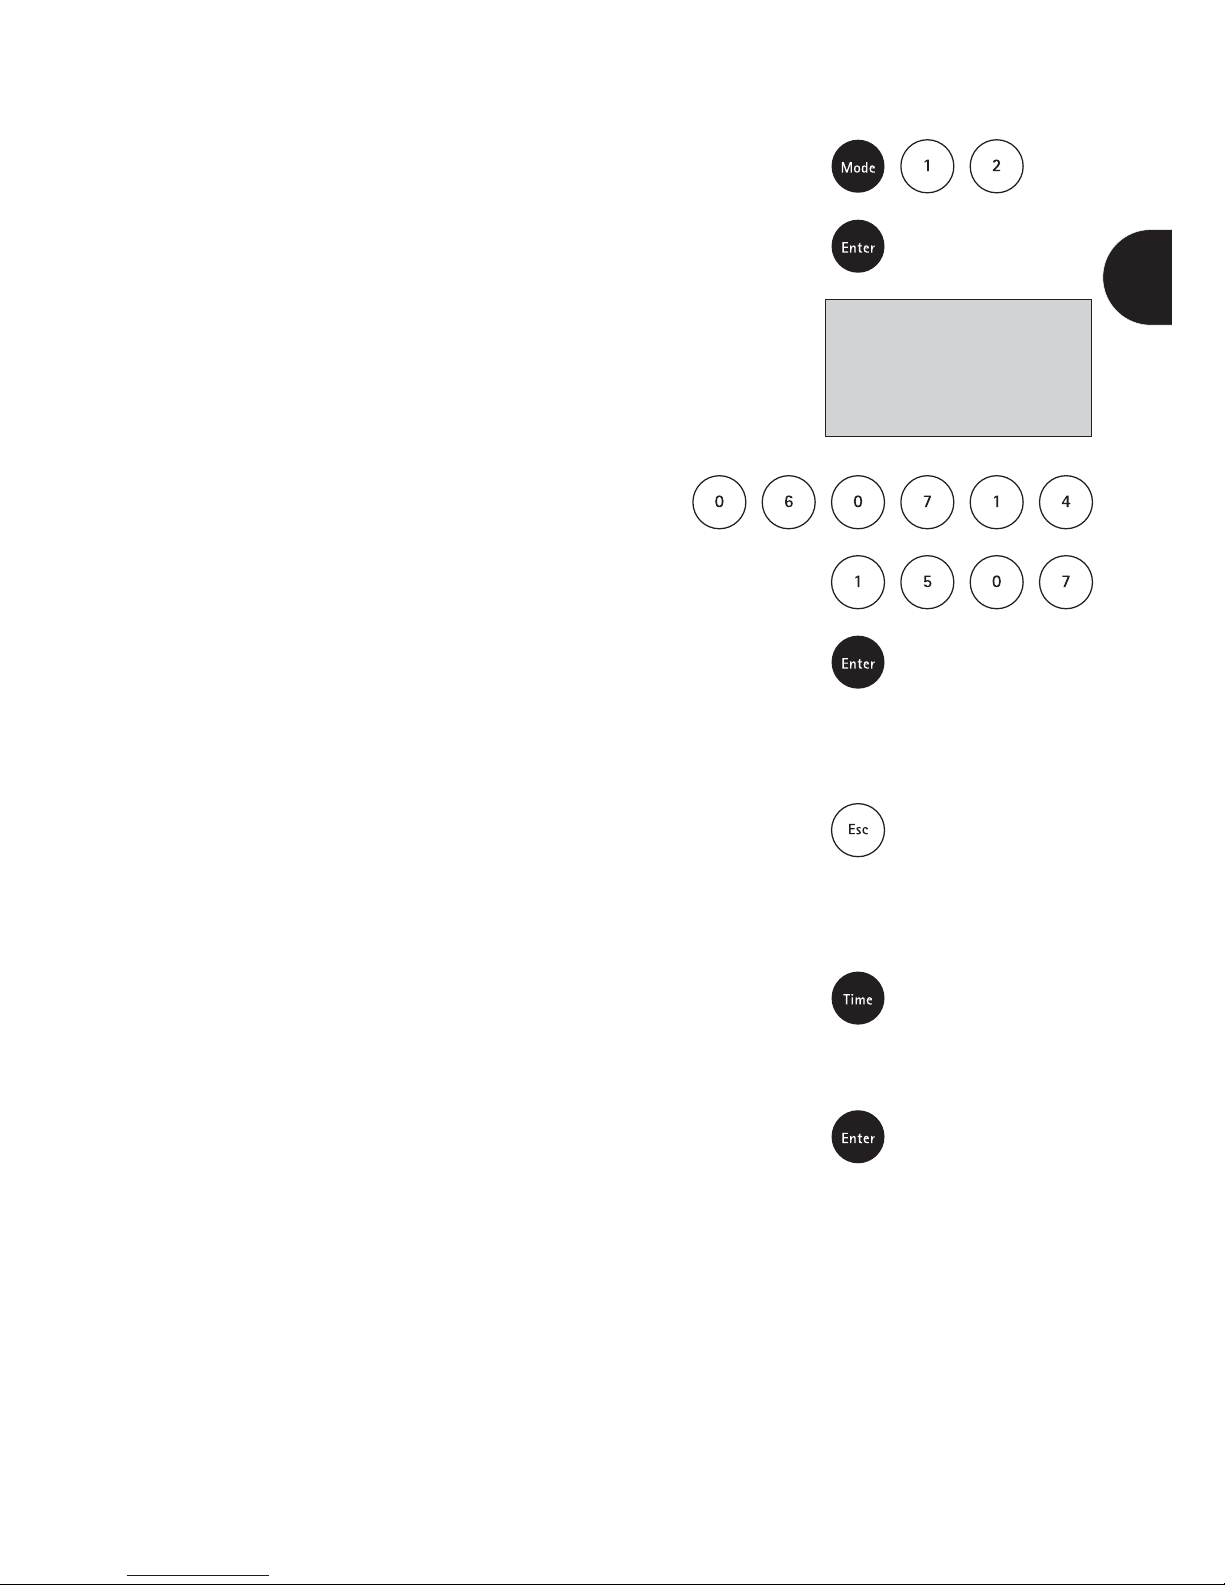
Press the keys [Mode] [1] [2] in succession.
Confirm your selection by pressing [Enter].
The display now shows:
The date and time are entered in the following sequence:
year, month, day,
e.g.: July 14, 2006 = [0] [6] [0] [7] [1] [4]
hours, minutes,
e.g.: 3.07pm = [1] [5] [0] [7].
Confirm your selection by pressing [Enter].
Note
When you confirm the entry by pressing [Enter] the seconds
are automatically set to zero.
Pressing the [Esc] key takes you back to the methodselection mode.
1.9 Time and date display
Press the [Time] key.
The display now shows the current time and date.
The unit returns to the previous routine after approx.
15 seconds
or when you press the [Enter] key.
1.10 Automatic switch-off
The Spectroquant® Multy switches off automatically 20 minutes
after the last time a key was pressed. In the last 30 seconds before
it switches off, the unit emits an acoustic signal. During
these 30 seconds you can press a key to prevent the unit from
switching off automatically. The automatic switch-off function is
inactive while the unit is performing operations (running countdown,
printing). After the operation in question has ended, the 20-minute
waiting time before the automatic switch-off function starts running anew.
<Clock>
yy-mm-dd hh:mm
__-__-__ __:__
en
Page 14
16
Operating mode
2.1 Selecting the method
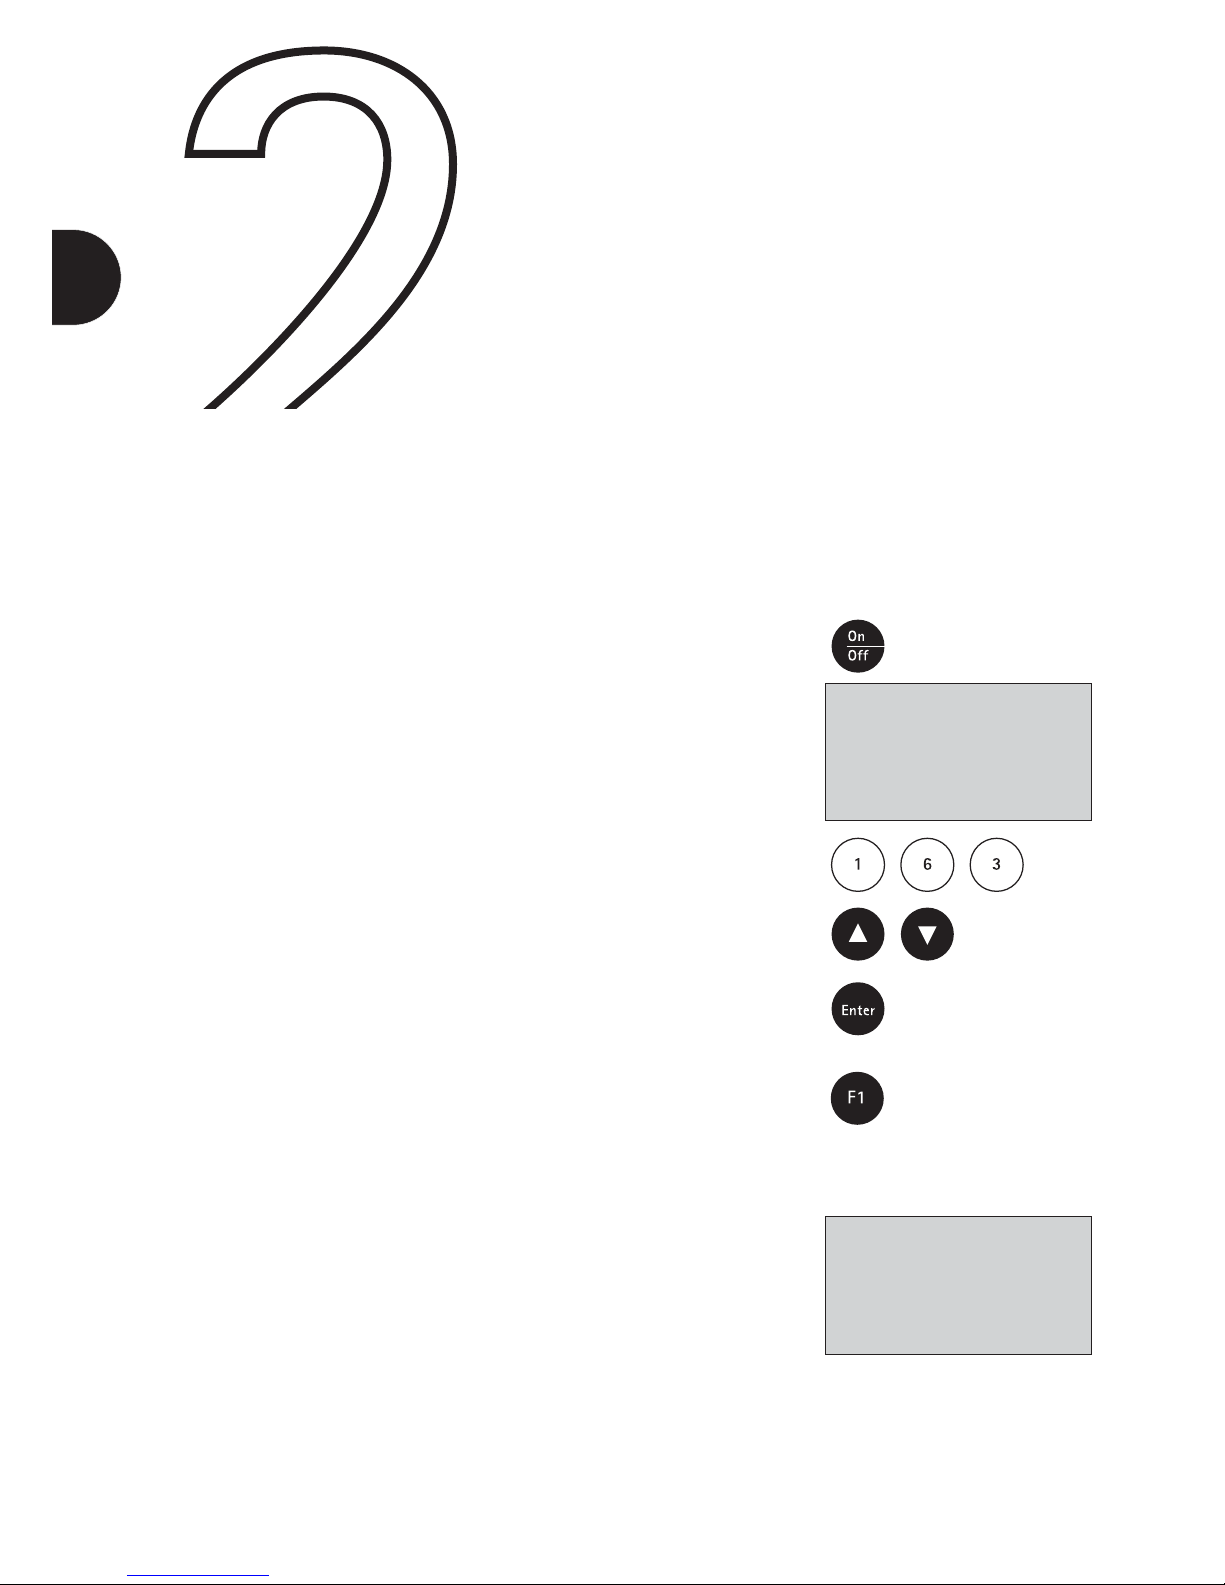
Switch on the Spectroquant® Multy by pressing the
[On/Off] key.
The display shows the selection list of the stored methods:
There are two ways to select the desired method:
a) by entering the method number directly, e.g.: [1] [6] [3]
for COD 14541, or
b) by pressing the [] or [] arrow keys to select the desired
method from the displayed list.
Confirm your selection by pressing [Enter].
Note
Pressing the [F1] key switches between the compact and
the detailed method-selection list. The method-selection list
must be shown on the display for this option.
Example for the detailed method-selection list
Line 1: Method number, method name, item number
Line 2: Measuring range
Line 3: Type of test (cell test or test)
Line 4: Cells used (16 mm/24 mm)
>> 10 Acid cap. 01758
20 Aluminium 14825
21 Aluminium 00594
... ...
... ...
163 COD 14541
25-1500 mg/l
Cell Test
16 mm
en
Page 15
17
Note
The five-digit item number (e.g. 14541) gives the five digits
in the middle of the catalogue/ordering number 1.XXXXX.0001,
in this case 1.14541.0001. In some cases in which the assignment is self-evident (e.g. monochloramine)
or else in which all Spectroquant® tests available for one
parameter can be used (e.g. chlorine), this number is not shown.
For an overview of all programmed methods please refer to the
included CD, section 5.1, “Overview of preprogrammed methods
and analytical procedures”.
2.2 Measuring with test kits
A detailed description of the procedure for the selected method
is given on the provided CD in section 5.1, “Overview of preprogrammed methods and analytical procedures”. The procedures
may differ slightly from those described in the respective package inserts.
After selecting the method, prepare the blank and sample for
measurement.
In the case of analysis specifications in which reaction times
must be observed, a timer (countdown) is integrated in
the method programme. (In such cases the cells must not be
inserted into the measurement compartment.)
After the method has been selected the display shows:
Example: Method 90, Bromine 00605
If you wish to exit the menu at this stage, simply press the
[Enter] key twice (= abort countdown) and then the [Esc]
key once.
After the method has been selected, the countdown function
is started by pressing the [Enter] key. The remaining time is
shown continuously. An acoustic signal is emitted in the last
10 seconds before the countdown expires. After the countdown
has run out, proceed as described in the analysis procedures.
In some methods there are several reaction times that have
to be considered; these are shown and processed in the proper
sequence.
en
90 Bromine 00605
0.10-5.00 mg/l Br2
Count-down 1
1:00
Start:
Page 16
18
Note
The running countdown can be skipped by pressing the [Enter]
key once. In this case the user must observe the necessary
reaction time him-/herself. (Failure to observe the specified
reaction time can lead to erroneous results.) Further options
to deactivate the countdown procedure: mode No. 13 or
Profi mode (mode No. 50).
After the countdown has expired the display shows:
Place the prepared blank in the measurement compartment
with the mark on the cell pointing towards the mark on
the unit case.
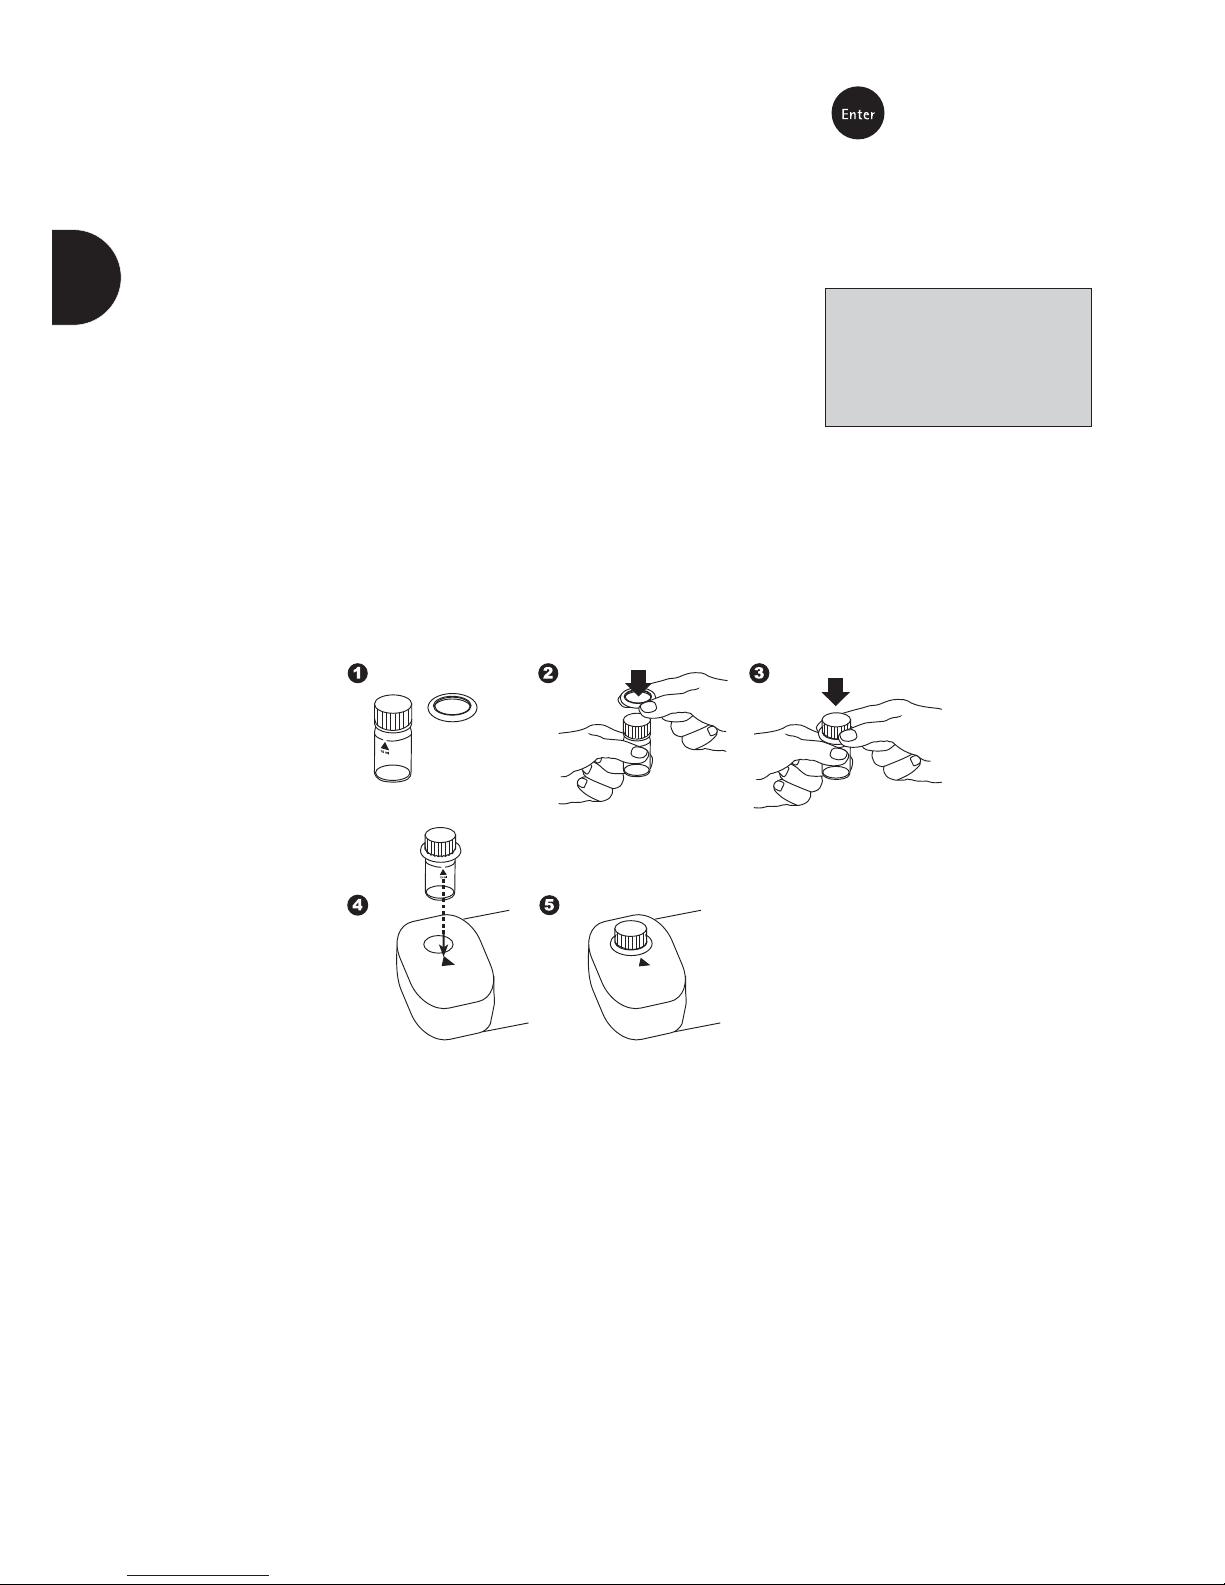
Positioning the cell (ø 24 mm)
Align the triangular mark on the cell with that on the Spectroquant®
Multy:
To afford better protection against sunlight, press the o-ring firmly
into place.
90 Bromine 00605
0.10-5.00 mg/l Br2
prepare Zero
press ZERO
en
Page 17
19
en
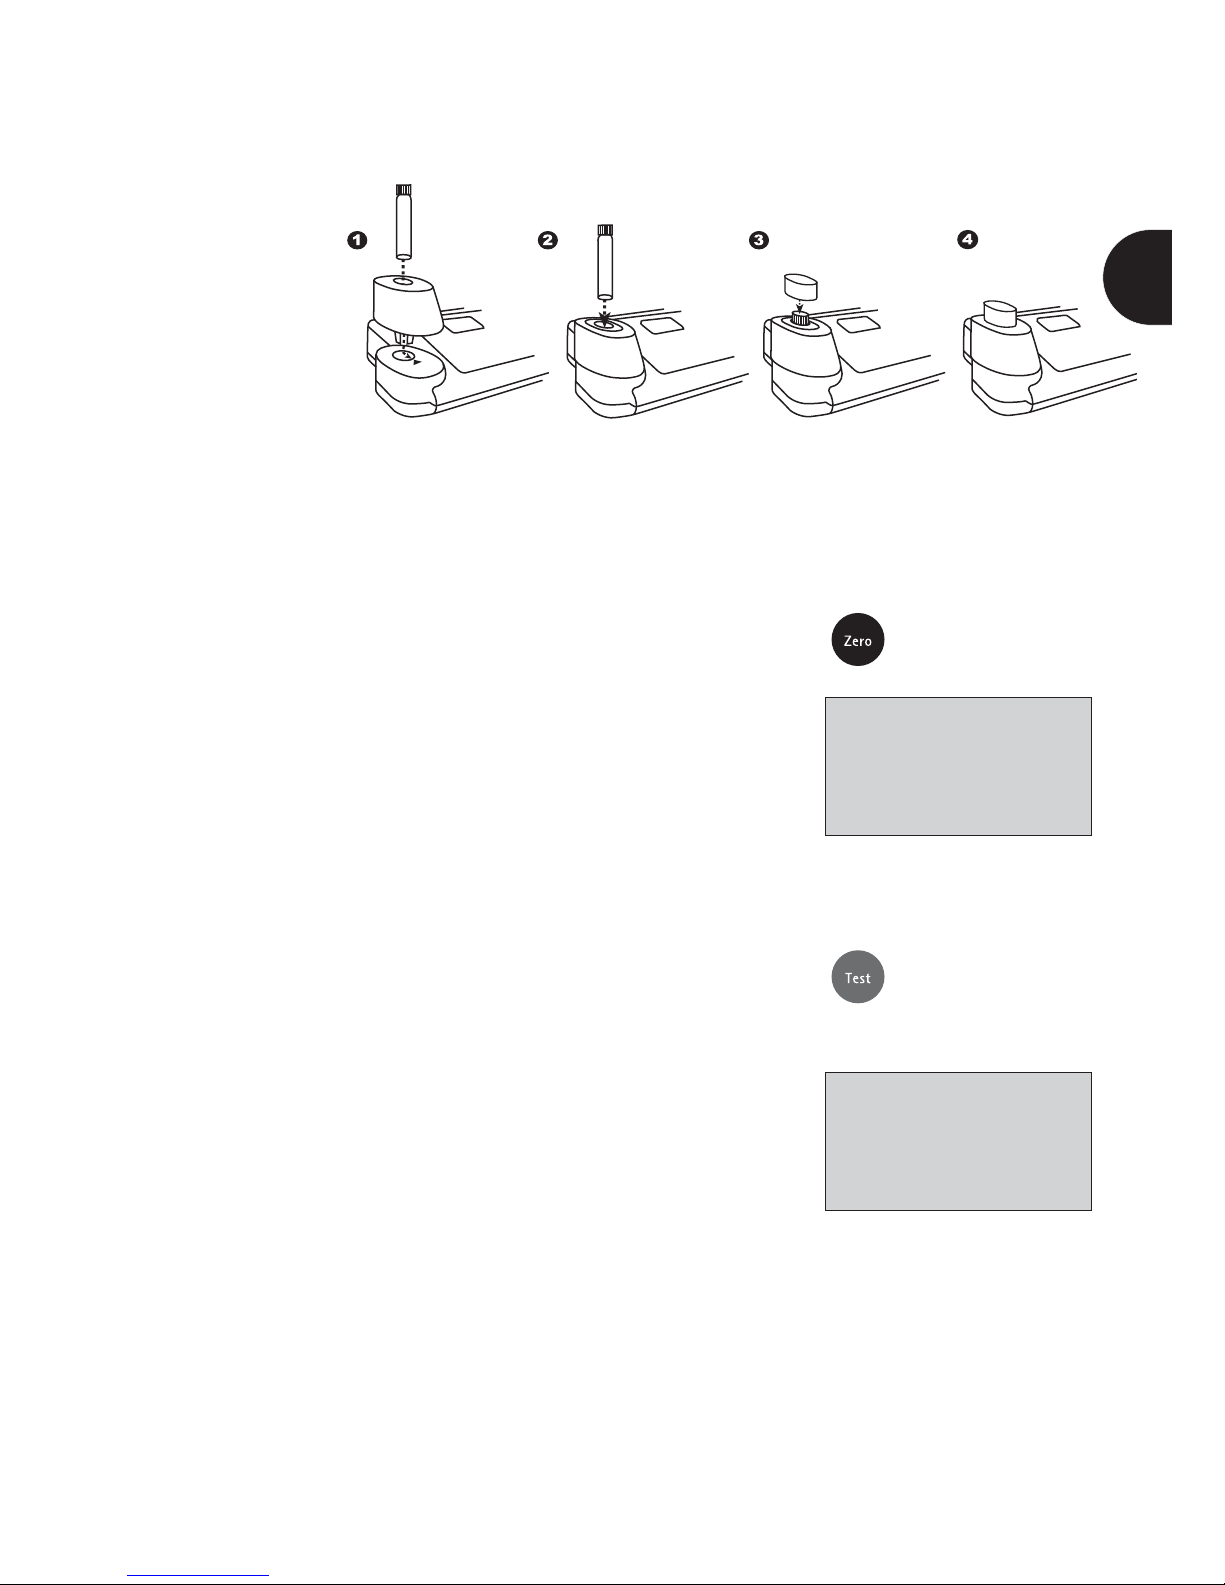
Positioning the cell (ø 16 mm)
Attach the 16-mm cell adapter.
Align the line mark above the item number of the cell with
the triangular mark on the Spectroquant® Multy. Subsequently attach
the lid to cover the adapter.
Press the [Zero] key.
The display shows:
Insert the prepared sample into the measurement compartment
with the cell mark aligned with the mark on the unit case.
Press the [Test] key.
The result is displayed in the following manner:
Example: Method 90 (Bromine 00605)
Line 1: Method number, method name, item number
Line 2: Measuring range
Line 3: Result (expressed as the concentration)
90 Bromine 00605
0.10-5.00 mg/l Br2
Zero accepted
prepare Test
press TEST
90 Bromine 00605
0.10 - 5.00mg/l Br2
2.11mg/l Br2
Page 18
90 Bromine 00605
0.10-5.00 mg/l Br2
Zero accepted
prepare Test
press TEST
20
In the event the result lies outside the respective measuring
range, the following message appears on the display:
the concentration of the sample lies below the measuring range
or, respectively,
the concentration of the sample lies above the measuring range.
After the result has been displayed
• it can be saved (see section 2.7, “Saving measurement results”
and section 2.8, “Retrieving saved measurement results” for
further details)
• it can be printed out (see section 5.3)
• a new method can be selected:
pressing the [Esc] key takes the colorimeter back to the
method-selection mode;
you can also enter a new method number directly
(confirm by pressing [Enter])
• further measurements can be made using the same or a
new zero setting:
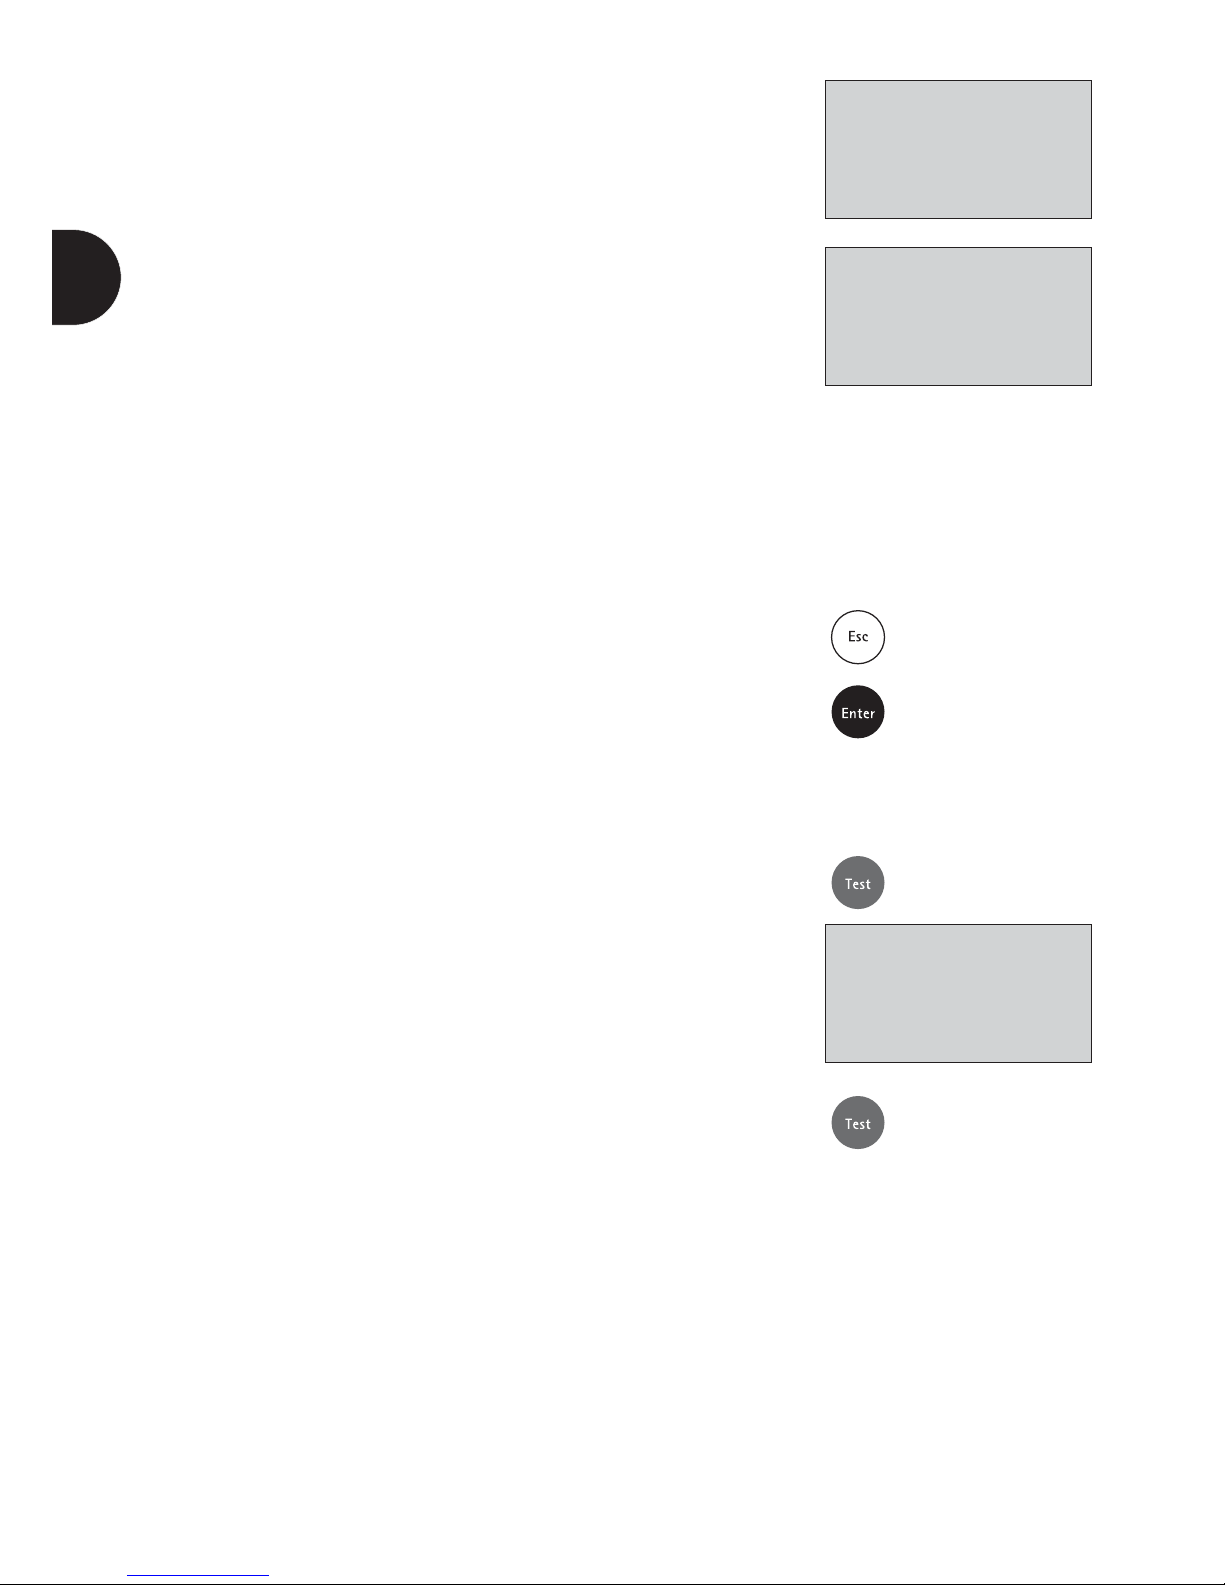
• If you wish to measure other samples using the same method:
Press the [Test] key.
The display shows:
Confirm by pressing [Test].
90 Bromine 00605
0.10 - 5.00mg/l Br2
Underrange Br2
90 Bromine 00605
0.10 - 5.00mg/l Br2
Overrange Br2
en
Page 19
21
en
• If you wish to measure other samples with a new zero setting:
Press the [Zero] key to reset to zero.
The display shows:
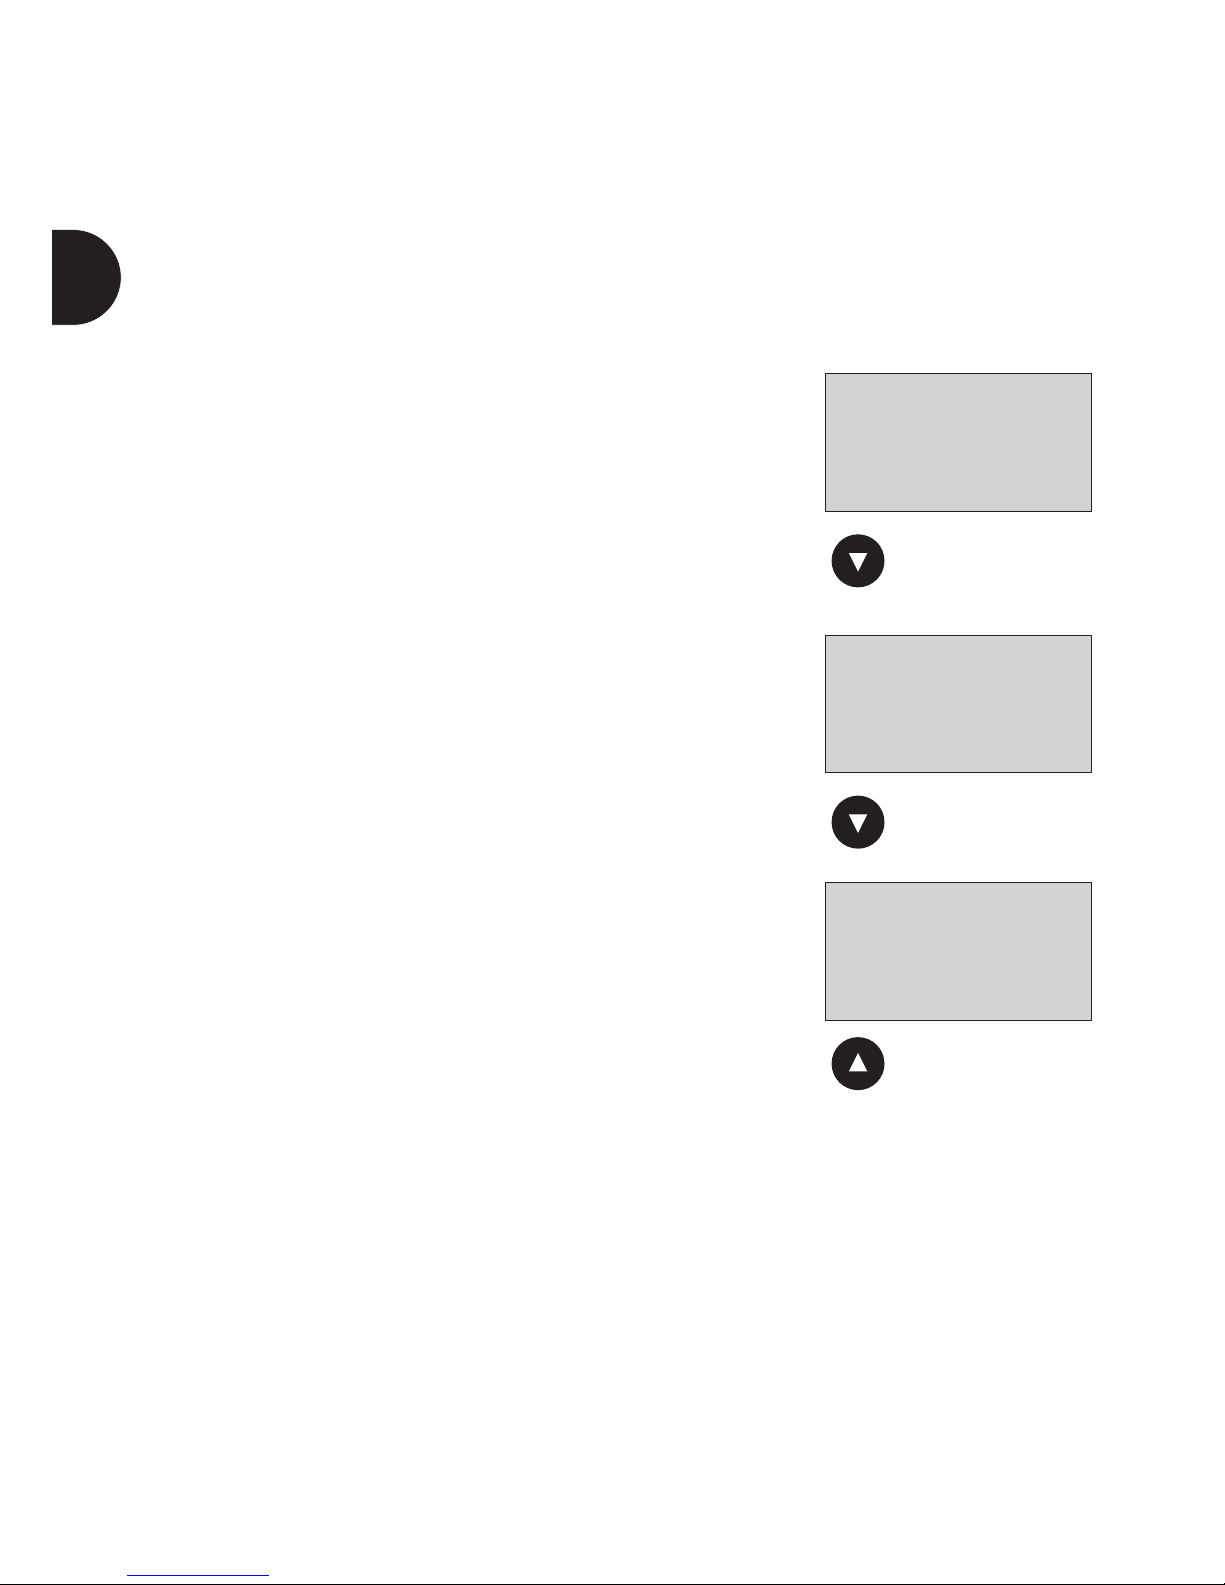
2.3 Differentiation
Some methods permit further differentiation (e.g. chlorine).
After selecting the method, e.g. 131 Chlorine Test, you are
prompted to state the type of measurement (e.g. differentiated,
free, or total).
Use the [] or [] arrow keys to select the desired
measurement type.
Confirm your selection by pressing [Enter].
90 Bromine 00605
0.10-5.00 mg/l Br2
Count-down 1
1:00
Start:
Chlorine Test
>> diff
free
total
Page 20
22
2.4 Altering the citation form
Wherever this is appropriate, it is possible to alter the citation
form (see section 5.1, “Overview of preprogrammed methods
and analytical procedures” for possible citation-form alternatives).
After the first sample has been measured using a specific
method and the result is shown on the display, you can alter
the citation form in the following manner:
Result shown on display using Method 380 (Phosphate 14543)
as an example:
Pressing the [] arrow key gives you the option to select
a citation form.
The result shown on the display changes to this:
Pressing the [] arrow key again shows the next
citation form:
Pressing the [] arrow key takes you back to the previous
citation form.
The citation form last shown on the display remains valid
for all consequent measurements until changed again.
380 Phosphate 14543
0.05-4.00mg/l PO4-P
0.33mg/l PO4-P
380 Phosphate 14543
0.15-12.26mg/l PO4
1.01mg/l PO4
380 Phosphate 14543
0.11-9.17mg/l P205
0.76mg/l P205
en
Page 21

23
en
2.5 Measuring absorbances
Besides measuring concentrations using a selected method,
the unit is also capable of measuring absorbances. For this you
call up the desired wavelength by entering the corresponding
method number or by choosing from the method-selection list.
Measuring range: -2600 mAbs to +2600 mAbs
Method No. Designation
600 A 430 nm
610 A 530 nm
620 A 560 nm
630 A 580 nm
640 A 610 nm
650 A 660 nm
The display shows e.g.:
Always zero the colorimeter using a filled cell
(e.g. with DI water).
The display shows e.g.:
Then measure the sample.
The display shows e.g.:
100 mAbs = 0.100 A (absorbance units)
Tip
Reaction times for your own measurements in the absorbance
mode can be more easily observed by using the user-countdown
function (see the following section 2.6, “User countdown”).
600 A 430 nm
-2600 - +2600 mAbs
prepare Zero
press ZERO
600 A 430 nm
-2600 - +2600 mAbs
Zero accepted
prepare Test
press TEST
600 A 430 nm
-2600 - +2600 mAbs
100 mAbs
Page 22
24
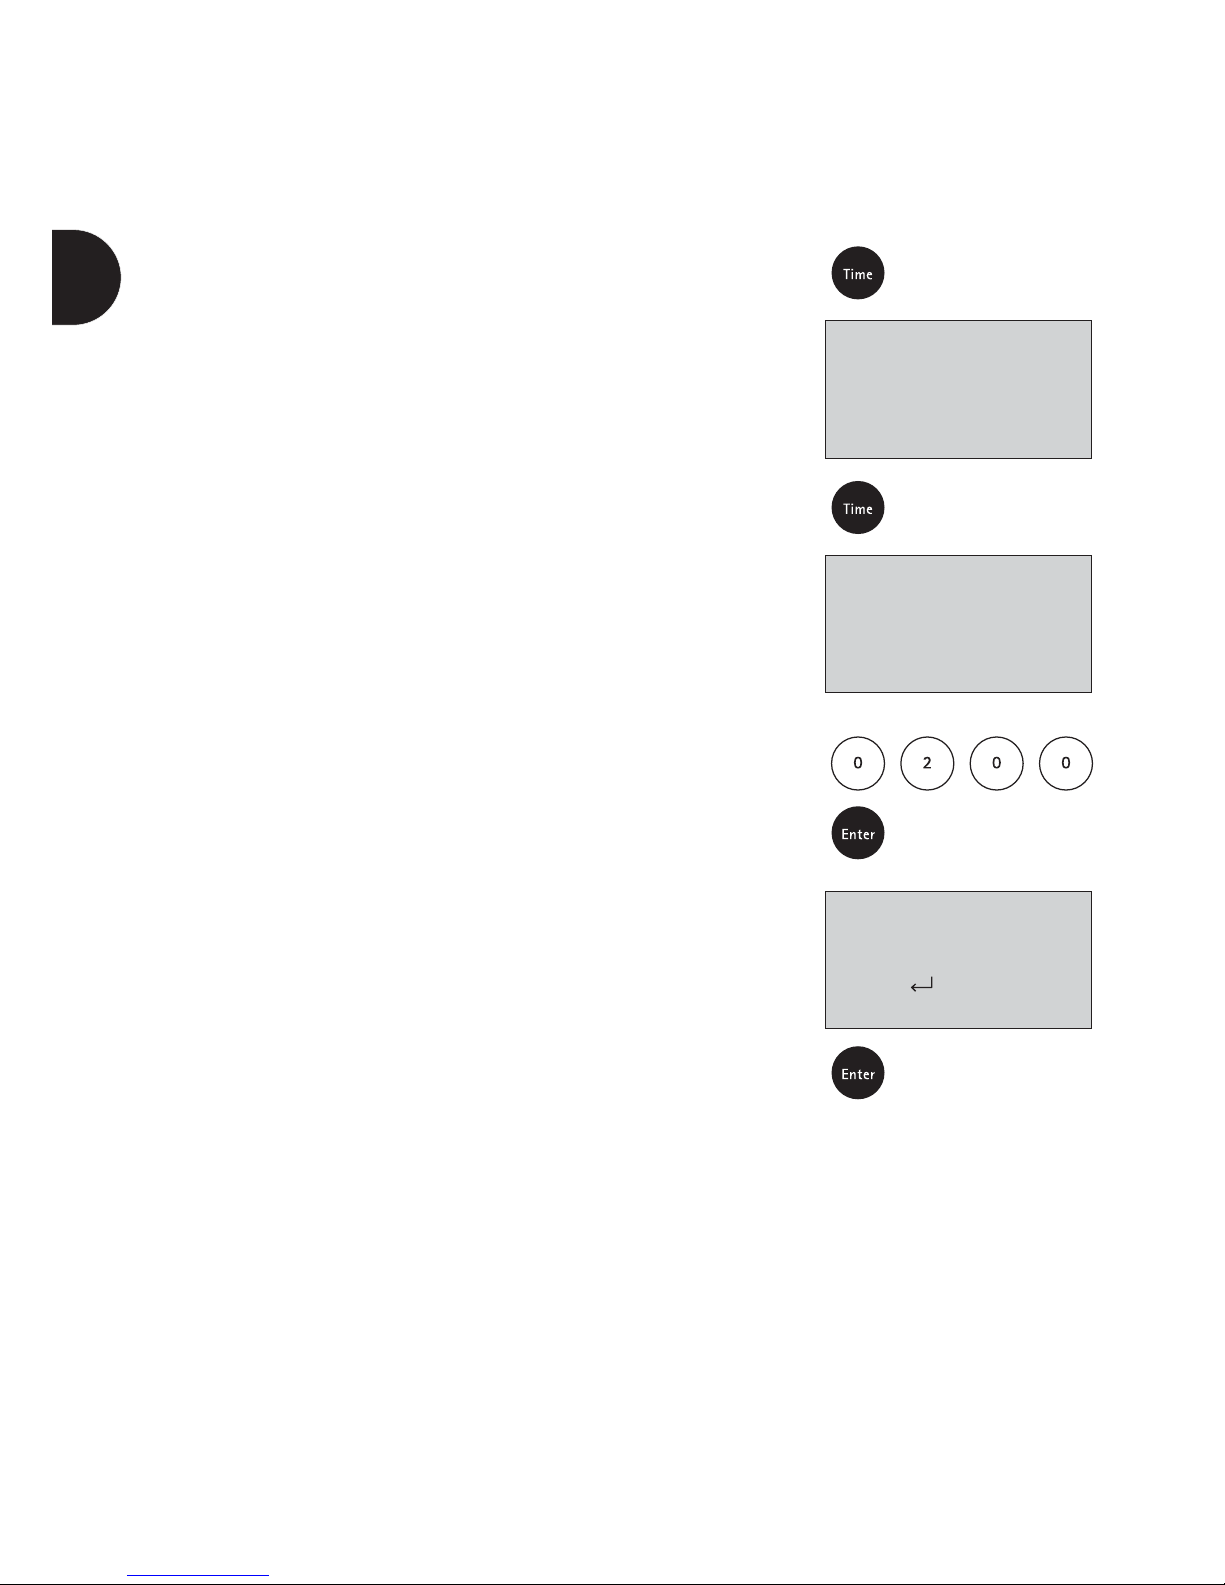
2.6 User countdown
(timer function)
This function enables the user to employ a self-defined
countdown time.
Press the [Time] key.
The display shows the current time and date.
Press the [Time] key again.
The display shows:
Enter the time in double digits, in the sequence minutes and
seconds, e.g.: 2 minutes, 0 seconds = [0][2][0][0].
Confirm your selection by pressing [Enter].
The display shows:
Press the [Enter] key to start the countdown.
After the countdown has expired, the unit returns to the
previous routine.
Note
The user-countdown function is available even when the
preset countdown function is deactivated.
15.58.40 2004-10-21
count-down
mm:ss
count-down
2:00
en
Page 23
25
en
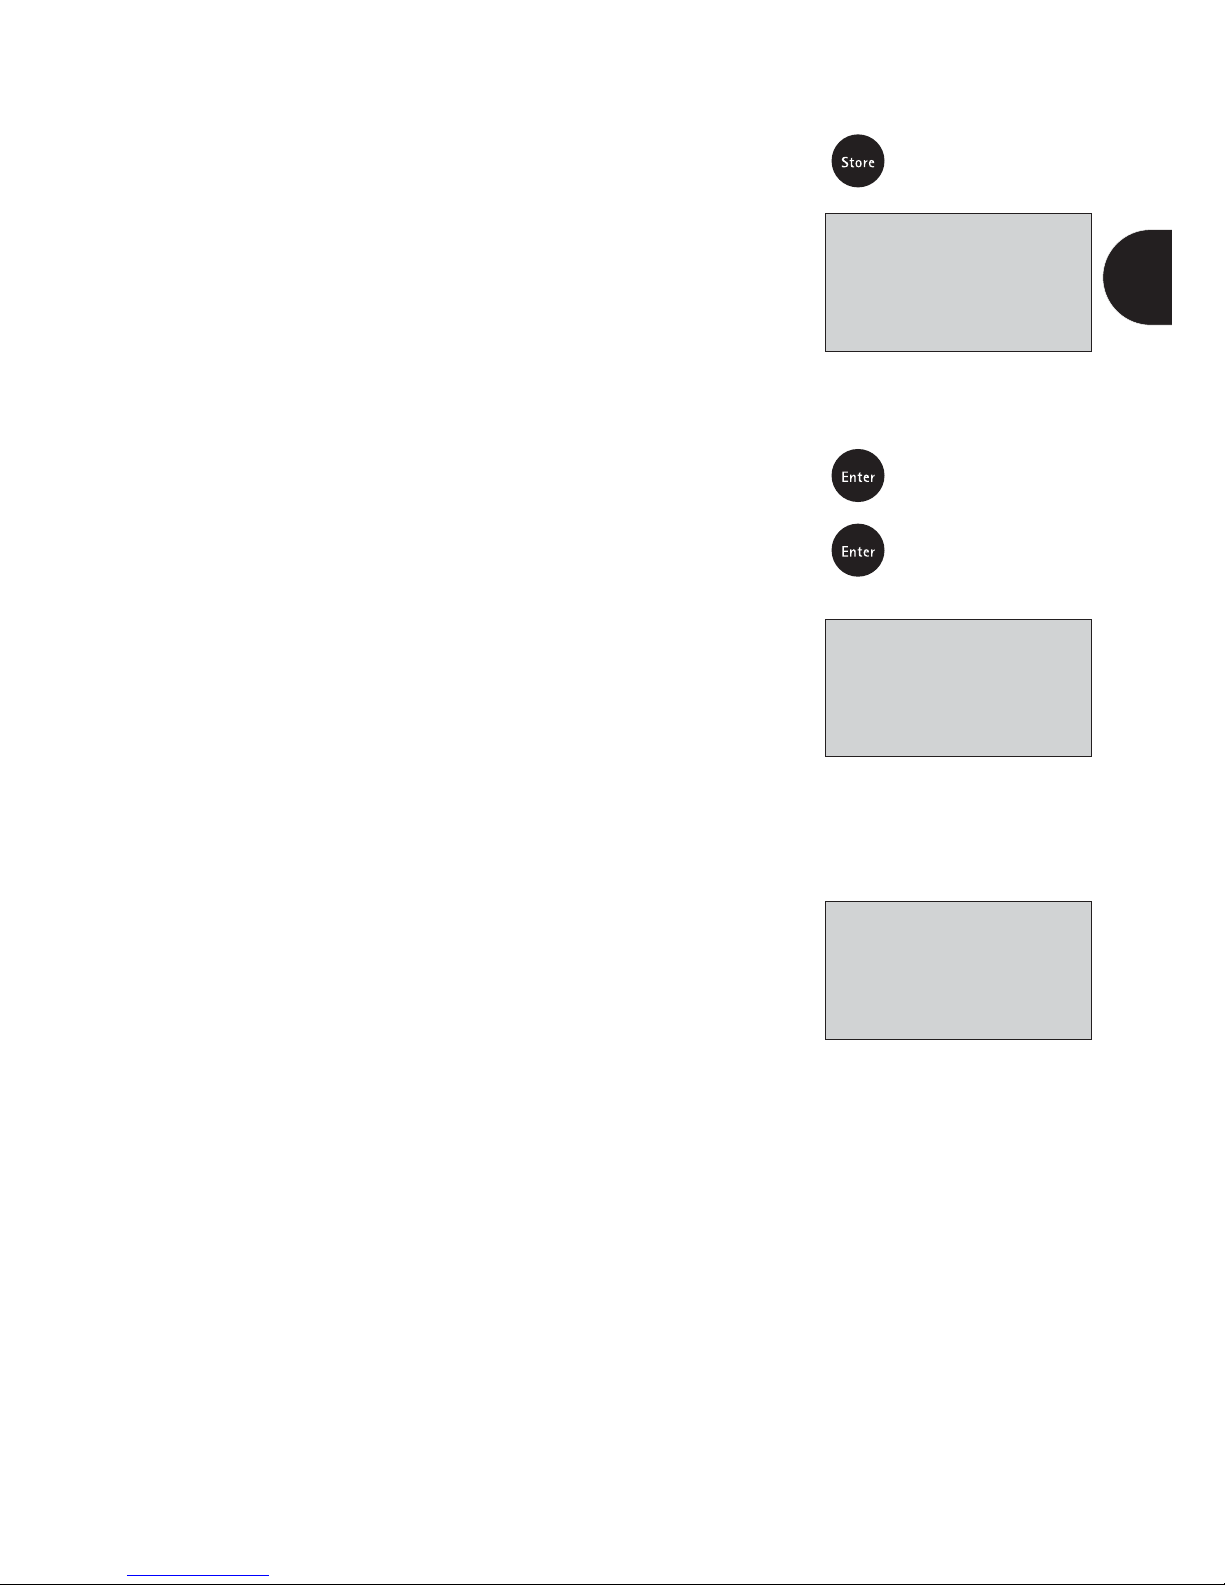
2.7 Saving measurement results
Press the [Store] key while the result is shown on the display.
The display shows
(Example: Method 31, Ammonium 14558):
The user is able to enter a six-digit code at this stage.
(The code No. can be used to show e.g. information regarding
the user or the sampling site.)
Confirm the code No. by pressing [Enter].
If you do not wish to enter a code No., simply confirm
by pressing [Enter]. (This results in the automatic assigment
of a code No. starting with 0.)
The entire data set is then stored together with the date, time,
code No., method, and result.
The display shows:
Note
The number of available memory records is also shown on the
display. Subsequently the measurement result is shown again.
When fewer than 30 free memory records are available,
the display shows:
It is advisable to delete the data memory as soon as possible
when no longer required (see section 2.9, “Deleting saved measurement results”). When all memory records are occupied,
it is not possible to save any further results.
31 Ammonium 14588
0.20-8.00 mg/l NH4-N
Code-No.:
_ _ _ _ _ _
31 Ammonium 14588
0.20-8.00 mg/l NH4-N
Stored!
storage: 997
free records left
storage: only 29
free records left
Page 24
26
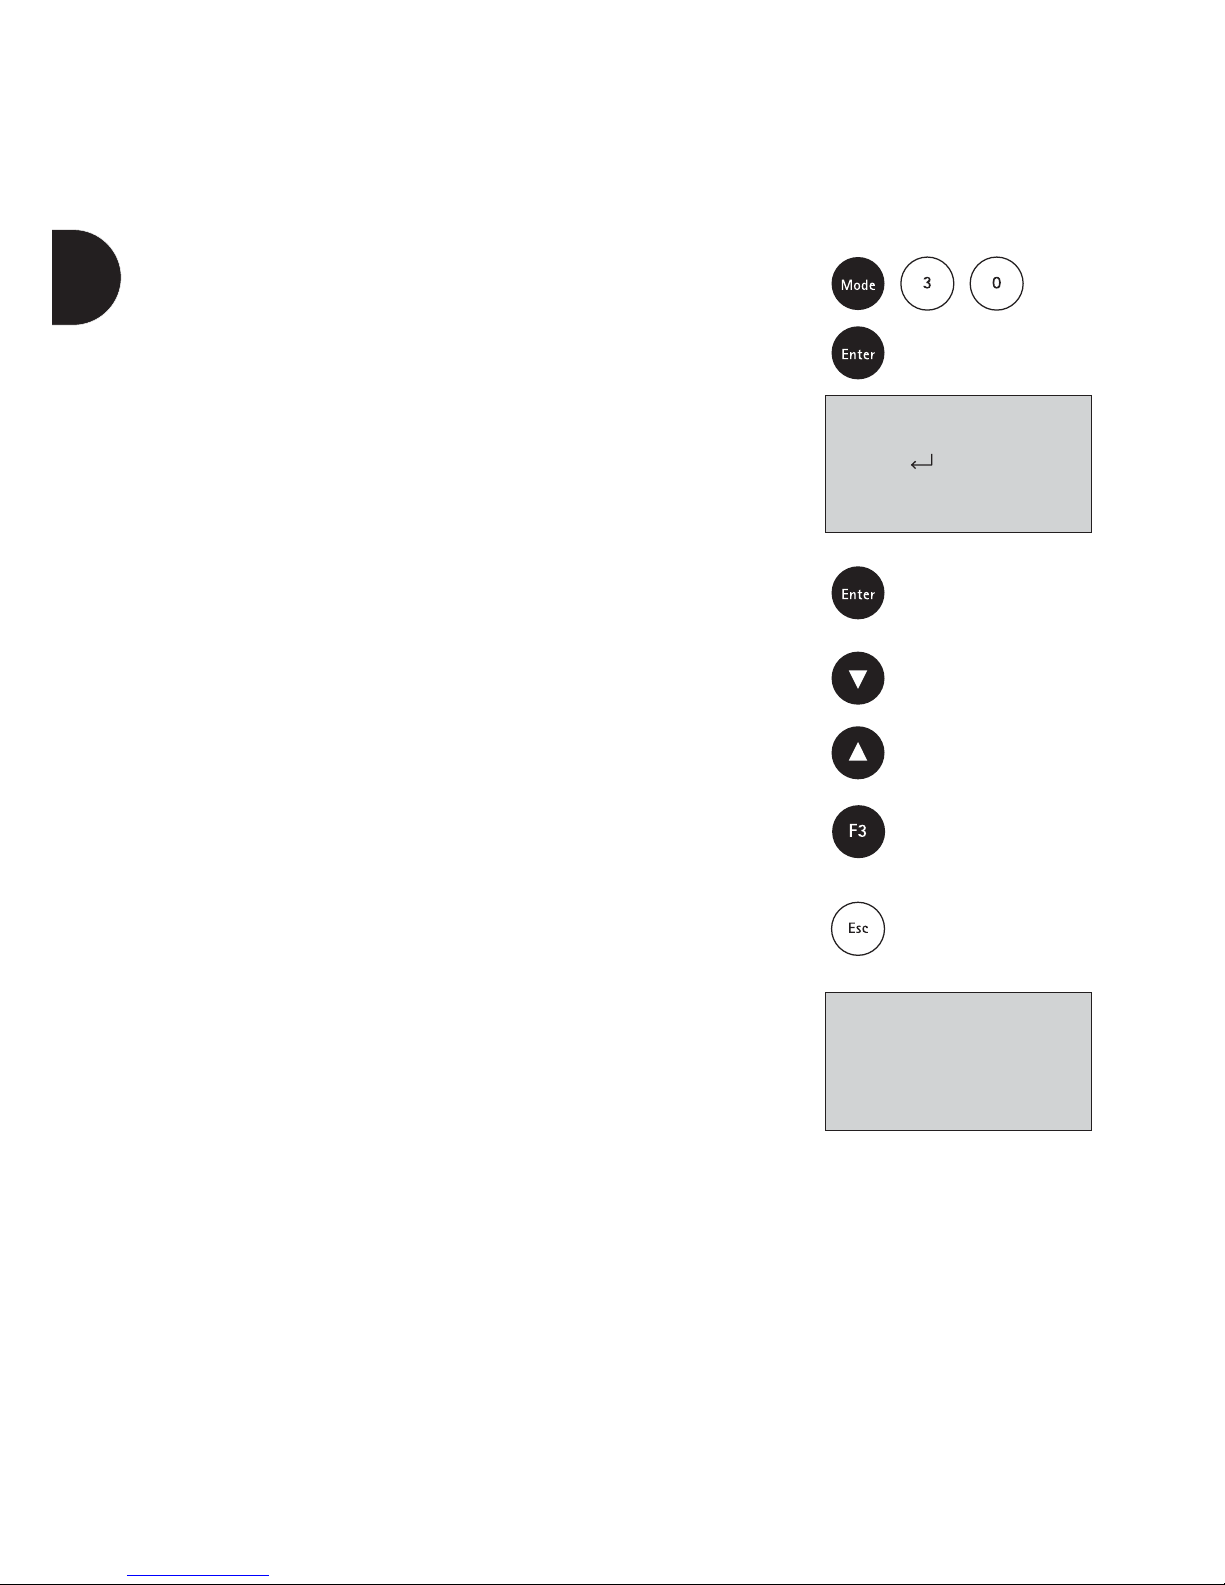
2.8 Retrieving saved
measurement results
2.8.1 Retrieving all saved measurement results
Press the keys [Mode] [3] [0] in succession.
Confirm your selection by pressing [Enter].
The display shows:
Confirm by pressing [Enter].
The data sets are then shown in reverse chronological sequence,
starting with the most recently saved measurement result.
Pressing the [] key takes you to the next data set.
Pressing the [] key takes you back to the previous data set.
Pressing the [F3] key prints out the result shown on the display.
Exit by pressing the [Esc] key.
If there are no data saved in the memory, the display shows:
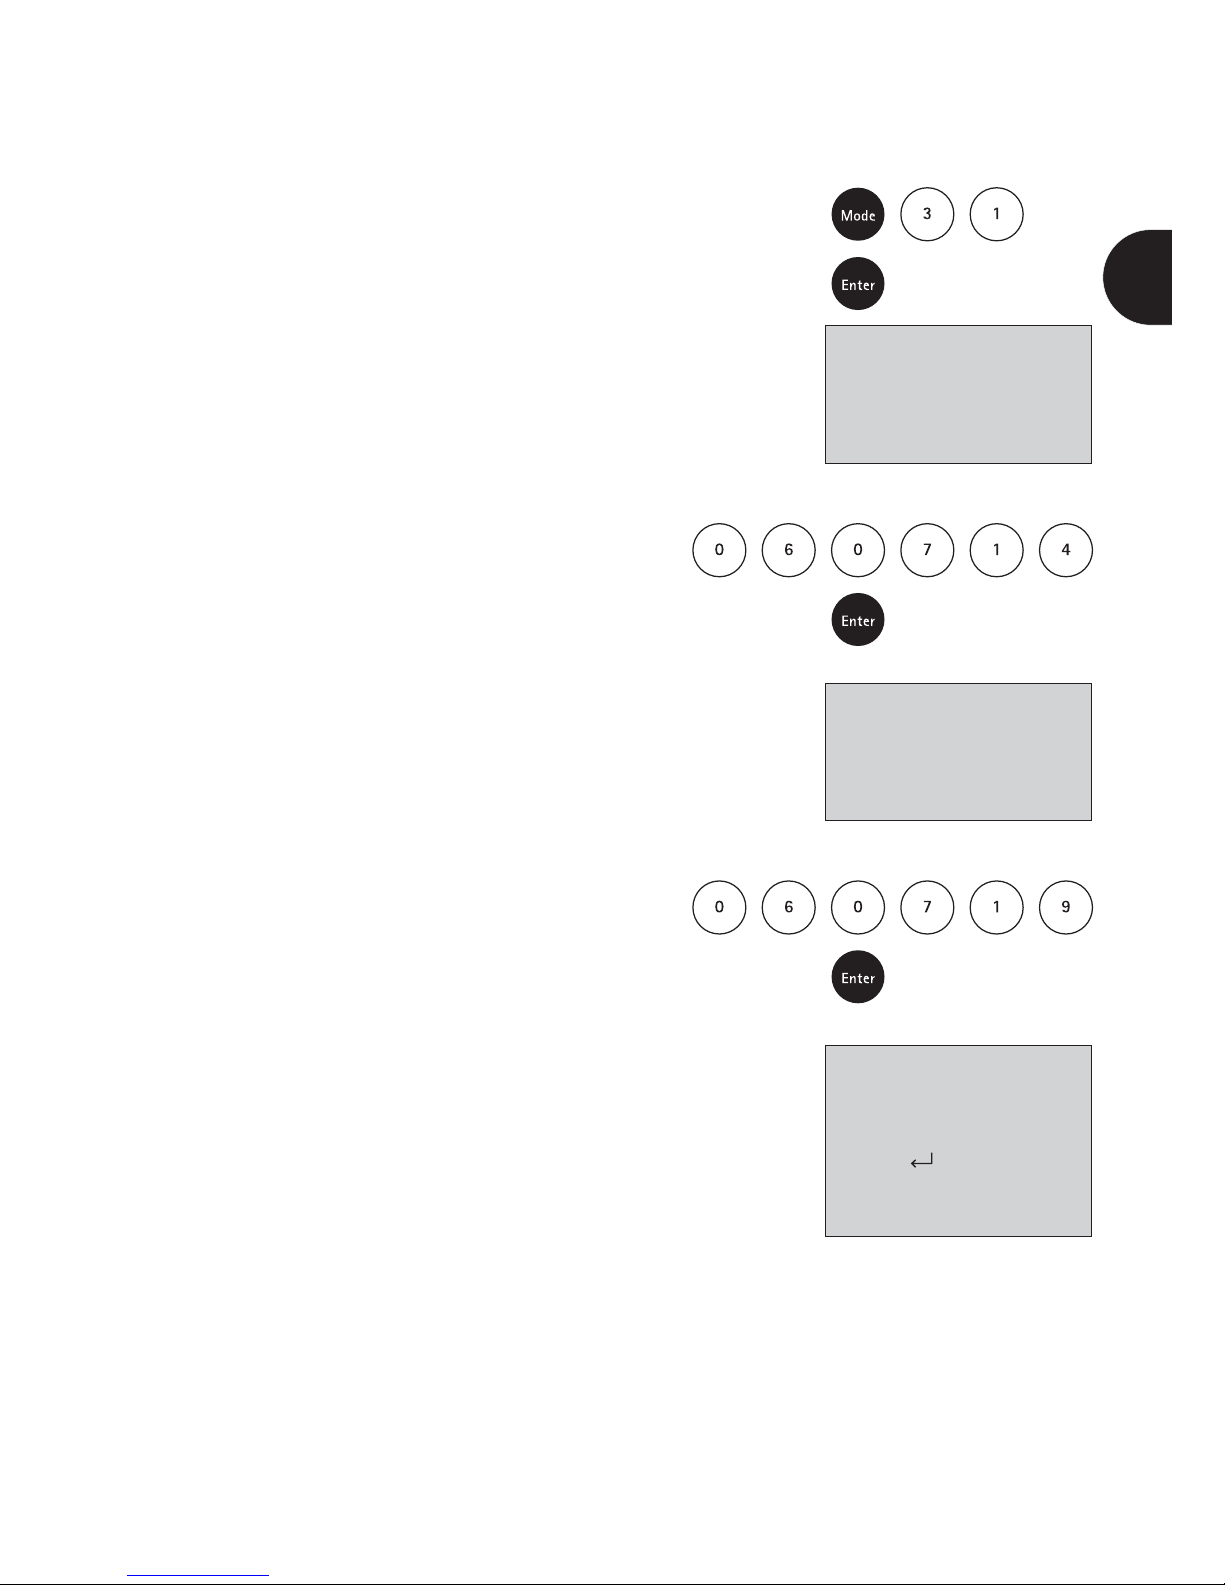
<storage>
display all data
Start: cancel: ESC
print: F3
print all: F2
<storage>
display all data
no data
en
Page 25
27
en
2.8.2 Retrieving saved measurement results
from a defined date range
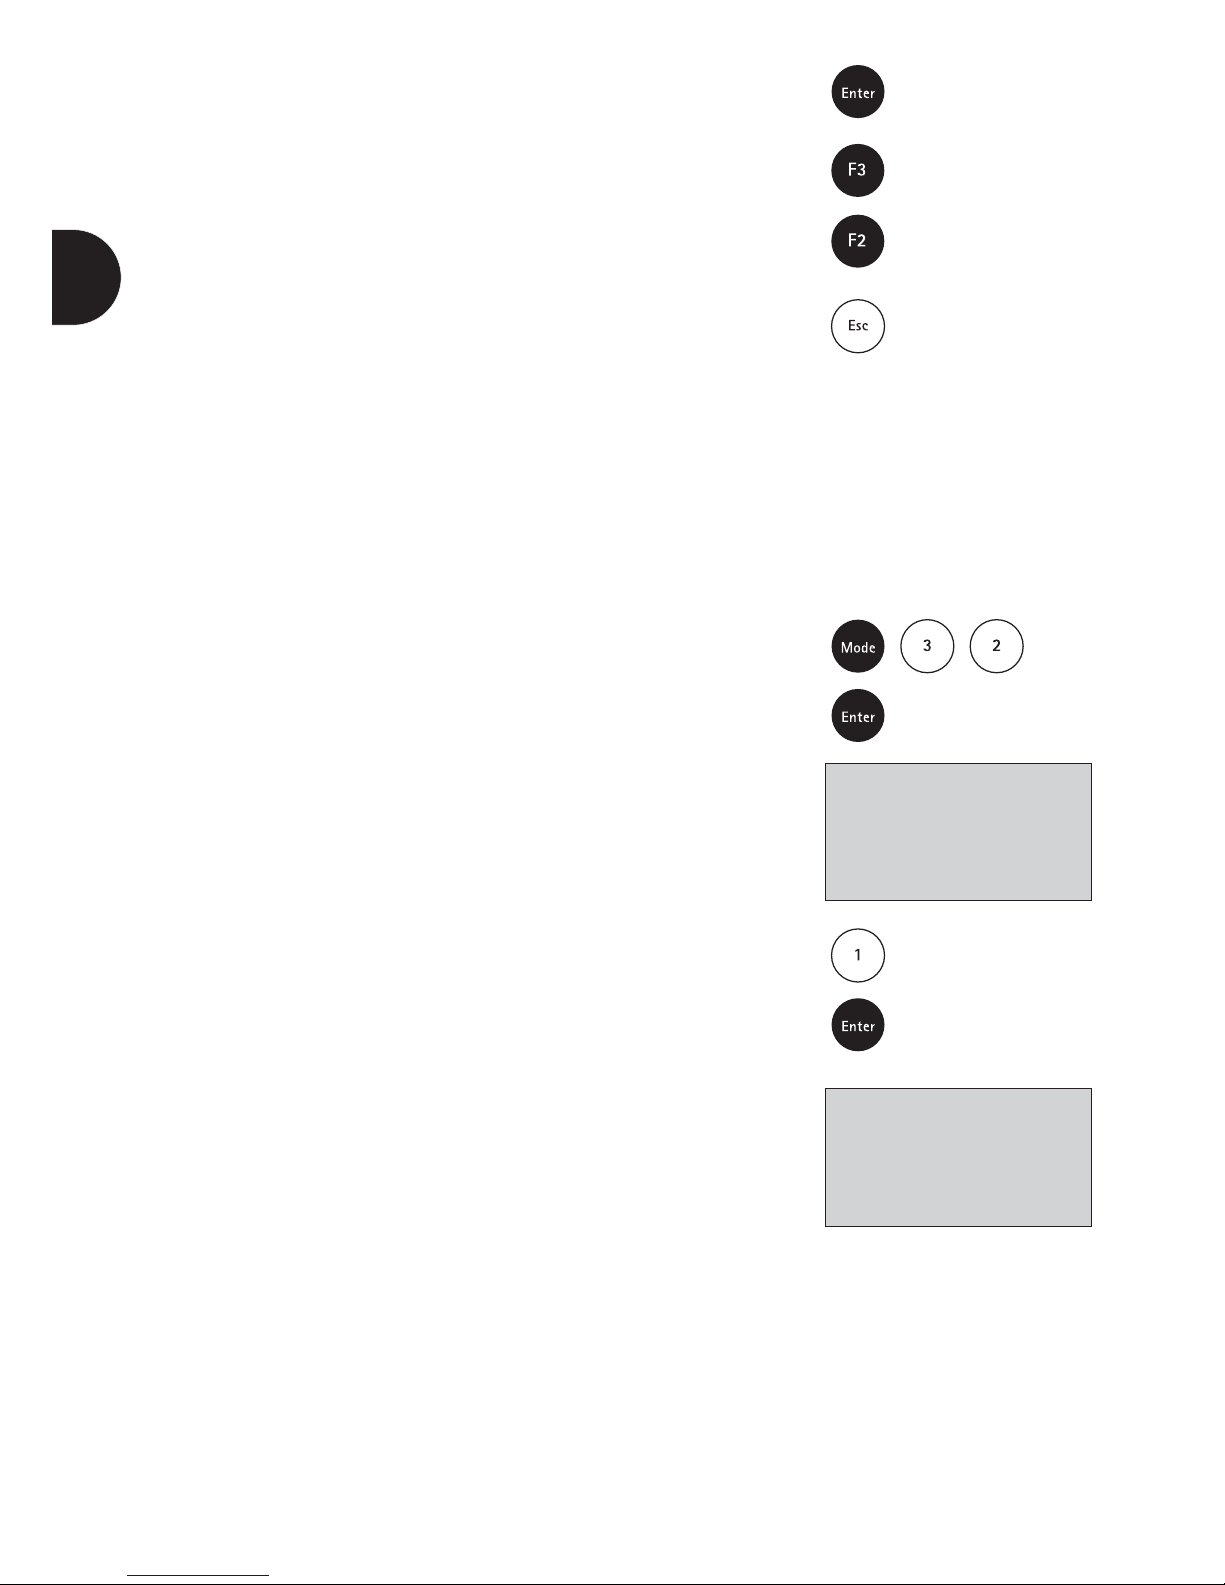
Press the keys [Mode] [3] [1] in succession.
Confirm your selection by pressing [Enter].
The display shows:
Enter the starting date in the sequence year, month, day:
e.g.: July 14, 2006 = [0] [6] [0] [7] [1] [4].
Confirm by pressing [Enter].
The display shows:
Enter the end date in the sequence year, month, day:
e.g.: July 19, 2006 = [0] [6] [0] [7] [1] [9].
Confirm by pressing [Enter].
The display shows:
<storage>
sorted: date
from yy-mm-dd
__-__-__
<storage>
sorted: date
to yy-mm-dd
__-__-__
<storage>
sorted: date
from 2006-07-14
to 2006-07-19
Start: cancel:ESC
print:F3
print all:F2
Page 26
28
Pressing the [Enter] key shows the saved test results
for the defined period of time.
Pressing the [F3] key prints out the result shown on
the display.
Pressing the [F2] key prints out all selected results.
Exit by pressing the [Esc] key.
Note
To show test results obtained on just one day, enter the same
date for both start and end date.
2.8.3 Retrieving saved measurement results
from a defined code-No. range
Press the keys [Mode] [3] [2] in succession.
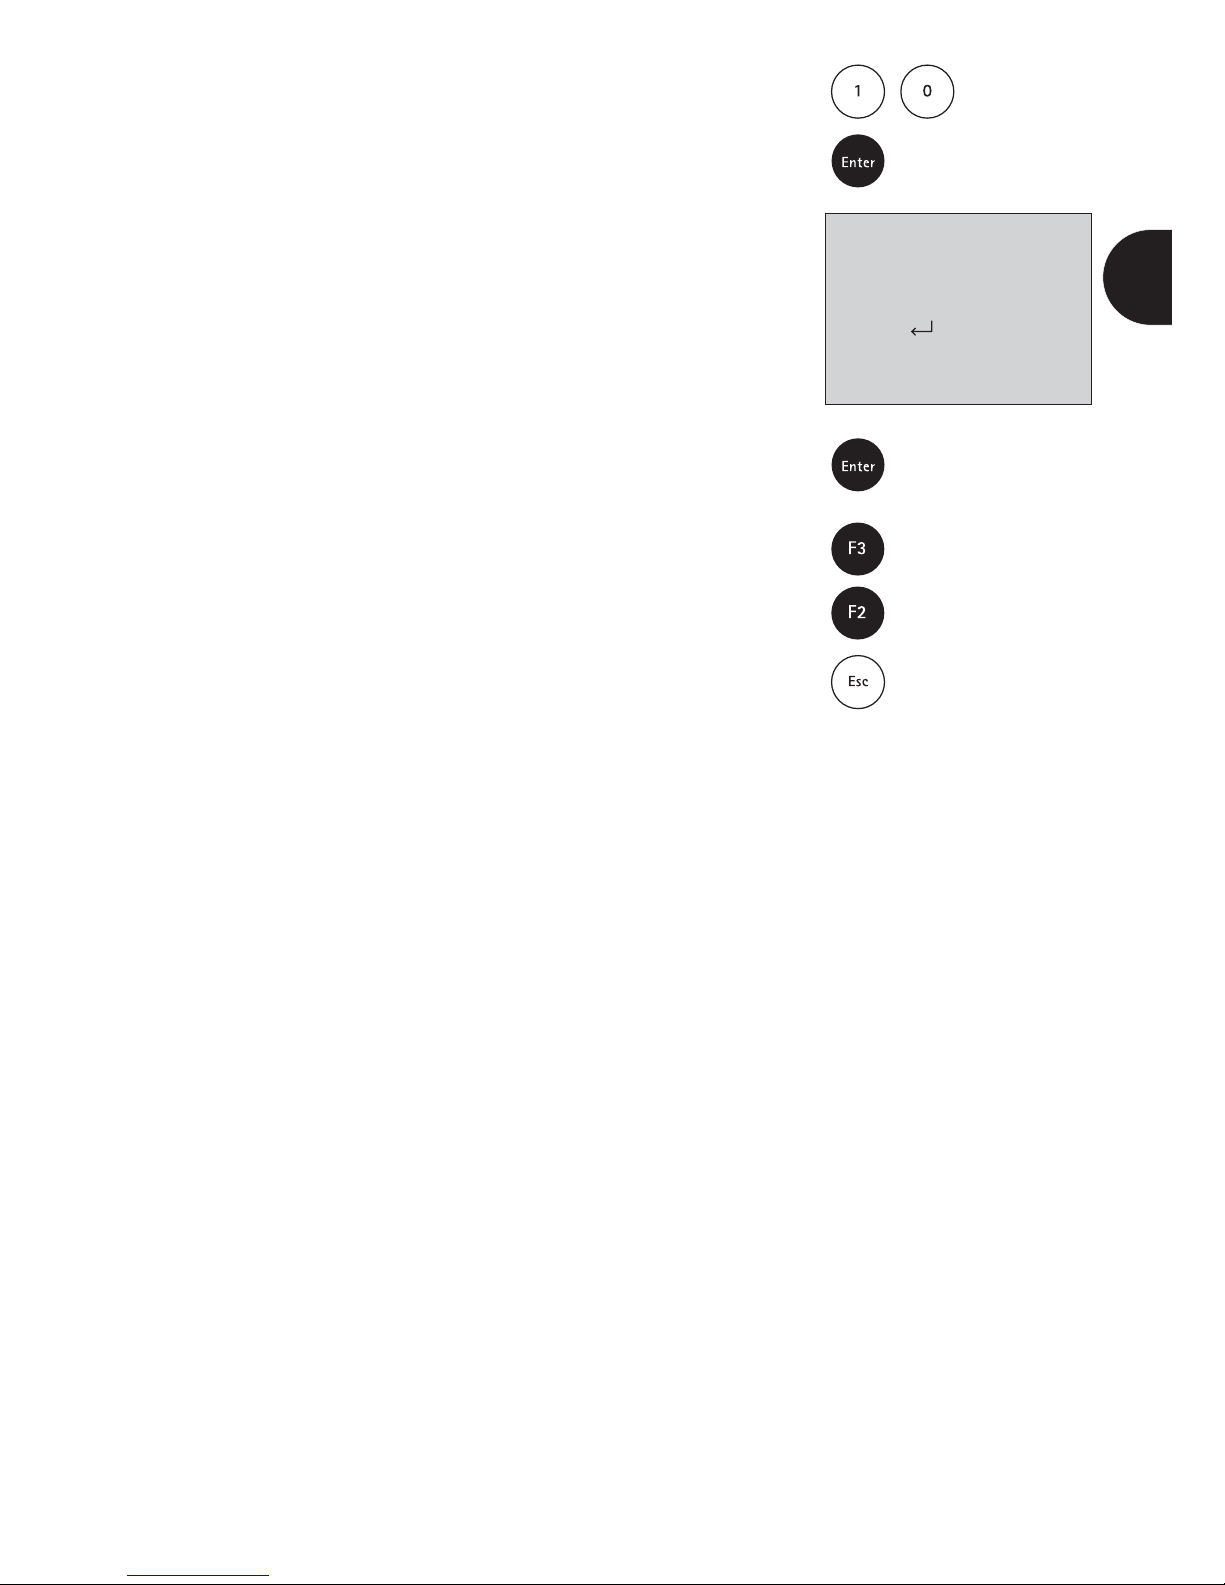
Confirm your selection by pressing [Enter].
The display shows:
Enter the start code No. (max. 6 digits), e.g.: [1].
Confirm by pressing [Enter].
The display shows:
<storage>
sorted: Code-No.
from _ _ _ _ _ _
<storage>
sorted: Code-No.
from 1 _ _ _ _ _
to _ _ _ _ _ _
en
Page 27
29
en
Enter the end code No. (max. 6 digits), e.g.: [1] [0].
Confirm by pressing [Enter].
The display shows:
Pressing the [Enter] key shows all saved test results for the
selected code-No. range.
Pressing the [F3] key prints out the result shown on the display.
Pressing the [F2] key prints out all selected results.
Exit by pressing the [Esc] key.
Note
To show test results with one and the same code No., enter the
same number for both the start and the end code No.
To show all test results without the code No. (code No. = 0),
enter a zero [0] for both the start and the end code No.
<storage>
sorted: Code-No.
from 000001
to 000010
Start: cancel:ESC
print:F3
print all:F2
Page 28
30
2.8.4 Retrieving saved measurement results
from a defined method
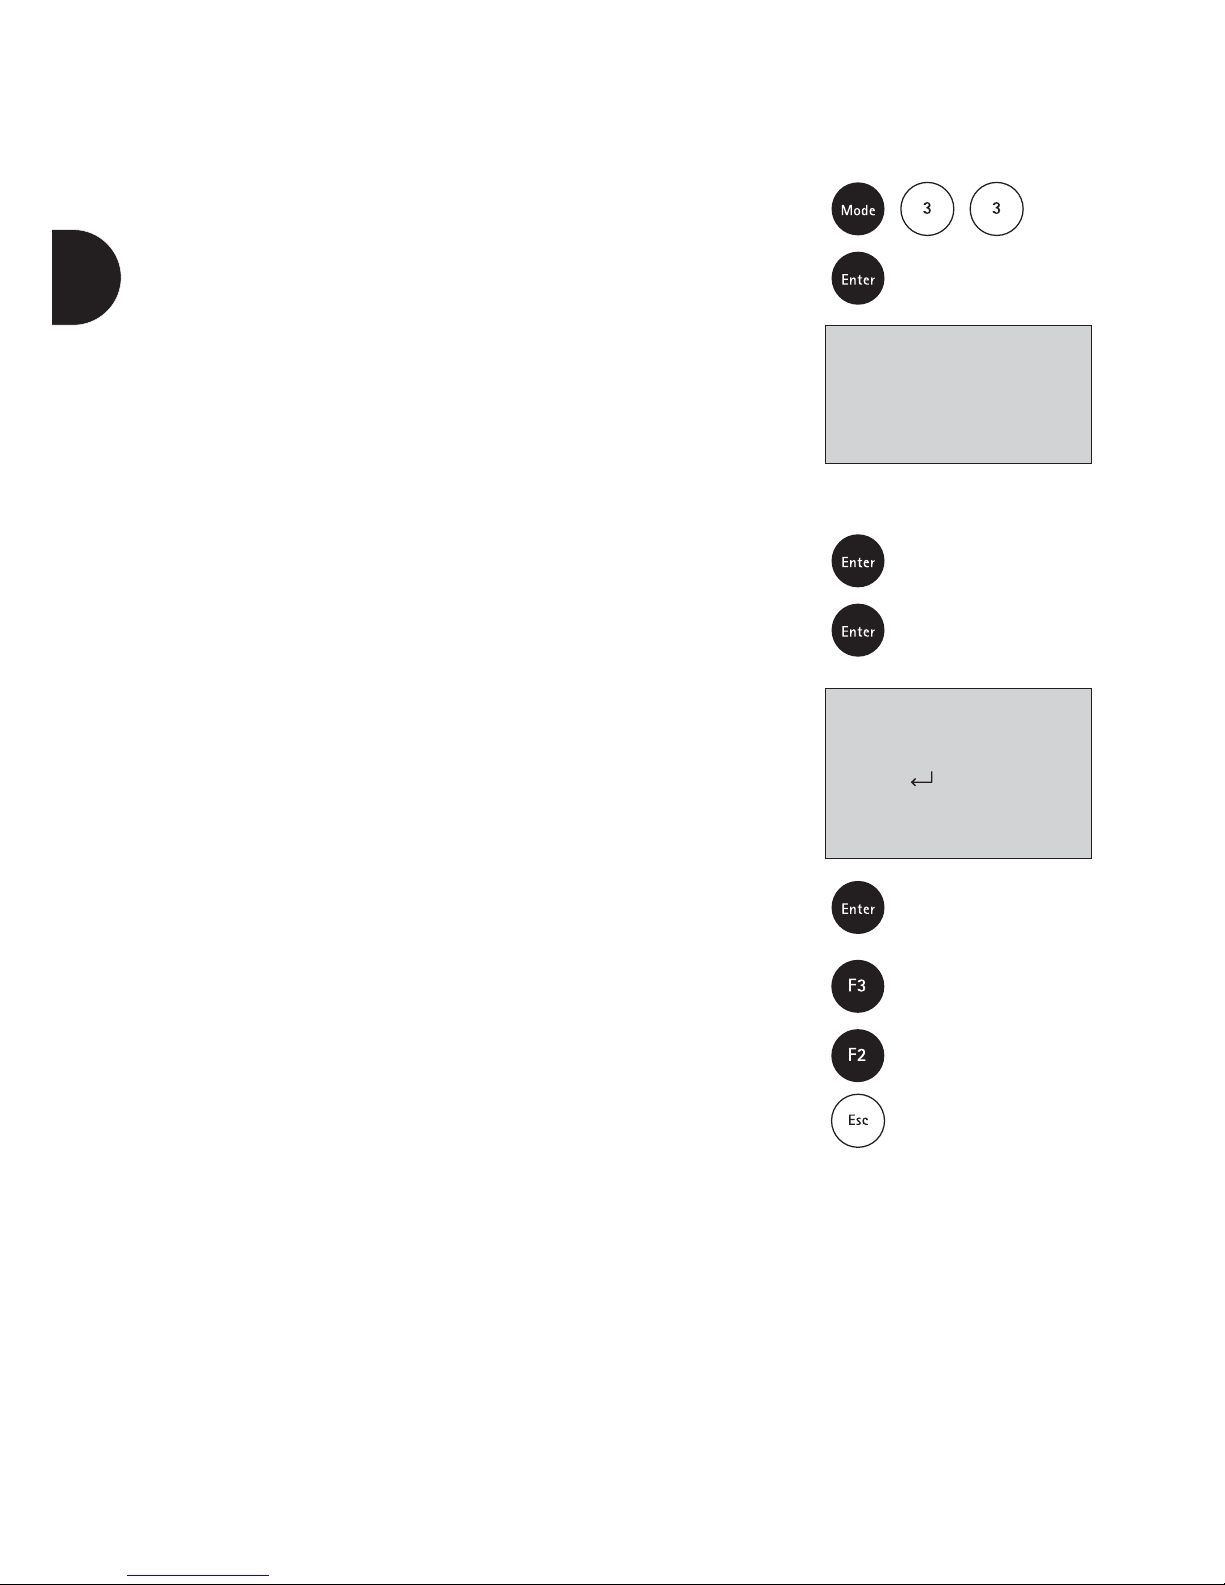
Press the keys [Mode] [3] [3] in succession.
Confirm your selection by pressing [Enter].
The display shows e.g.:
Select the desired method from the list or otherwise enter the
method number directly, e.g. 21 (aluminium 00594).
Confirm by pressing [Enter].
In the case of differentiated methods make the corresponding
new selection and confirm by pressing the [Enter] key.
The display shows:
Pressing the [Enter] key shows all saved test results for the
selected method.
Pressing the [F3] key prints out the result shown on the display.
Pressing the [F2] key prints out all selected results.
Exit by pressing the [Esc] key.
<storage>
>> 10 Acid cap. 01758
20 Aluminium 14825
21 Aluminium 00594
...
<storage>
method
21 Aluminium 00594
Start: cancel:ESC
print:F3
print all:F2
en
Page 29
31
en
2.9 Deleting saved
measurement results
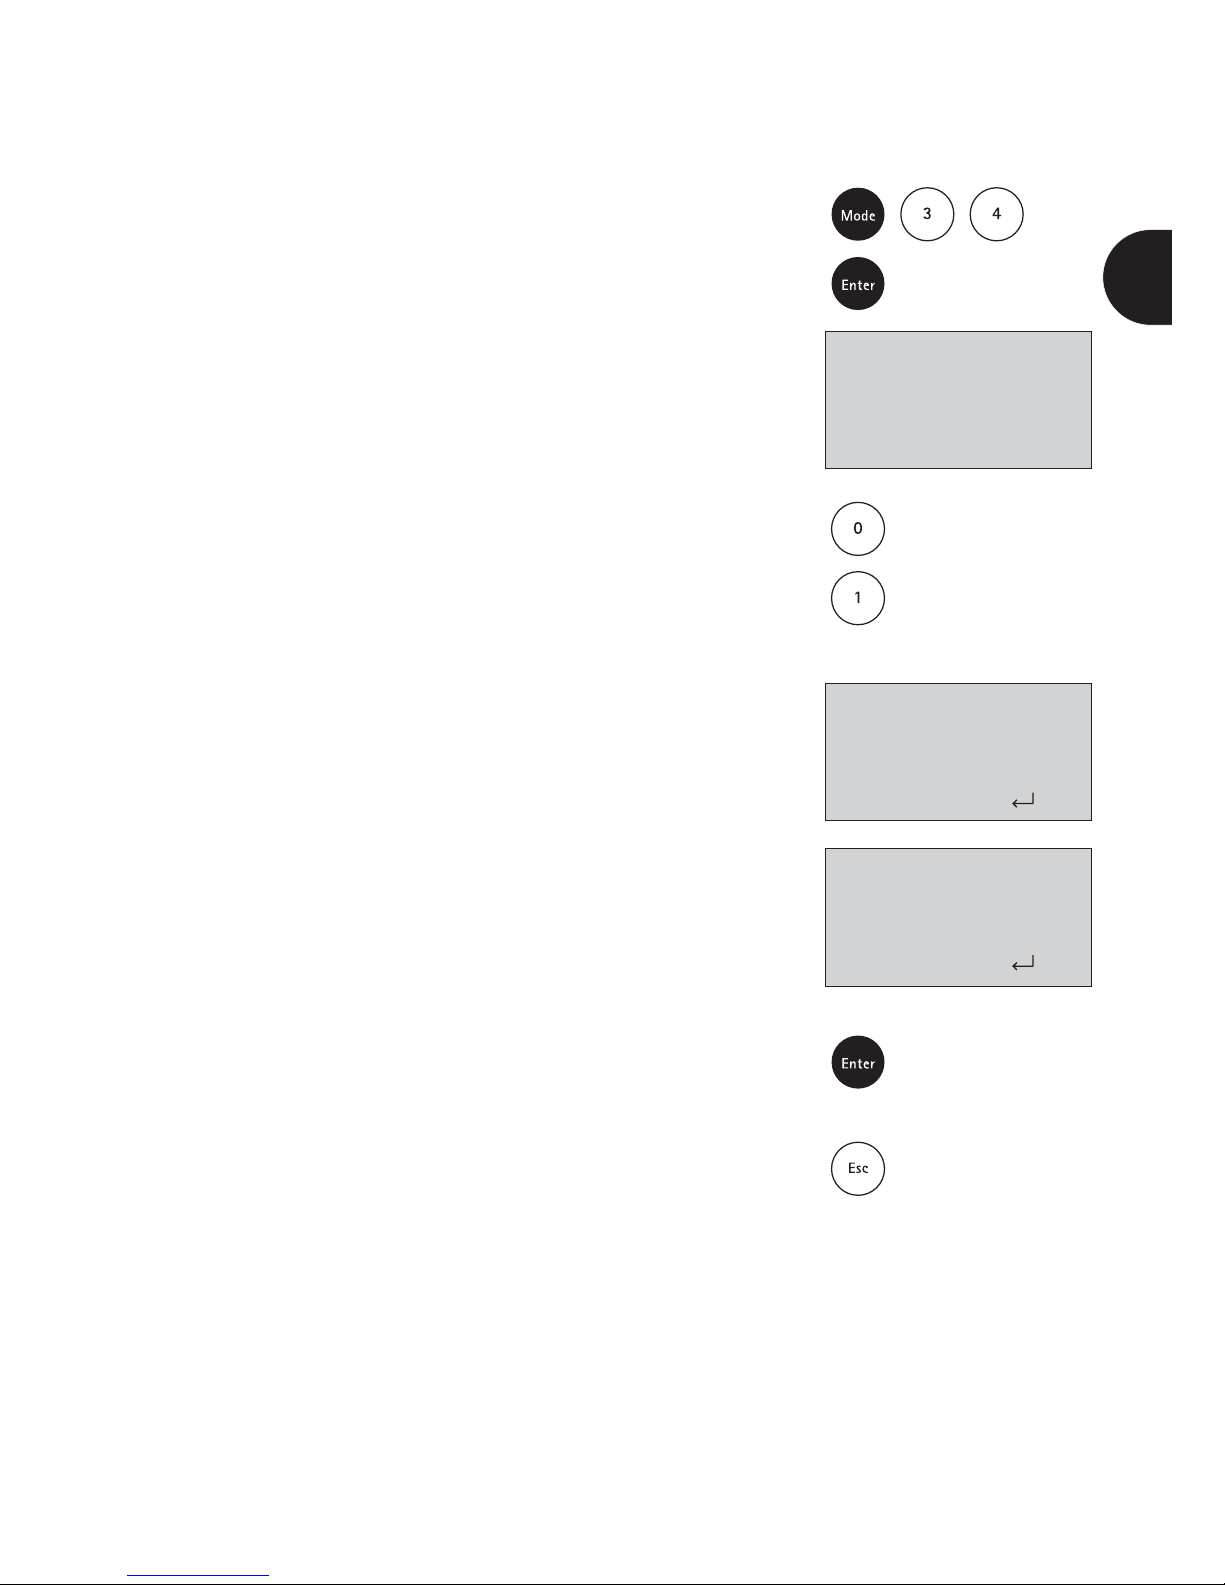
Press the keys [Mode] [3] [4] in succession.
Confirm your selection by pressing [Enter].
The display shows:
Pressing the [0] key saves the data for further use.
Pressing the [1] key deletes the data from the memory records.
The display shows:
or, respectively,
Confirm by pressing [Enter].
In the event that you press the [1] key by mistake, you can
exit the menu by pressing the [Esc] key if you wish to save the
data from deletion.
Note
All saved measurement results are deleted by this operation,
irrespective of the method.
<Delete data>
Delete all Data?
YES:1 NO:0
<Delete data>
Delete all Data?
YES:1 NO:0
do not delete
<Delete data>
Delete all Data?
YES:1 NO:0
Delete Data
Page 30
32
Other functions
3.1 User-specific method list
In the unit's delivery configuration the method-selection list
displays all available methods. Additionally the user can
configure the method-selection list to suit his/her specific
requirements.
After an update all new methods are automatically added
to the user list.
For software-technical reasons at least one method must be
activated in the user-specific method list. The unit automatically
activates the first method stored in the sorting list.
For this reason another method must be activated before the
automatically activated method can be deactivated.
3.1.1 Processing the user-specific method list
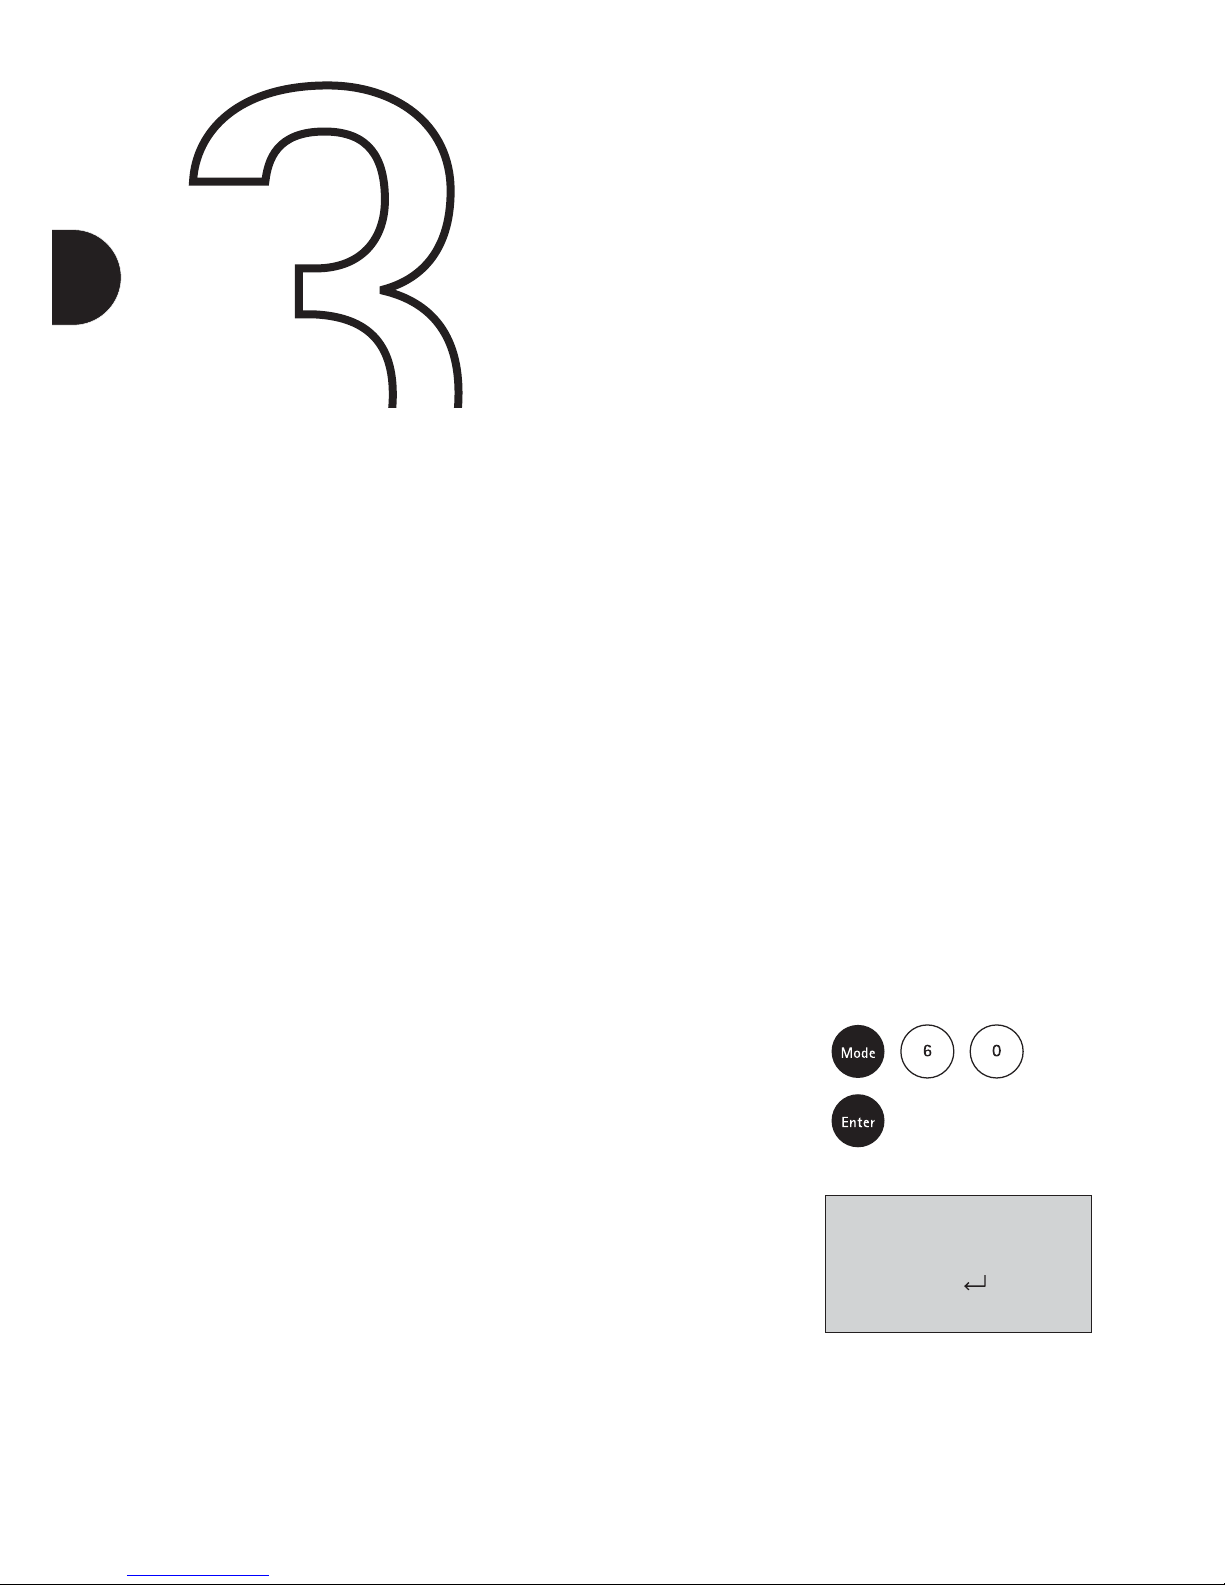
Press the keys [Mode] [6] [0] in succession.
Confirm your selection by pressing [Enter].
The display shows:
<methods list>
selected: •
toggle: F2
save:
cancel: ESC
en
Page 31
33
en
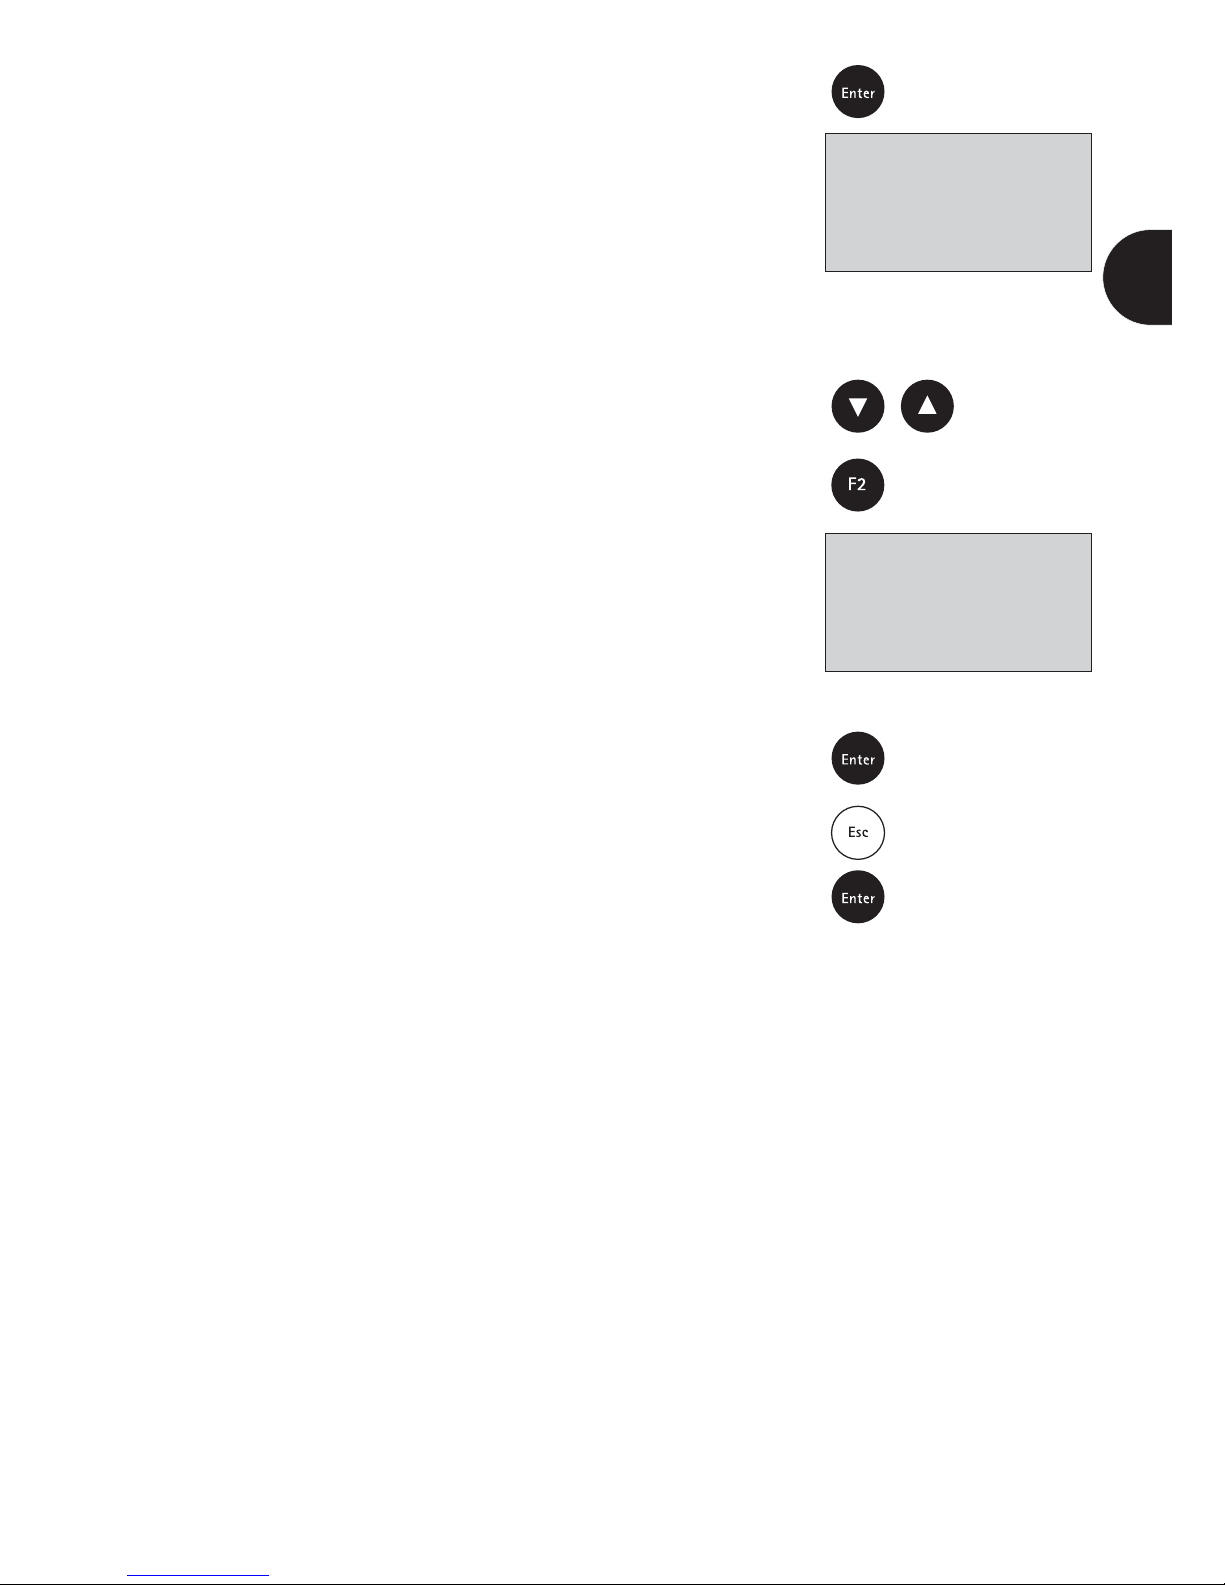
Start by pressing the [Enter] key.
The complete method list appears on the display.
Methods showing a dot (•) following the method number
appear in the method-selection list, while methods without
the dot are not shown.
Press the [] or [] keys to position the cursor next to the
method to be processed.
Use the [F2] key to switch between “activated” and “deactivated”.
Deactivated methods are then shown without the dot.
Select the next method and follow the above procedure to
adjust the list to match your requirements until all methods
show the desired settings.
Confirm your selection for saving by pressing [Enter].
Pressing the [Esc] key
and then the [Enter] key
enables you to exit this mode at any time without adopting
the alterations.
Tip
In the event that you wish for only a few methods to be shown
in the method-selection list, it is advisable to first execute
mode 62 “Mlist all off” (deactivate all methods) and then to
process the method-selection list using mode 60 “Method list”.
All you then need do is select the methods that you would
like to include in the method-selection list for later use by
marking them with the dot (•).
The names of the user polynomials (1-25) and user concentrations (1-10) all appear in the method list, even when they are
not programmed. Unprogrammed methods cannot be activated!
<methods list>
>>10•Acid cap. 01758
20•Aluminium 14825
21•Aluminium 00594
...
<methods list>
>>10•Acid cap. 01758
20 Aluminium 14825
21•Aluminium 00594
...
Page 32
34
3.1.2 User-specific method list:
Activate all methods
This mode function activates all methods
and the complete method-selection list appears when the unit
is switched on.
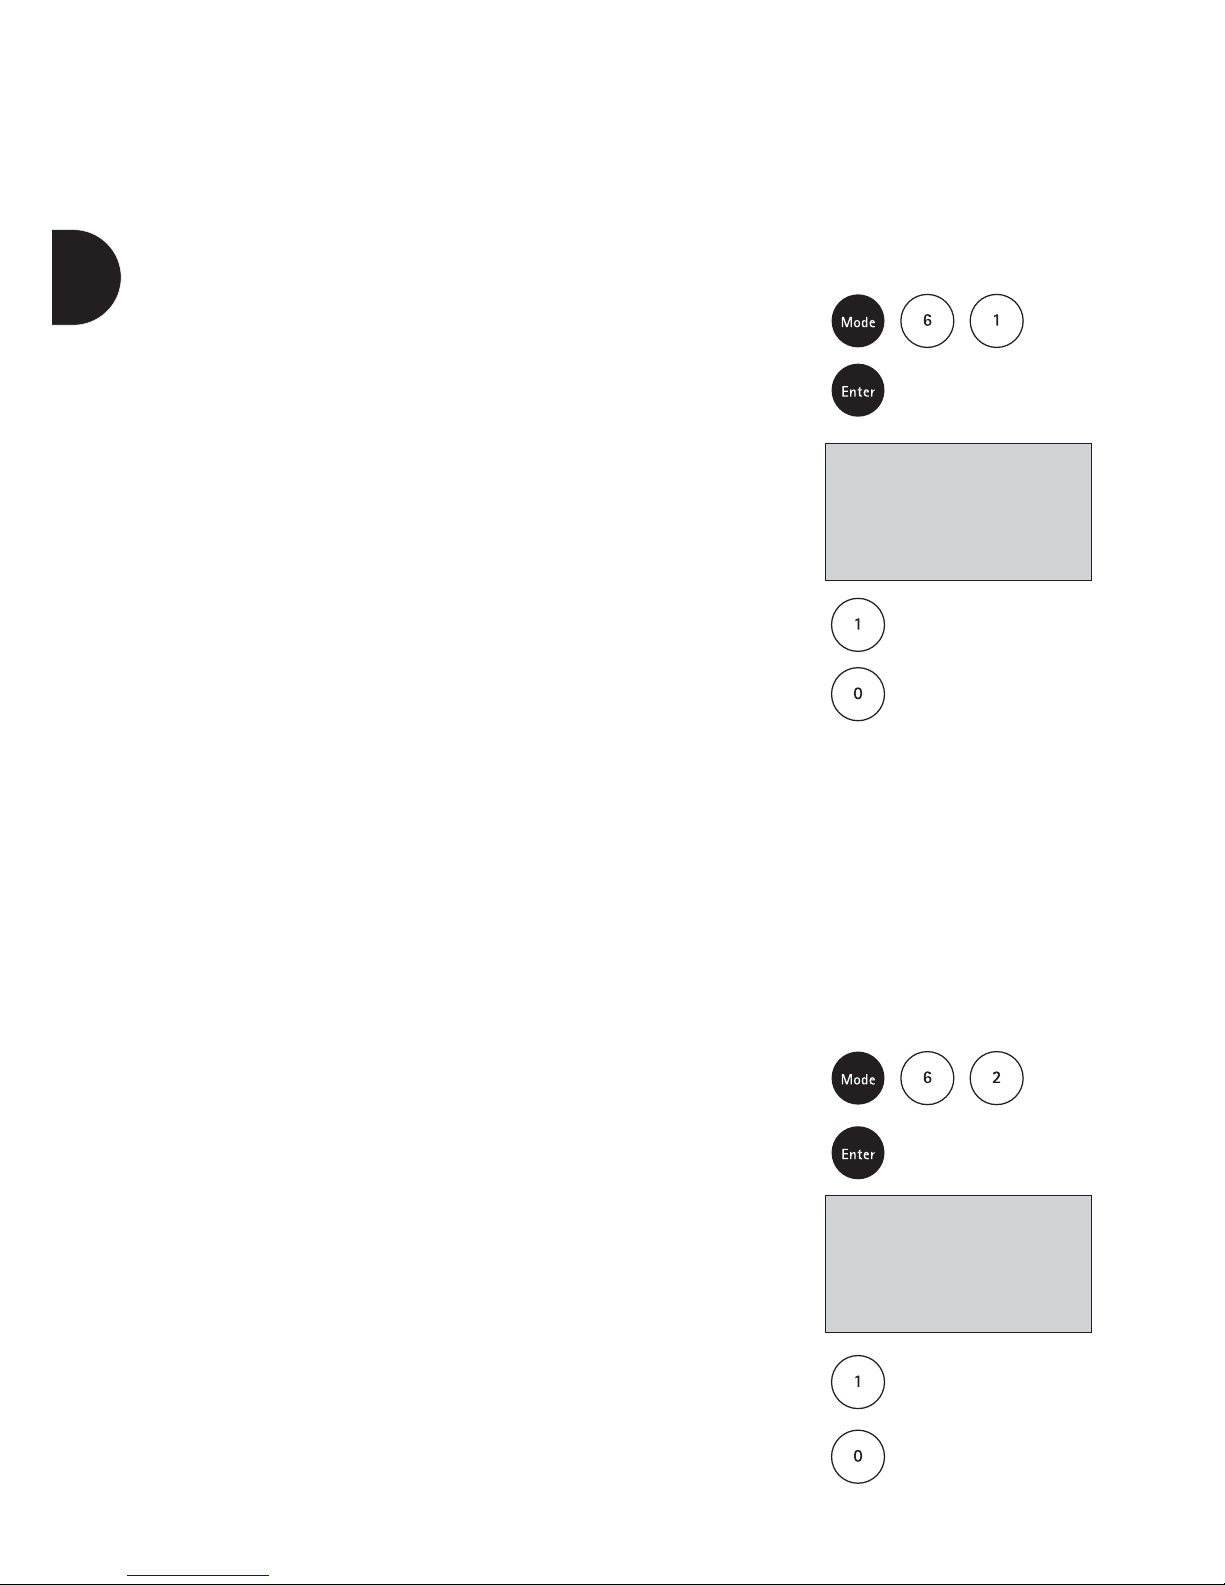
Press the keys [Mode] [6] [1] in succession.
Confirm your selection by pressing [Enter].
The display shows:
Pressing the [1] key shows all methods in the methodselection list.
Pressing the [0] key saves the current method-selection list
for later use.
The unit then returns to the mode menu.
3.1.3 User-specific method list:
Deactivate all methods
For software-technical reasons at least one method must be
activated in the user-specific method list. The unit automatically activates the first method stored in the sorting list.
Press the keys [Mode] [6] [2] in succession.
Confirm your selection by pressing [Enter].
The display shows:
Pressing the [1] key shows just one method in the method list.
Pressing the [0] key saves the current method list for later use.
The unit then returns to the mode menu.
<Mlist all on>
switch on all
methods
YES:1 NO:0
<Mlist all off>
switch off all
methods
YES:1 NO:0
en
Page 33
35
en
3.2 Profi mode
As a rule the methods include the following information:
a) Method
b) Measuring range
c) Date and time
d) Differentiation of measurement results
e) Observance of reaction times (countdown)
When the Profi mode is activated, the colorimeter restricts
itself to a minimum of user guidance. Items d and e are omitted.
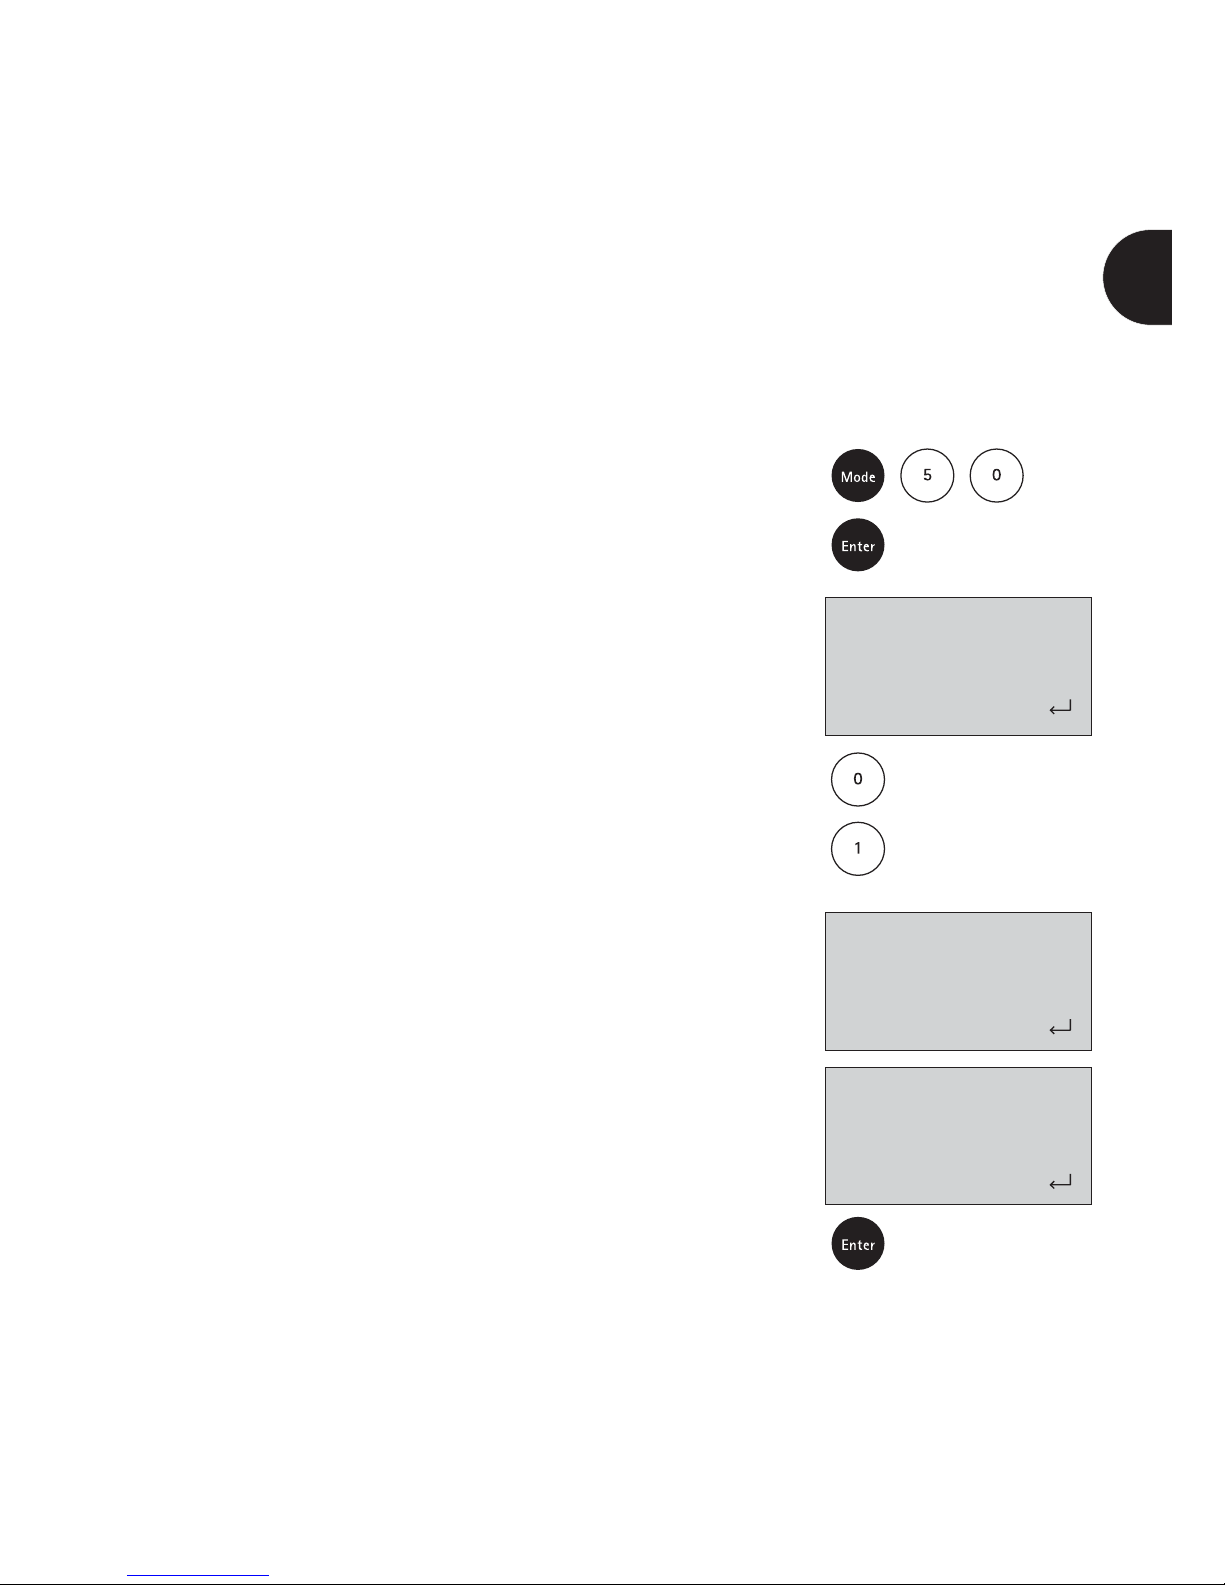
Press the keys [Mode] [5] [0] in succession.
Confirm your selection by pressing [Enter].
The display shows:
Pressing the [0] key deactivates the Profi mode.
Pressing the [1] key activates the Profi mode.
The display shows:
or
Confirm by pressing [Enter].
Note
It is also possible to save results in the Profi mode.
When results are saved here, the display also shows the
message: “Profi mode”. This selected setting remains
activated even when the unit is switched off until a new
setting is made.
<Profi-Mode>
actual:
switched off
ON:1 OFF:0
<Profi-Mode>
actual:
switched off
ON:1 OFF:0
switched on
<Profi-Mode>
actual:
switched off
ON:1 OFF:0
switched off
Page 34
36
3.3 Acoustic signals
3.3.1 Activating/deactivating the key beep
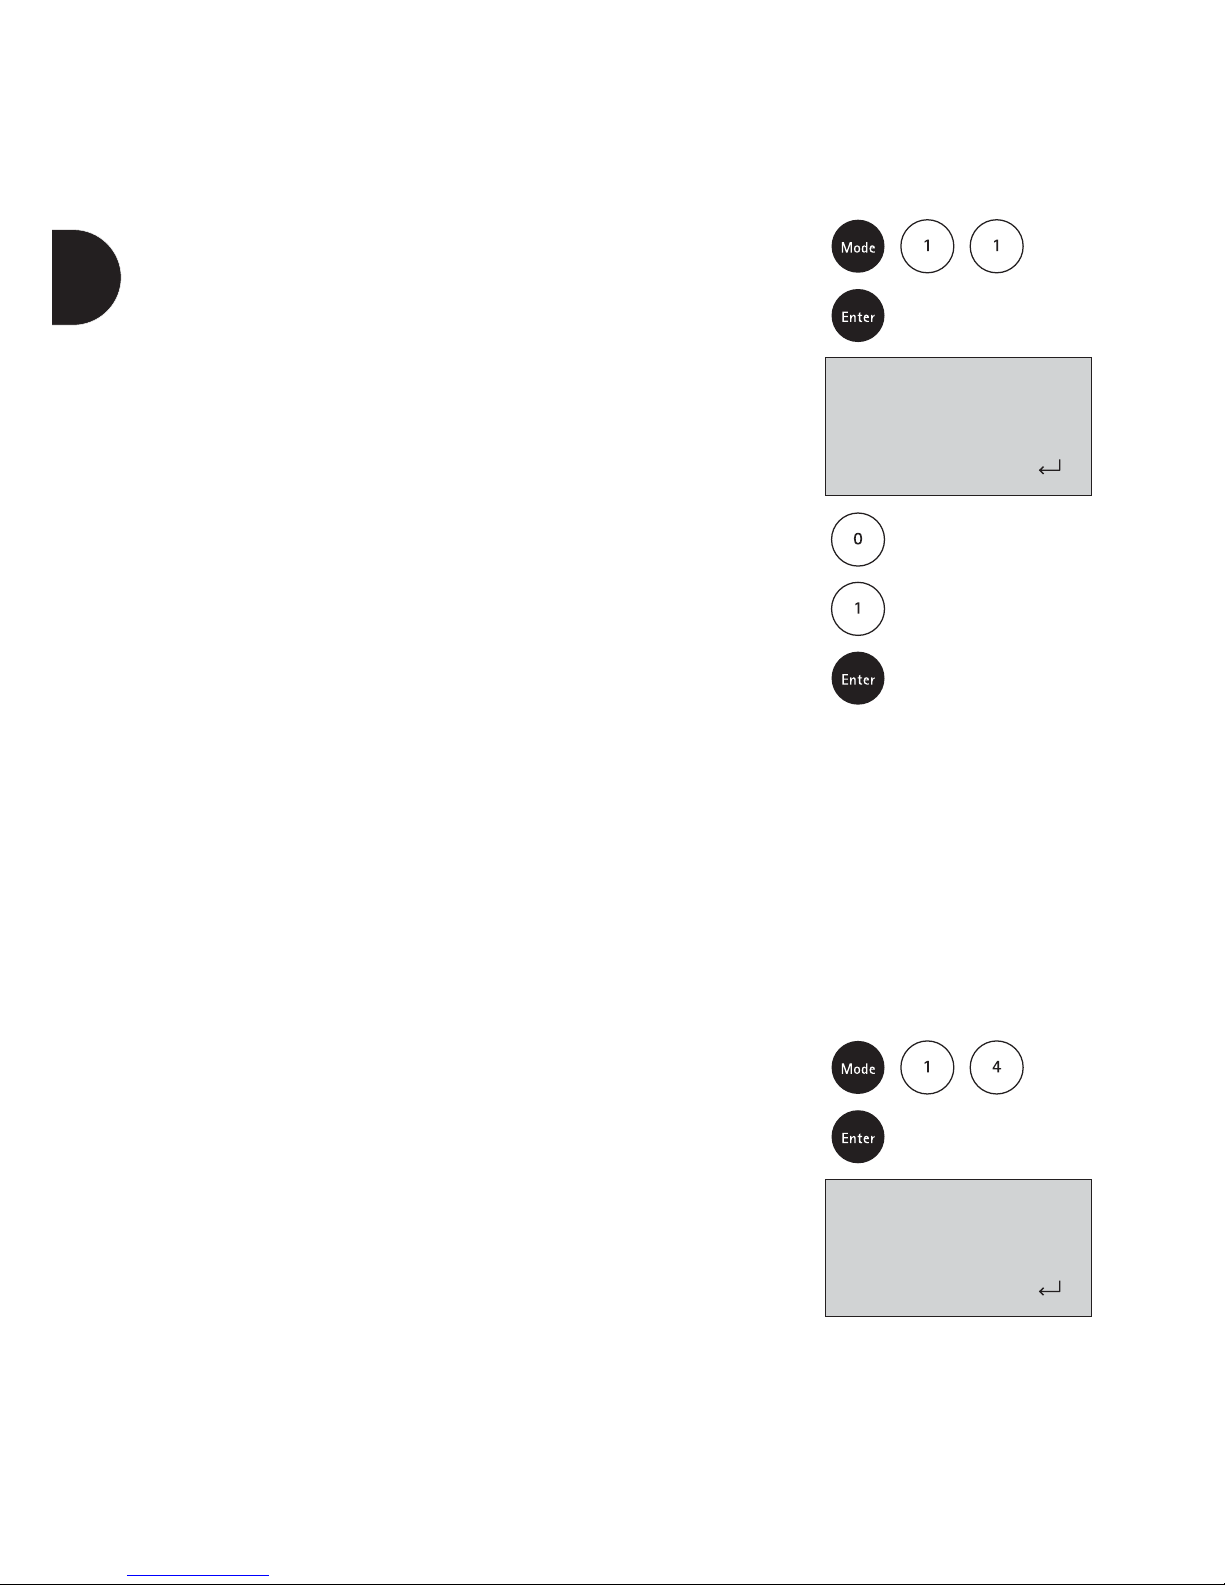
Press the keys [Mode] [1] [1] in succession.
Confirm your selection by pressing [Enter].
The display shows:
Pressing the [0] key deactivates the key beep function.
Press the [1] key activates the key beep function.
Confirm by pressing [Enter].
Note
In connection with methods that include a reaction time, the
unit emits an acoustic signal in the last 10 seconds before the
countdown expires even when the key beep function is inactive.
3.3.2 Activating/deactivating the signal beep
It takes the colorimeter approx. 8 seconds to perform a zero
calibration and measurements. It emits a brief signal beep at
the end of a measurement.
Press the keys [Mode] [1] [4] in succession.
Confirm your selection by pressing [Enter].
The display shows:
<Key-Beep>
ON:1 OFF:0
<signal-beep>
ON:1 OFF:0
en
Page 35
37
en
Pressing the [0] key deactivates the signal beep function.
Press the [1] key activates the signal beep function.
Confirm by pressing [Enter].
Note
In connection with methods that include a reaction time, the
unit emits an acoustic signal in the last 10 seconds before the
countdown expires even when the signal beep function is inactive.
3.3.3 Activating/deactivating the countdown
function (observance of reaction times)
Certain methods require the observance of reaction times.
These waiting times are stored as standard settings in the
respective methods in the form of a timer (countdown)
function. The countdown can be deactivated for all methods
involved in the following manner:
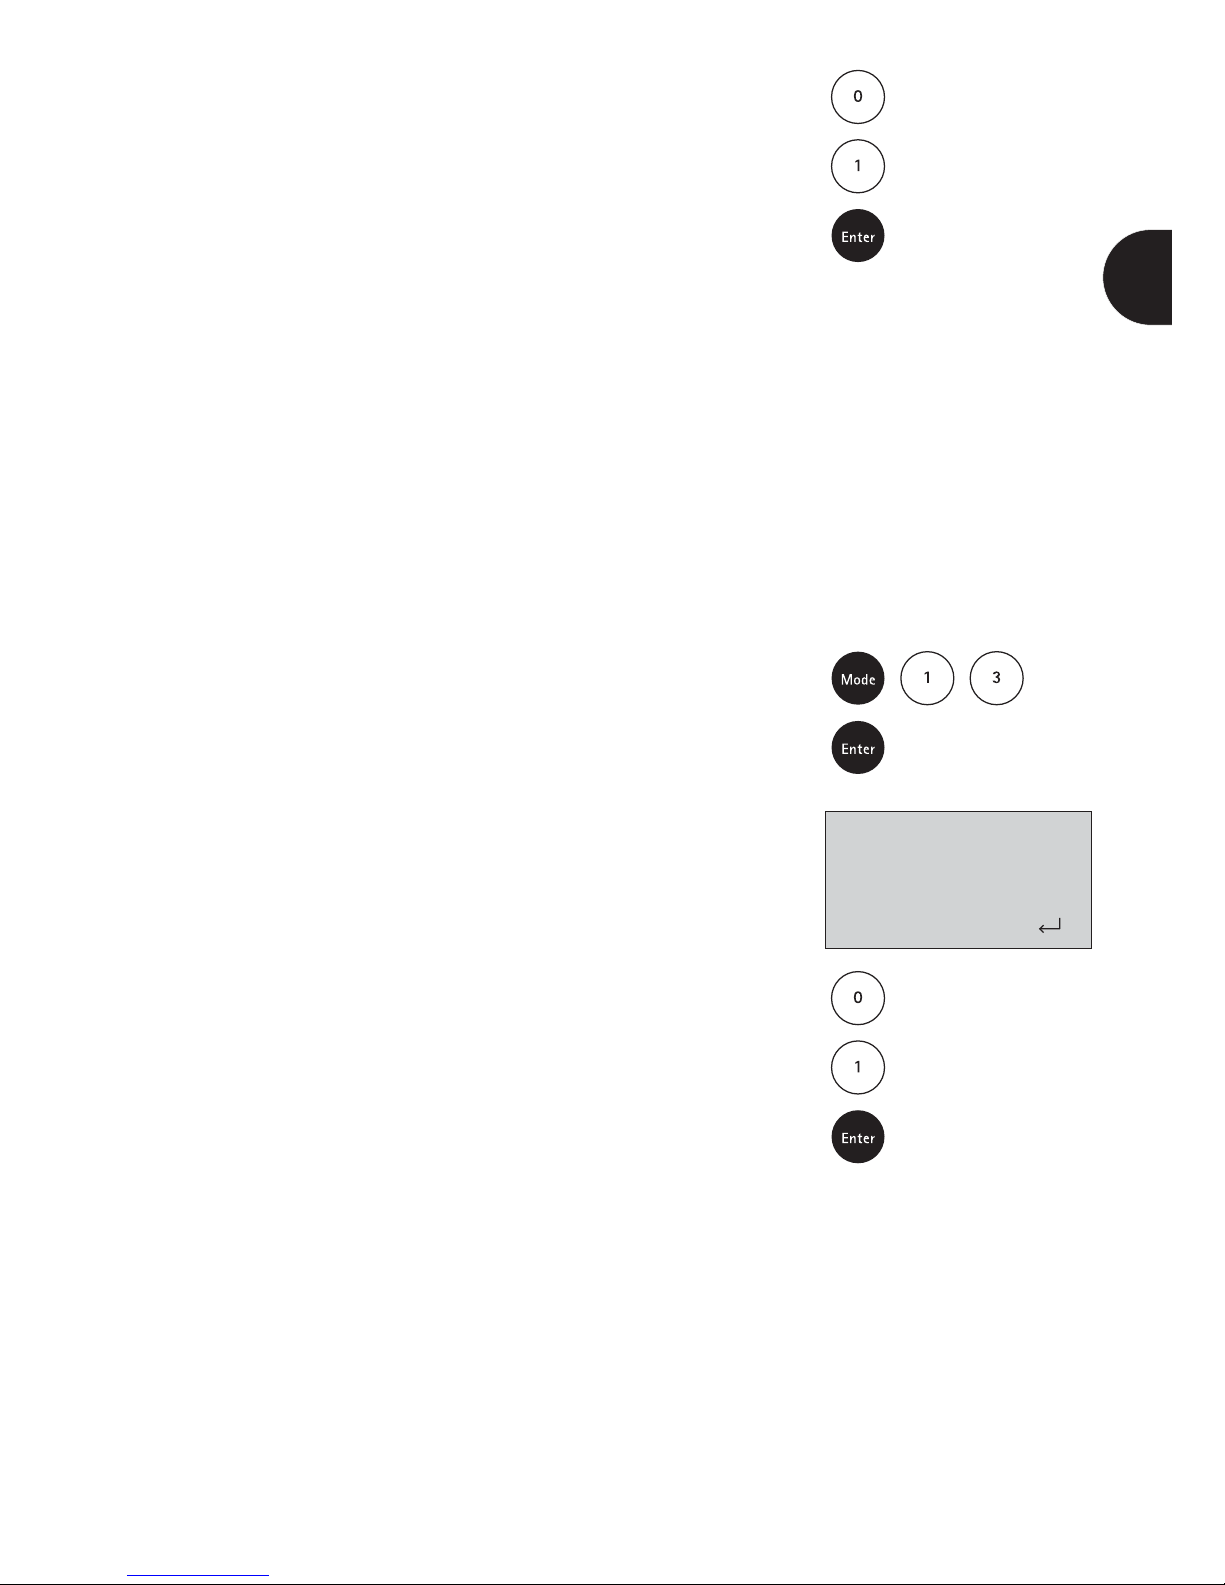
Press the keys [Mode] [1] [3] in succession.
Confirm your selection by pressing [Enter].
The display shows:
Pressing the [0] key deactivates the countdown function.
Pressing the [1] key activates the countdown function.
Confirm by pressing [Enter].
Note
When the countdown function is inactive, the necessary
reaction time must be observed by the user him-/herself. Failure
to observe the specified reaction time can lead to erroneous
results.
<countdown>
actual:
switched on
ON:1 OFF:0
Page 36
38
3.4 Setting the display contrast
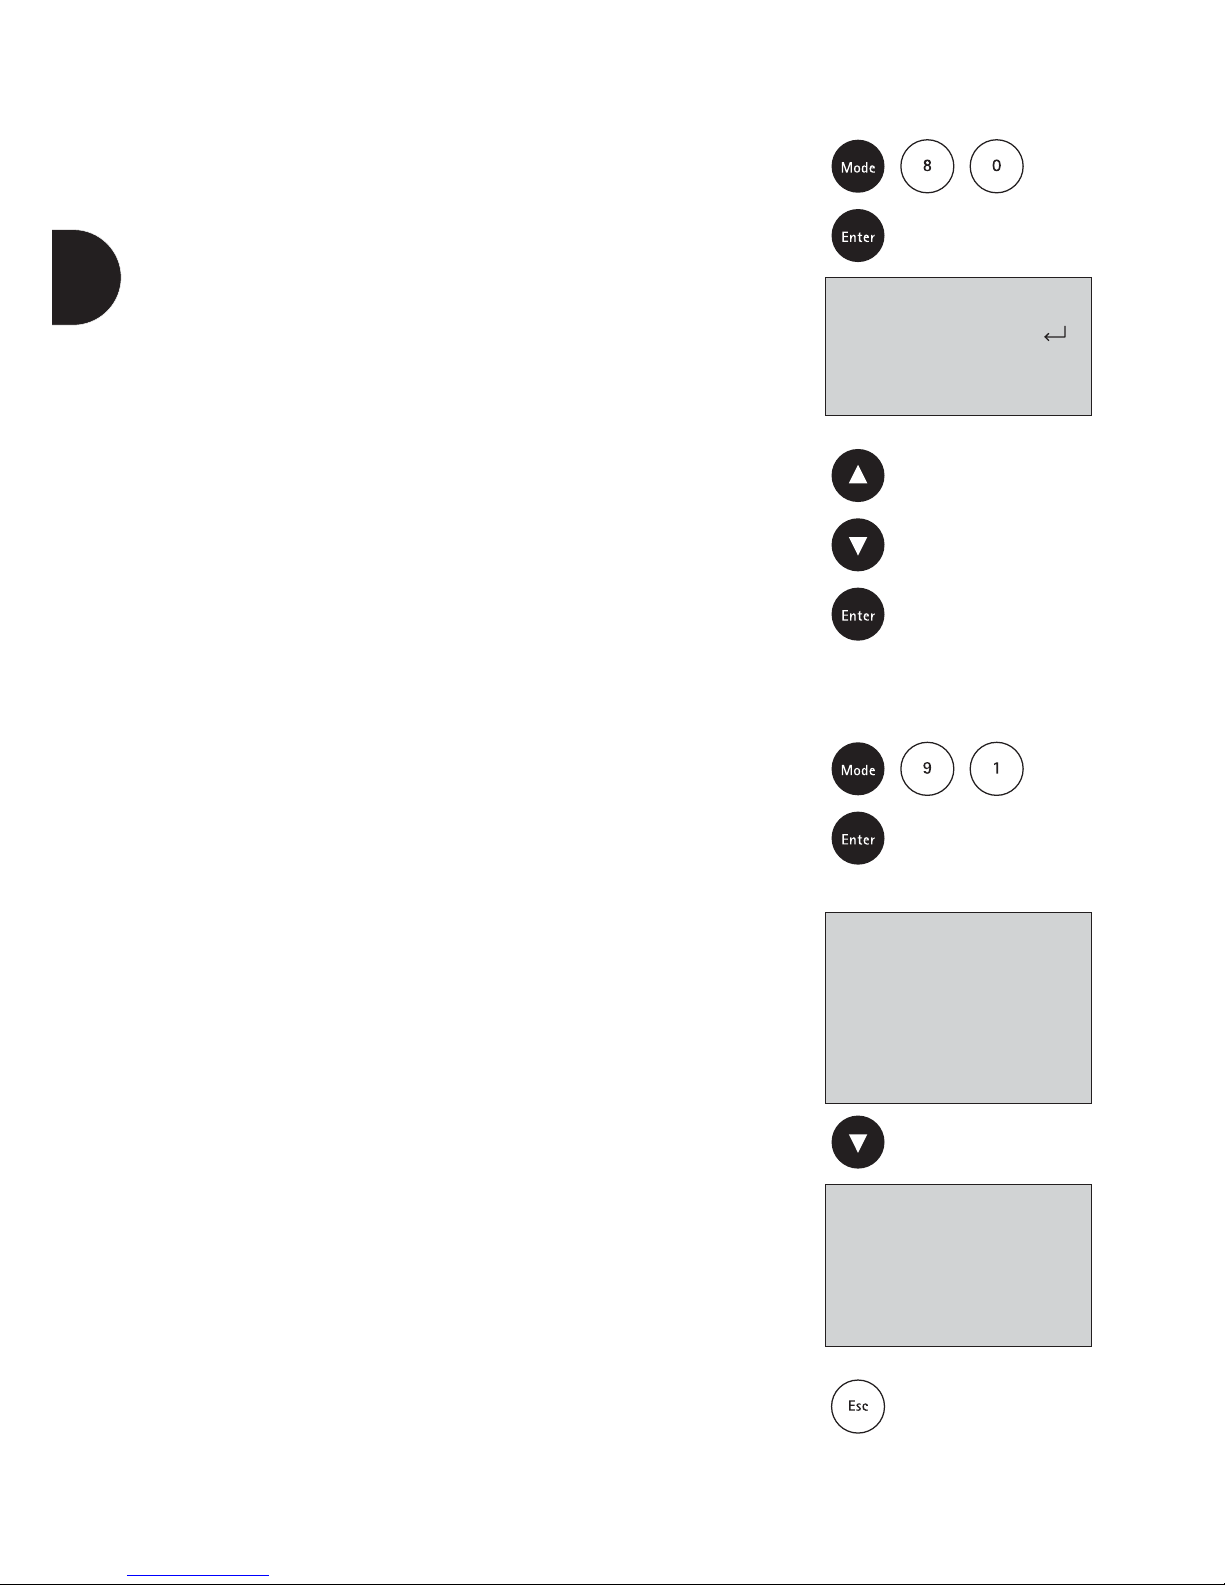
Press the keys [Mode] [8] [0] in succession.
Confirm your selection by pressing [Enter].
The display shows:
Pressing the [] key enhances the contrast of the LC display.
Pressing the [] key reduces the contrast of the LC display.
Confirm by pressing [Enter].
3.5 System info
Press the keys [Mode] [9] [1] in succession.
Confirm your selection by pressing [Enter].
This mode provides details on the current software version,
the number of measurements that have already been made,
and the number of free memory records.
Pressing the [] key takes you on to further information.
Press the [Esc] key to return to the mode menu.
< LCD contrast>
“LCD contrast”
<System-Info>
Software:
VO12.004.3.003.002
mains power:
yes
more: cancel: ESC
<System-Info>
Number of Tests:
6
free records left:
999
cancel: ESC
en
Page 37
39
4.1 User messages on the display
/ Error messages
Display message: ADU Err 01: xx (xx = 01, 02, 10, or 20)
Measure: Initialize LED parameters
Please carry out the following steps to set and save the LED
brightness parameters:
Test the software version of the unit by pressing the keys
[Mode] [9] [1].
The version should be V012.00x.3.003.zzz, with zzz = 003 or
higher. If you have a lower software version you should perform a software update (see chapter 5.5, "Software update via
Internet"). To do this download the current version for the
Spectroquant® Multy from our website
(www.service-test-kits.com).
The cell compartment must be clean and dry.
Fill one cell with distilled water and place it in the cell compartment. It is irrelevant whether you use a 16-mm or 24-mm
round cell.
Take care that the unit is NOT exposed to direct sunlight or a
bright spotlight.
Keep the [Mode] key pressed, switch off the unit
and switch it back on while pressing the [Mode] key.
Trouble-shooting
en
Page 38
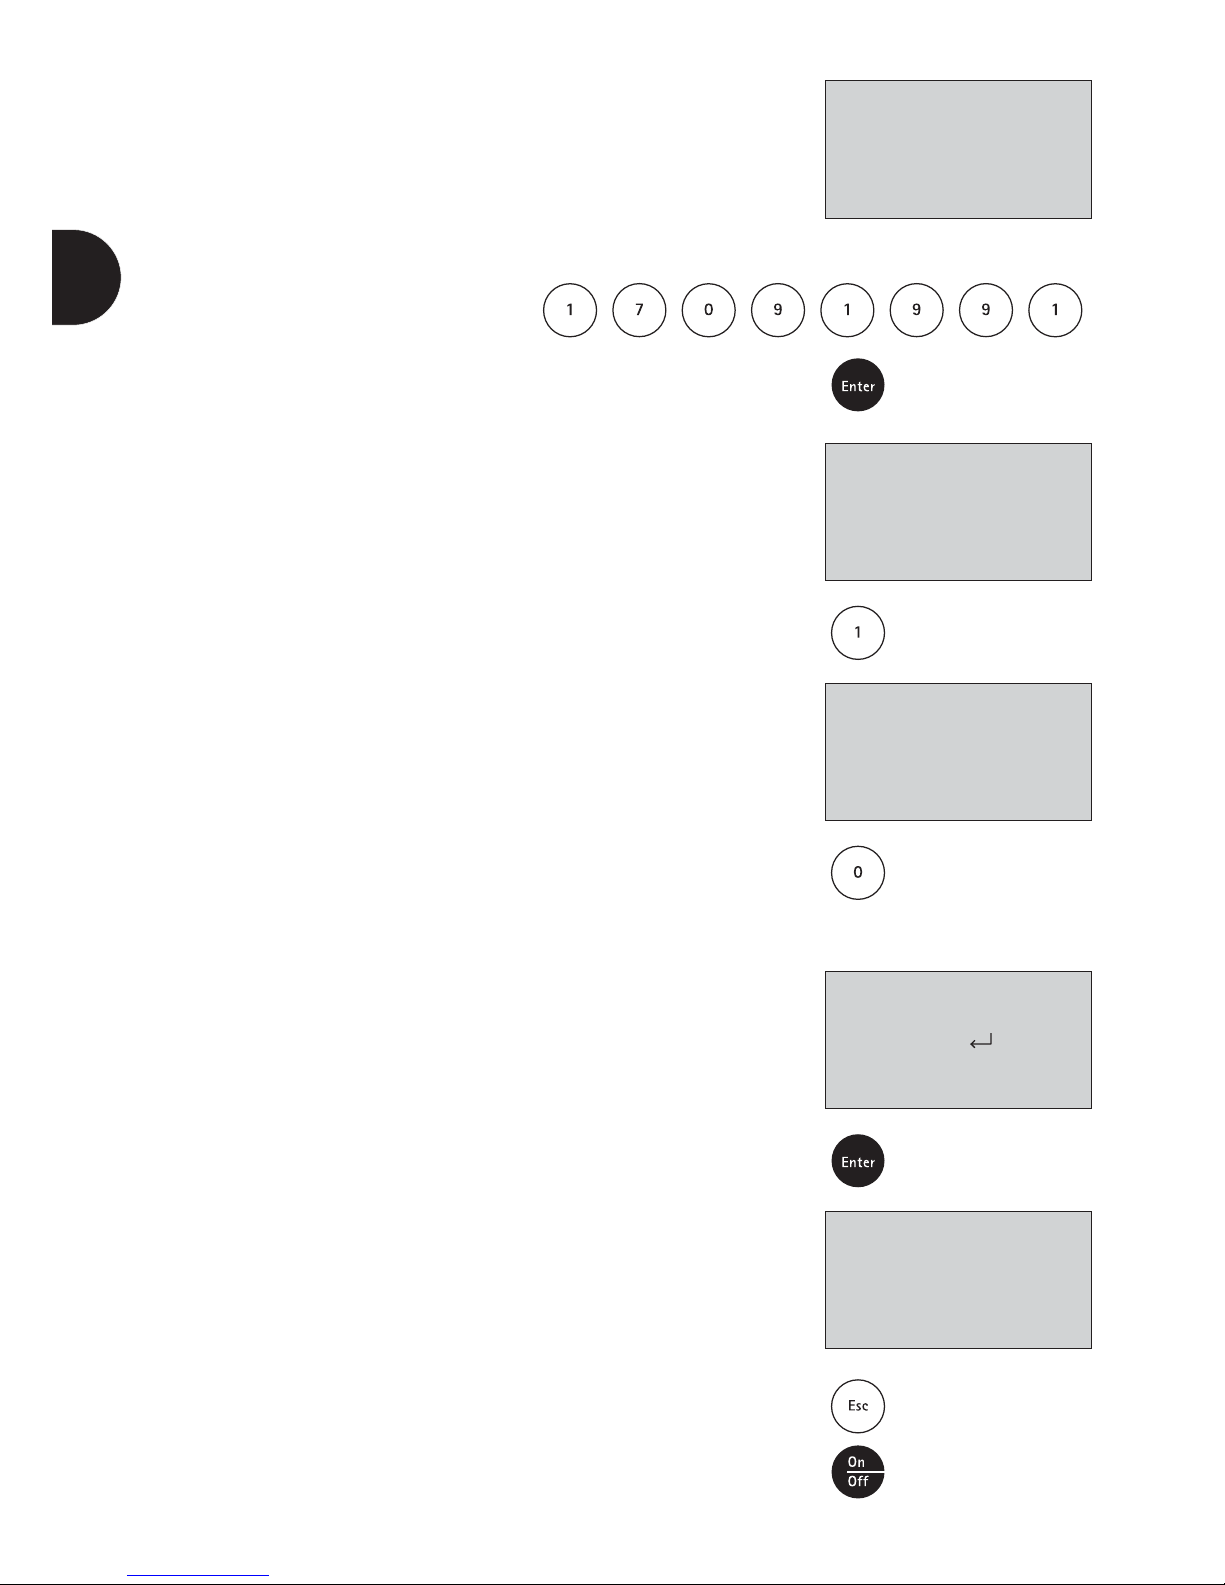
40
The display shows:
Enter the password: [1] [7] [0] [9] [1] [9] [9] [1].
Confirm by pressing [Enter].
The display shows:
Press the [1] key.
The display then shows:
Press the [0] key.
The LED parameters are now determined. The unit displays the
wavelength in operation, and shortly thereafter "LED-Opt. o.k."
if the determined parameter is correct.
When all the LEDs have been processed the display shows:
Confirm by pressing [Enter].
The display then shows:
Press the [Esc] key.
The unit continues to run normally. Now switch off by pressing
the [On/Off] key.
Thereafter the unit can be used as usual.
<Service Menu 01>
Password:
<Service Menu 01>
1: LED-Optim.
cancel: ESC
<LED-Optim.>
0: alle LEDs
1: LED wählen
cancel: ESC
<LED-Optim.>
LED Opt. o.k.
weiter mit
<Service Menu 01>
1: LED-Optim.
cancel: ESC
en
Page 39

41
en
Display message Possible causes Measures
Battery capacity
Full capacity
Warning signal every 3 minutes The battery capacity will be
out soon. Recharge battery pack;
Warning signal every 12 seconds operate the unit with mains adapter
Warning signal, the colorimeter switches itself off
E40 If the test result appears with Overrange/Underrange, Use a test with a standard
User cal. a user calibration is not possible of lower/higher concentration
here not possible Check sources of error, e.g.: user error (correct procedure,
observance of the reaction time, ...)
Jus Overrange E4, When the user makes calibrations, Check error sources, e.g.:
Jus Underrange E4 the setting of the specified value user error (correct procedure,
is possible only within defined limits. observance of reaction time,...)
These were exceeded or, respectively, not reached. standard (sample weight, dilution,
age, pH,...)
Repeat adjustment
Overrange Measuring range exceeded Where possible dilute sample or
select another measuring range
Turbidities in the sample Heed possible interferences
Light entering measurement compartment Seal ring attached to cell lid?
Repeat measurement with seal
ring attached
Overrange During the user calibration the upper measuring-range limit Carry out test with a standard
E1 was exceeded while setting to the specified value of lower concentration
Underrange Result below measuring range State result with lower than x mg/l
x = Lower limit of measuring range;
if necessary use a different
analytical method
Underrange E1 During the user calibration the lower measuring-range limit Carry out test with a standard
was not met while setting to the specified value. of a higher concentration
Zero Too much, too little incident light Zero cell in place?
not accepted Insert zero cell,
repeat measurement
Clean measurement compartment
Repeat zero calibration
Printer Timeout Printer inactive, no connection Connect printer,
check contacts,
switch on printer
Storage-system Power supply for storage Insert or replace the lithium
error system interrupted or not available. powerpack. Then execute mode 34
Use Mode 34 to delete the data
ADU Err 02: xx Light entering measurement compartment Seal ring attached to cell lid?
(xx = 01, 02, 10, Repeat measurement with seal
or 20) ring attached
Page 40

42
Display message Possible causes Measures
Err 51 LED used is too bright Perform a software update
Initialize LED parameters
see chapter 4.1
Err 53 Light path in measurement compartment is completely blocked Clean measurement compartment
Optics unit is mechanically defe Initialize LED parameters
Electronic defect on mainboard see chapter 4.1
It is not possible to calculate a value Correctly measured?
(e.g.: bound chlorine). If not, repeat
Example 1 Example: 1
While the values displayed
differ in terms of magnitude,
in consideration of the tolerances
they are identical.
In this case there is no bound
chlorine present in the sample.
Example 2 Example: 2
The result for free chlorine lies
outside the measuring range,
which is why the value for free
chlorine cannot be calculated.
Since no detectable free chlorine
is present, the proportion of
bound chlorine can be assumed
to be the total chlorine content.
Example 3 Example: 3
The result for total chlorine lies
outside the measuring range,
which is why the unit is not able to
calculate the value for bound
chlorine. In this case the sample
must be diluted to obtain the total
chlorine content.
4.2 Other potential sources of error
Problem Possible cause Measure
The colorimeter runs off mains power, Fuse (type A, delayed action, 20 mm) Replace fuse
but not with the otherwise fully is defective
functionable battery pack.
...
???
...
130 Chlorine CT
0.05-5.00 mg/l Cl2
0,60 mg/l free Cl
??? comb. Cl
0,59 mg/l total Cl
130 Chlorine CT
0.05-5.00 mg/l Cl2
Underrange free Cl
??? comb. Cl
0,59 mg/l total Cl
130 Chlorine CT
0.05-5.00 mg/l Cl2
0,60 mg/l free Cl
??? comb. Cl
Overrange total Cl
en
Page 41

43
en
4.3 Avoiding errors in
photometric measurements
1. The cells and lid must be cleaned thoroughly after each analy sis run to prevent errors due to cross-contamination. Even
the smallest residues of reagents will lead to erroneous results.
2. The outer walls of the cells must be clean and dry before the
analysis is carried out. Fingerprints or water droplets on the
light-path surfaces of the cells will lead to erroneous results.
3. The cells for the zero calibration and the test itself must always
be inserted into the measurement compartment in such a way
that the white triangle or, respectively, the line of the graduation
is correctly aligned with the corresponding mark on the case
(see page 16 or 17).
4. The zero calibration and the test itself must both be made with
the cell lid in place. The cell lid of the 24-mm cell must be
fitted with a seal ring. The 16-mm cell must be covered with
the lid for the adapter.
5. The formation of air bubbles on the inner walls of the cell will
lead to erroneous results. In this case attach the cell lid to
the cell and swirl the cell to eliminate any air bubbles before
carrying out the test.
6. Care must be taken to prevent any water from entering the
measurement compartment. Any entry of water into the case
of the colorimeter may result in the destruction of electronic
components and in damage due to corrosion.
7. Any contamination of the optical components in the measure ment compartment will lead to erroneous results. The light-path
surfaces of the measurement compartment must be checked
at regular intervals and cleaned wherever necessary. Use moist
wipes and cotton-wool buds for these cleaning operations.
8. Major differences in temperature between the colorimeter and
the local environment can lead to erroneous results, e.g. due to
condensation on the optical components and on the cell.
9. When operating the colorimeter make sure that it is protected
from direct sunlight.
Page 42

Important information
m CAUTION m
The colorimeter was developed for use in the laboratory for water analysis.
The accuracy of the instrument is only valid if the instrument is used in an
environment with controlled electromagnetic disturbances according to DIN 61326.
Wireless devices, e. g. wireless phones, must not be used near the instrument.
Important disposal instructions for batteries and accumulators
EC Guideline 2006/66/EG requires users to return all used and worn-out batteries and accumulators.
They must not be disposed of in normal domestic waste. Because our
products include batteries and accumulators in the delivery package our advice is as
follows:
Used batteries and accumulators are not items of domestic waste. They must be disposed
of in a proper manner. Your local authority may have a disposal facility; alternatively
you can hand them in at any shop selling batteries and accumulators.
You can also return them to the company which supplied them to you; the company is obliged
to accept them.
Important information
To Preserve, Protect and Improve the Quality of the Environment
Disposal of Electrical Equipment in the European Union
Because of the European Directive 2002/96/EC your electrical instrument must not be
disposed of with normal household waste!
For more information please visit the following website:
www.millipore.com/company/flx4/eu_regulatory_compliance
44
en
Page 43

45
en
Declaration of CE-Conformity
Declaration of EC-Conformity according to
DIRECTIVE 2004/108/EG OF THE EUROPEAN PARLIAMENT
AND OF THE COUNCIL of 2004, December the 15
th
Name of manufacturer: Merck KGaA
64271 Darmstadt
Germany
declares that this product
Product name: Spectroquant® Multy
meets the requirements of the following product family standard:
DIN EN 61326-1:2006
Immunity test requirements for equipment intended for use in industrial locations (Table 1)
Emission according to the requirements for class B equipment
Darmstadt, 10th January 2013
Merck KGaA
i. V. i. A.
B. Grau C. Klein
Director MM WFA Product Manager Photometry
Page 44

Table of contents
5 Contents of CD-ROM
5.1 Overview of preprogrammed methods and analytical procedures
5.2 Standard solutions
5.2.1 Use of Spectroquant® CombiCheck and ready-to-use
standard solutions
5.2.2 Preparation of standard solutions
5.3 Printing measurement results
5.3.1 Setting the print parameters
5.3.2 Printing all measurement results
5.3.3 Printing measurement results from a defined date range
5.3.4 Printing measurement results from a defined code-No. range
5.3.5 Printing measurement results from a defined method
5.4 Transferring data to a PC
5.5 Software update via the internet
5.6 User methods
5.6.1 User concentration method
5.6.2 User polynomials
5.6.3 Deleting a user method
5.6.4 Printing data for a user method
5.6.5 Initializing the user-method system
5.7 User-specific calibration
5.7.1 Saving the user-specific calibration
5.7.2 Deleting the user-specific calibration
5.8 Calculating the Langelier saturation index
5.9 Technical specifications
Page 45

CD-ROM
5.1 Overview of preprogrammed methods
and analytical procedures
Meth. No. Parameter Cat. No. Measuring range Blank Type of Type of
test cell
10 Acid cap. 01758 1.01758.0001 0.40 - 8.00 mmol/l OH RB Cell test 16 mm
20 Aluminium 14825 1.14825.0001* 20 - 700 μg/l Al RB Cell test 16 mm
21 Aluminium 00594 1.00594.0001 0.05 - 0.50 mg/l Al RB Test 24 mm
30 Ammonium 14739 1.14739.0001 10 - 2000 μg/l NH
4
-N RB Cell test 16 mm
31 Ammonium 14558 1.14558.0001 0.20 - 8.00 mg/l NH
4
-N RB Cell test 16 mm
32 Ammonium 14559 1.14559.0001 4.0 - 80.0 mg/l NH
4
-N RB Cell test 16 mm
33 Ammonium 14752 1.14752.0001* 0.02 - 1.30 mg/l NH
4
-N RB Test 24 mm
34 Ammonium 00683 1.00683.0001 1.0 - 50.0 mg/l NH
4
-N RB Test 16 mm
40 AOX 00675 1.00675.0001 0.05 - 2.50 mg/l AOX RB Cell test 16 mm
50 Arsenic 01747 1.01747.0001 5 - 100 μg/l As RB Test 16 mm
70 BOD 00687 1.00687.0001 0.5 - 3000 mg/l BOD H
2
O Cell test 16 mm
80 Boron 00826 1.00826.0001 0.05 - 2.00 mg/l B RB Cell test 16 mm
90 Bromine 00605 1.00605.0001 0.10 - 5.00 mg/l Br
2
H
2
O Test 24 mm
100 Cadmium 14834 1.14834.0001 25 - 1000 μg/l Cd RB Cell test 16 mm
101 Cadmium 01745 1.01745.0001 5 - 500 μg/l Cd RB Test 24 mm
110 Calcium 00858 1.00858.0001 10 - 250 mg/l Ca RB Cell test 16 mm
111 Calcium 14815 1.14815.0001 5 - 160 mg/l Ca RB Test 16 mm
120 Chloride 14730 1.14730.0001 5 - 125 mg/l Cl RB Cell test 16 mm
121 Chloride 14897 1.14897.0001 10 - 250 mg/l Cl RB Test 16 mm
122 Chloride 01804 1.01804.0001 0.5 - 15.0 mg/l Cl RB Cell Test 16 mm
123 Chloride 01807 1.01807.0001 0.50 - 5.00 mg/l Cl RB Test 24 mm
130 Cl2 CT 0.05-5.00 1.00595.0001
(free) 0.05 - 5.00 mg/l Cl
2
H
2
O Cell test 16 mm
1.00597.0001
(free + total)
131 Cl2 0.02-4.50 1.00598.0002 (free) 0.02 - 4.50 mg/l Cl2 H
2
O Test 24 mm
1.00598.0001
(free)
1.00602.0001 (total)
1.00602.0002 (total)
1.00599.0001 (free + total)
* in contrast to the instructions given in the package insert the sample volume as well as the reagent volume must be
doubled
RB = own reagent blank value
Page 46

Meth. No. Parameter Cat. No. Measuring range Blank Type of Type of
test cell
134 Cl2 0.10-6.00 1.00598.0002
(free) 0.10 - 6.00 mg/l Cl
2
H
2
O Test 16 mm
1.00598.0001
(free)
1.00602.0001 (total)
1.00602.0002 (total)
1.00599.0001 (free + total)
132 Cl2 LR 0.10-6.00 1.00086.0001 + 1.00087.0001
(free)
1.00086.0001 + 1.00087.0001 + 1.00088.0001 (total)
0.10 - 6.00 mg/l Cl
2
H
2
O Cell test 16 mm
133 Cl2 LR 0.02-4.50 1.00086.0001 + 1.00087.0001
(free)
1.00086.0001 + 1.00087.0001 + 1.00088.0001 (total)
0.02 - 4.50 mg/l Cl
2
H
2
O Test 24 mm
140 ClO2 0.05-8.50 1.00608.0001 0.05 - 8.50 mg/l ClO
2
H
2
O Test 24 mm
141 ClO2 0.20-10.00 1.00608.0001 0.20 - 10.00mg/l ClO
2
H
2
O Test 16 mm
150 Chromate 14552 1.14552.0001 0.05 - 2.00 mg/l Cr H
2
O Cell test 16 mm
151 Chromate 14758 1.14758.0001* 10 - 1400 μg/l Cr H
2
O Test 24 mm
168 COD 01796 1.01796.0001 5.0 - 80.0 mg/l COD RB Cell test 16 mm
160 COD 14540 1.14540.0001 10 - 150 mg/l COD RB Cell test 16 mm
161 COD 14895 1.14895.0001 15 - 300 mg/l COD RB Cell test 16 mm
162 COD 14690 1.14690.0001 50 - 500 mg/l COD RB Cell test 16 mm
163 COD 14541 1.14541.0001 25 - 1500 mg/l COD RB Cell test 16 mm
164 COD 14691 1.14691.0001 300 - 3500 mg/l COD RB Cell test 16 mm
165 COD 14555 1.14555.0001 0.50 -10.00 g/l COD RB Cell test 16 mm
169 COD 01797 1.01797.0001 5.00 - 90.00 g/l COD RB Cell test 16 mm
166 COD 09772 1.09772.0001 10 - 150 mg/l COD RB Cell test 16 mm
167 COD 09773 1.09773.0001 100 - 1500 mg/l COD RB Cell test 16 mm
570 COD 17058 1.17058.0001 5.0 - 60.0 mg/l COD RB Cell test 16 mm
571 COD 17059 1.17059.0001 50 - 3000 mg/l COD RB Cell test 16 mm
170 Color - 0 - 1000 mg/l Pt/Co (Hazen) H
2
O Method 24 mm
180 Copper 14553 1.14553.0001 0.05 - 8.00 mg/l Cu H
2
O Cell test 16 mm
181 Copper 14767 1.14767.0001 0.10 - 6.00 mg/l Cu H
2
O Test 16 mm
192 Cyanide 02531 1.02531.0001 10 - 350 μg/l CN H
2
O Cell test 16 mm
190 Cyanide 14561 1.14561.0001 10 - 350 μg/l CN H
2
O Cell test 16 mm
191 Cyanide 09701 1.09701.0001* 5 - 200 μg/l CN H
2
O Test 24 mm
200 Cyan. acid19250 119250.0001 2 - 160 mg/l Cys SB Test 24 mm
201 Cyan. acid19253 119253.0001 2 - 160 mg/l CyA SB Test 24 mm
220 Fluoride 14557 1.14557.0001 0.10 - 1.50 mg/l F RB Cell test 16 mm
222 Fluoride 00809 1.00809.0001 0.10 - 1.80 mg/l F RB Cell test 16 mm
221 Fluoride 14598 1.14598.0001 0.10 - 2.00 mg/l F RB Test 16 mm
223 Fluoride 00822 1.00822.0001 0.08 - 2.00 mg/l F RB Test 24 mm
230 Hydrazine 09711 1.09711.0001* 10 - 1200 μg/l N
2H4
RB Test 24 mm
560 HydroPerox 18789 1.18789.0001 0.02 - 5.50 mg/l H
2O2
RB Test 16 mm
240 Iodine 00606 1.00606.0001 0.10 - 5.00 mg/l I
2
H
2
O Test 24 mm
250 Iron 14549 1.14549.0001 0.05 - 4.00 mg/l Fe H
2
O Cell test 16 mm
251 Iron 14761 1.14761.0001* 0.01 - 2.00 mg/l Fe H
2
O Test 24 mm
1.14761.0002*
252 Iron 00796 1.00796.0001 0.10 - 5.00 mg/l Fe H
2
O Test 16 mm
260 Lead 14833 1.14833.0001 0.10 - 5.00 mg/l Pb RB Cell test 16 mm
261 Lead 09717 1.09717.0001 0.05 - 5.00 mg/l Pb RB Test 24 mm
270 Magnesium 00815 1.00815.0001 5.0 - 75.0 mg/l Mg RB Cell test 16 mm
280 Manganese 00816 1.00816.0001 0.10 -5.00 mg/l Mn H
2
O Cell test 16 mm
281 Manganese 01739 1.01739.0001 0.05 - 1.80 mg/l Mn RB Test 24 mm
282 Manganese 14770 1.14770.0001* 0.05 - 6.00 mg/l Mn H
2
O Test 24 mm
283 Manganese 01846 1.01846.0001 0.05 - 1.80 mg/l Mn RB Test 24 mm
290 Molybdenum 00860 1.00860.0001 0.02 - 1.00 mg/l Mo H
2
O Cell test 16 mm
291 Molybdenum 19252 119252.0001 0.5 - 45.0 mg/l Mo H
2
O Test 24 mm
300 Monochloramine 1.01632.0001 0.10 - 5.00 mg/l Cl
2
H
2
O Test 24 mm
310 Nickel 14554 1.14554.0001 0.10 - 6.00 mg/l Ni RB Cell test 16 mm
311 Nickel 14785 1.14785.0001* 0.05 - 5.00 mg/l Ni RB Test 24 mm
* in contrast to the instructions given in the package insert the sample volume as well as the reagent volume must be
doubled
RB = own reagent blank value SB = sample blank value
Page 47

Meth. No. Parameter Cat. No. Measuring range Blank Type of Type of
test cell
320 Nitrate 14542 1.14542.0001 0.5 - 15.0 mg/l NO
3
-N RB Cell test 16 mm
321 Nitrate 14773 1.14773.0001 0.5 - 15.0 mg/l NO
3
-N RB Test 16 mm
322 Nitrate 14556 1.14556.0001 0.10 - 3.00 mg/l NO
3
-N H2O Cell test 16 mm
323 Nitrate 01842 1.01842.0001 0.3 - 30.0 mg/l NO
3
-N RB Test 24 mm
330 Nitrite 14547 1.14547.0001 10 - 700 μg/l NO
2
-N H2O Cell test 16 mm
331 Nitrite 14776 1.14776.0001* 5 - 400 μg/l NO
2
-N H2O Test 24 mm
1.14776.0002*
332 Nitrite 00609 1.00609.0001 1.0 - 90.0 mg/l NO
2
-N H2O Cell test 16 mm
340 Nitrogen 14537 1.14537.0001 0.5 - 15.0 mg/l N RB Cell test 16 mm
550 Oxygen 14694 1.14694.0001 0.5 - 12.0 mg/l O
2
H2O Cell test 16 mm
555 Oxyg. scavengers 119251.0001 20 - 500 μg/l DEHA RB Test 24 mm
350 Ozone 0.02-3.00 1.00607.0001 0.02 - 3.00 mg/l O
3
H
2
O Test 24 mm
1.00607.0002
351 Ozone 0.10-4.00 1.00607.0001 0.10 - 4.00 mg/l O
3
H
2
O Test 16 mm
1.00607.0002
360 pH 01744 1.01744.0001 6.4 - 8.8 H
2
O Cell test 16 mm
370 Phenol 14551 1.14551.0001 0.10 - 2.50 mg/l C
6H5
OH RB Cell test 16 mm
371 Phenol 00856 1.00856.0001 0.10 - 5.00 mg/l C
6H5
OH RB Test 24 mm
387 Phosphate 00474 1.00474.0001 0.05 - 4.00 mg/l PO
4
-P H2O Cell test 16 mm
380 Phosphate 14543 1.14543.0001 0.05 - 4.00 mg/l PO
4
-P H2O Cell test 16 mm
388 Phosphate 00475 1.00475.0001 0.5 - 20.0 mg/l PO
4
-P H2O Cell test 16 mm
381 Phosphate 14729 1.14729.0001 0.5 - 20.0 mg/l PO
4
-P H2O Cell test 16 mm
382 Phosphate 00616 1.00616.0001 3.0 - 100.0 mg/l PO
4
-P H2O Cell test 16 mm
389 Phosphate 00673 1.00673.0001 3.0 - 100.0 mg/l PO
4
-P H2O Cell test 16 mm
383 Phosphate 14848 1.14848.0001* 0.01 - 2.50 mg/l PO
4
-P H2O Test 24 mm
384 Phosphate 00798 1.00798.0001 1.0 - 60.0 mg/l PO
4
-P H2O Test 16 mm
385 Phosphate 14842 1.14842.0001 0.5 - 30.0 mg/l PO
4
-P RB Test 16 mm
386 Phosphate 14546 1.14546.0001 0.5 - 25.0 mg/l PO
4
-P RB Cell test 16 mm
400 Potassium 14562 1.14562.0001 5.0 - 50.0 mg/l K H
2
O Cell test 16 mm
401 Potassium 00615 1.00615.0001 30 - 300 mg/l K H
2
O Cell test 16 mm
410 Residual hardness 14683 1.14683.0001 0.50 - 5.00 mg/l Ca RB Cell test 16 mm
420 Silicate 14794 1.14794.0001* 0.11 - 8.56 mg/l SiO
2
H
2
O Test 24 mm
421 Silicate 00857 1.00857.0001 11 - 1070 mg/l SiO
2
H
2
O Test 16 mm
422 Silicate 01813 1.01813.0001 0.004 - 0.500 mg/l SiO
2
RB Test 24 mm
430 Sodium 00885 1.00885.0001 10 - 300 mg/l Na RB Cell test 16 mm
444 Sulfate 02532 1.02532.0001 2.0 - 50.0 mg/l SO
4
RB Cell test 16 mm
440 Sulfate 14548 1.14548.0001 5 - 250 mg/l SO
4
H
2
O Cell test 16 mm
441 Sulfate 00617 1.00617.0001 50 - 500 mg/l SO
4
H
2
O Cell test 16 mm
442 Sulfate 14564 1.14564.0001 100 - 1000 mg/l SO
4
H
2
O Cell test 16 mm
443 Sulfate 01812 1.01812.0001 1.0 - 25.0 mg/l SO
4
H
2
O Test 24 mm
445 Sulfate 02537 1.02537.0001 5 - 300 mg/l SO
4
RB Test 16 mm
1.02537.0002
450 Sulfide 14779 1.14779.0001 0.10 - 1.50 mg/l S H
2
O Test 16 mm
460 Sulfite 14394 1.14394.0001 1.0 - 20.0 mg/l SO
3
RB Cell test 16 mm
461 Sulfite 01746 1.01746.0001 1.0 - 60.0 mg/l SO
3
RB Test 16 mm
470 Surfact-a 14697 1.14697.0001 0.05 - 2.00 mg/l MBAS RB Cell test 16 mm
473 Surfact-a 02552 1.02552.0001 0.05 - 2.00 mg/l MBAS RB Cell test 16 mm
471 Surfact-c 01764 1.01764.0001 0.05 - 1.50 mg/l RB Cell test 16 mm
472 Surfact-n 01787 1.01787.0001 0.10 - 7.50 mg/l RB Cell test 16 mm
480 Susp. solids - 50 - 750 mg/l H
2
O Method 24 mm
490 Tin 14622 1.14622.0001 0.10 - 2.50 mg/l Sn H
2
O Cell test 16 mm
500 TOC 14878 1.14878.0001 5.0 - 80.0 mg/l TOC RB Cell test 16 mm
501 TOC 14879 1.14879.0001 50 - 800 mg/l TOC RB Cell test 16 mm
510 Total hardness 00961 1.00961.0001 5 - 215 mg/l Ca RB Cell test 16 mm
520 Turbidity - 1 - 100 FAU H
2
O Method 24 mm
530 Volatile org. acids 1.01763.0001 50 - 3000 mg/l RB Cell test 16 mm
531 Volatile org. acids 1.01749.0001 50 - 3000 mg/l RB Cell test 16 mm
1.01809.0001 50 - 3000 mg/l RB Test 16 mm
540 Zinc 00861 1.00861.0001 25 - 1000 μg/l Zn RB Cell test 16 mm
541 Zinc 14566 1.14566.0001 0.20 - 5.00 mg/l Zn RB Cell test 16 mm
* in contrast to the instructions given in the package insert the sample volume as well as the reagent volume must be
doubled
RB = own reagent blank value
Page 48

Meth. No. Parameter Cat. No. Measuring range Blank Type of Type of
test cell
600 A 430 nm Absorbance
610 A 530 nm Absorbance
620 A 560 nm Absorbance
630 A 580 nm Absorbance
640 A 610 nm Absorbance
650 A 660 nm Absorbance
Page 49
Release 08/2014 - Spectroquant® Multy
Acid Capacity to pH 4.3
(Total Alkalinity)
101758
Cell Test
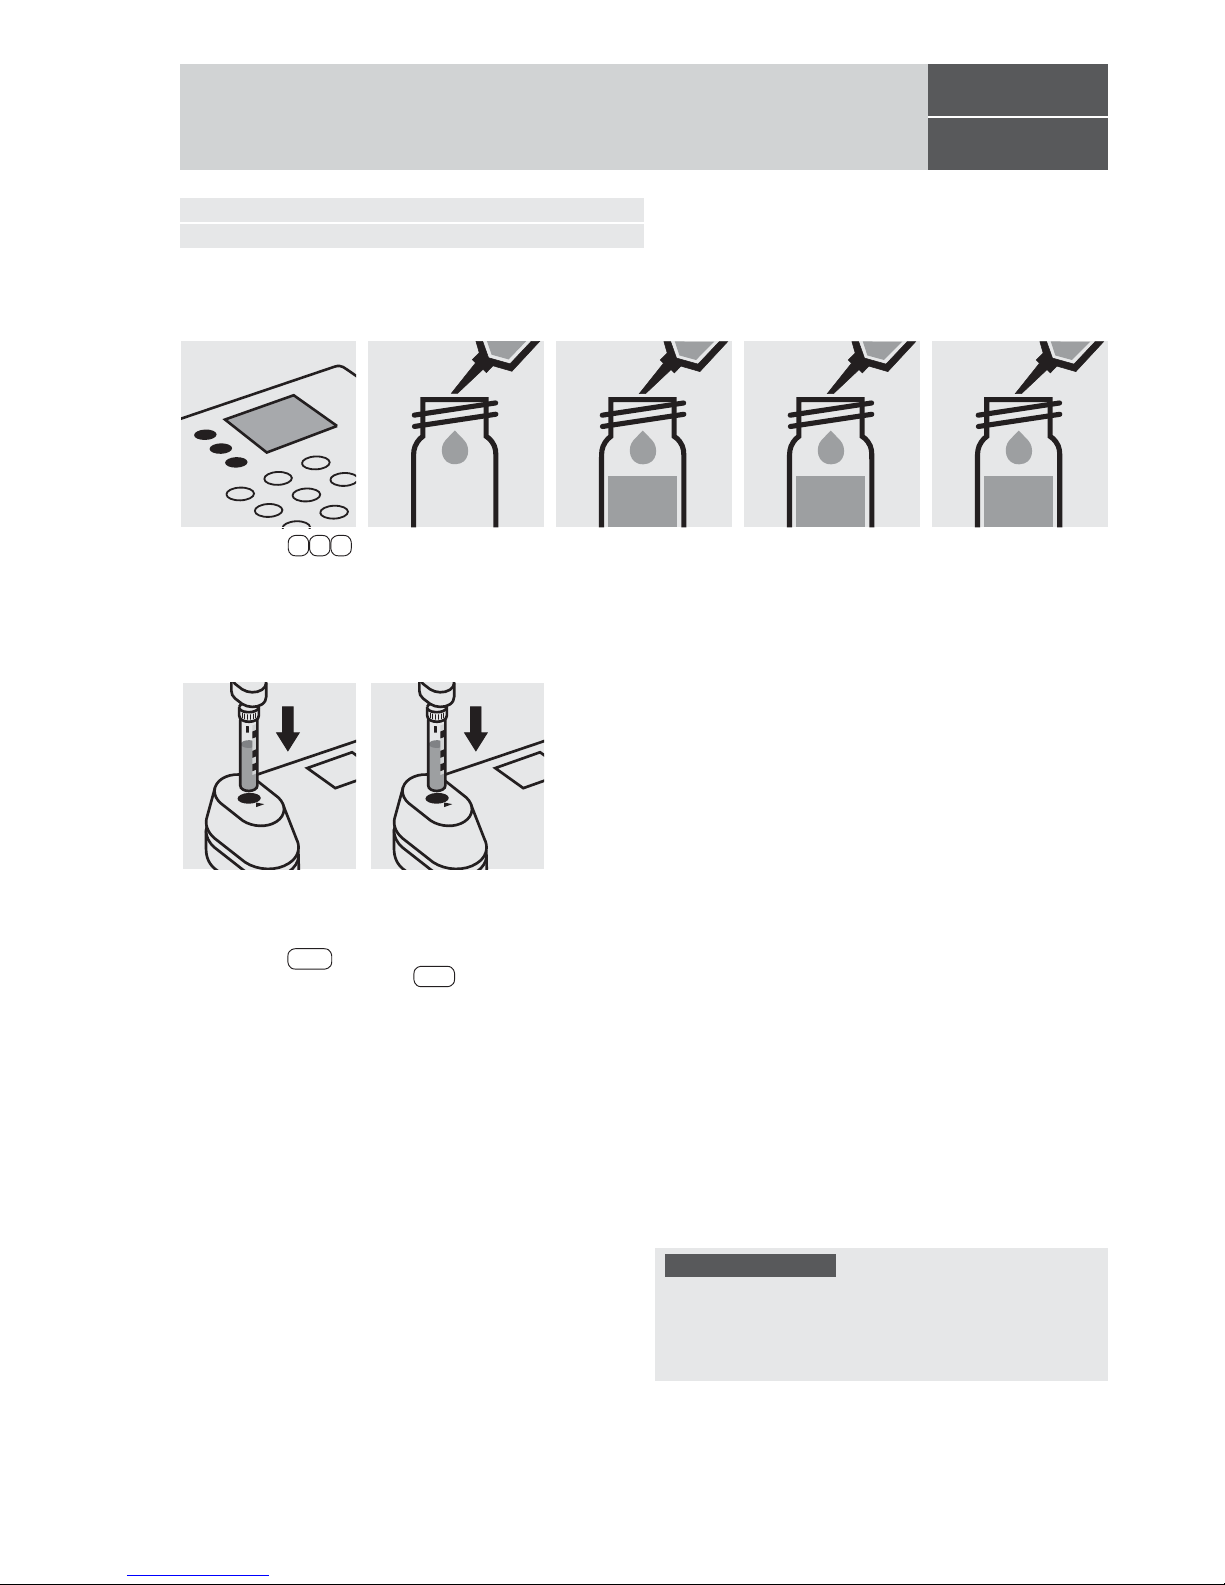
Select method 1 0 .
Measuring range: 0.40 – 8.00 mmol/l OH 16-mm cell
20 – 400 mg/l CaCO
3
16-mm cell
Pipette 4.0 ml each of
AC-1 into two round
cells.
Add to one cell 1.0 ml of
the sample with pipette,
close with the screw
cap, and mix.
Add to each cell 0.50 ml
of AC-2 with pipette,
close with the screw
cap, and mix.
Add to the second cell
1.0 ml of distilled water
with pipette, close with
the screw cap, and mix.
(Blank cell)
Insert the cell containing
the sample into the cell
compartment. Align the
mark on the cell with
that on the photometer.
Press Test .
Quality assurance:
To check the measurement system (test reagents, measurement device, and handling) a sodium h
ydroxide solution 1.0 mol/l, Cat.No. 109141, can be used after diluting
accordingly (see section “Standard solutions”).
Insert the blank cell into
the cell compartment.
Align the mark on the
cell with that on the photometer. Press Zero .
Page 50
Release 08/2014 - Spectroquant® Multy
Measuring range: 20– 700 µg/l Al 24-mm cell
Aluminium
114825
Test
Attention: In contrast to the instructions given in the package insert the sample volume as well as the reagent volume
must be doubled.
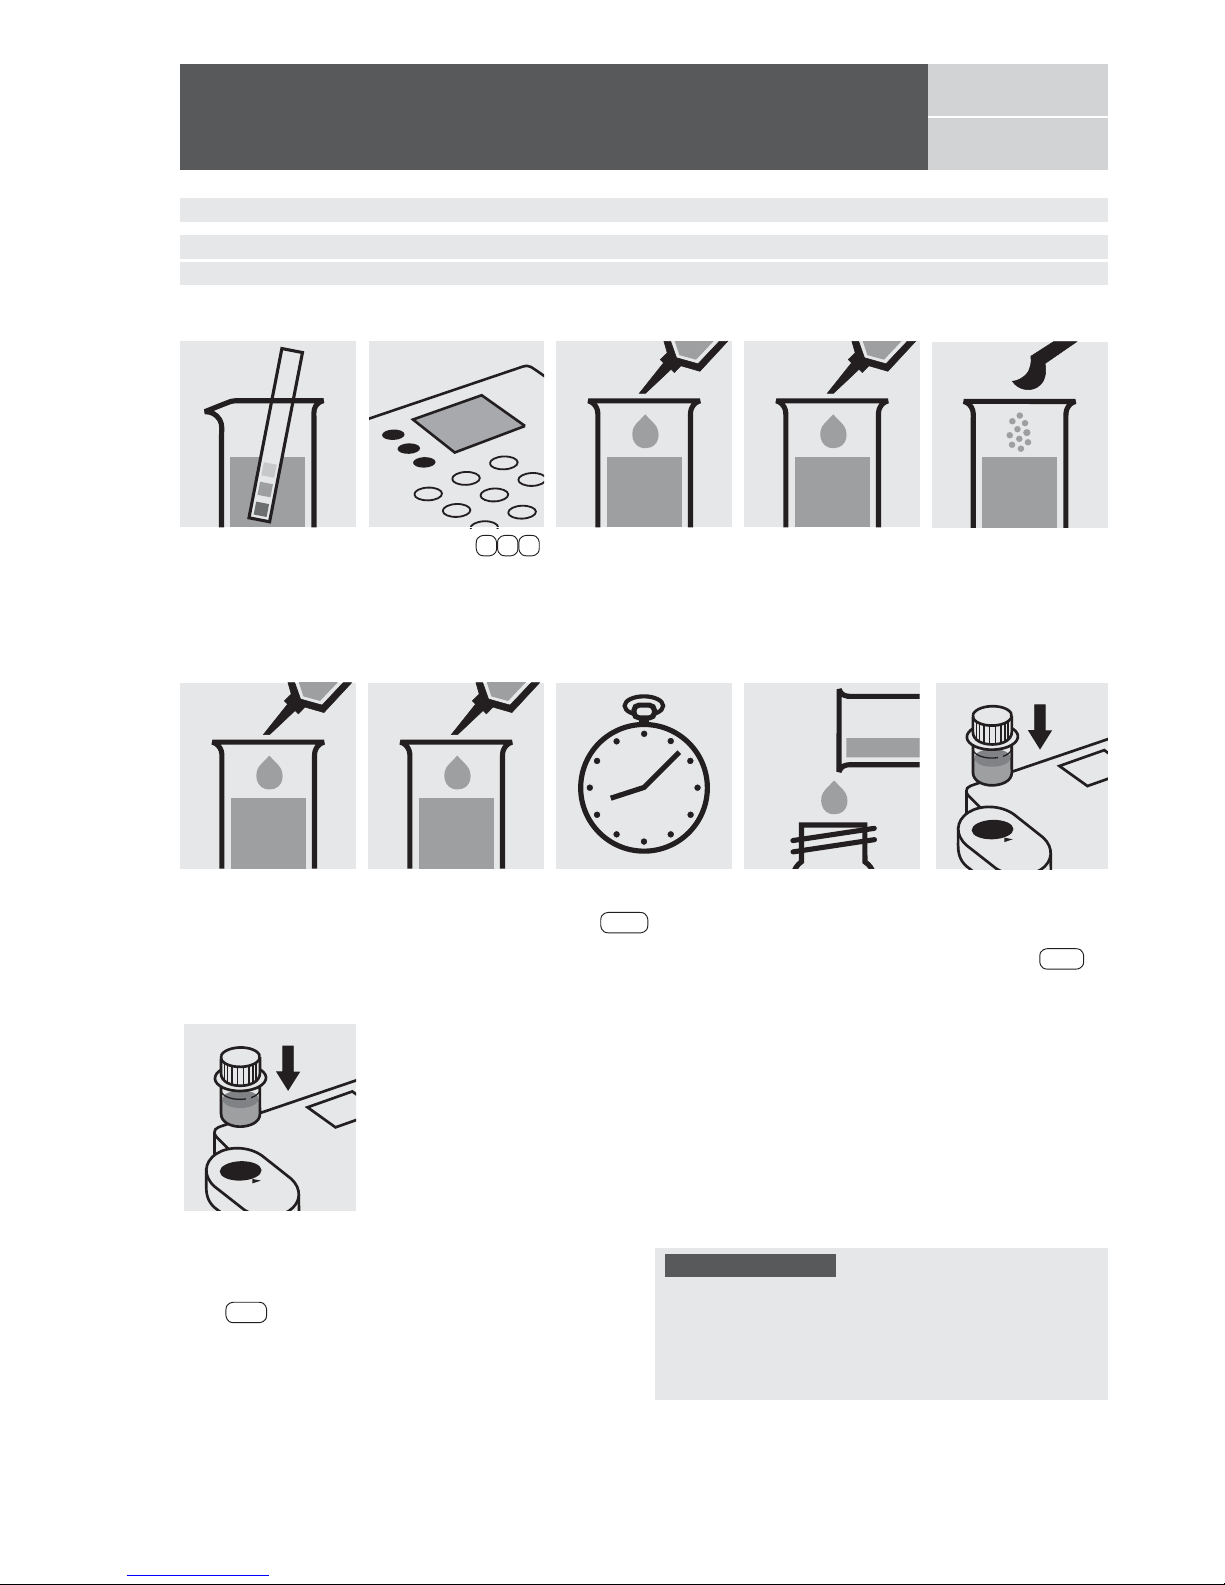
Transfer each solution
into a separate 24-mm
cell, close with the screw
caps.
Select method 2 0 .
Insert the blank cell into
the cell compartment.
Align the mark on the
cell with that on the photometer. Press Zero .
Insert the cell containing
the sample into the cell
compartment. Align the
mark on the cell with
that on the photometer.
Press Test .
Reaction time:
2 minutes
Press Enter to start
the countdown.
Check the pH of the
sample, specified range
:
pH 3 – 10.
If required, add dilute
sodium hydroxide
solution or sulfuric acid
drop by drop to adjust
the pH.
Add to each test tube
2 level blue microspoons
of Al-1 and dissolve the
solid substance.
Add to each test tube
2.4 ml of Al-2 with pipette and mix.
Add to each test tube
0.5 ml of Al-3 with pipette and mix.
Pipette 10 ml of the
sample into a test tube.
Pipette 10 ml of distilled
water into a second test
tube.
(Blank)
Quality assurance:
To check the measurement system (test reagents, measurement device, and handling) ready-f
or-use aluminium
standard solution Certipur
®
, Cat.No. 119770, concentration 1000 mg/l Al can be used after diluting accordingly.
The measurement results are expressed in µg/l.
Page 51
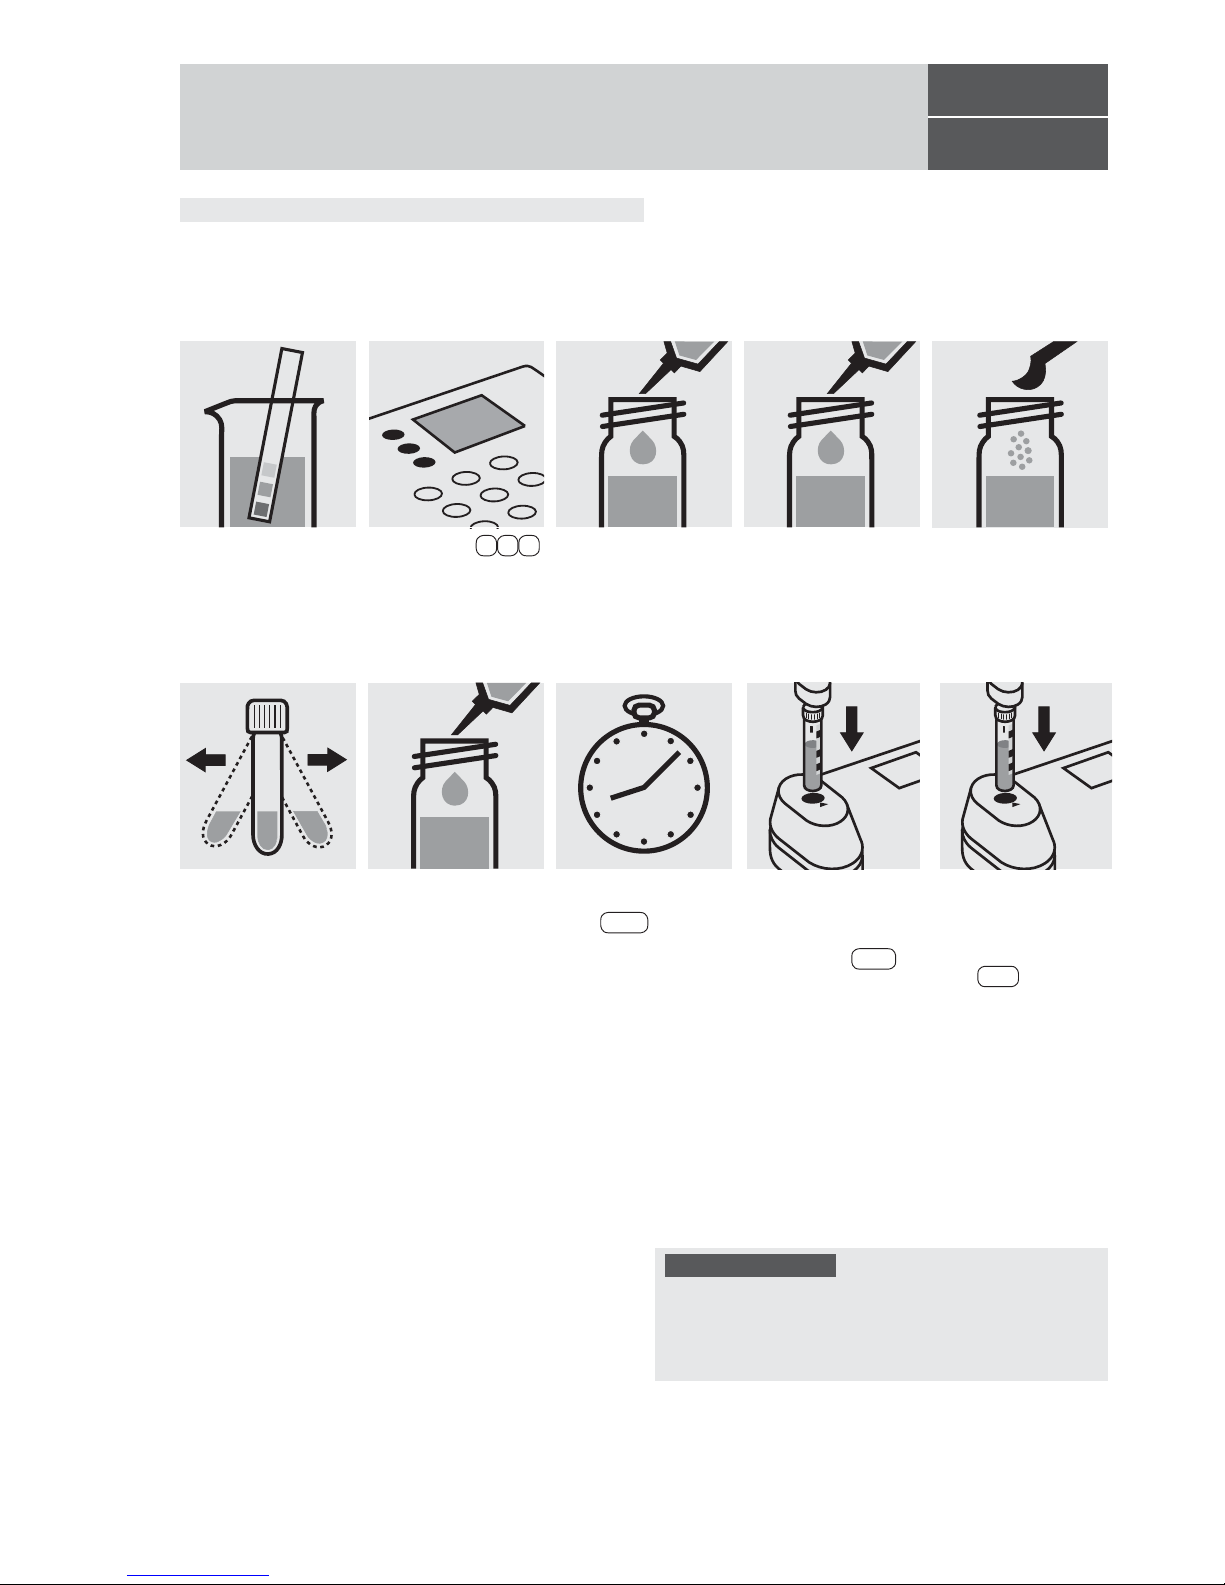
Add to each cell 1 level
blue microspoon of
Al-1K, close with the
screw cap.
Measuring range: 0.05 –0.50 mg/l Al 16-mm cell
Add to each test tube
0.25 ml of Al-2K with
pipette, close with the
screw cap, and mix.
100594
Cell Test
Aluminium
Pipette 6.0 ml of the
sample into a reaction
cell, close with the
screw cap, and mix.
Pipette 6.0 ml of distilled
water into a second
reaction cell, close with
the screw cap, and mix.
(Blank cell)
Shake both cells vigorously to dissolve the
solid substance.
Select method 2 1 .
Reaction time:
5 minutes
Press Enter to start
the countdown.
Insert the cell containing
the sample into the cell
compartment. Align the
mark on the cell with
that on the photometer.
Press Test .
Insert the blank cell into
the cell compartment.
Align the mark on the
cell with that on the photometer. Press Zero .
Quality assurance:
To check the measurement system (test reagents, measurement device, and handling) ready-f
or-use aluminium
standard solution Certipur
®
, Cat.No. 119770, concentration 1000 mg/l Al can be used after diluting accordingly.
Check the pH of the
sample, specified range
:
pH 3 – 10.
If required, add dilute
sodium hydroxide
solution or sulfuric acid
drop by drop to adjust
the pH.
Release 08/2014 - Spectroquant
®
Multy
Page 52
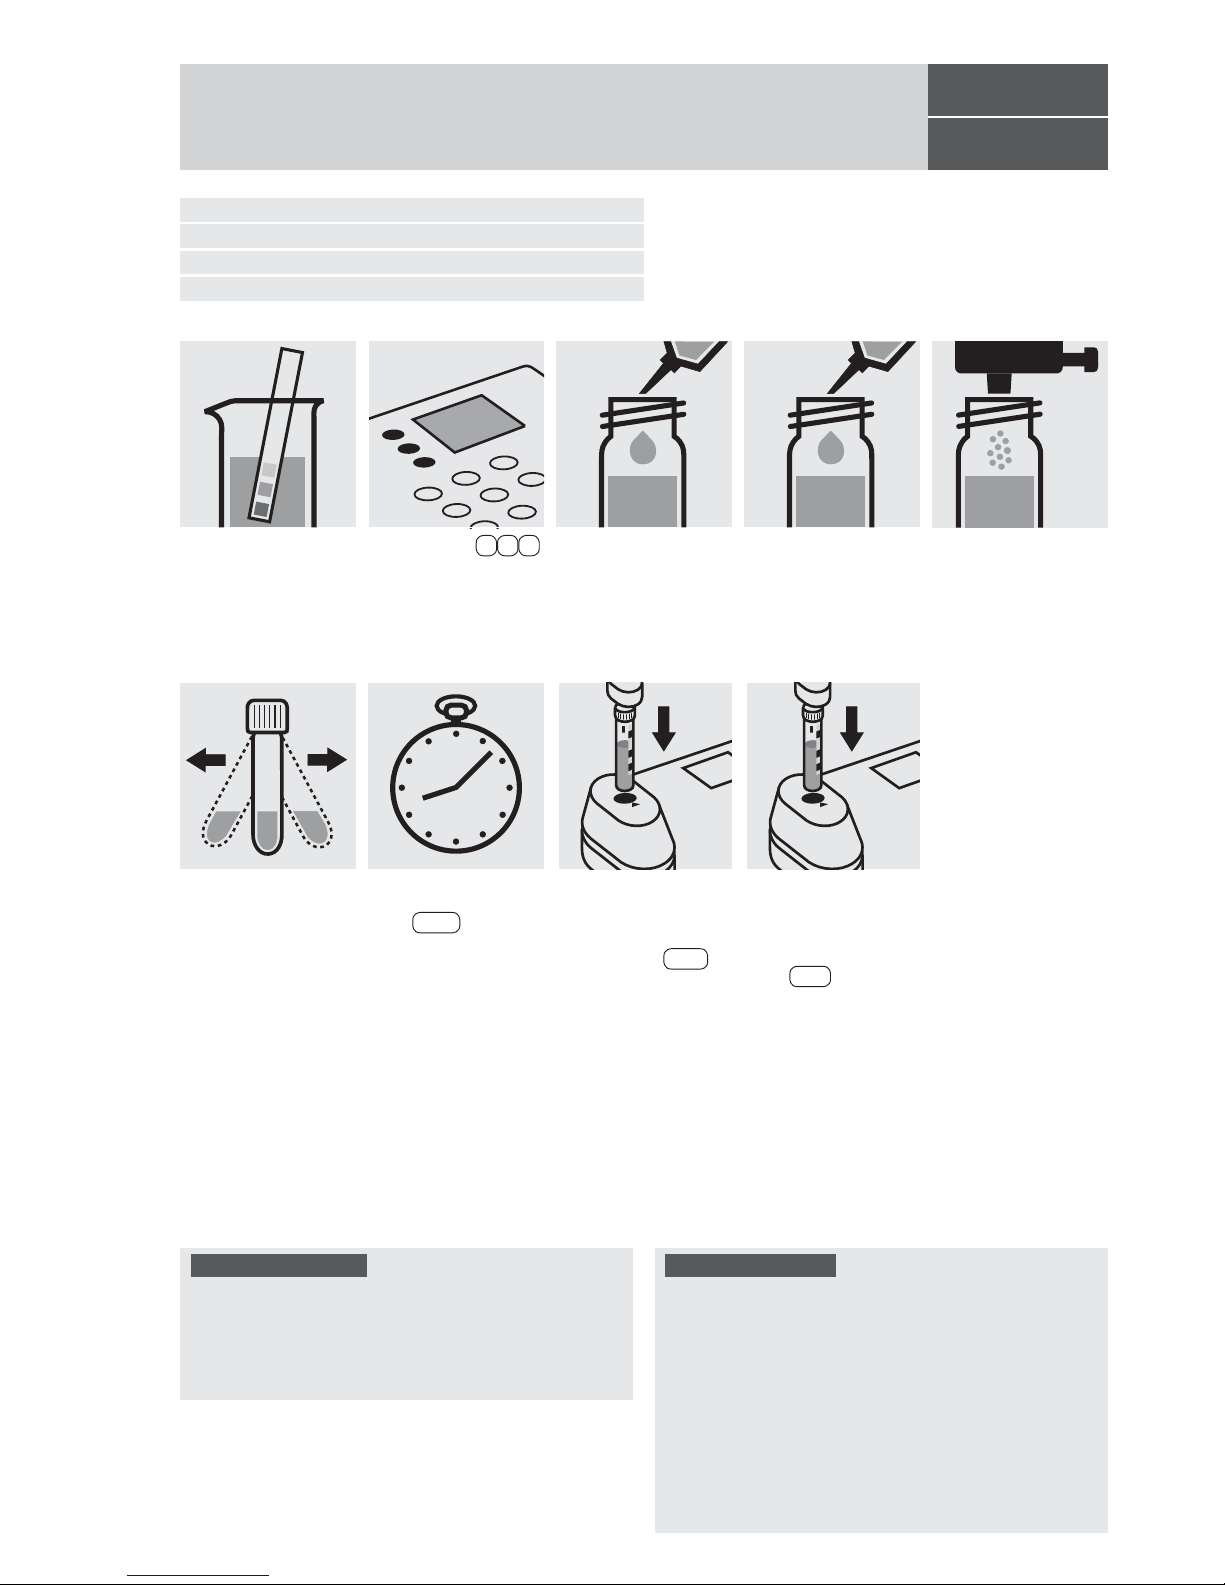
Release 08/2014 - Spectroquant® Multy
114739
Cell Test
Measuring range: 10 –2000 µg/l NH4-N 16-mm cell
13 –2576 µg/l NH
4
16-mm cell
10 –2000 µg/l NH
3
-N 16-mm cell
12 –2432 µg/l NH
3
16-mm cell
Ammonium
Pipette 5.0 ml of the
sample into a reaction
cell, close with the
screw cap, and mix.
Add to each cell 1 dose
of NH
4
-1K using the blue
dose-metering cap, close
with the screw cap.
Shake both cells vigorously to dissolve the
solid substance.
Pipette 5.0 ml of distilled
water into a second
reaction cell, close with
the screw cap, and mix.
(Blank cell)
Select method 3 0 .
Insert the cell containing
the sample into the cell
compartment. Align the
mark on the cell with
that on the photometer.
Press Test .
Reaction time:
15 minutes
Press Enter to start
the countdown.
Quality assurance:
To check the measurement system (test reagents, measurement device, and handling) w
e recommended to use
Spectroquant
®
CombiCheck 50, Cat.No. 114695, or the
Standard solution for photometric applications, CRM,
Cat.No. 125022 and 125023.
The measurement results are expressed in µg/l.
Ready-for-use ammonium standard solution
Certipur®,
Cat.No. 119812,
concentration 1000 mg/l NH
4
+
, can also
be used after diluting accordingly.
To check for sample-dependent effects the use of addition
solutions (e.g. in CombiCheck 50) is highly recommended.
Important:
Very high ammonium concentrations in the sample
produce turquoise-colored solutions (measurement solution should be yellow-g
reen to green) and false-low readings are yielded. In such cases the sample must be diluted (plausibility check).
Insert the blank cell into
the cell compartment.
Align the mark on the
cell with that on the photometer. Press Zero .
Check the pH of the
sample, specified range
:
pH 4 – 13.
If required, add dilute
sodium hydroxide
solution or sulfuric acid
drop by drop to adjust
the pH.
Page 53
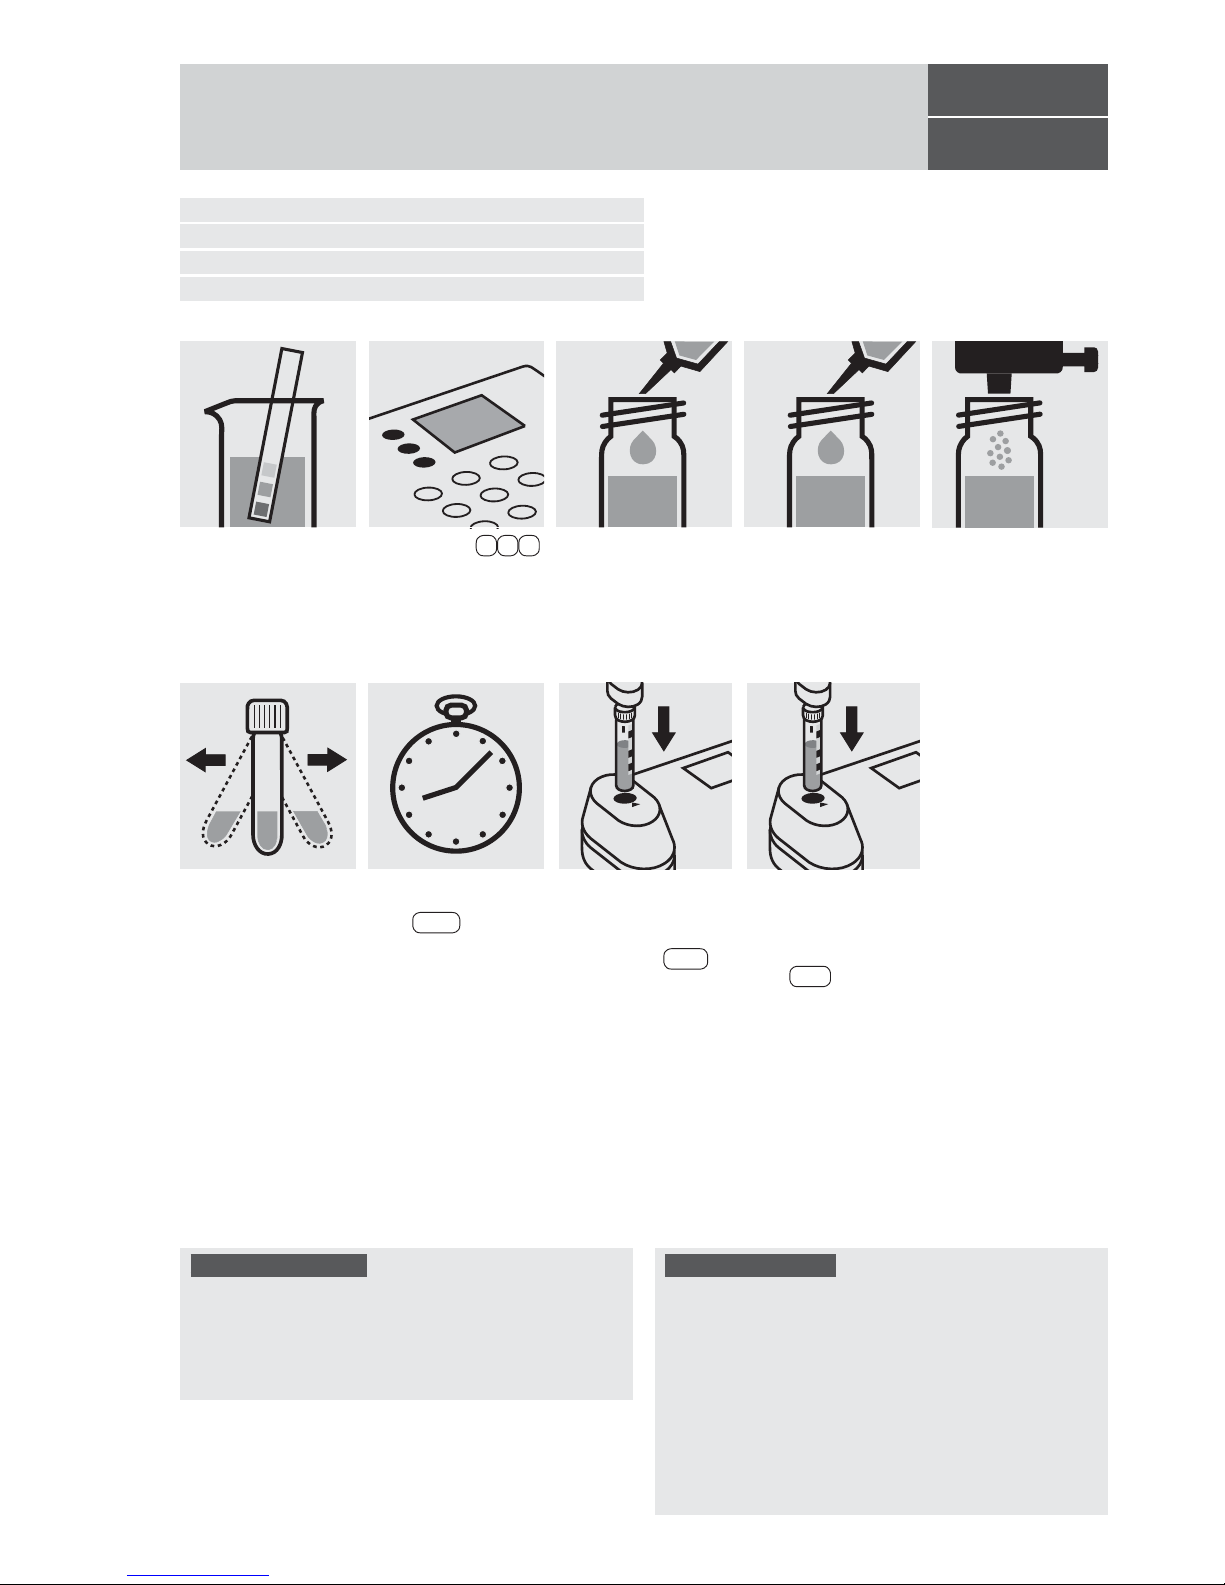
Release 08/2014 - Spectroquant® Multy
114558
Cell Test
Measuring range: 0.20 – 8.00 mg/l NH4-N 16-mm-cell
0.26 –10.30 mg/l NH
4
16-mm-cell
0.20 – 8.00 mg/l NH
3
-N 16-mm-cell
0.24 – 9.73 mg/l NH
3
16-mm-cell
Ammonium
Pipette 1.0 ml of the
sample into a reaction
cell, close with the
screw cap, and mix.
Add to each cell 1 dose
of NH
4
-1K using the blue
dose-metering cap, close
with the screw cap.
Shake both cells vigorously to dissolve the
solid substance.
Pipette 1.0 ml of distilled
water into a second
reaction cell, close with
the screw cap, and mix.
(Blank cell)
Select method 3 1 .
Insert the cell containing
the sample into the cell
compartment. Align the
mark on the cell with
that on the photometer.
Press Test .
Reaction time:
15 minutes
Press Enter to start
the countdown.
Quality assurance:
To check the measurement system (test reagents, measurement device, and handling) w
e recommended to use
Spectroquant
®
CombiCheck 10, Cat.No. 114676, or the
Standard solution for photometric applications, CRM,
Cat.No. 125022, 125023, 125024, and 125025.
Ready-for-use ammonium standard solution
Certipur®,
Cat.No. 119812,
concentration 1000 mg/l NH
4
+
, can also
be used after diluting accordingly.
To check for sample-dependent effects the use of addition
solutions (e.g. in CombiCheck 10) is highly recommended.
Important:
Very high ammonium concentrations in the sample
produce turquoise-colored solutions (measurement solution should be yellow-g
reen to green) and false-low readings are yielded. In such cases the sample must be diluted (plausibility check).
Insert the blank cell into
the cell compartment.
Align the mark on the
cell with that on the photometer. Press Zero .
Check the pH of the
sample, specified range
:
pH 4 – 13.
If required, add dilute
sodium hydroxide
solution or sulfuric acid
drop by drop to adjust
the pH.
Page 54
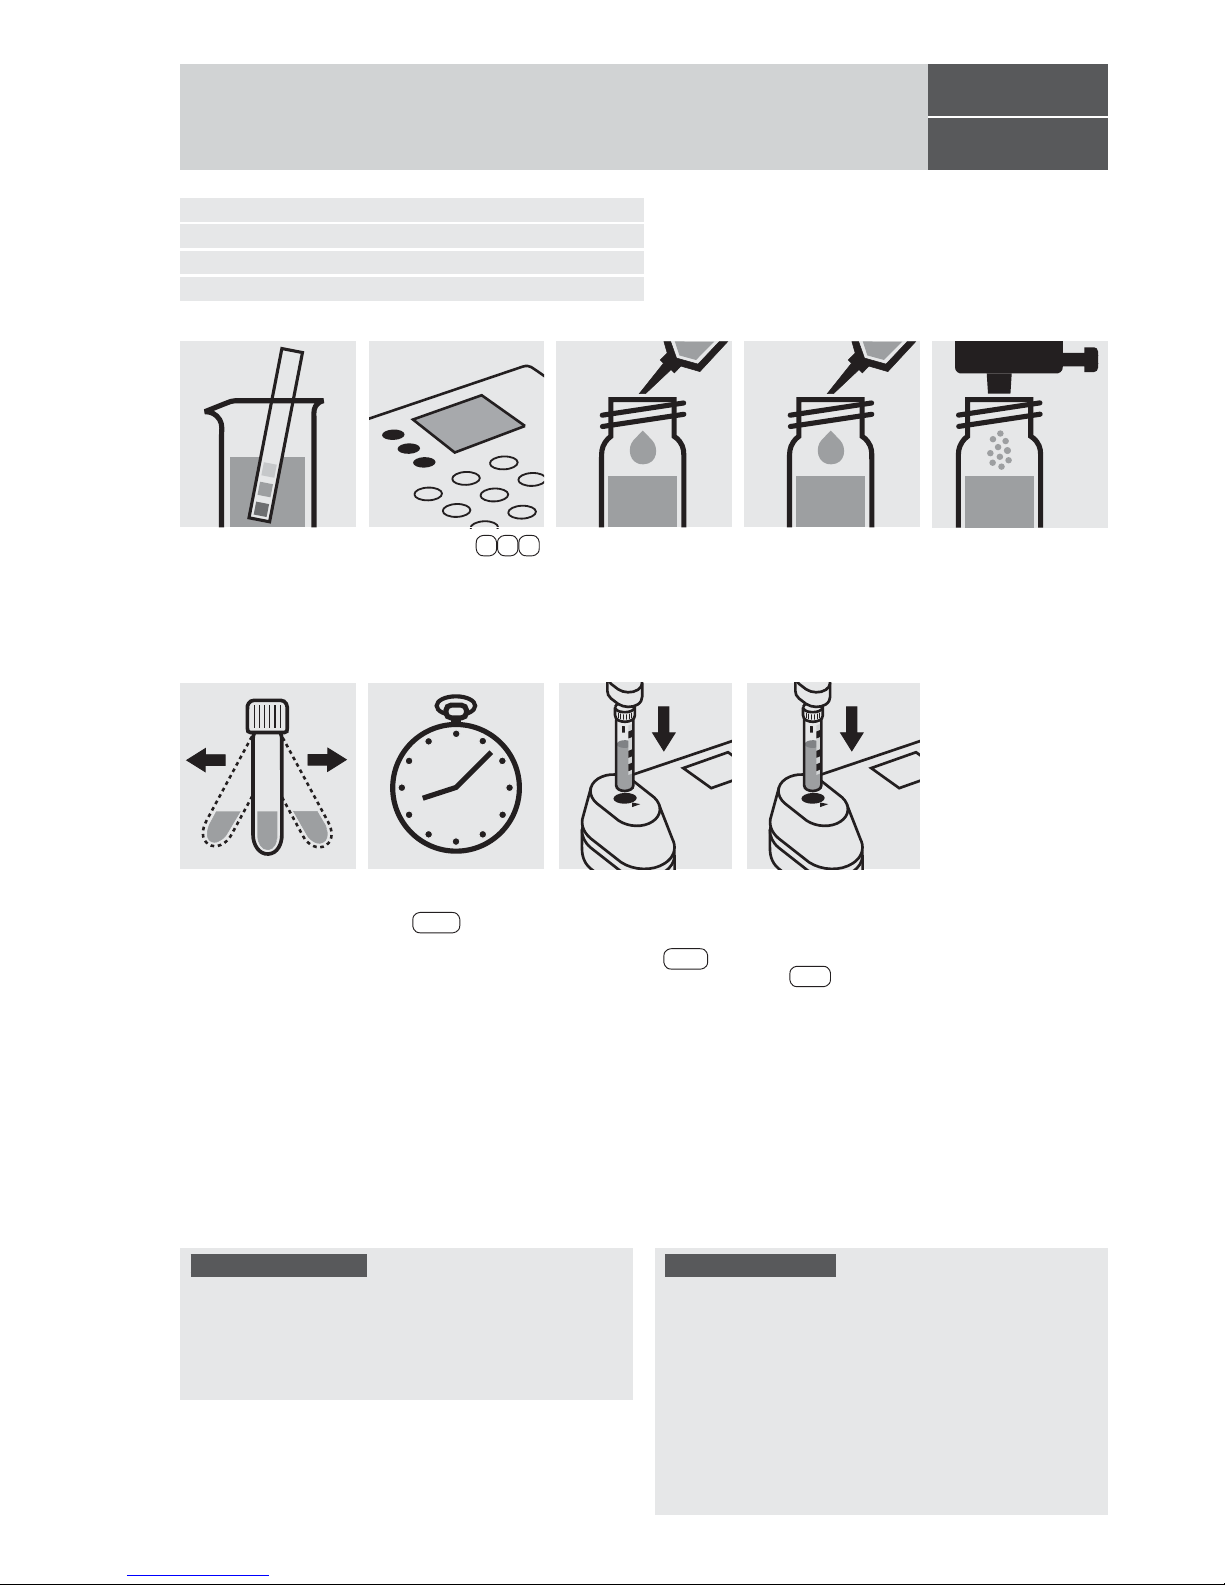
Release 08/2014 - Spectroquant® Multy
114559
Cell Test
Measuring range: 4.0– 80.0 mg/l NH4-N 16-mm-cell
5.2 – 103.0 mg/l NH
4
16-mm-cell
4.0– 80.0 mg/l NH
3
-N 16-mm-cell
4.9– 97.3 mg/l NH
3
16-mm-cell
Ammonium
Pipette 0.10 ml of the
sample into a reaction
cell, close with the
screw cap, and mix.
Add to each cell 1 dose
of NH
4
-1K using the blue
dose-metering cap, close
with the screw cap.
Shake both cells vigorously to dissolve the
solid substance.
Pipette 0.10 ml of
distilled water into a
second reaction cell,
close with the screw cap,
and mix.
(Blank cell)
Select method 3 2 .
Insert the cell containing
the sample into the cell
compartment. Align the
mark on the cell with
that on the photometer.
Press Test .
Reaction time:
15 minutes
Press Enter to start
the countdown.
Quality assurance:
To check the measurement system (test reagents, measurement device, and handling) w
e recommended to use
Spectroquant
®
CombiCheck 70, Cat.No. 114689, or the
Standard solution for photometric applications, CRM,
Cat.No. 125025, 125026, and 125027.
Ready-for-use ammonium standard solution
Certipur®,
Cat.No. 119812,
concentration 1000 mg/l NH
4
+
, can also
be used after diluting accordingly.
To check for sample-dependent effects the use of addition
solutions (e.g. in CombiCheck 70) is highly recommended.
Important:
Very high ammonium concentrations in the sample
produce turquoise-colored solutions (measurement solution should be yellow-g
reen to green) and false-low readings are yielded. In such cases the sample must be diluted (plausibility check).
Insert the blank cell into
the cell compartment.
Align the mark on the
cell with that on the photometer. Press Zero .
Check the pH of the
sample, specified range
:
pH 4 – 13.
If required, add dilute
sodium hydroxide
solution or sulfuric acid
drop by drop to adjust
the pH.
Page 55

Release 08/2014 - Spectroquant® Multy
Measuring range: 0.02 –1.30 mg/l NH4-N 24-mm cell
0.03 –1.67 mg/l NH
4
24-mm cell
0.02 –1.30 mg/l NH
3
-N 24-mm cell
0.02 –1.64 mg/l NH
3
24-mm cell
Ammonium
114752
Test
Add to each test tube
8 drops of NH
4
-3 and
mix.
Pipette 10 ml of the
sample into a test tube.
Add to each test tube
1.2 ml of NH
4
-1 with pi-
pette and mix.
Add to each test tube
2 level blue microspoons
of NH
4
-2.
Shake both test tubes
vigorously to dissolve
the solid substance.
Attention: In contrast to the instructions given in the package insert the sample volume as well as the reagent volume
must be doubled.
Pipette 10 ml of distilled
water into a second test
tube.
(Blank)
Transfer each solution
into a separate 24-mm
cell, close with the screw
caps.
Select method 3 3 .
Insert the cell containing
the sample into the cell
compartment. Align the
mark on the cell with
that on the photometer.
Press Test .
Reaction time:
5 minutes
Press Enter to start
the countdown.
Reaction time:
5 minutes
Press Enter to start
the countdown.
Quality assurance:
To check the measurement system (test reagents, measurement device
, and handling)
we recommended to use Spectroquant
®
CombiCheck 50, Cat.No. 114695, or the Standard solution for photometric applications,
CRM, Cat.No. 125022 and 125023.
Use 10 ml R-1 instead of the sample.
Ready-for-use ammonium standard solution
Certipur
®
, Cat.No. 119812,
concentration
1000 mg/l NH
4
+
, can also be used after diluting
accordingly.
To check for sample-dependent effects the use
of addition
solutions (e.g. in CombiCheck 50) is
highly recommended.
Use 10 ml sample + 0.1 ml R-2.
Insert the blank cell into
the cell compartment.
Align the mark on the
cell with that on the photometer. Press Zero .
Check the pH of the
sample, specified range
:
pH 4 – 13.
If required, add dilute
sodium hydroxide
solution or sulfuric acid
drop by drop to adjust
the pH.
Important:
Very high ammonium concentrations in the sample
produce turquoise-colored solutions (measurement solution should be yellow-g
reen to green) and false-low readings are yielded. In such cases the sample must be diluted (plausibility check).
Page 56
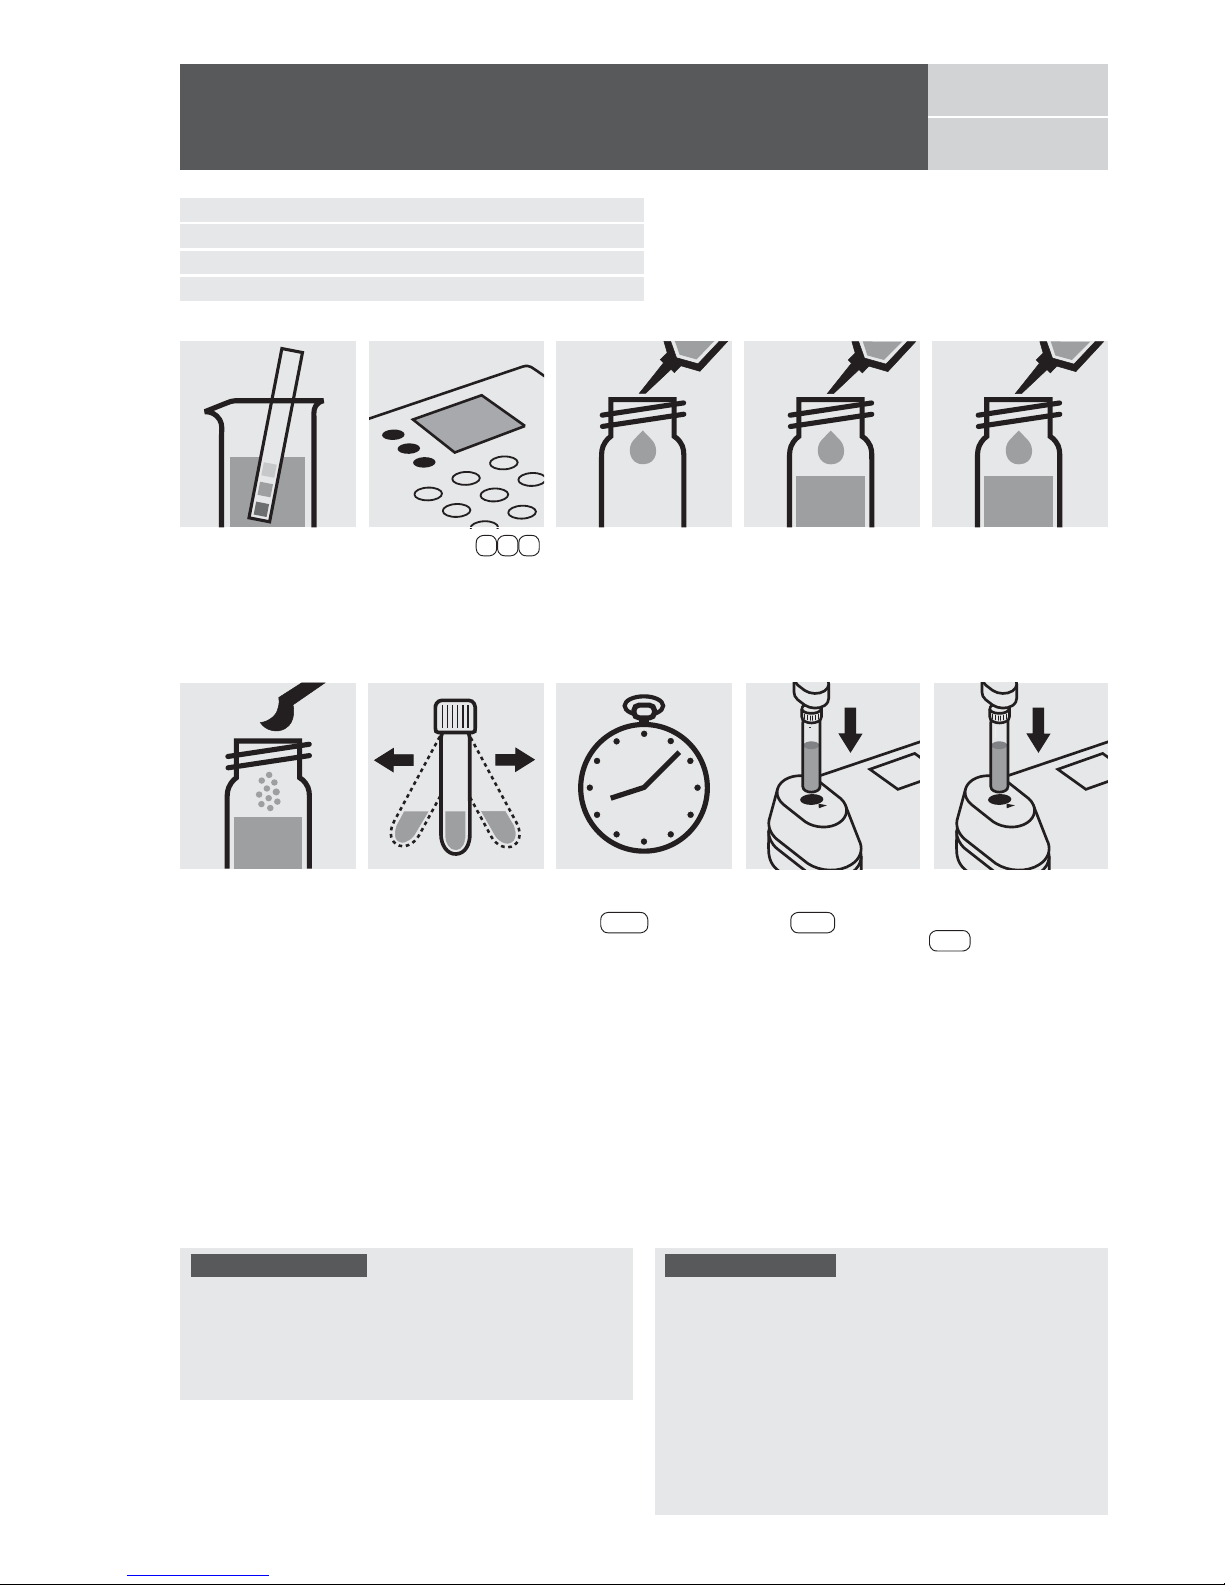
Release 08/2014 - Spectroquant® Multy
Measuring range: 1.0 –50.0 mg/l NH4-N 16-mm cell
1.3 –64.4 mg/l NH
4
16-mm cell
1.0 –50.0 mg/l NH
3
-N 16-mm cell
1.2 –60.8 mg/l NH
3
16-mm cell
Ammonium
100683
Test
Pipette 5.0 ml each of
NH
4
-1 into two 16-mm
cells.
Add
to the second cell
0.20 ml of distilled water
with pipette, close with
the screw cap, and mix.
(Blank cell)
Add to each cell 1 level
blue microspoon of
NH
4
-2, close with the
screw cap.
Shake both cells vigorously to dissolve the
solid substance.
Add
to one cell 0.20 ml
of the sample with pipette, close with the screw
cap, and mix.
Select method 3 4 .
Insert the blank cell into
the cell compartment.
Press Zero .
Insert the cell containing
the sample into the cell
compartment. Press
Test .
Reaction time:
15 minutes
Press Enter to start
the countdown.
Check the pH of the
sample, specified range
:
pH 4 – 13.
If required, add dilute
sodium hydroxide
solution or sulfuric acid
drop by drop to adjust
the pH.
Important:
Very high ammonium concentrations in the sample
produce turquoise-colored solutions (measurement solution should be yellow-g
reen to green) and false-low readings are yielded. In such cases the sample must be diluted (plausibility check).
Quality assurance:
To check the measurement system (test reagents, measurement device, and handling) w
e recommended to use
Spectroquant
®
CombiCheck 70, Cat.No. 114689, or the
Standard solution for photometric applications, CRM,
Cat.No. 125025 and 125026.
Ready-for-use ammonium standard solution
Certipur®,
Cat.No. 119812,
concentration 1000 mg/l NH
4
+
, can also
be used after diluting accordingly.
To check for sample-dependent effects the use of addition
solutions (e.g. in CombiCheck 70) is highly recommended.
Page 57
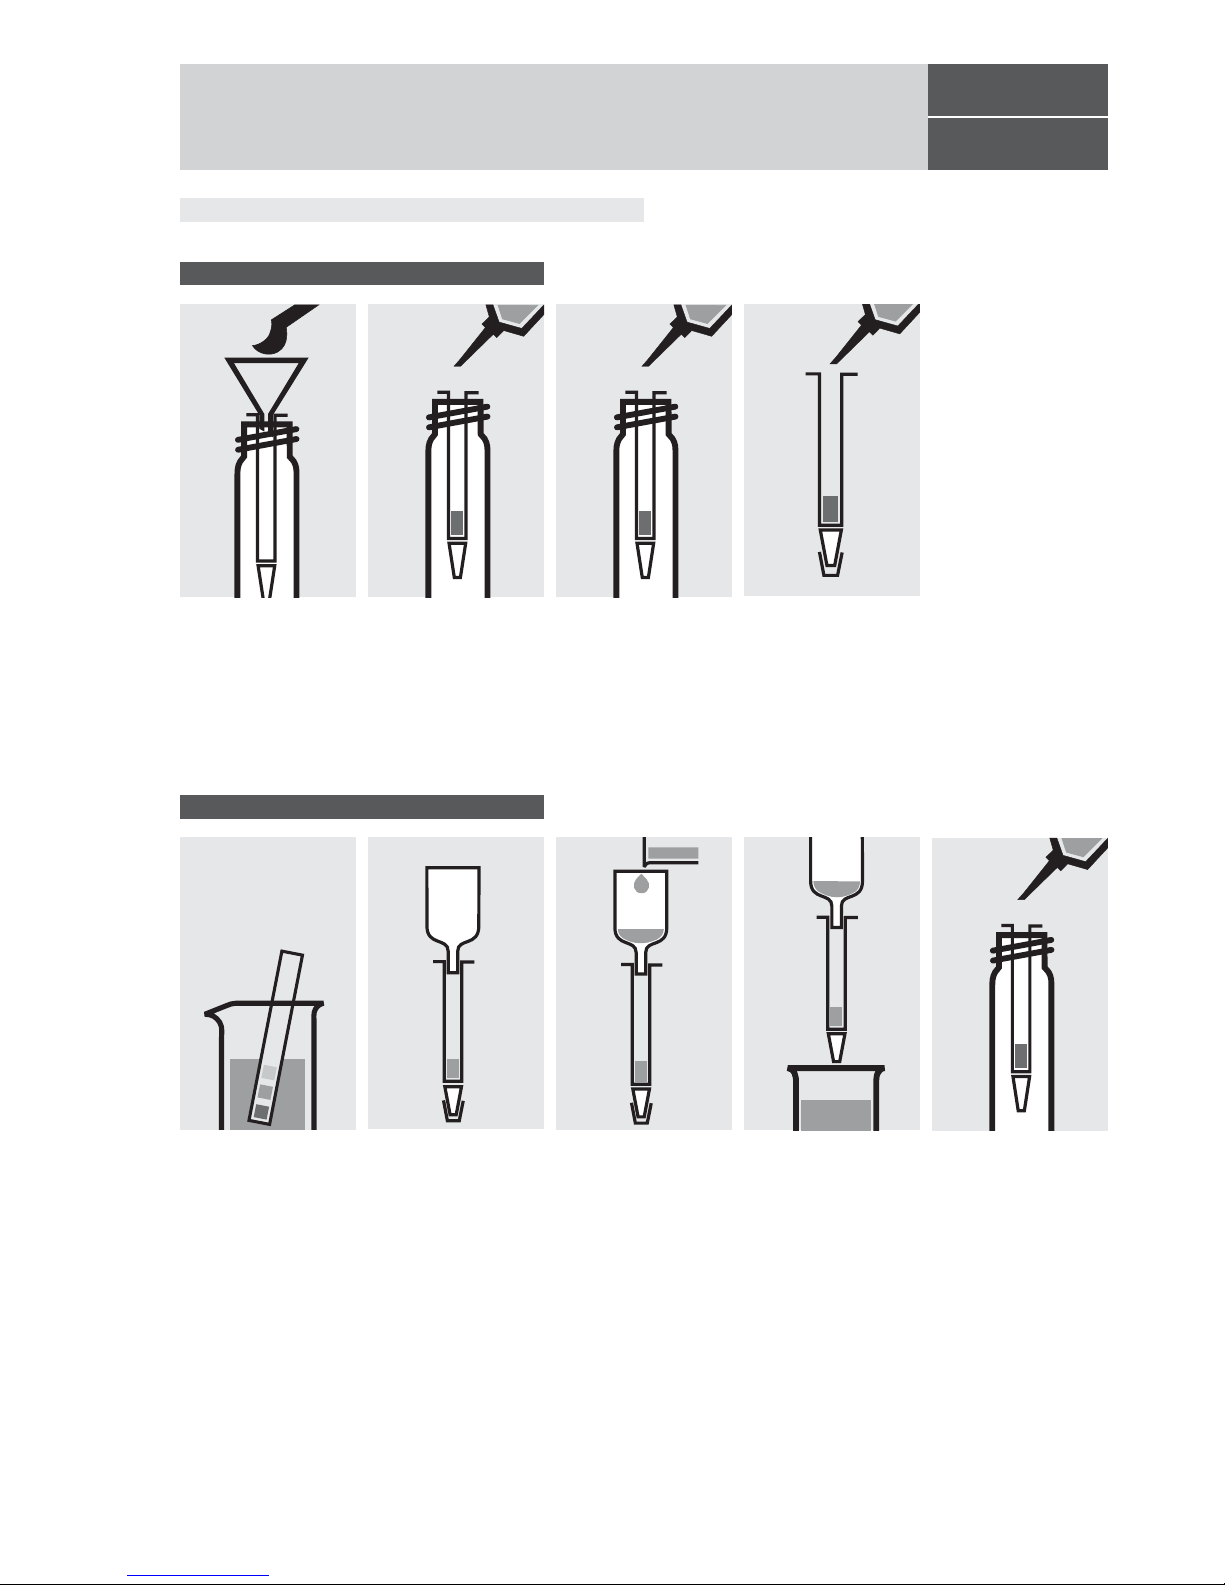
Release 08/2014 - Spectroquant® Multy
100675
Cell Test
Measuring range: 0.05– 2.50 mg/l AOX 16-mm cell
AOX
Adsorbable Organic Halogens (x)
Place the column in an
empty cell. Fill 1 level
blue microspoon of
AOX-1 into the column
using the glass funnel.
Run 3 separate
1-ml portions of
AOX-2 through the
column. Discard the
wash solution.
Run 3 separate
1-ml portions of
AOX-3 through the
column. Discard the
wash solution.
Close the bottom end of
the column with the
stopper. Apply to the
column 1 ml of AOX-3.
Close the top end of the
column with the stopper
and swirl to eliminate air
bubbles. Remove the
stopper on the top end
and fill the column to the
brim with AOX-3.
Attach the glass
reservoir to the prepared
column (closed at the
bottom end).
Fill 100 ml of the sample
and 6 drops of AOX-4
into the reservoir.
Remove the stopper
from the column outlet
and run the sample
through completely.
Detach the column from
the reservoir. Apply 3
separate 1-ml portions
of AOX-3. Discard the
wash solution.
Preparation of the adsorption column:
Sample enrichment:
Check the pH of the
sample, specified range
:
pH 6 – 7.
If required, add dilute
sodium hydroxide
solution or nitric acid
drop by drop to adjust
the pH.
Page 58
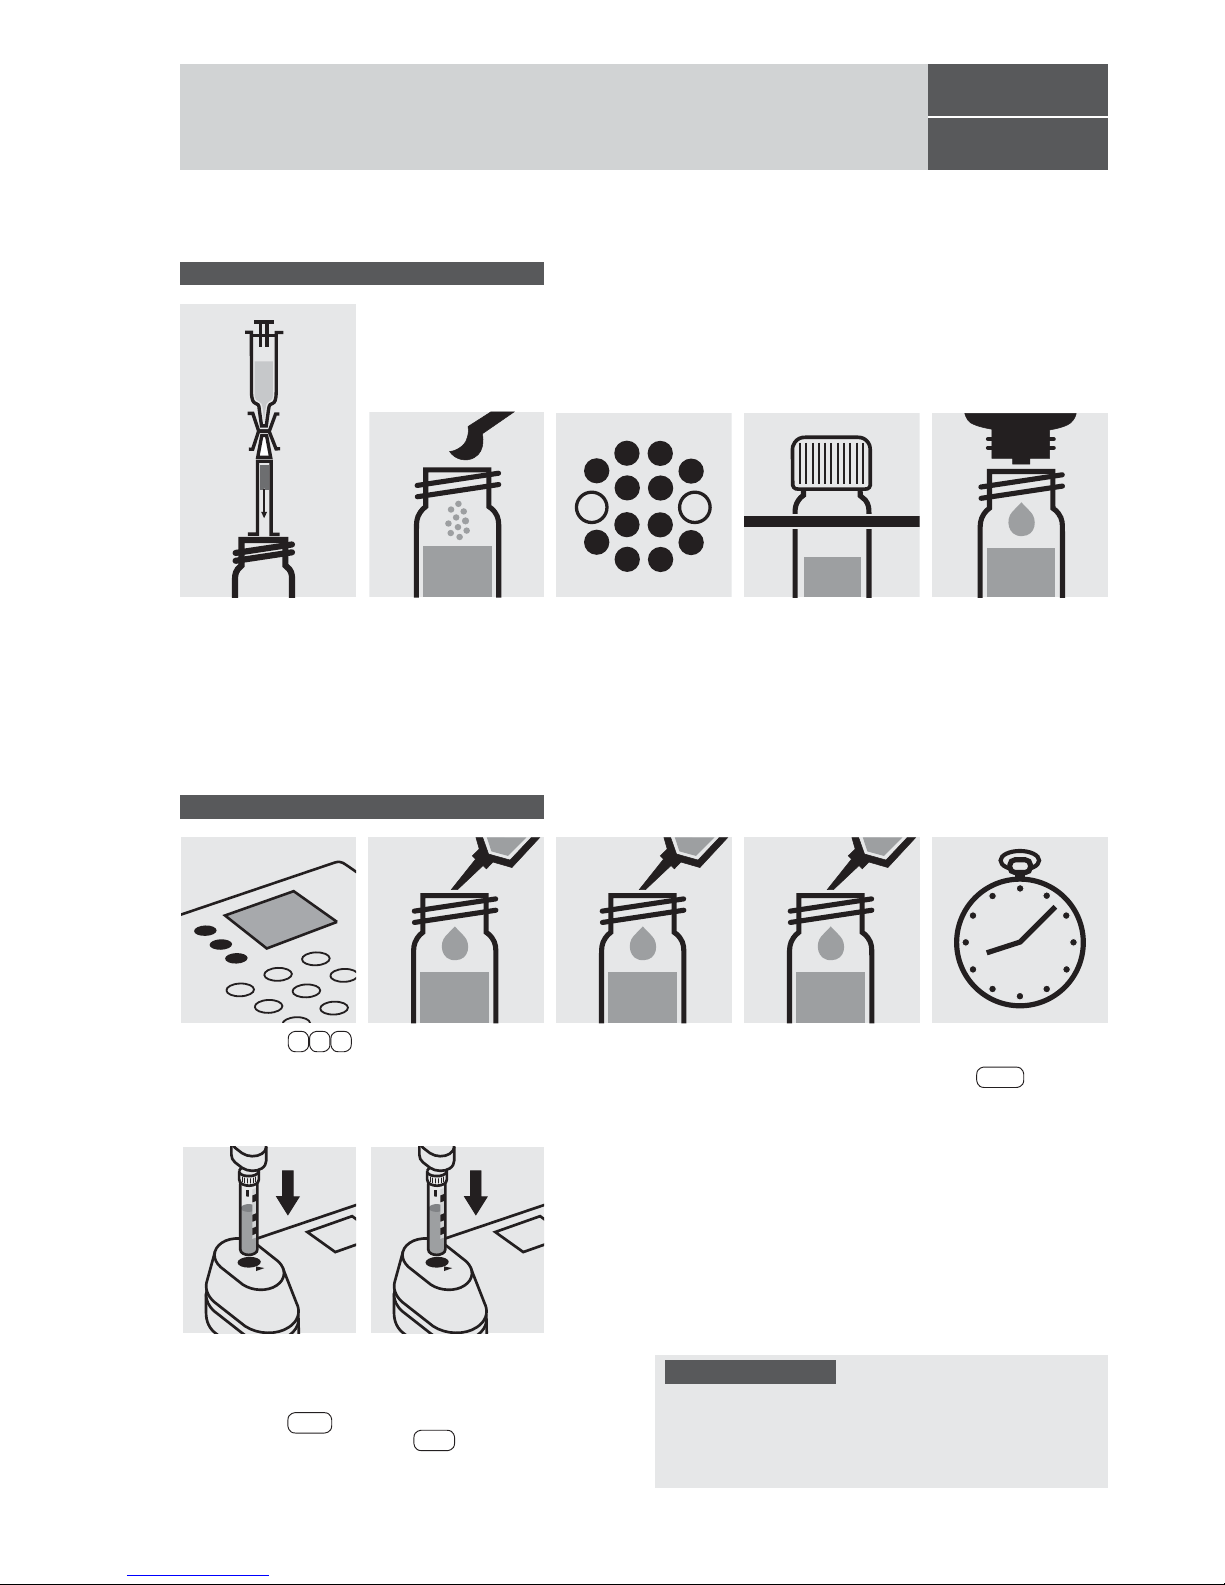
Release 08/2014 - Spectroquant® Multy
100675
Cell Test
AOX
Adsorbable Organic Halogens (x)
Pipette 0.20 ml each
of AOX-1K into two re-
action cells, close with
the screw cap, and mix.
Add to the second cell
7.0 ml distilled water with
pipette, close with the
screw cap, and mix.
(Blank cell)
Quality assurance:
To check the measurement system (test reagents, measurement device, and handling) Spectroquant
®
AOX Standard, Cat.No. 100680, concentration 0.2 – 2.0 mg/l can be
used.
Add to one cell 7.0 ml of
pretreated sample
(without charcoal) with
glass pipette, close with
the srew cap, and mix.
Select method 4 0 .
Insert the cell containing
the sample into the cell
compartment. Align the
mark on the cell with
that on the photometer.
Press Test .
Reaction time:
15 minutes
Press Enter to start
the countdown.
Fill the 10-ml syringe with
10 ml of reagent AOX-5
and attach the syringe
with the column outlet
using the connector. Place
the top end of the column
on an empty cell and rinse
the charcoal filling of the
column into an empty
16-mm cell.
Add 2 level green
microspoons of AOX-6,
close with the screw
cap, and mix.
Heat the cell at 120 °C
in the thermoreactor for
30 minutes.
Add 5 drops of AOX-4,
close the cell, and mix;
clear supernatant:
pretreated sample.
Remove the cell from
the thermoreactor and
place in a test-tube
rack to cool to room
temperature.
Digestion:
Determination:
Insert the blank cell into
the cell compartment.
Align the mark on the
cell with that on the photometer. Press Zero .
Page 59

Release 08/2014 - Spectroquant® Multy
Quality assurance:
To check the measurement system (test reagents, measurement device, and handling) ready-f
or-use arsenic stan-
dard solution Certipur
®
, Cat.No. 119773, concentration
1000 mg/l As can be used after diluting accordingly.
The measurement results are expressed in µg/l.
Measuring range: 5 –100 µg/l As 16-mm cell
Arsenic
101747
Test
Fill approx. 10 ml of
distilled water into a
16-mm cell (do not add
any reagents!), close
with the screw cap
.
(Blank cell)
Select method 5 0 . Insert the cell containing
the sample into the cell
compartment. Press
Test .
Place 350 ml of the
sample into an Erlenmeyer flask with ground
joint.
Add 5 drops of As-1
and mix.
Add 20 ml of As-2 with
pipette and mix.
Add 1 level green dosing
spoon of As-3 and
dissolve.
Add 1.0 ml of As-4 with
pipette and mix.
Pipette 5.0 ml of As-5
into the absorption tube.
Add 1.0 ml of As-6 with
pipette to the solution in
the Erlenmeyer flask
and mix.
Add 3 level red dosing
spoons of As-7. Imme-
diately attach the absorption tube to the
Erlenmeyer flask.
Leave to stand for
2 hours. During this time
carefully swirl the flask
several times or stir
slowly with a magnetic
stirrer.
Transfer the solution
from the absorption tube
into a 16-mm cell, close
with the screw cap.
Insert the blank cell into
the cell compartment.
Press Zero .
Check the pH of the
sample, specified range
:
pH 0 – 13.
Page 60
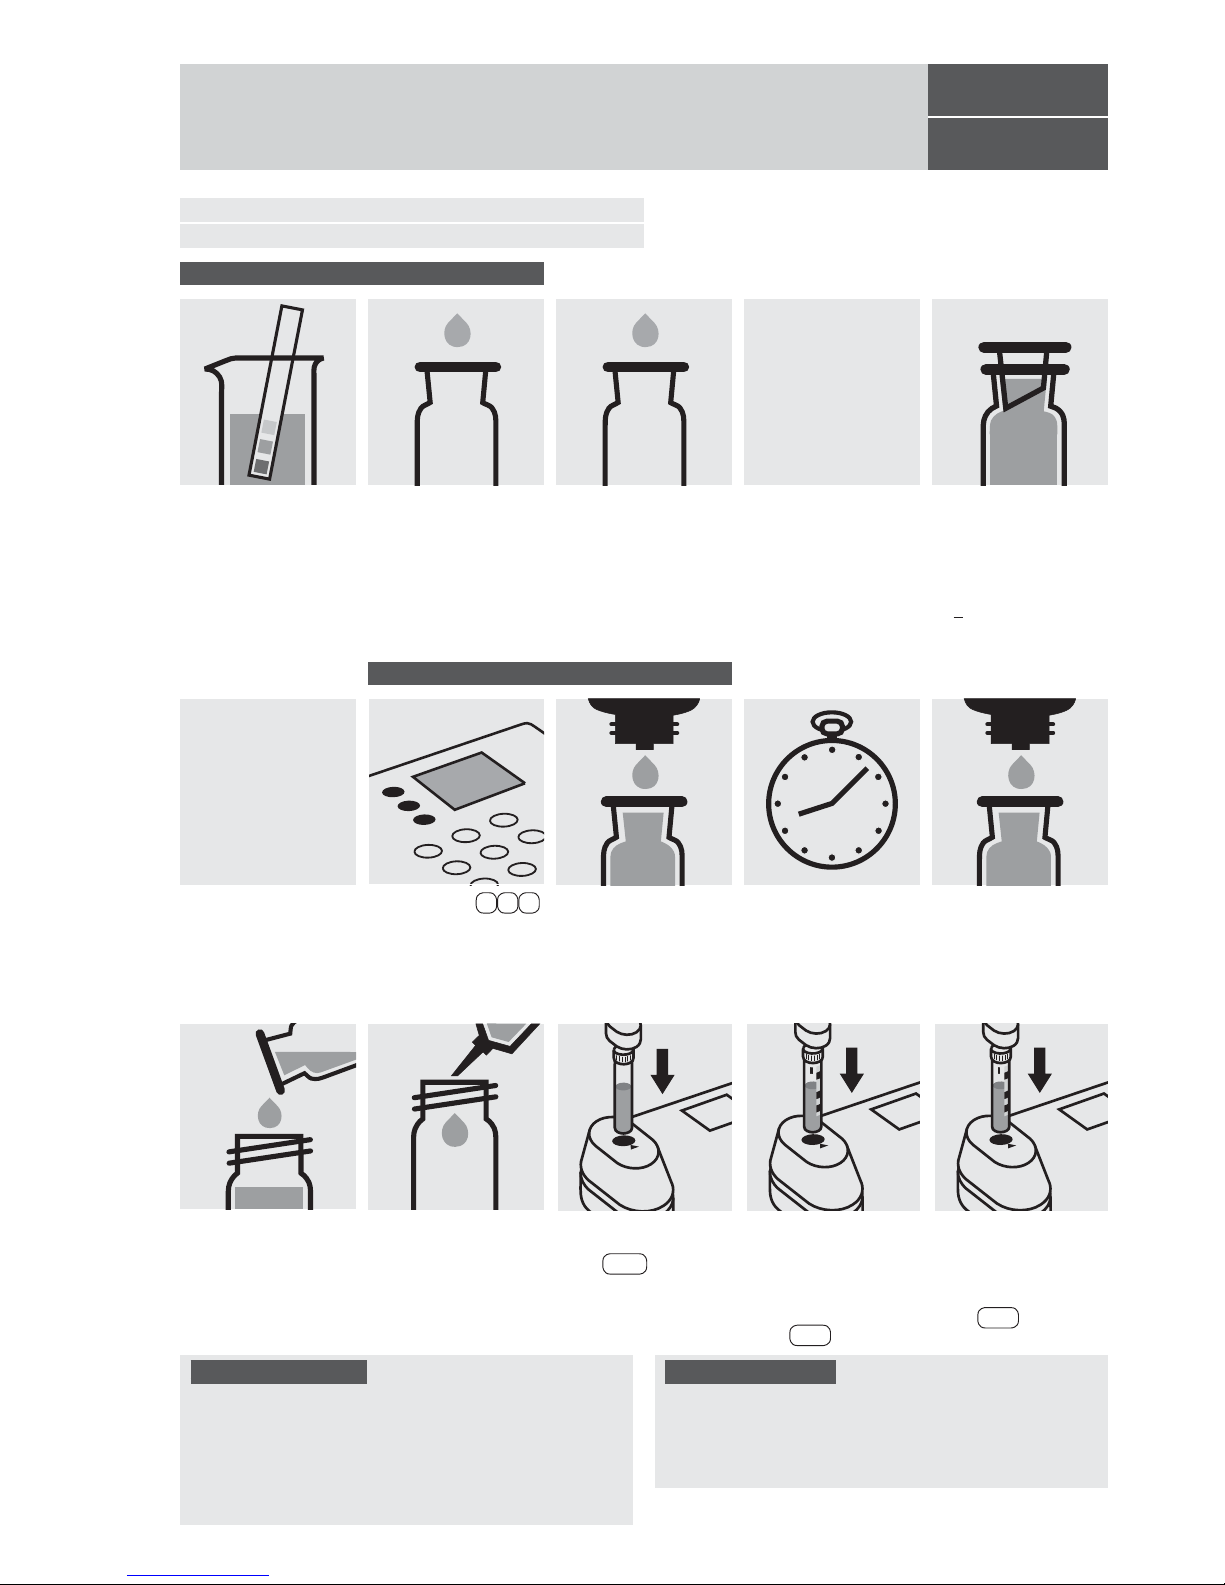
Release 08/2014 - Spectroquant® Multy
100687
Cell Test
Measuring range: 0.5 – 3000
1)
mg/l O
2
16-mm cell
1)
after corresponding dilution (details see package insert)
BOD
Biochemical Oxygen Demand
Fill approx. 10 ml of
distilled water into a
16-mm cell (do not add
any reagents!), close
with the screw cap
.
(Blank cell)
Insert the blank cell
(
nutrient-salt solution
)
into the cell compartment. Align the mark on
the cell with that on the
photometer.
Press Test .
Fill 2 oxygen reaction
bottles each with
pretreated sample
and 2 glass beads to
overflowing. Close
bubble-free with the
slanted ground-glass
stoppers.
Fill 2 oxygen reaction
bottles each with inocu-
lated nutrient-salt solution and 2 glass beads
to overflowing. Close
bubble-free with the
slanted ground-glass
stoppers.
Incubate one bottle
of pretreated sample
and one of inoculated
nutrient-salt solution
closed in a thermostatic
incubation cabinet at
20 + 1°C for 5 days.
Use one bottle of
pretreated sample
and one of inoculated
nutrient-salt solution
for the measurement
of the initial oxygen
concentration.
After incubation, use
one bottle of pretreated
sample and one of
inoculated nutrientsalt solution for the
measurement of the final
oxygen concentration.
Measurement of inital
oxygen concentration
= Result 1
(measurement sample)
= Result 1
(blank)
Measurement of final
oxygen concentration
= Result 2
(measurement sample)
= Result 2
(blank)
Preparation and incubation:
Determination:
Select method 7 0 . Add to each
oxygen re-
action bottle
10 drops
of BOD-3K, reclose,
and mix.
Add to each
oxygen
reaction bottle
5 drops of
BOD-1K and then 10
drops of BOD-2K, close
bubble-free, and mix for
approx. 10 seconds.
Transfer each solution
into a separate 16-mm
cell, close with the screw
caps.
Calculation:
BOD of measurement sample:
Result 1 – Result 2 (measurement sample) = A in mg/l
BOD of blank:
Result 1 – Result 2 (b
lank) = B in mg/l
BOD of original sample in mg/l = A • dilution factor – B
Insert the cell containing
the sample into the cell
compartment. Align the
mark on the cell with
that on the photometer.
Press Test .
Insert the blank cell into
the cell compartment.
Press Zero .
Quality assurance:
To check the measurement system (test reagents, measurement device, and handling) Spectroquant BOD Standard (analogous to EN 1899), Cat.No
. 100718, can be
used.
Check the pH of the
sample, specified range
:
pH 6 – 8.
If required, add dilute
sodium hydroxide
solution or sulfuric acid
drop by drop to adjust
the pH.
Reaction time:
1 minute
Page 61
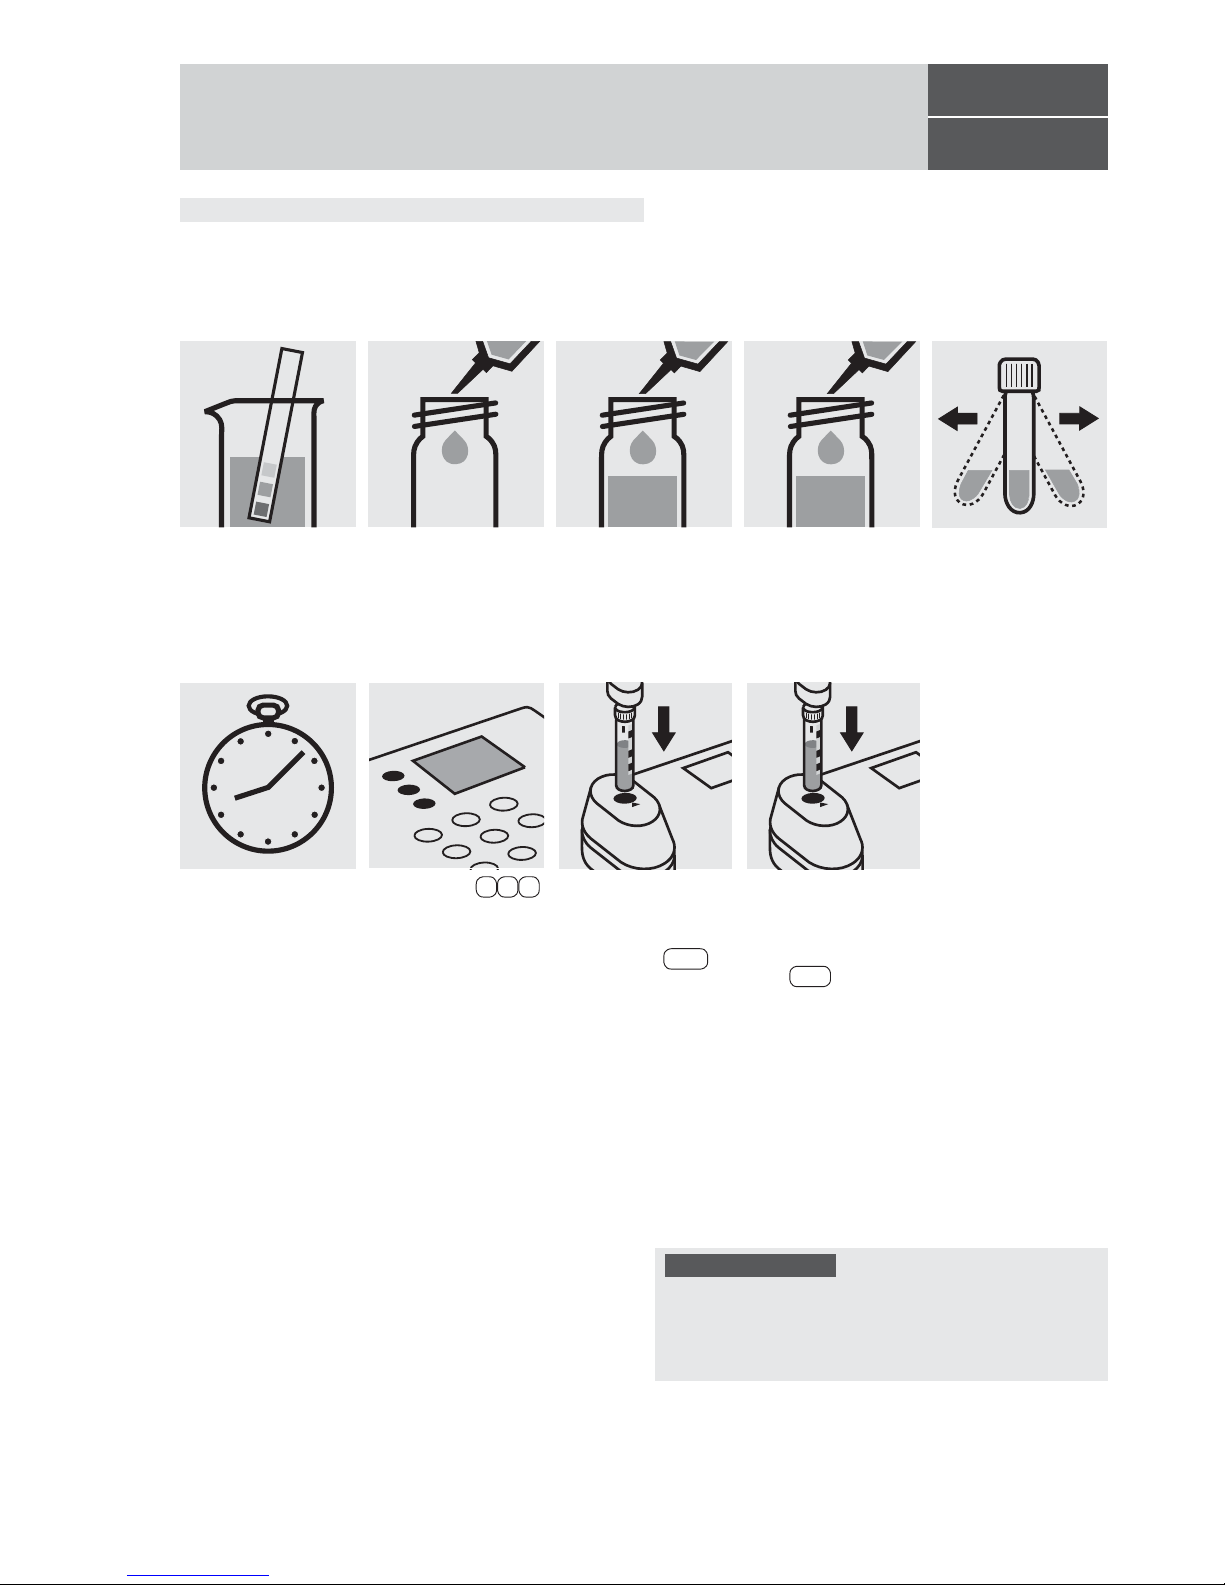
Release 08/2014 - Spectroquant® Multy
100826
Cell Test
Measuring range: 0.05– 2.00 mg/l B 16-mm cell
Boron
Quality assurance:
To check the measurement system (test reagents, measurement device, and handling) ready-f
or-use boron stan-
dard solution Certipur
®
, Cat.No. 119500, concentration
1000 mg/l B can also be used after diluting accordingly.
Pipette 1.0 ml each of
B-1K into two reaction
cells, close with the
screw cap, and mix.
Add to one cell 4.0 ml of
the sample with pipette,
close with the screw cap.
Shake both cells vigorously to dissolve the
solid substance.
Add to the second cell
4.0 ml of distilled water
with pipette, close with
the screw cap.
(Blank cell)
Insert the cell containing
the sample into the cell
compartment. Align the
mark on the cell with
that on the photometer.
Press Test .
Reaction time:
60 minutes
Check the pH of the
sample, specified range
:
pH 2 – 12.
If required, add dilute
sodium hydroxide
solution or nitric acid
drop by drop to adjust
the pH.
Select method 8 0 .
Insert the blank cell into
the cell compartment.
Align the mark on the
cell with that on the photometer. Press Zero .
Page 62
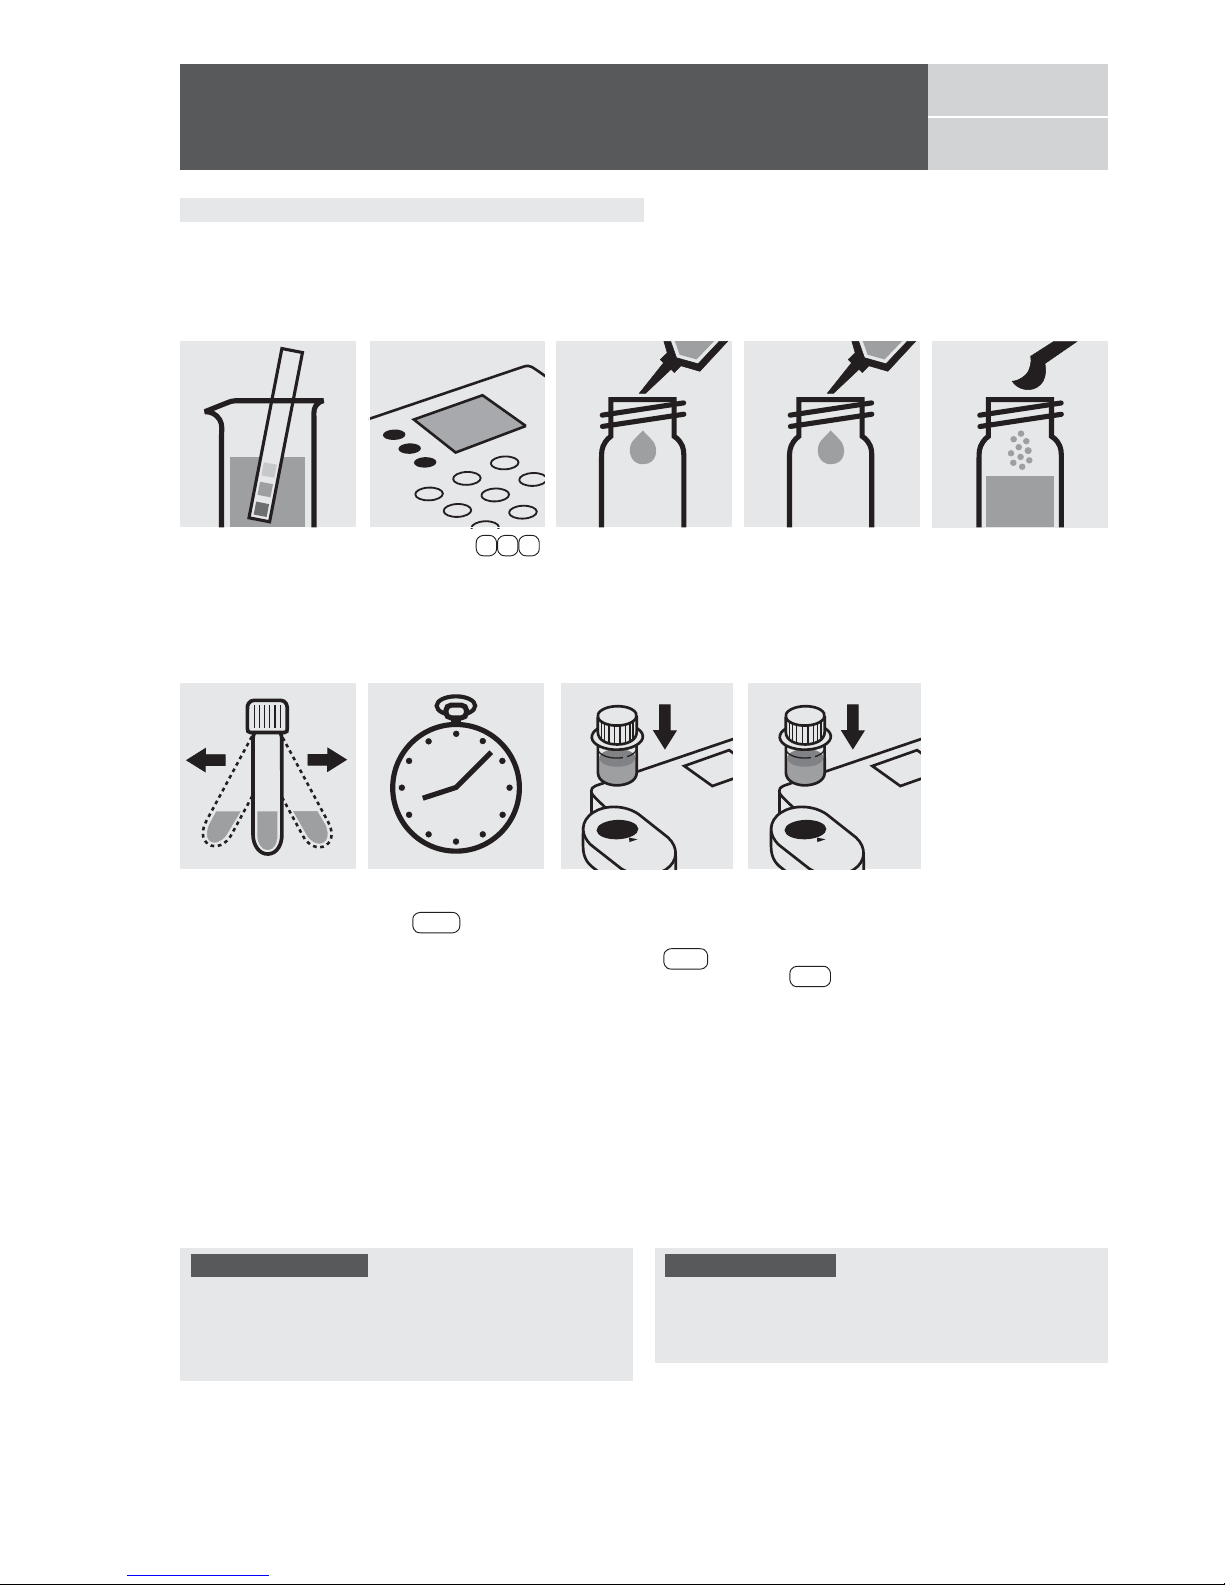
Release 08/2014 - Spectroquant® Multy
Pipette 10 ml of the
sample into a 24-mm
cell.
Add 1 level blue microspoon of Br
2
-1, close
with the screw cap.
Measuring range: 0.10– 5.00 mg/l Br2 24-mm cell
Bromine
100605
Test
Shake the cell vigorously to dissolve the
solid substance.
Fill approx. 10 ml of
distilled water into a
24-mm cell (do not add
any reagents!), close
with the screw cap
.
(Blank cell)
Insert the cell containing
the sample into the cell
compartment. Align the
mark on the cell with
that on the photometer.
Press Test .
Reaction time:
1 minute
Press Enter to start
the countdown.
Check the pH of the
sample, specified range
:
pH 4 – 8.
If required, add dilute
sodium hydroxide
solution or sulfuric acid
drop by drop to adjust
the pH.
Select method 9 0 .
Important:
Very high bromine concentrations in the sample produce
yellow-colored solutions (measurement solution should be
red) and f
alse-low readings are yielded. In such cases the
sample must be diluted (plausibility check).
Quality assurance:
To check the measurement system (test reagents, measurement device, and handling) a freshly prepared standard
solution
can be used (see section “Standard solutions”).
Insert the blank cell into
the cell compartment.
Align the mark on the
cell with that on the photometer. Press Zero .
Page 63
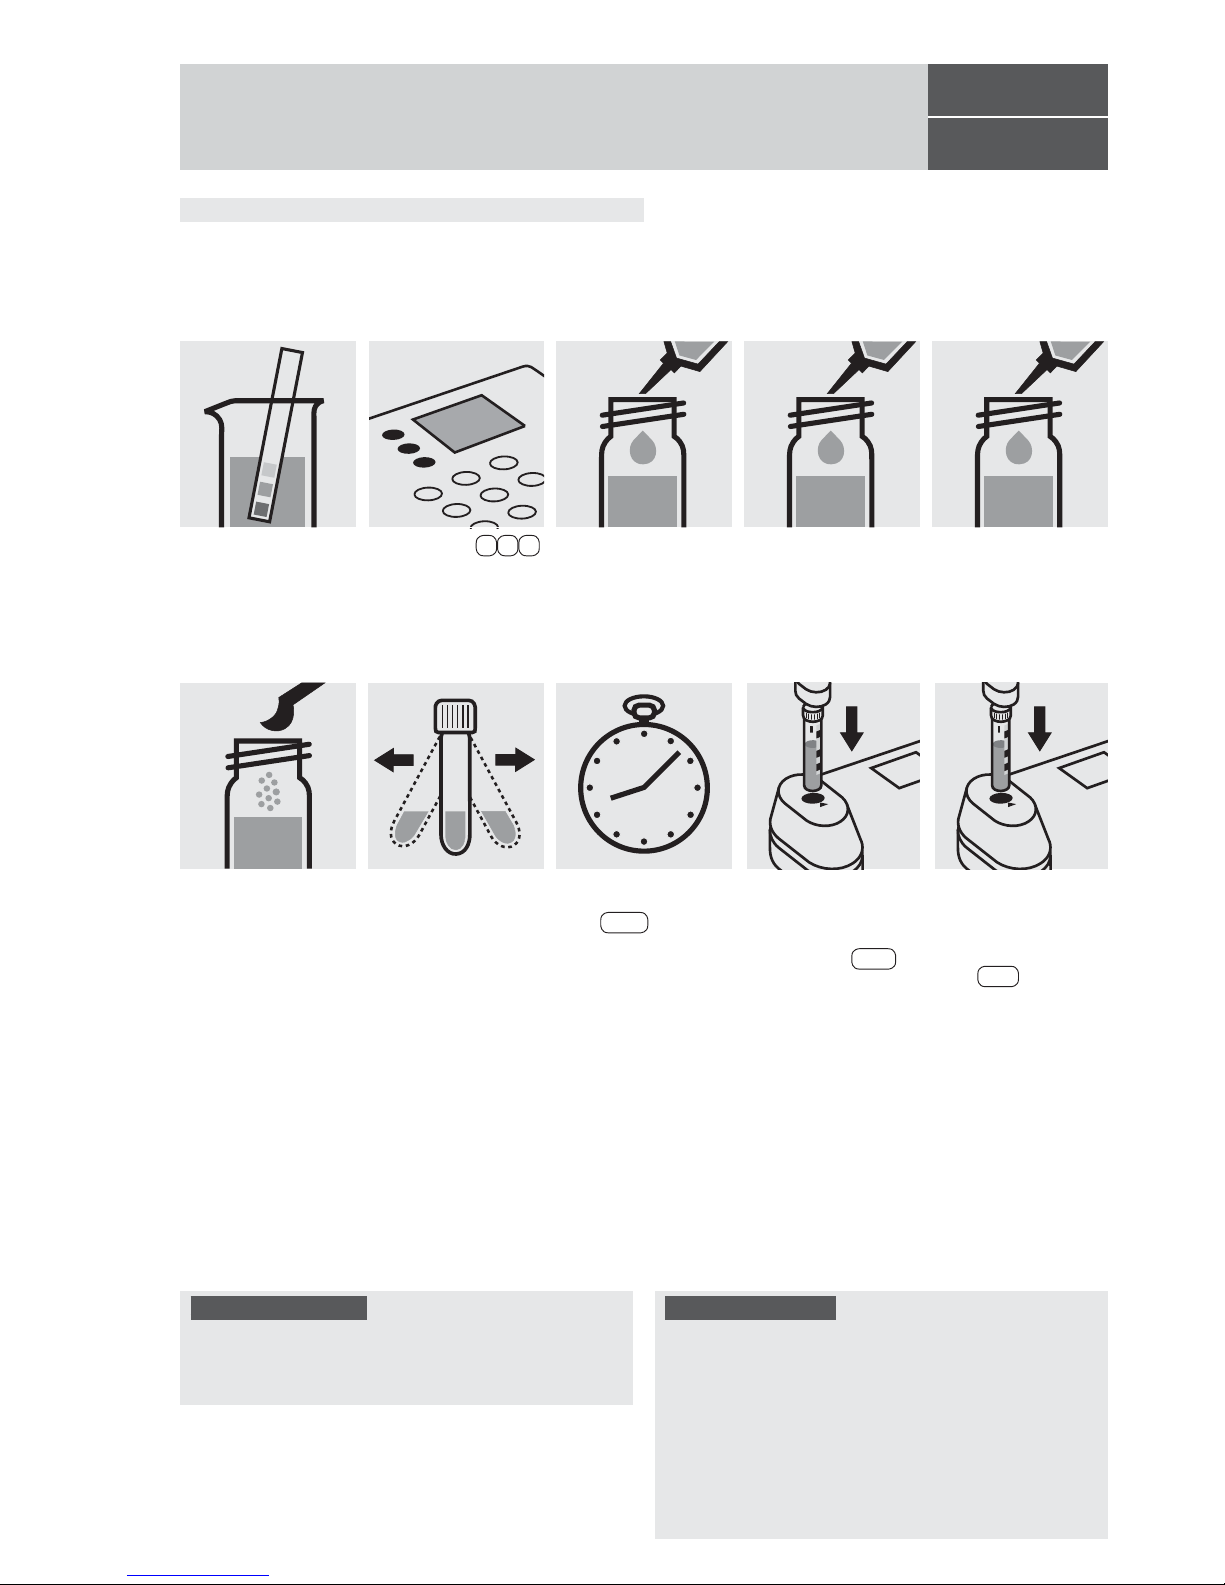
Release 08/2014 - Spectroquant® Multy
114834
Cell Test
Measuring range: 25– 1000 µg/l Cd 16-mm cell
Cadmium
Pipette 5.0 ml of the
sample into a reaction
cell, close with the
screw cap, and mix.
Add 0.20 ml each of
Cd-1K with pipette,
close with the screw
cap, and mix.
Add to each cell 1 level
green microspoon of
Cd-2K, close with the
screw cap.
Shake both cells vigorously to dissolve the
solid substance.
Pipette 5.0 ml of distilled
water into a second
reaction cell, close with
the screw cap, and mix.
(Blank cell)
Select method 1 0 0 .
Insert the cell containing
the sample into the cell
compartment. Align the
mark on the cell with
that on the photometer.
Press Test .
Reaction time:
2 minutes
Press Enter to start
the countdown.
Check the pH of the
sample, specified range
:
pH 3 – 11.
If required, add dilute
sodium hydroxide
solution or sulfuric acid
drop by drop to adjust
the pH.
Quality assurance:
To check the measurement system (test reagents, measurement device, and handling) w
e recommended to use
Spectroquant
®
CombiCheck 30, Cat.No. 114677.
The measurement results are expressed in µg/l.
Ready-for-use cadmium standard solution Certipur
®
,
Cat.No. 119777, concentration 1000 mg/l Cd, can also
be used after diluting accordingly.
To check for sample-dependent effects the use of addition
solutions (e.g. in CombiCheck 30) is highly recommended.
Important:
For the determination of total cadmium a pretreatment
with Crack Set 10C
, Cat.No. 114688 or Crack Set 10,
Cat.No. 114687, and thermoreactor is necessary.
Insert the blank cell into
the cell compartment.
Align the mark on the
cell with that on the photometer. Press Zero .
Page 64
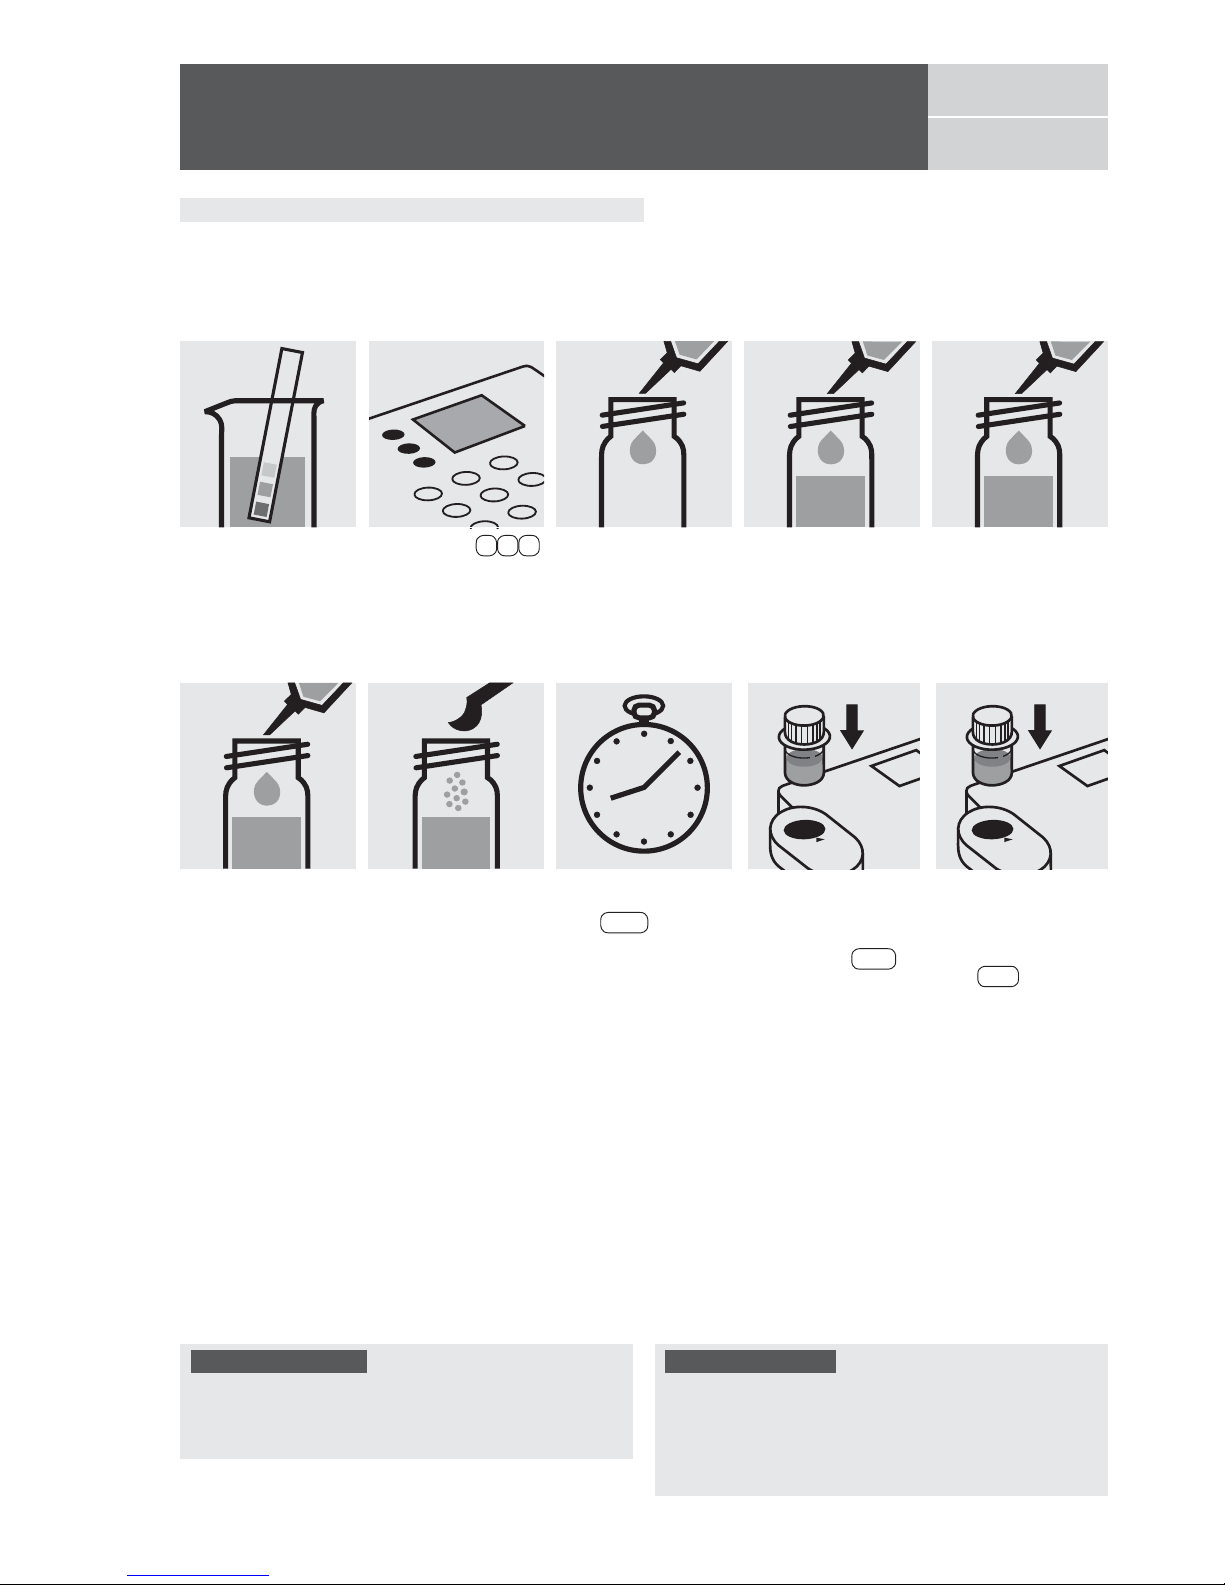
Release 08/2014 - Spectroquant® Multy
Pipette 1.0 ml each of
Cd-1 into two 24-mm
cells.
Add to one cell 10 ml of
the sample with pipette,
close with the screw
cap, and mix.
Add to each cell 0.20 ml
of Cd-2 with pipette,
close with the screw
cap, and mix.
Measuring range: 5– 500 µg/l Cd 24-mm cell
Add to each cell 1 level
green microspoon of
Cd-3, close with the
screw cap, and dissolve
the solid substance.
Cadmium
101745
Test
Add to the second cell
10 ml of distilled water
with pipette, close with
the screw cap, and mix.
(Blank cell)
Select method 1 0 1 .
Insert the cell containing
the sample into the cell
compartment. Align the
mark on the cell with
that on the photometer.
Press Test .
Reaction time:
2 minutes
Press Enter to start
the countdown.
Check the pH of the
sample, specified range
:
pH 3 – 11.
If required, add dilute
sodium hydroxide
solution or sulfuric acid
drop by drop to adjust
the pH.
Quality assurance:
To check the measurement system (test reagents, measurement device, and handling) ready-f
or-use cadmium
standard solution Certipur
®
, Cat.No. 119777, concentration 1000 mg/l Cd, can be used after diluting accordingly.
The measurement results are expressed in µg/l.
Important:
For the determination of total cadmium a pretreatment
with Crack Set 10C
, Cat.No. 114688 or Crack Set 10,
Cat.No. 114687, and thermoreactor is necessary.
Insert the blank cell into
the cell compartment.
Align the mark on the
cell with that on the photometer. Press Zero .
Page 65
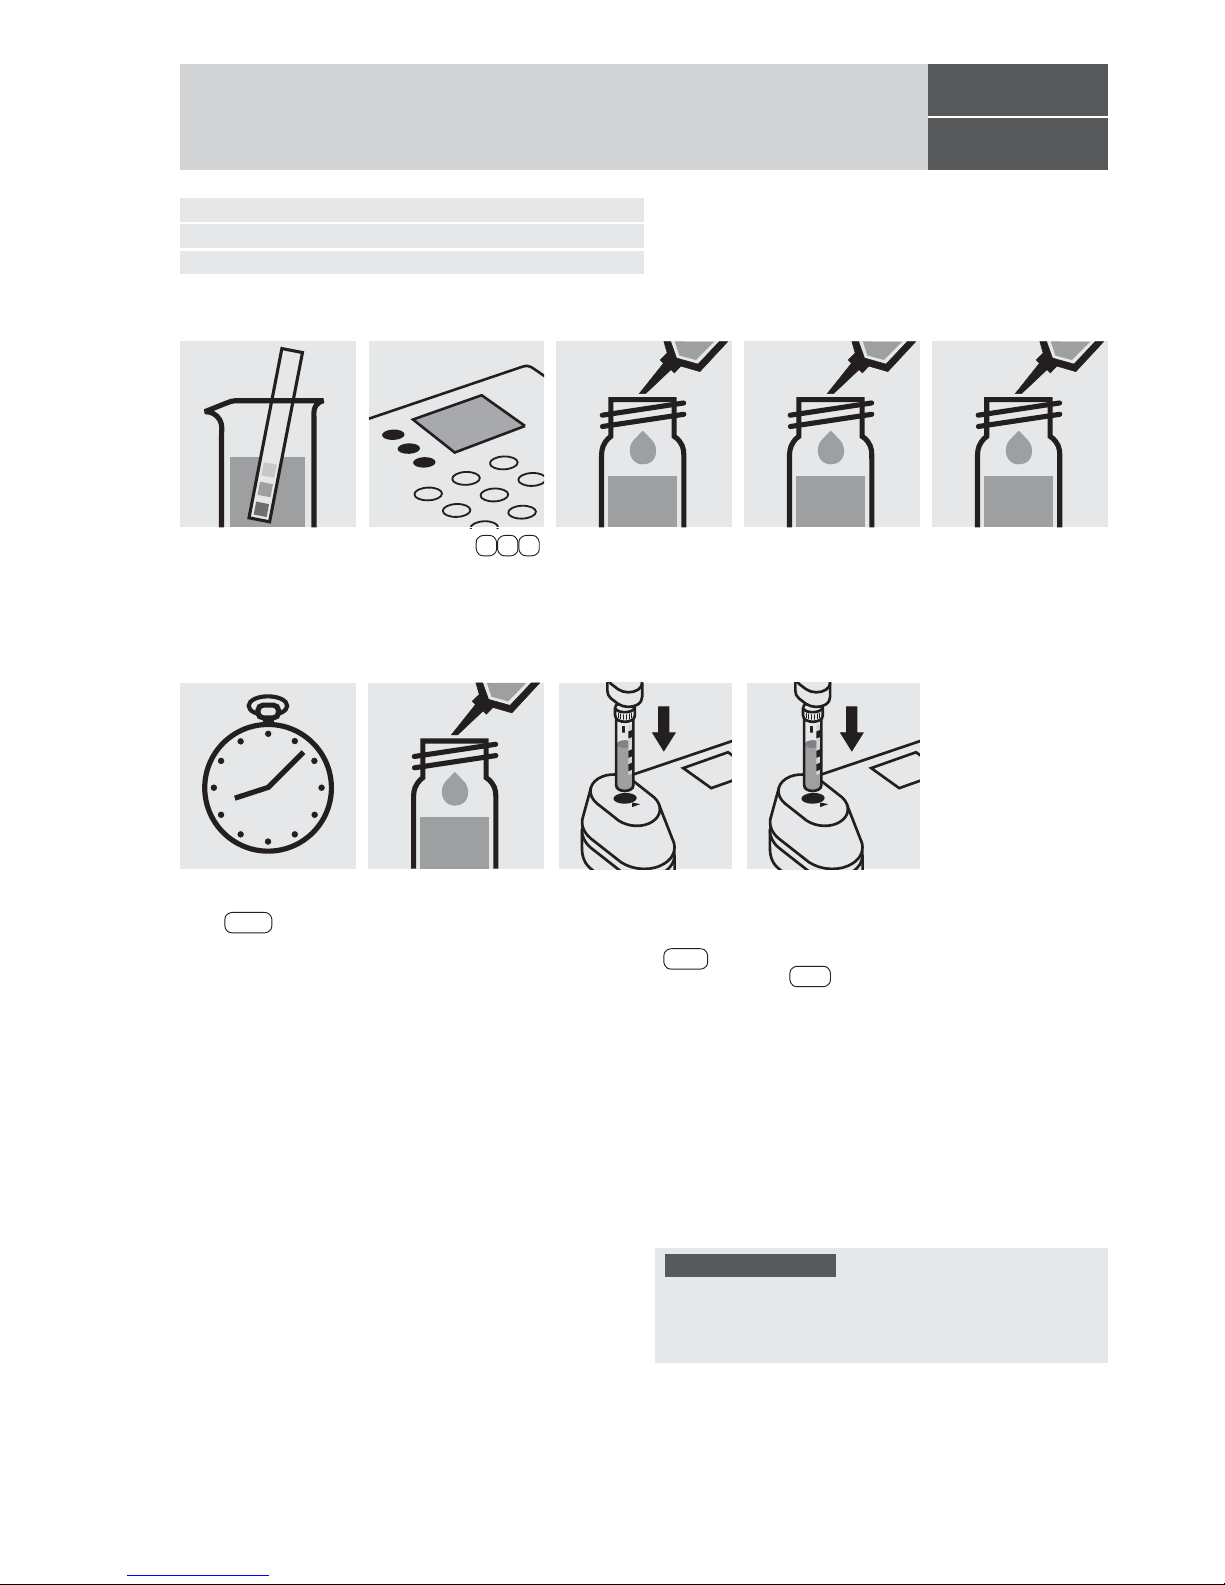
Release 08/2014 - Spectroquant® Multy
Measuring range: 10 –250 mg/l Ca 16-mm cell
14 – 350 mg/l CaO 16-mm cell
25 – 625 mg/l CaCO
3
16-mm cell
Pipette 1.0 ml of the
sample into a reaction
cell, close with the screw
cap, and mix.
Pipette 1.0 ml of distilled
water into a second reaction cell, close with the
screw cap, and mix.
(Blank cell)
Add to each cell 0.50 ml
of Ca-2K with pipette,
close with the screw
cap, and mix.
100858
Cell Test
Calcium
Add to each cell 1.0 ml
of Ca-1K with pipette,
close with the screw
cap, and mix.
Select method 1 1 0 .
Insert the cell containing
the sample into the cell
compartment. Align the
mark on the cell with
that on the photometer.
Press Test .
Check the pH of the
sample, specified range
:
pH 3 – 9.
If required, add dilute
sodium hydroxide
solution or hydrochloric
acid drop by drop to
adjust the pH.
Insert the blank cell into
the cell compartment.
Align the mark on the
cell with that on the photometer. Press Zero .
Reaction time:
exactly 3 minutes
Press Enter to start
the countdown.
Quality assurance:
To check the measurement system (test reagents, measurement device, and handling) a freshly prepared standard
solution can be used (see section “Standard solutions”).
Page 66
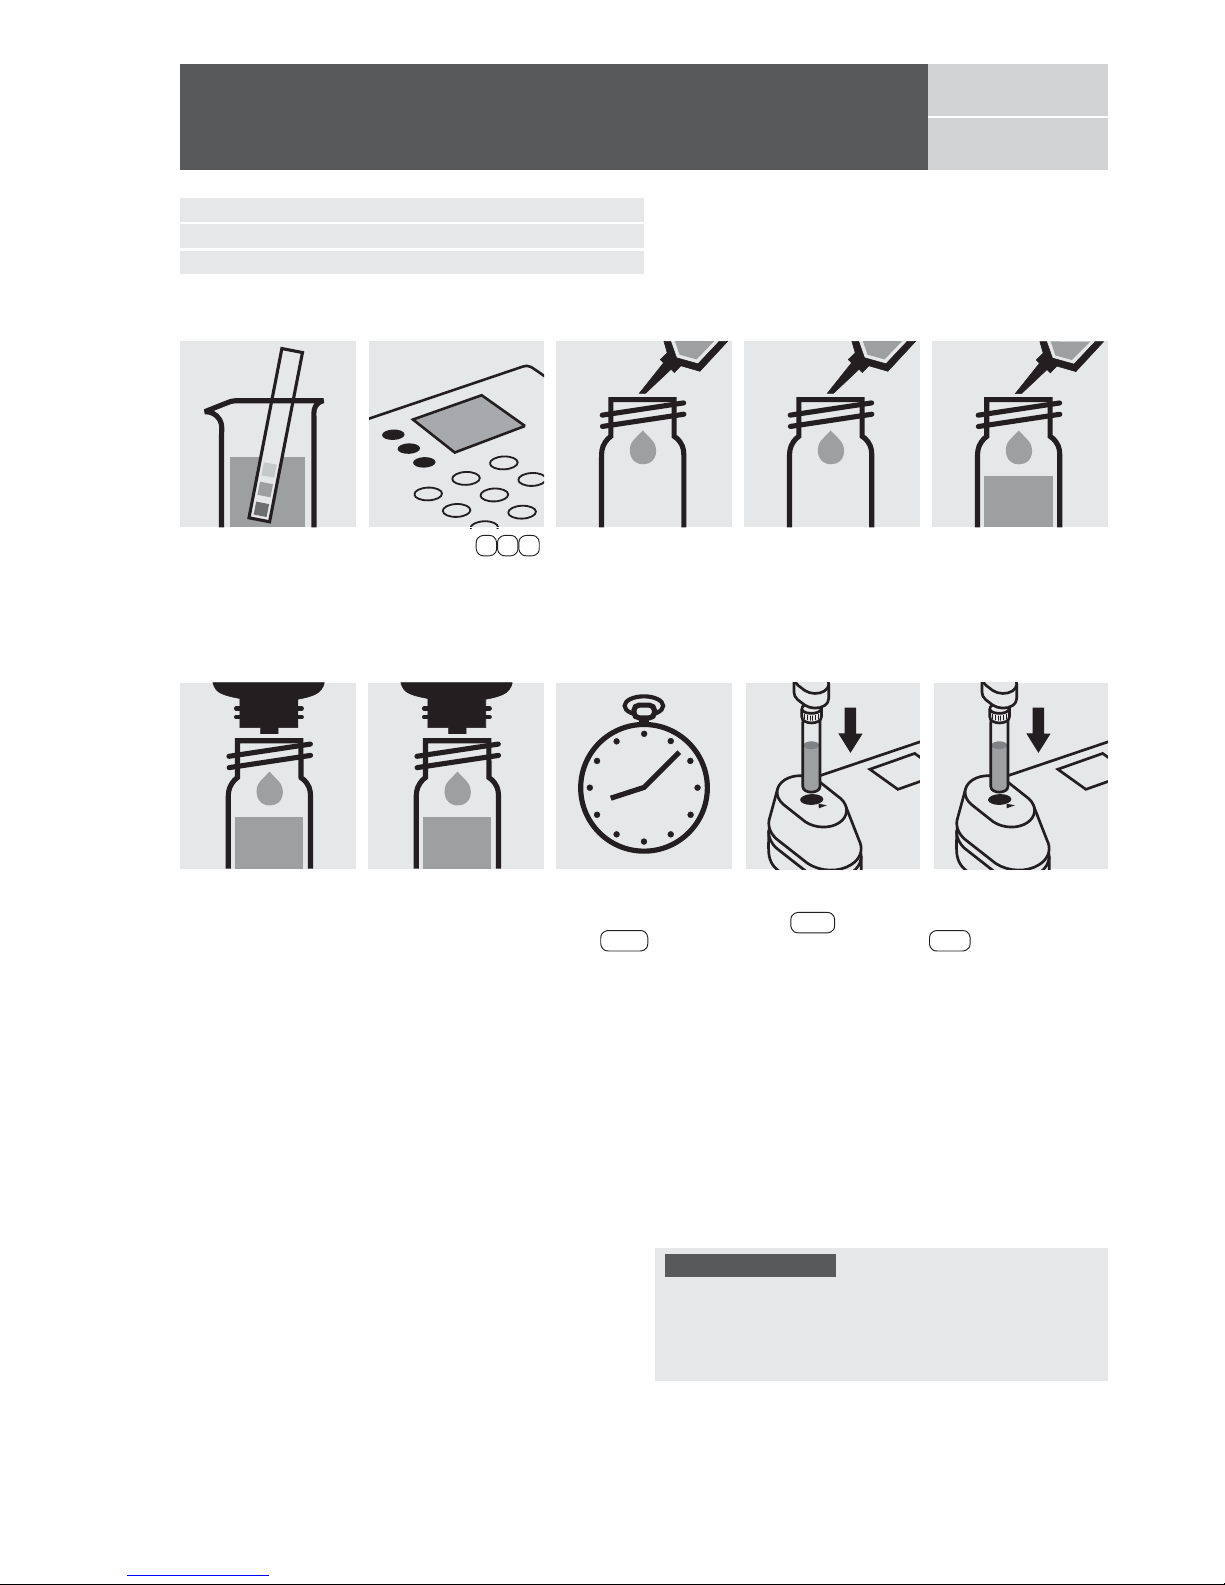
Release 08/2014 - Spectroquant® Multy
Pipette 0.10 ml of the
sample into a 16-mm
cell.
Add to each cell 4 drops
of Ca-2, close with the
screw cap, and mix.
Measuring range: 5 –160 mg/l Ca 16-mm cell
7 – 224 mg/l CaO 16-mm cell
13 – 400 mg/l CaCO
3
16-mm cell
Calcium
114815
Test
Add to each cell 4 drops
of Ca-3, close with the
screw cap, and mix.
Quality assurance:
To check the measurement system (test reagents, measurement device, and handling) ready-f
or-use calcium stan-
dard solution Certipur
®
, Cat.No. 119778, concentration
1000 mg/l Ca, can be used after diluting accordingly.
Add to each cell 5.0 ml
of Ca-1 with pipette, close
with the screw cap, and
mix.
Pipette 0.10 ml of
distilled water into a
second 16-mm cell.
(Blank cell)
Select method 1 1 1 .
Insert the cell containing
the sample into the cell
compartment. Press
Test .
Check the pH of the
sample, specified range
:
pH 4 – 10.
If required, add dilute
sodium hydroxide
solution or hydrochloric
acid drop by drop to
adjust the pH.
Reaction time:
8 minutes, measure
immediately.
Press Enter to start
the countdown.
Insert the blank cell into
the cell compartment.
Press Zero .
Page 67
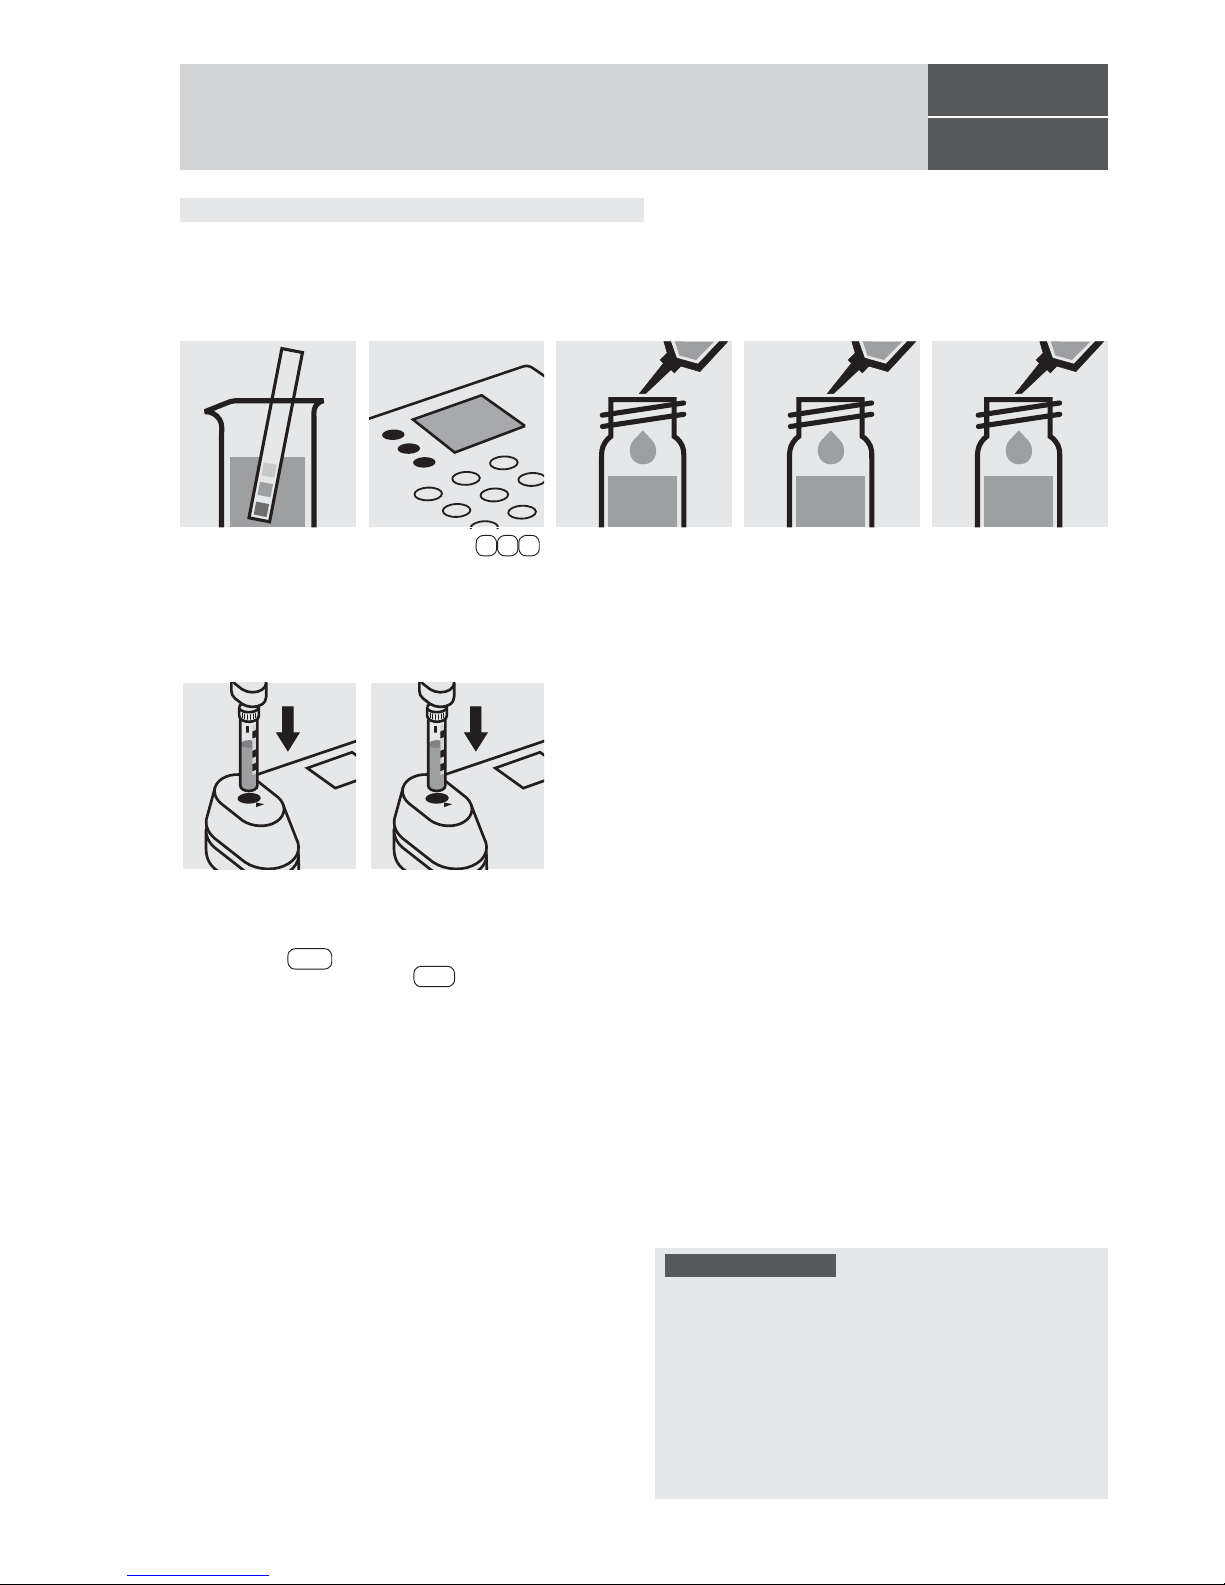
Release 08/2014 - Spectroquant® Multy
114730
Cell Test
Measuring range: 5–125 mg/l Cl 16-mm cell
Chloride
Quality assurance:
To check the measurement system (test reagents, measurement device, and handling) w
e recommended to use
Spectroquant
®
CombiCheck 10 and 20, Cat.No. 114676
and 114675.
Ready-for-use chloride standard solution Certipur
®
,
Cat.No. 119897, concentration 1000 mg/l Cl
–
, can also
be used after diluting accordingly.
To check for sample-dependent effects the use of addition
solutions (e.g. in CombiCheck) is highly recommended.
Pipette 0.50 ml each of
Cl-1K
into two reaction
cells, close with the
screw cap, and mix
.
Add to one cell 1.0 ml of
the sample with pipette,
close with the screw
cap, and mix.
Add to the second cell
1.0 ml of distilled water,
close with the screw cap,
and mix.
(Blank cell)
Select method 1 2 0 .
Insert the cell containing
the sample into the cell
compartment. Align the
mark on the cell with
that on the photometer.
Press Test .
Check the pH of the
sample, specified range
:
pH 1 – 12.
If required, add dilute
ammonia solution or
nitric acid drop by drop
to adjust the pH.
Insert the blank cell into
the cell compartment.
Align the mark on the
cell with that on the photometer. Press Zero .
Page 68
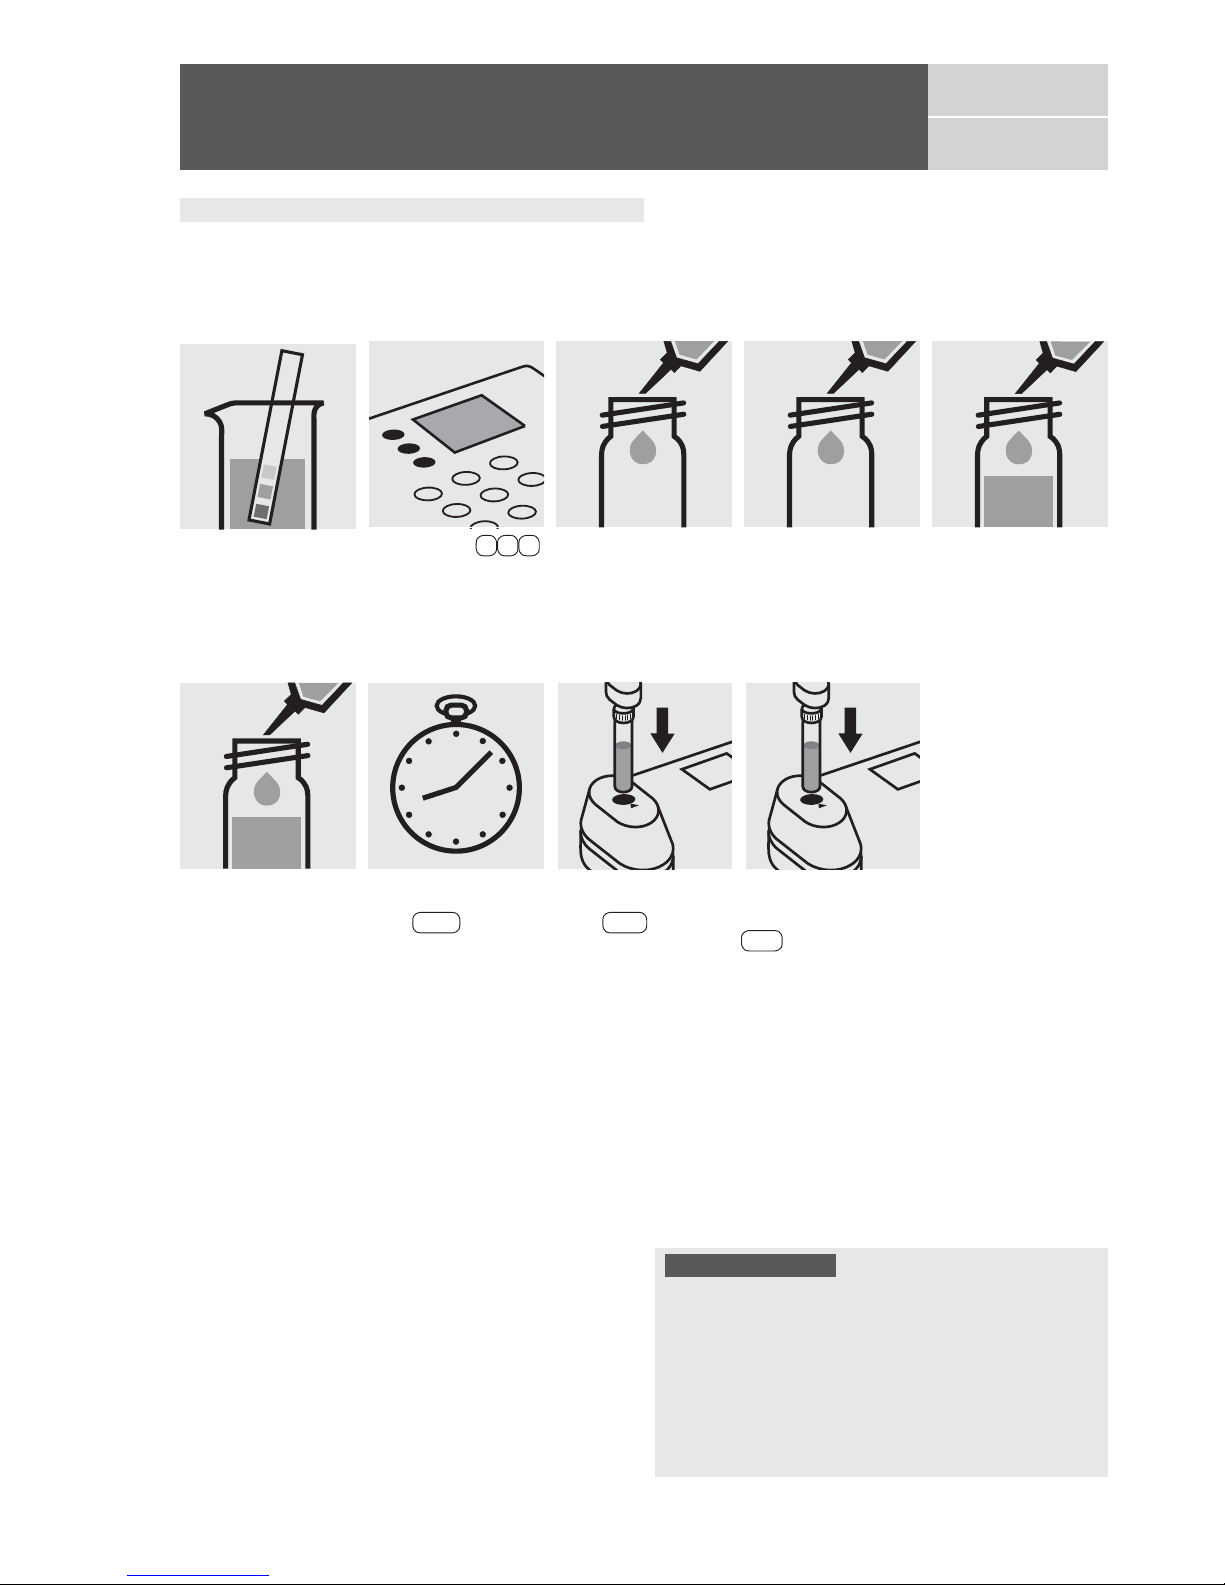
Release 08/2014 - Spectroquant® Multy
Pipette 1.0 ml of the
sample into a 16-mm
cell.
Add to each cell 2.5 ml
of Cl-1 with pipette,
close with the screw
cap, and mix.
Measuring range: 10– 250 mg/l Cl 16-mm cell
Chloride
114897
Test
Quality assurance:
To check the measurement system (test reagents, measurement device, and handling) w
e recommended to use
Spectroquant
®
CombiCheck 60, Cat.No. 114696.
Ready-for-use chloride standard solution Certipur
®
,
Cat.No. 119897, concentration 1000 mg/l Cl
–
, can also
be used after diluting accordingly.
To check for sample-dependent effects the use of addition
solutions (e.g. in CombiCheck 60) is highly recommended.
Add to each cell 0.50 ml
of Cl-2 with pipette,
close with the screw
cap, and mix.
Pipette 1.0 ml of
distilled water into a
second 16-mm cell.
(Blank cell)
Select method 1 2 1 .
Insert the cell containing
the sample into the cell
compartment. Press
Test .
Reaction time:
1 minute
Press Enter to start
the countdown.
Check the pH of the
sample, specified range
:
pH 1 – 12.
If required, add dilute
ammonia solution or
nitric acid drop by drop
to adjust the pH.
Insert the blank cell into
the cell compartment.
Press Zero .
Page 69
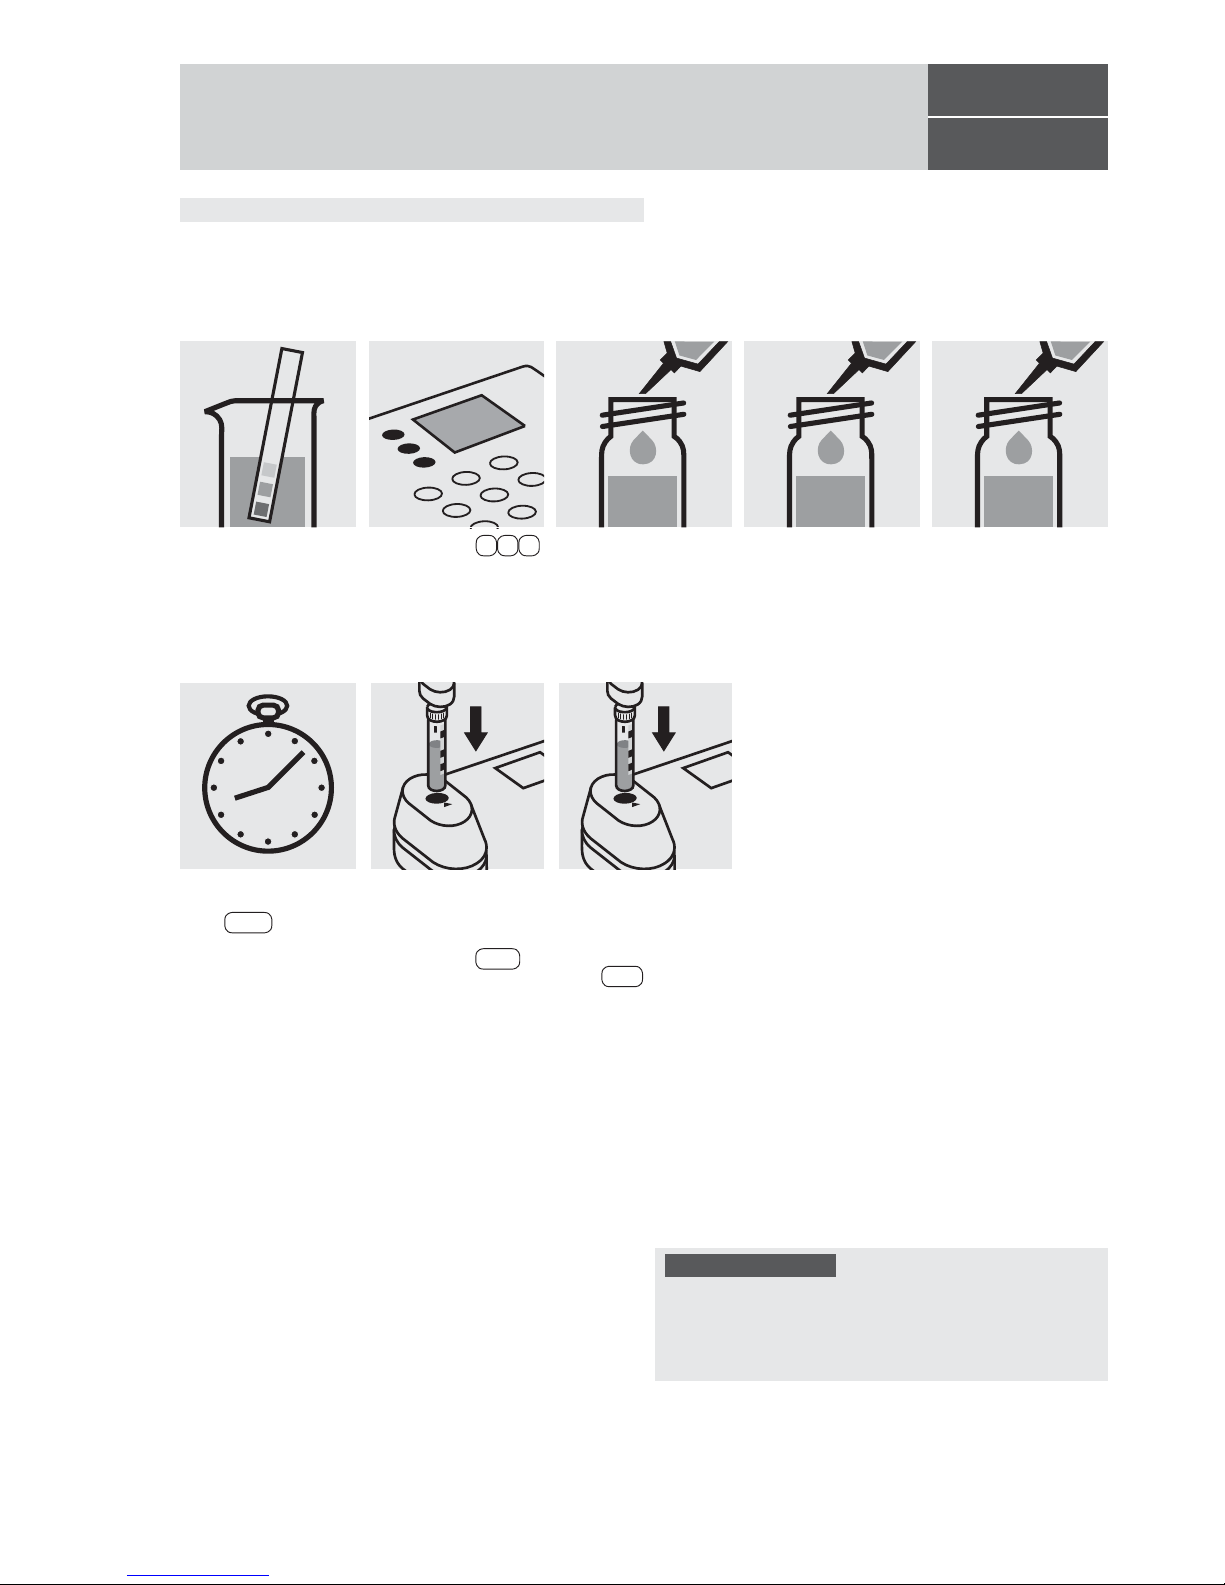
Release 08/2014 - Spectroquant® Multy
101804
Cell Test
Measuring range: 0.5–15.0 mg/l Cl 16-mm cell
Chloride
Insert the cell containing
the sample into the cell
compartment. Align the
mark on the cell with
that on the photometer.
Press Test .
Check the pH of the
sample, specified range
:
pH 3 – 11.
If required, add dilute
ammonia solution or
nitric acid drop by drop
to adjust the pH.
Insert the blank cell into
the cell compartment.
Align the mark on the
cell with that on the photometer. Press Zero .
Pipette 10 ml of the
sample into a reaction
cell, close with the
screw cap, and mix.
Add 0.25 ml each of
Cl-1K with pipette,
close with the screw
cap, and mix.
Pipette 10 ml of distilled
water into a second
reaction cell, close with
the screw cap, and mix.
(Blank cell)
Quality assurance:
To check the measurement system (test reagents, measurement device, and handling) ready-f
or-use chloride
standard solution Certipur
®
, Cat.No. 119897, concentra-
tion 1000 mg/l Cl
-
, can be used after diluting accordingly.
Select method 1 2 2 .
Reaction time:
10 minutes
Press Enter to start
the countdown.
Page 70
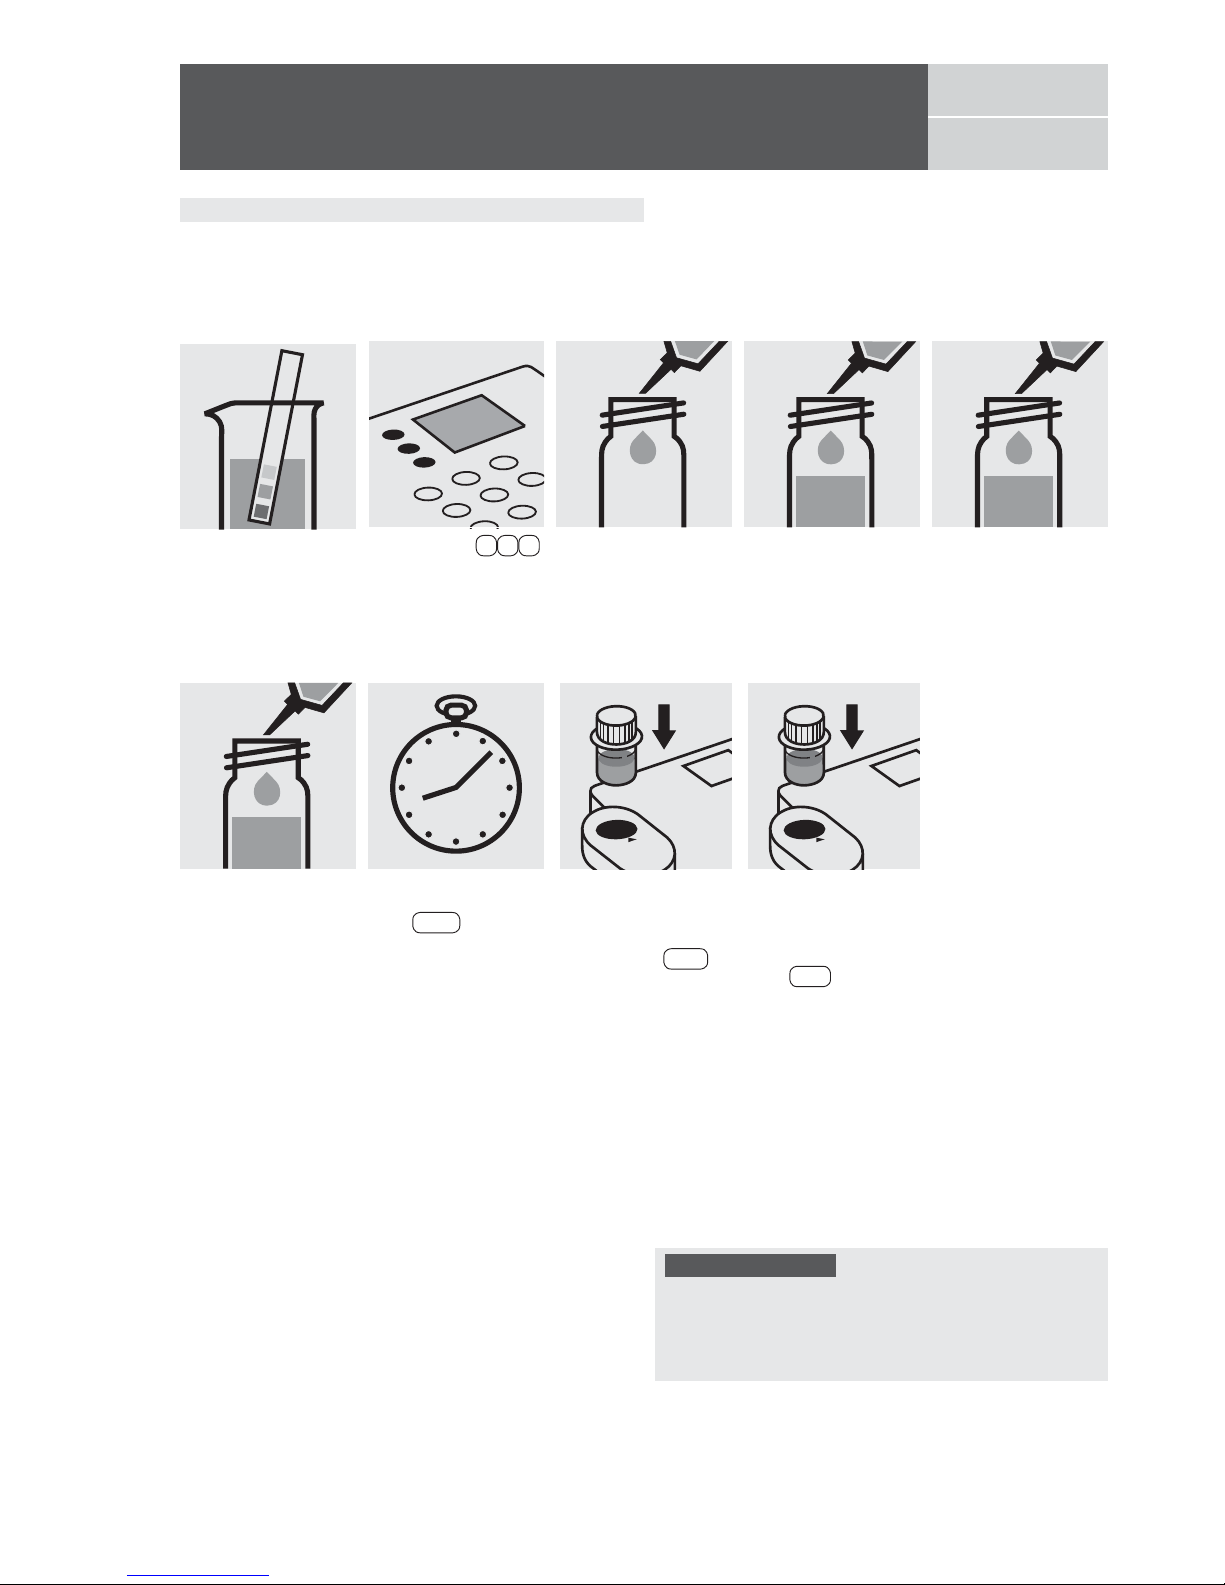
Release 08/2014 - Spectroquant® Multy
Pipette 0.20 ml each of
Cl-1 into two 24-mm
cells.
Add
to the second cell
10 ml of distilled water
(Water for analysis
EMSURE
®
, Cat.No.
116754, is recommended) with pipette, close
with the screw cap, and
mix.(Blank cell)
Measuring range: 0.50– 5.00 mg/l Cl 24-mm cell
Chloride
101807
Test
Add to each cell 0.20 ml
of Cl-2 with pipette,
close with the screw
cap, and mix.
Add 10 ml of the sample with pipette, close
with the screw cap,
and mix.
Check the pH of the
sample, specified range
:
pH 3 – 11.
If required, add dilute
ammonia solution or
nitric acid drop by drop
to adjust the pH.
Insert the cell containing
the sample into the cell
compartment. Align the
mark on the cell with
that on the photometer.
Press Test .
Insert the blank cell into
the cell compartment.
Align the mark on the
cell with that on the photometer. Press Zero .
Quality assurance:
To check the measurement system (test reagents, measurement device, and handling) ready-f
or-use chloride
standard solution Certipur
®
, Cat.No. 119897, concentra-
tion 1000 mg/l Cl
-
, can be used after diluting accordingly.
Select method 1 2 3 .
Reaction time:
10 minutes
Press Enter to start
the countdown.
Page 71
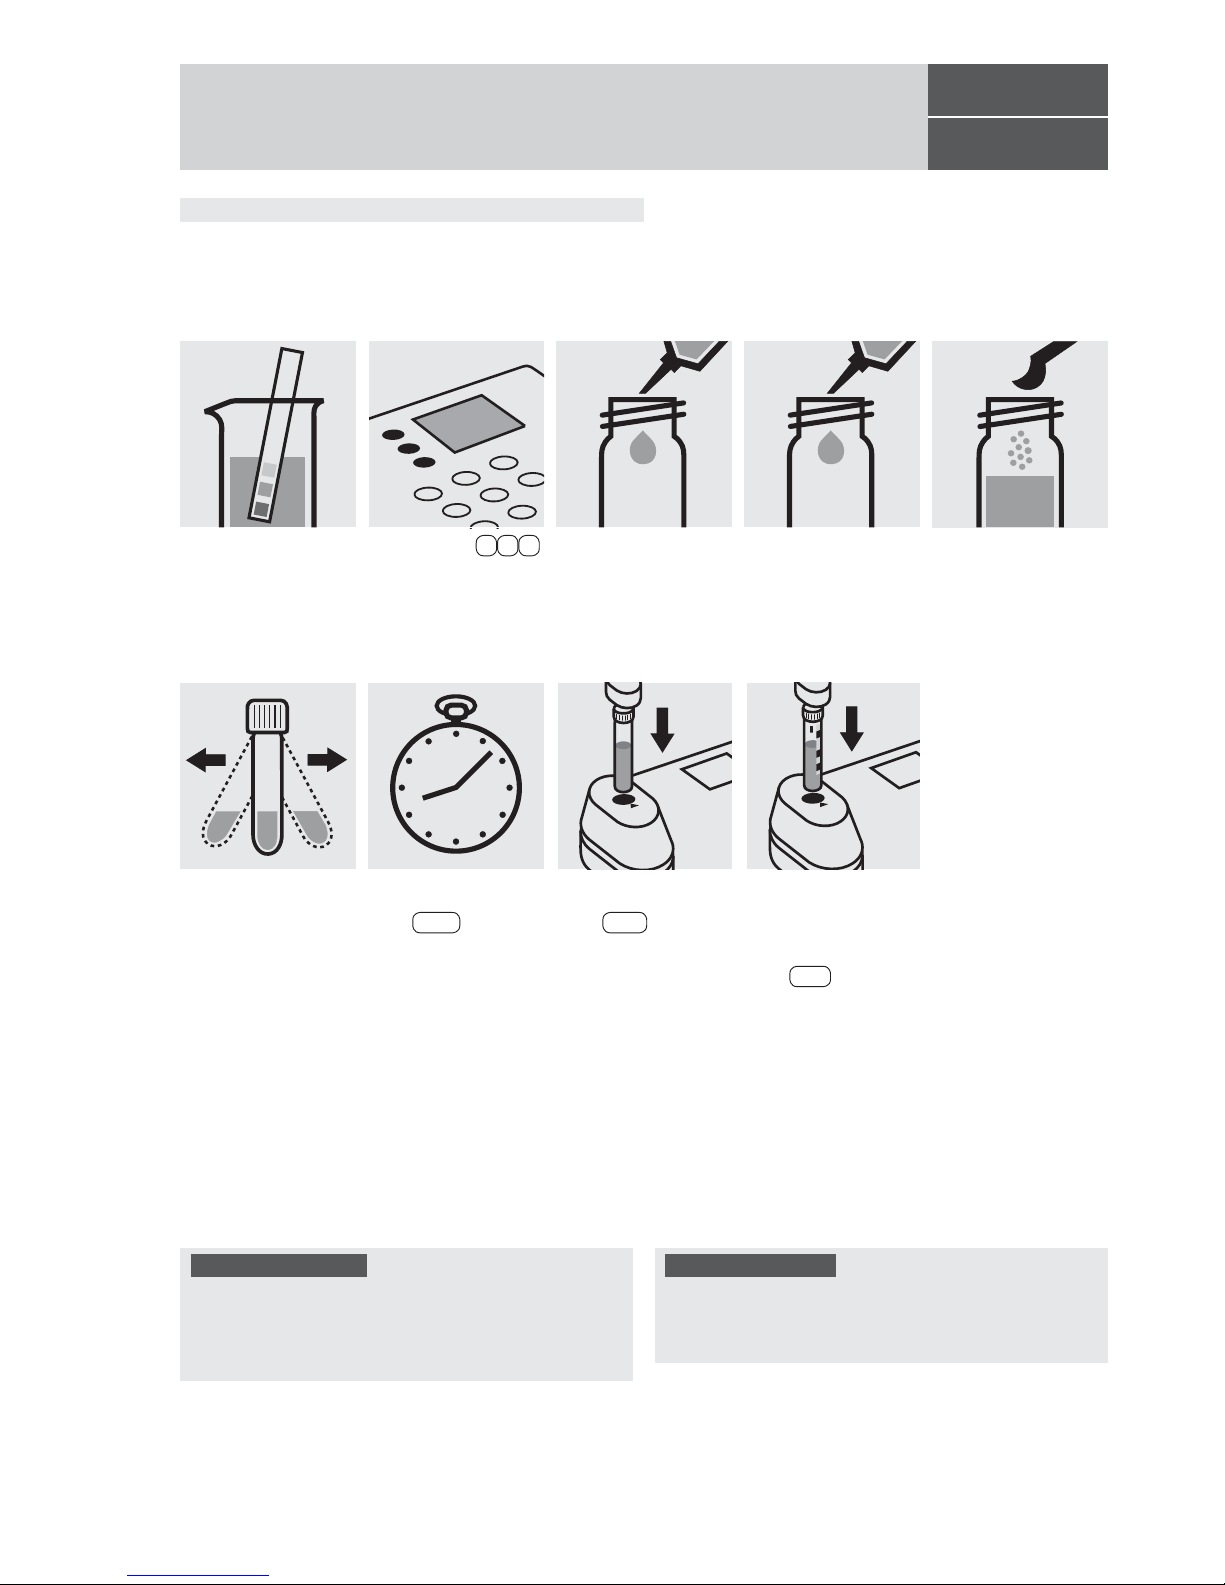
Release 08/2014 - Spectroquant® Multy
Add 1 level blue microspoon of Cl
2
-1, close
with the screw cap.
Pipette 5.0 ml of the
sample into a round cell.
100595
Cell Test
Measuring range: 0.05– 5.00 mg/l Cl
2
16-mm cell
Chlorine
Determination of free chlorine
Shake the cell vigorously to dissolve the
solid substance.
Fill approx. 10 ml of
distilled water into an
empty 16-mm cell (do
not add any reagents!),
close with the screw
cap
.
(Blank cell)
Select method 1 3 0 ,
select subitem >>free.
Insert the cell containing
the sample into the cell
compartment. Align the
mark on the cell with
that on the photometer.
Press Test .
Reaction time:
1 minute
Press Enter to start
the countdown.
Important:
Very high chlorine concentrations in the sample produce
yellow-colored solutions (measurement solution should be
red) and f
alse-low readings are yielded. In such cases the
sample must be diluted (plausibility check).
Quality assurance:
To check the measurement system (test reagents, measurement device, and handling) a freshly prepared standard
solution can be used (see section “Standard solutions”).
Insert the blank cell into
the cell compartment.
Press Zero .
Check the pH of the
sample, specified range
:
pH 4 – 8.
If required, add dilute
sodium hydroxide
solution or sulfuric acid
drop by drop to adjust
the pH.
Page 72
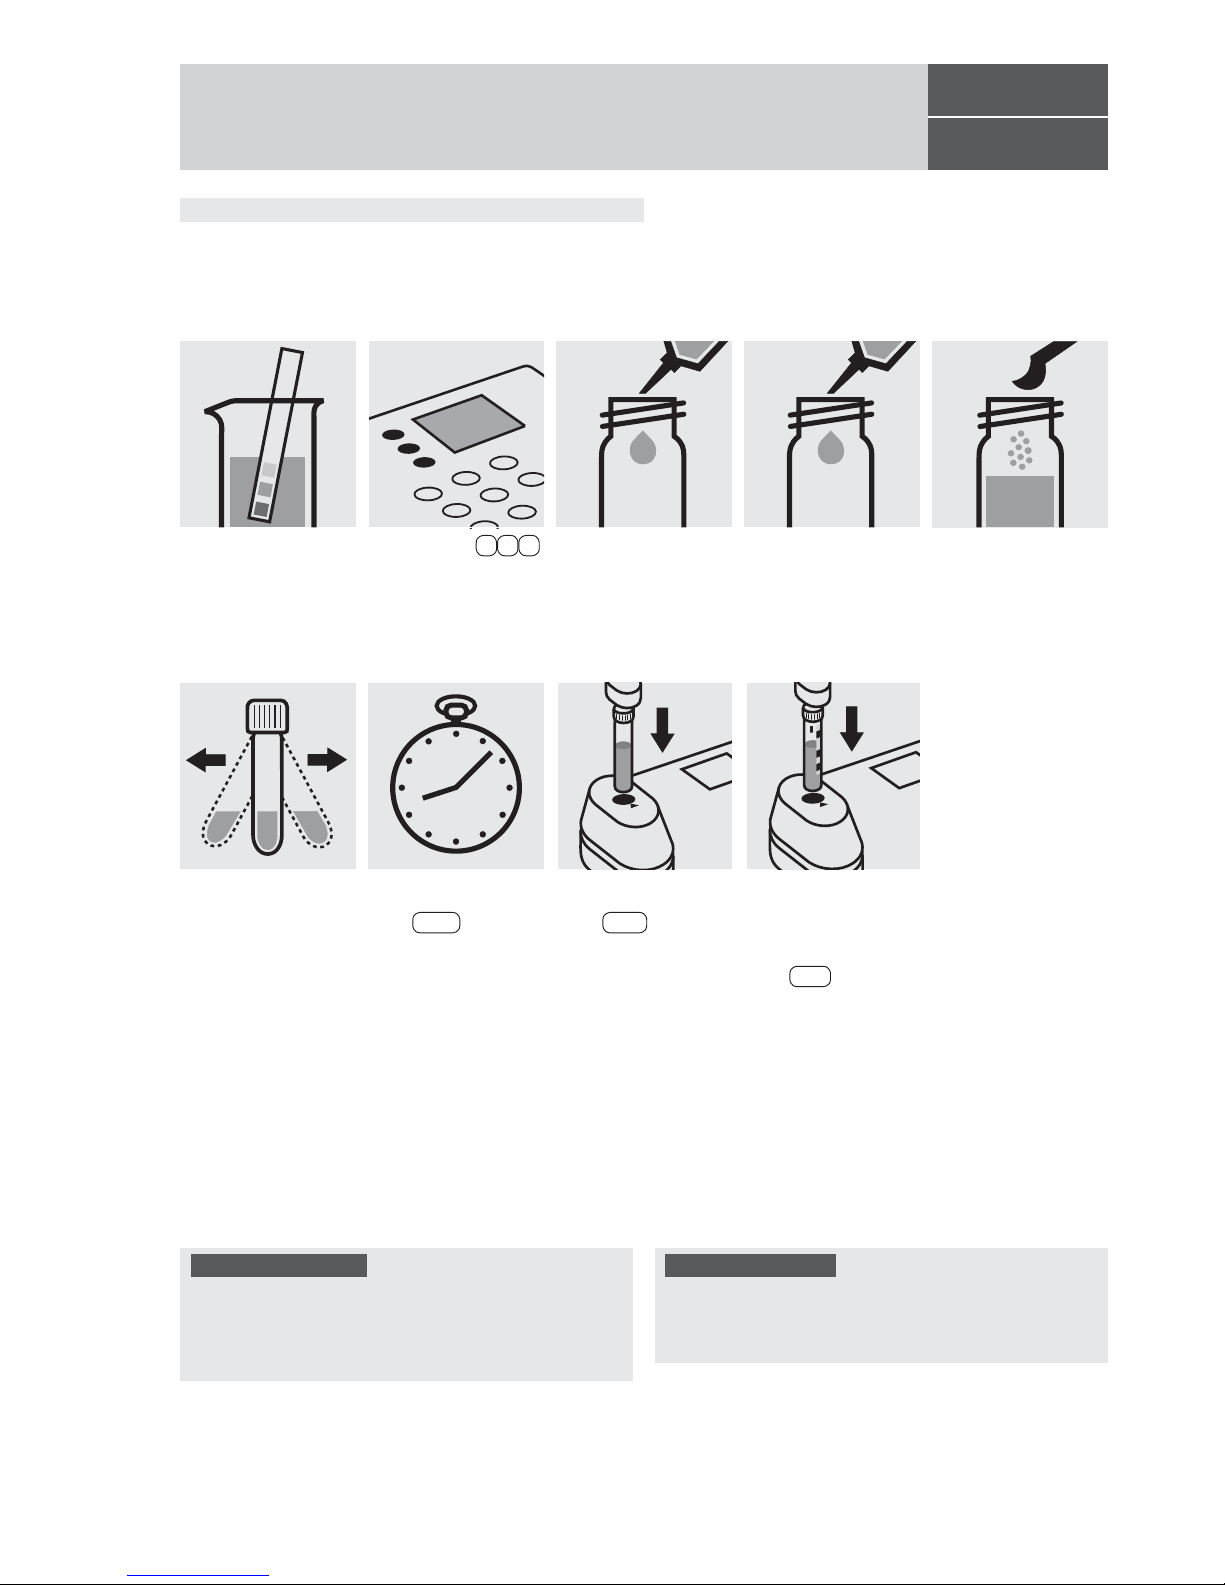
Release 08/2014 - Spectroquant® Multy
Add 1 level blue microspoon of Cl
2
-1, close
with the screw cap.
Pipette 5.0 ml of the
sample into a round cell.
100597
Cell Test
Measuring range: 0.05– 5.00 mg/l Cl
2
16-mm cell
Chlorine
Determination of free chlorine
Shake the cell vigorously to dissolve the
solid substance.
Fill approx. 10 ml of
distilled water into an
empty 16-mm cell (do
not add any reagents!),
close with the screw
cap
.
(Blank cell)
Select method 1 3 0 ,
select subitem >>free.
Insert the cell containing
the sample into the cell
compartment. Align the
mark on the cell with
that on the photometer.
Press Test .
Reaction time:
1 minute
Press Enter to start
the countdown.
Important:
Very high chlorine concentrations in the sample produce
yellow-colored solutions (measurement solution should be
red) and f
alse-low readings are yielded. In such cases the
sample must be diluted (plausibility check).
Quality assurance:
To check the measurement system (test reagents, measurement device, and handling) a freshly prepared standard
solution can be used (see section “Standard solutions”).
Insert the blank cell into
the cell compartment.
Press Zero .
Check the pH of the
sample, specified range
:
pH 4 – 8.
If required, add dilute
sodium hydroxide
solution or sulfuric acid
drop by drop to adjust
the pH.
Page 73
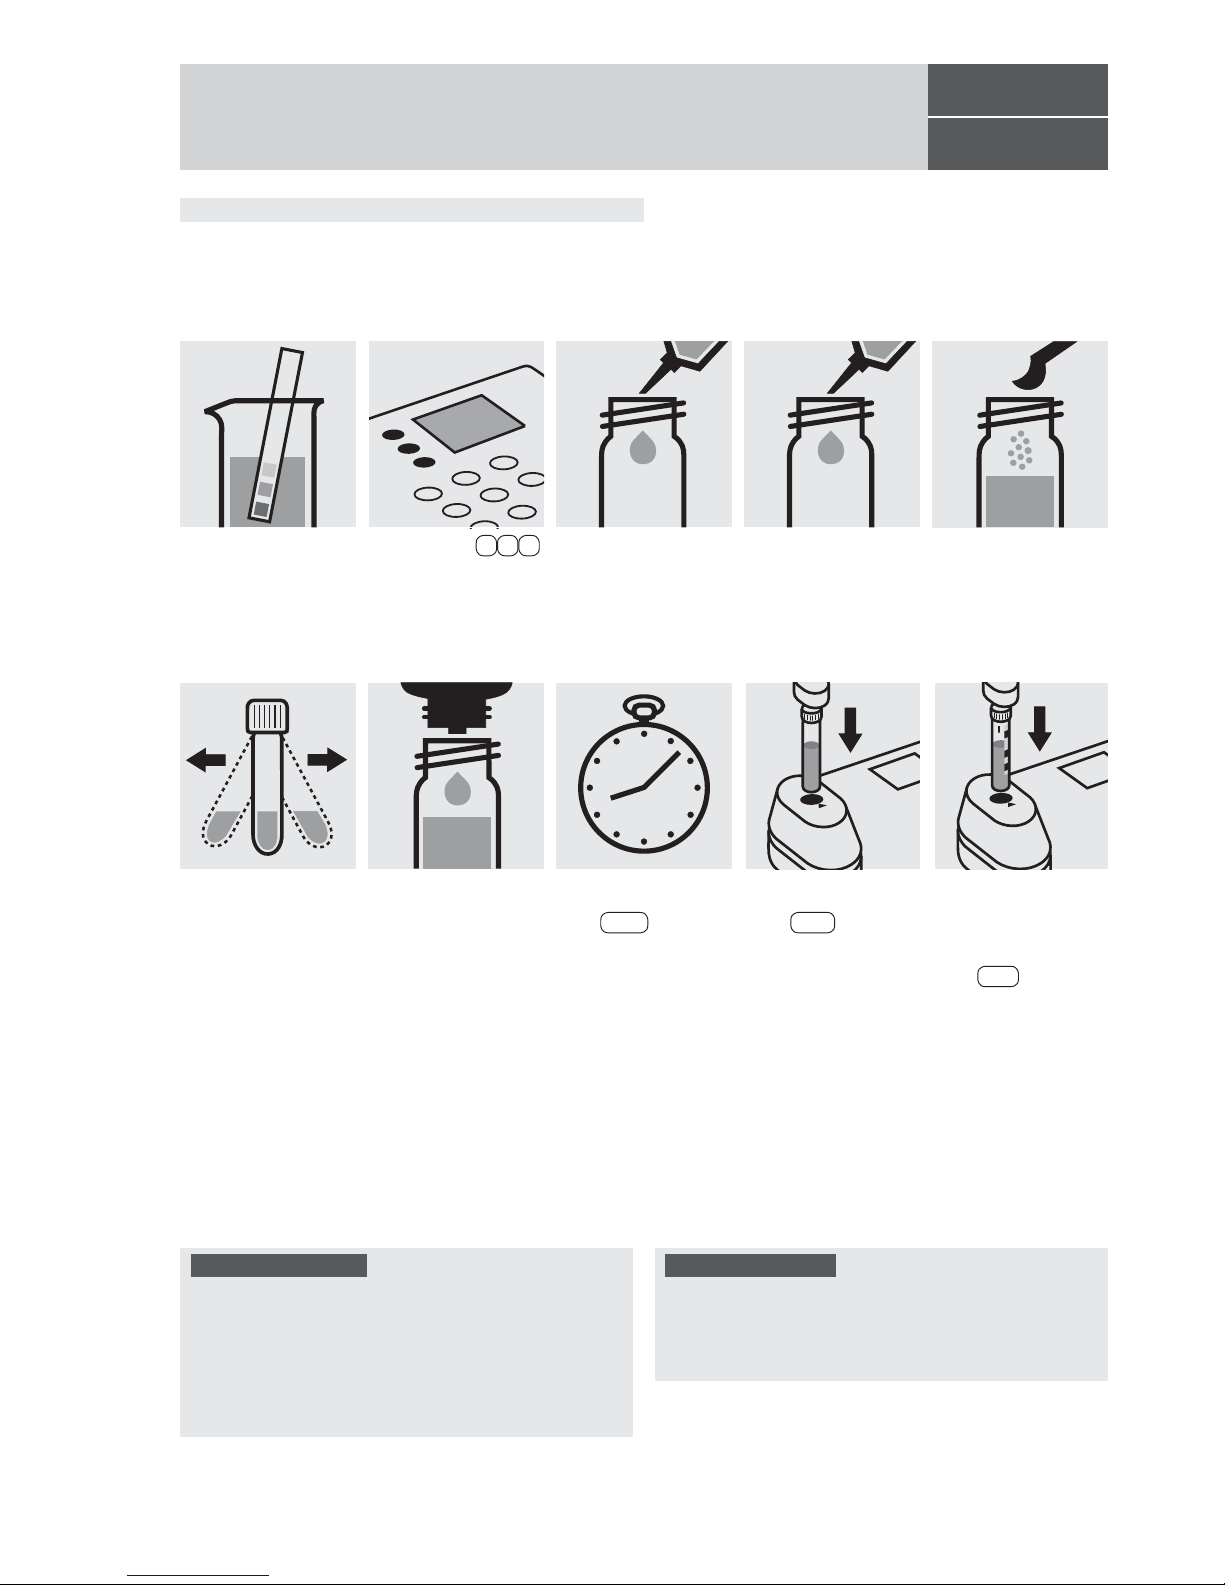
Add 1 level blue microspoon of Cl
2
-1, close
with the screw cap.
Pipette 5.0 ml of the
sample into a round cell.
100597
Cell Test
Measuring range: 0.05– 5.00 mg/l Cl
2
16-mm cell
Chlorine
Determination of total chlorine
Add 2 drops of Cl2-2,
close with the screw
cap, and mix.
Shake the cell vigorously to dissolve the
solid substance.
Fill approx. 10 ml of
distilled water into an
empty 16-mm cell (do
not add any reagents!),
close with the screw
cap
.
(Blank cell)
Select method 1 3 0 ,
select subitem >>total.
Insert the cell containing
the sample into the cell
compartment. Align the
mark on the cell with
that on the photometer.
Press Test .
Reaction time:
1 minute
Press Enter to start
the countdown.
Important:
Very high chlorine concentrations in the sample produce
yellow-colored solutions (measurement solution should be
red) and f
alse-low readings are yielded. In such cases the
sample must be diluted (plausibility check).
After each determination of total chlorine rinse the cell
with sulfuric acid 25 % and subsequently several times
with distilled water.
Quality assurance:
To check the measurement system (test reagents, measurement device, and handling) a freshly prepared standard
from Chloramine T GR, Cat.No. 102426, can be used (see
section “Standard solutions”).
Insert the blank cell into
the cell compartment.
Press Zero .
Check the pH of the
sample, specified range
:
pH 4 – 8.
If required, add dilute
sodium hydroxide
solution or sulfuric acid
drop by drop to adjust
the pH.
Release 08/2014 - Spectroquant
®
Multy
Page 74
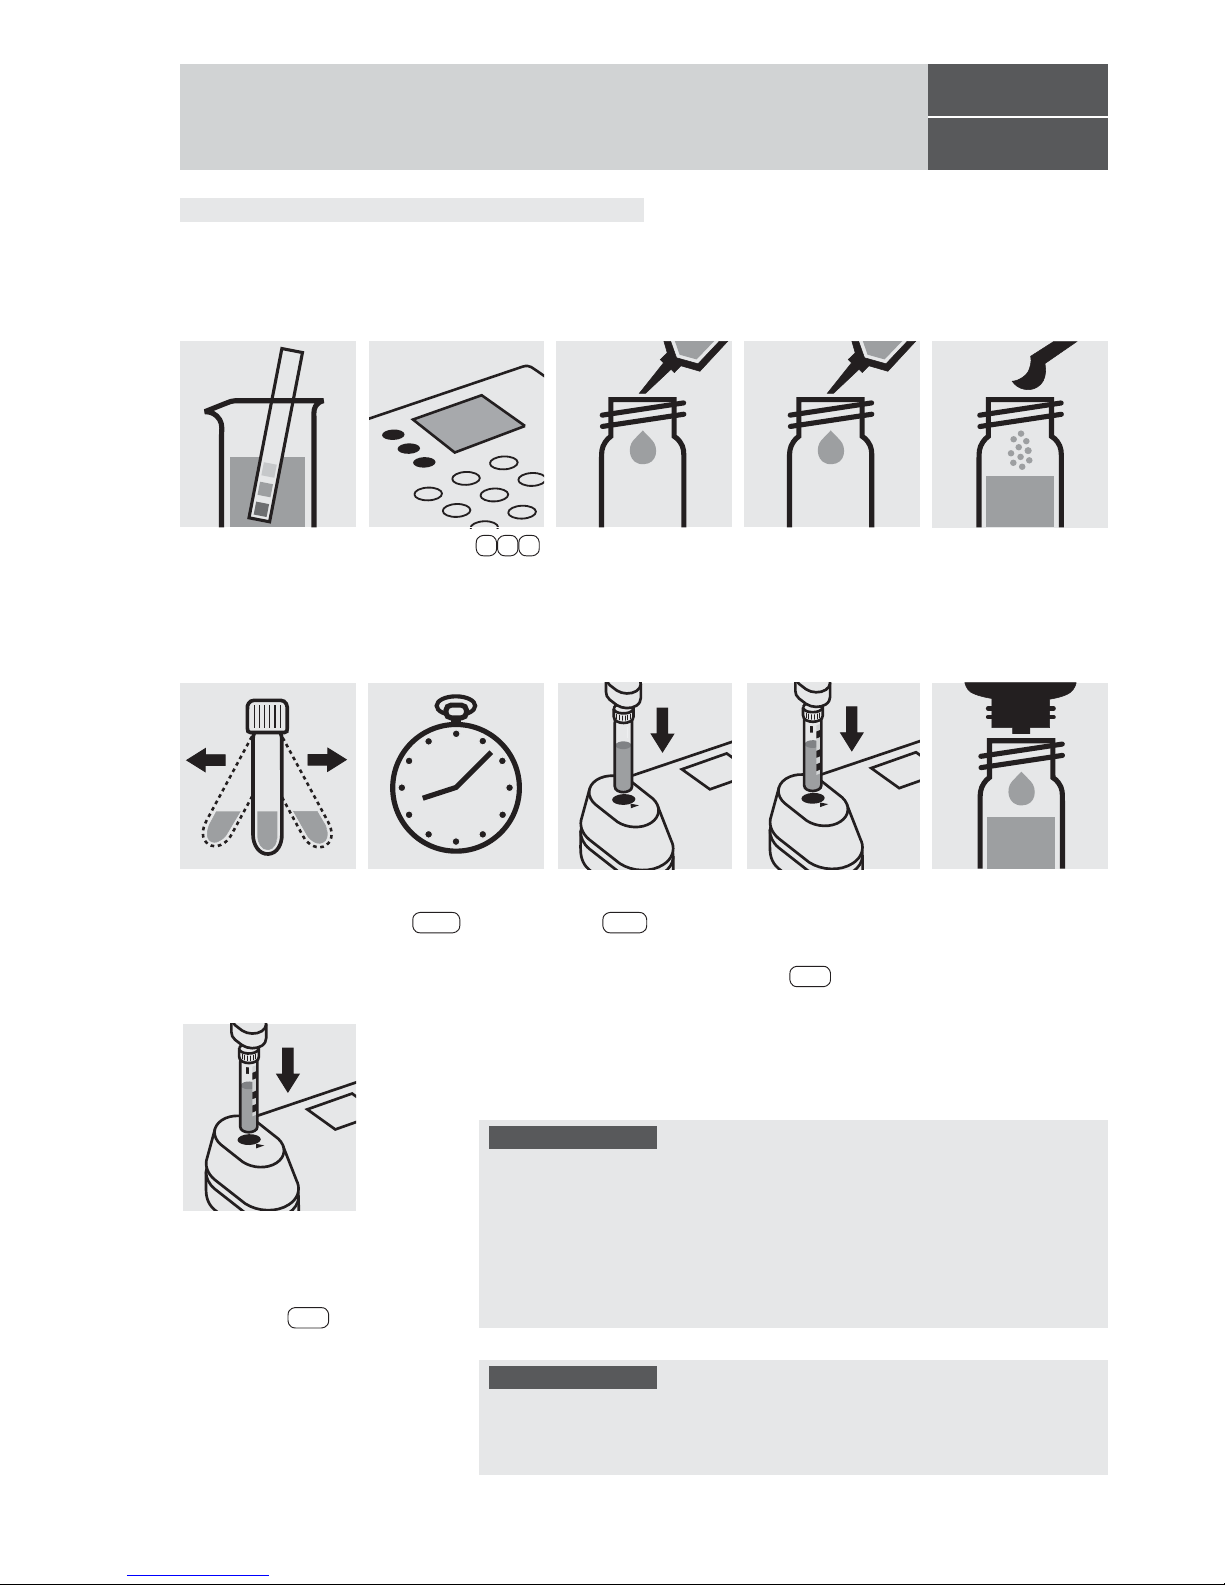
Add 1 level blue microspoon of Cl
2
-1, close
with the screw cap.
Pipette 5.0 ml of the
sample into a round cell.
100597
Cell Test
Measuring range: 0.05– 5.00 mg/l Cl
2
16-mm cell
Chlorine
Determination of free chlorine, total chlorine,
and combined chlorine
Remove sample cell
from the photometer,
open, add 2 drops of
Cl
2
-2, close with the
screw cap, and mix.
Shake the cell vigorously to dissolve the
solid substance.
Fill approx. 10 ml of
distilled water into an
empty 16-mm cell (do
not add any reagents!),
close with the screw
cap
.
(Blank cell)
Select method 1 3 0 ,
select subitem >>diff.
Insert the cell containing
the sample into the cell
compartment. Align the
mark on the cell with
that on the photometer.
Press Test . (= T1)
Reaction time:
1 minute
Press Enter to start
the countdown.
Insert anew the cell containing the sample into
the cell compartment.
Align the mark on the
cell with that on the photometer. Press Test .
(= T2)
Insert the blank cell into
the cell compartment.
Press Zero .
Check the pH of the
sample, specified range
:
pH 4 – 8.
If required, add dilute
sodium hydroxide
solution or sulfuric acid
drop by drop to adjust
the pH.
Important:
Very high chlorine concentrations in the sample produce yellow-colored solutions (measurement solution should be red) and false-low readings are yielded.
In such cases the sample must be diluted (plausibility check).
After each determination of total chlorine rinse the cell with sulfuric acid 25 % and
subsequently several times with distilled water.
For on-the-spot determinations where there are no suitable facilities for rinsing,
the cell contents can be transferred to a new 16-mm cell before the addition of
reagent Cl
2
-2. Use this second cell only for the determination of total chlorine!
Quality assurance:
To check the measurement system (test reagents, measurement device, and
handling) a freshly prepared standard solution can be used (see section “Standard solutions”).
Release 08/2014 - Spectroquant® Multy
Page 75
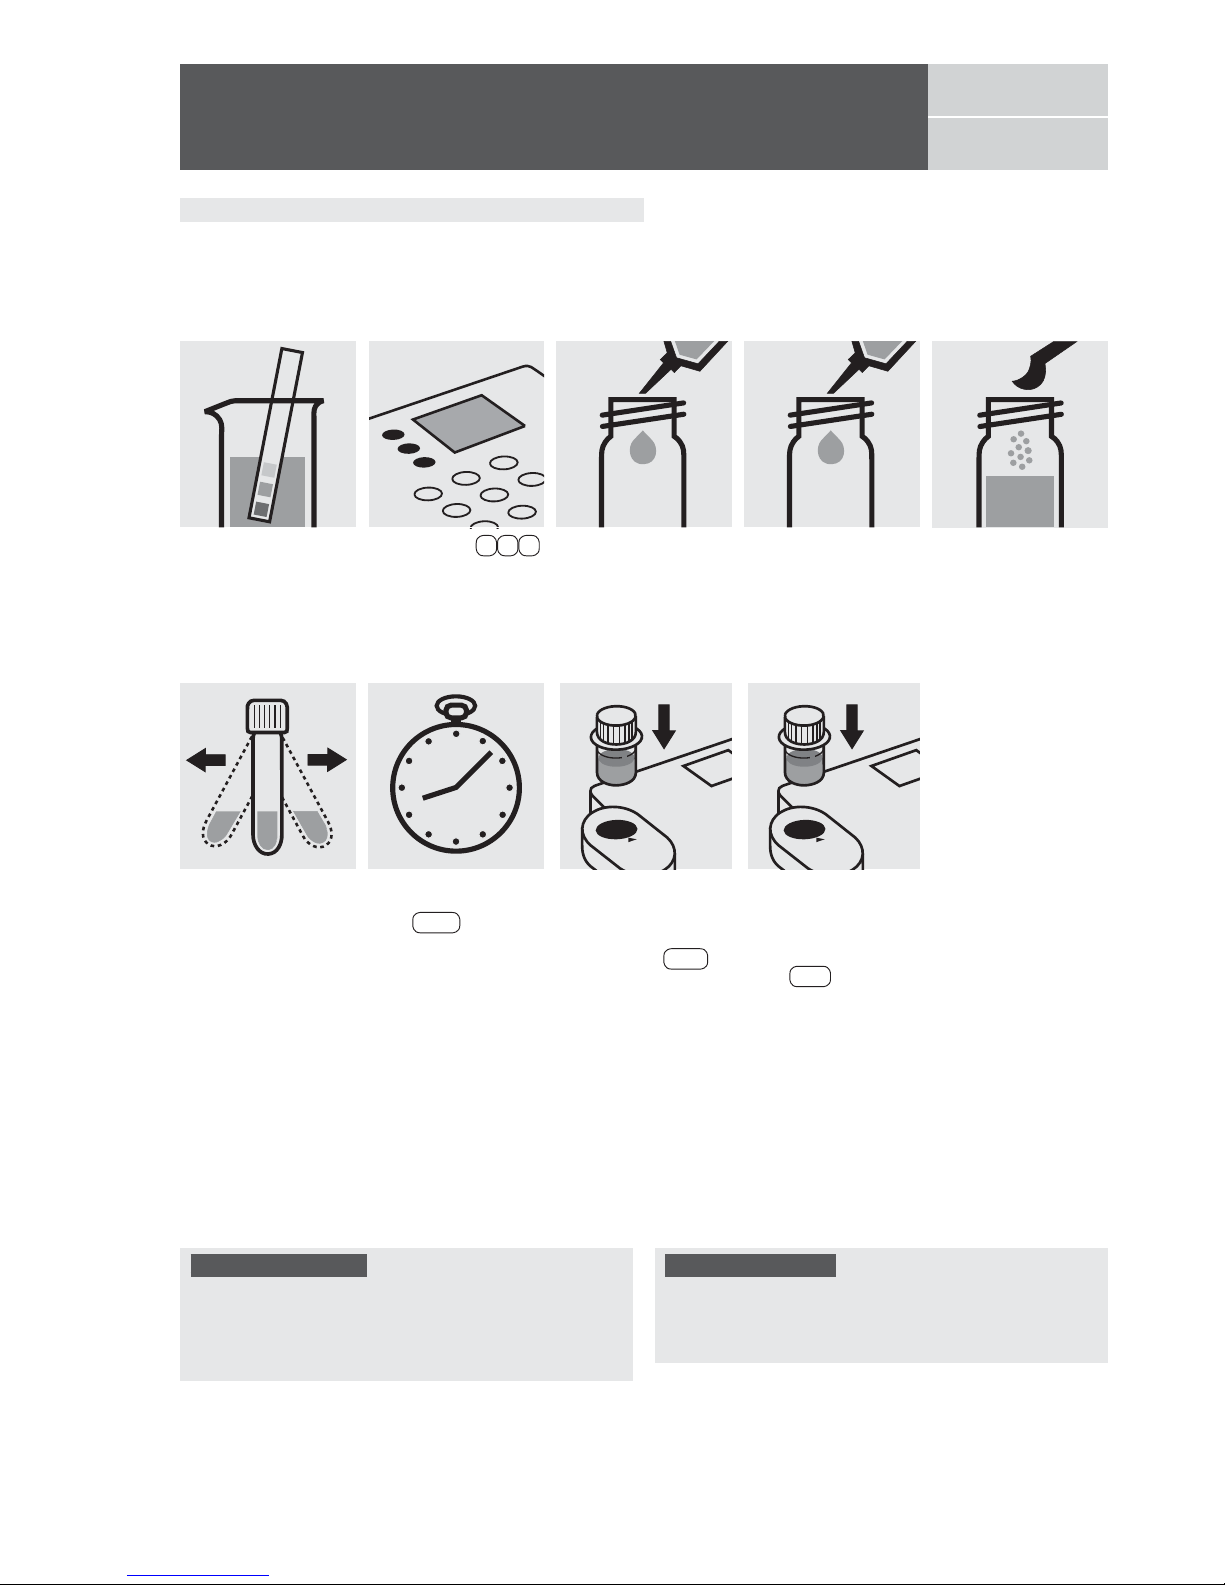
Release 08/2014 - Spectroquant® Multy
Pipette 10 ml of the
sample into a 24-mm
cell.
Add 1 level blue microspoon of Cl
2
-1, close
with the screw cap.
Measuring range: 0.02– 4.50 mg/l Cl2 24-mm cell
Chlorine
Determination of free chlorine
100598
Test
Shake the cell vigorously to dissolve the
solid substance.
Fill approx. 10 ml of
distilled water into a
24-mm cell (do not add
any reagents!), close
with the screw cap
.
(Blank cell)
Select method 1 3 1 ,
select subitem >>free.
Insert the cell containing
the sample into the cell
compartment. Align the
mark on the cell with
that on the photometer.
Press Test .
Reaction time:
1 minute
Press Enter to start
the countdown.
Important:
Very high chlorine concentrations in the sample produce
yellow-colored solutions (measurement solution should be
red) and f
alse-low readings are yielded. In such cases the
sample must be diluted (plausibility check).
Quality assurance:
To check the measurement system (test reagents, measurement device, and handling) a freshly prepared standard
solution can be used (see section “Standard solutions”).
Insert the blank cell into
the cell compartment.
Align the mark on the
cell with that on the photometer. Press Zero .
Check the pH of the
sample, specified range
:
pH 4 – 8.
If required, add dilute
sodium hydroxide
solution or sulfuric acid
drop by drop to adjust
the pH.
Page 76
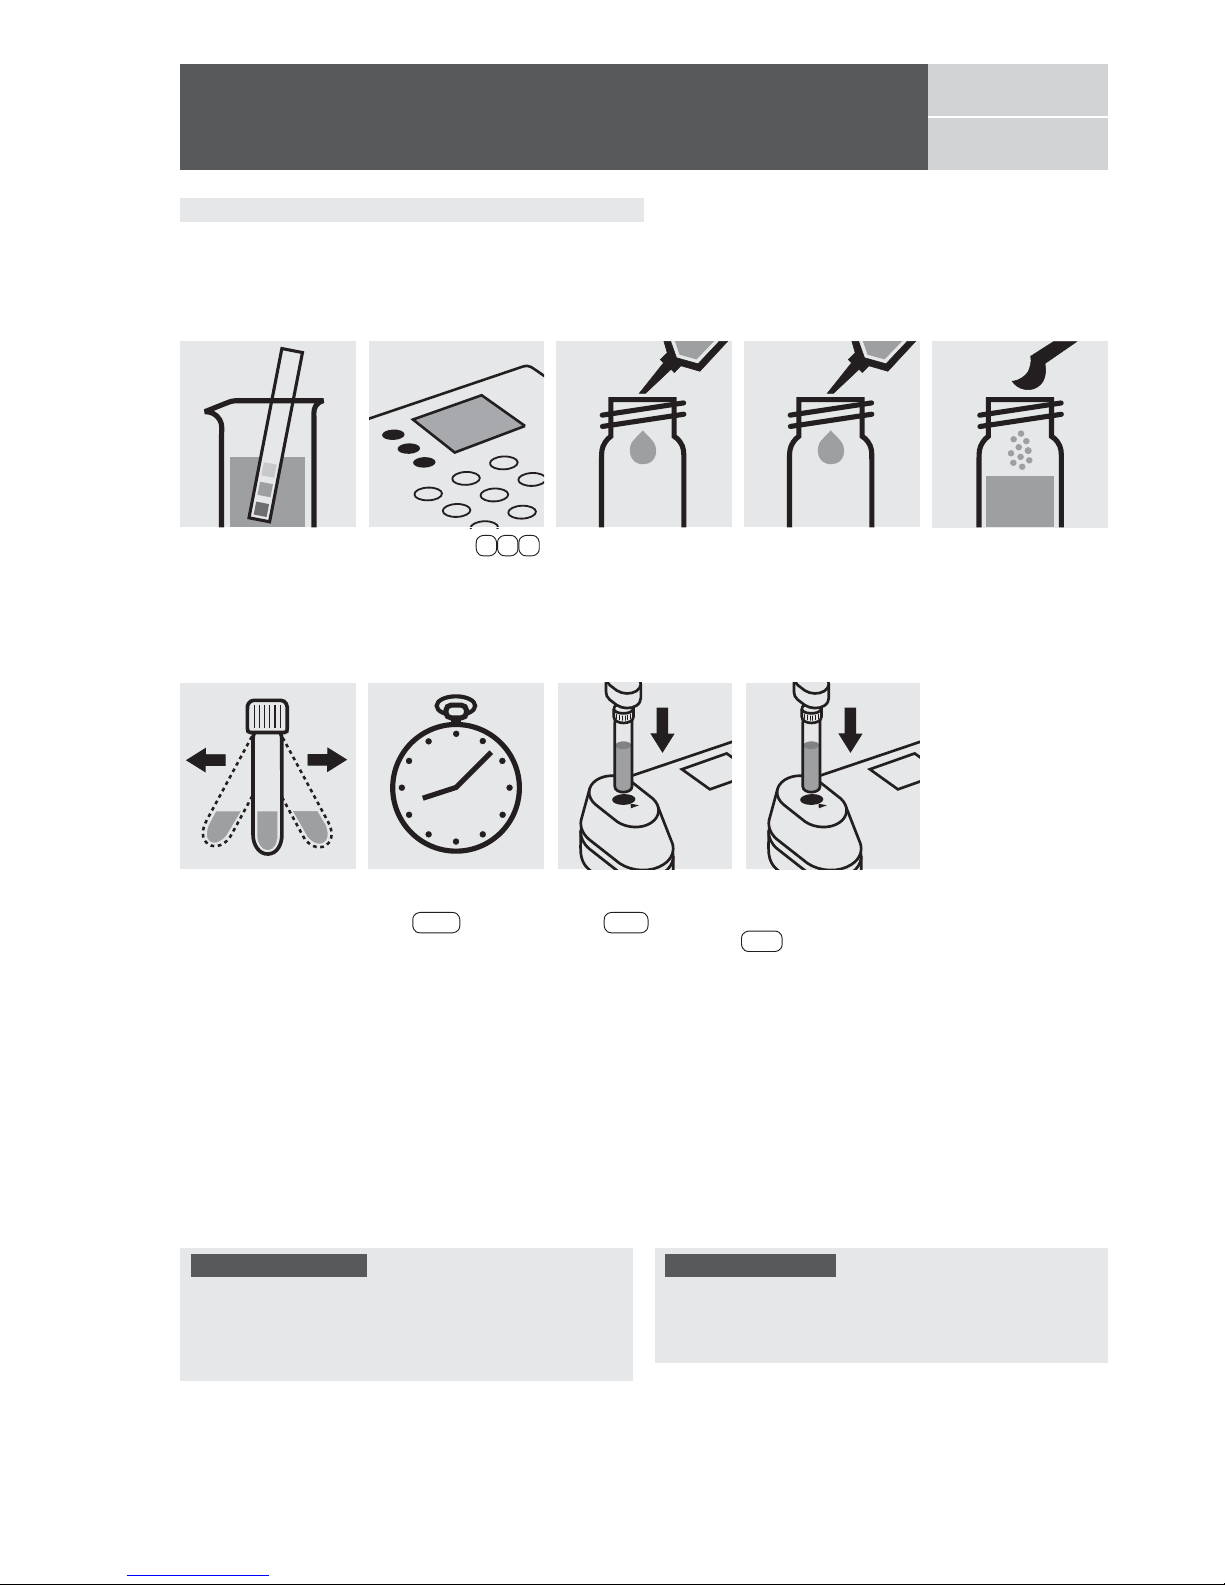
Insert the cell containing
the sample into the cell
compartment. Press
Test .
Insert the blank cell into
the cell compartment.
Press Zero .
Release 08/2014 - Spectroquant® Multy
Pipette 10 ml of the
sample into a 16-mm
cell.
Add 1 level blue microspoon of Cl
2
-1, close
with the screw cap.
Measuring range: 0.10– 6.00 mg/l Cl2 16-mm cell
Chlorine
Determination of free chlorine
100598
Test
Shake the cell vigorously to dissolve the
solid substance.
Fill approx. 10 ml of
distilled water into an
empty 16-mm cell (do
not add any reagents!),
close with the screw
cap
.
(Blank cell)
Select method 1 3 4 ,
select subitem >>free.
Reaction time:
1 minute
Press Enter to start
the countdown.
Important:
Very high chlorine concentrations in the sample produce
yellow-colored solutions (measurement solution should be
red) and f
alse-low readings are yielded. In such cases the
sample must be diluted (plausibility check).
Quality assurance:
To check the measurement system (test reagents, measurement device, and handling) a freshly prepared standard
solution can be used (see section “Standard solutions”).
Check the pH of the
sample, specified range
:
pH 4 – 8.
If required, add dilute
sodium hydroxide
solution or sulfuric acid
drop by drop to adjust
the pH.
Page 77
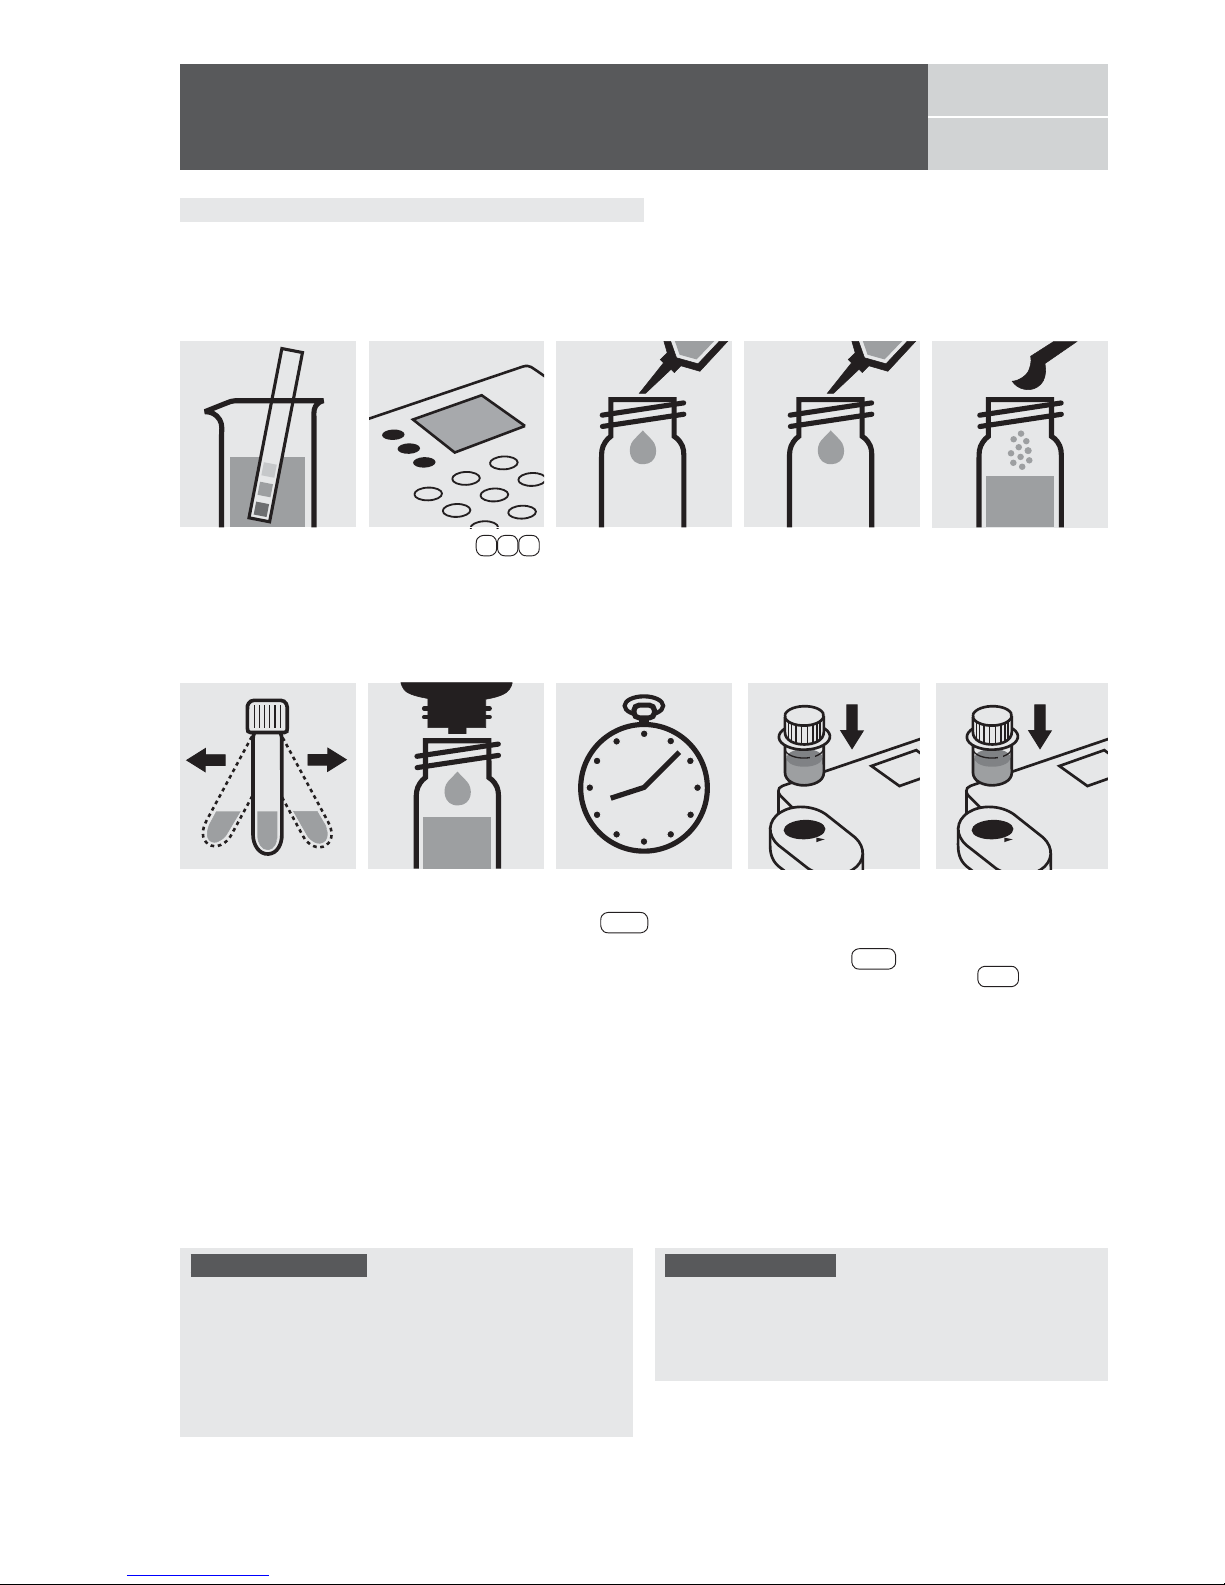
Release 08/2014 - Spectroquant® Multy
Pipette 10 ml of the
sample into a 24-mm
cell.
Add 1 level blue microspoon of Cl
2
-1, close
with the screw cap.
Measuring range: 0.02– 4.50 mg/l Cl2 24-mm cell
Chlorine
Determinatin of total chlorine
100602
Test
Add 2 drops of Cl2-2,
close with the screw
cap, and mix.
Shake the cell vigorously to dissolve the
solid substance.
Fill approx. 10 ml of
distilled water into a
24-mm cell (do not add
any reagents!), close
with the screw cap
.
(Blank cell)
Select method 1 3 1 ,
select subitem >>total.
Insert the cell containing
the sample into the cell
compartment. Align the
mark on the cell with
that on the photometer.
Press Test .
Reaction time:
1 minute
Press Enter to start
the countdown.
Quality assurance:
To check the measurement system (test reagents, measurement device, and handling) a freshly prepared standard
from Chloramine T GR, Cat.No. 102426, can be used (see
section “Standard solutions”).
Insert the blank cell into
the cell compartment.
Align the mark on the
cell with that on the photometer. Press Zero .
Check the pH of the
sample, specified range
:
pH 4 – 8.
If required, add dilute
sodium hydroxide
solution or sulfuric acid
drop by drop to adjust
the pH.
Important:
Very high chlorine concentrations in the sample produce
yellow-colored solutions (measurement solution should be
red) and f
alse-low readings are yielded. In such cases the
sample must be diluted (plausibility check).
After each determination of total chlorine rinse the cell
with sulfuric acid 25 % and subsequently several times
with distilled water.
Page 78
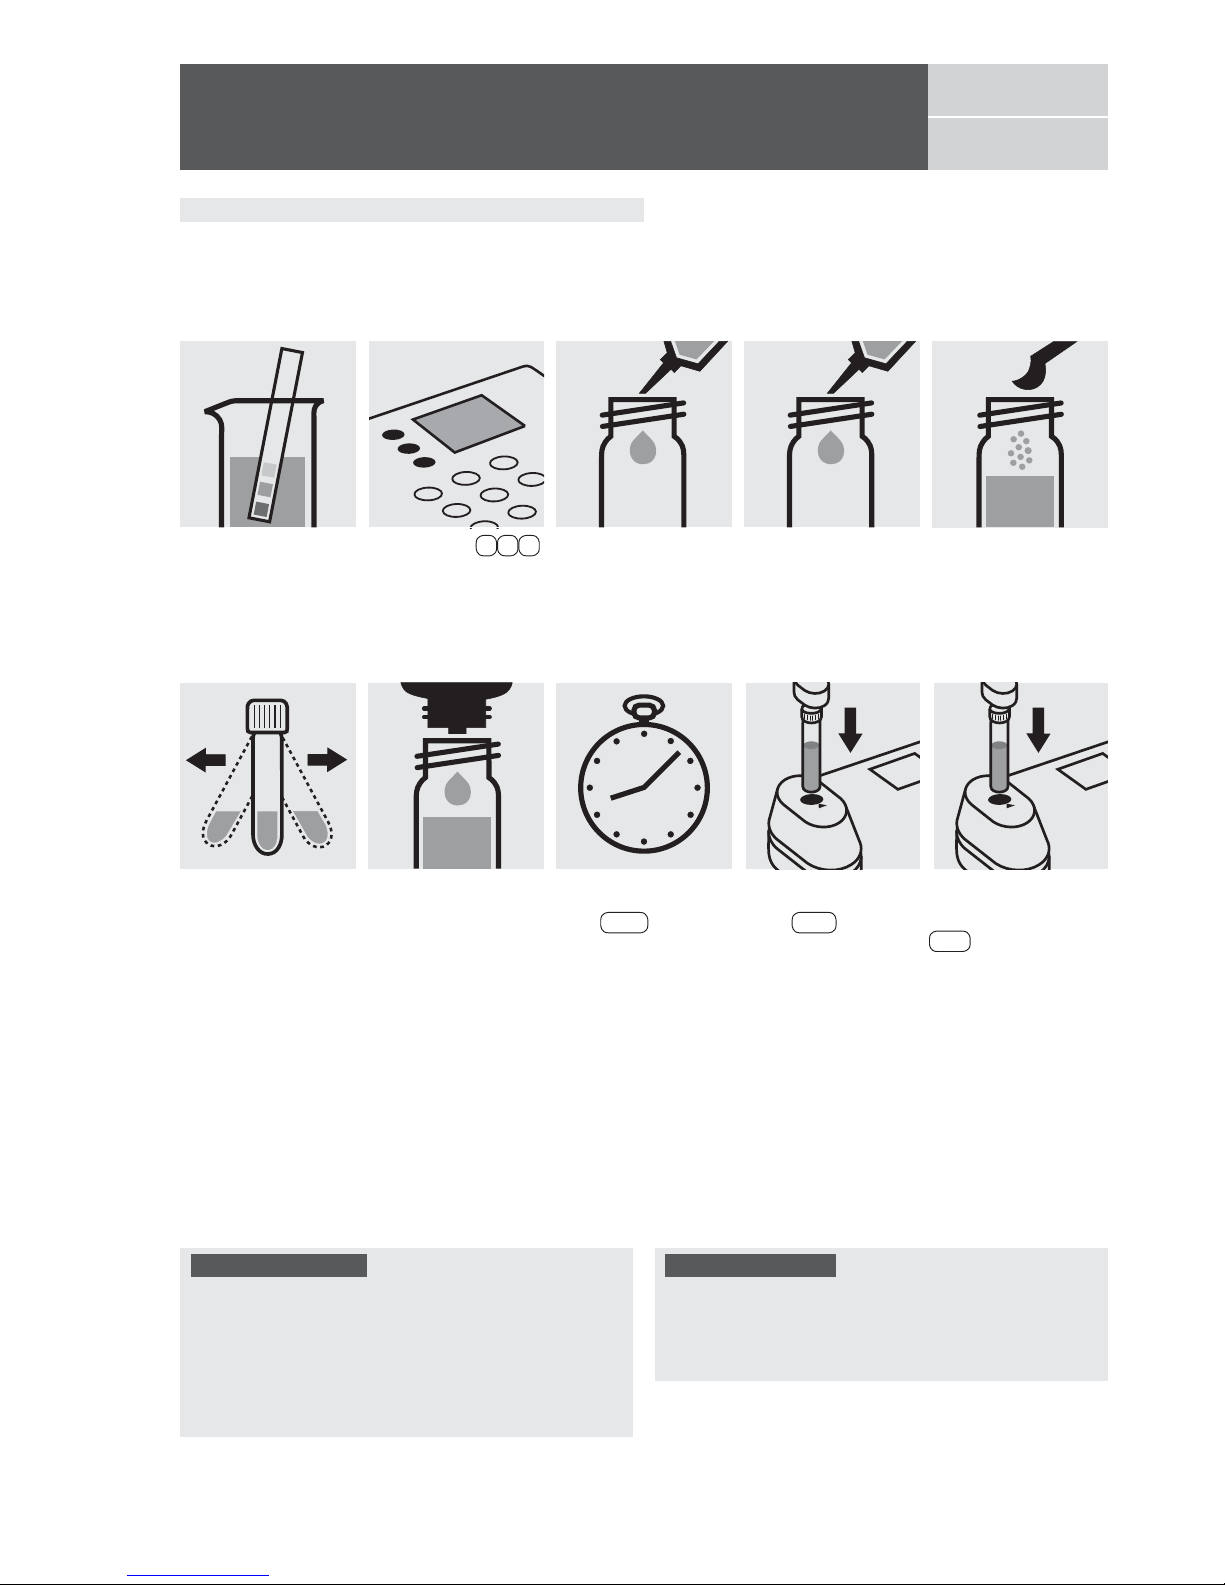
Insert the cell containing
the sample into the cell
compartment. Press
Test .
Insert the blank cell into
the cell compartment.
Press Zero .
Release 08/2014 - Spectroquant® Multy
Pipette 10 ml of the
sample into a 16-mm
cell.
Add 1 level blue microspoon of Cl
2
-1, close
with the screw cap.
Measuring range: 0.10– 6.00 mg/l Cl2 16-mm cell
Chlorine
Determinatin of total chlorine
100602
Test
Add 2 drops of Cl2-2,
close with the screw
cap, and mix.
Shake the cell vigorously to dissolve the
solid substance.
Fill approx. 10 ml of
distilled water into an
empty 16-mm cell (do
not add any reagents!),
close with the screw
cap
.
(Blank cell)
Select method 1 3 4 ,
select subitem >>total.
Reaction time:
1 minute
Press Enter to start
the countdown.
Quality assurance:
To check the measurement system (test reagents, measurement device, and handling) a freshly prepared standard
from Chloramine T GR, Cat.No. 102426, can be used (see
section “Standard solutions”).
Check the pH of the
sample, specified range
:
pH 4 – 8.
If required, add dilute
sodium hydroxide
solution or sulfuric acid
drop by drop to adjust
the pH.
Important:
Very high chlorine concentrations in the sample produce
yellow-colored solutions (measurement solution should be
red) and f
alse-low readings are yielded. In such cases the
sample must be diluted (plausibility check).
After each determination of total chlorine rinse the cell
with sulfuric acid 25 % and subsequently several times
with distilled water.
Page 79
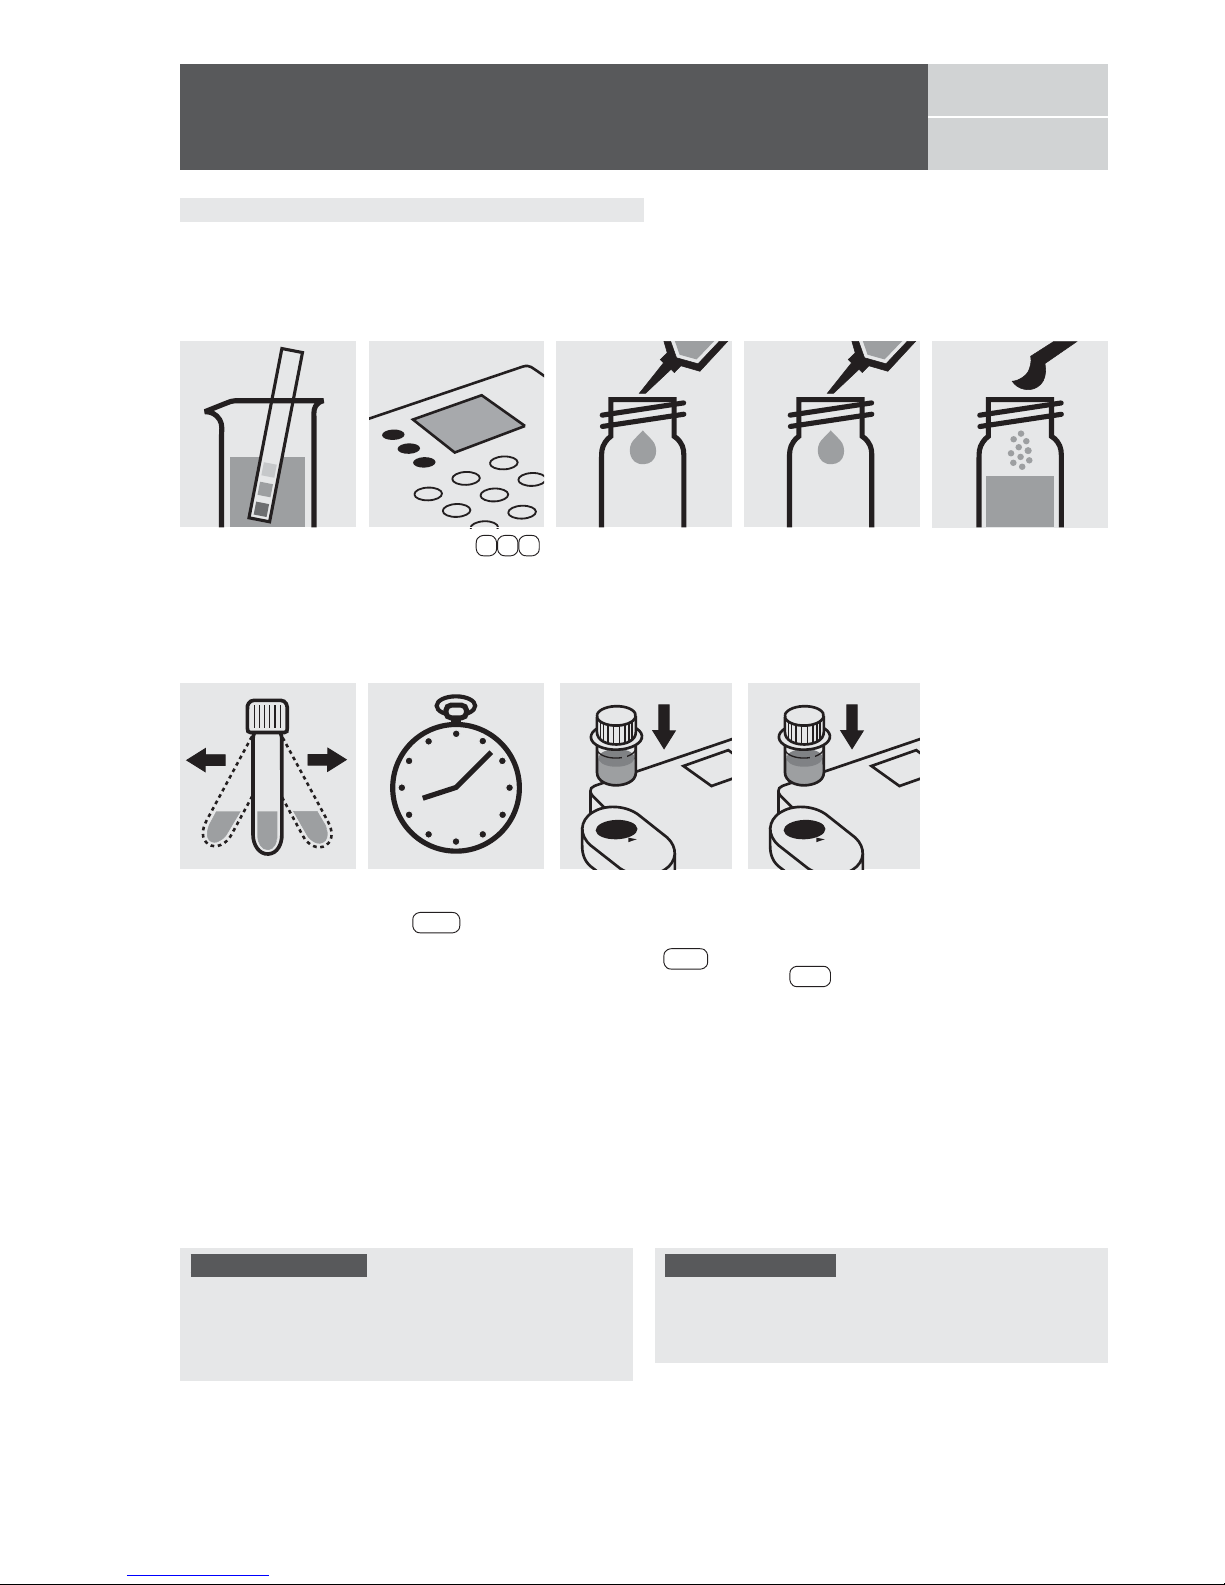
Release 08/2014 - Spectroquant® Multy
Fill approx. 10 ml of
distilled water into a
24-mm cell (do not add
any reagents!), close
with the screw cap
.
(Blank cell)
Add 1 level blue microspoon of Cl
2
-1, close
with the screw cap.
Measuring range: 0.02– 4.50 mg/l Cl2 24-mm cell
Chlorine
Detemination of free chlorine
100599
Test
Shake the cell vigorously to dissolve the
solid substance.
Pipette 10 ml of the
sample into a 24-mm
cell.
Select method 1 3 1 ,
select subitem >>free.
Insert the cell containing
the sample into the cell
compartment. Align the
mark on the cell with
that on the photometer.
Press Test .
Reaction time:
1 minute
Press Enter to start
the countdown.
Important:
Very high chlorine concentrations in the sample produce
yellow-colored solutions (measurement solution should be
red) and f
alse-low readings are yielded. In such cases the
sample must be diluted (plausibility check).
Quality assurance:
To check the measurement system (test reagents, measurement device, and handling) a freshly prepared standard
solution can be used (see section “Standard solutions”).
Insert the blank cell into
the cell compartment.
Align the mark on the
cell with that on the photometer. Press Zero .
Check the pH of the
sample, specified range
:
pH 4 – 8.
If required, add dilute
sodium hydroxide
solution or sulfuric acid
drop by drop to adjust
the pH.
Page 80
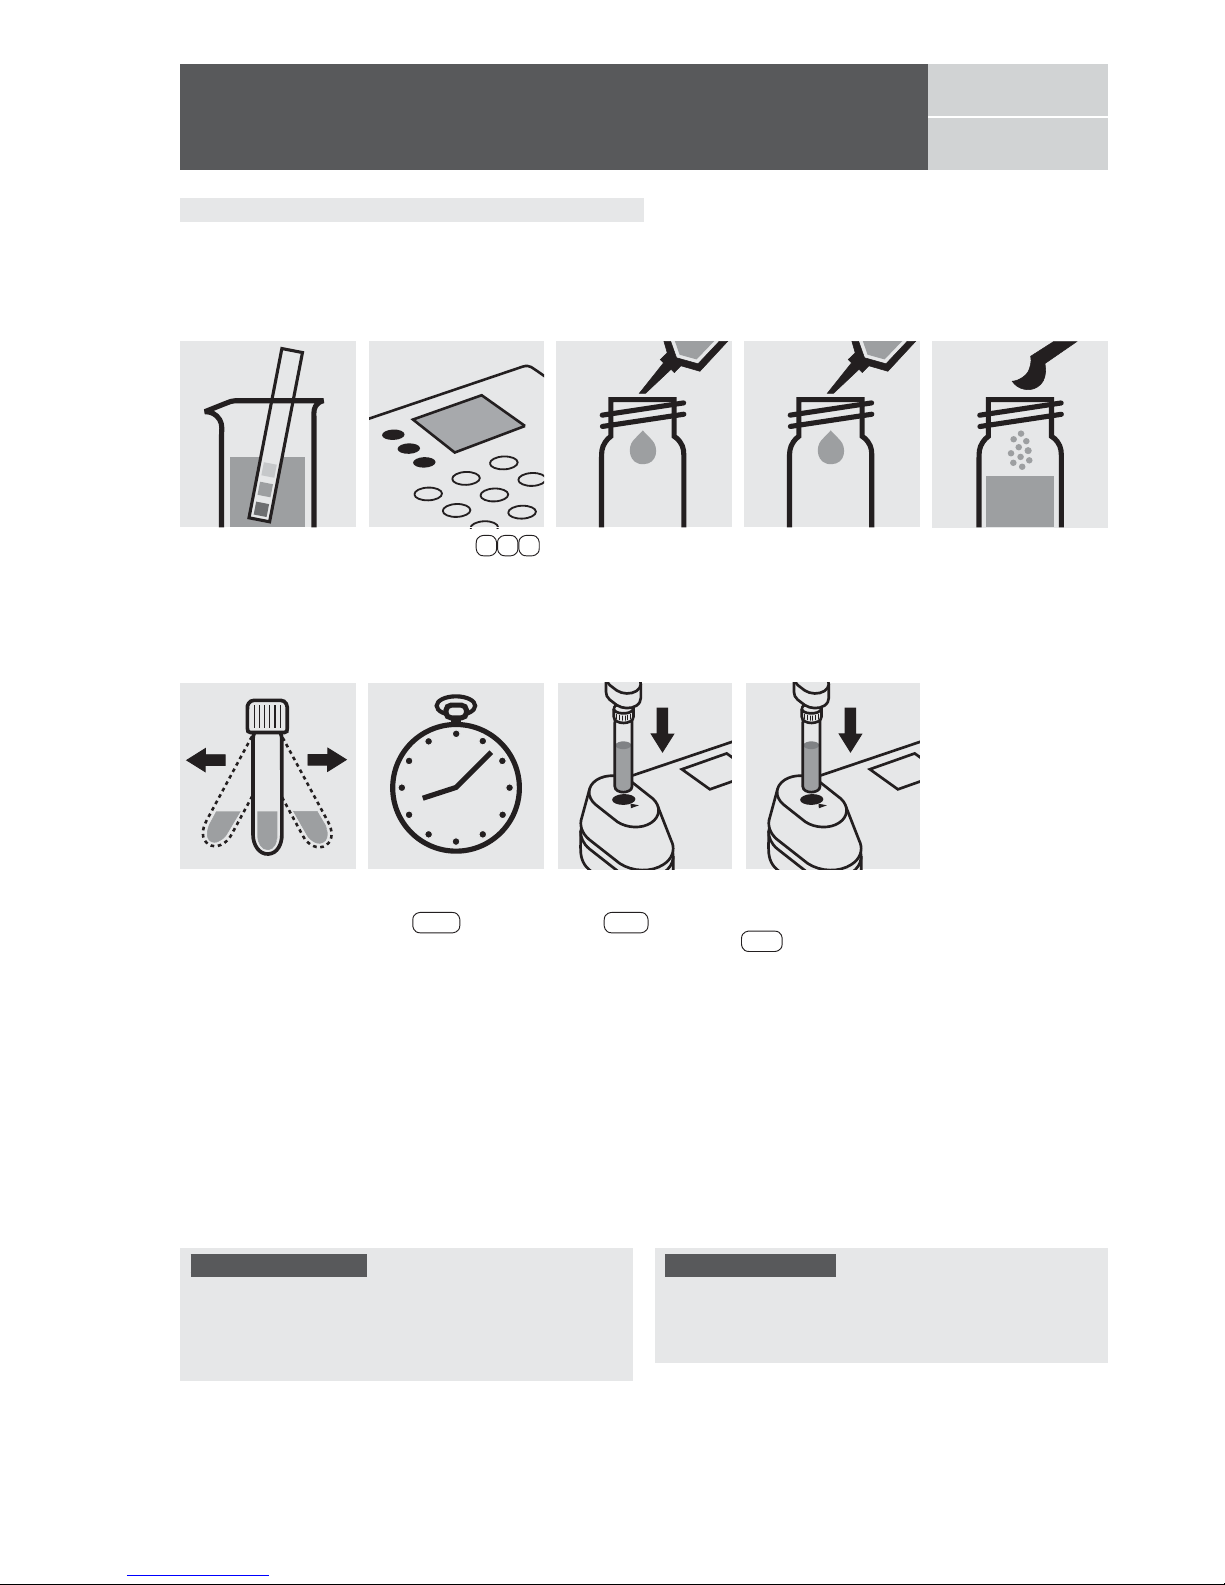
Insert the cell containing
the sample into the cell
compartment. Press
Test .
Insert the blank cell into
the cell compartment.
Press Zero .
Release 08/2014 - Spectroquant® Multy
Fill approx. 10 ml of
distilled water into an
empty 16-mm cell (do
not add any reagents!),
close with the screw
cap
.
(Blank cell)
Add 1 level blue microspoon of Cl
2
-1, close
with the screw cap.
Measuring range: 0.10– 6.00 mg/l Cl2 16-mm cell
Chlorine
Detemination of free chlorine
100599
Test
Shake the cell vigorously to dissolve the
solid substance.
Pipette 10 ml of the
sample into a 16-mm
cell.
Select method 1 3 4 ,
select subitem >>free.
Reaction time:
1 minute
Press Enter to start
the countdown.
Important:
Very high chlorine concentrations in the sample produce
yellow-colored solutions (measurement solution should be
red) and f
alse-low readings are yielded. In such cases the
sample must be diluted (plausibility check).
Quality assurance:
To check the measurement system (test reagents, measurement device, and handling) a freshly prepared standard
solution can be used (see section “Standard solutions”).
Check the pH of the
sample, specified range
:
pH 4 – 8.
If required, add dilute
sodium hydroxide
solution or sulfuric acid
drop by drop to adjust
the pH.
Page 81
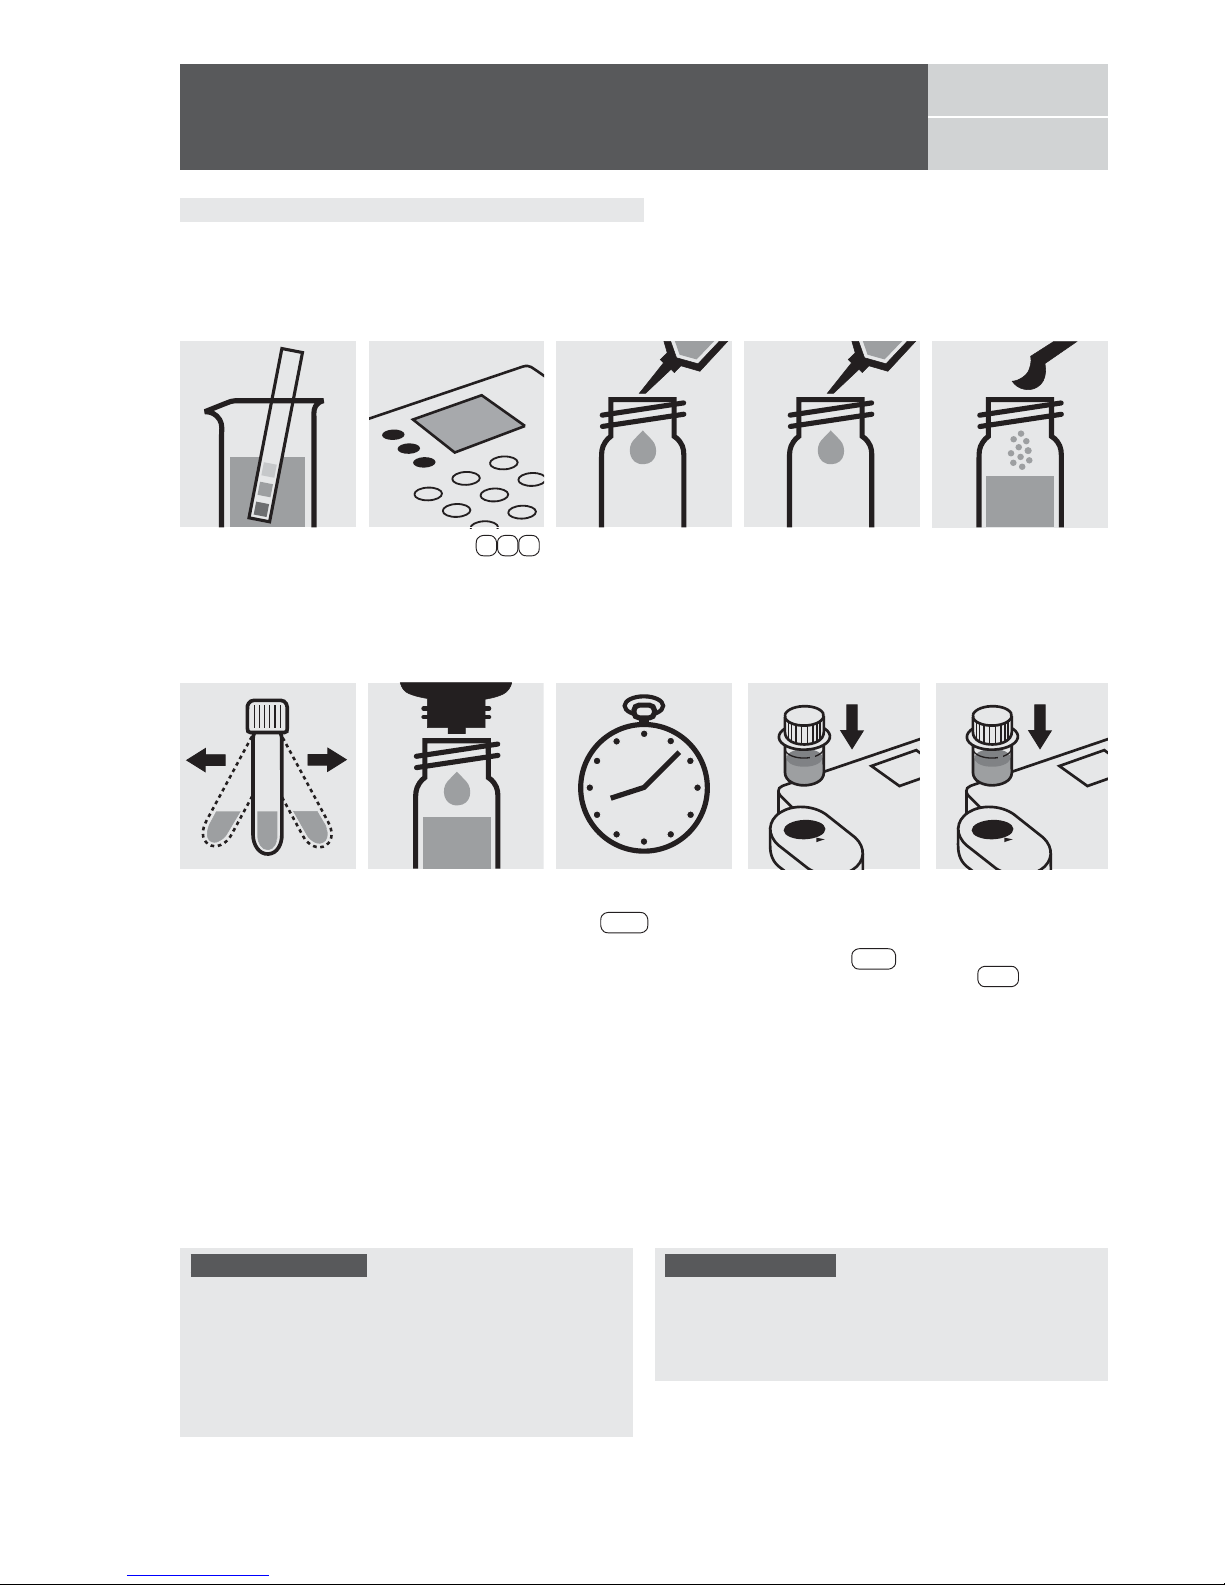
Pipette 10 ml of the
sample into a 24-mm
cell.
Add 1 level blue microspoon of Cl
2
-1, close
with the screw cap.
Measuring range: 0.02– 4.50 mg/l Cl2 24-mm cell
Chlorine
Determination of total chlorine
100599
Test
Shake the cell vigorously to dissolve the
solid substance.
Fill approx. 10 ml of
distilled water into a
24-mm cell (do not add
any reagents!), close
with the screw cap
.
(Blank cell)
Add 2 drops of Cl2-2,
close with the screw
cap, and mix.
Select method 1 3 1 ,
select subitem >>total.
Insert the cell containing
the sample into the cell
compartment. Align the
mark on the cell with
that on the photometer.
Press Test .
Reaction time:
1 minute
Press Enter to start
the countdown.
Important:
Very high chlorine concentrations in the sample produce
yellow-colored solutions (measurement solution should be
red) and f
alse-low readings are yielded. In such cases the
sample must be diluted (plausibility check).
After each determination of total chlorine rinse the cell
with sulfuric acid 25 % and subsequently several times
with distilled water.
Quality assurance:
To check the measurement system (test reagents, measurement device, and handling) a freshly prepared standard
from Chloramine T GR, Cat.No. 102426, can be used (see
section “Standard solutions”).
Insert the blank cell into
the cell compartment.
Align the mark on the
cell with that on the photometer. Press Zero .
Check the pH of the
sample, specified range
:
pH 4 – 8.
If required, add dilute
sodium hydroxide
solution or sulfuric acid
drop by drop to adjust
the pH.
Release 08/2014 - Spectroquant
®
Multy
Page 82
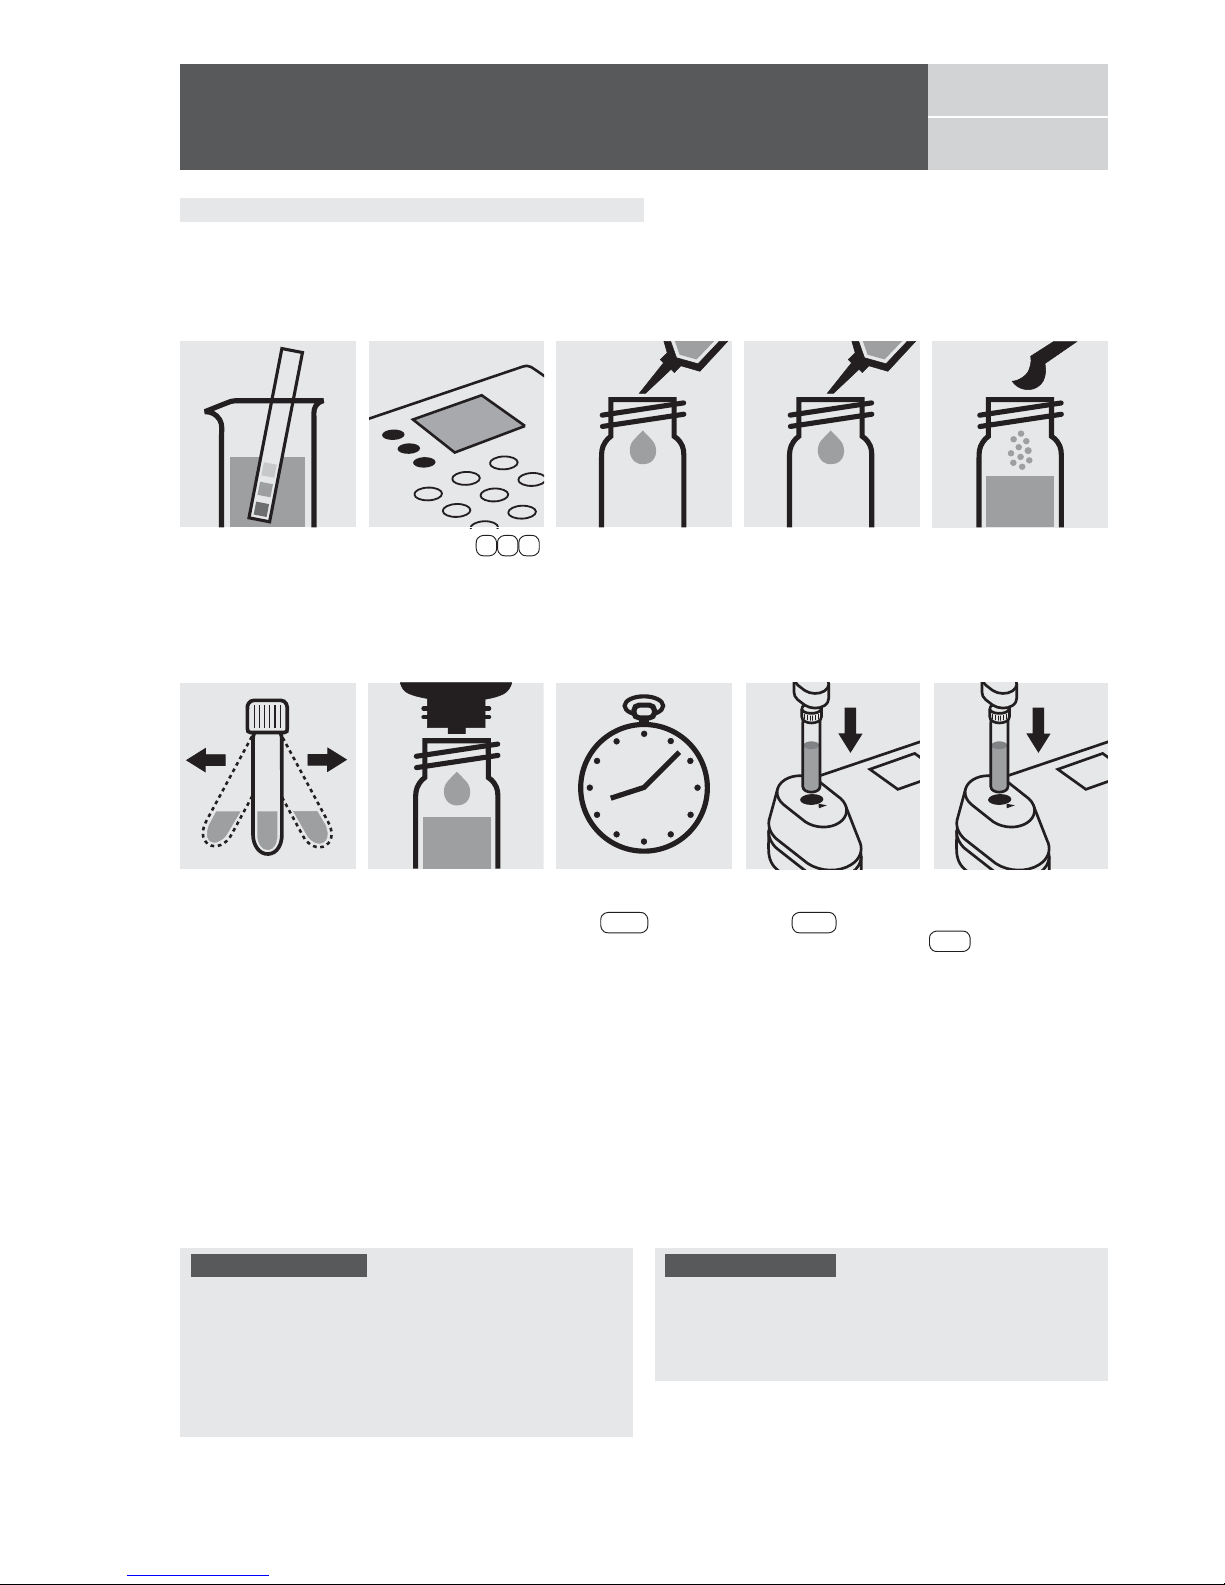
Insert the cell containing
the sample into the cell
compartment. Press
Test .
Insert the blank cell into
the cell compartment.
Press Zero .
Pipette 10 ml of the
sample into a 16-mm
cell.
Add 1 level blue microspoon of Cl
2
-1, close
with the screw cap.
Measuring range: 0.10– 6.00 mg/l Cl2 16-mm cell
Chlorine
Determination of total chlorine
100599
Test
Shake the cell vigorously to dissolve the
solid substance.
Fill approx. 10 ml of
distilled water into an
empty 16-mm cell (do
not add any reagents!),
close with the screw
cap
.
(Blank cell)
Add 2 drops of Cl2-2,
close with the screw
cap, and mix.
Select method 1 3 4 ,
select subitem >>total.
Reaction time:
1 minute
Press Enter to start
the countdown.
Important:
Very high chlorine concentrations in the sample produce
yellow-colored solutions (measurement solution should be
red) and f
alse-low readings are yielded. In such cases the
sample must be diluted (plausibility check).
After each determination of total chlorine rinse the cell
with sulfuric acid 25 % and subsequently several times
with distilled water.
Quality assurance:
To check the measurement system (test reagents, measurement device, and handling) a freshly prepared standard
from Chloramine T GR, Cat.No. 102426, can be used (see
section “Standard solutions”).
Check the pH of the
sample, specified range
:
pH 4 – 8.
If required, add dilute
sodium hydroxide
solution or sulfuric acid
drop by drop to adjust
the pH.
Release 08/2014 - Spectroquant
®
Multy
Page 83
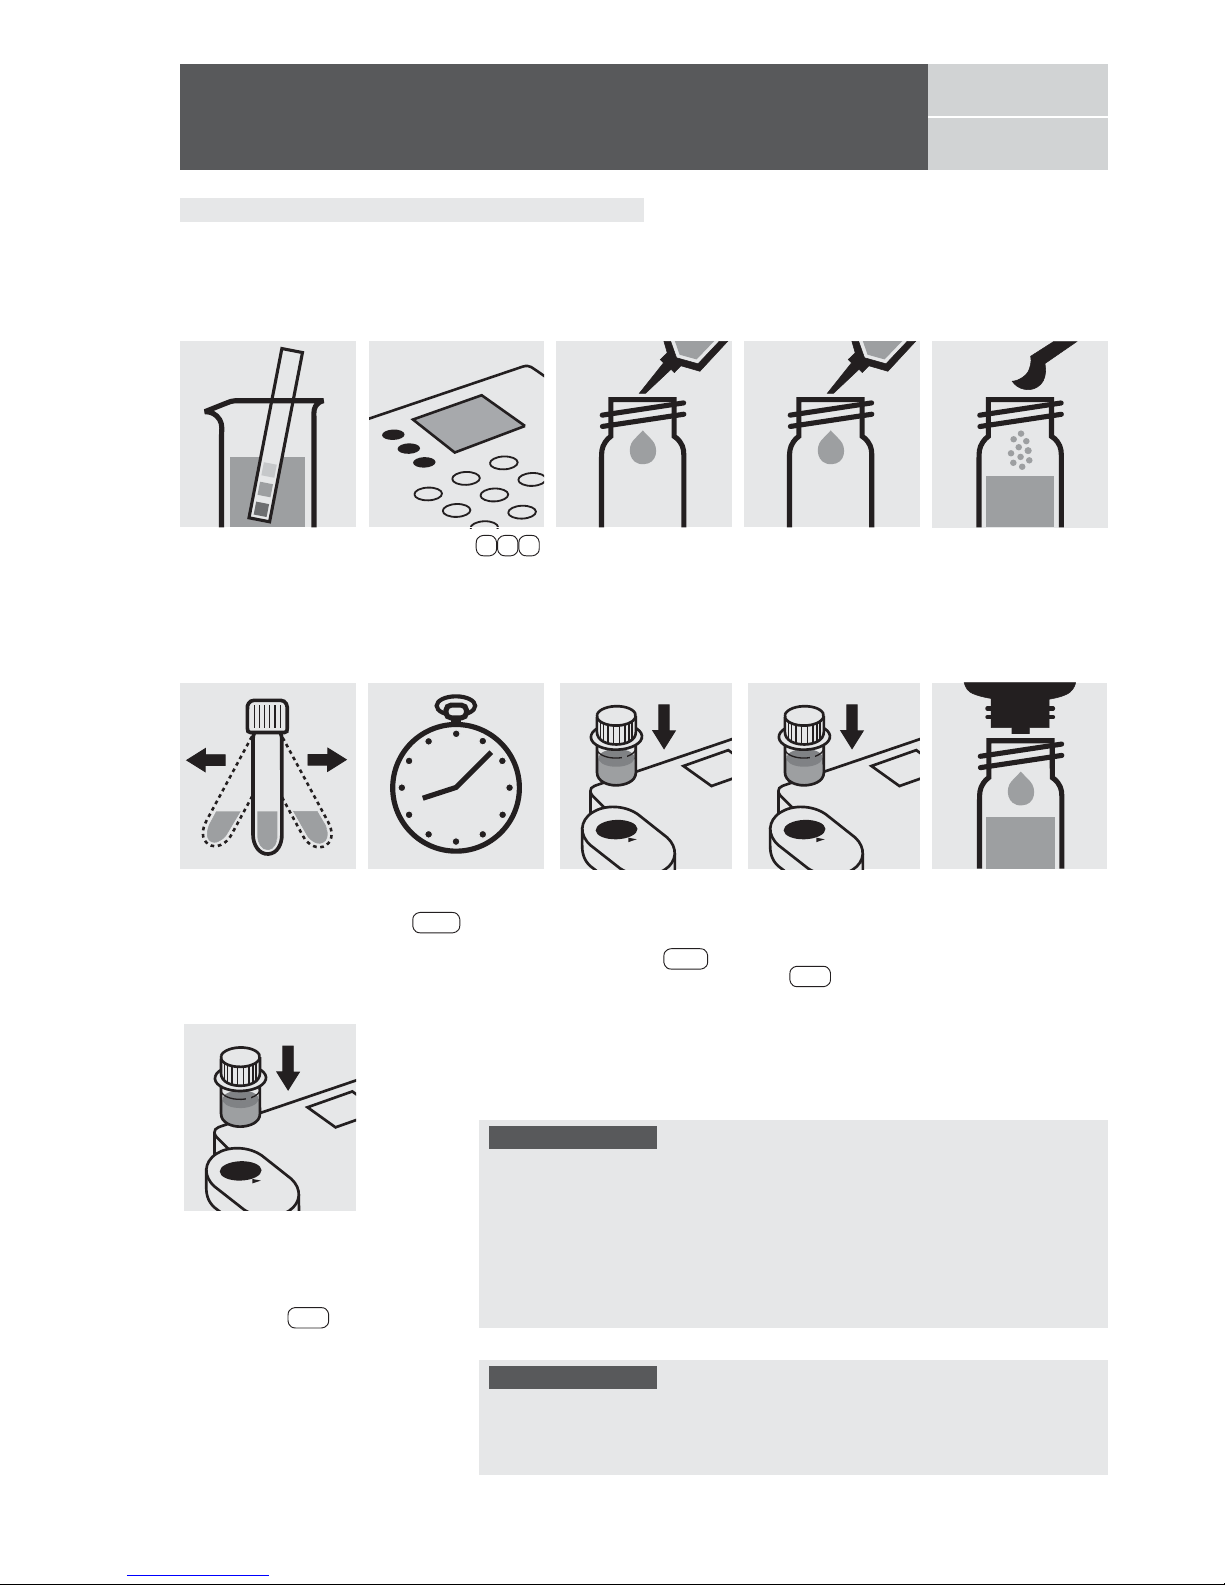
Pipette 10 ml of the
sample into a 24-mm
cell.
Add 1 level blue microspoon of Cl
2
-1, close
with the screw cap.
Measuring range: 0.02– 4.50 mg/l Cl2 24-mm cell
Chlorine
Determination of free chlorine, total chlorine,
and combined chlorine
100599
Test
Shake the cell vigorously to dissolve the
solid substance.
Fill approx. 10 ml of
distilled water into a
24-mm cell (do not add
any reagents!), close
with the screw cap
.
(Blank cell)
Remove the sample cell
from the photometer,
open, add 2 drops of
Cl
2
-2, close with the
screw cap, and mix.
Select method 1 3 1 ,
select subitem >>diff.
Reaction time:
1 minute
Press Enter to start
the countdown.
Insert the cell containing
the sample into the cell
compartment. Align the
mark on the cell with
that on the photometer.
Press Test . (= T1)
Insert anew the cell containing the sample into
the cell compartment.
Align the mark on the
cell with that on the photometer. Press Test .
(= T2)
Insert the blank cell into
the cell compartment.
Align the mark on the
cell with that on the photometer. Press Zero .
Check the pH of the
sample, specified range
:
pH 4 – 8.
If required, add dilute
sodium hydroxide
solution or sulfuric acid
drop by drop to adjust
the pH.
Important:
Very high chlorine concentrations in the sample produce yellow-colored solutions (measurement solution should be red) and false-low readings are yielded.
In such cases the sample must be diluted (plausibility check).
After each determination of total chlorine rinse the cell with sulfuric acid 25 % and
subsequently several times with distilled water.
For on-the-spot determinations where there are no suitable facilities for rinsing,
the cell contents can be transferred to a new 24-mm cell before the addition of
reagent Cl
2
-2. Use this second cell only for the determination of total chlorine!
Quality assurance:
To check the measurement system (test reagents, measurement device, and
handling) a freshly prepared standard solution can be used (see section “Standard solutions”).
Release 08/2014 - Spectroquant® Multy
Page 84
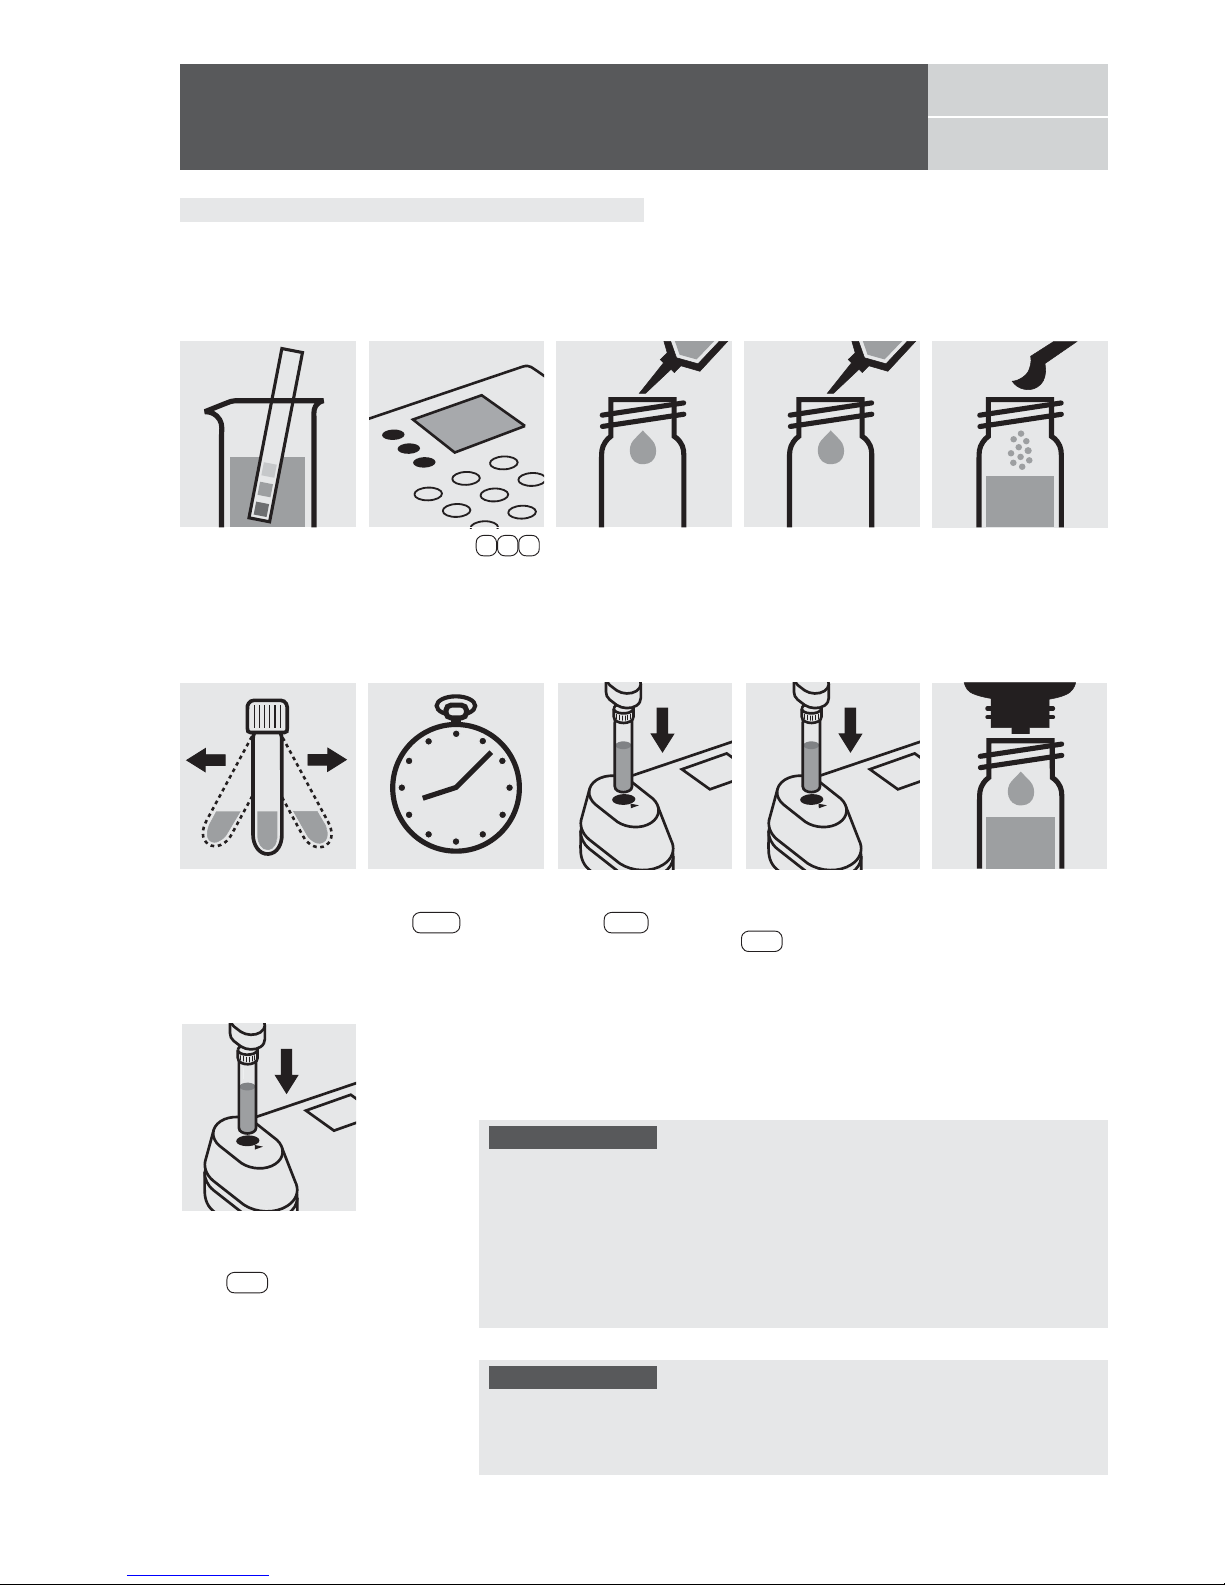
Pipette 10 ml of the
sample into a 16-mm
cell.
Add 1 level blue microspoon of Cl
2
-1, close
with the screw cap.
Measuring range: 0.10– 6.00 mg/l Cl2 16-mm cell
Chlorine
Determination of free chlorine, total chlorine,
and combined chlorine
100599
Test
Shake the cell vigorously to dissolve the
solid substance.
Fill approx. 10 ml of
distilled water into an
empty 16-mm cell (do
not add any reagents!),
close with the screw
cap
.
(Blank cell)
Remove the sample cell
from the photometer,
open, add 2 drops of
Cl
2
-2, close with the
screw cap, and mix.
Select method 1 3 4 ,
select subitem >>diff.
Reaction time:
1 minute
Press Enter to start
the countdown.
Check the pH of the
sample, specified range
:
pH 4 – 8.
If required, add dilute
sodium hydroxide
solution or sulfuric acid
drop by drop to adjust
the pH.
Important:
Very high chlorine concentrations in the sample produce yellow-colored solutions (measurement solution should be red) and false-low readings are yielded.
In such cases the sample must be diluted (plausibility check).
After each determination of total chlorine rinse the cell with sulfuric acid 25 % and
subsequently several times with distilled water.
For on-the-spot determinations where there are no suitable facilities for rinsing,
the cell contents can be transferred to a new 24-mm cell before the addition of
reagent Cl
2
-2. Use this second cell only for the determination of total chlorine!
Quality assurance:
To check the measurement system (test reagents, measurement device, and
handling) a freshly prepared standard solution can be used (see section “Standard solutions”).
Release 08/2014 - Spectroquant® Multy
Insert the cell containing
the sample into the cell
compartment. Press
Test . (= T1)
Insert the blank cell into
the cell compartment.
Press Zero .
Insert anew the cell containing the sample into
the cell compartment.
Press Test . (= T2)
Page 85
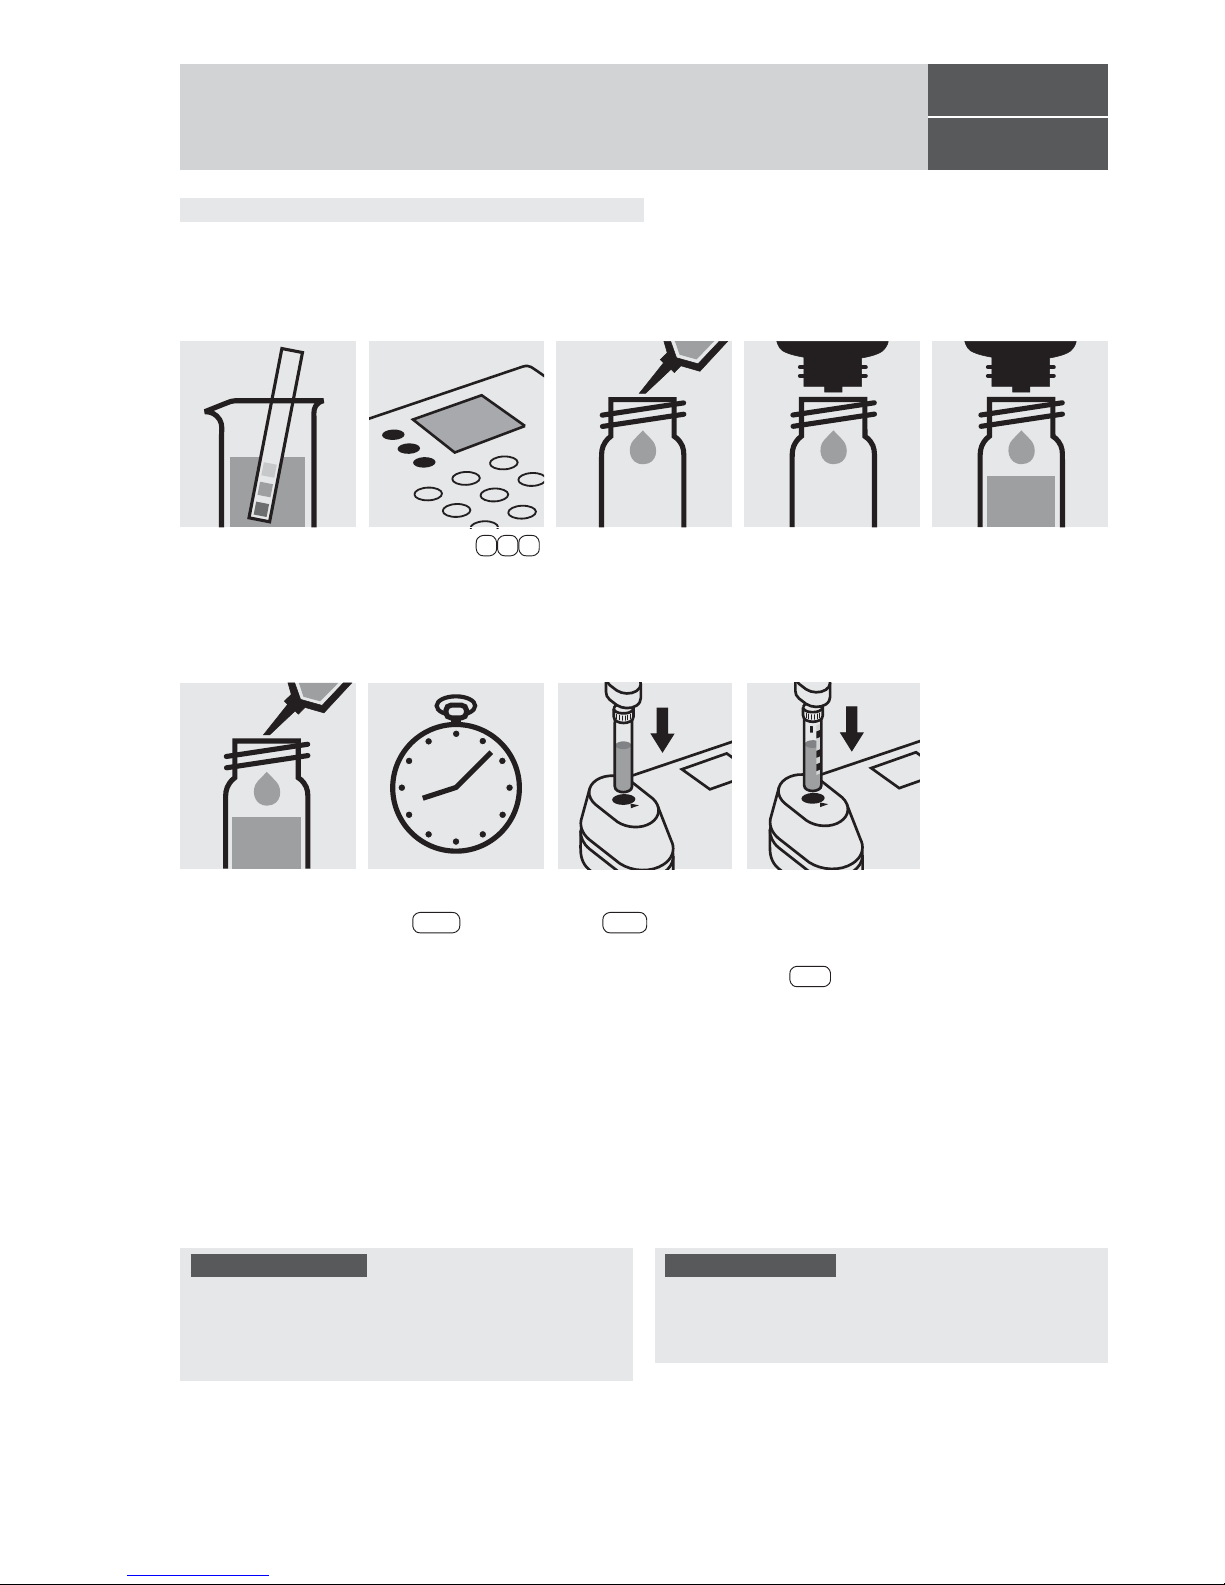
Add 3 drops of Cl2-2,
close with the screw
cap, and mix.
Place
6 drops of Cl2-1
into a round cell
.
Measuring range: 0.10– 6.00 mg/l Cl2 16-mm cell
Add 10 ml of the sample
with pipette
, close with
the screw cap, and mix.
Chlorine (with liquid reagents)
Detemination of free chlorine
100086/100087
Cell Test
Fill approx. 10 ml of
distilled water into an
empty 16-mm cell (do
not add any reagents!),
close with the screw
cap
.
(Blank cell)
Select method 1 3 2 ,
select subitem >>free.
Insert the cell containing
the sample into the cell
compartment. Align the
mark on the cell with
that on the photometer.
Press Test .
Insert the blank cell into
the cell compartment.
Press Zero .
Important:
Very high chlorine concentrations in the sample produce
yellow-colored solutions (measurement solution should be
red) and f
alse-low readings are yielded. In such cases the
sample must be diluted (plausibility check).
Quality assurance:
To check the measurement system (test reagents, measurement device, and handling) a freshly prepared standard
solution can be used (see section “Standard solutions”).
Check the pH of the
sample, specified range
:
pH 4 – 8.
If required, add dilute
sodium hydroxide
solution or sulfuric acid
drop by drop to adjust
the pH.
Release 08/2014 - Spectroquant
®
Multy
Reaction time:
1 minute
Press Enter to start
the countdown.
Page 86
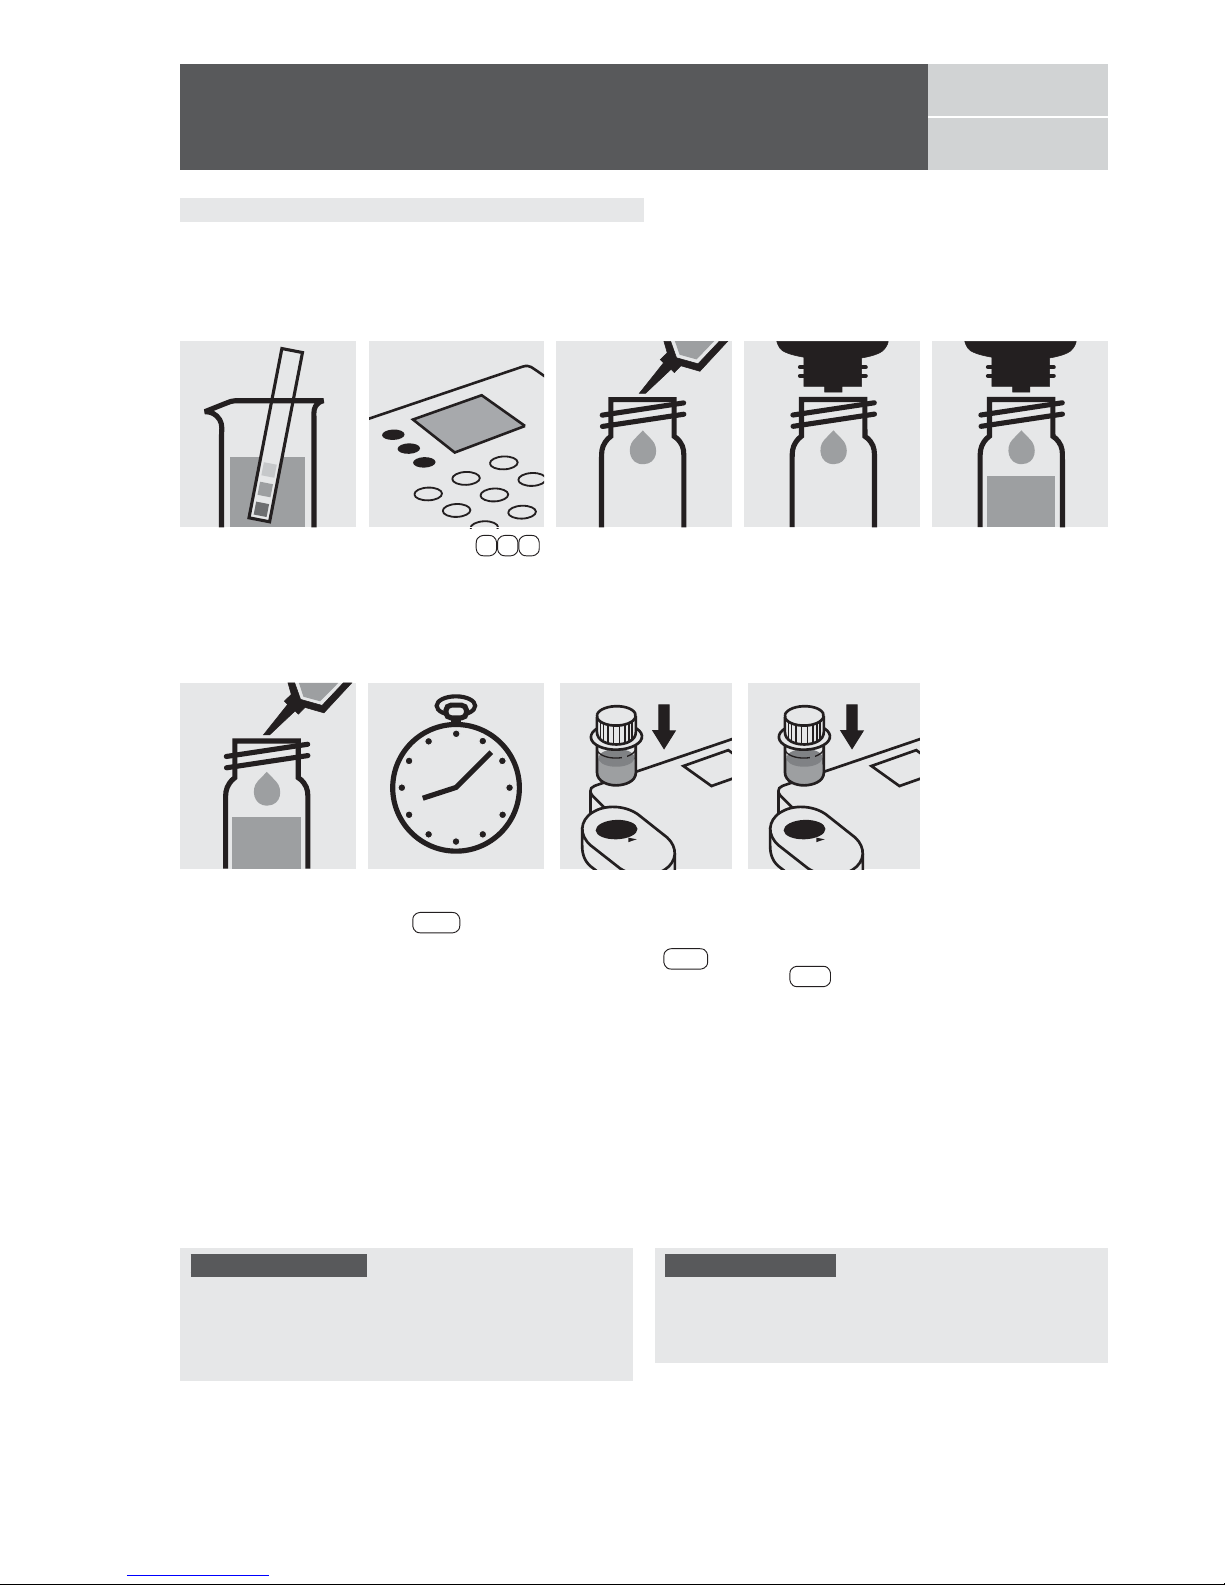
Add 3 drops of Cl2-2,
close with the screw
cap, and mix.
Place
6 drops of Cl2-1
into a 24-mm cell
.
Measuring range: 0.02– 4.50 mg/l Cl2 24-mm cell
Add 10 ml of the sample
with pipette
, close with
the screw cap, and mix.
Chlorine (with liquid reagents)
Detemination of free chlorine
100086/100087
Test
Fill approx. 10 ml of
distilled water into a
24-mm cell (do not add
any reagents!), close
with the screw cap
.
(Blank cell)
Select method 1 3 3 ,
select subitem >>free.
Important:
Very high chlorine concentrations in the sample produce
yellow-colored solutions (measurement solution should be
red) and f
alse-low readings are yielded. In such cases the
sample must be diluted (plausibility check).
Quality assurance:
To check the measurement system (test reagents, measurement device, and handling) a freshly prepared standard
solution can be used (see section “Standard solutions”).
Insert the cell containing
the sample into the cell
compartment. Align the
mark on the cell with
that on the photometer.
Press Test .
Insert the blank cell into
the cell compartment.
Align the mark on the
cell with that on the photometer. Press Zero .
Check the pH of the
sample, specified range
:
pH 4 – 8.
If required, add dilute
sodium hydroxide
solution or sulfuric acid
drop by drop to adjust
the pH.
Release 08/2014 - Spectroquant
®
Multy
Reaction time:
1 minute
Press Enter to start
the countdown.
Page 87
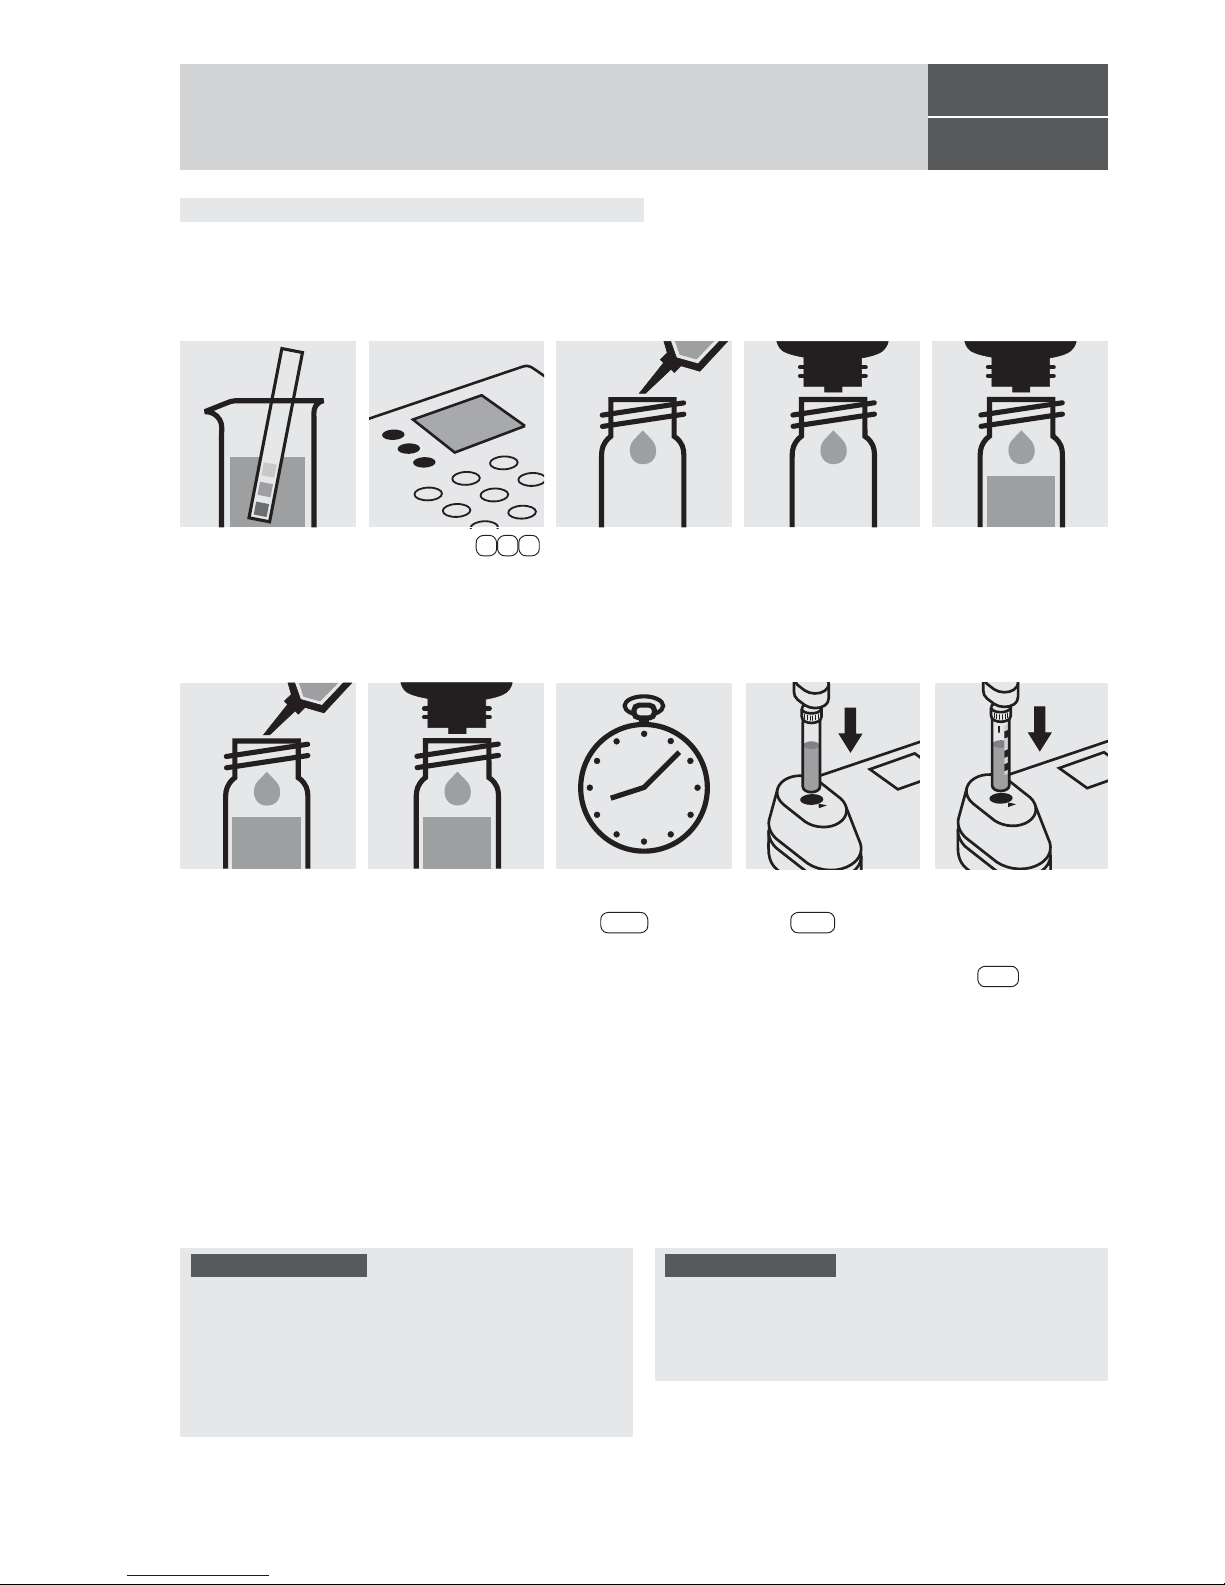
Add 3 drops of Cl2-2,
close with the screw
cap, and mix.
Place
6 drops of Cl2-1
into a round cell
.
Measuring range: 0.10– 6.00 mg/l Cl2 16-mm cell
Add 10 ml of the sample
with pipette
, close with
the screw cap, and mix.
Chlorine (with liquid reagents)
Detemination of total chlorine
Fill approx. 10 ml of
distilled water into an
empty 16-mm cell (do
not add any reagents!),
close with the screw
cap
.
(Blank cell)
Select method 1 3 2 ,
select subitem >>total.
Insert the cell containing
the sample into the cell
compartment. Align the
mark on the cell with
that on the photometer.
Press Test .
Insert the blank cell into
the cell compartment.
Press Zero .
Important:
Very high chlorine concentrations in the sample produce
yellow-colored solutions (measurement solution should be
red) and f
alse-low readings are yielded. In such cases the
sample must be diluted (plausibility check).
After each determination of total chlorine rinse the cell
with sulfuric acid 25 % and subsequently several times
with distilled water.
Quality assurance:
To check the measurement system (test reagents, measurement device, and handling) a freshly prepared standard
from Chloramine T GR, Cat.No. 102426, can be used (see
section “Standard solutions”).
100086/100087/
100088
Cell Test
Add 2 drops of Cl2-3,
close with the screw
cap, and mix.
Check the pH of the
sample, specified range
:
pH 4 – 8.
If required, add dilute
sodium hydroxide
solution or sulfuric acid
drop by drop to adjust
the pH.
Release 08/2014 - Spectroquant
®
Multy
Reaction time:
1 minute
Press Enter to start
the countdown.
Page 88
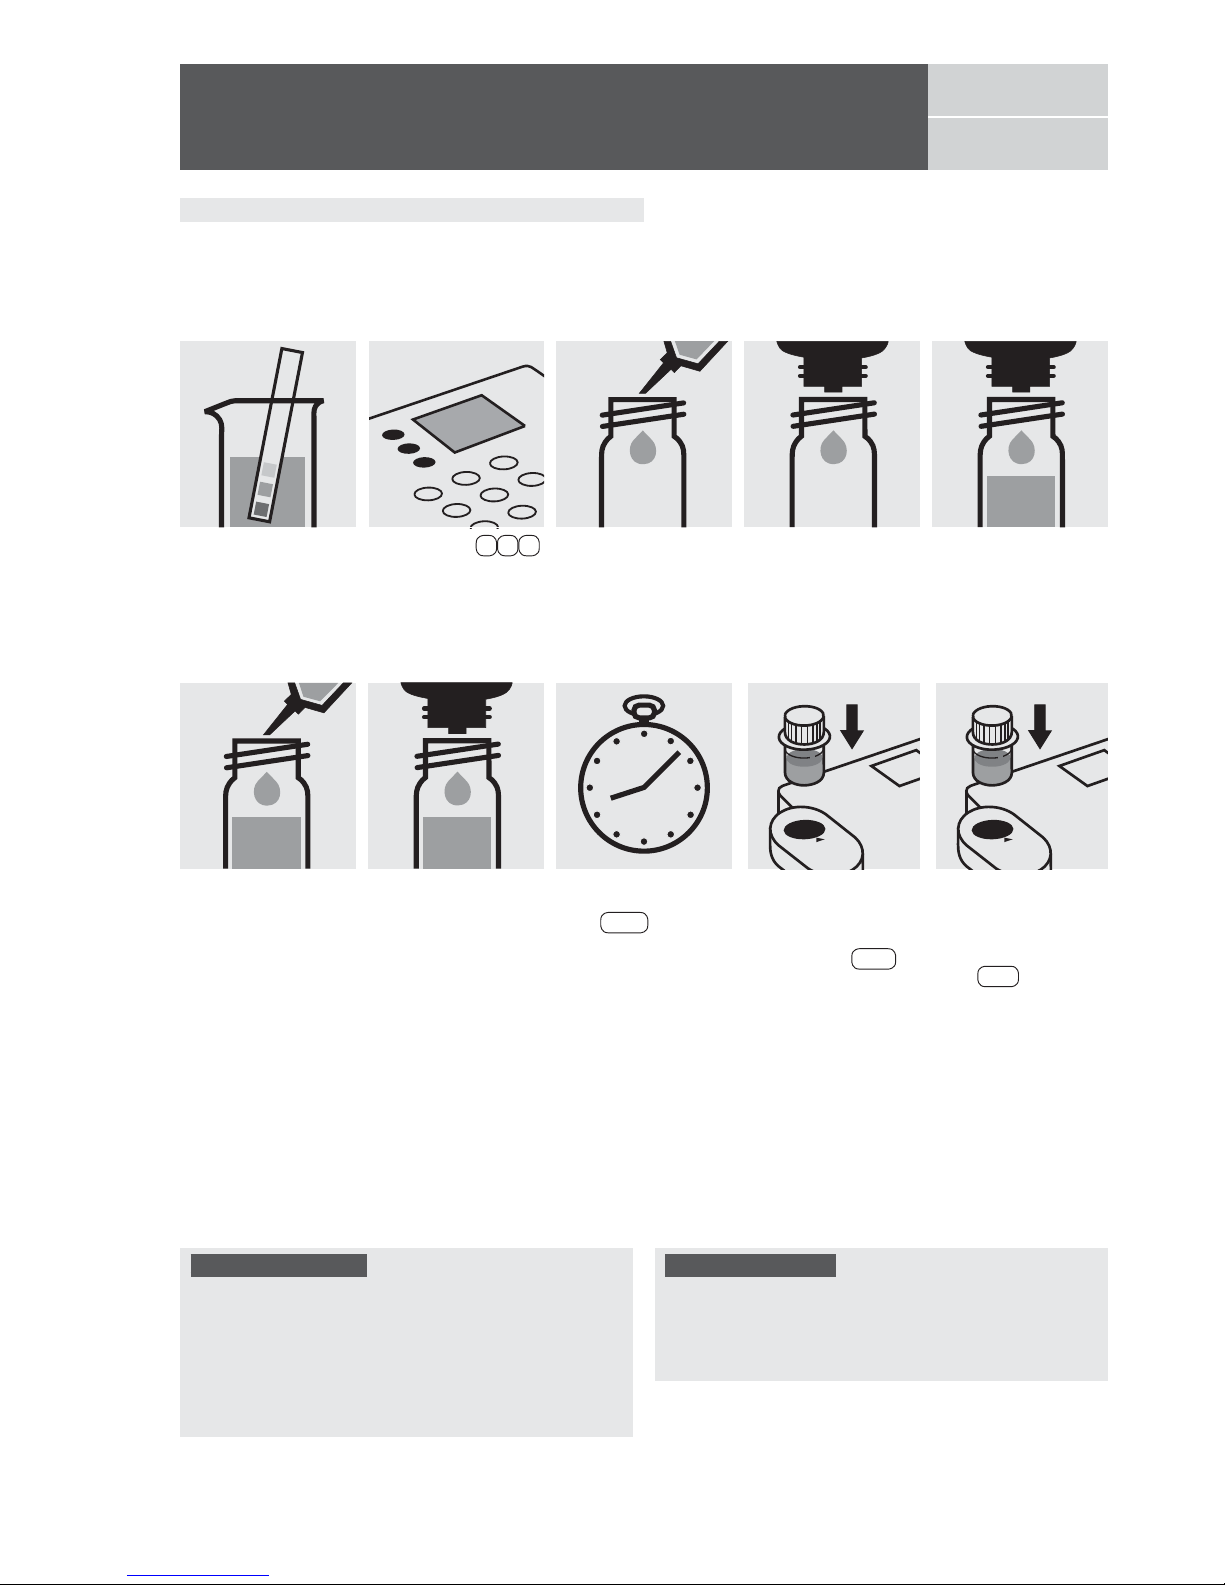
Add 3 drops of Cl2-2,
close with the screw
cap, and mix.
Place
6 drops of Cl2-1
into a 24-mm cell
.
Measuring range: 0.02– 4.50 mg/l Cl2 24-mm cell
Add 10 ml of the sample
with pipette
, close with
the screw cap, and mix.
Fill approx. 10 ml of
distilled water into a
24-mm cell (do not add
any reagents!), close
with the screw cap
.
(Blank cell)
Select method 1 3 3 ,
select subitem >>total.
Quality assurance:
To check the measurement system (test reagents, measurement device, and handling) a freshly prepared standard
from Chloramine T GR, Cat.No. 102426, can be used (see
section “Standard solutions”).
Insert the cell containing
the sample into the cell
compartment. Align the
mark on the cell with
that on the photometer.
Press Test .
Insert the blank cell into
the cell compartment.
Align the mark on the
cell with that on the photometer. Press Zero .
Chlorine (with liquid reagents)
Detemination of total chlorine
100086/100087/
100088
Test
Add 2 drops of Cl2-3,
close with the screw
cap, and mix.
Check the pH of the
sample, specified range
:
pH 4 – 8.
If required, add dilute
sodium hydroxide
solution or sulfuric acid
drop by drop to adjust
the pH.
Important:
Very high chlorine concentrations in the sample produce
yellow-colored solutions (measurement solution should be
red) and f
alse-low readings are yielded. In such cases the
sample must be diluted (plausibility check).
After each determination of total chlorine rinse the cell
with sulfuric acid 25 % and subsequently several times
with distilled water.
Release 08/2014 - Spectroquant® Multy
Reaction time:
1 minute
Press Enter to start
the countdown.
Page 89
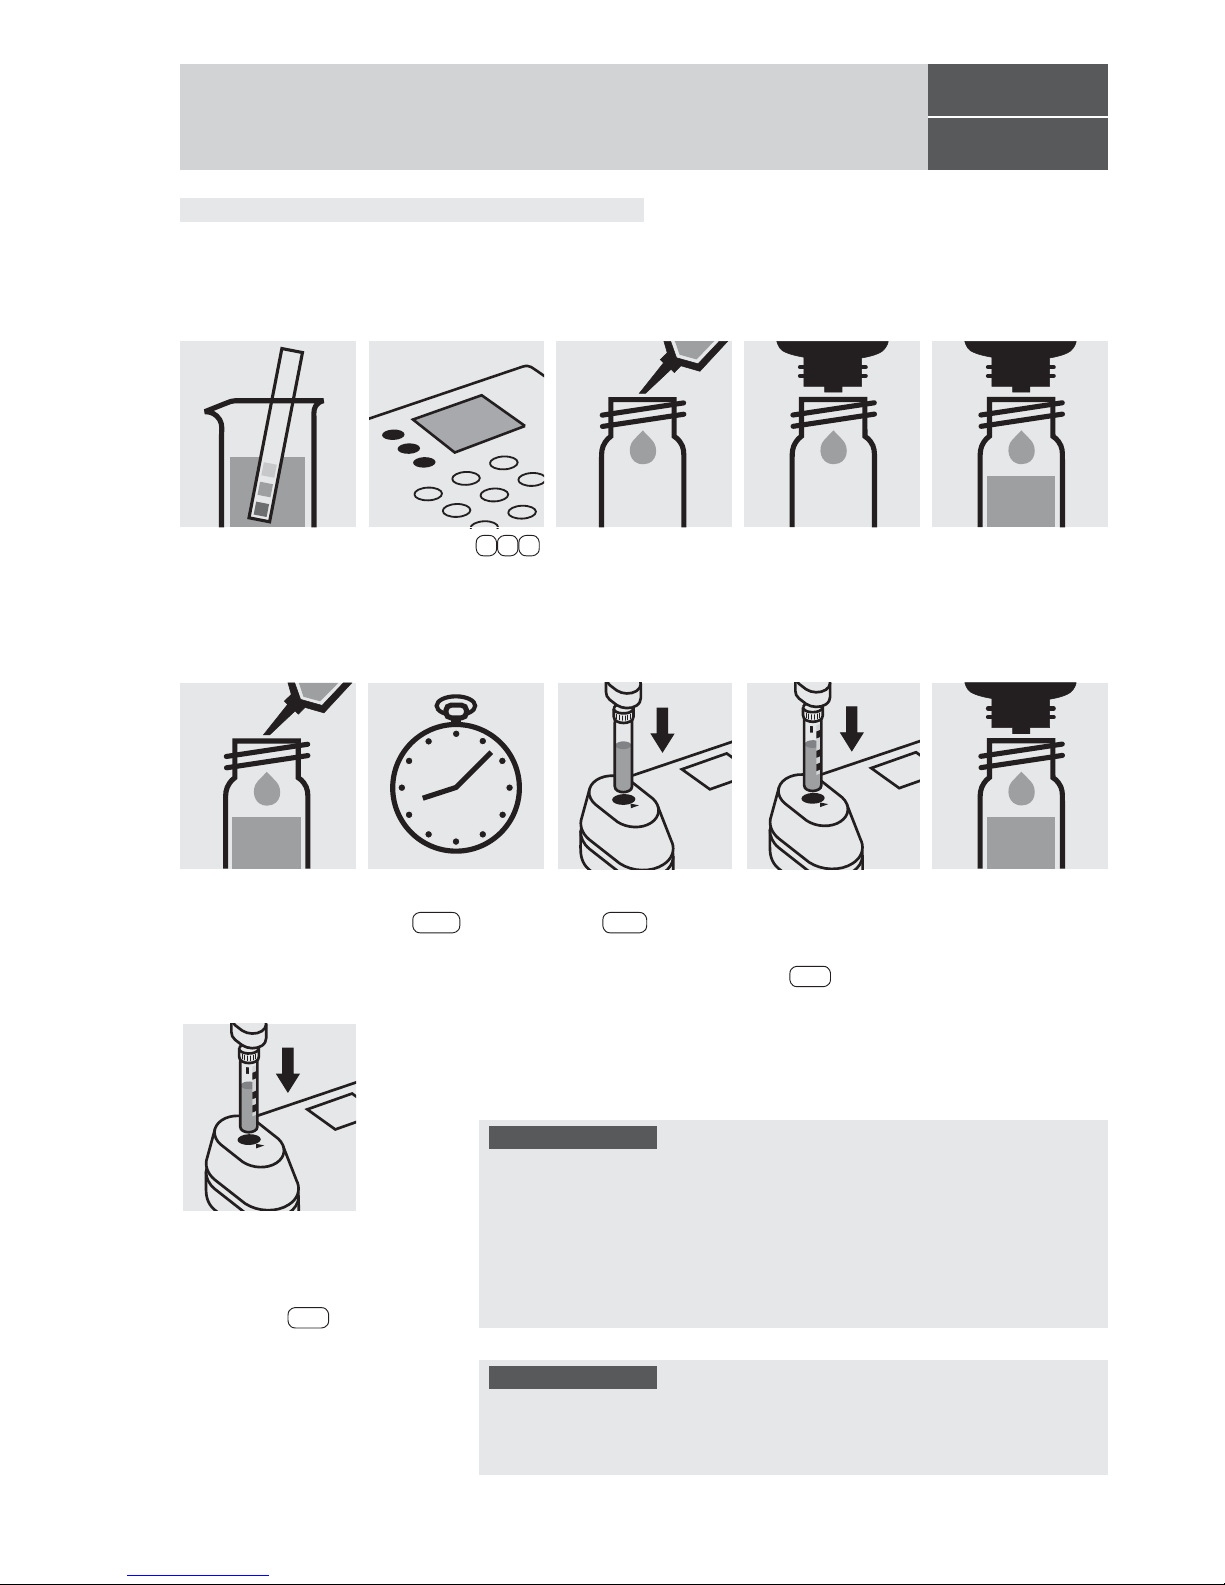
Add 3 drops of Cl2-2,
close with the screw
cap, and mix.
Place
6 drops of Cl2-1
into a round cell
.
Measuring range: 0.10– 6.00 mg/l Cl2 16-mm cell
Add 10 ml of the sample
with pipette
, close with
the screw cap, and mix.
Chlorine (with liquid reagents)
Determination of free chlorine,
total chlorine, and combined chlorine
Fill approx. 10 ml of
distilled water into an
empty 16-mm cell (do
not add any reagents!),
close with the screw
cap
.
(Blank cell)
Select method 1 3 2 ,
select subitem >>dif.
Insert the blank cell into
the cell compartment.
Press Zero .
100086/100087/
100088
Cell Test
Remove the sample cell
from the photometer,
open, add 2 drops of
Cl
2
-3, close with the
screw cap, and mix.
Insert the cell containing
the sample into the cell
compartment. Align the
mark on the cell with
that on the photometer.
Press Test . (= T1)
Insert anew the cell containing the sample into
the cell compartment.
Align the mark on the
cell with that on the photometer. Press Test .
(= T2)
Check the pH of the
sample, specified range
:
pH 4 – 8.
If required, add dilute
sodium hydroxide
solution or sulfuric acid
drop by drop to adjust
the pH.
Important:
Very high chlorine concentrations in the sample produce yellow-colored solutions (measurement solution should be red) and false-low readings are yielded.
In such cases the sample must be diluted (plausibility check).
After each determination of total chlorine rinse the cell with sulfuric acid 25 % and
subsequently several times with distilled water.
For on-the-spot determinations where there are no suitable facilities for rinsing,
the cell contents can be transferred to a new 16-mm cell before the addition of
reagent Cl
2
-3. Use this second cell only for the determination of total chlorine!
Quality assurance:
To check the measurement system (test reagents, measurement device, and
handling) a freshly prepared standard solution can be used (see section “Standard solutions”).
Release 08/2014 - Spectroquant® Multy
Reaction time:
1 minute
Press Enter to start
the countdown.
Page 90
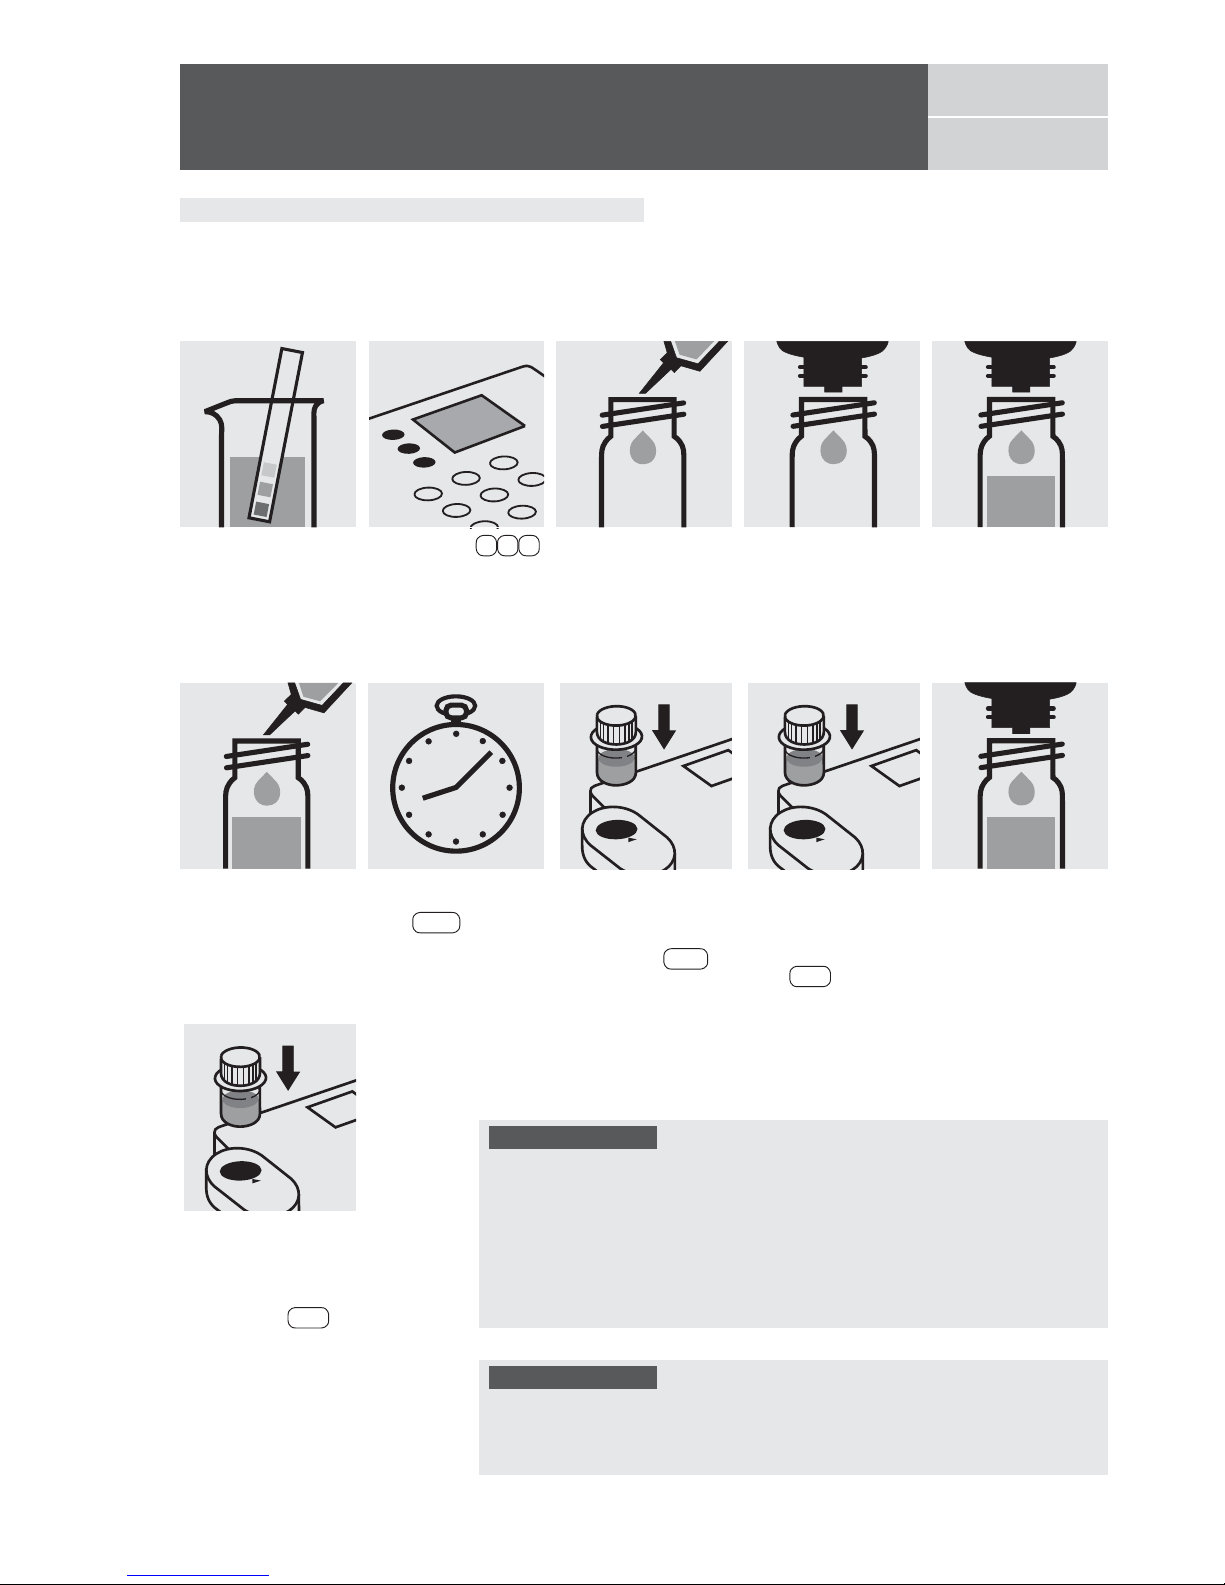
Add 3 drops of Cl2-2,
close with the screw
cap, and mix.
Measuring range: 0.02– 4.50 mg/l Cl2 24-mm cell
Add 10 ml of the sample
with pipette
, close with
the screw cap, and mix.
Chlorine (with liquid reagents)
Determination of free chlorine,
total chlorine, and combined chlorine
Select method 1 3 3 ,
select subitem >>diff.
100086/100087/
100088
Test
Remove the sample cell
from the photometer,
open, add 2 drops of
Cl
2
-3, close with the
screw cap, and mix.
Insert the cell containing
the sample into the cell
compartment. Align the
mark on the cell with
that on the photometer.
Press Test . (= T1)
Insert anew the cell containing the sample into
the cell compartment.
Align the mark on the
cell with that on the photometer. Press Test .
(= T2)
Place
6 drops of Cl2-1
into a 24-mm cell
.
Fill approx. 10 ml of
distilled water into a
24-mm cell (do not add
any reagents!), close
with the screw cap
.
(Blank cell)
Insert the blank cell into
the cell compartment.
Align the mark on the
cell with that on the photometer. Press Zero .
Check the pH of the
sample, specified range
:
pH 4 – 8.
If required, add dilute
sodium hydroxide
solution or sulfuric acid
drop by drop to adjust
the pH.
Important:
Very high chlorine concentrations in the sample produce yellow-colored solutions (measurement solution should be red) and false-low readings are yielded.
In such cases the sample must be diluted (plausibility check).
After each determination of total chlorine rinse the cell with sulfuric acid 25 % and
subsequently several times with distilled water.
For on-the-spot determinations where there are no suitable facilities for rinsing,
the cell contents can be transferred to a new 24-mm cell before the addition of
reagent Cl
2
-3. Use this second cell only for the determination of total chlorine!
Quality assurance:
To check the measurement system (test reagents, measurement device, and
handling) a freshly prepared standard solution can be used (see section “Standard solutions”).
Release 08/2014 - Spectroquant® Multy
Reaction time:
1 minute
Press Enter to start
the countdown.
Page 91
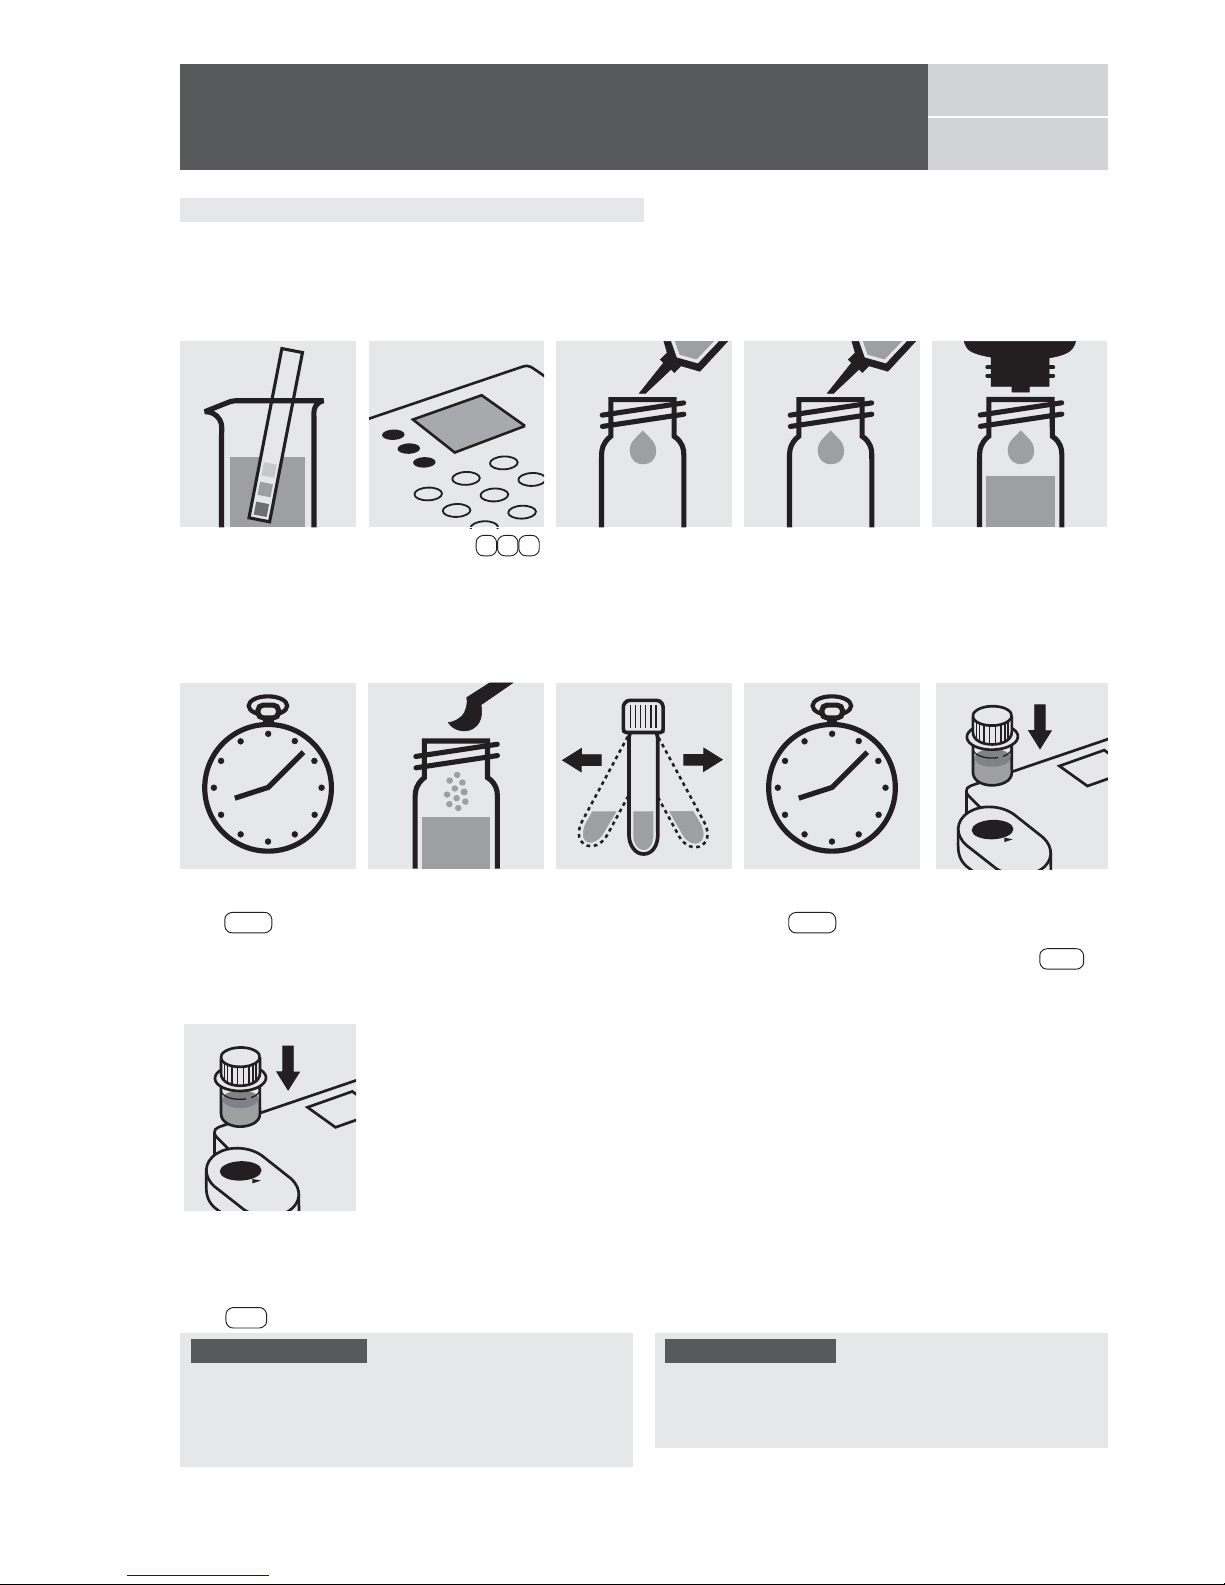
Release 08/2014 - Spectroquant® Multy
Pipette 10 ml of the
sample into a 24-mm
cell.
Add 2 drops of ClO
2
-1,
close with the screw
cap, and mix.
Chlorine Dioxide
100608
Test
Add 1 level blue microspoon of ClO
2
-2, close
with the screw cap.
Shake the cell vigorously to dissolve the
solid substance.
Measuring range: 0.05– 8.50 mg/l ClO2 24-mm cell
Quality assurance:
To check the measurement system (test reagents, measurement device, and handling) a freshly prepared standard
solution can be used (see section “Standard solutions”).
Fill approx. 10 ml of
distilled water into a
24-mm cell (do not add
any reagents!), close
with the screw cap
.
(Blank cell)
Select method 1 4 0 .
Insert the cell containing
the sample into the cell
compartment. Align the
mark on the cell with
that on the photometer.
Press Test .
Important:
Very high chlorine dioxide concentrations in the sample
produce yellow-colored solutions (measurement solution
should be red) and f
alse-low readings are yielded. In such
cases the sample must be diluted (plausibility check).
Insert the blank cell into
the cell compartment.
Align the mark on the
cell with that on the photometer. Press Zero .
Check the pH of the
sample, specified range
:
pH 4 – 8.
If required, add dilute
sodium hydroxide
solution or sulfuric acid
drop by drop to adjust
the pH.
Reaction time:
1 minute
Press Enter to start
the countdown.
Reaction time:
2 minutes
Press Enter to start
the countdown.
Page 92
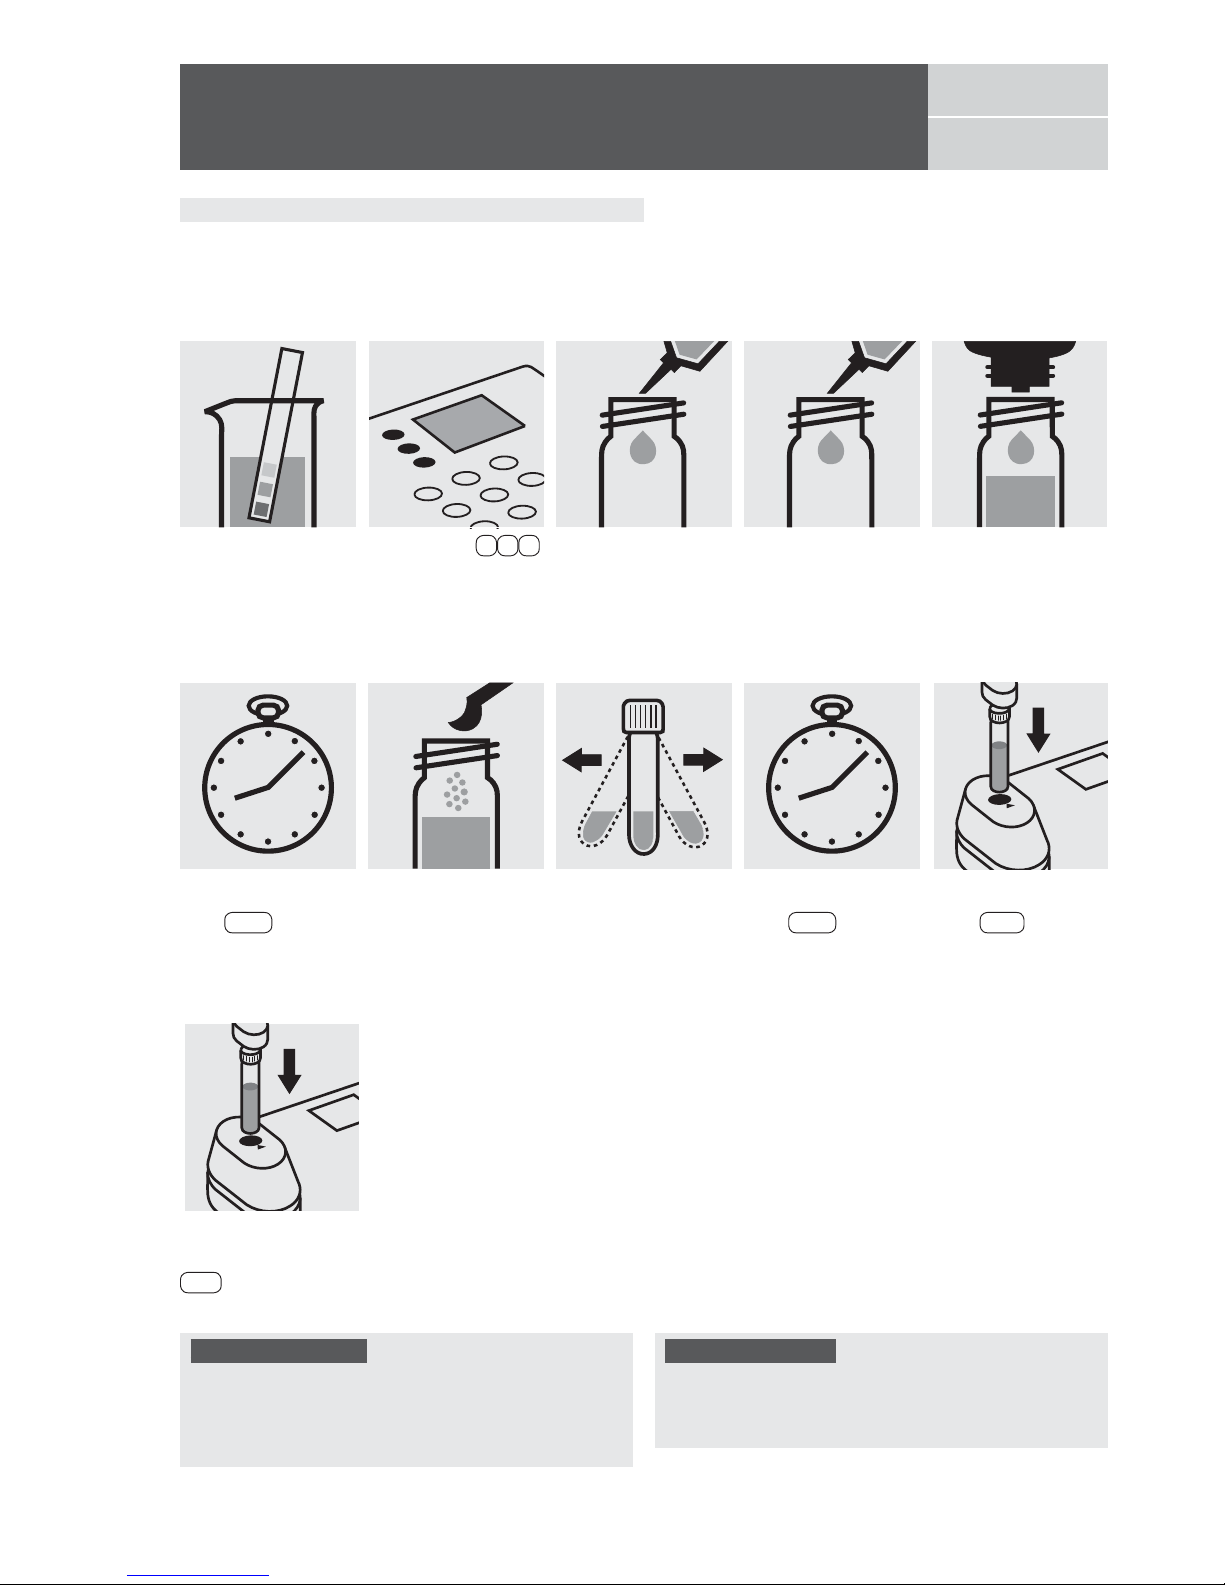
Insert the cell containing
the sample into the cell
compartment. Press
Test .
Insert the blank cell into
the cell compartment.
Press Zero .
Release 08/2014 - Spectroquant® Multy
Pipette 10 ml of the
sample into a 16-mm
cell.
Add 2 drops of ClO
2
-1,
close with the screw
cap, and mix.
Chlorine Dioxide
100608
Test
Add 1 level blue microspoon of ClO
2
-2, close
with the screw cap.
Shake the cell vigorously to dissolve the
solid substance.
Measuring range: 0.20– 10.00 mg/l ClO2 16-mm cell
Quality assurance:
To check the measurement system (test reagents, measurement device, and handling) a freshly prepared standard
solution can be used (see section “Standard solutions”).
Fill approx. 10 ml of
distilled water into an
empty 16-mm cell (do
not add any reagents!),
close with the screw
cap
.
(Blank cell)
Select method 1 4 1 .
Important:
Very high chlorine dioxide concentrations in the sample
produce yellow-colored solutions (measurement solution
should be red) and f
alse-low readings are yielded. In such
cases the sample must be diluted (plausibility check).
Check the pH of the
sample, specified range
:
pH 4 – 8.
If required, add dilute
sodium hydroxide
solution or sulfuric acid
drop by drop to adjust
the pH.
Reaction time:
1 minute
Press Enter to start
the countdown.
Reaction time:
2 minutes
Press Enter to start
the countdown.
Page 93
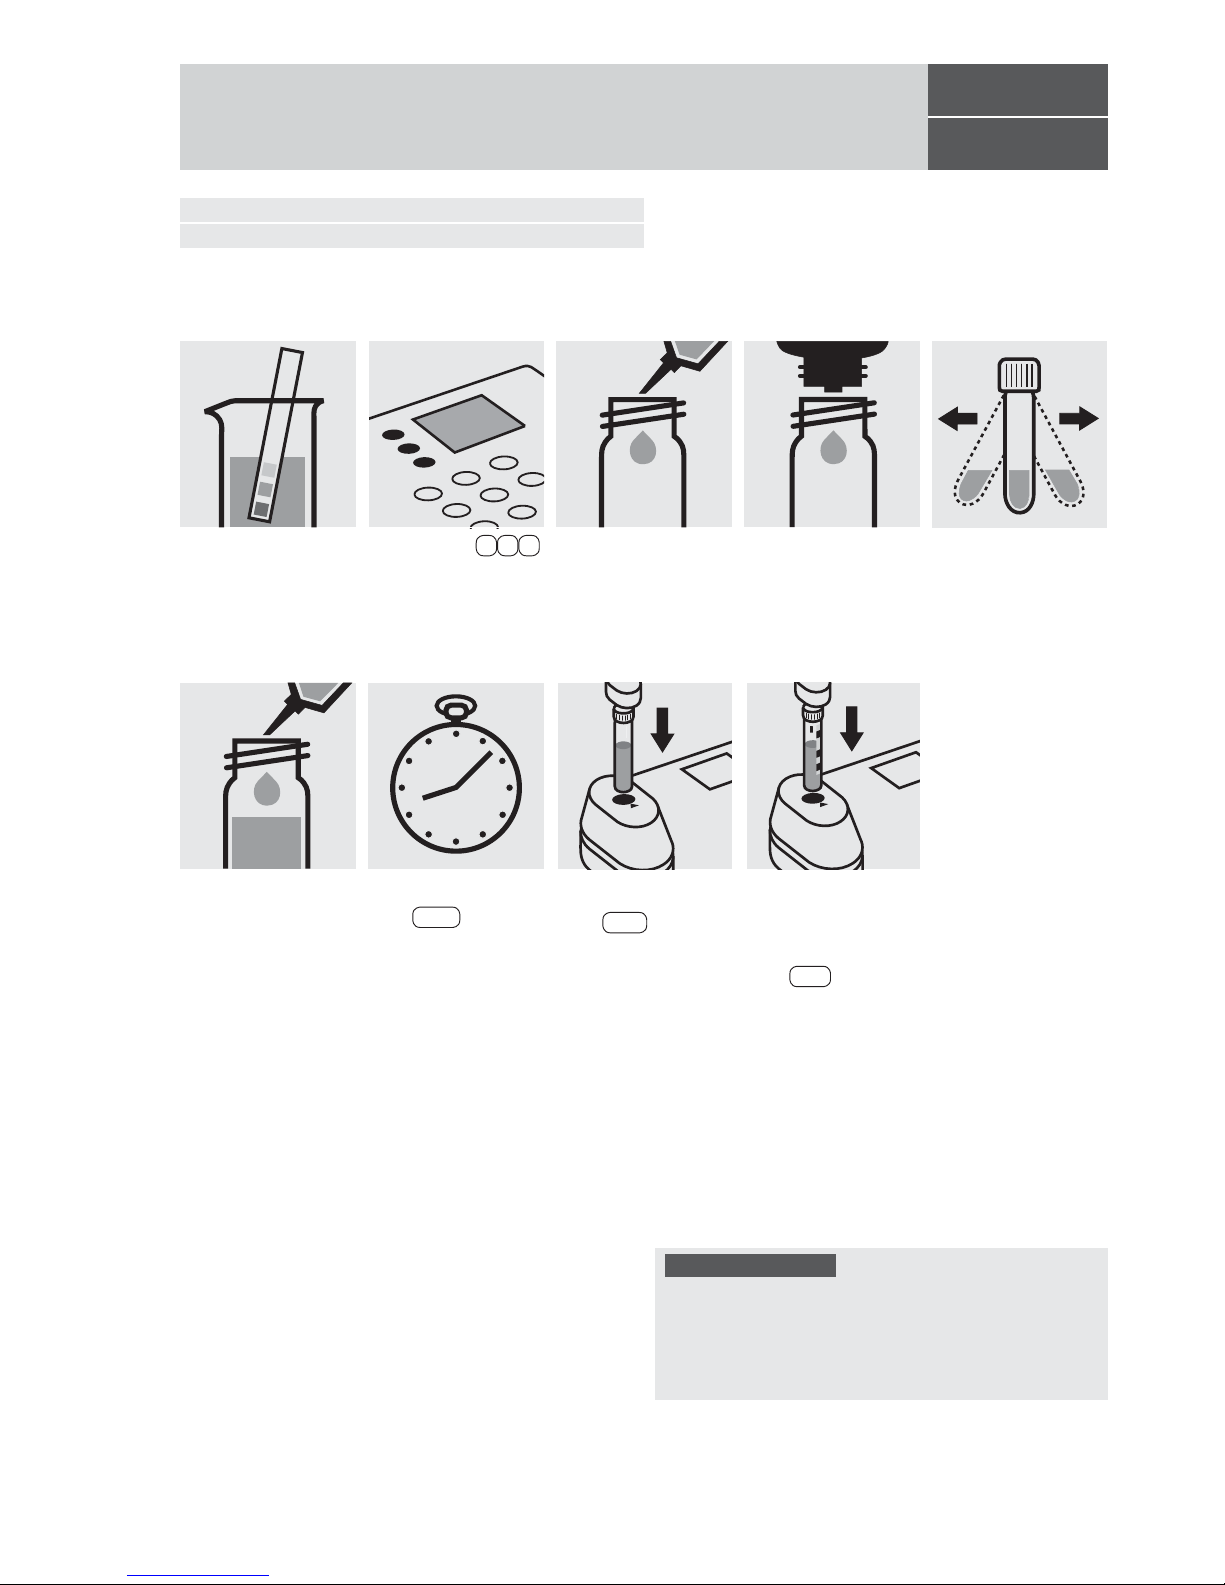
Release 08/2014 - Spectroquant® Multy
114552
Cell Test
Measuring range: 0.05– 2.00 mg/l Cr 16-mm cell
0.11– 4.46 mg/l CrO
4
16-mm cell
Chromate
Determination of chromium(VI)
Add 6 drops of Cr-3K
into a reaction cell, close
with the screw cap.
Shake the cell vigorously to dissolve the
solid substance and
leave to stand for
1 minute.
Quality assurance:
To check the measurement system (test reagents, measurement device, and handling) ready-f
or-use chromate
standard solution Certipur
®
, Cat.No. 119780, concen -
tration 1000 mg/l CrO
4
2–
, can be used after diluting
accordingly.
Add 5.0 ml of the sample
with pipette
, close with
the screw cap, and mix.
Fill approx. 10 ml of
distilled water into an
empty 16-mm cell (do
not add any reagents!),
close with the screw
cap
.
(Blank cell)
Select method 1 5 0 .
Insert the cell containing
the sample into the cell
compartment. Align the
mark on the cell with
that on the photometer.
Press Test .
Reaction time:
1 minute
Press Enter to start
the countdown.
Check the pH of the
sample, specified range
:
pH 1 – 9.
If required, add dilute
sodium hydroxide
solution or sulfuric acid
drop by drop to adjust
the pH.
Insert the blank cell into
the cell compartment.
Press Zero .
Page 94
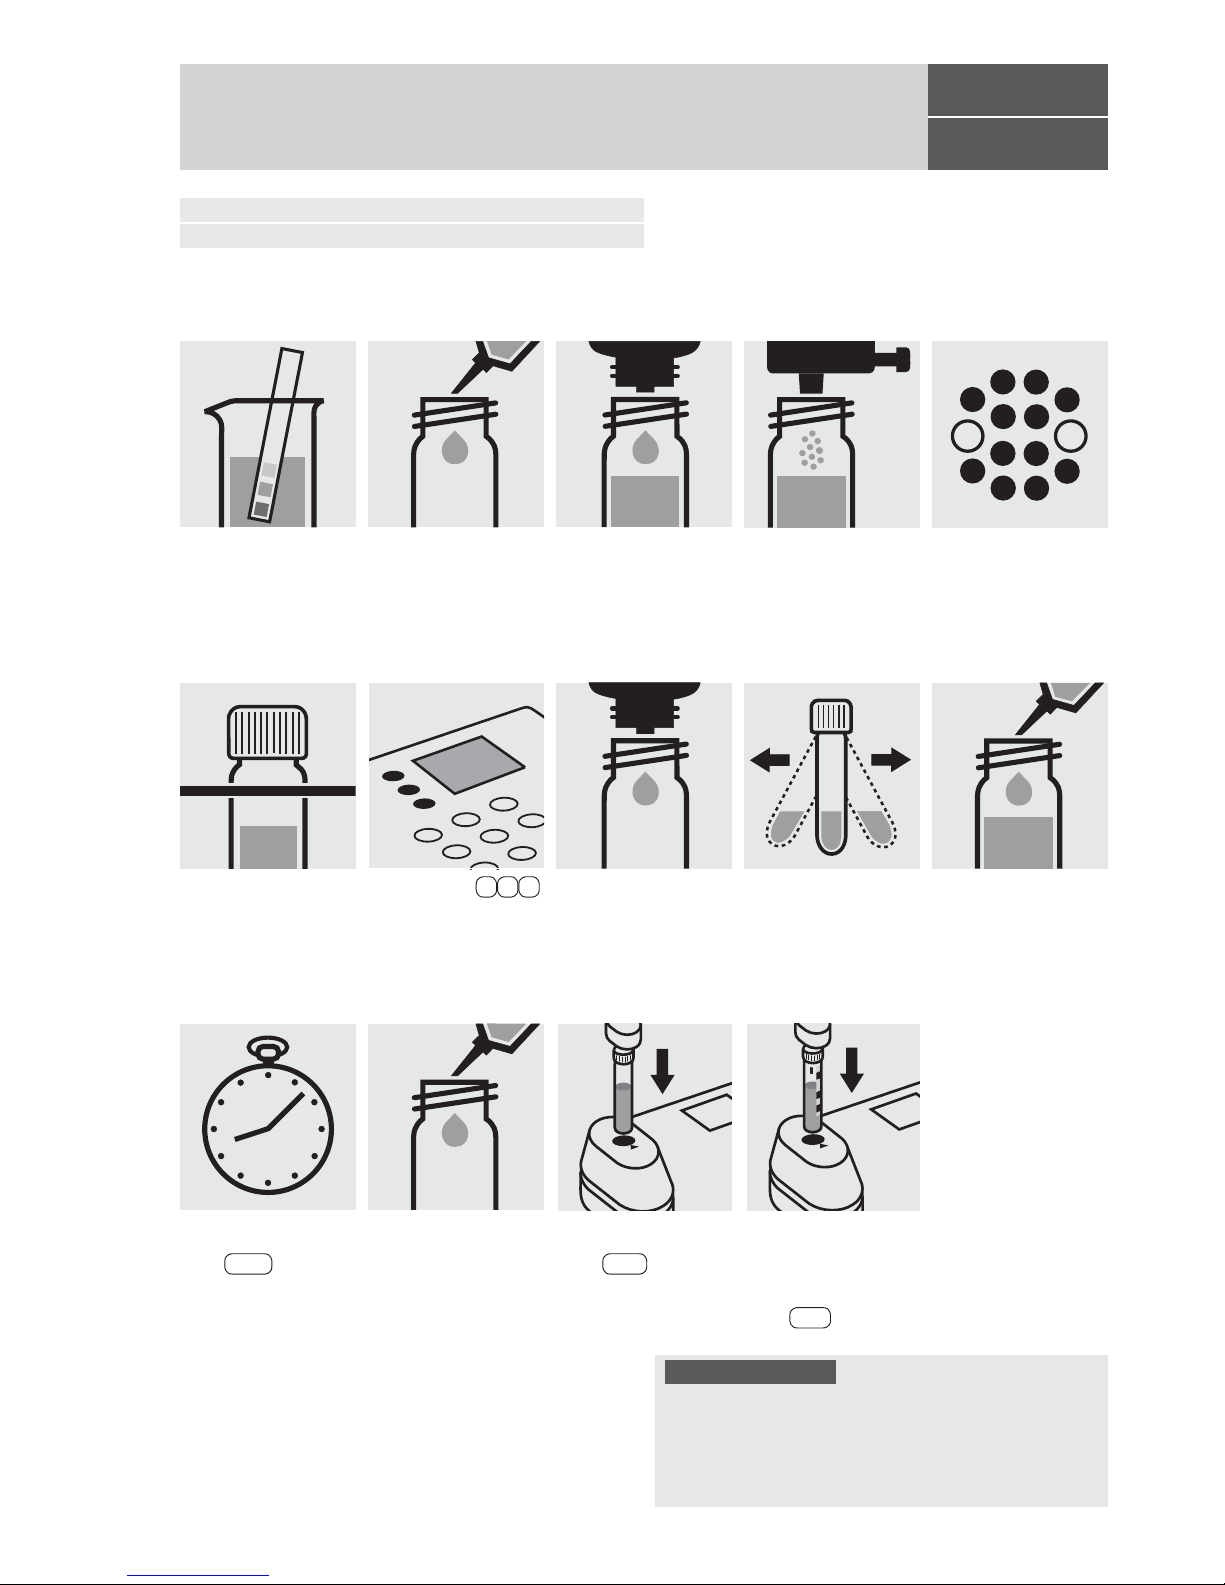
Release 08/2014 - Spectroquant® Multy
114552
Cell Test
Chromate
Determination of total chromium
= sum of chromium(VI) and chromium(III)
Quality assurance:
To check the measurement system (test reagents, measurement device, and handling) ready-f
or-use chromate
standard solution Certipur
®
, Cat.No. 119780, concen-
tration 1000 mg/l CrO
4
2–
, can be used after diluting
accordingly.
Pipette 10 ml of the
sample into an empty
16-mm cell.
Measuring range: 0.05– 2.00 mg/l Cr 16-mm cell
0.11– 4.46 mg/l CrO
4
16-mm cell
Fill approx. 10 ml of
distilled water into an
empty 16-mm cell (do
not add any reagents!),
close with the screw
cap
.
(Blank cell)
Select method 1 5 0 .
Insert the cell containing
the sample into the cell
compartment. Align the
mark on the cell with
that on the photometer.
Press Test .
Reaction time:
1 minute
Press Enter to start
the countdown.
Check the pH of the
sample, specified range
:
pH 1 – 9.
If required, add dilute
sodium hydroxide
solution or sulfuric acid
drop by drop to adjust
the pH.
Add 6 drops of Cr-3K
into a reaction cell,
close with the screw cap.
Shake the cell vigorously to dissolve the solid
substance and leave to
stand for 1 minute.
Add 5.0 ml of the pre-
treated sample
with
pipette
, close with the
screw cap, and mix.
Add 1 drop of Cr-1K,
close with the screw cap,
and mix.
Add 1 dose of Cr-2K
using the blue dosemetering cap, close the
reaction cell with the
screw cap.
Heat the cell in the
thermoreactor at 120°C
(100°C) for 1 hour.
Remove the cell from
the thermoreactor and
place in a test-tube rack
to cool to room temperature:
pretreated sample
.
Insert the blank cell into
the cell compartment.
Press Zero .
Page 95
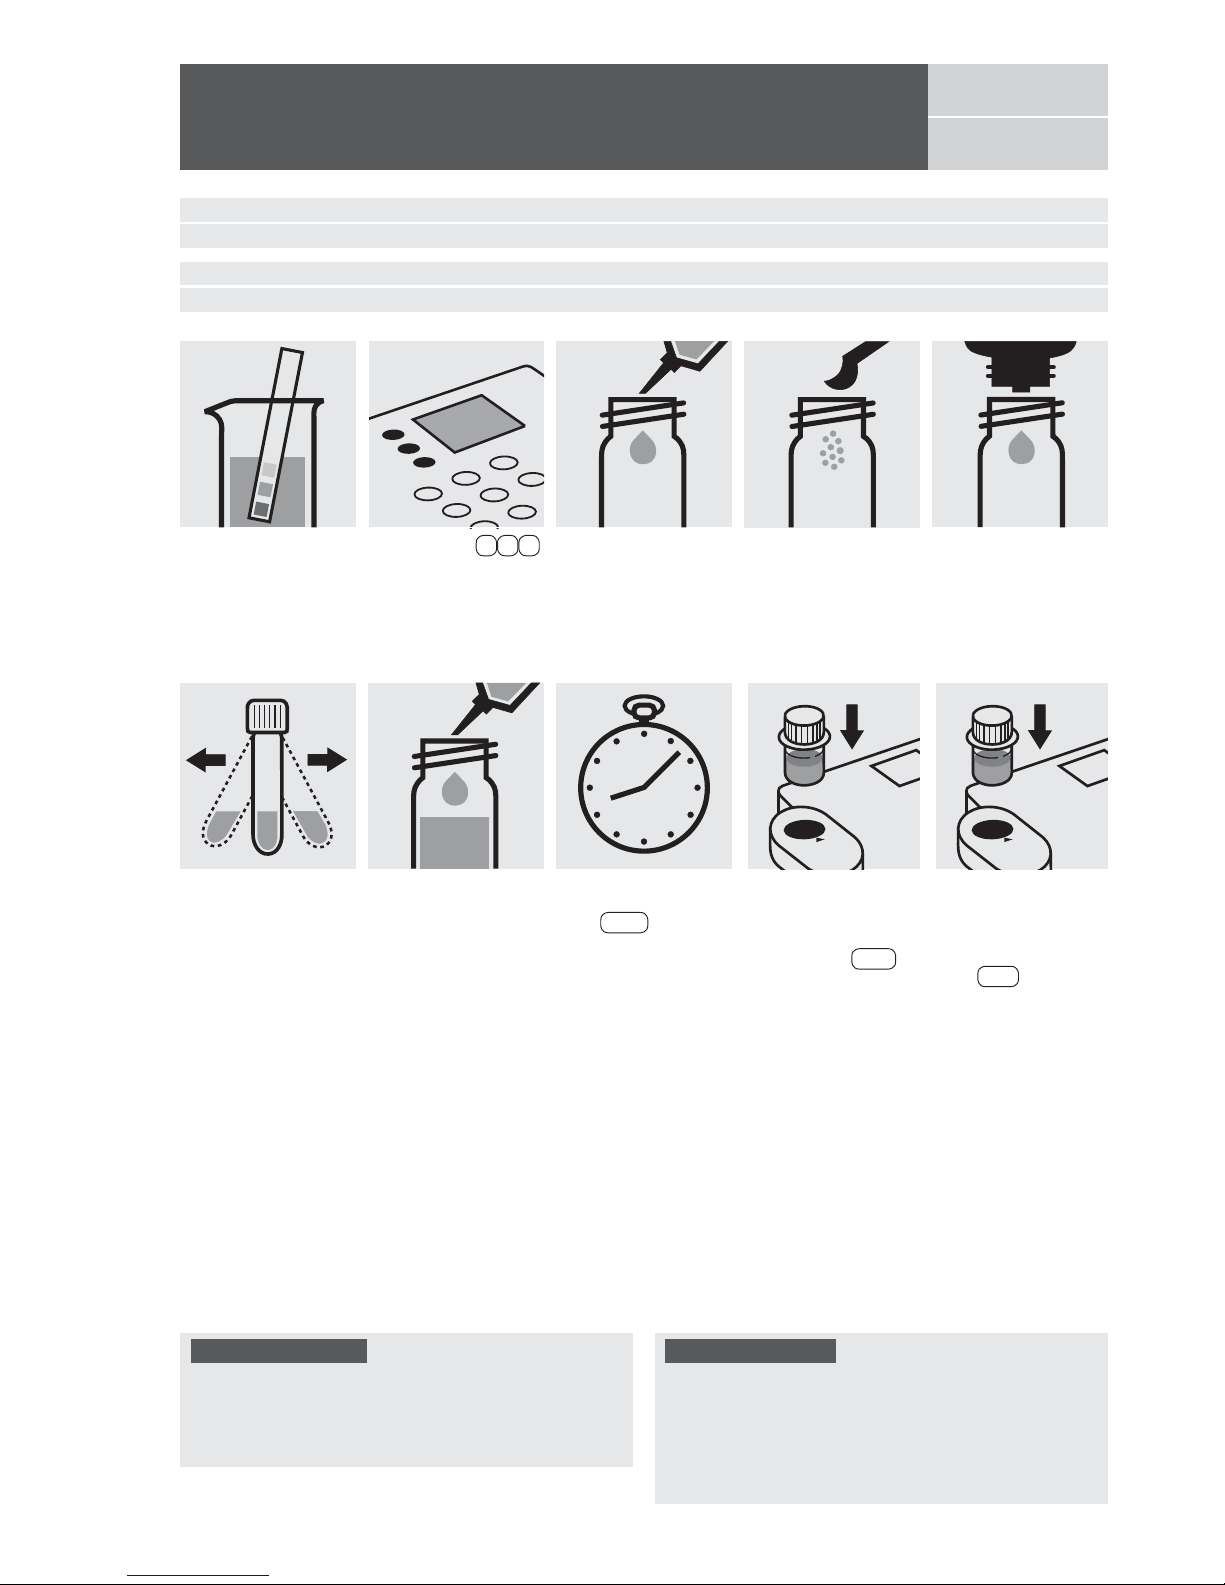
Release 08/2014 - Spectroquant® Multy
114758
Test
Shake the cell vigorously to dissolve the solid
substance.
Quality assurance:
To check the measurement system (test reagents, measurement device, and handling) ready-f
or-use chromate
standard solution Certipur
®
, Cat.No. 119780, concen-
tration 1000 mg/l CrO
4
2–
, can be used after diluting
accordingly.
The measurement results are expressed in µg/l.
Add 10 ml of the sample
with pipette
, close with
the screw cap, and mix.
Place 2 level grey microspoons of Cr-1 into a dry
24-mm cell.
Add 12 drops of Cr-2,
close with the screw cap.
Chromate
Determination of chromium(VI)
Important:
For the determination of total chromium = sum of
c
hromium(VI) and chromium(III) a pretreatment
with Crack Set 10C, Cat.No. 114688, or Crack Set 10,
Cat.No. 114687 and thermoreactor is necessary.
Measuring range: 10 –1400 µg/l Cr 24-mm cell
22 –3123 µg/l CrO
4
24-mm cell
Attention: In contrast to the instructions given in the package insert the sample volume as well as the reagent volume
must be doubled.
Fill approx. 10 ml of
distilled water into a
24-mm cell (do not add
any reagents!), close
with the screw cap
.
(Blank cell)
Select method 1 5 1 .
Insert the cell containing
the sample into the cell
compartment. Align the
mark on the cell with
that on the photometer.
Press Test .
Reaction time:
1 minute
Press Enter to start
the countdown.
Check the pH of the
sample, specified range
:
pH 1 – 9.
If required, add dilute
sodium hydroxide
solution or sulfuric acid
drop by drop to adjust
the pH.
Insert the blank cell into
the cell compartment.
Align the mark on the
cell with that on the photometer. Press Zero .
Page 96
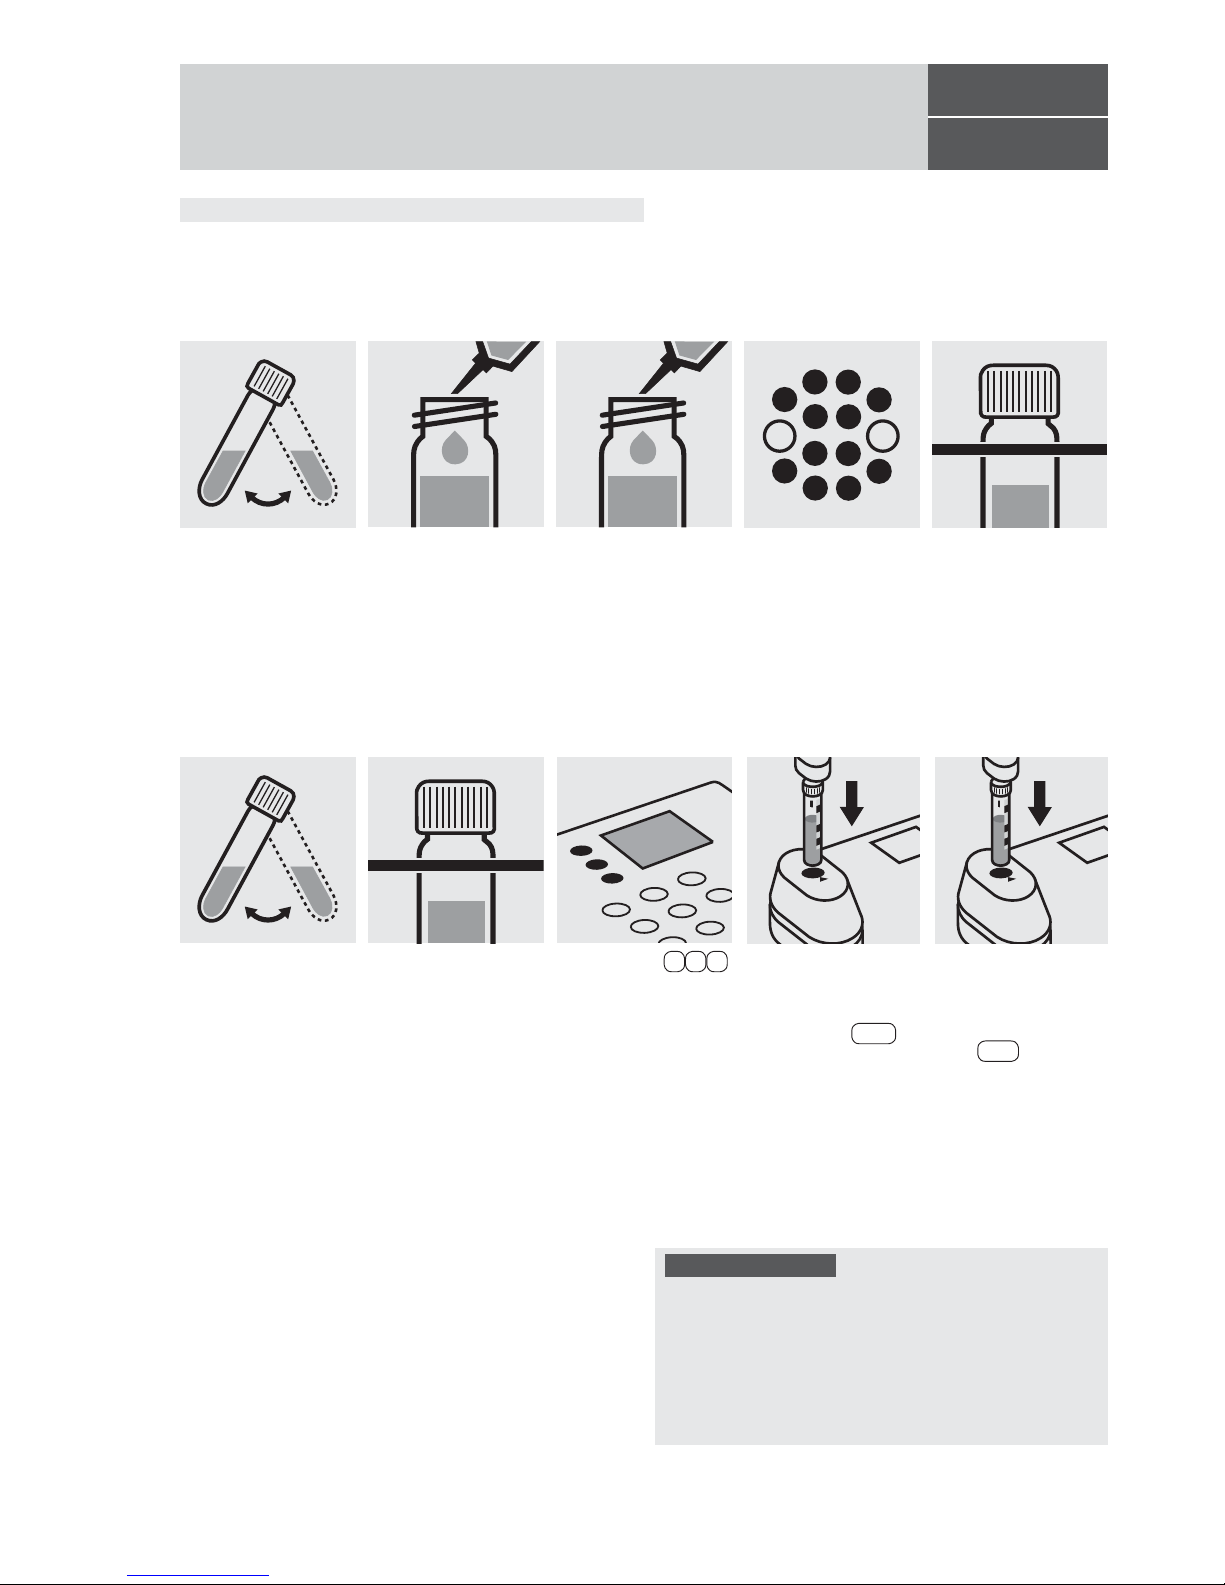
Release 08/2014 - Spectroquant® Multy
101796
Cell Test
COD
Chemical Oxygen Demand
Quality assurance:
To check the measurement system (test reagents, measurement device, and handling) w
e recommended to use
Spectroquant
®
CombiCheck 50, Cat.No. 114695, or the
Standard solution for photometric applications, CRM,
Cat.No. 125028.
To check for sample-dependent effects the use of addition
solutions (e.g. in CombiCheck 50) is highly recommended.
Measuring range: 5.0–80.0 mg/l COD or O2 16-mm cell
Select method 1 6 8 . Insert the cell containing
the sample into the cell
compartment. Align the
mark on the cell with
that on the photometer.
Press Test .
Carefully pipette 2.0 ml
of the sample into a
reaction cell, close tightly with the screw cap,
and mix vigorously.
Caution, the cell
becomes very hot!
Suspend the bottom
sediment in two cells by
swirling.
Heat both cells in the
thermoreactor at 148°C
for 2 hours.
Remove both cells from
the thermoreactor and
place in a test-tube rack
to cool.
Swirl both cells after
10 minutes.
Replace both cells in the
rack for complete cooling to room temperature.
(Very important!)
Insert the blank cell into
the cell compartment.
Align the mark on the
cell with that on the photometer. Press Zero .
Carefully pipette 2.0 ml
of distilled water (Water
for chromatography
LiChrosolv
®
, Cat.No.
115333, is recommended) into a second reaction cell, close tightly with
the screw cap, and mix
vigorously.
Caution, the cell
becomes very hot!
(Blank cell)
Page 97
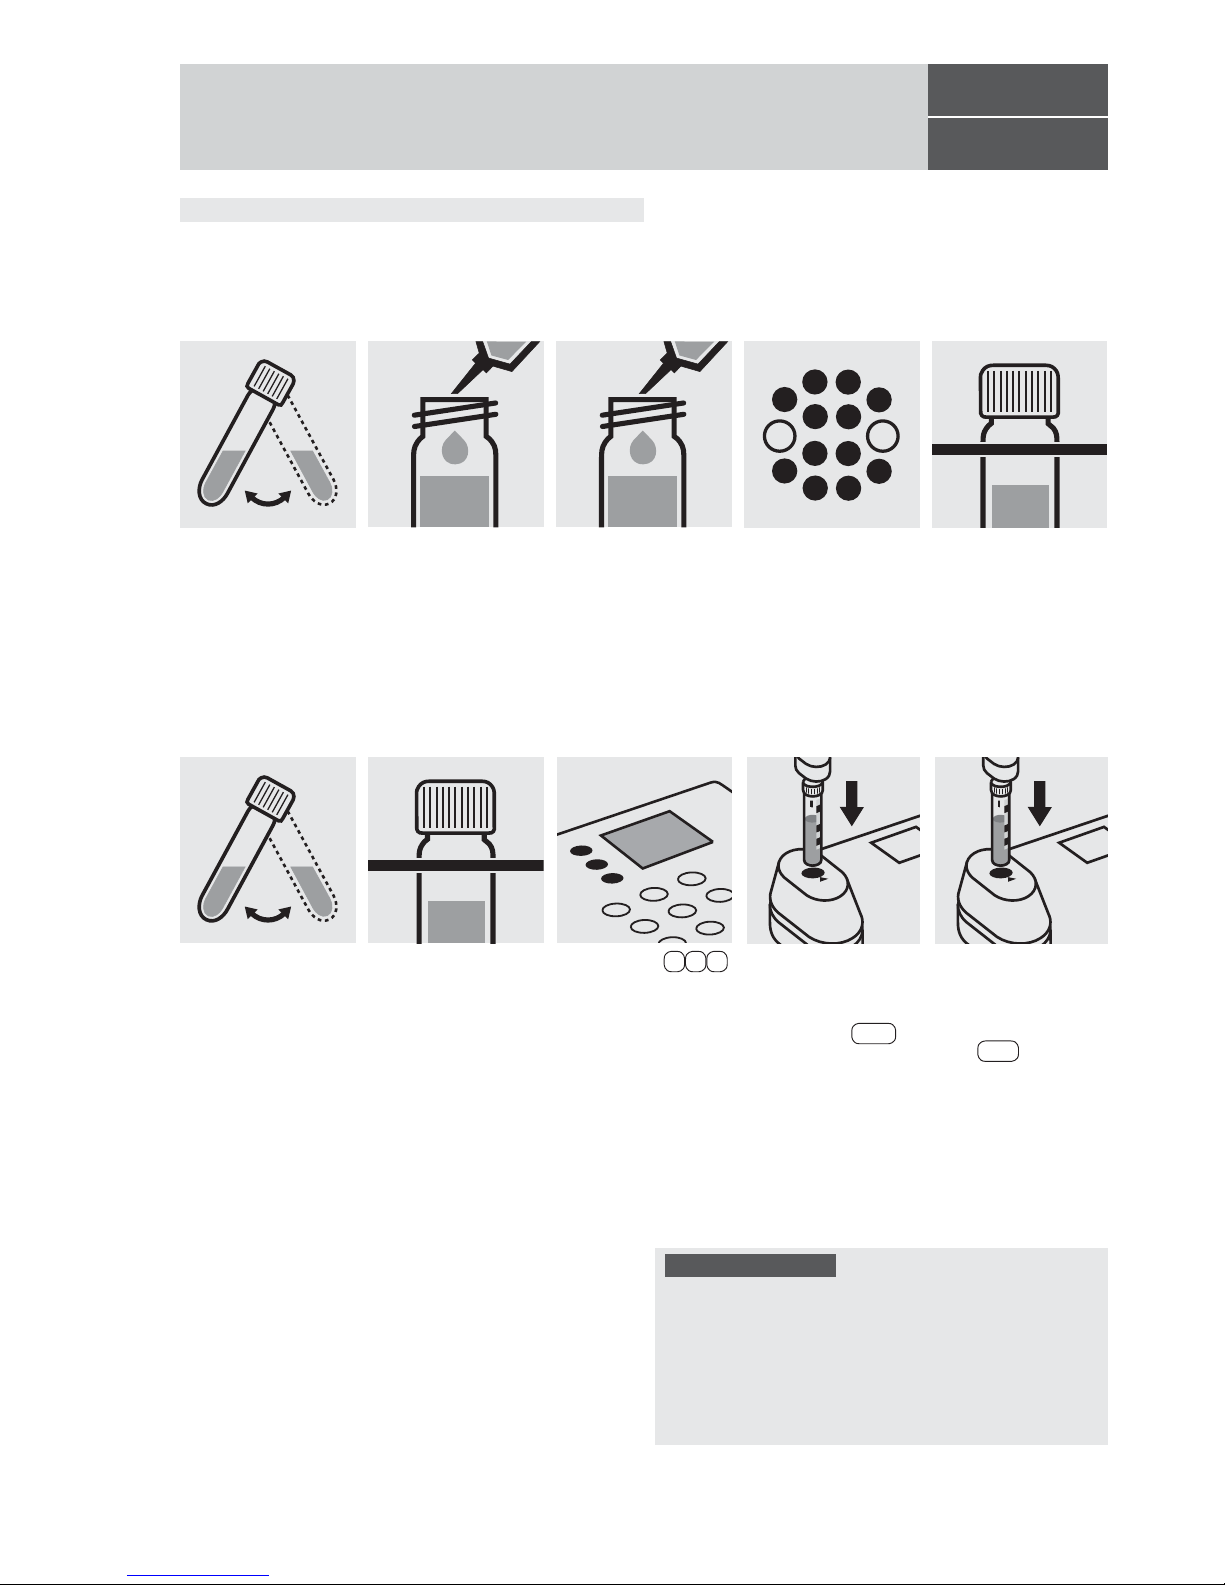
Release 08/2014 - Spectroquant® Multy
114540
Cell Test
COD
Chemical Oxygen Demand
Quality assurance:
To check the measurement system (test reagents, measurement device, and handling) w
e recommended to use
Spectroquant
®
CombiCheck 10, Cat.No. 114676, or the
Standard solution for photometric applications, CRM,
Cat.No. 125029.
To check for sample-dependent effects the use of addition
solutions (e.g. in CombiCheck 10) is highly recommended.
Measuring range: 10–150 mg/l COD or O2 16-mm cell
Select method 1 6 0 . Insert the cell containing
the sample into the cell
compartment. Align the
mark on the cell with
that on the photometer.
Press Test .
Carefully pipette 3.0 ml
of the sample into a
reaction cell, close tightly with the screw cap,
and mix vigorously.
Caution, the cell
becomes very hot!
Suspend the bottom
sediment in two cells by
swirling.
Heat both cells in the
thermoreactor at 148°C
for 2 hours.
Remove both cells from
the thermoreactor and
place in a test-tube rack
to cool.
Swirl both cells after
10 minutes.
Replace both cells in the
rack for complete cooling to room temperature.
(Very important!)
Insert the blank cell into
the cell compartment.
Align the mark on the
cell with that on the photometer. Press Zero .
Carefully pipette 3.0 ml
of distilled water (Water
for chromatography
LiChrosolv
®
, Cat.No.
115333, is recommended) into a second reaction cell, close tightly with
the screw cap, and mix
vigorously.
Caution, the cell
becomes very hot!
(Blank cell)
Page 98
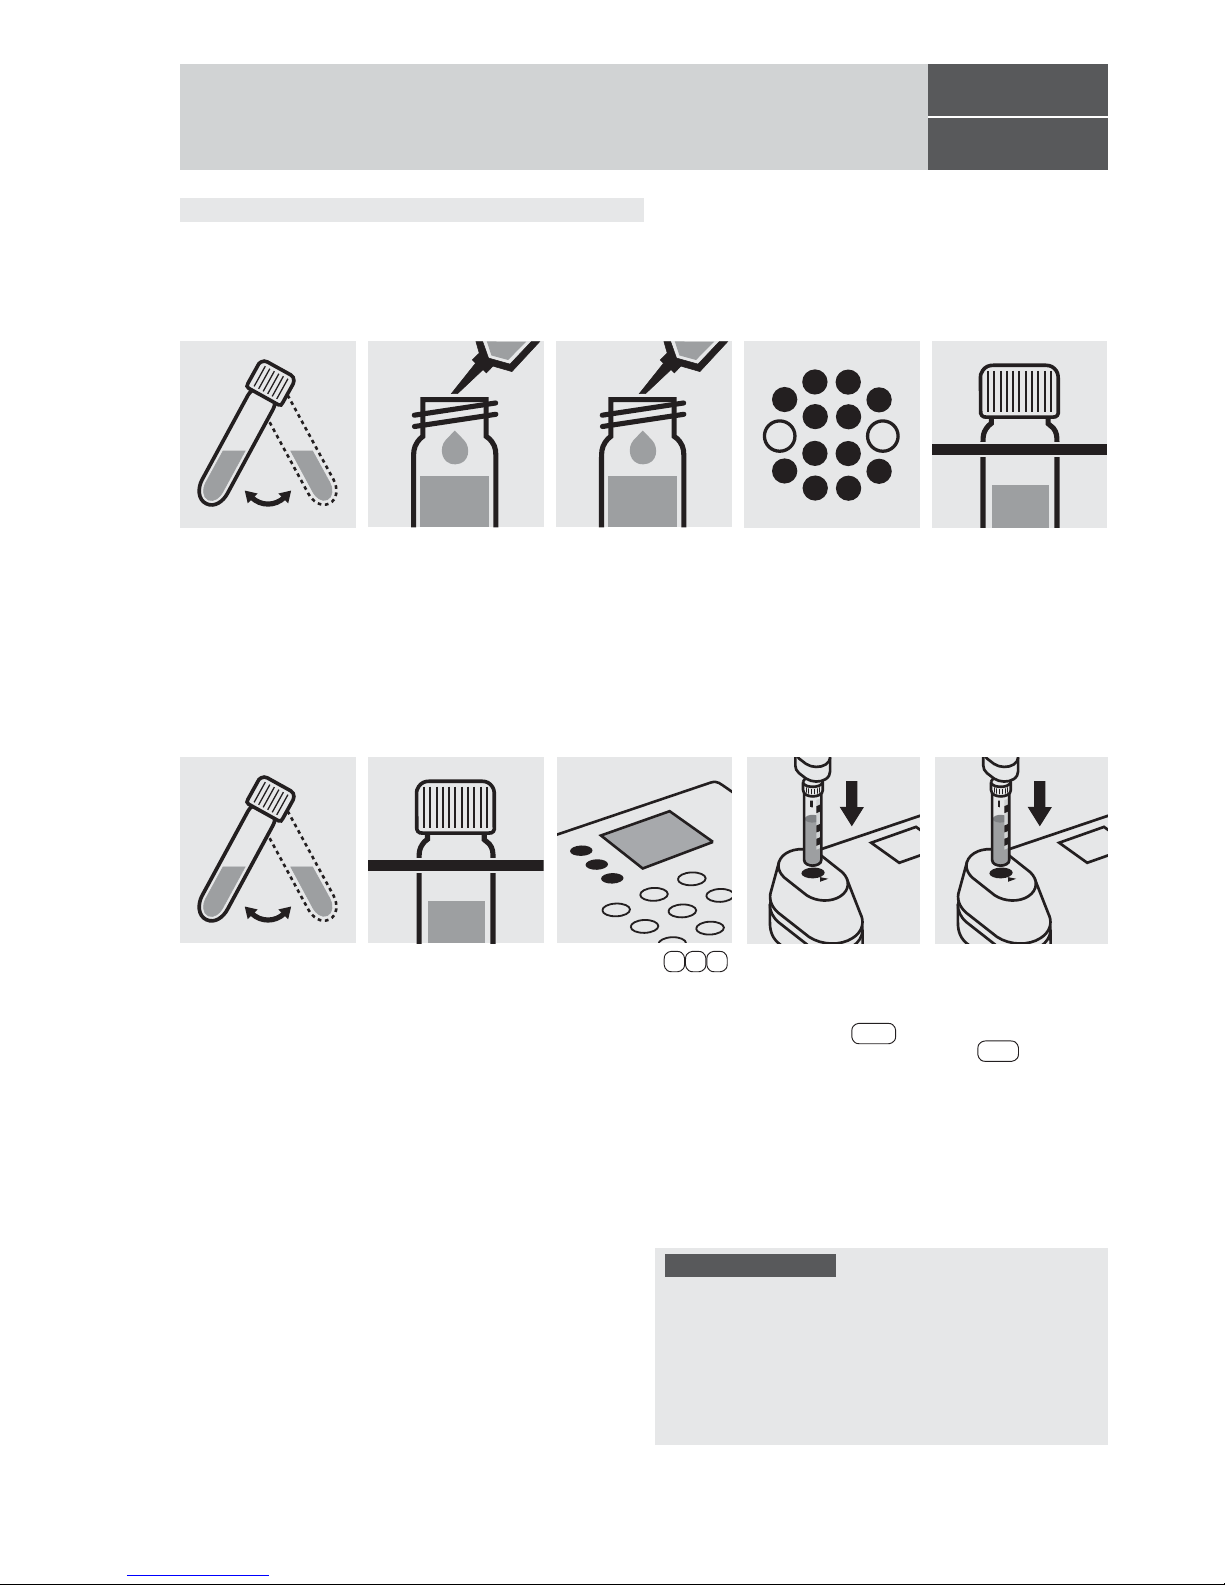
114895
Cell Test
COD
Chemical Oxygen Demand
Quality assurance:
To check the measurement system (test reagents, measurement device, and handling) w
e recommended to use
Spectroquant
®
CombiCheck 60, Cat.No. 114696, or the
Standard solution for photometric applications, CRM,
Cat.No. 125029 and 125030.
To check for sample-dependent effects the use of addition
solutions (e.g. in CombiCheck 60) is highly recommended.
Measuring range: 15–300 mg/l COD or O2 16-mm cell
Select method 1 6 1 . Insert the cell containing
the sample into the cell
compartment. Align the
mark on the cell with
that on the photometer.
Press Test .
Carefully pipette 2.0 ml
of the sample into a
reaction cell, close tightly with the screw cap,
and mix vigorously.
Caution, the cell
becomes very hot!
Suspend the bottom
sediment in two cells by
swirling.
Heat both cells in the
thermoreactor at 148°C
for 2 hours.
Remove both cells from
the thermoreactor and
place in a test-tube rack
to cool.
Swirl both cells after
10 minutes.
Replace both cells in the
rack for complete cooling to room temperature.
(Very important!)
Insert the blank cell into
the cell compartment.
Align the mark on the
cell with that on the photometer. Press Zero .
Carefully pipette 2.0 ml
of distilled water (Water
for chromatography
LiChrosolv
®
, Cat.No.
115333, is recommended) into a second reaction cell, close tightly with
the screw cap, and mix
vigorously.
Caution, the cell
becomes very hot!
(Blank cell)
Release 08/2014 - Spectroquant
®
Multy
Page 99
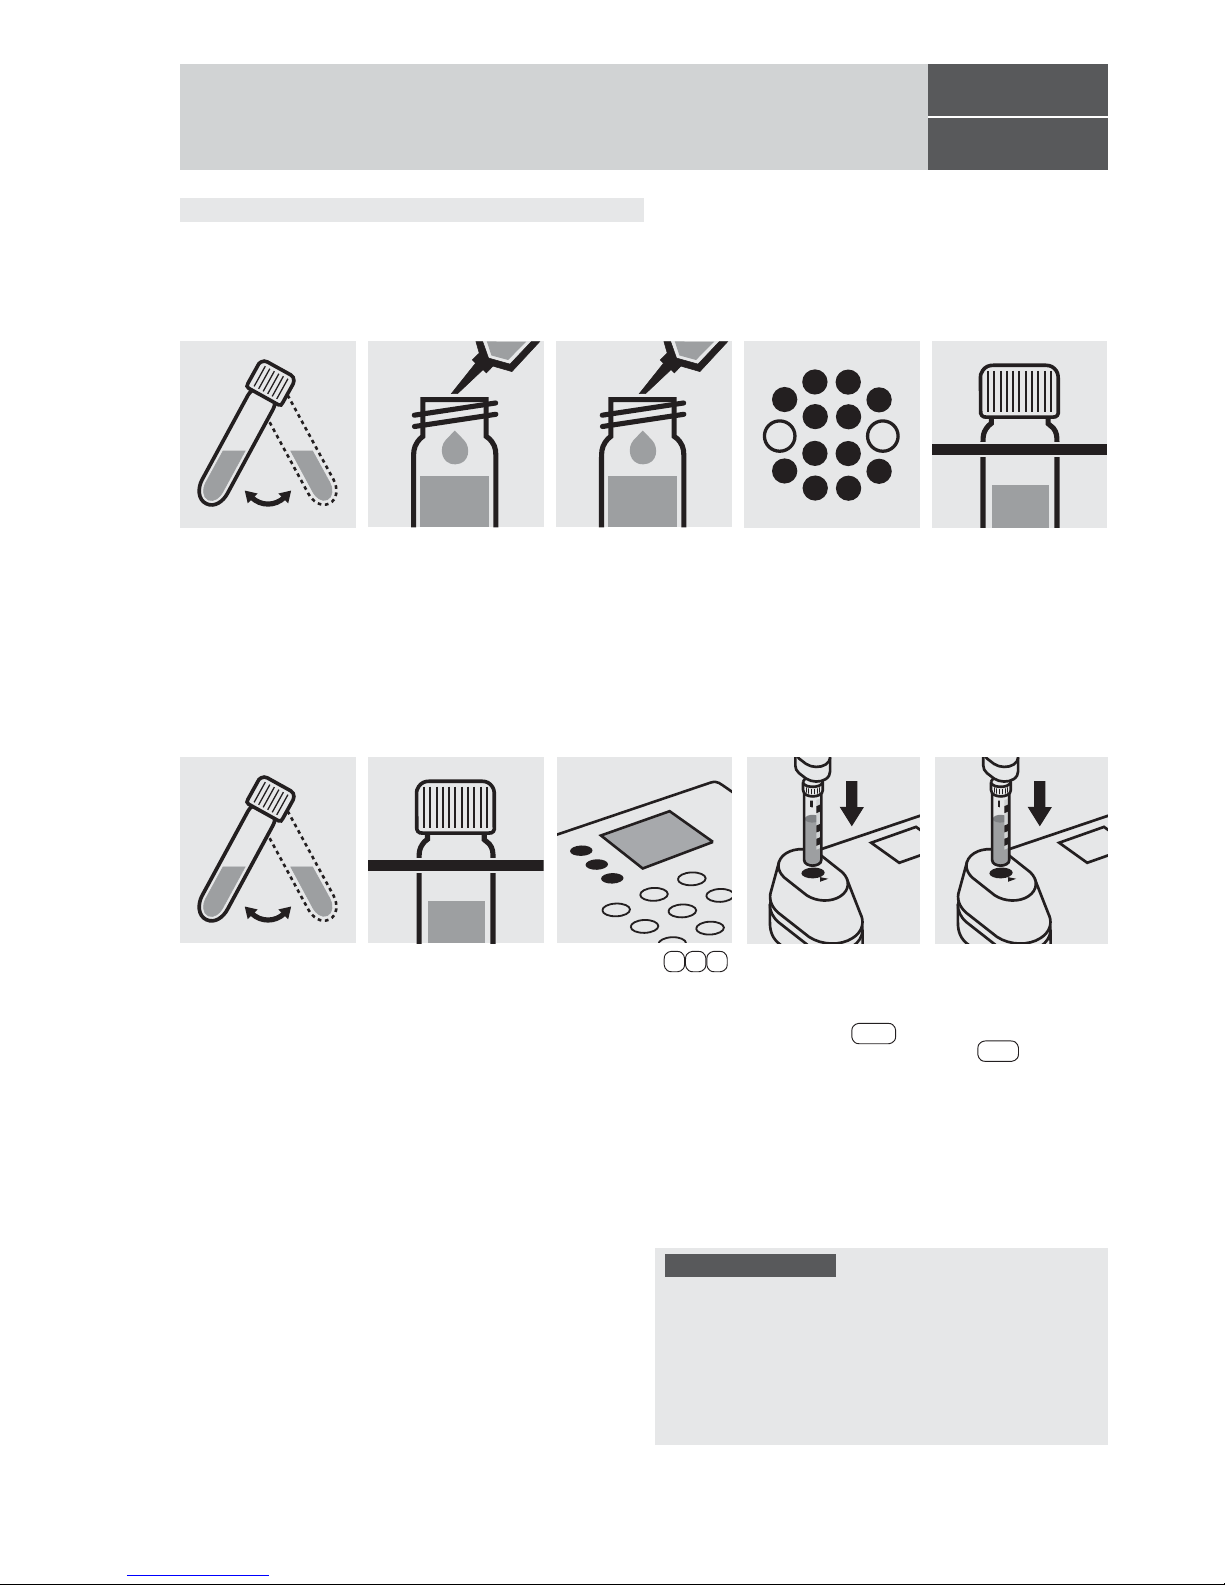
114690
Cell Test
COD
Chemical Oxygen Demand
Quality assurance:
To check the measurement system (test reagents, measurement device, and handling) w
e recommended to use
Spectroquant
®
CombiCheck 60, Cat.No. 114696, or the
Standard solution for photometric applications, CRM,
Cat.No. 125029, 125030, and 125031.
To check for sample-dependent effects the use of addition
solutions (e.g. in CombiCheck 60) is highly recommended.
Measuring range: 50–500 mg/l COD or O2 16-mm cell
Select method 1 6 2 . Insert the cell containing
the sample into the cell
compartment. Align the
mark on the cell with
that on the photometer.
Press Test .
Carefully pipette 2.0 ml
of the sample into a
reaction cell, close tightly with the screw cap,
and mix vigorously.
Caution, the cell
becomes very hot!
Suspend the bottom
sediment in two cells by
swirling.
Heat both cells in the
thermoreactor at 148°C
for 2 hours.
Remove both cells from
the thermoreactor and
place in a test-tube rack
to cool.
Swirl both cells after
10 minutes.
Replace both cells in the
rack for complete cooling to room temperature.
(Very important!)
Insert the blank cell into
the cell compartment.
Align the mark on the
cell with that on the photometer. Press Zero .
Carefully pipette 2.0 ml
of distilled water (Water
for chromatography
LiChrosolv
®
, Cat.No.
115333, is recommended) into a second reaction cell, close tightly with
the screw cap, and mix
vigorously.
Caution, the cell
becomes very hot!
(Blank cell)
Release 08/2014 - Spectroquant
®
Multy
Page 100
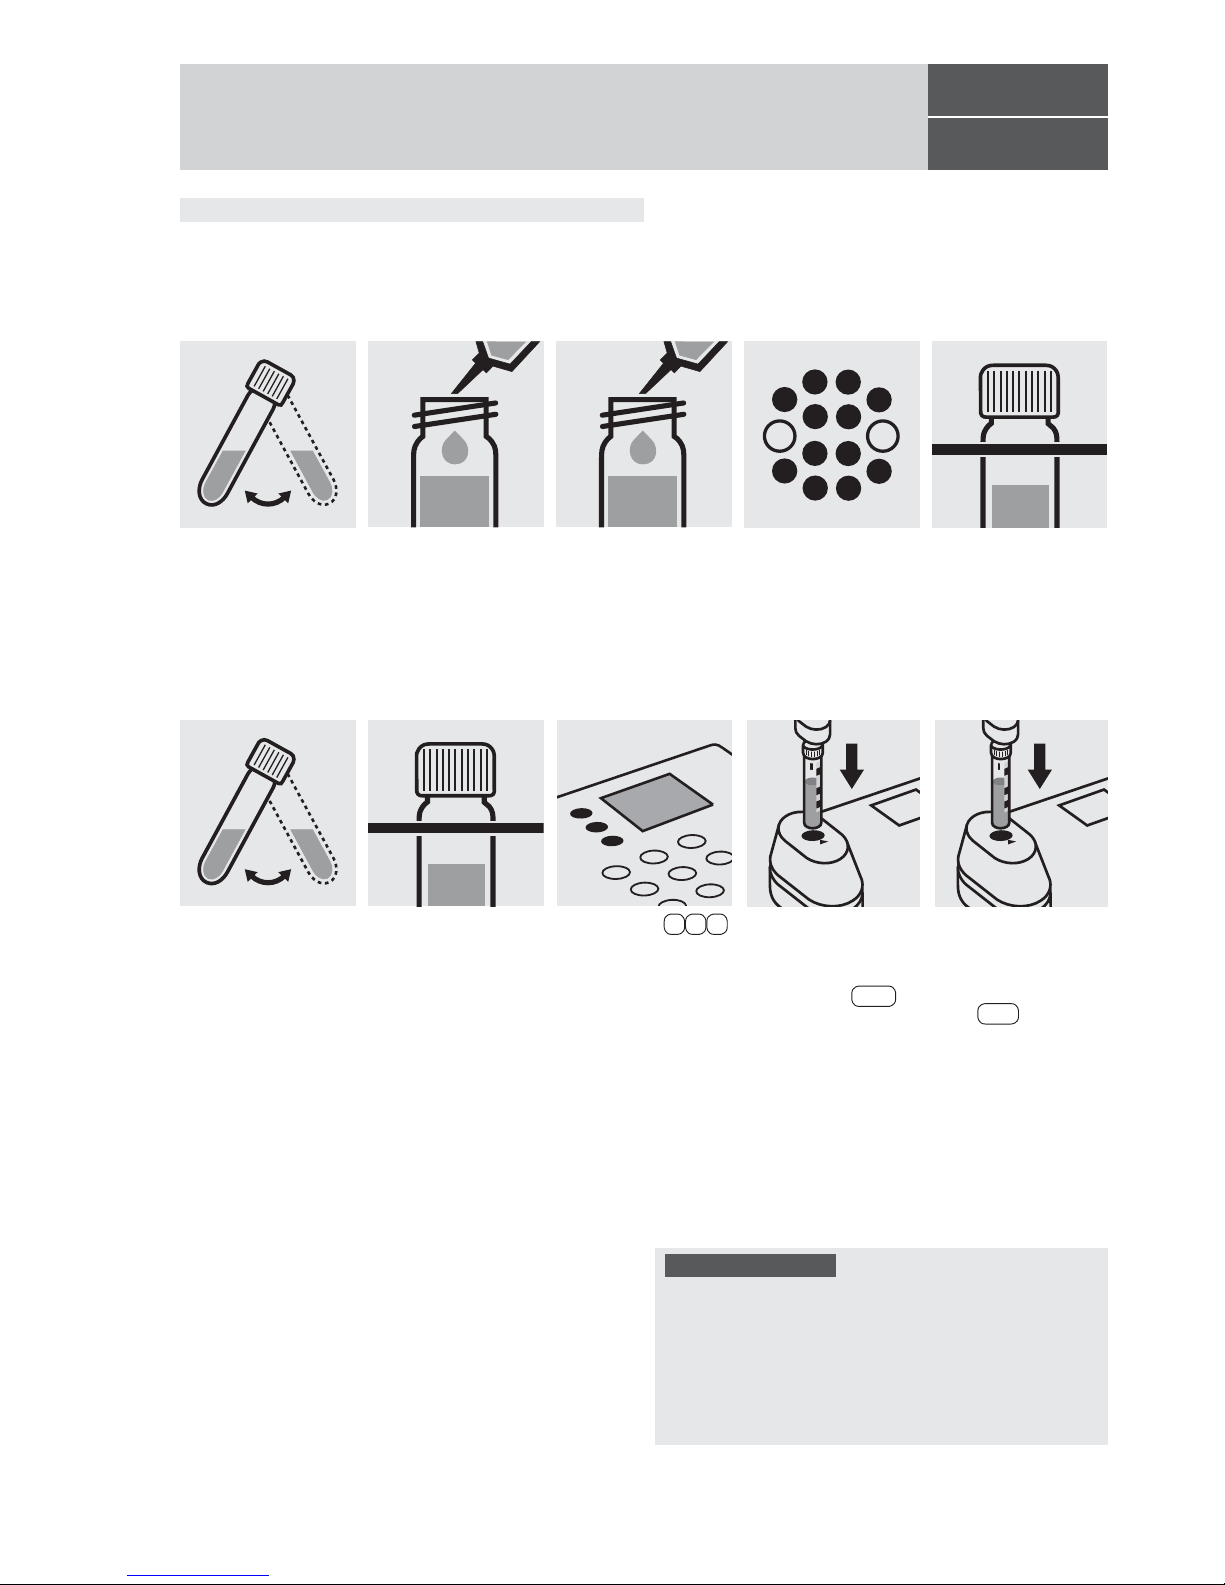
114541
Cell Test
COD
Chemical Oxygen Demand
Quality assurance:
To check the measurement system (test reagents, measurement device, and handling) w
e recommended to use
Spectroquant
®
CombiCheck 20, Cat.No. 114675, or the
Standard solution for photometric applications, CRM,
Cat.No. 125029, 125030, 125031, and 125032.
To check for sample-dependent effects the use of addition
solutions (e.g. in CombiCheck 20) is highly recommended.
Measuring range: 25–1500 mg/l COD or O2 16-mm cell
Carefully pipette 3.0 ml
of distilled water into a
second reaction cell,
close tightly with the
screw cap, and mix vigorously.
Caution, the cell
becomes very hot!
(Blank cell)
Select method 1 6 3 .
Insert the cell containing
the sample into the cell
compartment. Align the
mark on the cell with
that on the photometer.
Press Test .
Carefully pipette 3.0 ml
of the sample into a
reaction cell, close tightly with the screw cap,
and mix vigorously.
Caution, the cell
becomes very hot!
Suspend the bottom
sediment in two cells by
swirling.
Heat both cells in the
thermoreactor at 148°C
for 2 hours.
Remove both cells from
the thermoreactor and
place in a test-tube rack
to cool.
Swirl both cells after
10 minutes.
Replace both cells in the
rack for complete cooling to room temperature.
(Very important!)
Insert the blank cell into
the cell compartment.
Align the mark on the
cell with that on the photometer. Press Zero .
Release 08/2014 - Spectroquant® Multy
 Loading...