

Page 1
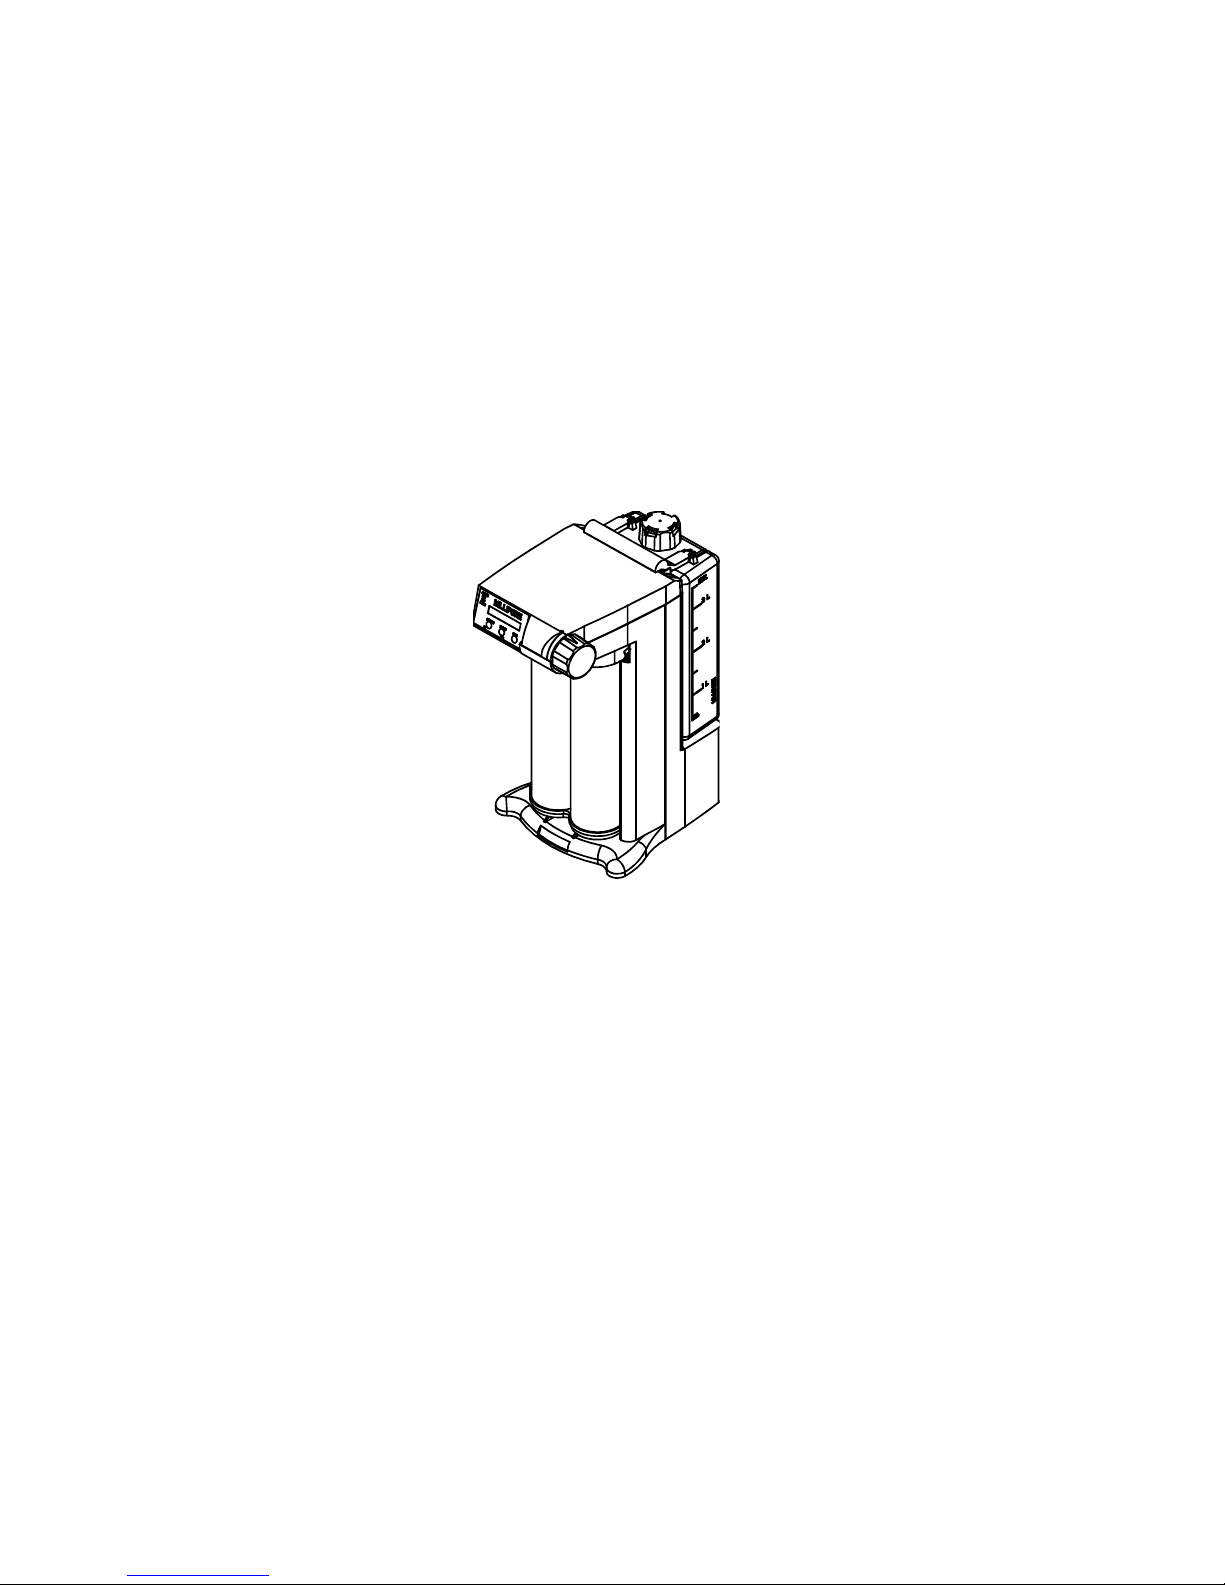
MILLIPORE
Page 1/36
Operating and
Maintenance Manual
™
Simplicity
Water Purification System
MILLIPORE
Page 1/36
Page 2

Page 2/36
NOTICE ___________________________________________
Information in this document is subject to change without notice and should not be construed as a
commitment by Millipore Corporation. Millipore Corporation assumes no responsibility for any errors that may appear in this document. This manual is believed to be complete and accurate at the
time of publication. In no event shall Millipore Corporation be liable for incidental or consequential
damages in connection with or arising from the use of this manual.
Copyright © 2004, all rights reserved, Millipore Corporation.
User manual: PF06022 (Rev. 1 - 05/04)
Manufacturer : MILLIPORE S.A.S., 67120 MOLSHEIM, FRANCE
Trademarks
Millipore is a registered trademark of Millipore Corporation or an affiliated company.
Simplicity, Elix, SimPak and SimFilter are trademarks of Millipore Corporation.
All other trademarks are trademarks of their respective manufacturer.
Congratulations on your purchase of the Simplicity Ultrapure Water System. This system has been
manufactured using state-of-the-art technologies and the highest quality components to insure years
of reliable performance. The system has been designed to be extremely easy-to-use and maintain.
This manual contains important safety information so we urge you to please read it thoroughly
before using the system. If you should have any questions or comments on this system, please
contact your local Millipore representative or visit our web site at http://www.millipore.com.
Page 2/36
NOTICE ___________________________________________
Page 3
Page 3/36
___________________________ DECLARATION OF CONFORMITY
DECLARATION OF CONFORMITY
EUROPEAN UNION EC DIRECTIVES
Directive 89/336/CEE
Directive 73/23/CEE
◆ These Lab Water Systems are designed and manufactured in application of the following
European Council directives :
– 89/336/CEE relating to Electromagnetic compatibility
– 73/23/CEE relating to electrical equipment designed for use within certain voltage
limits
◆ Standards to which conformity is declared as applicable are the following :
– EN 55022-1 : 1992
– EN 50082-1 : 1994
– EN 61010-1 : 1993 /A2 : 1995
___________________________ DECLARATION OF CONFORMITY
Page 3/36
Page 4

Cleaning ........................................................................................................... 16
System maintenance messages ............................................................................ 16
Page 4/36
TABLE OF CONTENTS _____________________________________
GETTING STARTED
HOW TO USE THIS MANUAL ............................................................... 6
Warnings ............................................................................................................ 6
Illustrations .......................................................................................................... 6
INTRODUCTION .................................................................................. 7
General Information ............................................................................................. 7
System performance ........................................................................................ 8
Environmental Conditions ................................................................................. 9
Electrical Operating Conditions ........................................................................ 9
Composition of materials in contact with water .................................................. 9
Dimensions and weight .................................................................................. 10
Safety information ......................................................................................... 10
INSTALLATION .................................................................................. 11
Unpacking ........................................................................................................ 11
Selecting a site for the Simplicity system ............................................................... 11
Filling the Integral Reservoir ................................................................................ 12
Installing the Reservoir Vent Filter ........................................................................ 12
Installating the purification Pack .......................................................................... 12
Electrical connection .......................................................................................... 13
Language Selection ............................................................................................ 13
Purging the Pak ................................................................................................. 14
Installing the SimFilter ........................................................................................ 14
STANDARD OPERATING OF THE SIMPLICITY ....................................... 15
Maintaining a minimum level of water in the reservoir .......................................... 15
Standard displayed messages ............................................................................. 15
Cleaning ........................................................................................................... 16
System maintenance messages ............................................................................ 16
Page 4/36
TABLE OF CONTENTS _____________________________________
GETTING STARTED
Page 5

Page 5/36
_____________________________________ TABLE OF CONTENTS
MORE ABOUT SIMPLICITY
USE OF THE KEYPAD ......................................................................... 17
Standard menu .................................................................................................. 17
Consumable lifetime ........................................................................................... 18
Choosing the non-temperature compensated resistivity display .............................. 19
Selecting the unit of measure .............................................................................. 20
Setting the displayed language ........................................................................... 21
UV lamp reset (Only for Simplicity 185) .............................................................. 21
MAINTENANCE ................................................................................. 22
Replacing the consumables ................................................................................. 22
Replacing the UV lamp (Only for Simplicity 185) ................................................. 23
UV Lamp replacement .................................................................................... 23
UV lamp reset ............................................................................................... 24
Shutting down the system for an extended period of time ...................................... 25
TROUBLESHOOTING ......................................................................... 26
Troubleshooting table ......................................................................................... 26
ORDERING INFORMATION ................................................................ 28
Millipore’s Standard Warranty ............................................................................ 29
ILLUSTRATIONS ................................................................................. 30
At the back of the document: ILLUSTRATIONS and TECHNICAL ASSISTANCE
_____________________________________ TABLE OF CONTENTS
MORE ABOUT SIMPLICITY
Page 5/36
Page 6

Page 6/36
HOW TO USE THIS MANUAL ______________________________
This manual describes how to install, maintain and use the Simplicity.
It is recommended that this document is completely read before
plugging in the unit to a source of electrical power. The system is easy
to use and to maintain. However, it is wise to be familiar with all its
functions as described in this manual.
Warnings _______________________________________________
Warning and Attention symbols will be placed near text when
important information is present.
: Attention (Important Details)
: Refer to Documentation
Illustrations _____________________________________________
Illustrations are referenced in the text and are located in the back
of this manual.
Page 6/36
HOW TO USE THIS MANUAL ______________________________
This manual describes how to install, maintain and use the Simplicity.
Page 7
Dispensing valve button 4
Front panel with Liquid Crystal Display and Keypad 5
Page 7/36
_________________________________________ INTRODUCTION
General Information ______________________________________
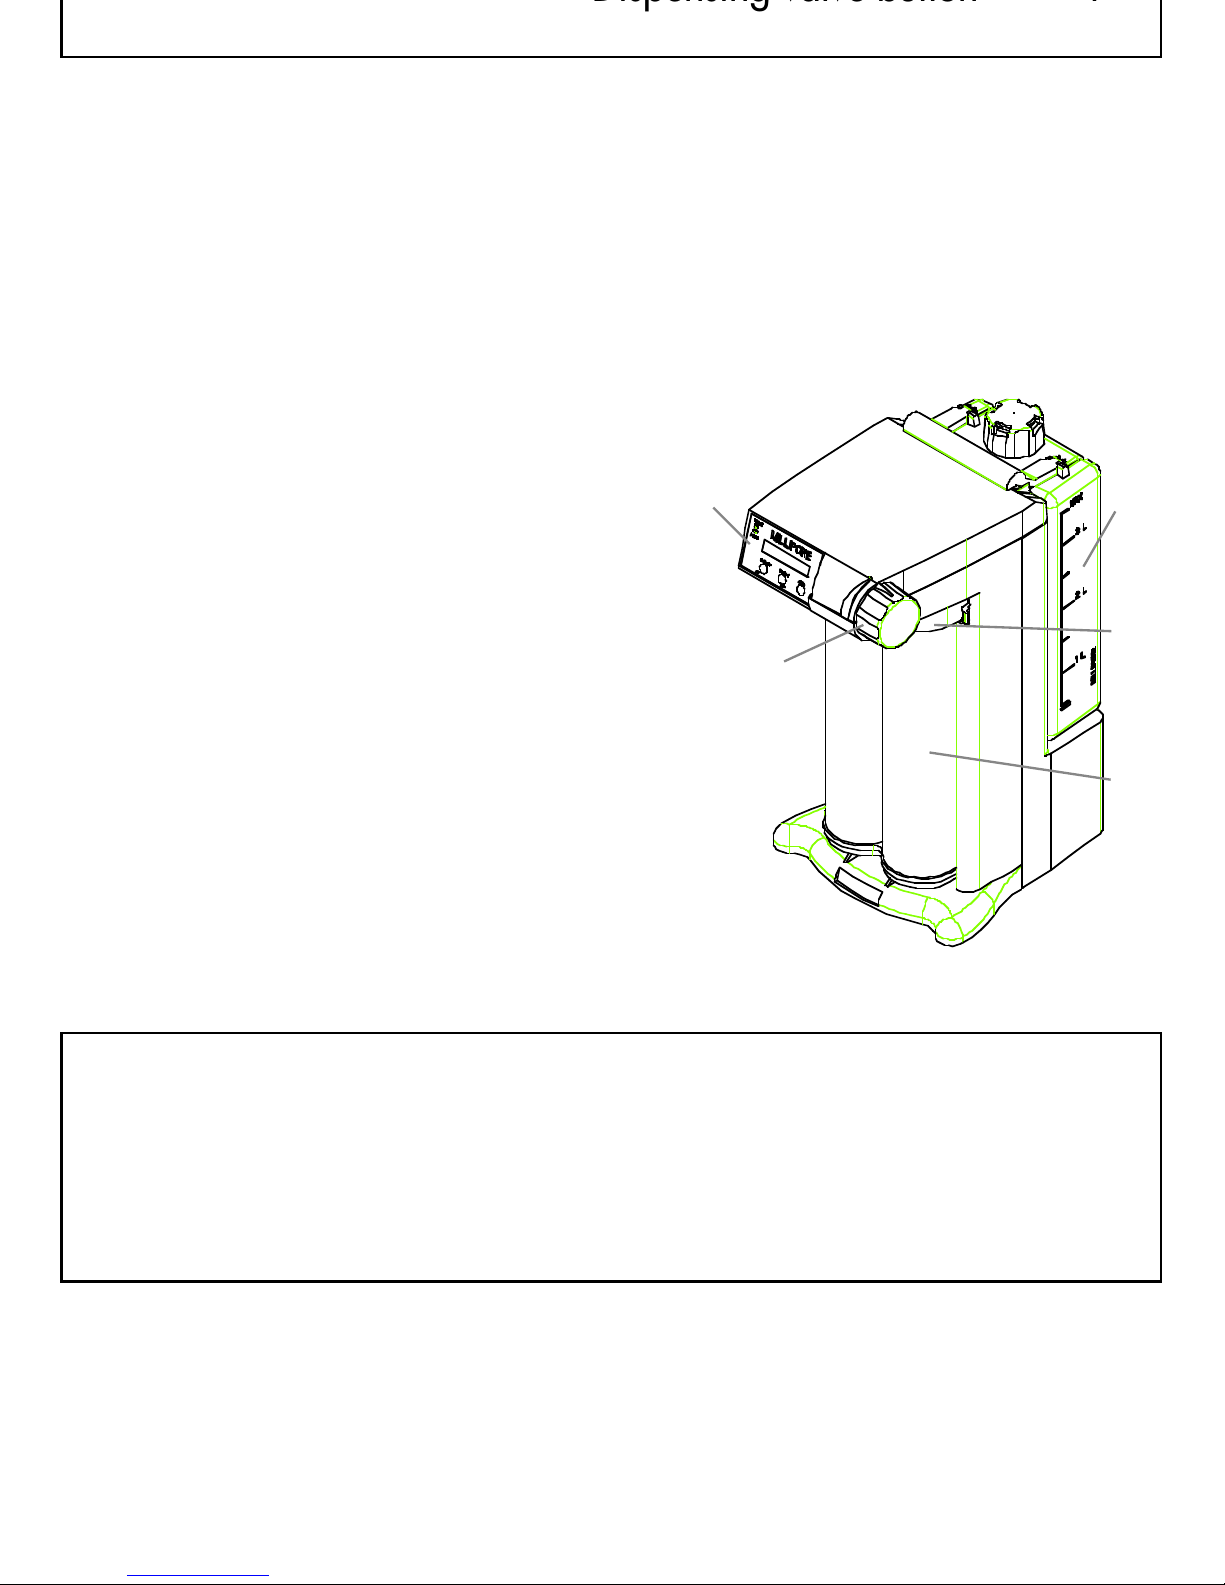
Simplicity is a water purification
system fed through an integrated
vented storage reservoir. The system
5
1
provides the final “polish” to remove
any remaining contaminants in water
pretreated by reverse osmosis,
electrodeionization (Elix), distillation
or deionization.
The Simplicity system is designed to
produce water of Type 1 quality.
This is equal to or better than ASTM,
CAP and NCCLS Type 1 water
quality standards.
SimPak locking handle 2
2
4
3
Reservoir 1
SimPak 3
Dispensing valve button 4
Front panel with Liquid Crystal Display and Keypad 5
Page 7/36
_________________________________________ INTRODUCTION
General Information ______________________________________
Page 8

Page 8/36
INTRODUCTION _________________________________________
System performance
Purified water quality
Simplicity Simplicity 185
Resistivity 18.2 MΩ-cm at 25 °C 18.2 MΩ-cm at 25 °C
TOC* 15 ppb 5 ppb
Micro-organisms ≤ 1 cfu/ml ≤ 1 cfu/ml
Particles (0.22 µm) < 1 / ml < 1 / ml
Flowrates
Typical product water flowrate Up to 0.5 L/mn 0.5 L/mn
Sound level 48 dB A at 1 metre 48 dB A at 1 metre
* Test conditions: System was equipped with a SimPak 1 purification
Pack. The feedwater for the reservoir came from an Elix system.
TOC in the feedwater was < 50 ppb. The quality of the product
water can vary as a function of the quality of the feedwater.
Page 8/36
INTRODUCTION _________________________________________
System performance
Page 9
housing: Ultrapure Quartz, SST
Page 9/36
_________________________________________ INTRODUCTION
Environmental Specifications
Storage temperature -40°C to 70°C at 5% to 80% RH
Operating temperature 5°C to 35°C at 5% to 80% RH
Feed water temperature 5°C to 30°C at 5% to 80% RH
Altitude range 2000 meters
This equipment is designed to be used in installation/overvoltage category II and pollution degree II.
Electrical Operating Conditions
Electrical consumption 30 VA
Electrical voltage 100, 120 VAC +/– 10%, 50/60 HZ +/– 3%
UV lamp lifetime after installation 2 years (700 days)
Main power cord length 2.4 meters / 8.3 feet
Composition of materials
Part Material Part Material
Pack adapter: PE Final Filter: Polycarbonate, Polysulfone
Pack: PP Fitting: PE, PA,
3.5 L reservoir: HDPE Resistivity cell: Stainless steel 316 L
Reservoir adapter: POM
Pump head: PP, Santoprene
UV lamp and O-rings: EPDM
housing: Ultrapure Quartz, SST
®
Three way valve: PP, POM
Tubing: PE
_________________________________________ INTRODUCTION
Environmental Specifications
Page 9/36
Page 10
Page 10/36
INTRODUCTION _________________________________________
Dimensions and weight
Height 460 mm (18.11 inches)
Length 248 mm (9.76 inches)
Depth 345 mm (13.58 inches)
Weight of dry system in his box Simplicity: 5.7 Kg (12.7 lbs)
Simplicity 185: 6.3 Kg (14.0 lbs)
Operating weight with full reservoir Simplicity:10.4 Kg (23.1 lbs)
Simplicity 185: 11.1 Kg (24.6 lbs)
Space required to remove and
install the reservoir. 20 cm around the unit (0.5 inches)
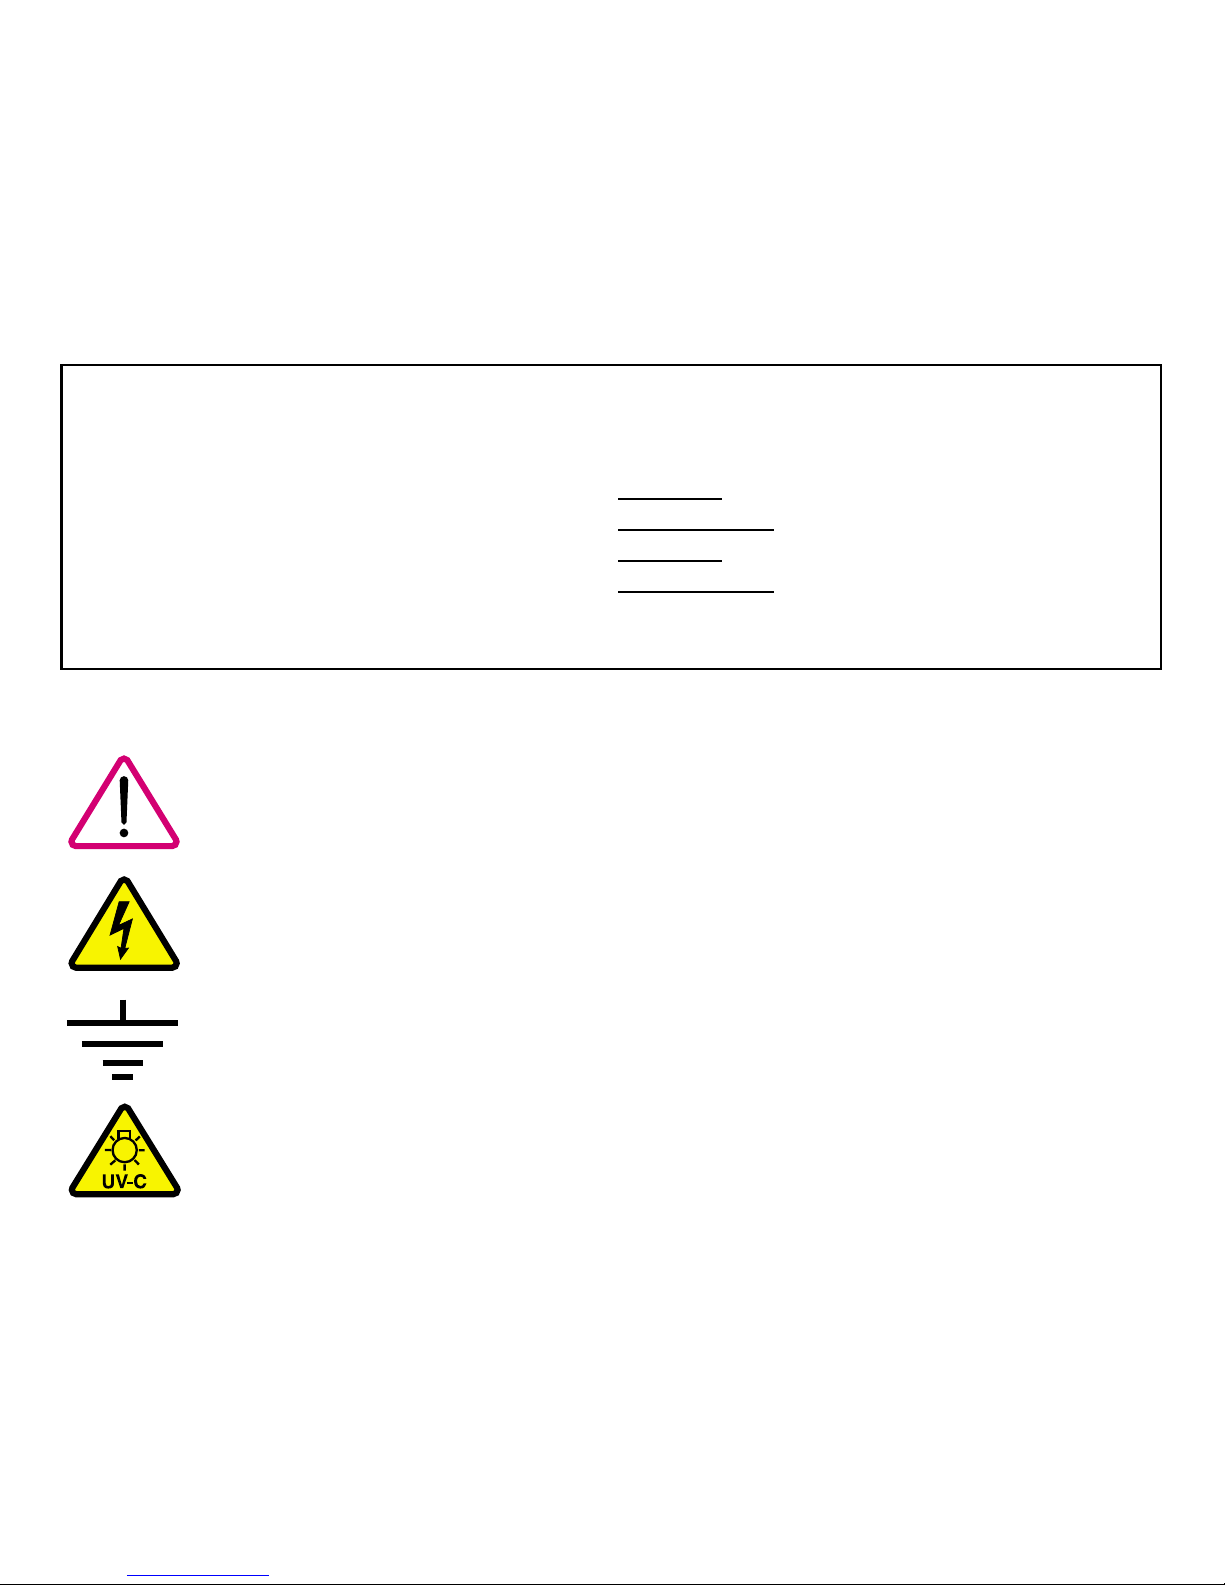
Safety information
: Danger!
: Electrical Danger!
: Ground Connection!
: Danger : UV Radiation!
Page 10/36
INTRODUCTION _________________________________________
Dimensions and weight
Page 11
to the space needed to remove and install the reservoir.
Page 11/36
___________________________________________INSTALLATION
Unpacking ______________________________________________
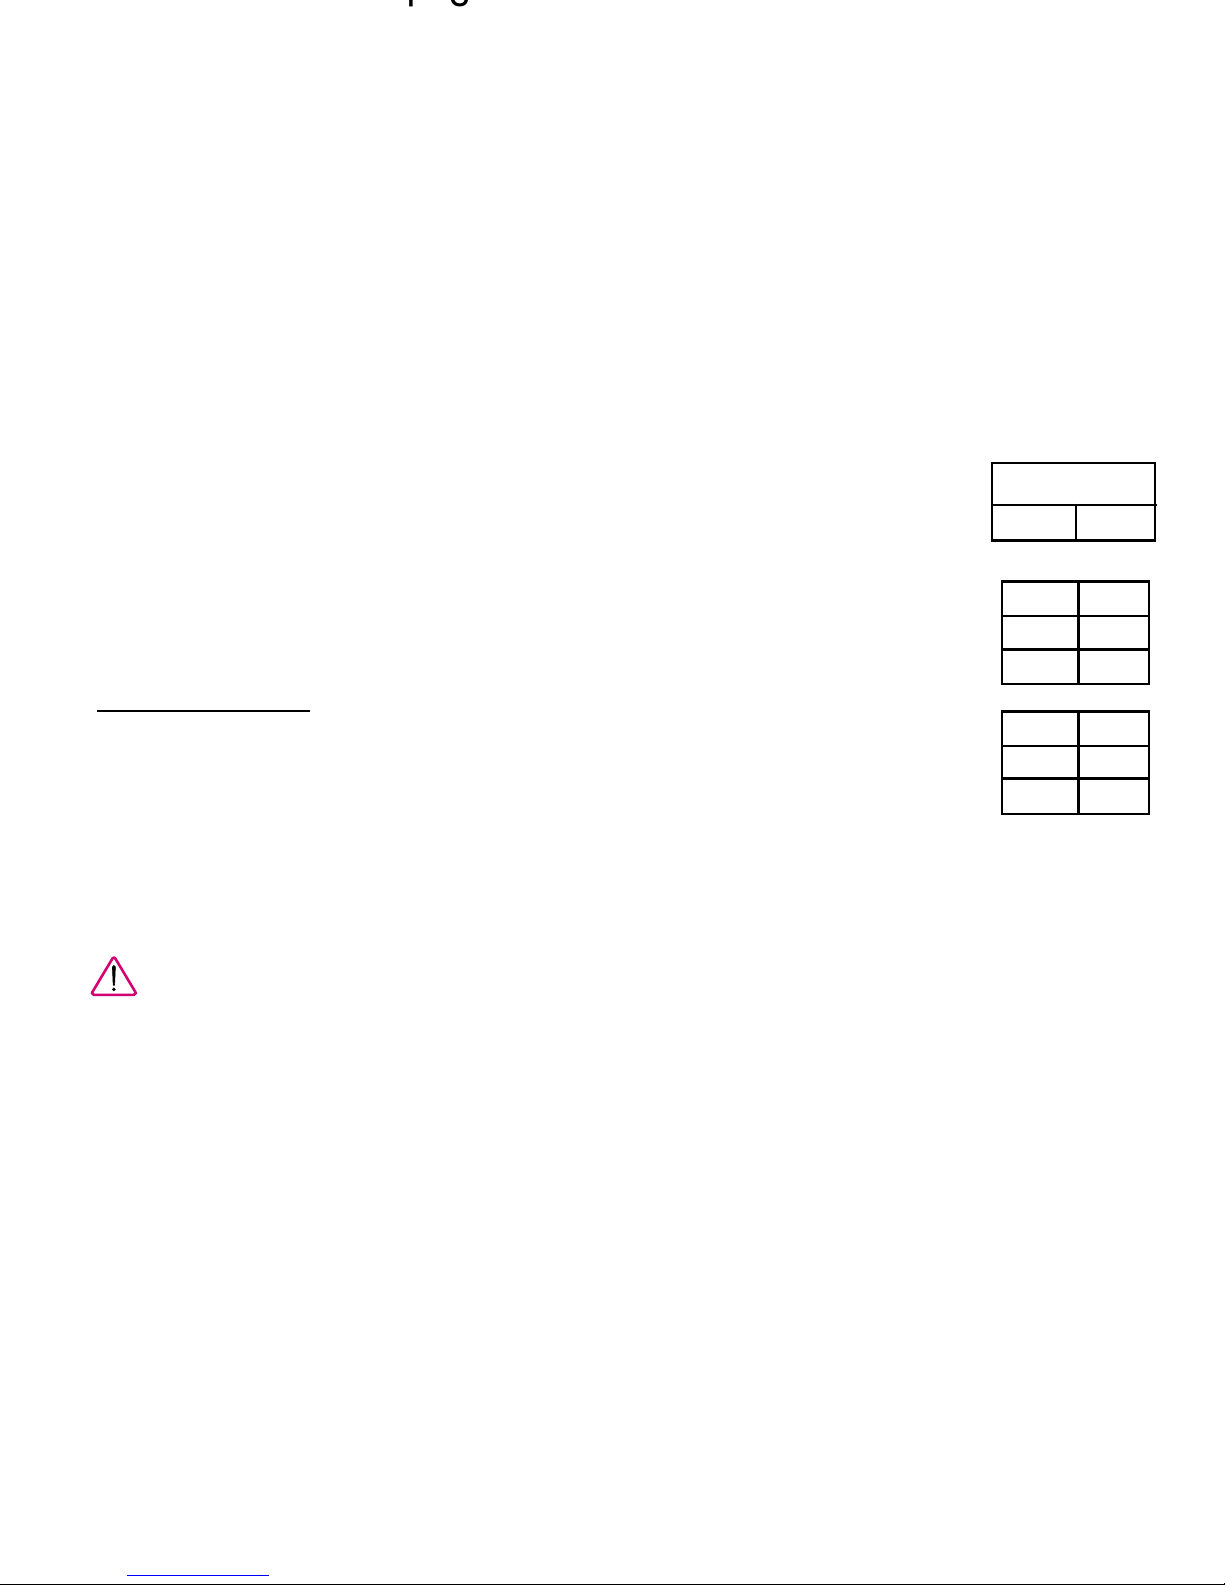
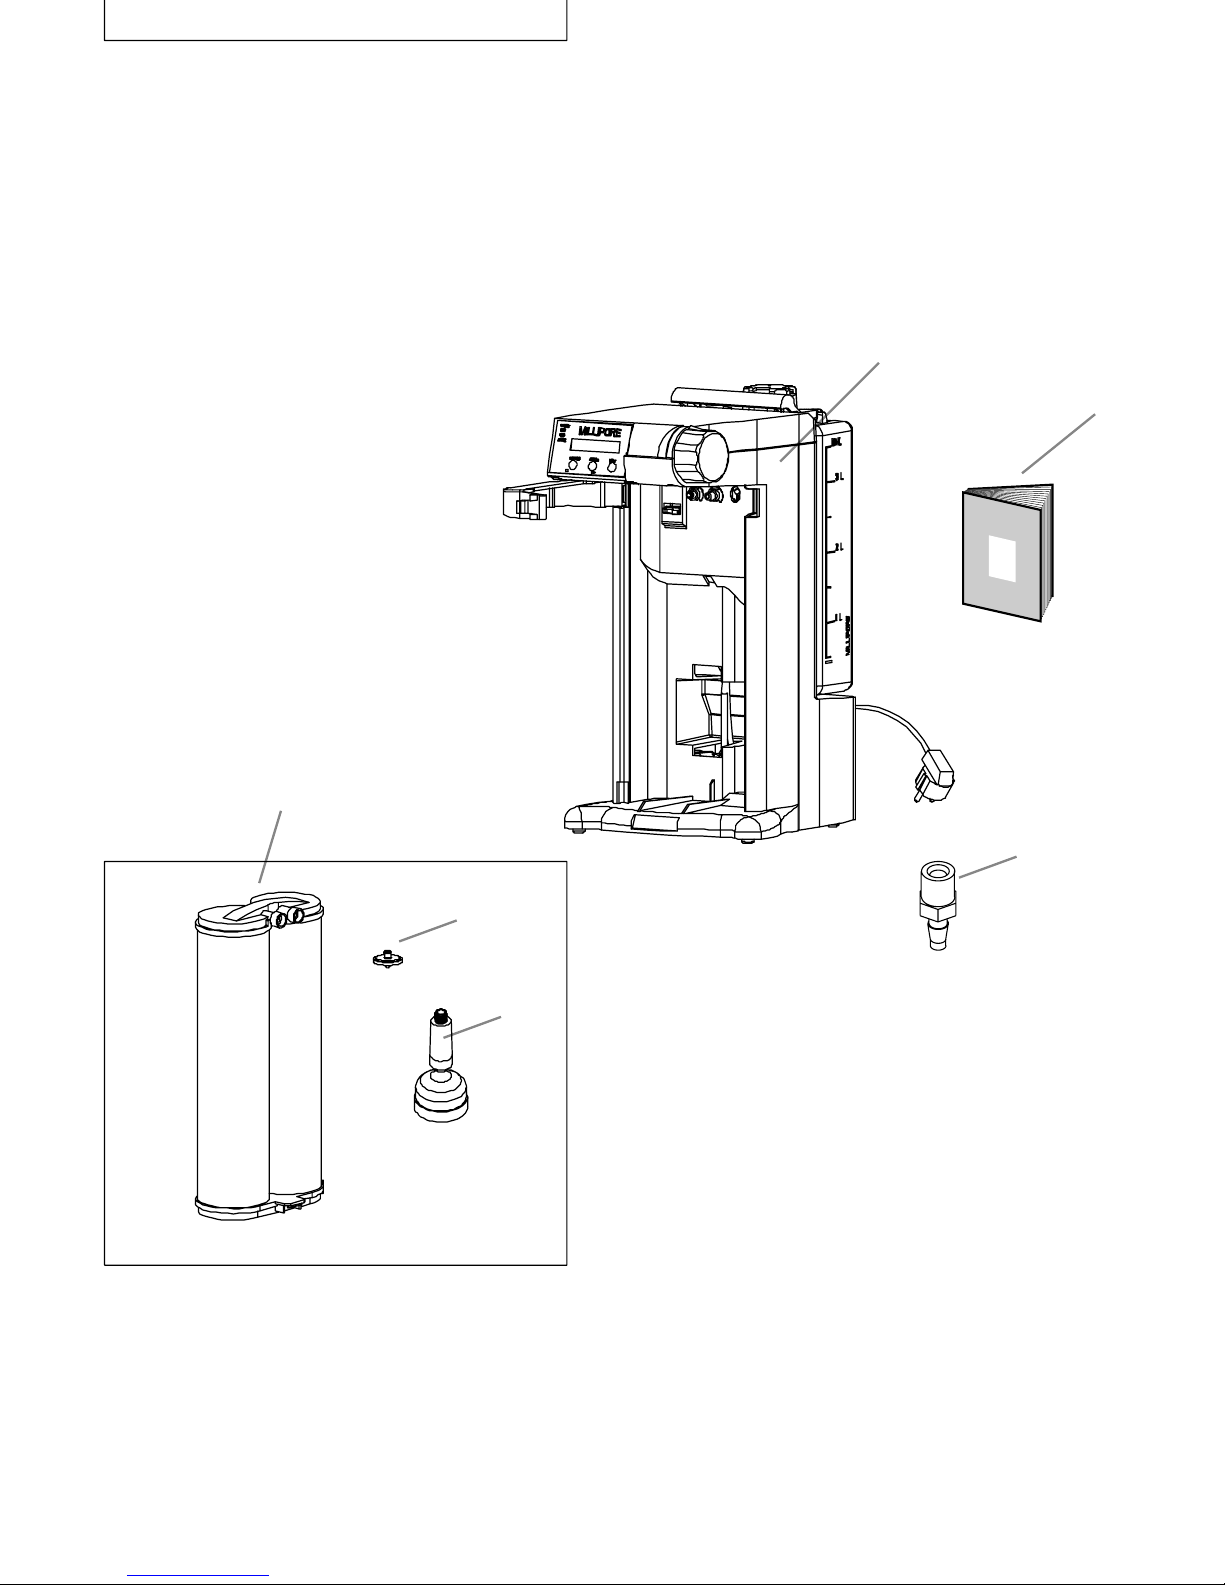
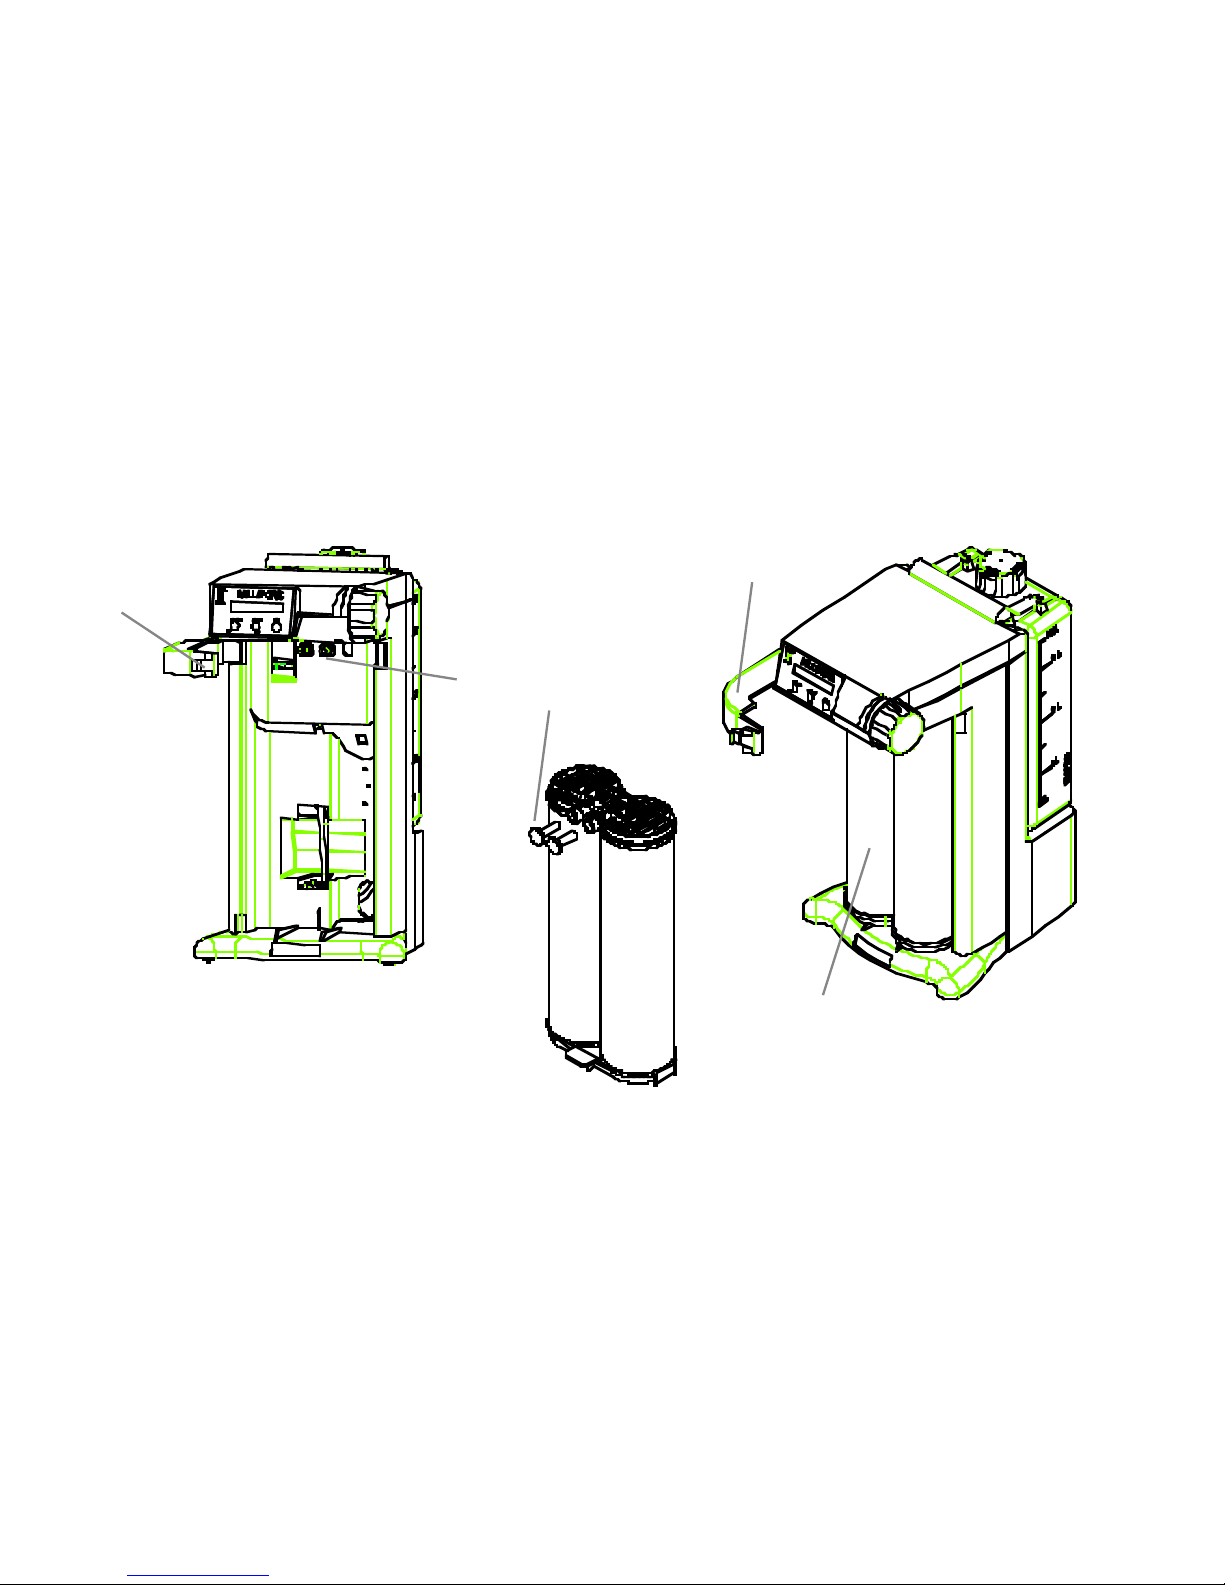
After unpacking the shipping container you should find (Figure 2):
Present?
Yes No
(A) Simplicity water purification system with reservoir
(B) User manual
(C) Point-of-use valve hose barb connector for purging a new SimPak
Ordered separately
(D) SimPak purification pack
(E) Reservoir vent filter
(F) SimFilter
Selecting a site for the Simplicity system _____________________
Warning: Do not plug in the electrical power cord into
a power source at this step.
The Simplicity system has been designed to be placed on any
laboratory bench (or suitable alternative). See the section
“Dimensions” page 10 of this manual for information related
to the space needed to remove and install the reservoir.
Page 11/36
___________________________________________INSTALLATION
Unpacking ______________________________________________
Page 12

Page 12/36
INSTALLATION ___________________________________________
Filling the Integral Reservoir _______________________________
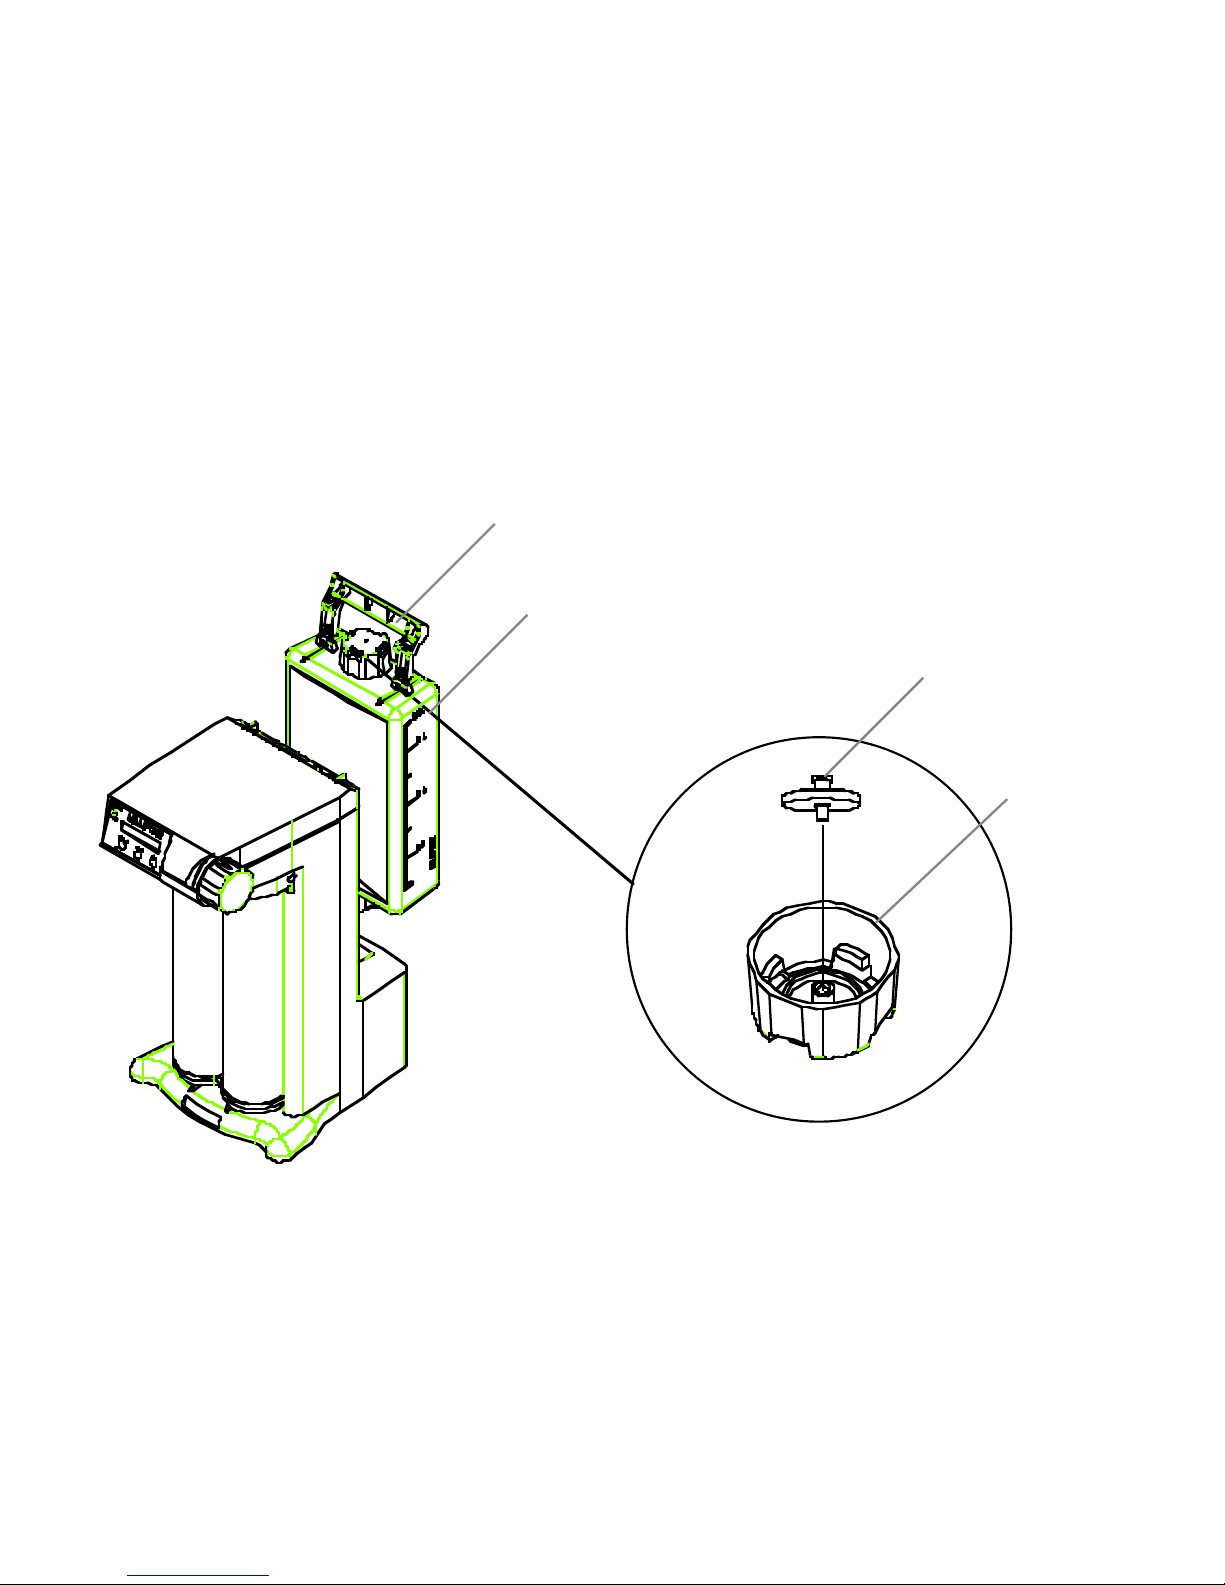
Figure 3
1. Raise the reservoir-locking handle to vertical position. (A)
2. Pull out the reservoir (B) using the locking handle.
3. Remove the reservoir cap (C) by twisting counter-clockwise 1/4 turn.
4. Fill the reservoir, re-install it and secure the locking handle into the body of the system.
Installing the Reservoir Vent Filter ___________________________
1. Install the Reservoir vent filter (D) into the reservoir cap.
2. Replace the reservoir cap by twisting clockwise 1/4 turn
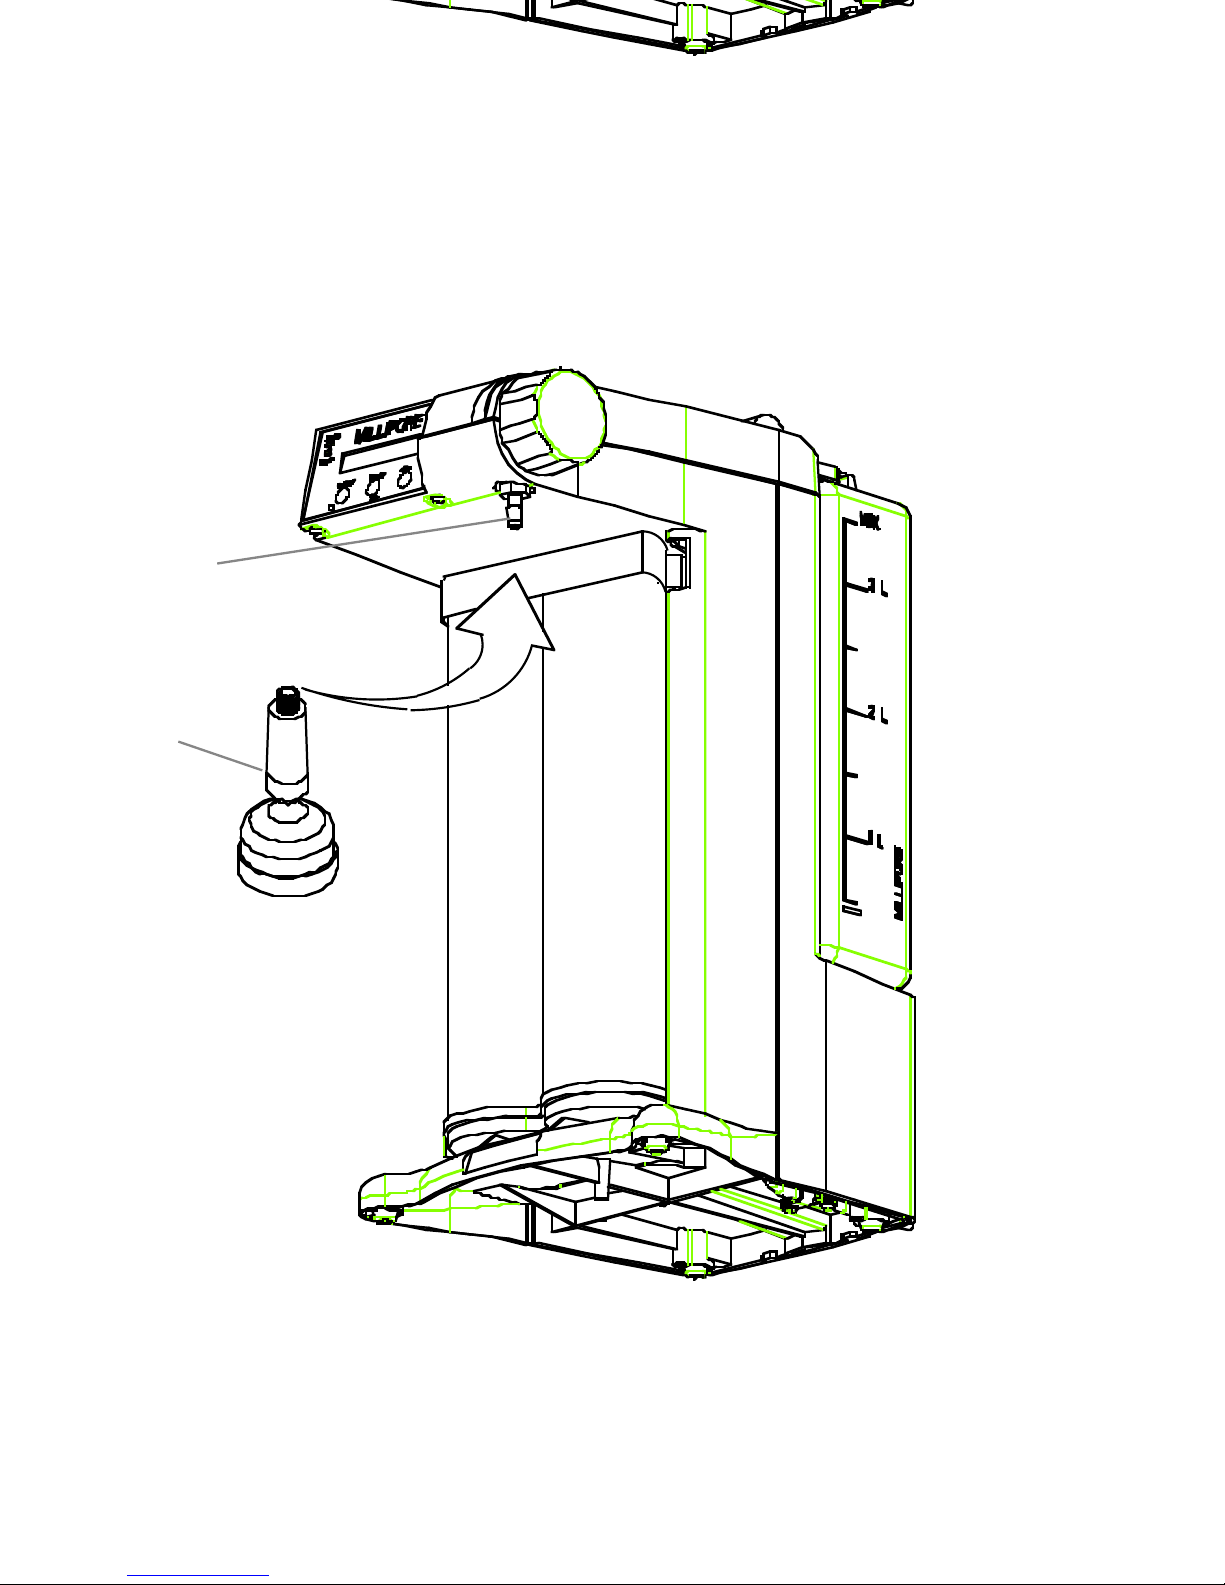
Installating the purification Pack ____________________________
Figure 4
1. Swing the Pack locking handle to the left by pressing on the locking tab (A).
2. Remove the two protective caps on the Simplicity connector (B).
3. Remove the two protective caps on the SimPak cartridge (C), Wet the two O-rings of the
Pack with a few drops of water.
4. Push the SimPak (D) firmly into the unit.
5. Secure the pak in place by closing the locking handle (E). The locking handle should
engage easily. If you need to force the handle, then the pack is not fully positioned into
the pack adapter.
Page 12/36
INSTALLATION ___________________________________________
Filling the Integral Reservoir _______________________________
Page 13
To accept and go back to normal operating mode,
press MENU button for 1 sec.
Page 13/36
___________________________________________INSTALLATION
Electrical connection ______________________________________
The electrical wall outlet must be accessible in the event that the Simplicity must be
unplugged quickly. To turn off the Simplicity, remove the power cord from the wall
outlet. The AC plug is the main disconnect for the system.
1. Connect the power cord to a grounded power source.
2. If necessary, put the system in STANDBY mode by depressing the OPERATE/STANDBY
button for two seconds.
3. Check that the point of use valve knob is in the upright position (closed).
Language Selection _______________________________________
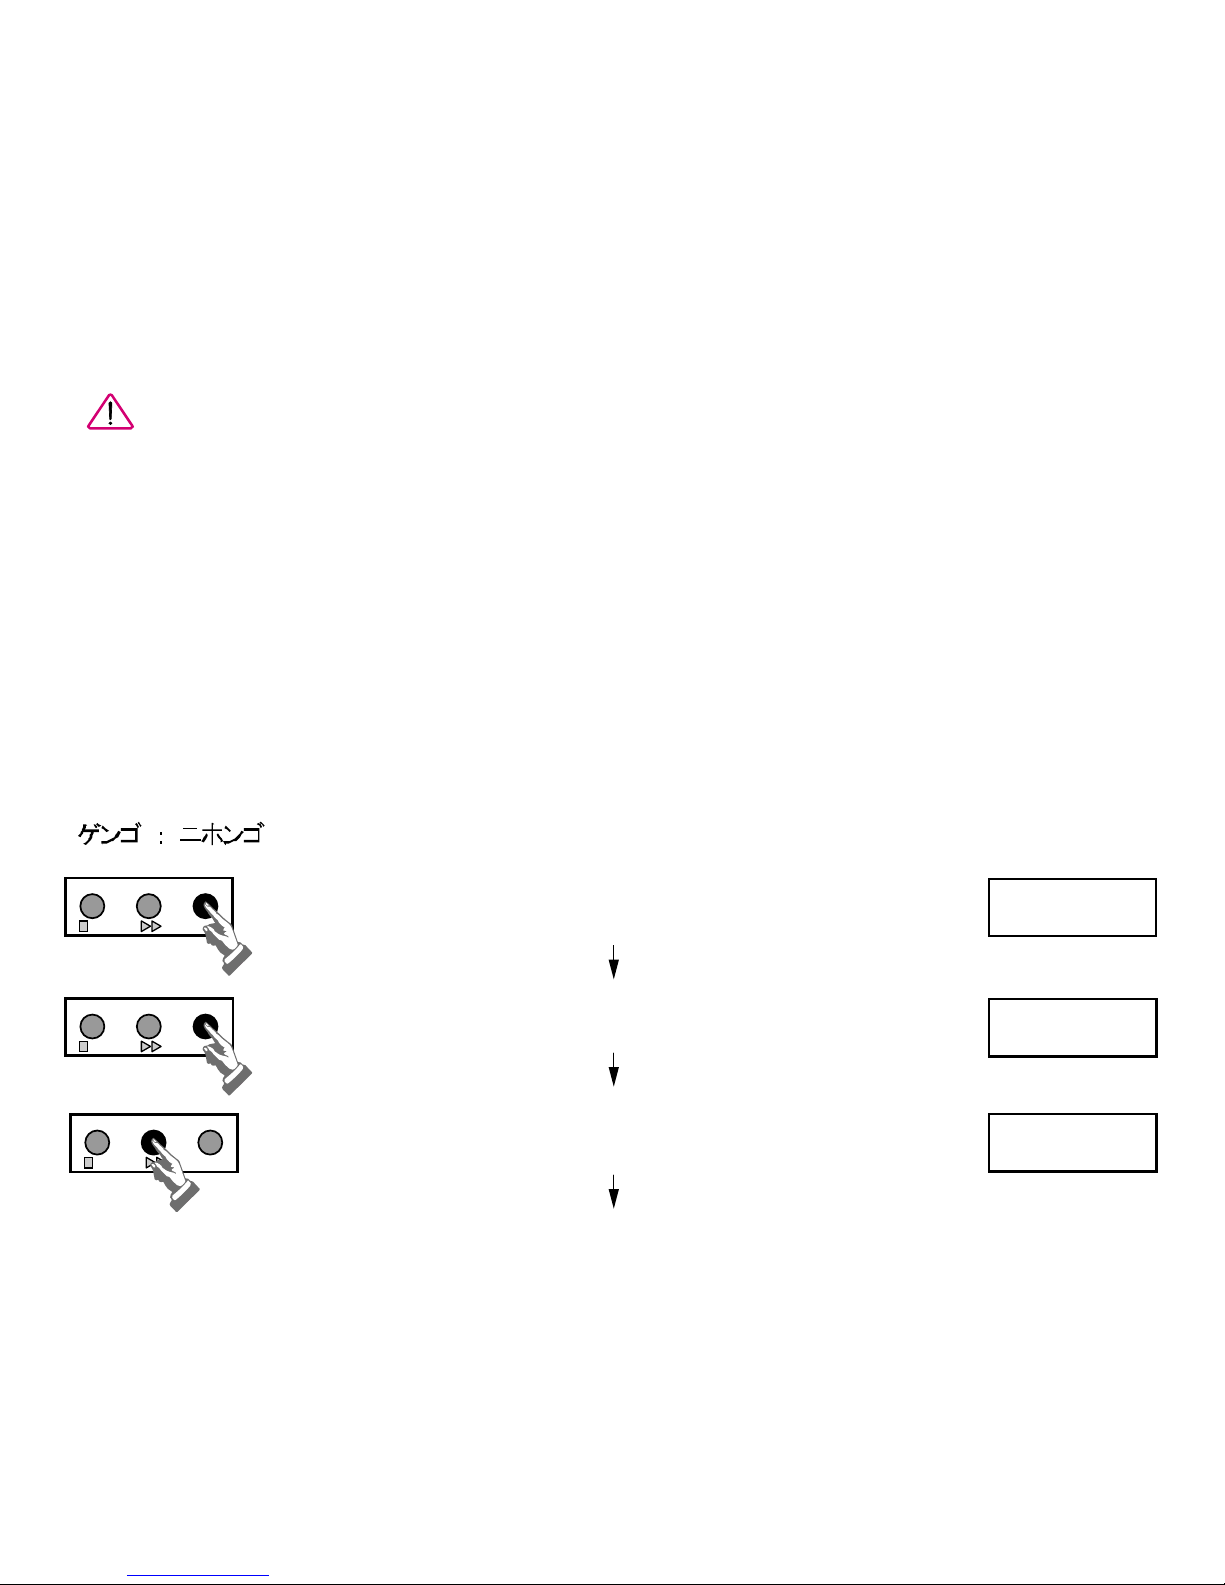
It is possible to change the displayed language on the LCD. The choices for the languages are
English, French (Français), German (Deutsch), Spanish (Español), Italian (Italiano) and Japanese
(( ).
0PERATE DISPLAY MENU
0PERATE DISPLAY MENU
0PERATE DISPLAY MENU
In either OPERATE or STANDBY mode,
press MENU for at least 2 seconds.
Press MENU several times to display
Press DISPLAY to change between: English,
French, German, Italian, Spanish or Japanese
To accept and go back to normal operating mode,
press MENU button for 1 sec.
PACK AGE
30 DAYS
SET LANGUAGE
ENGLISH
SET LANGUAGE
FRANCAIS
Page 13/36
___________________________________________INSTALLATION
Electrical connection ______________________________________
Page 14

The system is now ready to produce high quality water.
Page 14/36
INSTALLATION ___________________________________________
Purging the Pak __________________________________________
1. Install the connector (Figure 2,C) into the POU valve.
Note: Do not use Teflon tap on the connector tread. The seat of the valve contains
an O-ring seal.
The part should turn easily. Do not force, otherwise the valve thread could be
damaged.
2. Position a container under the outlet fitting.
3. Move the dispensing valve button down to open the valve.
4. Press the OPERATE button to switch from STANDBY to OPERATE mode.
5. After having drawn 1-2 litres of water from the system, close the valve.
6. If possible, leave the system in STANDBY mode overnight. This helps to hydrate the ion
exchange resin inside the SimPak. This procedure is requested each time a new SimPak is
installed.
Installing the SimFilter ____________________________________
Figure 5
1. Remove the connector (A) from the POU valve if installed.
2. Install the SimFilter (B) into the POU valve.
Note: Do not use teflon tape on the threading.
3. Press the OPERATE button to go from STANDBY to OPERATE mode.
4. Open the POU valve and draw around 0.5 litre of water through the SimFilter.
5. Switch the unit to STANDBY mode.
The system is now ready to produce high quality water.
Page 14/36
INSTALLATION ___________________________________________
Purging the Pak __________________________________________
Page 15

Page 15/36
__________________ STANDARD OPERATING OF THE SIMPLICITY
The simplicity system should be used in the manner specified by this user’s manual, otherwise the
protection provided by this equipment may be impaired.
Maintaining a minimum level of water in the reservoir _________
The simplicity is fed through the reservoir located at the back of the unit. Whenever the water in the
reservoir reaches half a liter level it is recommended to refill it.
If the simplicity runs out of water, proceed as follows:
1. Press the OPERATE button to go from OPERATE to STANDBY mode.
2. Refill the reservoir.
3. Replace the SimFilter by the hose barb connector and start the unit.
4. Open the POU valve, press OPERATE and draw approximately 0.2 litre of water.
5. Re-install the SimFilter.
Standard displayed messages _____________________________
Your Simplicity system has a number of operating modes which can be activated via the keypad.
Other modes are automatically activated by the microprocessor.
Page 15/36
__________________ STANDARD OPERATING OF THE SIMPLICITY
The simplicity system should be used in the manner specified by this user’s manual, otherwise the
protection provided by this equipment may be impaired.
Page 16

See section “Troubleshooting” pages 26 and 27.
Page 16/36
STANDARD OPERATING OF THE SIMPLICITY __________________
These different modes are displayed on the screen, and are described below:
OPERATING STATUS OF SYSTEM
MODE DISPLAY
STANDBY While in this mode, the system is not producing purified water.
Periodic recirculation is performed.
OPERATE System is running. Purified water can be delivered by opening the
PROD:18.2 MΩ.cm dispensing valve.
RECIRCULATION In STANDBY mode, the system automatically recirculates the water
5 mn every 3 hours in order to maintain the water quality during
periods of non-use.
OPERATE System is running and displays the water temperature instead of
TEMP.19°C the resistivity.
OPERATE System is running. Purified water can be delivered. Resistivity
19.8 MΩ.cm 22.9°C measure is not compensated at 25 °C. Water resistivity and
temperature are displayed permanently.
Cleaning ________________________________________________
The exterior of the Simplicity may be cleaned using a soft cloth dampened with a mild detergent.
Prior to cleaning assure that the system main AC power has been disconnected.
System maintenance messages _____________________________
See section “Troubleshooting” pages 26 and 27.
Page 16/36
STANDARD OPERATING OF THE SIMPLICITY __________________
These different modes are displayed on the screen, and are described below:
Page 17
Page 17/36
_____________________________________ USE OF THE KEYPAD
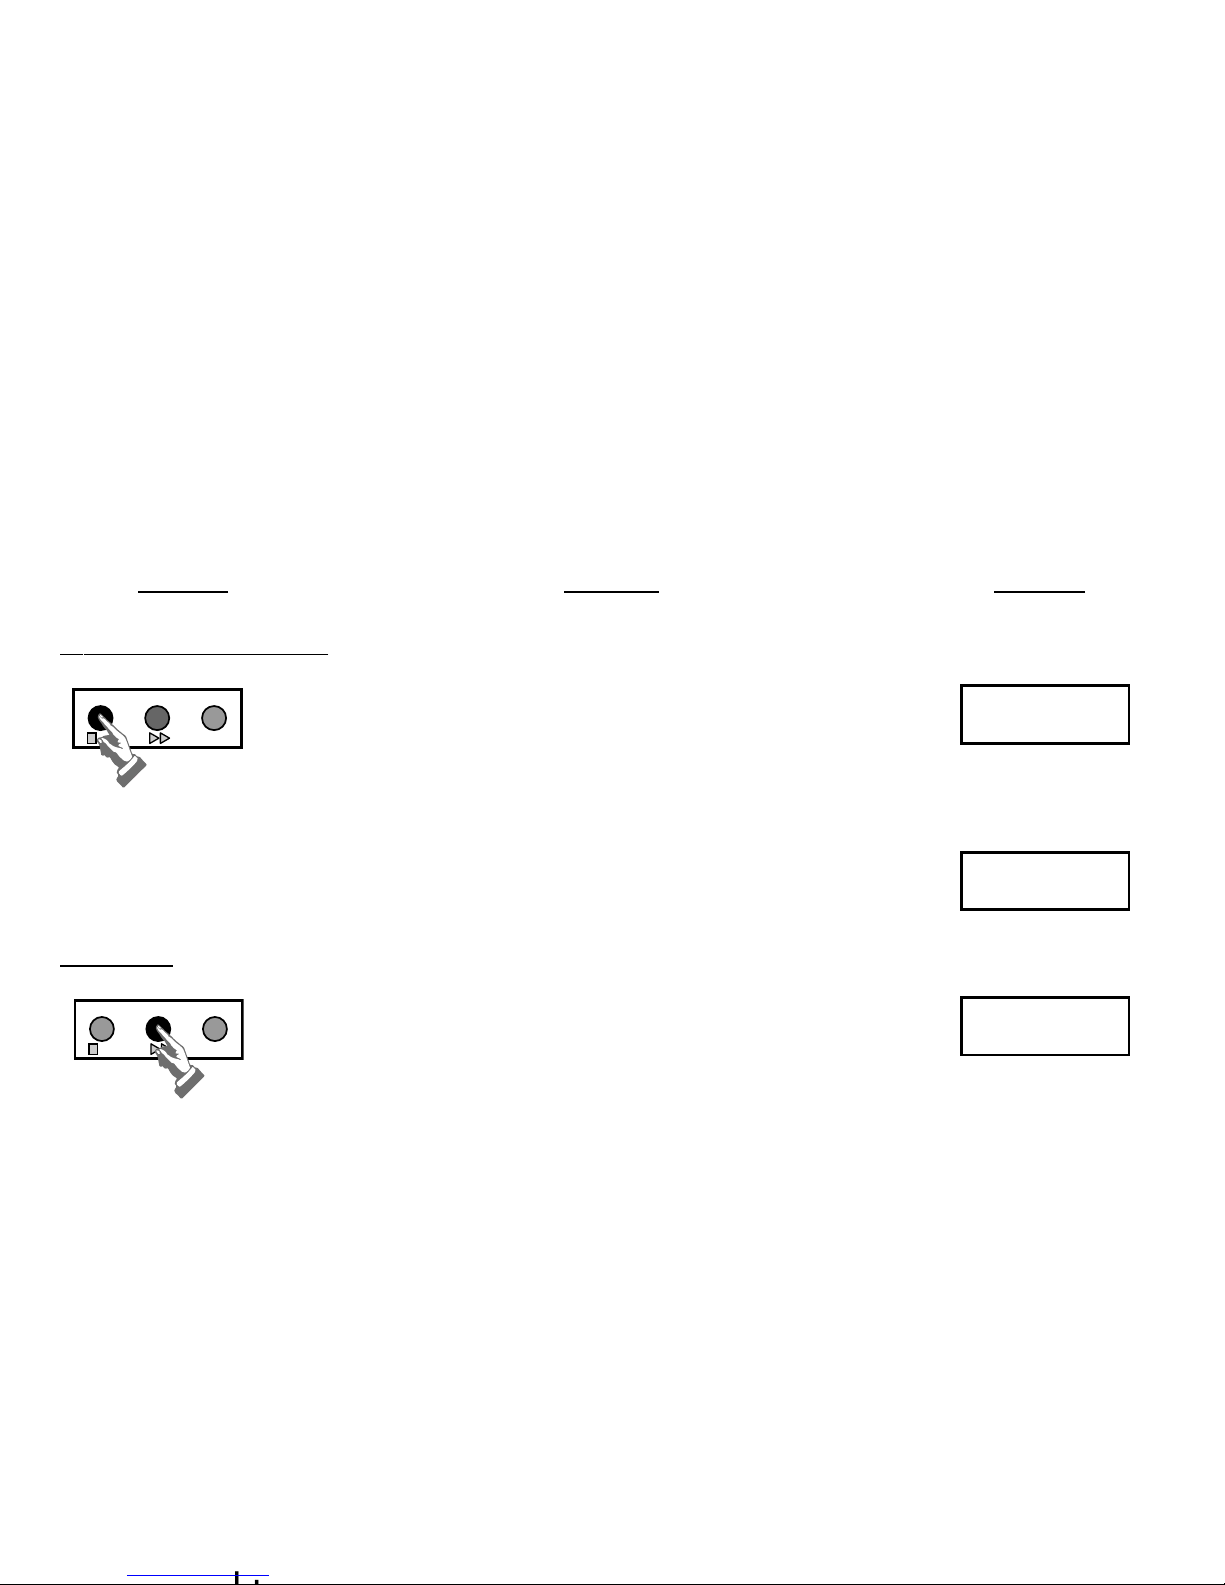
The keypad allows the user to activate the different operating
modes and to review information about consumables lifetime and
system configuration.
Standard menu __________________________________________
KEYPAD ACTION DISPLAY
STANDBY and OPERATE
0PERATE DISPLAY MENU
MEASURE
0PERATE DISPLAY MENU
Press the OPERATE keypad to switch between
these two modes
STANDBY
OPERATE
In OPERATE mode the system is ready to
deliver water through the dispensing valve
Press the DISPLAY button during OPERATE or
STANDBY mode to display the water temperature.
(Temperature display will be replaced by
resistivity after 3 seconds).
STANDBY
OPERATE
PROD: 18.2MΩ. cm
OPERATE
TEMP: 24.2°C
Page 17/36
_____________________________________ USE OF THE KEYPAD
The keypad allows the user to activate the different operating
Page 18
Page 18/36
USE OF THE KEYPAD ______________________________________
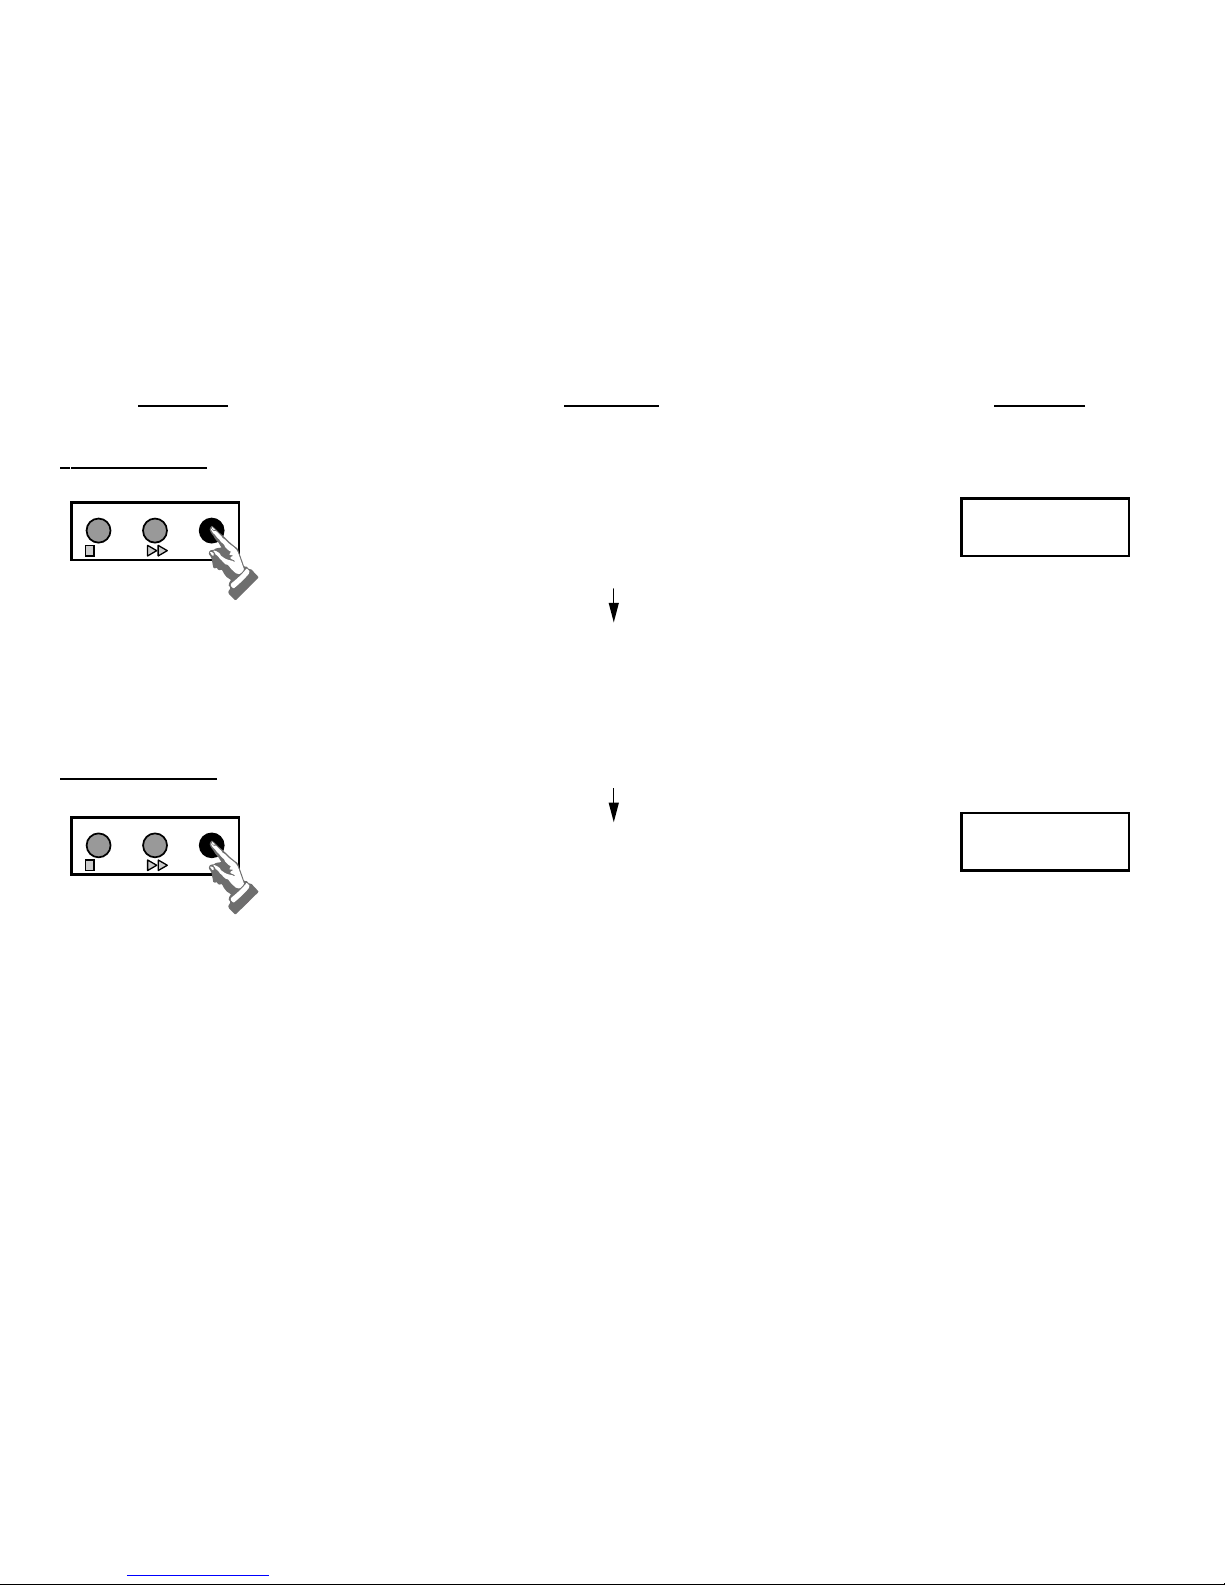
Consumable lifetime ______________________________________
KEYPAD ACTION DISPLAY
PAK LIFETIME
0PERATE DISPLAY MENU
In either OPERATE or STANDBY mode,
press MENU for at least 2 seconds
(The pak must be replaced after a maximum 365 days in service)
UV LAMP USE (only Simplicity 185)
0PERATE DISPLAY MENU
Press MENU once more to display the
UV lamp age.
To go back to normal operating mode,
maintain MENU button for 2 sec.
(The UV lamp must be replaced after a maximum 700 days in service)
PACK AGE
45 DAYS
UV LAMP AGE
9 DAYS
Page 18/36
USE OF THE KEYPAD ______________________________________
Consumable lifetime ______________________________________
Page 19
Page 19/36
_____________________________________ USE OF THE KEYPAD
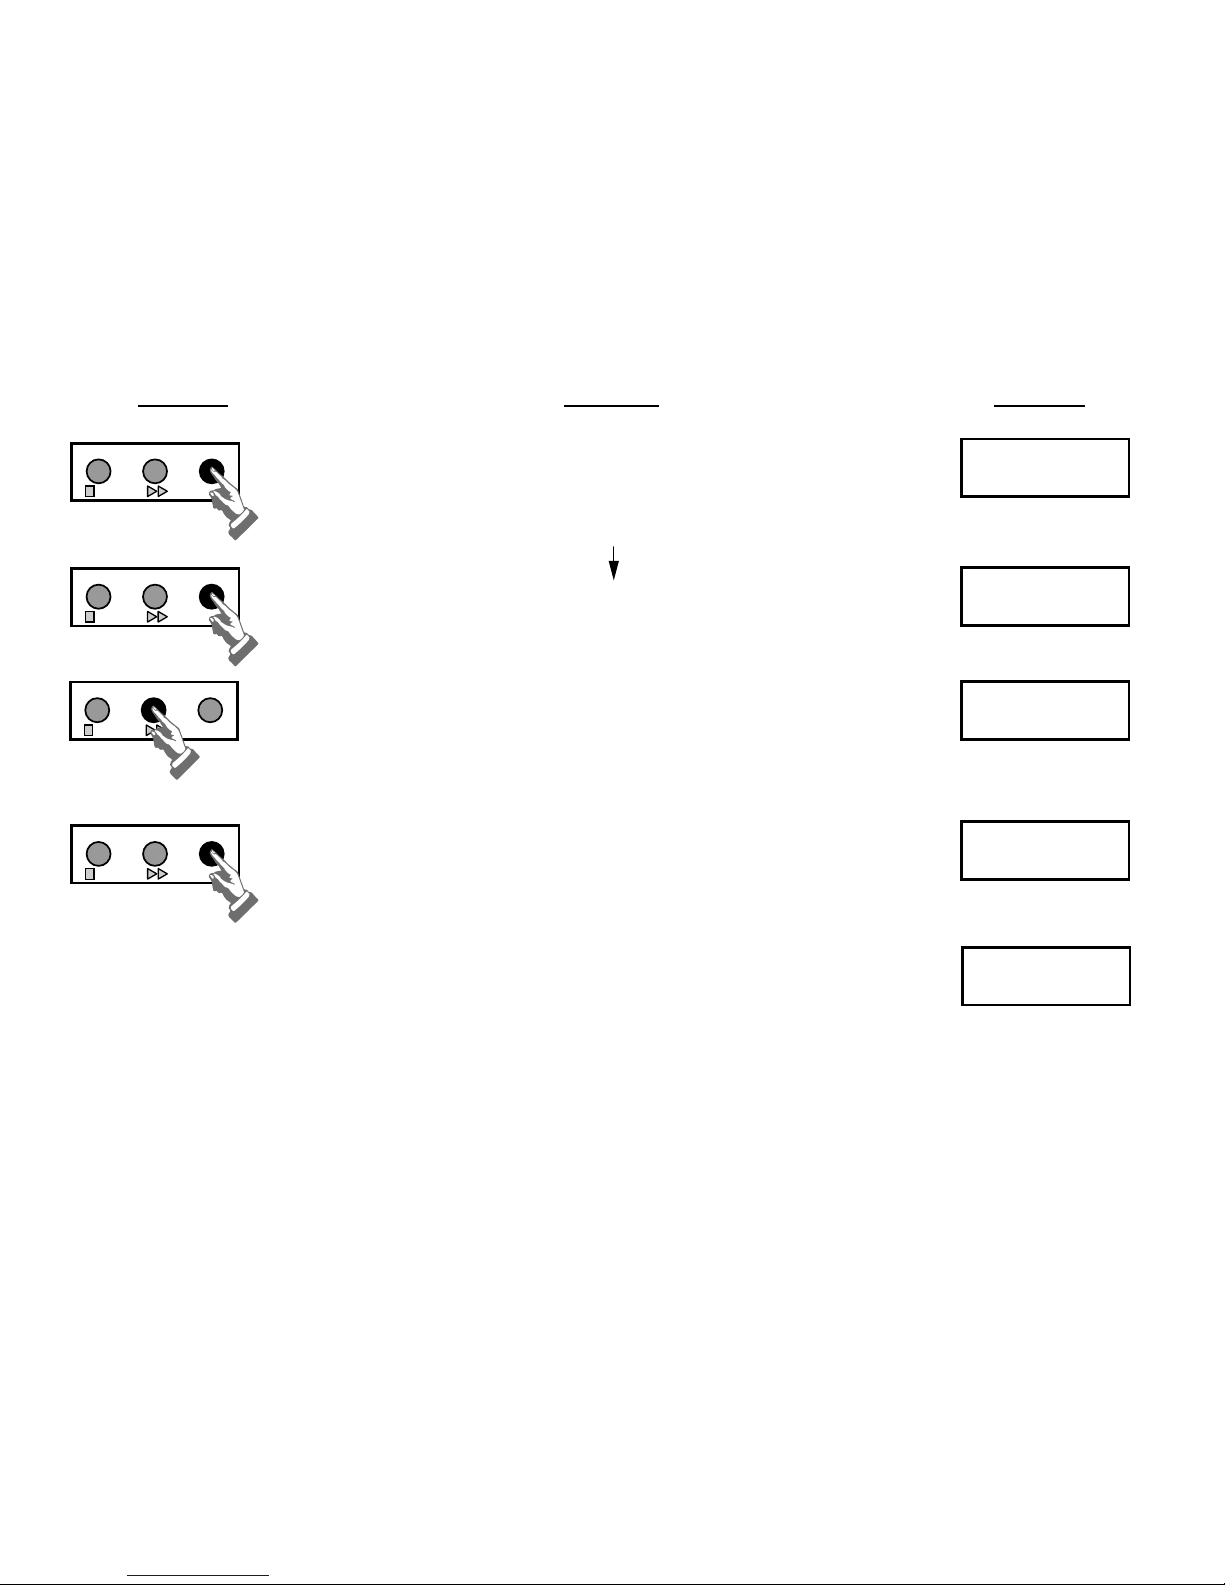
Choosing the non-temperature compensated resistivity display __
KEYPAD ACTION DISPLAY
0PERATE DISPLAY MENU
0PERATE DISPLAY MENU
0PERATE DISPLAY MENU
0PERATE DISPLAY MENU
In either OPERATE or STANDBY mode,
press MENU for at least 2 seconds
Press MENU button until it displays.
Press DISPLAY once to select Temperature
correction OFF.
To accept and go back to normal operating
mode, press MENU button for 2 sec.
(Example of displays in Operate mode)
PACK AGE
45 DAYS
TEMP.CORRECTION
ON
TEMP.CORRECTION
OFF
STANDBY
OPERATE
19.8 Ω cm 22.9°C
Page 19/36
_____________________________________ USE OF THE KEYPAD
Choosing the non-temperature compensated resistivity display __
Page 20
Page 20/36
USE OF THE KEYPAD ______________________________________
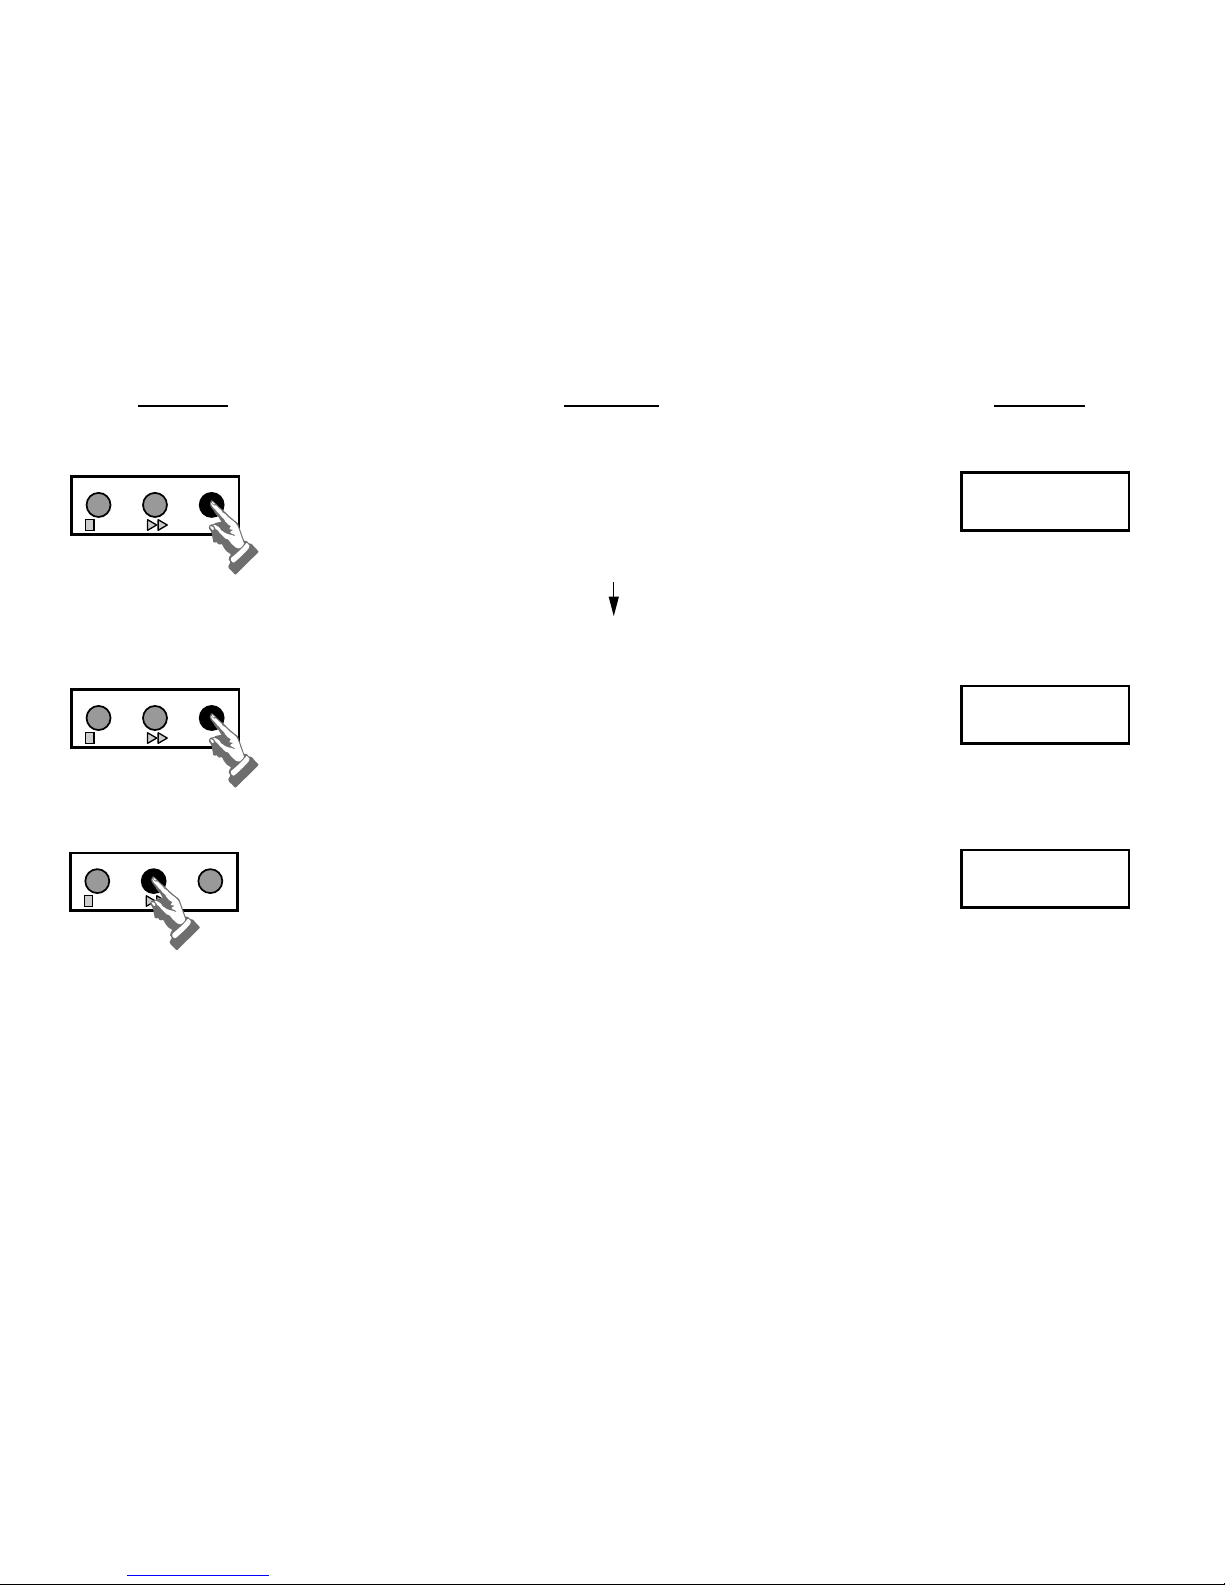
Selecting the unit of measure ______________________________
KEYPAD ACTION DISPLAY
0PERATE DISPLAY MENU
0PERATE DISPLAY MENU
0PERATE DISPLAY MENU
In either OPERATE or STANDBY mode
Press MENU for at least 2 seconds.
Press several times MENU to display.
Press DISPLAY once to select MΩ.cm (resistivity)
or µS/cm (conductivity).
To accept and go back to normal operating mode,
press MENU button for 2 sec.
PACK AGE
45 DAYS
PRODUCTION UNIT
MΩ . cm
PRODUCTION UNIT
µS / cm
Page 20/36
USE OF THE KEYPAD ______________________________________
Selecting the unit of measure ______________________________
Page 21
Page 21/36
_____________________________________ USE OF THE KEYPAD
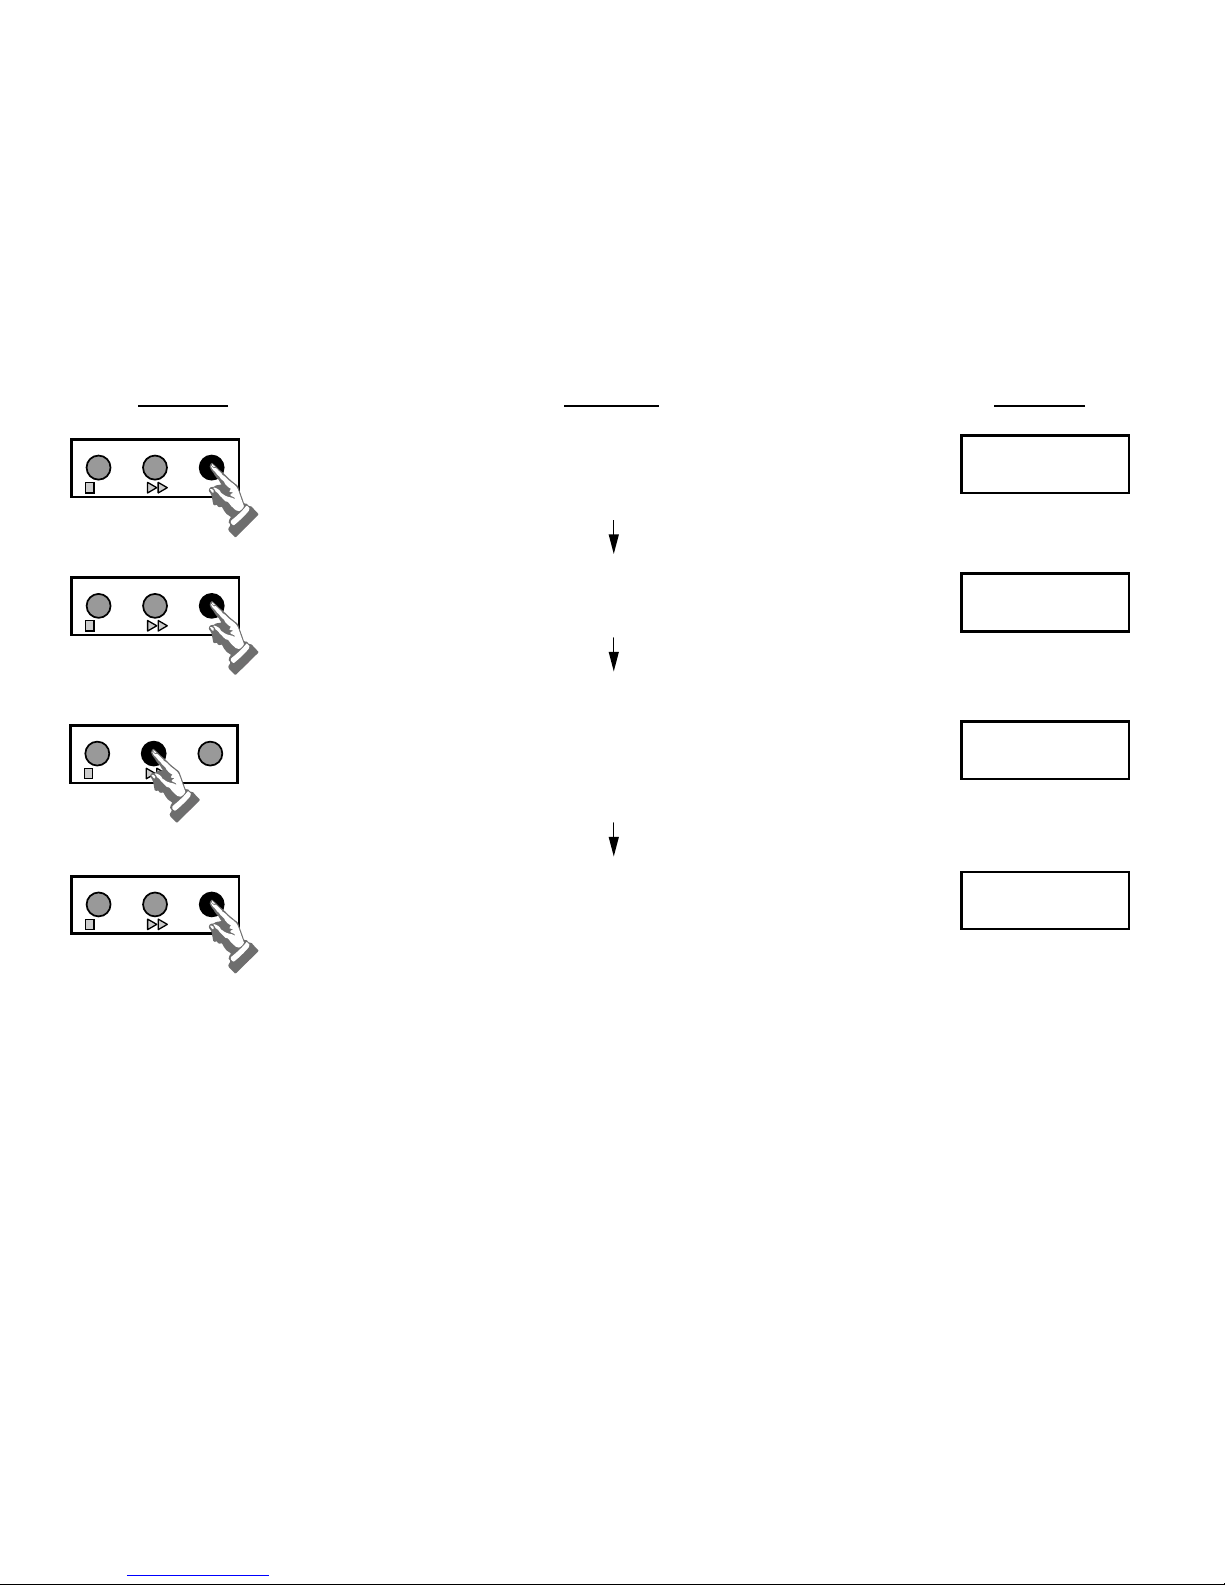
Setting the displayed language_____________________________
KEYPAD ACTION DISPLAY
0PERATE DISPLAY MENU
0PERATE DISPLAY MENU
0PERATE DISPLAY MENU
0PERATE DISPLAY MENU
In either OPERATE or STANDBY mode
Press MENU for at least 2 seconds.
Press MENU several times to display
Press DISPLAY to change between:
English, French, German, Italian, Spanish
or Japanese
To accept and go back to normal operating
mode, press MENU button for 1 sec
PACK AGE
45 DAYS
SET LANGUAGE
ENGLISH
SET LANGUAGE
ESPAGNOL
STANDBY
UV lamp reset (Only for Simplicity 185) _____________________
See “Maintenance” chapter page 23.
Page 21/36
_____________________________________ USE OF THE KEYPAD
Setting the displayed language_____________________________
Page 22

Page 22/36
MAINTENANCE __________________________________________
Replacing the consumables ________________________________
1. Put the Simplicity into STANDBY mode by pressing the OPERATE button. Do not turn off
the electrical power to the system.
2. Remove the old SimFilter ( Figure 5,B) from the Point of Use valve.
3. Open the Point Of Use valve for a few seconds to depressurize the system.
4. Swing the Pack locking handle (Figure 4,E) to the left by pressing on the locking tab (4,A).
5. Remove the old SimPak (4,D).
6. Remove the two protective caps on the new SimPak. Wet the two O-rings on the pak with
a few drops of water.
7. Push the new SimPak firmly into the unit.
8. Secure the place by closing the locking handle (4,E).
9. Remove the reservoir cap (3,C) and install the Millex vent filter (3,D), shipped with the
SimPak into the inner connector of the reservoir cap.
10. Install the connector (Figure 2,C) into the POU valve.
Note: Do not use Teflon tap on the connector tread
11. Position a container under the outlet fitting.
12. Move the dispensing valve button down to open the valve.
13. Press the OPERATE button to switch from STANDBY to OPERATE mode.
14. After having drawn 1-2 litres of water from the system, close the valve.
15. If possible, leave the system in STANDBY mode overnight. This helps to hydrate the ion
exchange resin inside the SimPak. This only needs to be followed each time a new SimPak
is installed.
16. Remove the connector (Figure 5,A) from the POU valve if installed.
17. Install the SimFilter (5,B) into the POU valve. Do not use teflon tape on the threading.
Page 22/36
MAINTENANCE __________________________________________
Replacing the consumables ________________________________
Page 23

Page 23/36
_________________________________________ MAINTENANCE
18. Press the OPERATE button to go from STANDBY to OPERATE mode
19. Open the POU valve and draw around 0.5 litre of water through the SimFilter.
20. Switch the unit to STANDBY mode.
The SimFilter should be changed whenever the product flowrate becomes too low (< 0.3 Litres/mn)
or whenever the SimPak is replaced. The lifetime of the SimFilter is dependent upon the quality of the
feedwater and dependent upon the amount of water dispensed through the unit. It is recommended
to replace the filter during replacement of the SimPak.
Replacing the UV lamp (Only for Simplicity 185) ______________
The UV lamp should be replaced every second year. The age of the UV lamp can be checked during
normal use. See “Consumable lifetime” page 18.
When, the message “EXCHANGE UV LAMP” is displayed, proceed as follows.
UV Lamp replacement
Note: The used UV lamp contains metallic mercury and should therefore be
disposed of by the owner, in agreement with local regulations.
1. Put the Simplicity into STANDBY mode by pressing the OPERATE button. Unplug the
electrical power cord from the power source.
2. Open the Point of Use valve for a few seconds to depressurise the system.
3. Swing the Pack locking handle (Figure 4,E) to the left by pressing on the locking tab
(Figure 4,A).
4. Remove the SimPak.
_________________________________________ MAINTENANCE
18. Press the OPERATE button to go from STANDBY to OPERATE mode
19. Open the POU valve and draw around 0.5 litre of water through the SimFilter.
Page 23/36
Page 24
Page 24/36
MAINTENANCE __________________________________________
WARNING: Verify that there is no electrical power going to the Pack at this time.
Accidental exposure to Ultraviolet light can cause damage to the eyes
and skin.
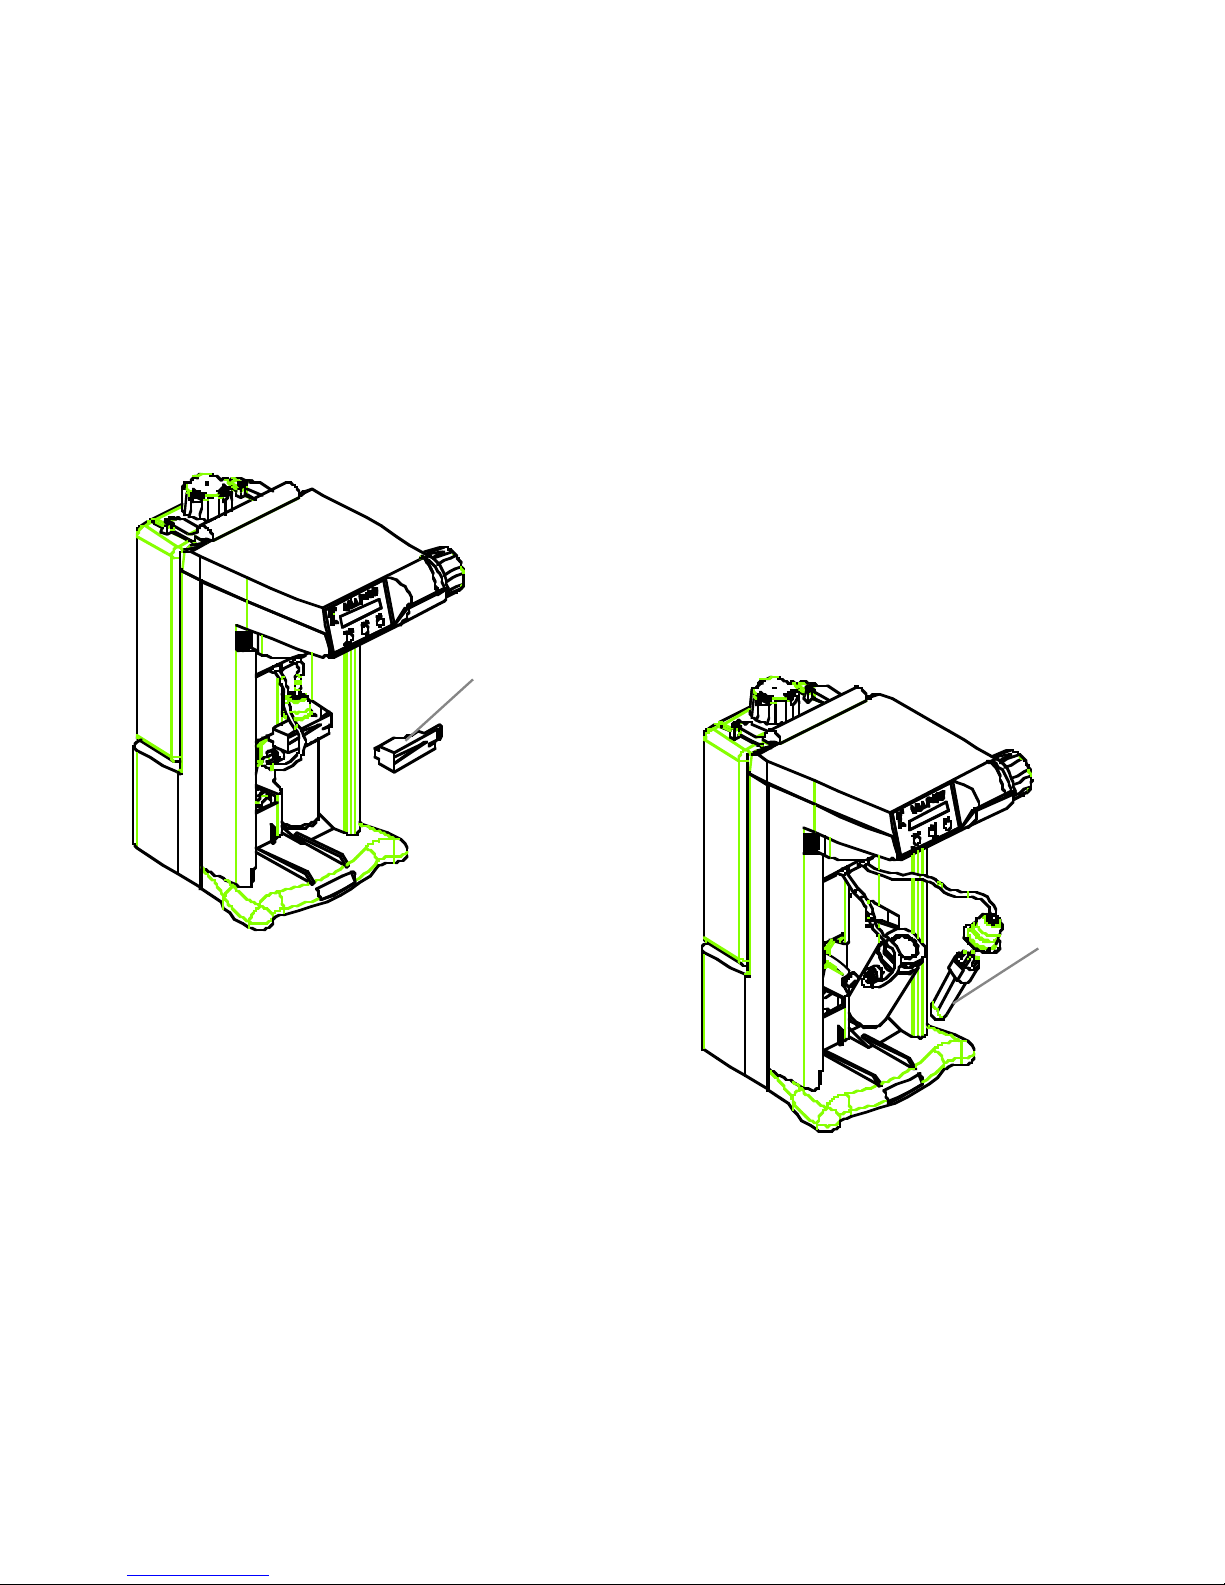
5. Push the UV lamp clip to the left and remove it (Figure 6,A).
6. The UV lamp can now be removed from the housing (Figure 6,B). Using the new UV
Lamp, follow steps 1-5 in reverse order.
Note: Use the gloves to avoid getting fingerprints on the new UV lamp.
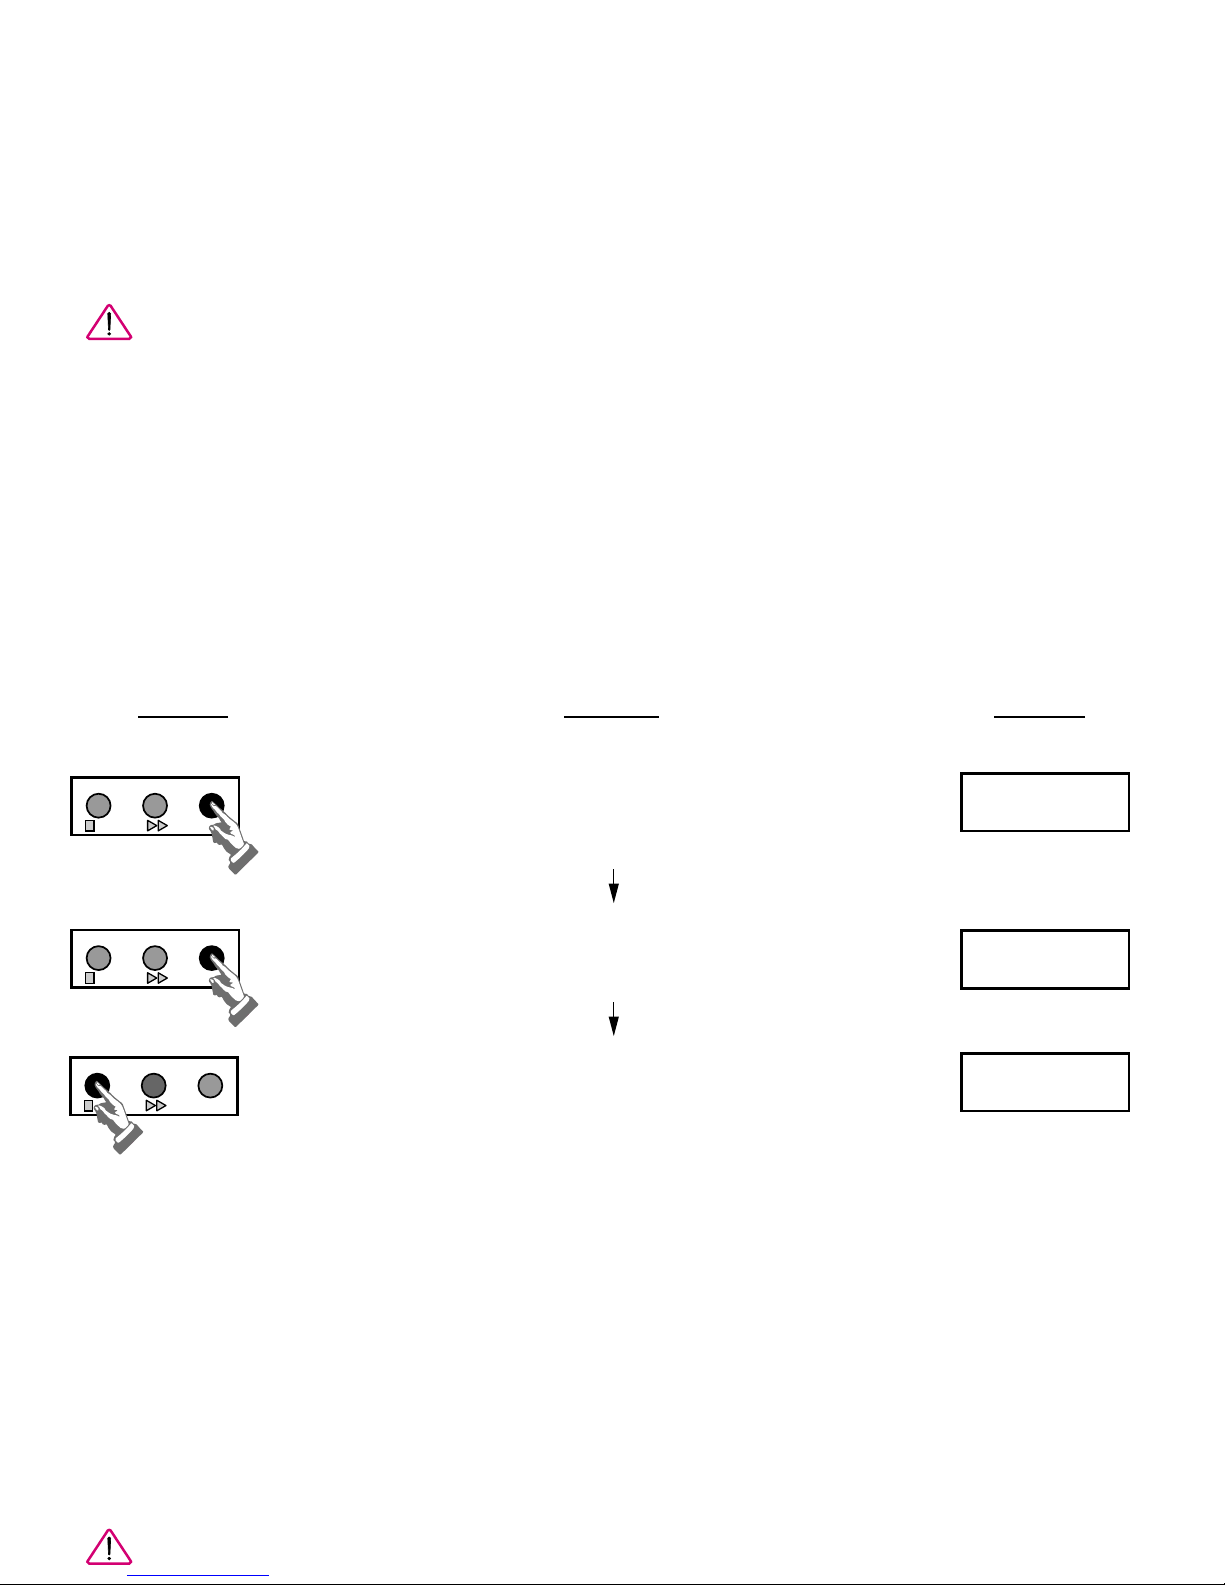
UV lamp reset
KEYPAD ACTION DISPLAY
0PERATE DISPLAY MENU
0PERATE DISPLAY MENU
0PERATE DISPLAY MENU
In either OPERATE or STANDBY mode,
press MENU for at least 2 seconds
Press MENU several times to display
Maintain OPERATE button for at least 10 sec.
to reset the UV lamp age.
The unit goes automatically back to
STANDBY mode.
PACK AGE
45 DAYS
UV COUNTER RESET
VALID:OP SWITCH
STANDBY
Page 24/36
MAINTENANCE __________________________________________
WARNING: Verify that there is no electrical power going to the Pack at this time.
Accidental exposure to Ultraviolet light can cause damage to the eyes
Page 25

Page 25/36
_________________________________________ MAINTENANCE
Shutting down the system for an extended period of time ______
Keep the Simplicity in STANDBY mode when water is not needed
for a few days. In this mode, the unit will operate all cycles to keep
the water quality optimum.
If the Simplicity is to be shut down for a long time, drain the
reservoir, remove the SimPak and Simfilter, and unplug the system.
Upon start-up, new cartridges should be installed. For further
information, please contact Millipore Technical Service.
Page 25/36
_________________________________________ MAINTENANCE
Shutting down the system for an extended period of time ______
Page 26

Page 26/36
TROUBLESHOOTING______________________________________
Troubleshooting table _____________________________________
Whenever the Yellow SERVICE LED is blinking, a message is displayed on the screen, which indicates
the nature of the service needed.
STATUS / PROBLEM CAUSE REMEDY
There is no electrical power to - No electrical power. Check the source of power.
the system. - The power cord is not plugged Check the power cord.
into the wall.
The Simplicity system is in - The tank is empty. Fill the tank.
PRODUCT mode but does not - Tank is not well positioned Check tank position
produce any or very little water. - Clogged Point of use filter. Replace the SimFilter
- Tank vent filter plugged Remove tank lid. If flowrate is
OK, replace the vent filter.
- Air is trapped in the SimPak Remove the SimFilter, purge
and the SimFilter. the system.
The system switches The simplicity is pre-set to Re-fill the reservoir if necessary
automatically from produce continuously for and press on OPERATE button.
PRODUCTION mode to 10 min. maximum.
mode to STANDBY mode.
RESISTIVITY < SP The reservoir is empty Fill the reservoir
Resistivity is below the Set Point Install new purification
cartridges.
Page 26/36
TROUBLESHOOTING______________________________________
Troubleshooting table _____________________________________
Page 27

Page 27/36
_____________________________________ TROUBLESHOOTING
STATUS / PROBLEM CAUSE REMEDY
EXCHANGE PACK. The operational lifetime of the Change the purification pack.
purification Pack has expired.
PACK OUT The Pak has not been installed Put the Pack back in place.
properly or has been removed.
EXCHANGE UV LAMP The operational lifetime of the Replace the UV lamp
UV lamp has expired.
CHECK UV LAMP Defective UV lamp Occurs when the UV lamp
doesn’t light anymore.
EEPROM ERROR The unit needs to be initialised Press the OPERATE button twice
_____________________________________ TROUBLESHOOTING
STATUS / PROBLEM CAUSE REMEDY
Page 27/36
Page 28

Page 28/36
ORDERING INFORMATION ________________________________
Systems
Simplicity Water Purification System, 230 V 50 Hz SIMS50000
Simplicity Water Purification System, 115 V 60 Hz SIMS60000
Simplicity 185 Water Purification System, 230 V 50 Hz SIMS5V000
Simplicity 185 Water Purification System, 115 V 60 Hz SIMS6V000
Consumables
SimPak 1 Kit, for Distilled, RO or Elix feed SIMPAKKR1
(Includes SimPak 1, SimFilter and Vent Filter)
SimPak 2 Kit, for DI feed SIMPAKKD2
(Includes SimPak 2, SimFilter and Vent Filter)
SimPak 1 purification pack SIMPAK0R1
SimPak 2 purification pack SIMPAK0D2
SimFilter Final Filter SIMFILTER
Reservoir Vent Filter SIMVENT00
Spare Reservoir SIMTANK01
UV Lamp Simplicity SIM0000UV
Page 28/36
ORDERING INFORMATION ________________________________
Systems
Page 29

Page 29/36
________________________________ ORDERING INFORMATION
Millipore’s Standard Warranty _____________________________
Millipore Corporation (“Millipore”) warrants the products will meet their applicable published
specifications when used in accordance with the applicable instructions for a period of one year from
shipment of the products. MILLIPORE MAKES NO OTHER WARRANTY, EXPRESSED OR IMPLIED.
THERE IS NO WARRANTY OF MERCHANTABILITY OR FITNESS FOR A PARTICULAR PURPOSE.
The warranty provided herein and the data, specifications and descriptions of Millipore products
appearing in Millipore’s published catalogues and product literature may not be altered except by
express written agreement signed by an officer of Millipore. Representations, oral or written, which
are inconsistent with this warranty or such publications are not authorized and if given, should not be
relied upon.
In the event of a breach of the foregoing warranty, Millipore’s sole obligation shall be to repair or
replace, at its option, the applicable product or part thereof, provided the customer notifies Millipore
promptly of any such breach. If after exercising reasonable efforts, Millipore is unable to repair or
replace the product or part, then Millipore shall refund to the customer all monies paid for such
applicable product or part. MILLIPORE SHALL NOT BE LIABLE FOR CONSEQUENTIAL, INCIDENTAL,
SPECIAL OR ANY OTHER INDIRECT DAMAGES RESULTING FROM ECONOMIC LOSS OR
PROPERTY DAMAGE SUSTAINED BY ANY CUSTOMER FROM THE USE OF ITS PRODUCTS.
Page 29/36
________________________________ ORDERING INFORMATION
Millipore’s Standard Warranty _____________________________
Page 30
* Only present on Simplicity 185.
Page 30/36
ILLUSTRATIONS __________________________________________
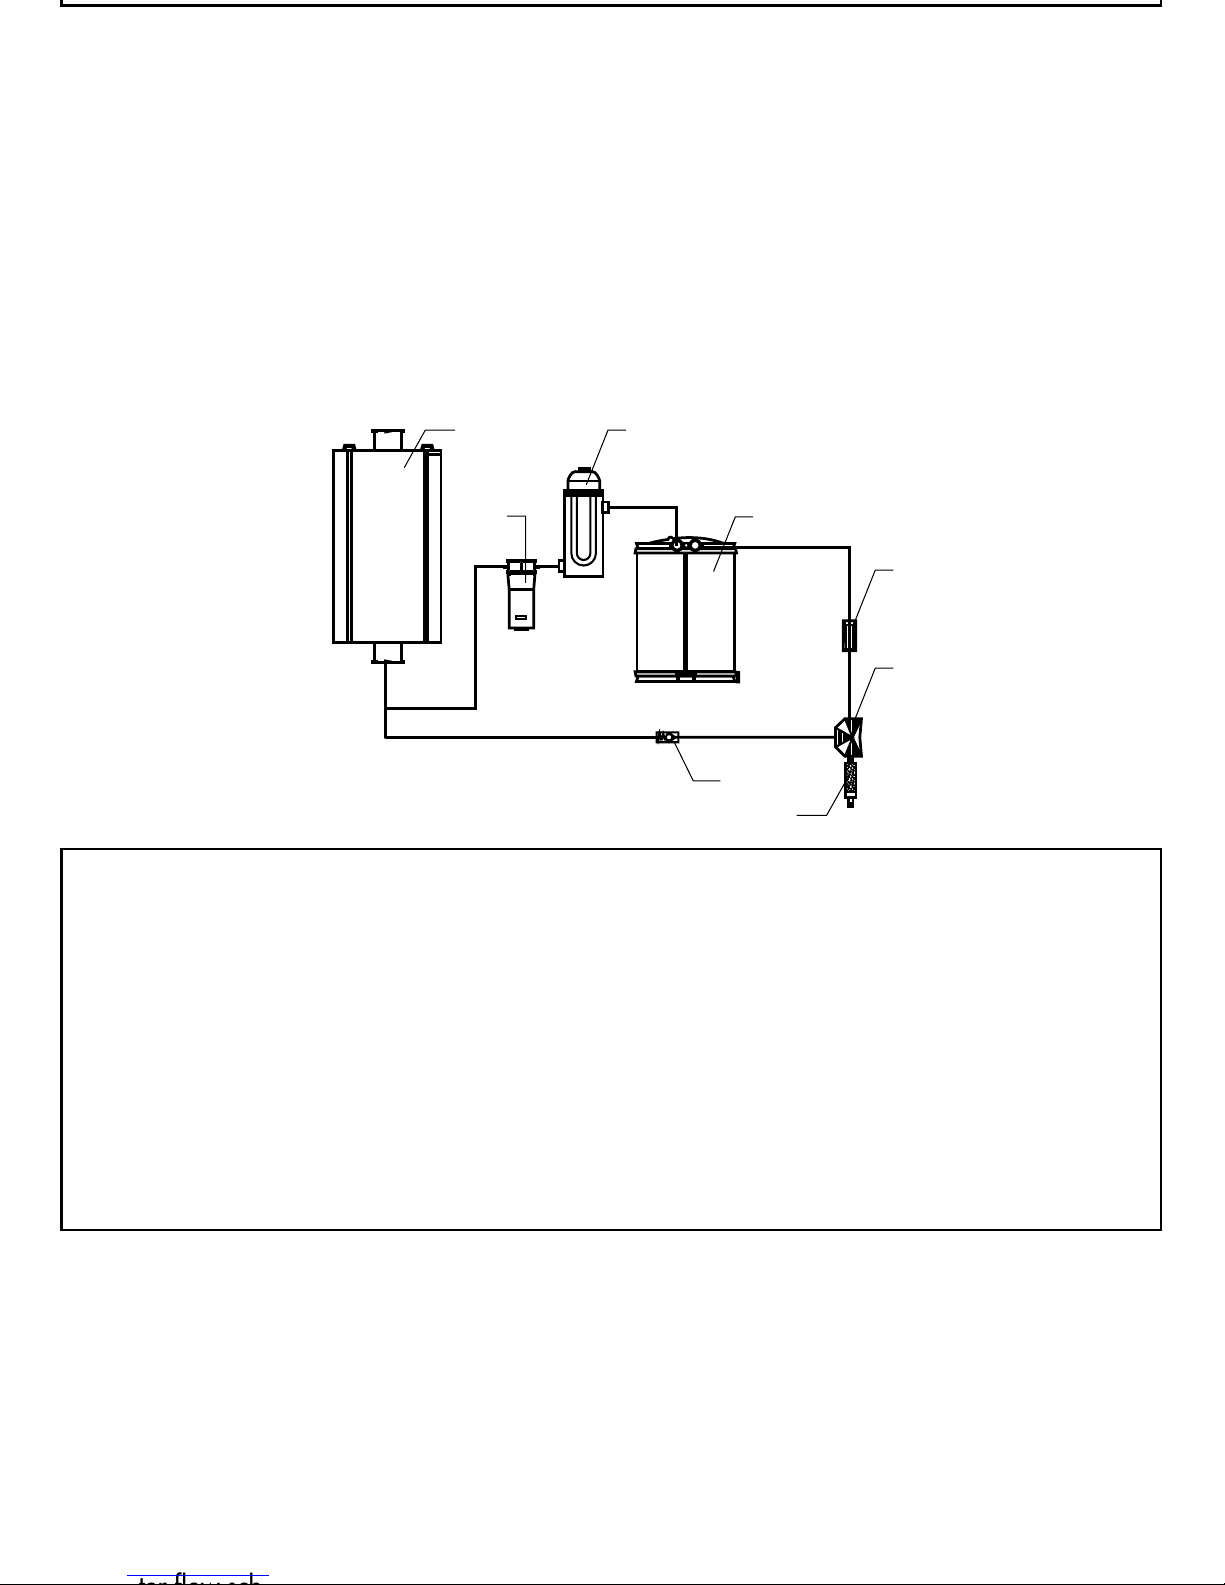
Figure 1
The water flow schematic of the Simplicity is shown below. Only the main components are shown.
13
2
4
5
6
7
8
Reservoir 1
Pump 2
* UV Lamp 3
Pak 4
Resistivity cell 5
Point of use with dispensing valve 6
Check valve 7
Final filter 8
* Only present on Simplicity 185.
Page 30/36
ILLUSTRATIONS __________________________________________
Figure 1
Page 31
Page 31/36
__________________________________________ ILLUSTRATIONS
Figure 2
A
B
MANUAL
MILLIPORE
D
C
E
F
Page 31/36
__________________________________________ ILLUSTRATIONS
Figure 2
Page 32
Page 32/36
ILLUSTRATIONS __________________________________________
Figure 3
A
B
D
Page 32/36
C
ILLUSTRATIONS __________________________________________
Figure 3
Page 33
Page 33/36
__________________________________________ ILLUSTRATIONS
Figure 4
E
A
B
C
__________________________________________ ILLUSTRATIONS
Figure 4
D
Page 33/36
Page 34
Page 34/36
ILLUSTRATIONS __________________________________________
Figure 5
A
B
Page 34/36
ILLUSTRATIONS __________________________________________
Figure 5
Page 35
Page 35/36
__________________________________________ ILLUSTRATIONS
Figure 6
A
B
Page 35/36
__________________________________________ ILLUSTRATIONS
Figure 6
Page 36

Tel. (852) 2803-9111
Fax (852) 2513-0313
Fax (06) 52.95.735
Page 36/36
To Place an Order or Receive Technical Assistance
For additional information call the nearest number listed below:
In the U.S. and Canada, call toll-free 1-800-MILLIPORE (1-800-645-5476)
In the U.S., Canada and Puerto Rico, fax orders toll-free 1-800-MILLIFX (1-800-645-5439)
On the Internet http://www.millipore.com
E-mail: [email protected]
Fax +1 (781) 533-8630
Millipore Worldwide
AUSTRALIA
Tel. 1 800 222 111
or (02) 9888 8999
Fax (02) 9878 0788
AUSTRIA, CENTRAL EUROPE,
C.I.S., AFRICA, MIDDLE EAST
AND GULF
Tel. (43) 1 877-8926
Fax (43) 1 877-1654
BALTIC COUNTRIES
Tel. 358-9-804 5110
Fax 358-9-256 5660
BELGIUM AND
LUXEMBOURG
Tel. (02) 726 88 40
Fax (02) 726 98 84
BRAZIL
Tel. (011) 548-7011
Fax (011) 548-7923
CANADA
Tel. 1-800-645-5476
Fax 1-800-645-5439
CHINA, PEOPLE’S
REPUBLIC OF
Beijing:
Tel. (8610) 6500-8063
Fax (8610) 6500-7372
Guangzhou:
Tel. (8620) 8755-4021
Fax (8620) 8755-4350
Hong Kong:
Tel. (852) 2803-9111
Fax (852) 2513-0313
Shanghai:
Tel. (8621) 5306-9100
Fax (8621) 5306-0838
CZECH REPUBLIC
Tel. 02-205 138 41
02-205 138 42
Fax 02-205 14294
DENMARK
Tel. 70 10 00 23
Fax 70 10 13 14
FINLAND
Tel. (09) 804 5110
Fax (09) 256 5660
FRANCE
Tel. (01) 30.12.70.00
Fax (01) 30.12.71.80
GERMANY
Tel. (06196) 494-0
Fax (06196) 43901
HUNGARY
Tel. 1-205 9784
Fax 1-205 9792
INDIA
Tel. (91) 80-839 46 57
Fax (91) 80-839 63 45
ITALY
Vimodrone (Milano):
Tel. (02) 25.07.81
Fax (02) 26.50.324
Roma:
Tel. (06) 52.03.600
Fax (06) 52.95.735
JAPAN
Tel. (03) 5442-9711
Fax (03) 5442-
9736 Analytical
9737 BioProcess
9734 Lab Water
KOREA
Tel. (822) 551-0990
Fax (822) 551-0228
MALAYSIA
Tel. 603-757 1322
Fax 603-757 1711
MEXICO
Tel. (525) 576-9688
Fax (525) 576-8706
THE NETHERLANDS
Tel. 076-5022000
Fax 076-5022436
NORWAY
Tel. 22 67 82 53
Fax 22 66 04 60
POLAND
Tel. 22-669 12 25
22-663 70 31
Fax 22-663 70 33
PUERTO RICO
Tel. (787) 273-8495
Fax (787) 747-6553
SINGAPORE
Tel. (65) 842 1822
Fax (65) 842 4988
SPAIN AND PORTUGAL
Madrid:
Tel. 917 283 960
Fax 917 292 909
Barcelona:
Tel. 934 525 530
Fax 934 516 048
SWEDEN
Tel. 08-628 69 60
Fax 08-628 64 57
SWITZERLAND
Volketswil:
Tel. (01) 908-30-60
Fax (01) 908-30-80
Lausanne:
Tel. (021) 648 51 18
Fax (021) 648 51 37
TAIWAN
Taipei:
Tel. (886-2) 700-1742
Fax (886-2) 755-3267
Hsin Chu City:
Tel. (886-3) 571-0178
Fax (886-3) 572-9520
U.K. AND IRELAND
Tel. (01923) 816375
Fax (01923) 818297
U.S.A.
Tel. (781) 533-6000
Fax (781) 533-3110
OTHER COUNTRIES
Millipore Intertech (U.S.A.)
Tel. +1 (781) 533-8622
Fax +1 (781) 533-8630
To Place an Order or Receive Technical Assistance
For additional information call the nearest number listed below:
Page 36/36
 Loading...