

Page 1

Notice
The information contained in this document is subject to change without notice.
Milletech makes no warranty of any kind with regard to this manual, including, but not
limited to, the implied warranties of merchantability and fitness for a particular purpose.
Milletech shall not be liable for any errors or for incidental or consequential damage in
connection with the furnishing, performance, or use of this manual.
All right reserved. Reproduction, adaptation, or translation of this manual is prohibited
without prior written consent of Milletech, except as allowed under the copyright laws.
Microsoft, Microsoft ActiveSync, Pocket PC, Outlook, Windows, and the Windows logo
are either registered trademarks or trademark of Microsoft Corporation in the United
States and/or other countries. Microsoft products are licensed to OEMs by Microsoft
Licensing, Inc., a wholly owned subsidiary of Microsoft Corporation.
All other brand names and product names used in this manual are the trade names,
service marks, trademarks, or registered trademarks of their respective owners.
Copyright©2003 Milletech Co., Ltd.
All rights reserved. Milletech, Io, Milletech logo and the Io logo are trademarks of
Milletech Co., Ltd., and may be registered in jurisdiction.
1
Page 2

Using This User’ s Guide
Thank you for buying the IO, the Microsoft Windows CE-powered device. The IO lets
you keep well organized with managing your business and personal information. You
will notice that IO has many of the same characteristics with Microsoft Windows. So you
can become familiar with the functionality of your IO and benefit from quick access to
essential information, interface with your desktop PC applications. Enjoy the
convenience and portability of IO.
This User Guide provides you quick and effective introduction for use of IO. It
describes all you need to know about how to use your device and the programs on your
IO. For more information, see the online Help on your IO.
Conventions Explanation
Some conventions may be used in this User’ s Guide that will help you get the
additional or highlight important information about the topic.
Warning(
): Caution or warning information about the topic. This is important
information that should be observed to prevent loss of data or damage to the IO.
Note(
) : Helpful information or a another way to do something about the topic.
2
Page 3

Table of Contents
Chapter 1. Getting Started
1.1.Introducing the Io
1.2.Io Hardware Features
1.3.Charging the Battery
1.4. Using the Stylus
1.5. Entering Data
1.6. Taskbar and Command bars
1.7. Configuring Settings Options
1.8. Using PC Cards
Chapter 2. Microsoft ActiveSync
2.1. Setting up Microsoft ActiveSync
2.2. Connecting to Your Desktop PC
2.3. Synchronizing Data
2.4. Browsing your Io on Your Desktop PC
2.5. Backing up and Restoring Data
2.6. Adding or Removing Programs
Chapter 3. Microsoft Outlook Applications
3.1. Calendar : Keeping Appointments and Meetings
3.2. Contacts : Managing Friends and Colleagues
3.3. Tasks : Keeping to Do List
3.4. Inbox : Sending and Receiving E-mail Message
Chapter 4. Companion Programs
4.1. Pocket Word
4.2. Spreadsheet
4.3. Microsoft File Viewers
4.4. Internet Explorer
4.5. Media Player
4.6. Inbox
4.7. Voice Recorder
4.8. Screen Rotation
4.9. IPSM
3
Page 4

4.10. Game
Chapter 5. Remote Connections
5.1 Connecting to an ISP
5.2 Connecting to Your Network
5.3 Connecting Directly to an E-mail Server
Chapter 6. Tips & Troubleshooting
Appendix A: Hardware Specification
Appendix B : Limited Warranty
FCC Statement
4
Page 5
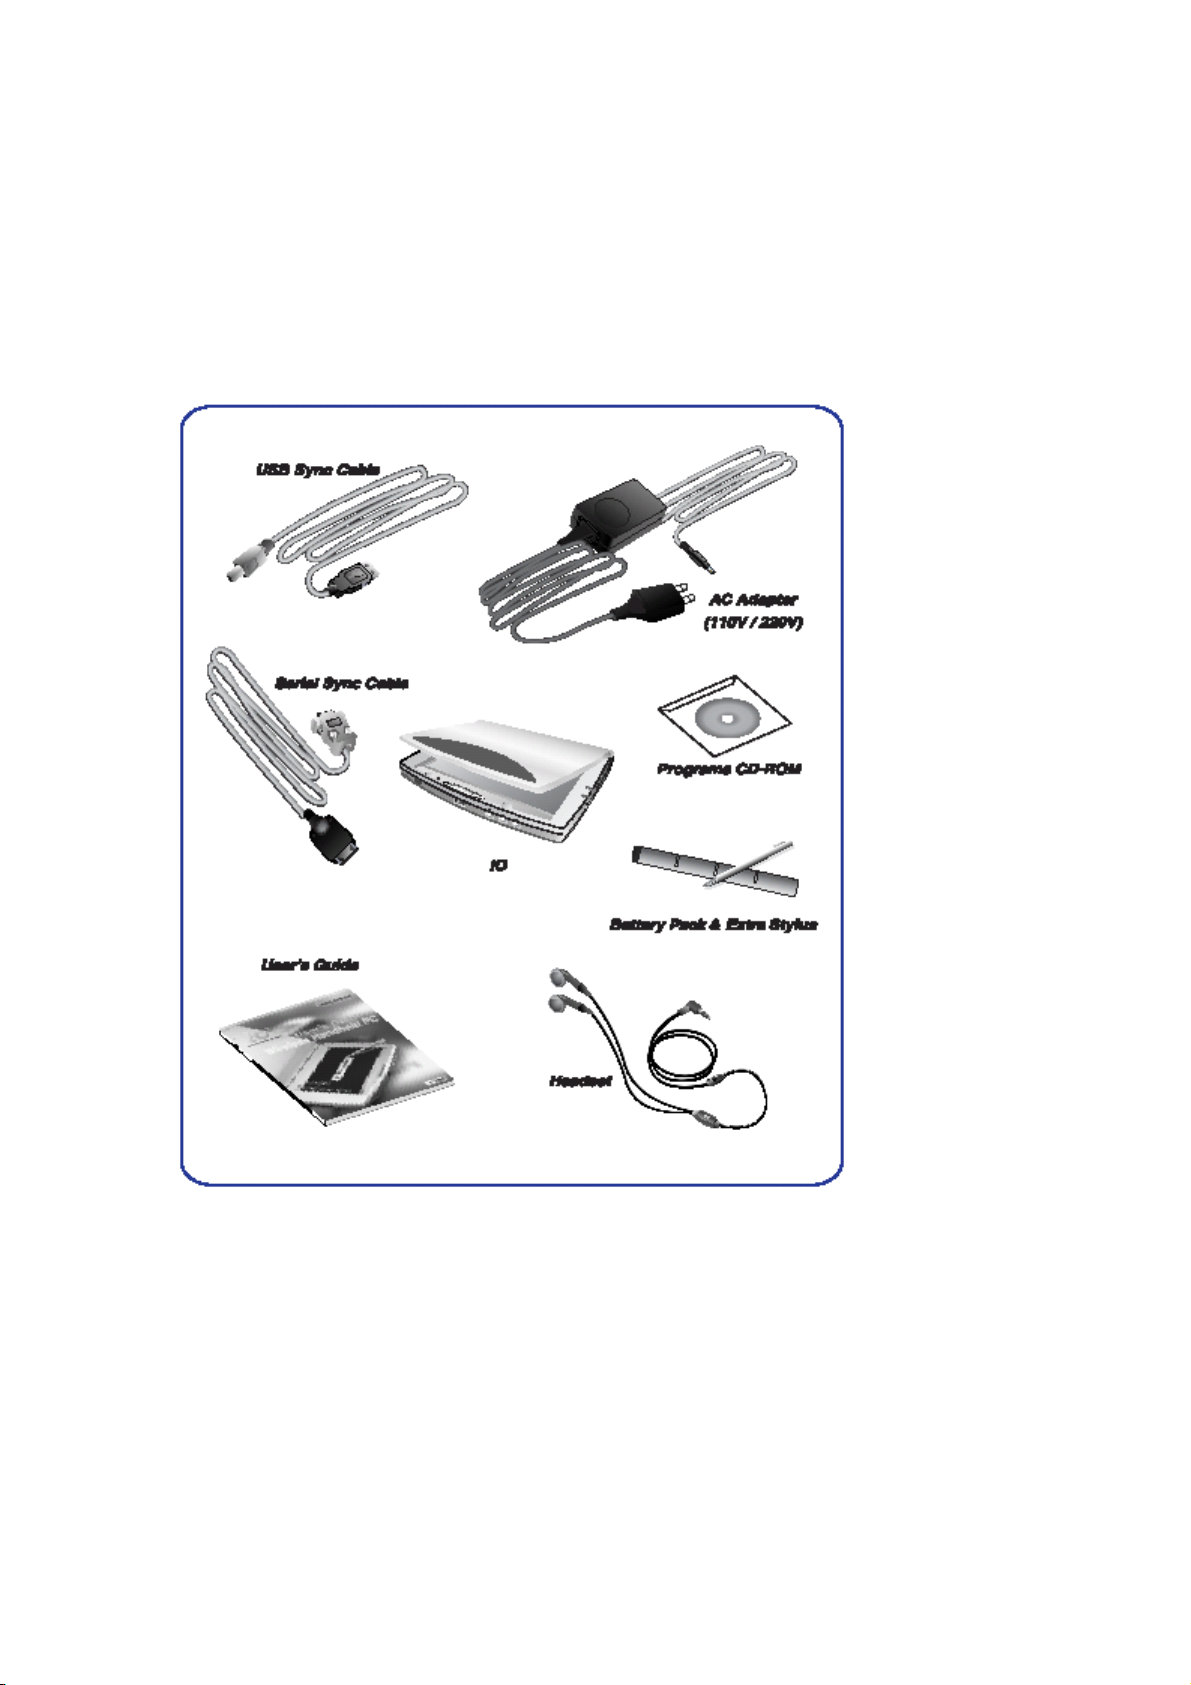
Chapter 1. Getting Started
1.1. Introducing the Io
Here’ s what comes in the box. Before you start, check that your package contains the
following items.
5
Page 6
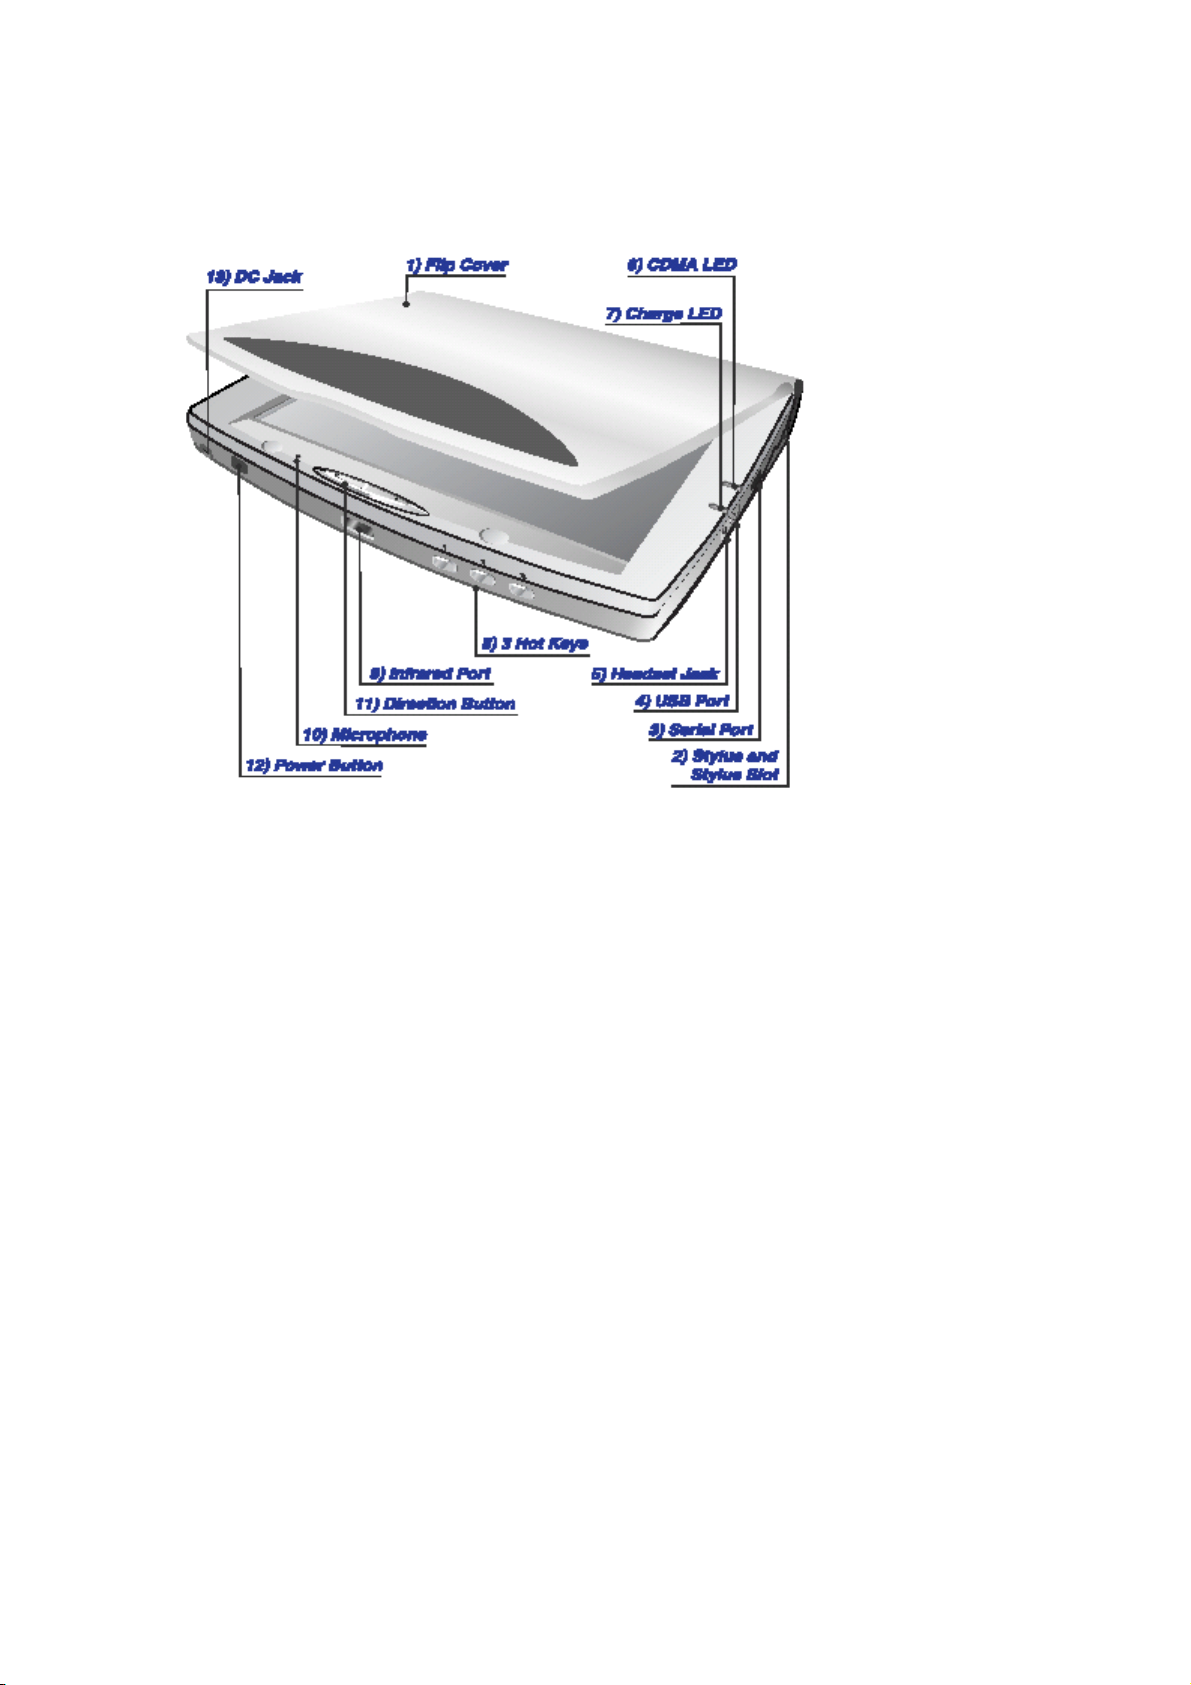
1.2. Io Hardware Features
1. Flip Cover
The cover protects the LCD when it is not in use.
2. Antenna Hole
You can build CDMA module into your Io optionally, and then antenna will be
equipped in the hole.
3. Stylus and Stylus Slot
Allows you tap items or write on the screen.
4. Serial Port
Connect to your desktop PC to transfer files or synchronize data by serial
connection.
5. USB Port
Connect to your desktop PC to transfer files or synchronize data by USB connection.
6. Earphone Jack
Listen to the stereo sound using earphone.
7. CDMA LED
When you connected by optional CDMA module, a steady green light stays on
indicating connection in progress.
8. Charge LED
A red light indicates charging the battery while connected to AC adapter.
6
Page 7
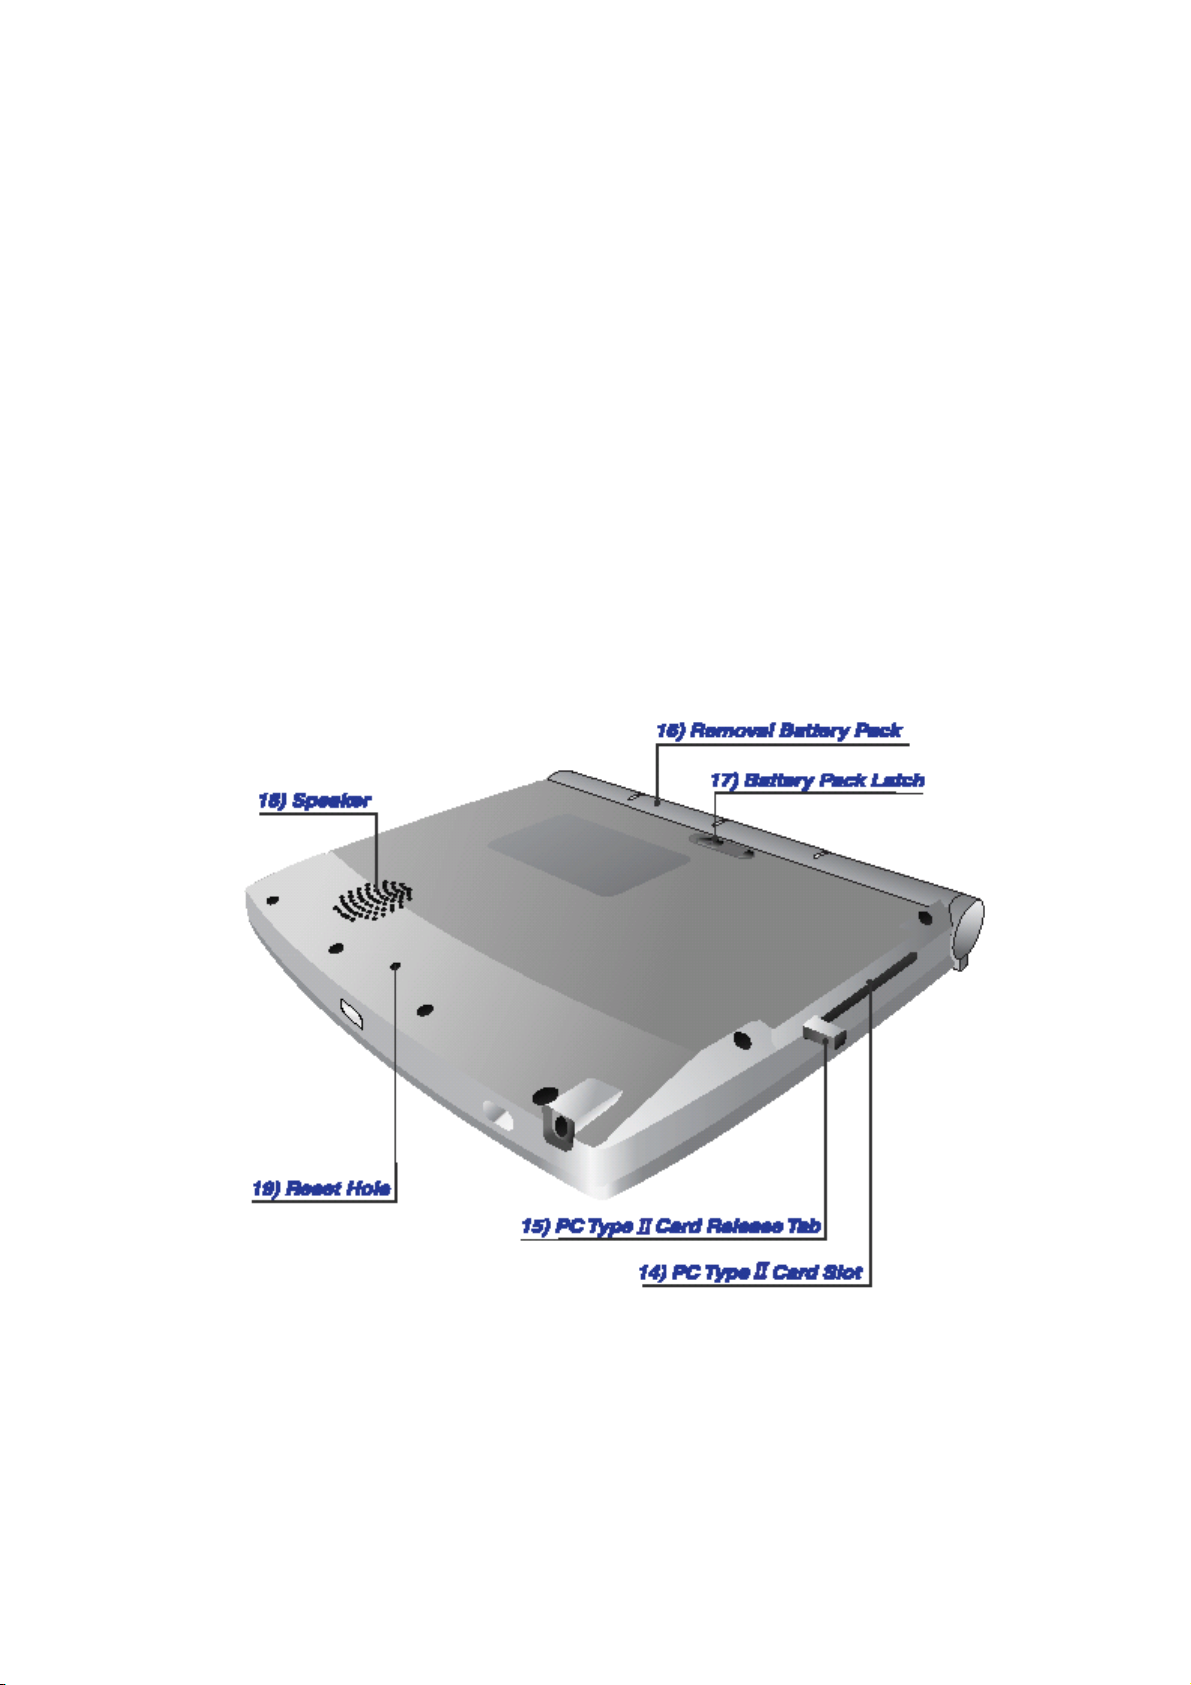
9. Hot Key
Allows you to quickly start 3 applications. Also you can change the functions of the
hot key to open different applications.
10. Infrared Port
Exchange data by infrared beam between your Io and other infrared-equipped
device.
11. Microphone
Allows you to record a sound files, such as voice memos.
12. Direction Button
Press it left and right to select the items.
13. Power Button
Turn on and turn off your Io. Just press power button to suspend operation, and
later when you turn it on, you can start working exactly where you left.
14. DC Jack
Connect to your Io to AC adapter to charge the battery.
15. PC Type II Card Slot
Insert a PC Card to expand memory or add other PC Card accessories.
16. PC type II Card Release Tab
7
Page 8

Press it to eject a PC Card from the PC Card slot.
17. Battery Pack
Rechargeable Li-Ion battery that provides power to your Io.
18. Battery Latch
Slide the latch in the direction of the arrow to install or remove the battery.
19. Speaker
Allows you to listen to sound.
20. Reset Hole
Restart your Io with the touch of a hole.
1.3. Setting Up the IO
Turning the IO On and Off
Using the power button, you can start and stop the operation of your IO. You can start
working immediately by pressing the power button on the front of your IO. When you
are finished, turn off your IO by pressing the power button or taping Suspend on the
Start menu. Turning off IO means suspending system operations not closing the system.
When you power on your IO, you will resume at the same point as when you suspended
operation.
You can also set IO setting options to auto-suspend or to turn it off after a preset
period time of continuous idle time. It allows you to save battery power. Tap settings,
Control Panel, Power and then tap Power Off tab.
Resetting the system
If your IO responds slowly or freezes, try resetting it to restart the system. Unsaved
data in open windows may be lost. There are two ways of resetting ; soft reset and
hard reset. Soft reset is similar to rebooting your desktop PC. To perform a soft reset,
using the stylus press reset hole in the rear of IO, and then the system restarts.
8
Page 9
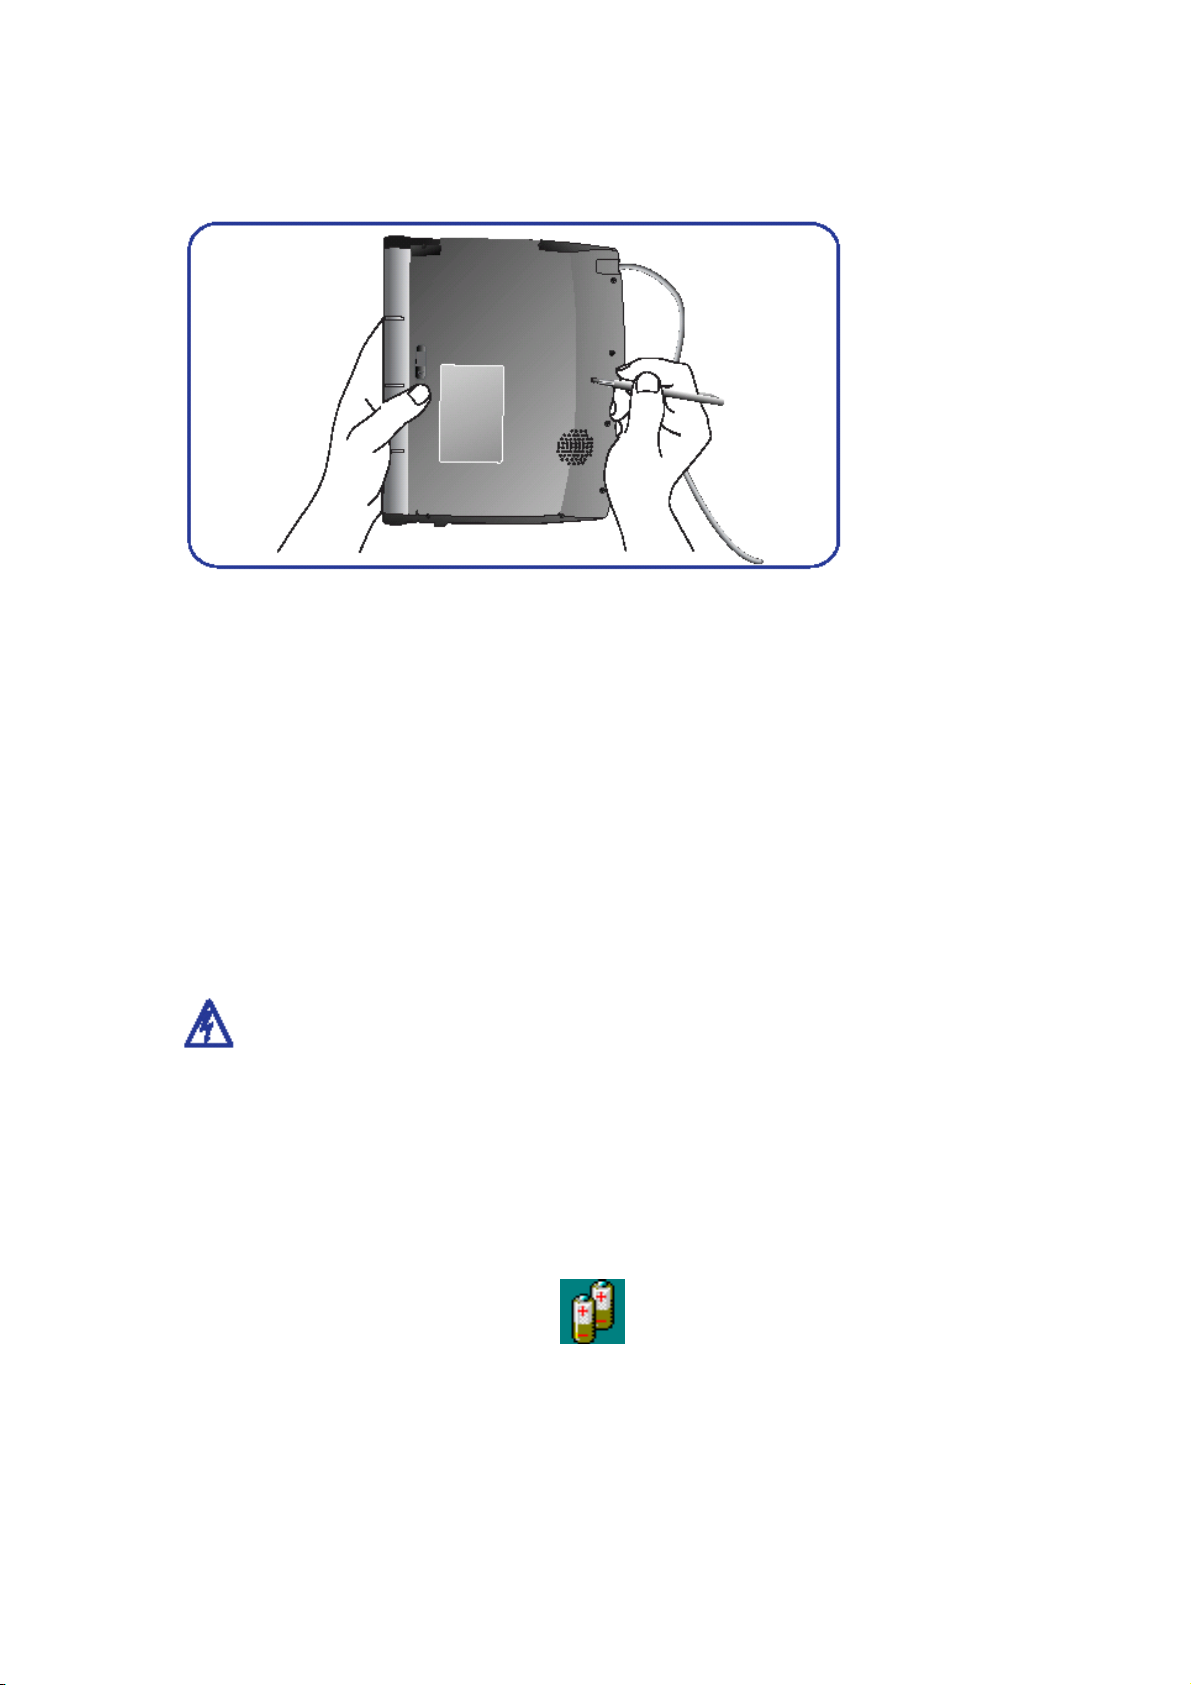
One another way to reset is a hard reset. If you forget your password on your
documents or want to clear all information from your IO, you should hard reset your IO.
After you perform a hard reset, all the memory on your IO are cleared and IO returns
to the factory settings.
Perform a hard reset as follows ;
-Remove the battery from your IO and wait least 1 minute, and then install the battery
again.
-Press the power button and simultaneously press the reset hole.
: Hard Reset deletes all data and programs created on your IO, and restores the
IO to its default settings. So using an ActiveSync, backup copy and restore of your
data.
For more information, see ActiveSync Help on your desktop PC.
1.4. Charging the Battery
The IO comes with a rechargeable Li-Ion battery. When the battery charge are low, you
will see the low battery warning icon
in the status area. If the battery level
becomes too low, the Io will automatically switch off and any information in progress
will not be saved. Recharge your battery immediately before you lose data on your Io.
9
Page 10
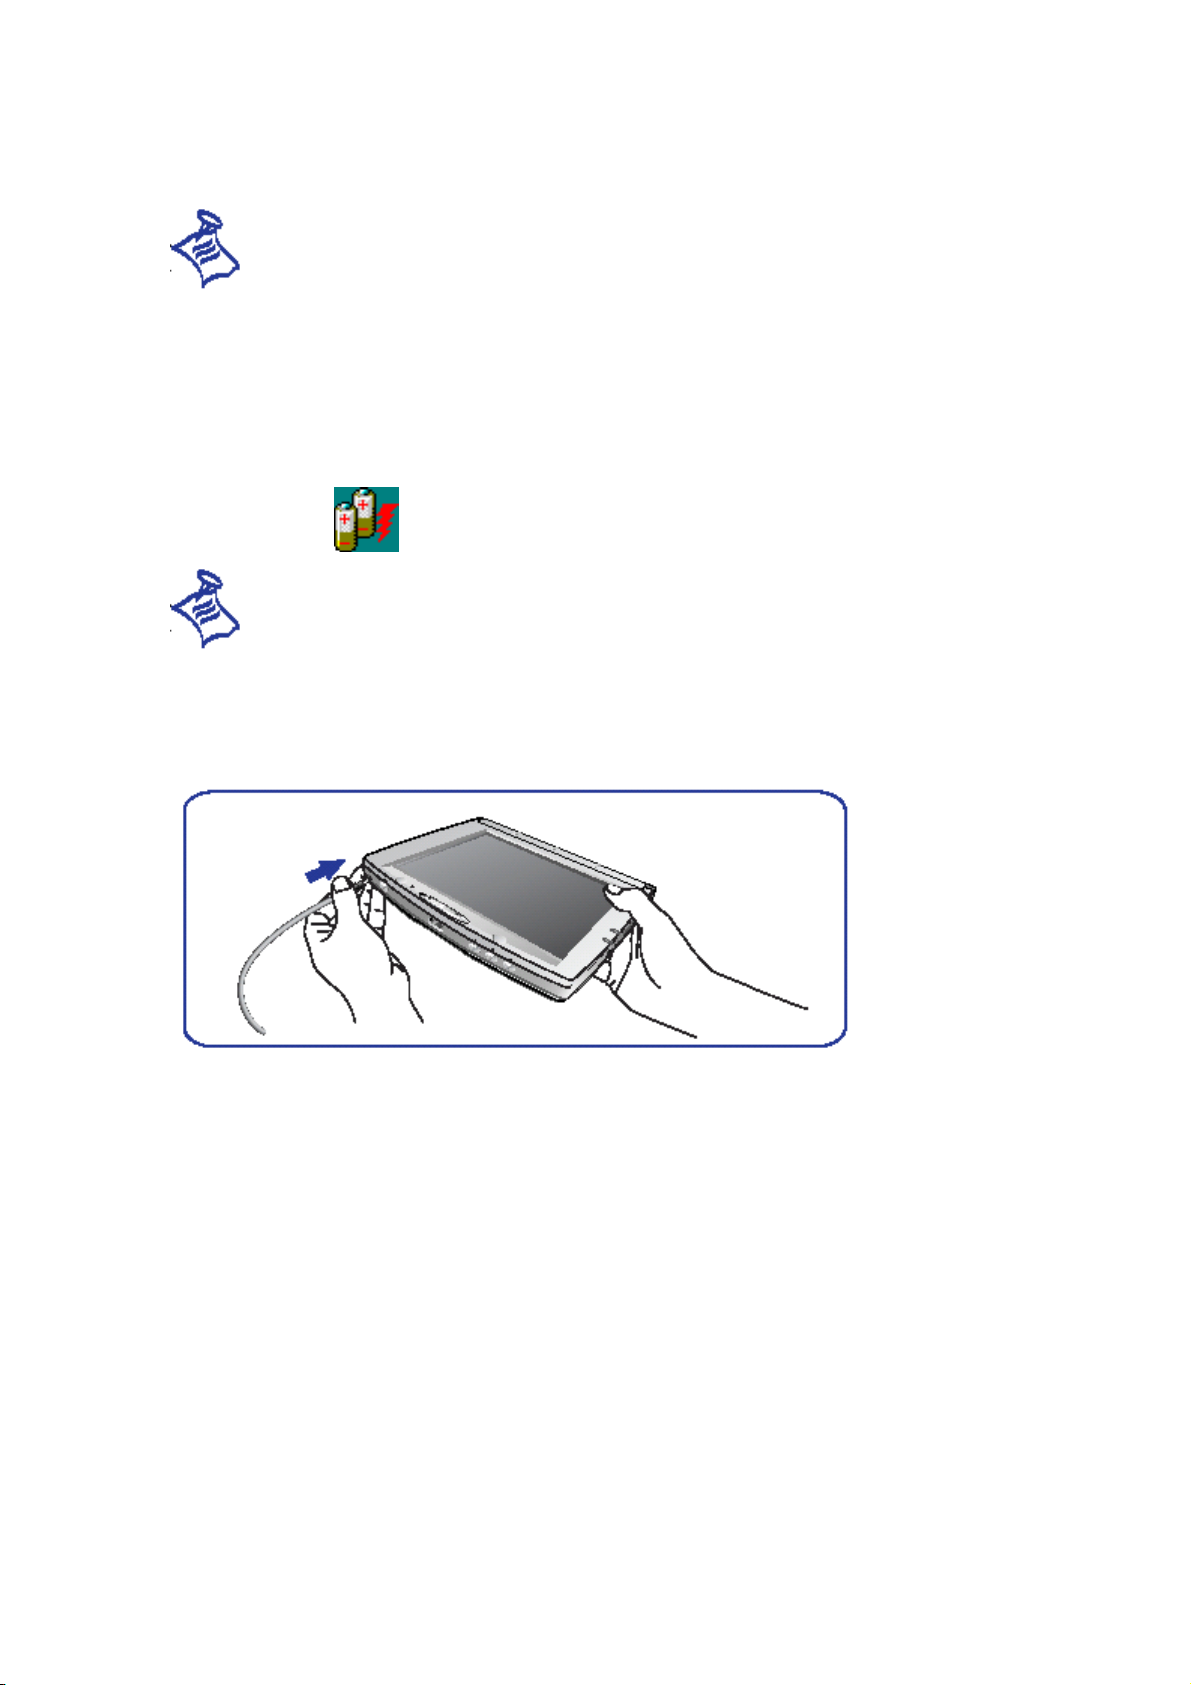
: The battery is delivered partially charged. So before using the Io for the first
time, you must fully charge the battery.
Connecting the AC Adapter
To charge the battery, you must connect to the AC adapter that comes with your Io.
While your Io is connected to AC adapter, the LED stays on indicating the battery is
charged and the
: To understand icons in the status area of your IO, select Help, Windows CE
Basics, Understanding Taskbar Icons.
To Connect to an AC Adapter
1. Plug the power cable to the one end of AC adapter.
2.
Connect the AC adapter cable to the DC jack on the front of your Io.
3. Plug the end of power cable into a wall outlet, then you will see a red light on
icon displays in the status area.
the Charge LED indicating Io is being charged.
Removing and Installing the Battery Pack
To Remove the Battery, Perform the following Steps ;
1. Connect IO to the AC adapter
2. Save any active data and turn the IO off
3. Lift the cover down your IO.
4. Gently press the battery pack latch in direction of arrow and simultaneously hold the
battery pack and pull up.
10
Page 11
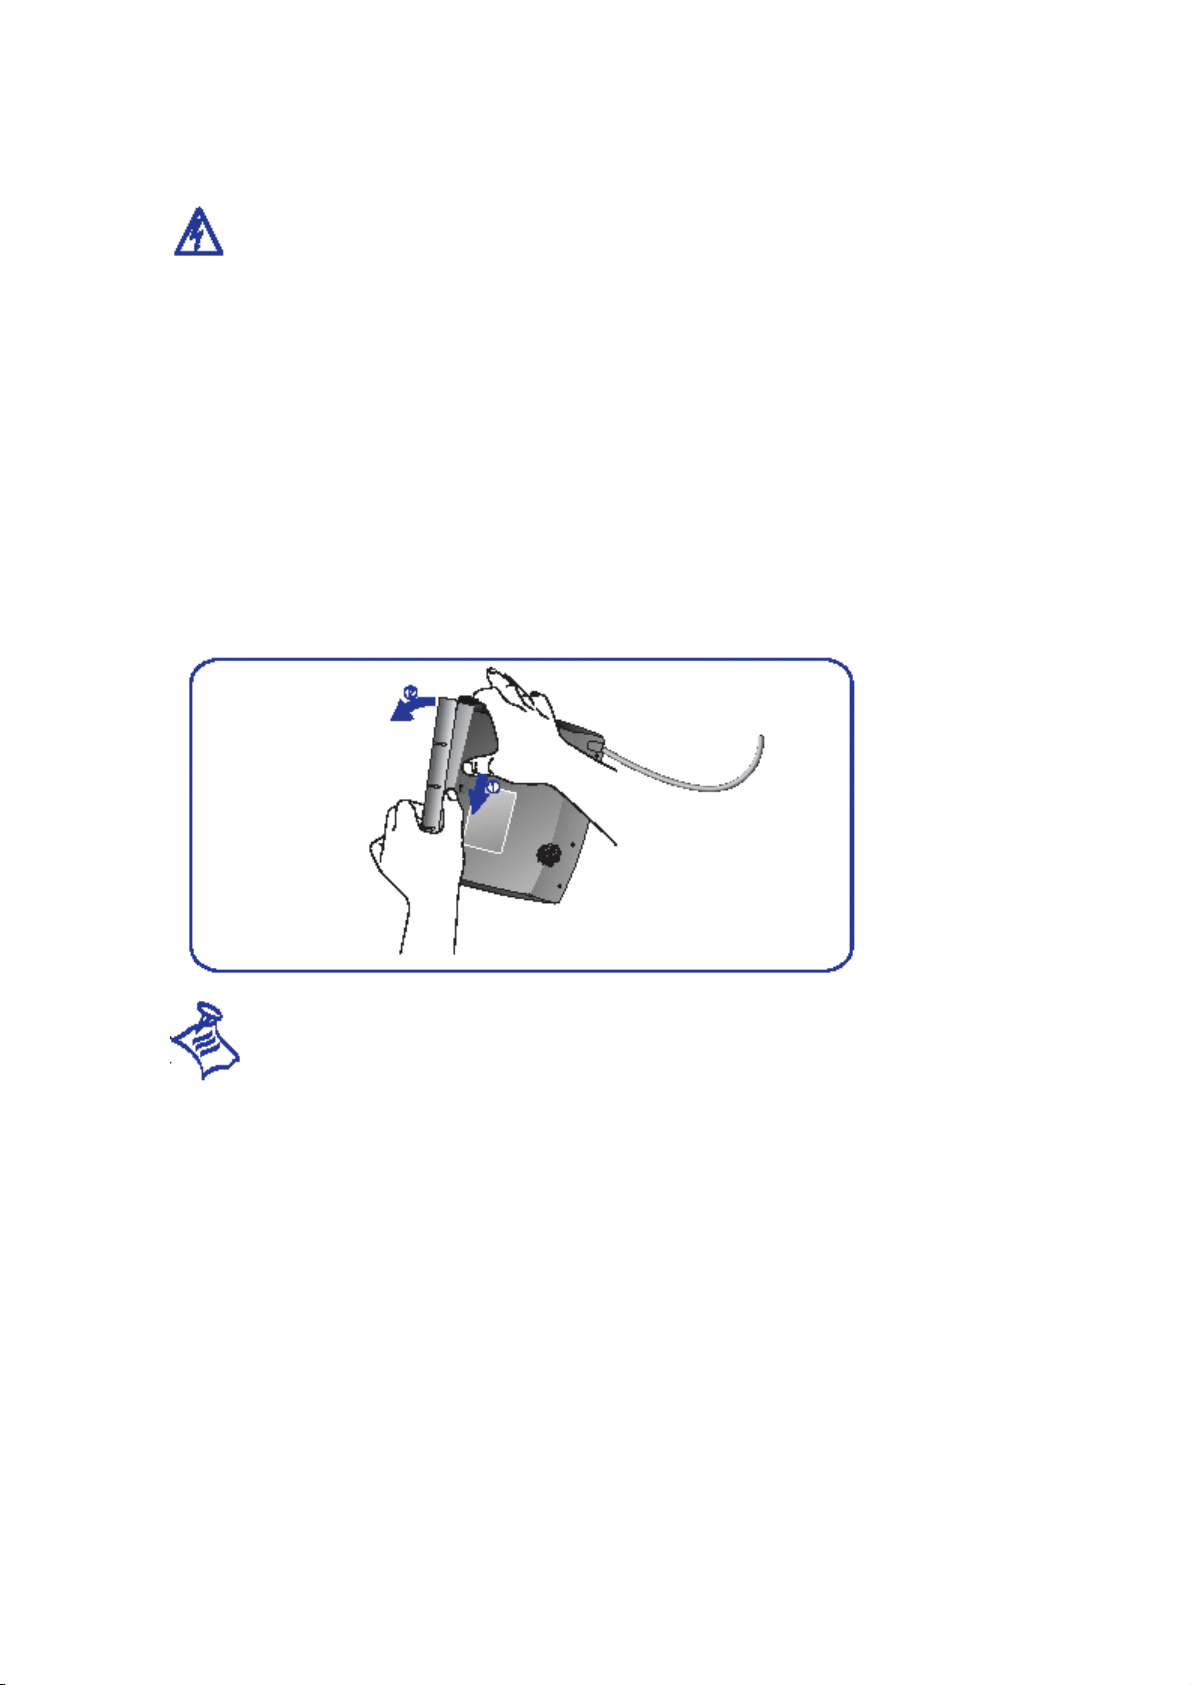
: Before you remove the battery from your IO, connect the IO to AC adapter. If
not, you must lose all data on your IO.
To Install the Battery
1. Lift the cover down your Io.
2. Gently press the battery latch on the bottom of Io.
3. Place the battery in the battery slot on the bottom of your Io and push them
firmly until it drops into place.
4. Make sure that battery fits into the side of your Io.
: If the battery’s performance has degraded (e.g., the battery’s charge lasts
only half as long as when it was new), consider replacing your worn battery with a new
battery.
1.5. Using the Stylus
Use the stylus like using a mouse to select objects on the screen. You can tap and drag
objects on the Io screen and enter the information on the screen. These are the basic
actions to get things done on your Io.
The following actions are available with stylus :
- Tap : Touch the stylus once on the screen to select a item or activate a button.
- Double-tap : Double-tap on the screen like a double-clicking on a mouse.
11
Page 12

- Drag : Hold the stylus on the screen and drag.
: Always use the point of stylus for tapping or making a select on the touch
screen, except actual pen, pencil or other sharp objects.
1.6. Entering Data
Using the Input Panel
Io includes the Input Panel to ender data on your documents. When you type using the
on-screen keyboard, the typed word appears at the insertion point. Tap the input panel
icon on the status area to open or hide the input panel.
12
Page 13
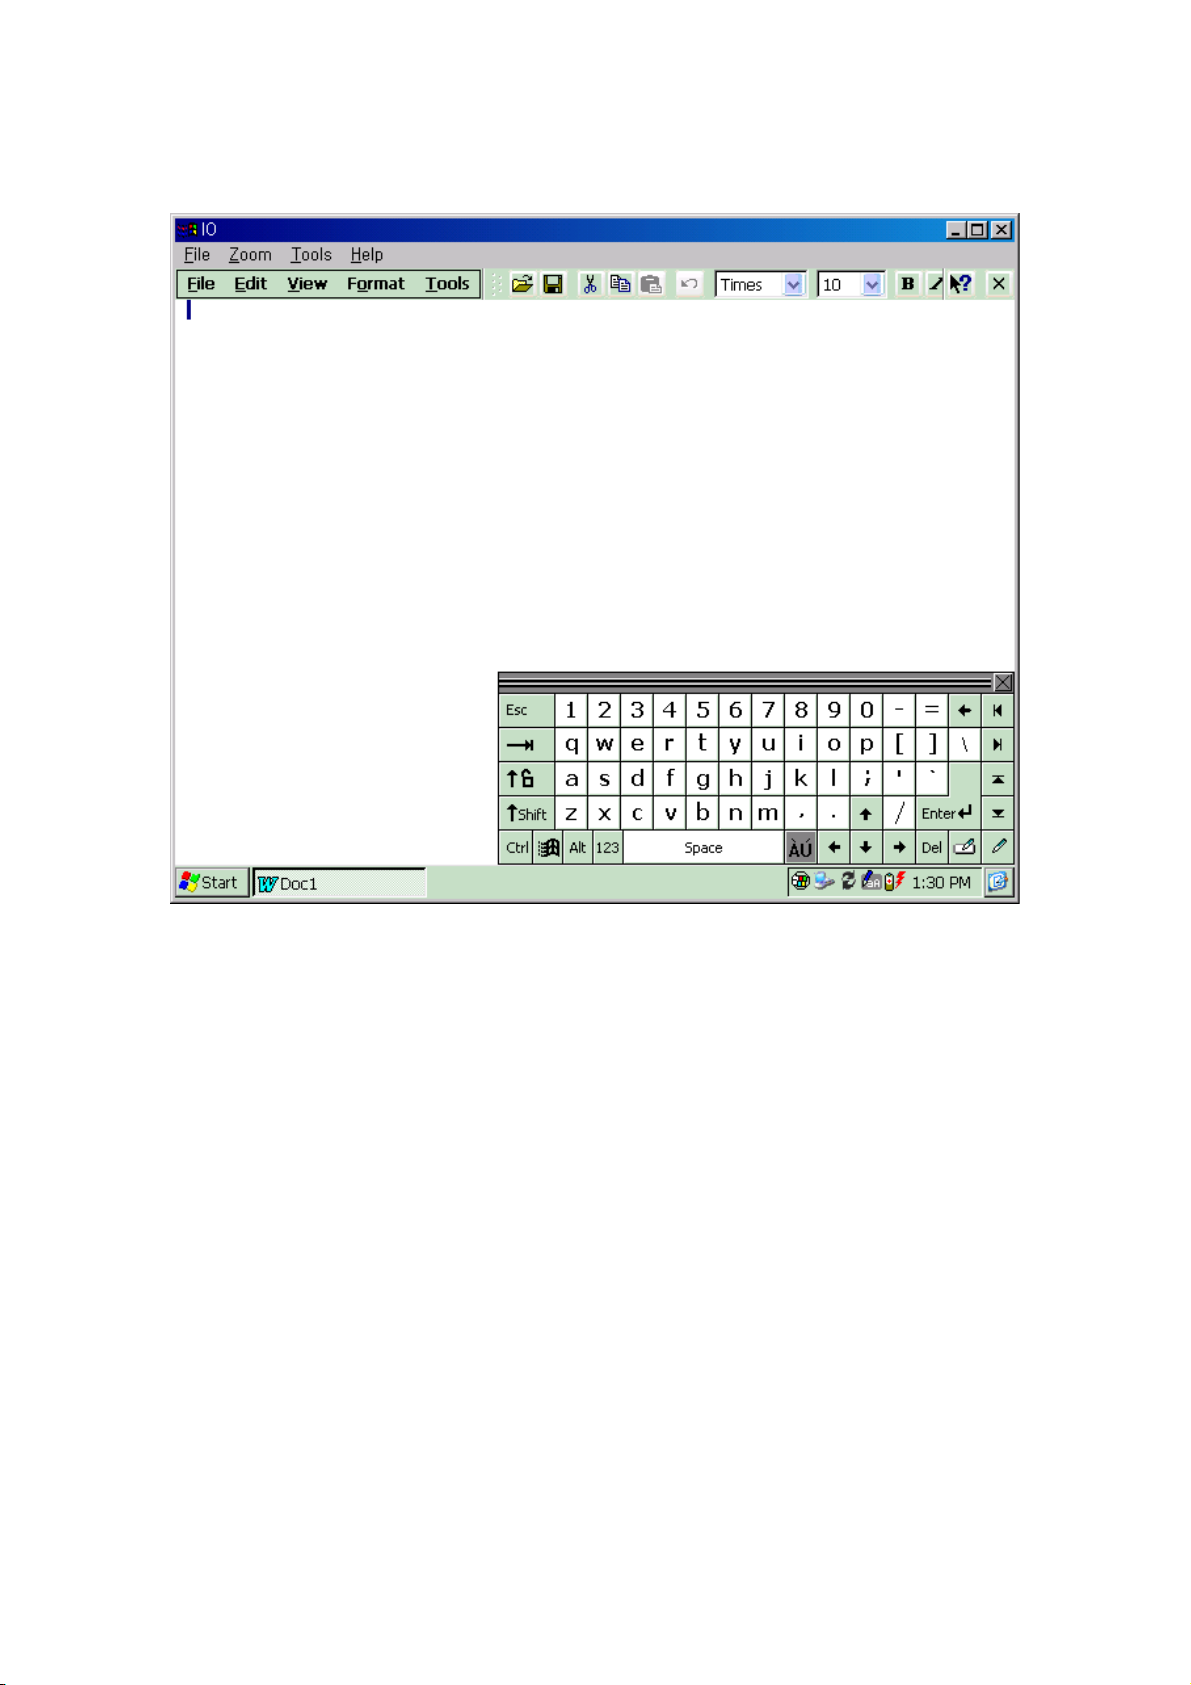
To Type On-screen Keyboard
1. Open any programs.
2. Tap the Input Panel icon in the status area.
3. Tap the letter with your stylus on the soft keyboard that displays.
4. It is inserted in the documents.
5. After you finish, tap the close button.
The default writing mode for on-screen keyboard is lowercase mode including
numbers. Pressing the CAP tab, you can use the uppercase mode that displays capital
letters and special characters. When you want to return to the lowercase mode, tap
CAP tab again. And, also you can use the uppercase mode pressing the Shift tab, but it
automatically returns to lowercase mode immediately.
13
Page 14
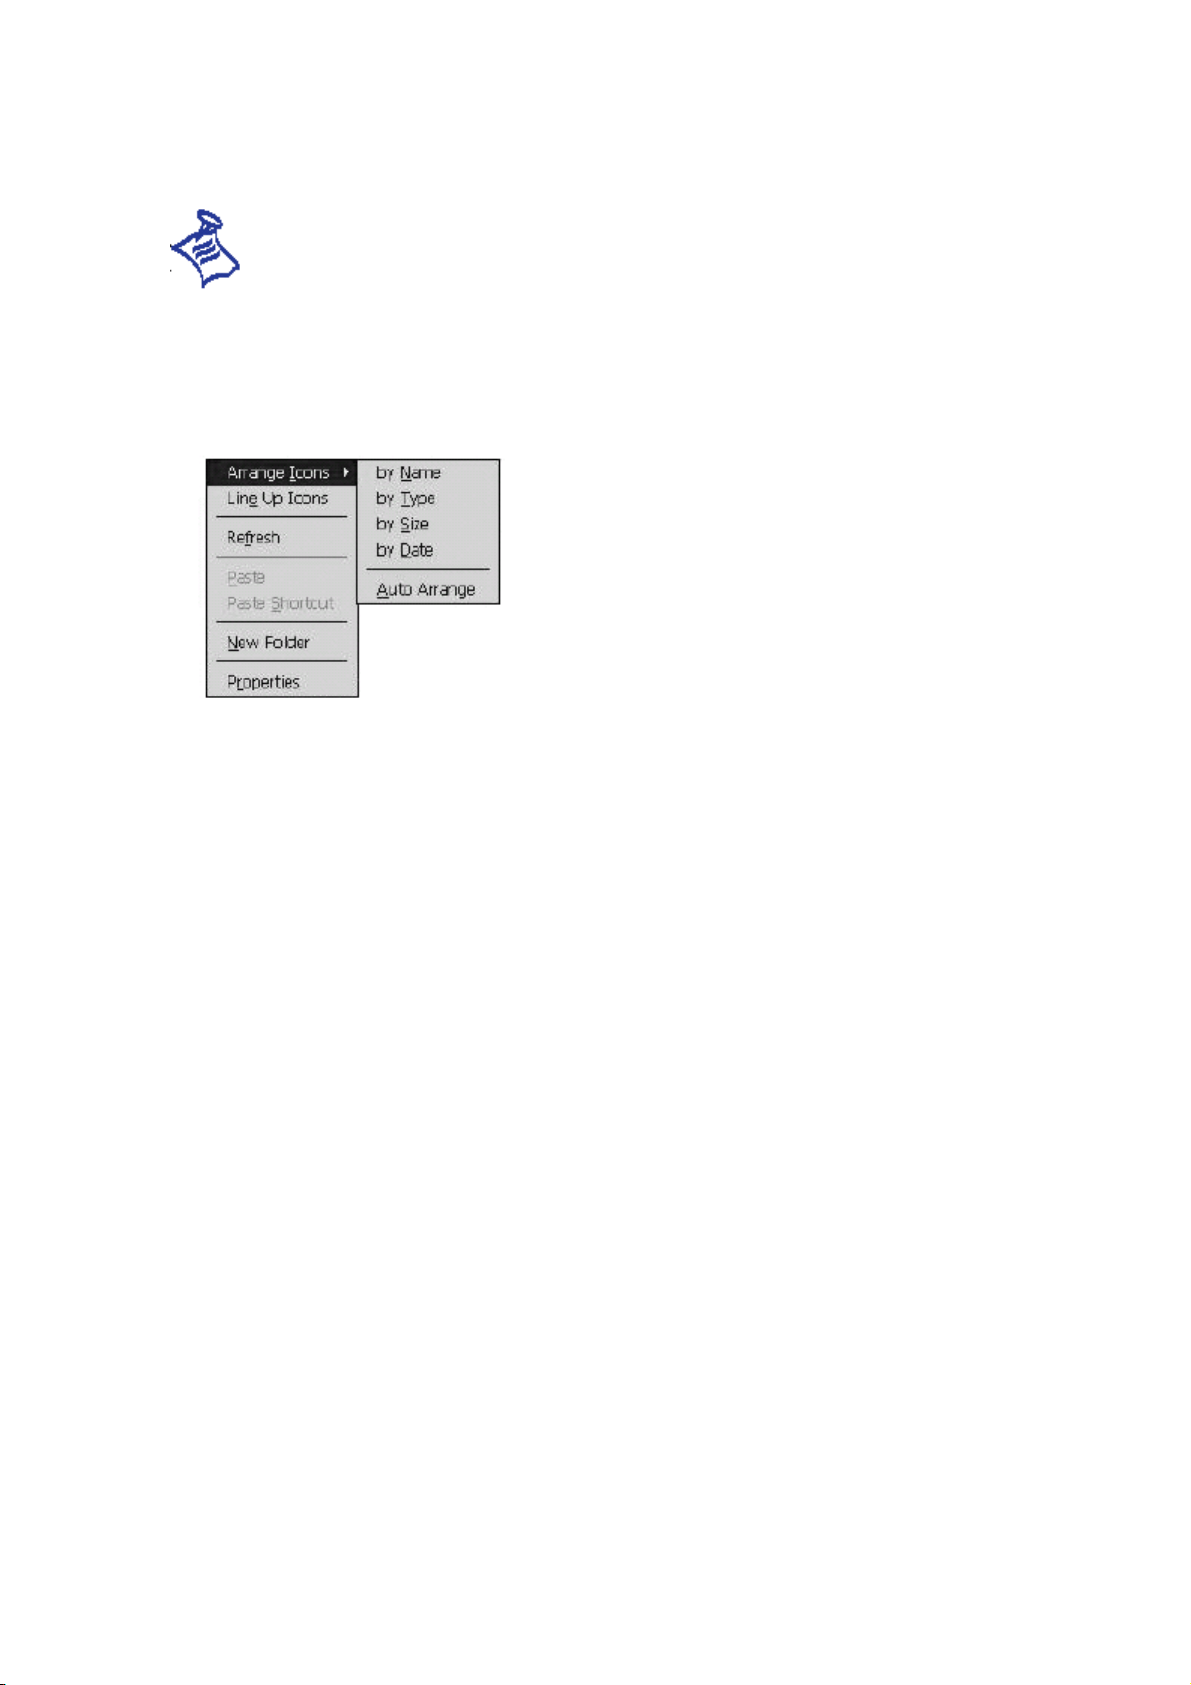
: you can use the CAP, Shift and Ctl tab like a left mouse button. While you tap
each them, the pop-up menu appears when you hold the stylus on the icon or on the
screen.
1.7. Taskbar and Command Bars
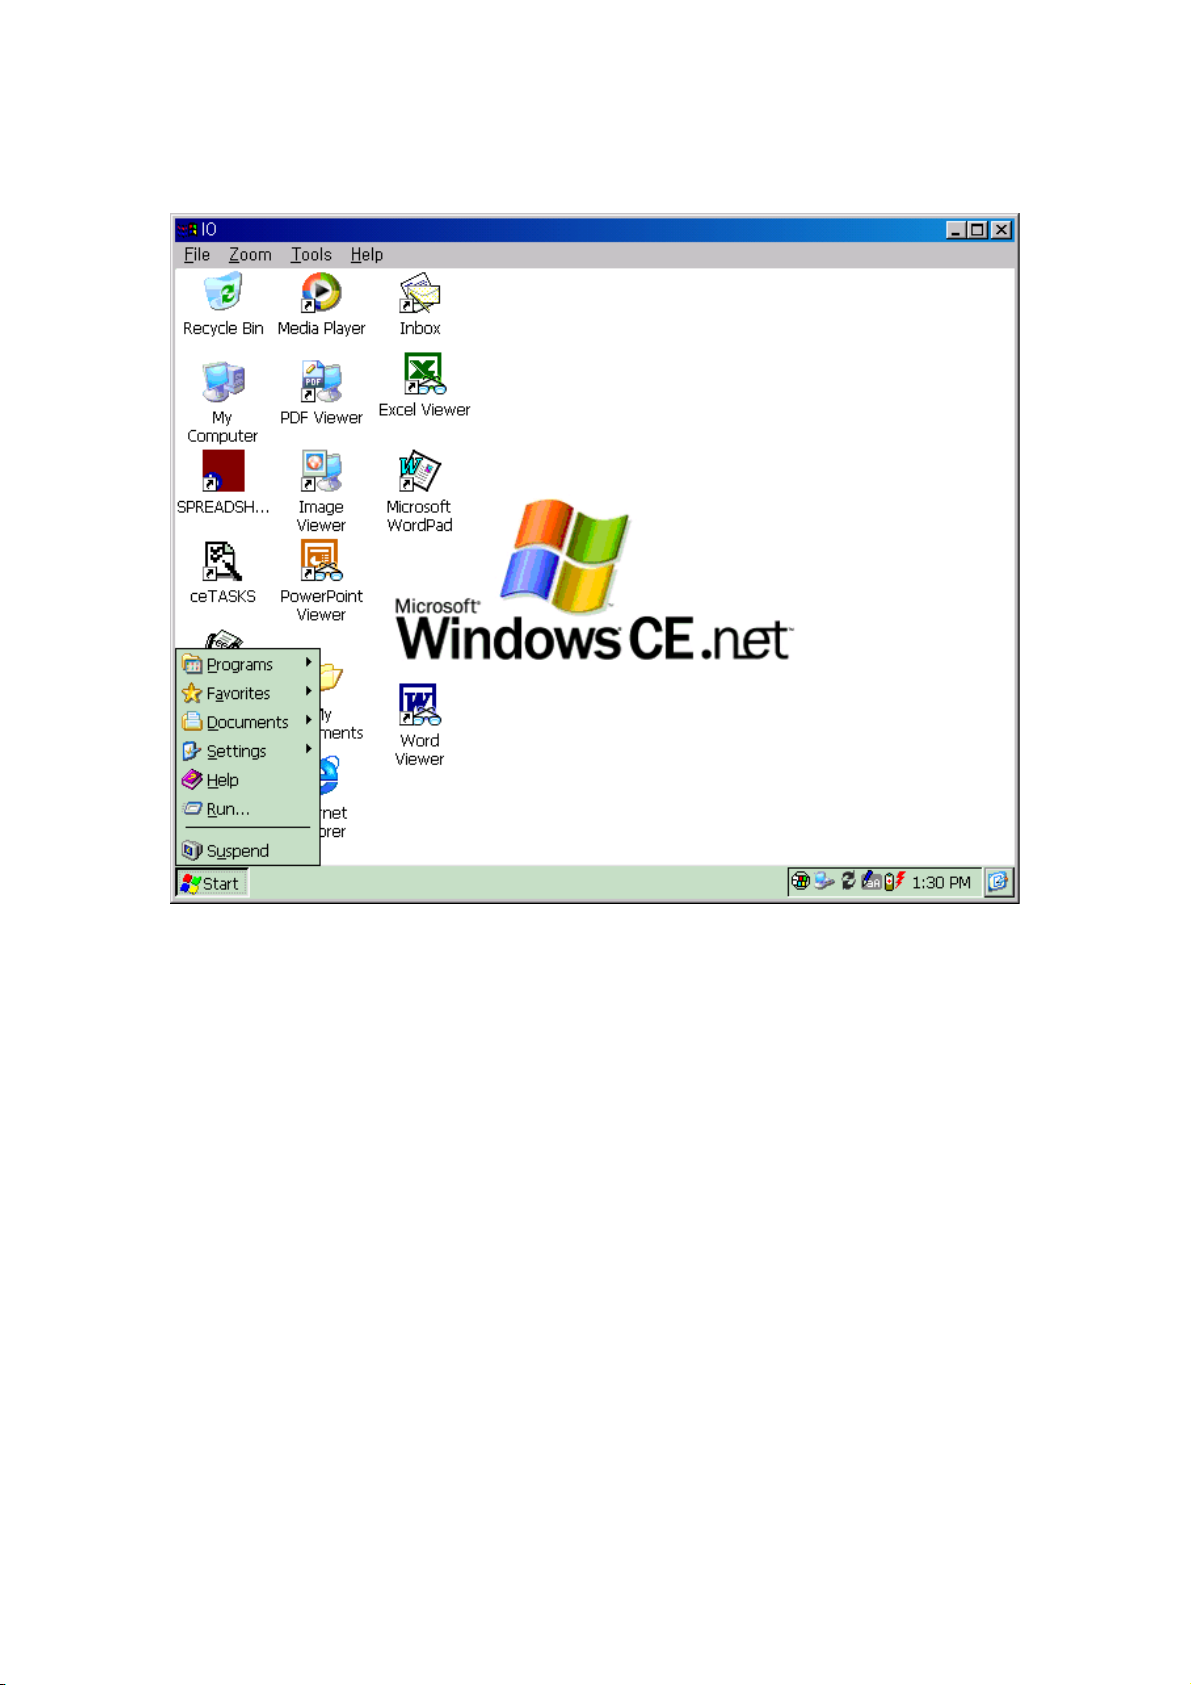
Taskbar contains Start menu and a status area. Use Start menu to open programs,
online Help, and recent documents you used. Just tap Start, and then the program or
item you want to open. To open programs using Start menu, copy the program button in
the Programs folder of Windows folder on your IO.
And also you have running programs are displayed in the taskbar. For information on
taskbar icons, On the Start menu on your Io, tap Help and select Understanding
Taskbar Icons.
14
Page 15
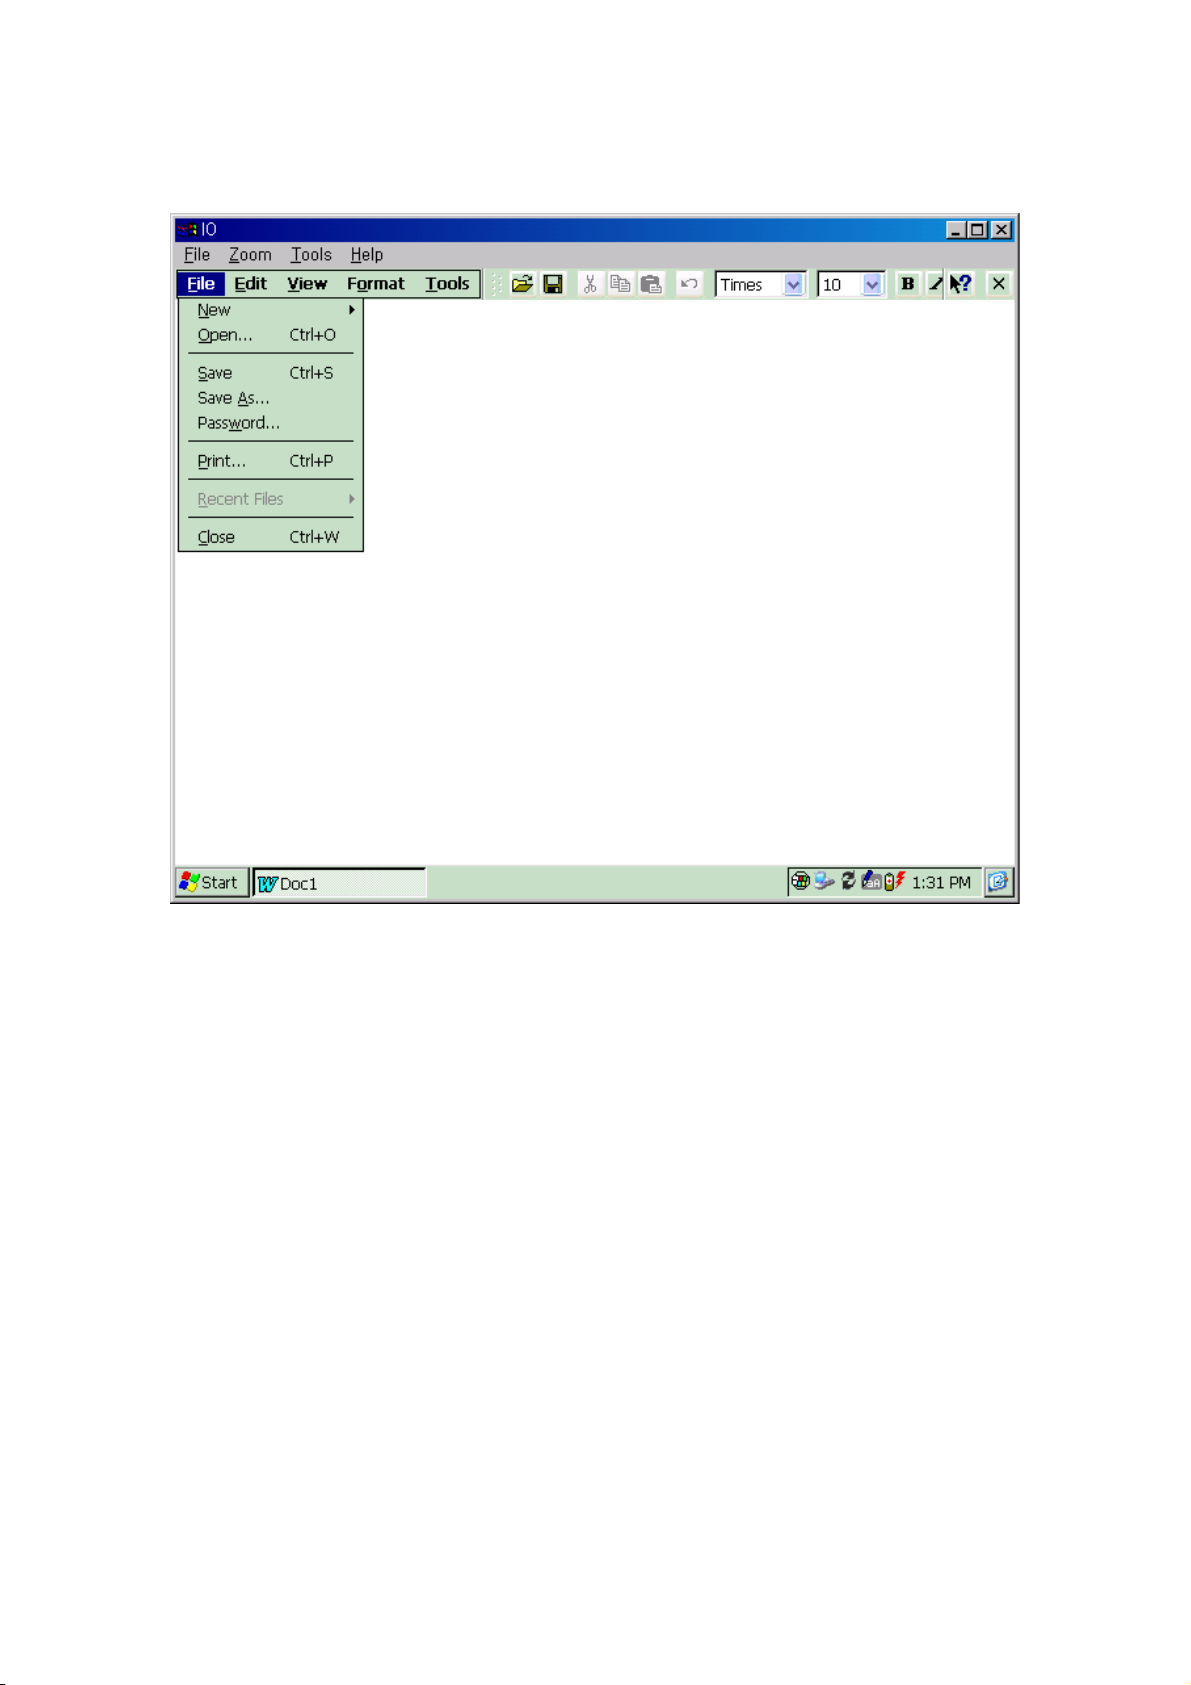
The command bar located at the top of each program. It displays both menu name and
toolbar button names. Tap the slider and drag to switch between displaying toolbar
buttons only, menu names only, or menu names and toolbar buttons. You can also drag
the slider down to move the toolbar under the menus.
15
Page 16
1.8. Configuring Settings
As on your desktop PC, you can adjust Io setting to suit the way you work. To see
available options, on the Start menu, tap Settings, and then Control Panel. Double-tap
the icon what you looking for. For more information, see the online Help on your Io.
Button
Configuring the hot keys applications to your favorite programs.
16
Page 17
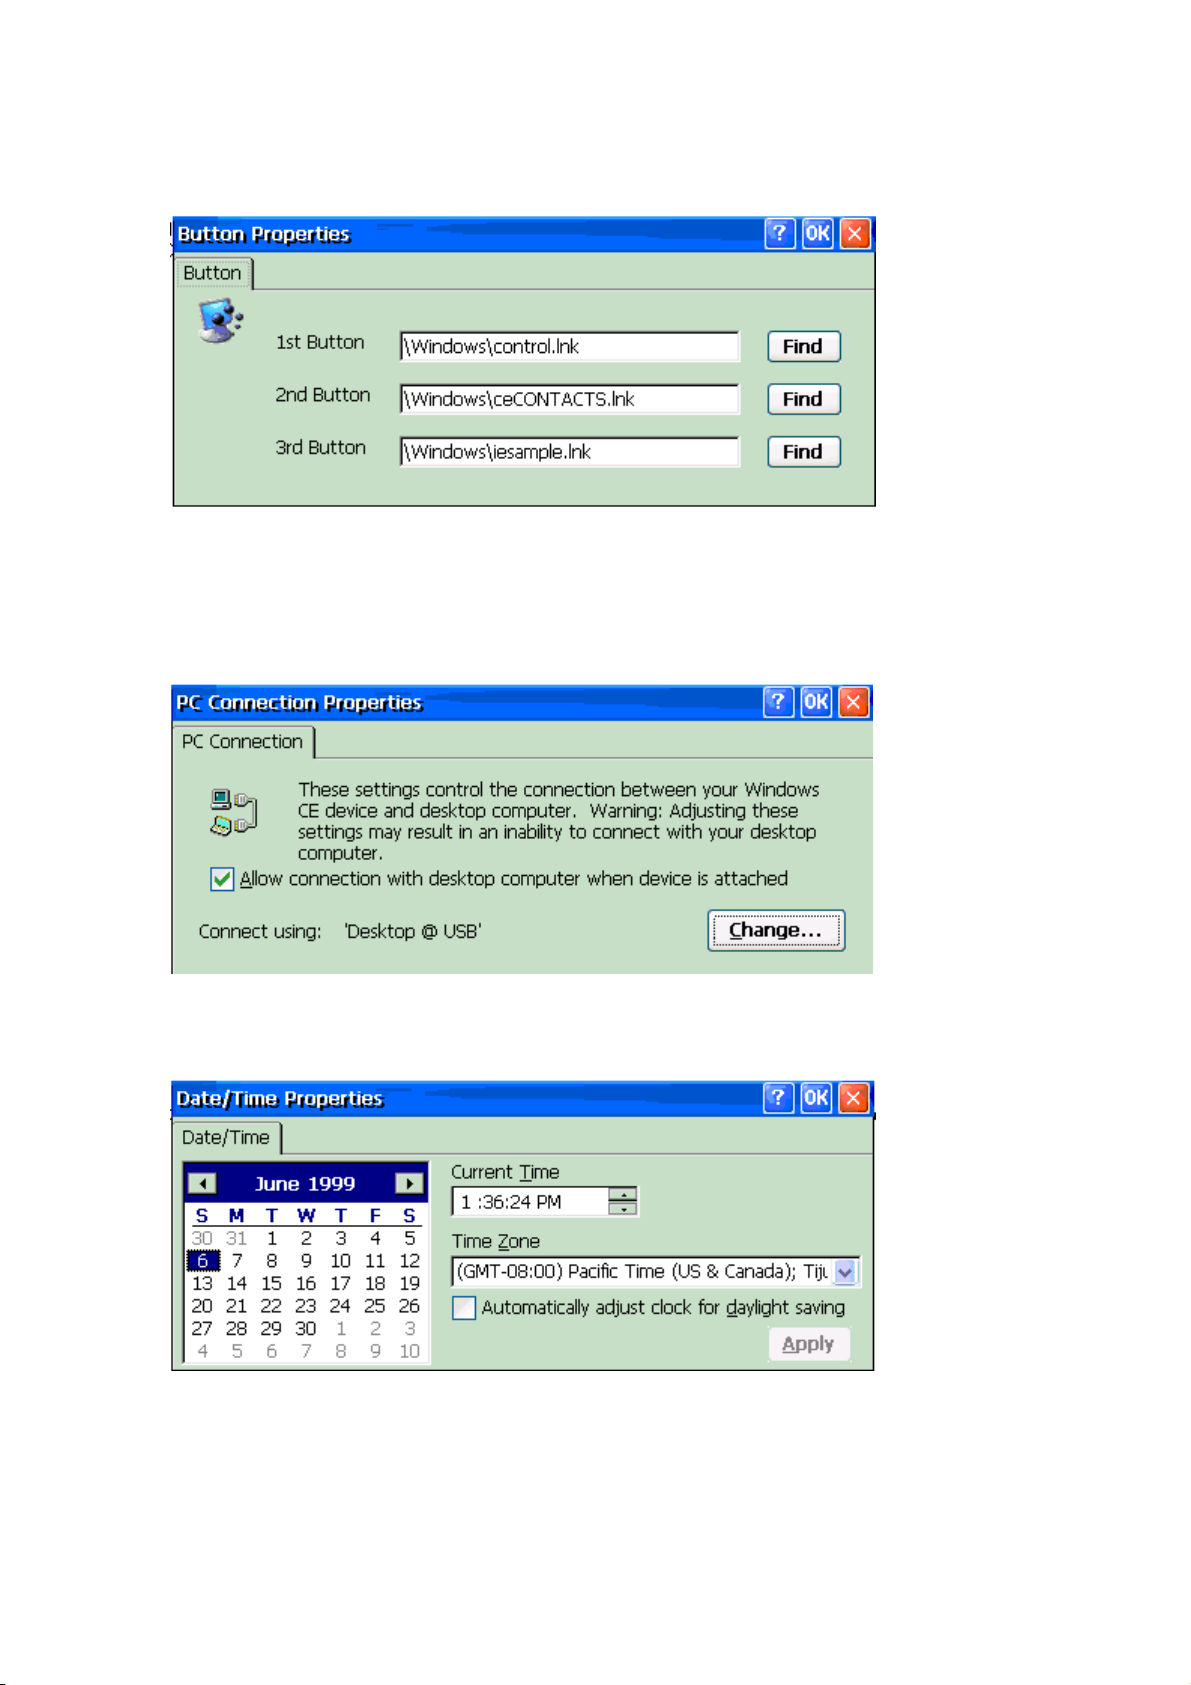
PC Connections
Type your device name and set options to establish a connection between your IO and
desktop PC. You can change the connection methods such as USB or Serial connection.
Date/Time
Change the time and date
Dialing
Create dialing locations and set dialing options for connecting to ISP or remote
17
Page 18
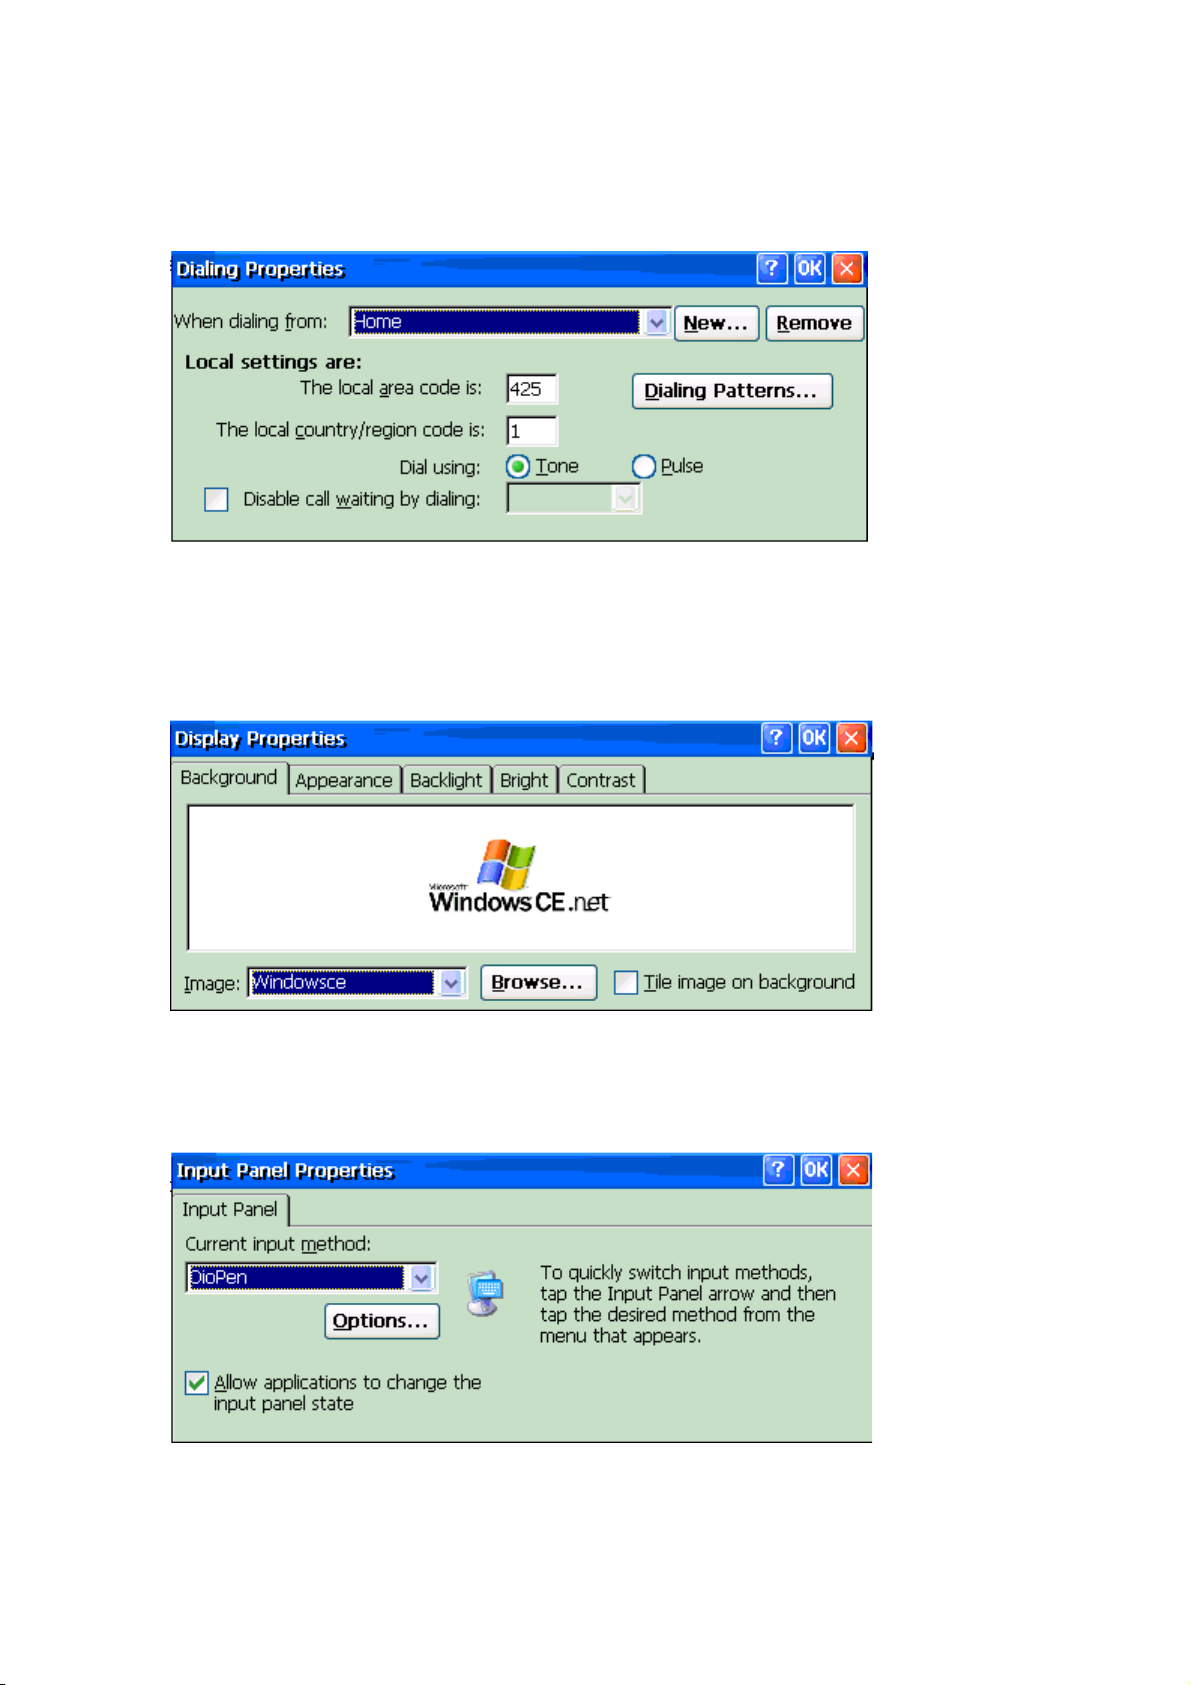
computer.
Display
Set the background image of your MS Windows and adjust backlight brightness and
contrast to save the battery life.
Input Panel
Select the input method you want.
18
Page 19
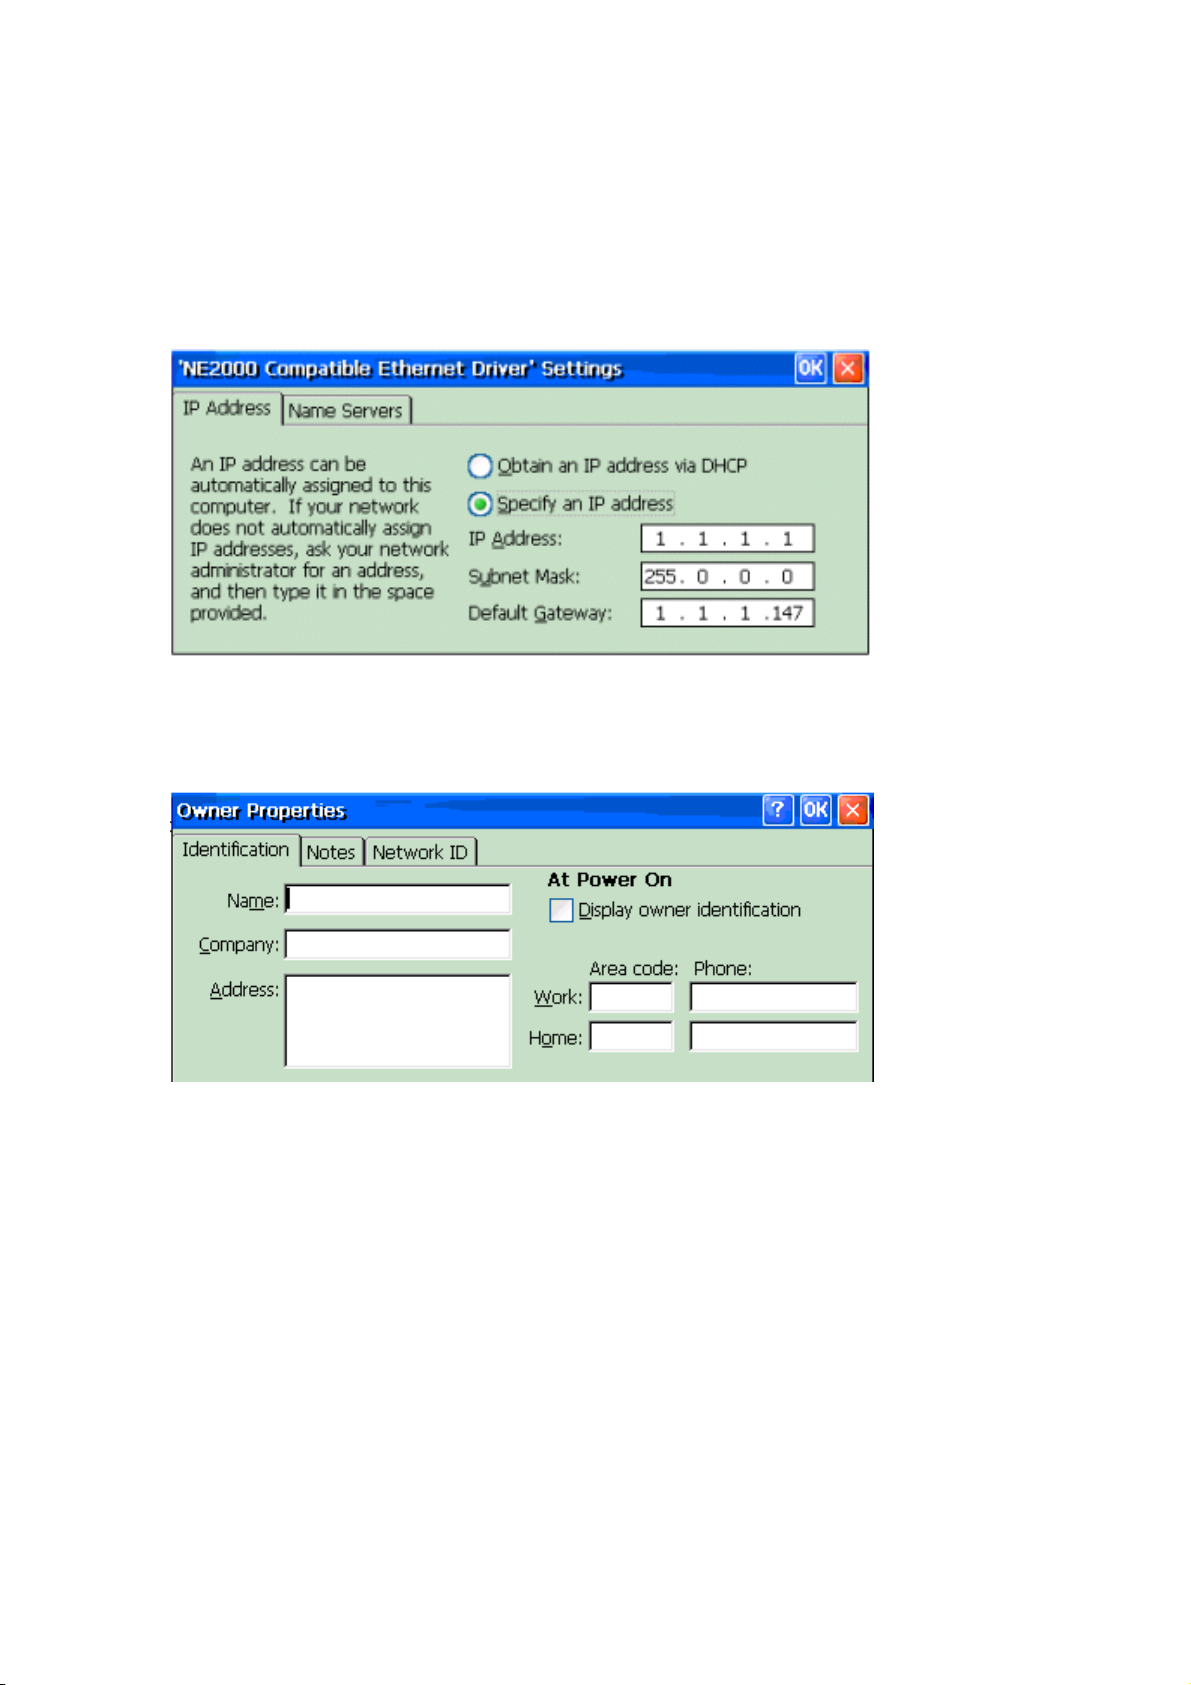
Network
Configure network interface cards, drivers, and your account for network connection.
To change the network driver settings, select the driver in the list and then tap
Properties button.
Owner
Enter your own information and add notes.
Password
Limit to your IO. The password can include both letters and numbers.
19
Page 20
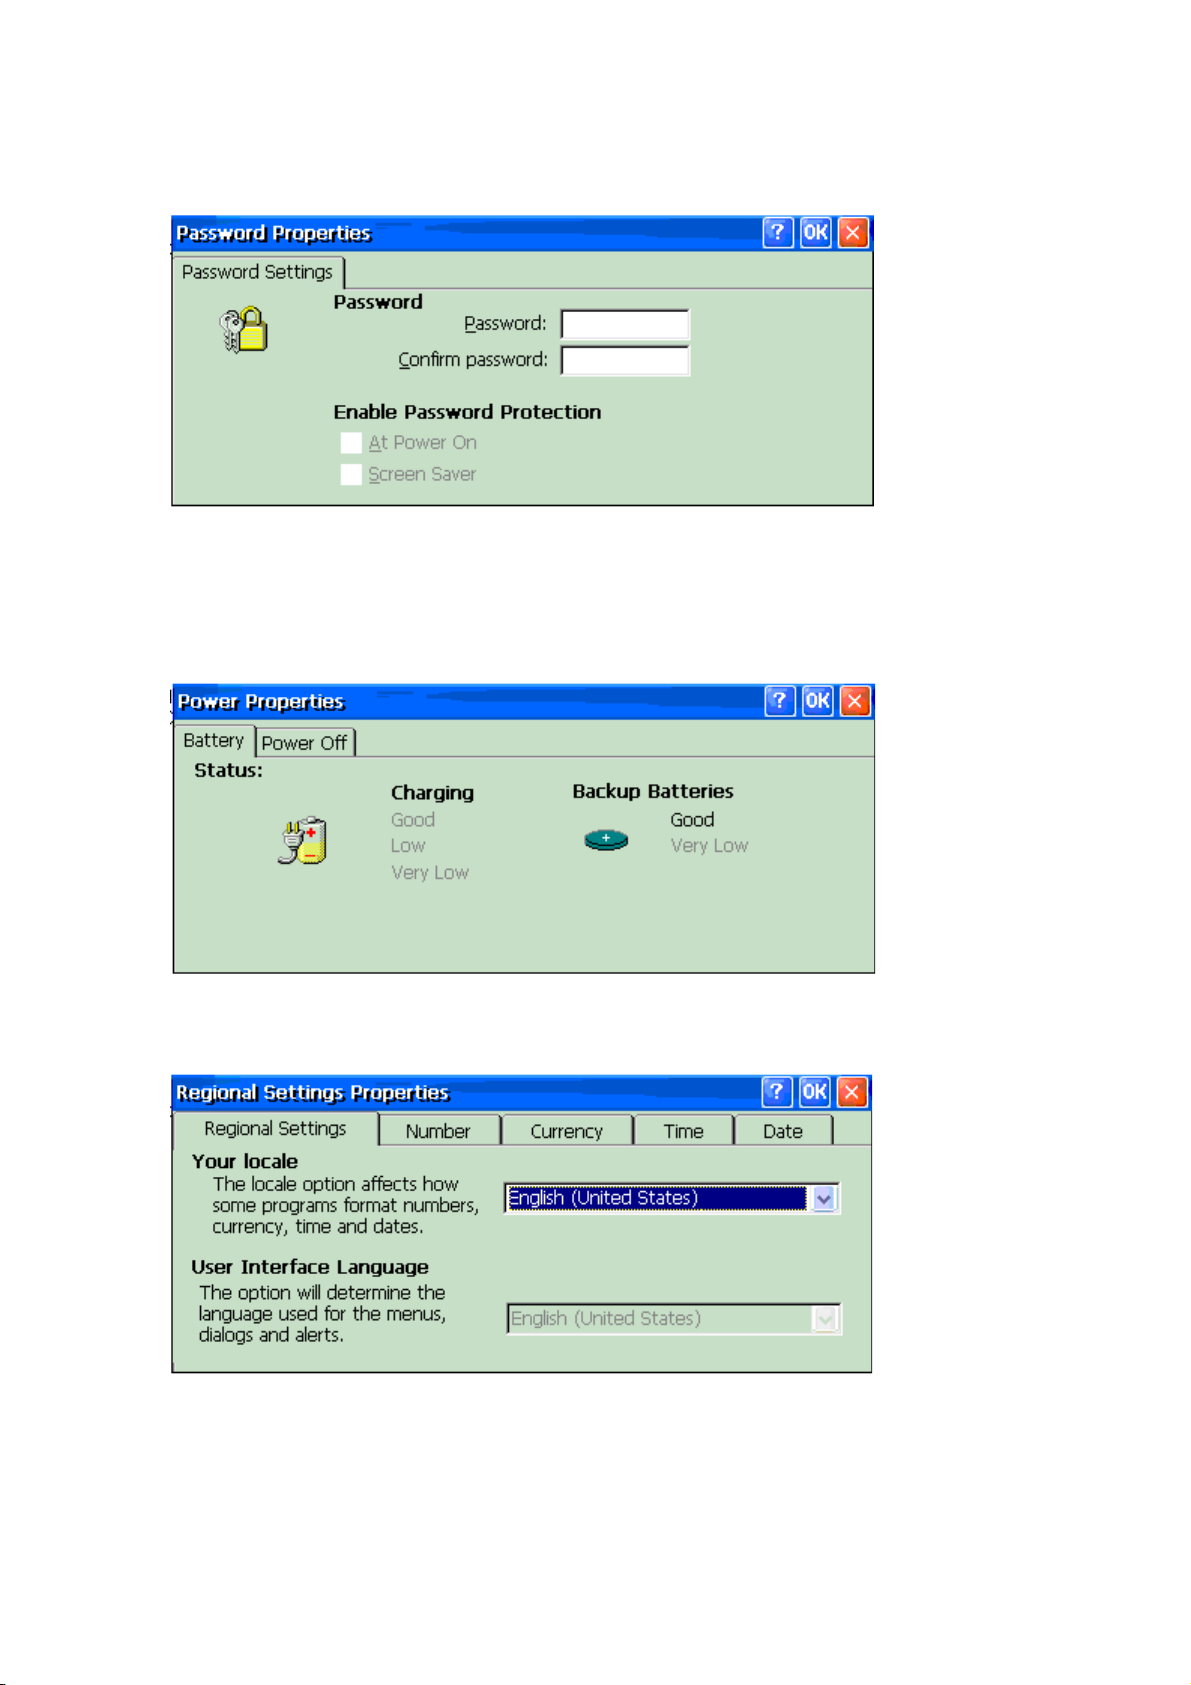
Power
Conserve battery life. You can monitor the battery charging and set the power off
options when the IO continues not in use.
Regional Settings
Customize the appearance of number, currency, time, date
Stylus
Recalibrate the stylus or adjust a speed of double tap.
20
Page 21
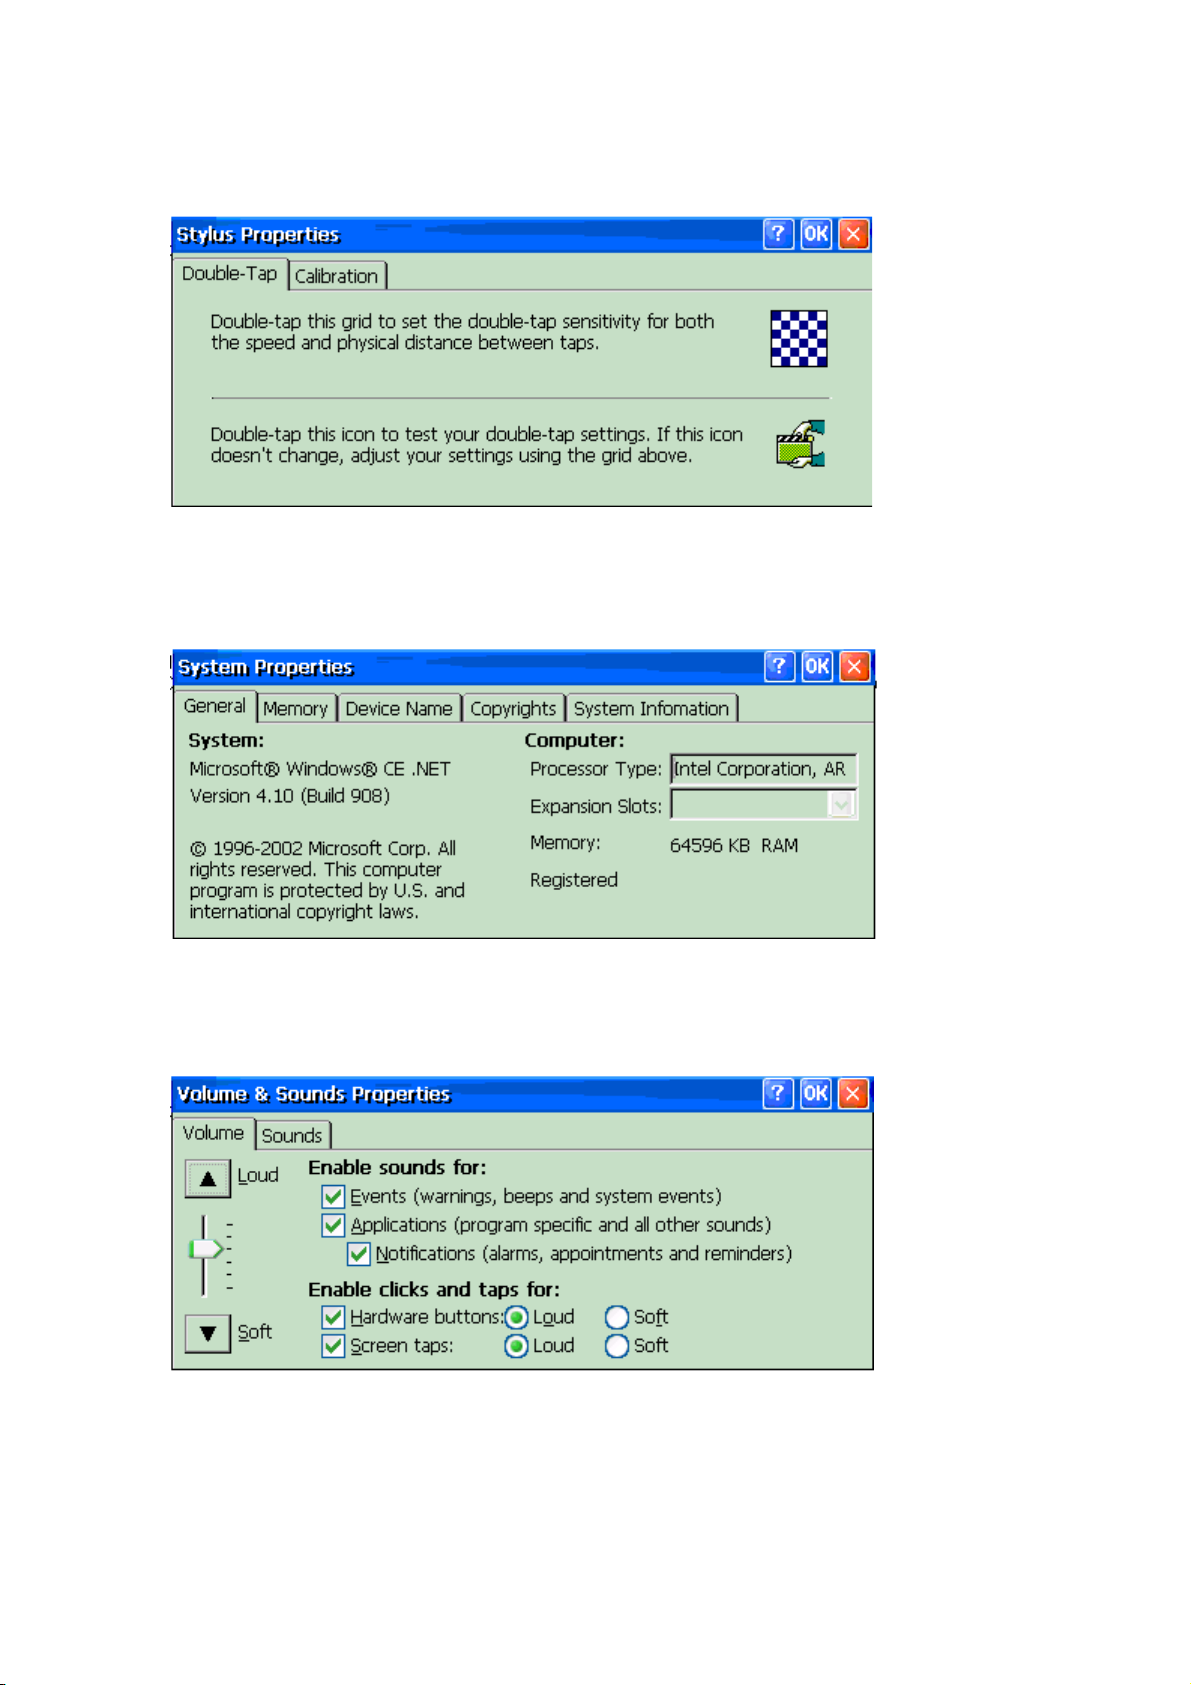
System
Display general system information and adjust the allocation of storage and program
memory. Tap the memory tab to change the memory allocation.
Volume & Sounds
Customize or turn off sounds. It also can save the battery power.
21
Page 22
: Mouse and Keyboard do not function in current. When the IO is equipped with
keyboard or mouse, you can set them.
1.9. Using PC Cards
The Io is equipped with a PC Card slot on the left side of your Io. When you installed a
PC Card into slot, ‘ Storage Card’ folder appears in My Computer folder on your Io.
: Most PC Cards use considerable power, and can quickly drain your battery.
Connect to AC adapter while using PC Cards.
To Install a PC Card, Carefully slide the card into the PC Card slot face up.
Make sure that the card is properly seated by pushing it in until it stops.
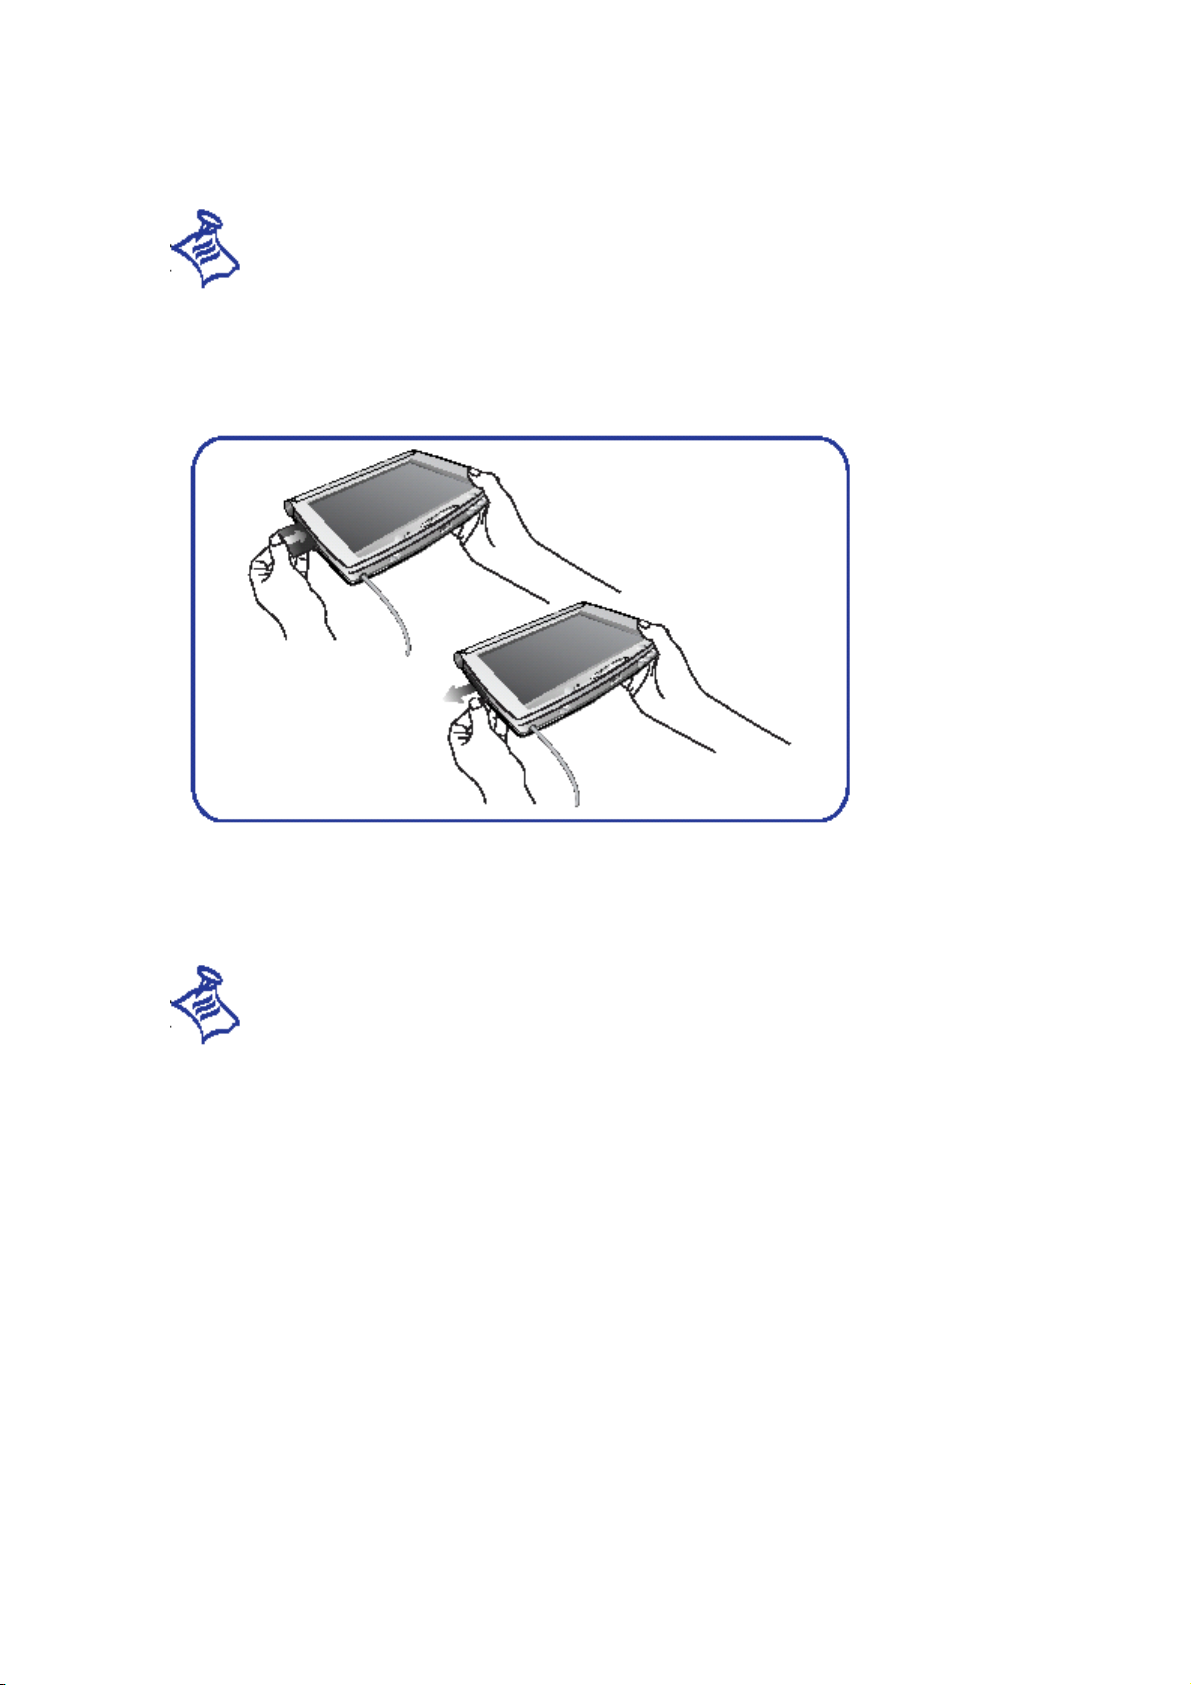
To Remove a PC Card, first press the PC Card release tab, and then the PC Card will be
pushed out of the slot slightly. Grasp the PC Card and pull it completely out of the slot.
22
Page 23

Chapter 2. Microsoft ActiveSync
2.1. Setting up Microsoft ActiveSync
Microsoft ActiveSync allows you to synchronize data such as e-mail and personal
information easily between your Io and your desktop PC. Using Microsoft ActiveSync,
updates both computers with most recent files, contacts, and calendar information.
For example, synchronize Microsoft Word and Spreadsheet documents between your Io
and your desktop PC. Your file is automatically converted to correct format.
: Sometimes you have to adjust conversion settings for files moved between
device and desktop PC. To set conversion settings, tap Options, Rules, Conversion
Settings tab in the ActiveSync windows.
Keep your PIMS(Inbox, Contacts, Calendar, Tasks)data with the most recent information
by synchronizing your Io with Microsoft Outlook on your desktop PC.
With ActiveSync, you can also :
Back up and restore your Io data
Move and copy (Rather than synchronize) files between your Io and your desktop PC
Add and remove programs on your Io
For more information , see ActiveSync online Help on your desktop PC.
To Install Microsoft ActiveSync
1. Insert the provided CD-ROM into your desktop PC.
2. Select and double-click the Microsoft ActiveSync Setup Wizard.
3. The Setup Wizard should start automatically. If it does not start, On My
Computer folder, double click on your CD-ROM drive to begin the installation
process.
4. Follow the instructions that appear on your screen to set up Microsoft
ActiveSync.
5. After you complete the installation, the Microsoft ActiveSync Get Connected
dialog box appears, prompting you connect your Io.
23
Page 24
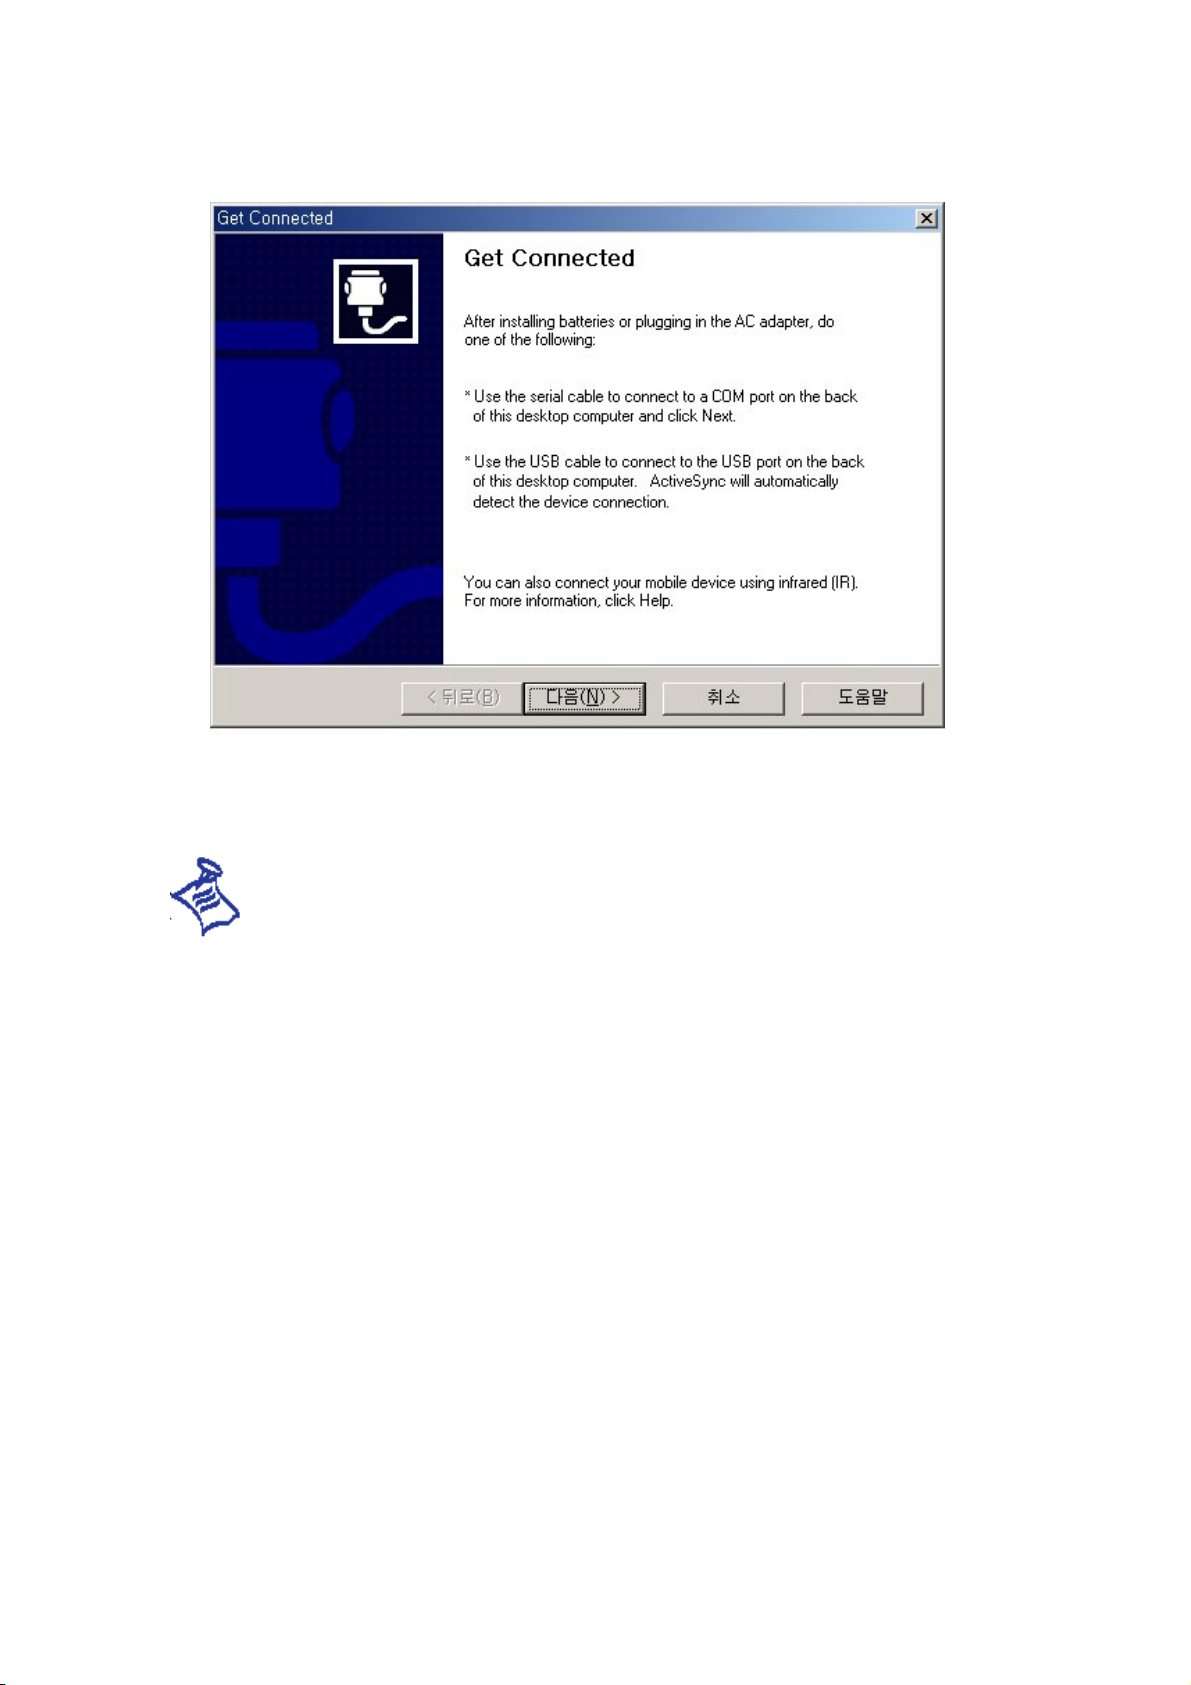
6. Connect your Io to the desktop PC using sync cable, and then ActiveSync will
prompted you to complete New Partnership Wizard.
: If you can not complete the connection between IO and your PC, make sure
that you are using connection method is selected. Tap Settings and Control Panel, and
tap Communications and PC Connection.
7. Follow the directions to complete the New partnership Wizard.
8. When you establish a partnership between both computers, Connected dialog
box appears that you are ready to synchronize data between your IO and your
PC.
9. And next, select the MilleTech and double click Setup.exe in the CD-ROM.
24
Page 25
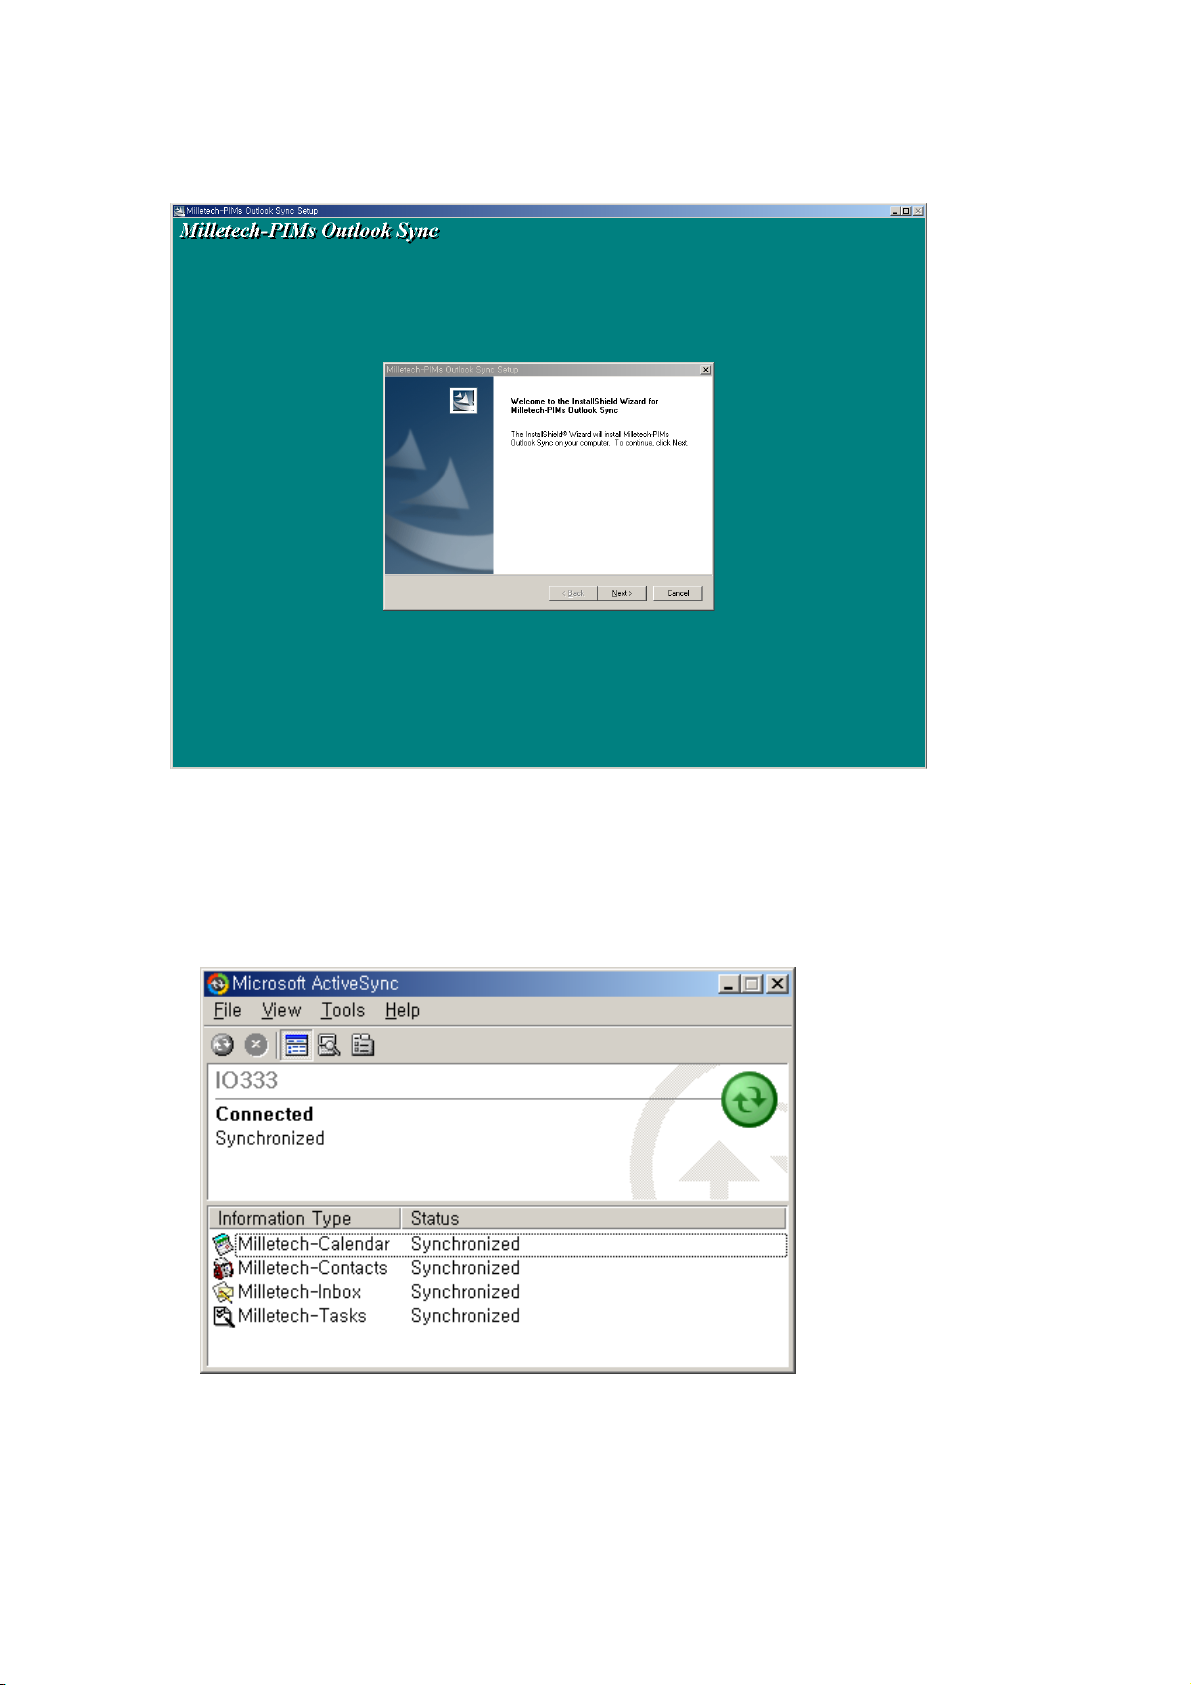
10. Complete the setup following the on-screen instructions.
11. On ActiveSync window, tap Options and choose the following applications ;
Milletech-Calendar, Milletech-Contacts, Milletech-Inbox, Milletech-Tasks.
1.2. Connecting to Your Desktop PC
Before your connect, you must install Microsoft ActiveSync on your desktop PC. Then
25
Page 26

you can connect to your IO and set up a partnership between both computers. After you
have established a partnership, you have several methods for connecting your IO to
your desktop PC.
You can connect your IO to your desktop PC using a serial connection(with the enclosed
serial sync cable). A USB connection (USB sync cable that comes with your IO). And
you can also connect to an infrared-equipped desktop PC or notebook PC using infrared
port. You can use a network connection with an optional PC Card. For information on
network connection, see Chapter 5. Remote Connections.
Connecting by Serial Port
IO is set as 19200 by default, connection to desktop PC is performed without problem
when the communications speed is set as 19200.
To Connect via Serial Port
1. Connect the AC adapter to the DC jack on the right side of the Io, and then plug
in the power cable.
2. Tap Settings, Control Panel and Communication. Tap PC Connection and select
the Serial 19200 in the drop-down list box.
3. Insert the one end of the serial sync cable into a serial sync cable into a serial
port your computer
4. Fully insert the end of the serial sync cable, arrow side up, into the serial port
on your Io.
Connecting via USB Port
Before you use USB connection, install USB driver on your desktop PC using provided
CD-ROM. Follow the instruction to set up USB drive. This section describes the setup
procedure for using the USB drive on Windows.
Installing the USB Driver
1. Insert the provided CD-ROM into your PC.
2. Select the CD-ROM and double click USB driver
3. Use the USB cable to connect the IO to the USB port on the PC.
4. The Add New Hardware Wizard dialog box appears and click Next.
5. Select Search for a suitable driver for my devices(recommended) and then click
Next.
26
Page 27

6. In Optional search locations, select Specify a location and then click Next.
7. The dialog box for specifying the location appears. Click the Browse.
8. Select USB driver on the CD-ROM drive and click Open.
9. Click the OK in the location specification dialog box.
10. Check that WCEUSBSH.INF has been detected and then click Next.
11. When driver installation is completed, click the Finish.
To Connect via USB Port
1. Tap Settings, Control Panel and Communication. Tap PC Connection and select
the Desktop@ USB in the drop-down list box.
2. Connect the flat USB connection to an available USB port on your desktop PC.
3. Plug the other end of the cable into the USB port on the right side of the Io.
4. Your Io will automatically establish a connection to the computer.
Connecting via IR(Infrared) port
Io is equipped with an IR(infrared) port. So you can also transfer data to another
infrared-equipped notebook or PC by infrared connection. The IR port is located on the
bottom of your Io.
To Transfer Data by Infrared Connection
1. Line up the infrared port on your Io with the infrared device on your notebook
or desktop PC.
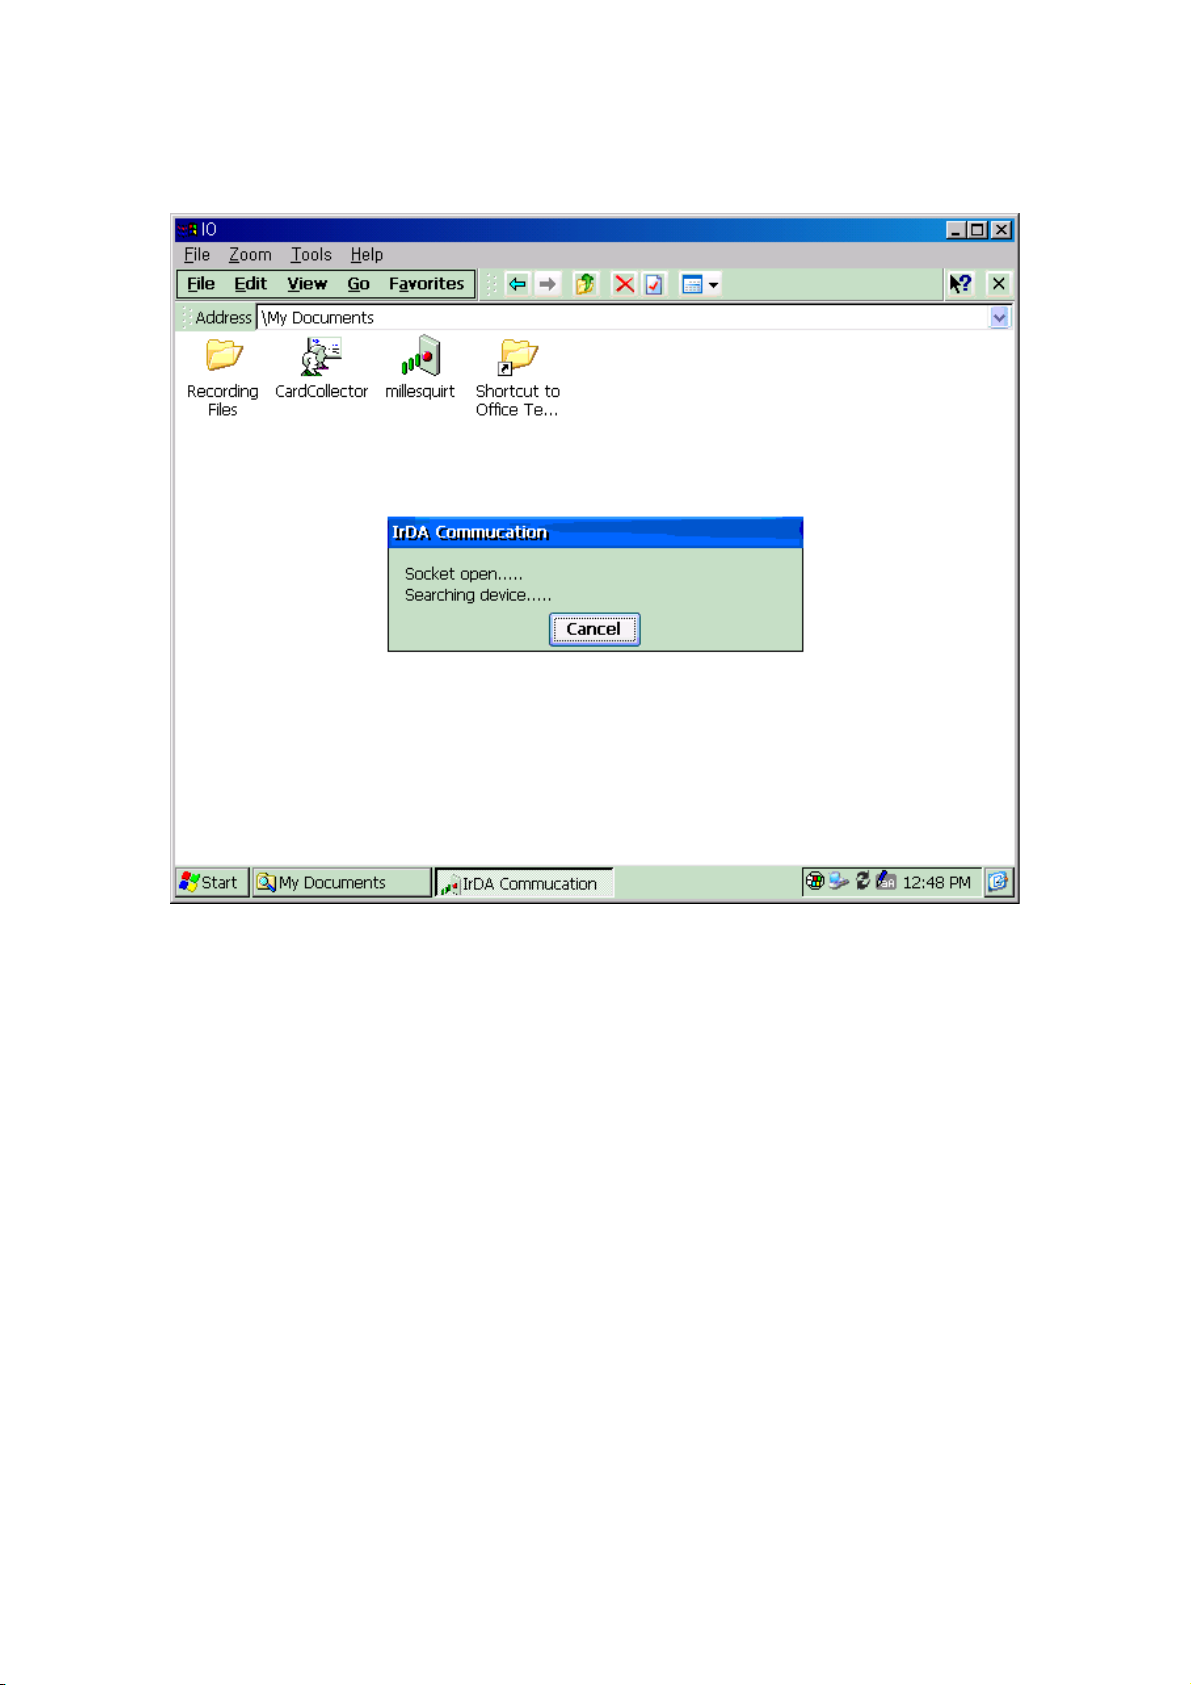
2. On your Io Start menu, tap Programs and then select Mille Squirt programs.
3. Tap Find to send the file you want and then tap Send. When you receive files,
open programs and then Io automatically receive files.
: When you transfer files via infrared connections with other palm-size PC or
handheld PC, Mille Squirt programs should be also installed in their devices.
27
Page 28
Troubleshooting Connections
Your Io is designed to automatically detect the connection type and configure itself to
communicate with your desktop PC. However, if you are unable to establish a
connection between your Io and your PC, check connection methods on your Io and
your PC.
To Set the Desired Connection Method on Your Io
1. On the start menu, tap Settings, Control Panel, then select Communications.
2. On the PC connection tab, under Connect using make sure that the connection
method is not displayed, tap Change.
3. In the Charge Connection dialog box, choose the desired connection method
from the connection list.
4. Tap OK twice to save your settings and exit.
28
Page 29
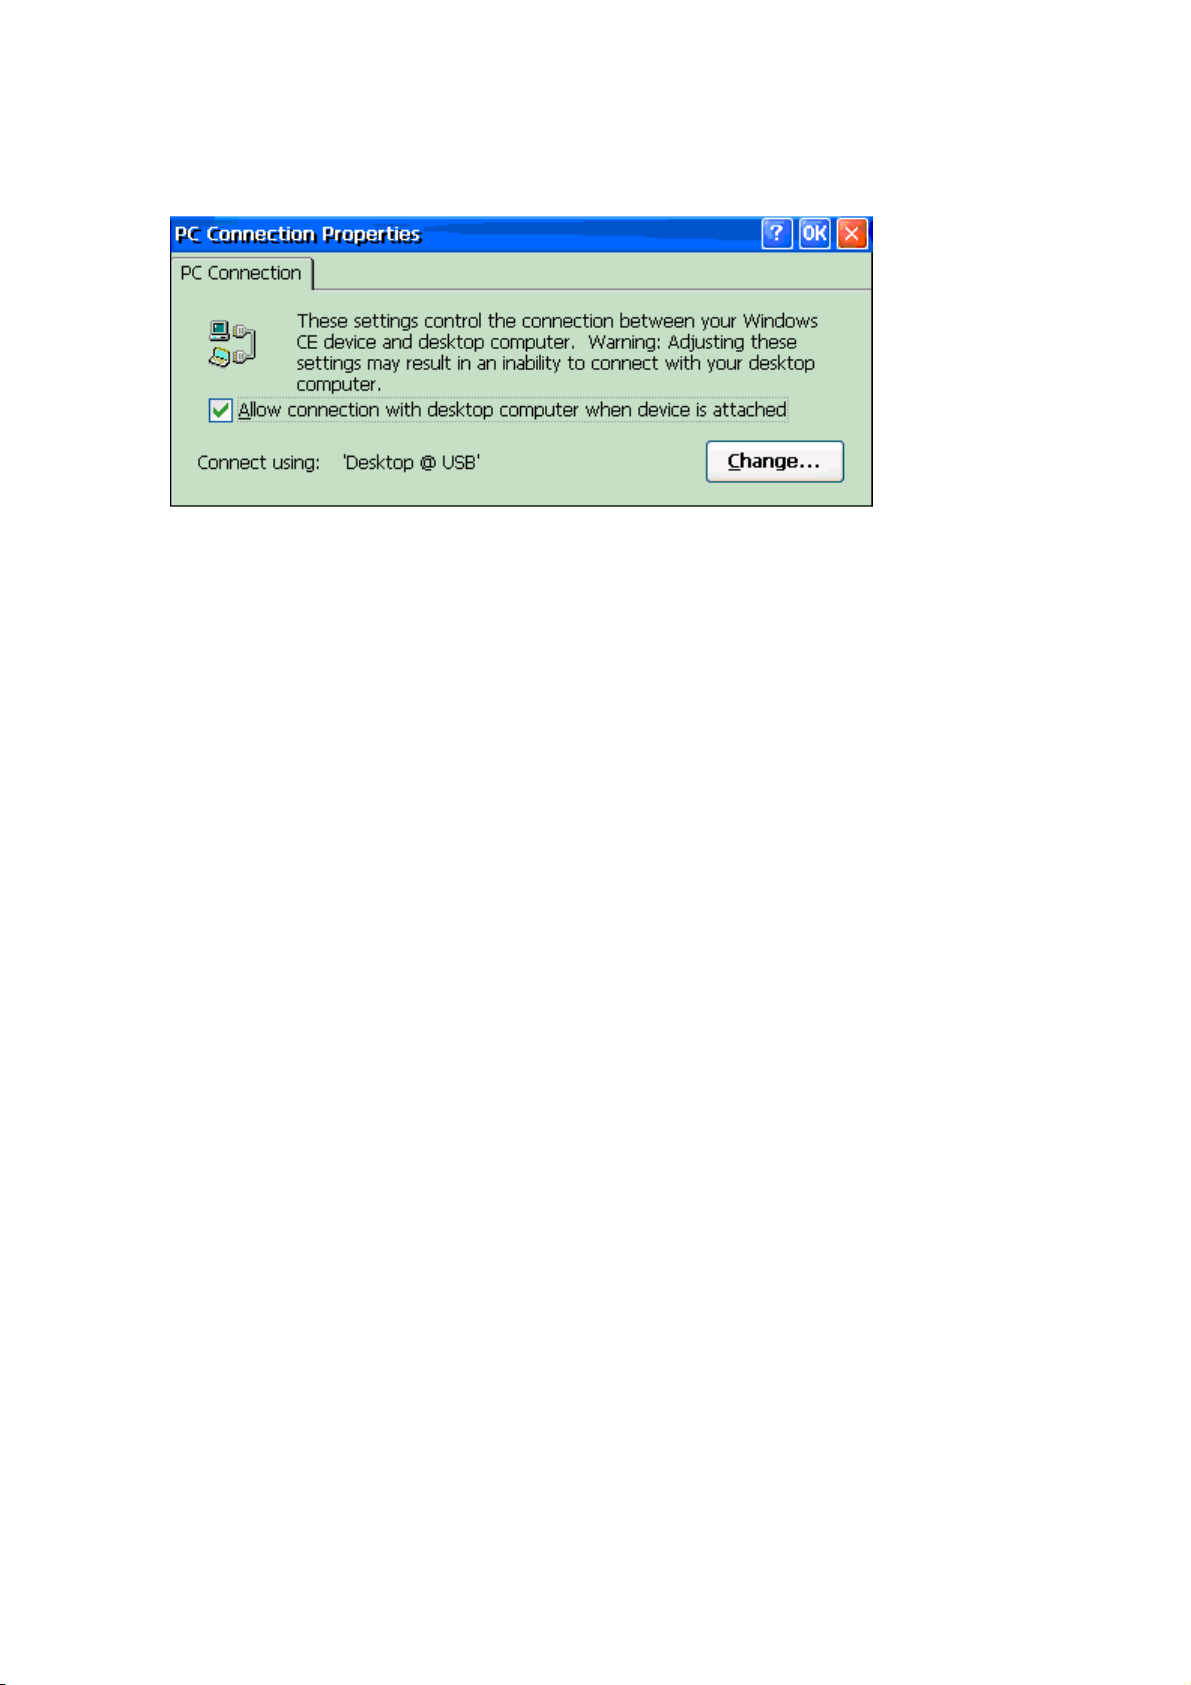
Also you can easily check and change the connection method on the screen. Tap
Programs, Communications, PC Link, and the ActiveSync dialog box appears. Choose a
method to connect to your desktop computer.
To Check the Connection Settings in ActiveSync on Your PC.
1. Verify that the sync cable from your Io is connected to the listed serial port in
the Connection Settings dialog box, or that Allow USB Connection with this
computer is selected.
2. If you are connecting via infrared, be sure that Allow serial or infrared
connection to this COM port is selected and that the correct IrDA COM port is
displayed.
29
Page 30
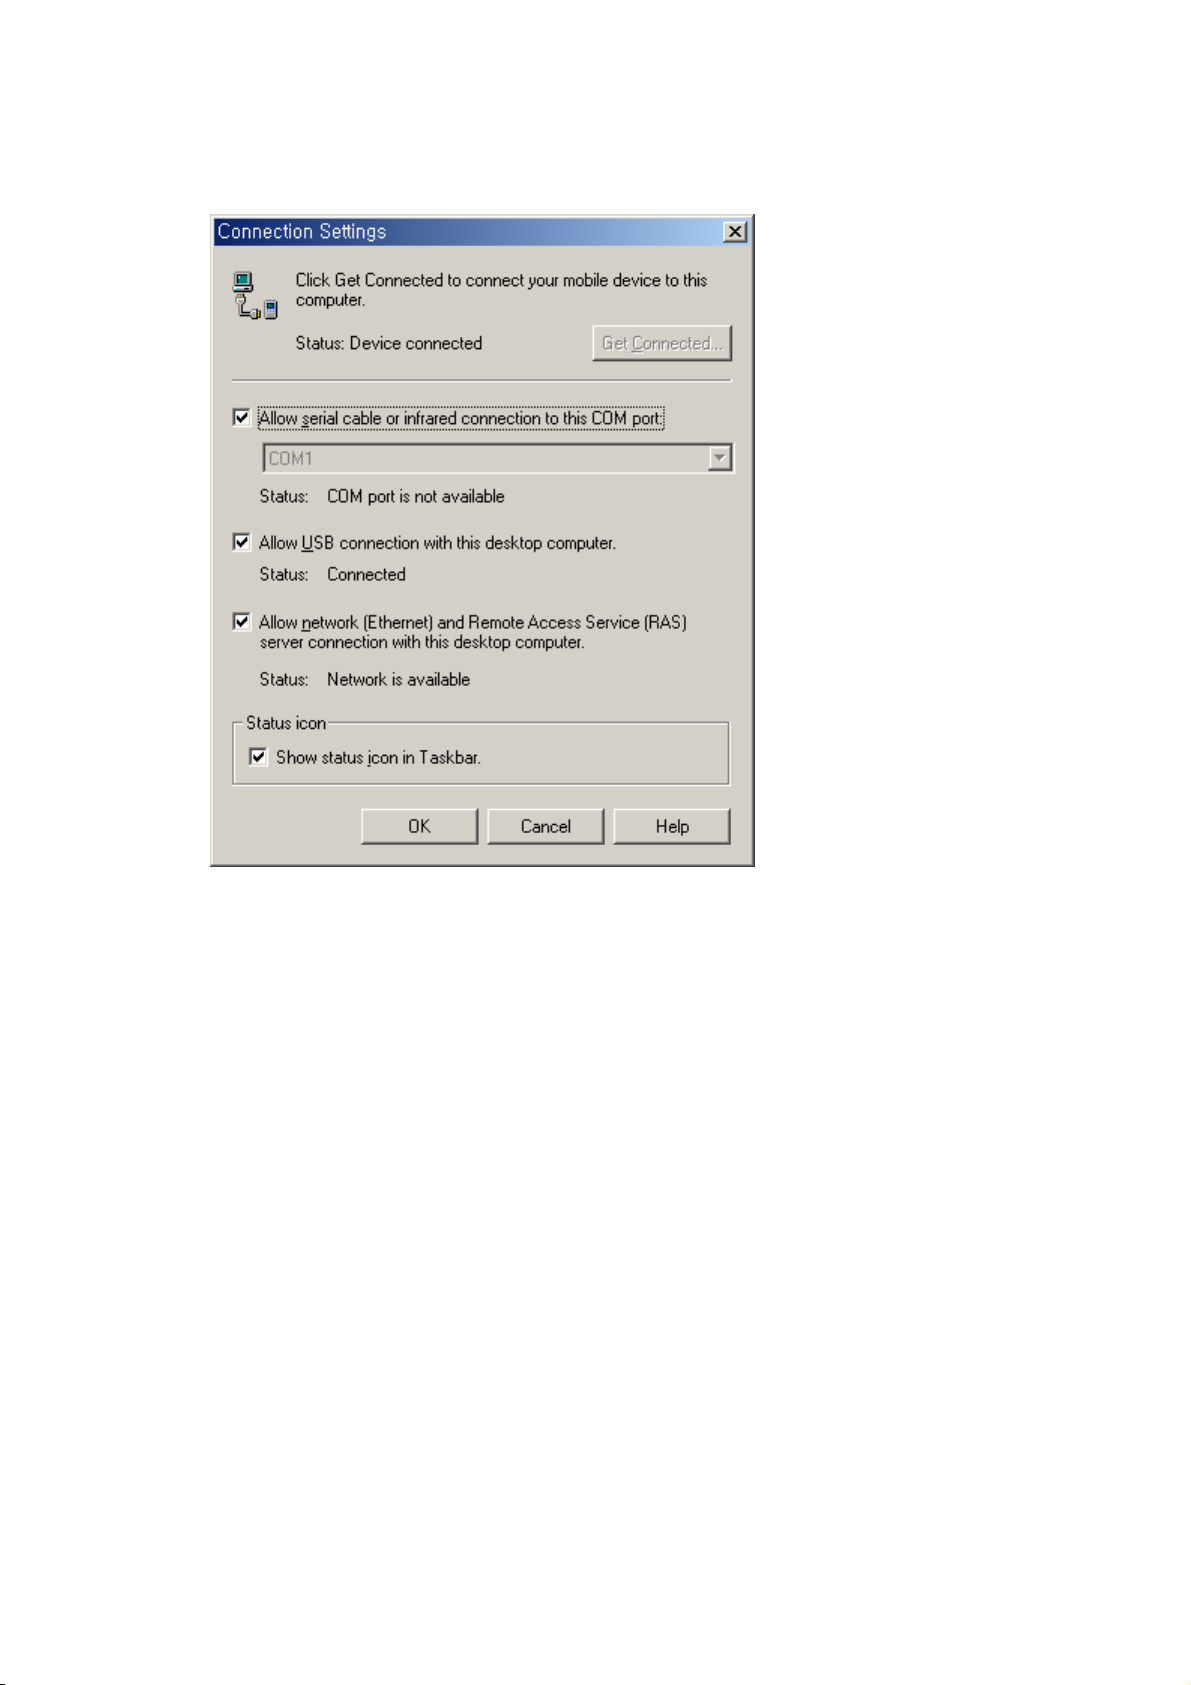
3. If you continue to have difficulty synchronizing, in the Connection Settings
dialog of the Microsoft ActiveSync window, clear the Allow check box for type
of connection you are using, and then click OK.
4. After the connection is disabled, reselect the appropriate Allow check box and
click OK to enable the connection again.
5. If the problem continues, use the ActiveSync Troubleshooter. The ActiveSync
Troubleshooter provides detailed diagnostic steps identify and correct common
problems. In ActiveSync window, click Connection Settings on the File menu.
Click Help in the Connection Settings window.
2.3. Synchronizing Data
Using ActiveSync you can synchronize some or all of following items.
PIMS data : Synchronize the Calendar, Contacts or Tasks information on your Io with
information stored in Outlook on your desktop PC.
30
Page 31

E-mail message : Synchronize your Io Inbox with the e-mail programs(Microsoft
Outlook) on your desktop PC. By synchronizing, you can use your desktop PC to send
message that you create on your Io. When you synchronize, you can do that following
item:
You can copy messages from the Inbox folder on your desktop PC to the Inbox folder
on your Io(by default, only the messages received in the past 3 days are synchronized,
and no attachments are copied)
Messages on in the Outlook folder on your Io are transferred to the Outlook on your
desktop PC and then sent from the program
Files : Synchronize the contents of the Synchronized Files folder (inside My documents)
on your Io with files stored in your in you’ re my document folder(Windows 95 / 98) or
in your Personal folder(Windows 2000 / NT) on your desktop PC.
Synchronization Options
You have several options for synchronizing data between your Io and your desktop PC. .
Press the Options on the ActiveSync window, and you will see three tabs-Sync Options,
Sync Mode, and Rules.
Sync Options
Sync Options dialog box displays all applications that your Io includes. You can choose
the application that will be synchronized by checking the applications This can be useful
if you have a complex schedule and only want to synchronize.
31
Page 32
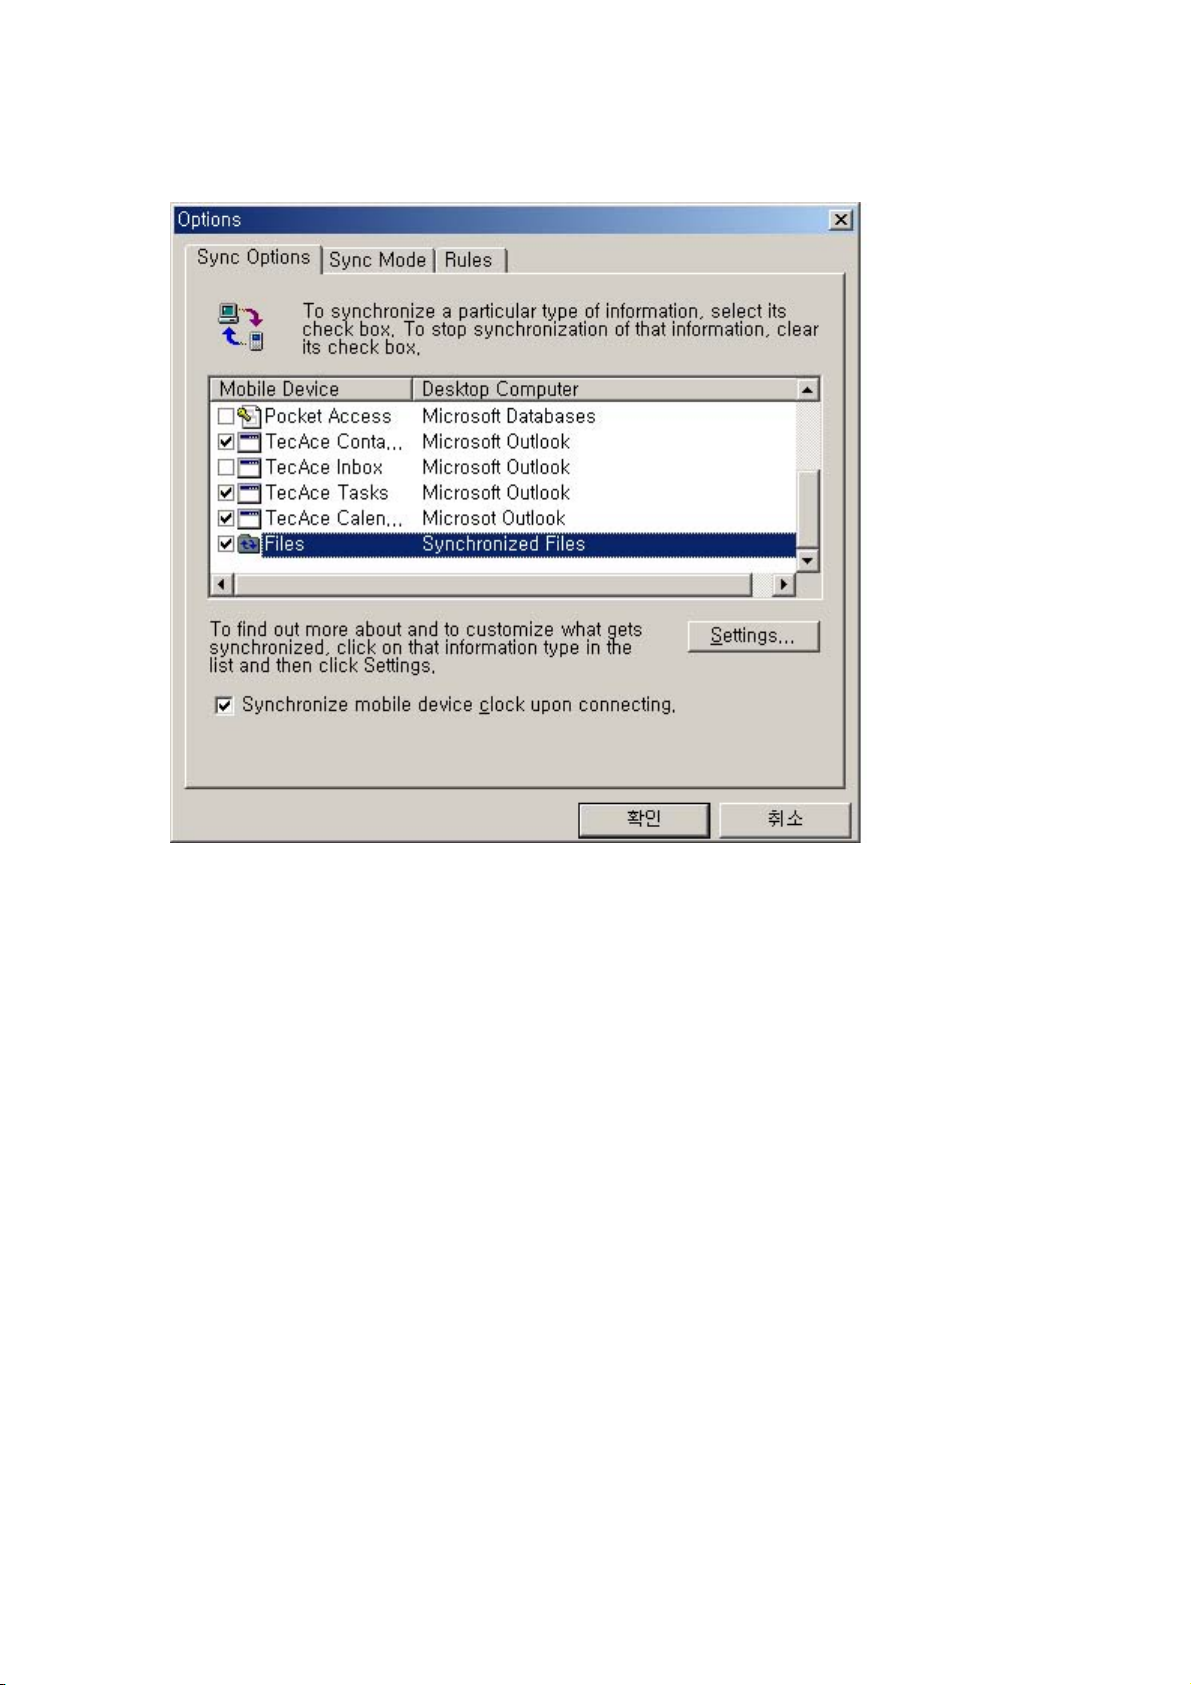
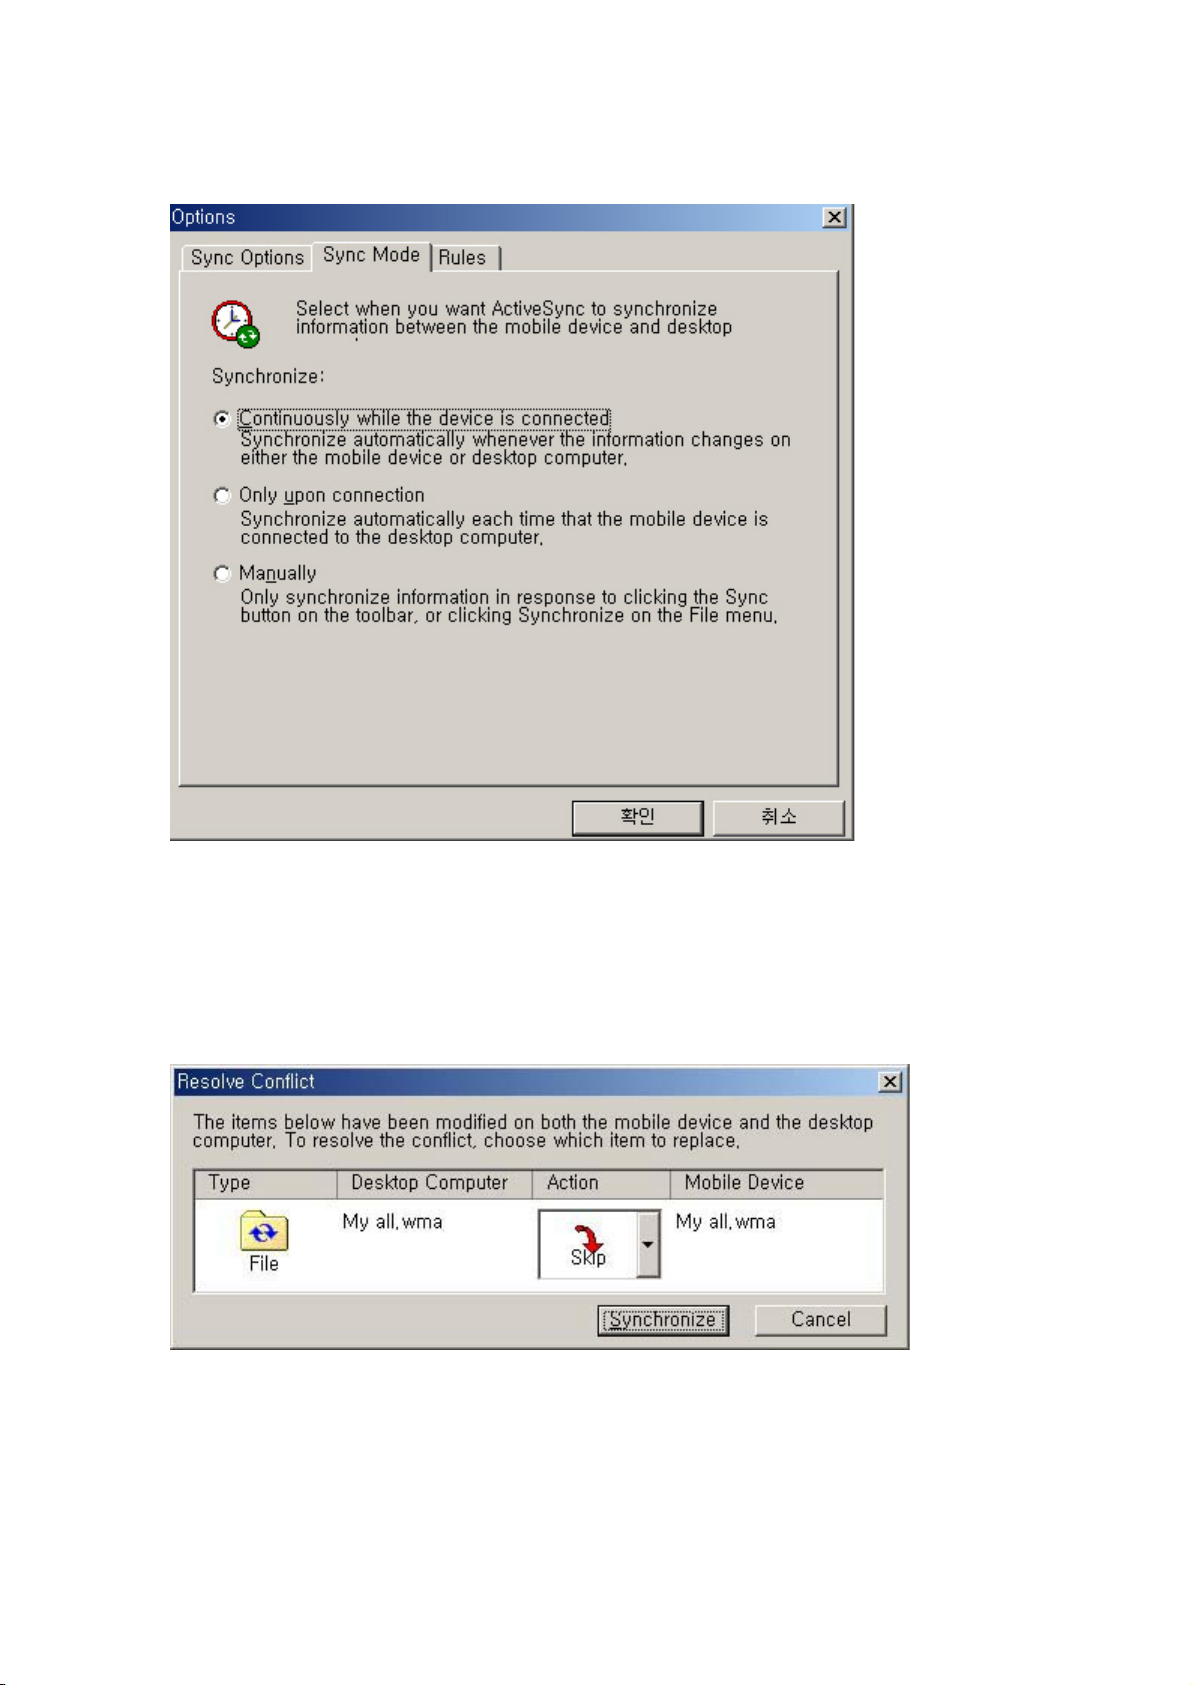
Sync Mode
You will choose the way for how ActiveSync operates ; Continuously, Only upon
connection, or Manually. You can automatically synchronized you Io and Outlook
whenever data changes on either or manually synchronize when you start ActiveSync
by clicking the Sync button.
32
Page 33
Sync Rules
If the same item(for example, and appointment or a task) has been modified on both
desktop PC and on the Io, ActiveSync will indicate that a synchronization conflict has
occurred.
You can either resolve the conflict by selecting one of the items to replace or you can
ignore the conflict, leaving the data on both computers unchanged.
You can resolve each conflict manually, at the time of synchronization, or you can
33
Page 34
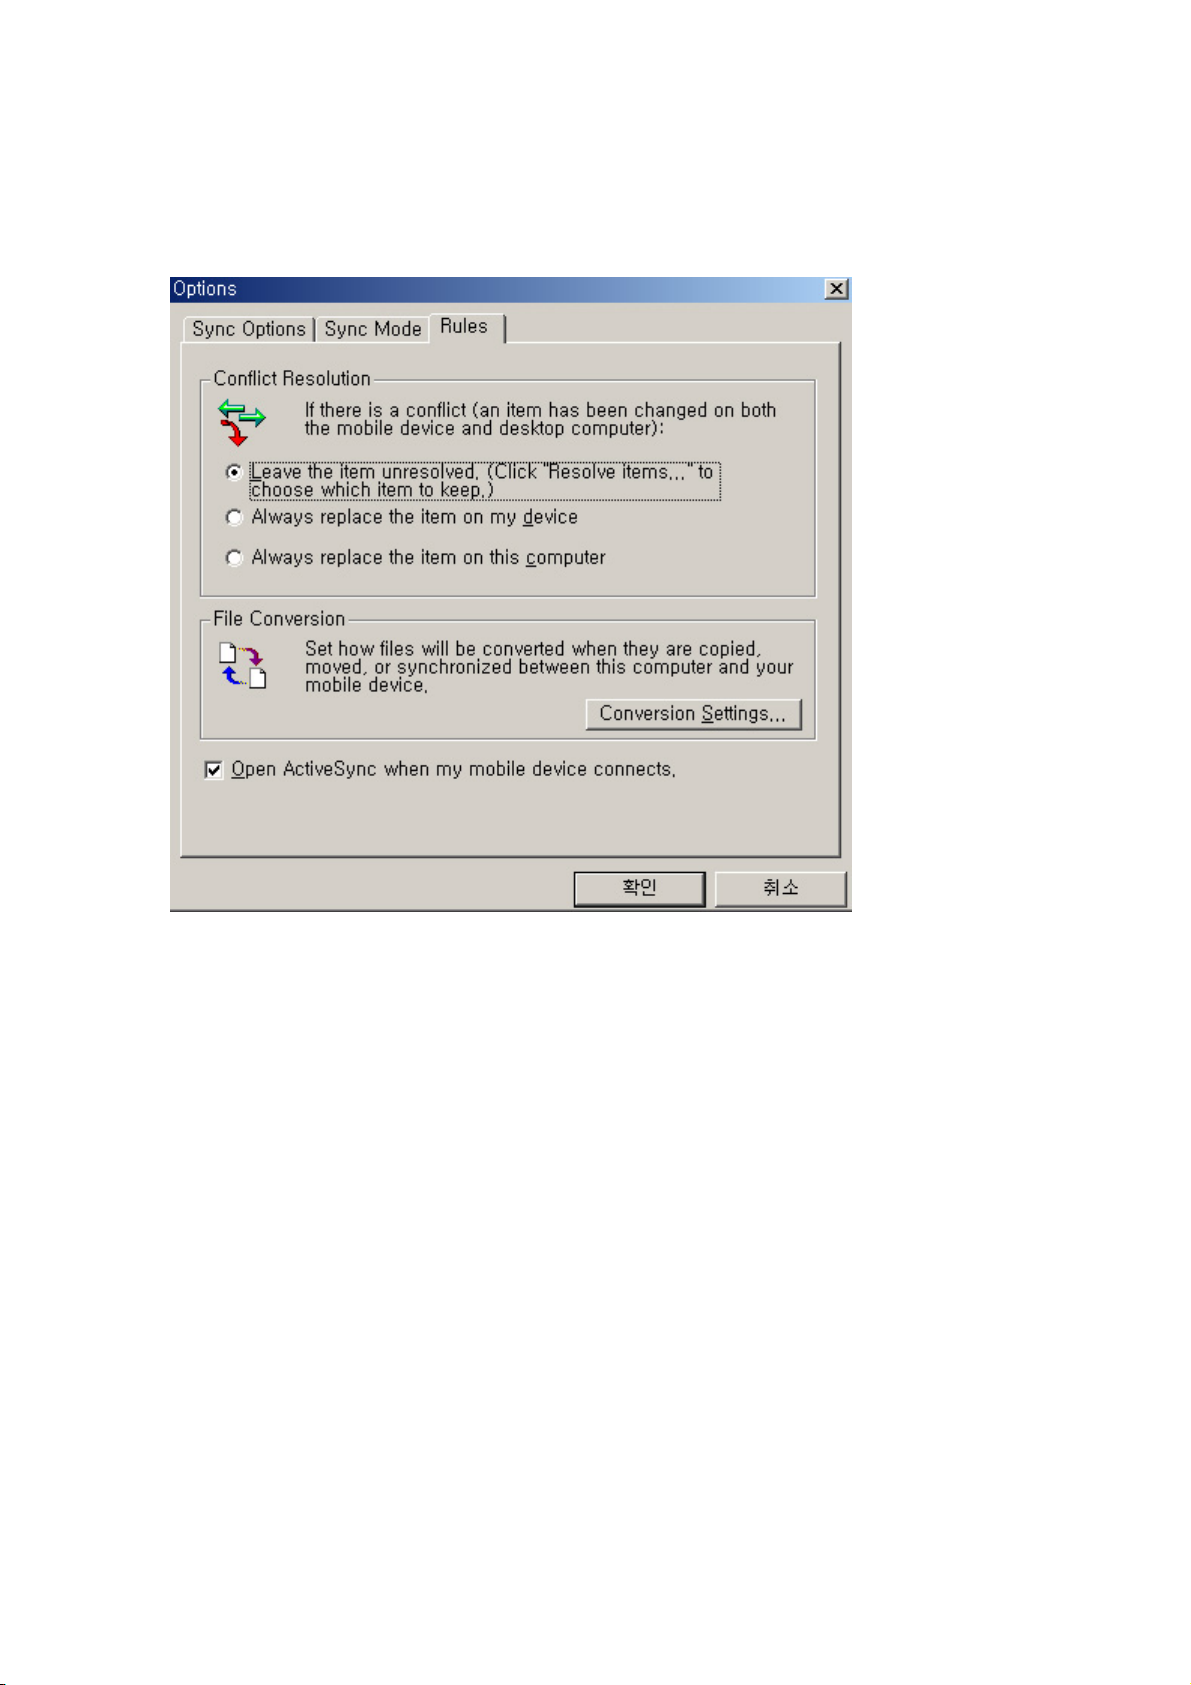
resolve conflicts automatically by setting a default option for conflict resolution.
2.4. Browsing your Io on Your Desktop PC
While your Io is connected to a desktop PC, you can browse the contents of your Io
from your desktop PC using Microsoft ActiveSync. On the ActiveSync Window, tap the
Explore button on the tool bar. And then click the Mobile Device icon. And then the
contents of your Io are displayed just like any other folder on your desktop PC.
34
Page 35
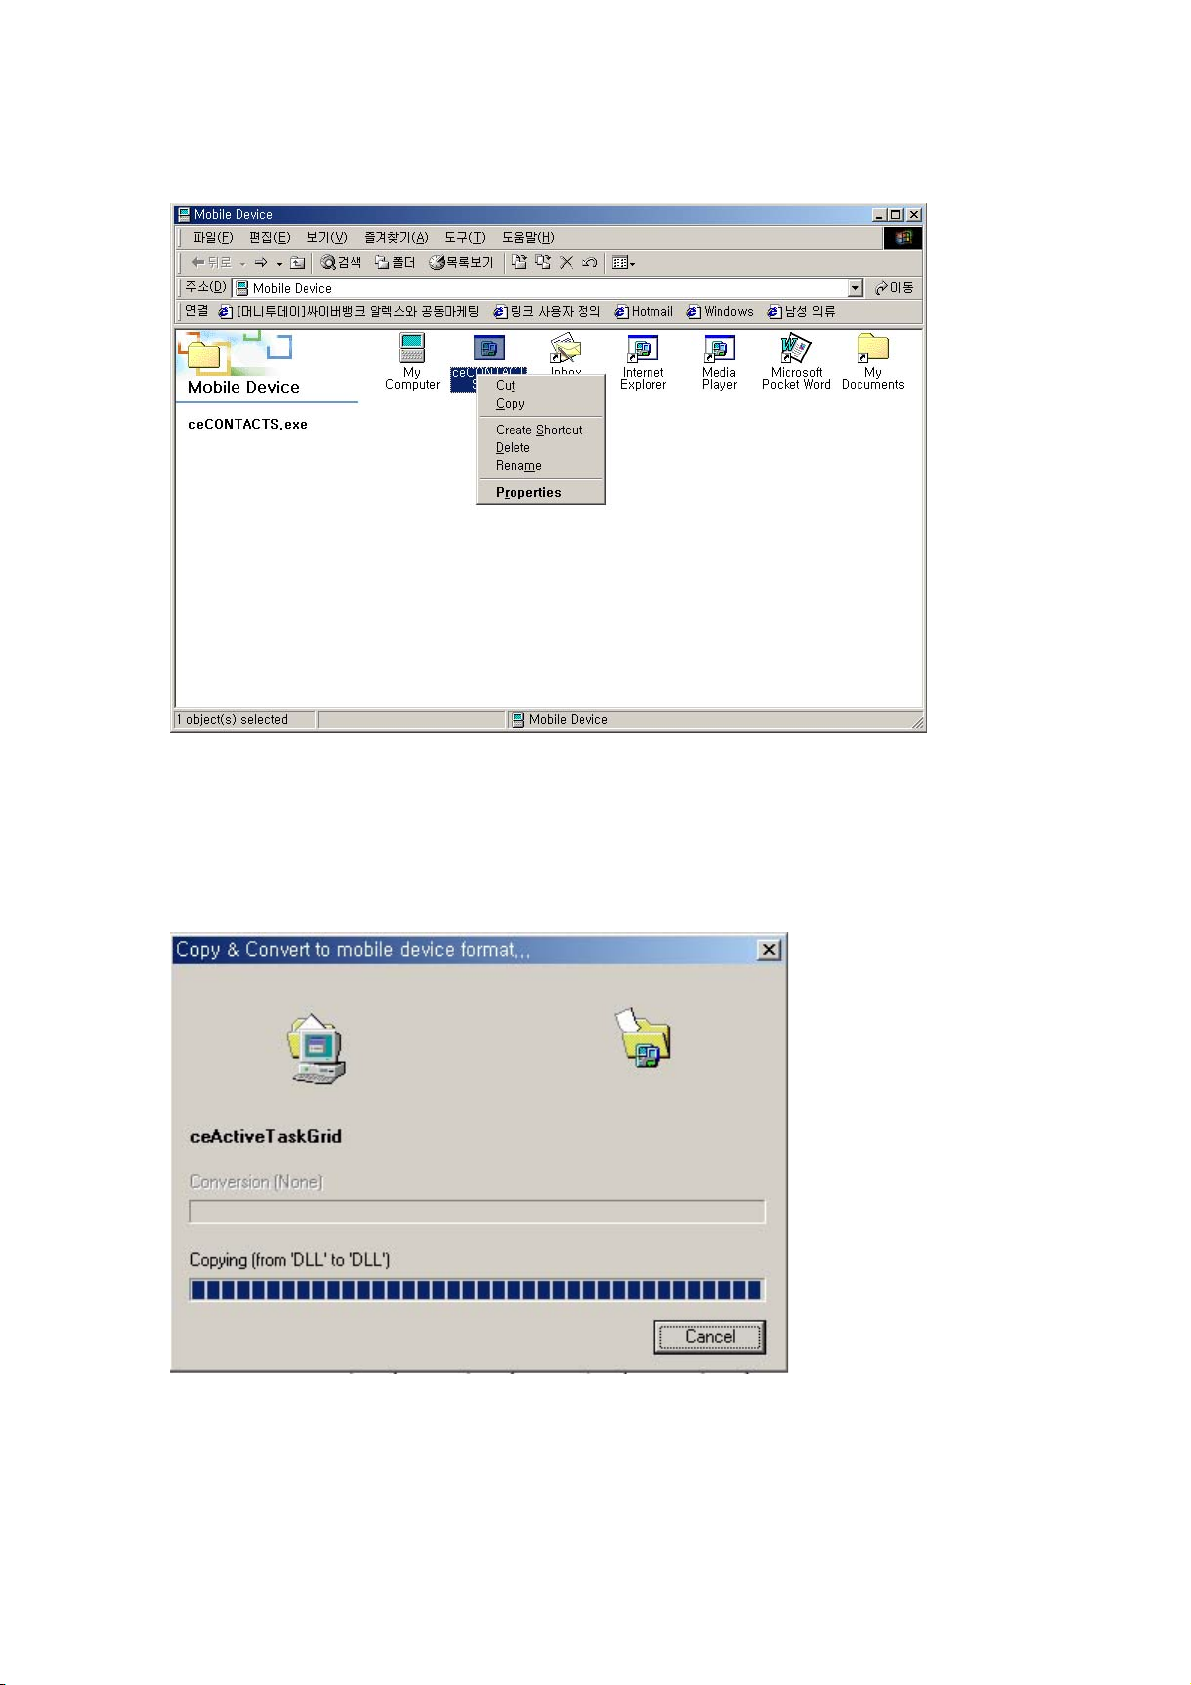
You can cut, paste, and copy files between folders on your Io and your desktop PC
simply by dragging the file icons between the appropriate folders. Some files may need
to be converted before you can use them on your Io. By default, Microsoft ActiveSync
automatically converts files to the appropriate file type.
You can choose not to convert files, or you can specify the conversions for each file
type by changing options in the File Conversion Properties dialog box.
35
Page 36

But you cannot open files or start programs stored on your Io. When you double click
the icon for a file or programs that is stored on your Io, Microsoft ActiveSync displays
the properties for that file of program.
2.5. Backing up and Restoring Data
Using the Microsoft ActiveSync Backup / Restore features, you can either creates a
complete duplicate of all data stored on your Io or replace the all information on your Io
with the information in the backup file, including files you have created, programs you
have installed, and any system settings and options you have set.
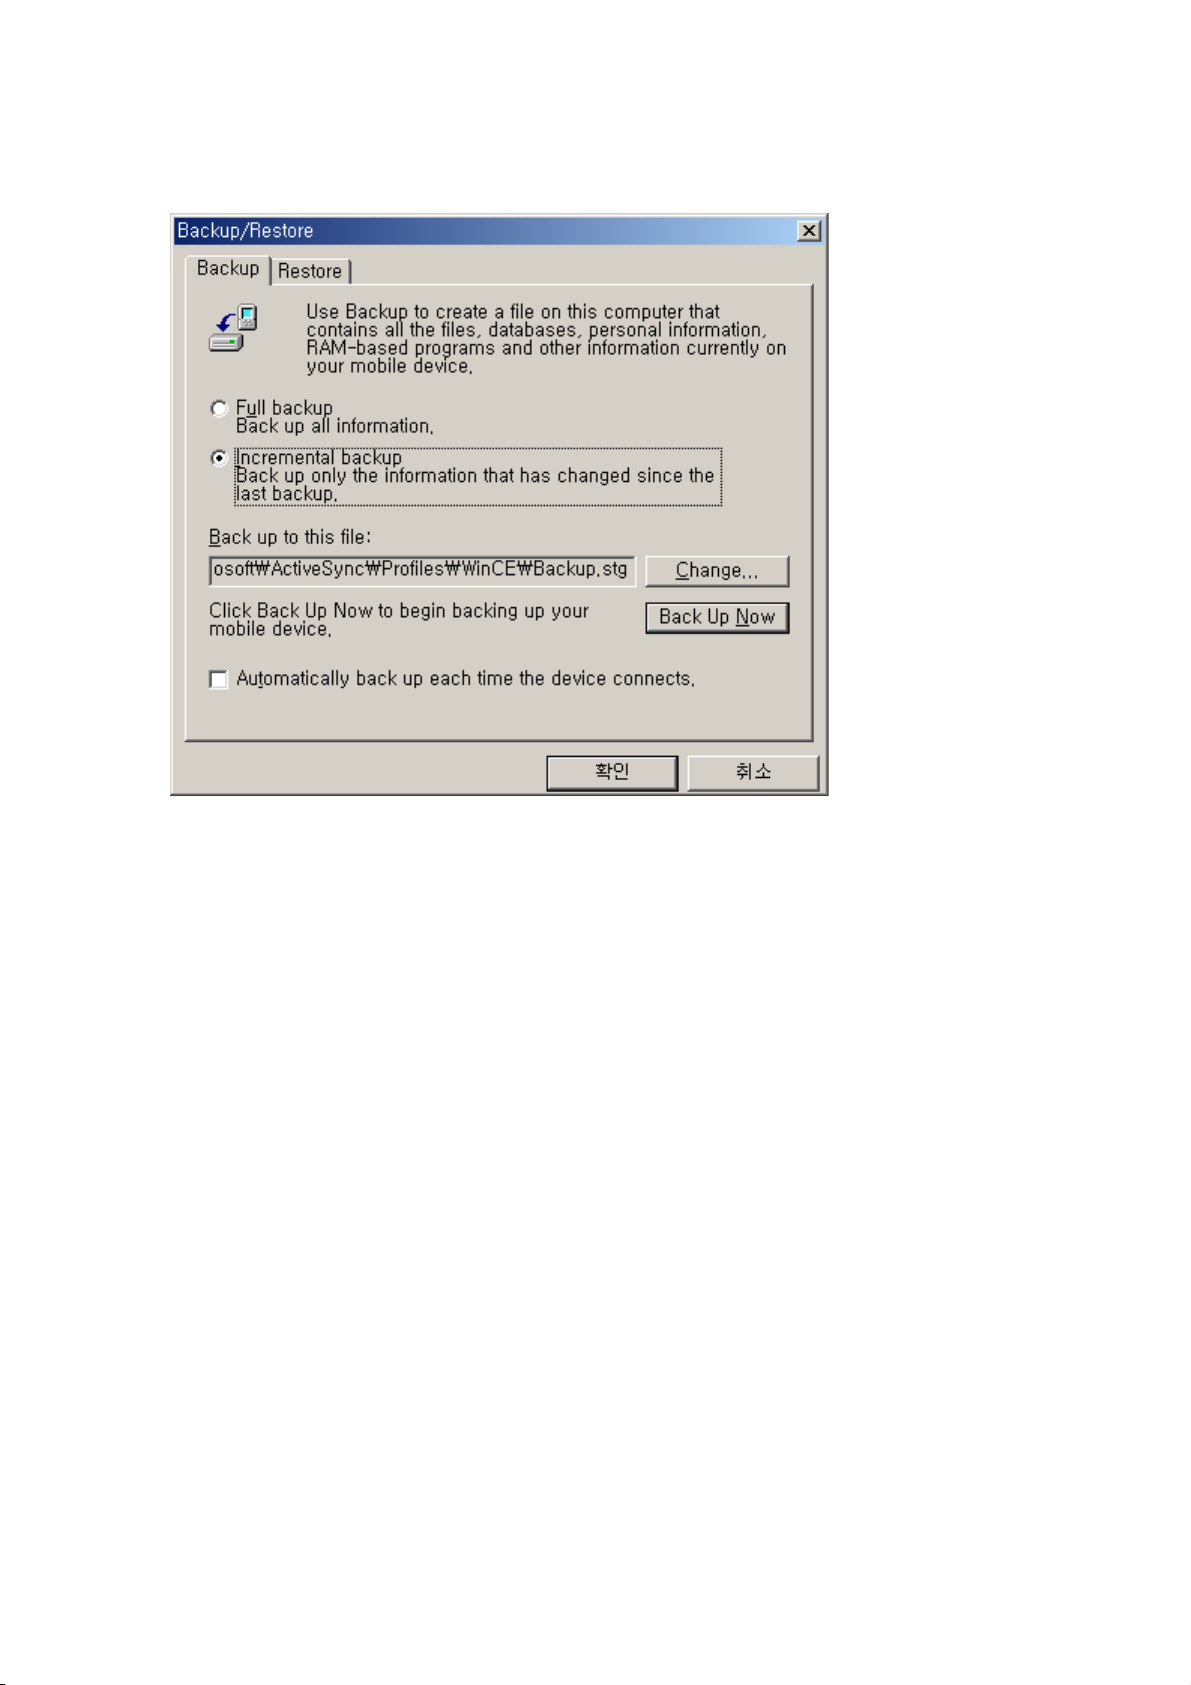
To Back up Data with ActiveSync
1. Connect your Io to your desktop PC.
2. In the ActiveSync window, on the Tools menu, tap Backup / Restore, and then
tap the Backup tab.
3. Select either Full Backup (to back up all information every time) or Incremental
Backup(to back up only new or updated information)
4. Click change to change the name of your backup file of to specify a location for
your backup file
5. Tap Back Up Now.
36
Page 37
To Restore Data with ActiveSync
1. Connect your Io to your desktop PC.
2. Close all running applications on your Io.
3. In the ActiveSync window, on the Tools menu, tap Backup / Restore, and then
tap the Restore.
4. Click Restore Now. Do not use your device until the restore process is complete.
5. Disconnect the sync cable, and perform a soft reset on your Io.
37
Page 38
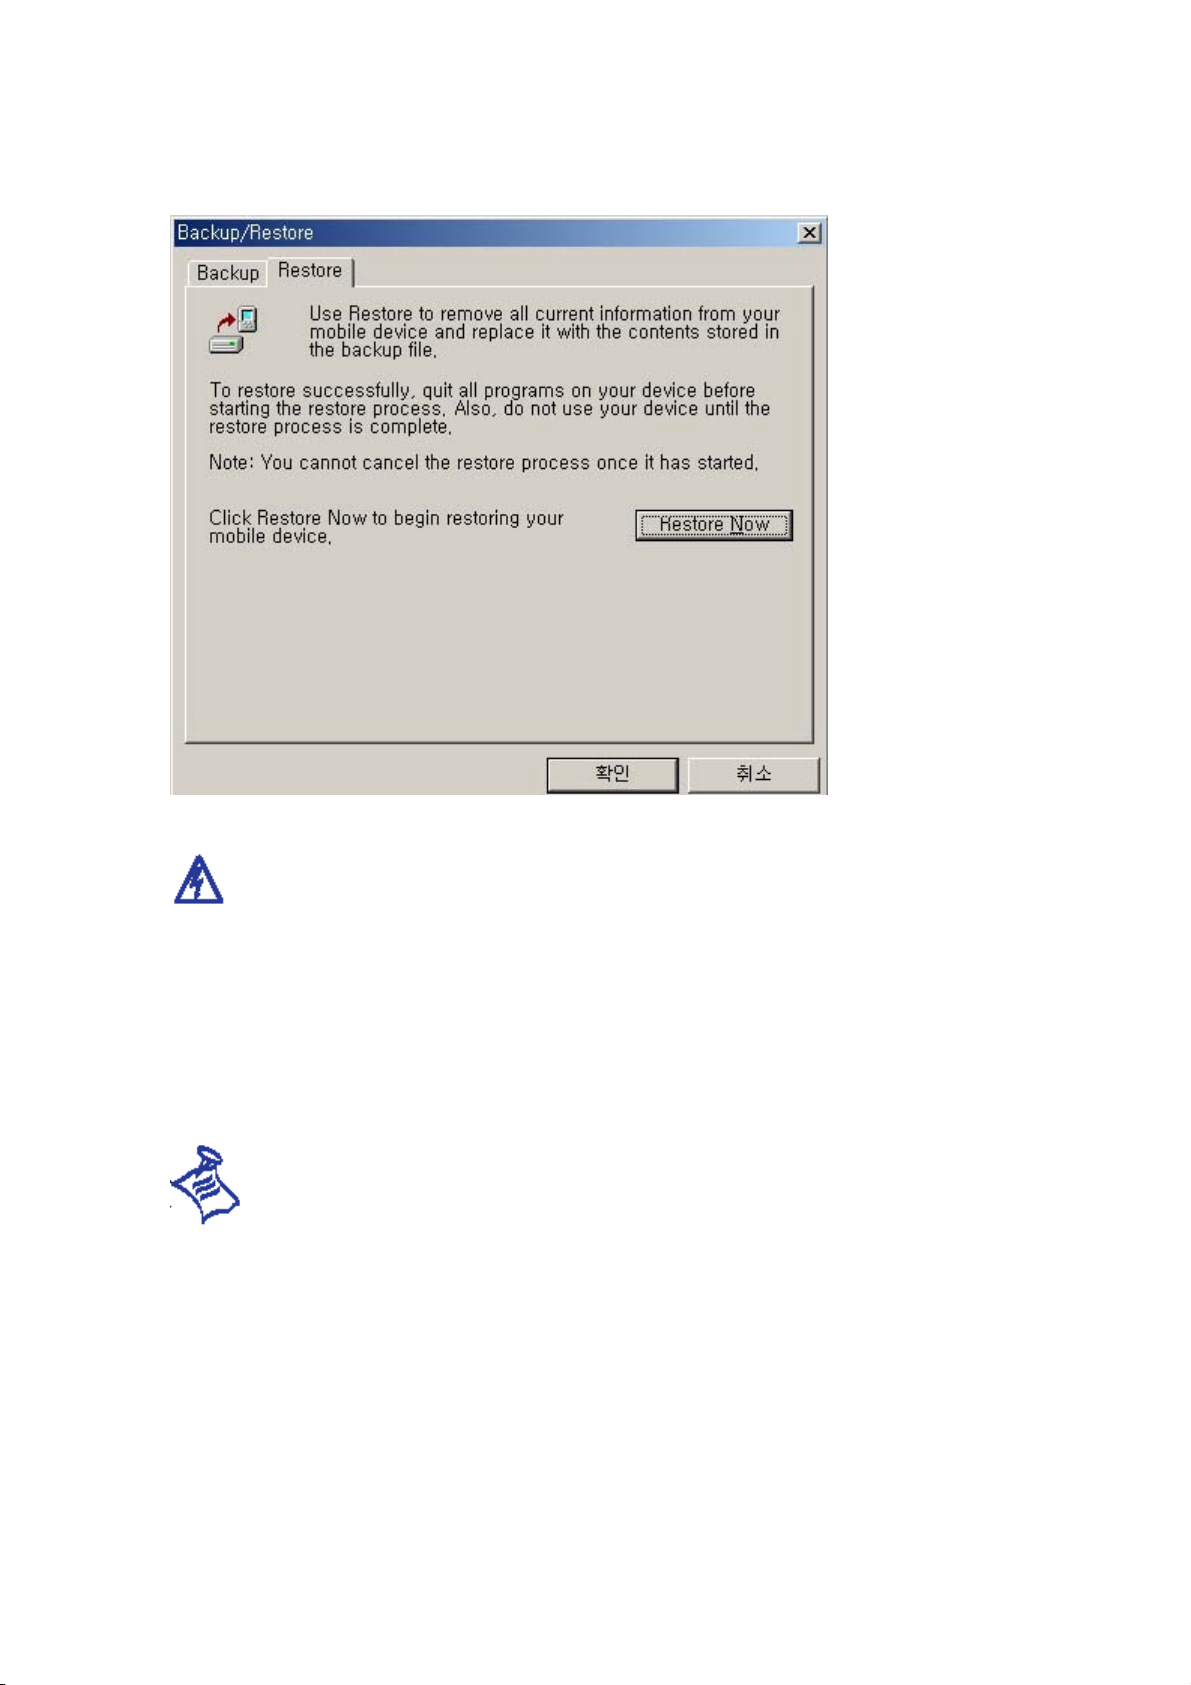
: Restoring data from ActiveSync replaces all information stored on your Io. Any
data added after the backup file was created will be lost.
2.6. Adding or Removing Programs
You can use the ActiveSync Add / Remove Programs to remove the program or to add
additional applications on your Io.
: The only programs that will run on your Io are those designed specially for MS
windows for H/PC. And also verify that programs are compatible with the Io‘s Strong
ARM Processor. You cannot run programs designed for other Windows Mobile platform,
like Pocket PC and other processor.
To Add or Remove Programs
1. Connect your Io to your computer and then open the ActiveSync window.
2. On the Tools menu in the ActiveSync window, click Add/Remove Programs
38
Page 39
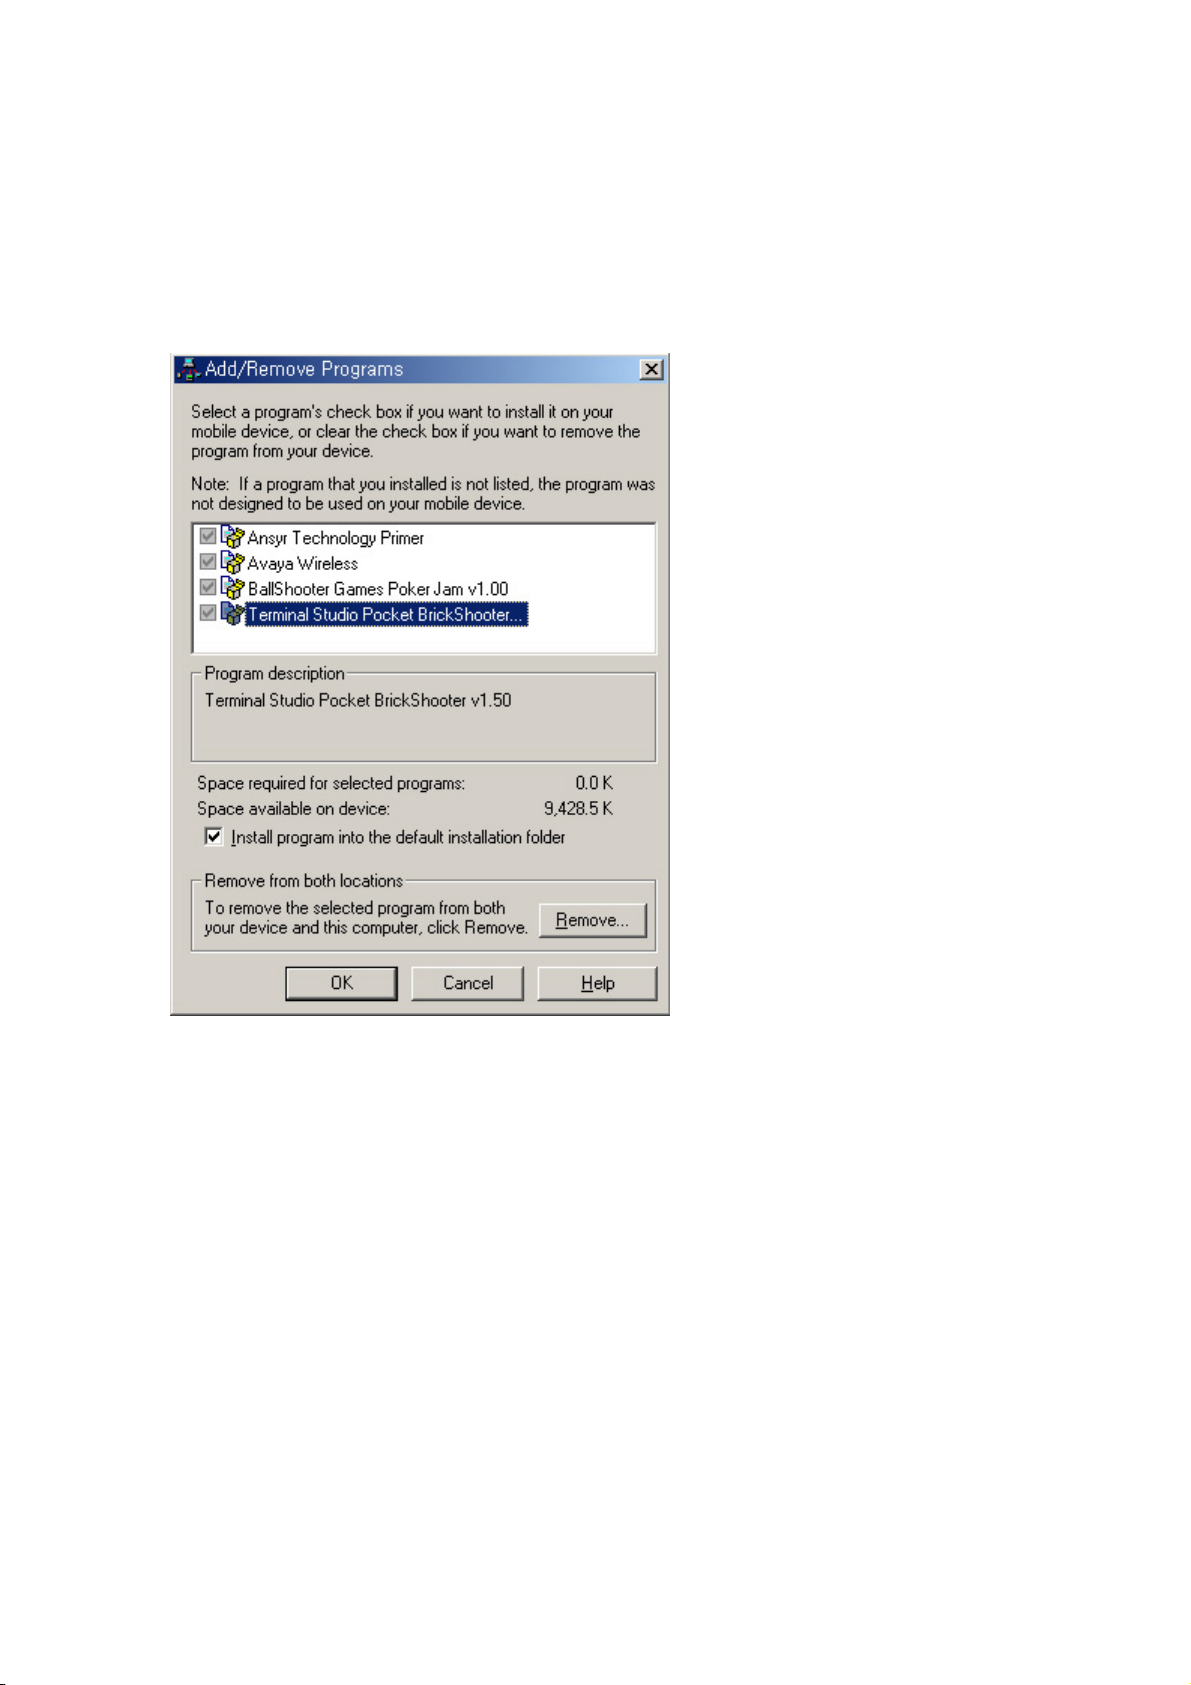
3. In the list of programs, activate the check box net to the program you wish to
install or clear the check box of the program you want to delete
4. If the program you want to remove is not shown on the list, you must remove it
manually
39
Page 40

Chapter 3. Microsoft Outlook Applications
You can organize your schedule and work with Calendar, Contacts, Tasks, Inbox and
Notes. You can use this programs individually or together, for example when you make
an appointment in Calendar, you can use the Contacts information. On the command bar
of the programs, tap Tools, enter data and tap Find now button.
Using Microsoft ActiveSync, you can synchronize PIMS information on your PC with
your Io. Each time your synchronize, ActiveSync compares the changes you made on
your device and PC and updates both computers with latest information. For information
on using ActiveSync, see Microsoft ActiveSync in this guide or ActiveSync Help on your
PC.
: Contact, Calendar and Tasks work together, but Inbox programs does not
work together Contacts, Calendar, Tasks . And also to synchronize these programs with
your desktop PC. You should set up connection between your Io and your desktop PC.
To Set up Connection, see Setting up Microsoft ActiveSync section in Chapter 2.
3.1. Calendar
Use Calendar to schedule appointments, meetings and other events. You can quickly
check your appointments in one of several views (Day, Week, Month, Year and Agenda)
40
Page 41
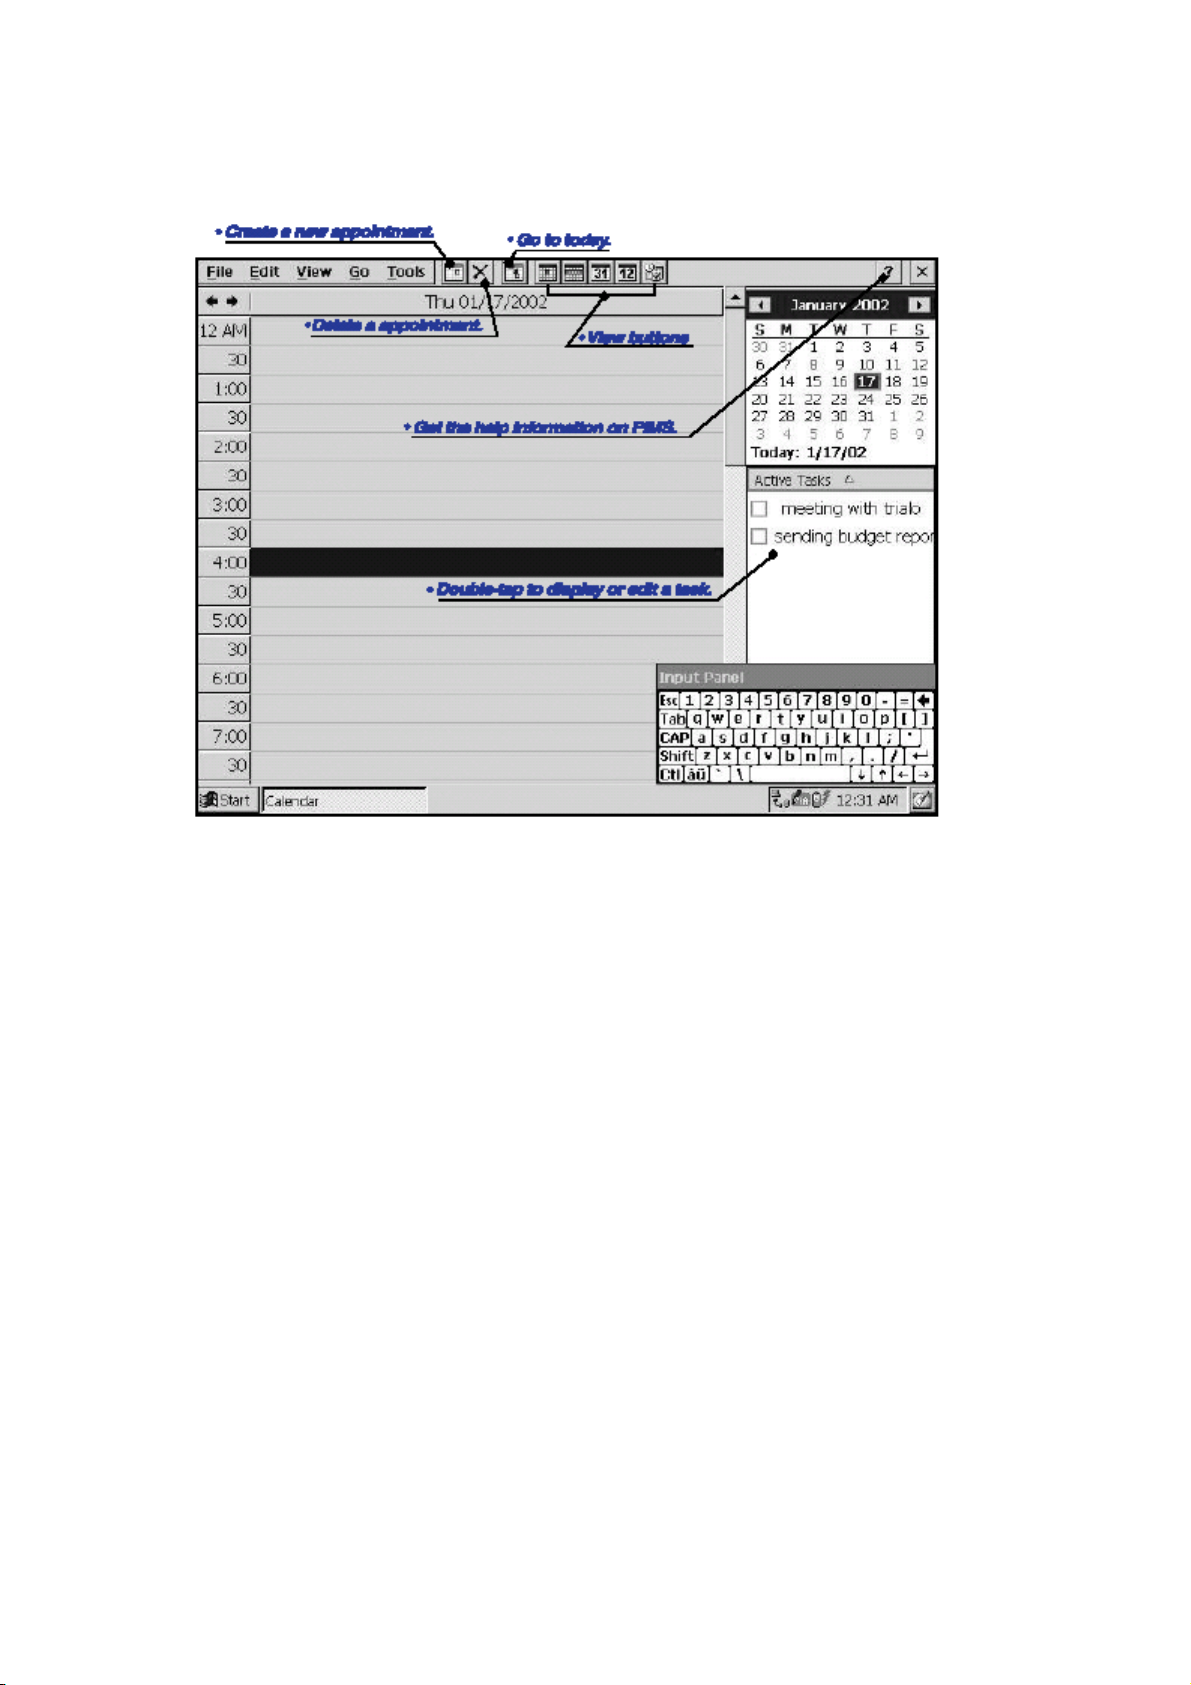
To Create an Appointment
1. On the Start menu, tap Programs and then Calendar or tap Calendar icon on the
screen.
2. On the Calendar menu, tap New or yap New icon.
41
Page 42
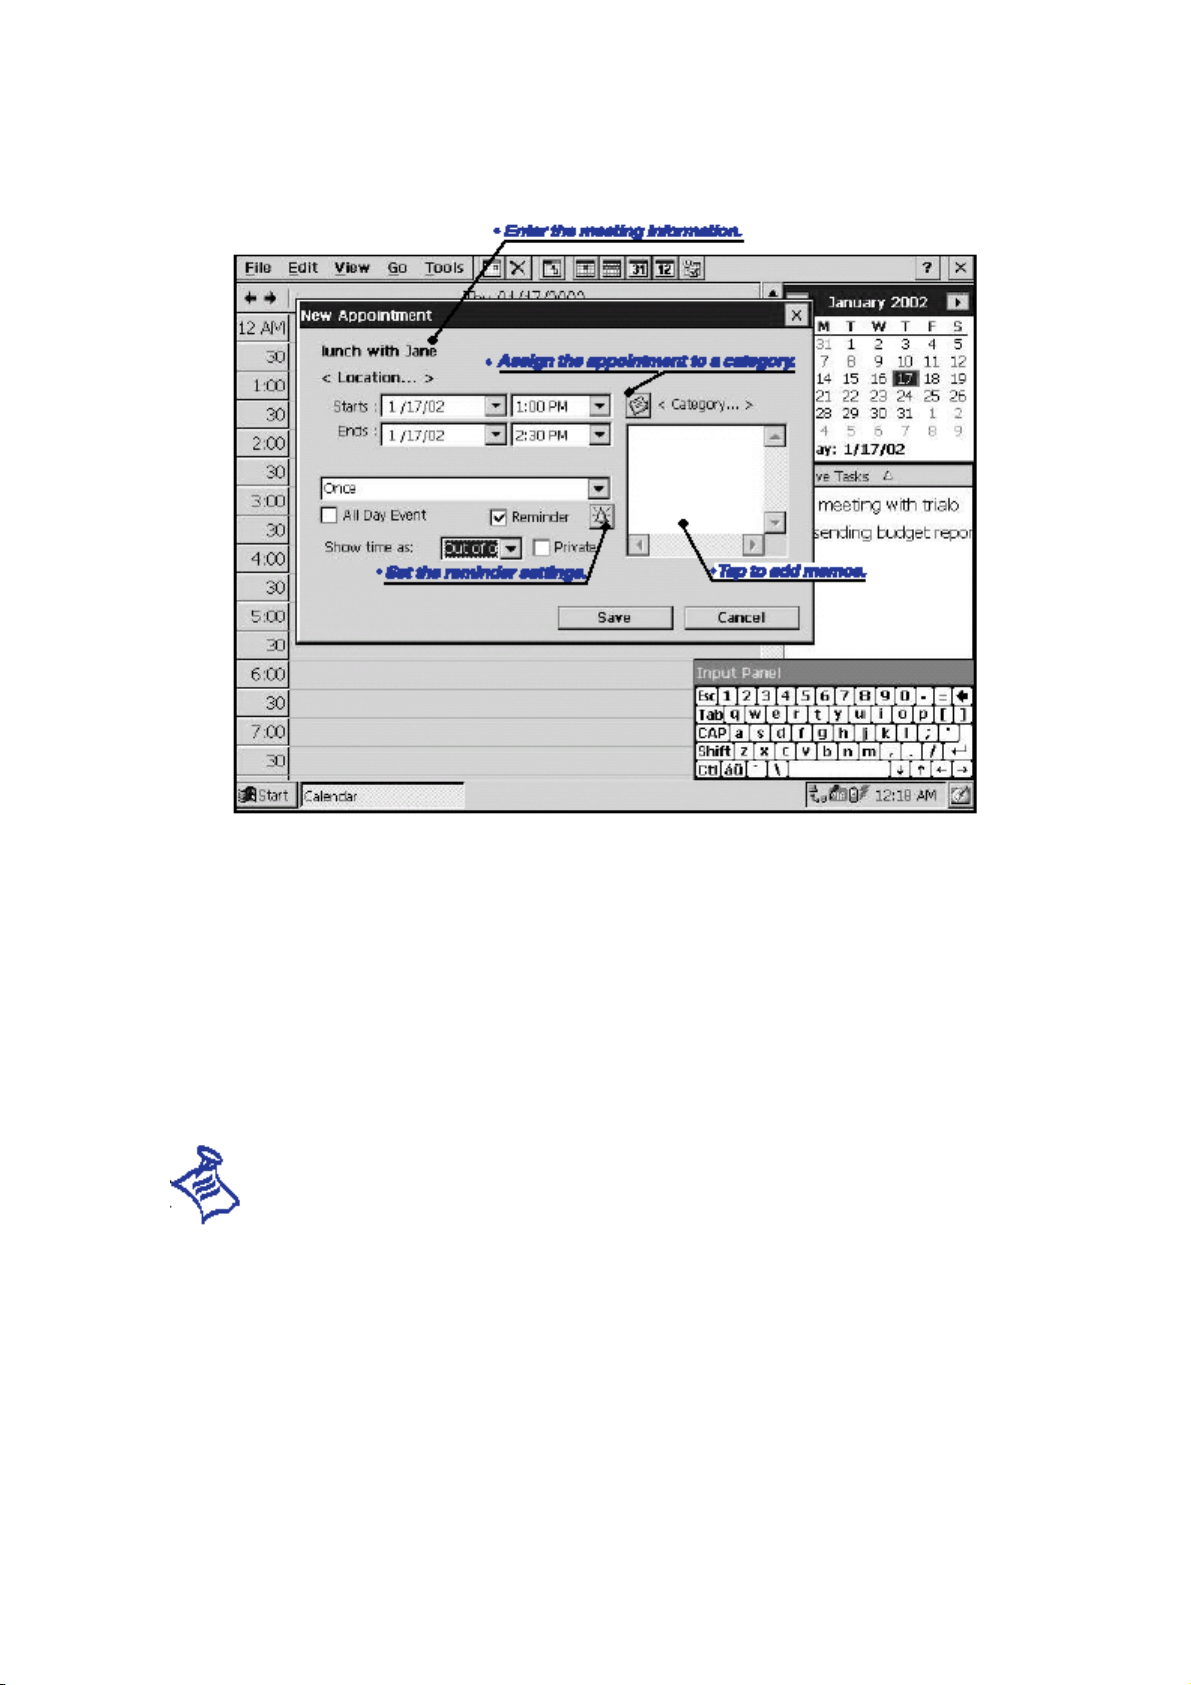
<Calendar 2>
3. Enter a description and a location
4. Select the time and date of your appointment , if needed
5. To add description, tap once in the Body area and then type your description
6. To assign the appointment to a category, tap the Edit in the Category area. and
then select a category from the list.
7. Select other desired options. When finished, tap OK
: Your Io will remind you about your appointments and meetings by playing a
sound, flashing the notification light and/or displaying a messages on the screen. To
choose the way you prefer to be modified, open the appointment or meeting, tap
Alarms .
42
Page 43
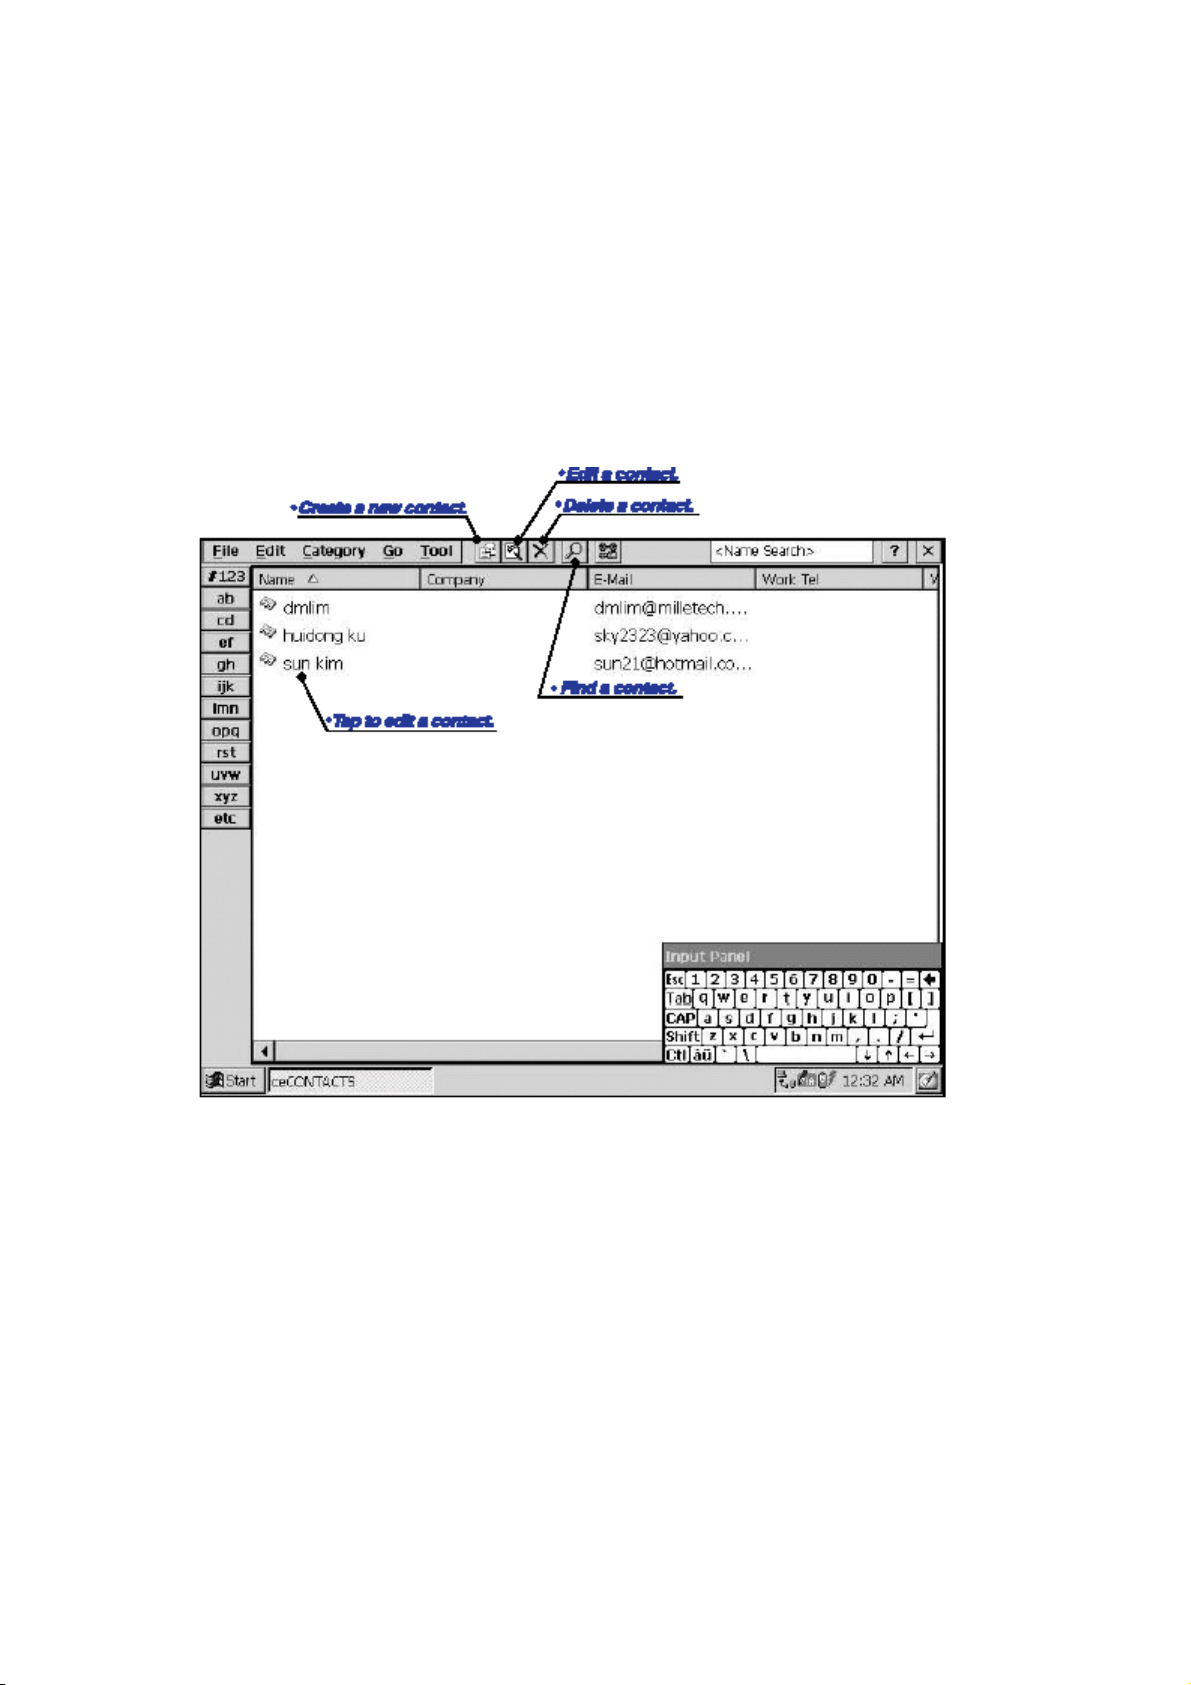
3.2. Contacts
The Contacts program maintains a list of your friends and colleagues so that you can
easily find the information anywhere you are looking for.
Using the IR port, you can also quickly share Contacts information with other Windows
CE-based mobile device users.
To Create a New Contact
1. On the Start menu, tap Programs and then Contacts or tap Contacts on the
screen.
2. On the file menu, tap New Contacts or tap New Contact button on the toolbar.
<Contact 2>
43
Page 44
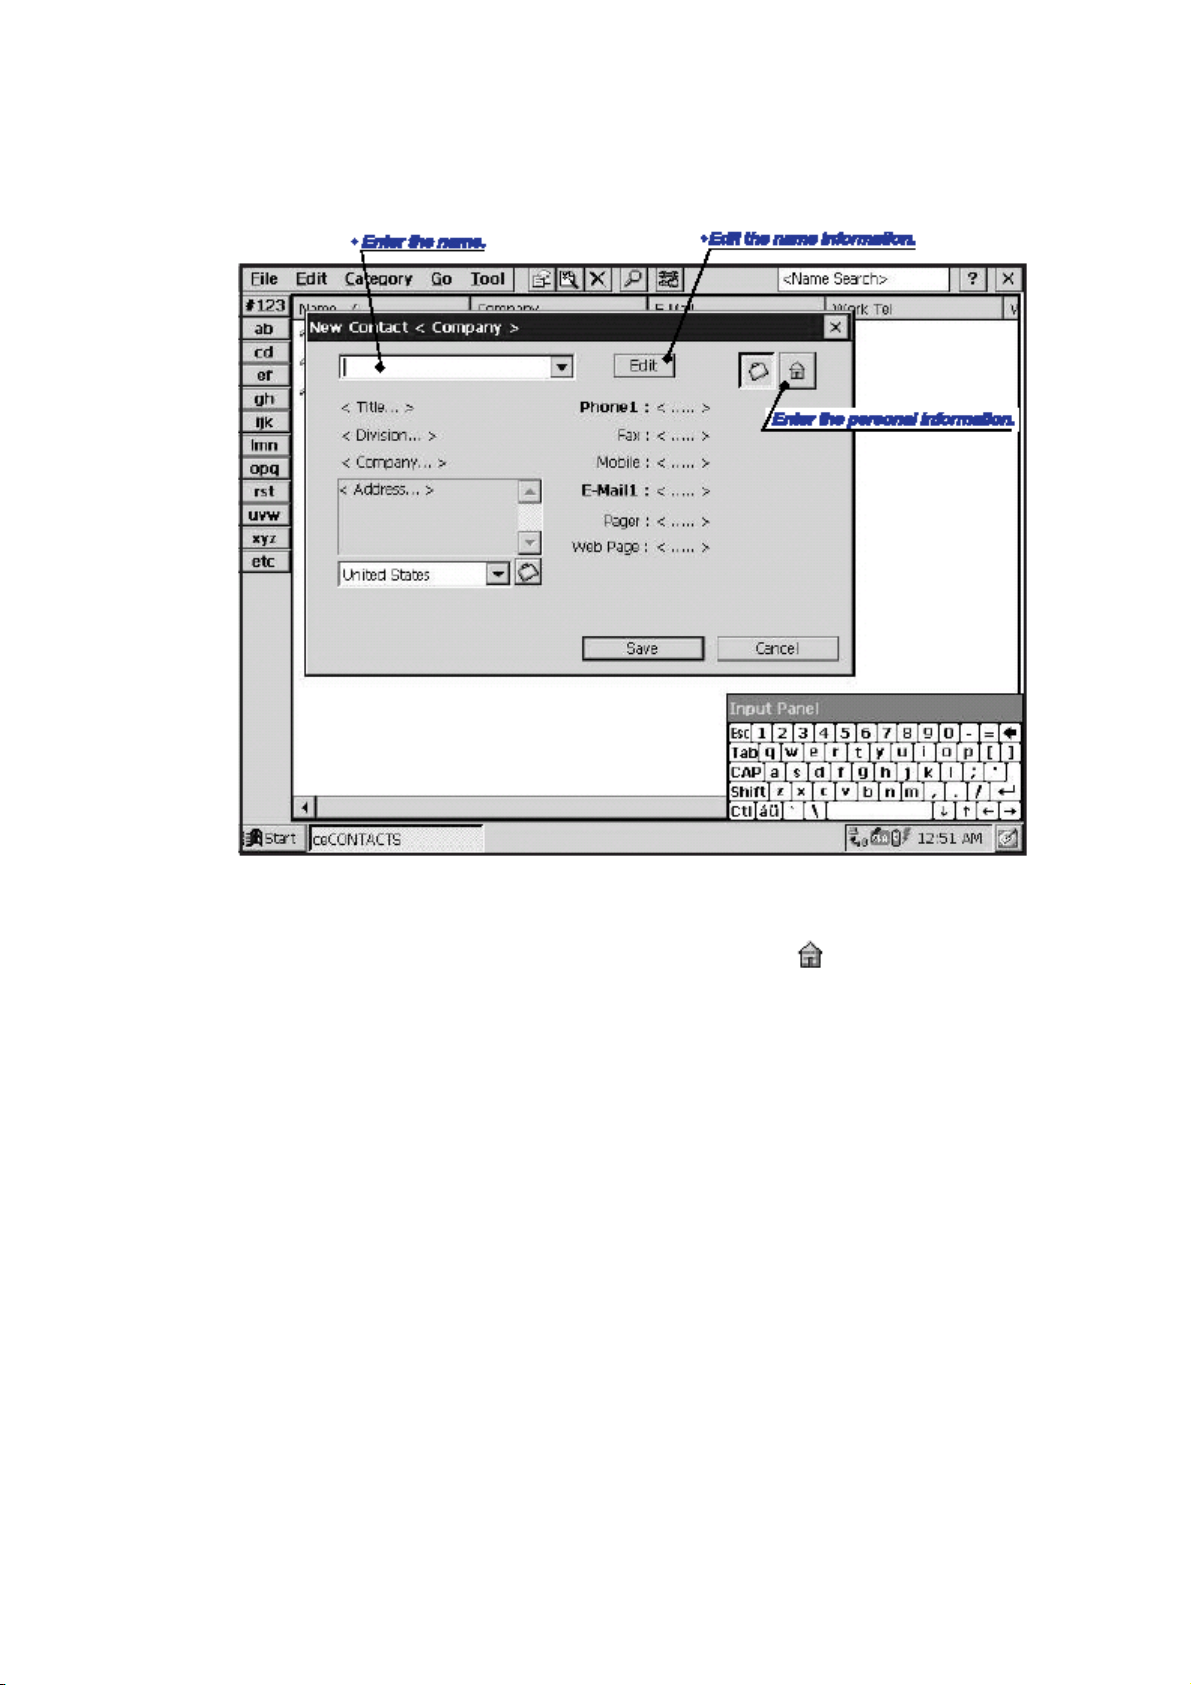
3. Enter a name and type other contact information
4. To add memos or assign the contact to a category, tap
select a category from the list.
5. When finished, tap Save.
3.3. Tasks
Use Tasks to keep track of what you have to do. Enter the details for a task in the task
list. You can even associate a date with the task and then set a reminder for yourself.
. And add memos or
44
Page 45
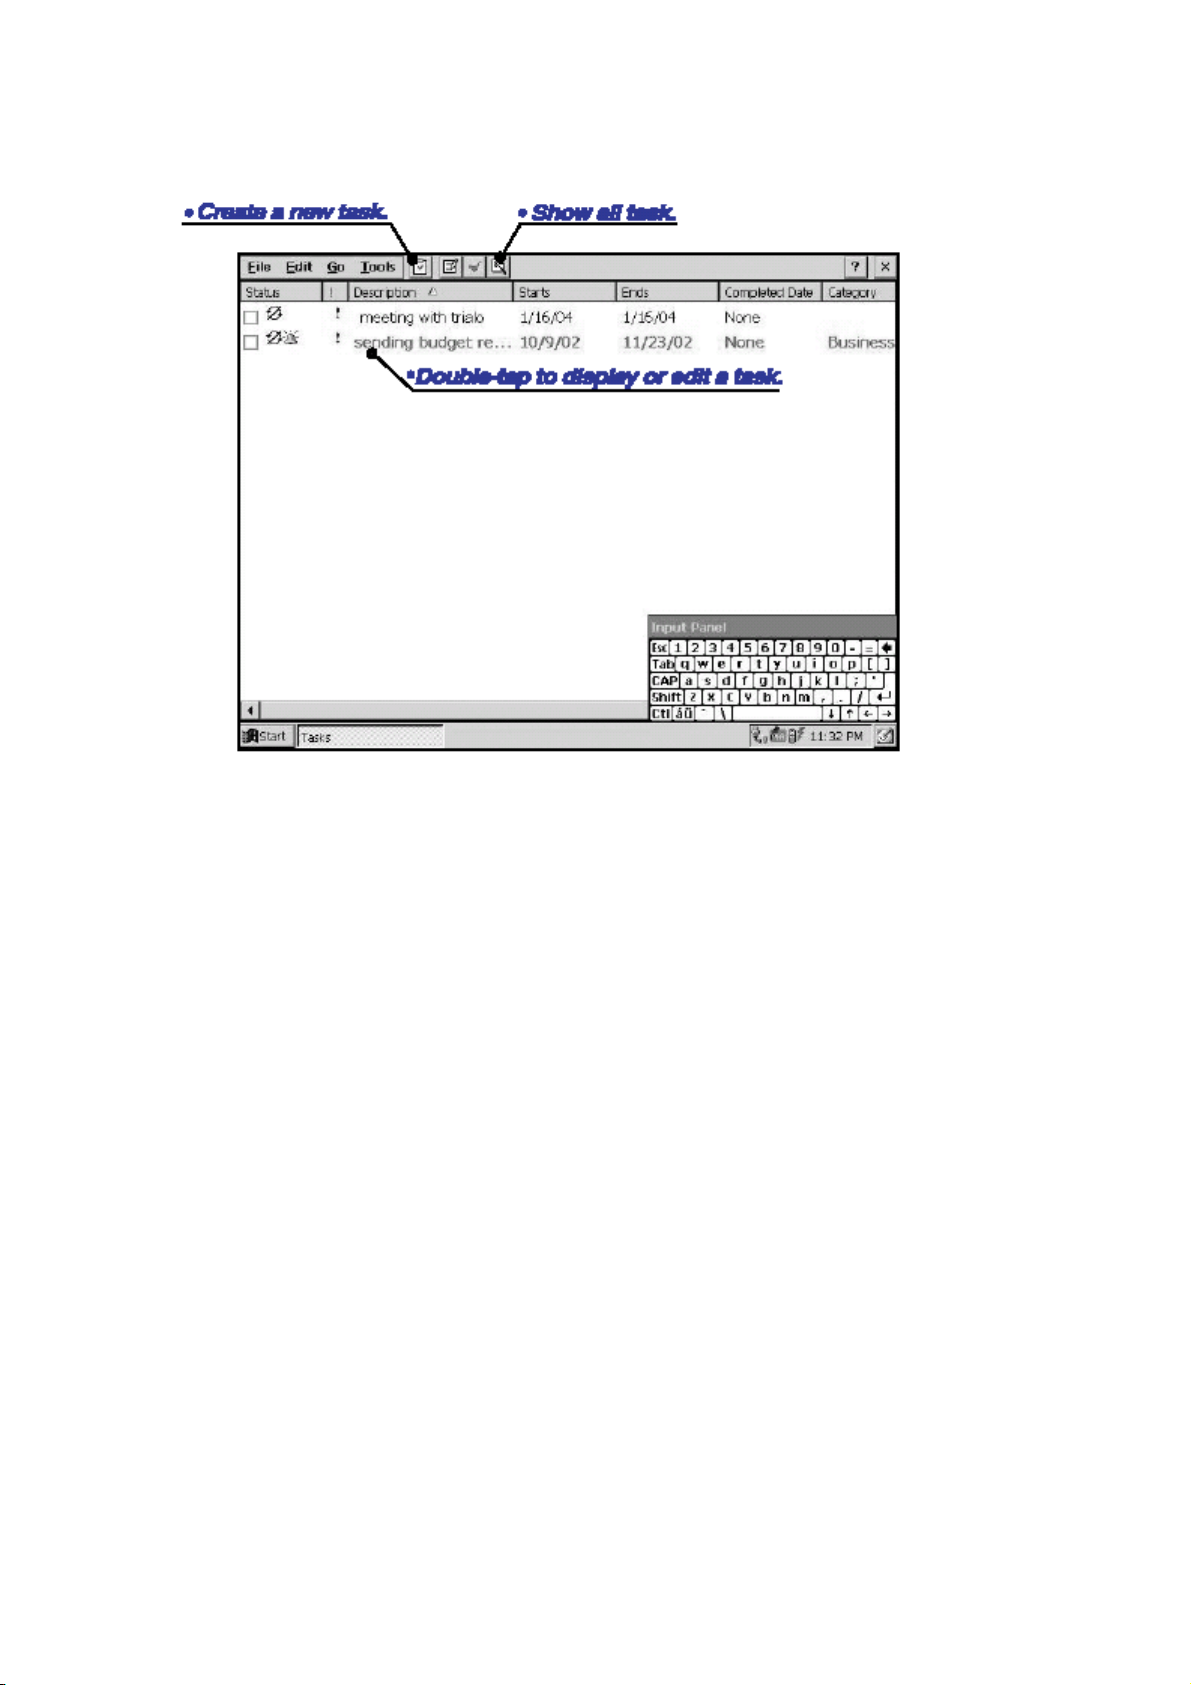
To Create a New Task
1. On the Start menu, tap Programs and then Tasks or select Tasks icon on the
screen.
2. On the File menu, tap New Tasks or tap New Task button on the tool bar
45
Page 46
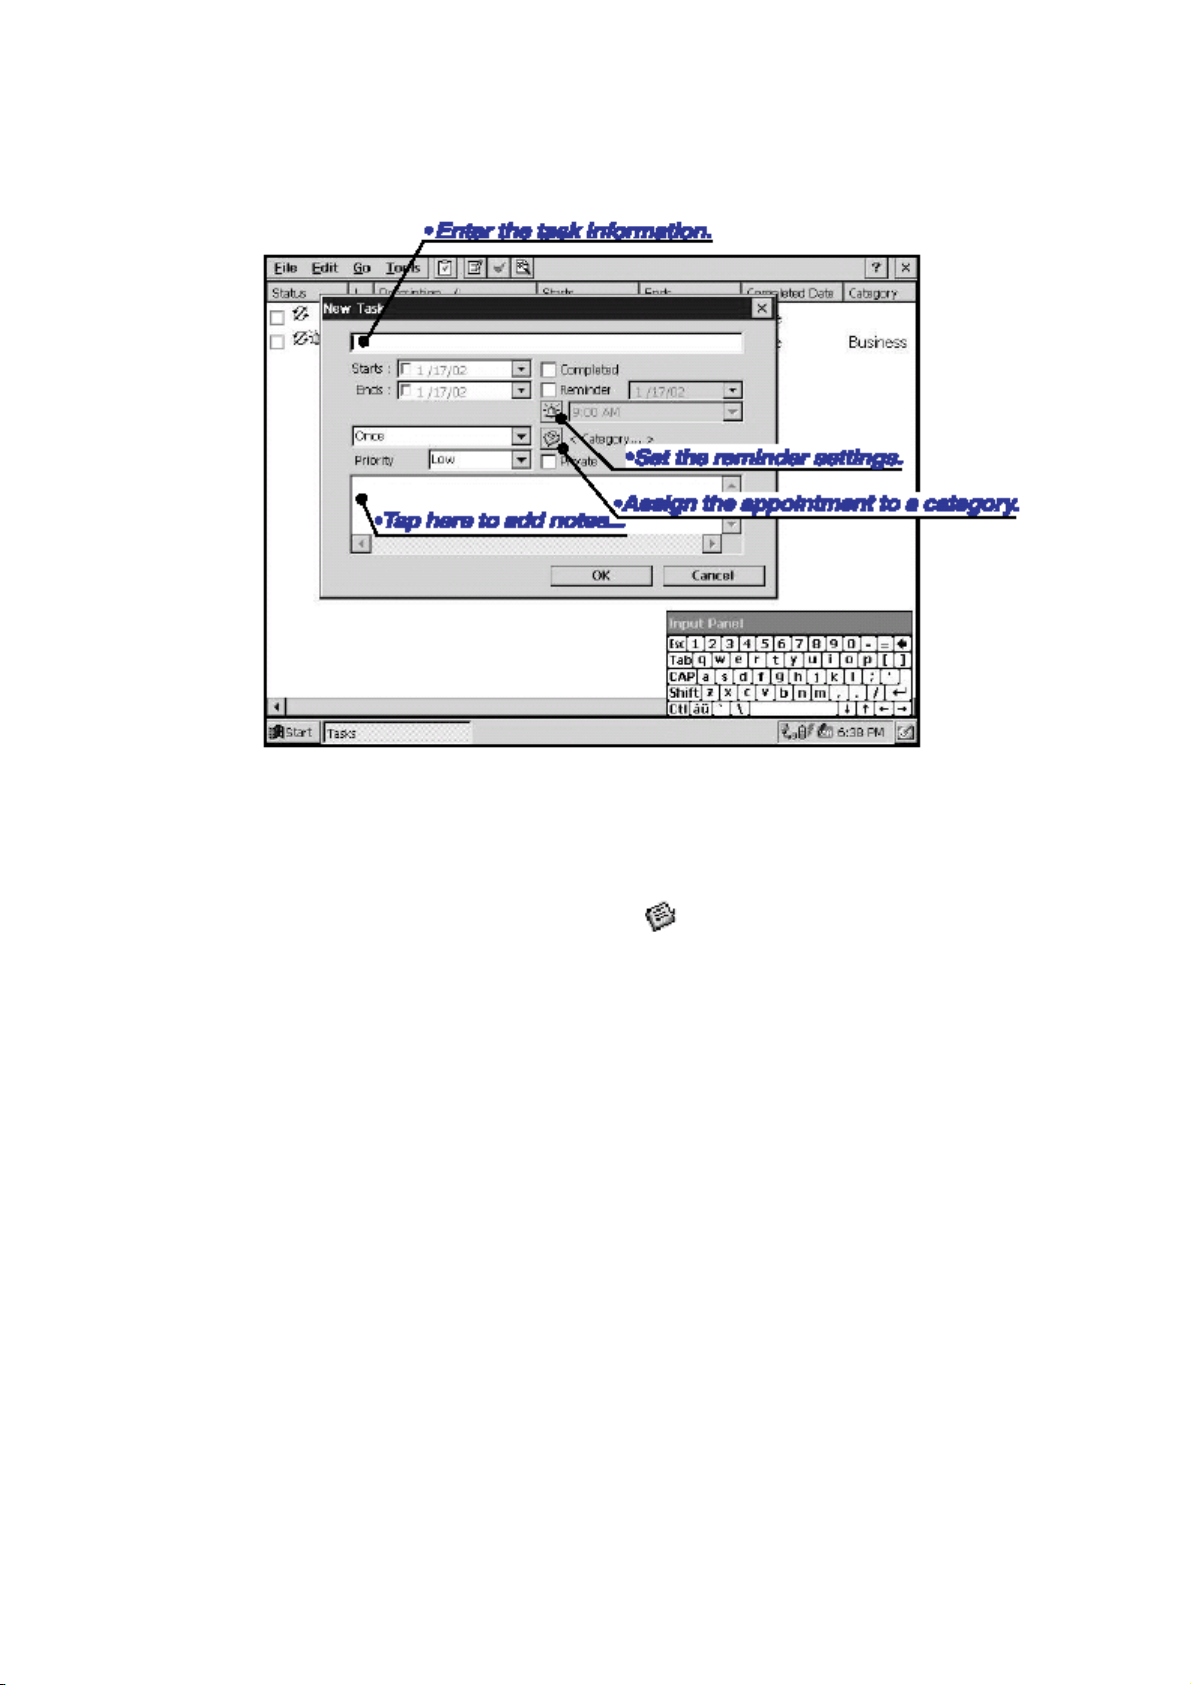
3. Enter a description
4. Select the start date, due date, and other information
5. When you need to select a category, tab and select a category from the list.
6. When finished, tap OK.
3.4. Inbox
Use Inbox to send and receive e-mail messages. You can access your e-mail by
synchronizing with your desktop PC or by connecting to a mail server through an
Internet or Network account.
46
Page 47
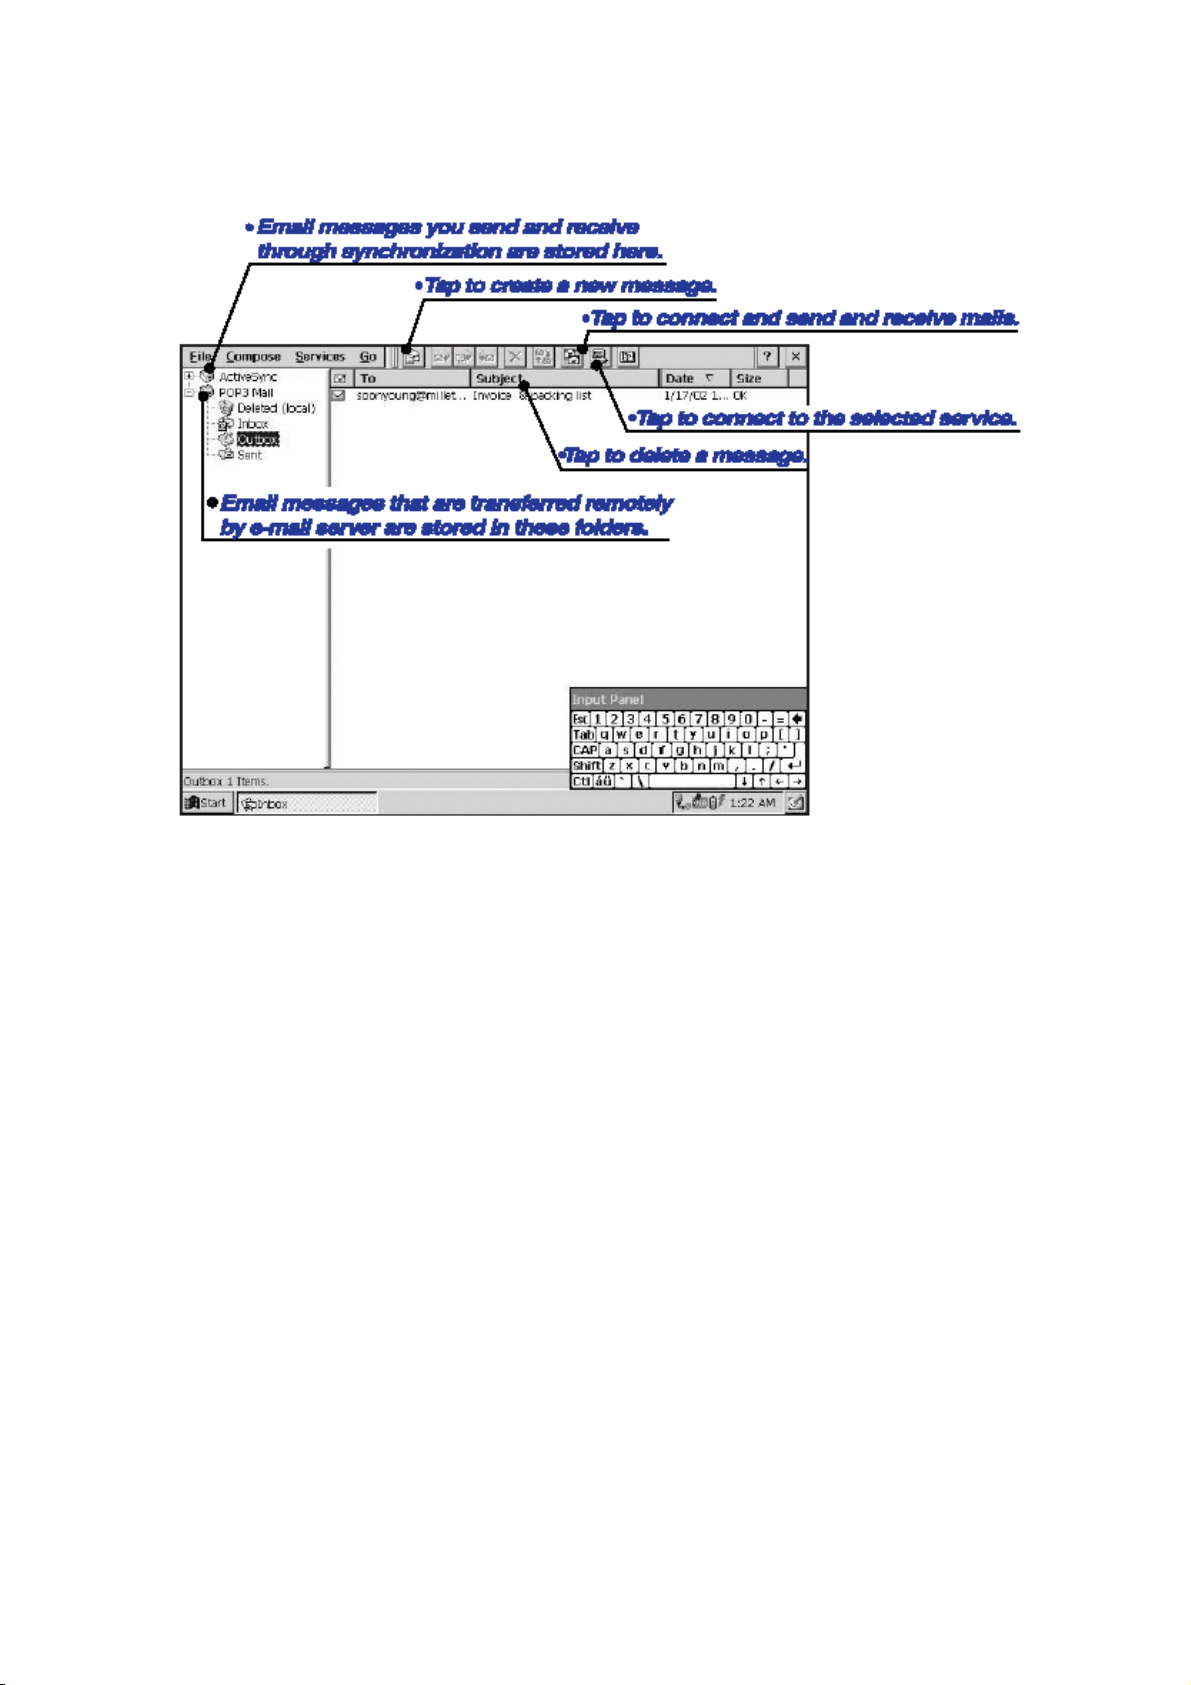
Synchronizing Messages
Using Microsoft ActiveSync, e-mail messages can be synchronized. So, Before using
Inbox, you need to enable message synchronization in ActiveSync
During Synchronization :
-E-mail messages are copied from the Inbox folder of Outlook on your desktop PC to
the Inbox folder on your Io. The messages on both computers are linked. So when you
delete a messages on your device, it is also deleted from the desktop PC the next time
you synchronize.
-And also e-mail messages in Outbox folder on your device are transferred to Outlook
on your desktop PC.
Connecting Directly to an E-mail Server
You can set up a connection to your e-mail server. When you are connected, you can
send and receive e-mails by using a modem or network connection and Inbox on your
device. Use a modem connection to connect to your Internet Service Provider(ISP), or
use a Ethernet Card to connect to local area network that your mail server is connected.
47
Page 48

Refer to the Connecting Directly to an E-mail Server in Chapter 5. for setting up
connection in addition to creating a connection to your ISP or network, You must give
Inbox the information it needs to communicate with your e-mail server.
Downloading Messages
To send and receive e-mail messages , select the Services menu , and make sure that
the service you want to use is selected. Then select the Connection buttons. When you
connected e-mail server, the messages on your Io and your mail-server are
synchronized. ; new messages are downloaded to the Io Inbox folder, messages in the
Io Outbox folder are sent, and messages that have been deleted on the e-mail server
are removed from the Io Inbox. Double-tap a message in the message list to open it. If
you read a message and decide that you need the full copy, select the Get full copy of it.
Disconnecting from the Server
You can work online or offline. When working online, you read and respond to messages
while connected to e-mail server. Messages are sent as soon as you tap Send. To
disconnect Inbox from you mail server ,
Select the Connection button again. or double-tap
in the status area and select
Disconnect.
When working offline, once you’ ve downloaded new message headers, you can
disconnect form e-mail server then decide which messages to download completely.
The next time you connect, Inbox downloads the complete message you’ ve marked for
retrieval and sends the messages you composed.
Managing Messages and Folders
By default, messages are displayed one of four folders in Inbox : Deleted(Local), Inbox,
Outbox, Sent. The deleted folder contains deleted messages on your device. The Inbox
folders contains received messages from your desktop or mail server. If you want
create more additional folders, tap File, Folder and then tap New Folder.
When you connect your e-mail server or synchronize with your desktop PC, Inbox
downloads only the first 100 lines of each message by default. No mail attachment are
downloaded. The original messages remain on the mail server or Outlook on your
desktop PC.
48
Page 49
By default, the most recently received messages are displayed first in the list. When
you receive a message, tap it in the list to open. Unread messages are displayed in bold.
You can mark the massages that your want to retrieve them entirely the next time you
synchronize or connect to your mail server. On the Inbox menu bar, tap Services and
then tap Get full copy.
You can specify your downloading preference when you set up the service or select
your synchronization options.
To change Inbox delivery options for mail synchronization, see ActiveSync online Help
on your desktop PC. To change Inbox delivery options for remote mail, in Inbox on your
device, tap Services and then Options. Select the options you want.
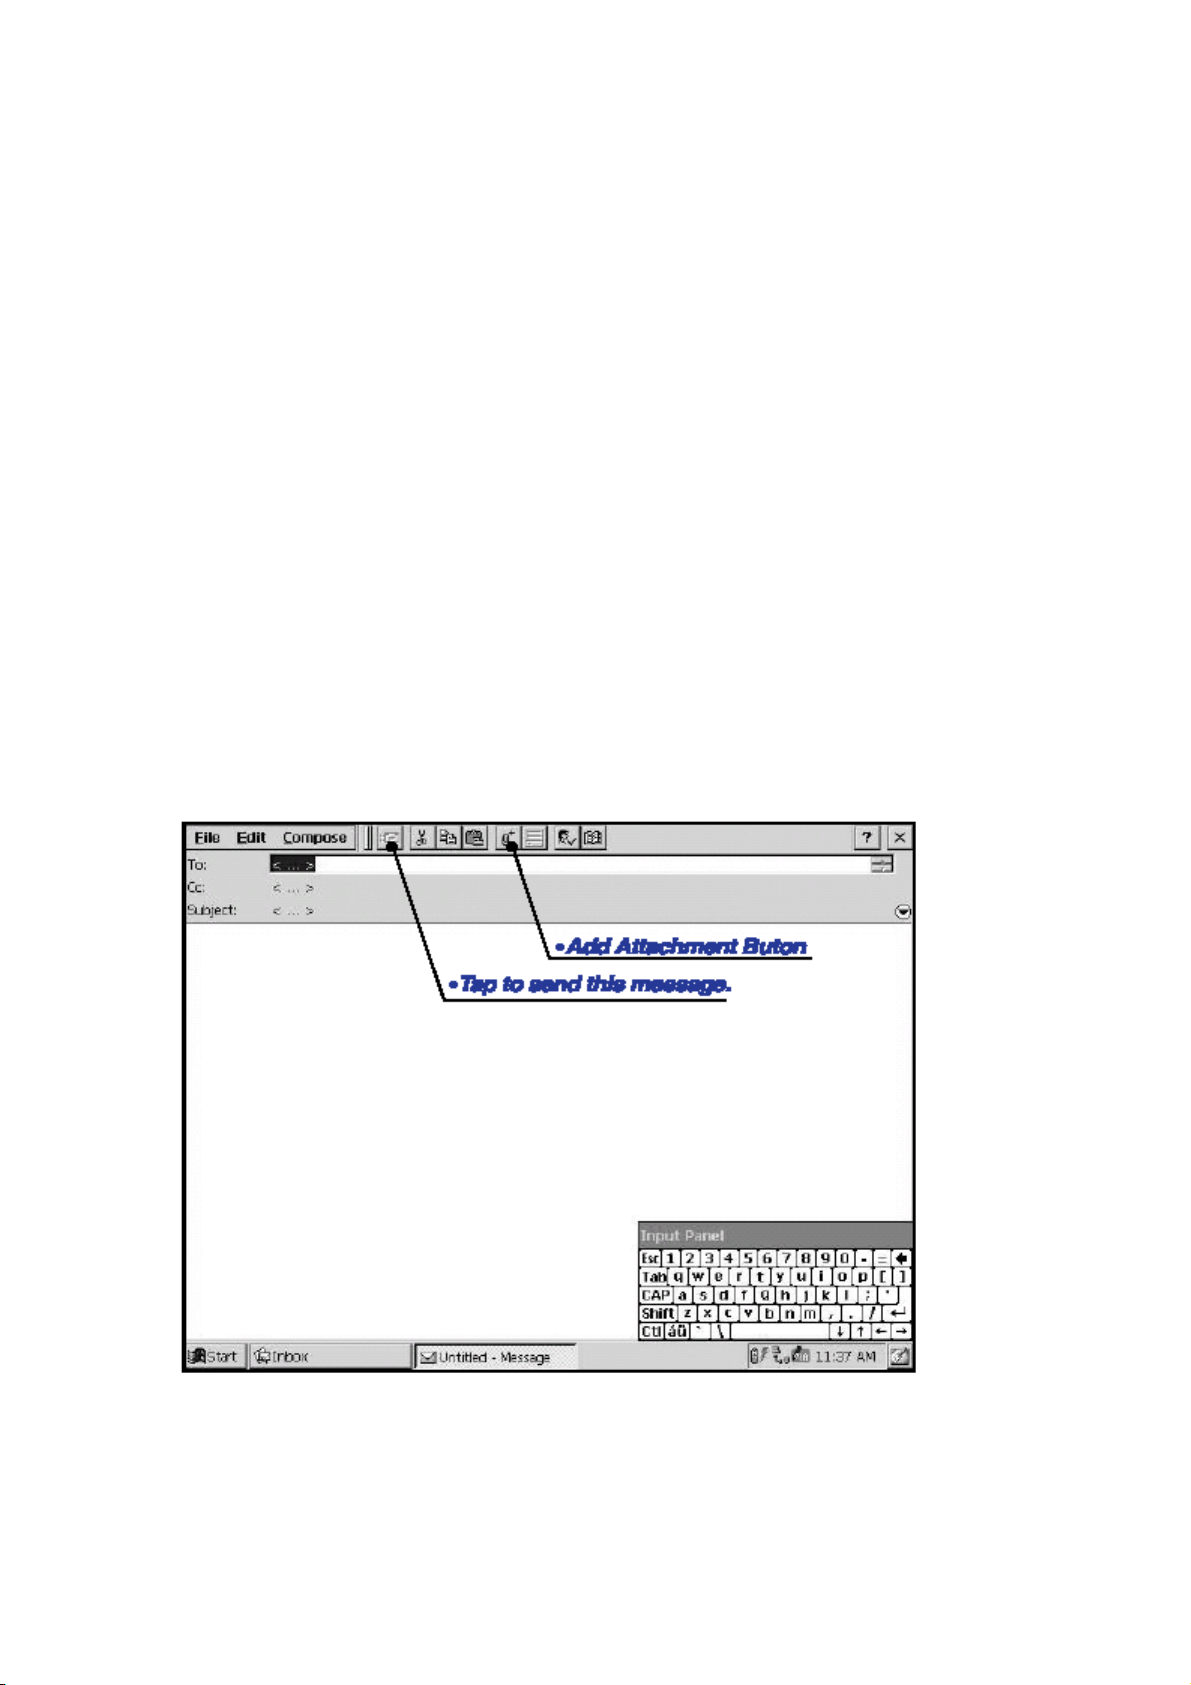
To Compose E-mail Messages
1. Tap Compose and then New message on the tool bar.
2. Enter an e-mail address.
3. When you finished, Tap Send icon on the toolbar.
If you are already connected, you can send and receive a e-mail message by tapping
49
Page 50

send button on the command or connected. The received message are placed in your
Inbox folder and the sent messages are placed on your IO.
The sent messages are placed in your Outlook folder on your device and will be
delivered in one of two ways.
-They are transferred to the Outbox folder in Outlook on your desktop PC the next time
your synchronize.
-They are transmitted to your mail server the next time you connect remotely.
: After you send and receive e-mail messages, be sure to close the connection.
To disconnect, tap Services and then Connect. Or double tap the connection icon in the
status area, and tap Disconnect.
50
Page 51

Chapter 4 Companion Program
Companion programs consist of Microsoft Pocket Word, Spreadsheet, and Windows
Media Player and X Audio. Pocket Word, Spreadsheet work with Windows versions of
the Microsoft Word and Excel on your PC to give you easy access to copies of your file.
You can create new documents on your Io, or you can copy file from your PC to your Io.
Synchronize between your PC and your Io so that you have the most up-to-date
information on both computers. Use Window Media Player to listen to digital Audio files
downloaded to your Io.
To switch to a companion program on your device, tap Programs on the Start menu, and
then tap the program you looking for.
If you need more information on using the companion programs, see online Help on the
device.
: If your companion programs documents contains important information, you
can protect it with a password. To do so, open the documents and tap Password on the
File menu. Password protected documents cannot be synchronized.
4.1. Pocket Word
Use Pocket Word to create documents, such as letters, trip report and meeting minutes.
And also you can use Pocket Word to open and edit documents created in the PC
version of Word.
Pocket Word allows you to save documents in a variety of formats, including Pocket
Word(.psw), rich text format(.rtf) and plain text format(.ptf). If you transfer document
between your device and your PC, Microsoft automatically converts the file to the
appropriate file type.
51
Page 52
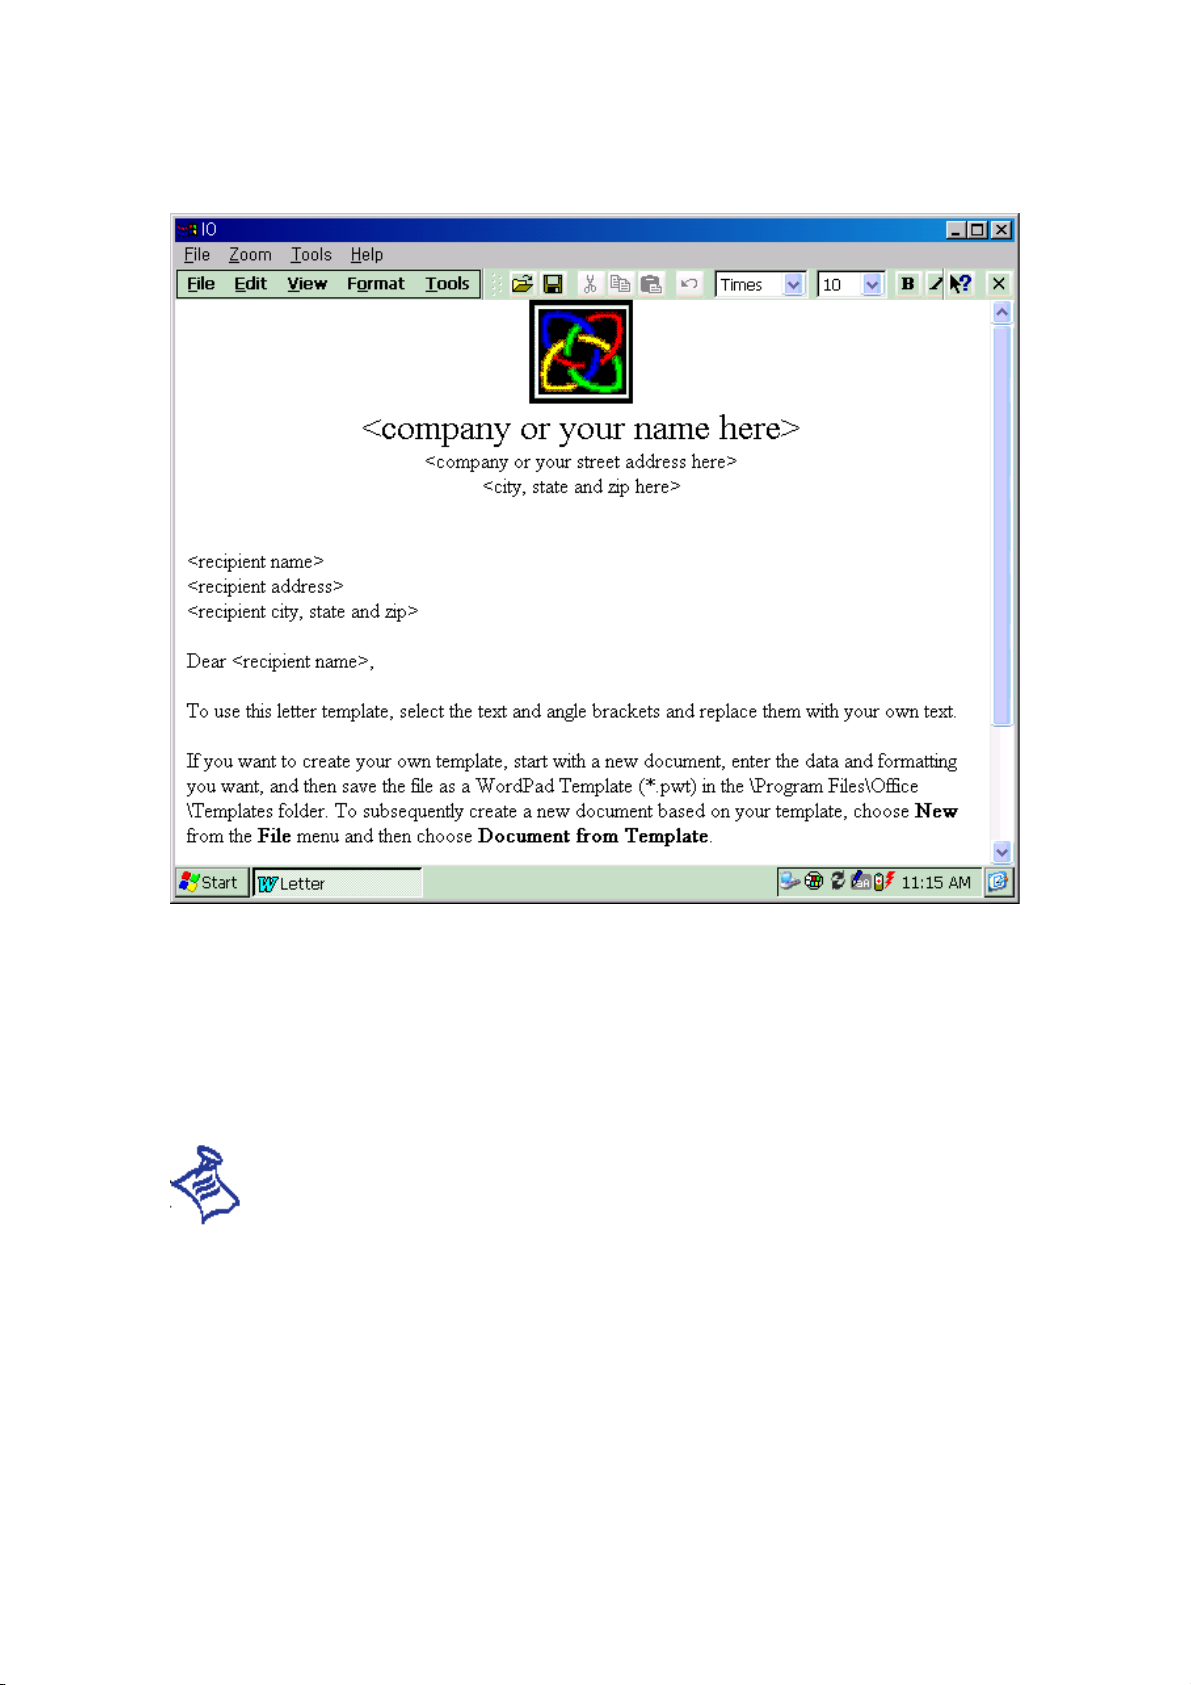
To Create a Document Using Pocket Word
1. Tap Programs, offices and tap Pocket word or select Pocket Word shortcuts.
2. On the File menu, tap New and then tap Document.
3. Type the document.
4. On the File menu, tap Save
5. Enter a file name, and then tap OK.
: To see more of your document, on the View menu, tap Full Screen.
4.2. Spreadsheet
Spreadsheet work with Microsoft Excel on your desktop PC, so you can also easily cut,
copy and create excel files on your lO. Use Spreadsheet to create workbooks, such as
expense reports and mileage logs. You can make new worksheet or select a template
from a Shortcut to Office Templates. And use Spreadsheet open and edit worksheets
created in the desktop PC version of Excel. You can save a worksheet in Pocket Excel
52
Page 53
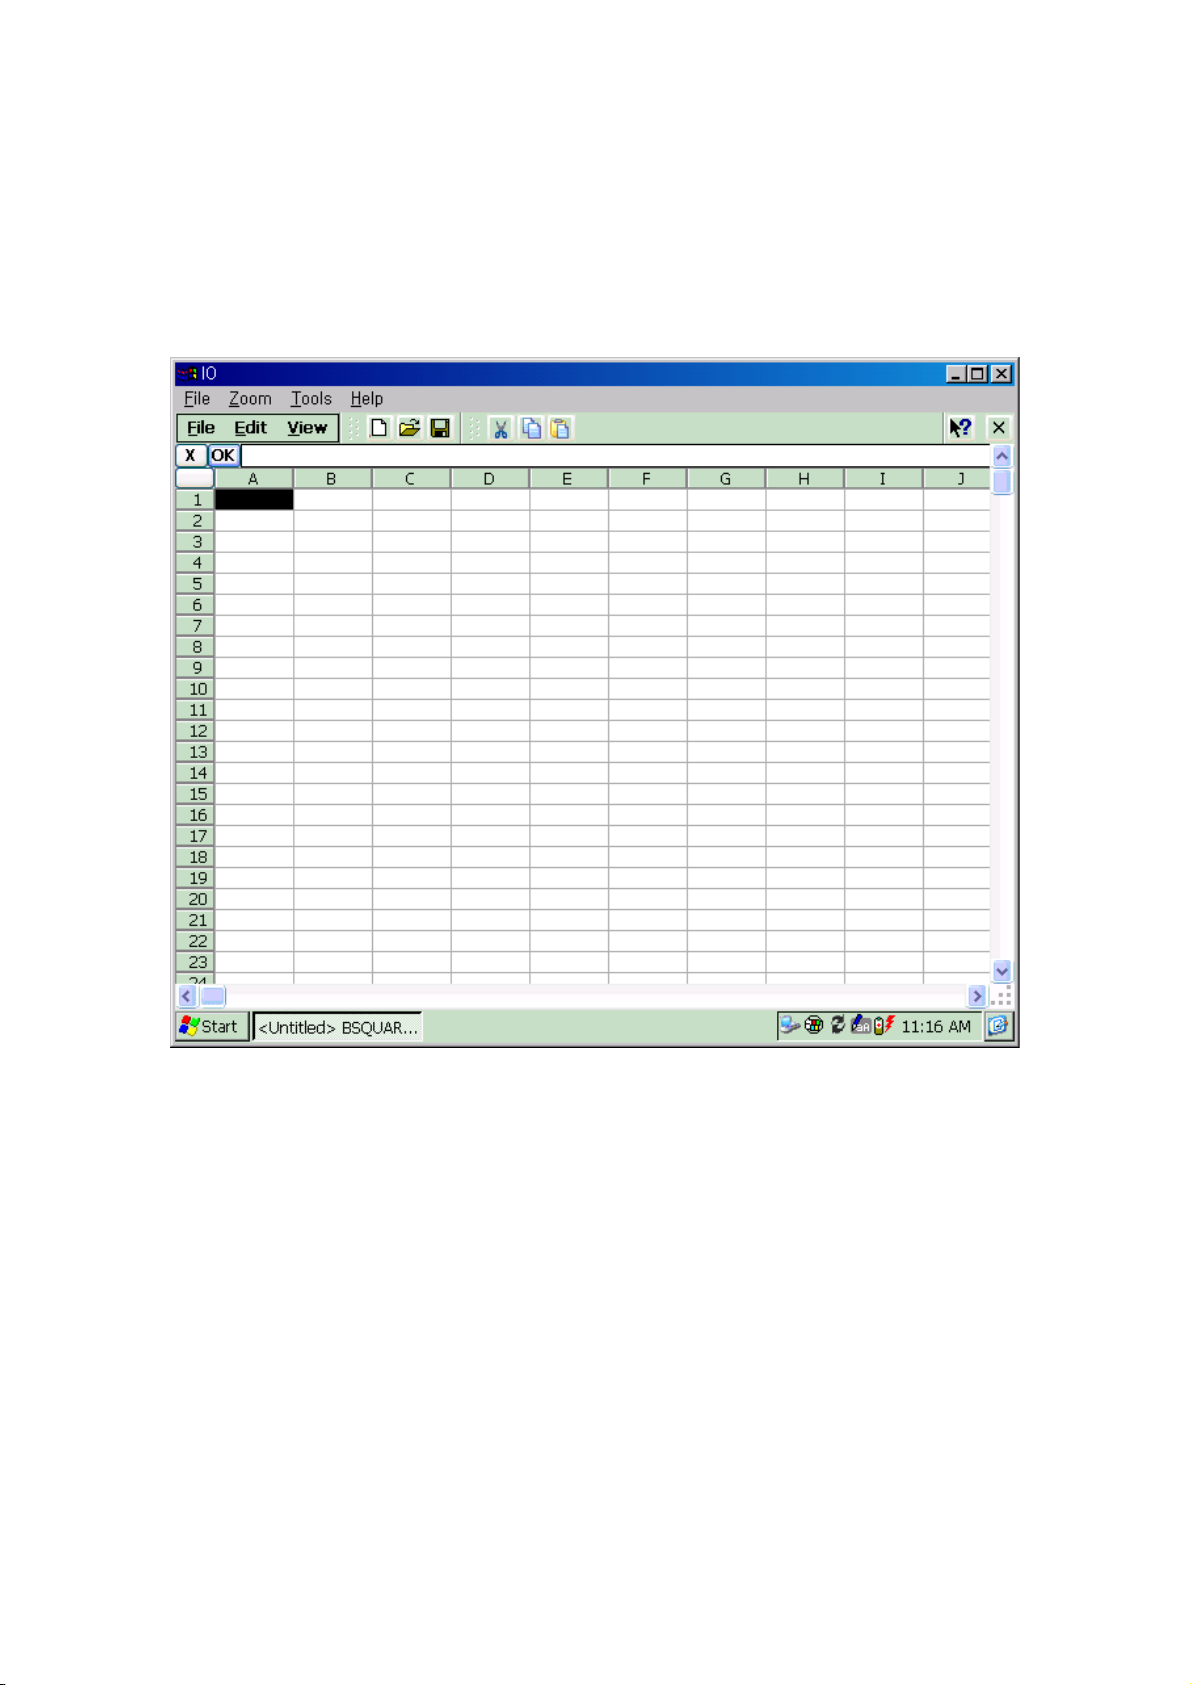
Files(.pxl) format.
SpreadSheet provides a number of functions such as formulas, functions. Tap Functions
button on the Tools menu, you can see all available functions in SpreadSheet. For more
information on using SpreadSheet, see online Help on your IO.
To Create a Spreadsheet
1. On the Start menu, tap Programs, Offices and then tap SpreadSheet or select
SpreadSheet shortcuts on the screen.
2. On the File menu, tap New Workbook.
3. Create your spreadsheet.
4. When finished, on the file menu, tap the Save.
4.3. Microsoft File Viewers
Microsoft File Viewers present powerful functions to view major file formats for
documents and images such as Word, Excel, PowerPoint, PDF, JPEG, and BMP, etc
In IO, Microsoft WordPad and SpreedSheet are available for drawing up documents and
viewing. However, it requires converting the file format between IO and desktop PC.
53
Page 54
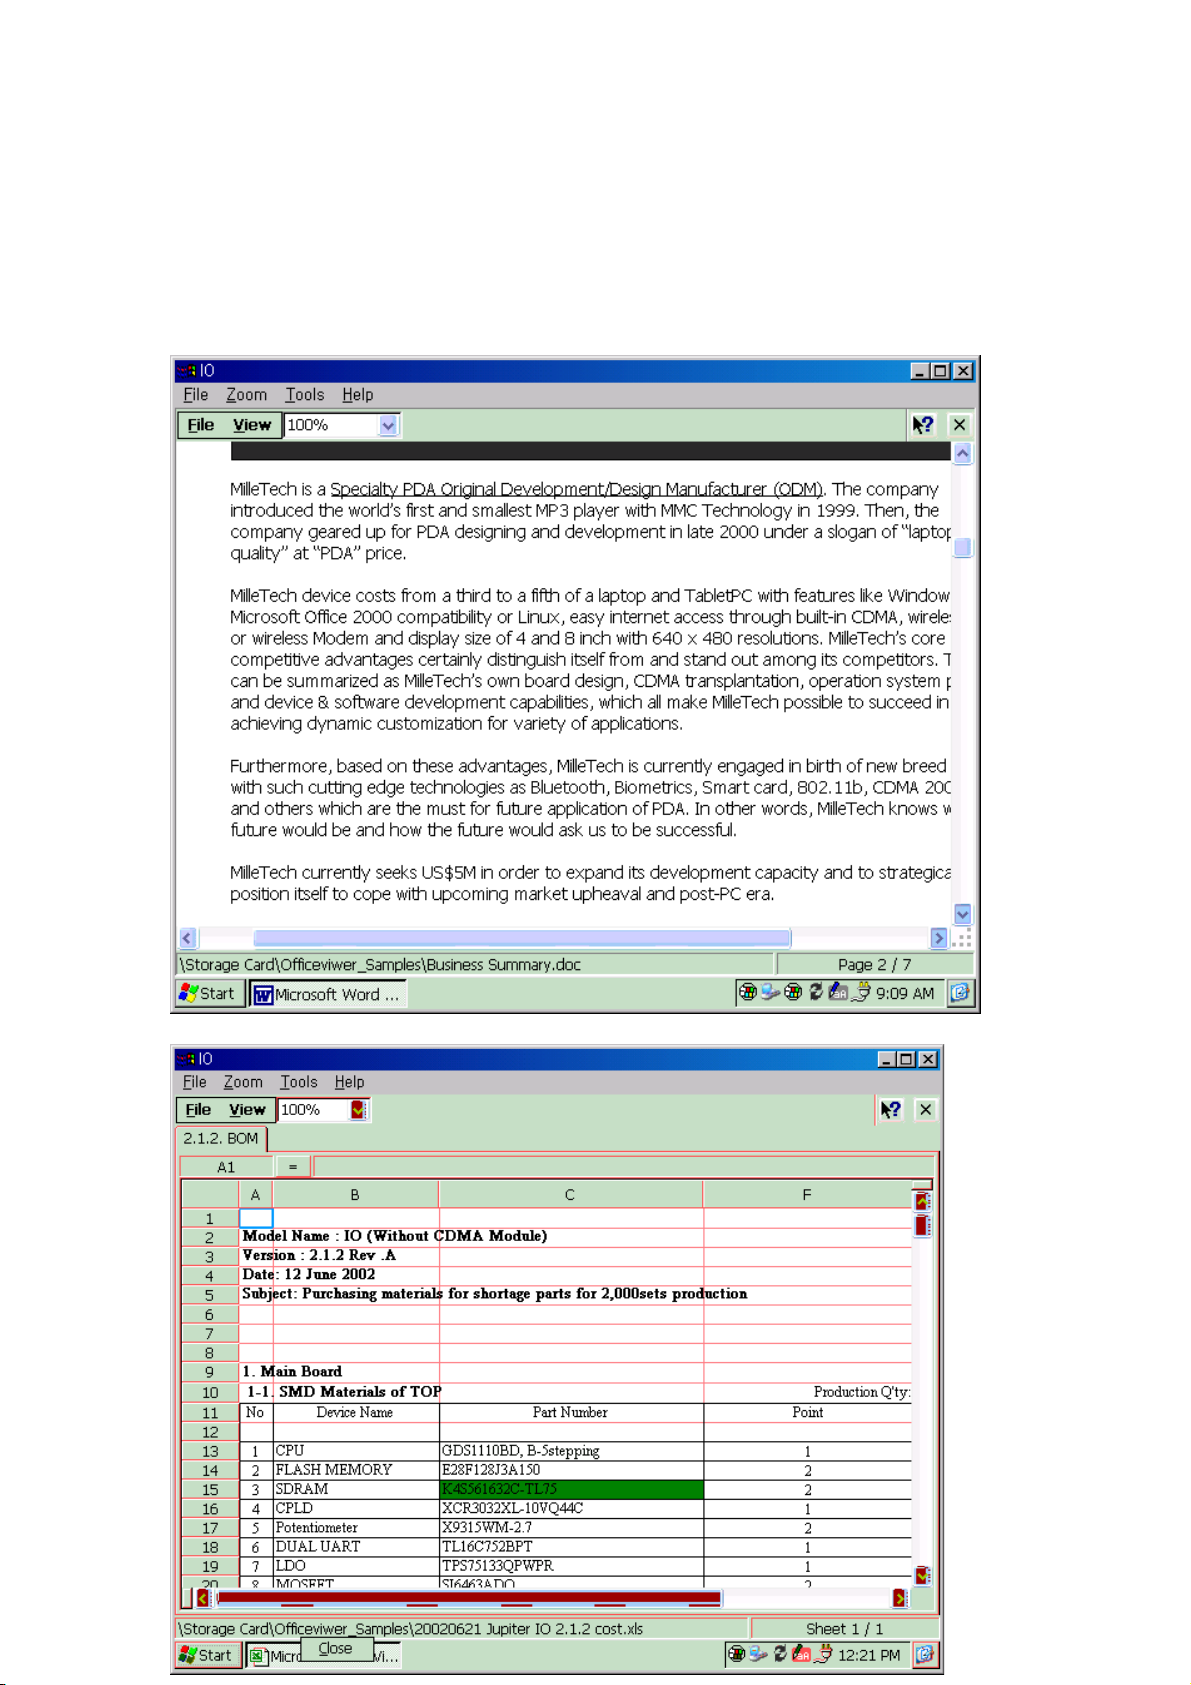
In contrast, these Microsoft File Viewers don’ t require individual settings for file
converting.
Microsoft Word Viewer
Microsoft Excel Viewer
54
Page 55
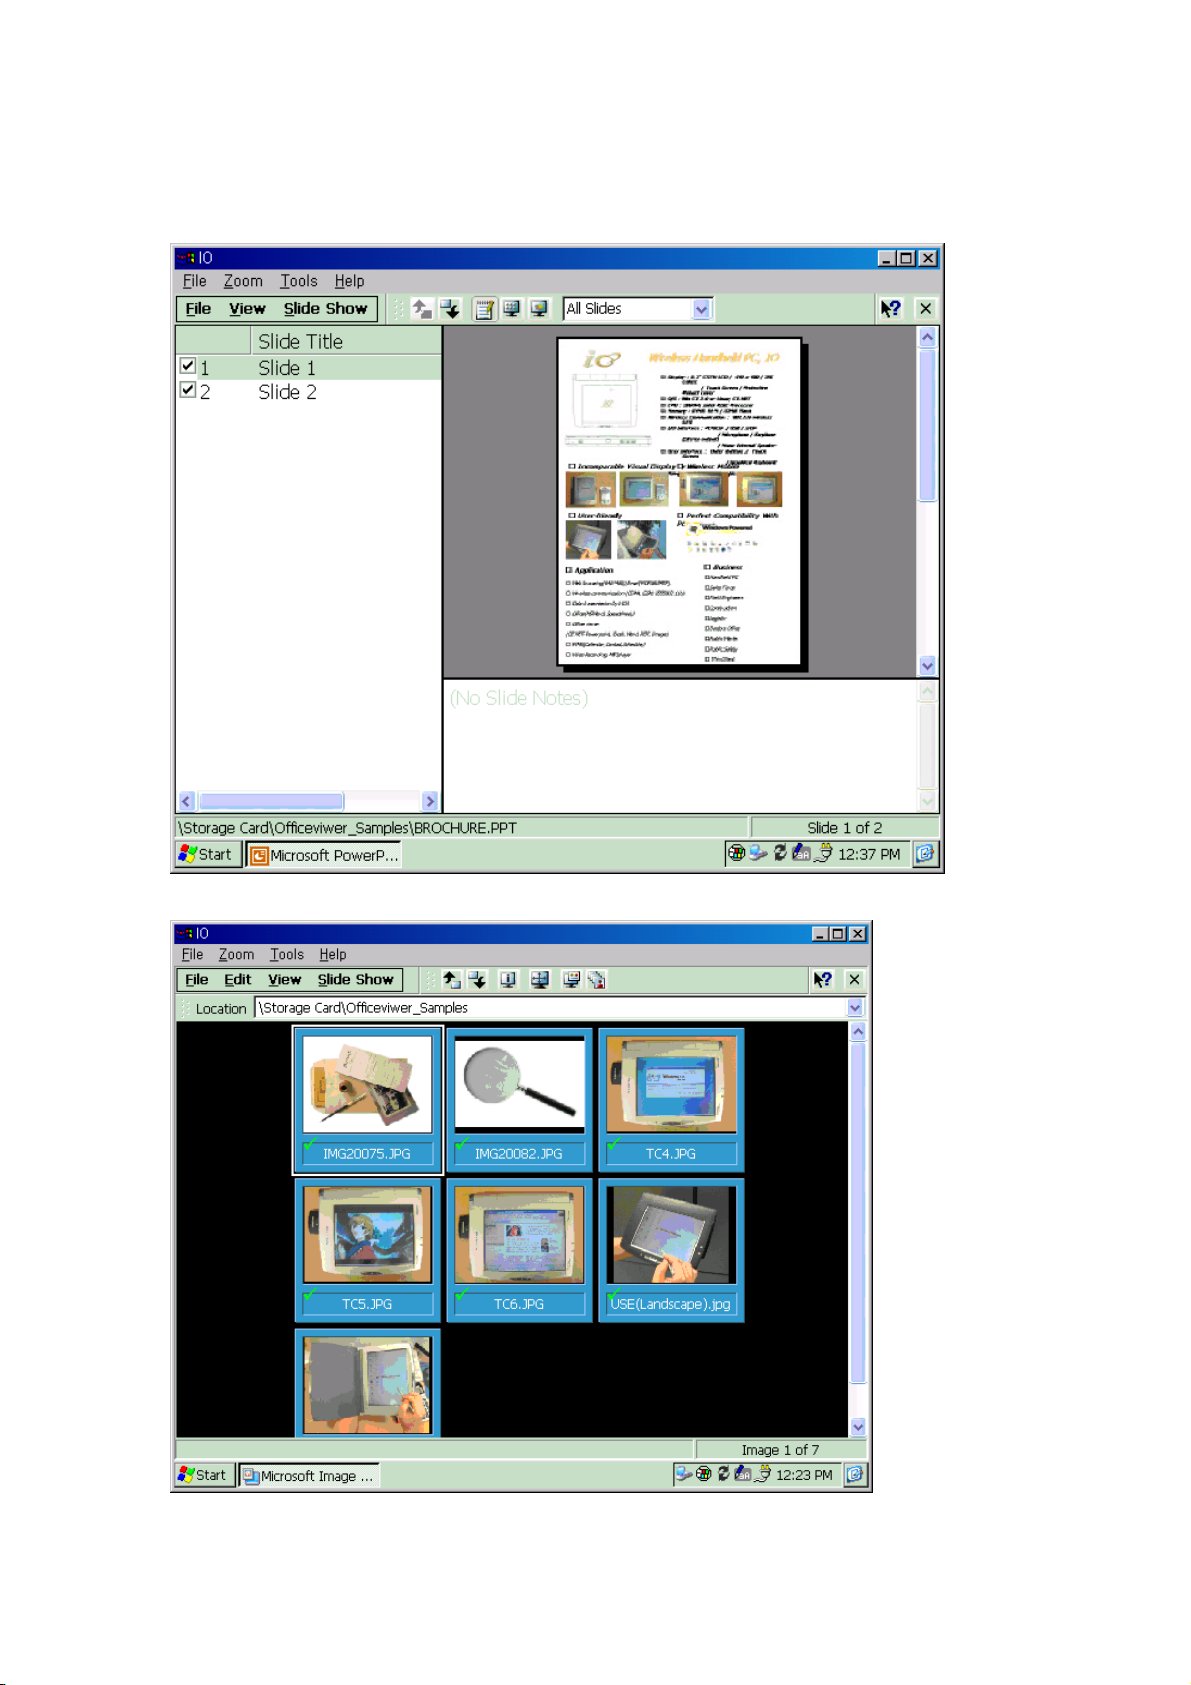
Microsoft Power Point Viewer
Microsoft Image Viewer
55
Page 56
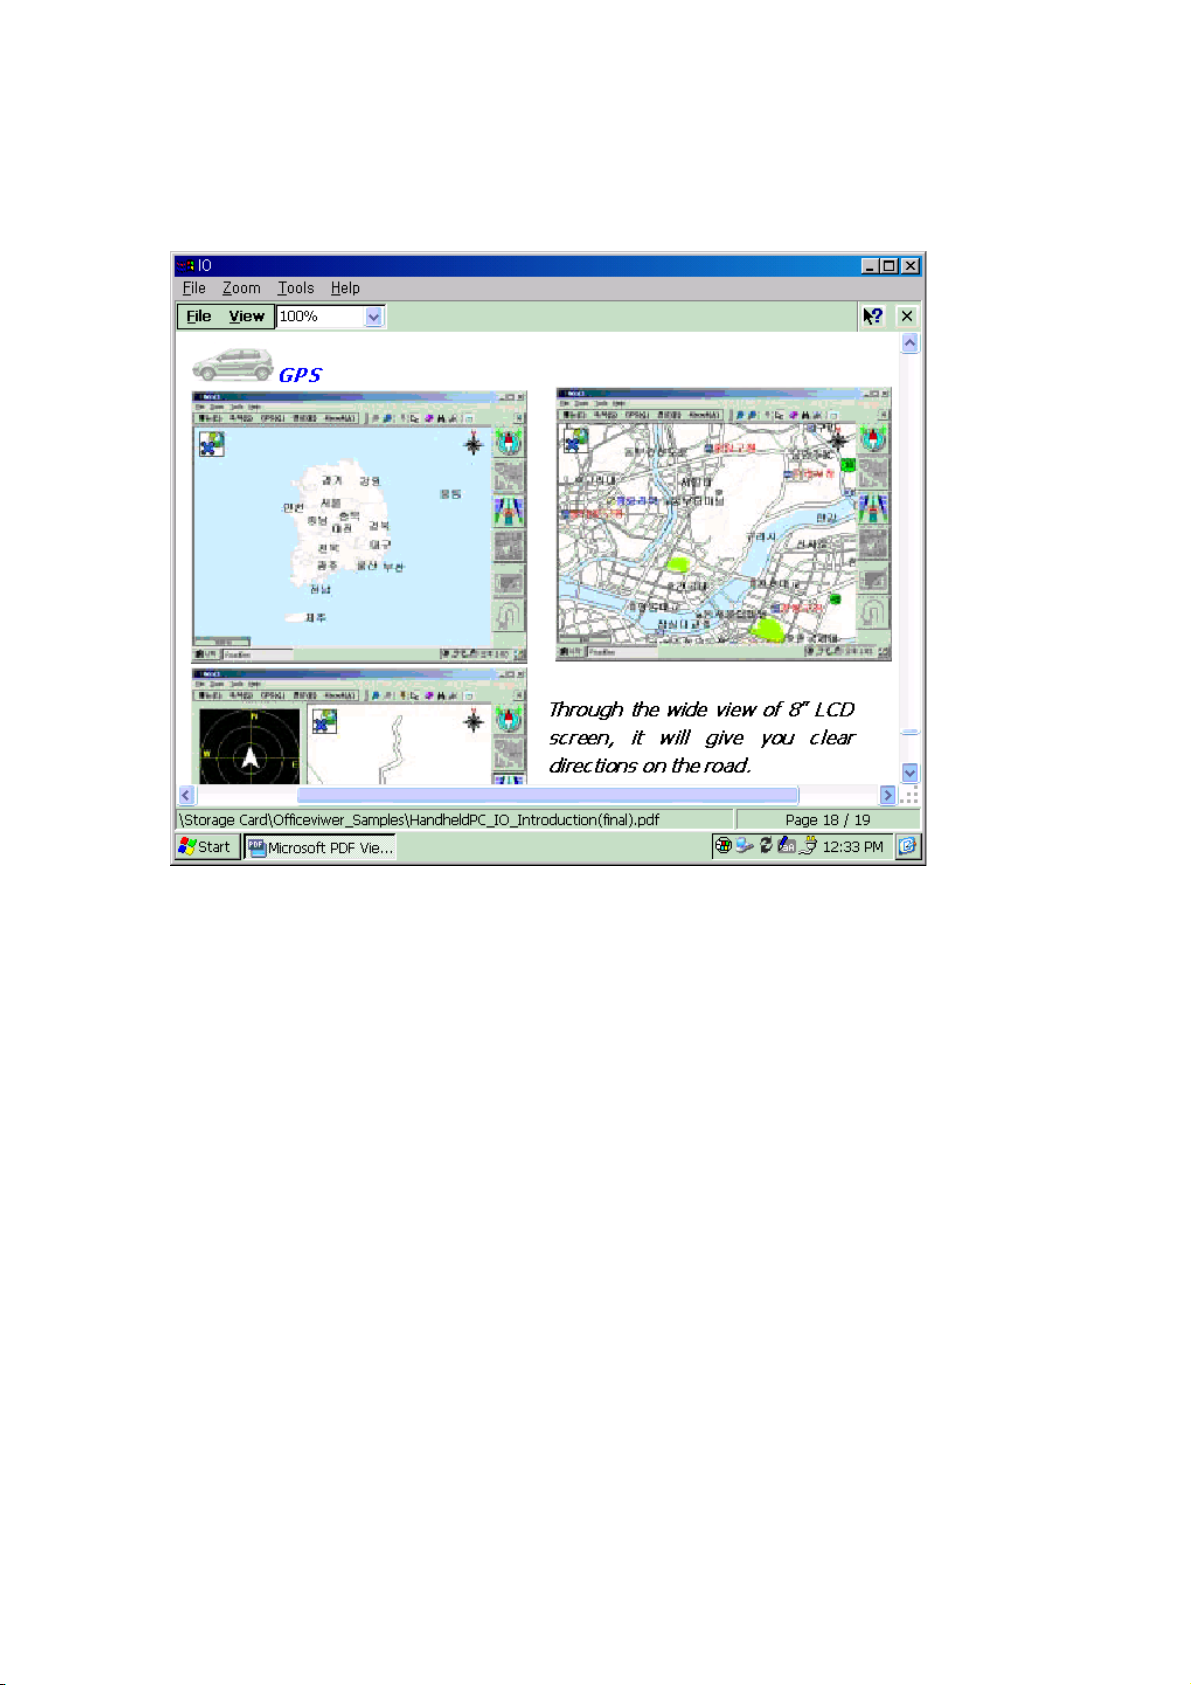
Microsoft PDF Viewer
4.4. Internet Explorer
Use Microsoft Internet Explorer to view Web pages or your corporate intranet with
your IO. To use Internet Explorer, you will need to install a modem or an Ethernet card
to connect to an Internet service provider(ISP) or network. After you have set up an
online connection with your ISP or your network account, you can dial up and start
browsing the Web or your intranet. You can set Internet Explorer to automatically dial a
connection you create whenever you start it. For more information on creating an ISP
or network connection, see Chapter 5. Remote Connections.
If you set up the Web service, you can set different Web browsing options and
preferences for each connection. You can determine how the connection is made and
what home and search page are displayed.
56
Page 57
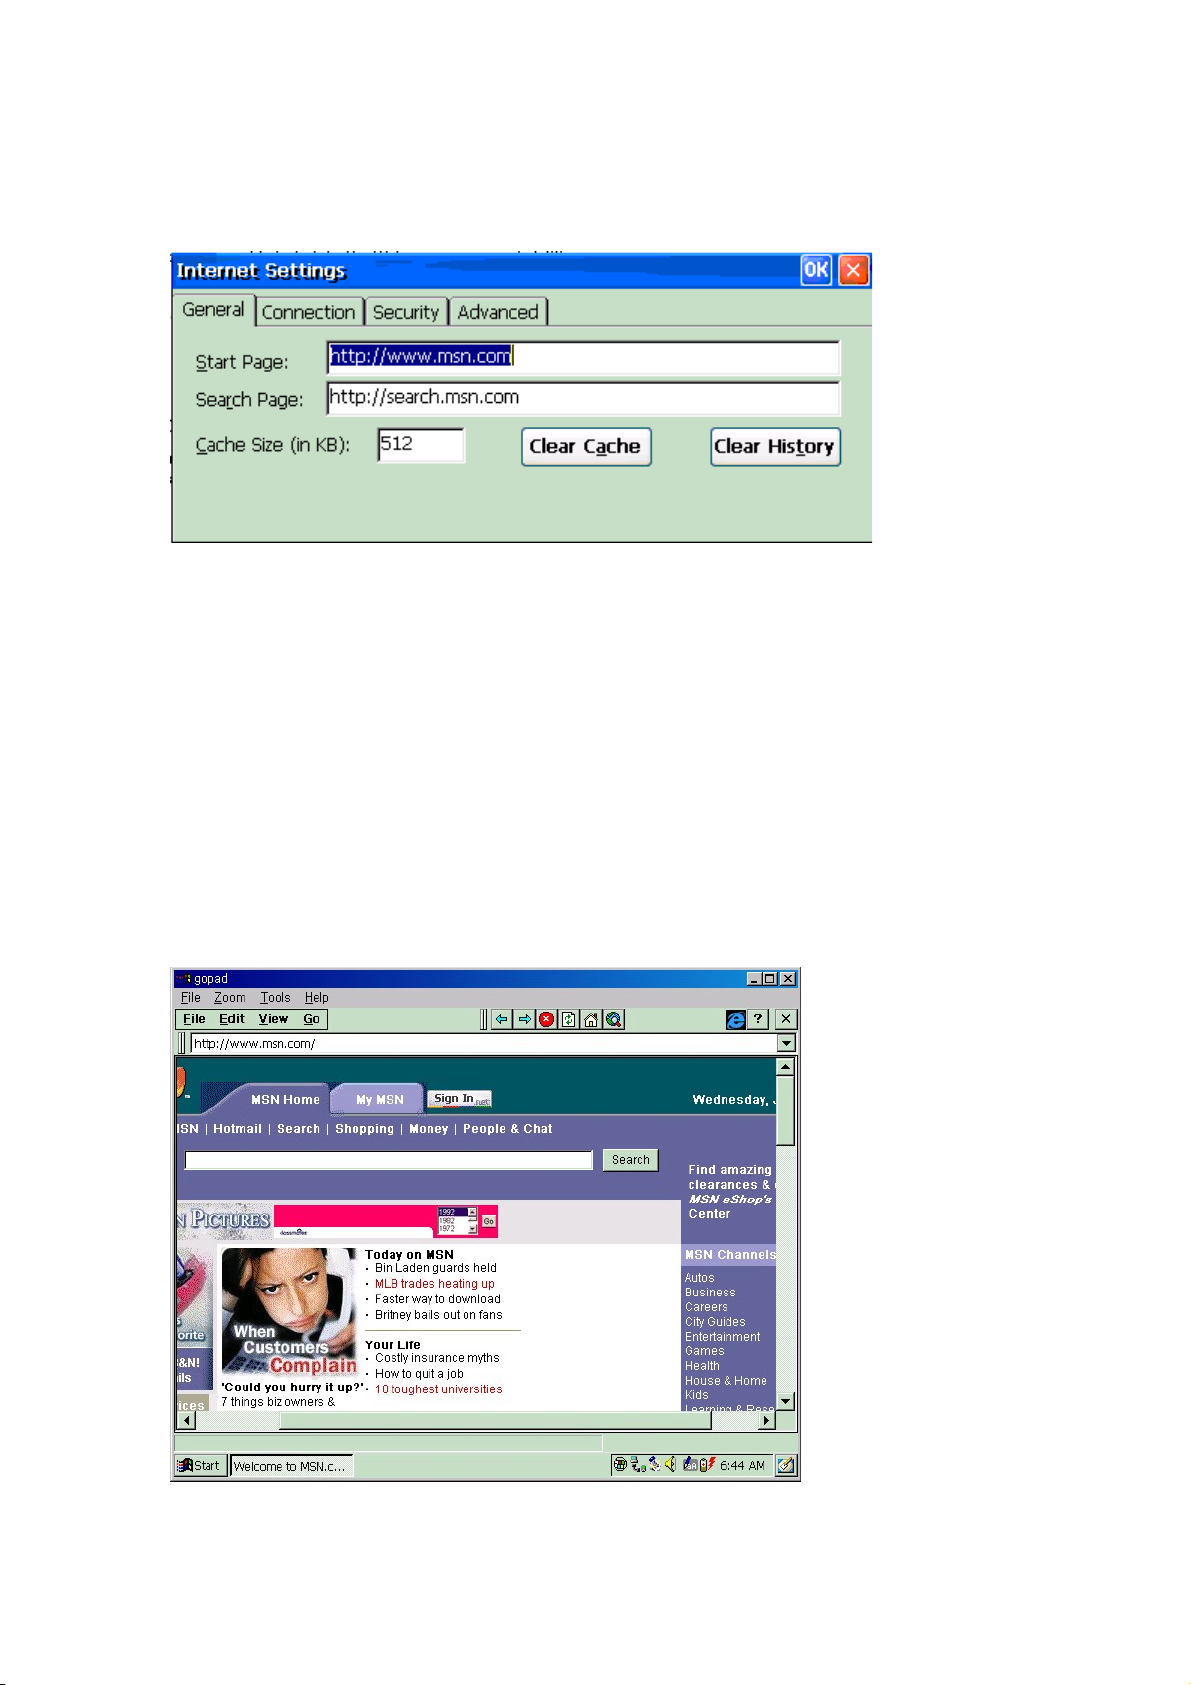
To Set Connection Options in Internet Explorer
1.In Internet Explorer, On the View menu, tap Internet Options.
2.Using Start Page, set the Web page that appears when you connect to the internet.
3.Select the Use LAN check box if you wish to connect using LAN.
4.If you are required to use a Proxy Server on a network, tap Use Proxy Server and
enter the server address.
5.Use the other Internet Options tabs to set information such as Cache Size, Underline
links. When you finished, tap Ok.
If you set up connection to Internet Explorer, you can connect to the Internet simply by
starting the program and entering your name and password.
57
Page 58
To Browse the Web Page
1.Tap Programs and Internet Explorer or double-tap Internet Explorer shortcuts
on the screen.
2. Tap Programs, Communications and then tap dial-up connection you created
to connect to Internet. Refer to the Chapter 5. Remote Connection.
3.Type the User name and Password. You can set optional information such as Dialing
Properties and Dialing Patterns.
4.When you finished, tap OK.
When you want to disconnect, make sure double-tap the connection icon the status area
to disconnect. For more detailed information on MS Internet Explorer features, settings,
and customization, see the online Help your IO.
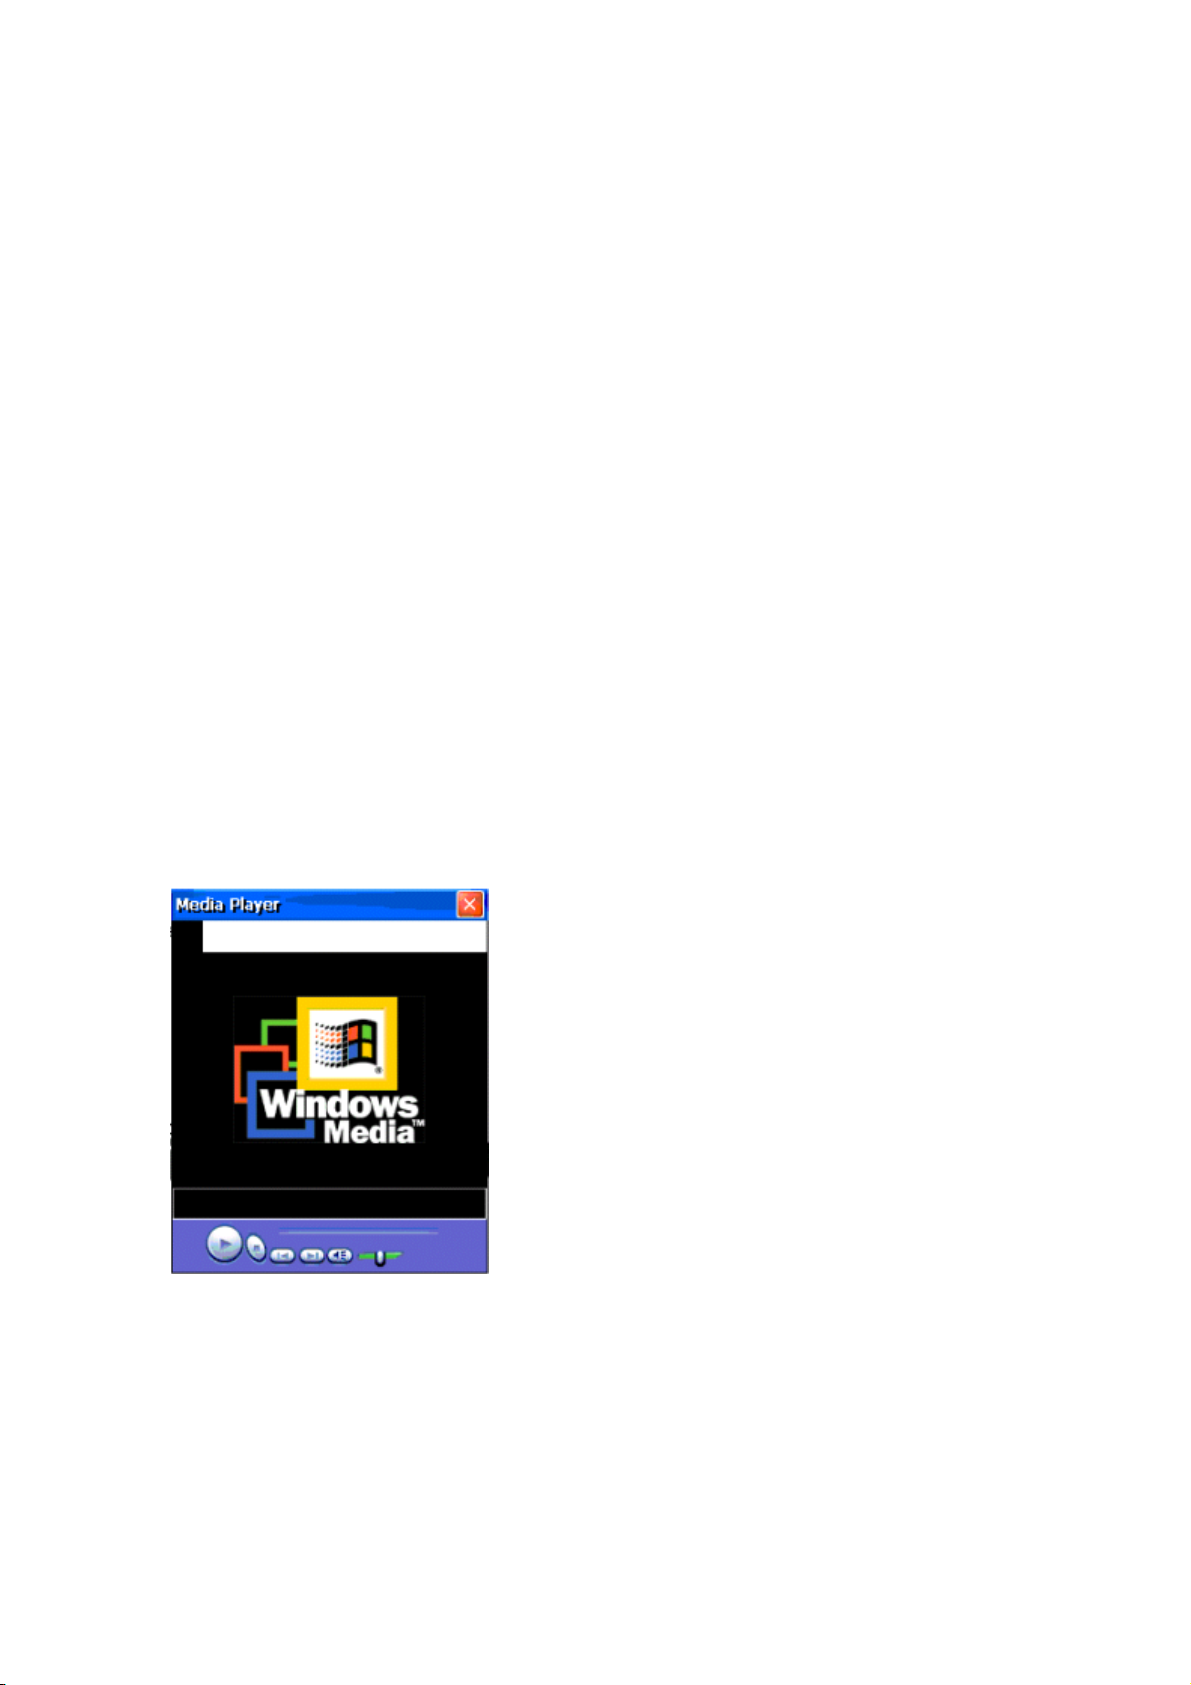
4.5. Media Player
Use Windows Media Player to listen to digital audio files and view the moving pictures.
On the Start menu, tap Programs and then select Media Player or select Media Player
hot icon on the screen.
4.6. Inbox
Through Inbox, IO users can synchronize e-mail messages between IO and desktop.
When IO is hooked up with Internet on wired or wireless basis, users can send email
message by setting up connection. Refer to Remote Connections in Chapter 5.
58
Page 59
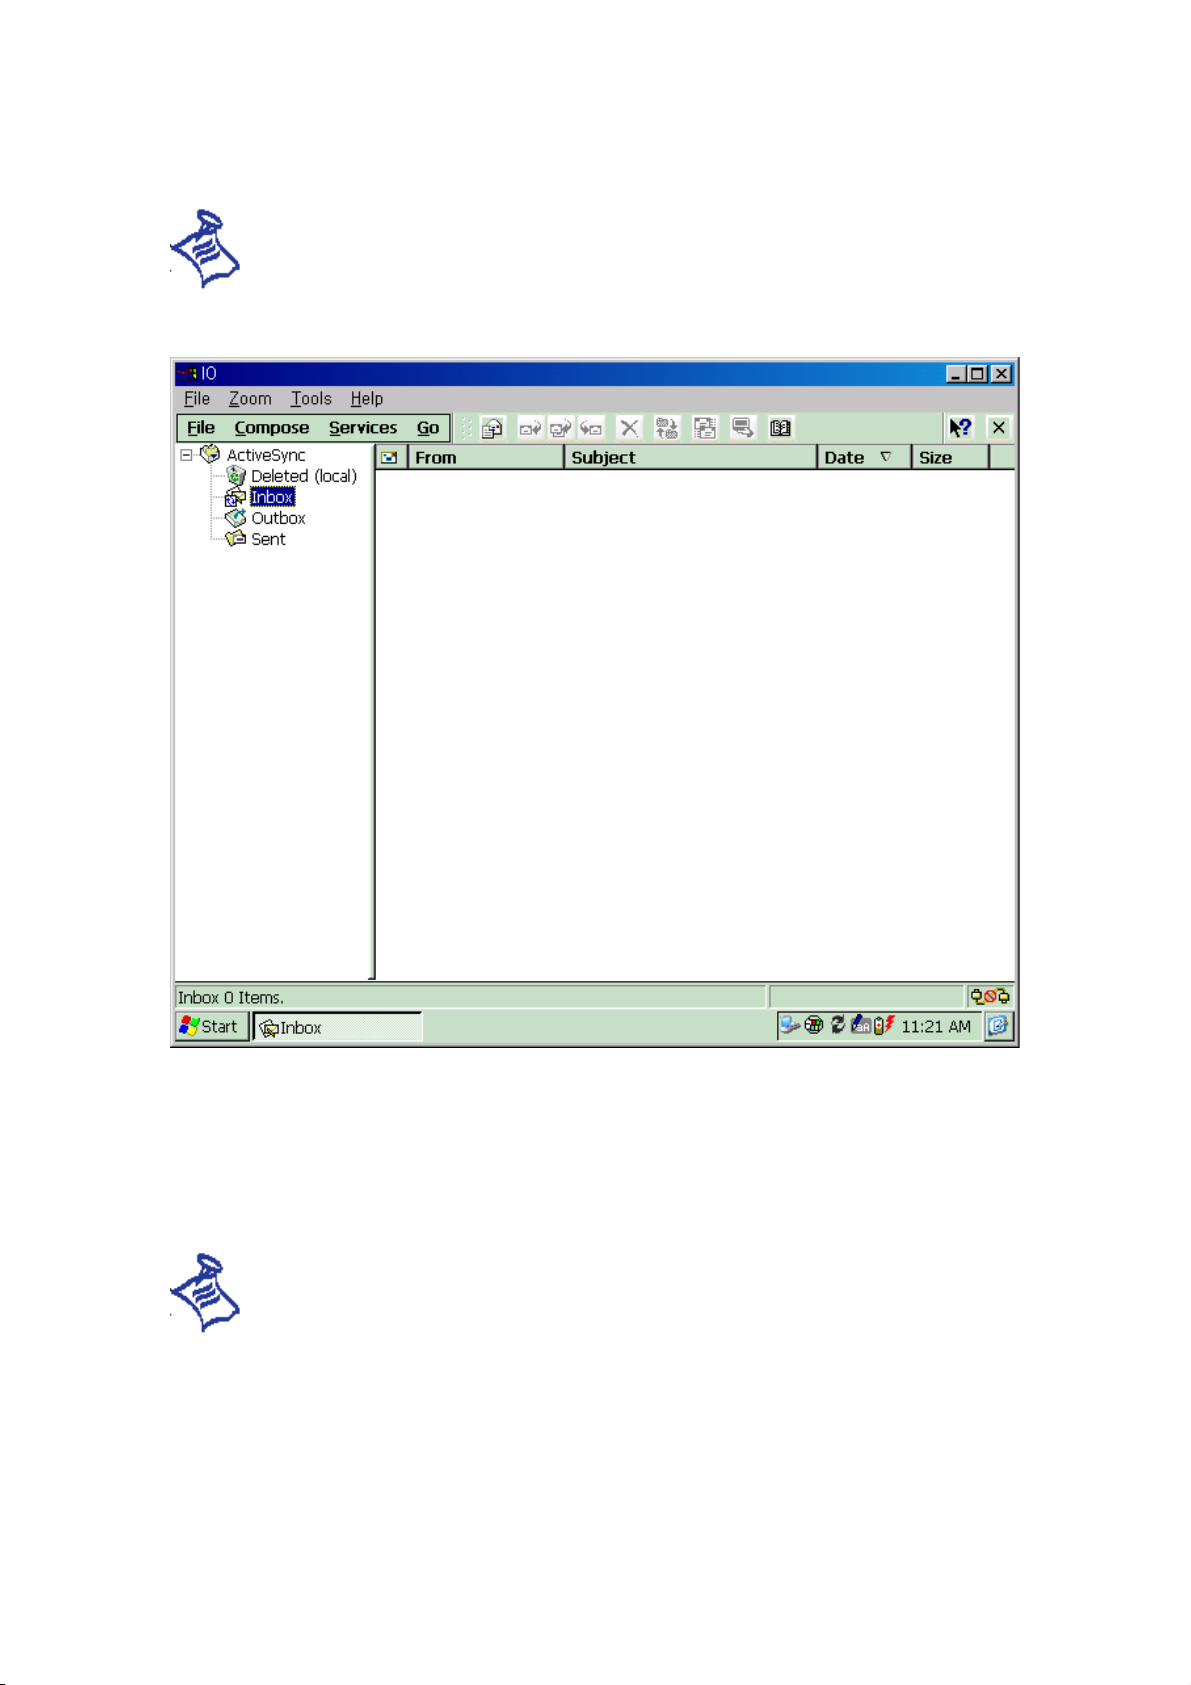
: For synchronization on e-mail messages between IO and desktop PC, be noted
that install Microsoft Outlook 2000 or Microsoft Outlook2002 in desktop PC.
4.7. Voice Recorder
You can use Milletech Voice Record Program to quickly capture ideas, reminders, and
phone numbers. Record any messages and save it and player later.
: The microphone is placed in the front of IO. Hold your IO so that the
microphone is near your mouth. And you can record a message of up to 1 minute.
To record and play a message
1. Open the MilleRecord Program
59
Page 60
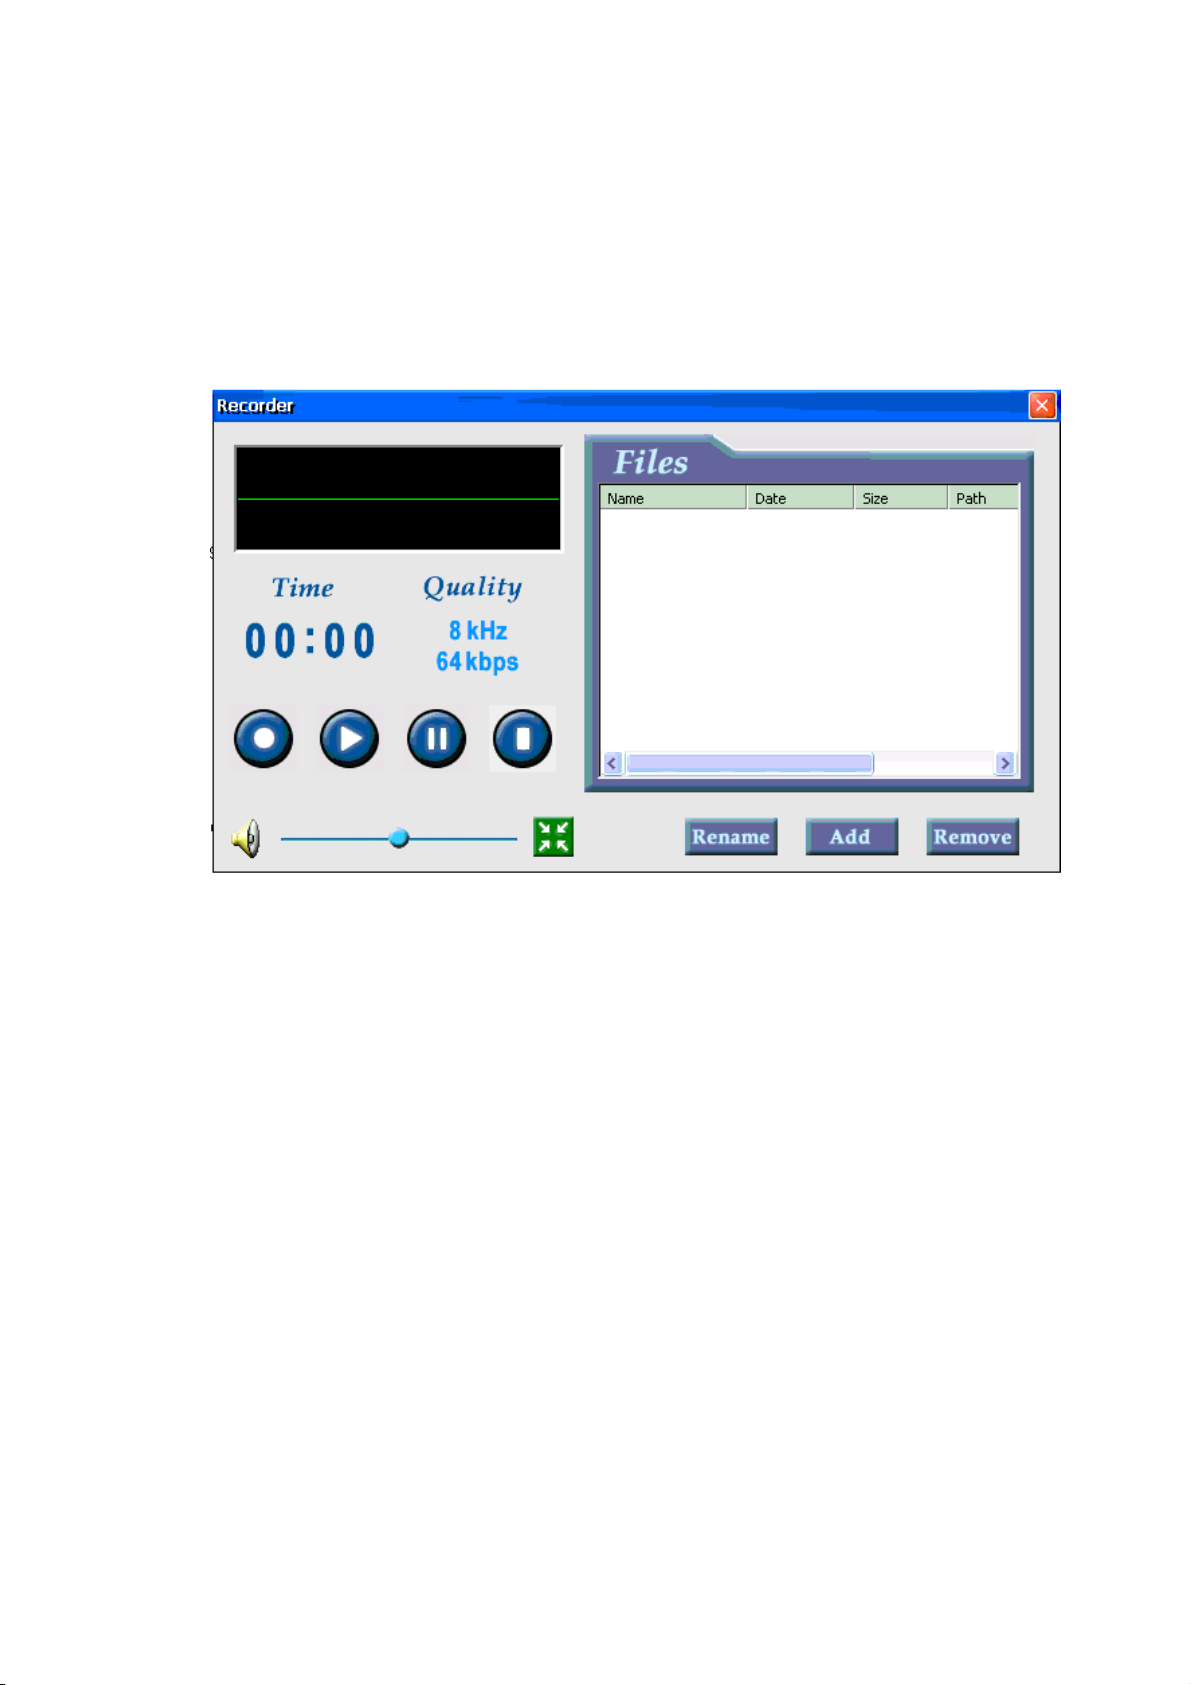
2. Tap the Record button on the Record window and speak your message into the
microphone.
3. When recording begins, Record button displays red light indicating recording is
in progress.
4. When finished, tap Stop button on the Record window.
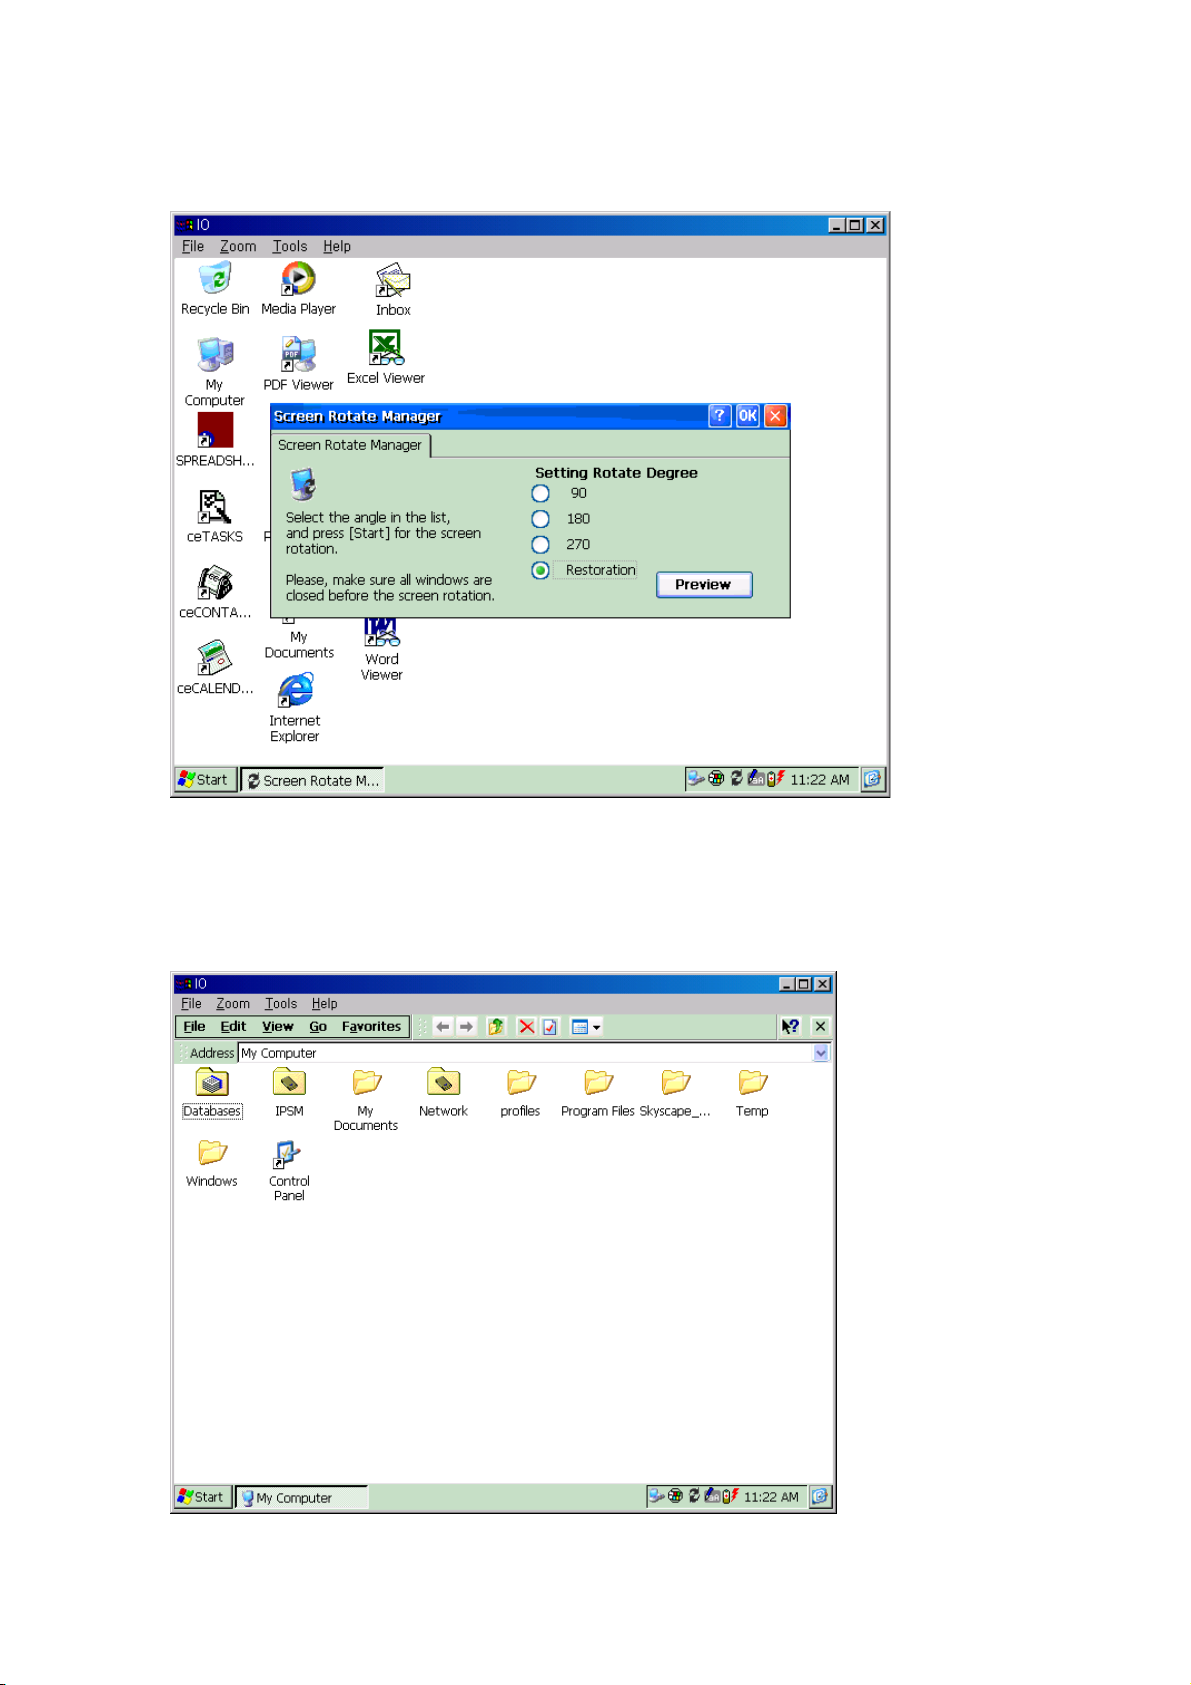
4.8. Screen Rotation
For a better user-environment, IO screen is available for rotation from Panorama
mode to Portrait mode. Users can set up the mode in Screen Rotate Manager.
60
Page 61
4.9. IPSM
When users make backup file, or need to save important data, use IPSM folder.
It protects data just like they are saved in ROM, so even when IO is completely
discharged or Hard Reset is done, they are protected.
61
Page 62
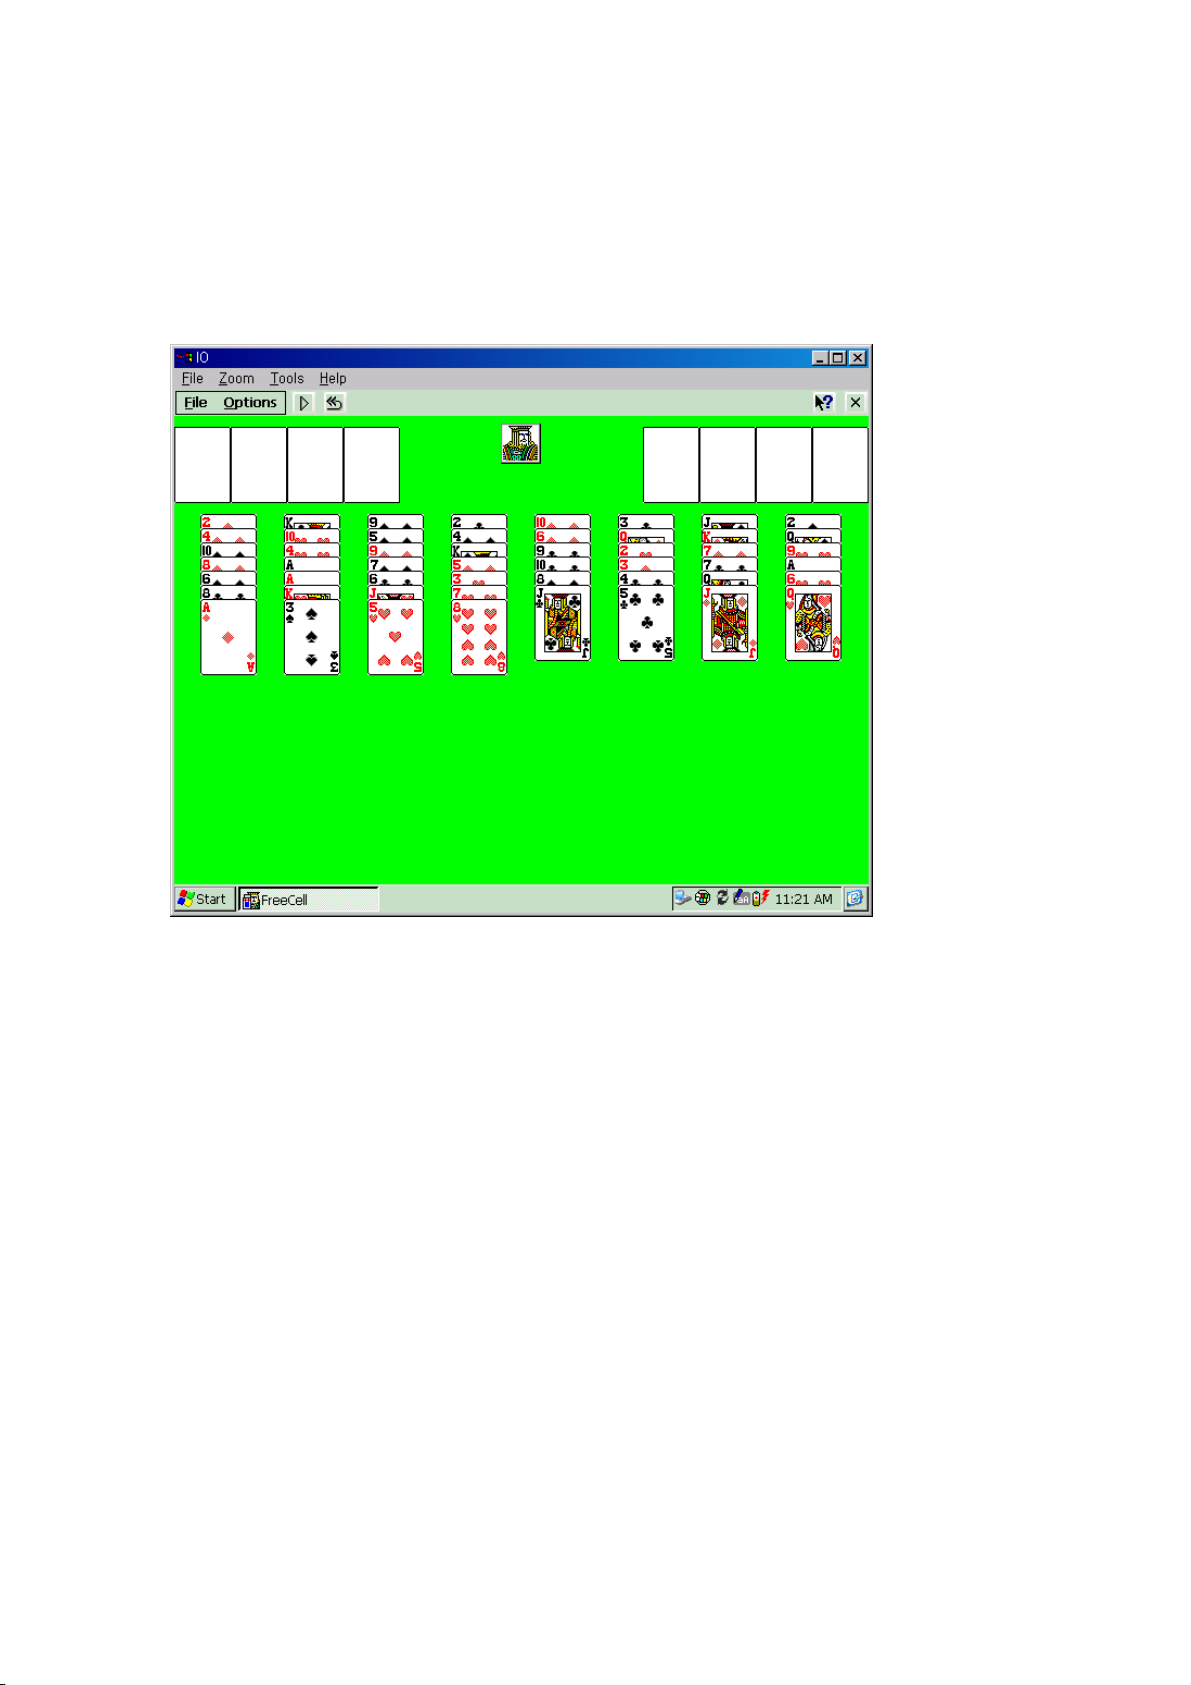
4.10. Game
In IO, it presents a kind of card games, Freecell. However, any games based on
Microsoft Win CE HPC version, it works in IO. For more games available, please, log
onto the website : www.milleTech.com
62
Page 63

Chapter 5. Remote Connections
Before you can browse the Web or send and receive e-mail message, communication
must be established between your Io and the Internet or a private network. To establish
communication, you must define at least one dial-up connection then select that
connection when you configure or activate Internet Explorer or Inbox.
You have the following connection options :
Connecting to ISP(Internet Service Provider)
After you connected to an ISP, you can send and receive e-mail using Inbox, view Web
pages using Internet Explorer. If this is the method you want, see ‘ Connect to an
ISP” . The communication software for creating an ISP already is installed.. For
information, see online Help on your device
Connecting to a Network
After you connected to a network, you can send and receive e-mail using Inbox, view
Web pages using Internet Explorer. To exchange e-mails, you should create either a
POP3 or IMAP4 nail service in Inbox. For more information, see online Help on your
device.
Connecting directly to an e-mail server
You can send and receive messages by connecting directly to your mail server. Use a
modem or Ethernet card to connect to your Internet Service Provider(ISP) or local area
network that your mail server is connected. Once connected, you can synchronize
information such as your Outlook applications data. For more information, see Microsoft
ActiveSync online Help on your PC.
5.1. Connect to an ISP
You can use your device to connect to your ISP by creating modem connection. Once
connected, you can exchange e-mails and browse the Web pages. To connect to an ISP,
you need to a modem card or external modem. For more information on installing
modem, see user guide for modem. Once the modem is set up, create a connection to an
ISP.
63
Page 64
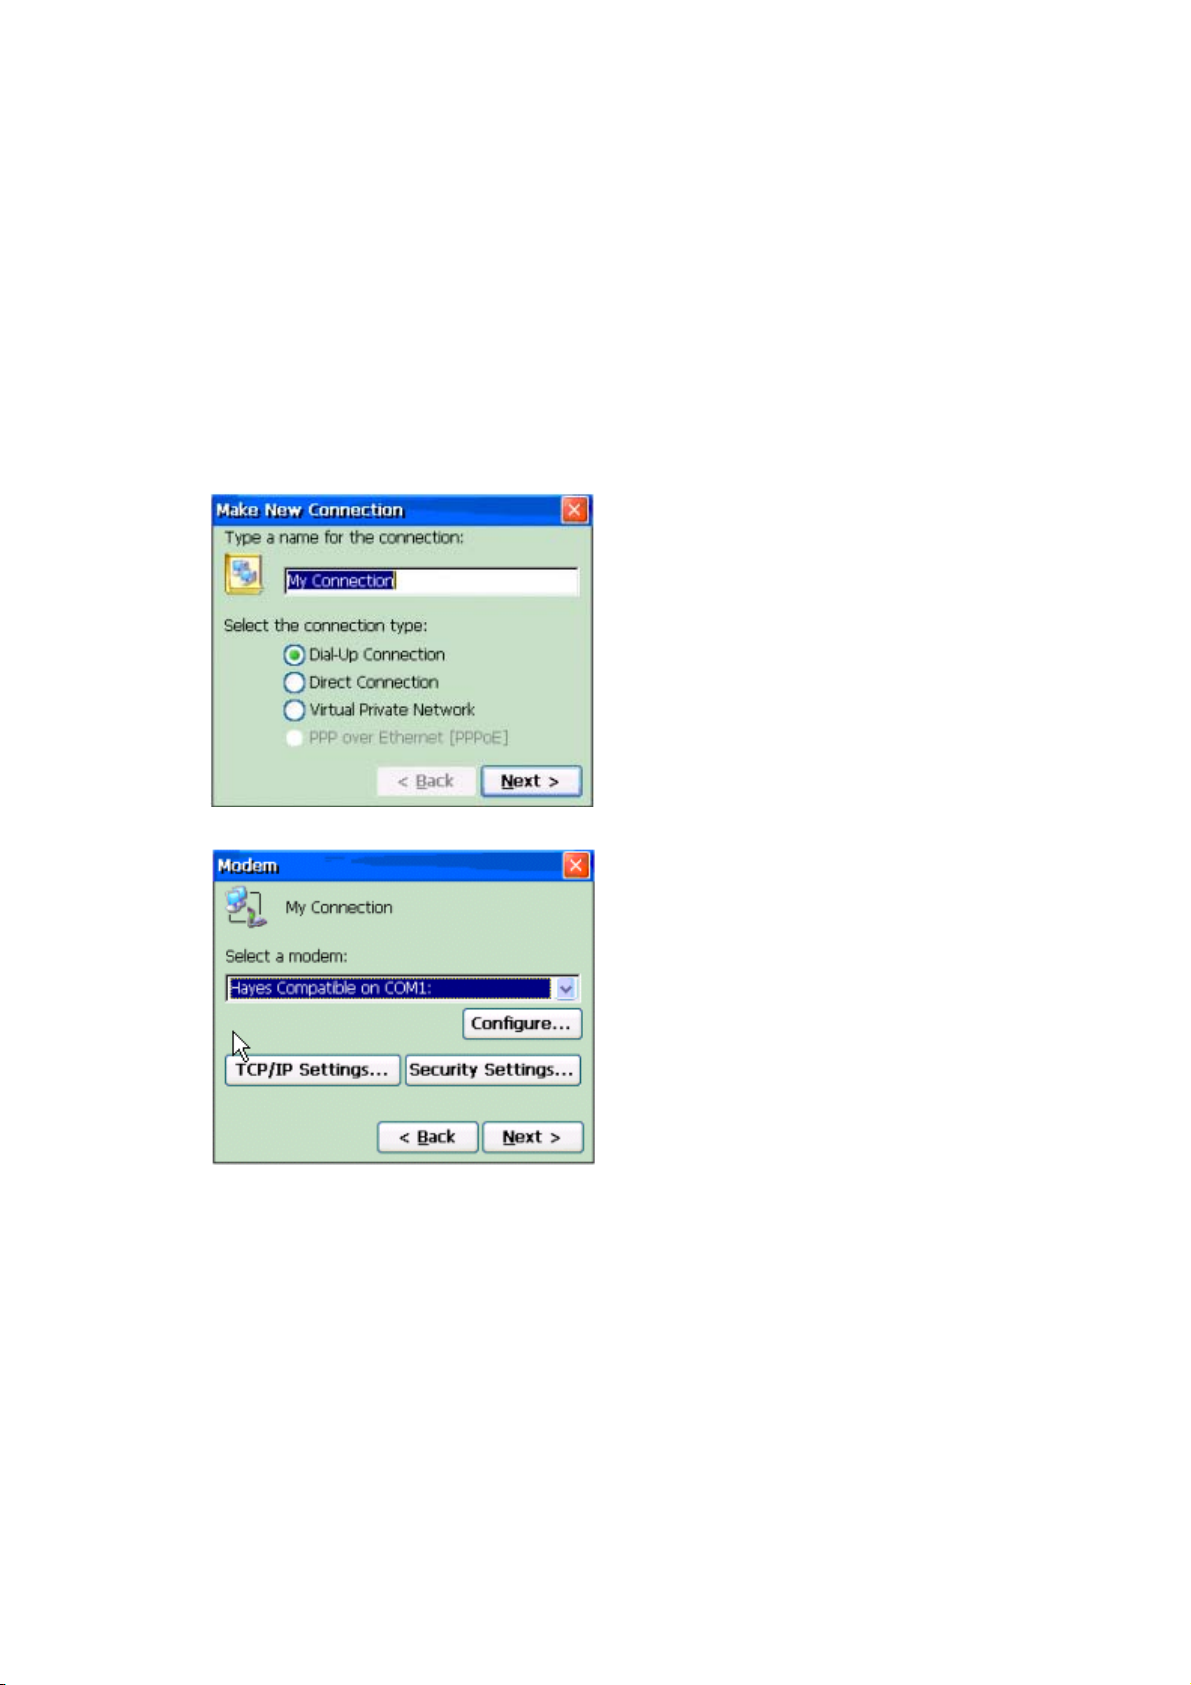
To Create a Connection to an ISP
1. Install a modem card that is compatible with IO.
2. Get the following information from your ISP : ISP dial-up telephone number,
user name, password.
3. On the Start menu, tap Programs and then Communications. Tap Remote
Networking icon.
4. Tap make New Connection
5. Enter a name for the connection and tap Next.
6. Select a modem you want use in the modem list and tap Next, and then adjust
Configure and TCP/IP settings to coincide with your network service provider’s
instruction.
64
Page 65
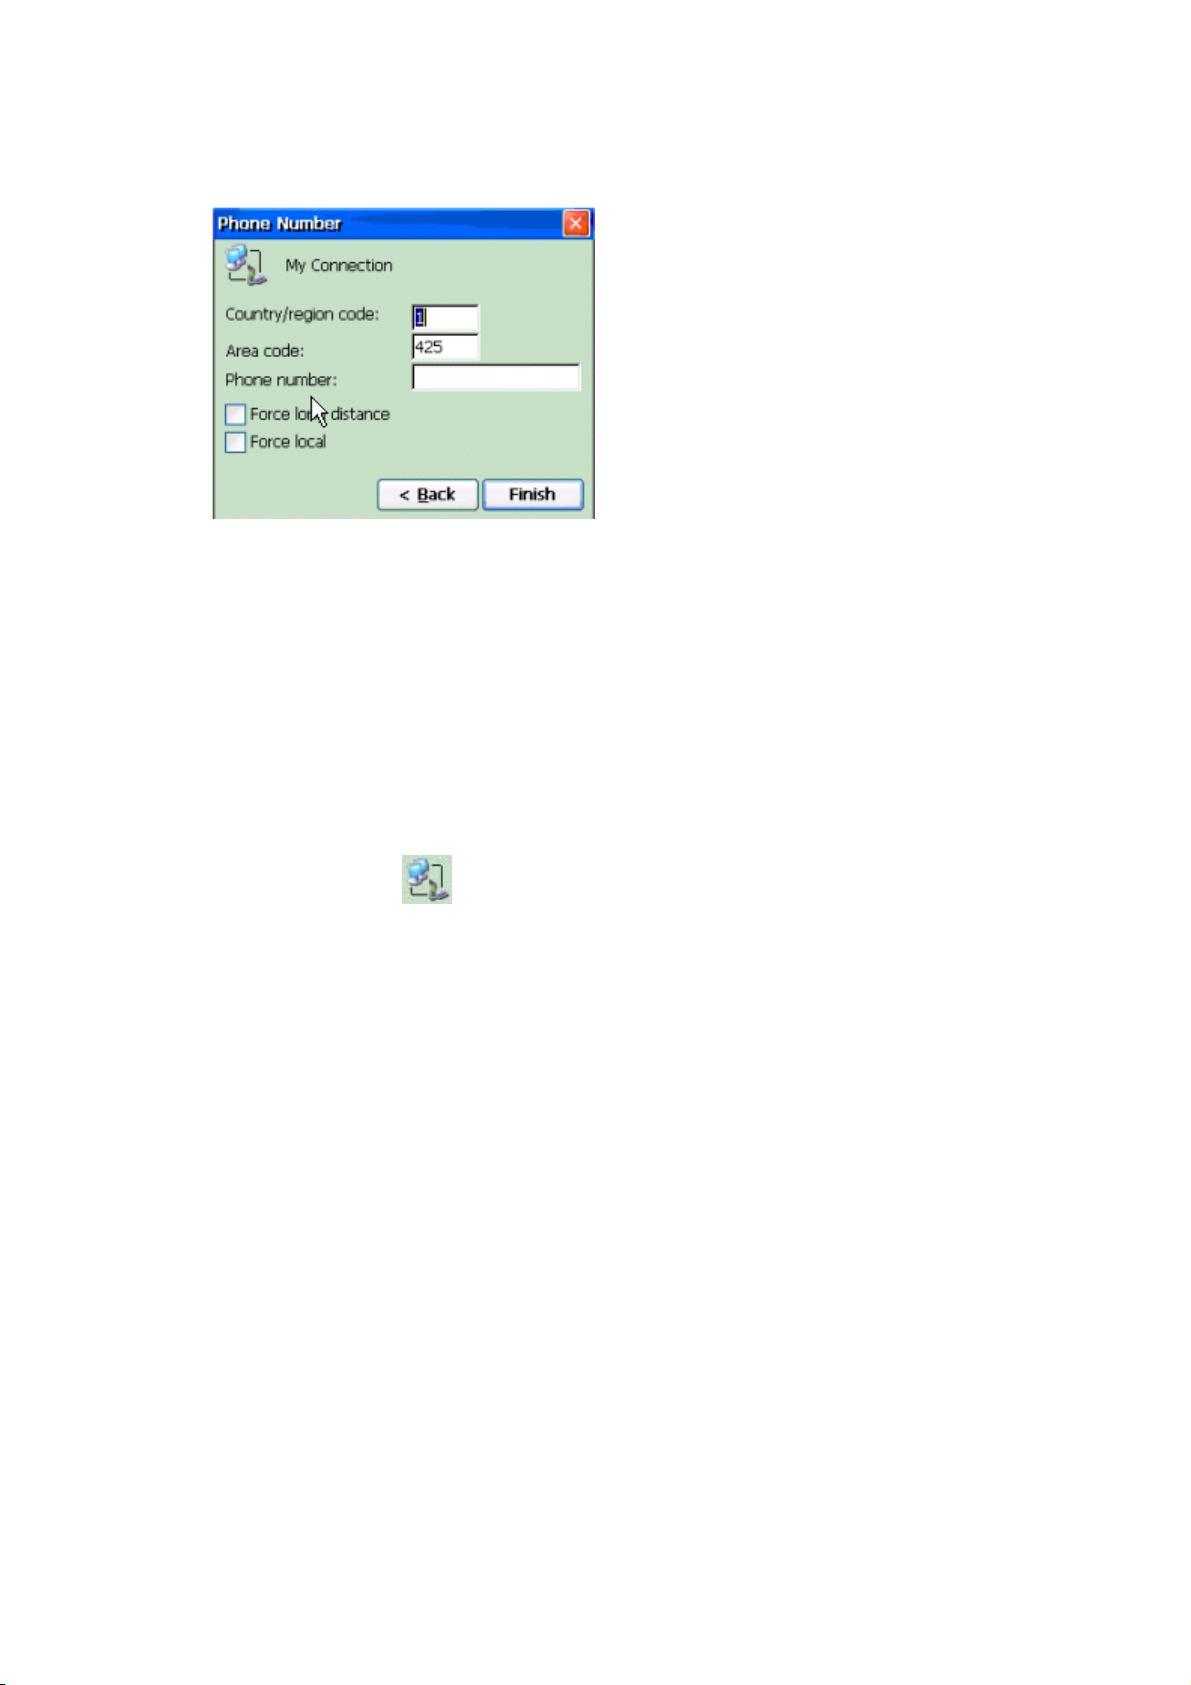
7. Enter the phone number of your modem and then select other desired option,
and then tap Finish.
The connection you created appears as an icon in the Remote Networking folder.
To start the connection, make sure that the modem is installed on IO. Tap the
connection icon and enter your name and password. Once connected, you can use
Internet Explorer or Inbox to send and receive e-mail messages. To use Inbox you
should get the additional information from your network administrator.
To disconnect, tap the
in the status area, and tap the Disconnect. If you do not
make sure close the connection, your connection becomes in progress
5.2. Connecting to your Network
If you have access to network, you can receive e-mail and view intranet pages, files on
your network folder, possibly access the Internet. For more information, see online
Help on your IO
You can connect to your network by creating a modem connection or Use an Ethernet
Card. Before you can create modem this connection, your network administrator need
to set your RAS account
To Create a Modem Connection
1. Get the following information from your network administrator: user name,
password and domain name and TCP/IP settings
2. Make sure your device is connected to a modem so in can dial the connection.
3. On the Start menu, tap Programs and then Communication. Tap Remote
65
Page 66

Networking icon.
4. Tap Make New Connection.
5. Enter a name for the connection and tap Next.
6. Select a modem you’ re going to use from the drop-down list and desired
options, tap Next.
7. Enter area code and phone number of your modem and then tap Finish.
8. Double-tap the icon you just created to start the dialing process
The connection you use created appears as an icon in the Remote Networking folder.
To start the connection, tap the connection icon. Enter your user name and password,
tap Connect. Your device will connect and you will see a Connected Massages. If not,
see the Chapter 6. Tips & Troubleshooting.
: Be sure to disconnect when you finish the connection in order to clear the
phone line and save battery power.
Once connected, you can :
Send and receive e-mail by using Inbox : Before you can use Inbox, you need to provide
the information it needs to communicate with the e-mail server. For more information, see
Connecting directly to an e-mail server.
Visit Internet or intranet Web pages using Internet Explorer. You may need to set up a
proxy server to visit Internet Web pages. For more information, see Internet Explorer
or online Help on your IO.
Synchronize : For more information, see ActiveSync Help on the desktop PC.
To create an Ethernet network connection
You do not need to create a new connection on your device. Instead, you need Ethernet
Card that is compatible with your device.
1. Get the following information from your network administrator: user name,
password and domain name
66
Page 67
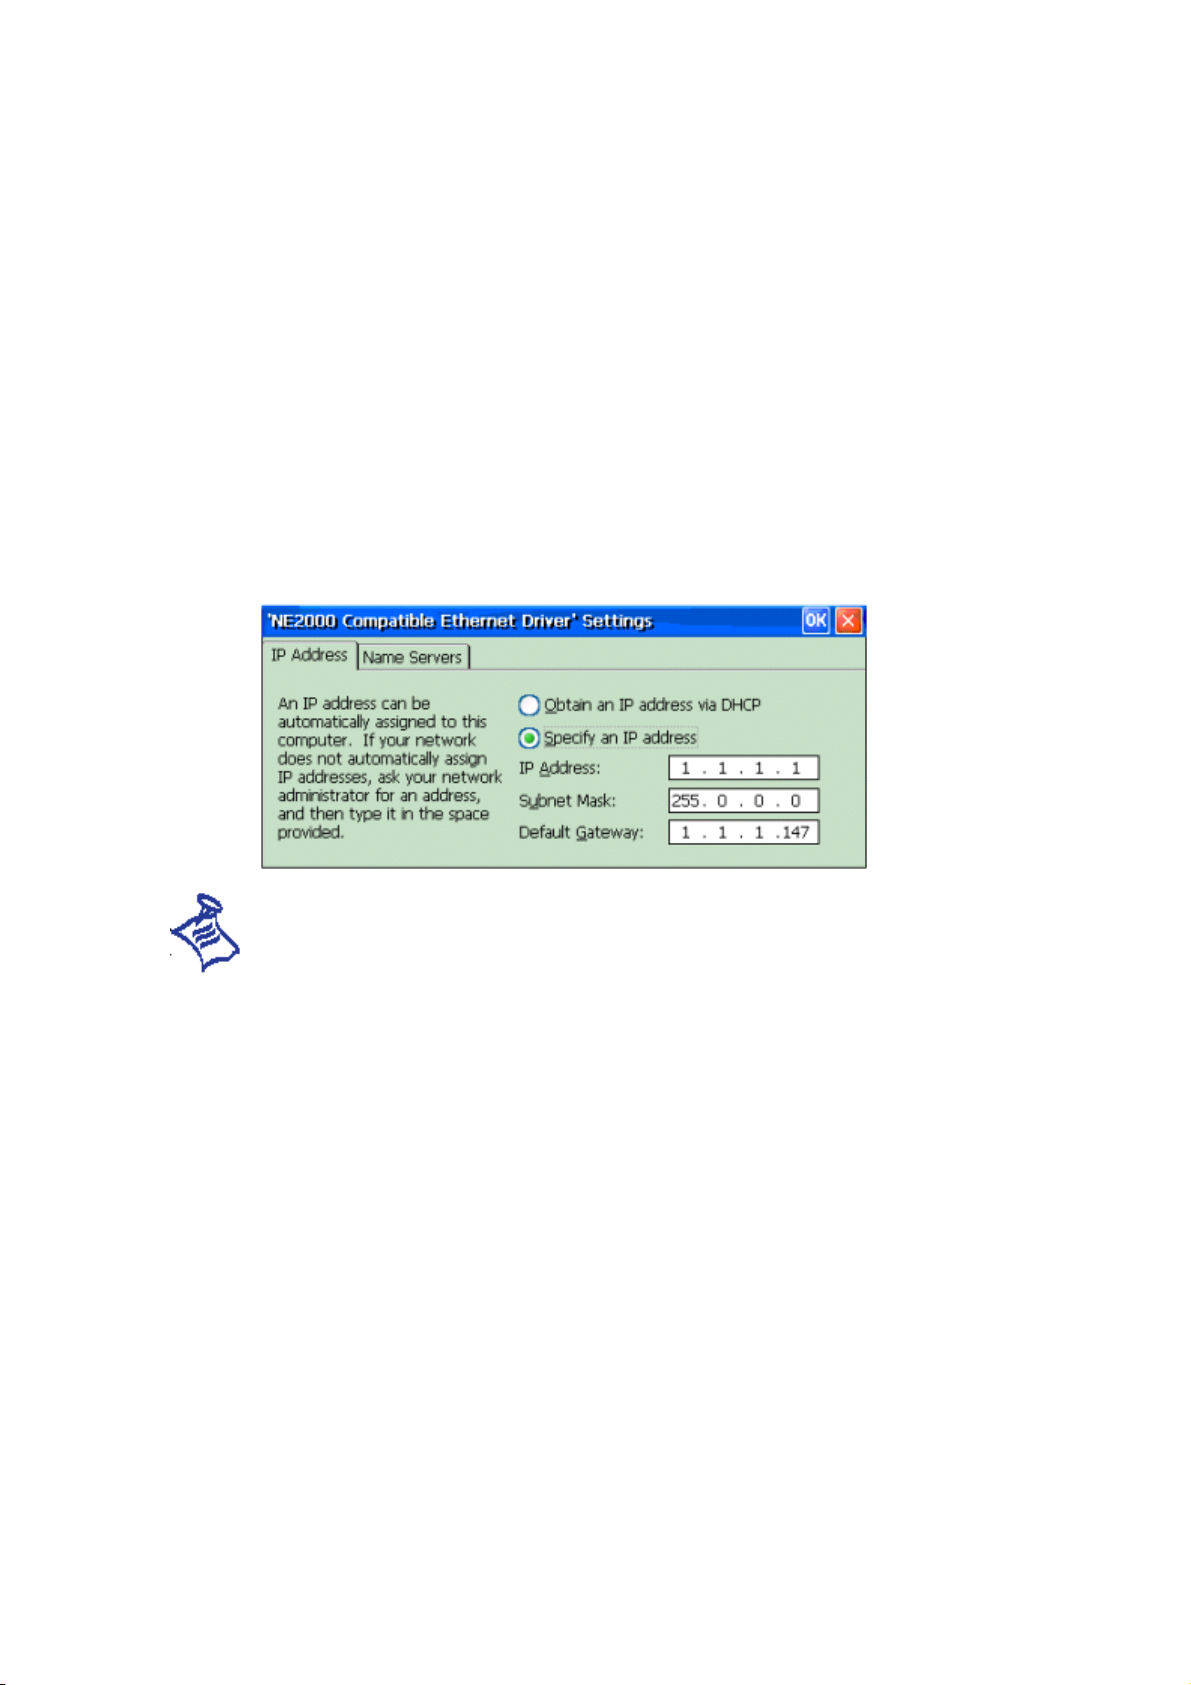
2. Use sync cable to connect IO and your desktop PC and install the necessary
driver for Ethernet Card on both computers. For installation driver, see the
guide for Ethernet Card.
3. Install an Ethernet Card into your device. And a message appears that ask if you
will use Ethernet Card using battery power, tap Yes.
4. Networking Settings will appear automatically the first time you installed the
Ethernet Card. You can select Obtain an IP address via DHCP or Specify an IP
address. To select these settings, get the necessary information from your
network administrator. When you finished, tap OK.
5. Open the Internet Explorer, and tap View menu, Internet Options. Check the box
next to the Use LAN(no autodial) and tap OK.
: If it does not appear or to change settings later, on the Start menu, tap Settings,
Control Panel. And tap the Network Connection icon you created. You can change the
network driver settings. Tap Control Panel, Network and select the driver and then
Properties button.
To disconnect, tap connection icon in the status area, and disconnect. If you do not
make sure close the connection, your connection becomes in progress.
5.3. Connecting directly to an e-mail server
You can set up a connection to an e-mail server so that you can send and receive e-
mail messages by using a modem or network connection and Inbox on your IO.
67
Page 68
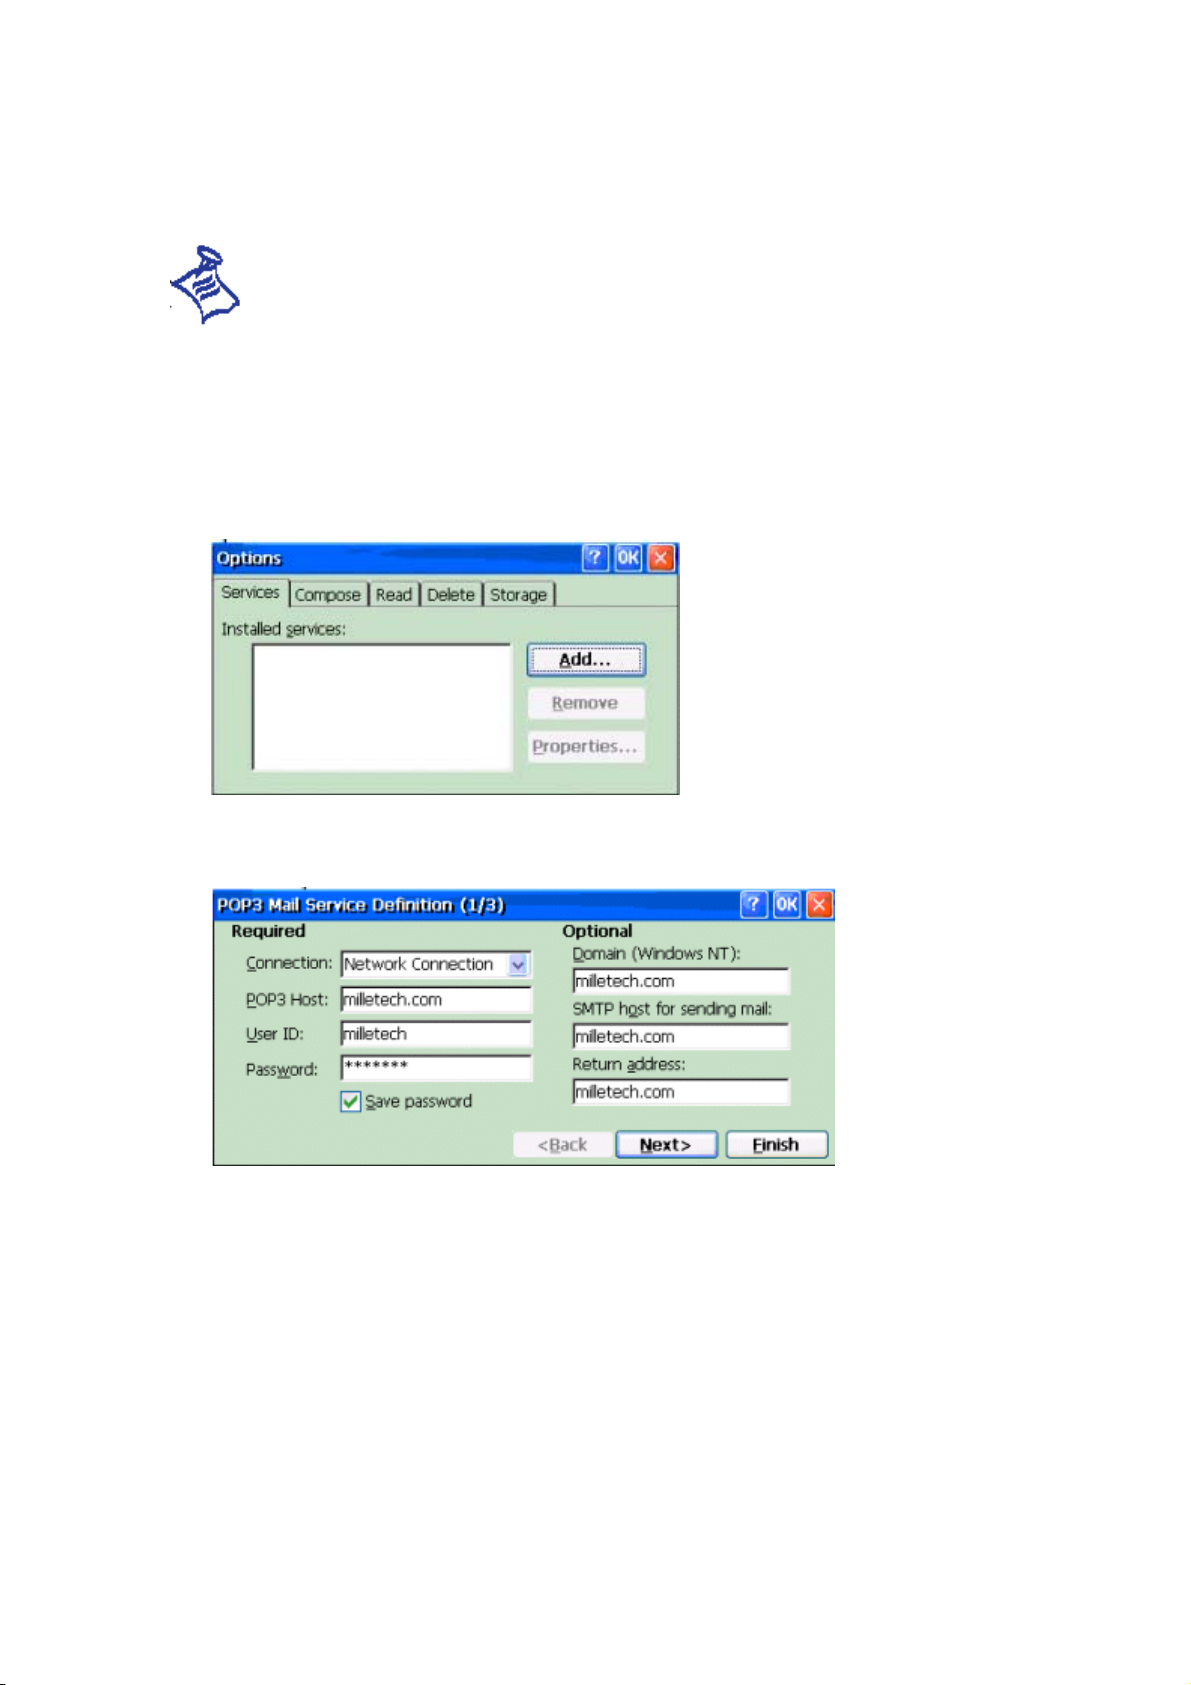
To create the modem or network connection, refer to the earlier section in this chapter.
: The ISP or network must use a POP3 or IMAP4 e-mail server and SMTP
gateway.
To Set Up an E-mail Service
1. Open Inbox on the Start menu or on the screen.
2. Tap Services on the menu and then choose Options
3. Tap Add in Options dialog box, and select the type of you are using ( POP3 or
IMAP 4) and tap OK.
4. Select the connection you are going to use. Enter your server name, user name
and password. You can also enter Optional information. Tap Next.
68
Page 69
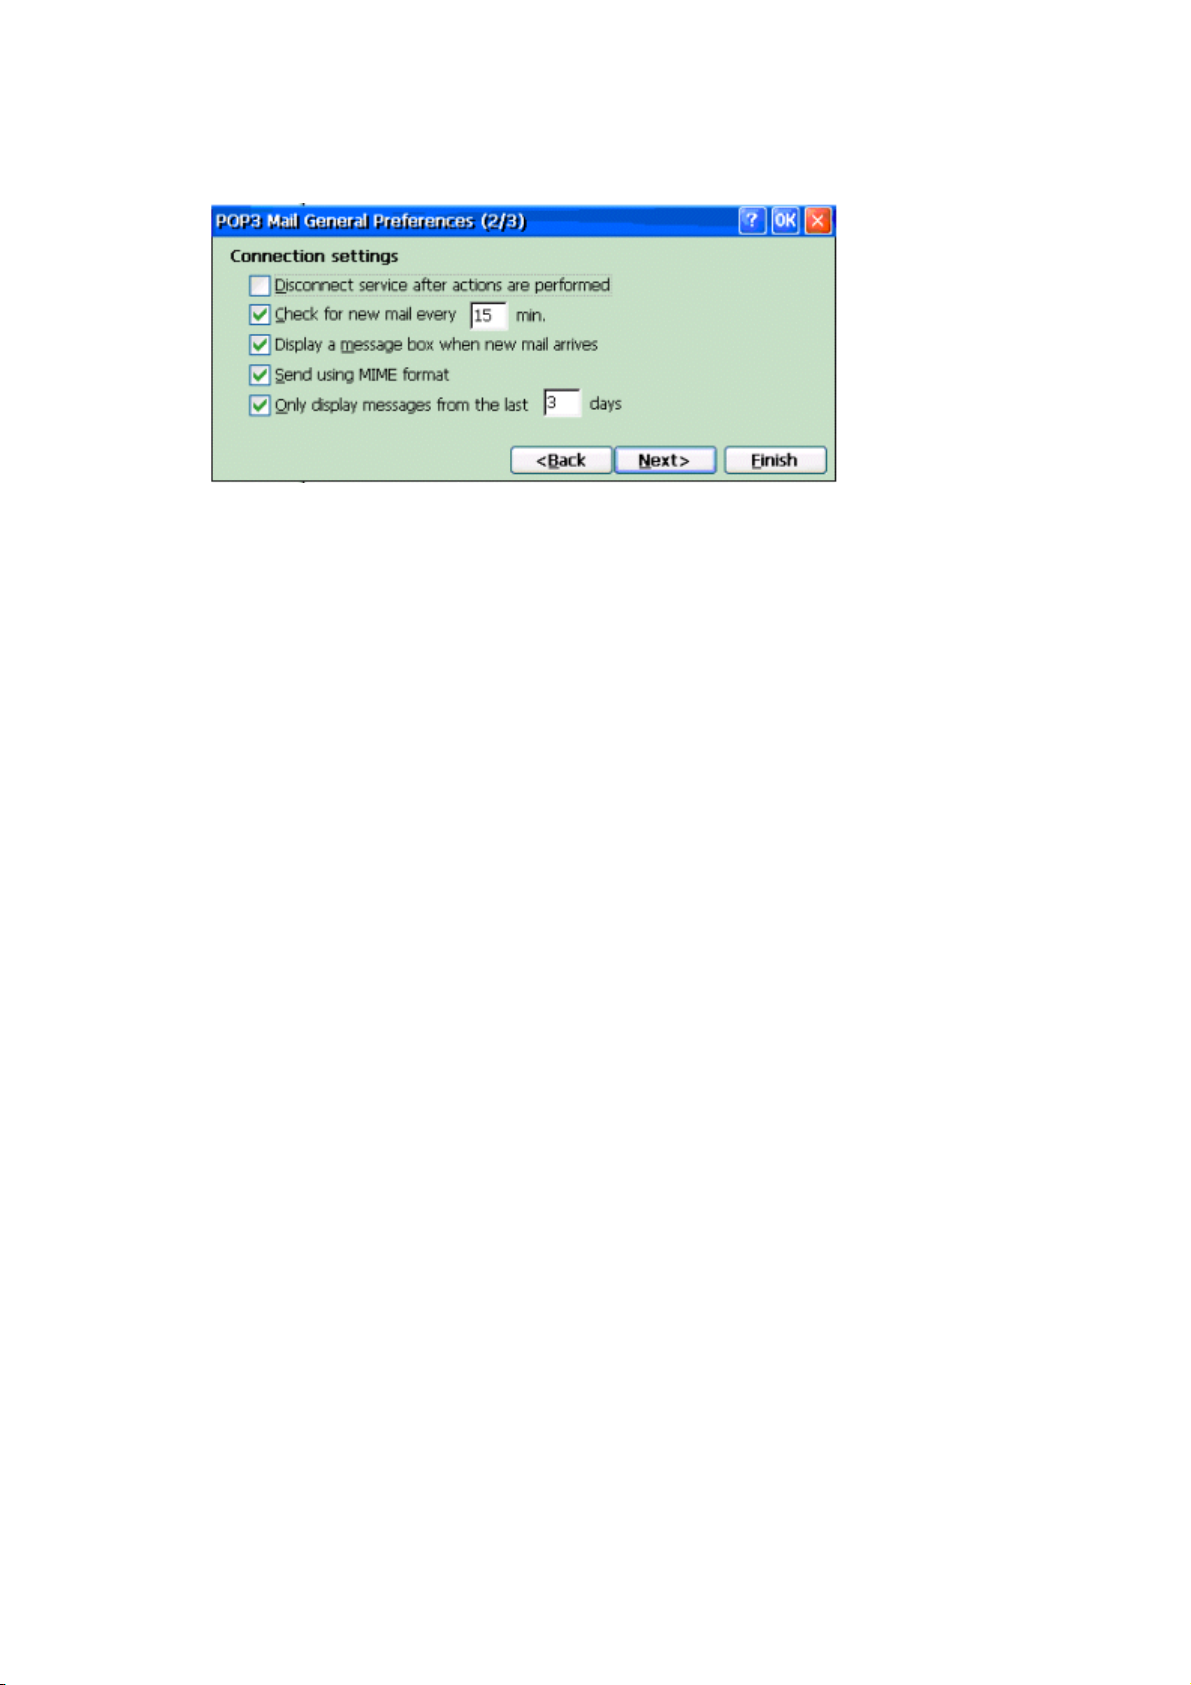
5. Next screen, Follow the onscreen instructions to select your preferences, you
do not need to change that selection..
6. When you finish, tap Finish.
After finish creating connection to a mail server, you can see the folder you created
under the ActiveSync folder. For more information on using the Inbox, programs, see
Inbox section in Chapter 3. or see online Help on your IO.
Chapter 6. Tips &Troubleshooting
Tips & TroubleShooting
If you are experiencing problems and your IO is not running correctly, review this
information described in the following sections to see if your problem listed, and then
try the following. You can also get more information for Windows CE services, tap Help
on the Start menu on your device.
Maintaining Memory
The memory on your IO is allocated between storage memory and program memory.
You can specify how much of the total memory is used for storage and programs
separately. If you notice that your Io is running slowly or that your programs do not run
consistently, try increasing program memory. If you need more memory for files and
documents, increase storage memory.
To Adjust Memory Allocation
1. Exit any applications that are running
2. On the Start menu, point to Settings, and then tap Control Panel
3. Double tap the System.
69
Page 70
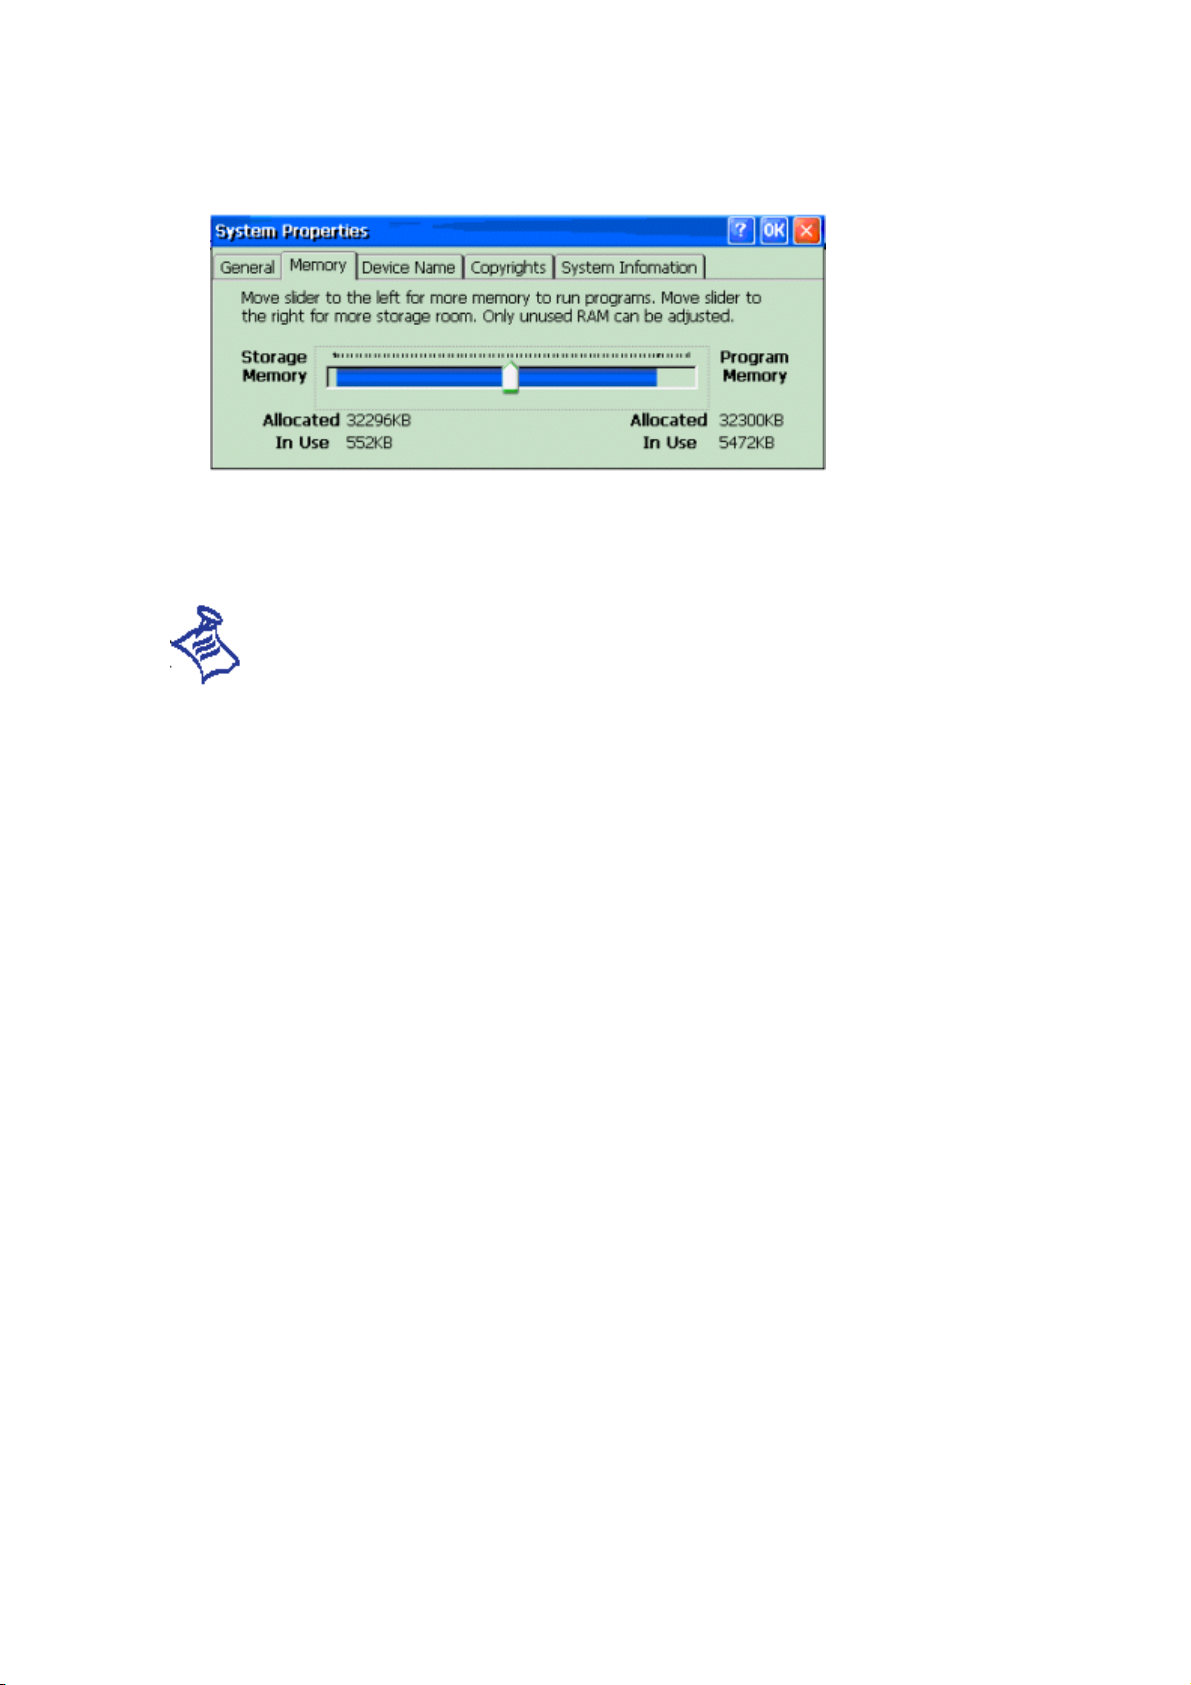
4. On the Memory tab, move the slider to the left to increase program memory, or
move the slider to the right to increase storage memory,.
: To clear memory, perform a hard reset. See Setting up the IO section in
chapter 1.
Battery runs out of power
When the batteries are low, you will see a battery low warning icon in the status area.
Immediately recharge the battery, if battery is discharged, you will lose all your data on
IO. If you want battery charge to last as long as possible. Refer to the following tips :
Connect your IO to AC adapter whenever possible, especially when :
Using a storage card, such as PC Card
Establishing a remote connection
Connecting to a computer
Playing audio files for extended periods
Adjusting sound volume or turn off needless sounds.
To monitor the battery power, on the Start menu tap Settings, Control Panel, Power.
70
Page 71
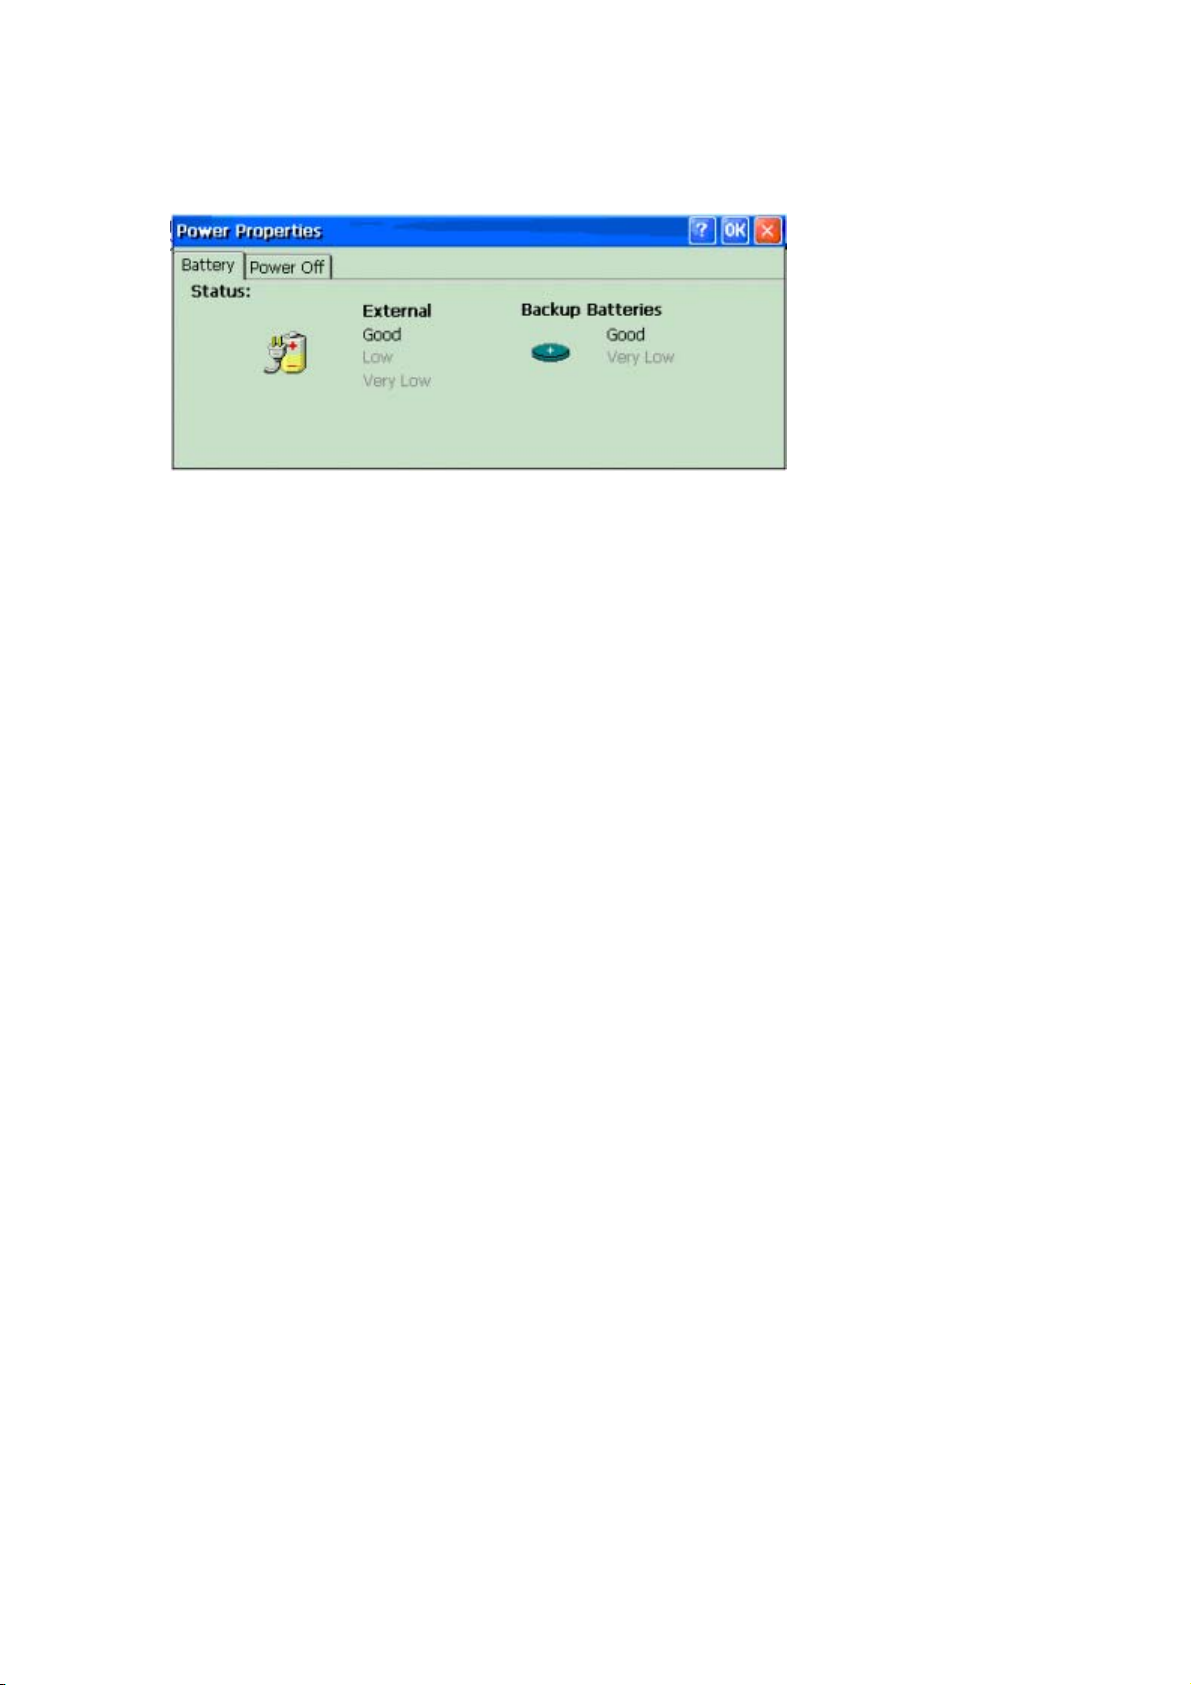
You can also conserve battery power by setting IO to automatically powers off
whenever it is idle for a continuous period time. Tap Power off in the Power window.
Screen freezes or responds slowly
Try resetting your IO. If the problem continues, you may have run out of memory.
Check your memory usage and clear storage memory as described above.
Io automatically shuts down/suspend
-IO is designed automatically turn itself off after a period activity.
-IO may be discharged to critically low level, connect the AC adapter.
-Reset the IO
-If your IO still does not operate, hard reset your IO.
Inaccurate respond to stylus taps
Recalibrate the screen. Tap Settings, Control Panel and select the Stylus and tap
calibration. Tap Recalibrate.
Forgetting the password
If you forget your password, you’ ll need to clear memory on the IO. However, before you
reset the IO, you have to perform a ActiveSync operation to backup data.
Audio Volume Too Low
Ensure that the volume level in the Control Panel / Volume and Sounds properties
window is set to the maximum levels.
Infrared(IR) connection problems
-Line up the IR ports so that they are unobstructed and within a range of 6
inches(15centimeters)
71
Page 72

-Make sure nothing is between the two IR ports.
-Adjust the room lighting. Some types of light interfere with IR connections. Try moving
a different location or turning off lights
-For more information, see ActiveSync online Help on your PC.
PC Card does not detected in IO.
-Make sure PC Card is inserted properly or drivers are installed on your Io.
-Remove and re-insert the PC Card correctly.
Modem connection problems
If you encounter problems when using a remote connection, see the following
information. For more information, see ActiveSync online Help on your PC.
Unable to dial out
-Verify that the modem is installed correctly.
-Make sure that you selected the modem card as your modem.
-Verify that you have set dialing properties correctly.
-Make sure the modem is waiting for dial tone. On the Start menu, tap Programs ,
Communications, and then Remote Networking. Select your connection and then tap
Properties on File menu. In the Dial-Up connection dialogue box, tap Configures and
then tap Call options. Verify that Wait for dial tone before dialing is selected.
Can dial out, but unable to make a proper connection
-Make sure that the network you are trying to connect with supports PPP(Point-to-
Point Protocol) from your network administrator or ISP.
-Verify that the dialing location is correct. On the Start menu, tap Settings and then
Control panel, and select the Dialing icon. Make sure that the location settings reflect
your current location.
-Verify that Dialing Pattern for the location is appropriate and the local country and
area code are correct.
-For more information on Dialing patterns, see online Help on your device.
Connection is unreliable
-Make sure that the modem is firmly seated and connected to both your device.
72
Page 73

-Disable call waiting. On the Start menu, tap Settings and then Control Panel, select
Dialing icon. Check the Disable call waiting by dialing and enter the disable code
specified by your telephone company.
Network Connection Problems
If you encounter problems when using a network connection, see the following
information.
-Verify that your network user name and password are correct from you network
administrator and also check that network you try to connect is available.
-Reset your IO.
-Check that you have added necessary server information.
-Make sure that you have an Ethernet Card that is compatible with your device. And
then remove and reinstall the Ethernet card.
-Check that whether network connection is selected as a connection method in the
ActiveSync windows when synchronize.
-Make sure that proper drives for you card are installed on your Io. For more
information, see the manual of network card.
-You may need to change the device name. Because when you are trying to connect
to a network, another device with the same name may be connected already.
Cable Connection Problems
If you encounter problems when using a network connection, see the following
information.
-Ensure that your device is turned on.
-If a modem or Ethernet card is installed into Io, remove it.
-Make sure that your do not have any other active connection.
-Make sure that the cable is plugged into a serial port or USB port on your desktop PC.
73
Page 74

Appendix A : IO Hardware Specifications
The following table provides general hardware specifications of Io H/PC by category.
Features Milletech Io
Display 8.2〃CSTN LCD with backlight
640 X 480 resolution
256 colors , touch Screen
Backlight Control Transmissive Display(Indoor/Outdoor) with 32 degrees
O/S Win CE.NET 4.1
Processor 206Mhz Strong ARM SA-1110
Memory 64MB RAM on main board (128MB maximum)
32MB Flash ROM
Interface USB 1.0 Device Compliant(Series B connector)
IrDA 1.1(SIR, 115,2kbps)
RS-232C serial communication(integrated in the special IO
connector)
DC Power
User Controls 3 Hot key, 2 Direction button, Power button
Audio Internal Microphone and speaker
Stereo Headphone Jack
Battery 6000mA Li-ion Rechargeable battery
External Input : 110V and 220V
Dimension 224m(W) x 190mm(H) x 26mm(D)
Weight 934g with battery
Basic Programs Microsoft Word
Microsoft File Viewers
Microsoft Internet Explorer
Microsoft Window Media Player
Microsoft Inbox
PIMS (Contact, Calendar , Tasks)
Spreadsheet
Voice Recorder
Appendix B : Limited Warranty
Milletech warrants this hardware product to be free form defects in both material and
workmanship, under normal use and services for one year from the date of purchase.
The battery is warranted for a period for 6month from the date of purchase. However if
the original date of purchase is obscure, it will be estimated by adding 3 months to
product manufacturing date.
If the equipment does not function properly during the warranty period due to defects in
either materials or workmanship, MilleTech will, at its option and expense, either repair
the defective product or part, or replace the equipment without charge, subject to the
conditions . All products that are replaced become the property of MilleTech.
74
Page 75

Replacement products may be new or reconditioned. Any replaced or repaired product
or part has a ninety(90) day warranty or reminder of the initial warranty period, which
ever is longer.
This warranty becomes null and void if you fail to pack the product in a manner
consistent with the original product packaging and damage occurs during product
shipment.
This Warranty does not cover : circumstances beyond MilleTech’s control ;
Service or parts to correct problems resulting from the use of attachments,
accessories or alterations not marketed or authorized by MilleTech
Service required as the result of unauthorized modifications or service
Misuse or abuse ; failure to follow MilleTech’s operating, maintenance or
repacking instructions ; failure to use items supplied by MilleTech (such as
adapters and cables)
MilleTech will not be responsible for any special, consequential or incidental damages
resulting from the purchase, use, or improper functioning of this equipment regardless
of the cause, such damages for which MilleTech will not be responsible include, but are
not limited to, loss of revenue or profit, downtime costs, loss of use of the equipment,
cost of any substitute equipment, facilities or services, or claims of your customers for
such damages.
Contact us
If you have any questions., please select the following options ;
Phone : 82-2-3430-6896
Fax: 82-2-3452-9379
E-mail : [email protected]
Or write to us at MilleTech Co., Ltd.
7F ASEM Tower, World Trade Center 159-1, Samsung-Dong, Kangnam-Gu, Seoul 135-798, Korea
FCC Statement
This device complies with part 15 of the FCC rules. Operation is subject to the
following two conditions : (1) This device may not cause harmful interface, and (2)this
device must accept any interference received, including interfaces that may cause
undesired operations.
75
Page 76

Note: This equipment has been tested and found to comply with the limits for a Class B
digital device, pursuant to Part 15 of the FCC rules. These limits are designed to
provide reasonable protection against harmful interference in a residential installation.
This equipment generates, uses, and can radiate radio frequency energy and, if not
installed and used in accordance with the instructions, may cause harmful interference
to radio communications. However, there is no guarantee that interference will not
occur in a particular installation. If this equipment does cause harmful interference to
radio or television reception, which can be determined by turning the equipment off and
on, the user is encouraged to try to correct the interference by one or more of the
following measures:
●Reorient or relocate the receiving antenna.
● Increase the separation between the equipment and receiver.
● Connect the equipment into an outlet on a circuit different from that to which the
receiver is connected.
●Consult the dealer or an experienced radio/TV technician for help.
The use of shielded I/O cables is required when connecting this equipment to any and
all optional peripheral or host devices. Failure to do so many violate FCC rules.
Caution: Changes or modifications not covered in this manual must be approved in
writing by the manufacturer’s Regulatory Engineering Department. Changes or
modifications made without written approval may void the user’s authority to operate
this equipment.
76
 Loading...