

Page 1
OM-169 510
June 1995
Processes
Plasma Arc (PA W) Welding
Description
Automatic Welding
Robot PAW Interface
Visit our website at
www.MillerWelds.com
Page 2

Page 3

EMF INFORMATION
NOTE
The following is a quotation from the General Conclusions Section
of the U.S. Congress, Office of T echnology Assessment,
Effects of Power Frequency Electric & Magnetic Fields –
Background Paper
Government Printing Office, May 1989): “. . . there is now a very
large volume of scientific findings based on experiments at the
cellular level and from studies with animals and people which clearly
establish that low frequency magnetic fields can interact with, and
produce changes in, biological systems. While most of this work is
of very high quality, the results are complex. Current scientific
understanding does not yet allow us to interpret the evidence in a
single coherent framework. Even more frustrating, it does not yet
allow us to draw definite conclusions about questions of possible
risk or to offer clear science-based advice on strategies to minimize
or avoid potential risks.”
, OTA-BP-E-53 (Washington, DC: U.S.
Considerations About Welding And The Effects Of Low Frequency Electric And
Magnetic Fields
To reduce magnetic fields in the workplace, use the following
Biological
procedures:
1. Keep cables close together by twisting or taping them.
2. Arrange cables to one side and away from the operator.
3. Do not coil or drape cables around the body.
4. Keep welding power source and cables as far away as
practical.
5. Connect work clamp to workpiece as close to the weld as
possible.
About Pacemakers:
The above procedures are among those also normally
recommended for pacemaker wearers. Consult your doctor for
complete information.
TABLE OF CONTENTS
SECTION 1 – SAFETY PRECAUTIONS AND SIGNAL WORDS 1. . . . . . . . . . . . . . . . . . . . . . . . . . . . . . .
1-1. General Information And Safety 1. . . . . . . . . . . . . . . . . . . . . . . . . . . . . . . . . . . . . . . . . . . . . . . . . .
1-2. Safety Alert Symbol And Signal Words 1. . . . . . . . . . . . . . . . . . . . . . . . . . . . . . . . . . . . . . . . . . . .
mod10.1 4/93
SECTION 2 – INTRODUCTION 1. . . . . . . . . . . . . . . . . . . . . . . . . . . . . . . . . . . . . . . . . . . . . . . . . . . . . . . . . . . .
2-1. Description 1. . . . . . . . . . . . . . . . . . . . . . . . . . . . . . . . . . . . . . . . . . . . . . . . . . . . . . . . . . . . . . . . . . . .
SECTION 3 – INSTALLATION 1. . . . . . . . . . . . . . . . . . . . . . . . . . . . . . . . . . . . . . . . . . . . . . . . . . . . . . . . . . . . .
3-1. Field Installation Instructions For PAW Interface Panel To Computer Interface 2. . . . . . . . . .
3-2. Shock Sensor Unit Assembly And Installation To Robot 4. . . . . . . . . . . . . . . . . . . . . . . . . . . . . .
3-3. High-Frequency Protection For Torch Cable 4. . . . . . . . . . . . . . . . . . . . . . . . . . . . . . . . . . . . . . . .
3-4. Torch And Torch Cable Installation To Robot 5. . . . . . . . . . . . . . . . . . . . . . . . . . . . . . . . . . . . . . .
3-5. Ground Cable Connections 9. . . . . . . . . . . . . . . . . . . . . . . . . . . . . . . . . . . . . . . . . . . . . . . . . . . . . .
3-6. Torch Cable Internal Connections To Plasma Welding Console 10. . . . . . . . . . . . . . . . . . . . . . .
3-7. PAW Interface Panel – Computer Interface Connection 10. . . . . . . . . . . . . . . . . . . . . . . . . . . . . .
3-8. PAW Interface Panel – Welding Power Source – PAW Console Connections 11. . . . . . . . . . .
3-9. Computer Interface – Input Power Connections 12. . . . . . . . . . . . . . . . . . . . . . . . . . . . . . . . . . . . .
3-10. Gas Set/Pilot Arc Start Push Button 12. . . . . . . . . . . . . . . . . . . . . . . . . . . . . . . . . . . . . . . . . . . . . . .
3-1 1. Remote Gas Set/Pilot Arc Start Switch Connections 12. . . . . . . . . . . . . . . . . . . . . . . . . . . . . . . . .
SECTION 4 – ROBOT PROGRAM MODIFICATIONS 13. . . . . . . . . . . . . . . . . . . . . . . . . . . . . . . . . . . . . . . . .
4-1. Setting Up Plasma (Non-Standard) Torch For MRH
2
Robot 13. . . . . . . . . . . . . . . . . . . . . . . . . .
4-2. Setting Up Plasma Torch For MRV2 Robot 13. . . . . . . . . . . . . . . . . . . . . . . . . . . . . . . . . . . . . . . . .
4-3. Marking Position Of Torch Head Assembly 13. . . . . . . . . . . . . . . . . . . . . . . . . . . . . . . . . . . . . . . . .
4-4. System Setup For MRH2 And MRV2 With C2 Robot Control 14. . . . . . . . . . . . . . . . . . . . . . . . . .
SECTION 5 – ELECTRICAL DIAGRAMS 21. . . . . . . . . . . . . . . . . . . . . . . . . . . . . . . . . . . . . . . . . . . . . . . . . . .
Figure 5-1. Circuit Diagram For Robot PAW System 21. . . . . . . . . . . . . . . . . . . . . . . . . . . . . . . . . . . . . . .
Figure 5-2. Circuit Diagram For Robot PAW Interface Panel 22. . . . . . . . . . . . . . . . . . . . . . . . . . . . . . . .
Figure 5-3. Wiring Diagram For Robot PAW Interface Panel 22. . . . . . . . . . . . . . . . . . . . . . . . . . . . . . . .
Figure 5-4. Circuit Diagram For High-Frequency Filter 23. . . . . . . . . . . . . . . . . . . . . . . . . . . . . . . . . . . . .
Figure 5-5. Wiring Diagram For High-Frequency Filter 23. . . . . . . . . . . . . . . . . . . . . . . . . . . . . . . . . . . . .
SECTION 6 – HF IN PLASMA ARC WELDING 24. . . . . . . . . . . . . . . . . . . . . . . . . . . . . . . . . . . . . . . . . . . . . .
SECTION 7 – PARTS LIST 26. . . . . . . . . . . . . . . . . . . . . . . . . . . . . . . . . . . . . . . . . . . . . . . . . . . . . . . . . . . . . . . .
OM-169 510 – 6/95
Page 4

Page 5
SECTION 1 – SAFETY PRECAUTIONS AND SIGNAL WORDS
1-1. GENERAL INFORMATION AND SAFETY A. General
Information presented in this manual and on various labels, tags, and plates on the unit pertains to equipment
design, installation, operation, maintenance, and troubleshooting which should be read, understood, and followed for the safe and effective use of this equipment.
B. Safety
The installation, operation, maintenance, and troubleshooting of plasma arc welding equipment requires
practices and procedures which ensure personal safety
and the safety of others.
Read and follow safety information in the Plasma Welding Console Owner’s Manual and Welding Torch Owner’s Manual, as well as the other Owner’s Manuals for
this system, to ensure the safe installation and operation
of the Plasma Arc Welding system.
SECTION 2 – INTRODUCTION
1-2. SAFETY ALERT SYMBOL AND SIGNAL
WORDS
The following safety alert symbol and signal words are
used throughout this manual to call attention to and
identify different levels of hazard and special instructions.
This safety alert symbol is used with the signal
words WARNING and CAUTION to call attention to the safety statements.
WARNING statements identify procedures or
practices which must be followed to avoid serious personal injury or loss of life.
CAUTION statements identify procedures or
practices which must be followed to avoid minor
personal injury or damage to this equipment.
IMPORTANT
statements identify special instructions
necessary for the most efficient operation of this equipment.
2-1. DESCRIPTION
The robot P AW interface panel is a control designed to
be used with a Thermal Dynamics WC 100B plasma
SECTION 3 – INSTALLATION
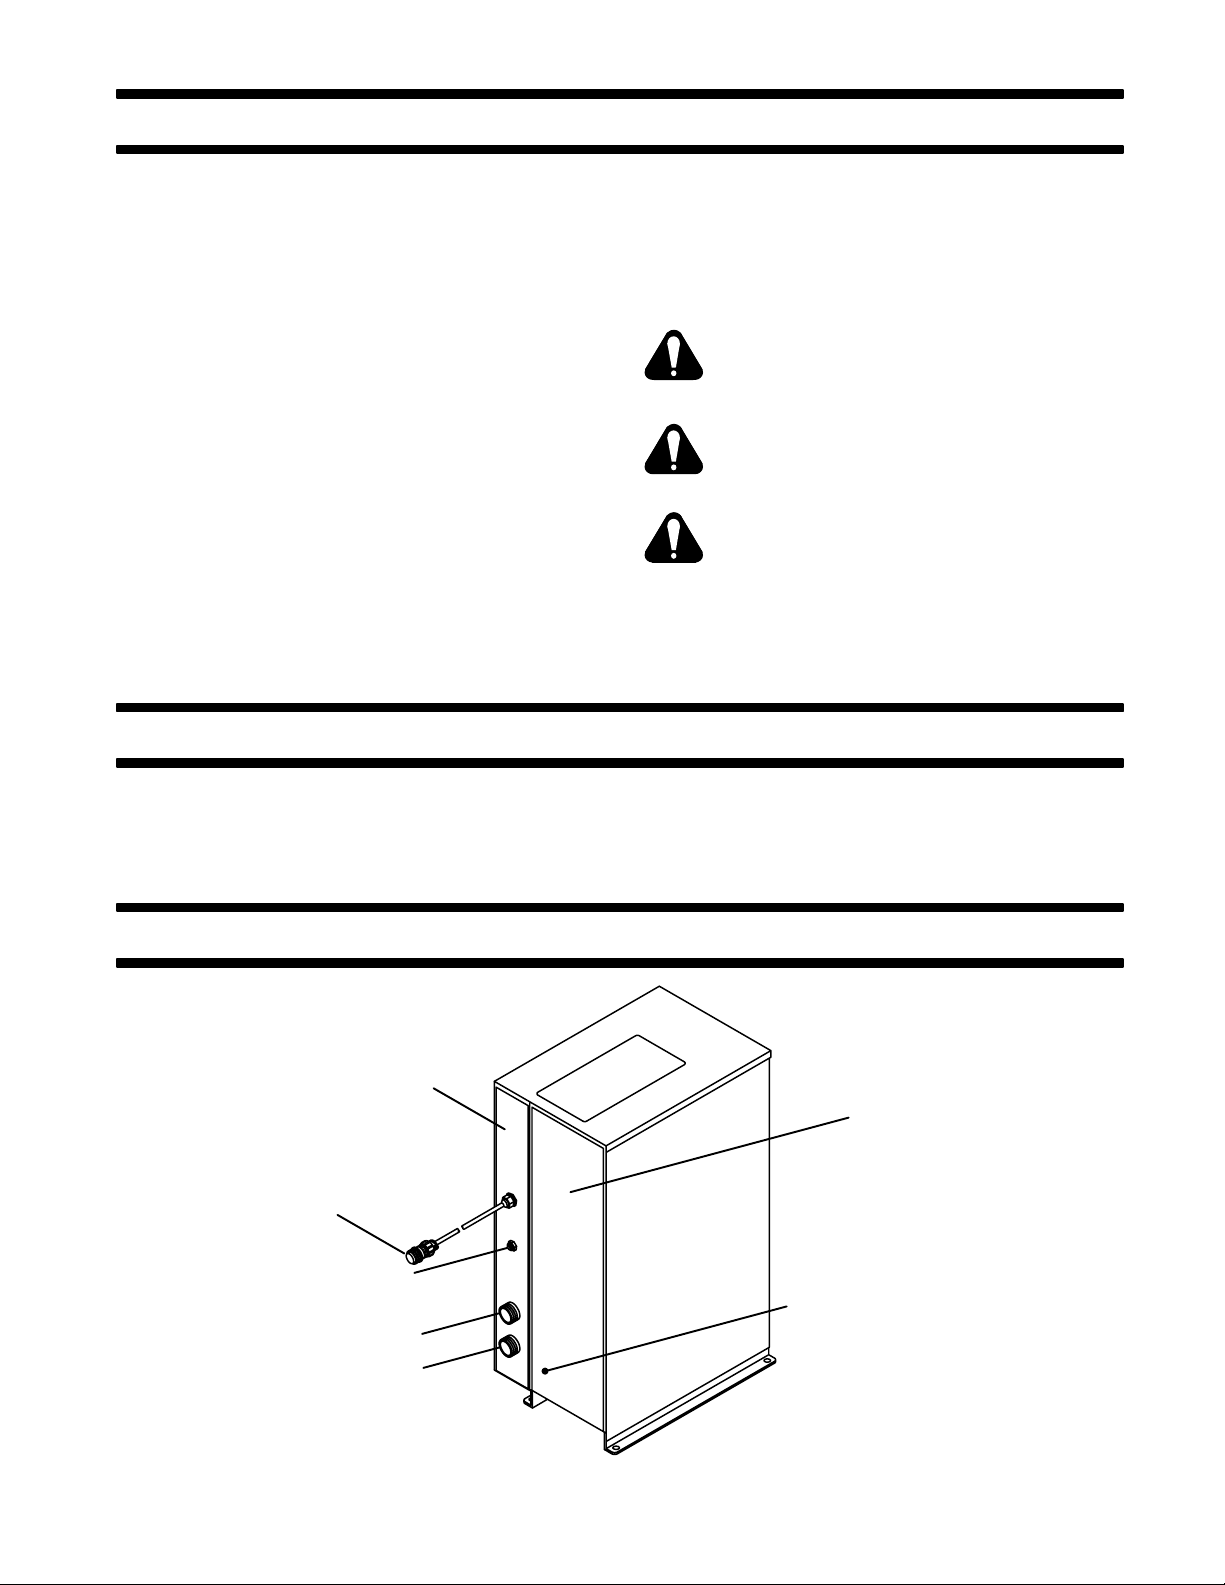
PAW Interface
Panel
Plug PLG21 Connects
To Computer Interface
Receptacle RC8
(See Section 3-7)
Gas Set/Pilot Arc
Start Push Button
Receptacle RC21
(See Section 3-8)
Receptacle RC20
(See Section 3-8)
welding console and a plasma arc welding torch
2
PWM-3A, MILLER Computer Interface, and MRH
or
MRV2 robot system for the Plasma Arc Welding (PAW)
process.
Computer
Interface
Computer Interface
Input Power Receptacle RC11
Location (See Section 3-9 And
Computer Interface Owner’s Manual)
Figure 3-1. PAW Interface Panel
ST-800 732
OM-169 510 Page 1
Page 6
IMPORT ANT:
When installing or operating plasma arc
welding equipment, refer to the Plasma Welding Console Owner’s Manual and Welding Torch Owner’s
Manual for specific precautionary information that applies to this equipment.
IMPORTANT:
All directions, such as left or right, are
with respect to the operator facing the Computer Interface front panel. Retain all hardware removed during
this procedure for reinstallation unless specifically told
otherwise.
3-1. FIELD INSTALLATION INSTRUCTIONS FOR
P A W INTERF ACE PANEL TO COMPUTER INTERFACE (Figure 3-1 And Figure 3-2)
WARNING: ELECTRIC SHOCK can kill.
•
Do not touch live electrical parts.
•
Shut down robot and welding power source,
and disconnect input power employing lock-
out/tagging procedures before beginning
this installation.
Lockout/tagging procedures consist of padlocking line disconnect switch in open position,
removing fuses from fuse box, or shutting off
and red-tagging circuit breaker or other disconnecting device.
CAUTION: ELECTROSTATIC DISCHARGE
(ESD) can damage circuit boards.
•
Put on properly grounded wrist strap BEFORE handling circuit boards.
•
Perform work only at a static-safe work area.
INCORRECT INSTALLATION or misaligned
plugs can damage circuit board.
•
Be sure that plugs are properly installed and
aligned.
EXCESSIVE PRESSURE can break circuit
board.
•
Use only minimal pressure and gentle movement when disconnecting or connecting
board plugs and removing or installing board.
1. Remove Computer Interface top cover and left
side panel.
2. Remove side panel from PAW Interface panel.
3. Install P AW Interface frame onto left side panel of
Computer Interface with sheet metal screws removed in Step 1 (see Figure 3-1).
4. Make the following internal connections to the
Computer Interface (see Figure 3-2).
a. Remove jumper link between terminals B and C
on terminal strip 2T.
b. Connect lead 26 from the Interface panel to ter-
minal B on terminal strip 2T.
c. Connect lead 60 from the Interface panel to top
mounting screw on filter FL1.
d. Connect green lead from the Interface panel to
the ground stud located directly above terminal
strip 2T.
IMPORT ANT :
Remove the outside star washer from the
ground stud to make room for the green lead terminal.
e. Remove plug PLG3 from receptacle RC1 on In-
terface Board PC4.
f. Connect plug PLG10 from the PAW Interface
panel to Interface Board PC4 receptacle RC1
where plug PLG3 was removed in Step 4e (plug
PLG3 is not connected for this application).
OM-169 510 Page 2
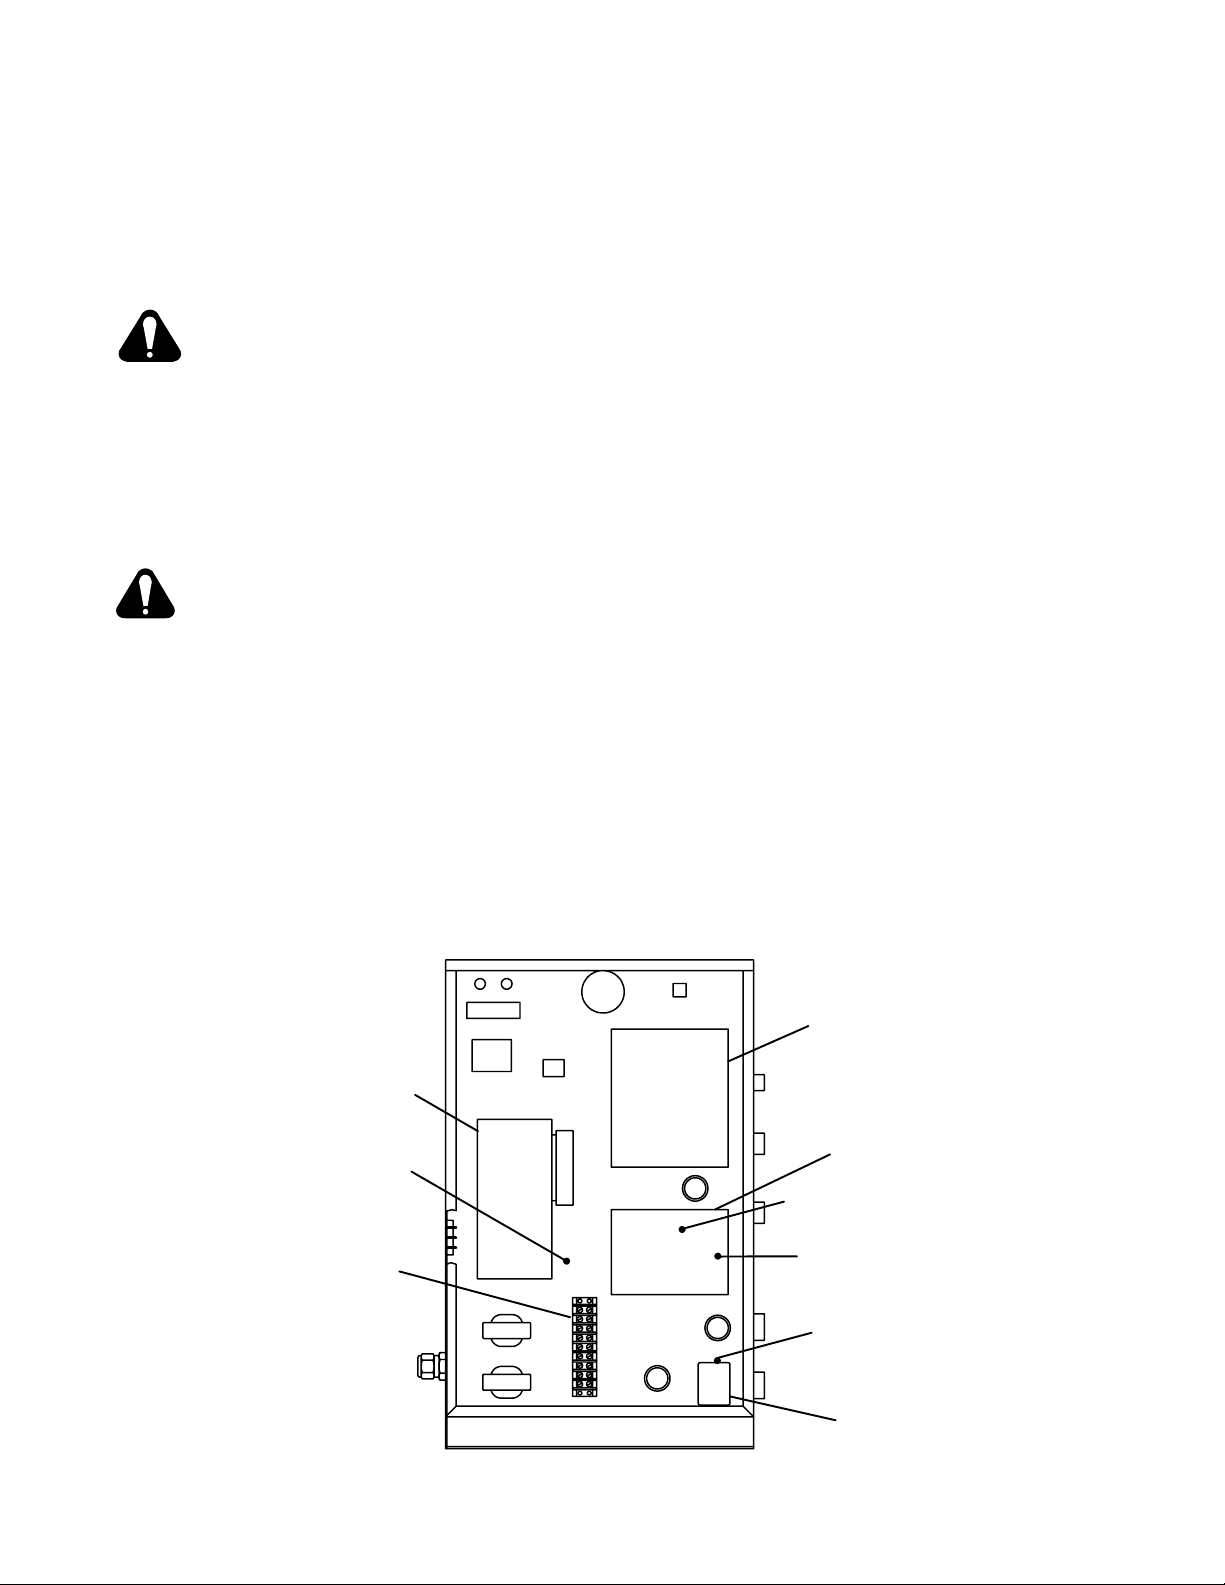
Motor Control
Board PC2
Ground Stud
Location
Terminal
Strip 2T
Figure 3-2. Computer Interface Internal Connections
Left Side View Of
Computer Interface
Voltage Control
Board PC1
Interface
Board PC4
PC4 Switch S1 Location
PC4 Receptacle RC1
Location
Mounting Screw
Location
Filter FL1
Ref. ST-139 887-C
Page 7
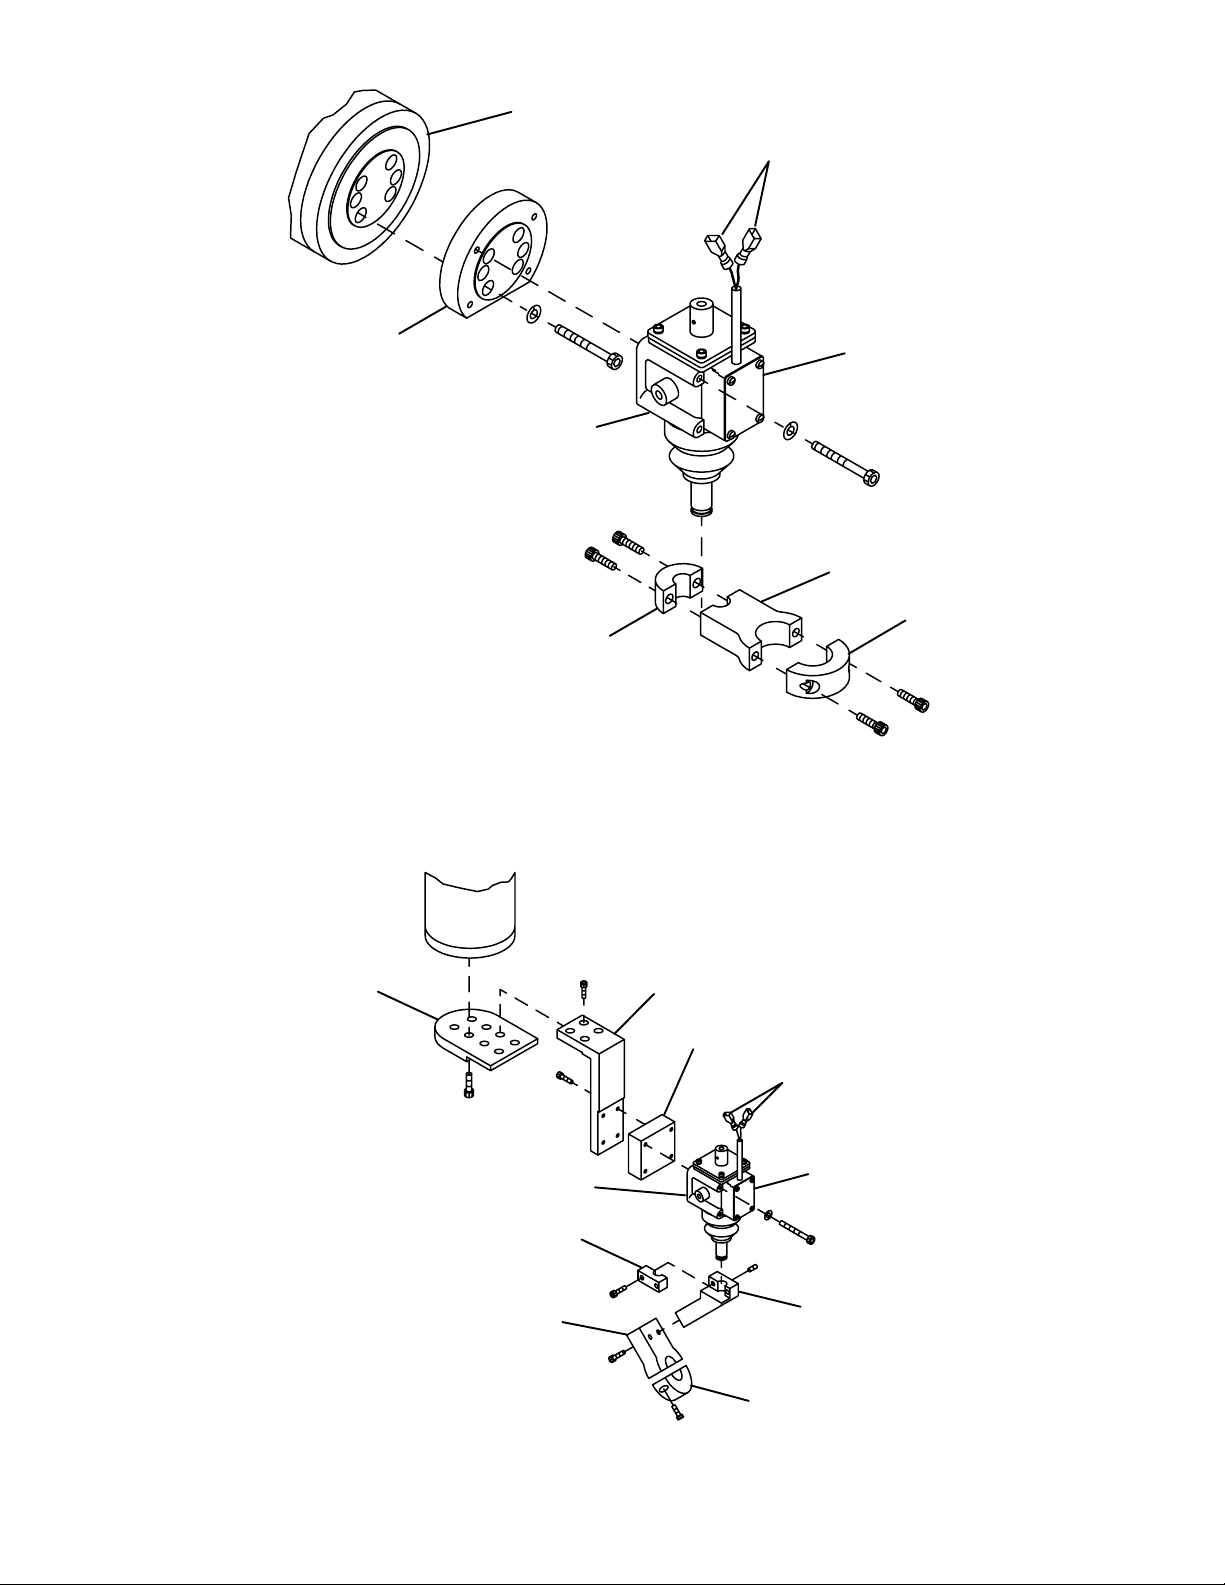
Robot Arm
Shock Sensor Leads
Insulator
Plate
Welding Gun
Body
Mounting
Bracket
Clamp
Shock Sensor
Torch
Mounting
Bracket
Figure 3-3. MRH2 Shock Sensor Unit Assembly And Installation
Torch Clamp
ST-800 733
Output Hub
Bracket
Welding Gun
Body
Angle Bracket
Clamp
Torch Mounting
Bracket
L-Bracket
Insulating Block
Shock Sensor
Leads
Shock Sensor
Angle Bracket
Torch Clamp
Figure 3-4. MRV2 Shock Sensor Unit Assembly And Installation
ST-800 778
OM-169 510 Page 3
Page 8

g. Connect lead 23 from PAW interface panel to
terminal A on terminal strip 2T.
h. Route plug 30/31 from PAW interface panel
through center baffle in computer interface. Disconnect plug PLG10 from plug PLG1 1 and connect PLG 30/31 to PLG 10/11.
5. Locate switch S1 on Interface Board PC4 (see
Figure 3-2). Remove varnish and potting compound from S1 and place the two DIP switches on
S1 in the following positions:
a. S1-1 (Disable Voltage Ramp) in OFF position.
b. S1-2 (Disable Stick Checking) in ON position.
6. Reinstall side panel onto PAW Interface panel.
7. Install supplied top cover onto the Computer Interface – PAW Interface panel.
3-2. SHOCK SENSOR UNIT ASSEMBLY AND
INSTALLATION TO ROBOT (Figure 3-3 And
Figure 3-4)
WARNING: ELECTRIC SHOCK can kill.
•
Do not touch live electrical parts.
•
Shut down robot and welding power source,
and disconnect input power employing lock-
out/tagging procedures before inspecting or
installing.
Lockout/tagging procedures consist of padlocking line disconnect switch in open position, removing fuses from fuse box, or shutting off and
red-tagging circuit breaker or other disconnecting device.
MOVING PARTS can cause serious injury.
•
Keep away from moving parts.
HOT SURFACES can cause severe burns.
•
Allow cooling period before servicing.
To assemble and install the shock sensor unit, refer to
Figure 3-3 or Figure 3-4 and proceed as follows:
2
A. MRH
1. If applicable, remove existing gun/torch and insu-
Models
lator plate from robot arm.
2. Install supplied insulator plate to robot arm with
screws removed in Step 1.
3. Assemble shock sensor, mounting bracket, and
torch clamp as shown in Figure 3-3.
4. Install shock sensor unit to the insulator plate
installed in Step 2 with supplied screws.
2
B. MRV
1. If applicable, remove existing shock sensor from
2. Assemble shock sensor, mounting bracket, and
3. Install shock sensor unit to robot insulating block
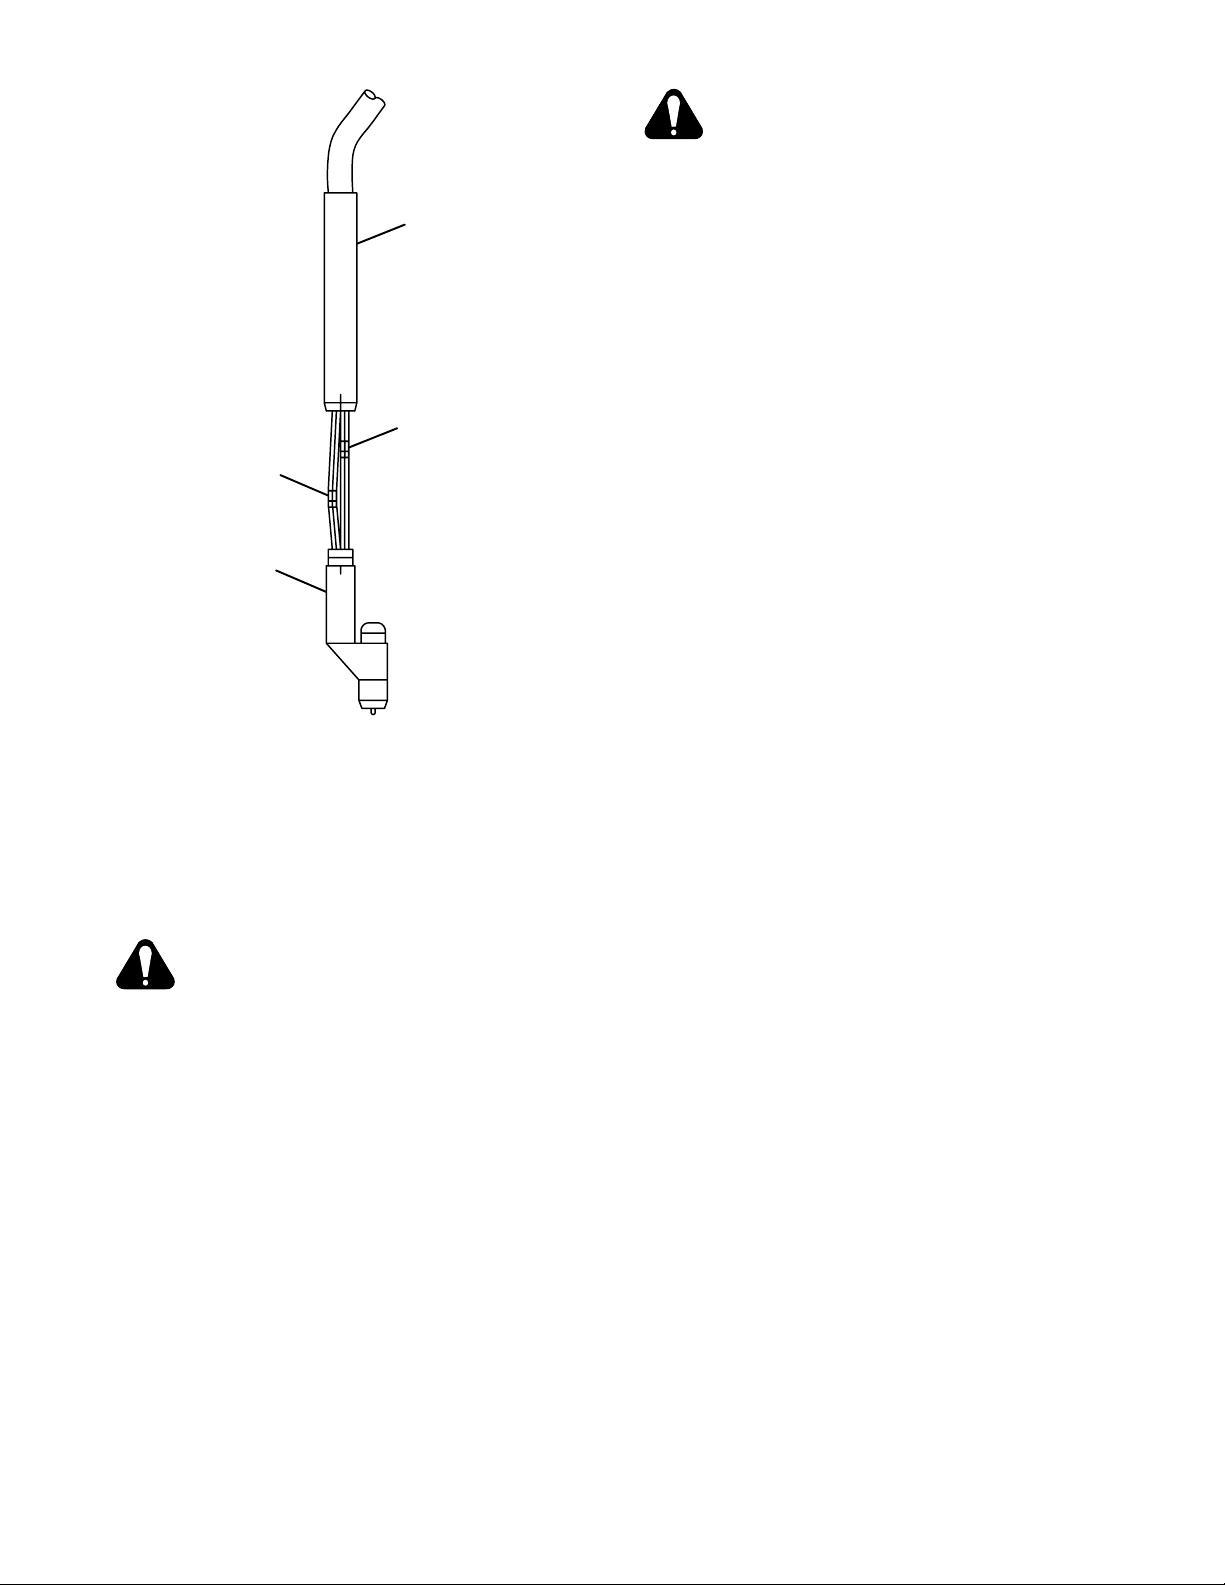
3-3. HIGH-FREQUENCY PROTECTION FOR
The Pilot mode switch on the WC 100B console provides a selection for the pilot arc mode of operation. If
plasma arc welding is performed with the switch in the
NORMAL position, the optional shield sleeving should
be installed on the torch cable.
The optional shield sleeving is for covering the torch
cable to prevent high frequency from interfering with robot operations.
IMPORT ANT:
Models
robot arm.
torch clamp as shown in Figure 3-4.
with screws removed in Step 1.
TORCH CABLE
When installing shield sleeving, be sure
end with lead and attached ring terminal is at console
end of the torch cable.
To install shield sleeving, proceed as follows:
1. Unscrew sleeve from torch head assembly
(see Figure 3-5).
2. Disconnect fittings and remove torch head assembly.
3. Insert torch cable into shield sleeving at end with
lead and attached ring terminal.
4. Slide shield sleeving over torch cable until end of
torch cable exits opposite end of shield sleeving.
5. Reconnect fittings from torch cable to torch head
assembly (match color-coded markings).
6. Check for coolant leaks at fittings by turning on recirculating coolant system. Tighten fittings if necessary .
OM-169 510 Page 4
Page 9
MOVING PARTS can cause serious injury.
•
Keep away from moving parts.
HOT SURFACES can cause severe burns.
•
Allow cooling period before servicing.
Sleeve
Green And Black
Connections
Yellow And Red
Connections
Torch Head
Assembly
ST-800 836
Figure 3-5. Connections At Torch Head Assembly
7. Screw sleeve onto torch head assembly.
8. Secure shield sleeving to torch cable using supplied clamp.
3-4. TORCH AND TORCH CABLE INST ALLATION
TO ROBOT (Figure 3-3 Thru Figure 3-11)
WARNING: ELECTRIC SHOCK can kill.
•
Do not touch live electrical parts.
•
Shut down robot and welding power source,
and disconnect input power employing lock-
out/tagging procedures before inspecting or
installing.
Lockout/tagging procedures consist of padlocking line disconnect switch in open position, removing fuses from fuse box, or shutting off and
red-tagging circuit breaker or other disconnecting device.
A. MRH2 Models
1. If applicable, remove the existing wire feed motor/reed relay mounting bracket and stabilizer
brace from the robot (refer to robot Owner’s
Manual for bracket and brace locations). Reinstall the two lifting brackets only (see robot Owner’s Manual and Figure 3-10).
2. If applicable, remove the wire feed hub support
from the robot (refer to robot Owner’s Manual for
hub support location). Install supplied torch cable
support bracket in location where hub support
was secured (see Figure 3-10).
3. The torch cable is enclosed in a black protective
case. Secure torch in torch clamp.
IMPORTANT:
Before operating, see Section 4 and robot Owner’s Manual for instructions for absolute offset
adjustment. When doing this procedure, remove the
shield cup and tip from torch and install the supplied
brass tip gauge.
4. If applicable, remove the existing clamps suspended from the outlet cable support arm and replace them with the two supplied clamps. Route
torch cable through new clamps so there is about
3-1/2 ft. (1 m) of cable between the top of the
shock sensor and the first clamp (see
Figure 3-10).
5. Route torch cable through torch cable support
bracket tray and secure with rubber straps.
6. Route remaining end of torch cable to the WC
100B welding panel for internal connections (see
Step 3, Section 3-6B).
7. The supplied high frequency filter box prevents
noise interference at the shock sensor circuit in
the Robot Control. T o install the filter , proceed as
follows:
OM-169 510 Page 5
Page 10
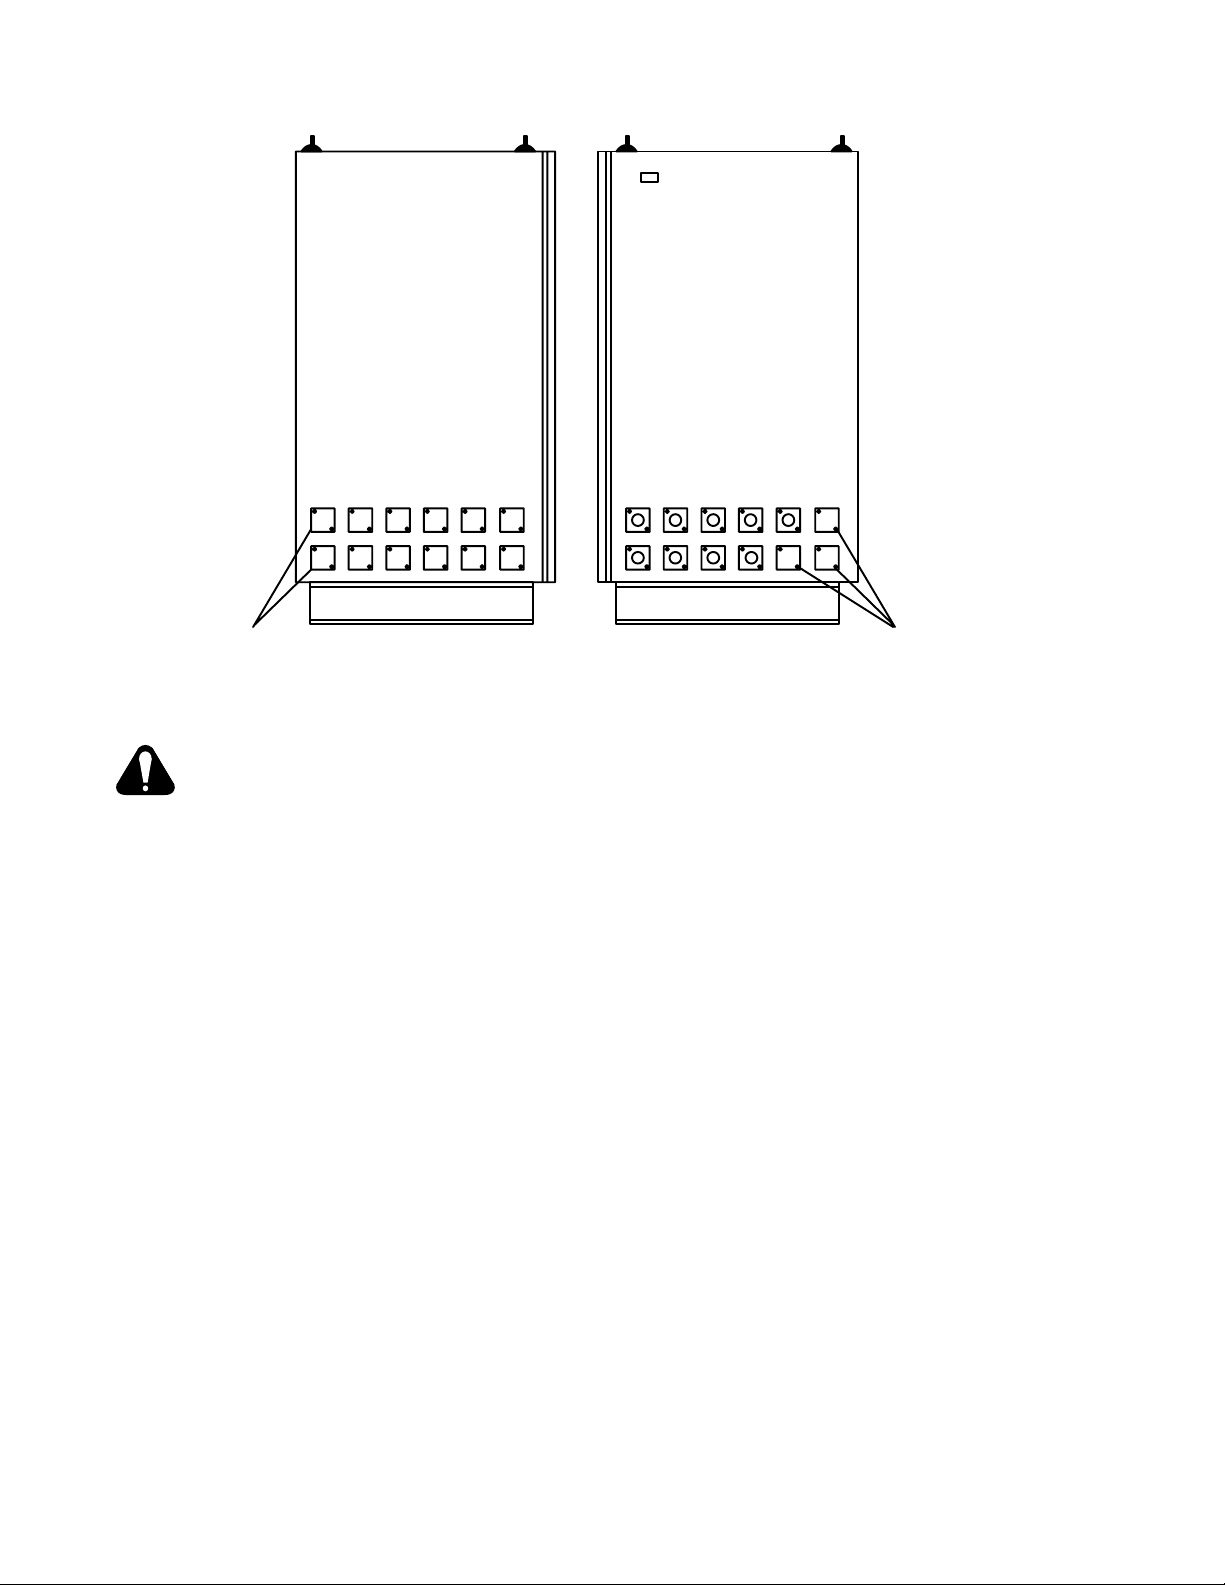
Robot Control
LEFT SIDE RIGHT SIDE
Blank Cover Plates
(Both Rows)
Figure 3-6. View Of Left And Right Sides Of Robot Control
WARNING: ELECTRIC SHOCK can kill.
ELECTROSTATIC DISCHARGE (ESD) can
damage circuit boards.
•
Do not touch live electrical parts.
•
Shut down welding power source and Robot
Control, and disconnect input power employ-
ing lockout/tagging procedures before inspecting high-frequency filter.
Lockout/tagging procedures consist of padlocking line disconnect switch in open position, removing fuses from fuse box, or shutting off and
red-tagging circuit breaker or other disconnecting device.
•
Put on properly grounded wrist strap BEFORE handling circuit boards or making con-
nections inside Robot Control.
•
Transport circuit boards in proper staticshielding carriers or packages.
•
Perform work only at a static-safe work area.
a. Open Robot Control cabinet door using the two
supplied keys, and rotate the power switch handle beyond the OFF position to the Reset/Open
position.
b. Select and remove a blank cover plate from Ro-
bot Control for installing high-frequency filter
(see Figure 3-6).
c. Remove screws securing cover to high-fre-
quency filter box, and remove cover from box.
d. Insert cord attached to box through opening in
Robot Control side panel where cover plate was
removed.
OM-169 510 Page 6
Blank Cover Plates
S-0782
e. Place a supplied external star washer over
each screw, and thread screws into mounting
holes in side panel (see Figure 3-7).
f. Tighten screws until star washers flatten and
penetrate through paint into metal surface.
g. Place remaining star washers over threaded
portion of each screw extending out from side
panel inside Robot Control, and install nut on
each screw.
h. Tighten nuts until star washers flatten and
penetrate through paint into metal surface.
i. Reinstall and secure cover onto filter box.
j. Route high-frequency cord inside Robot Con-
trol to Interlock board on left side panel of cabi-
net.
k. Route black and white leads to terminal block
TB1 (see Figure 3-9).
l. Connect black lead to terminal 4 on TB1.
m. Connect white lead to terminal 5 on TB1.
n. Close and secure Robot Control cabinet door.
o. Disconnect friction terminals on leads of exist-
ing shock sensor cord from shock sensor leads
at welding gun body (see Figure 3-8).
p. Remove existing shock sensor cord by discon-
necting plug from receptacle on robot.
Page 11

Robot Control
Side Panel
Screw
Filter Box
Star Washer
Cord
Nut
Figure 3-7. Installation Of Securing Hardware For Filter Box
q. Route supplied 35 ft. (10.5 m) shielded shock
sensor cable under the torch cable securing
straps on the outside of the protective casing so
that the two leads with friction connectors are
located near the shock sensor.
Shock Sensor
ST-152 641
r. Connect plug on end of cord to filter box recep-
tacle.
s. Connect friction connectors or plug on remain-
ing end of cord to shock sensor leads or recep-
tacle at shock sensor.
Leads
Welding
Gun
Body
Welding
Gun
Body
Figure 3-8. Welding Gun/Torch Shock Sensor Leads
ST-141 731 / ST-137 518
OM-169 510 Page 7
Page 12

TB2
CN68
Interlock
Board
TB1 (IN)
1
ESTOP
2
ESTOP
3
ESTOP
4
SHOCK
5
SHOCK
6
INCOM
7
INCOM
8
L
LAMP
9
AUTO
10
TEACH
11
ST#1
12
ST#2
13
ST#3
14
STOP
15
SV. ON
16
SV. ON
Terminal
Block TB1
TB1
CN69
CN80
LED301
LED202
LED203
LED204
LED205
LED101 LED305
LED304
F3 (3A)
JP304 JP303 JP302
CN33 CN32 CN31
LED401
LED402
LED403
LED601
LED404
JP601 JP602 JP603
LED405
LED406
CN70 CN71 CN72
JP701
CN67
CN38
CN73
CN37
CN22
JP301
LED602
JP501
CN28
LED603
CN40
LED501
LED303
LED302
FC11
CN41
CN46
JP306
CN45
F2
(1A)
Figure 3-9. Function Control Terminal Block TB1 On Interlock Board Inside Robot Control
OM-169 510 Page 8
CN47
LED503
LED502
DSW1
SW1
F4 (2A)
S-0729 / S-0727
Page 13

DC Welding
Power Source
PAW/Computer
Interface
Coolant
System
Robot Control
Ground
Rod No.1
115VAC Input
Power Cord
Torch Cable
Support Bracket
High Frequency
Filter Box
Shock Sensor
Cable
WC 100B
Plasma
Welding
Console
Outlet Cable
Support Arm
Lifting
Bracket
Ground Cable
Securing Bolt
Location
Clamps
Welding Gun
Body
Braided Ground
Cable
Ground
Rod No.2
Torch
Cable In
Protective Case
Shock
Sensor
Cable
Torch
ST-800 734
Figure 3-10. MRH2 Robot PAW System
B. MRV2 Models
1. Remove the outlet cable support arm and wire
drive assembly from the robot Axis 3 housing.
2. Install supplied torch cable support bracket onto
robot Axis 3 housing using the existing mounting
holes. Position supplied insulator plate between
bracket and robot, align holes and secure with
supplied hardware (see Figure 3-11).
3. Install supplied servo light box onto robot Axis 3
housing directly in front of torch cable support
bracket using the existing mounting holes (see
Figure 3-7). Position supplied insulator plate between light box and robot, align holes and secure
with supplied hardware. Connect plug on light
box cord to nearby matching receptacle located
on the side of the Axis 3 housing. The receptacle
on the light box is not used for this application.
4. Install cable hanger assembly with tool balancer
onto robot Axis 3 housing.
5. The torch cable is enclosed in a black protective
case. Secure torch in torch clamp using supplied
shim. Position torch handle so that there is
approximately 4 in. (96 mm) between the bottom
of the torch clamp and the torch tip. Clamp torch
cable to tool balancer on cable hanger and route
cable through support bracket.
IMPORTANT:
Before operating, see Section 4 and ro-
bot Owner’s Manual for instructions for absolute offset
adjustment. Install positioning gauge (universal J-bar
for MRH2 or I-bar for MRV2) onto robot output hub bracket. Remove the shield cup and tip from torch and install
the supplied brass tip gauge.
6. Route remaining end of torch cable to the WC
100B welding panel for internal connections (see
Step 3, Section 3-6B).
7. Install supplied high frequency filter box according to instructions for MRH2 (see Section 3-4A).
3-5. GROUND CABLE CONNECTIONS
(Figure 3-10 And Figure 3-11)
IMPORT ANT :
If welding power source is equipped with
a plastic case, only one ground cable is necessary for
connecting to robot base.
See Figure 3-10 or Figure 3-11 and install three supplied flat, braided ground cables as follows:
1. Connect one end of the ground cables to the customer-supplied ground rod (see robot Owner’s
Manual).
2. Connect remaining end of one ground cable to robot base as follows:
a. Locate unused threaded hole on robot base.
b. To ensure good electrical conduction, scrape
away enough paint from around the hole so that
the ground cable terminal will touch bare metal.
c. Attach ground cable terminal to base with sup-
plied 12 mm bolt.
OM-169 510 Page 9
Page 14

DC Welding
Power
Source
PAW/Computer
Interface
Coolant
System
Robot Control
115VAC Input
Power Cord
High Frequency
Filter Box
Shock Sensor
Ground
Rod No.1
WC 100B
Plasma
Welding
Console
Torch Cable
Support Bracket
Cable
Braided
Ground
Cable
Braided
Ground
Cable
Ground
Rod No.2
Servo
Light
Box
Cable
Hanger
Torch Cable
In Protective
Case
Welding
Gun
Body
Torch
ST-800 735-A
Shock
Sensor
Cable
Figure 3-11. MRV2 Robot PAW System
3. Route remaining end of another ground cable to
the plasma welding console. Connect ground
cable together with the lead from the shield sleeving after completing internal connections (see
Section 3-8).
4. Route remaining end of the last ground cable to
the welding power source. Connect ground cable
to welding power source case unless welding
power source is equipped with a plastic case,
then no connection is necessary.
3-6. TORCH CABLE INTERNAL CONNECTIONS
TO PLASMA WELDING CONSOLE
(Figure 3-12)
WARNING: ELECTRIC SHOCK can kill.
•
Do not touch live electrical parts.
•
Shut down robot and welding power source,
and disconnect input power employing lock-
out/tagging procedures before inspecting or
installing.
Lockout/tagging procedures consist of padlocking line disconnect switch in open position, removing fuses from fuse box, or shutting off and
red-tagging circuit breaker or other disconnecting device.
MOVING PARTS can cause serious injury.
•
Keep away from moving parts.
HOT SURFACES can cause severe burns.
•
Allow cooling period before servicing.
OM-169 510 Page 10
To make torch cable internal connections, proceed as
follows:
1. Remove WC 100B wrapper.
2. Route torch cable through strain relief on front
panel.
3. Connect 2 cables and 2 hoses to torch mounting
panel. The color-coded cables and hoses match
the color-coded connectors as follows:
a. Red to red
b. Yellow to yellow
c. Black to black
d. Green to green
4. Reinstall WC 100B wrapper.
3-7. PAW INTERFACE PANEL – COMPUTER IN-
TERFACE CONNECTION (Figure 3-1,
Figure 3-10, And Figure 3-11)
Connect plug PLG21 attached to cord extending from
the P AW Interface panel front panel to weld current relay
receptacle RC8 on the Computer Interface front panel.
Make connections as follows: align keyway , insert plug,
and rotate threaded collar fully clockwise.
Page 15

1 2 3 4 5 6 7 8 9 10 11 12 13 14 15
C
O
N
T.
1CR CSR PSR
PILOT PILOT
PLASMA
SHIELD
Figure 3-12. Terminal Strip TB1 Location Inside WC 100B Console
ST-800 736
3-8. PAW INTERFACE PANEL – WELDING POW-
ER SOURCE – PAW CONSOLE CONNECTIONS (Figure 3-1, Figure 3-10, And
Figure 3-11)
WARNING: ELECTRIC SHOCK can kill.
•
Do not touch live electrical parts.
•
Shut down robot and welding power source,
and disconnect input power employing lock-
out/tagging procedures before inspecting or
installing.
Lockout/tagging procedures consist of padlocking line disconnect switch in open position, removing fuses from fuse box, or shutting off and
red-tagging circuit breaker or other disconnecting device.
Make connections to units as follows:
1. Locate supplied cord with matching plug for welding power source Remote 14 receptacle and connect plug to receptacle.
2. Connect plug on remaining end of cord from Remote 14 receptacle to receptacle labeled Power
Supply Control on rear of WC 100B console.
3. Locate supplied cord with matching plug for P AW
interface panel receptacle RC20 and connect
plug to receptacle.
4. Connect plug on remaining end of cord from receptacle RC20 to receptacle labeled Remote
Control on front of WC 100B console.
5. Locate supplied cord with matching plug for P AW
interface panel receptacle RC21 and connect
plug to receptacle.
6. Remove wrapper from WC 100B console. Route
cord to rear of WC 100B console. Insert cord
through strain relief and route end of cord to terminal strip TB1 (see Figure 3-12).
7. Remove jumper leads from terminals on TB1 as
follows:
a. 10 and 11
b. 12 and 13
c. 13 and 14
8. Connect terminal connectors on remaining end of
cord to terminals as follows:
a. Green lead to terminal 5
b. Orange lead to terminal 6
c. Brown lead to terminal 10
d. Blue lead to terminal 11
e. White lead to terminal 12
f. Black and red leads to terminal 13
OM-169 510 Page 11
Page 16

g. Yellow lead to terminal 14.
9. Route cable from welding power source negative
(–) weld output receptacle through opening in
rear of WC 100B console. Route end of cable to
shunt, located where torch cable bus bar is connected, and connect cable to shunt at end opposite from bus bar.
10. Route cable from welding power source positive
(+) weld output receptacle and connect end of
cable to workpiece.
11. Reinstall WC 100B wrapper.
a. Remove paint from around right front screw
hole on right side of wrapper,
b. Connect ring terminal, located on end of lead
from shield sleeving, to wrapper using screw
that secures right front side of wrapper.
3-9. COMPUTER INTERFACE – INPUT POWER
CONNECTIONS (Figure 3-1, Figure 3-10,
And Figure 3-11)
Connect plug on supplied input power cord to 14-pin input power receptacle RC11 on the Computer Interface
front panel as follows: align keyway , insert plug, and rotate threaded collar fully clockwise. Connect input power plug on other end of cord to a 115 volts ac external
supply.
3-10. GAS SET/PILOT ARC ST ART PUSH BUTTON IMPORT ANT:
Thoroughly purge plasma torch gas line
before starting pilot arc.
This button starts shielding gas flow when the Run/Set
switch on the WC 100B welding panel is in the Set position. When the switch is in Run position, pressing the
button starts shielding gas flow and 5 seconds later
plasma gas flows and the pilot arc ignites.
WARNING: PLASMA ARC can cause injury.
•
Keep away from the torch tip.
•
Pilot arc can cause burns – keep away from
torch tip when pilot arc is present.
The pilot arc can be intermittent or continuous
depending on the application. ALWAYS point
torch away from personnel and toward work
when starting the pilot arc or leaving the pilot arc
on continuously .
To purge the plasma torch gas line, proceed as follows:
1. Turn on input power to welding power source and
WC 100B console.
2. Place Run/Set switch in the Set position.
3. Press the Gas Set/Pilot Arc Start push button.
IMPORTANT:
Gas flow and pilot arc stop when an
Emergency Stop button is pressed.
3-11. REMOTE GAS SET/PILOT ARC START
SWITCH CONNECTIONS
WARNING: ELECTRIC SHOCK can kill.
•
Do not touch live electrical parts.
•
Shut down robot and welding power source,
and disconnect input power employing lock-
out/tagging procedures before inspecting or
installing.
Lockout/tagging procedures consist of padlocking line disconnect switch in open position, removing fuses from fuse box, or shutting off and
red-tagging circuit breaker or other disconnecting device.
To make remote Gas Set/Pilot Arc Start switch connections, proceed as follows:
1. Remove side panel from PAW Interface panel.
2. Route one end of a 2-conductor, customer-supplied cord through strain relief on rear of P AW Interface panel.
3. Installing terminal connectors for connecting to
terminal strip 6T onto leads at end of cord inside
P AW Interface panel. Install a normally open momentary contact switch to remaining end of cord.
4. Connect leads to terminals 6TB and 6TD. Tighten
strain relief.
5. Reinstall side panel onto PAW Interface panel.
IMPORTANT:
The remote Gas Set/Pilot Arc Start
switch operates the same as the front panel push button
switch (see Section 3-10).
OM-169 510 Page 12
Page 17

SECTION 4 – ROBOT PROGRAM MODIFICATIONS
IMPORTANT:
The robot program must be changed to
accommodate plasma arc welding. The program is factory set to accommodate factory installed plasma arc
welding equipment. The following information pertains
to the robot Owner’s Manual and must be followed when
field installing plasma arc welding equipment.
WARNING: ELECTRIC SHOCK can kill.
•
Do not touch live electrical parts.
•
Shut down robot and welding power source,
and disconnect input power employing lock-
out/tagging procedures before inspecting or
installing.
Lockout/tagging procedures consist of padlocking line disconnect switch in open position,
removing fuses from fuse box, or shutting off
and red-tagging circuit breaker or other disconnecting device.
4-1. SETTING UP PLASMA (NON-STANDARD)
TORCH FOR MRH2 ROBOT (Figure 4-1)
It is necessary to use the robot Owner’s Manual in addition to this manual to complete the proper installation of
the torch.
IMPORT ANT:
Follow entire procedure in presented order.
1. Check System Data settings against the test
sheet supplied with the unit. These should match
before beginning installation.
2. Mount plasma arc welding torch according to
Section 3-3 of this manual. Make sure that supplied brass tip gauge and holder have been
installed on torch.
3. Do tool center point adjustment according to Section 4.6 of the robot Owner’s Manual.
4. The universal J-bar is included to record exact
torch position so that it is possible to recover position in case of a robot crash. Install universal Jbar as follows:
a. Remove 2 screws and cover plate from bottom
of Axis 5 gear housing.
b. Install universal J-bar onto Axis 5 by aligning in-
dex pin with hole in housing, and securing with
supplied screws.
Attaches To Bottom
Of Axis 5 Housing
Indexing Pin
Scribe Marks
Scribe marks where
torch tip touches
lower bar.
Lower Bar
Scribe around rod below
lower bar to record height.
Tighten screw and setscrew
when torch tip is touching
lower bar.
Setscrew
Rod
Screw
ST-146 220
Figure 4-1. Scribe Marks on Universal J-Bar
5. Position lower bar of universal J-bar so that it
touches torch tip gauge, and scribe marks on the
J-bar to indicate exact torch position as shown in
Figure 4-1.
6. Remove universal J-bar, and retain for future use.
4-2. SETTING UP PLASMA TORCH FOR MRV
ROBOT (Figure 4-1)
The plasma torch does not require any changes to data
in P ARMTER/SYSTEM/TOOL P ARAMETER. The standard I-bar is used for adjusting torch position and for
position recovery after a robot crash. Mount plasma arc
welding torch, install tip gauge, and follow mounting adjustment procedures according to instructions in Section 4 – System Set Up in the robot Owner’s Manual.
Loosen torch clamp setscrews and position torch so that
tip gauge touches I-bar reference point. Retighten setscrew.
After completing torch adjustment procedure, remove
tip gauge and reinstall cup onto end of torch.
4-3. MARKING POSITION OF TORCH HEAD AS-
SEMBLY (Figure 4-2)
When the mounting adjustment procedure is complete,
place scribe marks on the torch head assembly and
sleeve to mark the torch head assembly position for future alignment adjustments.
OM-169 510 Page 13
2
Page 18

MRV2 Robot MRH2 Robot
Robot
Arm
Sleeve
Torch
Head
Assembly
Scribe
Marks
Sleeve
Torch
Head
Assembly
Scribe
Marks
Robot
Arm
ST-800 747-A
Figure 4-2. Marking Position Of Torch Head Assembly
4-4. SYSTEM SETUP FOR MRH2 AND MRV2 WITH C2 ROBOT CONTROL
Set welding power source specifications in user parameters for the Plasma Arc Welding (P AW) process according to
the following instructions.
1. Turn on Robot Control input power by placing the power switch handle on the Robot Control cabinet door in the
ON position, and the following displays will appear as shown:
WELCOME TO
DIAGNOSIS
MILLER COOPERATIVE CONTROL
MILLER ELECTRIC Mfg. Co.
’92–07–31
08:30
DIAGNOSIS
’92–07–31
08:30
OM-169 510 Page 14
START DIAGNOSIS
WELCOME TO
MILLER COOPERATIVE CONTROL
STEP OF INITIAL DIAGNOSIS
1, 2, 3, 4, 5,
Page 19

TEACH
SERVO OFF
TEACH EDI
TFILEALLOTLOCK>
2. Press the FUNCTION APPLICA TION key for additional functions to appear on the display.
PARMTER CH ECK MANAGE SYS . SET MEMORY >
3. Press the F1
F1
key for the PARMTER function.
SELECT TYPE OF PARAMETER
TEACH MODE
BY FUNCTION KEY
SERVO OFF
SYSTEM SWI
TCH WELD I /O AUTO >
4. Press the FUNCTION APPLICA TION key for additional functions to appear on the display.
SELECT TYPE OF PARAMETER
TEACH MODE
BY FUNCTION KEY
SERVO OFF
SENSOR AR
5. Press F4
F4
key for the W–CHARA function to set welding characteristics.
C–S TOUCH–S W–CHARA S–DATA >
OM-169 510 Page 15
Page 20

AXI S ML4
TEACH
POWER SOURCE WI RE
GMAW .035 .045 .062
SYNERGIC .035 .045 .062
SERVO OFF
GTAW–100 .035 .045 .062
GTAW–300 .035 .045 .062
USER REGI STER
REGI ST MO
6. Use the INCREMENT
DI F Y SC _ ED I T
+
or DECREMENT
_
LECT key to select GTAW-300 by setting a wire size selection.
AXI S ML4
POWER SOURCE WI RE
TEACH
GMAW .035 .045 .062
SYNERGIC .035 .045 .062
SERVO OFF
GTAW–100 .035 .045 .062
GTAW–300 .035 .045 .062
USER REGI STER
REGI ST MO
DI F Y SC _E D I T
key and forward or back DISPLA Y SE-
7. Press the F1
TEACH MODE
F1
key for the REGIST function to register the change in Robot Control memory.
BY FUNCTION KEY
SERVO OFF
SENSOR AR
C–S TOUCH–S W–CHARA S–DATA >
8. To check settings, press the F4
SELECT TYPE OF PARAMETER
F4
key for the W–CHARA function.
OM-169 510 Page 16
Page 21

AXI S ML4
TEACH
POWER SOURCE WI RE
GMAW .035 .045 .062
SYNERGIC .035 .045 .062
SERVO OFF
REGI ST MO
9. Press the F2
F2
AXI S ML4
TEACH
SERVO OFF
GTAW–100 .035 .045 .062
GTAW–300 .035 .045 .062
USER REGI STER
DI F Y SC _ ED I T
key to select the MODIFY function.
RAT I NG OF POWER SOURCE
$WTBD3 1
TYPE SEPA. SYNER. T IG
RAT I NG CURRENT 200A
W–FEEDER RAT ING 256 i .
PUSH RECORD AFTER SETT I NG
10. Use the INCREMENT
AXI S ML4
TEACH
+
or DECREMENT
$WTBD3 1
RAT I NG OF POWER SOURCE
_
key to select RATING CURRENT parameter.
TYPE SEPA. SYNER. T IG
RAT I NG CURRENT 200A
SERVO OFF
W–FEEDER RAT ING 256 i .
PUSH RECORD AFTER SETT I NG
11. Use the numerical keys to amperage to the maximum current output of the welding power source.
OM-169 510 Page 17
Page 22

AXI S ML4
RAT I NG OF POWER SOURCE
TEACH
SERVO OFF
12. Press the RECORD
AXI S ML4
TEACH
SERVO OFF
RECORD
$WTBD3 1
TYPE SEPA. SYNER. T IG
RAT I NG CURRENT 300A
W–FEEDER RAT ING 256 i .
PUSH RECORD AFTER SETT I NG
key.
DISP. REF. DISP. REF.
1.50A1.5V50i.2.0V
2.150A 4.5V 102i . 4.0V
3.200A 6.0V 153i . 6.0V
4.250A 7.5V 205i . 8.0V
5.300A 10.0V 256i . 10.0V
13. Use the INCREMENT
+
or DECREMENT
_
key and forward or back DISPLA Y SE-
LECT key to change the scaling of the amperage and reference voltage.
AXI S ML4
TEACH
DISP. REF. DISP. REF.
1. 5A 0.0V 50i. 2.0V
2. 79A 2.0V 102 i . 4.0V
3.190A 5.0V 153i . 6.0V
SERVO OFF
4.301A 8.0V 205i . 8.0V
5.375A 10.0V 256i . 10.0V
OM-169 510 Page 18
Page 23

14. Press the RECORD
RECORD
key.
SELECT TYPE OF PARAMETER
TEACH MODE
BY FUNCTION KEY
SERVO OFF
SENSOR AR
C–S TOUCH–S W–CHARA S–DATA >
15. Check settings of weld characteristics as follows:
a. Press the F4
AXI S ML4
F4
key to select the W–CHARA function.
POWER SOURCE WI RE
TEACH
GMAW .035 .045 .062
SYNERGIC .035 .045 .062
SERVO OFF
REGI ST MO
b. Press the F2
F2
AXI S ML4
TEACH
SERVO OFF
GTAW–100 .035 .045 .062
GTAW–300 .035 .045 .062
USER REGI STER
DI F Y SC _E D I T
key to select the MODIFY function.
RAT I NG OF POWER SOURCE
$WTBD3 1
TYPE SEPA. SYNER. T IG
RAT I NG CURRENT 300A
W–FEEDER RAT ING 256 i .
PUSH RECORD AFTER SETT I NG
c. Press the RECORD
RECORD
key.
OM-169 510 Page 19
Page 24

AXI S ML4
DISP. REF. DISP. REF.
TEACH
SERVO OFF
16. Press the RESET
TEACH MODE
SERVO OFF
RESET
1. 5A 0.0V 50i. 2.0V
2. 79A 2.0V 102 i . 4.0V
3.190A 5.0V 153i . 6.0V
4.301A 8.0V 205i . 8.0V
5.375A 10.0V 256i . 10.0V
key.
SELECT TYPE OF PARAMETER
BY FUNCTION KEY
SENSOR AR
17. Press the TEACH MODE
C–S TOUCH–S W–CHARA S–DATA >
TEACH
key to return to the beginning of the Teach mode.
MODE
TEACH
SERVO OFF
TEACH EDI TFILEALLOTLOCK>
OM-169 510 Page 20
Page 25

SECTION 5 – ELECTRICAL DIAGRAMS
Figure 5-1. Circuit Diagram For Robot PAW System
SC-169 456
OM-169 510 Page 21
Page 26

Figure 5-2. Circuit Diagram For Robot PAW Interface Panel
SB-169 458
OM-169 510 Page 22
SB-169 459-A
Figure 5-3. Wiring Diagram For Robot PAW Interface Panel
Page 27

Figure 5-4. Circuit Diagram For High-Frequency Filter
SA-146 608-A
SA-146 609-B
Figure 5-5. Wiring Diagram For High-Frequency Filter
OM-169 510 Page 23
Page 28

SECTION 6 – HF IN PLASMA ARC WELDING
ЙЙЙЙЙЙЙЙ
ЙЙЙЙЙЙЙЙ
ЙЙЙЙЙЙЙЙ
mod6.2* 5/94
WARNING
HIGH-FREQUENCY RADIA TION can interfere with radio navigation, safety services, computers,
and communications equipment.
• Have only qualified person familiar with electronic equipment perform this installation.
• The user is responsible for having a qualified electrician promptly correct any interference problem resulting from the
installation.
• If notified by the FCC about interference, stop using the equipment at once.
• Have the installation regularly checked and maintained.
• Keep high-frequency source doors and panels tightly shut, keep spark gaps at correct setting, and use grounding and
shielding as shown in Figure 6-3 to minimize the possibility of interference.
Frequency (HF)
3
2 High
2
1
6
3
Plasma Arc Welding (PA W)
5
4
Figure 6-1. High Frequency In Plasma Arc Welding (PAW)
Welding Zone
3
50 ft
(15 m)
2
3
1
1
3
1 Plasma Arc Torch
2 High-Frequency Voltage
Used inside torch to ionize gap
between electrode and tip to help
start the pilot arc.
3 Electrode
4 Pilot Arc
5Tip
6 Shield Cup
Ref. S-0753
1 Sources Of Direct
High-Frequency Radiation
High-frequency source (Plasma
Arc Welding power source),
cables, torch, work clamp, workpiece, and work table.
2 Sources Of Conduction Of
High Frequency
Input power cable, line disconnect
device, and input supply wiring.
3 Sources Of Reradiation Of
High Frequency
Ungrounded metal objects, lighting, wiring, water pipe and fixtures,
external phone and power lines.
OM-169 510 Page 24
1
S-0754
Figure 6-2. Sources Of High-Frequency Radiation From Incorrect Installation
Page 29

7
Welding Zone
3
50 ft
(15 m)
50 ft
(15 m)
5
6
9
Ground All
Metal Objects
And All Wiring
In Welding Zone
Using #12 AWG Wire
1
2
9
4
Ground
Workpiece
If Required
By Codes
8
Nonmetal Building
1 Plasma Arc Welding Power Source
Ground metal machine case, line discon-
nect device, input supply, and workpiece (if
required).
2 Center Point Of Welding Zone
Midpoint between high-frequency source
and welding torch.
3 Welding Zone
A circle 50 ft (15 m) from center point in all
directions.
4 Torch And Work Cables
Keep cables close together.
9
11
10
5 Conduit Joint Bonding And Grounding
Electrically join (bond) all conduit sections
using copper straps or braided wire. Ground
conduit every 50 ft (15 m).
6 Water Pipe And Fixtures
Ground water pipe every 50 ft (15 m).
7 External Power Or Telephone Lines
Locate high-frequency source at least 50 ft
(15 m) away from power and phone lines.
8 Metal Building Panel Bonding
Methods
Bolt or weld building panels together, install
copper straps or braided wire across
seams, and ground frame.
Figure 6-3. Correct Installation
9
Metal Building
S-0755
9 Grounding Rod
Consult the National Electrical Code for
specifications.
10 Windows And Doorways
Cover all windows and doorways with
grounded copper screen of not more than
1/4 in (6.4 mm) mesh.
11 Overhead Door Track
Ground the track.
OM-169 510 Page 25
Page 30

SECTION 7 – PARTS LIST
Dia.
Mkgs.
CR10,11 052 964 RELAY, encl 24VDC DPDT 2. . . . . . . . . . . . . . . . . . . . . . . . . . . . . . . . . . . . . . . . . . . . . . . . . . . .
D1 169 465 DIODE, w/leads 1. . . . . . . . . . . . . . . . . . . . . . . . . . . . . . . . . . . . . . . . . . . . . . . . . . . . . . . . . . . . . . . . . . .
D2 169 467 DIODE, w/leads 1. . . . . . . . . . . . . . . . . . . . . . . . . . . . . . . . . . . . . . . . . . . . . . . . . . . . . . . . . . . . . . . . . . .
PB1 113 333 SWITCH, PB MC NO SPST 1. . . . . . . . . . . . . . . . . . . . . . . . . . . . . . . . . . . . . . . . . . . . . . . . . . . . . . . .
PC10 140 510 CIRCUIT CARD, RF filter 1. . . . . . . . . . . . . . . . . . . . . . . . . . . . . . . . . . . . . . . . . . . . . . . . . . . . . . . .
PLG10 115 094 CONNECTOR & SOCKETS, (consisting of) 1. . . . . . . . . . . . . . . . . . . . . . . . . . . . . . . . . . . . . . .
PLG11 115 092 CONNECTOR & SOCKETS, (consisting of) 1. . . . . . . . . . . . . . . . . . . . . . . . . . . . . . . . . . . . . . .
PLG12 115 093 CONNECTOR & SOCKETS, (consisting of) 1. . . . . . . . . . . . . . . . . . . . . . . . . . . . . . . . . . . . . . .
PLG21 047 544 CONNECTOR, circ 4 pin plug 1. . . . . . . . . . . . . . . . . . . . . . . . . . . . . . . . . . . . . . . . . . . . . . . . . . .
PLG30 131 054 CONNECTOR & SOCKETS, (consisting of) 1. . . . . . . . . . . . . . . . . . . . . . . . . . . . . . . . . . . . . . .
PLG31 135 635 CONNECTOR & PINS, (consisting of) 1. . . . . . . . . . . . . . . . . . . . . . . . . . . . . . . . . . . . . . . . . . . .
RC20,26 145 706 CIRCUIT CARD/CONNECTOR 1. . . . . . . . . . . . . . . . . . . . . . . . . . . . . . . . . . . . . . . . . . . . . . . . .
RC21 077 175 CONNECTOR, circ 11 pin sz 20 rcpt 1. . . . . . . . . . . . . . . . . . . . . . . . . . . . . . . . . . . . . . . . . . . . . .
TD1 169 460 TIMER, w/resistor 1. . . . . . . . . . . . . . . . . . . . . . . . . . . . . . . . . . . . . . . . . . . . . . . . . . . . . . . . . . . . . . . .
6T 038 839 BLOCK, term 20A 5P 1. . . . . . . . . . . . . . . . . . . . . . . . . . . . . . . . . . . . . . . . . . . . . . . . . . . . . . . . . . . . . .
OM-169 510 Page 26
Part
No.
Spectrum Interface
110 375 STAND-OFF SUPPORT, PC card No. 6 screw 4. . . . . . . . . . . . . . . . . . . . . . . . . . . . . . . . . . . . . . . . . . . . .
113 746 CONNECTOR, rect skt 24-18ga 4. . . . . . . . . . . . . . . . . . . . . . . . . . . . . . . . . . . . . . . . . . . . . . . . . . . . . . . . .
113 746 CONNECTOR, rect skt 24-18ga 8. . . . . . . . . . . . . . . . . . . . . . . . . . . . . . . . . . . . . . . . . . . . . . . . . . . . . . . . .
113 746 CONNECTOR, rect skt 24-18ga 6. . . . . . . . . . . . . . . . . . . . . . . . . . . . . . . . . . . . . . . . . . . . . . . . . . . . . . . . .
113 746 CONNECTOR, rect skt 24-18ga 2. . . . . . . . . . . . . . . . . . . . . . . . . . . . . . . . . . . . . . . . . . . . . . . . . . . . . . . . .
114 656 CONNECTOR, rect pin 24-18ga 2. . . . . . . . . . . . . . . . . . . . . . . . . . . . . . . . . . . . . . . . . . . . . . . . . . . . . . . . .
039 828 CONNECTOR, circ clamp str rlf sz 14-14S 1. . . . . . . . . . . . . . . . . . . . . . . . . . . . . . . . . . . . . . . . . . . . . . . .
113 746 CONNECTOR, rect skt 24-18ga 2. . . . . . . . . . . . . . . . . . . . . . . . . . . . . . . . . . . . . . . . . . . . . . . . . . . . . . . . .
049 455 CABLE, port No. 18 2/c (order by ft) 3ft. . . . . . . . . . . . . . . . . . . . . . . . . . . . . . . . . . . . . . . . . . . . . . . . . . . . .
139 040 BUSHING, strain relief .231/.394 ID x .733mtg hole 1. . . . . . . . . . . . . . . . . . . . . . . . . . . . . . . . . . . . . . . .
169 462 CASE SECTION, front/bottom 1. . . . . . . . . . . . . . . . . . . . . . . . . . . . . . . . . . . . . . . . . . . . . . . . . . . . . . . . . . .
139 454 PANEL, rear 1. . . . . . . . . . . . . . . . . . . . . . . . . . . . . . . . . . . . . . . . . . . . . . . . . . . . . . . . . . . . . . . . . . . . . . . . . .
NAMEPLATE, (order by model and serial number) 1. . . . . . . . . . . . . . . . . . . . . . . . . . . . . . . . . . . . . . . . . . . . . . . . . .
134 241 CABLE, port No. 18 2/c (order by ft) 35ft. . . . . . . . . . . . . . . . . . . . . . . . . . . . . . . . . . . . . . . . . . . . . . . . . . . . .
146 212 CONNECTOR, circ 10 pin plug 1. . . . . . . . . . . . . . . . . . . . . . . . . . . . . . . . . . . . . . . . . . . . . . . . . . . . . . . . . .
138 033 CONNECTOR, circ clamp str rlf sz 18 1. . . . . . . . . . . . . . . . . . . . . . . . . . . . . . . . . . . . . . . . . . . . . . . . . . . .
073 516 CONNECTOR, circ 11 skt plug 1. . . . . . . . . . . . . . . . . . . . . . . . . . . . . . . . . . . . . . . . . . . . . . . . . . . . . . . . . .
116 964 CONNECTOR, circ clamp str rlf sz 20-22 1. . . . . . . . . . . . . . . . . . . . . . . . . . . . . . . . . . . . . . . . . . . . . . . . .
097 426 CABLE, shld No. 18ga 10/c (order by ft) 5ft. . . . . . . . . . . . . . . . . . . . . . . . . . . . . . . . . . . . . . . . . . . . . . . . .
169 455 CABLE, interconnecting 15ft (consisting of) 1. . . . . . . . . . . . . . . . . . . . . . . . . . . . . . . . . . . . . . . . . . . . . . .
141 162 CONNECTOR & PINS, (consisting of) 1. . . . . . . . . . . . . . . . . . . . . . . . . . . . . . . . . . . . . . . . . . . . . . . . . . . .
134 731 CONNECTOR, circ pin push-in 14-18ga 14. . . . . . . . . . . . . . . . . . . . . . . . . . . . . . . . . . . . . . . . . . . . . . . . . .
079 739 CONNECTOR, circ clamp str rlf sz 17-20 1. . . . . . . . . . . . . . . . . . . . . . . . . . . . . . . . . . . . . . . . . . . . . . . . . .
110 015 CABLE, port No. 18 7/c (order by ft) 15ft. . . . . . . . . . . . . . . . . . . . . . . . . . . . . . . . . . . . . . . . . . . . . . . . . . . . .
048 598 CONNECTOR & SOCKETS, (consisting of) 1. . . . . . . . . . . . . . . . . . . . . . . . . . . . . . . . . . . . . . . . . . . . . . .
079 534 CONNECTOR, circ skt push-in 14-18ga 16. . . . . . . . . . . . . . . . . . . . . . . . . . . . . . . . . . . . . . . . . . . . . . . . . .
079 739 CONNECTOR, circ clamp str rlf sz 17-20 1. . . . . . . . . . . . . . . . . . . . . . . . . . . . . . . . . . . . . . . . . . . . . . . . .
169 464 CABLE, interconnecting 15ft (consisting of) 1. . . . . . . . . . . . . . . . . . . . . . . . . . . . . . . . . . . . . . . . . . . . . . .
047 636 CONNECTOR & PINS, (consisting of) 1. . . . . . . . . . . . . . . . . . . . . . . . . . . . . . . . . . . . . . . . . . . . . . . . . . . .
079 535 CONNECTOR, circ pin push-in 14-18ga 14. . . . . . . . . . . . . . . . . . . . . . . . . . . . . . . . . . . . . . . . . . . . . . . . . .
079 739 CONNECTOR, circ clamp str rlf sz 17-20 1. . . . . . . . . . . . . . . . . . . . . . . . . . . . . . . . . . . . . . . . . . . . . . . . .
120 104 CABLE, shld No. 18ga 6/c (order by ft) 15ft. . . . . . . . . . . . . . . . . . . . . . . . . . . . . . . . . . . . . . . . . . . . . . . . . .
146 211 CONNECTOR, circ 8 pin plug 1. . . . . . . . . . . . . . . . . . . . . . . . . . . . . . . . . . . . . . . . . . . . . . . . . . . . . . . . . . .
073 296 CONNECTOR, circ clamp str rlf sz 20-22 1. . . . . . . . . . . . . . . . . . . . . . . . . . . . . . . . . . . . . . . . . . . . . . . . .
141 224 CABLE, pwr interface (consisting of) 1. . . . . . . . . . . . . . . . . . . . . . . . . . . . . . . . . . . . . . . . . . . . . . . . . . . . .
152 370 CONNECTOR & SOCKETS, (consisting of) 1. . . . . . . . . . . . . . . . . . . . . . . . . . . . . . . . . . . . . . . . . . . . . . .
079 534 CONNECTOR, circ skt push-in 14-18ga 14. . . . . . . . . . . . . . . . . . . . . . . . . . . . . . . . . . . . . . . . . . . . . . . . . .
143 922 CONNECTOR, circ clamp str rlf sz 17-20 1. . . . . . . . . . . . . . . . . . . . . . . . . . . . . . . . . . . . . . . . . . . . . . . . . .
604 825 CABLE, port No. 18 3/c (order by ft) 16ft. . . . . . . . . . . . . . . . . . . . . . . . . . . . . . . . . . . . . . . . . . . . . . . . . . . . .
073 690 PLUG, str grd armd 2P3W 15A 125V 1. . . . . . . . . . . . . . . . . . . . . . . . . . . . . . . . . . . . . . . . . . . . . . . . . . . . .
073 476 CLAMP, strap rbr 5 holes .375 wide x 4.625 lg 10. . . . . . . . . . . . . . . . . . . . . . . . . . . . . . . . . . . . . . . . . . . .
Description Quantity
Page 31

Dia.
Mkgs.
Part
No.
Description Quantity
Spectrum Interface (Continued)
169 452 SHOCK SENSOR, w/cover (consisting of) 1. . . . . . . . . . . . . . . . . . . . . . . . . . . . . . . . . . . . . . . . . . . . . . . .
602 173 SCREW, set stl sch 10-32 x .250 cup point 2. . . . . . . . . . . . . . . . . . . . . . . . . . . . . . . . . . . . . . . . . . . . . . . .
141 564 CABLE, grd machine to rod 1. . . . . . . . . . . . . . . . . . . . . . . . . . . . . . . . . . . . . . . . . . . . . . . . . . . . . . . . . . . . .
146 002 TORCH GAUGE, universal 1. . . . . . . . . . . . . . . . . . . . . . . . . . . . . . . . . . . . . . . . . . . . . . . . . . . . . . . . . . . . .
169 454 TIP GAGE 1. . . . . . . . . . . . . . . . . . . . . . . . . . . . . . . . . . . . . . . . . . . . . . . . . . . . . . . . . . . . . . . . . . . . . . . . . . . .
♦171 042 SHIELD, plasma welding torch 1. . . . . . . . . . . . . . . . . . . . . . . . . . . . . . . . . . . . . . . . . . . . . . . . . . . . . . . .
143 352 CLAMP, cable 4. . . . . . . . . . . . . . . . . . . . . . . . . . . . . . . . . . . . . . . . . . . . . . . . . . . . . . . . . . . . . . . . . . . . . . . . .
169 453 BRACKET, mtg torch 1. . . . . . . . . . . . . . . . . . . . . . . . . . . . . . . . . . . . . . . . . . . . . . . . . . . . . . . . . . . . . . . . . . .
157 173 HOLDER, cable 1. . . . . . . . . . . . . . . . . . . . . . . . . . . . . . . . . . . . . . . . . . . . . . . . . . . . . . . . . . . . . . . . . . . . . . .
141 409 INSULATOR, plate torch 1. . . . . . . . . . . . . . . . . . . . . . . . . . . . . . . . . . . . . . . . . . . . . . . . . . . . . . . . . . . . . . . .
141 449 PANEL, side 1. . . . . . . . . . . . . . . . . . . . . . . . . . . . . . . . . . . . . . . . . . . . . . . . . . . . . . . . . . . . . . . . . . . . . . . . . .
+139 465 COVER 1. . . . . . . . . . . . . . . . . . . . . . . . . . . . . . . . . . . . . . . . . . . . . . . . . . . . . . . . . . . . . . . . . . . . . . . . . . . . .
134 464 LABEL, warning general precautionary 1. . . . . . . . . . . . . . . . . . . . . . . . . . . . . . . . . . . . . . . . . . . . . . . . . . .
602 969 PLUG, protective No. 6 plastic 2. . . . . . . . . . . . . . . . . . . . . . . . . . . . . . . . . . . . . . . . . . . . . . . . . . . . . . . . . . .
146 696 HF FILTER BOX, (consisting of) 1. . . . . . . . . . . . . . . . . . . . . . . . . . . . . . . . . . . . . . . . . . . . . . . . . . . . . . . . .
PC1 140 510 CIRCUIT CARD, RF filter 1. . . . . . . . . . . . . . . . . . . . . . . . . . . . . . . . . . . . . . . . . . . . . . . . . . . . . . . . . .
134 201 STAND-OFF SUPPORT, PC card .312/.375 4. . . . . . . . . . . . . . . . . . . . . . . . . . . . . . . . . . . . . . . . . . . . . . .
PLG10 115 092 CONNECTOR & SOCKETS, (consisting of) 1. . . . . . . . . . . . . . . . . . . . . . . . . . . . . . . . . . . . . . .
113 746 CONNECTOR, rect skt 24-18ga 8. . . . . . . . . . . . . . . . . . . . . . . . . . . . . . . . . . . . . . . . . . . . . . . . . . . . . . . . . .
PLG20 115 093 CONNECTOR & SOCKETS, (consisting of) 1. . . . . . . . . . . . . . . . . . . . . . . . . . . . . . . . . . . . . . .
113 746 CONNECTOR, rect skt 24-18ga 6. . . . . . . . . . . . . . . . . . . . . . . . . . . . . . . . . . . . . . . . . . . . . . . . . . . . . . . . . .
600 340 CABLE, port No. 16 2/c (order by ft) 4ft. . . . . . . . . . . . . . . . . . . . . . . . . . . . . . . . . . . . . . . . . . . . . . . . . . . . .
RC1 139 268 CONNECTOR, circ 10skt rcpt 1. . . . . . . . . . . . . . . . . . . . . . . . . . . . . . . . . . . . . . . . . . . . . . . . . . . . . .
148 104 CASE SECTION, front/bottom/rear 1. . . . . . . . . . . . . . . . . . . . . . . . . . . . . . . . . . . . . . . . . . . . . . . . . . . . . . .
148 103 WRAPPER 1. . . . . . . . . . . . . . . . . . . . . . . . . . . . . . . . . . . . . . . . . . . . . . . . . . . . . . . . . . . . . . . . . . . . . . . . . . . .
139 040 BUSHING, strain relief .231/.394 ID x .733mtg hole 1. . . . . . . . . . . . . . . . . . . . . . . . . . . . . . . . . . . . . . . .
107 983 BLANK, snap-in nyl .500mtg hole 2. . . . . . . . . . . . . . . . . . . . . . . . . . . . . . . . . . . . . . . . . . . . . . . . . . . . . . . .
148 943 LIGHT BOX, servo (consisting of) 1. . . . . . . . . . . . . . . . . . . . . . . . . . . . . . . . . . . . . . . . . . . . . . . . . . . . . . . .
134 171 CABLE, shock sensor and lights (consisting of) 1. . . . . . . . . . . . . . . . . . . . . . . . . . . . . . . . . . . . . . . . . . . .
RC1 048 282 CONNECTOR w/SOCKETS, (consisting of) 1. . . . . . . . . . . . . . . . . . . . . . . . . . . . . . . . . . . . . . . . . .
079 534 CONNECTOR, circ skt push-in 14-18ga Amp 66358-6 4. . . . . . . . . . . . . . . . . . . . . . . . . . . . . . . . . . . . .
604 571 CABLE, port No. 18 4/c (order by ft) 1ft. . . . . . . . . . . . . . . . . . . . . . . . . . . . . . . . . . . . . . . . . . . . . . . . . . . . .
010 116 GROMMET, rbr .375 ID x .500mtg hole 1. . . . . . . . . . . . . . . . . . . . . . . . . . . . . . . . . . . . . . . . . . . . . . . . . . .
PLG1 134 860 CONNECTOR & PINS, (consisting of) 1. . . . . . . . . . . . . . . . . . . . . . . . . . . . . . . . . . . . . . . . . . . . .
134 184 CONNECTOR, rect pin 20-16ga JST SLM-41T-1.3E 4. . . . . . . . . . . . . . . . . . . . . . . . . . . . . . . . . . . . . . .
117 160 PILOT LAMP, (consisting of) 2. . . . . . . . . . . . . . . . . . . . . . . . . . . . . . . . . . . . . . . . . . . . . . . . . . . . . . . . . . . . .
*115 276 BULB, LED red 28V min bayonet 1. . . . . . . . . . . . . . . . . . . . . . . . . . . . . . . . . . . . . . . . . . . . . . . . . . . . . . .
144 629 BRACKET, shock sensor and lights 1. . . . . . . . . . . . . . . . . . . . . . . . . . . . . . . . . . . . . . . . . . . . . . . . . . . . . . .
134 518 HANGER, cable assembly 1. . . . . . . . . . . . . . . . . . . . . . . . . . . . . . . . . . . . . . . . . . . . . . . . . . . . . . . . . . . . . .
134 529 INSULATOR, cable hanger 1. . . . . . . . . . . . . . . . . . . . . . . . . . . . . . . . . . . . . . . . . . . . . . . . . . . . . . . . . . . . .
159 599 SUPPORT, cable 1. . . . . . . . . . . . . . . . . . . . . . . . . . . . . . . . . . . . . . . . . . . . . . . . . . . . . . . . . . . . . . . . . . . . . .
149 442 BRACKET, mtg torch 1. . . . . . . . . . . . . . . . . . . . . . . . . . . . . . . . . . . . . . . . . . . . . . . . . . . . . . . . . . . . . . . . . . .
135 090 INSULATING BRACKET 1. . . . . . . . . . . . . . . . . . . . . . . . . . . . . . . . . . . . . . . . . . . . . . . . . . . . . . . . . . . . . . .
170 395 BLOCK, angle 1. . . . . . . . . . . . . . . . . . . . . . . . . . . . . . . . . . . . . . . . . . . . . . . . . . . . . . . . . . . . . . . . . . . . . . . . .
170 396 CLAMP, block angle 1. . . . . . . . . . . . . . . . . . . . . . . . . . . . . . . . . . . . . . . . . . . . . . . . . . . . . . . . . . . . . . . . . . .
170 397 BRACKET, offset 1. . . . . . . . . . . . . . . . . . . . . . . . . . . . . . . . . . . . . . . . . . . . . . . . . . . . . . . . . . . . . . . . . . . . . .
137 063 SPRING, ext .625 OD x .062 wire x 4.500 lg 1. . . . . . . . . . . . . . . . . . . . . . . . . . . . . . . . . . . . . . . . . . . . . .
119 622 CABLE CLAMP 1. . . . . . . . . . . . . . . . . . . . . . . . . . . . . . . . . . . . . . . . . . . . . . . . . . . . . . . . . . . . . . . . . . . . . . .
134 011 INSULATOR, bracket 1. . . . . . . . . . . . . . . . . . . . . . . . . . . . . . . . . . . . . . . . . . . . . . . . . . . . . . . . . . . . . . . . . .
+When ordering a component originally displaying a precautionary label, the label should also be ordered.
*Recommended Spare Parts.
♦OPTIONAL
BE SURE TO PROVIDE MODEL AND SERIAL NUMBER WHEN ORDERING REPLACEMENT PARTS.
OM-169 510 Page 27
Page 32

Notes
 Loading...