

Page 1
Miller Easy Lift™ Harness
User Guide
Document P/N 100-902
Miller Diving
®
1430 Jason Way
Santa Maria, CA 93455, USA
Telephone (805) 928-7772
FAX (805) 928-0342
E-Mail: sales@millerdiving.com
Web Site: www.millerdiving.com
Miller® and Miller Diving® are all registered trademarks of Morgan Diving Corp.
Use of these terms to describe products that are not manufactured by Miller
Diving® is not permitted.
The two dimensional images (such as photographs and illustrations) of our
products are © copyrighted and trademarks of Morgan Diving Corp. The three
dimensional forms of our products are trademark/trade dress protected.
© ⅯⅯⅩⅡ Morgan Diving Corp. All rights reserved. This manual is made available for the express use of owner of this Miller Diving® product. No part of this
manual may be reproduced, stored in any retrieval system, or transmitted, or
used in any form or by any means, whether graphic, electronic, mechanical,
photocopy, or otherwise by technology known or unknown, without the prior
written permission of Miller Diving®.
Document #120613010
Page 2
Warranty Information Miller Easy Lift Harness
II © ⅯⅯⅩⅡ Miller Diving. All rights reserved. Document # 120613010
Warranty Information
Miller Diving warrants every new harness and helmet to be free
from defects in workmanship for a period of three hundred sixty
ve (365) days from date of purchase. This warranty covers all
metal and plastic nylon webbing.
Should any part become defective, contact the nearest authorized
Miller Diving dealer. If there is no dealer in your area, contact
Miller Diving directly at (805) 928-7772. You must have a return
authorization from Miller Diving prior to the return of any item,
Upon approval from Miller Diving, return the defective part,
freight prepaid, to the Miller Diving plant. The part will be repaired or replaced at no charge as deemed necessary by Miller
Diving.
This warranty becomes null and void if:
1. The product has not been properly serviced and/or maintained
according to the appropriate Miller Diving manual. In addition, the user is responsible to ensure that all product updates
as recommended by Miller Diving have been performed.
2. Unauthorized modications have been made to the product.
3. The product has been abused or subjected to conditions which
are unusual or exceed the product’s intended service.
4. The harness has been used in polluted waters
B WARNING
Do not use the Miller Easy Lift harness in petroleum. The
petroleum will attack the nylon material of the webbing
which will result in the deterioration of the webbing and
equipment failure.
Page 3

Miller Easy Lift Harness Warranty Information
© ⅯⅯⅩⅡ Miller Diving. All rights reserved. Document # 120613010 III
Table Of Contents
II Warranty Information
IV Denitions of Signal Words Used in this Guide
V Miller Easy Lift Harness Terminology
VI Miller Diving
1 General Information
1 Pre-Donning Checks
1 Donning the Easy Lift Harness
3 Installing the leg straps
4 Weaving the vertical leg straps through the 3 hole
adjustment buckle
6 Inserting the leg buckles
7 Disconnecting the leg buckles
7 Maintenance of the Miller Easy Lift Harness
8 ANSI Compliance
8 ADCI Standards
9 Notes
Page 4
Denitions of Signal Words Used in this Guide Miller Easy Lift Harness
IV © ⅯⅯⅩⅡ Miller Diving. All rights reserved. Document # 120613010
Denitions of Signal Words Used in this Guide
B CAUTION
This word indicates a potentially hazardous situation,
which if not avoided, may result in minor or moderate injury. It may also be used to alert against unsafe
practices.
B WARNING
This word indicates a potentially hazardous situation,
which, if not avoided, could result in death or serious injury.
This user guide contains important safety information and should
always be available to those personnel using this equipment.
Read, understand, and retain all instructions before using this
equipment to prevent injury or equipment damage.
If you sell or loan this equipment to another person, be sure that
this manual accompanies the gear when you transfer possession
to them.
B WARNING
Do not use the Miller Easy Lift harness in petroleum. The
petroleum will attack the nylon material of the webbing
which will result in the deterioration of the webbing and
equipment failure.
Page 5
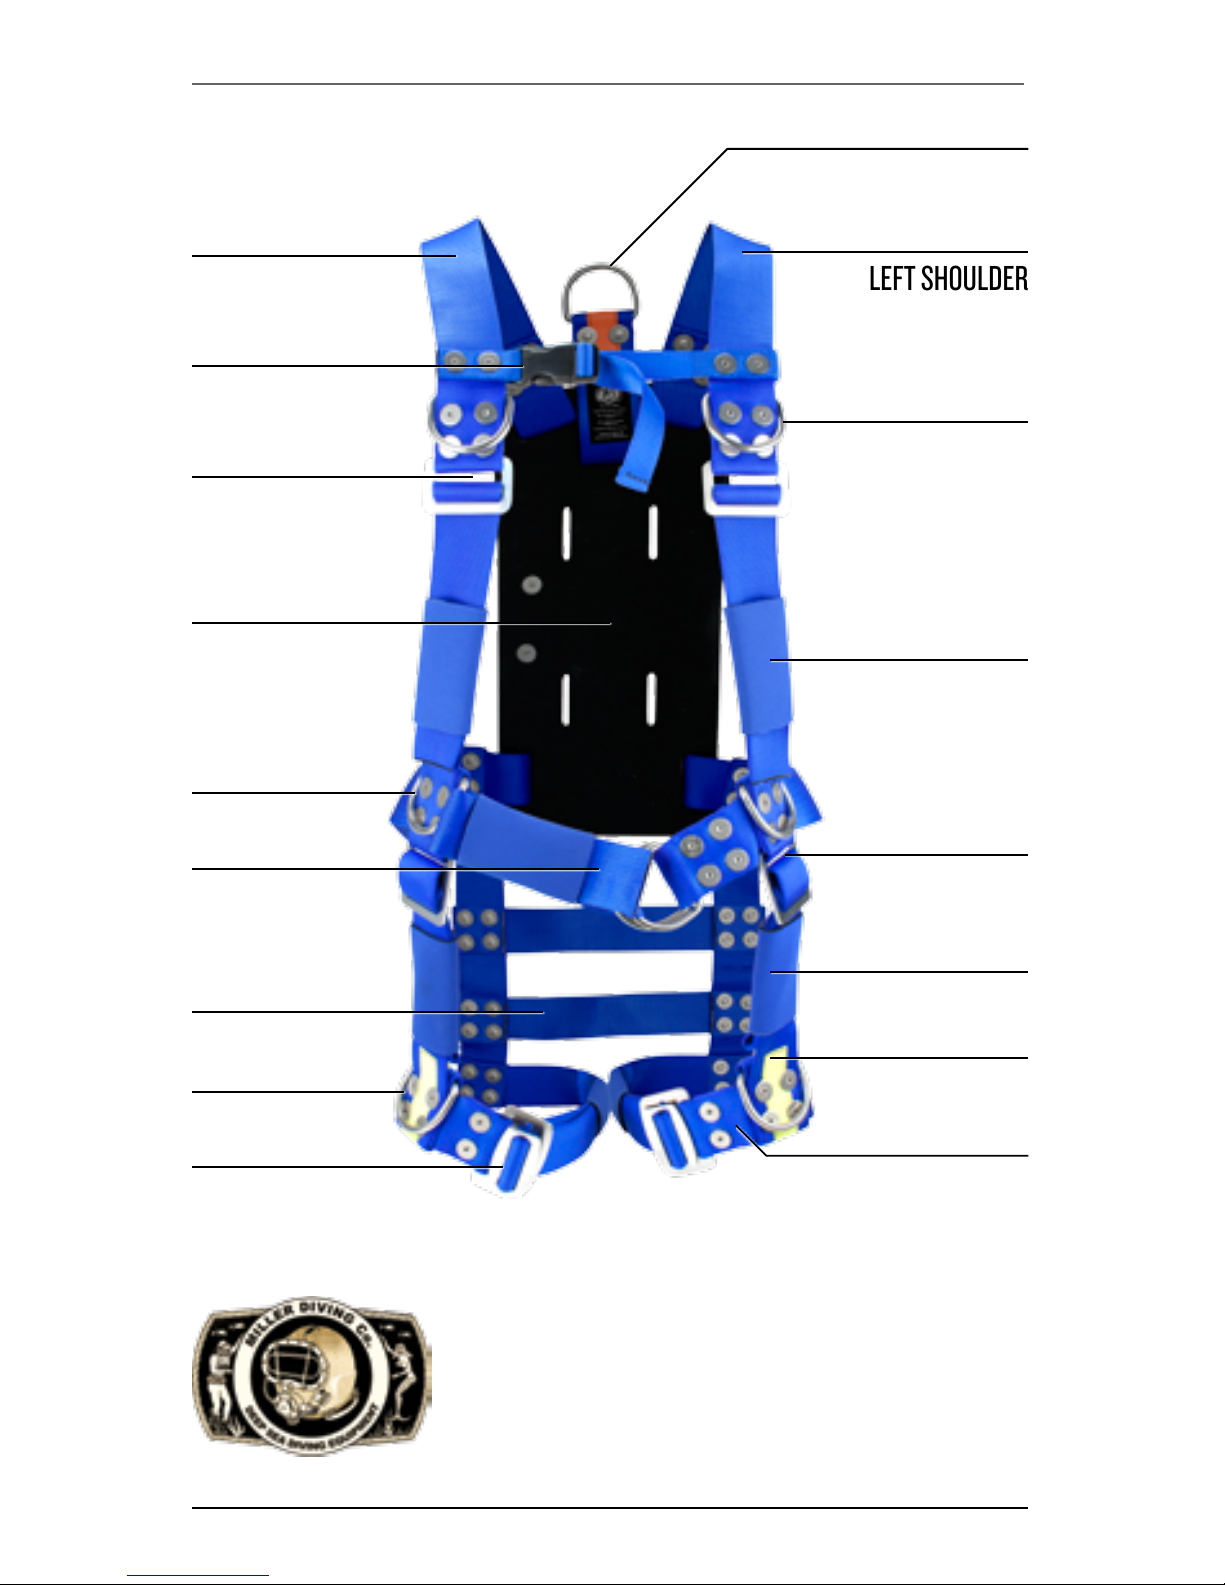
Miller Easy Lift Harness Miller Easy Lift Harness Terminology
© ⅯⅯⅩⅡ Miller Diving. All rights reserved. Document # 120613010 V
3 HOLE ADJUSTMENT
BUCKLE
LEG STRAP
CHEST D-RINGS
ADJUSTMENT
SLEEVES
LEFT SHOULDER
STRAP
MAIN LIFT RING (red to head)
LEG STRAP BUCKLES
WAIST STRAP
WAIST D-RINGS
SEAT WEBBING
LEG LIFT RING (yellow)
CHEST STRAP
SHOULDER STRAP
BUCKLES
RUBBER BACKPACK
RIGHT SHOULDER
STRAP
Miller Easy Lift Harness Terminology
Replacement Assemblies
905-250 Leg Strap, Left, Sm- Med
905-251 Leg Strap, Right, Sm-Med
905-252 Leg Strap, Left, Lrg-XL
905-253 Leg Strap, Right, Lrg-XL
VERTICAL LEG STRAPS
LEG LIFT RING (yellow)
Page 6

Miller Diving Miller Easy Lift Harness
VI © ⅯⅯⅩⅡ Miller Diving. All rights reserved. Document # 120613010
Miller Diving
Ben Miller
Ben Miller is the man behind the original designs of Miller Diving Equipment and a man dedicated to craftsmanship, quality and principles too
often lost in today's world of mass production and imitation. Miller, a
deep-sea commercial diver for over 11 years in the offshore oil elds of
Louisiana, designed each piece of equipment with the concern and expertise of a seasoned diving veteran. He personally tested each design in the
eld as he earned his living as a commercial diver, a career that started
in Louisiana in 1967.
The Legend Begins
The Miller bronze series of Diving Helmets were developed in the 1960’s
and 1970’s. In 1971 Ben designed the rst heavy-duty diving harness,
constructed with stainless steel rivets & washer plates and all stainless
hardware. Several more harness models followed in 1973 thus creating
a state-of-the-art Harness, Backpack and Bell Backpack models for the
commercial diving industry. In the following 30 years the designs of the
Helmets, Harnesses and Weight Belts help create and set the standard
for the industry, keeping with the tradition of safety, durability and easy
maintenance.
Looking Ahead
The world is constantly changing around us, in order for Miller Diving to
continue to thrive as a business we must look ahead, understand the needs
of our customers and shape our business to prepare for what is to come.
New Beginnings
Miller Diving is dedicated to continuing Ben Miller’s legacy of providing
the commercial diver with the highest quality, most rugged and reliable
diving equipment that can be produced.
Miller Diving is now located in Santa Maria, California and is proud to
manufacture and support the Miller Diving line of products. Ben’s traditions of high quality craftsmanship and innovative designs to keep the
Miller Diver at the forefront of safety and technology will continue.
Honoring The Past
Miller Diving engineers are completing the development of many of Ben’s
original concepts and utilizing new manufacturing
processes and techniques to help bring his ideas
to the market and produce the highest quality
commercial diving products possible. Honoring
the past by moving into the future.
www.millerdiving.com/
Page 7

Miller Easy Lift Harness General Information
© ⅯⅯⅩⅡ Miller Diving. All rights reserved. Document # 120613010 1
General Information
The Miller Easy Lift harness includes a rubber backpack to mount
a bail-out cylinder, shoulder strap, chest strap, waist strap, leg
straps, seat support straps and D-rings for umbilical and tool attachment. There are also three color coded D-rings to which the
Miller Extraction Bridle, with matching color coded clips, can
be attached for retrieving disabled divers. Each harness has an
identication plate attached to the backpack with serial number,
part number, manufacture date and other pertinent information.
Pre-Donning Checks
Inspect condition of webbing, rivets and proper weaving of webbing through buckles. For correct orientation of the harness and
leg straps, make sure the round head of the rivet is facing towards
the diver.
Donning the Easy Lift Harness
Have an assistant hold the harness in the upright position behind
the diver.
Slip the right arm through the right shoulder strap and left arm
through the left shoulder strap. Shoulder strap buckles should
be at mid-chest level.
Slip right arm through right
shoulder strap
Slip left arm through left
shoulder strap
Page 8

Donning the Easy Lift Harness Miller Easy Lift Harness
2 © ⅯⅯⅩⅡ Miller Diving. All rights reserved. Document # 120613010
Pass the waist strap around the waist and run the free end though
the double D-rings on the opposite end of the strap. Tighten strap
until snug. Waist strap should be positioned between the lower
chest to mid-stomach level. Adjust shoulder straps to obtain
proper positioning if necessary.
Run the free end
though the double
D-rings
Tighten strap
until snug.
Adjust shoulder
straps to obtain
proper positioning
Snap together and adjust the buckle on the chest strap. This will
hold the shoulder straps together.
Snap together the 1”
cross-chest strap
The chest strap holds the
shoulder straps together
Note: The D-ring on the waist should hang freely on the outside
of the lower arm strap webbing.
Remove the harness and add the leg straps.
Page 9

Miller Easy Lift Harness Installing the leg straps
© ⅯⅯⅩⅡ Miller Diving. All rights reserved. Document # 120613010 3
Installing the leg straps
Weave the right horizontal leg strap and hardware through the
right leg loop on the bottom of the seat webbing, by folding the
buckle for easier passage. Repeat this procedure with the left leg
strap through the left leg loop on the bottom of the seat webbing.
Fold leg strap
buckle for easier
passage through
leg loop
Slide leg strap
buckle and webbing
through bottom
leg loop
Pull buckle and
webbing fully
through bottom
leg loop
Note: This will put the short end of the leg strap on the inside of
the leg. Pull sleeve up over the loose ends of both straps, it will
keep the end from coming out
Page 10

Weaving the vertical leg straps through the 3 hole adjustment buckle Miller Easy Lift Harness
4 © ⅯⅯⅩⅡ Miller Diving. All rights reserved. Document # 120613010
Weaving the vertical leg straps through the 3 hole
adjustment buckle
SLOT #3
SLOT #1
SLOT #2
Slot numbering on the 3 hole adjustment buckle
MALE LEG STRAP
BUCKLE
FEMALE LEG STRAP
BUCKLE
Female and male leg strap buckles on the leg straps
a. Place the horizontal leg strap with the rivet heads towards
the diver’s leg and the female buckle towards the inside thigh,
bring vertical leg strap up behind and through slotted hole #1.
b. Make a loop with the strap and push strap down through
slotted hole #3 on the inside of the existing buckle strap that
holds the buckle to the harness.
Page 11

Miller Easy Lift Harness Weaving the vertical leg straps through the 3 hole adjustment buckle
© ⅯⅯⅩⅡ Miller Diving. All rights reserved. Document # 120613010 5
Bring the leg strap up through
slotted hole #1
Make a loop and push strap
down through slotted hole #3
c. Make a loop in the strap between #1 and #3 slotted holes.
Bring the strap up from behind and through #2 slotted hole.
d. From the #2 slot push the strap down through #1 slotted hole
on the inside of the existing vertical strap.
e. Tighten strap and pull sleeve over both straps. The vertical
strap will have the short end behind the vertical strap.
Page 12

Inserting the leg buckles Miller Easy Lift Harness
6 © ⅯⅯⅩⅡ Miller Diving. All rights reserved. Document # 120613010
Bring the
strap up through #2
slotted hole
Push the strap
down through #1
slotted hole
Tighten strap
and tuck the
loose end into the
adjustment sleeve
B CAUTION
The male buckle must be inserted in the correct direction
into the female buckle, failure to do so will result in the
inability to interlock the two buckles.
Inserting the leg buckles
Wrap leg strap and buckle around the leg, back to front. Push the
male buckle up through the female buckle and lock it.
Incorrect male buckle direction Correct male buckle direction
✓
The leg straps should t comfortably snug. Adjust these straps
as necessary.
Page 13

Miller Easy Lift Harness Disconnecting the leg buckles
© ⅯⅯⅩⅡ Miller Diving. All rights reserved. Document # 120613010 7
Push the male buckle up through
the female buckle
Lock buckles together
Disconnecting the leg buckles
To disconnect buckle, tilt the male end towards the rivets on the
female side of the buckle. Fit it into the female slot and push
buckle through. This will release the leg strap.
Maintenance of the Miller Easy Lift Harness
The Easy Lift harness is made using high tensile strength nylon
webbing and heavy duty stainless buckles and D-rings thereby
minimizing maintenance. However, it is essential to thoroughly
inspect the harness for damage and wear before and after each
dive. DO NOT USE the harness if its serviceability has been
compromised or if there is any doubt about its serviceability.
Wash the harness in clean fresh water after each use and hang
or lay out to dry in a clean dry shaded area out of direct sunlight.
If the harness has been exposed to any pollutants thoroughly clean
with warm soapy water and rinse thoroughly before storing. Do
not use bleach or any harsh chemicals on the harness.
B WARNING
DO NOT USE the harness in polluted water. Failure to follow this instruction may result in equipment failure and
serious injury.
Page 14

ANSI Compliance Miller Easy Lift Harness
8 © ⅯⅯⅩⅡ Miller Diving. All rights reserved. Document # 120613010
B WARNING
DO NOT USE bleach or any harsh chemicals on the harness. Bleach or harsh chemicals will attack the nylon material of the webbing which may result in the deterioration
of the webbing and equipment failure.
ANSI Compliance
The Miller Easy Lift Harness and Extraction Bridle have been
tested and meets all criteria for ANSI Z359.1 standards
ADCI Standards
The Miller Easy Lift Harness and Extraction Bridle meet the
ADCI Consensus Standards 6
th
Edition, section 6.3.4 harnesses.
Page 15

Miller Easy Lift Harness Notes
© ⅯⅯⅩⅡ Miller Diving. All rights reserved. Document # 120613010 9
Notes
 Loading...