

Millennium Surgical Algerbrush II Instruction Manual
Algerbrush II
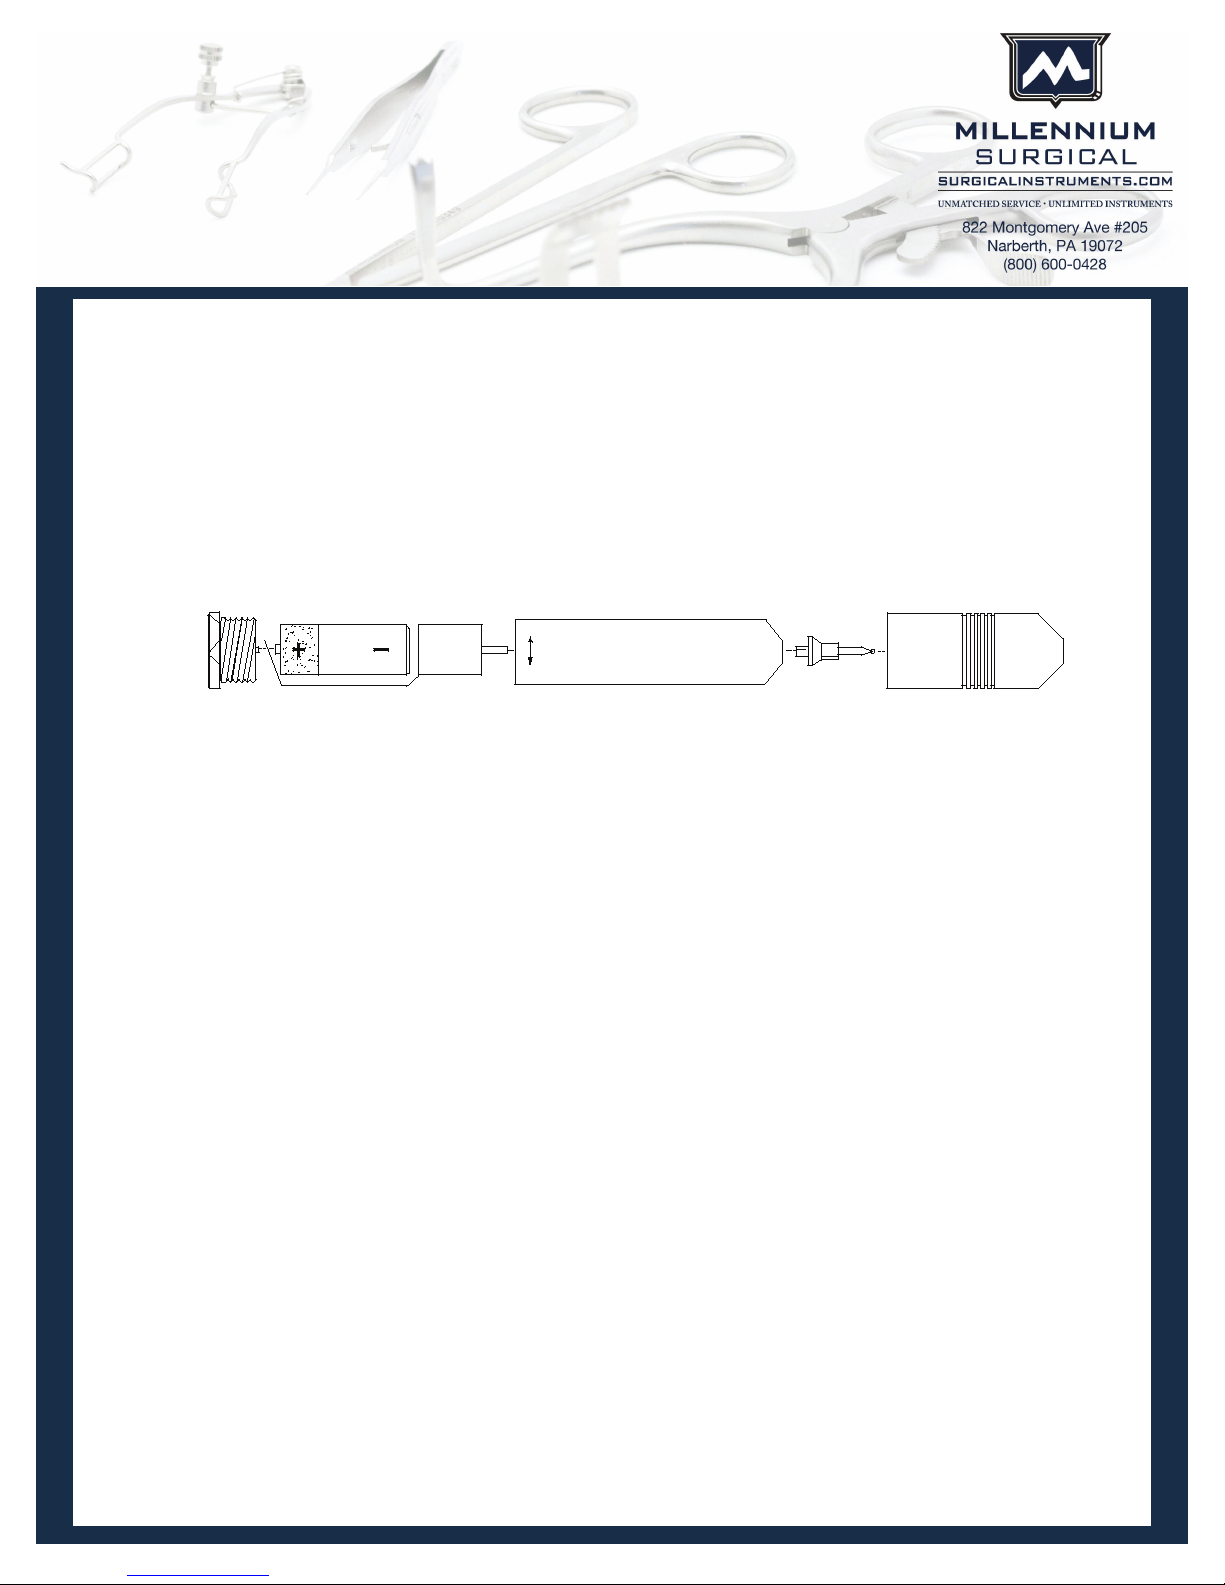
END CAP
BURR
CHUCK
HOUSING
AA BATTERY
SWITCH STRIP
OFF ON
MOTOREND NUT
Instructions for Use and Care
IFU-2016.03.07
e ALGERBRUSH II burr must be sterilized prior to its initial use and following each use thereaer (for sterilization
information, refer to section entitled “Sterilization” )
e chuck and burr on the ALGERBRUSH II are held together by friction and may become loose during shipment. Prior to
each use of the ALGERBRUSH II, check the following:
1) Burr ts snugly within the chuck
2) Chuck ts snugly on the motor sha
*** If either of the above parts is loose, injury to the patient could result if the assembly falls o during use. Please refer to
section entitled “Chuck and Burr Maintenance”
OPERATION
To start the ALGERBRUSH II, turn end nut in “ON” direction indicated on ALGERBRUSH II label, i.e., to the right
To stop the ALGERBRUSH II, turn end nut in “OFF” direction indicated on ALGERBRUSH II label, i.e., to the le
*** Note: To ensure ALGERBRUSH II is “OFF”, check that the chuck and burr have stopped spinning.
INSTALLATION / CHANGING OF BATTERY
*** Note: When changing battery, care should be taken not to put pressure on the battery clip as it may break at the point
where it attaches to the motor
• Remove chuck and burr assembly (see section entitled “Installation of Chuck and Burr Assembly”)
• Remove end nut
• Slide motor and battery assembly out of housing
• Battery must be installed - Pole rst (closest to motor; see ALGERBRUSH II diagram above)
(If battery installed + Pole rst, the ALGERBRUSH II will not function properly)
• Place new battery between motor and battery clip (- Pole closest to motor)
• Re-insert motor and battery assembly into housing
• Ensure motor seated properly in housing by checking the following:
1) Motor sha centered in hole at tip of housing
2) Tip of motor sha just even with top of housing
• Partially tighten end nut
• Note: if motor starts spinning, see section above entitled “Operation of ALGERBRUSH II” for
instructions to stop motor
Warning: If this device is/was used in a patient with or suspected of having Creutzfeldt-Jakob Disease (CJD), the device cannot be reused and must
be destroyed due to the inability to reprocess or sterilize to eliminate the risk of cross-contamination!
1

Algerbrush II
Instructions for Use and Care
IFU-2016.03.07
INSTALLATION OF CHUCK AND BURR ASSEMBLY
*** Note: Motor must be spinning when installing chuck and burr assembly to ensure motor seated properly
• To install, ensure motor is spinning, i.e., ALGERBRUSH II is “ON”
1) Gently push chuck and burr assembly onto motor sha
2) Base of chuck should be close to, but not touching, top of housing
3)Turn “OFF” ALGERBRUSH II until ready to use
• To remove,
1) Grasp base of chuck with ngers and pull away from motor sha - or -
2) Gently pry chuck o motor sha with suitable instrument
3)Turn “OFF” ALGERBRUSH II until ready to use
• To replace burr,
1) Remove chuck and burr assembly from motor sha (per instructions above)
2) While grasping base of chuck with ngers, grasp sha of burr with Foley hemostat and pull apart.
3) To insert new (sterilized) burr, use Foley hemostat to grasp burr (grasp in middle of sha); then,
push chuck onto bottom of burr sha until snug
CHUCK AND BURR MAINTENANCE
*** Chuck and burr assembly are held together by friction; should they become loose or not t snugly, use the following
procedures to tighten.
• If base of chuck becomes loose on motor sha, pinch base of chuck gently with small pliers as shown in
Figure I below (Note: slit in base of chuck should be facing directly away from you)
• If burr becomes loose in chuck, pinch longer portion of chuck gently with small pliers as shown in Figure
II below (Note: slit in longer portion of chuck should be facing directly away from you)
STERILIZATION OF THE ALGERBRUSH II
********* DO NOT AUTOCLAVE THE ENTIRE INSTRUMENT! IT WILL BE RUINED! *********
• Remove chuck and burr assembly from ALGERBRUSH II (per instructions above); Separating burr by itself is ne, but
burrs are small and hard to handle; therefore, it is easier to keep chuck and burr assembly together.
• Housing can be cleaned by wiping with alcohol
• Refer to Appendix 1 for validated sterilization and cleaning procedures.
APPENDIX 1: CLEANING AND STERILIZATION INSTRUCTIONS
Scope: e following is applicable before initial use and aer each subsequent use. Carbide burrs are provided mechancially
clean but are not sterilie (unless labeled as such). erefore, carbide burrs should be sterilized before rst use.
2
 Loading...