

Page 1
Millennium 2.4.6
DTS Decoder/Preamp
Operations Guide
-
MASTER
+
POWER LOCK
Toll Free Phone Number (888) 551 - 6789
Tech Support: (541) 683-8686 M-F 9AM - 5PM Pacific Time
TRIM
SURROUNDS CENTER LFE
Millennium Technologies
Incline Village, NV 89452-8359
Toll Free FAX Number (888) 515 - 3456
AUTO
-
MANUAL
E-Mail:service@5point1.com
Page 2

SAFETY INSTRUCTIONS
2
TO REDUCE THE RISK OF FIRE OR ELECTRIC SHOCK, DO NOT EXPOSE THIS UNIT TO
RAIN OR MOISTURE. DO NOT OPERATE THIS UNIT WITH THE METAL CHASSIS COVER
REMOVED.
1.To assure the finest performance, please read this manual carefully. Keep it in a safe place for
future reference.It is important that you adhere to any warnings and follow all instructions as
they pertain to the operation of this unit.
2. Install this unit in a cool, dry, clean place - away from windows, heat sources, sources of
excessive vibration, dust, moisture and cold.Avoid sources of humming (transformers,
motors).To prevent fire or electrical shock, do not expose the unit to rain and water.
3.This unit should be connected to a power supply only of the type described in the operating
instructions or as marked on the unit. Power-supply cords should be routed so that they are
not likely to be walked on or pinched by items placed upon or against them, paying particular
attention to cords at plugs, convenience receptacles, and the point where they exit from the
unit.
4. It is recommended that the power cord of this unit be unplugged from the outlet when left
unused for long periods of time.
5. Do not use force on switches, controls or connection wires.When moving the unit, first disconect the power plug and the wires connected to other equipment. Never pull the wires themselves.
6. Care should be taken so that objects do not fall into and liquids are not spilled inside the unit.
7.This unit should be serviced by qualified service personnel when:
a. Objects have fallen, or liquid has been spilled into the unit; or
b.The unit has been exposed to rain;or
c.The unit does not appear to operate normally or exhibits a marked change in
performance; or
d.The unit has been dropped, or the cabinet damaged.
8.The user should not attempt to service this unit beyond those means described in the operating instructions. All other servicing should be referred to qualified service personnel.
9. Precautions should be taken so that the grounding or polarization is not defeated.
10. Do not attempt to clean the unit with chemical solvents; this might damage the finish. Use a
clean, dry cloth.
11. Be sure to read the "TROUBLESHOOTING" section regarding common operating errors
before concluding that the unit is faulty.
CAUTION: TO REDUCE THE RISK OF
ELECTRONIC SHOCK, DO NOT REMOVE
COVER (OR BACK) NO USER SERVICEABLE
PARTS INSIDE. REFER SERVICING TO
QUALIFIED SERVICE PERSONNEL.
CAUTION
RISK OF ELECTRIC SHOCK
DO NOT OPEN
Page 3

TABLE OF CONTENTS
3
Introduction ...................................................................... 4
What is DTS? .................................................................. 4
Loudspeakers, Location and Amplification ...................... 5
Features ........................................................................... 6
Installation ........................................................................ 6
Includes six hook-up diagrams
Down Mix Configurations ................................................. 13
Setting Levels .................................................................. 14
Manual Mode
Auto Mode
Playing DTS Encoded Source Material ........................... 16
Troubleshooting ................................................................ 17
Warranty .................. ........................................................ 18
Block Diagram .................................................................. 19
Specifications ................................................................... 20
Page 4

INTRODUCTION
4
DTS Digital Surround provides up to 6 discrete (separate) channels of high quality digital audio,
resulting in exceptional clarity throughout a "true" 360˚ soundfield. DTS Digital Surround delivers
up to 6-channels of transparent 20 bit audio at 44.1 kHz, resulting in a better than CD sound
with high bit-rates and minimal digital compression. DTS represents the highest quality multichannel audio possible within the compact disc, laserdisc and DVD audio standards.
Any laserdisc, compact disc or DVD player with a digital output connector, can interface with the
Millennium 2.4.6 DTS Decoder/Preamp to deliver the 6 digitally encoded tracks to the appropriate amplifiers and loudspeakers.
In order to respect the "visions" of the artists/producers/engineers, the DTS format does not
interfere with the creative process but fully embraces it by flawlessly reproducing the multi-channel masters as they were intended.Initially, the sensible approach for all artists will be to work
within the 5.1 audio configurations already installed in millions of home environments.
Therefore, DTS envisions the following variations for pre-recorded software:
4.0 Music - Or iginal 4-Channel Masters with unprecedented separation
4.1 Music - 4-Channel Masters with added Low Frequency Enhancement (L.F.E.)
5.0 Music- 5 full-range Channels, utilizing a center "fill"
5.1 Movies- Original 6-Channel motion-picture soundtracks
5.1 Music - New 5-Channel audio mixes with added L.F.E.
Thank you for your purchase of the Millennium 2.4.6, a sophisticated digital sound
processor/preamp designed specifically for the reproduction of DTS encoded laserdiscs, compact discs and emerging DVDs.
The Millennium 2.4.6 DTS Decoder/Preamp is simple to use and easy to install in any type of
existing home theater sound system.Balancing the individual channels only takes a few minutes.With the addition of the Millennium 2.4.6, you can enjoy the superior audio performance of
DTS encoded 5.1 discrete digital 20 bit programs, a truly revolutionary new way to listen to
movies and music. Employ the Millennium 2.4.6 as a system upgrade, or as a stand-alone DTS
Decoder/Preamp - it’s your choice.
WHAT IS DTS?
NOTE OF CAUTION: When the Millennium 2.4.6 is inser ted into a pre-existing system,
rather than employed as a stand alone DTS Decoder/Preamp, you may notice an audible
artifact prior to the moment that the Millennium detects and locks to the DTS data stream.
This may manifest itself as a click or pop, but it is a brief instant of the raw DTS data
stream that you actually hear. It is important for you to follow the instructions in the section
“Setting Levels”and that you understand section ”Playing DTS Encoded Material” thoroughly to insure proper performance and complete satisfaction of your Millennium 2.4.6.
Page 5

LOUDSPEAKER, LOCATION & AMPLIFICATION
5
Since 5.1 channel discrete music surround programs are mixed with full frequency and dynamic
range in all channels, including the surrounds (except, of course, the LFE .1 subwoofer channel), it is recommended that you employ a minimum of four matched loudspeakers (L & R Front;
L & R Rear) in your listening environment.You might even consider the placement of these four
primary loudspeakers as two identical sets of stereo loudspeakers, so that no matter which way
you turn, 90˚ to the left or right, or 180˚ to the rear, you should be able to reproduce a satisfactory stereo soundstage between any pair of loudspeakers.Your center loudspeaker may be
restricted in size due to space considerations, but it should at least match the timbre of your four
mains. Fur ther, you should consider recessing the center loudspeaker creating somewhat of an
arc between the left and right front soundstage area. If the center loudspeaker is too dominant,
either by volume or placement, your left-right frontal soundstage image will be negatively impacted.
For the serious listener, there is the optimum “sweet spot”, which should mirror the vantage point
of the recording/mix engineers position. It is equidistant from all five main loudspeakers, including the center.Other than this “preferred” vantage point, if the entire listening space is energized
with a balanced mains loudspeaker system, than the phase and frequency coherence of the 5.1
channel surround program is maintained.You will be able to move around and never lose the
sense of dimension or spatiality.
Placement for the subwoofer, may take some experimentation on your part. In many cases one
sub will be satisfactory. However, space permitting, you might consider using two subwoofers in
your system.Tr y using a pair of forward firing subs, placed equidistant between the L & R front
loudspeaker. Or put one sub between the L & R front loudspeakers, and another sub, between
the two rear loudspeakers.This is really a subjective call and the experts change their minds just
about as often.
Amplification should be applied equally to all channels in order to complete the matching, balancing and positioning of your loudspeaker system.We do not recommend the use of dipole
loudspeakers, as some suggest, to “diffuse” the surround image. The surround image is created
by the mixing engineer, artist and /or producer when the program is recorded and mixed, not by
loudspeaker design or placement.
By following these suggestions, you may be able to closely emulate the conditions present during the actual mix of the program.While motion picture soundtrack mixes may not conform
exactly to the conditions we’ve noted here, music surround mixes that require a much higher
degree of accuracy, phase and frequency coherence most cer tainly do.
NOTE:
2-Channel Stereo Installation
If your current sound system is only 2-channel stereo, there is no installation diagram in this
manual for implementaion, however, it is a simple and straight-forward hook-up. Connect the
Left Front (channel 1) output of your stereo preamplifier/receiver to the Left Front input of the
Millennium 2.4.6; likewise with the Right Front (channel 2) I/O connections.Then, connect the
CD or LD Player’s (coax or optical) digtal output to the corresponding Millennium digital input.
Stereo analog program material will then pass through the Millennium untouched, to the Left
Front and Right Front channel power amplifiers(s)/loudspeakers.
For a complete 5.1 DTS upgrade you need to add power amplifiers/loudspeakers for the Center,
Left Surround, Right Surround, and LFE (subwoofer) channels. See the installation diagram on
page 7.
Page 6

FEATURES
6
Stand alone DTS Decoder/Preamp
Simply connect the Millennium’s digital input to your disc player’s digital output and you now
have a stand alone DTS 20 bit 5.1 channel decoder with volume control.
In-line, ‘pass-through’ design
The Millennium 2.4.6 can be inserted in-line between virtually any audio component where linelevel analog audio is present.It may also stand alone as a DTS Decoder/ Preamp if DTS is the
only 5.1 digital format you are decoding.
Automatic and Manual modes of operation
When a volume controlled line-level source is used, the Millennium 2.4.6 has the ability to match
its output volume to that of the analog source, and is controlled by the source.
Re-equalization
The Millennium 2.4.6 contains a proprietary re-equalization curve which is optimized for clarity
and smoothness from the 20-bit ultra-live and multi-dimensional DTS 5.1 channel digital audio
format.
Down-mixing capability
The Millennium 2.4.6 has the ability to down mix the surround, center, and/or sub audio into the
main left and right channels, accommodating systems with two to six channels.However, it is
recommended that to fully appreciate DTS 20 bit 5.1 channel digital surround programs, no
down mixing options be engaged, by leaving switches 1-2-3 in their factory preset (up) position.
Automatic prioritized digital input selection
If both coaxial and optical digital inputs on the Millennium 2.4.6 are simultaneously presented
with digital data, at the user’s option a configuration switch may favor one or the other automatically.
Individual trim adjustments
There are three ± 15dB tr im adjustments ( center, sub and surrounds) for optimizing the balance
of your loudspeakers relative to listening positions.
12V DC operation
The Millennium 2.4.6 is supplied with a separate 12V DC power supply, to keep noisy AC lines
away from the sensitive line-level signals. AC noise is kept near the wall outlet – where it
belongs. 12V DC operation also readily allows use in an RV, vessel or automobile installation.
Depending on the components currently in your sound system there are several possibilities for
the proper installation of the Millennium 2.4.6.We’ve provided diagrams for the most common
multi-channel system configurations on the following pages. If you encounter any problems with
interfacing the Millennium 2.4.6 into your existing system please contact us at (888) 551- 6789.
INSTALLATION
Page 7

7
CENTER/SUB AMP
C
S
C
S
SURROUND AMP
L
R
L
R
FRONT AMP
L
R
FRONT
L
R
IN OUT
REAR
L
R
IN OUT
L
R
CENTER
OUT
IN
LFE
OUT
IN
IN
IN
IN
DIGITAL OUT
(Coaxial)
CD Player
DIGITAL OUT
(Optical)
LD/DVD Player
OUT
IN
DIGITAL I/O
POWER
SERIAL #
12 VOLTS DC
SYSTEMDIGITAL I/0LFECENTERREARFRONT
OUT
IN
OUT
IN
OUTL
INR
L
R
IN OUT IN OUT
CONFIGURATION
1 8
1 2 3 4 5 6 7 8
Dip On
DTS Decoding Under License from
DTS Technology LLC
U.S. Patent Number 5,451,942
Designed & Engineered in the USA
INCLINE VILLAGE
NV 89452-8359
US & FOREIGN PATENTS PENDING
Design verified to comply with FCC
Part 15 for a Class B Digital Device
MANUAL MODE
Stand Alone Installation with Two Sources
In this configuration the Millennium 2.4.6
is being used as both a DTS decoder and
a preamp. This is particularly useful in
dedicated DTS systems or where there are
only two digital source devices. It does,
however, require that one of those sources
have an optical digital output and the other
must have a coaxial digital output
Page 8

8
FRONT
L
R
IN OUT
REAR
L
R
IN OUT
CENTER
OUT
IN
LFE
OUT
IN
MULTI-CHANNEL
RECEIVER
LD/DVD
C
S
In Out In Out In Out
FRONT REAR
OUT
IN
DIGITAL I/O
L
R
L
R
DIGITAL OUT
(Optical)
LD/DVD Player
DIGITAL OUT
(Coaxial)
CD Player
Out
L
R
Out
L
R
CD
In
L
R
C
S
L
R
FRONT REAR
SPEAKER OUTPUTS
POWER
SERIAL #
12 VOLTS DC
SYSTEMDIGITAL I/0LFECENTERREARFRONT
OUT
IN
OUT
IN
OUTL
INR
L
R
IN OUT IN OUT
CONFIGURATION
1 8
1 2 3 4 5 6 7 8
Dip On
DTS Decoding Under License from
DTS Technology LLC
U.S. Patent Number 5,451,942
Designed & Engineered in the USA
INCLINE VILLAGE
NV 89452-8359
US & FOREIGN PATENTS PENDING
Design verified to comply with FCC
Part 15 for a Class B Digital Device
AUTO MODE
Installation with Multi-channel Receiver and Two Sources
In this configuration the Millennium 2.4.6 is installed within an existing sound system
that uses a multi-channel A/V Receiver. The illustration shows two digital source devices
hooked up to the 2.4.6, one via a coaxial input, the other via an optical input. This
installation allows you to play non-DTS encoded material, directly from the Receiver. When
the material is DTS encoded all you have to do is turn on the 2.4.6, verify that it is in the
Auto mode, switch on and play your chosen digital source device.
Page 9

9
FRONT
L
R
IN OUT
REAR
L
R
IN OUT
CENTER
OUT
IN
LFE
OUT
IN
MULTI-CHANNEL
PREAMP
LD/DVD
C
S
In Out In Out In Out
FRONT REAR
OUT
IN
DIGITAL I/O
L
R
L
R
DIGITAL OUT
(Optical)
LD/DVD Player
FRONT AMP
L
R
L
R
IN
SURROUND AMP
L
R
L
R
IN
CENTER/SUB AMP
C
S
C
S
IN
DIGITAL OUT
(Coaxial)
CD Player
Out
L
R
Out
L
R
In
CD
POWER
SERIAL #
12 VOLTS DC
SYSTEMDIGITAL I/0LFECENTERREARFRONT
OUT
IN
OUT
IN
OUTL
INR
L
R
IN OUT IN OUT
CONFIGURATION
1 8
1 2 3 4 5 6 7 8
Dip On
DTS Decoding Under License from
DTS Technology LLC
U.S. Patent Number 5,451,942
Designed & Engineered in the USA
INCLINE VILLAGE
NV 89452-8359
US & FOREIGN PATENTS PENDING
Design verified to comply with FCC
Part 15 for a Class B Digital Device
AUTO MODE
Installation with Multi-channel Preamp and Two Sources
In this configuration the Millennium 2.4.6 is installed within an existing sound system
that uses a multi-channel A/V Preamp and separate amplifiers. The illustration shows
two digital source devices hooked up to the 2.4.6, one via a coaxial input, the other via an
optical input. This installation allows you to play non-DTS encoded material, directly from the
Preamp. When the material is DTS encoded all you have to do is turn on the 2.4.6, verify that
it is in the Auto mode, switch on and play your chosen digital source device.
Page 10

10
FRONT
L
R
IN OUT
REAR
L
R
IN OUT
CENTER
OUT
IN
LFE
OUT
IN
MULTI-CHANNEL
PREAMP
AUX Input
C
S
In Out In Out In Out
FRONT REAR
OUT
IN
DIGITAL I/O
L
R
L
R
DIGITAL IN
(Coaxial)
D to A
Converter
Out
L
R
FRONT AMP
L
R
L
R
IN
SURROUND AMP
L
R
L
R
IN
CENTER/SUB AMP
C
S
C
S
IN
DIGITAL OUT
(Coaxial)
CD Player
DIGITAL OUT
(Optical)
LD/DVD Player
POWER
SERIAL #
12 VOLTS DC
SYSTEMDIGITAL I/0LFECENTERREARFRONT
OUT
IN
OUT
IN
OUTL
INR
L
R
IN OUT IN OUT
CONFIGURATION
1 8
1 2 3 4 5 6 7 8
Dip On
DTS Decoding Under License from
DTS Technology LLC
U.S. Patent Number 5,451,942
Designed & Engineered in the USA
INCLINE VILLAGE
NV 89452-8359
US & FOREIGN PATENTS PENDING
Design verified to comply with FCC
Part 15 for a Class B Digital Device
AUTO MODE
Installation with Dedicated D-to-A Converter
In this configuration the Millennium 2.4.6 is installed within an existing sound system
that uses a multi-channel A/V Preamp that routes all digital devices through a
separate D-to-A Converter (DAC).It is essentially the same hook-up as that shown for
installation with a Preamp on the previous page, except the Millennium 2.4.6 Digital
out is routed back to the DAC's digital input. Analog audio outputs on both source devices
can also be patched into the Preamp directly. However, because the digital input of the
DAC is fed by 'The 2.4.6', it must be on at all times, regardless of whether the source
material is DTS encoded or not.
Page 11

11
FRONT
L
R
IN OUT
REAR
L
R
IN OUT
CENTER
OUT
IN
LFE
OUT
IN
DIGITAL OUT
(Optical)
LD/DVD Player
OUT
IN
DIGITAL I/O
"5.1 READY"
PRO LOGIC
RECEIVER/
PREAMP
5.1 INPUT
DB-25 Connector
DIGITAL IN
(Coaxial)
DIGITAL OUT
(Coaxial)
CD Player
DOLBY
DIGITAL
PROCESSOR
FRONT REAR
L
R
C
S
RF In
RF Out
OUTPUTS
Speakers are hooked up directly
to Receiver. If this were a preamp
there would be outputs to separate
amplifiers with speaker outputs.
POWER
SERIAL #
12 VOLTS DC
SYSTEMDIGITAL I/0LFECENTERREARFRONT
OUT
IN
OUT
IN
OUTL
INR
L
R
IN OUT IN OUT
CONFIGURATION
1 8
1 2 3 4 5 6 7 8
Dip On
DTS Decoding Under License from
DTS Technology LLC
U.S. Patent Number 5,451,942
Designed & Engineered in the USA
INCLINE VILLAGE
NV 89452-8359
US & FOREIGN PATENTS PENDING
Design verified to comply with FCC
Part 15 for a Class B Digital Device
MANUAL MODE
Stand Alone Installation with “5.1 Ready” Receiver or Preamp
In this configuration, the Millennium 2.4.6 is being installed into an existing
system with either a Receiver or Preamp that is "5.1 Ready". A "5.1 Ready"
Receiver or Preamp will provide a special DB-25 connector, which combines
all outputs through one cable. For hook-up to the 2.4.6 you must obtain a cable
with a DB-25 connector on one end and separate RCA connectors for patching
into the 2.4.6 on the other.
Page 12

12
FRONT
L
R
IN OUT
REAR
L
R
IN OUT
CENTER
OUT
IN
LFE
OUT
IN
DIGITAL OUT
(Optical)
LD/DVD Player
OUT
IN
DIGITAL I/O
"5.1 READY"
PRO LOGIC
RECEIVER/
PREAMP
5.1 INPUT
DB-25 Connector
DIGITAL IN
(Coaxial)
DIGITAL OUT
(Coaxial)
CD Player
DOLBY
DIGITAL
PROCESSOR
FRONT REAR
L
R
C
S
RF In
RF Out
OUTPUTS
Speakers are hooked up directly
to Receiver. If this were a preamp
there would be outputs to separate
amplifiers with speaker outputs.
POWER
SERIAL #
12 VOLTS DC
SYSTEMDIGITAL I/0LFECENTERREARFRONT
OUT
IN
OUT
IN
OUTL
INR
L
R
IN OUT IN OUT
CONFIGURATION
1 8
1 2 3 4 5 6 7 8
Dip On
DTS Decoding Under License from
DTS Technology LLC
U.S. Patent Number 5,451,942
Designed & Engineered in the USA
INCLINE VILLAGE
NV 89452-8359
US & FOREIGN PATENTS PENDING
Design verified to comply with FCC
Part 15 for a Class B Digital Device
MANUAL MODE
Add-on Installation with “5.1 Ready” Receiver or Preamp
In this configuration, the Millennium 2.4.6 is being installed into an existing
system with either a Receiver or Preamp that is "5.1 Ready". In addition, this
system contains a stand-alone Dolby Digital Processor. The outputs of the
Dolby Digtial Processor are fed into the 2.4.6, which them sends the signal back
the Receiver/Preamp via the special DB-25 connector/cable. If the connector is
not available, the output of the 2.4.6 can be sent to the RCA inputs on the
Receiver/Preamp.
Page 13

DOWN MIX CONFIGURATION
13
The Millennium 2.4.6 can be down-mixed to accommodate two to
six channel systems, using the System Configuration switches on
the back panel.The factory default position is for six channels. If
you are missing surround speakers or a center channel speaker,
the relevant audio information may be down-mixed into your main
left and right channels.
It is recommended, however, that the down mix configuration switches remain in their factory
default (up) position when employing the Millennium 2.4.6 in any 5.1 loudspeaker application. If
you are not using a Center channel loudspeaker, then you may try placing switch #2 in the down
position, which blends the center channel information into the Left and Right Front channels. It is
also possible to down mix the surround channel information into the main Left and Right Front
channels by placing switch #1 in the down position, but this effectively defeats the purpose and
intent of 5.1 music and movie surround program material.
Be extremely cautious down mixing the LFE .1 (extended Low Frequency Effects) channel.
Since almost all music mixes employ full frequency range program material on its primary channels, you can run the risk of generating excessive bass into the main Left and Front channels.
Do not put switch #3 in the down position unless you are confident your main Left and Right
loudspeakers can handle the additional bass information, regardless.
In the up (default) position switch #4 automatically prioritizes the coaxial input of the 2.4.6.To
prioritize the TOSLINK optical input, flip switch #4 to the down position.
Switches #5 and #6 control the pass-through functionality of the Millennium 2.4.6. Keeping both
switches in the up (default) position is considered ‘normal’ for installations where the 2.4.6 is
placed between the preamplifier and the amplifier. This provides automatic pass-through of all
analog channels when there is no DTS encoded signal present.
When using the 2.4.6 as a stand-alone DTS decoder/preamp, place switches #5 or #6 in their
down positions.This will disable the automatic pass-through feature for the analog signals, thus
eliminating the “click” of the pass-through relays when a DTS disc is played, skipped, or paused.
To selectively disable the pass-through feature in the Manual mode only, place switch #5 in the
up position and switch #6 in the down position.This configuration provides normal pass-through
and volume matching when in the Auto mode, yet silences any audible clicking when in the
Manual mode.
Follow the table below to configure playback of your DTS encoded source material for proper
playback in your system.
# Switch up Switch Down
1 Surround outputs active Surrounds down mixed to main*
2 Center output active Center down mixed to main*
3 LFE output active LFE output down mixed to main*
4 Coaxial input priority Optical (TOSLINK) input has priority
5 Auto Mode pass-through Auto Mode pass-through
functionality Enabled functionality Disabled
6 Manual Mode pass-through Manual Mode pass-through
functionality Enabled functionality Disabled
7 - 8 No effect** No effect**
*Outputs and trim controls of down mixed channels become inactive
**Reserved for future upgrade use
1 2 3 4 5 6 7 8
Dip On
Page 14

SETTING LEVELS
14
This section will assist you in balancing the levels on all your speakers.We’ve provided
step-by step instructions for both Manual and Auto Operation.You will use the MASTER volume
control and the individual trim controls on the 2.4.6’s front panel during set-up.
Manual Mode Operation
1. Place the front panel toggle switch in the down, or MANUAL position.
2. Using a DTS test and setup disc, choose a track with a white or pink noise source on the left
front channel only.
3. Set the MASTER level so that the noise from the speaker is at a comfortable level.*
4. Now switch to a track that has white noise on the right front to verify that both front speakers
are working correctly.
5. Now play a track with noise on the left rear, and set the SURROUNDS TRIM so that the level
closely matches what you heard from the front channels.
6. Now switch to a track that has white noise on the right rear to verify that both rear speakers
are working correctly.
7. Play a track with noise for the center and use the CENTER TRIM to match the level with the
front and rear channels.
8. Finally, play a track with noise for the LFE (sub) channel.Use the LFE TRIM to adjust the volume on your subwoofer until it is at a comfortable level.
9. The MASTER control sets the line output levels for all channels together, so once the TRIM
adjustments are made, you needn’t touch them again, only use the MASTER level control for
volume adjustment.
Your system is now balanced for Manual Mode operation, and you are ready to hear all the clarity and presence of DTS just as the recording studio engineers meant you to hear it.
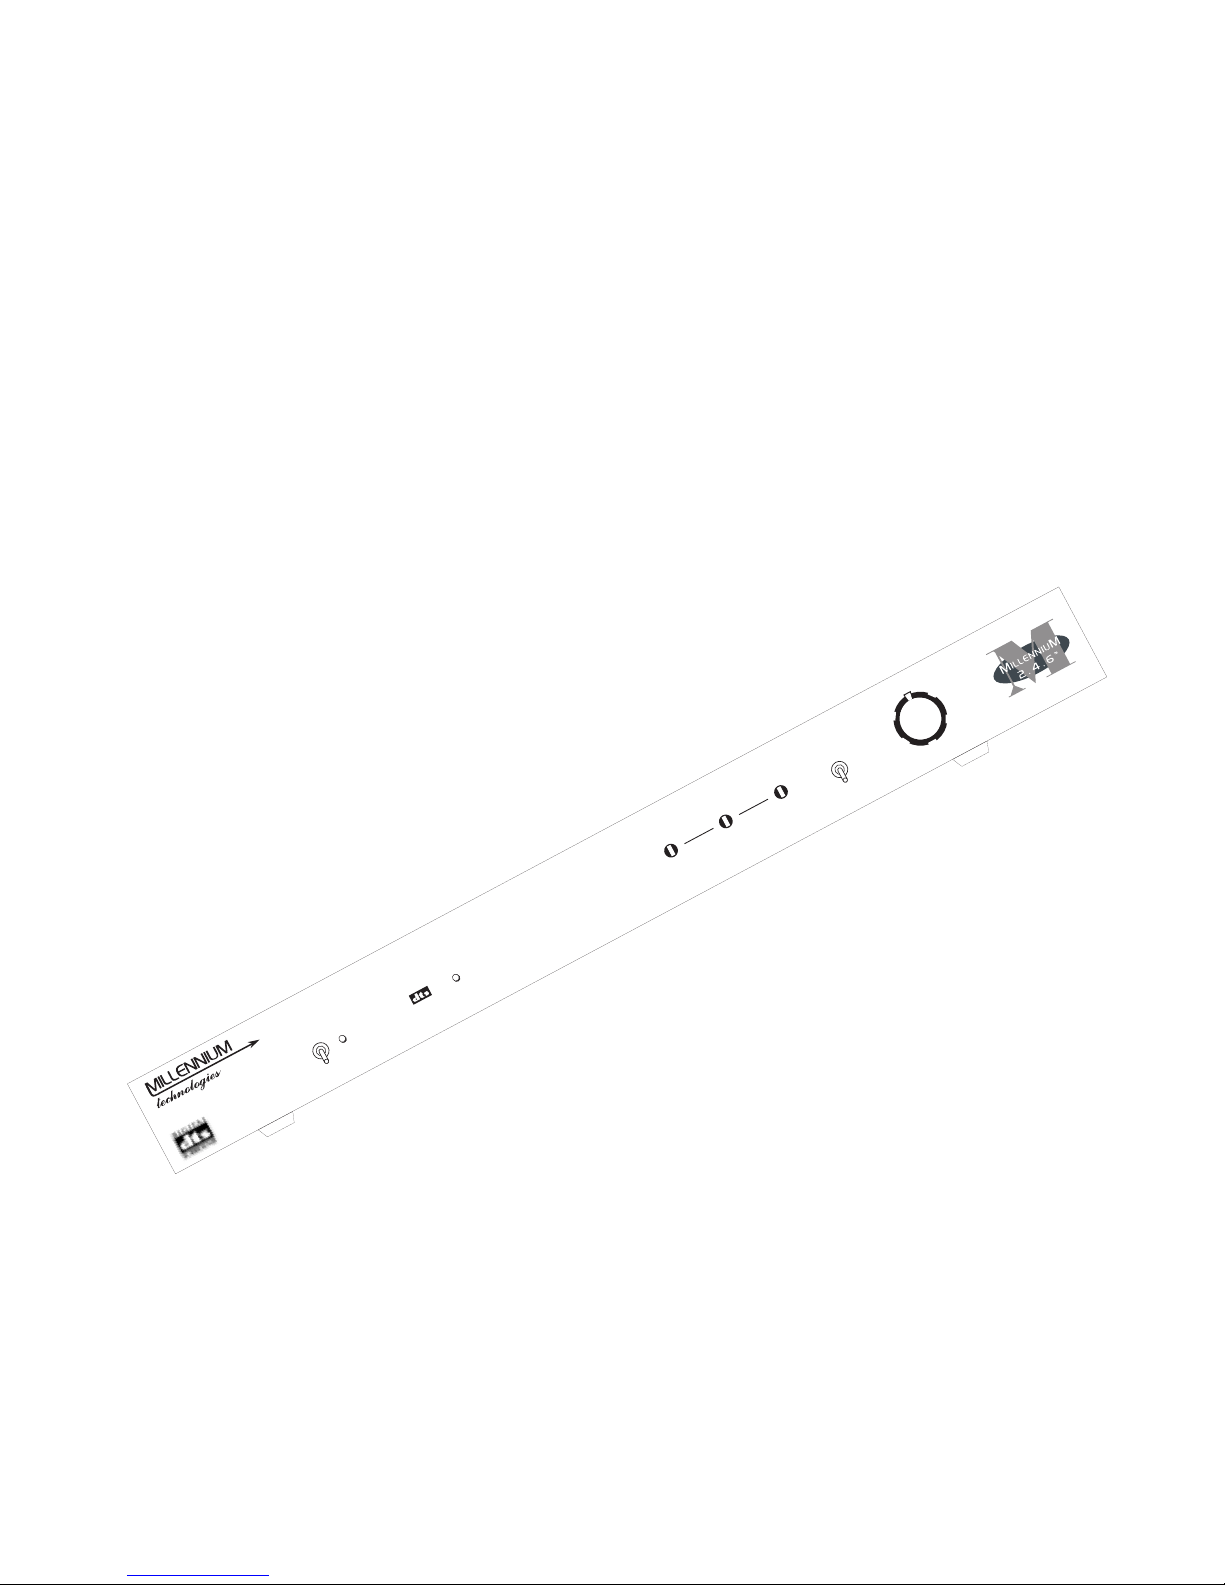
TRIM
SURROUNDS CENTER LFE
AUTO
+
-
-
MANUAL
MASTER
BALANCING TIP: For the most accurate results use a sound pressure level (SPL) meter.They
are readily available at your local Radio Shack®.While you can balance the Millennium 2.4.6 at
any SPL, choose a level such as 75dB and adjust all of the channels for the same reading.This
insures a good balance within a dB or two at the most.There is a greater potential for error
when setting the channel balance by ear. This is par ticularly useful for the LFE setting. What
may appear comfortable and “loud enough” during the set-up stage may be too soft once the
source material is played.This applies to both Manual and Auto mode operation.
Page 15

15
Automatic Mode Operation
NOTE: For automatic mode operation, the Millennium 2.4.6 is hooked up for “pass through”
operation. All line-level outputs from your Receiver or Preamp must be connected to at least the
main input jacks of the Millennium 2.4.6, and must come from a source with DTS data. In other
words, the raw DTS digital datastream must be present at the mains input (Left Front and Right
Front) to the Millennium 2.4.6 in order to use this automatic mode.
1.
Place the front panel toggle switch in the up, or AUTO position.
2.
In the automatic mode, the main volume level is set by matching the output level of the
Millennium 2.4.6 to the level of the DTS raw data stream (white noise) presented to the main
inputs of the Millennium 2.4.6. (For more information see section PLAYING DTS ENCODED
SOURCE MATERIAL.)
3. As a starting point, set the MASTER control to the middle position. (See Note 1 on next page)
4. Now use the volume control on your Receiver or Preamp to adjust the listening level. The
Millennium 2.4.6’s proprietary volume matching system will automatically track the input level,
allowing you to use your Receiver or Preamp’s remote control to set volume level.
5. To set up your individual speaker levels, use a DTS test and setup disc, and choose a track
with a white or pink noise source on the left front channel only.
6. Set the MASTER level so that the noise from the speaker is at a comfortable level.
7. Now switch to a track that has noise on the right front to verify that both front speakers are
working correctly.
8. Now play a track with noise on the left rear, and set the SURROUNDS TRIM so that the level
closely matches what you heard from the front channels.
9. Now switch to a track that has white noise on the right rear to verify that both rear speakers
are working correctly.
10. Play a track with noise for the center and use the CENTER TRIM to match the level with the
front and rear channels.
11. Finally, play a track with noise for the LFE (sub) channel.Use the LFE TRIM to adjust the
volume on your subwoofer until it is at a comfortable level.
12. The MASTER control sets the line output levels for all channels together, so once the TRIM
adjustments are made, you needn’t touch them again, only use the MASTER level control
for volume adjustment.
Your system is now balanced, and you are ready to hear all the clarity and presence of DTS just
as the recording studio engineers meant you to hear it.
Page 16

PLAYING DTS ENCODED MATERIAL
16
When presented with a valid digital input signal, it takes the Millennium 2.4.6 a moment to determine whether the input is DTS encoded or not, and we want to insure that you don’t get a blast
of noise from the analog inputs if it is indeed a DTS disc, so you might hear a click when playing
even a non-DTS disc.
The Millennium 2.4.6 automatically
assumes
the source is DTS, energizing its output relays
whenever it senses a valid signal at the digital input port. If the Millennium 2.4.6 then determines the signal is not DTS, it releases the relays after a few moments. The result is that you
may hear the relays clicking whenever a valid digital source is detected.
When the Millennium 2.4.6 is set up for “pass through”operation, the analog outputs from your
Receiver or Preamp are connected to the inputs of the Millennium 2.4.6.In this configuration,
when you play back a disc, the analog noise is presented to the Millennium 2.4.6’s analog
inputs, while the digital DTS data is simultaneously presented to the Millennium 2.4.6’s digital
input because DTS data is placed on a disc where the music data would normally go.Of course,
your disc player can’t tell the difference between the DTS datastream or analog program
sources. It takes a moment for the Millennium 2.4.6 to recognize the digital signal, and then
switch its outputs to substitute DTS for the pass-through audio. A
very
tiny bit of the DTS
datastream sound is passed through in that instant, which you then hear as a ‘click’.The audible
DTS datastream sound from the analog inputs is the raw DTS digital data being converted to
audio.
The simplest way to reduce the volume of the DTS datastream sound presented to the input of
the Millennium 2.4.6. is to turn down the volume of the Receiver or Preamp, which is driving the
Millennium 2.4.6. You can then compensate for this reduction by turning up the MASTER level
on the front of the Millennium 2.4.6 clockwise until the volume is satisfactory.However,
DO NOT
switch to Manual Mode with the MASTER level turned up to avoid damage to your system.
If you hear a hissing sound in the background whenever you play a DTS disc it is likely you’re
hearing channel to channel ‘cross-talk’, which means that one channel of your system is
cross-
ing over and
talk
ing on another adjacent channel. The very high input impedance and high
gains of most line-level systems make them susceptible to noise on adjacent lines.Try r unning
the Millennium 2.4.6 in manual mode, and then disconnect the analog outputs from your player
or transport. If the noise disappears, you know this is the source. You can reduce this effect by
moving the analog lines from your player or transport to another input, perhaps physically farther
from the input currently selected. Some rearrangement of the system wiring may be necessary.
Another possible cause is multiple ground paths, or a ‘ground-loop’. Ground-loops can be created in
any
system, and are not specifically DTS related. They are usually characterized by low
frequency humming sounds or pops and clicks when lights or other electrical equipment are
switched on and off, which could manifest itself as a low level hissing sound when a DTS disc is
played. Eliminating any unnecessary interconnects, reducing the length and increasing the quality of those you do need, and adding ground straps between components are all steps to cir-
cumvent this problem.
NOTE 1: When the Millennium 2.4.6 is inserted into a pre-existing system, rather than employed
as a stand alone DTS Decoder/Preamp the audible DTS datastream may be more apparent. In
order to mask this artifact during normal operation, simply set the Millennium Master gain at a
higher level (ie. 3 o’clock) and the preamp/receiver ahead of the Millennium at a lower level (ie.
9 o’clock). Final adjustment of both paramenters suggested is a matter of a few moments of
experimentation once you have your Millennium 2.4.6 installed.
NOTE 2: Due to occasional software data errors, the Millennium 2.4.6 may stop decoding the
DTS bit-stream. If this occurs, turn the power off and re-start, with the MASTER gain off.
Page 17

17
Power cord not plugged in
in, or power supply not plugged
into an AC outlet.
Loose or intermittent cabling.
Random light incident on
optical digital input.
Damaged disc
Incorrect analog input or
output cable connections.
Incorrect digital input
connections.
Incorrect input selection
on amplifier.
Volume control turned down.
Unit running in AUTO mode,
with low or no input level for
unit to match, from DTS
encoded software.
DTS datastream is interrupted.
Improper cable connections
or need for low frequency
isolation.
Unit turned off
Unit locked to DTS digital
signal -"DTS LOCK"
indication isn't lit.
Incorrect input selection
on amplifier.
Surround or Center trim
turned down.
Surround down mix is on.
Center down mix is on.
LFE down mix is on.
Unit too close to the
affected equipment.
SYMPTSYMPTOMOM CA CAUSEUSE POSSIBLE CURE POSSIBLE CURE
SYMPTOM CAUSE POSSIBLE CURE
Nothing lights up when
the power switch is in
the up (on) position.
Intermittent
operation
No Sound
Hum from Speakers
Loud Hiss
from Speakers
Sound Output from
surround or center
channels is lower
than other speakers
No sound from
surround speakers
No Sound from
center speaker
No Sound from
Subwoofer
Noise coming from
nearby television
or tuner
Firmly insert power plug connector into the
rear panel. Firmly plug the transformer into
wall outlet or power strip.
Check that all connections are secure. Replace
any defective cables.
Cover optical digital input if not in use.
Replace disc
Check all interconnect cable connections.
Refer to pg. 13; see dip switch #5 and 6.
Make sure digital output from DTS source is
connected to coax or optical input of unit.
Select the '5-ch discrete input' or equivalent
on the amplifier or receiver.
Turn the MASTER control clockwise.
Switch to MANUAL mode. If you get sound,
check interconnect cable connections to FRONT
inputs. In AUTO mode, the R FRONT input
must be presented with volume-controlled
audible DTS datastream sound.
Any player with a built-in digtal volume control
must be in the neutral/no effect position.
Check that all interconnect cables are firmly
in place. Disconnect any connections not
needed. Replace cables, add isolation
transformer(s)or add ground straps between
components if problem persists.
Switch unit on
Make sure DTS digital source is plugged into
coaxial or optical digital input of unit.
Select the '5-ch discrete input' (or equivalent)
mode on the receiver or preamp.
Turn surround or center trim clockwise to suit
.
Switch rear panel configuration switch #1 to the
up position to turn on surround output.
Switch rear panel configuration switch #2 to the
up position to turn on center output.
Switch rear panel configuration #3 to the
up position to turn on sub output.
Move unit farther from the affected equipment.
TROUBLESHOOTING GUIDE
Page 18

18
DTS Decoder
USER
INPUT
+1
+1
+1
AUTO LEVEL SAMPLE LINE
COAXIAL
COAXIAL
OPTICAL
DIGITAL INPUTS
DIGITAL OUTPUT
SYSTEM CONTROLLER
LINE
DRIVERS
LINE DRIVER
V
O
L
U
M
E
20 BIT
D-TO-A
20 BIT
D-TO-A
20 BIT
D-TO-A
20 BIT
D-TO-A
20 BIT
D-TO-A
20 BIT
D-TO-A
LPF: 2ND ORD
LPF: 2ND ORD
LPF: 2ND ORD
LPF: 2ND ORD
LPF: 2ND ORD
LPF: 2ND ORD
Left Front
Right Surr.
Left Surr.
Center
LFE
Right Front
AES
RECEIVER
INPUT
SELECT
+1
+1
+1
OUTPUT
SWITCHING
RIGHT FRONT INPUT
RIGHT FRONT OUTPUT
LEFT FRONT INPUT
LEFT FRONT OUTPUT
RIGHT SURROUD INPUT
RIGHT SURRPUND OUTPUT
LEFT SURROUND INPUT
LEFT SURROUND OUTPUT
CENTER INPUT
CENTER OUTPUT
LFE INPUT
LFE OUTPUT
ANALOG INPUTS/ OUTPUTS
DAC
SUPPLY
DIGITAL
SUPPLY
ANALOG
SUPPLY
INPUT
PROTECT
12VDC
POWER INPUT
BLOCK DIAGRAM
Page 19

WARRANTY
Millennium Technologies provides to the original purchaser of the Millennium 2.4.6 a (1) year
parts and labor warranty from the date of purchase.
The above warranty is in lieu of any other warranty, whether expressed, implied or statutory,
including, but not limited to, any warranty of merchantability, fitness for any particular purpose, or
any warranty arising out of any proposal, specification or sample, Millennium Technologies shall
not be liable for incidental or consequential damages.Millennium Technologies neither assumes
nor authorizes any person to assume for it any other liability.
If it becomes necessary to return this unit for repair, you must first secure a Return Authorization
Number and shipping address from 5.1 Marketing &Sales, Inc..Repack this unit in its original
carton and packing material, along with a written explanation of the problem.Be sure to include
reference to the Return Authorization Number given to you.If you believe the problem is covered
by the warranty, you must also include proof of purchase and, insure the shipment.
CONTACT INFORMATION
5.1 Marketing &Sales, Inc.
Toll Free (United States Only)
(888) 551 - 6789 FAX (888) 515 - 3456
Outside the United States
(775) 831 - 4459 FAX:(775) 831 - 4485
E-Mail:service@5point1.com
The user is cautioned that changes and modifications made to the equipment without approval
of the manufacturer could void the user’s authority to operate this equipment.
NOTE:This equipment has been tested and found to comply with the limits for a ClassB digital
device pursuant to part 15 of the FCC Rules.These limits are designed to provide reasonable
protection against harmful interference in a residental installation.This equipment generates,
uses and can radiate radio frequency energy and, if not installed and used in accordance with
the instructions, may cause harmful interference to radio communications.However, there is no
guarantee that interference will not occur in a particular installation.If this equipment does cause
harmful interference to radio or television reception, which can be determined by turning the
equipment off and on, the user is encouraged to try to correct the interference by one or more of
the following measures:
– Reorient or relocate the receiving antenna.
– Increase the separation between the equipment and receiver.
– Connect the equipment into an outlet on a circuit different from that to which the receiver is
located.
– Consult the dealer or an experienced radio/TV technician for help.
NOTE:Shielded audio and coaxial digital cables must be used for connection of the Millennium
2.4.6 DTS Decoder/Preamp to other equipment to minimize interference from and to nearby
electronic devices.
19
Page 20

SPECIFICATIONS
20
Analog I/O : 6 inputs, 6 outputs; standard RCA type connectors
Coaxial digital input: 1) AES consumer standard (RCA), 0.5Vp-p/75 ohm
Optical digital input: 1) TOSLINK
Coaxial digital output: AES consumer standard (RCA), 0.5Vp-p/75 ohm
(works with either digital input)
Analog outputs: Standard line level
(2Vrms at 0dB into 1K ohm (min.) load)
Analog inputs: Standard line level
(2Vrms at 0dB into 50K ohm (min.) load)
DTS Decoder: Motorola 56009 DSP (upgradable)
D-to-A Converter: 3) stereo 20 bit Delta Sigma DACs
Digital Filter: 8X interpolation, and .008 dB ripple
Frequency range: 10Hz to 20KHz
Frequency response: ± 0dB 10Hz to 20Khz (pass through mode)
-2.5dB @ 20KHz (DTS Decode mode
with proprietary re-equalization cur ve implemented)
LFE frequency response: ± 0dB 10Hz to 80Hz
- 6.5dB @120Hz
Signal to Noise ratio: 110dB
TRIM range: ±15dB minimum
MASTER level:
AUTO mode ±30dB minimum (offset range)
MANUAL mode 0dB fully clockwise; no output fully counter clockwise
Power requirement: 12V, 800mA (max) DC Supply
(supplied for most countries).
Power connector: 5.5 x 2.1mm center positive “barrel”connector,
located on rear panel; fits mating connector on power
supply.
Power fusing: Automatically resetting circuit protector
Dimensions: 17” W x 6.5” D x 2” H
Unit optionally mounts in standard 19” rack,
using 1 RU of vertical space
Weight: 6.8 lbs. without rack mount bracket
DTS Decoding under license from DTS Technology LLC, US Patent Number 5,451,942
Modifications may be made from to time to time without prior notice in order to insure the highest standards
and performance. Specifications and appearance may differ from those listed or shown.
Designed and Engineered in the USA
U.S.and Foreign Patents Pending
 Loading...