

Page 1
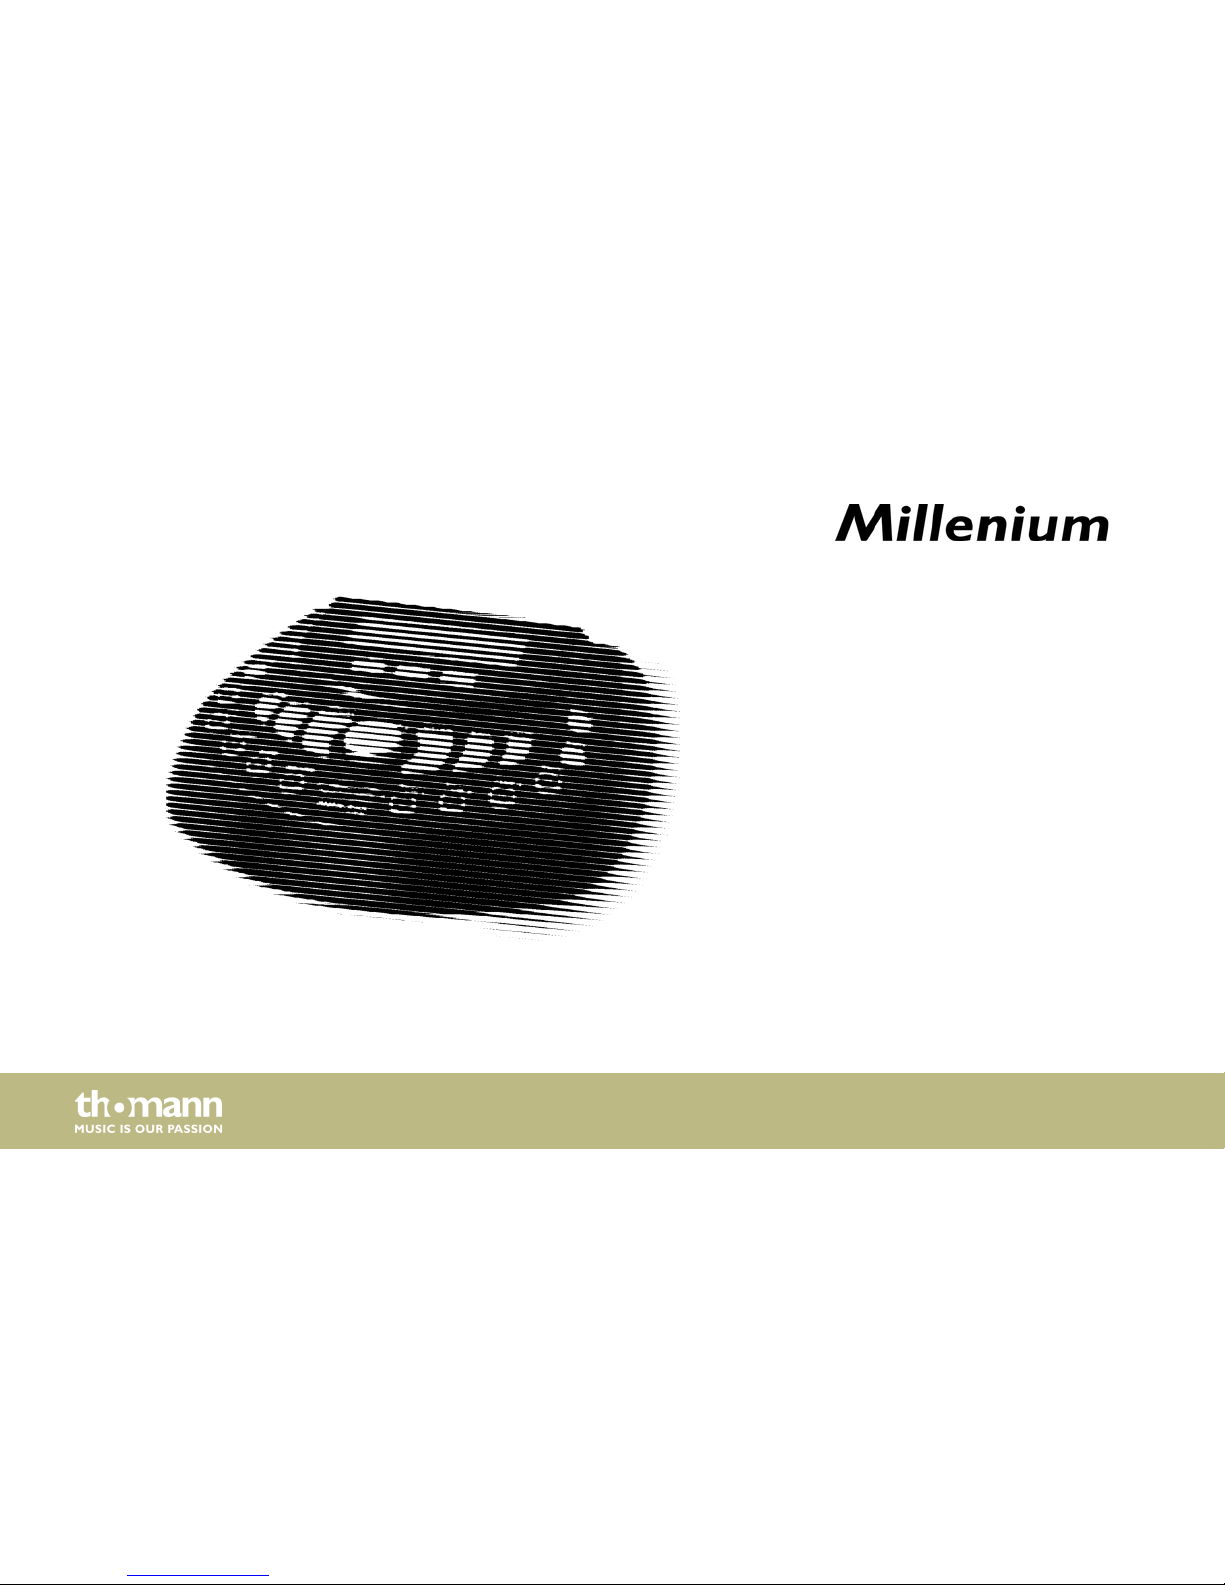
MPS-500 USB
e-drum module
user manual
Page 2

Musikhaus Thomann
Thomann GmbH
Hans-Thomann-Straße 1
96138 Burgebrach
Germany
Telephone: +49 (0) 9546 9223-0
E-mail: [email protected]
Internet: www.thomann.de
28.06.2016, ID: 305855 (V4)
Page 3

Table of contents
1 General notes............................................................................................................................................... 5
1.1 Further information........................................................................................................................... 6
1.2 Notational conventions.................................................................................................................... 7
1.3 Symbols and signal words............................................................................................................... 9
2 Safety instructions.................................................................................................................................. 11
3 Features....................................................................................................................................................... 14
4 Installation.................................................................................................................................................. 15
5 Operating elements............................................................................................................................... 18
6 Operating.................................................................................................................................................... 25
6.1 Functions............................................................................................................................................. 25
6.2 Playing, customising and accompanying songs.................................................................. 27
6.3 Drum kits ............................................................................................................................................ 30
6.4 Pad settings........................................................................................................................................ 35
6.5 Click settings...................................................................................................................................... 43
6.6 Recording function.......................................................................................................................... 46
Table of contents
MPS-500 USB
3
Page 4
6.7 Reset to factory defaults................................................................................................................ 48
7 Technical specifications....................................................................................................................... 49
8 Connector and pin assignments...................................................................................................... 50
9 Cleaning....................................................................................................................................................... 52
10 Protecting the environment.............................................................................................................. 53
11 Appendix..................................................................................................................................................... 54
11.1 Kit list.................................................................................................................................................. 54
11.2 MIDI implementation................................................................................................................... 55
Table of contents
e-drum module
4
Page 5

1 General notes
This manual contains important instructions for the safe operation of the unit. Read and follow
the safety instructions and all other instructions. Keep the manual for future reference. Make
sure that it is available to all those using the device. If you sell the unit please make sure that
the buyer also receives this manual.
Our products are subject to a process of continuous development. Thus, they are subject to
change.
General notes
MPS-500 USB
5
Page 6
1.1 Further information
On our website (www.thomann.de) you will find lots of further information and details on the
following points:
Download This manual is also available as PDF file for you to download.
Keyword search
Use the search function in the electronic version to find the topics of
interest for you quickly.
Online guides
Our online guides provide detailed information on technical basics
and terms.
Personal consultation For personal consultation please contact our technical hotline.
Service
If you have any problems with the device the customer service will
gladly assist you.
General notes
e-drum module
6
Page 7

1.2 Notational conventions
This manual uses the following notational conventions:
The letterings for connectors and controls are marked by square brackets and italics.
Examples: [VOLUME] control, [Mono] button.
Texts and values displayed on the device are marked by quotation marks and italics.
Examples: ‘24ch’ , ‘OFF’.
Letterings
Displays
General notes
MPS-500 USB
7
Page 8
The individual steps of an instruction are numbered consecutively. The result of a step is
indented and highlighted by an arrow.
Example:
1. Switch on the device.
2. Press [Auto].
ð
Automatic operation is started.
3. Switch off the device.
Text inputs that are carried out on the device are indicated by typewriter font.
Example: 2323
References to other locations in this manual are identified by an arrow and the specified page
number. In the electronic version of the manual, you can click the cross-reference to jump to
the specified location.
Example: See Ä ‘Cross-references’ on page 8.
Instructions
Text input
Cross-references
General notes
e-drum module
8
Page 9
1.3 Symbols and signal words
In this section you will find an overview of the meaning of symbols and signal words that are
used in this manual.
Signal word Meaning
DANGER! This combination of symbol and signal word indicates an
immediate dangerous situation that will result in death or
serious injury if it is not avoided.
CAUTION! This combination of symbol and signal word indicates a pos‐
sible dangerous situation that can result in minor injury if it
is not avoided.
NOTICE! This combination of symbol and signal word indicates a pos‐
sible dangerous situation that can result in material and
environmental damage if it is not avoided.
General notes
MPS-500 USB
9
Page 10
Warning signs Type of danger
Warning – danger zone.
General notes
e-drum module
10
Page 11

2 Safety instructions
Drum modules are intended to be used for converting digital trigger signals from drum pads
to various percussion sounds. Use the unit only as described in this manual. Any other use or
use under other operating conditions is considered to be improper and may result in personal
injury or property damage. No liability will be assumed for damages resulting from improper
use.
This device may be used only by persons with sufficient physical, sensorial, and intellectual
abilities and having corresponding knowledge and experience. Other persons may use this
device only if they are supervised or instructed by a person who is responsible for their safety.
Intended use
Safety instructions
MPS-500 USB
11
Page 12
DANGER!
Danger for children
Ensure that plastic bags, packaging, etc. are disposed of properly and are not
within reach of babies and young children. Choking hazard!
Ensure that children do not detach any small parts (e.g. knobs or the like) from
the unit. They could swallow the pieces and choke!
Never let children unattended use electrical devices.
CAUTION!
Possible hearing damage
With loudspeakers or headphones connected, the device can produce volume
levels that may cause temporary or permanent hearing impairment.
Do not operate the device permanently at a high volume level. Decrease the
volume level immediately if you experience ringing in your ears or hearing
impairment.
Safety
Safety instructions
e-drum module
12
Page 13
NOTICE!
Operating conditions
This device has been designed for indoor use only. To prevent damage, never
expose the device to any liquid or moisture. Avoid direct sunlight, heavy dirt, and
strong vibrations.
NOTICE!
External power supply
The device is powered by an external power supply. Before connecting the
external power supply, ensure that the input voltage (AC outlet) matches the
voltage rating of the device and that the AC outlet is protected by a residual cur‐
rent circuit breaker. Failure to do so could result in damage to the device and pos‐
sibly the user.
Unplug the external power supply before electrical storms occur and when the
device is unused for long periods of time to reduce the risk of electric shock or
fire.
Safety instructions
MPS-500 USB
13
Page 14
3 Features
n 431 sounds
n 20 drum kits, 20 user kit
n 40 songs, 15 user songs
n Metronome
n Recording function
n MIDI functions
n Flexible assignment of pad voices
n Headphones, LINE IN / OUT and USB (MIDI) connectors
n Automatic shutoff
Features
e-drum module
14
Page 15
4 Installation
Rack setup and assembly of the pads and pedals are described in detail in the enclosed set
assembly guide. Finally check that all cables between the pads and the drum module have
been properly connected.
Connect the supplied D-sub plug of the pad connector cable to the D-sub input socket on the
rear panel of the drum module.
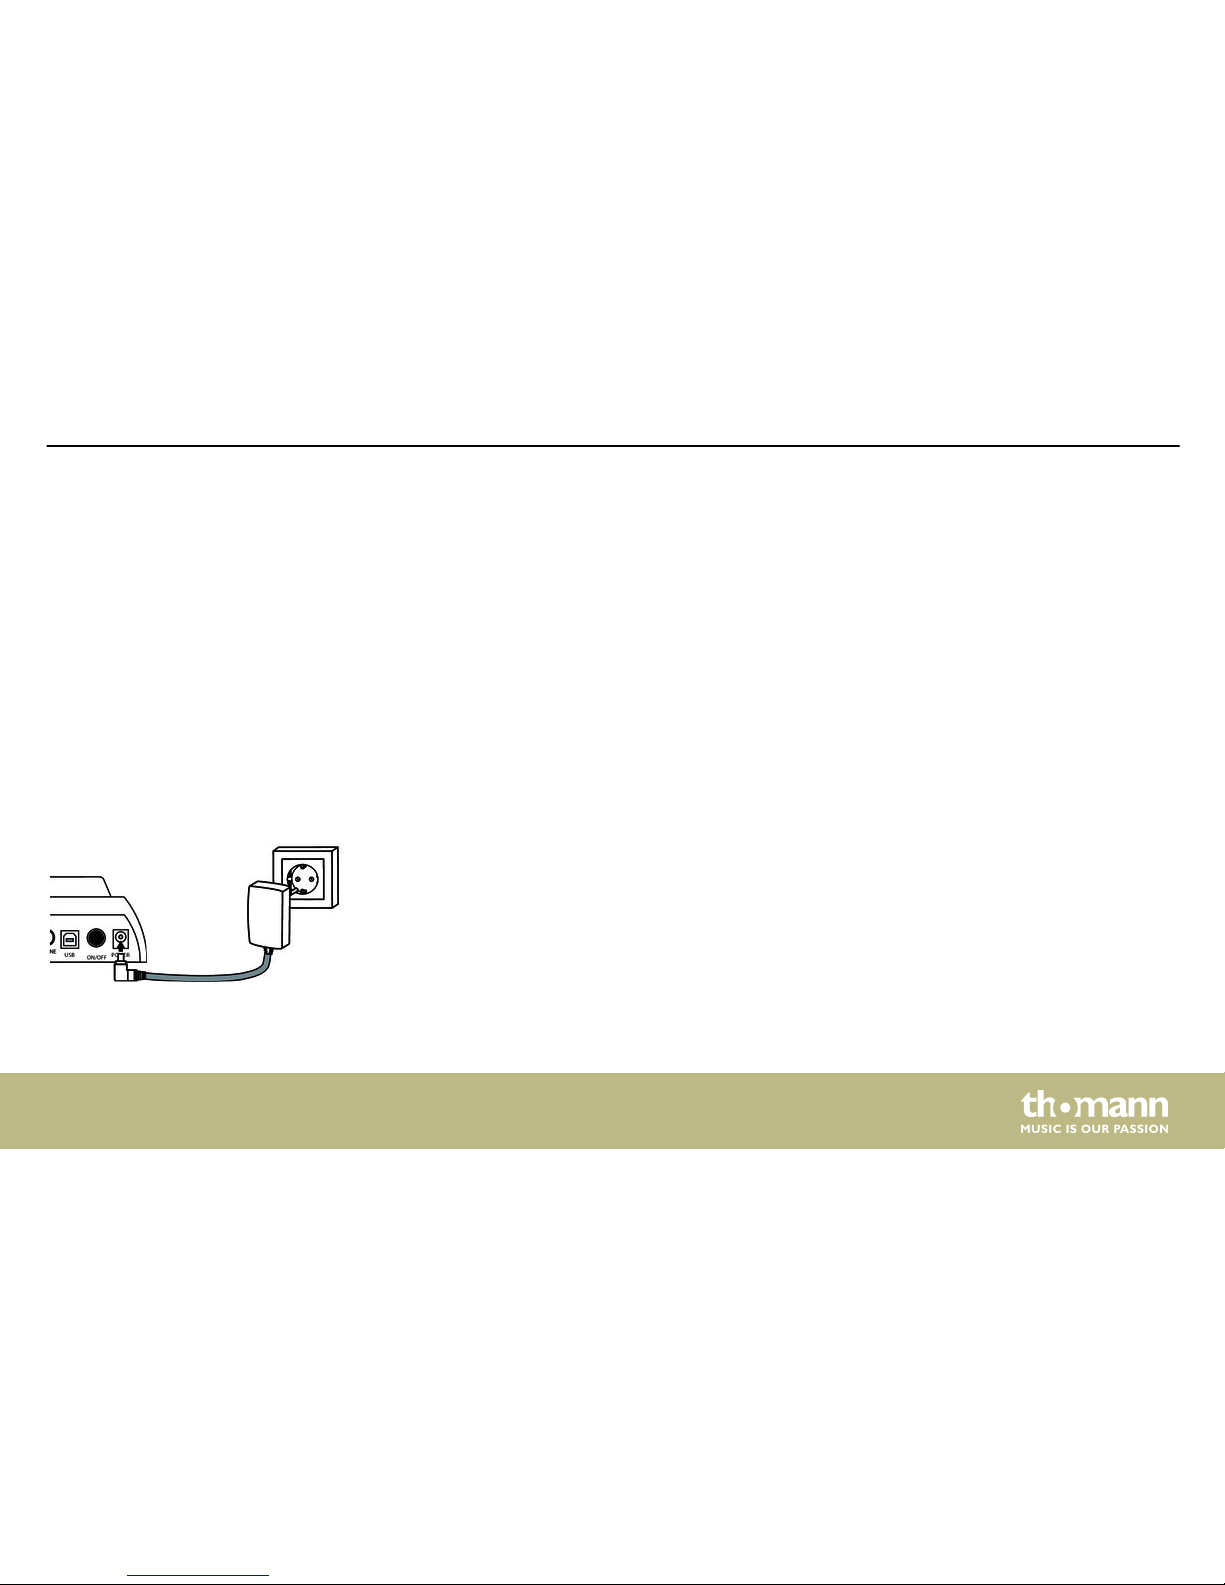
Connect the included power supply unit to the POWER input on the rear panel of the drum
module and then put the power plug into the power outlet.
Rack setup, connecting pads
and pedals
Connecting the pads
Connecting the power adapter
Installation
MPS-500 USB
15
Page 16
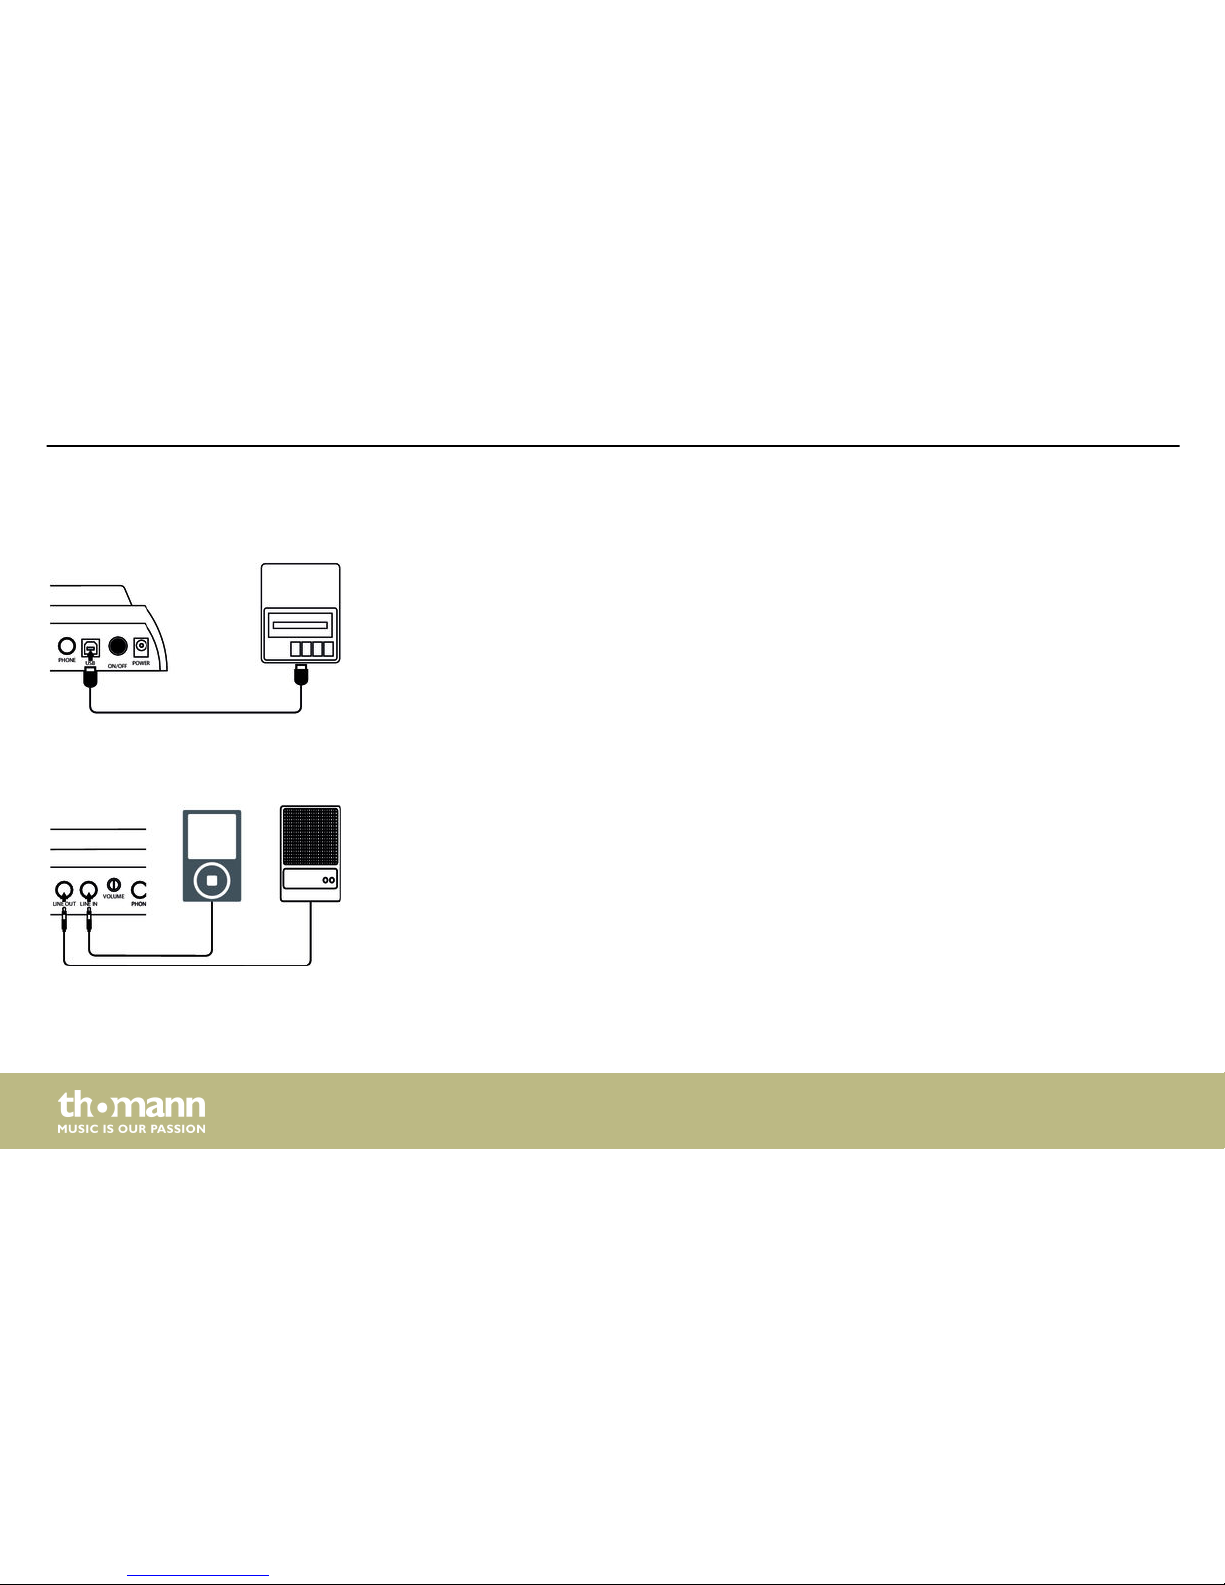
Connect your computer (Windows Vista/XP®, Mac) to the USB port on the rear panel of the
drum module.
Connect the inputs of your amplifier or active monitor to the output socket LINE OUT, CD or
MP3 players etc. to the LINE IN input socket on the rear panel of the drum module.
Connecting USB devices
Connecting audio devices
Installation
e-drum module
16
Page 17
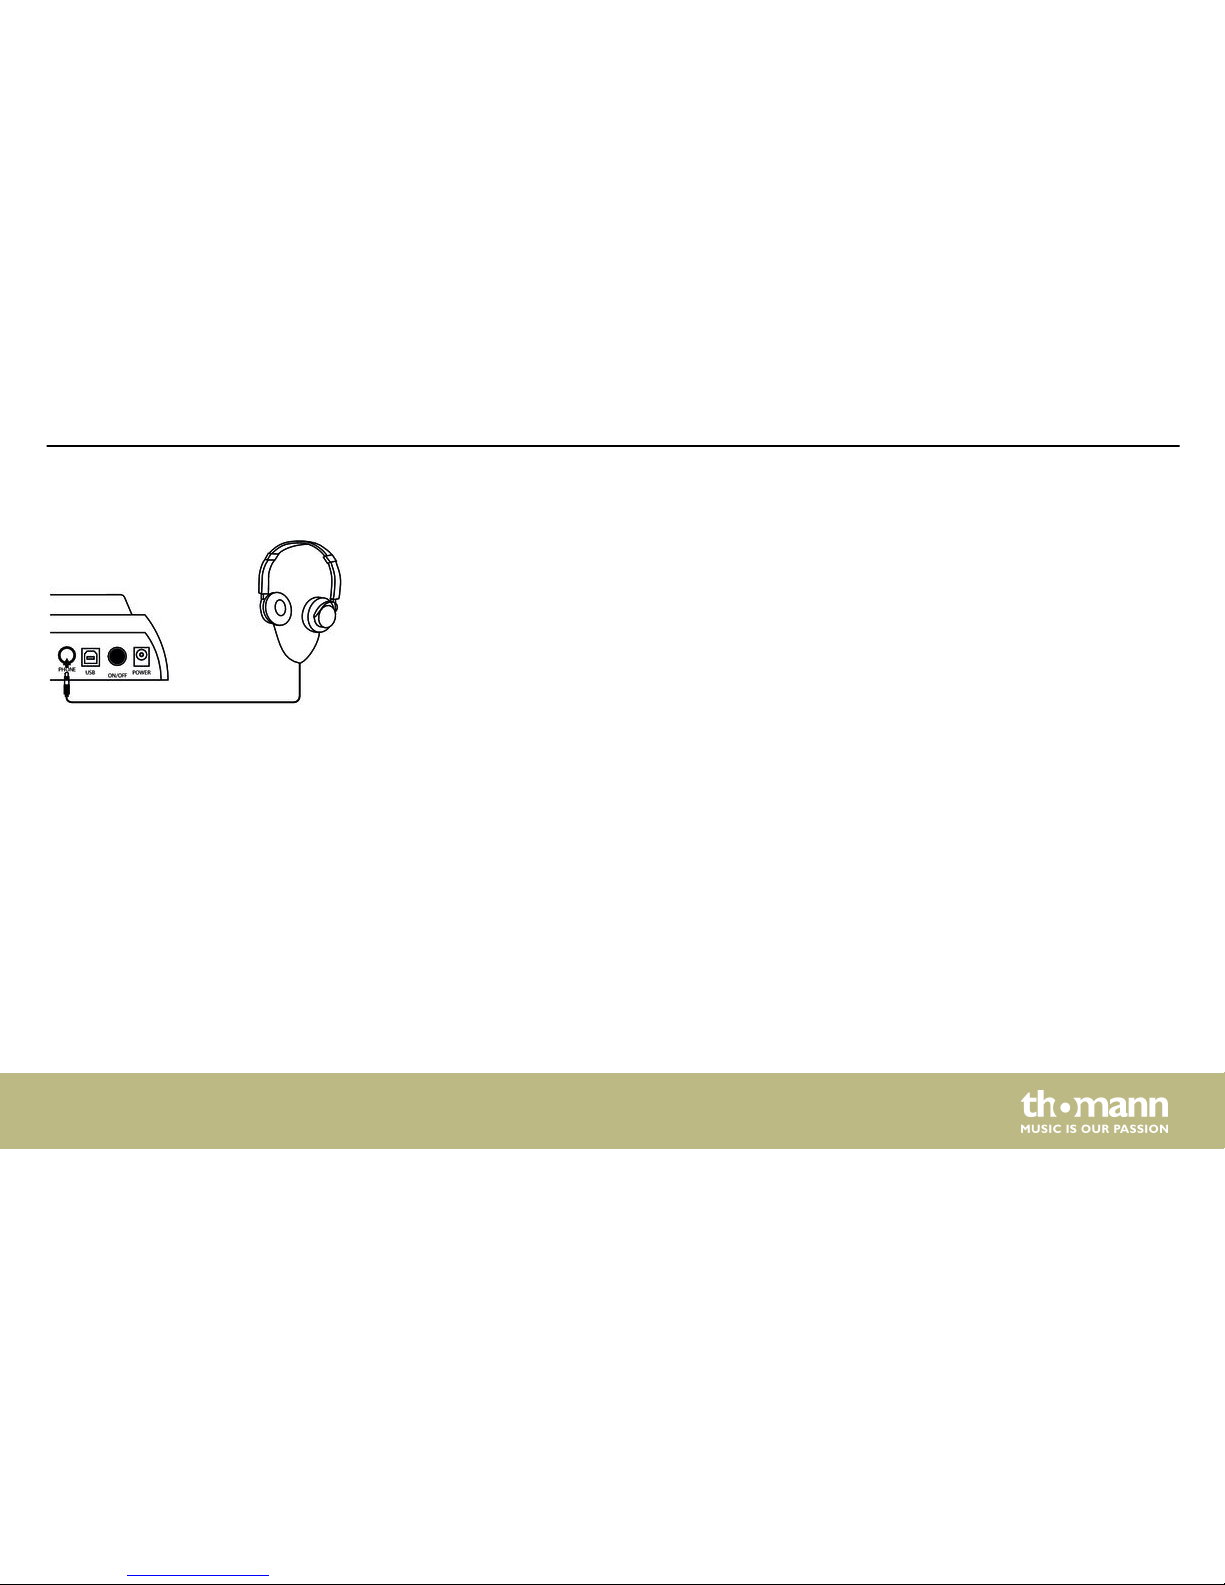
Connect your stereo headphones to the PHONE output on the rear panel of the drum module.Connecting headphones
Installation
MPS-500 USB
17
Page 18
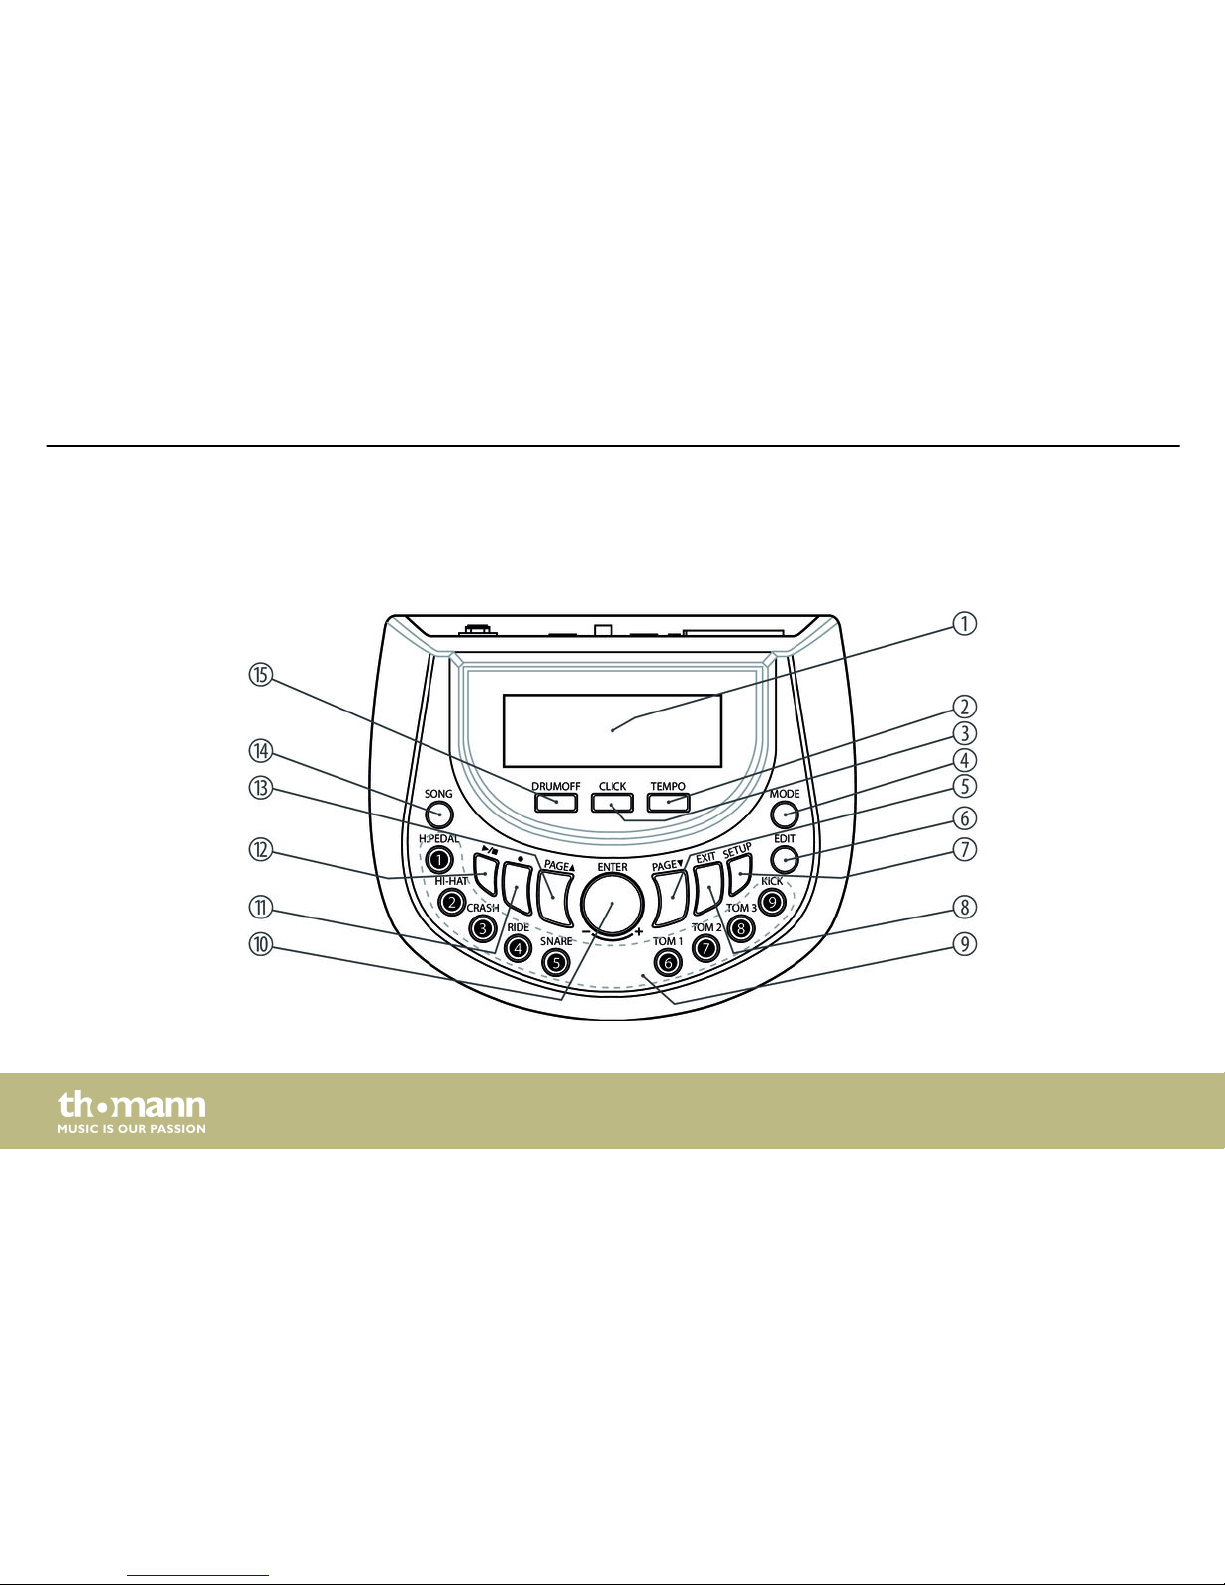
5 Operating elements
Front panel
Operating elements
e-drum module
18
Page 19
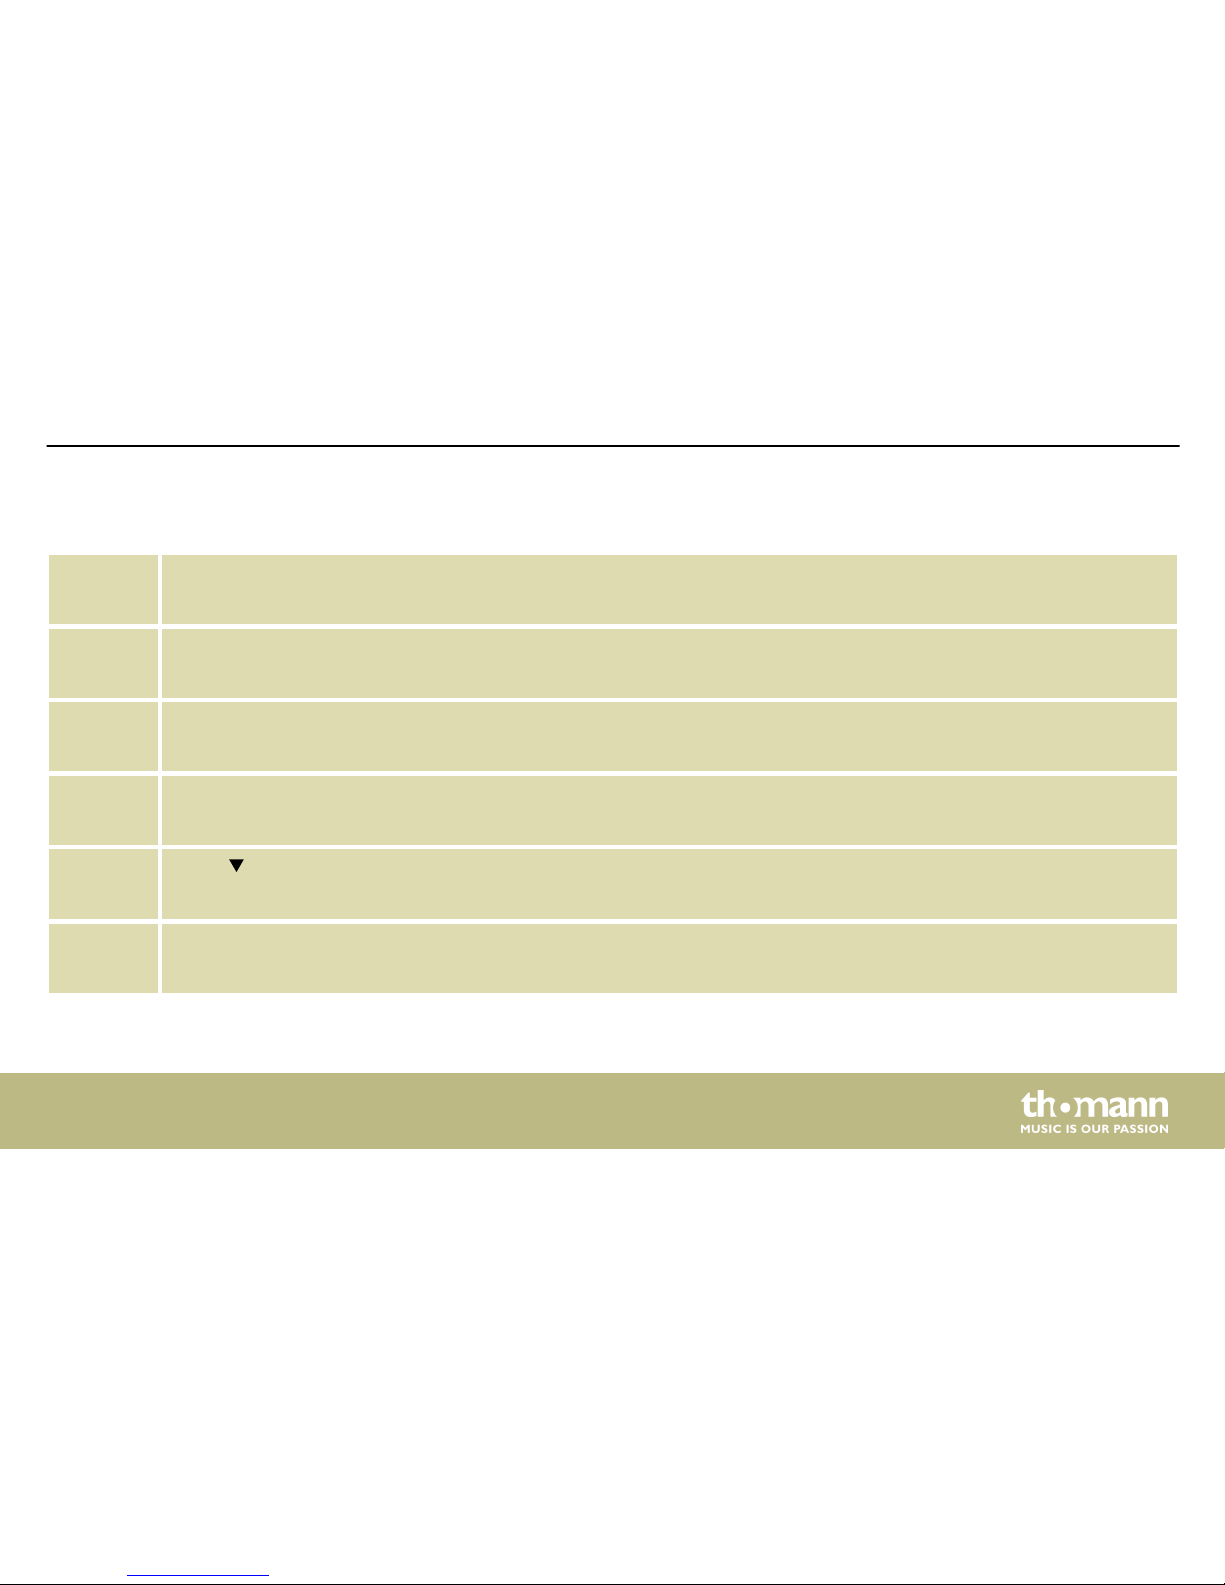
1 Backlit LCD
Displays the Song, Kit and Voice numbers and various setting parameters.
2 [TEMPO]
Adjusts the tempo of the click and of the song playback.
3 [CLICK]
Turns the metronome on and off and opens the click menu.
4 [MODE]
Button to switch between operating modes.
5
[PAGE]
Parameter selection down in EDIT and SETUP menu.
6 [EDIT]
Button to open the programming menu.
Operating elements
MPS-500 USB
19
Page 20
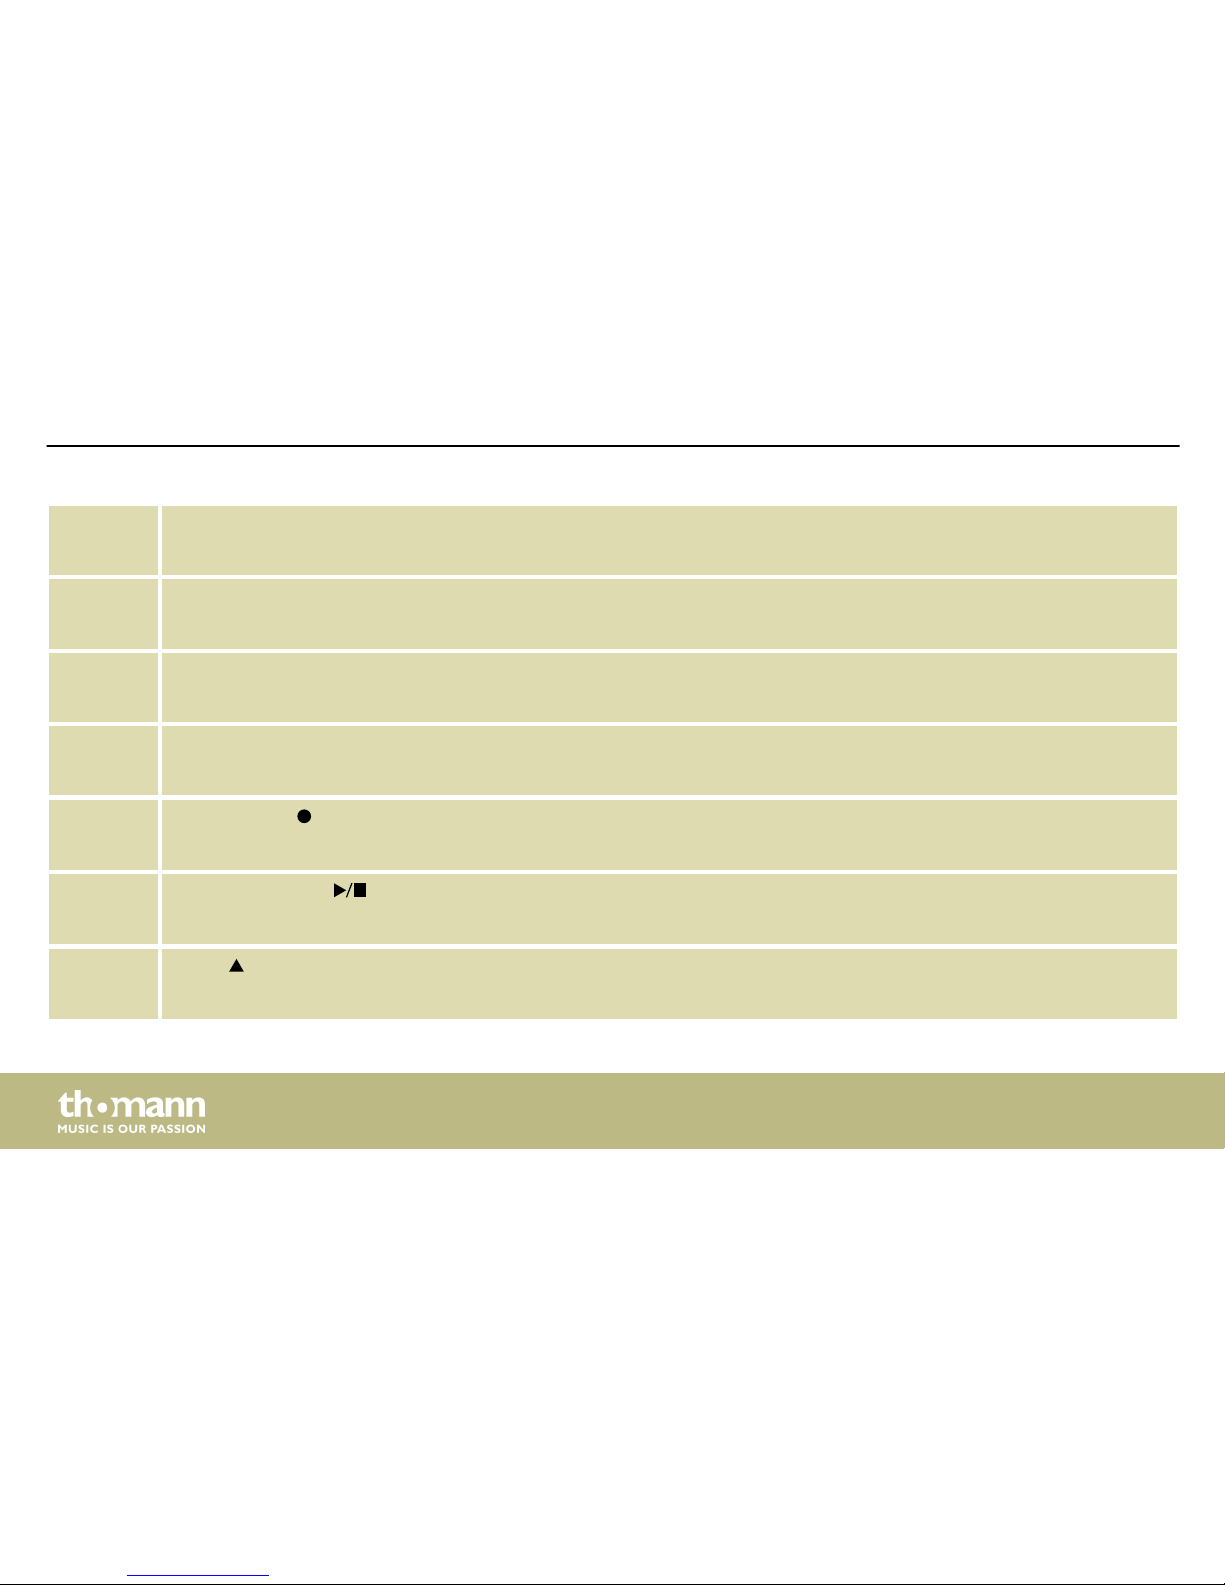
7 [SETUP]
Button to open the device settings menu.
8 [EXIT]
Return key to exit a menu or to discard changes.
9 Pad selection area
Buttons to activate and play pads and kits.
10 Rotary control [–] / [+] | [ENTER]
Rotating increases or decreases the value of the currently selected parameter. Press to confirm a selection or change.
11
Record button
Button to start recording.
12
Start / Stop button
Button to start and end Song playback and to stop recording.
13
[PAGE]
Parameter selection up in EDIT and SETUP menu.
Operating elements
e-drum module
20
Page 21
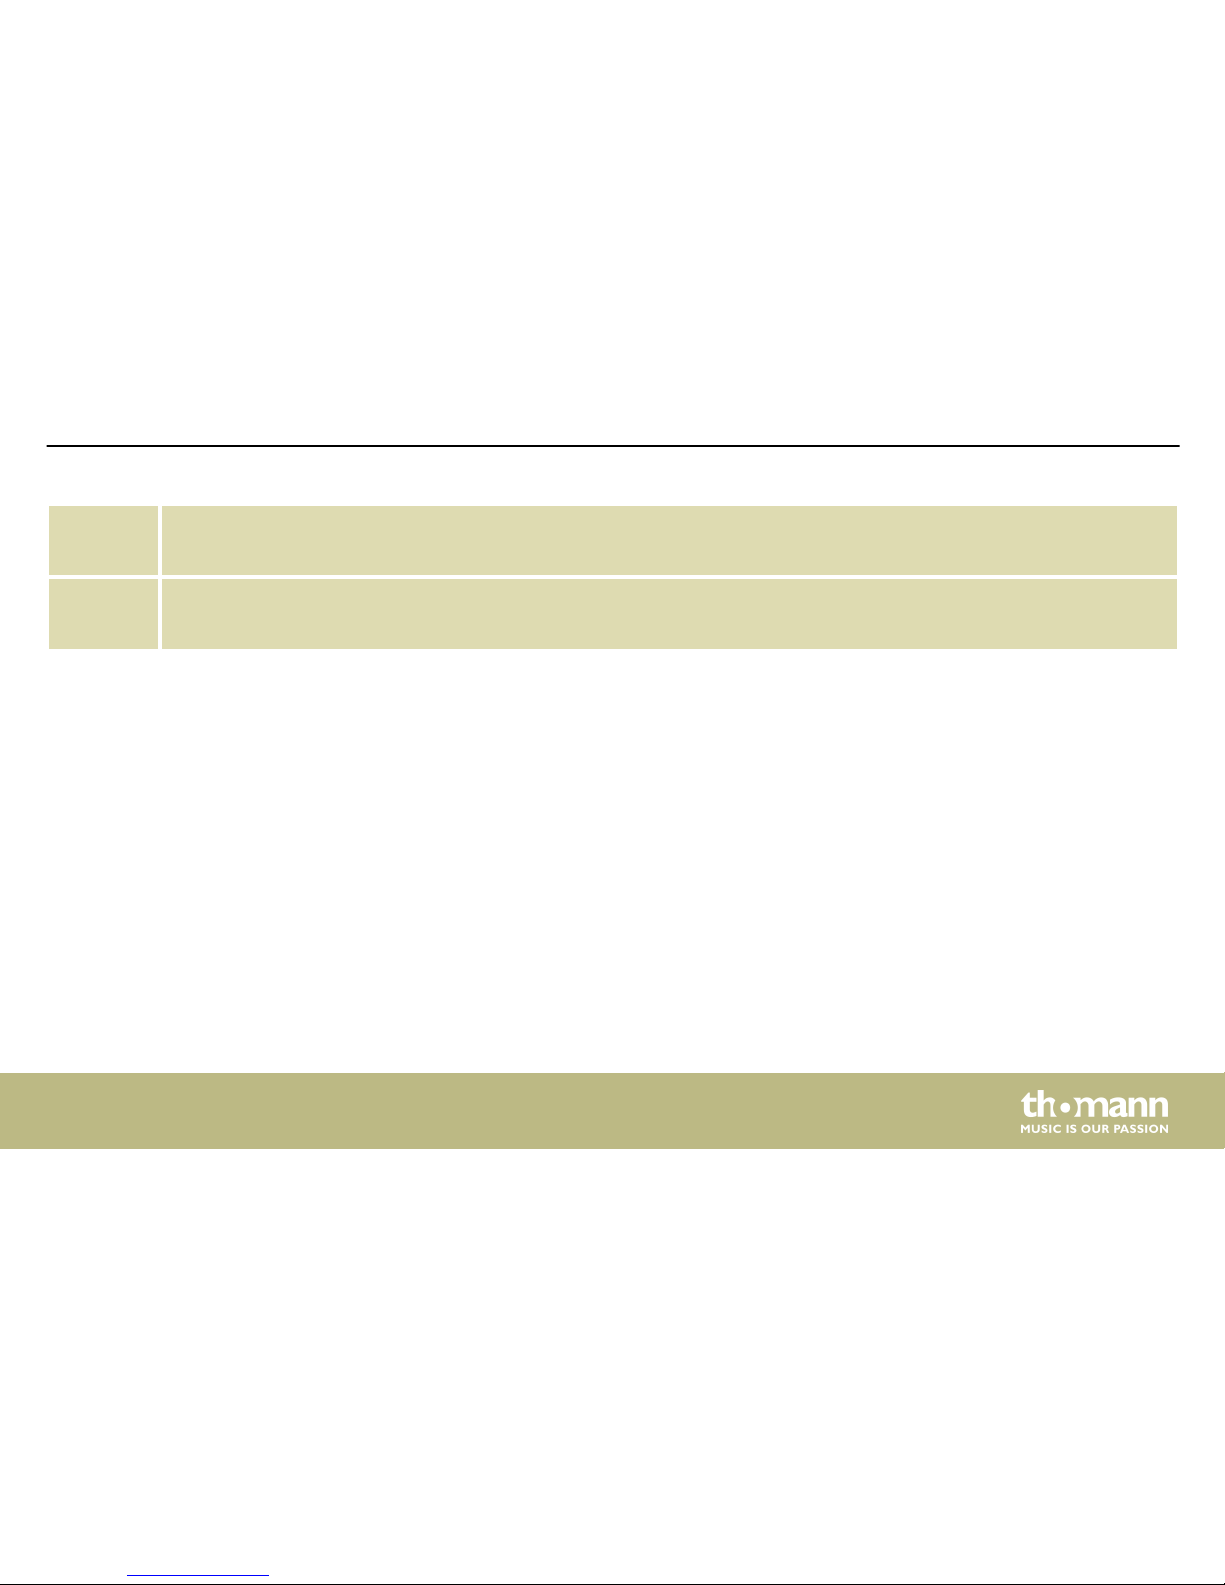
14 [SONG]
Button to call up the Demo mode and to play user songs.
15 [DRUMOFF]
Turns the drum track on and off when playing songs.
Operating elements
MPS-500 USB
21
Page 22
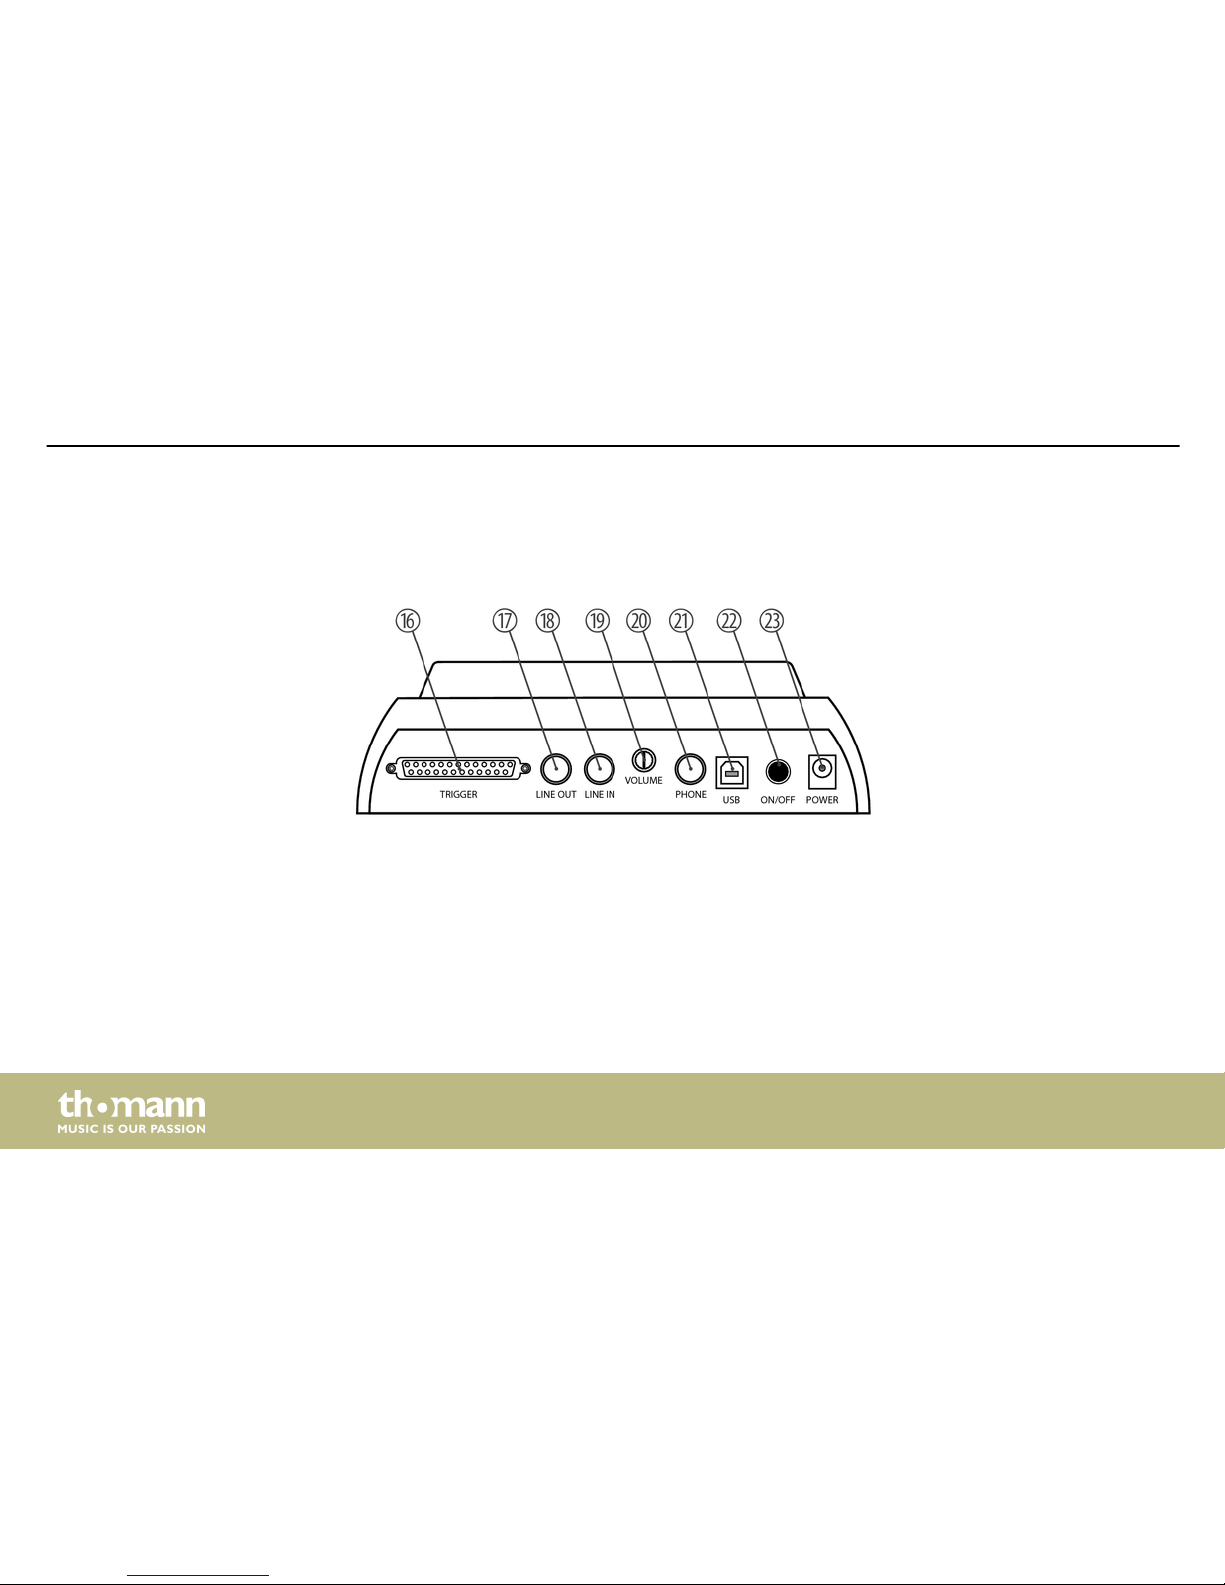
Rear panel
Operating elements
e-drum module
22
Page 23
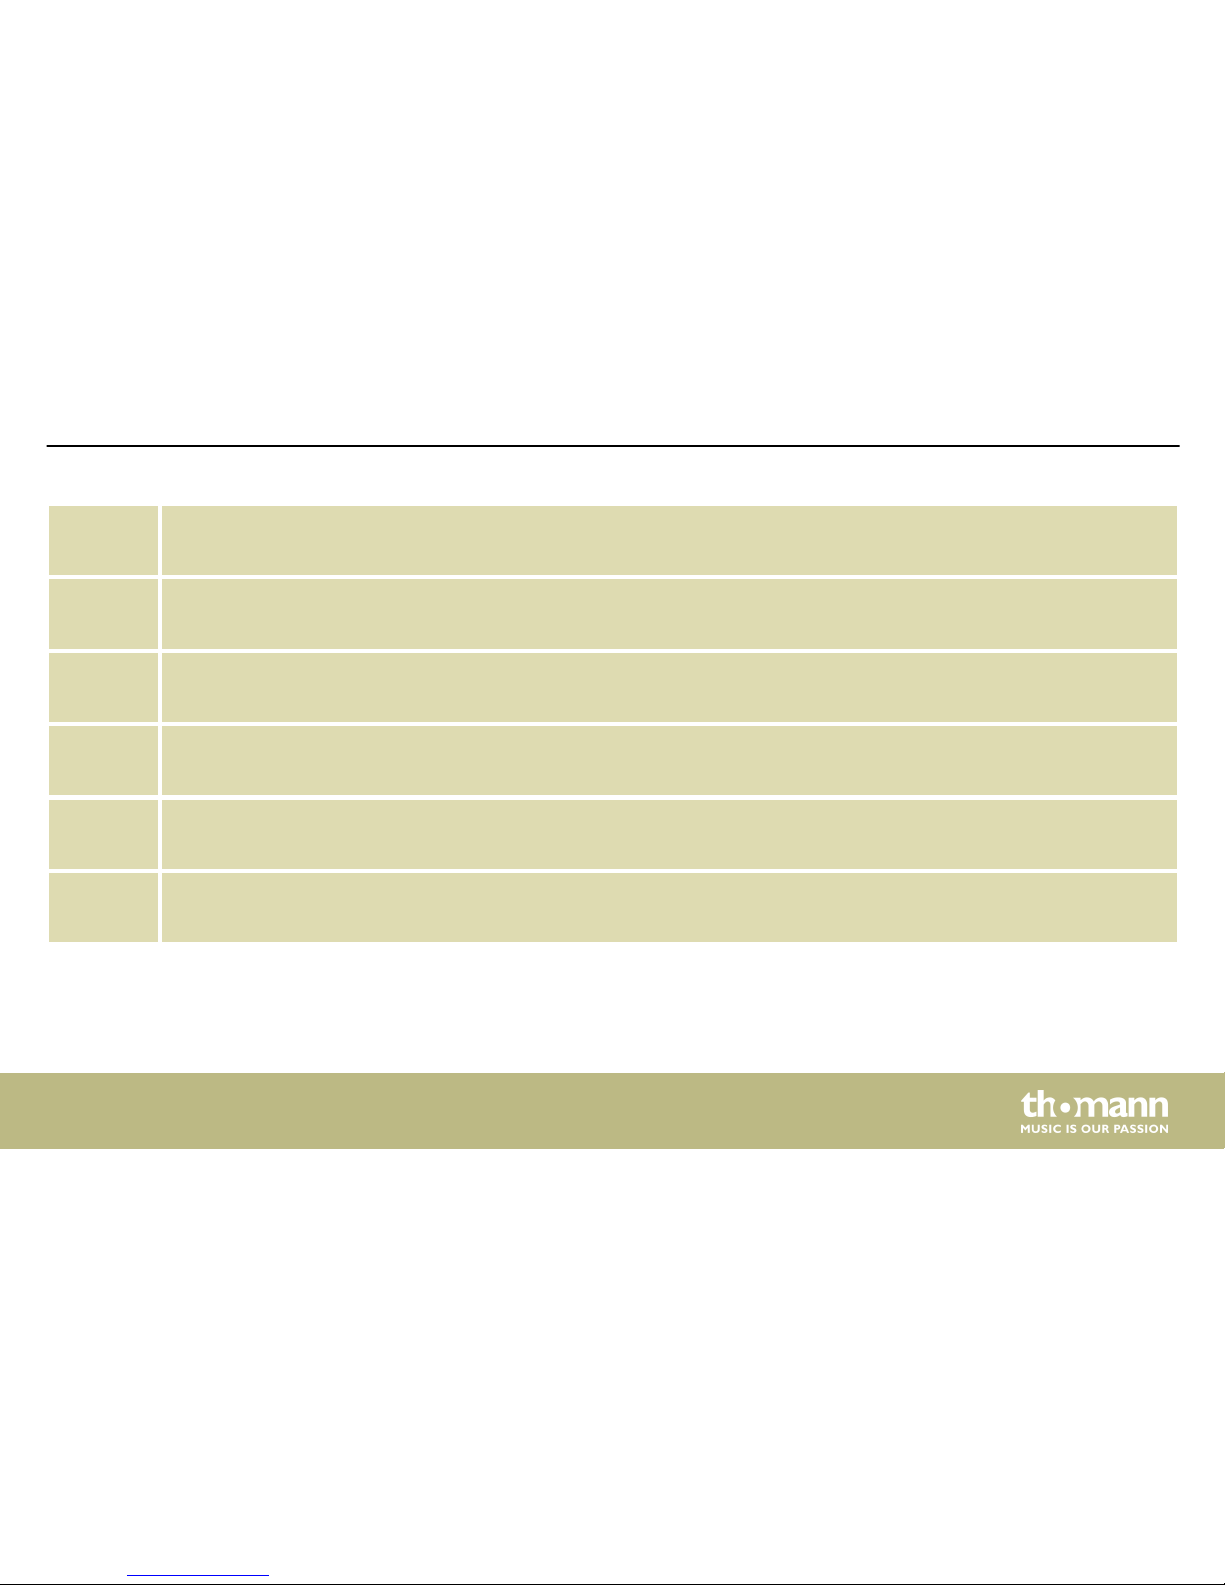
16 [TRIGGER]
Input for connecting the pads using the included cable.
17 [LINE OUT]
Output socket to connect an amplifier or powered monitor.
18 [LINE IN]
Input socket for connecting audio devices like CD and MP3 players, etc.
19 [VOLUME]
Rotary control for adjusting the headphones output volume.
20 [PHONE]
Headphones output.
21 [USB]
USB port for connecting a PC with USB-MIDI interface.
Operating elements
MPS-500 USB
23
Page 24
22 [ON / OFF]
Main switch to turn the device on and off.
23 [POWER]
Connection socket for the power adapter.
Operating elements
e-drum module
24
Page 25
6 Operating
6.1 Functions
Check all cable connections for correct fit before turning on.
Before switching on, turn the volume control [VOLUME] on the rear panel to min‐
imum.
Turn the drum module on using the [ON/OFF] switch on the rear panel.
If the module is not in use, it shuts off after 20 minutes automatically. To turn it on again, press
the [ON/OFF] button.
To adjust the volume strike a pad while turning the volume control [VOLUME] slowly clockwise.
Switching on
Automatic shutoff
Adjusting the volume
Operating
MPS-500 USB
25
Page 26
A drum kit is a compilation in which a certain sound and several sound parameters are
assigned to each trigger. Selecting different drum kits lets you customise the sound of your edrum sets in seconds to the desired music genre. In addition to the 20 preset drum kits you can
create and save 20 user kits (for more information, see Ä Chapter 11.1 ‘Kit list’ on page 54 and
Ä
Chapter 6.3 ‘Drum kits ’ on page 30).
1. After switching on, to the left beneath KIT the name of the current kit is displayed.
2. Use the rotary control [–] / [+] to select the desired kit. First come the preset kits, then
the user kits.
Upon delivery, all user kits are preset with a default assignment. Programming of user
kits is described in detail here Ä Chapter 6.3 ‘Drum kits ’ on page 30.
The selected drum kit is immediately active.
Press the button [CLICK] to turn the Click on and off again. When the Click is running, the indi‐
cator LED of the button lights. The various setting options are described in detail here
Ä
Chapter 6.5 ‘Click settings’ on page 43.
Selecting a drum kit
Click function
Operating
e-drum module
26
Page 27
6.2 Playing, customising and accompanying songs
Your digital drum set offers a total of 40 preset songs, which can be played individually of con‐
secutively.
1. Press the button [SONG].
ð
The indicator LED of the button lights, the display shows ‘01 WalkWithTree’ .
2. Use the rotary control [–] / [+] to select the desired song.
3.
Press the button Start/Stop .
ð
The indicator LED of the button lights and song playback starts.
4.
Press the START/STOP button again to stop playback.
ð
The indicator LED of the button goes out.
Tempo and time signature of the currently playing song are shown in the top right of
the display.
Playing preset songs
Operating
MPS-500 USB
27
Page 28
Your digital drum set offers two accompaniment modes for practising with preset songs.
n FULL
In this mode, you hear the whole song when accompanying, i.e. all tracks.
n DRUM MUTE
In this mode, the drum track of the song is muted.
To activate the desired mode press the button [DRUMOFF]. The indicator LED in the button
lights when the drum track is muted.
Press [MODE] to change the playback order of the songs with the rotary control [–] / [+] :
‘Repeat One’ , ‘Play All’, ‘Repeat All’, ‘Play One’. Press [MODE] again to return to the previous
display.
You digital drum set offers in total 15 memory slots for user songs (see also
Ä
Chapter 6.6
‘Recording function’ on page 46).
1. Press the button [SONG].
ð
The indicator LED of the button lights, the display shows ‘01 WalkWithTree’ .
2. Turn the [–] / [+] control to the left to select the desired user song 01 - 15.
Accompanying preset songs
Playing user songs
Operating
e-drum module
28
Page 29
3.
Press the button Start/Stop .
ð
The indicator LED of the button lights up and the selected song is played.
4.
Press Start/Stop again to stop playback.
Tempo and time signature of the currently playing song are additionally shown in the
top right of the display.
1. Press the button [SETUP].
2.
Use [PAGE] to select the parameter ‘BACK VOLUME’.
ð
The currently set value for song volume is flashing in the display.
3. Use the rotary control [–] / [+] to set the desired volume in a range from 0 to 127 (default
value is 41).
Adjusting song volume
Operating
MPS-500 USB
29
Page 30
4. Press [EXIT]. The display shows ‘Save Setups’ . Bottom right, ‘Yes’ is flashing. If you now
press [ENTER] the changes are stored and the Setup menu will be closed. If you turn the
rotary control [–] / [+] to the left, ‘No’ is flashing. If you now press [ENTER] the changes
will not be stored when closing the Setup menu.
6.3 Drum kits
The 431 preprogrammed sounds of the drum module can be programmed to any of the con‐
nected pads. So you can create user kits and store them in the device. The following sections
describe how to create your own kits.
1.
First, choose the desired kit (UserKit 1 - 20), see
Ä
Chapter 6.1 ‘Functions’ on page 25.
2. Press the button [EDIT] to switch to Edit mode.
ð
The indicator LED of the button lights. Next to ‘VOICETYPE’ , the current Voice cate‐
gory for the currently lit Pad button is flashing in the display.
Operating
e-drum module
30
Page 31
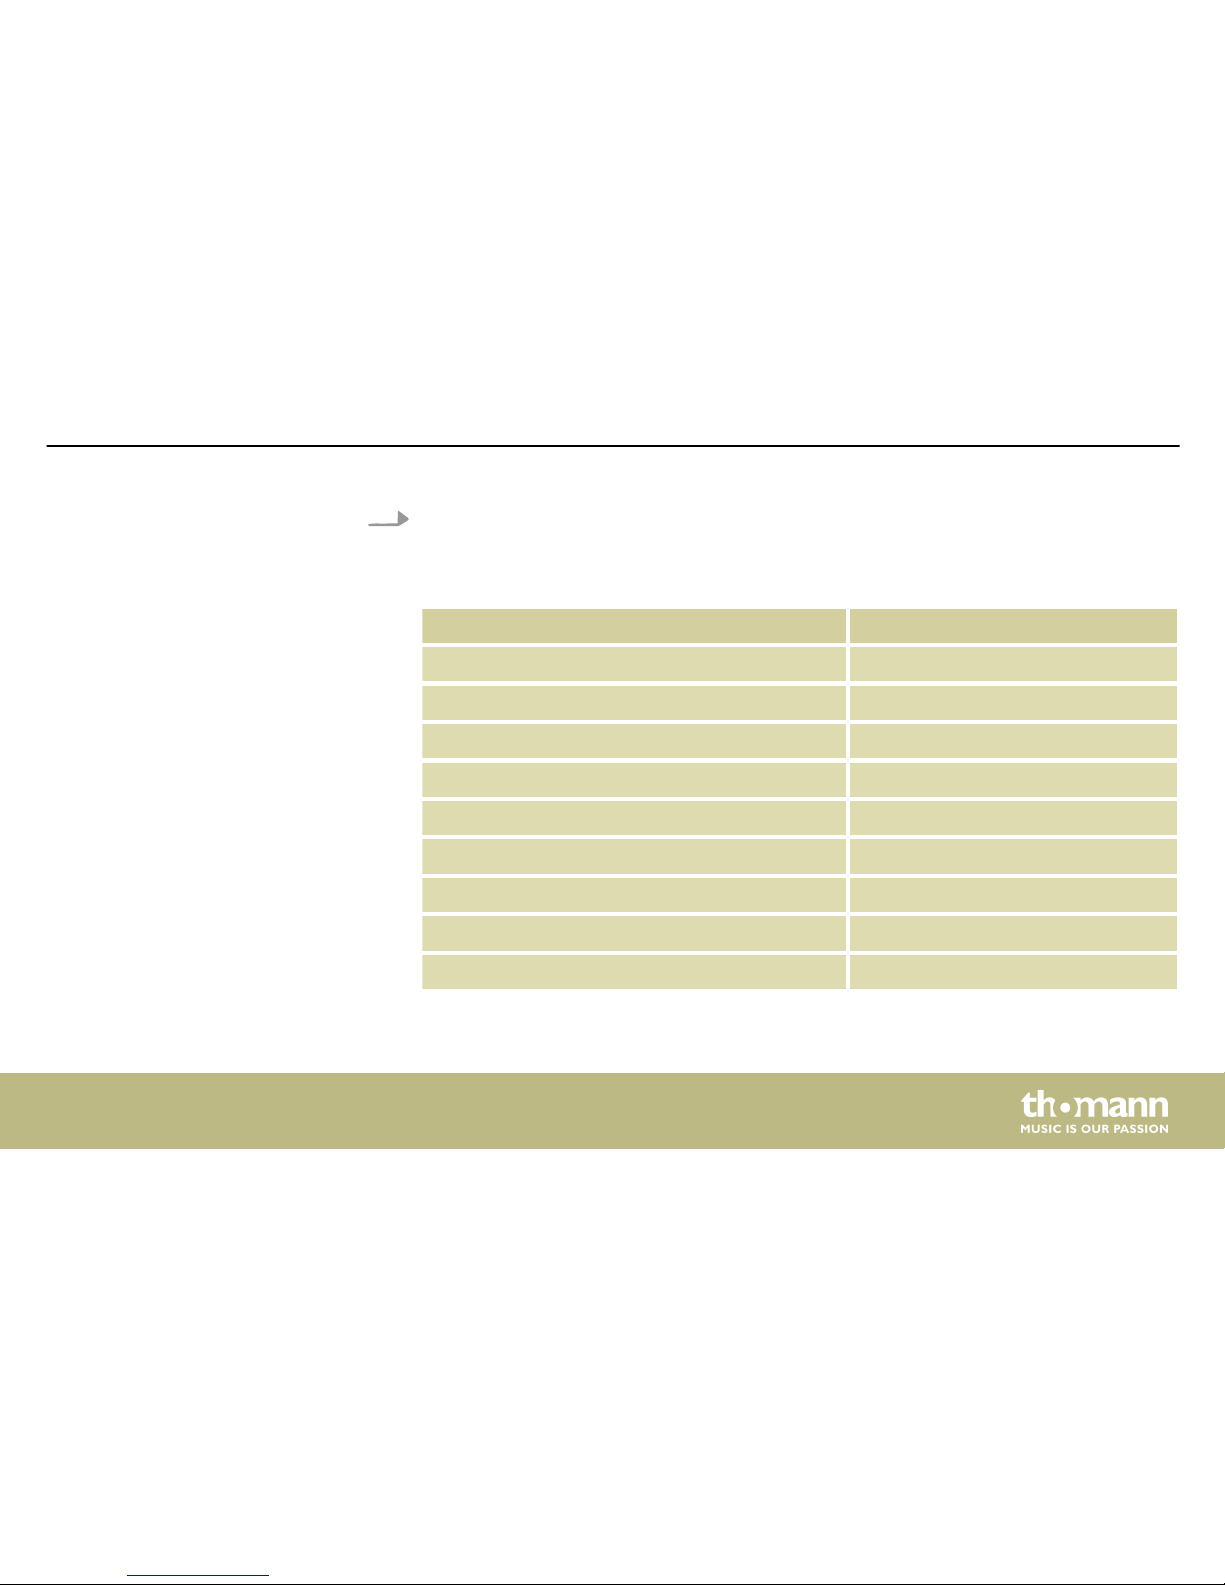
3. Press the button for the pad whose parameters you want to change. Please note that
some pads have multiple assignments, i.e., you have to press a button up to three times
to activate the desired trigger (see chart below). Alternatively, you can activate a trigger
directly by playing the corresponding pad area.
Trigger points, display Pad
PEDAL-Chick | PEDAL-Splash Hi-Hat pedal | close | open
HIHAT-Open | HIHAT-Close | HIHAT-HalfOpen Hi-Hat open | closed | half open
CRASH 1 | CRASH 1-Edge Crash cymbal | edge
RIDE-Bow | RIDE-Bell | RIDE-Edge Ride cymbal | bell | edge
SNARE-Head | SNARE-X-Stick | SNARE-Rim Snare | X stick | rimshot
TOM1 | TOM1-Rim Tom 1 | rimshot
TOM2 | TOM2-Rim Tom 2 | rimshot
TOM3 | TOM3-Rim Tom 3 | rimshot
KICK Bass drum
Operating
MPS-500 USB
31
Page 32
The possible assignment of the triggers depends on the actual configuration of
your drum set.
4.
Use [PAGE] to select one of the parameters described in the following.
Operating
e-drum module
32
Page 33
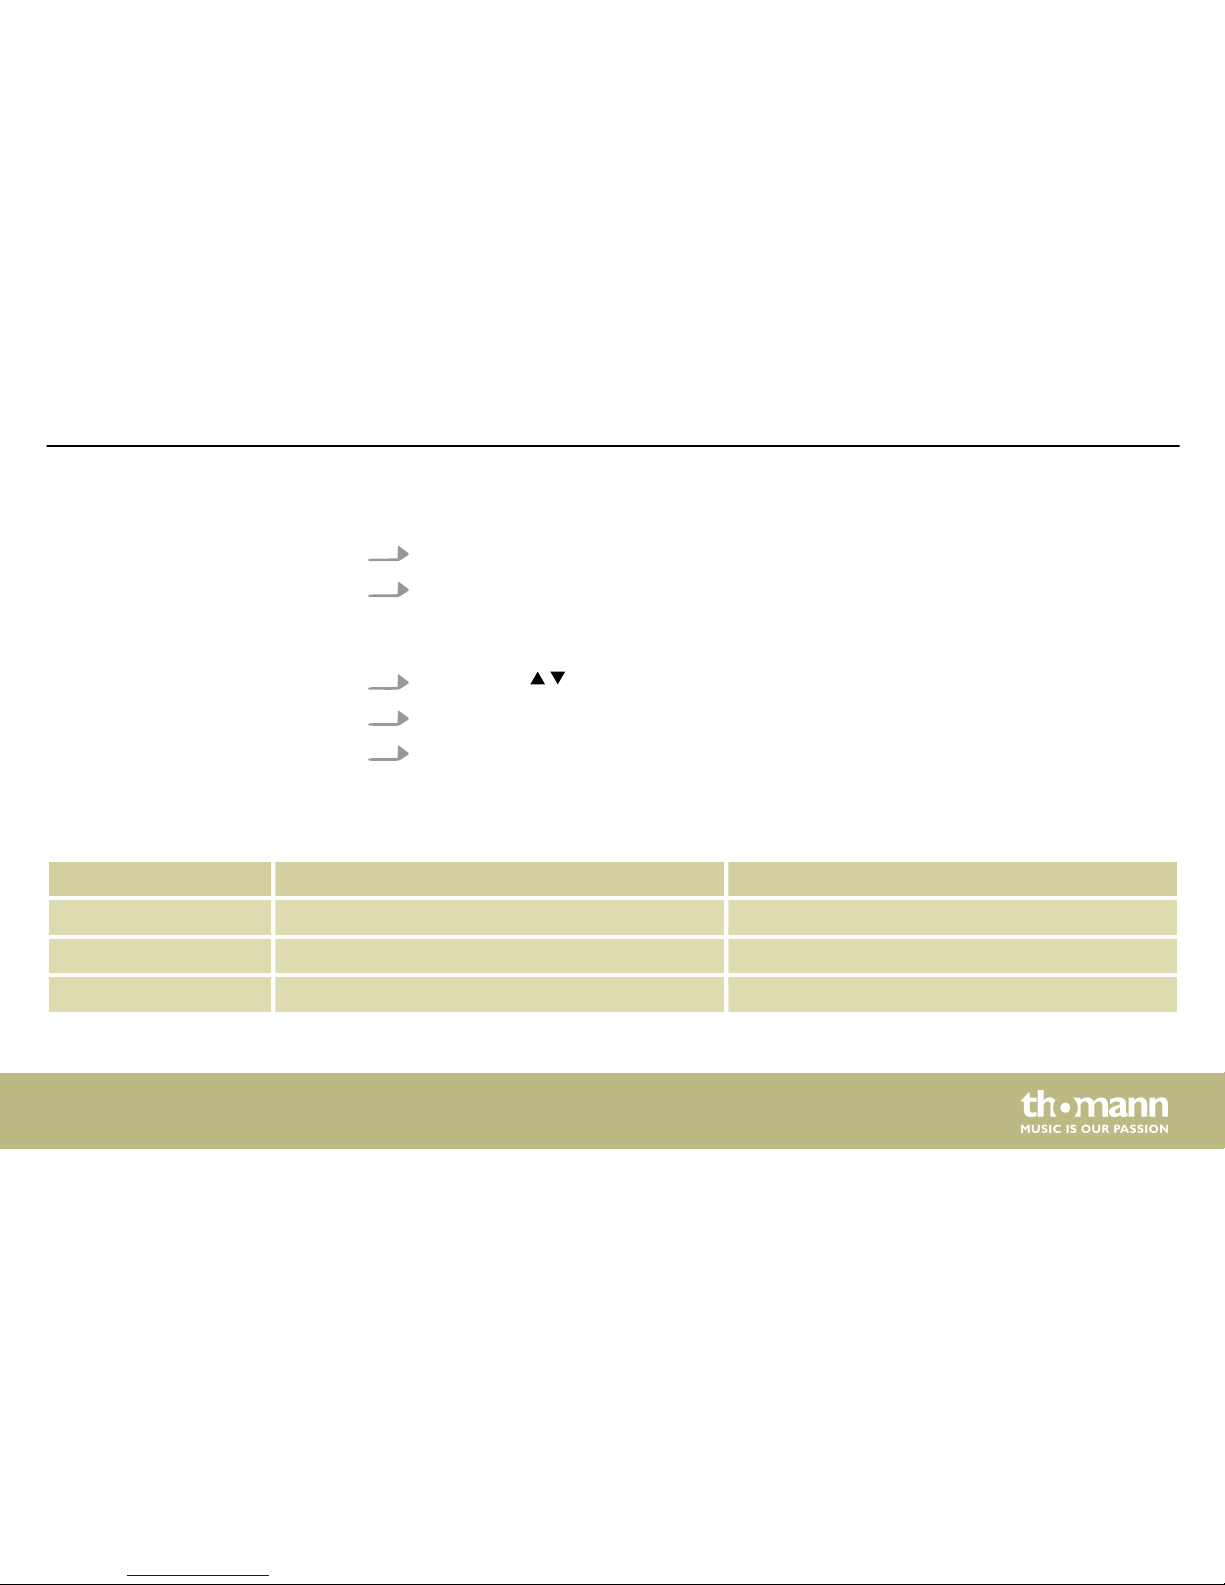
Proceed as follows to adjust the pad parameters:
1.
First, select the desired kit (see Ä Chapter 6.1 ‘Functions’ on page 25).
2. Press the button [EDIT] to switch to Edit mode.
ð
The indicator LED of the button lights. Next to ‘VOICETYPE’ , the current Voice cate‐
gory for the currently lit Pad button is flashing in the display.
3.
Press [PAGE] to jump to the desired parameter (see following chart).
4. To adjust the respective value turn the rotary control [–] / [+].
5. Use [ENTER] jump to the next parameter and so on.
Parameter, display Meaning Value range
Voicetype Voice category Kick, Snare, Tom, Ride, Crash, HiHat, Perc, Click, --Voice Sound assigned to the trigger Rock, Jazz, Indie etc.
Volume Volume 0 … 127
Adjusting trigger parameters
Operating
MPS-500 USB
33
Page 34
Parameter, display Meaning Value range
Reverb Reverb 0 … 127
Pitch Pitch –24 … +24
Pan Trigger position within the stereo signal (pan‐
orama right / left)
–64 … +63
After you have assigned all the pads with the desired sounds and adjusted the other parame‐
ters, you can save the settings as a user kit in the unit. To do so proceed as follows:
1. Press the button [EXIT].
ð
The confirmation prompt appears on the display: ‘Save Kits to UserKit xx?’ .
2. To select the desired memory location turn the rotary control [–] / [+].
3. Press [ENTER] to save the settings.
ð
The display shows ‘Save OK’ .
4. To quit editing without storing press again [EXIT].
Saving settings
Operating
e-drum module
34
Page 35
Already occupied memory slots are overwritten without further prompting.
Any unsaved changes will be lost when turning the drum module off.
Storing can be cancelled any time with [EXIT].
6.4 Pad settings
The Master Tune parameter allows you to adjust the pitch of a drum kit globally.
1.
Press the button [SETUP] and use [PAGE] to select the parameter Master Tune.
2. Use the rotary control [–] / [+] to select the desired value in a range from –50 to +50.
Default value is 0, this corresponds to the concert pitch A (440 Hz).
3.
Use [PAGE] to select the next parameter or quit the Setup menu with [EXIT].
ð
Then the confirmation prompt appears on the display: ‘Save Setups’ . ‘Yes’ is flashing.
For storing, press [ENTER] or turn the rotary control to the left so that ‘No’ is flashing
and then press [ENTER]. Then you quit the menu without storing.
Pitch
Operating
MPS-500 USB
35
Page 36
With this function, you can turn the built-in tone generator on or off. If you only want to use
the MIDI data sent by the device, you should disable the internal tone generator in order to
reduce latency.
1.
Press the button [SETUP ] and use [PAGE] to select the parameter Local.
2. To disable the function, turn the rotary control [–] / [+] to the left until ‘OFF’ is displayed.
To enable the function, turn the rotary control [–] / [+] to the right until ‘ON’ is displayed.
3.
Use [PAGE] to select the next parameter or quit the Setup menu with [EXIT].
ð
Then the confirmation prompt appears on the display: ‘Save Setups’ . ‘Yes’. For
storing, press [ENTER] or turn the rotary control to the left so that ‘No’ is flashing and
then press [ENTER]. Then you quit the menu without storing.
You can use the drume module to adjust the Touch sensitivity of each pad.
1. Press [SETUP].
2.
Use [PAGE] to select the menu item ‘Advance’.
3. Press [ENTER] to open the Advance menu.
ð
The parameter Sensitivity for TOM1 is displayed as the first setting value.
Local
Touch sensitivity
Operating
e-drum module
36
Page 37
4. Activate the desired pad using the pad select buttons or by striking it.
ð
The name of the selected pad appears in the display.
5. Adjust the sensitivity of the pad using the rotary control [–] / [+] to the desired value
(range from 0 to 127).
6.
Activate the next pad for sensitivity setting or use [PAGE] to select another desired
setting parameter.
If you step on the hi-hat pedal quickly, the usual chick sound is produced without playing the
pad additionally (closed hi-hat). When you release the pedal, the splash sound is generated
(open hi-hat). Both pressure and opening point can be set via the drum module.
1. Press [SETUP].
2.
Use [PAGE] to select the menu item ‘Advance’.
3. Press [ENTER] to open the Advance menu.
Hi-Hat response characteristic
Operating
MPS-500 USB
37
Page 38
4. Step on the hi-hat pedal to close the hi-hat.
If the hi-hat remains open while activating the ‘PDL Bottom’ (see 5.) the
module reads the value 120 and thus works with wrong parameters.
5. Press [H-PEDAL] while the hi-hat remains closed to set the closing point.
ð
The display shows the parameter ‘PDL Bottom’ and its actual value in ‘000’ format.
The symbol for the pedal flashes in the display.
6. Step on the hi-hat pedal or press [H-PEDAL] and use the rotary control [–] / [+] to set the
pressure point (range from 50 to 0).
7. Confirm the selection with [EXIT].
8. Repeat steps 1 to 5 and then press [HI-HAT] to specify the opening point.
ð
The display shows the parameter ‘PDL Top’ and its actual value in ‘000’ format. The
symbol for the pedal flashes in the display.
9. Step on the hi-hat pedal or press [HI-HAT] and use the rotary control [–] / [+] to set the
opening point in a range from 127 to 51.
Operating
e-drum module
38
Page 39
The drum module allows you to adjust the dynamic range of the individual pads and thus, the
signal-to-noise ratio.
1. Press [SETUP].
2.
Use [PAGE] to select the menu item ‘Advance’.
3. Press [ENTER] to open the Advance menu.
ð
Use [PAGE] to switch to the setting parameter Headroom.
4. Activate the desired pad using the pad select buttons or by striking it.
ð
The name of the selected pad appears in the display.
5. Adjust the dynamic range of the pads using the rotary control [–] / [+] to the desired
value (range from 0 to 127).
6.
Activate the next pad or use [PAGE] to select another desired setting parameter.
Here you can enter the timespan for the unit to ignore a second triggering. This can suppress
double-triggers caused by vibration.
1. Press [SETUP].
2.
Use [PAGE] to select the menu item ‘Advance’.
Dynamic range
Sense-Time
Operating
MPS-500 USB
39
Page 40
3. Press [ENTER] to open the Advance menu.
ð
Use [PAGE] to switch to the setting parameter SenseTime.
4. Activate the desired pad using the pad select buttons or by striking it.
ð
The name of the selected pad appears in the display.
5. Adjust the timespan for the pads using the rotary control [–] / [+] to the desired value
(range from 0 to 127).
6.
Activate the next pad or use [PAGE] to select another desired setting parameter.
The drum module allows you to adjust the touch velocity of the individual pads, i.e., the ratio
between strike pressure and resulting volume.
1. Press [SETUP].
2.
Use [PAGE] to select the menu item ‘Advance’.
3. Press [ENTER] to open the Advance menu.
ð
Use [PAGE] to switch to the setting parameter Trigger.
4. Activate the desired pad using the pad select buttons or by striking it.
ð
The name of the selected pad appears in the display.
Touch velocity
Operating
e-drum module
40
Page 41
5. Adjust the Touch velocity for the pads using the rotary control [–] / [+] (Linear, Exp1,
Exp2, Log1, Log2, Spline).
6.
Activate the next pad or use [PAGE] to select another desired setting parameter.
If several pads are mounted on a rack vibrations can be transmitted to other pads when you hit
a trigger and unintentionally trigger sounds. Crosstalk can be prevented by the temporary sup‐
pression of the trigger signal. This parameter is set automatically in the setup menu.
1. Press [SETUP].
2.
Use [PAGE] to select the menu item ‘Advance’.
3. Press [ENTER] to open the Advance menu.
ð
Use [PAGE] to switch to the setting parameter ‘Xtalk’.
4. Play any pad until you hear only the sound of this pad.
ð
The module automatically detects the vibration and compensates it while striking
the installed pads.
Here you can specify the note value for each pad to be used for sending MIDI data to external
devices.
Crosstalk
Note Send
Operating
MPS-500 USB
41
Page 42
1. Press [SETUP].
2.
Use [PAGE] to select the menu item ‘Advance’.
3. Press [ENTER] to open the Advance menu.
ð
Use [PAGE] to switch to setting parameter Note Send.
4. Activate the desired pad using the pad select buttons or by striking it.
ð
The name of the selected pad appears in the display.
5. Use the rotary control [–] / [+] to set the desired note value (range 0 to 127).
6.
Activate the next pad or use [PAGE] to select another desired setting parameter.
Press [EXIT] to change upwards from the Advance menu to the Setup menu. Press
again [EXIT] to close the Setup menu. The display shows ‘Save Setups’. Button right,
‘Yes’ is flashing. If you now press [ENTER] the changes are stored and the Setup menu
will be closed. If you turn the rotary control [–] / [+] to the left, ‘No’ is flashing. If you
now press [ENTER] the changes will not be stored when closing the Setup menu.
Operating
e-drum module
42
Page 43
6.5 Click settings
The Click menu allows you to adjust the time signature, the volume, the tempo and the sound
of the click:
1. Press [CLICK] to turn the Click on. At the same time the click menu opens up for eight
seconds.
2.
Within this time, use [PAGE] to select the parameter Volume. The currently set
volume is flashing in the display. Turn the control [–] / [+] to adjust the desired volume
value between 0 and 127. This will take effect immediately, the menu is automatically
closed eight seconds after the last input.
Volume
Operating
MPS-500 USB
43
Page 44
1. Press [CLICK] to turn the Click on. At the same time the click menu opens up for eight
seconds.
2.
Within this time, use [PAGE] to select the parameter Tempo. The currently set tempo
is flashing in the display. Turn the control [–] / [+] to adjust the desired tempo between
20 and 260 bpm. This will take effect immediately, the menu is automatically closed
eight seconds after the last input.
You can also set the click tempo outside this menu. To do so, press four times with
activated Click function on [TEMPO] at the desired tempo. The average value of the
three intervals is then used as new click tempo.
Tempo
Operating
e-drum module
44
Page 45
1. Press [CLICK] to turn the Click on. At the same time the click menu opens up for eight
seconds.
2.
Within this time, use [PAGE] to select the parameter Time-Sig. The currently set time
signature is flashing in the display. Turn the control [–] / [+] to select the desired time
signature. This will take effect immediately, the menu is automatically closed eight sec‐
onds after the last input.
1. Press [CLICK] to turn the Click on. At the same time the click menu opens up for eight
seconds.
2.
Within this time, use [PAGE] to select the parameter Voice. The currently set click
sound is flashing in the display. Turn the control [–] / [+] to set the desired sound
‘Claves’, ‘Bell’, ‘Beep’, or ‘CowBell’. This will take effect immediately, the menu is automat‐
ically closed eight seconds after the last input.
Time signature
Click sound
Operating
MPS-500 USB
45
Page 46
With [EXIT] you can quit the menu at any time.
Click keeps running during setting.
Press [CLICK] again to turn the Click function off.
6.6 Recording function
1.
Select the desired drum kit
Ä
Chapter 6.1 ‘Functions’ on page 25 and adjust the click
tempo and the time signature Ä Chapter 6.5 ‘Click settings’ on page 43.
2.
Press .
ð
The [REC.] indicator turns on.
3.
Press again. The recording starts – regardless of whether you hit a pad or not – after
one pre-roll bar.
Recording
Operating
e-drum module
46
Page 47
4.
To stop recording, press the button again.
ð
The [REC.] indicator turns off and ‘Save the song to UserSong 1’ appears.
5. Press [ENTER] if you want to save the song to memory location 1 for user songs.
ð
As confirmation, ‘Save OK’ appears.
6. If you want to save the song to another location select it with the rotary control [–] / [+]
and press [ENTER].
1. Press [SONG].
2. Use the rotary control [–] / [+] to select the desired user song.
3.
To play the song press the button .
4.
To stop recording, press the button again.
5. Press [SONG] to exit the playback mode.
Play a recording
Operating
MPS-500 USB
47
Page 48
6.7 Reset to factory defaults
1. Press the button [SETUP] to open the Setup menu.
2.
Use [PAGE] to select the menu item ‘Reset’.
3. Use the rotary control [–] / [+] to select one of the five options:
n ‘Reset Kits’ (resets all drum kits, including user kits)
n ‘Reset Settings’ (resets all system settings)
n ‘Reset Xtalk’ (resets crosstalk settings)
n ‘Reset Songs’ (deletes all user songs)
n ‘Reset All’ (restores factory default condition)
4. Confirm your selection with [ENTER].
The reset of the device settings will take some seconds. During this period, no pad
should be played. Then you should switch the unit off and on again.
Operating
e-drum module
48
Page 49
7 Technical specifications
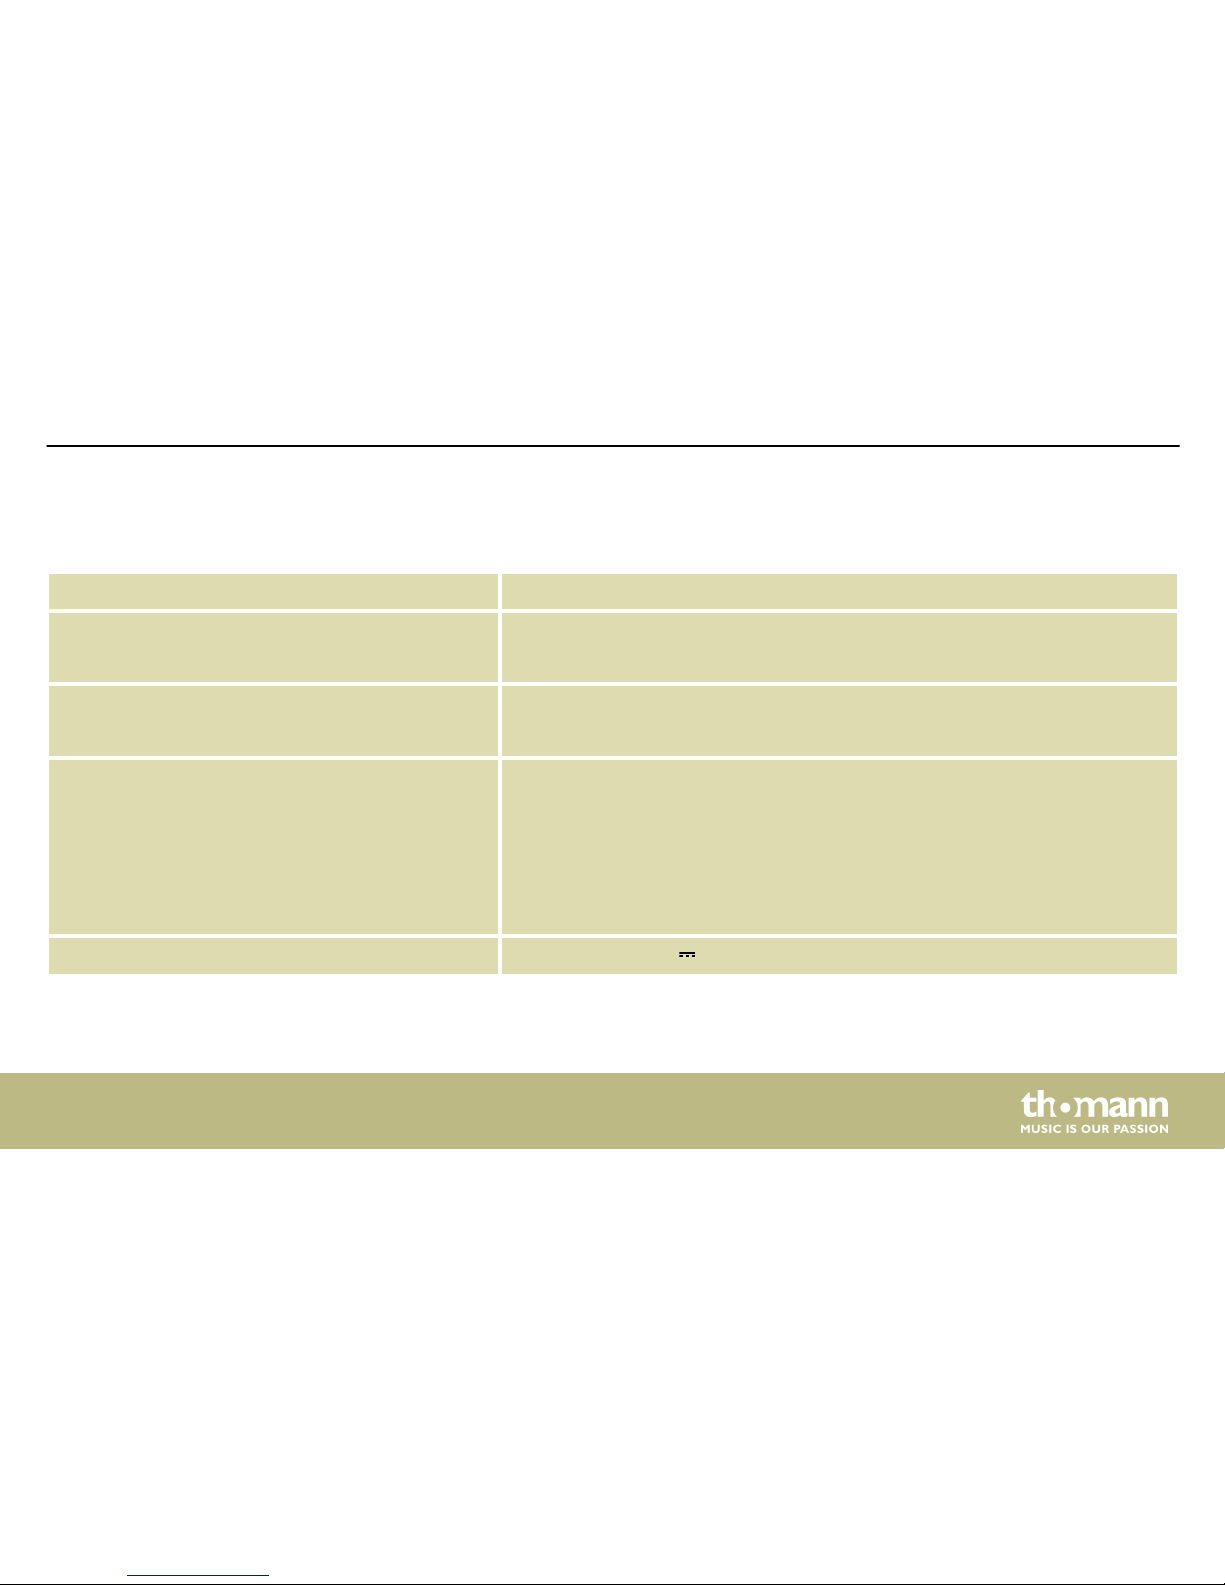
Sounds 431
Drum kits 20 preset kits
20 user kits
Songs 40 preset songs
15 user songs
Connections Headphones (1/4" phone socket)
Line in (1/4" phone socket)
Line out (1/4" phone socket)
SUB-D (pad cable connection)
USB
Operating supply voltage
Power adapter 12 V , 2000 mA
Technical specifications
MPS-500 USB
49
Page 50
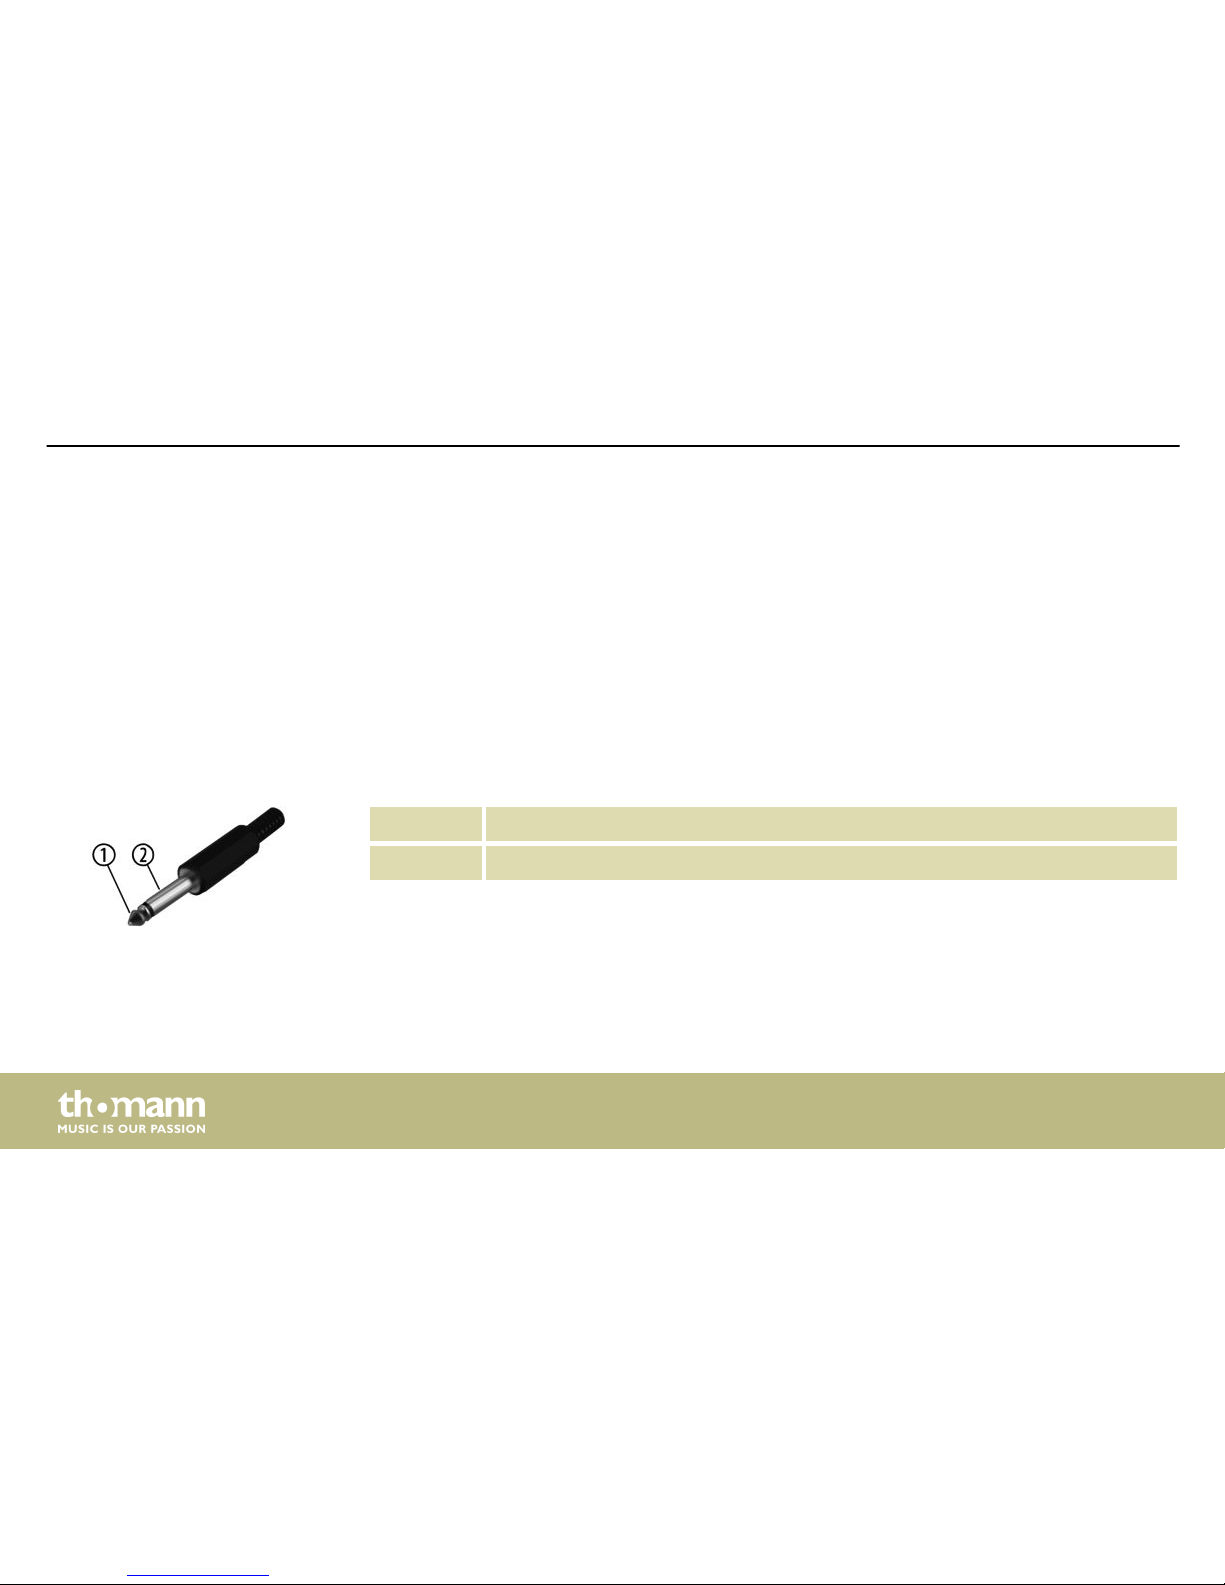
8 Connector and pin assignments
This chapter will help you select the right cables and plugs to connect your valuable equip‐
ment in such a way that a perfect sound experience is ensured.
Please note these advices, because especially in ‘Sound & Light’ caution is indicated: Even if a
plug fits into the socket, an incorrect connection may result in a destroyed power amp, a short
circuit or ‘just’ in poor transmission quality!
1 Signal
2 Ground, shielding
Introduction
1/4" TS phone plug (mono,
unbalanced)
Connector and pin assignments
e-drum module
50
Page 51
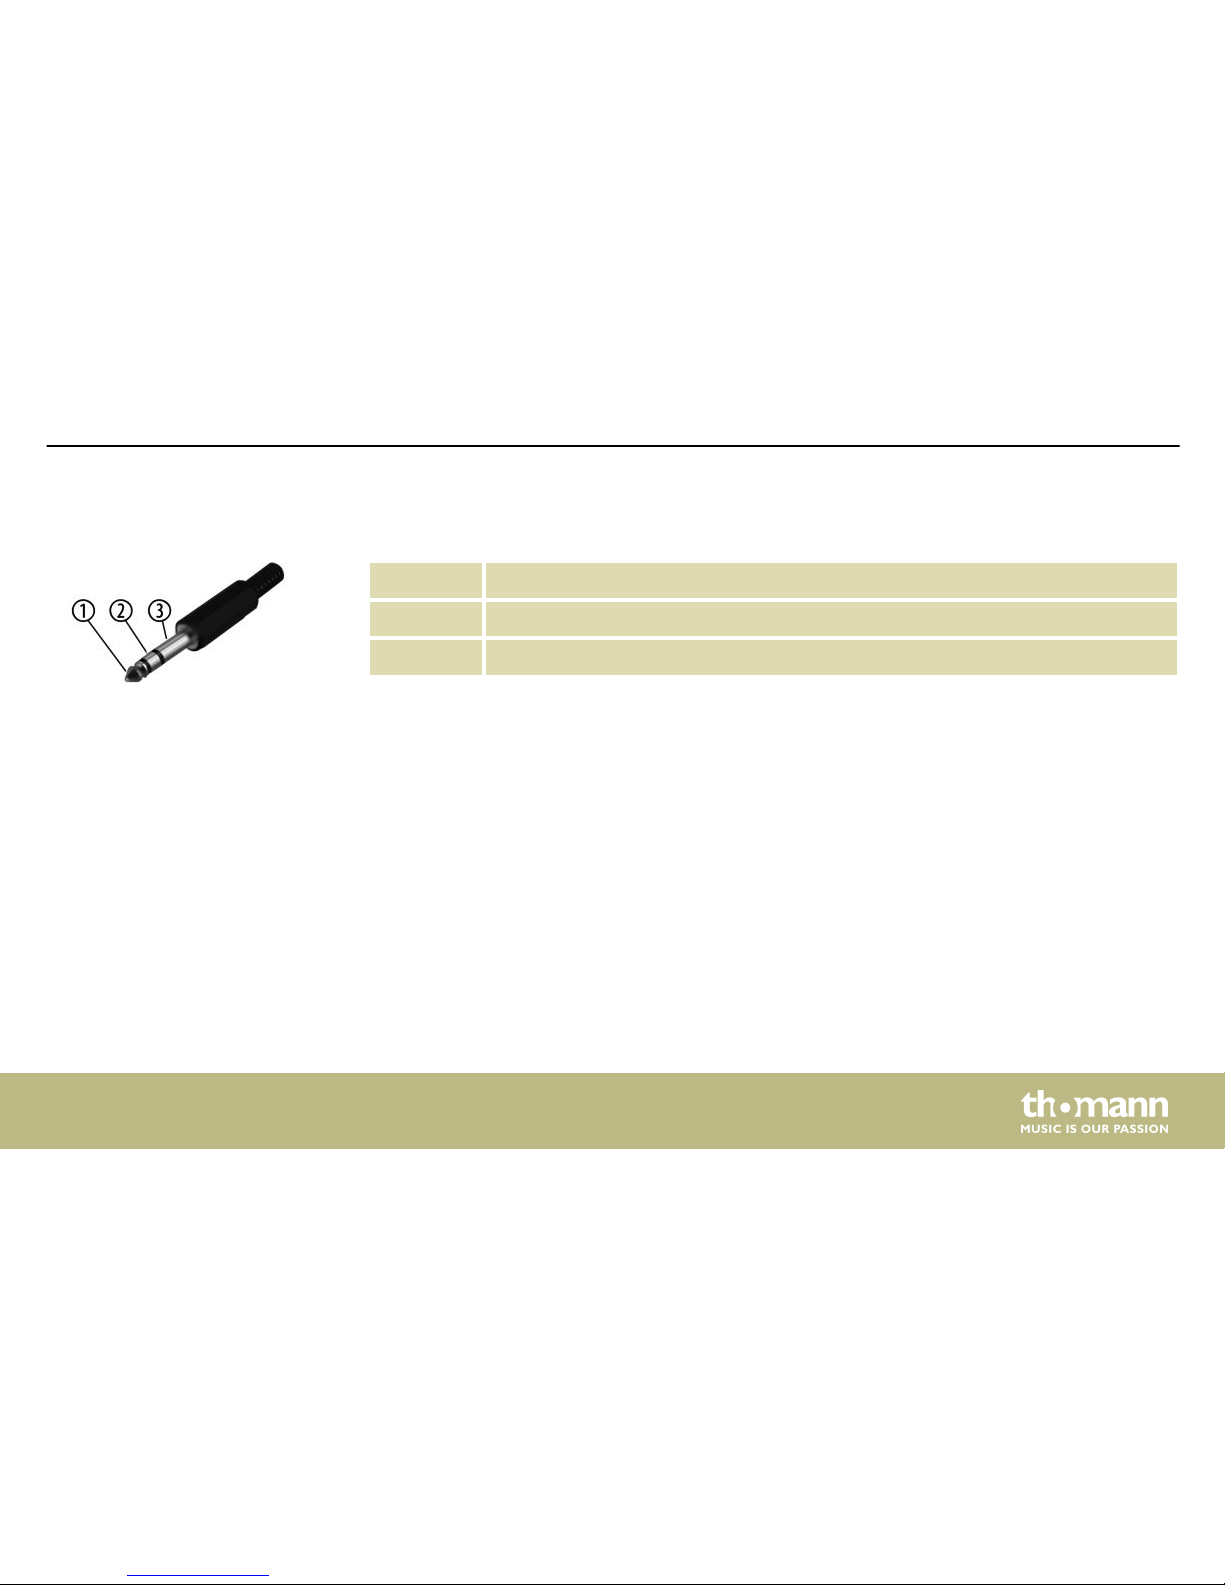
1 Signal (left)
2 Signal (right)
3 Ground
1/4" TRS phone plug (stereo,
unbalanced)
Connector and pin assignments
MPS-500 USB
51
Page 52
9 Cleaning
Clean the accessible parts of the device regularly. The frequency of cleaning depends on the
operating environment: moist, smoky or particularly dirty environments may cause a higher
accumulation of dirt on the components of the device.
n Use a dry soft cloth for cleaning.
n Remove stubborn stains with a slightly damp cloth.
n Never use cleaners containing alcohol or thinner.
n Never put any vinyl items on the device, as vinyl can stick to the surface or lead to its disco‐
louration.
Device parts
Cleaning
e-drum module
52
Page 53
10 Protecting the environment
For the transport and protective packaging, environmentally friendly materials have been
chosen that can be supplied to normal recycling.
Ensure that plastic bags, packaging, etc. are properly disposed of.
Do not just dispose of these materials with your normal household waste, but make sure that
they are collected for recycling. Please follow the notes and markings on the packaging.
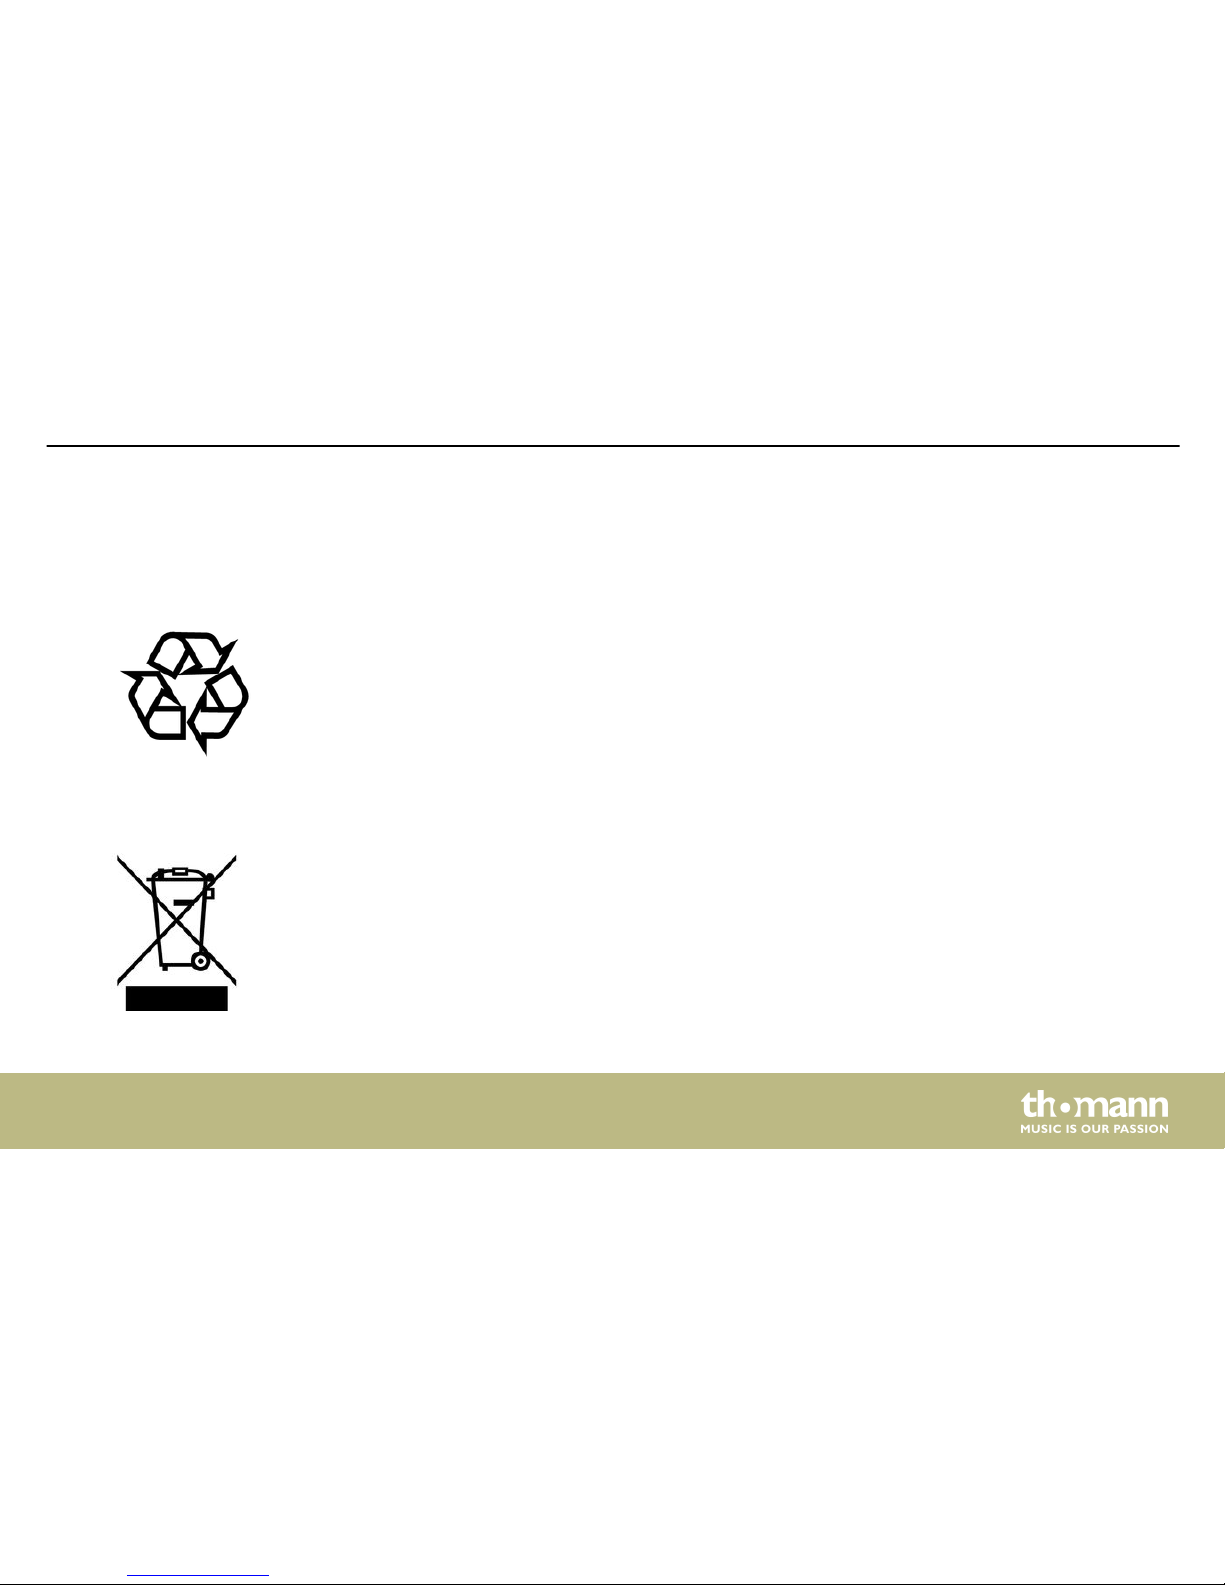
This product is subject to the European Waste Electrical and Electronic Equipment Directive
(WEEE). Do not dispose with your normal household waste.
Dispose of this device through an approved waste disposal firm or through your local waste
facility. When discarding the device, comply with the rules and regulations that apply in your
country. If in doubt, consult your local waste disposal facility.
Disposal of the packaging mate‐
rial
Disposal of your old device
Protecting the environment
MPS-500 USB
53
Page 54
11 Appendix
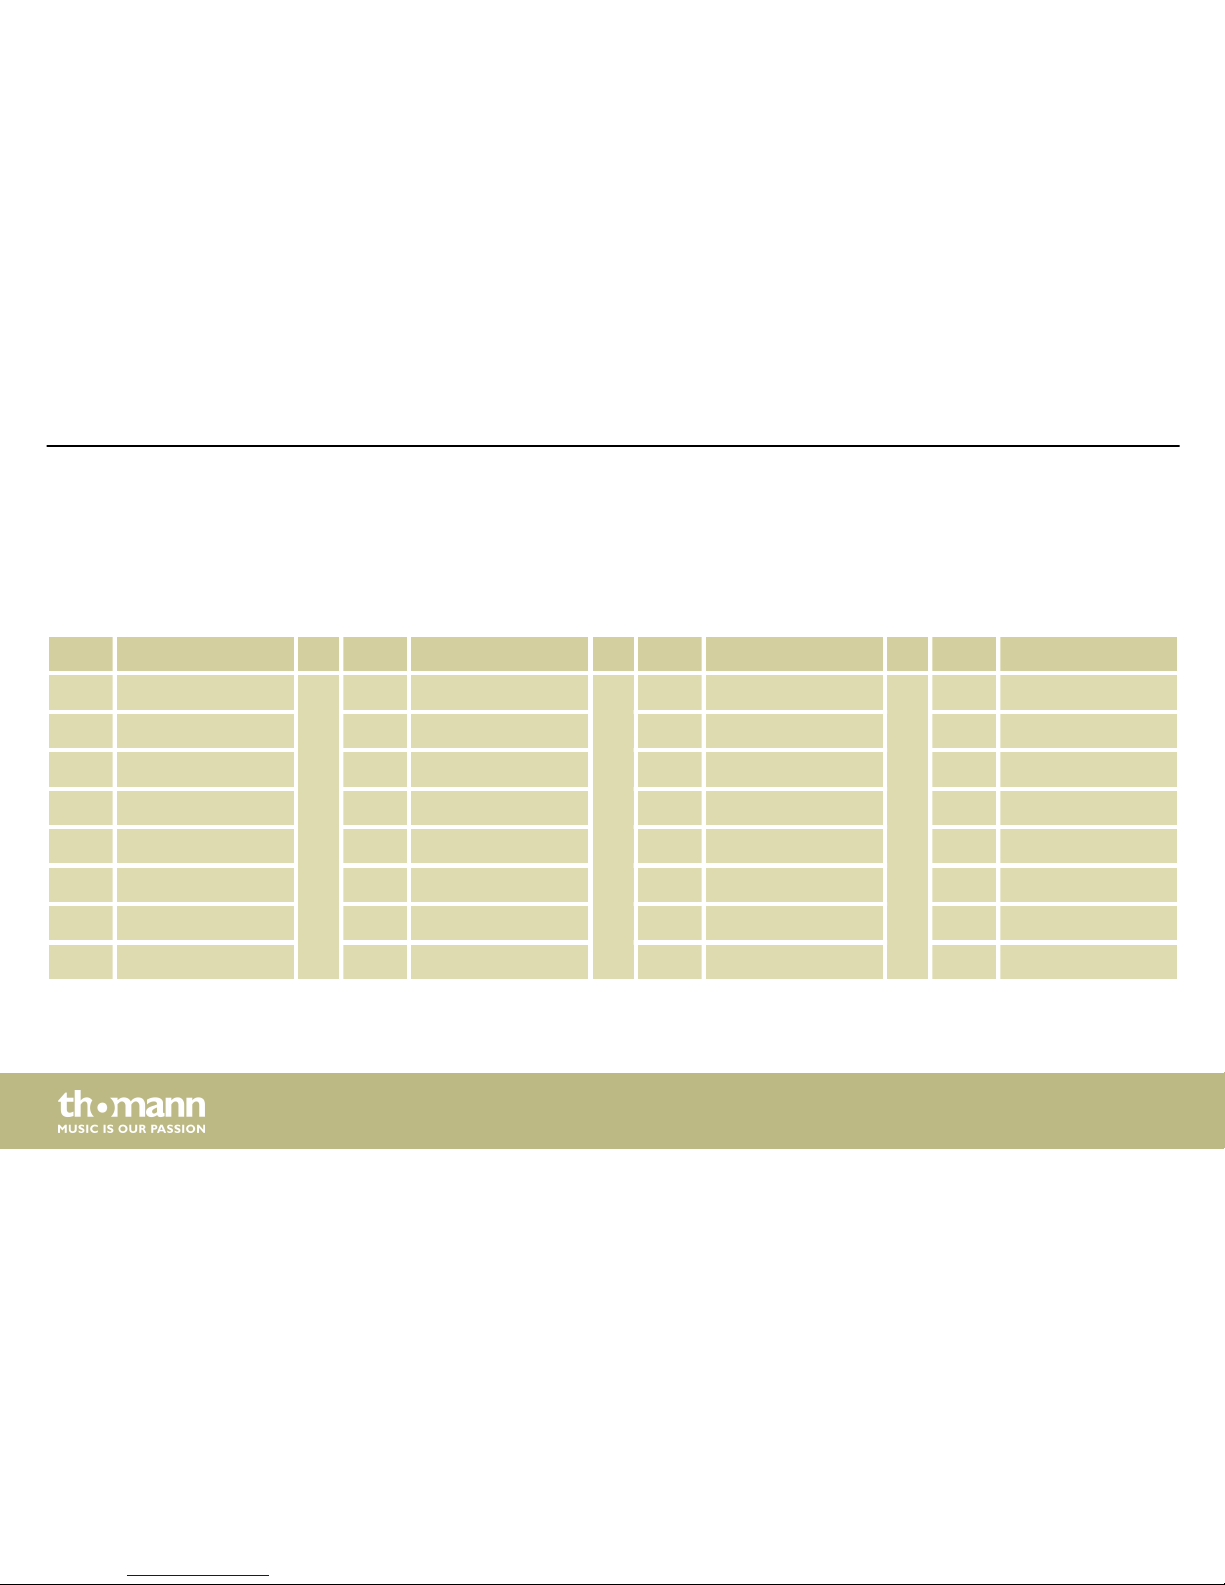
11.1 Kit list
No. Name No. Name No. Name No. Name
1 Rock 11 Fiesta 21 UserKit 1 31 UserKit 11
2 Funk 12 Mario 22 UserKit 2 32 UserKit 12
3 Popin 13 Impusle 23 UserKit 3 33 UserKit 13
4 Jazz 14 Loop 24 UserKit 4 34 UserKit 14
5 Metal 15 DirtySouth 25 UserKit 5 35 UserKit 15
6 Latin 1 16 Nebula 26 UserKit 6 36 UserKit 16
7 80s 17 Drumstep 27 UserKit 7 37 UserKit 17
8 Latin 2 18 Jungle 28 UserKit 8 38 UserKit 18
Appendix
e-drum module
54
Page 55
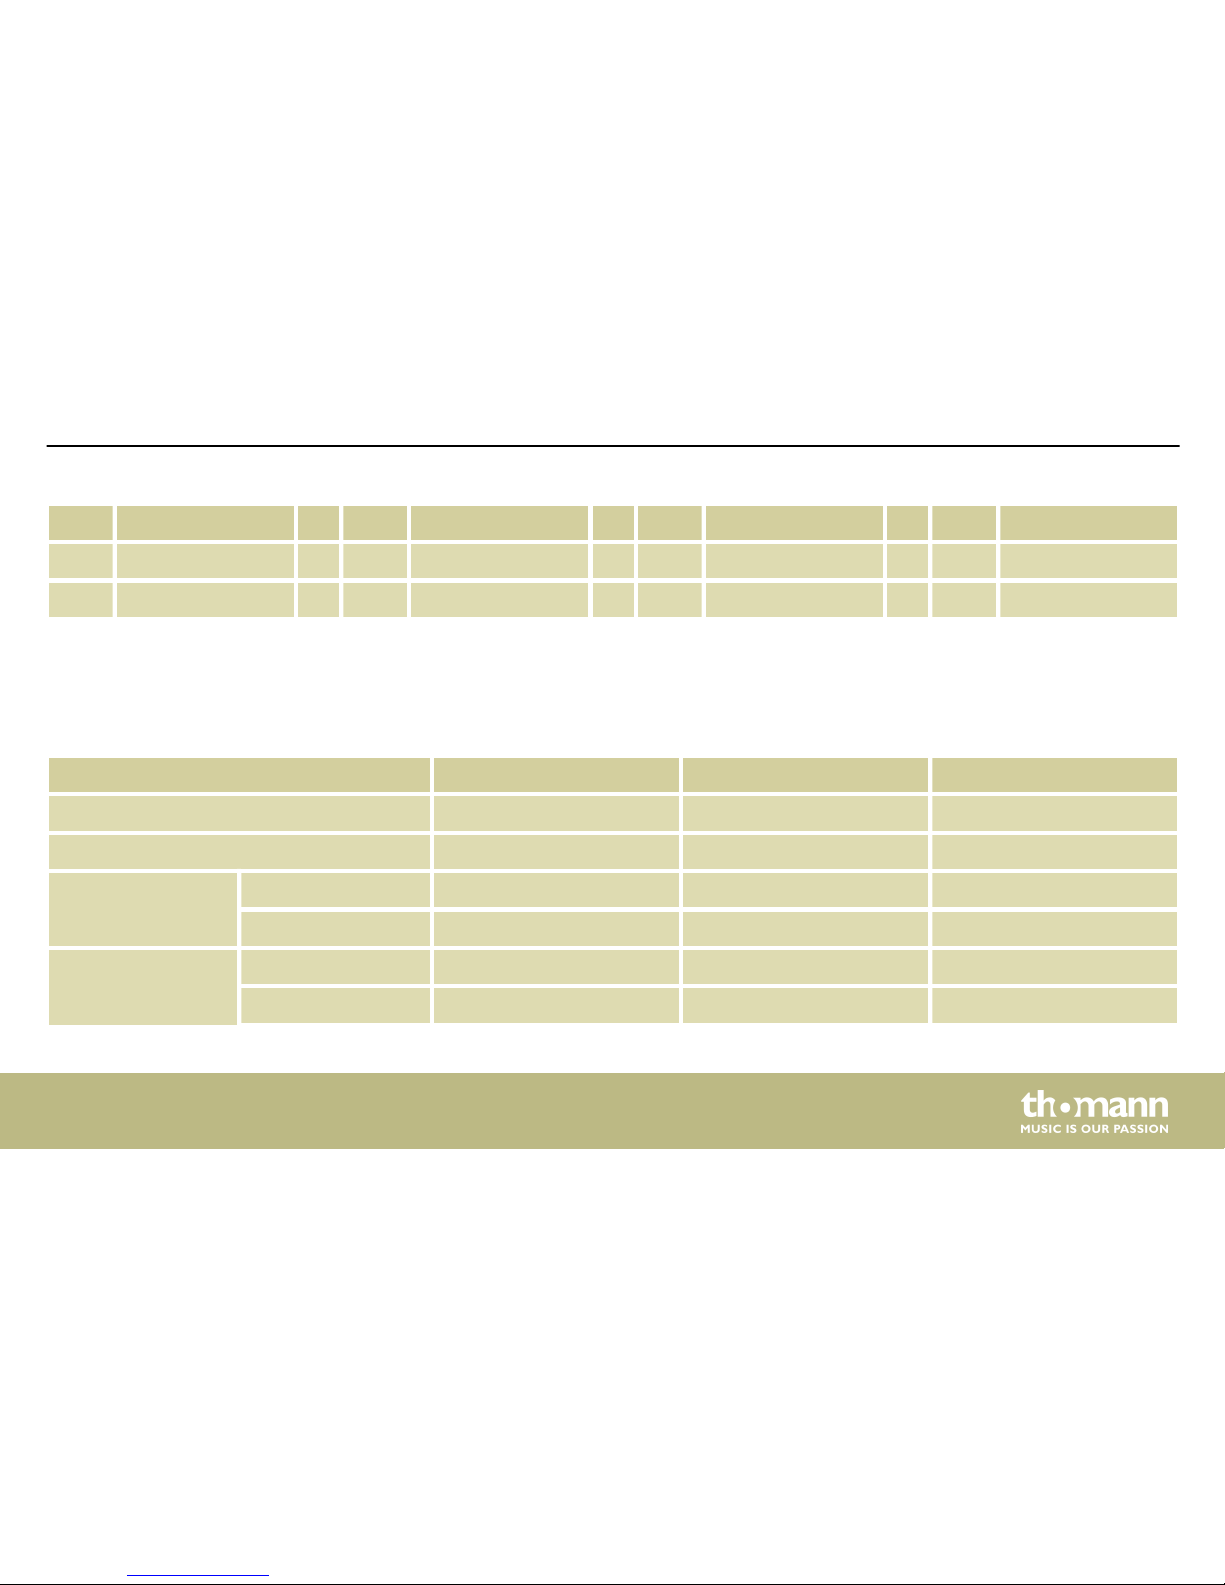
No. Name No. Name No. Name No. Name
9 Brush 19 Utopia 29 UserKit 9 39 UserKit 19
10 Sunray 20 BlueBay 30 UserKit 10 40 UserKit 20
11.2 MIDI implementation
Function Transmitted Recognized Remarks
Basic channel 10 1-16
Note number 0-127 0-127
Velocity Note ON 1-127 0-127
Note OFF 64 0-127
Major controls Yes No Hi-Hat pedal control
Yes Yes Reset all controller
Appendix
MPS-500 USB
55
Page 56
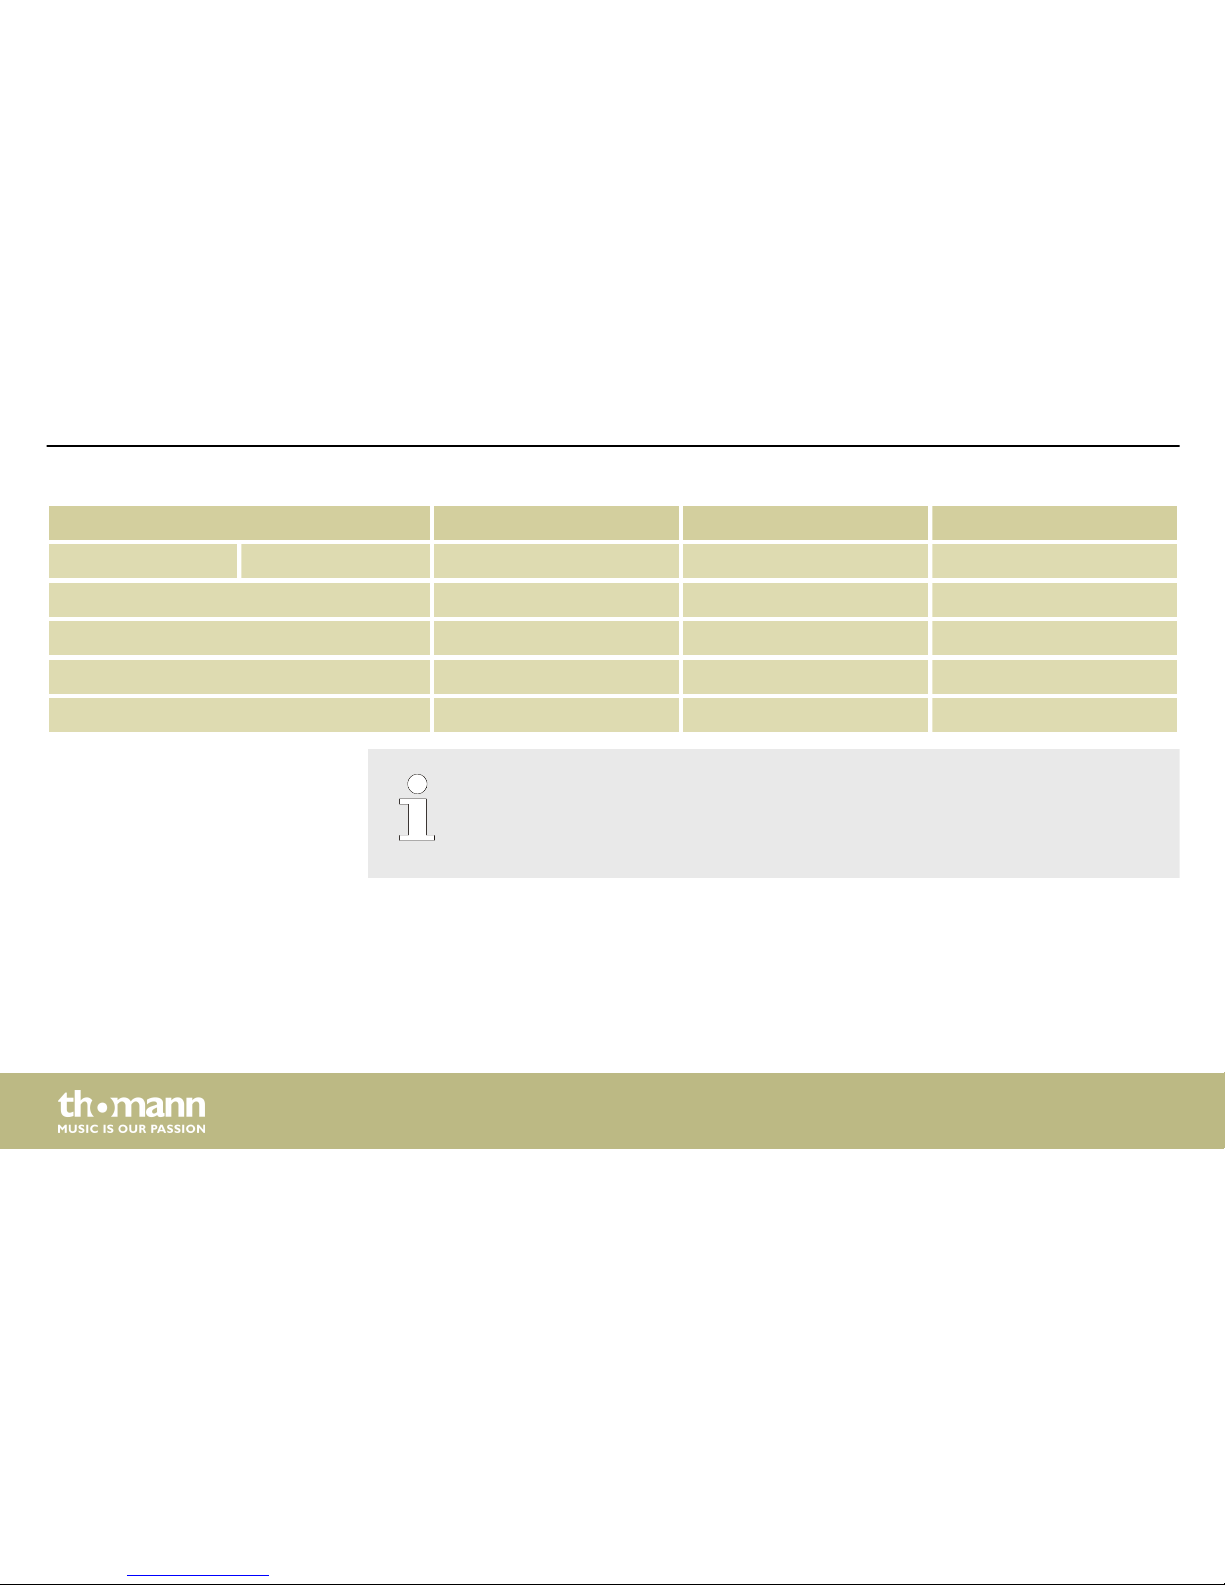
Function Transmitted Recognized Remarks
Yes Yes All notes OFF
Programme change No Yes
System exclusive Yes Yes
RPN No Yes
NRPN Yes Yes
Channel 10 supports bank 0 only.
For more information regarding the ‘System Exclusive’, ‘RPN’ and ‘NRPN’, please con‐
tact your sales representative.
Appendix
e-drum module
56
Page 57

Notes
MPS-500 USB
57
Page 58
Notes
e-drum module
58
Page 59

Page 60

Musikhaus Thomann · Hans-Thomann-Straße 1 · 96138 Burgebrach · Germany · www.thomann.de
 Loading...