

Page 1
MPS-425
e-drum module
user manual
Page 2

Musikhaus Thomann
Treppendorf 30
96138 Burgebrach
Germany
Telephone: +49 (0) 9546 9223-0
E-mail: [email protected]
Internet: www.thomann.de
27.04.2015, ID: 360238
Page 3
Table of contents
1 General information................................................................................................................................. 5
1.1 Further information........................................................................................................................... 6
1.2 Notational conventions.................................................................................................................... 7
1.3 Symbols and signal words............................................................................................................... 9
2 Safety instructions.................................................................................................................................. 11
3 Features....................................................................................................................................................... 14
4 Installation.................................................................................................................................................. 16
5 Connections and operating elements........................................................................................... 19
6 Operating.................................................................................................................................................... 27
6.1 Functions............................................................................................................................................. 27
6.2 Playing the drum kit........................................................................................................................ 29
6.3 Metronome function....................................................................................................................... 32
6.4 Drum kits............................................................................................................................................. 34
6.5 Playing, customising and accompanying Styles................................................................... 39
6.6 Utility menu........................................................................................................................................ 41
Table of contents
MPS-425
3
Page 4
6.7 Recording functions........................................................................................................................ 46
7 Technical specifications....................................................................................................................... 50
8 Plug and connection assignment.................................................................................................... 52
9 Cleaning....................................................................................................................................................... 54
10 Protecting the environment.............................................................................................................. 55
11 Appendix..................................................................................................................................................... 56
11.1 Song list............................................................................................................................................. 56
11.2 Kit list.................................................................................................................................................. 63
11.3 Drum Voice list................................................................................................................................ 65
11.4 MIDI implementation................................................................................................................... 96
11.5 General MIDI Backing Instrument List................................................................................. 100
11.6 General MIDI Drum Kit List....................................................................................................... 108
Table of contents
e-drum module
4
Page 5
1 General information
This manual contains important instructions for the safe operation of the unit. Read and follow
the safety instructions and all other instructions. Keep the manual for future reference. Make
sure that it is available to all those using the device. If you sell the unit please make sure that
the buyer also receives this manual.
Our products are subject to a process of continuous development. Thus, they are subject to
change.
General information
MPS-425
5
Page 6
1.1 Further information
On our website (www.thomann.de) you will find lots of further information and details on the
following points:
Download This manual is also available as PDF file for you to download.
Keyword search
Use the search function in the electronic version to find the topics of
interest for you quickly.
Online guides
Our online guides provide detailed information on technical basics
and terms.
Personal consultation For personal consultation please contact our technical hotline.
Service
If you have any problems with the device the
customer service will gladly assist you.
General information
e-drum module
6
Page 7
1.2 Notational conventions
This manual uses the following notational conventions:
The letterings for connectors and controls are marked by square brackets and italics.
Examples: [VOLUME] control, [Mono] button.
Texts and values displayed on the device are marked by quotation marks and italics.
Examples: ‘24ch’ , ‘OFF’.
Letterings
Displays
General information
MPS-425
7
Page 8
The individual steps of an instruction are numbered consecutively. The result of a step is
indented and highlighted by an arrow.
Example:
1. Switch on the device.
2. Press [Auto].
ð
Automatic operation is started.
3. Switch off the device.
References to other locations in this manual are identified by an arrow and the specified page
number. In the electronic version of the manual, you can click the cross-reference to jump to
the specified location.
Example: See Ä ‘Cross-references’ on page 8.
Instructions
Cross-references
General information
e-drum module
8
Page 9
1.3 Symbols and signal words
In this section you will find an overview of the meaning of symbols and signal words that are
used in this manual.
Signal word Meaning
DANGER! This combination of symbol and signal word indicates an
immediate dangerous situation that will result in death or
serious injury if it is not avoided.
CAUTION! This combination of symbol and signal word indicates a pos‐
sible dangerous situation that can result in minor injury if it
is not avoided.
NOTICE! This combination of symbol and signal word indicates a pos‐
sible dangerous situation that can result in material and
environmental damage if it is not avoided.
General information
MPS-425
9
Page 10
Warning signs Type of danger
Warning – danger zone.
General information
e-drum module
10
Page 11
2 Safety instructions
Drum modules are intended to be used for converting digital trigger signals from drum pads
to various percussion sounds. Use the unit only as described in this manual. Any other use or
use under other operating conditions is considered to be improper and may result in personal
injury or property damage. No liability will be assumed for damages resulting from improper
use.
This device may be used only by persons with sufficient physical, sensorial, and intellectual
abilities and having corresponding knowledge and experience. Other persons may use this
device only if they are supervised or instructed by a person who is responsible for their safety.
Intended use
Safety instructions
MPS-425
11
Page 12
DANGER!
Danger for children
Ensure that plastic bags, packaging, etc. are disposed of properly and are not
within reach of babies and young children. Choking hazard!
Ensure that children do not detach any small parts (e.g. knobs or the like) from
the unit. They could swallow the pieces and choke!
Never let children unattended use electrical devices.
CAUTION!
Possible hearing damage
With loudspeakers or headphones connected, the device can produce volume
levels that may cause temporary or permanent hearing impairment.
Do not operate the device permanently at a high volume level. Decrease the
volume level immediately if you experience ringing in your ears or hearing
impairment.
Safety
Safety instructions
e-drum module
12
Page 13
NOTICE!
Operating conditions
This device has been designed for indoor use only. To prevent damage, never
expose the device to any liquid or moisture. Avoid direct sunlight, heavy dirt, and
strong vibrations.
NOTICE!
External power supply
The device is powered by an external power supply. Before connecting the
external power supply, ensure that the input voltage (AC outlet) matches the
voltage rating of the device and that the AC outlet is protected by a residual cur‐
rent circuit breaker. Failure to do so could result in damage to the device and pos‐
sibly the user.
Unplug the external power supply before electrical storms occur and when the
device is unused for long periods of time to reduce the risk of electric shock or
fire.
Safety instructions
MPS-425
13
Page 14
3 Features
n 380 Voices
n 82 Styles
n 25 preprogrammed drum kits, 5 freely programmable user kits
n Metronome
n Reverb effect, 3-band EQ
n Backlit LCD
n Connectivity options:
– USB
– MIDI
– additional Crash pad
– AUDIO out
– AUX in
– Headphones
n 1 × stereo mesh head pad (Snare)
n 5 × mono pads (Bass drum, Toms, Hi-hat)
n 2 × cymbal pads with Choke function (Crash, Ride)
Features
e-drum module
14
Page 15
n Hi-hat controller and Bass drum pedal
n Convenient switching between left-handed and right-handed configuration
Features
MPS-425
15
Page 16
4 Installation
Setup and assembly of the pads and pedals are described in detail in the enclosed assembly
guide. Finally, check that all connecting cables are correctly connected between the pads and
the drum module.
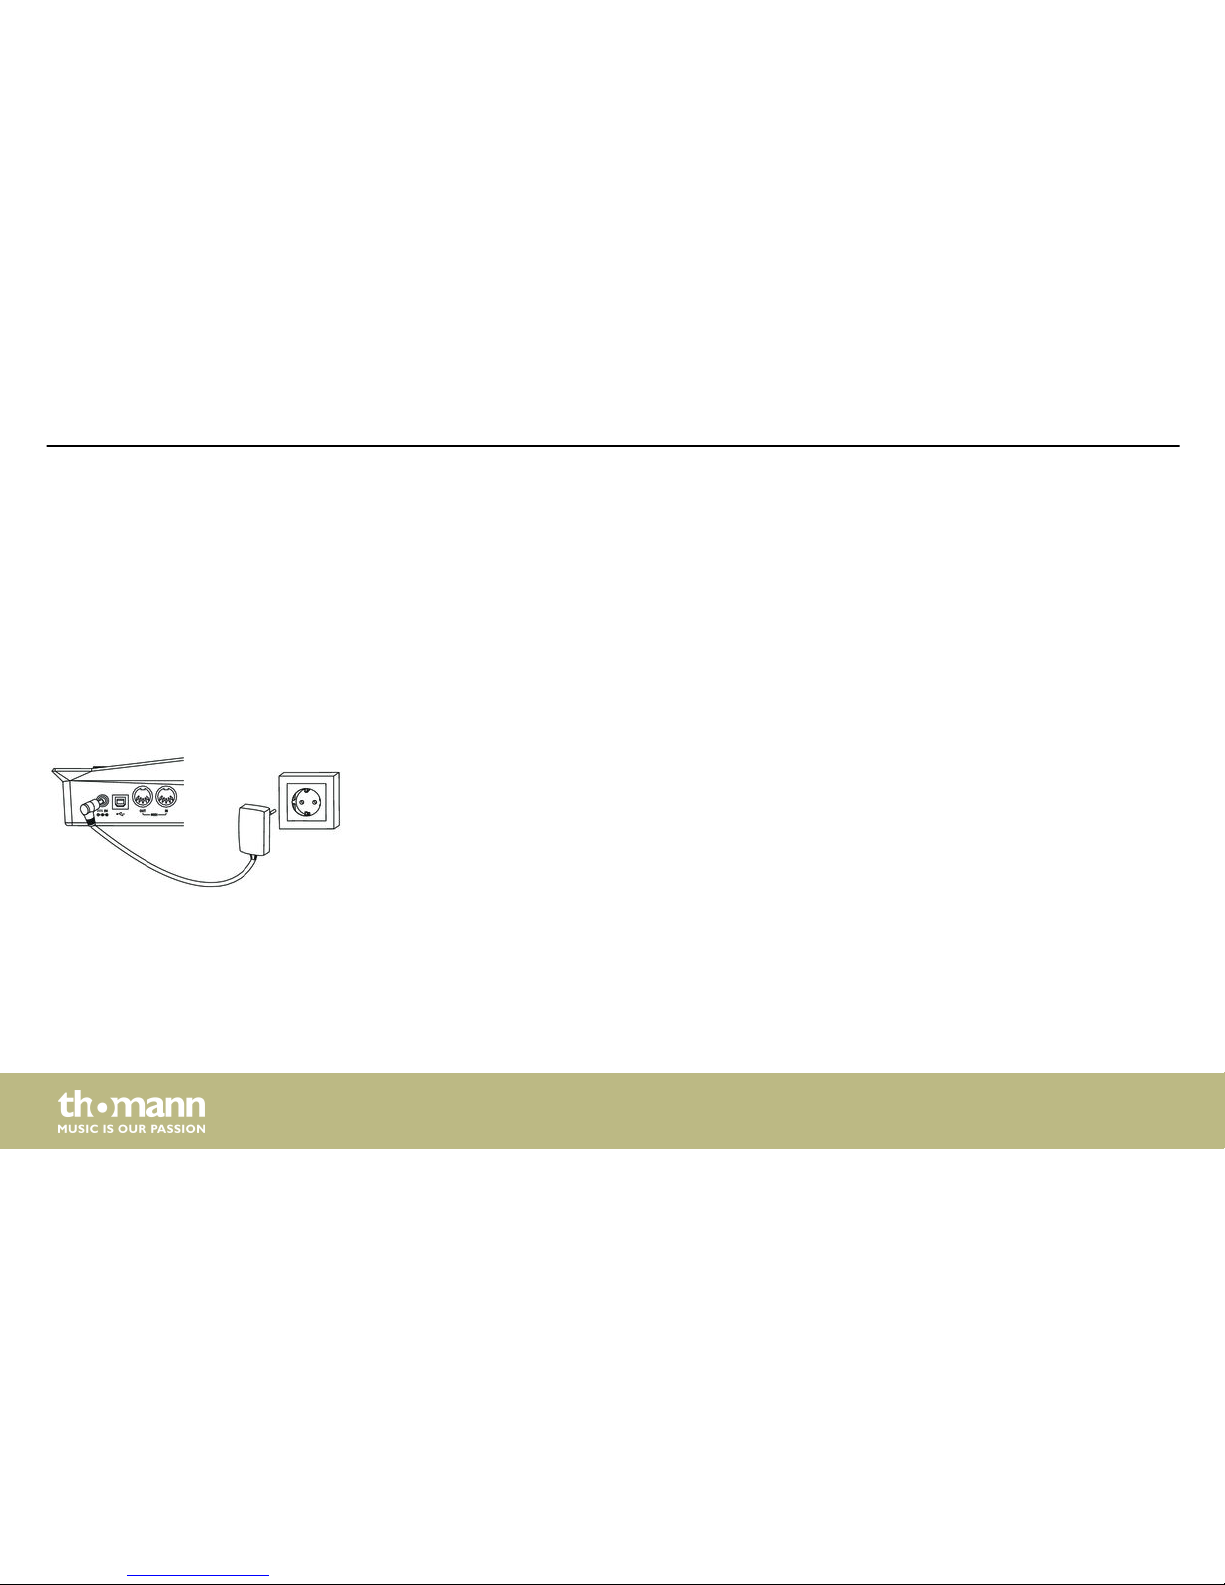
Connect the included power adapter to the 9V connector of the unit and then plug the power
adapter into a wall outlet.
Setup, connecting pads and
pedals
Connecting the power adapter
Installation
e-drum module
16
Page 17
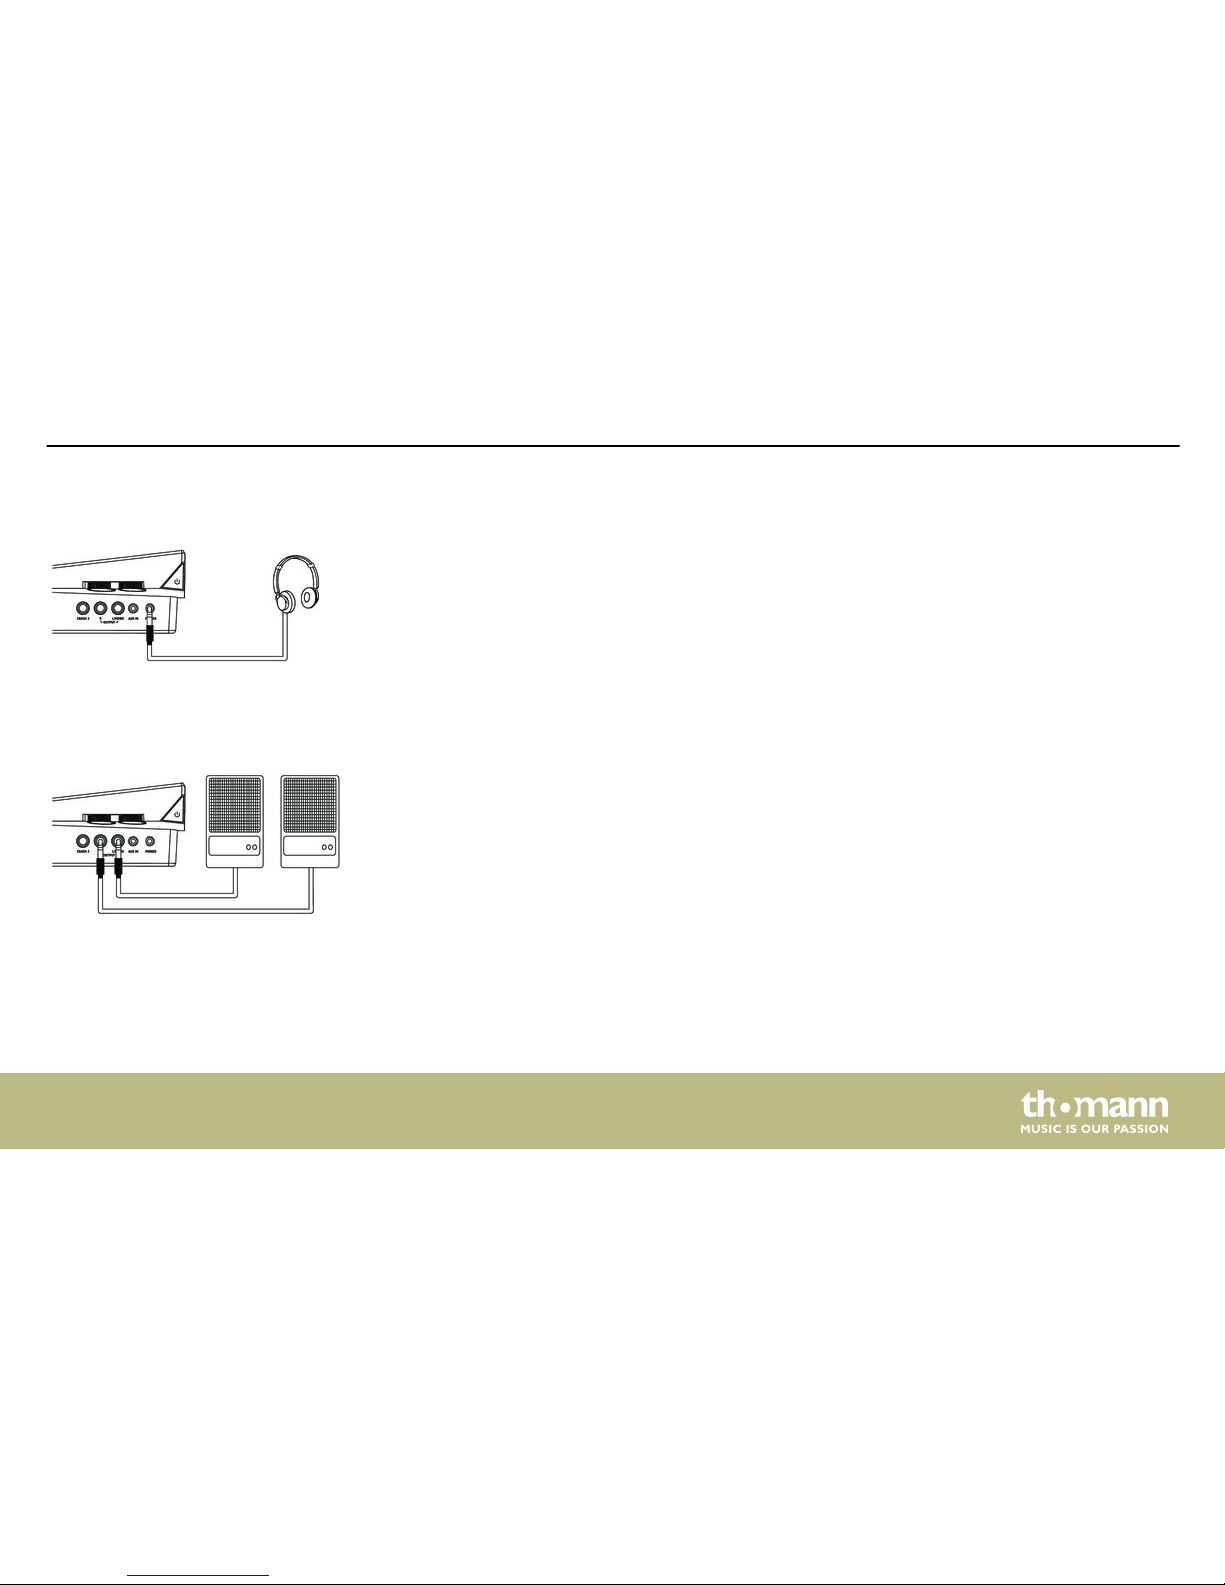
Connect your stereo headphones to the PHONES output of the drum module.
Connect the inputs of your amplifier or active monitors to the OUTPUT sockets of the drum
module. If you use a mono amplifier, connect its input to the output L / MONO socket of the
module.
Connecting headphones
Connecting audio devices
Installation
MPS-425
17
Page 18
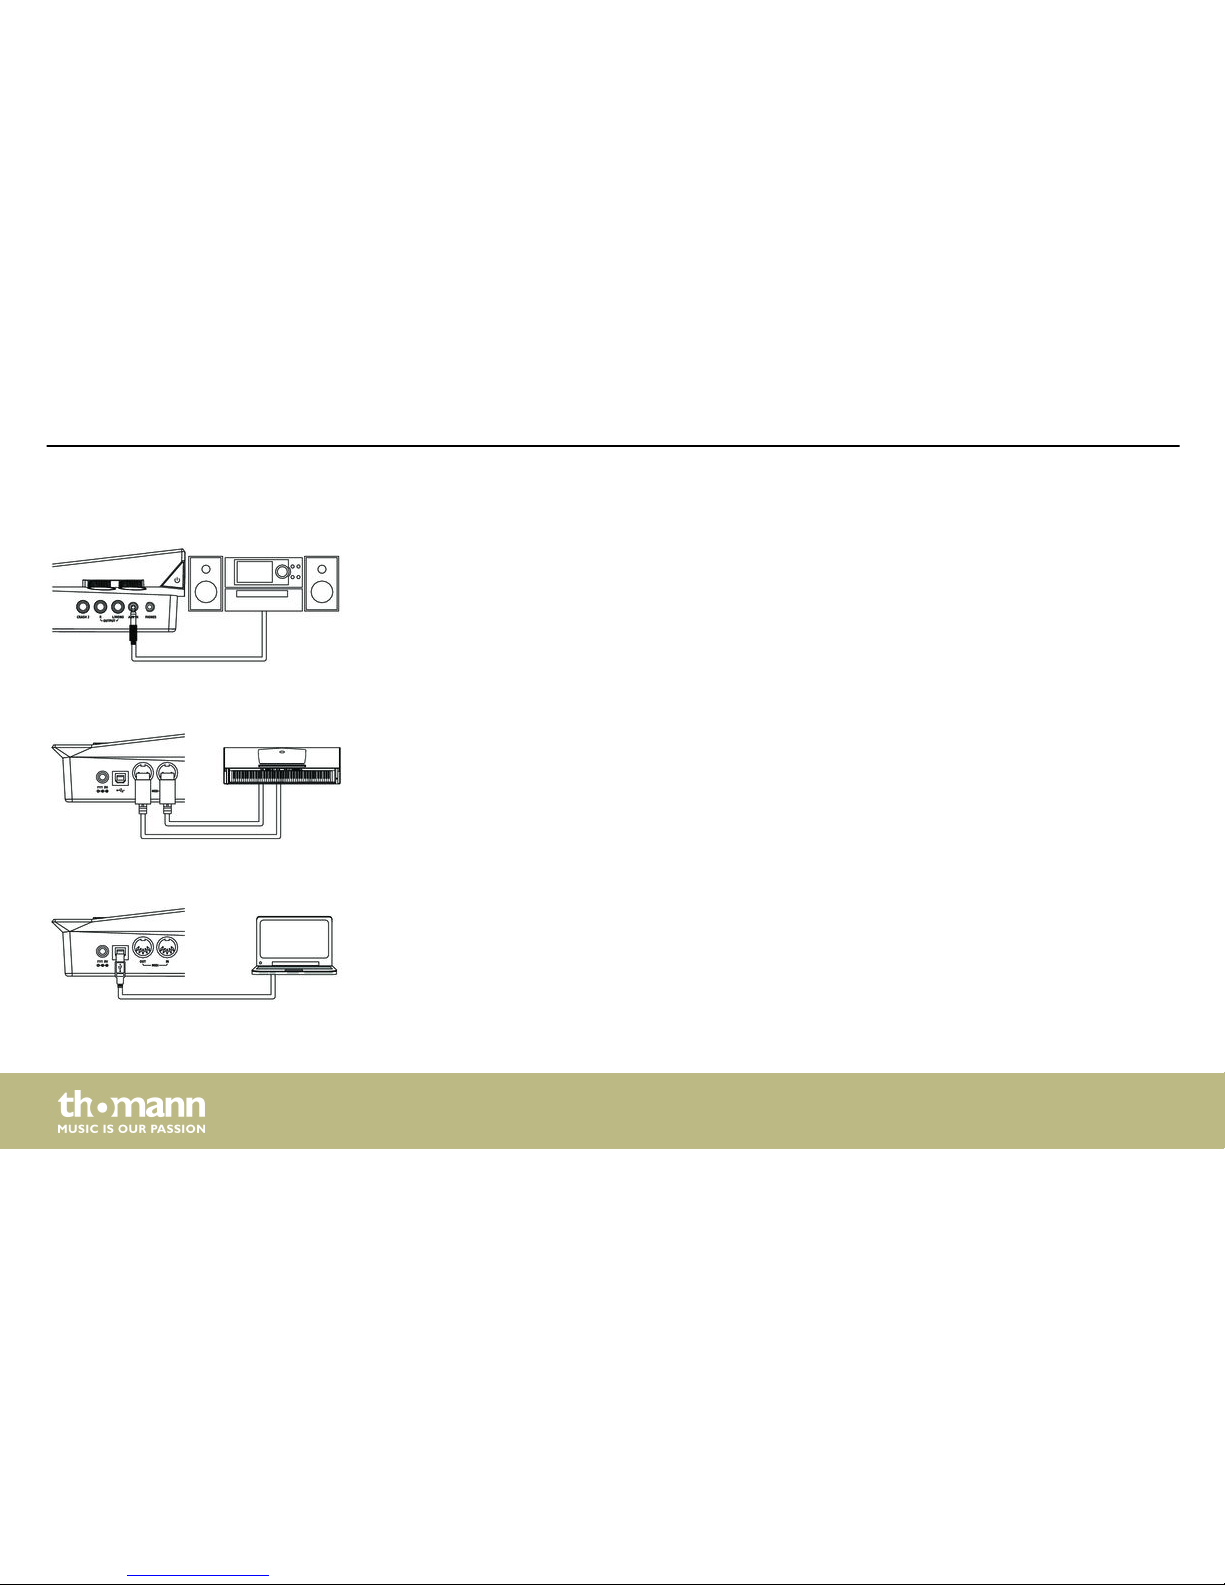
Connect your CD or MP3 player to the input socket AUX IN of the drum module.
Connect external MIDI devices to the MIDI IN / OUT sockets of the drum module.
Connect external MIDI devices or your computer to the USB port of the drum module.
Connecting a CD or MP3 player
Connecting MIDI devices
Connecting USB devices
Installation
e-drum module
18
Page 19
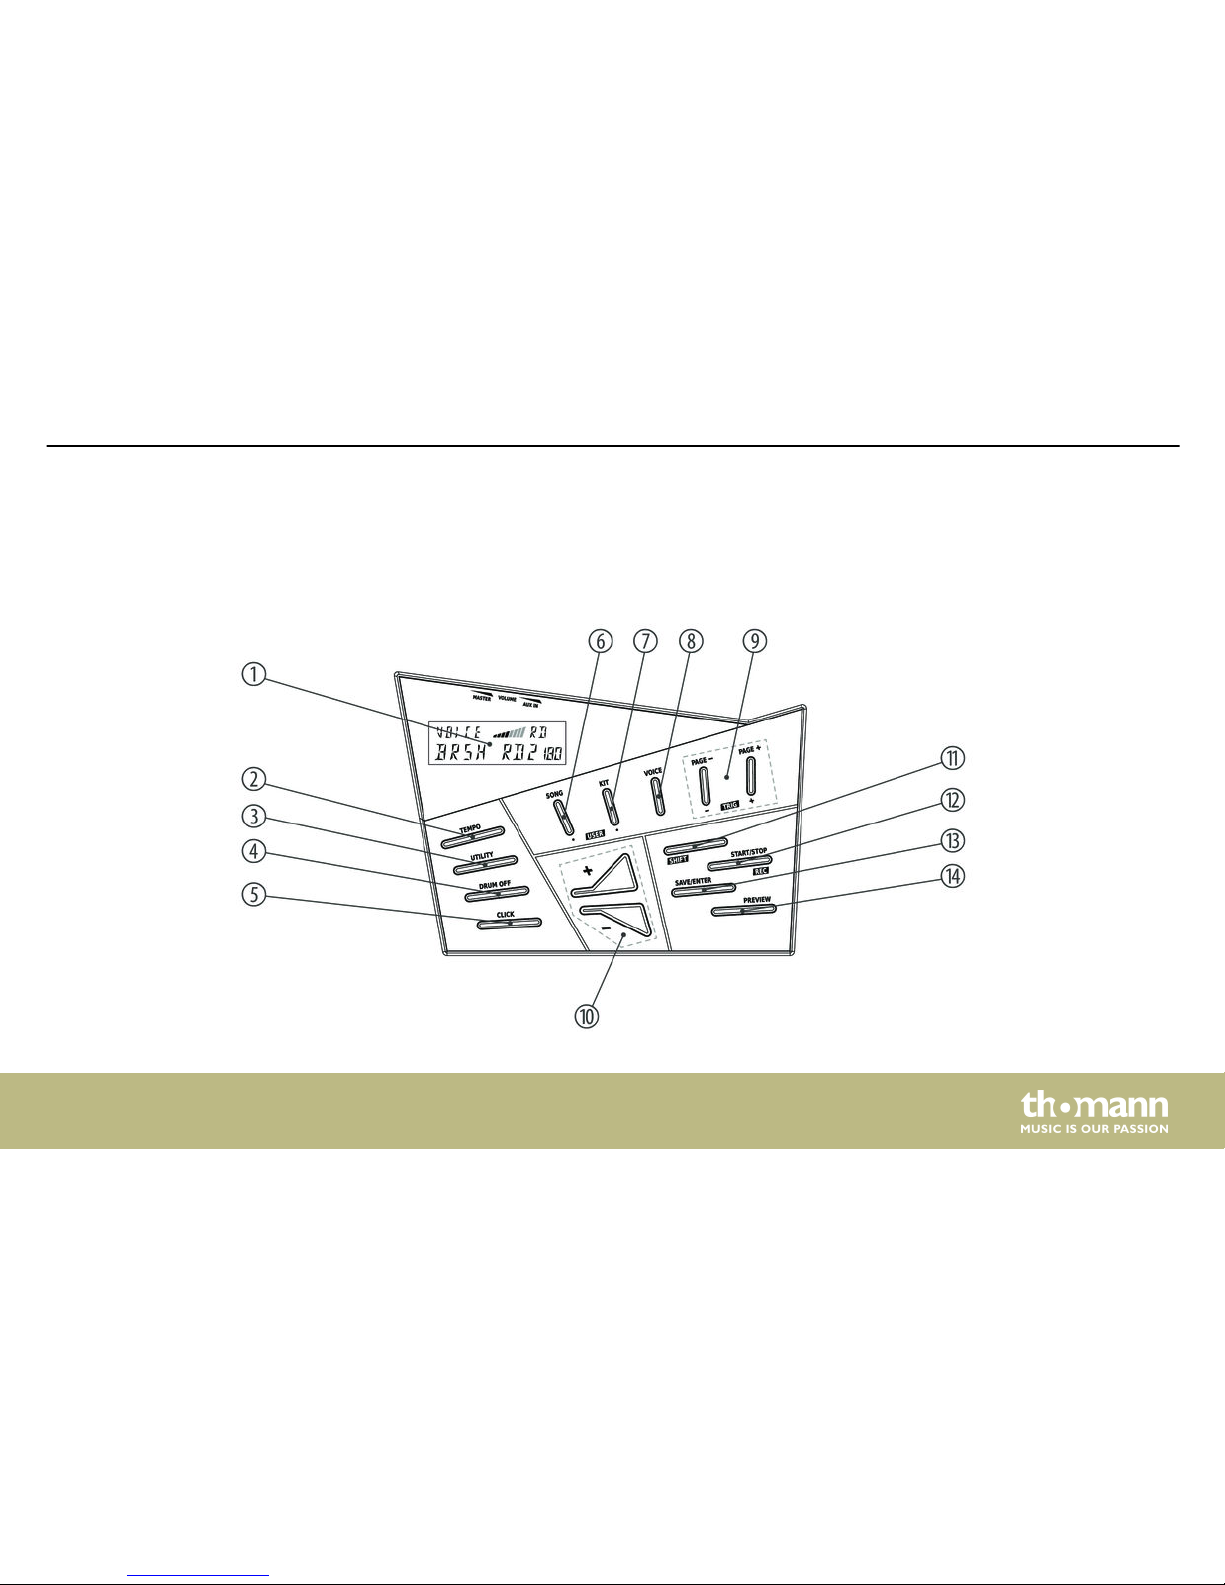
5 Connections and operating elements
Front panel
Connections and operating elements
MPS-425
19
Page 20
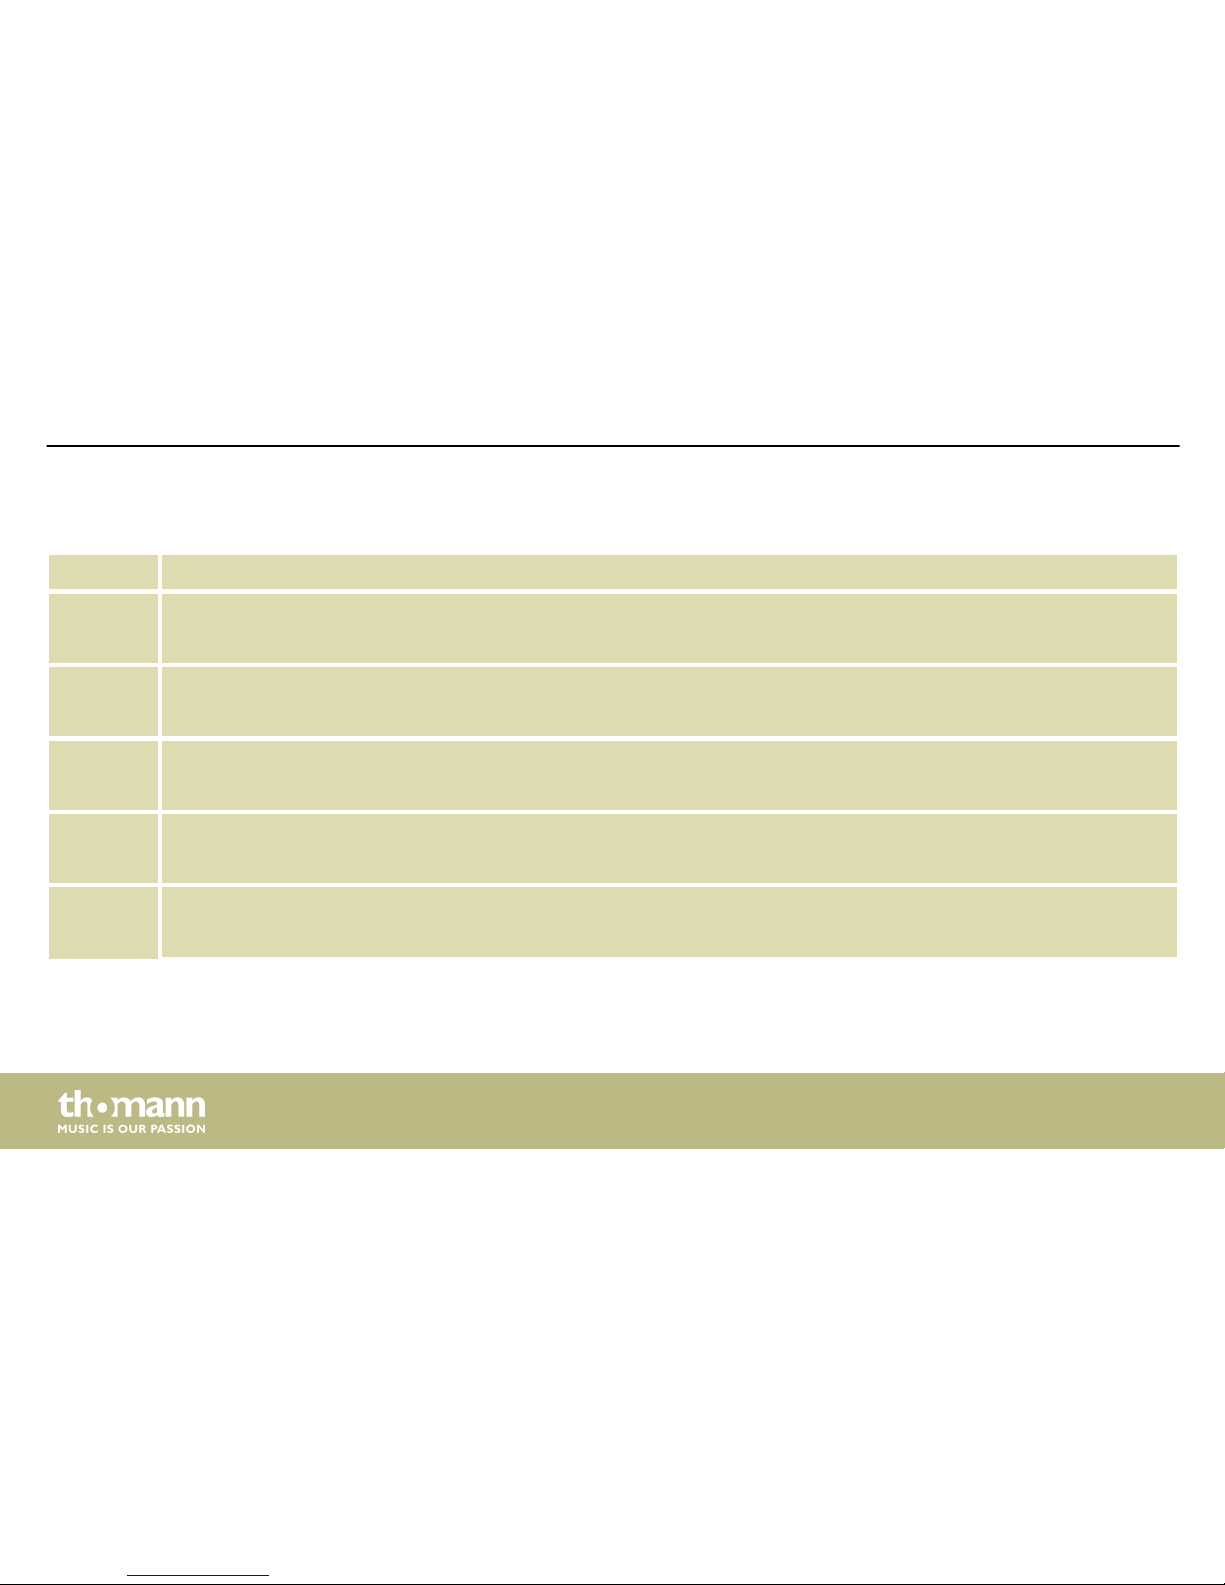
1 Display
2 [TEMPO]
Button to adjust metronome and playback tempo.
3 [UTILITY]
Button to open the Utility menu.
4 [DRUM OFF]
Button to mute the drum part of the playing Style or kit.
5 [CLICK]
Button to turn the metronome on and off.
6 [SONG]
Button to open the [SONG] . Here you can select a Style from the device memory.
Connections and operating elements
e-drum module
20
Page 21
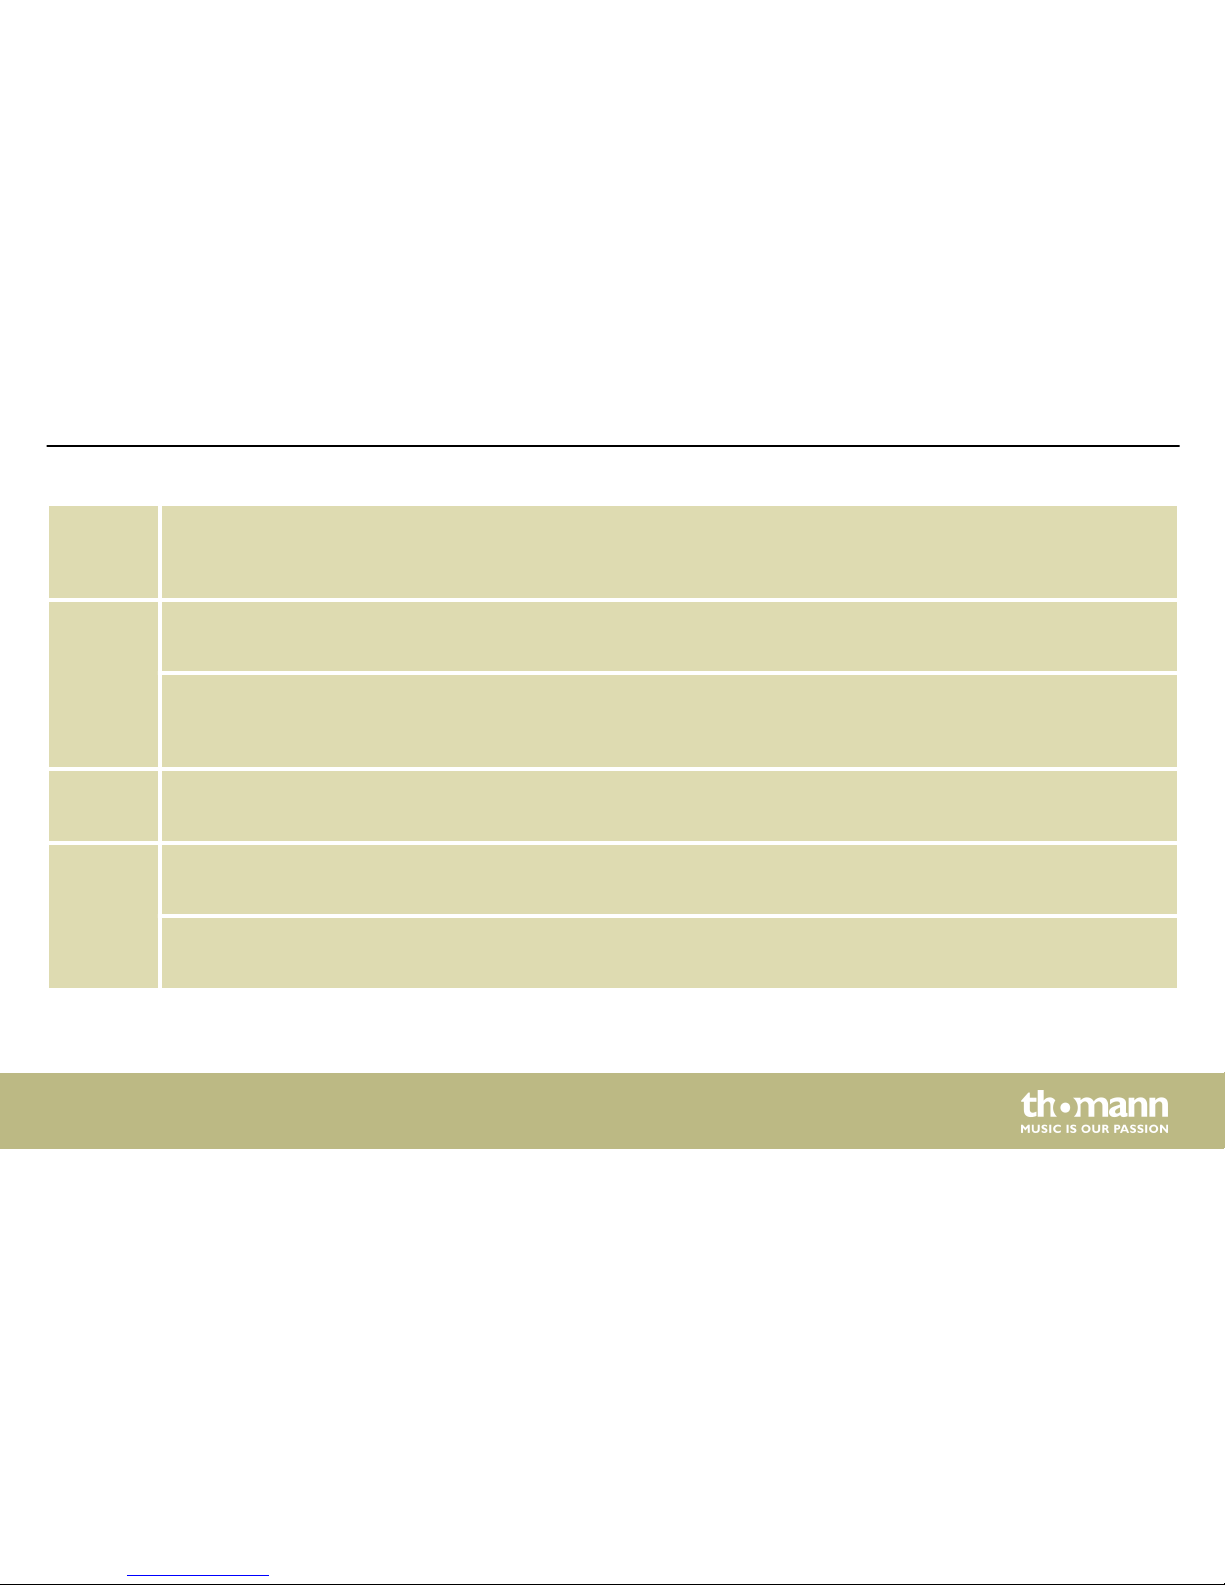
[SHIFT] + [SONG]
Key combination to open the [USER SONG] selection. Here you can select one of a maximum of five user recordings
from the device memory.
7 [KIT]
Button to open the [KIT] selection. Here you can select a drum kit (preset) from the device memory.
[SHIFT] + [KIT]
Key combination to open the [USER KIT] selection. Here you can select one of a maximum of five user presets from the
device memory.
8 [VOICE]
Button to open the [VOICE] selection.
9 [PAGE + | –]
Buttons to scroll forwards and backwards in the various menus.
[SHIFT] + [TRIG + | –]
Key combination to open the [PAD] selection. Here you can select one of the connected trigger.
Connections and operating elements
MPS-425
21
Page 22
10 [+ | –]
Keys to increase or decrease the currently displayed value.
11 [SHIFT]
Shift key to activate the secondary function of a button.
12 [START | STOP]
Button to start and stop song playback.
[SHIFT] + [REC]
Key combination to activate the recording function.
13 [SAVE | ENTER]
Button to store settings.
14 [PREVIEW]
Button to play a pad Voice.
Connections and operating elements
e-drum module
22
Page 23
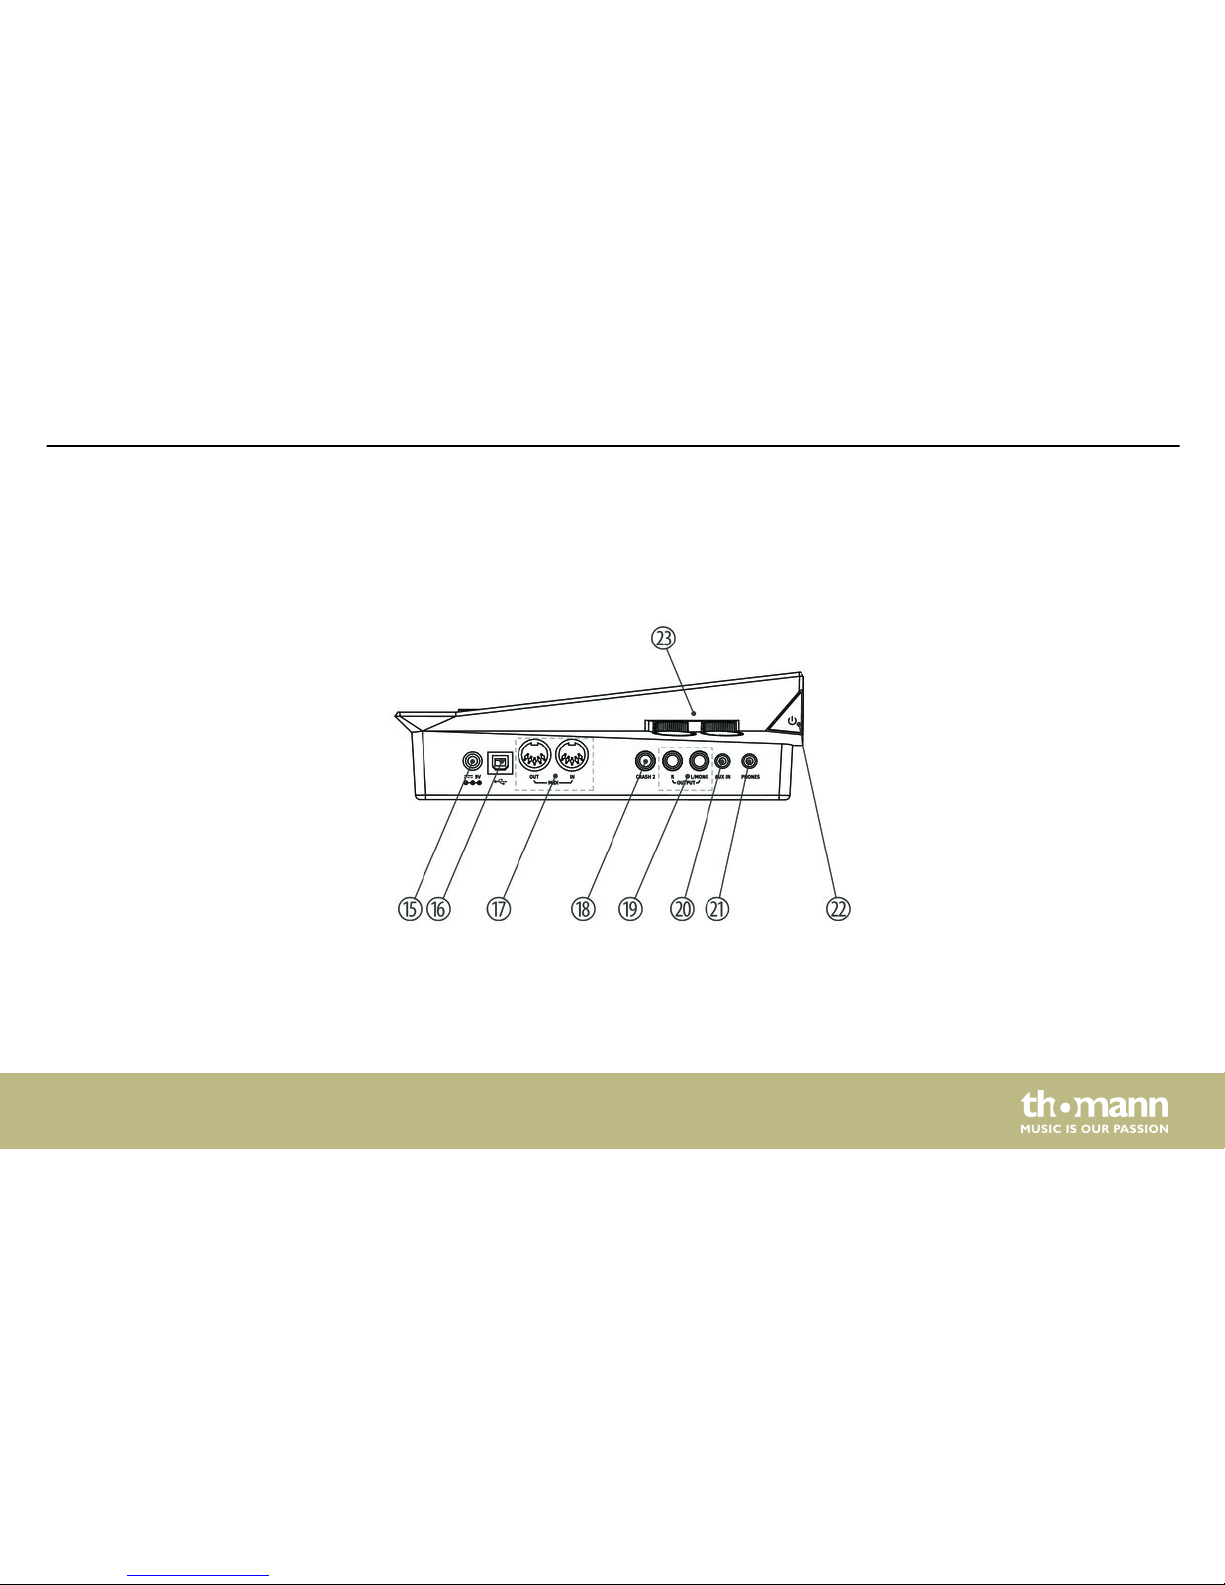
Rear panel
Connections and operating elements
MPS-425
23
Page 24
15 Connection socket for the power adapter.
16 Connection socket for USB cable.
17 [MIDI OUT | IN]
Connection sockets for an external MIDI device.
18 [CRASH 2]
Connection socket for an additional Crash pad.
19 [OUTPUT R | L / MONO]
Output for external audio devices.
20 [AUX IN]
Input for external audio devices like MP3 or CD players.
21 [PHONES]
Connection socket for headphones.
Connections and operating elements
e-drum module
24
Page 25
22 Main switch. Turns the device on and off.
23 [MASTER] | [AUX IN]
Rotary control to adjust the volume of the drum module and the AUX input.
Connections and operating elements
MPS-425
25
Page 26
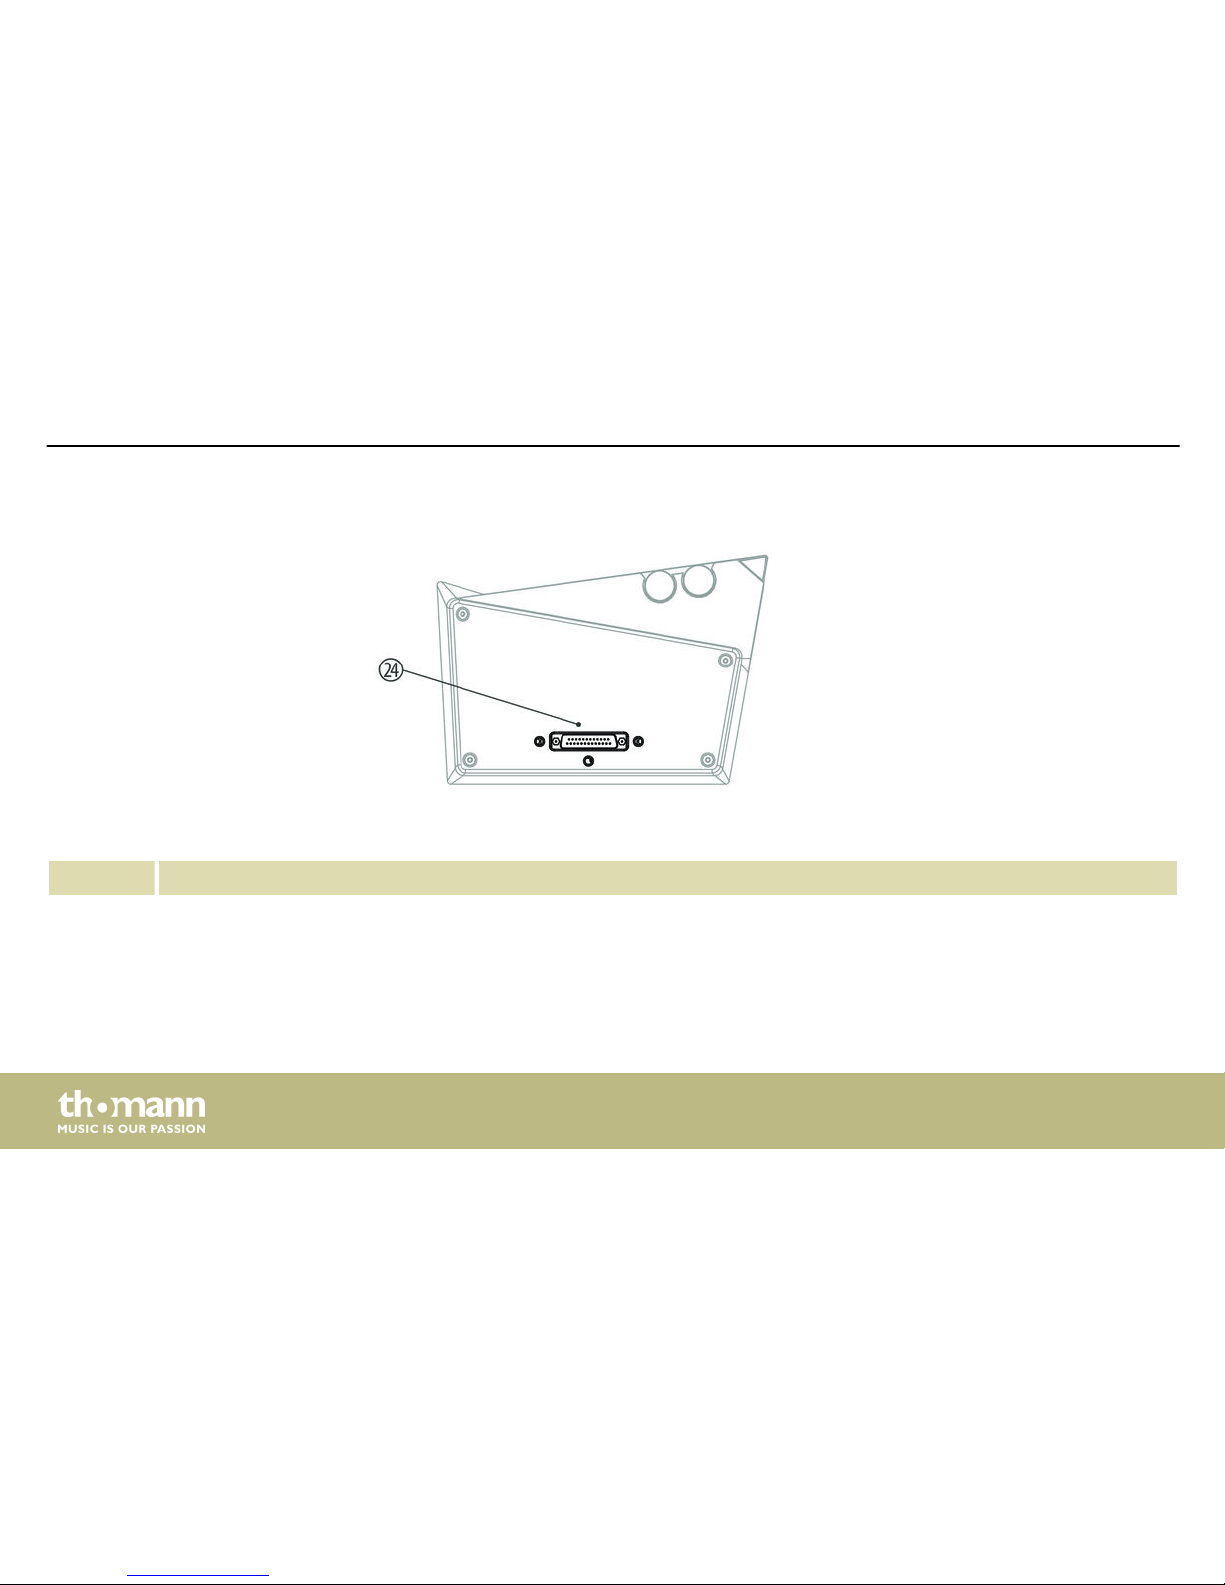
22 Multiple socket for connecting the pads.
Bottom
Connections and operating elements
e-drum module
26
Page 27
6 Operating
6.1 Functions
Check all cable connections for correct fit before turning on.
Before switching on, turn the volume control [VOLUME] to minimum.
Turn the drum module on using the main switch [POWER] at the bottom of the unit.
Automatic shutoff
– When the device is not used it automatically shuts off by default after 30 minutes.
– You can adjust or deactivate the automatic shutoff in the [UTILITY] menu.
Switching on
Operating
MPS-425
27
Page 28
Reset to factory defaults
1. Simultaneously keep the buttons [–] and [+] pressed.
2. Press [POWER].
ð
The display shows ‘FACRESET’ until the reset is finished.
To adjust the volume strike a pad while turning the volume control [VOLUME] slowly clockwise.
A drum kit is a compilation in which a certain sound and several sound parameters are
assigned to each trigger. Selecting different drum kits lets you customise the sound of your edrum sets in seconds to the desired music genre. Besides the 25 preinstalled drum kits and
nine GM drum kits you can also create and store five user drum kits (see Ä Chapter 11.2 ‘Kit list’
on page 63 and
Ä
Chapter 11.6 ‘General MIDI Drum Kit List’ on page 108).
1. Press [KIT].
ð
The display shows the current kit name and number.
2. Use the buttons [–] and [+] to select the desired kit.
Adjusting the volume
Selecting a drum kit
Operating
e-drum module
28
Page 29
You can change the Voices assigned to the pads to your liking.
1. Press [VOICE] on the drum module.
ð
The ‘VOICE’ menu is being opened.
2. Hit the pad whose voice you want to change or press [SHIFT] + [PAGE+] / [PAGE–].
ð
The name of the current pad is displayed.
3. Hit the respective pad and use the buttons [–] and [+] to select the desired Voice (see
Ä
Chapter 11.3 ‘Drum Voice list’ on page 65).
6.2 Playing the drum kit
Like on an acoustic drum kit, the pads respond to different playing techniques and dynamics.
All pads are velocity sensitive. Some voices change their timbre depending on the punch used.
Selecting Voices.
Operating
MPS-425
29
Page 30
n Pad
With the snare drum we distinguish between Head and Rimshot.
– Head
Strike the head only.
– Rimshot
Simultaneously strike the head and the rim or only the rim of the pad.
n Cymbal
With cymbals we distinguish between Cymbal Bowshot and Choke Play.
– Cymbal Bowshot
Play the bell area of the cymbal.
– Choke Play
Choke Play is possible with Crash and Ride cymbals but not with the Hi-hat. To do so,
stop the sound of the Crash and Ride cymbals with the hand at the edge of the cymbal
immediately after hitting it.
Operating
e-drum module
30
Page 31
n Hi-hat
With the Hi-hat we distinguish between Hi-hat pedal change, open Hi-Hat, closed Hi-hat,
Hi-hat pedal and Splash.
– Hi-hat pedal change
When the pedal is pressed in different positions, the voice changes when hitting the
Hi-hat pad (similar to an acoustic drum kit).
– Open Hi-hat
Strike the Hi-hat pad without pressing the pedal.
– Closed Hi-hat
Strike the Hi-hat pad with fully pressed pedal.
– Hi-Hat pedal
Press the Hi-hat controller pedal to generate a closed sound without striking the Hihat pad.
– Splash
Play the Hi-hat with fully pressed pedal and then open it suddenly.
Operating
MPS-425
31
Page 32
6.3 Metronome function
Press [CLICK] to turn the Click on and off again. When the Click is running the indicator LED of
the button is flashing.
Via the buttons [PAGE +] and [PAGE –] you get to the next or previous parameter (see
following table).
ð
The parameter setting can be changed with the buttons [+] and [–] .
Settings
Operating
e-drum module
32
Page 33
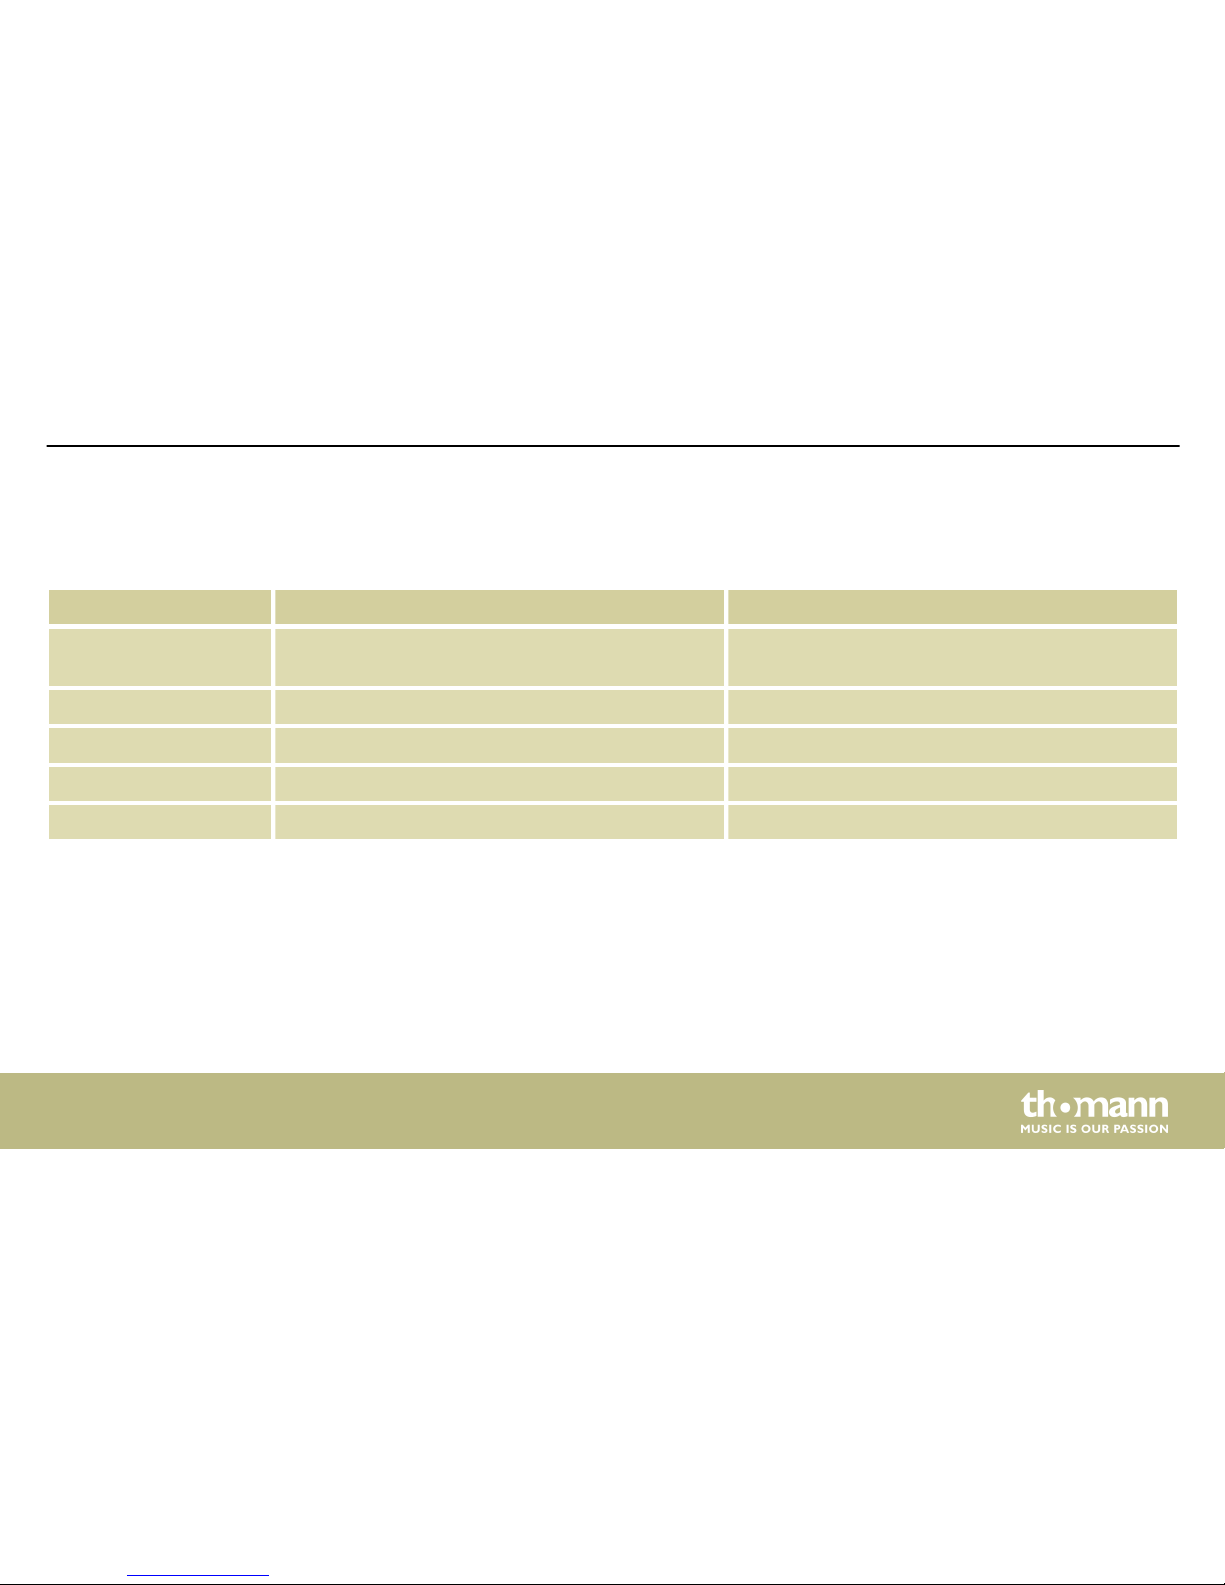
All changes are immediately effective. Exit the Settings menu by pressing the [CLICK] button.
Parameter, display Description Value range
NAME Name and number of the corresponding Click
voice
1 … 6
VOLUME Click volume 0 … 16
TEMPO Beats per minute 30 … 280
TIME SIGNATURE Emphasis on beats 0 … 9/2, 0 … 9/4, 0 … 9/8, 0 … 9/16
INTERVAL Beats per measure 1/2, 3/8, 1/4, 1/8, 1/12, 1/16
Operating
MPS-425
33
Page 34
6.4 Drum kits
A drum kit is a compilation in which a certain sound (Voice) and several sound parameters are
assigned to each trigger. Selecting different drum kits lets you customise the sound of your
drum kit in seconds to the desired music genre. Besides the 25 preprogrammed drum kits
(Ä Chapter 11.2 ‘Kit list’ on page 63) you can also create, customise and save five user drum kits.
Press [KIT].
ð
The display shows the number and name of the currently selected drum kit.
Selecting a drum kit
Operating
e-drum module
34
Page 35
You can assign a special sound to each individual trigger of the drum kit and set multiple
sound parameters.
Select the desired drum kit with the buttons [PAGE +] or [PAGE –]. The selected drum kit
is immediately active.
ð
The parameter setting can be changed with the buttons [+] and [–] .
Parameter, display Description Value range
KIT NAME Drum kit selection Preset 1 … 25
User: 5
VOLUME Volume of the pads of the drum kit 0 … 16
EQ HIGH Boost / cut of the high EQ frequencies –12 … 12
EQ MID Boost / cut of the mid EQ frequencies –12 … 12
EQ LOW Boost / cut of the low EQ frequencies –12 … 12
Customising a drum kit
Operating
MPS-425
35
Page 36
Voice parameters always refer only to a single pad. For example, if you change the volume of
the snare drum, the other pads are not affected.
1. Press [VOICE].
ð
The display shows the ‘VOICE’ menu.
2. Press [TRIG +] or [TRIG –] or play on the pad whose parameters you want to change.
3. Use the buttons [PAGE +] or [PAGE –] to select the parameter you want to change.
ð
The parameter setting can be changed with the buttons [+] and [–] .
Parameter, dis‐
play
Description Value range Trigger
VOICE NAME Voice assigned to the trigger 1 … 380 KI (KICK)
SN (Snare)
SNR (Snare rim)
T1 (Tom 1)
VOLUME Volume 0… … …16
PAN Trigger position within the stereo
signal (panorama right / left)
–8… … …8
Customising Voice parameters
Operating
e-drum module
36
Page 37
Parameter, dis‐
play
Description Value range Trigger
PITCH
T2 (Tom 2)
T3 (Tom 3)
HH (Hi-hat)
C1 (Crash 1)
RD (Ride)
C2 (Crash 2)
PS (Hi-hat Splash)
Pitch –8 … 8
REVERB Reverb 0… … …16
DECAY Decay –5… … …0
NOTE MIDI note assigned to the trigger 0… … …127
PAD SONG Pattern, Style 0 … 82, Off
Besides playing the pads, you can also press [PREVIEW] to select the various Voices.
The volume depends on how hard you press the button.
Operating
MPS-425
37
Page 38
The existing preset kits can be used as a basis for user kits. The user kits can then be stored in
the device memory.
1. Press [SAVE/ENTER].
ð
‘SV’ and the number and name of the first user kit appear on the display.
2. Use the buttons [+] or [–] to select the user kit you want to assign the settings of the
preset kit to.
3. Confirm the change with [SAVE/ENTER].
ð
The display briefly shows ‘SAVE OK!’ . Then the original kit is displayed with the new
name and the new memory location. The changes to the settings take immediately
effect.
Any unsaved changes will be discarded when selecting another kit or the device is
turned off.
Customising and storing user
kits
Operating
e-drum module
38
Page 39
6.5 Playing, customising and accompanying Styles
Your digital drum set features a total of 82 preprogrammed Styles. Style ‘001’ is displayed by
default when the drum module is turned on.
1. Press [SONG].
ð
The name and number of the current Style appear in the display.
2.
Use the buttons [PAGE–] and [+] to select the desired Style (see Ä on page 56).
ð
The parameter setting can be changed with the buttons [+] and [–] .
Style selection
Operating
MPS-425
39
Page 40
3. Press [START / STOP] to play or stop Patterns and Styles.
Parameter, display Description Value range
SONG NAME Pattern, Style 1… … …82
ACCOMPANIMENT
VOLUME
Preset Style volume. 0… … …16
DRUM VOLUME Drum kit volume 0… … …16
The drum track can be muted at any time during Style playback.
1. Press [DRUM OFF] to mute the drum sound of the Style.
ð
The indicator LED lights as long as the part is muted.
2. Press the button [DRUM OFF] to unmute the drum sound of the style again.
Muting drum sound
Operating
e-drum module
40
Page 41
6.6 Utility menu
Press [UTILITY] to open the menu. With [PAGE–/+] you can jump between the various parame‐
ters:
The touch sensitivity regulates the volume behaviour of a pad regardless of the actual strike
intensity. The higher the value, the higher the volume when playing, and vice versa.
Value range: 1 … 16.
This parameter controls the touch sensitivity of the rim trigger (snare and toms).
Value range: 1 … 16.
The threshold value determines from what intensity a trigger produces a sound. The higher
the value, the less sensitive the trigger responses to vibrations of other pads.
Value range: 1 … 16.
Sensitivity
Rim Sens
Threshold
Operating
MPS-425
41
Page 42
If several pads are mounted on a rack vibrations can be transmitted to other pads when you hit
a trigger and unintentionally trigger sounds. This crosstalk can be avoided by the appropriate
setting. The value should be set as low as possible.
Value range: 1 … 16.
X talk
Operating
e-drum module
42
Page 43
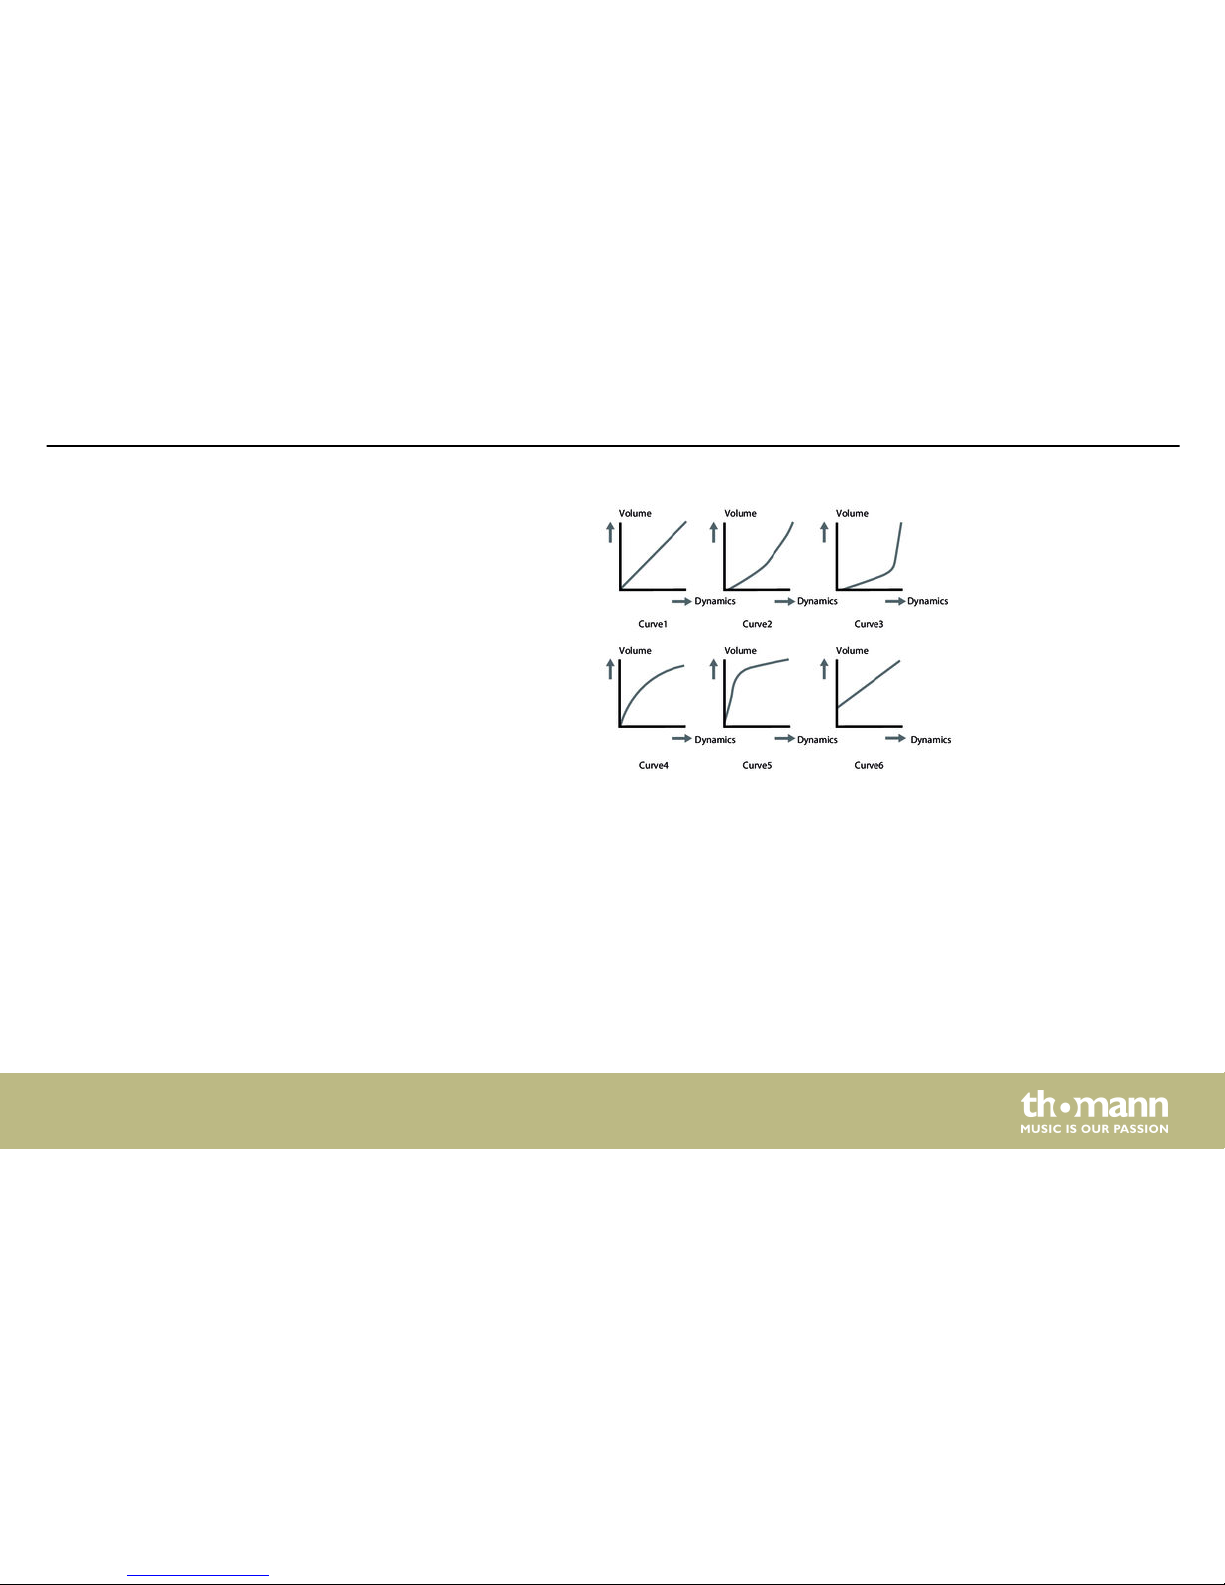
The trigger curve regulates the velocity, i.e., the ratio between the punch and volume. Use set‐
ting ‘Curve 1’ for the most natural ratio between punch and volume. When using ‘Curve 2’ or
‘Curve 3’ , a strong strike will cause a bigger change. When using ‘Curve 4’ or ‘Curve 5’, a light
strike will cause a bigger change. With the setting ‘Curve 6’ the volume changes less upon a
change of the strike. High volumes are already reached at a relatively low strike intensity.
Value range: Curve 1 … Curve 6.
Curve
Operating
MPS-425
43
Page 44
We call it ‘double trigger’ when multiple sounds are successively produced when playing a
pad. This effect can i.a. be caused by irregular waveforms especially in the decaying of the
trigger. With this parameter, these distortions can be suppressed. The higher the value is, the
higher the likelihood that rapidly successive strikes - such as in a drum roll - are no longer
detected. So the value should be set as low as possible.
Value range: 1 … 16.
This parameter regulates the touch sensitivity of the Hi-hat controller. The higher the value,
the less sensitive the trigger responses.
Value range: 0 … 2
This parameter regulates the touch sensitivity of the Splash trigger. The higher the value, the
less sensitive the trigger responses.
Value range: 1 … 5
Selecting ‘L’ or ‘R’ (default setting) allows to switch from left-handed to right-handed configu‐
ration of the entire set without having to change the wiring.
Value range: L … R
Retrig cancel
HH close
Splash
L-R exch
Operating
e-drum module
44
Page 45
This parameter defines the signal processing in the module: ON: Drum module and MIDI sound
are present at the output. OFF: Drum module is muted, only MIDI sound.
Value range: ON … OFF
This parameter defines the processing of programme change commands: ON: Programme
change commands for MIDI channel 10 are processed as selection [GM kit] . OFF: Programme
change commands for MIDI channel 10 are processed as selection [local kit] .
Value range: ON … OFF
This parameter defines the behaviour of the automatic shutoff: Select one of the following
options:
n ‘30’ (automatic shutoff after 30 minutes)
n ‘60’ (automatic shutoff after 60 minutes)
n ‘OFF’ (no automatic shutoff).
Local
GM mode
Auto Power
Operating
MPS-425
45
Page 46
6.7 Recording functions
With this function you can record your own drum track without presettings.
1. Simultaneously press the buttons [REC] and [SHIFT] + [START / STOP ].
ð
The Click is automatically turned on, the indicator LEDS of the buttons [CLICK], [REC]
and [START / STOP] are flashing. The recording will automatically start with your
playing or if you press the [START / STOP ] button. During recording, the indicator
LEDs of the buttons [REC] and [PLAY / STOP] light up.
2. To exit and save the recording, press the [START / STOP].
ð
The first unused user Style appears on the display.
3. Use the buttons [+] or [–] to select another user Style (for example, to overwrite an
existing one).
All preset Styles can be used as a basis for recording your own tracks.
Quick record
Recording via preset Styles
Operating
e-drum module
46
Page 47
1. Use the buttons [ PAGE +] or [PAGE –] to select the list of preset Styles for which you want
to record your own drum track.
2. Use the buttons [ +] or [–] to select the desired preset Style.
1. Simultaneously press [REC] and [SHIFT] + [START / STOP ] to enable the Recording mode.
ð
‘RECORD’ appears on the display. The indicator LEDs of the buttons [CLICK] and
[REC] are flashing.
2. Via the buttons [PAGE –/+] you get to the next or previous parameter (see following
table).
ð
The parameter setting can be changed with the buttons [+] and [–] .
3. After setting all parameters, you can start recording instantly. To do so, press the button
[START / STOP].
Recording settings
Operating
MPS-425
47
Page 48
4. Store the recording as a new user Style.
Parameter, display Description Value range
*U-SONG User Style A ‘*’ before the name means that there
are no recordings for the style.
001 … 005
SONG Preset Style 1 … 82
KIT Drum kit 1 … 30
TEMPO Tempo 30 … 280
TIME SIGNATURE Time signature 1 … 9/2, 1 … 9/4, 1 … 9/8, 1 … 9/16
INTERVAL Beats per measure 1/2, 3/8, 1/4, 1/8, 1/12, 1/16
DRUM OFF The drum part can be muted.
Parts 1 … 5 are always being overwritten.
ON/OFF
PRECOUNT Precount function ON/OFF
Operating
e-drum module
48
Page 49
1. Simultaneously press [REC] and [SHIFT] + [START / STOP ].
ð
The Click is automatically turned on, the indicator LEDS of the buttons [CLICK], [REC]
and [PLAY / STOP] are flashing. The device is now in recording mode.
2. Start recording with [START / STOP].
ð
The indicator LEDs of the buttons [REC] and [PLAY / STOP] are flashing during
recording and ‘RECORDING’ appears on the display.
3. Stop recording with [START / STOP].
ð
The indicator LEDs of the buttons [REC] and [START / STOP] turn off. The recording is
saved under the previously entered name as a new user Style in the device and will
appear on the display. To play your new Style simply press the button [START / STOP].
If the memory is full the display shows ‘REC FULL’ and the recording stops .
Starting and stopping recording
Operating
MPS-425
49
Page 50
7 Technical specifications
Voices 380
Drum kits 25 preset kits
5 user kits
Styles 82
Connections Headphones (1/4" phone socket)
AUX in (1/4" phone socket)
Audio output mono / stereo (1/4" phone socket)
MIDI in, MIDI out
USB out
Technical specifications
e-drum module
50
Page 51
Multiple socket for 1 × Kick pad (mono), 1 × Snare pad
(stereo), 3 × Tom pads (mono), 1 × Crash pad (mono),
1 × Ride pad (mono), 1 × Hi-hat pad (mono), 1 × Hi-hat
controller
Operating supply voltage
9V power adapter
Technical specifications
MPS-425
51
Page 52
8 Plug and connection assignment
This chapter will help you select the right cables and plugs to connect your valuable equip‐
ment in such a way that a perfect sound experience is ensured.
Please note these advices, because especially in ‘Sound & Light’ caution is indicated: Even if a
plug fits into the socket, an incorrect connection may result in a destroyed power amp, a short
circuit or ‘just’ in poor transmission quality!
Unbalanced transmission is mainly used in semi-professional environment and in hifi use.
Instrument cables with two conductors (one core plus shielding) are typical representatives of
the unbalanced transmission. One conductor is ground and shielding while the signal is trans‐
mitted through the core.
Unbalanced transmission is susceptible to electromagnetic interference, especially at low
levels, such as microphone signals and when using long cables.
In a professional environment, therefore, the balanced transmission is preferred, because this
enables an undisturbed transmission of signals over long distances. In addition to the conduc‐
tors ‘Ground’ and ‘Signal’, in a balanced transmission a second core is added. This also transfers
the signal, but phase-shifted by 180°.
Introduction
Balanced and unbalanced trans‐
mission
Plug and connection assignment
e-drum module
52
Page 53
Since the interference affects both cores equally, by subtracting the phase-shifted signals, the
interfering signal is completely neutralized. The result is a pure signal without any noise inter‐
ference.
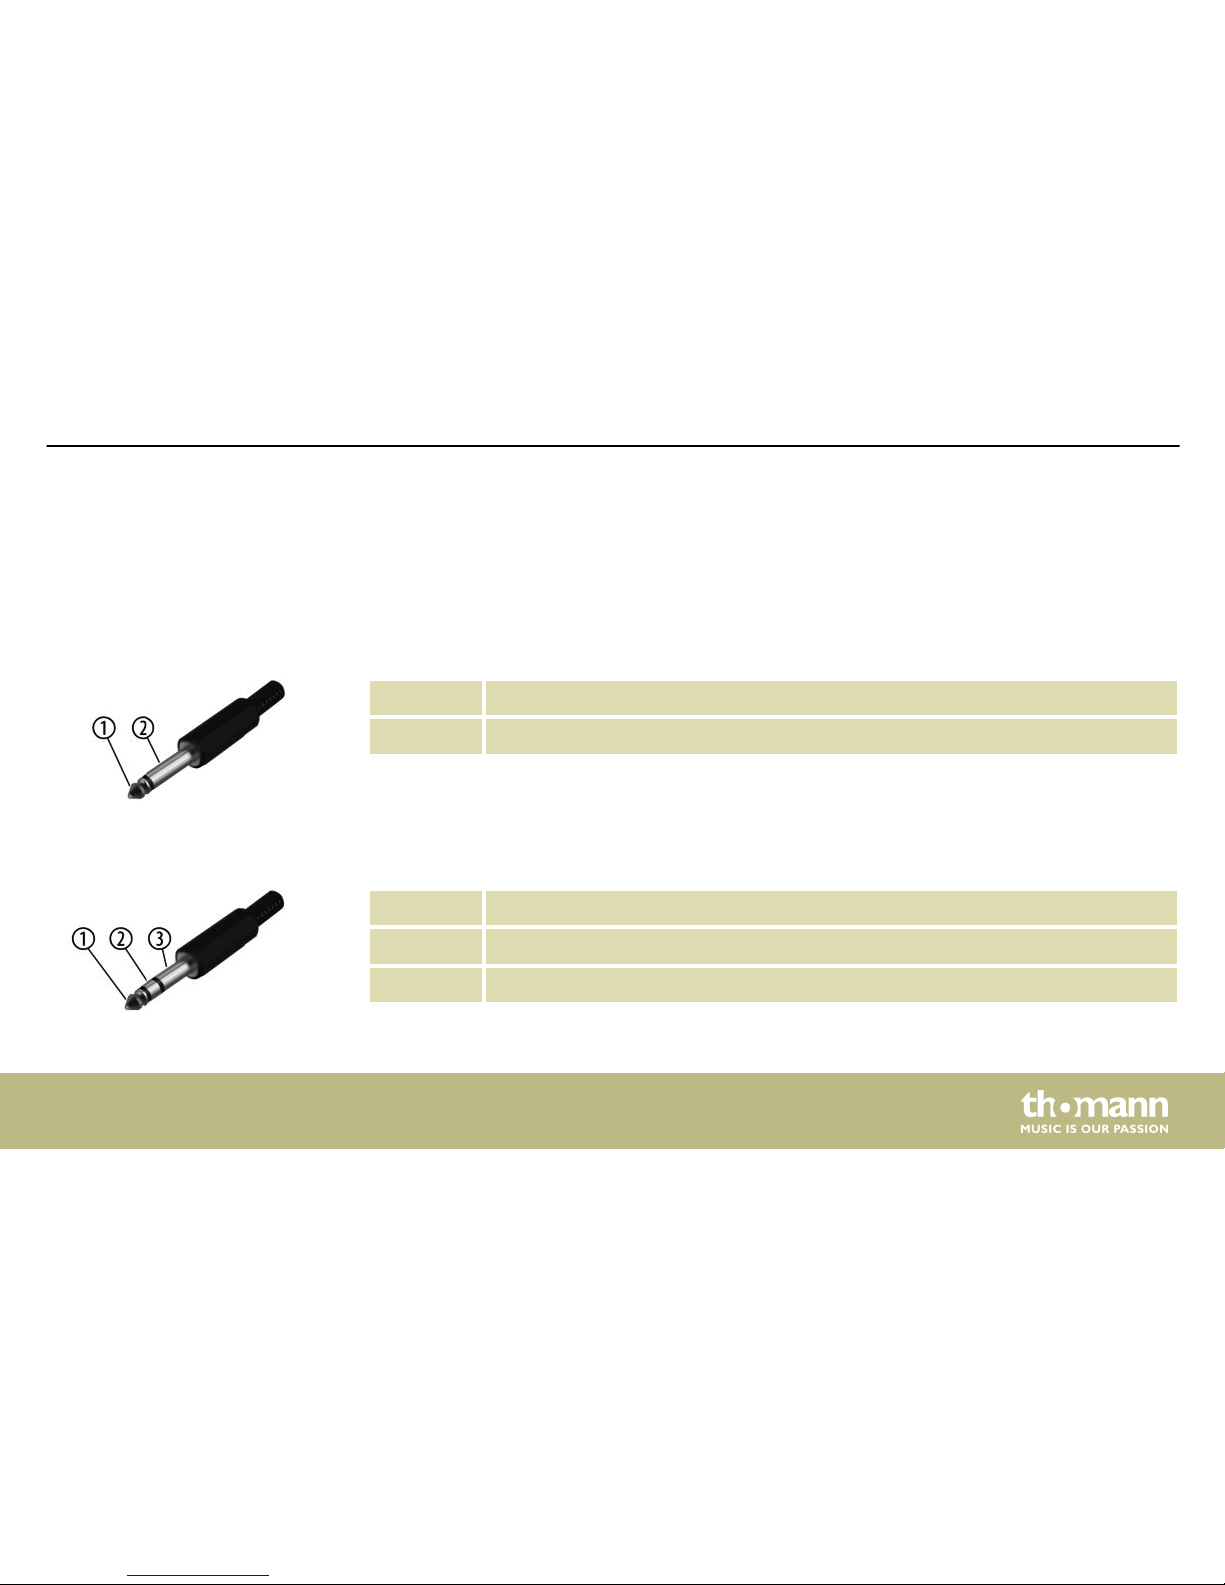
1 Signal
2 Ground, shielding
1 Signal (in phase, +)
2 Signal (out of phase, –)
3 Ground
1/4" TS phone plug (mono,
unbalanced)
1/4" TRS phone plug (mono, bal‐
anced)
Plug and connection assignment
MPS-425
53
Page 54
9 Cleaning
Clean the accessible parts of the device regularly. The frequency of cleaning depends on the
operating environment: moist, smoky or particularly dirty environments may cause a higher
accumulation of dirt on the components of the device.
n Use a dry soft cloth for cleaning.
n Remove stubborn stains with a slightly damp cloth.
n Never use cleaners containing alcohol or thinner.
n Never put any vinyl items on the device, as vinyl can stick to the surface or lead to its disco‐
louration.
Device parts
Cleaning
e-drum module
54
Page 55
10 Protecting the environment
For the transport and protective packaging, environmentally friendly materials have been
chosen that can be supplied to normal recycling.
Ensure that plastic bags, packaging, etc. are properly disposed of.
Do not just dispose of these materials with your normal household waste, but make sure that
they are collected for recycling. Please follow the notes and markings on the packaging.
This product is subject to the European Waste Electrical and Electronic Equipment Directive
(WEEE). Do not dispose with your normal household waste.
Dispose of this device through an approved waste disposal firm or through your local waste
facility. When discarding the device, comply with the rules and regulations that apply in your
country. If in doubt, consult your local waste disposal facility.
Disposal of the packaging mate‐
rial
Disposal of your old device
Protecting the environment
MPS-425
55
Page 56
11 Appendix
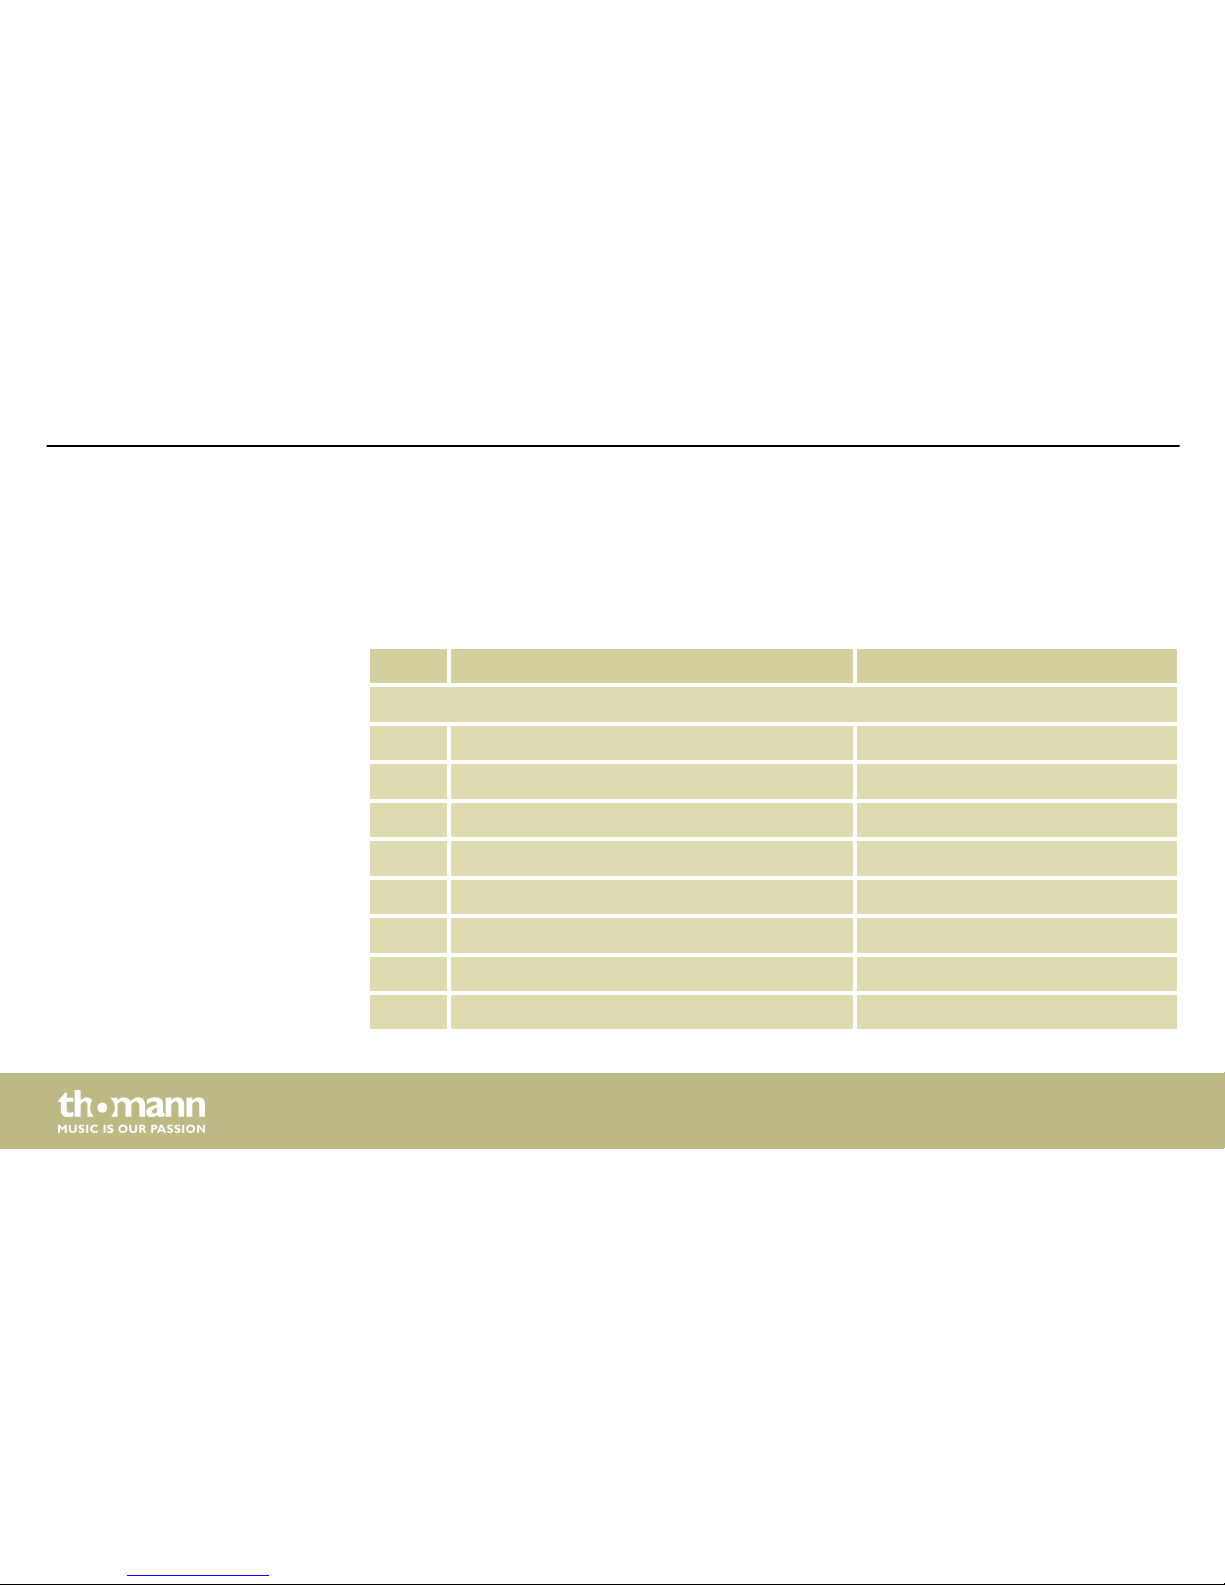
11.1 Song list
No. Name Display
PATTERN LOOP
001 Blues Funk BLUESFK
002 Fusion 1 FUSION 1
003 Cool Jazz COOLJAZZ
004 Ballad BALLAD
005 Samba1 SAMBA 1
006 Vintage Hip-Hop VTHIPHOP
007 Nu Jazz Funk NUJAZZFK
008 Soul SOUL
Appendix
e-drum module
56
Page 57
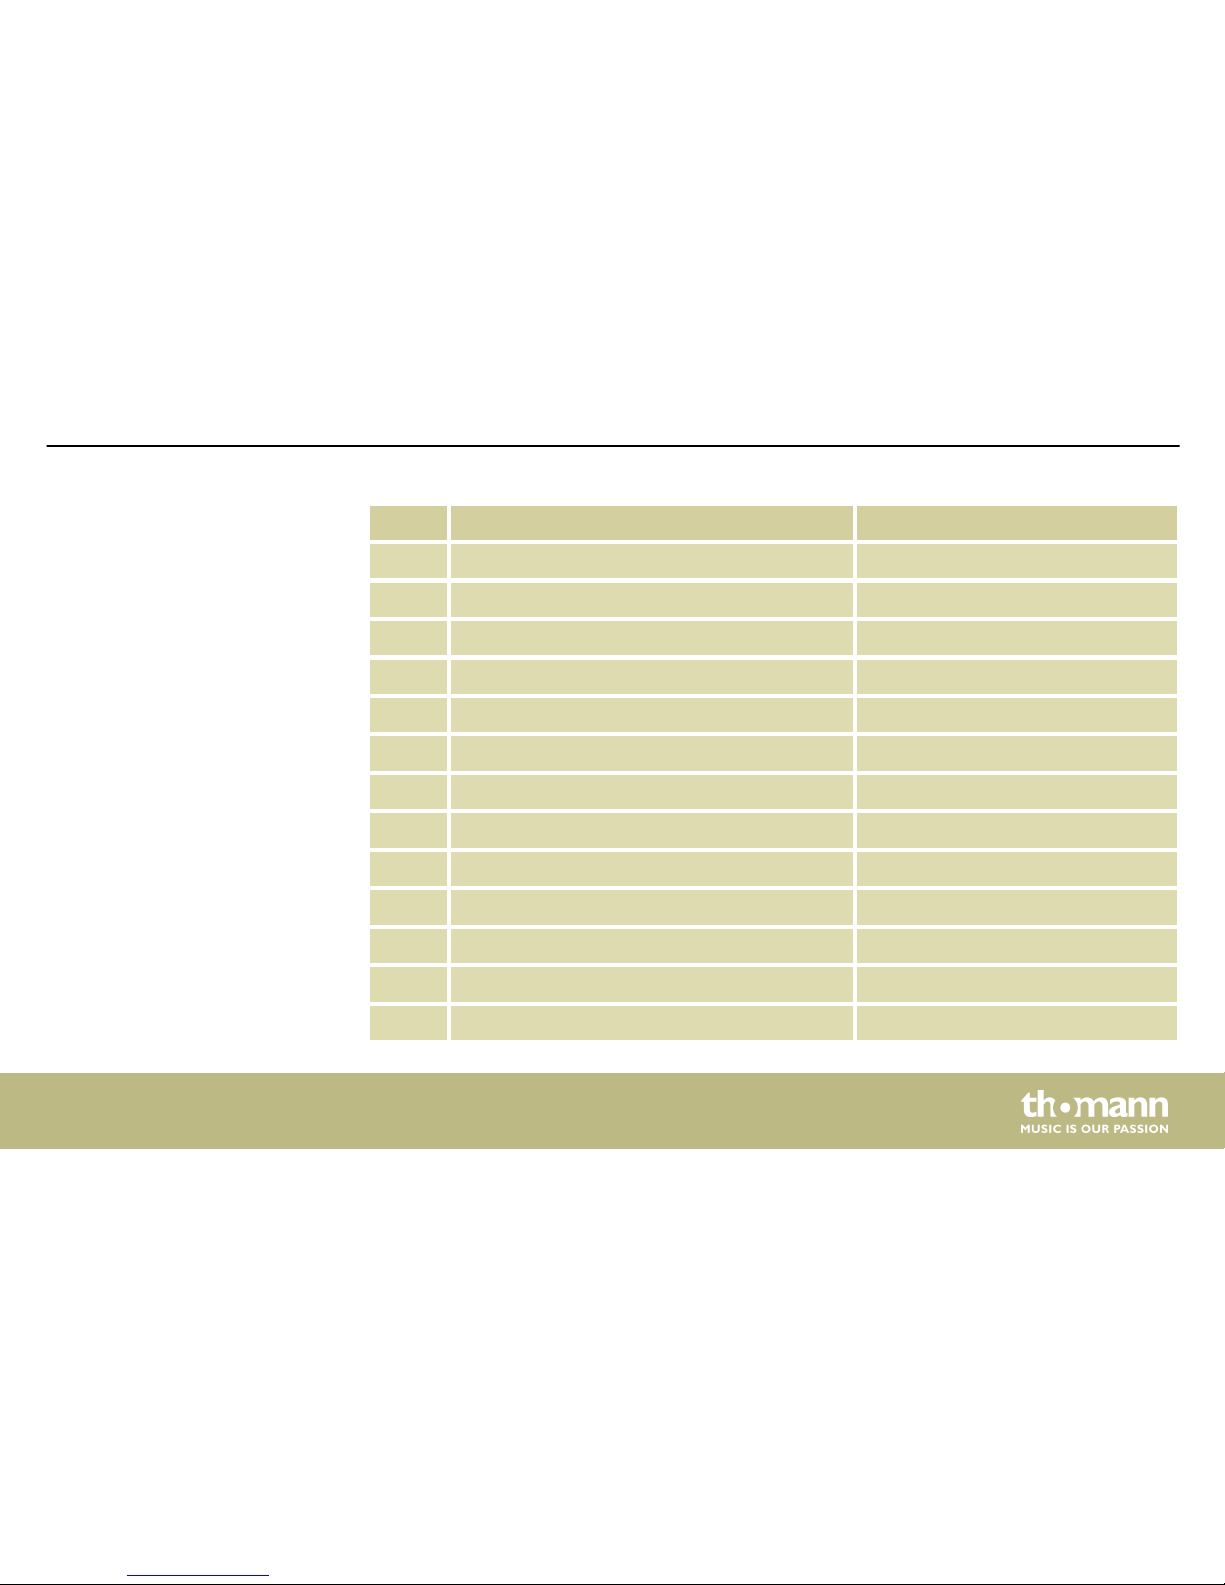
No. Name Display
009 R&B RNB
010 Big Band 1 BIGBAND1
011 Ska SKA
012 Classic Rock CLASSRK
013 Hardcore Hip-Hop HCHIPHOP
014 Vintage Dance Pop VTGDANCE
015 Nu-Metal NU-METAL
016 Salsa SALSA
017 Euro Hip-Hop EUHIPHOP
018 Bossa Nova BOSSA
019 Fusion 2 FUSION2
020 8Beat Pop 1 8BEATP1
021 Jazzy Funk JAZZYFK
Appendix
MPS-425
57
Page 58
No. Name Display
022 Swing Big Band SWBGBAND
023 Reggae 1 REGGAE 1
024 60's Pop 60'S POP
025 Vintage Funk VTGFUNK
026 Trance TRANCE
027 Heavy Rock HEAVYRK
028 Swing SWING
029 Punk PUNK
030 8BeatPop 2 8BEATP2
031 Disco House DISCOHOU
032 3/4 Folk 3/4 FOLK
033 Samba 2 SAMBA 2
034 Latin Rock LATINRK
Appendix
e-drum module
58
Page 59
No. Name Display
035 Reggae 2 REGGAE 2
036 Dance DANCE
037 Country Pop CTRYPOP
038 Country COUNTRY
039 Rock Ballad RKBALLAD
040 DancePop DANCEPOP
041 Bebop BEBOP
042 Rock N'Roll R'N'R
043 Band Jazz BANDJAZZ
044 Blues BLUES
045 3/4 Jazz 3/4 JAZZ
046 80's Metal 80SMETAL
047 6/8 Soul 6/8SOUL
Appendix
MPS-425
59
Page 60
No. Name Display
048 Latin Jazz LATINJAZ
049 TripHop TRIPHOP
050 Brit Pop BRITPOP
PERCUSSION LOOP
051 Indonesia INA
052 Latin LATIN
053 Bossa BOSSA
054 Samba SAMBA
055 3-4 Pop 3/4 POP
056 Pop POP
057 Jazz JAZZ
058 Reggae 1 REGGAE 1
059 Reggae 2 REGGAE 2
Appendix
e-drum module
60
Page 61
No. Name Display
060 Latin Rock LTNROCK
HIT
061 New Age Tap 1 NEWAGET1
062 Atmosphere Tap 3 ATMOSPT3
063 Polysynth Tap 5 POLYST5
064 Brass Tap 6 BRASST6
065 Fx Tap 8 FXT8
TAP
066 Bass Tap 1 BASST1
067 Bass Tap 3 BASST3
068 Bass Tap 5 BASST5
069 Swing Bass Tap 6 SWBASST6
070 Bass Tap 8 BASST8
Appendix
MPS-425
61
Page 62
No. Name Display
071 Crystal Tap 1 CRYSTLT1
072 Vibraphone Tap 3 VIBRAT3
073 Sawtooth Tap 5 SAWT5
074 Funk Gtslide Tap 6 FKGTRST6
075 Chorused Piano Tap 8 CHRPNOT8
076 Brightness Tap 1 BRIGHTT1
077 Lead Tap 3 LEADT3
078 Soundtrack Tap 5 SNDTRKT5
079 Funk Gtnote Tap 6 FKGTRNT6
080 Pad Tap 1 PADT1
081 Square Tap 3 SQURET3
082 Rain Tap 5 RAINT5
Appendix
e-drum module
62
Page 63
11.2 Kit list
No. Name No. Name
001 KITACOUSTIC 011 FX MIX
002 FUNK 012 POWER
003 STANDARD 013 LATIN
004 BRUSH 014 MARIMBA
005 DANCE 015 PERCUSS
006 ROCK 016 METAL
007 JAZZ 017 INDIAN
008 808 018 AFRICAN
009 909 019 ELECTRIC
010 FUNKBAND 020 REGGAE
Appendix
MPS-425
63
Page 64
No. Name No. Name
021 ORCHESTR 026 LIVE
022 SONGO 027 HOUSE
023 HIPHOP 028 JAZLATIN
024 BIG BAND 029 TECHNO
025 MAGIC 030 VINTAGE
Appendix
e-drum module
64
Page 65
11.3 Drum Voice list
Nr. Name Display
KICK
001 22”Acoustic Kick 1 22AC K1
002 22”Acoustic Kick 2 22AC K2
003 24”Standard Kick 24STD K
004 Brush Kick 1 BRUSH K1
005 Jazz Kick JAZZ K
006 22”Rock Kick 22ROCK K
007 Room Kick ROOM K
008 Vintage Kick VTG K
009 HipHop Kick HIPHOP K
010 Reggae Kick REGGAE K
Appendix
MPS-425
65
Page 66
Nr. Name Display
011 808 Kick 808 K
012 909 Kick 909 K
013 Electronic Kick ELEC K
014 Power Kick POWER K
015 Dance Kick DANCE K
016 FX Mix Kick FX MIX K
017 Techno Kick TECHNO K
018 Magic Kick MAGIC K
SNARE
019 14”Acoustic Snare 14AC S1
020 14”Acoustic Snare Rim 14AC SR1
021 14”Standard Snare 14STD S1
022 14”Standard Snare Rim 14ST SR1
Appendix
e-drum module
66
Page 67
Nr. Name Display
023 14”Funk Snare 1 14FK S1
024 14”Funk Snare Rim 1 14FK SR1
025 14”Funk Snare 2 14FK S2
026 14”Funk Snare Rim 2 14FK SR2
027 Brush Snare 1 BRUSH S1
028 Brush Snare Rim 1 BRSH SR1
029 Brush Snare 2 BRUSH S2
030 Brush Snare Rim 2 BRSH SR2
031 14”Jazz Snare 14JAZZ S
032 14”Jazz Snare Rim 14JZ SR
033 14”Rock Snare 14ROCK S
034 14”Rock Snare Rim 14RK SR
035 13”Damped Snare 13DP S1
Appendix
MPS-425
67
Page 68
Nr. Name Display
036 Orchestra Snare ORCH S
037 Orchestra Snare Rim ORCH SR
038 Fusion Snare FUSION S
039 Fusion Snare Rim FUS SR
040 Big Band Snare BB S
041 Big Band Snare Rim BB SR
042 Vintage Snare VTG S
043 Vintage Snare Rim VTG SR
044 Live Snare LIVE S
045 Live Snare Rim LIVE SR
046 Reggae Snare REGGAE S
047 Reggae Snare Rim RG SR
048 808 Snare 808 S
Appendix
e-drum module
68
Page 69
Nr. Name Display
049 808 Snare Rim 808 SR
050 909 Snare 909 S
051 909 Snare Rim 909 SR
052 Electronic Snare ELEC S
053 Power Snare POWER S
054 Dance Snare DANCE S
055 Dance Snare Rim DANCE SR
056 House Snare HOUSE S
057 House Snare Rim HOUSE SR
058 Techno Snare TECHNO S
059 Techno Snare Rim TEK SR
060 Magic Snare MAGIC S
061 Magic Snare Rim MAGIC SR
Appendix
MPS-425
69
Page 70
Nr. Name Display
062 Acoustic Snare Stick AC SX1
063 Standard Snare Stick 1 STD SX1
064 Brush Snare Stick BRUSH SX
065 Standard Snare Stick 2 STD SX2
066 Rock Snare Stick 1 ROCK SX1
067 Rock Snare Stick 2 ROCK SX2
068 Live Snare Stick LIVE SX
069 Fusion Snare Stick FUS SX
070 808 Snare Stick 808 SX
071 909 Snare Stick 909 SX
072 Electronic Snare Stick ELEC SX
073 House Snare Stick HOUSE SX
074 Techno Snare Stick TEK SX
Appendix
e-drum module
70
Page 71
Nr. Name Display
075 Brush Swirl BRUSH SW
TOM
076 Acoustic Tom 1 AC T1
077 Acoustic Tom 1 Rim AC T1R
078 Acoustic Tom 2 AC T2
079 Acoustic Tom 2 Rim AC T2R
080 Acoustic Tom 3 AC T3
081 Acoustic Tom 3 Rim AC T3R
082 Acoustic Tom 4 AC T4
083 Acoustic Tom 4 Rim AC T4R
084 Acoustic Tom 5 AC T5
085 Acoustic Tom 5 Rim AC T5R
086 Acoustic Tom 6 AC T6
Appendix
MPS-425
71
Page 72
Nr. Name Display
087 Acoustic Tom 6 Rim AC T6R
088 Brush Tom 1 BRUSH T1
089 Brush Tom 1 Rim BRSH T1R
090 Brush Tom 2 BRUSH T2
091 Brush Tom 2 Rim BRSH T2R
092 Brush Tom 3 BRUSH T3
093 Brush Tom 3 Rim BRSH T3R
094 Brush Tom 4 BRUSH T4
095 Brush Tom 4 Rim BRSH T4R
096 Brush Tom 5 BRUSH T5
097 Brush Tom 5 Rim BRSH T5R
098 Brush Tom 6 BRUSH T6
099 Brush Tom 6 Rim BRSH T6R
Appendix
e-drum module
72
Page 73
Nr. Name Display
100 Funk Tom 1 FUNK T1
101 Funk Tom 1 Rim FUNK T1R
102 Funk Tom 2 FUNK T2
103 Funk Tom 2 Rim FUNK T2R
104 Funk Tom 3 FUNK T3
105 Funk Tom 3 Rim FUNK T3R
106 Funk Tom 4 FUNK T4
107 Funk Tom 4 R FUNK T4R
108 Funk Tom 5 FUNK T5
109 Funk Tom 5 Rim FUNK T5R
110 Funk Tom 6 FUNK T6
111 Funk Tom 6 Rim FUNK T6R
112 Jazz Tom 1 JAZZ T1
Appendix
MPS-425
73
Page 74
Nr. Name Display
113 Jazz Tom 1 Rim JAZZ T1R
114 Jazz Tom 2 JAZZ T2
115 Jazz Tom 2 Rim JAZZ T2R
116 Jazz Tom 3 JAZZ T3
117 Jazz Tom 3 Rim JAZZ T3R
118 Jazz Tom 4 JAZZ T4
119 Jazz Tom 4 Rim JAZZ T4R
120 Jazz Tom 5 JAZZ T5
121 Jazz Tom 5 Rim JAZZ T5R
122 Jazz Tom 6 JAZZ T6
123 Jazz Tom 6 Rim JAZZ T6R
124 Fusion Tom 1 FUS T1
125 Fusion Tom 2 FUS T2
Appendix
e-drum module
74
Page 75
Nr. Name Display
126 Fusion Tom 3 FUS T3
127 Fusion Tom 4 FUS T4
128 1970’s Tom 1 70S T1
129 1970’s Tom 2 70S T2
130 1970’s Tom 3 70S T3
131 1970’s Tom 4 70S T4
132 808 Tom 1 808 T1
133 808 Tom 2 808 T2
134 808 Tom 3 808 T3
135 808 Tom 4 808 T4
136 808 Tom 5 808 T5
137 808 Tom 6 808 T6
138 909 Tom 1 909 T1
Appendix
MPS-425
75
Page 76
Nr. Name Display
139 909 Tom 2 909 T2
140 909 Tom 3 909 T3
141 909 Tom 4 909 T4
142 909 Tom 5 909 T5
143 909 Tom 6 909 T6
144 Electronic Tom 1 ELEC T1
145 Electronic Tom 2 ELEC T2
146 Electronic Tom 3 ELEC T3
147 Electronic Tom 4 ELEC T4
148 Electronic Tom 5 ELEC T5
149 Electronic Tom 6 ELEC T6
150 Power Tom 1 POWER T1
151 Power Tom 2 POWER T2
Appendix
e-drum module
76
Page 77
Nr. Name Display
152 Power Tom 3 POWER T3
153 Power Tom 4 POWER T4
154 Power Tom 5 POWER T5
155 Power Tom 6 POWER T6
156 Teckno Tom 1 TEK T1
157 Techno Tom 1 Rim TEK T1R
158 Techno Tom 2 TEK T2
159 Techno Tom 2 Rim TEK T2R
160 Techno Tom 3 TEK T3
161 Techno Tom 3 Rim TEK T3R
162 Techno Tom 4 TEK T4
163 Techno Tom 4 Rim TEK T4R
164 Techno Tom 5 TEK T5
Appendix
MPS-425
77
Page 78
Nr. Name Display
165 Techno Tom 5 Rim TEK T5R
166 Techno Tom 6 TEK 6
167 Techno Tom 6 Rim TEK T6R
168 Magic Tom 1 MAGIC T1
169 Magic Tom 1 Rim MAGC T1R
170 Magic Tom 2 MAGIC T2
171 Magic Tom 2 Rim MAGC T2R
172 Magic Tom 3 MAGIC T3
173 Magic Tom 3 Rim MAGC T3R
174 Magic Tom 4 MAGIC T4
175 Magic Tom 4 Rim MAGC T4R
RIDE
176 21” Acoustic Ride 21AC RD
Appendix
e-drum module
78
Page 79
Nr. Name Display
177 21” Acoustic Ride Edge 21AC RDE
178 21” Acoustic Ride Bell 21AC RDB
179 Brush Ride 1 BRSH RD1
180 Brush Ride 2 BRSH RD2
181 20” Funk Ride 20FK RD
182 20” Funk Ride Edge 20FK RDE
183 20” Funk Ride Bell 20FK RDB
184 20” Rock Ride 20RK RD
185 20'' Rock Ride Edge 20RK RDE
186 20'' Rock Ride Bell 20RK RDB
187 808 Ride 808 RD
188 20'' Room Ride 20RM RD
189 20'' Room Ride Edge 20RM RDE
Appendix
MPS-425
79
Page 80
Nr. Name Display
190 20'' Room Ride Bell 20RM RDB
191 20'' Metal Ride 20MT RD
192 20'' Metal Ride Edge 20MT RDE
193 20'' Metal Ride Bell 20MT RDB
194 House Ride HOUSE RD
195 House Ride Edge HOUS RDE
196 House Ride Bell HOUS RDB
197 Lo-Fi Ride LOFI RD
198 Lo-Fi Ride Edge LOFI RDE
199 Lo-Fi Ride Bell LOFI RDB
200 Junkyard Ride JKYD RD
201 Junkyard Ride Edge JKYD RDE
202 Junkyard Ride Bell JKYD RDB
Appendix
e-drum module
80
Page 81
Nr. Name Display
CRASH
203 16'' Acoustic Crash 1 AC C1
204 16'' Acoustic Crash 1 Edge AC C1E
205 16'' Acoustic Crash 2 AC C2
206 16'' Acoustic Crash 2 Edge AC C2E
207 16'' Standard Crash 1 STD C1
208 16'' Standard Crash 1 Edge STD C1E
209 16'' Standard Crash 2 STD C2
210 16'' Standard Crash 2 Edge STD C2E
211 Brush Crash 1 BRUSH C1
212 Brush Crash 2 BRUSH C2
213 Funk Crash 1 FUNK C1
214 Funk Crash 1 Edge FUNK C1E
Appendix
MPS-425
81
Page 82
Nr. Name Display
215 Funk Crash 2 FUNK C2
216 Funk Crash 2 Edge FUNK C2E
217 19'' Jazz Crash 1 JAZZ C1
218 19'' Jazz Crash 1 Edge JAZZ C1E
219 19'' Jazz Crash 2 JAZZ C2
220 19'' Jazz Crash 2 Edge JAZZ C2E
221 Rock Crash 1 ROCK C1
222 Rock Crash 1 Edge ROCK C1E
223 Rock Crash 2 ROCK C2
224 Rock Crash 2 Edge ROCK C2E
225 808Crash 808 C
226 909Crash 1 909 C1
227 909Crash 2 909 C2
Appendix
e-drum module
82
Page 83
Nr. Name Display
228 Electronic Crash 1 ELEC C1
229 Electronic Crash 2 ELEC C2
230 Orchestra Crash ORCH C
231 Room Crash ROOM C
232 Room Crash Edge ROOM CE
233 Vintage Crash 1 VTG C1
234 Vintage Crash 1 Edge VTG C1E
235 Vintage Crash 2 VTG C2
236 Vintage Crash 2 Edge VTG C2E
237 Big Band Crash 1 BB C1
238 Big Band Crash 1 Edge BB C1E
239 Big Band Crash 2 BB C2
240 Big Band Crash 2 Edge BB C2E
Appendix
MPS-425
83
Page 84
Nr. Name Display
241 Techno Crash 1 TEK C1
242 Techno Crash 1 Edge TEK C1E
243 Techno Crash 2 TEK C2
244 Techno Crash 2 Edge TEK C2E
245 Latin Crash 1 LATIN C1
246 Latin Crash 1 Edge LATN C1E
247 Latin Crash 2 LATIN C2
248 Latin Crash 2 Edge LATN C2E
249 China 1 CHINA1
250 China 1 Edge CHINA1 E
251 Splash SPLASH
252 Splash Edge SPLASH E
HIHAT
Appendix
e-drum module
84
Page 85
Nr. Name Display
253 14'' Acoustic Hi-hat 14AC HH
254 14'' Acoustic Hi-hat Edge 14AC HHE
255 14'' Acoustic Hi-hat Pedal 14AC HHP
256 14'' Acoustic Hi-hat Splash 14AC HHS
257 14'' Standard Hi-hat 14STD HH
258 14'' Standard Hi-hat Edge 14ST HHE
259 14'' Standard Hi-hat Pedal 14ST HHP
260 14'' Standard Hi-hat Splash 14ST HHS
261 Brush Hi-hat BRUSH HH
262 Brush Hi-hat Pedal BRSH HHP
263 Brush Hi-hat Splash BRSH HHS
264 14'' Rock Hi-hat 14RK HH
265 14'' Rock Hi-hat Edge 14RK HHE
Appendix
MPS-425
85
Page 86
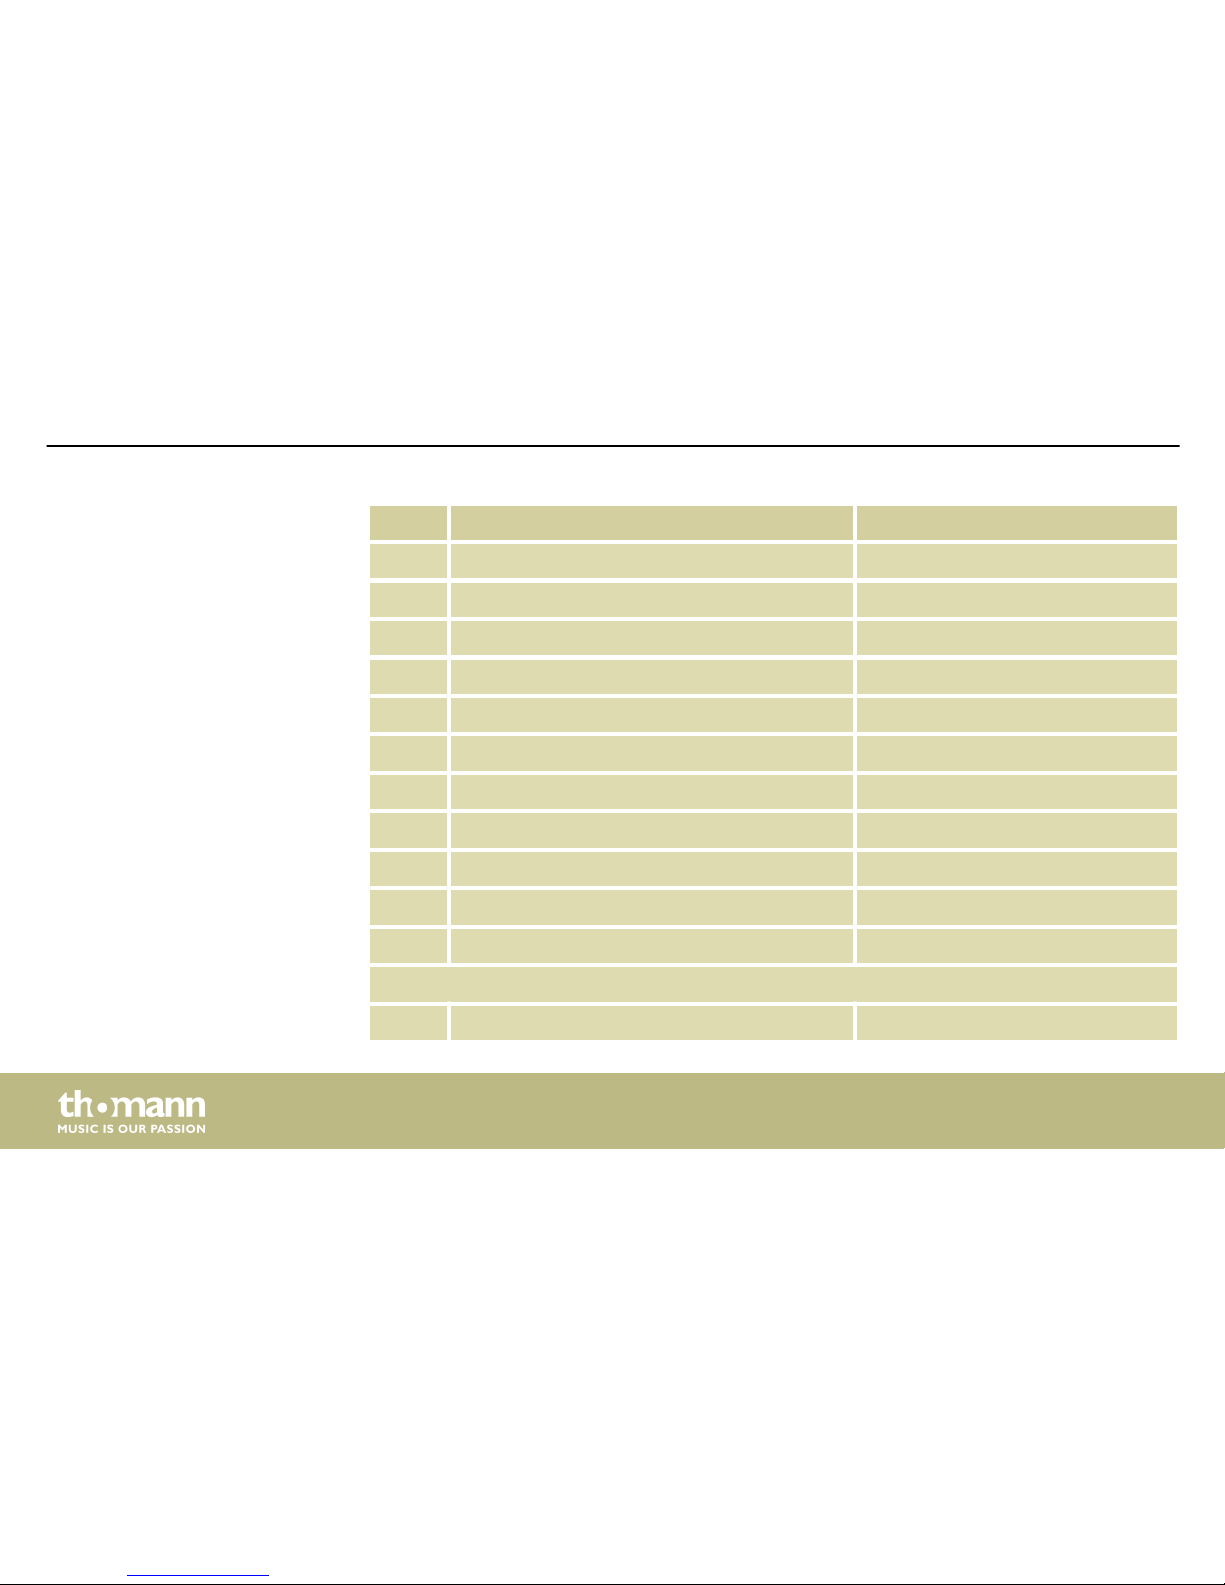
Nr. Name Display
266 14'' Rock Hi-hat Pedal 14RK HHP
267 14'' Rock Hi-hat Splash 14RK HHS
268 808 Hi-hat 808 HH
269 808 Hi-hat Pedal 808 HHP
270 808 Hi-hat Splash 808 HHS
271 909 Hi-hat 909 HH
272 909 Hi-hat Pedal 909 HHP
273 909 Hi-hat Splash 909 HHS
274 Dance Hi-hat DANCE HH
275 Dance Hi-hat Pedal DANC HHP
276 Dance Hi-hat Splash DANC HHS
PERCUSSION
277 Maracas MARACAS
Appendix
e-drum module
86
Page 87
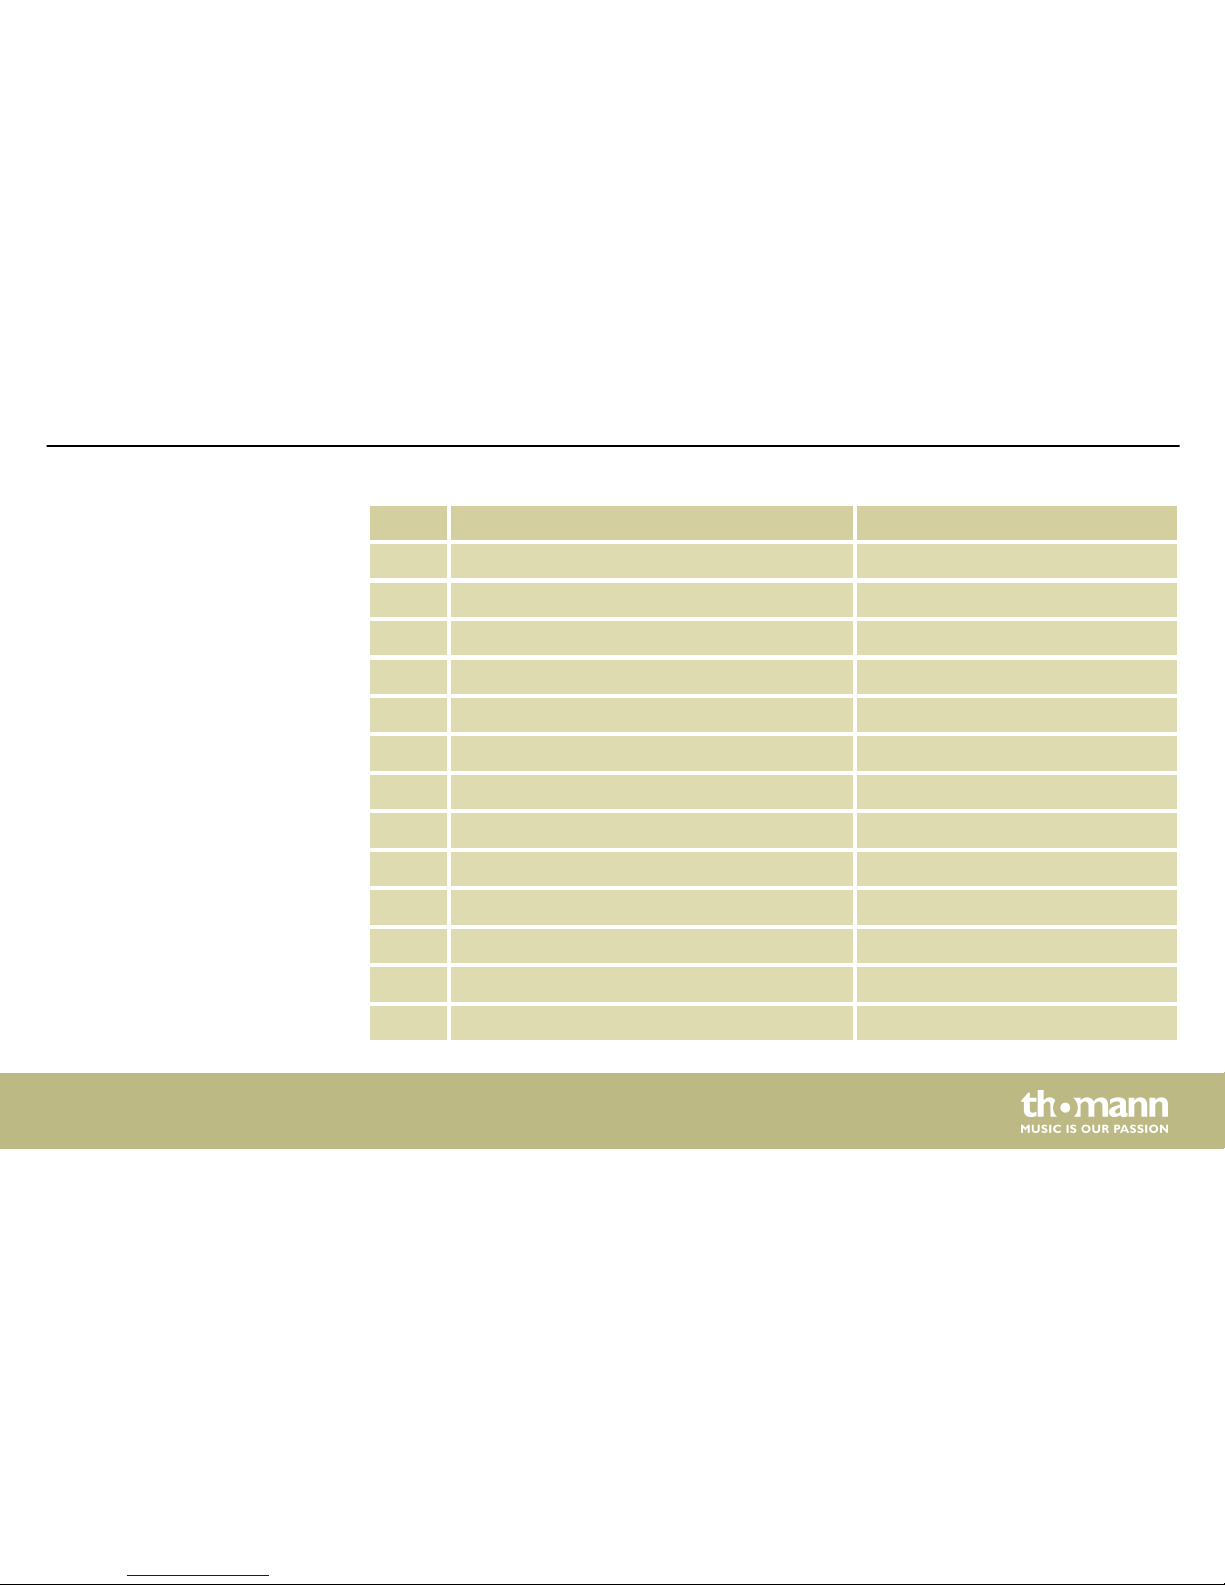
Nr. Name Display
278 Metronome Bell METRO BL
279 Mute Hi Conga 1 M CONGA1
280 Open Hi Conga 1 O CONGA1
281 Low Conga LO CONGA
282 High Bongo HI CONGA
283 Low Bongo LO BONGO
284 High Timbale 1 HI TIMB1
285 High Timbale 1 Rim HI TIM1R
286 High Timbale 2 HI TIMB2
287 High Timbale 2 Rim HI TIM2R
288 Low Timbale 1 LO TIMB1
289 Low Timbale 2 LO TIMB2
290 Low Timbale 3 LO TIMB3
Appendix
MPS-425
87
Page 88
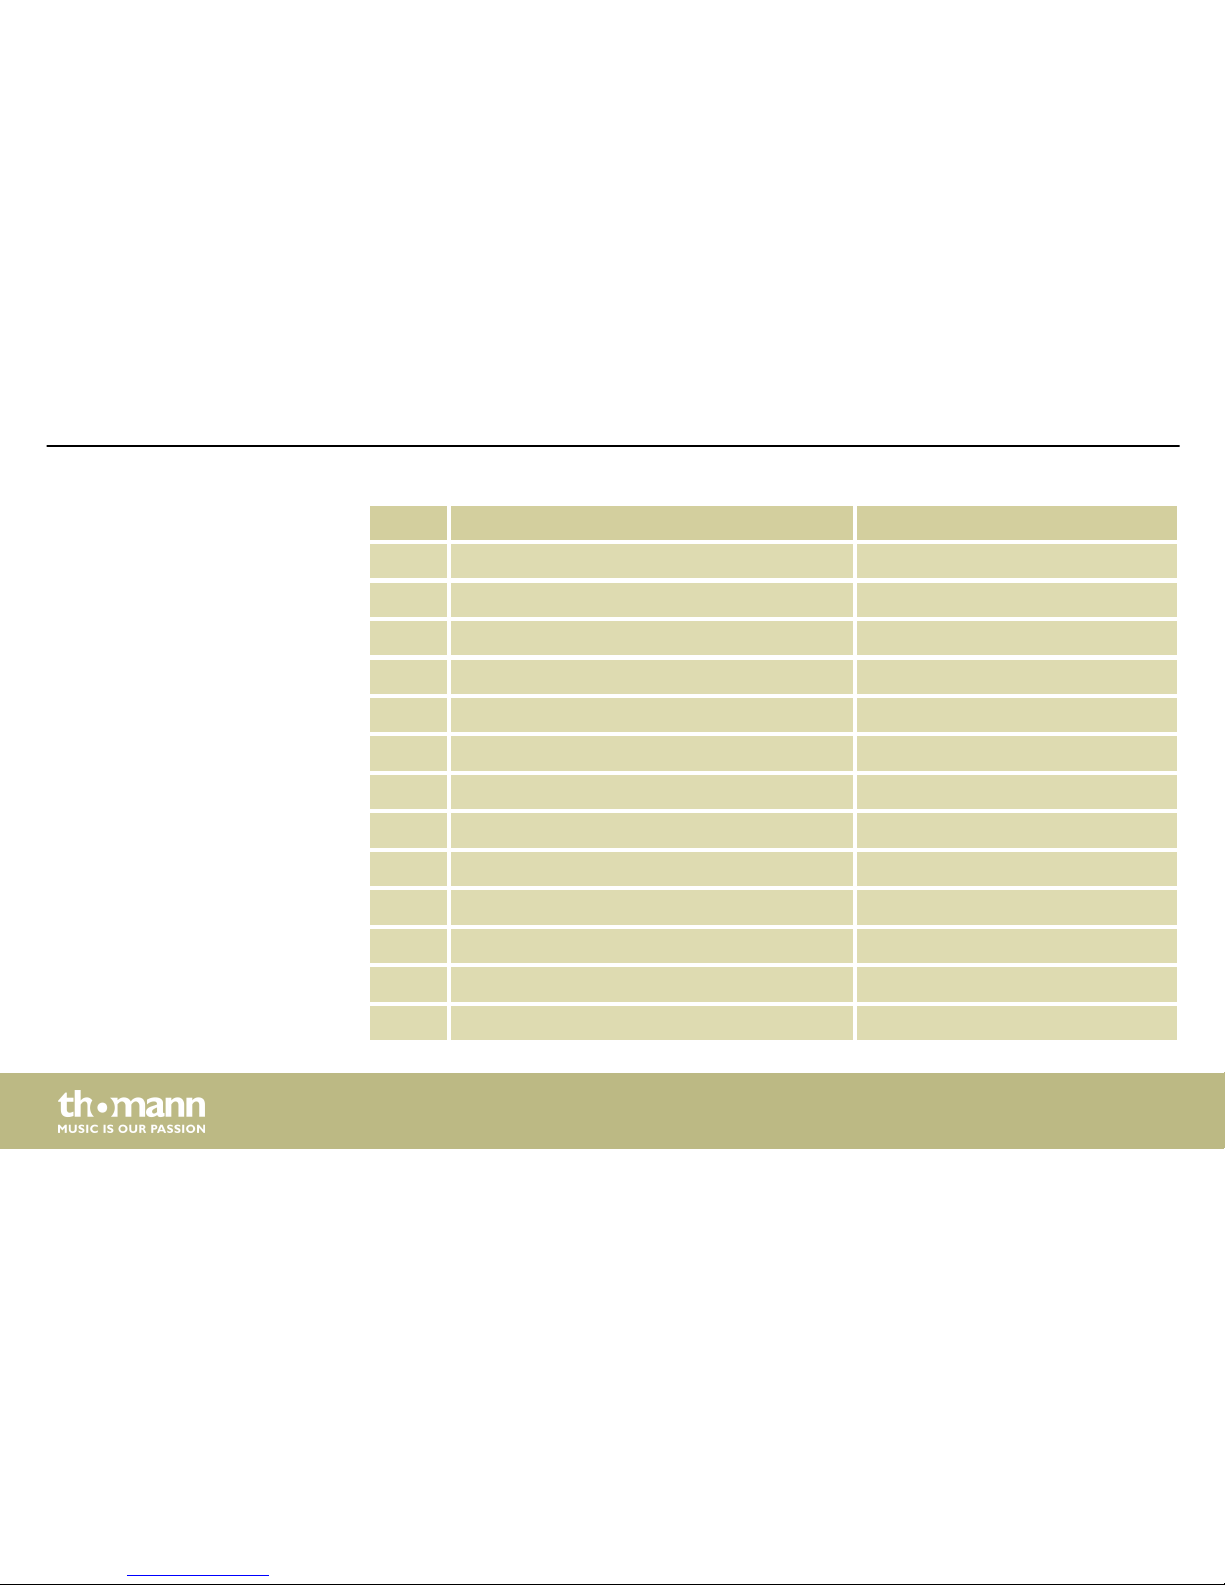
Nr. Name Display
291 High Agogo HI AGOGO
292 Low Agogo LO AGOGO
293 Claves CLAVES
294 Jingle Bell JINGL BL
295 Cowbell COWBELL
296 Bell Tree 1 BL TREE1
297 Bell Tree 2 BL TREE2
298 Tambourine TAMBORIN
299 Cabasa CABASA
300 Long Guiro L GUIRO
301 Short Guiro S GUIRO
302 Indian 1 INDIAN1
303 Indian 2 INDIAN2
Appendix
e-drum module
88
Page 89
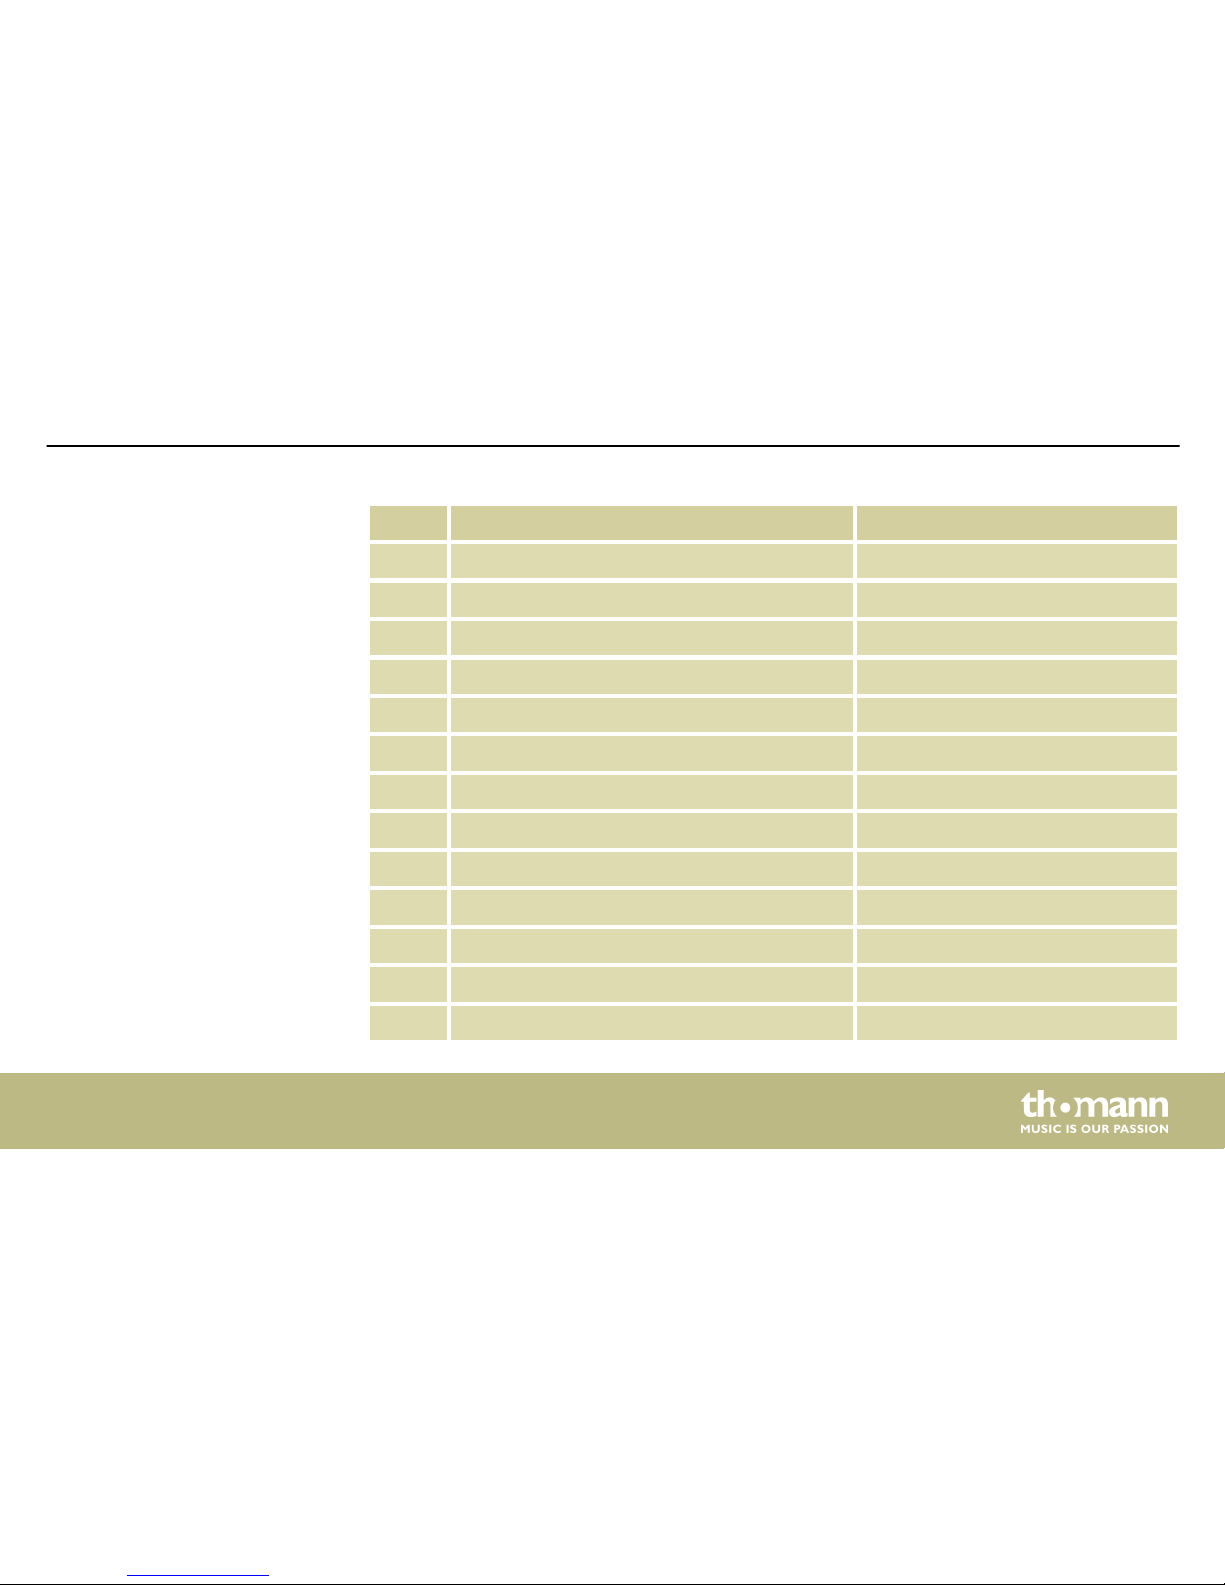
Nr. Name Display
304 Indian 3 INDIAN3
305 Indian 4 INDIAN4
306 Indian 5 INDIAN5
307 Indian 6 INDIAN6
308 Indian 7 INDIAN7
309 Indian 8 INDIAN8
310 Indian 9 INDIAN9
311 Indian 10 INDIAN10
312 Indian 11 INDIAN11
313 Indian 12 INDIAN12
314 Indian 13 INDIAN13
315 Indian 14 INDIAN14
316 Indian 15 INDIAN15
Appendix
MPS-425
89
Page 90
Nr. Name Display
317 Indian 16 INDIAN16
318 Indian 17 INDIAN17
319 African 1 AFRICA1
320 African 2 AFRICA2
321 African 3 AFRICA3
322 African 4 AFRICA4
323 African 5 AFRICA5
324 African 6 AFRICA6
325 African 7 AFRICA7
326 African 8 AFRICA8
327 African 9 AFRICA9
328 African 10 AFRICA10
329 African 11 AFRICA11
Appendix
e-drum module
90
Page 91
Nr. Name Display
330 African 12 AFRICA12
331 African 13 AFRICA13
332 African 14 AFRICA14
333 African 15 AFRICA15
334 African 16 AFRICA16
335 African 17 AFRICA17
336 Marimba C3 MARMB C3
337 Marimba A3 MARMB A3
338 Marimba C4 MARMB C4
339 Marimba Db4 MARB Db4
340 Marimba D4 MARMB D4
341 Marimba Eb4 MARB Eb4
342 Marimba E4 MARMB E4
Appendix
MPS-425
91
Page 92
Nr. Name Display
343 Marimba F4 MARMB F4
344 Marimba Gb4 MARB Gb4
345 Marimba G4 MARMB G4
346 Marimba Ab4 MARB Ab4
347 Marimba A4 MARMB A4
348 Marimba Bb4 MARB Bb4
349 Marimba B5 MARMB B5
350 Marimba C5 MARMB C5
351 Orchestra Timp C2 ORCHT C2
352 Orchestra Timp D2 ORCHT D2
353 Orchestra Timp E2 ORCHT E2
354 Orchestra Timp F2 ORCHT F2
355 Orchestra Timp G2 ORCHT G2
Appendix
e-drum module
92
Page 93
Nr. Name Display
356 Orchestra Timp A2 ORCHT A2
357 Orchestra Timp B2 ORCHT B2
358 Orchestra Timp C3 ORCHT C3
FX
359 FX 1 FX1
360 FX 2 FX2
361 FX 3 FX3
362 FX 4 FX4
363 FX 5 FX5
364 FX 6 FX6
365 FX 7 FX7
366 FX 8 FX8
367 FX 9 FX9
Appendix
MPS-425
93
Page 94
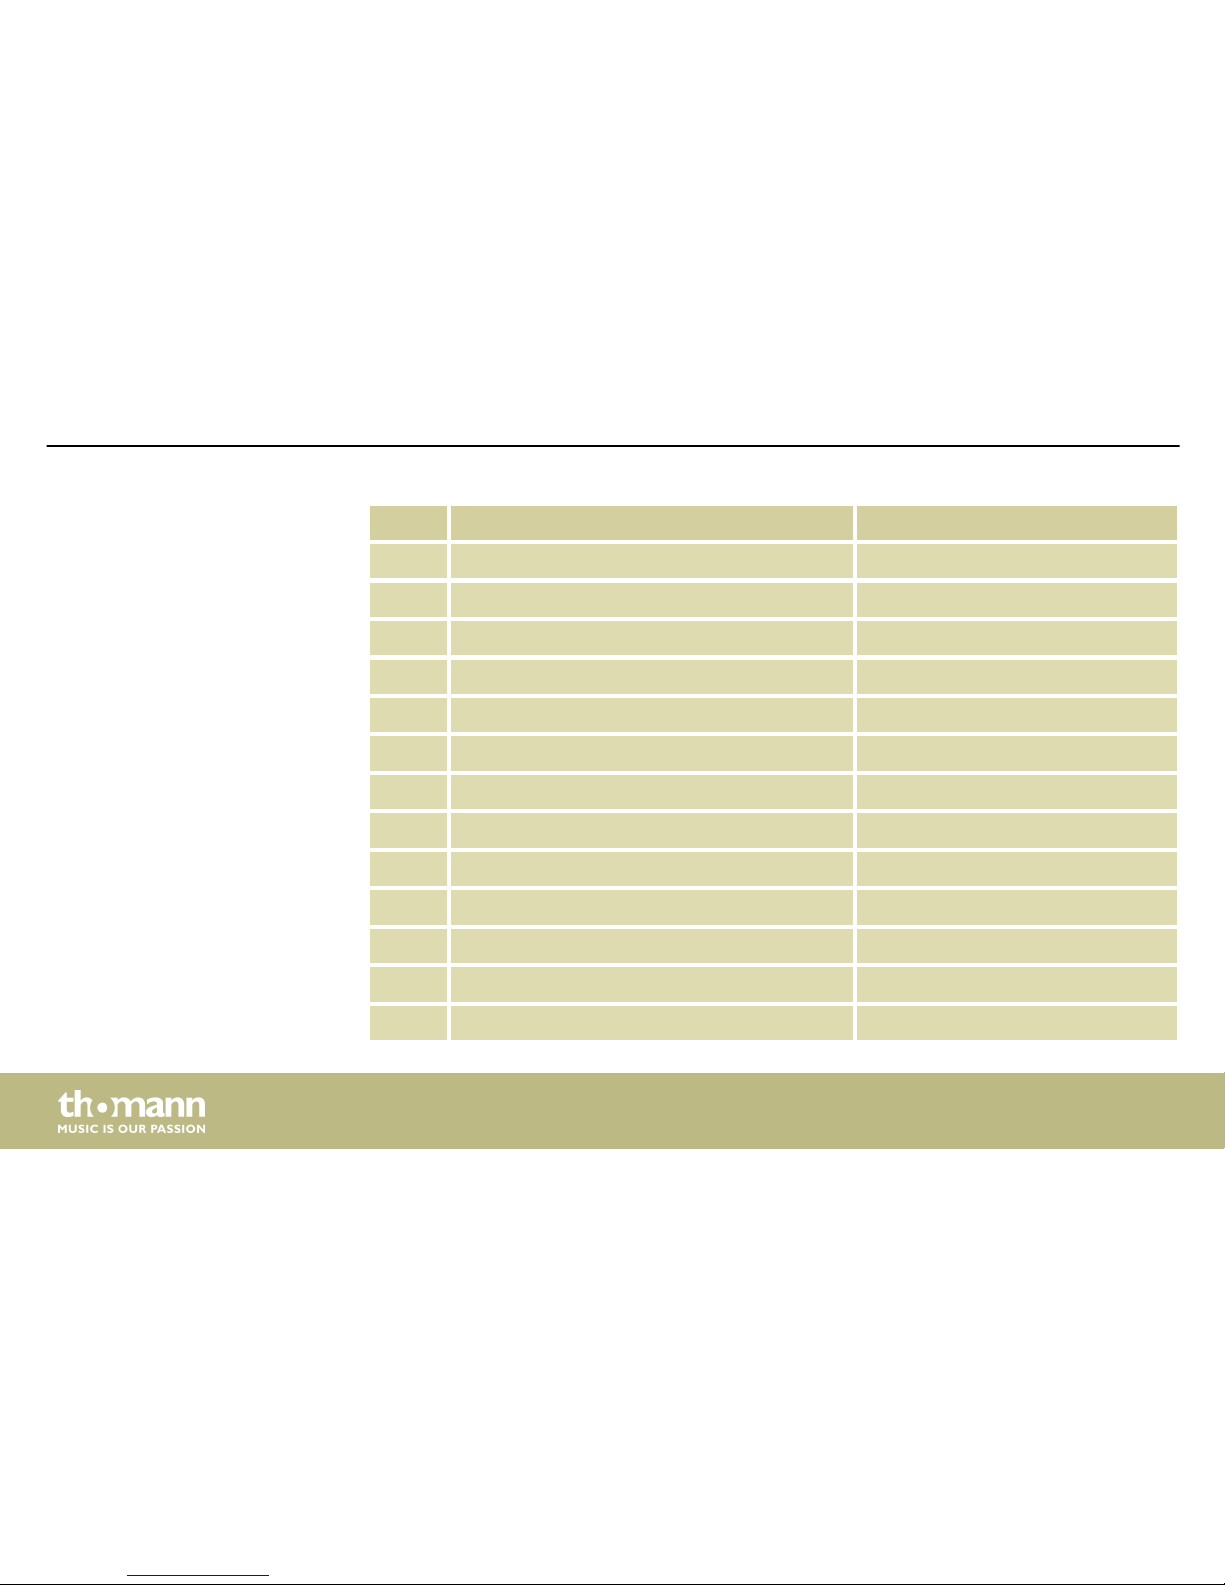
Nr. Name Display
368 FX 10 FX10
369 FX 11 Fx11
370 FX 12 Fx12
371 FX 13 FX13
372 FX 14 FX14
373 FX 15 FX15
374 FX 16 FX16
375 FX 17 FX17
376 FX 18 FX18
377 FX 19 FX19
378 FX 20 FX20
379 FX 21 FX21
380 MUTE MUTE
Appendix
e-drum module
94
Page 95
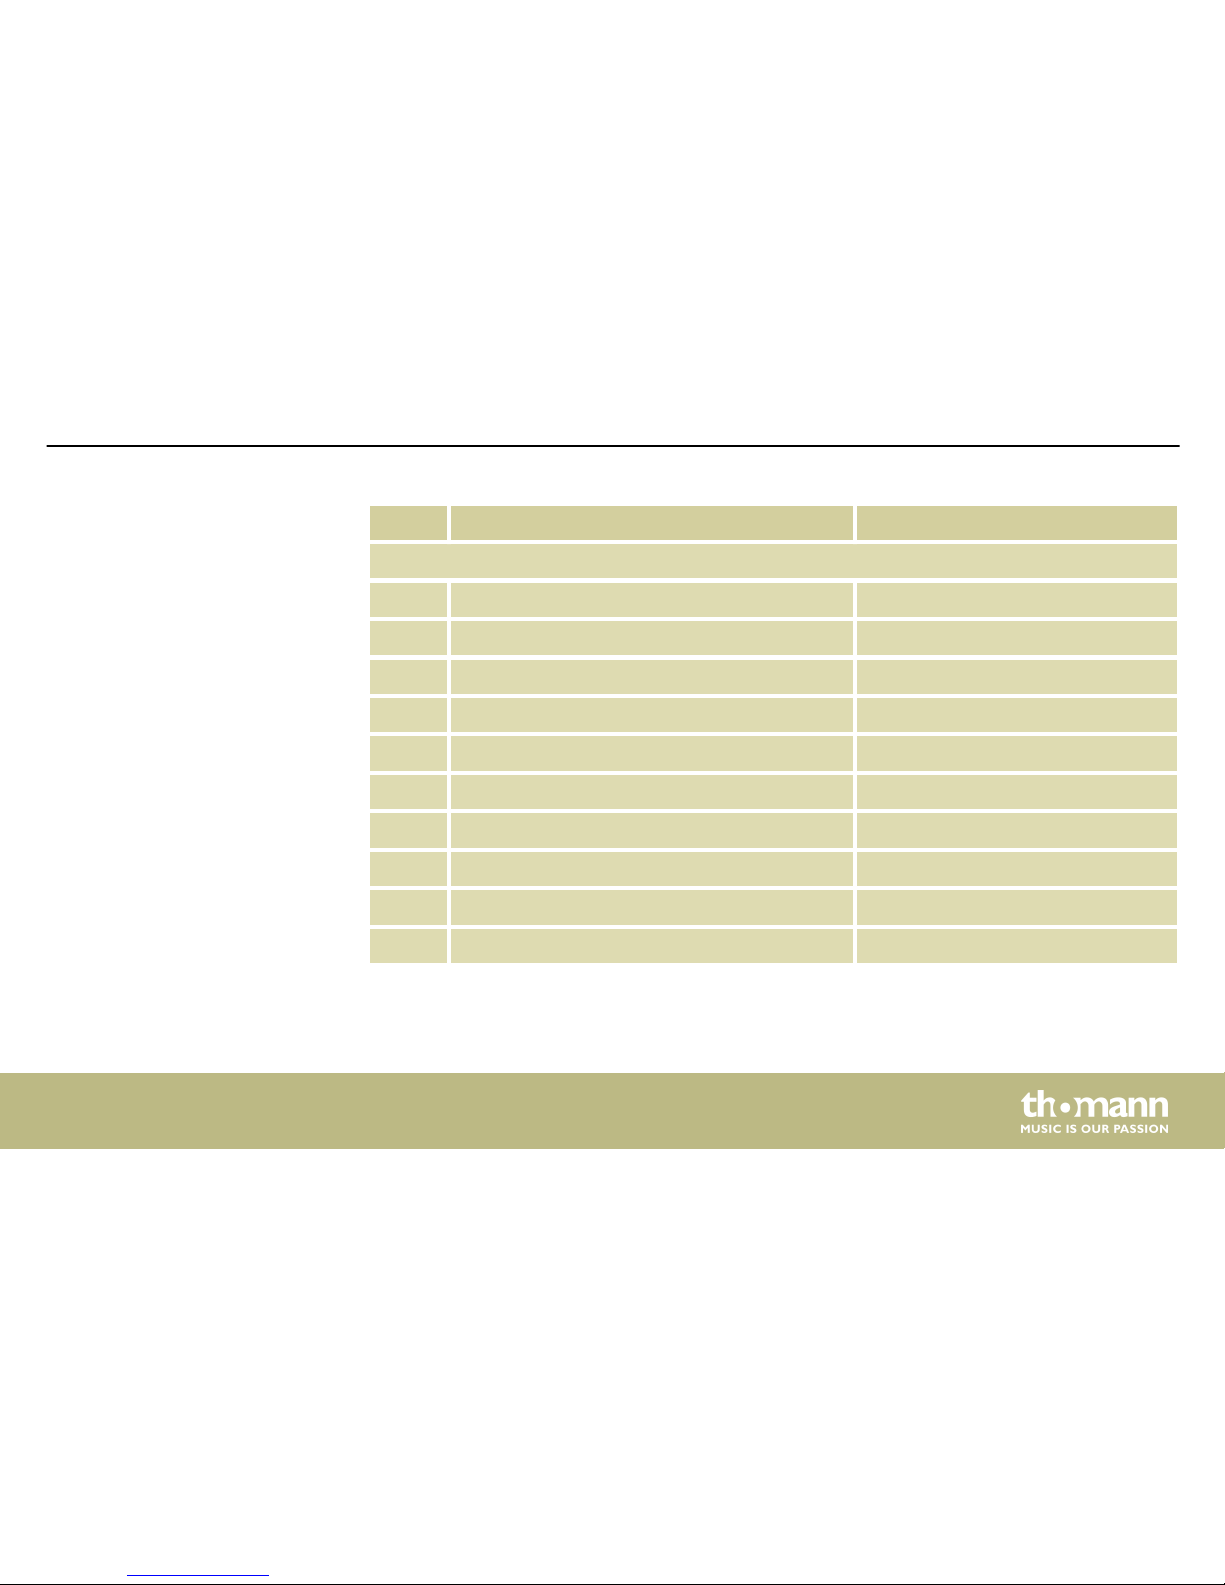
Nr. Name Display
HIHAT COMBINATION
381 Acoustic ACOUSTIC
382 Standard STANDARD
383 JazBrush BRUSH
384 Rock ROCK
385 808 808
386 909 909
387 Dance DANCE
388 Marimba MARIMBA
389 Indian INDIAN
390 African AFRICAN
Appendix
MPS-425
95
Page 96
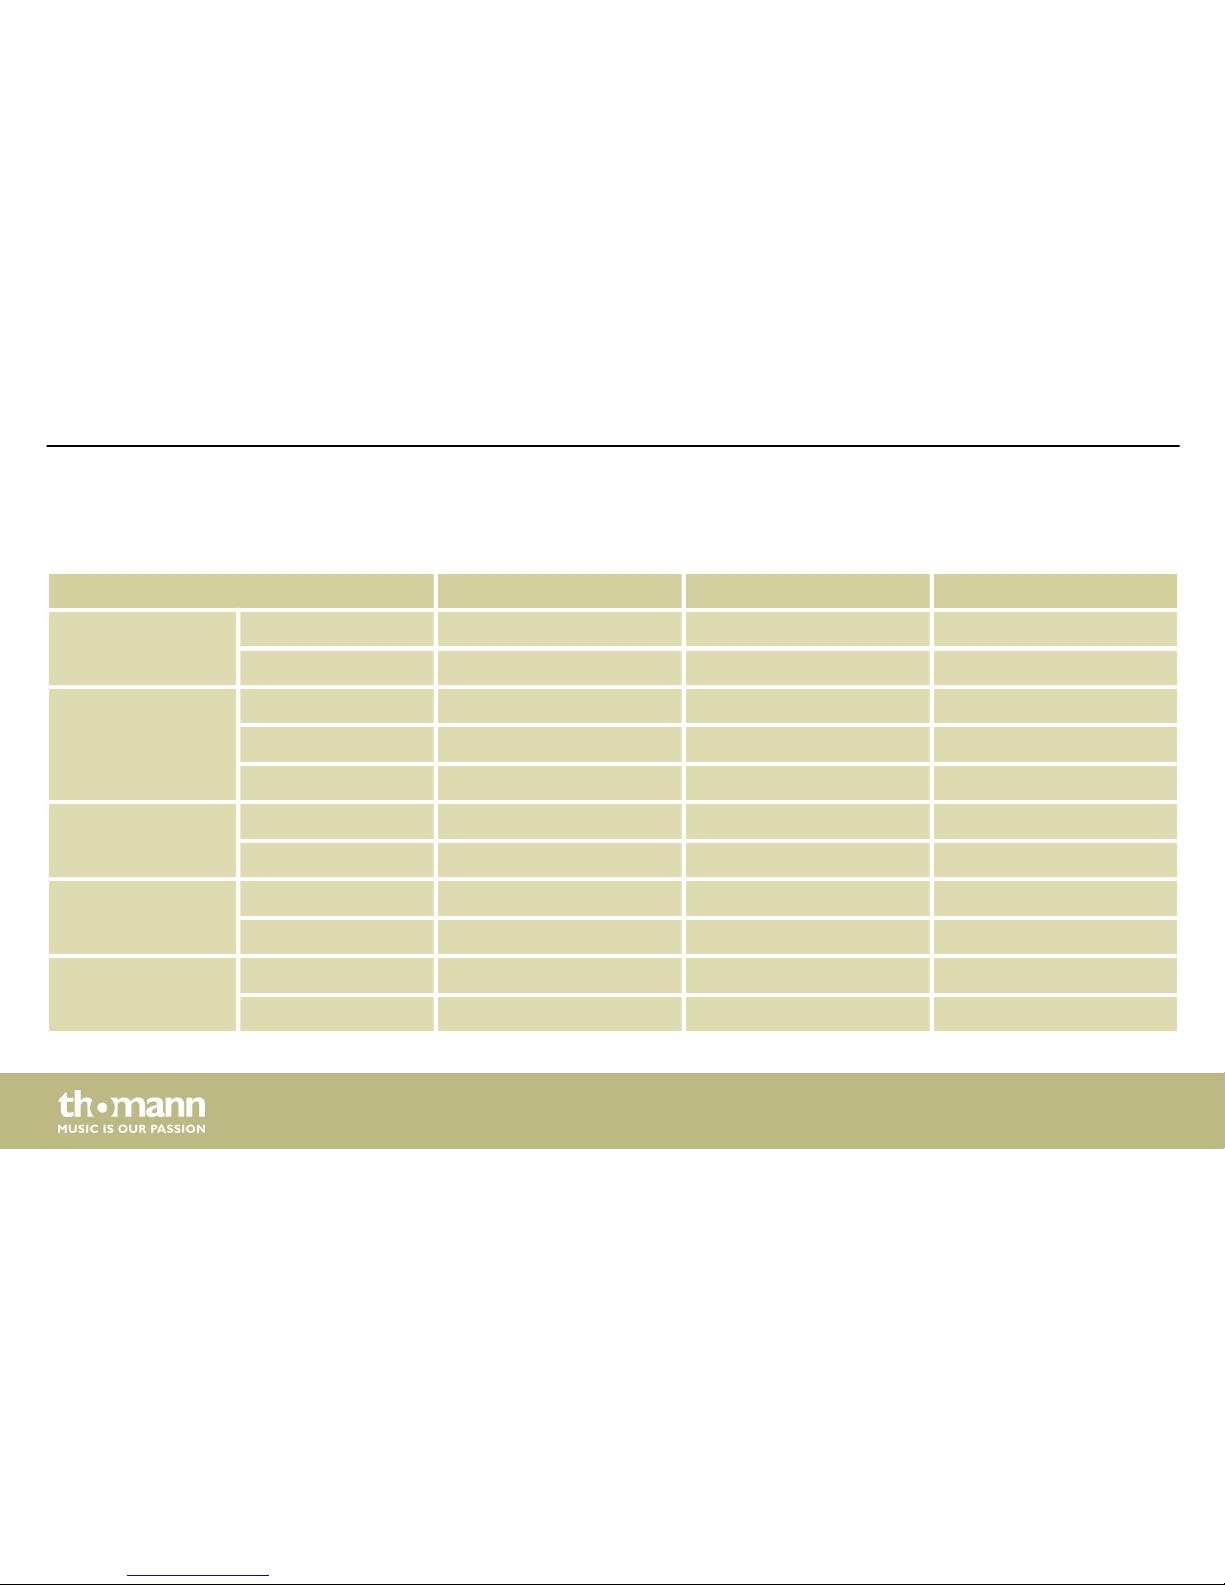
11.4 MIDI implementation
Function Transmitted Recognized Remarks
Basic channel Default Ch 10 1-16
Changed No No
Mode Default No No
Messages No No
Altered ******** ********
Note number 0…127 0…127
True voice ******** 0…127
Velocity Note ON Yes (99H, V=1…127) 0…127
Note OFF Yes (99H, V=0) 0…127
Aftertouch Keys No No
Channels No No
Appendix
e-drum module
96
Page 97
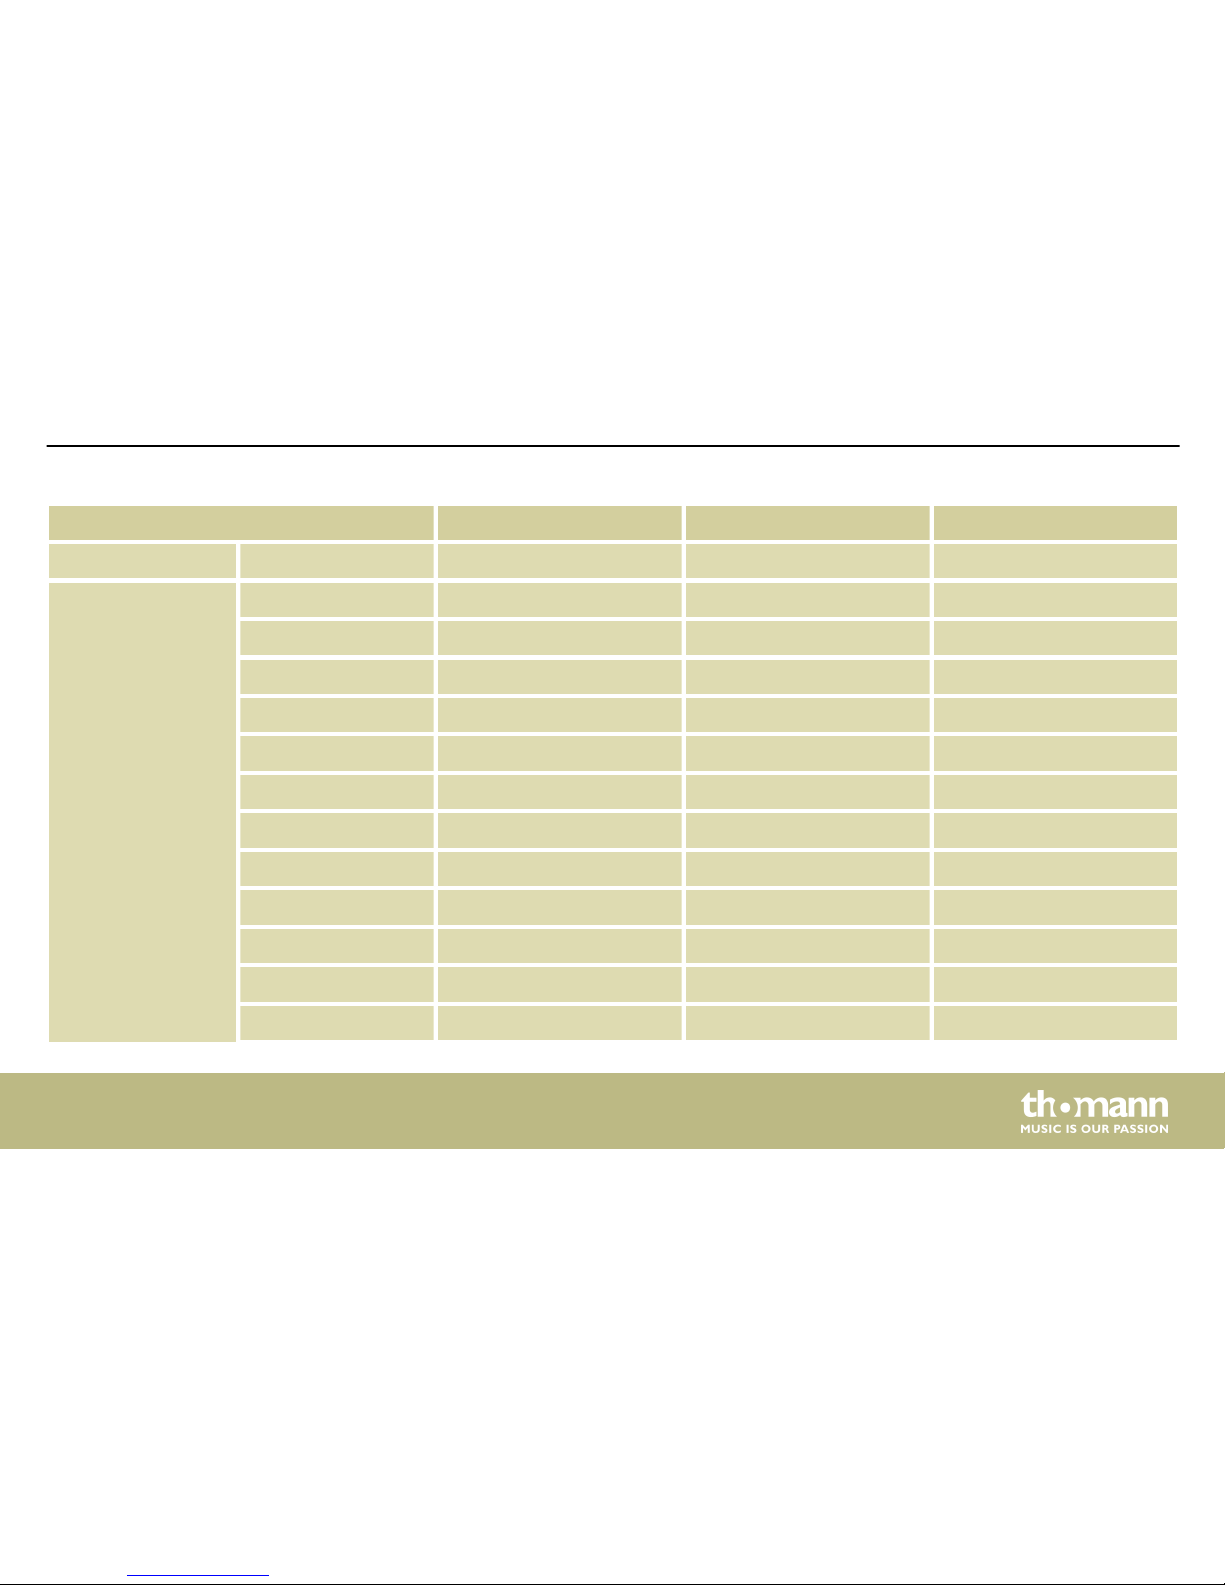
Function Transmitted Recognized Remarks
Pitch bender No Yes
Control change 0 No Yes Bank select
1 No Yes Modulation
5 No Yes Portamento time
6 No Yes Data entry
7 No Yes Volume
10 No Yes Pan
11 No Yes Expression
64 No Yes Sustain pedal
65 No Yes Portamento ON/OFF
66 No Yes Sostenuto pedal
67 No Yes Soft pedal
80 No Yes Reverb program
Appendix
MPS-425
97
Page 98
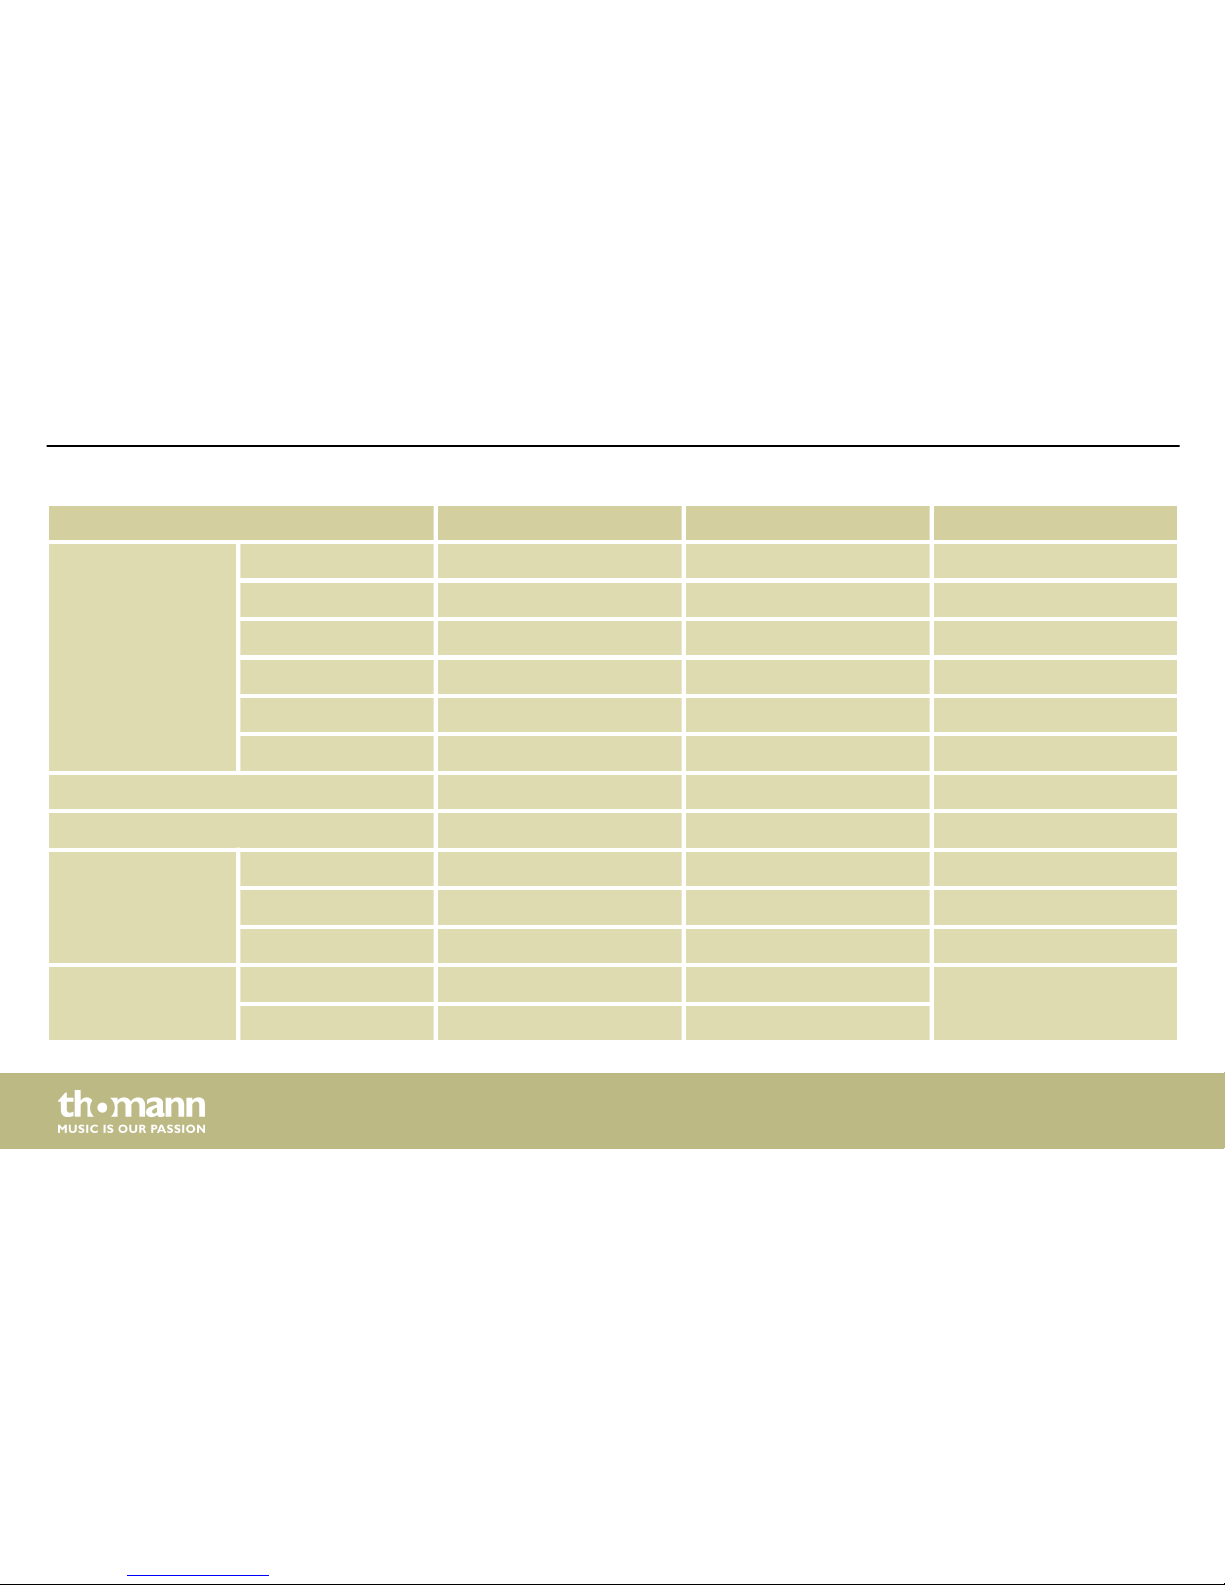
Function Transmitted Recognized Remarks
81 No Yes Chorus program
91 No Yes Reverb level
93 No Yes Chorus level
120 No Yes All Sound Off
121 No Yes Reset All Controllers
123 No Yes All Notes Off
Program change Yes Yes
System exclusive No Yes
System common Song Position No No
Song Select No No
Tune No No
System real time Clock Yes No START and STOP only
Command Yes No
Appendix
e-drum module
98
Page 99
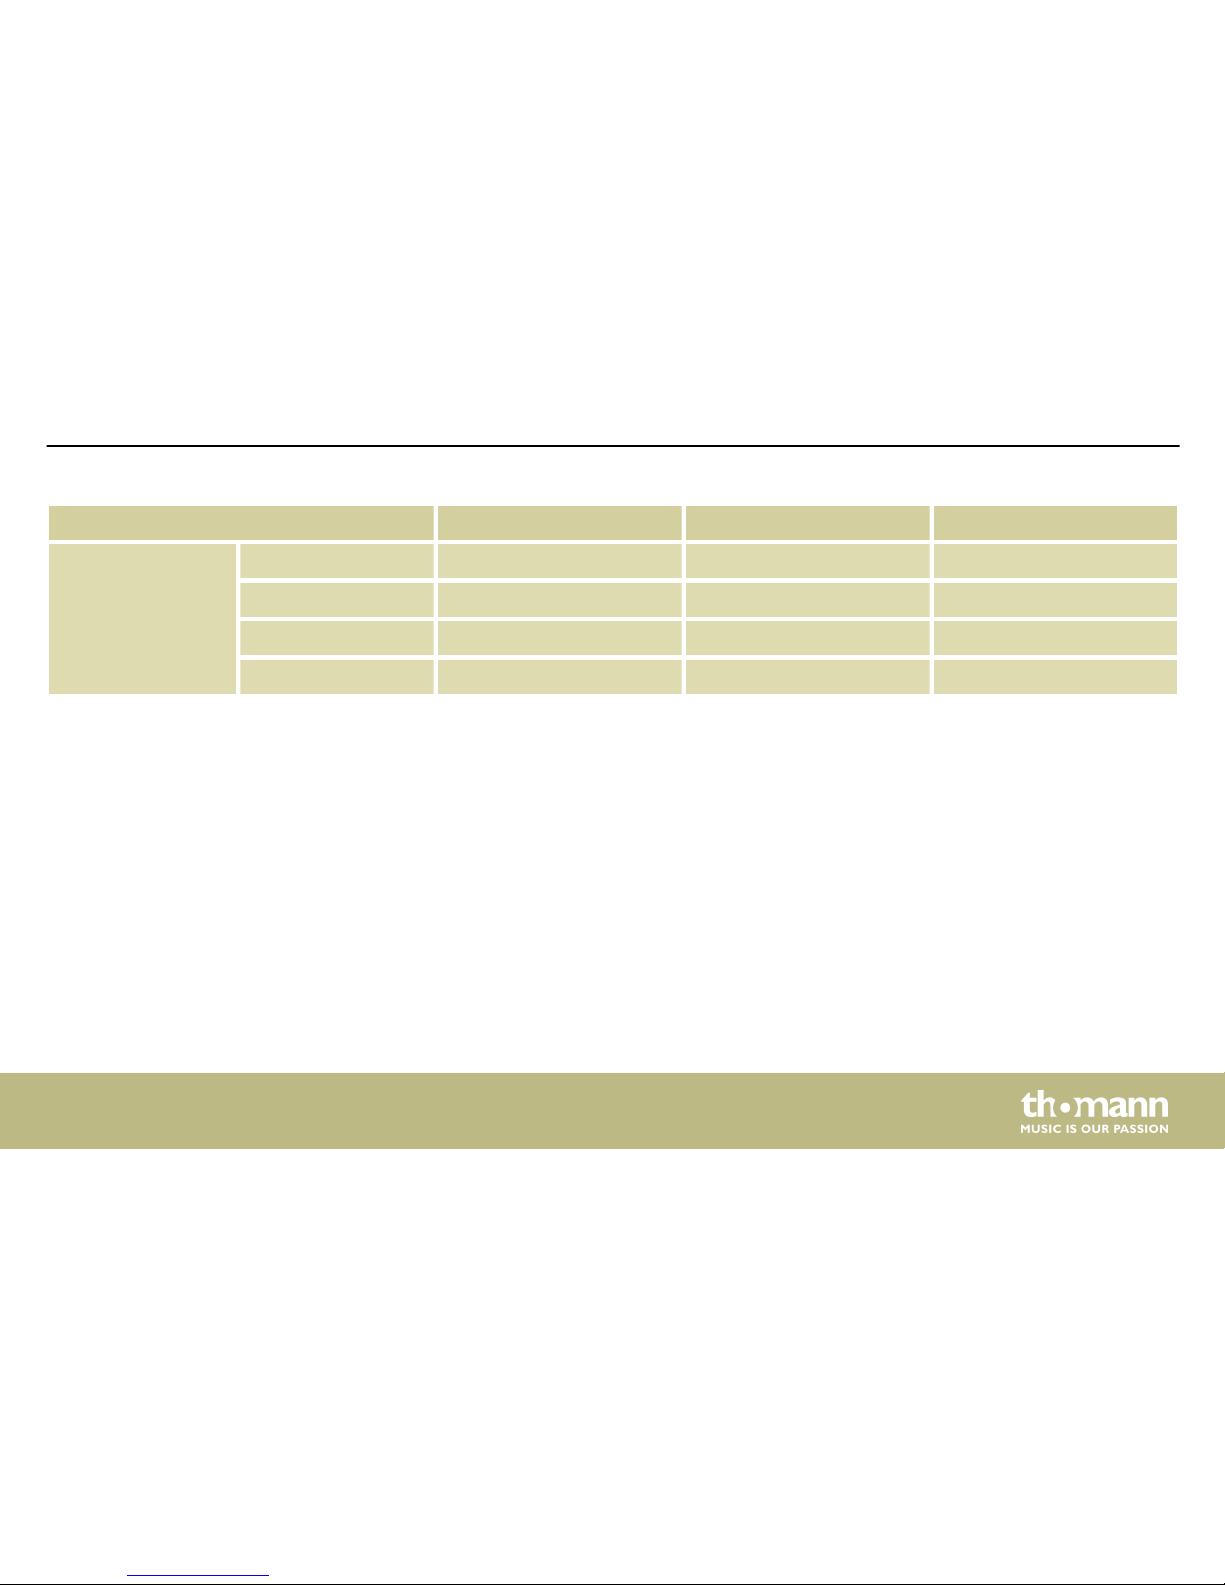
Function Transmitted Recognized Remarks
Aux messages Local ON/OFF No No
All Notes OFF No No
Active Sense Yes No
System reset No No
Appendix
MPS-425
99
Page 100
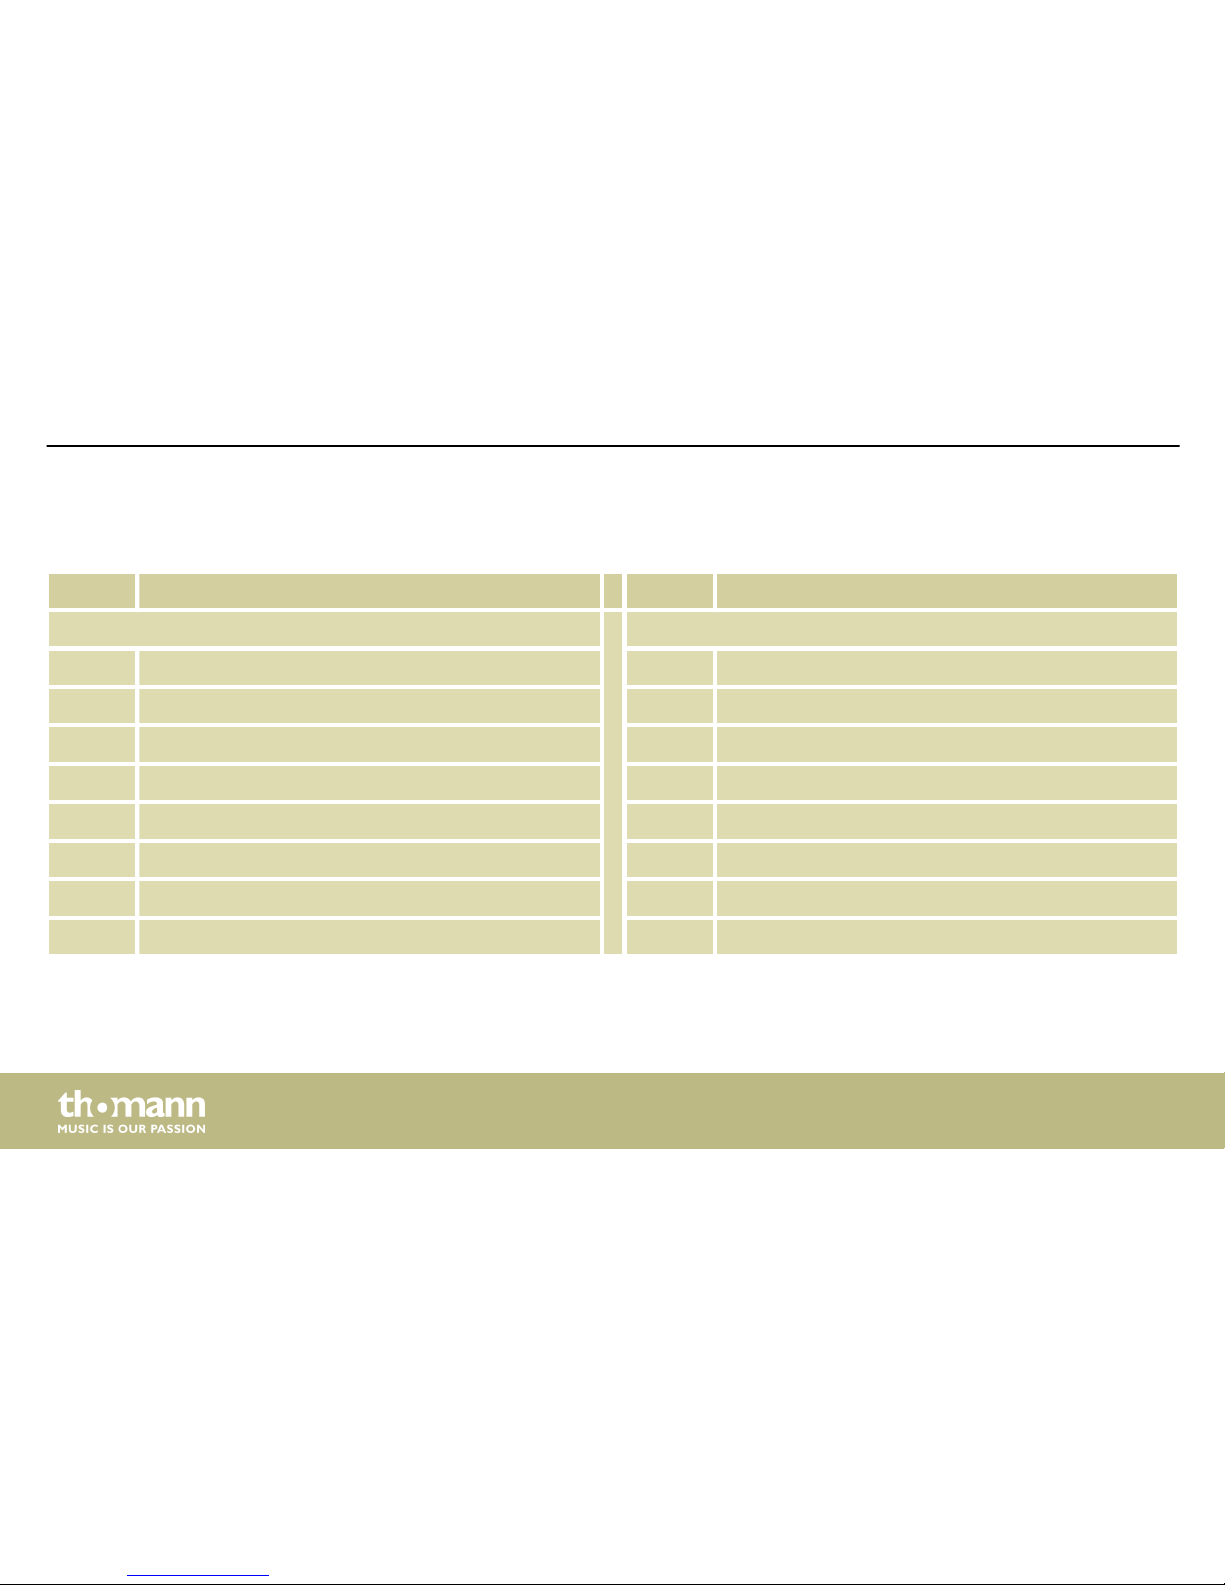
11.5 General MIDI Backing Instrument List
No. Name No. Name
Piano Mallet
1 Acoustic Grand Piano 9 Celesta
2 Bright Acoustic Piano 10 Glockenspiel
3 Electric Grand Piano 11 Music Box
4 Honky-Tonk Piano 12 Vibraphone
5 Electric Piano 1 13 Marimba
6 Electric Piano 2 14 Xylophone
7 Harpsichord 15 Tubular Bells
8 Clavi 16 Dulcimer
Appendix
e-drum module
100
 Loading...