

Page 1
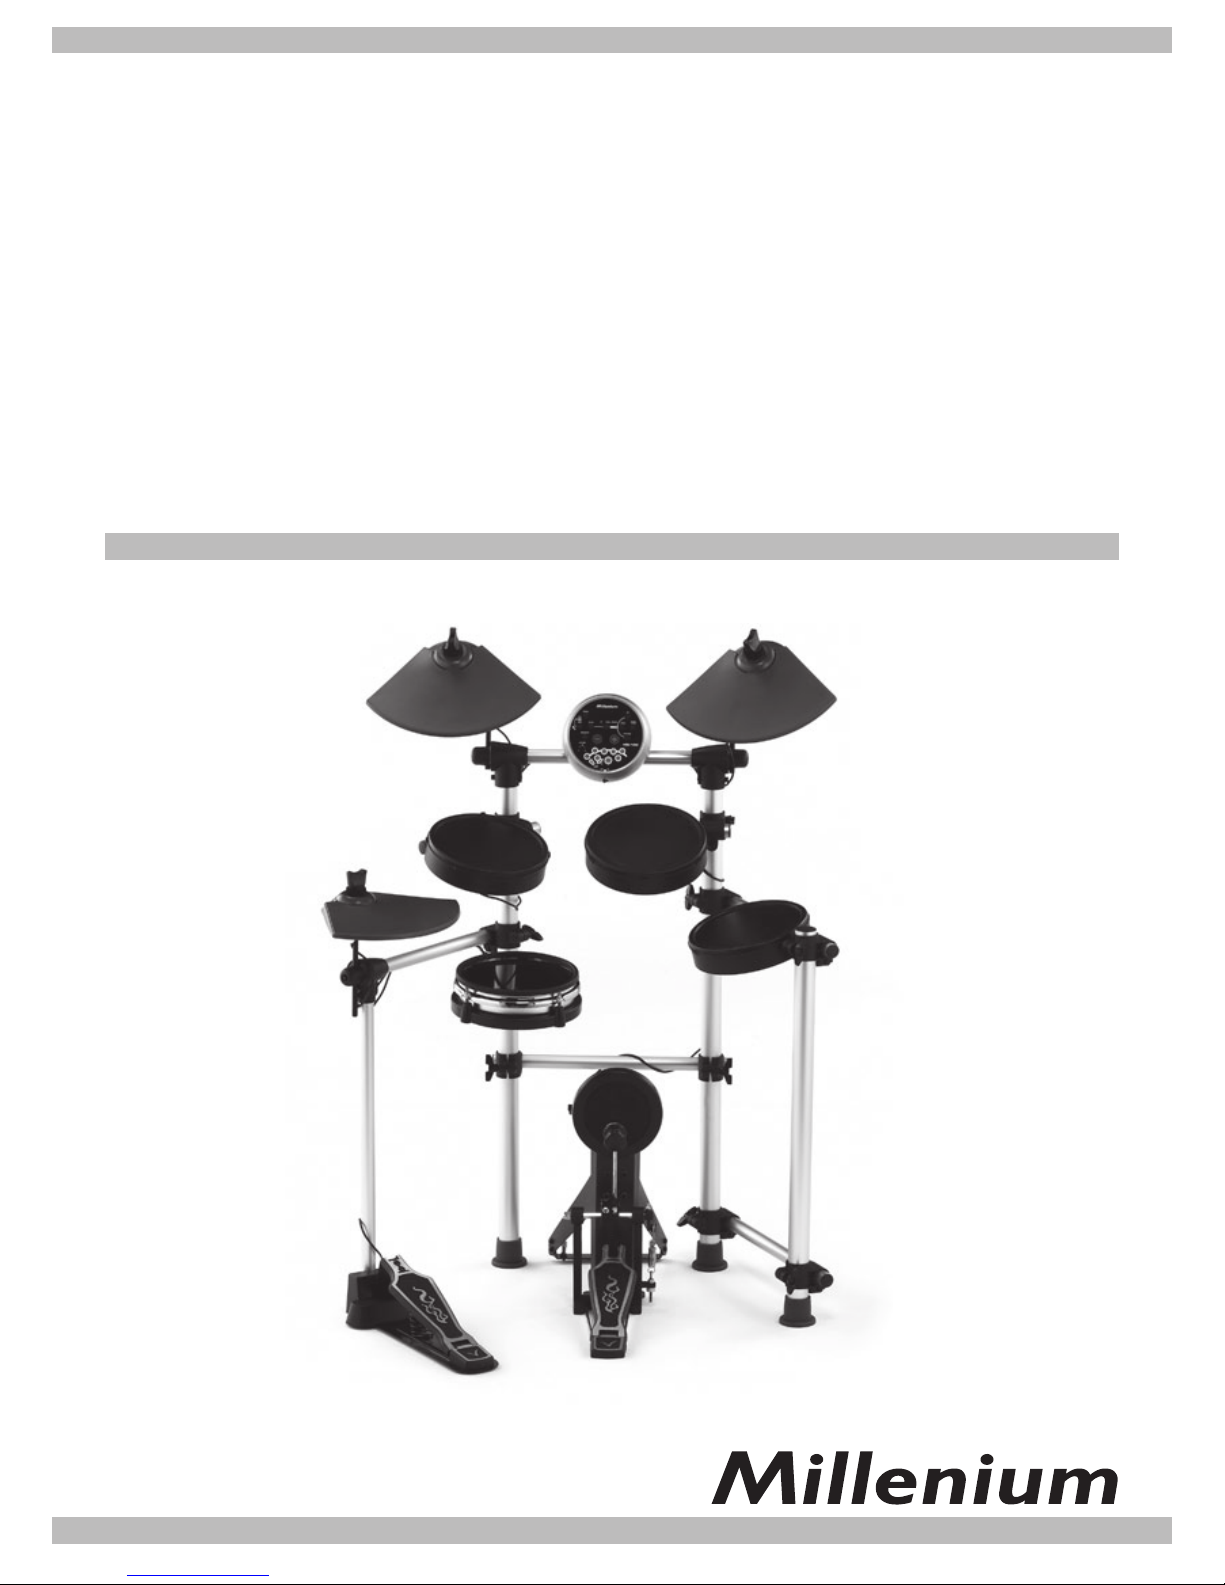
Owner’s Manual
DIGITal DruM seT
HD-100
Page 2
HD-100
2
www.thomann.de
Thank you for purchasing this digital drum set. It has been developed to act and play like an acoustic drum
set but with greater ease. Before you use your new instrument, we recommend you to read through this entire
manual, before you start to operate it.
Important safety instructions
For your own safety you must read through this chapter at rst completely!
Risk of electrical shocks!
• Only connect the device using the mains adaptor supplied to a properly wired and earthed mains power
socket providing mains voltage of 230 V ~ /50 Hz.
• Do not operate the device if the power adaptor, its cord or the mains plug is damaged.
• Never submerse the device in water. Wipe it with a slightly moistened cloth only.
• Do not expose the device to rain and never use it in a damp or wet environment. Make sure that the power
adaptor or the adaptor cable never becomes wet or moist during use.
• Never subject the device to direct sunlight, excessive high temperatures or dust.
• This instrument contains digital circuitry and may cause interference if placed too close to radio or television
receivers. If this occurs, move the instrument further away from the affected equipment.
• Under no circumstances may you open the housing of the device or the adaptor. Should you do so your
safety would not be assured and the warranty will become void. There are no operational components whatsoever inside, only really high voltage that can give you a deadly shock!
• Do not place objects containing uids, e.g. ower vases or beer bottles, on or near the device.
• Notice regarding disconnection from mains-power:
To completely disconnect the device from mains power, you must disconnect the adaptor from the power
socket. For this reason the device should be placed in a position where unobstructed access to the power
socket is assured at all times, so that in an emergency you will be able to immediately pull out the adaptor.
To eliminate the risk of re you should completely disconnect the adaptor from the power socket when the
device is not going to be used.
• Always grasp the power adaptor itself. Do not pull on the cord and never touch the power adaptor with wet
hands as this could result in a short circuit or an electrical shock. Do not place the device, speakers or anything else on the adaptor cord and make sure that it does not become clamped. Never tie knots in the adaptor cord and do not bind it together with other cables. Lay the adaptor cord so that no one can step on or
stumble over it. A damaged power adaptor can cause a re or an electrical shock. Check the power adaptor
and its cord from time to time. Should it become damaged contact our customer service department to have
it replaced.
• NEVER use the unit under the following conditions:
> In places subject to vibrations or bumps.
> In places with a temperature of over 45 °C/113 °F or less than 2 °C/35.6 °F.
> In places subject to excessive dryness or humidity (ideal conditions are between 35% and 80%).
Riskofre!
• Never leave the device unattended during operation.
• Do not place open re sources, such as candles, on the device.
• Never operate the device in the vicinity of heat sources such as cookers, heating elements or other heat
producing installations.
• Before a storm and/or a thunderstorm with a risk of lightning, please disconnect the device from the electrical power source.
Risk of personal injury!
• This appliance is not intended for use by individuals (including children) with restricted physical, physiologi-
cal or intellectual abilities or deciencies in experience and/or knowledge unless they are supervised by a
person responsible for their safety or receive from this person instruction in how the appliance is to be used.
Children should be supervised to ensure that they do not play with the appliance.
• Provide a stable location for the device.
• Do not operate the device if it has sustained a fall or is damaged. Have the device checked or, if necessary,
repaired by qualied technicians.
Page 3

www.thomann.de
3
• Important! Never play the drums with high volume level. Listening to music with high sound
pressure level, especially when using headphones, may cause permanent damage to your
hearing!
Handling the unit
• Never apply excessive force to the controls, connectors or other parts of the instrument.
• Always unplug cables by gripping the plug rmly, but not pulling on the cable.
• Disconnect all cables before moving the instrument.
• To avoid damage to the instrument and other devices to which it is connected, turn the power switches of all
related device OFF prior to connecting or disconnecting cables.
• Physical shocks caused by dropping, bumping, or placing heavy objects on the instrument can result in
scratches and more serious damage.
• The normal function of the product may be disturbed by strong electromagnetic interference. If so, simply
reset the product to resume normal operation by following the instruction manual. In case the function could
not be resumed, please use the product in another location.
• ESD, fast transient and surge may cause the unit to temporarily malfunction. Then switch the device off and
on again to resume normal operation.
Cleaning the unit
• Clean the unit with a dry soft cloth.
• A slightly damp cloth may be used to remove stubborn grime and dirt.
• Never use cleaners such as alcohol or thinner.
• Avoid placing vinyl object on top of the unit (vinyl can stick to and discolour the surface).
Features
X 100 drum and percussion sounds with high-grade resolution
X 10 preset and 5 programmable sets
X 30 built-in preset rhythms and one user rhythm
X Integrated metronome with 4 selectable click sounds
X Bass pad
X Including foot pedal, double zone snare pad, 3x tom pads, ride - Crash - hi-hat pad & hi-hat
controller
X Headphones output & mix In sockets
X USB connection
Page 4

HD-100
4
www.thomann.de
Table of contents
Important safety instructions ....................................................................................... 2
Features ....................................................................................................................... 3
The operating elements . . . .........................................................................................5
. . . on the top panel ............................................................................................5
. . . on the rear panel ............................................................................................6
Setup the drum set ...................................................................................................... 7
Connect the pads and the pedal .........................................................................7
Connect the power supply jack ............................................................................ 8
Connect your audio equipment ........................................................................... 8
Connect a CD player, etc. ..................................................................................... 8
Connect headphones.......................................................................................... 8
Connect a MIDI and USB device .......................................................................... 8
MIDI-Out format ......................................................................................................... 9
Functions ................................................................................................................... 10
Switch the power ON ........................................................................................10
Set the main volume ..........................................................................................10
Select a drum kit ................................................................................................ 10
Adjust the kit volume .........................................................................................10
Select a pad voice ............................................................................................... 11
Adjust the pad volume ....................................................................................... 11
Save kit ............................................................................................................... 11
Select a pattern ..................................................................................................12
Listen to the pattern........................................................................................... 12
Adjust the pattern volume .................................................................................12
Recording ................................................................................................................... 13
Enter the recording waiting mode ..................................................................... 13
Enter recording mode ........................................................................................13
Stop recording .................................................................................................... 13
Drum off ............................................................................................................. 14
Adjust the pattern tempo .................................................................................. 15
Click .................................................................................................................... 15
Select a click sound ............................................................................................ 15
Adjust the click volume .......................................................................................16
Factory reset ....................................................................................................... 16
Hi-Hat control ....................................................................................................16
Specifications .............................................................................................................17
Voice list ..................................................................................................................... 18
Pattern list .................................................................................................................. 19
Percussion set list ....................................................................................................... 20
MIDI implementation chart ....................................................................................... 21
Disposal ..................................................................................................................... 22
Page 5
www.thomann.de
5
The operating elements . . .
. . . on the top panel
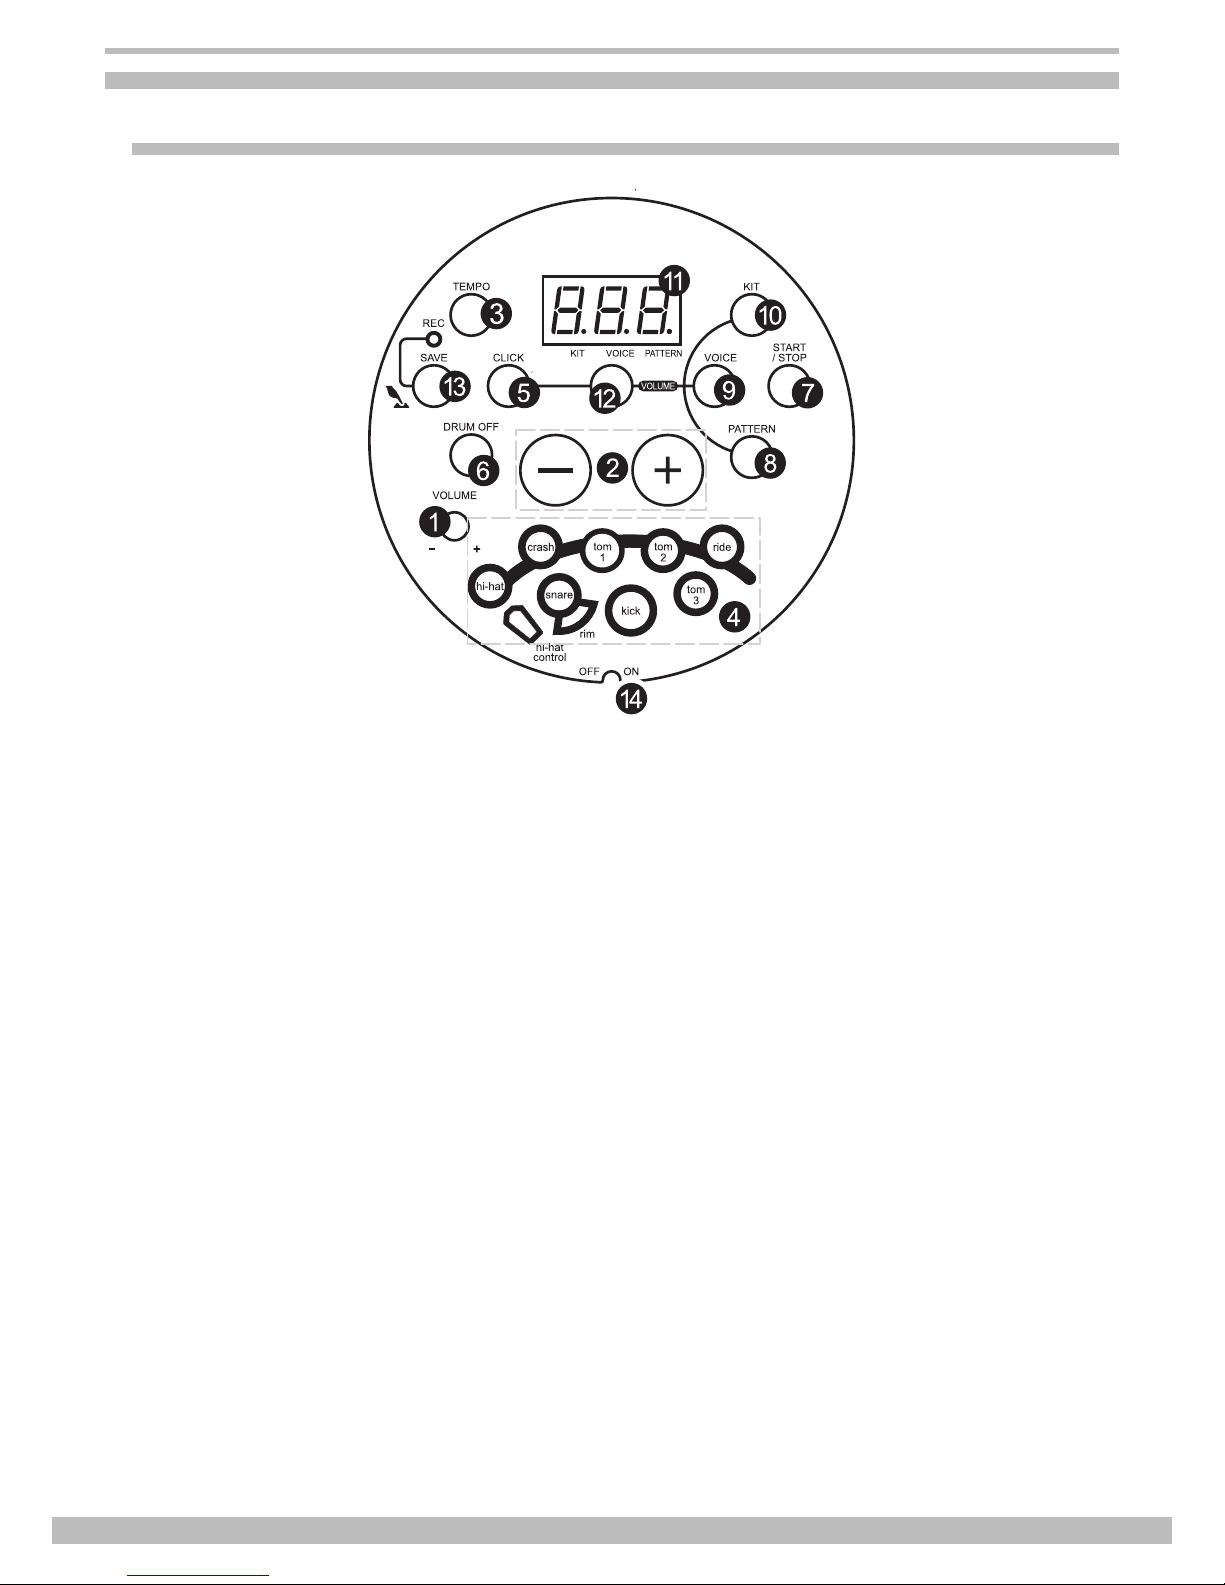
q VOLUME:
Volume control for the headphones output.
Turn it clockwise to increase the volume, turn it
anticlockwise to decrease it.
w +/–:
to adjust the currently selected parameter of the
menu (KIT, voice, pattern, click value, tempo
value, etc.).
e TEMPO:
to enter the tempo adjustment mode.
r Pad indicators:
During playing these indicators show the currently
triggered pads.
t CLICK:
to turn the metronome function on and off.
y DRUM OFF:
to mute the drum part of a song.
u START/STOP:
to start / stop the song playback.
i PATTERN:
to select the pattern and for choosing the midi
output format.
o VOICE:
to select the voice.
a KIT:
to select a drum kit.
s 3-digit LED display:
shows the parameter of the currently selected
menu.
d VOLUME:
to enter the volume adjustment mode and to
separately adjust kit volume, voice volume, click
volume and pattern volume.
f SAVE/REC:
Press this button briey to store the currently
selected kit as user kit. Keep this button pressed,
to start the record mode.
1$ ON/OFF:
to turn the unit on and off.
Page 6
HD-100
6
www.thomann.de
. . . on the rear panel
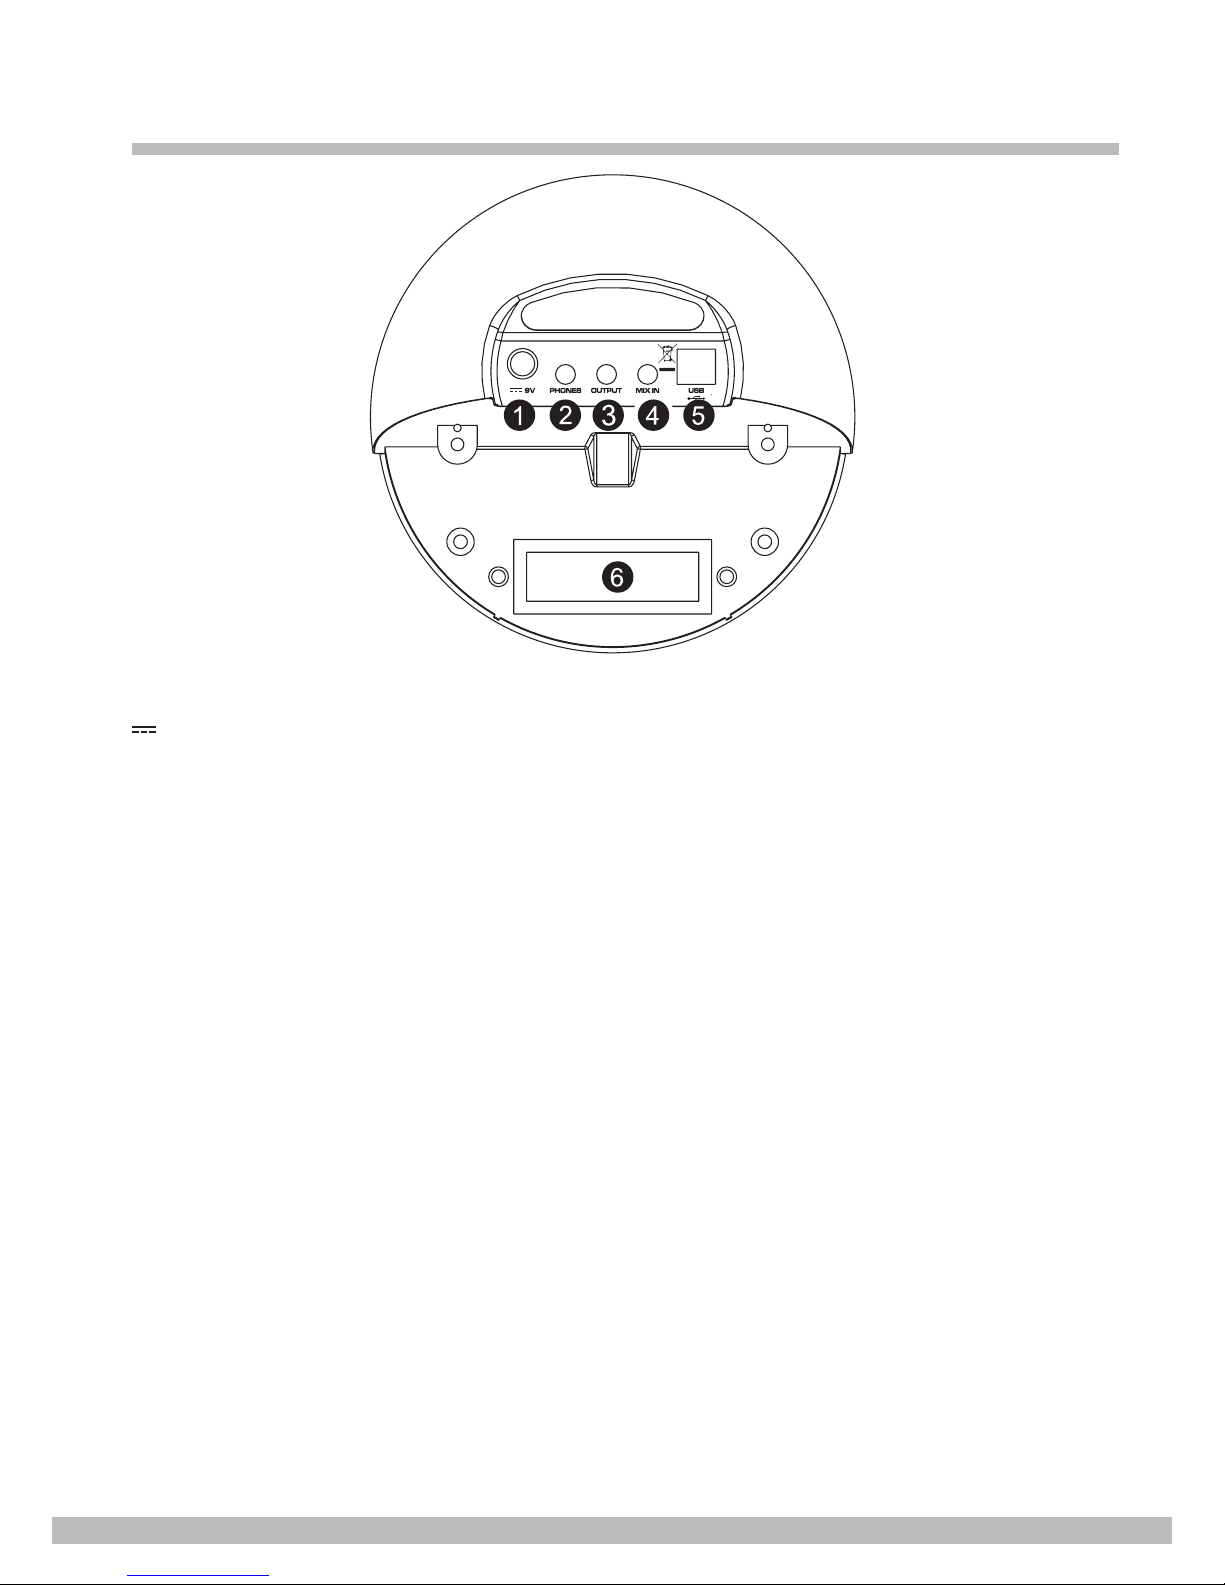
q 9 V
Plug in the cable of the mains adaptor here.
w PHONES:
Here you can connect your headphones (not
supplied).
e OUTPUT:
You can connect an audio system or drum
monitor to this stereo output.
r MIX IN:
Connect external audio devices like MP3 or CD
players to this input.
t USB:
Use this socket to connect the unit to a computer
(MIDI in/out via USB).
y Trigger input jacks:
Connect the individual pads to these terminals.
Page 7
www.thomann.de
7
Setup the drum set
CAUTION!
To prevent electric shock and damage to the device, make sure the power is
switched OFF on the drum module and all related device before making any
connection.
Connect the pads and the pedal
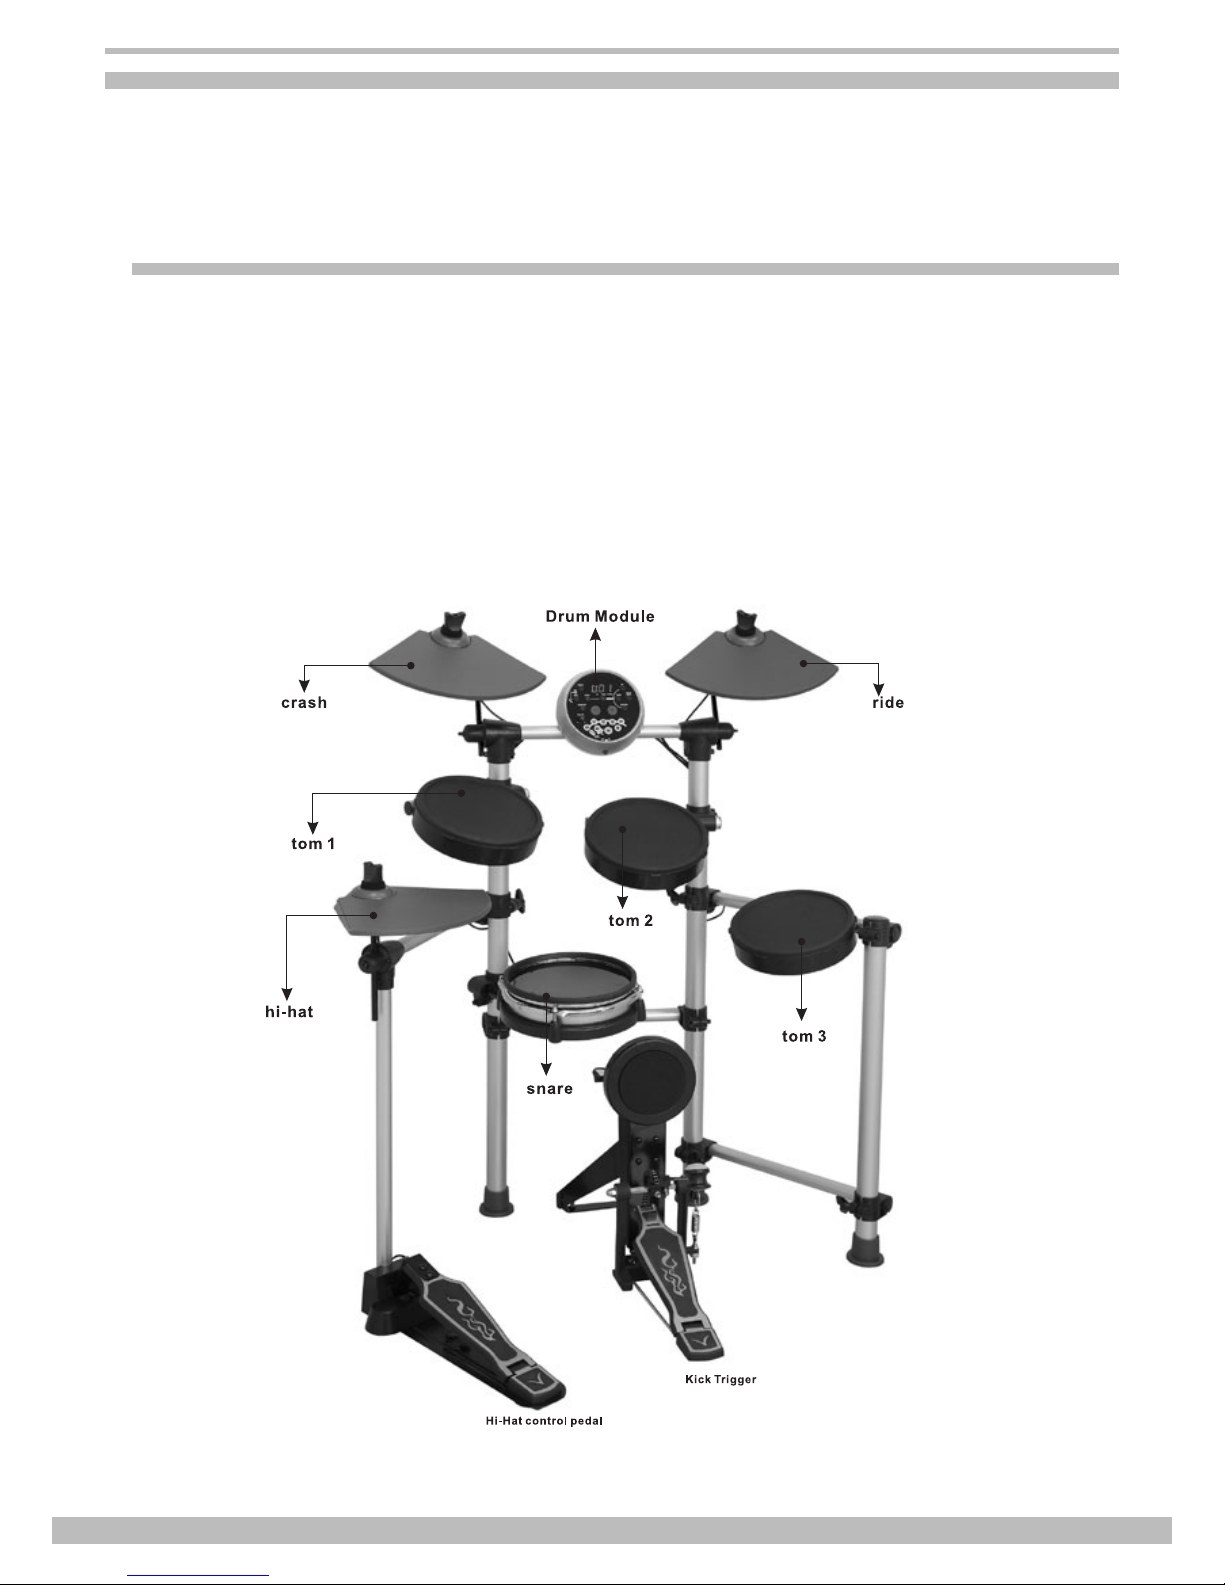
Connect with kick, snare, tom1~tom3, ride, crash, hi-hat, hi-hat control triggers using the cables provided.
The snare drum features a stereo input and supports double triggering (increase edge triggering); cymbal (ride
& crash), kick, tom, hi-hat are mono inputs that can’t response edge triggering. The Hi-hat pedal also has a
stereo input.
Note:
1. The voice of hitting the hi-hat pad is controlled by the hi-hat pedal. Similar to a real drum kit, the hi-hat
pad functions as an ‘open hi-hat’ when the pedal is released. When the pedal is stepped, it functions as a
‘closed hi-hat’.
2. The valid striking area of a cymbal pad (ride, crash or hi-hat) is half part of the pad on the player side,
which is different from other pads.
Page 8
HD-100
8
www.thomann.de
Connect the power supply jack
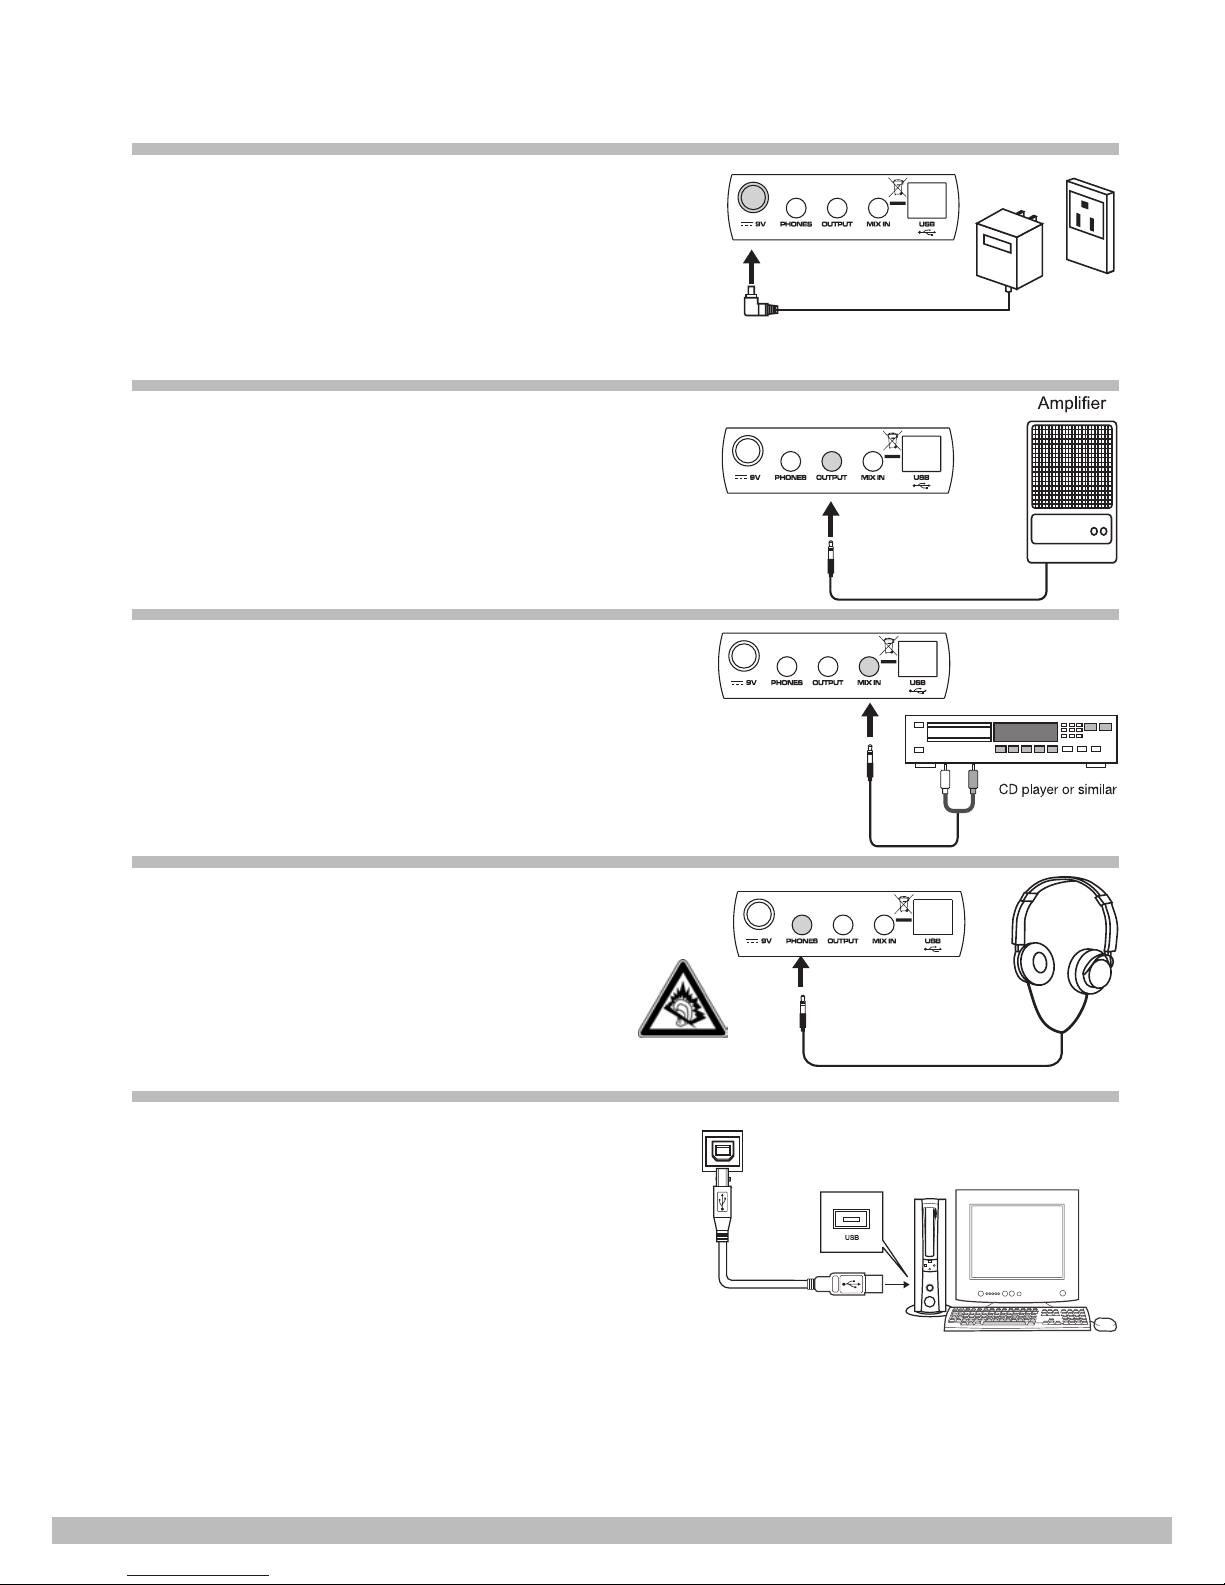
Make sure the power is switched OFF, then connect
the power adaptor with the DC jack on the rear panel.
1. To protect the speakers, amplier and the drum module
from damage, rotate the volume knob to the minimum
volume level before switching the power ON.
2. Make sure the power is switched OFF when
connecting the drum module to external devices.
Connect your audio equipment
If you want to listen to the drum voices with an
amplier, connect that amp to the OUTPUT jacks on
the rear panel.
Connect a CD player, etc.
The audio output of a CD player or other audio source
can be connected to the MIX IN jack on the rear panel
to mix it with the sound of the drum. This function is
convenient if you want to play along with a favourite
song.
Connect headphones
An optional set of stereo headphones can be
connected with the PHONES jack located on the rear
of the drum module.
CAUTION! Always adjust the volume to a comfortable
level! Listening to music with high sound pressure
level may cause permanent damage to your hearing!
Connect a MIDI and USB device
1. Connect a computer or other USB host devices that
supports USB Audio.
2. For devices with USB cable, you can choose “USB
Audio Device” in the device menu of the software
that transfers the midi data. The USB connection is
compatible with current operating systems. A driver is
not needed.
3. The drum module sends the MIDI data by hitting pads
or stepping pedal through USB port. But the data of
the click and song playing is not included. USB port
only sends and receives MIDI information.
Note:
Channel 11 is set as default percussion channel.
Page 9
www.thomann.de
9
MIDI-Out format
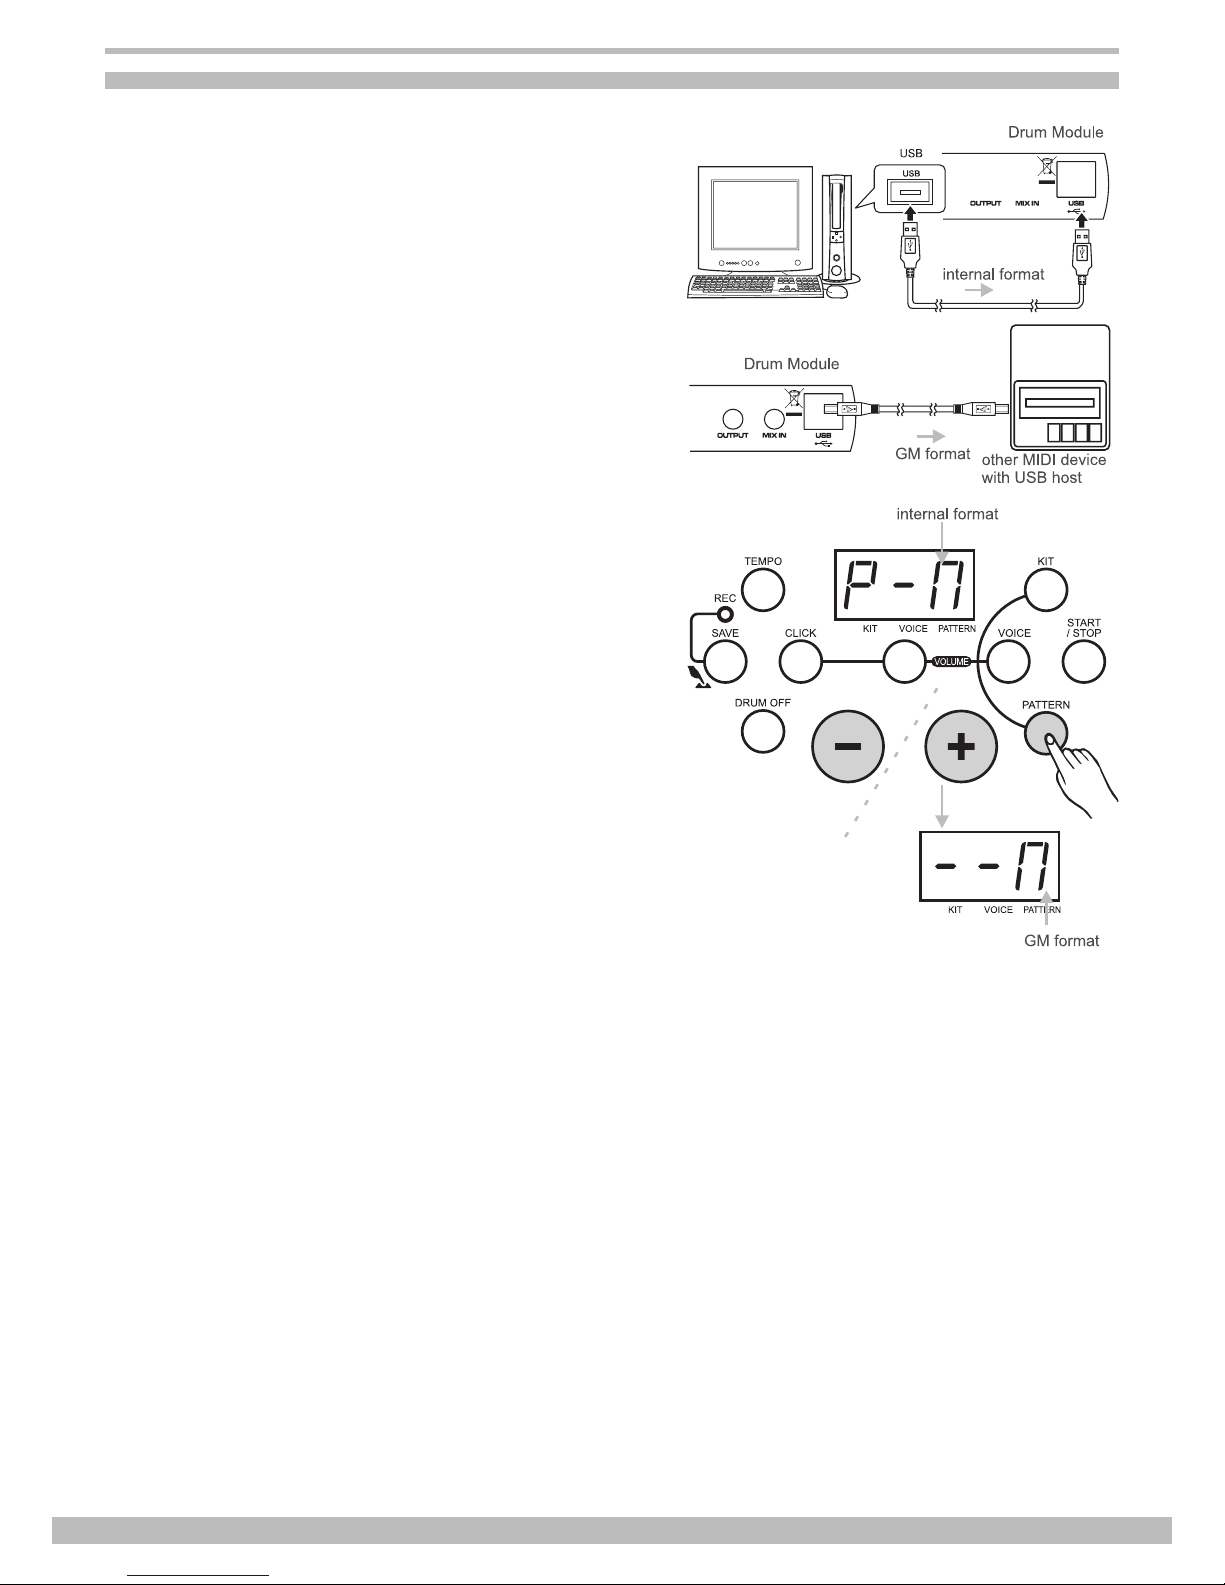
One of the two different MIDI output formats can be
selected for the drum module: the internal format
(default setting) and the GM format.
The internal format is used when the drum module
works as a sound source (drum module must be
connected to a computer or other module with USB
host device by USB, and send midi data to another
drum module. One drum module can‘t be connected
to another drum module by USB).
The GM format is used when some other sound
source is applied (drum module to other product which
supports GM format), such as a computer.
If you record your own drum play to computer
software with internal format, then only the drum
module could recognize and playback your own song
(recorded midi le) correctly.
Nevertheless, if you would like to playback your
recorded midi song in any sound source device which
supports GM format, we suggest you to record your
own drum performance with GM format output.
In pattern selecting mode, press the PATTERN button
to enter MIDI output format choice mode. The LED
display shows the current MIDI output format “P-N”
(default setting, internal format) or “--N” (GM format).
It can be selected by pressing the +/– buttons.
If the internal format (P-N) is selected, “program
change” and “note on/off” commands will be
transmitted. When the GM format (--N) is selected,
only ‘note on/off‘ commands will be transmitted.
Note:
The above setting only affects the primary percussion
channel. (MIDI channel 10)
Page 10
HD-100
10
www.thomann.de
Functions
Switch the power ON
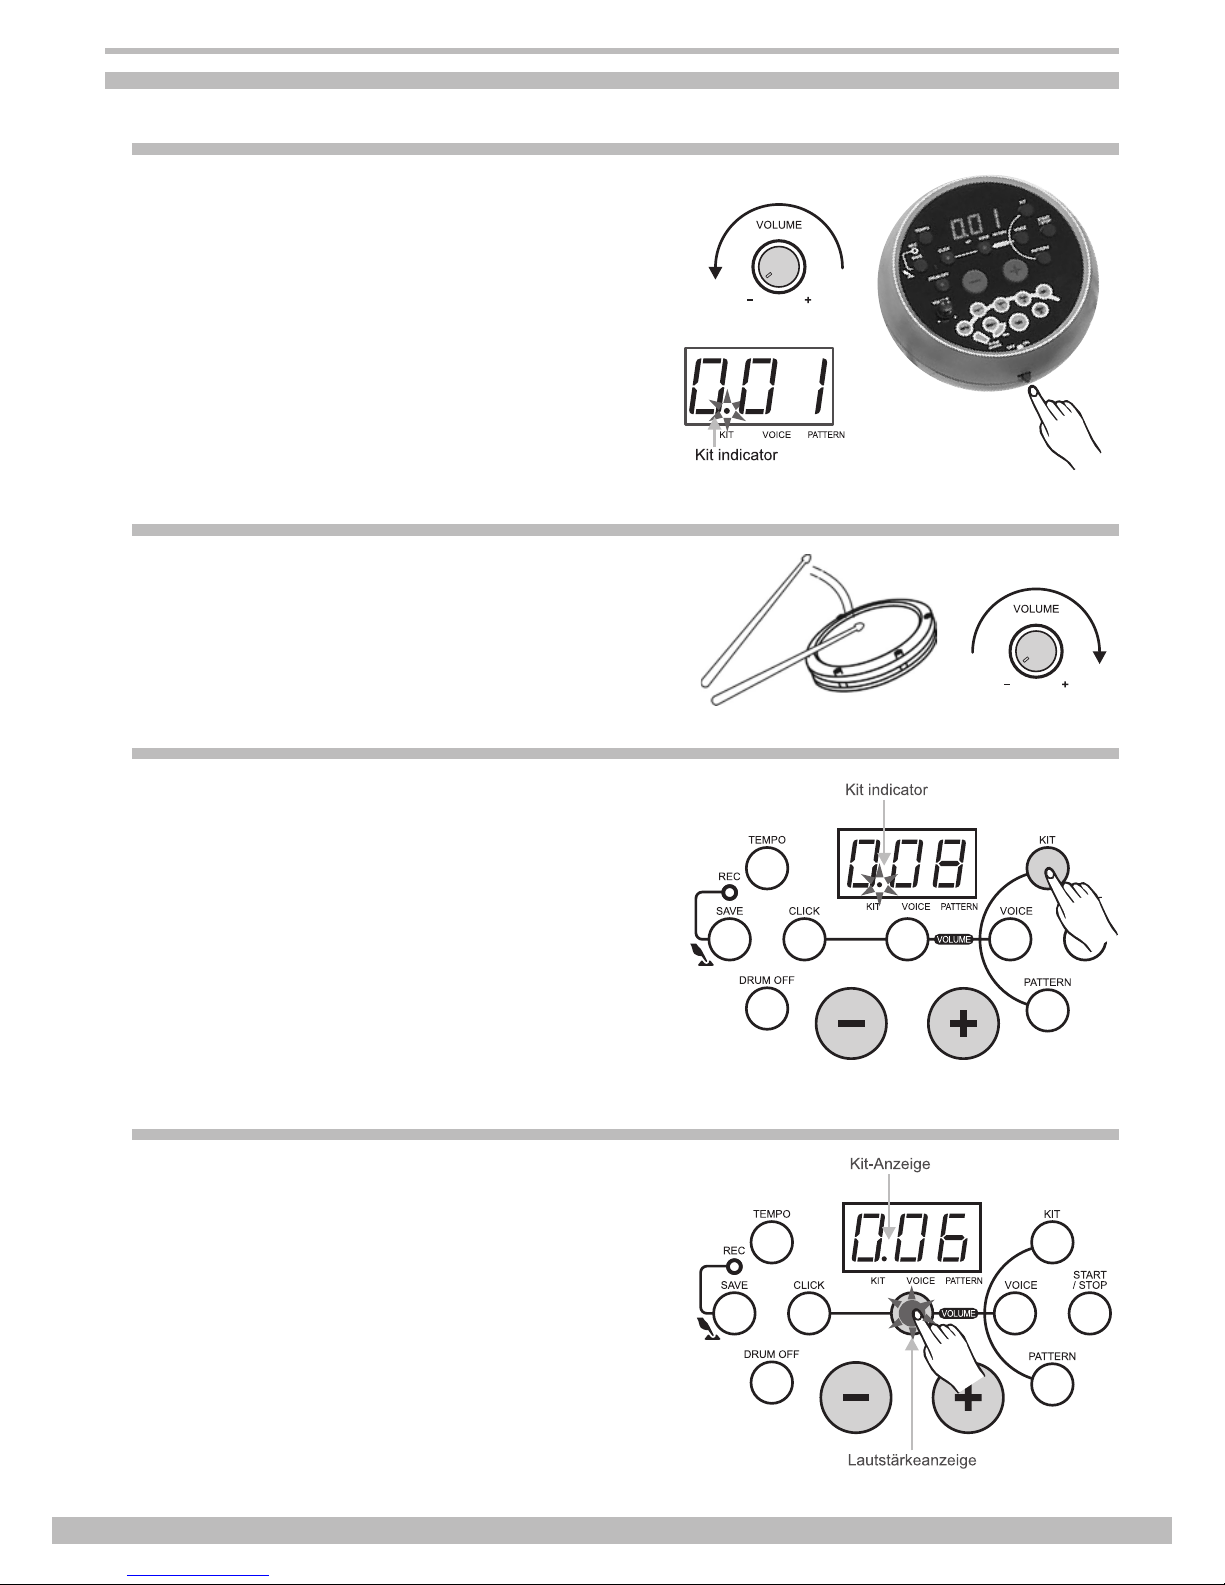
After all connections have been completed, rotate
the volume knob to the left (= minimum volume level)
before switching the power on.
Set the power switch to “ON” position to switch on the
power. The display then shows the kit‘s number and
its indicator lights up.
Set the main volume
While hitting a pad, gradually rotate the volume knob
until a comfortable volume level is reached.
Select a drum kit
The unit comes with 10 (001-010) preset drum kits
and 5 user kits (011-015).
Press the KIT button to enter KIT selecting mode,
3-digit LED displays the current KIT number and the
KIT indicator lights up.
In kit selecting mode, press + or – button to choose
any KIT (001-015, in cycle) as the current KIT.
Adjust the kit volume
In KIT selecting mode, press the VOLUME button to
enter volume adjusting mode, the volume indicator
lights up and the 3-digit LED displays the current
kit volume value. Adjust its value by pressing the
+/– buttons. (0-16, not in cycle). Then press the KIT
button again to enter the KIT selecting mode. The
volume indicator goes out.
Please note that in recording waiting mode, the KIT
volume value can be shown on the display but it can
not be adjusted.
Page 11
www.thomann.de
11
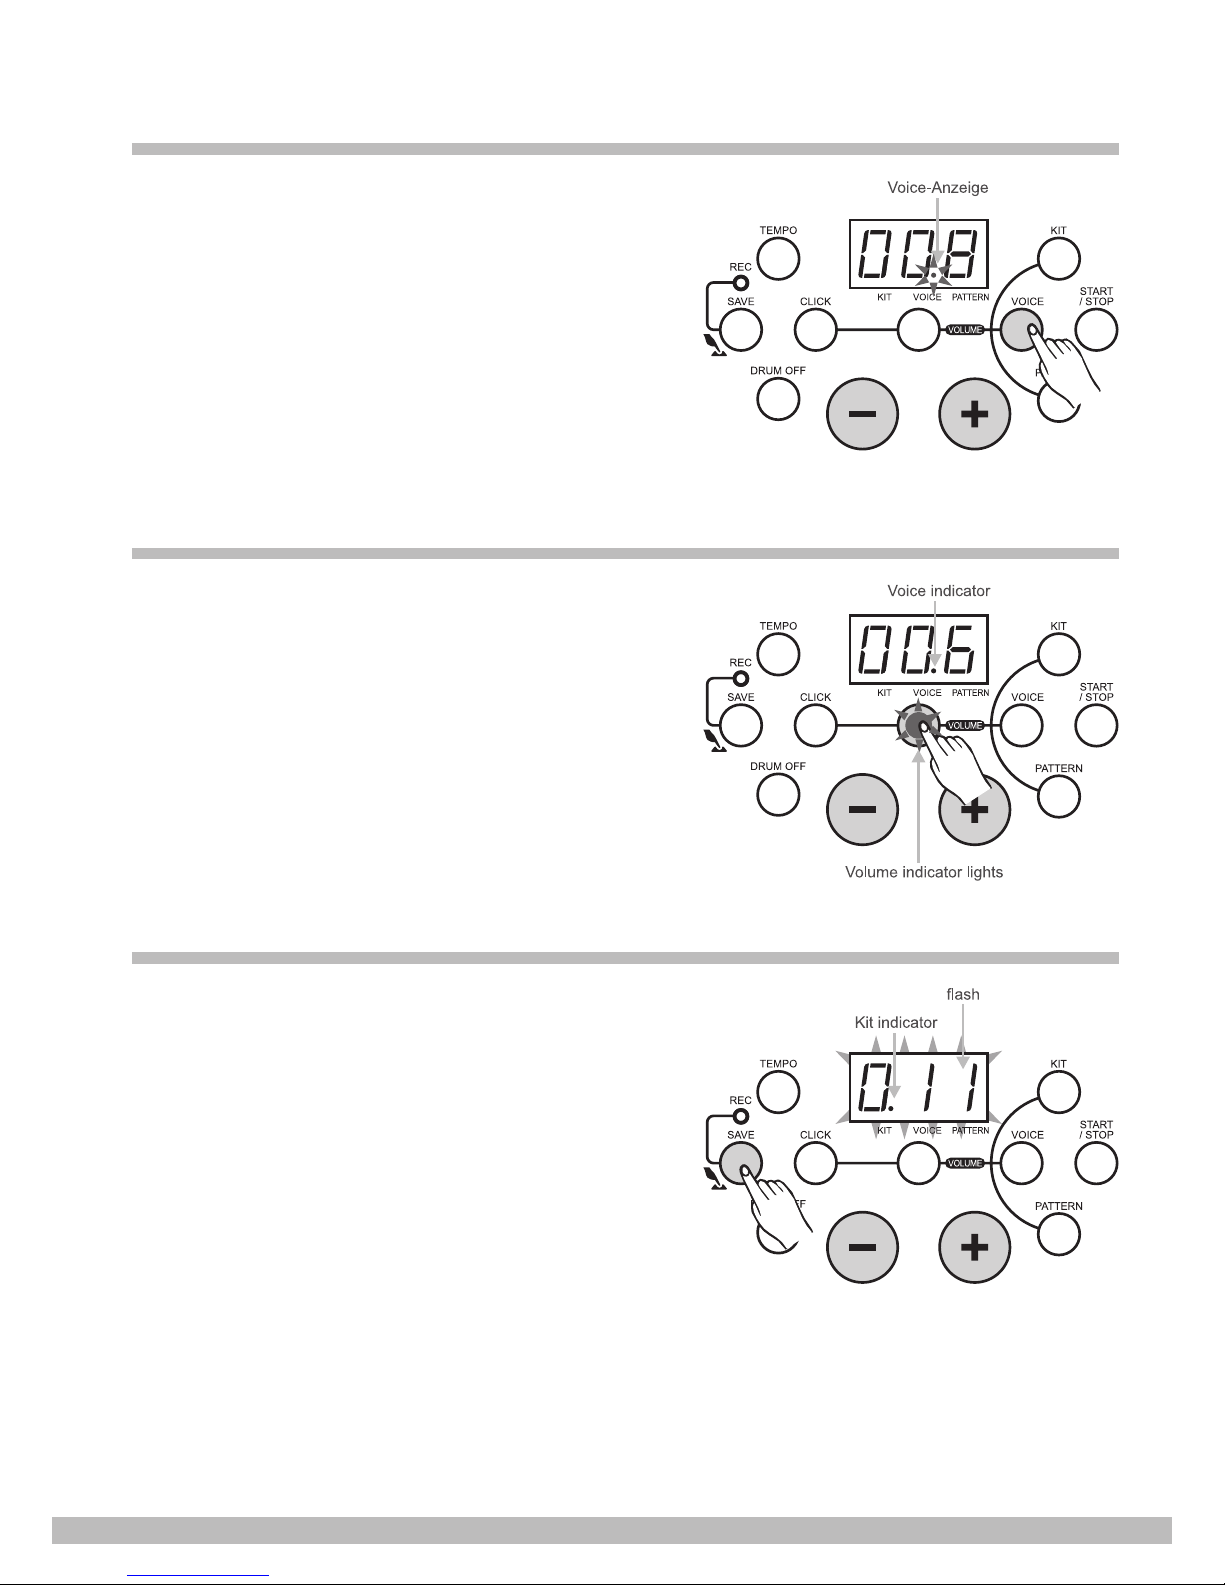
Select a pad voice
The drum module provides 108 built-in drum voices in
total to choose from.
Press the VOICE button to enter pad voice selecting
mode. The 3-digit LED displays the current pad voice
number and the voice indicator lights up.
In the pad voice selecting mode, press +/– buttons to
choose the voice of the current pad or cymbal (1-108,
in cycle).
Adjust the pad volume
In voice selecting mode, press the VOLUME button to
enter pad volume adjusting mode. Then the volume
indicator lights up and the LED displays the current
pad volume value.
Press the +/– buttons to adjust its value (0-16, not in
cycle).
Press the VOICE button again to enter voice selecting
mode.
Save kit
Press the SAVE button to enter KIT saving mode. The
LED displays the user KIT number to save, the KIT
indicator lights up and the user KIT number ashes.
Press +/– buttons to choose the user KIT (11-15, in
cycle) to save. During choosing the KIT, the user KIT
number will keep ashing.
Press the SAVE button again. The current KIT setting
(including all pads voice numbers and volume) is
saved into the selected user KIT.
When in recording mode, this function is not available
to the user.
Page 12
HD-100
12
www.thomann.de
Select a pattern
The unit offers 41 built-in patterns (40 preset patterns
and one user pattern).
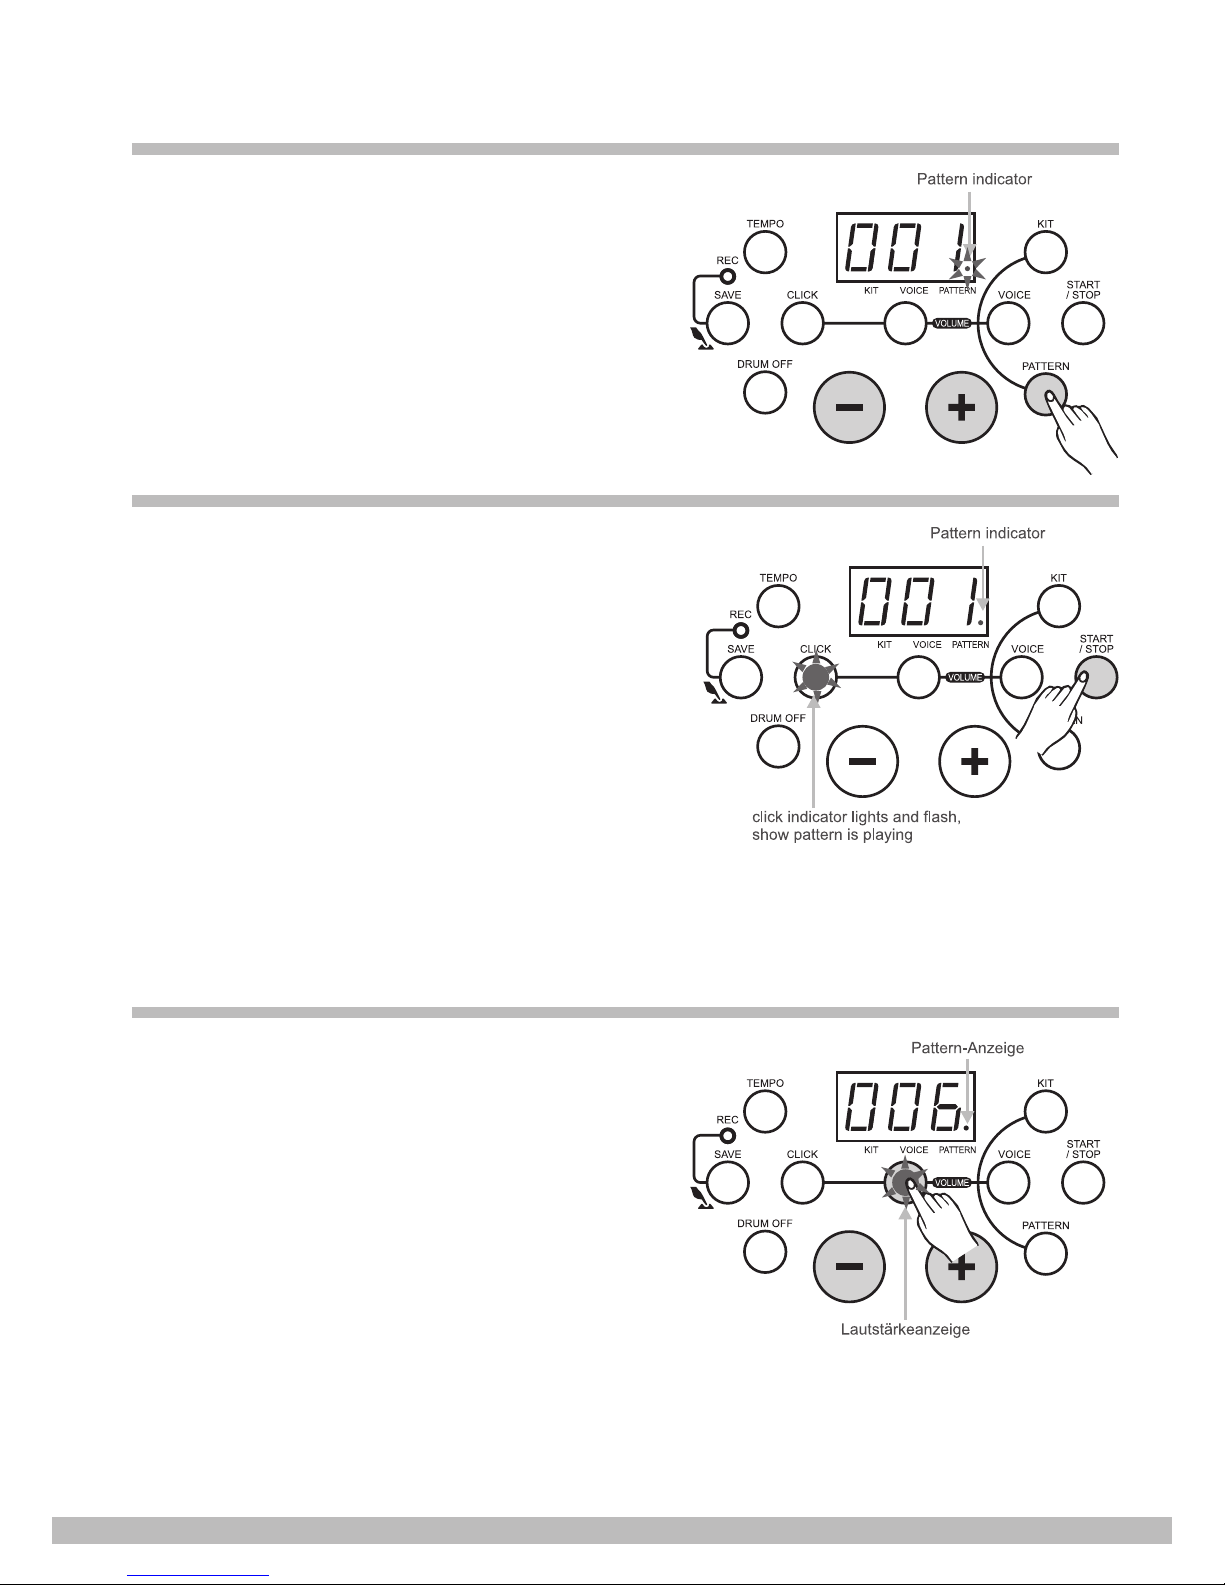
Press the PATTERN button to enter pattern choice
mode, the 3-digit LED displays the current pattern
number and the pattern indicator lights up.
Press the +/– buttons to choose the current pattern
number (1-41, in cycle).
Listen to the pattern
Press the START/STOP button to start/stop pattern
playing. In process of pattern playing, the click
indicator ashes, which shows the beat of the playing
pattern. Additionally the pad indicators light up in
accompany with the variable trigger sound in process
of pattern play, for easy learning and practicing. If
another pattern is selected in current song playing, it
will start to play at the next measure.
In pattern playing mode, press START/STOP button to
stop pattern play.
Note:
The pattern and the MIDI IN use the same 16 midi
channels. When you use MIDI IN to play a song, it
might affect the built-in pattern playing. So you must
reset the drum module.
Adjust the pattern volume
In pattern choice mode, press the VOLUME button to
enter pattern volume adjusting mode. The 3-digit LED
displays the accompaniment volume value of current
pattern (please note that the percussion part volume
can not be adjusted, it just can be muted on/off by
using DRUM OFF button). The volume indicator lights
up, press the +/– buttons to adjust the pattern volume
value (0-16, not in cycle). Then press the PATTERN
button again to enter pattern choice mode.
Please note that in recording waiting mode, the
pattern volume value could be shown on the display
but it could not be adjusted.
Note:
Pattern volume only controls the accompaniment part
volume of the pattern.
Page 13
www.thomann.de
13
Recording
Enter the recording waiting mode
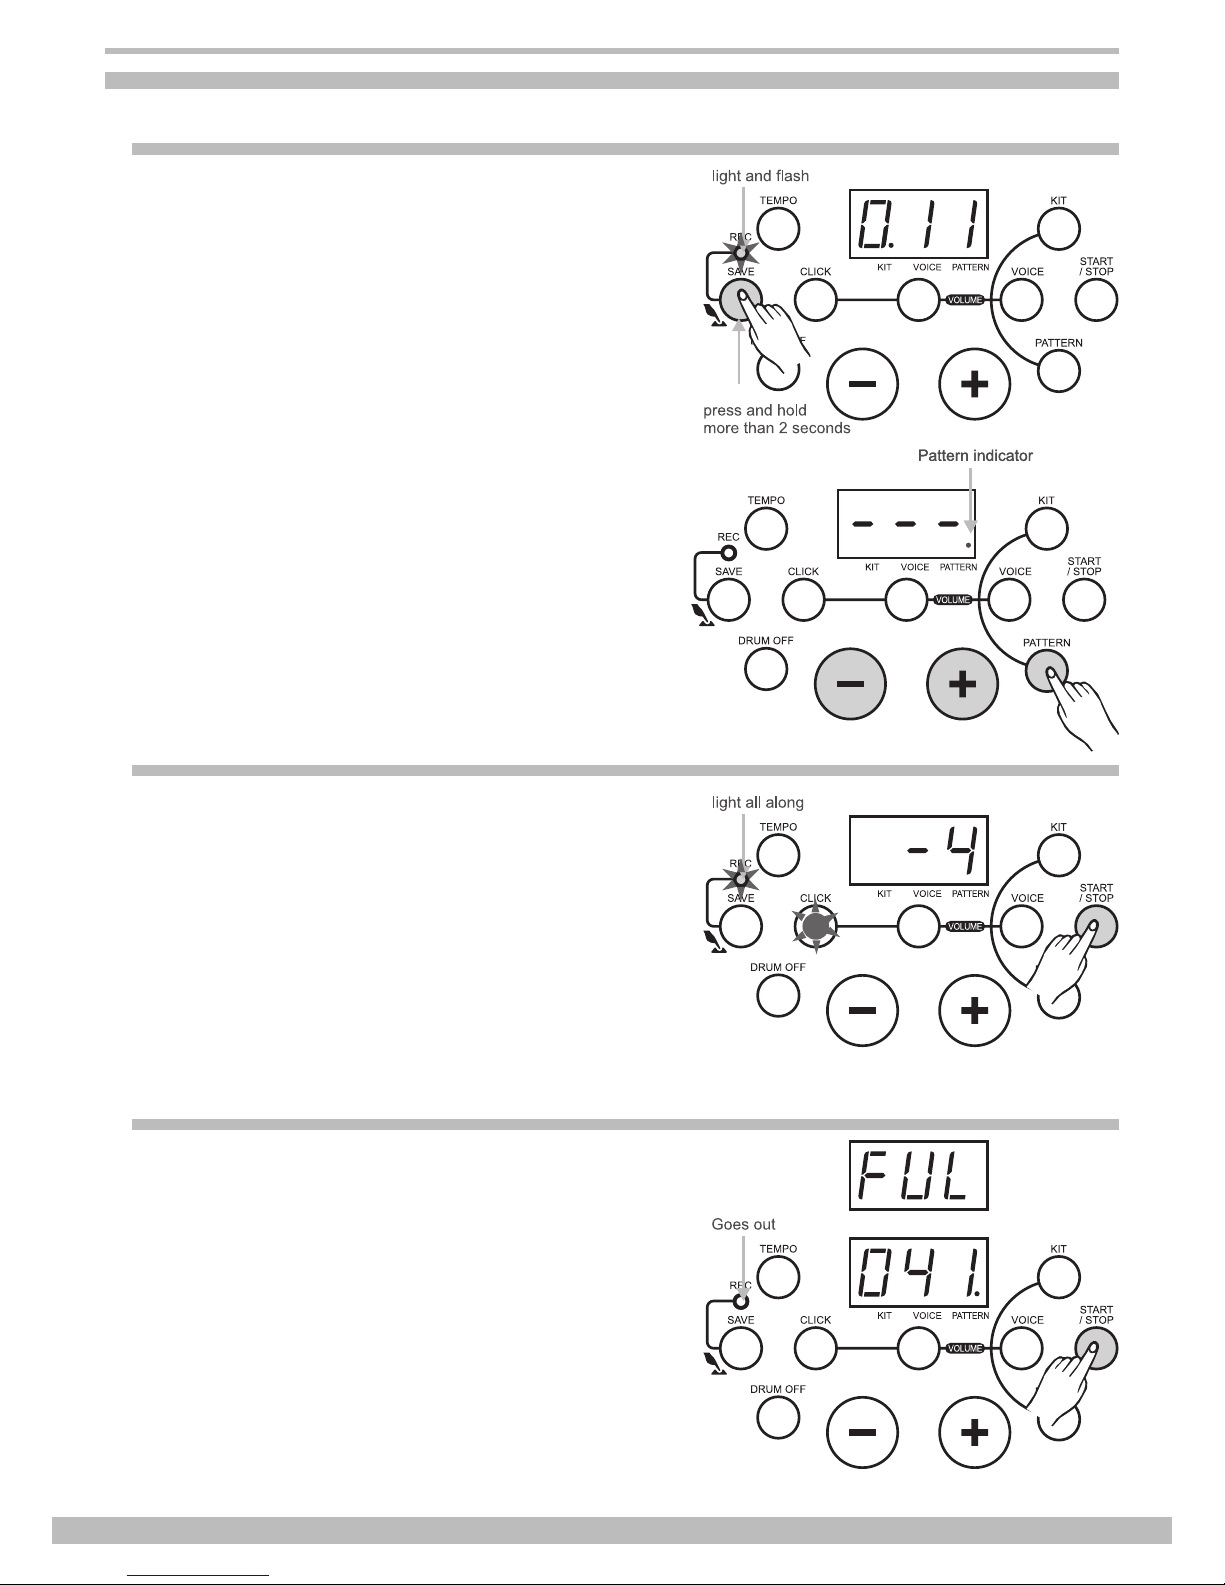
Press and hold the SAVE button for about 2 seconds,
to enter user pattern recording waiting mode. The
3-digit LED displays the KIT number and the REC
indicator ashes. In recording waiting mode the
correspondent parameter can be adjusted.
Q
Adjust pattern number as accompaniment.
Q
Adjust tempo value.
Q
Adjust KIT number.
Q
Switch drum off status.
Q
Turn on/off click.
In the Recording Waiting Mode, press the PATTERN
button to show the pattern (---/001~040) as
accompaniment for recording. Use the +/– buttons
to select the accompaniment. If “---” is selected, that
means the user would like to record a solo drum part.
Note:
VOICE selecting function is not available for the user
in recording waiting mode and time signature.
Enter recording mode
Press the START/STOP button or hit the pads to
enter recording mode. Then the REC indicator lights
all along and the 3-digit LED displays recording
measures.
Q
During recording, the original data will be replaced
with the newly recorded user pattern.
Q
One measure introductory beat (such as 4/4,display:
-4, -3, -2, -1).
Q
No parameters can be adjusted during recording.
Only „START/STOP“ and „CLICK“ buttons function
during recording.
Q
The click sound will not be recorded.
Stop recording
When the recording memory is full, the recording
automatically stops and the REC indicator goes out.
The 3-digit LED displays ‘ful’, then press the START/
STOP button to return to NO.41 PATTERN display.
If you press the START/STOP button during recording,
the recording will stop and the REC indicator goes
out. The unit then returns to NO.41 PATTERN display.
Page 14
HD-100
14
www.thomann.de
Playback User Pattern
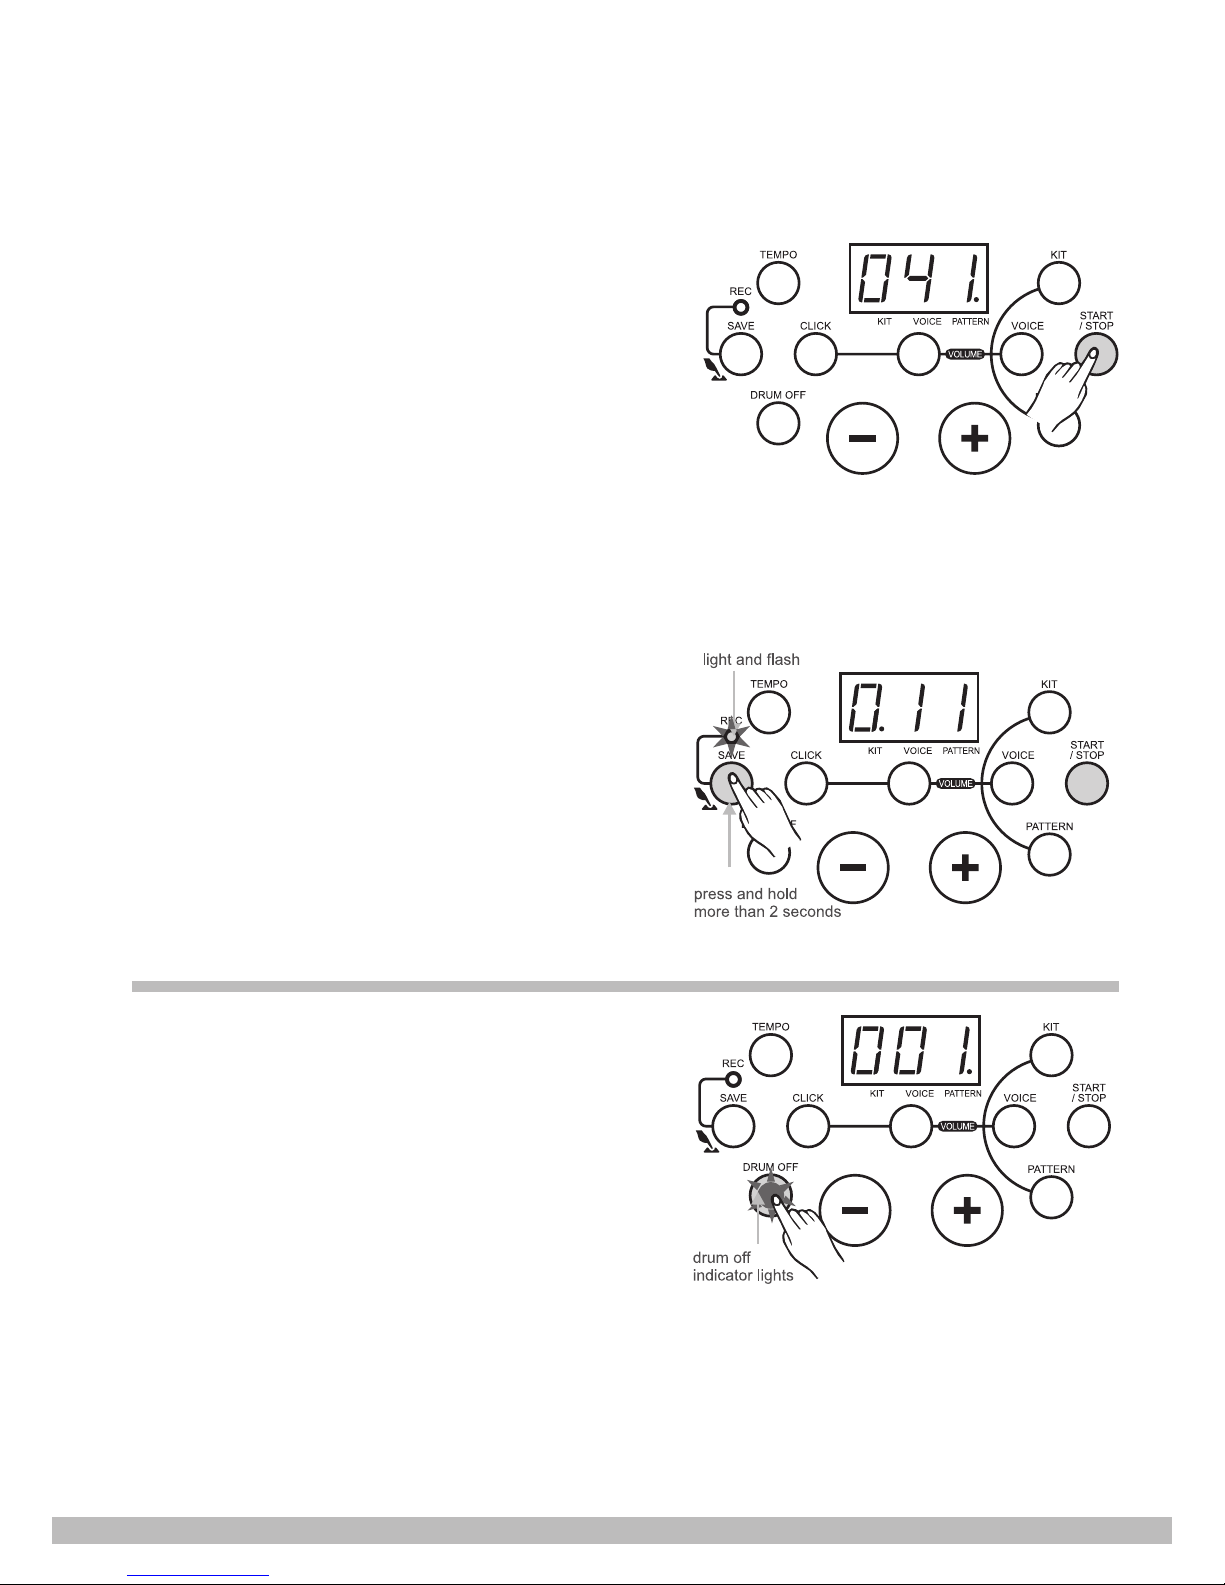
Choose the pattern number 41, then press the
START/STOP button to play user pattern.
Q
If there is no recording data, 3-digit LED displays “N-P”.
Q
The user is allowed to change pattern volume and
tempo value when playing user pattern.
Q
No measures displayed on LED.
Q
The unit does not play the user pattern in cycle.
Q
When using the DRUM OFF button, it just mutes the
drum part of the accompaniment and will not mute the
recorded part.
Q
Pattern volume and Kit volume only control the corresponding part of the accompaniment.
Note:
If the user selects another kit when playing back
the user pattern, the recorded kit data will also be
changed to the currently selected kit.
Recording notes
The recording capacity is about 5000 notes.
Quick recording
After choosing a favourite KIT and adjusting the
parameter well, (includes tempo, click etc.), the user
can easily press and hold the SAVE button to enter
recording waiting mode, then hit the pads or press the
START/STOP button to start recording.
Drum off
Press the DRUM OFF button to mute on/off the drum
part. If “drum off” is activated, the drum sound of the
currently playing pattern will be muted and the “drum
off” indicator lights up. This function is convenient for
user practise.
Page 15
www.thomann.de
15
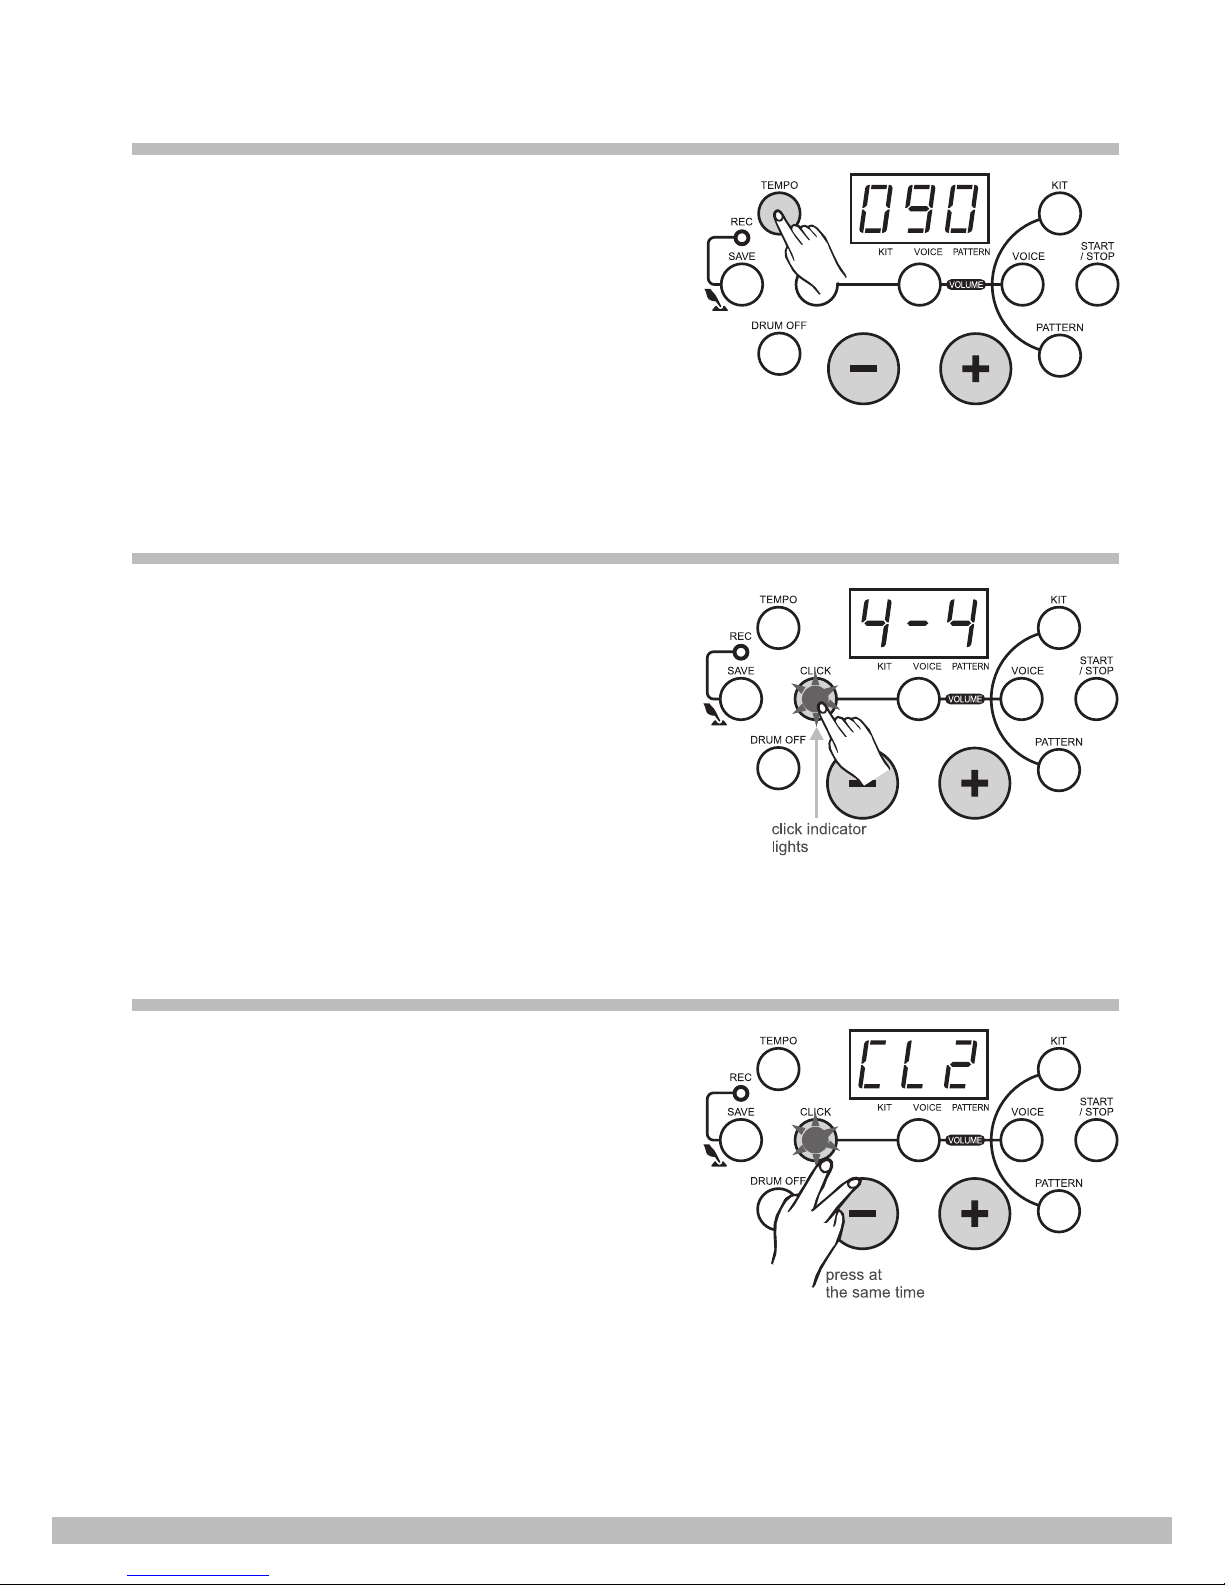
Adjust the pattern tempo
Press the TEMPO button to enter tempo adjustment
mode. The 3-digit LED then temporarily displays
TEMPO value.
Press the +/– buttons to change the tempo of click
and pattern playing (30-280, not in cycle).
Press + and – button at the same time, to reset to the
default value (the current pattern default tempo).
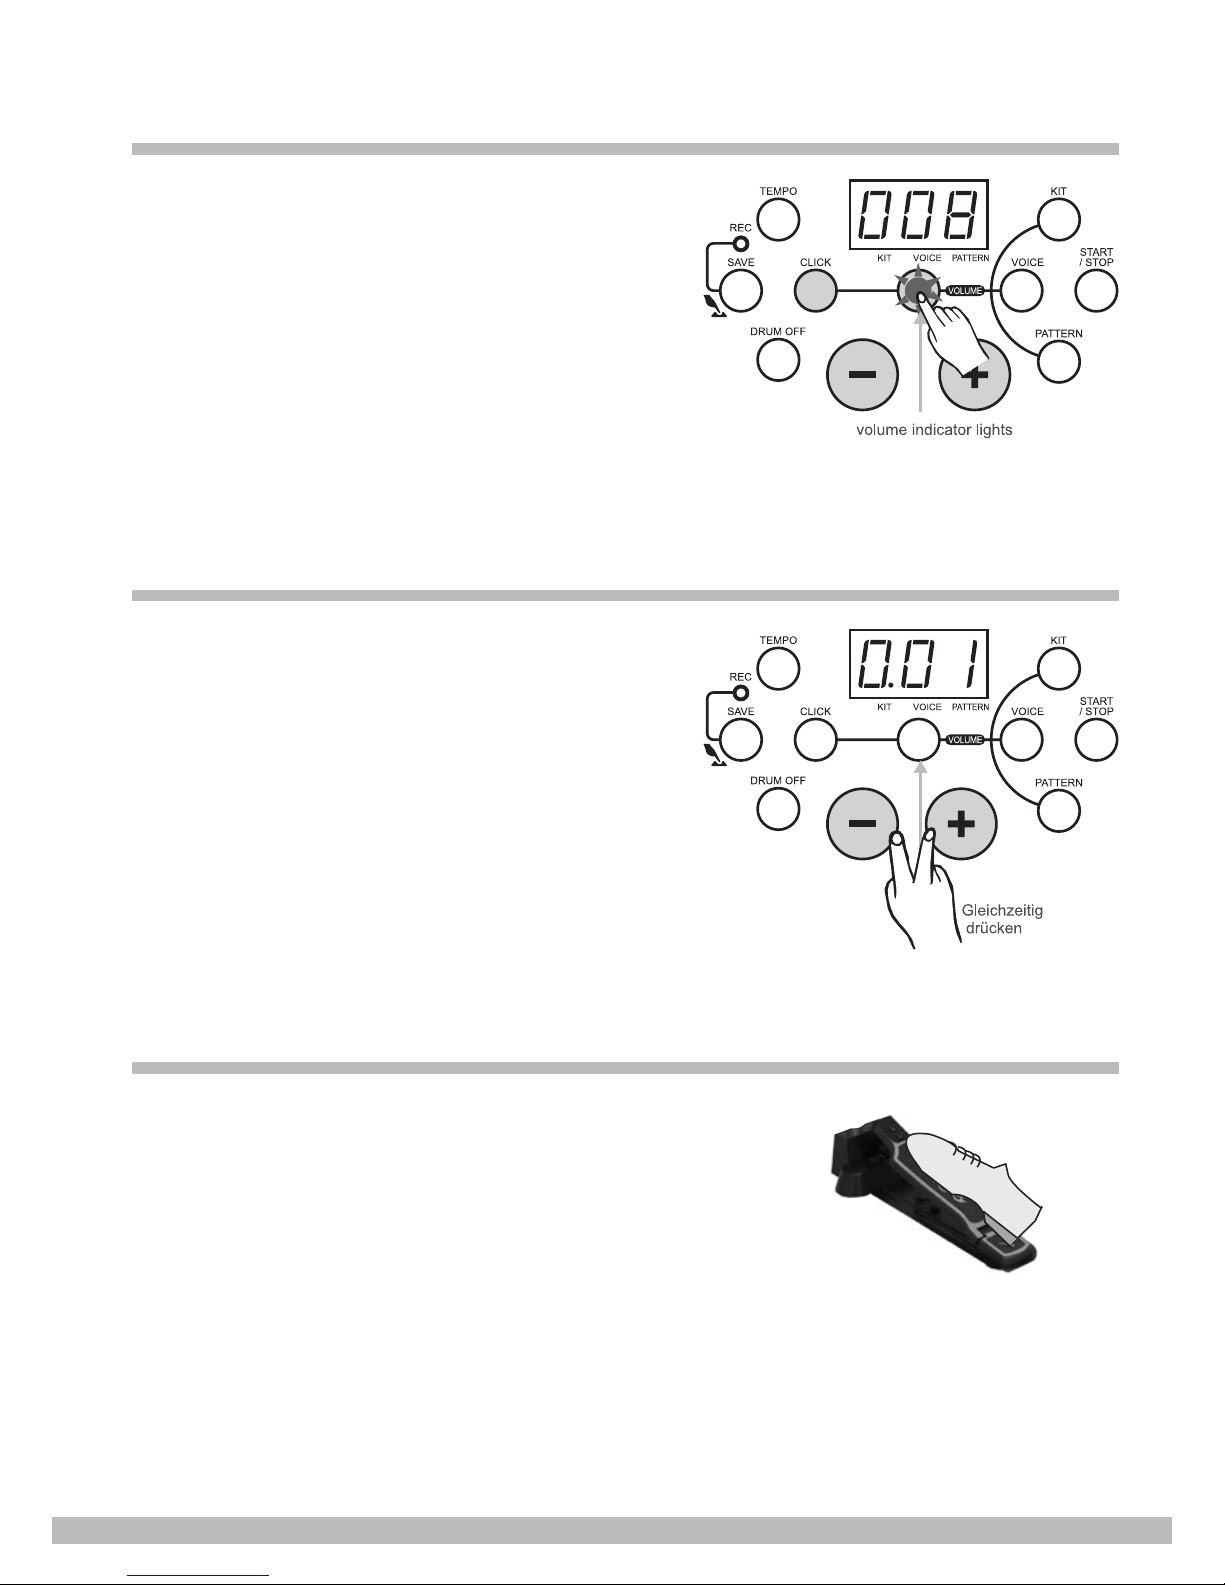
Click
Press the CLICK button to turn on/off the click
function. The 3-digit LED displays the current time
signature, and the click indicator lights and ash.
Press the +/– buttons to change the current time
signature. Press the CLICK button again to turn off the
click function.
9 kinds of time signatures can be chosen (1/4, 2/4,
3/4, 4/4, 5/4, 6/4, 7/4, 3/8, 6/8).
As a pattern is playing, the click indicator
automatically ashes according to the pattern beat,
but the click sound will not be turned on automatically.
Select a click sound
Press and hold the CLICK button, then press the
+/– buttons to adjust the click sound. The 3-digit LED
temporarily displays the current click sound ‘CLX’.
The drum module supports 4 click sounds:
metronome, beep, cowbell and voice. When turning
on the click, the default sound is “metronome”.
Page 16
HD-100
16
www.thomann.de
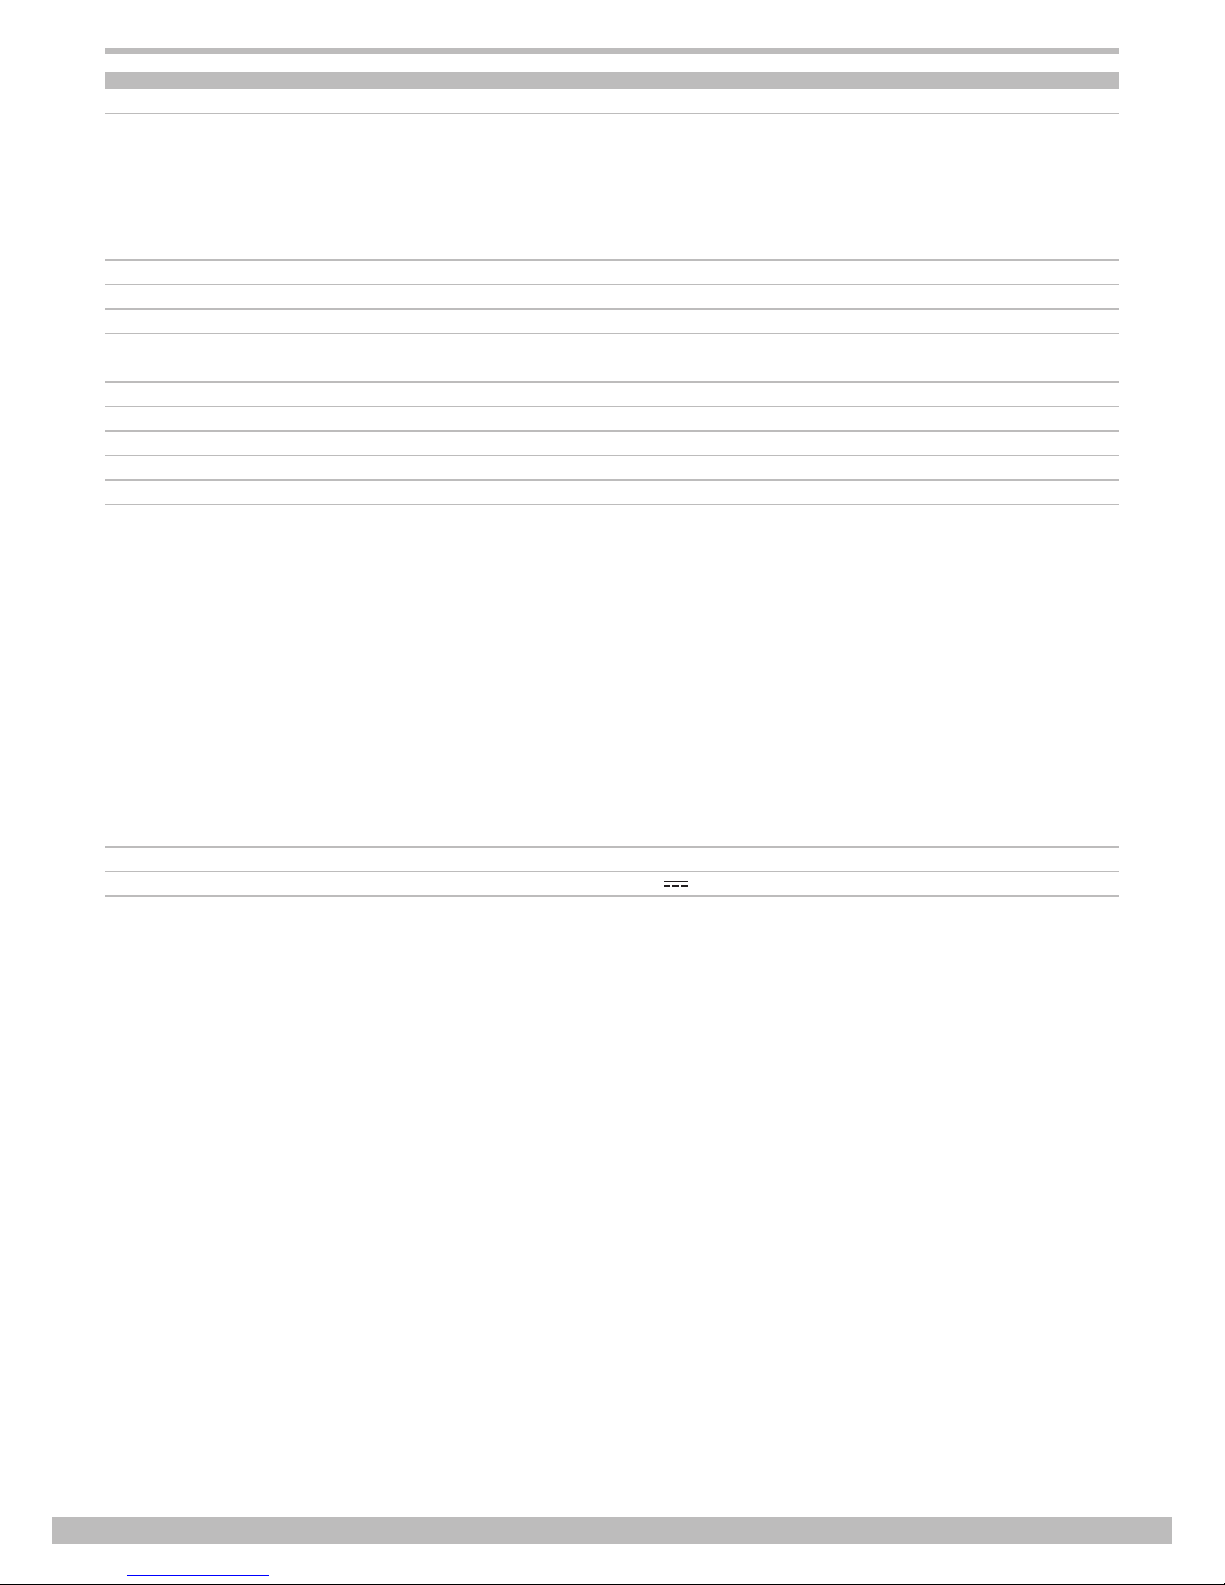
Adjust the click volume
In click time signature choice mode, press the
VOLUME button to enter click volume adjusting mode.
The volume indicator lights up and the 3-digit LED
displays the current click volume value. Its volume
value can be adjusted by pressing the +/– buttons
(0-16 not in cycle).
Return to click time signature choice mode
In click volume adjusting mode, press the CLICK
button to exit the volume adjusting mode and to return
to the click time signature choice mode.
Factory reset
If you keep both + and – buttons pressed at the same
time when turning on the drum module, it will be reset
to the factory default settings. The following data will
be replaced by the factory data:
Q
All users kits (include voice, volume setting).
Q
All recorded data.
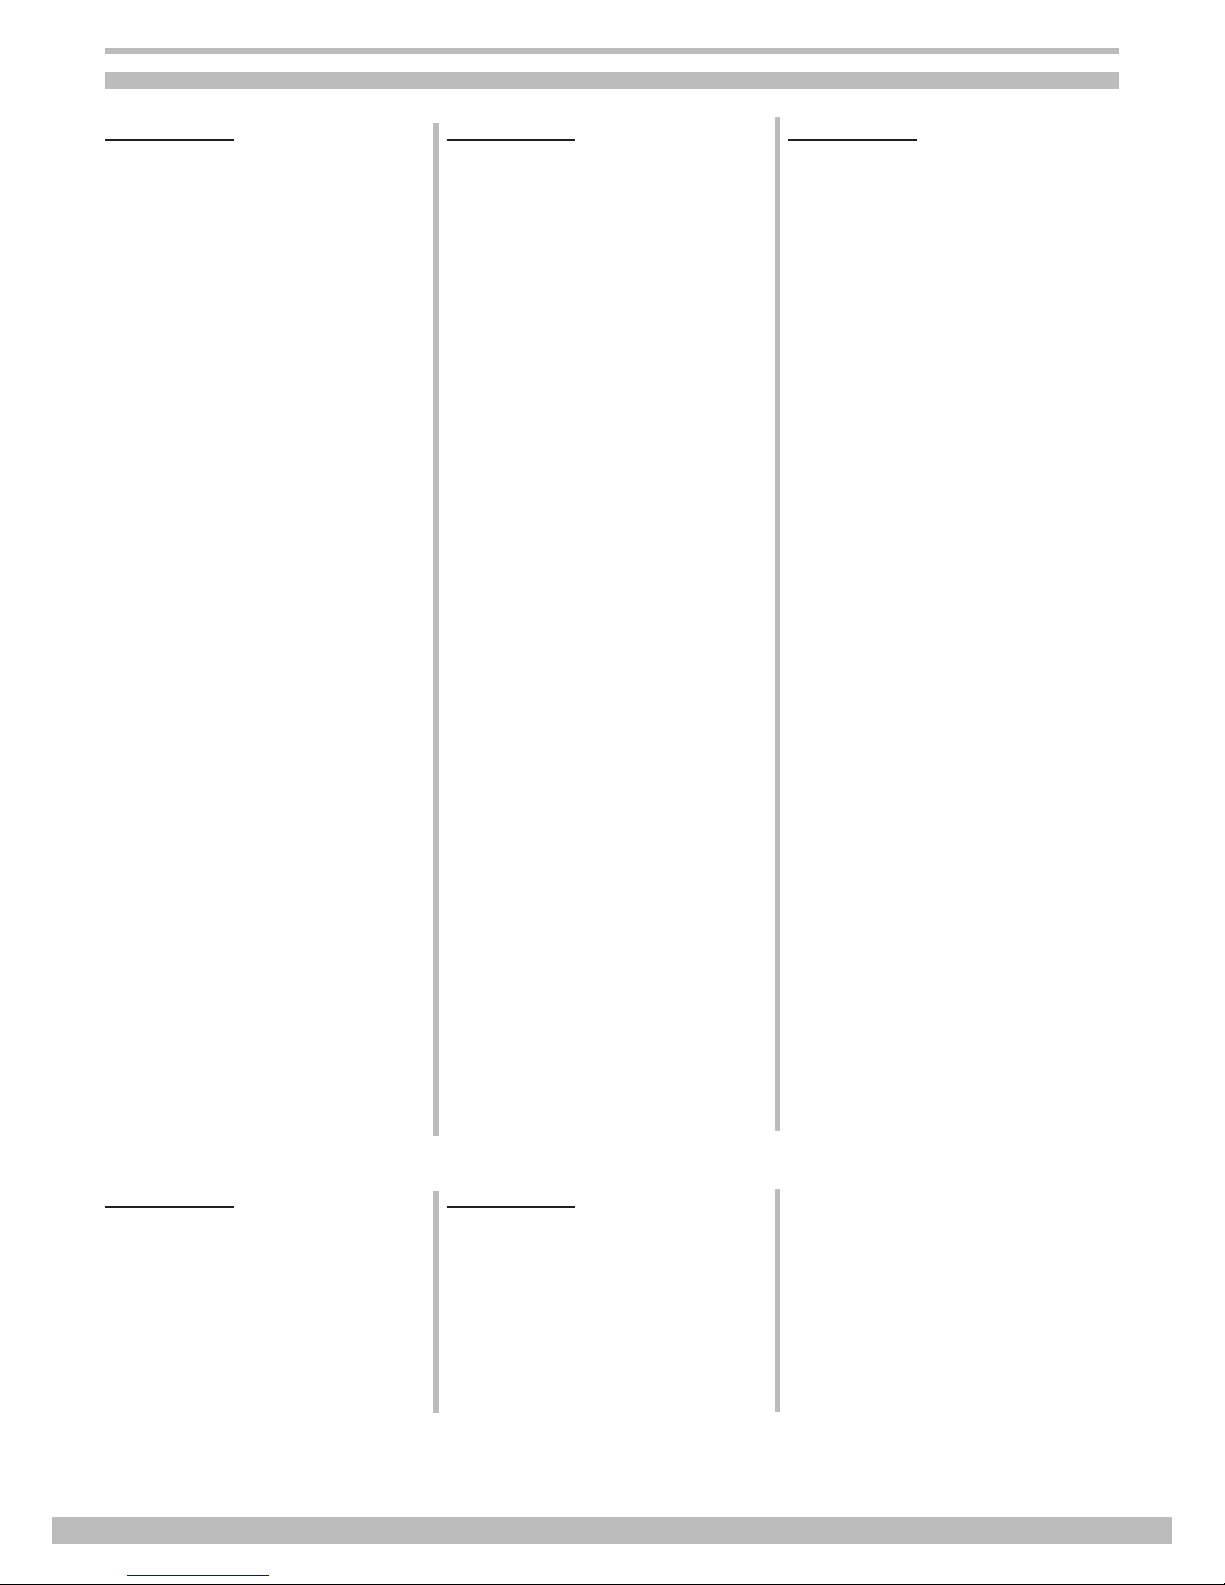
Hi-Hat control
Q
Open hi-hat: Strike the hi-hat without stepping the pedal.
Q
Closed hi-hat: Strike the hi-hat with the pedal stepped.
Q
Foot closed: Completely step down the pedal.
Q
Splash: play the hi-hat with the pedal fully stepped and then instantly
releasing it.
Page 17
www.thomann.de
17
Specifications
Drum Pads: 3 tom pads
2 cymbal pads
1 snare pad (dual trigger)
1 hi-hat control pedal
1 hi-hat
1 kick
Voices: 108 voices
Drum kits: 10 preset kits
5 user kits
Patterns: 40 preset songs and 1 user pattern
Display: LED display
Connections: PHONES
USB
OUTPUT
MIX IN
DC POWER
Hi-hat control
Hi-hat
Crash
Ride
Snare
Tom 1
Tom 2
Tom 3
Kick
Power Supply: AC mains adaptor (DC 9V )
Page 18
HD-100
18
www.thomann.de
Voice list
No. NAME
KICK
001 Standard Kick 1
002 Standard Kick 2
003 Classic Kick 1
004 Classic Kick 2
005 Rock Kick
006 Camco Kick 1
007 Camco Kick 2
008 Acoustic Kick 1
009 Acoustic Kick 2
010 Acoustic Kick 3
011 Acoustic Kick 4
012 TR606 Kick
SNARE
013 Standard Snare
014 Standard Snare Rim
015 Funk Snare
016 Funk Snare Rim
017 Funk Stick
018 Classic Snare
019 Classic Snare Rim
020 Rock Snare
021 Rock Snare Rim
022 Brush Snare
023 Brush Snare Rim
024 Camco Snare
025 Camco Snare Rim
026 TR606 Snare
TOM
027 Classic Tom 1
028 Classic Tom 2
029 Classic Tom 3
030 Classic Tom 4
031 Classic Tom 5
032 Classic Tom 6
033 Rock Tom 1
034 Rock Tom 2
035 Rock Tom 3
No. NAME
036 Rock Tom 4
037 Rock Tom 5
038 Rock Tom 6
039 Brush Tom 1
040 Brush Tom 2
041 Brush Tom 3
042 Brush Tom 4
043 Brush Tom 5
044 Brush Tom 6
045 Camco Tom 1
046 Camco Tom 2
047 Camco Tom 3
048 Camco Tom 4
049 Camco Tom 5
050 Camco Tom 6
051 TR606 Tom 1
052 TR606 Tom 2
053 TR606 Tom 3
054 TR606 Tom 4
055 TR606 Tom 5
056 TR606 Tom 6
RIDE
057 Classic Ride
058 Rock Ride
059 Brush Ride
060 TR606 Ride
CRASH
061 Classic Crash
062 Rock Crash 1
063 Rock Crash 2
064 Brush Crash
065 China Crash
066 TR606 Crash
HI HAT
067 Classic Open Hi Hat
068 Rock Open Hi Hat
069 TR606 Open Hi Hat
No. NAME
Percussions
070 Tabla 001
071 Tabla 002
072 Tabla 003
073 Tabla 004
074 Tabla 005
075 Tabla 006
076 Bongo High
077 Bongo Low
078 Conga 1
079 Conga 2
080 Conga 3
081 Timbale High
082 Timbale Low
083 Agogo High
084 Agogo Low
085 Cowbell 1
086 Cowbell 2
087 Cowbell 3
088 Cowbell 4
089 Cowbell 5
090 Cowbell 6
091 Cowbell 7
092 Cowbell 8
093 Cowbell 9
094 Cowbell 10
095 Hi Hat 001
096 Hi Hat 002
097 Hi Hat 003
098 Hi Hat 004
099 Hi Hat 005
100 Hi Hat 006
101 Hi Hat 007
102 Hi Hat 008
103 Hi Hat 009
104 Dj001
105 Dj002
106 Dj003
107 Dj004
108 Dj005
Preset kits and default user kits
No. NAME
001 Standard
002 Rock
003 Pop
004 Funk
005 Brush
006 Jazz
007 Table
008 Latin
No. NAME
009 TR606
010 DJ
011 User kit1 (Standard)
012 User kit2 (Rock)
013 User kit3 (Pop)
014 User kit4 (Funk)
015 User kit5 (Brush)
Note:
Number 001~010 are preset kits, number 011~015 are users kits.
Page 19

www.thomann.de
19
Pattern list
No. PATTERN
001 Fusion1
002 Latin Jazz1
003 Funk1
004 Latin Pop1
005 60‘s Rock
006 Big Band1
007 Drum N‘Bass
008 Ballad
009 Swing
010 Pop1
011 Funk2
012 Latin Jazz2
013 Pop Funk1
014 Latin Rock1
015 Big Band2
016 Pop Ballad
017 Pop Funk2
018 3/4Jazz
019 Pop Bossa
020 Samba1
021 6/8Ballad
No. PATTERN
022 Fusion2
023 Jazz1
024 Guitar Bossa
025 Break Beat
026 World1
027 Funk3
028 Latin Jazz3
029 Latin Pop2
030 Reggae1
031 World2
032 Latin
033 Bossa
034 Samba2
035 3/4Pop
036 Pop2
037 Jazz2
038 Reggae2
039 Reggae3
040 Latin Rock2
041 User Pattern
Page 20
HD-100
20
www.thomann.de
Standard (PC0)
27 High Q
28 Slap
29 Scratch Push
30 Scratch Pull
31 Sticks
32 Square Click
33 Metronome Click
34 Metronome Bell
35 STD Kick 2
36 STD Kick 2
37 Side Stick
38 STD Snare
39 Hand Clap
40 STD Snare Rim
41 STD Low Tom 2
42 Closed Hi-Hat
43 STD Low Tom 1
44 Pedal Hi-Hat
45 STD Mid Tom 2
46 Open Hi-Hat
47 STD Mid Tom 1
48 STD Hi Tom 2
49 Crash Cymbal 1
50 STD Hi Tom 1
51 Standard Ride
52 Chinese Cymbal
53 Ride Bell
54 Tambourine
55 Splash Cymbal
56 Cowbell
57 Crash Cymbal 2
58 Vibraslap
59 Ride Cambal 2
60 Hi Bongo
61 Low Bongo
62 Mute Hi Conga
63 Open Hi Conga
64 Low Conga
65 High Timbale
66 Low Timbale
67 High Agogo
68 Low Agogo
69 Cabasa
70 Maracas
71 Short Whistle
72 Long Whistle
73 Short Guiro
74 Long Guiro
75 Claves
76 Hi Wood Block
77 Low Wood Block
78 Mute Cuica
79 Open Cuica
80 Mute Triangle
81 Open Triangle
82 Shaker
83 Jingle Bell
84 Belltree
85 Castanets
86 Mute Surdo
87 Open Surdo
Percussion set list
Rock (PC1)
<
–
<
–
<
–
<
–
<
–
<
–
<
–
<
–
<
–
Rock Kick
<
–
Rock Snare
<
–
Rock Snare Rim
Rock Low Tom 2
<
–
Rock Low Tom 1
<
–
Rock Mid Tom 2
<
–
Rock Mid Tom 1
Rock Hi Tom 2
<
–
Rock Hi Tom 1
Rock Ride
<
–
<
–
<
–
<
–
<
–
<
–
<
–
<
–
<
–
<
–
<
–
<
–
<
–
<
–
<
–
<
–
<
–
<
–
<
–
<
–
<
–
<
–
<
–
<
–
<
–
<
–
<
–
<
–
<
–
<
–
<
–
<
–
<
–
<
–
<
–
<
–
Pop (PC2)
<
–
<
–
<
–
<
–
<
–
<
–
<
–
<
–
<
–
Pop Kick
<
–
Pop Snare Drum
<
–
Pop Snare Rim
Pop Low Tom 2
<
–
Pop Low Tom 1
<
–
Pop Mid Tom 2
<
–
Pop Mid Tom 1
Pop Hi Tom 2
<
–
Pop Hi Tom 1
<
–
<
–
<
–
<
–
<
–
<
–
<
–
<
–
<
–
<
–
<
–
<
–
<
–
<
–
<
–
<
–
<
–
<
–
<
–
<
–
<
–
<
–
<
–
<
–
<
–
<
–
<
–
<
–
<
–
<
–
<
–
<
–
<
–
<
–
<
–
<
–
<
–
Funk (PC3)
<
–
<
–
<
–
<
–
<
–
<
–
<
–
<
–
<
–
Funk Kick
<
–
Funk Snare
<
–
Funk Snare Rim
Funk Low Tom 2
<
–
Funk Low Tom 1
<
–
Funk Mid Tom 2
<
–
Funk Mid Tom 1
Funk Hi Tom 2
<
–
Funk Hi Tom 1
<
–
<
–
<
–
<
–
<
–
<
–
<
–
<
–
<
–
<
–
<
–
<
–
<
–
<
–
<
–
<
–
<
–
<
–
<
–
<
–
<
–
<
–
<
–
<
–
<
–
<
–
<
–
<
–
<
–
<
–
<
–
<
–
<
–
<
–
<
–
<
–
<
–
Brush (PC4)
<
–
<
–
<
–
<
–
<
–
<
–
<
–
<
–
<
–
Brush Kick
<
–
Brush Snare
<
–
Brush Snare Rim
Brush Low Tom 2
<
–
Brush Low Tom 1
<
–
Brush Mid Tom 2
<
–
Brush Mid Tom 1
Brush Hi Tom 2
<
–
Brush Hi Tom 1
Brush Ride
<
–
<
–
<
–
<
–
<
–
<
–
<
–
<
–
<
–
<
–
<
–
<
–
<
–
<
–
<
–
<
–
<
–
<
–
<
–
<
–
<
–
<
–
<
–
<
–
<
–
<
–
<
–
<
–
<
–
<
–
<
–
<
–
<
–
<
–
<
–
<
–
Jazz (PC5)
<
–
<
–
<
–
<
–
<
–
<
–
<
–
<
–
<
–
Jazz Kick
<
–
Jazz Snare
<
–
Jazz Snare Rim
Jazz Low Tom 2
<
–
Jazz Low Tom 1
<
–
Jazz Mid Tom 2
<
–
Jazz Mid Tom 1
Jazz Hi Tom 2
<
–
Jazz Hi Tom 1
<
–
<
–
<
–
<
–
<
–
<
–
<
–
<
–
<
–
<
–
<
–
<
–
<
–
<
–
<
–
<
–
<
–
<
–
<
–
<
–
<
–
<
–
<
–
<
–
<
–
<
–
<
–
<
–
<
–
<
–
<
–
<
–
<
–
<
–
<
–
<
–
<
–
606 (PC6)
<
–
<
–
<
–
<
–
<
–
<
–
<
–
<
–
<
–
TR606 Kick
<
–
TR606 Snare
<
–
TR606 Snare Rim
TR606 Low Tom 2
TR606 Closed Hi-Hat
TR606 Low Tom 1
TR606 Pedal Hi-Hat
TR606 Mid Tom 2
TR606 Open Hi-Hat
TR606 Mid Tom 1
TR606 Hi Tom 2
TR606 Crash Cymbal1
TR606 Hi Tom 1
<
–
<
–
<
–
<
–
<
–
<
–
<
–
<
–
<
–
<
–
<
–
<
–
<
–
<
–
<
–
<
–
<
–
<
–
<
–
<
–
<
–
<
–
<
–
<
–
<
–
<
–
<
–
<
–
<
–
<
–
<
–
<
–
<
–
<
–
<
–
<
–
<
–
DJ (PC7)
<
–
<
–
<
–
<
–
<
–
<
–
<
–
<
–
<
–
<
–
<
–
<
–
<
–
<
–
<
–
<
–
<
–
<
–
Dj Mix 5
<
–
Dj Mix 4
Dj Mix 3
Dj Mix 2
<
–
Dj Mix 1
<
–
<
–
<
–
<
–
<
–
<
–
<
–
<
–
<
–
<
–
<
–
<
–
<
–
<
–
<
–
<
–
<
–
<
–
<
–
<
–
<
–
<
–
<
–
<
–
<
–
<
–
<
–
<
–
<
–
<
–
<
–
<
–
<
–
<
–
<
–
<
–
<-:Same as the left one.
Page 21
www.thomann.de
21
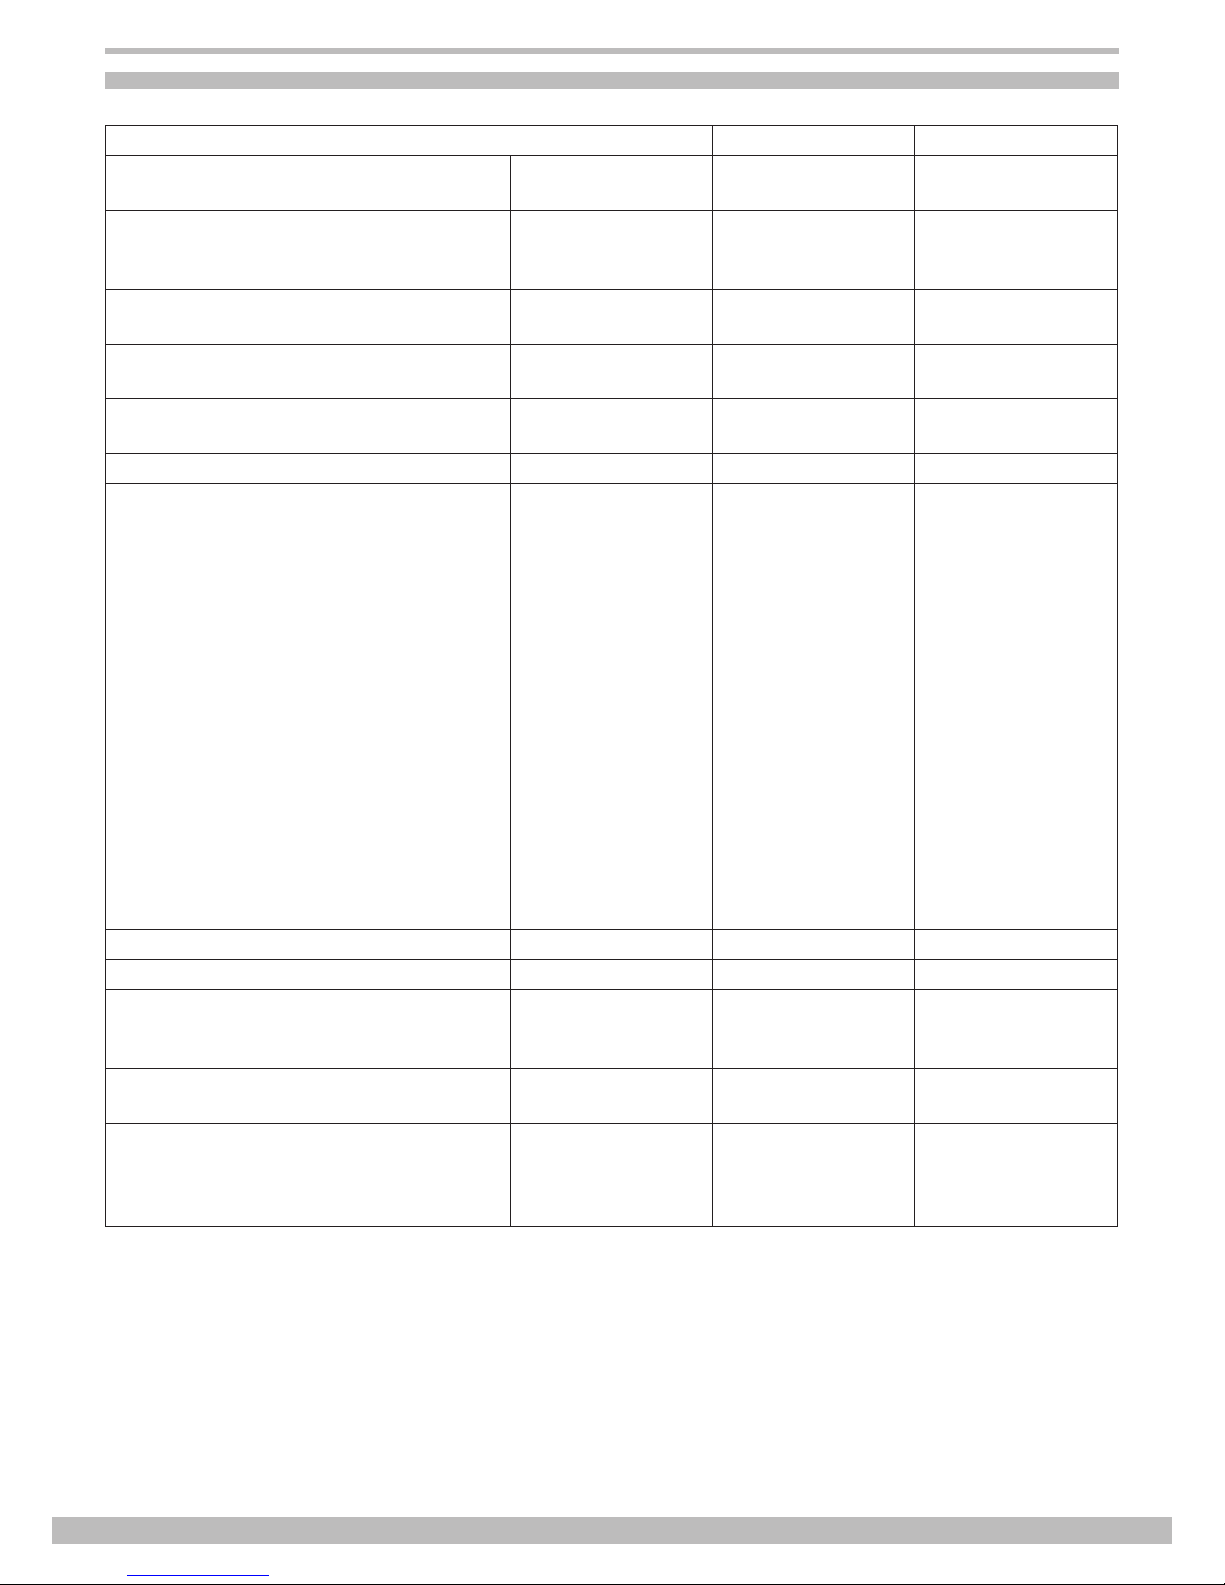
MIDI implementation chart
Function Transmitted Recognised Remarks
Basic
Channel
Default
Changed
10 ch
X
1 - 16
X
Mode
Default
Messages
Altered
X
X
***********
X
X
***********
Note
Number:
True voice
0 - 127
***********
0 - 127
0 - 127
Velocity Note on
Note off
O 99H, V=1-127
O (99H, V=0)
O
O
After
Touch
Key‘s
Channel‘s
X
X
X
X
Pitch Bend X O
Control
Change
0
1
5
6
7
10
11
64
65
66
67
80
81
91
93
120
121
123
X
X
X
X
X
X
X
X
X
X
X
X
X
X
X
X
X
X
O
O
O
O
O
O
O
O
O
O
O
O
O
O
O
O
O
O
Bank Select
Modulation
Portamento Time
Data Entry
Volume
Pan
Expression
Sustain Pedal
Portamento ON/OFF
Sostenuto Pedal
Soft Pedal
Reverb Program
Chorus Program
Reverb Level
Chorus Level
All Sound Off
Reset All Controllers
All Notes Off
Program Change O O
System Exclusive X O
System
Common
Song Position
Song Select
Tune
X
X
X
X
X
X
System
Real Time
Clock
Commands
X
X
X
X
AUX
Messages
Local ON/OFF
All Notes OFF
Active Sense
Reset
X
X
O
X
X
O
X
X
Note 1: Reverb program vv = 00H to 07H (default 04H)
00H : Room1 01H : Room2
02H : Room3 03H : Hall1
04H : Hall2 05H : Plate
06H : Delay 07H : Pan delay
O : YES X : NO
Note2: Chorus program vv = 00H to 07H (default 02H)
00H : Chorus1 01H : Chorus2
02H : Chorus3 03H : Chorus4
04H : Feedback 05H : Flanger
06H : Short delay 07H : FB delay
Note3: Just respond 3 type of RPN 000~002.
Page 22

HD-100
22
www.thomann.de
Disposal
Never throw the device into the regular household waste at the end of its useful life. This product is
subject to the European Directive 2002/96/EC.
Q
Dispose of the device through an approved disposal centre or at your community waste facility.
Q
Observe the current existing regulations. In case of doubt contact your disposal facility.
Q
The packaging is certied via a dual system. Take all packaging materials to an environmentally friendly
disposal facility in compliance with the local regulations.
Page 23

www.thomann.de
23
Page 24
© 2010 • Musikhaus Thomann e. K. • Treppendorf 30 • 96138 Burgebrach • Germany • www.thomann.de
 Loading...