

Milestone Systems M30, M50 Administrator's Manual

Milestone Systems
Milestone Husky M30/M50
Administrator Manual

Milestone Husky - Administrator Manual
Contents
2
Contents
Before you start ....................................................... 10
About minimum system requirements ................................. 10
About naming of host names ............................................... 10
About important port numbers ............................................ 10
About daylight saving time .................................................. 11
About virus scanning ........................................................... 12
System overview ...................................................... 14
Software and system components ....................................... 14
Clients ................................................................................. 16
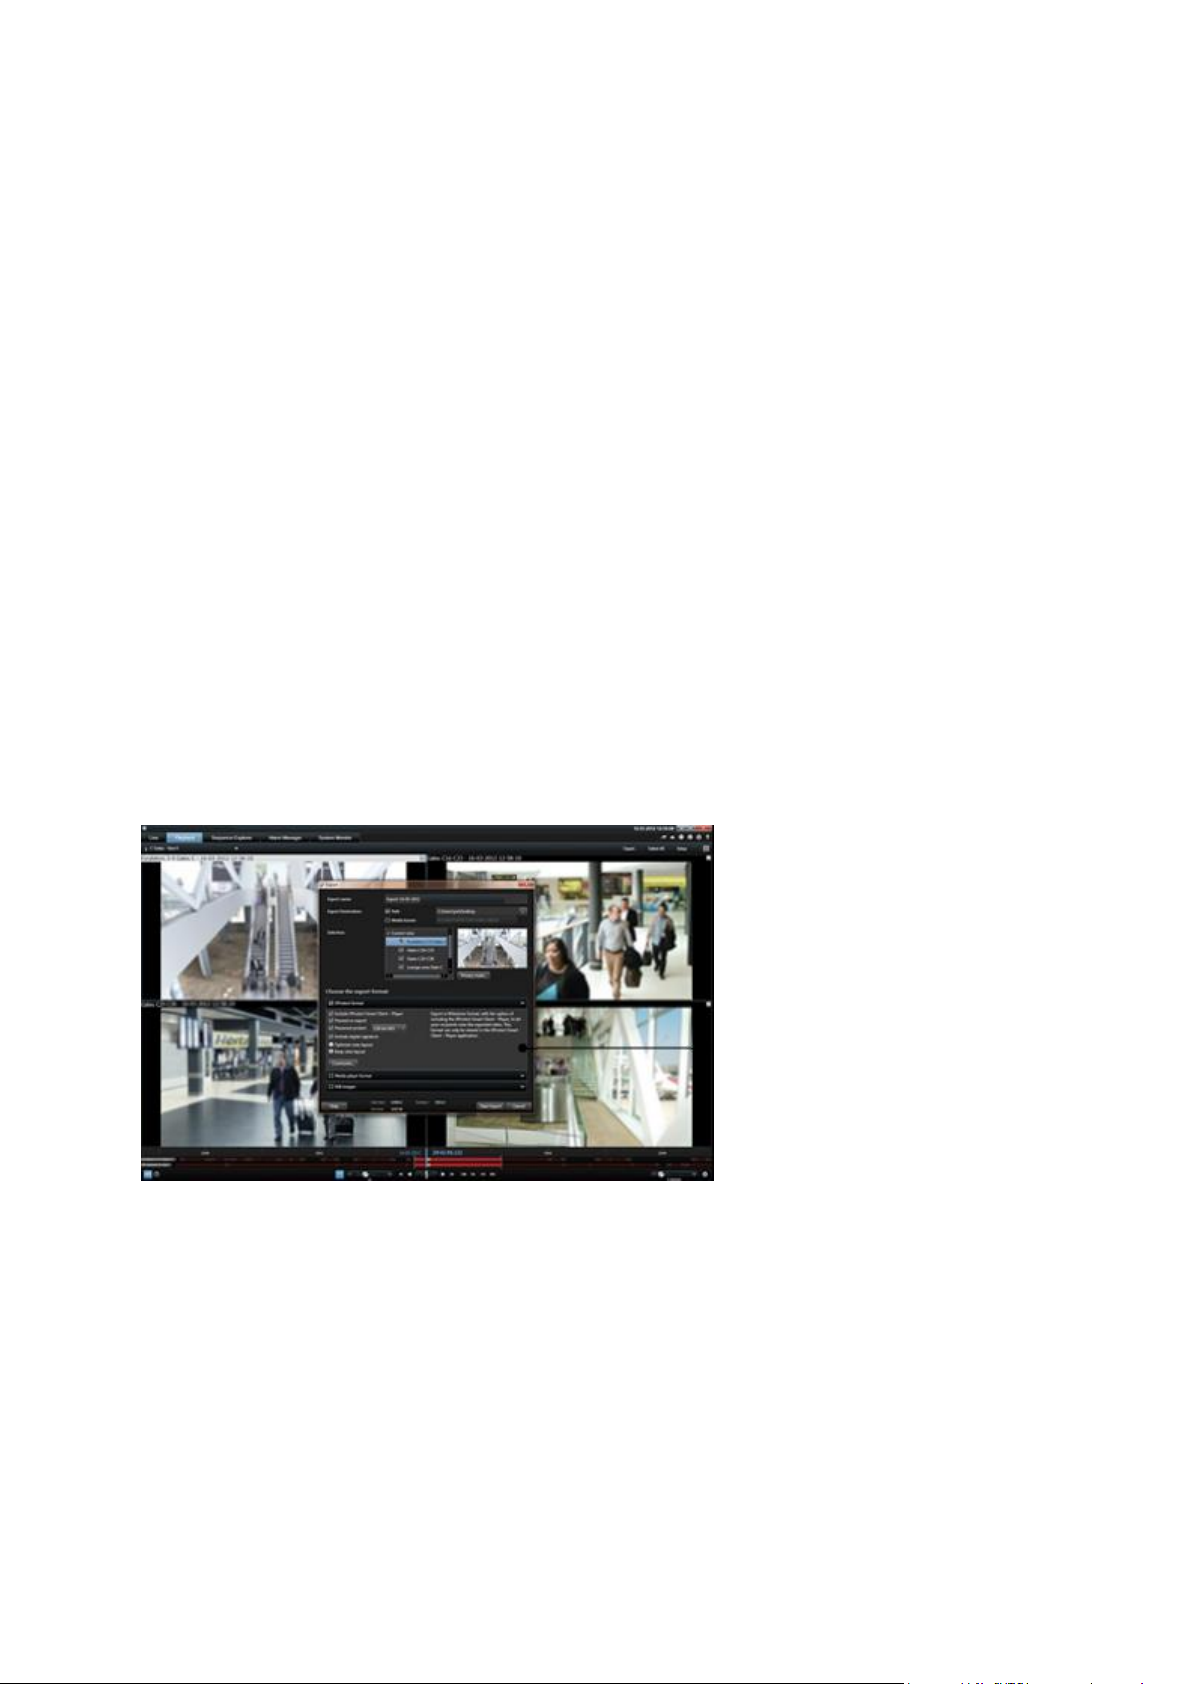
XProtect Smart Client ......................................................................... 16
Milestone Mobile client ....................................................................... 17
XProtect Web Client ............................................................................ 18
Recording Server Manager .................................................. 19
XProtect Download Manager ............................................... 20
Licenses............................................................................... 22
About licenses .................................................................................... 22
License information overview ............................................................. 23
About automatic license activation ..................................................... 24
About device changes without activation ........................................... 25
Hardware device summary ................................................................. 26
About replacing hardware devices ...................................................... 26
Get additional licenses ........................................................................ 27
About license activation ..................................................................... 28

Milestone Husky - Administrator Manual
Contents
3
Install and upgrade .................................................. 30
Install your system software ............................................... 30
Install XProtect Smart Client ............................................... 30
Install from the management server .................................................. 30
Install silently .................................................................................... 31
Install video device drivers ................................................. 32
About removing system components ................................... 32
Getting started ......................................................... 34
About the Getting started page ........................................... 34
Automatic configuration wizard ........................................... 34
Automatic configuration wizard: First page ........................................ 34
Automatic configuration wizard: Scanning options ............................. 35
Automatic configuration wizard: Select hardware manufacturers to scan
for ...................................................................................................... 35
Automatic configuration wizard: Scanning for hardware devices ....... 35
Automatic configuration wizard: Continue after scan ......................... 35
Add hardware wizard .......................................................... 35
Express ............................................................................................... 36
Manual ................................................................................................ 37
Configure storage wizard .................................................... 40
Configure storage: Video settings and preview................................... 40
Configure storage: Online schedule .................................................... 40
Configure storage: Live and recording settings (motion JPEG cameras)41
Configure storage: Live and recording settings - H.264/MPEG4 cameras43
Configure storage: Drive selection ...................................................... 45
Configure storage: Recording and archiving settings .......................... 47
Adjust motion detection wizard ........................................... 49

Milestone Husky - Administrator Manual
Contents
4
Adjust motion detection: Exclude regions ........................................... 49
Adjust motion detection: Motion detection ......................................... 49
Manage user access wizard ................................................. 51
Manage user access: Basic and Windows users .................................. 52
Manage user access: Access summary ................................................ 52
Advanced configuration ........................................... 53
Hardware devices ................................................................ 53
About hardware devices ..................................................................... 53
About microphones ............................................................................. 53
About speakers ................................................................................... 53
About recording audio ........................................................................ 53
About dedicated input/output devices ................................................ 54
Show or hide microphones or speakers .............................................. 54
Configure hardware devices ............................................................... 54
Delete/disable hardware devices ....................................................... 55
About replacing hardware devices ...................................................... 55
About the Replace Hardware Device wizard ....................................... 56
Speaker properties ............................................................................. 57
Hardware properties ........................................................................... 58
Cameras and storage information........................................ 60
About video and recording configuration ............................................ 60
About database resizing ..................................................................... 61
About motion detection ...................................................................... 61
About motion detection and PTZ cameras ........................................... 63
Configure camera-specific schedules .................................................. 63
Configure when cameras should do what ........................................... 65
Configure motion detection ................................................................ 65
Disable or delete cameras .................................................................. 65
Move PTZ type 1 and 3 to required positions ...................................... 66

Milestone Husky - Administrator Manual
Contents
5
Recording and storage properties ....................................................... 67
Camera properties .............................................................................. 85
MJPEG video format ............................................................................ 86
MPEG video format ............................................................................. 89
Microphones ...................................................................... 105
About microphones ........................................................................... 105
Configure microphones or speakers.................................................. 105
Show or hide microphones or speakers ............................................ 106
Microphone (properties) ................................................................... 106
Events and output ............................................................. 107
About input and output ..................................................................... 107
About events and output .................................................................. 107
Overview of events and output ......................................................... 107
Add an analytics event ...................................................................... 109
Add a hardware input event ............................................................. 109
Add a hardware output ..................................................................... 110
Add a manual event .......................................................................... 111
Add a generic event .......................................................................... 111
Add a timer event ............................................................................. 112
Configure hardware output on event ................................................ 112
Configure general event handling ..................................................... 112
Generate alarms based on analytics events ...................................... 113
Test a generic event ......................................................................... 113
General event properties .................................................................. 114
Events and output properties ........................................................... 115
Scheduling and archiving .................................................. 125
About scheduling .............................................................................. 125
About archiving ................................................................................ 126
Configure general scheduling and archiving ..................................... 130

Milestone Husky - Administrator Manual
Contents
6
General scheduling properties .......................................................... 131
Camera-specific scheduling properties ............................................. 134
Matrix ................................................................................ 136
About Matrix video-sharing .............................................................. 136
About Matrix-recipients .................................................................... 136
Configure Matrix ............................................................................... 137
Matrix properties .............................................................................. 137
Logs ................................................................................... 139
About logs ........................................................................................ 139
Configure system, event and audit logging ....................................... 142
Log properties .................................................................................. 142
Notifications ...................................................................... 144
About notifications ........................................................................... 144
Email ................................................................................................ 144
SMS .................................................................................................. 147
Scheduling ........................................................................................ 149
Central ............................................................................... 150
About Central ................................................................................... 150
Enable XProtect Central .................................................................... 150
Central properties ............................................................................. 151
Access control ................................................................... 151
About access control integration ...................................................... 151
XProtect Access licenses ................................................................... 152
Wizard for access control system integration ................................... 152
Access control properties ................................................................. 154
Server access .................................................................... 160
About server access .......................................................................... 160
About registered services ................................................................. 160

Milestone Husky - Administrator Manual
Contents
7
Configure server access .................................................................... 161
Server access properties .................................................................. 161
Master/Slave ..................................................................... 163
About master and slave .................................................................... 163
Configure master and slave servers .................................................. 163
Master/slave properties ................................................................... 164
Users ................................................................................. 165
About users ...................................................................................... 165
Add basic users ................................................................................ 165
Add Windows users .......................................................................... 165
Add user groups ............................................................................... 166
Configure user and group rights ....................................................... 167
User properties ................................................................................. 167
Services ............................................................................. 171
About services .................................................................................. 171
Start and stop services ..................................................................... 172
Servers .............................................................................. 172
LPR servers ...................................................................................... 173
Mobile server .................................................................................... 210
Alarms ............................................................................... 220
About alarms .................................................................................... 220
About maps ...................................................................................... 221
Add an alarm .................................................................................... 221
Add a time profile (for alarms) ......................................................... 222
Alarms properties ............................................................................. 222
MIP plug-ins ...................................................................... 226
About MIP plug-ins ........................................................................... 226
XProtect Transact .............................................................. 226

Milestone Husky - Administrator Manual
Contents
8
XProtect Transact introduction ......................................................... 226
XProtect Transact configuration ....................................................... 230
Settings .................................................................. 241
About automatic device discovery ..................................... 241
Change default file paths ................................................... 241
Options .............................................................................. 241
General ............................................................................................. 241
User Interface .................................................................................. 243
Connecting Hardware devices ........................................................... 244
Default File Paths ............................................................................. 244
Audio Recording ............................................................................... 244
Analytics Events ............................................................................... 245
Event Server Settings ....................................................................... 245
System maintenance .............................................. 247
Backing up and restoring configuration ............................. 247
About back up and restore of configuration ...................................... 247
Back up system configuration ........................................................... 247
Restore system configuration ........................................................... 248
Back up and restore alarm and map configuration ........................... 248
Export and import Management Application configuration ............... 251
Restore system configuration from a restore point ........................... 252
Importing changes to configuration .................................. 253
About importing changes to configuration ........................................ 253
About required fields for CSV files when you import changes to
configurations .................................................................................. 253
Import changes to configuration ...................................................... 254
Glossary of Terms .................................................. 255

Milestone Husky - Administrator Manual
Contents
9
Index ..................................................................... 263

Milestone Husky - Administrator Manual
Before you start
10
Before you start
About minimum system requirements
Important: Your system no longer supports Microsoft® Windows® 2003, but you can still
run/access clients from computers with Windows 2003.
Important: Your system no longer supports Microsoft® Windows® 32-bit OS, but you can still
run/access XProtect Web Client and XProtect Smart Client from computers with Windows 32-bit
OS.
For information about the minimum system requirements to the various components of your
system, go to the Milestone website http://www.milestonesys.com/SystemRequirements.
About naming of host names
Names of hosts you use in connection with your VMS system must following the Microsoft standard
of naming. This means that all host names must only use the ASCII letters 'a' through 'z' (in a
case-insensitive manner), the digits '0' through '9', and the hyphen ('-'). If you use country- or
regionally-specific characters as part of a host name for a component you use with the VMS, you
may not be able to establish a connection between the system and the host machine.
You must have administrator rights on the computer that should run the surveillance system. If
you do not have administrator rights, you cannot configure the surveillance system.
About important port numbers
Your system uses specific ports when it communicates with computers, cameras and other devices.
To be sure that your system runs as smoothly as possible, make sure that the following ports are
open for data traffic on your network when you use your system:

Milestone Husky - Administrator Manual
Before you start
11
Name
Description
Port 20 and 21 (inbound
and outbound)
Used for FTP traffic.
File Transfer Protocol (FTP) is a standard for exchanging files
across networks. FTP uses the TCP/IP standards for data transfer,
and is often used for uploading or downloading files to and from
servers.
Port 25 (inbound and
outbound)
Used for SMTP traffic.
Simple Mail Transfer Protocol (SMTP) is a standard for sending email messages between servers. This port should be open
because some cameras may send images to the surveillance
system server via e-mail.
Port 80 (inbound and
outbound)
Used for HTTP traffic between the surveillance server, cameras,
and XProtect Smart Client.
It is the default communication port for the surveillance system's
Image Server service.
Port 554 (inbound and
outbound)
Used for RSTP traffic in connection with H.264 video streaming.
Port 1024 (outbound only)
Used for HTTP traffic between cameras and the surveillance
server.
Port 1234 (inbound and
outbound)
Used for event handling.
Port 1237 (inbound and
outbound)
Used for communication with XProtect Central.
Port 8081 and 8082
Used for communication with the Mobile service.
Port 22331
Used for communication with the Event Server service.
You or your organization may also use other port numbers. An example could be that you have
changed the server access (on page 161) port from its default port number (80) to another port
number.
About daylight saving time
Daylight saving time (DST) is the practice of advancing clocks in order for evenings to have more
daylight and mornings to have less. The use of DST varies between countries/regions.
When you work with a surveillance system, which is inherently time-sensitive, it is important that
you know how the system handles DST.
Spring: Switch from Standard Time to DST
The change from standard time to DST is not much of an issue since you jump one hour forward.
Example:

Milestone Husky - Administrator Manual
Before you start
12
Product
TCP ports
XProtect Professional VMS
products
80, 25, 21, 1234, 1237, 22331
Milestone Mobile
8081
Milestone Husky™ Transact
9001
The clock jumps forward from 02:00 standard time to 03:00 DST, and the day has 23 hours. In
that case, there is no data between 02:00 and 03:00 in the morning since that hour, for that day,
did not exist.
Fall: Switch from DST to Standard Time
When you switch from DST to standard time in the fall, you jump one hour back.
Example:
The clock jumps backward from 02:00 DST to 01:00 standard time, repeating that hour, and the
day has 25 hours. You reach 01:59:59, then immediately revert back to 01:00:00. If the system
did not react, it would essentially re-record that hour, so the first instance of 01:30 would be
overwritten by the second instance of 01:30.
To solve such an issue from happening, your system archives the current video in the event the
system time changes by more than five minutes. You cannot view the first instance of the 01:00
hour directly in any clients, but the data is recorded and safe. You can browse this video in
XProtect Smart Client by opening the archived database directly.
About virus scanning
As is the case with any other database software, if an antivirus program is installed on a computer
running Milestone Husky™ software, it is important that you exclude specific file types and
locations, as well as certain network traffic. Without implementing these exceptions, virus scanning
uses a considerable amount of system resources. On top of that, the scanning process can
temporarily lock files which likely results in a disruption in the recording process or even database
corruption.
When you need to perform virus scanning, do not scan Recording Server directories containing
recording databases. The recording server directories are set to c:\mediadatabase\ by default, as
well as all folders under that location.
Avoid also to perform virus scanning on archive storage directories. In older versions of the
software, the databases are by default located in the installation folder, each being a subfolder with
the MAC address of the device recorded.
Create the following additional exclusions:
File types: .blk, .idx, .pic, .pqz, .sts, .ts
C:\Program Files\Milestone or C:\Program Files (x86)\Milestone and all subdirectories.
Exclude network scanning on TCP ports:
or
Exclude network scanning of the following processes:

Milestone Husky - Administrator Manual
Before you start
13
Product
Processes
XProtect Professional VMS
products
RecordingServer.exe, ImageServer.exe,
ManagementApplication.exe, ImageImportService.exe,
RecordingServerManager.exe,
VideoOS.ServiceControl.Service.exe, VideoOS.Event.Server.exe
Milestone Mobile
VideoOS.MobileServer.Service.exe
XProtect Transact
VideoOS.Transact.TransactService.exe
Organizations may have strict guidelines regarding virus scanning, however it is important that the
above locations and files are excluded from virus scanning.

Milestone Husky - Administrator Manual
System overview
14
Management Application
The Management Application is the main application in which you
add cameras, set up users and configure your system.
You do not use the Management Application to view live, playback
or archived video. Instead, you use one of the viewing clients.
Milestone Husky™ Smart
Client
XProtect Smart Client is a client for the daily operations of
security installations. Its streamlined interface makes it easy to
monitor installations of all sizes, manage security incidents and
access and export live and recorded video.
You must install XProtect Smart Client on any computer that
should be able to connect to your system and view video.
Milestone recommends that you always use the latest version of
XProtect Smart Client to best use new features and functions
included in your surveillance system.
Milestone Mobile
A free application designed by Milestone that allows you to view
video from your system from almost anywhere on your
smartphone or tablet.
You must install Milestone Mobile on all devices that should be
able to connect to your system and view video.
You can also control outputs, such as opening and closing doors
and switching lights on or off, allowing you to gain control and
dynamically respond to incidents in the system.
Milestone Husky™ Web
Client
A simplified web-based client application for XProtect surveillance
systems for viewing, playing back and sharing video from most
operating systems and web browsers.
You do not need to install any software to access XProtect Web
Client. To access your system through XProtect Web Client, you
must know the address of the surveillance system's server.
System overview
Software and system components
Your system consists of a number of components, each targeted at specific tasks and user types.
Software components
System components

Milestone Husky - Administrator Manual
System overview
15
Recording Server service
The Recording Server service runs to ensure that devices transfer
video streams to your system. The Recording Server service is
installed automatically and runs in the background on the
surveillance system server.
You manage the service through the Management Application.
Event Server service
Handles configuration of alarms and maps from all servers within
the surveillance system installations, including Master/slave
setups, throughout your organization.
The Event Server service enables monitoring and instant
overview of alarms and possible technical problems within your
systems.
The event server is automatically installed on the surveillance
system server and runs in the background.
Microsoft® SQL Server
Express Database
The surveillance system's alarm data is stored in a SQL Server
Express database.
The SQL database is a lightweight, yet powerful, version of a full
SQL server which is automatically installed on, and runs in the
background of, your surveillance system server.
Image Server service
Handles access to the surveillance system for users logging in
with clients.
The Image Server service is automatically installed and runs in
the background on the surveillance system server. You can
manage the service through the Management Application.
Download Manager
Manages the system-related features your organization's users
can access from a targeted welcome page on the surveillance
system server.
Milestone Husky - Administrator Manual
System overview
16
Clients
Clients are applications used for viewing live and recorded video from the hardware devices set up
in the Management Application. Your system supports three different clients:
XProtect Smart Client
Milestone Mobile client
XProtect Web Client
XProtect Smart Client
About XProtect Smart Client
Designed for Milestone Milestone Husky™ IP video management software, the XProtect Smart
Client is an easy-to-use client application that provides intuitive control over security installations.
Manage security installations with XProtect Smart Client which gives users access to live and
recorded video, instant control of cameras and connected security devices, and an overview of
recordings. Available in multiple local languages, XProtect Smart Client has an adaptable user
interface that can be optimized for individual operators’ tasks and adjusted according to specific
skills and authority levels.
The interface allows you to tailor your viewing experience to specific working environments by
selecting a light or dark theme, depending on room lighting or brightness of the video. It also
features work-optimized tabs and an integrated video timeline for easy surveillance operation.
Using the MIP SDK, users can integrate various types of security and business systems and video
analytics applications, which you manage through XProtect Smart Client.
XProtect Smart Client must be installed on users' computers. Surveillance system administrators
manage clients' access to the surveillance system through the Management Application. Recordings
viewed by clients are provided by your XProtect system's Image Server service. The service runs in
the background on the surveillance system server. Separate hardware is not required.
To download XProtect Smart Client, you must connect to the surveillance system server which
presents you with a welcome page that lists available clients and language versions. System
Milestone Husky - Administrator Manual
System overview
17
administrators can use XProtect Download Manager to control what clients and language versions
should be available to users on the welcome page of the XProtect Download Manager.
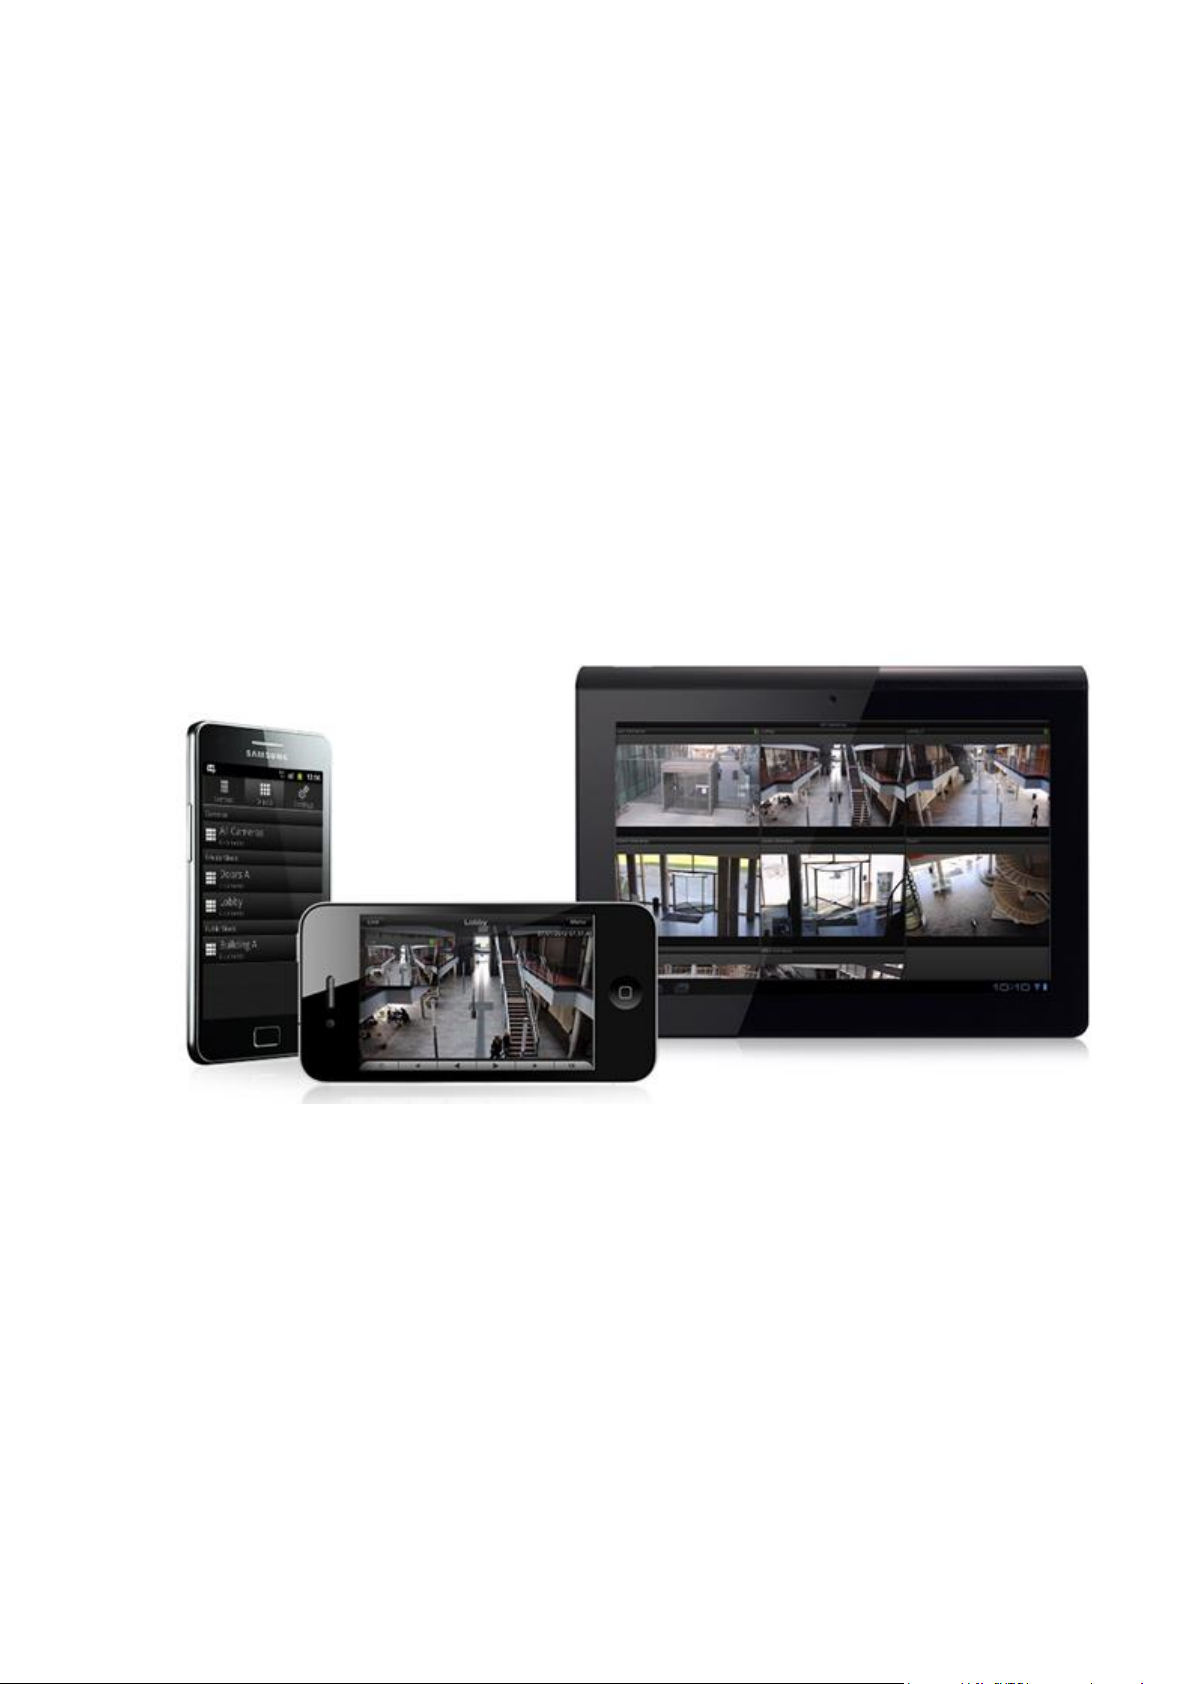
Milestone Mobile client
About Milestone Mobile client
Milestone Mobile client is a mobile surveillance solution closely integrated with the rest of your
XProtect system. It runs on your Android tablet or smartphone, your Apple® tablet, smartphone or
portable music player or your Windows Phone 8 tablet or smartphone and gives you access to
cameras, views and other functionality set up in the management clients.
Use the Milestone Mobile client to view and play back live and recorded video from one or multiple
cameras, control pan-tilt-zoom (PTZ) cameras, trigger output and events and use the Video push
functionality to send video from your device to your XProtect system.
If you want to use Milestone Mobile client with your system, you must add a Mobile server to
establish the connection between the Milestone Mobile client and your system. Once the Mobile
server is set up, download the Milestone Mobile client for free from Google Play, App Store or
Windows Phone Store to start using Milestone Mobile.
You need one hardware device license per device that should be able to push video to your
XProtect system.

Milestone Husky - Administrator Manual
System overview
18
XProtect Web Client
About XProtect Web Client
XProtect Web Client is a web-based client application for viewing, playing back and sharing video.
It provides instant access to the most commonly used surveillance functions, such as viewing live
video, play back recorded video, print and export evidence. Access to features depends on
individual user rights which are set up in the management client.
To enable access to the XProtect Web Client, you must install a Mobile server to establish the
connection between the XProtect Web Client and your system. The XProtect Web Client itself does
not require any installation itself and works with most Internet browsers. Once you have set up the
Mobile server, you can monitor your XProtect system anywhere from any computer or tablet with
Internet access (provided you know the right external/Internet address, user name and password).
Access XProtect Web Client
If you have a Milestone Mobile server installed on your computer, you can use the XProtect Web
Client to access your cameras and views. Because you do not need to install XProtect Web Client,
you can access it from the computer where you installed the Milestone Mobile server, or any other
computer you want to use for this purpose.
1. Set up the Milestone Mobile server in the Management Application.
2. If you are using the computer where Milestone Mobile server is installed, you can right-click
the Milestone Mobile Server icon in the system tray, and select Open XProtect Web
Client.
3. If you are not using the computer where Milestone Mobile server is installed, you can
access it from a browser. Continue with step 4 in this process.
4. Open an Internet browser (Internet Explorer, Mozilla Firefox, Google Chrome or Safari).
5. Type the external IP address, that is the external address and port of the server on which
the Milestone Mobile server is running.

Milestone Husky - Administrator Manual
System overview
19
Example: The Milestone Mobile server is installed on a server with the IP address 127.2.3.4
and is configured to accept HTTP connections on port 8081 and HTTPS connections on port
8082 (default settings of the installer).
In the address bar of your browser, type: http://1.2.3.4:8081 or https://1.2.3.4:8082,
depending on whether you want to use a standard HTTP connection or a secure HTTPS
connection. You can now begin using XProtect Web Client.
6. Add the address as a bookmark in your browser for easy future access to XProtect Web
Client. If you use XProtect Web Client on the local computer on which you installed the
Milestone Mobile server, you can also use the desktop shortcut which the installer creates.
Click the shortcut to launch your default browser and open XProtect Web Client.
You must clear the cache of Internet browsers running the XProtect Web Client before you can use
a new version of the XProtect Web Client. System administrators must ask their XProtect Web
Client users to clear their browser cache after upgrading, or force this action remotely (you can do
this action only in Internet Explorer in a domain).
Recording Server Manager
The Recording Server service is a vital part of the surveillance system. Video streams are only
transferred to your system while the Recording Server service is running. The Recording Server
Manager informs you about the state of the Recording Server service. It also lets you manage the
service.
In the notification area (the system tray), the Recording Server Manager's icon indicates whether
the Recording Server service is running or not.
- A green icon in the notification area indicates that the Recording Server service is running.
- A red icon in the notification area indicates that the Recording Server service has stopped.
By right-clicking the icon, you can open the Management Application, start and stop the Recording
Server service, view log files, and view version information.
Monitor System Status
Right-click the notification area's Recording Server icon and select Show System Status to get
access to the Status window.
The Status window lets you view the status of the image server(s) and connected cameras. The
status of each server/camera is indicated by a color:
Green indicates that the server or camera is running correctly.
Gray indicates that the camera (not the server) is not running. Typically, a camera is
indicated in gray in the following situations:
o The camera is not online (as defined in the camera's online period schedule).
o The Recording Server service has been stopped.
Red indicates that the server or camera is not running. This may because it has been
unplugged or due to a network or hardware error. Errors are listed in the Recording Server
log file.
Place your mouse pointer over a camera in the status window to view details about the relevant
camera. The information appears as a pop-up and updates about every 10 seconds.

Milestone Husky - Administrator Manual
System overview
20
Resolution
The resolution of the camera.
FPS
The number of frames per second (frame rate) currently used by
the camera. The number updates each time the camera has
received 50 frames.
Frame count
The number of frames received from the camera since the
Recording Server service was last started.
Received KB
The number of kilobytes sent the by camera since the Recording
Server service was last started.
Offline
Indicates the number of times the camera has been offline due to
an error.
XProtect Download Manager
The XProtect Download Manager allows you to manage the system-related features your
organizations can access. You can reach XProtect Download Manager from a targeted welcome
page on the surveillance system server.
To access XProtect Download Manager from Windows' Start menu: Select All Programs >
Milestone XProtect Download Manager > Download Manager.
Examples of user-accessible features
XProtect Smart Client. Users connect to the surveillance server through an Internet
browser where they are presented with a welcome page. From the welcome page, users
can download XProtect Smart Client software and install it on their computers.
Various plug-ins. Downloading such plug-ins can be relevant for users if your
organization uses add-on products with the surveillance system.
The welcome page
The welcome page links to downloads of various features. Users can select language from a menu
in the top right corner of the welcome page.
To view the welcome page, open an Internet browser (for example, Internet Explorer version 6.0
or later) and connect to the following address:
http://[surveillance server IP address or hostname]
If you have configured the Image Server service with a port number other than the default port 80
(you configure this as part of the server access properties), users must specify the port number as
well, separated from the IP address or hostname by a colon:
http://[surveillance server IP address or hostname]:[port number]
The content of the welcome page is managed through XProtect Download Manager and can look
different in different organizations.
Immediately after you install your system, the welcome page provides access to XProtect Smart
Client in all languages. You can also download XProtect Smart Client in 32-bit or 64-bit if you run a
64-bit operating system and in 32-bit if you run a 32-bit operating system. This initial look of the
welcome page is automatically provided through XProtect Download Manager's default
configuration.

Milestone Husky - Administrator Manual
System overview
21
Default configuration of XProtect Download Manager
XProtect Download Manager has a default configuration. This ensures that your organization's
users can access standard features without the surveillance system administrator having to set up
anything. The XProtect Download Manager configuration is represented in a tree structure.
Download Manager's tree structure explained:
The first level of the tree structure indicates that you are working with a system.
The second level indicates that this is the default setup.
The third level refers to the languages in which the welcome page is available. In the
example, the welcome page is available in a dozen languages (English, Arabic, Danish,
Dutch, French, and more).
The fourth level refers to the features that you can make available to users. For example,
you could limit these features to XProtect Smart Client.
The fifth level ( 5 ) refers to particular versions of each feature, for example, version 4.0,
32-bit, and more that you can make available to users.
The sixth level ( 6 ) refers to the language versions of the features which can be made
available to users. For XProtect Smart Client, which is only available with all languages
embedded, the only option is All Languages.
The fact that only standard features are initially available helps reduce installation time and save
space on the server. There is no need to have a feature or language version available on the server
if nobody is going to use it. You can make more features and/or languages available if you need to.
Making new features available
When you install new features, these are by default selected in XProtect Download Manager and
immediately available to users through the welcome page.
You can always show or hide features on the welcome page by selecting or clearing check boxes in
the tree structure. You can change the sequence in which features and languages are displayed on
the welcome page by dragging items and dropping them in the relevant position.
Hiding and removing features
You can remove features in several ways:
You can hide features from the welcome page by clearing check boxes in XProtect Download
Manager's tree structure. If you do this, the features are still installed on the surveillance system
server, and by selecting check boxes in the tree structure, you can quickly make the features
available again.
You can remove features which have previously been made available through XProtect Download
Manager. This removes the installation of the features on the surveillance system server. The
features disappear from XProtect Download Manager, but installation files for the features are kept
in the surveillance system server's Installers or relevant language folder, so you can re-install
them later if required. To do so:
7. In XProtect Download Manager, click Remove features...
8. In the Remove Features window, select the features you want to remove.
9. Click OK and then click Yes.

Milestone Husky - Administrator Manual
System overview
22
Licenses
About licenses
When you purchase your software and licenses, you receive:
An order confirmation.
A software license file (SLC) with the .lic extension and named after your SLC (Software
License Code).
Your SLC is also printed on your order confirmation and consists of several numbers and letters
grouped by hyphens similar to this:
o Product version 2014 or earlier: xxx-xxxx-xxxx
o Product version 2016 or later: xxx-xxx-xxx-xx-xxxxxx
The software license file contains all information about your purchased VMS products and licenses.
Milestone recommends that you store the information about your SLC and a copy of your software
license file in a safe place from which you can find them again. You can also see your SLC from the
Help menu > About. You may need the software license file or your SLC when you, for example
create a My Milestone user account, contact your reseller for support and if you need to make
changes to your system.
To get started, you download the software from our website. While you are installing (see "Install
your system software" on page 30) the software, you are asked to provide the software license file.
If you have not yet received the software license file, you can still install the software and run it for
a 30-day trial period with a maximum of eight added cameras and a retention time of maximum
five days. To continue using your system, you must import (see "Importing a new software license
file" on page Error! Bookmark not defined.) your software license file before the end of the trial
period.
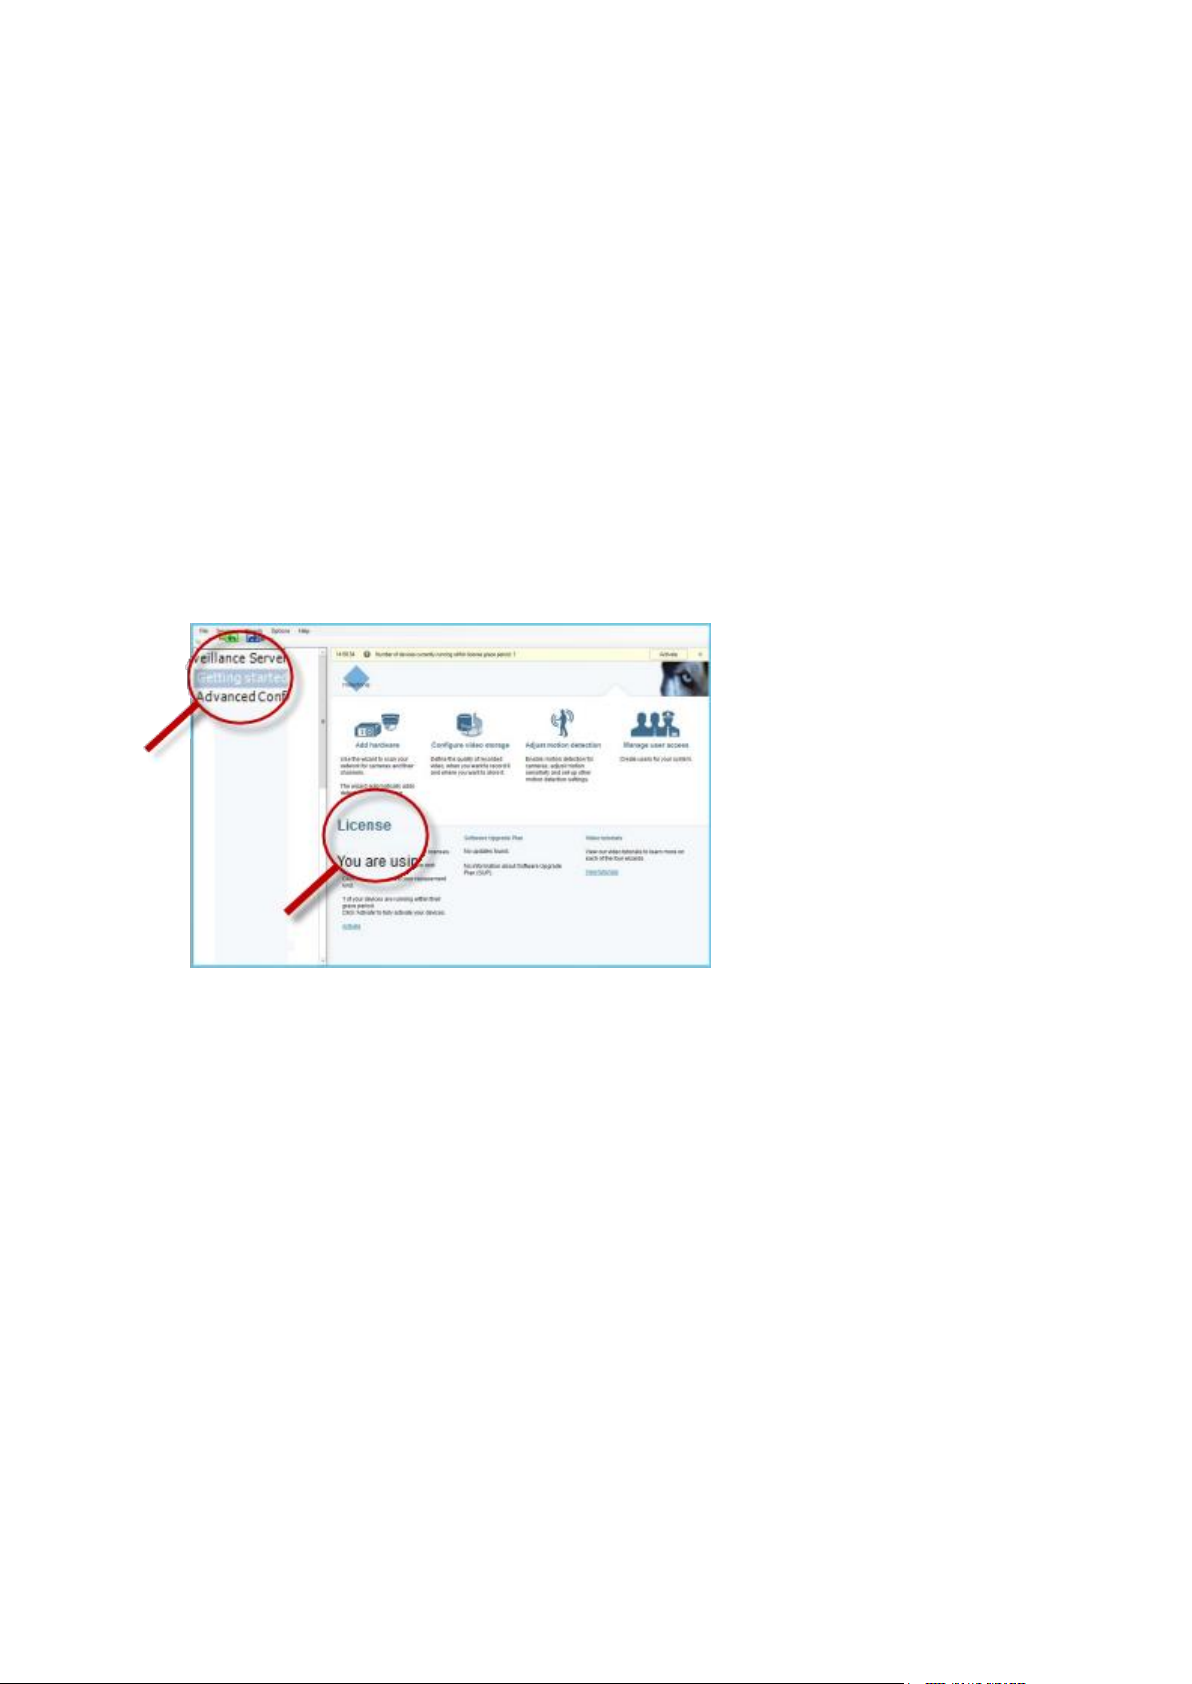
Once the installation is complete and you have activated your licenses, you can see an overview of
your licenses (see "License information overview" on page 23) for the current installation on the
Getting started page.
You have purchased at least two types of licenses:
Base licenses: As a minimum, you have a base license for one of the XProtect VMS products. You
may also have one or more base licenses for XProtect add-on products.
Hardware device licenses: Every hardware device that you add to your XProtect system requires
a hardware device license. You do not need hardware device licenses for speakers, microphones or
input and output devices attached to your cameras. You need only one hardware device license per
video encoder IP address even if you connect several cameras to the video encoder. A video
encoder can have one or more IP addresses.
For more information, see the list of supported hardware on the Milestone website
https://www.milestonesys.com/supported-hardware. If you want to use the video push feature in
Milestone Mobile, you also need one hardware device license per mobile device or tablet that
should be able to push video to your system. If you are short of hardware device licenses, you can
disable (see "Disable or delete cameras" on page 65) less important hardware devices to allow new
hardware devices to run instead. You may also need a hardware device license for some devices
that are NOT attached to your cameras. Examples of camera independent devices are perimeter
detectors and some types of audio devices and input/output boxes. See the supported hardware
site https://www.milestonesys.com/supported-hardware on the Milestone website.
Milestone Husky - Administrator Manual
System overview
23
Most XProtect add-on products require additional license types. The software license file also
includes information about your licenses for add-on products. Some add-on products have their
own separate software license files. You can find more information about add-on product licenses
here:
XProtect Access (see "XProtect Access licenses" on page 152)
XProtect LPR (see "LPR licenses" on page 175)
XProtect Transact
For add-on product licenses for XProtect Retail and XProtect Screen Recorder, see the
documentation for these products.
License information overview
On the Getting started page under License in the bottom left corner, see the following
information about your hardware device licenses:
The number of hardware device licenses activated on this server and the total number of
hardware device licenses you have purchased as part of the same software license file..
If the same software license file is shared on multiple surveillance systems in a
master/slave setup, the license overview shows the same total number of purchased
licenses for all systems.
To find out how many free licenses you have, add the number of activated licenses on all
your systems and subtract this number from the total number of purchased licenses.
Alternatively, visit our website for software registration http://online.milestonesys.com.
The maximum number of hardware devices you can add to each server in your VMS
system. To exceed this maximum, you must upgrade to a more advanced XProtect VMS
product. For more information about how to do this, contact your reseller.
The number of activated hardware devices you have replaced or added without having to
activate.
The column Changes without activation shows the number of hardware devices you can
replace or add without having to activate your hardware device licenses as well as how
many changes you have already made since last activation. Hardware devices added within
your number of device changes without activation run as fully activated hardware device
licenses and have the status Licensed in the Hardware device summary (on page 26)
table. Because you can add or replace devices without activating them, you gain flexibility
Milestone Husky - Administrator Manual
System overview
24
in the day-to-day maintenance of your system. For more information, see About device
changes without activation (on page 25).
The number of hardware devices running in a 30-day grace period. If you have already
used your number of device changes without activating this or have added more hardware
devices than you have purchased licenses for, the added hardware devices run in a grace
period. Once the grace period expires, cameras are disabled and stops sending video to the
system. You can also see when the first grace period for a hardware device expires.
For easy maintenance and flexibility, your VMS system is set up to automatically activate your
licenses online each time you add or remove hardware devices. Of course, automatic license
activation (see "About automatic license activation" on page 24) requires that your system is
connected to the Internet.
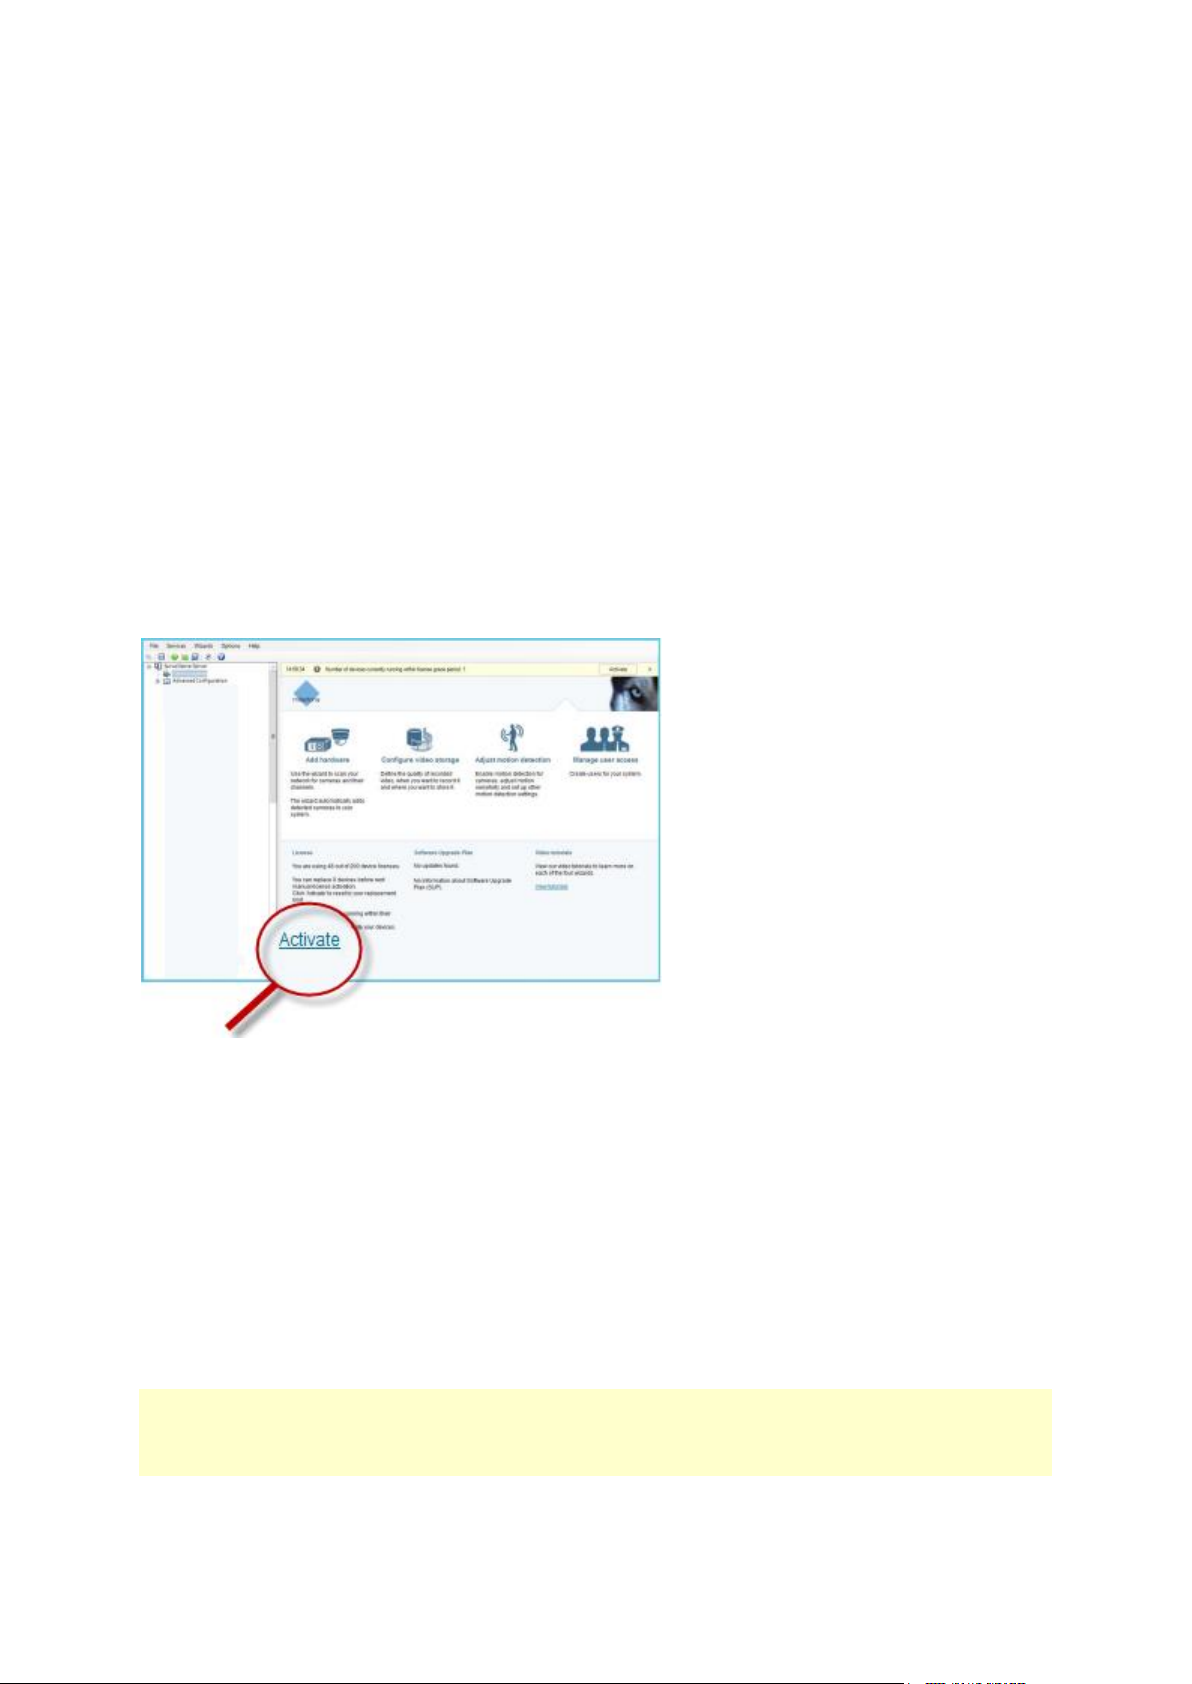
If your system is not connected to the Internet, and you have added or replaced hardware devices
within your number of device changes without activating them or have added hardware devices
that now run in a grace period, click the Activate link to activate your hardware device licenses.
Your number of device changes without activation now reflects the new number of activated
licenses. The hardware devices previously in grace period are moved to activated if you have
enough purchased licenses. For more information, see About license activation (on page 28).
About automatic license activation
Milestone recommends that your surveillance system is online so that your licenses are
automatically activated.
When your system is online, the system activates your hardware devices or other licenses a few
minutes after you have made your changes. The result is that:
you never have to manually start a license activation
the number of used device changes without activation is always zero
no hardware devices are within a grace period, unless you have added more hardware
devices than your number of purchased hardware device licenses allows.
In some cases you must activate licenses manually. Such cases are when you have purchased
additional licenses, if you have bought or renewed a Milestone Care subscription (see "About the
Getting started page" on page 34), or if Milestone has granted you a higher number of device
changes without activation (see "About device changes without activation" on page 25).

Milestone Husky - Administrator Manual
System overview
25
About device changes without activation
On the Getting started page, the column Changes without activation shows the number of
hardware devices you can replace or add without having to activate your hardware device licenses
and how many changes you have already made since the last activation.
Hardware devices added within your device changes without activation run as fully activated
hardware device licenses and has the status Licensed in the Hardware device summary (on page
26) table. One year after your last license activation, your number of used device changes
without activation is automatically reset to zero. Once the reset happens, you can continue to
add and replace hardware devices without activating the licenses.
The number of device changes without activation differs from installation to installation and is
calculated based on several variables. For a detailed description, see How the number of device
changes without activation is calculated (on page 25).
If your surveillance system is offline for longer periods of time, for example in cases with a
surveillance system on a ship on a long cruise or a surveillance system in a very remote place
without any Internet access, you can contact your Milestone reseller and request a higher number
of device changes without activation.
You must explain why you think you qualify for a higher number of device changes without
activation. Milestone decides each request on an individual basis. Should you be granted a higher
number of device changes without activation, you must activate your licenses to register the higher
number on your XProtect system.
How the number of device changes without activation is calculated
The device changes without activation are calculated based on three variables. If you have several
installations of the Milestone software, the variables apply to each of them separately. The
variables are:
o C% that is a fixed percentage of the total amount of activated licenses.
o Cmin that is a fixed minimum value of the number of device changes without
activation.
o Cmax that is a fixed maximum value of the number of devices changes without
activation.
The number of device changes without activation can never be lower than the Cmin value or
higher than the Cmax value. The calculated value based on the C% variable changes according to
how many activated devices you have on each installation in your system. Devices added with
device changes without activation are not counted as activated by the C% variable.
Milestone defines the values of all three variables and the values are subject to change without
notification. The values of the variables differ depending on the product.
For more information about the current default values for your product, go to My Milestone
http://www.milestonesys.com/device-change-calculation.
Examples based on C% = 15%, Cmin = 10 and Cmax =100
A customer buys 100 hardware device licenses. He adds 100 cameras to his system. Unless he has
enabled automatic license activation, his device changes without activation is still zero. He
activates his licenses and he now has 15 device changes without activation.
A customer buys 100 hardware device licenses. He adds 100 cameras to his system and activates
his licenses. His device changes without activation is now 15. The customer decides to delete a

Milestone Husky - Administrator Manual
System overview
26
Name
Description
Hardware Device Name
The name of your hardware device
License
The licensing status of your hardware devices. You can see the
following statuses: Licensed, [number of] day(s) grace
period, Trial. or Expired.
Video channels
The number of available video channels on your hardware
devices.
Speaker Channels
The number of available speaker channels on your hardware
devices.
Microphone Channels
The number of available microphone channels on your hardware
devices.
Address
The HTTP addresses of your hardware devices.
WWW
Links to your hardware devices' web addresses.
Port
The ports your hardware devices use.
Device Driver
The name of the device drivers associated with your hardware
devices.
hardware device from his system. He has now 99 activated devices and his number of device
changes without activation drops to 14.
A customer buys 1000 hardware device licenses. He adds 1000 cameras and activates his licenses.
His device changes without activation is now 100. According to the C% variable, he should now
have had 150 devices changes without activation, but the Cmax variable only allows him to have
100 devices changes without activation.
A customer buys 10 hardware device licenses. He adds 10 cameras to his system and activates his
licenses. His number of device changes without activation is now 10 because of the Cmin variable.
If the number was only calculated based on the C% variable, he would only have had 1 (15% of
10 = 1.5 rounded off to 1).
A customer buys 115 hardware device licenses. He adds 100 cameras to his system and activates
his licenses. His device changes without activation is now 15. He adds another 15 cameras without
activating them, using 15 out of 15 of his device changes without activation. He removes 50 of the
cameras from the system and his device changes without activation goes down to 7. This means
that 8 of the cameras previously added within the 15 device changes without activation go into a
grace period. The customer now adds 50 new cameras. Because the customer activated 100
cameras on his system last time he activated his licenses, the device changes without activation
goes back to 15 and the 8 cameras, which were moved into a grace period, moves back as device
changes without activation. The 50 new cameras go into a grace period.
Hardware device summary
You can get an overview of the status of your hardware device licenses and channels by expanding
Advanced Configuration > Hardware Devices. The Hardware Device Summary table
contains the following information:
About replacing hardware devices
If you remove a hardware device from a recording server and save the configuration, you also free
a hardware device license. Simply disabling a device does not free a license. You can replace a

Milestone Husky - Administrator Manual
System overview
27
licensed hardware device with a new hardware device and activate and license it instead. The total
number of purchased hardware device licenses corresponds to the total number of hardware
devices that can run on the surveillance system simultaneously.
When you replace a hardware device, you must use the Replace Hardware Device wizard (see
"About the Replace Hardware Device wizard" on page 56) to map all relevant databases of
cameras, microphones, inputs, outputs, and more. Remember to activate the license when you are
finished.
Get additional licenses
If you want to add more hardware devices or other components that require a license that you
currently do not have licenses for, you must buy additional licenses to enable the devices to send
data to your system before the grace period ends.
To get additional licenses for your system, contact your XProtect product reseller.
New licenses to your existing surveillance system version:
o Activate your licenses manually to get access to the new licenses.
For more information, see Activate licenses offline (on page 28) or Activate licenses
online (on page 28).
New licenses and an upgraded surveillance system version:
o You receive an updated software license file (.lic) with the new licenses and the new
version. You must use the new software license file during the installation of the new
version.

Milestone Husky - Administrator Manual
System overview
28
About license activation
This topic is only relevant if your surveillance system is offline or if you want to make a manual
license activation. If your system is online, your licenses are activated automatically. For more
information see About automatic license activation (on page 24).
When you have installed your VMS and added hardware devices, the hardware devices run in a 30day grace period. Before the end of the 30-day grace period, you must activate your hardware
device licenses or your hardware devices stop sending video to your surveillance system.
Milestone recommends that you activate your licenses before you make final adjustments to your
system and its hardware devices. For more information, see Activate licenses offline (on page 28)
and Activate licenses online (on page 28).
If you add more hardware devices than the number of purchased hardware device licenses, the
hardware devices run with in a grace period. If you want to see video from these hardware devices
after the expiry of the grace period, you must buy additional licenses (see "Get additional licenses"
on page 27). You can also disable (see "Delete/disable hardware devices" on page 55) less
important cameras to allow new hardware devices to run instead.
If you have several VMS products installed in a master/slave setup, you activate your licenses from
each installation and get an updated and activated .lic file for each installation. This is also the case
if all your VMS products share the same software license file.
Activate licenses online
This topic is only relevant if your surveillance system is offline or if you want to make a manual
license activation. If your system is online, your licenses are activated automatically. For more
information see About automatic license activation (on page 24).
If you have purchased additional licenses or want to upgrade, you must manually activate your
licenses. If the computer that runs the Management Application has Internet access, you can do a
manual online activation.
1. From the File menu, select Activate License Online.
2. The Online License Retrieval dialog box opens and your licenses are activated.
Activate licenses offline
This topic is only relevant if your surveillance system is offline or if you want to make a manual
license activation. If your system is online, your licenses are activated automatically. For more
information see About automatic license activation (on page 24).
You must manually activate your licenses if:
You have purchased additional licenses, want to upgrade
You have bought or renewed a Milestone Care subscription (see "About the Getting started
page" on page 34)
Milestone has granted you a higher number of device changes without activation (see
"About device changes without activation" on page 25)
1. From the File menu, select Activate License Offline.

Milestone Husky - Administrator Manual
System overview
29
2. Click Export to export a license request file.
3. The license request file is automatically given the same name as your SLC. If you have
several sites, remember to make the name unique so you easily can identify which file
belong to which site.
4. Copy the license request file (.lrq) to a computer with internet access and log into our
website for software registration http://online.milestonesys.com.
5. Copy the activated software license file (.lic) that has the same name as your license
request file to your computer with Management Application.
6. In the same dialog box that you opened in step 1, click Browse to use the activated
software license file.
7. Click Activate.
If the computer that runs the Management Application does not have Internet access, you can
activate licenses offline.
Activate licenses after grace period
If you do not activate a license for a hardware device or other device used with an add-on product
within the grace period, the device becomes unavailable and cannot send data to the surveillance
system.
The device itself, its configuration and other settings are not removed from the system
configuration.
To receive data from the expired device again, activate the license.
For more information see Activate licenses offline (on page 28) and Activate licenses online (on
page 28).

Milestone Husky - Administrator Manual
Install and upgrade
30
Install and upgrade
Install your system software
Do not install your surveillance software on a mounted drive. A mounted drive is a drive that is
attached to an empty folder on an NTFS (NT File System) volume, with a label or name instead of a
drive letter. If you use mounted drives, critical system features may not work as intended. You do
not, for example, receive any warnings if the system runs out of disk space.
Before you start: shut down any existing surveillance software. If you are upgrading, read
Upgrading from one product version to another product version (on page Error! Bookmark not
defined.) first.
1. Run the installation file
2. If you have a previous installation of your system or any of the other XProtect Professional
VMS products installed, the system detects this installation and informs you that your
previous installation is removed after installing the new version. If you accept this, click
Yes to continue the installation. All your recordings and configuration from the previous
version are available in the new version
3. Select language for the installer and then click Continue
4. Select Trial to install a 30-day trial version of the system software if you do not have a
software license file named after your SLC. If you have a software license file, first save it
on your local drive. Do not try to import it directly from a network drive or a USB stick.
Import it by typing the destination of the software license file or clicking Browse
5. Read and accept the license agreement. Indicate if you want to participate in the Milestone
data collection program and if you want to enable access to the Customer Dashboard
6. Select Typical or Custom installation. If you select Custom installation, you can select
application language, which features to install and where to install them. Let the installation
wizard complete
7. If you have installed a trial version, open the Management Application once the installation
is complete and select which of the XProtect Professional VMS products you want to use, for
example XProtect Enterprise
You can now begin to configure your system, see Configure your system in Management
Application.
Install XProtect Smart Client
You must install XProtect Smart Client on your computer before you can use it. You download
XProtect Smart Client from the surveillance system server and install it on your computer or install
directly from a DVD.
Install from the management server
Before you begin, visit the Milestone website and verify that your computer meets the XProtect
Smart Client's minimum system requirements http://www.milestonesys.com/SystemRequirements.
 Loading...