

Page 1
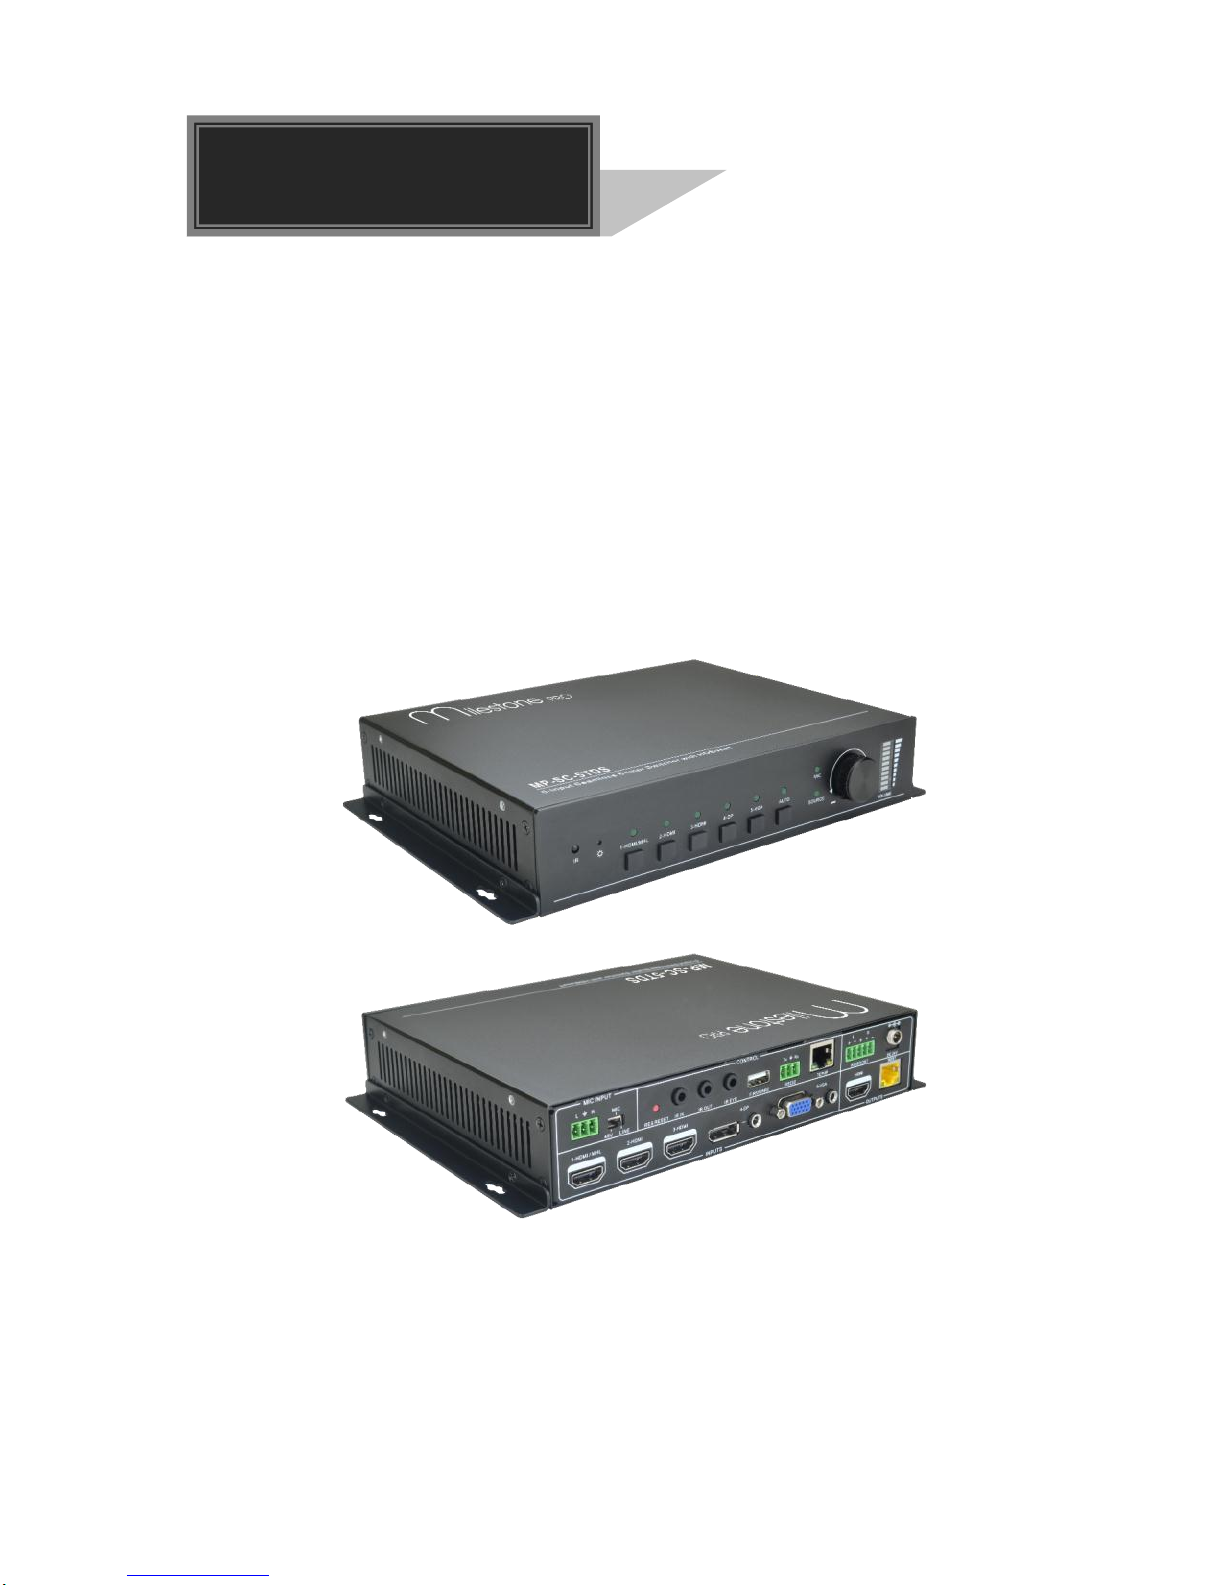
MP-SC-5TDS
Compact Scaler Switcher (with PoH)
All Rights Reserved
Version: MP-SC-5TDS_2016V1.0
User Manual
Page 2

Compact Scaler Switcher (with PoH)
Preface
Read this user manual carefully before using this product. Pictures shown in this manual
is for reference only, different model and specifications are subject to real product.
This manual is only for operation instruction only, not for any maintenance usage. The
functions described in this version are updated till August 2016. In the constant effort to
improve our product, we reserve the right to make functions or parameters changes
without notice or obligation. Please refer to the dealers for the latest details.
All product function is valid till 2016-8-13.
Trademarks
Product model and logo are trademarks. Any other trademarks mentioned in this manual
are acknowledged as the properties of the trademark owner. No part of this publication
may be copied or reproduced without the prior written consent.
FCC Statement
This equipment generates, uses and can radiate radio frequency energy and, if not
installed and used in accordance with the instructions, may cause harmful interference
to radio communications. It has been tested and found to comply with the limits for a
Class B digital device, pursuant to part 15 of the FCC Rules. These limits are designed
to provide reasonable protection against harmful interference in a commercial
installation.
Operation of this equipment in a residential area is likely to cause interference, in which
case the user at their own expense will be required to take whatever measures may be
necessary to correct the interference.
Any changes or modifications not expressly approved by the manufacture would void
the user’s authority to operate the equipment.
Page 3

Compact Scaler Switcher (with PoH)
SAFETY PRECAUTIONS
To insure the best from the product, please read all instructions carefully before using
the device. Save this manual for further reference.
Unpack the equipment carefully and save the original box and packing material for
possible future shipment
Follow basic safety precautions to reduce the risk of fire, electrical shock and injury
to persons.
Do not dismantle the housing or modify the module. It may result in electrical shock
or burn.
Using supplies or parts not meeting the products’ specifications may cause damage,
deterioration or malfunction.
Refer all servicing to qualified service personnel.
To prevent fire or shock hazard, do not expose the unit to rain, moisture or install this
product near water.
Do not put any heavy items on the extension cable in case of extrusion.
Do not remove the housing of the device as opening or removing housing may
expose you to dangerous voltage or other hazards.
Install the device in a place with fine ventilation to avoid damage caused by
overheat.
Keep the module away from liquids.
Spillage into the housing may result in fire, electrical shock, or equipment damage. If
an object or liquid falls or spills on to the housing, unplug the module immediately.
Do not twist or pull by force ends of the optical cable. It can cause malfunction.
Do not use liquid or aerosol cleaners to clean this unit. Always unplug the power to
the device before cleaning.
Unplug the power cord when left unused for a long period of time.
Information on disposal for scrapped devices: do not burn or mix with general
household waste, please treat them as normal electrical wastes.
Page 4

Compact Scaler Switcher (with PoH)
Contents
1. Introduction ................................................................................................................. 1
1.1 Introduction to MP-SC-5TDS ............................................................................. 1
1.2 Features ............................................................................................................ 1
1.3 Package List ...................................................................................................... 2
2. Panel Description ........................................................................................................ 3
2.1 Front Panel ........................................................................................................ 3
2.2 Rear Panel ......................................................................................................... 4
3. System Connection ................................ ................................ ................................ ..... 6
3.1 Usage Precautions ............................................................................................ 6
3.2 System Diagram ................................................................................................ 6
3.3 Connection Procedure ....................................................................................... 6
3.4 Connection of Microphone ................................................................................. 7
3.5 Application ................................ ......................................................................... 9
4. System Operations ................................................................................................... 10
4.1 Front Panel Buttons ......................................................................................... 10
4.1.1 Manual-Switching .................................................................................. 10
4.1.2 Auto-Switching ....................................................................................... 10
4.1.3 Volume Adjusting ................................................................................... 10
4.2 IR Control ........................................................................................................ 11
4.2.1 IR Remote ............................................................................................. 11
4.2.2 Control far-end device from local ........................................................... 12
4.2.3 Control local device from remote ........................................................... 12
4.2.4 CEC Function ........................................................................................ 13
4.3 RS232 Control ................................................................................................. 14
4.3.1 Installation/uninstallation of RS232 Control Software ............................ 14
4.3.2 Basic Settings ........................................................................................ 14
4.3.3 RS232 Communication Commands ...................................................... 16
4.3.4 Control MP-SC-5TDS or 3rd Party Device from Local ........................... 24
4.3.5 Control MP-SC-5TDS or 3rd party device form Remote ........................ 24
4.4 OSD Menu Control .......................................................................................... 25
4.4.1 OPTIONS .............................................................................................. 26
Page 5

Compact Scaler Switcher (with PoH)
4.4.2 PICTURE ............................................................................................... 26
4.4.3 SETUP .................................................................................................. 28
4.5 Web-based GUI Control .................................................................................. 29
4.5.1 Control Menu ......................................................................................... 29
4.5.2 Configuration Menu ............................................................................... 31
4.5.3 RS232 Control Menu ............................................................................. 33
4.5.4 Password Menu ..................................................................................... 34
4.5.5 Web-based GUI Update ........................................................................ 34
5. Specification ............................................................................................................. 35
6. Panel Drawing .......................................................................................................... 37
7. Troubleshooting & Maintenance ............................................................................... 38
8. After-sales Service .................................................................................................... 40
Page 6

Compact Scaler Switcher (with PoH)
1
1. Introduction
1.1 Introduction to MP-SC-5TDS
MP-SC-5TDS is a compact mini scaler switcher with 5 video inputs (1 HDMI/MHL, 2
HDMI, 1 DP, and 1 VGA) and 3 audio inputs (1 DP external audio, 1 VGA auxiliary audio,
1 MIC audio). The VGA input supports VGA, YPbPr and C-video, so MP-SC-5TDS is
compliant with multiple video signals.
MP-SC-5TDS scales & switches any video signal to HDMI output and HDBaseT output
(supports PoH and connects to an HDBaseT Receiver, up to a maximum transmission
distance of 70 meters.
With 1 IR IN, 1 IR OUT & 1 RS232, the IR & RS232 signals can be transmitted
bi-directionally between MP-SC-5TDS and the HDBaseT Receiver.
In addition, MP-SC-5TDS can be controlled via front panel buttons, IR remote, RS232
commands and web-based GUI.
1.2 Features
Compliant with HDMI1.4& HDCP2.2.
Supports CEC, with commands to enable/disable this function.
Supports video source auto-switching function.
Bi-directional IR & RS232 control.
Output resolutions selectable to assure preferred output, and supports various
output resolutions, such as 1920x1200, 1920x1080, 1600x1200, 1600x900,
1360x768, 1280x800, 1280x720, 1024x768.
VGA video supports C-video, YPbPr and VGA.
48V phantom power to support condenser microphone.
MIC port supports balance/unbalance signal, suppress the external noise
effectively.
3-level MIC input, supports condenser microphone, dynamic microphone and
wireless microphone.
Controllable via buttons, IR remote, RS232 & Web-based GUI.
Powerful OSD function.
Supports online software upgrading.
Page 7

Compact Scaler Switcher (with PoH)
2
1.3 Package List
1 x MP-SC-5TDS
2 x Mounting Ears with 4 screws
2 x Long Mounting Ears with 6 screws (Optional)
1 x Power Adapter (24VDC,2.71A)
4 x Plastic Cushions
1 x IR Remote
1 x VGA converting cable (VGA to YPbPr)
1 x HDBaseT Receiver
2 x Mounting Ears with 4 screws for HDBaseT Receiver
4 x Plastic Cushions for HDBaseT Receiver
1 x RS232 cable (3-Pin phoenix connector to DB9)
2 x 3-Pin phoenix connectors
1 x 5-Pin phoenix connector
1 x IR Emitter
1 x IR Receiver (with carrier wave)
1 x User Manual
Note
:
Please confirm if the product and the accessories are all included, if not, please
contact with the dealers.
Page 8
Compact Scaler Switcher (with PoH)
3
2. Panel Description
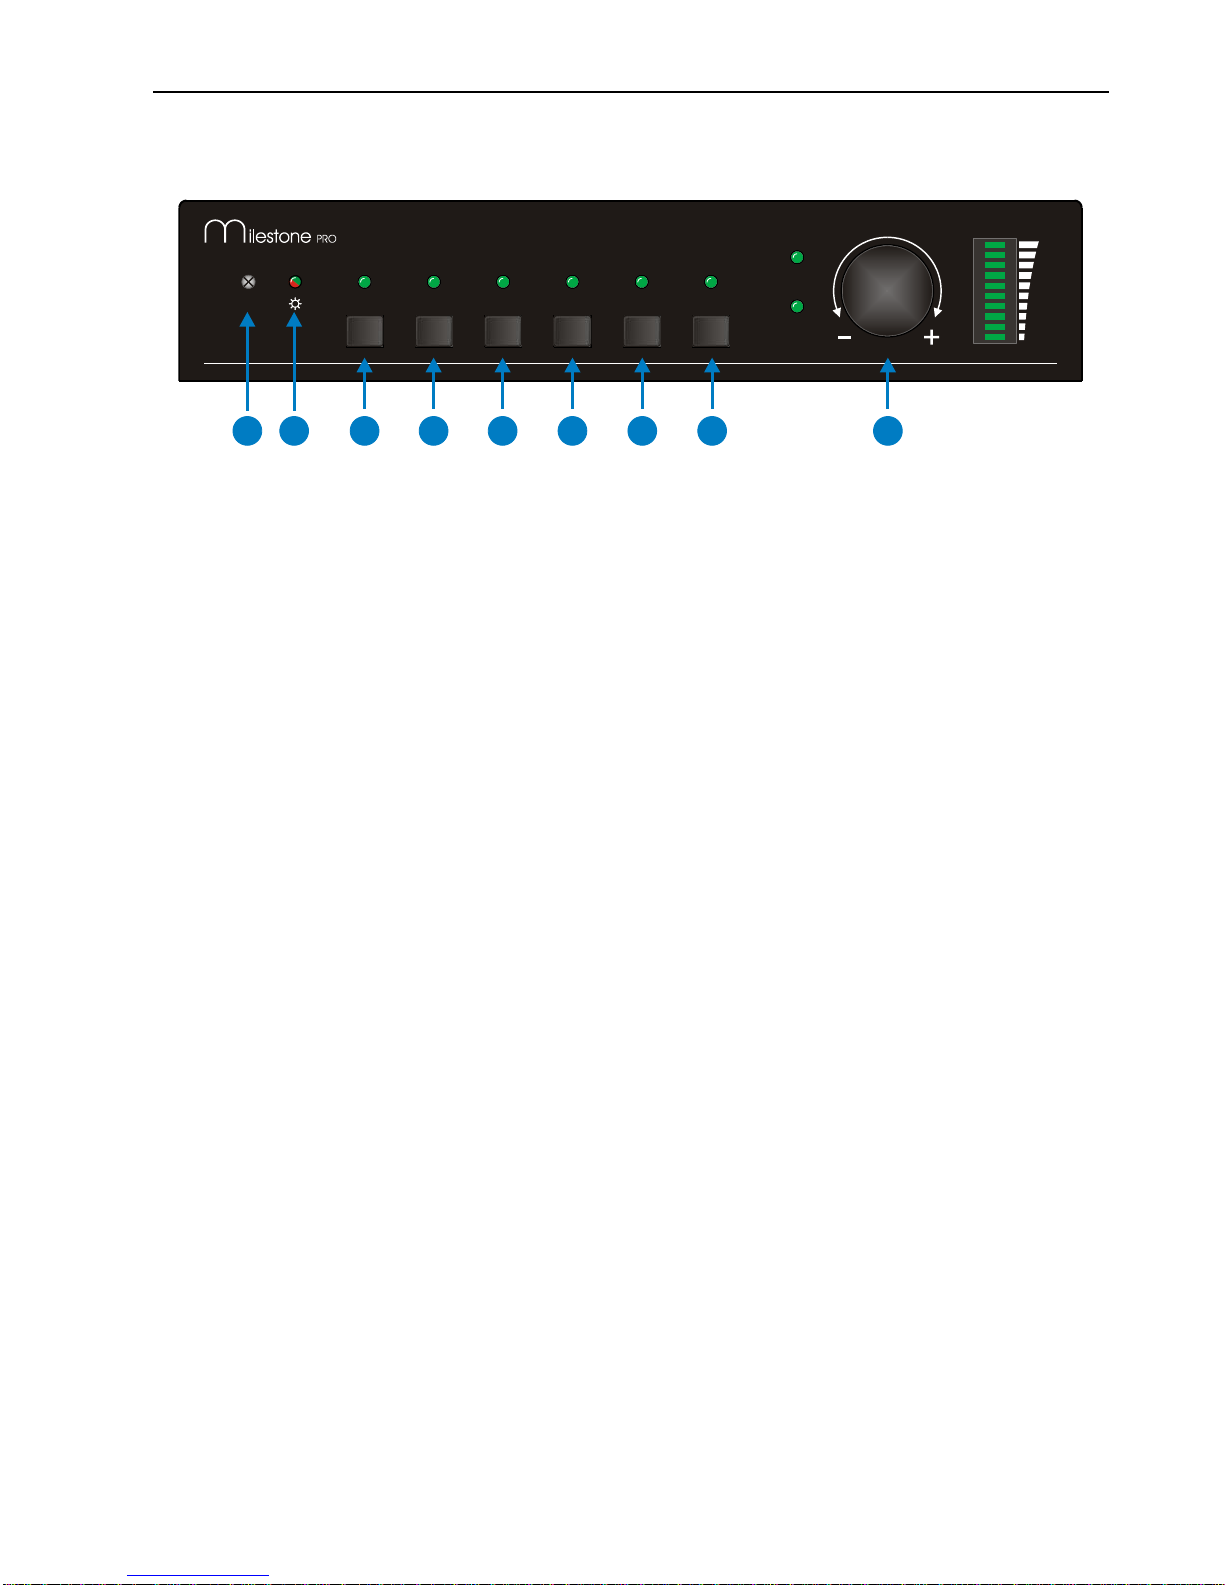
2.1 Front Panel
① Built-in IR Receiver
② Power indicator
Off when there is no power to the device
Green when the device is in standby mode
Red when the device is powered on.
③ 1-HDMI/MHL input Selector & Activity LED
④ 2-HDMI input Selector & Activity LED
⑤ 3-HDMI input Selector & Activity LED
⑥ 4-DisplayPort input Selector & Activity LED
⑦ 5-VGA input Selector Activity LED
⑧ Auto-Switching Mode Selector& Activity LED
Press this button to enter or exit Auto-switching mode, in this mode, select
input source via front panel button is not available, but RS232 command and IR
remote are able to switch mode. The auto LED turn green and keep on.
Note: When you set any VGA port to C-video or YPbPr in Manual-switching mode,
the system will not be able to enter Auto-switching mode.
⑨ Volume Knob
Note: Pictures shown in this manual are for reference only, different model and
specifications are subject to real product.
MP-SC-5TDS
SOURCE
MIC
VOLUME
IR 1-HDMI/MHL 5-VGA4-DP
3-HDMI
2-HDMI
AUTO
1
2
7
6
5
4
3
8 9
Page 9
Compact Scaler Switcher (with PoH)
4
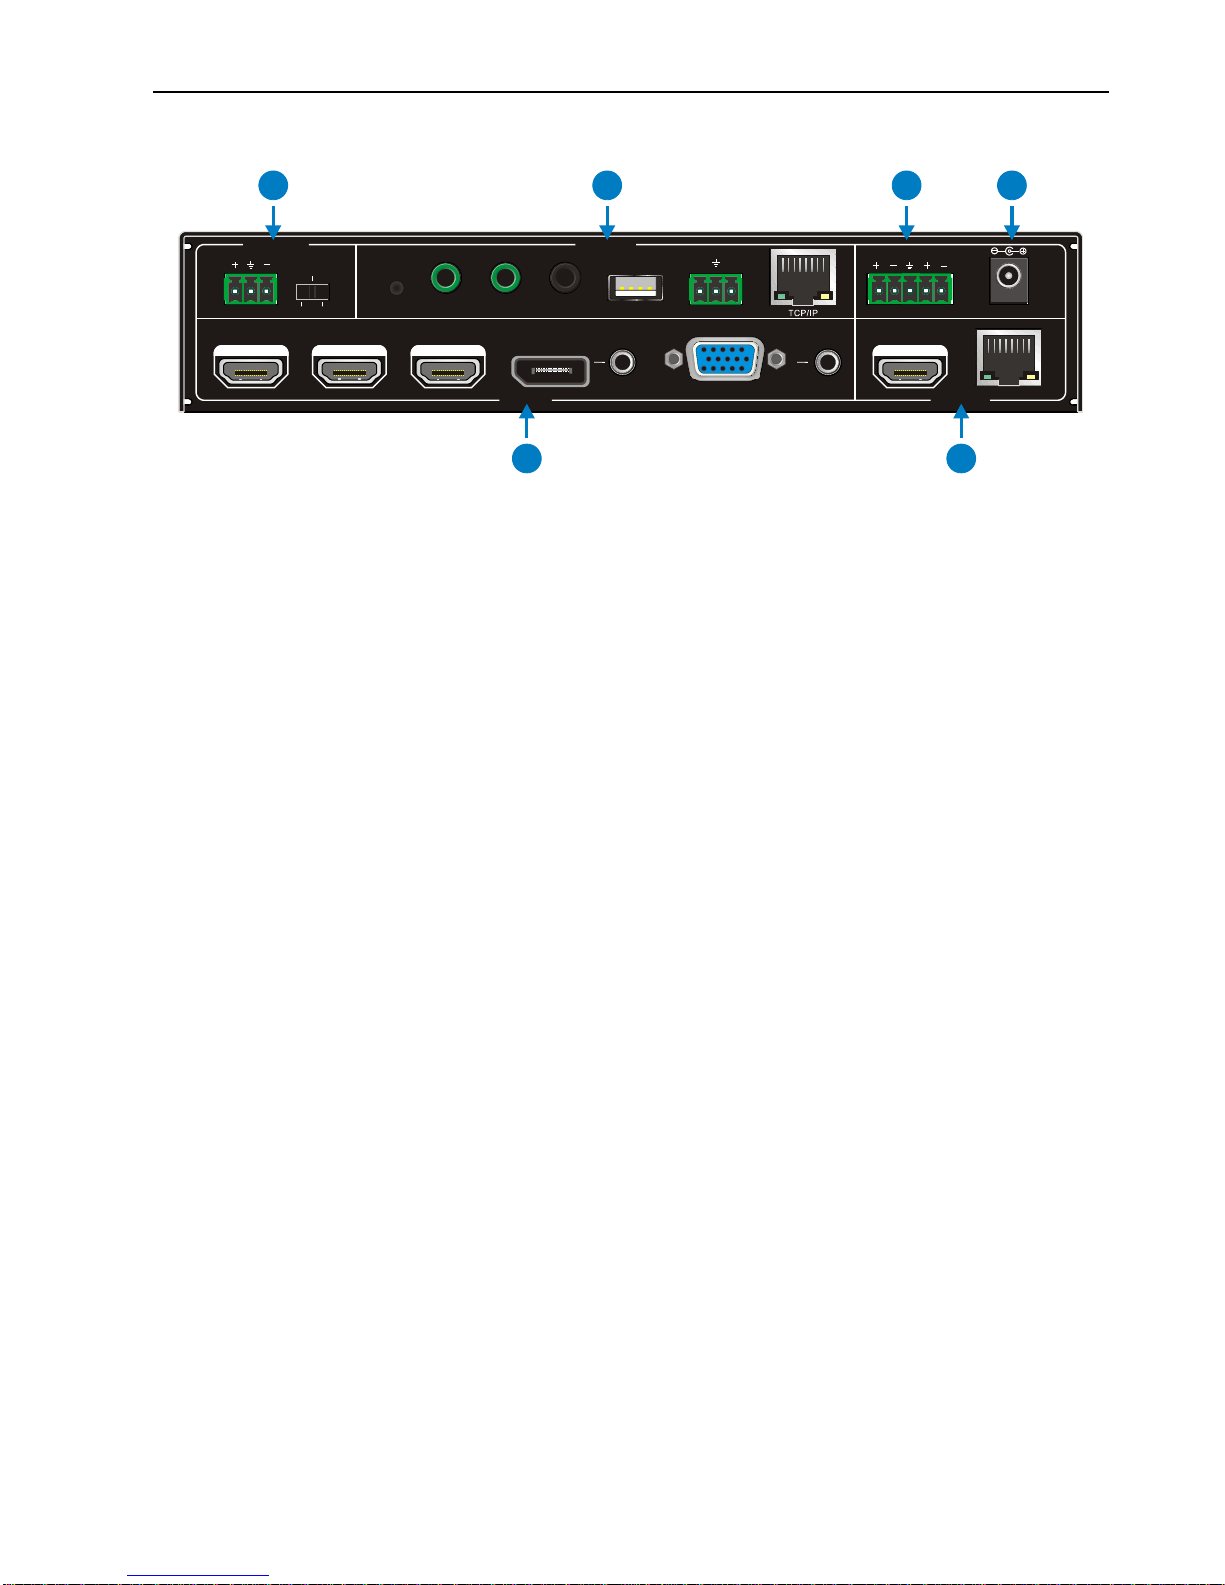
2.2 Rear Panel
① INPUTS
Video input ports: 1 HDMI/MHL input, 2 HDMI inputs, 1 DP and 1 VGA
Audio input ports: 1 DP external audio input and 1 VGA auxiliary audio input.
② OUTPUTS
HDMI output: HDMI video output port
HDBaseT output: Support PoH. Connect with an HDBaseT Receiver to
transmit AV signal or IR/RS232 control signal.
HDBaseT output boasts green and yellow indicator. The green indicator will blink
when power. If connect an HDBaseT receiver to this output successfully, the yellow
indicator will light up, and the green indicator will keeps blinking.
③ MIC INPUT
MIC audio port: connect to Microphone.
Dial switch: including 3 level
48V phantom power mode (connect with condenser microphone);
MIC mode (connect with dynamic microphone);
LINE mode (connect with wireless microphone or line audio).
④ CONTROL
RES RESET: press this button to reset the output resolution to 1280×720p.
IR IN: connect with IR receiver (with carrier wave only) to receive IR signal to
control far-end device which was connected to HDBaseT Receiver via
HDBaseT output port.
IR OUT: connect with IR emitter to control local source devices from remote.
IR EYE: connect with IR receiver (with carrier wave only) to receive IR signal
send by IR remote to control MP-SC-5TDS.
FIRMWARE: Type-A USB port for updating system firmware or loading
customized EDID data.
DC 24V 48V
LINE IR EYEIR IN IR OUT
MIC INPUT
MIC
FIRMWARE
AUDIO OUT
L R
RES RESET
RS232
Tx
Rx
INPUTS OUTPUTS
3-HDMI
2-HDMI1-HDMI / MHL 4-DP 5-VGA HDMI
HDBT
CONTROL
1
2
3
4
5
6
Page 10

Compact Scaler Switcher (with PoH)
5
RS232: Serial port, 3-pin phoenix connector, connect with a control device
(such as PC) to control MP-SC-5TDS or other devices connected with
HDBaseT Receiver.
TCP/IP: Ethernet port, connect with PC to control MP-SC-5TDS via
Web-based GUI.
⑤ AUDIO OUTPUT
Audio output port, the audio comes from the input audio corresponding to the
selected video source and is mixed with MIC audio.
⑥ DC 24V
Power port, connect with DC 24V power adapter.
Note: Pictures shown in this manual are for reference only, different model and
specifications are subject to real product.
Page 11
Compact Scaler Switcher (with PoH)
6
3. System Connection
3.1 Usage Precautions
System should be installed in a clean environment and has a prop temperature
and humidity.
All of the power switches, plugs, sockets and power cords should be insulated and
safe.
All devices should be connected before power on.
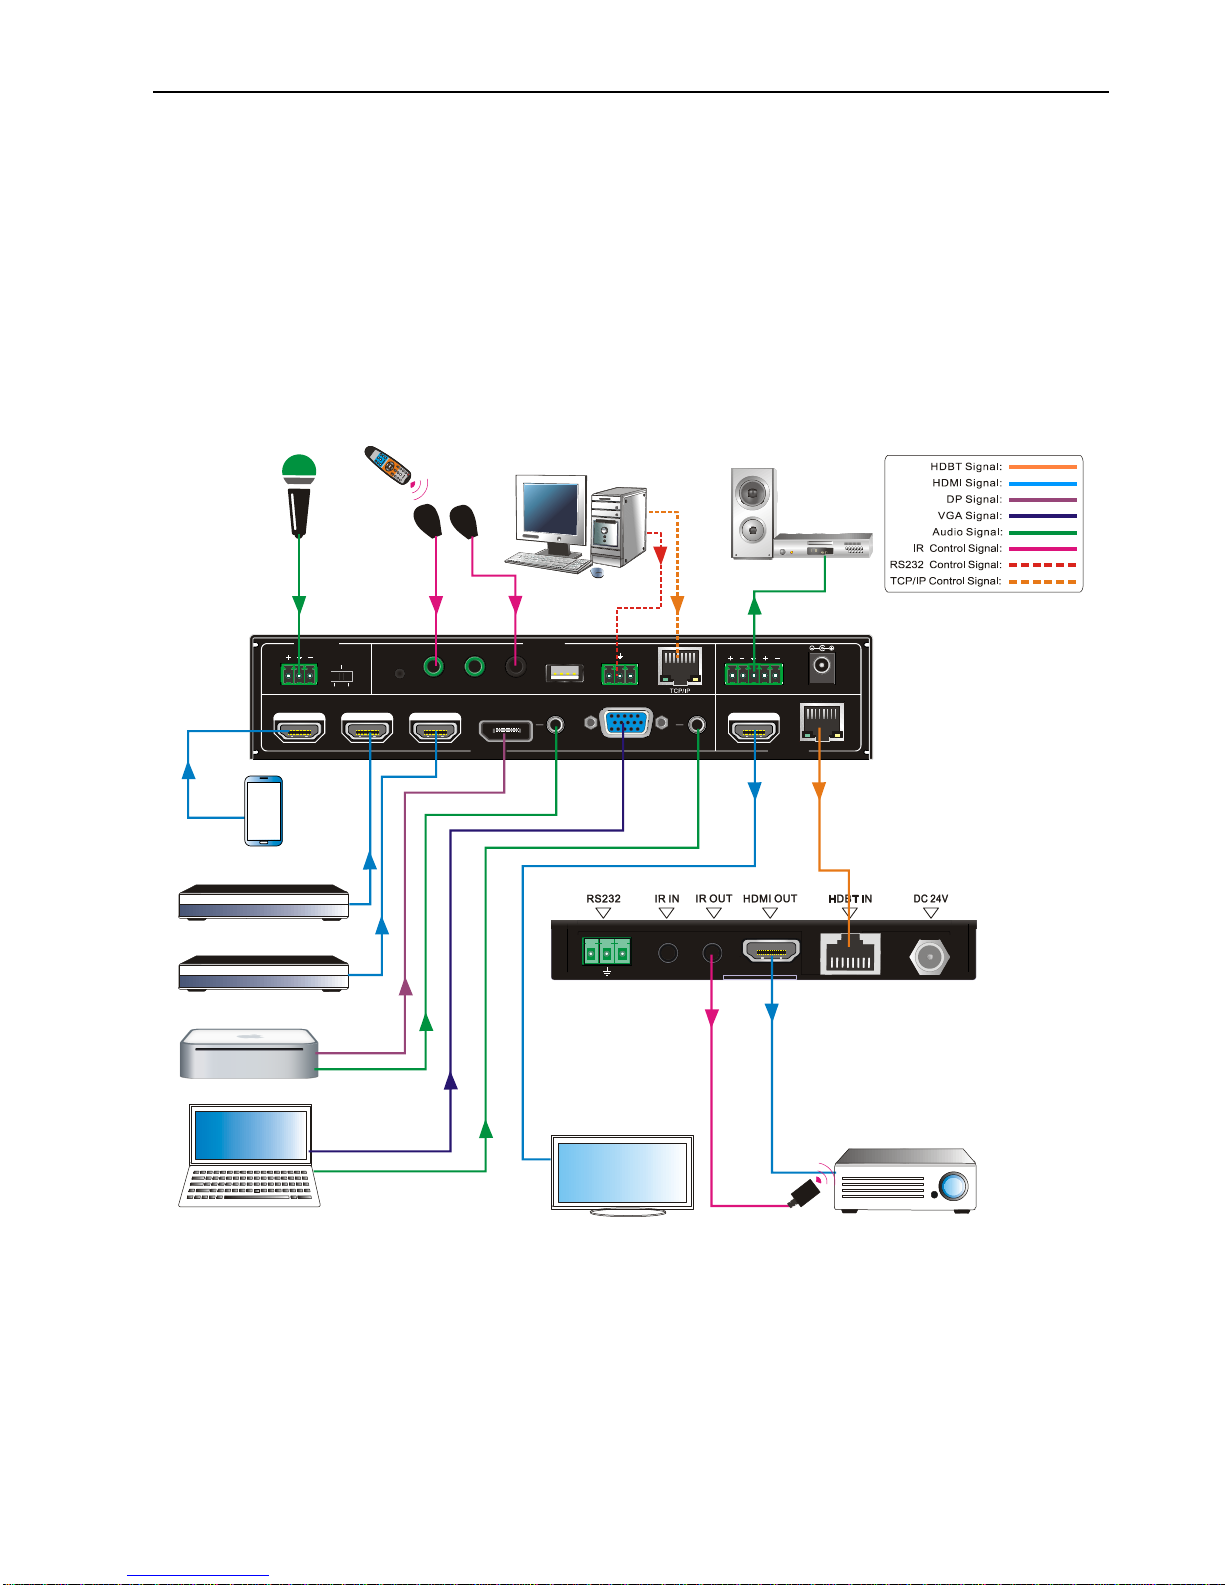
3.2 System Diagram
3.3 Connection Procedure
Step1. Connect HDMI source devices (e.g. Blue-ray DVD) to 1~3 HDMI input ports with
HDMI cable
Step2. Connect a DisplayPort source device (e.g. MAC MINI) to DP input port with
DC 24V 48V LIN E IR EYEIR IN IR OUT
MIC INPUT
MIC
FIRM WARE AUDIO O UT
L R
RES RES ET
RS23 2
Tx
Rx
INPU TS OUTP UTS
3-HDM I
2-HDM I1-HDMI / MHL 4-DP 5-VG A HDMI
HDBT
CONT ROL
Laptop
IR Receiver
Microphone IR Remote
S
t
a
n
d
b
y
AV amplifier
Mac Mini
Blu ray DVD-
Blu ray DVD-
RS232
Tx Rx
IR Emitter
HDBaseT Rec eiver
HDTV
Projector
PC
Cellphone(MHL)
Page 12

Compact Scaler Switcher (with PoH)
7
DisplayPort cable and DP audio input port with audio cable.
Step3. Connect a VGA source device (e.g. Laptop) to VGA input port with VGA cable
and VGA audio input port with audio cable.
Step4. Select MIC level and connect right microphone to MIC input port. MIC audio will
be transmitted to AUDIO OUTPUT port and mixed with source audio.
Step5. Connect a HDMI display device to HDMI output port with HDMI cable.
Step6. Connect HDBaseT Receiver to HDBT output port with twisted pair.
Step7. Connect speaker, headphone or AV amplifier to AUDIO OUTPUT port.
Step8. Connect control device (e.g. PC) to the TCP/IP port, MP-SC-5TDS can be
controlled via web-based GUI.
Step9. Connect control device (e.g. PC) to the RS232 port of MP-SC-5TDS or the
HDBaseT Receiver (bi-directional RS232 control, either end is available).
Step10. Connect IR receiver to the IR EYE port, MP-SC-5TDS can be control via IR
remote. For more details, please refer to 4.2.IR Control.
Step11. Both the MP-SC-5TDS and the HDBaseT Receiver have IR IN and OUT.
When one model is connected with IR receiver, the other model should connect
with an IR transmitter.
For example: When “IR IN” of MP-SC-5TDS connects with an IR receiver, the IR
transmitter must connect to IR OUT of HDBaseT Receiver.
The IR signal can be transmitted bi-directionally between the MP-SC-5TDS
and the HDBaseT Receiver.
Step12. Connect DC24V power adaptor to the power port (HDBaseT Receiver can be
powered by the MP-SC-5TDS with PoH function).
Note: If the power adapter is connecting with HDBaseT Receiver, the MP-SC-5TDS
can’t be powered from HDBaseT Receiver.
3.4 Connection of Microphone
MP-SC-5TDS provides with one 3-level microphone input port, to accommodate different
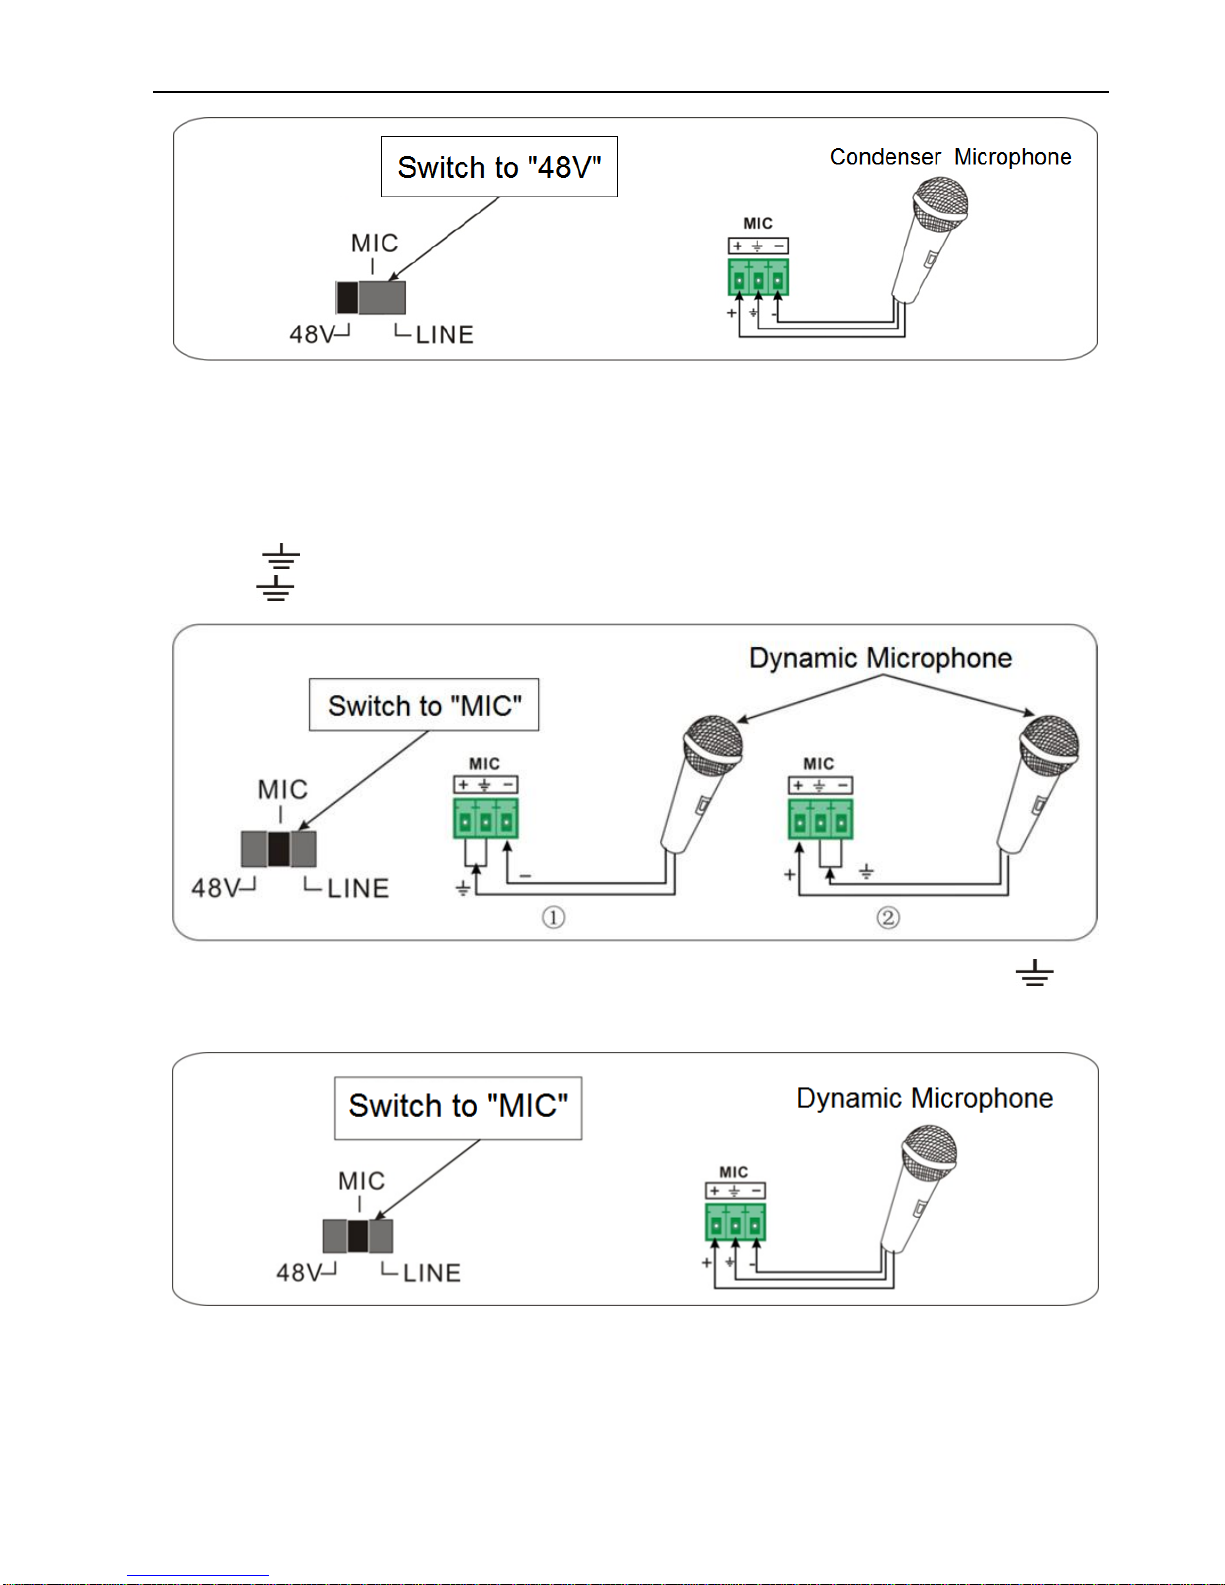
microphone input modes, including 48V phantom power mode, MIC mode & LINE mode.
48V phantom power Mode
48V phantom power input has a good frequency characteristic, high input impedance
and high sensitivity.
When switching to “48V”, the MIC input will provide a 48V phantom power. This is only
used for condenser microphone.
Connect the microphone in this way: “+” connects to positive, “-” connects to negative
and “ ” to ground.
Page 13
Compact Scaler Switcher (with PoH)
8
MIC Mode
MIC input has a low frequency characteristics, and wide frequency response.
When switch to “MIC”, the microphone input is used for connecting with dynamic
microphone. There are two different connection methods:
1) Unbalanced connection:
“+” and “ ” connect to ground, and “-” connects to signal.
“-” and “ ” connect to ground, and “+” connects to signal.
2) Balanced connection: “+” connects to positive, “-” connects to negative and “ ”
connects to ground.
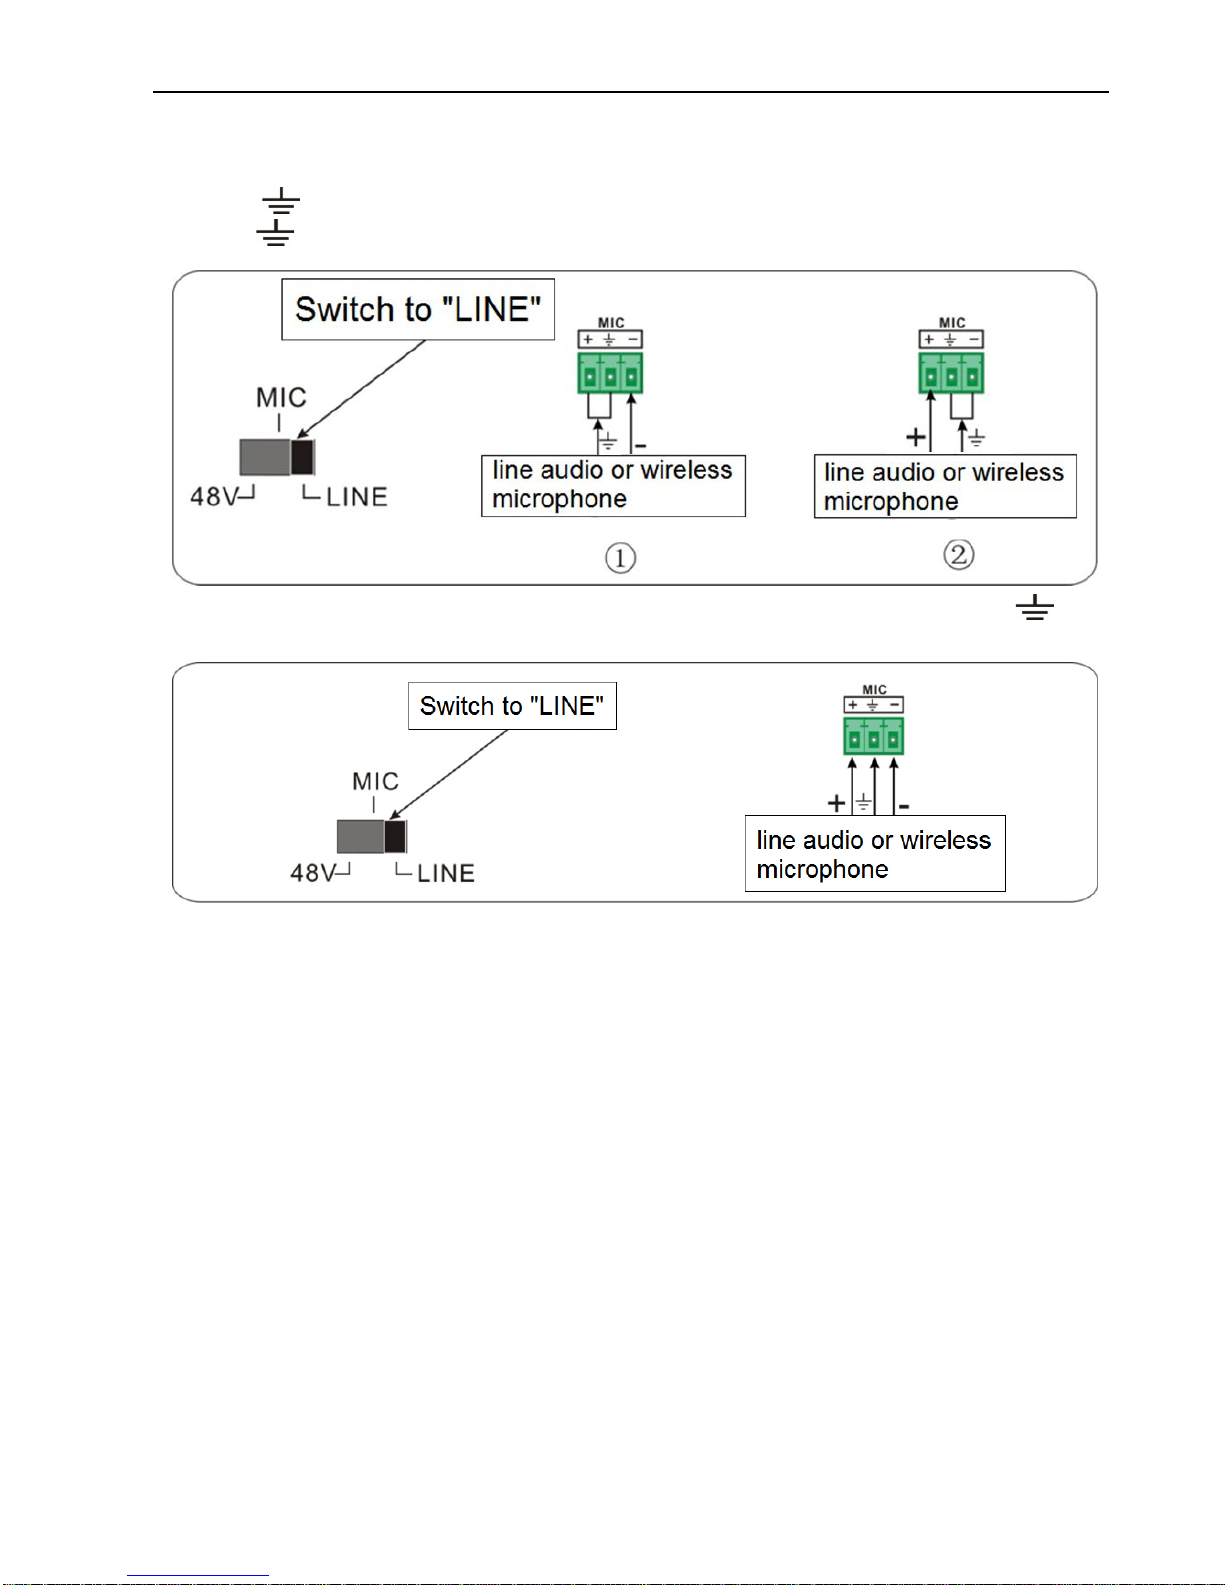
LINE Mode
LINE input has a low frequency characteristics, and wide frequency response.
When switch to “LINE”, the microphone input is used for connecting with line audio or
Page 14
Compact Scaler Switcher (with PoH)
9
wireless microphone output. There are two different connection methods:
1) Unbalanced connection:
“+” and “ ” connect to ground, and “-” connects to signal.
“-” and “ ” connect to ground, and “+” connects to signal.
2) Balanced connection: “+” connects to positive, “-” connects to negative and “ ”
connects to ground.
3.5 Application
MP-SC-5TDS has a good application in various occasions, such as computer realm,
monitoring, conference room, big screen displaying, television education, command &
control center and smart home etc.
Page 15

Compact Scaler Switcher (with PoH)
10
4. System Operations
4.1 Front Panel Buttons
Front panel buttons can be used for switching operations and volume adjusting.
4.1.1 Manual-Switching
Press 1-HDMI/MHL, 2-HDMI, 3-HDMI, 4-DP, 5-VGA on front panel to select the
corresponding input source.
4.1.2 Auto-Switching
Press AUTO to enter in auto-switching mode.
The auto-switching mode abides by the following principles:
New input
Once detecting a new input signal, the switcher would switch to this new signal
automatically.
Rebooting device
MP-SC-5TDS have the ability to save the last configuration before losing power. If
the last switching mode is auto-switching, once rebooted, the switcher will
automatically enter auto-switching mode, then detect all inputs and memorize their
connection status for future rebooting using. If the last displayed signal is still
available, the unit will output the signal. If not, the unit will detect all the input signals
wit priority from 1-HDMI/MHL to 5-VGA. When detected the first signal, it will transfer
to output.
Signal removing
Once removing the current display signal, MP-SC-5TDS will detect all input signals
with priority from 1-HDMI/MHL to 5-VGA. It will transfer the signal firstly detected to
be available to output devices.
Note:
When the DP signal is switched as input, the DP source device may not read the
EDID data from display device, at this point re-plug the DP source device to solve
this phenomenon.
Auto-switching function works only when inputting new signal, removing a signal or
power rebooting. With any VGA port set to C-video or YPbPr, the system will be not
able to enter in Auto-switching mode.
4.1.3 Volume Adjusting
Press Volume Knob to choose MIC/Source audio needed to be adjusted, the
corresponding LED will turn green and keep on.
Adjusting the Volume Knob in clockwise direction to increase sound volume.
Adjusting the Volume Knob in anti-clockwise direction to decrease sound volume.
Page 16
Compact Scaler Switcher (with PoH)
11
4.2 IR Control
4.2.1 IR Remote
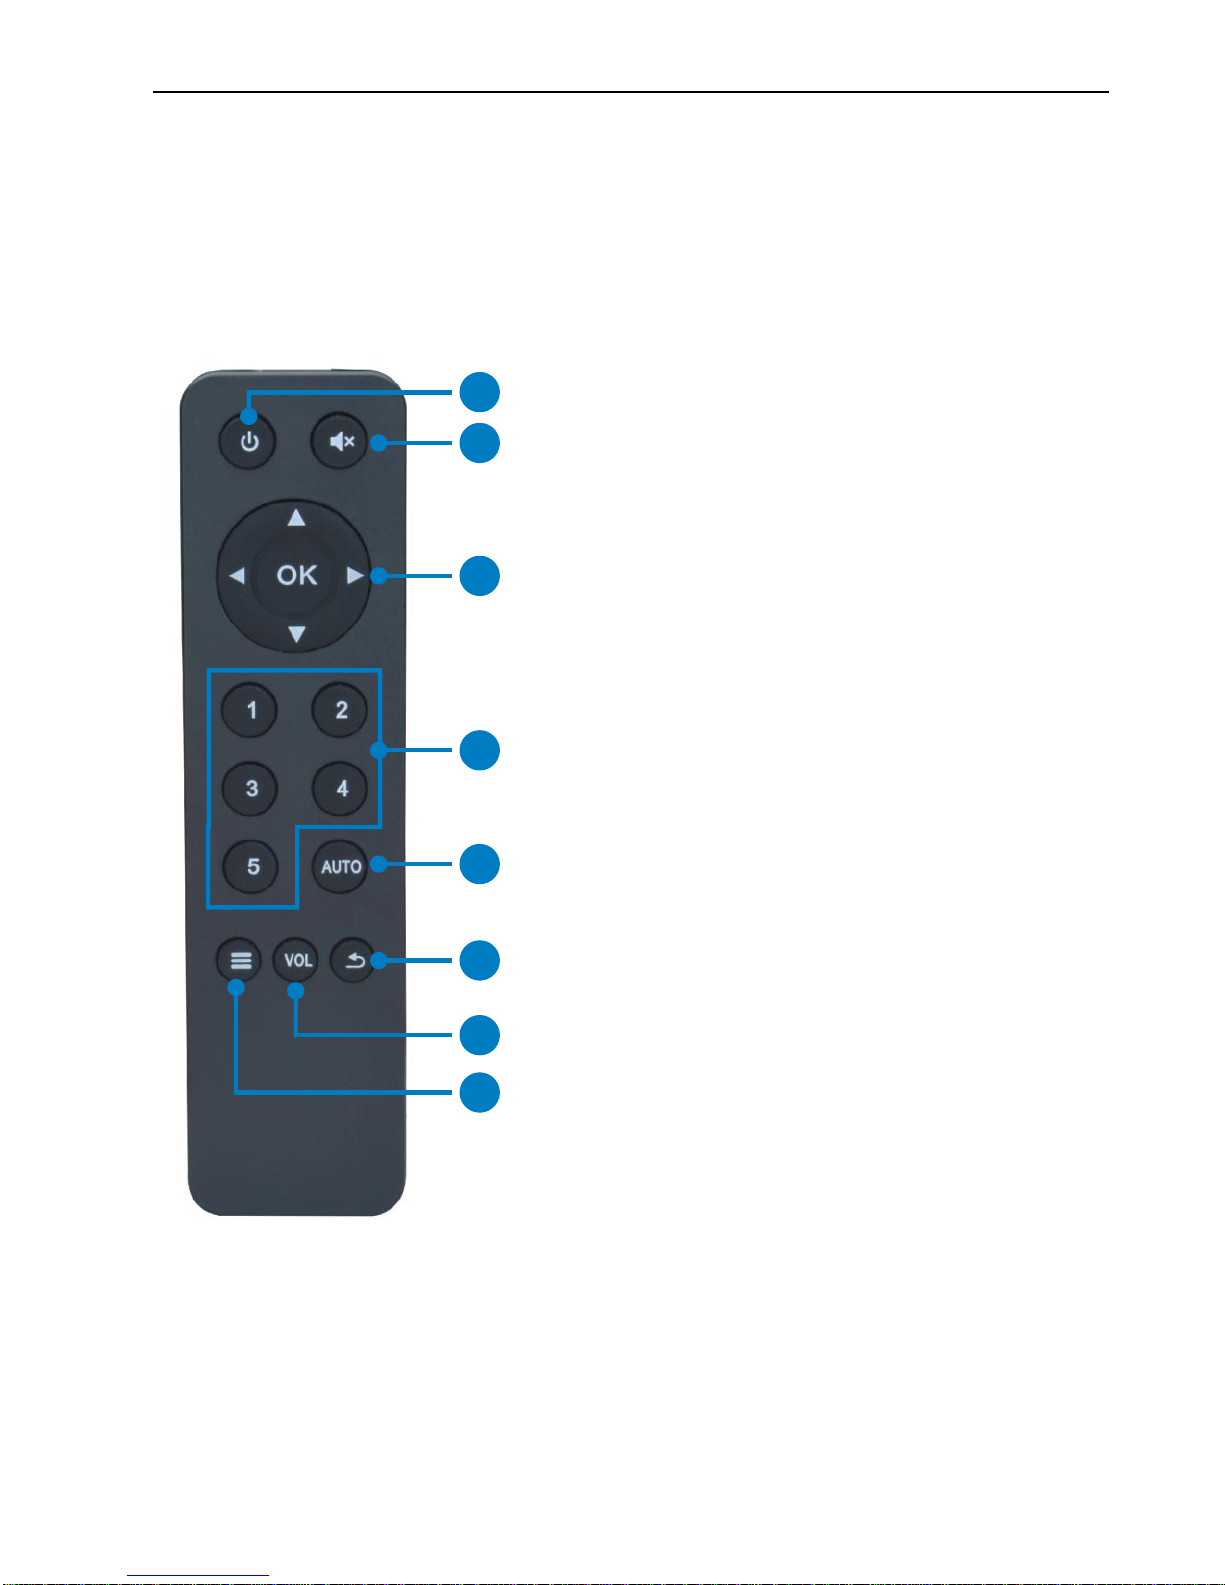
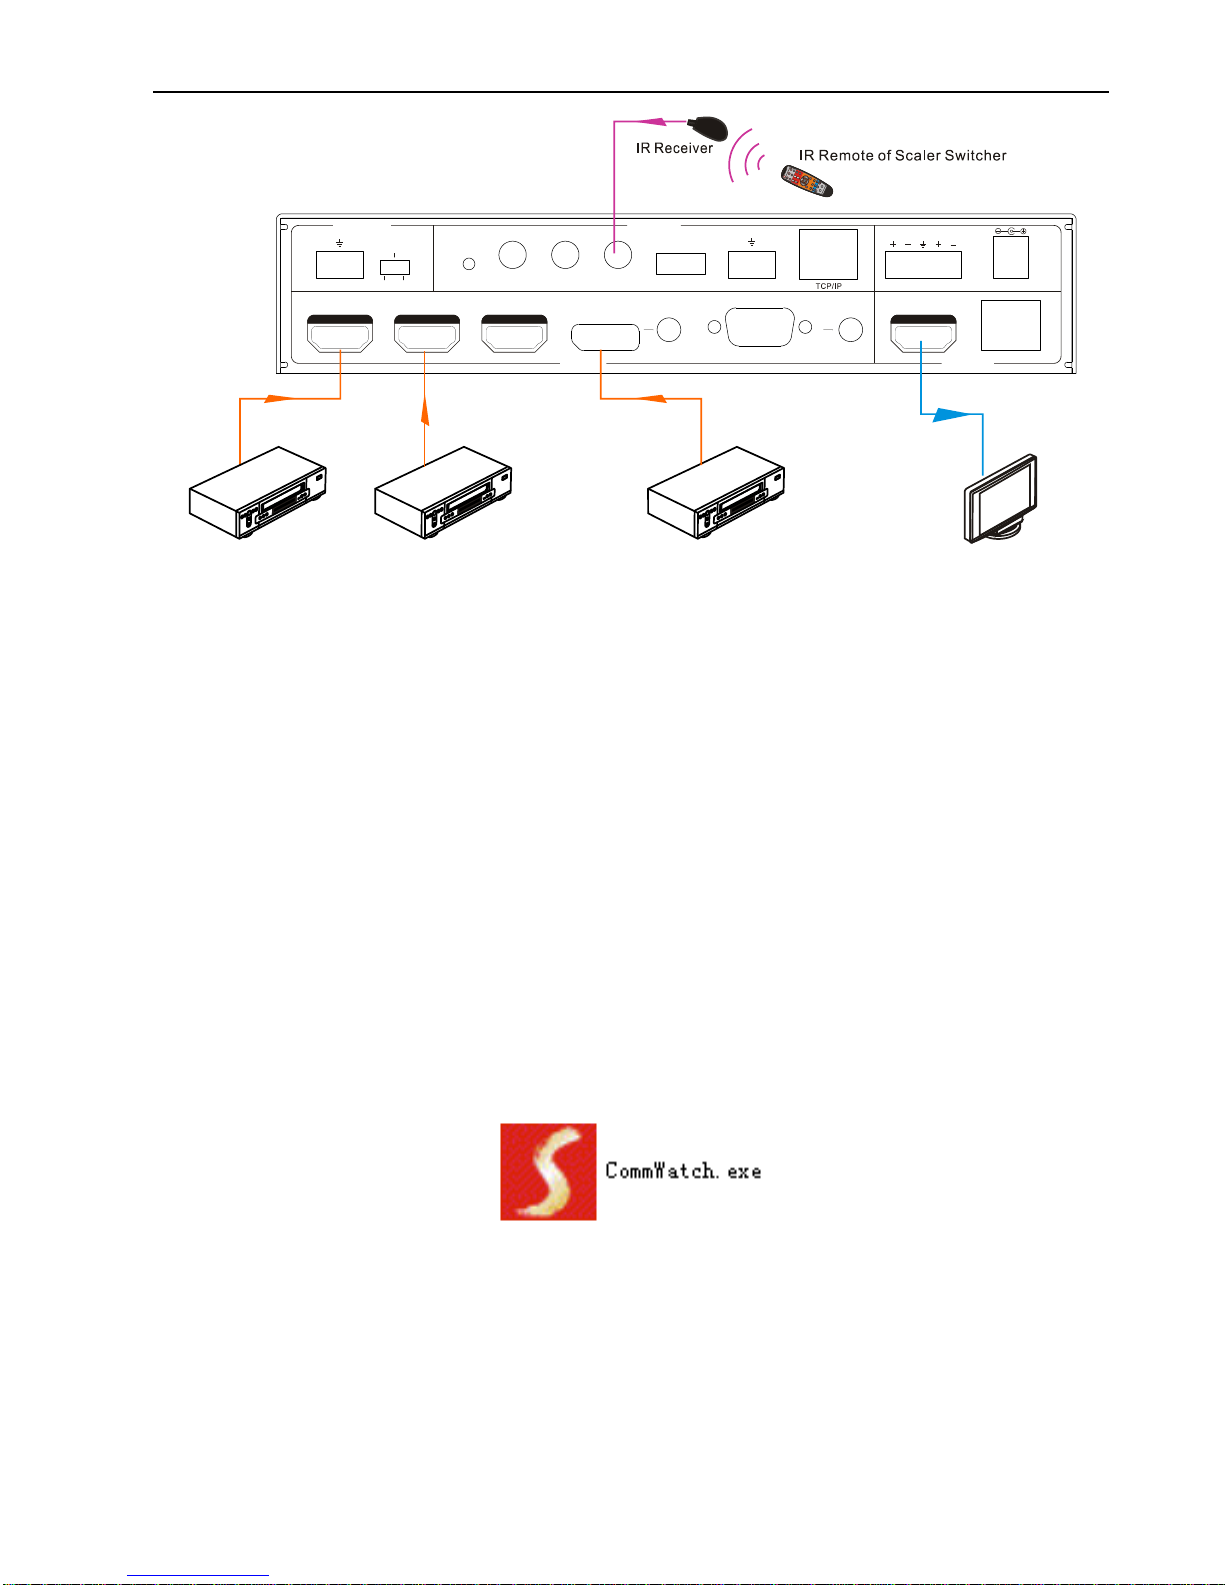
Connect IR receiver to IR EYE port, MP-SC-5TDS cans be controlled by using IR
remote. As CEC function, it is able to use the IR remote to turn on/off the HDMI source
or Display.
① Enter/ exit standby mode
② Mute/ unmute audio
③ OK: confirm button; Navigation buttons:
UP/DWON/LEFT/ RIGHT button, for value setting
or page-turn.
④ Input channel selection buttons: Select video
source via pressing corresponding button (audio
switched following the corresponding DP/VGA )
⑤ Auto button: Enter/Exit auto-switching mode.
⑥ Exit button: Exit OSD menu or current
operation.
⑦ Volume adjusting button: After pressing this
button, the volume adjusting menu will be showed
on Display, and then press UP/DOWON button to
increase/decrease volume.
⑧ Enter OSD menu or used to return to
previous menu.
2
3
4
5
6
7
8
1
Page 17
Compact Scaler Switcher (with PoH)
12
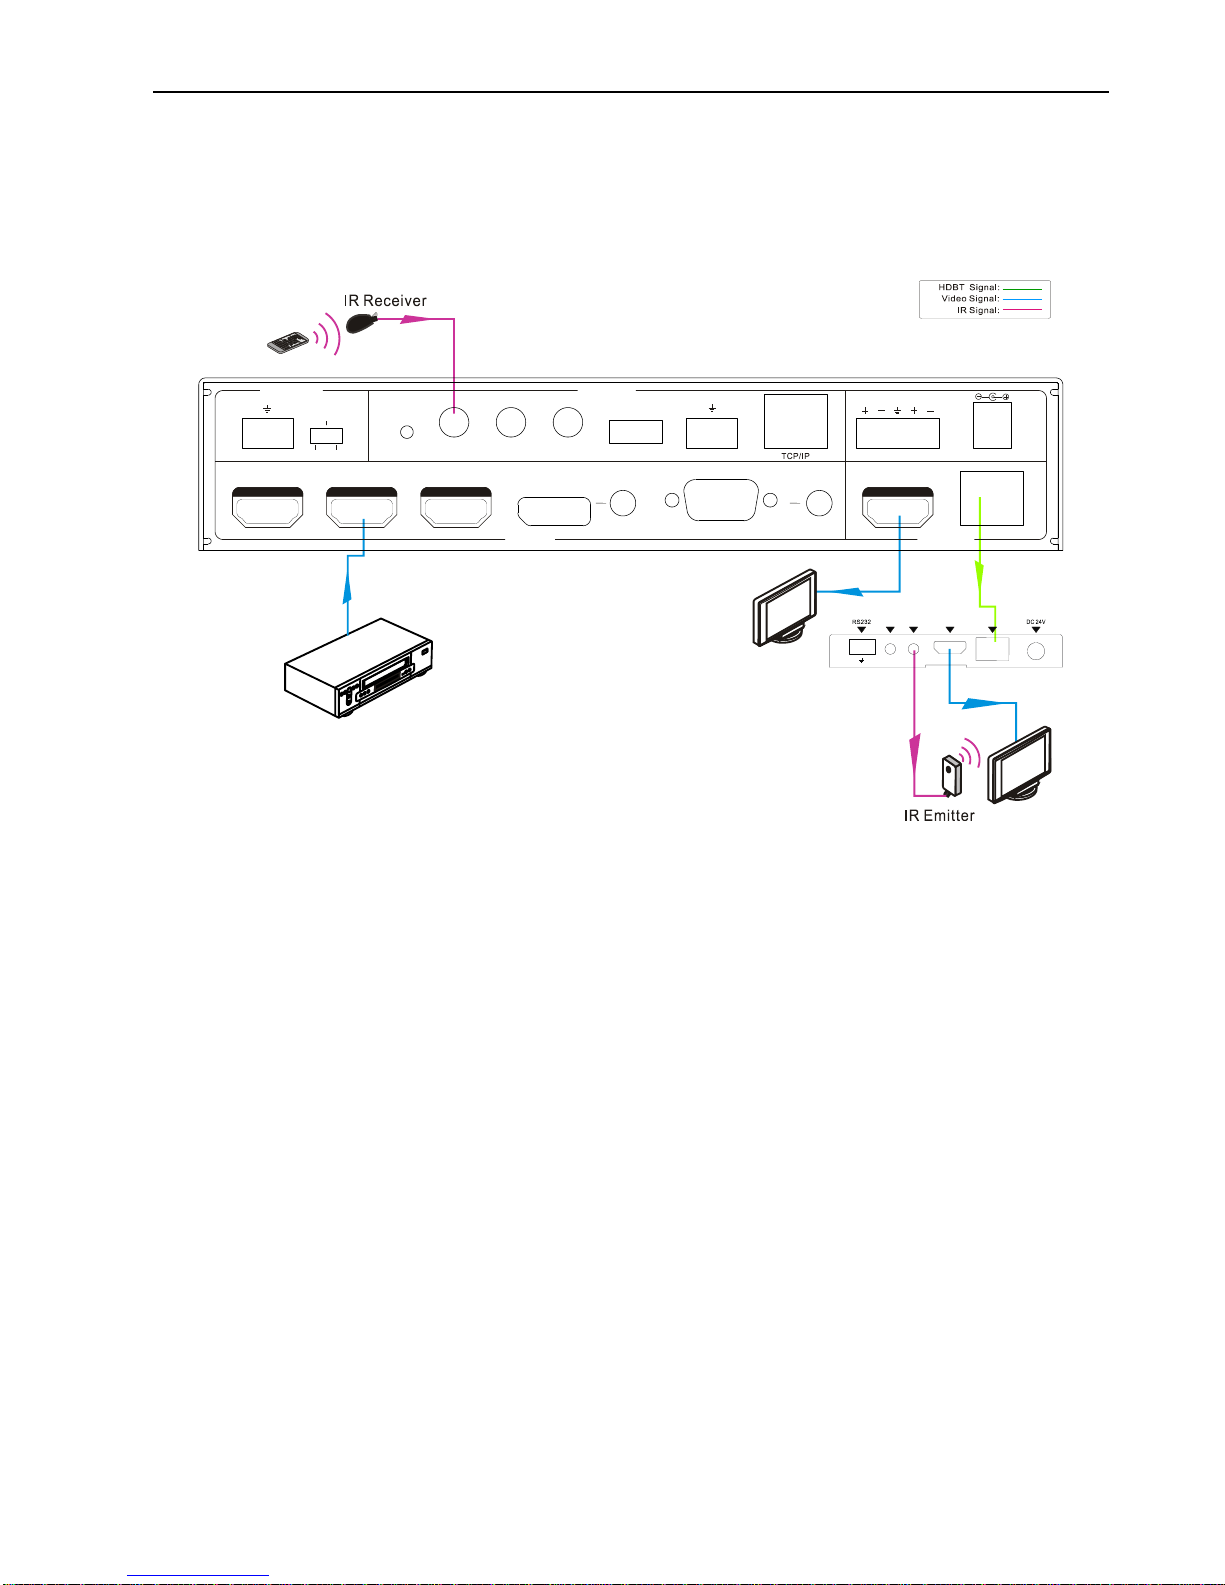
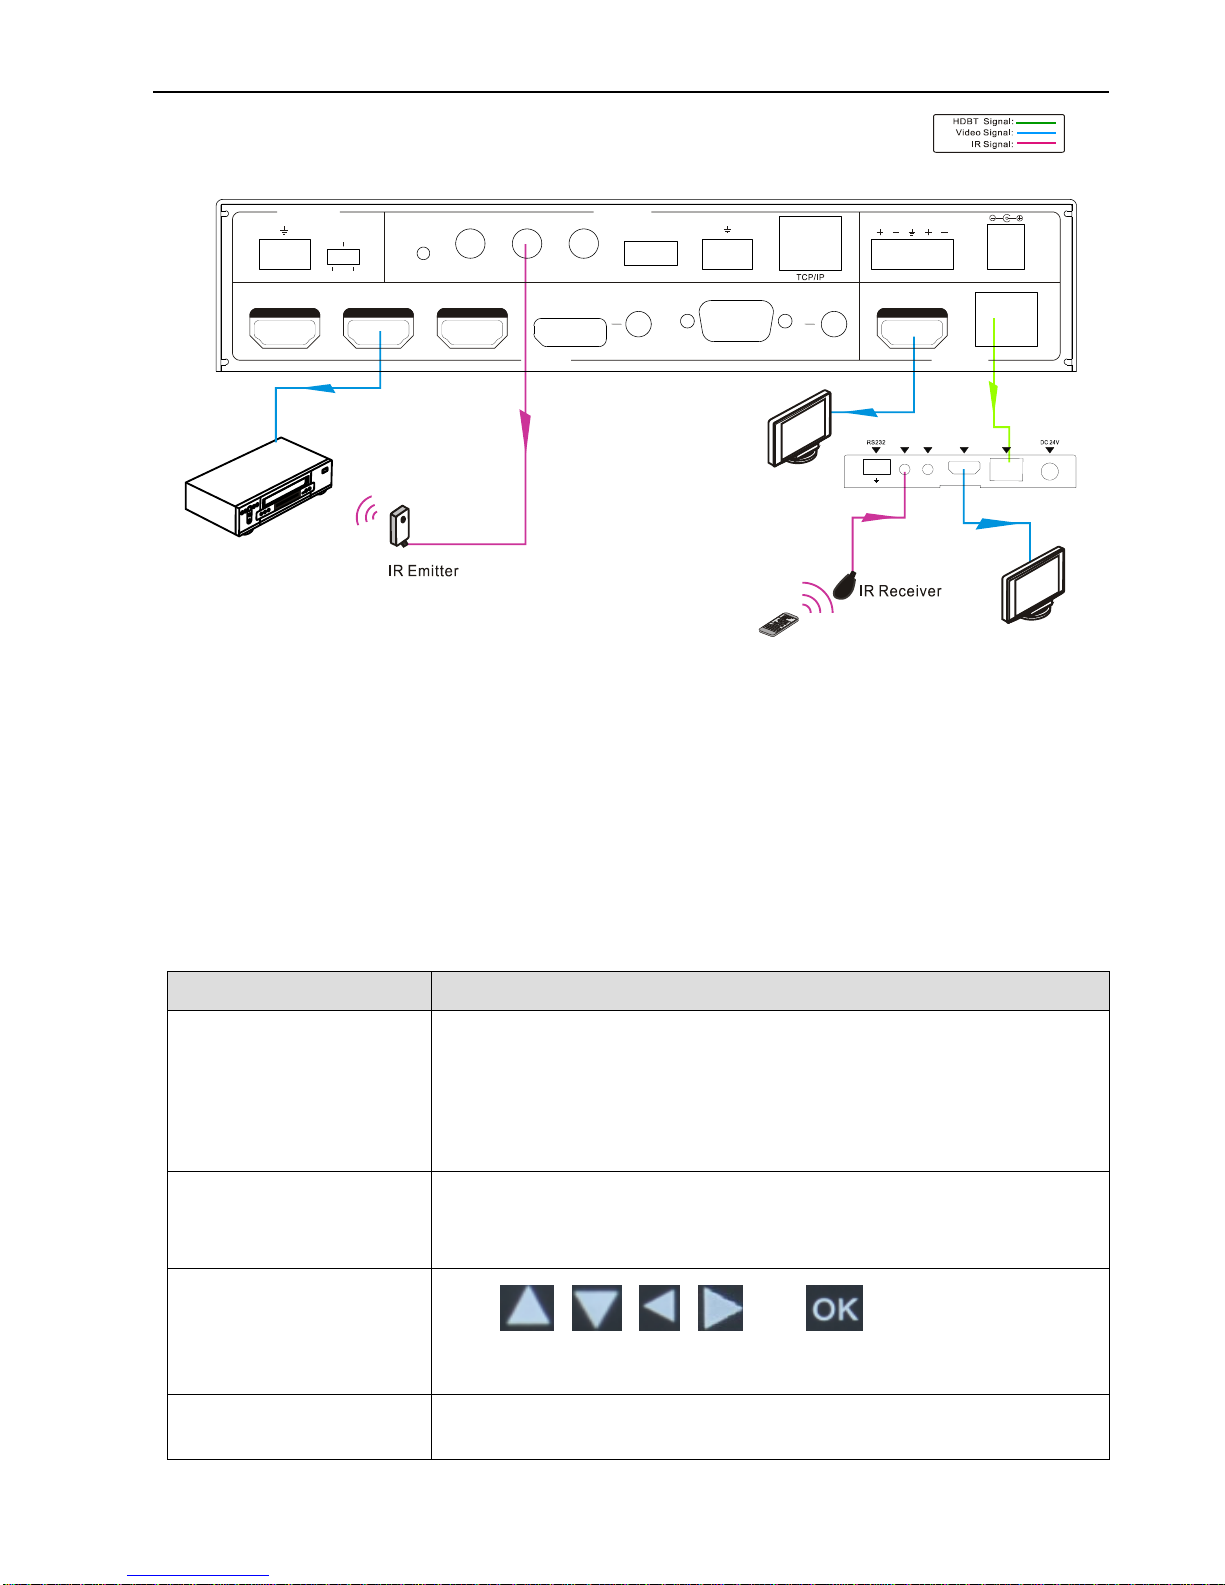
4.2.2 Control far-end device from local
Connect an IR receiver to IR IN port on MP-SC-5TDS and connect IR emitter to the IR
OUT port on the HDBaseT Receiver, the far-end device can be control by its IR remote
from local.
4.2.3 Control local device from remote
Connect an IR emitter to IR OUT port on MP-SC-5TDS and connect IR receiver to the IR
IN port on the HDBaseT Receiver, the source devices can be control by their IR remote
from remote.
DVD
IR Remote
HDTV
48V
LINE IR EYEIR IN IR OUT
MIC INPUT
MIC
FIRM WARE
AUDIO OUT
L R
RES RESET
RS232
Tx
Rx
L R
INPUTS OUTPUTS
3-HDMI
2-HDMI1-HDMI / MHL 4-DP 5-VGA HDMI
HDBT
CONTROL
DC 24V
I
R O
U
T
I
R
IN
HDM
I O
U
T
HDBT IN
Tx Rx
HDBaseT Receiver
HDTV
Page 18
Compact Scaler Switcher (with PoH)
13
4.2.4 CEC Function
MP-SC-5TDS supports CEC, it can be turned on/ off by sending RS232 commands or
OSD menu operations. The default setting is ON.
Commands pertaining to CEC: “50686%” (enable CEC) and “50687%” (disable CEC)
HDMI INPUT ports 1~3 support CEC, if the connected source devices also support CEC
and their CEC are on, users can control the source device and display via the IR remote
of the MP-SC-5TDS.
The working status related to CEC and STANDBY is showed as below:
Situation
Working Status
CEC: on, Standby: on
Press STANDBY button on IR remote, MP-SC-5TDS enters
in standby mode, so do all HDMI source devices and display.
Press STANDBY button again on IR remote, MP-SC-5TDS
exits standby mode, the previous selected HDMI input source
device and display start working too.
CEC: on, Standby: off
Press STANDBY button on IR remote, MP-SC-5TDS enters
in standby mode, HDMI 1~3 source devices and display keep
on.
CEC: on
Use , , , and buttons on IR
remote to control HDMI source device.
CEC: off
Unable to control HDMI source device and display through IR
remote
DVD
HDTV
48V
LINE IR EYEIR IN IR OUT
MIC INPUT
MIC
FIRMWARE
AUDIO OUT
L R
RES RESET
RS232
Tx
Rx
L R
INPUTS OUTPUTS
3-HDMI
2-HDMI1-HDMI / MHL
4-DP 5-VGA HDMI
HDBT
CONTROL
DC 24V
I
R
OU
T
I
R
IN
H
D
M
I O
U
T
HDBT IN
Tx Rx
HDBaseT Receiver
HDTV
IR Remote
Page 19
Compact Scaler Switcher (with PoH)
14
4.3 RS232 Control
As RS232 can be transmitted bi-directionally between MP-SC-5TDS and the HDBaseT
Receiver, so it is able to control a third party RS232 device from local or control
MP-SC-5TDS from remote. The baud rate support 2400, 4800, 9600(default), 19200,
38400, 57600 or 115200.
4.3.1 Installation/uninstallation of RS232 Control Software
Installation Copy the control software file to the computer connected with
MP-SC-5TDS.
Uninstallation Delete all the control software files in corresponding file path.
4.3.2 Basic Settings
First to connect MP-SC-5TDS with all input devices and output devices needed, then to
connect it with a computer which is installed with RS232 control software. Double-click
the software icon to run this software.
Here we take the software CommWatch.exe as example. The icon is showed as below:
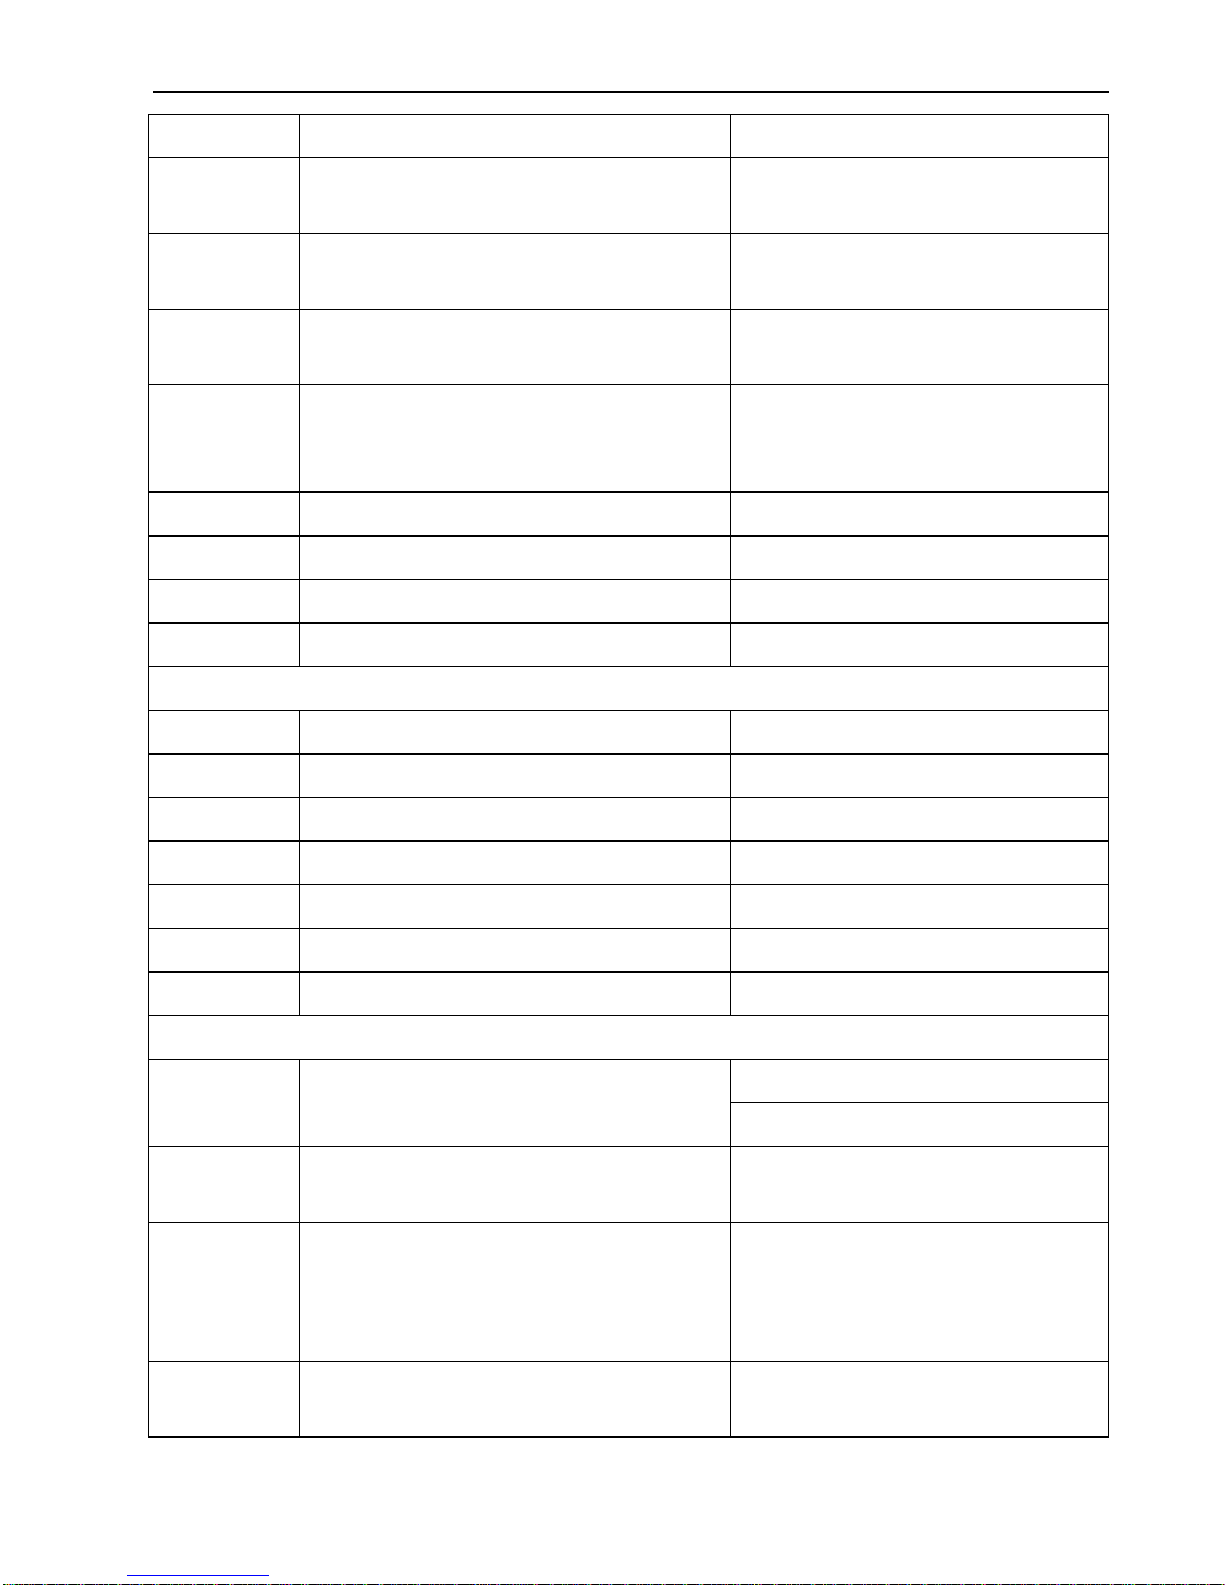
The interface of the control software is showed as below:
48V LIN E IR EYEIR IN IR OUT
MIC INPUT
MIC
FIRM WARE AUDIO O UT
L R
RES RE SET
RS23 2
Tx
Rx
L R
INPUTS OUTPUTS
3-HD MI2-HD MI1-HD MI / MHL 4-DP 5-VG A HDMI
HDBT
CONTROL
DC 24V
DVD(Signal Source)
O
K
Z
O
O
M
S
.
M
M
E
N
U
E
X
I
T
I
N
P
U
T
1
P
.
M
1
0
8
0
P
7
2
0
P
M
E
N
U
I
N
P
U
T
5
I
N
P
U
T
2
I
N
P
U
T
3
I
N
P
U
T
4
A
U
T
O
S
c
a
l
e
r
S
w
i
t
c
h
e
r
A
U
T
O
P
L
A
Y
/
P
A
U
S
E
S
T
O
P
R
E
V
F
W
D
I
N
P
U
T
S
O
U
R
C
E
C
E
C
C
O
N
T
R
O
L
M
I
C
M
U
T
E
M
I
C
L
I
N
E
L
I
N
E
M
U
T
E
DVD(Signal Source) DVD(Signal Source)
HDTV
Page 20
Compact Scaler Switcher (with PoH)
15
Please set the parameters of COM number, bound rate, data bit, stop bit and the parity
bit correctly, and then you are able to send command in Command Sending Area.
Parameter Configuration area
Monitoring area, indicates if the
command sent works.
Command Sending area
Page 21

Compact Scaler Switcher (with PoH)
16
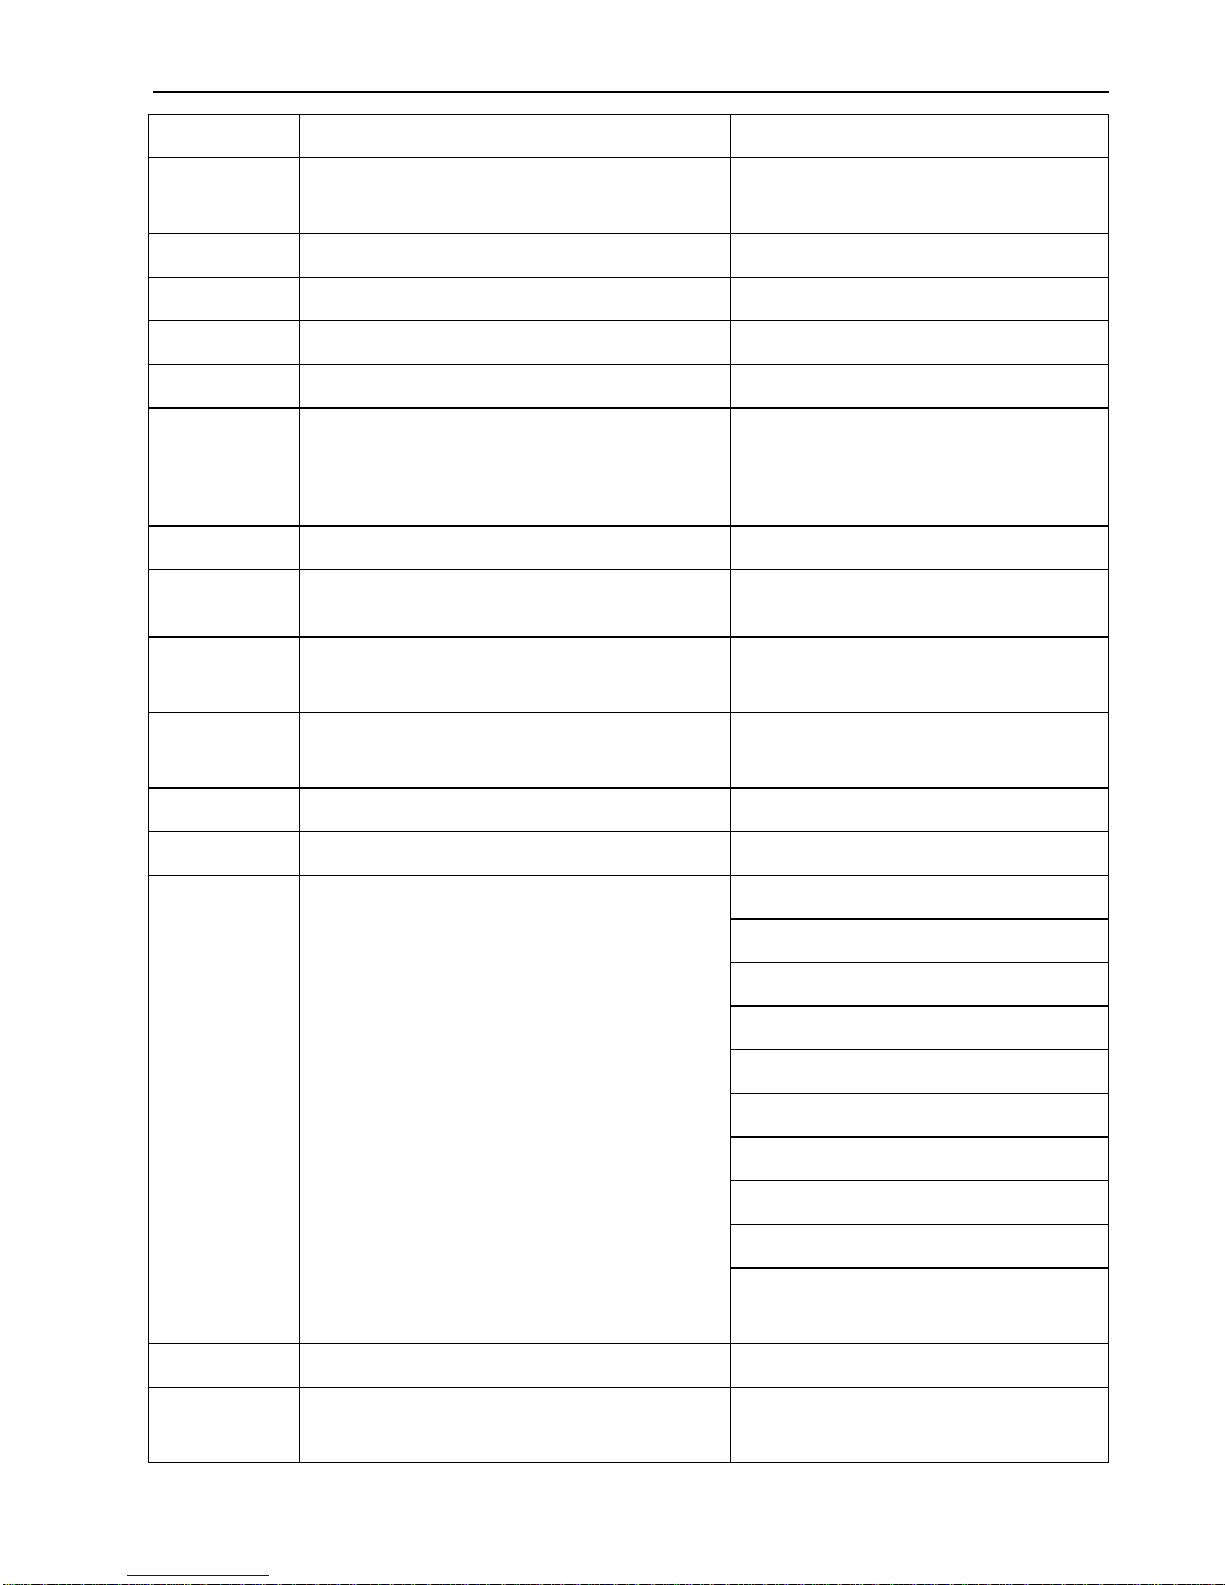
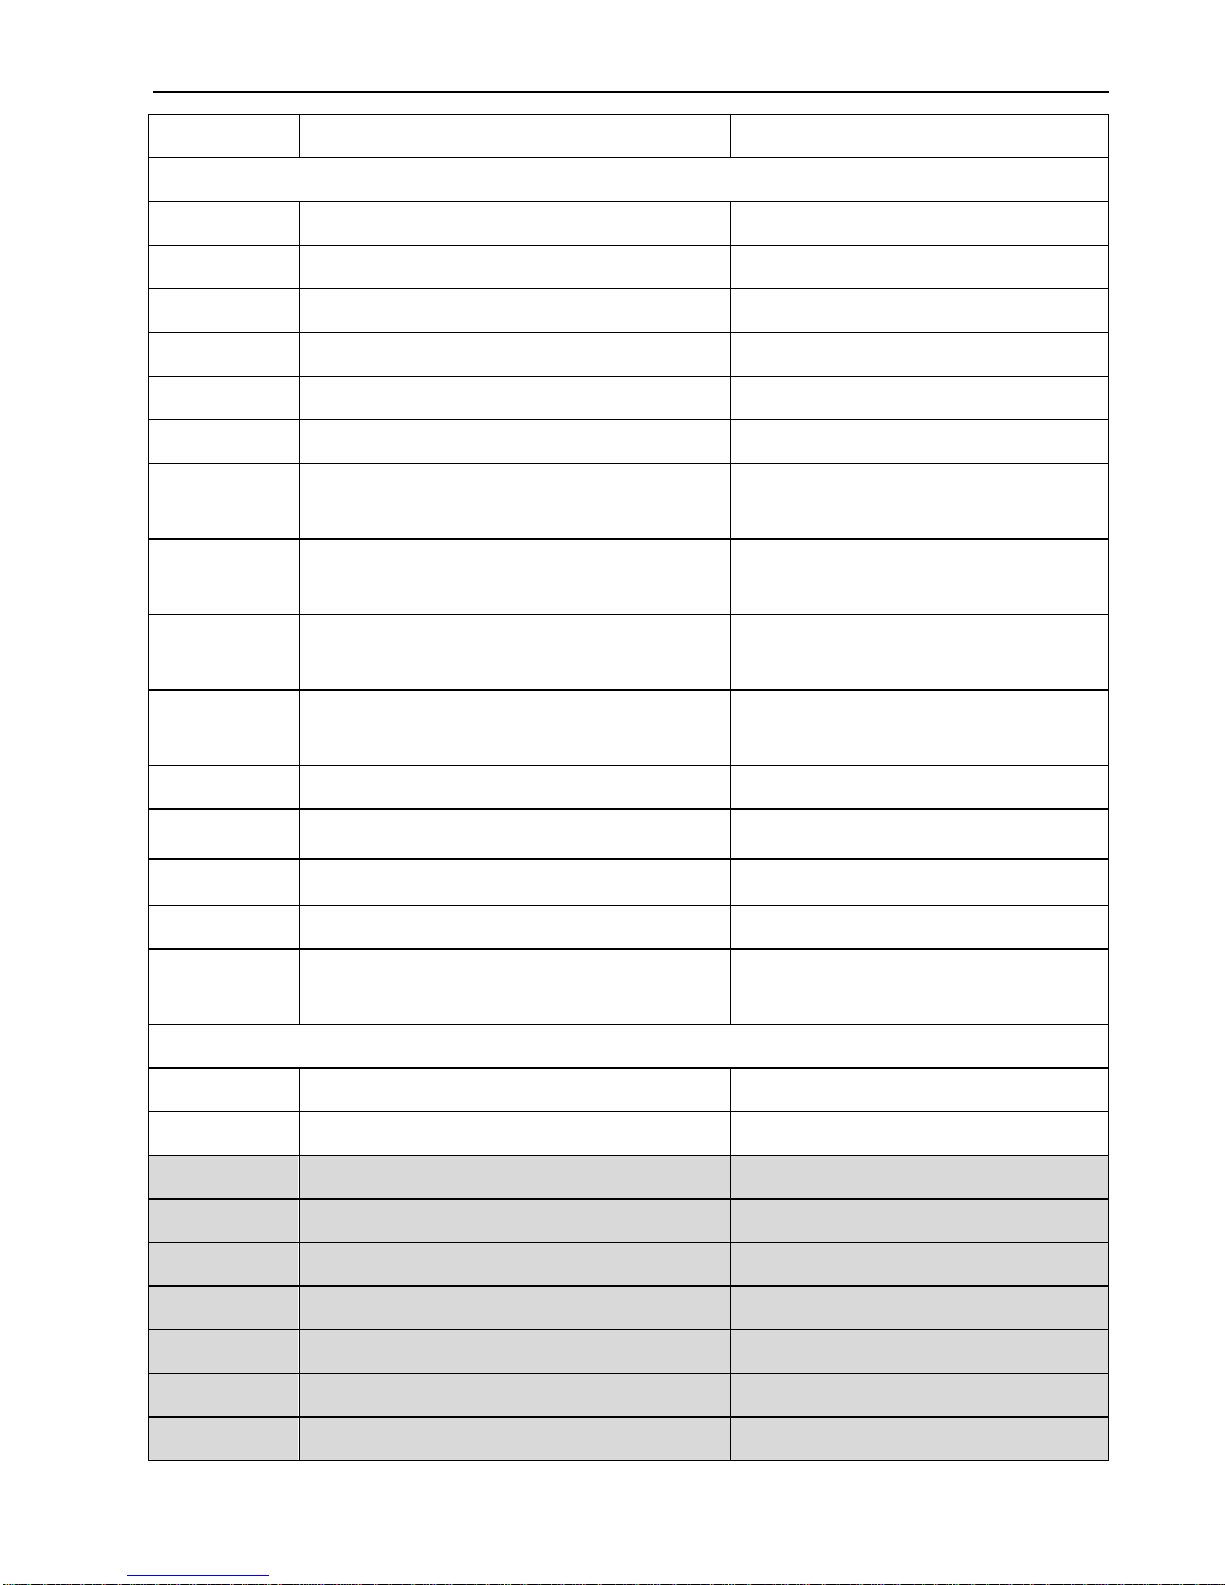
4.3.3 RS232 Communication Commands
Communication protocol: RS232 Communication Protocol
Baud rate: 9600 Data bit: 8 Stop bit: 1 Parity bit: none
Command
Function
Feedback Example
Switch Commands
50701%
Switch to 1-HDMI/MHL input
Switch to HDMI 1
50702%
Switch to 2-HDMI input
Switch to HDMI 2
50703%
Switch to 3-HDMI input
Switch to HDMI 3
50704%
Switch to 4-DP input
Switch to DP
50705%
Switch to 5-VGA input
Switch to VGA 1/YPbPr/AV
50683%
Set the signal format to VGA for
5-VGA input
Input 5 Set & Switch to VGA
50684%
Set the signal format to YPbPr for
5-VGA input
Input 5 Set & Switch to YPbPr
50685%
Set the signal format to AV(C-video)
for 5-VGA input
Input 5 Set & Switch to AV
50785%
Enable auto-switching
Auto Switching
50786%
Disable auto-switching
Manual Switching
Audio Commands
50600%
MUTE Source audio
Source Mute
50601%
UnMute Source audio
Source Unmute
50602%
Increase the volume of source audio
Source Volume: xx (xx=00~60)
50603%
Decrease the volume of source audio
Source Volume: xx (xx=00~60)
50722%
Mute MIC audio
MIC Mute
50723%
Unmute MIC audio
MIC Unmute
50726%
Mute VGA audio
VGA audio Mute
50727%
Unmute VGA audio
VGA audio Unmute
50728%
Mute DP audio
DP audio Mute
50729%
Unmute DP audio
DP audio Unmute
50724%
Increase the volume of MIC audio
MIC Volume: xx (xx=00~60)
50725%
Decrease the volume of MIC audio
MIC Volume: xx (xx=00~60)
508xx%
Set the volume of MIC audio
MIC Volume: xx (xx=00~60)
Page 22

Compact Scaler Switcher (with PoH)
17
Command
Function
Feedback Example
510xx%
Set the volume of source audio
Source Volume: xx (xx=00~60)
50706%
Select embedded audio as audio
input for DP video signal
DP Audio from Embedded
50707%
Select external audio as audio input
for DP video signal
DP Audio from External
Resolution Commands
50619%
Set the output resolution to 1360X768
HD
Resolution: 1360x768
50626%
Set the output resolution to 1024X768
XGA
Resolution: 1024x768
50627%
Set the output resolution to 1280X720
720P
Resolution: 1280x720
50628%
Set the output resolution to 1280X800
WXGA
Resolution: 1280x800
50629%
Set the output resolution to
1920X1080 1080P
Resolution: 1920x1080
50620%
Set the output resolution
to1920X1200 WUXGA
Resolution: 1920x1200
50621%
Set the output resolution
to1600X1200 UXGA
Resolution: 1600x1200
Setup Commands
50604%
Lock the front panel buttons
Front Panel lock
50605%
Unlock the front panel buttons
Front Panel Unlock
502xx%
Set the brightness to xx.
Brightness: xx (xx=00~99)
503xx%
Set the contrast to xx.
Contrast: xx (xx=00~99)
504xx%
Set the saturation to xx.
Saturation: xx (xx=00~99)
505xx%
Set the sharpness to xx.
Sharpness: xx (xx=00~99)
50607%
Adjust the color temperature
Color Temperature: xx (xx=
Cool/ Medium/ Warm/ User.)
50608%
Set the aspect ratio
Aspect Ratio: xx (xx= 16:9/ 4:3/
auto)
50614%
Set the picture mode
Picture Mode: xx (xx= dynamic/
standard/ mild/ user)
Page 23

Compact Scaler Switcher (with PoH)
18
Command
Function
Feedback Example
50655%
Freeze output image
Freeze: enable
50656%
Cancel the freezing of output image
Freeze: disable
50646%
Enable MIC Volume Icon display
Volume Icon: enable
50647%
Disable MIC Volume Icon display
Volume Icon: disable
50761%
Disable the mute icon of Source audio
display
Source Mute Icon: disable
50762%
Enable the mute icon of Source audio
display
Source Mute Icon: enable
50763%
Disable the mute icon of MIC audio
display
MIC Mute Icon: disable
50764%
Enable the mute icon of MIC audio
display
MIC Mute Icon: enable
50765%
Enable the freeze icon display
Freeze Icon: enable
50766%
Disable freeze icon display
Freeze Icon: disable
50644%
Enable channel status display
Input Icon: enable
50645%
Disable channel status display
Input Icon: disable
50650%
Check the channel status
Input Icon: xx
50606%
Auto-adjust the input parameter(VGA
only)
VGA Input Auto
50699%
Check the system version
Version Vx.x.x
50688%
Enable MIC noise detecting
MIC detect: enable
50689%
Disable MIC noise detecting
MIC detect: disable
50690%
Check MIC noise detecting statue
MIC detect: XXXX
50791%
HDCP Active mode
HDCP Active
50792%
HDCP Manual mode
HDCP Manual
50793%
Enable HDCP output
HDCP ON
50794%
Disable HDCP output
HDCP OFF
50795%
Inquire HDCP/ Manual HDCP
HDCP Manual
HDCP OFF/ON
50767%
Restore default EDID
EDID: initial
50768%
Bypass EDID data from output to
EDID: bypass
Page 24

Compact Scaler Switcher (with PoH)
19
Command
Function
Feedback Example
input
50769%
Upload custom EDID data to the
switcher
EDID: user
50770%
Inquire EDID status
EDID: initial
EDID: bypass
EDID: user
50782%
EDID management, copy the best
resolution data of one output to HDMI
input
EDID manage
Resolution:1920x1080
50787%
Enable serial control mode 1: control
Scaler & far-end from local RS232
RS232 Mode 1: RS232 Control
Scaler & Remote
50788%
Enable serial control mode 2: control
Scaler from local RS232 and far-end)
RS232 Mode 2: RS232 Control
Scaler
50714%
Auto Switch Mode: Disable the
automatic power off function
Auto Switch Mode: Set no input
to power off function: Disable
50715%
Auto Switch Mode: Set the automatic
power off time to 1 minute for No
signal input
Auto Switch Mode: Set no input
to power off time: 1 minute
50716%
Auto Switch Mode: Set the automatic
power off time to 2 minutes for No
signal input
Auto Switch Mode: Set no input
to power off time: 2 minutes
50717%
Auto Switch Mode: Set the automatic
power off time to 5 minutes for No
signal input
Auto Switch Mode: Set no input
to power off time: 5 minutes
50718%
Auto Switch Mode: Set the automatic
power off time to 10 minutes for No
signal input
Auto Switch Mode: Set no input
to power off time: 10 minutes
50719%
Check the automatic power off time
Auto Switch Mode: Set no input
to power off time: 1 minutes
Manual Switch Mode: Set no
input to power off function:
Disable
50740%
Manual Switch Mode: Disable
automatic power off function
Manual Switch Mode: Set no
input to power off time: 0 minutes
Page 25
Compact Scaler Switcher (with PoH)
20
Command
Function
Feedback Example
50741%
Manual Switch Mode: Set the power
off time to 1 minute
Manual Switch Mode: Set no
input to power off time: 1 minute
50742%
Manual Switch Mode: Set the power
off time to 2 minute
Manual Switch Mode: Set no
input to power off time: 2 minutes
50743%
Manual Switch Mode: Set the power
off time to 5 minute
Manual Switch Mode: Set no
input to power off time: 5 minutes
50744%
Manual Switch Mode: Set the power
off time to 10 minute
Manual Switch Mode: Set no
input to power off time: 10
minutes
50697%
Exit standby mode
Wake up!
50797%
Enter standby mode
Go to standby!
50698%
Software update
Software update
50617%
Reset to factory defaults
Factory Reset
Menu Commands
50609%
OK for OSD selection
Key: ok
50610%
LEFT button
Key: left
50611%
RIGHT button
Key: right
50612%
UP button
Key: up
50613%
DOWN button
Key: down
50616%
MENU button (enter OSD)
OSD: Enter
50618%
EXIT button (exit OSD)
OSD: Exit
Inquire Commands
50630%
Check the volume level
Source Volume: xx (xx=00~60)
MIC Volume: xx (xx=00~60)
50631%
Check the input source
Input: xx (xx= HDMI1/ HDMI2/
HDMI3/ DP/ VGA/ YPbPr/ AV)
50632%
Check the output resolution
Resolution: xx (xx=1920×1200/
1920×1080/ 1600×1200/
1360×768/ 1280×800/
1280×720/ 1024×768/1600x900
50633%
Check the image mode
Picture Mode: xx (xx= Dynamic/
Standard/ Mild/ User)
Page 26
Compact Scaler Switcher (with PoH)
21
Command
Function
Feedback Example
50635%
Check the image aspect ratio
Aspect Ratio: xx (xx= 16:9/ 4:3/
auto/)
50636%
Check the brightness
Brightness: xx (xx=00~99)
50637%
Check the contrast
Contrast: xx (xx=00~99)
50638%
Check the saturation
Saturation: xx (xx=00~99)
50639%
Check sharpness
Sharpness: xx (xx=00~99)
50640%
Check the color temperature
Color Temperature: xx
(xx= Cool/ Medium/ Warm/
User.)
50651%
Check Volume Icon display status
Volume Icon: xxxx
50712%
Check the audio input sources for DP
DP Audio from Embedded
50751%
Check whether the Source audio is
mute or not
Source Mute/Unmute
50752%
Check whether the MIC audio is mute
or not
MIC Mute/Unmute
50753%
Check the freeze status
Freeze: enable/disable
50754%
Check the panel locked status
Front Panel Lock/UnLock
50783%
Display statues including MIC, Source
audio, Resolution, Manual/
Auto-switching modes, VGA audio
mute on/off, DP audio status
Source Volume: XX
Mic Volume: XX
Input: XXXX
Resolution: XXXX
LINE Mute/Unmute
MIC Mute/Unmute
Switch status: XXXX
VGA Mute/Unmute
DP Mute/Unmute
DP Audio from
Embedded/External
50657%
Check IP address
192.168.0.178!
50712%
Check DP audio path
DP Audio from
Embedded/External
Page 27
Compact Scaler Switcher (with PoH)
22
Command
Function
Feedback Example
Adjustment Commands
50678%
Enable screen output adjusting
Enter Output Position Adjust
50679%
Disable screen output adjusting
Exit Output Position Adjust
50670%
Move the image to left
Output Position Adjust X xx
50671%
Move the image to right
Output Position Adjust X xx
50672%
Move the image up
Output Position Adjust Y XX
50673%
Move the image down
Output Position Adjust Y xx
50674%
Stretch left from left side (increase
image width)
Output Width Adjust xx
50675%
Pull right from left side (decrease
image width)
Output Width Adjust xx
50676%
Stretch upwards from bottom side
(decrease image height)
Output Height Adjust xx
50677%
Stretch downwards from bottom side
(increase image height)
Output Height Adjust xx
50730%
Turn off HDMI output
HDMI power off
50731%
Turn on HDMI output
HDMI power on
50732%
Turn off HDBT output
HDBT power off
50733%
Turn on HDBT output
HDBT power on
50734%
Turn on HDMI& HDBT output
synchronously
HDMI HDBT power on
CEC Commands
50687%
Disable CEC
HDMI CEC OFF
50686%
Enable CEC
HDMI CEC ON
50901%
Play&pause
CEC cmd: play&pause
50902%
Stop
CEC cmd: stop
50903%
Menu
CEC cmd: menu
50904%
Retreat
CEC cmd: rev
50905%
Forward
CEC cmd: fwd
50906%
Up
CEC cmd: up
50907%
Down
CEC cmd: down
Page 28

Compact Scaler Switcher (with PoH)
23
Command
Function
Feedback Example
50908%
Left
CEC cmd: left
50909%
Right
CEC cmd: right
50910%
Confirm command
CEC cmd: select
50911%
Exit command
CEC cmd: exit
50913%
Source power on
Source power on
50914%
Source power off
Source power off
50920%
TV power on
Display power on
50921%
TV power off
Display power off
Note:
Screen output adjusting avails only when the screen output adjusting is on. Send
command 50678% to turn on.
Under HDCP ON or HDCP OFF mode, the video signal can be switched to HDMI
and HDBaseT output seamlessly, while sending 50791% to set as HDCP Active
mode, the video signal can’t support seamless switching.
CEC commands with grey background avails only when CEC is on.
Page 29
Compact Scaler Switcher (with PoH)
24
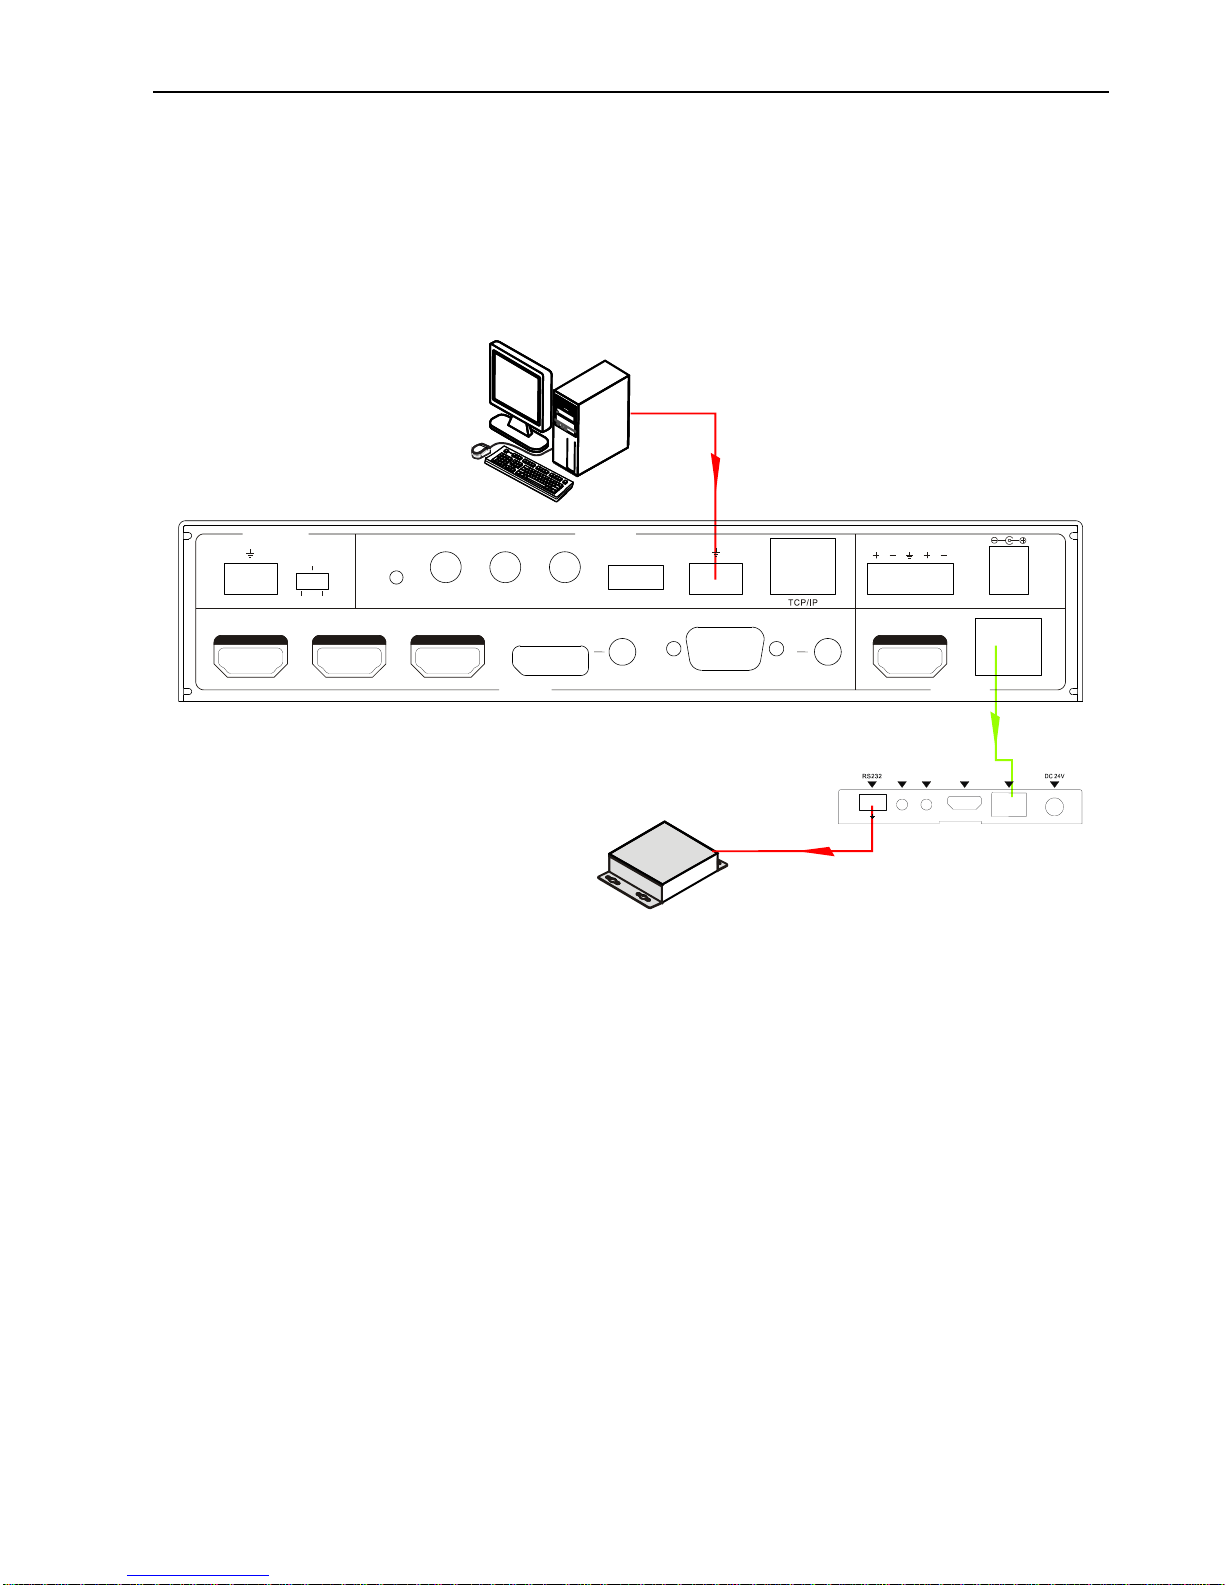
4.3.4 Control MP-SC-5TDS or 3rd Party Device from Local
Firstly, according the following connection diagram to connect all devices as needed.
Secondly, send command 50787% (serial control mode 1, factory default) via RS232
communication software.
Lastly, send the right command of MP-SC-5TDS or other remote RS232 device
connected in present system. Connect as below:
Control MP-SC-5TDS or 3rd party device from local
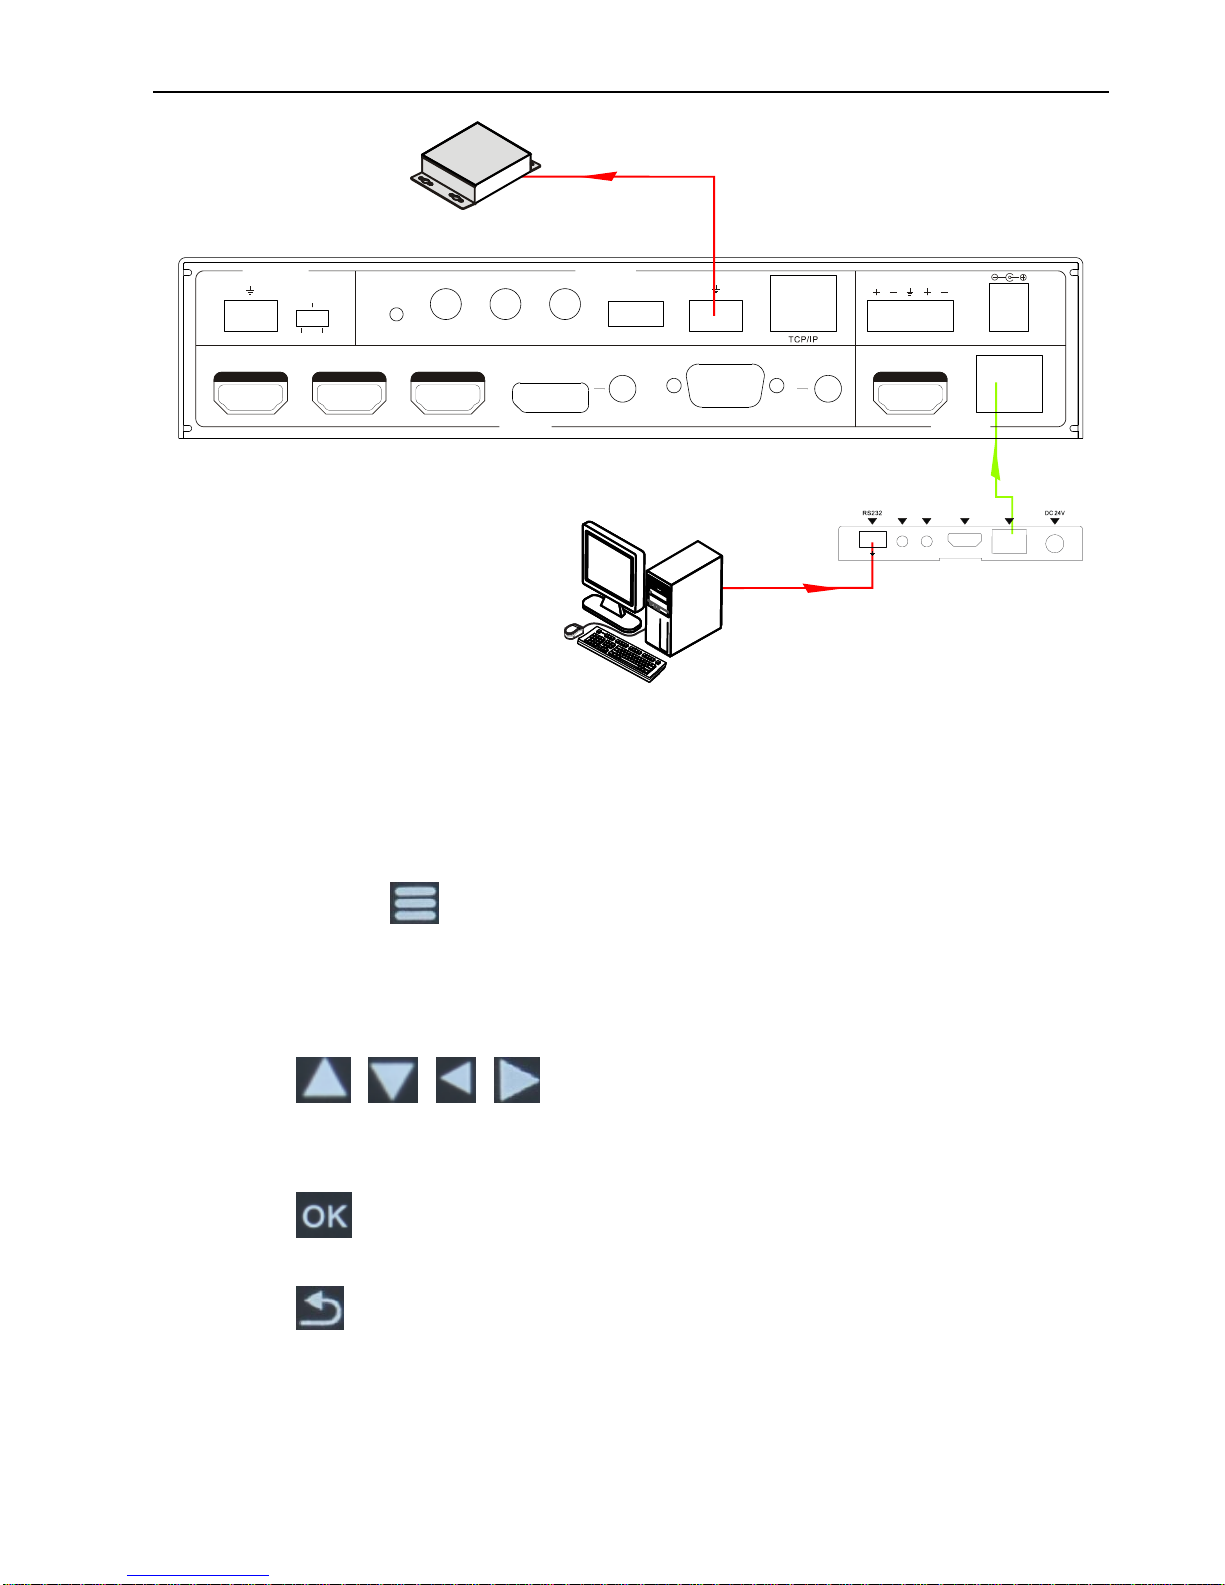
4.3.5 Control MP-SC-5TDS or 3rd party device form Remote
Firstly, according the following connection diagram to connect all devices as needed.
Secondly, send command 50788% via RS232 communication software.
Lastly, send the right command to control MP-SC-5TDS. Connect as below:
3rd party
PC
48V LINE IR EYEIR IN
IR OUT
MIC INPUT
MIC
FIRMWARE AUDIO OUT
L R
RES RESET
RS232
Tx
Rx
L R
INPUTS OUTPUTS
3-HDMI
2-HDMI1-HDMI / MHL 4-DP 5-VGA HDMI
HDBT
CONTROL
DC 24V
I
R
OU
T
IR
I
N
H
DMI
OU
T
HDBT IN
Tx Rx
HDBaseT Receiver
Page 30
Compact Scaler Switcher (with PoH)
25
Control MP-SC-5TDS or 3rd party device from Remote
4.4 OSD Menu Control
MP-SC-5TDS provides a powerful OSD operation menu, contains 3 parts: optional
settings, image settings, and system setting etc.
Press MENU button on IR remote or send command 50616% to enter in OSD
menu, so it is able to do some settings through the OSD menu.
Operation way:
Press , , , on the IR remote to switch between menu options
and menu pages.
Press on the IR remote to confirm the selection.
Press on the IR remote to exit OSD menu.
PC
48V LINE IR EYEIR IN IR OUT
MIC INPUT
MIC
FIRMWARE AUDIO OUT
L R
RES RESET
RS232
Tx
Rx
L R
INPUTS OUTPUTS
3-HDMI
2-HDMI1-HDMI / MHL 4-DP 5-VGA HDMI
HDBT
CONTROL
DC 24V
I
R
OU
T
I
R
IN
H
D
M
I O
U
T
HDBT IN
Tx Rx
HDBaseT Receiver
3rd party
Page 31
Compact Scaler Switcher (with PoH)
26
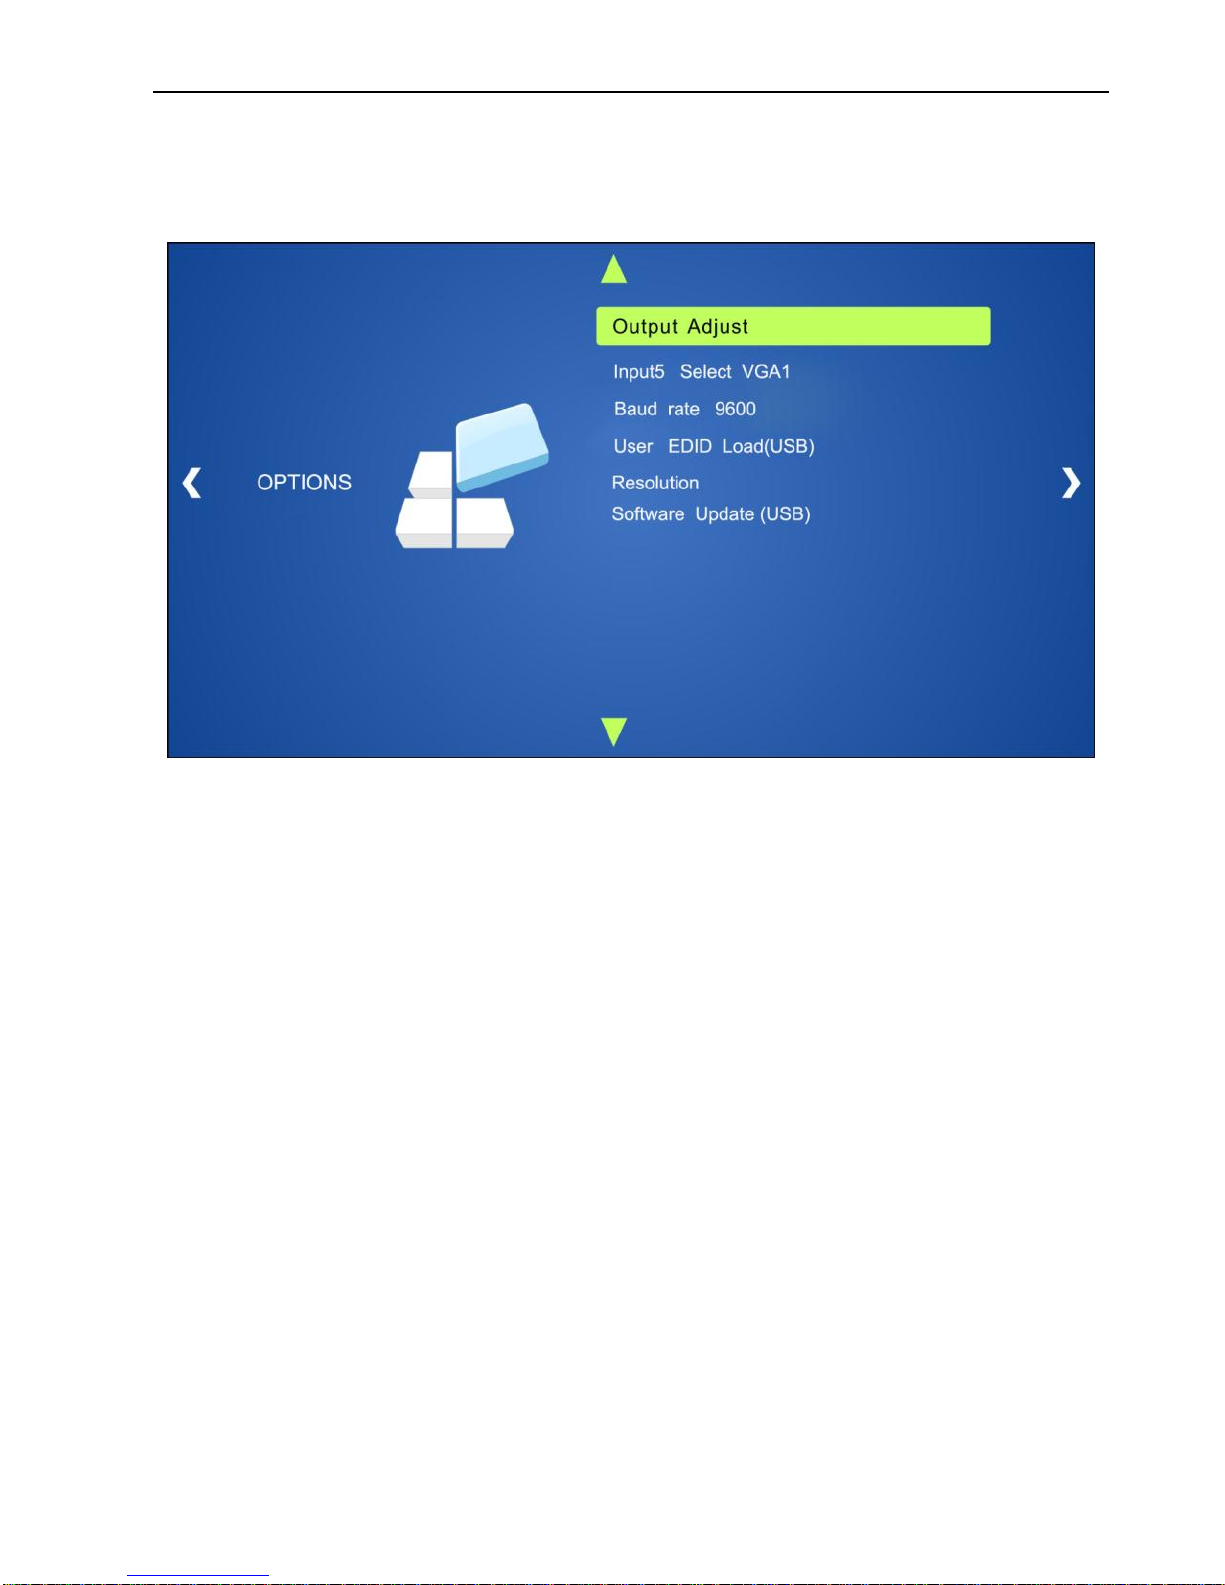
4.4.1 OPTIONS
Includes Output Adjust, Input 5 Select, Baud rate, User EDID Load (USB), Resolution,
and Software Update (USB).
Output Adjust: Adjust output image position (X: horizontal direction and Y: vertical
direction), ratio aspect (width and height), polarity adjustment (H Polarity and V Polarity)
and output setting (HDMI on/off and HDBT on/off).
Input5 Select: Select video source format for VGA input, includes AV 1 (C-video signal),
VGA 1 (VGA signal) and YPbPr 1 (Component video signal).
Baud rate: Set the baud rate for RS232 control, and it support 2400、4800、9600、19200、
38400、57600、115200.
User EDID Load (USB): Insert the USB flash disk with EDID file to FIRMWARE port to
load EDID data through this menu.
RESOLUTION: Set the output resolutions, and it support 1920x1200, 1920x1080,
1600x1200, 1600x900, 1360x768, 1280x800, 1280x720, 1024x768.
Software Update (USB): Insert the USB flash disk with updating file to USB port of
MP-SC-5TDS, to update the software through this menu.
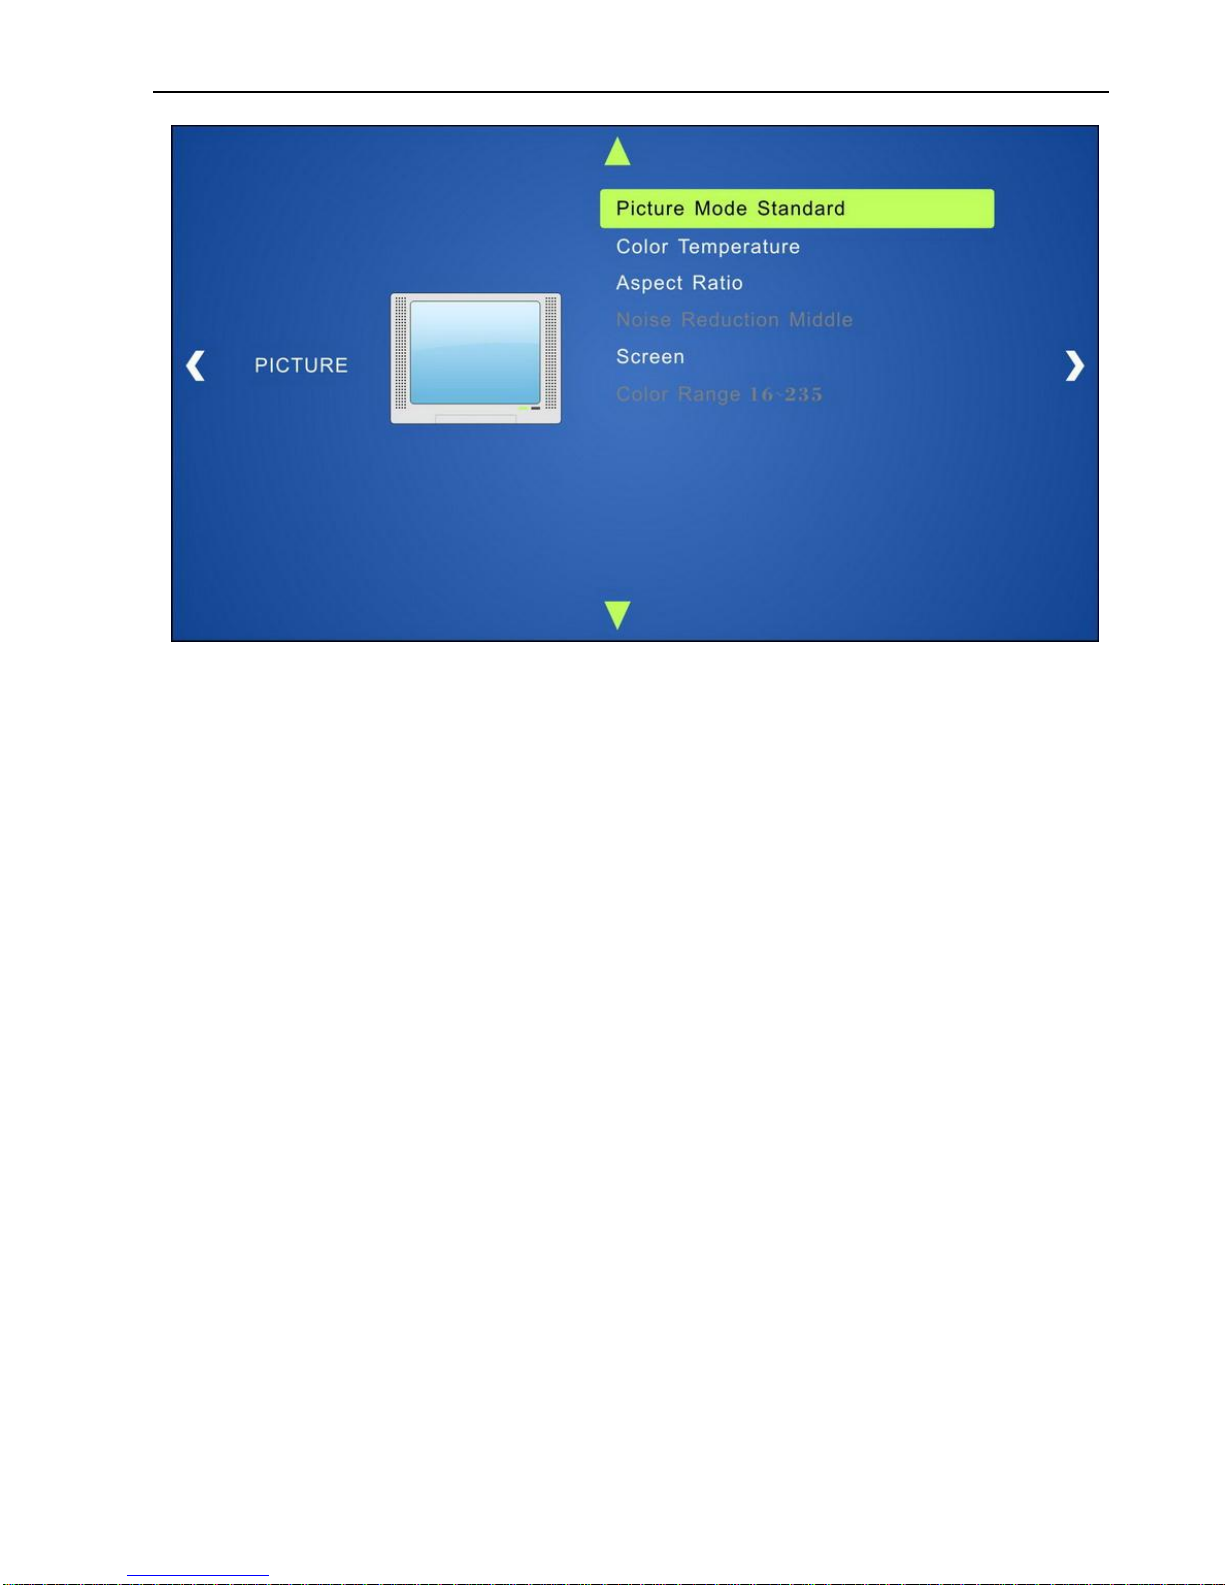
4.4.2 PICTURE
Including Picture Mode, Color Temperature, Aspect Ratio, Noise Reduction, Screen and
Color Range.
Please check the picture below:
Page 32
Compact Scaler Switcher (with PoH)
27
Picture mode: Includes Dynamic, Standard, Mild, and User. Only in User mode,
will it be able to set the image contrast, brightness, color and sharpness.
Color Temperature: Includes Cool, Medium, Warm and User. And only in User
mode, it is able to set values for Red, Green and Blue (RGB).
Aspect Ratio: Includes Native, 4:3, 16:9, Zoom1, Zoom2, Just Scan, and
Panorama. VGA format only supports 4:3, 16:9 and Panorama.
Noise Reduction (not for VGA format): Includes Off, Low, Middle, High and
Default.
Screen: (not for HDMI source): Includes Auto Adjust, Horizontal, Vertical, Size,
and Phase.
Color Range (not for HDMI format): 16~235 or 0~255.
Page 33
Compact Scaler Switcher (with PoH)
28
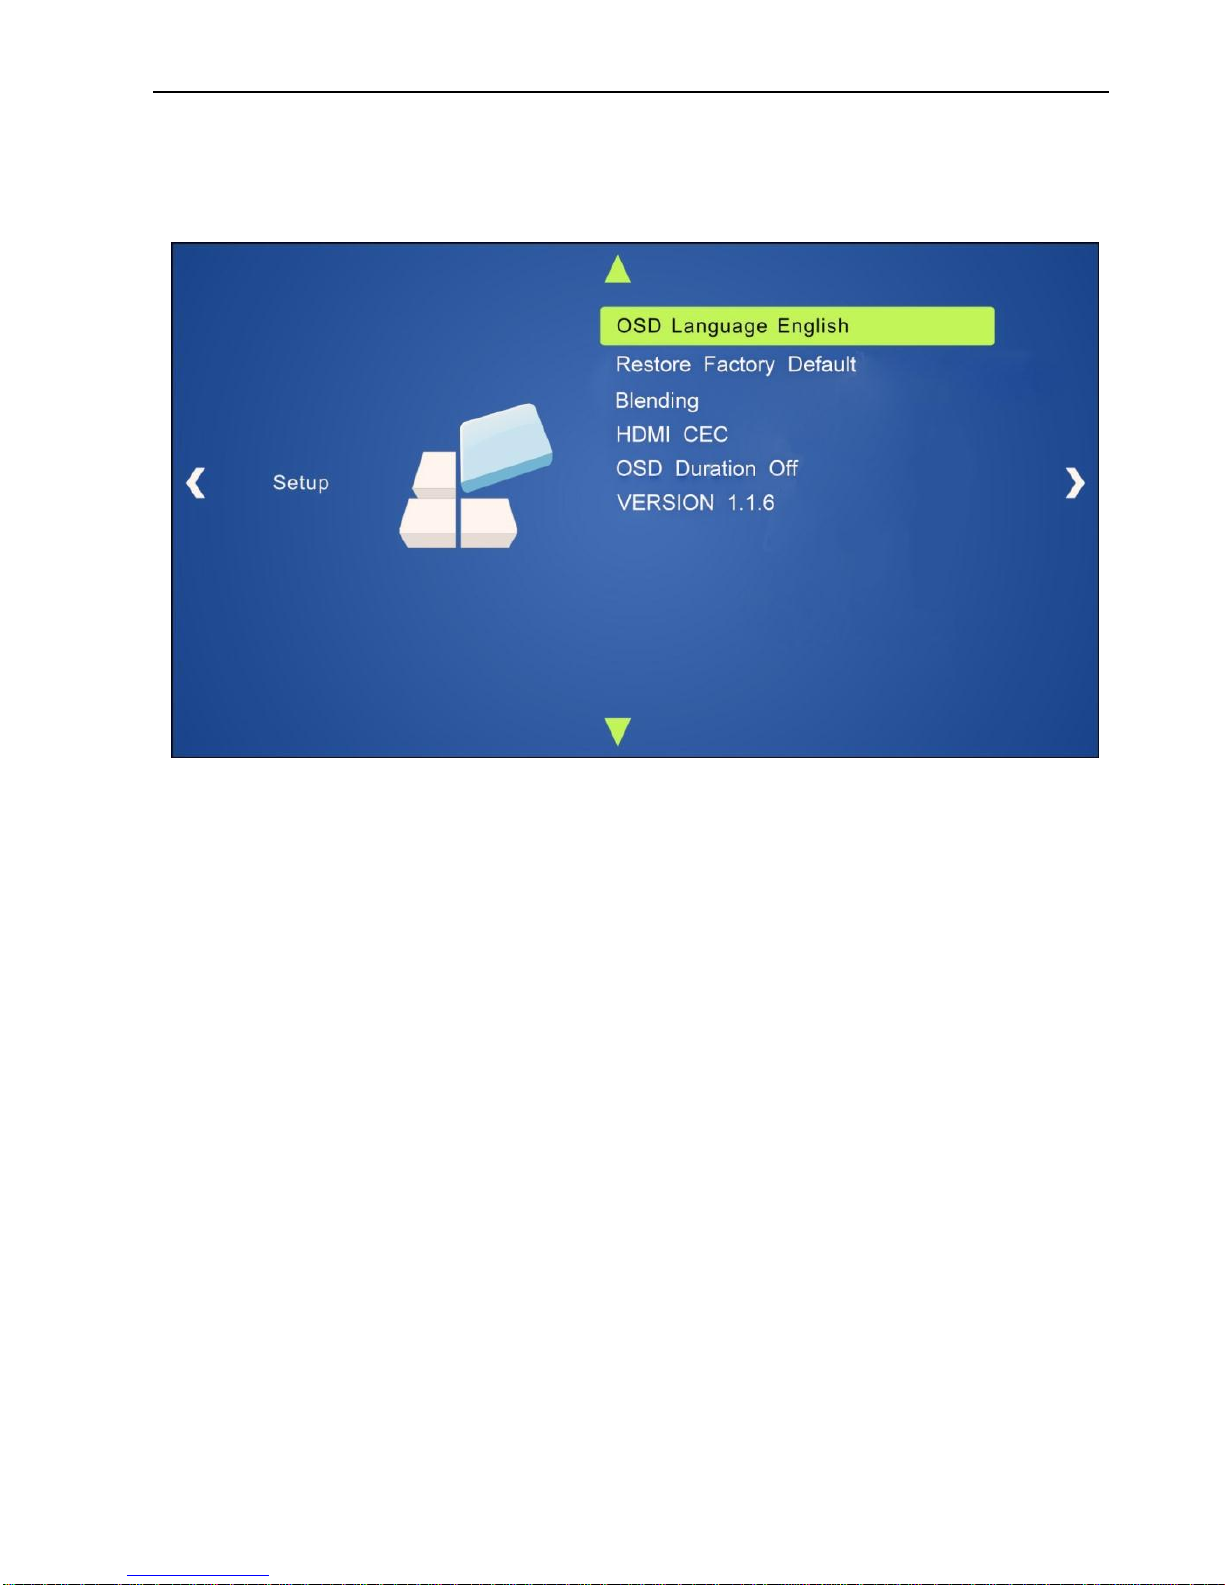
4.4.3 SETUP
Including OSD Language, Restore Factory Default, Blending, HDMI CEC, OSD
Duration and version inquiry
OSD Language: Supports 7 languages, including English (default), Chinese etc.
Restore Factory Default: Restores to original system state
Blending: Includes Low, Middle, High and Off.
HDMI CEC: Enable/disable CEC and auto-standby function. Default: CEC on,
STANDBY on. Only when CEC is on, will it be able to set auto-standby status.
OSD Duration: Includes 5 Sec, 10 Sec, 15 Sec and Off.
VERSION: Displays software version
Page 34

Compact Scaler Switcher (with PoH)
29
4.5 Web-based GUI Control
In addition to control MP-SC-5TDS via front panel button, IR remote and RS232
communication software. MP-SC-5TDS can be controlled via web-based GUI. It allows
users to interact with MP-SC-5TDS through graphical icons and visual indicators.
Type 192.168.0.178 in your browser, it will enter the log-in interface shown as below:
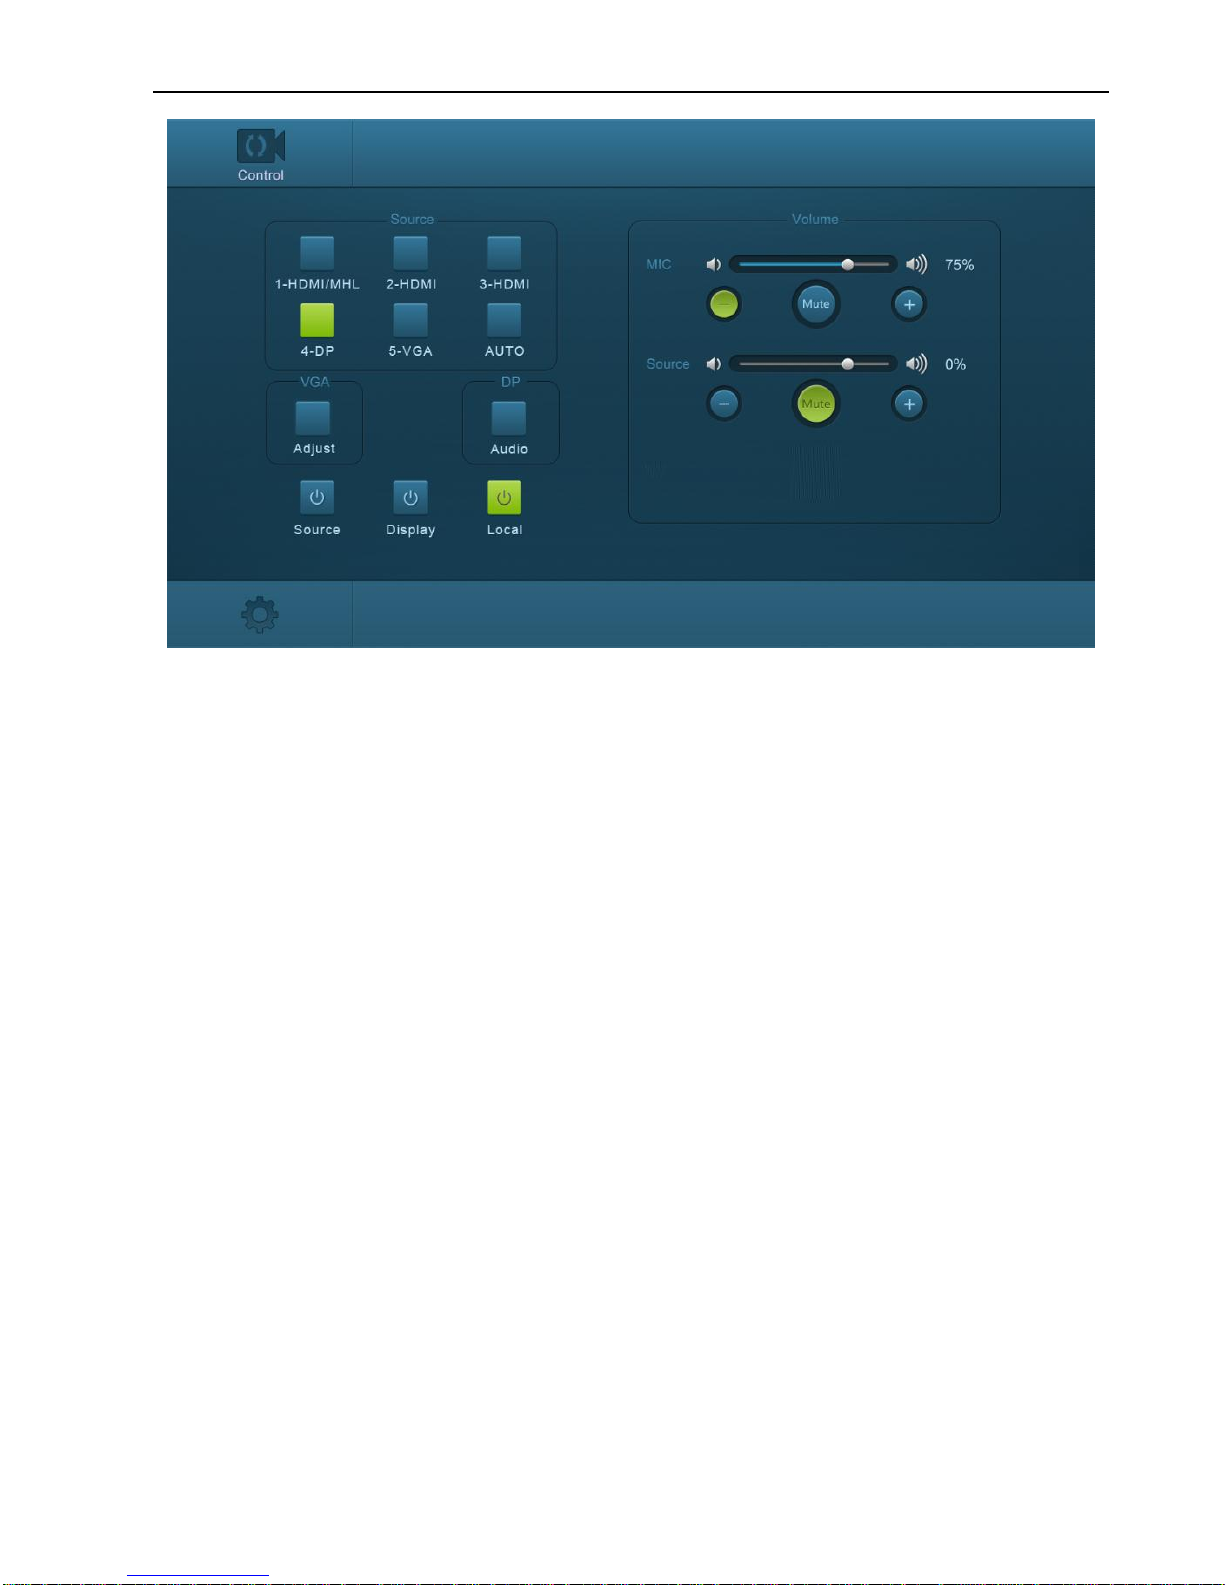
4.5.1 Control Menu
Type user name: user and password: user (default setting) on the log-in interface, and
then click Login to enter Control menu shown as below:
Page 35
Compact Scaler Switcher (with PoH)
30
Sources: Click the corresponding button (1-HDMI/MHL, 2-HDMI, 3-HDMI, 4-DP,
and 5-VGA) to select video input source.
VGA: Click Adjust to adjust the position of VGA video output image to make sure
the best visual effect.
DP: Click Audio to turn on/off the DP external audio input.
Volume: Click the corresponding positive/negative button to increase/decrease the
volume of microphone audio or source audio input. Click the corresponding Mute
button to mute/unmute microphone audio or source audio input.
Click Source to turn on/off input source device.
Click Display to turn on/off output display device.
Click Local to let MP-SC-5TDS into standby mode.
Page 36
Compact Scaler Switcher (with PoH)
31
4.5.2 Configuration Menu
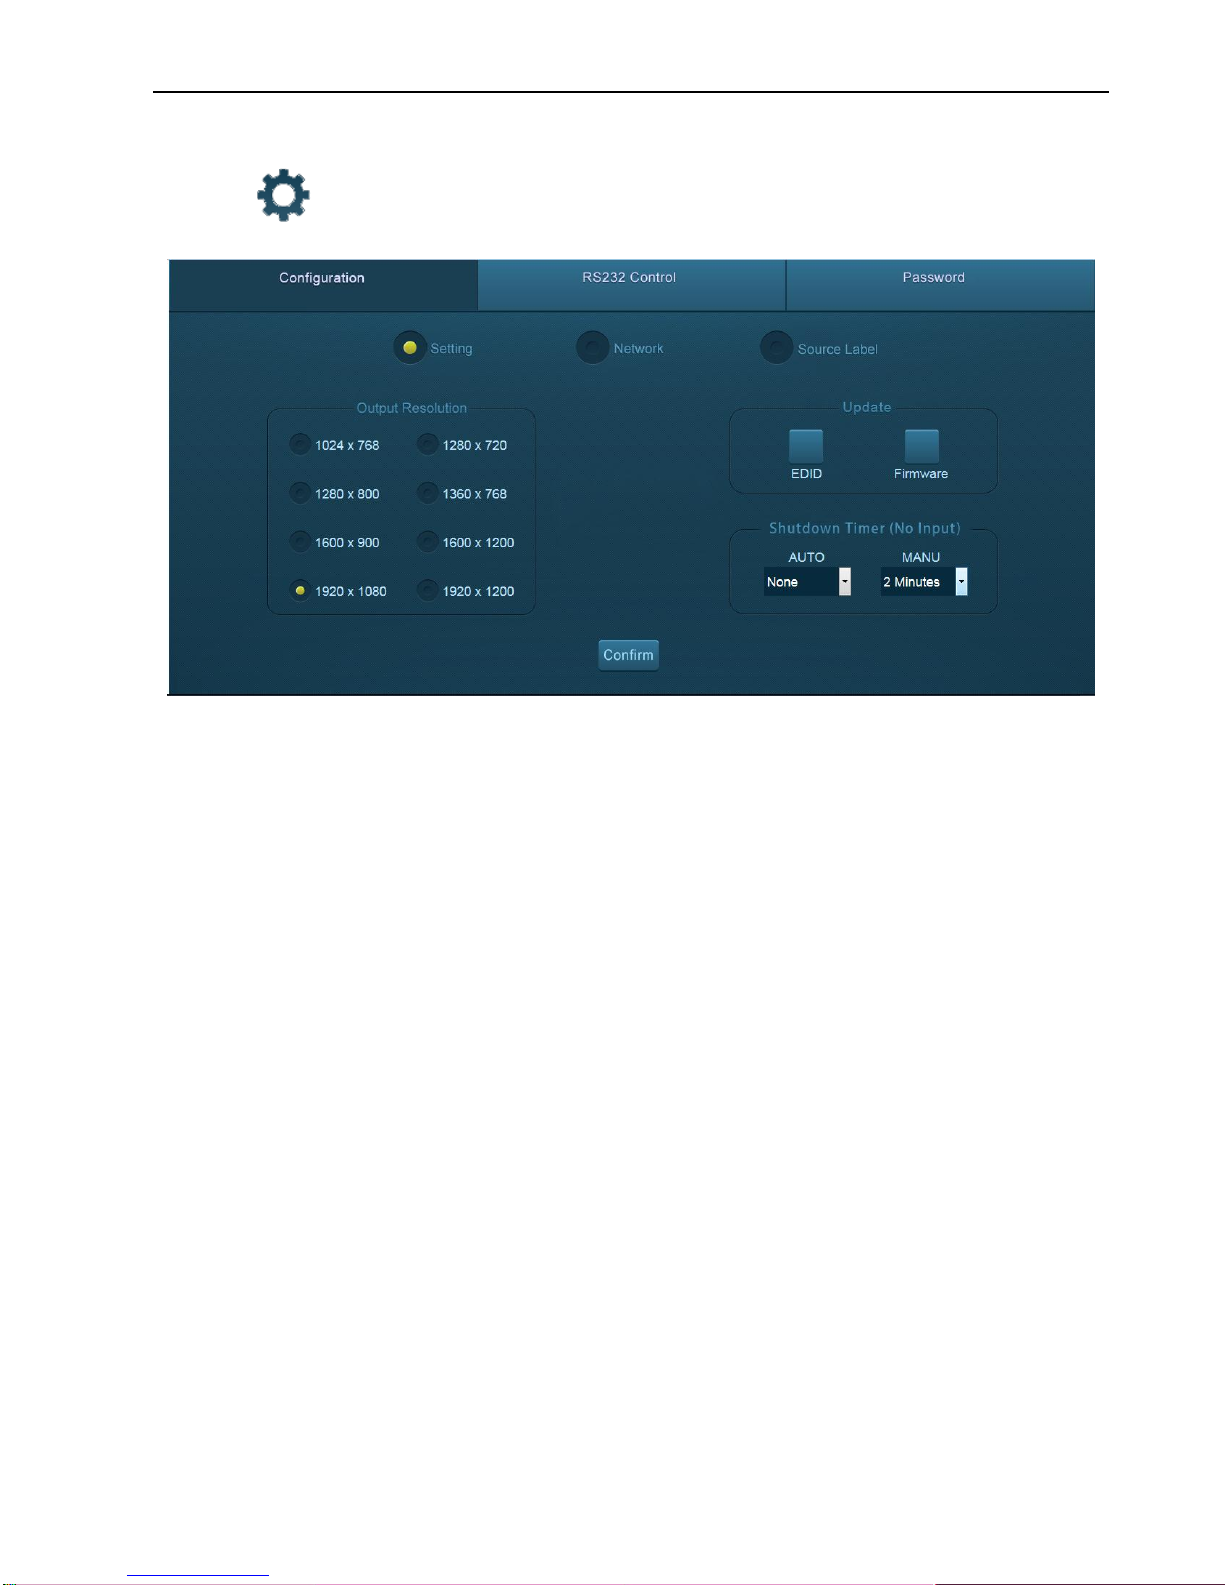
1. Click on control menu to enter setting menu shown as below:
Output Resolution: Select the output resolution that you need and then click
Confirm.
Update: Insert the USB flash disk with EDID file/software updating file to
FIRMWARE port, and then click EDID/Firmware to start update procedure.
Shutdown Timer(NO Input):Set the shutdown time under manual-switching
mode or auto-switching mode, including none, 1 minute, 2minutes, 5minutes and
10 Minutes. If MP-SC-5TDS can’t detect video source input, it will automatically
shut down after a preset interval.
Page 37
Compact Scaler Switcher (with PoH)
32
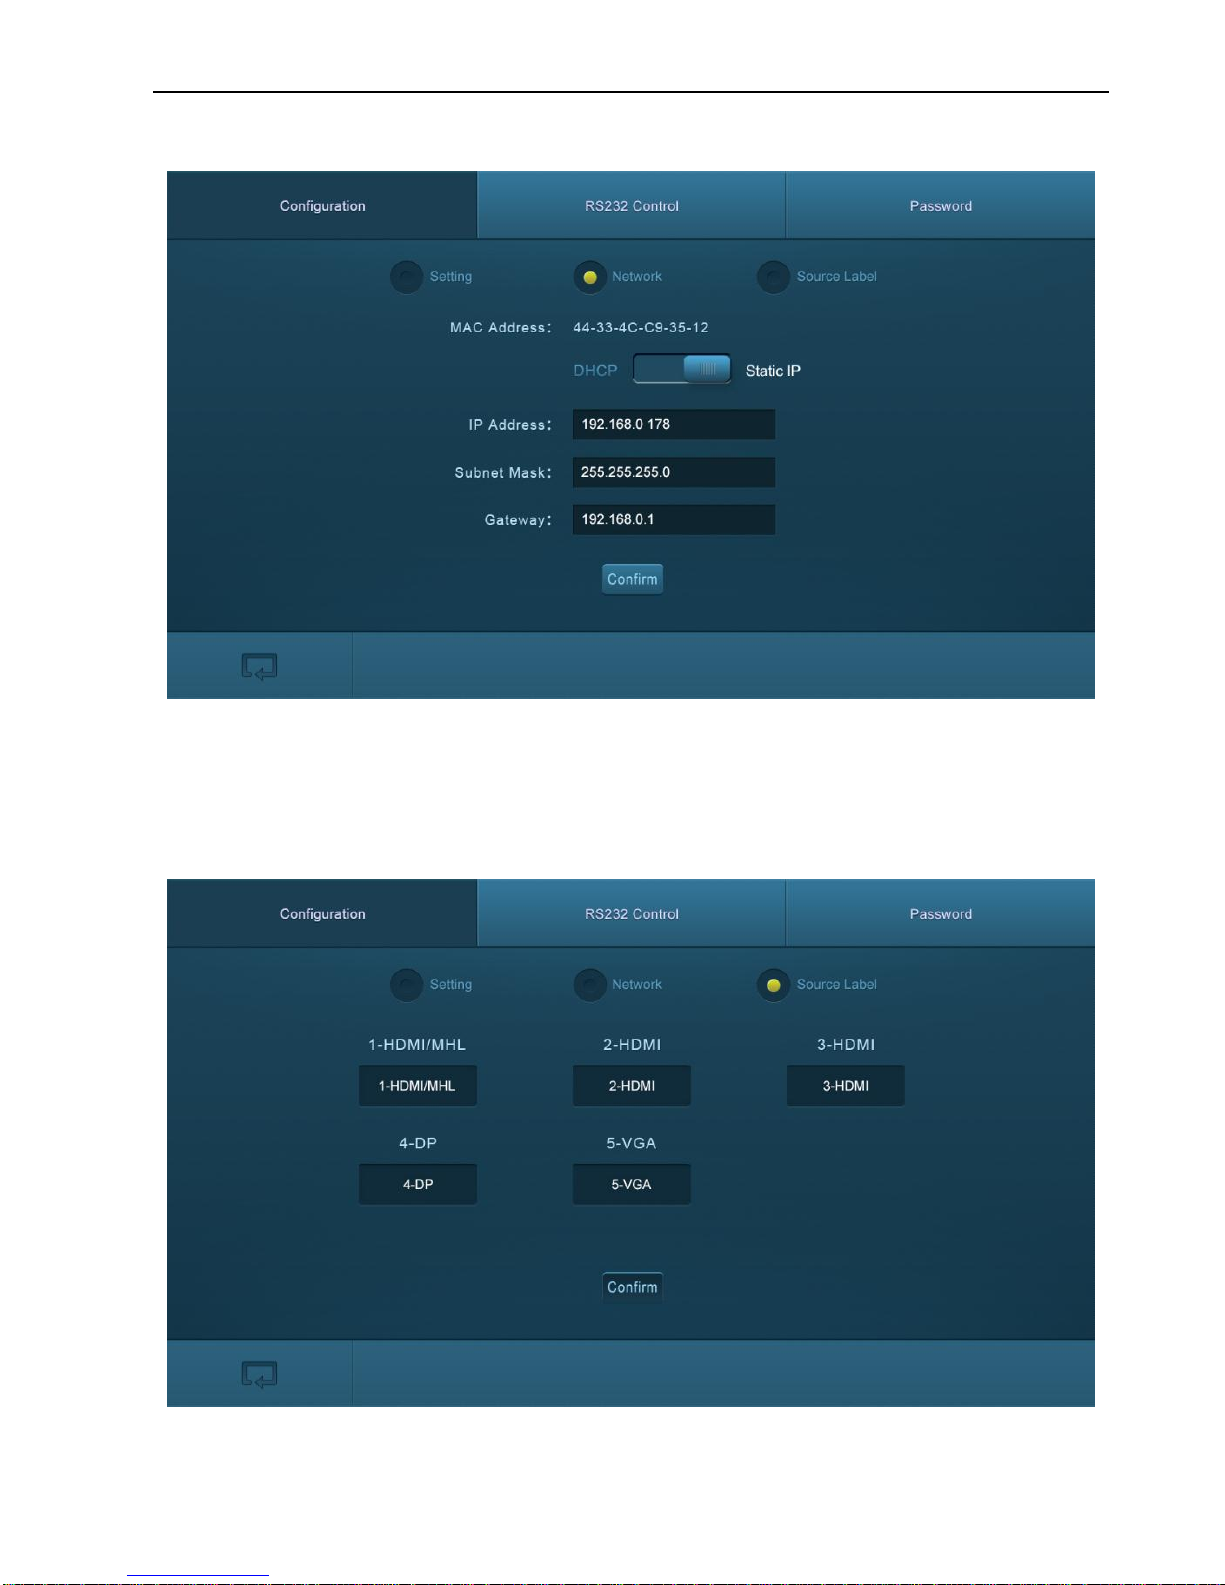
2. Click Network to enter network setting menu shown as below:
In this interface, dynamic or static IP mode can be selected. Under static IP mode, IP
address and subnet mask, gateway can be set and make sure the IP addresses are
different to avoid IP conflict.
3. Click Source Label to enter source label setting menu shown as below:
In this interface, the name of source input selection button can be modified as you need.
Page 38
Compact Scaler Switcher (with PoH)
33
4.5.3 RS232 Control Menu
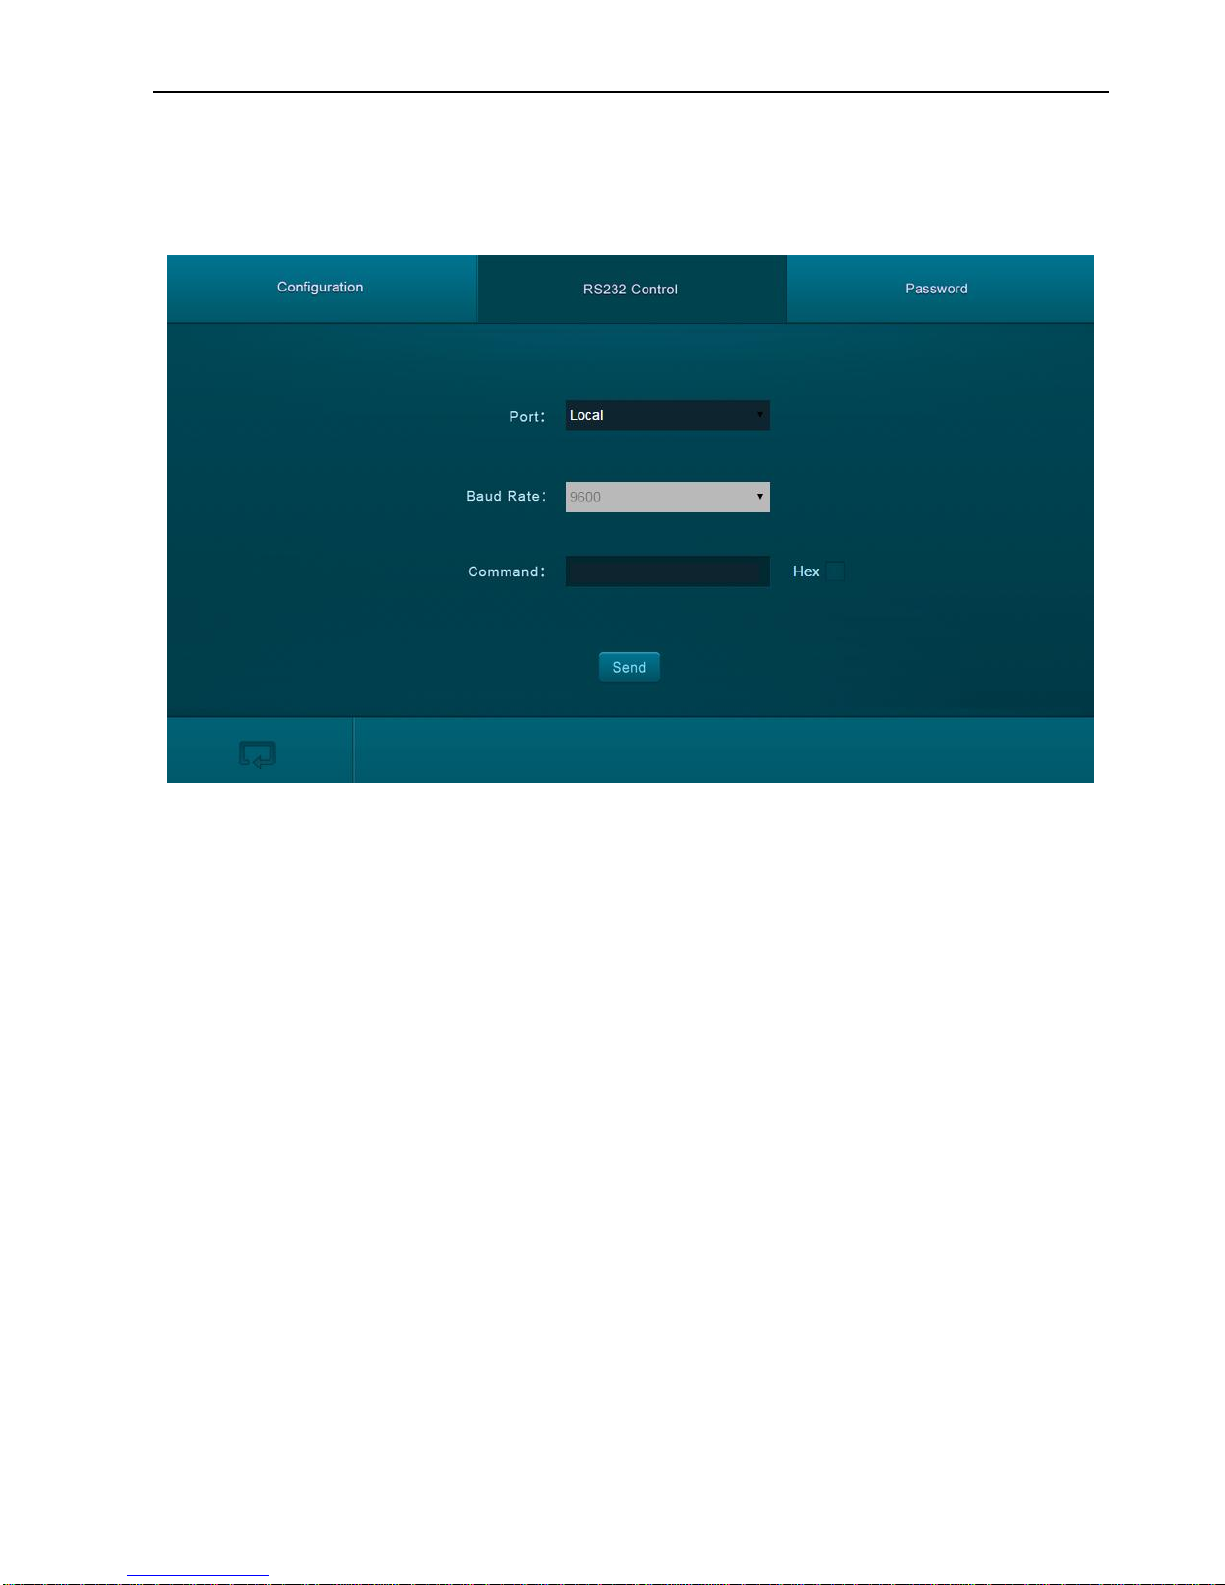
Click RS232 Control on the top of interface to enter RS232 control menu shown as
below:
Port: Local port refers to the RS232 port of MP-SC-5TDS, and the HDBT port
refers to the RS232 port of HDBaseT Receiver.
Baud Rate: The baud rate of local port is 9600 which can’t be modified, but for
HDBT port, it support 2400、4800、9600、19200、38400、57600、115200.
Command: Typing commands in this box to control MP-SC-5TDS or the far-end
device which is connected to HDBaseT Receiver. If checked the “Hex”, you can
enter hexadecimal value in the “Command” box.
Page 39
Compact Scaler Switcher (with PoH)
34
4.5.4 Password Menu
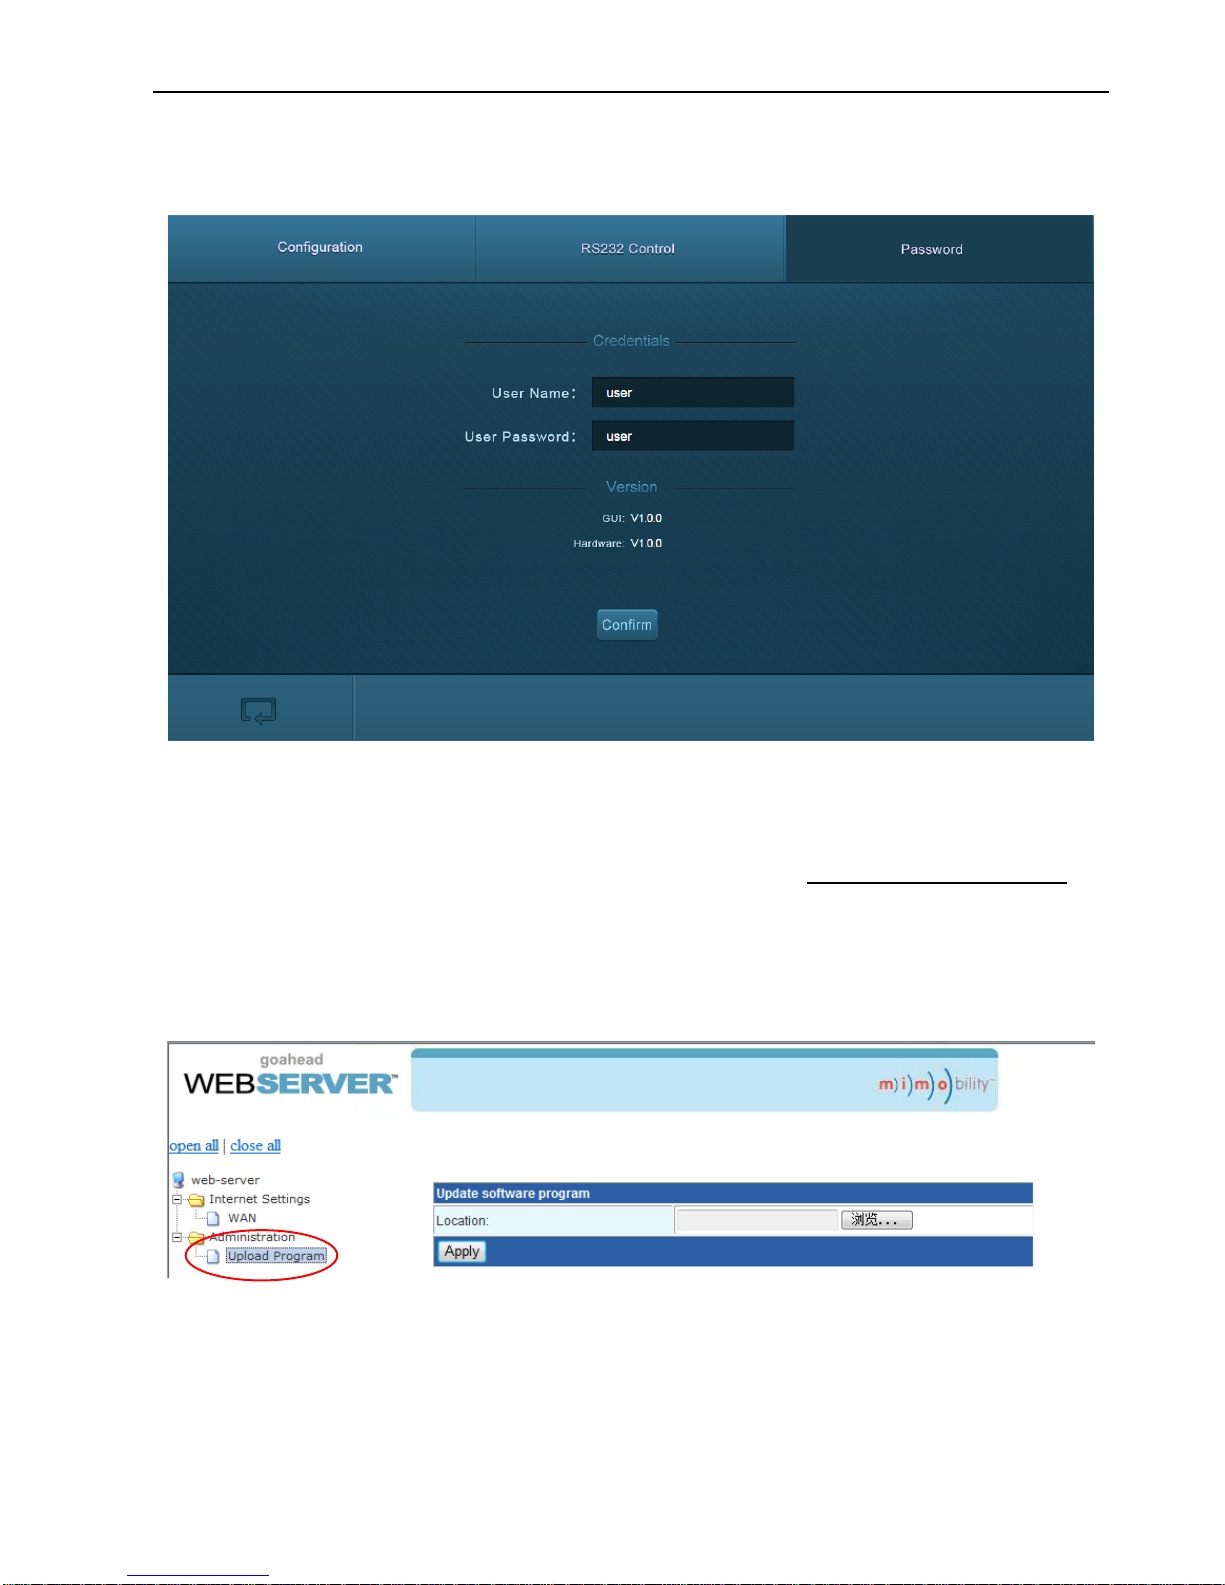
Click Password on the top of interface to enter password menu shown as below:
In this interface, the user name and password can be modified as you need.
4.5.5 Web-based GUI Update
Web-based GUI for MP-SC-5TDS supports online update in http://192.168.0.178:100.
Type the username and password (the same as the GUI log-in settings, modified
password will be available only after rebooting) to log in the configuration interface. After
that, click Administration at the source menu to get to Upload Program as shown
below:
Figure 4- 19 GUI Update
Select the desired update file and press Apply, it will start upgrading then.
Page 40
Compact Scaler Switcher (with PoH)
35
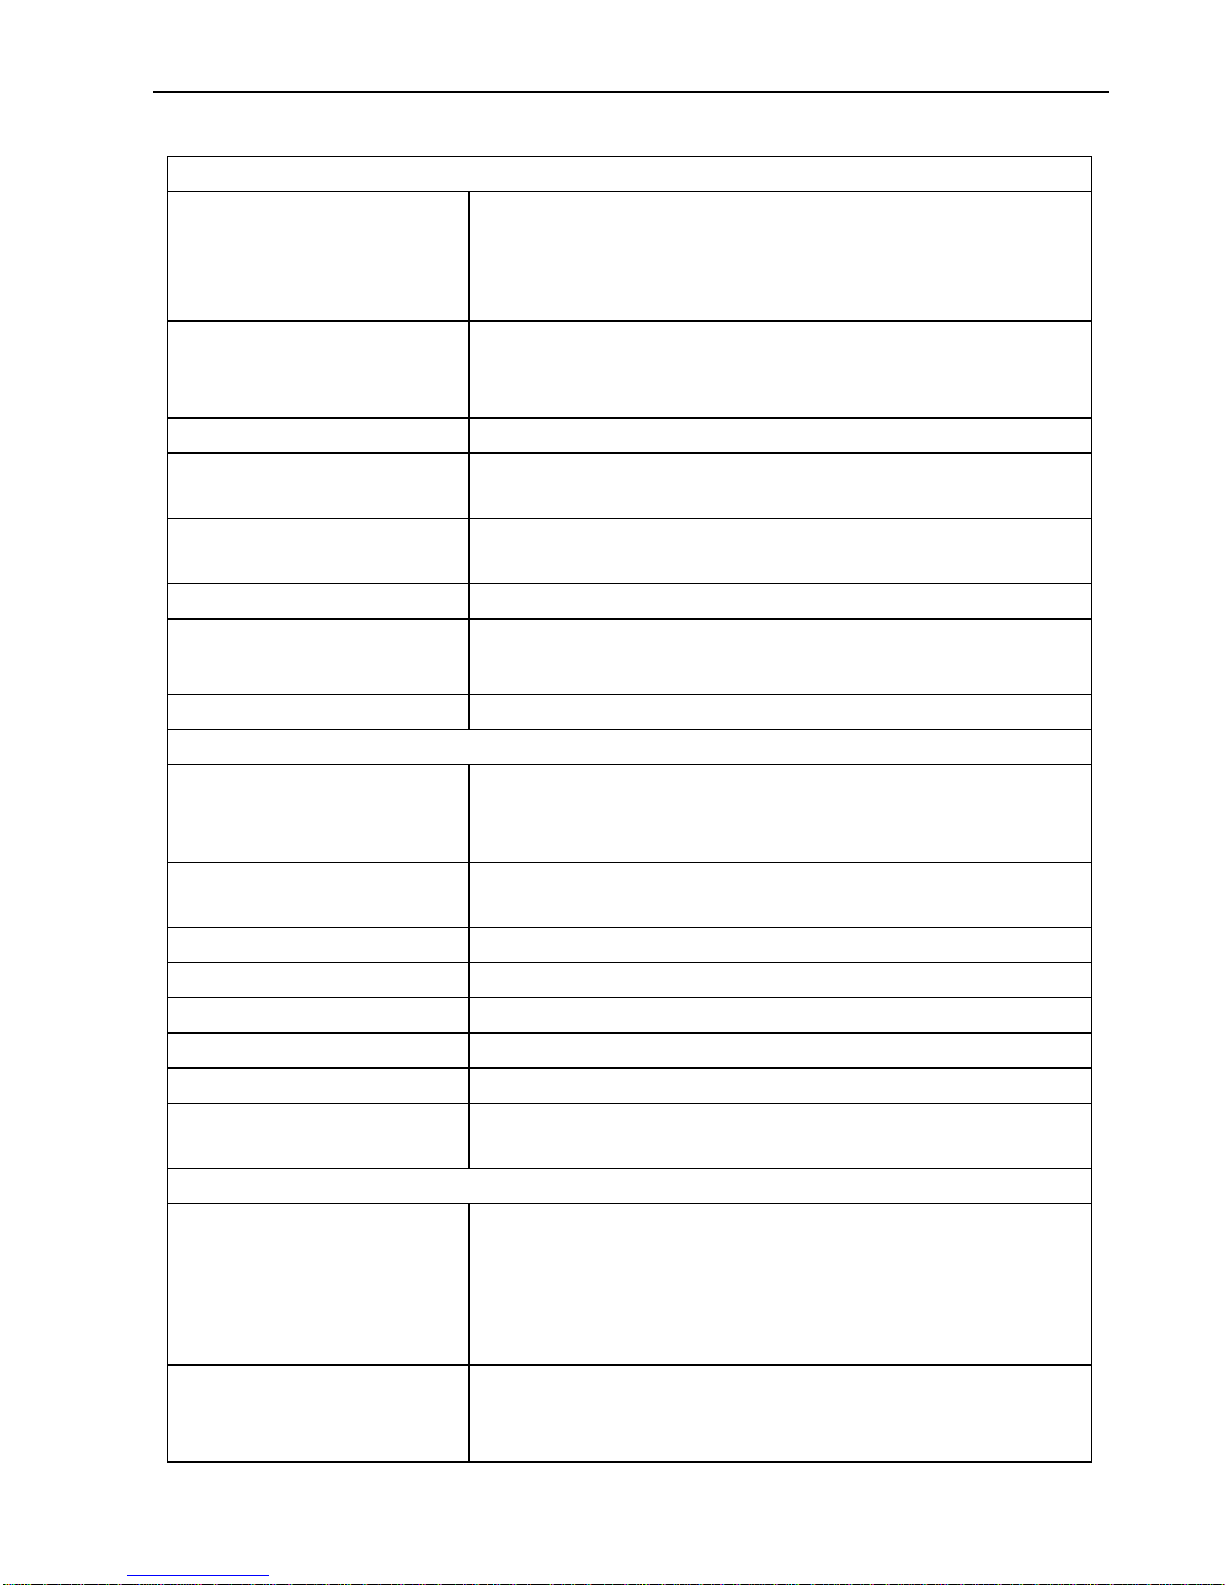
5. Specification
Video
Video input
1 HDMI/MHL;
2 HDMI;
1 DP;
1 VGA
Video Input Connector
3 female HDMI;
1 DisplayPort;
1 female VGA (15-pin)
Input Video Signal
HDMI, DP, YPbPr, C-video, VGA
Video Output
1 HDMI;
1 HDBaseT
Video Output Connector
1 female HDMI;
1 RJ45
Output Video Signal
HDMI,HDBaseT
Output Resolution
1920x1200, 1920x1080, 1600x1200, 1600x900,
1360x768, 1280x800, 1280x720, 1024x768.
Standards
Compliant with HDMI 1.4 & HDCP2.2
Audio
Audio Input
1 stereo audio input for DP
1 stereo audio input for VGA
1 Microphone audio
Audio Input Connector
2 3.5mm Stereo jacks
1 3-Pin phoenix connector
Audio Input Impedance
>10kΩ
Audio Output
1 Dual-Mono analog audio
Audio Output Connector
1 5-Pin phoenix connector
Audio Output Impedance
70Ω
Frequency Response
20Hz~20K Hz
Stereo Channel
Separation
>80dB @1KHz
Control Part
Control port
1 IR IN,
1 IR OUT,
1 IR EYE,
1 RS232,
1 TCP/IP
Control Connector
3 3.5mm mini jack;
1 3-Pin phoenix connectors;
1 RJ45
Page 41

Compact Scaler Switcher (with PoH)
36
General
Transmission Distance
1080P≤70m(Cat6)
Temperature
0 ~ +50℃
Humidity
10% ~ 90%
Power Supply
DC24V 2.71A
Power Consumption
27W
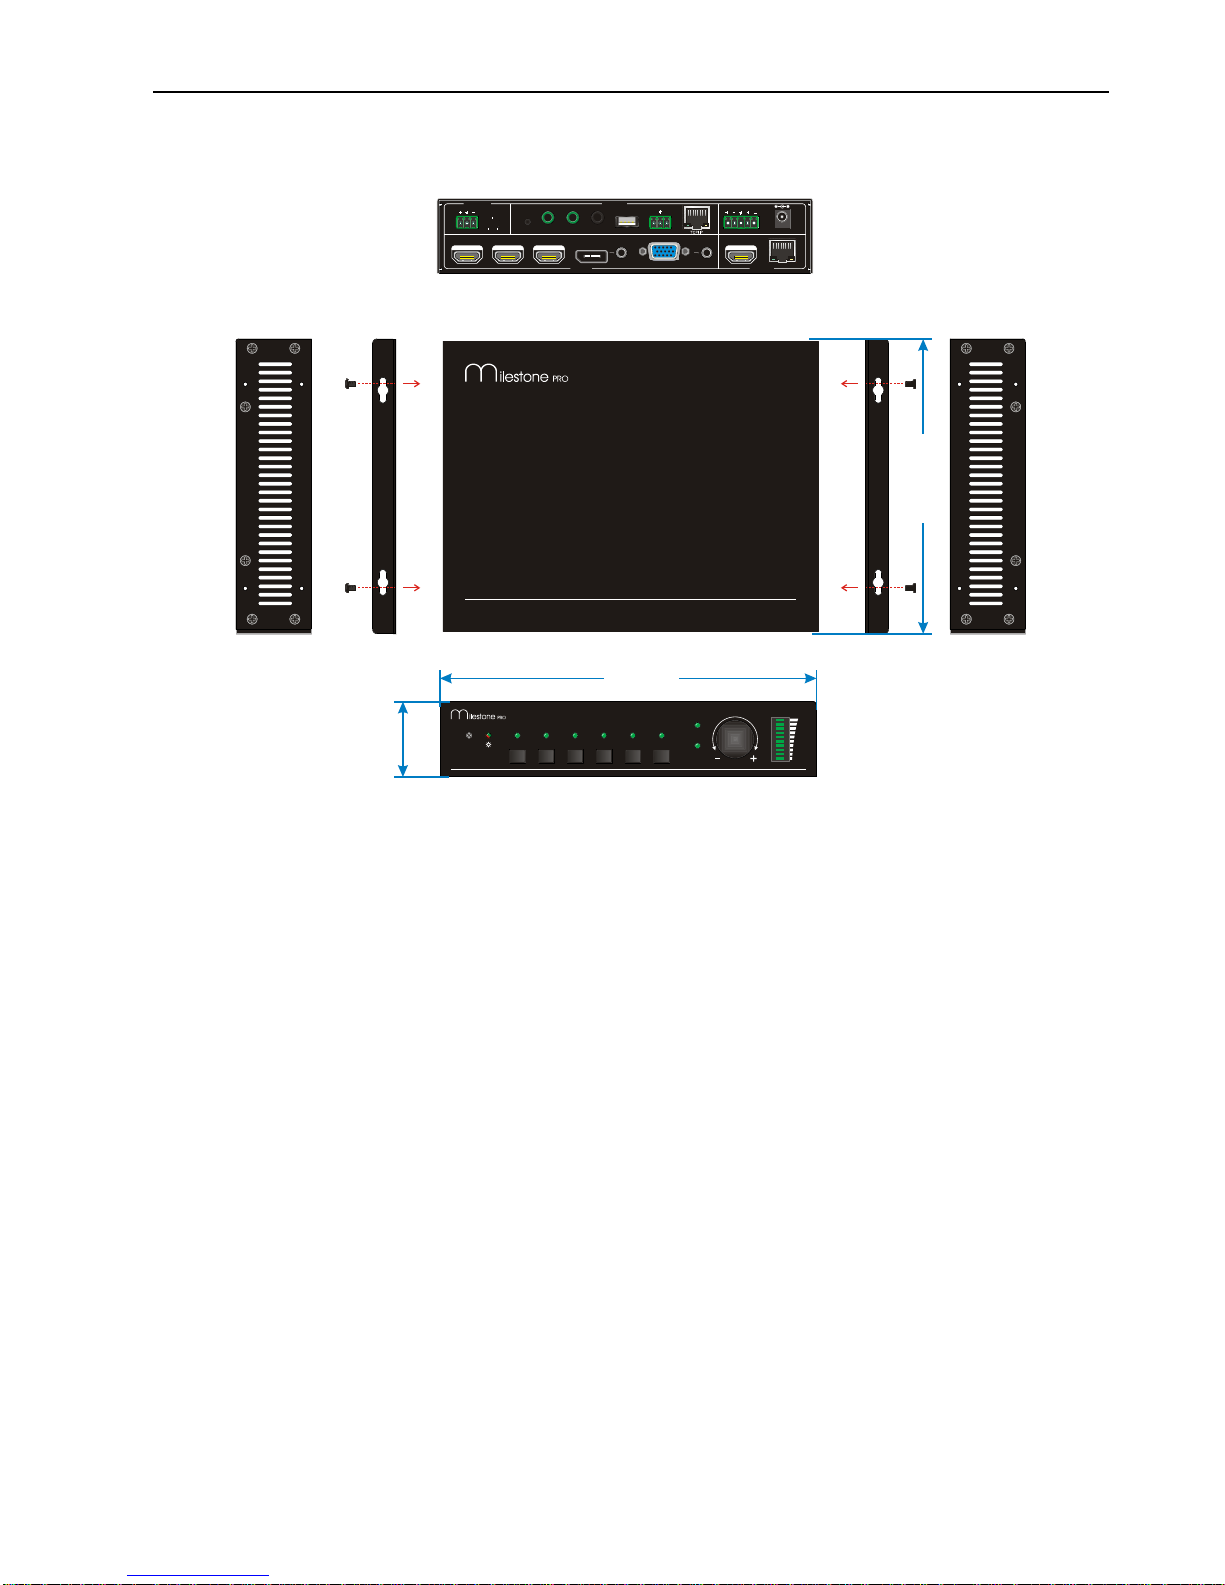
Dimension (W*H*D)
220mm x 44mm x 172.5mm
Weight
800g
Page 42
Compact Scaler Switcher (with PoH)
37
6. Panel Drawing
5-in put Se amless Scaler Switcher wi th HDB aseT
MP-SC-5TDS
MP-SC- 5TDS
SOURCE
MIC
VOLUME
IR 1-H DMI/MHL 5-VGA4-DP3-HDMI2-HDMI AUTO
DC 24V 48V
LINE IR EYEIR IN IR OUT
MIC INPU T
MIC
FIRMWARE
AUDIO OUT
L R
RES RESET
RS232
Tx
Rx
INPUTS OUTP UTS
3-HDMI2-HDMI1 -HDMI / MHL 4-DP 5-VGA HDMI
HDBT
CONTRO L
220 mm
1
7
2
.5 m
m
4
4
m
m
Page 43

Compact Scaler Switcher (with PoH)
38
7. Troubleshooting & Maintenance
Problems
Causes
Solutions
Output image with
snowflake
Bad quality of the
connecting cable
Try another high quality
cable.
Fail or loose connection
Make sure the connection
is good
No output image when
switching
No signal at the input /
output end
Check with oscilloscope or
multimeter if there is any
signal at the input/ output
end.
Fail or loose connection
Make sure the connection
is good
The switcher is broken
Send it to authorized
dealer for repairing.
POWER indicator doesn’t
work or no respond to any
operation
Fail connection of power
cord.
Make sure the power cord
connection is good.
EDID management does
not work normally
The HDMI cable is broken
at the output end.
Change for another HDMI
cable which is in good
working condition.
Static becomes stronger
when connecting the video
connectors
Bad grounding
Check the grounding and
make sure it is connected
well.
Cannot control the device
by control device (e.g. a
PC) through RS232 port
Wrong RS232
communication parameters
Type in correct RS232
communication
parameters.
Broken RS232 port
Send it to authorized
dealer for checking.
Cannot control the device
by front panel buttons while
can control it through
RS232 port
The front panel buttons are
locked
Send command 50605% to
unlock the front panel
buttons.
Page 44

Compact Scaler Switcher (with PoH)
39
Cannot control the device
by RS232 / IR remote /
front panel buttons
The device has already
been broken.
Send it to authorized
dealer for repairing.
If your problem persists after following the above troubleshooting steps, seek further
help from authorized dealer or our technical support.
Page 45

Compact Scaler Switcher (with PoH)
40
8. After-sales Service
If there appear some problems when running MP-SC-5TDS, please check and deal with
the problems referring to this user manual. Any transport costs are borne by the users
during the warranty.
1) Product Limited Warranty: We warrants that its products will be free from defects
in materials and workmanship for three years, which starts from the first day you
buy this product (The purchase invoice shall prevail).
Proof of purchase in the form of a bill of sale or receipted invoice which is evidence
that the unit is within the Warranty period must be presented to obtain warranty
service.
2) What the warranty does not cover:
Warranty expiration.
Factory applied serial number has been altered or removed from the product.
Damage, deterioration or malfunction caused by:
Normal wear and tear
Use of supplies or parts not meeting our specifications
No certificate or invoice as the proof of warranty.
The product model showed on the warranty card does not match with the
model of the product for repairing or had been altered.
Damage caused by force majeure.
Servicing not authorized.
Any other causes which does not relate to a product defect
Delivery, installation or labor charges for installation or setup of the product
3) Technical Support: Email to our after-sales department or make a call, please
inform us the following information about your cases.
Product version and name.
Detailed failure situations.
The formation of the cases.
Remarks: For any questions or problems, please try to get help from your local
distributor.
Page 46

Page 47

Page 48

 Loading...