

Page 1

Milestone Systems
XProtect® Transact Administrator's Guide
Page 2

Milestone XProtect® Transact
Administrator's Guide
www.milestonesys.com Contents
Contents
TARGET AUDIENCE ......................................................................... 6
INTRODUCTION................................................................................ 7
PRODUCT OVERVIEW ........................................................................................... 7
INTERACTION WITH SOURCES AND SURVEILLANCE SOLUTIONS ................................ 7
SYSTEM REQUIREMENTS ............................................................... 9
INSTALLATION AND LICENSING .................................................. 10
LICENSING ....................................................................................................... 10
INSTALL THE SOFTWARE .................................................................................... 10
UPGRADE FROM A PREVIOUS VERSION ................................................................ 11
REGISTER SLC ................................................................................................ 12
OBTAINING ADDITIONAL LICENSES ...................................................................... 12
GETTING STARTED ....................................................................... 14
ADMINISTRATION .......................................................................... 15
MANAGING SERVER SERVICE SETTINGS .............................................................. 15
SOURCES AND CONFIGURATIONS ....................................................................... 16
Different source providers ................................................................................................ 16
Reader-friendly data through configurations .................................................................. 17
Advanced event features ................................................................................................... 18
MANAGING SOURCES ........................................................................................ 18
Add a new source ............................................................................................................... 18
Edit a source ....................................................................................................................... 19
Delete a source ................................................................................................................... 19
Suspend/resume a source ................................................................................................ 19
Page 3

Milestone XProtect® Transact
Administrator's Guide
www.milestonesys.com Contents
Refresh the status of sources ........................................................................................... 19
The Create/Edit Source window ....................................................................................... 19
MANAGING CONFIGURATIONS ............................................................................ 22
Create a configuration ....................................................................................................... 23
An example configuration ................................................................................................. 23
Capture transaction data ................................................................................................... 26
Edit a configuration............................................................................................................ 27
Copy a configuration ......................................................................................................... 28
Export/import a configuration ........................................................................................... 29
Omit characters in a source's configuration ................................................................... 29
Use substitutions ............................................................................................................... 30
Add line breaks ................................................................................................................... 31
Use start and stop masks .................................................................................................. 31
The Create/Edit Configuration window ............................................................................ 32
The Edit Filter window ....................................................................................................... 34
The Select Input Source window ...................................................................................... 35
MASTER/SLAVE SETUP ...................................................................................... 36
Manage master/slave setup .............................................................................................. 37
Define a master server ....................................................................................................... 38
EVENTS AND EVENT GROUPS ............................................................................. 38
Manage events .................................................................................................................... 39
Manage event groups ........................................................................................................ 41
Create a generic event triggered by transaction data .................................................... 43
Test events .......................................................................................................................... 44
STORAGE AND LICENSING SETTINGS ................................................................... 47
XPROTECT TRANSACT SERVER SERVICE MENU...................... 48
VIEW TRANSACTIONS .................................................................. 49
INTEGRATE WITH XPROTECT CORPORATE .......................................................... 49
Page 4

Milestone XProtect® Transact
Administrator's Guide
www.milestonesys.com Contents
CREATE A VIEW WITH TRANSACTIONS IN THE XPROTECT SMART CLIENT ............... 51
BACK UP AND RESTORE THE TRANSACT DATABASE ............. 54
BACK UP .......................................................................................................... 54
About the SQL Server transaction log ............................................................................. 54
PREREQUISITES ................................................................................................ 54
BACK UP THE DATABASE ................................................................................... 55
RESTORE THE DATABASE .................................................................................. 56
REMOVE THE SOFTWARE ............................................................ 57
REMOVE THE SOFTWARE FROM WINDOWS AND THE DOWNLOAD MANAGER .......... 57
REMOVE THE SQL SERVER EXPRESS DATABASE ................................................ 57
GET HELP ....................................................................................... 58
GLOSSARY ..................................................................................... 59
INDEX .............................................................................................. 62
Page 5

Milestone XProtect® Transact
Administrator's Guide
www.milestonesys.com
Copyright, trademarks and disclaimer
Copyright, trademarks and disclaimer
Copyright
2012 Milestone Systems A/S.
Trademarks
XProtect is a registered trademark of Milestone Systems A/S.
Microsoft and Windows are registered trademarks of Microsoft Corporation. App Store is a service
mark of Apple Inc. Android is a trademark of Google Inc.
All other trademarks mentioned in this document are trademarks of their respective owners.
Disclaimer
This text is intended for general information purposes only, and due care has been taken in its
preparation.
Any risk arising from the use of this information rests with the recipient, and nothing herein should be
construed as constituting any kind of warranty.
Milestone Systems A/S reserve the right to make adjustments without prior notification.
All names of people and organizations used in the examples in this text are fictitious. Any resemblance
to any actual organization or person, living or dead, is purely coincidental and unintended.
This product may make use of third party software for which specific terms and conditions may apply.
When that is the case, you can find more information in the file
3rd_party_software_terms_and_conditions.txt located in your Milestone surveillance system
installation folder.
Page 6

Milestone XProtect® Transact
Administrator's Guide
www.milestonesys.com
Copyright, trademarks and disclaimer
Target audience
This document is intended for system administrators. This document explains how to install and
configure XProtect Transact as an add-on to a Milestone XProtect surveillance system.
Descriptions about how to browse transaction data and video recordings together using the XProtect
Smart Client are available in the XProtect Transact User’s manual aimed at end users who solely use
XProtect Transact for browsing transaction data and video recordings.
XPT25-am-e1-
Page 7

Milestone XProtect® Transact
Administrator's Guide
www.milestonesys.com
7
Introduction
Introduction
Product overview
XProtect Transact is a powerful tool for tracking transactions linked with video recordings of the
transactions taking place.
XProtect Transact is an add-on to Milestone's IP video surveillance solutions XProtect Basis+,
XProtect Professional, XProtect Enterprise and XProtect Corporate. Milestone XProtect XProtect
Transact can combine your digital video monitoring with transaction data from many kinds of
transaction data sources and for many purposes. You get a 1-to-1 correspondence of images to
transactions and the transaction data is time-linked with simultaneous display of transactions and
camera recordings.
Common transaction data sources are PoS (Point of Sale) or ATM (Automated Teller Machine) which
enables you to easy investigate and prove fraud. But actually any transaction data source that you
would like to time-link with digital video monitoring can be combined through XProtect Transact. A few
examples of other transaction data sources and purposes are: number plate recognition for collection
of road taxes, access control for combined visual identification for higher security—but the only limit is
your imagination. Note, that some solutions might require additional programs and/or customizations.
The examples used in this manual show typical retail situations and transactions data from PoS (Point
of Sale) or ATM (Automated Teller Machine). For these purposes, XProtect Transact speeds up
investigations into fraud by integrating digital video surveillance images with PoS (Point of Sale) or
ATM (Automated Teller Machine) transaction data: 1-to-1 correspondence of images to transactions.
transaction data is time-linked with video images of cash registers/ATMs for simultaneous display of
transactions and camera recordings. Whether the problem is internal or external perpetrators, it is
easy to find suspicious transactions with XProtect Transact's features for searching transactions by
cash register/ATM, camera, data, time or free text.
See also
Viewing transactions (see "View transactions" on page 49)
Interaction with Sources and Surveillance Solutions (on page 7)
Interaction with sources and surveillance solutions
There are several components in the XProtect Transact communication flow. XProtect Transact
consists of a Transact Server and a Transact Database.
The XProtect Transact Server has a service that listens for transactions from sources. Five different
kinds of source exist: Serial ports, TCP clients, TCP XML, Troy boxes and an Analytics XProtect
Transact provider (more types may be available in customized XProtect Transact installations).
Sources, in turn, are connected to the actual devices on which the transaction data is generated (cash
registers, ATMs, etc.).
When the XProtect Transact Server receives transaction data from a source, it stores the data in the
XProtect Transact Database.
Page 8

Milestone XProtect® Transact
Administrator's Guide
www.milestonesys.com
8
Introduction
Video recordings are stored independently on your surveillance server, as defined through the
configuration of your XProtect surveillance solution.
Example only: The blue arrows outline video recordings from the surveillance system, while the red
arrows outline transaction data from sources.In addition to an ATM, transaction data may also come
from a cash register or any other RS-232-enabled device.
In addition to an ATM, transaction data may also come from a cash register or any other
RS-232-enabled device.
Page 9

Milestone XProtect® Transact
Administrator's Guide
www.milestonesys.com
9
System requirements
Name
Description
CPU
Intel® Pentium 4 or compatible, minimum 2.4 GHz
RAM
512 MB
Network
Ethernet (100 Mbit recommended)
Operating System
Microsoft® Windows® XP Professional
Microsoft Windows Server 2003
Microsoft Windows Server 2008
Windows Vista™
Windows 7 (32-or 64-bit)
Software
Microsoft .NET 4.0 framework required
XProtect Corporate 3.0 or newer
XProtectEnterprise 6.0 or newer
XProtect Professional 6.0 or newer
XProtect Basis+ 6.0 or newer required
XProtect Smart Client 6.0 or newer
System requirements
Page 10

Milestone XProtect® Transact
Administrator's Guide
www.milestonesys.com
10
Installation and licensing
Installation and licensing
Licensing
When you purchase XProtect Transact, you also purchase two types of licenses:
Software License Code (SLC): A license to use the XProtect Transact application.
Connection License Key (CLK): A license for a certain number of simultaneously opened
transaction sources.
During the installation you are asked to enter both the SLC and the CLK. The Software License Code
is printed on the Product License Sheet enclosed with the XProtect Transact software as well as on
your order confirmation. You must, however, register your SLC (see "Register SLC" on page 12) to get
the CLK.
You can add an unlimited number of transaction sources (see "Managing sources" on page 18) in
XProtect Transact. You can, however, only view the number of simultaneous transaction sources
corresponding to your CLK. At any time, you can obtain a new CLK (see "Obtaining additional
licenses" on page 12) with more simultaneously viewed transaction sources.
Install the software
Read the License Terms on the Product License Sheet (enclosed with the software DVD) before
installing XProtect Transact.
Prerequisites: If you are upgrading, read Upgrading from a previous version (see "Upgrade from a
previous version" on page 11) first. Before installing the software, register your XProtect Transact
Software License Code (SLC) (see "Register SLC" on page 12). When the license is registered, a
Connection License Key (CLK) is generated. You need the CLK during the installation. Check that you
have the latest version of Microsoft .NET Framework 3.0. You can download .NET Framework 3.0
from Microsoft's Download Center at www.microsoft.com/downloads (see
http://www.milestonesys.com/?cid=413 - http://www.milestonesys.com/?cid=413).
If you are installing XProtect XProtect Transact on a computer running Windows Vista, you must run
the installation as an administrator.
Install XProtect Transact on the same computer as the server for XProtect Enterprise or XProtect
Professional or XProtect Basis+ or on the same computer as the management server for XProtect
Corporate.
To install XProtect Transact, do the following:
1. Run the XProtect TransactInstaller.exe installation file (either from the DVD or internet). The
wizard starts automatically.
2. Read and accept the license agreement.
3. Enter the SLC and CLK for your XProtect Transact solution.
4. SQL Server Install/Select: Choose between using an existing SQL 2005 Server on the
network or setting up a SQL Server Express Edition on the computer itself.
Page 11

Milestone XProtect® Transact
Administrator's Guide
www.milestonesys.com
11
Installation and licensing
Important: If you are updating from a previous version of XProtect Transact, we recommend
you install the new database application (read Updating from a Previous Version on page ).
o If you choose to setup a SQL Express Edition, only edit the SQL services user and
System administrator password fields are required. For example, if your local security
setup requires you to use another user than the one suggested per default. If you chose to
use another user that the default, this user must already be known by the server.
o If you use the existing SQL database, only edit available SQL servers if required. For
example, if your local security setup requires you to use another server than the one
suggested per default.
This installation may take a short while, after which you are automatically taken to the following
installation step.
5. Database Create/Select: If you are upgrading from a previous version, select whether you
want to use your existing database or create a new one. Specify a database password
manually only if your local security setup requires you to.
6. Install Server: On this installation step, the XProtect Transact server will be installed. Click
Next.
The XProtect Transact installation is complete.
You can now begin to configure your XProtect Transact (see "Getting started" on page 14) in
the XProtect Transact Administrator window.
Upgrade from a previous version
If you are updating from a previous version of XProtect Transact, note the following:
Before you install XProtect Transact 2.5, you must remove the XProtect Transact software,
XProtect Transact Plugin Installer and any XProtect Smart Client Plugins of the previous
XProtect Transact version.
XProtect Transact 2.5 uses a new database (Microsoft SQL Server 2005 Express Edition)
compared to previous versions of XProtect Transact (Microsoft SQL Server Desktop Engine).
XProtect Transact 2.5 can use the old database, but we recommend installing the new—and
better—XProtect Transact 2.5 database.
If a previous XProtect Transact database is detected on the computer during the installation, you will
be asked whether you want to install the new database Microsoft SQL Server 2005 Express Edition, or
update the old database.
If you choose to install the new database, the old database and its content are moved to a new folder
but remain on the computer and new transaction data will be stored in the new database. However,
XProtect Transact 2.5 cannot read data from the old database or make it available for browsing or
viewing.
If you have a lot of important data, update the old database. If you have less data, for example, seven
days of transaction data, export the data from the old database with the export features in the XProtect
Smart Client before you remove the previous XProtect Transact installation and install XProtect
Transact 2.5 with the new database.
Page 12

Milestone XProtect® Transact
Administrator's Guide
www.milestonesys.com
12
Installation and licensing
Even if the old database and its content remain on the computer, if you choose to install the new
database, it is not possible for you to access the data in the old database by removing XProtect
Transact 2.5 and reinstalling XProtect Transact 2.2. If it is very important for you to access the old
database, you can contact your Milestone vendor.
For information about the export features in the XProtect Smart Client see Exporting Data and
Recordings in the XProtect Smart Client in the XProtect Transact User’s manual and the separate
documentation for the XProtect Smart Client.
Register SLC
If you do not have your SLC, contact your vendor.
1. Go to the Milestone website at www.milestonesys.com, and click the Software registration link
in the menu.
2. Log in to the Software Registration Service Center with your user name (e-mail address) and
password.
Tip: If you have not used the Software Registration Service Center before, click t he New to
the system? link, and follow the instructions for registering yourself as a user, then log into the
Software Registration Service Center by using your registered user name and password.
3. In the Software Registration Service Center, click the Add SLC link.
4. Type your SLC. Confirm that you want to add the SLC to your account, and then click OK.
5. Once your SLC has been added, click the Main menu link.
6. Click the Logout link to log out of the Software Registration Service Center.
Tip: If you plan to use online activation when you activate your licenses, make sure you use
the same user name (e-mail address) and password that you used when you registered the
SLC.
Obtaining additional licenses
If you want to view more simultaneous transaction sources than you currently have licenses for, you
must purchase additional licenses for these transaction sources. You can add and configure an
unlimited number of transaction sources in XProtect Transact, but only simultaneously view the
number of sources that are included your CLK.
To obtain additional licenses for your XProtect XProtect Transact system, contact your XProtect
XProtect Transact vendor.
Once you have obtained the required additional licenses, do the following to activate them:
1. When you have received a confirmation about the purchase of the new licenses, go to the
Milestone website, and click the Software registration link in the menu.
2. Log in to the Software Registration Service Center with your user name (e-mail address)
and password.
3. Click the link representing your XProtect Transact SLC.
Page 13

Milestone XProtect® Transact
Administrator's Guide
www.milestonesys.com
13
Installation and licensing
4. Copy the updated CLK's 16-digit hexadecimal number displayed on the page.
5. Start the XProtect Transact Administrator, and click the General Settings tab.
6. In the Connection License Key (CLK) field, replace the current CLK by pasting the updated
CLK into the field.
7. If relevant, click the Sources tab, select an existing suspended source and click the Resume
button to be able to view data from this source. You can also add new sources. See Managing
Sources on page for more information.
8. Click Close to exit the XProtect Transact Administrator.
Page 14

Milestone XProtect® Transact
Administrator's Guide
www.milestonesys.com
14
Getting started
Getting started
Once the XProtect Transact Server is installed, you should perform the configuration tasks in this
order.
Check that your XProtect Transact Server service settings are correct.
1. From the taskbar, right-click the XProtect Transact Server Service Taskbar icon. Select
Server Service Configuration....
Tip: Server Services (see "Managing server service settings" on page 15) does not have to be
running during configuration, they will be (re)started automatically when configuration setting
are saved.
2. Verify that transaction data will be stored in the XProtect Transact Database for sufficiently
long time to cover your organization’s needs.
By default, transaction data will be stored for seven days, but you can change this default
value on the XProtect Transact Administrator window’s General settings tab.
Note that when defining individual sources (see next step), you can also define individual
transaction data storage lengths for each source.
3. Add your XProtect Transact’s sources. A source is a data source, typically a serial server,
through which transaction data is fed to the XProtect Transact Server and subsequently stored
in the XProtect Transact Database.
As part of defining a source, you define a configuration for the source. A configuration handles
the transformation of received data into presentable data. This is necessary because the
initially received data typically consists of a single string of information, in which it can be
difficult to see when individual transactions begin and end. If the data originates from a printer
connection, it may furthermore contain non-printing control characters used for indicating line
breaks, etc. By using configurations, the received data can be presented to end-users in a
format matching real-life receipts. You can of course base your configurations on real
transaction data sampled from your sources.
Tip: XProtect Transact comes with a built-in configuration called Epson default. Because
Epson is a widely recognized printer manufacturer, you can often save time by basing your
configuration on a copy (see "Copy a configuration" on page 28) of the Epson default
configuration.
4. Enable browsing and viewing of transaction (see "View transactions" on page 49) data
together with video recordings using the XProtect Smart Client. Note that browsing of
transaction data in the XProtect Smart Client requires a plugin.
See also
Managing sources (on page 18)
Managing Server Service Settings (on page 15)
Creating a configuration (see "Create a configuration" on page 23)
Viewing transactions (see "View transactions" on page 49)
Page 15
Milestone XProtect® Transact
Administrator's Guide
www.milestonesys.com
15
Administration
Name
Description
Service name
The name for the service communicating with the XProtect Smart
Client. By default Service. You can change the name if another
service has the same name.
Administration service name
The name for the service communicating with the XProtect Transact
Administrator. By default Admin. You can change the name if
another service has the same name.
Host
Specify the local IP address or host name of the XProtect Transact
Server Service.
Example of an IP address: 123.123.123.123
Example of a host name: OurDevice
Port
Specify the local port number on which communication between the
XProtect Transact Server service, any XProtect Transact
master/slave servers and the client applications should take place.
The default port number is 9001.
If you want to change the port number, make sure you select a port
number which is not already in use for other purposes. Click the Set
button to begin using the new port number.
Tip: To verify which ports are in use on a given computer, select
Start > All Programs > Accessories > Command Prompt. In the
command prompt window, type netstat -a and press ENTER to
display a list of all current TCP/IP network connections and listening
ports. For more information about the various parameters to use
with the netstat command, type netstat /? and press ENTER.
Protocol
Choose between http (default) and Net.Tcp. If you change from one
protocol to the other, you need to restart the XProtect Transact
Administrator, restart the surveillance system server, and restart the
relevant Smart ClientXProtect Smart Clients for the change to take
effect.
Outside host
Specify the outside IP address of the XProtect Transact Server
service so it can be accessed over the internet.
Administration
The XProtect Transact Server listens for transactions from cash registers and other sources, and
stores such transactions in the XProtect Transact Database. End-users can browse recordings and
transaction data (see "View transactions" on page 49) with the XProtect Smart Client.
Managing server service settings
In the XProtect Transact Server Service Configuration window you define general settings for the
XProtect Transact Server Service, and the ports and services used for communication between the
XProtect Transact Server Service, the XProtect Transact Administrator, any XProtect Transact
master/slave servers and the client applications.
Page 16
Milestone XProtect® Transact
Administrator's Guide
www.milestonesys.com
16
Administration
Outside port
Specify the outside port number on which communication between
the XProtect Transact Server service and the client applications
should take place so they can communicate over the internet.
Name
Description
Troy Box XProtect Transact
provider
Use when receiving transaction data from a Troy box on your
network through port 9100. Troy box is a popular name for a Troy
serial server. Provided the Troy box has been assigned an IP
address, it is able to receive serial input from a cash register, ATM
or any other RS-232 source and relay it to the XProtect Transact
Server through your network.
Serial Port XProtect Transact
provider
Use when receiving transaction data as input on the computer's
own serial port.
TCP XML XProtect Transact
provider
Use when receiving transaction data through a serial server device
and the transaction data is fed as XML packages. It is prerequisite
that the content of the XML packages includes a time stamp in the
following format: <Timestamp>date and time according the RFC
3339 standard</Timestamp>.
TCP Client XProtect Transact
provider
Use when receiving transaction through any kind of serial server
device. This option also allows you to receive data directly from a
PoS (Point of Sale) source, such as a cash register, provided the
PoS source can be configured for this purpose.
Sources and configurations
A source is a data source through which transaction data is fed to the XProtect Transact Server and
subsequently stored in the XProtect Transact Database. transaction data can originate from cash
registers, ATMs, etc. The connection between the XProtect Transact Server and the cash registers,
ATMs, etc. is in the XProtect Transact Administrator established through the definition of a source
provider.
The data initially received from sources typically consists of a single long string of information, and
includes control characters or other characters that are irrelevant and confusing when end-users want
to view the transaction data. You can transform the transaction data of this kind into a presentable,
reader-friendly form through configurations. Configurations are managed in the XProtect Transact
Administrator window's Sources tab since configurations are associated with and customized to the
different sources.
See also
Interaction with sources and surveillance solutions (on page 7)
Different source providers
There are five different kinds of source providers through which the transaction data is fed from a PoS,
ATM or others to the XProtect Transact Server:
Page 17

Milestone XProtect® Transact
Administrator's Guide
www.milestonesys.com
17
Administration
Analytics XProtect Transact
provider
Use when receiving alarm data in connection with the XProtect
Analytics software.
Additional kinds of sources may be available in customized
XProtect Transact installations.
When creating and editing a source (see "Managing sources" on
page 18), the different source settings vary depending on your
choice of source provider. See Managing Sources on page for
more information about how to create or edit sources.
Reader-friendly data through configurations
You can omit and substitute characters and define where individual transactions begin and end, so
end-users can view the transaction data in a format matching real-life till receipts, ATM receipts, etc. If
the data originates from a printer connection, it may for instance contain unprintable characters used
for indicating line breaks, when to cut off a till receipt, etc.
By creating a configuration, you can:
Clearly define when individual transactions begin and end.
Make sure line breaks are used as required.
Filter out unwanted characters.
Substitute characters, if required.
Tip: XProtect Transact comes with two built-in configurations called Epson default and Analytics.
The Analytics configuration is only available for sources that use the source provider TCP XML
XProtect Transact provider. Epson default is available for all the other source providers. Epson is a
widely recognized printer manufacturer; thus Epson’s way of dealing with control characters is often
supported by printers of other makes as well. You can often save time by basing your configuration on
a copy (see "Copy a configuration" on page 28) of the Epson default configuration.
The built-in configuration for the TCP XML XProtect Transact provider, Analytics, contains the
necessary configuration for transaction data received as XML packages through a serial server device.
Further configuration is not needed.
Configurations are managed in the XProtect Transact Administrator window's Sources tab since
configurations are associated with and customized to the different sources.
See also
Create a configuration (on page 23)
How to omit characters (see "Export/import a configuration" on page 29)
How to use substitutions (see "Use substitutions" on page 30)
How to add line breaks (see "Add line breaks" on page 31)
How to use start and stop masks (see "Use start and stop masks" on page 31)
Page 18

Milestone XProtect® Transact
Administrator's Guide
www.milestonesys.com
18
Administration
Advanced event features
Through XProtect Transact's event and event group features you can get XProtect Transact to listen
for occurrences of specific words, numbers, characters etc. in the transaction data and generate
events when the specified occurrences are found. Sources are also associated to event groups in the
XProtect Transact Administrator window's Sources tab. See Managing sources (on page 18) and
Events and event groups (on page 38) for more information.
Managing sources
A source, also called a source provider, is a data source through which transaction data is fed to the
XProtect Transact Server and subsequently stored in the XProtect Transact Database.
You define and edit the source settings for the XProtect Transact Server by clicking the Sources tab
in the XProtect Transact Administrator window.
Add a new source
To add a source, do the following:
1. Either from the Start menu or the desktop shortcut, open the XProtect Transact
Administrator window.
2. On the Sources tab, click Add New....
3. In the New Source window, in the Source name field,specify a name for the new source. In
the Source providers list, select the type of source. See Sources and configurations (on page
16) for more information about the available sources providers and their use.
Tip: The source name can contain spaces and special characters, such as @, $, %, æ.
4. In the Create Source window, specify properties (see "The Create/Edit Source window" on
page 19) for the source.
5. Select a standard configuration.
o If you are defining a source that uses the source provider TCP XML XProtect Transact
provider, select the standard configuration Analytics from the list in the Configuration
section.
o For all other source providers select the standard configuration Epson default from the list
in the Configuration section.
You can add a new configuration (see "Create a configuration" on page 23) or edit the
standard configuration (see "Edit a configuration" on page 27) later.
6. If you have defined transaction events and event groups (see "Events and event groups" on
page 38), you can associate the source with an event group in the Event Group list, to trigger
actions through generic events defined in the surveillance system.
7. When ready, click OK.
The new source will now appear in the transaction sources list on the XProtect Transact
Administrator window's Sources tab.
Page 19

Milestone XProtect® Transact
Administrator's Guide
www.milestonesys.com
19
Administration
Edit a source
To edit the properties and configuration of an existing source, do the following:
1. Either from the Start menu or the desktop shortcut, open the XProtect Transact
Administrator window.
2. On the Sources tab, select the required source and click Edit....
3. In the Edit Source window, change the necessary (see "The Create/Edit Source window" on
page 19) settings for the selected source.
4. Click OK to save the changes.
Delete a source
To delete a source, do the following:
1. Open the XProtect Transact Administrator window.
2. On Sources tab, select the required source and click Delete....
3. Click Yes to confirm the deletion.
Suspend/resume a source
When the source is running, you can click the Suspend button to stop the source. Since you only
have Connection License Keys to view a certain number of sources simultaneously, this could be a
reason for you to stop one source so you can start another. See Licensing (on page 10) for more
information.
You can start or stop the connection from a suspended or running source selected in the transaction
sources list. On the XProtect Transact Administrator window's Sources tab you can see whether
your sources are running or suspended.
IMPORTANT: While the source is suspended, no transaction data will be fed from the source to the
XProtect Transact Server and onwards to the client applications.
When the source is suspended, the button changes to Resume. Clicking the Resume button will lift
the suspension, and data will again be fed from the source to the XProtect Transact Server and
onwards to the client applications (provided the XProtect Transact Server service is running). See
Managing server service settings (on page 15) for more information.
Refresh the status of sources
If a source is unavailable, the source in question will be displayed as Disabled on the Sources tab.
When the source is available again, click the Refresh button to refresh the displayed status of the
source in XProtect Transact Administrator window.
The Create/Edit Source window
Much of the content of the Create/Edit Source window is the same regardless of which type of source
you are creating or editing.
Page 20
Milestone XProtect® Transact
Administrator's Guide
www.milestonesys.com
20
Administration
Name
Description
Source name
Read-only field displaying the name of the source as defined in the
New Source window.
Provider name
Read-only field displaying the type of the source as defined in the
New Source window.
Time to store transaction
Specify how long transaction data from the source in question
should be kept in the XProtect Transact Database.
Default:Use the XProtect Transact solution's default.
Transaction data older than the default number of days will
be deleted from the XProtect Transact Database, and will
therefore not be available for browsing in the client
applications.
Tip: The default number of days the transaction data is
stored if nothing else is specified for individual sources, is
defined in the XProtect Transact Administrator window,
on the General settings tab.
For ever: Store Transaction data for ever.
Even when Forever is selected, the ability to store
transaction data will be limited by the available disk space
on the computer running the XProtect Transact Database.
Days to store: Specify the required number of days for
which to store transaction data for the source in question.
The number of days may be higher as well as lower than
the XProtect Transact solution's default.
Transaction data older than the specified number of days will be
deleted from the XProtect Transact Database, and will therefore not
be available for browsing in the client applications. Make sure the
number of days is sufficiently high to cover your organization's
needs.
COM Port
Select the COM port (i.e. serial port) to be used for receiving data
from the source.
Bits per second
Select the bit rate (i.e. data transfer rate) with which data will be
sent on the serial connection.
The specified bit rate must match the bit rate used by device (cash
register, ATM, etc.) connected to the serial port source.
Page 21
Milestone XProtect® Transact
Administrator's Guide
www.milestonesys.com
21
Administration
Flow control
Select the flow control to be used on the serial connection. Flow
control adjusts the flow of data from one unit to another, making
sure that the receiving unit will be able to handle all the incoming
data. The use of flow control is relevant in asynchronous
communication, for example when the sending unit sends data
faster than the receiving unit is able to receive it.
None: Do not use flow control.
XonXoff: Use the XonXoff flow control mechanism, with
which the receiving unit sends an Xoff message to the
sending unit when the receiving unit's buffer is full. When
this is the case, the sending unit will stop sending data until
it gets an Xon message from the receiving unit, indicating
that the receiving unit is again ready to receive data. Xon
and Xoff messages are sent as part of the data itself.
CtsRts: Use the CtsRts flow control mechanism, with which
the sending unit sends an Rts (Ready to send) signal to the
receiving unit when the sending unit has data to send. In
turn the receiving unit will send a Cts (Clear to send) signal
to the sending unit when the receiving unit is ready to
receive data. Cts and Rts signals are sent on separate
wires in the cable, apart from the data itself.
DsrDtr: Use the DsrDtr flow control mechanism, with which
units send Dsr (Data set ready) and Dtr (Data terminal
ready) signals when exchanging data.
The selected flow control mechanism must match the flow control
mechanism used by device (cash register, ATM, etc.) connected to
the serial port source.
Parity
Enter the parity-checking protocol.
Data bits
If you have nonstandard devices, enter the number of data bits per
byte that the device sends.
Stop bits
If you have nonstandard devices, enter the number of stop bits per
byte that the device sends.
Configuration
From the list of existing configurations, select the configuration to
use for the source.
Tip: A single configuration can be used for several transaction data
connections as long as the transaction data come from a source of
the same type as the source for which the configuration was
created.
Add New...
Opens the Create Configuration window, in which you can define
the properties of a new configuration (see "Create a configuration"
on page 23).
Edit...
Available only when an existing configuration is selected.
Opens the Edit Configuration window, in which you can edit the
properties of the selected configuration.
Page 22

Milestone XProtect® Transact
Administrator's Guide
www.milestonesys.com
22
Administration
Delete
Available only when an existing configuration is selected. Lets you
delete the selected configuration. You will be asked to confirm that
you want to delete the configuration.
Copy...
Available only when an existing configuration is selected. Lets you
copy the selected configuration, edit it as required and save it under
a new name. Editing and saving takes place in the Create
Configuration window.
This may be especially relevant if you require two or more
near-identical configurations, in which case you can base
subsequent configurations on an existing one, thus minimizing your
workload.
Event groups
The Event group section lets you associate the source with an
event group or several event groups. The event group can then
trigger actions through generic events defined in Milestone XProtect
Enterprise or Milestone XProtect ProfessionalXProtect Professional.
Some of the content of the Create/Edit Source window is specific
for the source you have chosen.
Troy Box Sources
The Troy Box properties section lets you specify where to contact
the Troy box on your network. The following field is available:
Host name/address: Lets you specify host name or IP address of
the Troy box.
Tip: You do not need to specify a port number. XProtect Transact
knows that Troy boxes always communicate through port 9100.
TCP XML or TCP Client
Sources
The TCP port properties section lets you specify settings related
to the TCP port on which the TCP XML or TCP client provider will
be acting as source. The following fields are available:
Host name/address: Lets you specify host name or IP address of
the TCP XML or TCP client provider.
Port: Lets you specify the port number on which communication
with the TCP XML or TCP client source takes place.
Analytics XProtect Transact
Service port: This must be a unique number of your own choosing.
Source XSD File: Here you attach an XSD file to the source
configuration. The XSD files describe which XML format that can be
saved in XProtect Transact using the source. If no XSD file is
connected to the source, the provider will accept all valid XML. You
can use any XSD and it is possible to use more than one at a time.
Managing configurations
You define and edit the configurations of sources from the Sources tab in the XProtect Transact
Administrator window.
Page 23

Milestone XProtect® Transact
Administrator's Guide
www.milestonesys.com
23
Administration
Create a configuration
You do not need to create new configurations for sources that use the source provider TCP XML
XProtect Transact provider. Simply use the built-in configuration Analytics.
To create a new configuration to a source, do the following:
1. Open the XProtect Transact Administrator window.
2. On the Sources tab, click Add New... if you want to add a new source or the Edit... button to
edit an existing source. Define or – if required – edit the settings of the source. You are now
ready to add your new configuration.
3. In the Create/Edit Source window, in the Configuration section, click the Add New... button.
4. In the Create Configuration window, in the Name field, type a name for the configuration.
Tip: The name may contain spaces and special characters, such as @, $, %, æ, etc.
5. Click the Capture from Source button to capture some sample transaction data on which to
base your configuration. This will open the Select Input Source window.
6. In the Select Input Source window, select the required input source, then click the Start
button to being capturing transaction data. Wait sufficiently long for at least one, but preferably
more, transactions to complete, then click the Stop button. See How to Capture transaction
Data on page for more information about capturing transaction data.
7. Click OK to return to the Create Configuration window, in which the captured transaction data
will now appear in the Raw data field.
8. You are now ready to add filters: omit characters (define which characters to remove), add
substitutions (define which characters to replace with other characters) and add line breaks.
An example configuration
The following is an example only. The example outlines the capture of a limited amount of raw
(unformatted) transaction data, and how individual elements of the raw transaction data can
subsequently be marked in order to be omitted, substituted, replaced with line breaks, indicate the
beginning/end of a transaction, etc.
In this example, do the following:
Page 24

Milestone XProtect® Transact
Administrator's Guide
www.milestonesys.com
24
Administration
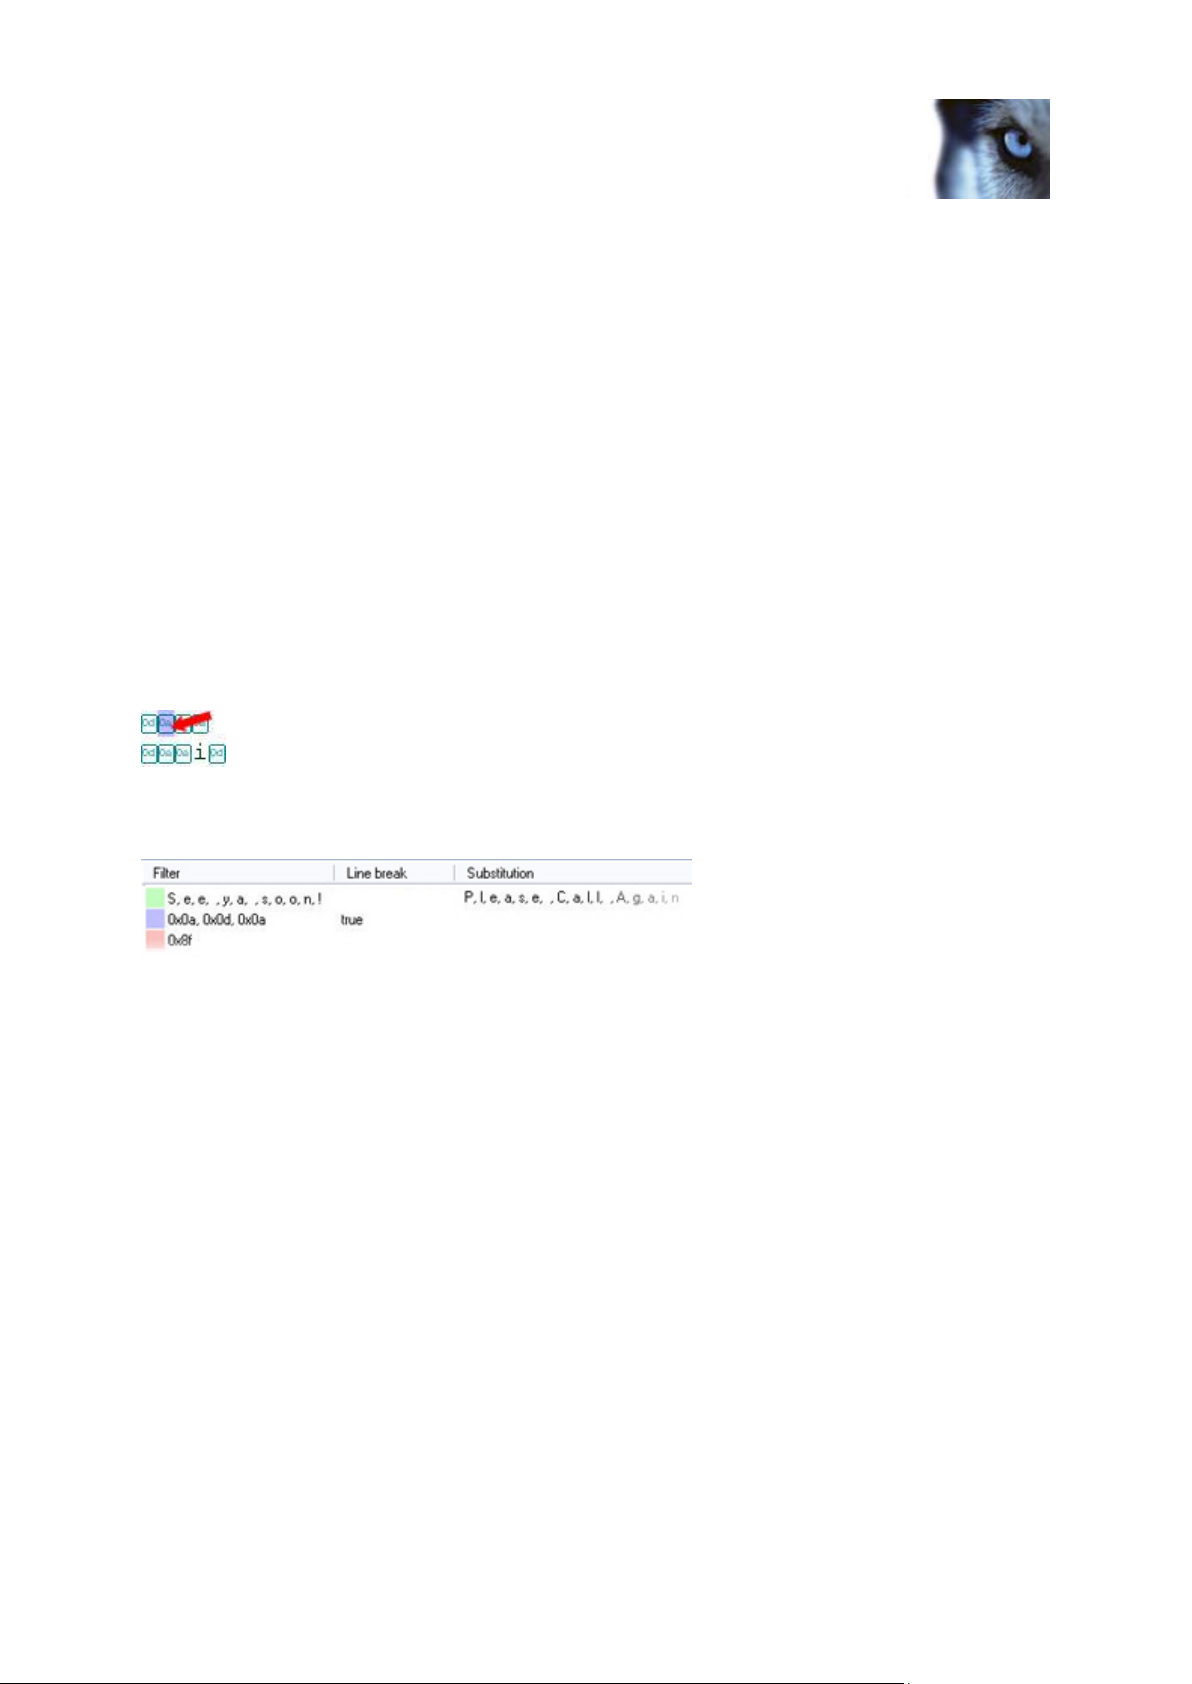
1. Click and drag in the Raw data field to select two control characters (non-printing characters,
typically used by printers for indicating line breaks, when to cut off a till receipt, etc.).
2. Click the Add New Line... button. A line break is inserted instead of the two control characters.
Furthermore, information about the two control characters replaced by the line break appear in
the [Filter overview list]:
Also note how the Filtered data field changes accordingly. The Filtered data field provides a
preview of how the transaction data will look when presented to end-users in the client
applications.
Page 25

Milestone XProtect® Transact
Administrator's Guide
www.milestonesys.com
25
Administration
In this example, the line break is all the formatting we require. In most cases, omissions
(removal of certain content) and substitutions would be required as well. They are applied in a
similar way, by dragging to select the required characters in the Raw data field, then clicking
the relevant button. See also: How to omit characters (see "Omit characters in a source's
configuration" on page 29), How to use substitutions (see "Use substitutions" on page 30) and
How to add line breaks (see "Add line breaks" on page 31).
3. When the required filters (omissions, substitutions or line breaks) are in place, add a start
mask (see "Use start and stop masks" on page 31). The start mask defines when a new
transaction begins, and helps keep individual transactions separate.
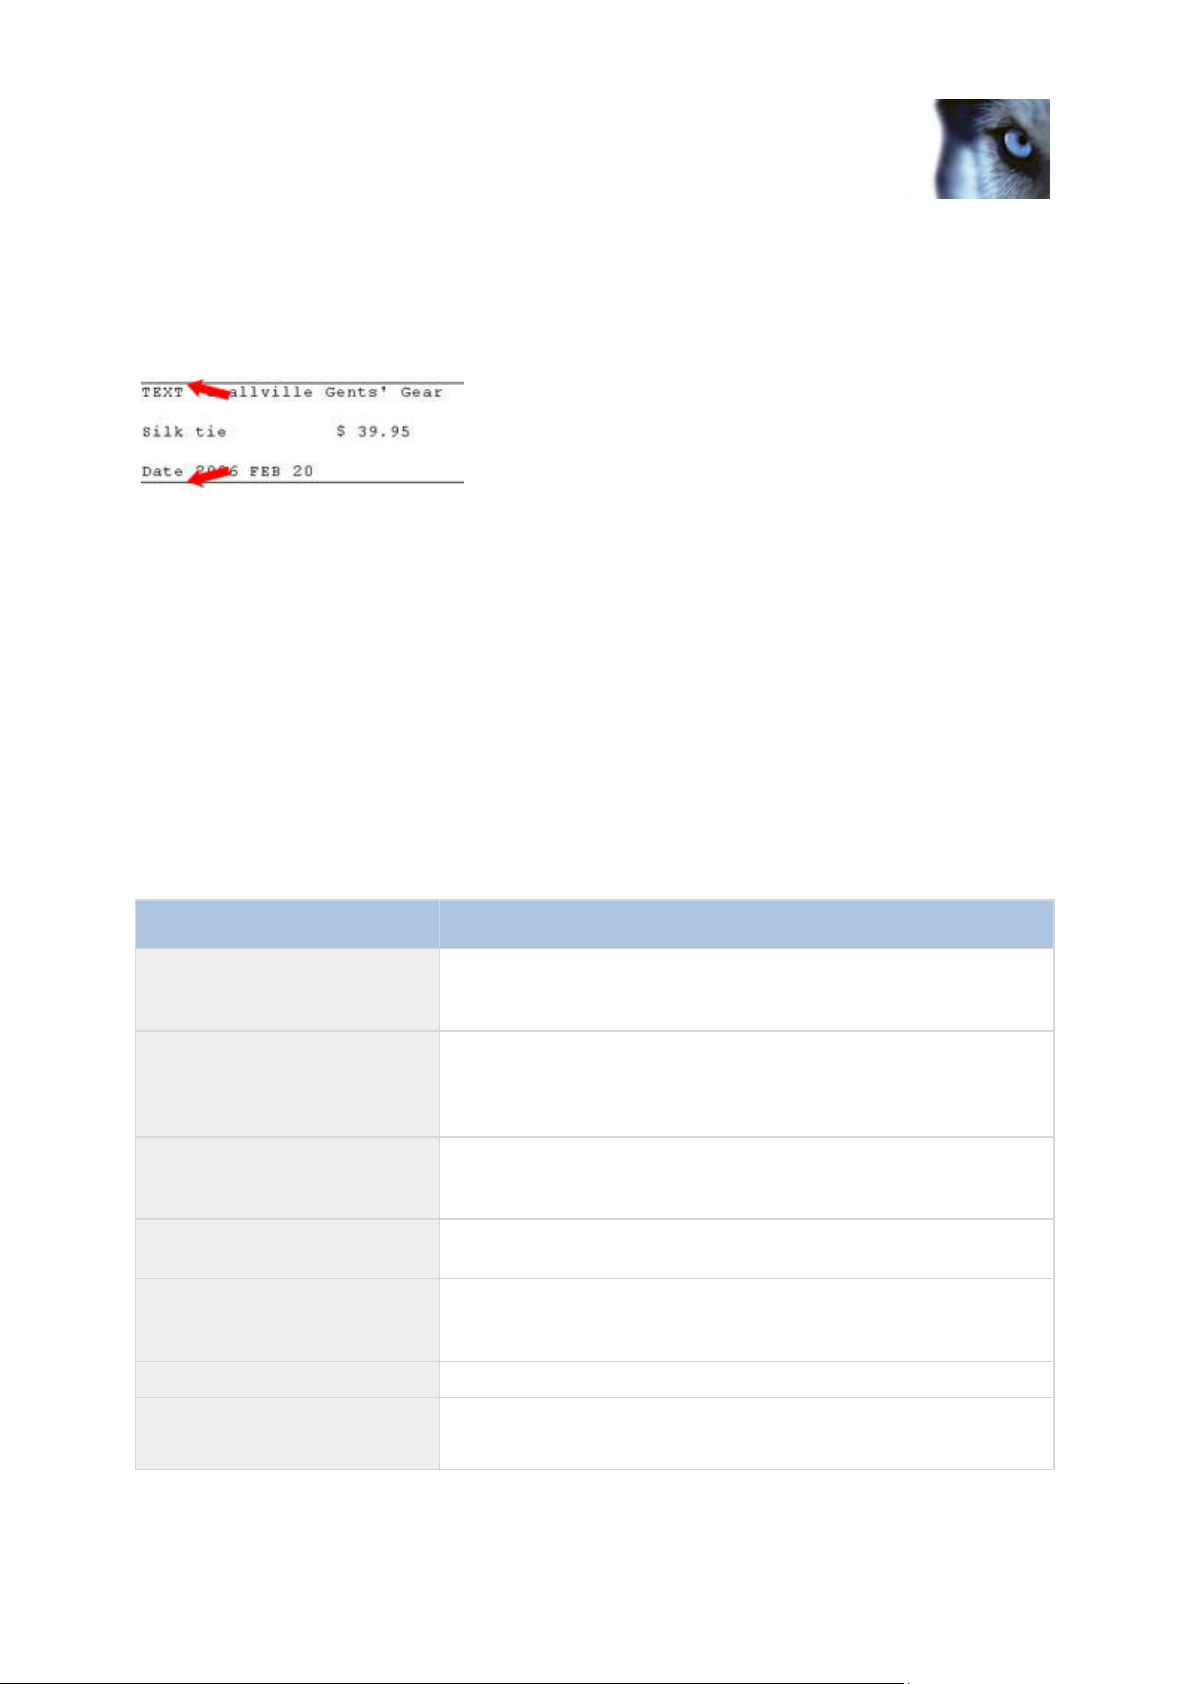
For each transaction, a start mask followed by a new line is compulsory – otherwise no date will be
recognized and fed into the system.
In this example we have noticed that all new transactions begin with the characters TEXT. We
therefore type TEXT in the Start Mask field. In the Filtered data field, XProtect Transact automatically
inserts a horizontal line above occurrences of the start mask, as an indication of the beginning of a
new transaction:
Note that start and stop masks are case sensitive; there is a difference between typing TEXT
and Text.
1. Add a stop mask. The stop mask defines the end of a transaction.
A stop mask is not compulsory, but can be useful if the received data contains irrelevant
information—perhaps information about opening hours or special offers—between actual
transactions.
Page 26

Milestone XProtect® Transact
Administrator's Guide
www.milestonesys.com
26
Administration
We have noticed that all transactions end with a line beginning with the characters Date. We
therefore type Date in the Stop Mask field. In the Filtered data field, XProtect Transact
automatically inserts a horizontal line below occurrences of the stop mask, as an indication of
the end of a transaction:
In this example, the stop mask occurred at the beginning of a line, but start and stop masks
may appear anywhere on a line: When XProtect Transact detects a start mask anywhere
within a line, it will know that a new transaction begins with that line. When XProtect Transact
detects a stop mask anywhere within a line, it will know that a transaction ends with that line.
Tip: You can use wildcards in start and stop masks. A wildcard is a special symbol that stands
for one or more characters. Three different methods for wildcard use, selected in the Use field,
are available. See The Create/Edit Configuration window (on page 32) for more information
about the Use field and other configuration settings.
1. When ready, click OK to save the configuration.
Configurations are saved together with the type of source (serial port, TCP client, TCP XML or Troy
box) for which it has been created. However, exported filters can be used with configurations created
for any type of source.
Tip: If you are going to create several near-identical configurations, you can use the Copy... button or
the Export Filters... and Import Filters... buttons in the Create/Edit Source window to quickly create
new configurations based on an existing configuration. See Copying a Configuration on page and
Exporting/Importing a Configuration on page for more information.
Capture transaction data
You can capture sample transaction data on which to base your configuration. If relevant you can
apply some filters and test your filters on the captured transaction data and see the result in the
Create/Edit Configuration window while you are applying the filters.
To capture sample transaction data, do the following:
Page 27

Milestone XProtect® Transact
Administrator's Guide
www.milestonesys.com
27
Administration
1. Access the Select Input Source window by clicking the Capture from source... button in the
Create/Edit Configuration window.
2. In the Select Input Source window's top section, select the required input source. Properties
of the selected source will be displayed in the Select Input Source window's lower section.
Tip: The list will only contain input sources matching the type of source you are currently
working with. Example: If you are currently working with a configuration for a serial port source,
only serial port input sources will appear in the list.
3. Click the Start button to begin capturing transaction data. When clicked, the Start button
changes to Stop.
4. Wait for at least one, but preferably more, transactions to complete. If the cash register, ATM,
etc. providing the transaction data is visible from where you are situated, you will easily be
able to determine how long to wait for. If the cash register, ATM, etc. is not visible, use the
number of captured bytes (displayed near the bottom of the window after you click the Start
button) as an indication of the amount of data captured. In most cases, capturing
approximately 3000 bytes of data is enough.
5. Click Stop to stop capturing transaction data.
6. When ready, click OK. The captured transaction data is displayed in the Create/Edit
Configuration window's Raw data field, ready for use when defining the properties of the
configuration..
Tip: You can save captured transaction data in a .capture file, and load the previously captured and
saved transaction data when you create a new configuration.
See also
The create/edit configuration window (on page 32)
Creating a configuration (see "Create a configuration" on page 23)
Edit a configuration
You do not need to edit the built-in configuration Analytics that is used in connection with the source
provider TCP XML XProtect Transact provider. Simply use the built-in configuration Analytics as is.
To edit a new configuration to a source, do the following:
1. Open the XProtect Transact Administrator window.
2. On the XProtect Transact Administrator window's Sources tab, click the Add New... button
if you want to add a new source or the Edit... button to edit an existing source.
3. In the Create/Edit Source window's Configuration section, click the Edit... button.
You can now edit the configuration.
Tip: If you are going to create several near-identical configurations, you can use the Copy... button in
the Create/Edit Source window to quickly create new configurations based on an existing
configuration for the same type of source. You can also use the Export Filters... and Import Filters...
buttons in the Create/Edit Configuration window to quickly create new configurations based on an
existing configuration for a different type of source.
Page 28

Milestone XProtect® Transact
Administrator's Guide
www.milestonesys.com
28
Administration
Configurations are saved together with the type of source (serial port, TCP client, TCP XML or Troy
box) for which it has been created. However, exported filters can be used with configurations created
for any type of source.
See also
Copy a configuration (on page 28)
Export/import a configuration (on page 29)
Omit characters (see "Omit characters in a source's configuration" on page 29)
Use substitutions (on page 30)
Add line breaks (on page 31)
Use start and stop masks (on page 31)
The create/edit configuration window (on page 32)
Create a configuration (on page 23)
Copy a configuration
You do not need to edit or copy the built-in configuration Analytics that is used in connection with the
source provider TCP XML XProtect Transact provider. Simply use the built-in configuration
Analytics as is.
You can copy configurations of the same source type (serial port, TCP client, TCP XML or Troy box)
for easy reuse of existing configurations.
To copy a configuration, do the following:
1. Open the XProtect Transact Administrator window.
2. On the XProtect Transact Administrator window's Sources tab, click the Add New... button
if you want to add a new source or the Edit... button to edit an existing source. Define or, if
required, edit the settings of the relevant source.
3. In the Create/Edit Source window's Configuration section, select the required configuration
and click the Copy... button.
Configurations are saved together with the type of source (serial port, TCP client, TCP XML or
Troy box) for which it has been created. So if you have selected a serial port source, you can
only select configurations defined for serial port sources. However, exported filters can be
used with configurations created for any type of source.
4. Type a name for the configuration in the Name field and change the required settings.
5. Click OK to save your new configuration.
See also
Copy a configuration (on page 28)
Create a configuration (on page 23)
Page 29

Milestone XProtect® Transact
Administrator's Guide
www.milestonesys.com
29
Administration
Edit a configuration (on page 27)
The create/edit configuration window (on page 32)
Export/import a configuration
If you want to reuse a configuration between different source types (serial port, TCP client or Troy box),
you can export the configuration from one source type and import it when you create or edit the
configuration for another source type.
Do the following:
1. Open the XProtect Transact Administrator window.
2. On the Sources tab, select a source that has the required source type (serial port, TCP client
or Troy box) for your export.
3. In the Edit Source window's Configuration section, select the required configuration and click
the Edit... button.
4. In the Edit Configuration window, click the Export Filters... button.
5. Specify a name for the export file and save it by clicking Save. The exported configuration's
filters are saved as a .filter file.
6. Cancel the Edit Configuration window and close the Edit Source window.
7. On the Sources tab, select the source that should reuse the exported configuration settings
and click the Edit... button. If you would like to add a new source, click the Add New... button.
See Creating a Configuration on page for more information.
8. In the Create/Edit Source window's Configuration section, click Add New... or Edit... as
required.
9. In the Create/Edit Configuration window, click Import Filters.... Select your previously
exported file and click Open.
10. Edit if relevant the imported filter settings. Specify a start mask and—if relevant—a stop mask
and click OK to save your new configuration.
For each transaction, a start mask followed by a new line is compulsory – otherwise no date will be
recognized and fed into the system.
Tip: If you are going to create several near-identical configurations for several sources of the same
source type, you can use the Copy... button in the Create/Edit Source window.
See also
Copy a configuration (on page 28)
Create a configuration (on page 23)
Omit characters in a source's configuration
You can filter out unwanted information (single or several characters) in the raw, unformatted
transaction data.
Page 30

Milestone XProtect® Transact
Administrator's Guide
www.milestonesys.com
30
Administration
To omit characters in a source's configuration, do the following:
1. In the Create/Edit Configuration, window click and drag to select the characters in the Raw
data field that you want to filter out.
2. Click the Omit button to filter out (remove) the selected characters.
You can immediately view the effect of your filter in the Filtered data field.
Tip: You can omit regular characters as well as control characters. Control characters are non-printing
characters, typically used by printers for indicating line breaks, when to cut off a till receipt, etc.
Example of a control character as it appears when displayed in the Raw data field:
In the Raw data field, the selected characters are highlighted in light pink. The filtered out characters
will also be listed and highlighted in light pink in the [Filters overview field].
Example of a substitution, a line break and an omission listed in the [Filters overview field]. In this example, the control
character 0x8f has been filtered out completely.
Tip: If you are not happy with an applied filter, you can always remove or edit it: Select the unwanted
filter in the [Filters overview field], then click the Delete Filter or Edit Filter... button.
Use substitutions
You can substitute information (one or more characters) in the raw, unformatted transaction data and
replace it with new text or characters.
To substitute content in a source's configuration, do the following:
1. In the Create/Edit Configuration window click and drag to select the characters in the Raw
data field that you want to substitute.
2. Click the Substitute... button to substitute (replace) the selected characters. In the Edit Filter
window type the characters that you want replace the selected characters with in the
Substitution field.
You can immediately view the effect of the substitution in the Filtered data field.
In the Raw data field, the selected characters will be highlighted in a light green color. The characters
to be substituted will also be listed and highlighted in a light green color in the [Filters overview field].
Example of a substitution, a line break and an omission listed in the [Filters overview field]. In this example, the characters
forming See ya soon! have been substituted with Please Call Again.
Page 31
Milestone XProtect® Transact
Administrator's Guide
www.milestonesys.com
31
Administration
Tip: You can substitute regular characters as well as control characters. Note, however, that new
control characters must be specified in Hex notation, e.g. ¥x[0-F][0-F].
Tip: If you are not happy with an applied substitution, you can always remove or edit it: Select the
unwanted substitution in the [Filters overview field], then click the Delete Filter or Edit Filter...
button.
Add line breaks
You can replace one or more characters, including control characters, with a line break so the initially
received transaction data which typically consists of a single long string of information, can be
presented in more reader-friendly manner.
To add a line break, do the following:
1. In the Create/Edit Configuration window click and drag to select the characters in the Raw
data field that you want to substitute with a line break.
2. Click Add New Line....
You can immediately view the effect of the new line break in the Filtered data field.
In the Raw data field, the selected characters will be highlighted in a light purple color. The characters
to be replaced with a line break will also be listed and highlighted in a light purple color in the [Filters
overview field].
Example of a substitution, a line break and an omission listed in the [Filters overview field]. In this example the control
characters 0x0a0x0d0x0a have been transformed into a line break.
Tip: If you are not happy with the applied line break, you can always remove or edit it: Select the
unwanted line break in the [Filters overview field], then click the Delete Filter or Edit Filter... button.
Use start and stop masks
You can define a start and stop mask to indicate where a transaction ends and a new begins.
Horizontal lines are inserted in the Filtered data field to visualize where the transaction starts and
ends, and will help to keep individual transactions separate. A stop mask is not compulsory, but can
be useful if the received data contains irrelevant information, such as information about opening hours
or special offers, between actual transactions.
To add a start or stop mask, do the following:
1. In the XProtect Transact Administrator window, on the Sources tab, click Add New... if you
want to add a new source or Edit... to edit an existing source.
2. In the Create/Edit Source window, in the Configuration section, click Add New... or Edit...
depending on whether you want to add or edit a new configuration.
Page 32
Milestone XProtect® Transact
Administrator's Guide
www.milestonesys.com
32
Administration
Name
Description
Name:
Lets you specify a name for the configuration. If required, the name
may contain spaces and special characters, such as @, $, %, æ,
etc.
Capture from Source...:
Opens the Select Input Source window, with which you can
capture sample transaction data for use when creating the
configuration. See How to Capture transaction Data on page for
more information.
Load from File...:
Lets you load previously captured transaction data saved in
a .capture file, and use the transaction data when creating the
configuration.
Save to File...:
Lets you save any captured transaction data currently open in the
Create Configuration window as a .capture file.
Export Filters...:
Lets you save the configuration's filters (omissions, substitutions or
line breaks) as a .filter file, which can subsequently be imported
and used in other configurations.
Import Filters...:
Lets you import previously exported .filter files.
Raw data:
Displays the raw transaction data, with indications of any added
filters (omissions, substitutions or line breaks).
3. In the Raw data field in the Create/Edit Configuration window find the characters in the
transaction data that indicate that a transaction begins or ends.
4. Type the start mask in the Start mask field and the stop mask in the Stop mask field.
In the Filtered data field, the start and stop mask will be indicated by a horizontal line:
This example shows a horizontal line inserted before the start mask TEXT and after the stop mask Date.
Tip: You can use wild cards in start and stop masks. Start and stop masks are case sensitive, unless
using regular expressions.
See also
The create/edit configuration window (on page 32)
The Create/Edit Configuration window
Configurations are managed in the XProtect Transact Administrator window's Sources tab since
configurations are associated with—and customized to—the different sources. You access the two
main configuration windows Create Configuration or Edit Configuration by clicking the Add New...
button in the Create Source window or Edit Source window.
The Create/Edit Configuration window has the following content:
Page 33
Milestone XProtect® Transact
Administrator's Guide
www.milestonesys.com
33
Administration
Filtered data:
Provides a preview of the transaction data as it will be presented in
client applications when viewed by end-users, with the omissions,
substitutions, line breaks and masks applied.
Omit:
Lets you filter out one or more characters selected in the Raw data
field.
Substitute...:
Opens the Edit Filter window, with which you can substitute one or
more characters selected in the Raw data field.
Add New Line:
Lets you replace one or more characters, including control
characters, selected in the Raw data field with a line break.
New Filter...:
Opens the Edit filter window, with which you can create filters
(omissions, substitutions or line breaks) by typing the required
characters rather than by selecting them in the Raw data field.
Edit Filter...:
Opens the Edit Filter window, with which you can edit the filter you
have selected in the [Filters overview field].
Delete Filter:
Lets you delete an existing filter selected in the [Filters overview
field].
[Filters overview field]:
Lists existing filters (omissions, substitutions or line breaks).
Name
Description
Start mask:
Lets you define a start mask, meaning which characters in the
transaction data you want to use for indicating the beginning of a
new transaction.
Stop mask:
Lets you define a stop mask, meaning which characters in the
transaction data you to use for indicating the end of a transaction.
If you create/edit a configuration for the source provider TCP XML XProtect Transact provider, the
Name setting is the only available setting in the Create/Edit Configuration window, since no
configuration is needed for this source provider.
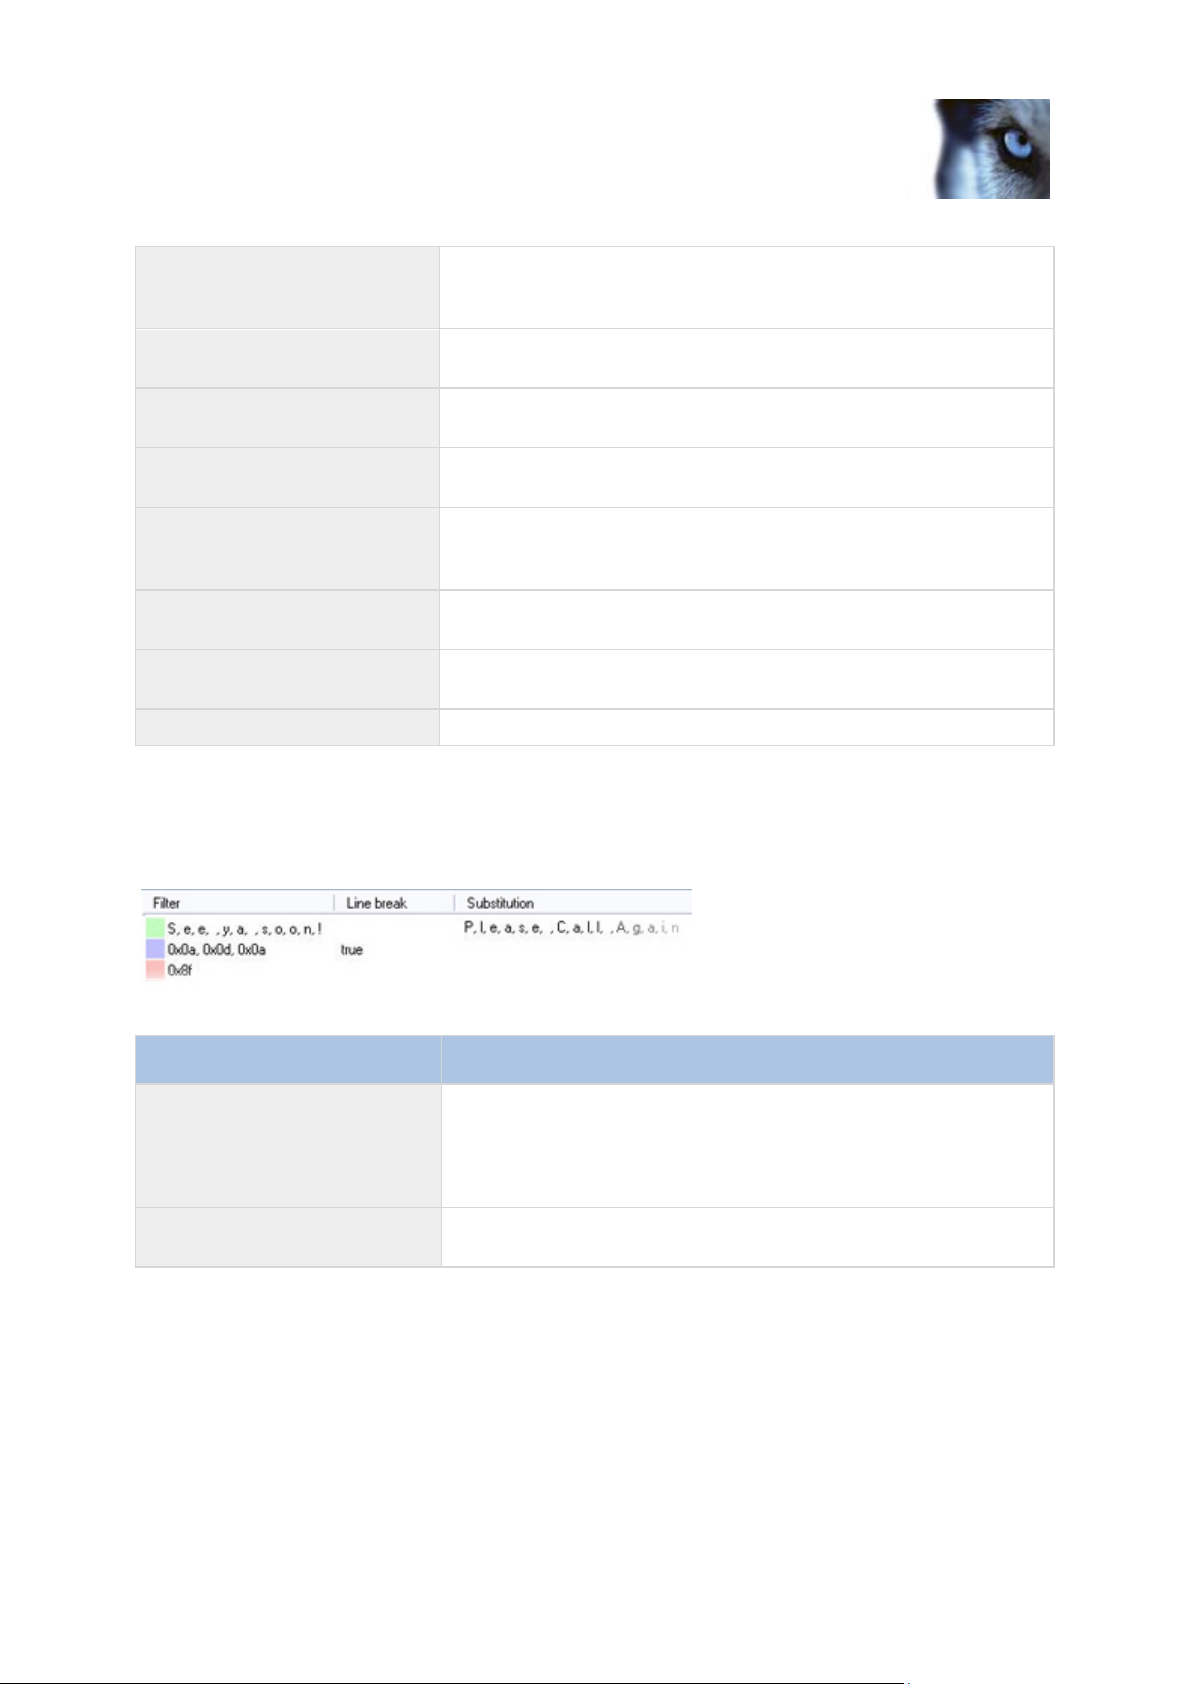
Defined filters are highlighted with different colors. Unwanted content is indicated by a light pink color,
substitutions by a light green color, and line breaks by a light purple color.
Example of a substitution, a line break and an omission listed in the [Filters overview field].
Page 34

Milestone XProtect® Transact
Administrator's Guide
www.milestonesys.com
34
Administration
Use:
You can use wildcards in start and stop masks. A wildcard is a
special symbol that stands for one or more characters. Wildcards
allow you to define start and stop masks without being 100%
specific about the masks' character content.
Two different types of wildcard use are available:
Wildcards: The start and/or stop mask are case sensitive. The
following wildcards can be used: ? (any one or more characters or
digits), * (zero or more characters or digits).
Regular Expression: Use regular expressions. A highly flexible
method with which software developers and other people with
programming knowledge can express how software should look for
a text pattern, and what to do when the text pattern is found. Any
case sensitivity, wildcards, etc. will depend entirely upon the way in
which you use regular transactions in your environment.
Events: Use already configured event patterns as a mask. If you
select this option, you can select one or more events (see "Manage
events" on page 39) to use as start and stop masks. If the search
string of any of the selected events is found, the transaction is
started or stopped. This makes it possible to re-use event
configurations to start and stop transactions.
Encoding:
Lets you select required character set to convert the source's
transaction data which is sent in bites to understandable text in
your language.
See also
Edit filter window (see "The Edit Filter window" on page 34)
Export/import a configuration (on page 29)
The create/edit configuration window (on page 32)
Use start and stop masks (on page 31)
Add line breaks (on page 31)
Omit characters (see "Omit characters in a source's configuration" on page 29)
Use substitutions (on page 30)
Add line breaks (on page 31)
The Edit Filter window
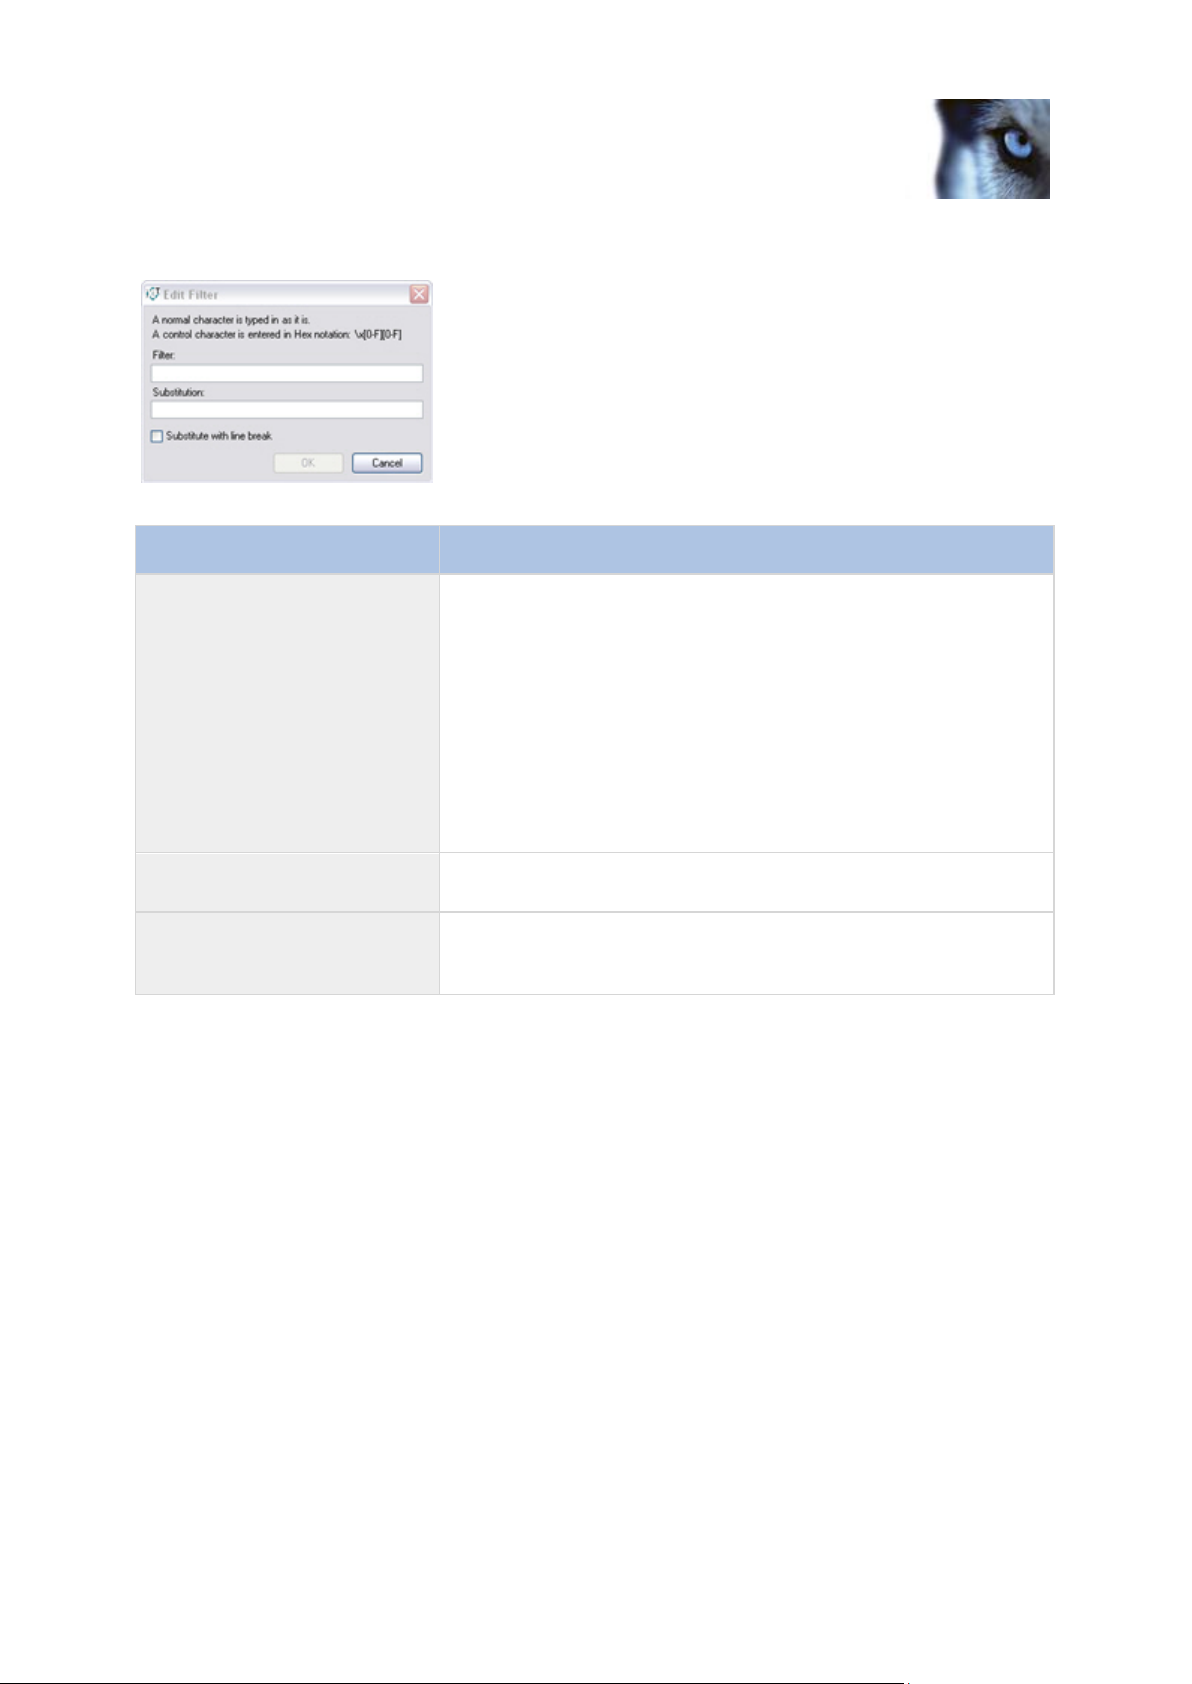
In the Edit Filter window, you can create or edit filters (omissions, substitutions or line breaks). You
can create new filters by clicking the New Filter... button and typing the required characters rather
than by selecting them in the Raw data field. To edit an existing filter, select the required filter in the
[Filters overview field] and click the Edit Filter... button.
Page 35
Milestone XProtect® Transact
Administrator's Guide
www.milestonesys.com
35
Administration
Name
Description
Filter:
Field may be used for three purposes:
If creating/editing an omission: Type or edit the
characters to be filtered out.
If creating/editing a substitution: Type or edit the
characters to be substituted, then type/edit the characters
you want to be used instead in the Substitution field.
If creating/editing a line break: Type or edit the characters
to be replaced by a line break, then select the Substitute
with line break check box.
Substitution:
Type or edit the characters to be used as substitution. The field is
unavailable if the Substitute with line break check box is selected.
Substitute with line break:
Select if content of Filter field should be replaced by a line break.
When this check box is selected any content in the Substitution
field will be cleared.
The Edit Filter window contains the following settings:
The Edit Filter window
See also:
Omit characters (see "Omit characters in a source's configuration" on page 29)
Use substitutions (on page 30)
Add line breaks (on page 31)
The Select Input Source window
In the Select Input Source window you can capture sample transaction data for use when creating a
configuration. You access the Select Input Source window by clicking the Capture from Source...
button in the Create/Edit Configuration window. See How to Capture transaction Data on page for
a step-by-step guide.
The Select Input Source window contains the following settings:
Page 36

Milestone XProtect® Transact
Administrator's Guide
www.milestonesys.com
36
Administration
Name
Description
Select a source for input
sampling:
Select the required input source from the list. The list will only
contain input sources matching the type of source you are currently
working with. Example: If you are currently working with a
configuration for a serial port source, only serial port input sources
will appear in the list.
Properties:
Names and values of the selected source are listed here.
Start/Stop:
Click the button to start or stop the capturing of transaction data.
The Select Input Source window; in this case only a single source is available for selection
Master/slave setup
You can set up several XProtect Transact servers in a master/slave relationship. The XProtect
Transact Administrator window lets you define which servers you require as masters for the
XProtect Transact server you are configuring. This enables XProtect Smart Client users to view
transaction data from more than one XProtect Transact server.
You can get full benefit of a XProtect Transact master/slave setup if you have Milestone XProtect
Enterprise or XProtect Corporate. This enables you to combine digital video monitoring from several
surveillance servers with transaction data from all your XProtect Transact servers. If you have
XProtect Professional or Milestone XProtect Basis+, you are still able to see transaction data from all
your XProtect Transact master/slave servers and combine it with video from the surveillance server in
the XProtect Smart Client.
Prerequisites – XProtect Professional or Milestone XProtect Basis+ The XProtect Transact
master server must be located on the same computer as the surveillance server.
Prerequisites – Enterprise Servers The XProtect Transact master server must be located on
the same computer as the Enterprise master server, and XProtect Transact slave servers must
be located on the same computers as the Enterprise slave servers. The Enterprise
Page 37

Milestone XProtect® Transact
Administrator's Guide
www.milestonesys.com
37
Administration
master/slave setup is defined in the ImageServer Administrator window. For more information
see the separate Enterprise documentation.
Prerequisites – Corporate The XProtect Transact master server must be located on the same
computer as the Corporate management server. See Integrating with Milestone XProtect
Corporate on page for more information.
Once XProtect Transact is installed and the master/slave relationship defined, the surveillance master
server sends information to XProtect Smart Clients about how to connect to its XProtect Transact
master and slave servers. Then XProtect Smart Clients and the XProtect Transact servers
communicate directly with each other for fastest updates.
If you change a XProtect Transact slave's server service settings in XProtect Transact Server Service
Configuration menu, you must ask the XProtect Smart Client users to log out and in of their XProtect
Smart Clients to reload the slave's server service settings so that the data feed to the XProtect Smart
Clients can continue.
A XProtect Transact server can be slave of any number of XProtect Transact master servers. It is a
good idea to define more masters so you have transaction data redundancy. If the primary XProtect
Transact master server for some reason should need maintenance, you can continue monitoring
transaction data through one of the other XProtect Transact master servers.
See also
Manage master/slave setup (on page 37)
Create a view with transactions in the XProtect Smart Client (on page 51)
Manage master/slave setup
You can set up several XProtect Transact servers in a master/slave relationship. This enables you to
view data from several XProtect Transact servers in the XProtect Smart Client.
You define the master servers for the XProtect Transact server you are configuring by clicking the
Masters tab in the XProtect Transact Administrator window.
Edit a master server
Prerequisites: When you edit a master server for the XProtect Transact server, you need to enter the
master server's server service settings. Have this information ready when editing the master/slave
setup.
To edit a master server, do the following:
1. On the XProtect Transact server that is configured as slave, open the XProtect Transact
Administrator and click the Masters tab.
2. Select the master server you want to edit, then click the Edit... button.
3. Edit the required settings in the Master Information dialog.
Remove a master server
To remove a master server from the list of master servers on the Masters tab, select the unwanted
master server in the list and click Delete.
Page 38

Milestone XProtect® Transact
Administrator's Guide
www.milestonesys.com
38
Administration
Name
Description
Administration service name
The administration service name of the master server.
Host
The IP address or host name of the master server.
Port
The port number of the master server.
Protocol
The protocol used by the master server.
Update slave information
To send a slave server's server service settings to its master servers, click the Update button on the
Masters tab.
When you change a slave server's server service settings information, it is immediately sent to the
server's master servers. If, for some reason, a master server is not running when this happens, you
are notified. When the master server is running again, you can click the Update button to resend the
slave server's updated server service settings to its masters.
Master setup dialog elements
The MasterInformation window contains the following fields:
Tip: You can find all of the information about the master server's server service settings on the
master's Server Service Setting window in the right-click menu of the XProtect Transact Server
Service Taskbar icon.
Define a master server
Prerequisites: When defining a master server for the XProtect Transact server you are configuring,
you need to enter the master server's server service settings. Have information about the master
server's server service settings ready when defining the master/slave setup.
To define a master server, do the following:
1. On the XProtect Transact server that is going to be configured as slave, open the XProtect
Transact Administrator.
2. On the Masters tab, click Add New....
3. Specify the administration service name, host name and port number of the master server, and
click OK.
Events and event groups
Through XProtect Transact's event and event group features you can get XProtect Transact to listen
for occurrences of specific words, numbers, characters etc. in the transaction data and generate
events when the specified occurrences are found. When an occurrence is found a transaction event is
triggered.
For easy and flexible usage of transaction events, you can group events in event groups. Each
transaction event can be member of several groups. With event groups you also specify how
transaction data is send to your surveillance system, and you can associate sources to an event
group.
Page 39
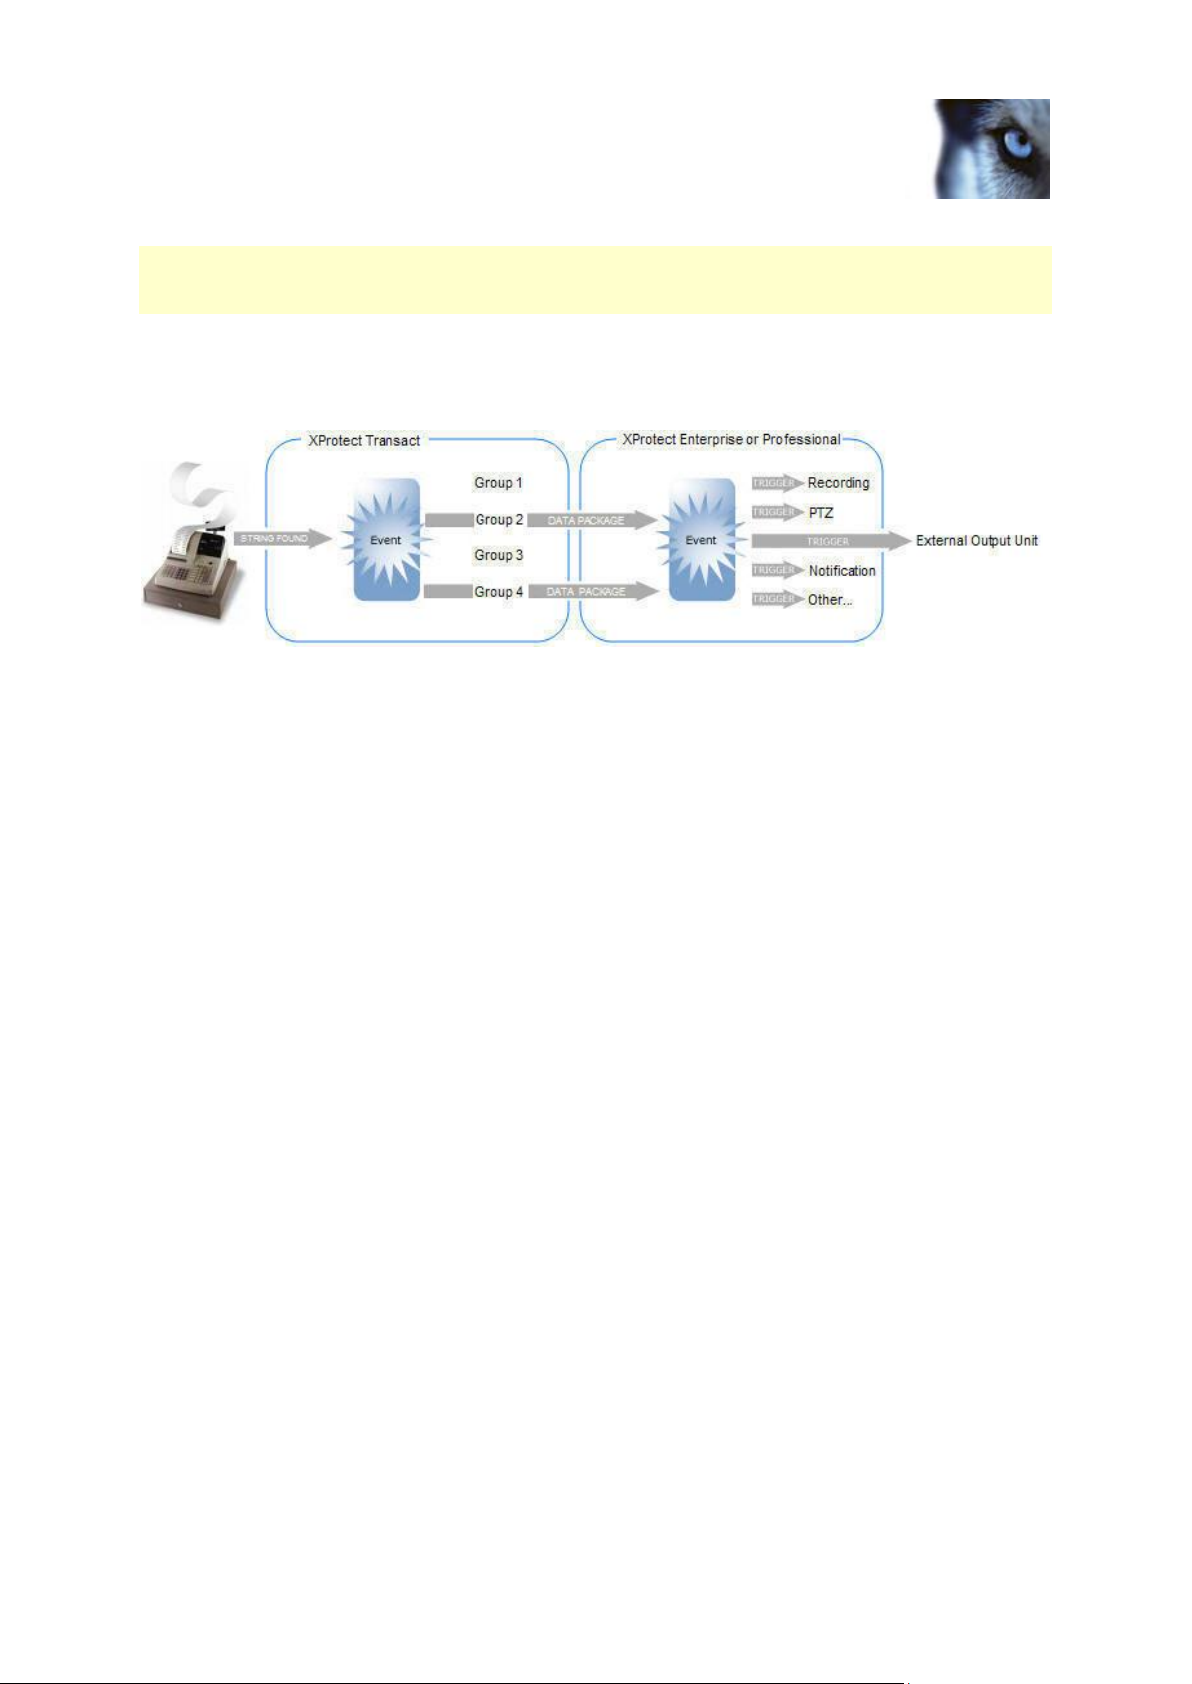
Milestone XProtect® Transact
Administrator's Guide
www.milestonesys.com
39
Administration
Transaction events are supported in XProtect Enterprise and XProtect Professional. To trigger
transaction events in the surveillance system it is prerequisite that you define generic events in the
surveillance system that match the criteria of the transaction events from XProtect Transact.
When a transaction event is triggered, the transaction event groups containing the event send a TCP
or UDP data package to XProtect Enterprise or XProtect Professional. The data package is then
analyzed by the generic events in the surveillance system. If the transaction event is matching
specified criteria in a generic event, the actions specified in the generic event are triggered.
Example: The source's transaction data contains an occurrence that triggers a transaction event. The
transaction event is member of event groups 2 and 4. Each group sends a TCP or UDP data package
to the surveillance system on which defined generic events triggers one or more actions.
See also
Manage events (on page 39)
Manage event groups (on page 41)
Create a generic event triggered by transaction data (on page 43)
Test events (on page 44)
Manage events
Through XProtect Transact's event and event group features you can get XProtect Transact to listen
for occurrences of specific words, numbers, characters etc. in the transaction data and generate
events when the specified occurrences are found. For easy and flexible usage of transaction events,
you can group events in event groups (see "Manage event groups" on page 41).
You define and edit the events on the Events tab in the XProtect Transact Administrator window.
Add an event
To add an event, do the following:
1. Open the XProtect Transact Administrator window.
2. On the Events tab, click the Add New... button. This will open the New Event window.
3. In the Name field, specify a name for the new event.
4. In the Search string field, write the string you would like to search for in the Transaction data.
You can search for words, numbers and special characters that match the string you would
like to find in the Transaction data. You can only search for one string at a time. A string can
consist of several words or similar as long as this exactly matches the Transaction data.
Page 40

Milestone XProtect® Transact
Administrator's Guide
www.milestonesys.com
40
Administration
For example, you can create a search string that looks for the occurrence of Word1 Word2.
This will find occurrences of Word1 Word2 but not occurrences of Word2 Word1 or Word1
Word3 Word2 and so on. Select Case sensitive if you would like to differentiate between
upper and lowercase letters in the Search string field.
5. In the Search type field select between three ways of searching for the phrase specified in the
Search string field:
o Simple: Use simple search, with which any Transaction data containing an occurrence of
the specified search string will be found.
o Exact: Use exact match, with which occurrences of the specified search string will be
found only if they are preceded and followed by a blank space. Example: If you specify the
search phrase return, only occurrences in which the phrase return appears surrounded by
spaces will be highlighted, whereas occurrences such as returned item will not.
o Wildcards: Search using wildcards. Three different characters can be used as wildcards:
The asterisk character (*). Place a asterisk after the search string, with which
occurrences of the specified search string will be found also if the search string is
followed by any number of characters. Example: If you specify return* as your search
string, all occurrences containing the letters return, such as returned item, returns
and similar, will be highlighted.
The question mark character (?), with which any single character can be substituted.
Example: If you specify the search phrase j?ck, all occurrences such as jack, jock, etc.
will be highlighted. You may use several question mark characters in your search.
Examples: jac???n or j?cks?n.
The hash character (#), with which any single digit can be substituted. Example: If you
specify the search phrase 4#, all occurrences such as 40, 41, etc. will be highlighted.
You may use several hash characters in your search. Examples: 4## or 12#4##7.
o Reg Ex: Search using the regular expressions.
You must enclose your search criteria in quotation marks for them to be included in your
search.
For a list of regular expressions, go to Microsoft's MSDN website:
http://msdn.microsoft.com/en-us/library/az24scfc.aspx.
6. In the Event string field specify the string that you want to send in a TCP/UDP data package
to the surveillance system.
7. In the Check if expression matches search string, you can test whether the search type
expression produces the results you want to see. Enter the result you want to test for and the
area below the field displays the results of the test (for example, Match or No match).
8. Click OK to save your settings.
When you have created an event, an event group and a generic event in your surveillance system that
matches the criteria in the Transaction event, you can test your Transaction event to verify that the
specified action is triggered in your surveillance system.
See also
Manage event groups (on page 41)
Page 41

Milestone XProtect® Transact
Administrator's Guide
www.milestonesys.com
41
Administration
Create a generic event triggered by Transaction data (on page 43)
Test events (on page 44)
Edit an event
To edit an event, do the following:
1. In the XProtect Transact Administrator window, on the Events tab, select the required
event and click Edit....
2. In the Edit Event window, change the required settings.
3. Click OK to save your settings.
Delete an event
To delete an event, select the required event on the XProtect Transact Administrator window's
Events tab and then click Delete.
Manage event groups
For easy and flexible usage of transaction events, you can group events in event groups. Each
transaction event can be member of several groups. With event groups you also specify how
transactions data is send to your surveillance system, and you can associate sources to an event
group. It is prerequisite that you define generic events in the surveillance system that match the
criteria of the transaction events from XProtect Transact.
Transaction events are supported in XProtect Enterprise and XProtect Professional.
You define and edit the events groups on the Event Groups tab in the XProtect Transact
Administrator window.
See also
Sources and configurations (on page 16)
Events and event groups (on page 38)
Manage events (on page 39)
Create a generic event triggered by transaction data (on page 43)
Test events (on page 44)
Add an event group
To add an event group, do the following:
1. Open the XProtect Transact Administrator window.
2. On the Event Groups tab, click the Add New... button. This will open the New Event Group
window.
3. In the Name field, specify a name for the new event group.
Page 42

Milestone XProtect® Transact
Administrator's Guide
www.milestonesys.com
42
Administration
4. In the Address field, specify the host name or IP address of your surveillance system.
5. In the Port field, specify the port number on which to send events to your surveillance system.
It is prerequisite that the specified port number is the same as the one the surveillance system
uses when listening for generic events.
Tip: The surveillance systems listen for generic events on the port specified as Alert Port in
the surveillance system (default is port 1234). From the surveillance system's Administrator
click the Advanced... button in the I/O Setup window to access the Advanced window to
verify which port number is used.
6. In the Protocol field, specify whether you want to send the events as TCP or UDP data
packages to the surveillance system. The default protocol is UDP since it uses less bandwidth
than TCP. If your network does not support UDP, simply select TCP.
7. To specify the group you can do one of two things.
o In the Events list select one or more events that you want to include in the event group
o In the Match expression field use the expressions (AND, OR and NOT) to match groups
against each other. You can test the results of your filter criteria in the Event string field.
Example: You have three event groups. For the third group, in the the Match expression
field you enter "group1" or "group2". If events listed in group 1 or group 2 appear, group 3
will be triggered and the event you have set up for group 3 will be sent to the server.
8. Click OK to save your settings.
When you have created an event, an event group and a generic event in your surveillance system that
matches the criteria in the transaction event, you can test your transaction event to verify that the
specified action is triggered in your surveillance system.
See also
Create a generic event triggered by transaction data (on page 43)
Manage events (on page 39)
Test events (on page 44)
Edit an event group
To edit an event group, do the following:
1. In the XProtect Transact Administrator window, on the Event Groups tab, select the
required event group and click Edit....
2. In the Edit Event Group window, change the required settings.
3. Click OK to save your settings.
Delete an event group
To delete an event, in the XProtect Transact Administrator window, on the Event Groups tab,
select the required event group and click Delete.
Page 43
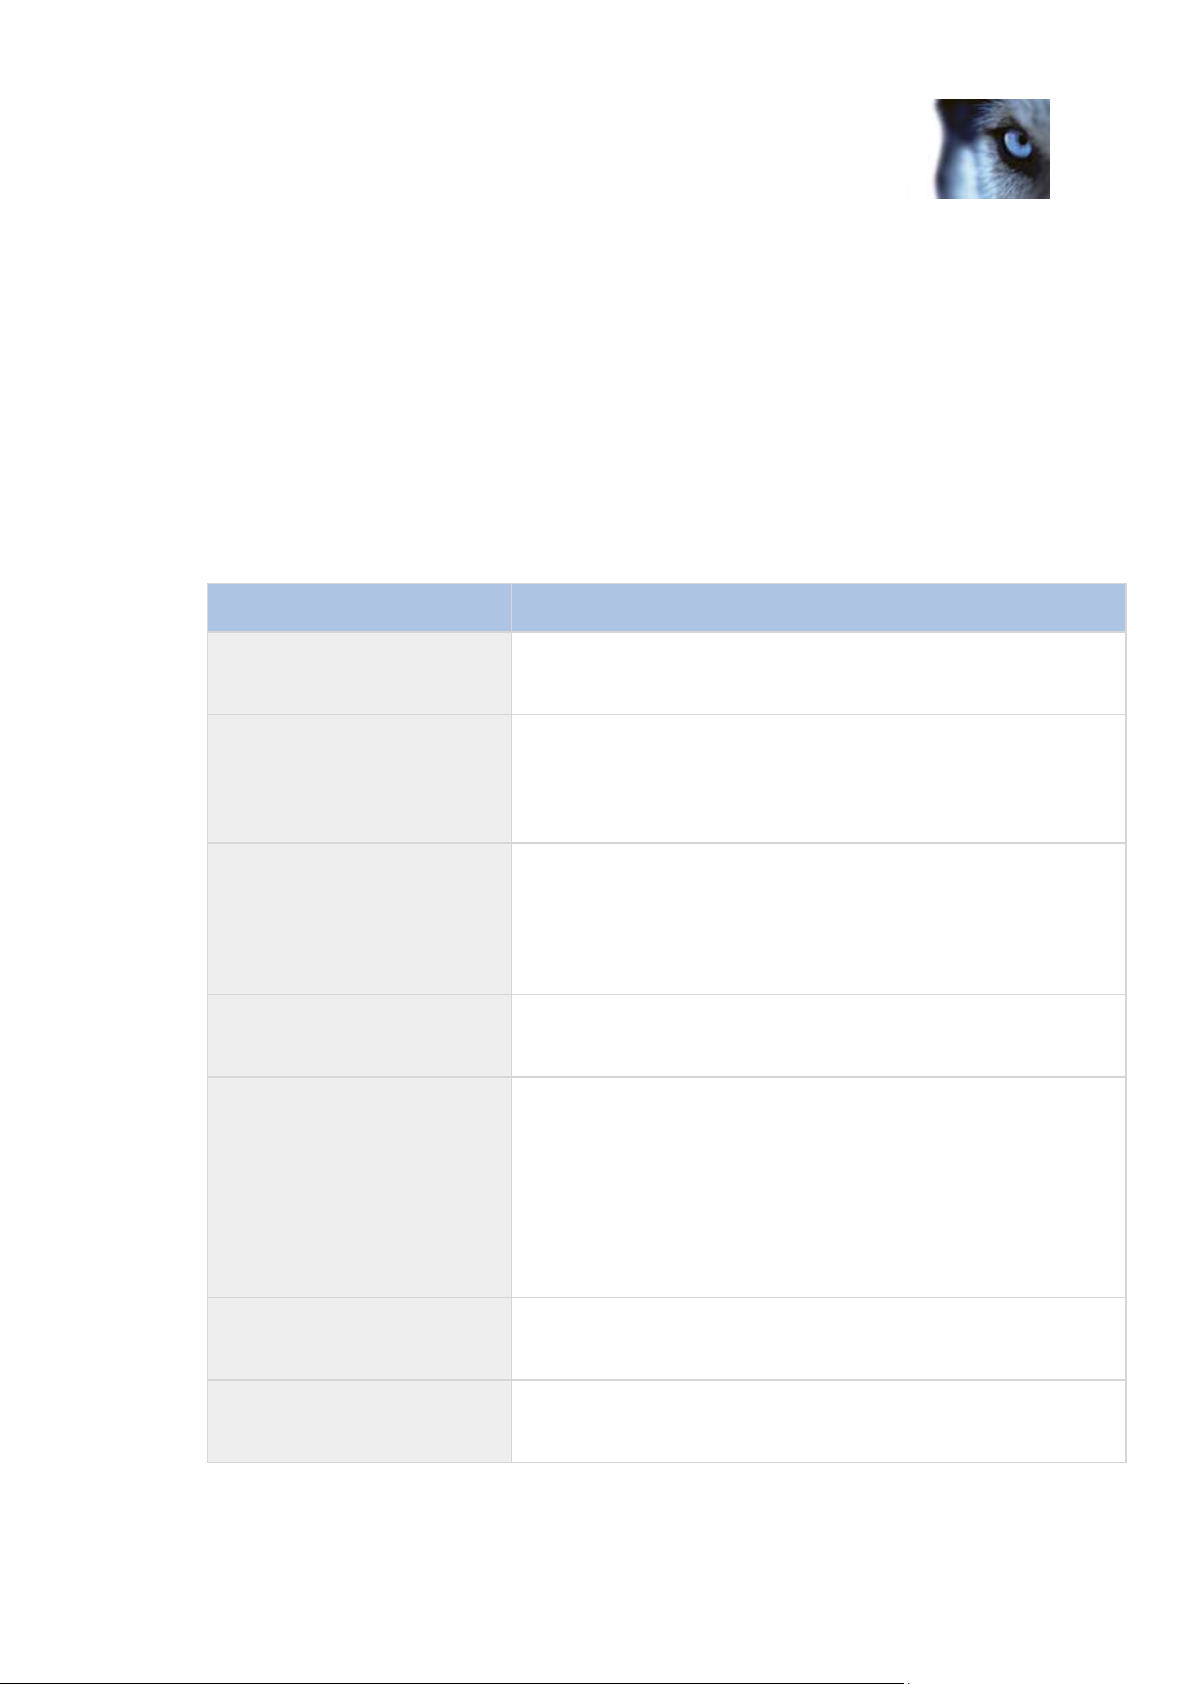
Milestone XProtect® Transact
Administrator's Guide
www.milestonesys.com
43
Administration
Name
Description
Name
Specify a name for the event in the surveillance system. Note that
event names must not contain the following characters: < > & ' "
¥ / : * ? | [ ]
Event Protocol
Lets you select which protocol the surveillance system should listen
for in order to detect the transaction event. Select the same protocol
as the protocol specified for the transaction event that is to trigger
this generic event. You can also select Any to be able to receive
both TCP and UDP data packages.
Event rule type
Select how particular the surveillance system should be when
analyzing received data packages: Match if the received package
must contain only the exact message specified in the Event
message include field (see description in the following), Search if
the received package must contain the message specified in the
Event message include field, but may also have other content.
Event priority
Specify a priority between 0 (lowest priority) and 1000 (highest
priority) for the event, in case a received data package matches
more than one event.
Event rule string
In the Event substring field, specify the XProtect Transact event
string or parts of it that you want the surveillance system to look for
when analyzing the transaction data packages. Then click the Add
button to add the specified term(s) to the Event message include
field, the content of which is used when analyzing received data
packages. You are furthermore able to use processing order
parentheses and two different Boolean operators in the Event
message include field by clicking the buttons to the right of the
field.
Send Email if this event
occurs
Select to send an e-mail alert automatically when the event occurs.
To use e-mail alerts, the e-mail alert feature must be set up in the
surveillance system's E-Mail setup window.
Send SMS if this event occurs
Select to send an SMS alert automatically when the event occurs.
To use SMS alerts, the SMS alert feature must be set up in the
surveillance system's SMS settings window.
Create a generic event triggered by transaction data
Generic events in XProtect Enterprise or XProtect Professional can be based on the analysis of
received TCP and UDP data packets as it is the case with transaction events from Milestone XProtect
XProtect Transact.
To add a generic event in XProtect Enterprise or XProtect Professional, do the following:
1. In the Administrator window, click the Generic Events... button. This will open the Generic
Events window.
2. In the Generic Events window, first select the Generic item, then click the Add new event...
button. This will open the Add New Event window in which you can specify the new event.
3. Now specify information in the following fields:
Page 44

Milestone XProtect® Transact
Administrator's Guide
www.milestonesys.com
44
Administration
When you have created an event, an event group and a generic event in your surveillance system that
matches the criteria in the transaction event, you can test your transaction event to verify that the
specified action is triggered in your surveillance system.
See also
Manage events (on page 39)'
Manage event groups (on page 41)
Test events (on page 44)
For more information about generic events see the separate documentation for XProtect Enterprise or
XProtect Professional.
Test events
Once you have created a transaction event and added a generic event in your surveillance system
that matches your transaction event, a quick and easy way to test your transaction event is to verify
that an alarm or event is generated in XProtect Smart Client.
In this example we create a transaction event and a generic event in the surveillance system. Your
required events may be different, but you can still use the outlined principles.
1. Create an event called Withdrawal, that listens for occurrences of the string withdrawal and
sends the event string withdrawal to the surveillance system.
Page 45

Milestone XProtect® Transact
Administrator's Guide
www.milestonesys.com
45
Administration
2. Create an event group called Withdrawal Event Group and fill in the necessary information
about the surveillance systems address and port number. Select UDP as protocol.
3. Create a generic event called Withdrawal in your surveillance system's Administrator
application. See How to Create a Generic Event Triggered by transaction Data on page for
more information. Make sure that the selected protocol and event (rule) string matches the one
in the Withdrawal Event Group created in step 2.
Page 46

Milestone XProtect® Transact
Administrator's Guide
www.milestonesys.com
46
Administration
Access to features in the Administrator application, including generic events, may require
administrator rights.
4. In the XProtect Transact Administrator window, on the Event Groups tab, select the event
group Withdrawal Event Group.
5. Select the Withdrawal event from the Events list and click Test.
Example: The event Withdrawal is selected for testing. You can also test events that are already included in the event group.
6. Open the XProtect Smart Client and log into the required surveillance server to verify that an
event matching your transaction event is generated in the Event list. See XProtect Smart
Client's separate documentation for more information on how to view events from the alarm
list.
Page 47

Milestone XProtect® Transact
Administrator's Guide
www.milestonesys.com
47
Administration
Name
Description
Default days to store
transactions
Specify the default number of days for which to store transaction
data. If you do not specify otherwise, the default is seven days.
Transaction data older than the specified number of days will be
deleted from the XProtect Transact Database, and will therefore not
be available for browsing in the client applications.
Make sure the default number of days is sufficiently high to cover
your organization's needs.
The field lets you specify a default number of days, which will be
used if nothing else has been defined for individual sources. See
Adding a New Source in the Managing Sources topic on page for
more information about how to define transaction storage periods
for individual sources.
MAC Address
View the MAC address of your computer.
Software License Code (SLC)
View your XProtect Transact Administrator Software License Code
(SLC)
Connection License Key
(CLK)
Lets you update the Connection License Key (CLK). Below this field
you can see how many sources you can view simultaneously.
7. So far you have only tested the transaction event. The event must be included in an event
group and a source must be associated with the event group before XProtect Transact listens
for occurrences in the transaction data. If the test was successful, include the Withdrawal
event in the event group Withdrawal Event Group, and if required associate sources with the
event group.
8. You can include the event in other events groups. Repeat if relevant the test of the event in
connection with the other events groups. If relevant select existing sources and associate them
with event groups that include the Withdrawal event.
See also
Manage event groups (on page 41)
Managing sources (on page 18)
Storage and licensing settings
On the General Settings tab in XProtect Transact Administrator you can define the default number of
days to store transaction data and update your XProtect Transact installation's licensing information.
See also
Licensing (on page 10)
Page 48
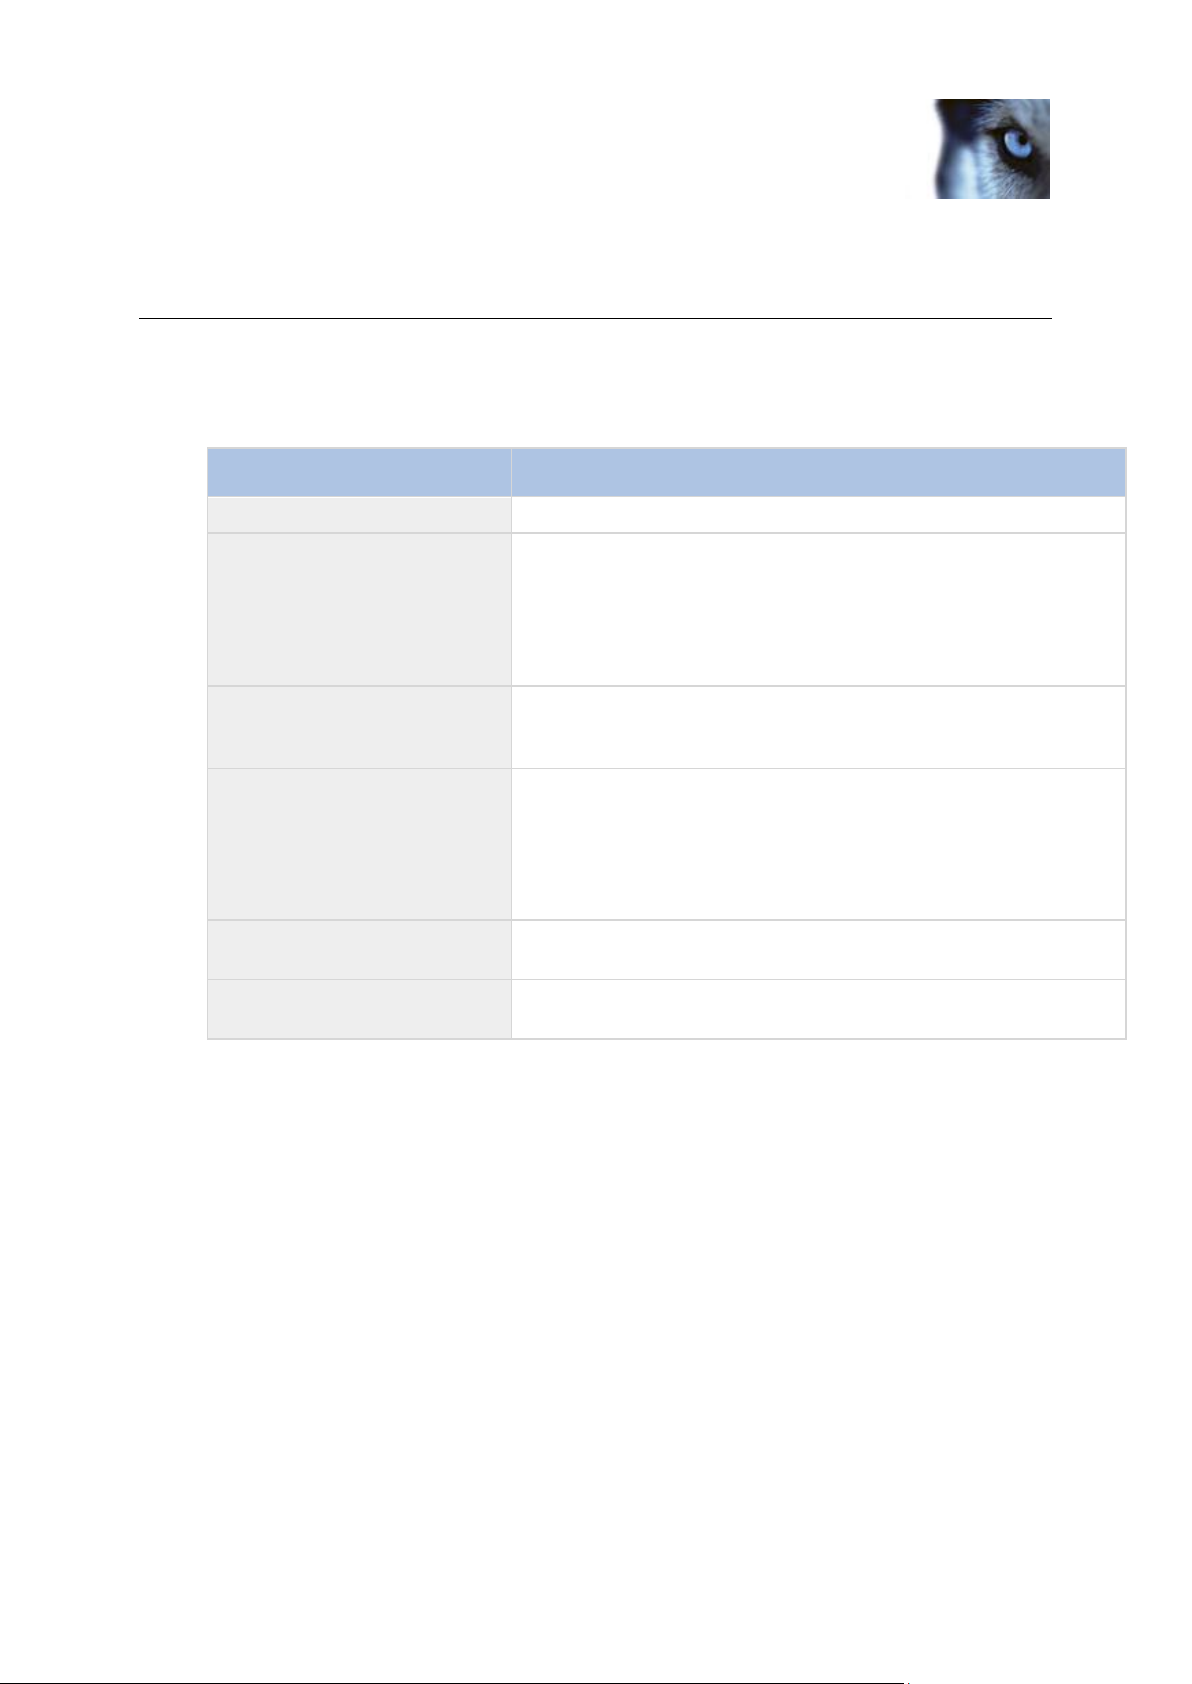
Milestone XProtect® Transact
Administrator's Guide
www.milestonesys.com
48
XProtect Transact Server Service
menu
Name
Description
Start Server Service
Lets you start the XProtect Transact Server service.
Stop Server Service
Lets you stop the XProtect Transact Server service.
IMPORTANT: As long as the service is stopped, it will not find
transactions from cash registers or other sources, and will therefore
not store such transactions in the XProtect Transact Database.
Server Service
Configuration...
This opens the Server Service Configuration window where
administration of XProtect Transact Server Service settings is
handled. See Managing Server Service Settings on page .
Open Administrator...
This opens the XProtect Transact Administrator window. See
Managing Server Service Settings on page , Sources and
Configurations on page , Master/Slave Setup on page , Events and
Event Groups on page and License Settings on page for more
information about how to configure the different XProtect Transact
settings.
Show System Status...
This opens the Show System Status window where you get
detailed information on all system sources and their current status.
Show Log...
This opens the Show Log window where you get detailed system
log information.
XProtect Transact Server Service menu
1. You access the XProtect Transact Server Service Icon right-click menu from the taskbar.
2. Right-click the XProtect Transact Server Service Icon and a menu appears. In addition to
Help, About and Exit, it contains the following:
Page 49

Milestone XProtect® Transact
Administrator's Guide
www.milestonesys.com
49
View transactions
View transactions
With the XProtect Smart Client application, you can view transaction data together with recordings of
the transaction taking place.
In the XProtect Smart Client you simply create a view, select the required transaction data source (for
example a particular cash register), then the required video sources (for example two cameras
covering the area around the cash register from different angles), and you are ready to browse.
The time-linking of the transaction data and video recordings enables you to view and browse the
transaction data and video recordings simultaneously.
Integrate with XProtect Corporate
If your organization has XProtect Corporate surveillance solutions and you want to view transaction
data together with recordings from cameras defined in a XProtect Corporate solution, you must add
the XProtect Transact master server in the XProtect Corporate Manager application, before XProtect
Transact and XProtect Corporate can communicate with each other.
Prerequisite: The XProtect Transact Server and the XProtect Corporate Management Server must be
installed on the same computer.
Tip: If you have several XProtect Transact servers in a master/slave relationship, define the XProtect
Transact Server that shares the computer with the XProtect Corporate Management Server as master.
See Managing Master/Slave Setup on page for more information.
When the communication between the XProtect Transact Server and the Corporate Management
Server is established, you will be able to view transaction data together with recordings from
Corporate cameras in XProtect Smart Clients.
To add a XProtect Transact Server in the XProtect Corporate Manager application, do the following:
1. Open the XProtect Corporate Manager.
2. From the Tools menu, select XProtect Enterprise Servers...
3. In the Add/Remove Protect Enterprise Servers window, click Add....
4. Enter the IP address or the host name of the required XProtect Transact server in the
XProtect Enterprise server IP / Host name field.
5. Enter the port number used by the XProtect Transact server in the Port number field.
Page 50
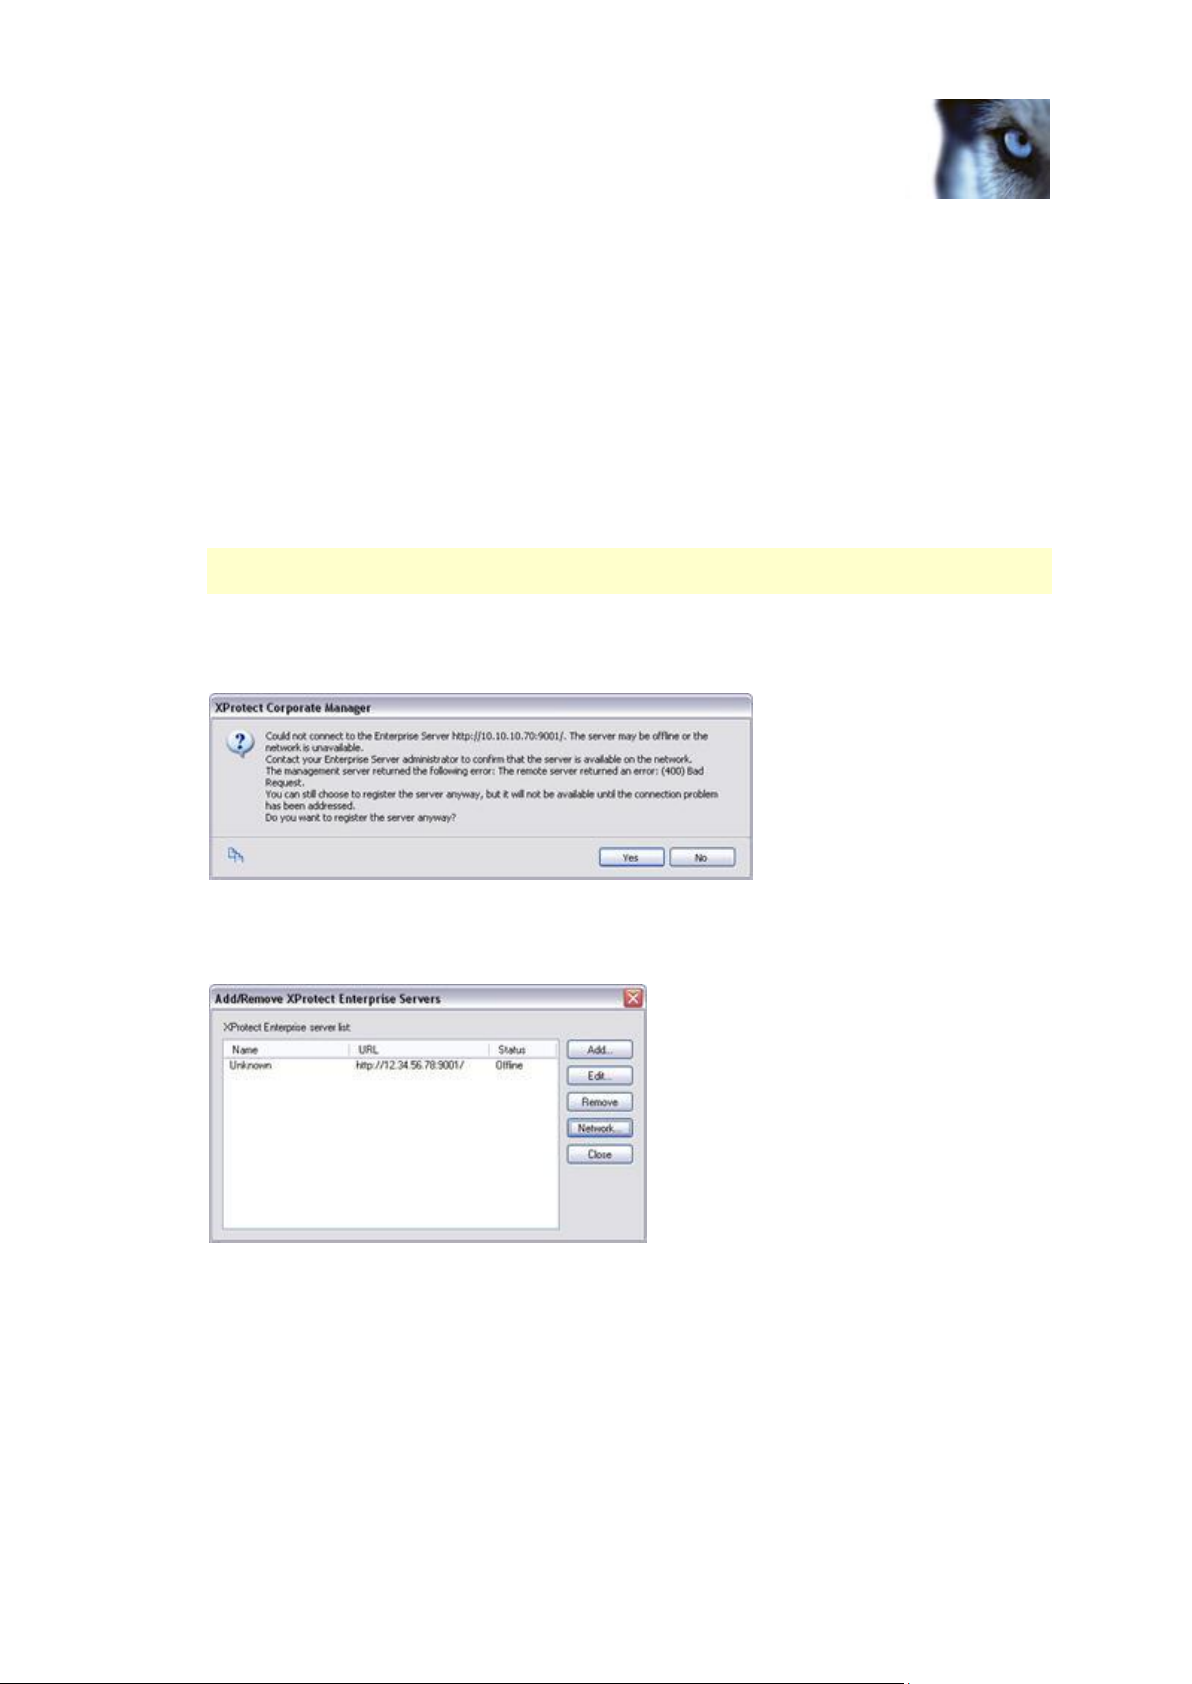
Milestone XProtect® Transact
Administrator's Guide
www.milestonesys.com
50
View transactions
Tip: The XProtect Transact server's default port number is 9001; if in doubt, you can find the
port number used by the required XProtect Transact server on the Server Service Setting
window in the right-click menu of the XProtect Transact Server Service Taskbar icon.
6. Enter your user name and password in the Username and Password fields. You can do this
in two ways:
o Select Windows and click the browse button to the right of the Username field to use the
Windows authentication method which authenticates the administrator through the
administrator's Windows login.
o Select Basic and enter the XProtect Enterprise administrator's user name and password in
the Username and Password fields.
You must enter a user name, but the information is not used since access to transaction data
is not restricted by user rights and Corporate roles.
7. Click OK to close the Add XProtect Enterprise Server window.
The following error message is shown:
8. Ignore the error message, and click Yes to add the XProtect Transact server. The XProtect
Transact server is now listed in Add/Remove Protect Enterprise Servers window with the
name Unknown and the status Offline.
Page 51

Milestone XProtect® Transact
Administrator's Guide
www.milestonesys.com
51
View transactions
9. Click Network... to define that Corporate will be handling the token authentication of the
XProtect Smart Clients.
10. Specify the LAN IP address of the XProtect Corporate Management Server.
11. When you are ready, click OK.
12. Click Close to close the Add/Remove Protect Enterprise Servers window.
You are now ready to view transaction data together with recordings from Corporate cameras in
XProtect Smart Clients. See Installing the XProtect Transact Plugin for the XProtect Smart Client on
page and Creating a View with transactions in the Smart ClientXProtect Smart Client on page for
more information.
Create a view with transactions in the XProtect Smart Client
If your XProtect Smart Client user rights permit you to create views, you can create views with
transactions together with recordings. Simply create the required view with XProtect Transact content
on the XProtect Smart Client's Setup tab.
Creating a view may not be necessary if views in shared groups are used in your organization. Views
in shared groups can be shared among XProtect Smart Client users. If a view with XProtect Transact
content is available in a shared group, you may simply select the view on the XProtect Smart Client's
Live or Browse tabs, and begin live viewing or browsing of transaction data with matching video
recordings. Consult your system administrator if in doubt about whether views in shared groups are
available in your organization.
To create a view with XProtect Transact content, do the following:
1. Open and log in to the XProtect Smart Client.
Tip: For information about how to open and log in to the XProtect Smart Client, see separate
documentation for your XProtect Smart Client.
1. In the XProtect Smart Client, select the Setup tab.
2. On the Setup tab, create a new view.
Page 52
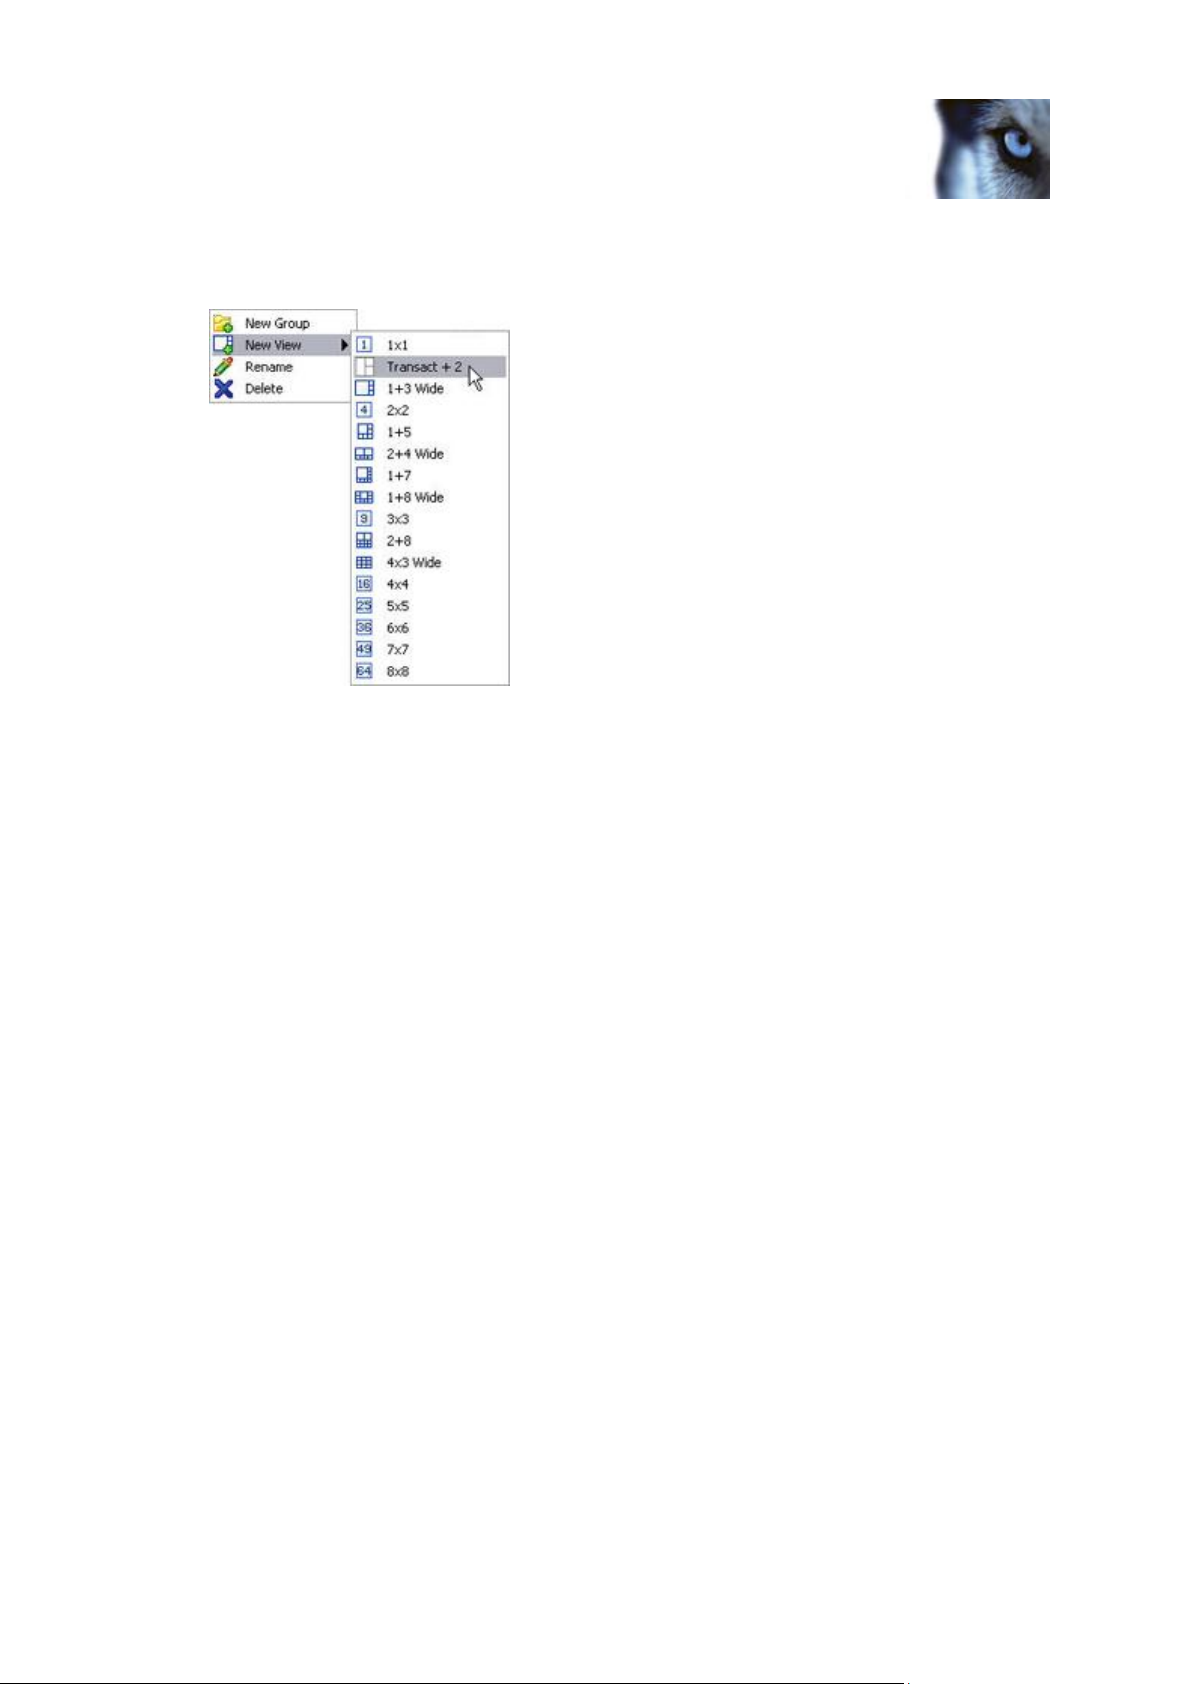
Milestone XProtect® Transact
Administrator's Guide
www.milestonesys.com
52
View transactions
You may select any view layout from the list, but some layouts, such as the Transact + 2
layout, are particularly suited for viewing transaction data and camera images together:
Example of available layouts; more layouts may
be available in your version.
Depending on requirements and user rights, you may create the view in a shared or private group.
Tip: For further information about how to create views, see separate documentation for your XProtect
Smart Client.
1. Drag the required cameras from the Setup tab's System Overview section to the view's
camera slots.
2. This step, and the next, may not be necessary if you are using one of the XProtect Transact
views particularly suited for viewing transaction data and camera images together.
Drag the System Overview section's Transact Source entry to the slot in which you want to
view transaction data.
The transaction data slot now changes color. However, you must still specify exactly which
XProtect Transact source you want to view transaction data from.
Tip: If more than one XProtect Transact source is available, and if enough positions are
available in the view, you can include more than one XProtect Transact source in the view.
You can also create several views with different transaction sources.
See Status of transaction sources for information about the status bar of transaction view
positions and the different possible states of a source.
Page 53

Milestone XProtect® Transact
Administrator's Guide
www.milestonesys.com
53
View transactions
3. Select the view's transaction data position, then expand the Setup tab's Properties section and
expand the list over XProtect Transact servers:
Color legend:
o Gray: Starting up (will only be visible on slow connections).
o Yellow: Getting status.
o Red: Unable to connect to server.
o Green: OK.
If color indication for a service is red, the system will keep trying every five seconds until
contact is made to the server.
4. Once the required server connection is OK, click the source you wish to display in the
transaction Data Position:
Repeat if your view should contain more than one XProtect Transact source.
The view is now ready for use.
Tip: You can change the font size used for displaying the transaction data as well as the line width.
You change these settings in the Setup tab's Properties section.
Page 54

Milestone XProtect® Transact
Administrator's Guide
www.milestonesys.com
54
Back up and restore the Transact
Database
Back up and restore the Transact Database
Back up
The Transact Server stores data in a database. You can choose to store the database in two different
ways:
Network SQL Server: Lets you store XProtect Transact data in a database on an existing
SQL Server on your network. XProtect Transact points to the database location on the SQL
Server.
SQL Server Express Edition: Lets you store XProtect Transact data in a SQL Server
Express Edition database on the XProtect Transact Server itself.
Milestone always recommends that you back up your XProtect Transact database: having a backup
gives you the ability to restore your XProtect Transact data in a disaster recovery scenario. Backing up
also has the added benefit that it flushes the SQL Server’s transaction log.
About the SQL Server transaction log
Each time a change in the XProtect Transact data occurs, the SQL Server will log the change in its
transaction log—regardless whether it is a SQL Server on your network or a SQL Server Express
edition. The transaction log is essentially a security feature that makes it possible to roll back and undo
changes to the SQL Server database. The SQL Server by default stores its transaction log indefinitely,
and therefore the transaction log will over time add more and more entries. The SQL Server’s
transaction log is by default located on the system drive, and if the transaction log just grows and
grows, it may in the end prevent Windows from running properly.
Flushing the SQL Server’s transaction log from time to time is a good idea. Flushing it does not in itself
make the transaction log file smaller, but it prevents it from growing out of control. XProtect Transact
does not, however, automatically flush the SQL Server’s transaction log at specific intervals.
You can do several things on the SQL Server itself to keep the size of the transaction log down,
including truncating and/or shrinking the transaction log (for numerous articles on this topic, go to
support.microsoft.com and search for SQL Server transaction log). However, backing up the
XProtect Transact database is generally a better option since it flushes the SQL Server’s transaction
log and gives you the security of being able to restore your XProtect Transact data in case something
unexpected happens.
Prerequisites
You need:
Microsoft® SQL Server Management Studio Express, a tool that can be downloaded for free from
the Microsoft download website. Among its many features for managing SQL Server databases are
some easy-to-use backup and restoration features. Download and install the tool on your existing
Management Server. Other backup tools than SQL Server Management Studio Express will also work,
but this guide describes the use of SQL Server Management Studio Express.
Page 55
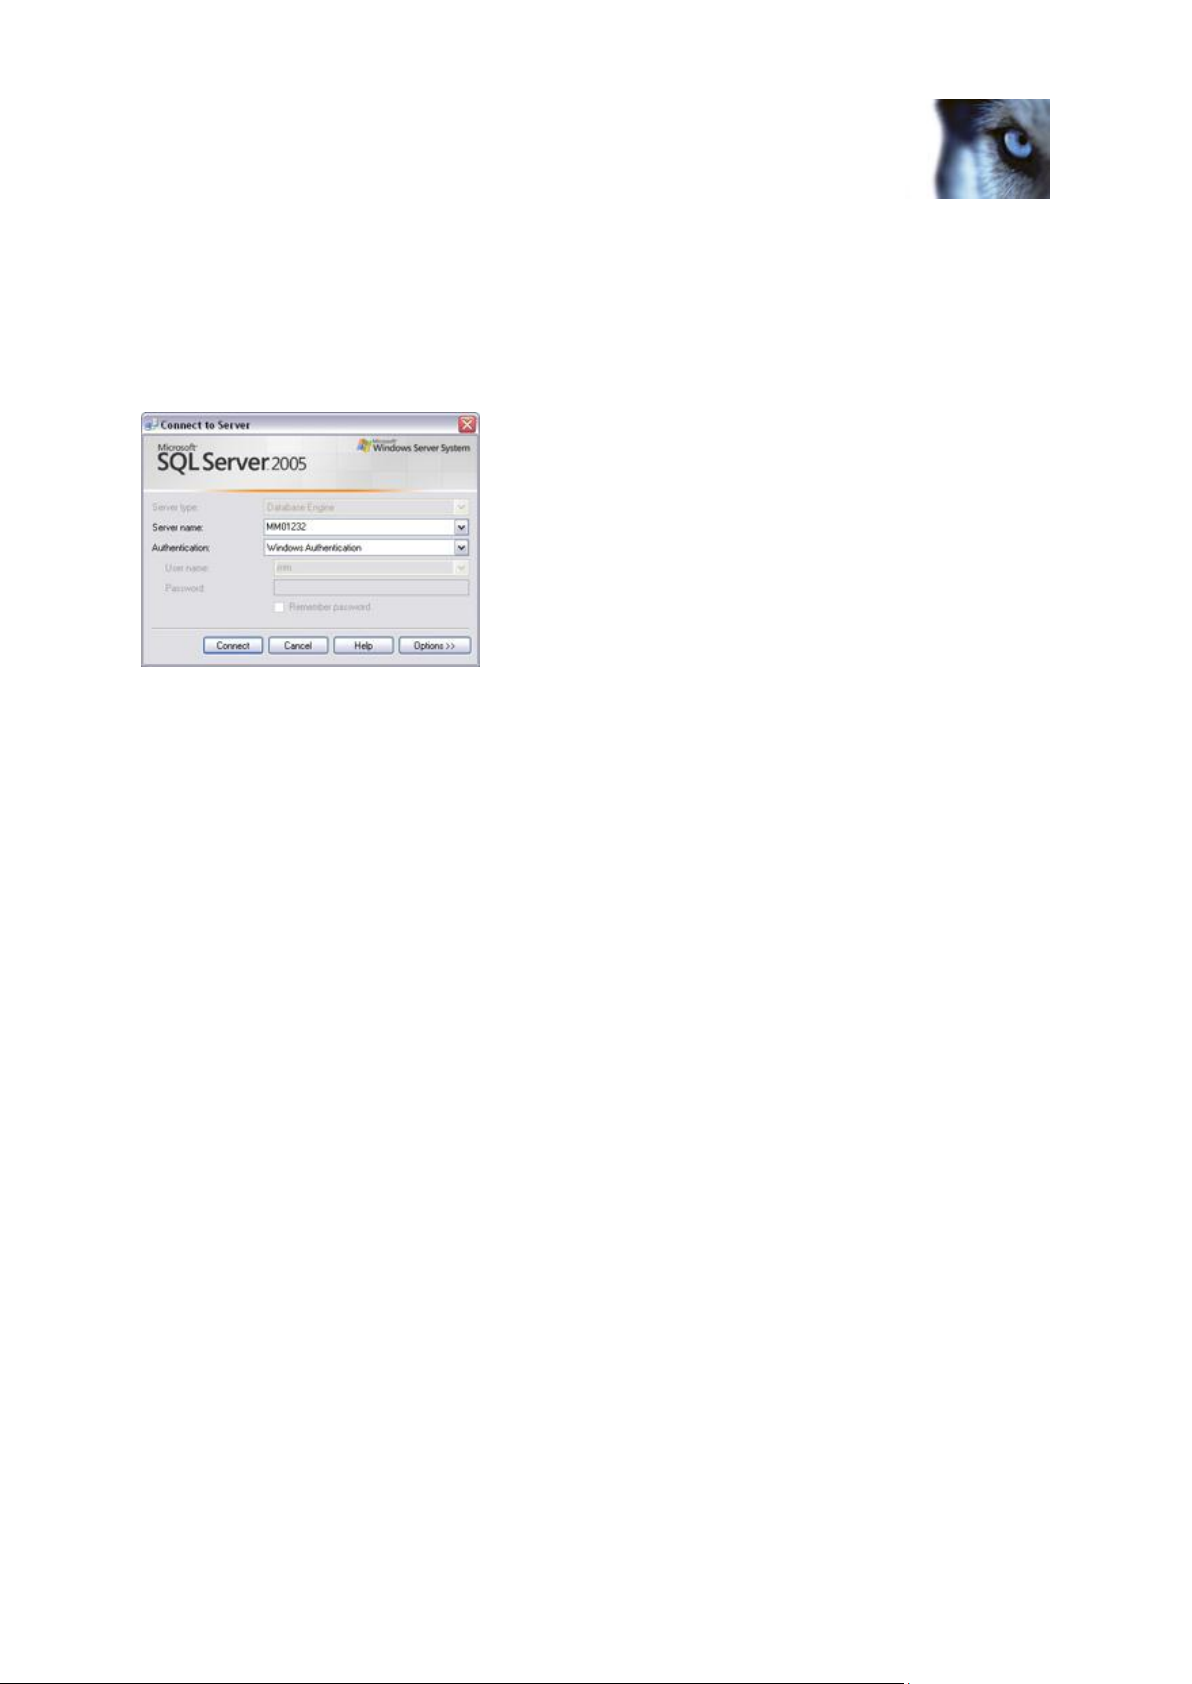
Milestone XProtect® Transact
Administrator's Guide
www.milestonesys.com
55
Back up and restore the Transact
Database
Back up the database
Stop the XProtect Transact Server service to prevent changes to the database being made during the
backup process. Note that XProtect Transact will not work while the XProtect Transact Server service
is stopped. It is important that you remember to start the service again once you have finished backing
up the database.
1. Open Microsoft SQL Server Management Studio Express from the Windows Start menu.
2. When you open the tool, you are prompted to connect to a server.
3. Specify the name of the required SQL Server (in the example illustration in the following, the
server is called MM01232), and connect with the user account under which the database was
created.
Tip: You do not have to type the name of the SQL server: if you click inside the Server name field and
select <Browse for more...>, you can select the required SQL Server from a list instead.
Once connected, you see a tree structure in the Object Explorer in the left part of the window.
Expand the SQL Server item, then the Databases item. We are primarily interested in the
VIDEOOS_XProtect Transact database.
1. Right-click the VIDEOOS_XProtect Transact database, and select Tasks > Back Up...
2. On the Back Up Database dialog’s General page, do the following:
o Under Source: Verify that the selected database is VIDEOOS_XProtect Transact and
that the backup type is Full.
o Under Destination: A destination path for the backup is automatically suggested. Verify
that the path is satisfactory. If not, remove the suggested path, and add another path of
your choice.
3. On the Back Up Database dialog’s Options page, do the following:
o Under Reliability: Select Verify backup when finished and Perform checksum before
writing to media.
4. When ready, click OK to begin the backup. When backup is finished, you see a confirmation.
Eit Microsoft SQL Server Management Studio Express after this.
5. During the backup process, the XProtect Transact Server service was stopped to prevent
database changes being made until you were done. Remember to start the XProtect Transact
Server service again.
Page 56

Milestone XProtect® Transact
Administrator's Guide
www.milestonesys.com
56
Back up and restore the Transact
Database
Restore the database
Most users never need to restore their backed-up XProtect Transact database, but if you ever have
the need, use the following process:
1. Stop the XProtect Transact Server service to prevent changes to the database being made
during the backup process. Note that XProtect Transact does not work while the XProtect
Transact Server service is stopped. It is important that you remember to start the service
again once you have finished restoring the database.
2. Open Microsoft SQL Server Management Studio Express from Windows’ Start menu. When
you open the tool, you are prompted to connect to a server. Specify the name of the required
SQL Server and connect with the default settings.
3. Once connected, you see a tree structure in the Object Explorer in the left part of the window.
Expand the SQL Server item, then the Databases item.
4. Right-click the VIDEOOS_XProtect Transact database, and select Tasks > Restore >
Database...
5. In the Restore Database dialog's General page, do the following: Under Source for restore,
select From device, and click the button to the right of the field.
6. In the Specify Backup dialog’s Backup media list, make sure that File is selected. Then click
the Add button.
7. In the Locate Backup File dialog, locate and select your backup file VIDEOOS_XProtect
Transact.bak. Then click OK.
8. Back in the Specify Backup dialog, the path to your backup file is now listed. Click OK.
9. Back on the Restore Database dialog’s General page, your backup is now listed under
Select the backup sets to restore. Make sure you select the backup by selecting the check
box in the Restore column.
10. Now go to the Restore Database dialog’s Options page, and select Overwrite the existing
database. Leave the other options as they are.
11. When ready, click OK to begin the restoration. When the restoration is finished, you will see a
confirmation. When finished, exit Microsoft SQL Server Management Studio Express.
Tip: If instead you get an error message telling you that the database is in use, try exiting Microsoft
SQL Server Management Studio Express completely, then repeat steps 1-10.
Important: During the backup process, the XProtect Transact Server service was stopped to prevent
database changes being made until you were done. Remember to start the XProtect Transact Server
service again.
Page 57

Milestone XProtect® Transact
Administrator's Guide
www.milestonesys.com
57
Remove the software
Remove the software
You can remove your XProtect Transact installation in the following ways:
Remove the software from Windows and the Download Manager
To remove the XProtect Transact software, follow the normal Windows procedure for uninstalling
programs (see the Windows Help for more information).
If your surveillance system includes the Download Manager, you should also remove the XProtect
Transact plugin from the Download Manager.
1. Open the Download Manager.
2. Hide the feature from the download web page by clearing the check boxes and then clicking
OK. To remove the XProtect Transact software completely, click the Remove features...
button in the Download Manager.
3. Select the XProtect Transact features you want removed from the surveillance server and click
Remove. You will be asked to confirm the removal.
4. If your surveillance system does not include the Download Manager, you should make sure
that any links to XProtect Transact are removed from the Surveillance server's download
pages available to XProtect Smart Client users.
Remove the SQL Server Express database
IMPORTANT: Removing the XProtect Transact Database will also remove all content of the database.
To remove the XProtect Transact Database, including all of its content, do the following:
1. On the computer on which the XProtect Transact software is installed, select Microsoft SQL
Server 2005 entry and the follow the normal Windows procedure for uninstalling programs
(see the Windows Help for more information).
2. In the Microsoft SQL Server 2005 Uninstall window, select VIDEOOS_XProtect
Transact:Database Engine and click Next. If you cannot select VIDEOOS_XProtect
Transact:Database Engine, select Remove SQL Server 2005 instance components first.
3. You are asked to confirm that you want to remove Microsoft SQL Server 2005 (Database
Engine: VIDEOOS_XProtect Transact) from the computer. If you are sure that you want to
remove the database, click the Finish button and follow the remaining instructions.
Page 58

Milestone XProtect® Transact
Administrator's Guide
www.milestonesys.com
58
Get help
Get help
You can access the XProtect Transact help system by pressing F1 on your keyboard.
The help system is context-sensitive, which means it automatically displays a help topic relevant to the
area you are working with. Help topic texts may contain various types of links, notably expanding
drop-down links that display detailed information when you click them.
Tip: If you want to quickly collapse all texts from expanding drop-down links in a help topic, click the
title of the topic on the Contents tab.
When you print a help topic, the topic is printed as you see it on your screen. Therefore, if a topic
contains expanding drop-down links, click each required drop-down link to display the text in order for
it to be included in your printout. This allows you to create targeted printouts, containing exactly the
amount of information you want.
Page 59

Milestone XProtect® Transact
Administrator's Guide
www.milestonesys.com
59
Glossary
Glossary
A
ATM: Automated Teller Machine; an unattended machine that dispenses cash when a personal coded
card is used. ATMs are often placed outside banks.
AVI: A popular file format for video. Files in this format carry the .avi file extension.
C
CLK: Connection License Key; a registration key required for every transaction data source that can
be viewed simultaneously on the surveillance system. If you do not have system administration
responsibilities, you do not have to deal with CLKs. System administrators obtain CLKs as part of the
software registration process. System administrators enter the CLK during installation and can update
the CLK information in the XProtect Transact Administrator application.
Codec: A technology for compressing and decompressing audio and video data, for example in an
exported AVI file. MPEG and Indeo are examples of frequently used codecs.
Configuration: 1) The way a software or hardware system is set up. 2) In this software specifically:
Settings determining how received transaction data are transformed into presentable data, through the
use of so-called filters and masks. This is necessary because the initially received transaction data
typically consists of a single long string of information, in which it can be difficult to see when individual
transactions begin and end.
Control Character: Non-printing characters; typically used by receipt printers for indicating line breaks,
when to cut off a till receipt, etc.
D
DirectX: A Windows extension providing advanced multimedia capabilities.
DLK: Device License Key; a registration code required for every device (IP network camera or IP
video server) installed on the surveillance system. If you do not have system administration
responsibilities, you do not have to deal with DLKs. System administrators obtain DLKs as part of the
software registration process. System administrators use the Import DLKs... feature in the
Administrator application to import DLKs into the surveillance system.
Driver: A small program used for controlling / communicating with a device.
F
Fisheye: A technology that allows creation and viewing of 360-degree panoramic images.
FPS: Frames Per Second, a measure indicating the amount of information contained in motion video.
Each frame represents a still image, but when frames are displayed in succession the illusion of
motion is created. The higher the FPS, the smoother the motion will appear. Note, however, that a
high FPS may also lead to a large file size when video is saved.
Frame Rate: A measure indicating the amount of information contained in motion video. Typically
measured in FPS (Frames Per second).
Page 60

Milestone XProtect® Transact
Administrator's Guide
www.milestonesys.com
60
Glossary
H
Host: A computer connected to a TCP/IP network. A host has its own IP address, but may -depending
on network configuration - furthermore have a name (host name) in order to make it easily identifiable.
HTTP: HyperText Transfer Protocol, a standard for exchanging files across the internet. HTTP is the
standard used for formatting and transmission of data on the world wide web.
I
I/O: Short for Input/Output.
IP: Internet Protocol; a protocol (standard) specifying the format and addressing scheme used for
sending data packets across networks. IP is often combined with another protocol, TCP (Transmission
Control Protocol). The combination, known as TCP/IP, allows data packets to be sent back and forth
between two points on a network for longer periods of time, and is used when connecting computers
and other devices on the internet.
IP Address: Internet Protocol address; the identifier for a computer or device on a network. Used by
the TCP/IP protocol for routing data traffic to the intended destination. An IP address consists of four
numbers, each between 0 and 256, separated by full stops (example: 192.168.212.2).
IPIX: A technology that allows creation and viewing of 360-degree panoramic images.
M
MAC Address: Media Access Control address, a 12-character hexadecimal number uniquely
identifying each device on a network.
MPEG: A group of compression standards and file formats for digital video developed by the Moving
Pictures Experts Group (MPEG). MPEG standards use so-called lossy compression as they store only
the changes between frames, removing often considerable amounts of redundant information:
Keyframes stored at specified intervals record the entire view of the camera, whereas the following
frames record only pixels that change. This helps greatly reduce the size of MPEG files.
P
PoS: Point of Sale.
PTZ: Pan/Zoom/Tilt; a highly movable and flexible type of camera.
R
RS-232: Shot for Recommended Standard 232; a standard interface for connecting serial devices.
S
SLC: Software License Code; a product registration code required for using the surveillance system
software. If you do not have system administration responsibilities, you do not have to deal with SLCs.
System administrators use SLCs when installing and registering the software.
Source: A data source through which transaction data is fed to the server and onward to the client
applications. Three different kinds of sources exist: Serial ports, TCP clients and Troy boxes. Sources,
in turn, are connected to the actual devices on which the transaction data is generated (cash registers,
ATMs, etc.).
Page 61

Milestone XProtect® Transact
Administrator's Guide
www.milestonesys.com
61
Glossary
T
TCP: Transmission Control Protocol; a protocol (standard) used for sending data packets across
networks. IP is often combined with another protocol, IP (Internet Protocol). The combination, known
as TCP/IP, allows data packets to be sent back and forth between two points on a network for longer
periods of time, and is used when connecting computers and other devices on the internet.
Troy Box: Popular name for a Troy serial server.
V
Video Server: A device, typically a standalone device, which is able to stream video from a number of
connected client cameras. Video servers contain image digitizers, making it possible to connect
analog cameras to a network.
Page 62

Milestone XProtect® Transact
Administrator's Guide
www.milestonesys.com
62
Index
Delete an event • 42
Index
A
About the SQL Server transaction log • 55
Add a new source • 19
Add an event • 40
Add an event group • 43
Add line breaks • 18, 26, 29, 32, 35, 36
Administration • 16
Advanced event features • 19
An example configuration • 24
B
Back up • 55
Back up and restore the Transact Database •
55
Delete an event group • 44
Different source providers • 17
E
Edit a configuration • 19, 28, 30
Edit a master server • 38
Edit a source • 20
Edit an event • 42
Edit an event group • 43
Events and event groups • 19, 39, 42
Export/import a configuration • 18, 29, 30, 35
G
Get help • 59
Getting started • 11, 14
Glossary • 60
Back up the database • 56
C
Capture transaction data • 27
Copy a configuration • 14, 18, 29, 30
Copyright, trademarks and disclaimer • 5
Create a configuration • 14, 18, 19, 22, 24, 28,
29, 30, 31
Create a generic event triggered by transaction
data • 40, 42, 43, 44
Create a view with transactions in the XProtect
Smart Client • 38, 52
D
Define a master server • 39
Delete a source • 20
I
Install the software • 10
Installation and licensing • 10
Integrate with XProtect Corporate • 50
Interaction with sources and surveillance
solutions • 7, 17
Introduction • 7
L
Licensing • 10, 20, 48
M
Manage event groups • 40, 42, 45, 48
Manage events • 35, 40, 42, 43, 45
Manage master/slave setup • 38
Page 63

Milestone XProtect® Transact
Administrator's Guide
www.milestonesys.com
63
Index
Managing configurations • 23
Managing server service settings • 14, 16, 20
Managing sources • 10, 14, 18, 19, 48
Master setup dialog elements • 39
Master/slave setup • 37
O
Obtaining additional licenses • 10, 12
Omit characters in a source's configuration •
26, 29, 31, 35, 36
P
Prerequisites • 55
Product overview • 7
R
Reader-friendly data through configurations •
18
T
Target audience • 6
Test events • 40, 42, 43, 45
The Create/Edit Configuration window • 27, 28,
29, 30, 33, 35
The Create/Edit Source window • 19, 20, 21
The Edit Filter window • 35, 36
The Select Input Source window • 36
U
Update slave information • 39
Upgrade from a previous version • 10, 11
Use start and stop masks • 18, 26, 29, 33, 35
Use substitutions • 18, 26, 29, 31, 35, 36
V
View transactions • 7, 14, 16, 50
Refresh the status of sources • 20
Register SLC • 10, 12
Remove a master server • 39
Remove the software • 58
Remove the software from Windows and the
Download Manager • 58
Remove the SQL Server Express database •
58
Restore the database • 57
S
Sources and configurations • 17, 19, 42
Storage and licensing settings • 48
Suspend/resume a source • 20
System requirements • 9
X
XProtect Transact Server Service menu • 49
Page 64

About Milestone Systems
Founded in 1998, Milestone Systems is the global
industry leader in open platform IP video
management software. The XProtect platform delivers
powerful surveillance that is easy to manage, reliable
and proven in thousands of customer installations
around the world. With support for the widest choice
in network hardware and integration with other
systems, XProtect provides best-in-class solutions to
video enable organizations – managing risks,
protecting people and assets, optimizing processes
and reducing costs. Milestone software is sold
through authorized and certified partners. For more
information, visit:
www.milestonesys.com.
 Loading...