

Page 1

Milestone Systems
Milestone Husky™ X8 NVR
Getting started guide
April 2019
Page 2

Getting started guide | Milestone Husky™ X8 NVR
Contents
Copyright, trademarks, and disclaimer 3
Your new Milestone Husky™ X8 4
Front view 5
Back view 6
Getting started checklist 7
Before you install 8
Prepare networkand devices
Obtain a software license code
Prepare yourunit
Turn on the unit and complete the Husky Assistant wizard 11
Windowsfirst run
Complete the Husky Assistant wizard
11
12
Install XProtect VMS 16
Installa recording server
Installa failover recording server
Download the XProtect® Device Pack
Update Windows
18
19
20
21
Install clients on other computers 22
InstallXProtect Smart Client
XProtect Smart Client interface
22
23
8
8
9
Installthe Management Client
Management Client interface
24
25
System scaling 26
2 | Contents
Page 3

Getting started guide | Milestone Husky™ X8 NVR
Copyright, trademarks, and disclaimer
Copyright © 2019 Milestone Systems A/S
Trademarks
XProtect is a registered trademark of Milestone Systems A/S.
Microsoft and Windows are registered trademarks of Microsoft Corporation. App Store is a service mark of Apple
Inc. Android is a trademark of Google Inc.
All other trademarks mentioned in this document are trademarks of their respective owners.
Disclaimer
This text is intended for general information purposes only, and due care has been taken in its preparation.
Any risk arising from the use of this information rests with the recipient, and nothing herein should be construed
as constituting any kind of warranty.
Milestone Systems A/S reserves the right to make adjustments without prior notification.
All names of people and organizations used in the examples in this text are fictitious. Any resemblance to any
actual organization or person, living or dead, is purely coincidental and unintended.
This product may make use of third-party software for which specific terms and conditions may apply. When that
is the case, you can find more information in the file 3rd_party_software_terms_and_conditions.txt located in your
Milestone system installation folder.
3 | Copyright, trademarks, and disclaimer
Page 4

Getting started guide | Milestone Husky™ X8 NVR
Your new Milestone Husky™ X8
You have just received:
l Milestone Husky™ X8
l Hard drives (if ordered from Milestone)
l Hard drive trays
l Power cables
l Getting started guide
l Warranty agreement
You can use your Milestone Husky™ X8 in different setups depending on your system requirements:
l Standalone Installation
l Multi-unit installation, where one Milestone Husky X8 takes the role of the management server and the
recording server, while other Milestone Husky X8 units are installed as recording servers
l Milestone Husky X8 as the recording server in an existing XProtect system
Note these flexible features:
l Milestone Husky X8 is shipped with XProtect video management software pre-loaded
l Husky Assistant completes the installation of XProtect to optimize the use of Milestone Husky X8
l Milestone Husky X8 can be used with any version of the five XProtect VMS products by entering a valid
software license code (SLC)
Milestone Husky X8 exists in two models: the HX8RC and the HX8R, with or without a CNA card with 2 x 10Gb/s LAN
ports. This guide covers both models. The following sections will take you through the minimum steps to get
started with your Milestone Husky X8:
l Front view on page 5
l Back view on page 6
l Getting started checklist on page 7
For more product information and support, go to the Milestone Husky X8 product information web page
(https://www.milestonesys.com/HuskyX8-support/). You can also use your mobile phone to scan the QR code on
the back of the unit. This will take you to the same web page.
Remember to check the Milestone website (https://www.milestonesys.com/downloads/) for updates to the Husky
Tools Installer, which gives you the most recent version of Husky Assistant.
4 | Your new Milestone Husky™ X8
Page 5
Getting started guide | Milestone Husky™ X8 NVR
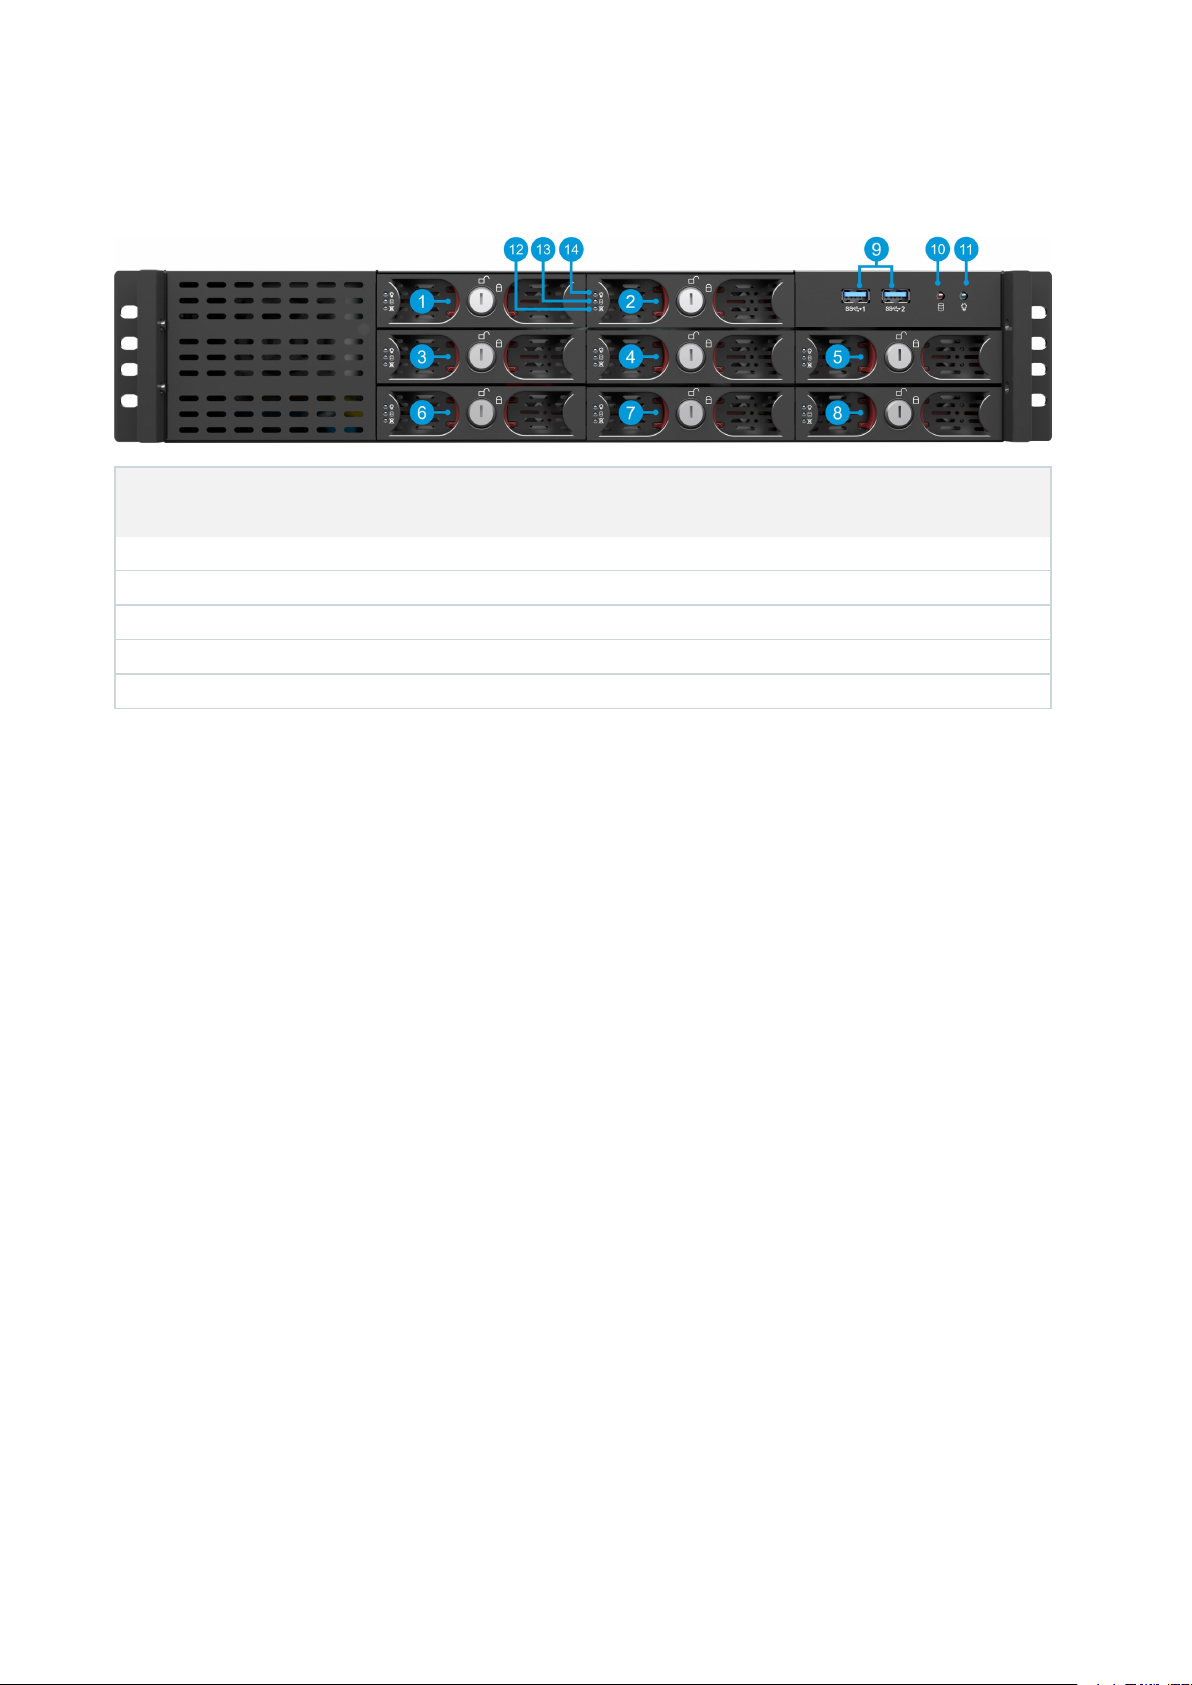
Front view
Connectors LED status indicators LED colors
1-8. Data hard drive bays 10. Hard drive activity Flashing orange
9. 2 x USB 3.0 ports 11. Unit power Blue means ON
12. Data hard drive failure Red
13. Data hard drive activity Flashing green
14. Data hard drive power Blue means ON
5 | Front view
Page 6
Getting started guide | Milestone Husky™ X8 NVR
Back view
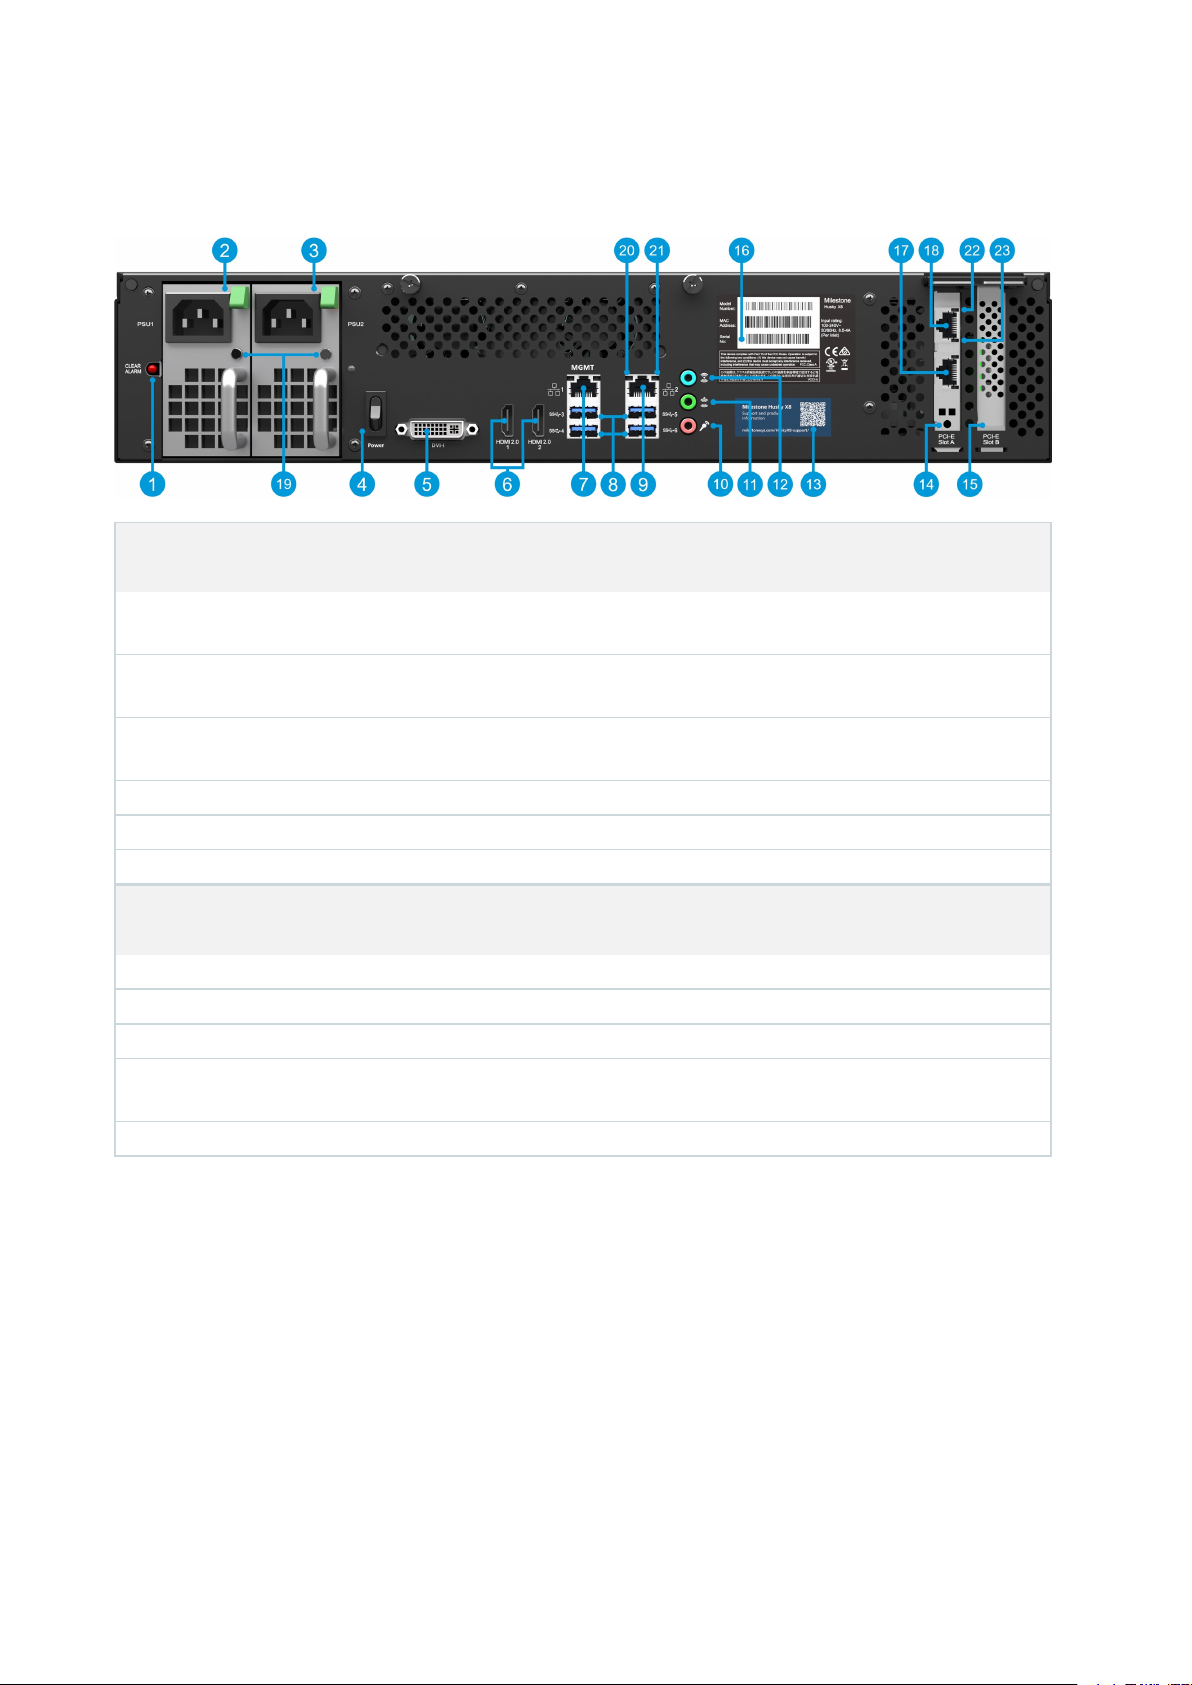
Connectors
1. Clear alarm button (power
supply)
2. Power supply 1 (hot
swappable)
3. Power supply 2 (hot
swappable)
4. Power switch 10. Audio IN 16. Label with serial number
5. DVI display port 11. Audio OUT 17. (Option CNA card LAN port 2)
6. 2 x HDMI display ports 12. Audio MIC 18. (Option CNA card LAN port 1)
LED status indicators LED colors
19. Power supply Red = Only one power supply is connected. Green = Both are connected
20. LAN ports activity Flashing yellow
21. LAN ports link speed Yellow = 100Mb/s. Green = 1Gb/s. Off = 10Mb/s
22. CNA card LAN ports link
speed
23. CNA card LAN ports activity Flashing green
7. LAN port 1 (Intel AMT) 13. QR code for support and information
8. 4 x USB 3.0 ports 14. PCI-E slot A (Option: 2 x 10Gb/s CNA card)
9. LAN port 2 15. PCI-E slot B (RAID controller)
Yellow = 1Gb/s. Green = 10Gb/s
6 | Back view
Page 7
Getting started guide | Milestone Husky™ X8 NVR
Getting started checklist
This guide applies to all models of the Milestone Husky X8. Follow the checklist below to ensure that you carry out
the steps of your installation in the right order. Each step is detailed in the subsequent sections.
l Assign static IP addresses to all system components and cameras
Prepare network and
devices
Obtain a software
license code
Prepare your unit
Turn on the unit and
complete the Husky
Assistant
l Make sure camera models and firmware are supported by the
XProtect system
l Cameras must be connected to the network, and you can access
them from your unit
l Purchase XProtect software and obtain the license file
l Go to the Milestone website (https://online.milestonesys.com/) and
register your SLC
This step does not apply to XProtect Essential+
systems
l Mount the unit using a shelf or rails to support the chassis
l Insert hard drives
l Connect peripherals, LAN, and power
l Configure computer name and domain or workgroup settings
l Select if you want to install the Intel® AMT local management
software
l Select RAID configuration
l Select the pre-loaded XProtect software version or go to the
Milestone website (https://www.milestonesys.com/downloads/) and
download the relevant XProtect version
Install XProtect VMS
Download the latest
XProtectDevice Pack
Update Windows
®
Install clients on
other computers
7 | Getting started checklist
l Detailed description of system installation
l Detailed description of recording server installation
l A device pack is automatically included when you install the XProtect
software. For support of new devices and firmware versions, get the
latest device pack
l Make sure that your Windows operating system is updated with all the
latest Windows updates
l Install XProtect Smart Client
l Install XProtect Management Client
Page 8

Getting started guide | Milestone Husky™ X8 NVR
Before you install
Milestone recommends that you go through the steps described in the next sections before you start the actual
installation.
Prepare network and devices
1. Assign static IP addresses to all system components, devices, and cameras.
To prepare and configure your devices or cameras, follow the instructions provided by the camera
manufacturer.
2. Make sure your cameras and devices are supported and connected to the camera network.
On the Milestone website, you can find a detailed list of supported devices and firmware versions
(https://www.milestonesys.com/supported-devices/).
3. Connect your local area network with internet connection, if available, to LAN port 1. This network is for
management and viewing.
4. Connect your camera network to LAN port 2. If your unit is equipped with a CNA card, connect your camera
network to the CNA card LAN ports.
Obtain a software license code
Your Milestone Husky unit is shipped with XProtect video management software pre-loaded, and you can use it
with any version of the five XProtect VMS products by applying a valid software license code (SLC). You receive the
SLC when you purchase the XProtect product. Read more about Milestone XProtect products and Milestone Care™
coverage on the Milestone website to find out which product matches your needs.
The SLC is printed on your order confirmation, and the software license file is named after your SLC. Milestone
recommends that you register your SLC on the Milestone website (https://online.milestonesys.com/) before
installation. Your reseller may have done that for you.
You can also run the free version of XProtect Essential+ on your unit. This version provides you with basic
functionality and a limited number of cameras compared to a purchased XProtect VMS system. In this case, the
license is provided with the installer. To receive this free license, your unit needs to be connected to the internet
during installation.
When you run Husky Assistant, you can see the version of the pre-loaded VMS. If you want a different version, you
can choose that option if you have a valid SLC.
If your unit is used as a recording server to an existing VMS system, you do not need an SLC. This setup is covered
by the SLC that you bought with the VMS system.
XProtect software is licensed through different types of licenses:
8 | Before you install
Page 9
Getting started guide | Milestone Husky™ X8 NVR
l Base licenses: Controls which XProtect product you can use.
l Hardware device licenses: Controls how many hardware devices you may connect to the Milestone Husky
unit. A hardware device can be a camera, encoder, or similar, identified by a separate IP address. You do
not need licenses for speakers, microphones, or input and output devices attached to the hardware
devices.
l Add-on product licenses: Your new Milestone Husky unit can run any XProtect add-on product. Most
XProtect add-on products require additional licenses.
After installation, the surveillance system runs on licenses that need to be activated before a certain period ends.
This is the grace period. Once the installation is complete, you can get an overview of your licenses for all
installations with this SLC on the Basics > License Information node in the Management Client.
Milestone recommends that you activate your licenses before you make the final adjustments.
l For online activation, log in to the Software Registration page with your My Milestone account on the
Milestone website (https://online.milestonesys.com/).
l For offline activation, you must export a license request (.lrq) file in the Management Client, and then log in
to the Software Registration page and upload the .lrq file.
Once you have uploaded the .lrq file, Milestone emails you an activated .lic file for import.
Prepare your unit
Always place the unit on a shelf or use rails to support the chassis.
If you ordered the unit without hard drives, make sure that your hard drives are compatible
with your unit. For information on supported and approved hard drives, go to the Milestone
Husky X8 product information web page (https://www.milestonesys.com/HuskyX8-
support/).
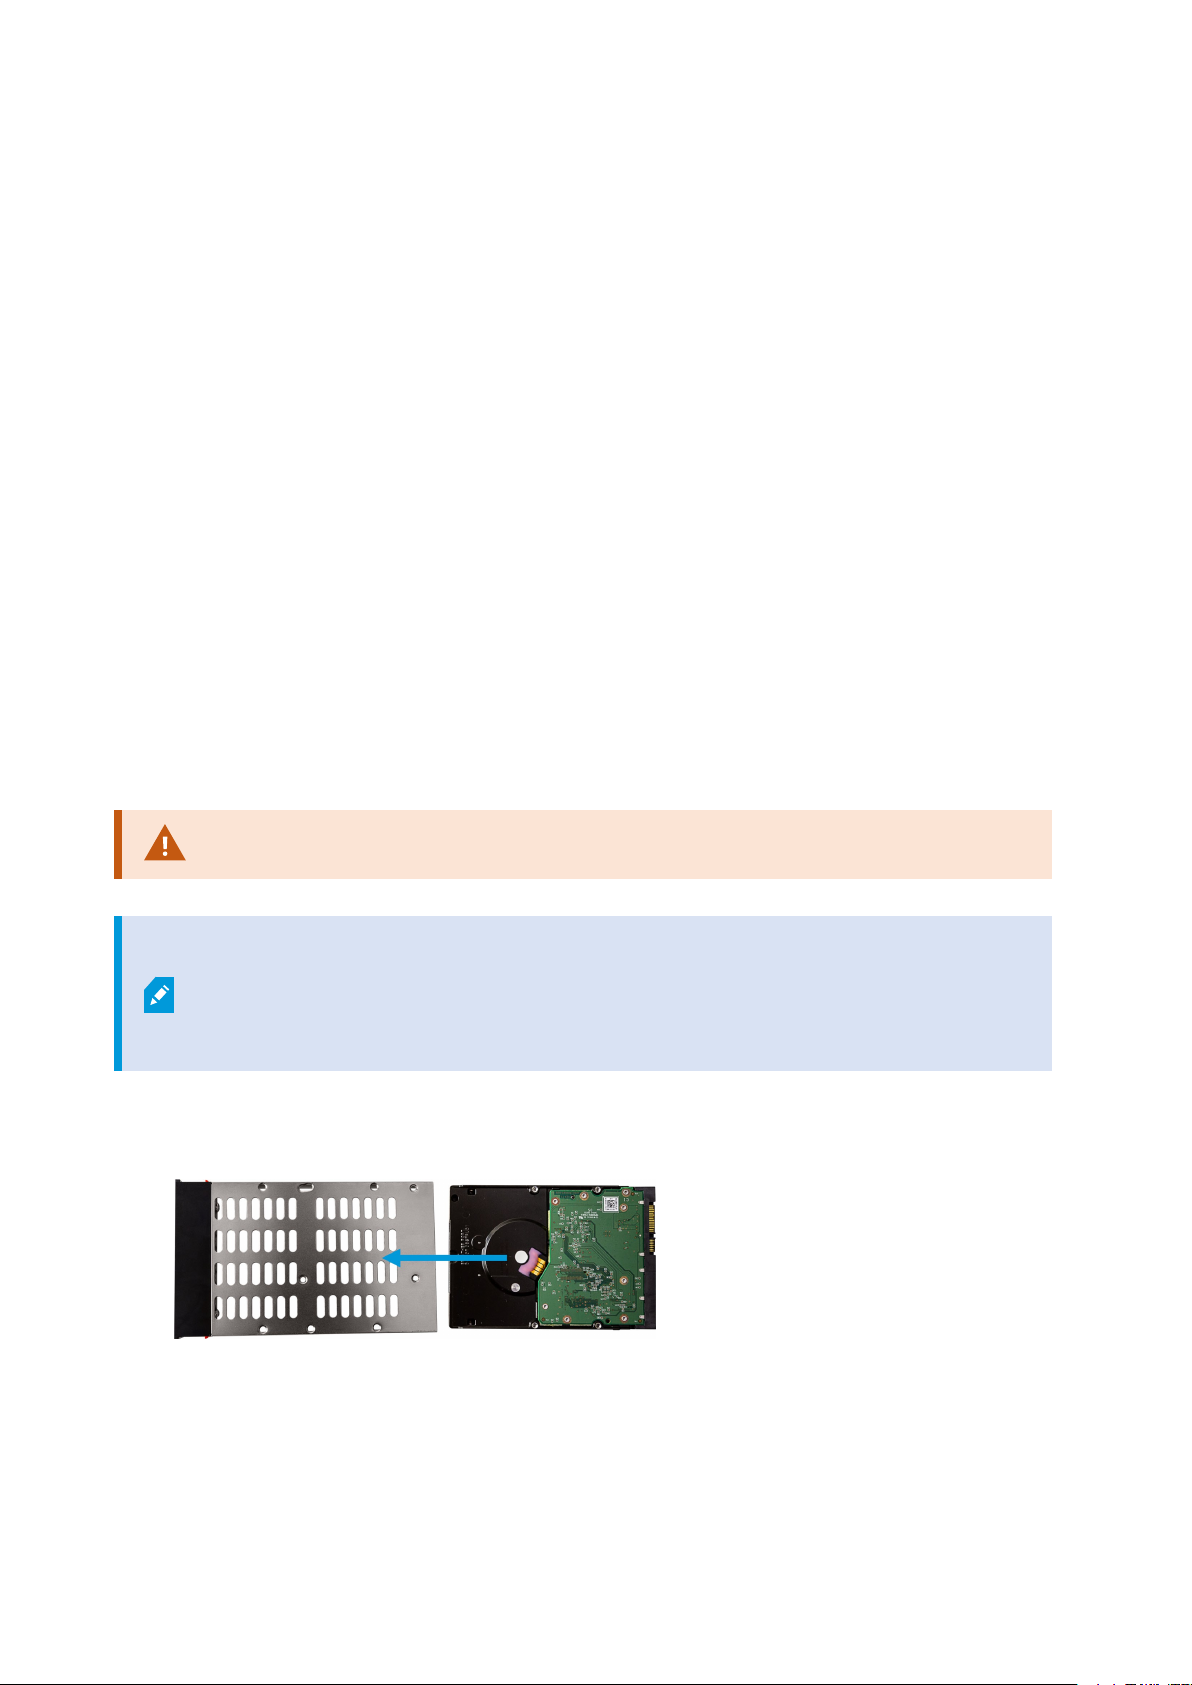
1. Locate the hard drives and the trays. Turn the hard drives and the trays upside down, and slide the hard
drives into the trays.
9 | Before you install
Page 10

Getting started guide | Milestone Husky™ X8 NVR
2. Use the supplied screws to fasten the hard drive to the tray.
3. Slide each of the trays into the hard drive bays located on the front of your unit. Pinch the buttons inside
the tray before you insert the tray.
4. Lock the trays to protect your hard drives from unauthorized removal.
5. Connect your peripherals: mouse, keyboard, audio, and cameras, to the backplane connectors.
6. Connect your local area network with internet connection, if available, to LAN port 1. This network is for
management and viewing.
7. Connect your camera network to LAN port 2. If your unit is equipped with a CNA card, connect your camera
network to the CNA card LAN ports.
8. Connect both power cables and plug them into a power socket.
If you only connect one power cable, both power supply LEDs turn red and an
audible alarm starts. In this case, connect both power cables and clear the alarm on
the power supply alarm clear button.
10 | Before you install
Page 11

Getting started guide | Milestone Husky™ X8 NVR
Turn on the unit and complete the Husky Assistant wizard
Turn on your Milestone Husky unit and wait for Windows to boot for the first time.
Windows first run
Configure the country, language, keyboard, and account information:
1. Select your region and click Yes.
2. Select the right keyboard layout and click Yes.
3. Add a second keyboard layout or click Skip.
4. Create an account with a user name and password.
5. Click Next and wait for the Windows desktop to appear.
11 | Turn on the unit and complete the Husky Assistant wizard
Page 12

Getting started guide | Milestone Husky™ X8 NVR
Complete the Husky Assistant wizard
The Husky Assistant now starts automatically. This wizard helps you check, select, and configure your Milestone
Husky X8 with:
l Computer name and domain or workgroup
l Intel AMT local management
l Data storage drive detection
l VMS version
l Data storage RAID configuration
l Additional system optimizations
12 | Turn on the unit and complete the Husky Assistant wizard
Page 13

Getting started guide | Milestone Husky™ X8 NVR
1. Select your preferred language and click Next.
2. Click Computer name / Domain changes to configure computer name and domain or workgroup settings.
When completed, Windows will require a restart to apply the changes.
3. Restart Windows and wait for Windows to boot.
The Husky Assistant restarts. Select your preferred language and click Next.
4. Because you have already configured the name and domain setting, click Next.
13 | Turn on the unit and complete the Husky Assistant wizard
Page 14

Getting started guide | Milestone Husky™ X8 NVR
5. Select if you want to enable the Intel AMT local management software and click Next.
Intel Active Management Technology (Intel AMT) provides the user and administrator
with the ability to monitor the status of the management and security technologies
that are built into the Intel chips inside your Milestone Husky X8. Only users and
administrators connected via LAN port 1 can use this feature.
6. Make sure that all hard drives are detected and click Next.
7. Select the preferred RAID configuration to match your storage requirement. Click Next.
14 | Turn on the unit and complete the Husky Assistant wizard
Page 15

Getting started guide | Milestone Husky™ X8 NVR
8. You have three options:
l To install a standalone system with the pre-loaded XProtect version, select Install pre-loaded
Milestone XProtect and click Next.
l To use your unit as a recording server, select Install from Management Server and click Next.
Provide the IP address of the computer with the management server installed, and credentials. The
installation files for the recording server will be downloaded from the management server later.
l To select another XProtect version, select Download another VMS version and click theMilestone
website link to download the installation file. When your download is complete, click Next. Read the
information page and click Next.
9. The Summary screen appears. Verify your selections and click Apply to start the process.
l If you selected the pre-loaded VMS in step 8, the system automatically starts the installation of
XProtect. Continue to Install XProtect VMS on page 16, step 3.
l If you selected to install a recording server, continue to Install a recording server on page 18.
l If you downloaded another XProtect version, continue to Install XProtect VMS on page 16, step 1.
15 | Turn on the unit and complete the Husky Assistant wizard
Page 16

Getting started guide | Milestone Husky™ X8 NVR
Install XProtect VMS
The XProtect VMS installer installs all server and client components on your Milestone Husky unit. The recording
server is authorized, so you are ready to use the system after installation.
You can install a free version of XProtect Essential+. This version provides you with limited capabilities of the
XProtect VMS for a limited number of cameras. You must have internet connection to install XProtect Essential+.
The recording server scans your network for hardware. Discovered devices are added automatically to your
system. Cameras are preconfigured in views, and a default operator role is created. After installation, XProtect
Smart Client opens and you are ready to use the system.
Microsoft®IIS is automatically installed during the process. Afterward, you may be prompted to restart your
computer. Do so and after restart, depending on your security settings, one or more Windows security warnings
may appear. Accept these and the installation completes.
1. Run the Milestone XProtect VMS Products 2019 R1 System Installer.exe file from the location
where you saved it.
2. The installation files unpack. Depending on your security settings, one or more Windows®security
warnings appear. Accept these and the unpacking continues.
3. When done, the Milestone XProtect VMS dialog box appears:
1. Select the Language to use during the installation (this is not the language that your system uses
once installed. The language that your system uses is selected later). Click Continue.
2. Read the Milestone End-user License Agreement. Select the I accept the terms in the license
agreement check box and click Continue.
3. In Type the location of the license file, enter your license file from your XProtect provider.
Alternatively, use the browse function to locate it. The system verifies your license file before you
can continue. Click Continue.
If you do not have a valid license file, you can get one for free. Click
Download free XProtect Essential+ license.
The free license is downloaded and appears in the license file field. Click
Continue.
4. Select Single computer.
A list of components to install appears (you cannot edit this list). Click Continue.
16 | Install XProtect VMS
Page 17

Getting started guide | Milestone Husky™ X8 NVR
5. In the Specify recording server encryption window, you can secure communication by encrypting the
connections from clients and services that retrieve data streams from the recording server.
Select a valid certificate in the list. For more information about preparing your system for secure
communication using recording server data encryption, download the XProtect VMS manual from the
Milestone website (https://www.milestonesys.com/support/help-yourself/manuals-and-guides/).
You can also enable encryption after this installation from the Recording Server Manager tray icon in the
notification area.
6. In the Specify recording server settings window:
1. In the Recording server name field, enter the name of the recording server. The default is the
name of the computer.
2. The Management server address field shows the address and port number of the management
server: localhost:80.
3. In the Select your media database location field, select the location where you want to save your
video recording. Milestone recommends that you save your video recordings in a separate location
from where you install the software and not on the system drive. The default location is the drive
with the most space available.
4. In Retention time for video recordings, define how long you want to save the video recordings for.
You can enter from between 1 and 999 days, where 7 days is the default retention time.
5. Click Continue.
7. In the Select file location and product language window:
1. In the File location field, select the location where you want to install the software.
2. In Product language, select the language in which your XProtect product should be installed.
3. Click Install.
The software now installs.
8. When the installation is complete, a list shows the components that are installed on the computer.
Click Continue to add hardware and users to the system.
If you click Close now, you bypass the configuration wizard and the XProtect
Management Client opens. You can make configurations, such as add hardware and
users to the system in the Management Client.
17 | Install XProtect VMS
Page 18

Getting started guide | Milestone Husky™ X8 NVR
9. In the Enter user names and passwords for hardware window, enter the user names and passwords for
the hardware that you have changed from the manufacturer defaults.
The installation program will scan the network for hardware with specified credentials and hardware with
manufacturer default credentials.
Click Continue.
10. In the Select the hardware to add to the system window, select the hardware that you want to add to the
system. Click Continue.
11. In the Configure the devices window, you can give the hardware descriptive names by clicking the edit
icon next to the hardware name. This name is then prefixed to the hardware devices.
Expand the hardware node to enable or disable hardware devices, such as cameras, speakers and
microphones.
Cameras are enabled by default, and speakers and microphones are disabled by
default.
Click Continue.
12. In the Add users window, you can add Windows users and basic users. These users can have either the
Administrators role or the Operators role.
Define the user and click Add.
When you are done adding users, click Continue.
When the installation and initial configuration are done, the Configuration is complete window appears, where
you see:
l A list of cameras and devices that are added to the system
l A list of users who are added to the system
l Addresses to the XProtect Web Client and XProtect Mobile client, which you can copy and share with your
users
When you click Close, the XProtect Smart Client opens and is ready to use.
Finally, when the Husky Assistant completes the setup process, click Finish.
Install a recording server
If you chose to use your Milestone Husky unit as a recording server in the Husky Assistant wizard, the recording
server installation starts automatically while the Husky Assistant wizard runs in the background. When prompted:
18 | Install XProtect VMS
Page 19

Getting started guide | Milestone Husky™ X8 NVR
1. Select the language that you want to use during the installation. Click Continue.
2. Select:
l Typical to install a recording server with default values
l Failover to install a recording server as a failover recording server, complete the steps described in
Install a failover recording server on page 19
l Custom to install a recording server with custom values
3. Specify the recording server settings:
l Recording server name
l Management server address
l Media database location for saving recordings
Click Continue.
4. If you selected Custom:
1. Specify the number of recording servers that you want to install on this computer. Click Continue.
2. Specify the service account. If needed, enter a password and confirm it. Click Continue.
5. In the Specify recording server encryption window, you can secure communication by encrypting the
connections from clients and services that retrieve data streams from the recording server.
Select a valid certificate in the list. For more information about preparing your system for secure
communication using recording server data encryption, download the XProtect VMS manual from the
Milestone website (https://www.milestonesys.com/support/help-yourself/manuals-and-guides/).
You can also enable encryption after this installation from the Recording Server
Manager tray icon in the notification area.
6. Select File location for the program file. In Product language, select the language in which you want to
install the server. Click Install.
7. The software is now installed. When the installer is complete, you see a list of successfully installed
components. Click Close.
You can check the state of the recording server from the Recording Server Manager tray icon.
8. When the Husky Assistant completes the setup process, click Finish.
Install a failover recording server
After you have selected Failover in the recording server installation wizard, you continue installation as follows:
19 | Install XProtect VMS
Page 20

Getting started guide | Milestone Husky™ X8 NVR
During the installation process, you are asked to specify a user account under which the
Failover Server service should run. This user account must have administrator rights in the
system.
1. Specify failover recording server properties. Click Continue.
2. When installing a failover recording server, you must use the particular user account labeled This account.
If needed, enter a password and confirm it. Click Continue.
3. In the Specify recording server encryption window, you can secure communication by encrypting the
connections from clients and services that retrieve data streams from the recording server.
Milestone recommends that you make the same selections as on the recording server from which this
failover recording server takes over. For more information about preparing your system for secure
communication using recording server data encryption, download the XProtect VMS manual from the
Milestone website (https://www.milestonesys.com/support/help-yourself/manuals-and-guides/).
You can also enable encryption after this installation from the Failover Recording Server Manager tray icon
in the notification area.
4. Select File location for the program file. In Product language, select the language in which you want to
install the server. Click Install.
5. The software now installs. When done, you see a list of successfully installed components. Click Close.
You can check the state of the failover recording server from the Failover Recording Server Manager tray
icon.
6. When the Husky Assistant completes the setup process, click Finish.
Download the XProtect® Device Pack
A device pack is a set of drivers that is installed with your XProtect system to interact with your devices. A device
pack is installed on the recording server. Milestone adds support for new devices and firmware versions on an
ongoing basis, and releases device packs every two months on average. A device pack is automatically included
when you install the XProtect system. To get the latest device pack, manually check for newer versions to
download and install.
To update your device pack after installation, go to the download section of the Milestone website
(https://www.milestonesys.com/downloads/) and download the relevant installation file.
If your system uses very old cameras, you may need to download the device pack for
legacy devices. For more information, see
https://www.milestonesys.com/community/business-partner-tools/device-packs/.
20 | Install XProtect VMS
Page 21

Getting started guide | Milestone Husky™ X8 NVR
Update Windows
To update your Windows operating system with all the latest Windows updates, go to Windows Update settings
and check for updates. Make sure to install all available updates and restart the Husky unit if required.
21 | Install XProtect VMS
Page 22

Getting started guide | Milestone Husky™ X8 NVR
Install clients on other computers
For best performance, you can access your XProtect system from other computers via dedicated clients:
l XProtect Smart Client used for viewing video
l XProtect Management Client used for configuring and managing the system
Install XProtect Smart Client
The XProtect system has a built-in public installation web page. From this web page, you can download and install
XProtect Smart Client on any other computer on the network.
1. To access the public installation webpage, enter the following URL in your browser: http://[computer
address]/installation/
[computer address] is the IP address or host name of the XProtect VMS computer.
2. Click All Languages and run the downloaded file.
3. Click Yes to all warnings. Unpacking starts.
4. Select the language for the installer and then click Continue.
5. Read and accept the license agreement. Click Continue.
6. Select the installation type. Click Typical to choose the default values and start the installation.
7. Open XProtect Smart Client. The XProtect Smart Client login dialog box appears.
8. Specify the host name or the IP address of your XProtect VMS computer in the Computer field.
9. Select authentication, enter your user name and password. Click Connect and XProtect Smart Client opens.
10. You can verify the default views or add new views: In Setup mode, add a group and then a view to this
group.
22 | Install clients on other computers
Page 23

Getting started guide | Milestone Husky™ X8 NVR
11. Add a camera to one of the view items by dragging and dropping it into a view item and click Setup again.
Check that you can see live video and that the round video indicator in the upper right corner of the camera
view is either green or red. Green means that the camera sends video to the system, while red means that
the system is also currently recording the video.
To read in details about the features in XProtect Smart Client and what you can accomplish with your
system, click the Help icon in the upper right corner or press F1 for context sensitive help.
XProtect Smart Client interface
23 | Install clients on other computers
Page 24

Getting started guide | Milestone Husky™ X8 NVR
In XProtect Smart Client, you view live video on the Live tab, and recorded video on the Playback tab. When you
select the Live tab, your XProtect Smart Client connects to the surveillance system server and displays live video
from cameras in the selected view.
Item Function
1 Task buttons
2 Application toolbar
3 View
4 View item
5 Tabs
6 Panes
7 Application buttons
8 Timeline
9 The camera toolbar
Install the Management Client
The XProtect VMS has a built-in administrative installation web page. From this web page, administrators can
download and install the Management Client or other XProtect system components to any other computer on the
network.
1. To access the administrative installation web page, enter the following URL in your browser: http://
[computer address]/installation/admin/
[computer address] is the IP address or host name of the XProtect VMS computer.
2. Click All Languages for the Management Client installer. Run the downloaded file.
3. Click Yes to all warnings. Unpacking starts.
4. Select the language for the installer. Click Continue.
5. Read and accept the license agreement. Click Continue.
6. Select file location and product language. Click Install.
7. The installation is complete. A list of successfully installed components is displayed. Click Close.
8. Click the icon on the desktop to open the Management Client.
9. The Management Client login dialog appears.
10. Specify the host name or the IP address of your management server in the Computer field.
11. Select authentication, enter your user name and password. Click Connect. The Management Client
launches.
24 | Install clients on other computers
Page 25

Getting started guide | Milestone Husky™ X8 NVR
To read in details about the features in the Management Client and what you can accomplish with your system,
click Help in the tools menu.
Management Client interface
1. Tools menu
2. Shortcut icons
3. Site navigation pane
4. Overview pane
5. Video preview
6. Properties
7. Properties tabs
25 | Install clients on other computers
Page 26

Getting started guide | Milestone Husky™ X8 NVR
System scaling
To be able to scale to thousands of cameras across multiple sites, the system consists of components that handle
specific tasks. If you have installed all components on a standalone Milestone Husky X8, you can instead install the
components on separate dedicated servers in a distributed system to scale and distribute the load.
If you need the highest performance of the Milestone Husky X8, you should choose the HX8RC model which is
equipped with a 2 x 10Gb/s CNA card.
Depending on the configuration, one standalone Milestone Husky X8 can handle 300-400 cameras. With optimal
configuration, the HX8RC model can handle up to 750 cameras.
Not all components are needed in all installations. You can always add additional recording servers, failover
recording servers, or XProtect Mobile servers for hosting and providing access to XProtect Mobile client and
XProtect Web Client.
26 | System scaling
Page 27

helpfeedback@milestone.dk
About Milestone
Milestone Systems is a leading provider of open platform video management software; technology that helps
the world see how to ensure safety, protect assets and increase business efficiency. Milestone Systems
enables an open platform community that drives collaboration and innovation in the development and use of
network video technology, with reliable and scalable solutions that are proven in more than 150,000 sites
worldwide. Founded in 1998, Milestone Systems is a stand-alone company in the Canon Group. For more
information, visit https://www.milestonesys.com/.
 Loading...