

Page 1

MILESTONE
HELPING
PATIENTS
PRESTO PRO
Automatic processor/stainer
for next generation frozen sections
Operator Manual - MM136
Page 2

Page 3

PRESTO PRO MM136-002 – Operator Manual
Thank you for choosing one of our systems and welcome to the ever more crowded club of Milestone laboratory
instrumentation users.
We feel confident that you will be fully satisfied adding this new device to your laboratory.
We recommend to ready carefully this operator manual and to always keep it within reach for convenient and
quick referencing.
For any clarification or request for assistance, please contact our representative in your country:
Or contact:
Milestone s.r.l.
Via Fatebenefratelli, 1/5
24010 Sorisole (BG) Italy
Tel. +39.035.412 8264
Fax +39.035.575498
web site www.milestonemed.com
e-mail marketing@milestonemedsrl.com
Read carefully this manual before using the instrument.
MM136-002 – PRESTO PRO – Operator Manual
2018-11
3
Page 4

PRESTO PRO MM136-002 – Operator Manual
CONTENTS
CONTENTS ....................................................................................................................................................... 4
1. INTRODUCTION ........................................................................................................................................ 6
1.1. Symbols used .................................................................................................................................... 6
1.2. Designated uses ................................................................................................................................ 7
1.3. Technical specifications ..................................................................................................................... 7
1.3.1.
Touch control terminal ............................................................................................................... 7
1.4. Transport and storage conditions ...................................................................................................... 8
1.5. Warning information ........................................................................................................................... 9
1.6. Label ................................................................................................................................................ 10
1.7. Compatible reagents ........................................................................................................................ 10
1.8. Waste disposal ................................................................................................................................ 11
2. INSTALLATION ........................................................................................................................................ 12
2.1. Space requirements ......................................................................................................................... 12
2.2. Unpacking and check list ................................................................................................................. 13
2.3. Fume extraction system ................................................................................................................... 16
2.4. Water fitting ...................................................................................................................................... 17
2.4.1.
Water drain .............................................................................................................................. 18
2.5. Electrical installation ........................................................................................................................ 19
2.5.1.
Power supply ........................................................................................................................... 19
2.6. Final placement ............................................................................................................................... 20
2.7. General description .......................................................................................................................... 20
2.7.1.
Remove or place the reagent cover disc ................................................................................. 21
2.7.2.
Add protection labels to the disc covering the reagents .......................................................... 22
2.7.3.
Cover of the second loading position ...................................................................................... 22
2.7.4.
Loading positions of the racks on the arm of the PRESTO PRO ............................................ 23
2.7.5.
Remove or replace the caps to the reagent vessels ............................................................... 23
2.7.6.
Remove or place the tray of reagent vessels .......................................................................... 24
2.7.7.
Reagent positions inside PRESTO PRO ................................................................................. 25
2.7.8.
Connect the barcode reader .................................................................................................... 26
2.7.9.
Rear panel ............................................................................................................................... 27
2.8. Remote alarm connection ................................................................................................................ 28
2.9. Reagents.......................................................................................................................................... 28
2.10. Accessing and exiting the system ................................................................................................... 29
2.11. Create a new user ........................................................................................................................... 30
2.12. Changing the language .................................................................................................................... 32
2.13. Set Date and Time ........................................................................................................................... 33
2.14. Fill the FineFIX reagent in the PRESTO PRO ................................................................................. 33
2.14.1. Load the consumable changes ................................................................................................ 33
2.14.2. Sequence of software activation .............................................................................................. 34
2.15. Load the reagents in the PRESTO PRO vessels ............................................................................ 35
2.15.1. Labels ...................................................................................................................................... 35
2.15.2. Load fixation, staining and cleaning reagents in the PRESTO PRO ....................................... 36
2.15.3. FineFIX heating settings .......................................................................................................... 40
2.16. Most used programs ........................................................................................................................ 42
2.17. Owner Settings ................................................................................................................................ 44
3. USE PRESTO PRO.................................................................................................................................. 46
3.1. Loading slides in the rack ................................................................................................................ 46
3.2. Run a program ................................................................................................................................. 46
3.2.1.
Run a favourite standard protocol............................................................................................ 48
3.2.2.
Run a favourite “Continuous” protocol ..................................................................................... 51
3.2.3.
Press the start button to run a standard protocol .................................................................... 57
3.2.4.
Press the start button to run a “Continuous” protocol .............................................................. 59
3.3. Editing a program ............................................................................................................................ 60
3.3.1.
Modify a standard protocol ...................................................................................................... 60
3.3.2.
Modify a “Continuous” protocol ................................................................................................ 62
3.3.3.
Modify the temperature of the fixation reagent ........................................................................ 63
4. REAGENT MANAGEMENT ..................................................................................................................... 64
4.1. Use of FineFIX ................................................................................................................................. 64
4.2. Reuse of reagents ........................................................................................................................... 66
4
Page 5

PRESTO PRO MM136-002 – Operator Manual
4.3. Setting the configuration of reagents ............................................................................................... 68
4.4. Edit reagents list .............................................................................................................................. 69
5. SAFETY PROCEDURE ........................................................................................................................... 70
5.1. Water error ....................................................................................................................................... 70
5.2. Arm position lost error ...................................................................................................................... 73
6. MAINTENANCE ....................................................................................................................................... 76
6.1. Introduction ...................................................................................................................................... 76
6.2. Before/after every process ............................................................................................................... 76
6.3. Daily ................................................................................................................................................. 77
6.4. Weekly ............................................................................................................................................. 77
6.5. Yearly ............................................................................................................................................... 77
7. DECONTAMINATION AND CLEANING .................................................................................................. 78
7.1. Safety precautions ........................................................................................................................... 78
7.2. Procedure for PRESTO PRO decontamination and cleaning ......................................................... 78
7.2.1.
Detergents ............................................................................................................................... 78
7.2.2.
Procedure ................................................................................................................................ 79
8. REPORTING ............................................................................................................................................ 81
8.1. Exporting saved process data ......................................................................................................... 81
8.1.1.
How to delete a saved process................................................................................................ 82
8.2. Exporting the events log .................................................................................................................. 83
9. OPTIONALS ............................................................................................................................................. 84
9.1. External exhaust fume filter kit (Code 61550/F) .............................................................................. 84
9.2. FineFIX tanks ................................................................................................................................... 84
A.
Appendix – Hints and tips .................................................................................................................... 85
A.1. Fatty tissues ..................................................................................................................................... 85
A.2. Tips to modify the staining protocol ................................................................................................. 85
B.
Appendix – Alarm management .......................................................................................................... 86
B.1. Alarm management ......................................................................................................................... 86
5
Page 6

PRESTO PRO MM136-002 – Operator Manual
1. INTRODUCTION
1.1. Symbols used
The instructions marked with this symbol are important and must be read carefully.
An instruction accompanied by this WARNING symbol means you need to proceed with
caution. Failure to follow the instruction may endanger the user or cause damage to the
device.
When an instruction features this symbol, great care is required as there is the risk of
an electric shock. Carefully follow the instruction in order to avoid this kind of accident.
Biohazard: pay attention when performing a procedure marked with this symbol, as
there is a biological contamination hazard.
Pay attention: parts identified with this symbol are areas at risk of crushing hand and
or fingers.
Surfaces identified by this symbol feature a high temperature hazard.
Inflammable material.
CE Logo: this instrument complies with European Community directives.
IVD medical device according to directive 98/79/EC.
Symbol of the European WEEE directive (2002/96/EC):
electric/electronic material – do not disperse in the environment.
Fragile
Manufacturer.
6
Page 7

PRESTO PRO MM136-002 – Operator Manual
1.2. Designated uses
Milestone PRESTO PRO and its optional parts have been designed for laboratory use and are therefore able
to withstand the harshest lab conditions. They have been developed for continuous use in procedures for
fixation, processing and staining of specimens for extemporaneous diagnoses in a quick, reliable and
standardized manner.
Milestone PRESTO PRO must solely be used with the reagents listed in the “Compatible reagents” chapter,
refer to chapter 1.7.
Any other use of the instrument should be deemed as misuse and voids the manufacturer's
warranty.
1.3. Technical specifications
REF 100300: PRESTO PRO 230V~ 50/60Hz 180W
REF 100301: PRESTO PRO 115V~ 60Hz 180W
Productivity: 120 slides per hour
194 slides per hour with loading “Continuous”
Rack capacity: 6 slides
Number of stations: 10
Reagent vessel volume: 200ml
Operating Temperature: 18°C – 30°C (64.4°F – 86°F)
Humidity (relative): up to 80% non-condensing
Maximum altitude: 2000m (6561ft)
Air intake flow interval: 35-45m3/h (cubic meters per hour).
Weight: 42Kg (92lb)
The instrument is intended for laboratory use (indoor use) only.
1.3.1. Touch control terminal
The following picture shows the Touch Control Terminal of the PRESTO PRO unit. It is possible to operate the
unit simply by touching the icons on the screen.
7
Page 8

PRESTO PRO MM136-002 – Operator Manual
Two USB ports are at the sides of the Touch Terminal.
When the USB ports are not used, it is required to leave the port protection on, as shown
in the picture above.
Characteristics: TFT-LCD 7” widescreen color display
Resolution 800X480,
Resistive Touchscreen
Mass storage 4GB
CPU 1GHz
Windows™ Embedded Compact 7
Programs: Pre-stored and customizable user defined programs.
I/O-Interface: 2x USB ports 2.0, 1x LAN Ethernet 10/100 Mbps RJ-45.
The manufacturer reserves the right to change and/or improve the specifications with no
prior notice and without incurring any obligation.
1.4. Transport and storage conditions
Temperature: –20°C up to +60°C (-4°F up to 140°F)
Humidity: up to 80% (up to 50% at 40°C) (104°F) non-condensing.
Before switching on PRESTO PRO (when coming from a storage chamber), allow the
instrument to reach operating environment conditions (at least half an hour).
8
Page 9

PRESTO PRO MM136-002 – Operator Manual
It is important that normal standards for safety and good laboratory practices are
1.5. Warning information
Any use of the instrument other than specified forfeits the warranty provided by the manufacturer.
PERSONAL DATA
The Device described herein is not intended for managing personal data of natural persons. Personal data of
natural persons shall not be inserted into the Device during the use of the Device. The organization that uses
the Device shall implement appropriate measures to ensure that no personal data of natural persons are
inserted into the Device. All the data referred to a person and inserted into the device shall use, at least, the
pseudonymization, in such a manner that the personal data can no longer be attributed to a specific data
subject without the use of additional information, provided that such additional information is kept separately
and is subject to technical and organizational measures to ensure that the personal data are not attributed to
an identified or identifiable natural person.
The main power supply plug is to be considered as disconnect device. Disconnect all plugs from the power
outlet before assembling the system, before connecting optional parts (if any) and before cleaning it.
The equipment must be connected to well visible sockets and accessible by the operator.
The instrument is supplied with replaceable fuses, but their replacement must be effected by trained and
authorized SERVICE personnel. If the system is still not properly working, please contact the local authorized
and trained SERVICE representative or the manufacturer.
All parts of the equipment and its optional parts shall be supplied only by the manufacturer.
DO NOT OPEN THE UNIT'S BODY. Failure to comply with the instructions in the
documentation might lead to a reduction in the device's safety. Should the equipment
not work correctly you are kindly requested to contact the supplier or manufacturer.
Do not remove the instrument, optional parts, panels or cover. Only authorized and
qualified personnel may repair and access the instrument's internal components.
applied. Always use common sense and the best-known laboratory practice when
operating the instrument.
The Competent Authority who owns the instrument has the primary responsibility for
incidents due to operations on the instrument without attending personnel in charge
of use or repairs.
Only use the reagents listed in chapter 1.7 “Compatible reagents”, to avoid damage
to the instrument. Failure to follow the instructions might lead to decreased device
safety.
9
Page 10

PRESTO PRO MM136-002 – Operator Manual
Fixative
Staining
Cleaning
1.6. Label
MILESTONE SRL
Via Fatebenefratelli, 1/5 – 24010 Sorisole (BG) – ITALY
Tel. +39.035.4128264
Fax. +39.035.575498
PRESTO PRO
REF 100300
SERIAL NUMBER (SN)
INPUT
MANUFACTURED:
For an explanation of symbols see chapter 1.1.
1.7. Compatible reagents
reagents
Milestone
FineFIX
Limonene
Reagents
Haematoxylin
Eosin
Reagents
Ethanol >99.9%
(Ethanol)
Acetic Acid 2% in
water
(Acetic Acid 2%)
Xylene
(Xylene)
Isoparaffin
(Isoparaffin,
MileGREEN)
Isopropanol
(Isopropanol)
DO NOT USE REAGENTS OTHER THAN THOSE LISTED ABOVE.
In case of doubts please contact: application@milestonemedsrl.com.
DO NOT USE HYDROCHLORIC ACID in any concentration.
10
Page 11

PRESTO PRO MM136-002 – Operator Manual
Handle with care and st
ore in a cool dry space using a tightly closed container.
1.8. Waste disposal
This instrument is a medical in-vitro device and is usually installed in a laboratory where are specimens and
other biological tissue. For your safety, it is therefore required to clean and disinfect the instrument prior to
coming into contact with it. It is also required to wear gloves when operating the system.
In the event this instrument should be returned to Milestone S.r.l., it is required to clean and disinfect the unit
before shipping it. Non-disinfected devices shall not be accepted and you will be contacted to pay the relative
disinfection costs.
International health standards require shipments of biological hazard material to be effected in standard
containers (risk of sanctions).
Do not remove the frame panels of the unit during cleaning operations.
Disconnect the power supply before any operation.
Do not use direct or high-pressure water to clean the unit.
For safety reason, any operation without the personal protective equipment must be
avoided.
It is recommended to use polyphenolic based disinfectants to clean and disinfect the instrument.
For further information, please contact the manufacturer: application@milestonemedsrl.com.
Complying with directive 2012/19/EC of the European Parliament and of the Council of 4 July 2012 on waste
electrical and electronic equipment (WEEE), the separate collection environmental managed of equipment is
mandatory.
It is necessary to return the used equipment to the distributor or to inquire about the presence of a local
empowered system for collection and disposal of WEEE.
The in-observance of Directive 2012/19/EC or of the local law which acknowledge it can have potential effects
on the environment and human health.
This symbol indicates separate collection
for electrical and electronic materials
If additional requirements on accident prevention and environmental protection exist in the country of
operation, this instruction manual must be supplemented by appropriate instructions to ensure compliance to
such requirements.
Waste disposal of the reagents
Vapours may collect in empty containers. We therefore recommend treating empty
containers as hazardous waste.
Waste material should be disposed of in an approved incinerator or in a designated landfill
site, in compliance with all provincial and local government regulation.
Certain reagents may have effects on health and cause environmental pollution.
For further information please refer to the SDS (Safety Data Sheet) provided by your supplier.
11
Page 12
PRESTO PRO MM136-002 – Operator Manual
20cm
20cm
20cm
44cm
50cm
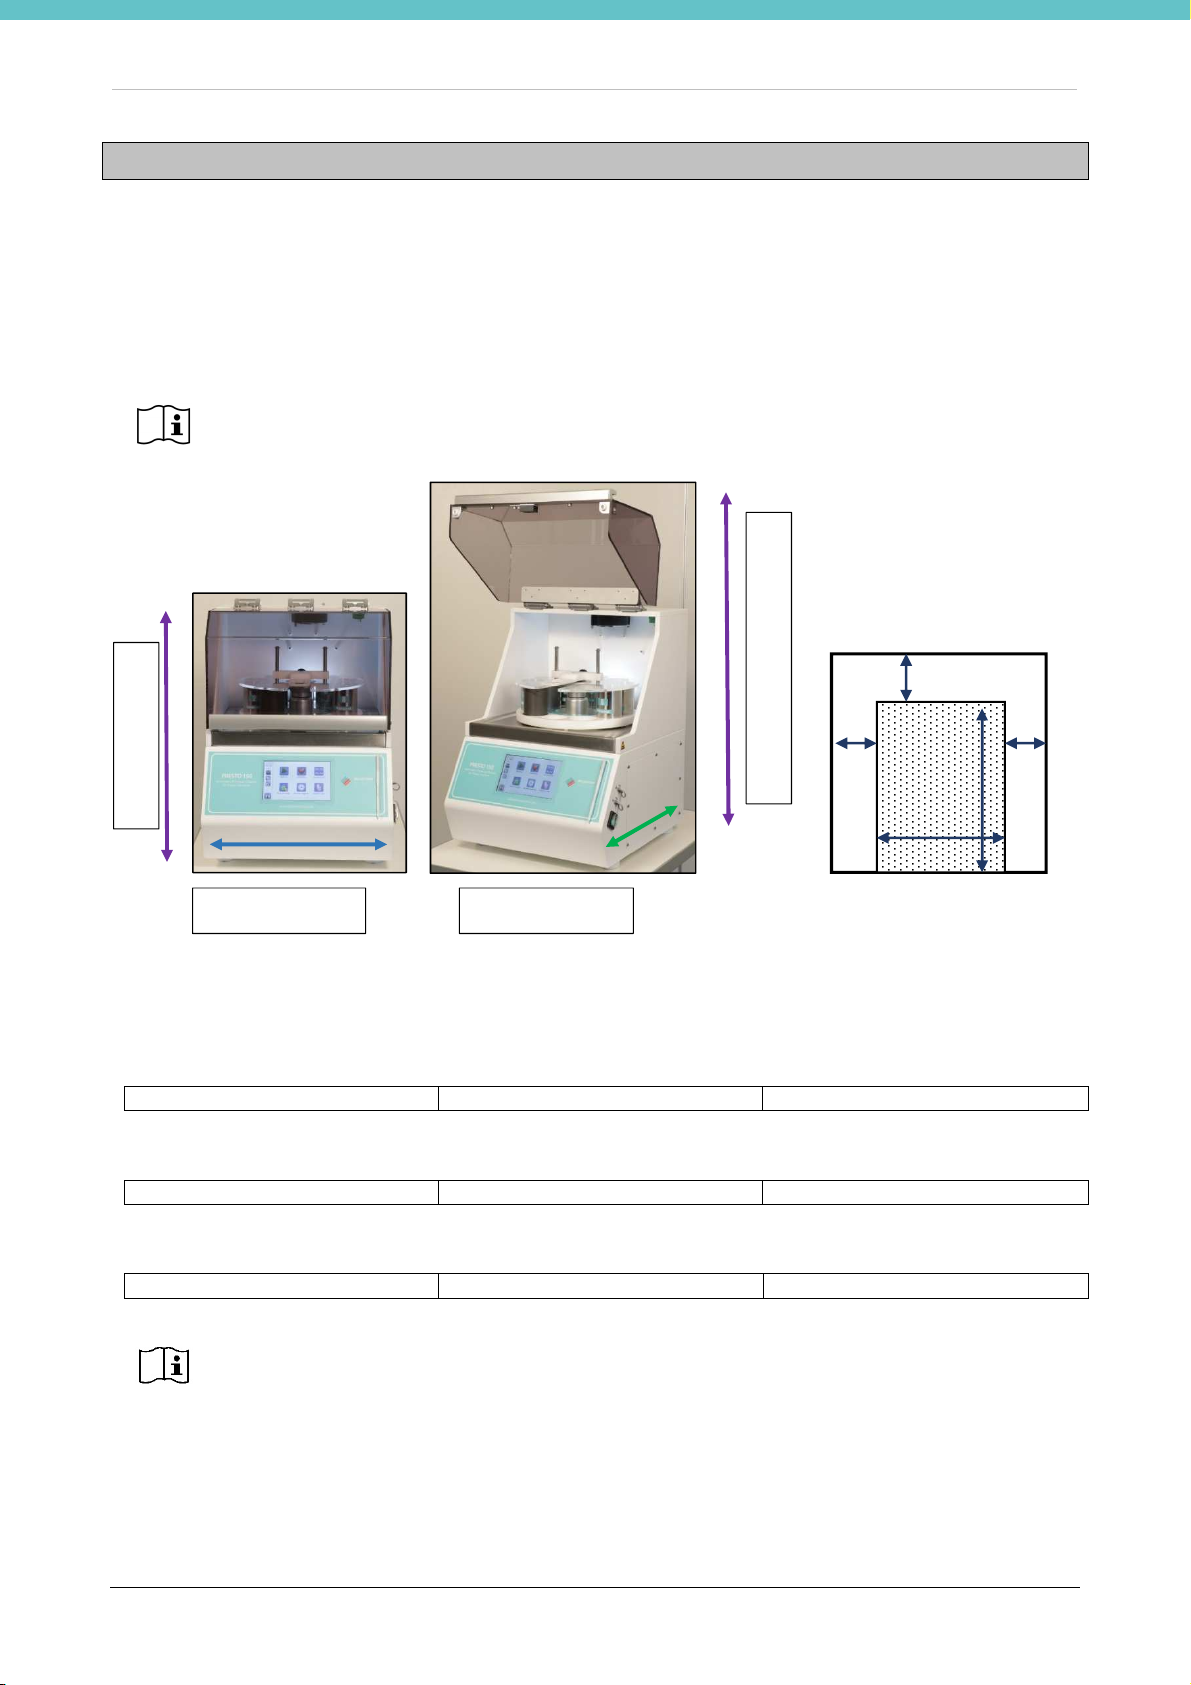
2. INSTALLATION
Milestone PRESTO PRO is an instrument that requires the utmost attention when unpacked and installed.
Arrange a bench at least 84cm (33in) wide and 70cm (27.5in) deep able to withstand the weight of PRESTO
PRO which is 42Kg (92.5 lbs).
Then place PRESTO PRO on the bench, ensuring the unit is level and the table is not flammable and vibration
proof. Ensure the instrument is positioned away from heat sources or from direct sunlight. Finally, ensure the
box collecting excess reagents is in the proper position.
Ensure the unit is not placed against any side surface thus restricting intake/outlet cooling
air: leave at least a 20cm (7.9in) distance on each side.
Maximum height 860 mm
Height 610 mm
Width 440mm Depth 525mm
2.1. Space requirements
PRESTO PRO is shipped in a wooden case with the following dimensions:
Width: 580mm (23in) Height: 1000mm (39.4in) Depth: 1050mm (41.3in)
Unit dimensions:
Width: 440mm (17.3in) Height: 610mm (24in) Depth 525mm (20.7in)
Dimensions of the space required to place the unit
Width: 840mm (33in) Height: 900mm (35.4in) Depth: 725mm (28.5in)
The MINIMUM depth required for the bench is 725mm (28.5in).
PRESTO PRO is a heavy instrument. Ensure the bench can withstand it.
At least two people are necessary to move and unpack the instrument.
12
Page 13
PRESTO PRO MM136-002 – Operator Manual
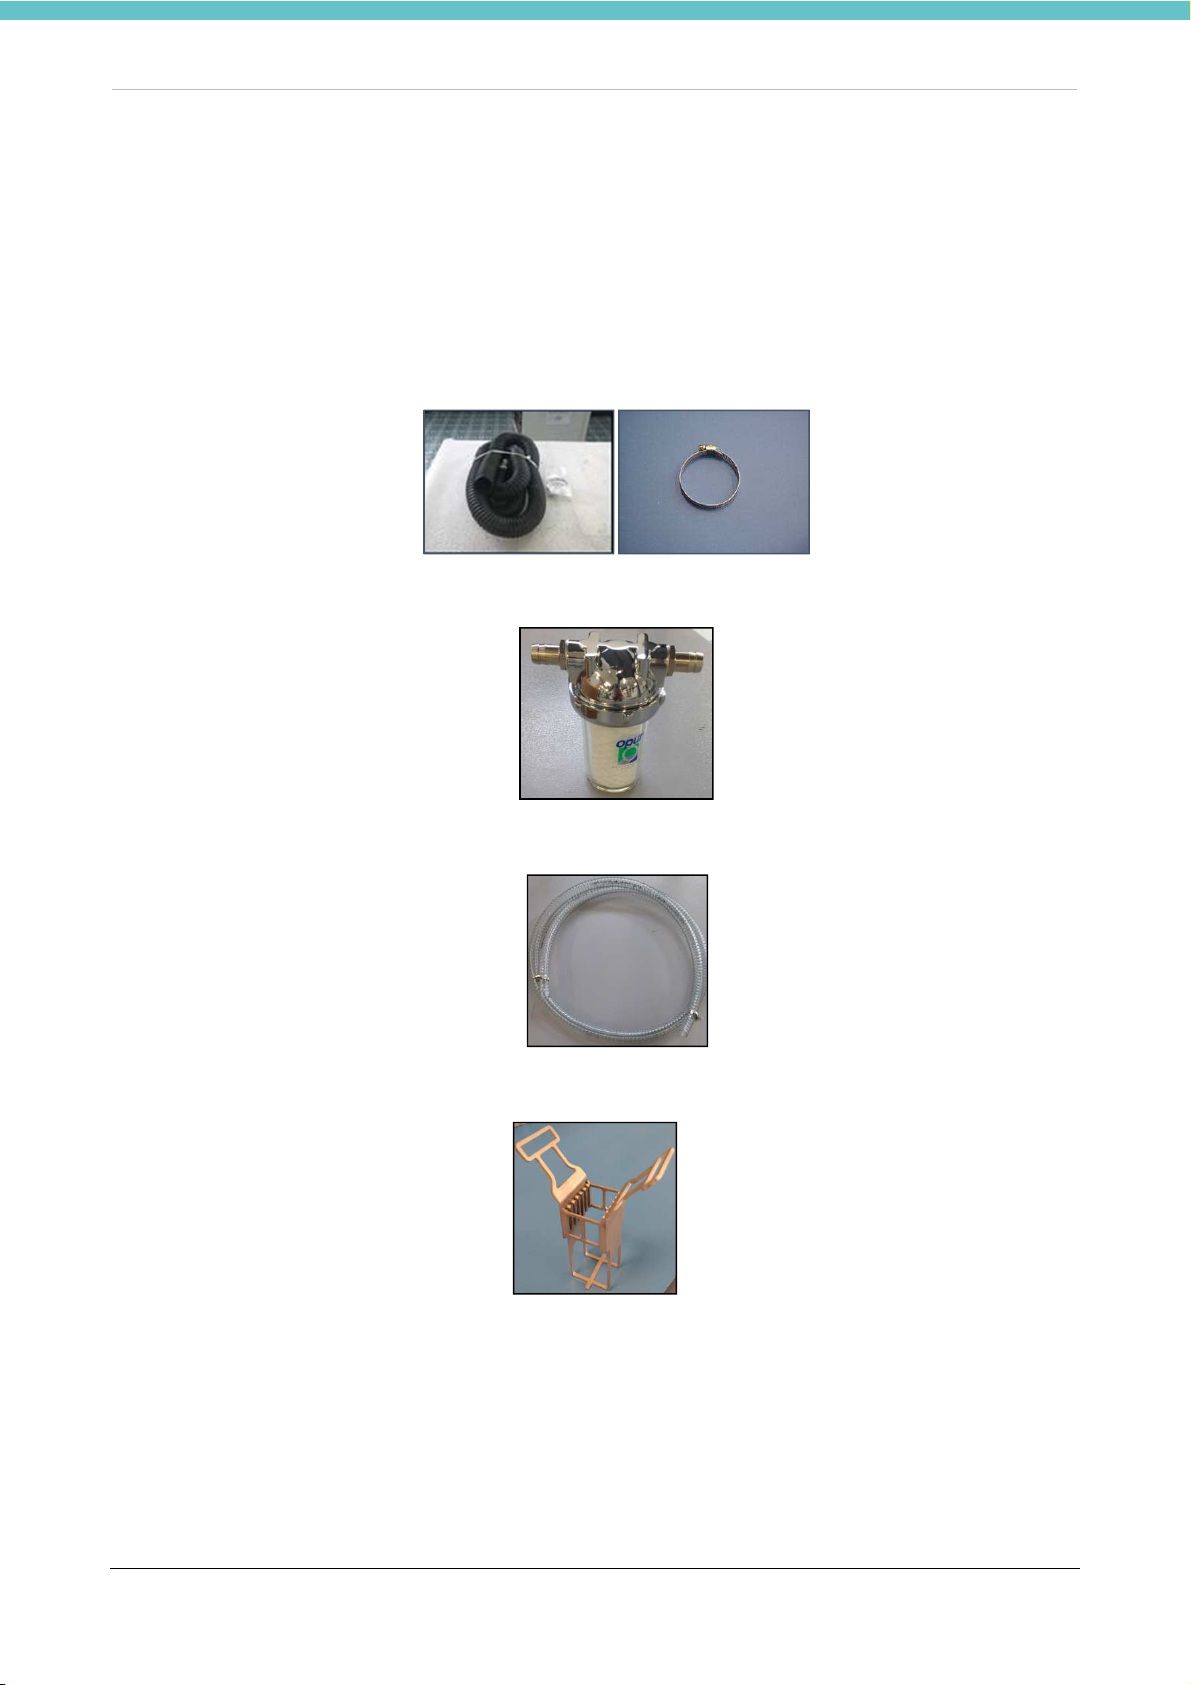
2.2. Unpacking and check list
On opening the package ensure all parts are present by checking the list attached with the shipment. The
utmost attention must be paid during PRESTO PRO unpacking to prevent scratches or damage to the body.
The PRESTO PRO system (REF 100300 and REF 100301) includes the following components:
• Qty.1 Main power supply cable (Code 50036 for 230V version)
• Q.ty. 1 Exhaust tube with 2 metal clamps (Code 61410)
• Qty. 1 20µm water filter (Code 100180L) with two G 1/2’’ connectors (Code 68278)
• Qty. 2 Water pipe 2m (Code 68309)
• Qty. 3 Electro-polished steel rack for 6 slides (Code 100177)
13
Page 14
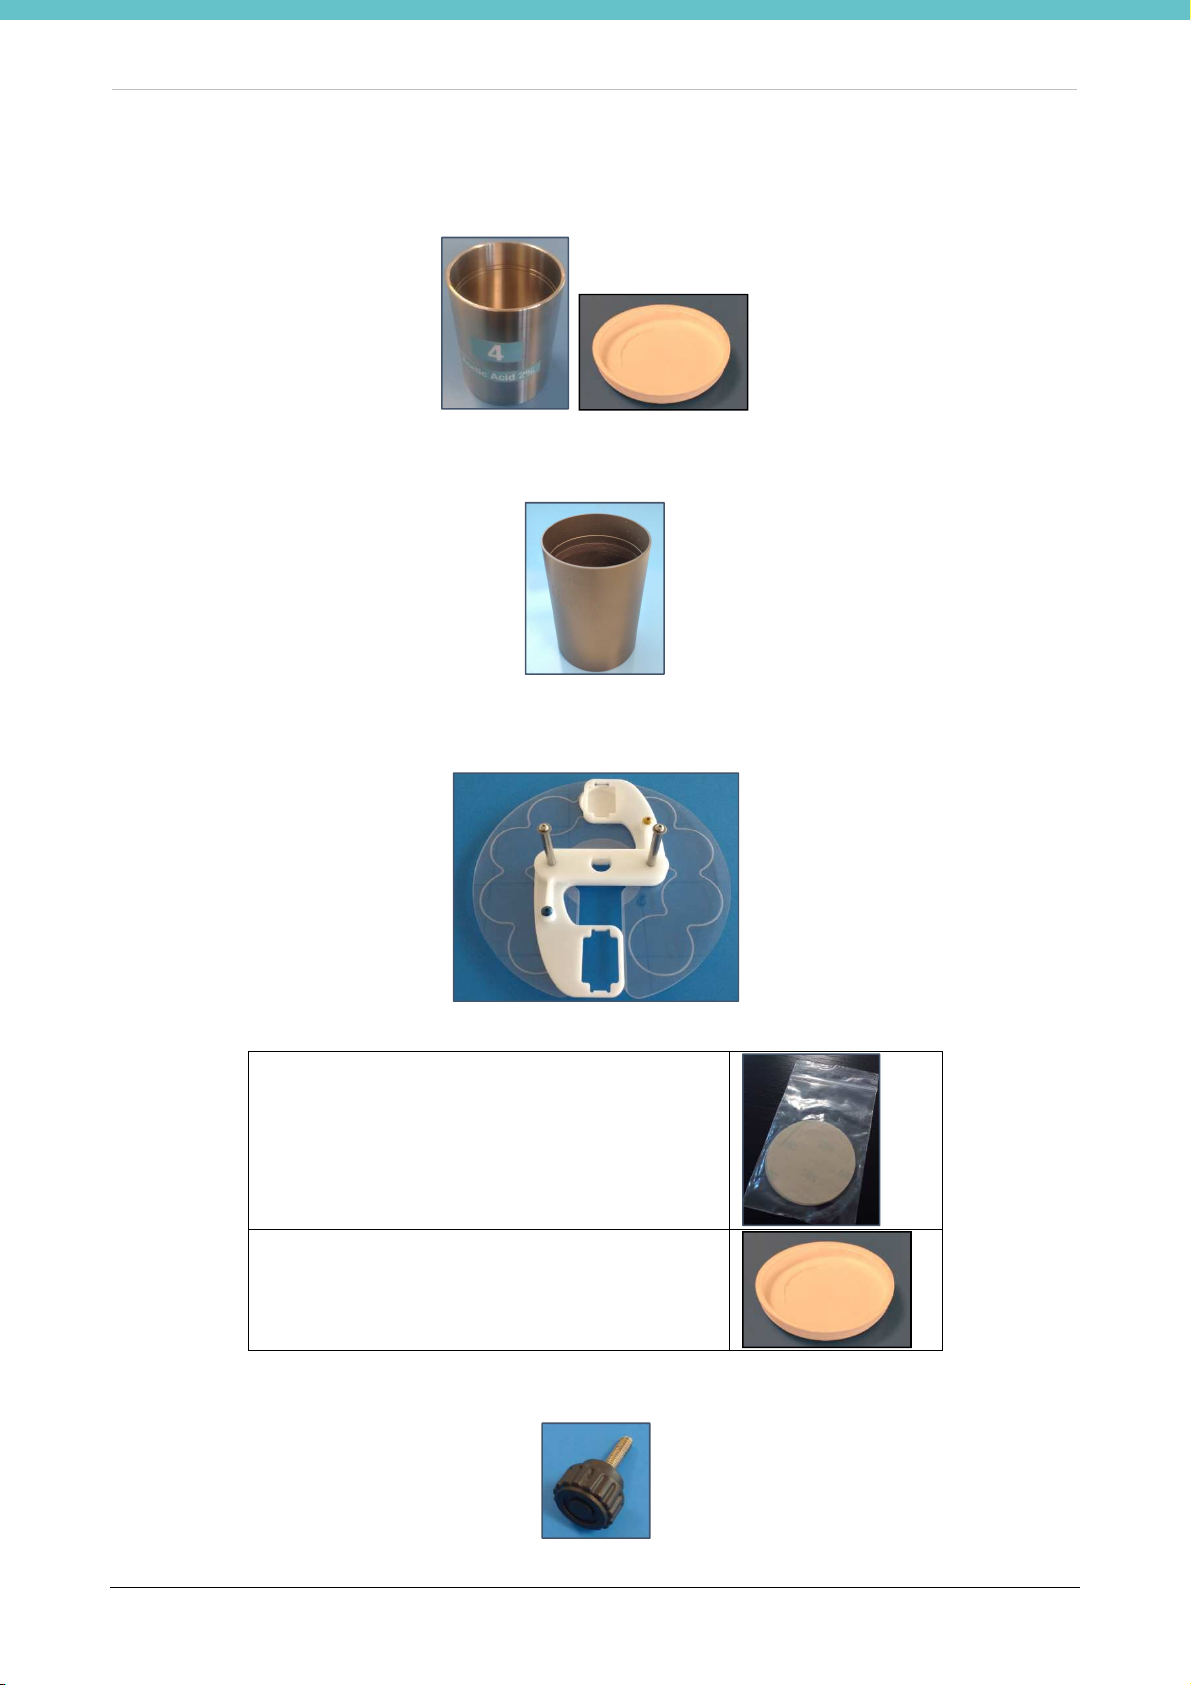
PRESTO PRO MM136-002 – Operator Manual
Code
100323
Code 100212
• Qty. 10 Steel reagent container (Code 100197). Eight containers are labelled and designated for the
positions in the PRESTO PRO. The other two are for transporting the slides from the cryostat and the
stained ones to their place of assembly.
• Qty. 1 Aluminum vessel for heated reagents (Code 100344)
• Qty. 1 Reagent container cover disc (Code 100375)
Consisting of:
10 protective polyester discs (
Cover of the second position (
)
)
• Qty. 1 Safety screw of the reagent container cover disc (Code 100348)
14
Page 15

PRESTO PRO MM136-002 – Operator Manual
• Qty. 1 Tray for vessels (Code 100367)
• Qty. 1 Kit reagent labels (Code 100356)
White labels
for customization
of reagents
• Qty.1 Magnetic pen to work with the touch screen terminal (Code 50597/M)
• Qty.1 Operation manual in electronic form
• Q.ty 1 Linear barcode reader (Code 370059)
15
Page 16

PRESTO PRO MM136-002 – Operator Manual
2.3. Fume extraction system
PRESTO PRO is ventilated through the external exhaust outlet located at the rear of the instrument, with a
pipe connected to the fume extraction system (if any).
The external fume extraction system must be properly installed at all times, according to
local regulations in force on laboratory safety.
The customer is required to adapt the hose connector. The plastic hose supplied has these specifications:
• Length: 3m
• Outer diameter: 69mm
• Inner diameter: 60mm
The external fume extraction system must assure an air flow of 40m3/h
(cubic meter per hour).
There is no filter on the fume extraction system of the unit.
it is possible to connect an external exhaust fume extraction kit (Code 61550/F), please refer
to chapter 9.1.
Connect the exhaust tube (Code 61377) to the appropriate outlet on the back panel.
Use the metal strap to fasten the pipe to the fume exhaust duct. (Code 50051).
Now connect the other end of tube to the fume extractor of the laboratory.
16
Page 17

PRESTO PRO MM136-002 – Operator Manual
It is mandatory to install the water filter between the tap and the
water inlet in the PRESTO
2.4. Water fitting
The PRESTO PRO unit is to be connected to the water system in order to work properly. On the back of the
unit are the ports for water inlet (left) and drain (right), pictured below.
Connect the (cold) water pipe to the water inlet at the rear of the unit. Gradually open the water "supply".
Connect the drain pipe to the water outlet at the rear of the unit.
PRO. The filter prevents the formation of limestone and dirt in the water system of
PRESTO PRO.
The filter fittings are G 1/2’’.
In order to simplify the replacement of the filter cartridges, it is important to have a tap
upstream of the filter, as pictured below.
Milestone recommends working in cooperation with the hospital’s clinical engineering
department when installing the water system of PRESTO PRO.
Water connections:
Water inlet: connection for a 17mm pipe (with G 1/2’’ fitting)
Water outlet: connection for a 17mm pipe (with G 1/2’’ fitting)
The minimum difference in height between the water outlet and the water system is at
least 50cm (19.7in), otherwise the system does not drain water properly.
Ensure the drain pipe has a slope of approximately 10cm (4in) for every meter.
Incoming water pressure: maximum 2bar, minimum 1bar
Milestone recommends using a water softener.
17
Page 18

PRESTO PRO MM136-002 – Operator Manual
2.4.1. Water drain
The drain water is polluted with the reagents in which the rack is dipped before rinsing.
The amount of reagent that a fully loaded rack (6 slides) takes in is about 1 – 1.5ml. Therefore, the drain water
of a standard process, with water flow duration 30 seconds, contains about 1.5ml FineFIX, haematoxylin and
2% acetic acid. In other words, the concentration of these substances in the drain water is about 0.075%
FineFIX and haematoxylin and 0.0015% of acetic acid.
The waste water may contain pathogens and must be connected according to local
regulations.
In the interest of safety, the operator must be present throughout the entire process.
18
Page 19

PRESTO PRO MM136-002 – Operator Manual
Before connecting the plug to the laboratory’s socket, check that the power supply voltage
2.5. Electrical installation
2.5.1. Power supply
The power supply line needs to be grounded. The earthing connection of the
power supply socket must be designated and come directly from the electrical distribution board of the
laboratory.
Carefully ascertain that:
• There is an earthed connection in the laboratory. Do not connect Milestone units without earthing
connection.
• The power cords (size and distance from the electric board) are compliant with the label on the back
of the unit.
• The socket is visible and accessible.
The power supply line needs to be grounded (Class I device).
Power line protection:
115V version: Miniature circuit breaker curve C, 15A, residual current device: 30mA.
230V version: Miniature circuit breaker curve C, 10A, residual current device: 30mA.
A power cord is supplied with Schuko plug.
of the unit matches the power supply line of the laboratory.
Damage occurs if the instrument is supplied with incorrect power supply.
19
Page 20

PRESTO PRO MM136-002 – Operator Manual
3
1
2
4
5
6
7
8
9
1
2
3
4
5
6
7
2.6. Final placement
The PRESTO PRO unit may now be placed in its final position of use. Ensure the unit is level.
Then connect:
The main power supply cable to the power plug located at the rear of the unit, then plug the power supply
cable into the socket.
Now it is possible to switch PRESTO PRO on.
2.7. General description
1. Work area cover
2. Intake
3. Disc covering the reagents
4. Reagent vessels
5. Tray of the reagent vessels
6. Touch screen terminal
7. USB ports
8. Main power switch
9. Collecting tray (Code 100360) BEA
1. Arm with rack supports
2. Standard rack position (BLUE)
3. Secondary rack position (YELLOW)
4. Reagent containers
5. Water container
6. FineFIX Container
7. Tray of the reagent containers
20
Page 21

PRESTO PRO MM136-002 – Operator Manual
2.7.1. Remove or place the reagent cover disc
Removal of the reagent cover disc is required for reagent change operations and for PRESTO PRO cleaning
and maintenance.
To remove the disc, move the safety screw of the covering disc to the front, moving the arm of the standard
position (BLUE) back (see section 2.7.7).
In case of filling or changing the reagents or for cleaning PRESTO PRO press the icon of the reagent
management page: the software automatically moves the arm in that position (see chapter 2.15).
At this point, loosen the screw and lift the rack support, which allows the covering disc to be extracted as it is
connected to it. Pay attention not to hit the reagent vessels.
Upon completing the operations that required disc removal, always place it back in position.
Always place the disc back in position to prevent excessive evaporation of the reagents
and preserve their cleanliness.
To put the covering disc back in position, place it on the central piston so that the standard position (BLUE) is
at the back; the hole for the safety screw is visible and the hole engages to the base of the arm. The hole in
fact has a semicircular shape with one straight side, which must be positioned in front of the operator. Place
the safety screw and tighten it, while holding the rack support steady.
Always tighten the safety screw completely.
21
Page 22

PRESTO PRO MM136-002 – Operator Manual
2.7.2. Add protection labels to the disc covering the reagents
The cover disc is in direct contact with the reagents and in some cases, it needs greater protection. Some vinyl
labels are supplied together with the reagent cover disc, which make the disc more resistant once they are
applied.
Milestone recommends to reinforce the protection disc in the positions where the following reagents are:
• acids
• alcohol solvents (ethanol, isopropanol)
• xylene and xylene substitutes (isoparaffin, limonene)
For further information, please contact: application@milestonemedsrl.com.
Underneath the disc there are slots to indicate the position for the protection labels. Turn the cover disc over
and apply the label in the appropriate position, following the guide markings.
2.7.3. Cover of the second loading position
The reagent covering disc has a hole at the secondary loading position (marked in yellow) so that it can be
used. This hole can be closed when the protocols are not used continuously, in order to reduce evaporation
of the reagents.
Remove the reagent covering disc and, while holding the arm raised, place the cover on the hole and push it
downwards until the hole is completely covered.
Remove the cap to use the second loading position (yellow).
22
Page 23

PRESTO PRO MM136-002 – Operator Manual
Secondary
Standard
2.7.4. Loading positions of the racks on the arm of the PRESTO PRO
The arm of the PRESTO PRO has two loading positions for racks:
The standard loading position: it is the position used for all the standard protocols and for all the odd
numbered cycles of the “Continuous” protocols, and is marked in blue
The secondary loading position: it is the position used only for even numbered cycles (from the second
cycle onwards) of the “Continuous” protocols, and is marked in yellow.
This manual refers to the standard loading position, in blue, unless specified otherwise.
loading
position
loading
position
2.7.5. Remove or replace the caps to the reagent vessels
The reagent vessels are fitted with a cap that prevents evaporation and oxidation of the reagents. The caps
must be removed before any process and it is suggested to place them back after using PRESTO PRO if it is
not going to be used for a long time (more than 24 hours).
Remove the cap while holding the vessel steady and with a slow and gentle movement to prevent the vessel
from moving and spilling the reagent. After removing the cap clean it from any trace of reagent and set it aside
(for instance, in the space behind the reagent vessel tray).
Place the cap back while holding the container and with a slow and gentle motion paying attention not to spill
out the reagent in the vessel.
It is possible to apply a label with the number on the cap, so as to always use the same cap for each vessel.
Use the Kit of reagent labels (Code 100356).
23
Page 24

PRESTO PRO MM136-002 – Operator Manual
2.7.6. Remove or place the tray of reagent vessels
The support disc of the vessels is required for correct positioning of the reagent vessels.
To remove the support disc (for the purpose of cleaning), remove the reagent protection disc (refer to chapter
2.7.1) and all the reagent containers (do not remove the container in position 3 which is for water).
It is required to bring the PRESTO PRO arm to lower position, preferably in the 5DOWN position with arm
turned backwards (see section 2.7.7). Press the icon of the reagent management page: the software
automatically moves the arm in that position (see chapter 2.15).
Lift the support disc and extract it from the water container and the housing for the fixative container.
Remove the support disc without fitted vessels.
To replace the support disc, insert its central hole in the arm shaft, turn the disc so that the number 10 on the
disc label is in front of the operator and the metal water glass and support for the FineFIX container go through
the side holes.
24
Page 25

PRESTO PRO MM136-002 – Operator Manual
2.7.7. Reagent positions inside PRESTO PRO
The slide rack support may make two movements:
• circular motion to move the rack in one of the 10 reagent positions
• vertical motion to lift the rack for moving from one reagent and lower it for dipping in another. In every
position, the vertical movement also allows to perform:
- dripping to move the rack up and down in the reagent, so as to stir the reagent and achieve
better contact between specimen and reagent.
- dipping to shake the rack in order to remove excess reagent from the slide (this function is
recommended after staining reagents).
There are 10 positions inside the PRESTO PRO and they are numbered clockwise:
• Position 10: position immediately in front of the operator. It may be:
- 10UP, PRESTO PRO reset position
- 10DOWN, standby position where the cover disc closes the reagent vessels to prevent
evaporation.
• Position 1 In this position the reagent vessel is designated for FineFIX for specimen processing. This
is the only heated position of PRESTO PRO.
Position 1DOWN with arm lowered is the loading position of the rack at the start of a process.
25
Page 26

PRESTO PRO MM136-002 – Operator Manual
• Position 3: This position is fixed and designated for the rinse water reagent, the flow of which is
regulated automatically.
• Position 5DOWN Position taken for reagent change that assures simple removal of the cover disc.
• Positions 2, 4, 5, 6, 7, 8, 9 and 10: these positions are designated for the staining and cleaning
reagents. The reagents set by default in these positions are those used in the default HIGH QUALITY
program recommended by Milestone (refer to chapter 3.2). The reagents in these positions are not
fixed and may be set by the user, refer to chapter 4.3 Setting the configuration of reagents .
2.7.8. Connect the barcode reader
Connect the reader’s USB to one of the USB ports on the right side of PRESTO PRO.
26
Page 27

PRESTO PRO MM136-002 – Operator Manual
1
2
3
4
5
6
7
8
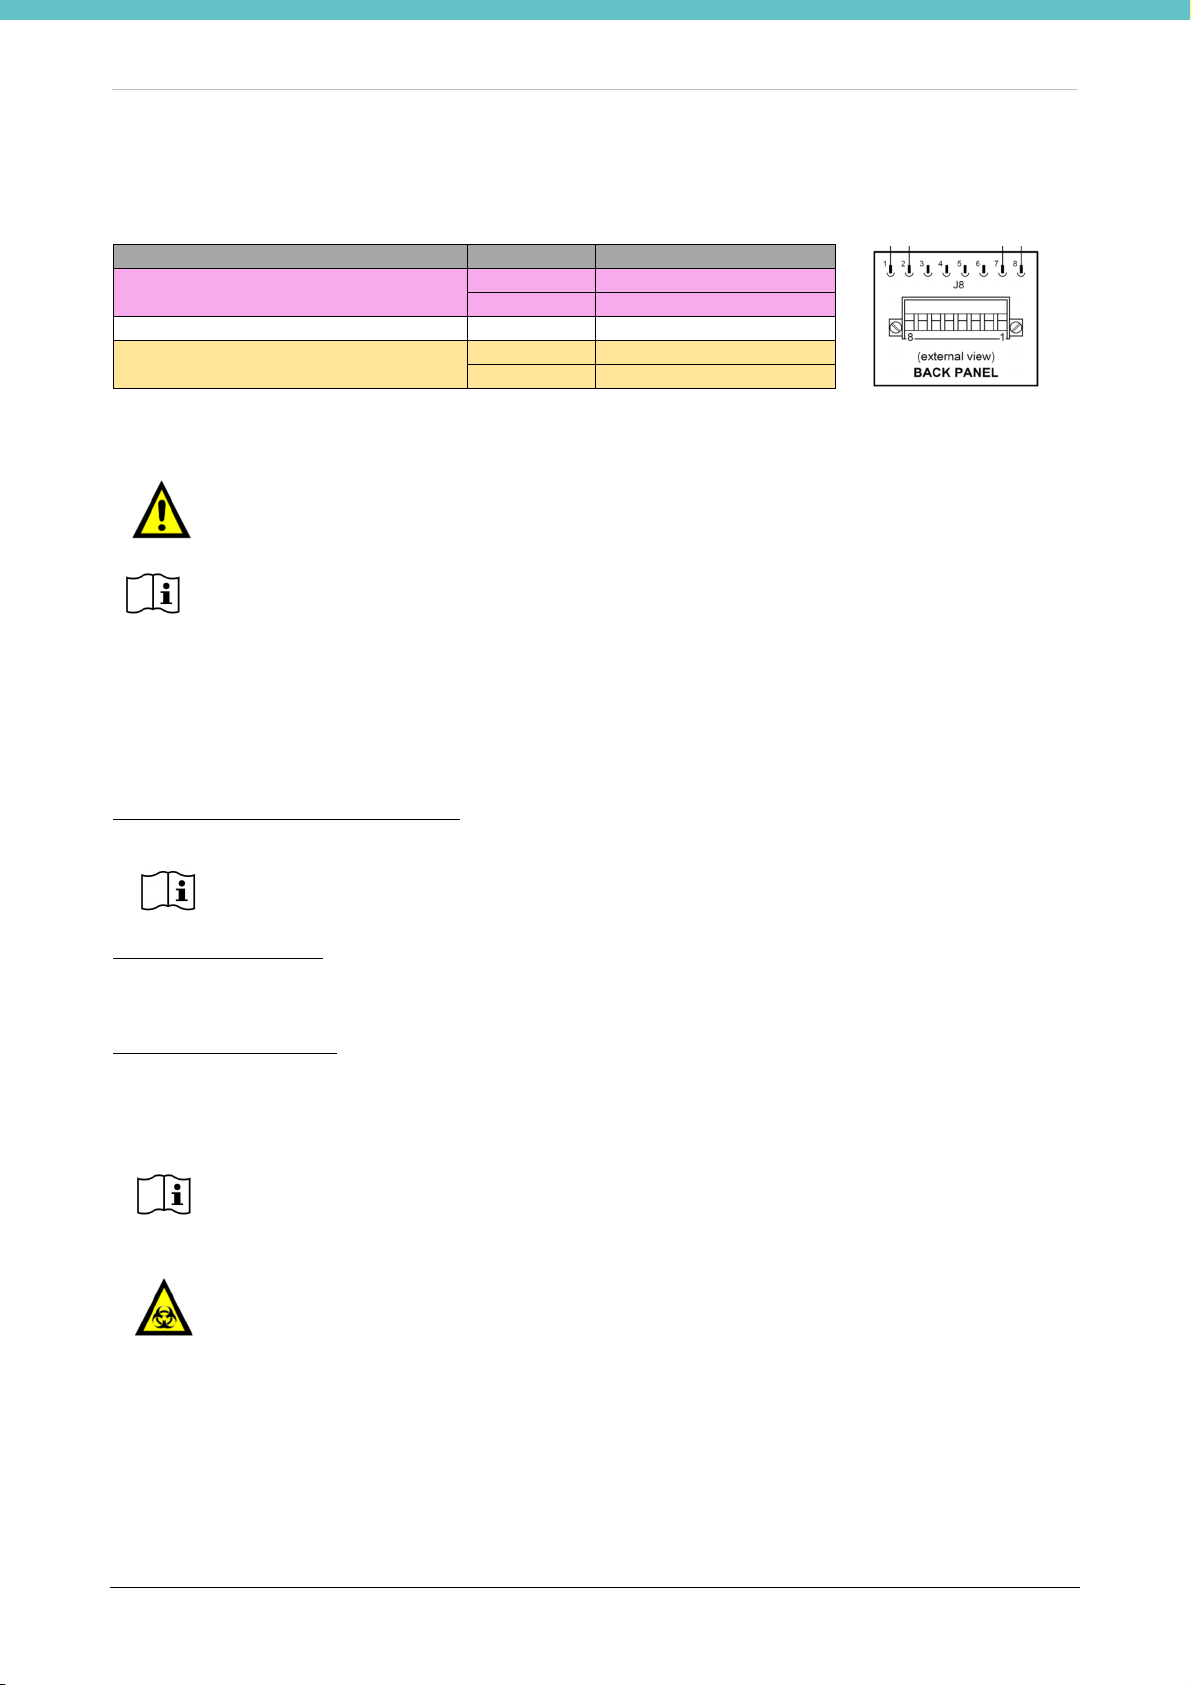
2.7.9. Rear panel
The following are found on the PRESTO PRO rear panel:
1. Connection to the fume extraction system
2. External alarms connector
3. Ethernet/LAN connection
4. General fuses
5. Spare fuses
6. Power plug
7. Label with serial number
8. Water inlet/outlet connections
27
Page 28
PRESTO PRO MM136-002 – Operator Manual
Reagent REQUIRED for operation: FineFIX Concentrate (5L tank: REF: 70148 or 10L
Please refer to manual MM029 for proper usage and dilution of FineFIX.
Handle reagents with care and store in a cold dry space using a tightly closed container.
2.8. Remote alarm connection
PRESTO PRO is also fitted with connection for external alarm devices.
Output Contact Status
1. Identifies the alarm status of the
PRESTO PRO
…
2. External pump command,
24Vdc 1A max output
Output 2, for the external pump, can be used only for demonstration purposes. It is strictly forbidden to use the
contact for auxiliary pumps during operation with histological samples.
For safety reasons and to prevent damages to the internal relays, the voltage of the
external devices that are connected to PRESTO PRO must be lower than 24 VDC - 1A.
See also the equipment's label which provides some important information.
Always provide the unit's serial number to Customer Support.
1 Normally OPEN
2 COMMON alarm
7 +0Vdc 1A max Pump
8 +24Vdc 1A max Pump
2.9. Reagents
Complete the set up with reagents, by providing at least:
FIXATION/PROCESSING REAGENTS:
• 200mL of diluted FineFIX
tank: REF: 70149) is not included in the unit, to be ordered apart.
STAINING REAGENTS:
• 200mL Hematoxylin
• 200mL Eosin
CLEANING REAGENTS:
• 200mL of Isopropanol
• 200mL 2% Acetic Acid in water
• 400mL 100% Ethanol (2 vessels).
The above reagents must be on site and available at the time of unit installation.
Vapours may build up in the vessels. Treat empty vessels as hazardous.
Waste reagents are to be disposed of in suitable incinerators, in compliance with all local,
regional and state laws.
For further information please refer to the SDS (Safety Data Sheet) provided by the
reagent’s supplier.
28
Page 29

PRESTO PRO MM136-002 – Operator Manual
2.10. Accessing and exiting the system
When the System is switched on, the LOG IN screen is displayed by default. Press the “Admin” button, enter
the password (published in the separate document inserted in the Operation Manual) and press “Enter”.
THE MAIN ADMINISTRATOR PAGE is displayed which shows the MAIN FUNCTIONS.
In any screen, press the HOME button to go back to the MAIN PAGE.
The MAIN PAGE may be customized in the USERS settings, choosing from FAVOURITE and MAIN
FUNCTIONS (see chapter 2.11).
Log-in as SERVICE is only available for authorized persons.
SERVICE has full access to all functions.
29
Page 30

PRESTO PRO MM136-002 – Operator Manual
2.11. Create a new user
Access the “Settings” screen by pressing the icon which is in the status bar on the left, then in the new
screen select “Users” to create a NEW USER.
The USERS setting screen is displayed, as shown below. Click on Add, a keyboard appears. Enter the NEW
USER name and press “Enter”.
Now select and configure the parameters of the NEW USER choosing the:
• CATEGORY.
• USER PASSWORD: click on the password box, a number pad appears as shown below, enter the
password (max 6 digits and minimum 1) and confirm.
• USER CONFIGURATION: select the control box “Set ‘Favourites’ as Home Page” in order to have the
FAVOURITE PROGRAMS set as the new user's main page.
30
Page 31

PRESTO PRO MM136-002 – Operator Manual
Ask p
assword for processing
Ask password for reagent replace
Now select the appropriate FUNCTIONS for the NEW USER:
WHEN MARKED the new USER can:
Create and edit programs
Replace waste reagents
Set reagent position, open the list of reagents and edit
reagents details
By pressing the arrow (see picture below) it is possible to choose the appropriate ACCESS LEVEL upon
program start “Ask for USER and PASSWORD” or “Automatically login as ADMINISTRATOR”.
The following screen is displayed:
Select:
procedure
procedure
The software recognizes who starts the program (through
password).
The software recognizes who is performing the reagent replace
procedure (through password).
31
Page 32

PRESTO PRO MM136-002 – Operator Manual
2.12. Changing the language
From the HOME PAGE, go to the “Settings” screen and select “Language” (see figure below).
Choose the required language from the drop down menu then press OK and Yes below the message displayed
and the system automatically reboots to enable the changes.
32
Page 33

PRESTO PRO MM136-002 – Operator Manual
2.13. Set Date and Time
Access the “Settings” screen from the MAIN PAGE by pressing the icon which is on the status bar on
the left, then in the new screen select “Date/Time”.
In the time setting window, it is possible to set the Time Zone, thus activating the automatic time update
throughout the year.
2.14. Fill the FineFIX reagent in the PRESTO PRO
2.14.1. Load the consumable changes
On each container of FineFIX there is a barcode to enable the use of PRESTO PRO and for counting the
reagent changes.
The barcode of a FineFIX 5L container (REF 70148) fills about 100 changes.
The barcode of a FineFIX 10L container (REF 70149) fills about 200 changes.
The amount of diluted FineFIX obtained with these containers is higher than required to perform the number
of changes loaded. The FineFIX that can be prepared in excess is intended for maintenance of wet slides, up
to loading in the PRESTO PRO, please refer to chapter 3.1.
33
Page 34

PRESTO PRO MM136-002 – Operator Manual
2.14.2. Sequence of software activation
Select the icon “FineFIX code”
Select “Recharge FineFIX loads”
These icons are on the FineFIX heater page.
Insert the FineFIX barcode with the reader or manually (in this case press ENTER)
The “FineFIX Heater” page indicates the available
number of loads.
It is now possible to load the code of another container
of FineFIX or fill in the vessel in position 1 of the
PRESTO PRO with the reagent, please refer to next
chapter.
The software accepts each code once.
There is a warning threshold in the “Owner settings” section (chapter 2.17), by default it is 10 loads.
When the available loads fall below this threshold, the reagents icon shows a yellow symbol, which indicates
that it will be shortly required to load another code.
34
Page 35

PRESTO PRO MM136-002 – Operator Manual
2.15. Load the reagents in the PRESTO PRO vessels
Follow the procedures below to load the PRESTO PRO with the staining reagents.
2.15.1. Labels
Each glass has two labels:
1. POSITION NUMBER
2. REAGENT NAME
Eight glasses already have the label with numbers up to 10, except for number 1 as this position is for the
aluminum container for the heated reagent, and number 3 as the container in this position is fixed and intended
for flushing water.
Place the label with the reagent name on the numbered glasses based on the configuration required for
staining, see section 2.7.7. The picture below shows an example of the rinsing ethanol in position 6.
Some white labels are available for customization of reagents (see chapter 2.2).
35
Page 36

PRESTO PRO MM136-002 – Operator Manual
2.15.2. Load fixation, staining and cleaning reagents in the PRESTO PRO
Select “Reagents” from the MAIN FUNCTIONS screen.
The slide rack support goes into position 5DOWN (see chapter 2.7.7), and the reagent in vessels management
screen is displayed (picture below right).
Reagents of the vessels loaded in the PRESTO PRO are divided into three categories, for diversified
management of reagents:
1. FIXATIVE
Milestone recommends the use of FineFIX as fixation reagent to achieve better quality results.
Thanks to its special composition, FineFIX fixates, dehydrates and clears the sample.
FineFIX is a concentrated reagent that is to be diluted in ethanol for use.
Please refer to manual MM029 for preparation of FineFIX to the work dilution and its usage.
To replace/load the fixation reagents select the Fixative section (blue circle in the picture below).
Tap the “Replace fixative reagents” box to open the reagent change page and update the date and clear the
number of cycles made by the fixative reagents.
Open the lid and remove the reagents cover disc, refer to chapter 2.7.1
Then remove the fixation reagents vessels. The software indicates the positions and short name of the glasses
containing the fixation reagents and shows a diagram of reagents configuration.
Glasses have labels with the position number and name of the reagent that help not to mix them up.
In the procedure to replace reagents, after emptying the glasses, it is advisable to clean them with paper in
order to remove any precipitate.
36
Page 37

PRESTO PRO MM136-002 – Operator Manual
T
he inside of the vessel has two etched lines, which indicate the MAX and MIN level (see
Add 160mL of reagent in the vessel and slowly and carefully place it back in the position indicated by the
software (position 1).
photo below). Keeping the reagents within the two levels assures proper staining of
specimens. Milestone recommends keeping the fixation and staining reagents level to the
minimum and the cleaning reagents to the maximum.
The vessel is to be placed inside the heating housing for the fixation reagent.
At the end of the procedure press the icon to go back to the reagent management page.
The fixation reagent is to be heated and brought to the operating temperature. If the heater is on, the following
message is displayed, asking to wait 5 minutes for the reagent to be ready before starting a process:
Press OK to complete the procedure.
At this point, the date and number of cycles performed by the fixation reagents are cleared.
It is possible to start a process before the heating time. Milestone recommends waiting for
the reagent to heat.
37
Page 38

PRESTO PRO MM136-002 – Operator Manual
The inside of the vessel has two etched lines, which indicate the MAX and MIN level (see
2. STAINING
To replace/load the staining reagents select the Staining section (blue circle in the picture below).
Tap the “Replace staining reagents” box to open the reagent change page and update the date and clear the
number of cycles made by the staining reagents.
Open the lid and remove the reagents cover disc, refer to chapter 2.7.1
Then remove the staining reagents vessels. The software indicates the position and short name of the glasses
containing the staining reagents and shows a diagram of reagents configuration.
Glasses have labels with the position number and name of the reagent that help not to mix them up.
In the procedure to replace reagents, after emptying the glasses, it is advisable to clean them with paper in
order to remove any precipitate.
Add 200mL of reagent in each vessel and slowly and carefully place it back in the position indicated by the
software.
photo below). Keeping the reagents within the two levels assures proper staining of
specimens. Milestone recommends keeping the staining reagents level to the minimum and
the cleaning reagents to the maximum.
38
Page 39

PRESTO PRO MM136-002 – Operator Manual
The vessel is to be placed inside the housing in the vessel tray. On this tray, positions are indicated by a central
label.
At the end of the procedure press the icon to go back to the reagent management page. At this point,
date and number of cycles performed by the staining reagents are cleared.
3. CLEANING
To replace/load the cleaning reagents select Cleaning reagents (blue circle in the picture below).
Tap the “Replace cleaning reagents” box to open the reagent change page and follow the instructions given
by the software as instructed above for the staining reagents.
At the end of the procedure press the icon to go back to the reagent management page. The date and
number of cycles made by the cleaning reagents will be reset to zero.
At the end of these operations, log out from the reagent change page by pressing the HOME icon.
39
Page 40

PRESTO PRO MM136-002 – Operator Manual
The right operating temperature of FineFIX is between 35 and 40°C
(95°F and 104°F)
. Within
Now the icon will no longer have the STOP red symbol.
2.15.3. FineFIX heating settings
FineFIX is the only reagent in PRESTO PRO that is used at a temperature other than room temperature.
Upon first switching on the unit FineFIX heating is not active and the relevant icon in the settings screen shows
a red symbol at bottom right (see picture below left).
For settings of the FineFIX reagent maintenance temperature, select “FineFIX heater” from the MAIN
FUNCTIONS screen. The “FineFIX heater” page shows that the heater is OFF.
Switch on FineFIX heating by clicking on the “ON” button in the center of the screen (picture at top right).
Heating enabled can only be set by ADMINISTRATOR and users authorized to modify the
reagents (Chapter 2.11).
this range, FineFIX is able to process and fixate tissue sections up to 6 µm thick in 15
seconds, with high quality results.
At this point, heating is enabled and brings the reagent to the set temperature. The time required to reach the
temperature varies from 10 to 20 minutes and depends on the laboratory and reagent temperature.
The icon shows an orange warning dot until the set temperature is reached. In this case, it is not advisable to
start a process but it is possible by replying YES to the following message displayed when the process is
started up:
40
Page 41

PRESTO PRO MM136-002 – Operator Manual
When the maintenance temperature is reached, heating status becomes “ready”, the icon no longer shows the
warning symbol and the process may be performed using the reagent at the optimal temperature.
41
Page 42

PRESTO PRO MM136-002 – Operator Manual
2.16. Most used programs
This function lets you insert FAVOURITE programs in the MAIN PAGE.
Access the “Settings” screen by pressing the icon which is on the status bar on the left and the
•
icon then select “Set favourites”. The “Choose the Favourite to set” page is displayed.
Press the “Not defined” icon.
•
Select the “Program” and Colour of the button.
•
The “Preview” is displayed at bottom left (see picture below).
Press “Save Favourite” to save changes.
•
The icon of the new program is now visible in the list of the "Choose the Favourite to Set" screen.
•
42
Page 43

PRESTO PRO MM136-002 – Operator Manual
If the user's main page is set as FAVOURITES (picture at bottom left), press to go back to the main
•
functions page.
If the main page is set as MAIN FUNCTIONS (picture at bottom right), press “Favourites” to open the screen
shown at bottom right.
43
Page 44

PRESTO PRO MM136-002 – Operator Manual
GENERAL
VENTILATION
2.17. Owner Settings
This function is available only for SERVICE and ADMINISTRATOR.
Access the “Settings” screen by pressing the icon which is on the status bar on the left, then select the
settings page by pressing the icon , then in the new screen select “Owner”.
The Owner's settings screen is displayed as shown in the pictures below.
Select “General” to modify:
Institute name where the unit is installed.
•
Department name where the unit is installed.
•
Consumable alert threshold of the number of
•
available loads below which the software alerts
to the need to load the FineFIX code (see
chapter 2.14.1).
By default, the threshold is set to 10 loads.
Select Ventilation to manage the work area's
extraction:
• Always ACTIVE: extraction is activated when
the machine is switched on.
• Always OFF: extraction is always off, even
during processing.
NOT RECOMMENDED.
Risk of fumes in the laboratory.
• Processing and cover opening: extraction is
only activated during the process and when the
cover is opened.
44
Page 45

PRESTO PRO MM136-002 – Operator Manual
ENABLES
INTERNET CONNECTION
Select “Enable” to choose whether to enable or not:
• Water during the entire run
• Sound 10 seconds before the end of the run
To connect PRESTO PRO to the internet.
MILEWATCH
Not available.
45
Page 46

PRESTO PRO MM136-002 – Operator Manual
3. USE PRESTO PRO
Milestone PRESTO PRO is controlled by a Touch Control Terminal, based on Windows CE 7.
Milestone PRESTO PRO has been specifically designed to fixate, process and stain slides for extemporaneous
diagnoses in a quick, reliable and standardized manner.
3.1. Loading slides in the rack
PRESTO PRO's rack can house up to 6 slides.
Insert the slides in the rack, gently, sliding them between the appropriate partitions.
To keep the slides wet, keep them immersed in FineFIX, using the reagent vessel with the specific label
“Cryostat FineFIX”.
While loading the slides in the rack, keep the rack immersed in FineFIX, to prevent the
specimens from drying.
It is important to ensure the “Cryostat FineFIX” is clean. Milestone recommends changing
it at least once a week.
3.2. Run a program
The default protocols on the PRESTO PRO are:
ULTRA QUALITY, which lasts 3 minutes and 52 seconds:
STEP. VESSEL REAGENT TIME
(sec)
1 1 FineFIX 60 35-40°C (95—104°F) YES NO
2 3 Water 10 Room YES NO
3 2 Haematoxylin 30 Room YES YES
4 3 Water 10 Room YES NO
5 4 Acetic ac. 4 Room YES NO
6 3 Water 4 Room YES NO
7 5 Eosin 14 Room YES YES
8 6 Ethanol 10 Room YES NO
9 8 Ethanol 10 Room YES NO
10 7 Isopropanol 10 Room YES NO
HIGH QUALITY, which lasts 2 minutes and 18 seconds
STEP. VESSEL REAGENT TIME
(sec)
1 1 FineFIX 15 35-40°C(95—104°F) YES NO
2 3 Water 5 Room YES NO
3 2 Haematoxylin 15 Room YES YES
4 3 Water 5 Room YES NO
5 4 Acetic ac. 1 Room YES NO
6 3 Water 3 Room YES NO
7 5 Eosin 5 Room YES YES
8 6 Ethanol 7 Room YES NO
TEMPERATURE IMMERSION DRIPPING
TEMPERATURE IMMERSION DRIPPING
46
Page 47

PRESTO PRO MM136-002 – Operator Manual
The first two steps of the program are fixed: it is not possible to change position and reagent
Water steps cannot last less than 3 seconds.
Milestone recommends using the following working solutions:
9 8 Ethanol 7 Room YES NO
10 7 Isopropanol 5 Room YES NO
CONTINUOUS, which lasts 2 minutes and 20 seconds
STEP. CONTAINER REAGENT TIME
(sec)
1 1 FineFIX 10 35-40°C (95—104°F) YES NO
2 3 Water 5 Room YES NO
3 2 Haematoxylin 15 Room YES YES
4 3 Water 5 Room YES NO
5 4 Acetic Acid 1 Room YES NO
6 3 Water 3 Room YES NO
7 5 Eosin 1 Room YES YES
8 6 Ethanol 10 Room YES NO
9 8 Ethanol 5 Room YES NO
10 7 Isopropanol 15 Room YES NO
TEMPERATURE IMMERSION DRIPPING
The Standard protocols (HIGH and ULTRA QUALITY) require the first cycle to end before the second one can
start.
The Continuous loading protocols allow another cycle to start even when the previous one is still in progress,
saving time as a result.
(FineFIX for step 1 and water for step 2).
When drawing up a new program, these stages cannot be deleted.
- Harris Haematoxylin
- 1% Alcohol eosin (with 0.1% Phloxine)
- 2% acetic acid in water
In the interest of safety, the operator must be present throughout the entire process.
47
Page 48

PRESTO PRO MM136-002 – Operator Manual
Before starting a process ensure the reagent vessels do not ha
ve the cap (see
chapter
3.2.1. Run a favourite standard protocol
For reasons of safety, if the cover of the work area is opened while the arm is moving, the
arm stops immediately.
2.7.5) and check proper reagent level, as they are subject to evaporation. The correct level
of reagents is between the two lines etched inside the vessel. Milestone recommends
keeping the staining reagents level to the minimum and the cleaning reagents to the
maximum.
Select a Favourite Standard Protocol (picture below) from the list of favourite protocols (see chapter 2.16).
The standard protocols do not have the word “CONTINUOUS” in the title.
The standard loading position (BLUE) of the slide rack goes in the loading position above the container in
position 1DOWN, ready to load the rack in the FineFIX container. Refer to chapter 2.7.7 for the positions in
the PRESTO PRO.
The support of the slide rack goes in the loading position above the vessel in position 1DOWN, ready to load
the rack in the FineFIX vessel. Refer to chapter 2.7.7 for the positions in the PRESTO PRO.
At the start of each process the software performs a water flow check which lasts few
seconds.
The screen to enter process data and to start it is displayed. Enter the number of slides in the rack, pressing
the number keys from 1 to 6, then enter “Case ID” and “Run ID” (process identification code) data. It is not
mandatory to enter any of this data.
The program is set already, based on the selected favourite, and cannot be changed.
48
Page 49

PRESTO PRO MM136-002 – Operator Manual
Open the PRESTO PRO cover and load the rack on the support, in position 1DOWN. Once closed, the START
button is displayed at bottom right: press this button to start a process.
The cycle starts only when the START button is pressed.
The processing screen is displayed, which shows process information.
On the left, the schematic depiction of the positions of PRESTO PRO's reagents, with the rack's position
highlighted in green and information concerning the stage in progress.
The following is displayed at top right: the selected protocol, the process identification code (if entered) and
the total process time. The remaining time before the end of the process is shown in the yellow box immediately
underneath.
Below are two examples of screens during processing: on the left during the FineFIX stage and on the right
while moving to the water cleaning stage after the haematoxylin phase:
Upon completing the process, the rack is kept immersed in the last reagent to prevent the specimens from
drying and a buzzer warns the user. Extract the rack.
The process ends when PRESTO PRO's cover is opened to remove the rack with the specimens.
49
Page 50

PRESTO PRO MM136-002 – Operator Manual
It is recommended
to close the reagent vessels with the relevant caps after using PRESTO
During a process, if required, press “A
bort” to stop the process and remove the rack with
Once the rack with slides is removed, the software goes back to the main screen.
PRO if it is not going to be used for a long time (more than 24 hours). Refer to chapter 2.7.5.
slides.
50
Page 51

PRESTO PRO MM136-002 – Operator Manual
Before starting a proce
ss ensure the reagent containers do not have the cap (see
chapter
3.2.2. Run a favourite “Continuous” protocol
For reasons of safety, if the cover of the work area is opened while the arm is moving, the
arm stops immediately.
2.7.5) and check proper reagent level, as they are subject to evaporation. The correct level
of reagents is between the two lines etched inside the container. Milestone recommends
keeping the staining reagents level to the minimum and the cleaning reagents to the
maximum.
With this type of protocol, a cycle can be started when the previous one is still in progress.
CYCLE 1 (Blue)
Select a Favourite Continuous Program (picture below) from the list of favourite protocols (see chapter 2.16).
The continuous loading programs have the word “CONTINUOUS” in the title.
The standard loading position of the slide rack goes in the loading position above the container in position
1DOWN, ready to load the rack in the FineFIX container. Refer to chapter 2.7.7 for the positions in the PRESTO
PRO.
At the start of each process the software performs a water flow check which lasts few
seconds.
A screen is displayed, in this case with blue background, for entering the data of the process and starting it.
Enter the number of slides in the rack, pressing the number keys from 1 to 6, then enter “Case ID” and “Run
ID” (process identification code) data. It is not mandatory to enter any of this data.
The protocol is set already, based on the selected favourite, and cannot be changed.
51
Page 52

PRESTO PRO MM136-002 – Operator Manual
Open the PRESTO PRO cover and load the rack on the support, in position 1DOWN. Once closed, the START
button is displayed at bottom right: press this button to start a process.
The cycle starts only when the START button is pressed.
The processing screen appears, which has two sections: the one on the left is for the process in the standard
position (BLUE) and the one on the right is for the process in the secondary position (YELLOW).
The following is shown in the left section when the first cycle starts: the selected protocol, the process
identification code (if entered) and the total process time. Immediately below are the timers counting down to
the end of the process and the end of the stage in progress. The yellow box provides information on the stage
in progress and the schematic depiction of the positions of PRESTO PRO's reagents, with the rack's position
highlighted in green and information concerning the stage in progress.
The section to the right shows the time remaining before the secondary position (YELLOW) can be used to
start a second cycle before the previous one has ended.
When the first cycle is in the Ethanol stage, the secondary position (YELLOW) of the arm is in the rack loading
position and a second cycle can therefore be started while the first is still in progress.
52
Page 53

PRESTO PRO MM136-002 – Operator Manual
The option of starting a second cycle is available while the ethanol stage of the first cycle is in progress (10
seconds). There is an audio alarm during this period of time and the time remaining to start the second cycle
and the button for starting it are shown in the right section of the page.
There are two courses of action:
A) If the second cycle does not need to be started, simply ignore the start button and the current cycle will
continue as normal.
In this case, the audio alarm can be silenced by pressing the relevant button in the bar on the right side
.
The following screen is displayed at the end of the first cycle and there is an audio alarm.
Remove the rack to end the cycle.
Once the rack with slides is removed and the cover of the work area is closed, the software goes back to the
main screen.
B) If other sections need to be processed/stained, press the start button to start the second cycle (yellow):
CYCLE 2 (Yellow)
A screen appears, in this case with yellow background, for entering the data of the process and starting it.
Enter the number of slides in the rack, pressing the number keys from 1 to 6, then enter “Case ID” and “Run
ID” (process identification code) data. It is not mandatory to enter any of this data.
The protocol is set already, based on the selected favourite. It is the same as that of CYCLE 1 and cannot be
changed.
53
Page 54

PRESTO PRO MM136-002 – Operator Manual
Open the PRESTO PRO cover and load the rack on the support, in position 1DOWN. Once closed, the START
button is displayed at bottom right: press this button to start the second cycle and continue the first.
The second cycle starts and the first continues only when the START button is pressed.
The processing screen appears. It has two sections: the one on the left is for the process in the standard
position (BLUE) and the one on the right is for the process in the secondary position (YELLOW).
When the second cycle starts, the two sections of the screen display the information of the relevant cycle: the
selected protocol, the process identification code (if entered) and the total time of the process, the time
remaining before the end of the process and before the end of the stage in progress, the information on the
stage in progress and the schematic depiction of the positions of PRESTO PRO’s reagents.
The following screen is shown at the end of the first cycle and there is an audio alarm.
Remove the rack to end cycle 1 and continue cycle 2.
54
Page 55

PRESTO PRO MM136-002 – Operator Manual
Once the rack is removed from the standard position (BLUE) and the cover of the PRESTO PRO is closed
again, stage 2 (yellow) continues and the time remaining to the option of starting the third cycle, using the
standard position again, is shown in the left section of the screen.
When the second cycle is in the Ethanol stage, the standard position (BLUE) of the arm is in the rack loading
position and a third cycle can thus be started while the second is still in progress.
The option of starting a third cycle is available when the ethanol stage of the second cycle is in progress (10
seconds). There is an audio alarm during this period of time and the time remaining to start the third cycle and
the button for starting it are shown in the left section of the page.
There are two courses of action:
A) If the third cycle does not need to be started, simply ignore the start button and the current cycle continues
as normal. In this case, the audio alarm can be silenced by pressing the relevant button in the bar on the right
side .
The following screen appears at the end of the second cycle and there is an audio alarm.
Remove the rack to end the cycle.
Once the rack with slides is removed, the software goes back to the main screen.
55
Page 56

PRESTO PRO MM136-002 – Operator Manual
Cycles can be run continuously one after the other until the reagents have expired.
It is recommended to close the reagent containers with the relevant caps after using
During a process, if required, press “Abort” to stop the process and remove the rack with
B) If other sections need to be processed/stained, press the start button to run the third cycle that uses the
standard position with blue reference colour.
Open the PRESTO PRO cover and load the rack on the support, in position 1DOWN. Once closed, the START
button is displayed at bottom right: press this button to start a process.
The third cycle starts and the second one continues only when the START button is pressed.
PRESTO PRO if it is not going to be used for a long time (more than 24 hours). Refer to
chapter 2.7.5
slides. If two cycles are in progress, both are stopped.
56
Page 57

PRESTO PRO MM136-002 – Operator Manual
Before starting a process ensure
the reagent vessels do not have the cap (see
chapter
3.2.3. Press the start button to run a standard protocol
For reasons of safety, if the cover of the work area is opened while the arm is moving, the
arm stops immediately.
2.7.5) and check proper reagent level, as they are subject to evaporation. The correct level
of reagents is between the two lines etched inside the vessel. Milestone recommends
keeping the staining reagents level to the minimum and the cleaning reagents to the
maximum.
Press “Start run” from the MAIN FUNCTIONS screen.
The standard loading position (BLUE) of the slide rack goes in the loading position above the container in
position 1DOWN, ready to load the rack in the FineFIX container. Refer to chapter 2.7.7 for the positions in
the PRESTO PRO.
At the start of each process the software performs a water flow check which lasts few
seconds.
The screen to enter process data and to start it is displayed. Enter the number of slides in the rack, pressing
the number keys from 1 to 6, then enter “Case ID” and “Run ID” (process identification code) data. It is not
mandatory to enter any of this data.
Press the arrow under the word “Protocol” to bring up the list of protocols in the software, if any have been
created (refer to chapter 3.3 Editing a program).
By pressing the start button, you can select the desired program from among the standard ones.
The software always suggests the last selected standard process.
Open the PRESTO PRO cover and load the rack on the support, in position 1DOWN. Once closed, the START
button is displayed at bottom right: press this button to start a process.
57
Page 58

PRESTO PRO MM136-002 – Operator Manual
During a process, if required, press “Abort” to stop the process and remove the rack with
The cycle starts only when the START button is pressed.
The processing screen is displayed, which shows process information.
On the left, the schematic depiction of the positions of PRESTO PRO's reagents, with the rack's position
highlighted in green and information concerning the stage in progress.
The following is displayed at top right: the selected protocol, the process identification code (if entered) and
the total process time. The remaining time before the end of the process is shown in the yellow box immediately
underneath.
Below are two examples of screens during processing: on the left during the FineFIX stage and on the right
while moving to the water cleaning stage after haematoxylin:
Upon completing the process, the rack is kept immersed in the last reagent to prevent the specimens from
drying and a buzzer warns the user. Extract the rack.
The process ends when PRESTO PRO's cover is opened to remove the rack with the specimens.
Once the rack with slides is removed, the software goes back to the main screen.
It is recommended to close the reagent vessels with the relevant caps after using PRESTO
PRO if it is not going to be used for a long time (more than 12 hours). Refer to chapter 2.7.5.
slides.
58
Page 59

PRESTO PRO MM136-002 – Operator Manual
Before starting a process ensure the reagent containers do not have the cap (see
chapter
3.2.4. Press the start button to run a “Continuous” protocol
For reasons of safety, if the cover of the work area is opened while the arm is moving, the
arm stops immediately.
2.7.5) and check proper reagent level, as they are subject to evaporation. The correct level
of reagents is between the two lines etched inside the container. Milestone recommends
keeping the staining reagents level to the minimum and the cleaning reagents to the
maximum.
Press “Start continuous” from the MAIN FUNCTIONS screen.
The standard loading position of the slide rack goes in the loading position above the container in position
1DOWN, ready to load the rack in the FineFIX container. Refer to chapter 2.7.7 for the positions in the PRESTO
PRO.
At the start of each process the software performs a water flow check which lasts few
seconds.
The screen to enter the data of cycle 1 and to start it is displayed. Enter the number of slides in the rack,
pressing the number keys from 1 to 6, then enter “Case ID” and “Run ID” (process identification code) data. It
is not mandatory to enter any of this data.
Press the arrow under the word “Protocol” to bring up the list of “Continuous” protocols in the software, if any
have been created (refer to chapter 3.3).
The desired protocol can be selected from among the “Continuous” ones.
59
Page 60

PRESTO PRO MM136-002 – Operator Manual
The protocol selected for the first cycle is the same for all consecutive continuous ones.
The software always suggests the last selected “Continuous” process.
Proceed as described in chapter 3.2.2.
3.3. Editing a program
3.3.1. Modify a standard protocol
The Standard protocols (HIGH and ULTRA QUALITY) require the first cycle to end before the second one
can start and cannot have the word “Continuous” in the title
Select the “Set protocols” button from the MAIN FUNCTIONS screen.
There are two categories of protocols:
DEFAULT PROTOCOLS (for example HIGH QUALITY): the owner is Milestone and the user can only
copy them.
USER PROTOCOLS: the user is the owner and they may be edited, deleted and copied.
To create a new protocol:
1. Select the program to be copied, then press “Copy”.
To create a standard protocol, you need to start with an existing standard one (without the
word “Continuous” in the title).
2. The copied program screen opens.
60
Page 61

PRESTO PRO MM136-002 – Operator Manual
The first two stages of each protocol (FineFIX and rinsing water of the FineFIX) cannot be
The new protocol you have created will be shown in the drop
-
down menu in the pr
ocess
3. By default, the new program is called “Copy of…”: if preferable, rename the program using the keypad
and press “Enter”.
Standard protocols must not have the word “Continuous” in the title. The software prevents
it from being entered.
4. To edit a stage, select it and press “Modify” after which it is possible to edit “Vessel” (Position) and
“Reagent”, selecting from the options in the drop-down menu.
eliminated or moved.
5. Edit the stage time, clicking in the relevant box, to bring up a number keypad, then click “OK”. Modify
the arm’s movement, adding “dipping” and/or “dripping”.
6. To add a step press “Add”: the new step will be added last. To change its position select it and move
it with the arrows on the right. To remove a step, select it then press “Delete”.
7. Press the HOME icon and “Yes” to save the changes.
1 2
3 4
5 6
start page, under the icon .
Changes to a user protocol do NOT require to copy it before making changes.
61
Page 62

PRESTO PRO MM136-002 – Operator Manual
A program may only be run if the reagents in the protocol are loaded in the “Reagents”
section and their positions match those indicated in the protocol. Refer to chapter 4.
3.3.2. Modify a “Continuous” protocol
The Continuous protocols let you run an additional cycle even when the previous one is still in progress, saving
time as a result, and must have the word “Continuous” in the title.
Select the “Set protocols” button from the MAIN FUNCTIONS screen.
There are two categories of protocols:
DEFAULT PROTOCOLS (for example HIGH QUALITY): the owner is Milestone and the user can only
copy them.
USER PROTOCOLS: the user is the owner and they may be edited, deleted and copied.
A new “Continuous” protocol can be modified or created only by starting with a protocol of the same type,
and the new protocol must have the word “Continuous” in the title.
The procedure for creating a new “Continuous” protocol is the same as that described in chapter 3.3.1 but:
62
Page 63

PRESTO PRO MM136-002 – Operator Manual
- The word “Continuous” must be retained in the name of the protocol
- A new stage cannot be added and the order of the stages cannot be changed
- The stage time can be modified only for the Haematoxylin and Eosin stages
- Changing the time of the Haematoxylin stage causes the Isopropanol stage to change in the same
way, and the following message is displayed:
3.3.3. Modify the temperature of the fixation reagent
The FineFIX reagent is maintained at such a temperature that when it comes in contact with the slides, it is
between 35°C and 40°C (95—104°F).
If the FineFIX temperature needs to be changed, it is required to change the maintenance temperature in the
“FineFIX heater” section .
Refer to chapter 2.15.3.
63
Page 64

PRESTO PRO MM136-002 – Operator Manual
Handle reagents with care and store in a cold dry space using a tightly closed container.
Sheet) provided by the reagent’s
4. REAGENT MANAGEMENT
Reagents in the PRESTO PRO are divided into three types:
• Fixation/processing reagents (FineFIX)
• Staining reagents
• Cleaning reagents
The three types of reagents are managed in the “Reagents” section. See chapter 2.15. The
fixation/processing reagent is considered a consumable and it is managed as such. See chapter 2.14.
Vapours may build up in the vessels. Treat empty vessels as hazardous.
Waste reagents are to be disposed of in suitable incinerators, in compliance with all local,
regional and state laws.
For further information please refer to the SDS (Safety Data
supplier.
4.1. Use of FineFIX
FineFIX is managed as number of changes that can be made.
The available changes are loaded by means of a bar code system (see chapter 2.14). Each tank of
concentrated FineFIX has an unambiguous bar code that enables the PRESTO PRO for the number of
changes that can be made with that tank:
- The barcode of a 5L tank (REF 70148) fills about 100 changes.
- The barcode of a 10L tank (REF 70149) fills about 200 changes.
The number of loaded changes decreases every time the reagent is changed and turns the icon of the FineFIX
code page from GREEN to YELLOW to RED, based on the set threshold (10 changes by default, as described
in chapter 2.17). For example, if a 5L tank of concentrated FineFIX is loaded and the threshold of consumables
is 10, the icon of the FineFIX code is green up to the first 89 changes, then it becomes yellow from 90 to 99
changes made and red when 100 changes have been made. When RED, changes cannot be made and it is
not possible to start a process.
64
Page 65

PRESTO PRO MM136-002 – Operator Manual
Reagent st
atus
Icon
“FineFIX code” page
Number of available changes
above the “Consumable alert
threshold”.
Number of available changes
below the “Consumable alert
threshold”.
0 available changes.
In order to load consumables, select the “FineFIX code” icon from the FineFIX heater page and follow the
procedure illustrated in the chapter 2.14.1.
65
Page 66

PRESTO PRO MM136-002 – Operator Manual
The fixation/processing reagent expires after 1 day and the expiration cannot be either
4.2. Reuse of reagents
Select “Reagents” from the MAIN FUNCTIONS screen (picture below left).
The standard position (BLUE) of the slide rack goes into position 5DOWN (see chapter 2.7.7), and the
reagent management screen is displayed (picture at bottom right).
The time of reagents use may be controlled through:
1. “Check the expiration date”: this field automatically displays “Loaded date” and “Expiration date” of the
reagent, according to “Max days” of use set.
modified or deselected. The fixation/processing reagent evaporates more quickly as it is
heated and must therefore be changed on a daily basis.
2. “Check the performed cycles”: this field automatically displays the “Performed cycles” and “Max cycles” set.
By default, 10 performed cycles are set before the expiration date.
For the reagents (except on the days of expiration of the fixation reagent) it is possible to change the type of
control by selecting the relevant boxes to activate the settings described above.
Settings for reagents turn the “Reagents” icon from GREEN to YELLOW to RED, based on the remaining
reuse of reagents (1 day and/or 1 cycle). For example, if 10 cycles are set as maximum limit, the reagent icon
is green for the first 8 cycles (up to 1 cycle before the limit is reached); it then turns yellow if 9 cycles have
been performed and red once 10 cycles have been performed. When RED, processes cannot be started.
66
Page 67

PRESTO PRO MM136-002 – Operator Manual
Reagent status
Icon
Only users
authorized
to edit the reagents' parameters are allowed to
perform these
Staining and/or cleaning reagent at least 2
cycles/days from the threshold.
Fixation reagent at least 2 cycles from the limit.
Staining and/or cleaning reagent at 1 cycle/day from
the threshold.
Fixation reagent at 1 cycle from the limit.
At least one threshold reached.
For each of the three types of reagents it is possible to change the number of days (except for the fixation
reagent, see above) and number of cycles before expiry, by clicking in the suitable box and using the keypad
displayed.
changes. It is always possible for SERVICE and ADMINISTRATOR users.
Refer to chapter 2.11.
By default, both staining and cleaning reagents are checked by date of expiry, with a period of use of 7 days,
and by number of cycles performed, with a maximum number of 10 cycles.
The default maximum life of the fixation reagent is one day and is controlled according to the number of cycles
carried out, with a maximum number of 10 cycles.
Milestone recommends checking the staining reagents by days (7 days) and the cleaning
reagents by number of cycles (10 cycles).
67
Page 68

PRESTO PRO MM136-002 – Operator Manual
POSITION
REAGENT
CATEGORY
4.3. Setting the configuration of reagents
Enter the reagents management page “Reagents”. On the left is the schematic depiction of the reagents'
positions in the PRESTO PRO.
The reagents configuration is as follows by default:
1 FineFIX Processing
2 Haematoxylin Staining
3 Water Cleaning
4 2% acetic acid in water Cleaning
5 Alcohol eosin Staining
6 Ethanol 1 Cleaning
7 Isopropanol Cleaning
8 Ethanol 2 Cleaning
To change the reagent in a position, tap on the relevant position in the diagram.
For example, to change the reagent Eosin in position 5, tap the relevant circle (see above). The following page
is displayed, which lets you choose one of the reagents from the reagents' list:
Select the desired reagent, for instance ethanol and press “OK”. The reagent in position 5 will be changed.
Reagents FineFIX in position 1 and Water in position 3 are fixed and cannot be changed.
It is always possible to go back to the default set-up by pressing the button
and clicking on YES when asked to confirm.
68
Page 69

PRESTO PRO MM136-002 – Operator Manual
4.4. Edit reagents list
To access the list of reagents, press the icon “Vessels Reagents” in the main page, then “Reagent list” The
following page is displayed with the list of reagents set by default:
Default reagents cannot be deleted.
Default reagents settings cannot be edited.
To add a reagent, press the “Add” key. Then enter the new reagent name and press “ENTER”.
The new reagent has been created and the following may be selected: Short name (three letters or figures),
colour and category: whether fixative, staining or cleaning reagent (example below).
The reagents created by the user may be deleted.
69
Page 70

PRESTO PRO MM136-002 – Operator Manual
The safety procedure should be considered as an em
ergency procedure to be used once
5. SAFETY PROCEDURE
The safety procedure is triggered in the event of PRESTO PRO operation lock-down and consists of guided
manual staining using PRESTO PRO reagents.
only to save ready slides. Upon completing the procedure contact technical support to
solve the problem in the unit.
5.1. Water error
At the start of each process the software performs a water flow check which lasts a few
seconds.
Two problems linked to water may trigger the safety procedure:
• Water is missing during a process. In this case, slide cleaning would not be optimal and the safety
procedure is required.
• Water overflow the water drain is clogged, flow is to be stopped and slide staining is to be performed under
a safety procedure.
The rack is brought back into the FineFIX vessel to maintain the slides secure until the safety procedure starts.
A sound alarm advises the user: it is possible to silence the alarm by pressing the icon (image below).
A screen is displayed with the instructions to use the PRESTO PRO reagents for manual staining:
- Obtain a container with clean water
- Open the work area cover
- Remove the screw from the cover disc
- Remove the reagent cover disc (see section 2.7.1)
- Open the protocol to be followed
70
Page 71

PRESTO PRO MM136-002 – Operator Manual
After that, the screen of the protocol that had been selected at the start of the process is displayed, indicating
the stage at which the process was interrupted, so it may resume from that stage (for example, in the case of
the image below, from the first water cleaning).
For each stage, the reagent, its position in the PRESTO PRO and the stage duration are indicated: use the
reagents in the PRESTO PRO to manually stain the specimens. To perform the protocol, the screen provides
a timer already set with the time for each stage.
At the end of the procedure press the HOME icon to go back to the main page.
71
Page 72

PRESTO PRO MM136-002 – Operator Manual
In the case of a safety procedure during a “Continuous” cycle, the slides are not returned to the FineFIX
container and the procedure to be followed is slightly different:
- Obtain a container with clean water
- Open the work area cover
- Remove the rack/two racks
- Remove the screw from the covering disc
- Remove the reagent covering disc (see section 2.7.1)
- Open the protocol to be followed
If only one cycle was in progress, the screen of the protocol that had been selected at the start of the process
is displayed, indicating the stage at which the process was interrupted, so it may resume from that stage (for
example, in the case of the image below, from the first water rinsing).
If two processes were in progress, the protocol to be followed and the stage during which it was interrupted is
shown for each process.
For each stage, the reagent, its position in the PRESTO PRO and the stage duration are indicated: use the
reagents in the PRESTO PRO to manually stain the specimens. To perform the protocol, the screen provides
a timer already set with the time for each stage.
At the end of the procedure press the HOME icon to go back to the main page.
72
Page 73

PRESTO PRO MM136-002 – Operator Manual
5.2. Arm position lost error
Either in the event the arm position should be lost during a process or the arm should be unable to reach a
position (Arm positioning time-out), the software initiates the safety procedure.
A sound alarm advises the user: it is possible to silence the alarm by pressing the icon (image below).
A screen is displayed with the instructions to use the PRESTO PRO reagents for manual staining:
- Open the work area cover
- Remove the screw from the cover disc
- Remove the reagent cover disc (see section 2.7.1)
- Open the water flow for the rinse stage, by pressing .
- Open the protocol to be followed
The screen of the protocol that had been selected at the start of the process is displayed, indicating the stage
at which the process has been interrupted, so it may resume from that stage (for example in the image below,
from the step in acetic acid).
For each stage, the reagent, its position in the PRESTO PRO and the stage duration are indicated: use the
reagents in the PRESTO PRO to manually stain the specimens. To perform the protocol, the screen provides
a timer already set with the time for each stage.
73
Page 74

PRESTO PRO MM136-002 – Operator Manual
At the end of the procedure press the HOME icon to go back to the main page.
74
Page 75

PRESTO PRO MM136-002 – Operator Manual
In the case of a safety procedure during a “Continuous” cycle, the procedure to be followed is slightly different:
- Open the work area cover
- Remove the rack/two racks
- Remove the screw from the covering disc
- Remove the reagent covering disc (see section 2.7.1)
- Open the water flux for the rinse stage, by pressing .
- Open the protocol to be followed
If a single cycle was in progress, the screen of the protocol that had been selected at the start of the process
is displayed, indicating the stage at which the process has been interrupted, so it may resume from that stage.
If two processes were in progress, the protocol to be followed and the stage from which to restart manual
staining is shown for each process.
For each stage, the reagent, its position in the PRESTO PRO and the stage duration are indicated: use the
reagents in the PRESTO PRO to manually stain the specimens. To perform the protocol, the screen provides
a timer already set with the time for each stage.
At the end of the procedure press the HOME icon to go back to the main page.
75
Page 76

PRESTO PRO MM136-002 – Operator Manual
Contact annually your local distributor or Milestone offices directly:
6. MAINTENANCE
6.1. Introduction
PRESTO PRO maintenance is performed at 2 levels:
The FIRST is at laboratory level: a simple routine maintenance that prevents the likelihood of more serious
problems. Minimum routine maintenance is required by the laboratory personnel using the PRESTO PRO. The
following procedure is required to assure optimal PRESTO PRO performance.
The SECOND level of maintenance is technically more detailed and is not the responsibility of laboratory
personnel. The unit requires technical preventive maintenance once a year to maintain the high performance
and prevent any malfunctions.
customersupport@milestonemedsrl.com, for how to perform Preventive Maintenance and
regular inspections in order to maintain your PRESTO PRO within safe operative standards.
6.2. Before/after every process
Ensure PRESTO PRO is generally kept clean after each use. Do not use abrasive or sharp material in order
not to damage the casing.
Before starting a process ensure the reagent vessels do not have the cap on and if so, remove it (refer to
chapter 2.7.5) and check proper reagent level, as they are subject to evaporation. The correct level of reagents
is between the two lines etched inside the vessel. Milestone recommends keeping the staining reagents level
to the minimum and the cleaning reagents to the maximum.
76
Page 77

PRESTO PRO MM136-002 – Operator Manual
6.3. Daily
It is required to check reagent level inside the vessels every day. The level of reagents must be between the
two etched lines inside the vessel. Milestone recommends keeping the staining reagents level to the minimum
and the cleaning reagents to the maximum.
Replace the fixation/processing reagent every day since it is heated hence it evaporates more quickly.
Ensure the staining agents do not show an oxidized reagent film, if so filter or replace them.
Check the general cleanliness of the equipment and, if necessary, follow the procedures described in chapter
7.
6.4. Weekly
It is required to check for any residual reagent in the drawer (Code 100360). In this case: remove it from its
seat under the unit by extracting it from the front of the unit and empty it.
It is recommended to change the staining reagents and check the level of cleanliness of cleaning reagents, if
required replace them.
It is advisable to check the FineFIX reagent near the cryostat. Change the reagent and clean the container if
necessary.
6.5. Yearly
Contact your technical support for a preventive maintenance contract.
77
Page 78

PRESTO PRO MM136-002 – Operator Manual
For reasons of safety, any operation without the required pe
rsonal protection equipment is
PRESTO PRO decontamination is mandatory due to the biological hazard, arising from use
Do NOT remove the side panels of the unit during the cleaning operations.
For decontamination and cleaning do not use procedures other than explaine
d in this
Before every operation disconnect the power supply. Do not use direct or high
-
pressure
It is recommended to use polyphenol
-
based disinfectants.
7. DECONTAMINATION AND CLEANING
The procedure described in this chapter must be performed on a daily basis.
to be avoided.
of fresh specimens.
7.1. Safety precautions
The personnel involved in decontamination of PRESTO PRO and its optional parts (if any) must wear personal
protection equipment, specifically:
• HI-RISK type single-use protection gloves (100% latex or equivalent material). Personal protection system
compliant with the EN 374 standard and the 89/686/EEC Directive.
• Antibacterial mask for surgical/operating theatre use and white coat. Personal protection system
compliant with the EN 149 standard Grade FFP3D and the 89/686/EEC Directive.
7.2. Procedure for PRESTO PRO decontamination and cleaning
7.2.1. Detergents
It is required to strictly follow the instructions below to carry out a correct cleaning and decontamination
procedure.
chapter.
water to clean the instrument.
For further information, please contact our specialists at: application@milestonemedsrl.com.
78
Page 79

PRESTO PRO MM136-002 – Operator Manual
Germicidal efficacy of polyphenol-based disinfectant agents:
5 minutes: Human Immunodeficiency Virus Type 1 (HIV-1), Hepatitis B Virus (HBV), Hepatitis C
Virus (HCV), Rotavirus, Coronavirus SARS.
15 minutes: Staphylococcus Aureus, Candida Albicans.
30 minutes: Pseudomonas Aeruginosa, Mycobacterium Bovis (TB).
7.2.2. Procedure
1. Move the arm to position 5DOWN, by pressing the icon . For PRESTO PRO's arm positions refer to
chapter 2.7.7
2. Switch off the unit and disconnect the power supply.
3. Open the work area lid, remove the cover disc as explained in chapter 2.7.1, remove all reagent vessels
except the fixed one in position 3, paying attention not to overturn them.
4. Remove the vessel support tray, by lifting it and extracting it from PRESTO PRO's arm, as explained in
chapter 2.7.6
5. Then clean all parts according to the rules set out below.
79
Page 80

PRESTO PRO MM136-002 – Operator Manual
Surface underneath the reagent vessels
• Clean the PRESTO PRO surface with a cloth
moistened with alcohol and, if required, remove
any reagent residues with a non-abrasive tool.
• Dry with adsorbent paper or a clean cloth.
Fixed vessel for water, and rack
• Spray the disinfectant (see section 7.2.1) and
let sit for at least 30 minutes.
• Rinse with water to remove the disinfectant.
• Clean the inside of the fixed vessels with paper
tissue or with a clean cloth.
• Wash the outside with a cloth moistened with
alcohol and, if required, remove any reagent
residues with a non-abrasive tool.
• Dry with adsorbent paper or a clean cloth.
Support tray, reagent vessels cover disc and rack
support
• Wash these parts with a cloth moistened with
alcohol and, if required, remove any reagent
residues with a non-abrasive tool.
• Dry with adsorbent paper or a clean cloth.
Steel and aluminum vessels
• After removing the waste reagent, clean inside
the vessels using paper or a clean cloth.
Ensure there are no pieces of paper or
residues of specimens in the vessels.
Work area cover
• Clean the PRESTO PRO cover with a damp
cloth.
• Dry the surface with paper or with a clean
cloth.
6. Place back in position:
- the reagent vessel positioning tray,
- the vessels, with caution in order not to spill the contents and paying attention to fit them in the previous
positions,
- the reagents cover disc, according to the instructions in chapter 2.7.1.
7. Close the work area cover.
On completion of the cleaning operations, wait at least 5 minutes before connecting the
power supply cable.
80
Page 81

PRESTO PRO MM136-002 – Operator Manual
8. REPORTING
PRESTO PRO provides the required documentation for the Laboratory's reporting activity. It is in fact possible
to export a document including all the process information and the “Events log”.
8.1. Exporting saved process data
Access the “Settings” screen by pressing the icon on the status bar on the left, then select the “Log book”
button in the new screen, finally select the “Saved runs” icon.
The following screen is displayed, which shows all saved processing files on the right, listed by date (on the
left). The dates are automatically created by the software.
Select a date (in the example below 17-Aug-2017) and the cycle(s) saved that day will be displayed on the
right.
Press the file name to see the program run. Press “Open” (picture above) to view the data of the highlighted
file (picture below).
81
Page 82

PRESTO PRO MM136-002 – Operator Manual
Press the icon to go back to the screen of saved processes.
To export the data, insert the USB drive in one of the slots on the right side of the unit. Then select the process
of interest and press (Export) or (Export all) to copy all cycles performed.
A folder is created in the USB drive, called PRESTO PRO_SN, containing the "Saved “sub-folder and the
processes sorted by date and named with the end time, as in the example below:
8.1.1. How to delete a saved process
Select a date and press “Delete” to delete all processes saved on that day (picture below left). Then confirm.
Select a Process and press “Delete” to delete ONLY the highlighted process (picture below right). Then
confirm.
Alternatively, press “Delete All” to delete ALL programs saved on the PRESTO PRO.
Press to go back to the MAIN MENU.
82
Page 83

PRESTO PRO MM136-002 – Operator Manual
8.2. Exporting the events log
These functions are available only for SERVICE and ADMINISTRATOR personnel.
Access the “Settings” screen by pressing the icon which is on the status bar on the left, then in the new
screen select the “Log book” button and select the “Events log” icon.
The following screen is displayed, which shows the list of all actions, alarms and reagent movements
performed.
The list may be saved on a USB drive, inserting it in one of the slots on the side of the unit and pressing “Export
to USB”.
A folder is created on the USB drive, called PRESTO PRO_SN, containing the LogEvents file.
83
Page 84

PRESTO PRO MM136-002 – Operator Manual
9. OPTIONALS
Not included, to be ordered separately:
9.1. External exhaust fume filter kit (Code 61550/F)
The external exhaust fume filter kit includes a spare cartridge.
The filter is required if PRESTO PRO is NOT connected to the laboratory fume extraction
system.
Below a picture of the filter:
Airflow range of 28-32m3/h (cubic meters per hour).
The external fume filter must be installed in a proper manner every time, in compliance with
the regulations in force on laboratory safety.
If PRESTO PRO is connected to a laboratory fume extraction system, the filter is to be
changed ONCE PER YEAR.
Otherwise, without external extraction, it must be changed EVERY 6 MONTHS.
Please refer to manual MM109 - Installation of the external exhaust fume filter kit - Operation
Manual, for further details on how to install or change the external exhaust fume filter kit.
9.2. FineFIX tanks
• 5L tank REF 70148
• 10L tank REF 70149
Refer to MM029 - FineFIX - Operator Manual for how to prepare the FineFIX working solution
and its use.
84
Page 85

PRESTO PRO MM136-002 – Operator Manual
A. Appendix – Hints and tips
A.1. Fatty tissues
A problem arising from fatty specimens is that they tend to adhere less to the slide and to detach during
staining. In this case, it is recommended to heat the slide before taking the section and/or cut a thinner slice.
A.2. Tips to modify the staining protocol
Improvement of slide cleaning
Reduction of Haematoxylin non-specific
- Increase the time of the 2% Acetic Acid step.
- Set the time of water rinsing step after Acetic Acid by the same duration.
- Do not increase the water rinsing time after Haematoxylin, 10 seconds are sufficient to remove the
excess stain.
Reduction of Haematoxylin non-specific
- Add a third cleaning in alcohol after the Eosin step, in addition to the two existing ones.
- Add a cleaning step in 95% ethanol after the Eosin step: 5% water increases removal of Eosin nonspecific.
Modification of staining
Reduction of Eosin intensity
- Reduce the step in Eosin up to 2 seconds. A shorter step is not recommended as the dipping
movement would not occur, which makes the stain consistent.
- Add a third cleaning in alcohol after the Eosin step, in addition to the two existing ones.
- Add a cleaning step in 95% ethanol after the Eosin step: 5% water increases removal of Eosin nonspecific.
Increase the intensity of Haematoxylin
- Lengthen the Haematoxylin step up to 60 seconds.
- Eliminate the Acetic Acid step
- Do not reduce the water rinsing time after Haematoxylin
Increase the Haematoxylin/Eosin contrast
- Lengthen the Haematoxylin step up to 60 seconds.
- Add a Lithium Carbonate step, after the Acetic Acid step and water rinsing.
- Reduce the step in Eosin up to 2 seconds. A shorter step is not recommended as the dipping
movement would not occur, which makes the stain consistent.
- Add a cleaning step in 95% ethanol after the Eosin step: 5% water increases removal of Eosin nonspecific.
- Use a solution of 50% Eosin diluted in ethanol.
85
Page 86

PRESTO PRO MM136-002 – Operator Manual
Code
DESCRIPTION
WHAT TO DO
B. Appendix – Alarm management
B.1. Alarm management
1 Serial communication
fault
2 Arm positioning time-out 1. Ensure nothing is blocking the arm movement. Then press
3 Arm position lost
(Lost position error)
4 Fan not running
6 Cover Open
1. Press 'Clear' to reset the alarm.
2. Reboot the system (wait 2 minutes before the rebooting).
3. Call your customer service if the issue cannot be fixed.
1. Press 'Clear' to reset the alarm.
2. Reboot the system (wait 2 minutes before rebooting).
3. Contact support if the problem cannot be solved.
'Clear' to reset the alarm.
2. Press 'Silent' to hide the alarm.
3. Call your customer service if the issue cannot be fixed.
1. Ensure nothing prevents the arm’s movement. Then press
'Cancel' to reset the alarm.
2. Press 'Silent' to acknowledge the alarm.
3. Call support if the problem cannot be solved.
1. Press 'Clear' to reset the alarm.
2. Press 'Silent' to hide the alarm.
3. Call your customer service if the issue cannot be fixed.
1. Press 'Clear' to reset the alarm.
2. Press “Silent” to acknowledge the alarm.
3. Contact support if the problem cannot be solved.
1. Close the cover to reset the alarm.
2. Press 'Silent' to hide the alarm.
3. Call your customer service if the issue cannot be fixed.
1. Close the cover to clear the alarm.
2. Press “Silent” to acknowledge the alarm.
3. Contact support if the problem cannot be solved.
14 Water is missing
15 Water overflow
86
1. Check if outside taps are open. Press 'Clear' to reset the alarm.
2. Check that the water hoses are not bent or obstructed by
anything. Then press 'Clear' to reset the alarm.
3. Press 'Silent' to hide the alarm.
4. Call your customer service if the issue cannot be fixed.
1. Check if external taps are open. Press 'Clear' to reset the alarm.
2. Check that the hoses are not bent or occluded by anything.
Press 'Clear' to reset the alarm.
3. Press “Silent” to acknowledge the alarm.
4. Contact support if the problem cannot be solved.
1. Check that the water hoses are not bent or obstructed by
anything. Then press 'Clear' to reset the alarm.
2. Press 'Silent' to hide the alarm.
3. Call your customer service if the issue cannot be fixed.
1. Check that the water hoses are not bent or occluded by
anything. Then press 'Clear' to reset the alarm.
2. Press “Silent” to acknowledge the alarm.
3. Contact support if the problem cannot be solved.
Page 87

PRESTO PRO MM136-002 – Operator Manual
Code
DESCRIPTION
WHAT TO DO
18 Fixative temperature too
low
17 Fixative temperature too
high
1. Press 'Clear' to reset the alarm.
2. Reboot the system.
3. Call your customer service if the issue cannot be fixed.
1. Press 'Clear' to reset the alarm.
2. Restart the system.
3. Contact support if the problem cannot be solved.
1. Press 'Silent' to hide the alarm.
2. Wait 10 minutes and then press 'Clear' to reset the alarm.
3. Call your customer service if the issue cannot be fixed.
1. Press “Silent” to acknowledge the alarm.
2. Wait 10 minutes and press 'Cancel' to reset the alarm.
3. Contact support if the problem cannot be solved.
87
Page 88

Page 89

Page 90

Page 91

Page 92

Milestone Srl
Via Fatebenefratelli, 1/5 - 24010 Sorisole (BG) - Italy
Tel +39 035 4128264 - Fax +39 035 575498
marketing@milestonemedsrl.com
www.milestonemed.com
 Loading...