

Page 1
Administrator's Manual
Milestone Systems
Milestone Systems
Milestone Husky™ M10
Milestone Husky M10
Administrator’s Manual
Page 2

Milestone Husky M10 Administrator’s Manual
Milestone Husky™ M10 User Guide
TABLE OF CONTENTS
Getting Started............................................................................................ 2
Log In.......................................................................................................... 3
User Account............................................................................................... 4
Types of Accounts............................................................................... 4
Create and Manage Accounts............................................................. 5
Get Support Information....................................................................... 8
Email Notications....................................................................................... 8
Port Mapping............................................................................................... 9
Discover Cameras....................................................................................... 9
License Cameras......................................................................................... 12
With Internet Connection..................................................................... 12
Without Internet Connection................................................................. 13
How to Generate a License Request.................................................. 15
Transfer License Request File.............................................................. 15
How to Upload License Validation File................................................ 16
Congure Cameras....................................................................................... 18
General................................................................................................. 20
Video.................................................................................................... 21
Recording............................................................................................. 22
Motion Detection................................................................................... 23
Live View....................................................................................................... 25
Pan, Tilt, Zoom Controls....................................................................... 27
Search and Playback............................................................................ 28
Export Video.......................................................................................... 31
Update Software......................................................................................... 35
Technical Support Information.................................................................... 36
Page 3
Milestone Husky M10 Administrator’s Manual
Getting Started
Before using the Milestone Husky M10, make sure that the Milestone Husky M10 is properly
connected to the network. For details connecting the appliance, please see your Milestone
Husky M10 Quick Start Guide. If you plan to log into the Milestone Husky M10 from another
computer (recommended), you can do this by opening Windows Explorer (Start> Computer),
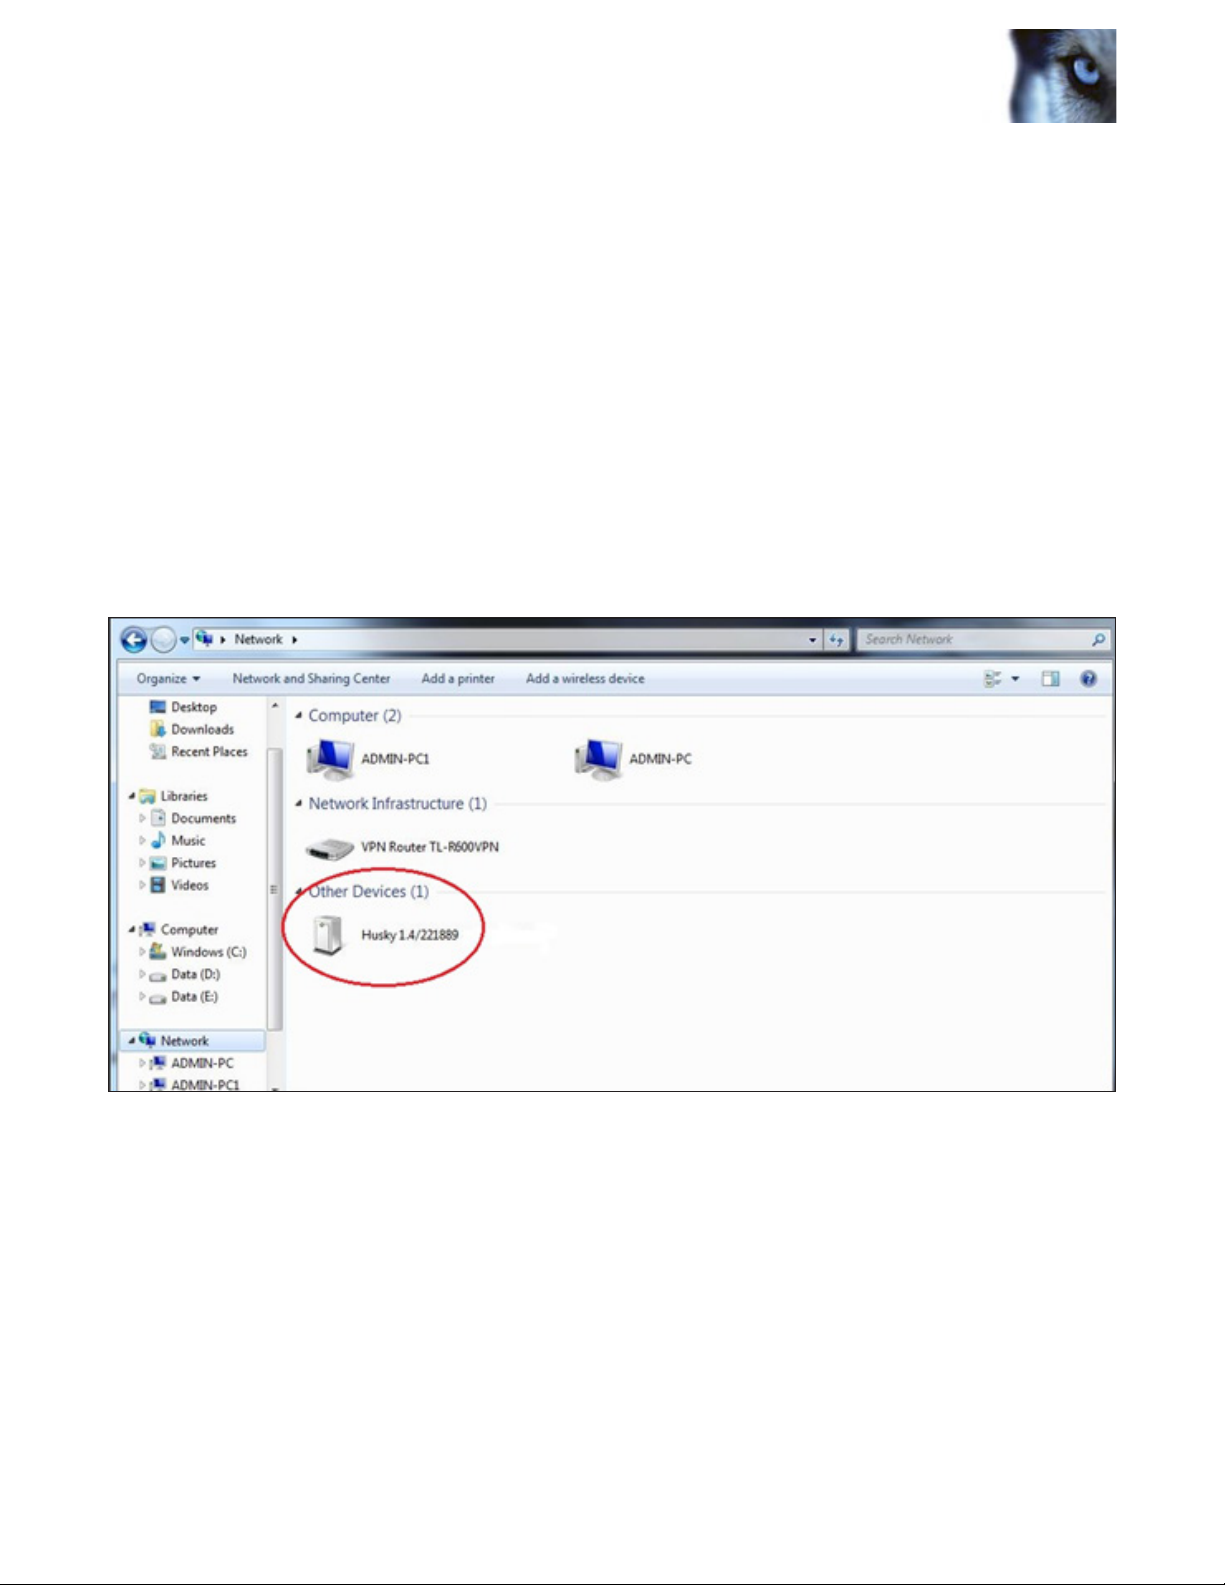
scrolling down in the left-hand pane until you see Network, then clicking on it and waiting for
the right-hand pane to populate. When it is done, you should nd Husky under Other Devices
(see Figure 1). Double-click on the Husky icon and your default web browser will launch and
connect you to the Milestone Husky M10.
www.milestonehusky.com
Figure 1: Other Devices
2
Page 4
Milestone Husky M10 Administrator’s Manual
Log In
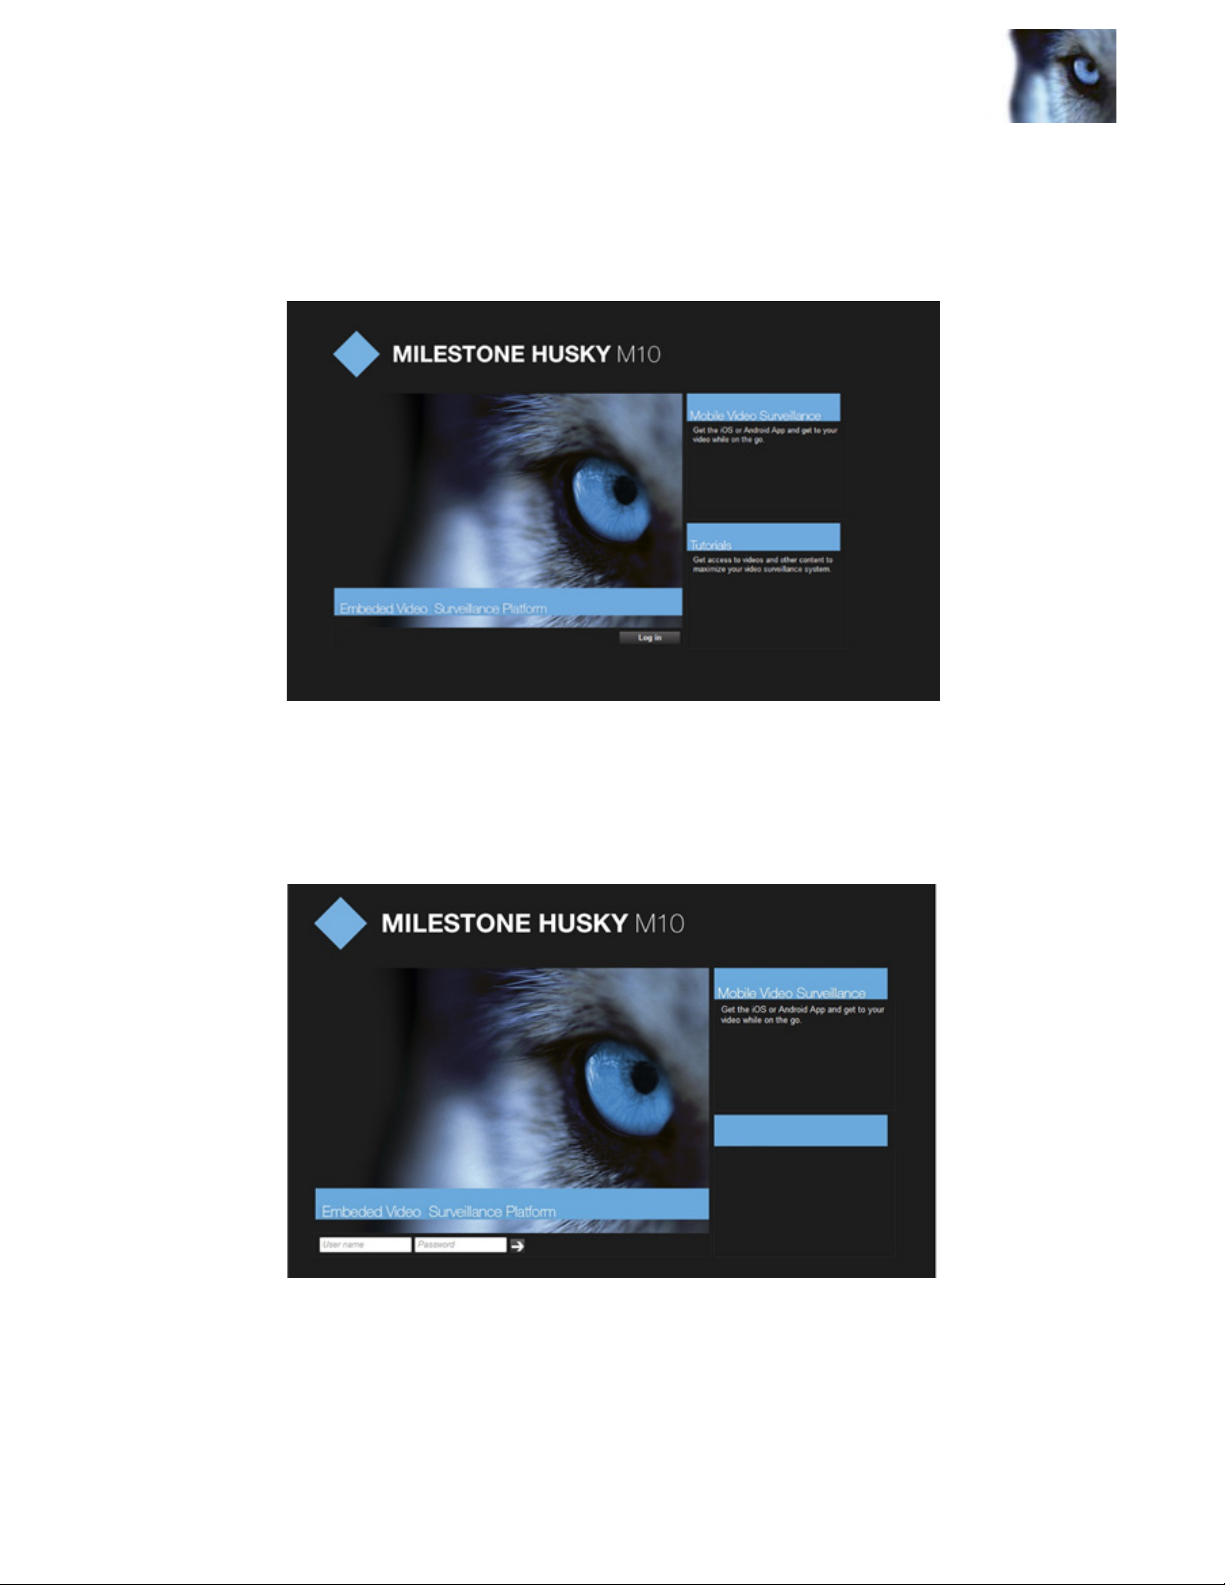
At the Milestone Husky log-in screen:
If no user accounts yet exist: Click the Login button at the bottom of the screen to login.
Figure 2: Milestone Husky M10 Log-in Screen without any users congured on the system.
If user accounts exist:
Enter your username and password before clicking the arrow (See Figure 3).
Figure 3. Milestone Husky M10 Log-in Screen.
If no account has been created, just click on the arrow to log in. Once you have logged in you
will be able to create and edit user accounts.
www.milestonehusky.com 3
Page 5

Milestone Husky M10 Administrator’s Manual
User Account
Types of Accounts
There are two types of user accounts within the Milestone Husky M10: Administrative accounts
and Standard accounts. Administrative Users have access to all functions, whereas Standard
Users have limited access. (See Table 1)
Function Administrator Account Standard User
Live View X X
Playback Mode X X
Download and Delete Exports X X
Pan, Tilt, Zoom Camera X X
Change Camera Settings X
Change User Settings X
Delete Recordings X
Activate Camera Licenses X
Update Software X
Manually Search for New Cameras X
Network settings X
Date & time settings X
Table 1
www.milestonehusky.com 4
Page 6
Milestone Husky M10 Administrator’s Manual
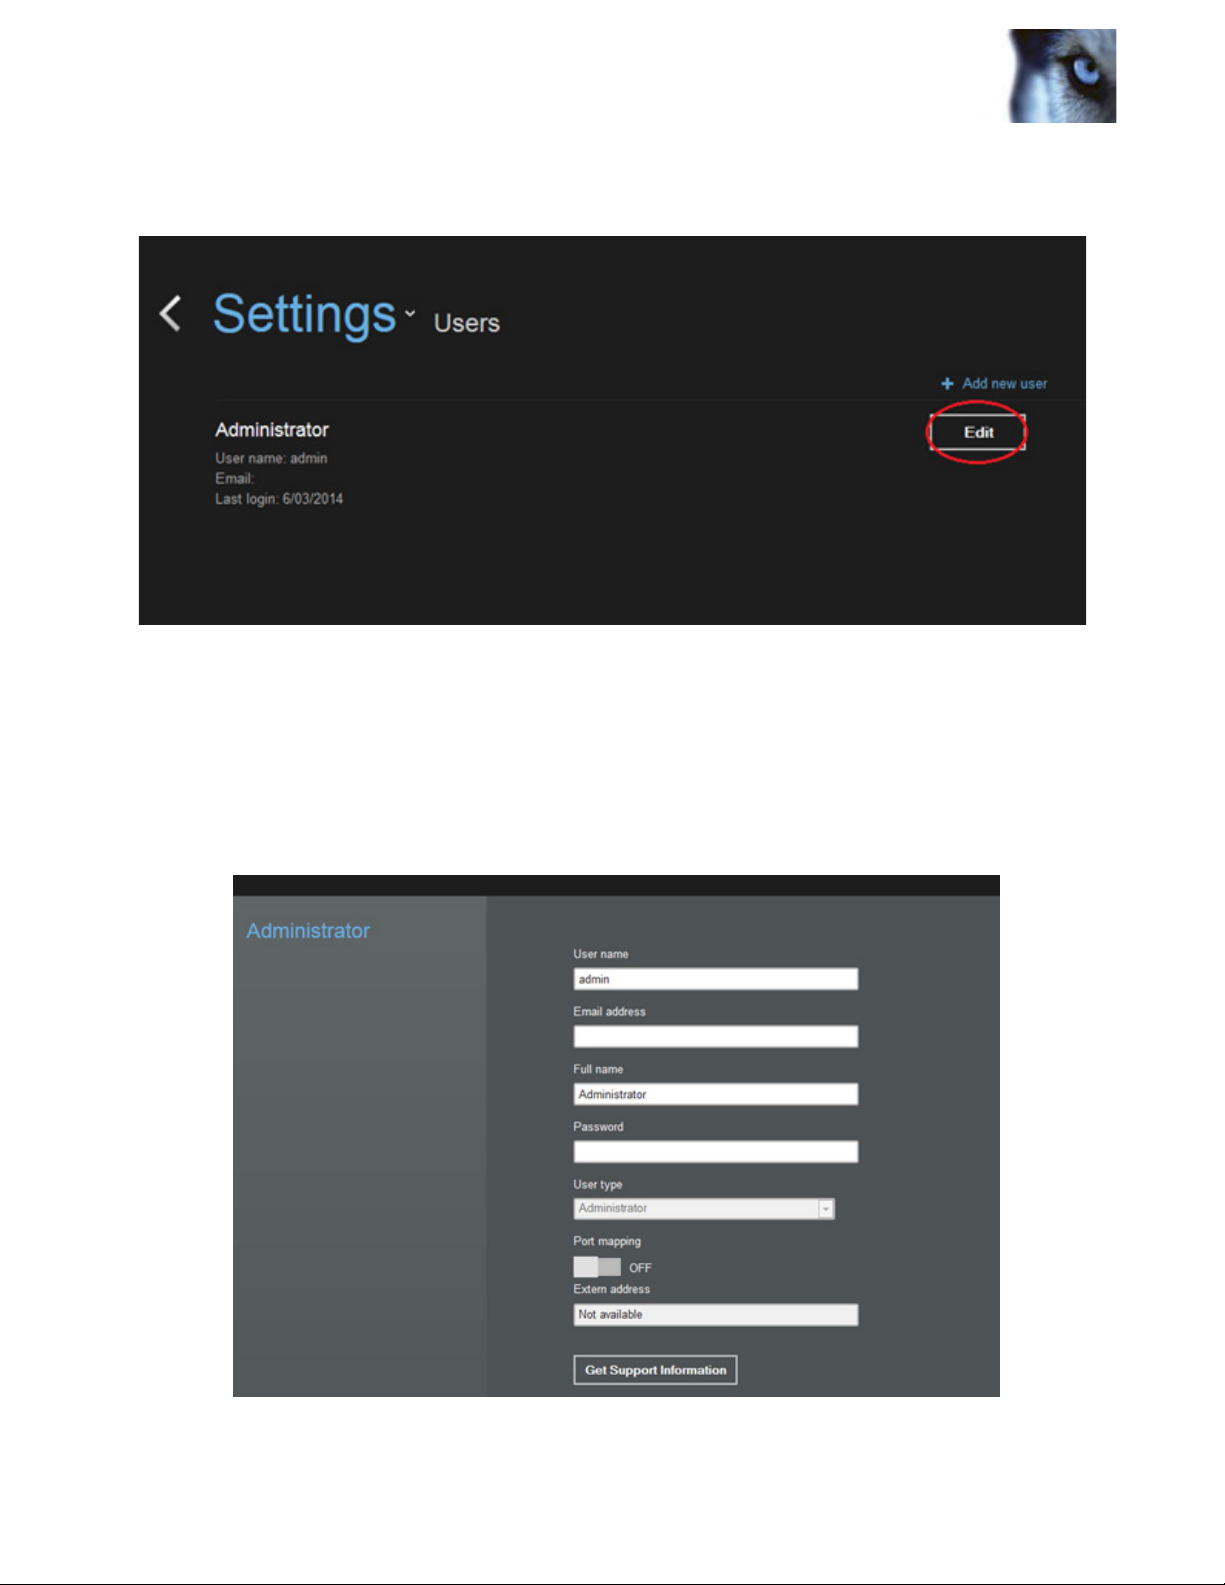
Create and Manage Accounts
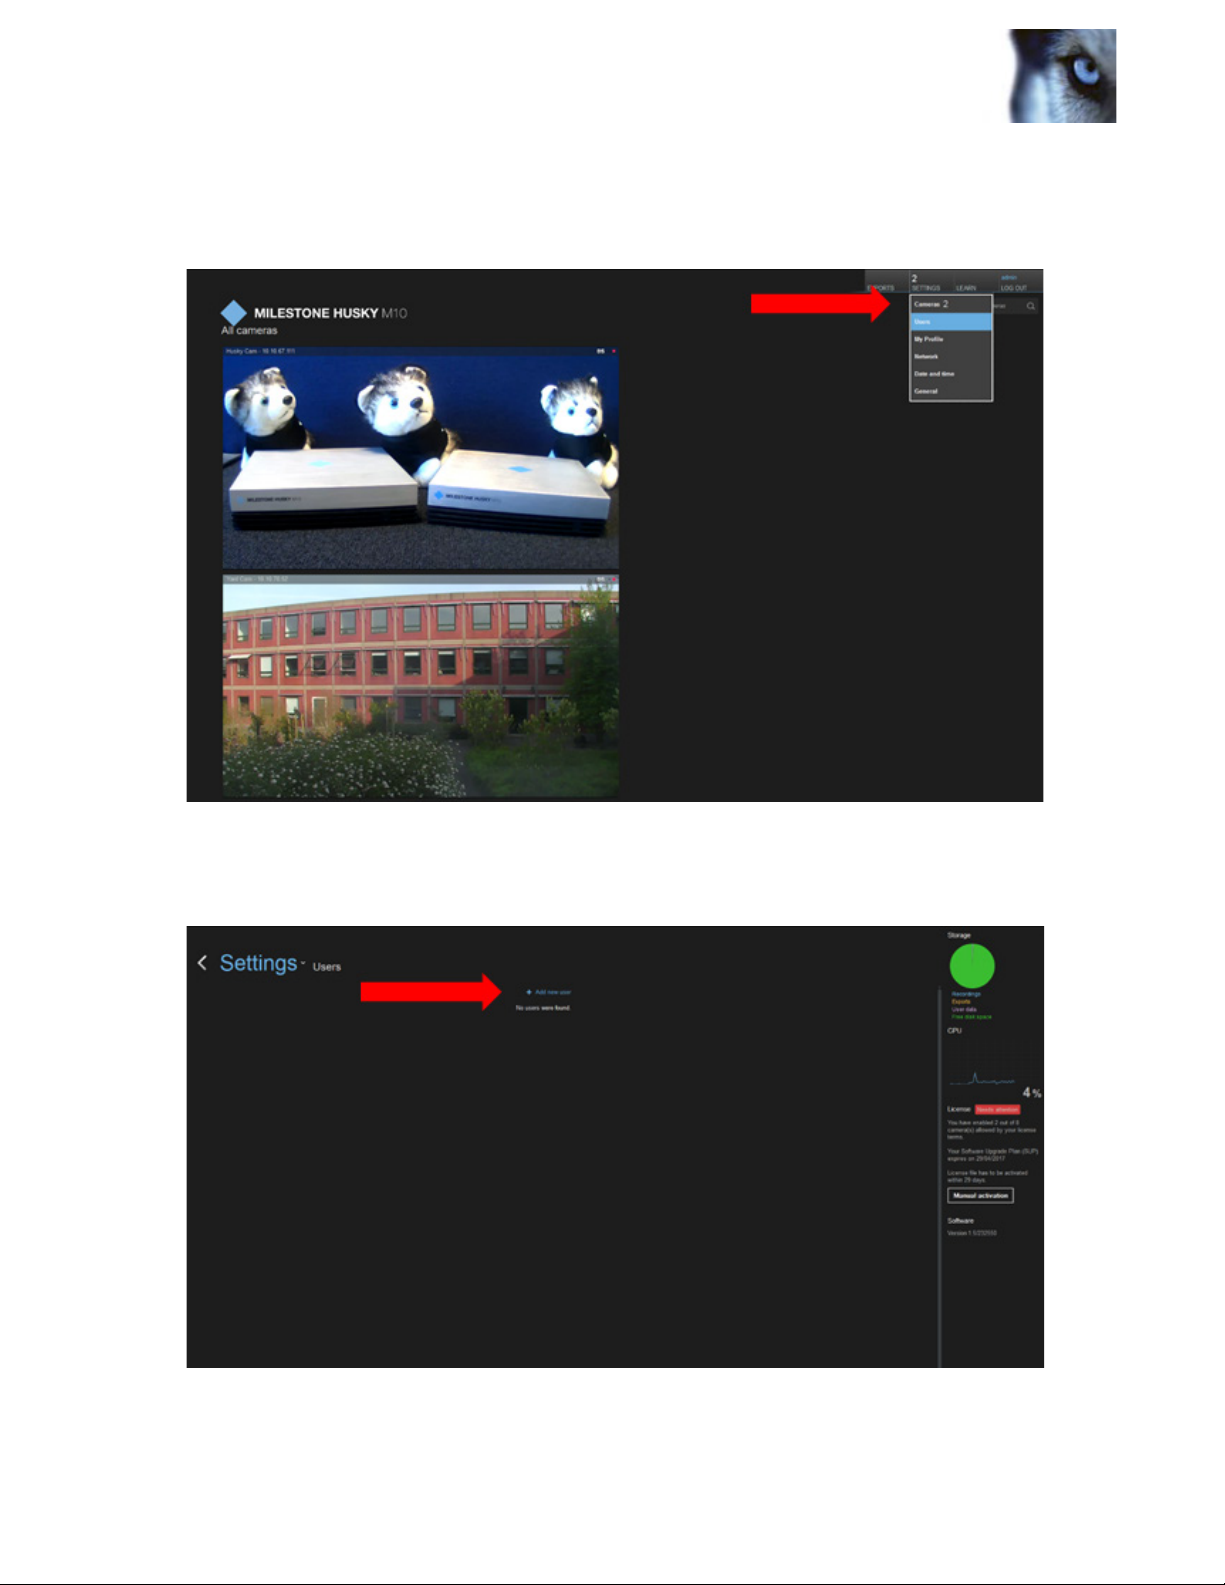
To create an account, click on Settings> Users.
Now click on Add new user:
Figure 4. Settings > Users.
Figure 5. User page.
www.milestonehusky.com 5
Page 7
Milestone Husky M10 Administrator’s Manual
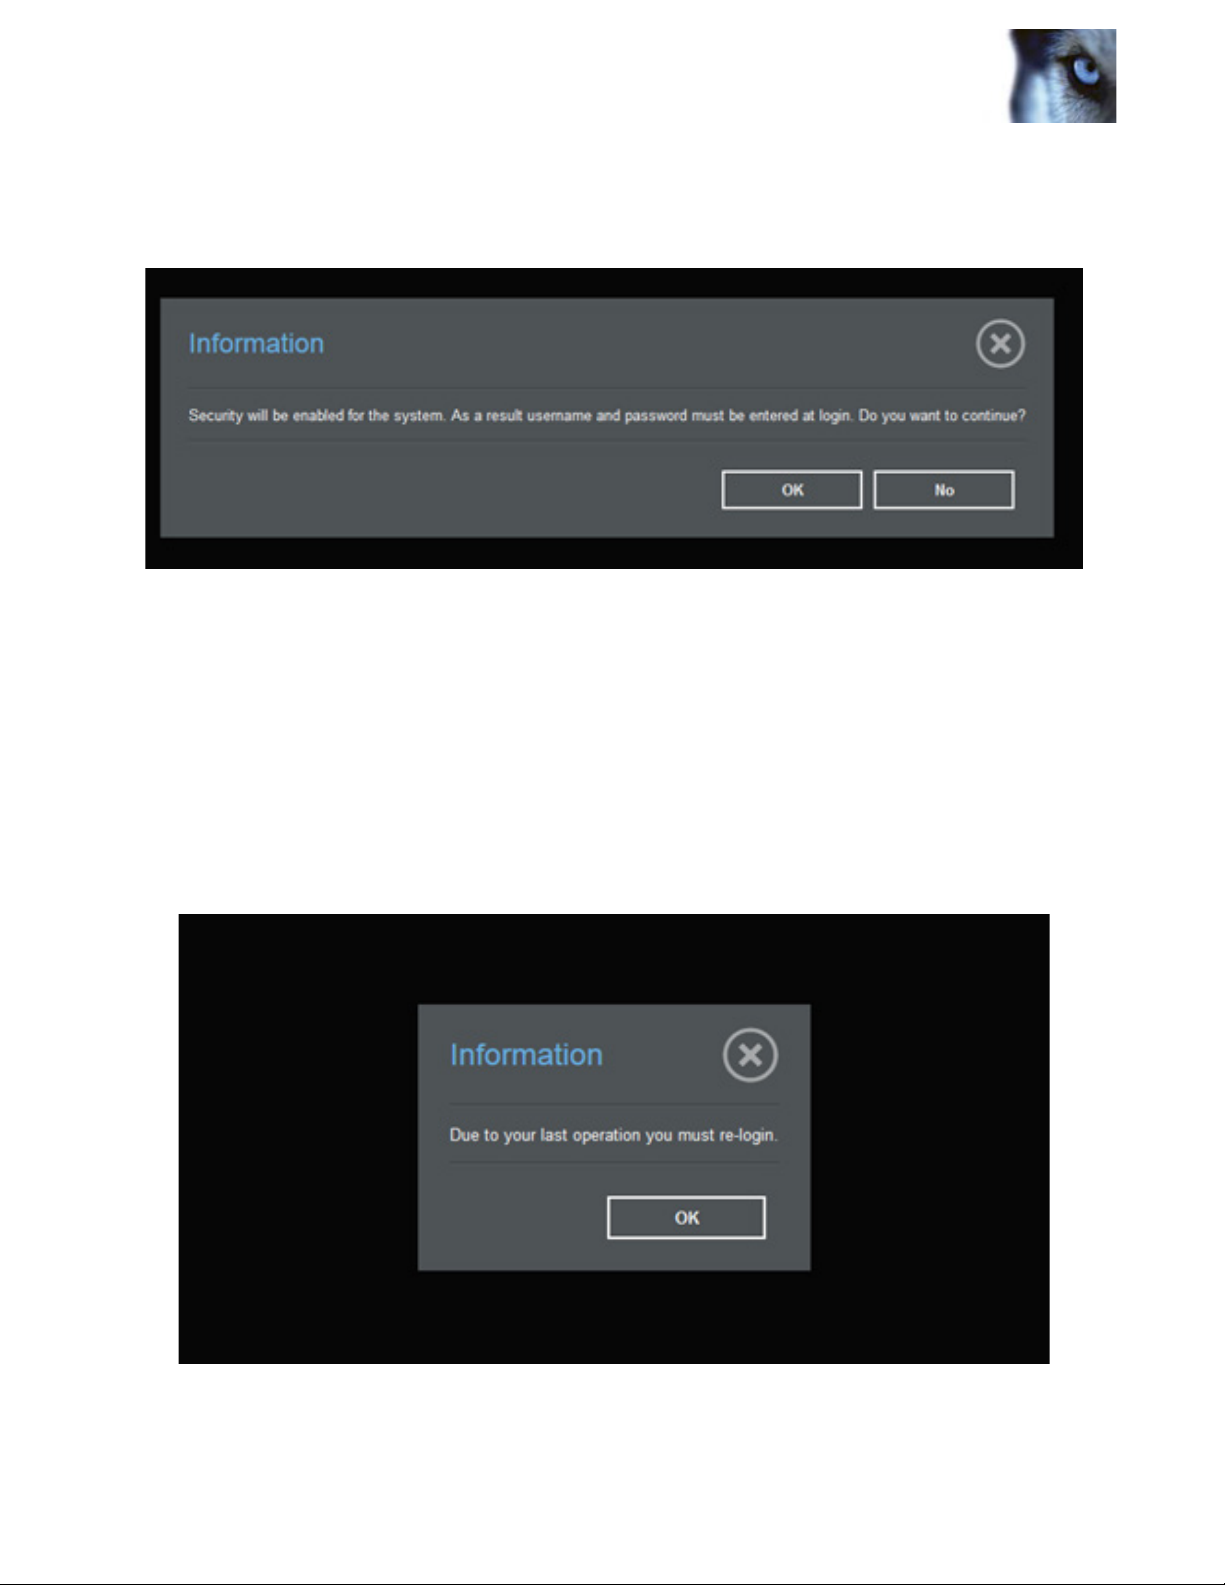
When the rst user on the system is about to be created an “Information dialogue” is displayed.
Figure 6. Information dialogue displayed.
First user created on the system will automatically be an administrator.
(Users after the rst user will be a Standard User by default.)
“Due to your last operation you must re-login” dialogue is displayed when the rst user has
been created.
Figure 7: Due to your last operation you must re-login.
www.milestonehusky.com 6
Page 8
Milestone Husky M10 Administrator’s Manual
Click on the Edit button and ll in necessary information, then click OK:
Figure 8. Edit user.
A menu will appear with options to change the account type, edit the username, email, etc.,
of each account. It is not necessary to add an email address unless that user wishes to
receive email alerts about system changes. For more information, see the section on Email
Notications.
Figure 9: Edit user menu.
www.milestonehusky.com 7
Page 9

Milestone Husky M10 Administrator’s Manual
Get Support Information
At the bottom of the Edit Users screen you will see “Get Support Information.” This button
launches a function to gather information for troubleshooting and emails the information to
Milestone Support. If you are having a technical issue with your Milestone Husky M10 device
and need to send information to Milestone technical support, use this button. You will need
to have an email address in your administrator prole for this to function properly. If no email
address is entered, one will get an URL from where the Support File (zip) can be downloaded
(see screenshot below).
If you do not receive an email make sure that the following email milestonehusky@gmail.com
is not caught in your email spam lter.
Figure 10: Get support Information.
Email Notications
It is possible to receive automatic email notications from Milestone Husky M10 when system
changes occur – such as adding or deleting a camera. In order to receive email notications,
make sure that your email is entered in your account information. To learn how to change
user account settings, see the section of this guide pertaining to User Accounts. If you would
like to stop email notications, simply remove your email from your account information.
www.milestonehusky.com 8
Page 10
Milestone Husky M10 Administrator’s Manual
Port Mapping
When port mapping is enabled the Husky M10 will try to enable external access to the system
over internet by conguring the router. The external URL to the system can be seen on the login
page. Make sure that the default passwords for users have been changed prior to enabling this
to avoid un-authorized access to the system. Make sure to use strong passwords.
Discover Cameras
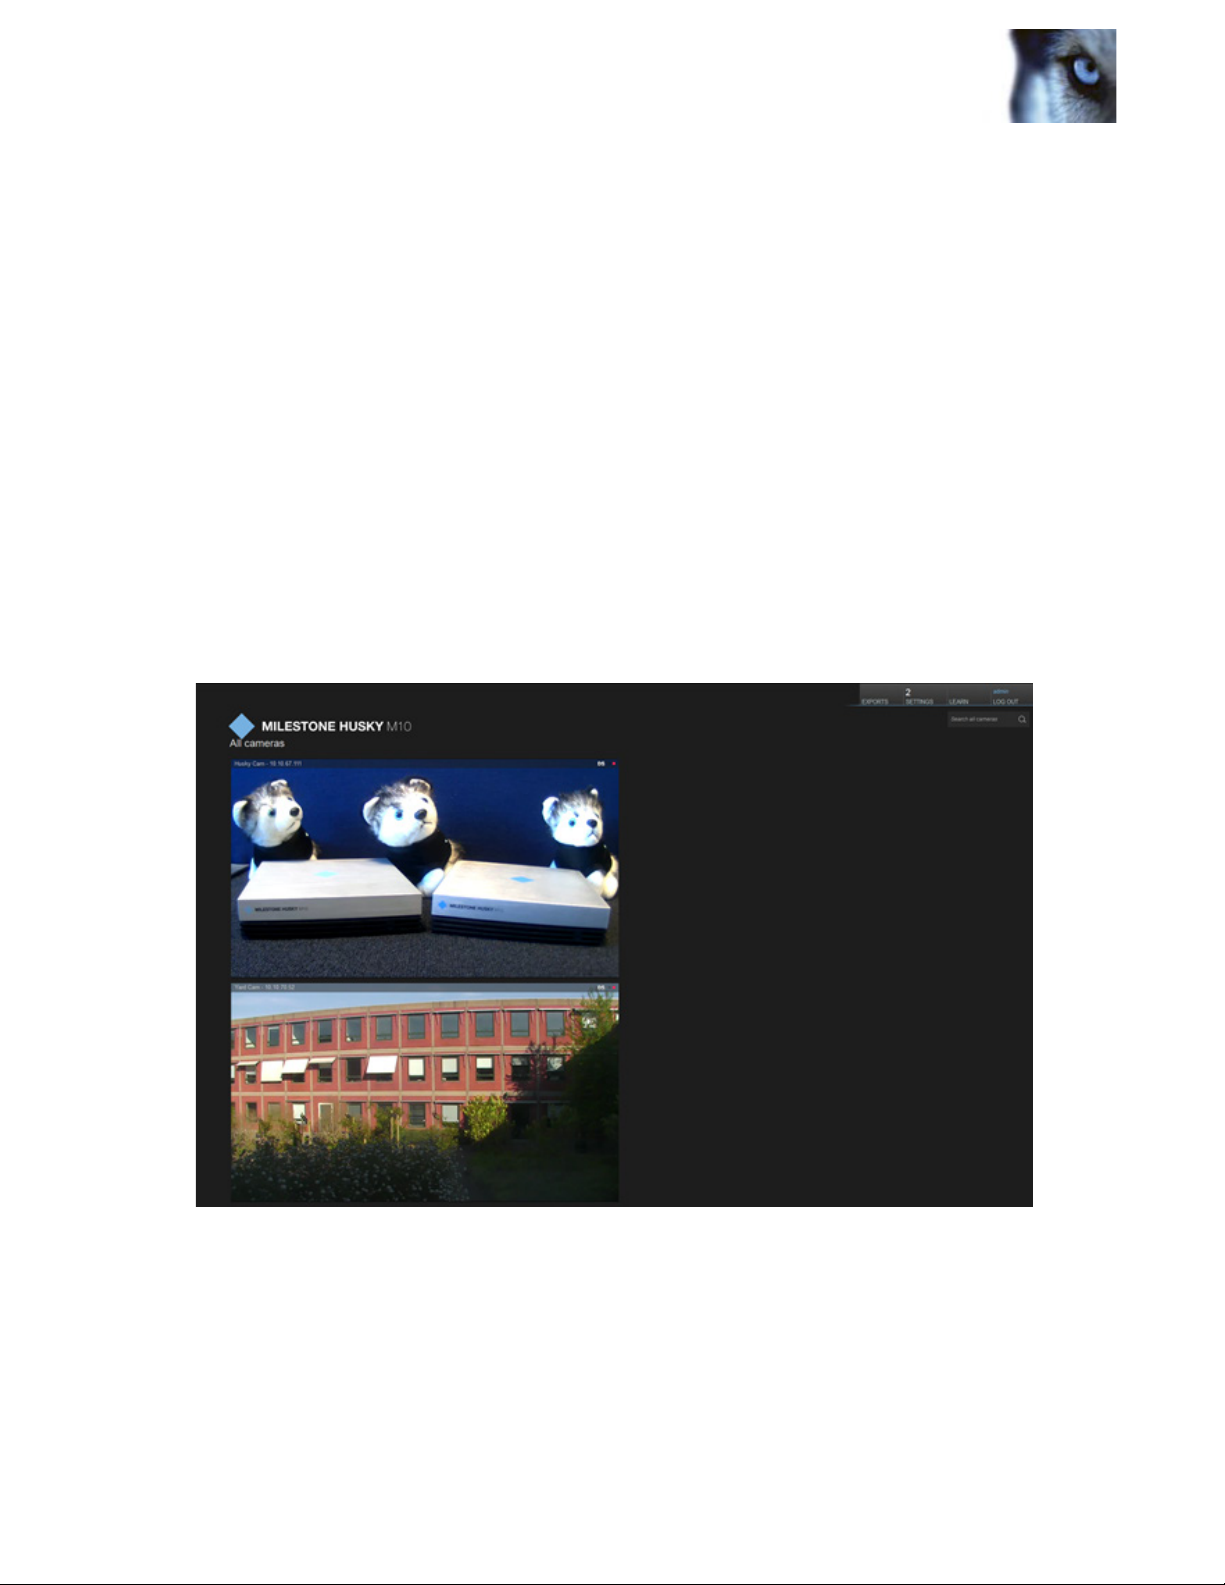
Once you have logged in, the cameras that the Milestone Husky M10 has automatically
discovered will appear on the main screen. For information on how to connect cameras to the
unit, please see the Milestone Husky M10 Quick Start Guide. If properly connected, your
main screen should look similar to this:
Figure 11: Main screen.
www.milestonehusky.com 9
Page 11
Milestone Husky M10 Administrator’s Manual
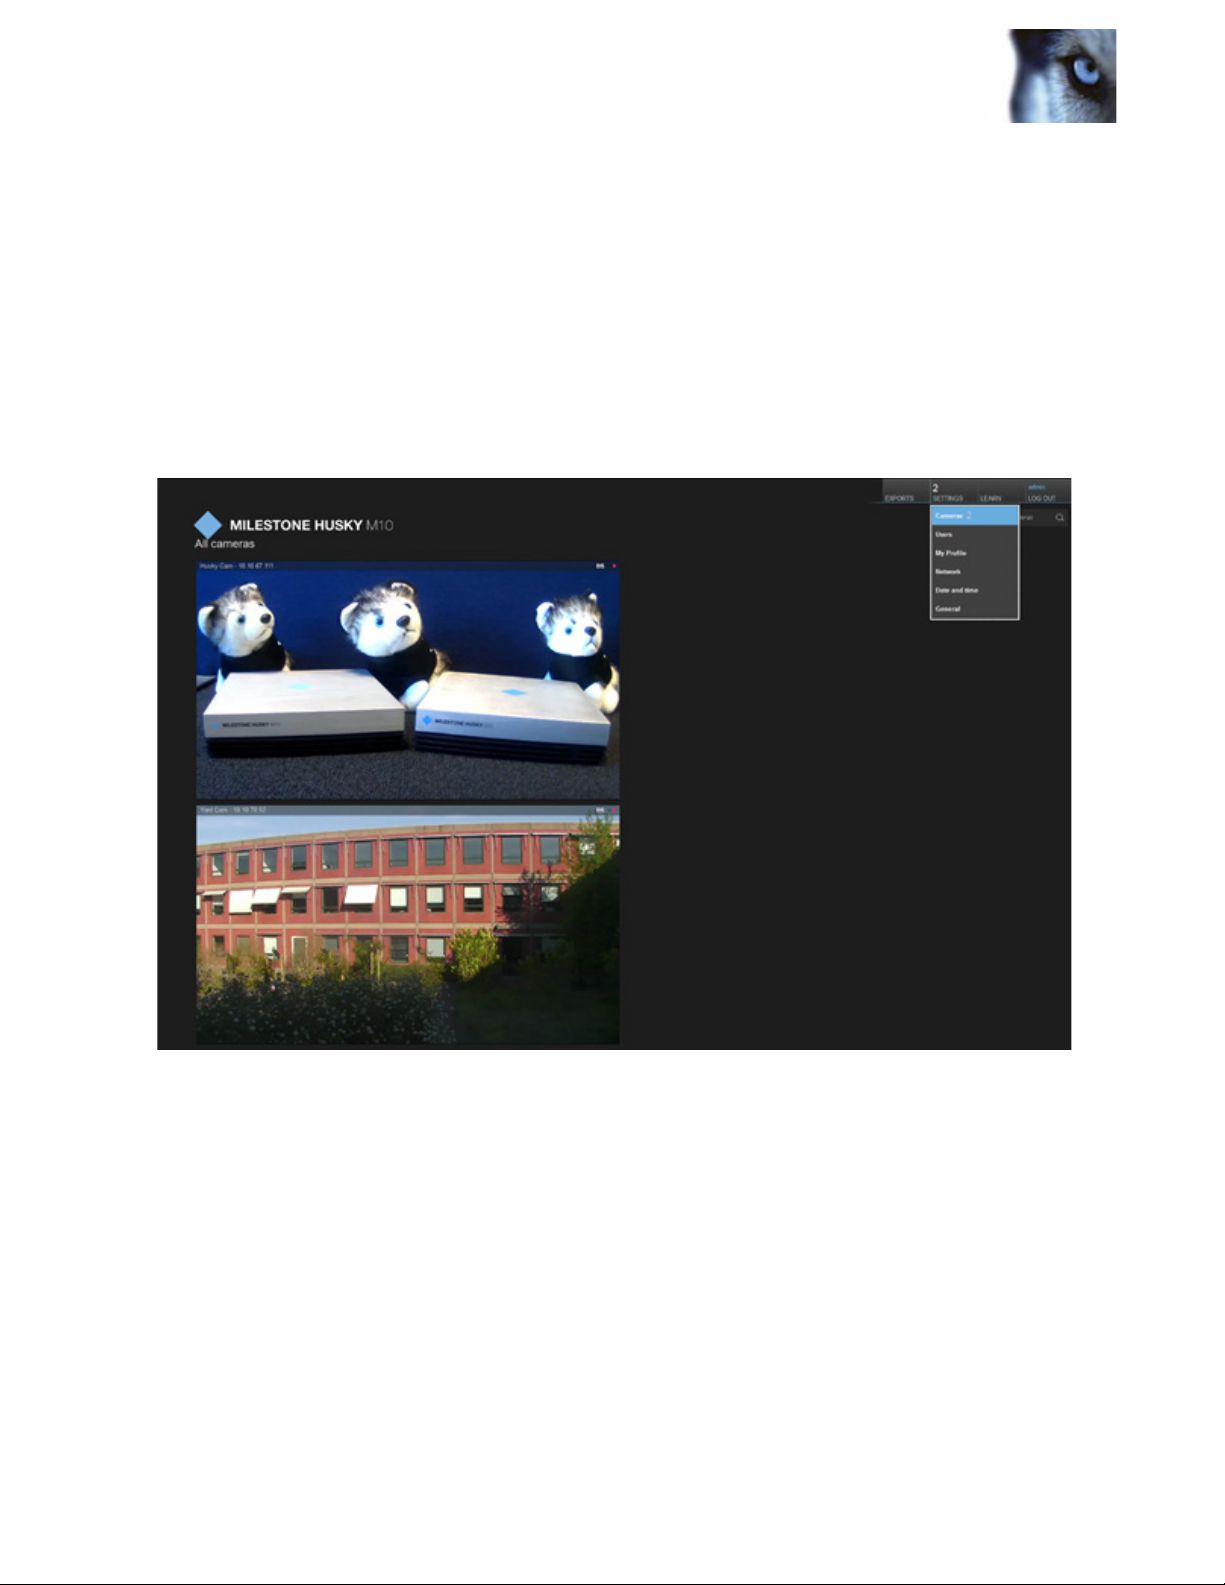
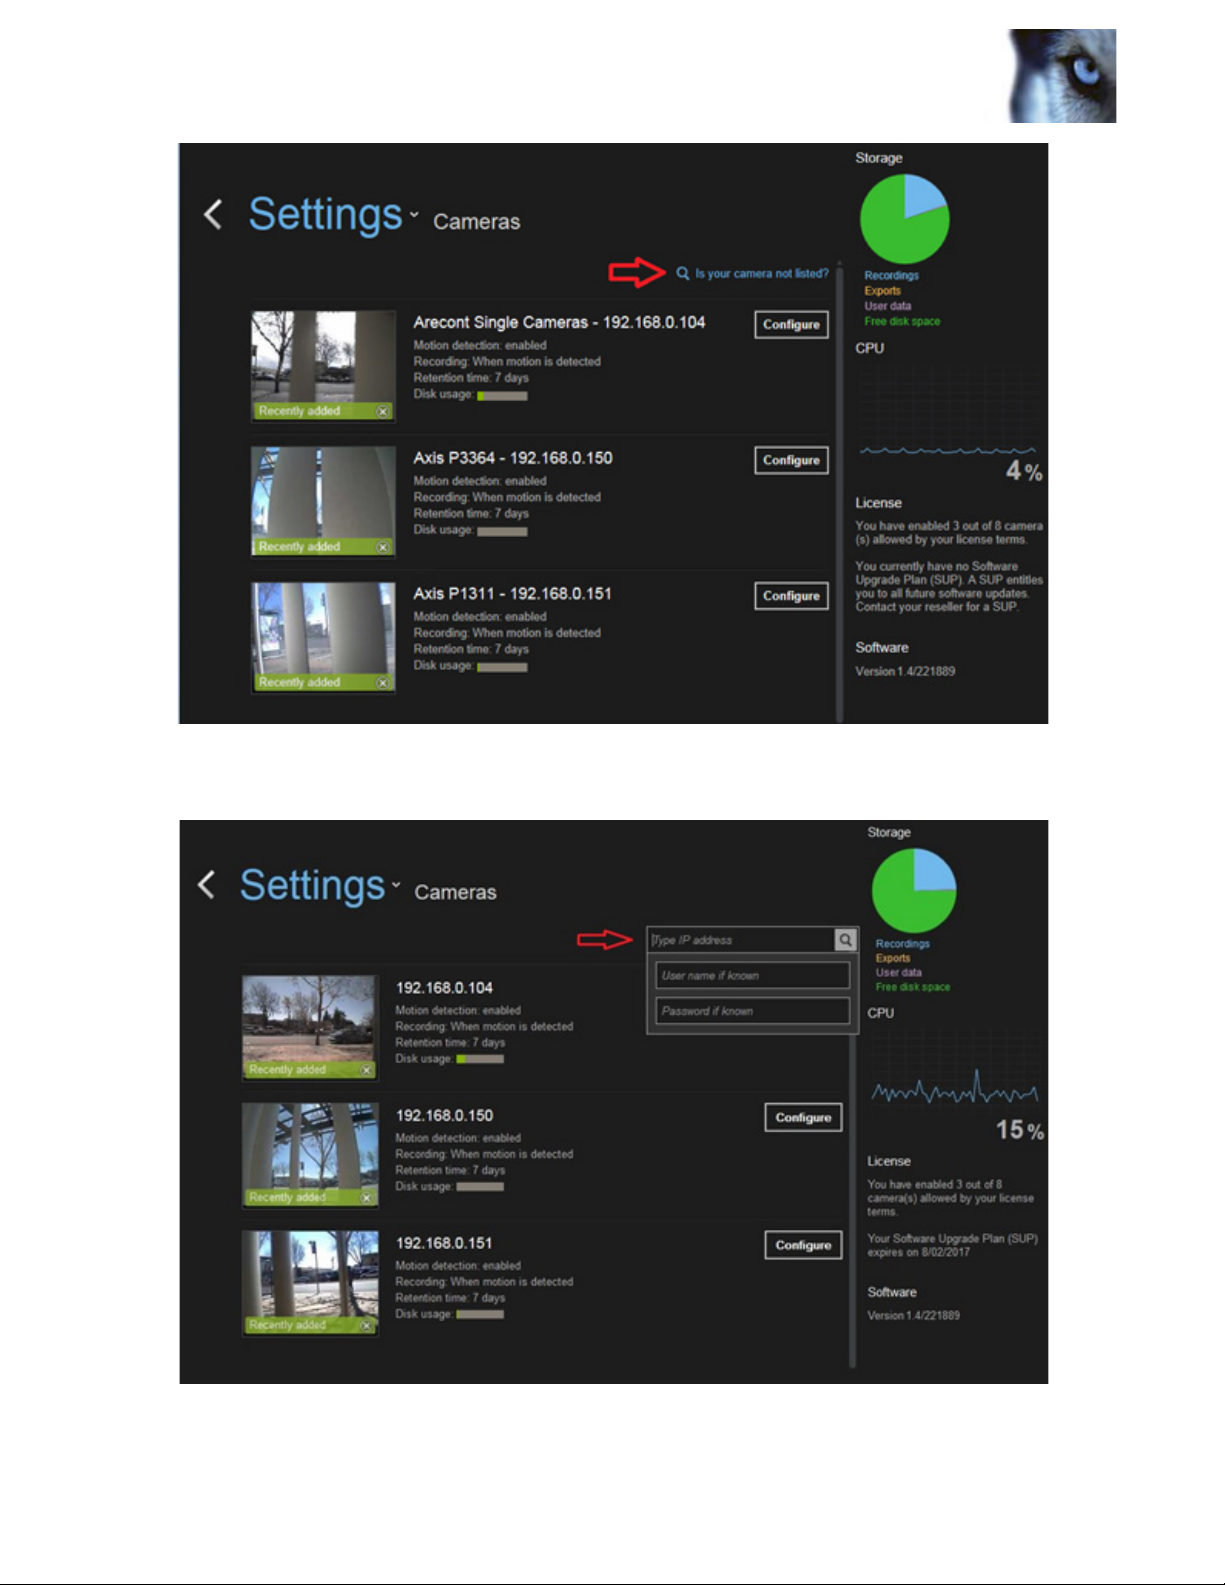
If your camera is properly connected but does not show up on the screen, it is possible to
manually make the connection (Note: Only Administrative Users have access to this function).
This option can be found by selecting “Cameras” from the dropdown menu under the
Settings tab in the upper right corner of the screen.
Figure 12: How to locate “Camera Settings”.
Once you arrive at the settings screen you will see a magnifying glass icon that says “Is your
camera not listed?” When you click on this link, a box will appear asking you to type in the
IP address of the camera, as well as the camera username and password. Once you have
completed these steps the camera will be connected and will appear on the home screen.
www.milestonehusky.com 10
Page 12
Milestone Husky M10 Administrator’s Manual
Figure 13: How to discover cameras.
Figure 14: Discover cameras.
www.milestonehusky.com 11
Page 13

Milestone Husky M10 Administrator’s Manual
License Cameras
The Milestone Husky M10 is a licensed product that must have cameras that are attached
to it activated within 30 days of adding each camera. After 30 days the cameras will stop
recording until activated. If your Milestone Husky M10 has access to the Internet, the
cameras are automatically activated in the background with no user intervention required.
With Internet Connection
If the unit has an Internet connection camera licenses will be automatically applied as
cameras are connected to the Milestone Husky M10. No manual steps are necessary. If you
are an Administrative User, you can you can check this feature on the Camera Settings page,
which you can nd by clicking on the Settings tab in the upper right corner of the Home
page and selecting “Cameras” from the dropdown menu. In the bottom right corner of this
page you will see a section labeled “License” that will tell you how many of your licenses
are currently activated. This number should match the number of cameras that are currently
connected to the unit – unless they have been disabled.
Figure 15: View camera licenses.
www.milestonehusky.com 12
Page 14

Milestone Husky M10 Administrator’s Manual
Without Internet Connection
If the Milestone Husky M10 does not have an Internet connection, camera licenses must
be manually activated. There is a 30-day grace period after installation for the activation to
take place. After those 30 days, if the cameras have not been activated, the cameras will stop
being recorded. Cameras need to be activated:
• Within the rst 30-days of installation.
• When a new camera is added.
• Whenever a camera is replaced.
If you plan to activate manually, it is best to connect all the cameras to the Milestone Husky
M10 rst, so you can activate all the licenses at once. To manually apply camera licenses, you
must be on the Camera Settings page. To navigate to this page, click on the Settings tab in
the upper right corner of the Home page and select “Cameras” from the dropdown menu.
On the right side of this page you will see a section labeled “License” that has a red warning
box reading “Needs Attention,” meaning that the licenses need to be activated.
Figure 16: Needs attention.
www.milestonehusky.com 13
Page 15

Milestone Husky M10 Administrator’s Manual
To begin the activation process, it is easiest doing it from another computer. Click on the
button that reads “Manual Activation” located in the License section. Or click the red “Need
attention” sticker on a thumbnail (only displayed in case you are totally out of licenses or the
device lacking credentials).
Figure 17: Manual activation.
A screen will appear with three steps. First, you must generate an LRQ le (License Request
File) by clicking on the button that reads “Generate.”
Figure 18: Manually activate license.
www.milestonehusky.com 14
Page 16

Milestone Husky M10 Administrator’s Manual
How to Generate a License Request
The “Generate” button produces a le that will appear in the Downloads bar at the bottom of
the screen. Click on the arrow directly to the right of the le and select “Show in folder” from
the dropdown menu that appears.
Figure 19: How to generate a license request.
The le will appear in its folder window. Click and drag the le, dropping it onto a thumb drive
or another removable storage device. Check that the le is saved on the removable storage
device and eject the device.
Transfer License Request File
You must now go to a computer that has an Internet connection. Go to the Milestone Husky
M10 Manual Activation website: http://www.milestonesys.com/activatemilestonehusky
Once at this page, upload the LRQ le off of the storage device and enter your email.
www.milestonehusky.com 15
Page 17

Milestone Husky M10 Administrator’s Manual
Figure 20: How to receive a license validation le.
Within a few minutes you will receive an email to the address you entered. The email
will contain another le with the license validation. Download this le and save it to the
removable storage device. Check that the le is saved on the removable storage device and
eject the device.
How to Upload License Validation File
Take the storage device and connect it to the Milestone Husky M10 unit again. Go back to the
Manually Active License page and click the button under Step 3 that reads Select File.
Figure 21: How to upload license validation le.
www.milestonehusky.com 16
Page 18

Milestone Husky M10 Administrator’s Manual
Select the License Validation File that was sent to you and click Open. You will be brought
back to the instruction screen while the le loads. Once the le is completely uploaded you will
see a message letting you know that the upload was successful.
Figure 22: Successful upload.
You can now return to the Camera Settings page. To conrm that the licensing process
worked, check the License section on the right side of the screen. The message should read
that you have activated the same number of cameras that you have connected to the unit and
display the total number of licenses you have available.
Figure 23: License section.
www.milestonehusky.com 17
Page 19

Milestone Husky M10 Administrator’s Manual
Congure Cameras
You can nd the conguration options for your cameras by clicking on the Settings tab in the
upper right corner of the Home page and selecting “Cameras” from the dropdown menu
(Note: Only Administrative Users have access to this function). The number on the Settings
tab indicates the number of cameras connected to the Milestone Husky M10.
Figure 24: How to locate “Camera Settings”.
Once you are at the settings page you will see a list of all of your connected cameras. If a
camera does not show up, check to be sure that your system is properly connected (see the
Milestone Husky M10 Quick Start Guide). If all cameras are connected but one still does not
show up, see the Discovering Cameras section of this guide.
www.milestonehusky.com 18
Page 20

Milestone Husky M10 Administrator’s Manual
Once all cameras are properly connected, you can begin the conguration process. Newly
discovered cameras that have yet to be congured will have a green bar with the message
“Recently added” over the video frame. Newly discovered cameras may also have the red
“Need attention” sticker on the thumbnail. These cameras may be: 1) Out of License or 2)
Lacking credentials.
Figure 25: Recently added.
Next to each camera there is a button that reads “Congure.”
Figure 26: How to locate camera congurations.
www.milestonehusky.com 19
Page 21

Milestone Husky M10 Administrator’s Manual
When you click on this button you will be lead to a screen that contains four areas of camera
conguration settings: General, Video, Recording, and Motion Detection.
Figure 27: Camera conguration options.
General
Figure 28: General camera settings
Under the General settings tab you will nd options to:
• Enable or disable the camera
• See the IP address of the camera
• Change the name of the camera
• Delete the camera
www.milestonehusky.com 20
Page 22

Milestone Husky M10 Administrator’s Manual
Figure 29: Video camera settings.
Under the Video settings tab you will nd options to:
• Choose your encoding settings
• Edit the frames per second
• Change the resolution of the recorded video
• Choose the video rotation
Your codec options are JPEG and H264 Main Prole. JPEG encoding is optimal for obtaining
best video quality, however it uses more disk space than H264. For longer retention time,
select the H264 option.
Frames per section (FPS) 10 is sufcient for most surveillance scenes, but should be considered
to be increased for faster movement scenes.
The size of the hard drive (HD) can be reduced to improve retention time.
For optimal motion detection, it is best to spend the time to congure correctly and to increase
retention time.
www.milestonehusky.com 20
Page 23

Milestone Husky M10 Administrator’s Manual
Recording
Figure 30: Recording camera settings.
Under the Recording settings tab you will nd options to:
• Select when the camera records
• Select seconds to record before motion is detected.
• Select seconds to record after motion is detected.
• Select whether to record Audio (Not legal in all places)
• Choose how long the recordings are retained
• Check the disk usage
• Delete the current recordings
Because the Milestone Husky M10 is capable of motion detection, it is possible to set the
camera to record only when motion is detected. This option is found in the dropdown menu
labeled “Recording.” Details about motion detection conguration are found in the following
section.
Figure 31: Recording dropdown menu.
www.milestonehusky.com 22
Page 24

Milestone Husky M10 Administrator’s Manual
Motion Detection
Figure 32: Motion detection camera settings.
Under the Motion Detection settings tab you will see the live feed from the camera divided
by a grid. The motion occurring in the live feed will be highlighted in green. Using the grid
overlaying the feed you can designate areas of the grid to exclude from motion detection
simply by clicking on the square you would like to exclude. At the bottom of the page, in the
section labeled “Exclusion Grid Settings” you are able to change the grid dimensions and
clear the grid selections.
www.milestonehusky.com 23
Page 25

Milestone Husky M10 Administrator’s Manual
Below is an example of the motion detection grid. Note how the tree area has been excluded
so that the camera will not trigger on the wind blowing the tree branches.
Figure 33: Exclusion Grid.
In the middle of the motion detection page there are three sliding bars. The rst two bars are
labeled “Detection Adjustments.” You can use these bars to choose the size of movements
that the camera picks up and how sensitive the camera is to these movements. The third
sliding bar is labeled “System Performance.” This bar controls the amount of impact that
motion detection has on the CPU. Therefore, the more impact on the CPU, the greater the
accuracy of motion detection.
www.milestonehusky.com 24
Page 26

Milestone Husky M10 Administrator’s Manual
Live View
It is possible to see the live feed from a camera in two different areas. The landing page of
the Milestone Husky M10 software shows the feed from all cameras, however the feeds are
smaller and do not have controls. To see a more detailed live view, click directly on the video
of the camera you would like to observe more closely. The video will expand on the screen
showing a larger view of that feed.
Figure 34: How to locate Expanded Live View.
www.milestonehusky.com 25
Page 27

Milestone Husky M10 Administrator’s Manual
From this screen you can switch between live camera feeds by clicking on the various feeds.
You can also observe larger versions of multiple feeds simultaneously by clicking on the grid
icon located in the lower left quadrant of the screen.
Grid
View
Figure 36: Grid View.
Full
sceen
Figure 35: How to locate Grid View and Full Screen mode.
www.milestonehusky.com 26
Page 28

Milestone Husky M10 Administrator’s Manual
Pan, Tilt, Zoom Controls
If the camera you are using is equipped with PTZ capabilities, it is possible to control and
move the camera using the Milestone Husky M10. To control the camera, you must be in Live
View mode, viewing the enlarged live feed of the desired camera. To view the controls, click
the pan icon in the lower right corner of the feed.
Figure 37: Pan, tilt, zoom controls.
Using the arrows icons in the video, it is possible to move the camera left and right, up and
down, and to zoom in or out.
www.milestonehusky.com 27
Page 29

Milestone Husky M10 Administrator’s Manual
Search and Playback
Search and playback can be found from Live View mode. You can nd the live view screen
from the home screen by clicking on the feed of the camera you want to view.
Figure 38: How to locate Playback Mode – Click on camera feed image.
From the live view, click on the small playback button in the lower left corner of the camera feed.
Figure 39: How to locate Playback Mode – Click on small playback button.
www.milestonehusky.com 28
Page 30

Milestone Husky M10 Administrator’s Manual
A toolbar will extend from the circle and you are now in Playback mode. From here you can
navigate through the recordings using the arrows and the sliding bar. To go back to a specic
day and time, click on the calendar icon in the toolbar.
Figure 40: How to locate Go To – Click on Calendar icon.
www.milestonehusky.com 29
Page 31

Milestone Husky M10 Administrator’s Manual
A menu will pop up with a calendar at the bottom. To use the calendar, click and drag the day,
hour, or minute bar until you arrive at the desired time. To make that time active in the large
view, click the “Go To” button.
Figure 41: Go To Calendar pop-up.
To return to live view, either click on the “Live View” button in the pop-up calendar or click on
the X in the upper right corner of the window to close the calendar.
click to
close
calendar
Figure 42: Go To Calendar pop-up – Click on X or Live to close calendar
www.milestonehusky.com 30
Page 32

Milestone Husky M10 Administrator’s Manual
Export Video
To export video you must be in Playback mode. To learn how to access Playback mode, see
the “Search and Playback” section of this guide. Once you are in Playback mode you will
see the Export icon in the bottom right corner of the feed.
Figure 43: How to locate Export Mode.
When you click on the export button a screen will pop up with two side-by-side calendars.
www.milestonehusky.com 31
Page 33

Milestone Husky M10 Administrator’s Manual
Figure 44: Selecting video to export.
The calendars represent the start time and the end time of the clip you would like to export.
For example, there was an incident in your ofce on the night of July 16 and you want to export
the clip from 1:45 a.m. to 3 a.m. that morning. Grab and drag the day, hour, and minute bars
on the respective calendars until you arrive at the desired start and end times. When the times
are correct, click the “Export” button and Milestone Husky M10 will create the le you wish to
download.
www.milestonehusky.com 32
Page 34

Milestone Husky M10 Administrator’s Manual
Figure 45: Exporting video.
Once the export le has been created, click the “Download” button and the video will be
saved on the Milestone Husky M10 Server Switch hard drive. If you press “Close”, the export
is created in the background and the system can continued to be operate.
www.milestonehusky.com 33
Page 35

Milestone Husky M10 Administrator’s Manual
To download the video to your computer, go to the Main page and click on the tab labeled
“Exports” in the upper right corner of the screen. Here you will nd all of your exported video
les (which can be previewed) and have the option to download the les to the computer you
are viewing from. From this screen you can download and/or delete previously exported les
as well.
Figure 46: How to locate exports.
Figure 47: Exports.
www.milestonehusky.com 34
Page 36

Milestone Husky M10 Administrator’s Manual
The exported le will be saved to your computer as a MKV le (Matroska multimedia le).
To view the exported le from your computer you can use many different free video players
including the VLC media player, which can be downloaded from http://www.videolan.org.
Once the media player is installed you will be able to watch all video recordings downloaded
from the Milestone Husky M10.
Update Software
The Milestone Husky M10 will not automatically update, but the option to update the software
will become available when a new version is released by Milestone Systems. (Note: Only
Administrative Users can update the software.) Milestone Husky M10 software updates, when
available, can be found on the Camera Settings page. You can access this page by clicking
on the Settings tab in the upper right corner of the Home page and selecting “Cameras” from
the dropdown menu.
Figure 48: How to locate Camera Settings for software update installation.
www.milestonehusky.com 35
Page 37

Milestone Husky M10 Administrator’s Manual
When you arrive at the Camera Settings page you will see a button in the lower right corner
of the screen prompting you to install the software update. If this button does not appear, you
are currently operating with the latest Milestone Husky M10.
Figure 49: Update software button.
Technical Support Information
If you are having difculties with your Milestone Husky M10, please contact your integrator.
For more information, you can visit www.milestonesys.com.
www.milestonehusky.com 36
Page 38

About Milestone Systems
Founded in 1998, Milestone Systems is the global
industry leader in open platform IP video
management software. The XProtect platform delivers
powerful surveillance that is easy to manage, reliable
and proven in thousands of customer installations
around the world. With support for the widest choice
in network hardware and integration with other
systems, XProtect provides best-in-class solutions to
video enable organizations – managing risks,
protecting people and assets, optimizing processes
and reduci
ng costs. Milestone software is sold
through authorized and certified partners. For more
information, visit:
www.milestonesys.com
.
 Loading...