

Page 1

LOGOS One
All-in-one Rapid Tissue Processor
Operator Manual
MM098
MILESTONE
HELPING
PATIENTS
Page 2

Page 3

Milestone s.r.l.
MM098-002 – LOGOS ONE – Operator Manual
3
Thank you for having selected our system and welcome to the ever growing world club of users for Milestone
laboratory instrumentation.
We are sure that you will be completely satisfied with this new tool entering your laboratory.
We invite you to read carefully this operator manual and to keep it in reach for convenient and fast
consulting.
For any possible clarification or any request for assistance please contact either our Representative in your
country:
Or contact
Milestone s.r.l.
Via Fatebenefratelli, 1/5
24010 Sorisole (BG) Italy
Tel. +39.035.412 8264
Fax +39.035.575498
web site www.milestonemedsrl.com
e-mail [email protected]
Please read the user manual before using the device.
MM098-002 – LOGOS ONE – Operator Manual
2015-07
Page 4

Milestone s.r.l.
MM098-002 – LOGOS ONE – Operator Manual
4
SUMMARY
SUMMARY .................................................................................................................................................. 4
1 INTRODUCTION ................................................................................................................................ .. 6
1.1 Symbol used................................................................................................................................. 6
1.2 Designated uses ........................................................................................................................... 7
1.3 Technical specifications ................................................................................................................ 7
1.3.1 Touch control terminal .............................................................................................................. 7
1.4 Transportation and storage conditions ................................................................ .......................... 8
1.5 Warning information...................................................................................................................... 9
1.6 Labeling explanation ................................ ................................................................ ....................10
1.7 Compatible reagents ....................................................................................................................10
1.8 Waste disposal of the equipment .................................................................................................11
2 INSTALLATION ...................................................................................................................................12
2.1 Space requirements.....................................................................................................................12
2.2 Unpacking and checking list .........................................................................................................13
2.3 Placement ...................................................................................................................................15
2.3.1 Unit overview ................................................................ ........................................................... 15
2.4 Fumes extraction system .............................................................................................................16
2.5 Power supply ...............................................................................................................................17
2.6 Electrical installation ....................................................................................................................17
2.6.1 Back side connection plate 230V Version .................................................................................18
2.6.2 Back side connection plate 115V Version .................................................................................18
2.6.3 Main power supply connection .................................................................................................19
2.6.4 Power supply connection (NO UPS mode) ...............................................................................19
2.6.5 Power supply connection (Local UPS mode) ............................................................................20
2.7 Remote alarm connection ............................................................................................................22
2.8 Internet connection ...................................................................................................................... 22
2.9 Reagents .....................................................................................................................................24
2.10 Log in and log out ........................................................................................................................24
2.10.1 Create a new user ................................................................................................................25
2.11 Set system date and time ............................................................................................................27
2.12 Set language ...............................................................................................................................27
2.13 Load LOGOS ONE with wax ........................................................................................................28
2.13.1 Wax heating setting .............................................................................................................30
2.14 Load LOGOS ONE with reagents ................................................................................................32
2.14.1 Set up LOGOS ONE with reagents.......................................................................................33
2.14.2 Cleaning procedure for cleaning tanks .................................................................................39
2.15 Most used programs ....................................................................................................................39
2.16 Owner settings ............................................................................................................................41
3 OPERATE WITH LOGOS ONE ............................................................................................................44
3.1 Loading cassettes into the rack ....................................................................................................44
3.1.1 Rack loading-unloading tool .....................................................................................................45
3.2 Run a program ............................................................................................................................46
3.2.1 Run of the most used program ................................ ................................................................ .46
3.2.2 Run a standard program .......................................................................................................... 54
3.2.3 Run two processes simultaneously ..........................................................................................57
3.2.4 Run a program using the STEP START function ......................................................................59
3.2.5 Run a DELAYED PROGRAM ..................................................................................................60
3.2.6 Add WAX .................................................................................................................................63
3.2.7 Screen saver ...........................................................................................................................64
3.3 Run a cleaning cycle of the main cavity ........................................................................................65
3.3.1 Tanks for process and main cavity cleaning .............................................................................66
3.4 Reagents group and programs.....................................................................................................68
3.5 Run a cleaning cycle of the WAX .................................................................................................69
3.6 Retrieving saved processes .........................................................................................................71
3.6.1 How to delete a saved process ................................................................................................74
3.7 Modify a program .........................................................................................................................74
3.7.1 Modify a standard program ......................................................................................................75
3.7.2 Correlation between racks and programs .................................................................................76
Page 5

Milestone s.r.l.
MM098-002 – LOGOS ONE – Operator Manual
5
3.7.3 Modify a main cavity cleaning program.....................................................................................78
3.7.4 Modify a WAX cleaning ............................................................................................................79
4 REAGENTS MANAGEMENT ...............................................................................................................80
4.1 Reagents reuse life ......................................................................................................................80
4.1.1 Reagents settings ....................................................................................................................81
4.1.2 Recommendations for reuse life ...............................................................................................82
4.2 Reagents replacement procedure ................................................................................................83
4.2.1 ....................................................................................................................................................83
4.2.2 Reagent NOT USED FOR RINSING ........................................................................................84
4.2.3 Reagent USED FOR RINSING ................................................................................................86
4.2.4 Change reagents during a WAX phase ................................................................ ....................87
4.3 Wax replacement procedure ........................................................................................................88
5 SAFETY MODE PROCEDURE ............................................................................................................90
5.1 Power failure ...............................................................................................................................90
5.2 Regent loading time-out ...............................................................................................................92
6 REPORTING ................................................................ ....................................................................... 94
6.1 Export processing from the terminal to the USB key .....................................................................94
6.2 Install and operate with the LogViewer .........................................................................................95
6.2.1 Open process ..........................................................................................................................95
6.2.2 Print process............................................................................................................................97
6.2.3 Send process to customer support (Milestone) .........................................................................98
6.2.4 Change settings .......................................................................................................................99
6.2.5 Other functions ........................................................................................................................99
6.3 Reagents Log and Events Log from the terminal to the USB key ................................................100
7 MAINTENANCE .................................................................................................................................102
7.1 Introduction ...............................................................................................................................102
7.2 After each run ............................................................................................................................102
7.2.1 Rack cleaning procedure .......................................................................................................102
7.3 Every 5 runs ..............................................................................................................................104
7.4 Weekly ................................................................................................ ...................................... 104
7.5 Monthly .....................................................................................................................................105
7.6 Yearly ........................................................................................................................................107
7.7 How to start the remote assistance ............................................................................................107
8 OPTIONAL ........................................................................................................................................108
9 GOOD TISSUE PROCESSING PRACTICE .......................................................................................112
9.1 Specimens ................................................................................................................................112
9.2 Fixation .....................................................................................................................................112
9.3 Beware ...................................................................................................................................... 113
9.4 Reagents ...................................................................................................................................114
9.4.1 Alcohols quality ......................................................................................................................114
9.5 Tissue processing selection guidelines ......................................................................................115
9.6 Presoaking guidelines ................................................................................................................116
A. Appendix ................................................................................................ ....................................... 118
A.1. TISSUE PROCESSING THROUBLESHOOTING GUIDE ...........................................................118
A.2. OVERVIEW OF HISTOPROCESSING TROUBLE SHOOTING..................................................125
B. Appendix ................................................................................................ ....................................... 126
B.1. HOW TO MANAGE AN ALARM .................................................................................................126
C. Appendix .......................................................................................................................................128
C.1. HOW TO MANAGE SAMPLES WHILE AN ALARM IS OCCURRING .........................................128
Page 6

Milestone s.r.l.
MM098-002 – LOGOS ONE – Operator Manual
6
1 INTRODUCTION
1.1 Symbol used
An instruction accompanied by this symbol provides a quite important and require
more attention.
An instruction accompanied by this symbol provides a cautionary statement: failure to
follow the instruction may endanger the operator or cause damage to the instrument.
An instruction accompanied by this symbol provides a caution against electric shock.
Be sure to follow the instruction to prevent accidents resulting from electric shock.
Biohazard: be careful when you execute the procedure marked with this symbol:
danger of biohazard contamination.
Surfaces identified with this symbol are at danger temperature (more than 70°C/158°F).
Potentially flammable.
Please read SERVICE Manual (operation for SERVICE only).
CE logo: this instrument complies to European Community directives.
IVD medical device according to 98/79/EC directive.
WEEE European directive symbol (2002/96/EC):
Electric/electronic device do not throw out in the environment.
Manufacturer.
Fragile.
Page 7

Milestone s.r.l.
MM098-002 – LOGOS ONE – Operator Manual
7
1.2 Designated uses
The Milestone LOGOS ONE and its accessories have been engineered for laboratory use and can therefore
withstand the harshest laboratory conditions for continuous use in Histological sample preparation
procedures.
The instrument is intended for laboratory use (indoor use) only.
The Milestone LOGOS ONE is specifically designed to automatically (when an automatic run is selected) or
semi-automatically (when a dual run is selected) execute these processes for histopathological applications:
Fixation, Post-fixation
Dehydration and Clearing
Drying
Paraffin wax infiltration
The Milestone LOGOS ONE must be operated exclusively with the reagents listed in section Compatible
reagents 1.7.
1.3 Technical specifications
CODE 61500/R: Power supply input: 230V~ 50Hz 2000W,
CODE 61501/R: Power supply input: 230V~ 60Hz 2000W.
Working Temperature: 15°C – 30°C (59°F – 86°F)
Humidity (relative): up to 80%
Maximum altitude: 2000m
Fan air flow range: 54–58m3/h (cube meter per hour).
1.3.1 Touch control terminal
The following picture shows the Touch Control terminal of the LOGOS ONE unit. It is possible to operate the
unit by simply touching the icons on the screen.
Two USB PORTS are located on the right side of the Touch Control Terminal.
Please refer to chapter 9.4.1 for purity grade of reagents.
Any other use of the instrument is considered improper and may void the warranty
provided by the manufacturer.
Page 8

Milestone s.r.l.
MM098-002 – LOGOS ONE – Operator Manual
8
Characteristics: TK-WIN10CEi-TFT-LCD color display
Resolution 800x600 pixels, 8’’
Touch screen
Mass storage CF 512MB
RAM 256 MB
CPU 500MHz
Windows™ CE.NET 6.0
Programs: Multiple pre-stored programs, with customizable user defined programs
I/O-Interface: 2x USB port 2.0, 1x LAN Ethernet 10/100 Mbps RJ-45
1.4 Transportation and storage conditions
Temperature: –20°C up to +60°C
Humidity: up to 80% (up to 50% at 40°C – 104°F) non-condensing
The manufacturer reserves the right to change and/or improve specifications without
notice and without incurring any obligation.
Before turning LOGOS ONE on (when coming from a storage room), let the unit reach
working environmental conditions (at least half an hour).
Page 9

Milestone s.r.l.
MM098-002 – LOGOS ONE – Operator Manual
9
1.5 Warning information
Should the equipment be used in different ways than those specified by the manufacturer, the warranty
provided by the manufacturer may be void.
Main power plugs are considered disconnecting device. Disconnect all plugs from the socket outlet before
assembling of the system, before connection of the accessories and before cleaning.
Equipment shall be connected to a main power socket outlet which is accessible and visible by the operator.
Equipment is provided with replaceable fuses, however their replacement is to be performed by properly
authorized service personnel. If the system is not properly working, please contact the local authorized and
trained service representative of the manufacturer.
All parts of the equipment and all accessories must be supplied only by the manufacturer.
DO NOT OPEN THE CHASSIS. Failure to follow the instruction in the documentation
might lead to a reduction of device safety. If the equipment is not working properly,
please contact your supplier or the manufacturer.
Do not remove the instrument, accessories, panels or cover. Only authorized and
qualified SERVICE personnel may repair the instrument and access the instrument’s
internal components.
It is important that normal standards for safety and good laboratory practices are
applied. Always use common sense and the best known practice when operating the
instrument. Failure to follow the instructions in the documentation might lead to a
reduction of device safety.
The Competent Authority owning the instrument has primary responsibility for
accident-free operation together with designated personnel who operates SERVICE
or repair it.
To avoid damage to the instrument, use only the reagents listed in section 1.7
Compatible reagents. Failure to follow the instructions in the documentation might
lead to a reduction of device safety.
Use caution when handling hot, molten WAX.
METAL PARTS
Never introduce metal parts into the MAIN CAVITY.
High voltage discharges may cause uncontrolled increases of temperature, which
could damage the unit and result in incorrect tissue processing also. Failure to
follow the instructions in the documentation might lead to a reduction of device
safety.
Be careful: exhaust reagents are toxic and carcinogenic.
Handle with care and follow the local standard regulations.
Page 10

Milestone s.r.l.
MM098-002 – LOGOS ONE – Operator Manual
10
1.6 Labeling explanation
For symbols explanation see Chapter 1.1.
1.7 Compatible reagents
Fixatives
Holding
Dehydration
Clearing
Impregnation
Other
Cleaning
Milestone
FineFIX®
PBS buffer
Milestone
JFC® solution
WAX, Histology
grade
Alcohol/water
(60/40) solution
(Flushing)
Xylene
Formalin,
buffered or
unbuffered
Alcohol/water
(70/30)
solution
Milestone
Prowave®
solution
Isoparaffin
Milestone
MileGREEN®
solution
Ethanol
Ethanol
Isopropanol
Water
Xylene
Isoparaffin
Milestone
MileGREEN®
solution
Please refer to chapter 9.4.1 for purity grade of reagents.
DO NOT USE REAGENTS DIFFERENT FROM THOSE LISTED ABOVE.
In case of doubts please contact: [email protected].
Page 11

Milestone s.r.l.
MM098-002 – LOGOS ONE – Operator Manual
11
1.8 Waste disposal of the equipment
This instrument is an in-vitro medical device and it is usually installed in a laboratory where specimens and
other biological tissues are present. For your safety, it is therefore required to clean and disinfect before
entering in contact with it. You must also wear gloves when operating the system.
In case of return it is required that the unit is cleaned and disinfected before sending it back to Milestone.
Non-disinfected devices will be no longer accepted and you will be contacted to pay the relative disinfection
cost.
International health rules require that shipments of biohazard materials are not done in standard packages
(risk of sanctions).
It is recommended to use enzymatic detergents and polyphenolic based disinfectants or chlorine substitutes
to clean and disinfect the instrument. In alternative, to decontaminate the instrument, the use of a solution of
1:10 Bleach (recommended by the CDC for disinfecting) is also allowed.
For further information, please contact the manufacturer: [email protected].
In addition, complying with directive 2002/96/EC of the European Parliament and of the Council of 27
January 2003 on waste electrical and electronic equipment (WEEE), the separate collection environmental
managed of equipment is mandatory.
It is necessary to return the used equipment to the distributor or to inquire about the presence of a local
empowered system for collection and disposal of WEEE.
The in-observance of Directive 2002/96/EC or of the local law which acknowledges it can have potential
effects on the environment and human health.
This symbol indicates separate collection
for electrical and electronic equipment
If additional requirements on accident prevention and environmental protection exist in the country of
operation, this instruction manual must be supplemented by appropriate instructions to ensure compliance to
such requirements.
Waste disposal of reagents
For further information please refer to the MSDS (Material Data Safety Sheet) provided by your supplier.
Do not remove the side panels of the unit during the cleaning operations.
Before doing any operation disconnect the power supply.
Do not use direct or high-pressure water to clean the instrument.
For safety reason, any operation without the individual protective devices must be
avoided.
Handle with care and store in a cool dry space using a tightly closed container.
Vapors may collect in empty containers. Treat empty containers as hazardous.
Waste material should be disposed of in an approved incinerator or in a designated landfill
site, in compliance with all federal, provincial and local government regulations.
Some reagents can have potential health effects and cause environmental pollution if not
correctly disposed.
Page 12

Milestone s.r.l.
MM098-002 – LOGOS ONE – Operator Manual
12
2 INSTALLATION
Milestone LOGOS ONE is a precision instrument that requires the utmost care when it is unpacked and
installed. Move LOGOS ONE to its final location. Make sure that the floor is level and is made of nonflammable material. The following pictures show the dimensions of LOGOS ONE and the space required:
2.1 Space requirements
LOGOS ONE is delivered in a wood box with these dimensions:
Width: 920mm (36.2in)
Height: 1320mm (52in)
Depth: 1500mm (59in)
The space dimensions required to locate the unit are the following (drawer and covers opened):
Width: 1100mm (43in)
Height: 1600mm (63in)
Depth: 1200mm (47in)
LOGOS ONE is a heavy instrument. Contact a structural engineer before placing the unit (analyze the
building structure).
LOGOS ONE Weight (read carefully):
LOGOS ONE FULL (all tanks): 320kg (706lb) (wax and all reagents loaded in proper tanks).
LOGOS ONE EMPTY: 250kg (552lb) (no reagents; no Paraffin Wax histological grade).
Unit density 640kg/m2 (0.9lb/in2).
1500mm
1090mm
695mm
760mm
Page 13

Milestone s.r.l.
MM098-002 – LOGOS ONE – Operator Manual
13
2.2 Unpacking and checking list
When unpacking, check that all parts correspond to the packing list included in the shipment. Utmost care
must be made during unpacking of LOGOS ONE, to avoid any scratch or damage to the external surface.
CODE
DESCRIPTION
INCLUDING
Power supply input
61506/R
LOGOS ONE COMPLETE
PACKAGE
61502/R
115V~ 60Hz 2000W
61503/R
Starter Kit LOGOS ONE
61506/R-USA
LOGOS ONE COMPLETE
PACKAGE
61502/R
115V~ 60Hz 2000W
61503/R-USA
Starter Kit LOGOS ONE-USA
61504/R
LOGOS ONE COMPLETE
PACKAGE
61500/R
230V~ 50Hz 2000W
61503/R
Starter Kit LOGOS ONE
61505/R
LOGOS ONE COMPLETE
PACKAGE
61501/R:
230V~ 60Hz 2000W
61503/R
Starter Kit LOGOS ONE
The LOGOS ONE COMPLETE PACKAGE includes:
A. The LOGOS ONE unit (with power supply cable) including the following items:
1. Nr. 1 WAX draining tube CODE 62497
2. Nr. 1 Tanks labels CODE 65633
3. Nr. 1 CD with LOGOS ONE Operator Manual (MM098), Maintenance Instructions, LOGOS ONE
Quick Start Guide (MM101).
B. The Starter Kit LOGOS ONE (CODE 61503/R) includes the following items:
CODE
DESCRIPTION
Q.ty
IMAGE
66105
Rack Transfer Kit
1
66165A/210
Split Rack 210 cassettes
1
62348
Antiscratching Spatula to
remove wax traces
1
62160
USB Data Traveler
containing the LogViewer
Software
1
Page 14

Milestone s.r.l.
MM098-002 – LOGOS ONE – Operator Manual
14
61597
Exhaust Tube complete
1
The Starter Kit LOGOS ONE (CODE 61503/R-USA) includes the following items:
CODE
DESCRIPTION
Q.ty
IMAGE
66105
Rack Transfer Kit
1
66165A/210
Split Rack 210 cassettes
2
62348
Antiscratching Spatula to
remove wax traces
2
62160
USB Data Traveler
containing the LogViewer
Software
1
61597
Exhaust Tube complete
1
70170
Tank 5 liters capacity 9
61550/F
External exhaust
FORMALIN fumes filter
kit, including one spare
filter
1
Page 15

Milestone s.r.l.
MM098-002 – LOGOS ONE – Operator Manual
15
2.3 Placement
Now LOGOS ONE unit can be positioned in its final place of use. When the instrument is positioned, push
down the lever of the wheels (CODE 66464) to block them.
2.3.1 Unit overview
MAIN CAVITY on the LEFT WAX CAVITY on the RIGHT.
To open the MAIN CAVITY cover: push the button, then rotate the handle (clockwise), then flip up the cover.
To open the WAX CAVITY cover: push the button, then rotate the handle (clockwise), then flip up the cover.
In the bottom of the main cavity (left) there is a mesh filter to block the eventual floaters and dirty parts.
Block the four lateral wheels (indicated with green arrow the two frontal) BUT do not block
the central one of the drawer (indicated with yellow arrow).
Page 16

Milestone s.r.l.
MM098-002 – LOGOS ONE – Operator Manual
16
Refer to chapter 7.5 for its maintenance.
2.4 Fumes extraction system
LOGOS ONE is vented, to comply with CAP regulations, through the external exhaust outlet positioned on
the back of the instrument, with a hose dedicated to the external fume extraction system (if any).
The customer is required to adapt the hose connector. The plastic hose supplied has these characteristics:
Length: 3m (110”)
External diameter: 69mm (2.72”)
Internal diameter: 60mm (2.36”)
Insert the exhaust tube (CODE 61377) on the proper outlet (back panel).
Use the metal cable clamp (CODE 50051) to fix the hose to the exhaust fume pipeline.
The external fume extraction system must be properly installed at all times, according to
local regulations in force on laboratory safety.
The external fume extraction system must permit an air flux of 58 m3/h (cube meter per
hour).
There is no air filter on the unit exhaust system.
It is possible to connect an external exhaust fumes filter kit.
See chapter 8 for information about this optional (CODE 61550).
Page 17

Milestone s.r.l.
MM098-002 – LOGOS ONE – Operator Manual
17
Now connect the other side of tube to the fume extractor of the laboratory.
2.5 Power supply
Power supply line must have a ground connection (yellow/green, green or bare wire).
Do not use the blue/white wire (neutral of power line). Power supply neutral has to be referred to ground.
Carefully check that:
A strong ground connection is made available in the lab to assure the unit works correctly. Do not
connect a Milestone unit without ground connection.
A dedicated ground connection direct from the main electric box (cabinet) of the laboratory to our
unit is ideal to eliminate any possible interference/electronic noise originated by other instruments
supplied with the same line.
Power supply line wires (their size and distance from the switch board) used in the laboratory are
compliant with the label positioned on the back side of our units.
Plug/socket is visible during the normal use and easily accessible.
Power line protection:
115V: Miniature circuit breaker curve C, 20A, interruption more than 6000A.
230V: Miniature circuit breaker curve C, 16A, interruption more than 6000A.
Residual current device: 30mA (Class I device).
Only 230V version: a schuko terminated power cord is provided.
The 115V version is not terminated.
2.6 Electrical installation
Before connecting the plug to the laboratory’s socket CHECK that the power supply
voltage of the unit matches the power supply line of the laboratory.
Damages occur when wrong power supplies the instrument.
Page 18

Milestone s.r.l.
MM098-002 – LOGOS ONE – Operator Manual
18
2.6.1 Back side connection plate 230V Version
On the back side of the LOGOS ONE are positioned the connection plates:
Description:
1. Speaker
2. Remote/external alarm connector
3. Ethernet/LAN plug
4. UPS side supply (controller power supply input)
5. UPS supplier socket (energy output to local ups
unit)
6. Main power supply
2.6.2 Back side connection plate 115V Version
On the back side of the LOGOS ONE are positioned the connection plates:
Description:
1. Speaker
2. Remote/external alarm connector
3. Ethernet/LAN plug
4. UPS side supply (controller power supply input)
5. UPS supplier socket (energy output to local ups
unit)
6. Main power supply
As separable power cord, it is strictly required to use power cord with wire size at least of
1.5mm² (equal to minimum AWG12). A size less of 1.5mm² (AWG12) cannot guarantee a
proper functionality of the unit and overheating of the power cord.
See also the Label of the instrument that provides some important information.
Always communicate the Serial Number of the unit to Customer Support.
See also the Label of the instrument that provides some important information.
Always communicate the Serial Number of the unit to Customer Support.
1 2 3 6 5
4
1
2
3
4
5
6
Page 19

Milestone s.r.l.
MM098-002 – LOGOS ONE – Operator Manual
19
2.6.3 Main power supply connection
ONLY FOR 115V VERSION, add plug to the cable:
Connect the two black wires to power pins of the plug and the yellow/green to ground’s pin.
Diameter approx. 10mm, size of wires AWG12.
ONLY FOR 230V VERSION, connect the cable to connector 1 (see the chapter 2.6.1).
2.6.4 Power supply connection (NO UPS mode)
There are two ways to connect the LOGOS ONE to power supply line.
Characteristic: This is the easier way to supply the LOGOS ONE, but it does NOT protect the unit from
power supply failure.
In fact, in case of power failure, user cannot remove samples from LOGOS ONE nor do any other
operations.
For this reason, Milestone s.r.l. does NOT suggest this type of connection.
Make sure to inform the customer that in this way a power supply failure inhibits any operation with
LOGOS ONE
NEVER DIRECTLY CONNECT LOGOS ONE TO THE SWITCHBOARD.
IT IS REQUIRED TO USE A SEPARABLE PLUG, WITHOUT A LOCKING DEVICE to mate
with the socket-outlet in the laboratory.
As separable power cord, it is strictly required to use power cord with wire size at least of
1.5mm² (equal to minimum AWG12). A size less of 1.5mm² (AWG12) cannot guarantee a
proper functionality of the unit and overheating of the power cord.
Page 20

Milestone s.r.l.
MM098-002 – LOGOS ONE – Operator Manual
20
Connect the by-pass cable (CODE 66643) from (5) UPS supplier socket to (4) UPS side supply.
Then connect the socket to main power supply (6): now it is possible to turn the LOGOS ONE “ON”.
Do not connect UPS supplier socket (4) directly to the laboratory socket power supply:
this input power supply complies to CISPR 11 class A and may cause electromagnetic
interference to other devices.
2.6.5 Power supply connection (Local UPS mode)
Characteristic: Milestone s.r.l. strongly recommends this type of connection as it protects the LOGOS ONE
from power supply failure. In this case, in fact, LOGOS ONE cannot process, but can execute all other
procedures. In fact “UPS side supply” provides energy at logic circuits.
Even when LOGOS ONE is directly plugged into the main hospital UPS line or power emergency line, we
observed occurring of delays or discontinuity of a few seconds/ minutes of the power supply. In this case,
LOGOS ONE stops working and the standard power failure procedure, that puts tissues in safety, is not
activated. For this reason, we highly recommend to install a UPS module on any LOGOS ONE unit.
Milestone can supply only UPS at 230Volt-50/60Hz (CODE 66100) with the following technical
specifications:
230V version (CODE 66100)
Voltage input 230V 50/60Hz according to your power supply
Power 1000VA/600W (minimum)
Capacity 15 minutes @ 500W (minimum)
Output 230V±10% 50/60±1Hz
Transfer time 6ms (max)
With cord set for connections
Weight: 9.6 kg (if provided locally: max 20kg - 44lb)
UPS unit at 115Volt-60Hz must be provided locally with the following minimum technical specifications:
115V version
Voltage input 115V 60Hz according to your power supply
Power 1000VA/600W (minimum)
Capacity 15 minutes @ 500W (minimum)
Output 230V±10% 60±1Hz
Transfer time 6ms (max)
With cord set for connections
Footprint max 190x600 mm
Weight max 20kg (44lb)
Before using the UPS, charge the battery according to the manufacturer's specifications.
Before connecting the UPS to the Unit, mount the UPS holder supplied with the Unit as shown below.
Page 21

Milestone s.r.l.
MM098-002 – LOGOS ONE – Operator Manual
21
Do not load more than 15Kg on the UPS holder.
Connect the “UPS supplier socket” (connector type IEC320–C13), (refer to figure below) to the UPS power
input. Maximum current 4A (230V), frequency same as local (refer to figure below-A).
Connect the UPS power output to the “UPS side supply” (connector type IEC320-C14) (refer to figure belowB).
Finally connect the socket to main power supply connector input (6): now it is possible to turn LOGOS ONE
ON.
Wrong connections of UPS prejudice the functionality of safety procedures detailed in the
chapter 5.1.
B
A
Page 22

Milestone s.r.l.
MM098-002 – LOGOS ONE – Operator Manual
22
2.7 Remote alarm connection
LOGOS ONE is also provided with two auxiliary outputs in order to connect external devices:
2.8 Internet connection
It is necessary to connect LOGOS ONE to Internet to get Remote Assistance services.
IT IS NOT ADVISED TO RUN PROGRAMS WITH LOGOS ONE WHILE USING THE
REMOTE ASSISTANCE CONNECTION.
PROCESSES IN REMOTE ASSISTANCE ARE FOR TESTING USE ONLY,
NEVER PLACE SPECIMENS INSIDE LOGOS ONE.
In order to access the remote assistance (as described in the chapter 7.7), you need to get the following data
from the Information Technology Department/Network Administrator of the customer:
LAN connection with standard RJ45 Ethernet cable and connector,
Dedicated IP address and Subnet Mask (strongly preferred to DHCP service); only port 80 has to be
enabled without limitations,
LAN gateway and DNS server addresses,
At least 150kb/s real transfer rate (uploading and downloading).
When connecting LOGOS ONE to remote assistance, it is necessary that Firewall, traffic
data filters and all software are disabled. Milestone s.r.l. suggests to fix the IP address in
order to properly set up the LAN defenders.
From Log-in screen click on ADMINISTRATOR. Insert ADMINISTRATOR password (issued as a separate
document inserted in the Operator Manual) and press enter.
Output
Contact
Status
1
Identifies the LOGOS ONE alarm
switch
1
Normally CLOSED
2
Normally OPEN
3
COMMON
2
Identifies the LOGOS ONE end
program
7
Normally OPEN
8
COMMON
For safety reasons and for preventing any damage to the internal relays, any external
devices that need to be connected to LOGOS ONE unit must have a maximum Voltage
lower than 40 VDC – 1A.
Page 23

Milestone s.r.l.
MM098-002 – LOGOS ONE – Operator Manual
23
Press “Settings” to access the administrator screen.
Then press “Owner” and choose the “Remote Connection” tab:
Select “Specify an IP address”. Enter the data required supplied by the Network Administrator.
For example:
IP Address
192.168.1.235
Subnet Mask
255.255.255.0
Default Gateway add.
192.168.1.6
DNS server address
192.168.1.7
WINS
Not required
Each time you click on a white box, a num-pad appears; enter the number required and press enter. Fill all
the white boxes with the data network. At the end Press HOME button to store the data.
Page 24

Milestone s.r.l.
MM098-002 – LOGOS ONE – Operator Manual
24
2.9 Reagents
Complete the set up with reagents, by providing at least:
PROCESSING REAGENTS:
1 tank of 5l (or 1US gal) Formalin 10% or FineFIX
1 tank of 5l (or 1US gal) Flushing solution (60% absolute alcohol/40% tap water)
1 tank of 5l (or 1US gal) Absolute Ethanol
2 tanks of 5l (or 1US gal) Absolute Ethanol for rinsing
1 tank of 5l (or 1US gal) Absolute Isopropanol
4kg (8,82 lb) Paraffin, Histology grade
If you want to process fatty tissues larger than 3mm, it is suggested to provide also a second
isopropanol tank: 1 tank of 5l (or 1US gal) Absolute Isopropanol
Alternative to isopropanol:
1 tank of 5l (or 1US gal) JFC® - for processing of larger fatty tissues (3mm and larger), use of
Milestone JFC solution is recommended.
1 tank of 5l (or 1US gal) MileGREEN® - for processing of larger fatty tissues (3mm and larger), use
of Milestone MileGREEN® solution is recommended.
If an isopropanol alternative is used, a flushing in isopropanol after xylene/JFC or
isoparaffin before paraffin is ALWAYS REQUIRED.
CLEANING REAGENTS:
1 tank of 5l (or 1US gal) Xylene or Isoparaffin (MileGREEN®)
1 tank of 5l (or 1US gal) Absolute Ethanol
1 tank of 5l (or 1US gal) tap Water.
2.10 Log in and log out
As a default, when the system is switched on, the LOG IN screen appears. Press “Administrator” button,
enter the password (issued as a separate document inserted in the Operator Manual) and press “Enter”.
The above reagents must be onsite and available at time installation of unit.
Refer to chapter 9.4.1 for purity grade of reagents.
Tank to be filled with tap water must be either supplied locally and in this case it is
required to use a clean tank, or can be purchased directly from the manufacturer (for
details see Chapter 8).
Page 25

Milestone s.r.l.
MM098-002 – LOGOS ONE – Operator Manual
25
The Administrator HOME PAGE appears showing, as a default, the main functions grouped by different
colors.
In whatever screen you are, press the “Home” button to return to the HOME PAGE. You can customize
the HOME PAGE under the USERS settings, choosing between “Favorites” and “Main functions” (see
below).
2.10.1 Create a new user
Go to the Settings screen and select Users to create a NEW USER.
The USERS setting screen appears, as shown below. Click on Add, a keyboard appears. Enter the NEW
USER name and press Enter.
SERVICE Log-in is available for authorized personnel only.
ADMINISTRATOR can access to a restricted SERVICE functions.
SERVICE has complete access to the unit functionalities.
Page 26

Milestone s.r.l.
MM098-002 – LOGOS ONE – Operator Manual
26
Now select and configure the parameters of the NEW USER choosing the:
USER CATEGORY.
USER PASSWORD: click on the password box, a num-pad appears as shown below, enter the
password (max 6 numbers) and confirm.
USER CONFIGURATION (HOME PAGE): select the Set Favourites as HOME Page checkbox to
have FAVOURITES PROGRAMS as default.
Now select the appropriate FUNCTIONS for the NEW USER:
Pressing the arrow (see figure below, circle) it is possible to choose the appropriate ACCESS LEVEL in the
program startup (here automatically Ask for USER and PASSWORD). The following window will appear:
WHEN MARKED the new USER can:
Create and modify programs
Replace the exhausted reagents
Set the tanks status (empty/fill the tank), open the
reagents list and modify the reagents details (ex: max
number of processed cassettes)
Set as ready the WAX when the WAX heating status
icon becomes YELLOW
Run a program starting from any phase, even not the
first one of the list
Page 27

Milestone s.r.l.
MM098-002 – LOGOS ONE – Operator Manual
27
Selecting:
Ask password for processing
procedure
The software recognizes (through a password system) who is
performing some operations during the processing (who starts the
program, unloads the cassettes, aborts the program).
Ask password for reagent
management procedure
The software recognizes (through a password system) who is
performing some operations during the reagent management (who
replaces the reagents manually).
2.11 Set system date and time
From the HOME PAGE, go into the “Settings” screen and select “Date/time” (see figure below).
In the time setting window, it is possible to set the TIME ZONE, thus activating the automatic update of time
during the year.
2.12 Set language
From the HOME PAGE, go into the “Settings” screen and select “Language” (see figure below).
Choose the language required from the drop down menu then press YES and the system automatically
reboots to enable changes.
After changing this setting, please reboot the system.
Page 28

Milestone s.r.l.
MM098-002 – LOGOS ONE – Operator Manual
28
2.13 Load LOGOS ONE with wax
Log in as Administrator to switch on the Wax heating power and reset wax loading date.
Enter in Reag./Cons. screen: a RED icon appears over the WAX CAVITY and the word Replace is RED.
Select the WAX CAVITY and press Replace reagent button (figure below).
The screen below appears, showing the WAX replacement procedure. Follow the procedure displayed on
the screen.
A message reminds that this operation will reset WAX management count to zero. Press
YES to confirm.
Page 29

Milestone s.r.l.
MM098-002 – LOGOS ONE – Operator Manual
29
HOW TO OPERATE:
1
Lift up the frontal panel
2
Lock the tube on the unit
3
Place the other end of the hose into a wax waste
container
4
Turn the lever down to open
5
At the end of the discharge close the wax valve and
remove the hose
6
Lift down the frontal panel
7
Open the right cover of LOGOS ONE and place paraffin
in the cavity.
We suggest to clean the cavity with
paper before insert new paraffin.
In LOGOS ONE it is possible to load solid as well as already molten new WAX.
It is necessary to fill the LOGOS ONE WAX CAVITY (right side cavity) with approximately
4kg of histology grade WAX.
MAX and MIN levels for the MOLTEN WAX are etched on the LOGOS ONE WAX CAVITY
wall.
Strictly maintaining the molten WAX level between these markings assures the
appropriate coverage of all three cassette layers of the rack during process.
Page 30

Milestone s.r.l.
MM098-002 – LOGOS ONE – Operator Manual
30
Wait until the new solid wax you have loaded has melted (100 minutes). If molten wax is loaded, the Wax
status icon becomes yellow. Check the wax status (fully molten) and press “Set as ready” button.
2.13.1 Wax heating setting
From the “Settings” screen select the “Heating” button (left figure below) or from the “Main menu” select the
WAX icon on the status bar (right figure below).
The “heating settings” screen appears displaying information about the Heating Status and the Cavity Level.
(Main processing chamber on the left and WAX chamber on the right in the same screen).
After the replacement, the software resets wax loading date automatically to the current
date and turns WAX HEATING ON.
By default WAX reuse life is checked by number of days (maximum 14 days). If you want
to change it, follow the instructions reported in the chapter 4.1.1.
Page 31
Milestone s.r.l.
MM098-002 – LOGOS ONE – Operator Manual
31
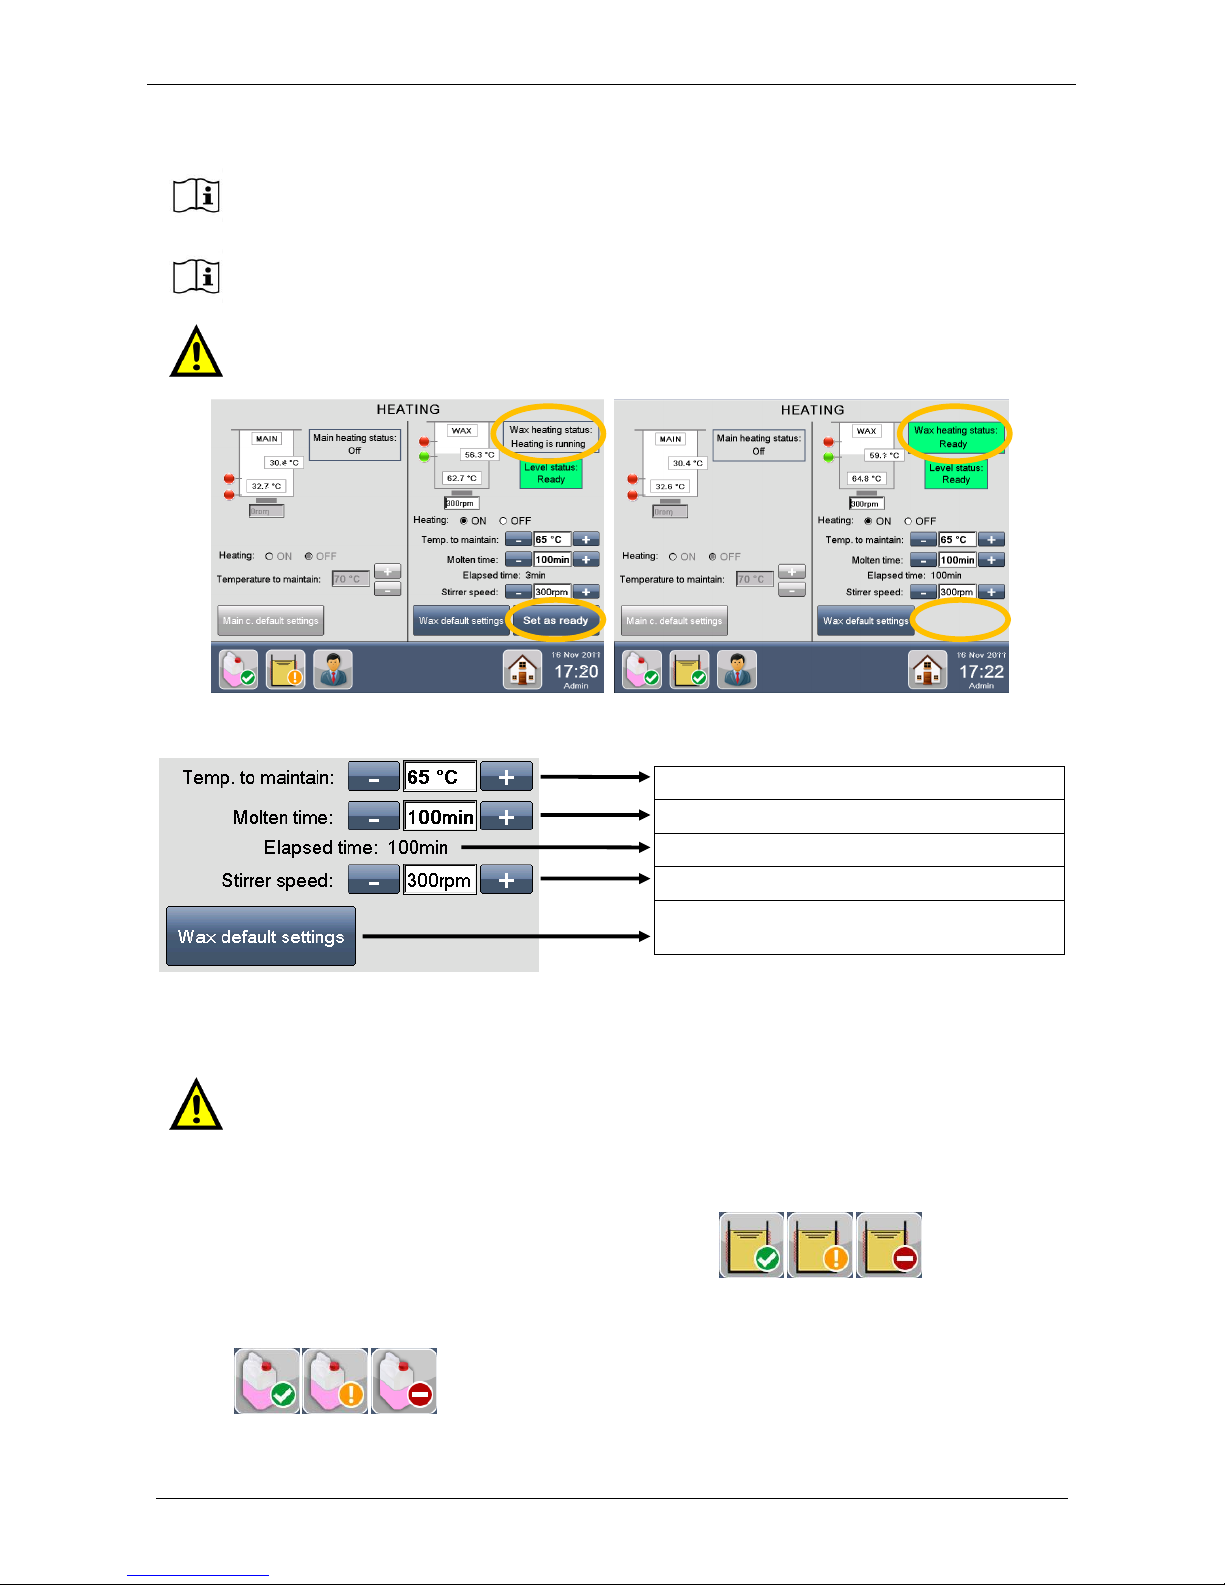
Only when the WAX is ready for use (fully molten), the graph shows the lower level sensor as active
(green/covered) and the maximum level sensor as inactive (red/uncovered), as shown in the figure above.
OTHER FUNCTIONS:
The Molten Time is a pre-set value. Milestone s.r.l. strongly recommends NOT to modify it.
The maintaining temperature is a default value set according to Milestone s.r.l. standard
programs. The modification of this value is only allowed under direct control of Milestone
applicative support.
LOGOS ONE software will indicate with an alarm if the WAX level is incorrect. See
paragraphs 2.13 and 3.5 for how to manage the WAX, its reuse life and when proceeding
with the WAX cleaning protocol.
ADMINISTRATOR/SERVICE can modify all parameters of these fields; incorrect use of
these settings may lead to system malfunction. Use only under direct control of
Milestone s.r.l. technical support.
The WAX heating status icon indicates through a change in color the:
WAX levels.
WAX “Temperature to maintain”.
The reagent status icon indicates status of WAX (and all the other reagents) and shows through a change
in color the reagent status based on n° of cassettes processed and/or cycles
performed and/or expiration date. Please refer to chapter 4.
USER can only “Set as ready” the WAX (if allowed by the ADMINISTRATOR in the USER
Settings) when the WAX heating status icon becomes YELLOW and the “Set as ready”
button becomes active (see the figures below).
It is only possible to “Set as ready” the WAX when its temperature is 4°C lower than the
preset temperature value, so a process can be immediately started.
In any case, it is necessary that operator checks actual status of the WAX inside the
CAVITY before setting “wax as ready”.
WAX is kept at this temperature when ON
Time to completely melt the WAX
WAX heating time remaining before use
WAX CAVITY stirrer speed
Restore WAX default settings
Page 32
Milestone s.r.l.
MM098-002 – LOGOS ONE – Operator Manual
32
2.14 Load LOGOS ONE with reagents
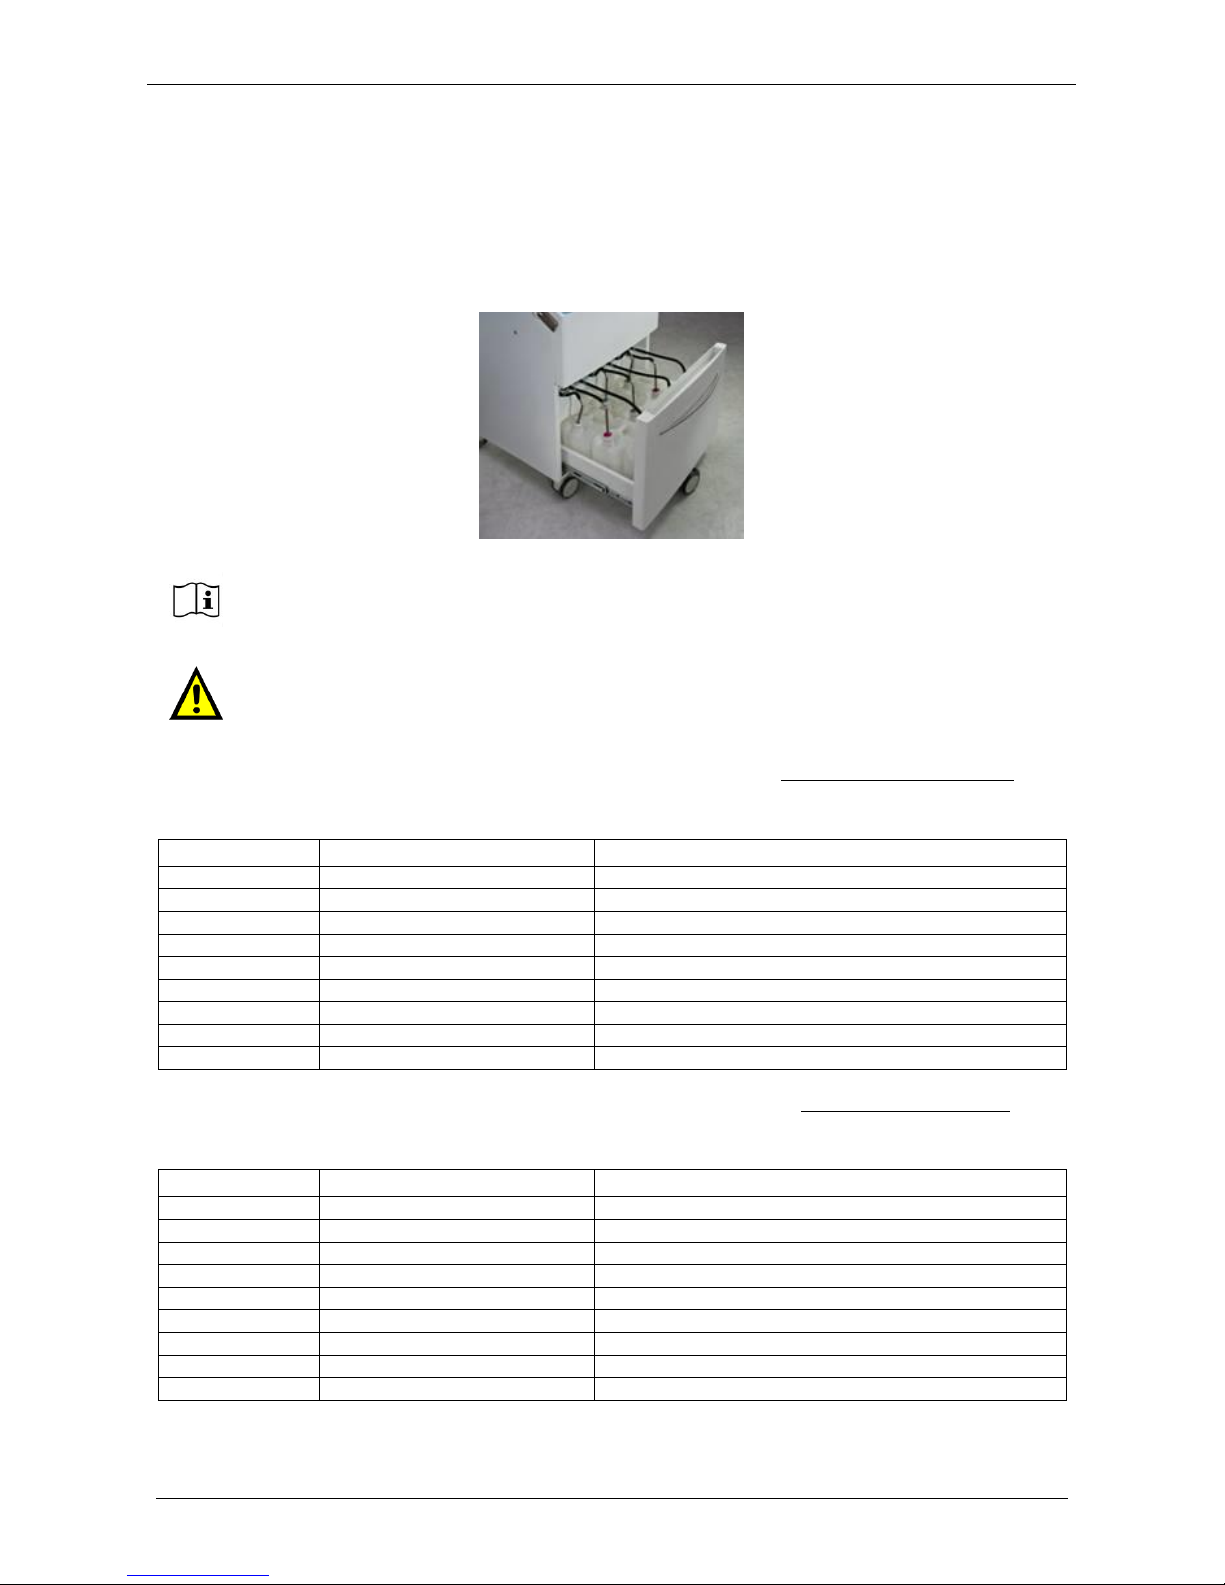
LOGOS ONE drawer hosts 9 tanks. It’s possible to use commercial tanks (already filled with reagents) or
clean tanks (to be filled with reagents) which must be either supplied locally or purchased directly from the
manufacturer. For details see Chapter 8: tanks 5 liters capacity (CODE 70170) and tanks 5 liters capacity
xylene proof (CODE 70170F).
Milestone medical application staff suggests the following use of the tanks IF HistosMATE is not in use in the
laboratory to clean the rack:
Milestone medical application staff suggests the following use of the tanks IF HistosMATE is in use in the
laboratory to clean the rack:
It is possible to process up to 3 layers of the Split rack with 5 liters tanks and up to
2 layers with 1 US gallons (3.8 liters).
Do not insert tanks with a capacity lower than 3.8 liters because the reagent will be
too much contaminated.
Do not use tanks higher than 30cm because the length of the pipes will not be
enough. See the chapter 2.14.1.
Tank nr.
Reagent type
Reagent name
Tank nr. 1
Fixative
Formalin\FineFIX®
Tank nr. 2
Flushing
Flushing
Tank nr. 3
Rinsing reagent #1
Ethanol
Tank nr. 4
Dehydration
Ethanol
Tank nr. 5
Clearing
Isopropanol
Tank nr. 6
Clearing
Isopropanol2
Tank nr. 7
Cleaning
Cleaning Xylene\Isoparaffin (MileGREEN®)
Tank nr. 8
Cleaning
Cleaning Ethanol
Tank nr. 9
Cleaning
Cleaning Water
Tank nr.
Reagent type
Reagent name
Tank nr. 1
Fixative
Formalin\FineFIX®
Tank nr. 2
Flushing
Flushing
Tank nr. 3
Rinsing reagent #1
Ethanol
Tank nr. 4
Rinsing reagent #2
Ethanol
Tank nr. 5
Dehydration
Ethanol
Tank nr. 6
Clearing
Isopropanol
Tank nr. 7
Clearing
Isopropanol2
Tank nr. 8
Cleaning
Cleaning Xylene\Isoparaffin (MileGREEN®)
Tank nr. 9
Cleaning
Cleaning Ethanol
Page 33
Milestone s.r.l.
MM098-002 – LOGOS ONE – Operator Manual
33
2.14.1 Set up LOGOS ONE with reagents
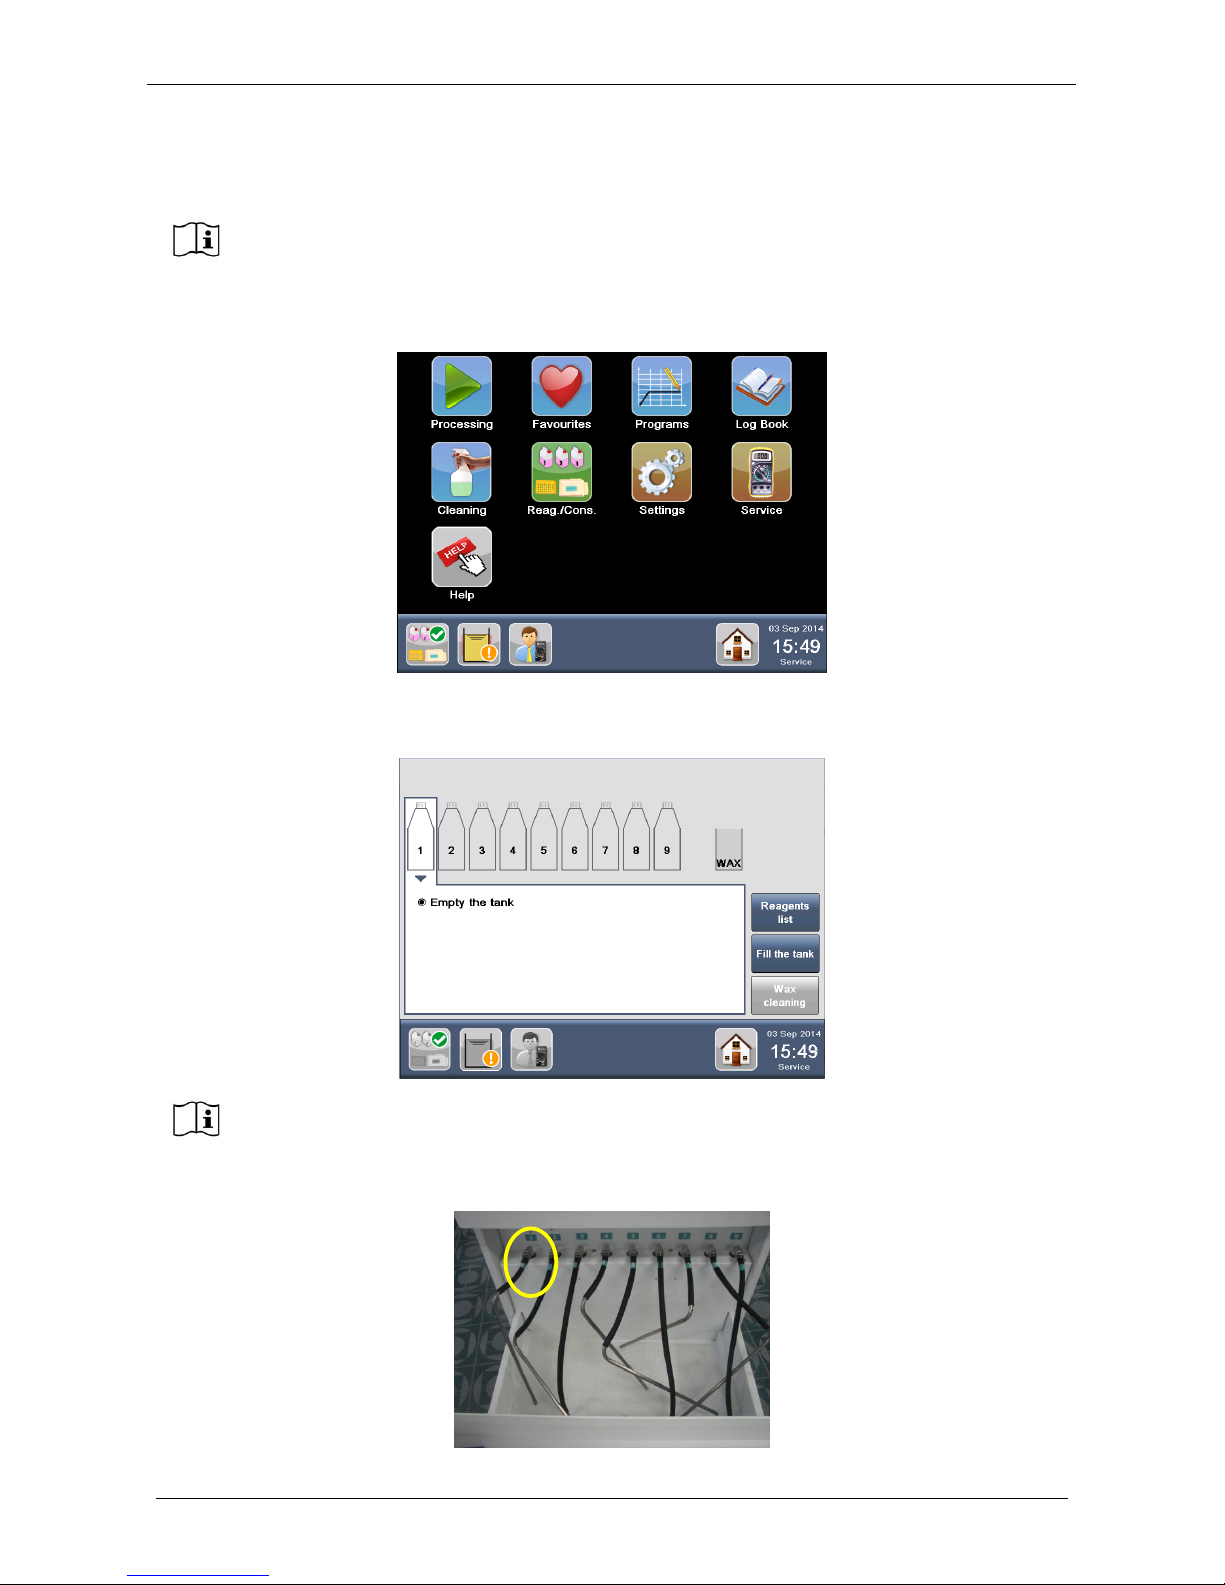
Select “Reag./Cons.” from the MAIN FUNCTIONS screen. In alternative, press directly the “Reagents status”
icon on the STATUS BAR of the HOME PAGE.
The REAGENTS CONFIGURATION screen appears (figure below), showing the default settings of the
tanks. Select the tank in position NUMBER 1.
Start set up of the tanks from hose number 1, as shown below.
It is necessary to first load the tanks with reagents before operating the unit.
Before continuing with next operations, open the drawer where the processing tanks
have to be inserted.
Page 34
Milestone s.r.l.
MM098-002 – LOGOS ONE – Operator Manual
34
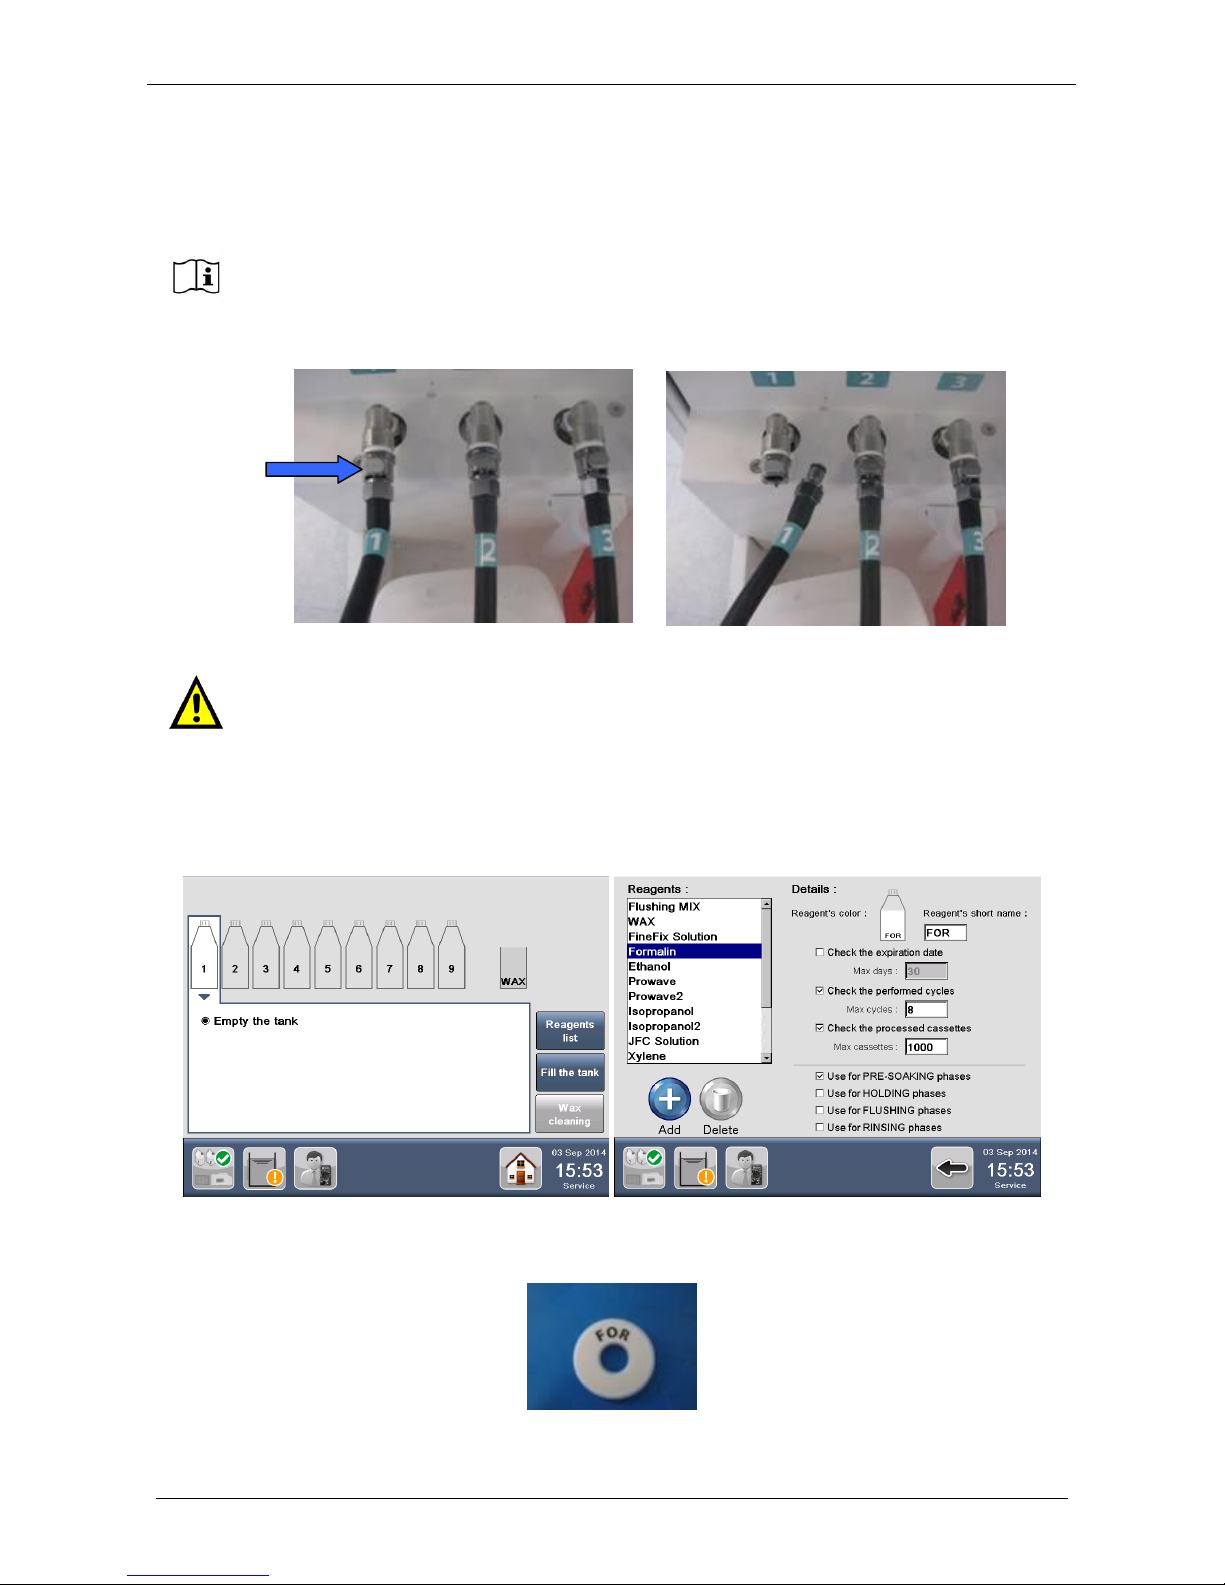
Pipe number 1, 2, 4, 5, 7, 8 are provided with a RAPID CONNECTOR to simplify insertion/extraction. Just
press the rapid connector to easily insert/extract any pipes from each tank, as shown below.
Pipe number 3, 6 and 9 are not provided with rapid connectors, they are the longest pipes with the possibility
to simplify insertion/extraction without complete detaching of the pipe.
Press the rapid connector corresponding to the tube number 1, as shown below.
Choose the plastic ring suitable for the reagent you want to use in each position (in case of position
Nr. 1, Formalin is suggested) as follows: press “Reagents list” from the Reagents configuration
screen, look to the color and the short name of the reagent (Formalin), then choose the
corresponding plastic ring.
The PLASTIC RING that corresponds to Formalin reagent (position 1) is white with the short name “FOR”.
Now insert it in the metallic pipe.
There are numbered stickers 1-9 on each pipe and their position.
It’s suggested to insert the Formalin tank in position number 1 and the Flushing tank in
position number 2.
TANK POSITION IS strongly suggested only for formalin and flushing.
Other tanks can be positioned according to user’s preference request.
PRESS
HERE
Page 35
Milestone s.r.l.
MM098-002 – LOGOS ONE – Operator Manual
35
The image below shows the final configuration.
Insert the tank containing fresh reagent (Formalin in this case) in the correct position (hose number 1
in this case), then insert the rapid connector in the corresponding position (number 1 in this case).
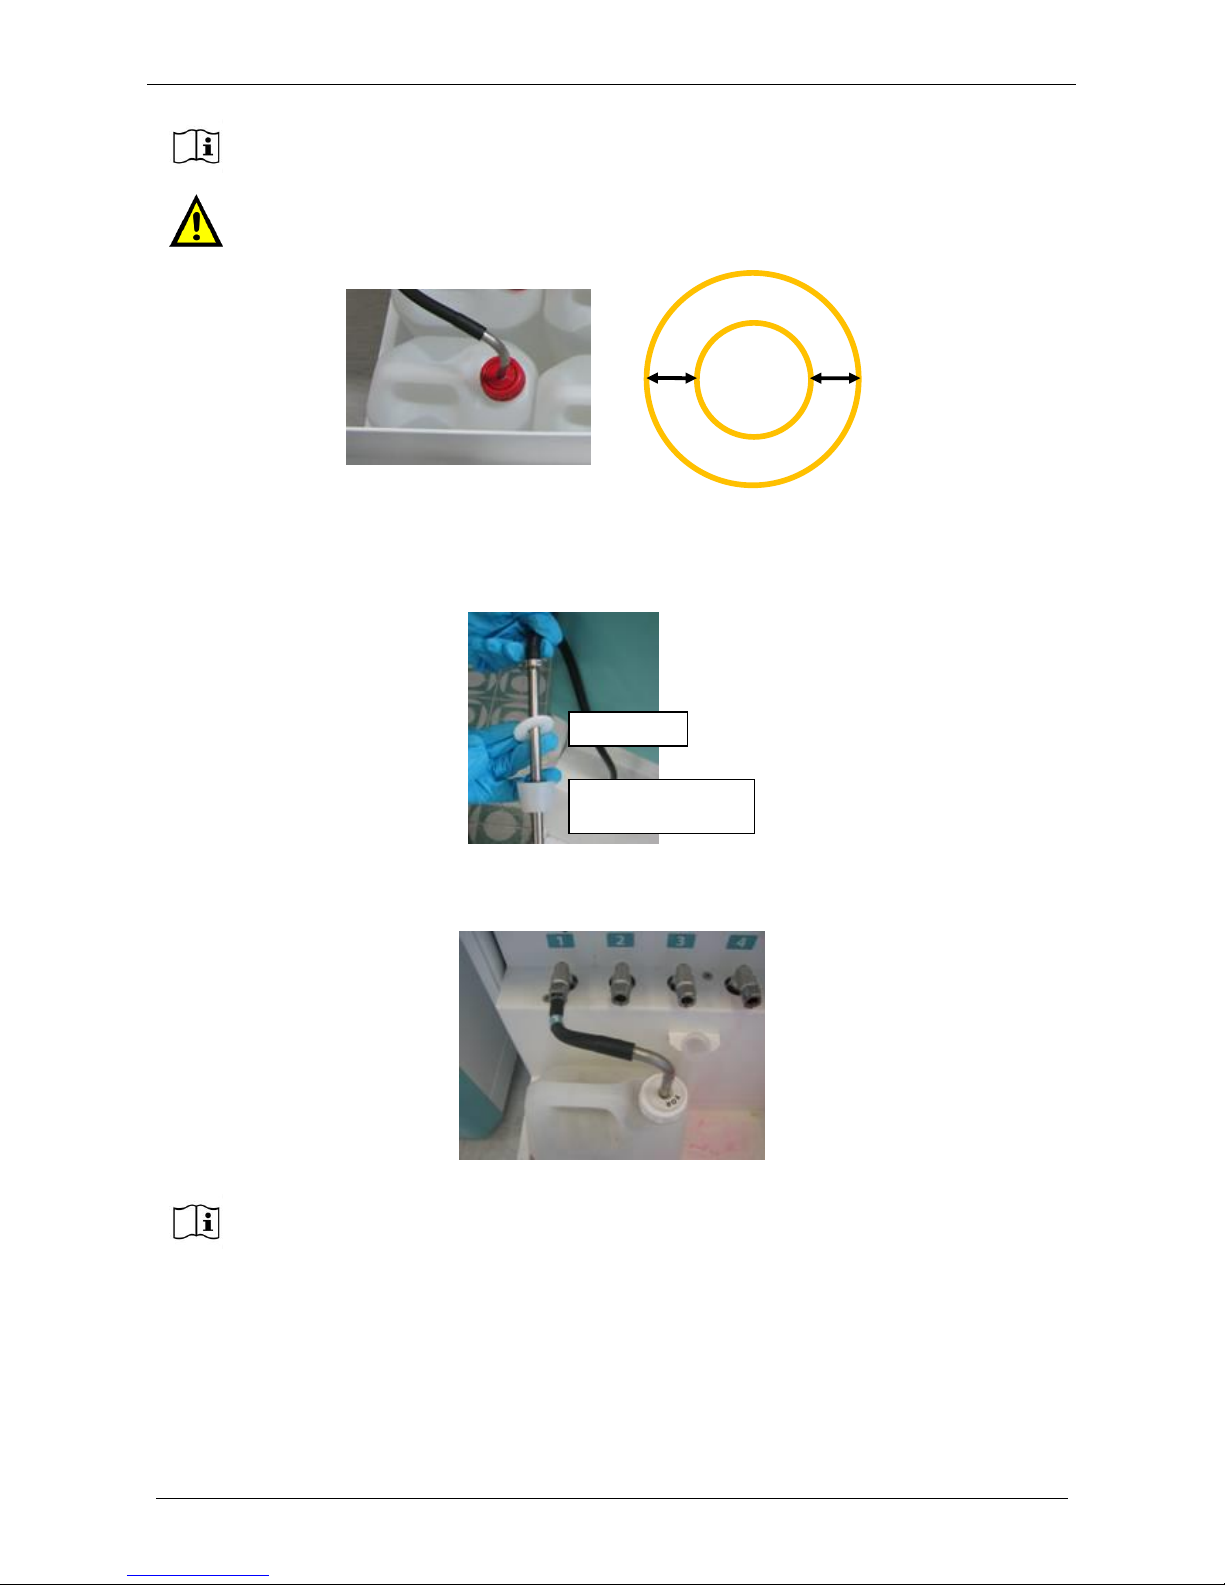
Milestone suggests to make manually an hole into the original cup of the tank, as shown
below.
If you make an hole into the cup, it is required that the diameter hole is minimum 6mm
larger than the metallic pipe.
Always check that you have properly entered the rapid connectors.
Plastic ring
Hole into the original
cup of the tank
≥3mm
≥3mm
Pipe
Cup’s hole
Page 36
Milestone s.r.l.
MM098-002 – LOGOS ONE – Operator Manual
36
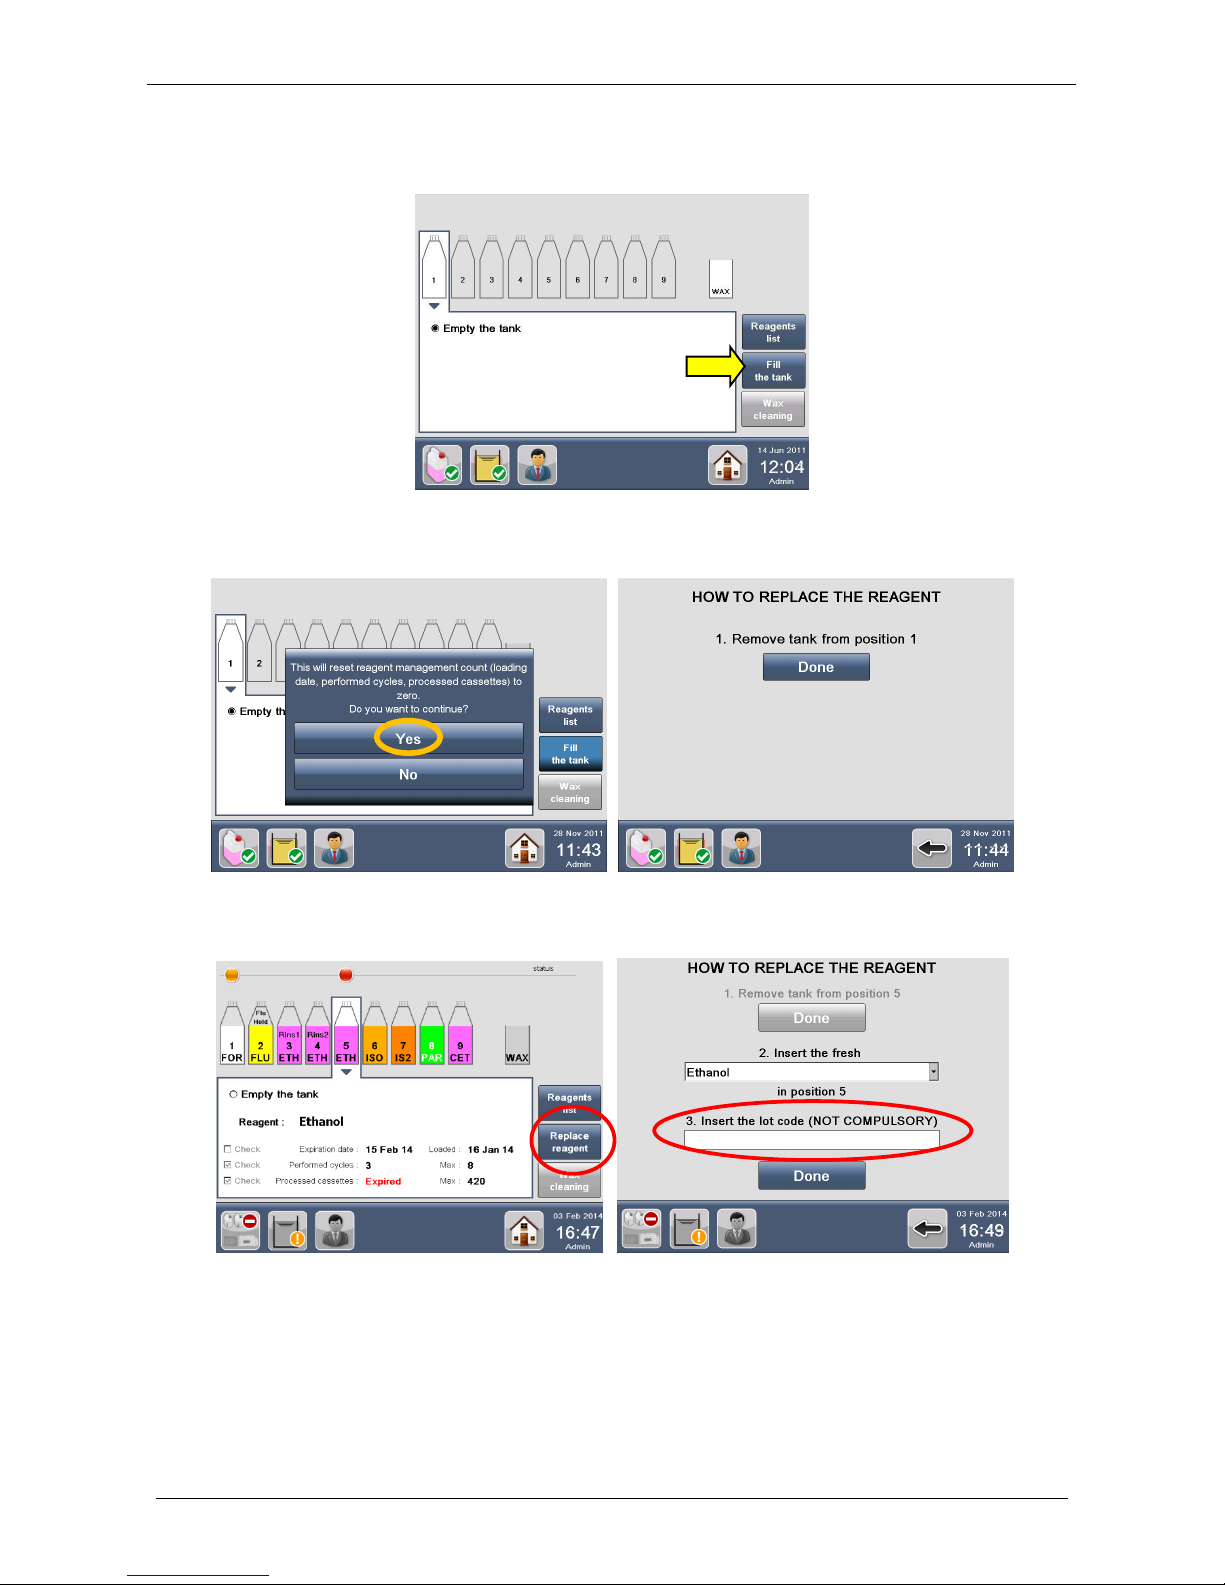
Only after positioning of the tank in the drawer, in the REAGENTS CONFIGURATION screen select
the tank in position NUMBER 1 and press “Fill the tank”.
The following message appears, click YES. The screen on the right appears showing the REAGENT
REPLACEMENT PROCEDURE; press Done to confirm and follow the steps:
Select the reagent to insert in the drop-down menu (Ethanol in this case).
Page 37
Milestone s.r.l.
MM098-002 – LOGOS ONE – Operator Manual
37
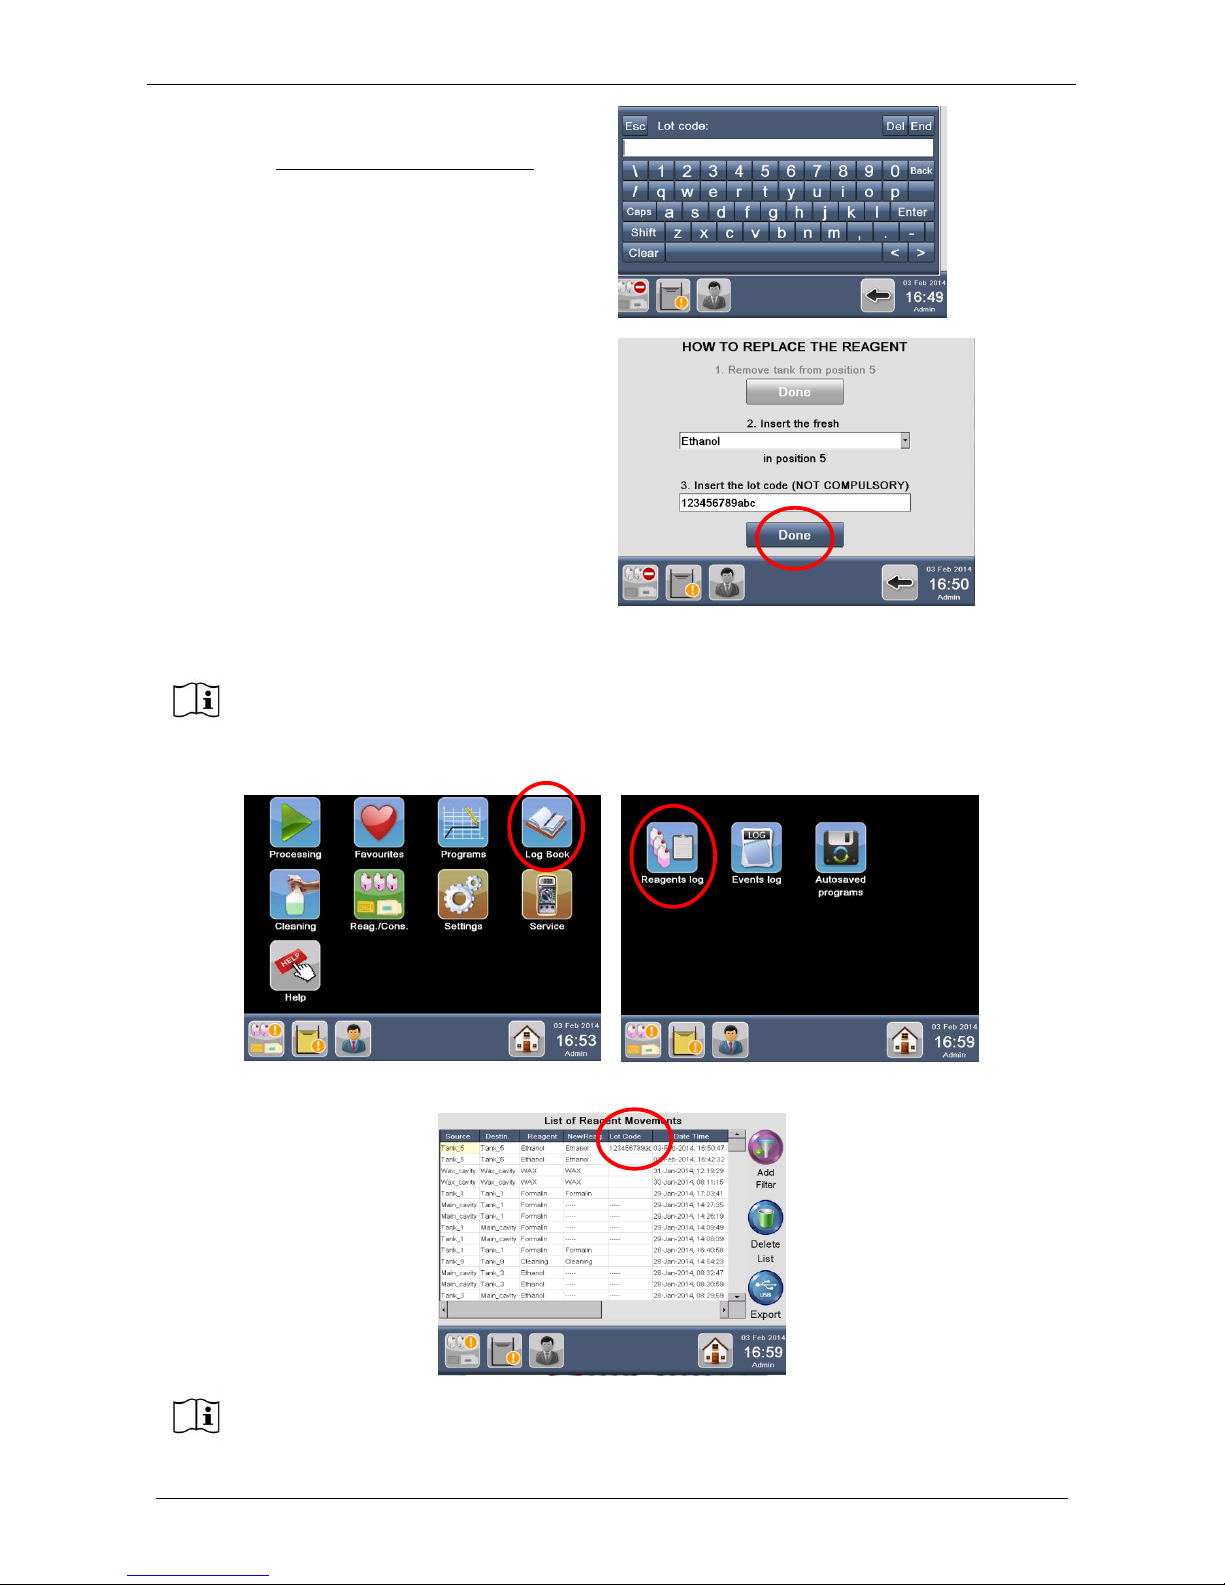
It is possible to insert in that field the REAGENT
LOT CODE. This function is not compulsory.
If a bar code reader is connected to LOGOS ONE,
the code can be automatically read. If not, press
the field window, a keyboard appears to allow entry
of the LOT number.
When the code is inserted, the following screen
appears: the lot number is shown into the field.
Press “Done” to complete the replacement
procedure.
The Lot Code is saved in the Reagents Log under “Log Book” icon.
The Lot Code is reported under the new column LOT CODE.
Lot code is not compulsory. So if not needed, follow the regular procedure to replace a
reagent, by pressing “Done” without inserting any code before.
Refer to the chapter 6.3 to get instructions on how to export the Reagent log list.
Page 38
Milestone s.r.l.
MM098-002 – LOGOS ONE – Operator Manual
38
Repeat the same procedure for all other tanks. Now you are ready to process.
TANK NUMBER
REAGENT
SHORT NAME
COLOR
1
Formalin
FOR
White
2
Flushing
FLU
Yellow
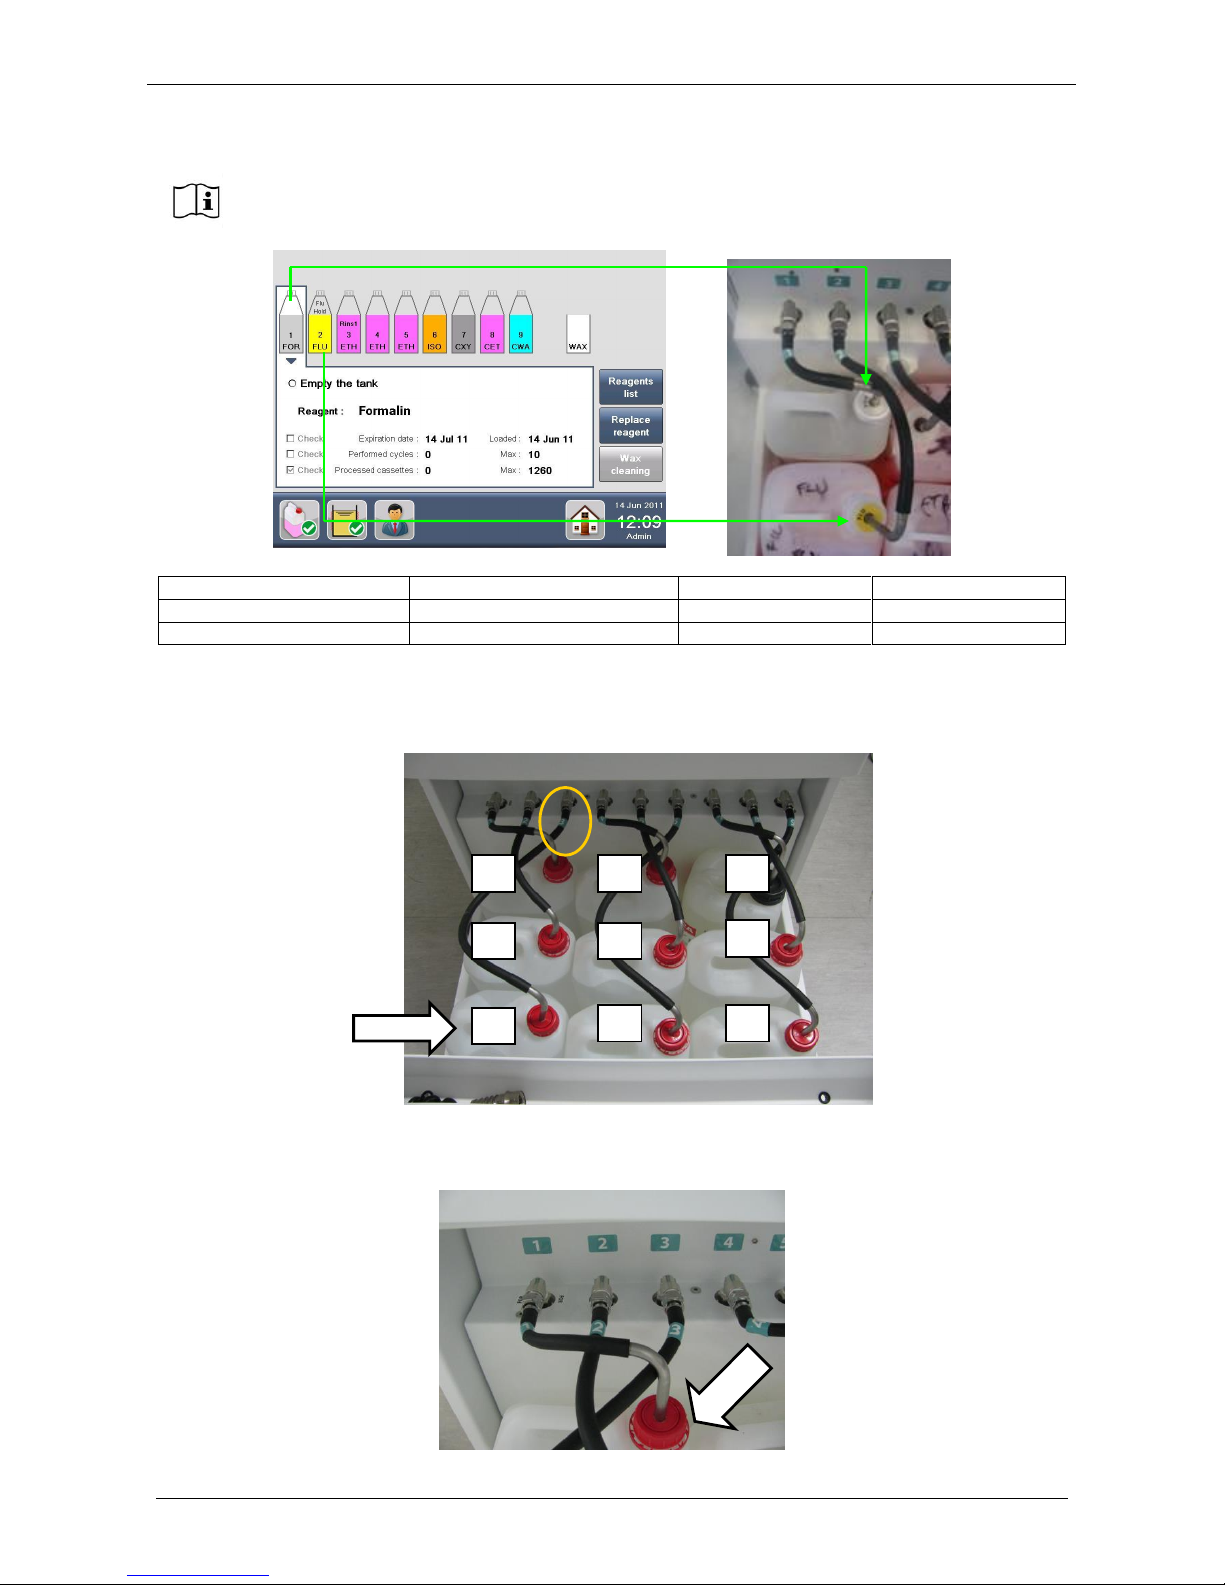
It’s required to insert the tanks with the order of the numbers showed in figure below. For example the tank
referring to the tube number 3 and to the position number 3 (see the circle in figure below) must be inserted
in the position 3 showed by the arrow below. The same concept is required for all the other tanks.
It’s required to insert the tanks with the orientation showed in figure below: the tank number 1 has the cup on
the right, not on the left (see the arrow). The same concept is required for all the other tanks.
The tanks as displayed by the software, with their numbers, short names and colors,
correspond to the real tanks as positioned in the drawer with their plastic rings.
1 2 3 4 5 6 7 8 9
Page 39
Milestone s.r.l.
MM098-002 – LOGOS ONE – Operator Manual
39
2.14.2 Cleaning procedure for cleaning tanks
TO BE PERFORMED AFTER EVERY CHANGE OF CLEANING REAGENTS
Reagents required: Xylene, Isoparaffin or substitute and Ethanol.
Purpose of cleaning: is performed on all CLEANING tanks that have potential contamination from WAX
residues.
When to clean: to be performed EVERY TIME cleaning reagents are changed.
Removal of tanks: open the drawer, press the rapid connectors and extract the tanks to be cleaned.
Dispose of reagent according to lab practices appropriate for that reagent.
Cleaning procedure: perform a rinse in Xylene or Isoparaffin or substitute (close tank and shake for a few
minutes), dispose of waste reagents and follow with two quick rinses in Ethanol.
Reinstalling of tanks and reagent replacement: load tanks with fresh cleaning reagents, put the pipes,
then insert the tanks and the rapid connectors in the corresponding position. Complete replacement of
reagent that resets reagent management counts.
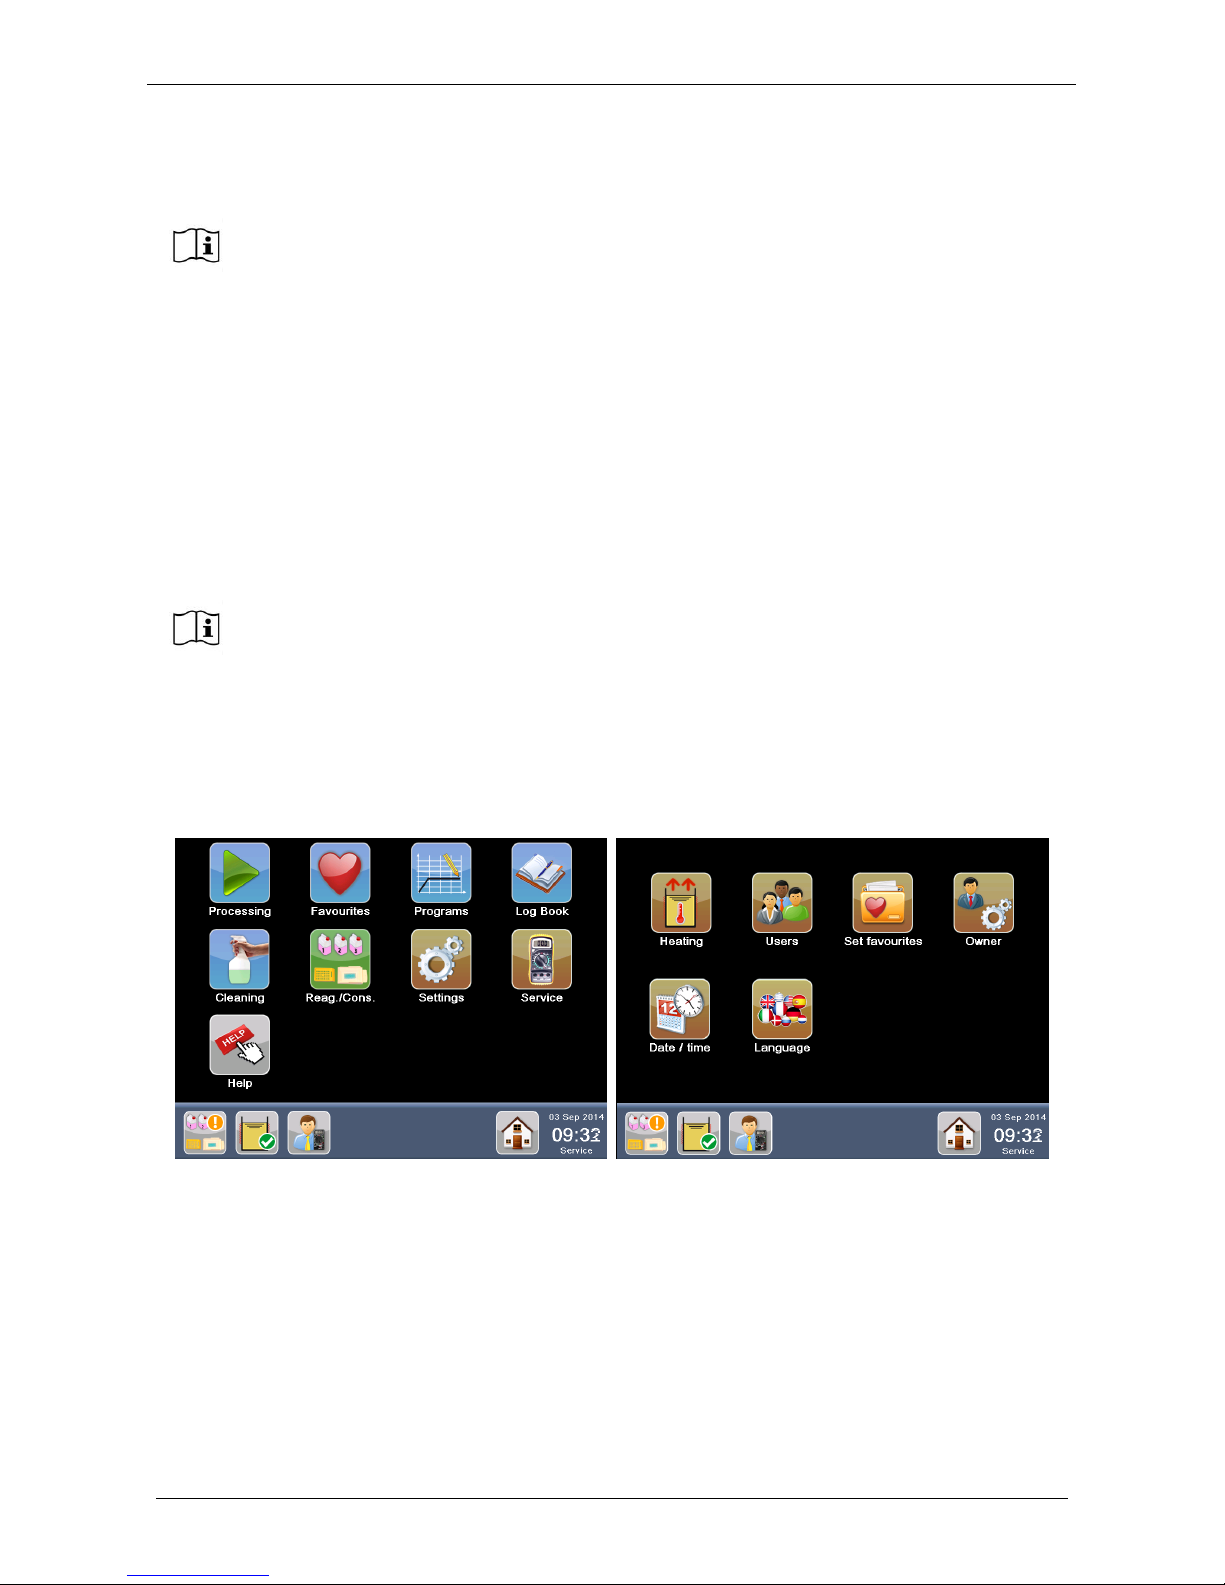
2.15 Most used programs
This function allows inserting FAVOURITE programs in the HOME PAGE.
1. Press “Settings” from the MAIN FUNCTIONS screen and select “Set favourites”.
It’s required to execute the cleaning procedure when the cleaning tanks are not
commercial but either supplied locally or purchased directly from the manufacturer
because it’s possible to reuse them several times.
When the cleaning tanks are severely contaminated on the basis of their use change them.
Tank xylene proof CODE 70170F (for details see Chapter 8).
Page 40
Milestone s.r.l.
MM098-002 – LOGOS ONE – Operator Manual
40
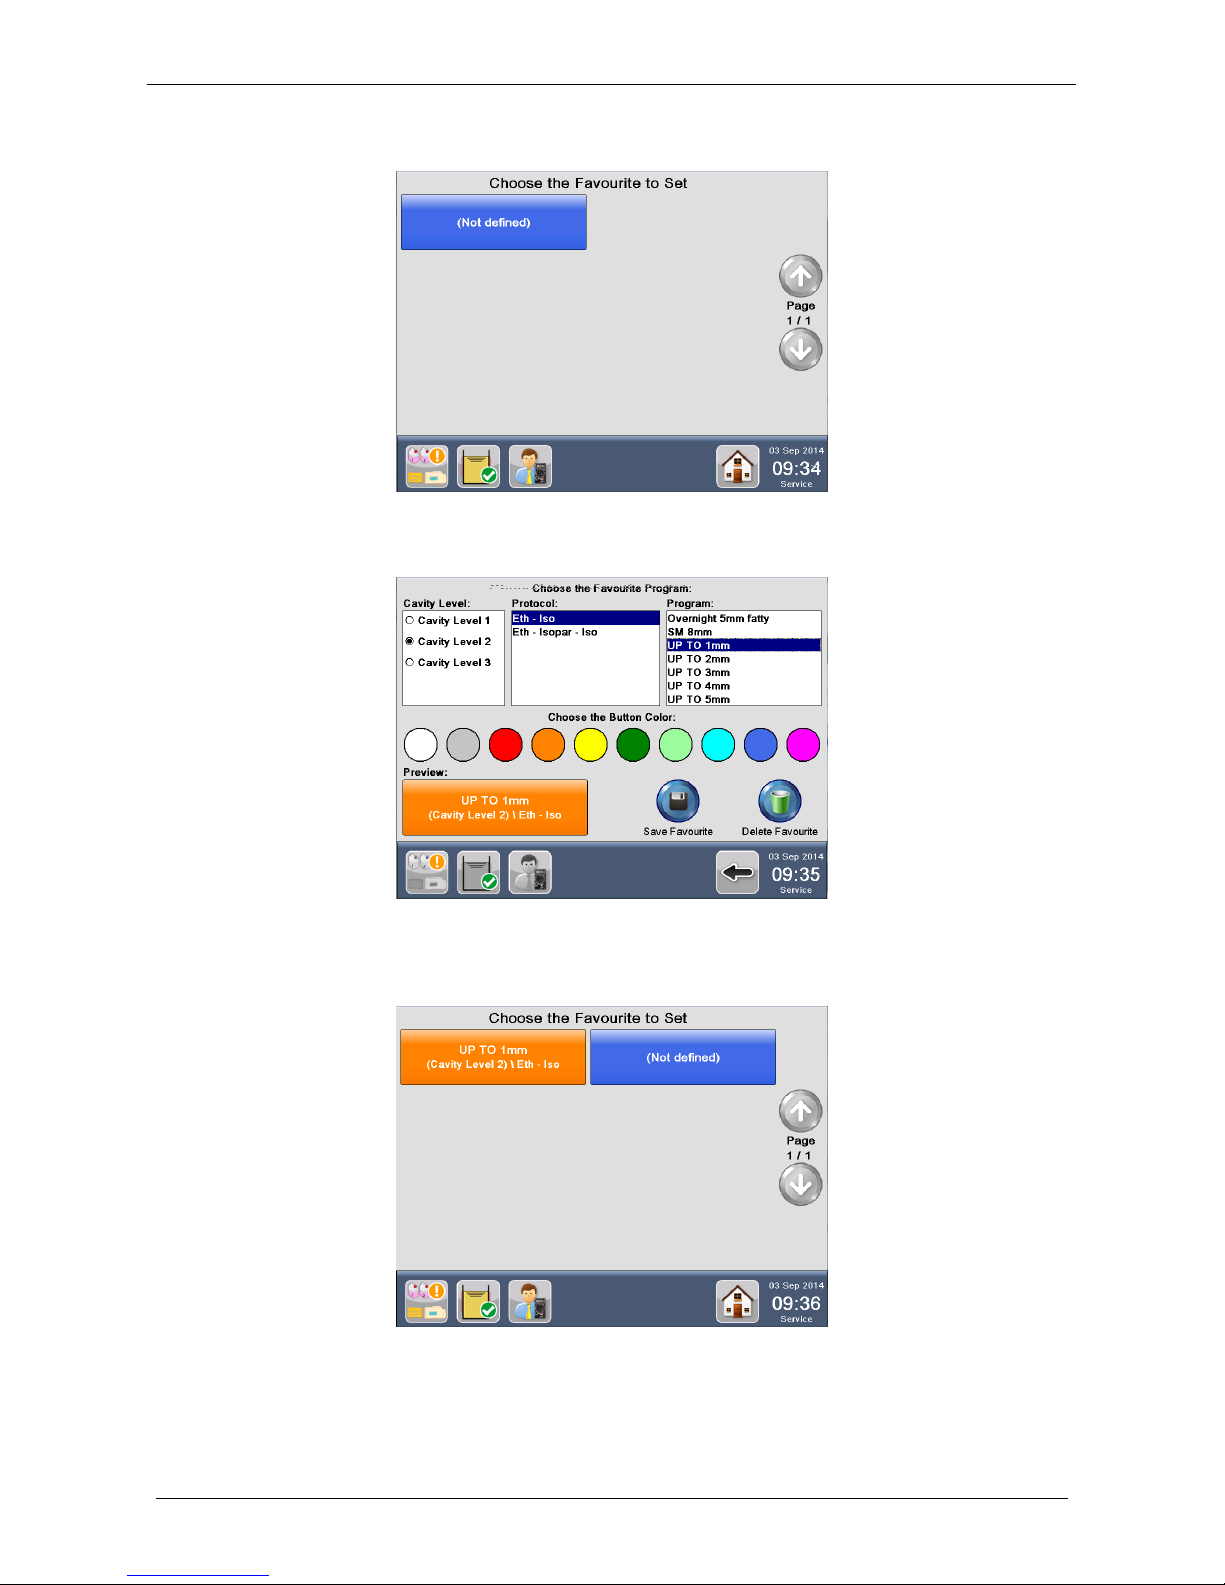
2. Click on NOT DEFINED icon:
3. Select the CAVITY LEVEL, the PROTOCOL, the PROGRAM and the BUTTON COLOR to change
TEXT and BACKGROUND COLOR. Preview is displayed on bottom left.
4. Press Save Favourite to save changes.
5. The program icon is now listed in the Choose the Favourite to Set screen.
Page 41
Milestone s.r.l.
MM098-002 – LOGOS ONE – Operator Manual
41
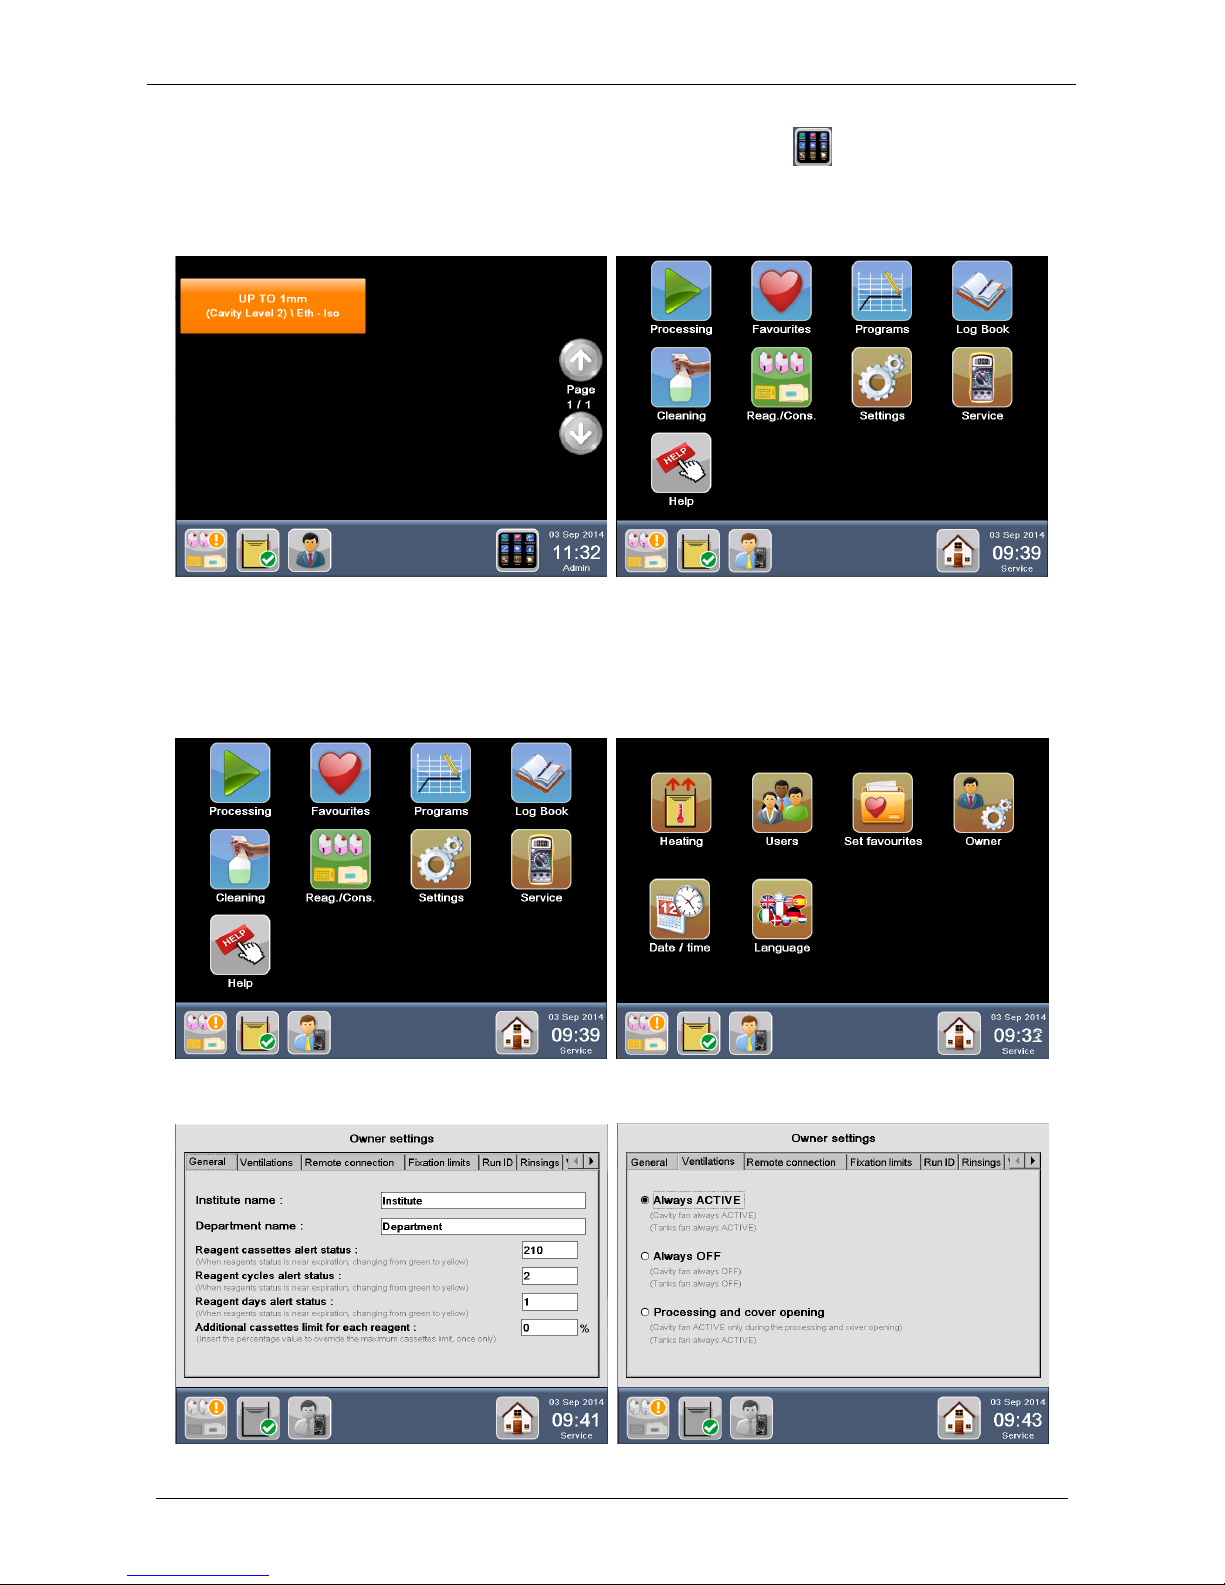
If USER HOME PAGE is set as FAVOURITES (figure below left), press the button to return to the Main
functions screen.
If HOME PAGE is set as MAIN FUNCTIONS, press Favourites to open the FAVOURITES SCREEN (figure
below right)
2.16 Owner settings
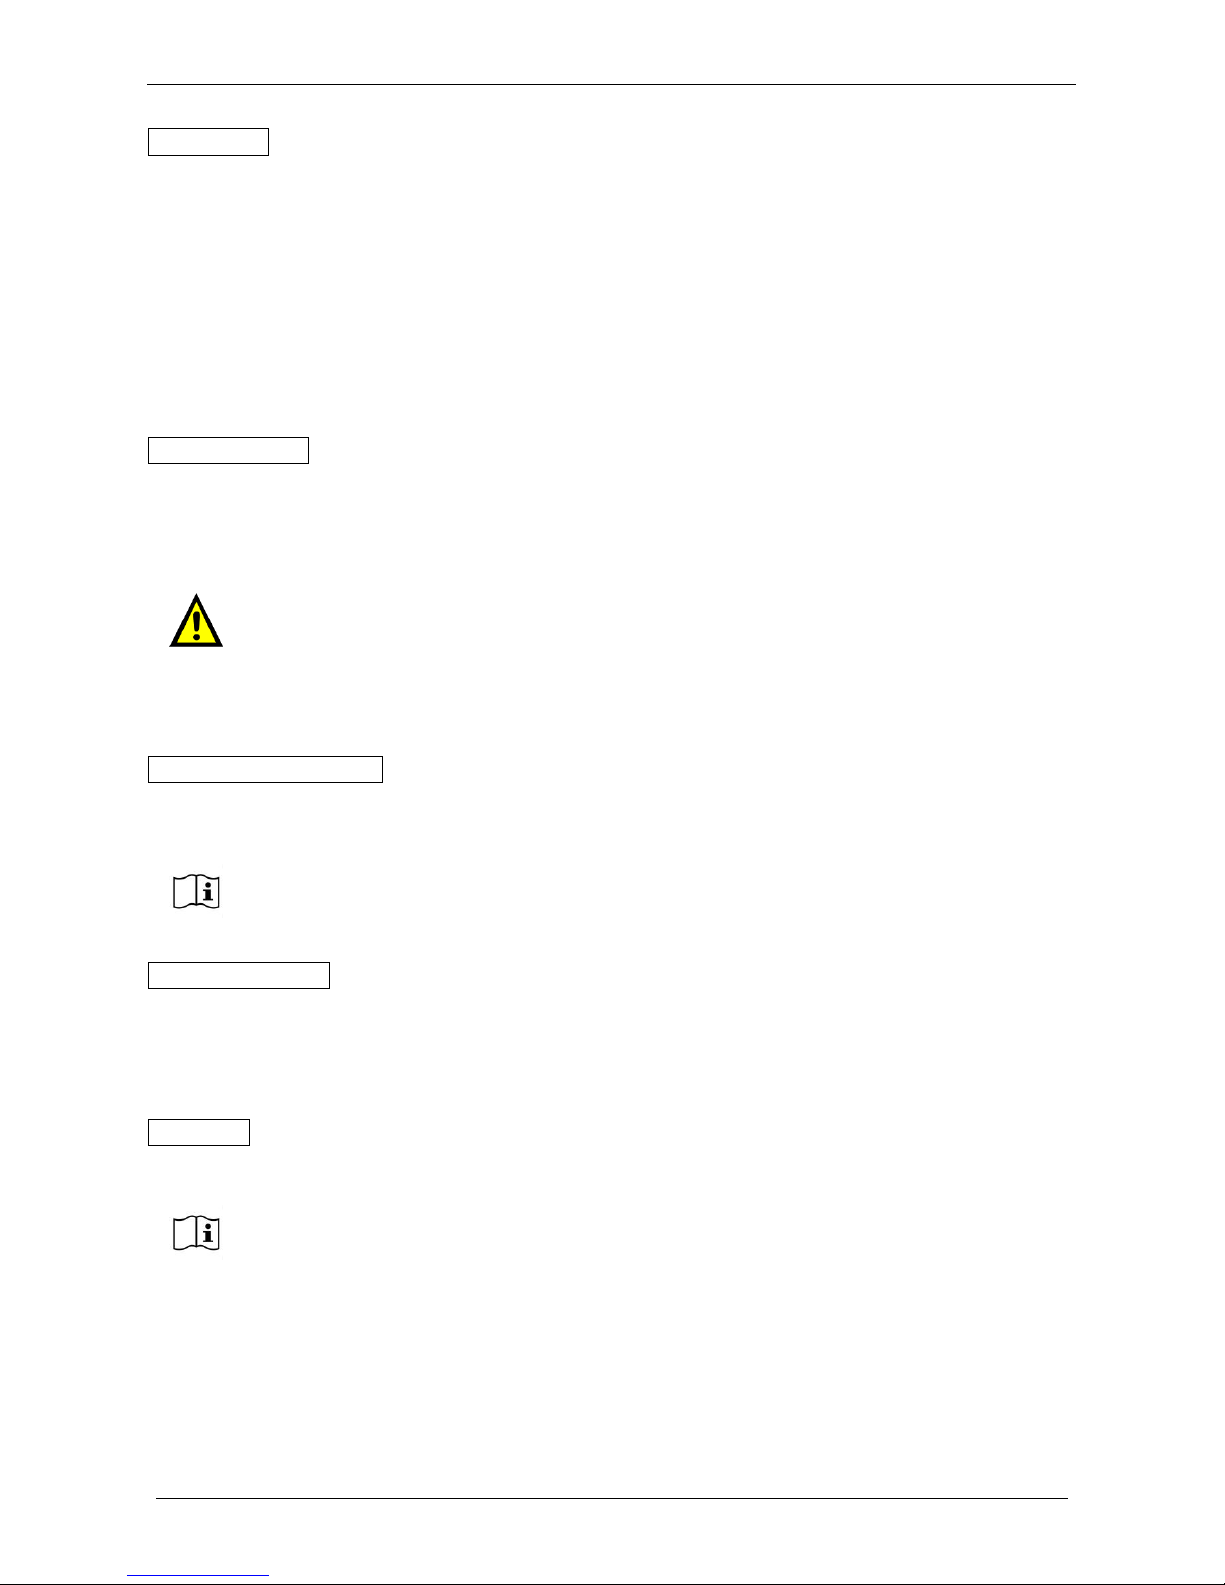
This function is available only for SERVICE and ADMINISTRATOR. Press Settings from the MAIN
FUNCTIONS screen, then Owner.
The OWNER SETTINGS screen appears as shown in the picture below.
Page 42
Milestone s.r.l.
MM098-002 – LOGOS ONE – Operator Manual
42
GENERAL
Select General to modify:
Institute and Department name where unit is installed.
Reagent Cassettes Alert Status: this number indicates that the reagent status is near expiration (on the
base of the number of cassettes processed) and the reagents status icon turns from green to yellow (see
chapter 4).
Reagent Cycles Alert Status: this number indicates that the reagent status is near expiration (on the base
of the cycles run) and the reagents status icon turns from green to yellow (see chapter 4).
Reagent Days Alert Status: this number indicates that the reagent status is near expiration (on the base of
the days of use) and the reagents status icon turns from green to yellow (see chapter 4).
VENTILATIONS
Select Ventilations to manage exhaust fumes fans of cavity (working area) and tanks (holder), choose either:
Always active: both exhaust fans are activated at the switching ON of the unit.
Always off: both exhaust fans are always OFF, even during the processing.
NOT SUGGESTED.
Risk of fumes in the laboratory environment.
Processing and cover opening: the cavity ventilation is activated only during the processing and when
opening the covers while the tanks ventilation is always active.
REMOTE CONNECTION
Select Remote connection to edit and modify the network settings for remote assistance.
Data required must be supplied by the Laboratory Network ADMINISTRATOR (Primary WINS not required).
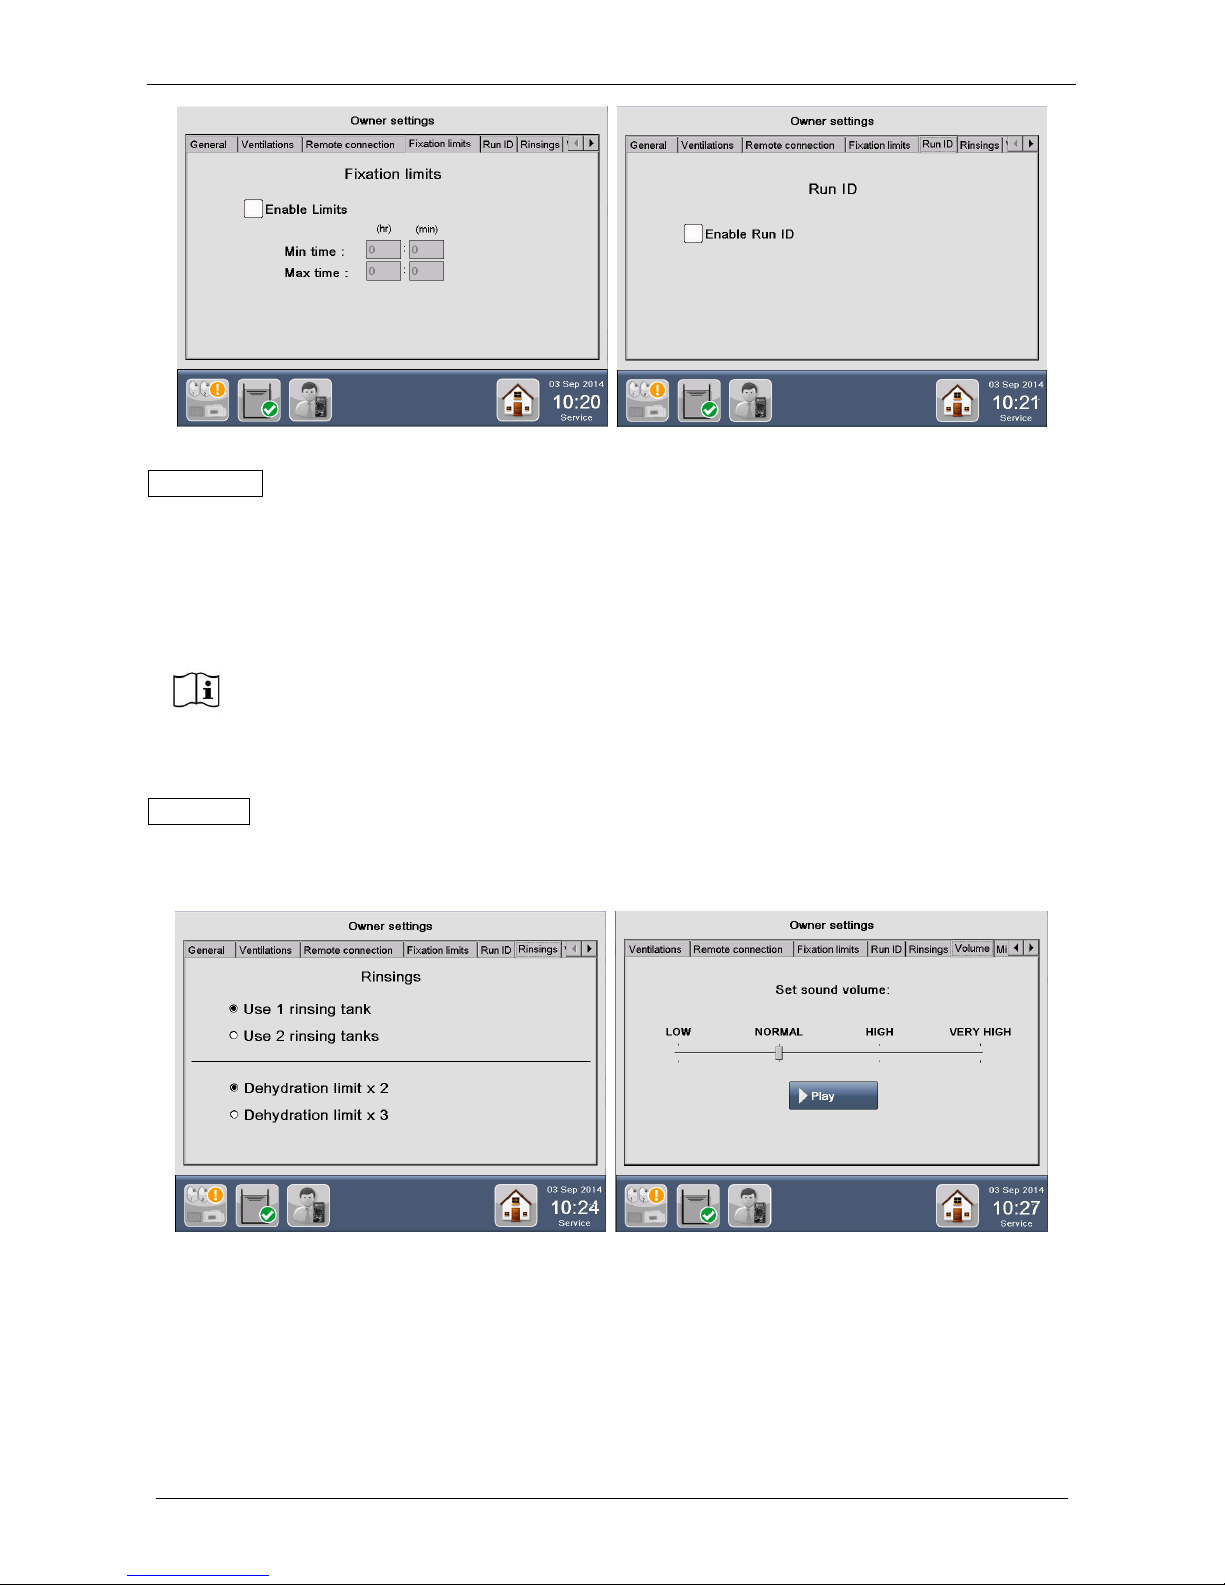
FIXATION LIMITS
Select Fixation limits to set Minimum and Maximum Fixation time. When enabled, before starting a protocol,
the software warns USER if the total fixation time is under or over the limits set and manages the Holding
solution. Refer also to chapter 3.2.5 and 4.1.1.
RUN ID
If Run ID is ticked, software requires user to enter the Run ID before running a program.
For further details see chapter 2.8.
Enable or disable Run ID check according to your internal laboratory practice
(Good Laboratory Practice, GLP).
Page 43
Milestone s.r.l.
MM098-002 – LOGOS ONE – Operator Manual
43
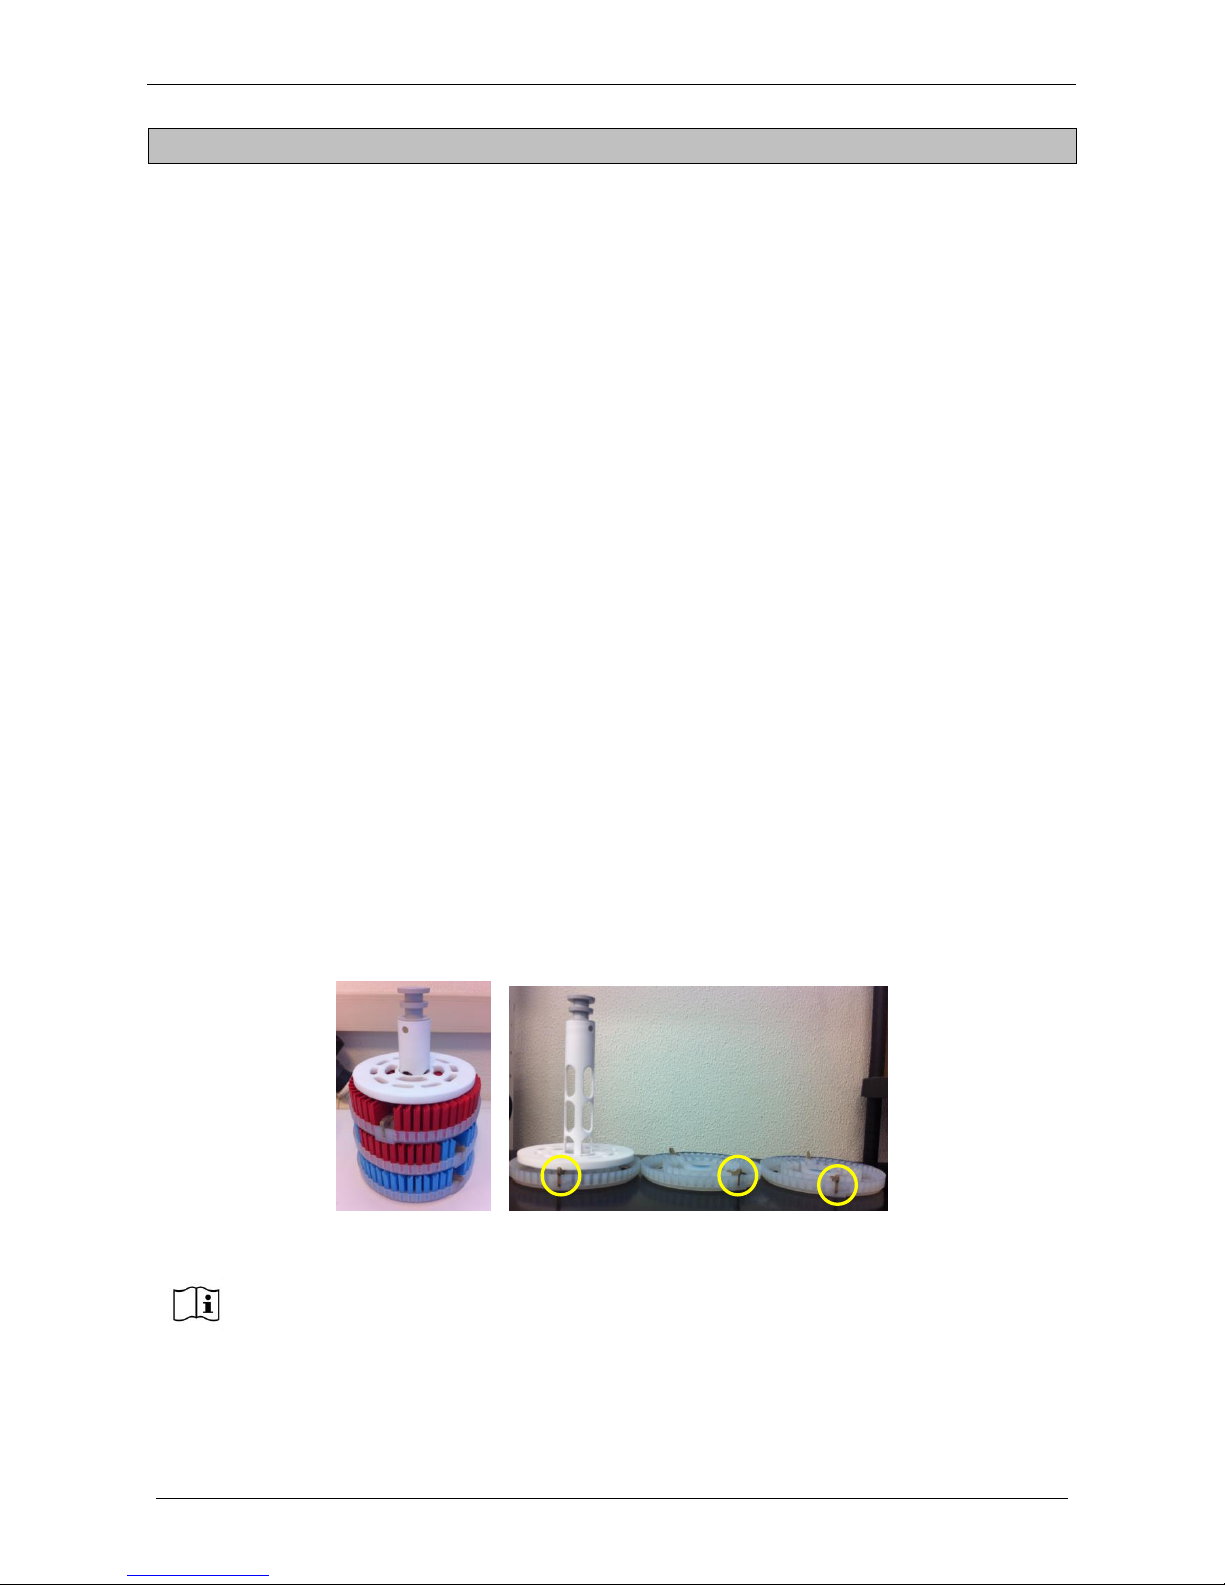
RINSINGS
Select Rinsings and set if user needs to:
Load 1 or 2 rinsing tanks in the reagents configuration screen.
Modify rinsings’s processed cassettes limit.
VOLUME
By default the settings is NORMAL, it is possible to lower or increase volume BUT for safety it is not possible
to totally silence it.
By default the Unit is set up to work with 1 rinsing tank. If you want to work with 2 rinsing
tanks, please contact Milestone Application department to change the group of program.
Dehydration limit x2: this is a default value for the expiration of rinsing reagent, please
don’t modify it.
If you need more information please contact Milestone Application department.
Page 44
Milestone s.r.l.
MM098-002 – LOGOS ONE – Operator Manual
44
3 OPERATE WITH LOGOS ONE
LOGOS ONE is controlled by the Touch Control Terminal, which is a Windows CE 6.0 based.
It is a rapid TISSUE PROCESSOR for histology laboratories that guarantees high standard results. It can be
used in automatic or in dual mode depending on the laboratory demands.
The Resistance power output is automatically controlled by a PID (Proportional Integrative Derivative)
system, which allows the operator to set up the desired real parameters (Time and Temperature) by simply
drawing a curve. If a pre-stored program is used, it is only required to adjust the time of the procedure in
relation to the application specifications.
Thanks to the TIME at TEMPERATURE working procedures, LOGOS ONE allows consistency and
reproducibility of high quality results. The unit will always reproduce the same conditions of temperature in
the set times by automatically adjusting the Resistance power level.
LOGOS ONE has two cavities: a MAIN cavity and a WAX cavity. This feature allows user to run a process in
two different ways:
- AUTOMATIC mode: wax will be automatically pumped from the WAX cavity to the MAIN cavity for the
impregnation phase.
- DUAL mode: USER is required to MANUALLY move the RACK from the MAIN to the WAX CAVITY. A new
process can immediately be started in the MAIN CAVITY without waiting for the end of the impregnation
step. This allows for significant TIME SAVING.
The following section shows how to create, store, modify and run a program with the Touch Control
Terminal.
3.1 Loading cassettes into the rack
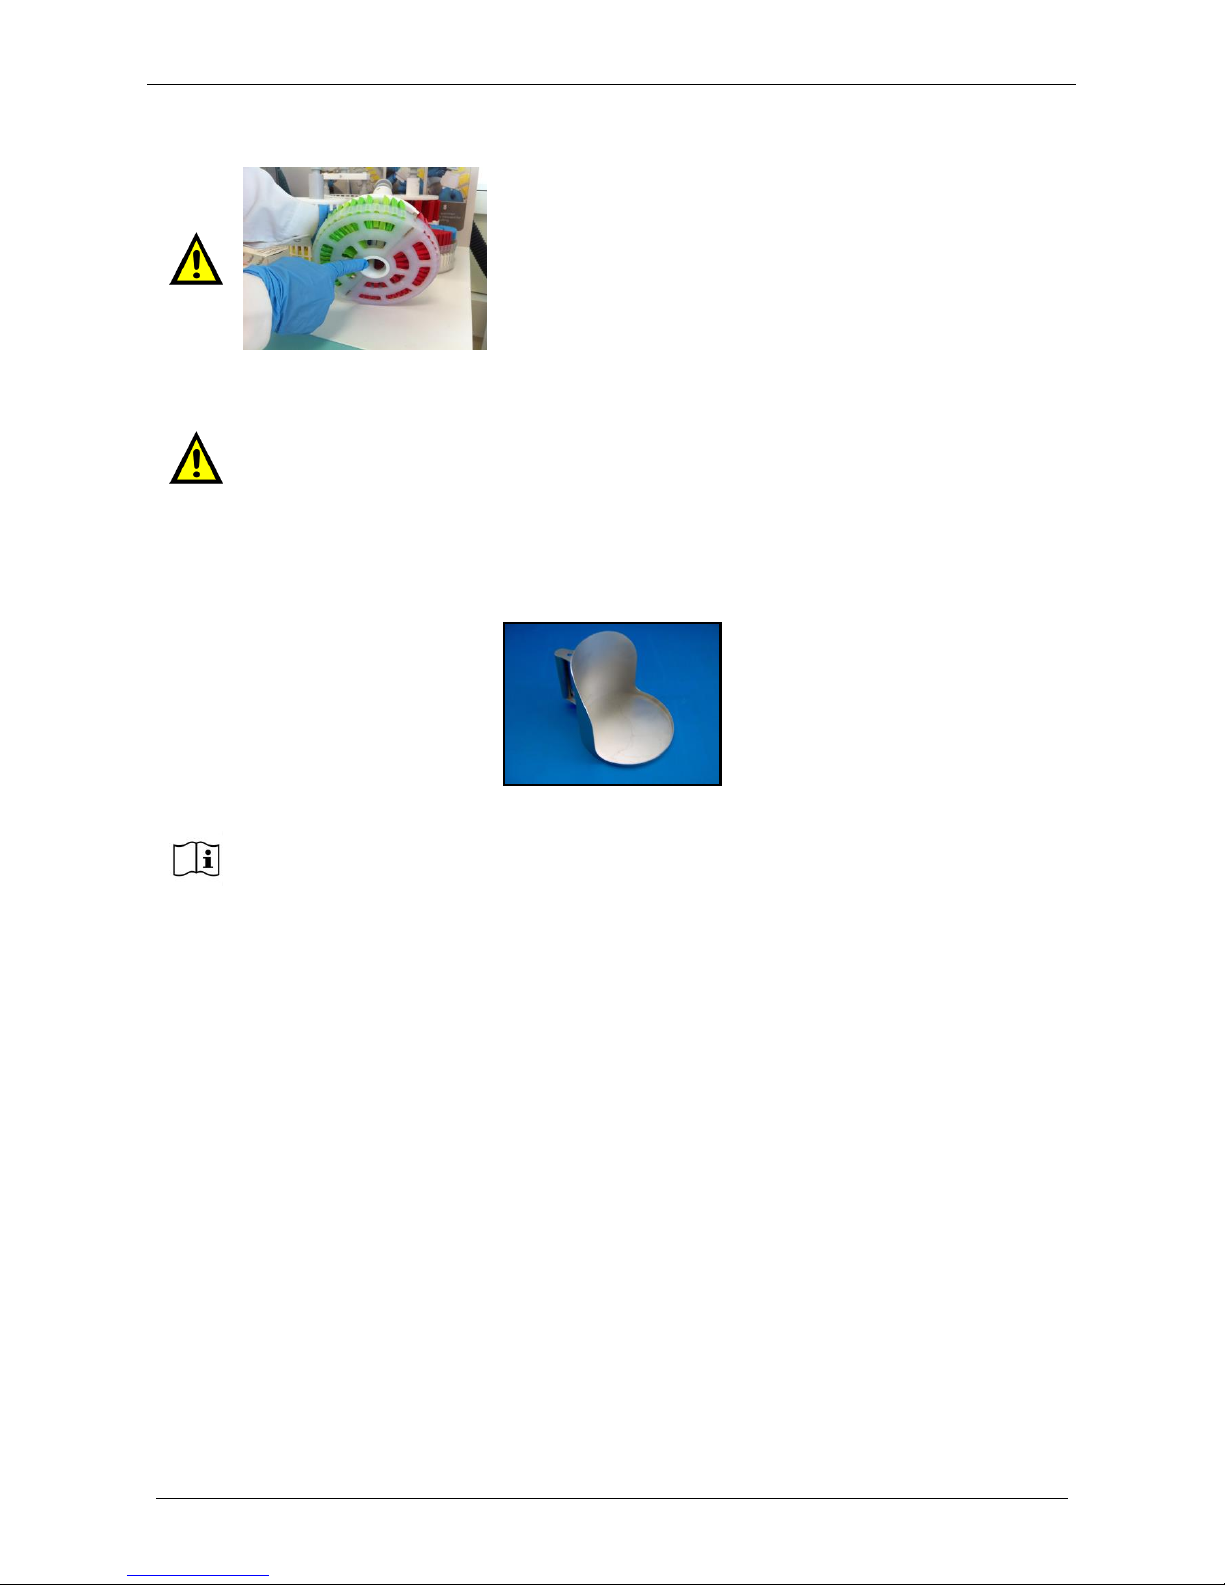
The Split Rack is made by 3 separate layers; each layer holds 70 cassettes for a total of 210 cassettes
(figure below).
Load the 3 layers of the SPLIT RACK CODE 66165A/210 with cassettes.
Each LAYER comes in a split design of two halves for simultaneous, convenient use in different grossing
rooms and embedding stations.
Each layer is provided with a locking mechanism (circles in figure below) to assure perfect closing of the two
halves.
Fully load each layer with cassettes, starting from the bottom layer first and avoid random
placement of cassettes over the three layers.
Start loading cassettes into a new layer only when the layer in use is full, thus avoiding a
possible “low reagent” situation in the cavity.
Page 45
Milestone s.r.l.
MM098-002 – LOGOS ONE – Operator Manual
45
Position the CASSETTE FIXING DISK on top of the last layer in use and load the rack into the LOGOS ONE.
3.1.1 Rack loading-unloading tool
Recommended to unload the rack at the end of the processing cycle, to avoid dripping of melted paraffin.
Recommended also to load rack with cassettes when it is wet, in order to avoid dripping of formalin or other
solutions on the floor or on the LOGOS ONE unit.
The first rack layer must be blocked in that position:
Do not insert the layer from the column: this will avoid stirrer rotation.
The fixing disk must always be used, with either 1, 2 or full layer rack in order to avoid
possible spilling out of cassettes from the rack during the processing.
If you position paper between the rack and the tool to keep it clean, remember to don’t
leave the rack dirty by wax up to the paper for many minutes because in that case the
paper will be attached to the rack.
Page 46
Milestone s.r.l.
MM098-002 – LOGOS ONE – Operator Manual
46
3.2 Run a program
3.2.1 Run of the most used program
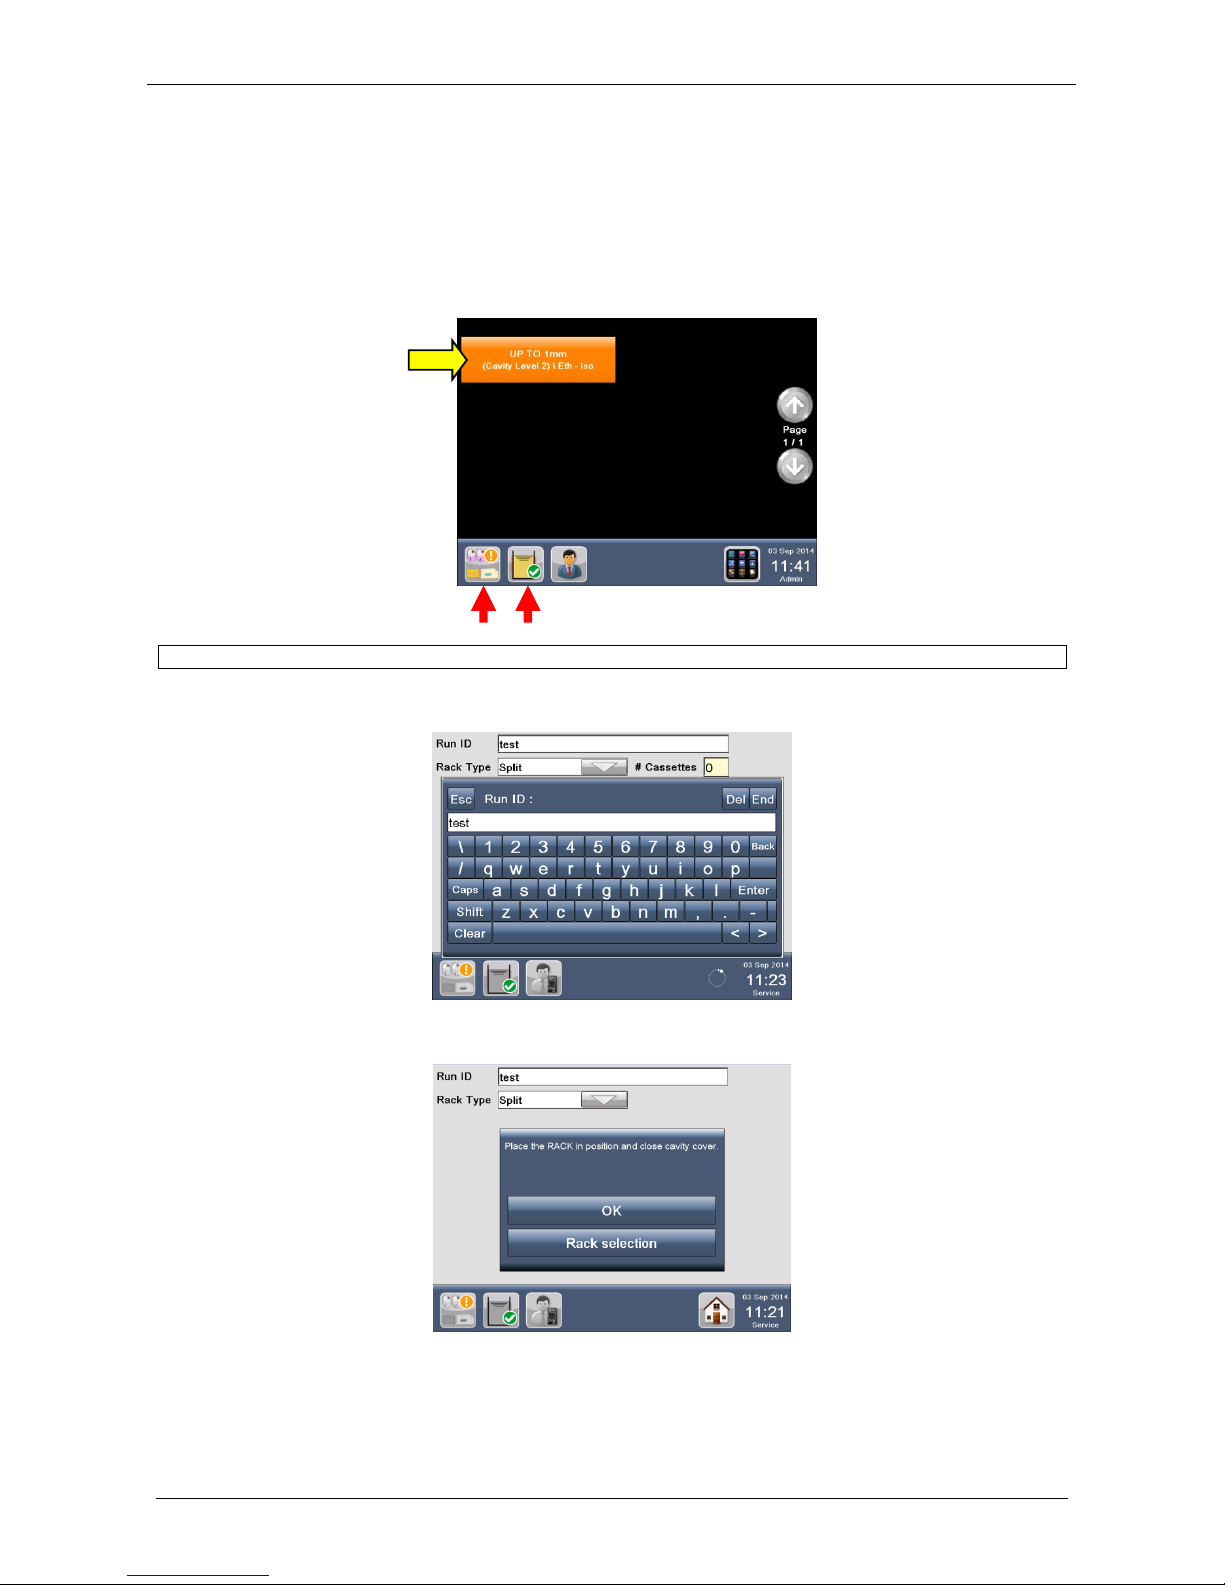
Select a Favourite program (figure below) out of the list of FAVOURITE PROTOCOLS (see chapter 2.15).
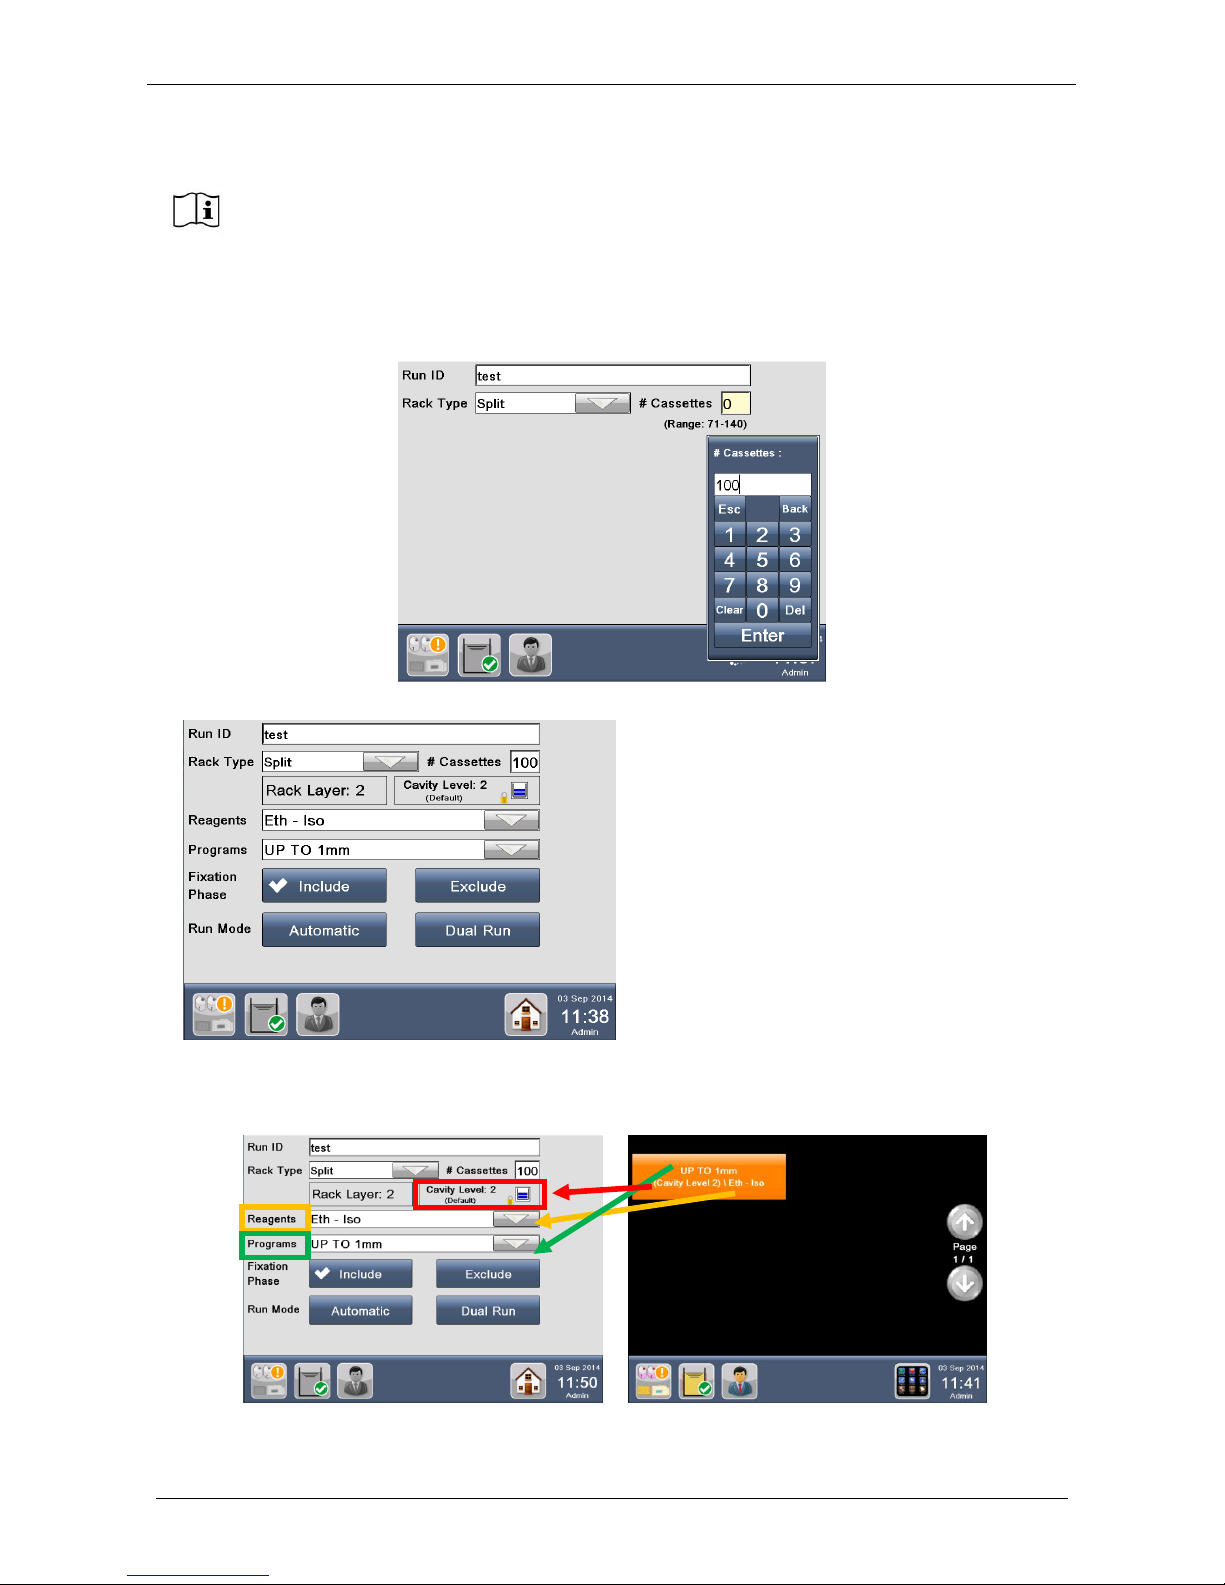
The following screen appears: enter the Run ID of the process to be run (if required).
The window below appears.
WAX and REAGENTS status bar: see chapter 4 how to manage them.
Page 47
Milestone s.r.l.
MM098-002 – LOGOS ONE – Operator Manual
47
Enter the number of cassettes to be processed (see the figure below), up to 140 if two layers has been
selected (up to 210 for three layers). Press “Enter”.
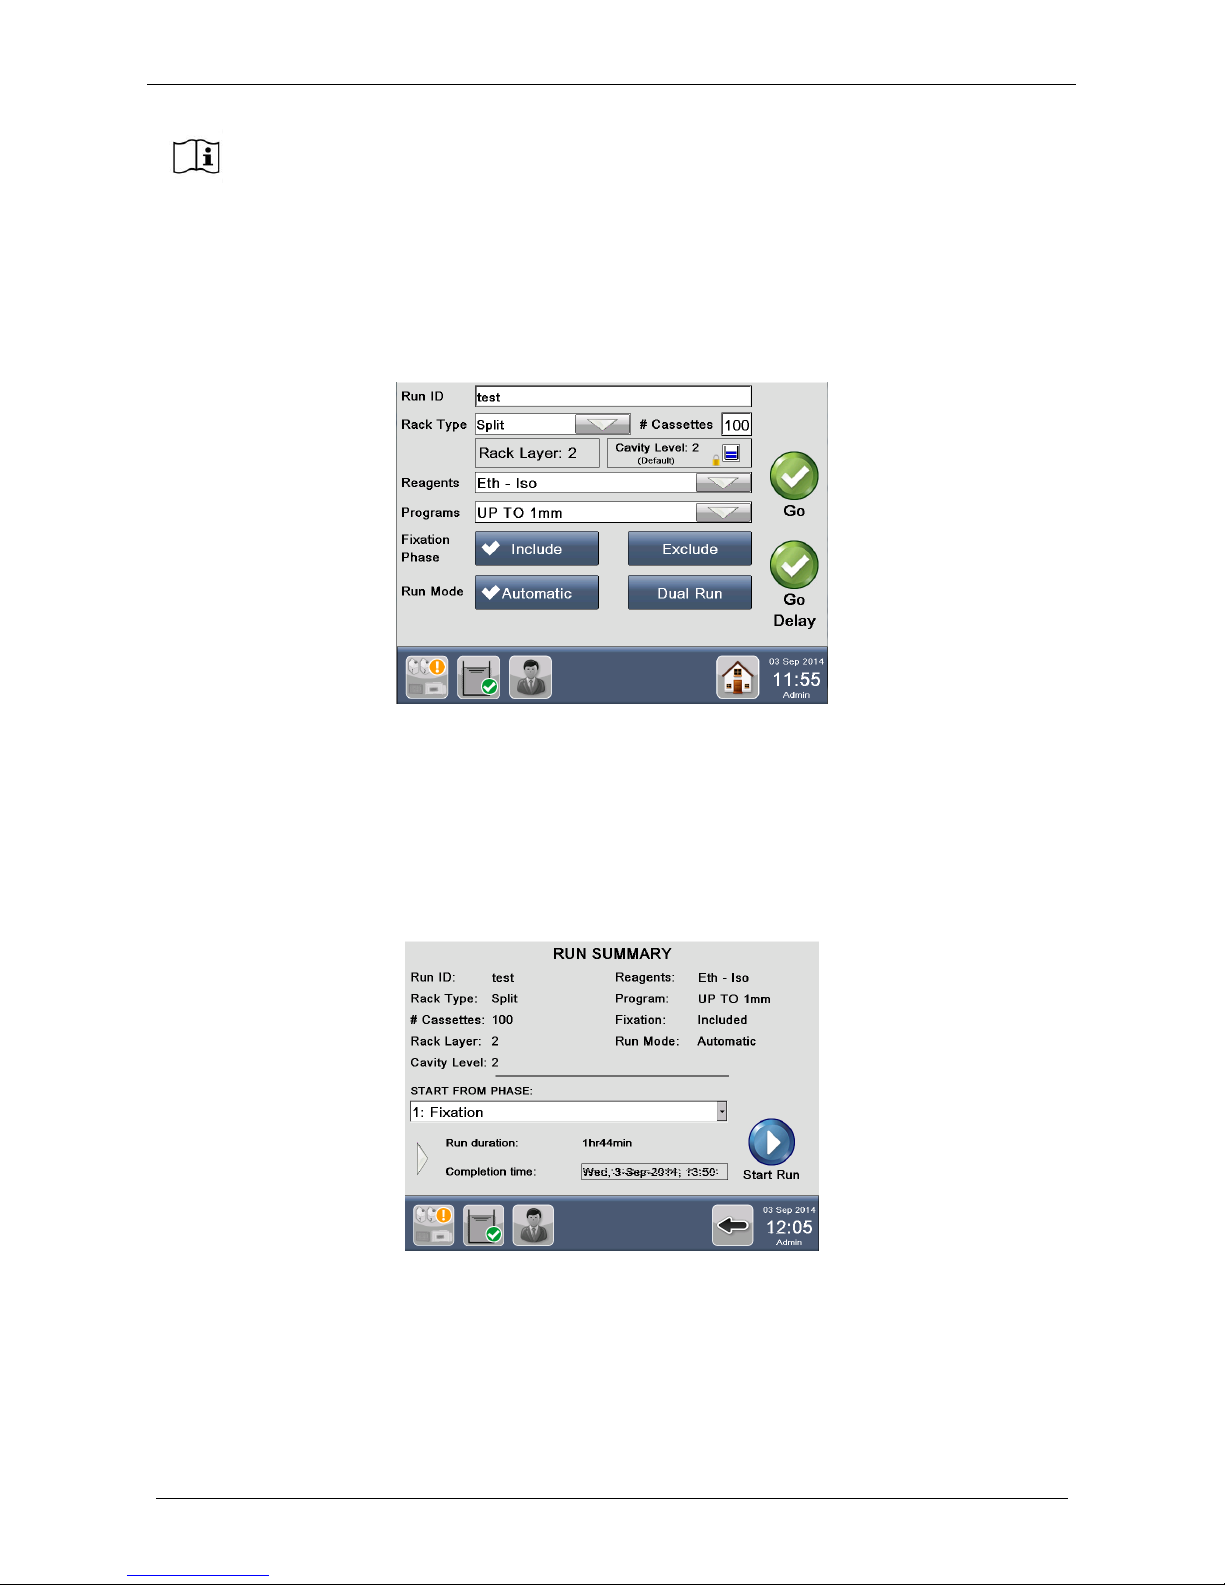
The “Reagents” (in this case: “Eth-Iso”) and the “Program” (in this case “Up to 1mm”) are automatically
displayed, according to the Favorite protocol selected (figure below).
It is not possible to change the rack of a favourite program because the rack is set in the
program, so pressing RACK SELECTION you will come back to the Home screen.
At the start of a non favourite program the software automatically remembers the last rack
selected, if another rack model must be selected press RACK SELECTION and all the rack
models will be displayed.
In this example, a 2 layers favourite
was selected
- Rack Layer: 2
- Cavity Level: 2
Page 48
Milestone s.r.l.
MM098-002 – LOGOS ONE – Operator Manual
48
Choose the Run Mode: AUTOMATIC or DUAL RUN.
A. AUTOMATIC: at the end of the last phase in the MAIN CAVITY, WAX is AUTOMATICALLY pumped
from the WAX CAVITY into the MAIN CAVITY.
B. DUAL RUN: at the end of the last phase in the MAIN CAVITY, an audio alarm warns USER to
MANUALLY move the rack from the MAIN to the WAX CAVITY, where WAX phase will be executed.
Choose the STARTING way: GO or GO DELAY (for details see chapter 3.2.6).
A. GO: the run is started immediately.
B. GO DELAY: start of the run is delayed so that program automatically starts and is completed by the
time set by the USER.
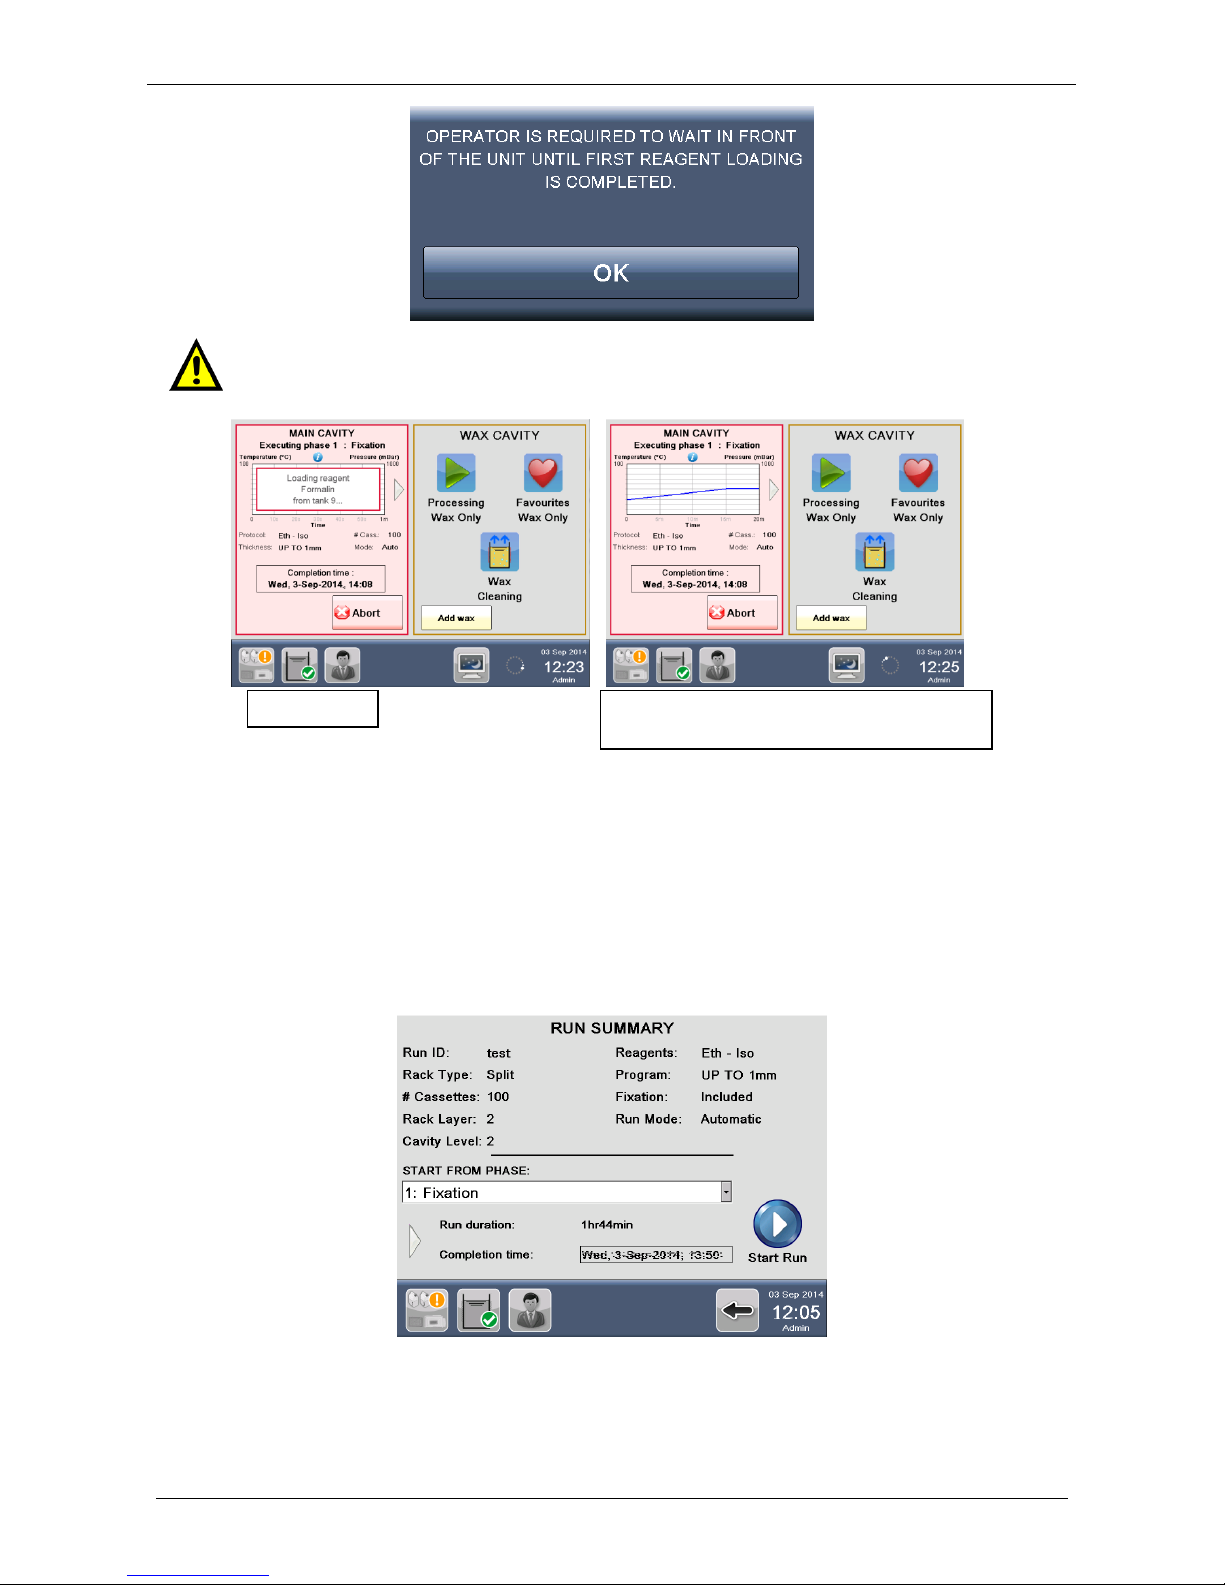
The following screen appears. All the details of the process are shown, like the Run duration and the
Completion time. Press “Start Run” to run the cycle NOW.
The following message appears, read carefully the message on the screen and press OK to start the
process.
The heating fixation phase is included as default; if not required, select “Exclude” to skip
it. It’s suggested to include the heating fixation phase in the process to standardize the
results.
Page 49
Milestone s.r.l.
MM098-002 – LOGOS ONE – Operator Manual
49
In both AUTOMATIC and DUAL RUN modes, on completion of first reagent loading, a graph is displayed on
the screen with detailed processing information, while the program is running.
Refer to following paragraphs for run mode details: automatic or dual.
3.2.1.1 Automatic run mode
If AUTOMATIC run mode is selected, the following RUN SUMMARY screen appears, displaying all details of
the process, like RUN DURATION and the COMPLETION TIME. Press Start run to run the cycle NOW.
On completion of first reagent loading, a graph is displayed on the screen with detailed processing
information.
To assure safety of samples, in fact, it is necessary that operator stays close to the unit at
the beginning of a new process until loading of the first reagent is completed and the
graph is displayed on the screen.
WAIT…
LOADING COMPLETED
UNIT CAN NOW BE UNATTENDED
Page 50
Milestone s.r.l.
MM098-002 – LOGOS ONE – Operator Manual
50
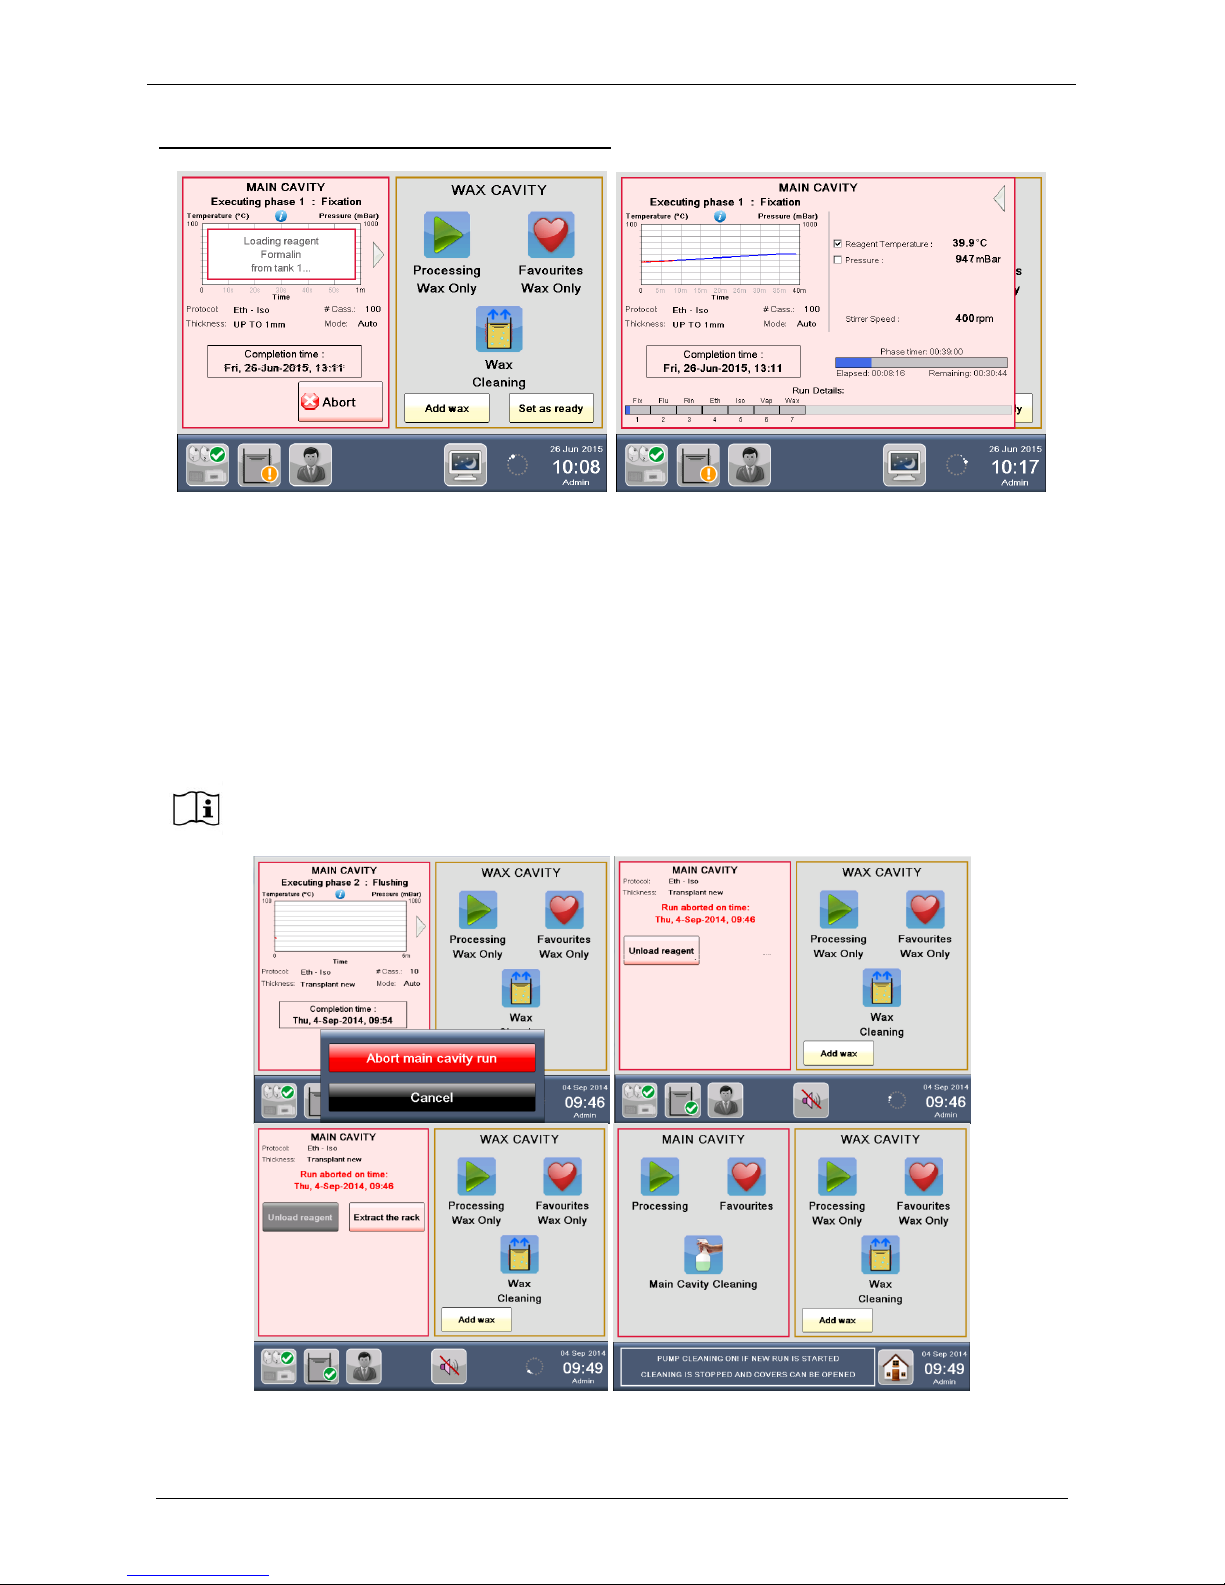
GRAPH DISPLAYED DURING PROGRAM RUNNING
Picture on the left: EXECUTING PHASE NUMBER and NAME, phase graph with pre-set (blue) / real (red)
temperature. Under the graph: PROTOCOL type, NUMBER OF CASSETTES processed, THICKNESS, RUN
MODE and processing COMPLETION TIME.
For further information, press the arrow on the right of the MAIN CAVITY graph:
Picture on the right: REAGENT TEMPERATURE, STIRRER SPEED, time DETAILS of the current phase
(highlighted in blue) and RUN DETAILS of the total program.
On the bottom left all phases of the program are displayed with the completed or actual in blue.
To return to the left screen press the arrow in the top right.
If necessary in every moment it is possible to press ABORT to stop the program, unload
reagent and cassettes (Extract the rack).
Page 51
Milestone s.r.l.
MM098-002 – LOGOS ONE – Operator Manual
51
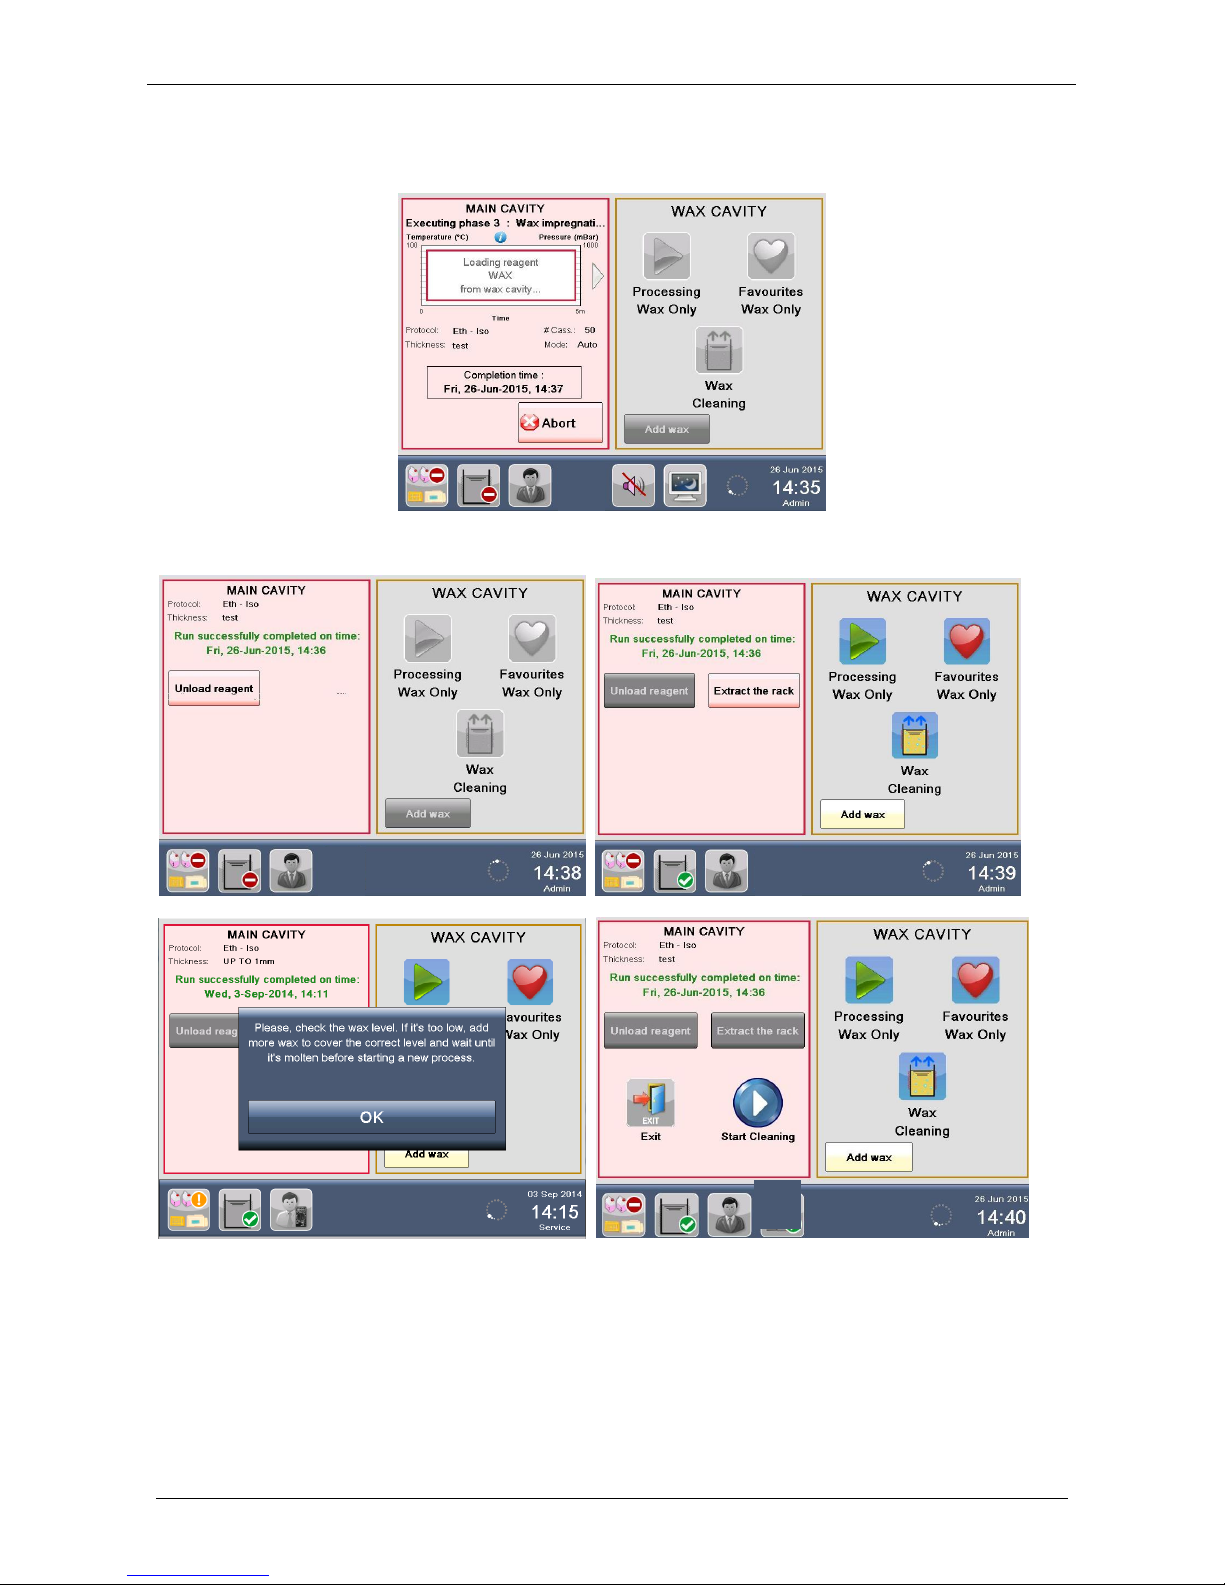
An AUTOMATIC process ends with WAX impregnation performed in the MAIN CAVITY (left cavity and part
of the screen, with PINK background), as shown below.
In this case WAX is AUTOMATICALLY pumped from the WAX CAVITY (right) to the MAIN CAVITY (left).
An audio alarm warns when program is over; press Unload reagent, then Extract the rack.
After every WAX phase it is suggested to check the wax level (image above left), to be ready with the right
quantity of wax in the next run.
Now press: Exit to perform later the MAIN CAVITY CLEANING CYCLE.
Start Cleaning to perform immediately the MAIN CAVITY CLEANING CYCLE.
Page 52
Milestone s.r.l.
MM098-002 – LOGOS ONE – Operator Manual
52
3.2.1.2 Dual run mode
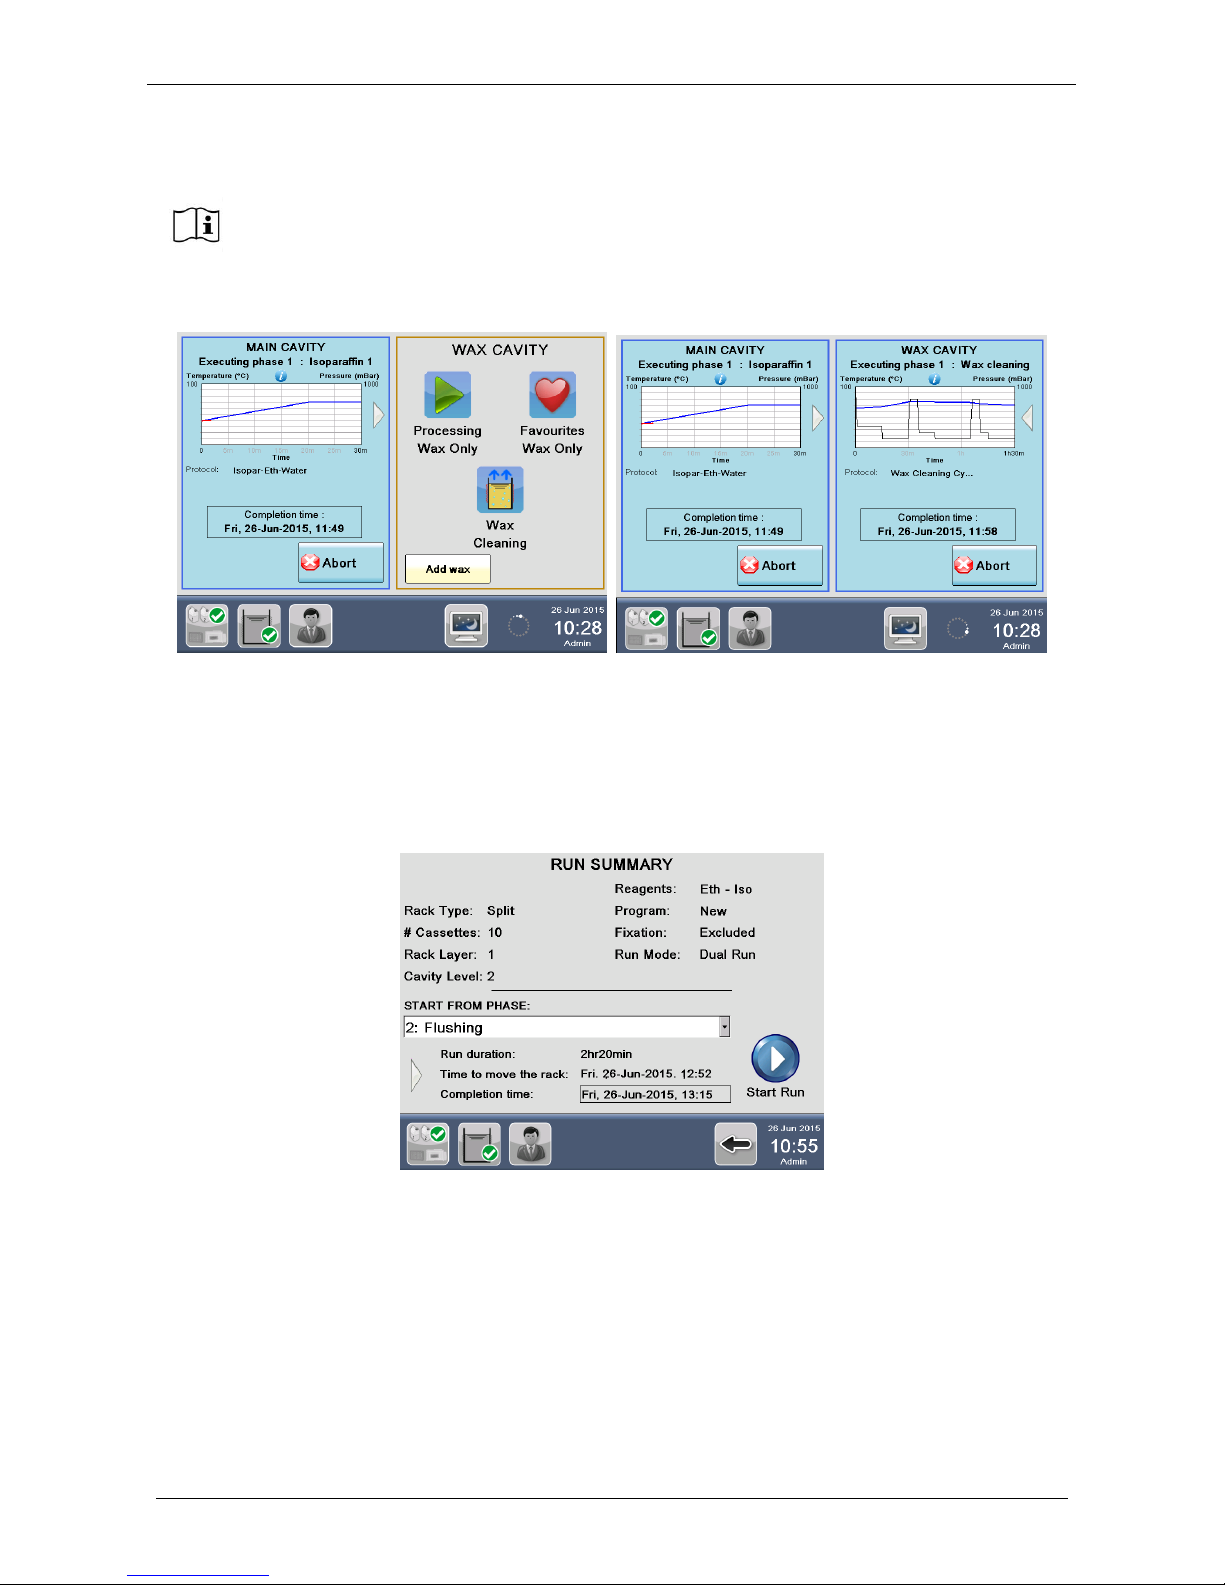
If DUAL RUN run mode is selected, the following RUN SUMMARY screen appears, displaying process
details, like RUN DURATION, COMPLETION TIME and also TIME TO MOVE THE RACK, that shows
exactly when the presence of USER is required to MANUALLY MOVE THE RACK to WAX CAVITY (see
below). Press Start run to run the cycle NOW.
On completion of first reagent loading, a graph is displayed on the screen with detailed processing
information.
On completion of the process, it is necessary to carry out a MAIN CAVITY CLEANING
CYCLE (for further information, see the chapter 3.3).
Failure to do this, will prevent user from starting a new process in the MAIN CAVITY.
During the main cavity cleaning is not possible to use the unit for processing and it is
therefore suggested to run in parallel a wax cleaning cycle, by pressing the icon “Wax
cleaning” in the right part of the screen. The duration of the main cavity cleaning and the
wax cleaning is more or less the same.
Page 53
Milestone s.r.l.
MM098-002 – LOGOS ONE – Operator Manual
53
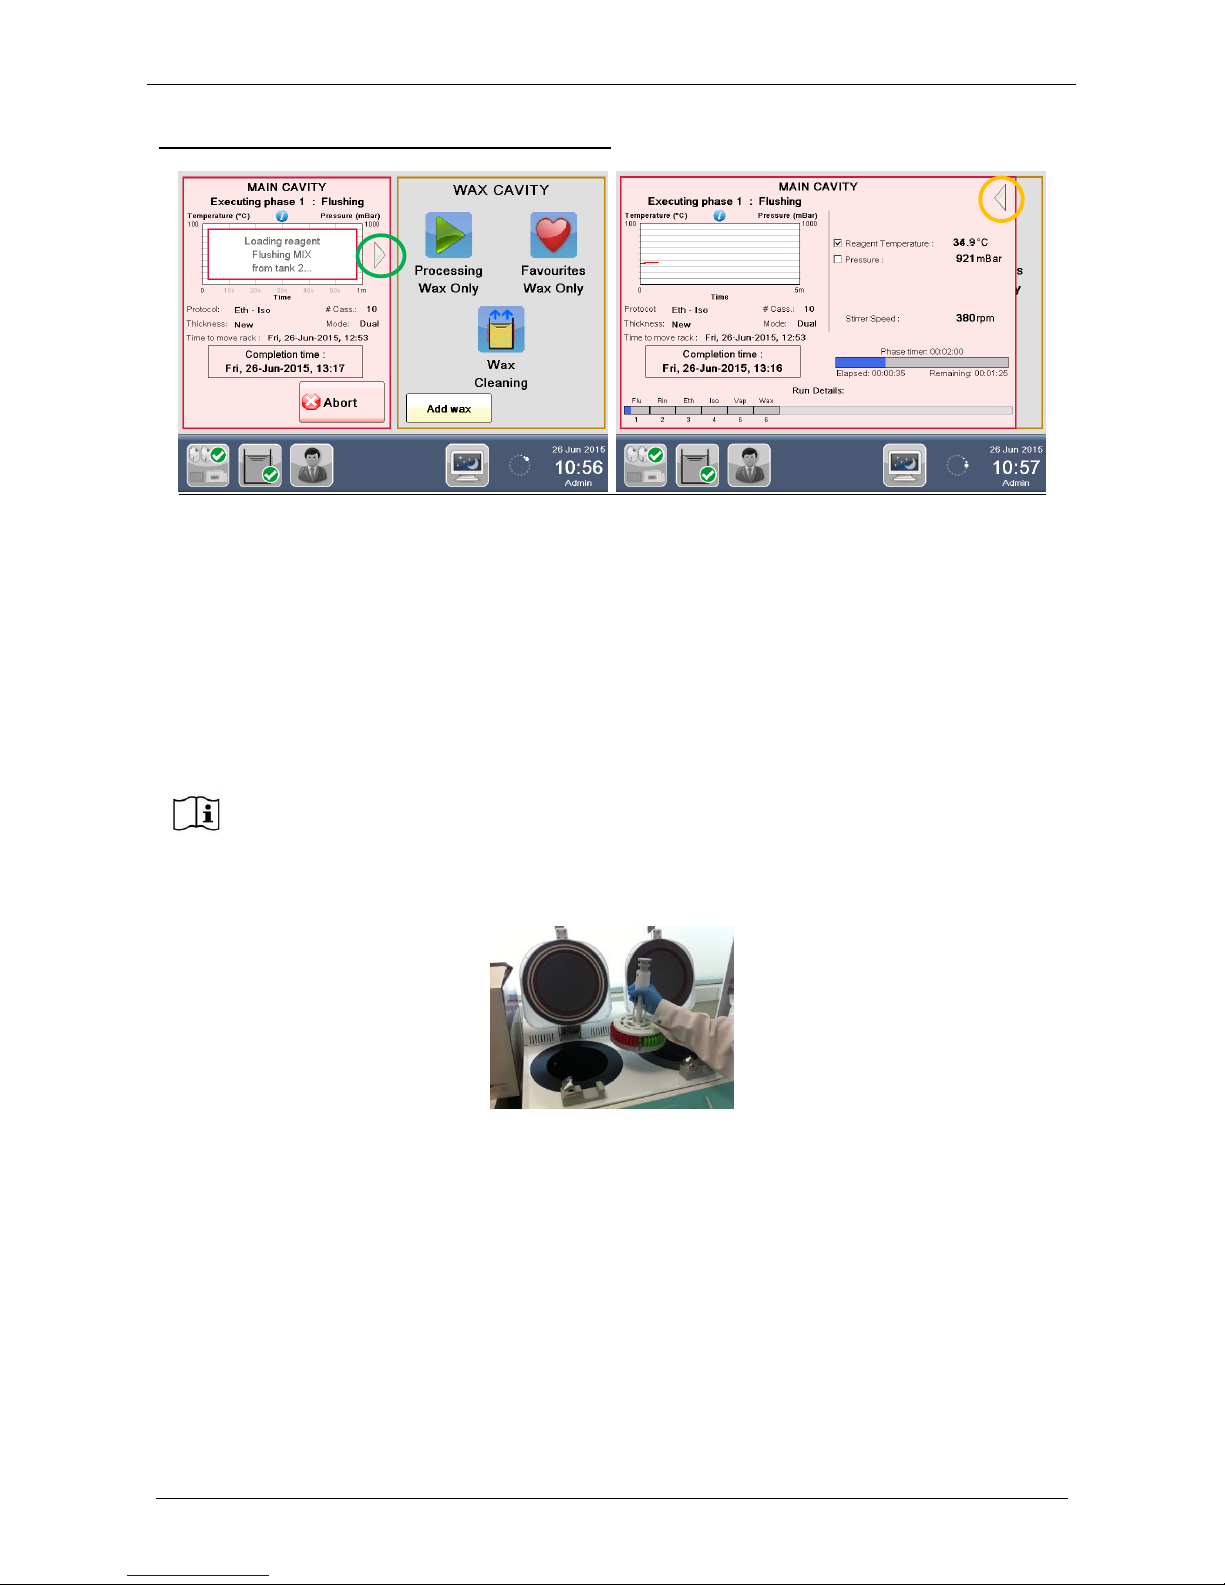
GRAPH DISPLAYED DURING PROGRAM RUNNING
Picture on the left: EXECUTING PHASE NUMBER and NAME, phase graph with pre-set (blue) / real (red)
temperature. Under the graph: PROTOCOL type, NUMBER OF CASSETTES processed, THICKNESS, RUN
MODE, TIME TO MOVE THE RACK and processing COMPLETION TIME.
For further information, press the arrow on the right of the MAIN CAVITY graph (green circle):
Picture on the right: REAGENT TEMPERATURE, STIRRER SPEED, time DETAILS of the current phase
(highlighted in blue) and RUN DETAILS of the total program. On the bottom left all phases of the program
are displayed with the completed or actual in blue.
To return to the left screen press the arrow in the top right (yellow circle).
At TIME TO MOVE THE RACK USER is required to MANUALLY MOVE THE RACK to WAX CAVITY
(RIGHT).
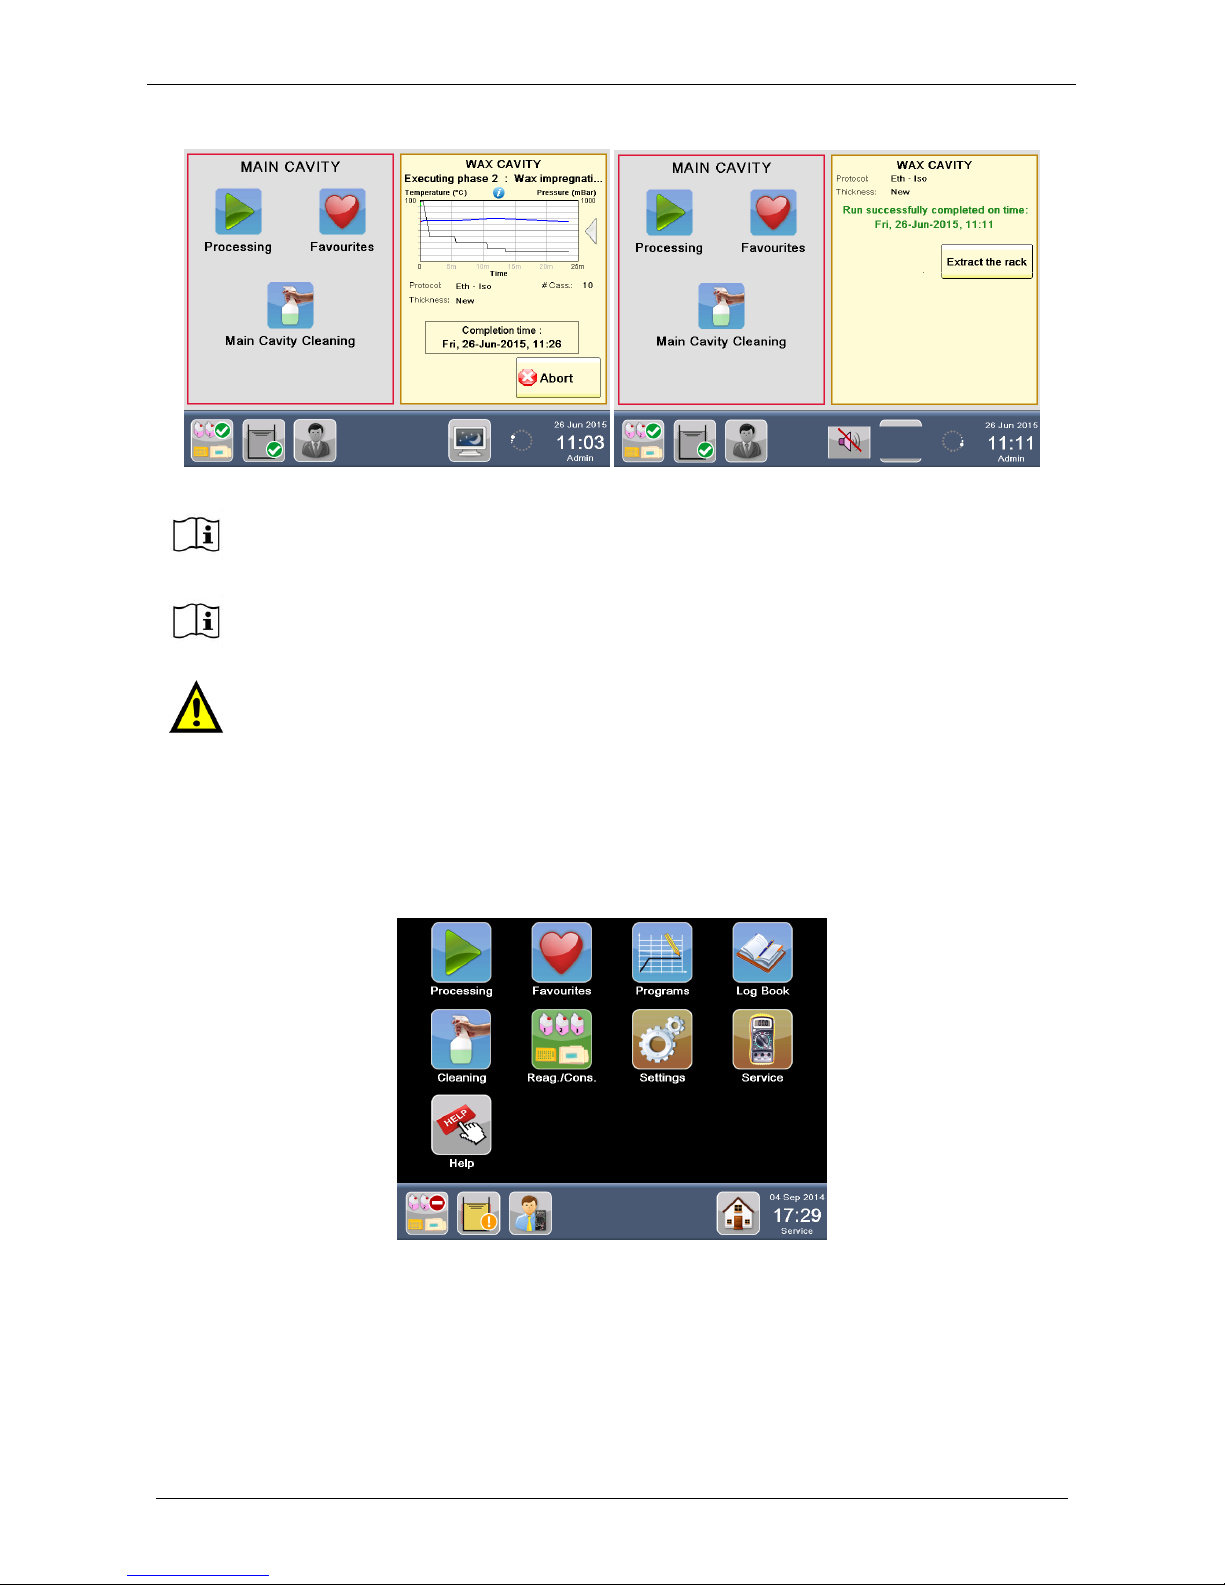
Last phase of a DUAL process is WAX impregnation performed in the WAX CAVITY (right cavity and part of
the screen, with YELLOW background), as shown below. An audio alarm warns that program is over; press
Extract the rack.
If necessary in every moment it is possible to press ABORT to stop the program, unload
reagent and cassettes (Extract the rack), refer to chapter 3.2.1.1.
Page 54
Milestone s.r.l.
MM098-002 – LOGOS ONE – Operator Manual
54
3.2.2 Run a standard program
Press PROCESSING from the MAIN FUNCTIONS screen.
For further details refer to chapter 3.2.1.
The following screen appears: enter the Run ID of the process to be run (if required).
After MANUAL movement of the rack to the WAX CAVITY, the DUAL mode allows USER to
immediately start a new process (AUTOMATIC or DUAL) in the MAIN CAVITY, without
waiting for the end of the WAX phase of the previous process run.
DUAL mode does NOT require a final MAIN CAVITY CLEANING CYCLE, as requested
instead by the AUTOMATIC mode. In fact, in this case, WAX phase is directly performed in
WAX CAVITY, leaving the MAIN CAVITY uncontaminated by WAX.
Should the operator not be present at TIME TO MOVE THE RACK, AFTER 10 MINUTES THE
DUAL PROCESS TURNS TO AUTOMATIC and WAX is AUTOMATICALLY pumped into the
MAIN CAVITY to keep samples safe. For further details see the chapter 3.2.3.
Page 55
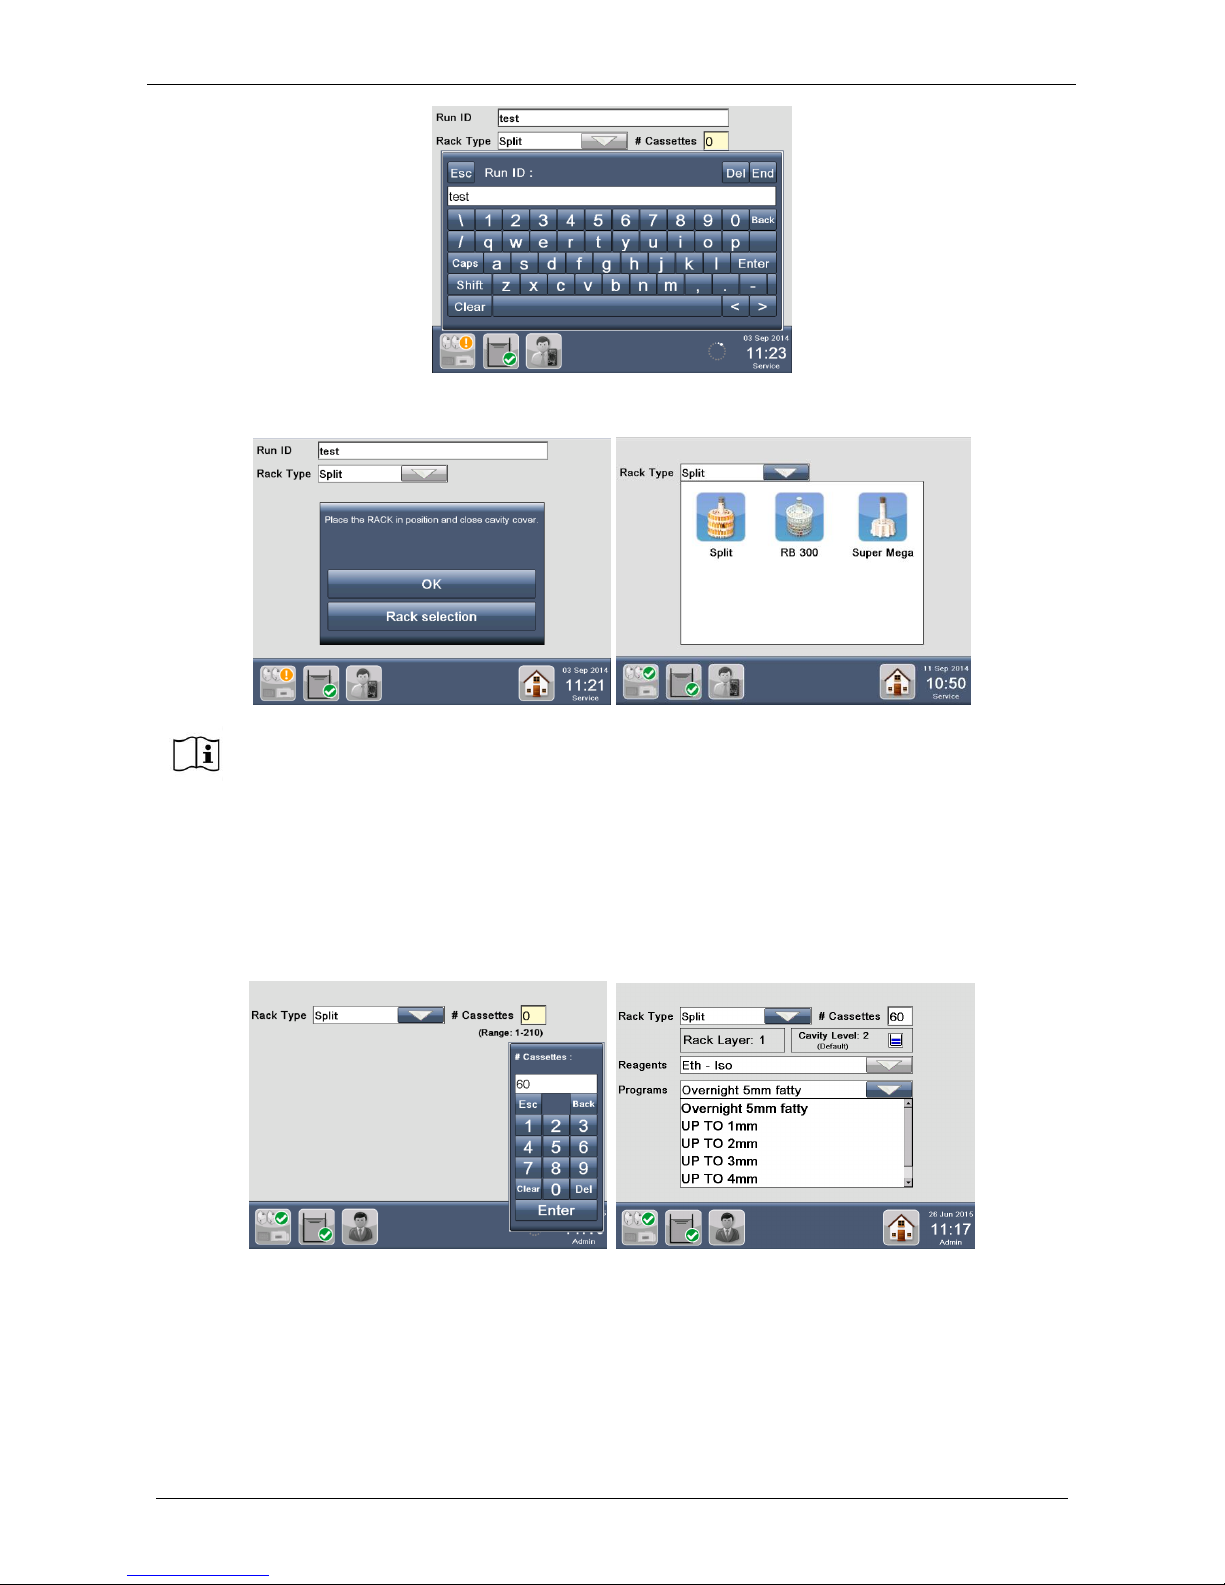
Milestone s.r.l.
MM098-002 – LOGOS ONE – Operator Manual
55
The window below appears.
The window shown below appears, enter number of cassettes (60 in this case) to be processed: up to 140
two layers would be selected, up to 210 three layers. Press “Enter”.
In the example, 60 cassettes have been selected, so the software automatically sets a process of 2 layers
rack and the following posts appear (figure below):
- Rack Layer: 1
- Cavity Layer: 2 (Default)
At the start of a program the software automatically remembers the last rack selected, if
another rack model must be selected press RACK SELECTION and all the rack models will
be displayed.
Page 56
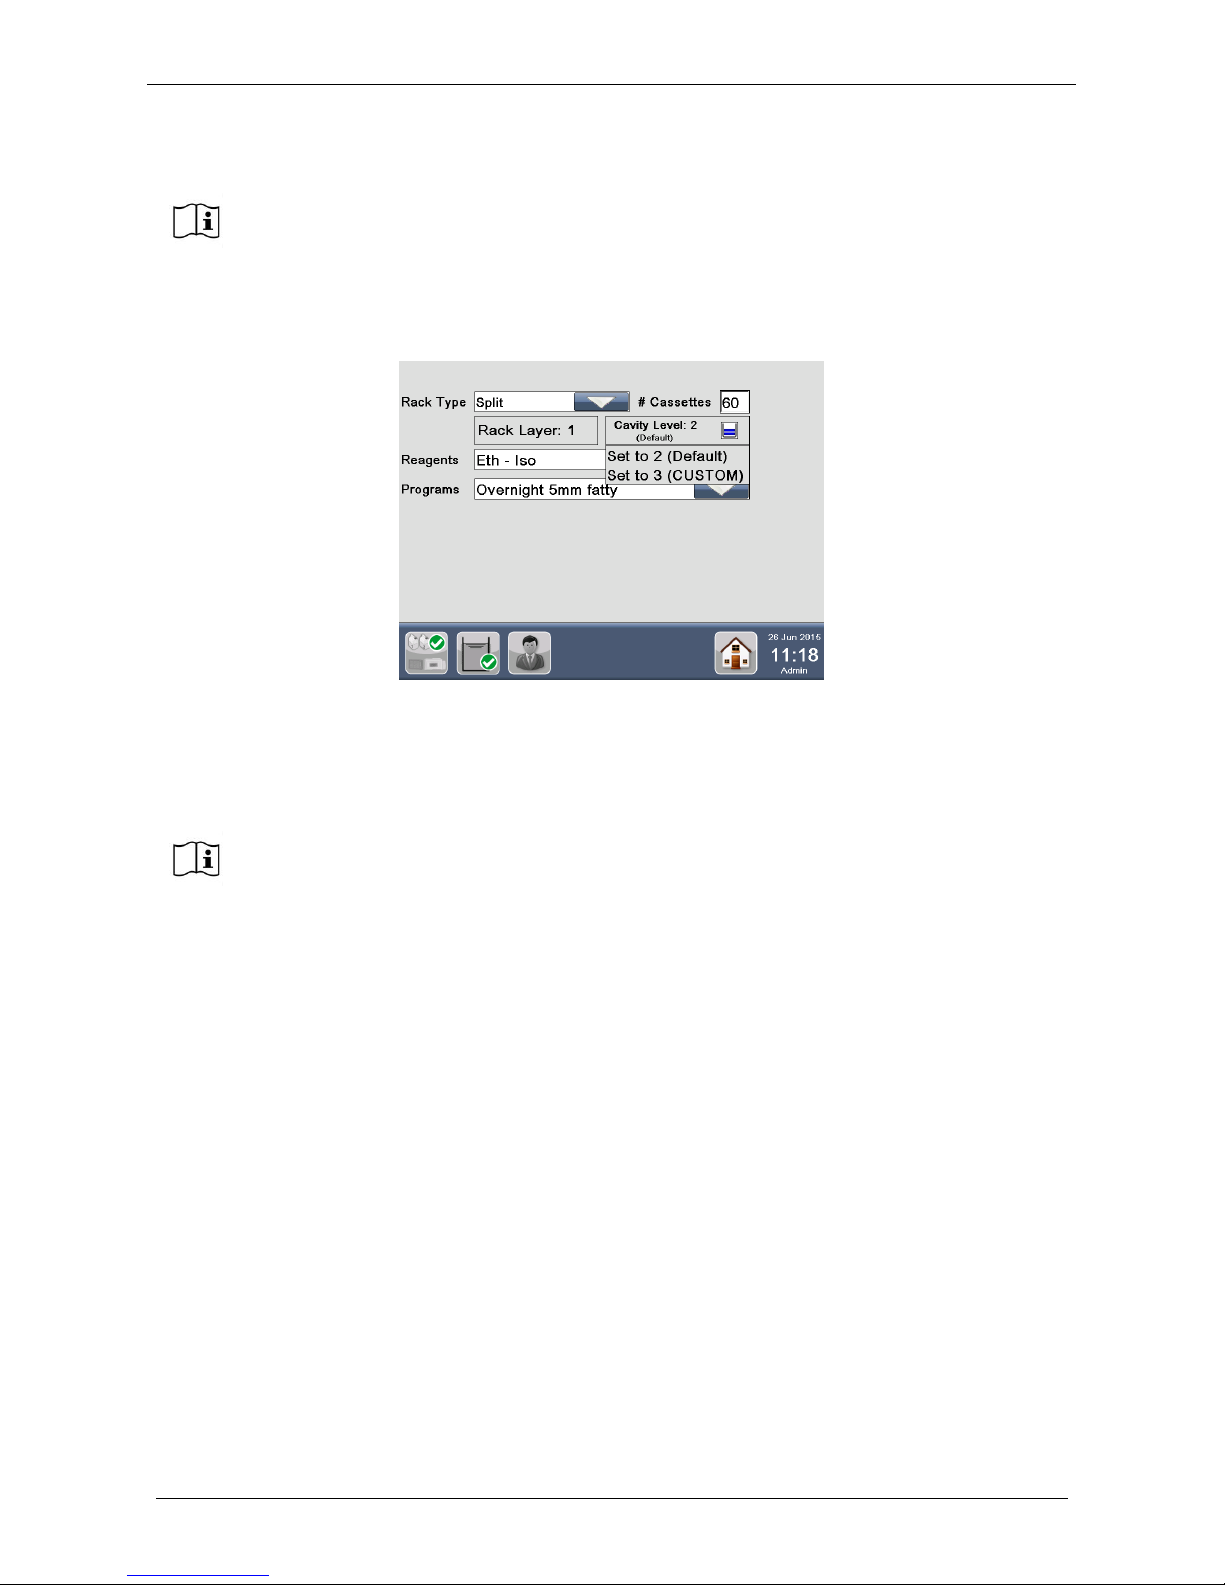
Milestone s.r.l.
MM098-002 – LOGOS ONE – Operator Manual
56
To force the cavity level press the Cavity icon, as shown below. The following screen appears.
It is possible to force the cavity level at an upper level, as indicated in the previous figure, even if the number
of cassettes is only 60.
Refer to chapter 3.2.5.1 for further details.
Normally the software automatically sets a process with:
SPLIT RACK
“Rack Layer: 1” – “Cavity Level: 2” if from 1 to 70 cassettes are inserted
“Rack Layer: 2” – “Cavity Level: 2” if from 71 to 140 cassettes are inserted
“Rack Layer: 3” – “Cavity Level: 3” if from 141 to 210 cassettes are inserted
SUPERMEGA RACK
“Rack Layer: 1” – “Cavity Level: 2” if from 1 to 12 supermega cassettes are inserted
“Rack Layer: 2” – “Cavity Level: 3” if from 13 to 24 supermega cassettes are inserted
RB300 (Random Basket 300)
“Cavity Level: 3” if from 1 to 300 cassettes are inserted
Therefore when using:
SPLIT RACK, it is possible to force the Cavity Level at 3 (when starting a program with Cavity Level 2),
SUPERMEGA RACK, it is possible to force the Cavity Level at 3 (when starting a program with Cavity
Level 2),
RB300, it is NOT possible to force the Cavity Level because it only works with 3 layers of reagent,
It is possible to force an upper custom level at the start of a standard program.
This function is NOT available when starting a Favourite program. Below the instructions.
When starting a program in “Delay Mode”, it is possible to add extra cassettes during the
pre-soaking phase, as explained in the chapter 3.2.5 (remember that it is possible only in
this phase). The number of cassettes, that is allowed to add, depends of the “Cavity level”
of the process.
If you insert a number of cassettes that corresponds to “Cavity level: 2”, it will be possible
to force the cavity level only to 3 layers.
The programs available will be that of the layer chosen, so it won’t be possible to start a
ONE LAYER program if the TWO LAYERS is forced
Page 57
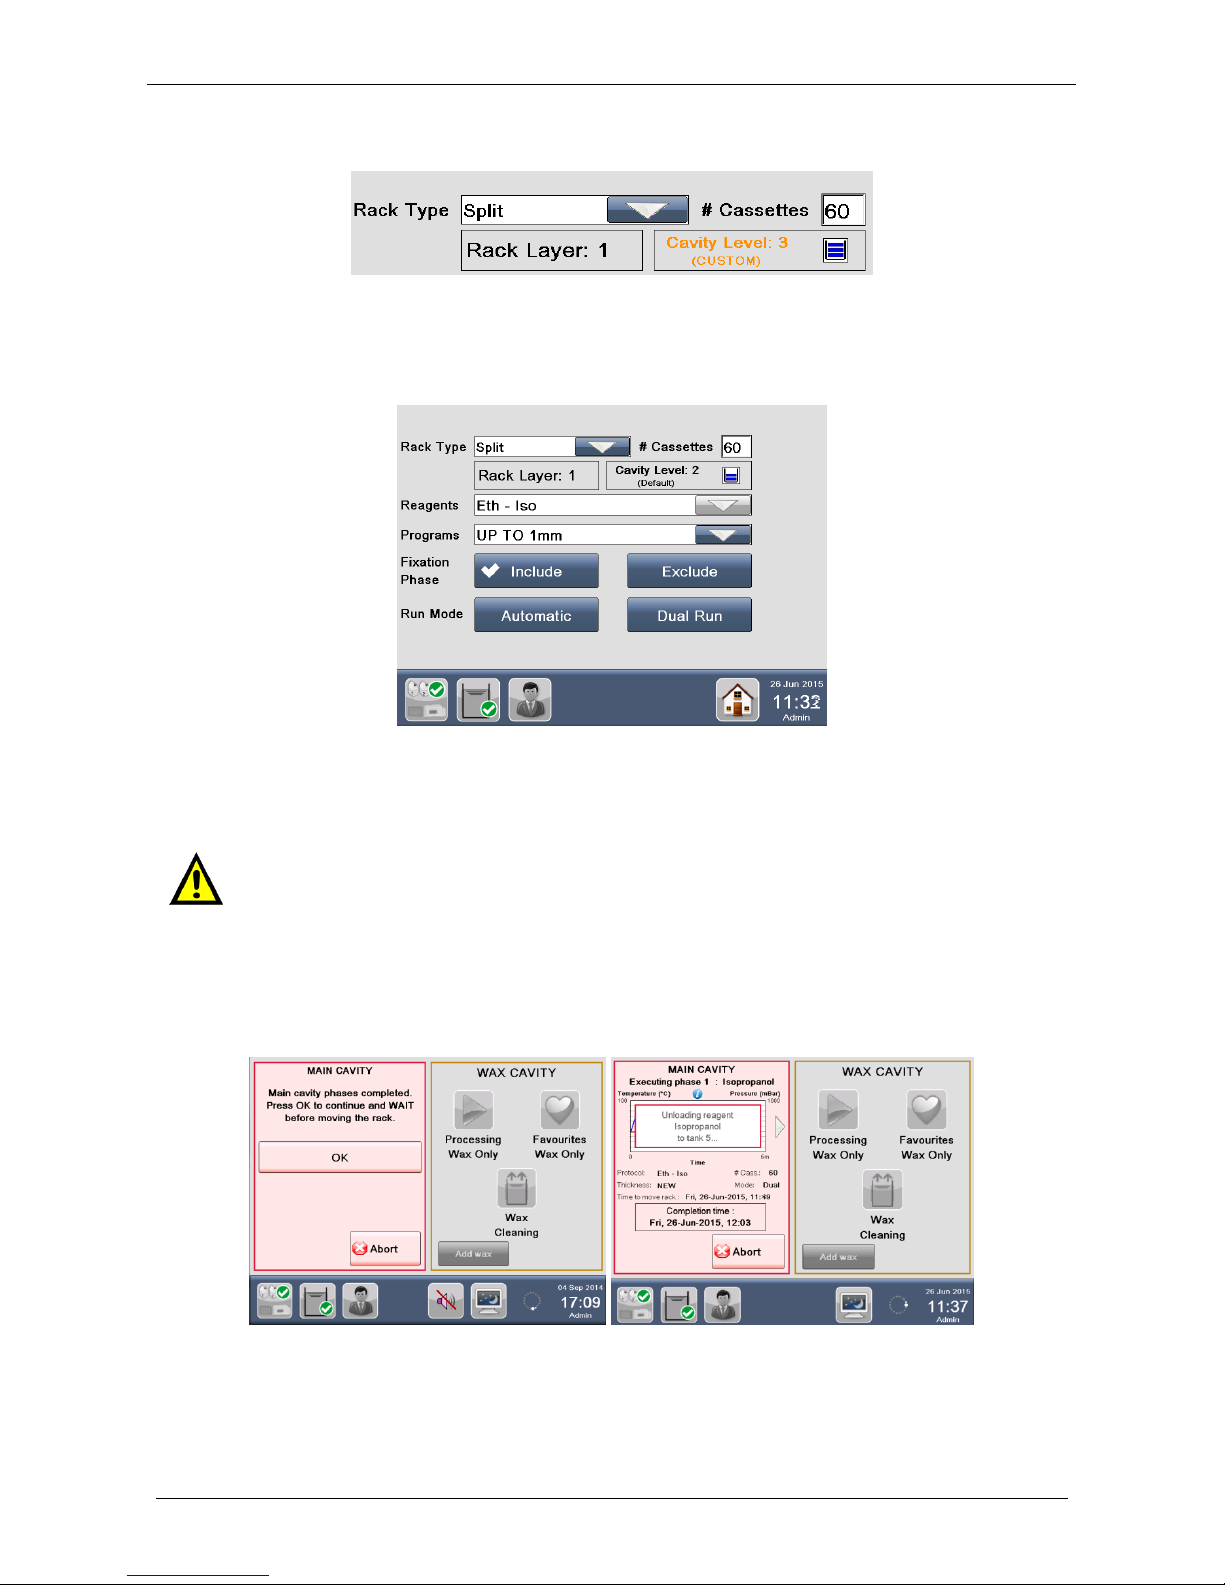
Milestone s.r.l.
MM098-002 – LOGOS ONE – Operator Manual
57
If you select a CUSTOM level (for example “Cavity Level: 2” as shown below), the color displayed is orange.
The following description will be performed by using the “Cavity level: 2 (Default)”.
When you insert the number of cassettes, the following screen appears. Choose the “Reagents” (for
example “Eth-Iso”) and the “Program” (in this case “UP TO 1mm”), as shown below.
The following screen appears.
To run the process follow the instructions reported above, in the chapter 3.2.1.
3.2.3 Run two processes simultaneously
In DUAL RUN mode (described in the chapter 3.2.1.2), an audio alarm warns the operator that the last
phase in the MAIN CAVITY has been completed.
1. The following screen appears, with an audio alarm that requires USER to press OK to unload the reagent
from the MAIN CAVITY.
A. If operator presses OK, immediately the UNLOADING of the last reagent starts.
B. If operator does not press OK, the UNLOADING of the last reagent AUTOMATICALLY starts after 4
minutes.
When running parallel processing, it is required to perform the pre-soaking outside the
unit. Refer to chapter 9.6 for Presoaking guidelines.
Page 58
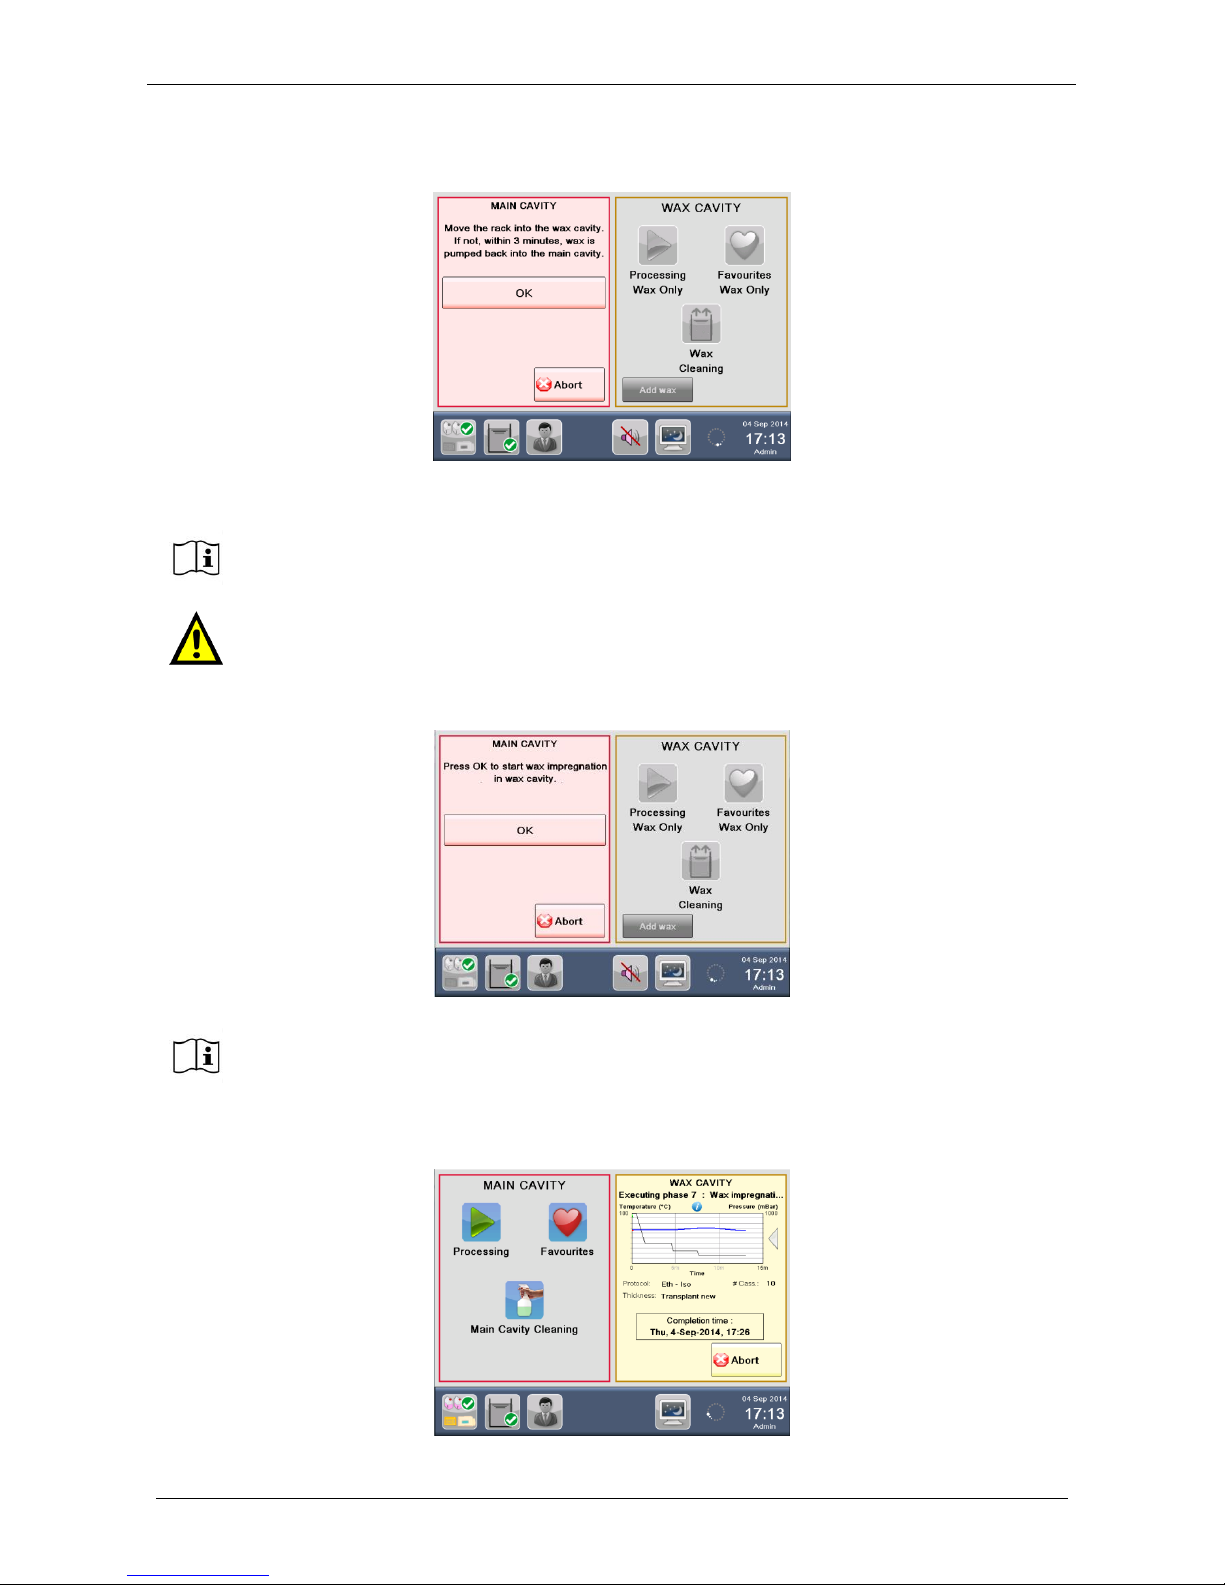
Milestone s.r.l.
MM098-002 – LOGOS ONE – Operator Manual
58
2. On completion of the UNLOADING (and of vaporization, if required by the program in use), it is necessary
to MANUALLY move the RACK from the MAIN CAVITY to the WAX CAVITY. A message with an audio
alarm warns the operator:
A. If operator does not press OK within 3 minutes, WAX is automatically loaded in the MAIN CAVITY.
Removal of the rack must be done within 3 minutes.
Should this not be done, the system AUTOMATICALLY pumps WAX in the MAIN CAVITY to
preserve samples.
If the RUN MODE becomes AUTOMATIC, after it is required to run a MAIN CAVITY
CLEANING.
B. If operator presses OK this message appears with an audio alarm:
A. If operator presses OK, WAX IMPREGNATION starts immediately IN WAX CAVITY.
B. If operator does not press OK, after 1 minute WAX IMPREGNATION starts IN WAX CAVITY.
NOW MOVE MANUALLY THE RACK IN THE WAX CAVITY (right).
Page 59
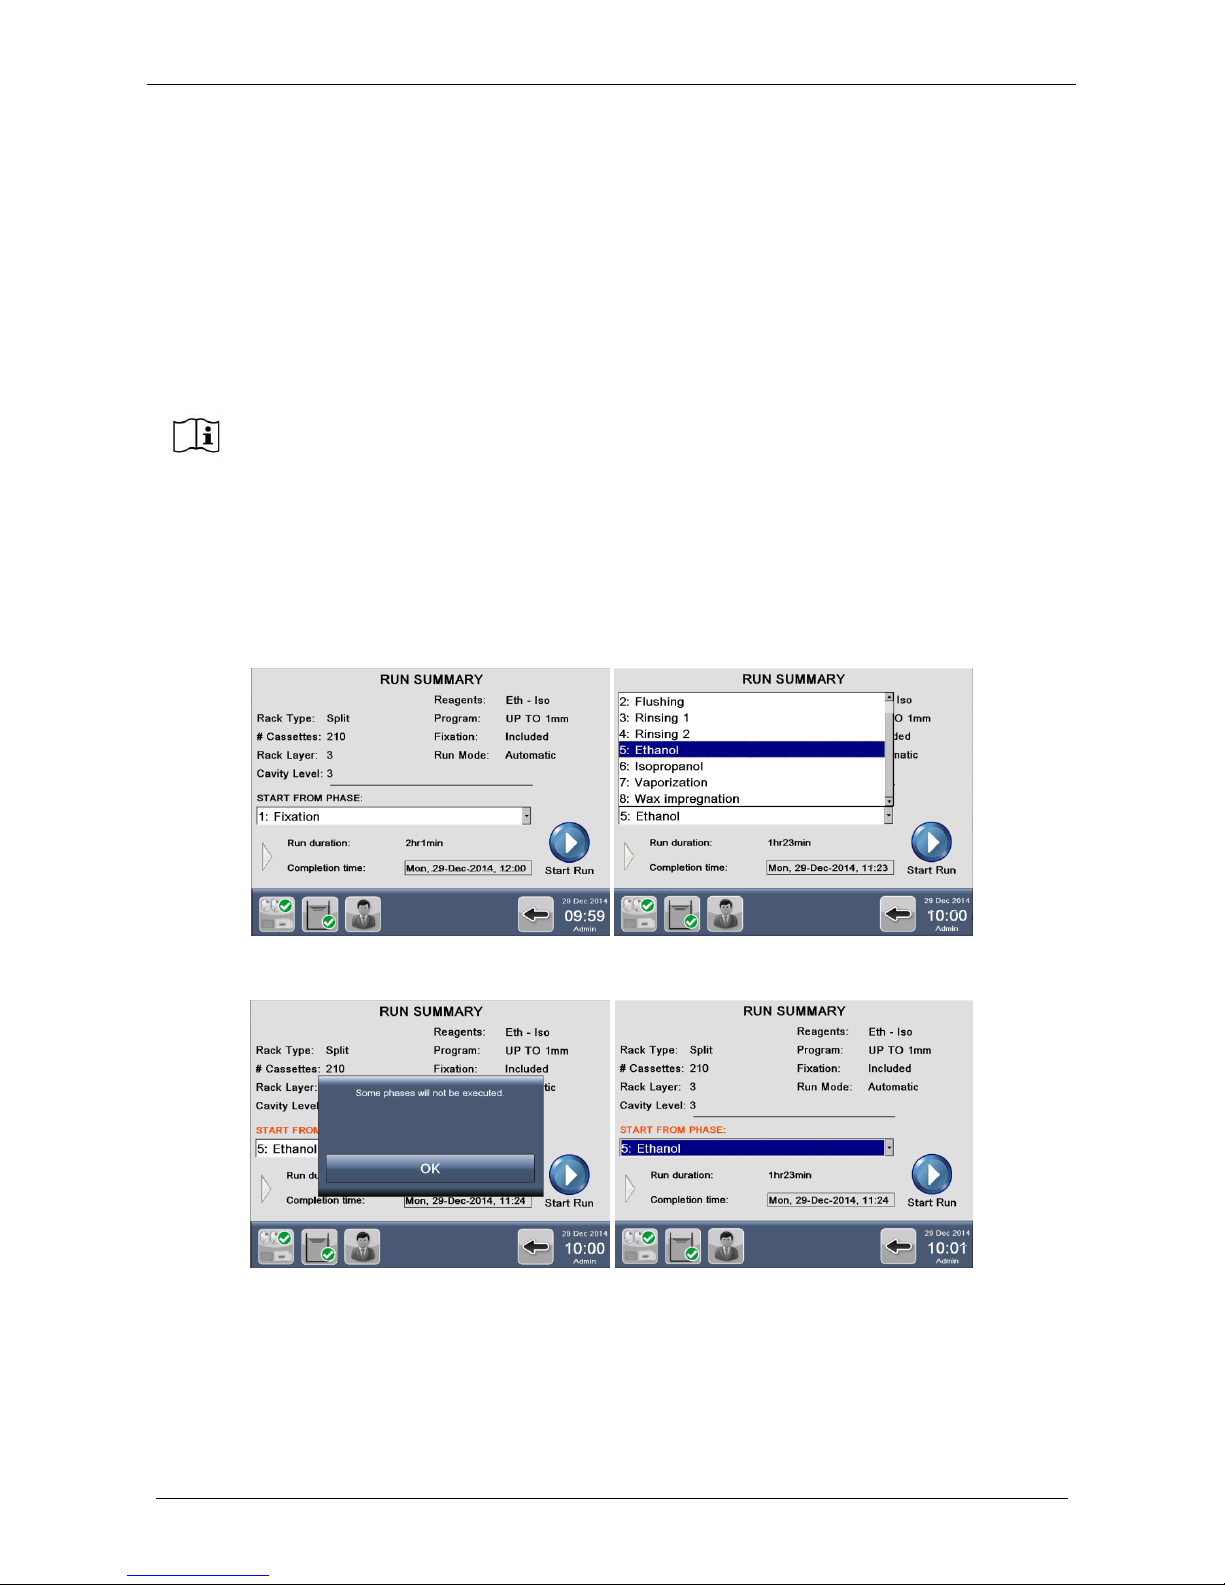
Milestone s.r.l.
MM098-002 – LOGOS ONE – Operator Manual
59
While the WAX phase is running in the WAX CAVITY, it’s possible to start a new process in the MAIN
CAVITY, as shown below.
During the WAX impregnation phase in wax cavity, 3 icons are displayed on the left screen as shown above.
It’s possible to start a new process in the MAIN CAVITY.
Press:
Processing: to run a standard or a modified protocol, as described in the chapter 3.2.2.
Favourites: to run a Favourite protocol, as described in the chapter 3.2.1.
MAIN CAVITY Cleaning: to run a cleaning of the MAIN CAVITY, as described in the chapter 3.3.
3.2.4 Run a program using the STEP START function
In the starting screen listing all process details (“Run Summary”), select the starting phase you require, as
shown below.
In the example, “Ethanol” is selected as the starting phase (so, phase number 5), and then press “Start Run”.
It is not required to clean the main cavity because the wax is not moved in case of dual
run.
The software automatically calculates the WAX availability.
If WAX must be cleaned after this run the software automatically calculates WAX cleaning
program time and wax availability.
Page 60
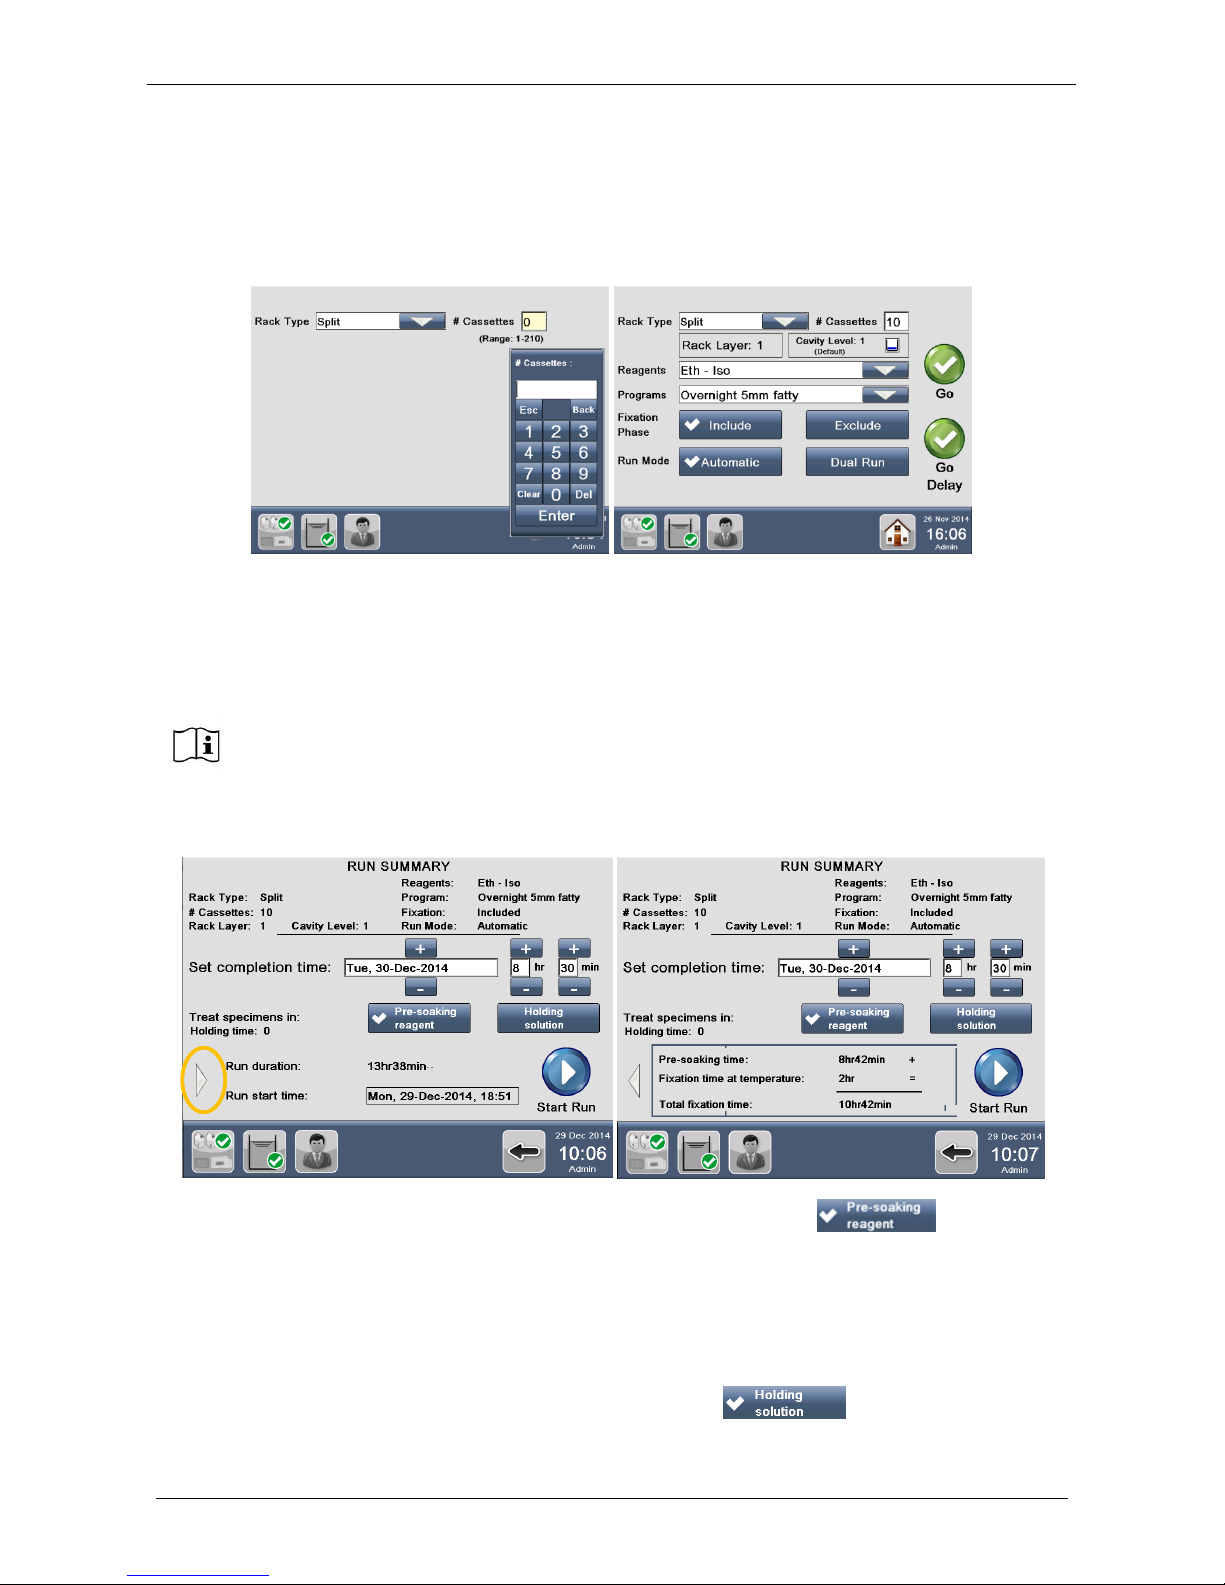
Milestone s.r.l.
MM098-002 – LOGOS ONE – Operator Manual
60
3.2.5 Run a DELAYED PROGRAM
The window below appears, if either a Favorite program (see chapter 3.2.1) or a Standard program (see
chapter 3.2.2) is selected. Enter the exact number of cassettes in the box, choose if fixation phase must be
excluded or not, select the Run Mode and press “Go delay”.
The following window appears: set the completion time. In fact, “Delay Start” function allows setting when the
program has to finish, without modification of the existing protocol. The system keeps samples immersed in:
• Pre-soaking reagent (formalin at room temperature)
OR
• Holding reagent (flushing mix at room temperature)
By default Pre-soaking reagent is selected, if you want to keep the specimens immersed in Holding solution,
select its icon.
If you leave selected “Pre-soaking” (see above that is thicked by the arrow ) as reagent to
keep the specimens: the “Holding time” is zero.
If you press the grey arrow (figure above, yellow circle), the fixation protocol details are displayed:
• “Pre-soaking time”: it depends on the starting time to complete the processing as set by user.
• “Fixation time at temperature”: the duration of the heated fixation phase of the protocol.
• “Total fixation time”: the sum of the two times above.
If you select “Holding” (see below that is thicked by the arrow ) as reagent to keep the
specimens:
See the chapter 4.1.1 to set Pre-soaking and Holding reagent.
Page 61
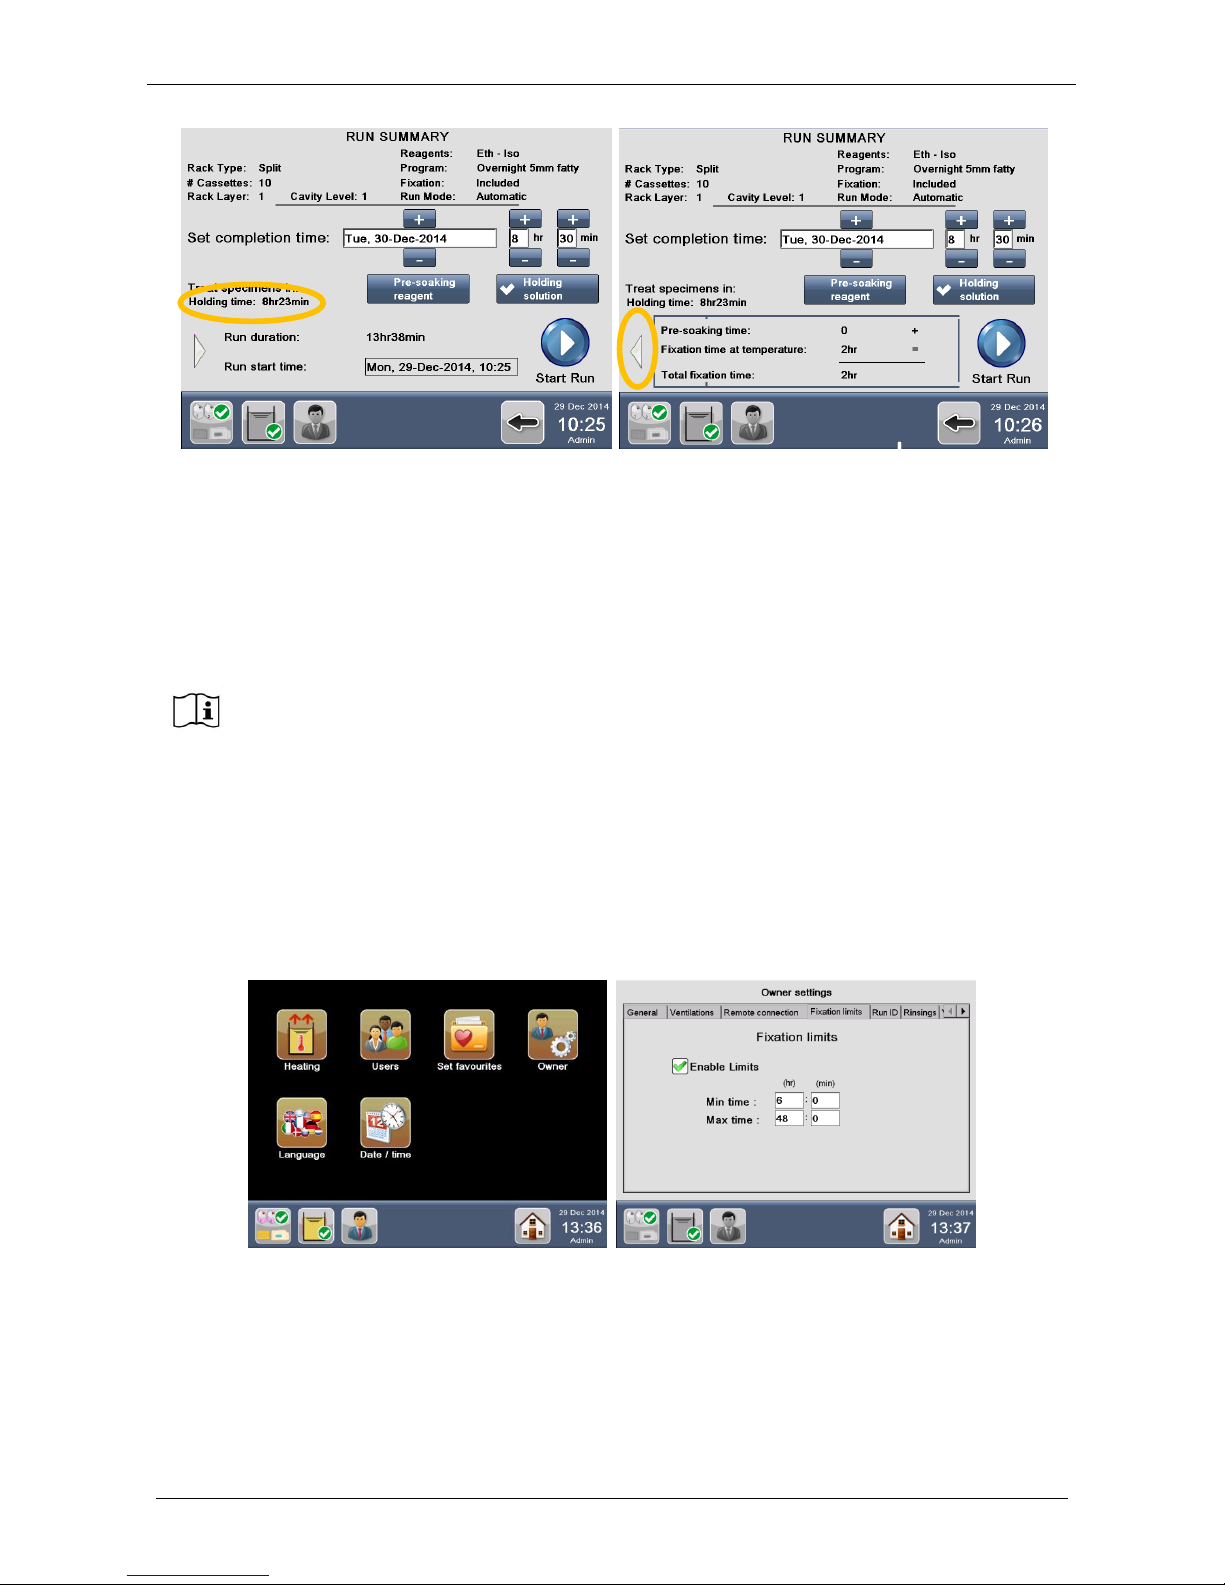
Milestone s.r.l.
MM098-002 – LOGOS ONE – Operator Manual
61
the “Holding time” is NOT zero (as the previous case), but it depends on the starting time to complete the
processing as set by user. The “Holding time” is indicated by the figure above left, yellow circle.
If you press the grey arrow (figure above right, yellow circle), the fixation protocol details are displayed:
• “Pre-soaking time”: it is zero because “holding” is the reagent set to keep the specimens, not pre-
soaking.
• “Fixation time at temperature”: the duration of the heated fixation phase of the protocol
• “Total fixation time”: the sum of the two times above.
By selecting “Enable Limits” and entering Min and Max fixation times (see chapter 2.16 and figure below
right), when starting a program the system calculates the time necessary to keep samples in HOLDING
SOLUTION (default reagent Flushing MIX).
In fact, on the base of the:
-external time in fixative (value entered by user, requested only if fixation limits are enabled)
-fixation time at temperature (value set in the program)
the software calculates by difference the necessary pre-soaking time to reach the Max fixation limit set.
Moreover software keeps samples in HOLDING SOLUTION up to the start of the program.
When enabling the control of the “Total Fixation Time” in “Owner Settings”, the
specimens will be automatically kept in pre-soaking reagent and, only in case the Total
fixation time is exceeded, the holding reagent will be used, as explained below in detail.
Page 62
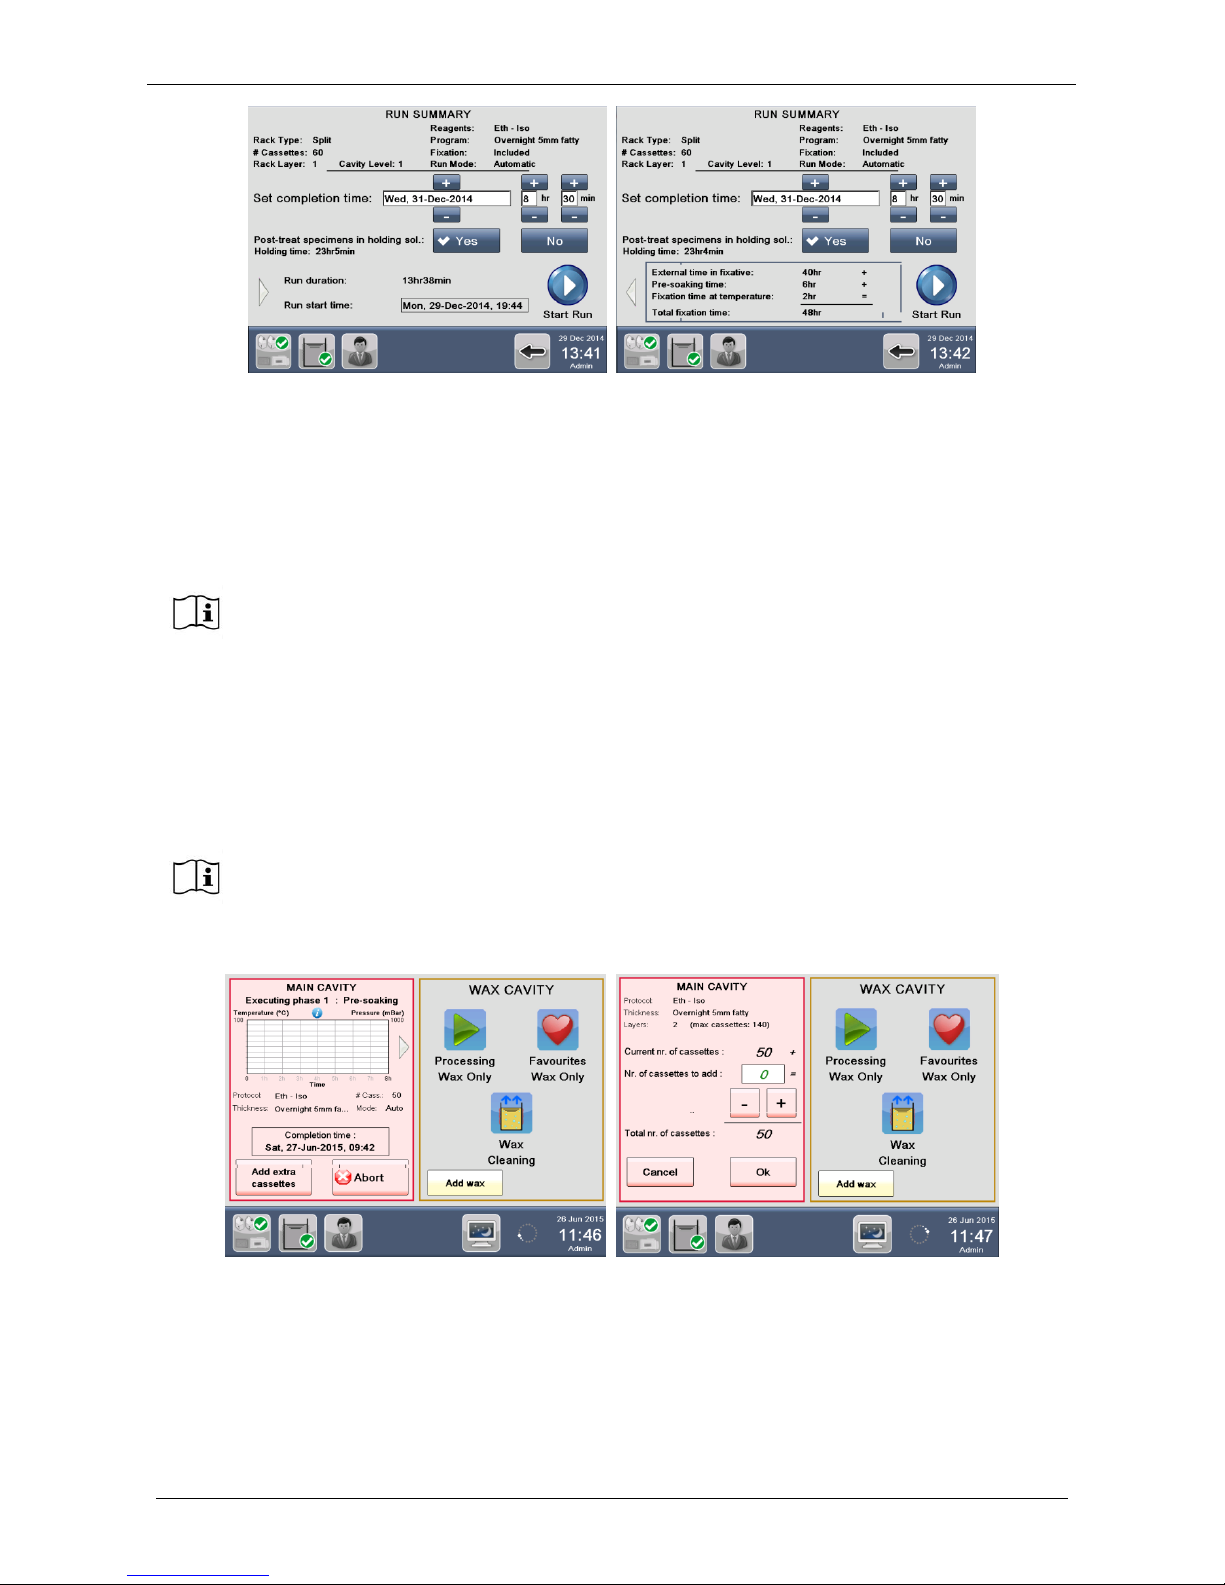
Milestone s.r.l.
MM098-002 – LOGOS ONE – Operator Manual
62
Please refer to chapter 4.1.1 for how to set the reagent to be used as PRESOAKING and HOLDING.
3.2.5.1 Add extra cassettes
When starting a program in “Delay Mode”, it is possible to add extra cassettes during the pre-soaking or
holding phase, as explained in the chapter 3.2.5.
The number of cassettes, that is allowed to add, depends of the “Cavity level” of the process.
In the example reported in this chapter, the “Cavity level” is “2” and so it will be possible in the pre-soaking or
holding phase to add cassettes up to 140 cassettes (here 50 cassettes have been selected and so only 90
cassettes is allowed to add to arrive at 140 cassettes).
Pressing “Add extra cassettes”, the right screen appears: enter number of cassettes to be added and press
OK to continue processing.
Failure to press the OK button, automatically the software will continue the processing after 30 minutes of
pausing adding the cassettes entered.
This function is active ONLY in the pre-soaking or holding phase of a DELAYED
PROGRAM.
It is possible to open the cover without any alarm.
The formalin is not unloaded in the tank, it remains in the cavity without heating.
Page 63
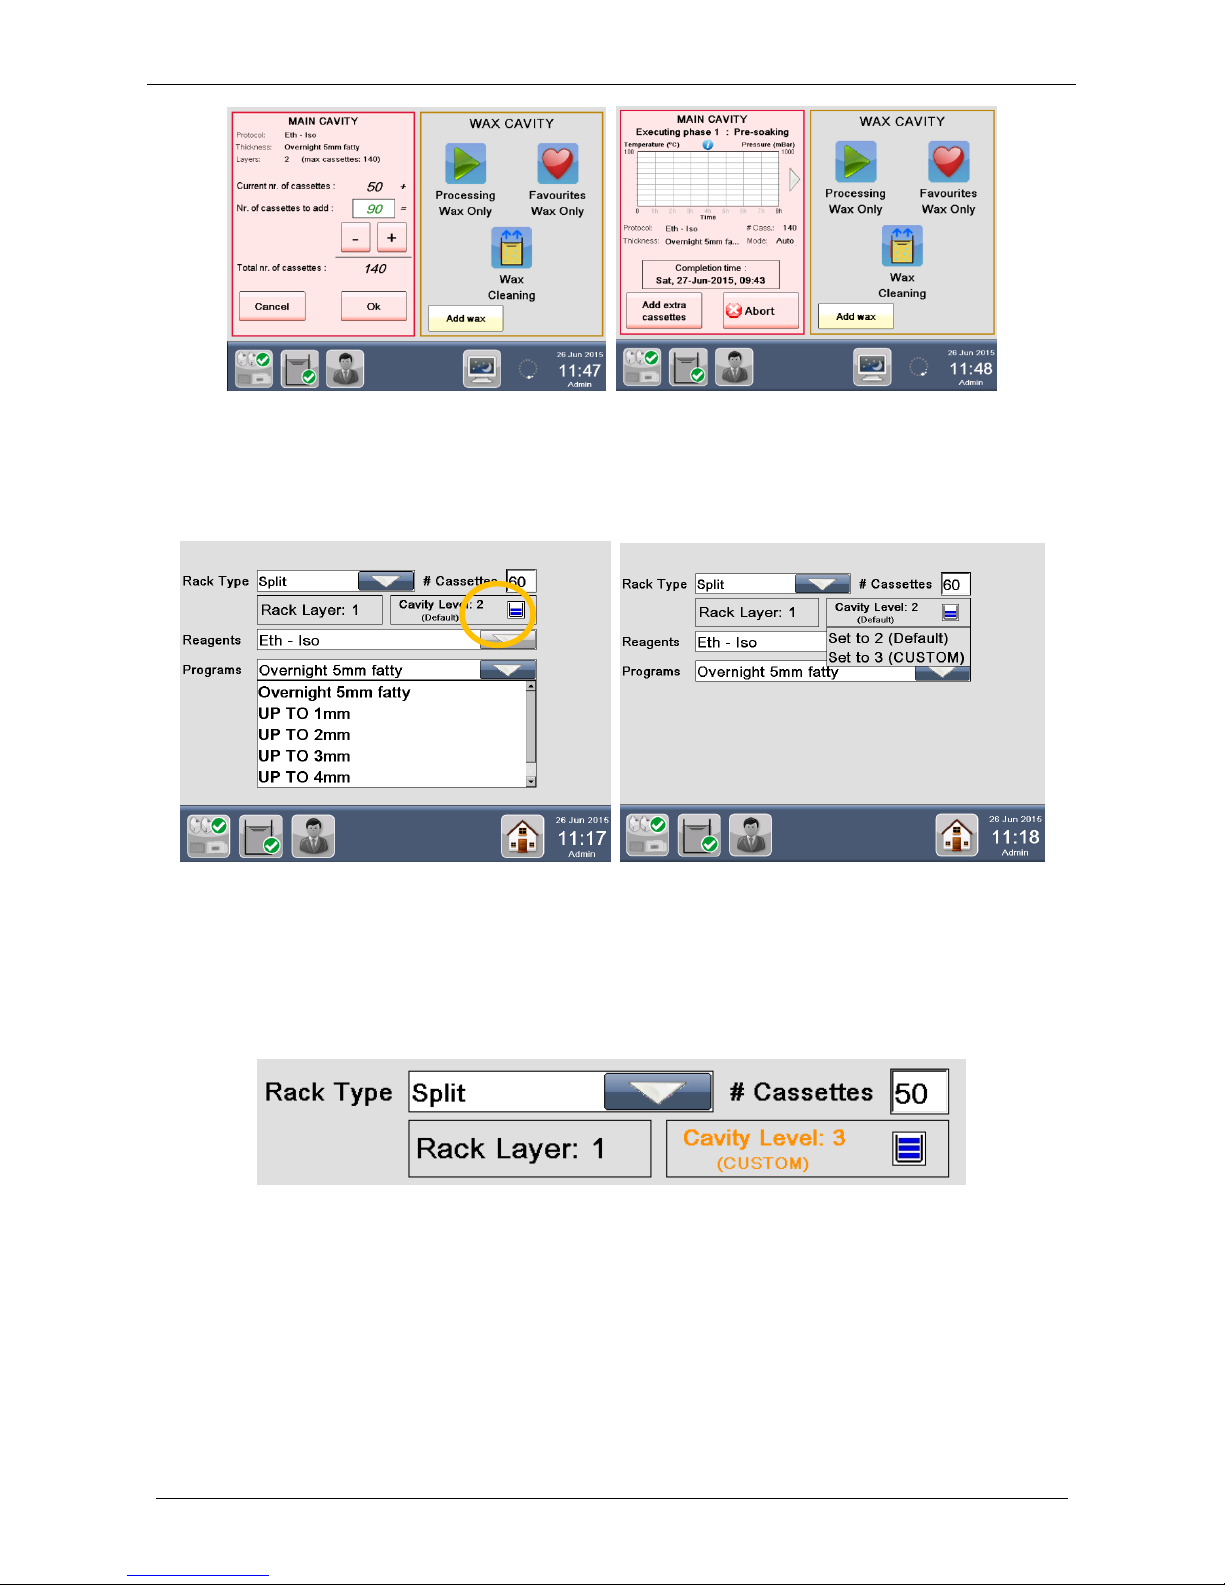
Milestone s.r.l.
MM098-002 – LOGOS ONE – Operator Manual
63
At the start of a program it is possible to force an upper cavity level, if more cassettes are required to be
inserted, press the Cavity icon, as shown in the circle below. The following screen appears.
Refer to chapter 9.6 Presoaking guidelines.
Refer to chapter 3.2.2 for how to force an upper custom level at the start of a program.
If you press “Set to 2 (CUSTOM)”, the process will be executed with 2 levels of reagents and so it will be
possible to add cassettes to fill 2 layers of the rack. The tag “CUSTOM” means that the cavity level
chosen (“2” in this case) does NOT correspond to the rack layer.
If you press “Set to 3 (CUSTOM)”, the process will be executed with 3 levels of reagents and so it will be
possible to add cassettes to fill 3 layers of the rack. The tag “CUSTOM” means that the cavity level
chosen (“3” in this case) does NOT correspond to the rack layer.
3.2.6 Add WAX
While the wax cavity is not active there is a button ADD WAX, in case the level of wax is low, it is possible to
add it.
Pressing also the button ADD WAX a timer of 20 minutes starts allowing the new wax added melting.
The wax icon change the color from RED (low level) to YELLOW (melting time) to GREEN when the 20
minutes melting time is reached. If already totally melted before the end of the 20 minutes, it is possible to
set it AS READY having immediately the green color.
Page 64
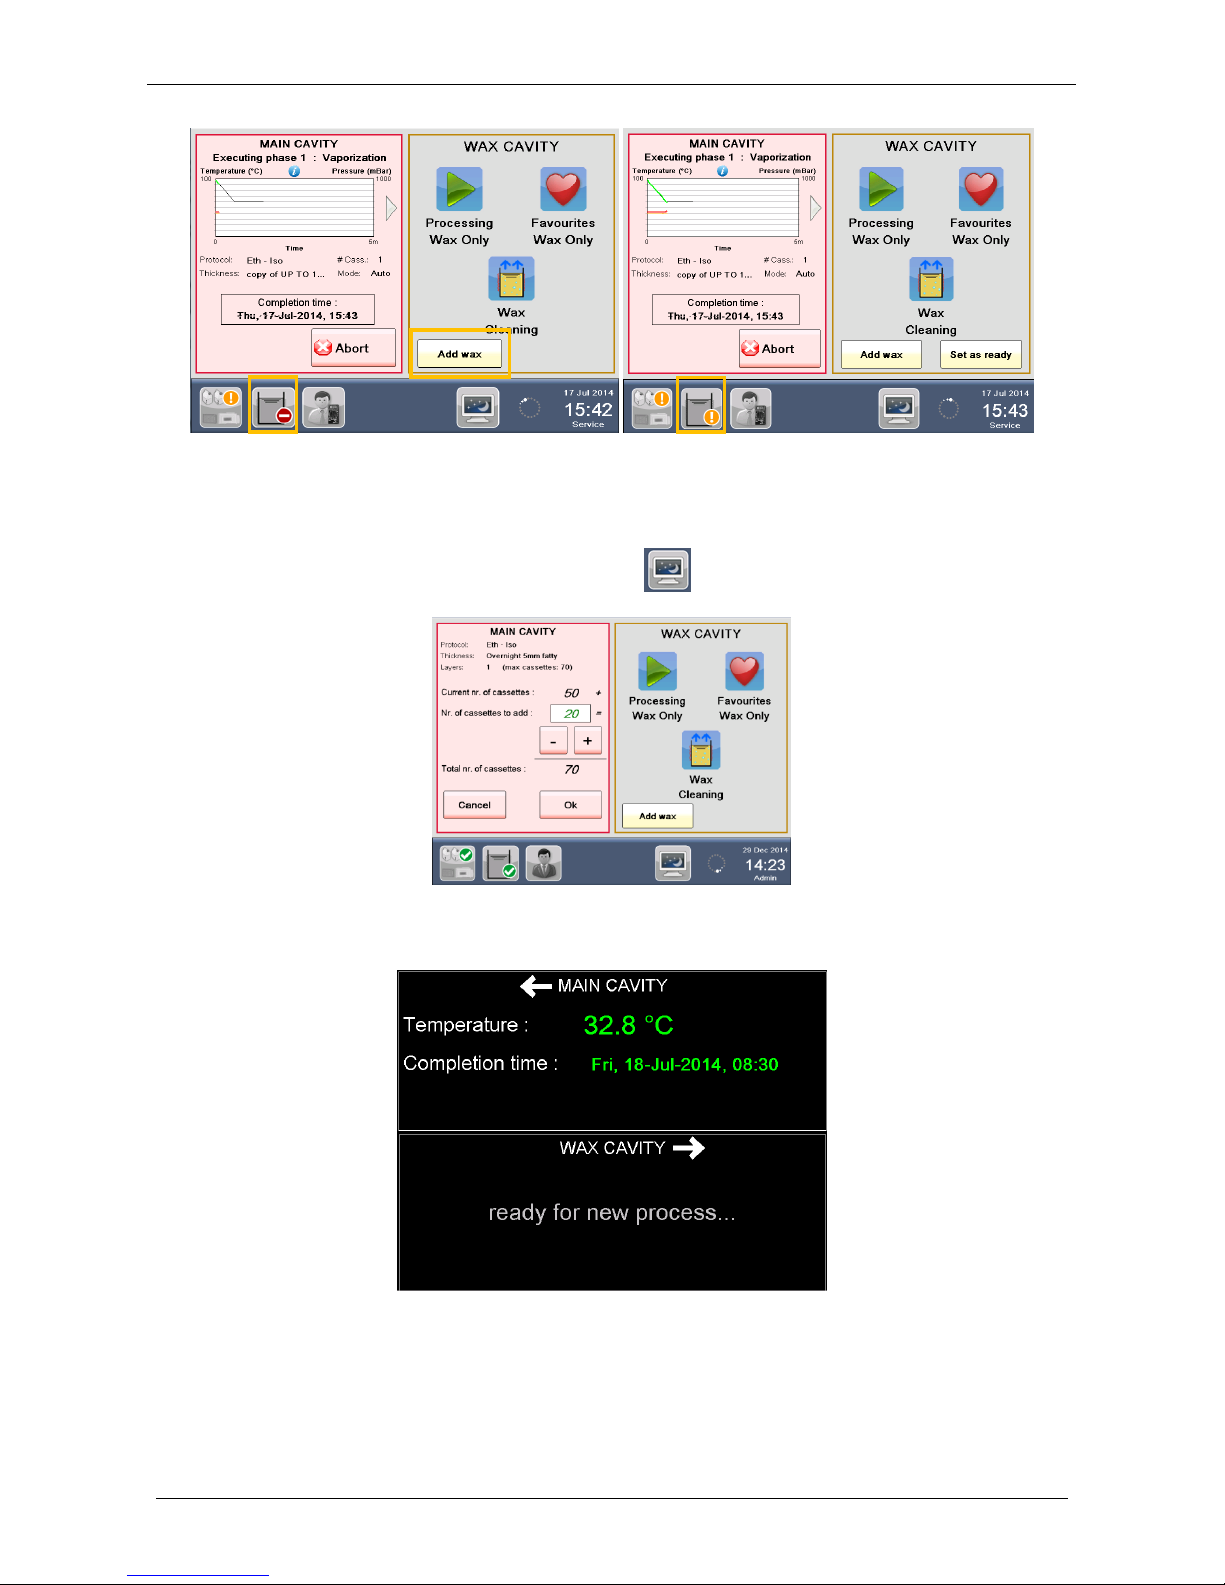
Milestone s.r.l.
MM098-002 – LOGOS ONE – Operator Manual
64
3.2.7 Screen saver
When the LOGOS ONE is running after 5 minutes of inactivity the screen saver comes out automatically.
It is possible to recall it in every moment pressing the icon on the status bar.
The screen saver gives very useful information during a program: for example when a cavity is free for a new
process is written “ready for new process”.
To exit from the screen saver simply touch the screen and insert the access password. This is a very useful
function for samples and user safety.
Page 65
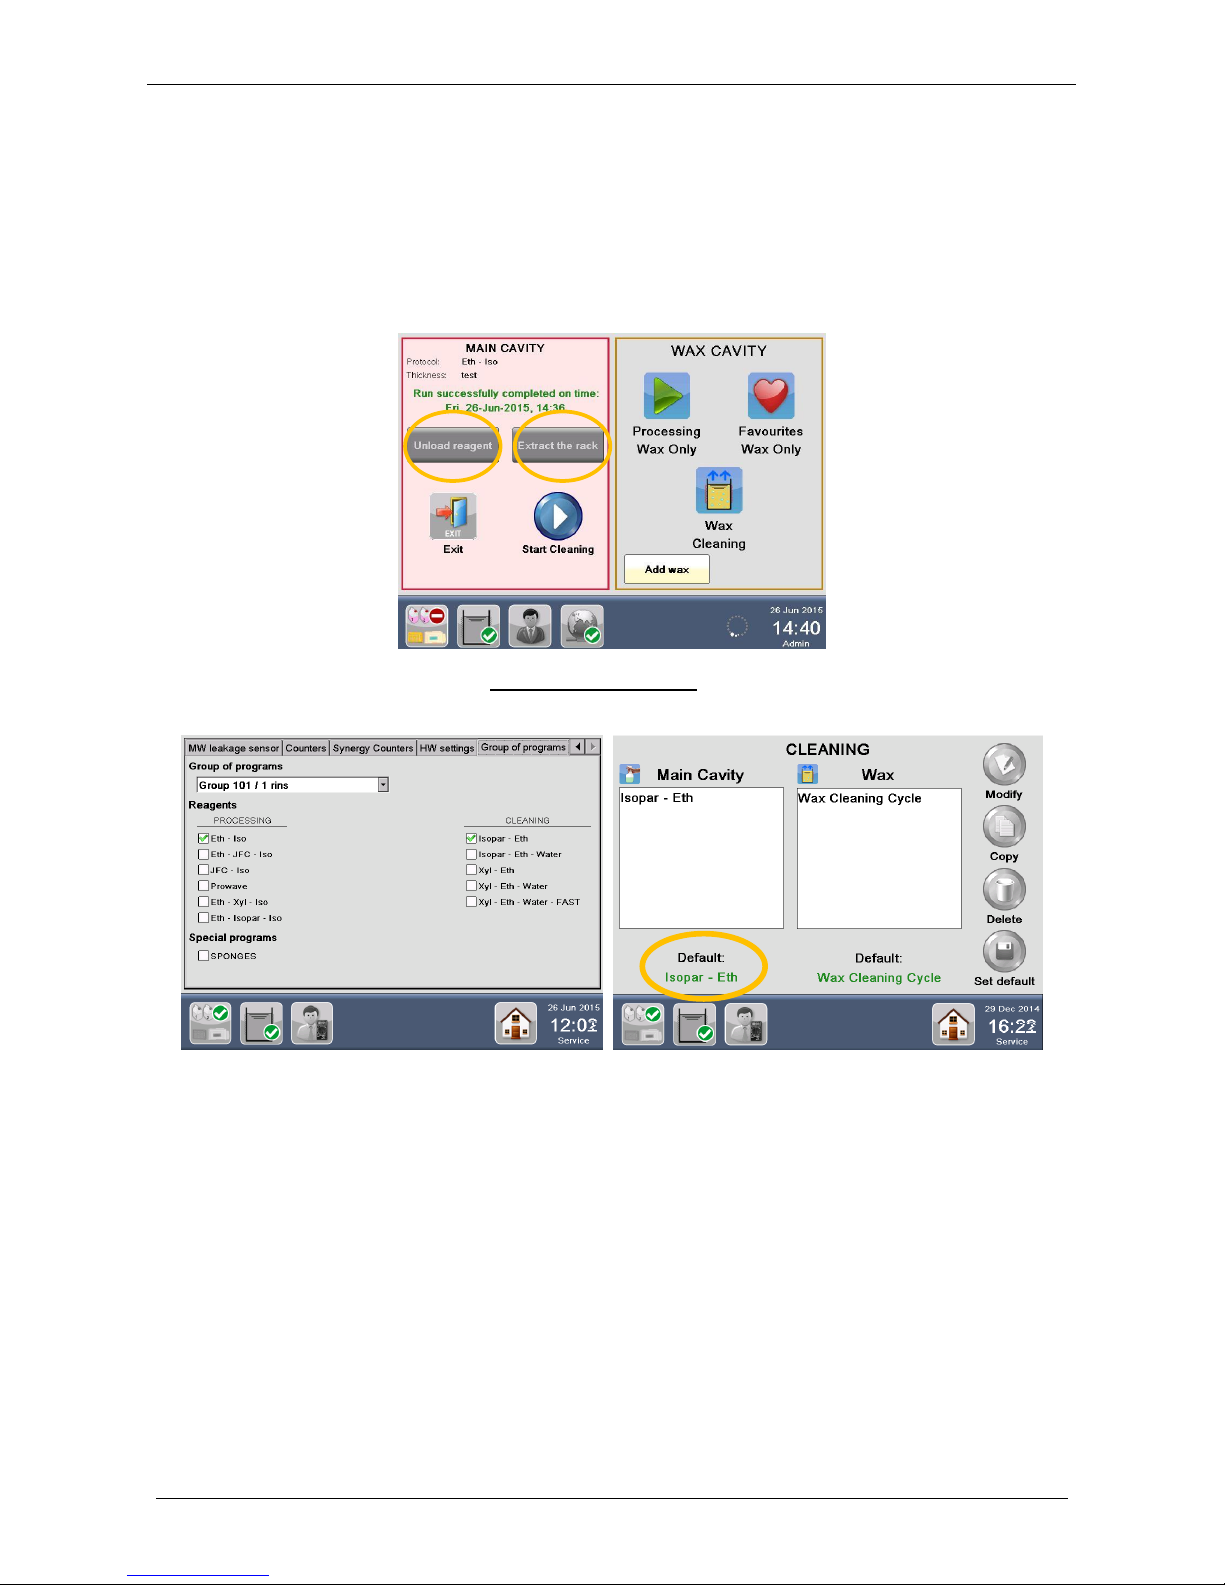
Milestone s.r.l.
MM098-002 – LOGOS ONE – Operator Manual
65
3.3 Run a cleaning cycle of the main cavity
At the end of an automatic process (see the chapter 3.2.1.1), it is required to carry out a MAIN CAVITY
CLEANING, as this has been filled with WAX.
Unload the reagent and extract the rack by pressing the corresponding icons in the figure below (yellow
circles); download the cassettes and start the cleaning protocol in the processing screen, press START
CLEANING and run directly a cleaning program.
The CLEANING REAGENTS set in the Group of Programs page (SERVICE ONLY) are the only one that are
visualized in the cleaning page.
Choose the default program according to the cleaning reagents loaded in the REAGENT CONFIGURATION:
Only one program can be chosen by default and will be the one that starts automatically after an automatic
run that moves the paraffin in the main cavity. All the calculation for cavity availability are done on that cycle
duration.
The CLEANING REAGENTS set in the Group of Program page are the only one that are visualized in the
cleaning page.
Only one program can be chosen by default and will be the one that starts automatically after an automatic
run that moves the paraffin in the main cavity.
The same for the Wax Cleaning cycle, only one is set by default and all the calculation for wax and
chambers availability are done on that cycle.
Page 66
Milestone s.r.l.
MM098-002 – LOGOS ONE – Operator Manual
66
Rack CANNOT be positioned inside the cavity when running the “FAST” cleaning cycle,
but it must be cleaned outside the cavity.
The cleaning procedure based on the 2 tanks cleaning reagents (“Isopar-Eth” or “Xyl-Eth”) is suggested
when all other 7 tanks positioned in the LOGOS ONE drawer are already in use for processing, and this
makes impossible the use of 3 tanks for cleaning.
To start the cleaning cycle later, press “Exit” and go to the Main menu.
When ready to start the cleaning cycle, press “Cleaning” from the Main Menu, then “Main cavity cleaning”.
Only one program can be chosen by default and will be the one that starts automatically.
The same for the Wax Cleaning cycle, only one is set by default and all the calculation for wax and
chambers availability are done on that cycle.
3.3.1 Tanks for process and main cavity cleaning
CASE 1:
- HistosMATE available to clean the rack only 2 cleaning tanks required AND
- Specimens to be processed include big routine samples 2 isopropanols are required in overnight run
In this case it is suggested to choose:
GROUP WITH 2 RINSINGS
TANK NR.
TANK REAGENT
REAGENT
1
FORMALIN
FORMALIN
2
FLUSHING MIX
ETHANOL from 60% to 70%
3
RINSING 1
ETHANOL 100%
4
RINSING 2
ETHANOL 100%
5
ETHANOL
ETHANOL 100%
6
ISOPROPANOL
ISOPROPANOL 100%
7
ISOPROPANOL 2
ISOPROPANOL 100%
8
CLEANING ISOPARAFFIN or XYLENE
ISOPARAFFIN or XYLENE
9
CLEANING ETHANOL
ETHANOL from 96% to 100%
It is also possible to clean the rack (WITHOUT cassettes) inside the Main cavity, for further
information see the chapter 7.2.1.
If you perform a cleaning cycle with 3 tanks, “Isopar-Eth-Water” or “Xyl-Eth-Water”, it’s
required to use a clean tank (to be filled with tap water), which must be either supplied
locally or purchased directly from the manufacturer (for details see Chapter 8).
If you perform a cleaning cycle with only 2 tanks, “Isopar/Eth” or “Xyl/Eth”, without the
step of water, at the end of the cleaning protocol it is required to dry the Main cavity using
paper towel.
If you perform a cleaning cycle with only 2 tanks, without the step of water, make sure to
leave the Main cavity cover open for at least 30 minutes before starting a new processing
run.
Page 67

Milestone s.r.l.
MM098-002 – LOGOS ONE – Operator Manual
67
CASE 2:
- HistosMATE available to clean the rack only 2 cleaning tanks required AND
- Specimens to be processed include only little samples
In this case it is suggested to choose:
GROUP WITH 2 RINSINGS
TANK NR.
TANK REAGENT
REAGENT
1
FORMALIN
FORMALIN
2
FLUSHING MIX
ETHANOL from 60% to 70%
3
RINSING 1
ETHANOL 100%
4
RINSING 2
ETHANOL 100%
5
ETHANOL
ETHANOL 100%
6
ISOPROPANOL
ISOPROPANOL 100%
7
ISOPROPANOL (spare)
ISOPROPANOL 100%
8
CLEANING ISOPARAFFIN or XYLENE
ISOPARAFFIN or XYLENE
9
CLEANING ETHANOL
ETHANOL from 96% to 100%
CASE 3:
- HistosMATE NOT available to clean the rack 3 cleaning tanks required AND
- Specimens to be processed include big routine samples 2 isopropanols are required in overnight run
In this case it is suggested to choose:
GROUP WITH 1 RINSING
TANK NR.
TANK REAGENT
REAGENT
1
FORMALIN
FORMALIN
2
FLUSHING MIX
ETHANOL from 60% to 70%
3
RINSING 1
ETHANOL 100%
4
ETHANOL
ETHANOL 100%
5
ISOPROPANOL
ISOPROPANOL 100%
6
ISOPROPANOL 2
ISOPROPANOL 100%
7
CLEANING ISOPARAFFIN or XYLENE
ISOPARAFFIN or XYLENE
8
CLEANING ETHANOL
ETHANOL from 96% to 100%
9
CLEANING WATER
WATER
Page 68
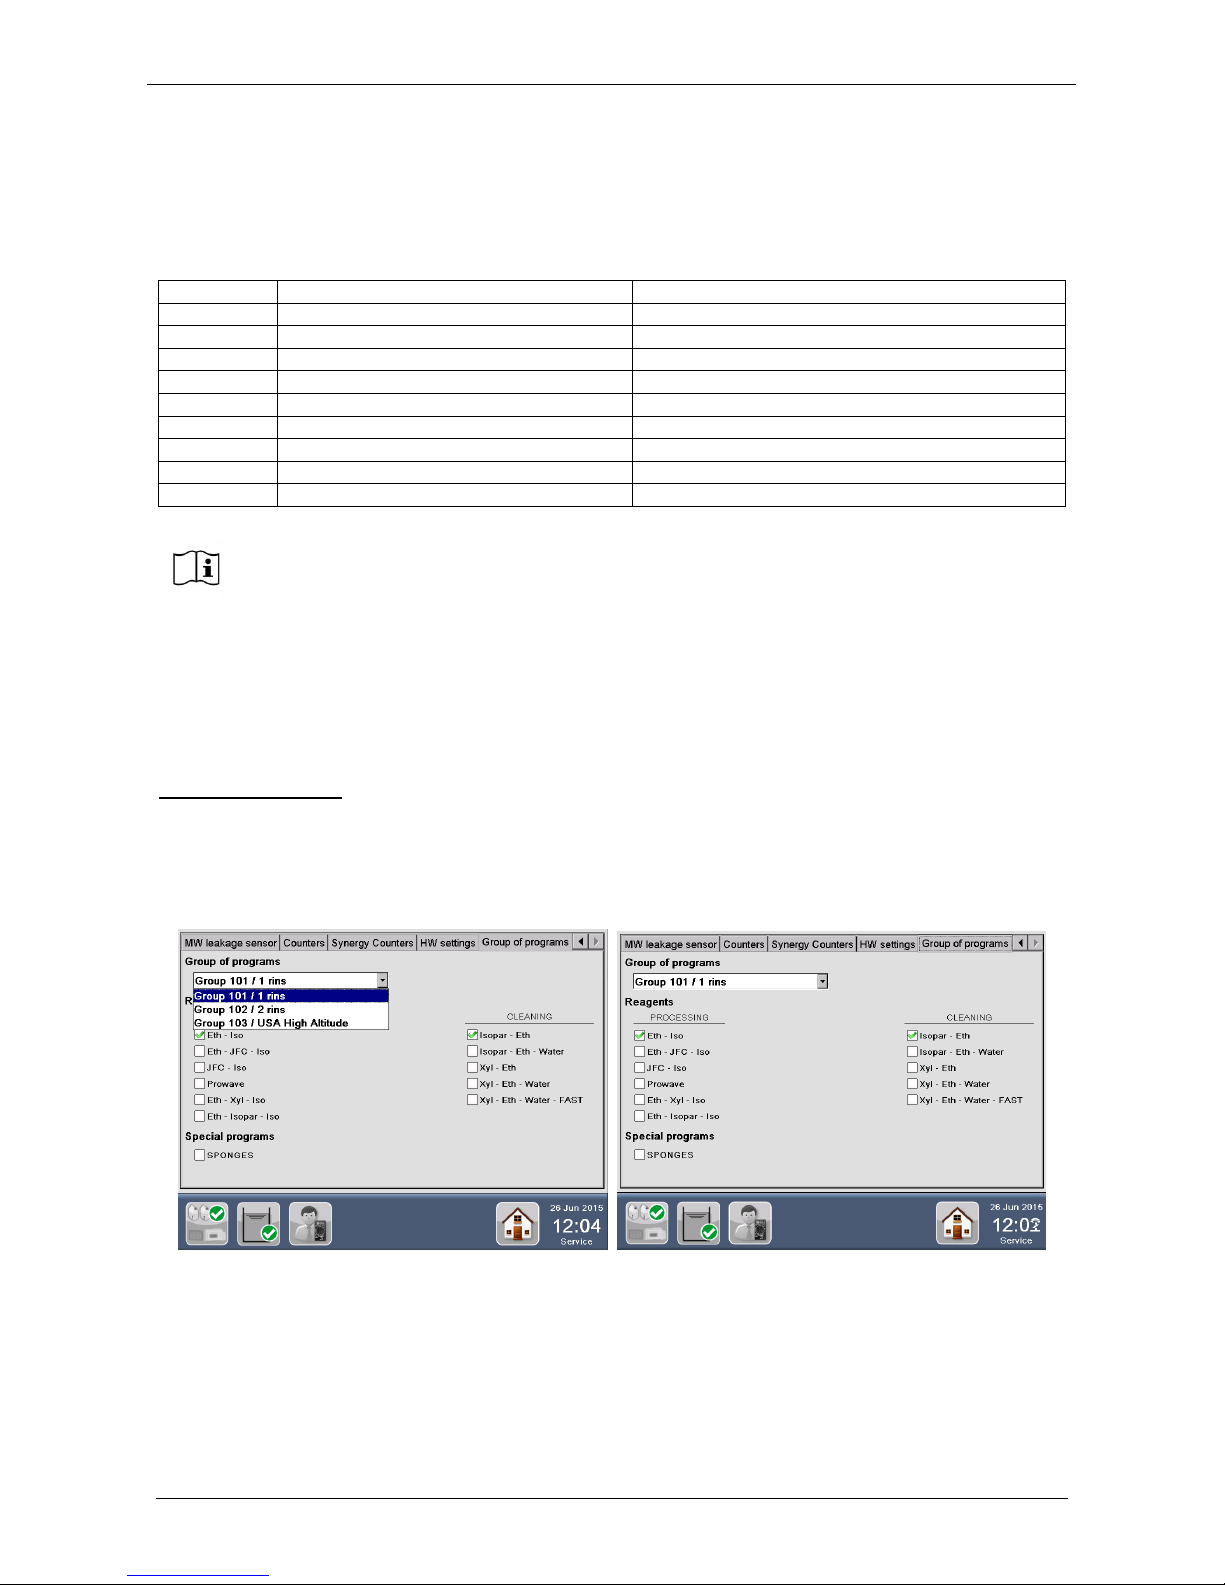
Milestone s.r.l.
MM098-002 – LOGOS ONE – Operator Manual
68
CASE 4:
- HistosMATE NOT available to clean the rack 3 cleaning tanks required AND
- Specimens to be processed include only little samples
In this case it is suggested to choose:
GROUP WITH 1 RINSING
TANK NR.
TANK REAGENT
REAGENT
1
FORMALIN
FORMALIN
2
FLUSHING MIX
ETHANOL from 60% to 70%
3
RINSING 1
ETHANOL 100%
4
ETHANOL
ETHANOL 100%
5
ISOPROPANOL
ISOPROPANOL 100%
6
ISOPROPANOL (spare)
ISOPROPANOL 100%
7
CLEANING ISOPARAFFIN or XYLENE
ISOPARAFFIN or XYLENE
8
CLEANING ETHANOL
ETHANOL from 96% to 100%
9
CLEANING WATER
WATER
3.4 Reagents group and programs
The system allows (ONLY TO SERVICE PERSONNEL) to select the Group of programs, the Reagents for
Processing and for Cleaning and the Special Programs, that are visualized and /or hidden in the unit.
LOGOS ONE Default
GROUP OF PROGRAMS: Group 101 /1 rins
REAGENTS PROCESSING: Eth – Iso
REAGENTS CLEANING: Isopar – Eth
SPECIAL PROGRAMS: none
Isopropanol and isopropanol2 are the same reagent but they are named in different ways
because used in different phases with different properties.
Page 69
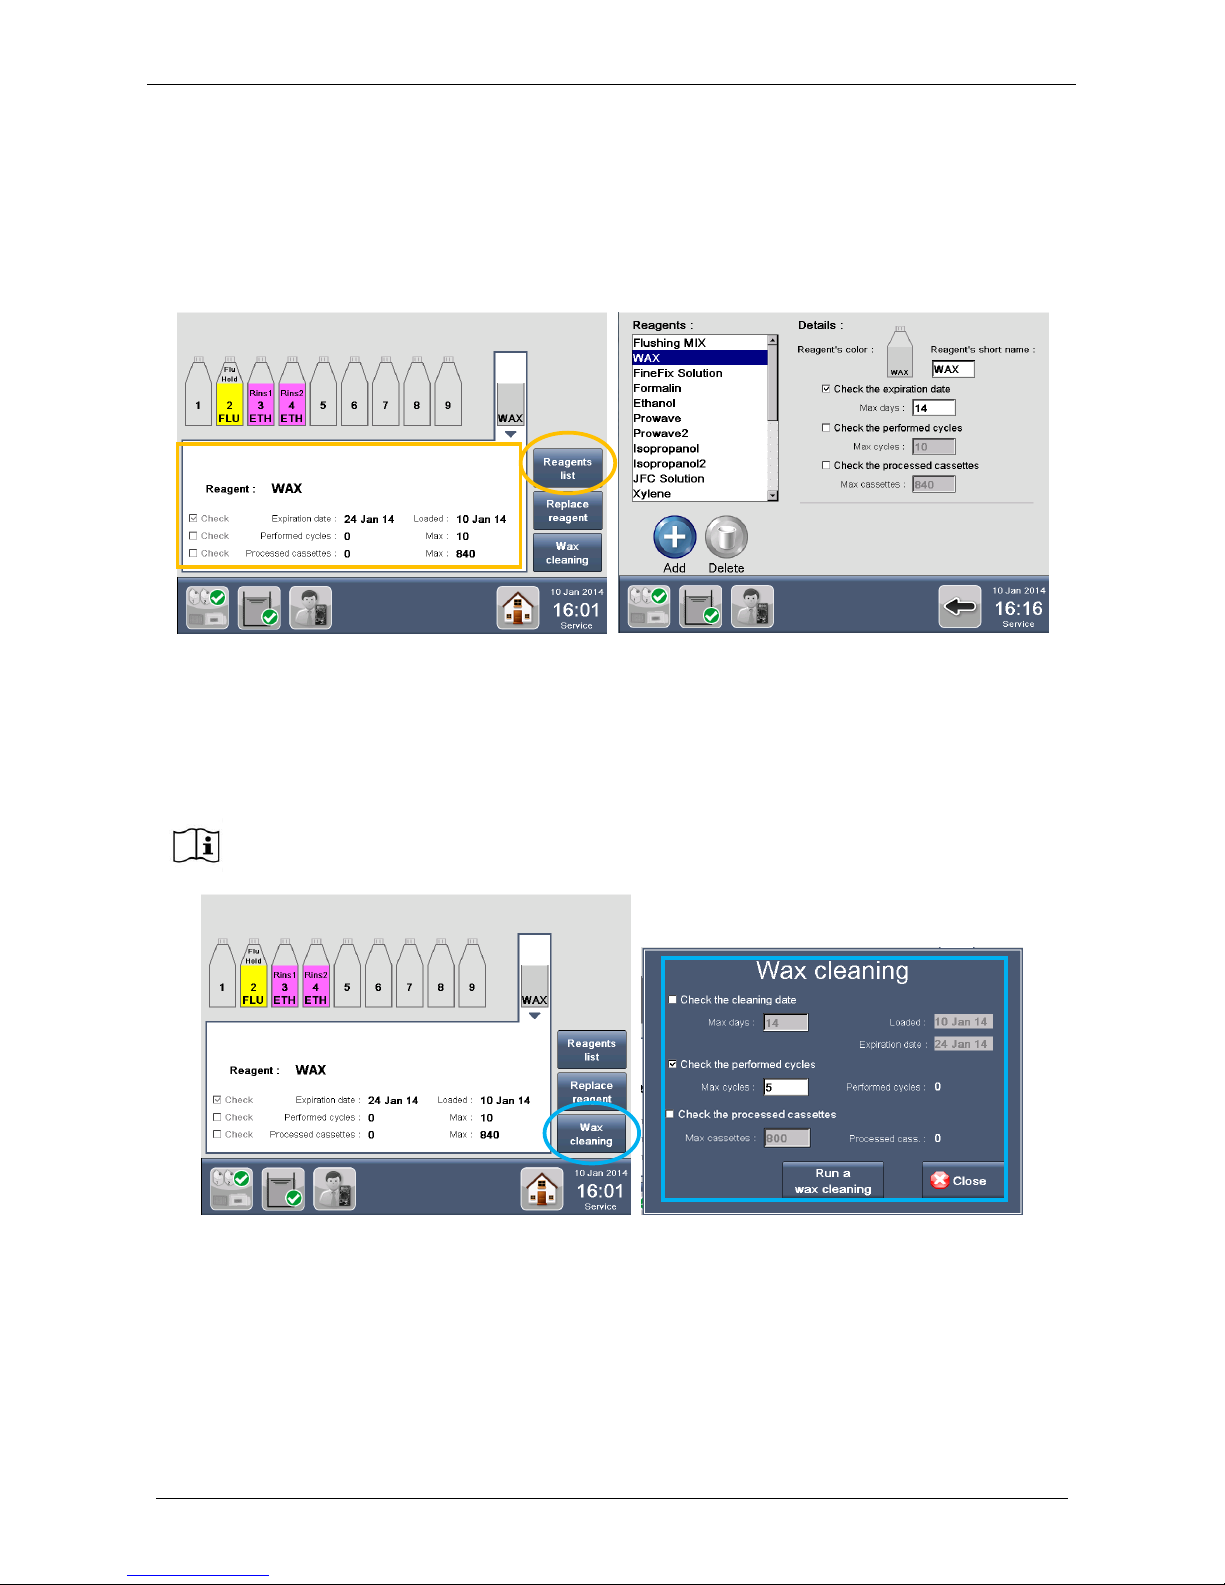
Milestone s.r.l.
MM098-002 – LOGOS ONE – Operator Manual
69
3.5 Run a cleaning cycle of the WAX
WAX for expiration is controlled using the REAGENT LIST.
By default it is checked for “Expiration date”: 14 days, but the Administrator can change the setting in the
Wax settings of the reagents list.
WAX for cleaning is controlled under the icon WAX CLEANING. From this icon there are the WAX cleaning
setting and also the possibility to run the cleaning cycle.
By default WAX for cleaning is checked for “Performed cycles”: 5 cycles, but the Administrator can change
the setting in the WAX cleaning window.
The cleaning cycle will block the starting of a processing run, if the cleaning setting limits are reached.
There are the “traffic lights” colors for cleaning or expiration, green, yellow and red, but the message on the
WAX cavity will be different, TO CLEAN when the WAX reaches the CLEANING limit (it takes 90 minutes):
The cleaning cycle will block the starting of a processing run, if the cleaning setting limits
are reached.
Page 70
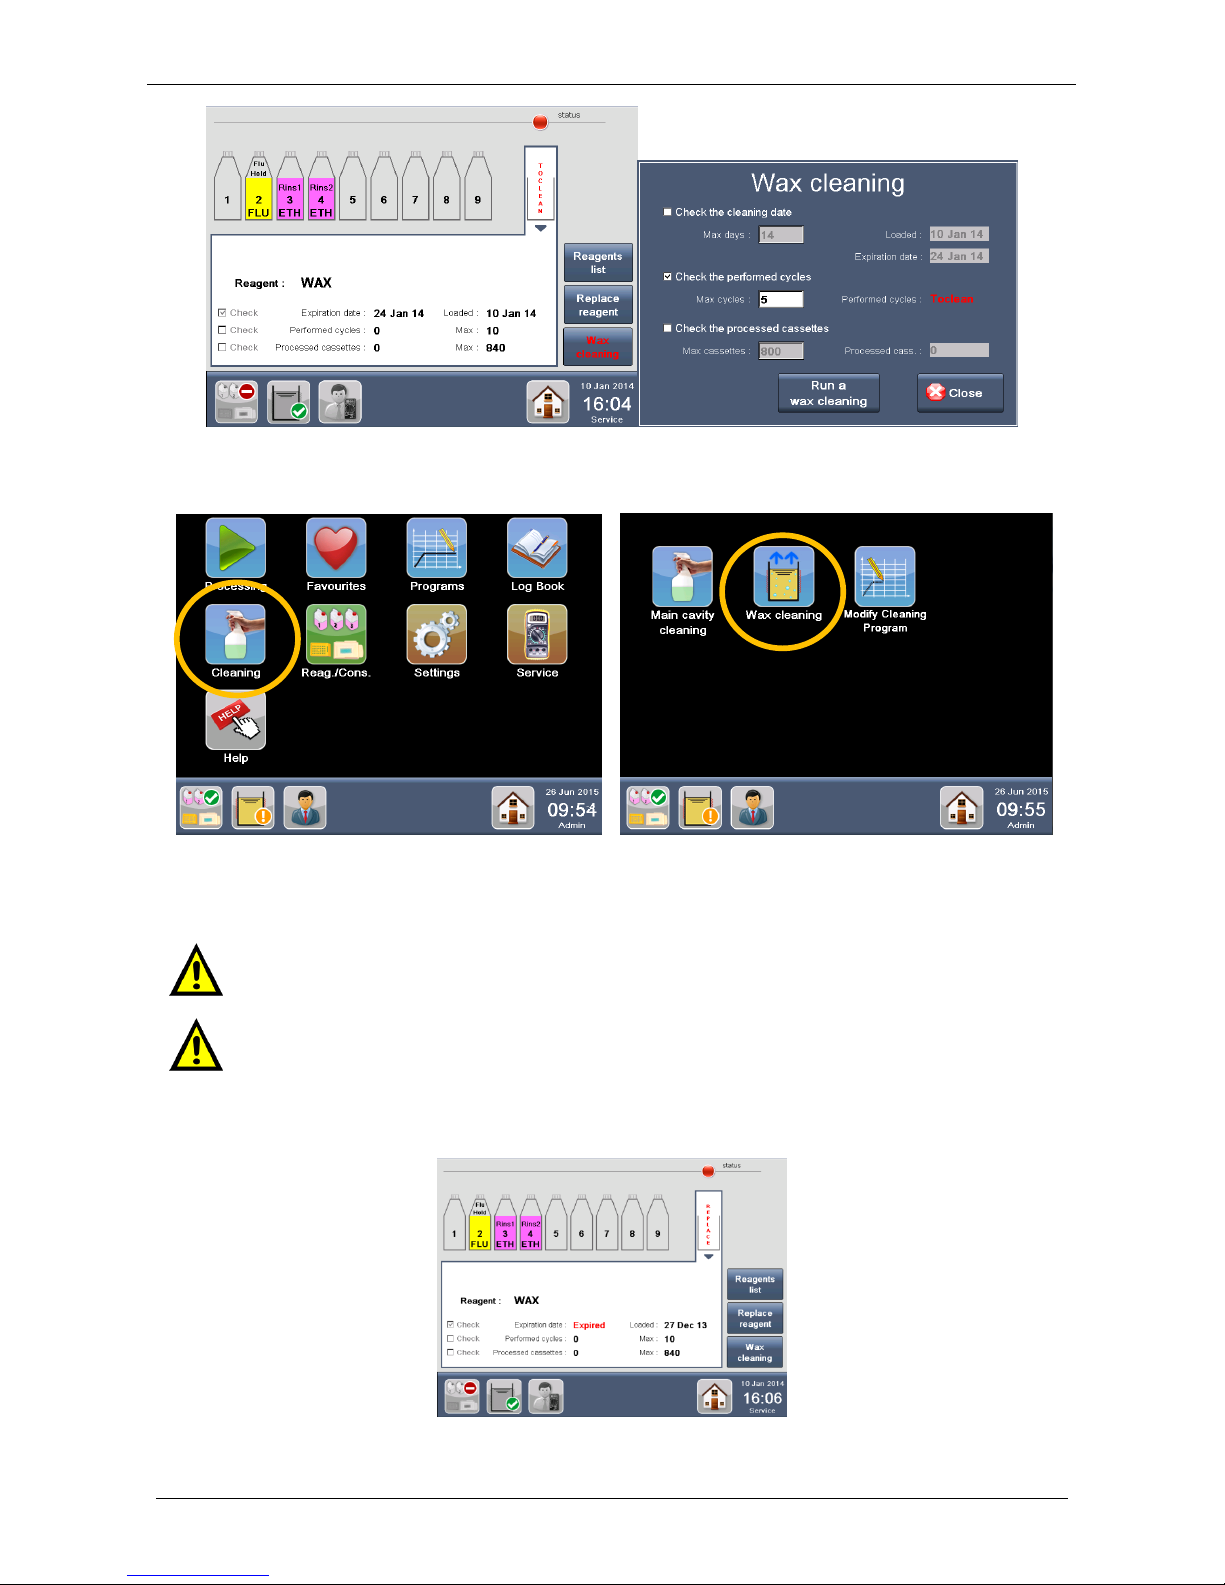
Milestone s.r.l.
MM098-002 – LOGOS ONE – Operator Manual
70
Another way to run a “Wax cleaning” protocol is to select “Cleaning” from the MAIN FUNCTIONS screen and
then “Wax cleaning”, as shown below.
When a wax cleaning cycle has been COMPLETED, the wax values reported in the Reagent Configuration
screen under the WAX cleaning icon (number of cassettes processed, performed cycles and loading date)
are RESET to zero but not the EXPIRATION LIMITS in the reagent configuration screen.
DO NOT load LOGOS ONE rack during the “WAX cleaning procedure”.
Wax must be completely replaced (and NOT cleaned) at least twice a month, depending on
the use of LOGOS ONE. See the chapter 2.13 for the wax replacement procedure.
REPLACE when the WAX reaches the EXPIRATION limit:
Page 71
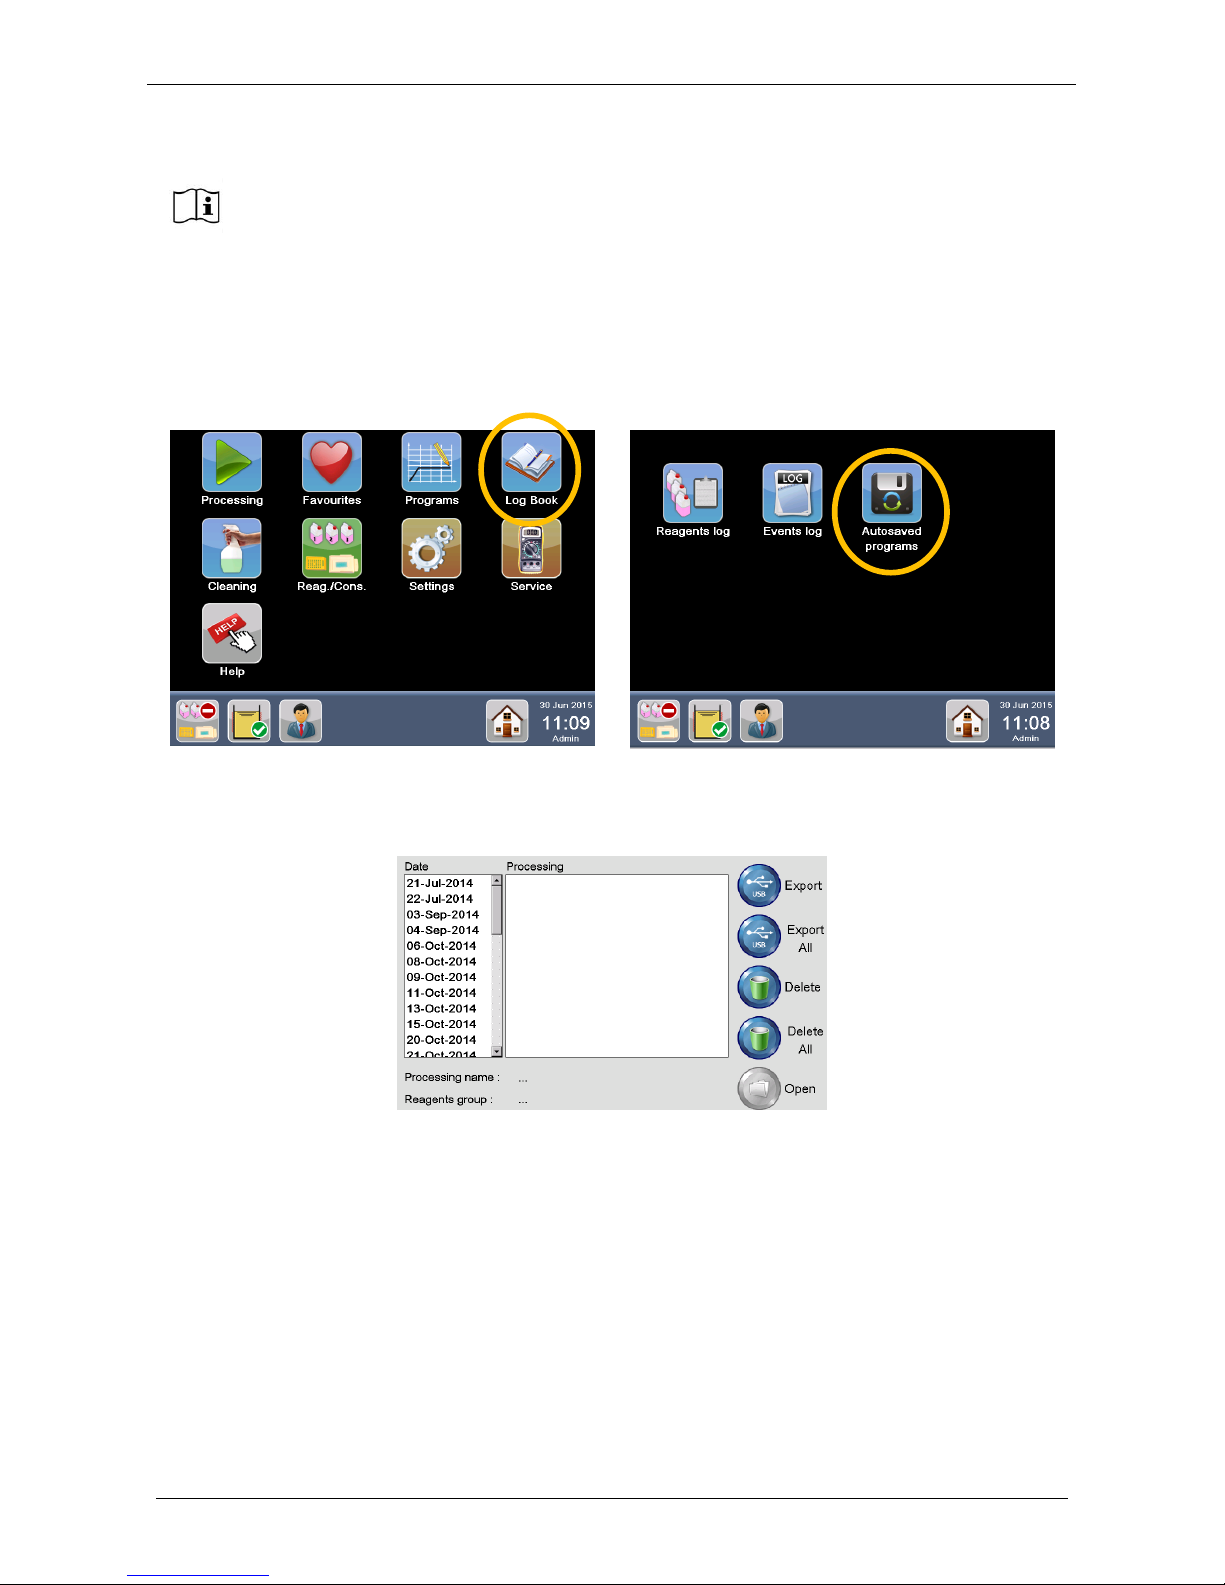
Milestone s.r.l.
MM098-002 – LOGOS ONE – Operator Manual
71
Refer to chapter 2.13 Load LOGOS ONE with wax.
3.6 Retrieving saved processes
Select “LOG Book” button from the MAIN FUNCTIONS screen (figure below) then select “Saved Runs”.
The following screen appears (figure below) showing on the left all the SAVED PROCESSING FILES, sorted
by DATE. The dates are automatically created by the software.
Select one date (in the example below “4-Sep-2014”) and the cycle(s) saved that day will appear on the
right.
WAX exchange resets to zero also WAX cleaning counters.
If WAX must be cleaned after a program the software advises to clean it at the end of the
last wax available program.
Page 72
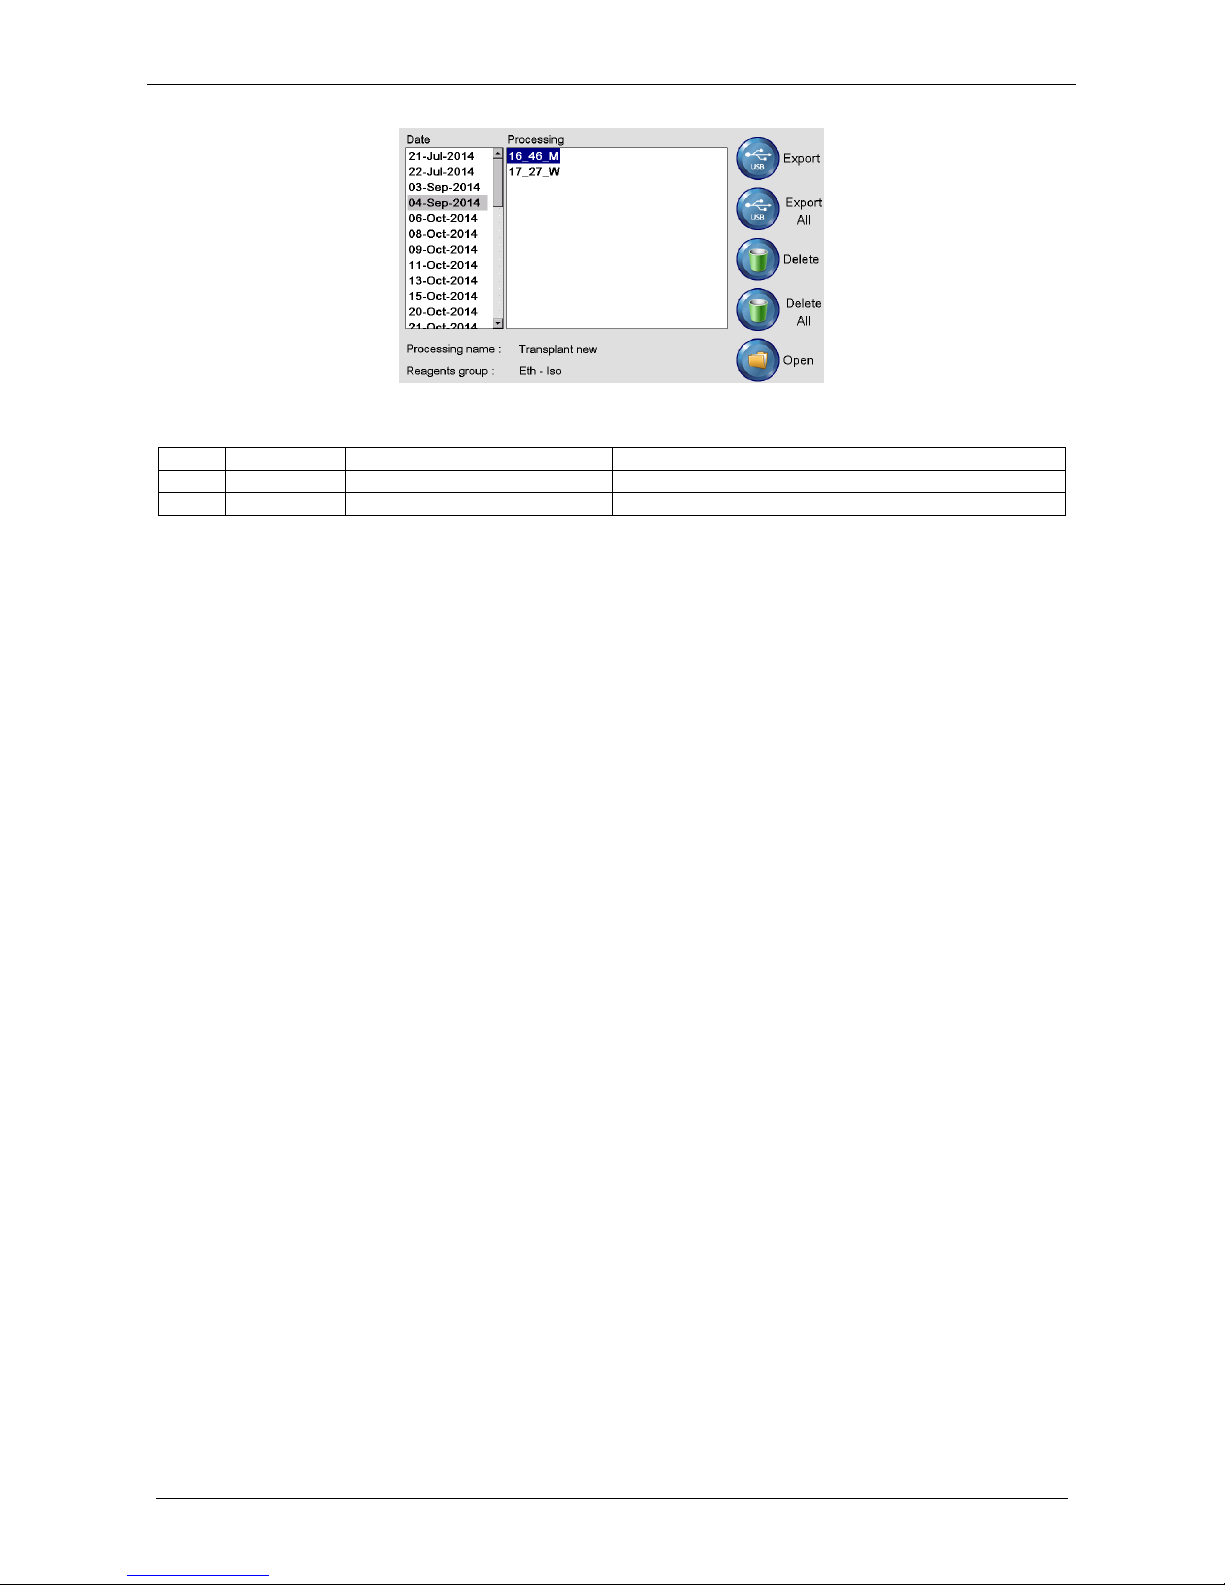
Milestone s.r.l.
MM098-002 – LOGOS ONE – Operator Manual
72
File names indicate type of program and cavity where ended.
FINISH
TYPE
Date
End time
M= finished in MAIN CAVITY
Nothing= processing
W= finished in WAX CAVITY
Cleaning= cleaning program
Page 73
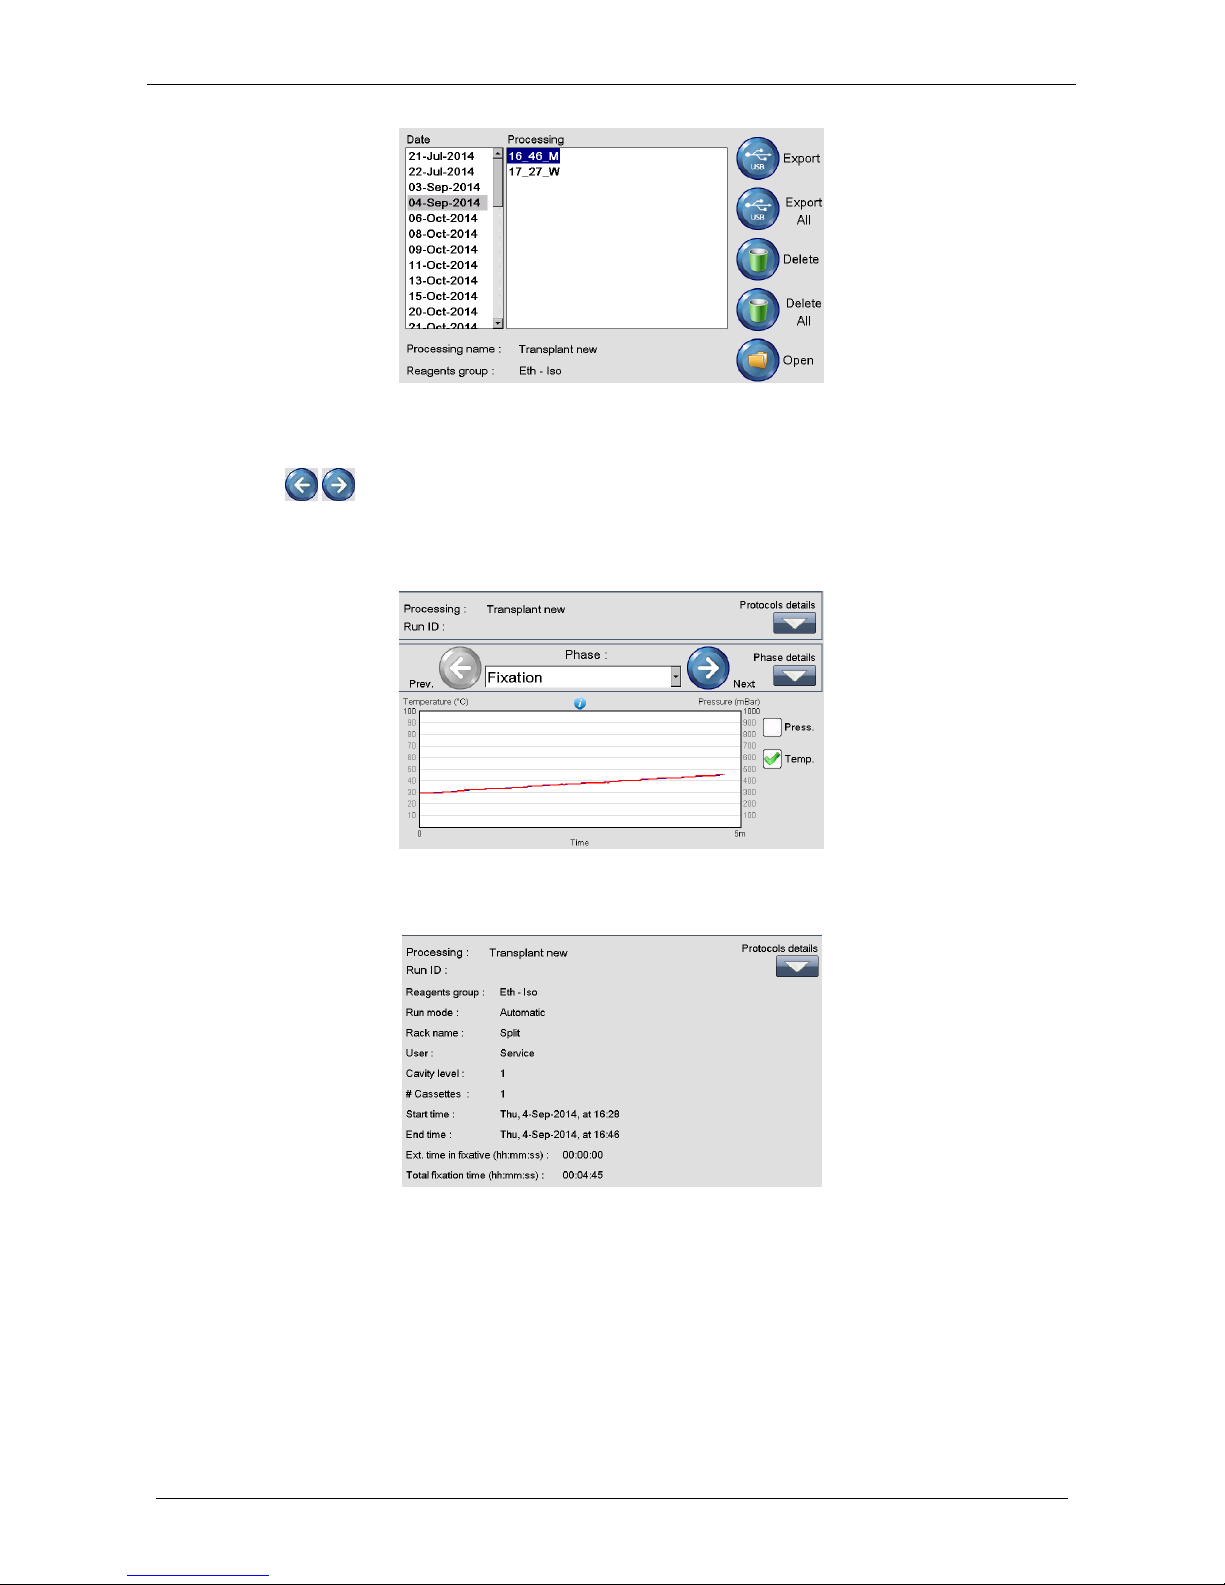
Milestone s.r.l.
MM098-002 – LOGOS ONE – Operator Manual
73
Click on the file name to see the details. Press Open to visualize the graphs of the highlighted file (figure
above).
Click the icons (figure below) to see the graphs of the different saved processing PHASES.
Heated phases graphs show up to 2 colored lines, describing the PRESET TEMPERATURE (blue) and the
REAL TEMPERATURE (red) output values about the current step (In this case: Fixation). Not heated phases
graphs show only 1 colored line, the REAL TEMPERATURE red. Details are directly explained on the graph.
Press Protocols details to see them, if required.
Press Phase details to see them, if required.
Page 74
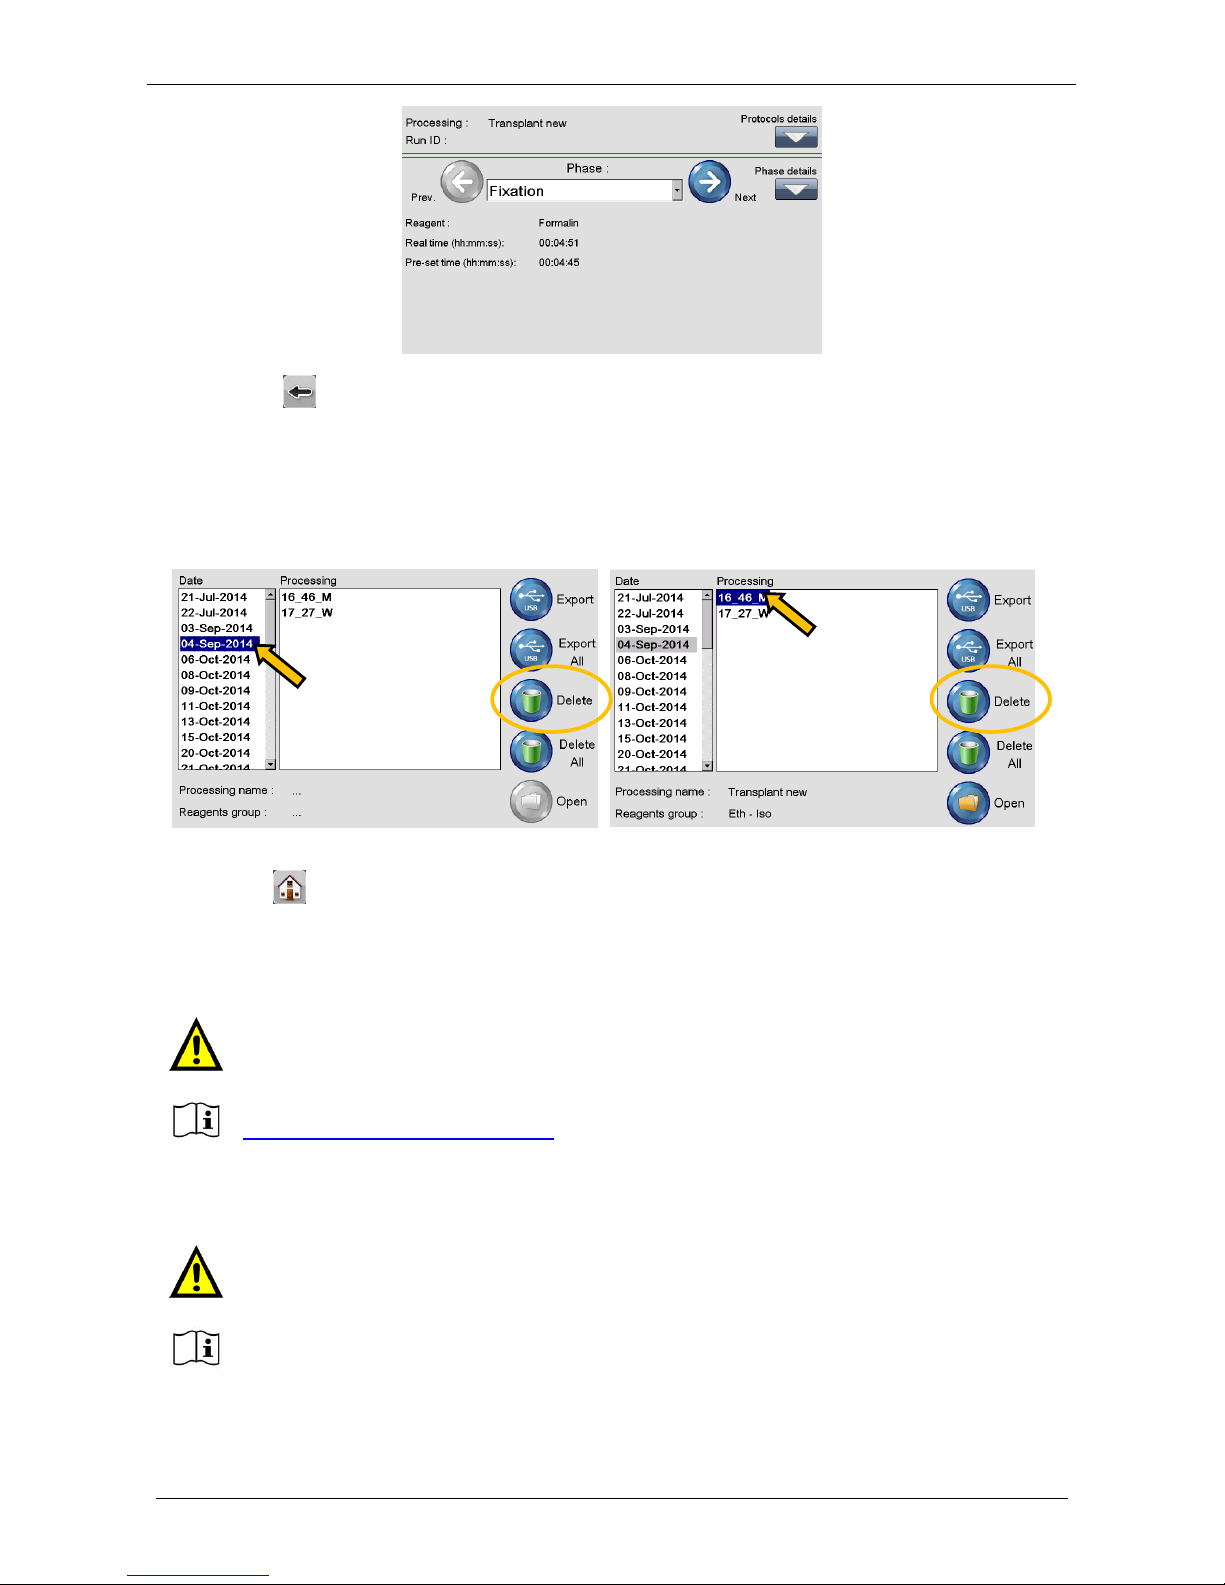
Milestone s.r.l.
MM098-002 – LOGOS ONE – Operator Manual
74
Press the icon to go back to the Saved processing screen.
3.6.1 How to delete a saved process
Select a Date and press Delete to cancel all processes saved that day (left figure).
Select a Process and press Delete to cancel ONLY the process highlighted (right figure).
Alternatively press Delete All to cancel ALL programs stored on LOGOS ONE.
Press HOME to return to the MAIN MENU.
3.7 Modify a program
DEFAULT PROTOCOLS: the Owner is MILESTONE and USER can only COPY them.
USER PROTOCOLS: the Owner is USER and he can MODIFY, DELETE and COPY them (if any).
This function is NOT to create a NEW PROGRAM. For this, it is necessary to choose the
default program that most fits your requirements, make a copy and modify its details.
Before making any modifications to a program, please contact our Application support:
Modification of a USER’s protocol does NOT require copying it before making the changes
required.
Take care to modify ONLY the Time At Temperature part of the curve.
Do not modify the Ramp - up time.
Page 75
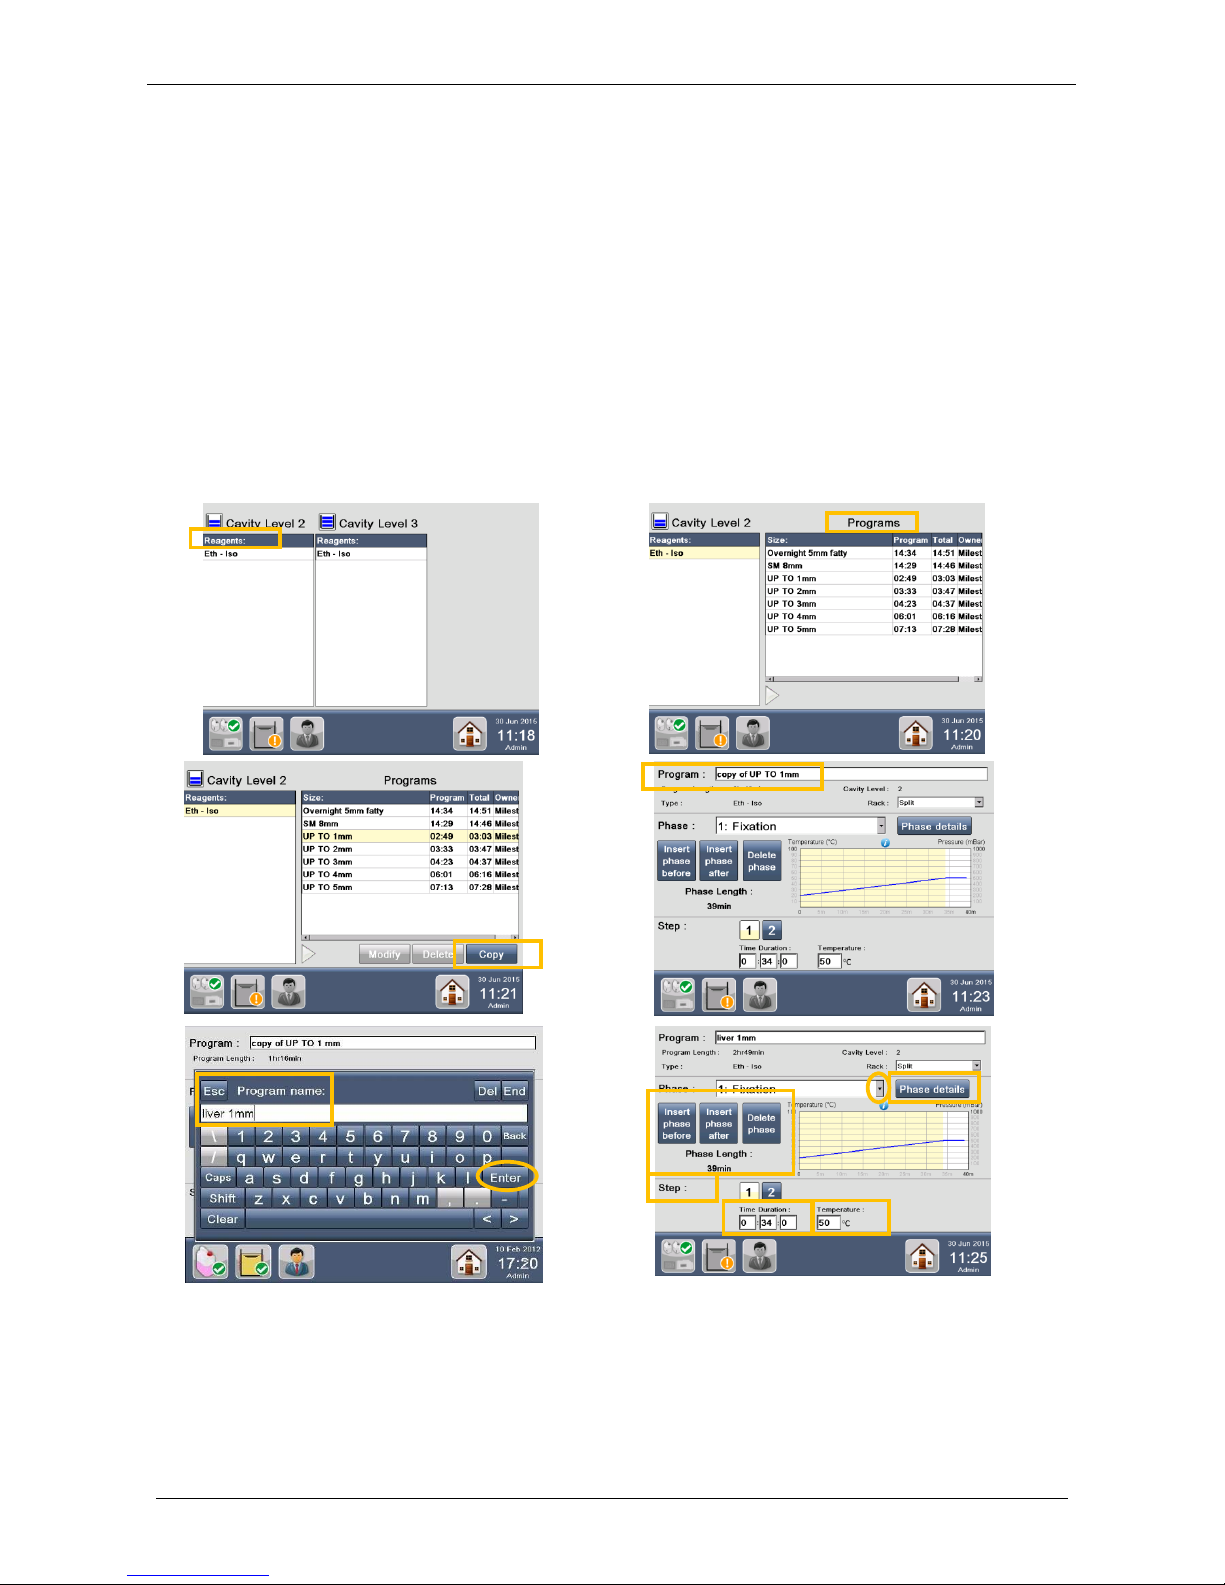
Milestone s.r.l.
MM098-002 – LOGOS ONE – Operator Manual
75
3.7.1 Modify a standard program
Select Programs button from the MAIN FUNCTIONS screen.
SEE NEXT PAGE FOR PICTURES:
1. This screen lists all the existing programs divided by REAGENTS.
2. Select the REAGENT PROGRAM to be copied.
3. Select the PROGRAM to be copied, then press Copy.
4. The copy program screen is open.
5. RENAME the program using the keyboard and press enter.
6. Choose the parameters to be modified.
7. To ADD a step, select the last step, then press ADD. To DELETE a step, select it, then press
DELETE.
8. Modify the PHASE DETAILS.
9. Press HOME button and YES to save changes.
10. Choose the REAGENT PROGRAM just modified, your protocol is saved there.
1
2
3
4
5
6
Page 76
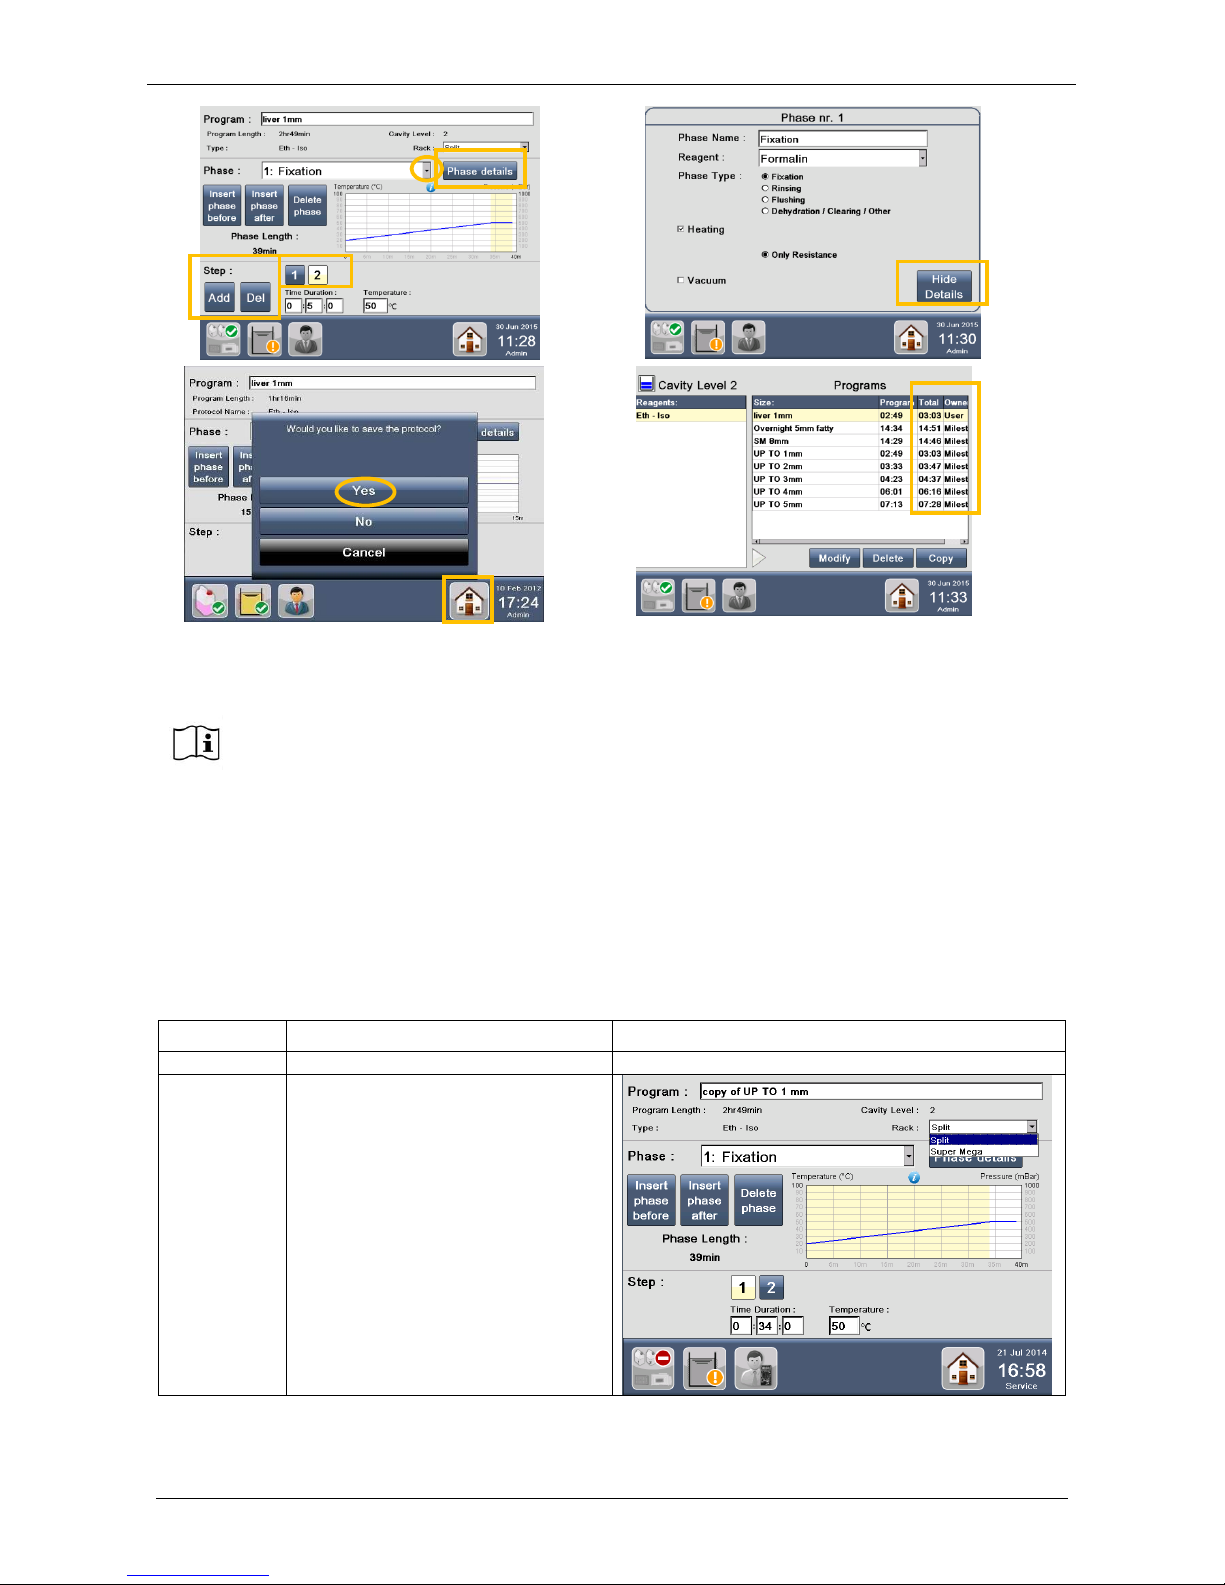
Milestone s.r.l.
MM098-002 – LOGOS ONE – Operator Manual
76
7
8
9
10
3.7.2 Correlation between racks and programs
At the star of a program, programs proposed by the software are related only to the selected rack.
In the “Modify program” section it is possible to change the association between a program and the rack,
following this logic:
LAYERS
LOGOS ONE
CAVITY LEVEL AND RACK
1
NOT PRESENT
NOT PRESENT
2
-Split RACK (1 – 140 cassettes)
-Super Mega RACK (1 – 12
cassettes)
The max number of phases in a process is 15.
The max number of steps in a phase is 10.
The max length of a step is 24 hours.
Consequently the max length of a phase is 240 hours.
It is not possible to set temperatures out of this range: 20-85°C during a program
modification.
Page 77
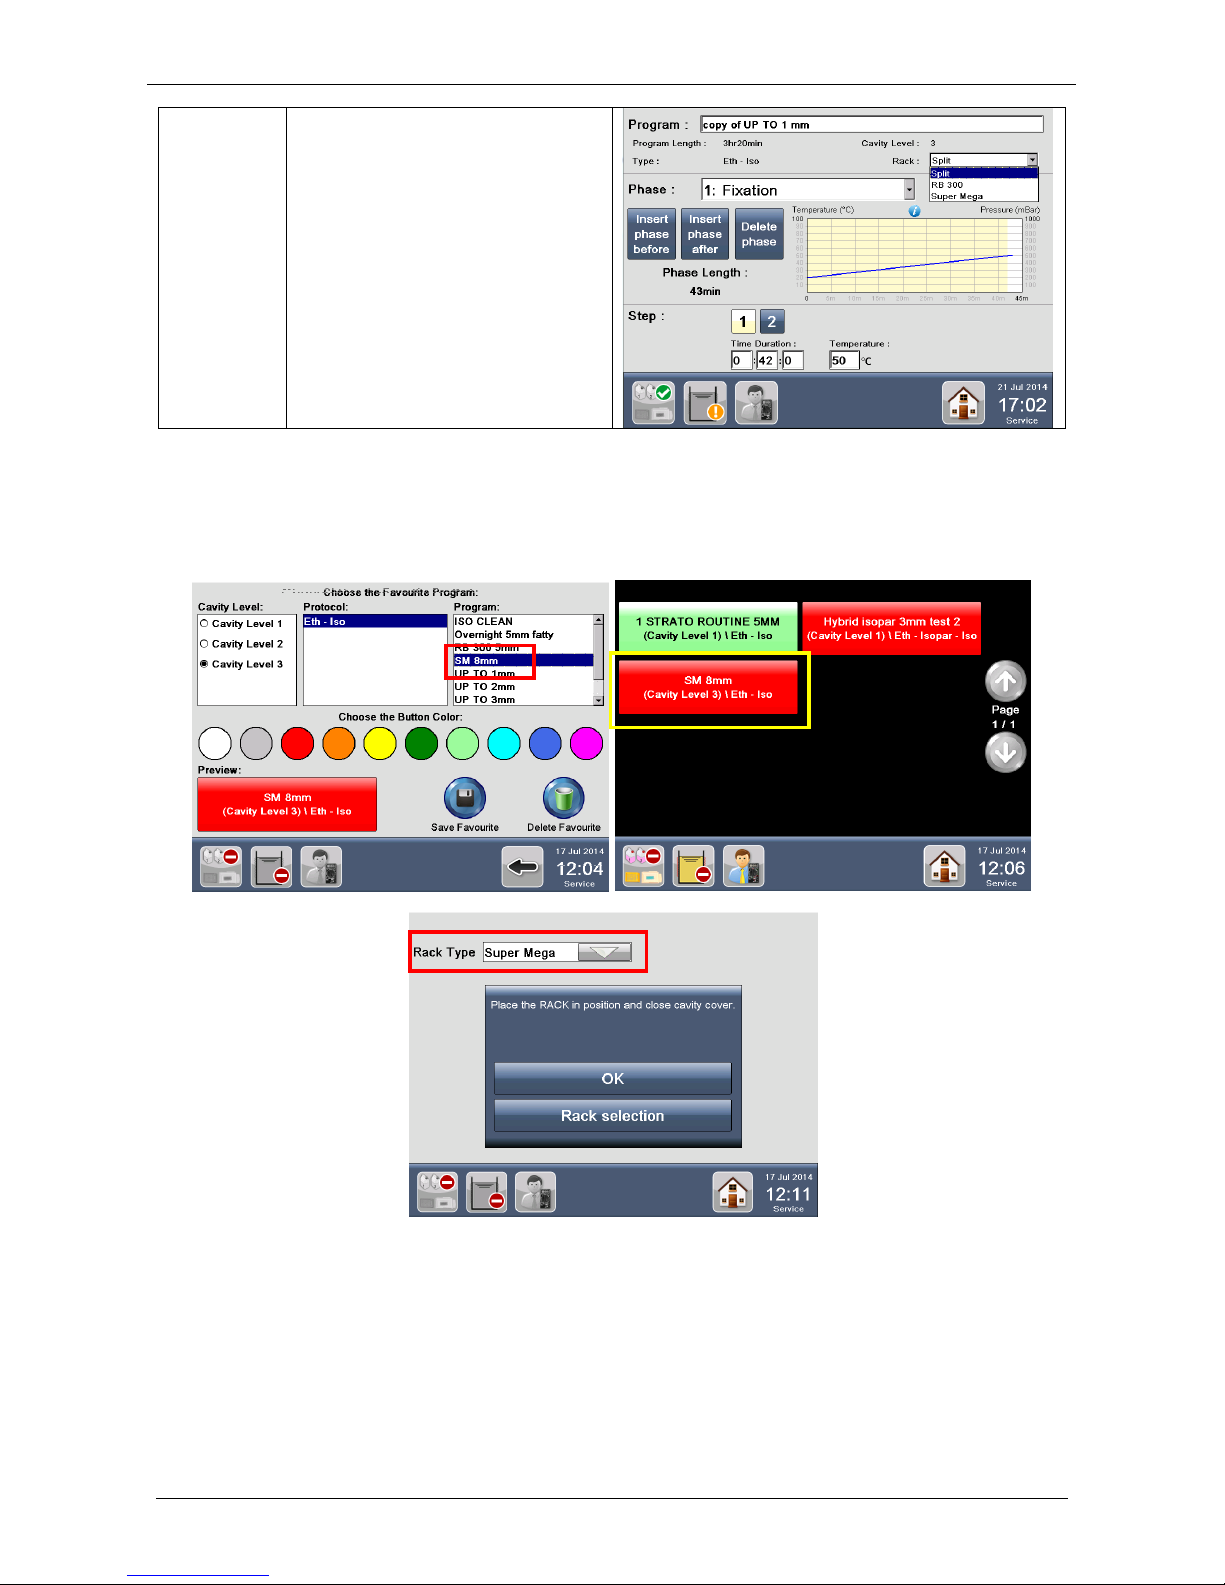
Milestone s.r.l.
MM098-002 – LOGOS ONE – Operator Manual
77
3
-Split RACK (141 – 210 cassettes)
-Super Mega RACK (13 – 24
cassettes)
-RB 300 (1-300 cassettes)
Because of the correlation between rack and program also a favourite program is correlated to one rack, that
is automatically selected in the favourite program.
In the following example a favourite program for SuperMega rack (SM) is set, so when the favourite is started
automatically the rack type is selected.
If a change of rack is necessary, it means that the program selected is not correct, pressing RACK
SELECTION, the Home Page is shown.
Page 78
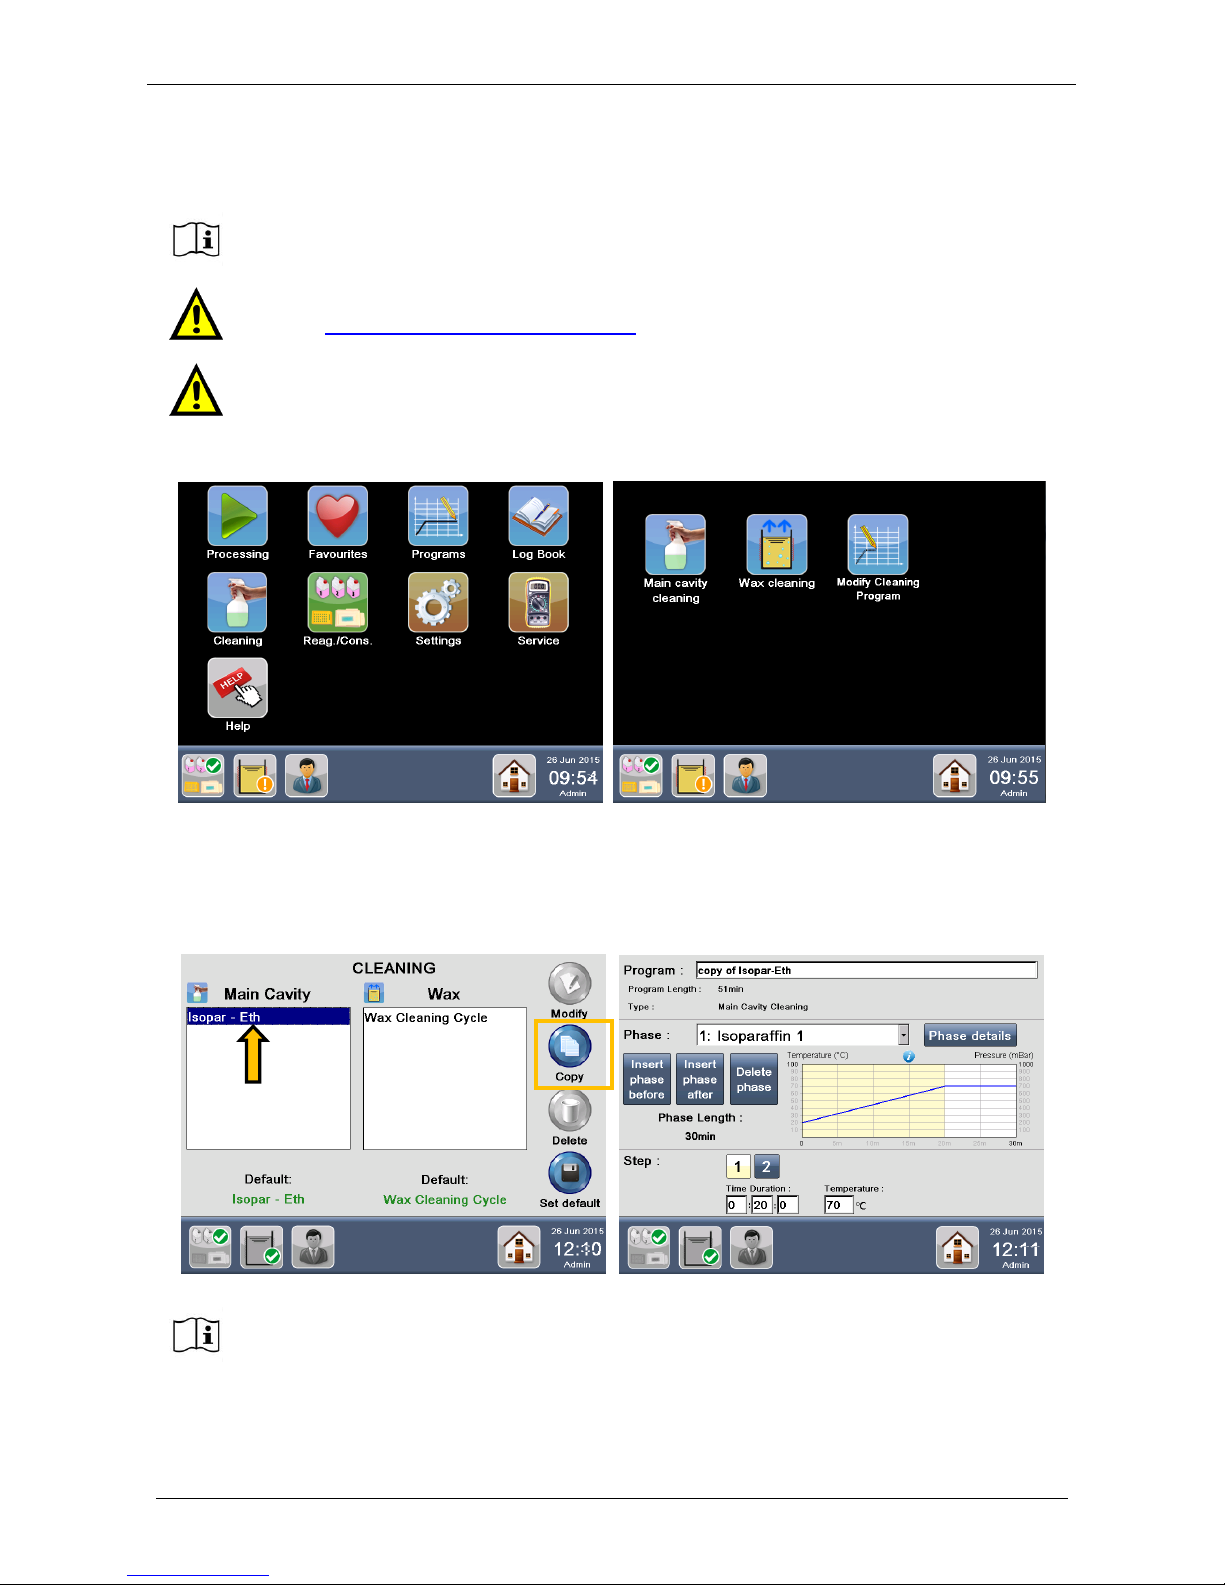
Milestone s.r.l.
MM098-002 – LOGOS ONE – Operator Manual
78
3.7.3 Modify a main cavity cleaning program
Select Cleaning from the MAIN FUNCTIONS screen, then press Modify Cleaning Program.
The following screen appears (figure below left), showing all existing programs for the MAIN CAVITY (on the
left) and for the WAX (on the right): default protocols as well as protocols created by the USER (if any).
Choose the program of your interest (figure below right, arrow). Press Copy button (figure below right,
rectangle), re-name the program and modify the fields.
This function is NOT to create a NEW PROGRAM. For this, it is necessary to choose the
default program that most fits your requirements, make a copy and modify its details.
Before making any modifications to a cleaning program, please contact our Application
support: [email protected].
For optimum CLEANING RESULTS, Milestone strongly recommends using the CLEANING
default programs.
For safety reasons, the factory pre-stored protocols cannot be directly modified or
deleted.
Page 79
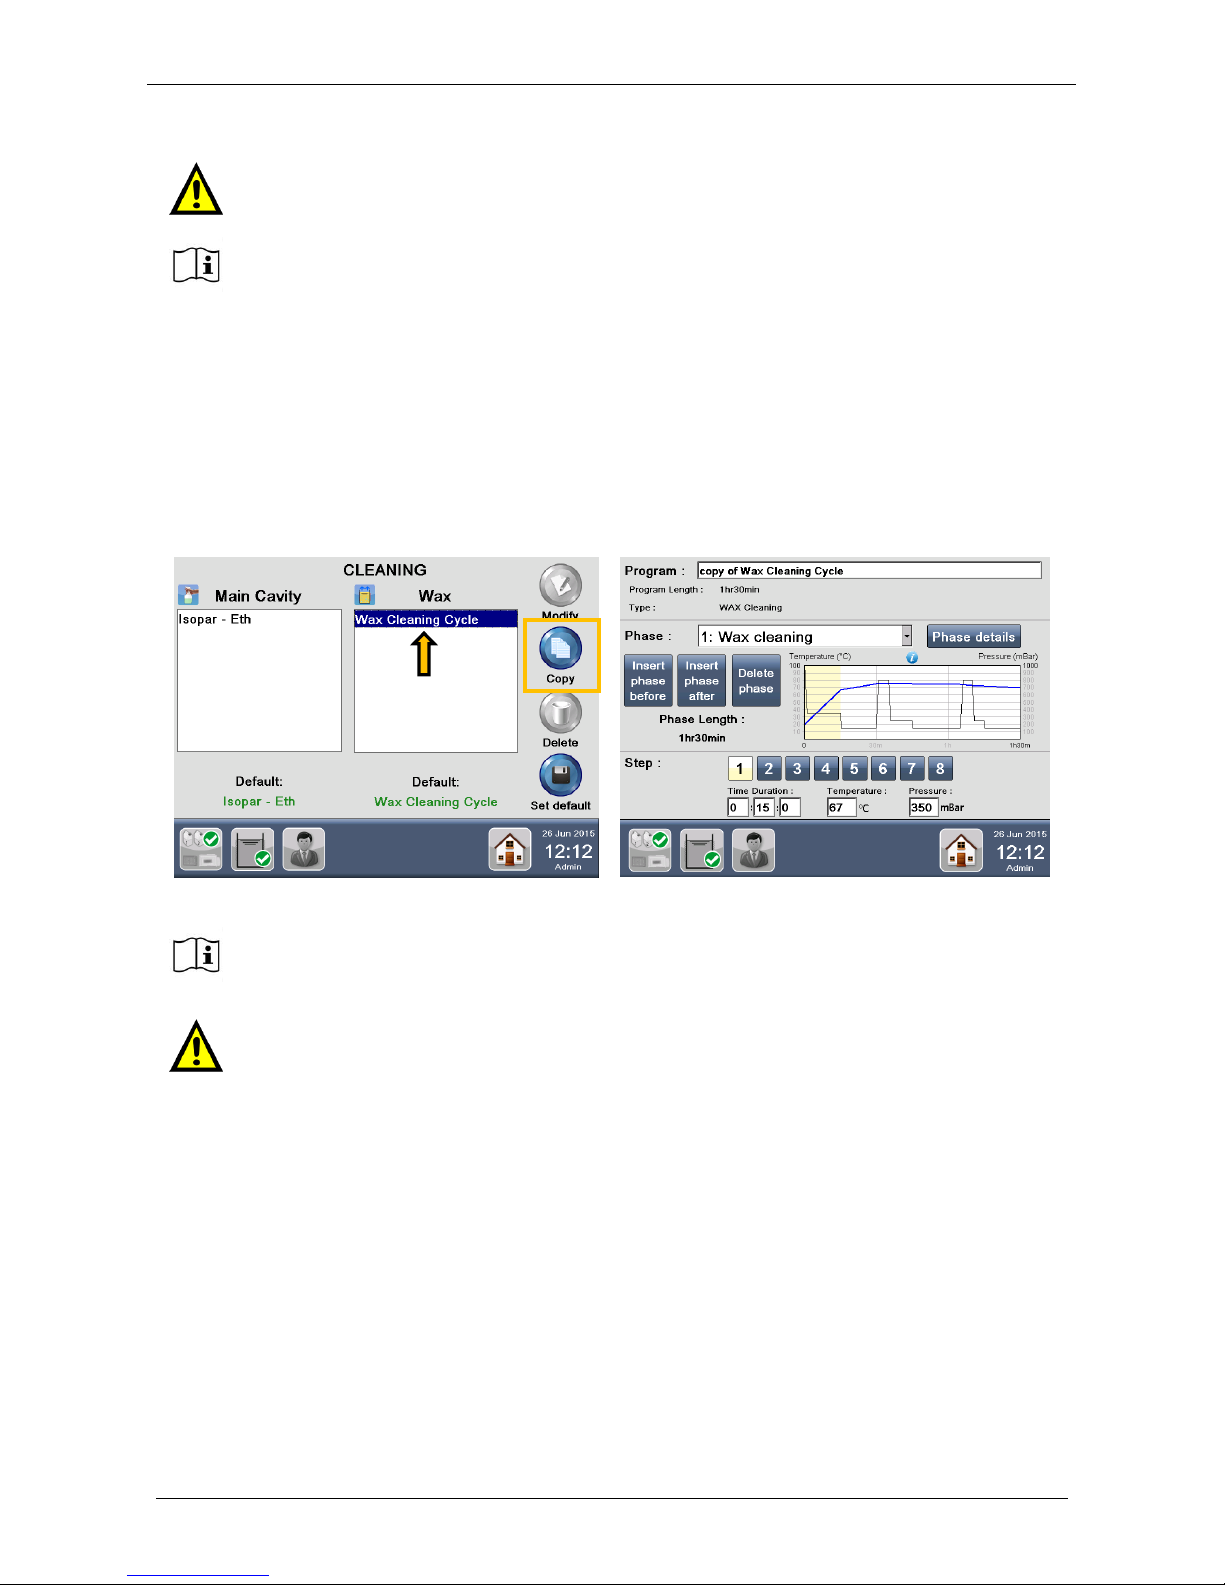
Milestone s.r.l.
MM098-002 – LOGOS ONE – Operator Manual
79
3.7.4 Modify a WAX cleaning
Select Cleaning from the MAIN FUNCTIONS screen, then press Modify Cleaning Program.
The screen on the right appears, showing the existing cleaning programs for the MAIN CAVITY(on the left)
and for the WAX (on the right): default protocols as well as protocols created by the USER (if any).
Choose the program of your interest (figure below, arrow). Press Copy button (figure below, rectangle), re-
name the program and modify the fields.
Take care to modify ONLY the Time At Temperature part of the curve.
Do not modify the Ramp - up time.
The Modify and Delete buttons are made available only for already copied protocols.
For safety reasons, the factory pre-stored protocols cannot be directly modified or
deleted.
The Modify and Delete buttons are made available only for already copied protocols.
Take care to modify ONLY the Time At Temperature part of the curve.
Do not modify the Ramp - up time.
Page 80
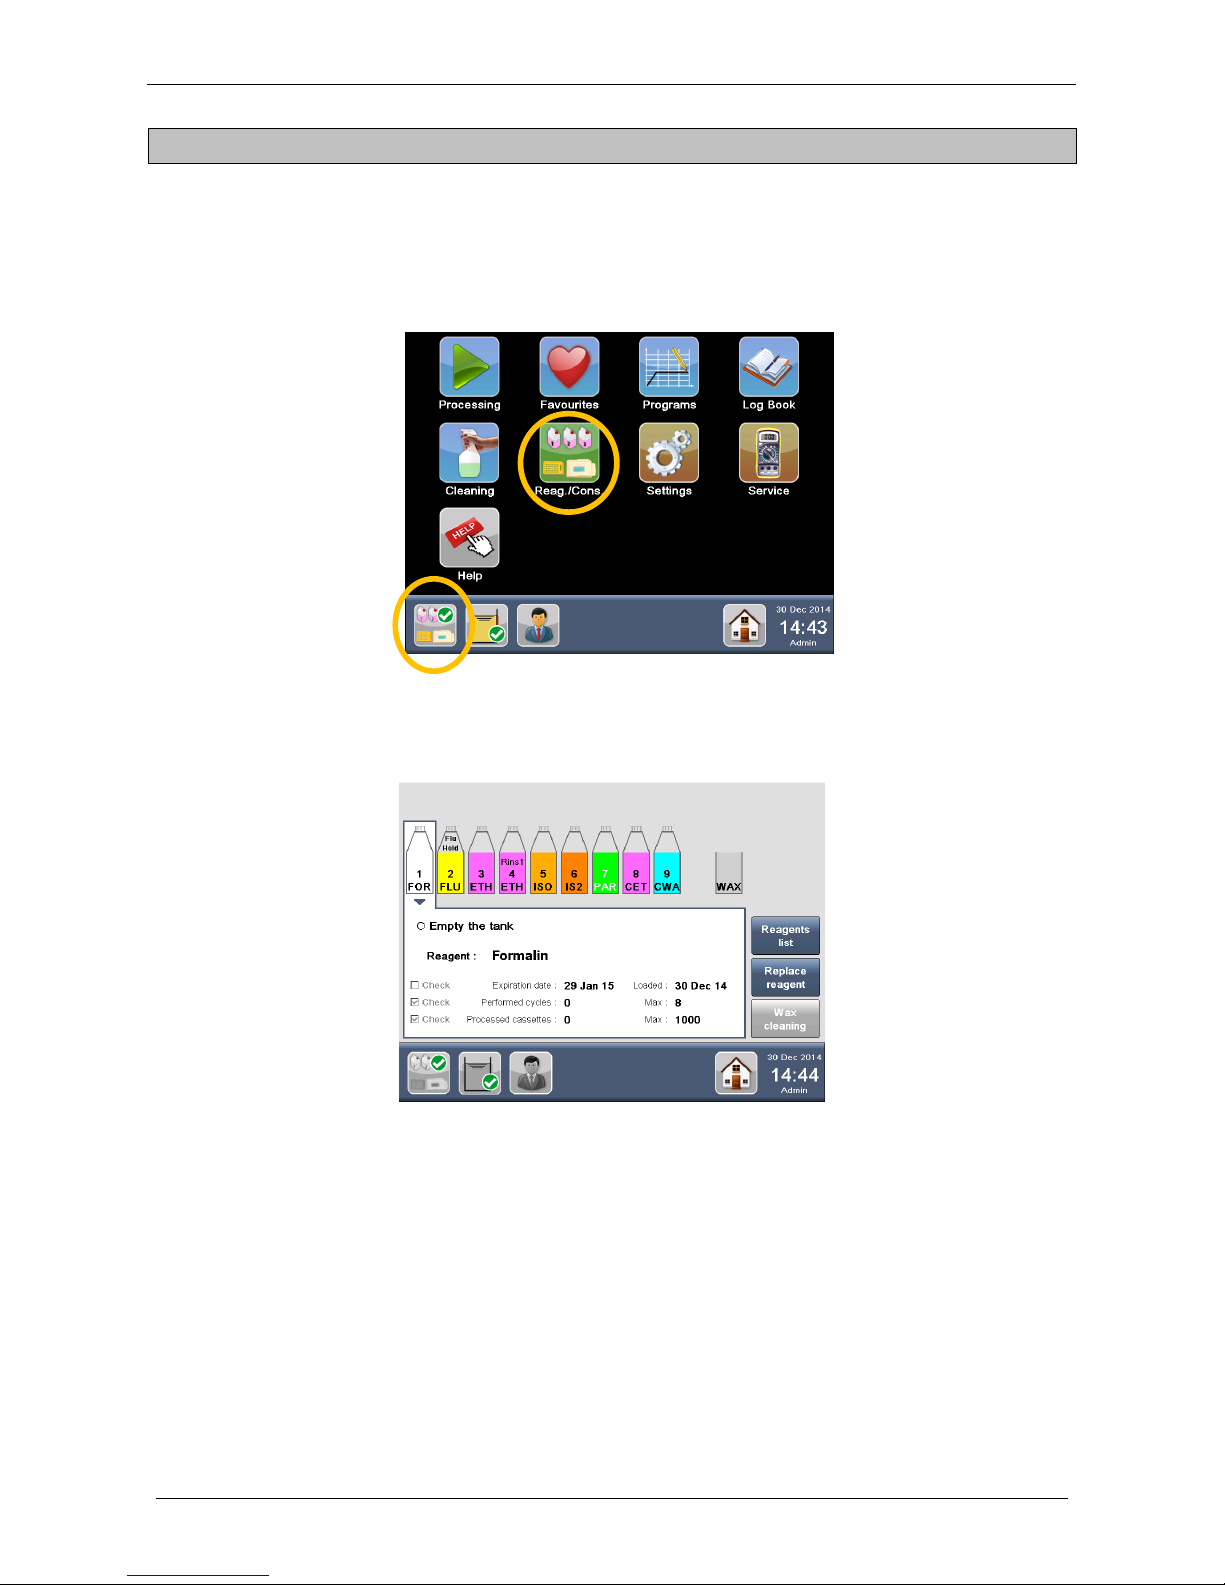
Milestone s.r.l.
MM098-002 – LOGOS ONE – Operator Manual
80
4 REAGENTS MANAGEMENT
4.1 Reagents reuse life
Select “Reag./Cons.” from the MAIN FUNCTIONS screen or press directly the “Reagents status icon” on the
STATUS BAR of the HOME PAGE.
The REAGENTS MANAGEMENT window appears, showing the settings and the status of all the reagents
loaded in the unit (Wax included). It is possible to check the reagents STATUS by selecting the relative
TANK (or WAX CAVITY) in the upper part of the screen.
The PARAMETERS of the reagent selected are shown in details (figure below) on the lower part of the
screen.
Page 81
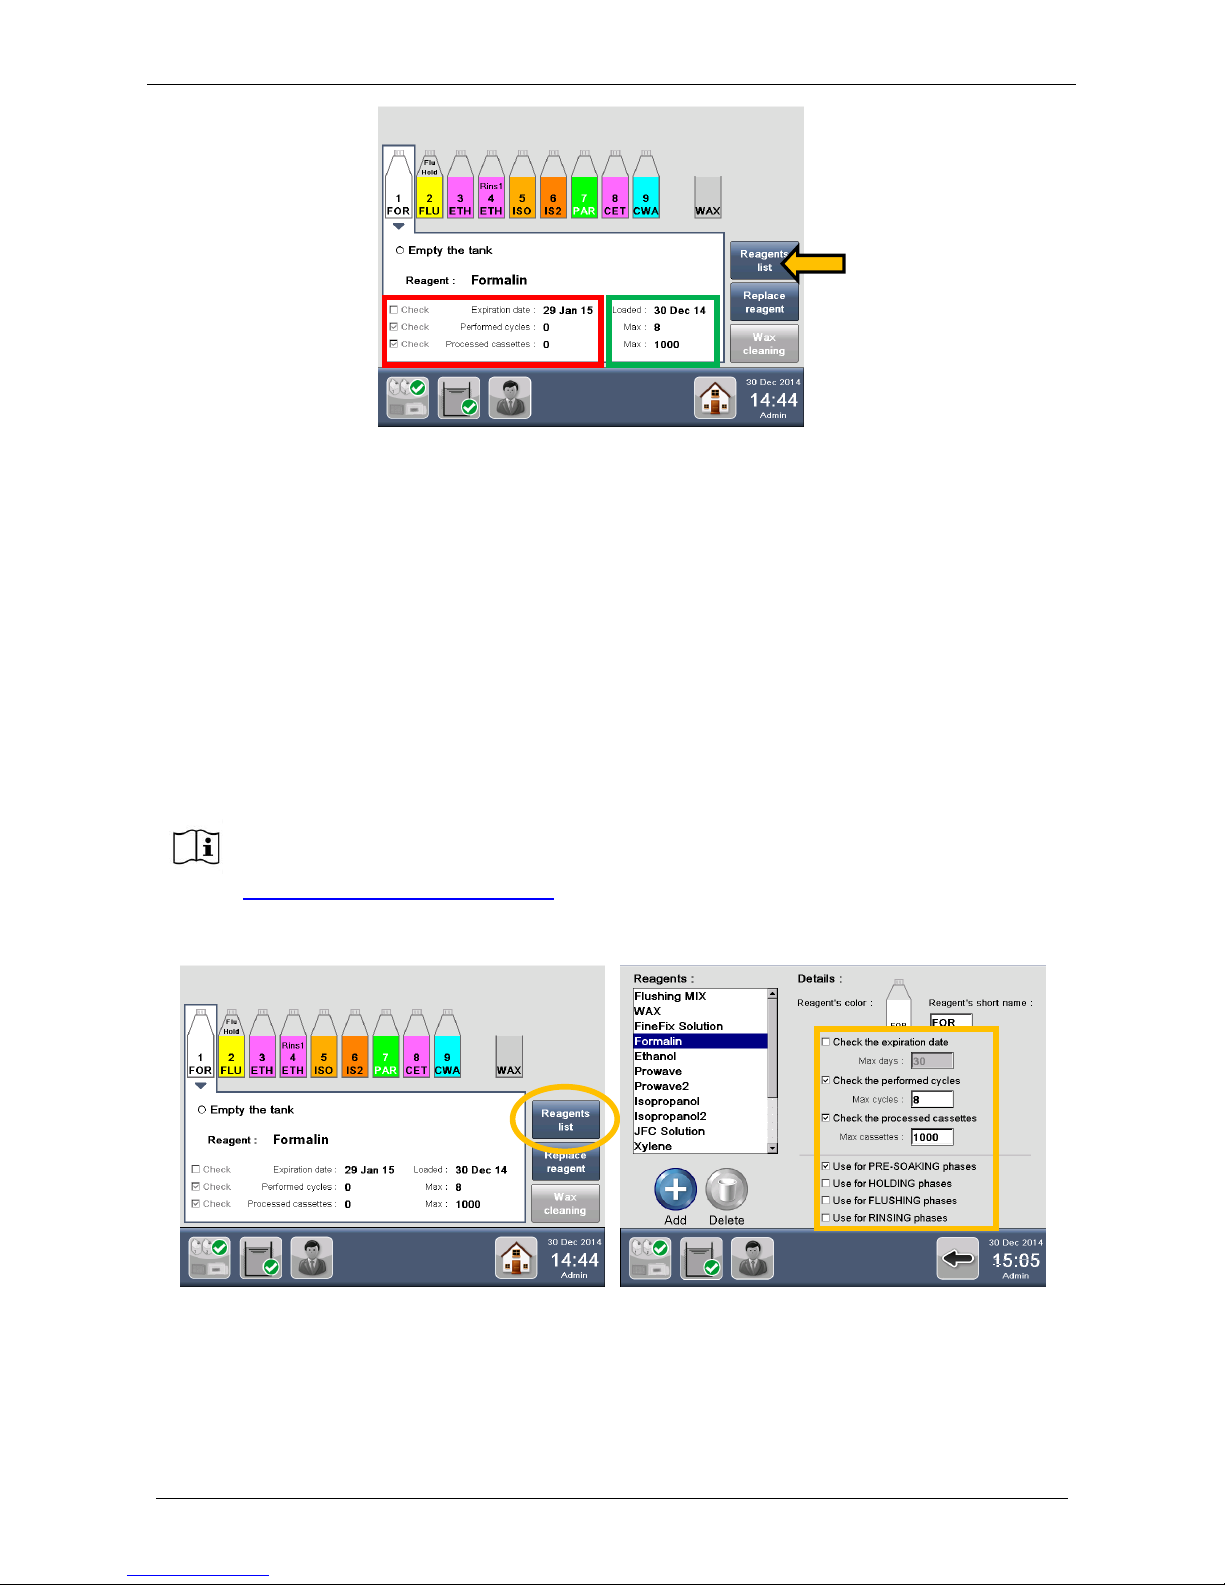
Milestone s.r.l.
MM098-002 – LOGOS ONE – Operator Manual
81
The REUSE LIFE (red square, figure above, for further details see the chapter 4.1.1) of the reagent can be
checked by:
1. Expiration Date. This date shows the reagent EXPIRING DATE, according to requirements set into the
Reagent List.
2. Performed cycles. This field automatically shows the cycles already completed.
3. Processed cassettes. This field automatically shows the cassettes already processed.
Additional information is shown on the right side of the windows (green square) and refers to the REAGENT
SETTINGS edited into the “Reagent list” (figure above, arrow).See chapter 4.1.1 for further clarifications.
4.1.1 Reagents settings
From the REAGENT CONFIGURATION, select the “Reagent List” icon: the LIST of preset reagents appears.
Default reagents settings of LOGOS ONE (expiration date, max number of cassettes and
max number of cycles) refer to use of tanks of 5 liters/US gallons capacity and to
processing without papers and sponges. In any other case, like use of different tanks
capacity or use of sponges, please contact our Application Dept at
[email protected] to get proper instructions.
Page 82
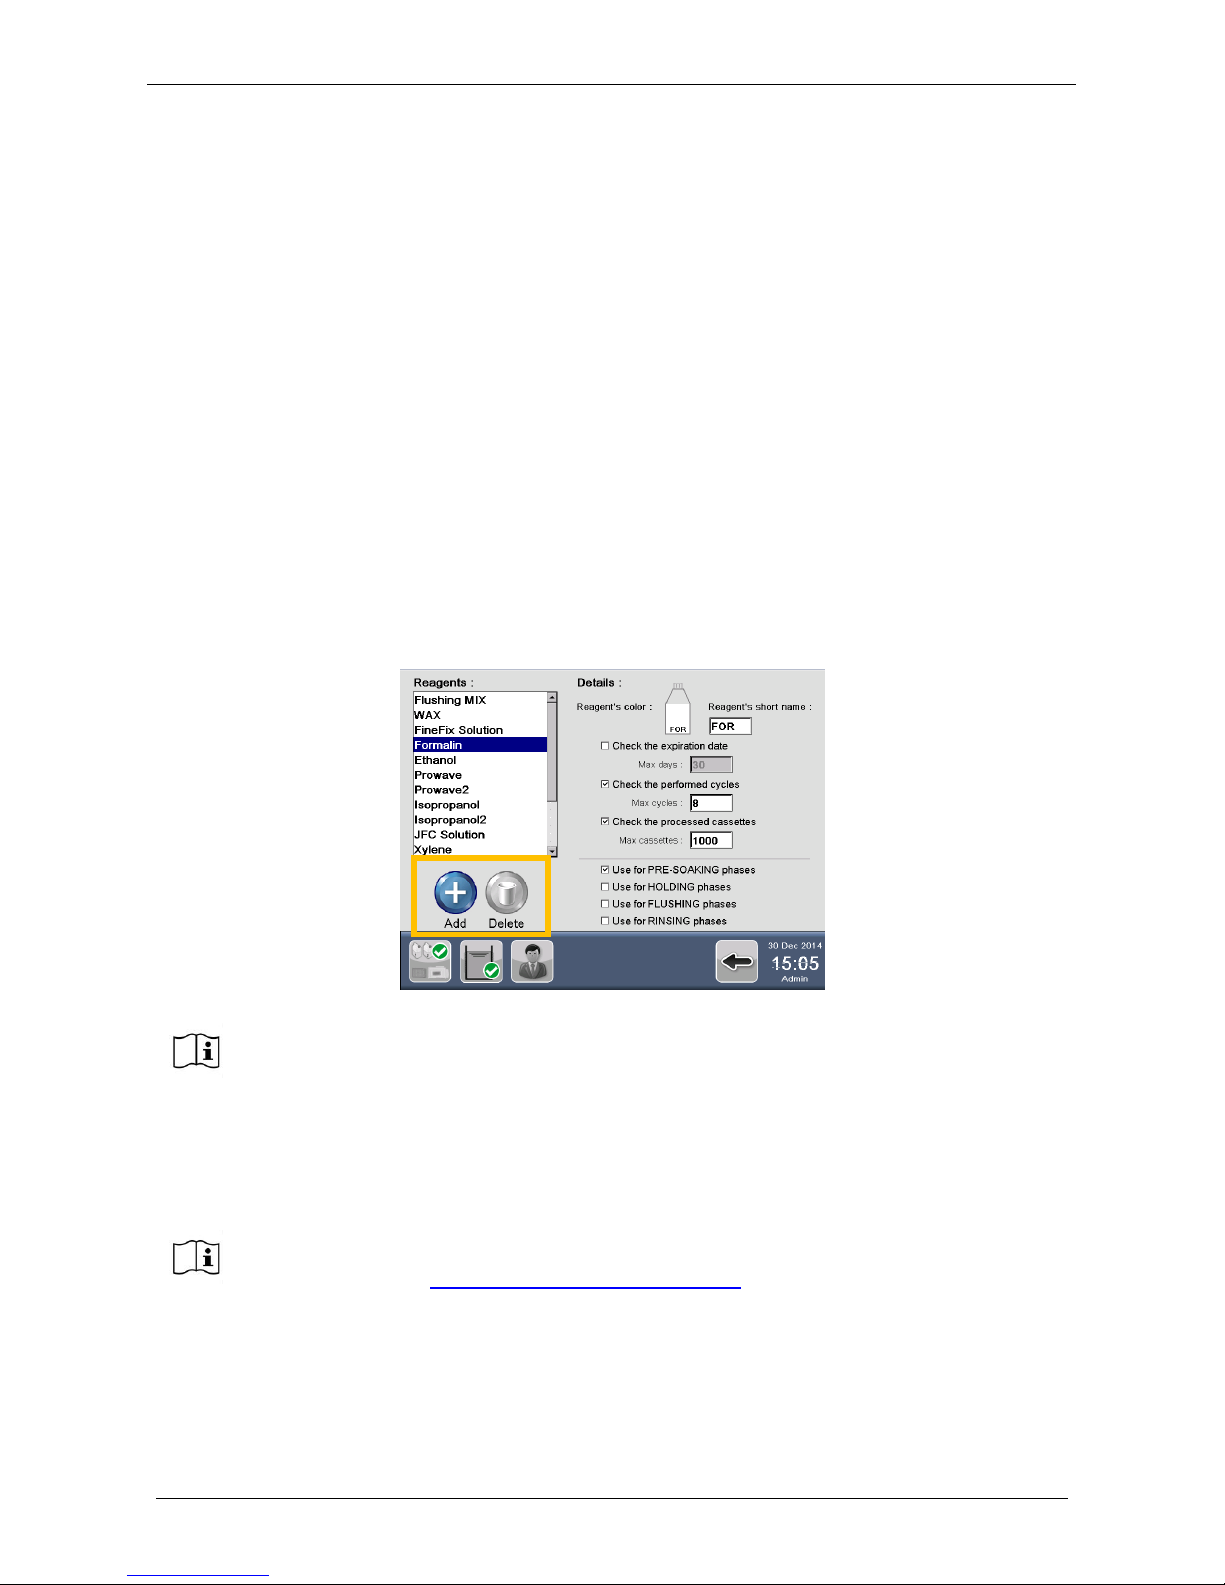
Milestone s.r.l.
MM098-002 – LOGOS ONE – Operator Manual
82
REUSE LIFE of each reagent can be defined using the check boxes (see figure above on the right, yellow
square):
Check the expiration date. Tick this box to check the reagent expiration date, according to your
requirements.
Check the performed cycles. Tick this box to check the maximum number of cycles to be carried out with
the reagent in use.
Check the processed cassettes. Tick this box to check the maximum number of cassettes to be processed
with this reagent.
Use for PRE-SOAKING phases. Tick this box to set the reagent to be used as PRE-SOAKING reagent
(refer to chapter 3.2.5).
Use for HOLDING phases. Tick this box to set the reagent to be used as HOLDING reagent (refer to
chapter 3.2.5).
Use for FLUSHING phases. Tick this box to set the reagent to be used as FLUSHING reagent.
Use for RINSING phases. Tick this box to set the DEHYDRATION reagent to be used also as RINSING
reagent.
Click on the relative Check boxes to activate the settings described above (points 1,2,3 in the chapter 4.1)
regarding date of next change, number of maximum processing runs and/or processed cassettes performed
with any reagent, so that the system automatically warns before the process starts.
“Add” a new reagent or “Delete” it (figure below, yellow square) by pressing on the relative icon.
Every new added reagent can be used for any phase. Once added, it is possible to set the reagent’s short
name, color, check its expiration date, its performed cycles and its processed cassettes and set the
maximum values.
4.1.2 Recommendations for reuse life
The following recommendations are conceived as a guideline to ensure quality processing.
For safety reasons, factory pre-stored reagents cannot be deleted.
Default reagents settings are factory set, to assure optimal results. Don’t modify them.
For any possible clarification or any request for assistance please contact either our
application support: [email protected] to get proper instructions.
Page 83
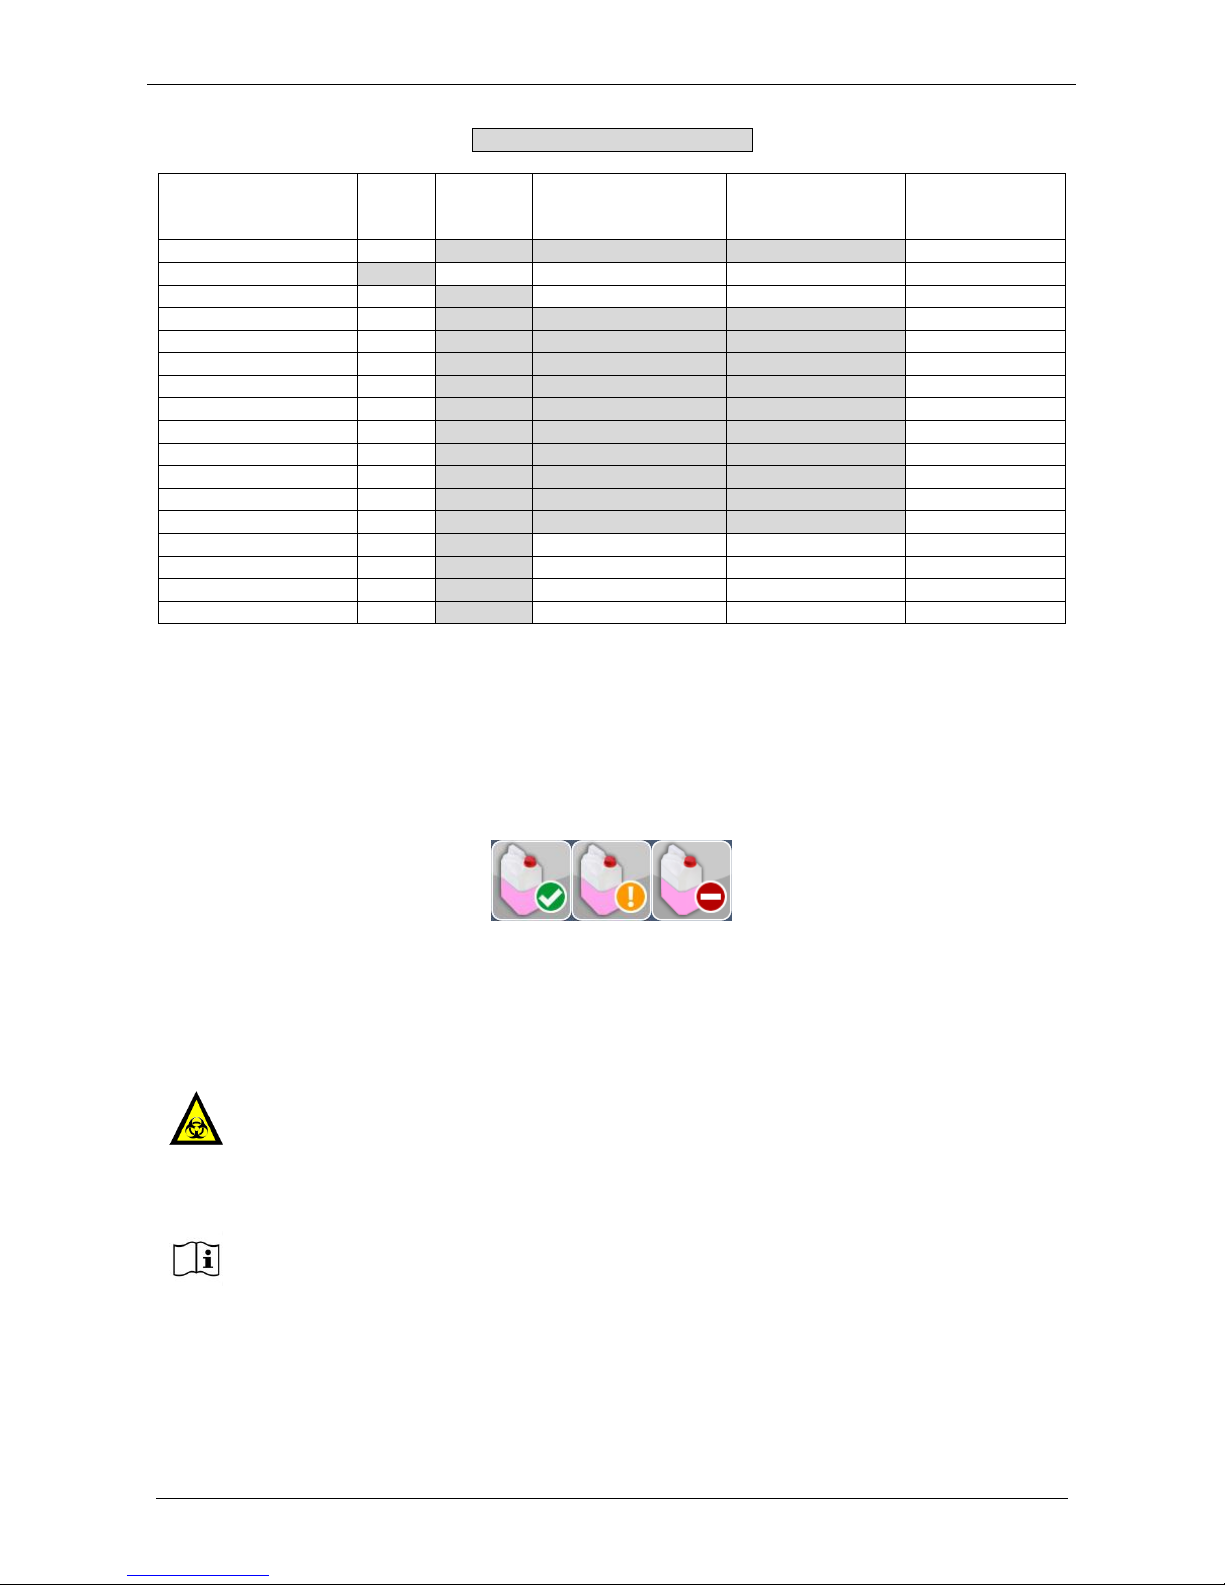
Milestone s.r.l.
MM098-002 – LOGOS ONE – Operator Manual
83
REAGENT CHECKED FOR:
REAGENT
MAX
DAYS
MAX
CYCLES
MAX CASSETTES
5lt tanks
MAX
CASSETTES
3.8lt tanks
USE FOR
Flushing MIX
30
8
840
672
Holding/Flushing
WAX exchange
14
10
840
840
WAX cleaning
7 5 420
420
FineFIX
30
8
1000
800
Formalin
30
8
1000
800
Presoaking
Ethanol
30
8
420
336
Rinsing
Prowave
30
8
420
336
Prowave2
30
8
550
440
Isopropanol
30
8
420
336
Isoparopanol2
30
8
550
440
JFC
30
8
550
440
Xylene
30
8
630
504
Isoparaffin
30
8
630
504
Cleaning Ethanol
7
5
\ \
Cleaning Isoparaffin
7
5
\ \
Cleaning Water
7
5
\ \
Cleaning Xylene
7
5
\ \
The REAGENTS SETTINGS makes the REAGENTS STATUS icon turn from GREEN to YELLOW to RED,
depending on the remaining reuse life of the reagents (for example 1 day, 1 cycle and/or 1 full cassette rack,
as described in the chapter 2.16).
Example, if reagent cassettes alert status is set at 210 and a reagent checked for the processed cassettes
has a limit of 630, the REAGENTS STATUS icon is green until 419 cassettes (one full rack before reaching
the limit); then turns to yellow from 420 to 629 and then to red at 630 cassettes. When RED, processing
cannot be launched. Reagent status icon with different colors is shown below.
4.2 Reagents replacement procedure
4.2.1
Handle with care and store in a cold dry space using a tightly closed container.
Vapors may collect in empty containers. Treat empty containers as hazardous.
Waste material should be disposed of in an approved incinerator or in a designated landfill
site, in compliance with all federal, provincial and local government regulation.
Some reagents can have potential health effects and cause environmental pollution if not
correctly disposed.
For further information please refer to the MSDS (Material Data Safety Sheet) provided by
your supplier.
In case a reagent is used in at least 2 tanks, only when it has expired in all the tanks where
this is in use, the reagent status icon becomes red.
For the correct use of tanks please refer to chapter 2.14.
Page 84
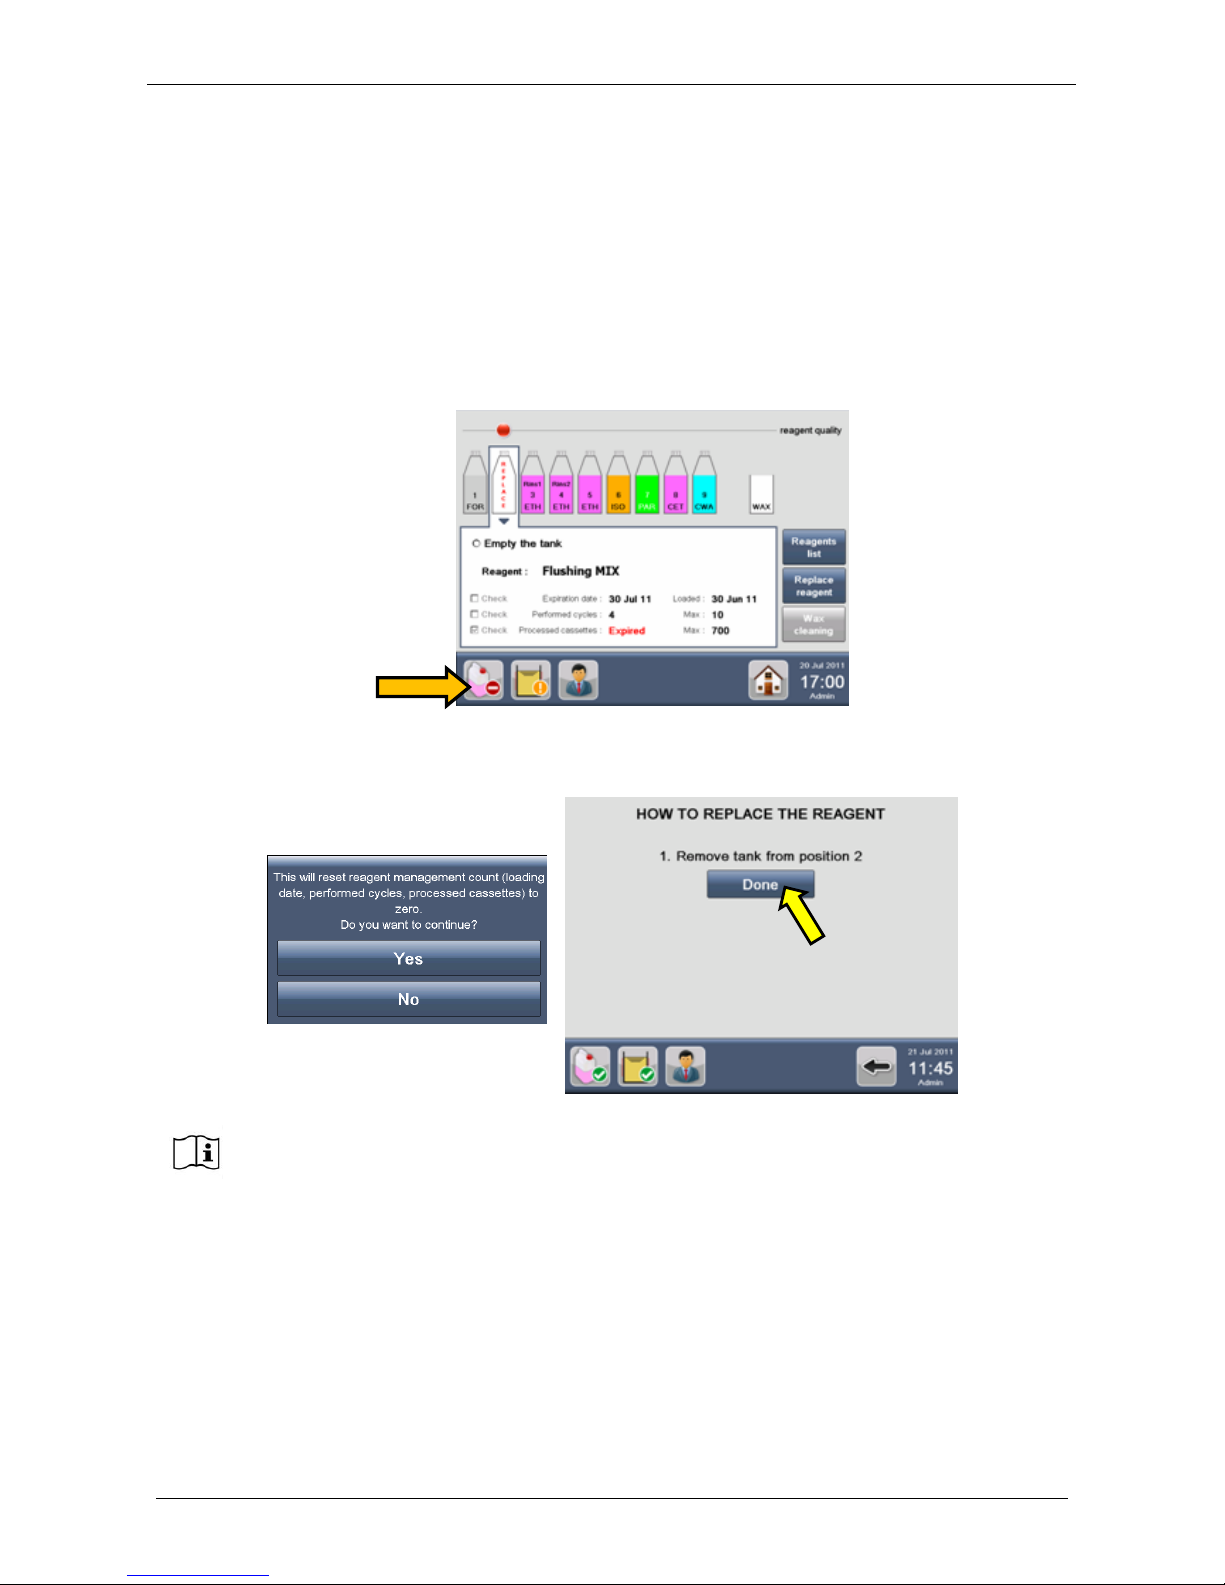
Milestone s.r.l.
MM098-002 – LOGOS ONE – Operator Manual
84
4.2.2 Reagent NOT USED FOR RINSING
When a reagent NOT used for rinsing has expired its reuse life (in this case: number of processed
cassettes), a RED symbol appears over the corresponding tank and the word REPLACE blinks in red. The
reagents STATUS ICON also turns from green to RED (figure below).
Select Reagents from the MAIN FUNCTIONS screen. In alternative, press directly the Reagents status icon
on the STATUS BAR of the HOME PAGE.
The REAGENTS CONFIGURATION screen appears (figure below). automatically the expired tank in
position NUMBER 2 blinks.
Select the EXPIRED reagent (in this case Flushing MIX) and press the Replace Reagent button (figure
below).
Click YES on the message displayed and the screen on the right appears showing the REAGENT
REPLACEMENT PROCEDURE. Follow the steps written below:
Remove the EXPIRED TANK from the position indicated by the software (number 2 in this case) and press
Done (see next figure) to confirm.
Before continuing with next operations, open the tanks holder doors where the processing
tanks are inserted.
Page 85
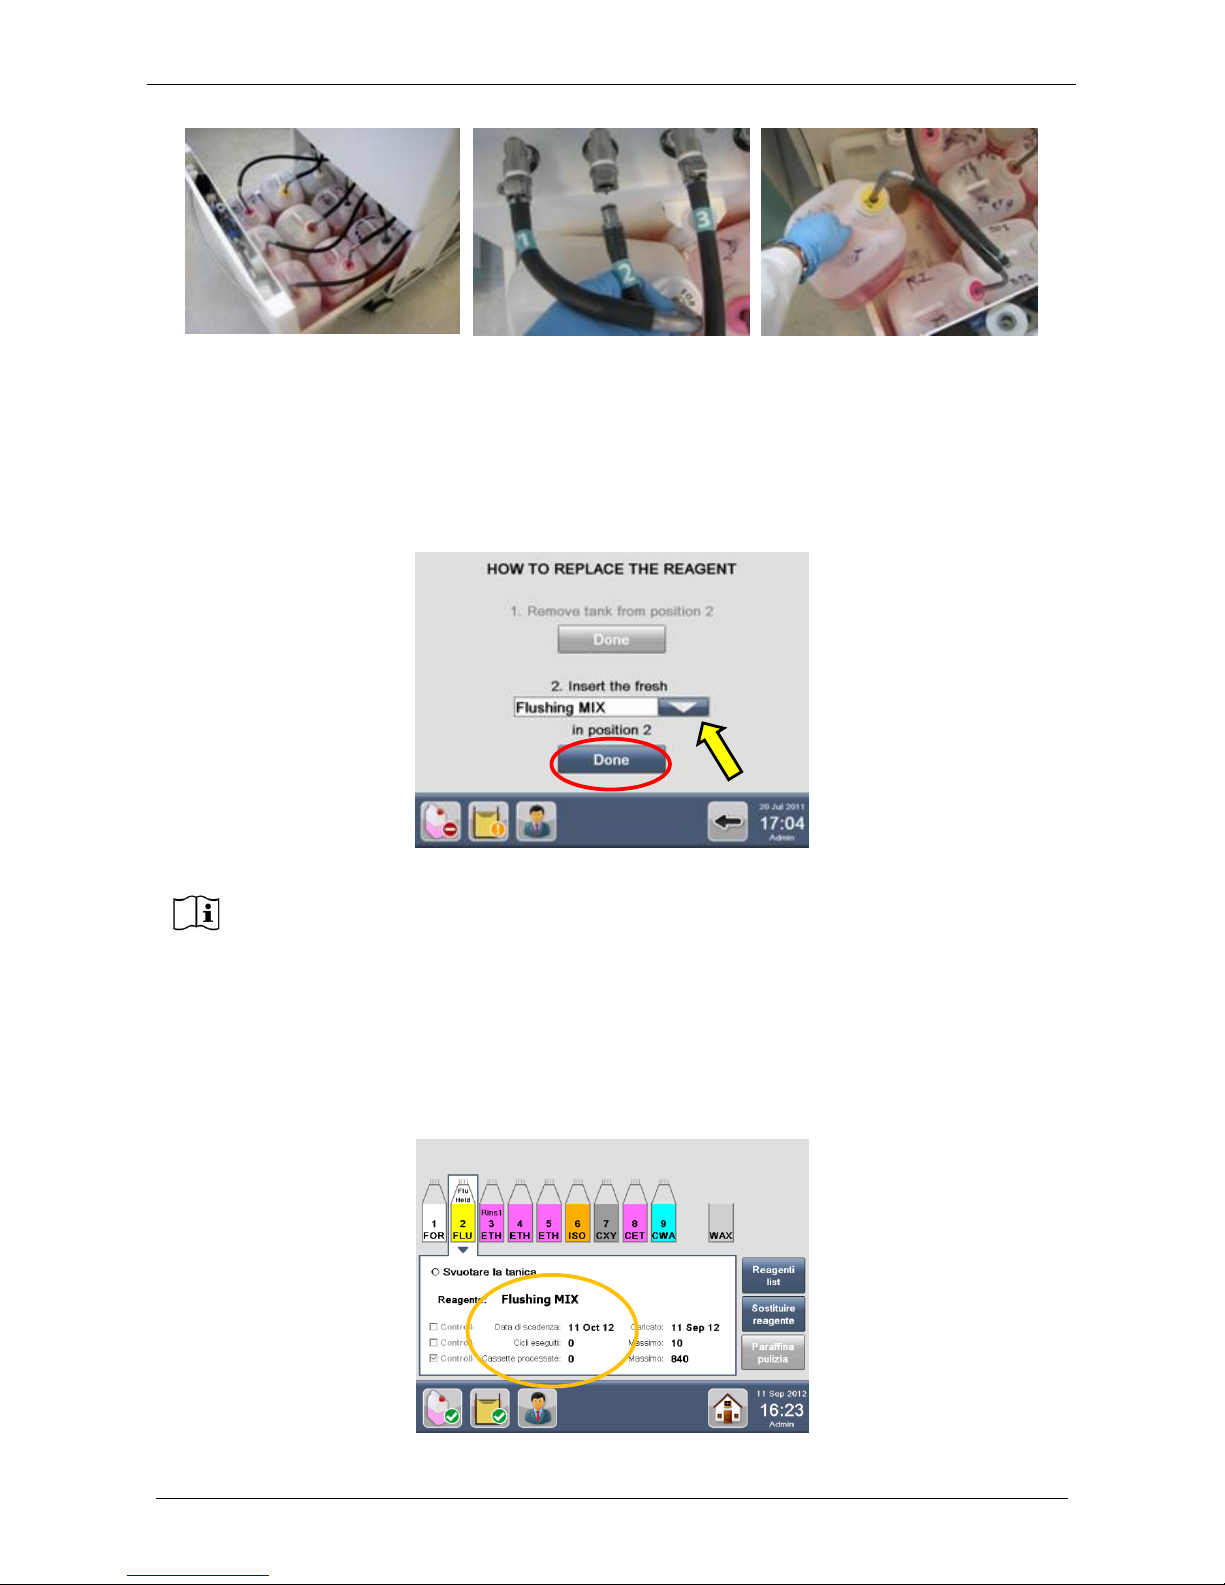
Milestone s.r.l.
MM098-002 – LOGOS ONE – Operator Manual
85
Dispose of the exhausted reagent.
Load the tank with the FRESH REAGENT (Flushing MIX in this case).
Put the tank containing fresh reagent into the position indicated by the software (number 2 in this case).
Select the reagent in the drop-down menu. The software, as a default, suggests filling with the same reagent
already loaded into the tank. To load a different reagent, select it from the drop-down menu (figure below,
circle). Press Done to confirm and return directly to the REAGENT CONFIGURATION screen.
Close the tanks holder doors and check the reagent level (working label).
Settings are automatically saved by the software.
After the replacement, the software resets the reagent management count to zero and the loading date
automatically changes to the current date (figure below). The reagents status icon also turns from red to
GREEN (figure below).
The software always suggests the last reagent loaded.
Make sure tank fitting is correctly inserted in its relative housing, and that the tank is
aligned with the others.
Page 86
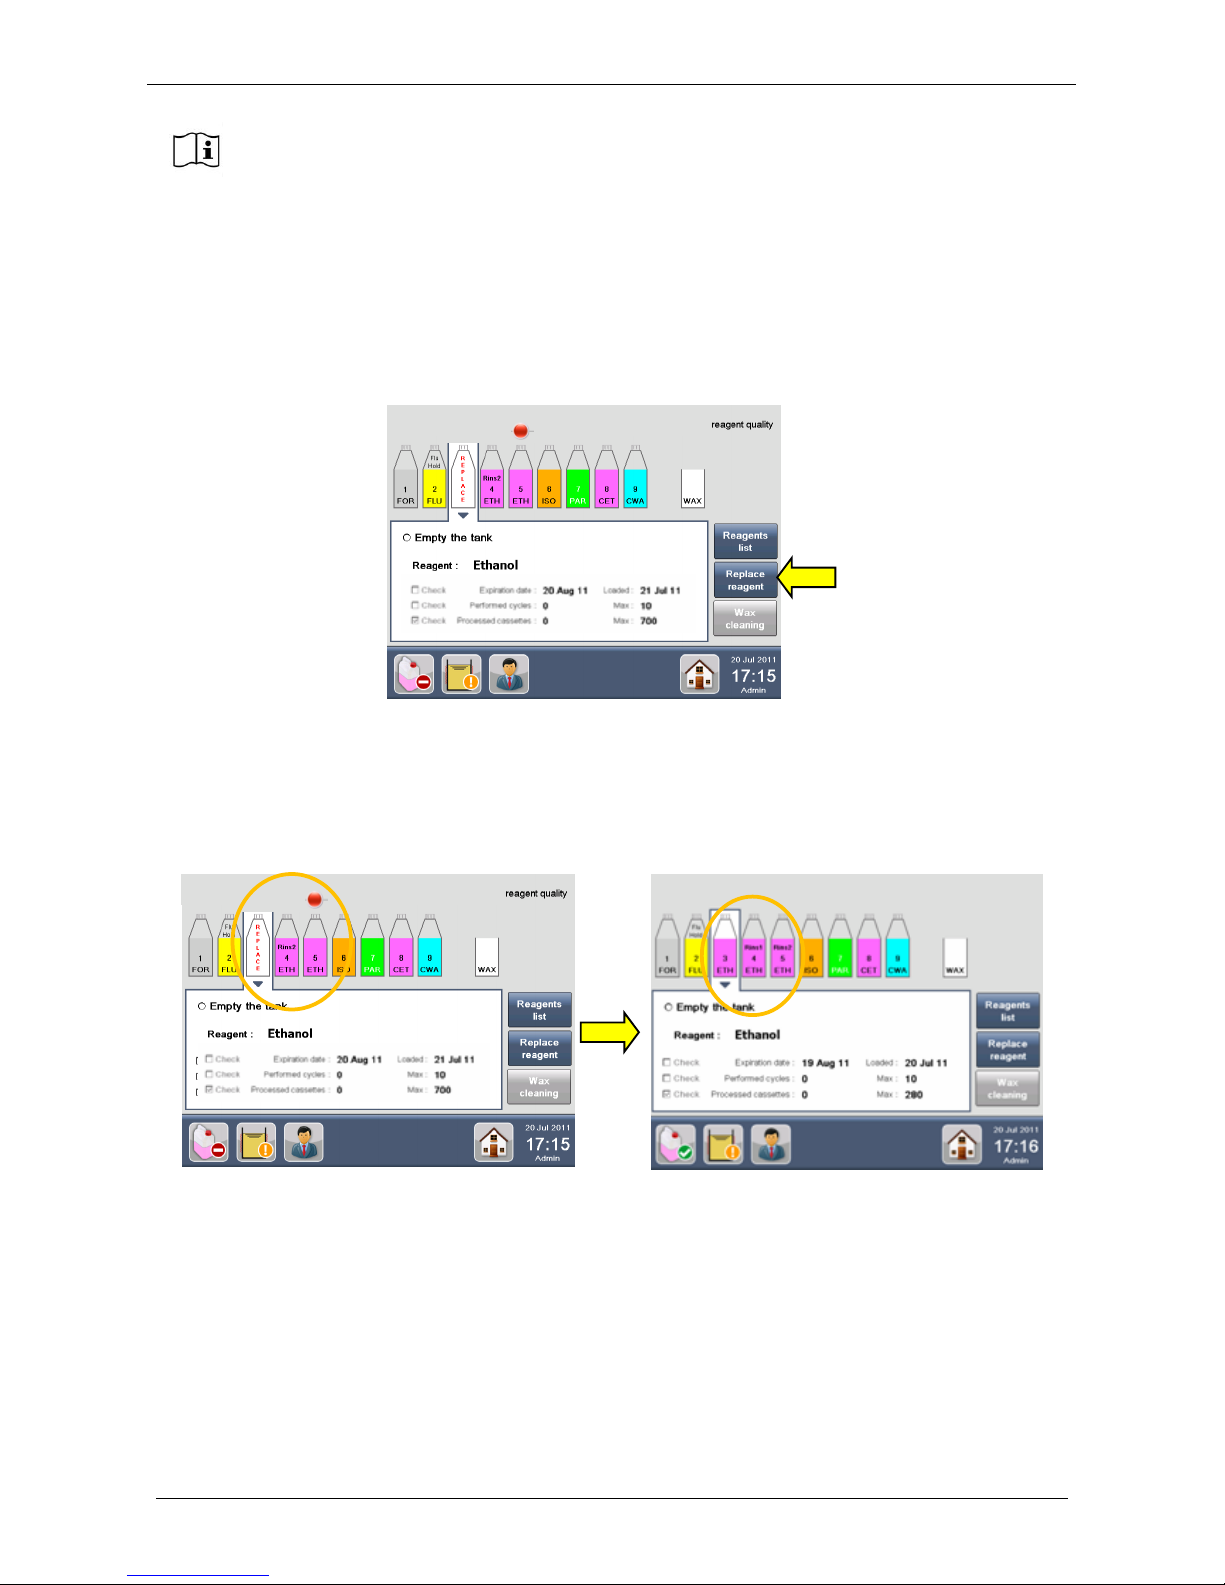
Milestone s.r.l.
MM098-002 – LOGOS ONE – Operator Manual
86
4.2.3 Reagent USED FOR RINSING
When a reagent USED ALSO for rinsing (in this case Ethanol) has expired its reuse life (in this case the
number of processed cassettes) a RED symbol appears over the ETHANOL reagent BUT the word Replace
blinks in red over the RINSING 1 reagent.
1. Select the blinking RINSING 1 reagent and press the Replace Reagent button (see figure below).
2. Follow the procedure how to replace the reagent described in chapter 4.2.1.
3. After the replacement, the software resets the reagent management count to zero and renames the
old RINSING1 reagent as new DEHYDRATION reagent (figure below). The software renames the other
tanks containing the reagent used also for rinsing as Rinsing 1 reagent and Rinsing 2 reagent, according to
the number of cassettes already processed.
This procedure has been conceived to increase shelf life of Ethanol allowing more use as Rinsing despite
the expiration as dehydration reagent.
At the end of the procedure it is possible to check the correspondence between the tanks
as diplayed by the software, with their numbers, names and colors, and the real tanks as
positioned inside the drawer.
Page 87
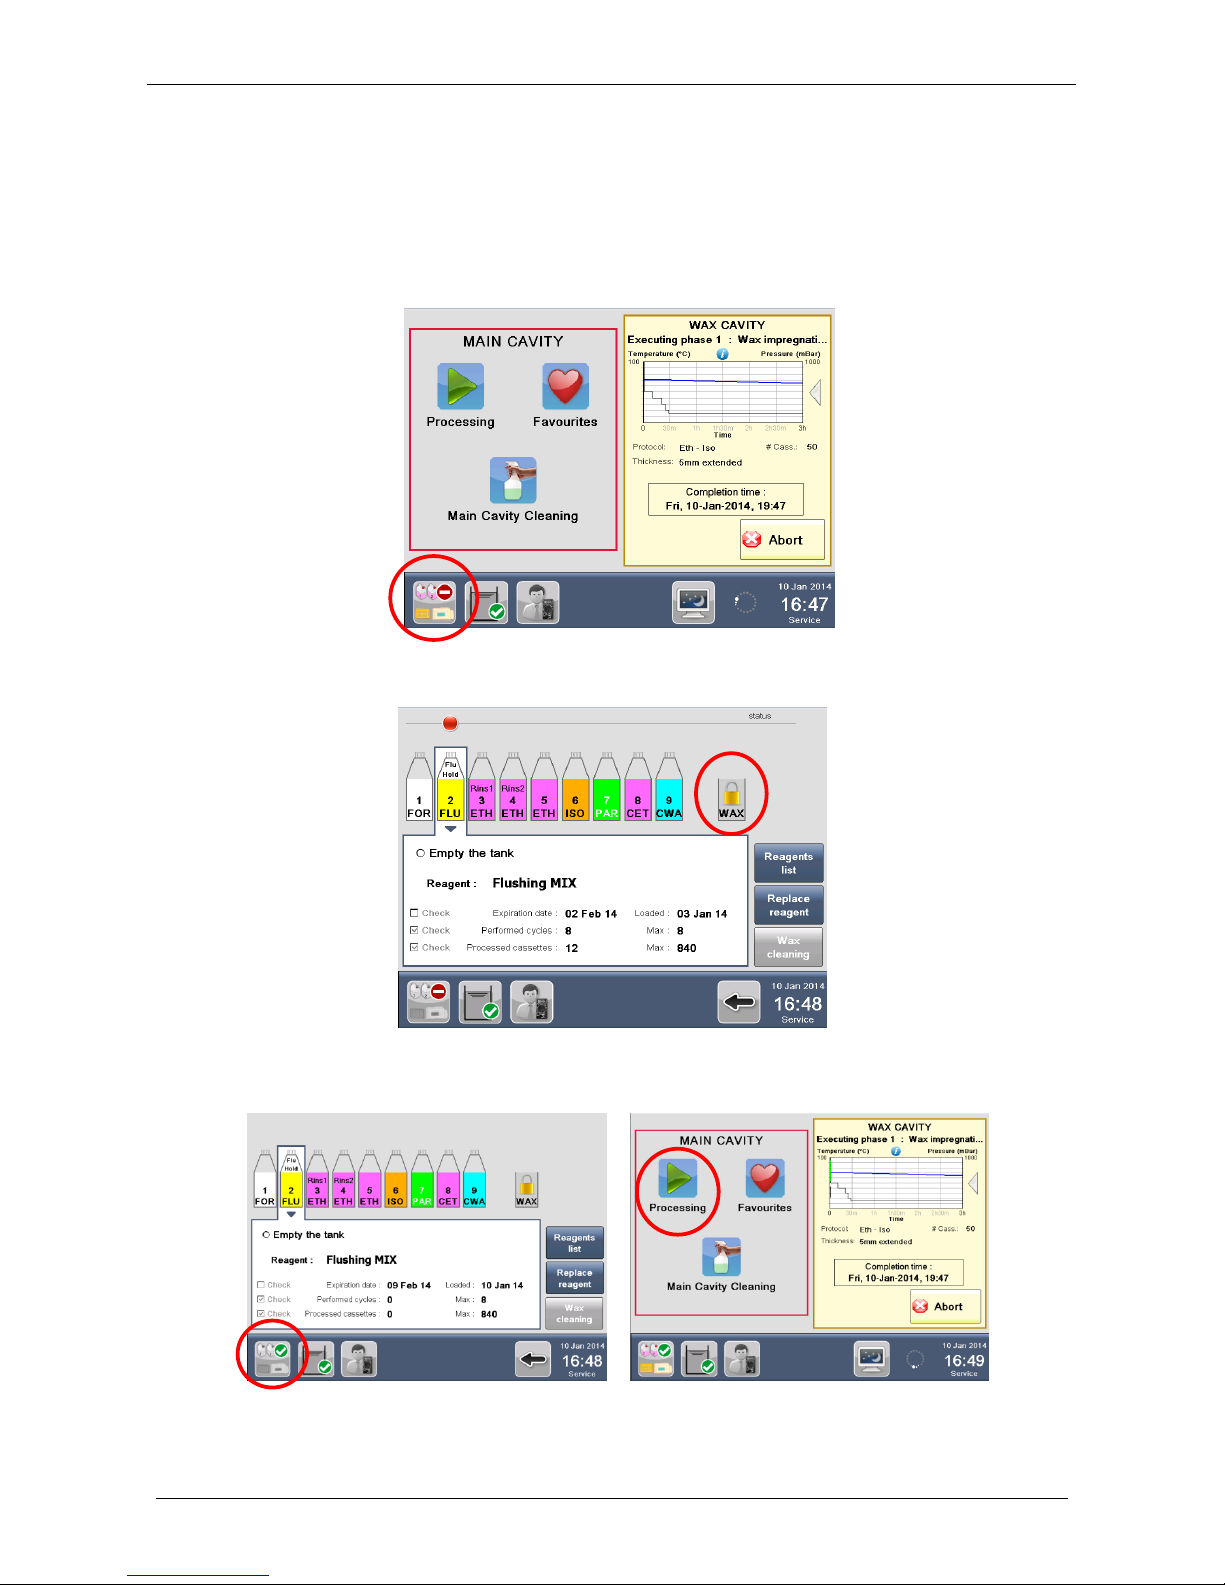
Milestone s.r.l.
MM098-002 – LOGOS ONE – Operator Manual
87
4.2.4 Change reagents during a WAX phase
During a WAX phase, both in MAIN and WAX cavity, it is now possible to perform the reagents replacement
procedure from the “Reagents status” icon on the STATUS BAR.
The icons that are active are colored, the inactive are grayed out.
During the reagents replacement procedure, a padlock appears on the WAX tank because it is the only
reagent in current use and cannot be changed until the wax is completed.
In this way during the WAX phase it is possible to change the other reagent tanks and start a new run in the
main cavity.
Page 88
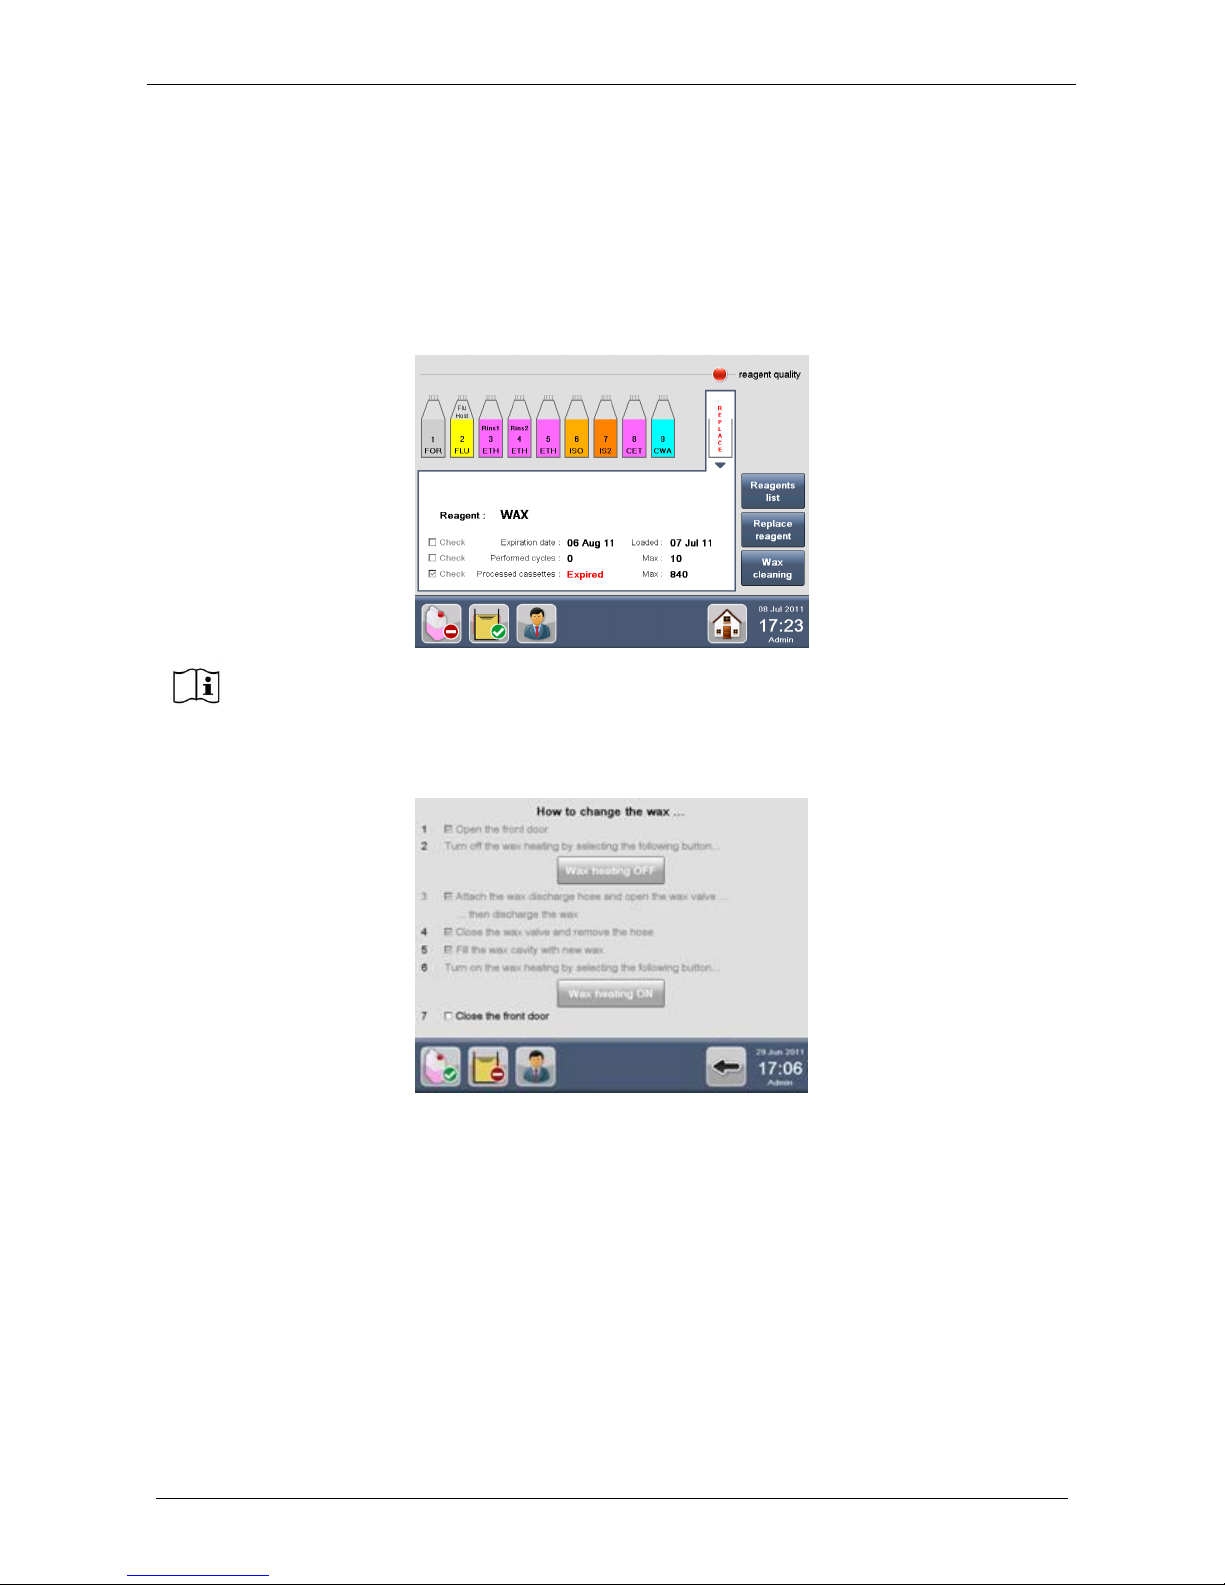
Milestone s.r.l.
MM098-002 – LOGOS ONE – Operator Manual
88
4.3 Wax replacement procedure
When WAX needs to be changed because heavily contaminated, dirty or smells of alcohols that a WAX
standard cleaning cycle (see the chapter 3.5) cannot eliminate, replace it as follows:
1. If WAX reuse life has expired, a RED icon appears over the WAX CAVITY (REAGENT
CONFIGURATION screen) and the word Replace is RED. Select the WAX CAVITY and press Replace
reagent button (figure below).
2. The screen below appears, showing the WAX replacement procedure. Follow the procedure
displayed on the screen.
A message reminds that this operation will reset WAX management count to zero. Press
YES to confirm.
Page 89
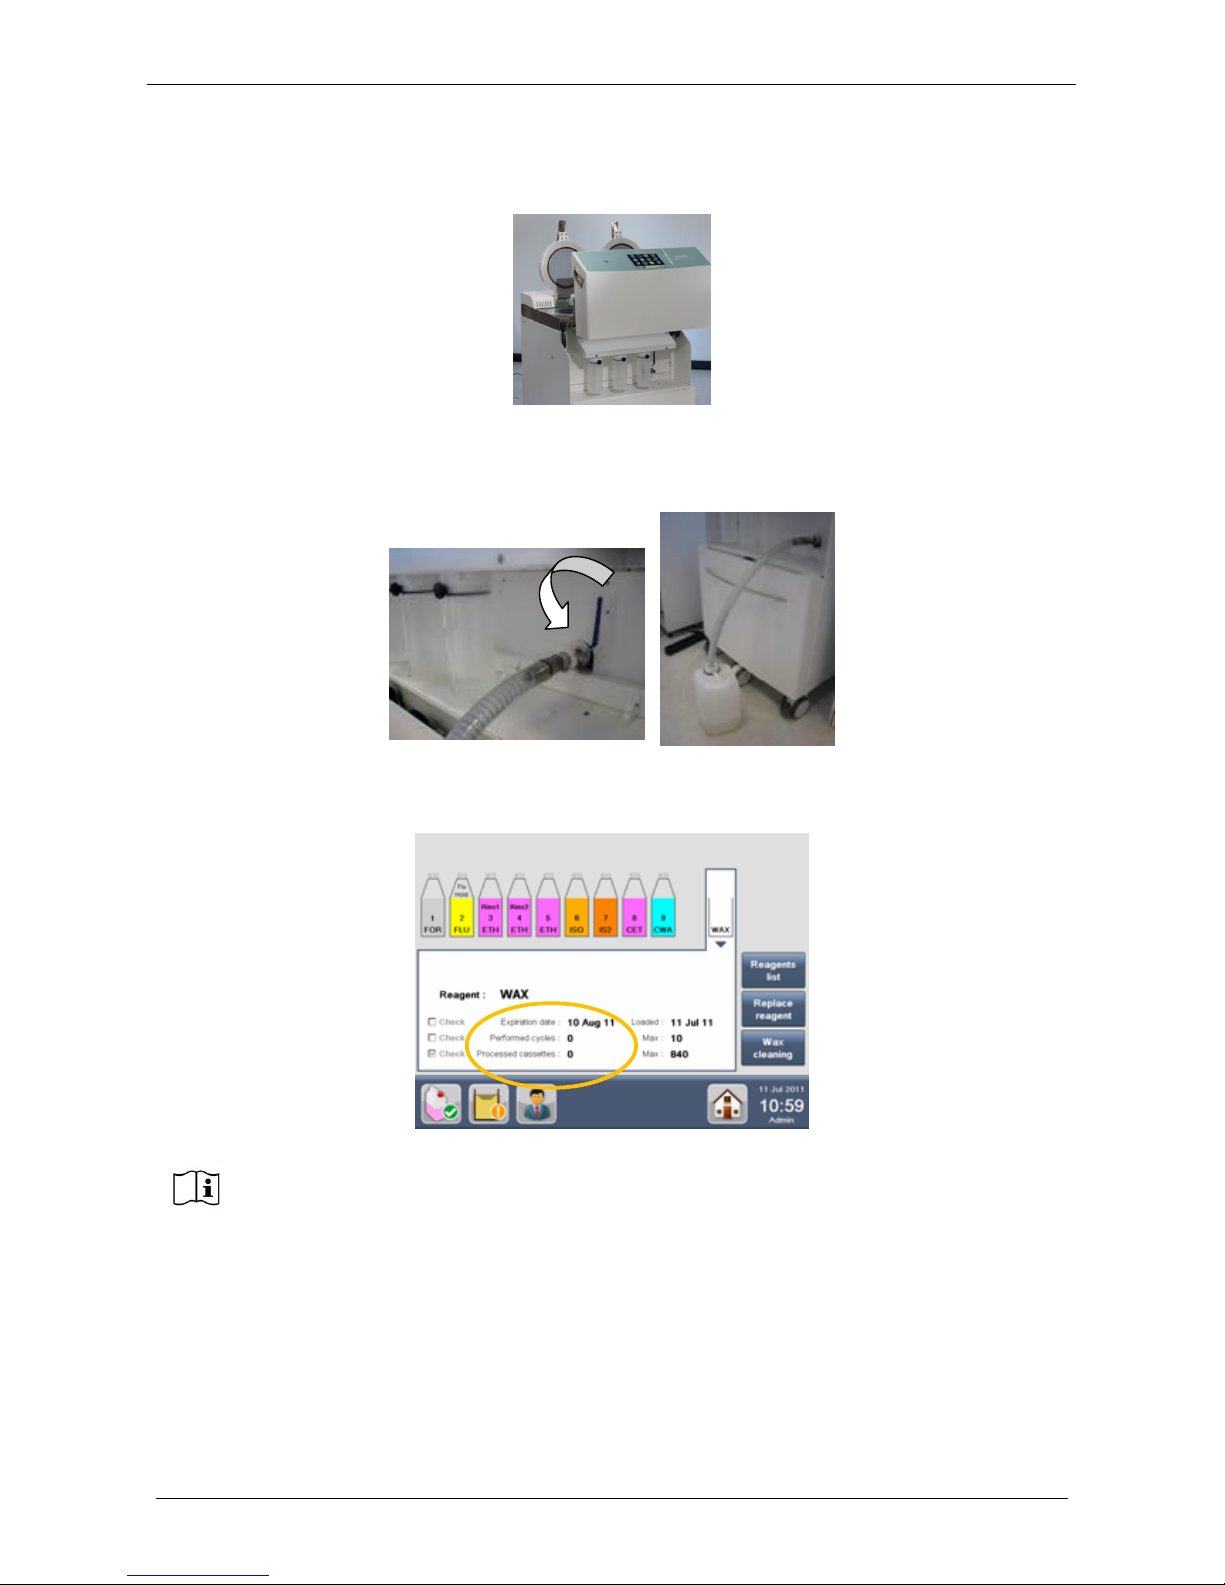
Milestone s.r.l.
MM098-002 – LOGOS ONE – Operator Manual
89
HOW TO OPERATE
A. Lift the front panel.
B. Lock the tube on the unit as shown in figure below.
C. Place the other end of the hose into a WAX waste container.
D. Turn the lever down to open.
After the replacement, the software resets WAX management count to zero and the loading date
automatically changes to the current date.
3. Wait until the new solid WAX loaded has melted (100 minutes). If molten WAX is loaded, the WAX
status icon becomes yellow. Check the WAX status (fully molten) and press Set as ready button, as
indicated in the chapter 2.13.
In LOGOS ONE it is possible to load solid as well as already molten new WAX.
Page 90
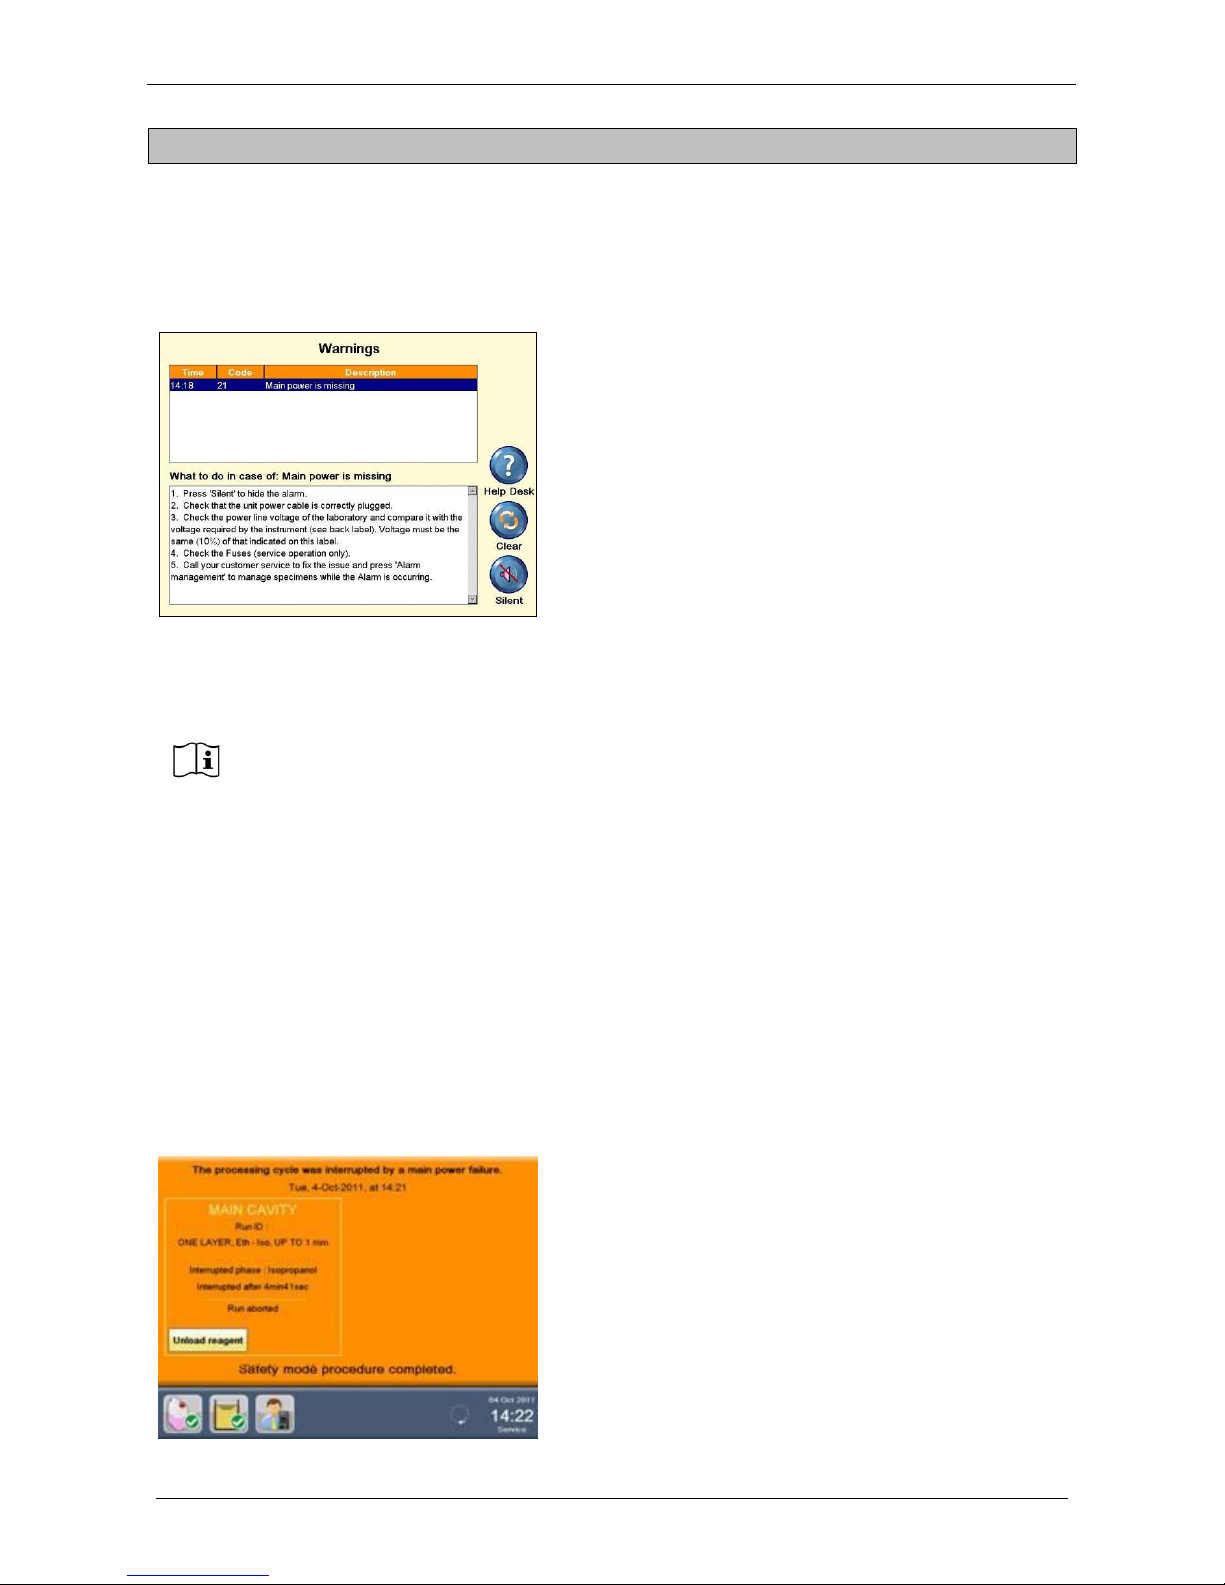
Milestone s.r.l.
MM098-002 – LOGOS ONE – Operator Manual
90
5 SAFETY MODE PROCEDURE
5.1 Power failure
LOGOS ONE can be equipped with an external UPS system, as described in the chapter 2.6.5, so that, in
case of power failure, the software can put the specimens rack in “Safe mode”.
In case of power failure during any phase, the program turns to Pause mode and this screen appears:
The MAIN POWER FAILURE ALARM is audible for 3
minutes with an intermittent audio signal.
The insulation of the cavities assures that the reagent loaded
and the WAX are kept warm during this period.
DURING THE 3 MINUTES COUNTDOWN
An auxiliary connector exit on the back of the unit is activated: here it is possible to connect an external
light/sound alarm or a beeper to call the hospital service assistance to remove the specimens rack from
LOGOS ONE (see the chapters 2.7).
In case of power failure, these functions are interrupted:
- Main cavity heating
- Wax heating
- Tissue processing
The terminal and the built-in stirrers remain operative in order to put the samples in the “safety position”.
The Terminal Computer remains active during the countdown, BUT:
If during this time the main power comes back on, the system will restart from the point the
program stopped.
Instead, if the system goes in “Power failure procedure” at the end of the countdown (3
minutes), at the next start up the system will advise of what happened, showing the details of
the step where the program stopped, thus allowing, through a STEP START program (for
further details see chapter 3.2.4), to end the interrupted program.
When the power supply comes back ON after a power failure, the system will automatically
reboot and the following screen appears:
The screen reports that a power failure occurred, with
following details:
Date and Time: when the program stopped
Processing Cycle: Run ID, protocol name and size
Interrupted phase
Interrupted after
The operator is then able to Unload Reagent, Unload
cassettes and then CONTINUE the processing by STEP
START (for further details see chapter 3.2.4), according to
the indications of the last step performed by the unit prior to
power failure.
Should the main power supply turn on during the 3 minutes of Main Power Failure alarm
mode, the program will automatically re-start from the point it was interrupted.
Page 91

Milestone s.r.l.
MM098-002 – LOGOS ONE – Operator Manual
91
AFTER THE 3 MINUTES WITHOUT POWER, WITH UPS
The system automatically puts the specimens rack in “Safe mode”, according to the following schedule:
PHASE
CONDITION
POWER FAILURE
PROCEDURE
PHASE1
POWER FAILURE
PROCEDURE
PHASE2
POWER FAILURE
PROCEDURE
PHASE3
Fixation
Flushing
Rinsing1/2
Dehydration
Clearing
Wax
Cleaning
MAIN CAVITY
LOADING
FINISH LOADING
N.A.
N.A.
Fixation
Flushing
Rinsing1/2
Dehydration
Clearing
Wax
Cleaning WAX
PHASE
RUNNING
STOP THE PHASE
N.A.
N.A.
Cleaning
MAIN CAVITY
PHASE
RUNNING
STOP THE PHASE
TIMED
UNLOADING
N.A.
Fixation
WAX
UNLOADING
THE SOLUTION
FINISH
UNLOADING
LOADING SAME
REAGENT
N.A.
Flushing
Rinsing1/2
Dehydration
Clearing
UNLOADING
THE SOLUTION
IF NEXT PHASE
EXISTS AND IS
NOT WAX
IF NEXT PHASE
EXISTS AND IS
WAX AVAILABLE
IF NEXT PHASE
EXISTS AND IS
WAX NOT
AVAILABLE
FINISH
UNLOADING
FINISH
UNLOADING
FINISH
UNLOADING
LOADING NEXT
REAGENT
LOADING WAX IN
MAIN CAVITY
RELOADING
SAME REAGENT
Cleaning
MAIN CAVITY
UNLOADING
THE SOLUTION
FINISH
UNLOADING
N.A.
N.A.
Since WAX cannot be melted in “Power failure procedure”, operator is required to wait till
the completion of WAX remaining heating time, before removing the specimens.
In case of power failure during the WAX impregnation in MAIN CAVITY or in WAX CAVITY,
the rack cannot be unloaded until the WAX heating time is completed (by default 100
minutes melting time). The specimens are safe anyway in the solid WAX, so there is no
risk of damage if they are not removed.
In case of power failure during the transfer of WAX between the two cavities, it is
impossible to start a new process until the WAX heating time is completed (by default 100
minutes melting time).
Page 92
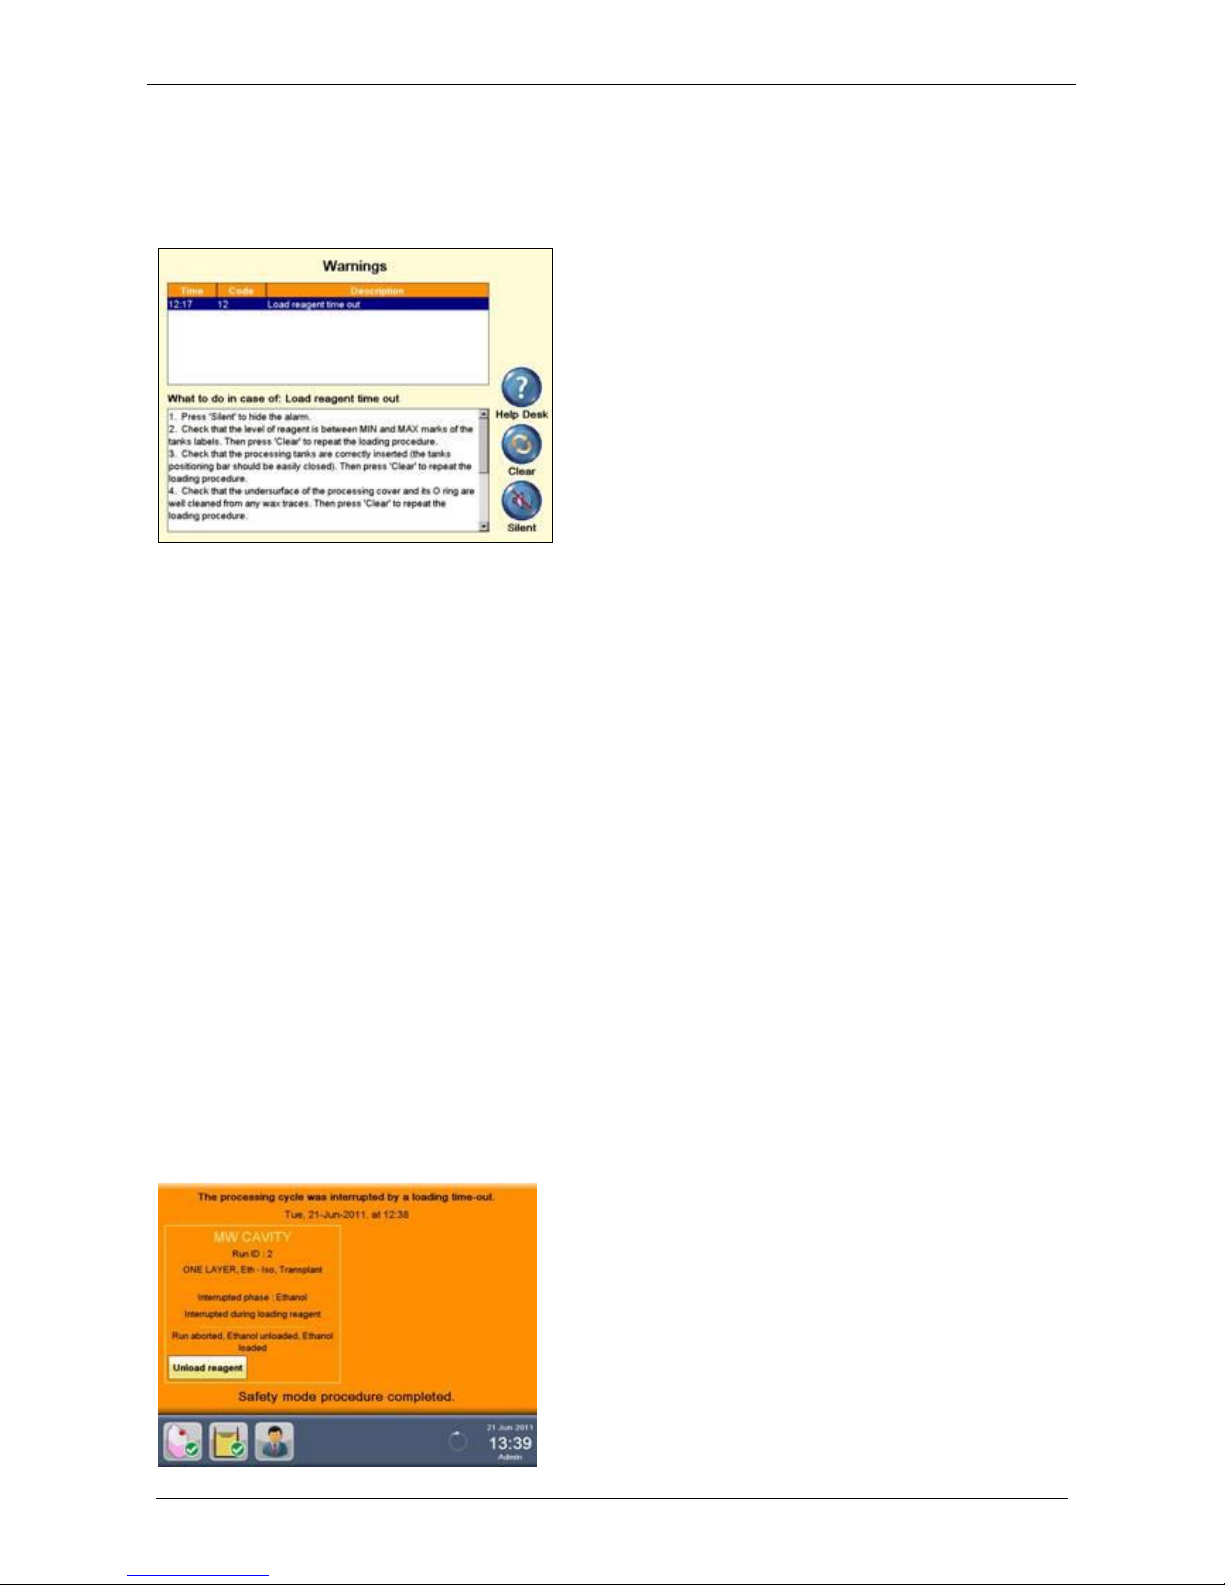
Milestone s.r.l.
MM098-002 – LOGOS ONE – Operator Manual
92
5.2 Regent loading time-out
In case of reagent loading time out, if a processing tank is empty or if the reagent quantity isn’t enough to
cover the appropriate level sensor, the program turns to PAUSE mode and this screen appears:
The LOADING TIME-OUT ALARM is audible for 20
minutes with an intermittent audio signal. During this period
the reagent loaded (if any) will be kept into the cavity.
DURING THE 20 MINUTES COUNTDOWN
If the operator is in the Laboratory during this phase, he can:
Silent the audio alarm (figure above) and in the meantime check that the reagent level of the processing
tank isn’t too low and eventually fill the tank with new reagent (see chapter 2.14 for details). Only maintaining
the right reagents level assures the coverage of all the cassettes.
Clear the audio alarm (figure above) and Abort the processing to unload the rack with specimens from the
unit. Then check that the reagent level of the processing tank isn’t too low and eventually fill the tank with
new reagent (see chapter 2.14 for details). Only maintaining the right reagents level assures the coverage of
all the cassettes.
After this check, the operator can continue the processing with the STEP START function, starting from the
phase not executed (see chapter 3.2.4 for details).
AFTER THE 20 MINUTES
If Reagent Loading Time-Out occurs when nobody is in the Laboratory, after 20 minutes the system starts
the Safety mode procedure and automatically puts the specimens in “safe mode” following this schedule:
In case of reagent loading time-out, the unit (after 20 minutes) will enter in SAFETY MODE
procedure, unloading the reagent (if any) and loading the previous reagent of the protocol
used. The previous reagent and its fumes prevent samples from drying.
In case of reagent loading time-out of the FIRST reagent of the protocol used, the reagent
movement will be stopped and the rack remains into the cavity. The reagent and its fumes
prevent samples from drying.
This function assures that samples are kept soaked in the reagent until the arrival of the operator and the
software will advise what happened and at which stage the process has been stopped.
The screen will display that Safety Mode Procedure has
been activated, with following details:
- Date and Time: when the program stopped
- Processing Cycle: Run ID, protocol name and size
- Phase loading step
When the operator is back in the Laboratory, he can Unload
Reagent, Unload cassettes and then CONTINUE the
processing by STEP START (for further details see chapter
3.2.4), according to the indications of the last phase not
executed prior to loading time out.
Page 93
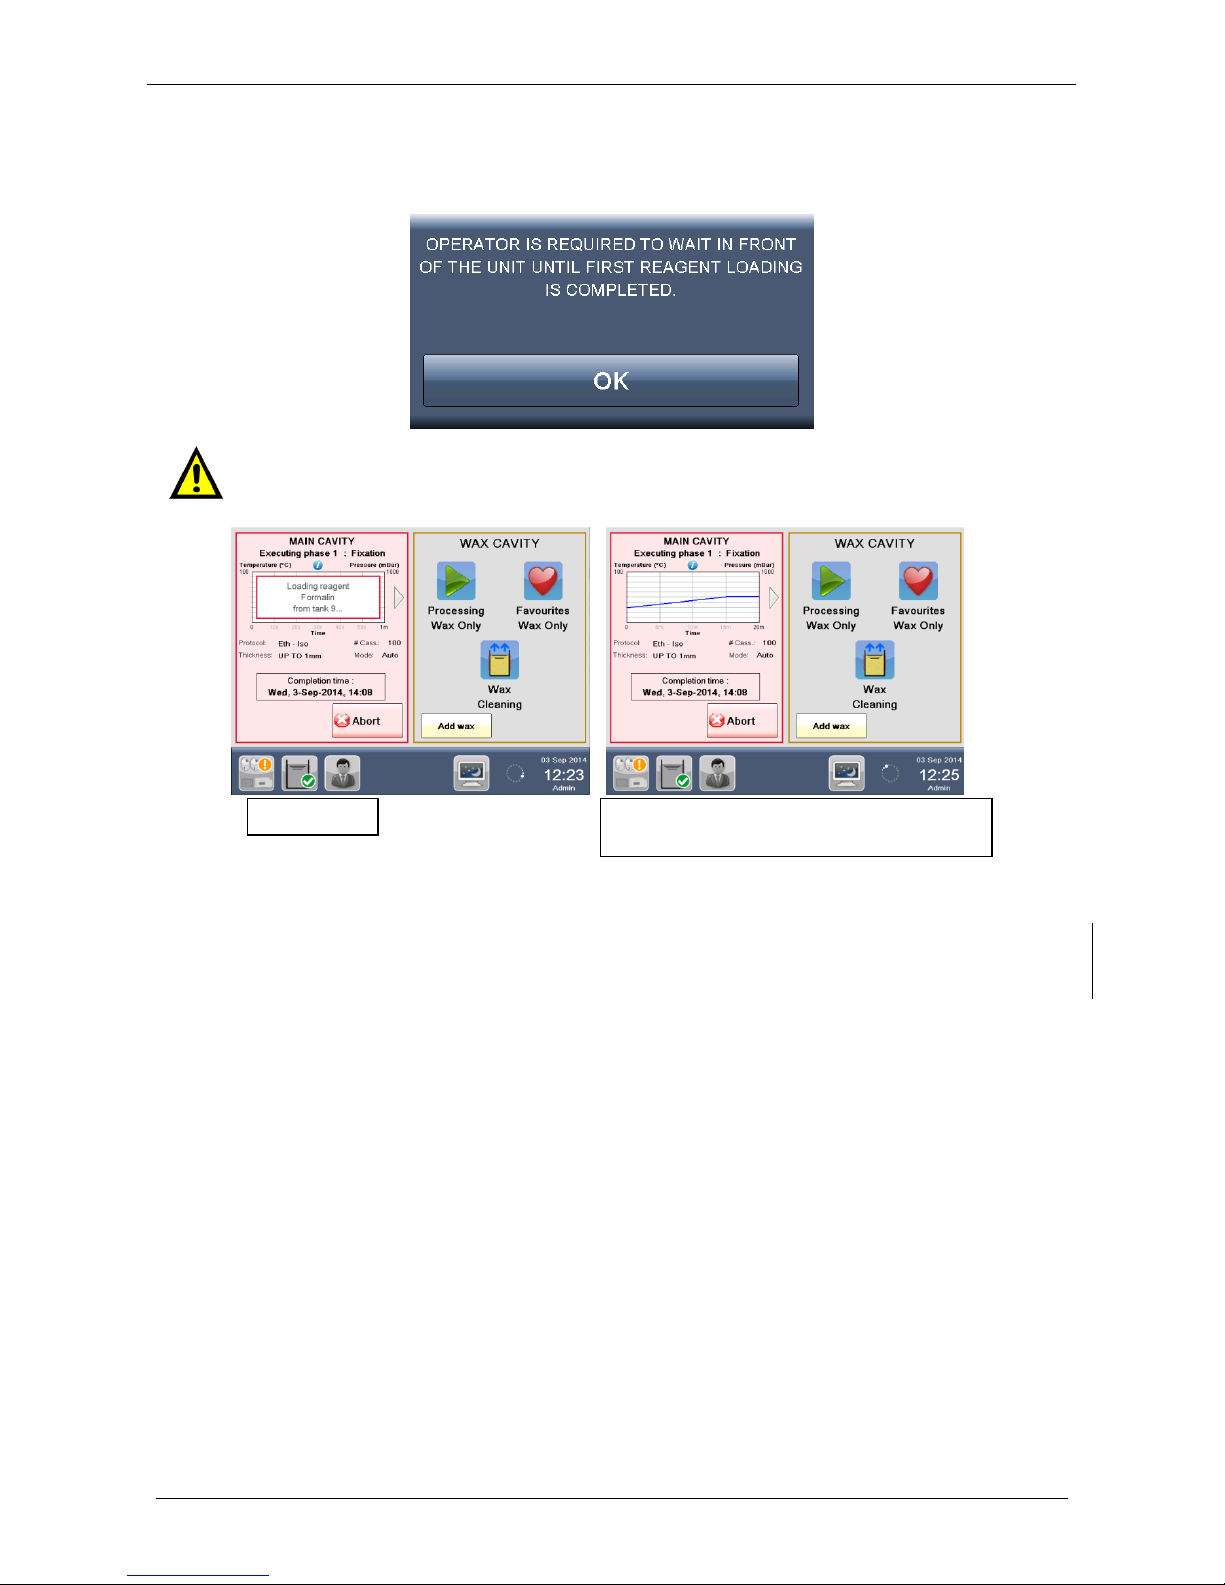
Milestone s.r.l.
MM098-002 – LOGOS ONE – Operator Manual
93
The following message appears every time a program is started, read carefully the message on the screen
and press OK to start the process.
The following logic is for every phase:
Stop the loading
If previous reagent exist
Timed unloading
Timed loading previous reagent
If previous reagent do not exist
Do nothing
So if the phase is the first, the previous reagent does not exist, this is the reason why it is it is necessary that
operator stays close to the unit at the beginning of a new process until loading of the first reagent is
completed and the graph is displayed on the screen, this lasts no more than 2 minutes in normal conditions.
To assure safety of samples, in fact, it is necessary that operator stays close to the unit at
the beginning of a new process until loading of the first reagent is completed and the
graph is displayed on the screen.
WAIT…
LOADING COMPLETED
UNIT CAN NOW BE UNATTENDED
Page 94
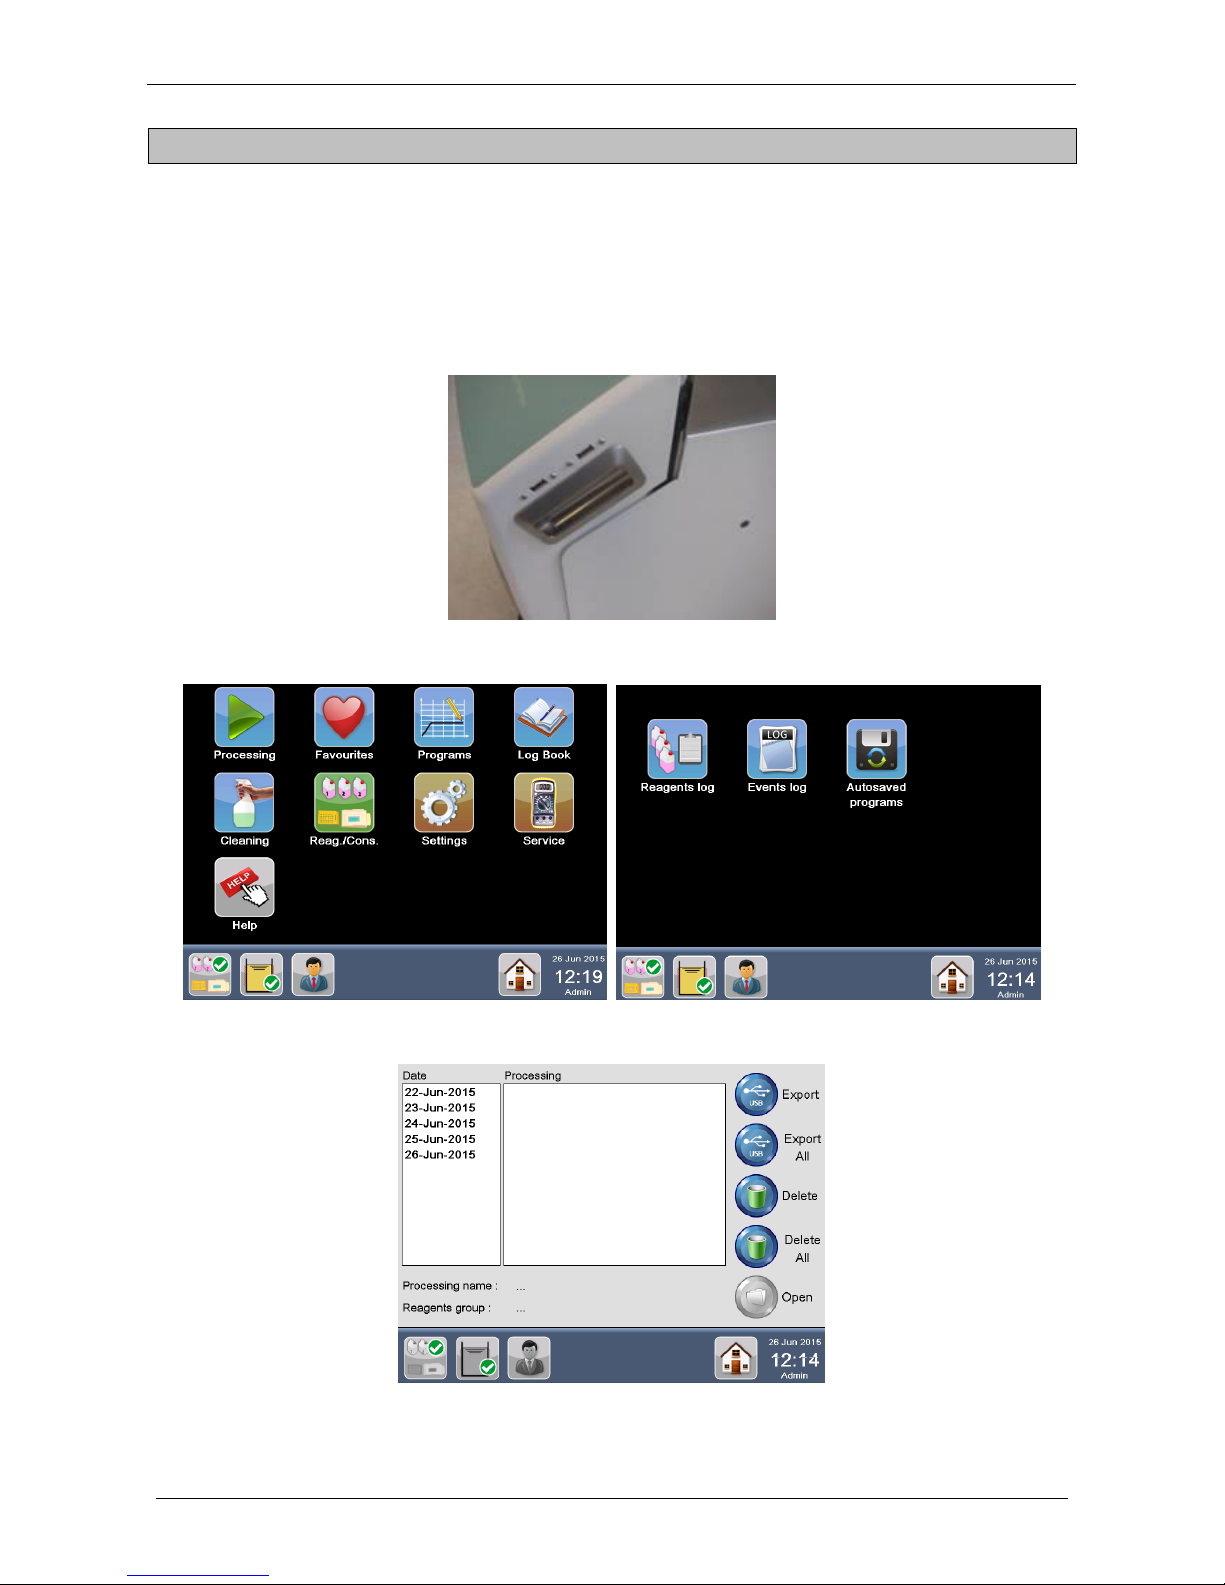
Milestone s.r.l.
MM098-002 – LOGOS ONE – Operator Manual
94
6 REPORTING
LOGOS ONE provides the documentation necessary for the report activity of the Laboratory. In fact it is
possible to export a document including all necessary information like the real time and temperature
performed by the unit, the reagent management and the Events Logs.
6.1 Export processing from the terminal to the USB key
Insert the USB memory stick into its slots placed on the right side of the terminal (figure below).
Select “Log Book” button from the MAIN FUNCTIONS screen and then select “Autosaved programs”.
The following screen appears.
Page 95
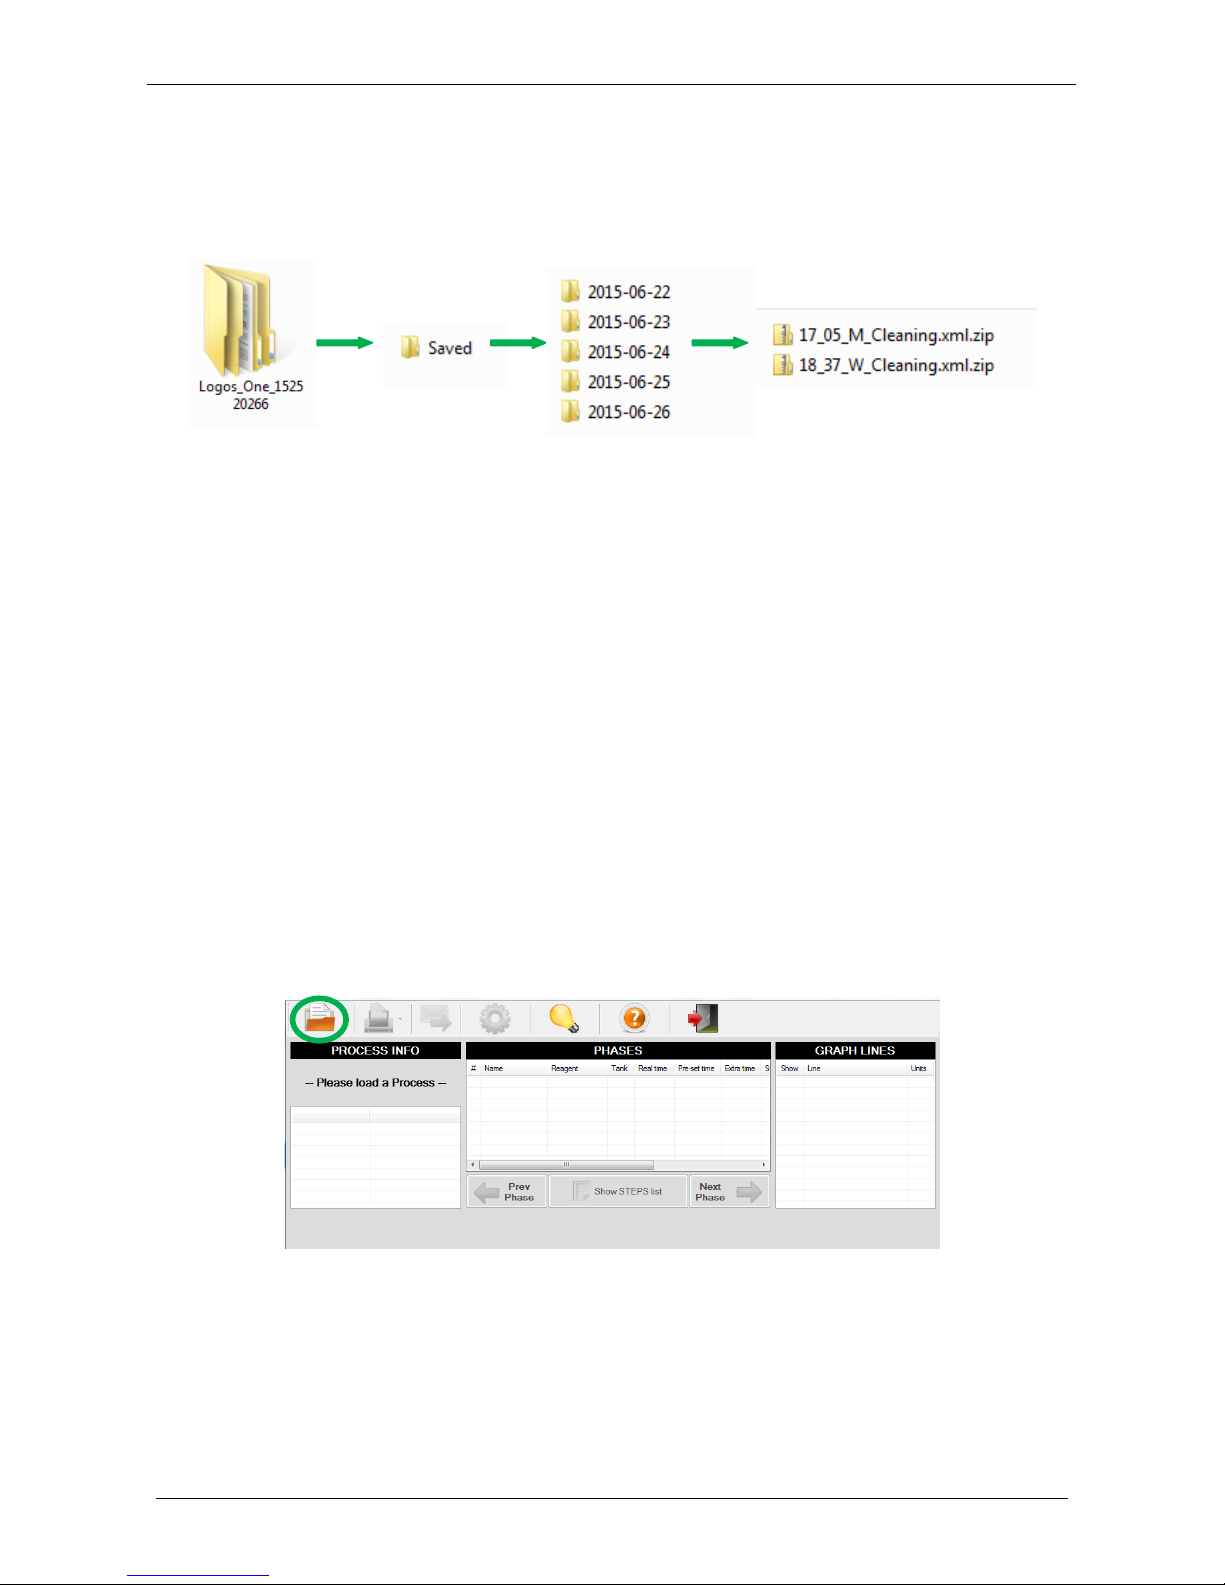
Milestone s.r.l.
MM098-002 – LOGOS ONE – Operator Manual
95
This allows you to export all the saved processed graphics: select the file of interest and press “Export” or
“Export All” to copy the whole Hard Disk content.
After exporting plug the USB in a PC, a folder named “Logos_ONE_S.N.” is present containing the folder
“Saved”: here are the folders listed by date including all the processes saved of that day.
Alternatively choose “Delete” or “Delete All” if you want to definitely eliminate one file only or every file
saved, respectively.
6.2 Install and operate with the LogViewer
The USB key provided with the unit contains the LogViewer folder. Double click on the
“SetupLogViewer.exe” icon to install the program. The LogViewer software is now ready to work.
Microsoft.NET Framework 4.0 is a prerequisite to this application, the setup will install it if not present on
your PC.
Christal Report Runtime is a prerequisite to this application the setup will install it if not present on your PC.
6.2.1 Open process
Plug the USB memory stick on the LOGOS ONE terminal where all processes are stored and export them on
the key, as described in chapter 6.1.
• Open the LogViewer software (go to “Start Menu\All programs\Milestone srl\Milestone LogViewer” or
click on the “LogViewer” icon created on your desktop).
• Plug the USB key in your PC and “Open” a process by clicking on the relative icon (green circle).
• Select the USB folder with saved processes of interest (see the example below).
Page 96
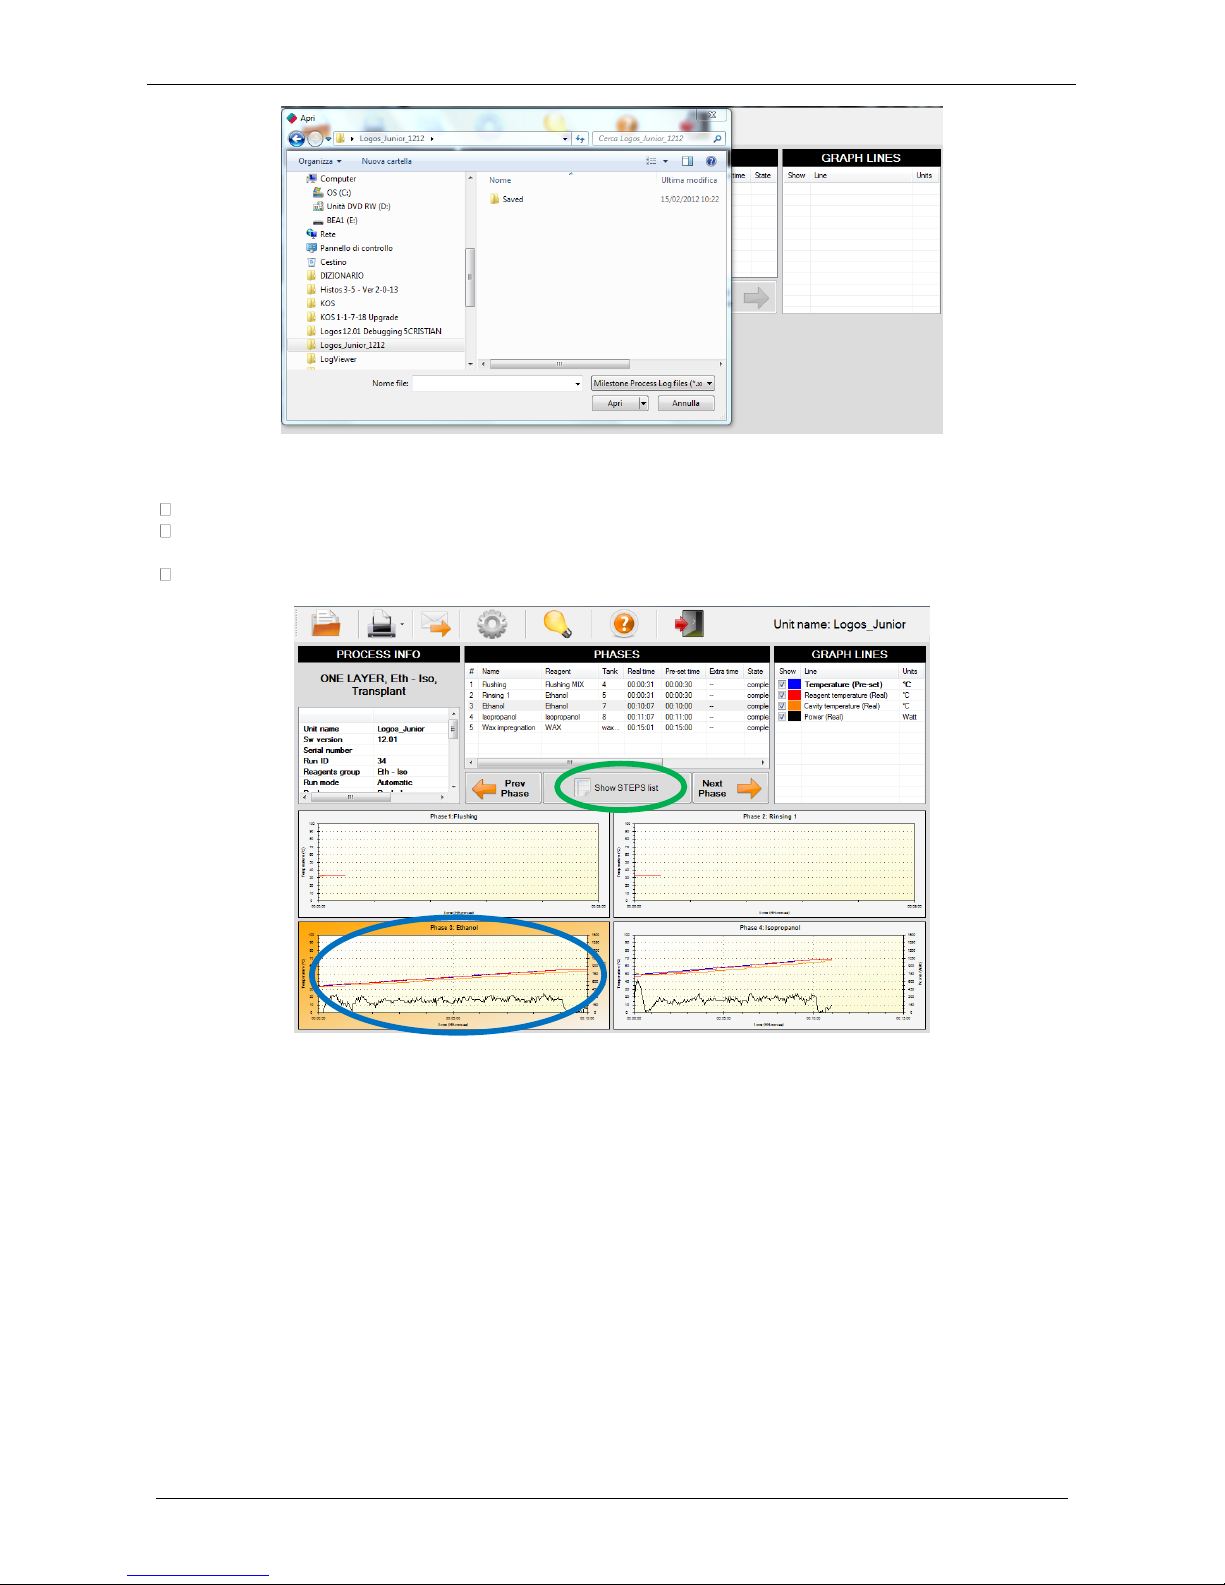
Milestone s.r.l.
MM098-002 – LOGOS ONE – Operator Manual
96
• Now all the process phases are shown. Data available are listed in the following fields:
PROCESS INFO: all details of that process.
PHASES: all details of different phases. Click on "Show step list" for details of the selected STEP
(green circle).
GRAPH LINES: info and selection.
• For an enlarged view of a processing curve, click directly on it (blue circle figure above).
• Click on “Prev Phase” or “Next Phase” arrow (red circles figure below) to view phases before or after
it respectively.
Page 97
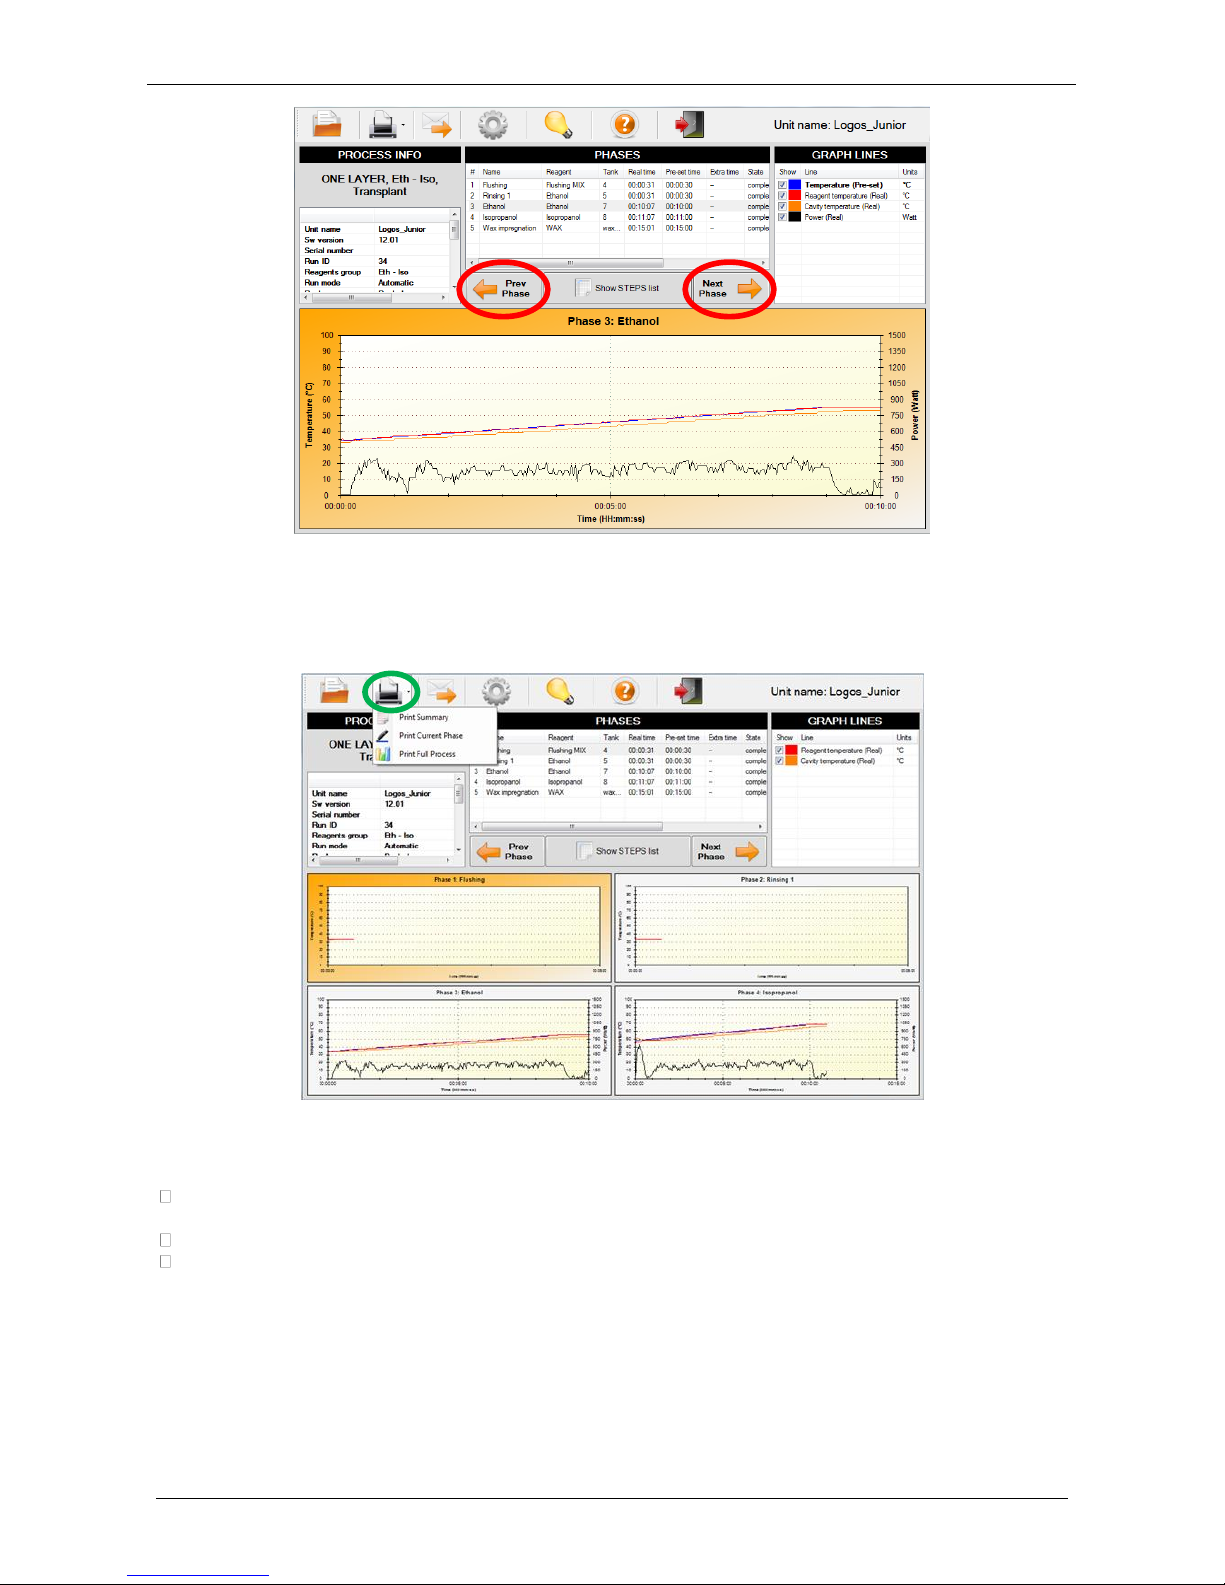
Milestone s.r.l.
MM098-002 – LOGOS ONE – Operator Manual
97
6.2.2 Print process
• Preview/printing of the curves is possible by selecting the “Print” icon (green circle).
• Select the appropriate printing format from the drop down menu:
Print summary: this print preview includes all phases (without graphs) with process and unit
information.
Print current phase: this print preview includes phase selected with process and unit data.
Print full process: this print preview includes all phases (with graphs) with process and unit
information.
• When the print preview required has been selected, click on the “Print” icon from the bar in the upper
left of the preview page (green rectangle).
Page 98
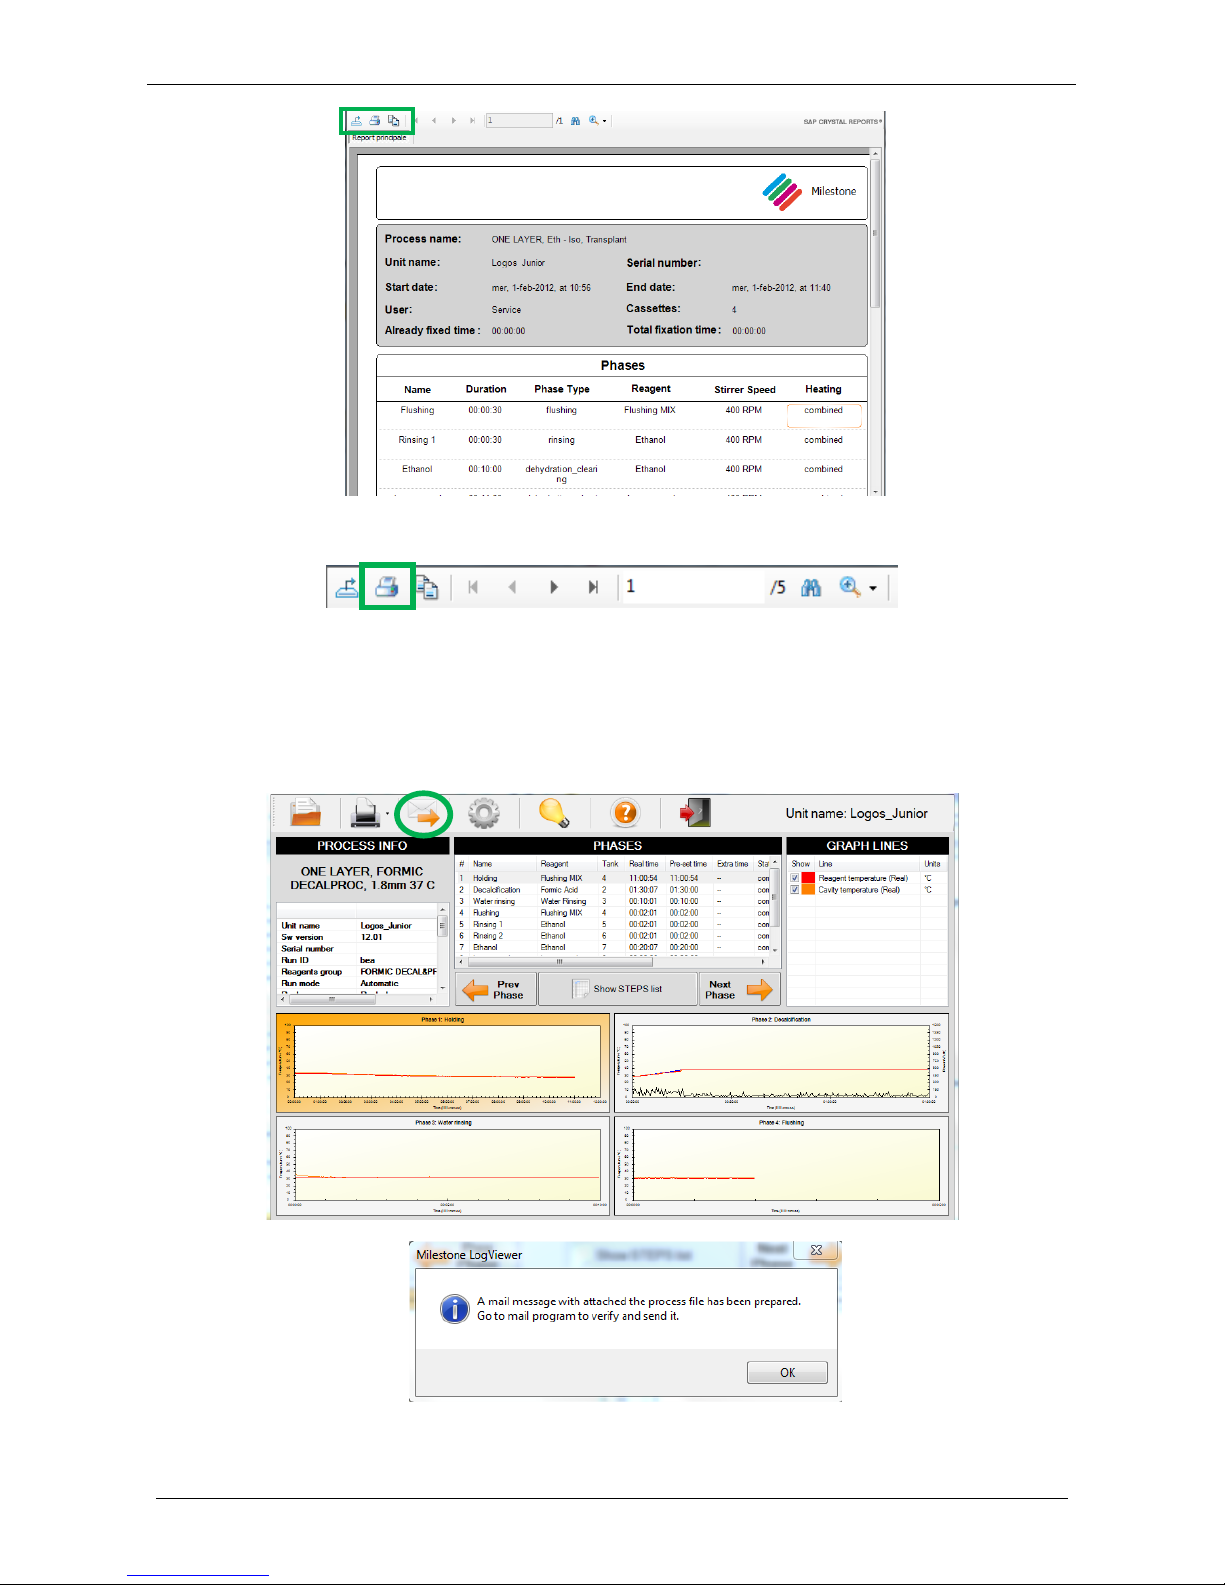
Milestone s.r.l.
MM098-002 – LOGOS ONE – Operator Manual
98
Enlarged view of the “Print” icon from the bar in the upper left of the preview page.
6.2.3 Send process to customer support (Milestone)
• Click on the icon “Send process to customer support” (green circle) to forward an automatic
message to Milestone customer support e-mail.
• This message opens:
Page 99
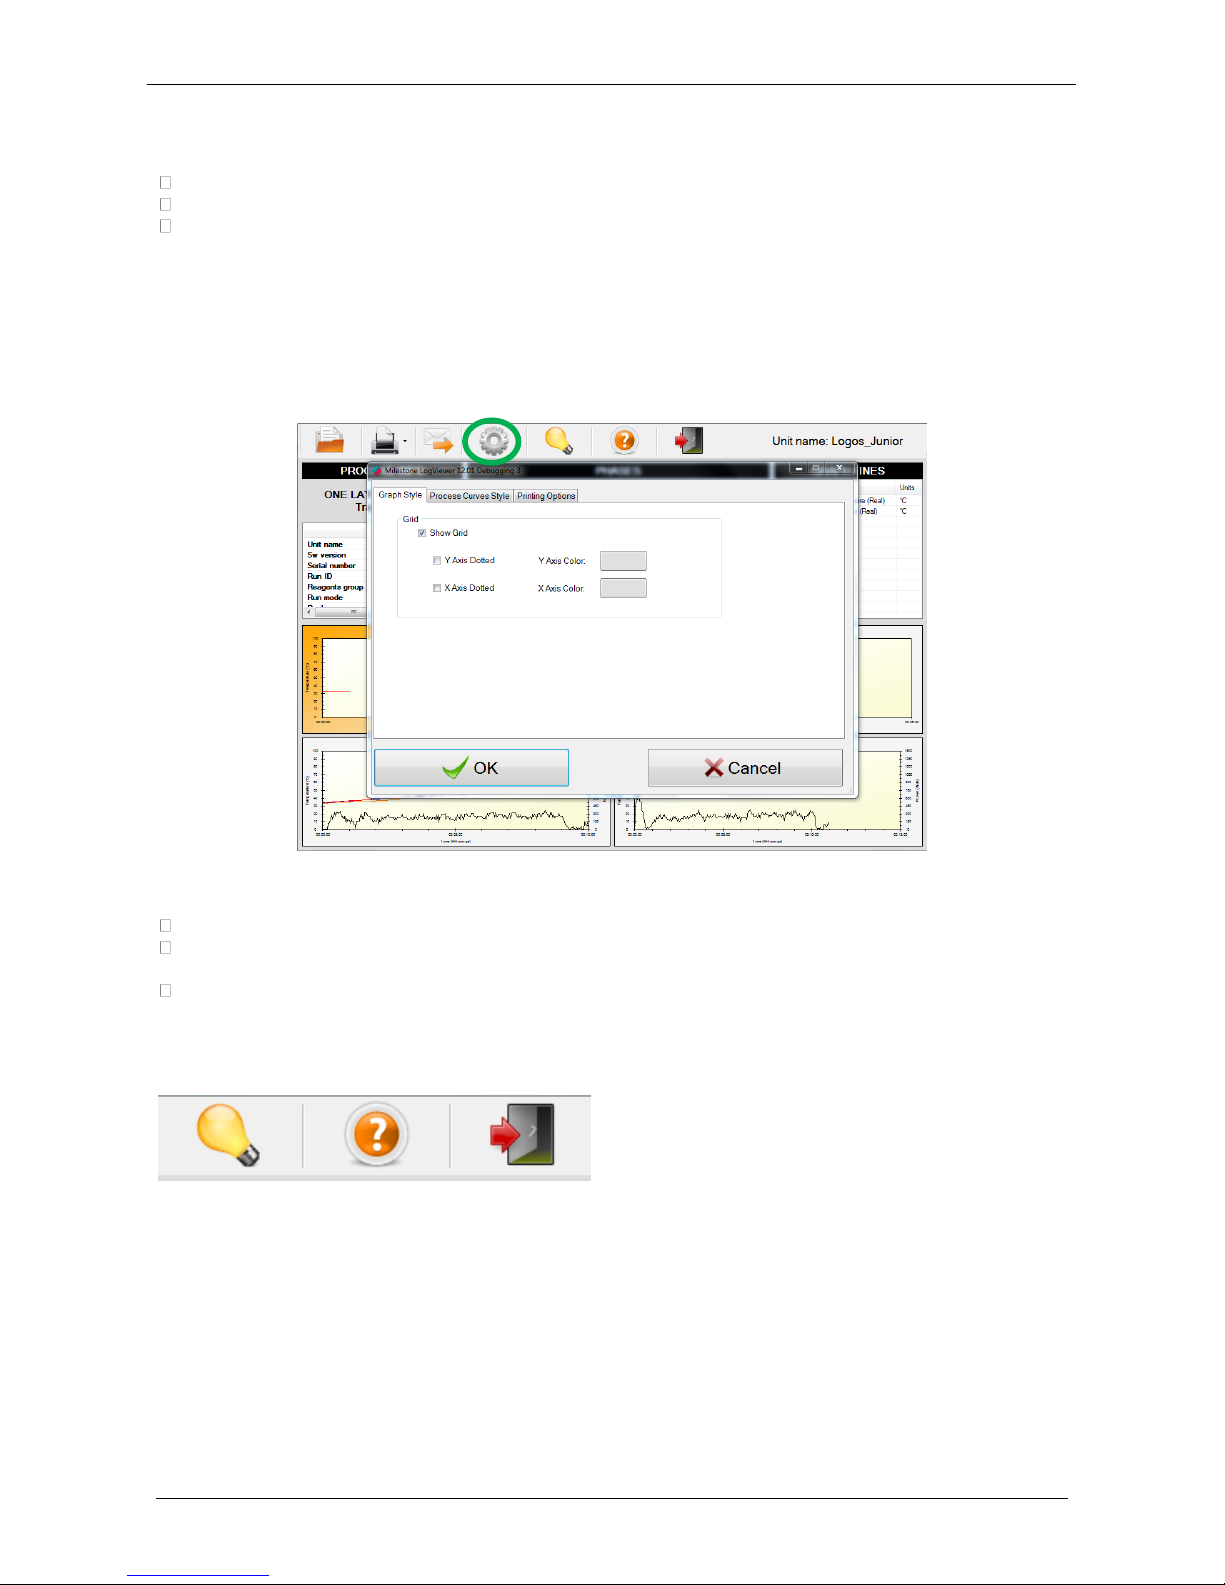
Milestone s.r.l.
MM098-002 – LOGOS ONE – Operator Manual
99
• Press OK and check your e-mail, a preset message appears with the following information:
TO: [email protected]
OBJECT: Milestone UNIT NAME (Serial number)
TEXT: To Milestone Customer Support...
• Just send the e-mail.
6.2.4 Change settings
• Select “Settings” icon (green circle), to change the settings configuration.
• All settings are displayed as follows:
Graph style: modify the color of the X/Y axes, show/hide the grid, get axes displayed as dotted.
Process curves style: modify color and thickness of the Pre-set and Real values lines (temperature
and power).
Printing options: modify pages header.
6.2.5 Other functions
1. About Milestone LogViewer
2. View help (HOW TO)
3. Exit Application
1 2 3
Page 100
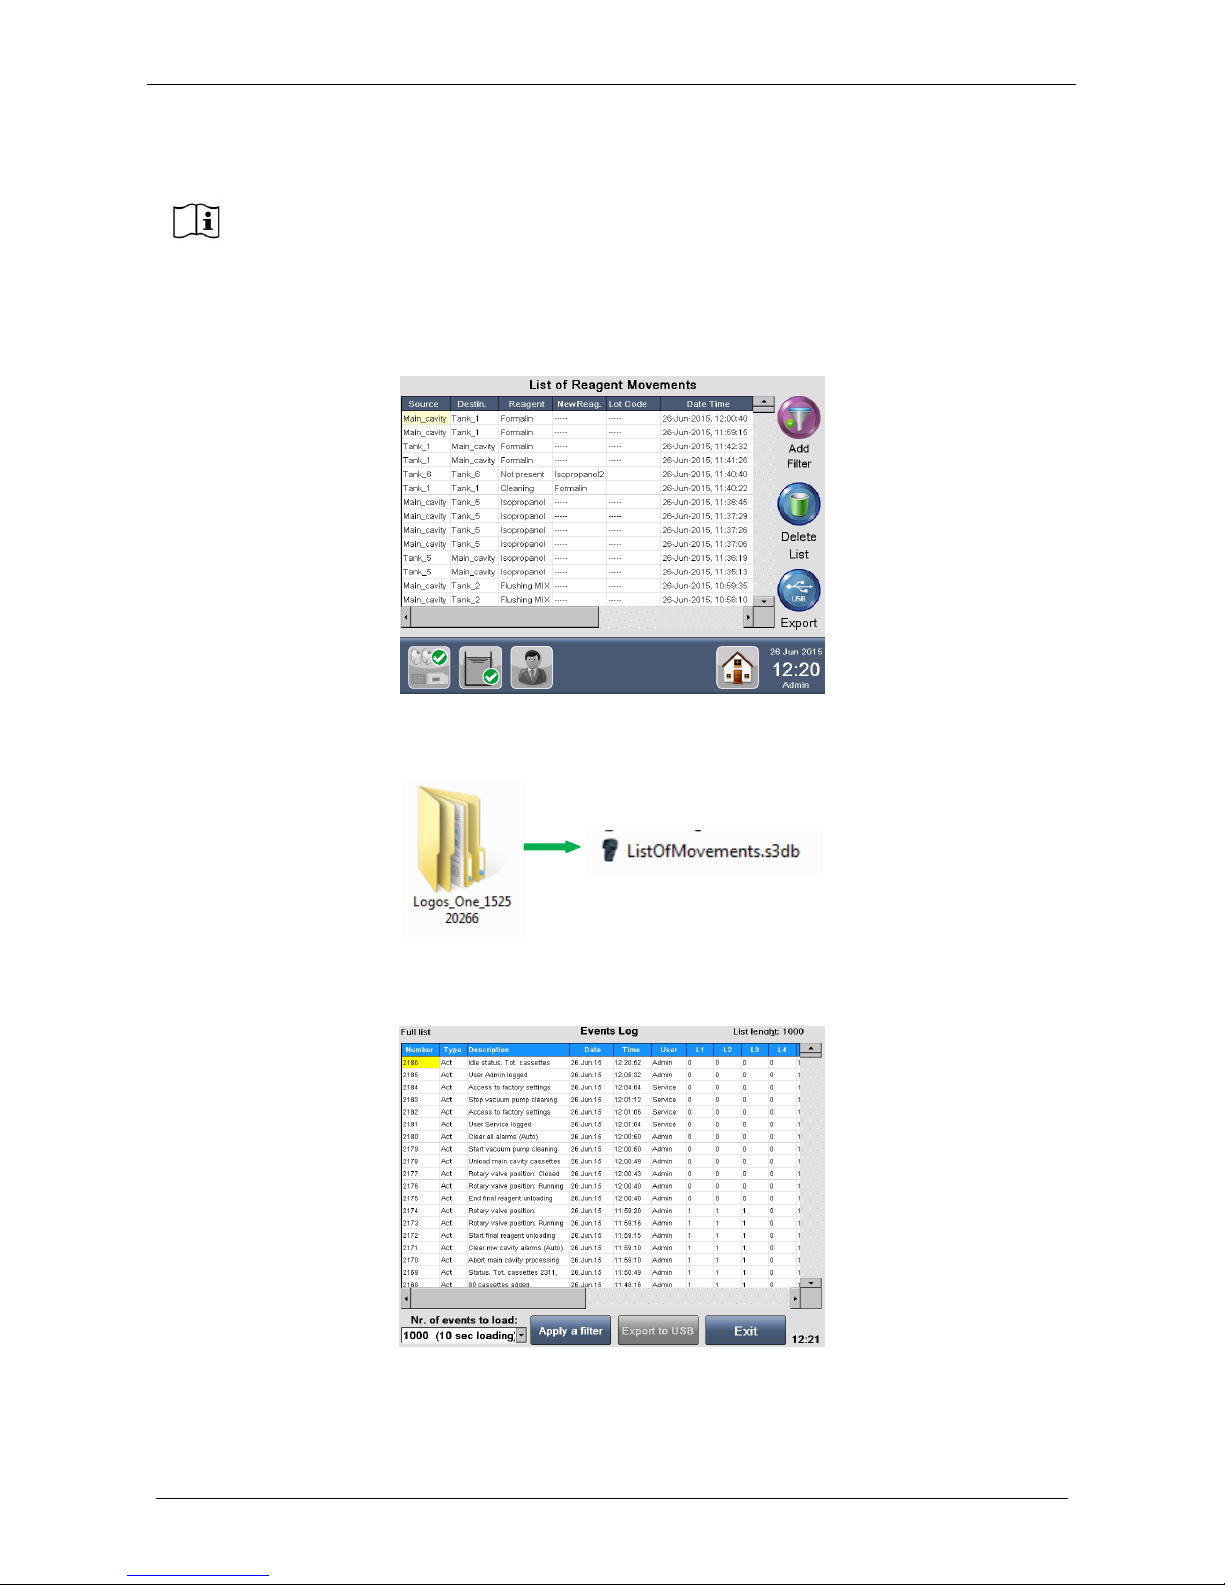
Milestone s.r.l.
MM098-002 – LOGOS ONE – Operator Manual
100
6.3 Reagents Log and Events Log from the terminal to the USB key
Insert the USB memory stick into its slots placed on the right side of the terminal.
Select Log Book button from the MAIN FUNCTIONS screen and then select Reagents Log. The following
screen appears where it is possible to export the List of Reagent Movements: press Export to copy it.
After exporting plug the USB in a PC, a folder named “Logos_ONE_S.N.” is present containing the file
“ListOfMovements.s3db.
Select Log Book button from the MAIN FUNCTIONS screen, then Events Log. The following screen
appears where it is possible to export the Events Log: press Export to USB to copy it.
These functions are available only for SERVICE and ADMINISTRATOR personnel.
 Loading...