

Page 1
milestone
XProtect
Event Proxy User
Guide
Page 2

Event Proxy User Guide
Copyright, Trademarks and Important Information
Copyright
© 2009 Milestone Systems A/S.
Trademarks
XProtect is a registered trademark of Milestone Systems A/S.
Microsoft and Windows are registered trademarks of Microsoft Corporation.
All other trademarks mentioned in this document are trademarks of their respective owners.
Disclaimer
This document is intended for general information purposes only, and due care has been taken in
its preparation.
Any risk arising from the use of this information rests with the recipient, and nothing herein should
be construed as constituting any kind of warranty.
Milestone Systems A/S reserve the right to make adjustments without prior notification.
All names of people and organizations used in this document's examples are fictitious. Any
resemblance to any actual organization or person, living or dead, is purely coincidental and
unintended.
EP-UG-2009-05-07
www.milestonesys.com Page 2 Copyright, Trademarks and...
Page 3

Event Proxy User Guide
Contents
INTRODUCTION.......................................................... 4
Prerequisites...................................................................................... 4
INSTALLATION........................................................... 5
Event Proxy Components...................................................................... 5
CONFIGURATION........................................................ 6
The Rules and Events Tab..................................................................... 7
The Communication Tab ....................................................................... 8
Input Events......................................................................................... 8
Adding an Input Event.........................................................................8
Editing an Input Event.........................................................................9
Deleting an Input Event.......................................................................9
Output Events..................................................................................... 10
Adding an Output Event..................................................................... 10
Editing an Output Event..................................................................... 10
Deleting an Output Event................................................................... 10
States ................................................................................................. 11
Adding a State ................................................................................. 11
Editing a State ................................................................................. 11
Deleting a State ............................................................................... 12
Rules .................................................................................................. 12
Adding a Rule................................................................................... 12
Logical operators .............................................................................. 14
Editing a Rule................................................................................... 14
Deleting a Rule................................................................................. 14
Receiving Input Events....................................................................... 14
Sending Output Events ....................................................................... 15
Logs.................................................................................................... 15
www.milestonesys.com Page 3 Contents
Page 4
Event Proxy User Guide
Introduction
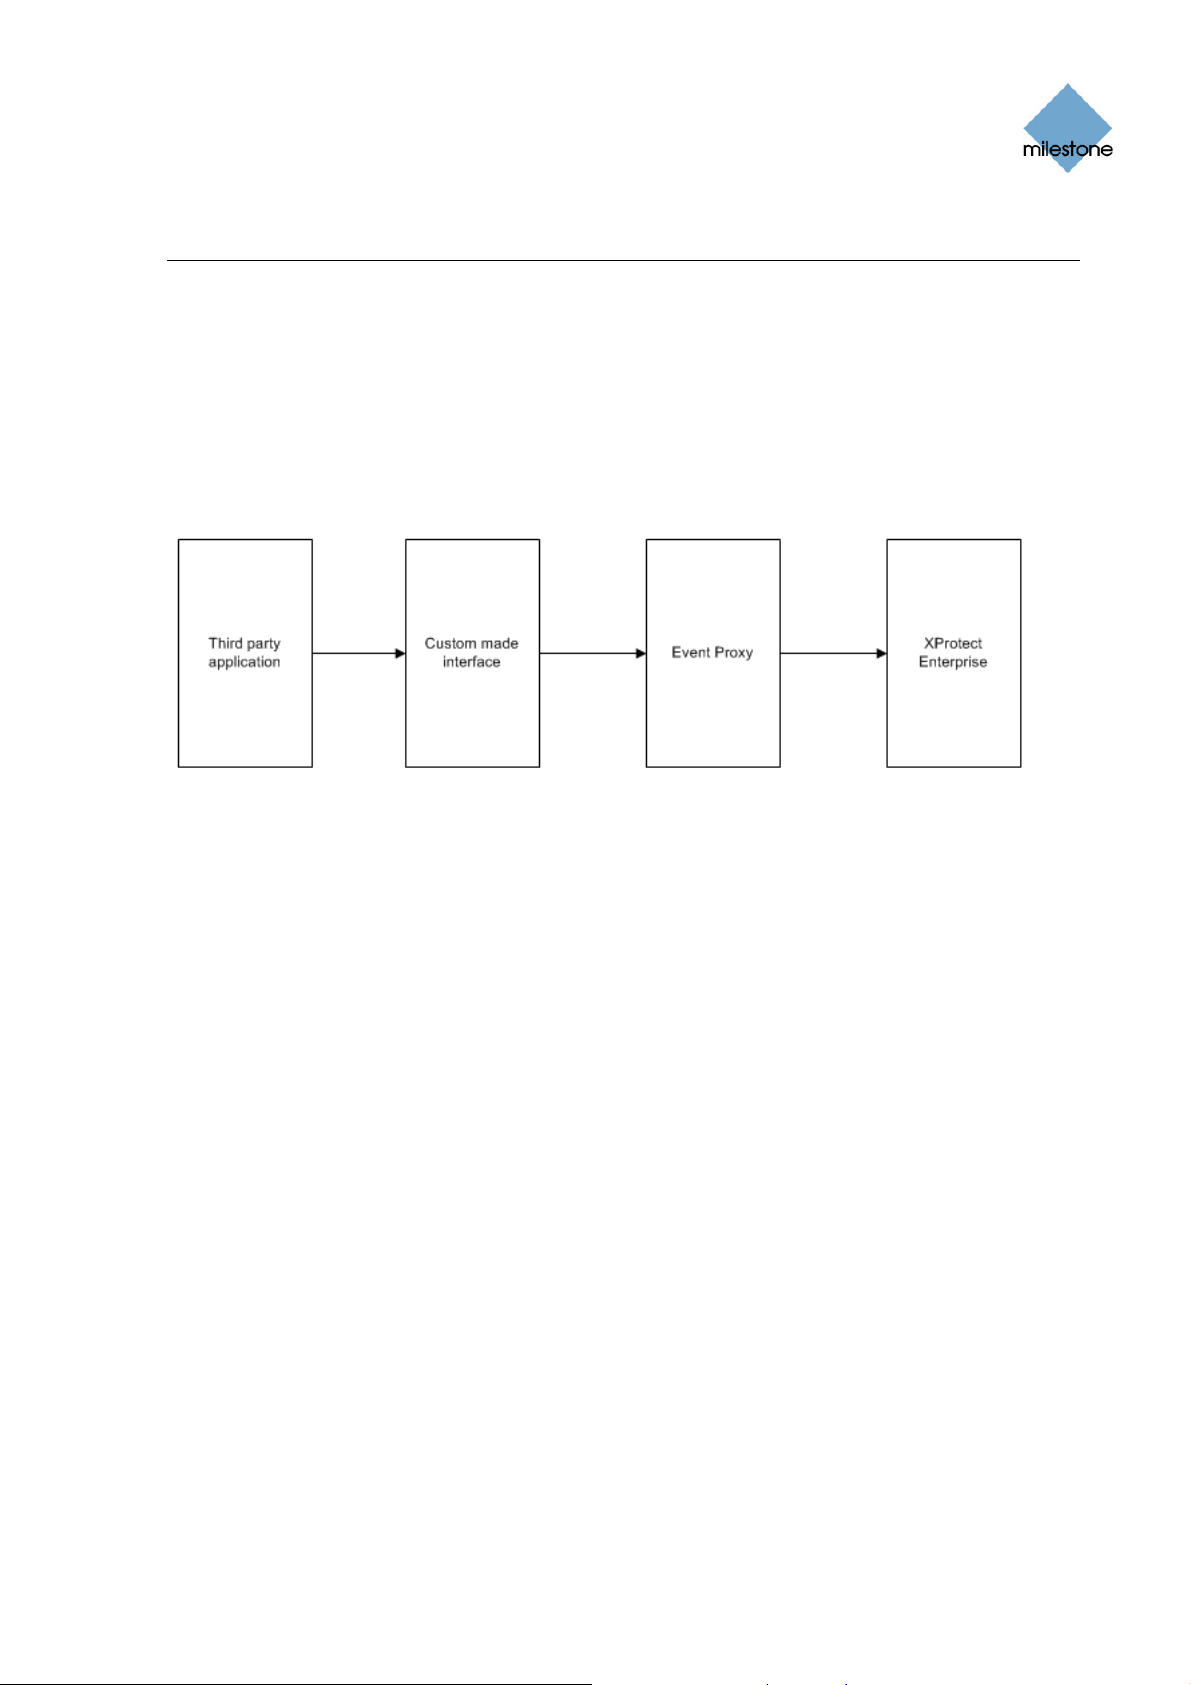
Milestone Event Proxy is an add-on program to the Milestone XProtect Enterprise and Professional
surveillance systems.
In order to minimise false alarms the Event Proxy acts as a filter on incoming input events from
third party applications to the Milestone XProtect surveillance system. Third party applications
communicate with the surveillance system through a custom made interface. The Event Proxy
receives input from this interface and sends output to the surveillance system.
Based on rules using logical operators the Event Proxy decides if the input events should result in
an event going to Milestone XProtect.
Application and communication overview
Prerequisites
To make use of the Event Proxy, a system must have been set up, containing:
An application that sends generic events that the surveillance system can receive
A Milestone XProtect Enterprise or Professional surveillance system
The Event Proxy add-on
www.milestonesys.com Page 4 Introduction
Page 5

Event Proxy User Guide
Installation
To install the event proxy, run the EventProxyInstaller.exe file and follow the instructions in the
setup program.
After installation, the system is ready for configuration.
Event Proxy Components
The event proxy installation consists of:
File Description
VideoOS.EventProxy.EventProxyService.exe The application. Runs as a Windows
service.
VideoOS.EventProxy.ProxySetup.exe The GUI used to set up the system.
VideoOS.Diagnostics.Logging.dll,
VideoOS.EventProxy.Common.dll,
VideoOS.EventProxy.EventFilter.dll and
VideoOS.EventProxy.ProxyConfiguration.dll
VideoOS.EventProxy.EventProxyService.exe.config The general configuration file for the
EventProxyConfig.xml The specific configuration file for the
Four dll files used by the application.
application.
application containing information on the
events and rules that have been set up.
www.milestonesys.com Page 5 Installation
Page 6

Event Proxy User Guide
Configuration
Double-click the VideoOS.EventProxy.ProxySetup.exe file to open the Event Proxy Setup 1.0
window which gives you access to all configuration features.
IMPORTANT: This version of the Event Proxy supports characters from Windows code page 20127
only, i.e. American 7-bit characters. Use of national characters anywhere in events or rules may
cause the system to malfunction.
IMPORTANT: Always remember to save new or edited settings by clicking the OK button in the
Event Proxy Setup 1.0 window. Also remember to restart the Windows service called VideoOS
Event Proxy Service for the new settings to take effect.
Tip: You are able to change the VideoOS Event Proxy Service service’s startup type to automatic,
so that the service will start automatically each time Windows is started.
The Event Proxy Setup 1.0 window consists of two tabs.
www.milestonesys.com Page 6 Configuration
Page 7
Event Proxy User Guide
The Rules and Events tab and the Communication tab.
The Rules and Events Tab
On the Rules and Events tab you are able to configure following settings:
Input events (see Input Events on page 8 for more information)
Output ev
ates (see States on page 11 for more information)
St
Rules (see Rules on page 12 for more information)
www.milestonesys.com Page 7 Configuration
ents (see Output Events on page 10 for more information)
Page 8

Event Proxy User Guide
The Communication Tab
On the Communication tab you are able to configure following settings:
How to receive input (see Receiving Input Events on page 14 for more information)
How to send output events (see Sending Output Events on page 15 for more
in
formation)
Logs (see Logs on page 15 for more information)
Input Events
You are able to add, edit and delete input events in the Rules and Events tab’s Input Events group
box.
The Input Events group box on the Rules and Even ts tab.
Adding an Input Event
To add an input event, do the following:
1. In the Input Events group box click the Add button. Alternatively press the Insert key on
the keyboard when the input events list view is active.
The Create Input Event window opens.
2. Enter a unique name for the input event in the Event name text box.
3. Enter the actual text that is received from the third party application in the Event text text
box.
Note: The text is case sensitive (e.g. “Fence 17 triggered” is NOT the same as “fence 17
triggered”).
4. Click the OK button or press the Enter key on the keyboard to accept the entered values.
www.milestonesys.com Page 8 Configuration
Page 9

Event Proxy User Guide
Editing an Input Event
To edit an input event, do the following:
1. Select the required input event in the Input Events group box.
2. Click the Edit button, or press the F2 key on the keyboard.
The Edit Input Event window opens.
3. Change the required settings, and click the OK button or press the Enter key on the
keyboard to accept the changes.
Deleting an Input Event
To delete an input event, select the input event in the Input Events group box, and then press the
Delete button.
Note: If the event is used in a rule, you can’t delete it, unless you remove the event from the rule
or delete the rule first.
www.milestonesys.com Page 9 Configuration
Page 10

Event Proxy User Guide
Output Events
You are able to add, edit and delete output events in the Rules and Events tab’s Output Events
group box.
The Output Events group box on the Rules and Events tab.
Adding an Output Event
To add an output event, do the following:
1. Click the Add button in the Output Events group box. Alternatively press the Insert key on
the keyboard when the output events list view is active.
The Create Output Event window opens.
2. Enter a unique name for the output event in the Event name text box.
3. In the Event text text box, enter the actual text that is to be sent to the XProtect
surveillance system when this output event is triggered.
4. Click the OK button or press the Enter key on the keyboard to accept the entered values.
Editing an Output Event
To edit an output event, do the following:
1. Select the required output event in the Output Events group box.
2. Click the Edit button, or press the F2 key on the keyboard.
The Edit Output Event window opens.
3. Change the required settings, and click the OK button or press the Enter key on the
keyboard to accept the changes.
Deleting an Output Event
To delete an output event, select the event in the Output Events group box, and press the Delete
button.
Note: If the event is used in a rule, you can’t delete it, unless you remove the event from the rule
or delete the rule first.
www.milestonesys.com Page 10 Configuration
Page 11

Event Proxy User Guide
States
You are able to add, edit and delete states in the Rules and Events tab’s Rules group box.
Adding a State
To add a state, do the following:
1. Click the Add button in the Sates group box. Alternatively press the Insert key on the
keyboard when the states list view is active.
The Create State window opens:
2. Enter a unique name for the state in the State Name text box.
3. In the Low To High Event combo box select which input event turns the state from Low
(not set) to High (set).
4. In the High To Low Event combo box select which input event turns the state from High
(set) to low (not set).
5. Check the Initially High checkbox if the state should be high (set) initially. Uncheck this box
if the state should be initially Low.
6. Click the OK button or press the Enter key on the keyboard to accept the entered values.
Editing a State
To edit a state, do the following:
1. Select the required state in the States group box, and click the Edit button, or press the F2
key on the keyboard.
The Edit State window opens.
2. Change the required settings.
3. Click the OK button or press the Enter key on the keyboard to accept the changes.
www.milestonesys.com Page 11 Configuration
Page 12

Event Proxy User Guide
Deleting a State
To delete a state, select the required state in the Stats group box, and press the Delete button.
Rules
You are able to add, edit and delete rules in the Rules and Events tab’s Rules group box.
The Rules group box on the Rules and Events tab.
Adding a Rule
To add a rule, do the following:
1. Click the Add button in the Rules group box. Alternatively press the Insert key on the
keyboard when the rules list view is active.
The Create Rule window opens:
www.milestonesys.com Page 12 Configuration
Page 13

Event Proxy User Guide
2. Enter a unique name for the rule in the Rule name text box.
3. In the Output event combo box select which output event to trigger when the conditions of
the rule (input events and logical expression) are fulfilled.
4. Enter how many seconds the rule should be active by entering the number of seconds in
the Rule timeout (seconds) control.
Retrigger timer check box:
When the Retrigger timer check box is selected, the rule will be active for the selected
number of seconds after arrival of the last input event used by this rule.
When the Retrigger timer check box is NOT checked, the rule will be active for the
selected number of seconds after arrival of the first input event used by this rule.
Note: Only if all the input events used by the rule arrive within its active period, the
conditions of the rule are fulfilled. When the rule times out, it is reset and is no longer
active, until a new relevant input event arrives.
5. Set up a logical expression for the rule by double-clicking input events in the Available
input events list box, and states in the Available States list box, and clicking the logical
operator buttons (AND, OR, NOT, “(“ and “)”). Selected objects will be appended to the end
of the existing logical expression.
Alternatively a logical expression can be set up by writing it directly in the Logical
expression text box.
The logical expression can be written and shown using either operator symbols or operator
www.milestonesys.com Page 13 Configuration
Page 14

Event Proxy User Guide
text (i.e. “&” or “AND”) by toggling the Show operator as symbol check box.
6. Click the OK button or press the Enter key on the keyboard to accept the entered values.
Logical operators
¾ “AND”: event 1 AND event 2 AND …
o Means that all events must be High at the same time before an event is sent to
Milestone XProtect
¾ “OR”: event 1 OR event 2 OR …
o Means that at least one of the events must be High before an event is sent to
Milestone XProtect
¾ “NOT”: Indicates that the “true” state is low instead of normal high
o The state NOT will in a rule be combined with the logical operators “AND” or “OR”
¾ “(” and “)”: Is used to group logical statements, e.g. (event 1 AND NOT event 2) OR event
3
o Means that if either event 1 is High and event 2 is Low at the same time or event 3
is High an event is sent to Milestone XProtect
Meaning that if event 1 is high and event 2 is Low an event is sent to
Milestone XProtect regardless of what state event 3 is in.
Likewise, if event 3 is High an event is sent to Milestone XProtect
regardless of the state of event 1 and event 2
Editing a Rule
To edit a rule, do the following:
1. Select the required rule in the Rules group box, and click the Edit button, or press the F2
key on the keyboard.
The Edit Rule window opens.
2. Change the required settings.
Tip: You are able to edit a logical expression directly in the Logical expression window.
3. Click the OK button or press the Enter key on the keyboard to accept the changes.
Deleting a Rule
To delete a rule, select the required rule in the Rules group box, and press the Delete button.
Receiving Input Events
You are able to configure how input events from a third party application should be received by the
event proxy in the Communication tab’s Receive input events on group box.
www.milestonesys.com Page 14 Configuration
Page 15

Event Proxy User Guide
The Receive input events on group box on the Communication tab.
To configure how the event proxy should receive input events from a third party application, do the
following:
1. From the Communication tab, select the TCP or UDP option button depending on it is a TCP
or UDP-based event.
2. Enter the port number for the communication in the Port text box.
3. If the computer has more than one network adapter and a specific one must be used, enter
the host name or IP address in the Host text box. If not you can leave the text box empty.
Sending Output Events
You are able to configure how output events should be sent to the XProtect surveillance system in
the Communication tab’s Send output events on group box.
The Send output events on group box on the Communication tab.
To configure how the event proxy should send output events to XProtect, do the following:
1. From the Communication tab, select the TCP or UDP option button depending on it is a TCP
or UDP-based event.
2. Enter the port number for the communication in the Port text box.
3. Enter the host name or IP address in the Host text box.
Logs
You are able to configure how much information you would like to log in the Communication tab’s
Logging group box.
www.milestonesys.com Page 15 Configuration
Page 16

Event Proxy User Guide
The Logging group box on the Communication tab.
To configure how much information you would like to log, select or deselect the following check
boxes:
Check box Description
Log input events Logging of input event arrivals.
Log output events Logging of output events sent.
Log rule engine events Logging of rule engine events. A rule engine event is when the
conditions of the rule (input events and logical expression) are
fulfilled.
Input, output and rule engine events are by default logged in a file called EventProxy.log in Event
Proxy’s installation folder (typically the C:\Program Files\Milestone\Milestone Event Proxy folder).
Warnings and errors are by default always logged. They are logged in Windows Event Viewer. To
open Event Viewer and view the log file, select Run in Windows Start menu. Then type eventvwr in
the Run window, and in the Event Viewer window, select the EventProxy.log.
All event log settings can be altered by editing the
VideoOS.EventProxy.EventProxyService.exe.config file. Note, that the settings in the
VideoOS.EventProxy.EventProxyService.exe.config file take precedence of the settings defined in
the Communication tab’s Logging group box.
www.milestonesys.com Page 16 Configuration
Page 17

Event Proxy User Guide
Milestone Systems offices are
located across the world. For
details about office addresses,
phone and fax numbers, visit
www.milestonesys.com.
www.milestonesys.com Page 17 Milestone Systems Office Locations
 Loading...