

Page 1
Milestone
XProtect™
Central 3.7
Administrator’s
Manual
Page 2

Milestone XProtect 3.7; Administrator’s Manual
Target Audience for this Document
This document is intended for administrators of the XProtect Central surveillance system
monitoring solution.
This document explains how to install, configure and maintain an XProtect Central solution through
the XProtect Central Server and Client software.
For explanations of how to use the Client software in day-to-day operation, administrators should
refer to the XProtect Central User’s Manual, available on the software DVD and from the Milestone
Systems website www.milestonesys.com.
This document is not of interest to end users, such as security personnel operating the XProtect
Central solution on a day-to-day basis through the XProtect Central Client. Such users should solely
refer to the XProtect Central User’s Manual.
XPC37-am-2-(a2)-300610
www.milestonesys.com Target Audience for this Document
Page 3

Milestone XProtect 3.7; Administrator’s Manual
Contents
COPYRIGHT, TRADEMARKS AND IMPORTANT
INFORMATION ........................................................... 8
PRODUCT OVERVIEW .................................................9
Role of Central Server........................................................................... 9
Role of Central Client.......................................................................... 10
Updates .............................................................................................. 10
MINIMUM SYSTEM REQUIREMENTS.......................... 11
Computer Running Central Server ...................................................... 11
Computer Running Central Client........................................................ 11
SERVER: INSTALLATION........................................... 12
Upgrading from Previous Version ....................................................... 12
Reuse Database................................................................................ 12
Things to Consider before Installation................................................12
XProtect Central Server Installation Procedure.................................. 13
About Installation on Windows Vista.................................................. 16
SERVER: CONNECTION TROUBLESHOOTING............. 18
Client Login Fails with “Error 401 – Unauthorized” Message .............. 18
Client Login Fails with “Method Not Allowed” Message ...................... 20
Client Login Fails with “Cannot load type …” Message........................ 20
Client Login Fails with “The Remote Server Returned …” Message.....21
SERVER: FILE LOCATIONS........................................ 23
www.milestonesys.com Page 3 Contents
Page 4

Milestone XProtect 3.7; Administrator’s Manual
SERVER: USE ACROSS TIME ZONES .......................... 24
CLIENT: INSTALLATION ........................................... 25
Upgrading from Previous Version ....................................................... 25
Installation Procedure........................................................................ 25
CLIENT: LOGGING IN & OUT..................................... 27
Logging In .......................................................................................... 27
Got Login Problems? ......................................................................... 27
Which Login Information to Provide to End Users .............................. 28
Logging Out........................................................................................ 28
CLIENT: OVERVIEW.................................................. 29
Display of Client’s Sections Can Be Turned On and Off ....................... 30
Simplifying the Client User Interface.................................................. 30
CLIENT: SUGGESTED CONFIGURATION SEQUENCE... 31
CLIENT: LICENSING ................................................. 32
Getting a Central License Key............................................................. 32
CLIENT: SURVEILLANCE SERVERS ............................ 34
Defining a New Server........................................................................ 34
Disabling/Enabling Connection to a Server......................................... 36
Editing a Server Definition.................................................................. 36
Deleting a Server Definition................................................................ 37
Adding Slave Servers.......................................................................... 37
Grouping Servers in Folders................................................................ 37
CLIENT: USERS, GROUPS & ROLES ........................... 39
www.milestonesys.com Page 4 Contents
Page 5

Milestone XProtect 3.7; Administrator’s Manual
About Users, Groups & Roles .............................................................. 39
User & Group Information by Default Imported from Active Directory....... 39
Prerequisites for Using Active Directory............................................ 39
User and Group Concepts................................................................... 39
Role Concept.................................................................................... 40
Users .................................................................................................. 40
Importing Users ............................................................................... 40
Adding a User to a Role ..................................................................... 41
Removing a User from a Role ............................................................. 41
Removing Users ............................................................................... 41
Groups................................................................................................ 42
Importing Groups ............................................................................. 42
Adding a Group to a Role................................................................... 43
Removing a Group from a Role ........................................................... 43
Removing Groups ............................................................................. 43
If Not Using Active Directory.............................................................. 43
Roles .................................................................................................. 44
Administrator Role ............................................................................ 44
Defining a New Role.......................................................................... 45
Editing a Role................................................................................... 48
Deleting a Role................................................................................. 48
CLIENT: ALARMS ...................................................... 49
Alarm Definitions................................................................................ 49
Defining a New Alarm........................................................................ 49
Editing an Alarm Definition................................................................. 52
Deleting an Alarm Definition............................................................... 52
Editing Alarm Settings........................................................................ 53
Cleaning Up Unwanted Alarms............................................................ 53
Alarm Time Profiles ............................................................................ 55
Defining a New Time Profile................................................................ 55
Editing a Time Profile ........................................................................ 57
Deleting a Time Profile ...................................................................... 57
Alarm Priority Names & Colors ........................................................... 57
www.milestonesys.com Page 5 Contents
Page 6

Milestone XProtect 3.7; Administrator’s Manual
CLIENT: MAPS .......................................................... 59
What Can You Do with Maps? ............................................................. 59
Using Map Hierarchies ....................................................................... 59
Navigating Between Map Hierarchy Levels........................................ 59
Placing Server, Camera and Device Indicators on Maps.......................... 60
Editing General Map Settings.............................................................. 60
Loading Map Background Images........................................................ 60
Deleting Unwanted Map Background Images..................................... 61
Changing the Font Used in Map Indicator Fields..................................... 61
Changing the Background Color of Map Indicator Texts .......................... 61
Using Animated Map Indicators........................................................... 61
Defining a New Map............................................................................62
Editing a Map Definition...................................................................... 62
Changing a Map’s Location in a Map Hierarchy .................................. 62
Loading a New Map....................................................................... 63
Deleting a Map Definition ................................................................... 63
Lock Feature....................................................................................... 63
Map Indicator Overview...................................................................... 63
CLIENT: LOGGING ....................................................68
Editing Log Settings............................................................................ 68
Log Locations...................................................................................... 68
Log Date & Time Format..................................................................... 68
CLIENT: VIDEO DESTINATIONS................................ 69
Defining a Video Destination .............................................................. 69
Editing a Video Destination................................................................. 69
CLIENT: VERSION INFORMATION............................. 70
BACKING UP & RESTORING THE XPROTECT CENTRAL
DATABASE................................................................ 71
Why Back Up?..................................................................................... 71
www.milestonesys.com Page 6 Contents
Page 7

Milestone XProtect 3.7; Administrator’s Manual
What is the SQL Server transaction log, and why does it need to be flushed?71
Prerequisites ...................................................................................... 71
Backing Up the Database.................................................................... 72
Restoring the Database ...................................................................... 73
REMOVAL.................................................................. 74
Server.................................................................................................74
Removing the Server Software ........................................................... 74
Removing the SQL Server Database .................................................... 74
Client.................................................................................................. 75
INDEX ...................................................................... 76
www.milestonesys.com Page 7 Contents
Page 8

Milestone XProtect 3.7; Administrator’s Manual
Copyright, Trademarks and Important Information
Copyright
© 2010 Milestone Systems A/S.
Trademarks
XProtect is a registered trademark of Milestone Systems A/S.
Microsoft and Windows are registered trademarks of Microsoft Corporation.
All other trademarks mentioned in this document are trademarks of their respective owners.
Disclaimer
This document is intended for general information purposes only, and due care has been taken in
its preparation.
Any risk arising from the use of this information rests with the recipient, and nothing herein should
be construed as constituting any kind of warranty.
Milestone Systems A/S reserve the right to make adjustments without prior notification.
All names of people and organizations used in this document's examples are fictitious. Any
resemblance to any actual organization or person, living or dead, is purely coincidental and
unintended.
www.milestonesys.com Page 8 Copyright, Trademarks and …
Page 9

Milestone XProtect 3.7; Administrator’s Manual
Product Overview
XProtect Central provides a central overview of any number of XProtect Corporate, XProtect
Enterprise or XProtect Professional installations throughout your organization—whether near or far.
XProtect Central is thus a powerful monitoring solution, providing you with an instant overview of
alarms and possible technical problems through a flexible and intuitive user interface. XProtect
Central ...
• Provides graphical hierarchical overviews of XProtect Corporate, XProtect Enterprise or
XProtect Professional installations and their status
• Provides overview of all incoming alarms, including filtering possibilities
• Allows for multiple operators handling the same pool of alarms
• Provides dynamic role-based setup of alarm handling: operators can see and handle alarms
in different ways
• Provides a central technical overview of all components: servers, cameras, and external
units
• Allows central logging of all incoming alarms and system information
• Supports plugins, allowing customized integration of other systems, for example access
control systems
XProtect Central is a significant addition to any multi-site environment because it delivers central
overview, control, and scalability.
Role of Central Server
The XProtect Central Server receives event and status information from XProtect Corporate,
XProtect Enterprise or XProtect Professional installations, and presents it for operators connected to
the server through XProtect Central Clients.
Video is fed straight from surveillance systems to XProtect Central Clients.
Once installed, XProtect
Central Server primarily
runs as a service in the
background. No
administration is required
on the XProtect Central
Server itself, unless you
want to access log files,
server definition in XML
format, or similar (see
Server: File Locations on
page 23).
The vast majority of
administration takes place
through the XProtect
Central Client, using an
Administrator role (see
page 44). This way you are
able to configure which
XProtect Corporate, XProtect Enterprise or XProtect Professional installations XProtect Central
www.milestonesys.com Page 9 Product Overview
Page 10
Milestone XProtect 3.7; Administrator’s Manual
should connect to, which other users should be allowed access with the XProtect Central Client,
how status and event information should be displayed on maps, etc.
Role of Central Client
The XProtect Central Client is used for connecting to the
XProtect Central Server in order to view status and
alarm information from connected surveillance systems.
The XProtect Central Client is also used by XProtect
Central administrators for configuration of the system;
since administrators have access to a number of
otherwise hidden configuration features in the XProtect
Central Client.
Once the system has been configured by administrators,
other users (operators, etc.) are able to access XProtect
Central Client’s regular feature set.
Updates
Milestone Systems regularly release service updates for our products, offering improved
functionality and support for new devices.
If you are an XProtect Central system administrator, it is recommended that you check the
Milestone Systems website www.milestonesys.com for updates at regular intervals in order to
make sure you are using the most recent version.
www.milestonesys.com Page 10 Product Overview
Page 11

Milestone XProtect 3.7; Administrator’s Manual
Minimum System Requirements
Computer Running Central Server
• CPU: 2.4 GHz (dual core processor recommended).
• RAM: 1 GB (2 GB recommended).
• Network: Ethernet (100 Mbit recommended).
• Graphics adapter: Any supported by Microsoft
• Hard disk type: Any supported by Microsoft Windows.
• Hard disk space: Minimum 100 MB free (depends on number of servers and alarm
settings).
• Operating System: Microsoft® Windows® XP Professional (32 bit or 64 bit*), Windows
Server 2003 (32 bit or 64 bit*), Windows Server 2008 R1/R2 (32 bit or 64 bit*), Wi ndows
Vista® Business (32 bit or 64 bit*), Windows Vista Enterprise (32 bit or 64 bit*), Windows
Vista Ultimate (32 bit or 64 bit*), Windows 7 Professional (32 bit or 64 bit*), Windows 7
Enterprise (32 bit or 64 bit*) and Windows 7 Ultimate (32 bit or 64 bit*).
* Running as a 32 bit application.
• .NET Framework 3.5 and Internet Information Services (IIS) 6.0 or newer,
downloadable from http://www.microsoft.com/downloads/, must be installed on computers
running the XProtect Central Server. See Server: Installation on page 12 for information
about how to install the Central Server, including how to install IIS.
®
Windows®.
Computer Running Central Client
• CPU: 2.4 GHz.
• RAM: 1 GB (2 GB or higher recommended on Microsoft Windows Vista).
• Network: Ethernet (100 Mbit recommended).
• Graphics Adapter: AGP or PCI-Express, 1024×768 (1280×1024 recommended), 16-bit
colors.
• Hard disk space: Minimum 50 MB free.
• Operating System: Microsoft Windows XP Professional (32 bit or 64 bit*), Windows
Server 2003 (32 bit or 64 bit*), Windows Server 2008 R1/R2 (32 bit or 64 bit*), Wi ndows
Vista Business (32 bit or 64 bit*), Windows Vista Enterprise (32 bit or 64 bit*) and
Windows Vista Ultimate (32 bit or 64 bit*), Windows 7 Professional (32 bit or 64 bit*),
Windows 7 Enterprise (32 bit or 64 bit*) and Windows 7 Ultimate (32 bit or 64 bit*).
* Running as a 32 bit application.
• Net Framework 2.0 and DirectX 9.0, downloadable from http://www.microsoft.com/
downloads/, must be installed on computers running the Central Client.
www.milestonesys.com Page 11 Minimum System Requirements
Page 12

Milestone XProtect 3.7; Administrator’s Manual
Server: Installation
Upgrading from Previous Version
If upgrading from XProtect Central version 3.1 to version 3.7, you need to remove the version 3.1
server software before installing the version 3.7 software. Use Windows' Add Remove Programs
feature to remove the previous server software version.
Reuse Database
If you are upgrading from XProtect Central version 3.1, you are able to reuse your existing
XProtect Central database of alarms. You will thus be able to view, and work with, alarms from
your previous XProtect Central version 3.1 in your new XProtect Central version 3.7, provided you
note the following:
Even though you remove the XProtect Central version 3.1 server software, make sure you do not
remove the Microsoft SQL Server Desktop Engine used as the alarm database in XProtect Central
version 3.1.
Then, when you install XProtect Central version 3.7, new fields will be added to the database,
allowing its content to be used with XProtect Central version 3.7. Your configuration from XProtect
Central version 3.1 will then work in XProtect Central version 3.7 too.
Bear in mind that alarms will never be kept for longer than specified in your Alarm Settings (see
page 53), regardless of which XProtect Central version the alarms originate from.
Things to Consider before Installation
Before you install the XProtect Central Server, consider the following:
IIS (Internet Information Services)
Make sure IIS (Internet Information Services) is installed on the computer on which XProtect
Central Server will be installed.
If IIS is not installed, do the following to install IIS:
IMPORTANT: IIS should be installed before .NET Framework 2.0.
Tip: Have your Windows installation CD ready; it may be required during the IIS installation.
1. Open Window’s Control Panel by selecting Start > Control Panel.
2. In the Control Panel, select Add or Remove Programs.
3. In the left side of the Add or Remove Programs window, click Add/Remove Windows
Components.
4. Select the check box on the Internet Information Services (IIS) line (the line may also be
called Application Server).
www.milestonesys.com Page 12 Server: Installation
Page 13
Milestone XProtect 3.7; Administrator’s Manual
5. Only required if using Windows 2003 Server: Click the Details button and select the
ASP.NET component, then click OK.
6. Click Next, and follow the remaining instructions.
.NET Framework
Make sure .NET Framework is installed on the computer on which XProtect Central Server will be
installed.
Tip: Windows 2003 Servers have .NET Framework ready-installed; the .NET Framework installation
only has to be verified on Windows XP Servers.
If required, .NET Framework is downloadable from http://www.microsoft.com/downloads/.
IMPORTANT: .NET Framework should be installed after IIS.
XProtect Enterprise and XProtect Professional Version
If you are going to use your XProtect Central solution for connecting to XProtect Enterprise or
XProtect Professional systems, it is highly recommended that you use XProtect Enterprise version
5.6c or later/XProtect Professional version 6.5b or later.
Windows Vista
If installing the XProtect Central Server on a computer running Windows Vista, read About
Installation on Windows Vista on page 16 before you proceed with the installation procedure below.
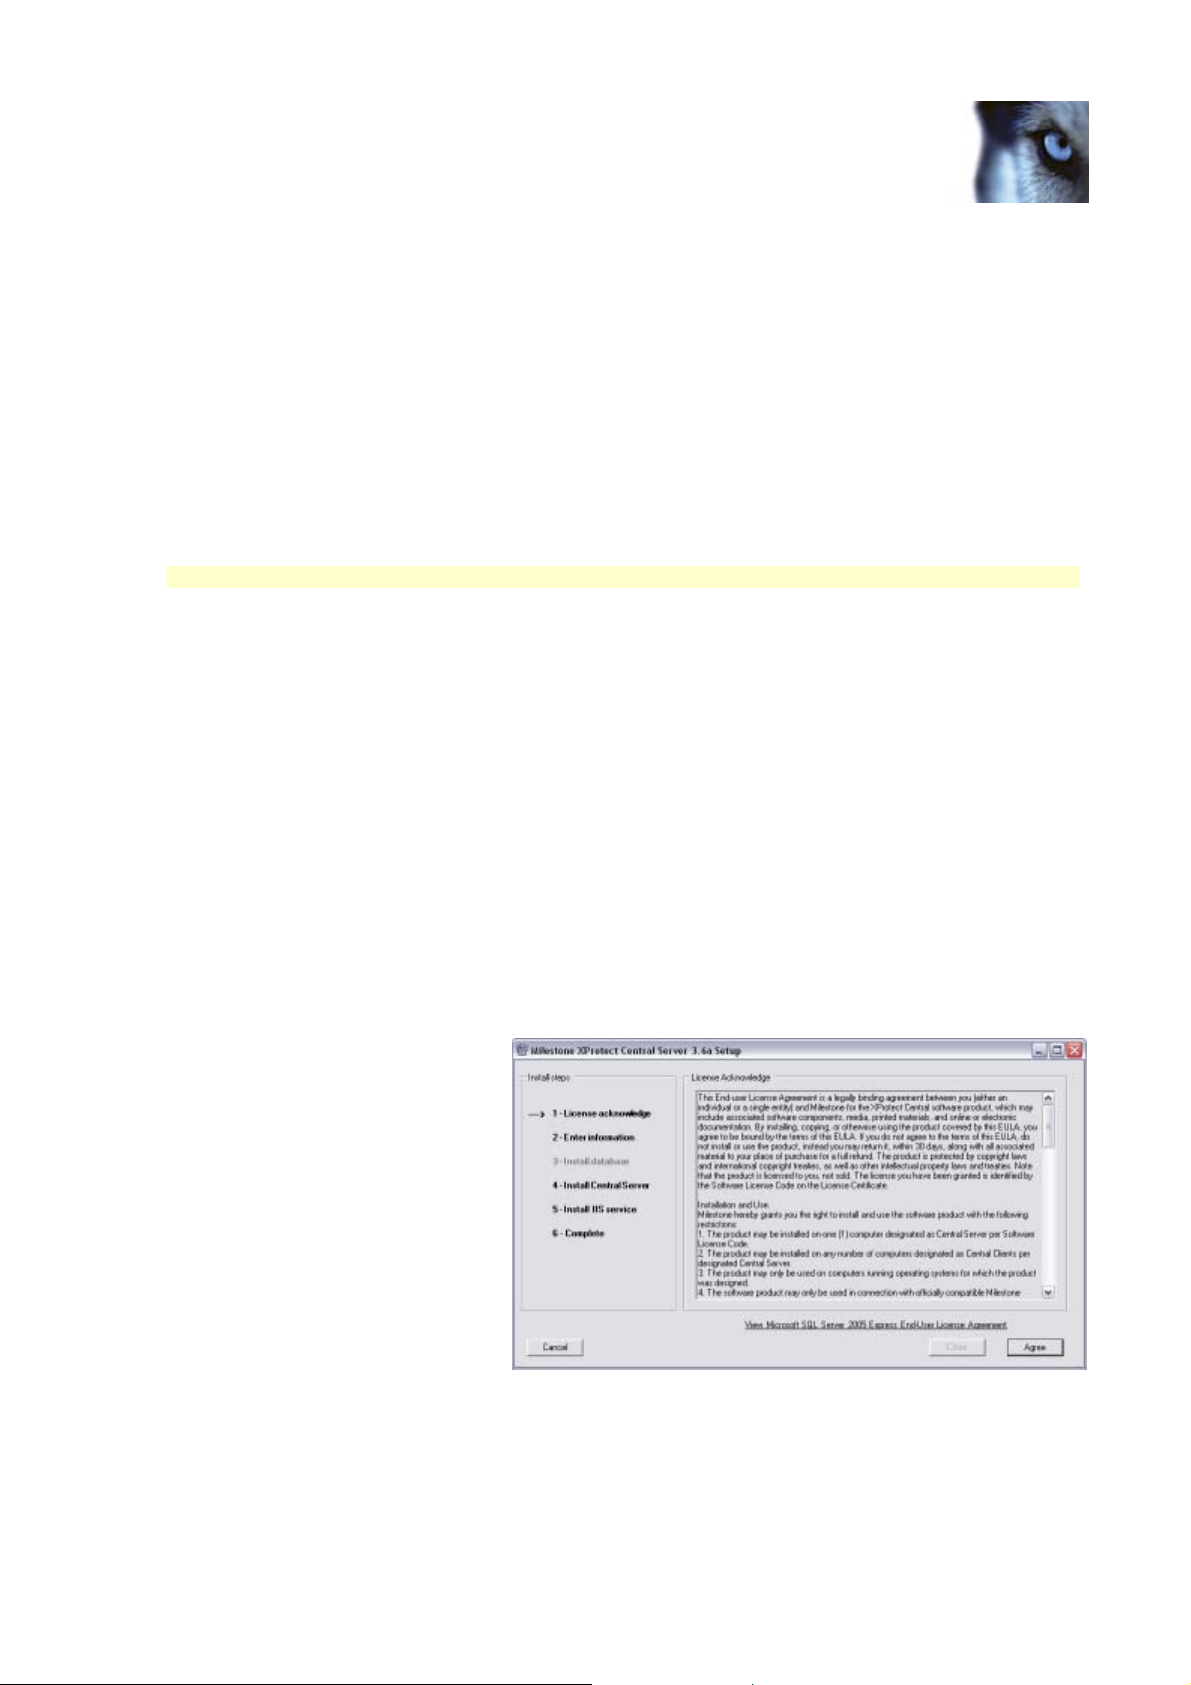
XProtect Central Server Installation Procedure
1. Insert the XProtect Central software DVD. After a short while, the Milestone XProtect
Central Server Setup
window will open.
Tip: If the Milestone
XProtect Central Server
Setup window does not
open automatically upon
inserting the DVD, run the
CentralServerInstaller.exe
file from the DVD.
Alternatively, if you are
installing a version
downloaded from the
internet, run the .exe file
from the location you have
saved it to.
In the left part of the window you will see a list of the steps involved in the installation:
Begin by reading the licence terms. By clicking the View Microsoft SQL ... link you are
furthermore able to read the license terms for the Microsoft SQL Server Express Edition will
act as XProtect Central’s database.
www.milestonesys.com Page 13 Server: Installation
Page 14
Milestone XProtect 3.7; Administrator’s Manual
When ready, click the installation window’s Agree button to continue to the next step of the
installation.
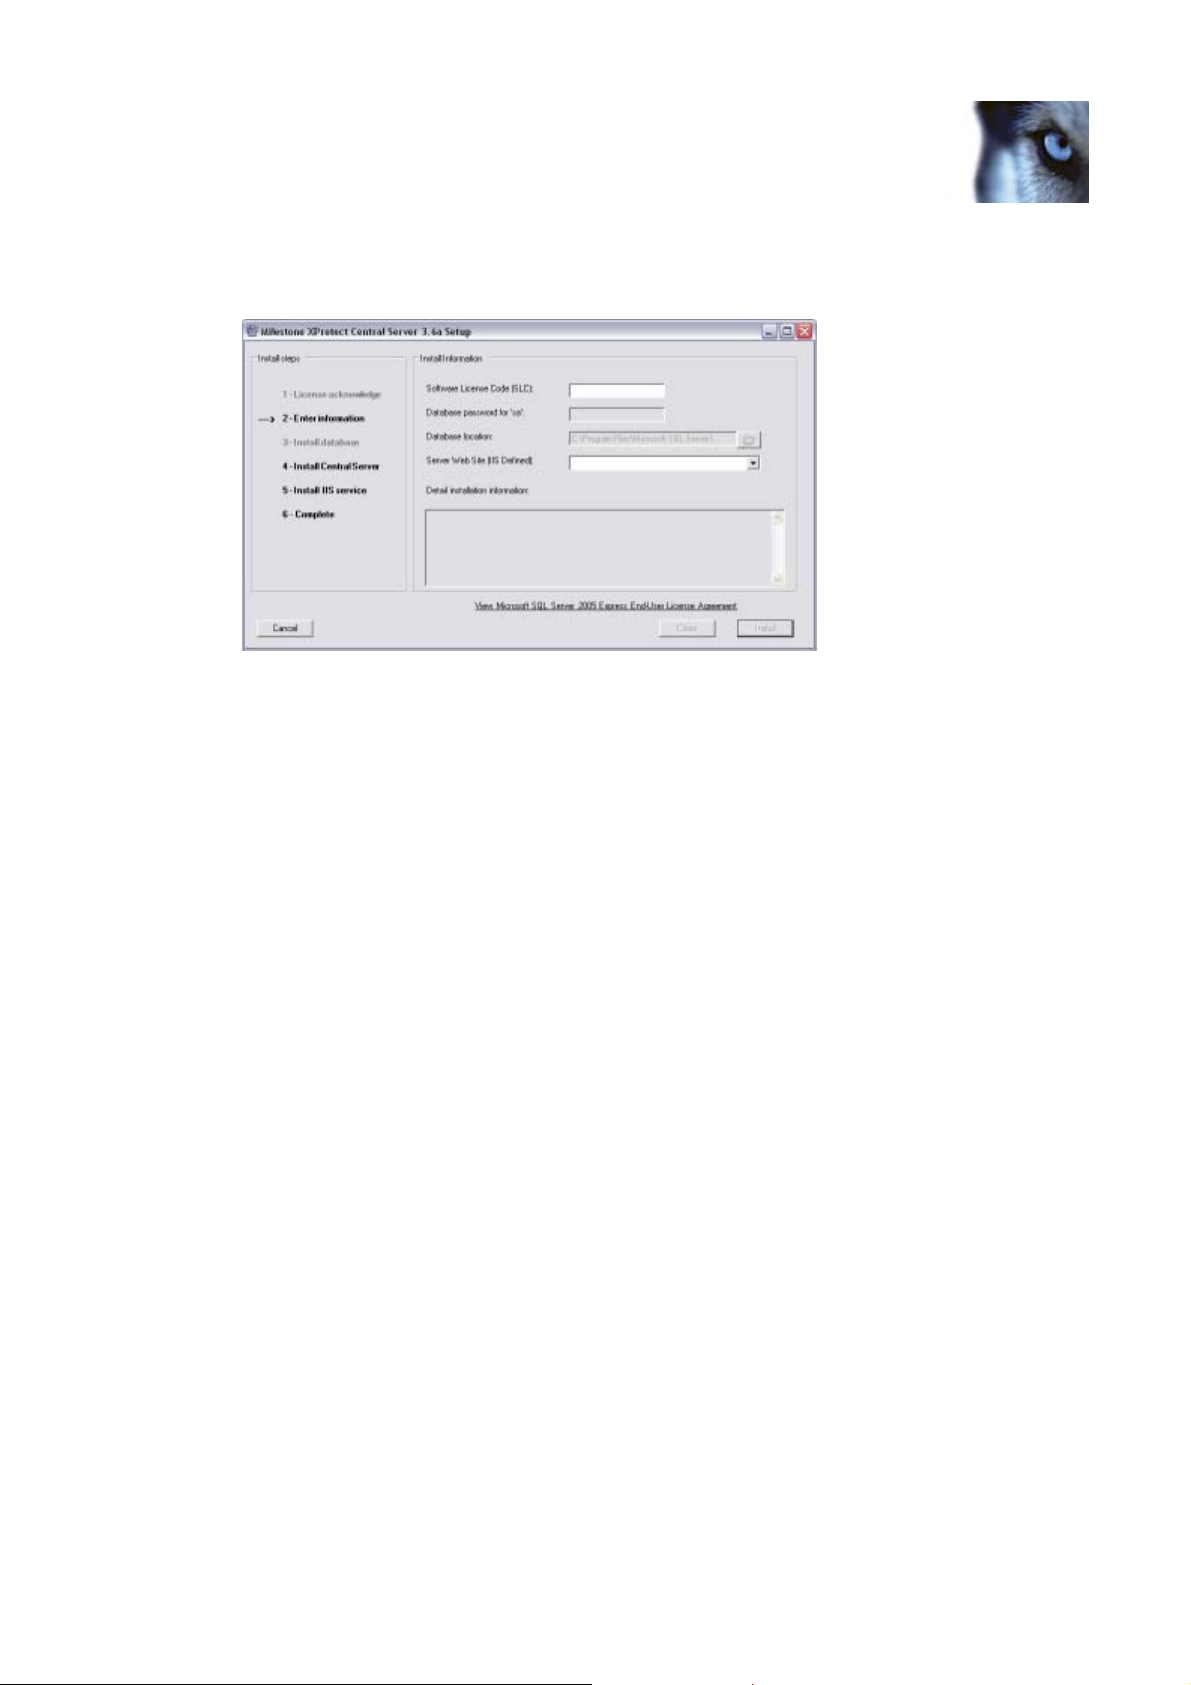
2. On the second step, specify information in the following fields:
• Software License Code (SLC): (Required) Type your XProtect Central Software
License Code (SLC). The SLC is printed on the Product License Sheet enclosed with
the software DVD.
• Database password for ‘sa': (Optional) Ability to specify a password to be used
when accessing the XProtect Central database. A password is not compulsory.
Tip: ‘sa' simply means system administrator, and refers to the implicit user name
associated with the password.
• Database location: (Optional) Ability to define a specific location for the database
(the database should always be stored locally on the computer on which XProtect
Central Server is installed). If you wish to use XProtect Central’s default location for
the database (typically in a subfolder under C:\Program Files\Microsoft SQL
Server\... on the computer on which XProtect Central Server is installed), simply
leave the field blank. If you require a specific location for your database, click the
browse button next to the field, and select the required location.
• Server Web Site (IIS defined): (Required) Specify required server web site. If
no special site/port is required, simply select Default Web Site, port=80.
When ready, click the Install button.
3. Installation will automatically move to the next step, called Install database, during which
Microsoft SQL Server Express Edition will be installed. The SQL Server Express Edition will
act as XProtect Central’s database. When ready, or if SQL Server Express Edition is already
installed, installation will automatically move to the next step.
4. During this step, called Install central server, installation of the XProtect Central Server
itself automatically begins.
After a short while, a wizard window will prompt you to select which folder you want to
install the server software in (a default installation folder is automatically suggested; you
may change it if required):
www.milestonesys.com Page 14 Server: Installation
Page 15
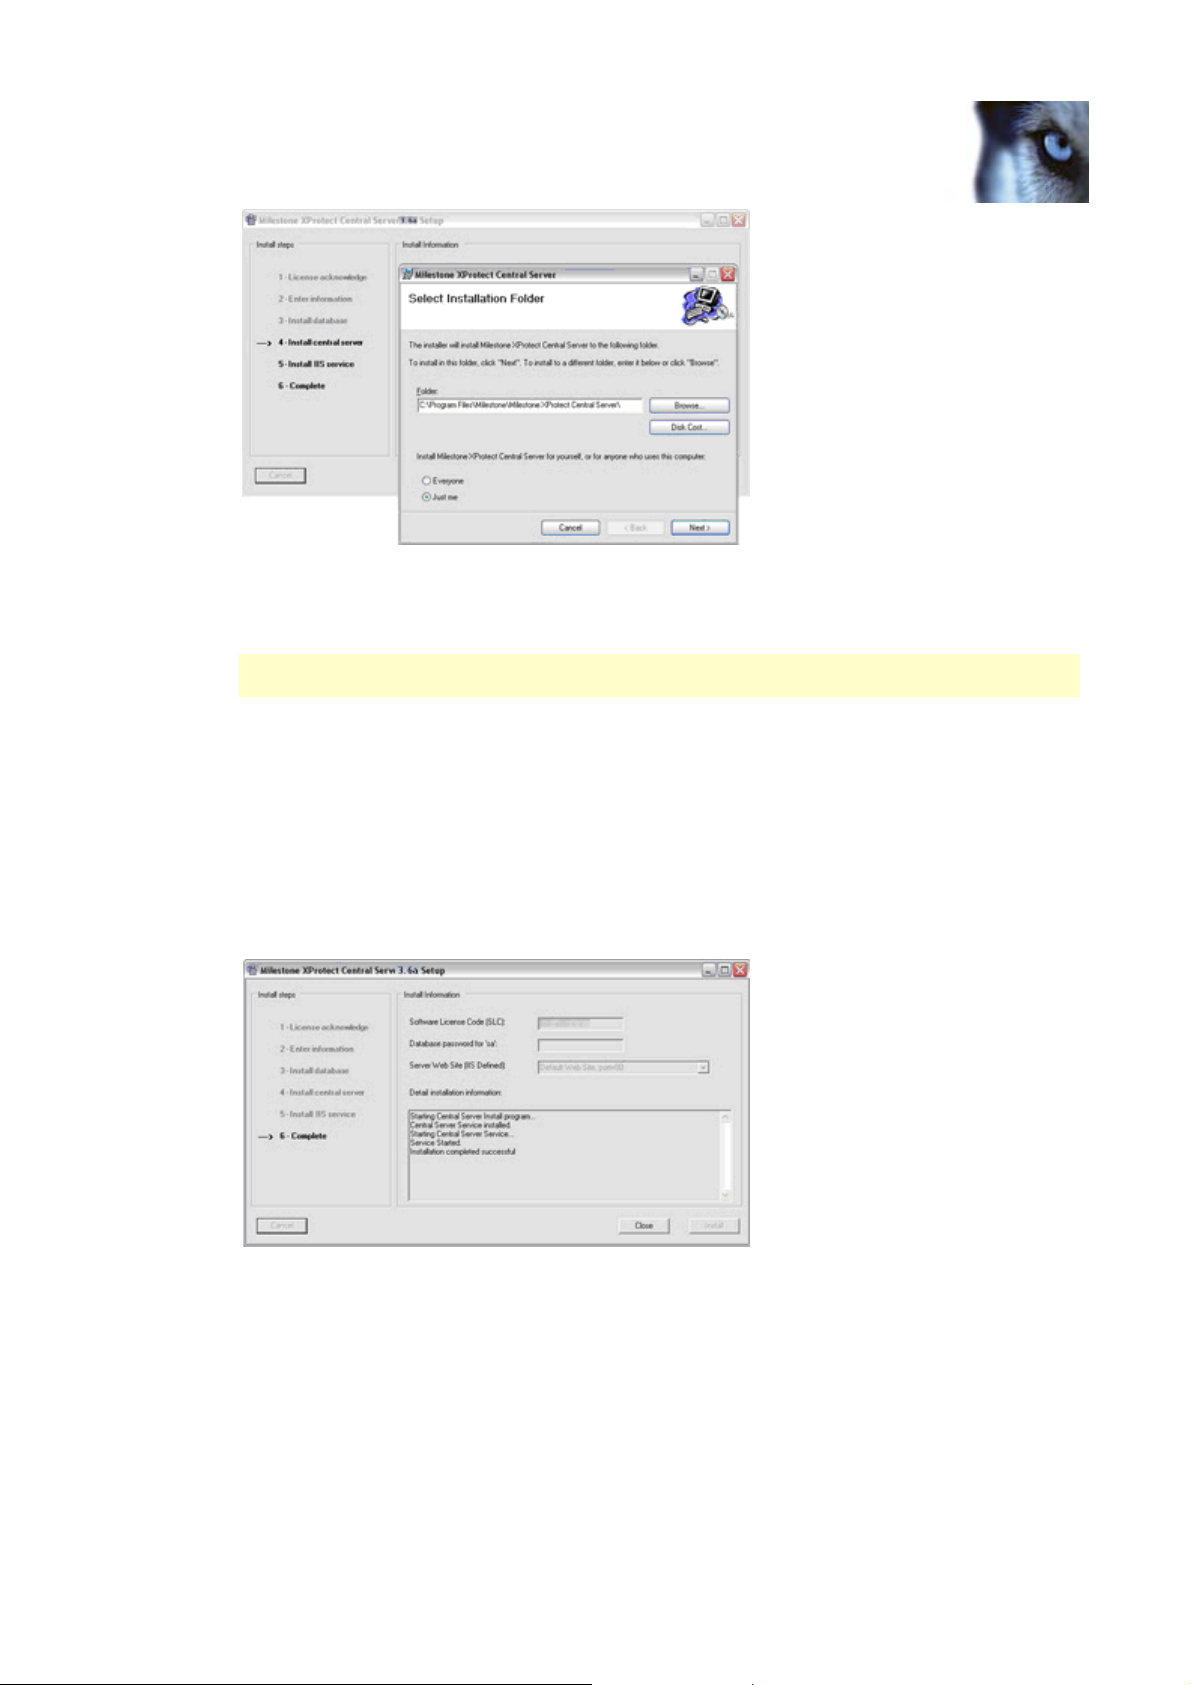
Milestone XProtect 3.7; Administrator’s Manual
You also have the option of specifying whether the server software should be accessible
just by you or by everyone using the computer on which you are installing it. If in doubt,
select Everyone.
Users with local administrator rights on the computer will always be able to access the
server software.
When ready, click Next to continue installing the server software.
When installation of the server software ends, click the wizard window’s Close button to
move to the next step of the main installation.
5. During this step, called Install IIS service, Milestone XProtect Central Internet Information
Services (IIS) will automatically be installed. When the service is installed, you are
automatically taken to the last step of the installation.
6. The last step simply provides an overview of what you have achieved:
The installation process is complete; click the Close button.
Tip: If you subsequently experience problems with your XProtect Central Server
installation, for example that clients cannot communicate with the server, try the solutions
suggested in the following chapter.
www.milestonesys.com Page 15 Server: Installation
Page 16
Milestone XProtect 3.7; Administrator’s Manual
About Installation on Windows Vista
The following information only applies if installing the XProtect Central Server on a computer
running Windows Vista.
You can use this information to set up the XProtect Central Server on a single computer.
Do the following:
1. Determine the status of the firewall, and make sure it is disabled.
2. Log in to Windows Vista using an administrator account.
3. Install Internet Information Services (IIS).
Your Windows Vista computer may already have IIS installed. If IIS is already installed,
verify its IIS 6 compatibility, and that Basic Authentication as well as Windows
Authentication is enabled (if not, enable it).
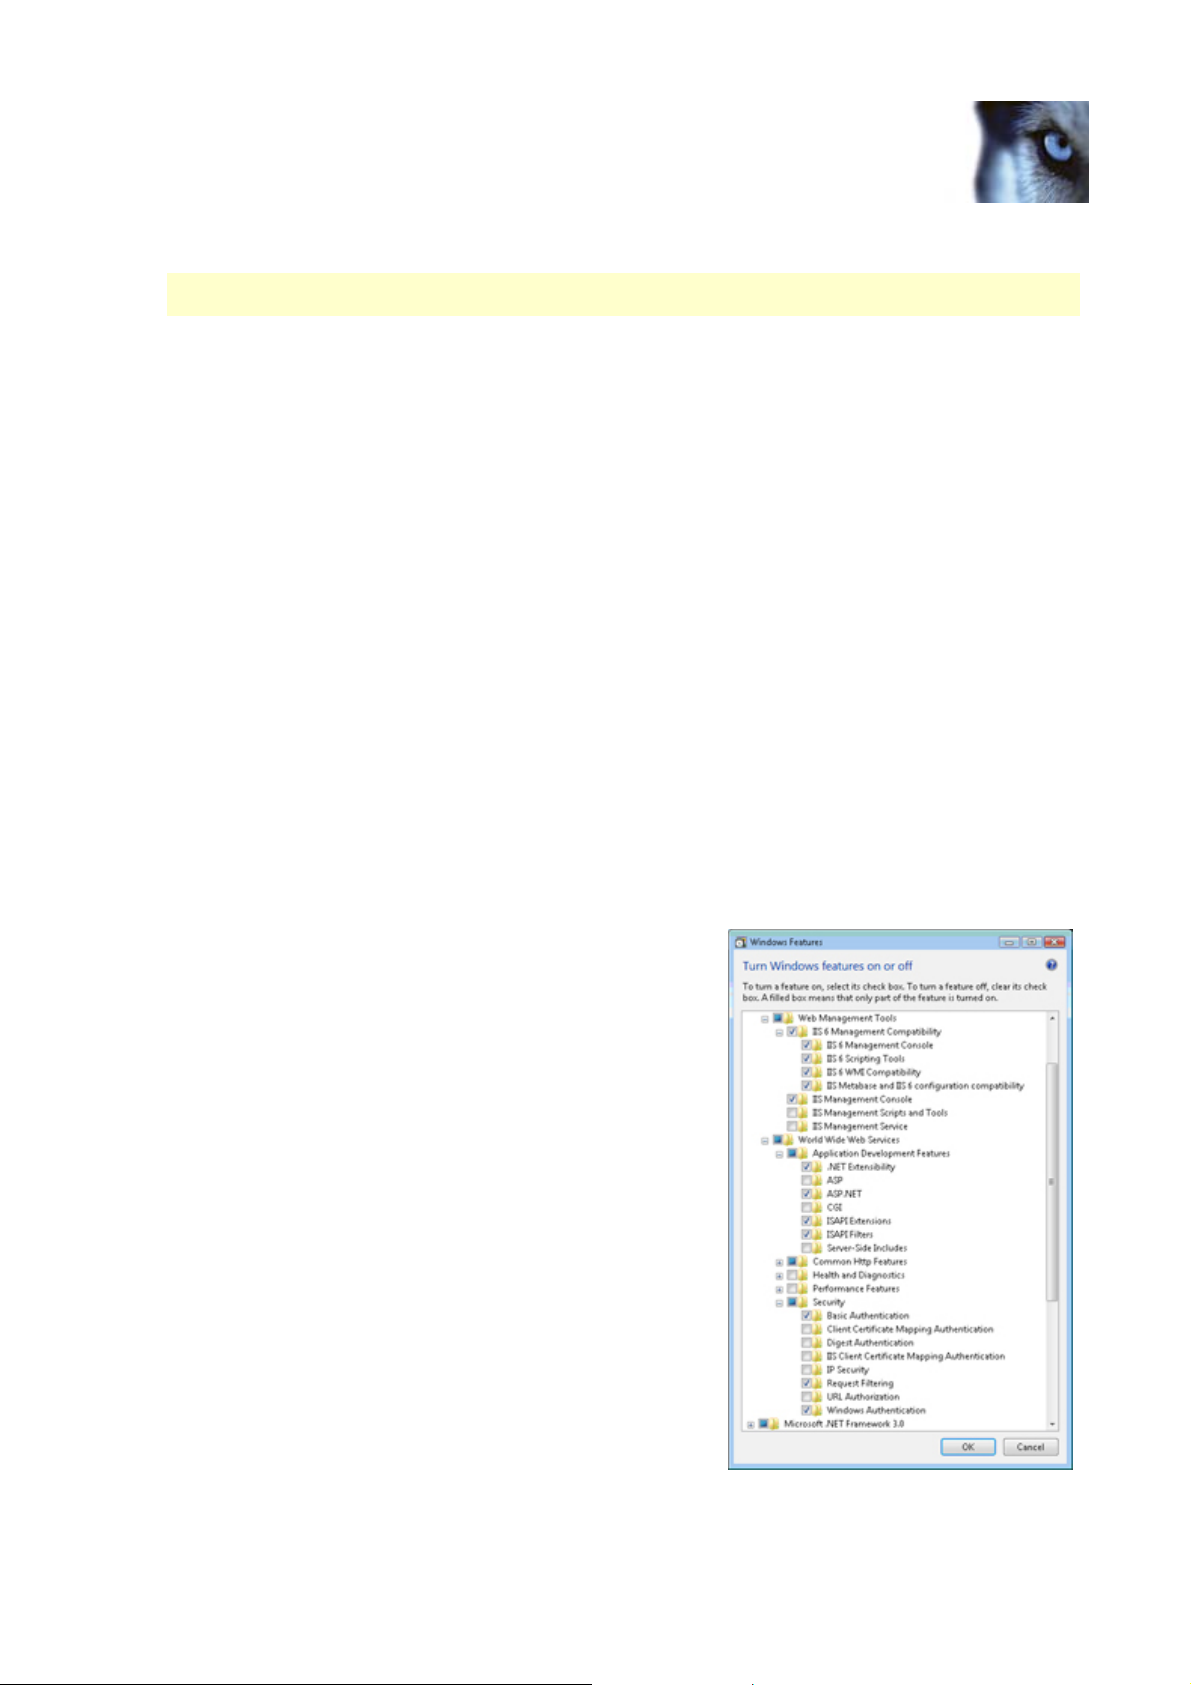
If IIS is not installed, follow this procedure to install and enable the required modules:
a. Click Start, select Control Panel, and open Programs and Features.
b. Click Turn Windows Features On or Off. This will start the Windows features
selector.
c. On the feature selection page, expand the following items, and specify the following
(do not make any other changes than those listed in the following):
i. Select and expand Internet Information Services.
ii. Expand Web Management Tools.
iii. Expand IIS 6 Management
Compatibility.
o Select IIS 6 Management
Console.
o Select IIS 6 Scripting Tools
(IIS 6 WMI Compatibility,
IIS Metabase and IIS 6
configuration compatibility
will automatically be
selected).
o Close IIS 6 Management
Compatibility.
iv. Enable IIS Management Console.
v. Expand World Wide Web Services.
vi. Expand Application Development
Features.
o Select ASP.NET.
o Close Application
Development Features.
vii. Expand Security.
www.milestonesys.com Page 16 Server: Installation
Page 17
Milestone XProtect 3.7; Administrator’s Manual
o Select Basic Authentication.
o Select Windows Authentication.
d. Click OK to start IIS installation; note that the IIS installation may take several
minutes to complete.
4. Now install the XProtect Central Server as described on page 13.
5. Upon installation of the XProtect Central Server, make the following changes in Windows
Vista:
a. Click Start, select Control Panel, and open Administrative Tools.
b. Open Internet Information Services (IIS) Manager.
c. Expand the server item in the Connections tree.
d. Expand the Web Sites item.
e. Expand the Default Web Site item.
f. Select the virtual folder named Central (if you specified a different virtual directory
name during the XProtect Central Server installation, click the virtual folder with
that name).
i. Click Advanced Settings (located in the Actions section on the left side).
ii. Select Behavior/Application Pool, and click the button located in the right
side of the property.
iii. Change the Application Pool from DefaultAppPool to Classic .NET AppPool,
then click OK to close the dialog.
iv. Click OK to close the Advanced Settings dialog.
g. Open the authentication configuration view.
i. Verify that Basic Authentication is enabled.
ii. Verify that Windows Authentication is enabled.
iii. Verify that the remaining three authentication types are disabled.
www.milestonesys.com Page 17 Server: Installation
Page 18

Milestone XProtect 3.7; Administrator’s Manual
Server: Connection Troubleshooting
The following issues may occasionally occur once you have installed the XProtect Central Server
and clients begin to connect to it. For each issue, one or more solutions are available.
• Client Login Fails with “Error 401 – Unauthorized” Message (immediately below)
• Client Login Fails with “Method Not Allowed” Message (see page 20)
• Client Login Fails with “Cannot load type …” Message (see page 20)
• Client Login Fails with “The Remote Server Returned …” Message (see page 21)
Client Login Fails with “Error 401 – Unauthorized” Message
This issue may be caused by three different settings, and consequently resolved in one of the three
following ways:
Solution 1: Change Login Settings
If using a local user account on the server: When specifying user name during login, make sure
that you only specify the user name itself (i.e. do not specify for example serverpc/username), and
that the Domain field is left empty.
Solution 2: Change Simple File Sharing Settings
If using a local user account on the server, the default settings in Windows Professional specify that
simple file sharing is used. This may conflict with XProtect Central Server, and should be changed
the following way:
1. On the computer running XProtect Central Server, right-click the Start button, and select
Explore.
2. In the Start Menu window, select the Tools menu, then select Folder Options...
3. Select the View tab.
4. Scroll to the bottom of the Advanced settings list, and make sure that the Use simple file
sharing (Recommended) check box is cleared.
5. Click OK, and close the Start Menu window.
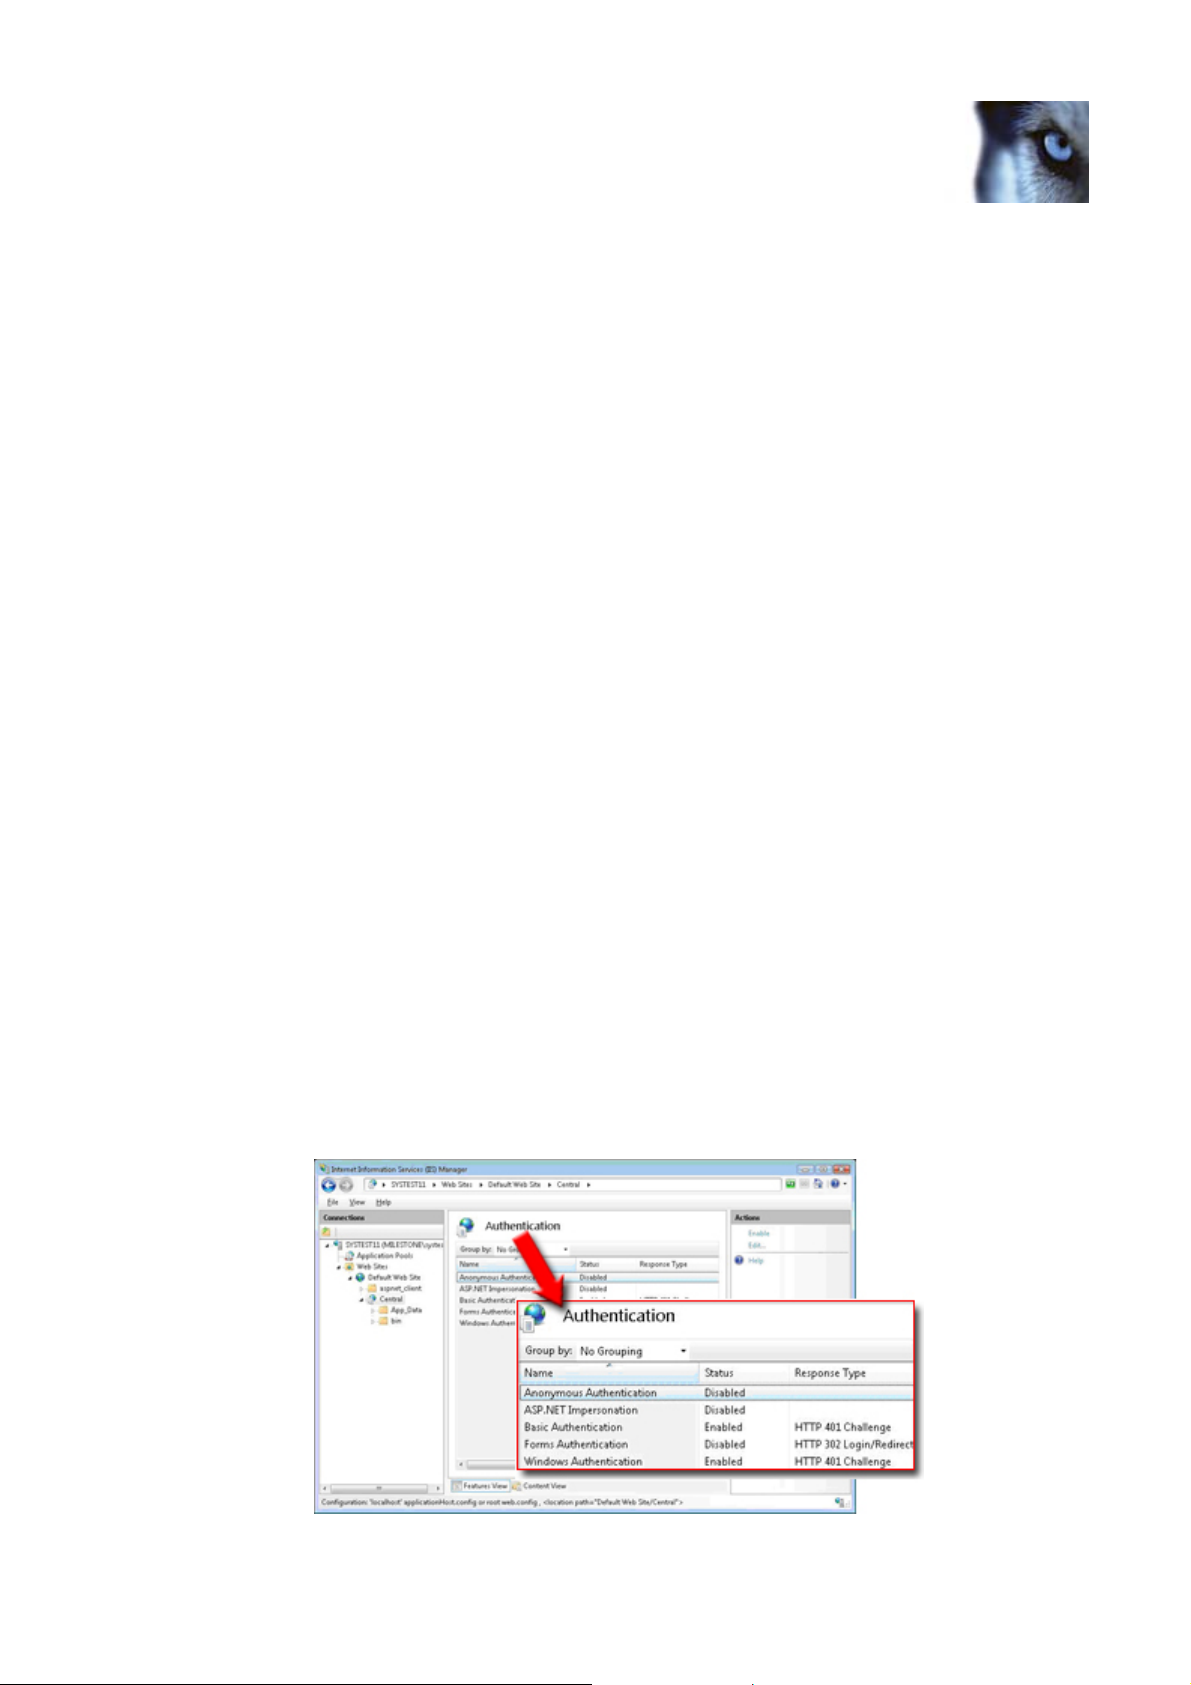
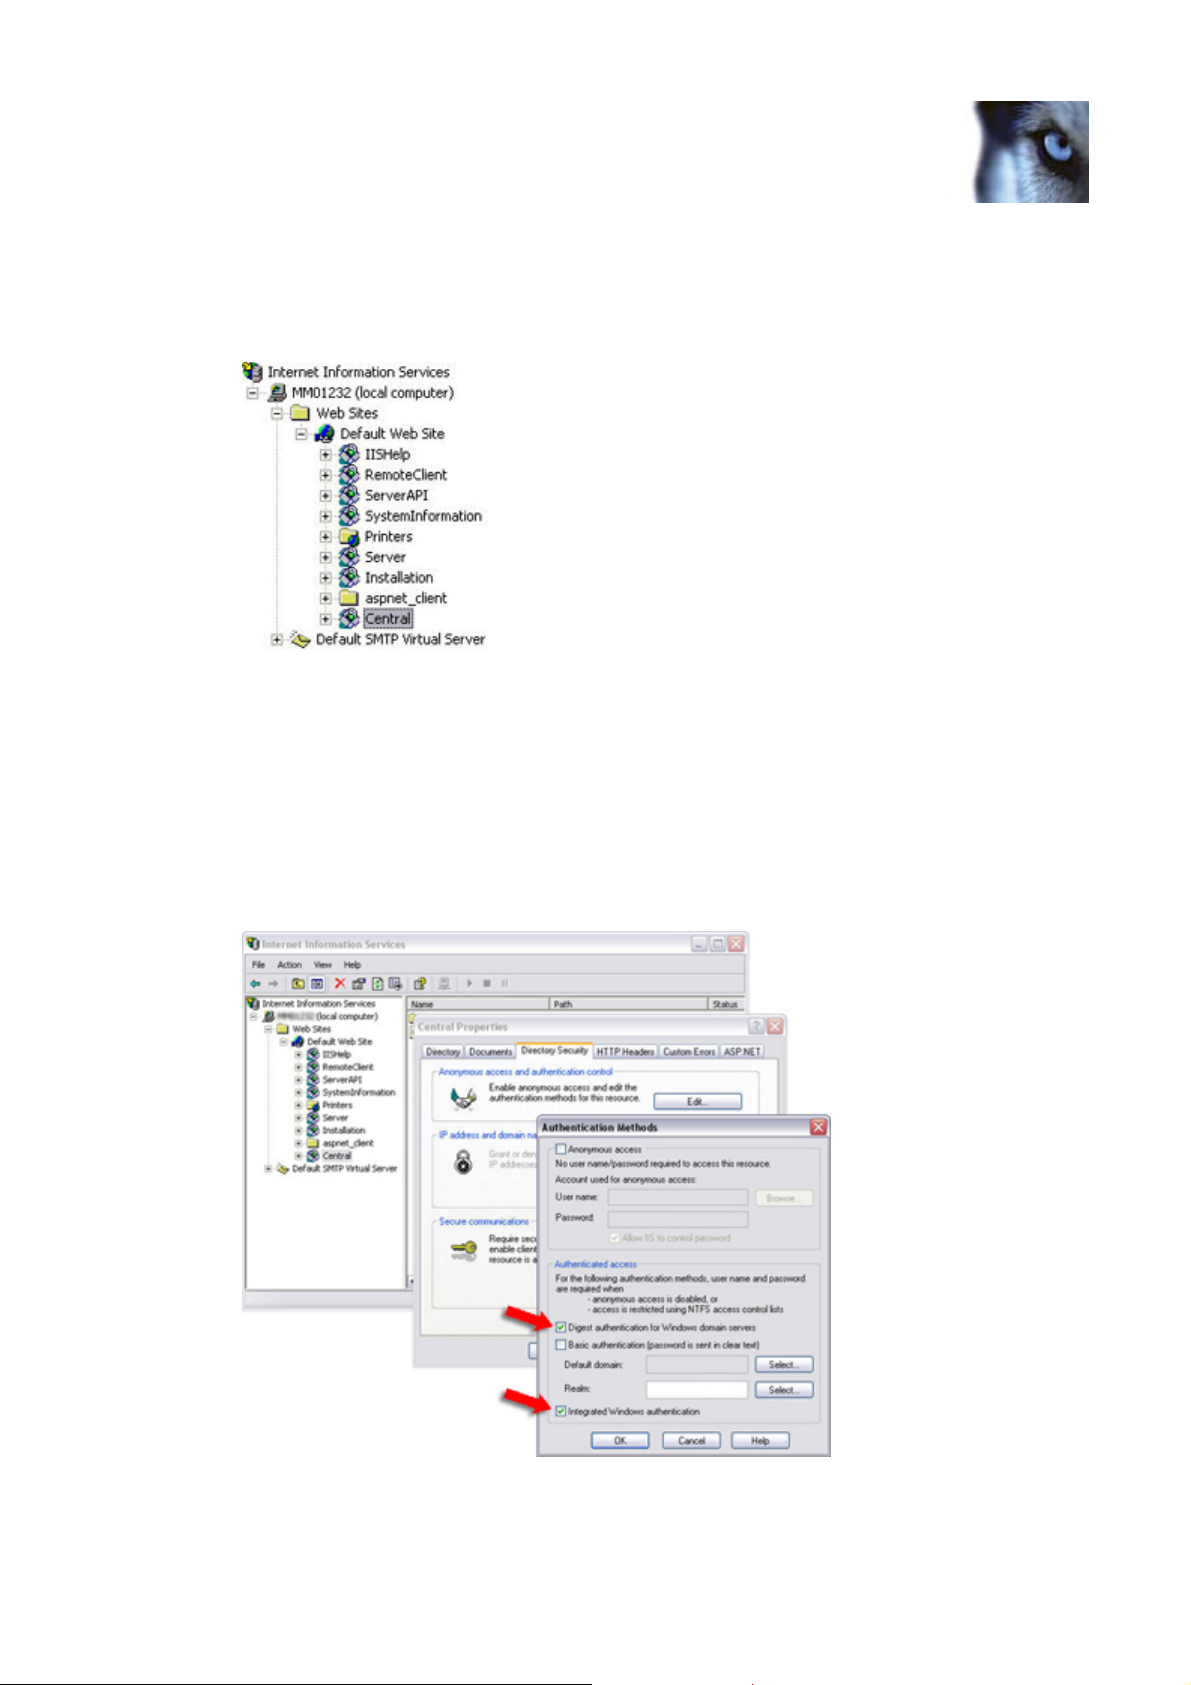
Solution 3: Change IIS Settings
Before the XProtect Central Server can be accessed by XProtect Central Clients, do the following to
configure the Milestone XProtect Central Internet Information Service (IIS):
www.milestonesys.com Page 18 Server: Connection Troubleshooting
Page 19
Milestone XProtect 3.7; Administrator’s Manual
1. Open Windows' Internet Information Services window by selecting Start > Control Panel >
Administrative Tools > Internet Information Services.
2. In the Internet Information Services window’s left pane, locate and right-click Central (if
you specified a different virtual directory name during the XProtect Central Service setup,
locate and right-click that name):
Example only; content on your
computer may be different
3. In the resulting menu, select Properties. This will open the Central Properties dialog.
4. Select the Directory Security tab.
5. In the Anonymous access and authentication control section, click the Edit... button. This
will open the Authentication Methods dialog.
6. Make sure that only the Digest authentication for Windows domain servers and Integrated
Windows authentication check boxes are selected, as outlined in the following illustration:
Example only; content and dialog layout on your computer may be different
7. Click OK twice, and close the Internet Information Services window. XProtect Central
Clients will now be able to access the XProtect Central Server.
www.milestonesys.com Page 19 Server: Connection Troubleshooting
Page 20
Milestone XProtect 3.7; Administrator’s Manual
Client Login Fails with “Method Not Allowed” Message
If you receive a Method not allowed message the first time you attempt to log in to the XProtect
Central Server with an XProtect Central Client, ASP.NET extensions are probably not available on
the server. This may be the case if .NET Framework 2.0 was installed before IIS on the server.
Solution: Install ASP.NET Extensions
To install ASP.NET extensions on the computer running the XProtect Central Server, do the
following:
1. Click Start and select Run...
2. In the Run dialog’s Open field, type the following:
C:\WINDOWS\Microsoft.NET\Framework\v2.0.50727>aspnet_regiis -i
3. Click OK.
Client Login Fails with “Cannot load type …” Message
If .NET Framework 1.x and 2.x are both installed on the server, Windows' default settings may
cause .NET version 1.x to be used whereas .NET version 2.x is required when running XProtect
Central.
When this is the case, you will see the following error message when attempting to connect with an
XProtect Central Client:
The message reads: Unable to login to [server], the server reported the following information:
Cannot load type VideoOS.Central.ServerAPI.ServerConnectionPoint, VideoOS.Central.ServerAPI,
Version=3.5.x.x, Culture=neutral, PublicKeyToken=null.
Solution: Change .NET Version
To change the .NET version from 1.x to 2.x, do the following:
1. Click Start, and select Control Panel.
2. Click Administrative Tools.
3. Click Internet Information Services.
4. In the Internet Information Services window’s left pane, locate and right-click Central (if
you specified a different virtual directory name during the XProtect Central Service setup,
locate and right-click that name):
www.milestonesys.com Page 20 Server: Connection Troubleshooting
Page 21
Milestone XProtect 3.7; Administrator’s Manual
Example only; content on your
computer may be different
5. In the resulting menu, select Properties. This will open the Central Properties dialog.
6. In the Central Properties dialog, select the ASP.NET tab.
7. In the ASP.NET version list, change the .NET version from 1.x to 2.x. Example:
8. Click OK.
9. Close the Internet Information Services and Administrative Tools windows if still open.
Client Login Fails with “The Remote Server Returned …” Message
If the XProtect Central Server is installed on a computer running Windows XP 64 bit, use of
ASP.NET version 2.0.50727 must be allowed on the server.
If not, you will see the
following error
message when
attempting to connect
with an XProtect
Central Client:
The message reads: Unable to login to [server], the server reported the following information: The
remote server returned an error: (404) Not Found.
www.milestonesys.com Page 21 Server: Connection Troubleshooting
Page 22

Milestone XProtect 3.7; Administrator’s Manual
Solution: Allow Use of ASP.NET Version 2.0.50727
To allow use, do the following:
1. Click Start, and select Control Panel.
2. Click Administrative Tools.
3. Click Computer Management.
4. In the Computer Management window's left pane, click Services and Applications, then
click Internet Information Services and select Web Service Extensions.
5. In the Computer Management window's right pane, verify that ASP.NET v2.0.50727 has the
status Allowed. If not, click ASP.NET v2.0.50727 to display a group of buttons, then click
the Allow button.
6. Close the Computer Management and Administrative Tools windows if still open.
www.milestonesys.com Page 22 Server: Connection Troubleshooting
Page 23

Milestone XProtect 3.7; Administrator’s Manual
Server: File Locations
On the XProtect Central Server, files are stored at the following locations:
• Server EXE and DLL Files
Located in C:\Program Files\Milestone\Milestone XProtect Central Server\
• Server Definition in XML Format
Located in C:\Program Files\Milestone\Milestone XProtect Central Server\config
• Background Images Loaded onto Server
Before clients can use a background image in a map, the background image must be
loaded onto the XProtect Central Server. When such images are loaded onto the server,
they will be located in C:\Program Files\Milestone\Milestone XProtect Central
Server\images
• DLL Files for Running IIS-Related Processes
Located in C:\INetPub\wwwroot\Central
• Log and Trace Files
Located in C:\Program Files\Milestone\Milestone XProtect Central Server\logs. See also Log
Locations on page 68.
www.milestonesys.com Page 23 Server: File Locations
Page 24

Milestone XProtect 3.7; Administrator’s Manual
Server: Use Across Time Zones
The XProtect Central Server registers date and time information using UTC, Coordinated Universal
Time.
This means that your XProtect Central Server is able to effortlessly receive and process event and
status information from surveillance system installations located in different time zones.
On XProtect Central Clients, time and date information will always be presented in local values,
based on the Client user’s regional settings, but actions performed in the Client will be registered in
UTC on the Server.
Tip: UTC (Coordinated Universal Time) is the official world reference for time. While GMT
(Greenwich Mean Time) is still widely used, it has officially been replaced by UTC. Being based
upon atomic clocks, UTC is considered more accurate than GMT, which is based on the Earth’s
rotation and references to the positions of celestial bodies. In day-to-day use the difference is
negligible, and GMT and UTC are often used interchangeably.
www.milestonesys.com Page 24 Server: Use Across Time Zones
Page 25
Milestone XProtect 3.7; Administrator’s Manual
Client: Installation
Upgrading from Previous Version
If upgrading from XProtect Central version 3.1 to version 3.7, you do not need to remove your
previous XProtect Central Client version; it will be overwritten when you install the latest Client
version.
Installation Procedure
1. Shut down any Milestone software running.
2. Insert the XProtect Central software DVD. After a short while, the Milestone XProtect
Central Client Setup Wizard will open.
Tip: If the Milestone XProtect Central Client Setup Wizard does not open automatically
upon inserting the DVD, run the CentralClientInstaller.exe file from the DVD. Alternatively,
if you are installing a version downloaded from the internet, run the .exe file from the
location you have saved it to.
3. On the wizard’s first page, click Next:
4. On the wizard’s second page, select the folder in which you want to install XProtect Central.
Also select whether just yourself or everyone using the computer should be able to access
the XProtect Central Client; if in doubt, select Everyone.
www.milestonesys.com Page 25 Client: Installation
Page 26

Milestone XProtect 3.7; Administrator’s Manual
When ready, click Next.
5. On the wizard’s third page, confirm the installation by clicking Next:
A progress bar will show the status of your installation:
6. When installation is complete, click the Close button on the wizard’s final page:
7. You are now able to log in with your XProtect Central Client: Simply double-click the
XProtect Central Client shortcut on your desktop.
For more information about logging in, see Client: Logging In & Out on page 27.
www.milestonesys.com Page 26 Client: Installation
Page 27

Milestone XProtect 3.7; Administrator’s Manual
Client: Logging In & Out
Logging In
To log in to the XProtect Central system with an XProtect Central Client, do the following:
1. Double-click the Milestone XProtect Central Client shortcut on your desktop:
Alternatively, select Milestone XProtect Central Client from Windows' Start menu.
2. In the login window’s Connect To field, type or select the name or IP address of the
XProtect Central Server as specified by your XProtect Central administrator. Internet
connections may use different ports for different purposes; therefore, the server name or
IP address may include a port number (example: 123.123.123.123:80, where :80 indicates
the port number).
Tip: If you want to avoid having to type or select the name/IP address of the server the
next time you log in, select the Connect automatically box. If you wish to be able to select
between several servers, however, do not select the Connect automatically box.
By default, you will log to XProtect Central with your active Windows account. This means
that if you have logged in to the computer on which your XProtect Central Client is installed
as, for example, JohnSmith, you will by default log in to the XProtect Central Server as
JohnSmith as well.
• If you wish to log in with your active Windows account, simply click OK.
• If you wish to log in with a different Windows account, click the login window’s
Options >> button, and specify the required user name, password and domain,
then click OK.
3. The XProtect Central Client window opens. You now have access to information from the
XProtect Central Server.
Got Login Problems?
If you experience problems when attempting to log in with your XProtect Central Client, consider
the following:
• Have you specified the server address correctly? Make sure that the XProtect Central
Server name/IP address you specified in the login dialog is correct, and that it includes the
http:// prefix. Bear in mind that the address of your XProtect Central Server may include a
port number; for example http://123.123.123.123:80, where :80 indicates the port
number.
• Have you got access rights? If you are not logging in as an XProtect Central
administrator, access rights must have been set up for you by an XProtect Central
administrator before you are able to log in with your XProtect Central Client.
www.milestonesys.com Page 27 Client: Logging In & Out
Page 28

Milestone XProtect 3.7; Administrator’s Manual
• Has the server been correctly set up? Client connection issues may occasionally be
linked to the way in which the XProtect Central Server has been installed and configured.
See Server: Connection Troubleshooting on page 18.
Which Login Information to Provide to End Users
Once end users have their Clients installed, they need to be able to connect their Clients to the
XProtect Central Server. Therefore, provide end users with information about:
• The IP address or hostname of the computer running the XProtect Central Server. Bear in
mind that the IP address or hostname may include a port number. If a port number is
used, it is specified immediately after the IP address/hostname, separated by a colon.
Example: http://123.123.123.123:80, where :80 indicates the port number.
• If end users should log in with Windows accounts other than their active Windows accounts
(i.e. the ones with which they are already logged in on their computers), inform each user
about which user name, password and domain to use when logging in.
Logging Out
To log out of your XProtect Central Client, click the Log Out button in the top right corner of the
Client window:
www.milestonesys.com Page 28 Client: Logging In & Out
Page 29

Milestone XProtect 3.7; Administrator’s Manual
Client: Overview
The XProtect Central Client is used for connecting to
the XProtect Central Server in order to view status and
alarm information from connected surveillance systems.
The XProtect Central Client is also used by XProtect
Central administrators for configuration of the system,
since administrators have access to a number of
otherwise hidden configuration features in the XProtect
Central Client.
Once the system has been configured by
administrators, other users (operators, etc.) are able to
access XProtect Central Client’s regular feature set.
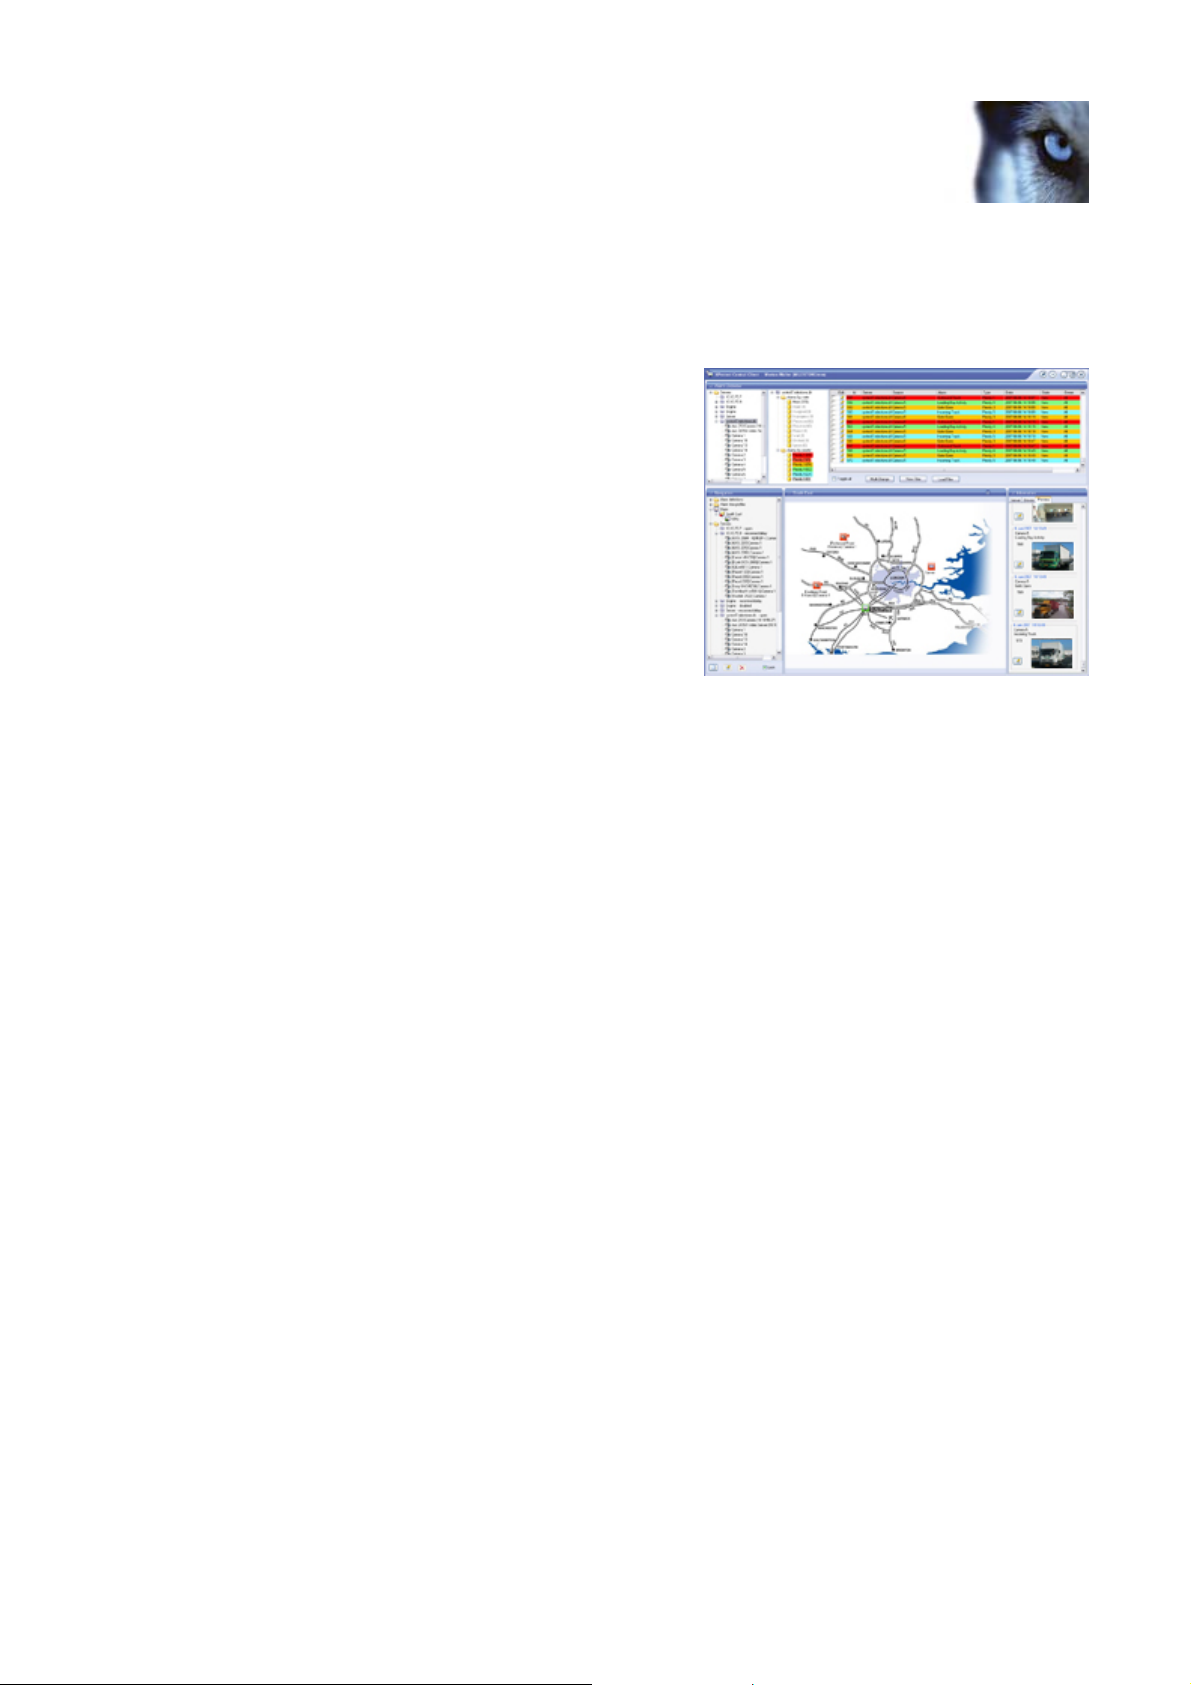
The main window of the XProtect Central Client is
divided into four main sections:
• Alarm Overview Section: Provides alarm information in a list format, which can be
filtered to allow an easy, yet detailed, overview. Lists alarms with information about time,
source, state of the alarm (New, Assigned, Resolved, ...), priority, etc. Filtering features let
users control which alarms to display in the list. From the Alarm Overview users are able to
view further information about individual alarms, including the ability to view recordings of
incidents, the ability to add comments, and print details. Users are also able to change the
state of alarms (for example from Assigned to Resolved). Roles (see page 43) determine
exactly which features individual users (or groups of users) have access to.
• Navigation Section: Where configuration takes place; see suggested configuration
sequence on page 31. Most of the Navigation section’s features are available for
administrators only. For regular users, the Navigation section provides a hierarchical
representation of the maps available in the Map section as well as a list of the servers,
cameras, etc. available for monitoring.
• Map Section: Provides visual representations of the surveillance systems being monitored.
• Information Section: Provides details about selected items on three tabs, including one
with preview images from the most current alarms.
Administrators are able to simplify the Central Client user interface. This can occasionally be
relevant, for example if certain operators only use their Clients for simple verification purposes.
See Simplifying the Client User Interface on page 30.
This Manual Focuses on Features in the Navigation Section
Since configuration takes place through the Client’s Navigation section, the features of this section
are the center of attention in the following chapters. The Client’s other sections are described in
much more detail in the XProtect Central User’s Manual, available on the software DVD and from
www.milestonesys.com.
www.milestonesys.com Page 29 Client: Overview
Page 30

Milestone XProtect 3.7; Administrator’s Manual
Display of Client’s Sections Can Be Turned On and Off
This allows users to customize their client in order to suit their needs. By default all the Client’s
sections are displayed.
To turn display of sections on/off, click the Show Application Menu button
in the top right corner of the Client window. From the resulting menu,
select View..., and select which sections to display.
Simplifying the Client User Interface
If required, administrators are able to simplify the Central Client user interface. This can
occasionally be relevant, for example if certain operators only use their Clients for simple
verification purposes.
To simplify the user interface of a Central Client, do the following on the computer on which the
Client is installed:
1. Make sure the Central Client is closed. Then open the XProtect Central Client folder under
the user’s application data. The folder is typically located under C:\Documents and
Settings\[user]\Application Data\Milestone\XProtect Central Client
2. Copy the file GUISettings.xml.
3. Open the Central Client installation folder (the folder is typically located under C:\Program
Files\Milestone\Milestone XProtect Central Client) and paste the file into that folder.
4. Right-click the file and select Open With > Notepad.
5. Edit the file as required. Especially the states under <availableStates> are interesting,
since they determine which states users are able to select for alarms.
You can simply remove states from the user’s view by deleting entire lines in the file, for
example by deleting the line <state stateix=”8” statename=”Wait” />. Alternatively, you
can edit states’ names, for example by changing the line <state stateix=”8”
statename=”Wait” /> to <state stateix=”8” statename=”Resolve Later” />
6. When ready, save the file. Then open the Central Client to view the effect of your changes.
If you later want to return to the Central Client’s normal user interface, simply remove the file
GUISettings.xml from the Central Client installation folder (the one typically located under
C:\Program Files\Milestone\Milestone XProtect Central Client).
www.milestonesys.com Page 30 Client: Overview
Page 31

Milestone XProtect 3.7; Administrator’s Manual
Client: Suggested Configuration Sequence
Having installed the XProtect Central Server and Client, you use the XProtect Central Client to
configure the XProtect Central system before inviting operators to use it.
It is recommended that you perform configuration tasks in the following order:
1. Specify your XProtect Central license key. The number of XProtect XProtect Corporate,
XProtect Enterprise or XProtect Professional server installations you are able to cover in
your XProtect Central solution depends upon your XProtect Central license key. See page
32 for more information.
2. Define the XProtect XProtect Corporate, XProtect Enterprise or XProtect Professional
servers you want to include in your XProtect Central solution. See page 34 for more
information.
3. Define XProtect Central users/groups and their roles (roles determine users'/groups'
rights). See page 39 for more information.
4. Optional: Define alarm time profiles. Alarms (see 5 below) are by default always active, but
by defining time profiles (for example covering Monday-Friday or every Saturday between
16.00 and 18.00), you can limit alarms to specific periods of time. See page 55 for more
information.
5. Define alarms. Alarms in XProtect Central are based on events registered on XProtect
Corporate, XProtect Enterprise or XProtect Professional installations: When a particular
event is registered, an alarm will appear in XProtect Central. See page 49 for more
information.
6. Define maps. Maps are visual representations allowing an intuitive overview of all your
surveillance system installations in the XProtect Central Client’s Map section. See page 59
for more information.
7. Define other settings as required, for example logging settings and video destinations
(settings related to optional integration with XProtect Matrix). In some organizations,
plugins may be used for integrating additional functionality, for example an access control
system, with XProtect Central; this may also require additional configuration.
8. Optional: It is recommended that you create a backup copy of the configuration you have
created in steps 1-6.
9. Distribute XProtect Central Clients to operators. Remember to inform operators about the
IP address/hostname of the XProtect Central Server, as well as any port number to be
used; they will need this information when logging in with their clients.
www.milestonesys.com Page 31 Client: Configuration Sequence
Page 32

Milestone XProtect 3.7; Administrator’s Manual
Client: Licensing
Your XProtect Central license determines the number of XProtect Corporate, XProtect Enterprise or
XProtect Professional servers you are able to include in your XProtect Central solution.
To specify or edit your XProtect Central license key, do the following:
1. Expand the Settings entry in the Client’s Navigation section, right-click License
Registration, and select Edit License Registration... This will open the License Registration
window.
The Server MAC address and Software license code fields will be pre-filled based on
information specified during the installation of the XProtect Central Server.
2. In the Central license key field, type or edit your XProtect Central license key.
Most users will have received their XProtect Central license key from their Milestone vendor
when purchasing XProtect Central.
If you do not have an XProtect Central license key, you can get one from the Milestone
website; see Getting a Central License Key in the following.
3. With the Validate button, you are able to check that you have entered the correct XProtect
Central license key. If the license key is valid, the system will respond with a confirmation
window listing the maximum allowed number of servers for the license:
The maximum allowed number of servers for the license will furthermore be listed in the
License Registration dialog’s Number of licensed servers field.
4. When ready, click OK.
Getting a Central License Key
Most users will have received their XProtect Central license key from their Milestone vendor when
purchasing XProtect Central. If you do not have an XProtect Central license key, you can get one
from the Milestone website.
Do the following:
www.milestonesys.com Page 32 Client: Licensing
Page 33

Milestone XProtect 3.7; Administrator’s Manual
1. Go to www.milestonesys.com.
2. Click the Login link, select Software registration, and log in to the Software Registration
Service Center.
Tip: If you do not have an account yet, click the New to the system? link, complete the
registration process, and then log in.
3. When logged in, you will see a list of your currently registered Software License Codes
(SLCs).
Tip: If you have not yet registered the Software License Code for your XProtect Central
installation, do so by clicking the Add SLC link, and then following the instructions. When
you reach the confirmation page, click the Current SLCs link to return to the list of your
currently registered Software License Codes.
4. The listed Software License Codes are clickable. Click the one representing your XProtect
Central installation. You will now see a page with detailed information about the Software
License Code for your XProtect Central installation.
5. Click the Add new MAC link, and specify the MAC address of the computer on which the
XProtect Central Server software is installed.
Tip: A MAC address is a 12-character hexadecimal number uniquely identifying each device
on a network. To find the MAC address of a computer, open a command prompt window,
and type ipconfig -all, then press RETURN. The 12-character hexadecimal Physical Address
(example: 00-11-ab-00-11-ab) is the MAC address.
Also specify a description of the computer on which the XProtect Central Server software is
installed; this will help you identify it if you later want to edit your Software License Code
details.
6. When ready, click the Submit button. When asked whether you want to add the MAC
address to the Software License Code, click the Yes button. You will now see a confirmation
page.
7. On the confirmation page, click the Get all keys via email link. When you click the link, the
XProtect Central license key will be sent to the e-mail address you specified in your
Software Registration Service Center login.
8. When you receive the e-mail, look for the 16-character Device license key. This is your
XProtect Central license key.
www.milestonesys.com Page 33 Client: Licensing
Page 34

Milestone XProtect 3.7; Administrator’s Manual
Client: Surveillance Servers
Before XProtect Central is able to connect to XProtect Corporate, XProtect Enterprise or XProtect
Professional servers, the servers must be defined through the XProtect Central Client. When a
server has been defined, you will automatically have access to information from cameras and other
devices connected to the server.
Defining a New Server
To define a server, do the following:
1. In the Client’s Navigation section, right-click the Servers
entry, and select New... This will open the Server Connection
dialog.
Tip: You are also able to group servers in a folder structure
of your choice (see page 37); when that is case, simply
right-click the required folder.
2. In the Server Connection dialog’s Server address field,
specify the required server’s IP address (example:
123.123.123.123) or hostname (example: ourserver).
3. In the Server type list, select the type of server you want to establish a connection to:
XProtect Enterprise/XProtect Professional or XProtect Corporate.
4. In the Authentication: Central / Status API section, specify the Port, User name and
Password used for the interface between the server and XProtect Central.
• If connecting to an XProtect Enterprise or XProtect Professional server:
The information in the Port (default port number is 1237), User name, and
Password fields must match exactly what has been specified on the XProtect
Enterprise server.
How to verify this if using XProtect Enterprise or XProtect Professional version 7.0
or later:
a. Open the XProtect Enterprise or XProtect Professional server's Management
Application.
b. In the Management Application's navigation pane, expand Advanced
Configuration, right-click Central, and select Properties.
c. Make sure that Enable Milestone XProtect Central connections is selected.
d. The value in the Login name field must match the value in the User name
field on XProtect Central.
e. The value in the Password field must match the value in the Password field
on XProtect Central.
f. The value in the Port field must match the value in the Port field on
XProtect Central. Normally, port 1237 is used.
www.milestonesys.com Page 34 Client: Surveillance Servers
Page 35

Milestone XProtect 3.7; Administrator’s Manual
How to verify if using XProtect Enterprise or XProtect Professional versions earlier
than 7.0:
a. Open the XProtect Enterprise or XProtect Professional server’s
Administrator application.
b. In the Administrator, click the General Settings... button to open the
General Settings window.
c. In the General Settings window’s Milestone XProtect Central Settings
section, verify that the Enable Milestone XProtect Central connections check
box is selected.
d. Click the Settings... button to open the Milestone XProtect Central Settings
dialog.
e. The value in the Login field must match the value in the User name field on
XProtect Central.
f. The value in the Password field must match the value in the Password field
on XProtect Central.
g. The value in the Port field must match the value in the Port field on
XProtect Central. Normally, port 1237 is used.
h. Use of the IP field is optional. If using the IP field, the value in the IP field
must match the value in the Server address field on XProtect Central.
• If connecting to an XProtect Corporate server: Default port number is 80. Fill
the User name and Password fields as follows:
o If you have administrator rights on the XProtect Corporate Management
Server in question, type the user name and password you normally use
when logging in to the XProtect Corporate Management Server.
o If you do not have administrator rights on the XProtect Corporate
Management Server in question, contact the server’s administrator for the
user name and password of a user who has either administrator rights or a
role with Application Security Rights to use the Status API.
5. Relevant only if connecting to an XProtect Enterprise or XProtect Professional
server: A connection to the XProtect Enterprise or XProtect Professional server’s Image
Server service is required in order to be able to view recorded and live video as well as still
images in XProtect Central.
In the Authentication: Image Server section, specify Port, User name, and Password.
Default port number is 80. The user name and password must belong to a real or pseudo
user account which has been defined through XProtect Enterprise/XProtect Professional.
The account in question must have access to all cameras on the required XProtect
Enterprise or XProtect Professional server.
Note that if XProtect Enterprise or XProtect Professional will be accessed from the internet
via a router or firewall, Outside Access (from XProtect Enterprise/XProtect Professional
version 7.0 called Internet access) must be enabled in the Image Server Administrator
application (from XProtect Enterprise/XProtect Professional version 7.0 in the Management
Application). See the XProtect Enterprise or XProtect Professional documentation for further
information.
www.milestonesys.com Page 35 Client: Surveillance Servers
Page 36

Milestone XProtect 3.7; Administrator’s Manual
Tip: You are able to test the connection to the Image Server by clicking the Test button; a
Test Result dialog will list the cameras you are able to access.
6. Optional: If wishing to log all registered events on the server, select Enabled in the Event
logging section. Logged events will be written in a log file stored on the XProtect Central
Server (under ...\Program Files\Milestone\Milestone XProtect Central Server\logs). The log
file is shared by all servers for which event logging has been enabled, but logged events
are clearly labelled to identify which server they belong to. A new log file is generated
every day, named after the day it covers (e.g. Event2007-06-15.log).
Tip: Event logging can provide very useful information; it allows you to see which events
are generated on the server, and hence which events may be relevant to use for triggering
alarms in XProtect Central. Furthermore, logged events can be valuable for statistical
purposes; for example for determining network problems based on the number of logged
Not responding events.
7. When ready, click the Save button to save the server definition.
Your server definition will be listed in the Client’s Navigation section. You will now be able
to drag indicators representing the server as well as each of its associated devices
(cameras, etc.) onto maps in the Client’s Map section. Remember that the Lock check box
(see page 63) must be cleared before you are able to drag such indicators onto maps.
Troubleshooting tips:
• If the server listing in the Navigation section indicates that there is no license for
the server, there may be two reasons: Either you have not yet specified an
XProtect Central license code (see page 32), or you have exceeded the number of
servers allowed with your existing XProtect Central license code.
Disabling/Enabling Connection to a Server
Before you are able to edit the details of a server definition in XProtect Central, the connection to
the server must be disabled. The same applies if you want to delete a server definition.
• Disabling a Server: To disable the connection to a server, right-click the required server
entry in the Client’s Navigation section, then select Disable server.
IMPORTANT: While the connection to a server is disabled, other clients will not be able to
access the server, and no alarm information will be received from the server in question.
• Enabling a Server: To enable a previously disabled connection to a server, right-click the
required server entry in the Client’s Navigation section, then select Enable server.
Editing a Server Definition
Before you are able to change the details of an existing server definition, such as the server’s IP
address, etc., the connection to the server must be disabled (see previous). When the connection
to the server has been disabled, right-click the required server entry in the Client’s Navigation
section, and select Edit... This will open the Server Connection dialog, in which you are able to
make changes to the server definition. The Server Connection dialog’s fields are described on page
34.
www.milestonesys.com Page 36 Client: Surveillance Servers
Page 37

Milestone XProtect 3.7; Administrator’s Manual
Deleting a Server Definition
Before you are able to delete a server definition, the connection to the server must be disabled
(see page 36). When the connection to the server has been disabled, right-click the unwanted
server entry in the Client’s Navigation section, then select Delete... You will be asked to confirm
that you want to delete the server; if you are sure, click Yes to delete the server.
Adding Slave Servers
On XProtect Enterprise systems, several XProtect Enterprise servers can be included in a
master/slave setup.
If an XProtect Enterprise server defined in your Client’s Navigation section is a master server, you
are able to add all of its slave servers to XProtect Central in one go simply by right-clicking the
required server and selecting Add Slave Servers.
When adding slave servers, keep in mind the maximum number of servers allowed by your
XProtect Central license (see page 32).
Slave Servers with XProtect Corporate
When adding an XProtect Corporate Management Server in Central, all XProtect Corporate
recording servers under the Management Server in question are automatically added to Central as
well (provided your XProtect Central license allows the required total number of servers).
However, on XProtect Corporate systems, it is also possible to add XProtect Enterprise servers as
slaves running under XProtect Corporate Management Server.
Such XProtect Enterprise servers are not added automatically when adding the XProtect Corporate
Management Server to Central; instead they must be added to Central separately.
Grouping Servers in Folders
You are able to group servers in a folder structure of your choice. Added servers are by default
simply listed alphabetically in Clients, but by creating a folder structure you can present the servers
logically according to your organization’s needs
You create the folder structure in the Client’s Navigation section. You—and other Client users—will
then be able to see the folder structure in two places: Under the main Servers folder in the
Navigation section itself, and in the Alarm Overview section’s alarm navigation tree.
Creating a Folder
1. In the Client’s Navigation folder, right-click the folder under which you want to create the
new folder. If creating your first folder, you must create it under the main Servers folder.
2. From the menu that appears, select Create Folder...:
www.milestonesys.com Page 37 Client: Surveillance Servers
Page 38

Milestone XProtect 3.7; Administrator’s Manual
3. Specify a name for the new folder, and click OK.
Adding a Server to a Folder
There are two ways of adding a server to a folder:
• If adding an existing server: Make sure the Navigation section’s Lock feature (see page 63)
is off. Then simply drag the required server to the required folder.
• If adding a new server: Right-click the required folder, and select New... to define the new
server (see page 34).
Tip: You can add more than one server to a folder.
Renaming a Folder
1. In the Client’s Navigation folder, right-click the folder you want to rename.
2. From the menu that appears, select Rename Folder...
3. Specify a new name for the folder, and click OK.
Deleting a Folder
You cannot delete a folder if it contains servers or subfolders.
1. In the Client’s Navigation folder, right-click the folder you want to delete.
2. From the menu that appears, select Delete Folder...
3. Provided the folder does not contain any servers or subfolders, it will be deleted without
further warning.
www.milestonesys.com Page 38 Client: Surveillance Servers
Page 39

Milestone XProtect 3.7; Administrator’s Manual
Client: Users, Groups & Roles
About Users, Groups & Roles
User & Group Information by Default Imported from Active Directory
XProtect Central users and groups are primarily
imported from Active Directory. Active Directory
is a distributed directory service included with
several Windows Server operating systems; it
identifies resources on a network in order for
users or applications to access them. Users as
well as groups are specified centrally in Active
Directory.
Using Active Directory for import of existing user and group information into XProtect Central has
several benefits: The fact that users as well as groups are specified centrally in Active Directory
means that you will not have to create any user accounts from scratch in XProtect Central. It also
means that you will not have to configure any authentication of users on XProtect Central;
authentication is handled by Active Directory.
When you have imported users and groups from Active Directory into XProtect Central, you are
able to specify which roles they should have on the XProtect Central system. Roles determine
which of XProtect Central’s features users and groups will be able to use.
No Active Directory? Don't worry!
Some organizations choose not to use Active
Directory. Even if Active Directory is not used
in your organization, you can still import users
into your XProtect Central system. See If Not
Using Active Directory on page 43 for more
information.
Prerequisites for Using Active Directory
In order to be able to import users and groups through the Active Directory service, a server with
Active Directory installed and acting as domain controller must be available on your network.
Consult your network administrator if in doubt.
User and Group Concepts
Active Directory uses the concepts of users and groups.
• Users: Users are Active Directory objects representing individuals with a user account.
Example:
• Groups: Groups are Active Directory objects able to contain several users. By importing a
group into XProtect Central, you are able to import all of the group’s members (i.e. users)
in one go. In the following example, a group called Management Group contains two users,
Adolfo and Wayne:
www.milestonesys.com Page 39 Client: Users, Groups & Roles
Page 40

Milestone XProtect 3.7; Administrator’s Manual
Groups can contain any number of users. Note that a user can be a member of more than
one group. For instance, an organization’s security manager could be a member of the
organization’s Management Group as well as the organization’s Security Staff Group. The
number of groups in an organization may vary from one or two to occasionally several
hundreds, depending on the structure of the organization.
Role Concept
In Central, roles determine users' rights.
• Default Administrator Role: By default Central has an administrator role, called admin.
Users with the admin role have access to the full set of configuration features in Central.
Users with the admin role are able to create other roles on Central. Users with the admin
role also have access to viewing operational status and alarm information from all cameras
and other devices on servers connected to Central.
• Other Roles: Users who have another role than the admin role will always have more
limited access rights. For more information about how to create other roles, as well as
which access rights it is possible to specify for such roles, see page 45.
Users
Importing Users
XProtect Central users are primarily imported from Active Directory. In order to be able to import
users through the Active Directory service, a server with Active Directory installed and acting as
domain controller must be available on your network. Read more on page 39. If you do not wish to
use Active Directory when importing users into XProtect Central, read If Not Using Active Directory
on page 43 before continuing.
1. In XProtect Central Client’s Navigation section, expand the User Configuration entry, and
right-click Users.
2. Select Import from Active Directory ... This will open the Import Users and Groups dialog:
www.milestonesys.com Page 40 Client: Users, Groups & Roles
Page 41

Milestone XProtect 3.7; Administrator’s Manual
3. In the Import Users and Groups dialog, click the Add button. This will open the Select Users
or Groups dialog:
4. In the Select Users or Groups dialog, verify that the required domain is specified in the
From this location field. If not, click the Locations... button to browse for the required
domain.
5. In the Enter the object names to select box, type the required user names, display names
or other types of identifier which Active Directory will be able to recognize.
Tip: Typing part of a name is often enough. Use the Check Names feature to verify that the
names you have entered are recognized by Active Directory.
6. Click OK. You are returned to the Import Users and Groups dialog, in which the required
users will now be listed.
7. Click OK. The required users will be imported into XProtect Central. Upon import, the
names of the imported users will be added under Users in the Client’s Navigation section.
Provided roles have been defined, you are now able to select roles for the imported users.
See Defining a New Role on page 45 and Adding a User to a Role in the following for
further information.
Adding a User to a Role
1. In the Client’s Navigation section, select User Configuration, then Users.
2. Right-click the required user name, select Add user to role ..., then select the required role.
Removing a User from a Role
1. In the Client’s Navigation section, select User Configuration, then Users.
2. Right-click the required user name, select Remove user from role ..., then select the
required role.
Removing Users
1. In XProtect Central Client’s Navigation section, expand the User Configuration entry and
right-click Users.
2. Select Import from Active Directory ... This will open the Import Users and Groups dialog:
www.milestonesys.com Page 41 Client: Users, Groups & Roles
Page 42

Milestone XProtect 3.7; Administrator’s Manual
3. In the Import Users and Groups dialog, select the users you want to remove, then click the
Remove button.
4. Click OK.
Groups
Importing Groups
All groups to be used in XProtect Central are imported from Active Directory. In order to be able to
import groups through the Active Directory service, a server with Active Directory installed and
acting as domain controller must be available on your network. Read more on page 39.
To import groups into XProtect Central, do the following:
1. In XProtect Central Client’s Navigation section, expand the User Configuration entry and
right-click Groups.
2. Select Import from Active Directory ... This will open the Import Users and Groups dialog.
3. In the Import Users and Groups dialog, click the Add button. This will open the Select Users
or Groups dialog.
4. In the Select Users or Groups dialog, verify that the required domain is specified in the
From this location field. If not, click the Locations... button to browse for the required
domain.
5. In the Enter the object names to select box, type the required group names.
Tip: Typing part of a group name is often enough. Use the Check Names feature to verify
that the names you have entered are recognized by Active Directory.
6. Click OK. You are returned to the Import Users and Groups dialog, in which the required
groups will now be listed.
7. Click OK. The required groups will be imported into XProtect Central. Upon import, the
names of the imported groups will be added under Groups in the Client’s Navigation
section. Provided roles have been defined, you are now able to select roles for the imported
groups. See Defining a New Role on page 45 and Adding a Group to a Role in the following
for further information.
www.milestonesys.com Page 42 Client: Users, Groups & Roles
Page 43

Milestone XProtect 3.7; Administrator’s Manual
Adding a Group to a Role
1. In the Client’s Navigation section, select User Configuration, then Groups.
2. Right-click the required group name, select Add group to role ..., then select the required
role.
All members of the group will get the selected role.
Removing a Group from a Role
1. In the Client’s Navigation section, select User Configuration, then Groups.
2. Right-click the required group name, select Remove group from role ..., then select the
required role.
All members of the group will be removed from the role.
Bear in mind that individual users may be members of more than one group. If you want to
be sure that a particular user is completely removed from a particular role, it is
recommended that you check whether the user is a member of other groups and, if so,
whether the user’s membership of other groups does not still tie the user to the role.
Removing Groups
To remove groups from XProtect Central, do the following:
1. In XProtect Central Client’s Navigation section, expand the User Configuration entry and
right-click Groups.
2. Select Import from Active Directory ... This will open the Import Users and Groups dialog:
3. In the Import Users and Groups dialog, select the groups you want to remove, then click
the Remove button.
4. Click OK.
If Not Using Active Directory
While Active Directory import of users and groups is the primary way of handling users in XProtect
Central, it is also possible to use XProtect Central without Active Directory.
If using XProtect Central without Active Directory, note the following:
www.milestonesys.com Page 43 Client: Users, Groups & Roles
Page 44

Milestone XProtect 3.7; Administrator’s Manual
• When installing the XProtect Central Server, the user must be a local PC user on the
server. See also page 12 and 44.
• On the computer running the XProtect Central Server, simple file sharing must be disabled
the following way:
1. On the computer running XProtect Central Server, right-click the Start button, and
select Explore.
2. In the Start Menu window, select the Tools menu, then select Folder Options...
3. Select the View tab.
4. Scroll to the bottom of the Advanced settings list, and make sure that the Use
simple file sharing (Recommended) check box is cleared.
5. Click OK, and close the Start Menu window.
• Users are imported into XProtect Central by the administrator in the XProtect Central Client
almost as when using Active Directory (see page 40). However, when importing the users,
you must refer to particular users defined on the XProtect Central Server, as in the
following example where the user USER001 on an XProtect Central server with the
computer name PC001 is imported:
• There are no changes to the way in which roles are defined by the administrator in XProtect
Central. See page 41 for more information.
• When logging in to the XProtect Central Server with an XProtect Central Client, make sure
that only user name and password is specified. Do no specify any server name, PC name or
IP address as part of the user name information.
Roles
Administrator Role
By default, XProtect Central has an administrator role, called admin. Users with the admin role
have access to the full set of configuration features in XProtect Central.
Users with the admin role also have access to viewing operational status and alarm information
from all cameras and other devices on servers connected to XProtect Central.
www.milestonesys.com Page 44 Client: Users, Groups & Roles
Page 45

Milestone XProtect 3.7; Administrator’s Manual
The admin role cannot be deleted.
It is possible to edit the admin role, but only in order to change the name of the role from the
default name admin to something else.
For information about adding users and/or groups to the admin role, see Adding a User to a Role
on page 41 and Adding a Group to a Role on page 43. It is recommended that only a few users in
your organization have the admin role.
IMPORTANT: Users who have local administrator rights on the computer on which the XProtect
Central server is installed will always be able to use XProtect Central with the rights of the
administrator role.
Defining a New Role
In XProtect Central, all other roles than the administrator role have limited access to the Client’s
feature set. None of the Client’s configuration features will be available for other roles.
What Are Users with a Non-Administrator Role Able to Do?
Users or groups defined in XProtect Central with a role other than the administrator role will be
able to:
• Connect to the XProtect Central Server with the XProtect Central Client
• View alarms and operational status information from servers and devices to which access
has been defined for the particular role
• Use maps, the visual representations allowing an intuitive overview of surveillance system
installations in the XProtect Central Client
• Print reports containing information about alarms
• If defined for role: Manage alarms (change states and priorities of alarms, re-delegate
alarms to other users, temporarily disable new alarms)
• If defined for role: Acknowledge and temporarily snooze operational status information in
the XProtect Central Client
• If defined for role: View video (recorded video, live video, and single images) in the
XProtect Central Client
• If defined for role: Change state (for example from New to Assigned) of several alarms
simultaneously (otherwise state must be changed on a per-alarm basis)
• If defined for role: Manage bookmarks (i.e. select and use individual images from exact
times within a video sequence)
Role Definition Procedure
To define a new role in XProtect Central, do the following:
1. In the Client’s Navigation section, select User Configuration, right-click Roles and select
New... This will open the Role Definition dialog:
www.milestonesys.com Page 45 Client: Users, Groups & Roles
Page 46

Milestone XProtect 3.7; Administrator’s Manual
Dialog may have extra section (highlighted in yellow in illustration) if
your organization uses plugins for connecting Central to third-party
systems (such as access control systems, fire alarm systems, etc.).
2. In the Role Definition dialog, specify a name for the new role in the Role name field.
3. In the Role Definition dialog’s Function access section, select the XProtect Central Client
features to which users and groups with the new role should have access:
• Alarm management: The right to change states and priorities of alarms, re-
delegate alarms to other users, add information to an alarm’s history, and
temporarily disable new alarms
• Operational acknowledgement: The right to acknowledge and temporarily
snooze operational status information
• View video: The right to view video (recorded video, live video, and single images,
including preview images on the Preview tab in the Client’s Information section,
and in the Client’s Alarm Detail window as well as images inserted into print
reports). See the XProtect Central User’s Manual, available on the software DVD as
well as from www.milestonesys.com, for more information about the features.
• Multiple alarm change: (Requires that Alarm management is also selected) The
right to change the state of multiple selected alarms simultaneously, using the
Multi Change button in the Client’s Alarm Overview section. Without this right, the
Multi Change button will be unavailable, and users who want to change the state of
an alarm will need to do this on a per-alarm basis, through making a new entry in
the Alarm Detail window. See the XProtect Central User’s Manual, available on the
software DVD as well as from www.milestonesys.com, for more information about
the multi change feature.
• Bookmark management: (Requires that Alarm management is also selected) The
right to manage bookmarks (selected individual images from exact times within a
video sequence) in the Client’s Video Viewer window. See the XProtect Central
User’s Manual, available on the software DVD as well as from
www.milestonesys.com, for more information about the bookmark feature.
4. In the Role Definition dialog’s Camera access section, specify the servers, cameras, and/or
other devices to which users and groups with the new role should have access. You are
www.milestonesys.com Page 46 Client: Users, Groups & Roles
Page 47

Milestone XProtect 3.7; Administrator’s Manual
able to specify this in two ways: By manual definition, or by using existing server-defined
access rights.
• Manual definition: Lets you manually select each server, camera, and/or other
device to which users or groups with the role should have access. Selection takes
place in a tree structure (see example below). To use manual definition, do the
following:
a. Select the Manual defiinition option.
b. Select required servers, cameras, and other devices in the tree structure:
Selecting a server in the tree structure will not automatically select all
cameras/events on the server in question; all cameras/events to which the role
should have access must be selected individually. However, selecting a camera or
event will automatically select the corresponding server too, as you cannot give
access to a camera without giving access to the server to which the camera is
connected.
• Server definition: Lets you use a particular user’s
access rights as they have been defined on an
XProtect Enterprise/XProtect Professional system’s
Image Server(s) or on an XProtect Corporate
Management Server. The user’s access rights will
then apply for all XProtect Central users and
groups with the role.
The user can be a real user whose access rights
match the requirements for the role, or a pseudo
user created with the sole purpose of being used
for defining the access rights of an XProtect
Central role.
To use server definition, do the following:
a. Select the Use server definition option.
b. In the User and Password fields (see illustration), type the user’s user
name and password as they have been specified on the XProtect Enterprise
or XProtect Professional server(s)/XProtect Corporate Management Server.
c. To test which devices the specified user is able to access, click the Test...
button
5. Relevant only if your organization uses plugins for connecting Central to third-party
systems: If plugins are used on your system, the Role Definition dialog will contain an extra
section called Other device access. From this section, you are able to select third party
systems to which users with the role should have access.
6. When ready, click the Save button to save the new role definition.
For information about how to add XProtect Central users and groups to the role, see Adding
a User to a Role on page 41 and Adding a Group to a Role on page 43.
www.milestonesys.com Page 47 Client: Users, Groups & Roles
Page 48

Milestone XProtect 3.7; Administrator’s Manual
Editing a Role
To edit a role, select User Configuration in the Client’s Navigation section, expand Roles, right-click
the required role and select Edit...
This will open the Role Definition dialog in which you are able to make changes to the role. For a
detailed description of the Role Definition dialog, see Defining a New Role on page 45.
Note that for the administrator role (see page 44), only the name of the role can be changed as by
default the administrator has full access to all XProtect Central configuration features and all
cameras on servers connected to XProtect Central.
Deleting a Role
You are able to delete a role even if the role has users and/or groups attached to it.
To delete a role, select User Configuration in the Client’s Navigation section, expand Roles, right-
click the unwanted role and select Delete... You will be asked to confirm that you want to delete
the role; if you are sure, click OK.
Note that the administrator role (see page 44) cannot be deleted.
www.milestonesys.com Page 48 Client: Users, Groups & Roles
Page 49

Milestone XProtect 3.7; Administrator’s Manual
Client: Alarms
Alarm Definitions
You must define alarms before they can be used in XProtect Central.
You define alarms based on events registered on your XProtect Corporate, XProtect Enterprise or
XProtect Professional installations: when a particular event (for example Motion Detected) is
registered on an XProtect Corporate, XProtect Enterprise or XProtect Professional installation, an
alarm can appear in XProtect Central.
Tip: If XProtect Corporate systems are connected to your XProtect Central solution, you can even
use XProtect Corporate’s custom events/user-defined events for triggering alarms in XProtect
Central.
If required, the same event can be used to trigger several different alarms in XProtect Central.
Defining a New Alarm
To define a new alarm, do the following:
1. In the Client’s Navigation section, right-click Alarm Definitions, then select New Alarm...
This will open the Alarm Definition dialog.
2. Type a name for the alarm in the Name field. The alarm’s name will appear whenever the
alarm is listed, for example in the Client’s Alarm Overview section, in logs, etc.
Tip: Alarm names do not have to be unique, but using unique and descriptive alarm names
can be advantageous in many situations.
3. Optionally, type a description text in the Description field.
Tip: Description texts can, for example, be used to include a list of actions which operators
must complete if the alarm occurs.
4. In the Event message list, select the event which should be used to trigger the alarm.
Some event messages will only work with XProtect Corporate systems.
What does External Event mean? An External Event is any event not directly related to
a camera or server, for example input from buttons, sensors, external data streams,
XProtect Corporate custom events/user-defined events, etc.
5. In the Sources list, select which servers, cameras or other devices the event should
originate from in order to trigger the alarm. Your options depend upon which type of event
you have selected in the Event message list.
www.milestonesys.com Page 49 Client: Alarms
Page 50

Milestone XProtect 3.7; Administrator’s Manual
Examples:
• If your alarm is based on an event like Server Not Responding, the only relevant
sources are servers. Thus, only servers will be available for selection in the Sources
list. You can either select individual servers, or all servers in one go (by selecting
the All servers box):
• If your alarm is based on a camera-related event like Motion Detected, cameras
become selectable. You can select individual cameras under a specific server, select
all cameras under a server in one go (by selecting the All sources box under the
required server), or even select all cameras under all servers in one go (by
selecting the All cameras box):
• If your alarm is based on an event like External Event (i.e. on input from buttons,
sensors, external data streams, etc.), inputs defined on the servers become
selectable. As with cameras (see previous example), you are able to select
individual inputs or some/all inputs in one go:
6. Optionally, select one or more cameras in the Related cameras list. The Related cameras
list allows you to select cameras for inclusion in the alarm definition even though they are
not themselves triggering the alarm.
This can be relevant, for example, if you have selected an external event (such as a door
being opened) as the Source for your alarm: You would of course not be able to view
recordings from the door detector itself, but by defining one or more cameras located near
the door as Related devices, you would be able to include the cameras' recordings of the
incident in the alarm. Also, if the camera triggering the alarm is unable to provide images,
the alarm will use images from the devices specified in Related cameras.
7. In the Enabled section, select when
the alarm should be enabled for
triggering in XProtect Central. If you
have not defined alarm time profiles
(see page 55), you will only be able
to select Always. If you have defined
one or more time profiles, they will
be selectable from the list.
8. In the Alarm priority list, select a priority for the alarm. Priorities can be used for sorting
purposes in the Client’s Alarm Overview list.
www.milestonesys.com Page 50 Client: Alarms
Page 51

Milestone XProtect 3.7; Administrator’s Manual
9. In the Owner list, select whether a particular user should be responsible for the alarm, or
whether it should be shared by all users. Note that because user access rights may vary,
users in the list may vary depending on your selection in the Sources list.
10. The Actions section in the lower part of the window lets you define a number of optional
actions:
• Trigger an event: Defined events on surveillance system servers trigger alarms in
Central, but with this feature you can also let Central alarms trigger custom
events/user-defined events on XProtect Corporate systems. To select required
custom events/user-defined events, click the plus sign(s) next to the required
XProtect Corporate server(s), then select the required custom event(s)/userdefined events.
The Trigger an event feature only works with XProtect Corporate systems.
• Auto close alarm on: Lets you select if the alarm should automatically switch to
Closed state upon a particular event. This is possible for alarms triggered by some
(but not all) events. For example, if your alarm is triggered by a Not Responding
camera, the alarm can be closed automatically when the camera is Responding.
The possibility of automatically closing alarms triggered by Motion Detected when a
Motion End event occurs will only work for cameras connected to XProtect
Corporate systems.
• Video destination: If Video Destinations (settings related to integration of alarms
with XProtect Matrix; see page 69) have been defined, you are able to select a
video destination to which live video will automatically be sent when the alarm
occurs. Note that you can only select a video destination if you have defined one or
more cameras among the alarm’s Sources and/or Related cameras.
• Start video viewing: Lets you control how recorded video of incidents will be
presented to users who view the recorded video in the Client’s Video Viewer
window. By specifying a number of seconds in the field, you can make the
displayed video sequence start a number of seconds before the triggering event
took place. This allows operators and other personnel to also view what took place
prior to an alarm; in some cases this can be highly valuable information. See the
XProtect Central User’s Manual, available on the software DVD as well as from
www.milestonesys.com, for more information about the Client’s Video Viewer
window.
Use of this feature requires that recorded video from before the event will actually
be available; it is thus important that you verify this. Video from before the event
may be available for various reasons, for example because the required camera
always records, or because prebuffering is used for the camera in question.
Prebuffering is a feature for provisionally keeping video on the surveillance system
server for a number of seconds regardless whether there turns out to be a reason
to keep it or not (if not, it is simply discarded). Prebuffering thus allows viewing of
recorded video from before events take place, even when a camera is otherwise
configured to only keep recorded video in the event of detected motion.
• Viewing image quality: Determines the quality of video played back in
connection with the alarm definition in question, but also affects bandwidth usage.
If the Central Client is used over the internet, over a slow network connection, or if
for other reasons you need to limit bandwidth use, image quality can be reduced on
the server side by selecting e.g. Low or Medium. When selecting a reduced image
quality, images from the selected camera is re-encoded to a JPEG format on the
surveillance system server before being sent to the Central Client. Re-encoding
takes place along the following lines:
www.milestonesys.com Page 51 Client: Alarms
Page 52

Milestone XProtect 3.7; Administrator’s Manual
o Full: The default setting, providing the full quality of the original video.
o SuperHigh: Re-encoding to an output width of 640 pixels (VGA) and a JPEG
quality level of 25%.
o High: Re-encoding to an output width of 320 pixels (QVGA) and a JPEG
quality level of 25%.
o Medium: Re-encoding to an output width of 200 pixels and a JPEG quality
level of 25%.
o Low: Re-encoding to an output width of 160 pixels and a JPEG quality level
of 20%.
Height will scale according to the width and the aspect ratio of the original video.
While using a reduced image quality helps limit bandwidth use, it will—due to the
need for re-encoding images—use additional resources on the surveillance system
server.
• Viewing frame rate: Lets you select a frame rate for video played back in
connection with the alarm definition in question. Select between Unlimited, Middle,
or Low. The effect of your selection can be illustrated as follows:
Effect Unlimited Medium Low
JPEG Send all frames Send every 4th
MPEG (I-frame) Send all frames Send all frames Send all frames
MPEG (P-frame) Send all frames Do not send any
Example: If you set the Viewing frame rate option to Low, and the surveillance
system administrator has configured a camera to feed JPEG images at a frame rate
of 20 frames per second, you will experience an average of 1 frame per second
when viewing video from that camera in the Central Client in connection with the
alarm definition in question. If the administrator had configured the camera with a
feed as low as 4 frames per second, you would, if selecting Low, experience an
average of 0,2 frames per second.
When ready, click OK to save your alarm definition.
frame
frames
Send every 20th
frame
Do not send any
frames
Editing an Alarm Definition
To edit an existing alarm definition, right-click the required alarm in the Client’s Navigation section,
then select Edit Alarm...
This will open the Alarm Definition dialog, in which you are able to edit the definition of the alarm.
The Alarm Definition dialog’s fields are described in Defining a New Alarm on page 49.
When ready, click OK to save your edited alarm definition.
Deleting an Alarm Definition
To delete an existing alarm definition, right-click the unwanted alarm in the Client’s Navigation
section, then select Delete Alarm... You will be asked to confirm that you want to delete the alarm;
if you are sure, click OK to delete the alarm.
www.milestonesys.com Page 52 Client: Alarms
Page 53

Milestone XProtect 3.7; Administrator’s Manual
Editing Alarm Settings
Alarm settings are general for all alarms on your XProtect Central system; they determine how
long alarms are kept for before they are deleted.
To edit alarm settings, do the following:
1. Right-click Alarms in the Client’s Navigation section, then select Edit Alarm Settings... This
will open the Alarm Settings dialog.
2. You are now able to edit two settings:
• The number of days for which to keep closed alarms, i.e. alarms in the states
Closed, Auto-closed, Ignore, and Reject.
This is normally set to a low number, such as 3 days, but you can define any
number up to 99.999 days, server space permitting. The value 0 can be used to
indicate keep closed alarms indefinitely, server space permitting.
• The number of days for which to keep all other alarms, i.e. alarms not in the states
Closed, Auto-closed, Ignore, and Reject.
This is normally set to a somewhat higher number, such as 30 days, but you can
define any number up to 99.999 days, server space permitting. The value 0 can be
used to indicate keep all other alarms indefinitely, server space permitting.
3. When ready, click OK to save the alarm settings.
IMPORTANT: Alarms often contain video recordings. While the alarm information itself is stored
on the XProtect Central Server, the associated video recordings are fetched from the relevant
surveillance system server when XProtect Central users wish to view them. Therefore, if it is vital
for your organization to have access to video recordings from all your alarms, make sure that video
recordings from relevant cameras are stored on relevant surveillance system servers for at least as
long as you intend to keep alarms on the XProtect Central Server.
Cleaning Up Unwanted Alarms
Occasionally you may find that one of your alarm definitions has generated too many irrelevant
alarms, and that you want to quickly get rid of all these alarms.
When this is the case, the alarm cleanup feature lets quickly you do the following with all alarms
generated on the basis of a selected alarm definition:
• Change their state
• Delete them
Example: An alarm definition based on motion detection has generated too many irrelevant alarms.
First, you edit the alarm definition so it will lead to fewer alarms in the future. Then, what do you
do with the irrelevantly generated alarms? With alarm cleanup, you can delete all alarms generated
by the alarm definition in question. Alternatively, you may decide to keep the irrelevant alarms, but
use alarm cleanup to change their states.
To use alarm cleanup, do the following:
1. In the Client’s Navigation section, right-click the required alarm definition, and select Alarm
Cleanup from the menu that appears:
www.milestonesys.com Page 53 Client: Alarms
Page 54

Milestone XProtect 3.7; Administrator’s Manual
2. The Alarm Cleanup window opens. In the Name field at the top of the window, verify that
you have selected the required alarm definition. It is very important to make sure that you
are dealing with the correct alarm.
3. The Statistics field shows how many alarms—generated on the basis of the selected alarm
definition—are stored in the XProtect Central Server’s database. The alarms are sorted by
state (New, Open, etc.). In the example illustration, the database contains 1997 alarms
generated based on our alarm definition, all of which are in the New state.
You may find that the Statistics field shows a higher number of alarms than you are
currently able to see in your Client’s Alarm Overview section. There can be a number of
reasons for this: For example, you may have used an alarm load filter so that your Alarm
Overview only lists alarms in certain states; or you may have selected that your Alarm
Overview should only list alarms associated with a specific camera (whereas the alarm
definition may cover multiple cameras, servers and/or external devices). See the XProtect
Central User’s Manual, available on the software DVD as well as from
www.milestonesys.com, for more information about alarm load filters and similar features.
4. Now select whether you want to change the state of all alarms generated on the basis of
the selected alarm definition, or whether to simply delete them:
• To change state, select Change state on all alarms generated by this definition,
then select the required new state from the list.
• To delete, select Delete all alarms generated by this definition from database,
permanently.
www.milestonesys.com Page 54 Client: Alarms
Page 55

Milestone XProtect 3.7; Administrator’s Manual
IMPORTANT: The action you select will be performed on the XProtect Central Server.
Therefore all alarms generated based on the selected alarm definition will be affected, even
though you—due to filtering or other limitations—may not see all the alarms in your Client’s
Alarm Overview section.
5. Click OK. If you selected the delete option in the previous step, the alarms will be deleted
permanently. You will therefore be asked to confirm that you want to delete the alarms.
Alarm Time Profiles
Time profiles are periods of time defined in XProtect Central. Once time profiles are defined, you
can use them when defining new alarms or editing existing alarm definitions. For example, you can
create a time profile which covers the period from 14.30 to 15.30 on Mondays, and then use the
time profile to make sure that certain alarm definitions in XProtect Central are only enabled within
the period of time covered by the time profile.
Time profiles are highly flexible: they can be based on one or more single periods of time, on one
or more recurring periods of time, or a combination of single and recurring times. Many users will
be familiar with the concepts of single and recurring time periods from calendar applications, such
as the one in Microsoft Outlook
IMPORTANT: Time profiles always apply in the XProtect Central Server’s local time.
®
.
Defining a New Time Profile
1. In the Client’s Navigation section, right-click Alarm time profiles, then select New Time
Profile... This will open the Time Profile window:
Time and date format may be different on your system
2. In the Time Profile window, type a name for the new time profile in the Name field.
Optionally, type a description of the new time profile in the Description field.
3. In the Time Profile window’s calendar, select either the Day View, Week View, or Month
View tab, then right-click inside the calendar and select either Add Single Time..., or Add
Recurring Time...
www.milestonesys.com Page 55 Client: Alarms
Page 56

Milestone XProtect 3.7; Administrator’s Manual
Tip: If you select a time period by dragging in the calendar before right-clicking, the
selected period will automatically be used in the dialog that appears when you select Add
Single Time... or Add Recurring Time...
• Single time:
When you select Add Single Time..., the Select Time dialog appears:
Specify Start time and End time. If the time is to cover whole days, select the All
day event box. When ready, click OK.
• Recurring time:
When you select Add Recurring Time..., the Select Recurring Time dialog appears:
Specify time range, recurrence pattern, and range of recurrence. When ready, click
OK.
Tip: A time profile is able to contain several periods of time. If you want your time profile
to contain further periods of time, simply add more single times or recurring times.
4. When you have specified the required time periods for your time profile, click the Time
Profile window’s OK button.
You can now use the time profile
when defining new alarms or
editing existing alarm definitions.
When defining/editing the alarm,
simply select the required time
profile in the Alarm Definition
dialog’s Enabled list.
www.milestonesys.com Page 56 Client: Alarms
Page 57

Milestone XProtect 3.7; Administrator’s Manual
Editing a Time Profile
To edit an existing time profile, right-click the required time profile in the Client’s Navigation
section, then select Edit Time profile...
This will open the Time Profile window, in which you are able to edit the definition of the alarm. The
Time Profile window’s fields are described in Defining a New Time Profile on page 55.
In the Time Profile window, edit the time profile as required. Remember that a time profile may
contain more than one time period, and that time periods may be recurring.
Tip: The small month overview in the top right corner of the Time Profile
window can help you get a quick overview of the time periods covered by the
time profile, as dates containing specified times are highlighted in bold. In the
illustration to the right, the bold dates indicate that time periods have been
specified on several days, and that a recurring time may have been specified
on Mondays.
When you have made the required changes to the time profile, click the Time
Profile window’s OK button.
Deleting a Time Profile
To delete an existing time profile, right-click the unwanted time profile in the Client’s Navigation
section, then select Delete Time Profile...
You will be asked to confirm that you want to delete the time profile; if you are sure, click OK to
delete the alarm.
You cannot delete a time profile if it is used by an alarm definition. When this is the case, you must
change the alarm definition before deleting the time profile.
Alarm Priority Names & Colors
You are able to edit alarm priority names (by default called Priority 1 to Priority 6) as well as the
colors used when listing alarms in the Client’s Alarm Overview section. Do the following:
1. In the Client’s Navigation section, expand Settings, right-click Priority Definition, and select
Edit priority definition... This will open the Priority Definition window:
www.milestonesys.com Page 57 Client: Alarms
Page 58

Milestone XProtect 3.7; Administrator’s Manual
2. In the Priority Definition window you are able to overwrite the current priority names with
new ones as required.
To change the color used when displaying alarms in the Client’s Alarm Overview section,
click the Edit button for the priority in question. This will open a standard Windows Color
dialog, in which you are able to pick a basic color or define new custom colors as required.
Tip: By clicking the Reset to Default button you can quickly revert to XProtect Central’s
default priority colors if you are not happy with the ones you have created. Note that
clicking the button only resets colors; priority names are not affected.
www.milestonesys.com Page 58 Client: Alarms
Page 59

Milestone XProtect 3.7; Administrator’s Manual
Client: Maps
What Can You Do with Maps?
Maps are basically visual representations of the environments in which your surveillance
installations exist. They are displayed in the XProtect Central Client’s Map section. Maps are
excellent for providing end users, such as security personnel, with an intuitive overview of your
systems.
Map information is stored on the XProtect Central Server, and is thus accessible by all XProtect
Central Clients.
You may use simple colored backgrounds for your maps, or you may import background images,
such as street plans, building plans, photographs, etc., and use them in your maps.
You create and manage maps using the Maps entry in the Client’s Navigation section. See Defining
a New Map on page 62 for more information.
Using Map Hierarchies
You are able to use any number of maps, and place
them in any number of hierarchies according to your
needs. By clicking map hierarchy indicators on the
maps themselves, operators can easily move up and
down through map hierarchies.
To manage a hierarchy of maps in the Client’s
Navigation section, simply move maps to required
levels in the hierarchy: Make sure the Navigation
section’s Lock check box (see page 63) is cleared,
then drag each map to the required level in the
Navigation section’s hierarchy.
Navigating Between Map Hierarchy Levels
It is possible to move between map hierarchy levels simply be selecting the required level in the
Navigation section’s hierarchy.
However, whenever you create a new map under an existing map, a map hierarchy indicator
is automatically placed in the Client’s Map section. The map hierarchy indicator serves as a
quick visual link to the new map. The same applies if you move existing maps in the
Navigation section’s hierarchy.
The map hierarchy indicator will by default be placed in the top left corner of the map under which
the new map was created, but (having cleared the Lock check box; see page 63) you can move the
indicator to any required position in the map.
When operators want to move from one map to another underlying map, they can simply click a
map hierarchy indicator.
Map hierarchy indicators may have different colors: Green map hierarchy indicators indicate that
no alarms are present on underlying maps; red map hierarchy indicators indicate that alarms or
operational status indications on underlying maps require attention.
www.milestonesys.com Page 59 Client: Maps
Page 60

Milestone XProtect 3.7; Administrator’s Manual
Example of red map hierarchy indicator
indicating alarms on underlying maps
To move to a higher level in a map hierarchy, operators click the
title bar.
button in the Map section’s
Placing Server, Camera and Device Indicators on Maps
You can easily place indicators representing servers, cameras, and other devices (for example
input/output devices or entities capable of generating system events, such as XProtect
Enterprise/XProtect Professional event buttons) on any map. This way, you can allow operators to
quickly pair alarms with exact physical locations.
To place a server, camera or other device indicator on a map, make sure the Navigation section’s
Lock check box (see page 63) is cleared, then drag the required server, camera or other device
from the Navigation section onto the required map in the Map section.
Dragging a camera indicator onto a map in the Map section
Indicators will change color according to the operational state of servers, cameras or devices they
represent. Indicators will also show if new alarms are present on a server/device. For an overview
of server and device indicators, including their colors and alarm indications, see Map Indicator
Overview on page 63.
Tip: You can make the indicators animated by right-clicking the Maps entry in the Client’s
Navigation section, then selecting Edit Map Settings... This will open the Map settings dialog, in
which you are able to select animated indicators for alarm and operation error indications
respectively.
Editing General Map Settings
Map settings are general settings shared by all maps. To edit map settings, right-click the Maps
entry in the Client’s Navigation section, then select Edit Map Settings... This will open the Map
Settings window.
Loading Map Background Images
Before you can use a background image in a map, the background image must be loaded onto the
XProtect Central Server. Loading the background image onto the XProtect Central Server ensures
that all XProtect Central Clients will be able to see it.
To load a background image onto the XProtect Central Server, do the following:
www.milestonesys.com Page 60 Client: Maps
Page 61

Milestone XProtect 3.7; Administrator’s Manual
1. Click the Map Settings window’s Load... button. This will open Windows’s standard Open
dialog.
2. Locate and select the required background image, then click the Open button. This will load
the background image onto the XProtect Central Server.
Deleting Unwanted Map Background Images
To delete a background image, select the unwanted image in the Map Settings window’s list of
background images, than click the Delete button.
Changing the Font Used in Map Indicator Fields
To change the font used in map indicator texts, click the Map Settings window’s Edit... button. This
will open a standard Windows Font dialog, in which you are able to change the following:
• Font (example: Arial)
• Font style (example: bold italic)
• Size (example: 10 pt)
• Effects (example: underline)
• Language script (example: Vietnamese)
When ready, click the Font dialog’s OK button to return to the Map Settings window.
Changing the Background Color of Map Indicator Texts
The background of map texts can be adjusted from completely transparent to a completely
saturated version of the color chosen as background color for selected items in your Windows
version.
To change the background, select a value in the Map Settings dialog’s Text background filter list. A
value of 0 will make the background completely transparent; a value of 100 will make the
background completely saturated.
The following three examples show a map text with a Text background filter value of 0, 50 and 100
respectively, where the color chosen as background color for selected items in Windows is white:
0
50
100
Using Animated Map Indicators
Indicators on maps can be still (default) or animated. When animated, indicators will blink; any
indications of new alarms will blink red/yellow.
It is possible to select animation for operational error indications, for alarm indications, or for both.
Simply select the required check boxes, Alarm messages and/or Operational error, in the Map
Settings window.
www.milestonesys.com Page 61 Client: Maps
Page 62

Milestone XProtect 3.7; Administrator’s Manual
Defining a New Map
To define a new map, do the following:
1. In the Client’s Navigation section, right-click Maps, then select New Map... This will open
the Map Setup dialog.
2. Type a name for the new map in the Map name field.
3. Select a background to be used in the map. You can either use a simple background color
or an imported image.
• Using a Background Color: Click the Color button to select a color.
Tip: You are able to create your own colors by clicking the Color dialog’s Define
Custom Colors button.
When ready, click OK.
• Using a Background Image: This requires that at least one background image has
been loaded onto the XProtect Central Server; see Editing General Map Settings on
page 60. Any loaded background images will be selectable in the Map
Setup dialog’s Background section; simply select the required background image.
4. Click the Save button. Your new map will appear in the Navigation section.
Tip: If you have a hierarchy of maps, you can easily move the map to the required level in
the hierarchy: Make sure the Navigation section’s Lock check box (see page 63) is cleared,
then simply drag the map to the required level in the hierarchy.
5. Place any required server, camera, and/or device indications on the map: Make sure the
Navigation section’s Lock check box is cleared, then drag the required servers, cameras,
and/or other devices from the Navigation section onto the map.
Editing a Map Definition
To edit the definition of an existing map, do the following:
1. In the Client’s Navigation section, right-click the
required map, then select Edit Map... This will open
the Map Setup dialog.
2. Change the map definition as required; see Defining
a New Map on page 62 for descriptions of the
dialog’s fields.
3. When ready, click the Save button.
Changing a Map’s Location in a Map Hierarchy
If you have a hierarchy of maps in the Client’s Navigation section, you
can easily move the map to the required level in the hierarchy: Make
sure the Navigation section’s Lock check box is cleared, then simply drag
the map to the required level in the hierarchy.
www.milestonesys.com Page 62 Client: Maps
Page 63

Milestone XProtect 3.7; Administrator’s Manual
Loading a New Map
Before you can use a background image in a map, the background image must be loaded onto the
XProtect Central Server. Loading the background image onto the XProtect Central Server ensures
that all XProtect Central Clients will be able to see it.
To load a background image onto the XProtect Central Server, do the following:
1. Click the Map Setup window’s Load… button. This will open Windows’s standard Open
dialog.
2. Locate and select the required background image, then click the Open button. This will load
the background image onto the XProtect Central Server.
Deleting a Map Definition
To delete a defined map, right-click the unwanted map in the Client’s Navigation section, then
select Delete Map... You will be asked to confirm that you want to delete the map; if you are sure,
click OK. You can also delete a background image from the Map Setup window; select the
unwanted background image in the Map Setup window’s list of background images, then click the
Delete button.
You cannot delete a map with content, i.e. a map containing server, camera, or device indications,
or a map which links to a map on a lower level in a map hierarchy. Remove any content before
deleting a map.
Lock Feature
The Navigation section’s Lock check box controls whether items in the Navigation section itself as
well as indicators on maps in the Map section can be moved. The Lock check box also determines
whether you are able to drag server and device indicators from the Navigation section to the Map
section and vice versa.
The Lock check box is located in the lower right corner of the Navigation section.
When the Lock check box is selected, items in Navigation section as well as map indicators
cannot be moved.
When the Lock check box is cleared, items in Navigation section as well as map indicators
are moveable.
Map Indicator Overview
Depending on configuration, maps in the Client’s Map section often display indicators representing
servers, cameras, and other devices (for example input/output devices or entities capable of
generating system events, such as XProtect Enterprise/XProtect Professional event buttons), their
operational status, and whether any alarms require attention.
The following list provides an overview of indicators and their meanings. Note that depending on
your configuration indicators may be animated (blinking).
www.milestonesys.com Page 63 Client: Maps
Page 64

Milestone XProtect 3.7; Administrator’s Manual
When viewing the list, note that New alarms are alarms in the New state; in-progress alarms
are alarms in the Open, Assigned, In Progress, Wait, or On Hold states. When an indicator signifies
no alarms, no new or in-progress alarms exist, but closed alarms (i.e. alarms in the Closed, Auto-
Closed, Reject, Ignore, and Resolved states) may exist.
Map Hierarchy Indicators
No operational errors and no alarms on underlying map (map icon on green square)
No operational errors, but in-progress alarms, on underlying map (map icon on green
square with yellow envelope icon)
No operational errors, but new alarms, on underlying map (map icon on green square
with red envelope icon; if animated indicators are used, envelope will be blinking
red/yellow)
Operational errors, but no alarms, on underlying map (map icon on red square)
Operational errors and in-progress alarms on underlying map (map icon on red square
with yellow envelope icon)
Operational errors and new alarms on underlying map (map icon on red square with
red envelope icon; if animated indicators are used, envelope will be blinking
red/yellow)
Server Indicators
Server has no operational errors and no alarms (server icon on green square)
Server has no operational errors, but has in-progress alarms (server icon on green
square with yellow envelope icon)
Server has no operational errors, but has new alarms (server icon on green square
with red envelope icon; if animated indicators are used, envelope will be blinking
red/yellow)
Server has operational errors, but no alarms (server icon on red square)
Server has operational errors and in-progress alarms (server icon on red square with
yellow envelope icon)
Server has operational errors and new alarms (server icon on red square with red
envelope icon; if animated indicators are used, envelope will be blinking red/yellow)
Server has operational status indication acknowledged or snoozed, and no alarms
(server icon on yellow square)
Server has operational status indication acknowledged or snoozed, and in-progress
alarms (server icon on yellow square with yellow envelope icon)
www.milestonesys.com Page 64 Client: Maps
Page 65

Milestone XProtect 3.7; Administrator’s Manual
Server has operational status indication acknowledged or snoozed, and new alarms
(server icon on yellow square with red envelope icon; if animated indicators are used,
envelope will be blinking red/yellow)
Server has new alarms disabled and no alarms (server icon on orange square)
Server has new alarms disabled and in-progress alarms (server icon on orange square
with yellow envelope icon)
Server has new alarms disabled and new alarms (registered before new alarms were
disabled) (server icon on orange square with red envelope icon; if animated indicators
are used, envelope will be blinking red/yellow)
What does Acknowledged and Snoozed mean? By right-clicking a server indicator
users get access to a menu from which they can acknowledge that they are aware of
the operational status of the server. The menu also lets users snooze (i.e. put on hold)
the display of operational status information from the server. Read more about using
the map indicator menus in the XProtect Central User’s Manual, available on the
software DVD as well as from www.milestonesys.com.
Camera Indicators
Camera has no operational errors and no alarms (camera icon on green square)
Camera has no operational errors, but has in-progress alarms (camera icon on green
square with yellow envelope icon)
Camera has no operational errors, but has new alarms (camera icon on green square
with red envelope icon; if animated indicators are used, envelope will be blinking
red/yellow)
Camera has operational errors, but no alarms (camera icon on red square)
Camera has operational errors and in-progress alarms (camera icon on red square
with yellow envelope icon)
Camera has operational errors and new alarms (camera icon on red square with red
envelope icon; if animated indicators are used, envelope will be blinking red/yellow)
Camera has operational status indication acknowledged or snoozed and no alarms
(camera icon on yellow square)
Camera has operational status indication acknowledged or snoozed, and in-progress
alarms (camera icon on yellow square with yellow envelope icon)
Camera has operational status indication acknowledged or snoozed, and new alarms
(camera icon on yellow square with red envelope icon; if animated indicators are used,
envelope will be blinking red/yellow)
Camera has new alarms disabled and no alarms (camera icon on orange square)
www.milestonesys.com Page 65 Client: Maps
Page 66

Milestone XProtect 3.7; Administrator’s Manual
Camera has new alarms disabled and in-progress alarms (camera icon on orange
square with yellow envelope icon)
Camera has new alarms disabled and new alarms (registered before new alarms were
disabled) (camera icon on orange square with red envelope icon; if animated
indicators are used, envelope will be blinking red/yellow)
Camera stopped (either manually or automatically according to a predefined schedule
or rule in the surveillance system) and no alarms on camera (camera icon on black
square)
Camera stopped (either manually or automatically according to a predefined schedule
or rule in the surveillance system) and in-progress alarms on camera (camera icon on
black square with yellow envelope icon)
Camera stopped (either manually or automatically according to a predefined schedule
or rule in the surveillance system), but new alarms on camera (camera icon on black
square with red envelope icon; if animated indicators are used, envelope will be
blinking red/yellow)
What does Acknowledged and Snoozed mean? By right-clicking a server indicator
users get access to a menu from which they can acknowledge that they are aware of
the operational status of the server. The menu also lets users snooze (i.e. put on hold)
the display of operational status information from the server. Read more about using
the map indicator menus in the XProtect Central User’s Manual, available on the
software DVD as well as from www.milestonesys.com.
Device Indicators - for Input Devices and Other Event-Generating Entities, such as
XProtect Enterprise/XProtect Professional Event Buttons, VMD Events, and Generic
Events)
Device has no operational errors and no alarms (lightning icon on green square)
Device has no operational errors, but has in-progress alarms (lightning icon on green
square with yellow envelope icon)
Device has no operational errors, but has new alarms (lightning icon on green square
with red envelope icon; if animated indicators are used, envelope will be blinking
red/yellow)
Device has operational errors, but no alarms (lightning icon on red square)
Device has operational errors and in-progress alarms (lightning icon on red square
with yellow envelope icon)
Device has operational errors and new alarms (lightning icon on red square with red
envelope icon; if animated indicators are used, envelope will be blinking red/yellow)
Device has operational status indication snoozed and no alarms (lightning icon on
yellow square)
www.milestonesys.com Page 66 Client: Maps
Page 67

Milestone XProtect 3.7; Administrator’s Manual
Device has operational status indication snoozed and in-progress alarms (lightning
icon on yellow square with yellow envelope icon)
Device has operational status indication snoozed and new alarms (lightning icon on
yellow square with red envelope icon; if animated indicators are used, envelope will be
blinking red/yellow)
Device has new alarms disabled and no alarms (lightning on orange square)
Device has new alarms disabled and in-progress alarms (lightning on orange square
with yellow envelope icon)
Device has new alarms disabled and new alarms (registered before new alarms were
disabled (lightning on orange square with red envelope icon; if animated indicators are
used, envelope will be blinking red/yellow)
What does Acknowledged and Snoozed mean? By right-clicking a server indicator
users get access to a menu from which they can acknowledge that they are aware of
the operational status of the server. The menu also lets users snooze (i.e. put on hold)
the display of operational status information from the server. Read more about using
the map indicator menus in the XProtect Central User’s Manual, available on the
software DVD as well as from www.milestonesys.com.
www.milestonesys.com Page 67 Client: Maps
Page 68

Milestone XProtect 3.7; Administrator’s Manual
Client: Logging
Editing Log Settings
To specify or edit logging settings for your XProtect Central solution, expand the Settings entry in
the Client’s Navigation section, right-click Log Settings, and select Edit Log Settings... This will
open the Log Settings dialog, which contains the following fields:
• Keep log for [xx] day(s): Lets you specify the number of days for which to keep the
XProtect Central log. Default is 30 days. A value of 0 will indicate keep log indefinitely
(server space permitting).
• Log server communication: Select check box if you want to save a separate log of server
communication in addition to the regular log, for the number of days specified.
Log Locations
Log and trace files are located in a Logs folder on the XProtect Central Server, typically in
C:\Program Files\Milestone\Milestone XProtect Central Server\logs.
• Log files named along the structure Cyyyy-mm-dd.log (example: C2007-06-15.log) are
daily generated general logs.
• Log files named along the structure Eventyyyy-mm-dd.log e.g. Event2007-06-15.log) are
daily generated logs of events occurred on XProtect Corporate, XProtect Enterprise or
XProtect Professional servers.
For this type of logs to be generated, Event logging must be enabled individually for
required servers in XProtect Central Client; see Defining a New Server on page 34.
• Log files named according to the structure traceyyyy-mm-dd-hh-mm-ss.log are logs of
traced server communication, where hh-mm-ss indicates the time of the first entry in the
log. Example: trace2007-06-15-13-05-00.log for a trace log file with a first entry generated
at five minutes past one in the afternoon on 15th June 2007.
For this type of logs to be generated, Trace server communication must be enabled in the
XProtect Central Client; see Editing Log Settings above.
Log Date & Time Format
Information in logs on the XProtect Central Server is presented with timestamps in local time with
an indication of the GMT offset. Example: A timestamp of 15-06-2007 13:16:00 GMT+02:00 for a
log entry from sixteen minutes past one in the afternoon on 15th June 2007 in a time zone which is
two hours ahead of GMT.
Tip: GMT (Greenwich Mean Time) is the former official world reference for time. It is still widely
used, but has officially been replaced by UTC (Coordinated Universal Time). UTC, which is based
upon atomic clocks, is considered more accurate than GMT, which is based on the Earth’s rotation
and references to the positions of celestial bodies. In day-to-day use the difference is negligible,
and GMT and UTC are often used interchangeably.
www.milestonesys.com Page 68 Client: Logging
Page 69

Milestone XProtect 3.7; Administrator’s Manual
Client: Video Destinations
The video destinations feature allows you to specify Matrix recipients for use by XProtect Central. A
Matrix recipient is a computer capable of viewing XProtect Matrix-triggered live video. This is
possible on computers with either the XProtect Matrix Monitor or the XProtect Smart Client
installed.
For XProtect Corporate installations used with your XProtect Central solution, only Matrix recipients
with an XProtect Smart Client installed are supported.
Once Matrix recipients are defined, you can—when creating or editing alarm definitions; see page
49—specify that live video should be sent automatically to a required Matrix recipient when an
alarm is triggered. Operators will also be able to manually send live video from a selected camera
to a Matrix recipient, either by right-clicking the required camera on a map, or by pressing a
particular key on their keyboards.
Defining a Video Destination
To define a new video destination, do the following:
1. Expand the Settings item in the Client’s Navigation section, right-click Video Destinations,
and select New... This will open the Video Destination Setup window.
2. In the Video Destination Setup window’s Name field, type a descriptive name for the video
destination.
3. In the Address field, specify the IP address (example: 123.123.123.123) or host name
(example: ourserver) of the required Matrix recipient.
Tip: XProtect Central automatically detects whether the Matrix recipient in question uses
an XProtect Matrix Monitor or an XProtect Smart Client.
4. In the Port field, specify the port number to be used when connecting to the Matrix
recipient. By default port 12345 is used for such connections, but note that a different port
number may be used from some Matrix recipients.
5. In the Password field, type the password required when connecting to the Matrix recipient.
6. In the Activation hot key list, select a key (from F5 to F12) to be used as a keyboard
shortcut for quickly sending live video from a selected camera to the Matrix recipient.
7. Click the Save button. Your video destination will be listed in the Client’s Navigation
section, and you will be able to select it when creating or editing alarm definitions.
Editing a Video Destination
To edit an existing video destination definition, right-click the required video destination item in the
Client’s Navigation section, and select Edit... This will open the Video Destination Setup window, in
which you are able to make changes to the video destination definition. The Video Destination
Setup window’s fields are described in Defining a Video Destination above.
www.milestonesys.com Page 69 Client: Video Destinations
Page 70

Milestone XProtect 3.7; Administrator’s Manual
Client: Version Information
You may occasionally require information about the exact version of your XProtect Central Client,
for example if you require support for your product.
To view information about your Client version, including the exact version number, click the Central
Client icon in the top left corner of the Client window, and select About...:
This will open a window displaying detailed information about your XProtect Central Client. The
version number, which may also include letters, for example 3.7a, will appear in the lower part of
the window.
www.milestonesys.com Page 70 Client: Version Information
Page 71

Milestone XProtect 3.7; Administrator’s Manual
Backing Up & Restoring the XProtect Central Database
Why Back Up?
The XProtect Central Server stores data in a database. The database can be stored in two different
ways:
• Network SQL Server: You have chosen to store XProtect Central data in a database on an
existing SQL Server on your network. When that is the case, XProtect Central simply points
to the database’s location on the SQL Server.
• SQL Server Express Edition: You have chosen to store XProtect Central data in a SQL
Server Express Edition database on the XProtect Central Server itself.
Regularly backing up your XProtect Central database is always recommended: Having a backup
gives you the ability to restore your XProtect Central data—primarily alarms—in a disaster recovery
scenario. However, backing up also has the added benefit that it flushes the SQL Server’s
transaction log.
What is the SQL Server transaction log, and why does it need to be flushed?
Each time a change in the XProtect Central data occurs, the SQL Server will log the change in its
transaction log—regardless whether it is a SQL Server on your network or a SQL Server Express
edition. The transaction log is essentially a security feature that makes it possible to roll back and
undo changes to the SQL Server database. The SQL Server by default stores its transaction log
indefinitely, and therefore the transaction log will over time build up more and more entries.
The SQL Server’s transaction log is by default located on the system drive, and if the transaction
log just grows and grows, it may in the end prevent Windows from running properly. Flushing the
SQL Server’s transaction log from time to time is thus a good idea; flushing it does not in itself
make the transaction log file smaller, but it prevents it from growing out of control. XProtect
Central does not, however, automatically flush the SQL Server’s transaction log at specific
intervals. This is because users have different needs. Some want to be able to undo changes for a
very long time, others do not care; what would suit one organization’s needs could be problematic
for others.
You can do several things on the SQL Server itself to keep the size of the transaction log down,
including truncating and/or shrinking the transaction log (for numerous articles on this topic, go to
support.microsoft.com and search for SQL Server transaction log). However, backing up XProtect
Central’s database is generally a better option since it flushes the SQL Server’s transaction log and
gives you the security of being able to restore your XProtect Central data in case something
unexpected happens.
Prerequisites
You will need:
• Microsoft
www.microsoft.com/downloads. Among its many features for managing SQL Server
www.milestonesys.com Page 71 Backing Up & Restoring the …
®
SQL Server Management Studio Express, a tool downloadable for free from
Page 72

Milestone XProtect 3.7; Administrator’s Manual
databases are some easy-to-use backup and restoration features. Download and install the
tool on your existing Management Server. Other backup tools than SQL Server
Management Studio Express will also work, but this document describes use of SQL Server
Management Studio Express.
Backing Up the Database
1. Stop the Central Server service to prevent changes to the database being made during the
backup process. Note that XProtect Central basically will not work while the Central Server
service is stopped; it is thus important to remember to start the service again once you
have finished backing up the database.
2. Open Microsoft SQL Server Management Studio
Express from Windows’ Start menu, typically by
selecting All Programs > Microsoft SQL Server 2005
> SQL Server Management Studio Express. When
you open the tool, you are prompted to connect to a
server. Specify the name of the required SQL Server
(in the example illustration in the following, the
server is called MM01232), and connect with the
user account under which the database was created.
Tip: You do not have to type the name of the SQL
server: If you click inside the Server name field and
select <Browse for more...>, you can select the required SQL Server from a list instead.
Once connected, you will see a tree structure in the Object Explorer in the left part of the
window. Expand the SQL Server item, then the Databases item. We are primarily
interested in the VIDEOOS_CENTRAL database.
3. Right-click the VIDEOOS_CENTRAL database, and select Tasks > Back Up...
4. On the Back Up Database dialog’s General page, do the following:
• Under Source: Verify that the selected database is VIDEOOS_CENTRAL and that the
backup type is Full.
• Under Destination: A destination path for the backup is automatically suggested.
Verify that the path is satisfactory. If not, remove the suggested path, and add
another path of your choice.
5. On the Back Up Database dialog’s Options page, do the following:
• Under Reliability: Select Verify backup when finished and Perform checksum before
writing to media.
6. When ready, click OK to begin the backup. When backup is finished, you will see a
confirmation. When finished, exit Microsoft SQL Server Management Studio Express.
7. During the backup process, the Central Server service was stopped to prevent database
changes being made until you were done. Remember to start the Central Server service
again.
www.milestonesys.com Page 72 Backing Up & Restoring the …
Page 73

Milestone XProtect 3.7; Administrator’s Manual
Restoring the Database
Luckily, most users never need to restore their backed-up XProtect Central database, but if you
ever have the need, use the following process:
1. Stop the Central Server service to prevent changes to the database being made during the
backup process. Note that XProtect Central basically will not work while the Central Server
service is stopped; it is thus important to remember to start the service again once you
have finished restoring the database.
2. Open Microsoft SQL Server Management Studio Express from Windows’ Start menu,
typically by selecting All Programs > Microsoft SQL Server 2005 > SQL Server Management
Studio Express. When you open the tool, you are prompted to connect to a server. Specify
the name of the required SQL Server, and connect.
3. Once connected, you will see a tree structure in the Object Explorer in the left part of the
window. Expand the SQL Server item, then the Databases item.
4. Right-click the VIDEOOS_CENTRAL database, and select Tasks > Restore > Database...
5. The Restore Database dialog’s General page, do the following: Under Source for restore,
select From device, and click the
6. In the Specify Backup dialog’s Backup media list, make sure that File is selected. Then click
the Add button.
7. In the Locate Backup File dialog, locate and select your backup file
VIDEOOS_CENTRAL.bak. Then click OK.
8. Back in the Specify Backup dialog, the path to your backup file is now listed. Click OK.
9. Back on the Restore Database dialog’s General page, your backup is now listed under
Select the backup sets to restore. Make sure you select the backup by selecting the check
box in the Restore column.
10. Now go to the Restore Database dialog’s Options page, and select Overwrite the existing
database. Leave the other options as they are.
11. When ready, click OK to begin the restoration. When the restoration is finished, you will
see a confirmation. When finished, exit Microsoft SQL Server Management Studio Express.
Tip: If instead you get an error message telling you that the database is in use, try exiting
Microsoft SQL Server Management Studio Express completely, then repeat steps 1-10.
12. During the backup process, the Central Server service was stopped to prevent database
changes being made until you were done. Remember to start the Central Server service
again.
button to the right of the field.
www.milestonesys.com Page 73 Backing Up & Restoring the …
Page 74

Milestone XProtect 3.7; Administrator’s Manual
Removal
Server
To completely remove the XProtect Central Server, you must remove the server software as well as
the Microsoft SQL Server Express Edition acting as XProtect Central’s database.
Removing the Server Software
To remove the XProtect Central Server, do the following on the computer on which XProtect Central
Server is installed:
1. Open Windows' Control Panel by selecting Start > Control Panel.
2. In the Control Panel, select Add or Remove Programs. This will open the Add or Remove
Programs window.
3. In the Add or Remove Programs window’s list of currently installed programs, select
Milestone XProtect Central Server, click the Remove button and follow the instructions.
4. When ready, close the Add or Remove Programs window and the Control Panel window.
Removing the SQL Server Database
Removing the database will delete all alarms generated in your XProtect Central solution; you will
thus not be able to see the alarm information again. As opposed to alarm information, video
recordings will not be deleted by removing the XProtect Central database, as video is stored in
separate databases and/or archives for the surveillance system servers.
To remove the Microsoft SQL Server Express Edition acting as XProtect Central’s database, do the
following:
1. Open Windows' Control Panel by selecting Start > Control Panel.
2. In the Control Panel, select Add or Remove Programs. This will open the Add or Remove
Programs window.
3. In the Add or Remove Programs window’s list of currently installed programs, select
Microsoft SQL Server, and click the Remove button. This will open the Microsoft SQL Server
Uninstall window.
4. In the Microsoft SQL Server Uninstall window, make sure the Remove SQL Server instance
components check box is selected, then select the instance VIDEOOS_CENTRAL: Database
Engine.
5. Click Next and follow the simple instructions.
6. When ready, close the Add or Remove Programs window and the Control Panel window.
www.milestonesys.com Page 74 Removal
Page 75

Milestone XProtect 3.7; Administrator’s Manual
Client
To remove the XProtect Central Client, do the following on the computer on which XProtect Central
Client is installed:
1. Open Windows' Control Panel by selecting Start > Control Panel.
2. In the Control Panel, select Add or Remove Programs. This will open the Add or Remove
Programs window.
3. In the Add or Remove Programs window’s list of currently installed programs, select
Milestone XProtect Central Client, click the Remove button and follow the instructions.
4. When ready, close the Add or Remove Programs window and the Control Panel window.
www.milestonesys.com Page 75 Removal
Page 76

Milestone XProtect 3.7; Administrator’s Manual
Index
—.—
.NET Framework.............................................................................................................. 13
—A—
About Box....................................................................................................................... 70
Actions, Selecting in Alarm Definitions ................................................................................ 51
Activation Hot Key, Video Destinations................................................................................69
Active Directory...............................................................................................................39
Active Directory, If Not Using.............................................................................................43
Address, Video Destinations .............................................................................................. 69
Admin............................................................................................................................ 44
Administrator Role ...........................................................................................................44
Alarm Definitions, Defining................................................................................................49
Alarm Definitions, Deleting................................................................................................ 52
Alarm Definitions, Editing.................................................................................................. 52
Alarm Definitions, Editing General Settings..........................................................................53
Alarm Management, Role Right.......................................................................................... 46
Alarm Overview Section, Client.......................................................................................... 29
Alarm Priority Names and Colors........................................................................................ 57
Alarm Priority, Alarm Definitions ........................................................................................ 50
Alarm Time Profiles, Defining............................................................................................. 55
Alarm Time Profiles, Deleting............................................................................................. 57
Alarm Time Profiles, Editing............................................................................................... 57
Alarm Time Profiles, Selecting in Alarm Definitions................................................................ 50
Alarms Cleanup ...............................................................................................................53
Alarms, Cleaning Up Unwanted.......................................................................................... 53
Alarms, Number of Days to Keep........................................................................................53
Animated Map Indicators .................................................................................................. 61
Auto Close Alarm On, Alarm Definitions............................................................................... 51
—B—
Back Up XProtect Central Database .................................................................................... 71
Background Color, Changing for Text on Map Indicators ........................................................ 61
Bookmark Management, Role Right ....................................................................................46
—C—
Camera Indicators ........................................................................................................... 63
Camera Indicators, Placing on Maps....................................................................................60
Cannot Load Type …......................................................................................................... 20
Central License Key.......................................................................................................... 32
Change State on All Alarms Generated by … ........................................................................ 54
Client Installation............................................................................................................. 25
www.milestonesys.com Page 76 Index
Page 77

Milestone XProtect 3.7; Administrator’s Manual
Client Removal................................................................................................................ 75
Client, Overview of........................................................................................................... 29
Closed Alarms, Number of Days to Keep..............................................................................53
Configuration, Suggested Sequence.................................................................................... 31
Copyright .........................................................................................................................8
Corporate Servers, Defining in Central................................................................................ 34
Customization, Client ....................................................................................................... 30
—D—
Database Location............................................................................................................14
Database Password for ‘sa’................................................................................................14
Database, Back Up & Restore ............................................................................................ 71
Delete All Alarms Generated by … ...................................................................................... 54
Device Indicators............................................................................................................. 63
Device Indicators, Placing on Maps..................................................................................... 60
Disable Server................................................................................................................. 36
Disclaimer ........................................................................................................................8
Display Name, Alarm Priorities........................................................................................... 57
DLL Files, Server..............................................................................................................23
—E—
Enable Server..................................................................................................................36
Enabled, Selecting When Alarm Definitions Should Be ........................................................... 50
Enterprise Servers, Defining in Central................................................................................ 34
Enterprise Version, 5.6c or Later Recommended................................................................... 13
Error 401 - Unauthorized .................................................................................................. 18
Event Logging ................................................................................................................. 36
Event Message, Selecting in Alarm Definitions......................................................................49
EXE Files, Server ............................................................................................................. 23
External Event, Alarm Definitions....................................................................................... 49
—F—
File Locations on Server....................................................................................................23
Folders, Grouping Servers in ............................................................................................. 37
Font, Changing for Indicators on Maps................................................................................ 61
Framework, .NET............................................................................................................. 13
—G—
Grouping Servers............................................................................................................. 37
Groups, Adding to Roles.................................................................................................... 43
Groups, Importing ........................................................................................................... 42
Groups, Removing ........................................................................................................... 43
Groups, Removing from Roles............................................................................................ 43
—H—
Hierarchies, Maps ............................................................................................................ 59
—I—
IIS................................................................................................................................. 12
www.milestonesys.com Page 77 Index
Page 78

Milestone XProtect 3.7; Administrator’s Manual
Image Server.................................................................................................................. 35
Images, Using as Backgrounds on Maps.............................................................................. 60
Indicators....................................................................................................................... 63
Indicators, Placing on Maps............................................................................................... 60
Information Section, Client................................................................................................ 29
Installation, Client............................................................................................................ 25
Internet Information Services............................................................................................ 12
Irrelevant Alarms............................................................................................................. 53
—K—
Keep Log For (Days) ........................................................................................................ 68
—L—
License Registration ......................................................................................................... 32
Lock...............................................................................................................................63
Log Date and Time Format................................................................................................ 68
Log Files......................................................................................................................... 23
Log Locations.................................................................................................................. 68
Log Settings.................................................................................................................... 68
Logging In, Client ............................................................................................................ 27
Logging Out, Client .......................................................................................................... 28
Login Error.................................................................................................................18, 20
—M—
MAC Address, Server........................................................................................................ 32
Manual Entry, Role Definition Method.................................................................................. 47
Map Hierarchies............................................................................................................... 59
Map Indicators ........................................................................................................... 60, 63
Map Indicators, Animated ................................................................................................. 61
Map Indicators, Changing Background Color of Text.............................................................. 61
Map Indicators, Changing Font........................................................................................... 61
Map Section, Client ..........................................................................................................29
Map Settings, General ...................................................................................................... 60
Maps, Defining ................................................................................................................ 62
Maps, Deleting ................................................................................................................ 63
Maps, Editing ..................................................................................................................62
Maps, Loading and Deleting Background Images .................................................................. 60
Maps, Lock Feature.......................................................................................................... 63
Maps, What You Can Do With ............................................................................................ 59
Matrix ............................................................................................................................69
Method Not Allowed ......................................................................................................... 20
MSDE Database, Reuse of................................................................................................. 12
Multiple Alarm Change Role Right....................................................................................... 46
—N—
Navigation Section, Client ................................................................................................. 29
www.milestonesys.com Page 78 Index
Page 79

Milestone XProtect 3.7; Administrator’s Manual
Navigation Section, Lock Feature........................................................................................ 63
—O—
Operational Acknowledgement, Role Right...........................................................................46
Other Device Access, Role Definition................................................................................... 47
Owner, Selecting in Alarm Definitions ................................................................................. 51
—P—
Password, Role Definition..................................................................................................47
Password, Server Connection........................................................................................34, 35
Password, Video Destinations ............................................................................................ 69
Plugins........................................................................................................................... 47
Port ...............................................................................................................................34
Port, Video Destinations.................................................................................................... 69
Priority Definition.............................................................................................................57
Priority Names and Colors................................................................................................. 57
Priority, Selecting in Alarm Definitions ................................................................................ 50
Product Overview...............................................................................................................9
Professional Servers, Defining in Central ............................................................................. 34
Professional Version, 6.5b or Later Recommended................................................................ 13
—R—
Recurring Time, Alarm Time Profiles ...................................................................................56
Removal, Client............................................................................................................... 75
Removal, Server.............................................................................................................. 74
Reset to Default, Alarm Priority Names and Colors................................................................58
Restore Backed-up XProtect Central Database...................................................................... 73
Roles, Adding Groups to.................................................................................................... 43
Roles, Adding Users to...................................................................................................... 41
Roles, Defining................................................................................................................ 45
Roles, Deleting................................................................................................................ 48
Roles, Editing.................................................................................................................. 48
Roles, Removing Groups from............................................................................................ 43
Roles, Removing Users from..............................................................................................41
—S—
Server Address................................................................................................................34
Server Connection ........................................................................................................... 34
Server Definition, Role Definition Method.............................................................................47
Server File Locations ........................................................................................................23
Server Indicators............................................................................................................. 63
Server Indicators, Placing on Maps..................................................................................... 60
Server MAC Address......................................................................................................... 32
Server Removal............................................................................................................... 74
Server Type.................................................................................................................... 34
Server Web Site (IIS Defined) ........................................................................................... 14
www.milestonesys.com Page 79 Index
Page 80

Milestone XProtect 3.7; Administrator’s Manual
Server, Enable/Disable ..................................................................................................... 36
Servers, Grouping............................................................................................................ 37
Single Time, Alarm Time Profiles........................................................................................ 56
Slave Servers..................................................................................................................37
SLC ..........................................................................................................................14, 32
Software License Code.................................................................................................14, 32
Sources, Selecting in Alarm Definitions ............................................................................... 49
SQL Server Desktop Engine Database, Reuse of ...................................................................12
SQL Server Transaction Log...............................................................................................71
Start Video Viewing, Alarm Definitions ................................................................................51
Surveillance Servers, Defining in Central............................................................................. 34
—T—
Target Audience ................................................................................................................2
Test Button, Role Definition...............................................................................................47
Test Button, Server Connection.......................................................................................... 36
Text, Changing Background Color for Map Indicators............................................................. 61
Time Profiles, Defining...................................................................................................... 55
Time Profiles, Deleting...................................................................................................... 57
Time Profiles, Editing........................................................................................................ 57
Time Zones, Use Across....................................................................................................24
Trace Files.................................................................................................................23, 68
Trace Server Communication.............................................................................................68
Trademarks ......................................................................................................................8
Transaction Log, SQL Server..............................................................................................71
Trigger an Event, Alarm Definitions .................................................................................... 51
Troubleshooting, Client/Server Connection .......................................................................... 18
—U—
Unable to Login … Cannot Load Type …............................................................................... 20
Uninstallation, Client ........................................................................................................75
Uninstallation, Server....................................................................................................... 74
Unwanted Alarms............................................................................................................. 53
Updates.......................................................................................................................... 10
Upgrading from Previous Version, Client.............................................................................. 25
Upgrading from Previous Version, Server.............................................................................12
User Name, Role Definition................................................................................................ 47
User Name, Server Connection .....................................................................................34, 35
User, Role Definition......................................................................................................... 47
Users, Adding to Roles...................................................................................................... 41
Users, Importing.............................................................................................................. 40
Users, Removing.............................................................................................................. 41
Users, Removing from Roles..............................................................................................41
www.milestonesys.com Page 80 Index
Page 81

Milestone XProtect 3.7; Administrator’s Manual
—V—
Version Information, Viewing in Client.................................................................................70
Video Destinations, Defining..............................................................................................69
Video Destinations, Editing................................................................................................ 69
Video Destinations, Selecting in Alarm De finitions.................................................................51
Vista, Windows...........................................................................................................13, 16
—W—
Windows Vista............................................................................................................13, 16
—X—
XML Server Definition.......................................................................................................23
XProtect Corporate Servers, Defining in Central.................................................................... 34
XProtect Enterprise Servers, Defining in Central ...................................................................34
XProtect Enterprise Version, 5.6c or Later Recommended ......................................................13
XProtect Matrix................................................................................................................ 69
XProtect Professional Servers, Defining in Central................................................................. 34
XProtect Professional Version, 6.5b or Later Recommended....................................................13
www.milestonesys.com Page 81 Index
Page 82

Milestone Systems offices are
located across the world. For
details about office addresses,
phone and fax numbers, visit
www.milestonesys.com.
 Loading...