

Page 1
V3.01
Page 2

User Manual
Installation Notes
Please be advised of the following tips before using your NVR:
Keep all liquids away from the NVR.
Place the NVR in a well-ventilated environment.
Ensure NVR is running within the allowed humidity and operating temperature.
It will lead to shorting when dust on the circuit board of NVR gets damp; please dedust
regularly with banister brush regarding the circuit board, connector, chassis and chassis fan.
Improper replacement of the battery may result in hazard of explosion. Direct replacement
conducted by users is prohibited. Replace with the same or equivalent type only.
Note
The equipment mainly mentioned in this manual is MS-N1000/MS-N5000/MS-N7000
/MS-N8000 Series NVR, including:
MS-N1004/MS-N1008/MS-N5008/MS-N5016/MS-N7016/MS-N8016.
Page 3

User Manual
Content
1. Product Introduction ..................................................................................................................... 1
1.1 Introduction ......................................................................................................................... 1
1.2 Product Key Functions ........................................................................................................ 1
2. Hardware ....................................................................................................................................... 3
2.1 Panel Buttons and Lights Instructions ................................................................................. 4
2.2 Using a USB Mouse ............................................................................................................ 7
2.3 IR Remote Controller .......................................................................................................... 8
3. Local Operation .......................................................................................................................... 10
3.1 Wizard Setting ................................................................................................................... 10
3.2 Playback ............................................................................................................................ 12
3.2.1 Video Playback ....................................................................................................... 12
3.2.2 Picture Playback ..................................................................................................... 17
3.3 Camera Settings ................................................................................................................ 20
3.3.1 Camera Management ............................................................................................. 20
3.3.2 Camera Search ....................................................................................................... 27
3.3.3 PTZ Configuration ................................................................................................. 30
3.3.4 Privacy Mask .......................................................................................................... 37
3.3.5 OSD configuration ................................................................................................. 38
3.4 Record Settings ................................................................................................................. 40
3.4.1 Record Mode .......................................................................................................... 41
3.4.2 Record Schedule Setting ........................................................................................ 42
3.4.2 Advanced settings................................................................................................... 48
3.5 Event Settings ................................................................................................................... 49
3.5.1 Video Loss .............................................................................................................. 49
3.5.2 Motion Detection ................................................................................................... 53
3.5.3 Alarm Input ............................................................................................................ 59
3.5.4 Alarm Output .......................................................................................................... 62
3.5.4 Exception ............................................................................................................... 63
3.6 Status ................................................................................................................................. 65
3.6.1 Device Information ................................................................................................ 65
3.6.2 Network Status ....................................................................................................... 65
3.6.3 Camera Status ........................................................................................................ 66
3.6.4 Disk Status ............................................................................................................. 67
3.6.5 Event Status ............................................................................................................ 67
3.7 Live View Settings ............................................................................................................ 69
3.7.1 Live View ............................................................................................................... 69
3.7.2 Layout Configuration ............................................................................................. 71
3.7.3 More Settings ......................................................................................................... 72
3.8 System Settings ................................................................................................................. 73
3.8.1 General Setting ....................................................................................................... 73
3.8.2 Network Settings .................................................................................................... 74
3.8.3 Disk Management .................................................................................................. 81
Page 4

User Manual
3.8.4 Holiday Configuration ........................................................................................... 84
3.8.5 User Account Settings ............................................................................................ 85
3.8.6 Upgrade .................................................................................................................. 88
3.8.7 Save/Load Configuration ....................................................................................... 90
3.8.8 Auto Maintenance .................................................................................................. 92
3.9 Shutdown .......................................................................................................................... 93
3.9.1 Logout .................................................................................................................... 93
3.9.2 Reboot .................................................................................................................... 93
3.9.3 Shutdown ............................................................................................................... 93
3.9.4 Close....................................................................................................................... 93
4. Service......................................................................................................................................... 94
Page 5

User Manual
www.milesight.com 1
1. Product Introduction
1.1 Introduction
Milesight NVR Series are positioned at management and storage application of HD video
data, and own multi-disc management systems, front end HD device management system,
HD video analysis system and high-capacity system for video. It adopts the technology of
high flow capacity data network transmitting & transmission, with multi-channel video
decoding, to achieve functions like intelligent management, safe storage, HD decoding etc.
1.2 Product Key Functions
Basic Information
Milesight NVR Series including MS-N1000/MS-N5000/MS-N8000, can work with IP
camera and connect with third party IP cameras which support ONVIF.
Monitoring
Supports HDMI video output, can live view and play back separately.
For HD HDMI display, maximum to 1920*1080P resolution.
Supports 1/4/8/8_1/9 /16 screen live view, channel sequence is adjustable.
Supports live view fast menu operating.
Supports live view group switch, manual switch and automatic patrol, the interval of
automatic sequence can be adjusted.
Supports motion detection, video loss alert.
Supports various PTZ protocols, PTZ preset, auto patrol and patrol pattern.
Supports central zoom in by clicking the mouse at arbitrary area.
Supports privacy mask
Supports OSD title and date configuration
HDD Management
Supports S.M.A.R.T technology.
Recording/Snapshot and Playback
Support holiday‟s time.
Support recycle and non-recycle recording mode.
Support multiple recoding types, including timing, alarm, motion detection, motion or
alarm, motion and alarm, etc.
Support 12 recording time periods with separate recording types.
Support pre-record and post-record time for motion detection or snapshot, alarm
recording or snapshot, motion and alarm recording, motion or alarm recording. And
supports pre-record for manual and timing.
Page 6

User Manual
www.milesight.com 2
Supports local recording/snapshot.
Supports digital zoom function at arbitrary area in playback.
Supports video data playback.
Supports pause, fast play, slow play, skip forward, and skip backward when playback,
locating in progress bar by dragging the mouse.
Supports snapshot manually.
Backup
Supports USB port backup.
Supports FAT32 format backup
Supports backup device maintenance and management.
Alarm & Exception
Supports video loss alarm.
Supports motion detect configure and alarm
Supports Network disconnected/HDD Full/Record Fail/HDD Error abnormal alarm
Supports various alarm response such as audible warning, send email, camera motion
detecting, on/off relay
Other Functions:
Supports multi-level user management, administrator can create multiple users with
access rights.
Supports manual triggering and clearing of alarms.
Supports operation of configured information import/export.
Network:
Supports unicast and multicast, support TCP, UDP, and RTP for unicast.
Supports remote search, playback and download of video files, support breakpoint
resume.
Supports remote acquiring and configuring of parameters, support remote import and
export of device parameters.
Supports P2P remote access.
Supports remote acquiring of device status, system log and alarm status.
Supports remote button operation.
Supports remote operate system maintenance by format of hard disk, upgrade, and
reboot, etc.
Supports upload alarm and exceptions to remote host.
Supports remote manual start or stop of recording.
Supports remote manual start or stop of alarm output.
Supports remote BMP image capturing.
Supports remote PTZ control
Built-in WEB Server
Page 7

User Manual
www.milesight.com 3
Model
MS-N1004/
MS-N1008
MS-N5008
MS-N5016
MS-N7016
MS-N8016
Video/Audio
Input
Network Video
Input
4/8 8 16
16
Bandwidth
Requirement
20Mbps/40
Mbps
40Mbps
80Mbps
80Mbps
Audio Input
- - 1*3.5mm
1*RCA
Video/Audio
Output
HDMI Output
1 1 1
1
VGA Output
- - -
1
Audio Output
- - 1*3.5mm
1*RCA
Recording
Resolution
3MP/1080P/UXGA/720P/VGA/D1/CIF/QCIF
5MP/3MP/1080P/UXGA/720P/V
GA/D1/CIF/QCIF
Synchronous
Playback
4/8 8 16
16
Video/Audio
Compression
video
H.264
Audio
Compression
G.711 U-Law
Audio Bit Rate
8Kbps
Storage
Drivers
2 SATA
HDD (2.5‟)
2 SATA HDD (3.5‟)
4 SATA HDD
(3.5‟)
8 SATA HDD
(3.5‟)
External
Storage
- - -
1 eSATA
Capacity
Up to 2TB
capacity for
each HDD
Up to 4TB capacity for each HDD
Recording
Management
Recording
Manual recording, timer recording, motion detection recording, alarm recording,
motion detection recording or alarm recording, motion detection recording and
alarm recording
Snapshot
Manual Snapshot, Motion Detection Snapshot, Alarm Snapshot, Snapshot to Email
Playback
Video playback, Image playback
Backup
Backup
Video backup/Image backup
Network
Protocol
IPv4, HTTP, NTP, SMTP, PPPoE, DDNS
External
Interface
Network
Interface
2 RJ45 100M/1000M
2 RJ45 100M/1000M
Serial Interface
- - -
1 RS-485 for PTZ
- - -
1 RS-232 for Console
- - -
1 RS-485 for Keyboard
USB Interface
2 USB 2.0
4 USB 2.0
Alarm Input
- - 4
16
Alarm Output
- - 2
4
Power Supply
DC12V
1.5A
DC12V 5A
AC 100-240V 47Hz-63Hz
Page 8
User Manual
www.milesight.com 4
2. Hardware
2.1 Panel Buttons and Lights Instructions
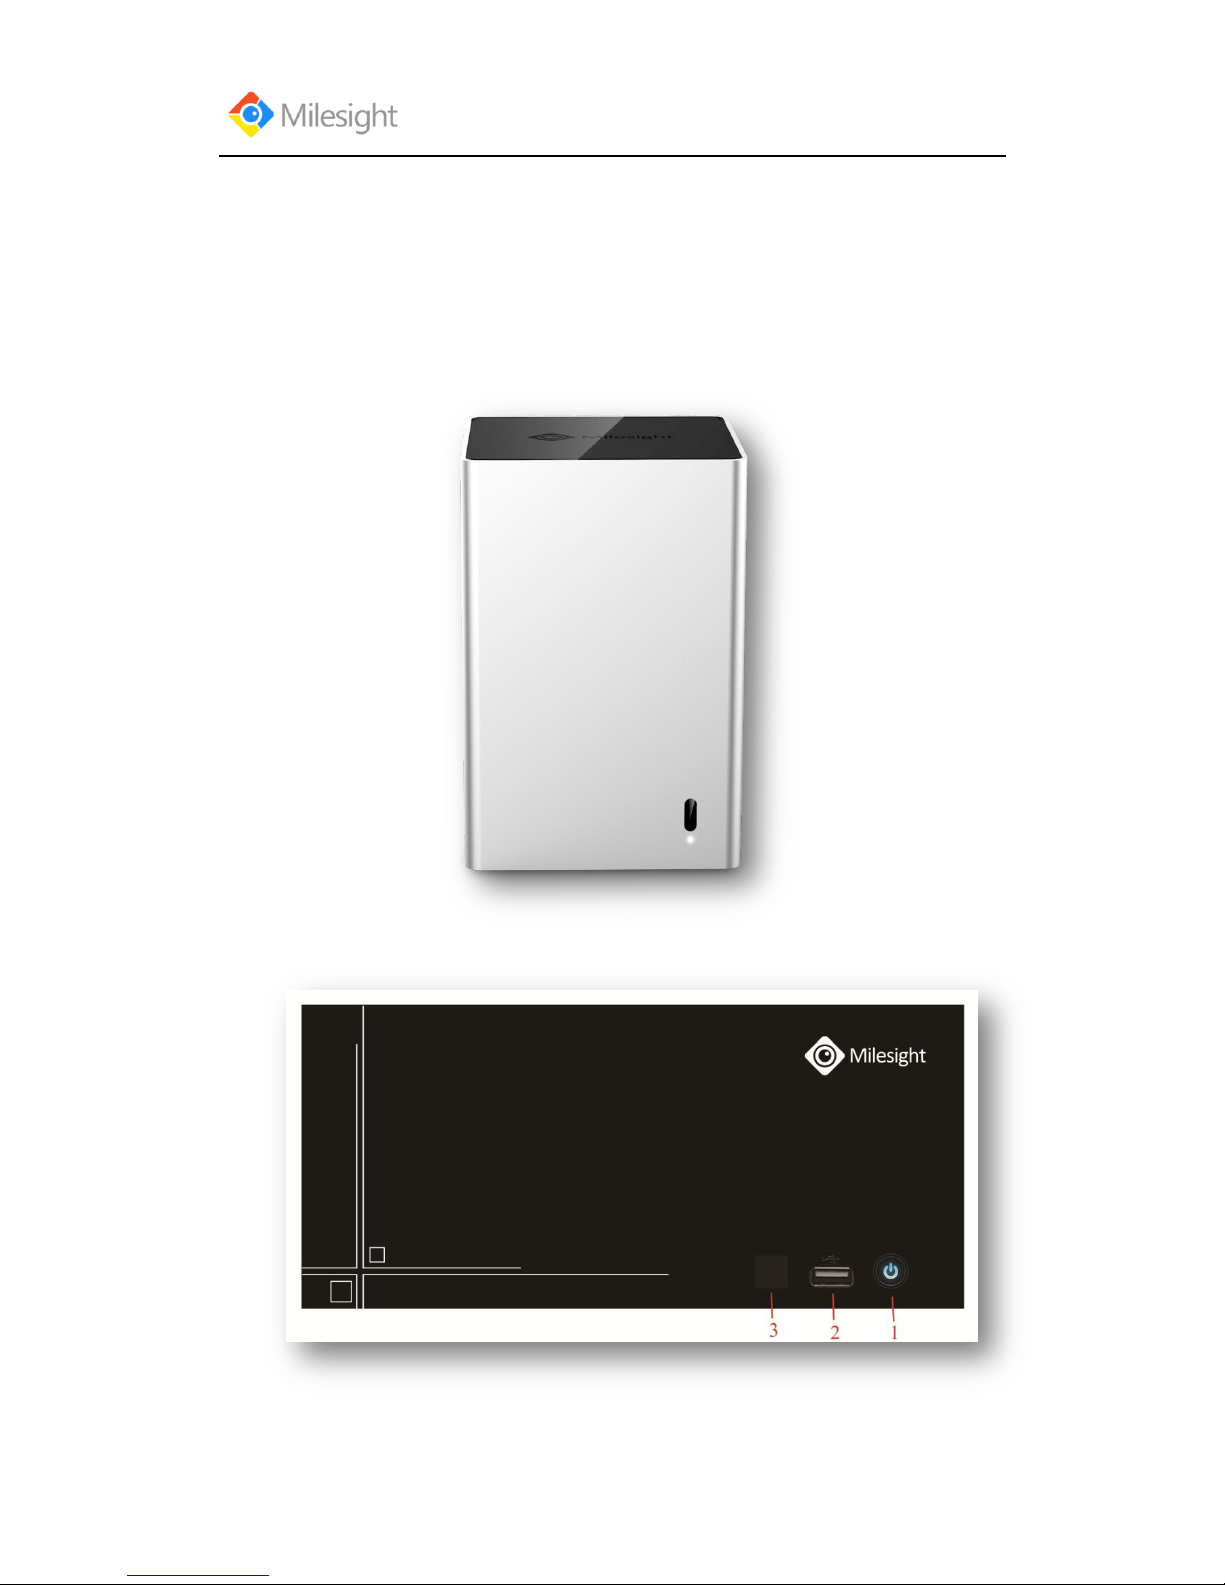
(1) MS-N1000 Series: MS-N1004/MS-N1008
(2) MS-N5000 Series: MS-N5008/MS-N5016
Page 9

User Manual
www.milesight.com 5
NO.
Item
Description
1
POWER
Powers NVR on/off.
2
USB Ports
USB ports for additional devices such as USB mouse, USB
flash drive and USB HDD.
3
IR Receiver
Receiver for IR signal.
(3) MS-N8000 Series: MS-N8016
1
Alarm
Alarms indicator turns red when switching value is detected.
Ready
Ready indicator turns red in process of boot; indicator turns
green when NVR is in normal operation.
Status
Status indicator turns green when NVR is controlled by a
remote controller, indicator turns red when controlled by a
keyboard and turns orange when remote controller and
keyboard are used at the same time.
HDD
HDD indicator turns red when data is being read or written.
Recording
Recording indicator turns red when NVR is being recorded.
Network
Network indicator turns to green when network connection is
normal.
Guard
Guard indicator turns green when the device is armed, turns
off when the device is unarmed. The arm/disarm state can be
switch by pressing and holding on ESC button for more than
3 seconds.
2
Alphanumeric
Buttons
(1)Alphanumeric buttons are used to switch the
corresponding channel in live view or PTZ Control mode.
(2)Alphanumeric buttons are used to input numbers and
characters in edit mode.
3
Control Panel Locker
Control panel can be locked or unlocked by the dedicated
key. 4 IR Receiver
Receiver for IR signal.
5
USB Ports
USB ports for additional devices such as USB mouse, USB
Page 10
User Manual
www.milesight.com 6
flash drive and USB HDD.
6
ESC
(1) ESC button is used to return to previous menu
(2) To disarm the NVR by pressing and holding more than 3
seconds in live view mode.
REC/SHOT
(1) The REC/SHOT button is used to enter recording
configuration interface.
(2) When controlling a PTZ, press the REC/SHOT Button to
invoke preset positions.
(3) Open and close sound system when playback.
PLAY BACK/AUTO
(1) Enter the playback interface.
(2) Auto scan when in PTZ control.
ZOOM
Zoom control when in PTZ control.
A/focus+
(1)Switch the input methods including figure, letters and
symbols.
(2) Auto scan when in PTZ control.
EDIT/IRIS+
(1) Used to enter the edit state.
(2) Delete the character in front of the cursor.
(3) Open up the IRIS of the camera when in PTZ state.
MENU
(1) Enter the main menu interface.
(2) Display/cover playback toolbar when in playback state.
(3) Open/close the sound of front panel by pressing and
holding more than 3 seconds.
F1/Light
(1) Select all items on the list.
(2) Control light status when in PTZ control.
(3) Switch to playback or sequence play in playback state.
F2/AUX
The F2/AUX button is used to switch menu attribute page.
MAIN/SPOT/ZOOM-
(1) Switch between main and spot output.
(2) To zoom the camera in PTZ mode.
Multi-frame/Focus-
(1) Used to switch between single screen and multi screen
mode.
(2) Adjust the focus in PTZ mode.
PTZ/IRIS-
(1) Enter the PTZ control interface.
(2) Control IRIS of camera in PTZ control
7
Direction
(1) Move the active selection in a menu, select menu items
setting.
(2) Up/down button stands for single frame fast
forward/playback, left/right button stands for speed
up/slow down the video.
(3) Switch live view channel or screen in live view mode.
(4) Move the PTZ when in PTZ control.
Enter
(1) Confirm selection in menu modes.
(2) Switch to tick checkbox and ON/OFF.
(3) In playback mode, can be used to play or pause the
Page 11
User Manual
www.milesight.com 7
video.
(4) In cruise mode, press to pause/restart the cruise.
8
JOG SHUTTLE
Control
(1) In menu mode, it can move active bar of the menu up
and down.
(2) Switch the live view channel or screen in live view
mode.
(3) Move the PTZ up and down in PTZ control.
9
POWER
Powers NVR on/off.
2.2 Using a USB Mouse
Item
Click
Description
Left
Button
Single- click
Live view: select the channel and show the live view fast
menu interface.
Menu: select and confirm.
Double-click
Switch between single screen to multi-screen when in live
view mode and playback mode.
Click and
drag
(1) Control rotation direction in PTZ mode.
(2) Set the target area in tamper-proof, motion detection and
privacy mask alarm settings.
(3) Drag the digital zoom area.
(4) Drag the channel and the time scroll bar.
Right
Button
Single-click
Live view: shows pop-up menu.
Menu: escape and go to previous menu.
Scroll-
wheel
Scroll up
Scroll up the page.
Scroll down
Scroll down the page.
Page 12
User Manual
www.milesight.com 8
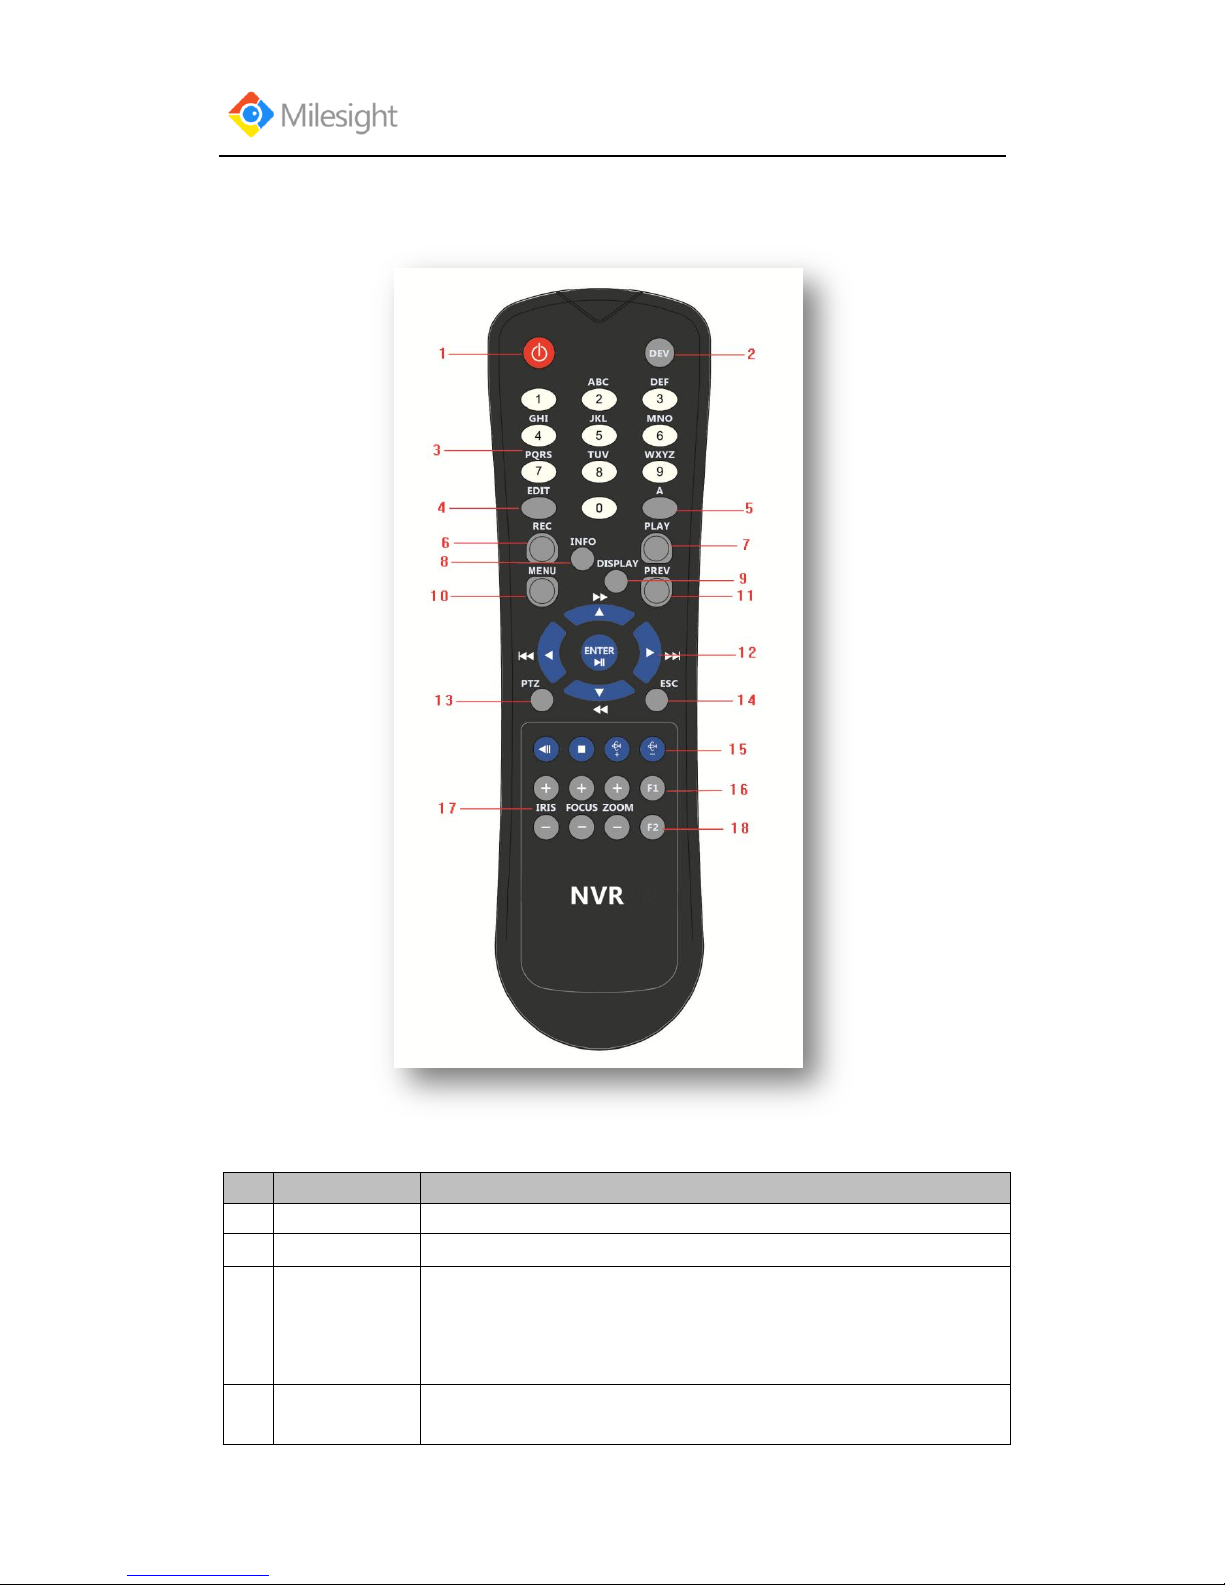
2.3 IR Remote Controller
F-2.1
NO
Name
Description
1
POWER
Power on/off the NVR
2
DEV
Enables/disables remote control
3
ABC/123
(1)Alphanumeric buttons are used to switch the corresponding channel
in live view or PTZ Control mode.
(2)Alphanumeric buttons are used to input numbers and characters in
edit mode.
4
EDIT
(1)Used to enter the edit state.
(2)Delete the character in front of the cursor.
Page 13
User Manual
www.milesight.com 9
(3) Open up the IRIS of the camera when in PTZ state.
5
A
(1)Switch the input methods including figure, letters and symbols.
(2) Auto scan when in PTZ control.
6
REC
(1)The REC/SHOT button is used to enter recording configuration
interface.
(2)When controlling a PTZ, press the REC/SHOT Button to invoke
preset positions.
(3)Open and close sound system when playback.
7
PLAY
(1)Enter the playback interface.
(2)Auto scan when in PTZ control.
8
INFO
Zoom control when in PTZ control.
9
DISPLAY
(1)Switch between main and spot output.
(2)To zoom the camera in PTZ mode.
10
MENU
(1)Enter the main menu interface.
(2)Display/cover playback toolbar when in playback state.
(3)Open/close the sound of front panel by pressing and holding more
than 3 seconds.
11
PREV
(1)Used to switch between single screen and multiscreen mode.
(2)Adjust the focus in PTZ mode.
12
DIRECTION/
ENTER
(1)Move the active selection in a menu, select menu items setting.
(2)Up/down button stands for single frame fast forward/playback,
left/right button stands for speed up/slow down the video.
(3)Switch live view channel or screen in live view mode.
(4)Move the PTZ when in PTZ control.
13
PTZ
(1)Confirm selection in menu modes.
(2)Switch to tick checkbox and ON/OFF.
(3)In playback mode, can be used to play or pause the video.
(4)In cruise mode, press to pause/restart the cruise.
14
ESC
Same as ESC button on front panel
15
RESERVED
Reserve the settings
16
F1
(1)Select all items on the list.
(2)Control light status when in PTZ control.
(3)Switch to playback or sequence play in playback state
17
PTZ
CONTROL
To adjust the iris, focus and zoom of a PTZ camera.
18
F2
The F2 button is used to switch menu attribute page.
Page 14
User Manual
www.milesight.com 10
3. Local Operation
3.1 Wizard Setting
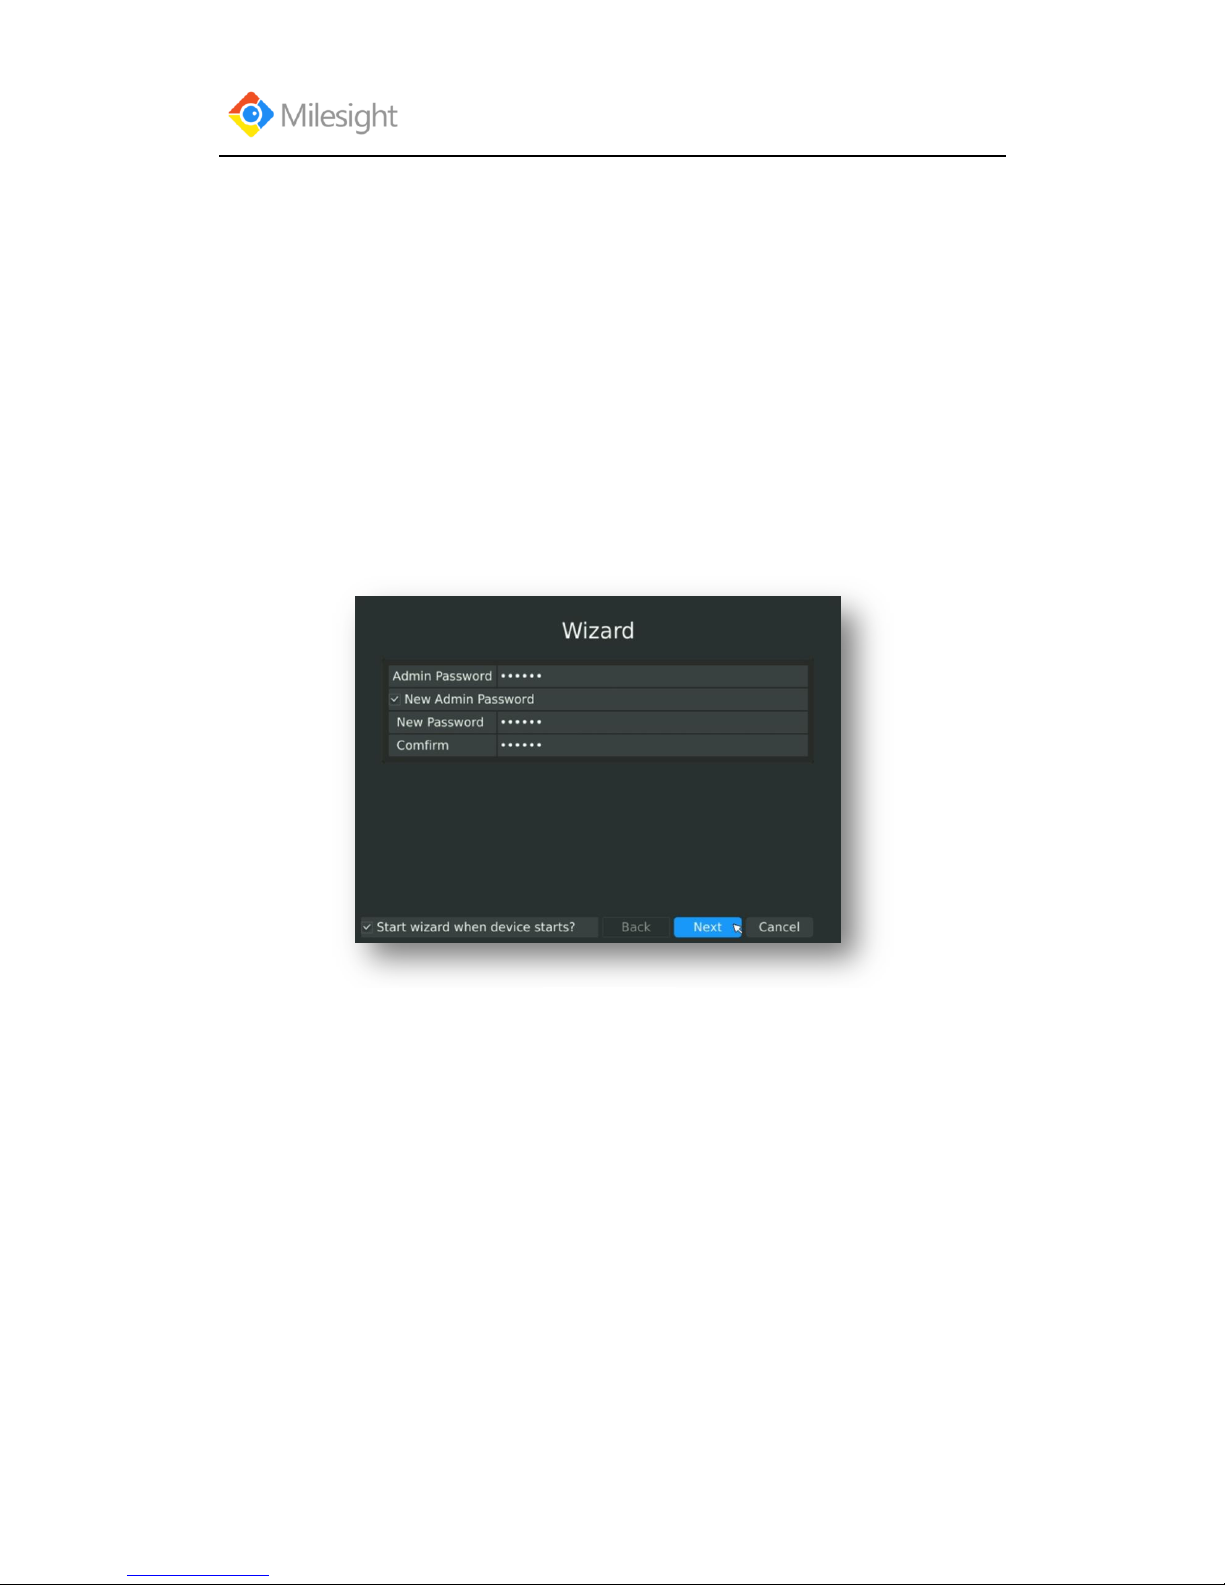
By default, the Setup Wizard will start once the NVR has loaded. The Setup Wizard will guide you
complete some important settings to make sure the device function well. You can choose if you
will enable wizard when device starts.
Please complete the configuration as following:
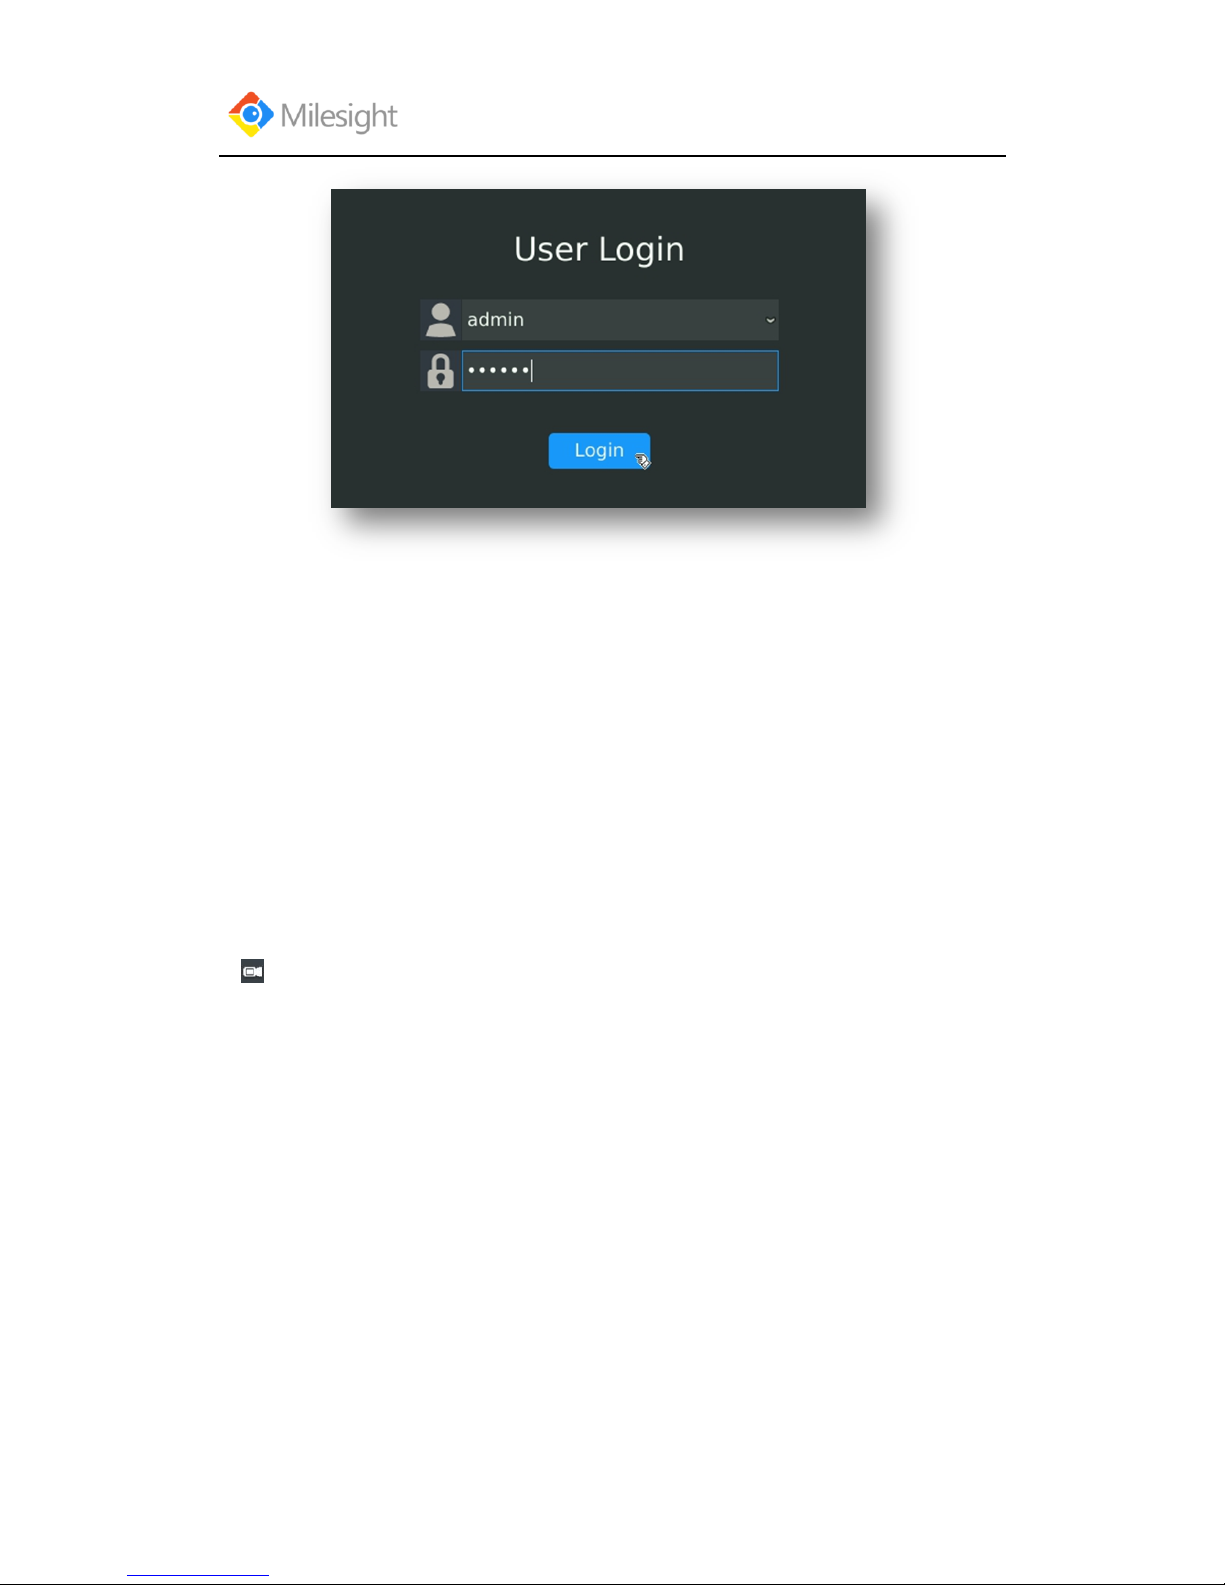
Step1. Input the username and password (Default username is „admin‟ and password is
„123456‟)
If you want to modify the admin password, input the new password.
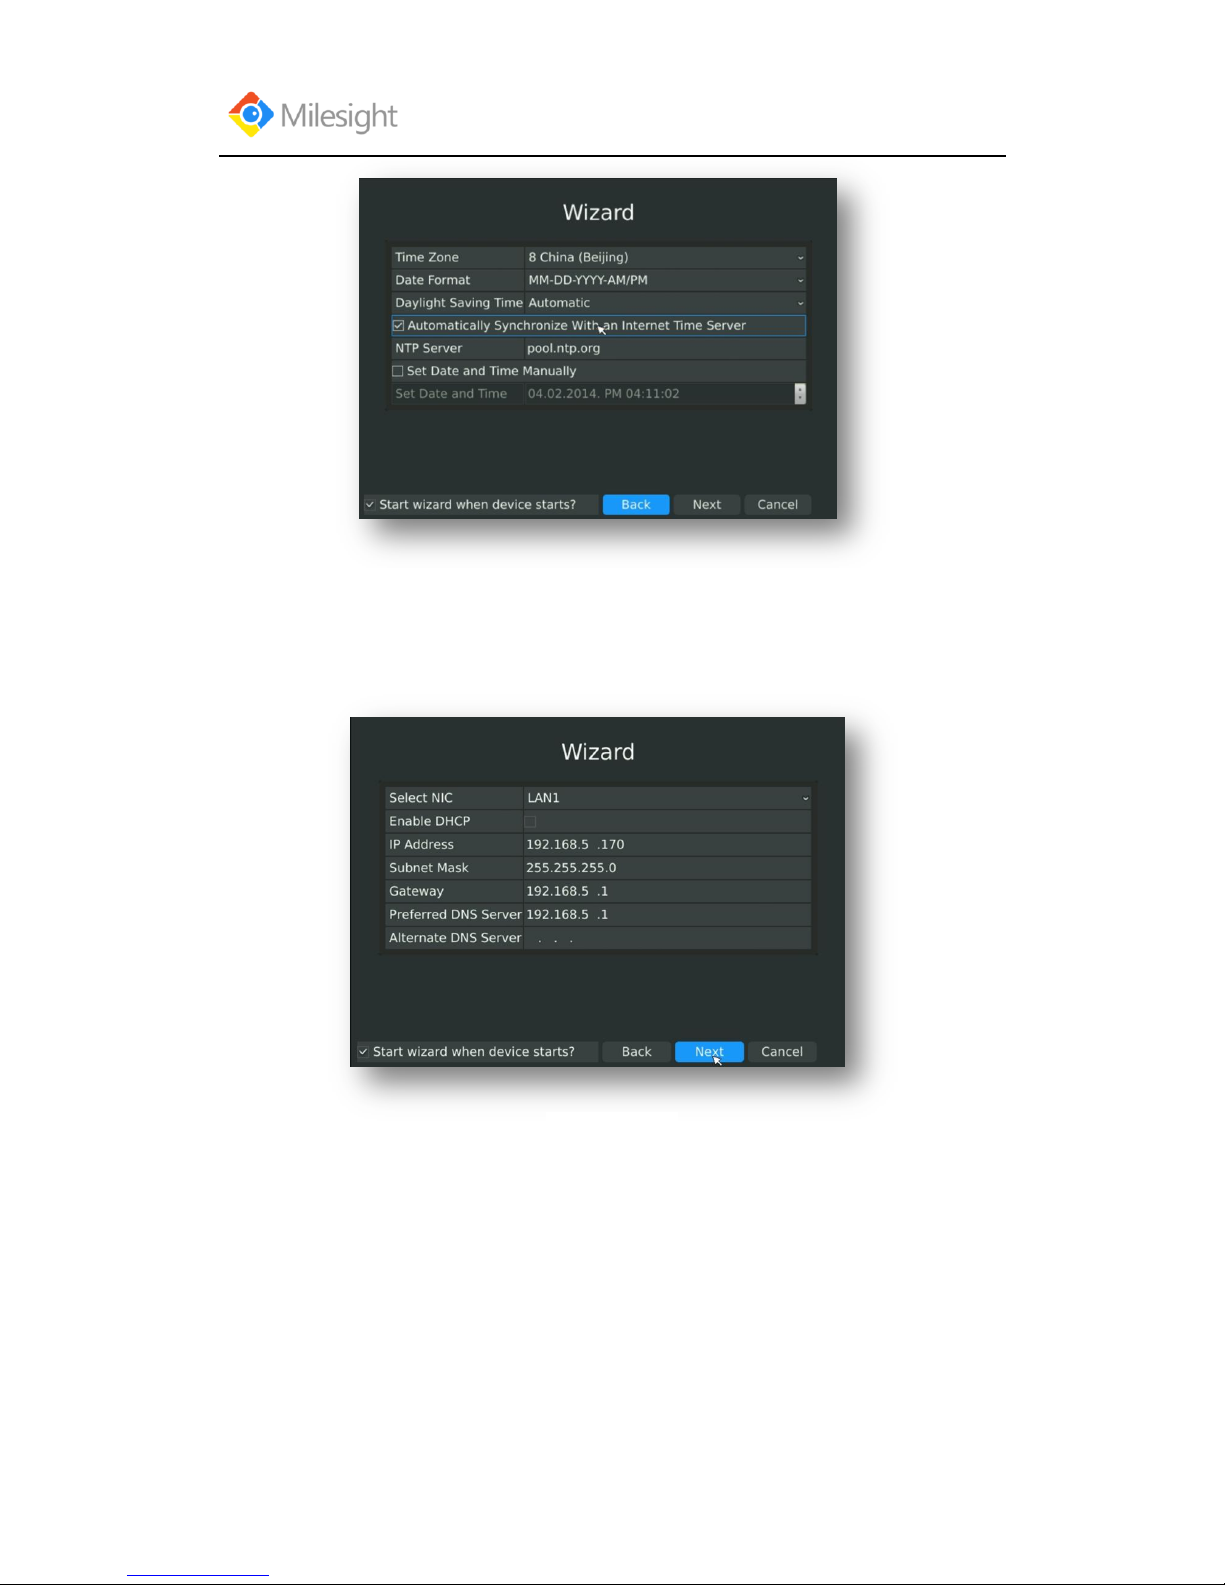
Step2. Date and time setting
Select the Time Zone and Date Format or you can set date and time manually.
F-3.1.1
Page 15
User Manual
www.milesight.com 11
Step3. Network setting
Input the IP Address, Subnet Mask, Gate Way and Preferred DNS Server.
Step4. Login
Input the username and password.
F-3.1.2
F-3.1.3
Page 16
User Manual
www.milesight.com 12
3.2 Playback
To play and backup the recorded files in specified time period.
3.2.1 Video Playback
It can support playback according to recorded time. Play recorded files in specified time period;
synchronous playback of multi channels is supported.
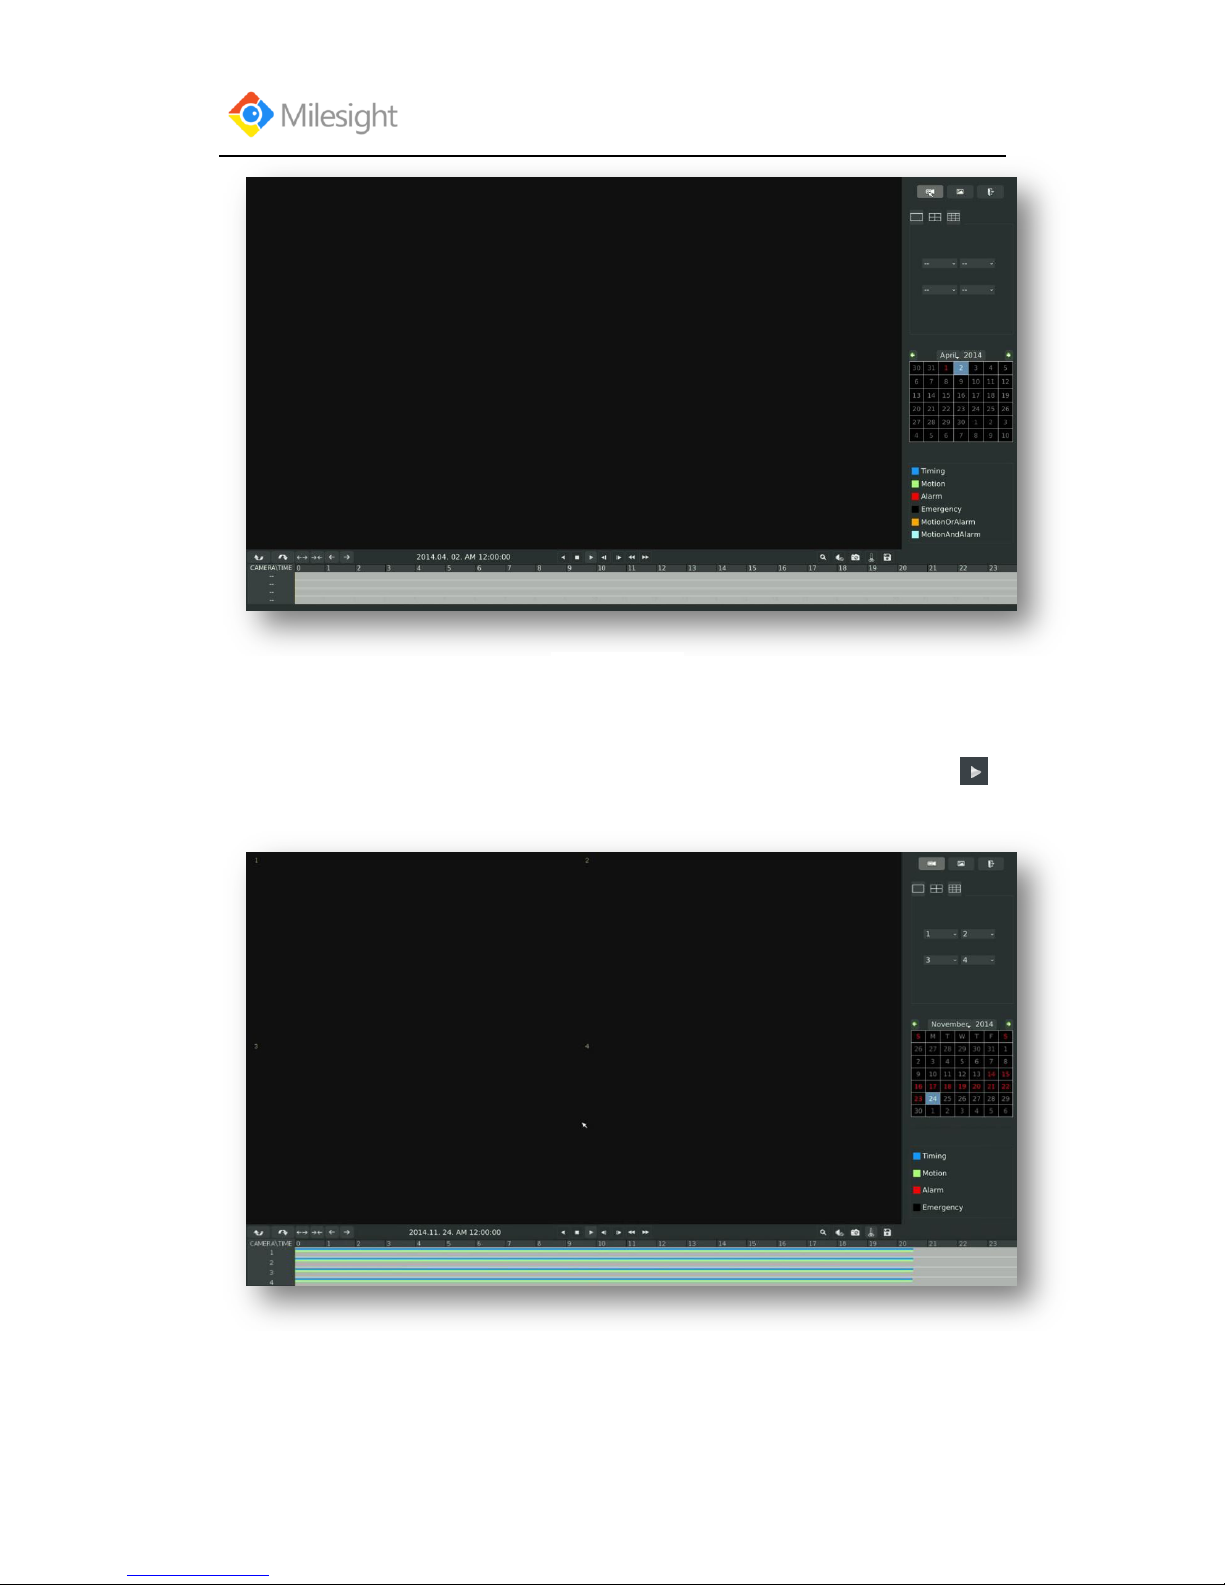
Step1. Enter Video Playback Interface shown in F-3.2.1 by clicking Main menuPlayback
→
F-3.1.4
Page 17
User Manual
www.milesight.com 13
Step2. Select a desired channel and date
Select playback layout and channel. Click the date in red when there are recorded files of the
selected channels, the record type with recording data will be show as below, and then click to
playback.
Note:
1. The day in red has recording files; please select the date in red to playback.
2. 16 channels can be selected to playback synchronously.
F-3.2.1
F-3.2.2
Page 18
User Manual
www.milesight.com 14
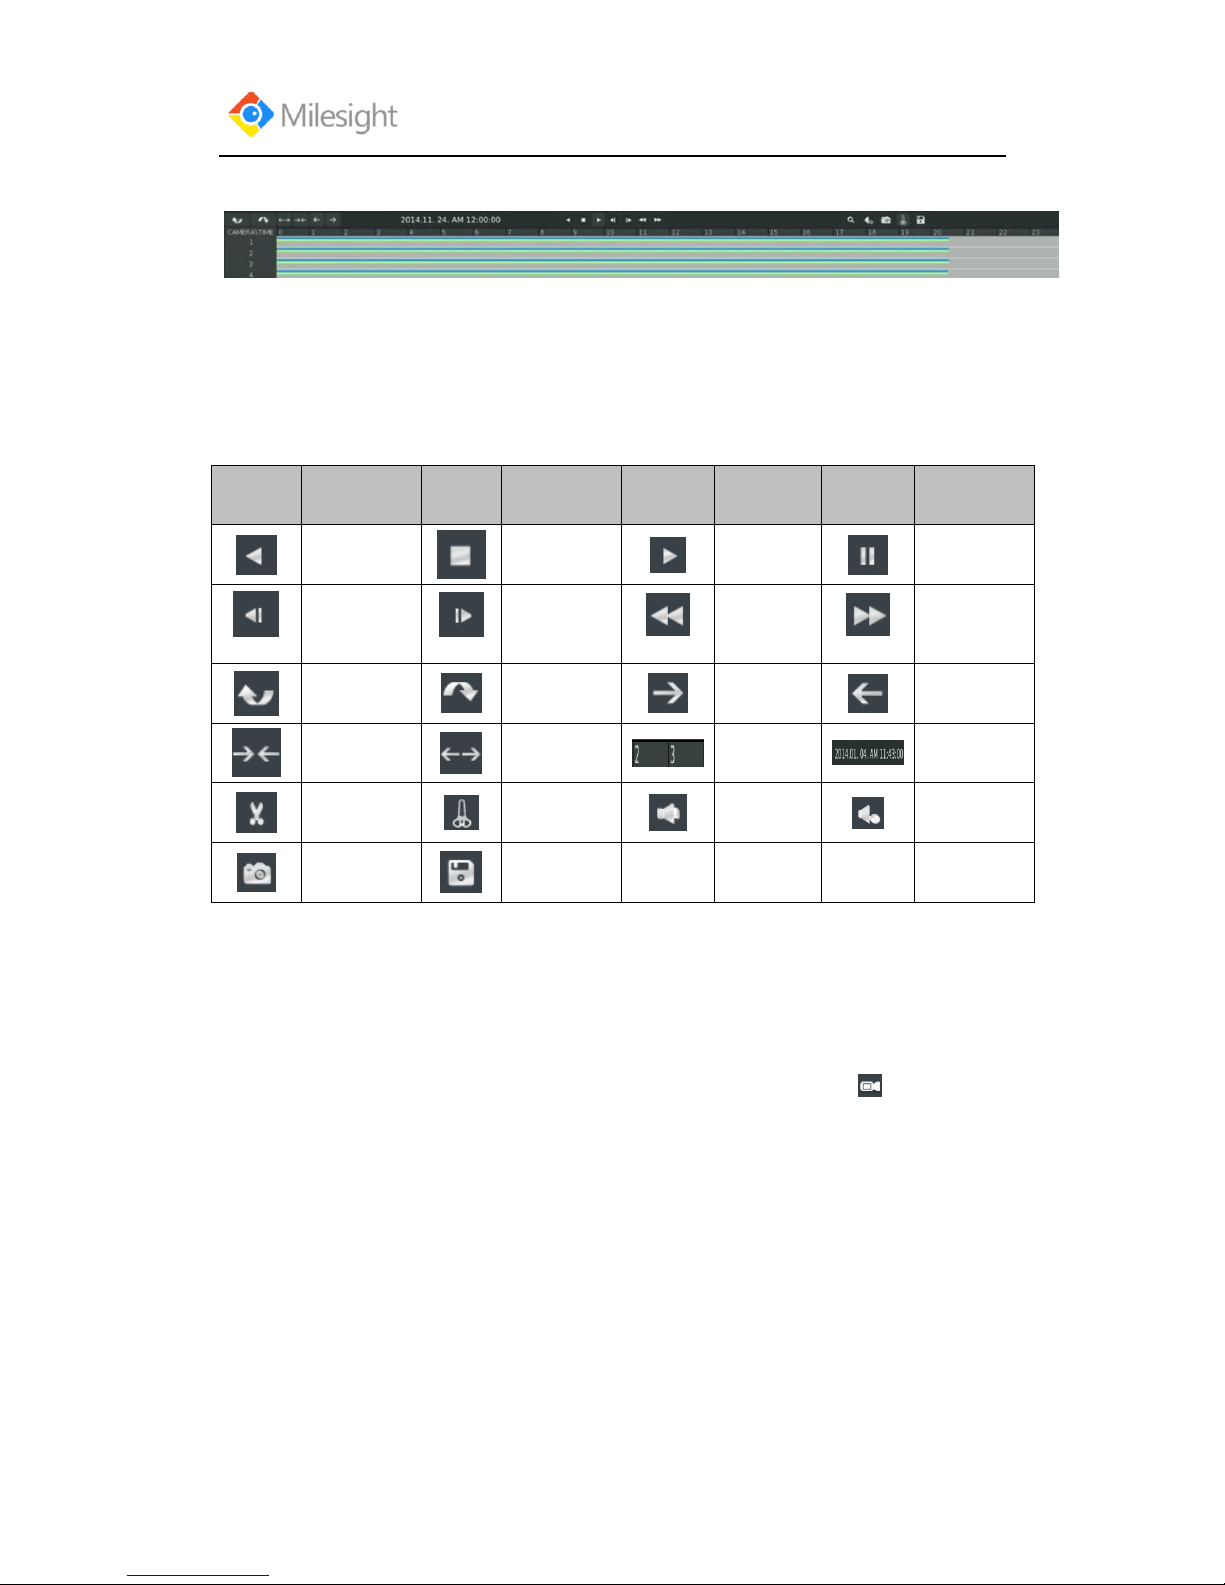
Video Playback Tool Bar Description
The tool bar can display multi-event record. It shows that in this record period what kind of event
has happened. The symbolic meaning of each color is as showed bellow:
Blue—Timing Green --- Motion
Red --- Alarm Black --- Emergency
And take this bar above for example, it means in this recording period there are motion and timing
event which have triggered.
Button
Description
Button
Description
Button
Descripti
on
Button
Description
Rewind
Stop
Play
Pause
Reverse
Step
Forward
Step
Fast
Backward
Fast
Forward
Previous 4
Cams
Next 4
Cams
Timeline
Backward
Timeline
Forward
Timeline
Zoom In
Timeline
Zoom Out
Timeline
Playback
Position
Timeline
Cutting
Timeline
Cut Off
Audio On
Audio Off
Snapshot
Backup
3.2.1.1 Video Files Backup
Regular recorded files can be backed up by various devices, such as USB flash drives (USB flash
disk, USB HDDs, USB writer), CD/DVD writer and eSATA, etc.
Satep1.Enter video playback interface by clicking Main menu→Playback→
Page 19
User Manual
www.milesight.com 15
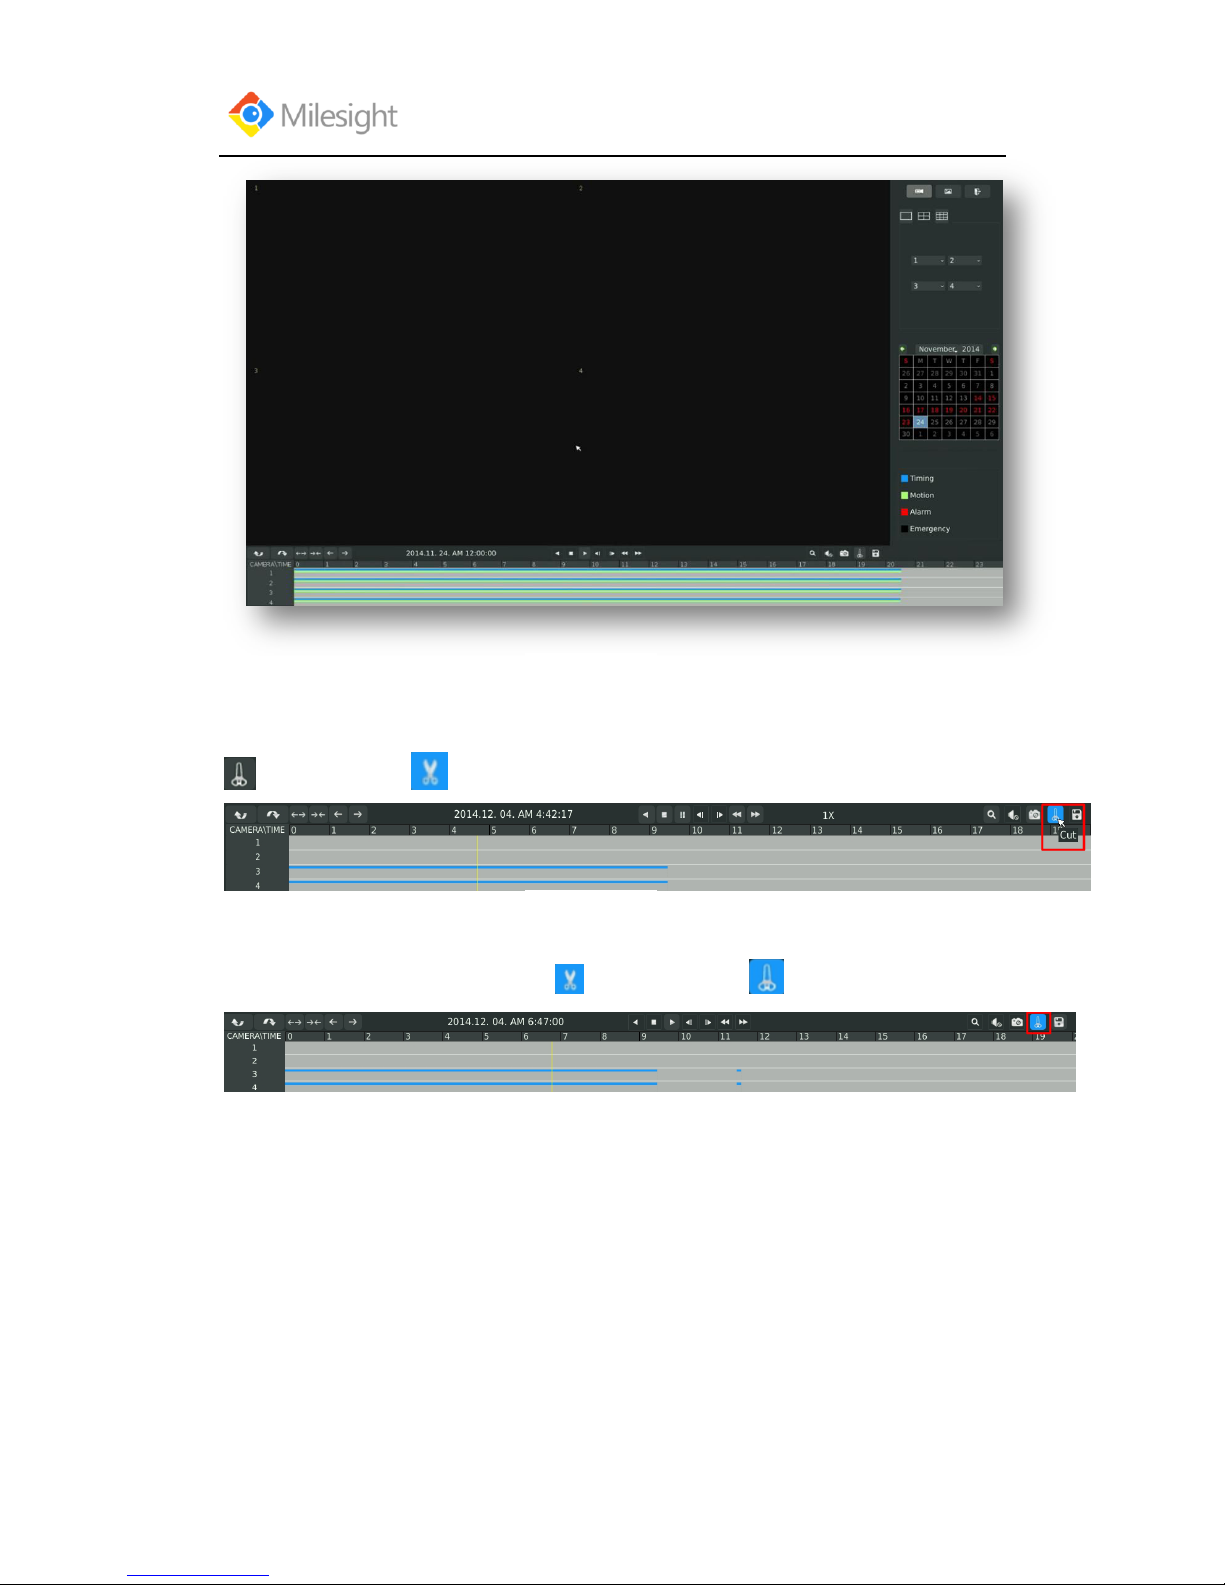
Step2.Select Recorded files for Backup
Select the channel and date you want to backup, then select the start time at time line and click
, it will change into which means cut begins.
Select the end time at time line and click , it will change into ,which means cut ends.
F-3.2.3
F-3.2.4
F-3.2.5
Page 20
User Manual
www.milesight.com 16
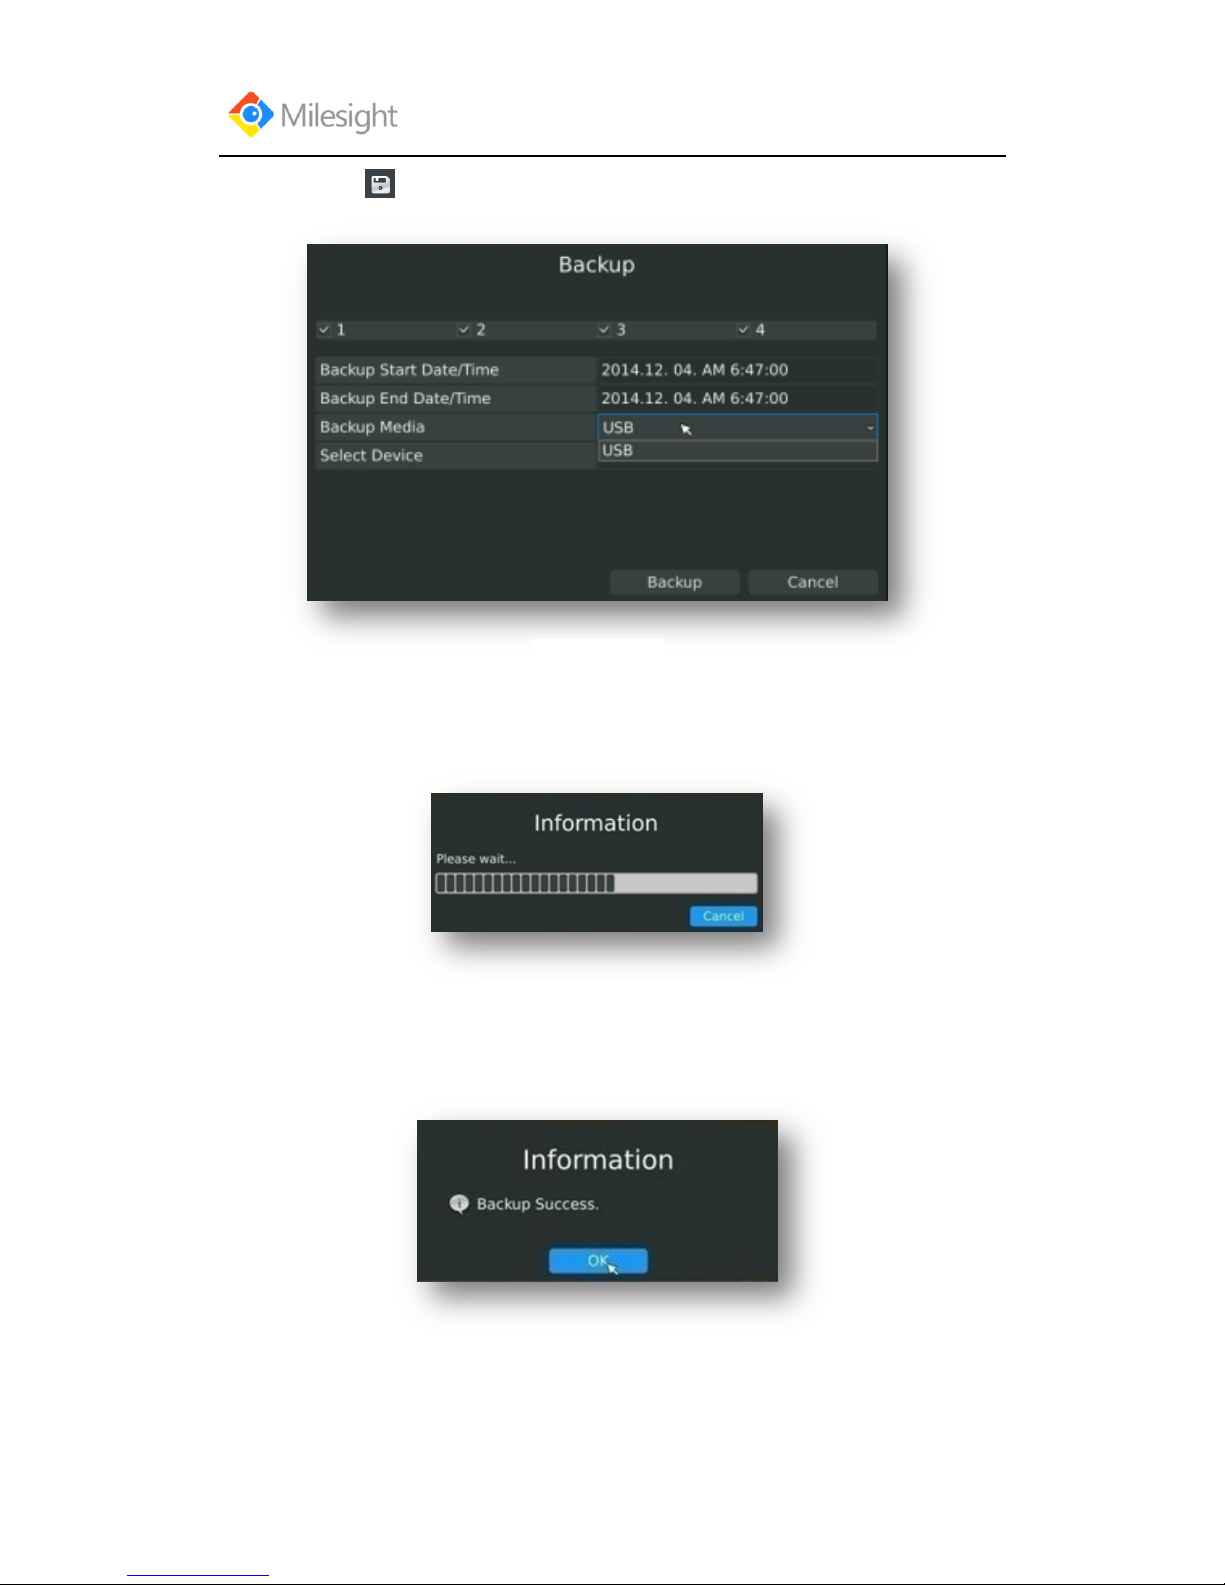
Step3.Click enters to backup interface, select Backup media and click [Backup].
Step4. The pop-up window will prompt: Please wait…
Step5.When all backup files have been exported, „Backup Success‟ will be prompted.
F-3.2.6
F-3.2.7
F-3.2.8
Page 21
User Manual
www.milesight.com 17
3.2.2 Picture Playback
Search and look for the snapshot files saved in HDD.
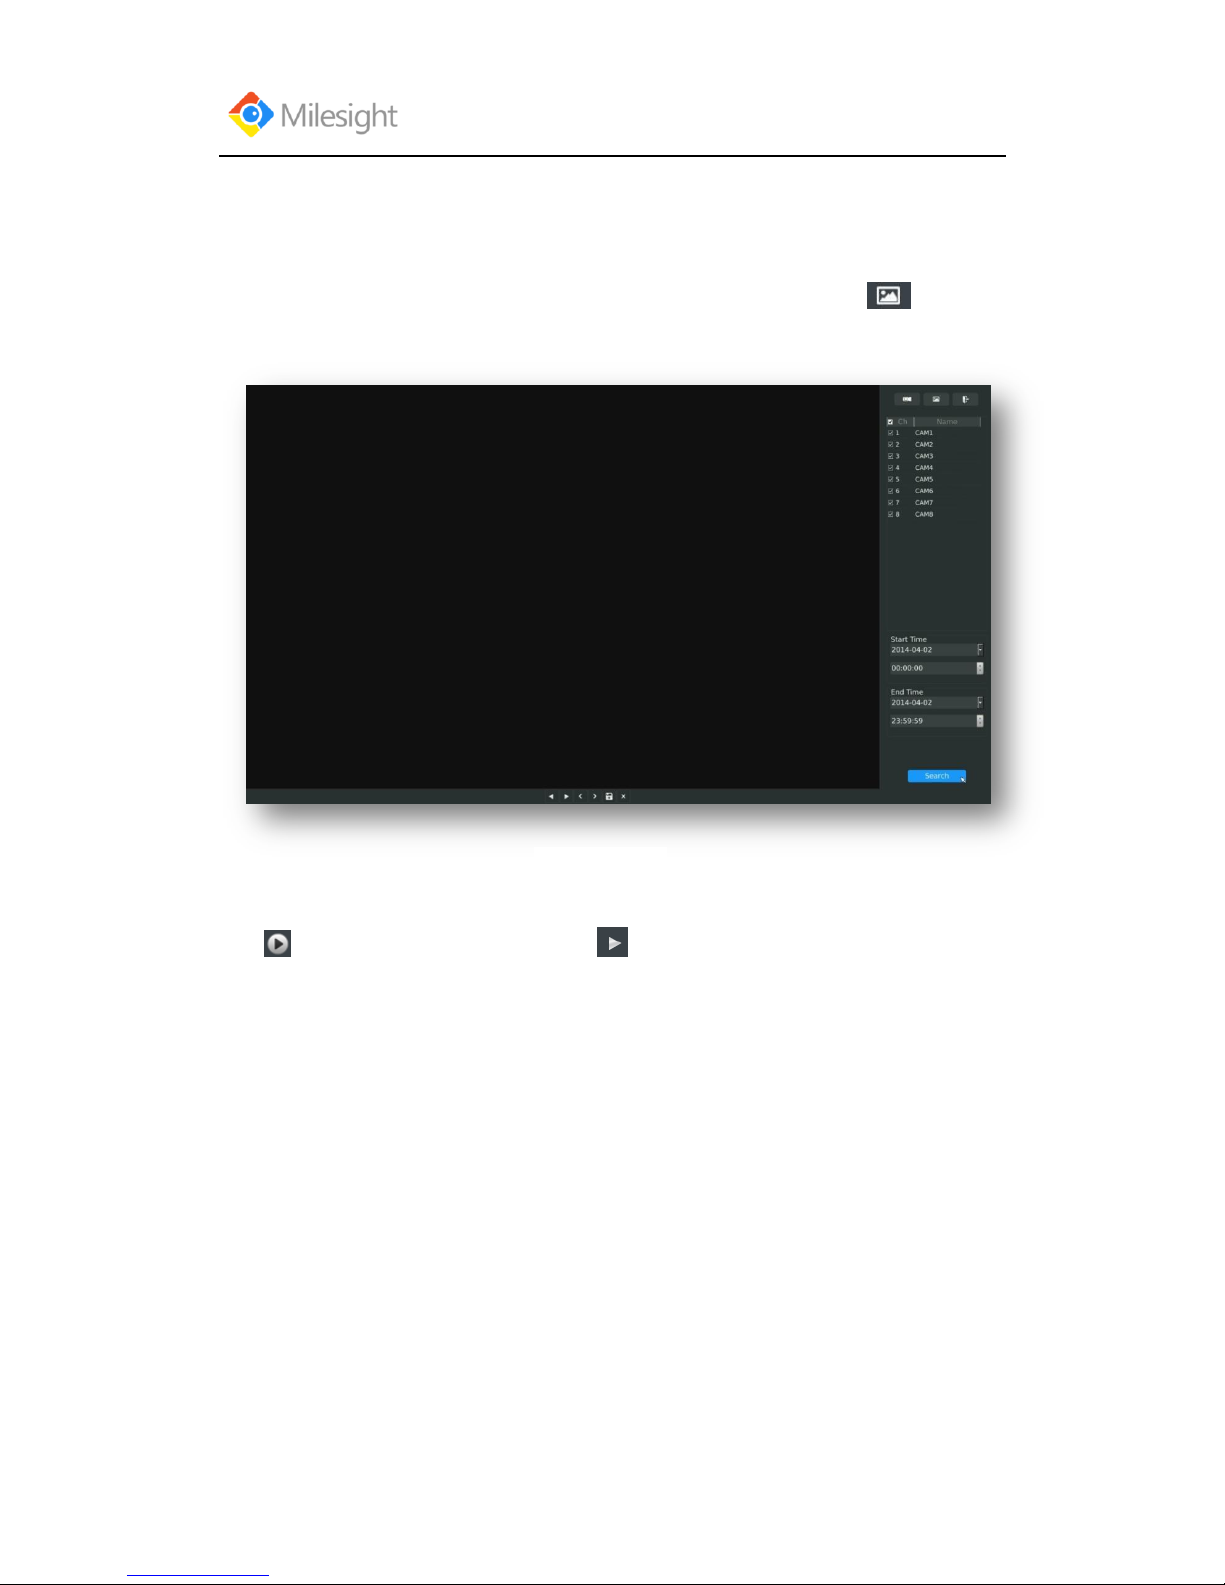
Step1.Enter Picture Playback Interface by clicking Main menuPlayback→
Select a desired channel, start time and end time, click [Search]
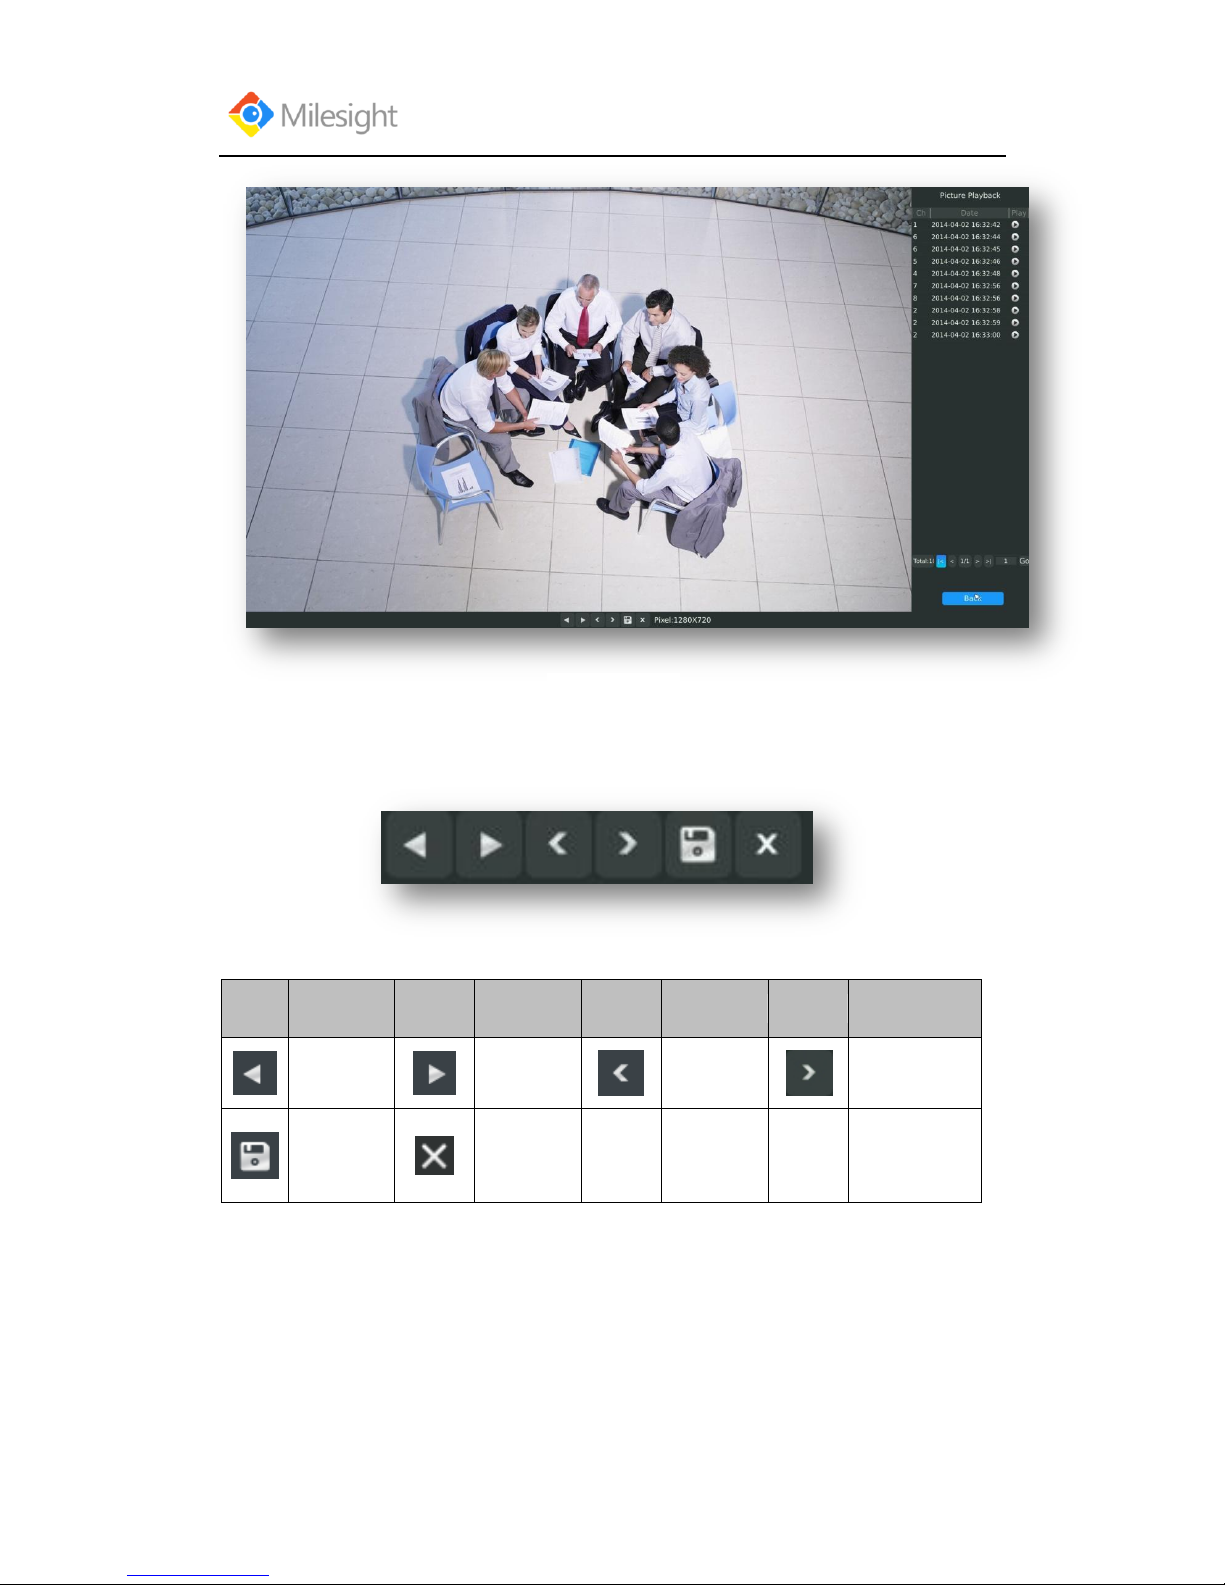
Step2. Enter Picture Info List, Look up the Pictures.
Click to play the desired pictures. Or click to auto play the picture.
F-3.2.9
Page 22
User Manual
www.milesight.com 18
Picture Playback Tool Bar Description
Button
Description
Button
Description
Button
Description
Button
Description
Backward
Play
Play
Previous
Picture
Next Picture
Backup
pictures
Close
F-3.2.10
Page 23
User Manual
www.milesight.com 19
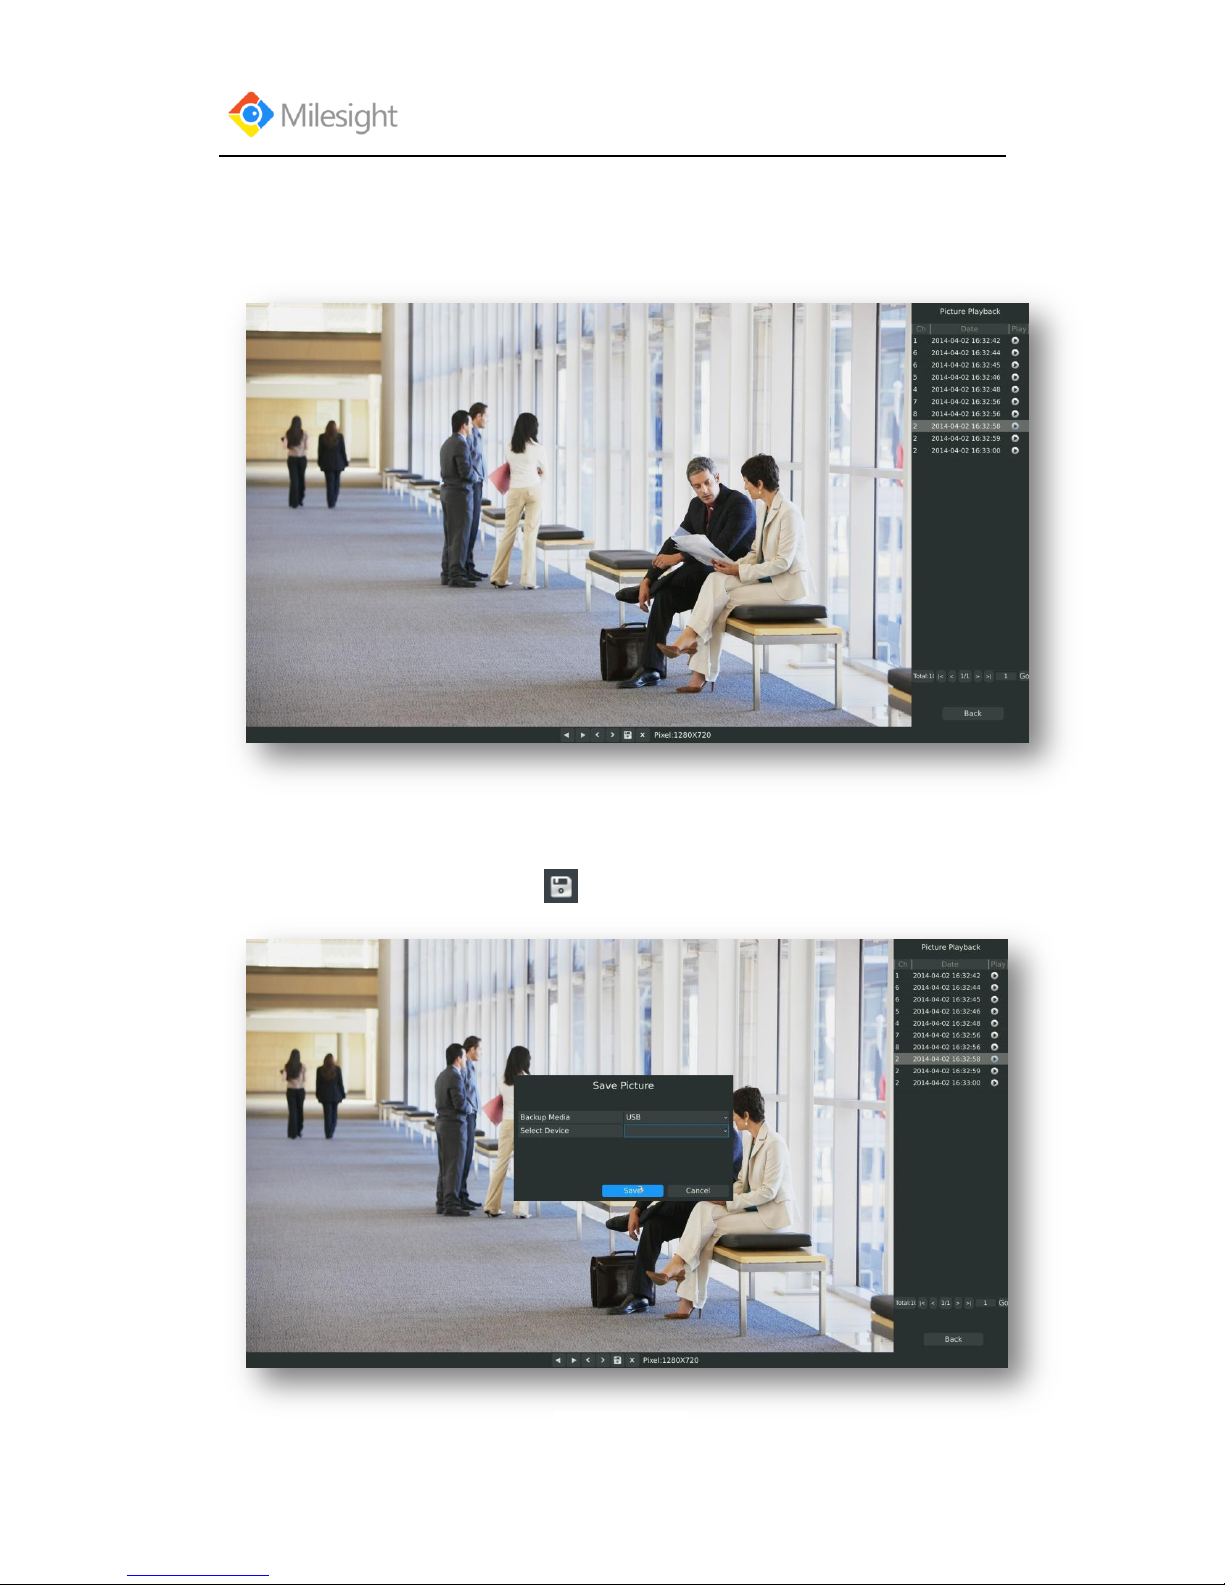
3.2.2.1 Picture Files Backup
Step1: Select pictures you want to backup in picture playback interface.
Step2: Select backup media and click to save picture.
F-3.2.12
F-3.2.11
Page 24
User Manual
www.milesight.com 20
3.3 Camera Settings
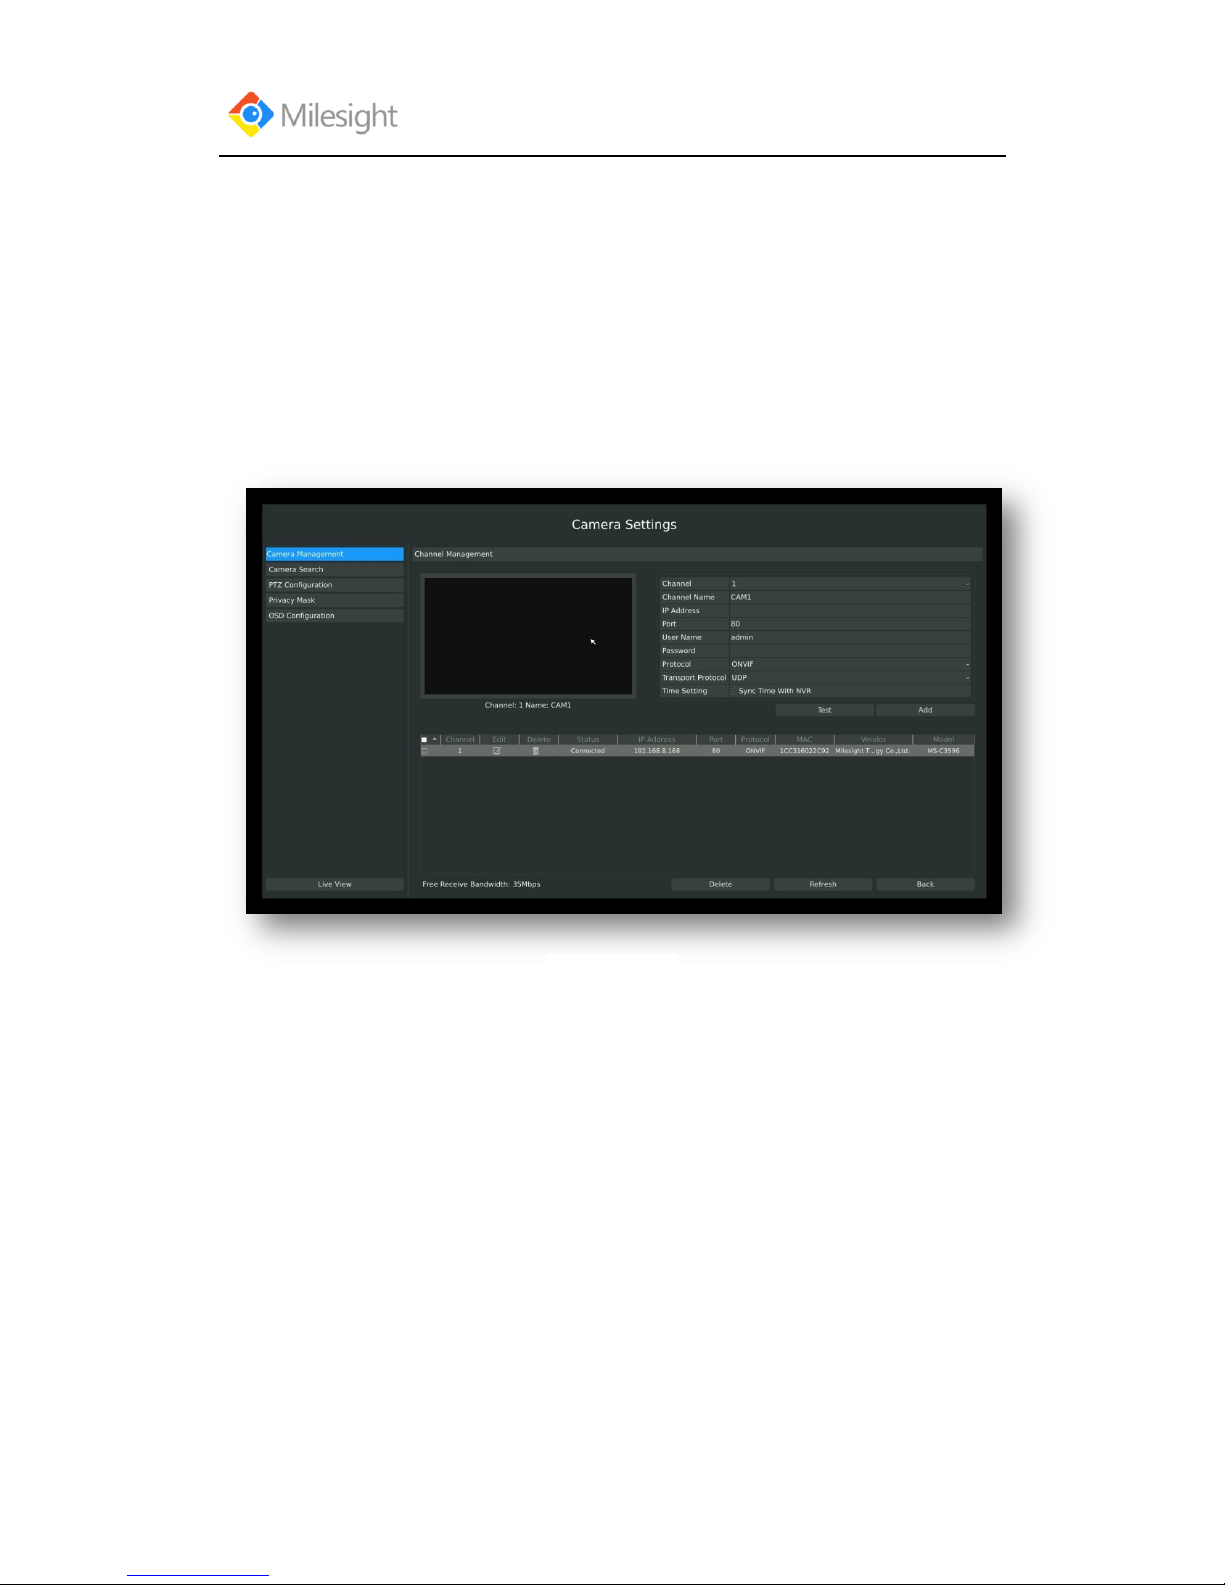
Before configuration, please ensure that the IP device is connected to the same network as
your NVR and that the network setting for your NVR is properly setup.
3.3.1 Camera Management
Step1.Enter camera management interface by clicking main menuCamera Camera
Management to enter camera management interface.
Step2.Add IP Channel
Method1. Add IP Channel in camera search interface
1.Enter to camera search interface by clicking Main Menu→ Camera→ Camera to Search.
F-3.3.1
Page 25
User Manual
www.milesight.com 21
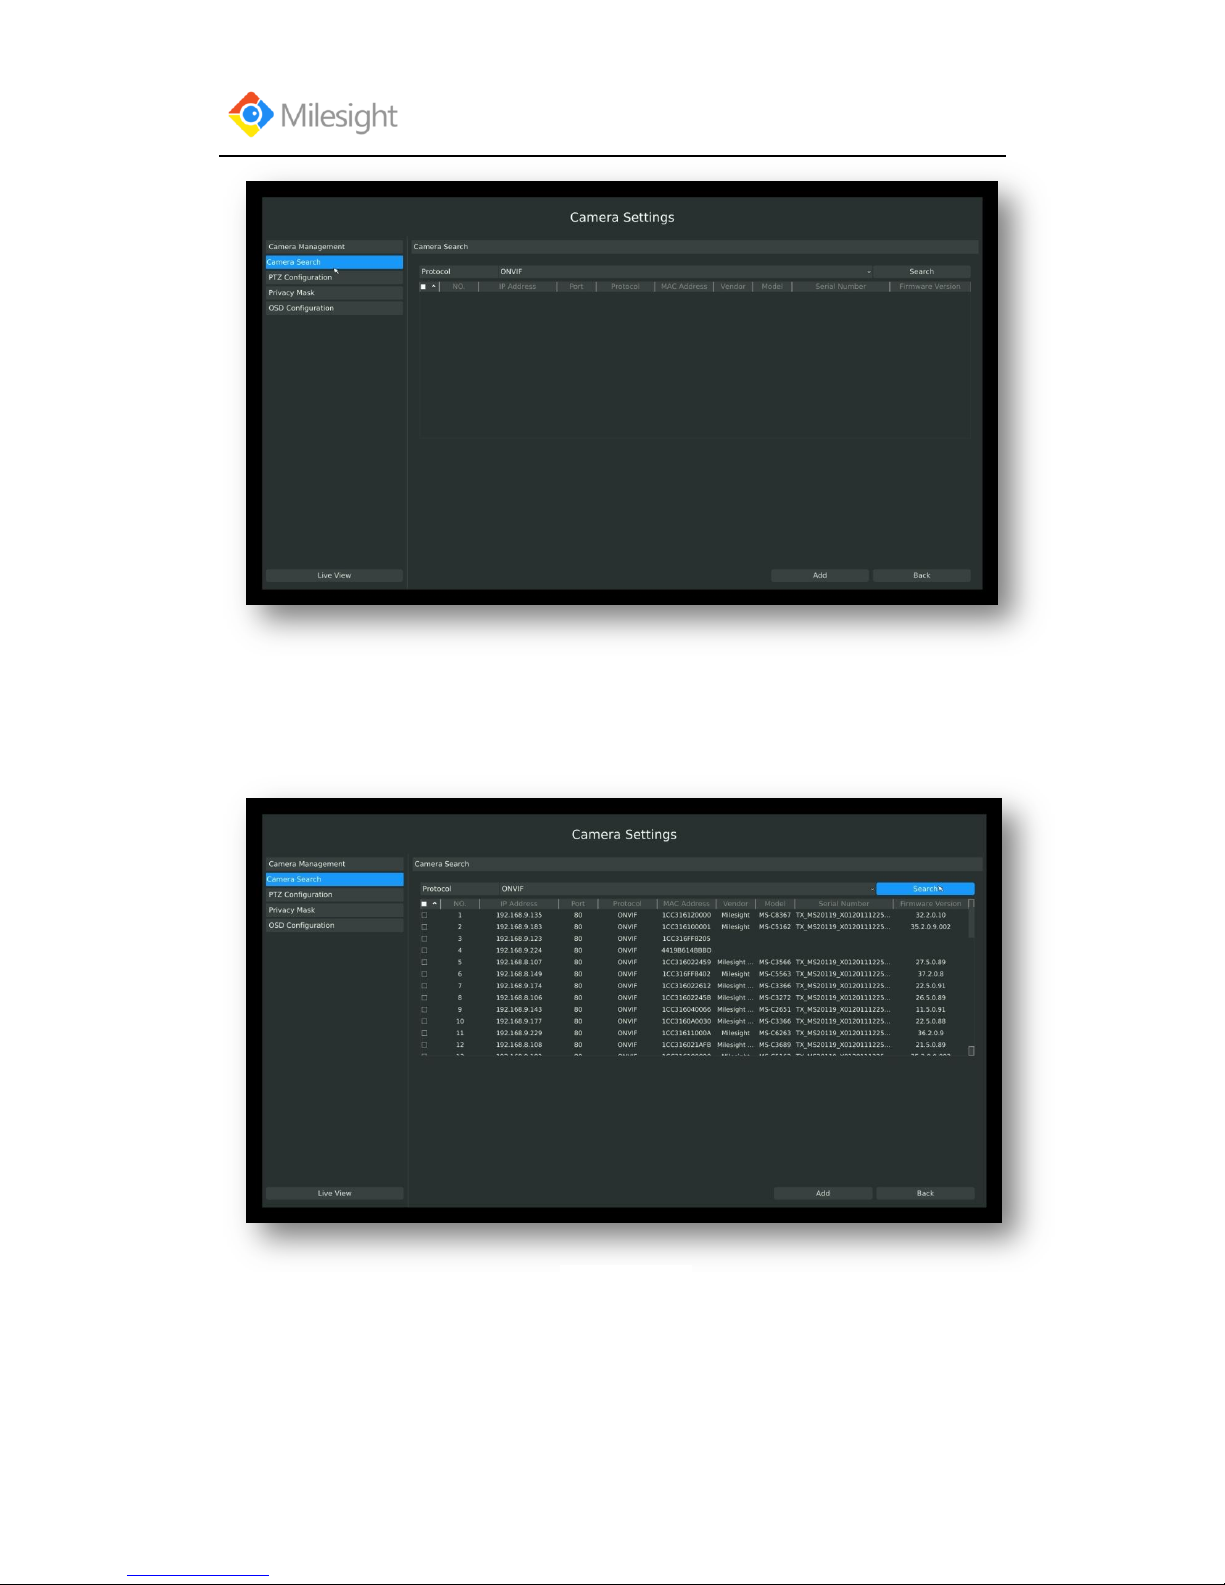
2. Click [search] button to quickly search the IP devices that support ONVIF at the same network
segment with NVR.
F-3.3.2
F-3.3.3
Page 26
User Manual
www.milesight.com 22
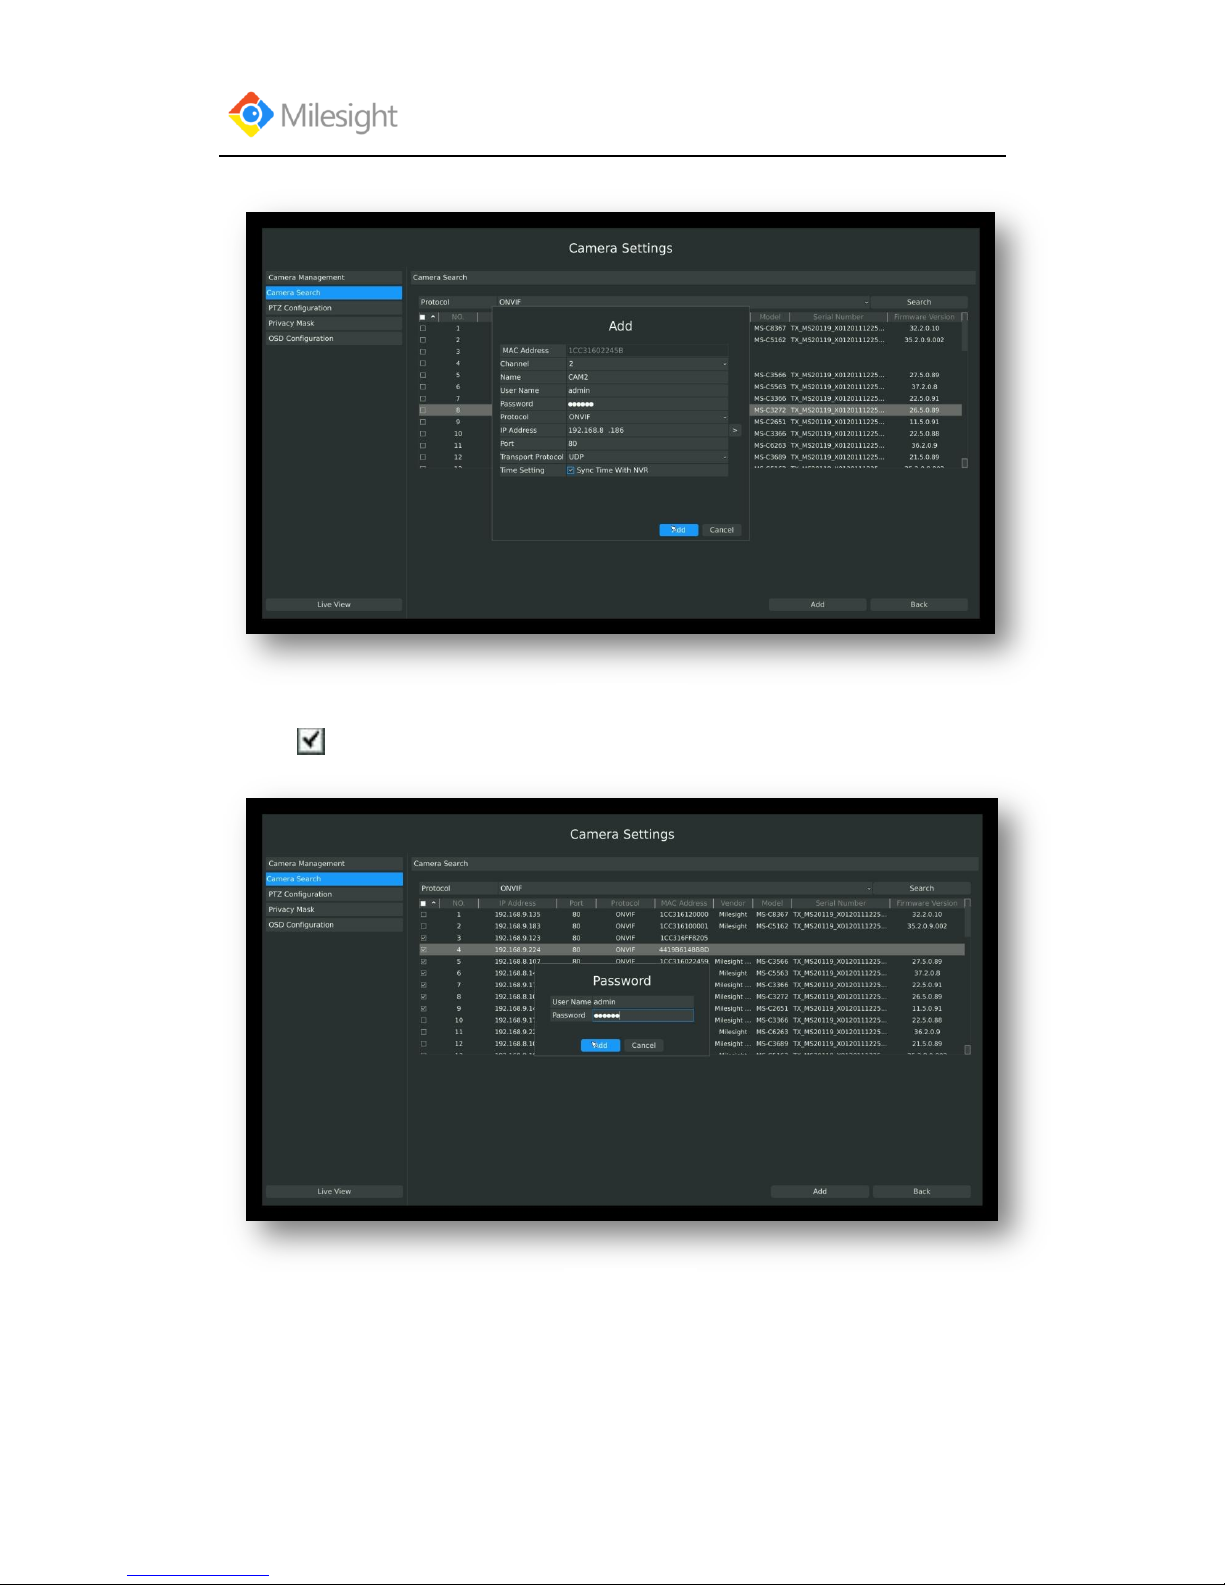
3. Double click the channel, input password and click [Add] button.
Or Check to bulk adding the IP cameras if they are with same password.
F-3.3.4
F-3.3.5
Page 27
User Manual
www.milesight.com 23
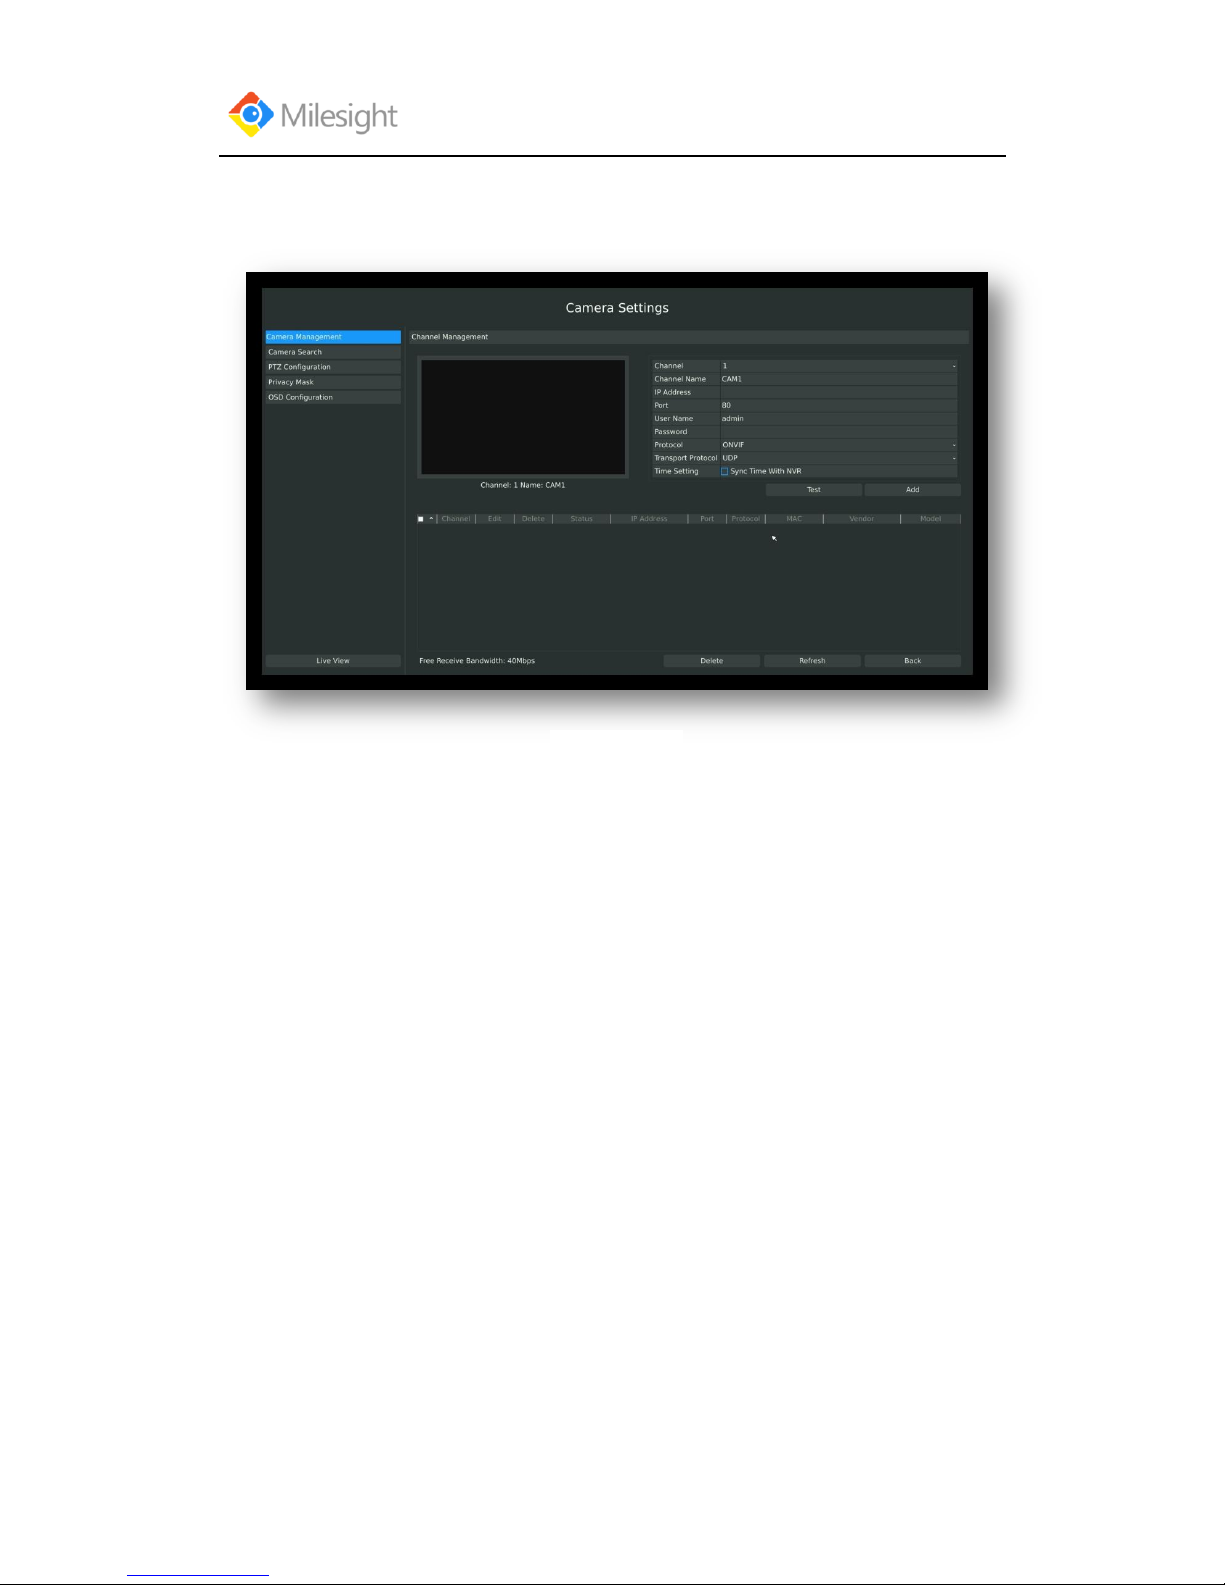
Method2. Add IP Channel in camera management interface
1.Enter to camera management menu by clicking Main Menu → Camera → Camera to
Management
2. Select the attribute page of „IP Channel‟, select idle channel then input complete information
Click [Add] button.
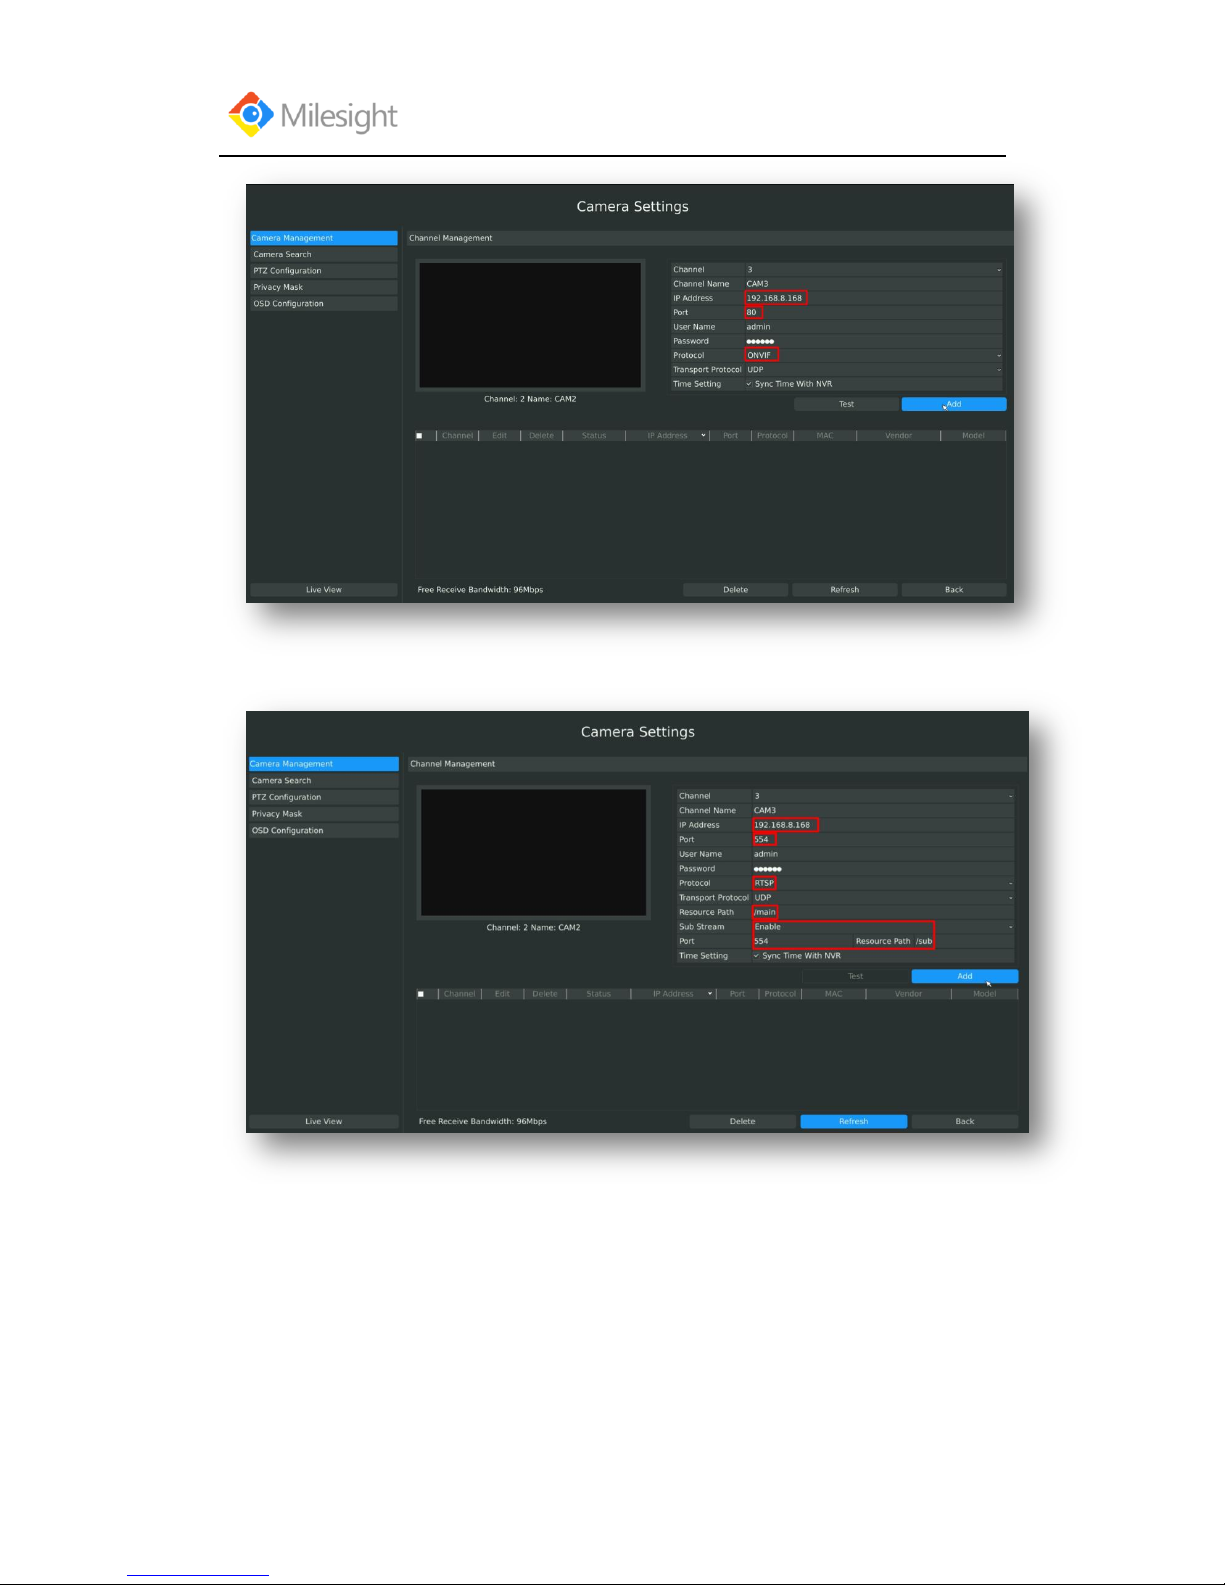
There are 3 ways to add camera:
1. ONVIF: Add the camera with ONVIF protocol, you can add any IP cameras with ONVIF
compatible if select this protocol. The detail formats are showed in F-3.3.7;
2. RTSP: Use RTSP to add camera. You can add any IP cameras which have RTSP protocol
streams.
You need select 554 for the port and input the resource path for the camera. Take Milesight device
for example, for main stream the resource path is “/main” and the second stream is “/sub”.
The details about adding format are showed in F-3.3.8;
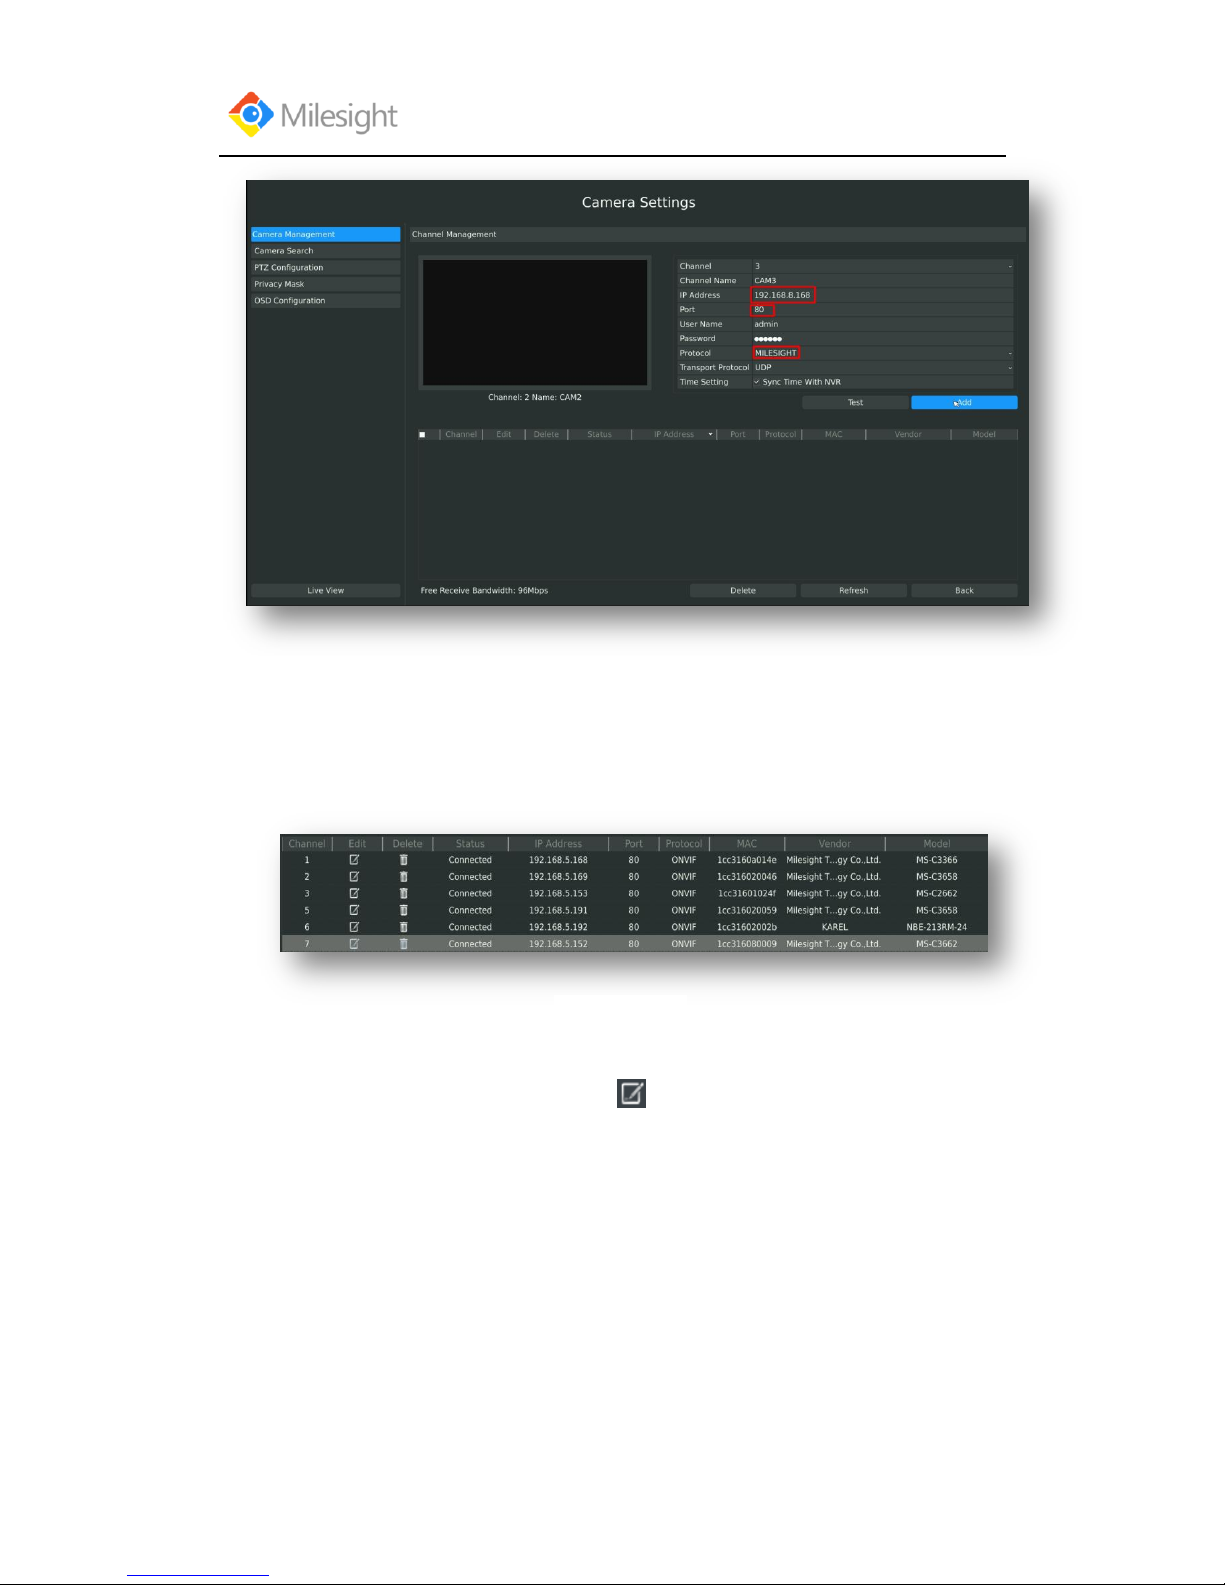
3. MILESIGHT: If your IP camera is a milesight device you can select this protocol to add
cameras. The detail formats are showed in F-3.3.9;
F-3.3.6
Page 28
User Manual
www.milesight.com 24
F-3.3.7 ONVIF
F-3.3.8 RTSP
Page 29
User Manual
www.milesight.com 25
Step3.Check the connection status
After adding the IP channels, click [Refresh] button, the [state] will show [connected] as below, If
not, you need to check if the network is connected or whether the user name, password is correct
or not.
Step4.Configure IP Channel
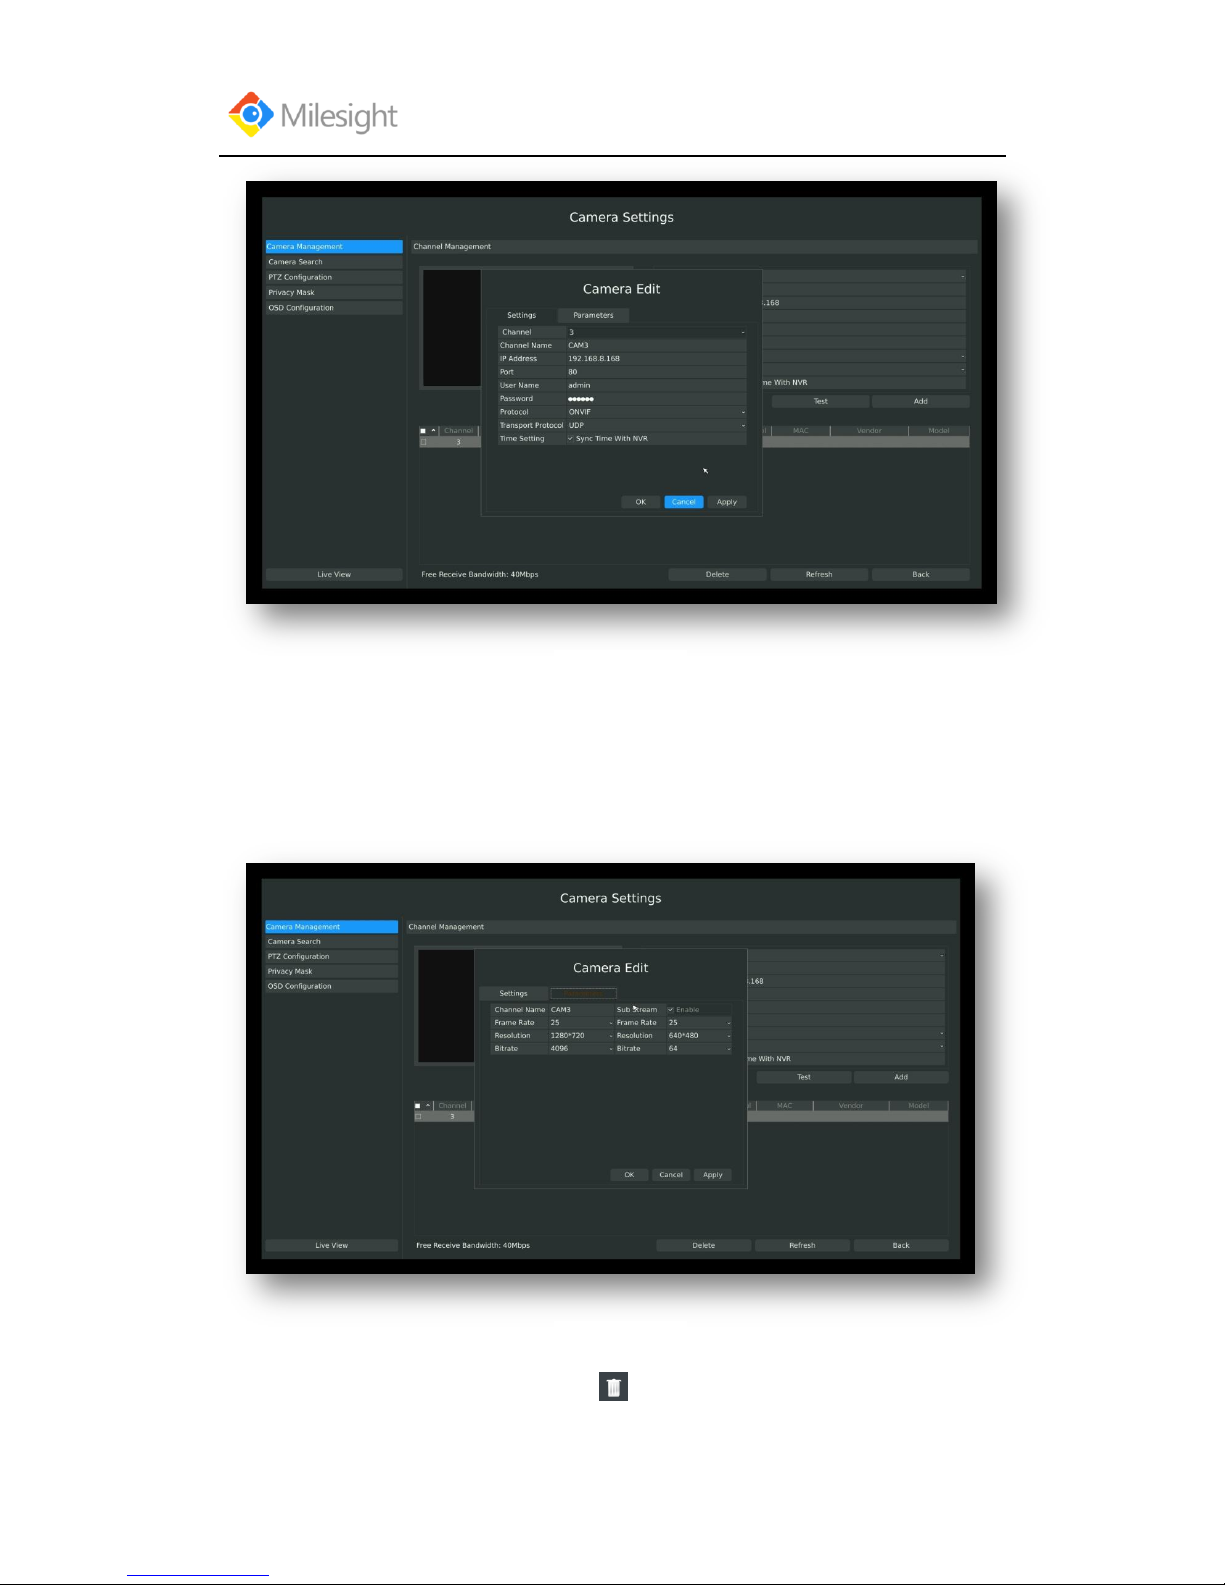
1. After successfully adding the channel, click or double-click this channel to re-edit the
channel info, address, and password, etc.
F-3.3.10
F-3.3.9 MILESIGHT
Page 30
User Manual
www.milesight.com 26
Note:
By default, the user name and password entered here are the default user name and
password. The management port is 80 and the default Transport protocol is UDP.
2. Select [Parameters] attribute page to re-edit this channel parameters. Click [Save] to save the
configuration
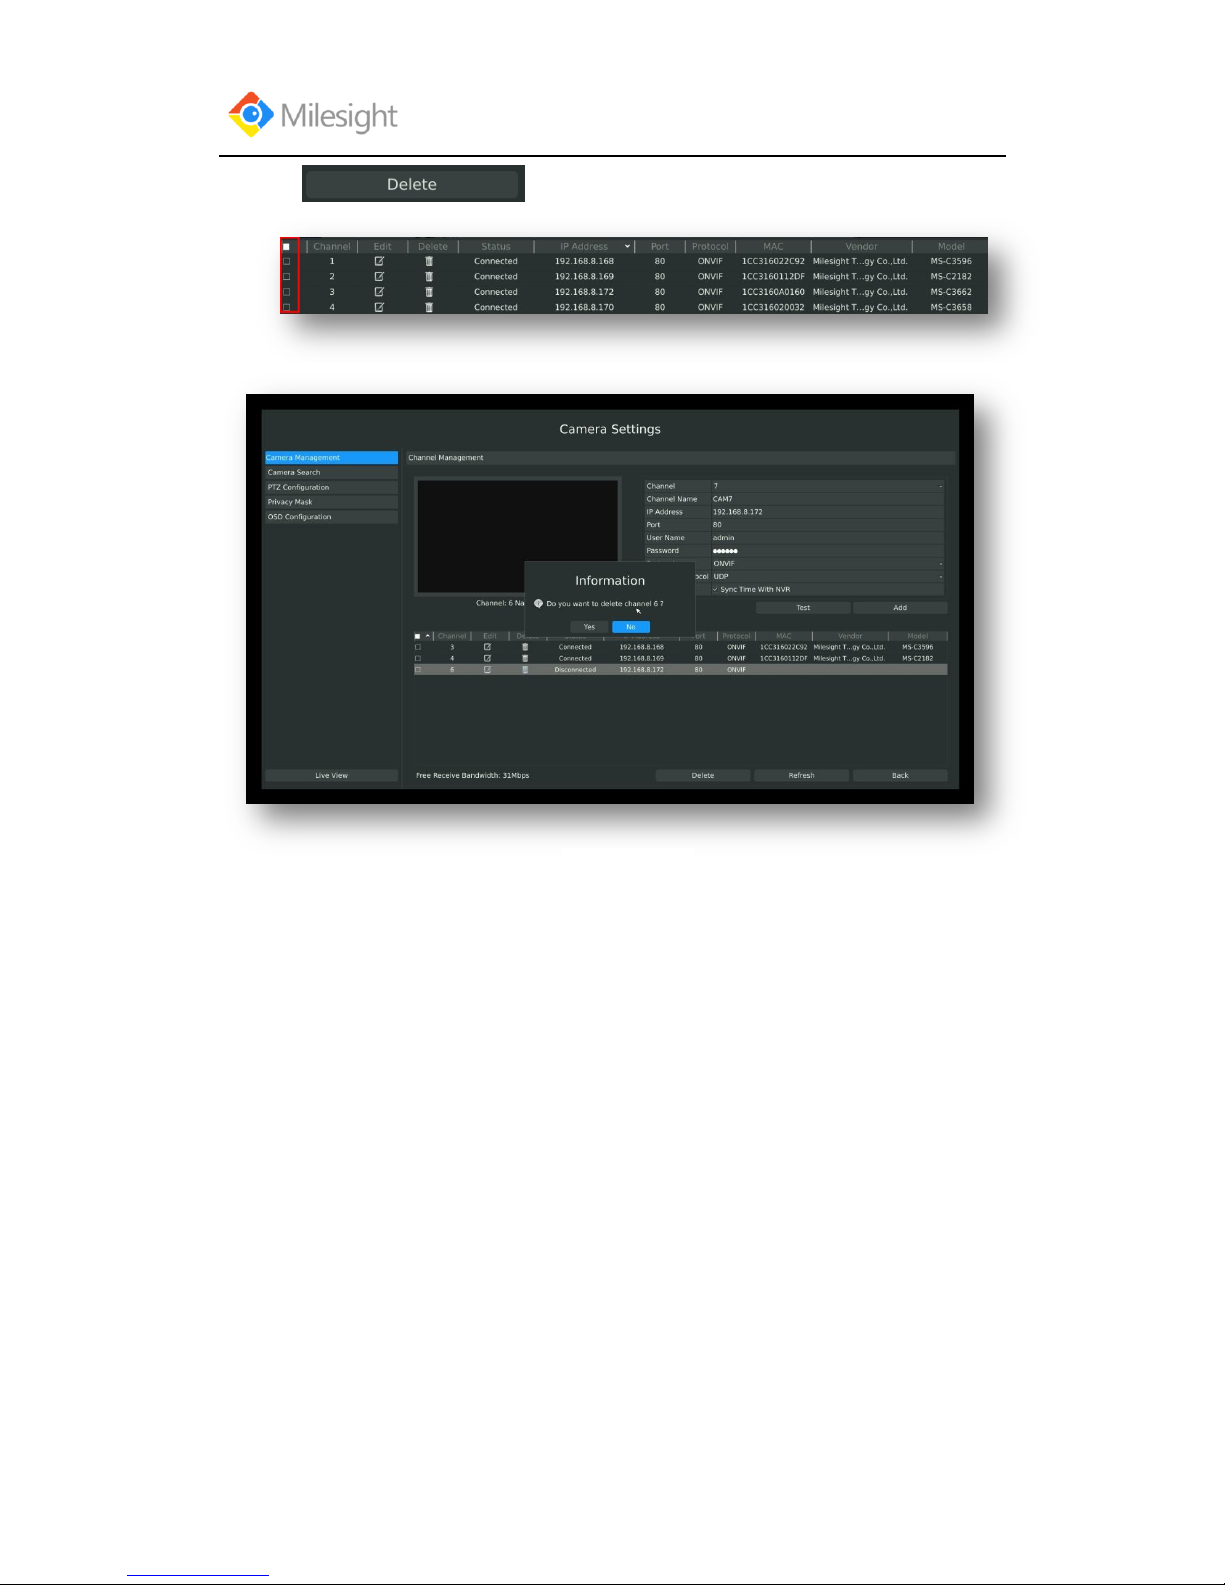
3. You can delete this IP channel by clicking , or you can multi-select the devices and then
F-3.3.11
F-3.3.12
Page 31
User Manual
www.milesight.com 27
click to delete.
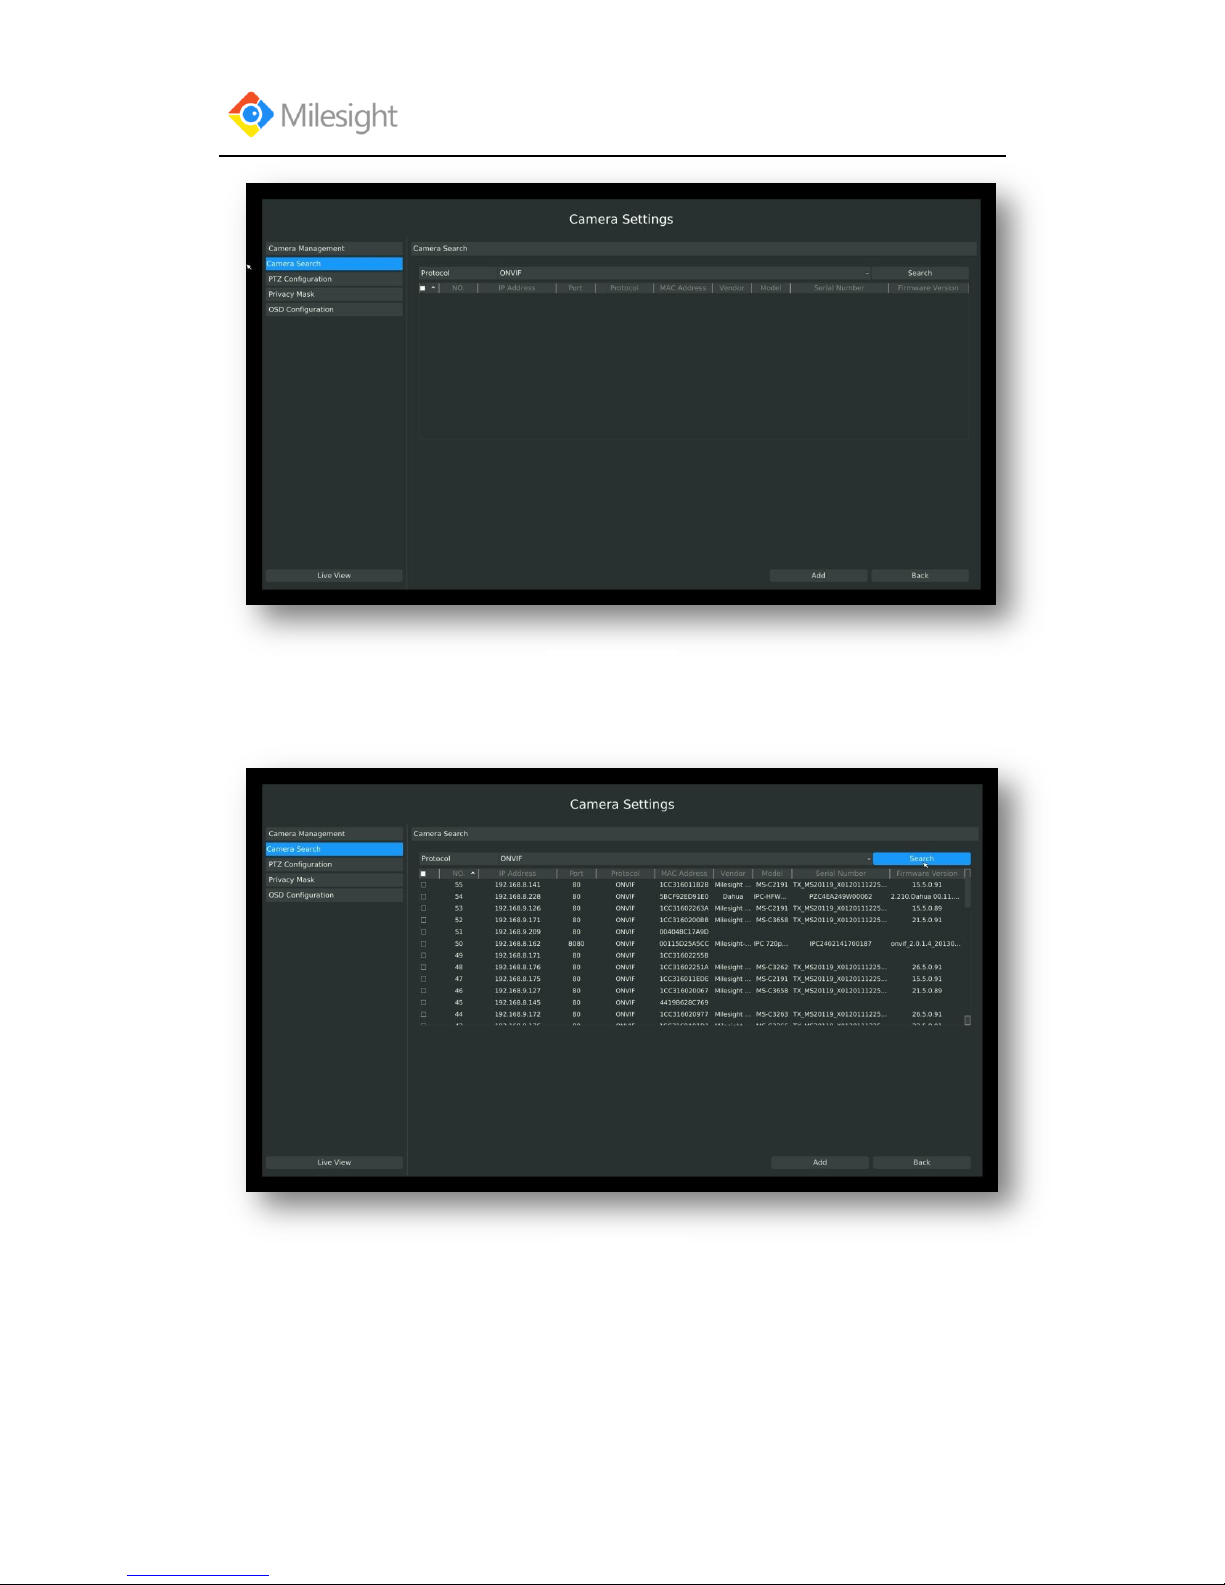
3.3.2 Camera Search
You can search and add IP cameras here
Step1.Enter camera search interface by clicking Main menu Camera Camera Search
F-3.3.13
Page 32
User Manual
www.milesight.com 28
Step2. Click [search] to quickly search the IP devices that support ONVIF at the same
network segment with NVR.
Note:
The IP devices found in the list are those that support ONVIF protocol and in the same
network segment with NVR.
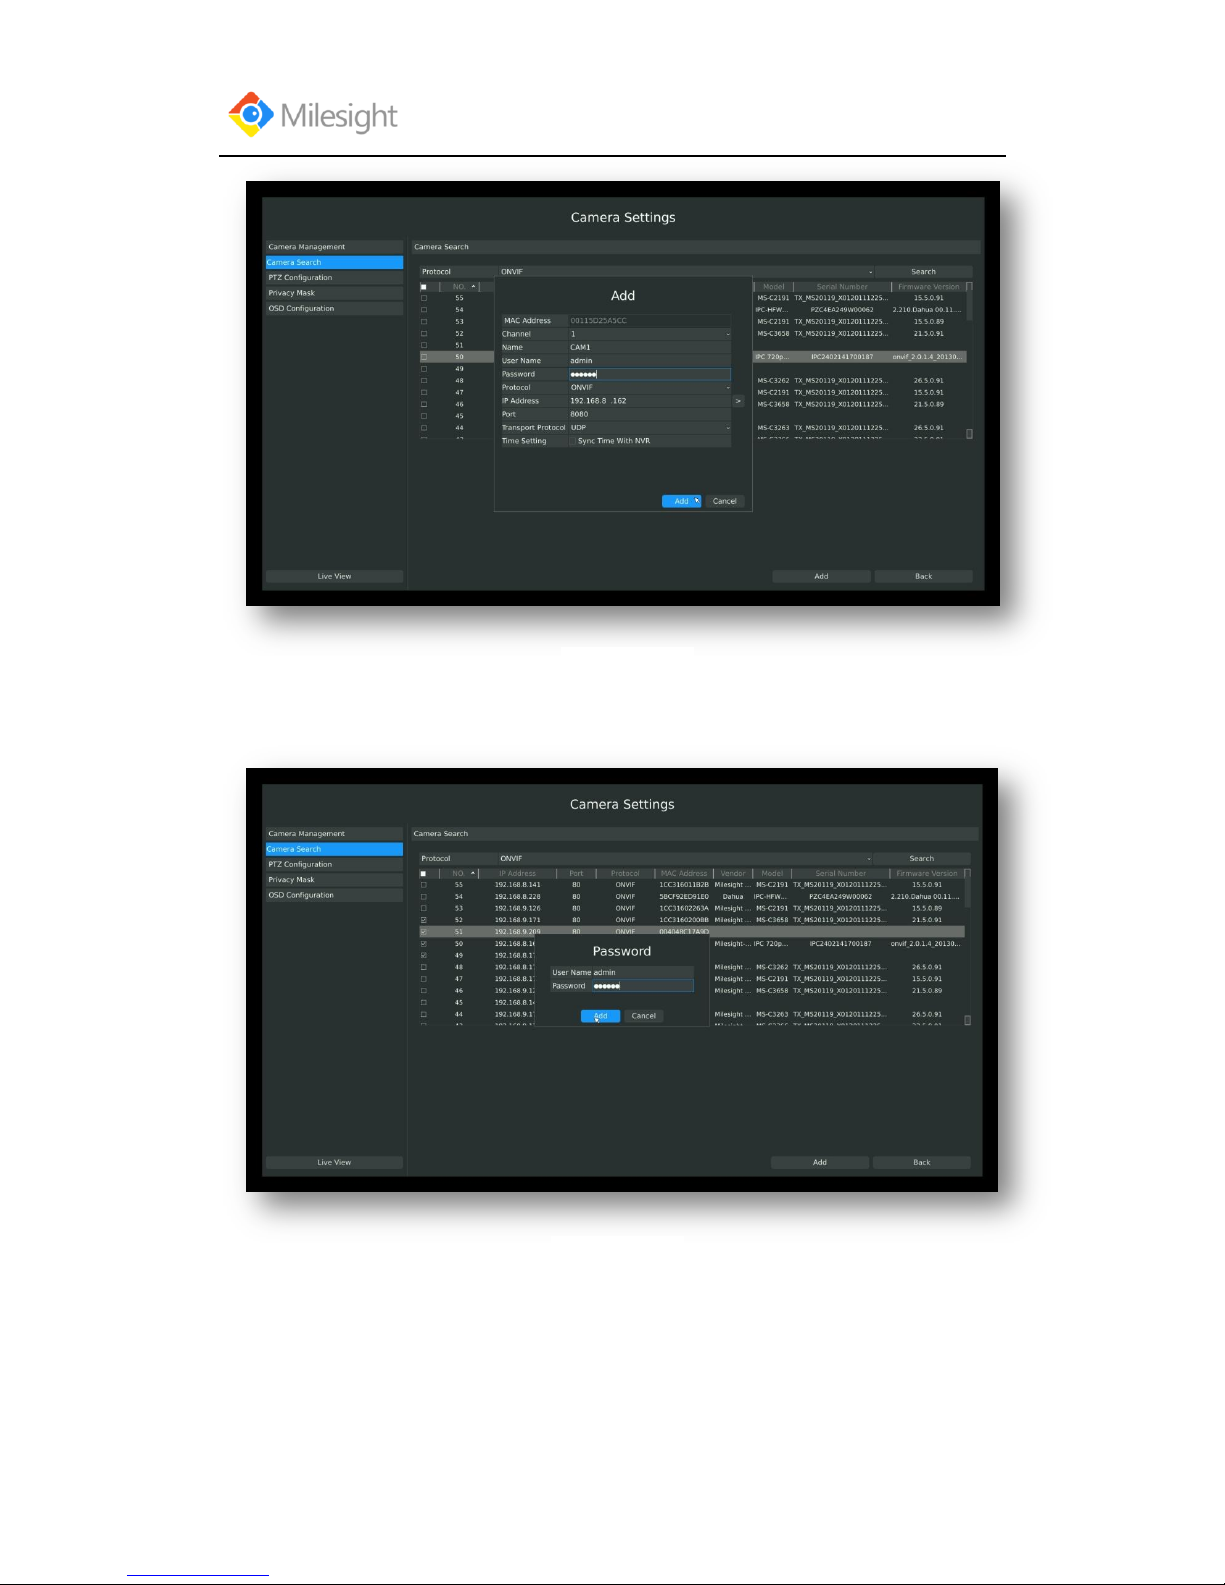
Step2.Add IP Camera
Double click the channel, input password and click [Add] button.
F-3.3.14
F-3.3.15
Page 33
User Manual
www.milesight.com 29
Or you can bulk adding the IP cameras if they are with same password. Click [OK] to finish bulk
adding.
F-3.3.16
F-3.3.17
Page 34
User Manual
www.milesight.com 30
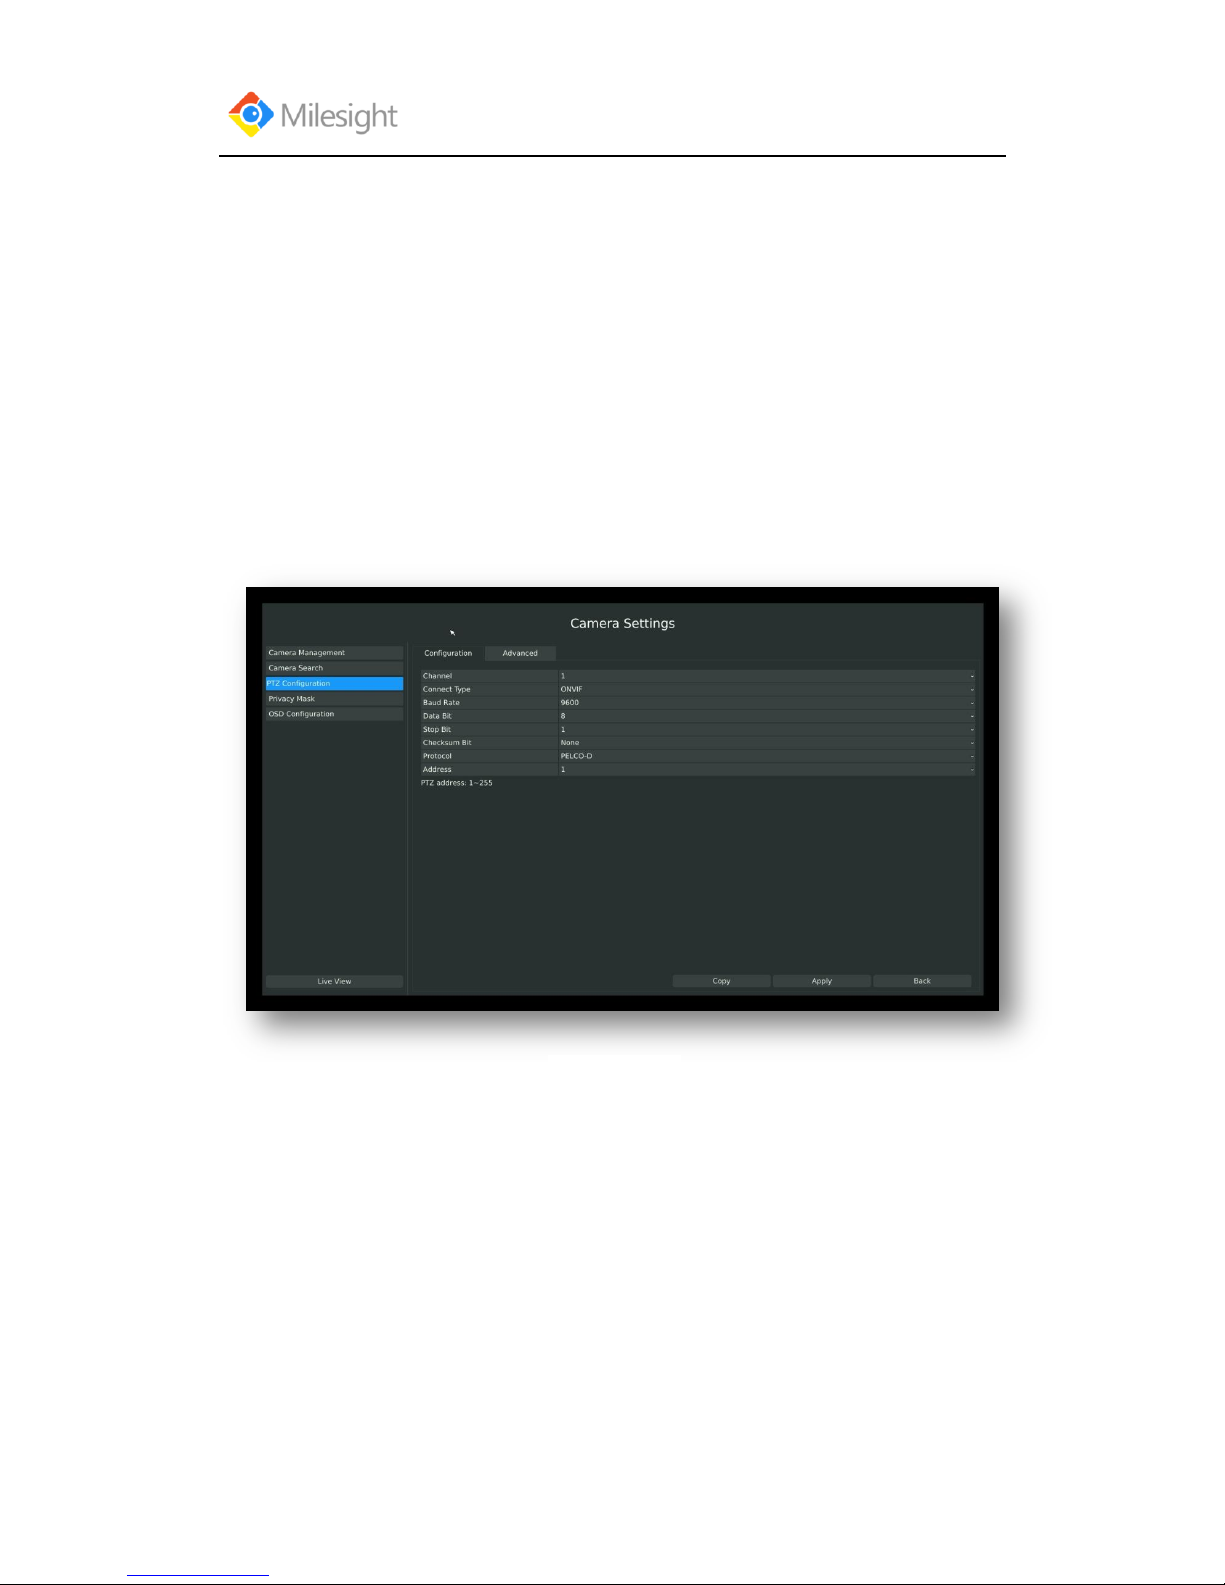
3.3.3 PTZ Configuration
3.3.3.1 PTZ control Parameters Configuration
Note:
Settings for a PTZ camera must be configured before it can be used. Make sure that the PTZ
and RS-485 of the NVR are connected properly.
Step: Enter configuration interface by clicking Main Menu CameraPTZ Configuration,
select “Configuration” page
Select a channel and set the PTZ parameters. You can click [Copy] to copy the same configuration
to other channels.
Note: The PTZ protocol and address of IP channel must be consistent with those of the PTZ
decoder.
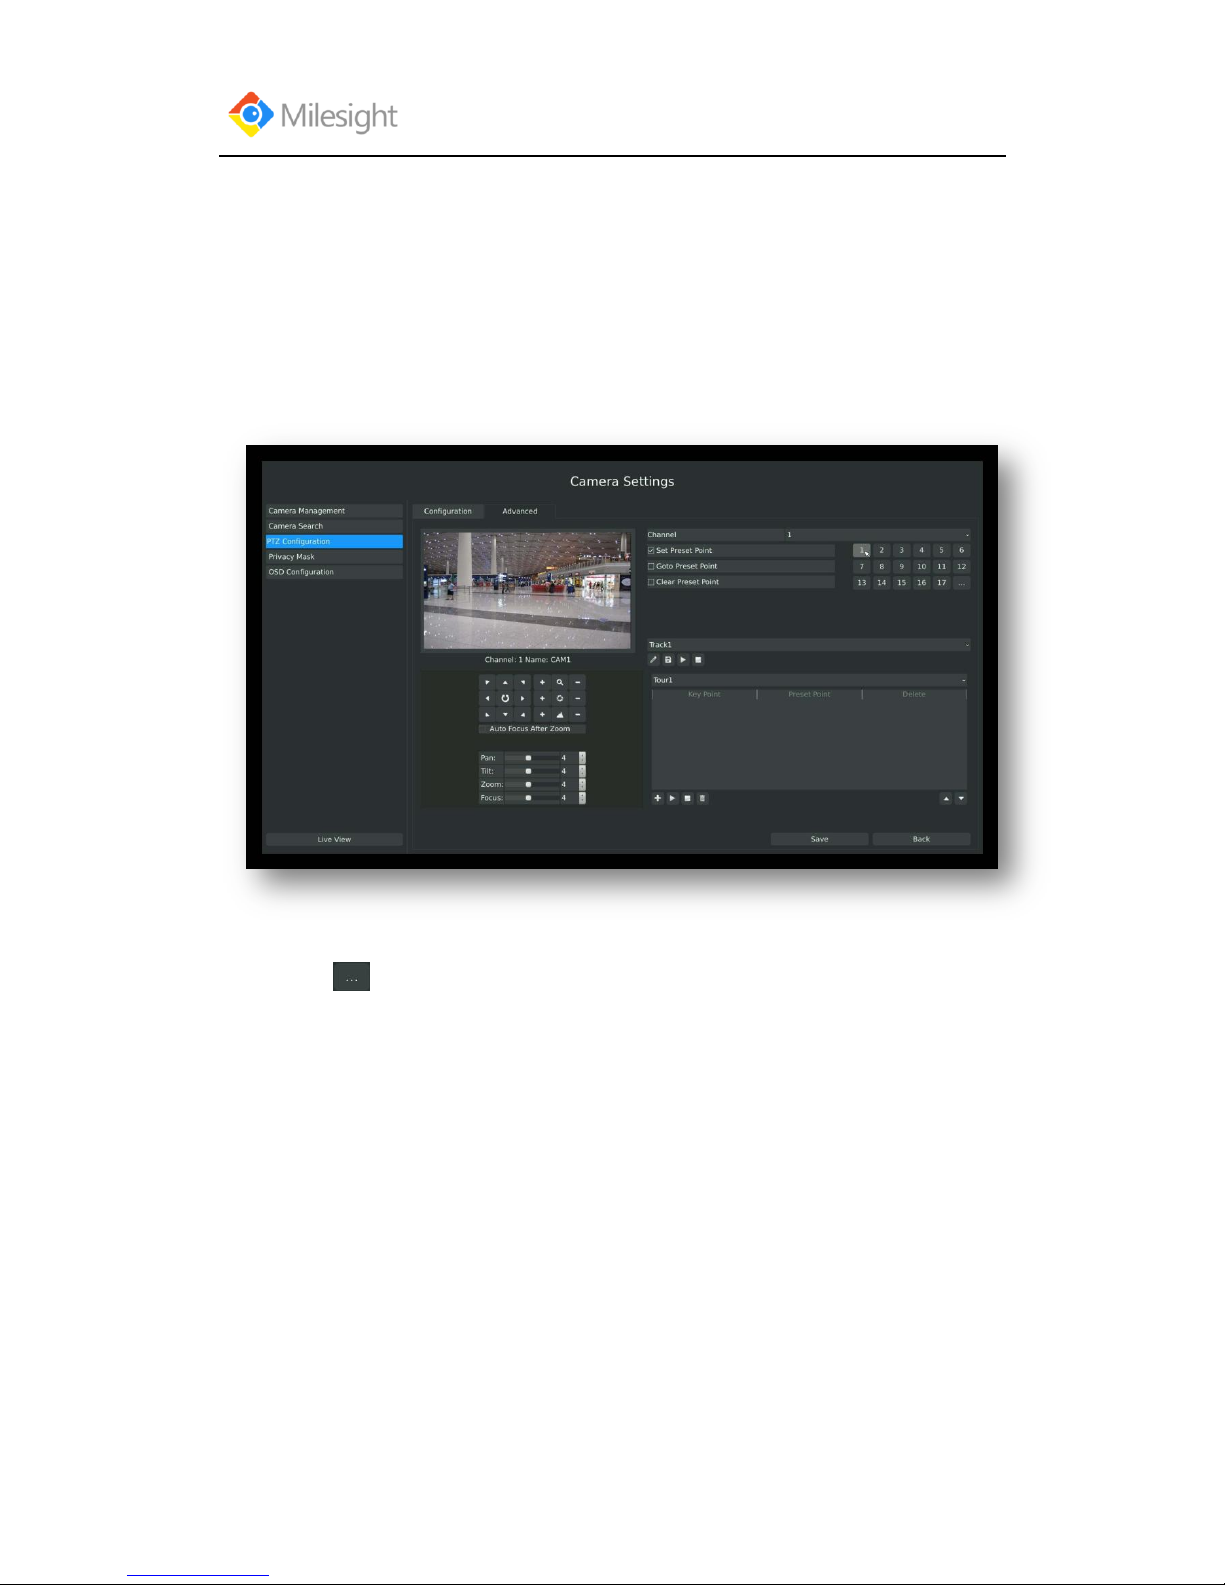
3.3.3.2 Advanced Configuration
There are two patrol ways can be set: Track Patrol and Tour Patrol
Note:
1. IP channel does not support configuration and calling of presets, patrols and patterns.
2. The functioning of presets patrols and patterns need front PTZ decoder to support.
F-3.3.18
Page 35
User Manual
www.milesight.com 31
Route: Main Menu CameraPTZ Configuration, select “Advanced” page
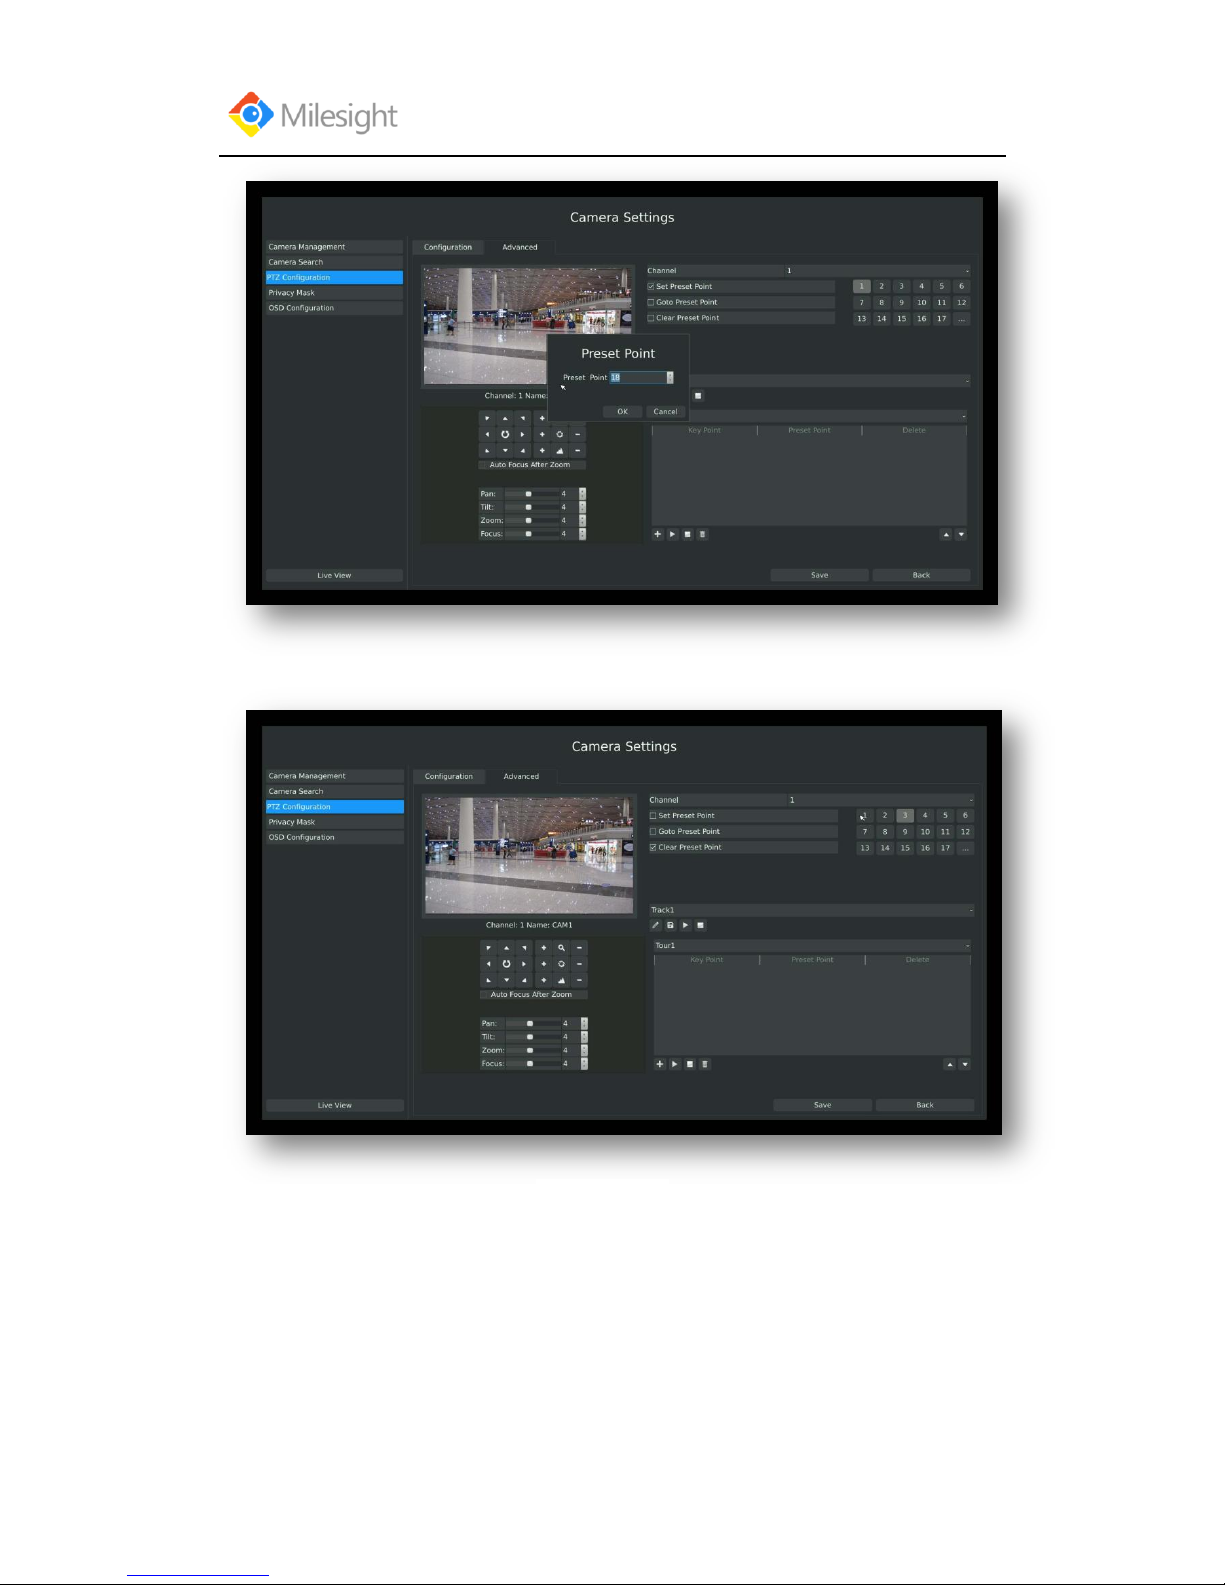
1. Presets Point Setup
Preset can be set to move your PTZ camera to a desired preset location. The preset point is the
preparation for Tour Patrol.
Step1. Use the PTZ direction key to rotate the position of preset. Then select “Set Preset
Point” and select a preset number to finish a preset point setting. Repeat above steps to set
more preset points.
Step2. Click to save or call more preset points after number 17.
F-3.3.19
Page 36
User Manual
www.milesight.com 32
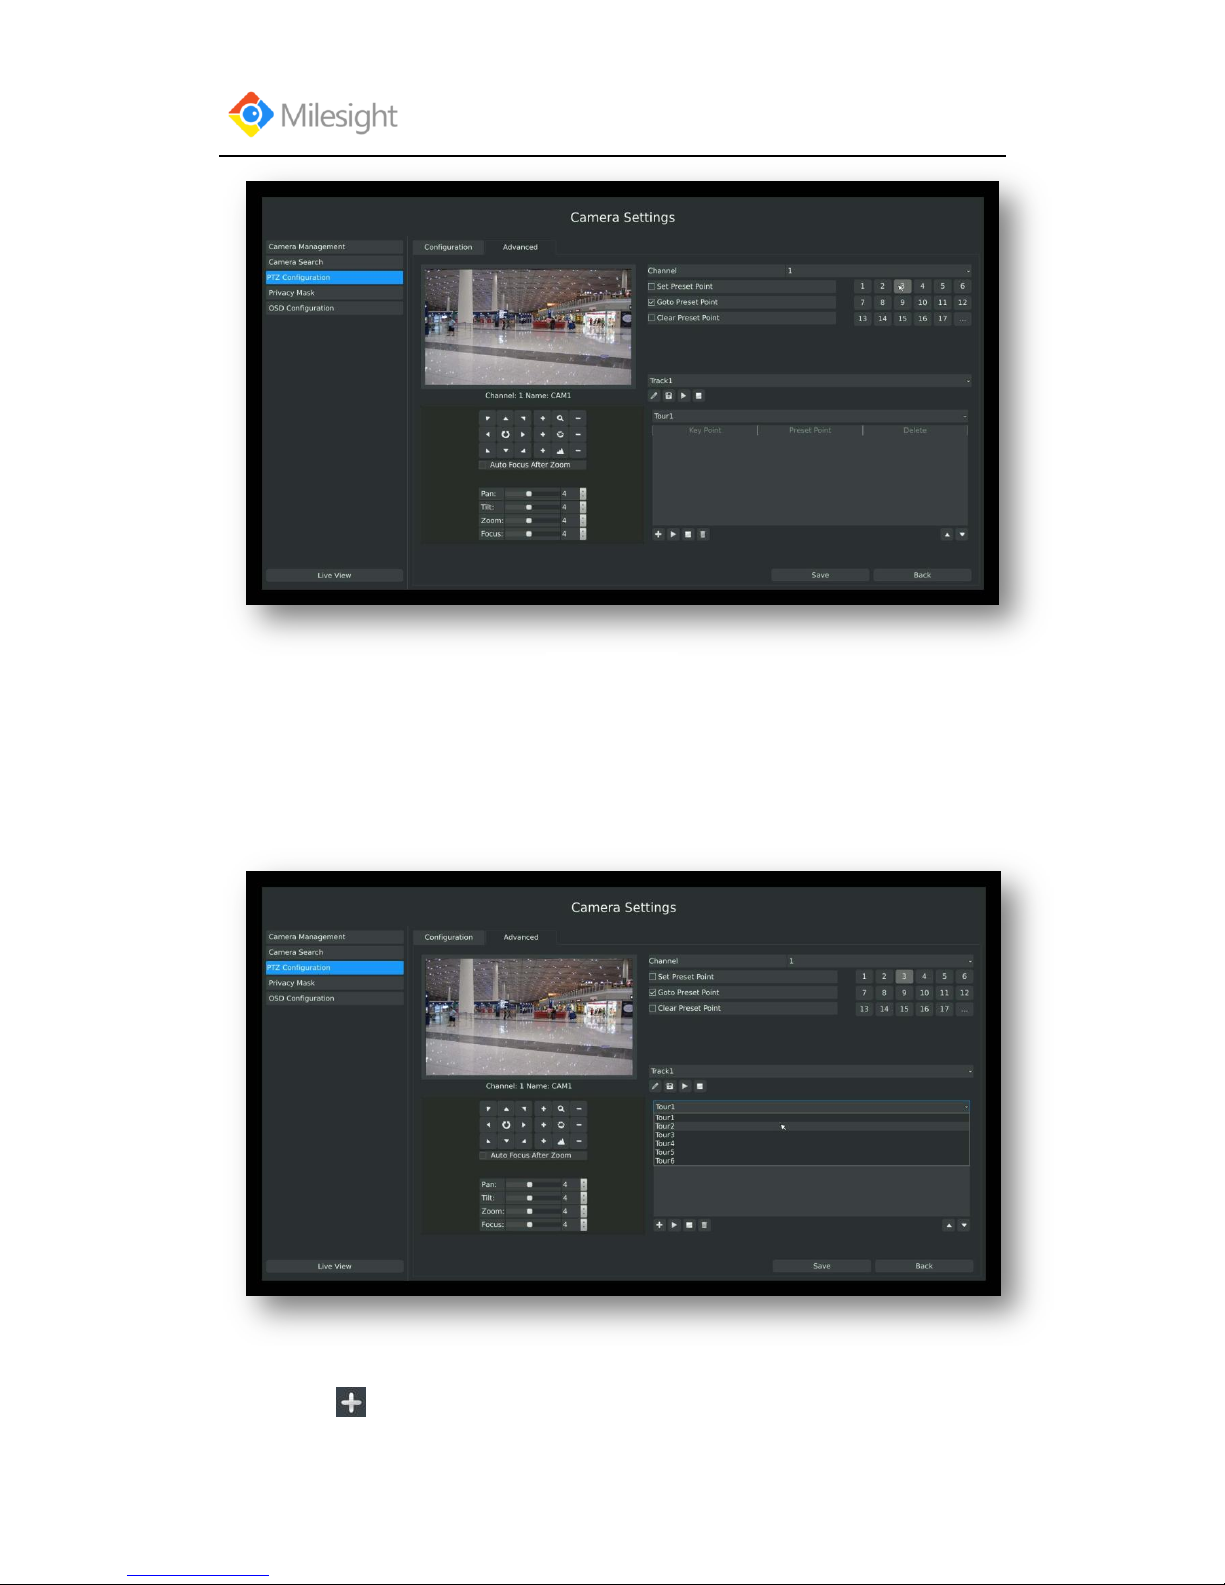
Step3. Select „Clear Preset Point‟ and click a preset number to delete the preset point.
Step4. Select “Go to Preset Point”. Click a preset number to check the preset point.
F-3.3.20
F-3.3.21
Page 37
User Manual
www.milesight.com 33
2. Tour Patrol
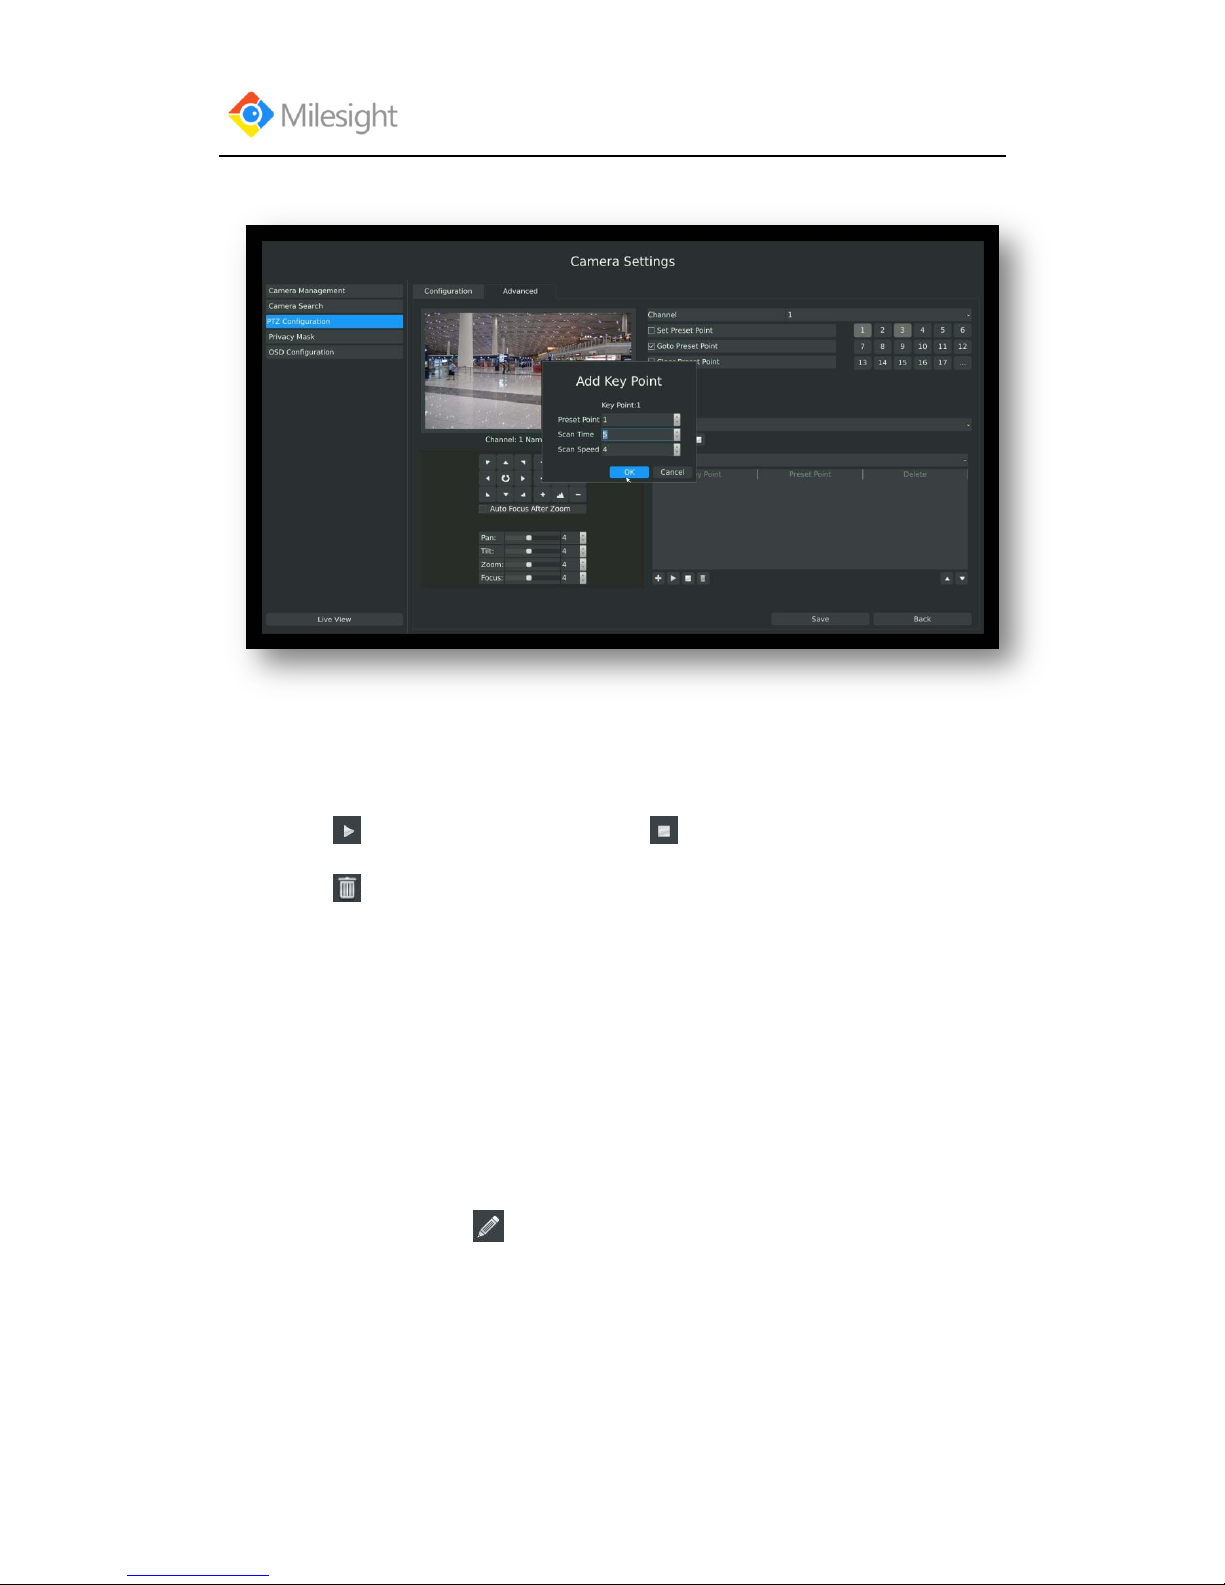
The camera will patrol according to the key points. The total time and patrol speed of the tour is
variable.
Step1. Select a tour. Up to 6 tours could be set.
Step2. Click to add key points. Set the key point parameters (including preset point
F-3.3.22
F-3.3.23
Page 38
User Manual
www.milesight.com 34
number, scan time and scan speed) and click [OK].
Step3. Repeat the above steps to add more key points to the tour patrol.
Step4. Select a key point, select [Delete] and select [Yes] in the dialog box to delete it.
Step5. Click to preview the tour patrol. Click to stop.
Step6. Click and select [Yes] in the dialog box to delete all key points of the tour patrol.
Note:
1. The key point decides the patrol path, which will run according to numerical order of the
key points.
2. Scan time is how long the patrol stays on the preset point.
3. Scan speed is the rotate speed of speed dome from one preset point to the next.
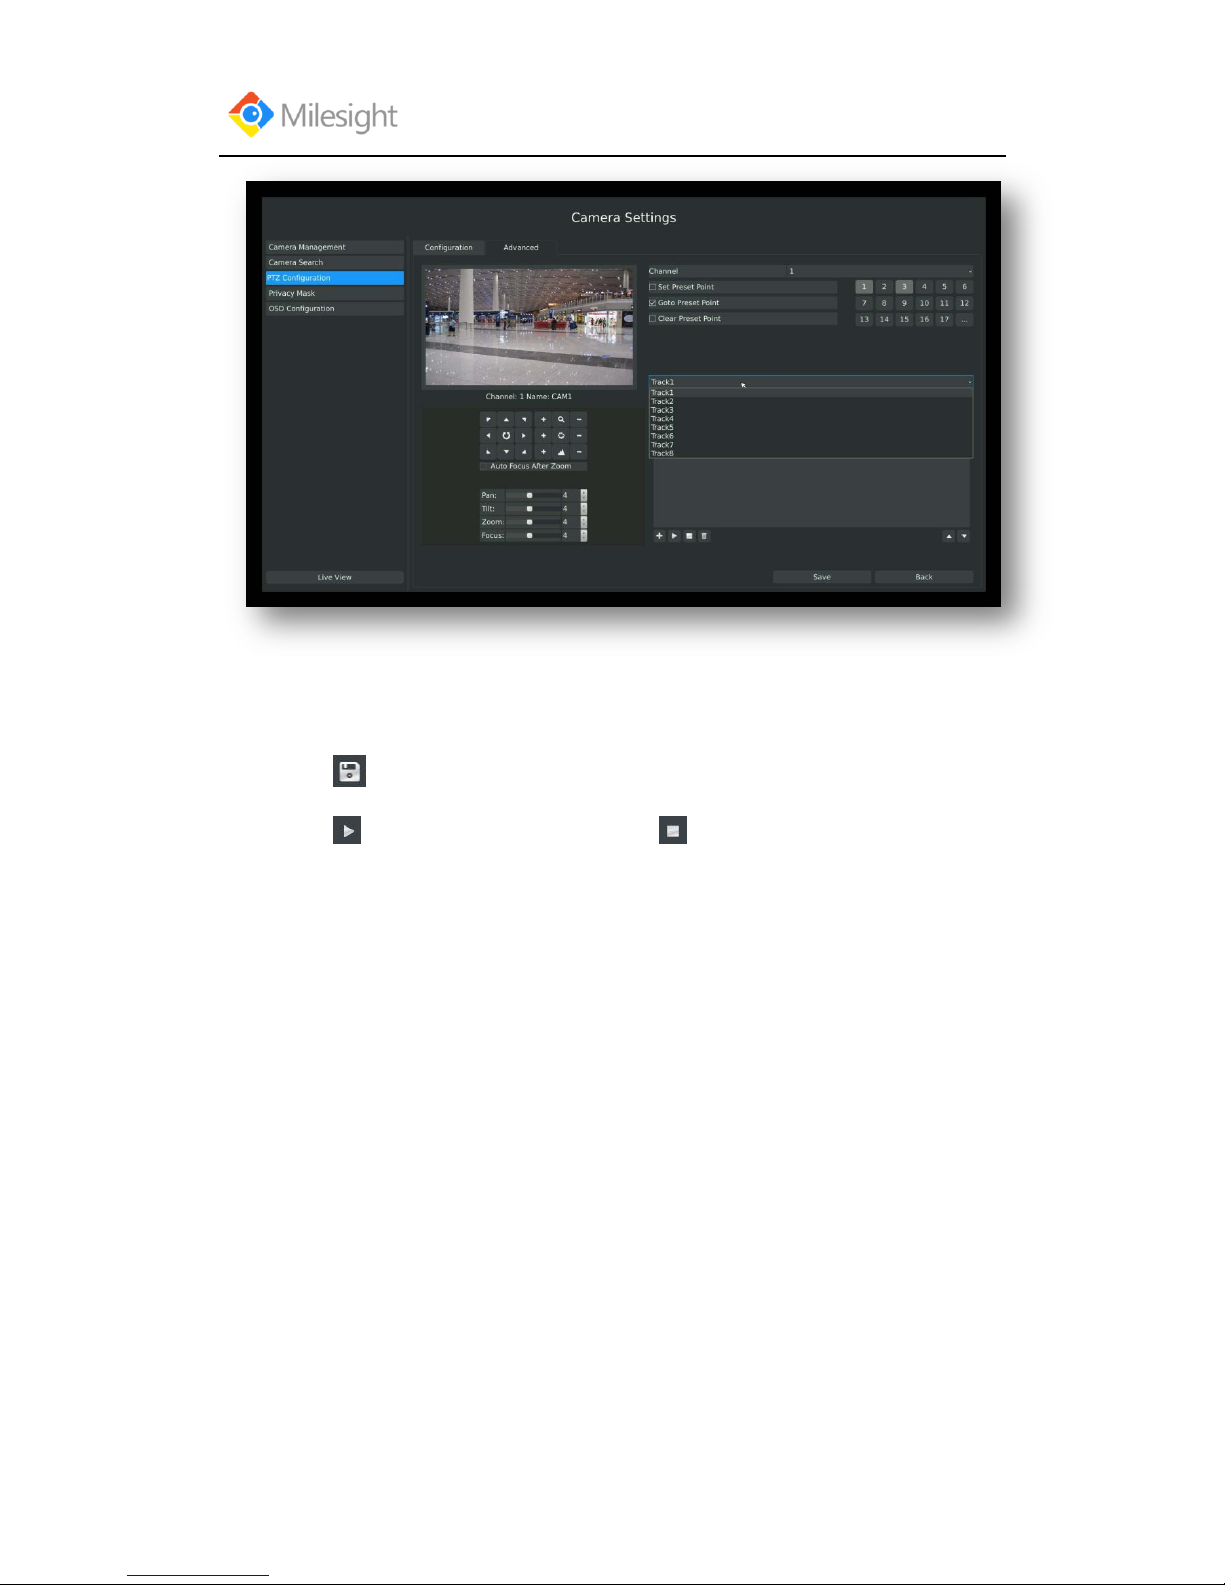
3. Track Patrol
The camera will patrol back and forth in a constant speed. There are only a start point and an end
point.
Step1. Select a track and click . Up to 8 tracks could be set.
F-3.3.24
Page 39
User Manual
www.milesight.com 35
Step2. Drag the mouse or click 8 direction keys of mouse control field to rotate PTZ.
Step3. Click to save the PTZ movement patterns to the Track Patrol.
Step4. Click to preview the track patrol. Click to stop.
3.2.3.3 PTZ Control Operation
In live view mode, select quick menu of live view channel to enter PTZ control mode. It can
access PTZ control by PTZ control bar or panel PTZ control button.
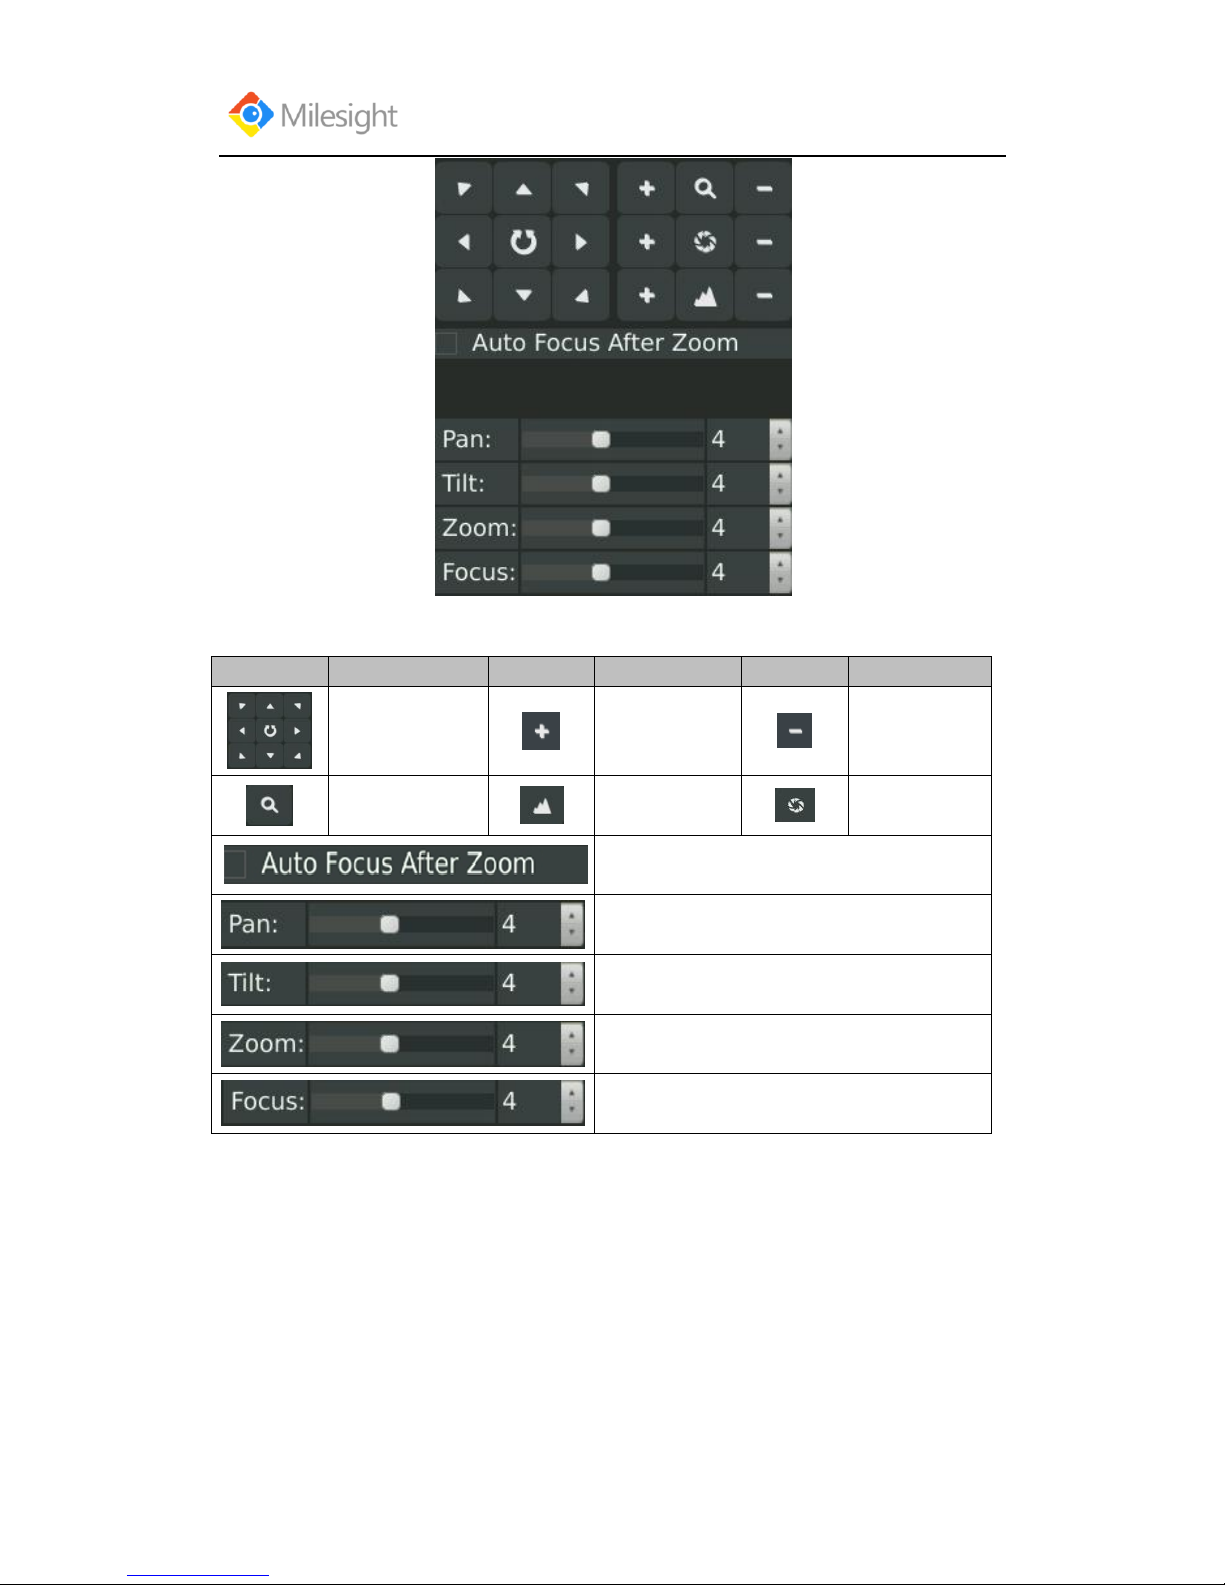
Description of PTZ Control Bar
F-3.3.25
Page 40
User Manual
www.milesight.com 36
Icon
Description
Icon
Description
Icon
Description
PTZ Direction
Control and Auto
Scan Button
Adjust Zoom+,
Focus+,
IRIS+
Adjust
Zoom-,Focus-,
IRIS-
Zoom: Zoom in
or out
Focus
IRIS
Focus automatically after manual zoom
Horizontal Movement Adjustment
Vertical Movement Adjustment
Zoom Adjustment
Focus Adjustment
F-3.3.26
Page 41
User Manual
www.milesight.com 37
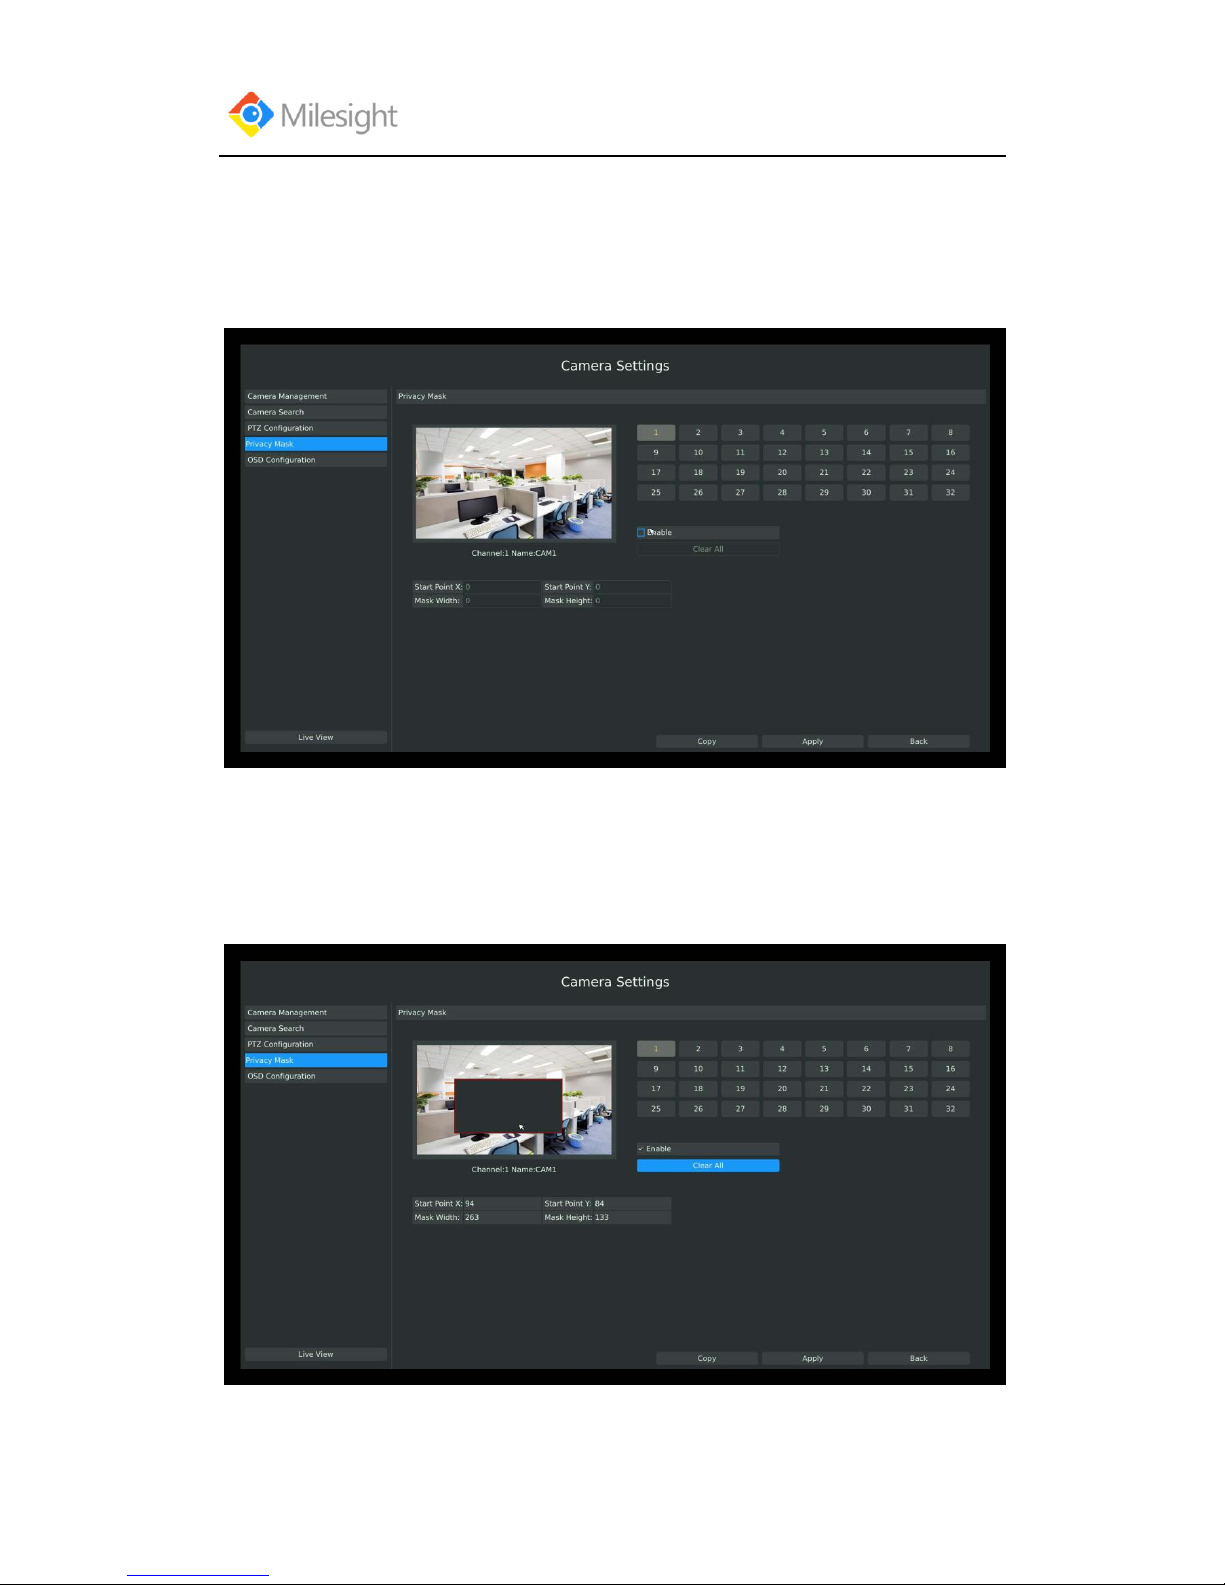
3.3.4 Privacy Mask
Milesight NVR support privacy mask. It used to cover some privacy area which is not proper to
appear on monitor.
Entering Privacy Mask interface by clicking: Main Menu CameraPrivacy Mask.
You can add a privacy mask by following steps:
Step1: Select channel on the right top of the interface, and enable it on the below of the channel;
Step2: Set the area of privacy mask:
Way1: Drag the mouse to select the area which is privacy on the live window;
Way2: Set the coordinates of privacy area in the columns below the live window;
F-3.3.27
F-3.3.28
Page 42
User Manual
www.milesight.com 38
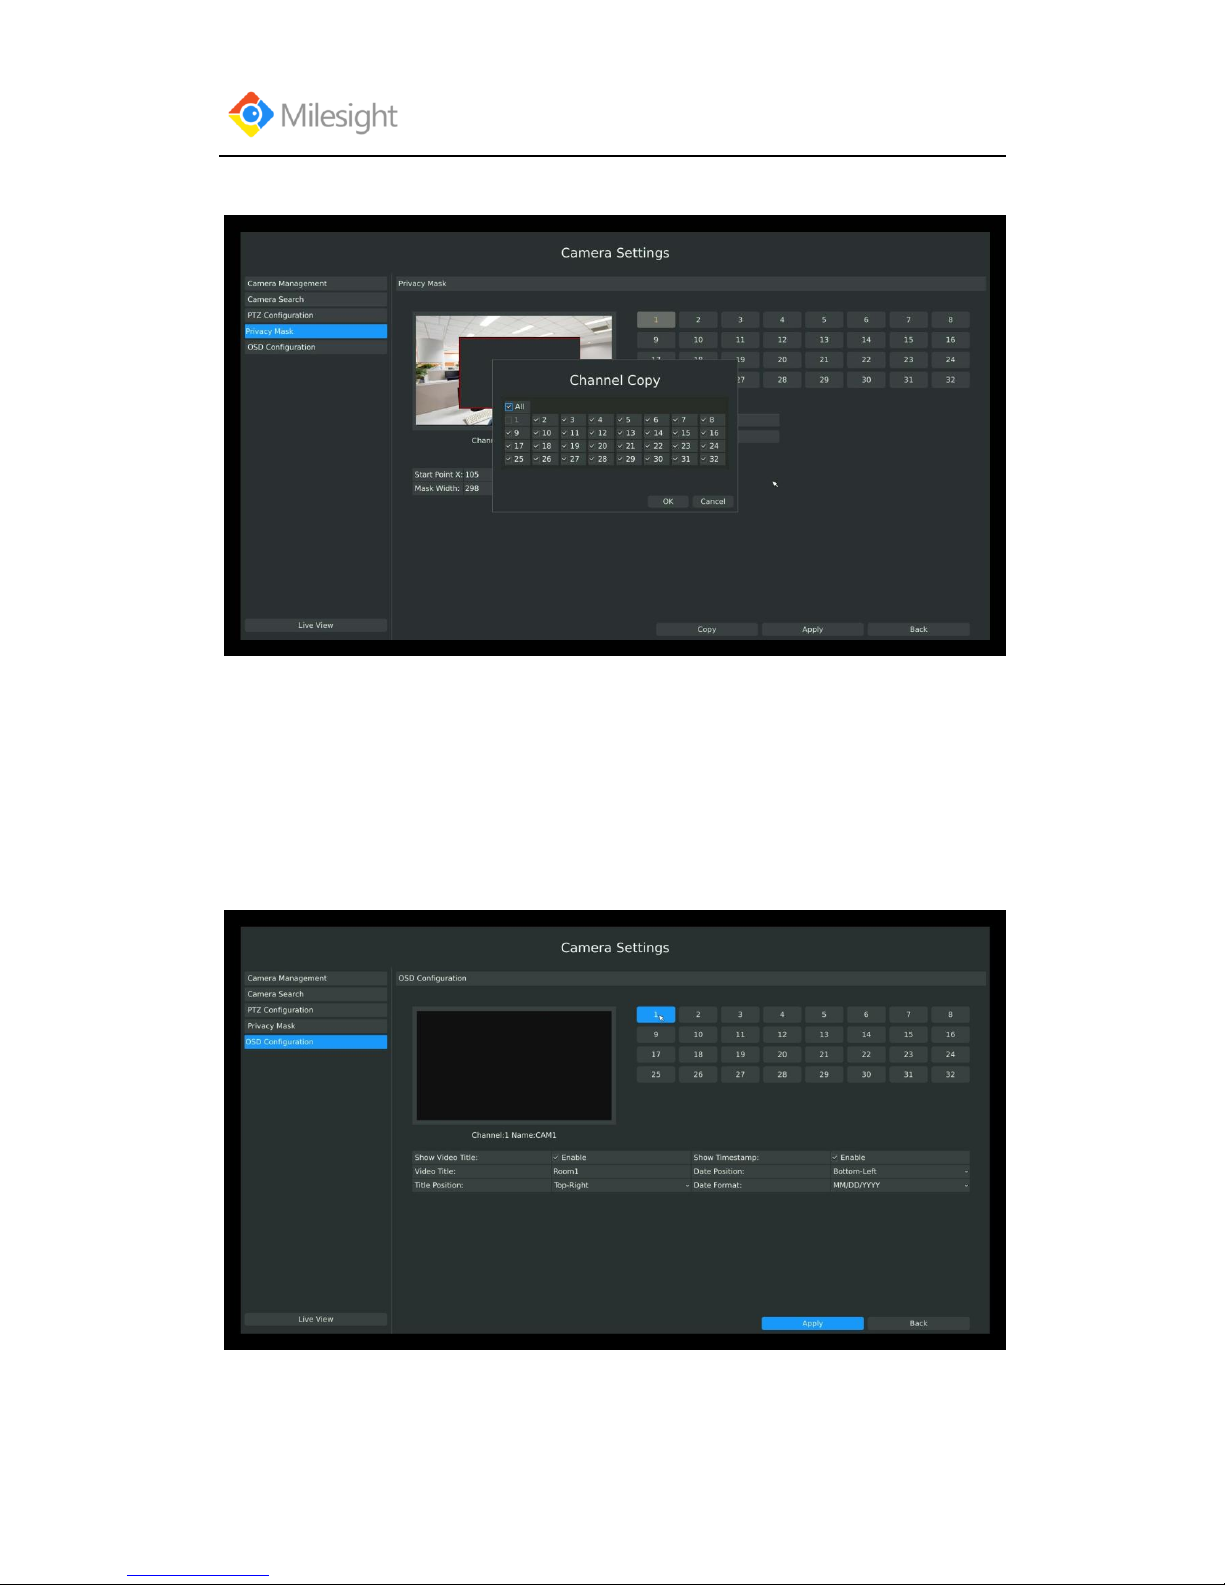
Step3: Copy the privacy area to the other channels by click the “copy” button on the bottom of the
windows;
Step4: Select “Apply” to save the settings.
3.3.5 OSD configuration
You can set OSD (On Screen Display) on NVR, and the OSD will be synchronized on IPC.
Entering OSD Configuration interface by clicking: Main Menu CameraOSD Configuration.
Step1: Select channel by clicking the channel number on the right-top, the selected channel will
change into gray and the channel number will change into yellow;
F-3.3.29
F-3.3.30
Page 43
User Manual
www.milesight.com 39
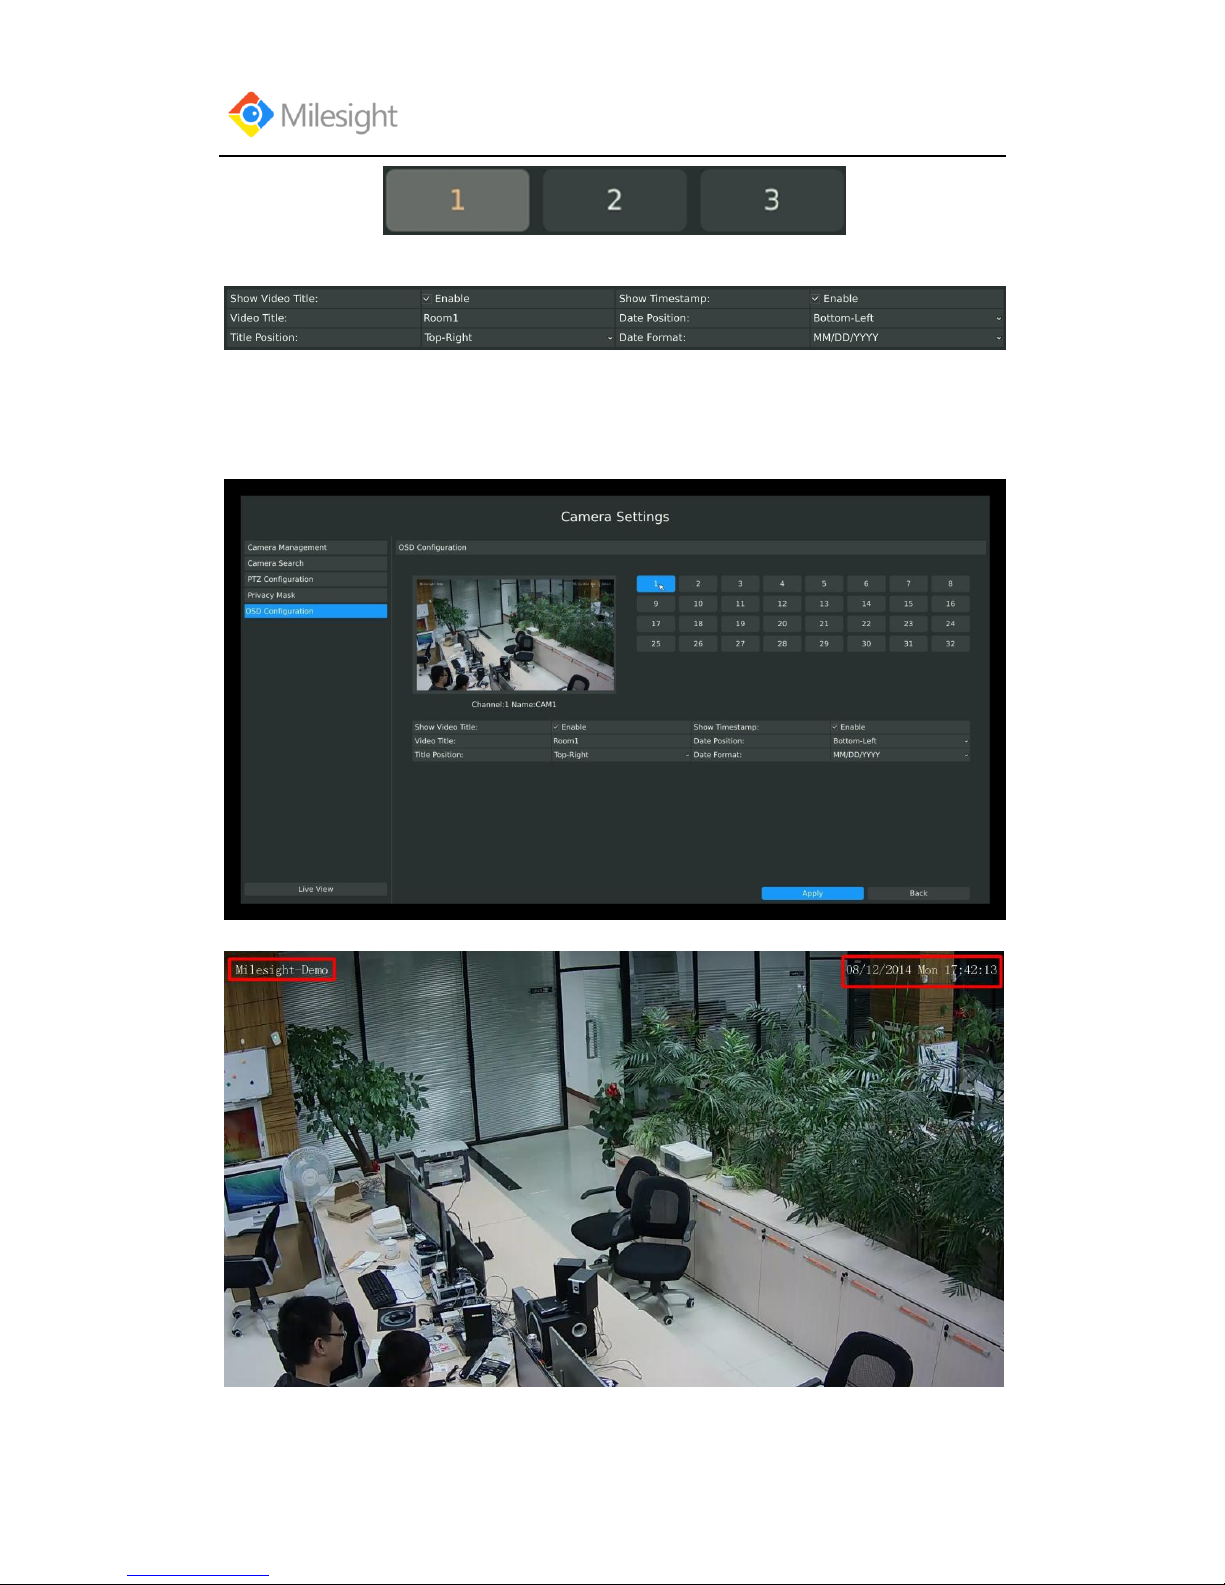
Step2: Enable video title and timestamp:
[Video Title]: Set the video title for the channel;
[Title Position]: Set the position for the video title: Top-Left or Top-Right;
[Date Position]: Set the position for the date: Top-Left, Top-Right, Bottom-Left or Bottom-Right;
[Date Format]: Set format for date: YYYY-MM-DD, MM/DD/YY or DD/MM/YYYY;
Step3: Select “Apply” to save the settings.
F-3.3.31
F-3.3.32
Page 44
User Manual
www.milesight.com 40
3.4 Record Settings
Preparation for Configuration
Step1.Ensure your NVR has Install and initialize the HDD.
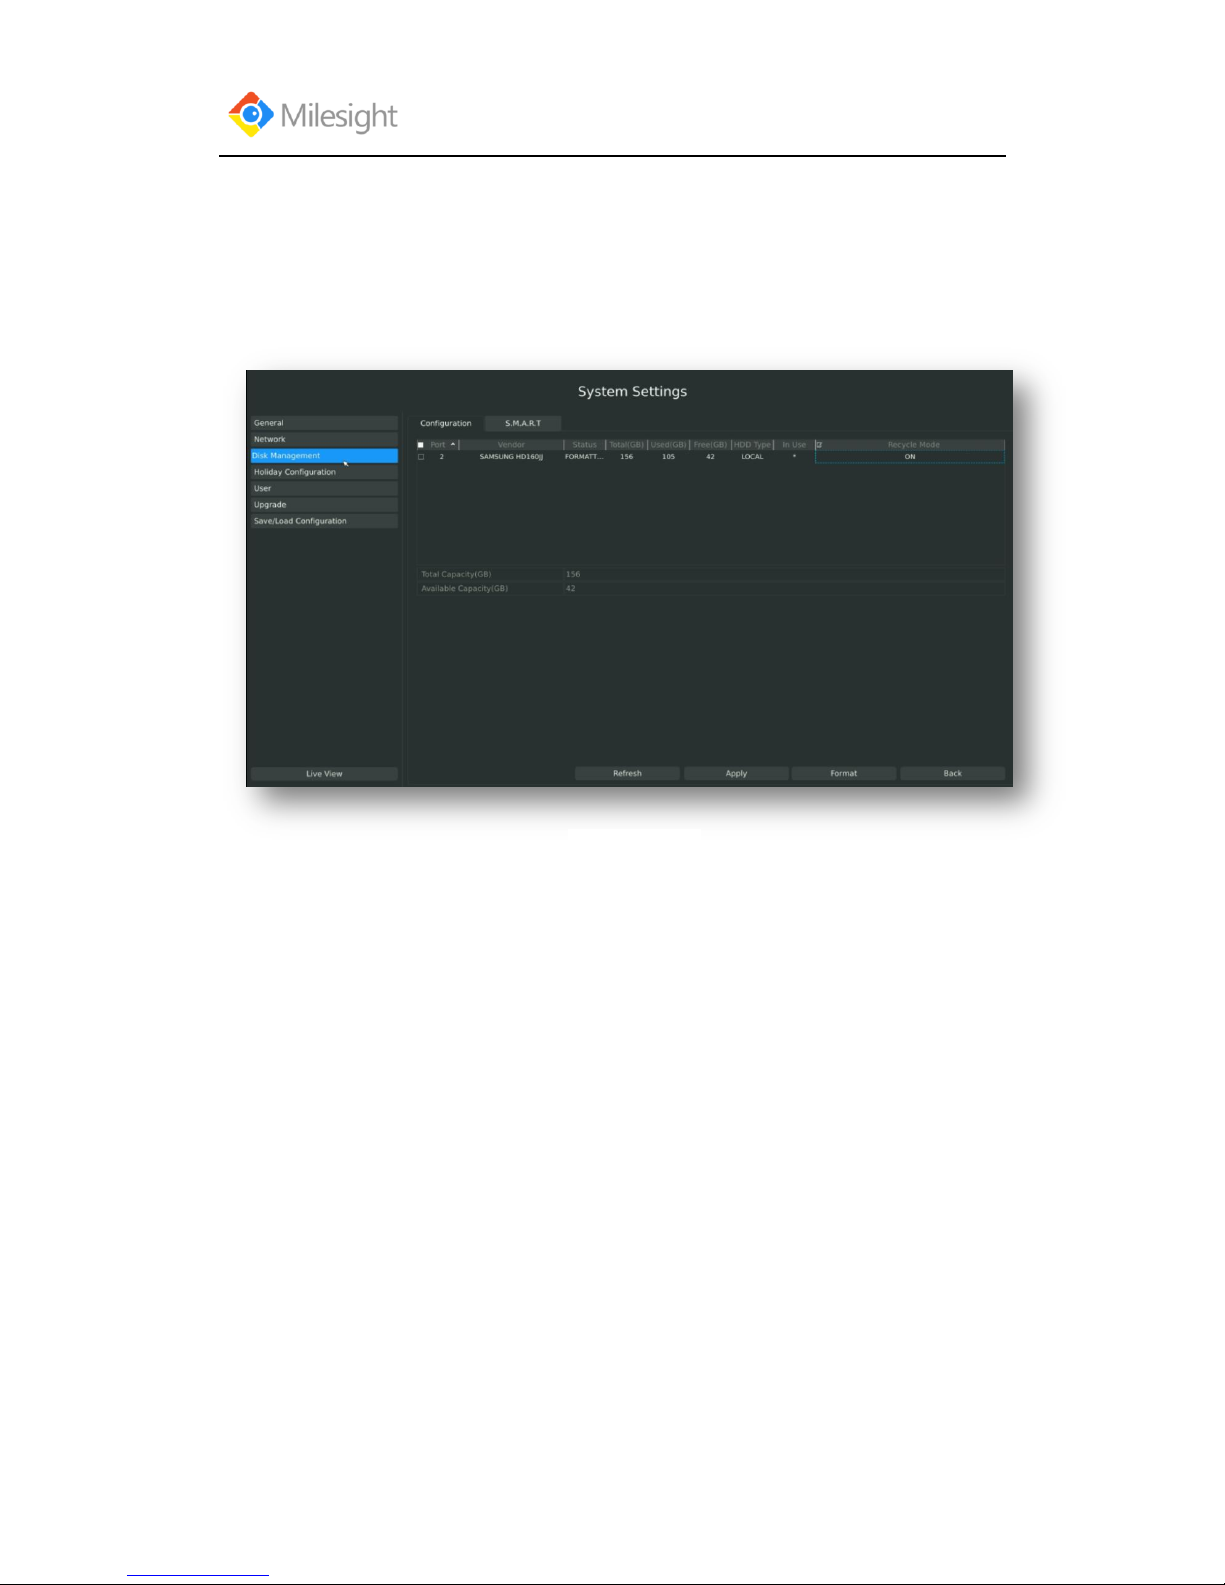
Enter disk management interface by clicking System Settings→Disk Management
Step2. Ensure that HDD has sufficient storage space.
Enter disk management interface by clicking System Setting → Disk Management. Select
[Recycle Mode] to ON in the case of insufficient capacity of HDD.
F-3.4.1
Page 45
User Manual
www.milesight.com 41
3.4.1 Record Mode
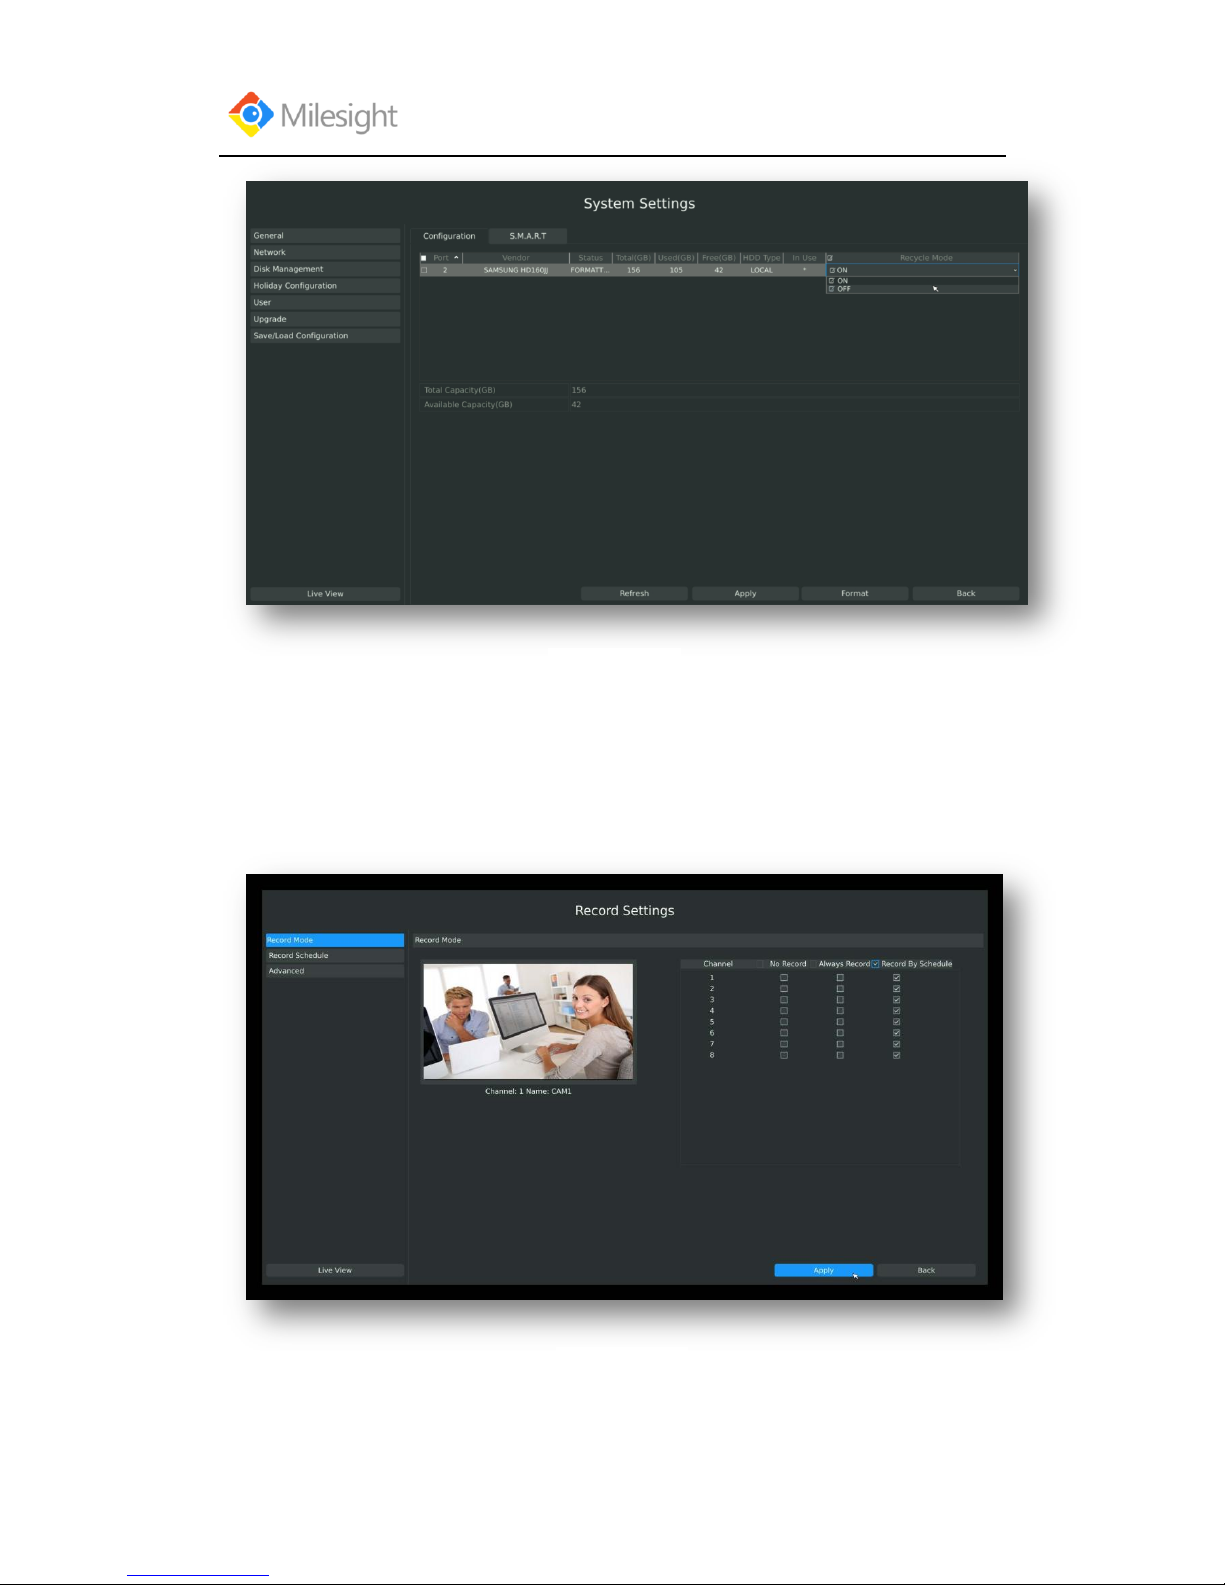
Step 1. Enter to record mode menu by clicking Main Manu → Record → Record Mode.
There are three record modes: No Recording/Always Record/Record by Schedule. You can select
desired one to every channel.
[No Record]: NVR will not record if you choose this column;
[Always Record]: It will always record the chosen channel;
F-3.4.2
F-3.4.3
Page 46
User Manual
www.milesight.com 42
[Record By Schedule]: If you want NVR to record by schedule, then you need select this
column and then go to 3.4.2;
Step2. Click [Apply] to save the configuration.
3.4.2 Record Schedule Setting
Note: The days are devided as Holiday/Sunday/Monday/Tuesday/Wednesday/Thursday/Friday/
Saturday. The schedule of Holiday is superior to other days. To set the holiday information, go to
Chapter.3.8.4.
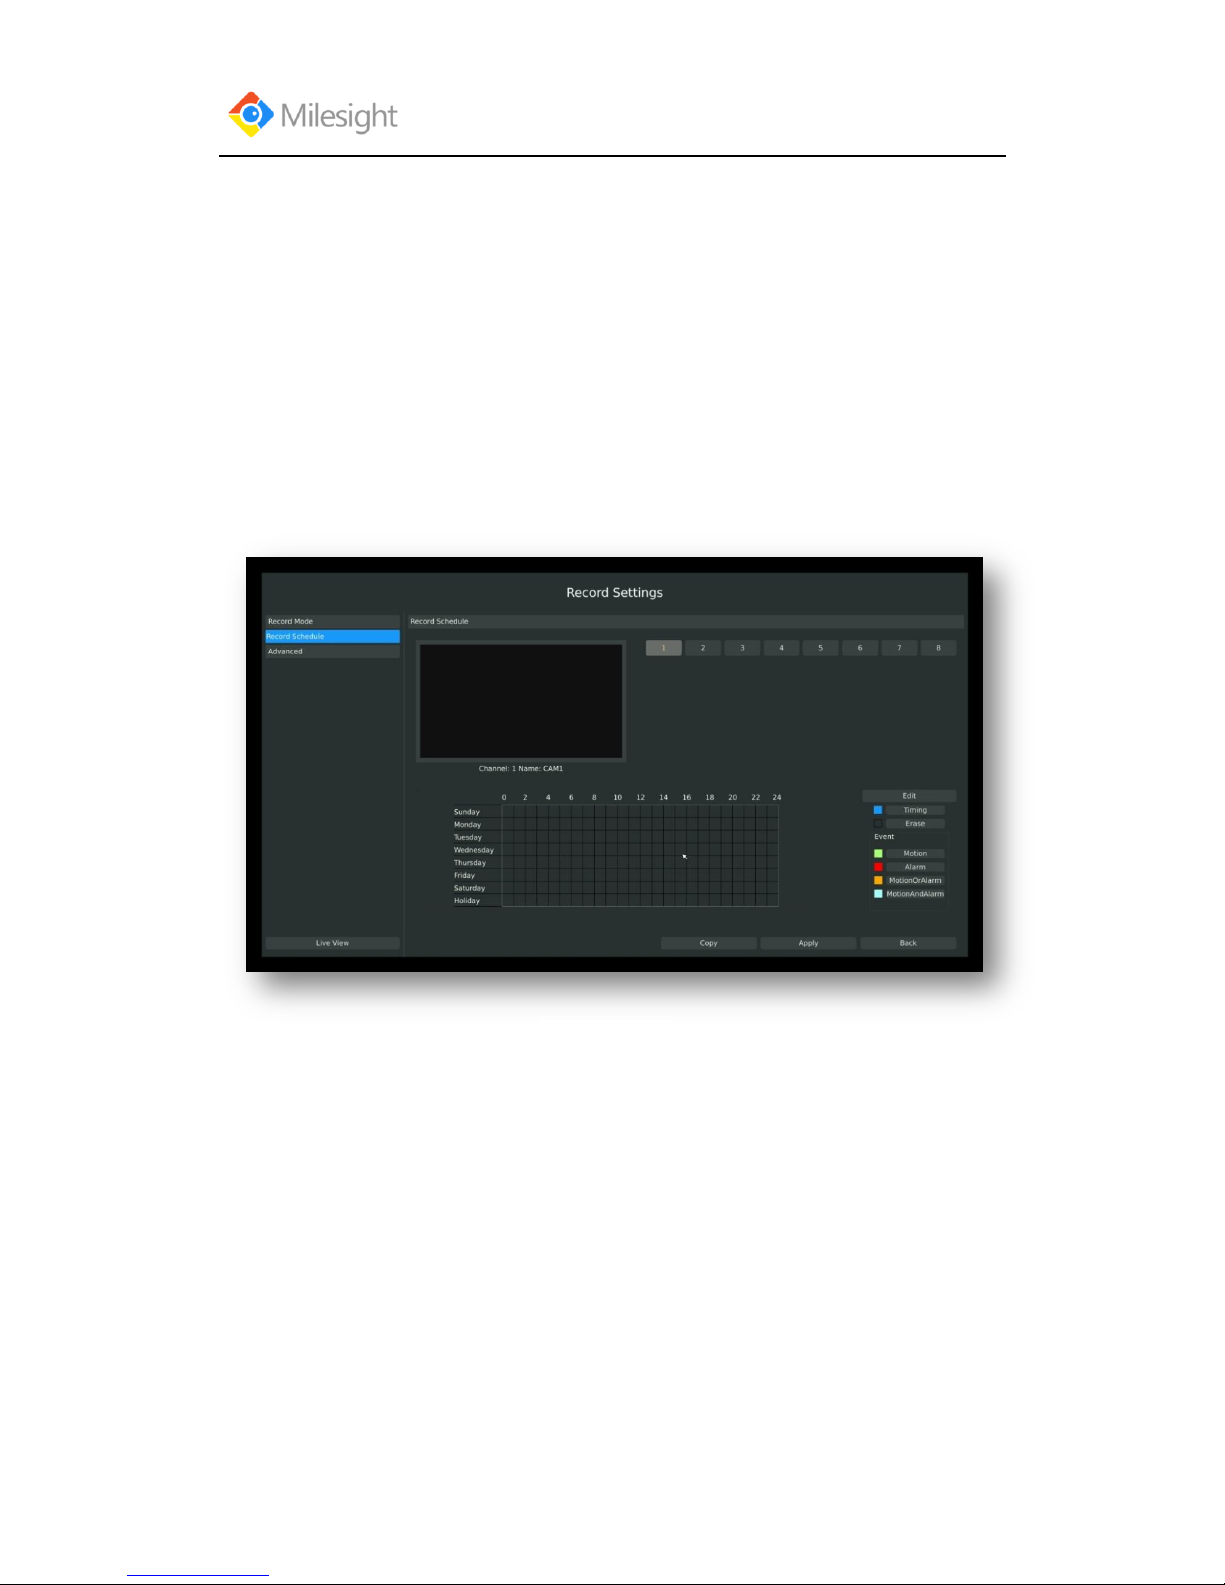
Method1. General Setting
Step1.Enter Record schedule interface by clicking Record Settings→Record Schedule
Step2.Select desired channel (eg. Channel 1)and click [Edit] button
F-3.4.4
Page 47
User Manual
www.milesight.com 43
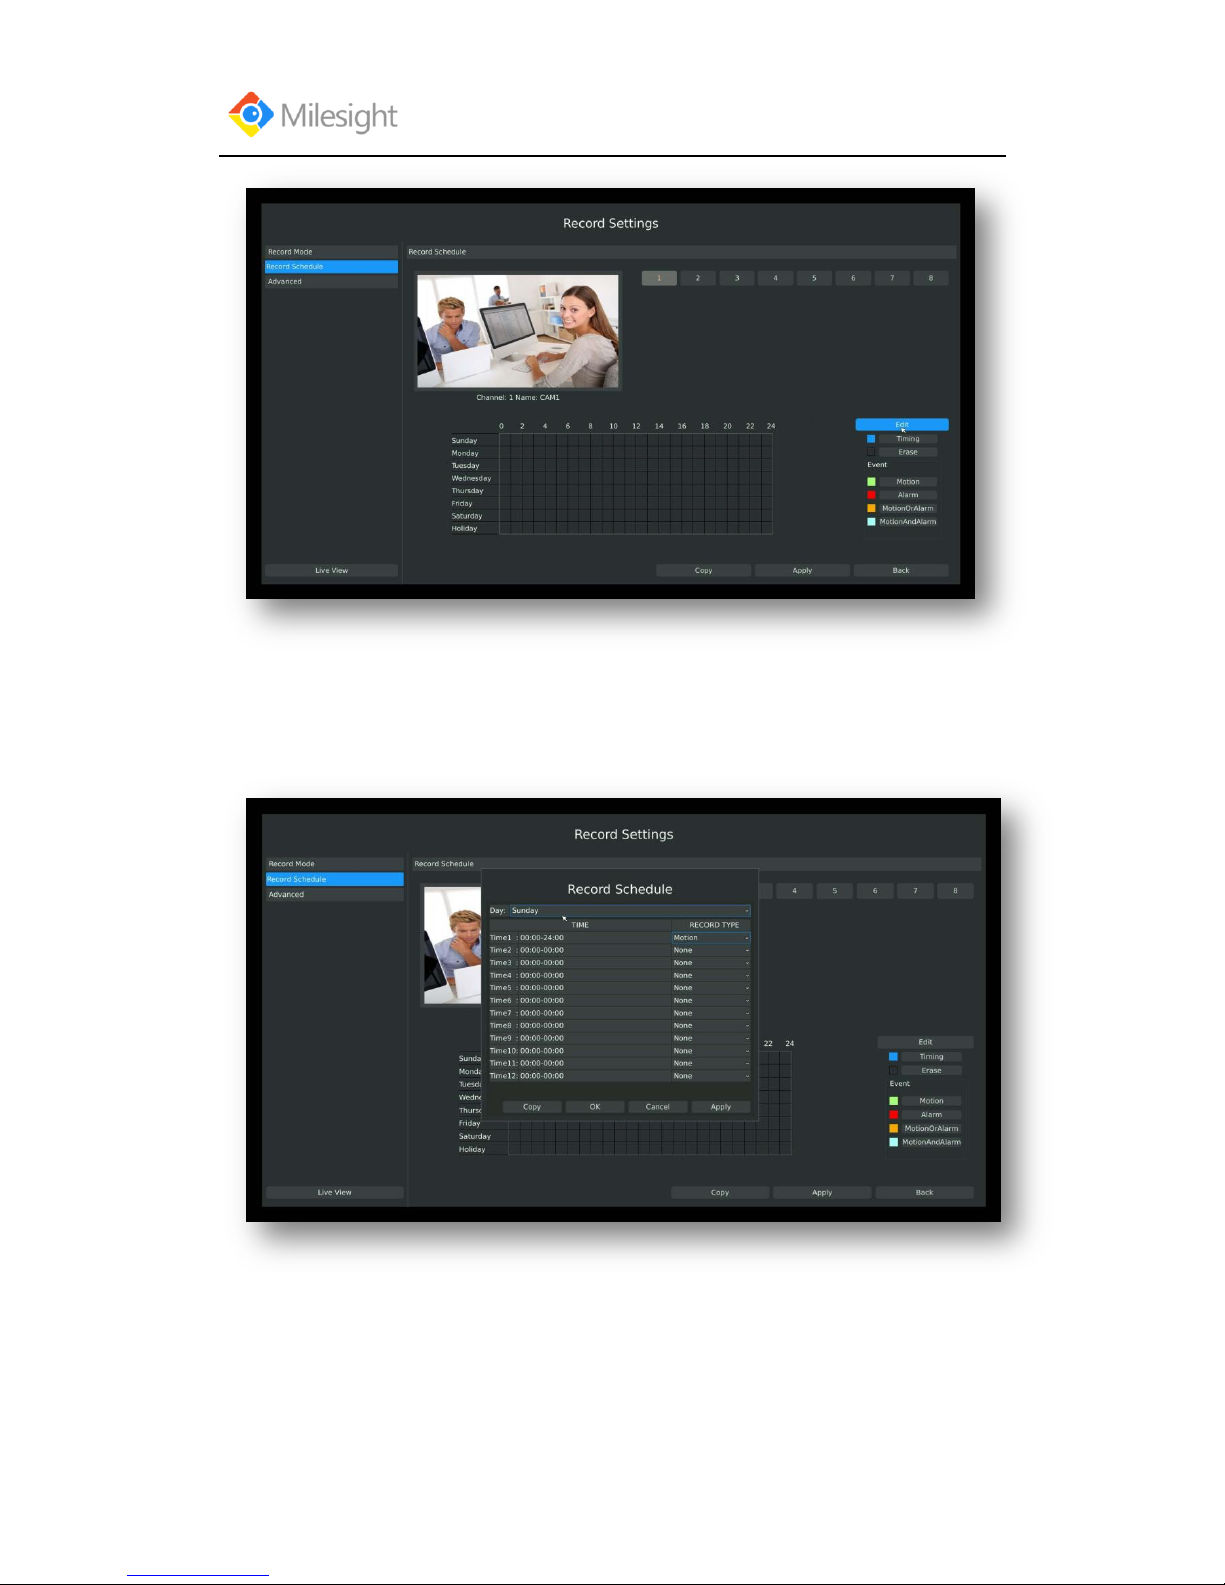
Step3.Set record schedule
Select a day from the drop-down list of [Day], and select [Record Type] to setup the recording
period, up to 12 periods can be set. (eg.01:00 to 05:00 for none recording; 06:00 to 18:00 for
timing recording; 19:00 to 21:00 for Motion recording; 22:00 to 24:00 for Alarm recording)
Note: Time periods cannot overlap with each other.
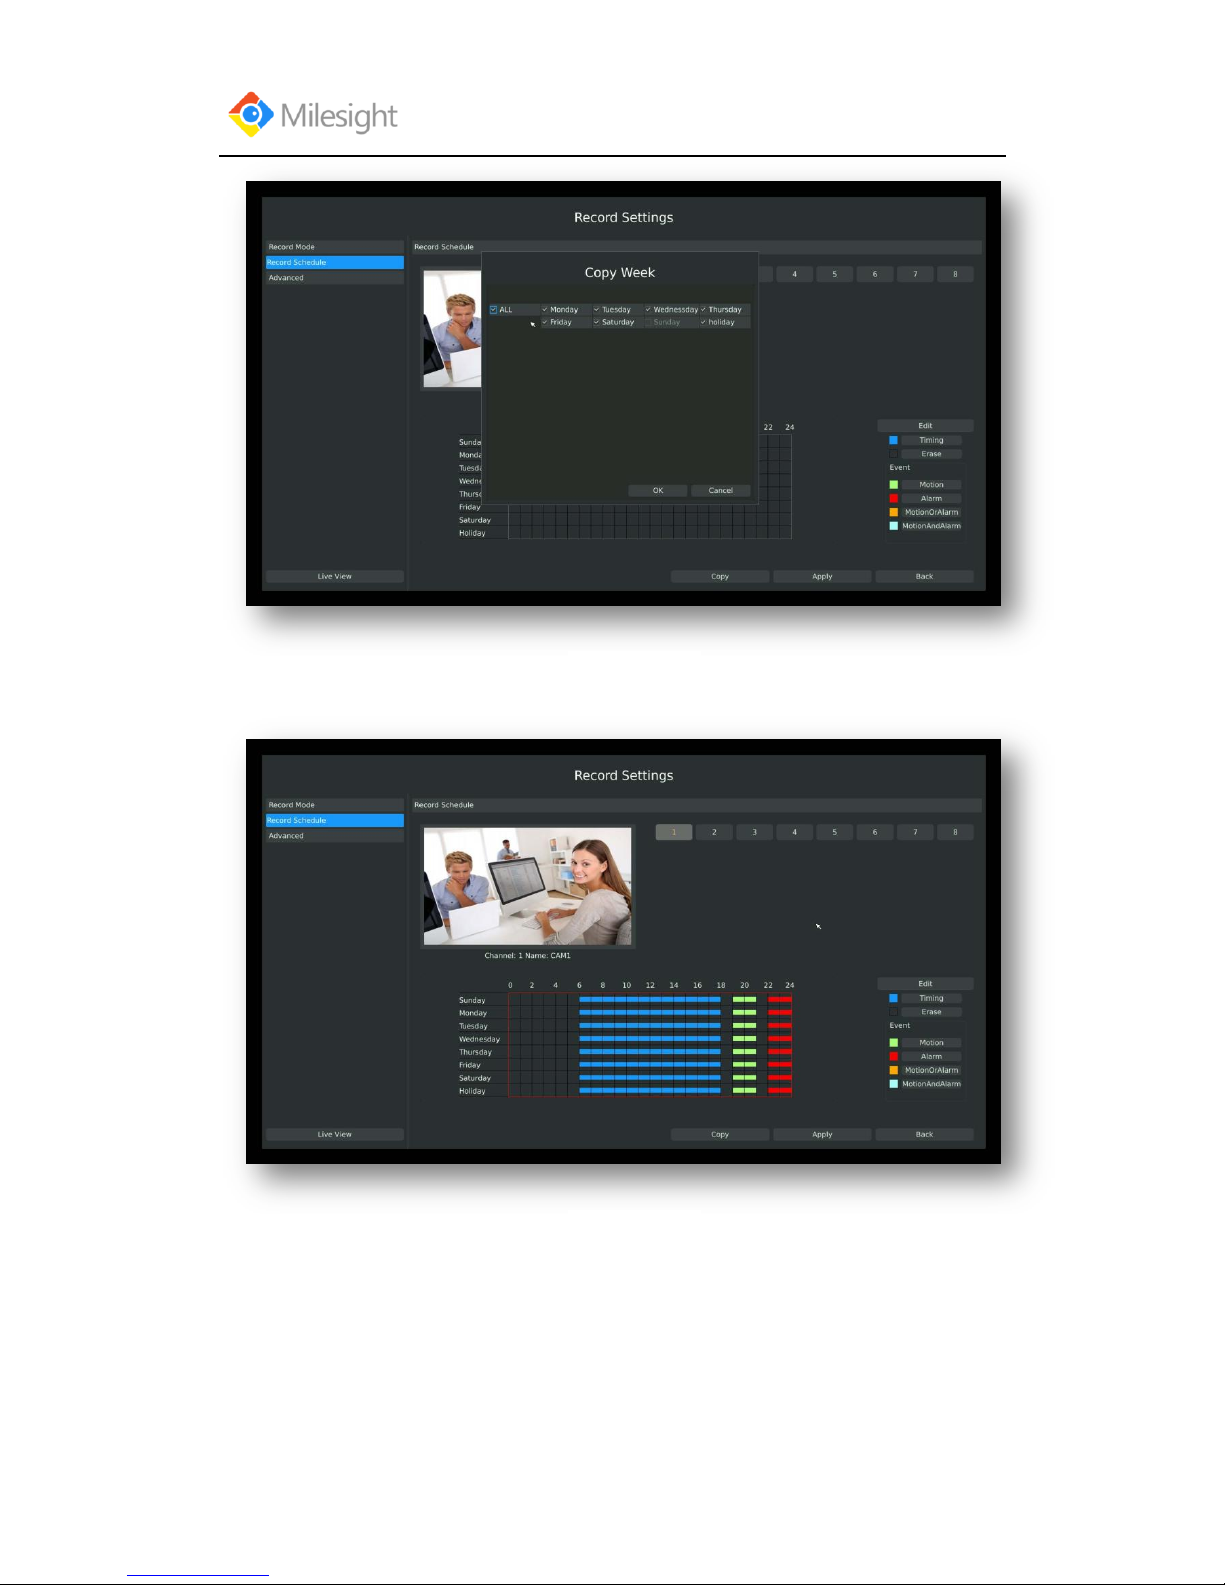
Step4.Click [Copy] to copy settings to other weekdays, and then click [Apply] to confirm the
setting.
F-3.4.5
F-3.4.6
Page 48
User Manual
www.milesight.com 44
Step5.After above steps, this channel with show as below:
Step6.Copy the recording settings to other channels
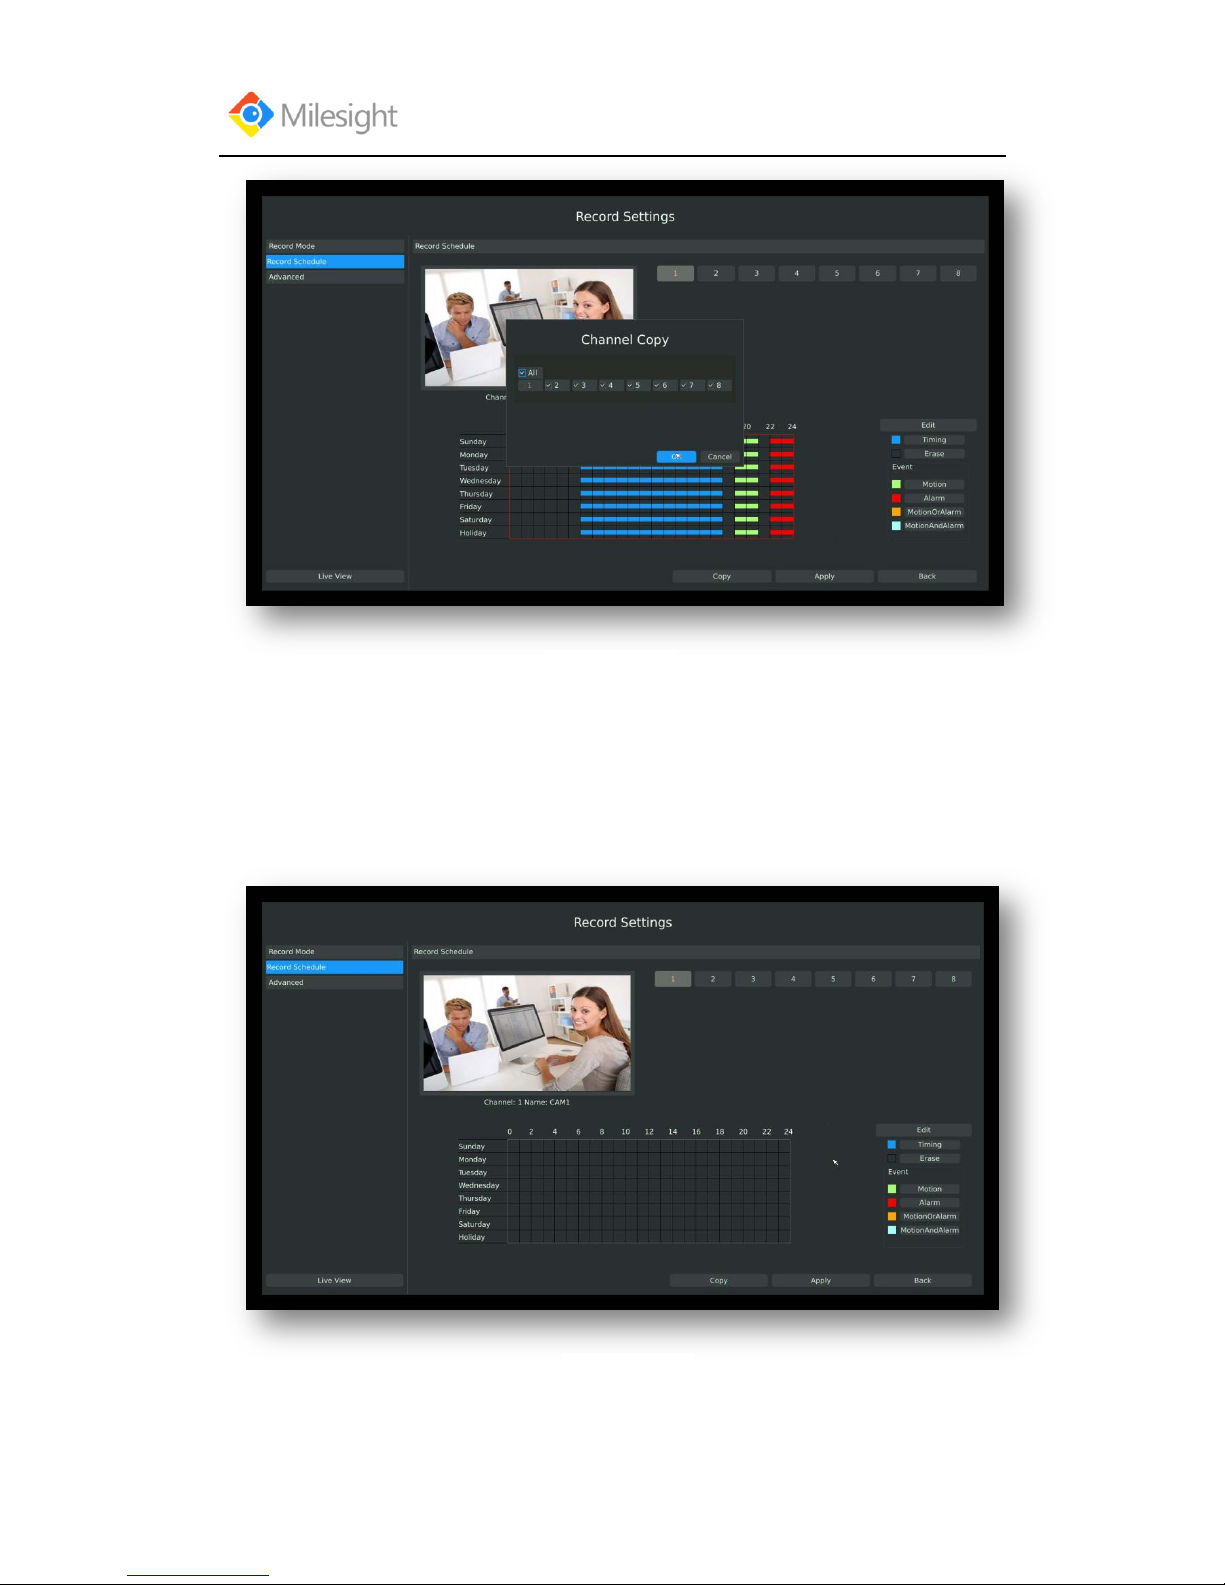
Select [Copy] to copy the same settings to other channels. And click [OK] to save the
configuration.
F-3.4.7
F-3.4.8
Page 49
User Manual
www.milesight.com 45
Step7.Save the configuration
Click [Apply] button to save the configuration, and then click [Back] to return to the previous
menu.
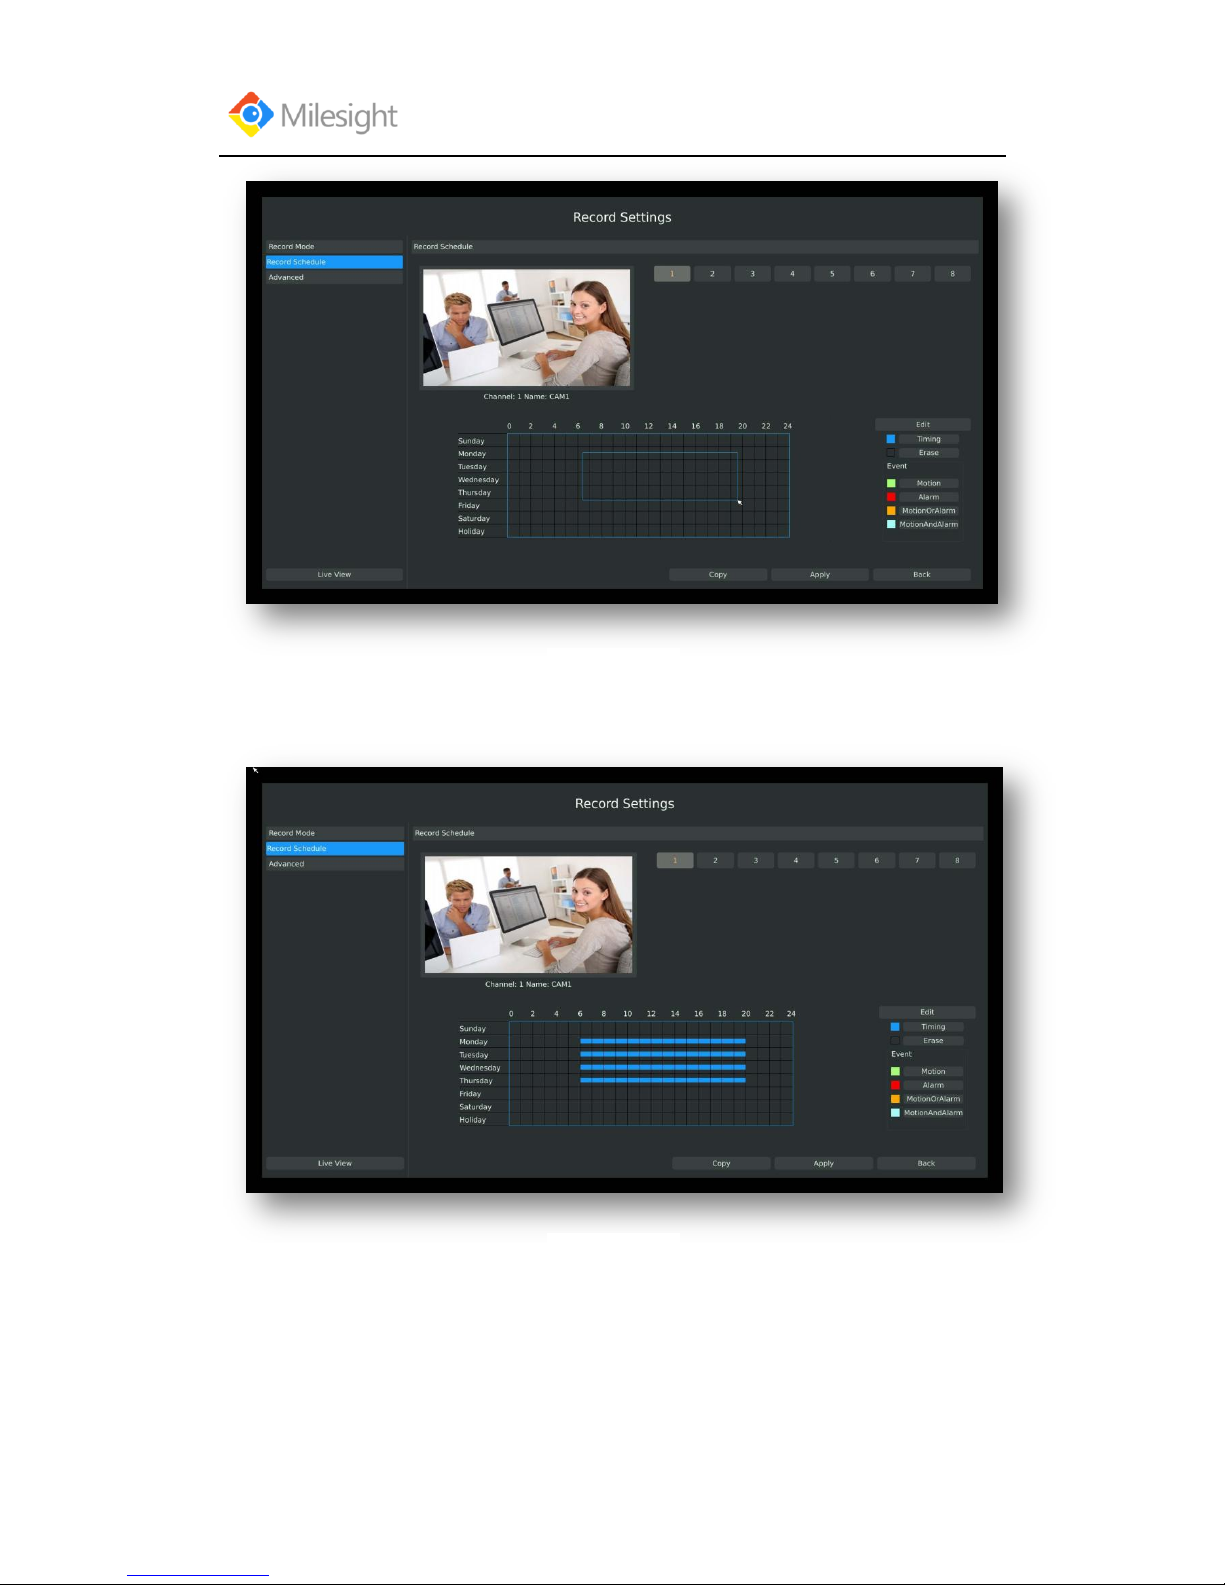
Method2.Set record schedule by drag the mouse
Step1.Enter Record schedule interface by clicking Record Settings→Record Schedule
Step2.Click desired channel and record type show as below:
F-3.4.9
F-3.4.10
Page 50
User Manual
www.milesight.com 46
Step3.Drag the mouse to draw certain areas in recording setting zone and then click[Apply]
to save the configuration.
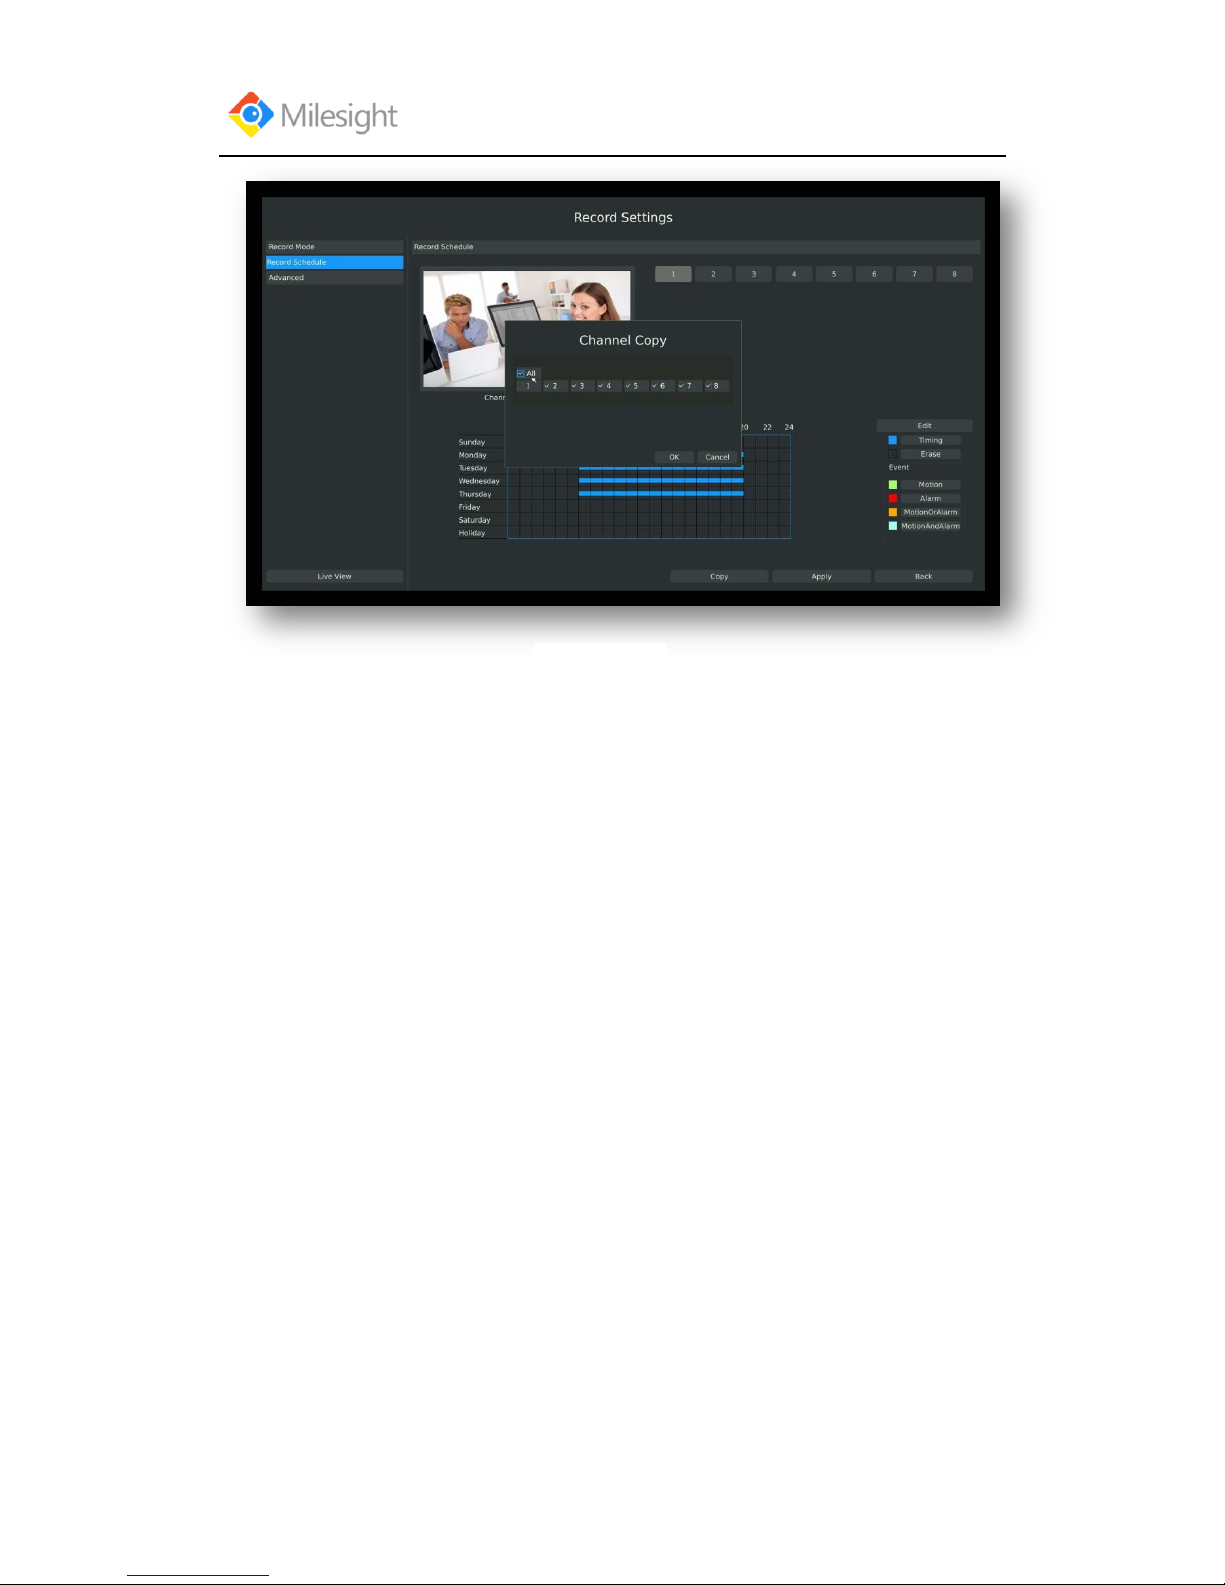
Step4. Copy the recording settings to other channels.
Select [Copy] to copy the same settings to other channels. And click [OK] to save the
configuration.
F-3.4.11
F-3.4.12
Page 51
User Manual
www.milesight.com 47
F-3.4.13
Page 52
User Manual
www.milesight.com 48
3.4.2 Advanced settings
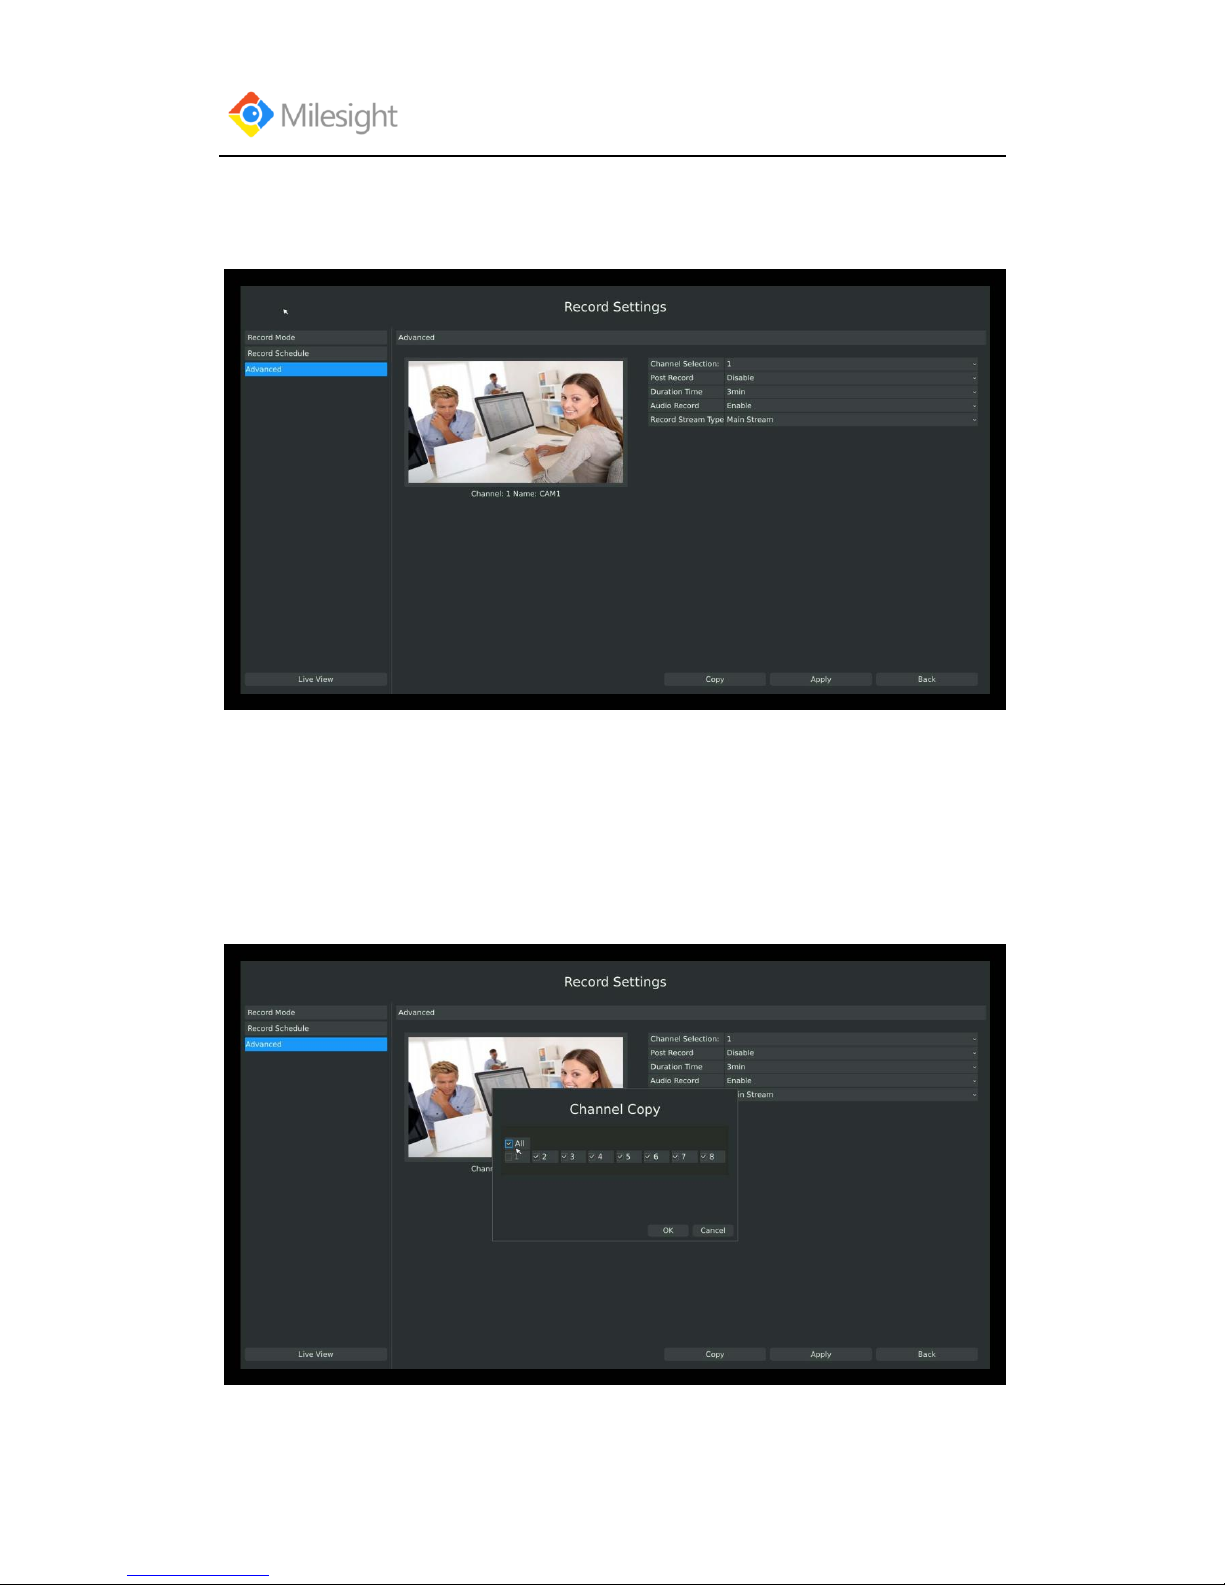
You can set the advanced settings there.
Illustration for Parameters
[Channel Selection]: Select the channel which will be set.
[Post Record ]: Enable/Disable post record after the event is over
[Duration Time]: Event pre-record duration before event alarm
[Audio Record]: Select to record audio or not
[Record Stream Type]: Select Main stream or sub stream for record
Lastly choose you can choose the copy button to copy the settings of record for other channels.
F-3.4.14
F-3.4.15
Page 53
User Manual
www.milesight.com 49
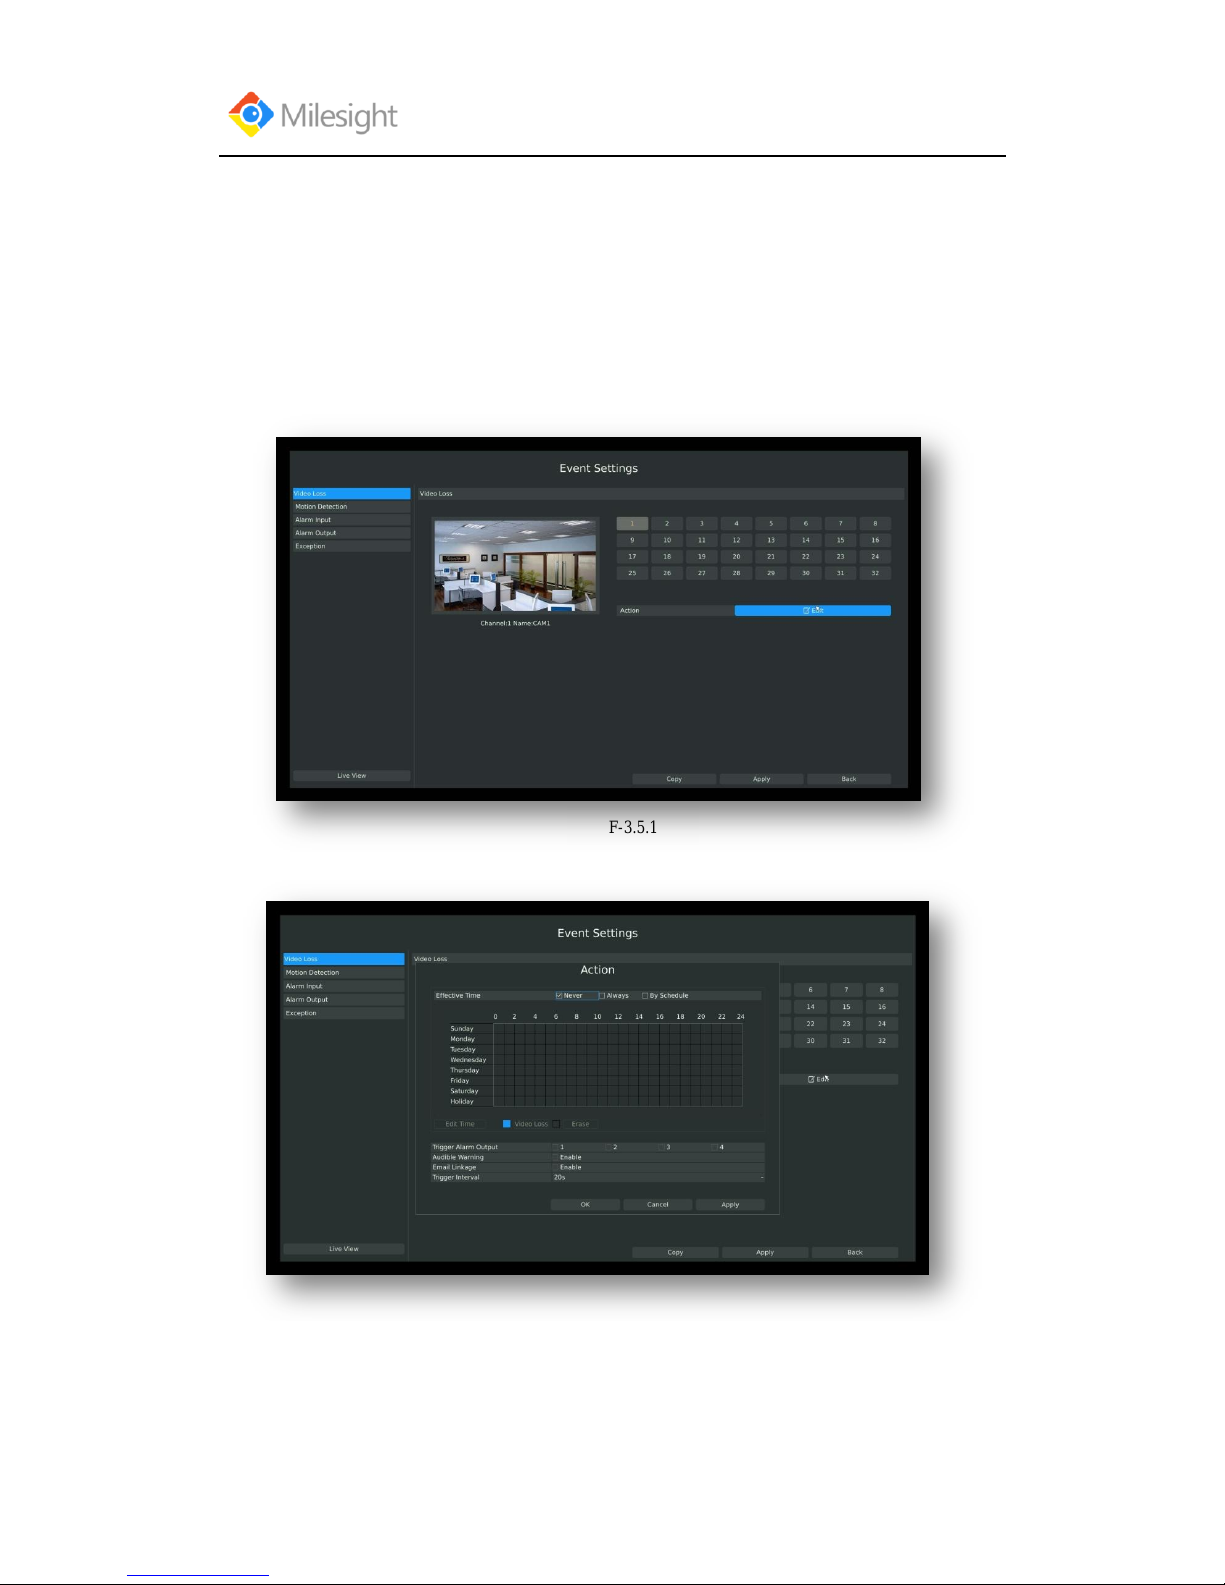
F-3.5.1
3.5 Event Settings
3.5.1 Video Loss
Your NVR can be setup to detect video loss and trigger an action.
Step1.Enter video loss configuration interface by clicking Main Menu→Event→Video Loss .
Step2.Select a desired channel and click [Edit] to configure video loss.
Step3.Select effective time to setup when you want to trigger actions once video loss is
detected.
F-3.5.2
Page 54
User Manual
www.milesight.com 50
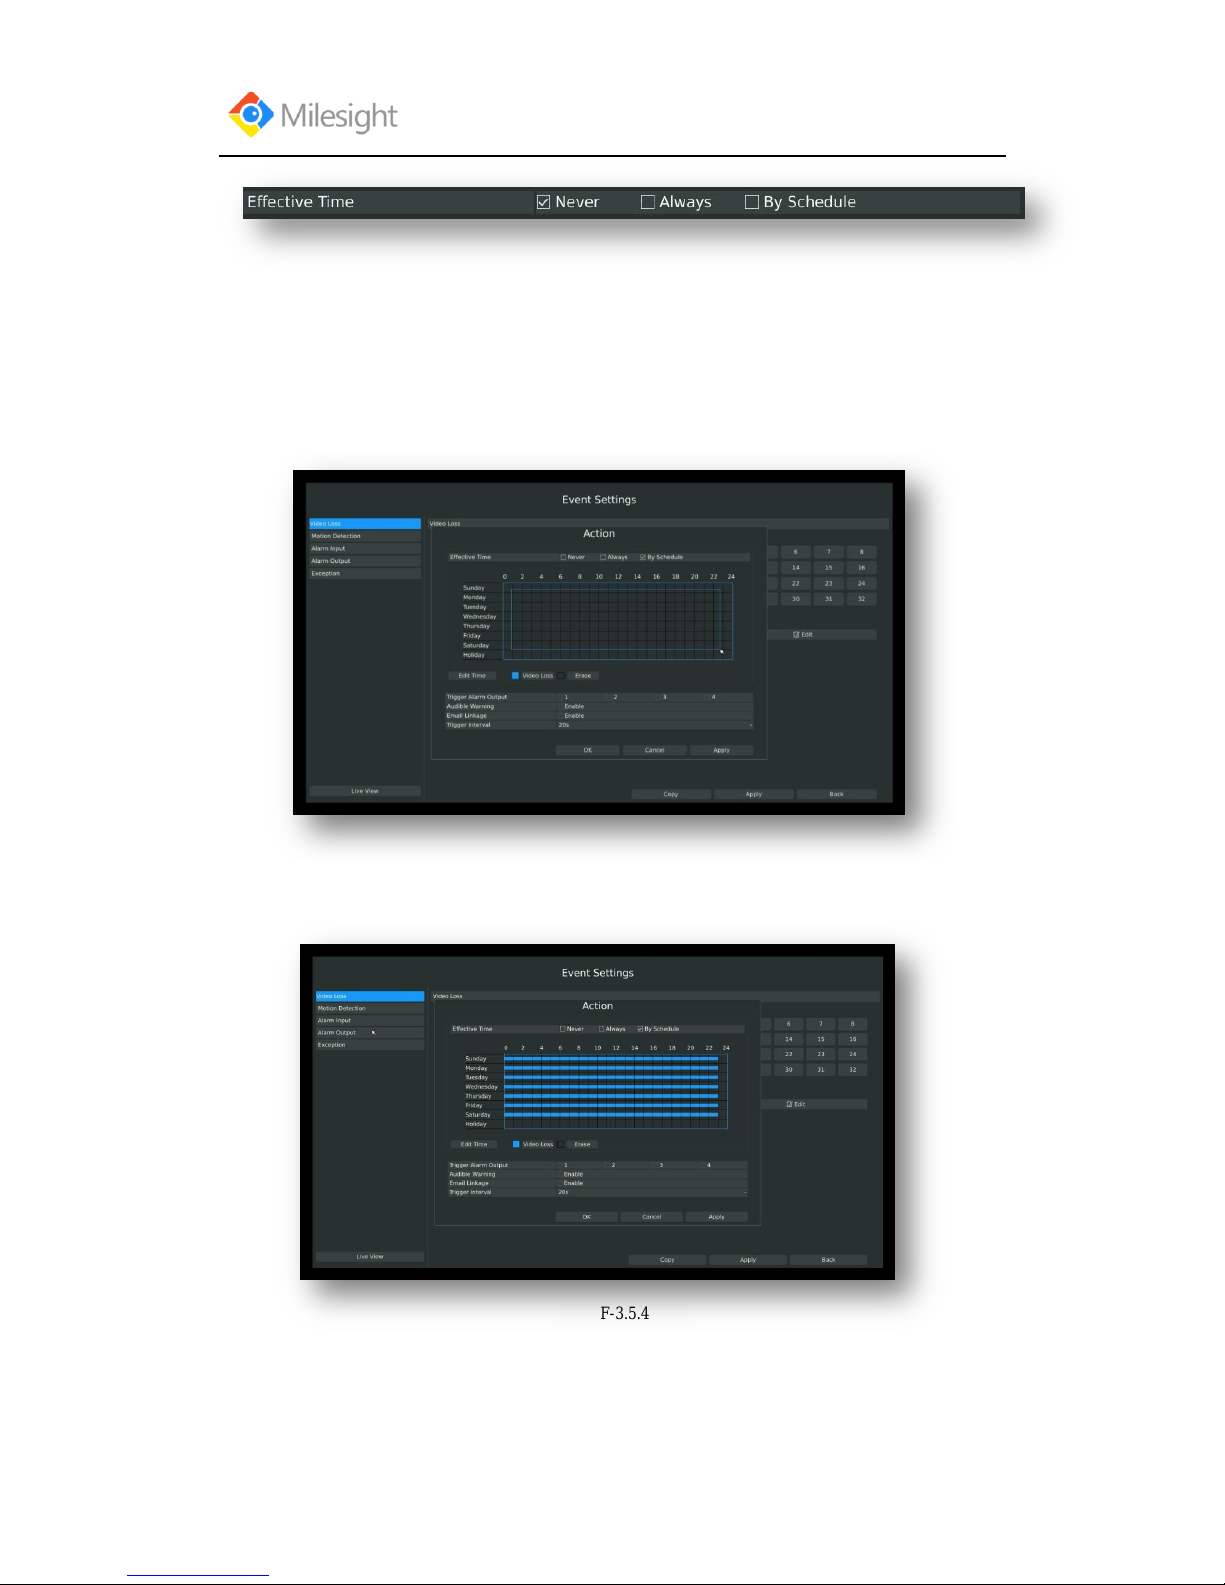
F-3.5.4
[Never]: Your NVR will not trigger any actions when [Never] button is checked. No matter the
[Audible Warning] or [Email Linkage] checkboxes are checked or not.
[Always]: Your NVR will always trigger actions when [Always] button is checked. Please make
sure [Audible Warning] or [Email Linkage] is checked.
[By Schedule]: You can drag the mouse to draw certain area in schedule setting zone, show as
below:
After dragging this will show as below:
Or click [Edit Time] to set schedules. Schedule can be set for all week or any day of the week with
up to 12 time periods per day. Video loss actions take effect in the scheduled period only.
F-3.5.3
Page 55
User Manual
www.milesight.com 51
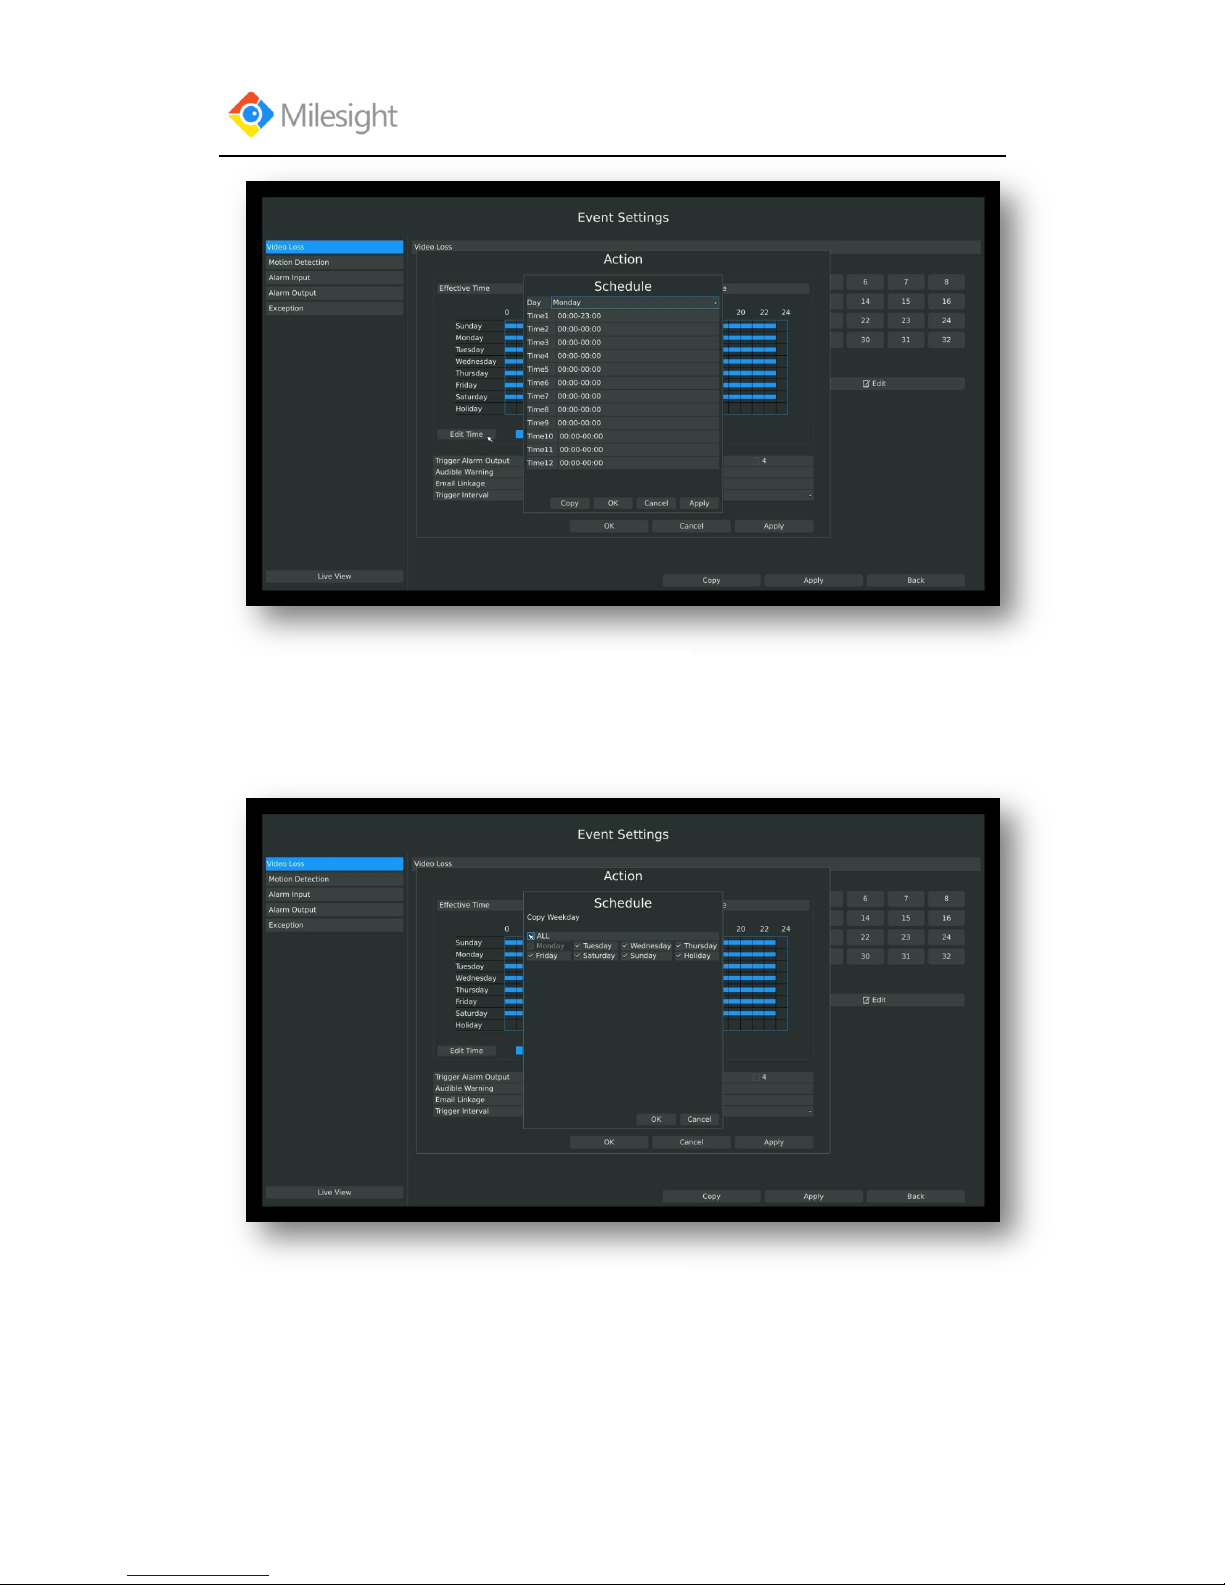
Note: Time periods cannot overlap with each other.
Step4. Click [Copy] to copy the video loss schedule to other weeks, and then click [OK].
F-3.5.5
F-3.5.6
Page 56
User Manual
www.milesight.com 52
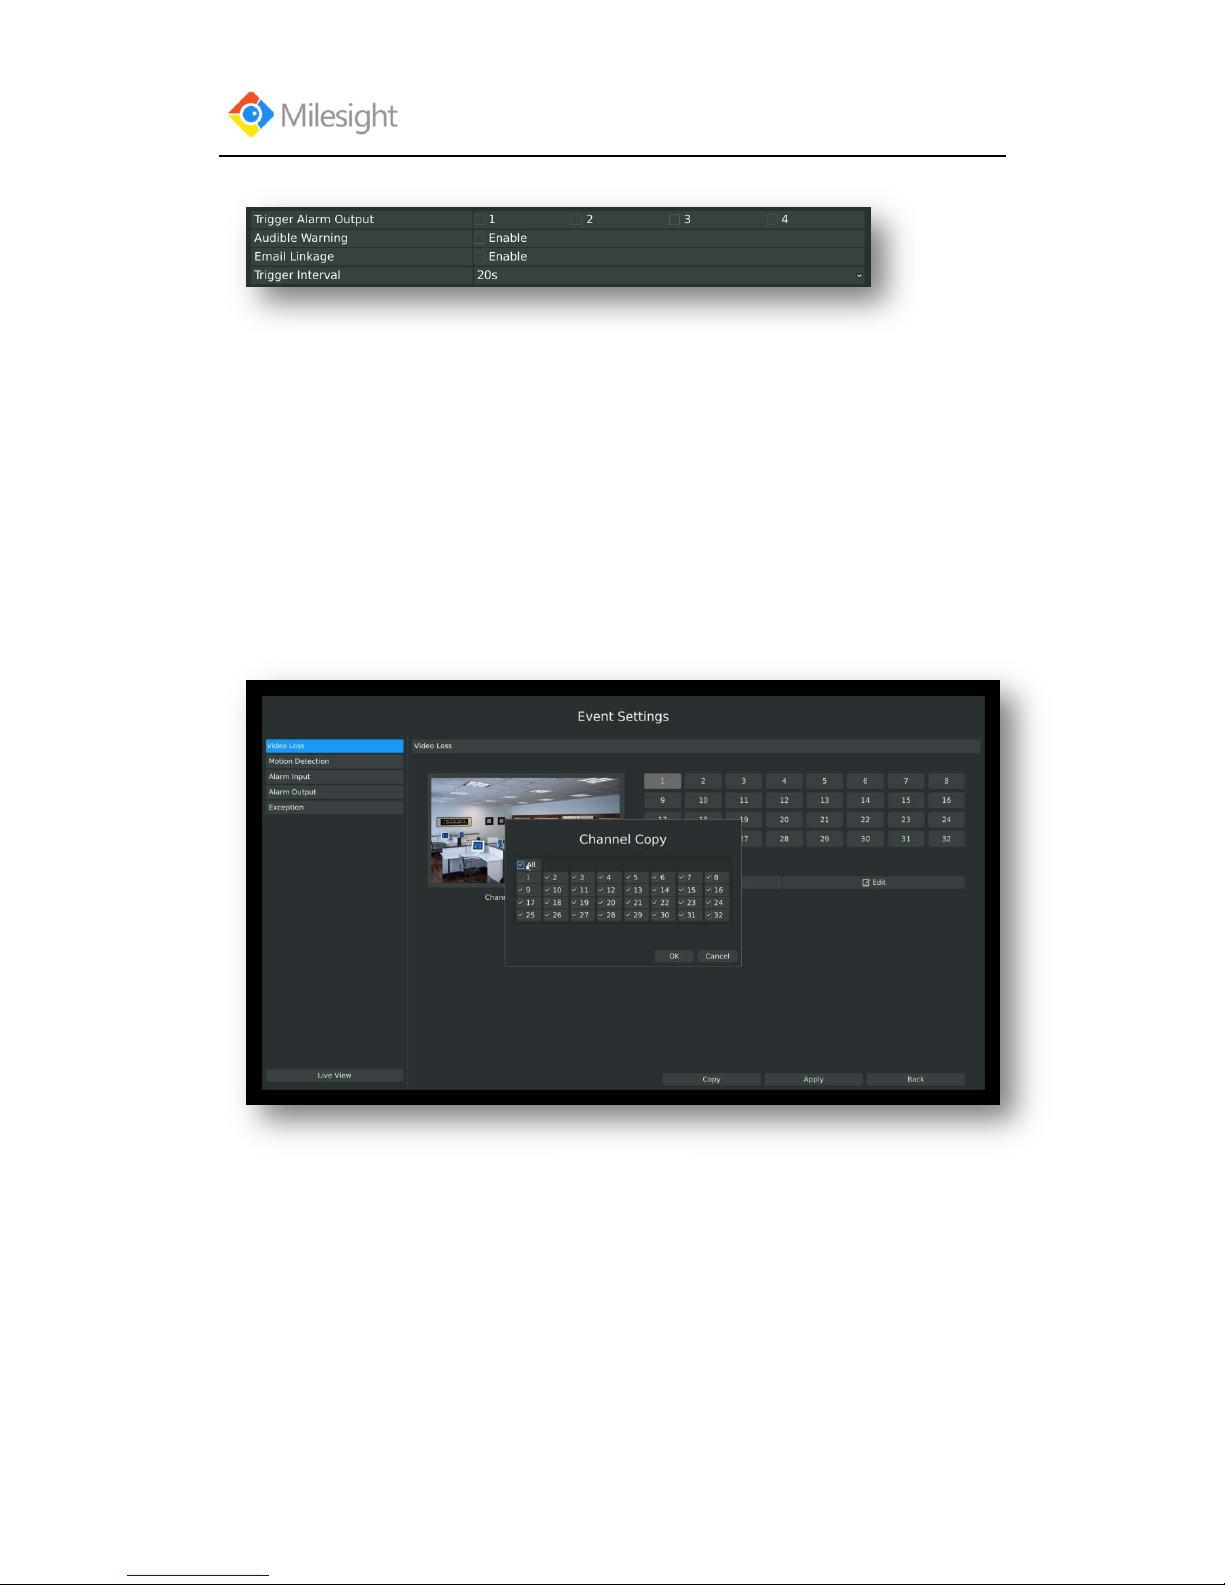
Step5: Select actions you want when video loss is detected.
[Trigger Alarm Output]: Select whether trigger the alarm output or not when video loss is
detected.
Audible Warning: Trigger an audible beep when video loss is detected
Email Linkage: Send video loss note to specified email address when video loss is
detected.(Please refer to 3.8.2.4 Mail configuration for mail address setting)
Trigger Interval: Set the interval between two events.
Note: These actions will only take response according to effective time you choose
Step6. Click [OK] or [Apply] to confirm the settings. Repeat above steps for other channels.
Or click [Copy] to copy settings to other channels.
F-3.5.7
Page 57
User Manual
www.milesight.com 53
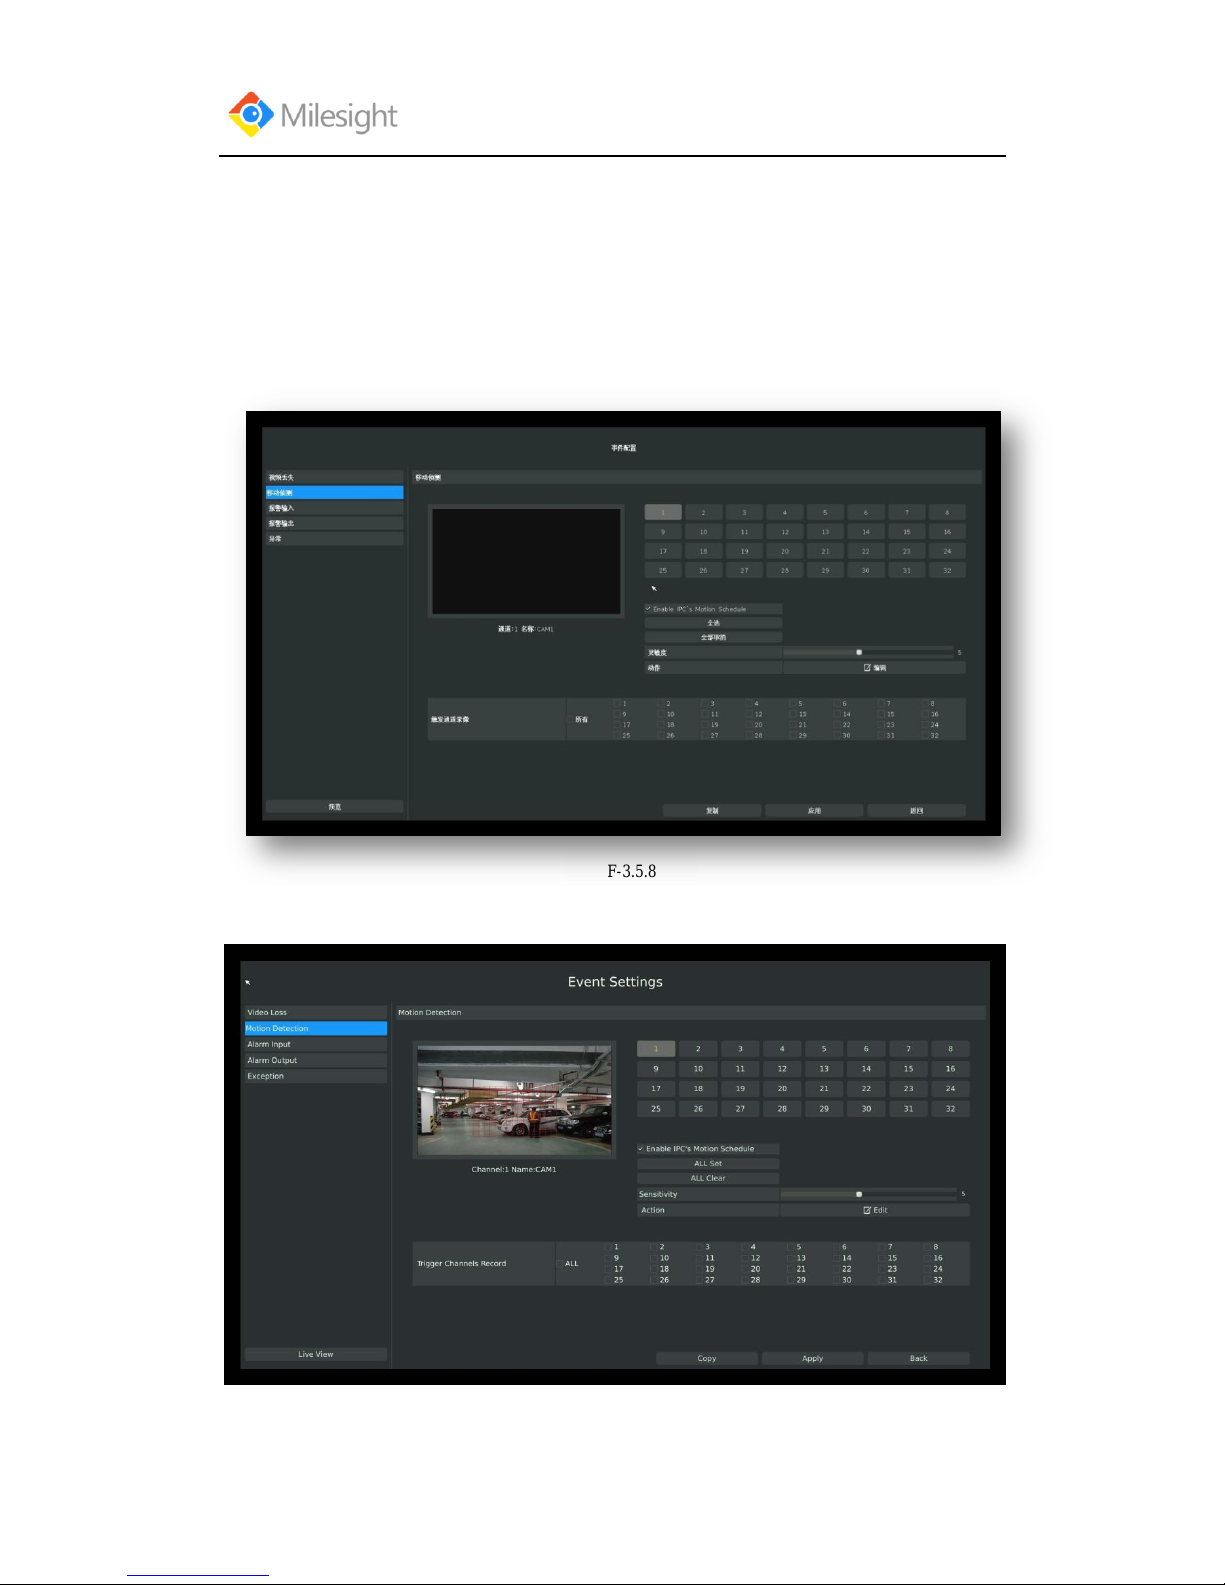
F-3.5.8
3.5.2 Motion Detection
Your NVR can be setup to motion detect and trigger an action. You can set the motion detection
on NVR or on IPC web, both sides‟ settings will be synchronous in both devices.
Step1.Enter motion detection setting interface by clicking Main Menu→Event→Motion
Detection.
Step2. Set the trigger area for motion detection.
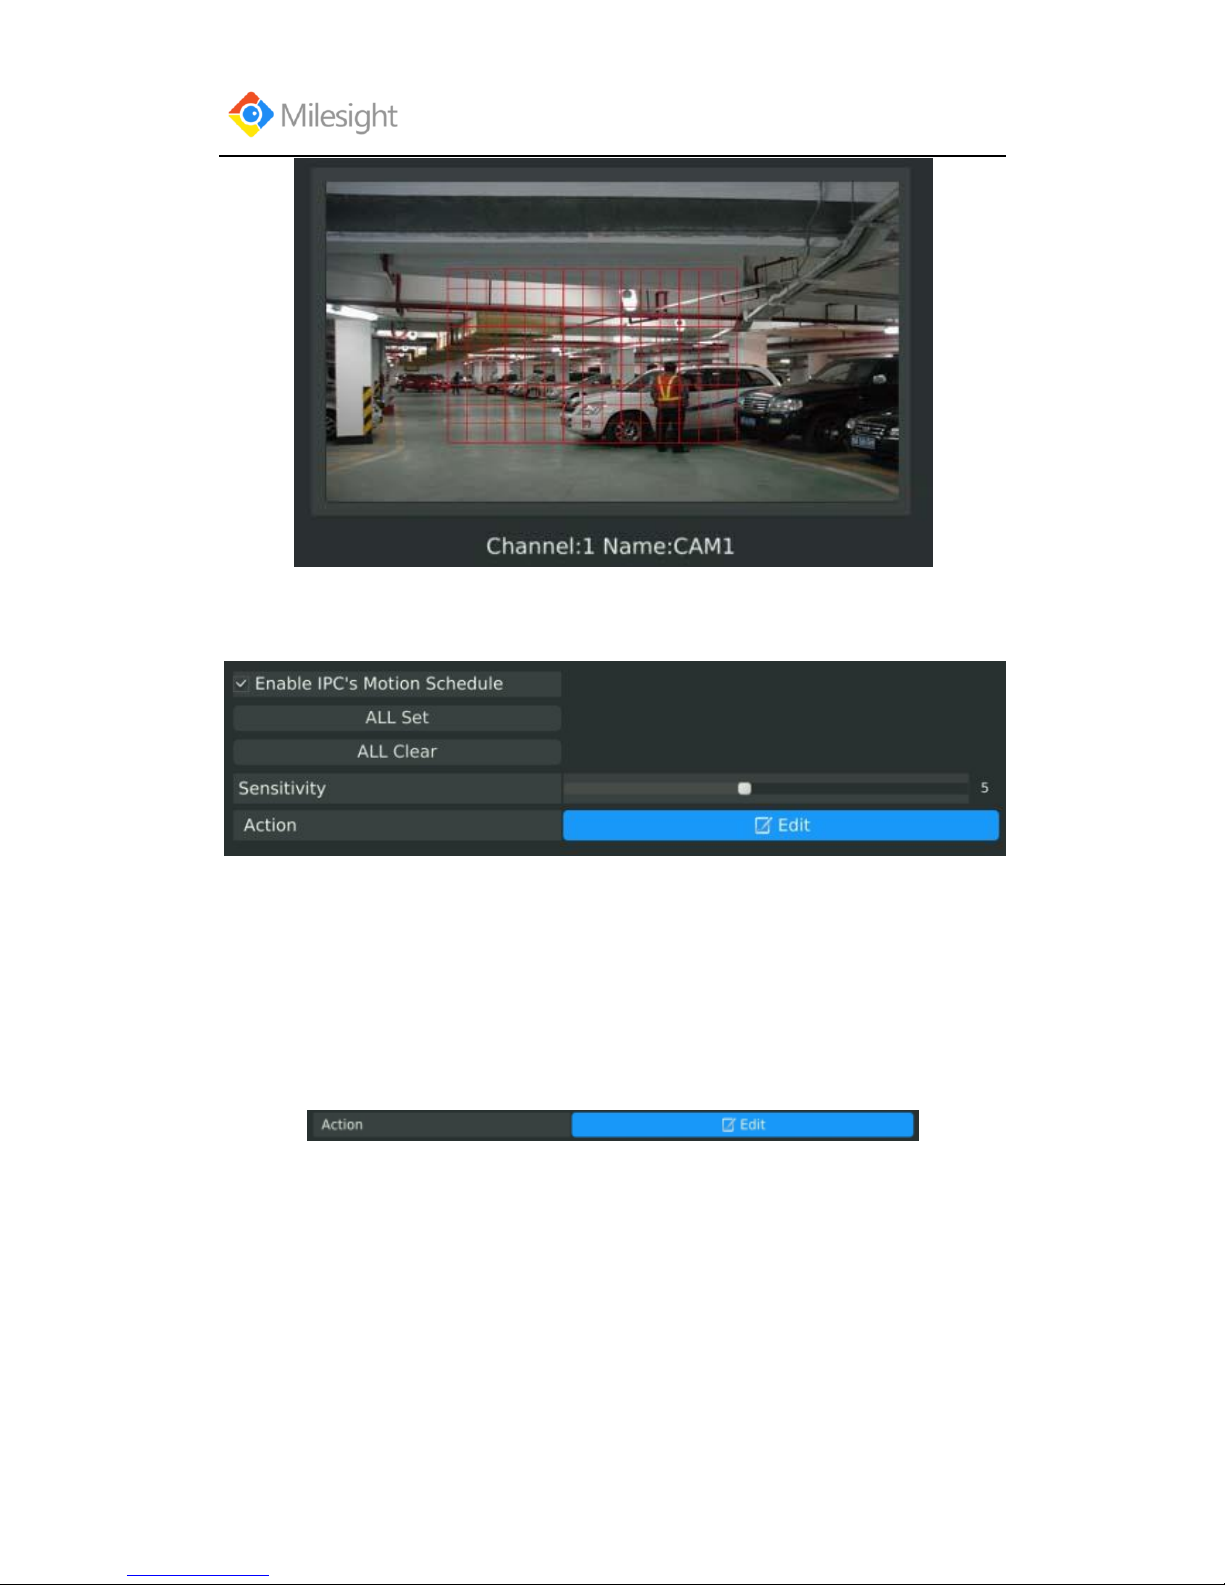
You can set the area by dragging the mouse on live view window:
F-3.5.9
Page 58
User Manual
www.milesight.com 54
And meanwhile the area will be synchronized in IPC.
Step2. Select the schedule, sensitivity and trigger area for motion detection.
[Enable IPC‟s Motion Schedule]: If it is enabled here, motion detect will take effect 7*24h; If it
is not enabled, motion detect will take effect as the schedule which is set on the IPC web.
[All Set]: Set all area as the trigger area;
[All Clear]: Clear all trigger area;
[Sensitivity]: Set sensitivity for motion detection, range from 1 to 10.It will synchronize to IPC if
you set sensitivity here;
[Action]: Edit action once motion is detected, refers to next step;
Step3. Select the desired channel and click [Edit] to configure motion detection action.
F-3.5.10
Page 59
User Manual
www.milesight.com 55
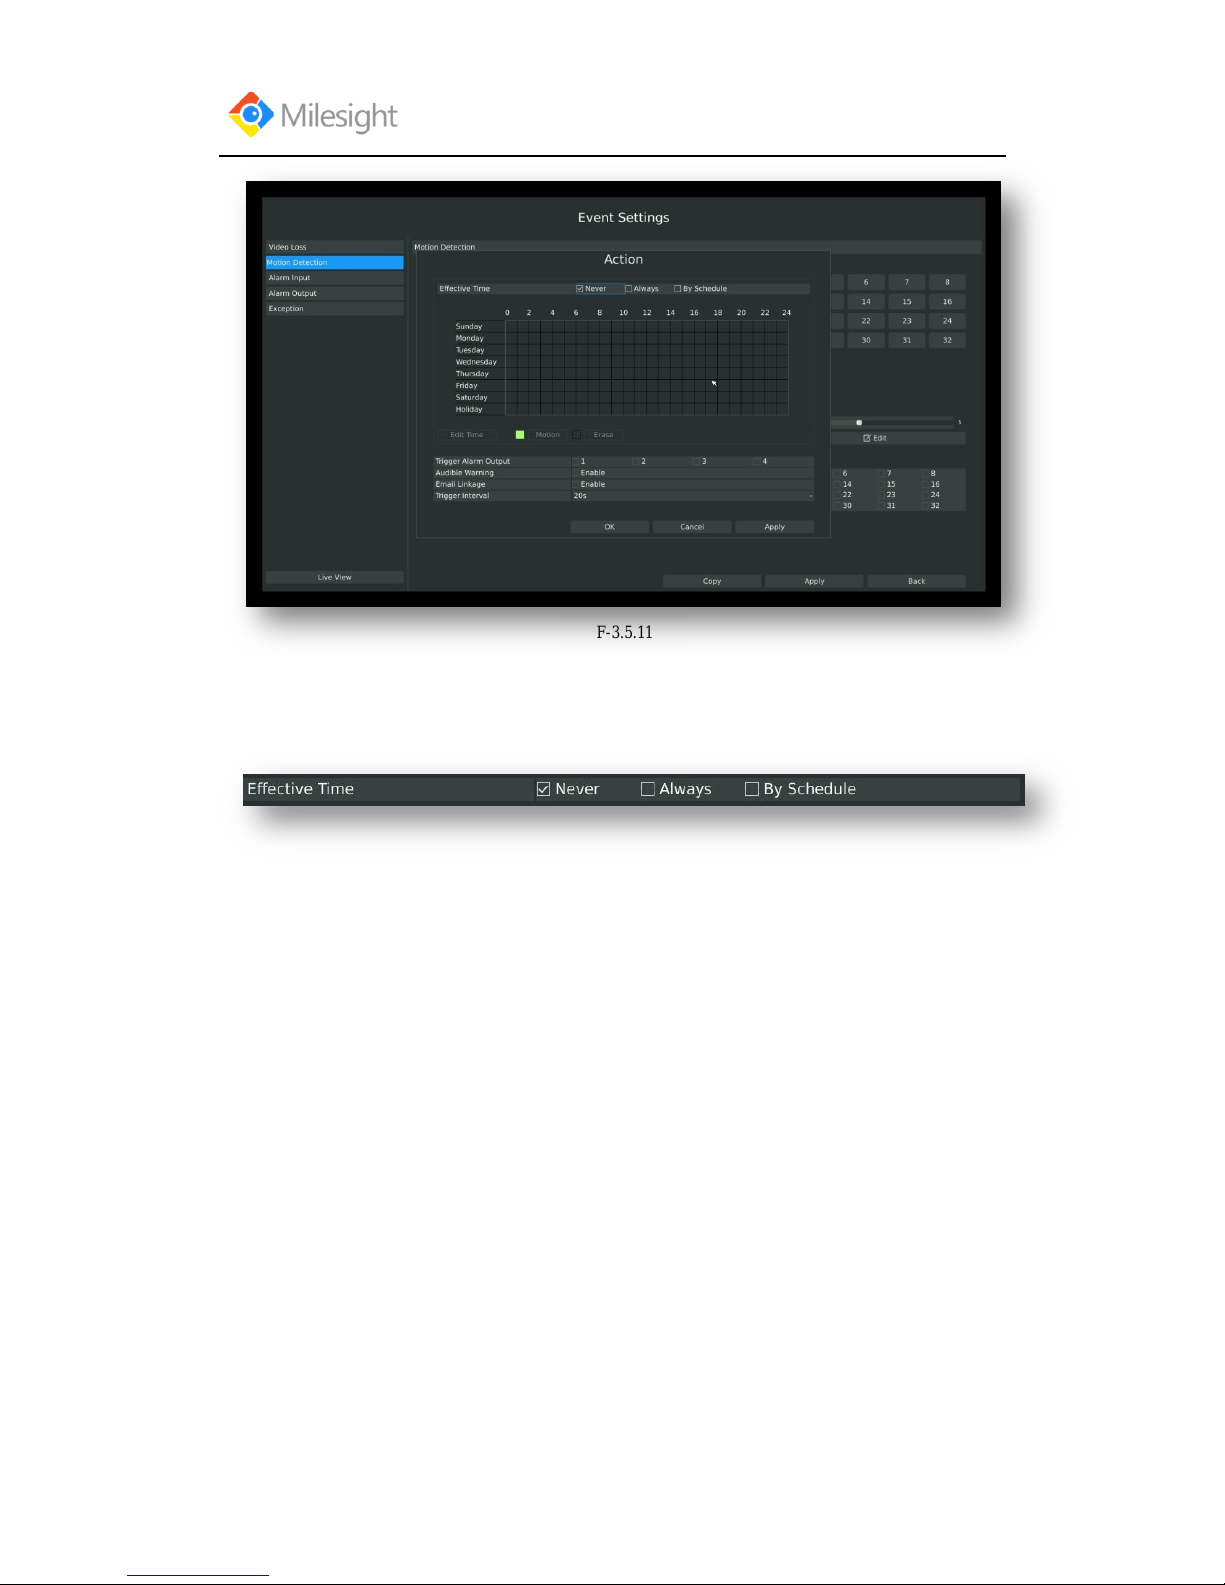
F-3.5.11
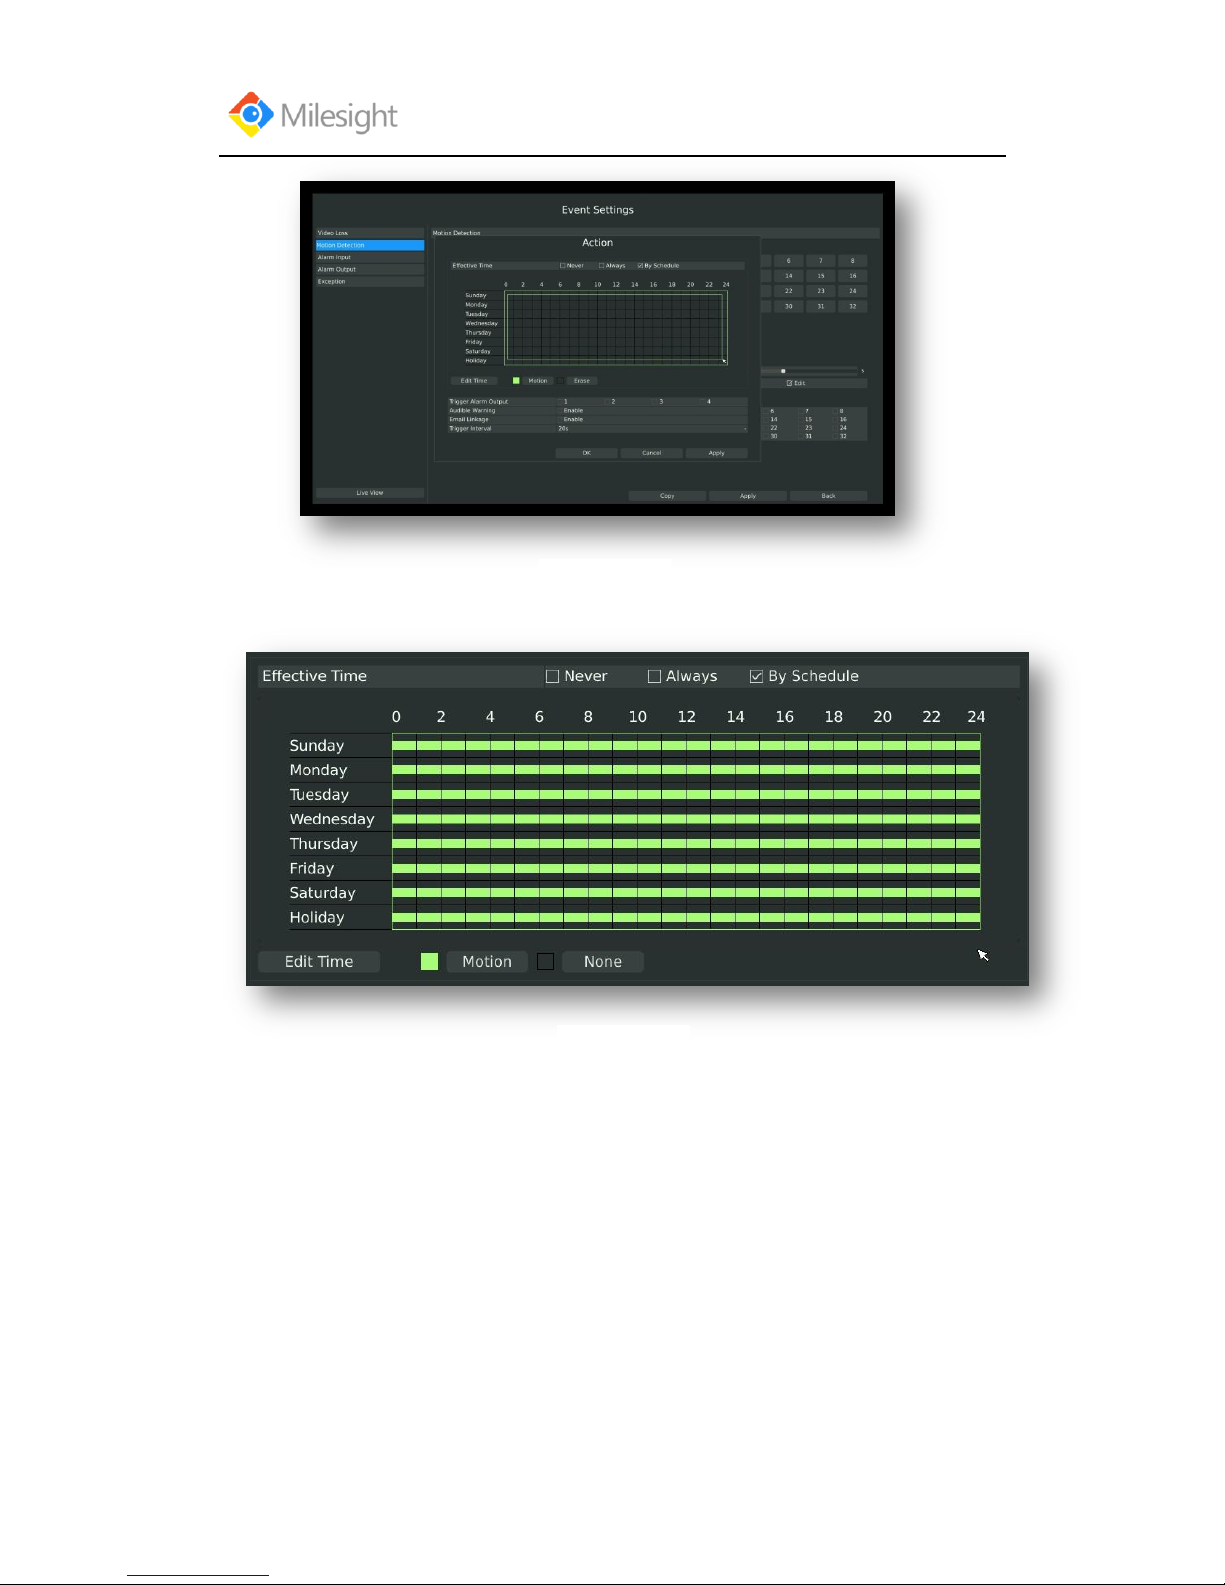
Step4. Select effective time to setup when you want to trigger actions once motion is
detected.
[Never]: Your NVR will not trigger any actions when [Never] button is checked. No matter the
[Audible Warning] or [Email Linkage] checkboxes are checked or not.
[Always]: Your NVR will always trigger actions when [Always] button is checked. Please make
sure [Audible Warning] or [Email Linkage] is checked.
[By Schedule]: You can drag the mouse to draw certain area in schedule setting zone, show as
below:
Page 60
User Manual
www.milesight.com 56
After dragging, this channel will show as below:
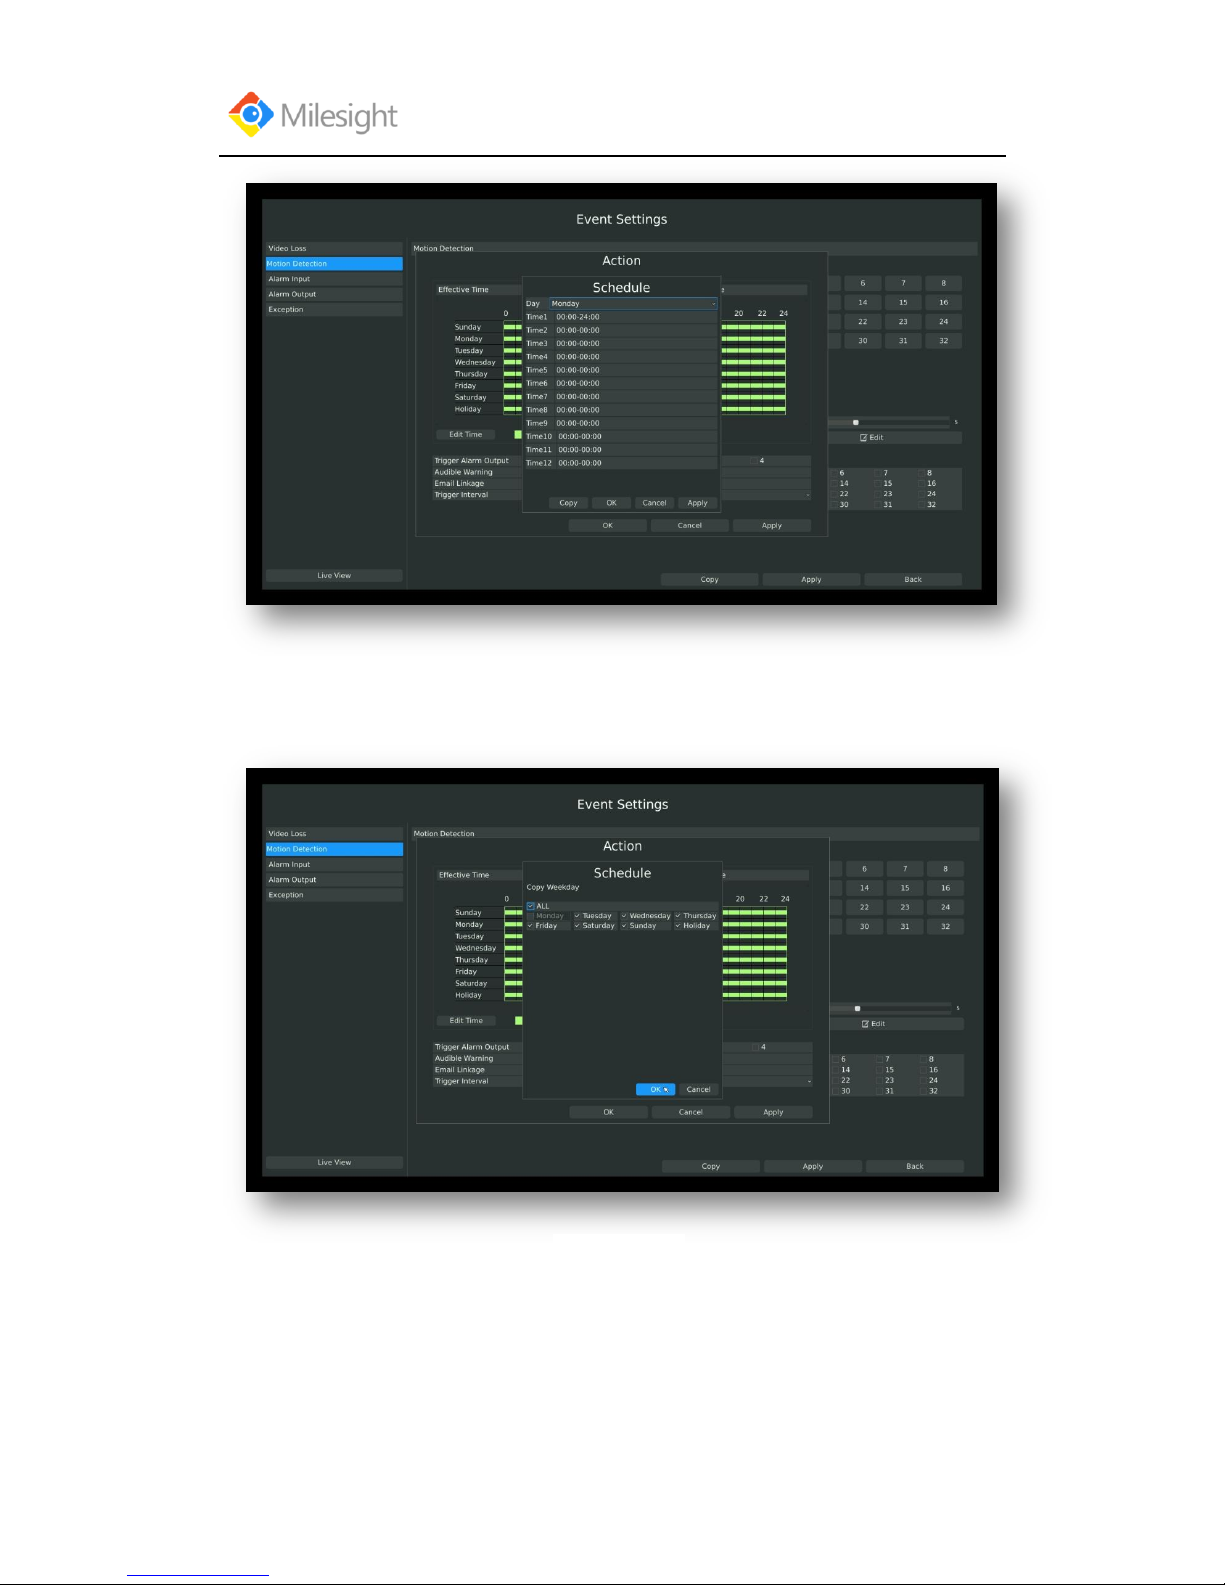
Or click [Edit Time] to setup schedules. Schedule can be set for all week or any day of the week
with up to 12 time periods per day. Motion detection actions take effect in the scheduled period
only.
F-3.5.12
F-3.5.13
Page 61
User Manual
www.milesight.com 57
Note: Time period cannot overlay with each other
Step5.Click [Copy] to copy the motion detection schedules to other weekdays.
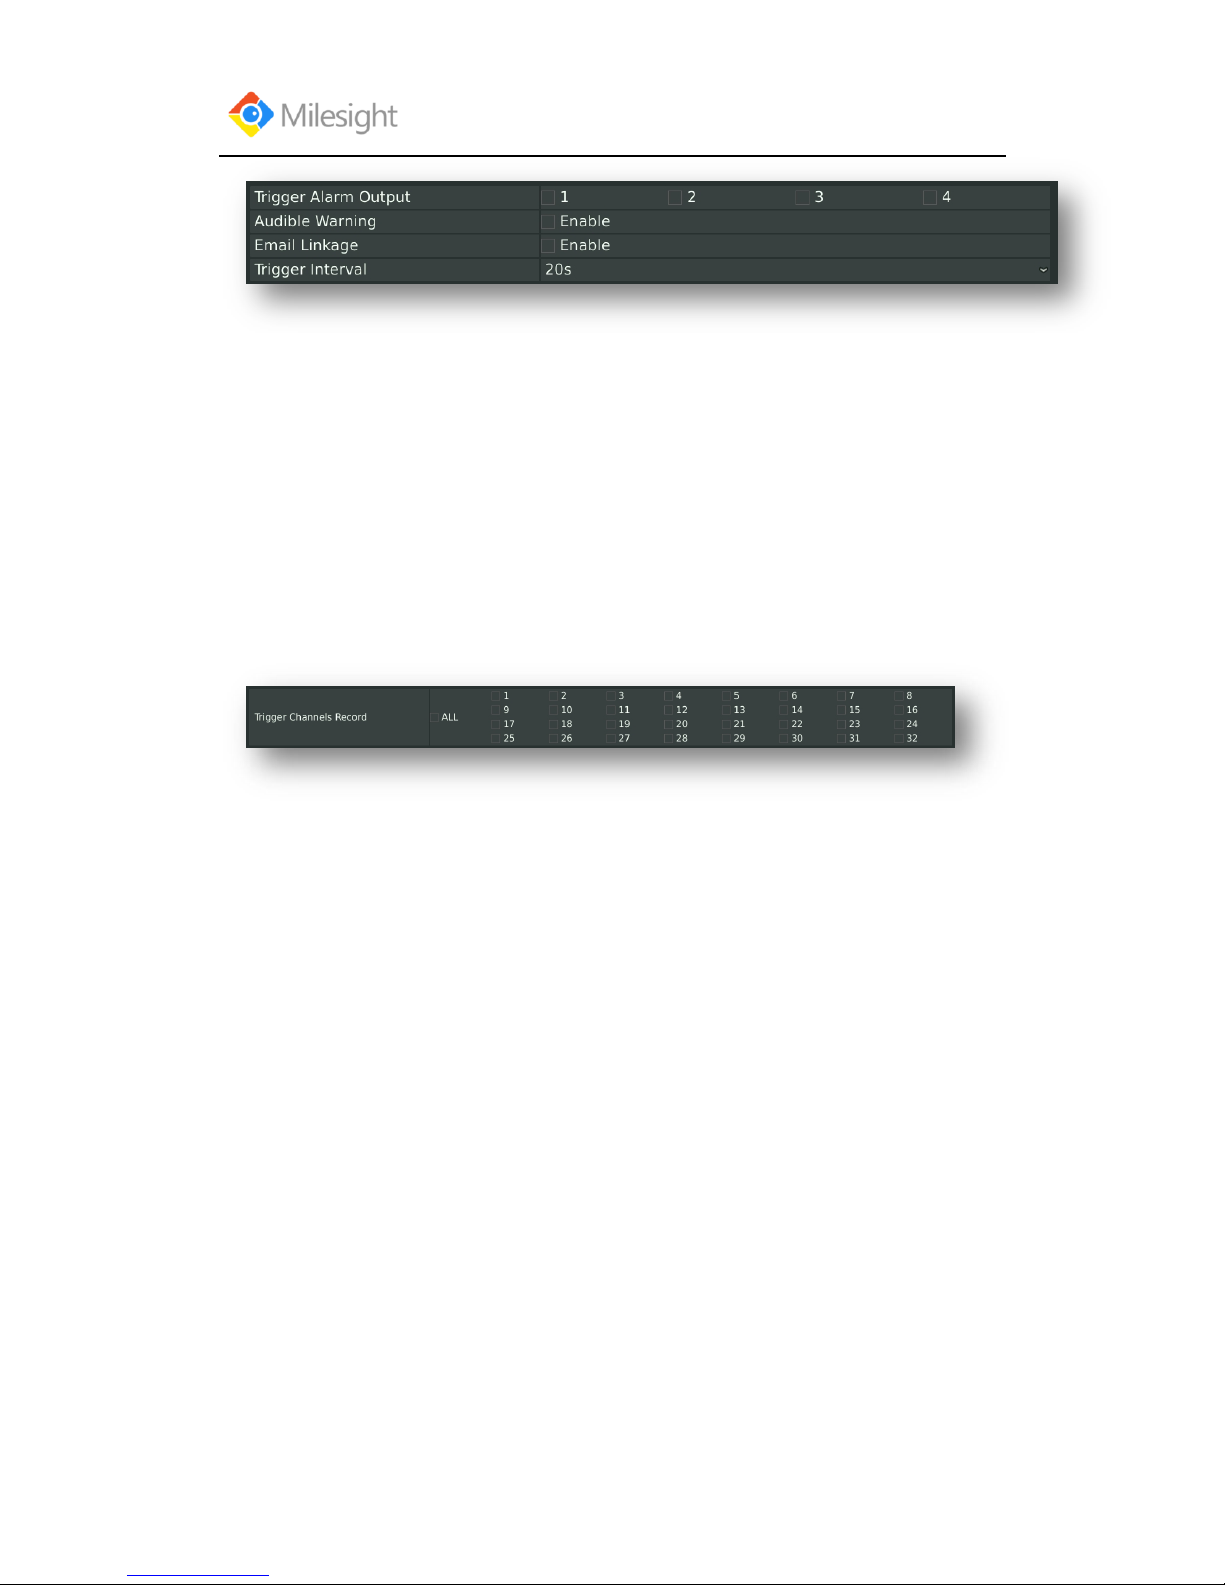
Step6. Select actions you want when motion is detected
F-3.5.14
F-3.5.15
Page 62
User Manual
www.milesight.com 58
[Trigger Alarm Output]: Select whether trigger the alarm output or not when video loss is
detected.
Audible Warning: Trigger an audible beep when video loss is detected
Email Linkage: Send video loss note to specified email address when video loss is
detected.(Please refer to 3.8.2.4 Mail configuration for mail address setting)
Trigger Interval: Set the interval between two events.
Note: These actions will only take response according to effective time you choose
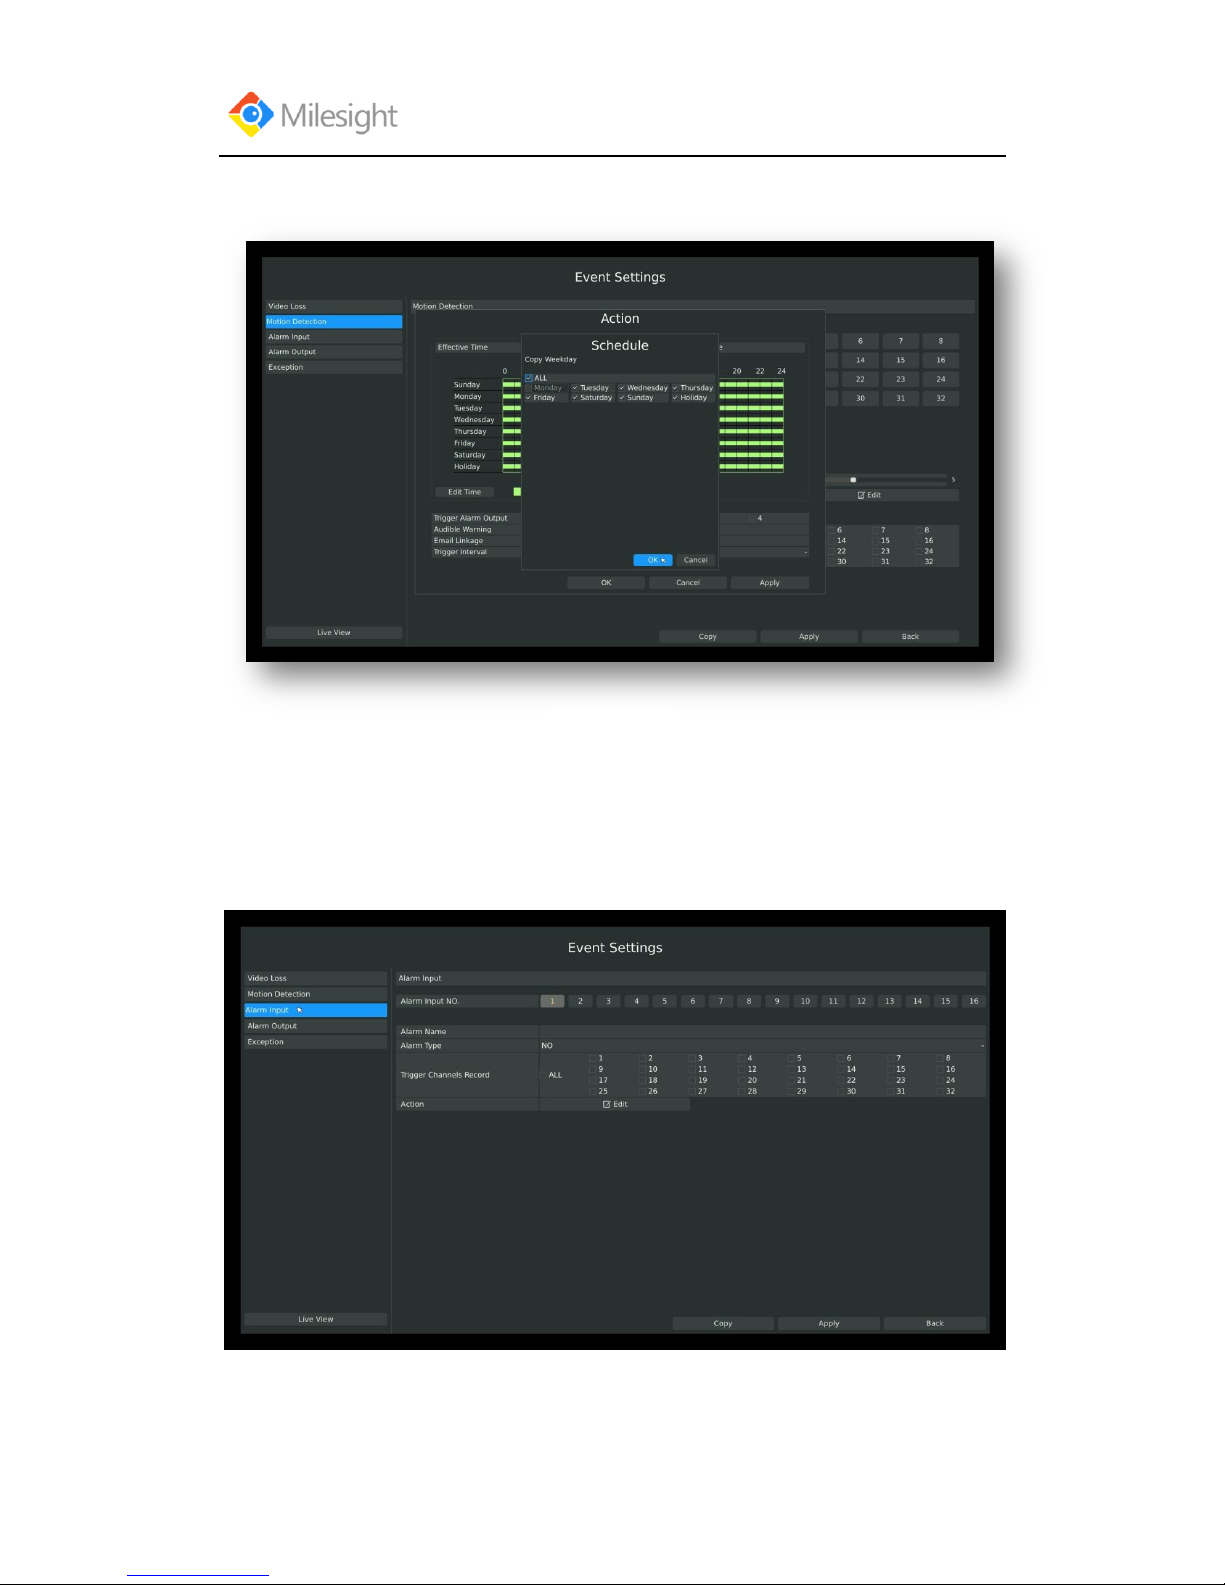
Step7:[Trigger Channels Record]: Select channels to trigger for recording when motion is
detected by checking the checkboxes under the desired channels. Please make sure other channels
has setup motion recording schedule. (Refer to 3.4 Record settings)
Page 63
User Manual
www.milesight.com 59
Step8. Click [Apply] or [OK] to confirm settings. Repeat above steps to other channel. Or
click [Copy] to copy settings to other channel.
3.5.3 Alarm Input
Alarm Input function is supported on MS-N5016, MS-N5116, MS-N8016, MS-N8032.
Step 1: Select Main Menu-Event-Alarm Input:
F-3.5.16
F-3.5.17
Page 64
User Manual
www.milesight.com 60
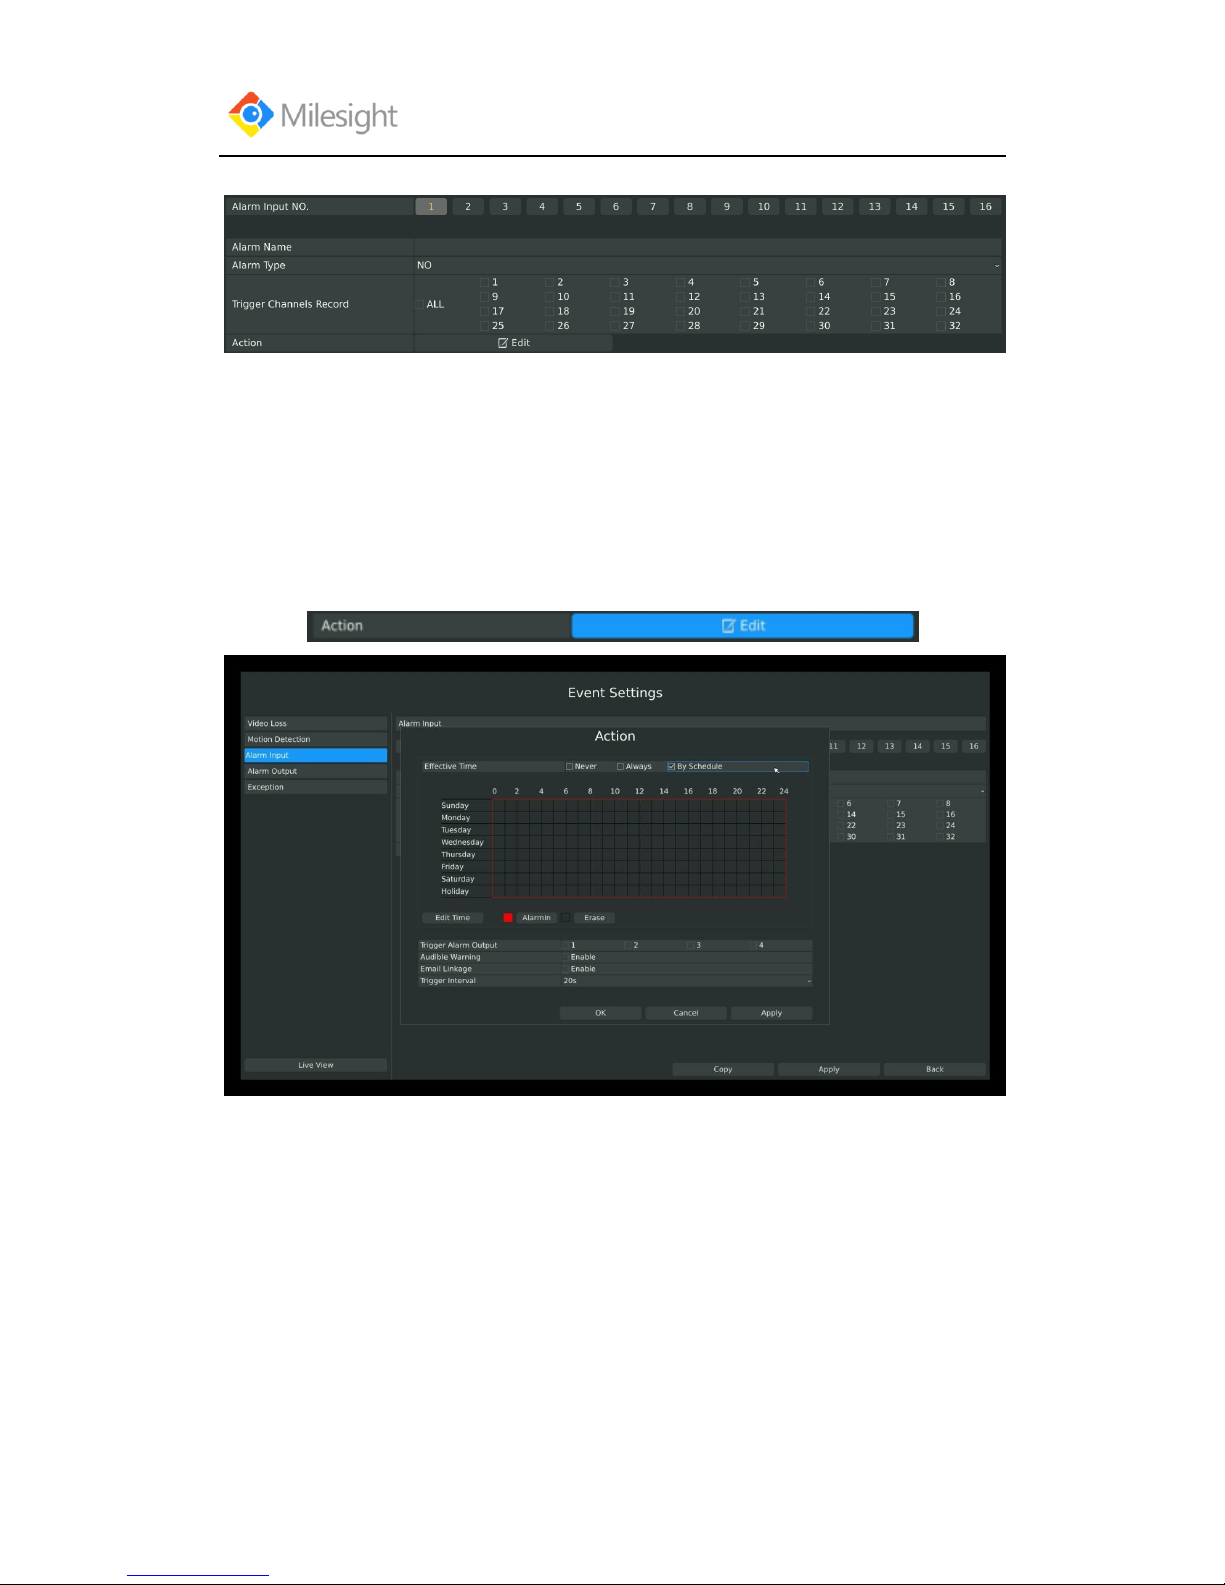
Step 2: Set Alarm input channel, Alarm Name, Alarm Type and Record Channels:
[Alarm Input NO]: The channel which has input signal;
[Alarm Name]: Set a name for the alarm;
[Alarm Type]: Select alarm type: NO or NC;
[Trigger Channels Record]: Once the channel in the [Alarm Input No] has alarm input, which
channels will be triggered to record. Refer to 3.4 Record Settings;
Step3: Set action for alarm input by click:
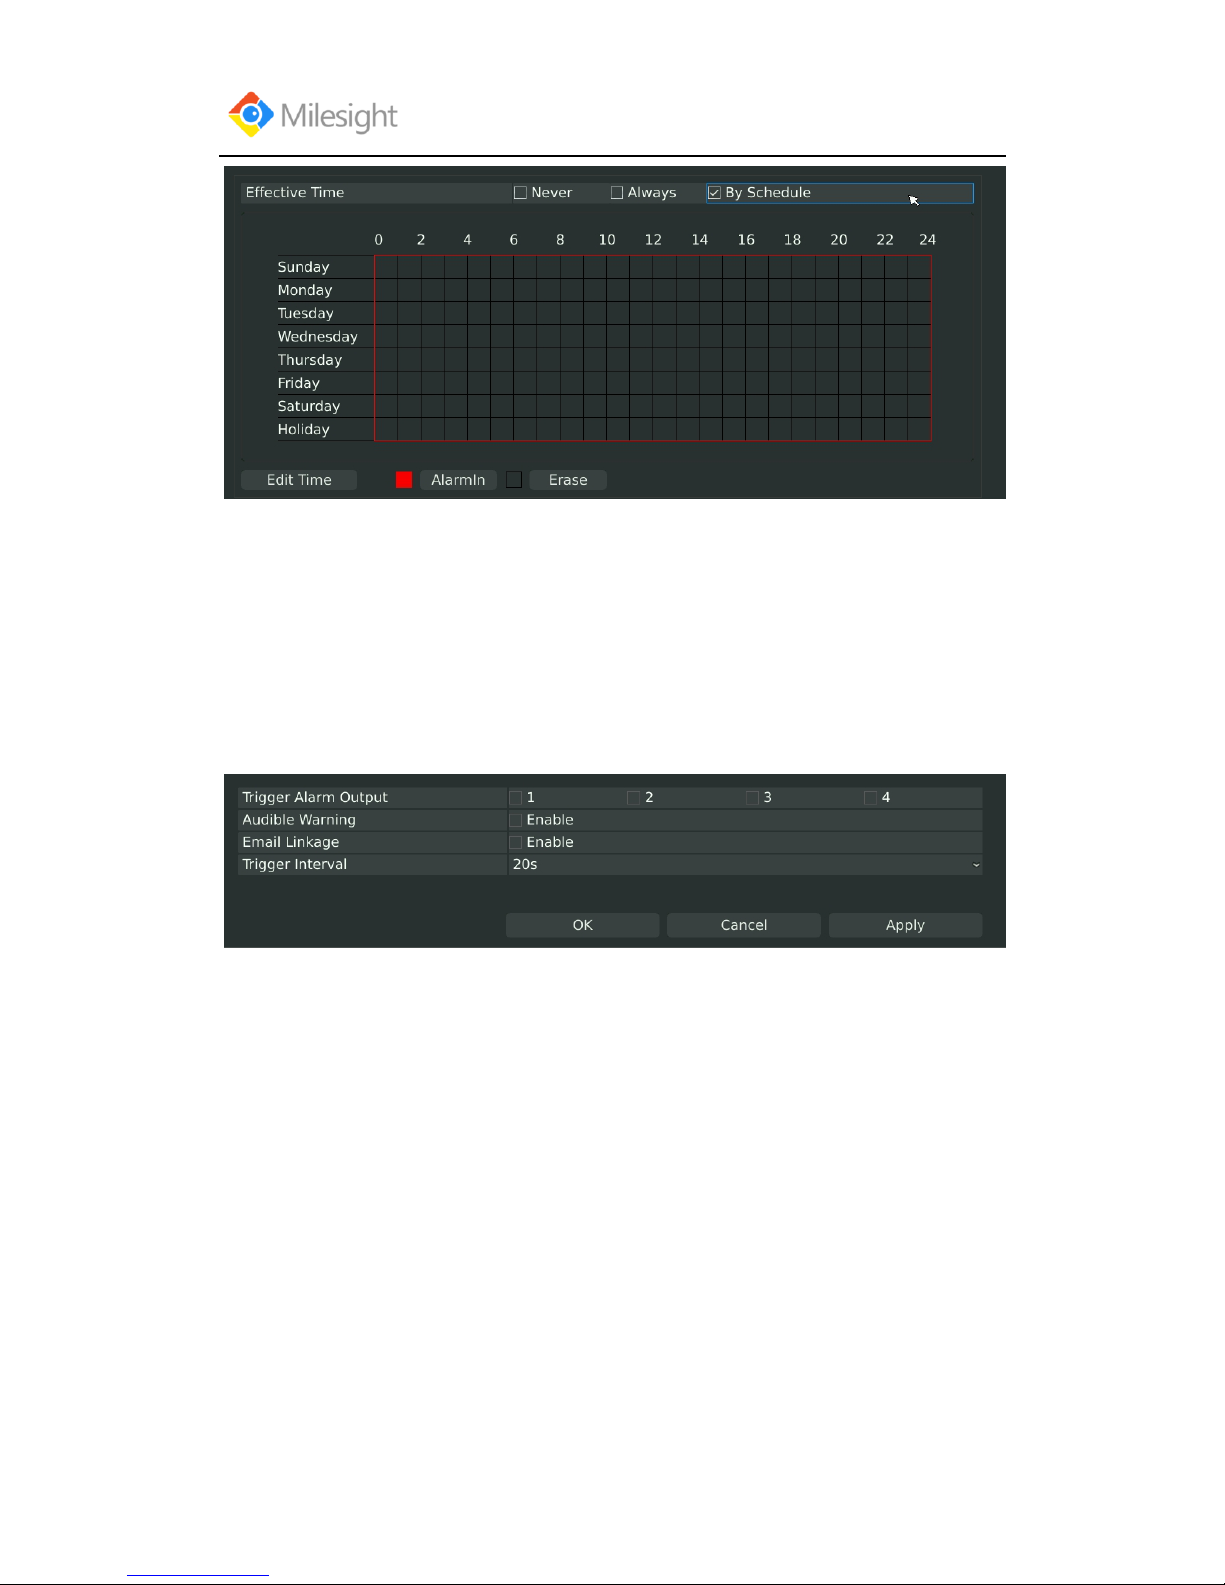
You need to set 1.Effective time and 2.Action on this Action Interface:
1. Effective time:
F-3.5.18
F-3.5.19
Page 65
User Manual
www.milesight.com 61
You can set three different modes for effective time:
[Never]: Will have no action triggered if it is checked;
[Always]: Will always trigger the action if checked;
[By Schedule]: Will take effect by the schedule you set.
If you choose By Schedule, you need to set schedule by 1.drag the mouse on the time schedule
area or 2.by click the “Edit Time” button.
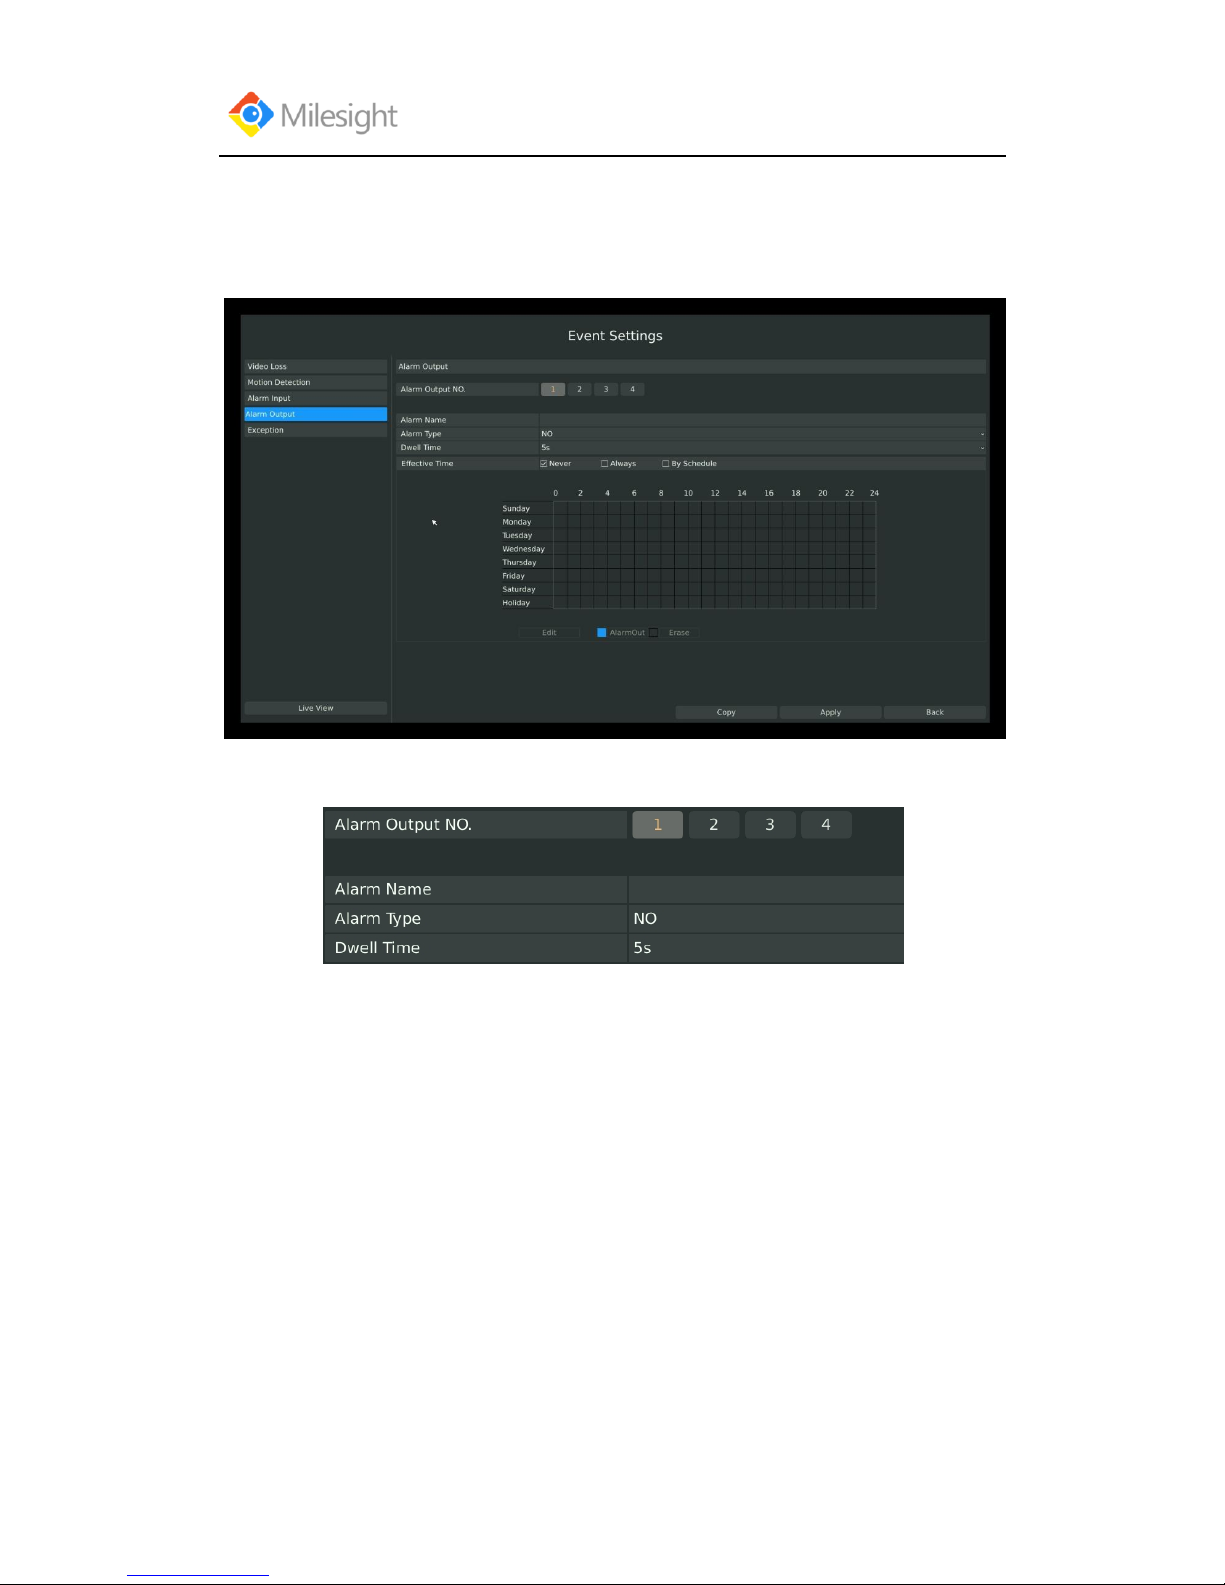
2. Action
[Trigger Alarm Output]: Select whether trigger the alarm output or not when video loss is
detected.
Audible Warning: Trigger an audible beep when video loss is detected
Email Linkage: Send video loss note to specified email address when video loss is
detected.(Please refer to 3.8.2.4 Mail configuration for mail address setting)
Trigger Interval: Set the interval between two events.
Note: These actions will only take response according to effective time you choose.
Lastly need to APPLY these settings to take effect.
F-3.5.20
F-3.5.21
Page 66
User Manual
www.milesight.com 62
3.5.4 Alarm Output
Alarm Output function is supported on MS-N5016, MS-N5116, MS-N8016, MS-N8032.
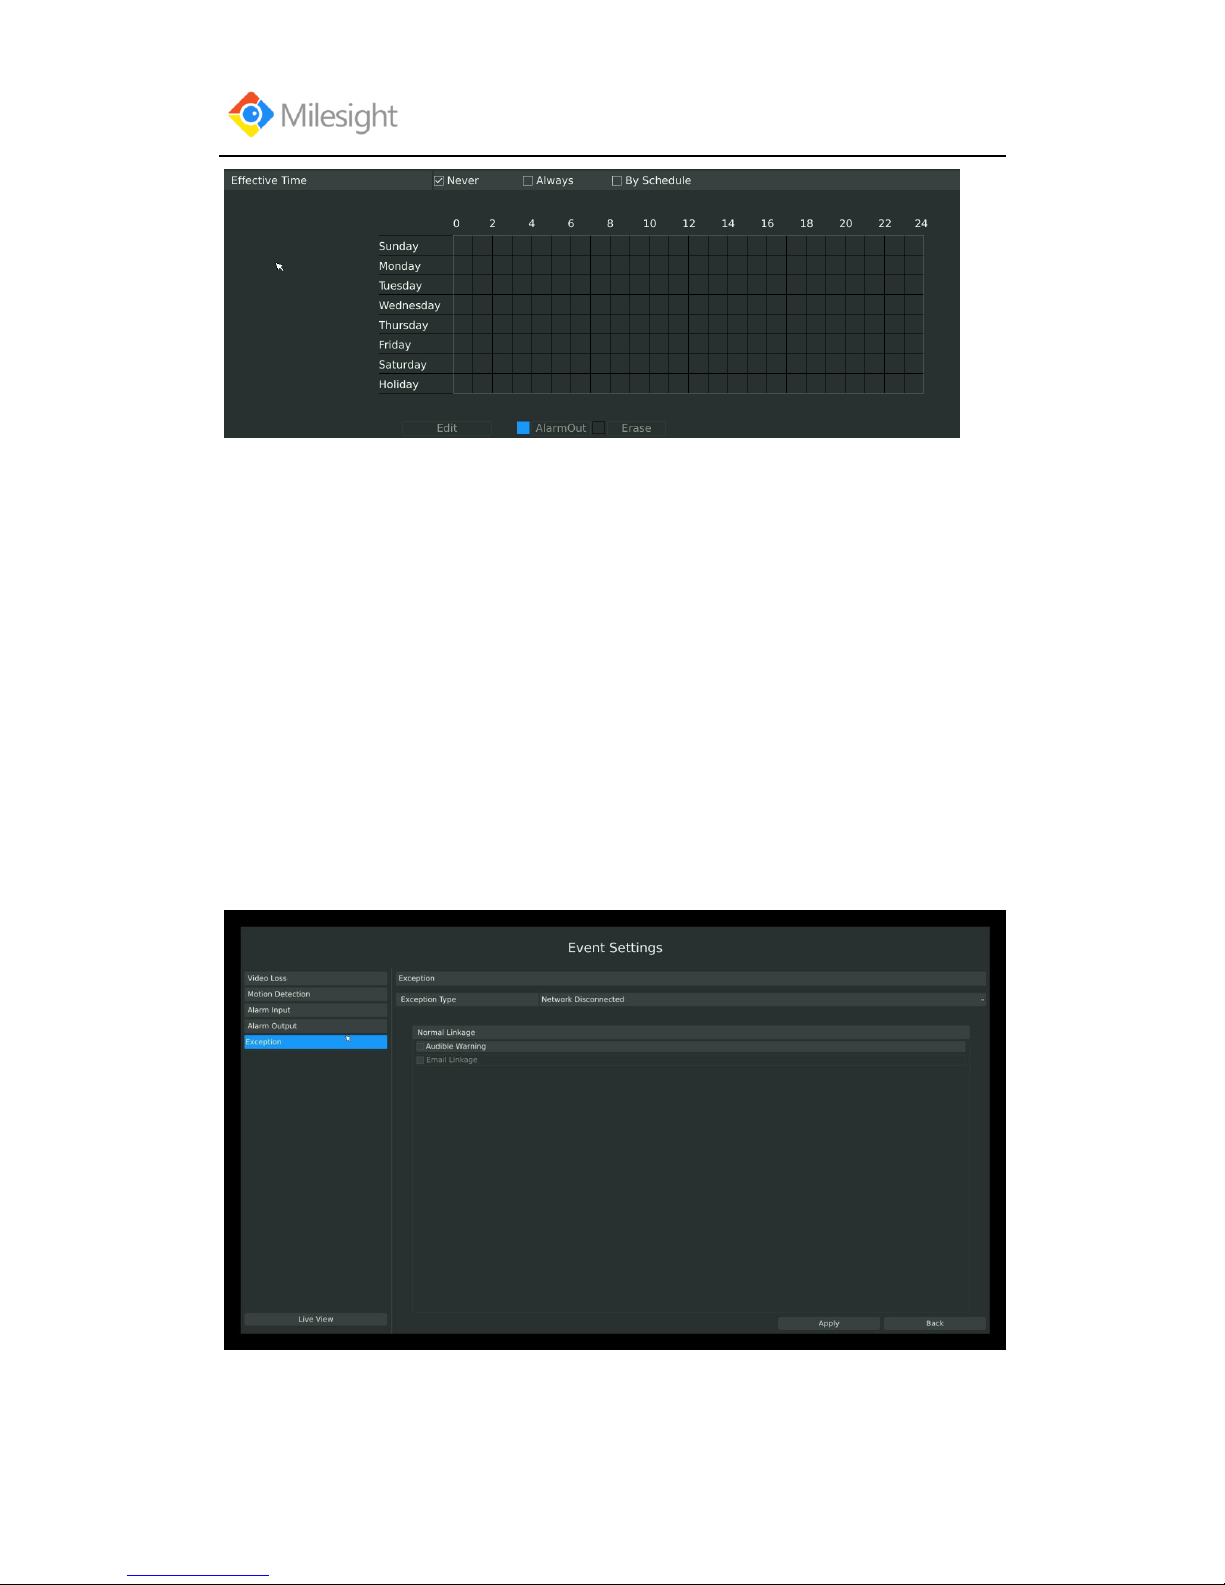
Step 1: Select Main Menu-Event-Alarm Output:
Step 2: Set Alarm output channel, Alarm Name, Alarm Type and Record Channels:
[Alarm Output NO]: The channel which will output the alarm signal;
[Alarm Name]: Set a name for the alarm;
[Alarm Type]: Select alarm type: NO or NC;
[Dwell Time]: Set the output time for alarm, if that is too long when alarm out is outputting, you
can select the Manually Clear to stop it.
Step3: Select Effective Time for alarm output:
F-3.5.22
Page 67
User Manual
www.milesight.com 63
You can set three different modes for effective time:
[Never]: Will have no action triggered if it is checked;
[Always]: Will always trigger the action if checked;
[By Schedule]: Will take effect by the schedule you set.
If you choose By Schedule, you need to set schedule by 1.drag the mouse on the time schedule
area or 2.by click the “Edit Time” button.
Lastly need to APPLY these settings to take effect.
3.5.4 Exception
Milesight NVR support exception alarm hint for1. Network Disconnected; 2
.HDD Full; 3.Record Fail; 4.HDD Error;
Step1. Enter Exception by clicking Main Menu-Event-Exception:
Step2. Select Exception Type:
There are 4 kinds of alarm type:
F-3.5.23
F-3.5.24
Page 68

User Manual
www.milesight.com 64
[Network Disconnected]: Lost of network;
[HDD Full]: When HDD is full. It usually happened when Recycle Mode is OFF.
[Record Fail]: When record Failed. Including HDD Error, HDD Full, no HDD and so on.
[HDD Error]: When HDD Error.
Step2. Select alarm type:
[Audible Warning]: Will trigger audio alarm if checked;
[Email Linkage]: Will send alarm Email if checked.
Page 69
User Manual
www.milesight.com 65
3.6 Status
You can have a quick view of the information of the device, network, camera, disk and event. This
part is only for your rapid reference. If you want to make any configuration, please go to
corresponding parts accordingly.
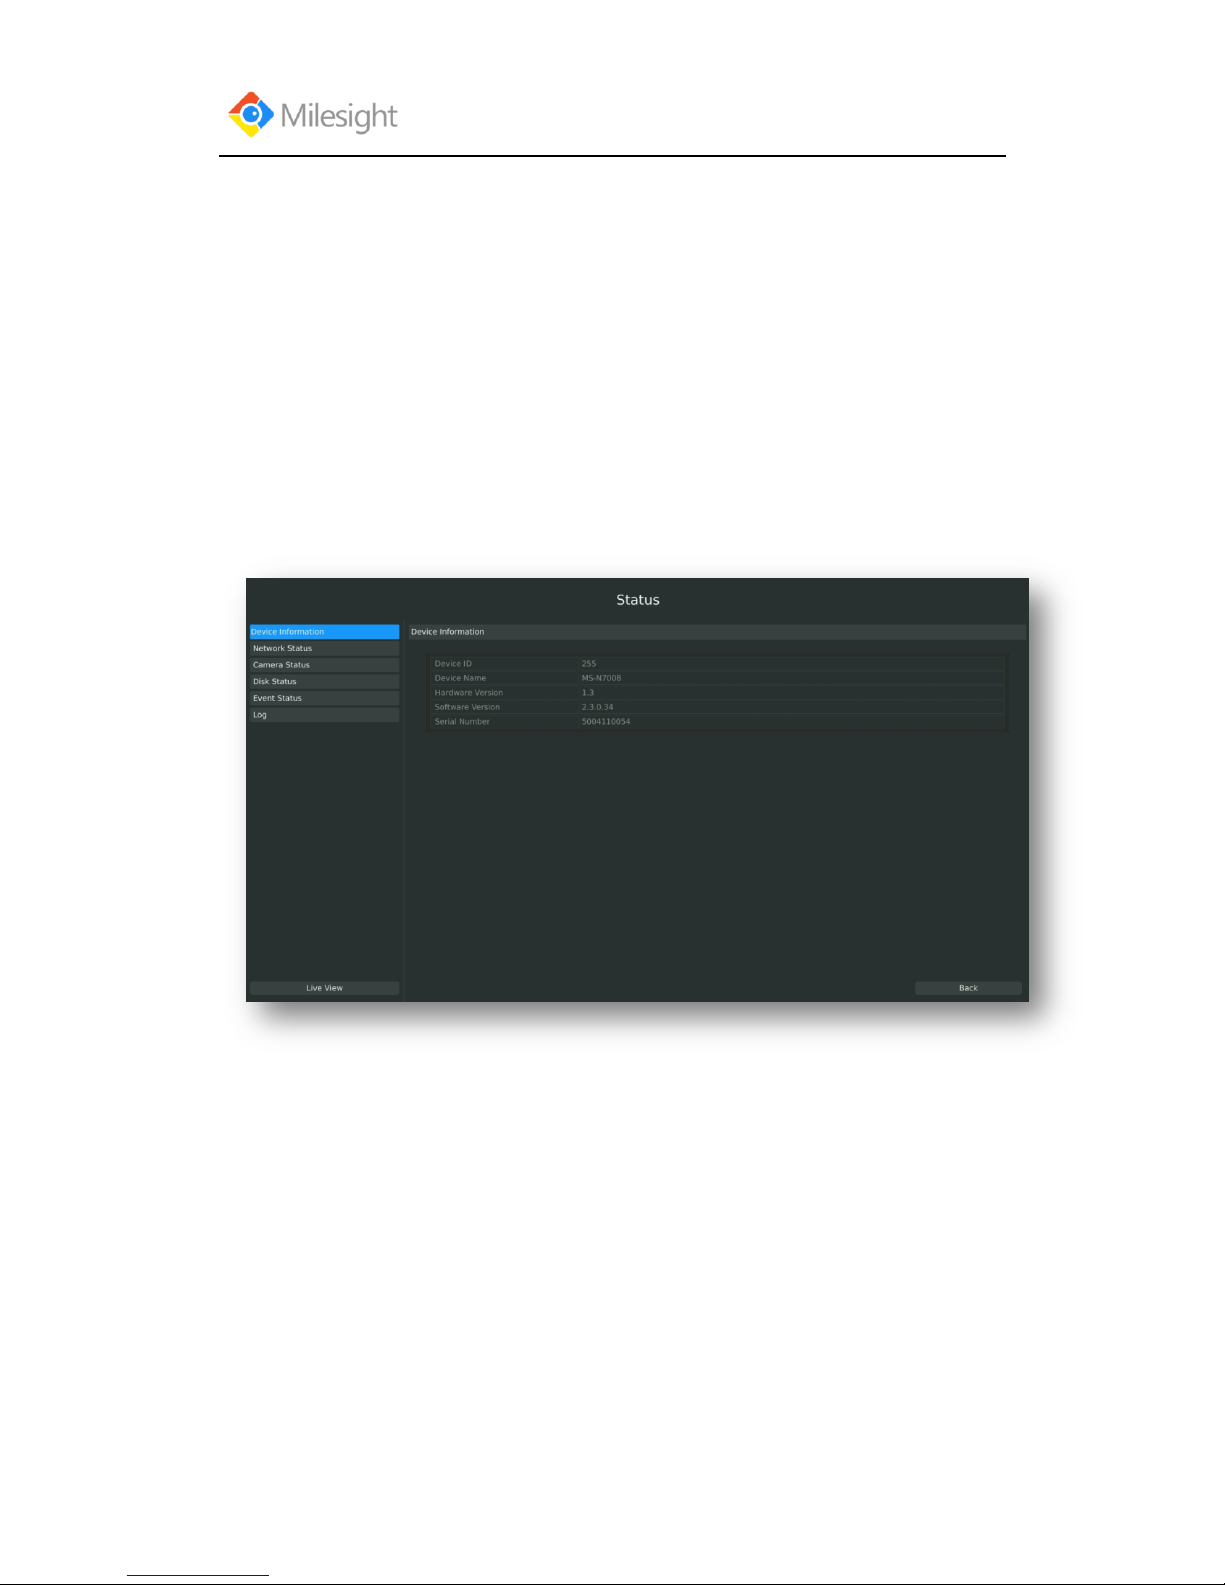
3.6.1 Device Information
Step: Enter Device information menu by clicking Main MenuStateDevice Information
It will show you information in F-3.6.1, including: Device ID, Device Name, Hardware Version,
Software Version, and Serial Number.
F-3.6.1
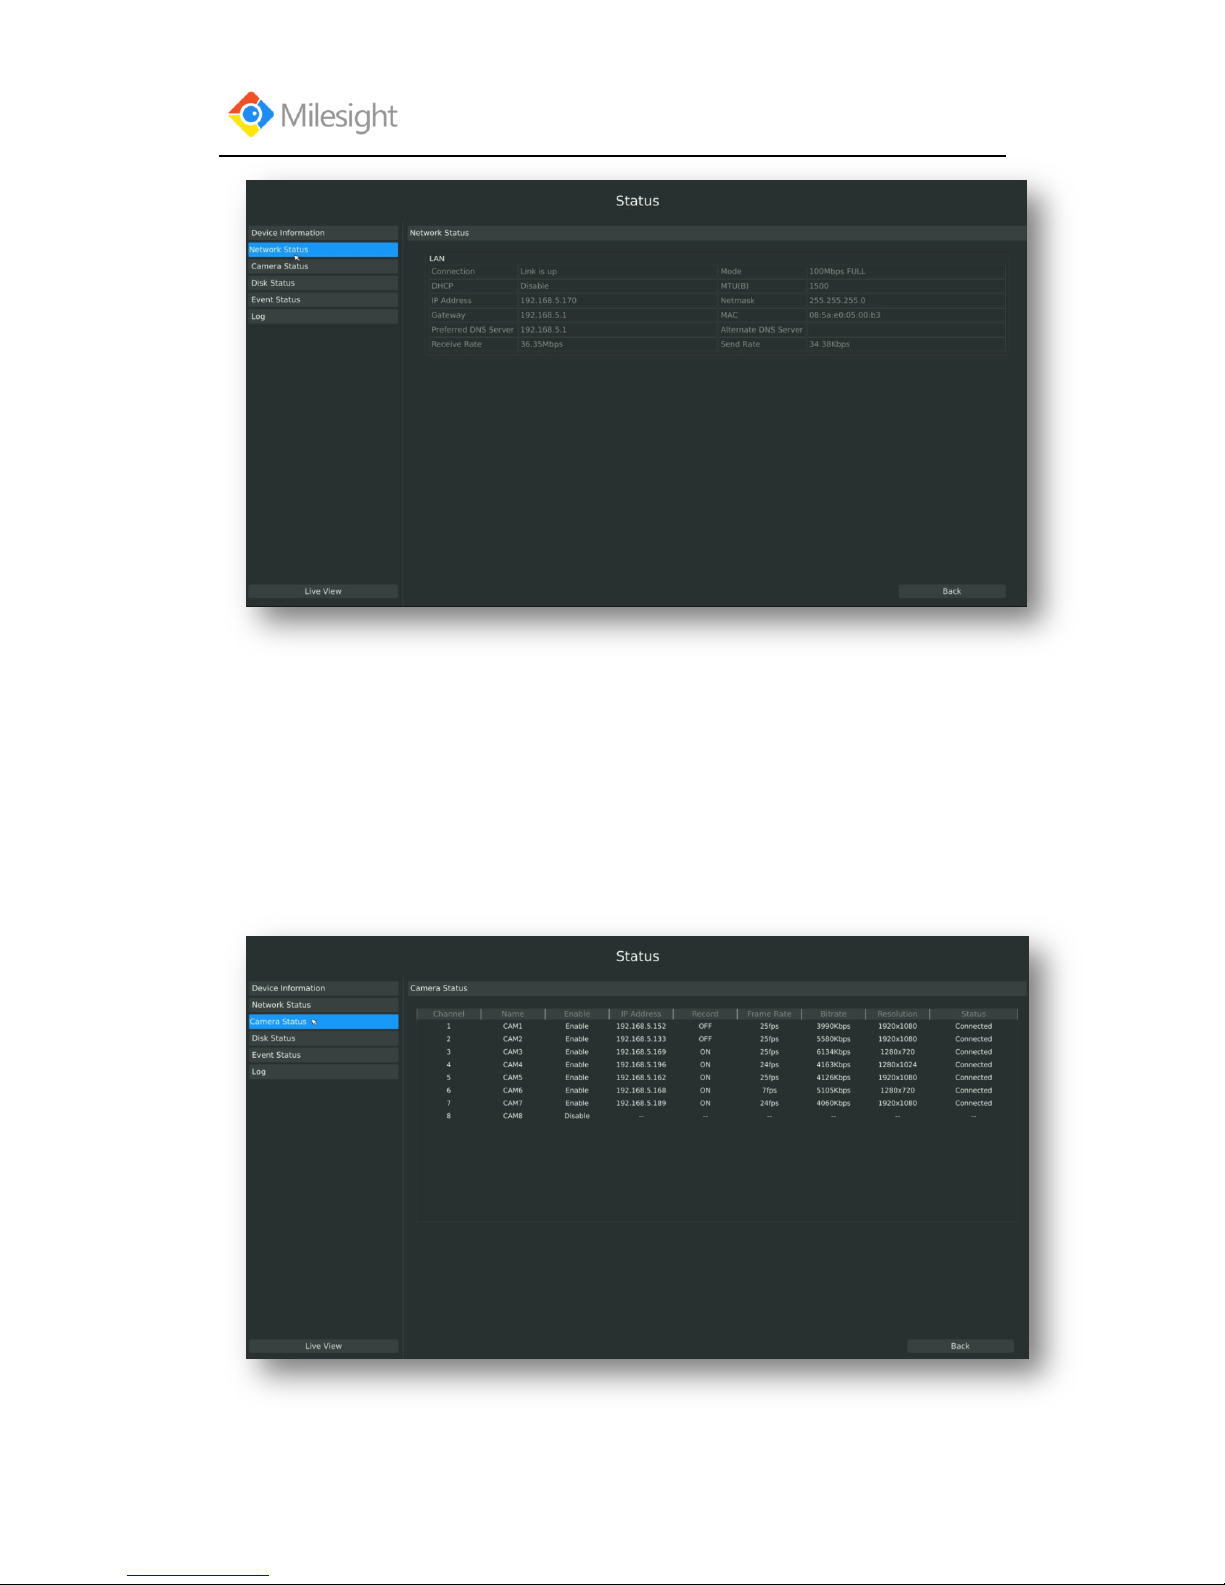
3.6.2 Network Status
Step: Enter Network Status menu by clicking Main MenuStateNetwork Status
It will show you information in F-3.6.2, including: Connection, Mode, DHCP, MTU(B), IP
Address, Net mask, Gateway, MAC, Preferred DNS Server, Alternate DNS Server, Receive Rate,
and Send Rate.
Page 70
User Manual
www.milesight.com 66
F-3.6.2
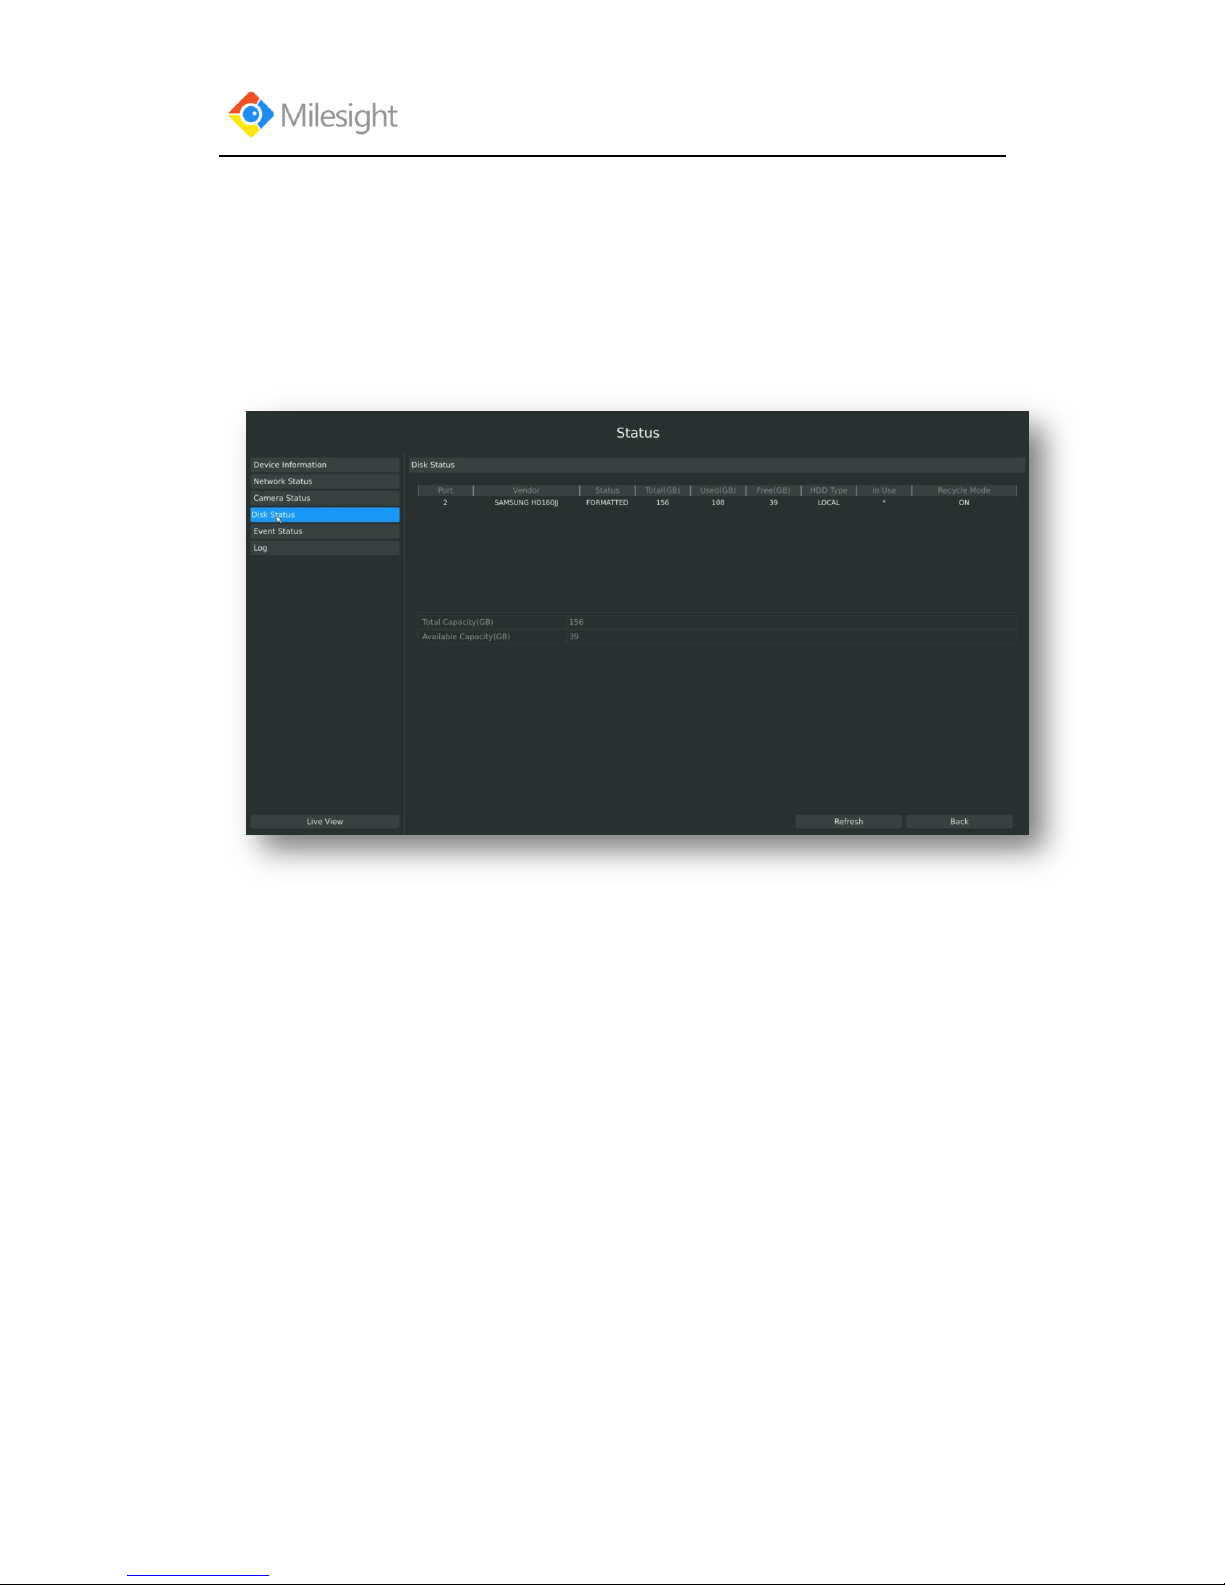
3.6.3 Camera Status
Step: Enter camera status menu by clicking Main MenuStateCamera Status
It will show you information in F-3.6.3, including: Channel, Name, Enable, IP Address, Record,
Frame Rate, Bitrate, Resolution and State.
F-3.6.3
Page 71
User Manual
www.milesight.com 67
3.6.4 Disk Status
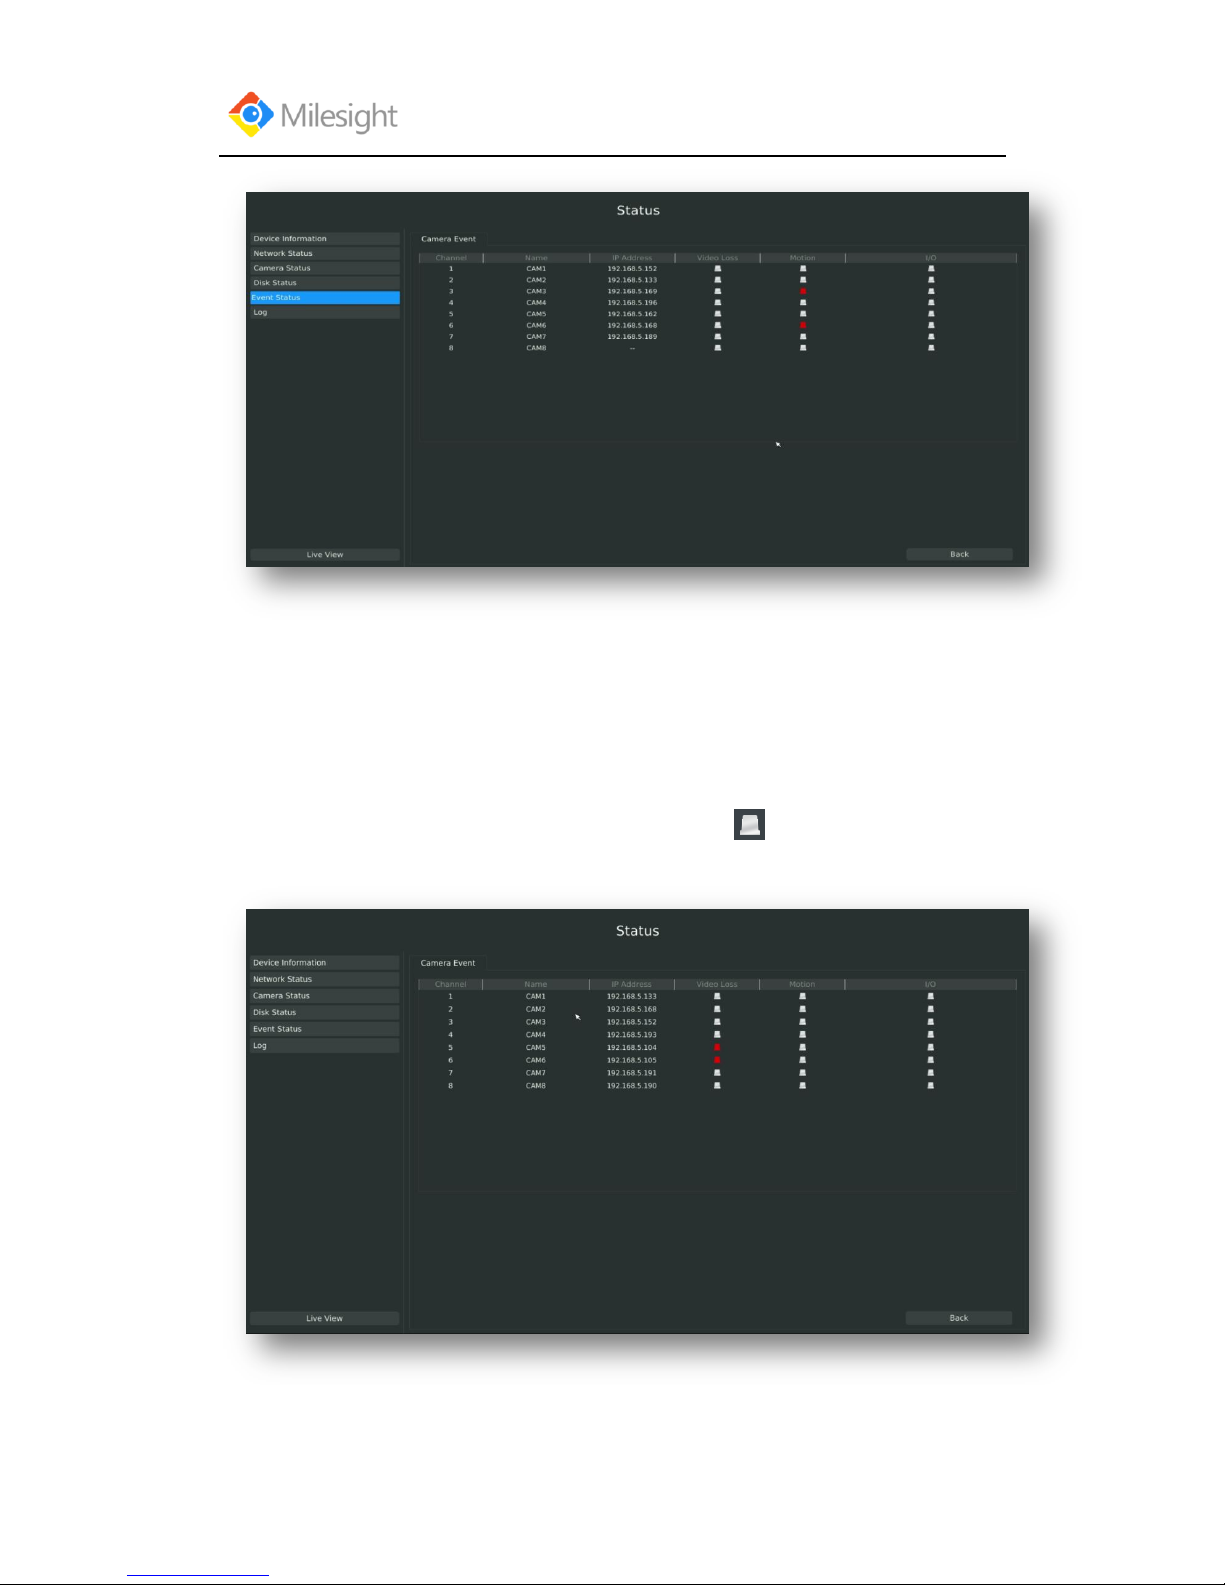
Step: Enter disk status menu by clicking Main MenuStateDisk Status
It will show you information in F-3.6.4, including: Port, Vendor, State, Total(GB), Free(GB), HDD
Type, In Use, and Recycle Mode. You can see the Total Capacity (GB) and Available Capacity
(GB) as below:
F-3.6.4
3.6.5 Event Status
3.6.5.1 Alarm Status
Step: Enter alarm page by clicking Main MenuStateEvent Status
It will show you the Alarm Input List in F-3.6.5.
Page 72
User Manual
www.milesight.com 68
F-3.6.5
3.6.5.2 Camera Event Status
Step: Enter camera event page by clicking Main MenuStateEvent Status.
It will show you the camera event status in F-3.6.6. If the shows in red, it means the
corresponding project is active.
F-3.6.6
Page 73

User Manual
www.milesight.com 69
3.7 Live View Settings
3.7.1 Live View
Watching a Live View
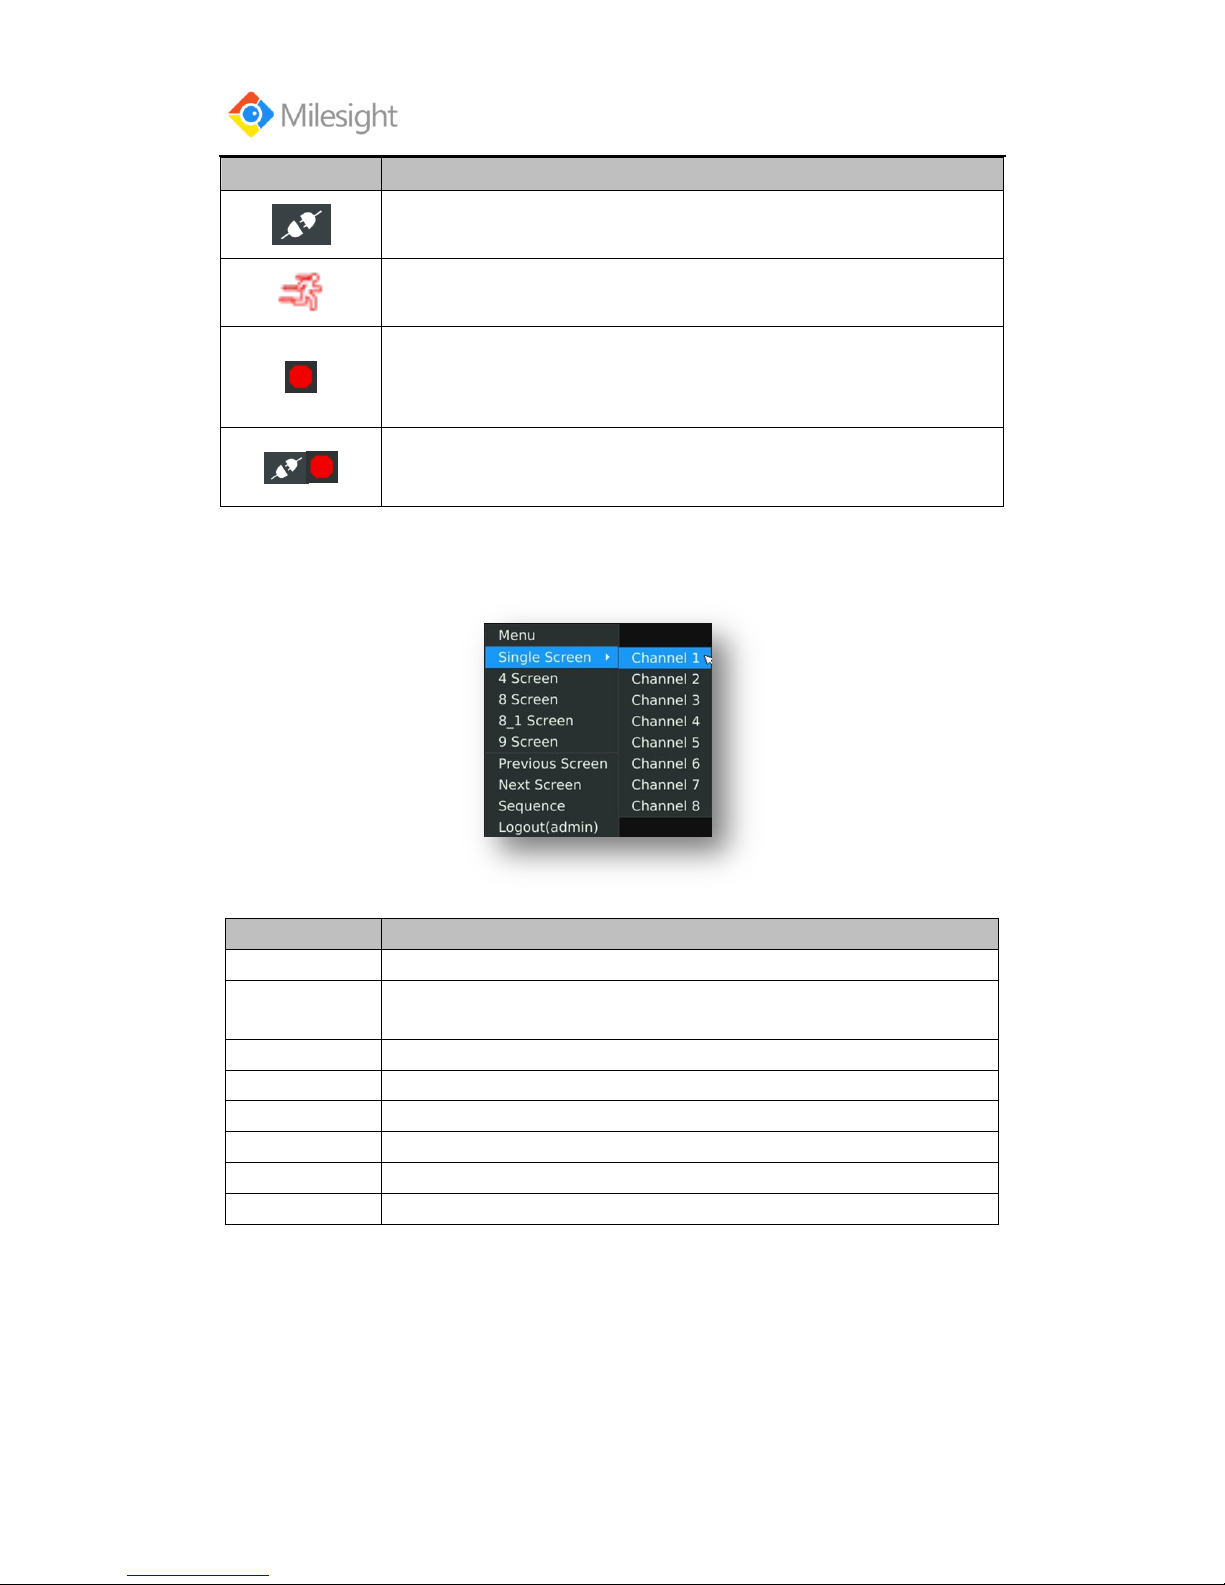
There are multiple icons on each channel displayed in live view mode, indicating the recording
and alarm status of the channel.
Page 74
User Manual
www.milesight.com 70
Icons
Descriptions
Indicates video loss or tampering alarm
Indicates motion detection alarm
Indicates the current channel is recording. The recording may have been
started manually, from a schedule, motion detection, alarm, and/or triggered
from motion and alarm.
Indicates exception alarm and recording.
Use the Right Button of the Mouse in Live View
Item
Description
Menu
Enter main menu
Single Screen
The channel chosen will spread the whole screen. You could also reveal this
function by double clicking the channel.
Sub Screen Ctrl
Switch to sub screen to operate.
Previous Screen
Switch to the previous screen
Next Screen
Switch to the next screen
Sequence
Enable single/multi-screen cruise in live view mode
Sub Sequence
Enable single/multi-screen cruise in AUX live view mode
Logout
Click it to logout current user account.
Quick Operation for Live View
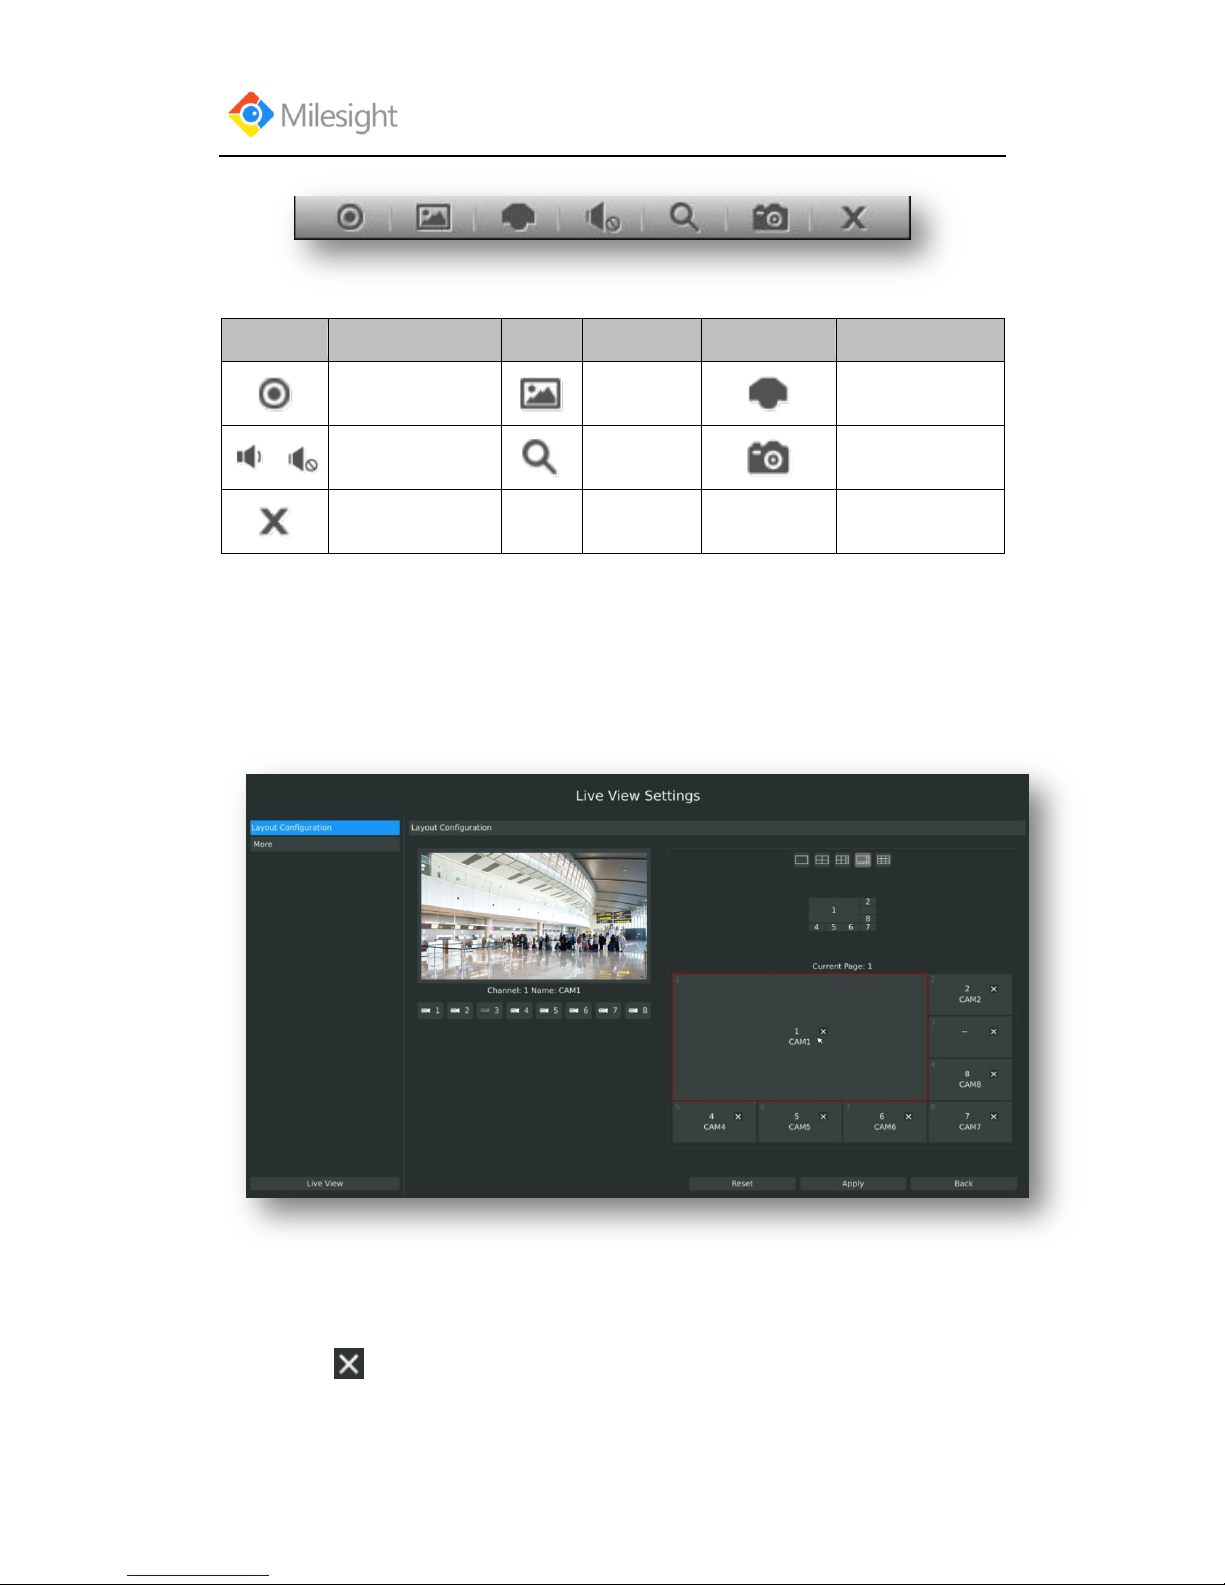
Enter the live view interface; left click the channel, the quick menu will appear.
Quick menu operations include playback, recording manually, snapshot, PTZ, zoom, and image
configuration.
Quick Menu Instructions for Main Output Live View
F-3.7.1
Page 75
User Manual
www.milesight.com 71
Icon
Description
Icon
Description
Icon
description
Manually recording
Image
configure
PTZ Control
Sound on/off
Digital zoom
Snapshot by
manually
Close
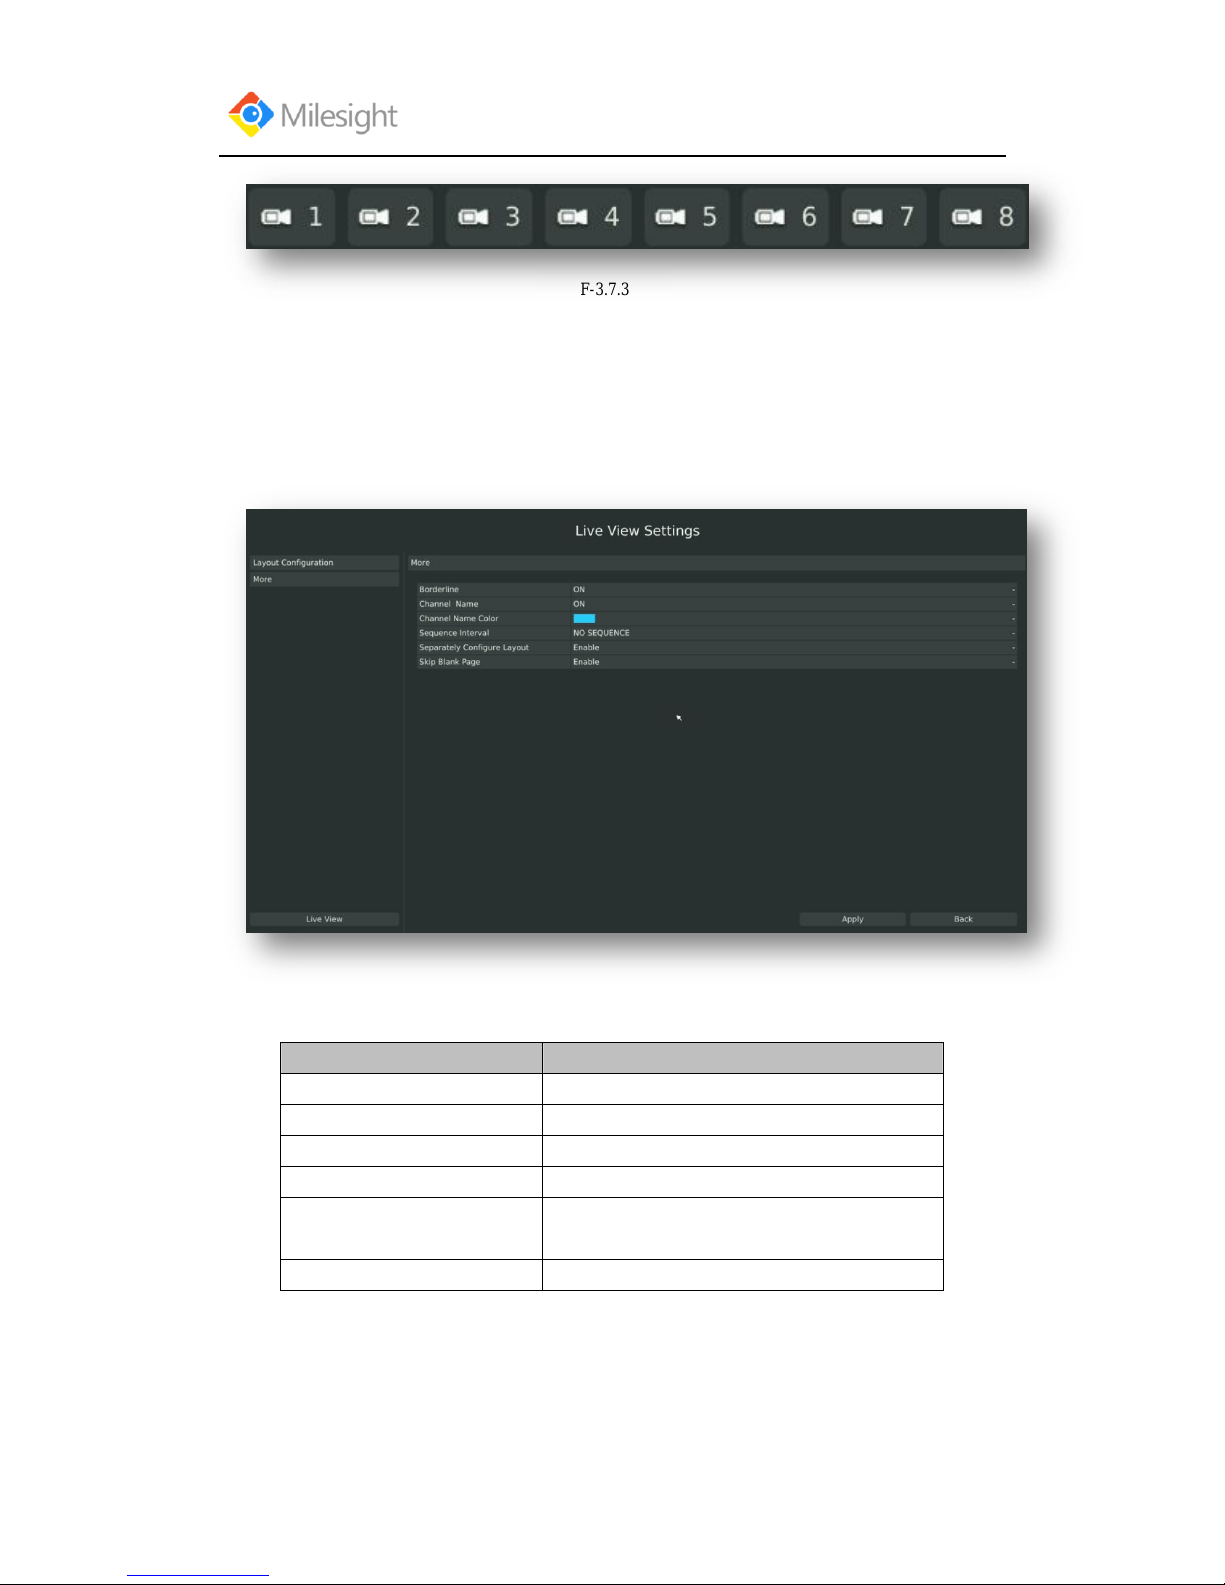
3.7.2 Layout Configuration
Step1: Enter layout configuration menu by clicking Main MenuLive ViewLayout
configuration
F-3.7.2
You can choose single screen/4/ 8 /8-1/9 screens for layout configuration according to your needs
and preferences.
Step2. Click to close a channel, or click a desired channel (shown F-3.7.3)to add in and
then click “Apply” to confirm settings. Click “Reset” to reset the layout.
Page 76
User Manual
www.milesight.com 72
F-3.7.3
3.7.3 More Settings
Live View Parameters Settings
Step: Enter the more setting interface by clicking Main MenuLive ViewMore
F-3.7.4
Item
Description
Borderline
Borderline ON/OFF
Channel Name
Display the channel name
Channel Name Color
To change the color of the channel name
Sequence Interval
Set sequence interval in live view mode
Separately Configure Layout
To configure channel order of all layouts
respectively
Skip Blank Page
Skip blank page in sequence mode
Page 77
User Manual
www.milesight.com 73
3.8 System Settings
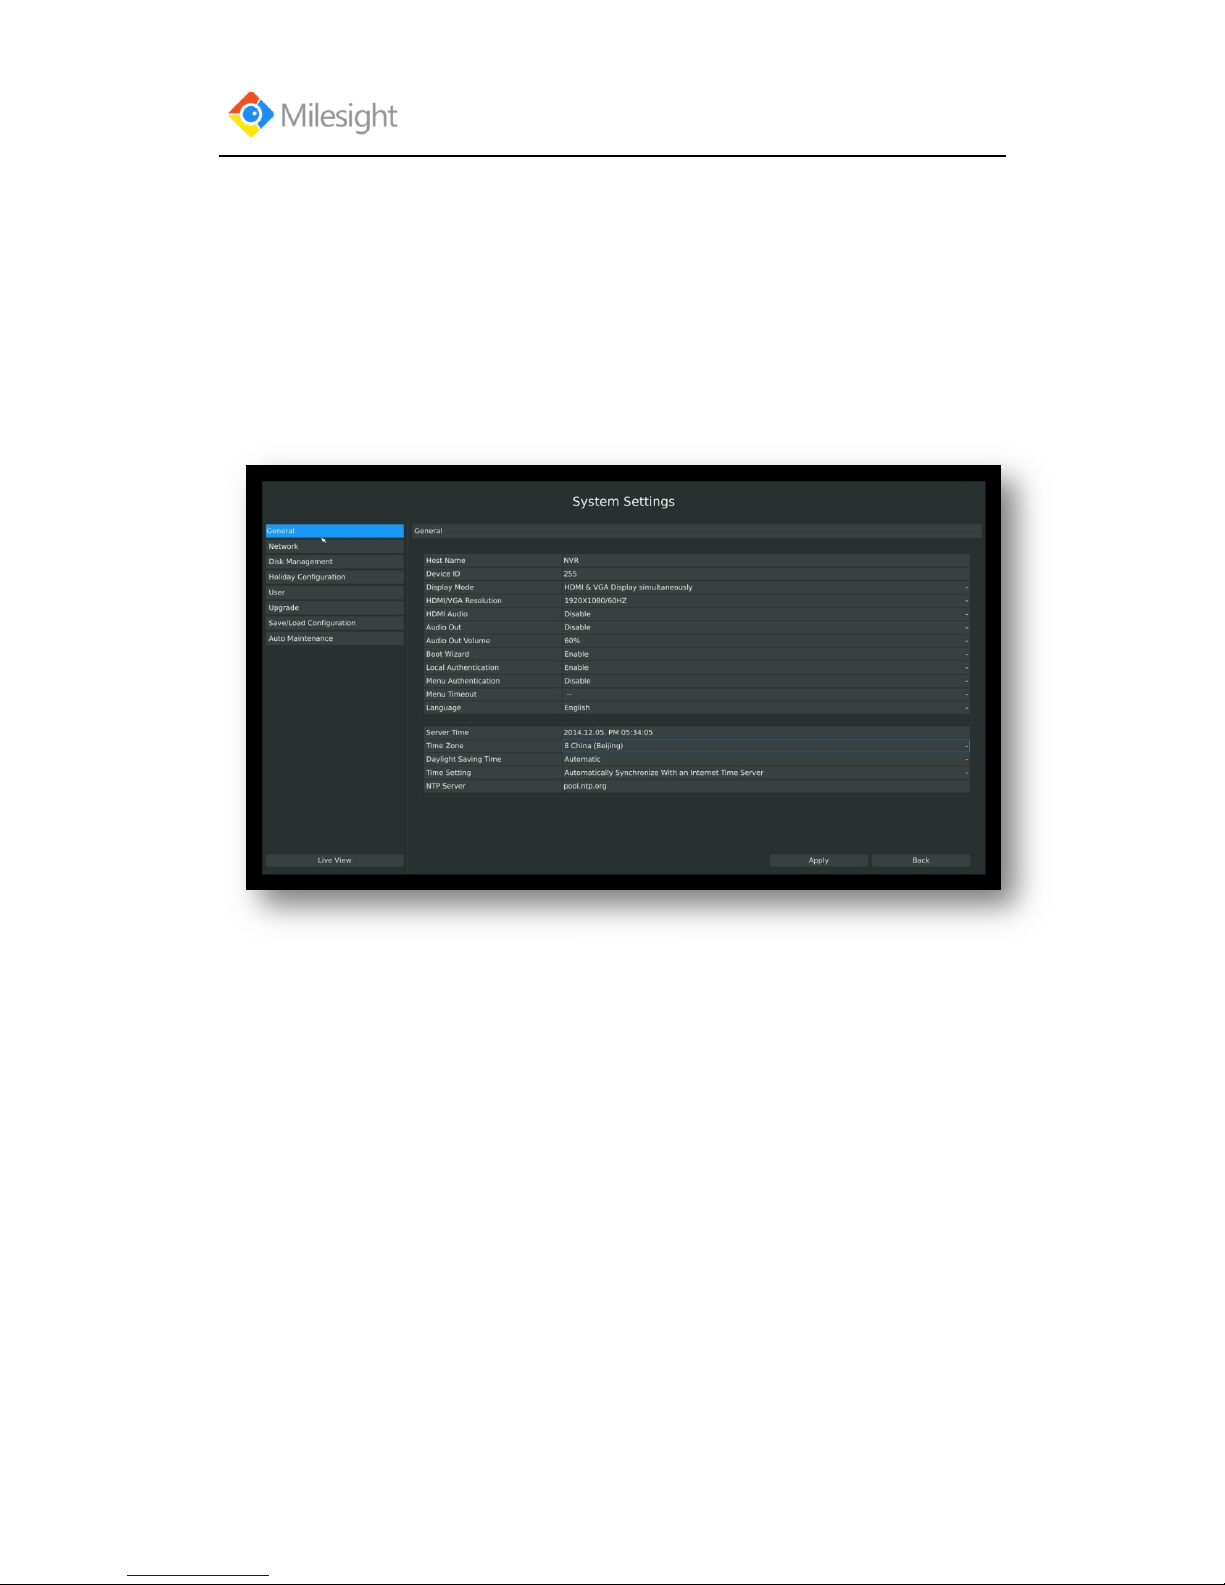
3.8.1 General Setting
Step: Enter general menu by clicking Main MenuSystem SettingsGeneral
To setup the general parameters of NVR, including modify the host name, device ID, select
resolution, and set system time manually, etc.
F-3.8.1
Page 78
User Manual
www.milesight.com 74
3.8.2 Network Settings
3.8.2.1 Basic Configuration
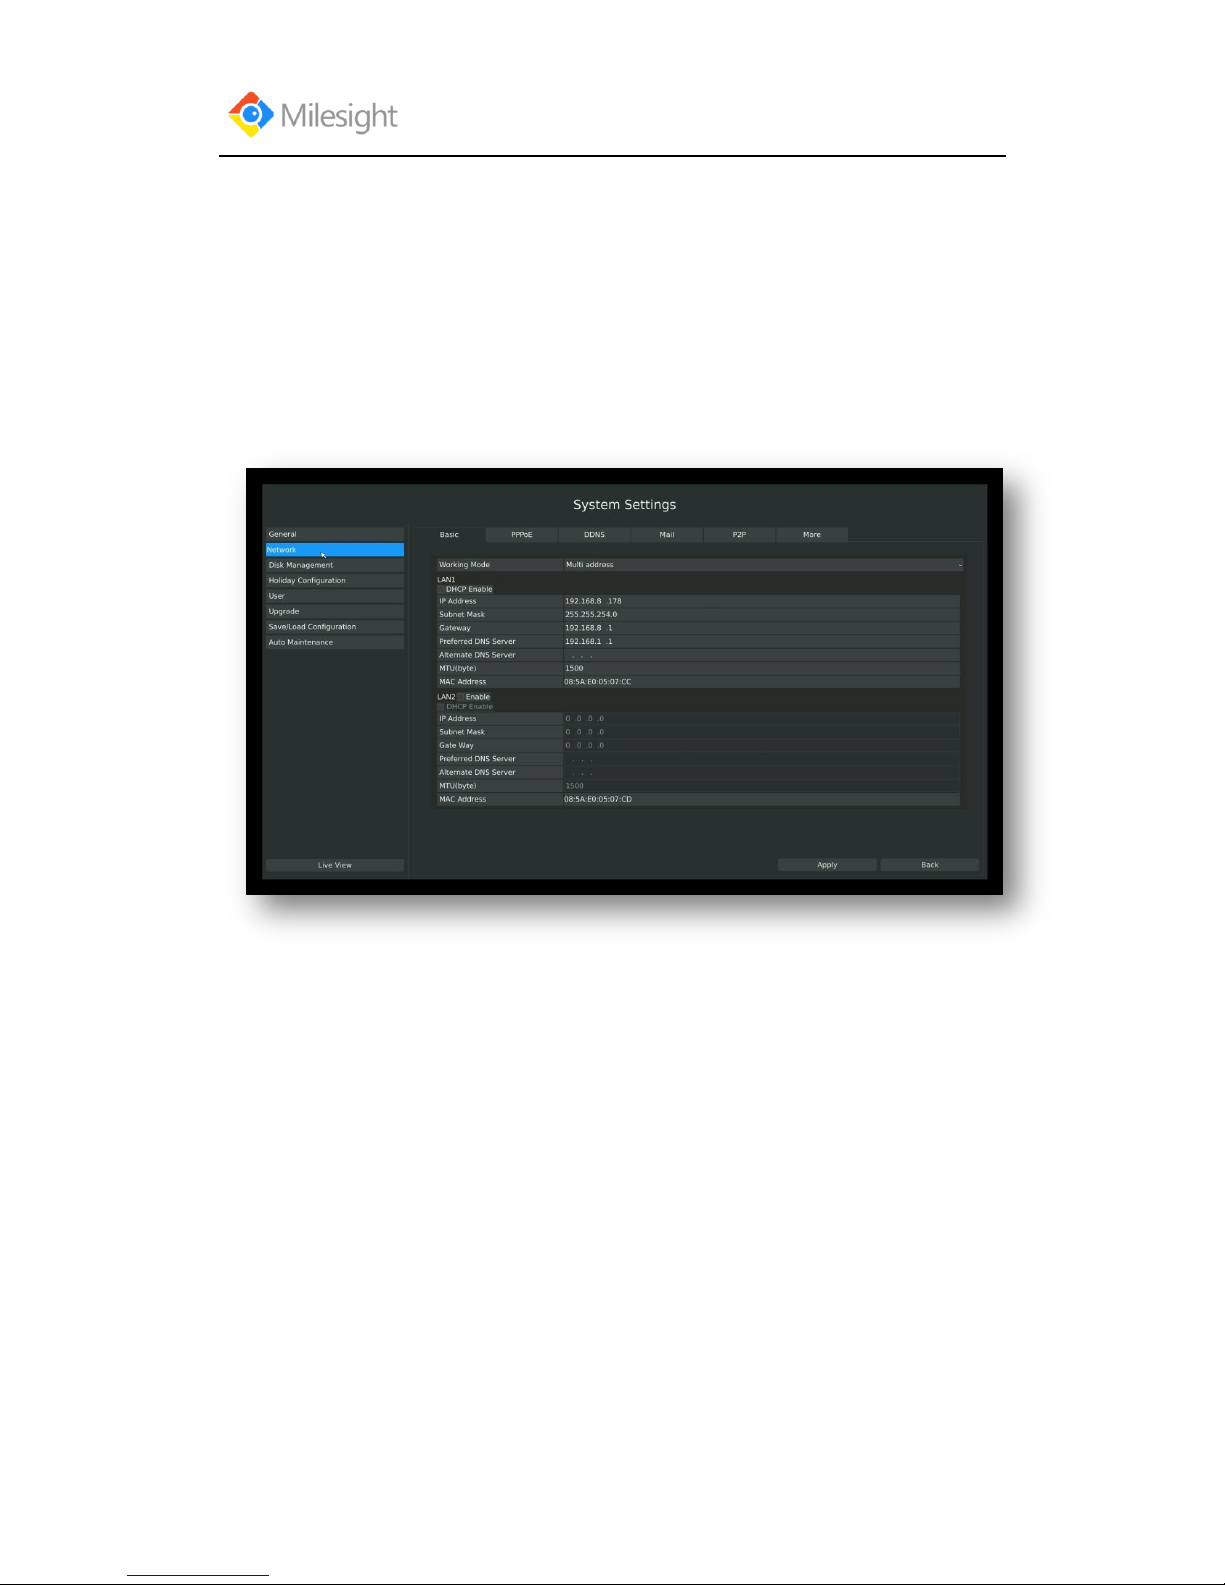
Step: Enter the network setting menu to set the network parameters by clicking Main
MenuSystem SettingsNetwork, select “Basic” page
Basic configuration includes working mode, IP address, subnet mask, gateway, MTU, DNS server,
etc.
F-3.8.2
Notes:
1. Check the DHCP checkbox if there has a DHCP server running in networks.
2. The valid range of MTU is 500~9676.
3. Do not input an IP address conflict with another device.
Page 79
User Manual
www.milesight.com 75
3.8.2.2 PPPOE Configuration
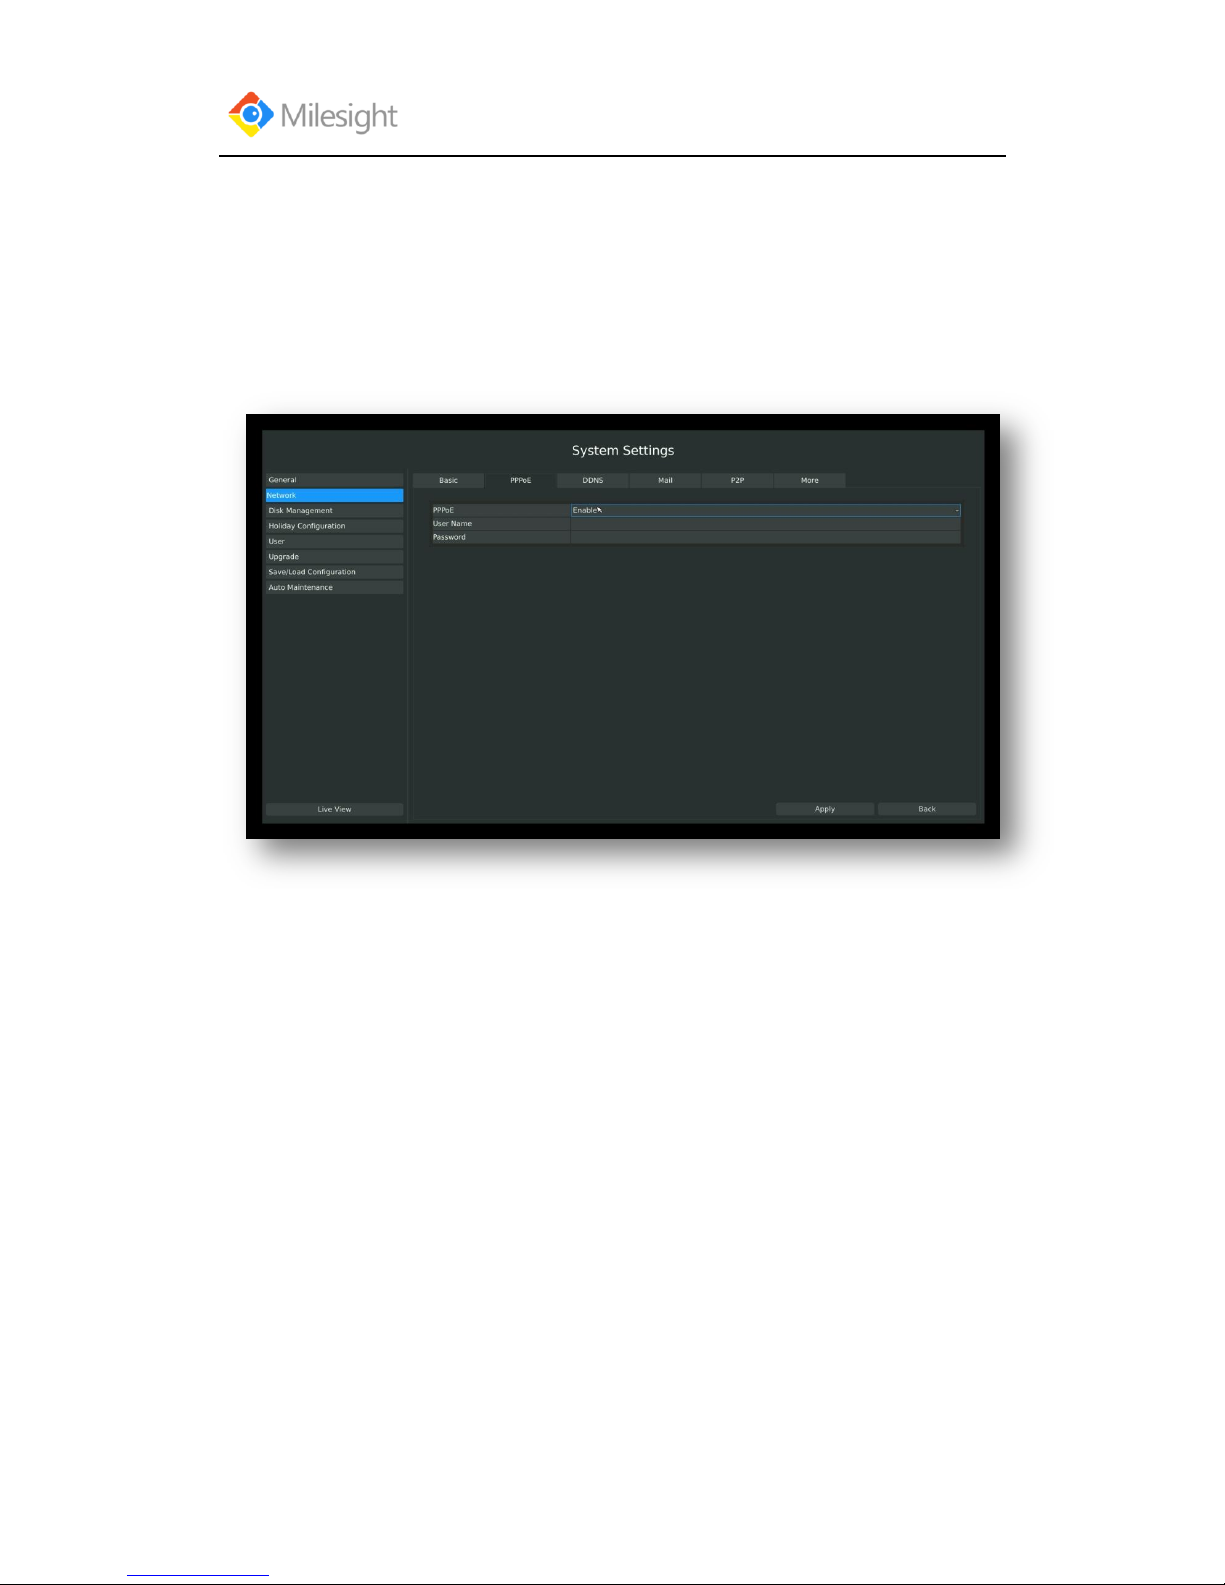
Step: Enter PPPOE menu by clicking Main MenuSystem SettingsNetwork. Select
“PPPOE” page
Check the PPPoE checkbox to enable the feature, and then input user name, password and confirm
password for PPPoE access.
F-3.8.3
Note:
PPPoE user name and password can be obtained from your service provider. Once the setup
is completed, a connected status will be shown.
Page 80
User Manual
www.milesight.com 76
3.8.2.3 DDNS Configuration
If your NVR is setup to use PPPoE to connect public network, you may need to use DDNS
(Dynamic Domain Name System) to solve the problems from dynamic IP address.
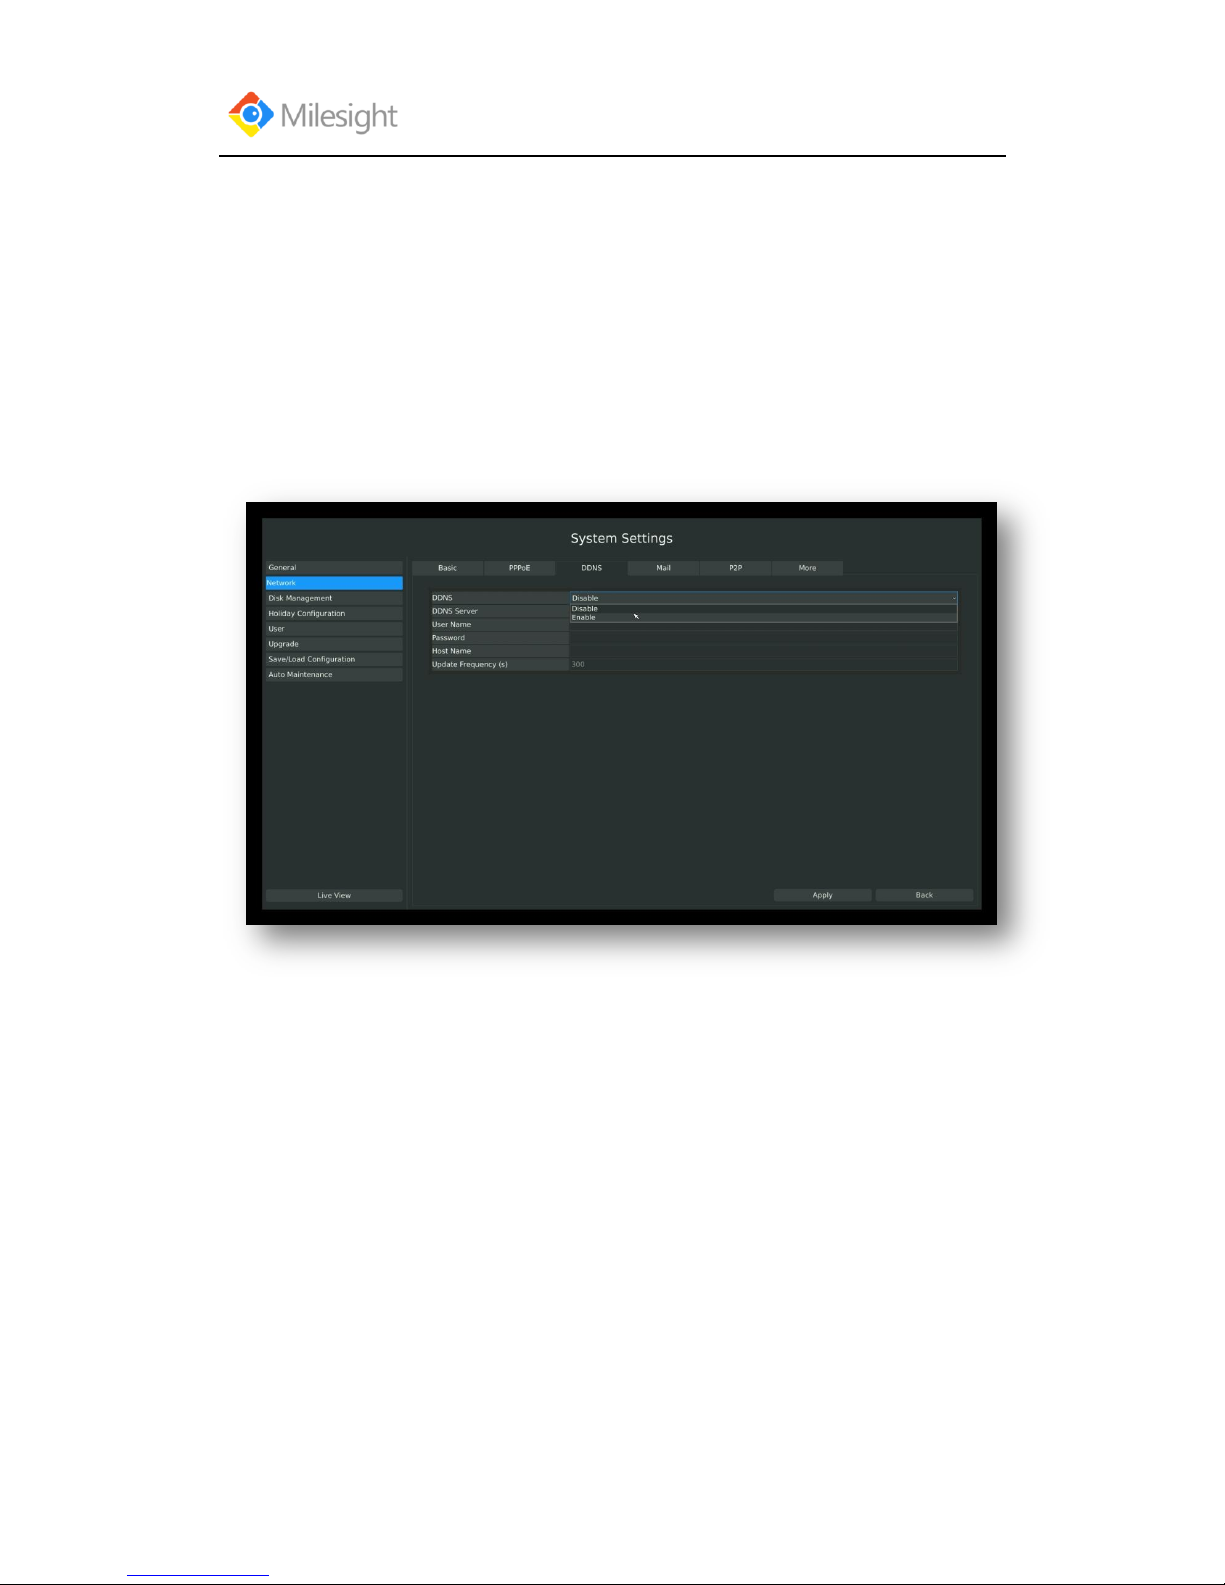
Steps: Enter DDNS configuration menu by clicking Main MenuSystem SettingsNetwork,
Select “DDNS” page
Check the DDNS checkbox to enable the feature. Select “DDNS Server”, and input username,
password and host name, and then confirm.
Click [Apply] for application.
Note: “host name” can use letters, figures and hyphen (-), and must begin with letters.
F-3.8.4
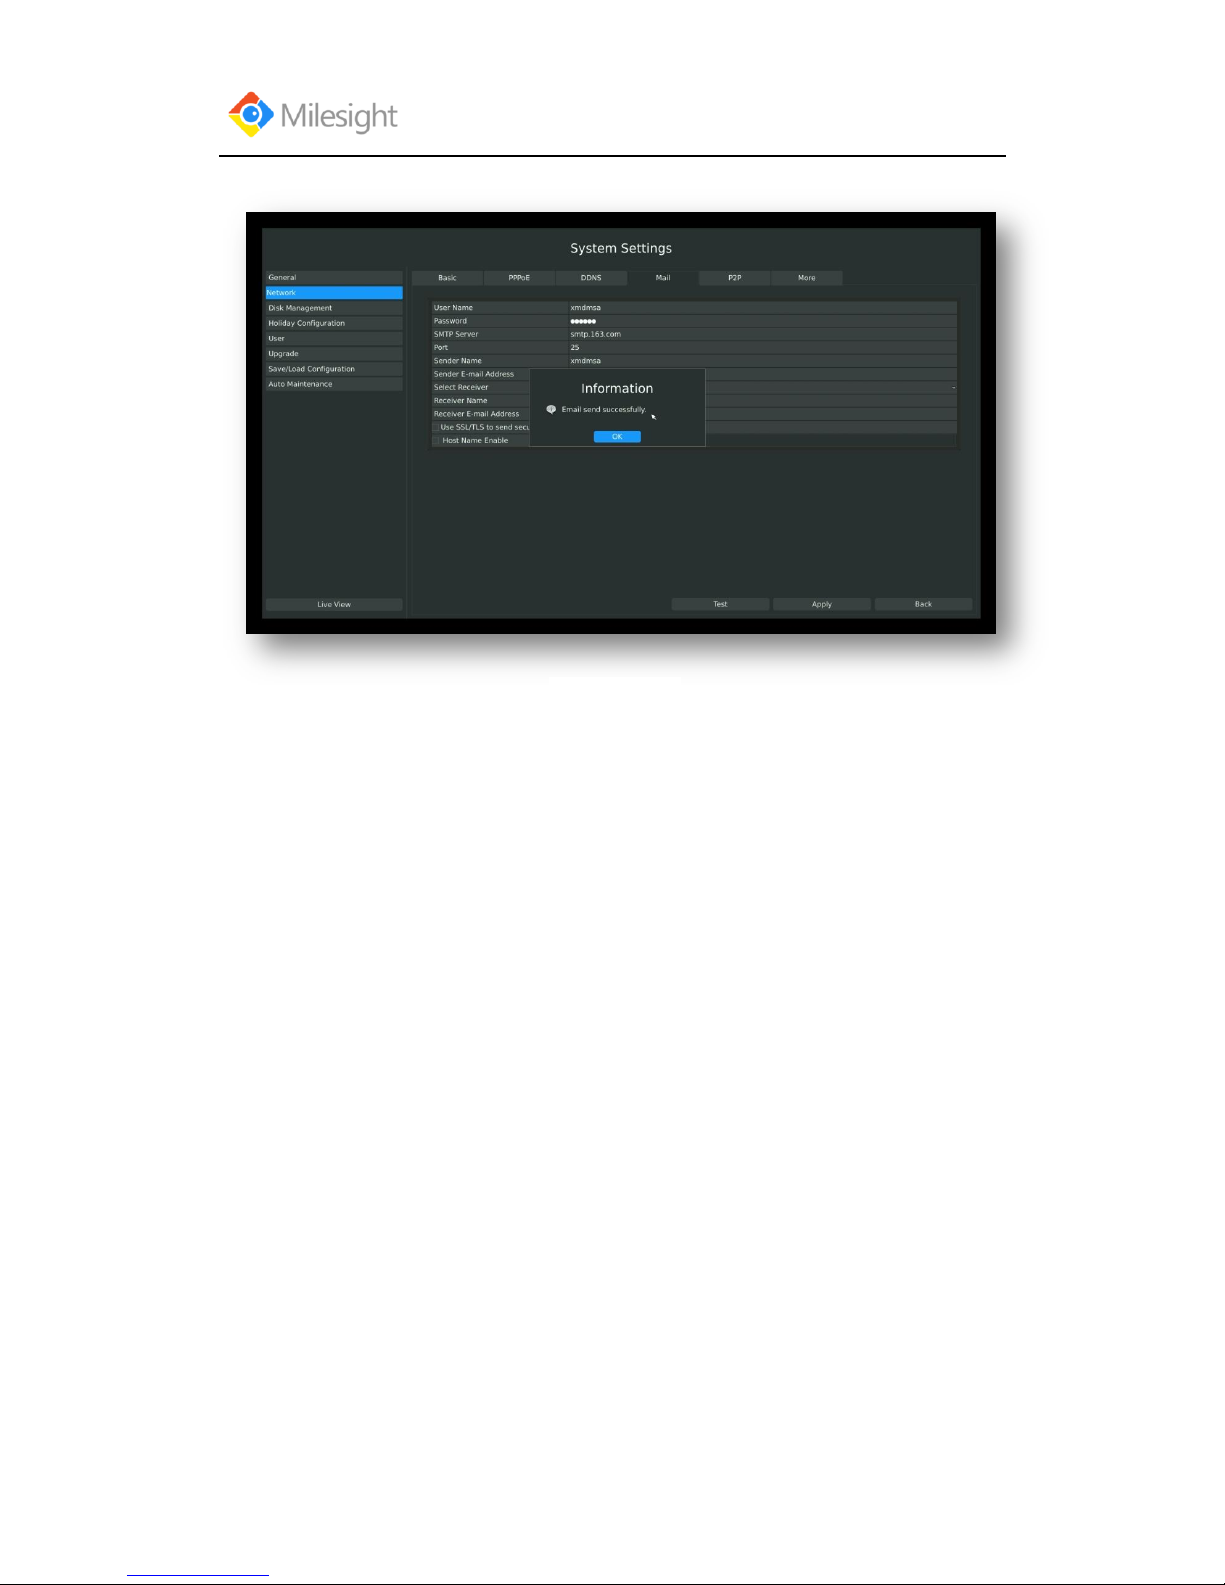
3.8.2.4 MAIL Configuration
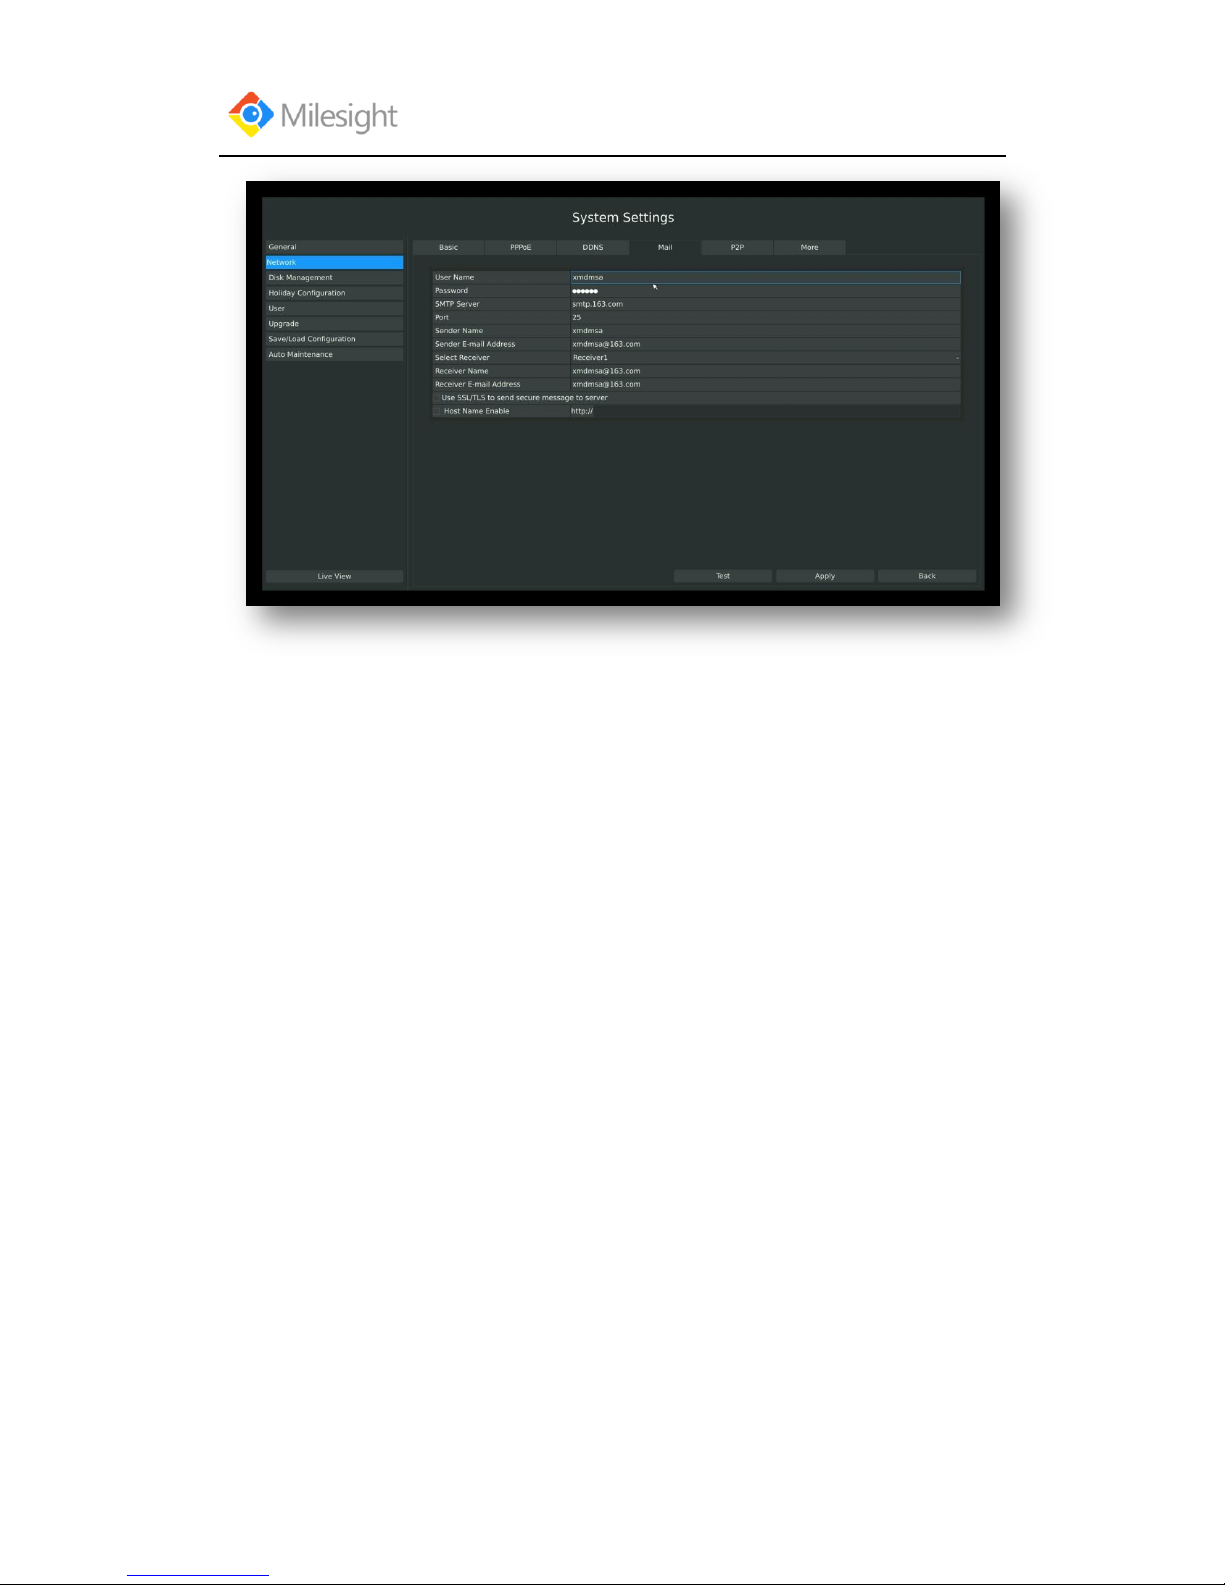
Check if the SMTP port can be set or not. Please enable SSL/TLS according to actual mailbox.
(Some SMTP server needs to secure connection)
Steps: Enter Mail configuration page by clicking Main MenuSystem SettingsNetwork→
Mail
Set the Sender E-mail Address, User Name, Password, and SMTP Server:
Page 81
User Manual
www.milesight.com 77
F-3.8.5
[Username]: The E-mail address you choose to send emails.
[Password]: The password of the E-mail.
[SMTP Server]: The SMTP Server of your E-mail.
[Port]: The port of SMTP Server, it‟s usually 25.
[Sender Name]: Named by yourself for the Sender E-mail.
[Sender E-mail Address]: It must be same with [Username].
[Select Receiver]: You can have 3 receivers once.
[Receiver Name]: Named by yourself for the Receiver E-mail.
[Receiver E-mail Address]:E-mail Address for the receivers.
[Enable SSL/TLS]: Security Protocol of email sending.
[Host Name Enable]: For attaching URL when sending emails.
Page 82
User Manual
www.milesight.com 78
Select [Test] to check if the Mail function is workable
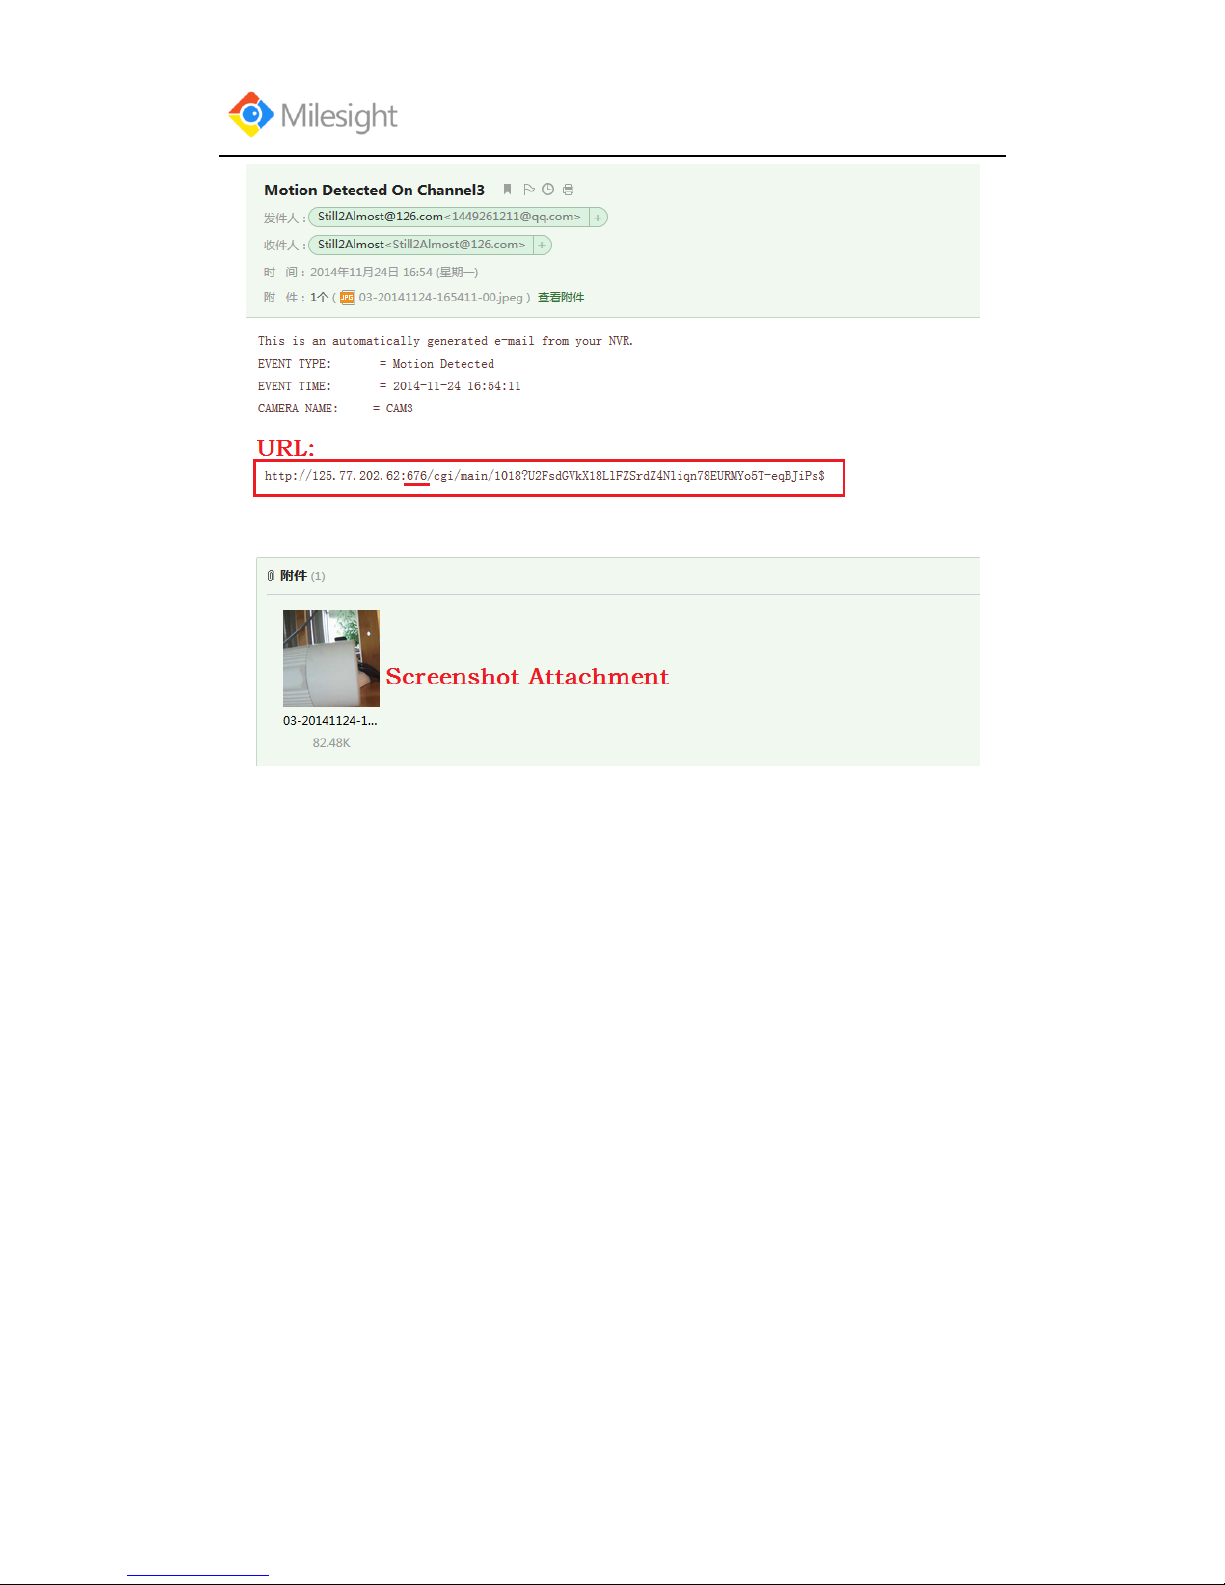
Noted:
1). You will get a screenshot every time for motion detection email sending.
2). If you use a port forward IP of NVR for the Host Name, please type the entire
address including the port.
3). If click the URL in the alarm emails within 10 minutes, you can visit NVR Web
GUI without login.
F-3.8.6
Page 83
User Manual
www.milesight.com 79
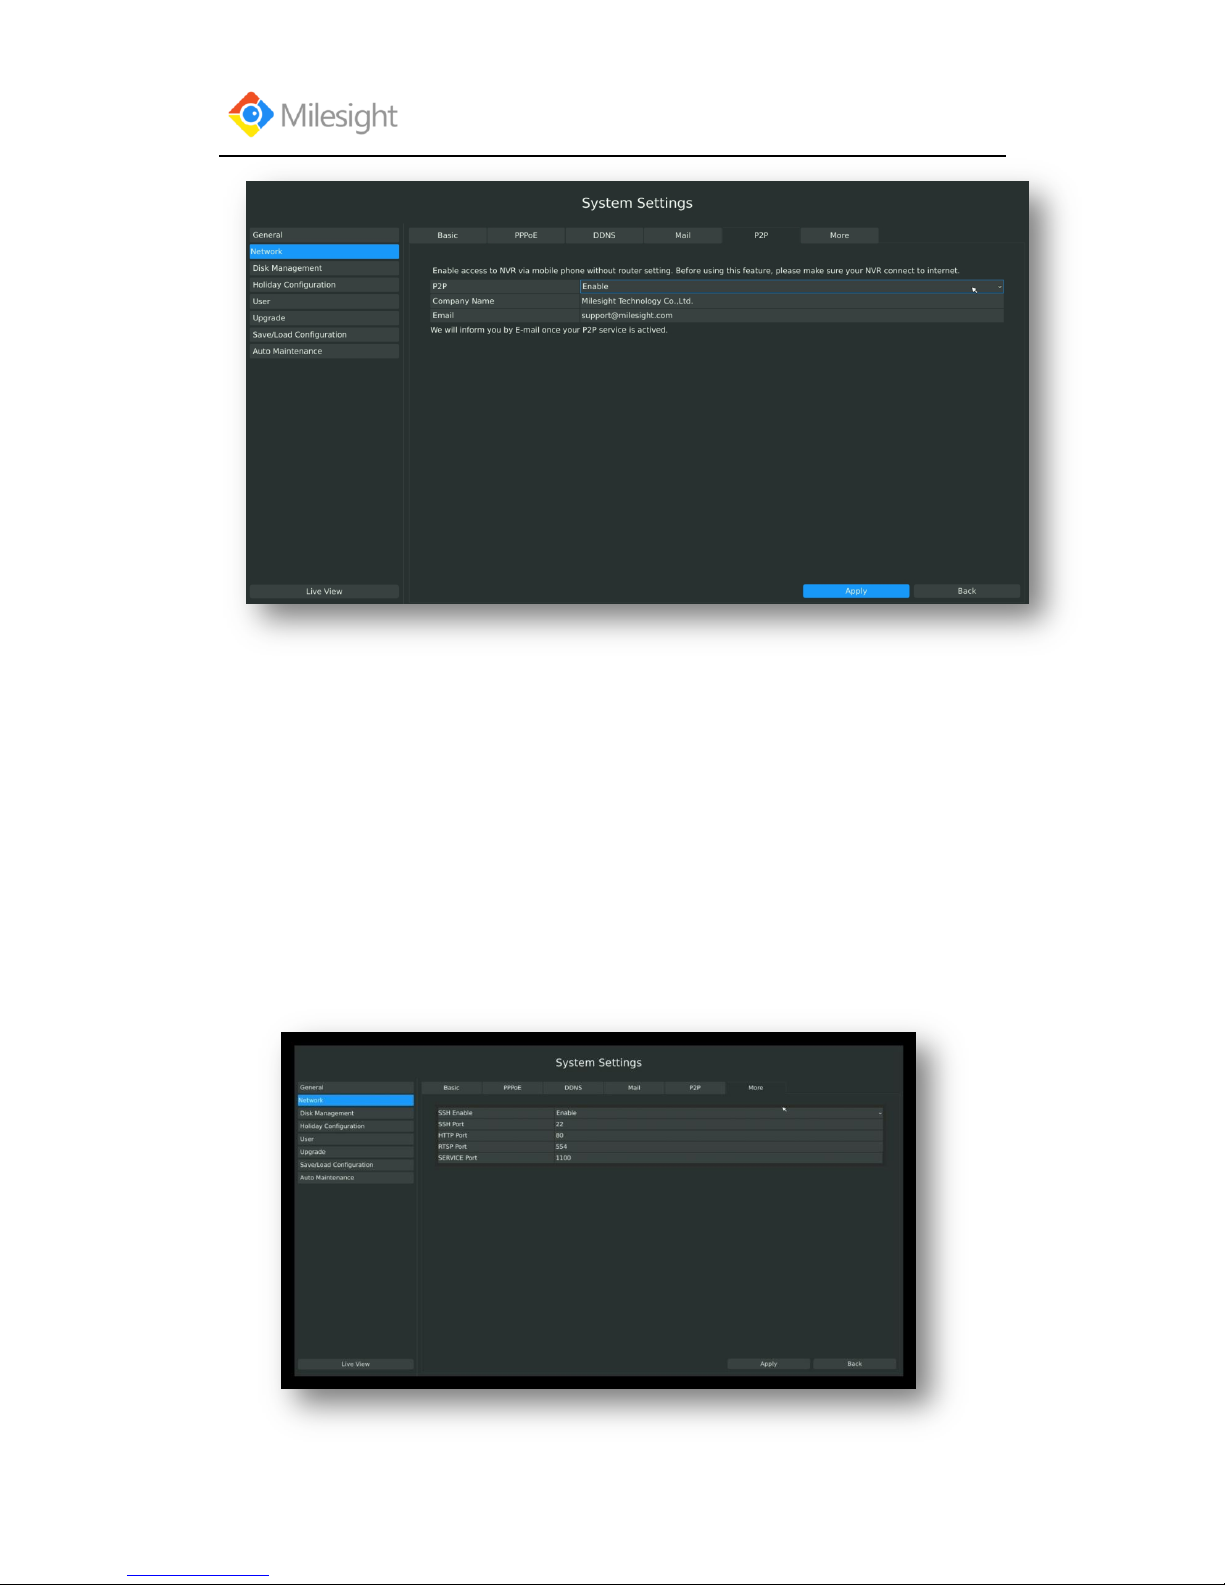
3.8.2.5 P2P
You can use M-VMS to watch the remote live view by P2P.With the introduction of P2P, you can
watch the NVR Live view from WAN without do any port forwardings on the router.
Right click on the live view and choose “Menu”->“System”->“Network” ->“P2P”, you will see
the image like bellow:
F-3.8.7
Page 84
User Manual
www.milesight.com 80
1. Choose “Enable” from the drop-down list of “P2P”;
2. Fill in your Company Name or your Individual Name in the “Company Name”;
3. Fill in your Email address in the “Email” for active;
4. Apply the settings.
3.8.2.6 More
Steps :Enter More configuration page by clicking Main MenuSystem SettingsNetwork
→More
F-3.8.8
F-3.8.9
Page 85

User Manual
www.milesight.com 81
SSH Port Setting
Secure Shell (SSH) has many functions; it can replace Telnet, and also provides a secure channel
for FTP, POP, even for PPP.
1. Check the SSH Enable checkbox to enable the feature.
2. Please modify SSH ports according to actual application.
Note: The default SSH port is 22.
HTTP Port Setting
The default HTTP port is 80. Please modify HTTP ports according to actual application.
Notes:
1. The default HTTP port for IE browser is 80.
2. HTTP port is used for remote network access.
RTSP Port Setting
Real Time Streaming Protocol (RTSP) is an application layer protocol in TCP/IP protocol system.
The default RTSP port is 554. Please modify RTSP port according to actual application.
Note:
1. RTSP port is used for remote network live view.
2. RTSP port valid range is 554 or 1024~65535.
Service Port Setting
Service port is used to remote access when add NVR by mobile device.
The default RTSP port is 1100. Please modify RTSP port according to actual application.
Note:
1. You can add this port when using P2P/prot mapping/LAN IP to add NVR.
2. When port mapping, you still need map 554 to 554. Only then you can use 1100 to watch
the live view by remote WAN.
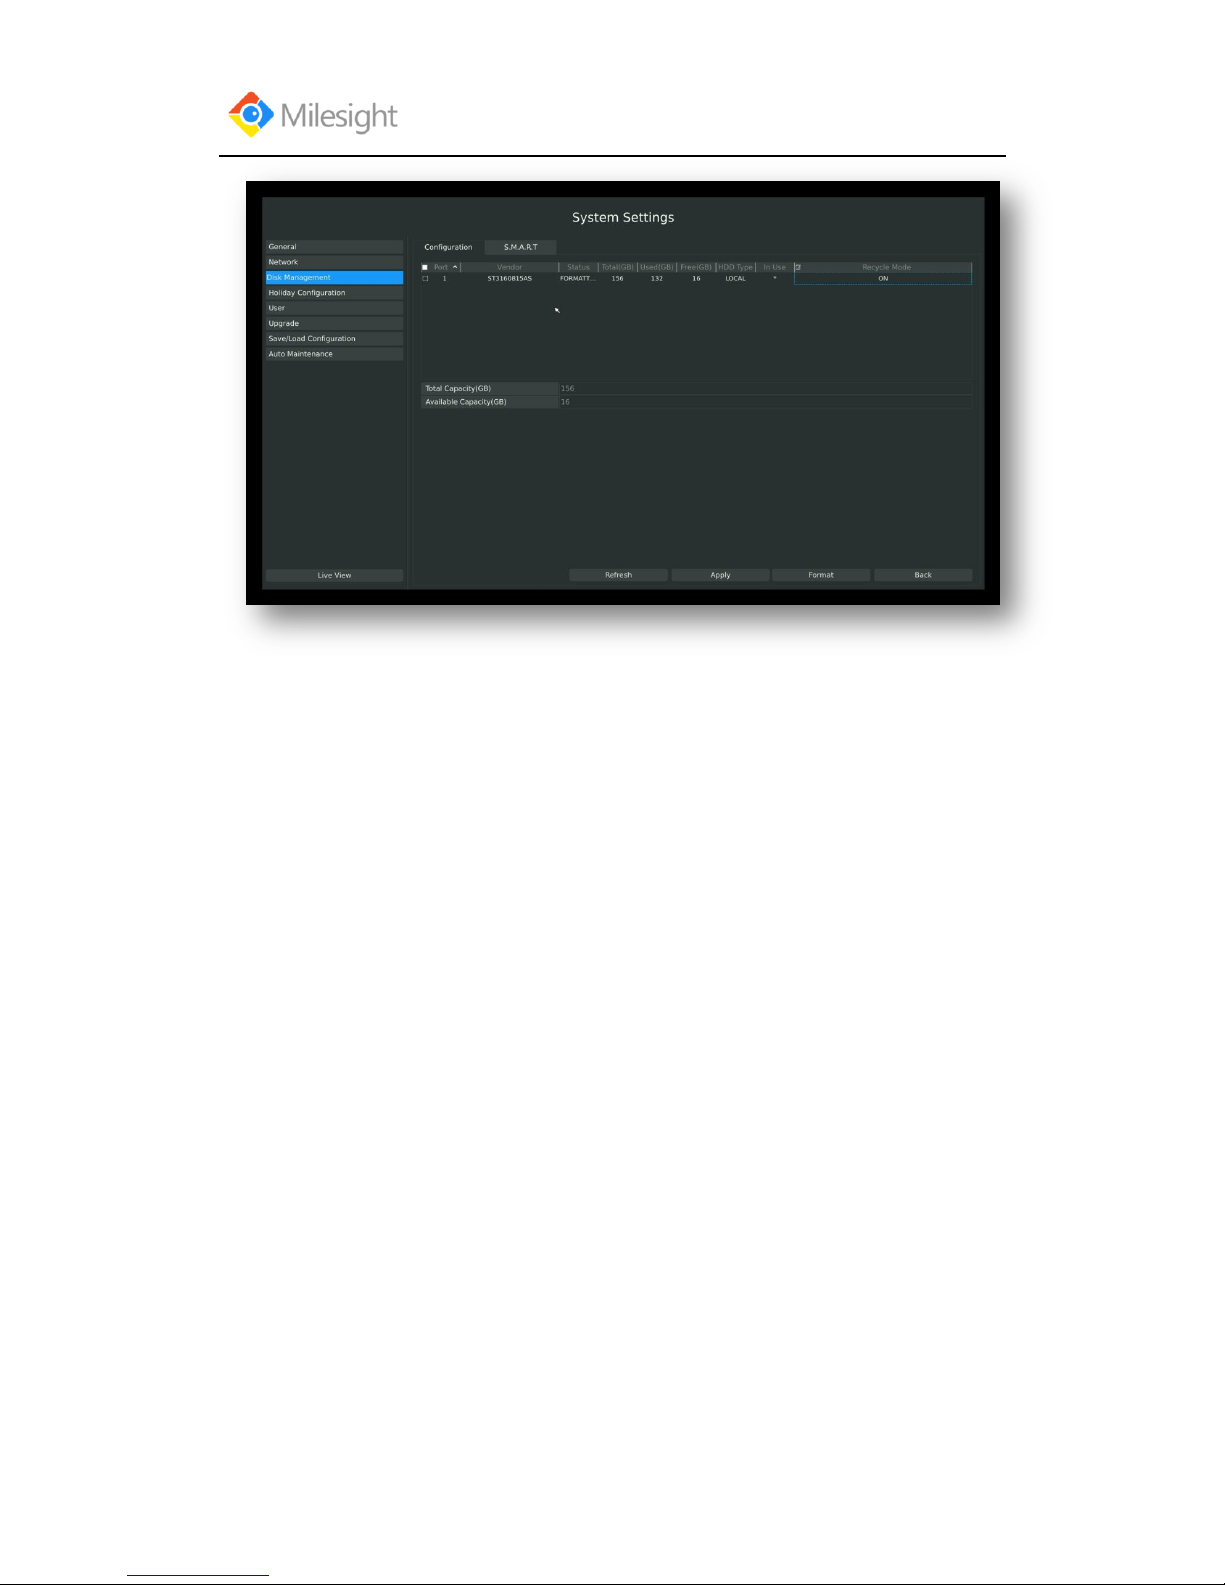
3.8.3 Disk Management
3.8.3.1 Disk Configuration
Steps: Enter disk configuration menu by clicking Main MenuSystem SettingsDisk
Management→Configuration
Configuration page contains the basic information of the disk, see F-3.8.8. Select a disk and click
[Format] to format the disk.
Page 86
User Manual
www.milesight.com 82
F-3.8.10
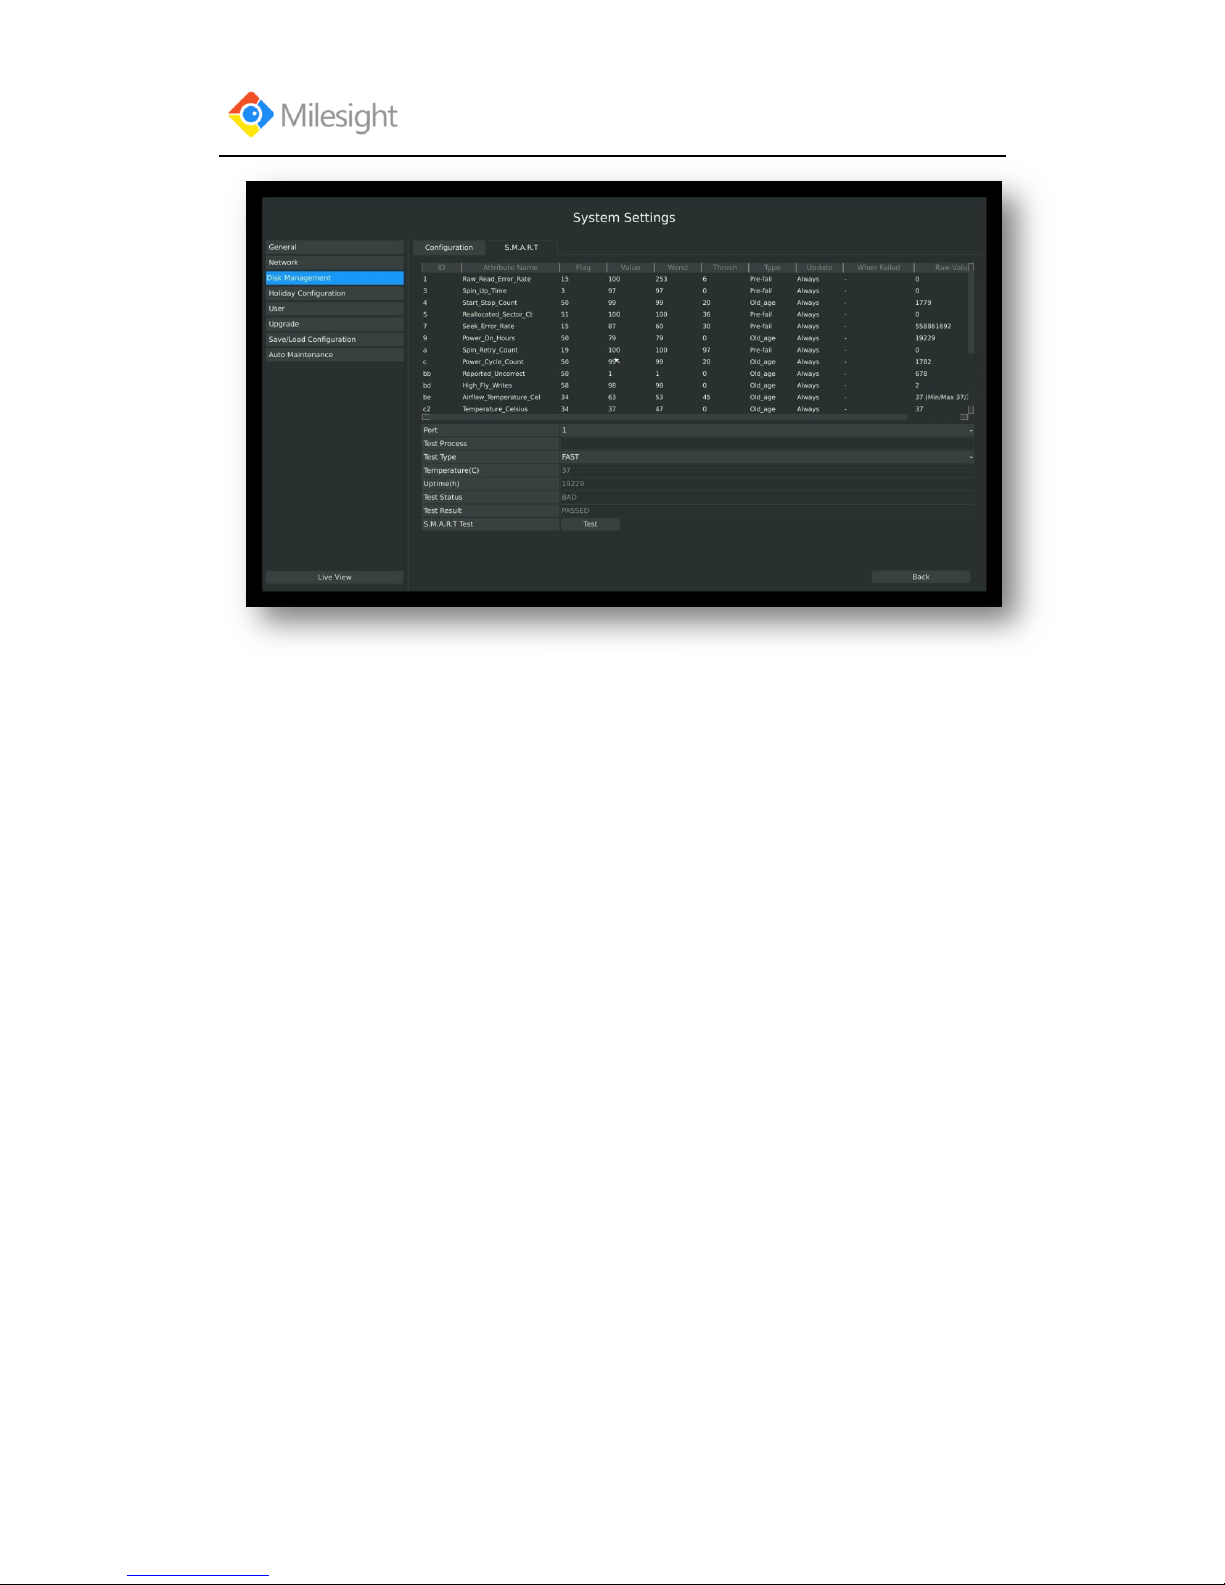
3.8.3.2 S.M.A.R.T Detection
S.M.A.R.T detection is a monitoring system of HDD that detects and reports on various indicators
of anticipating failures of HDD.
Step: Enter S.M.A.R.T configure page by clicking Main MenuSystem Settings Disk
Management →S.M.A.R.T
You can command S.M.A.R.T self-checking function to check the HDD status.
Select “Test type”, and click “apply” for S.M.A.R.T detection.
Page 87
User Manual
www.milesight.com 83
Note:
1. Test type has “fast” and “full” options.
2. Test Status can be“status good”, “status bad” and “bad tracks exist”.
3. Test result can be“passed” or “failed”.
F-3.8.11
Page 88
User Manual
www.milesight.com 84
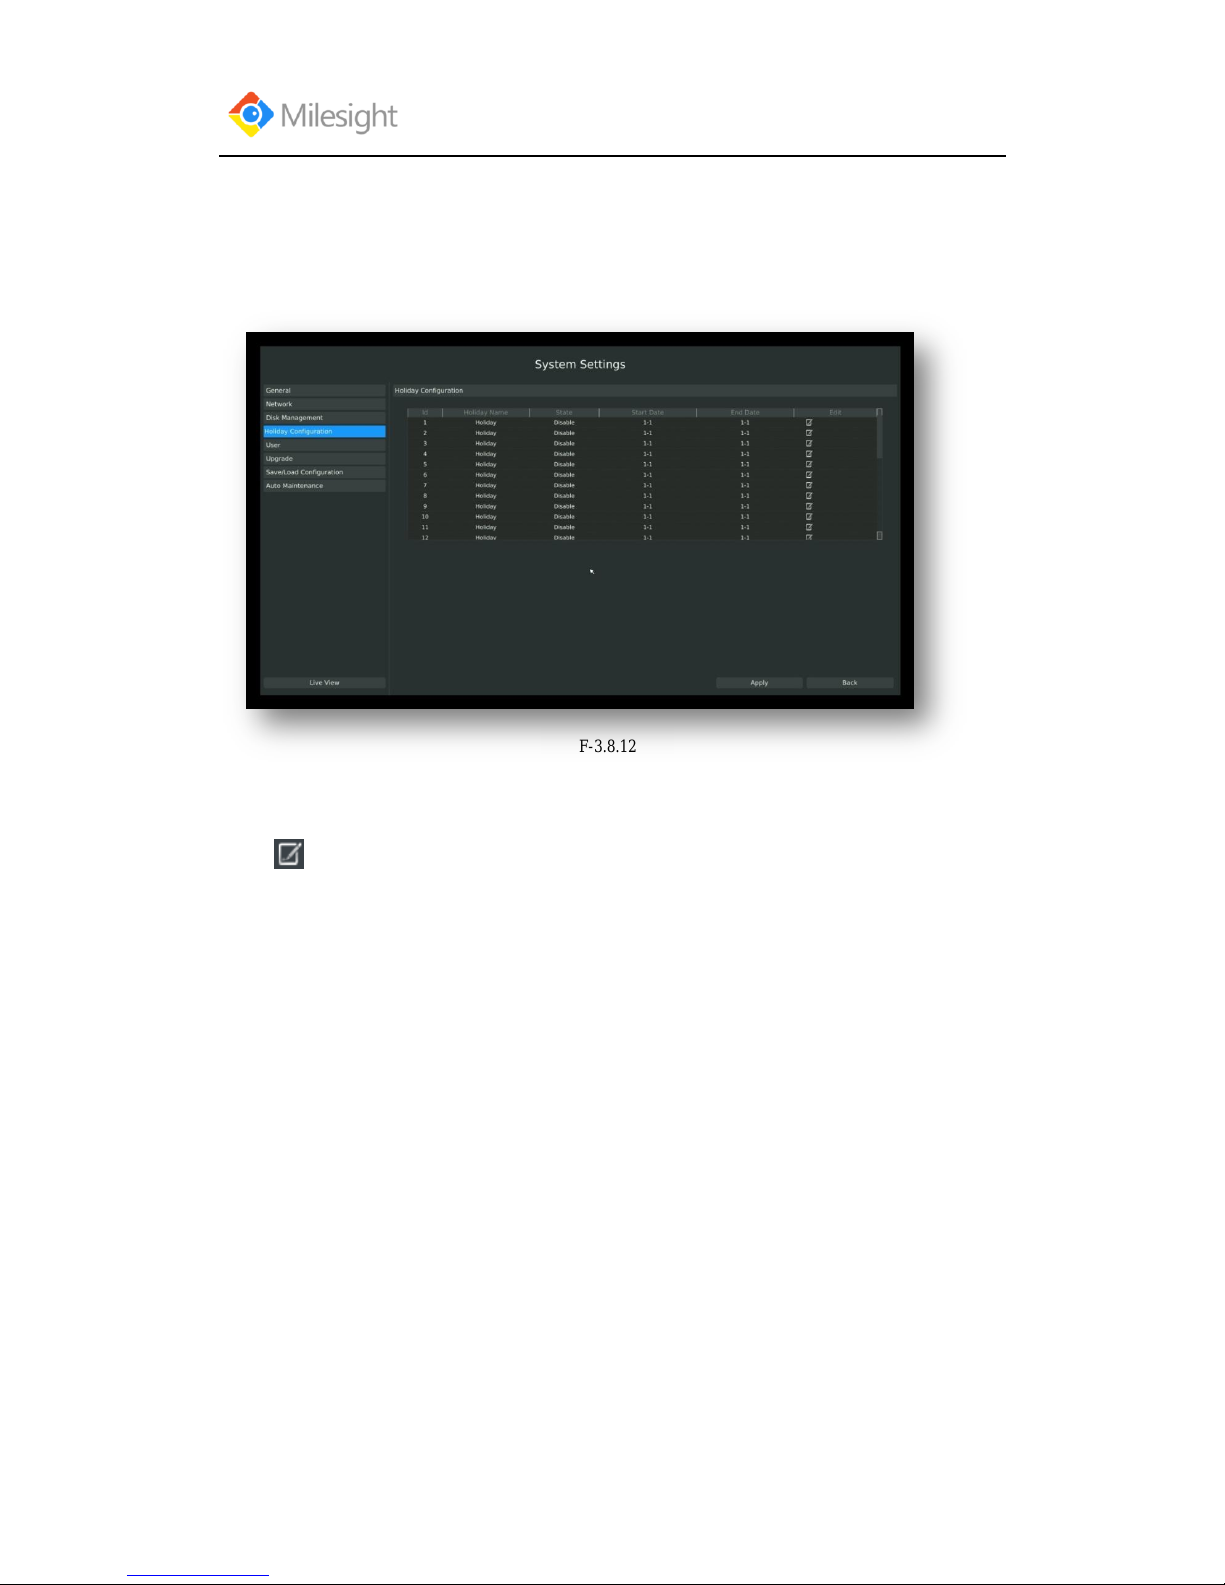
F-3.8.12
3.8.4 Holiday Configuration
It can configure the record or image capture schedule for holidays of the current year.
Step1.Enter holiday setting menu by clicking System Setting→Holiday Configuration.
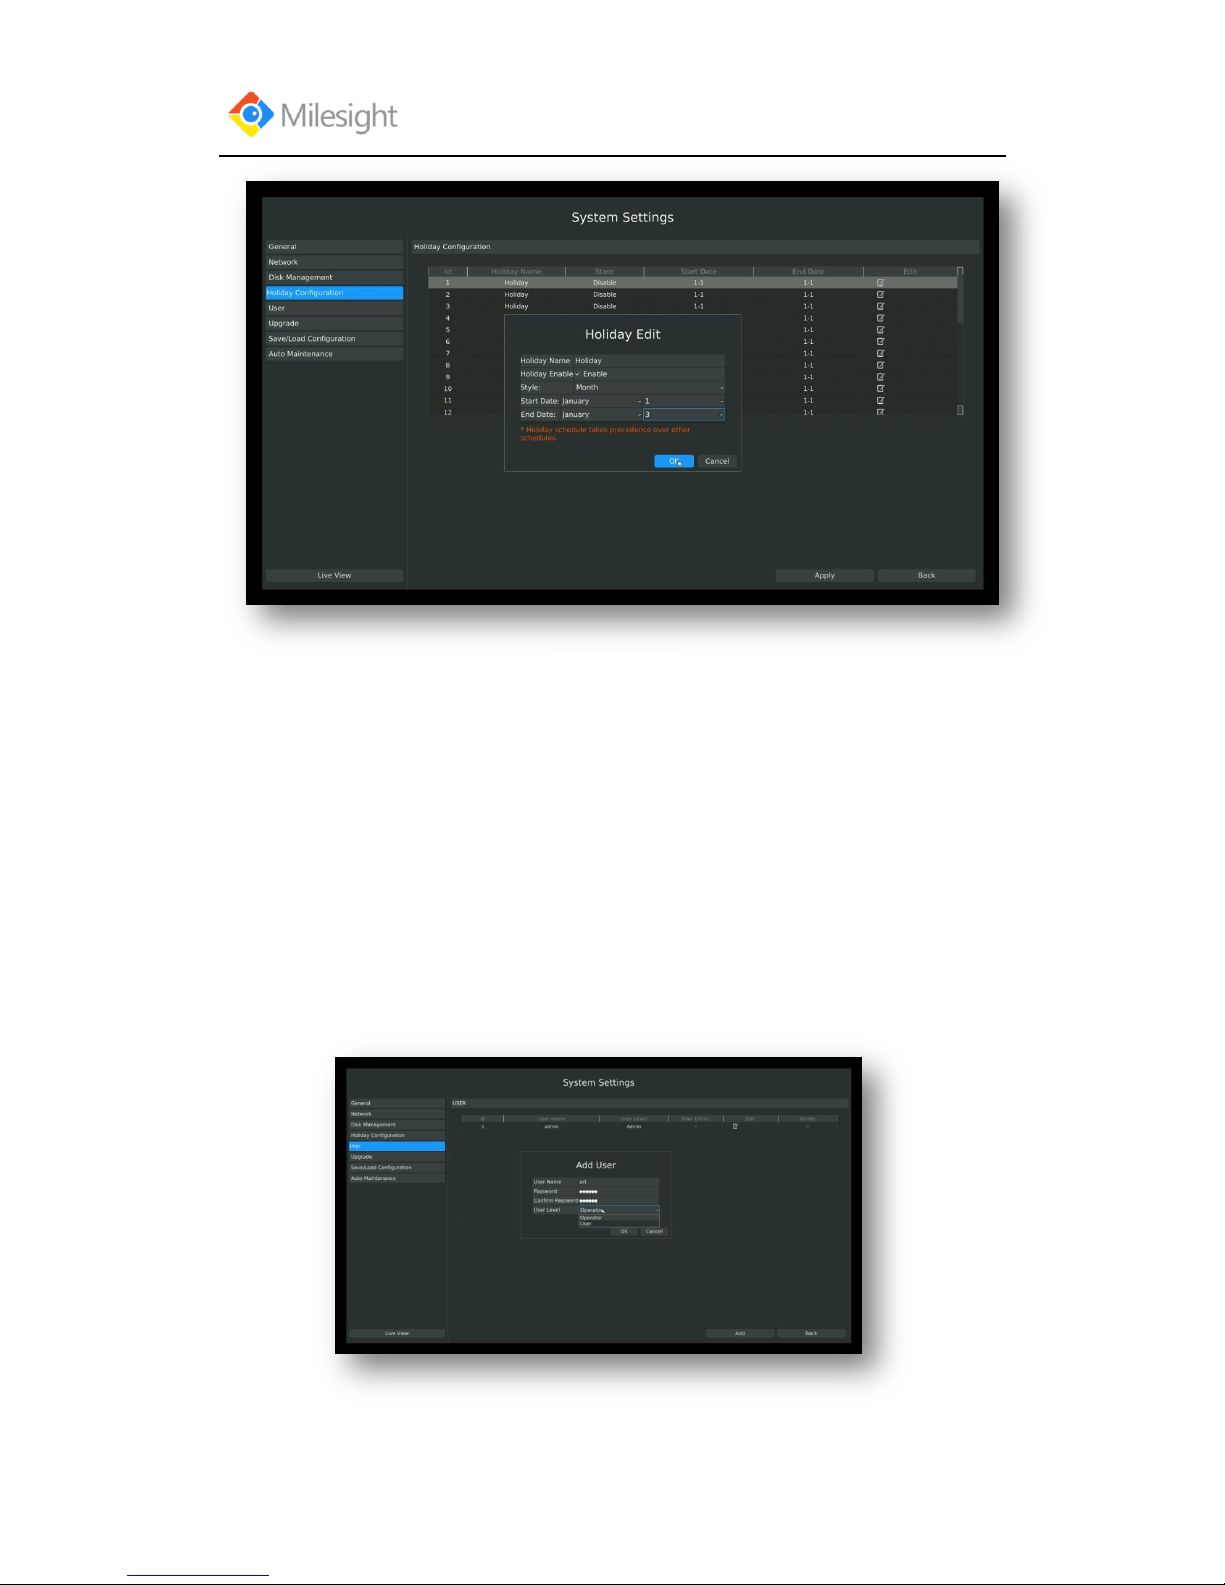
Step2.Edit the holiday schedule
Click to open holiday configuration page to modify holiday name, check the „Holiday
Enable‟ checkbox, and then select [style] to setup Start/End date. Then click [OK] to save the
configuration and return to holiday configuration page. Click [Apply] to confirm settings.
Note: There are Month, Week, and Date in “Style” mode.
Page 89
User Manual
www.milesight.com 85
3.8.5 User Account Settings
By default, your NVR comes with the user name: “admin” and the password: “123456”. The
administrator has the authority to add or delete a user account and configure parameters for the
user.
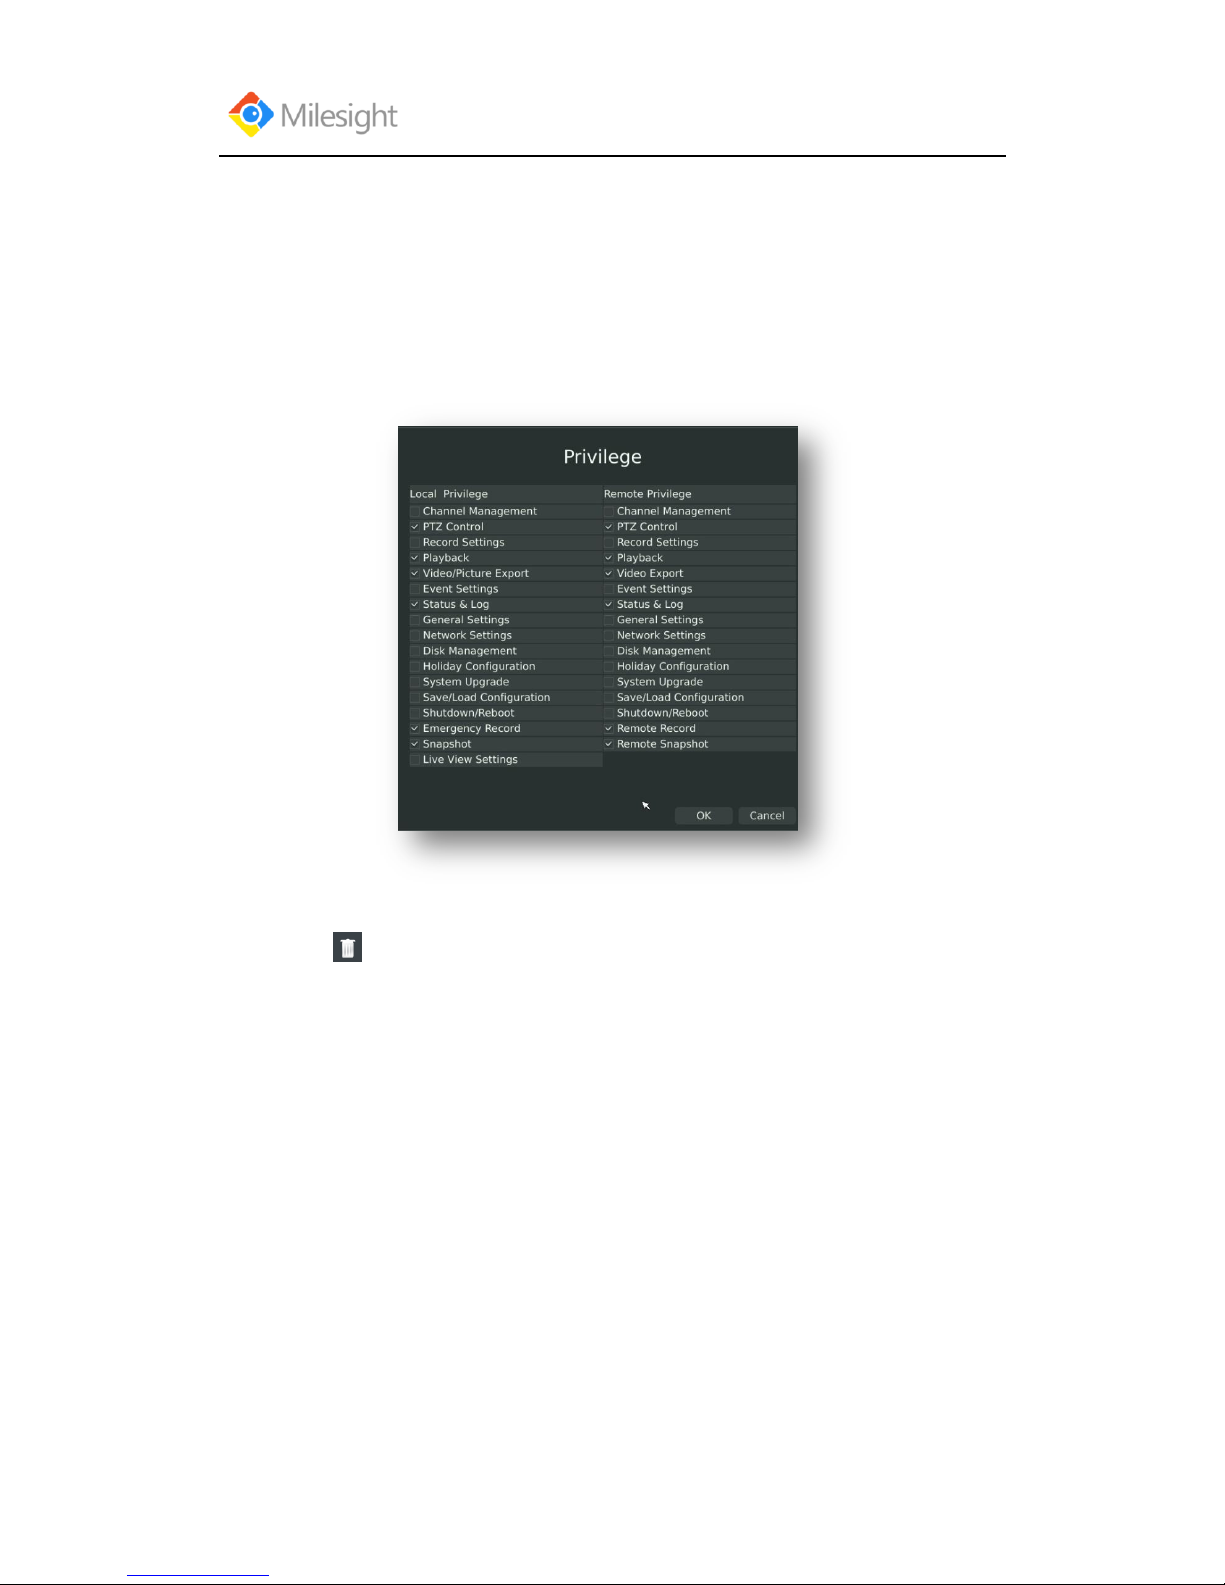
Add New User
Step1:Enter user setting menu by clicking Main MenuSystem SettingsUser
Click [Add] to enter add user menu, input information for the new user, select user level and click
[OK].
F-3.8.13
F-3.8.14
Page 90
User Manual
www.milesight.com 86
Note:
User name can be comprised of letters and figures. The user level is separated into User and
Operator with different authority.
Step2: Set user privileges
Select the user that has been added and click [limit] button to enter user privilege menu.
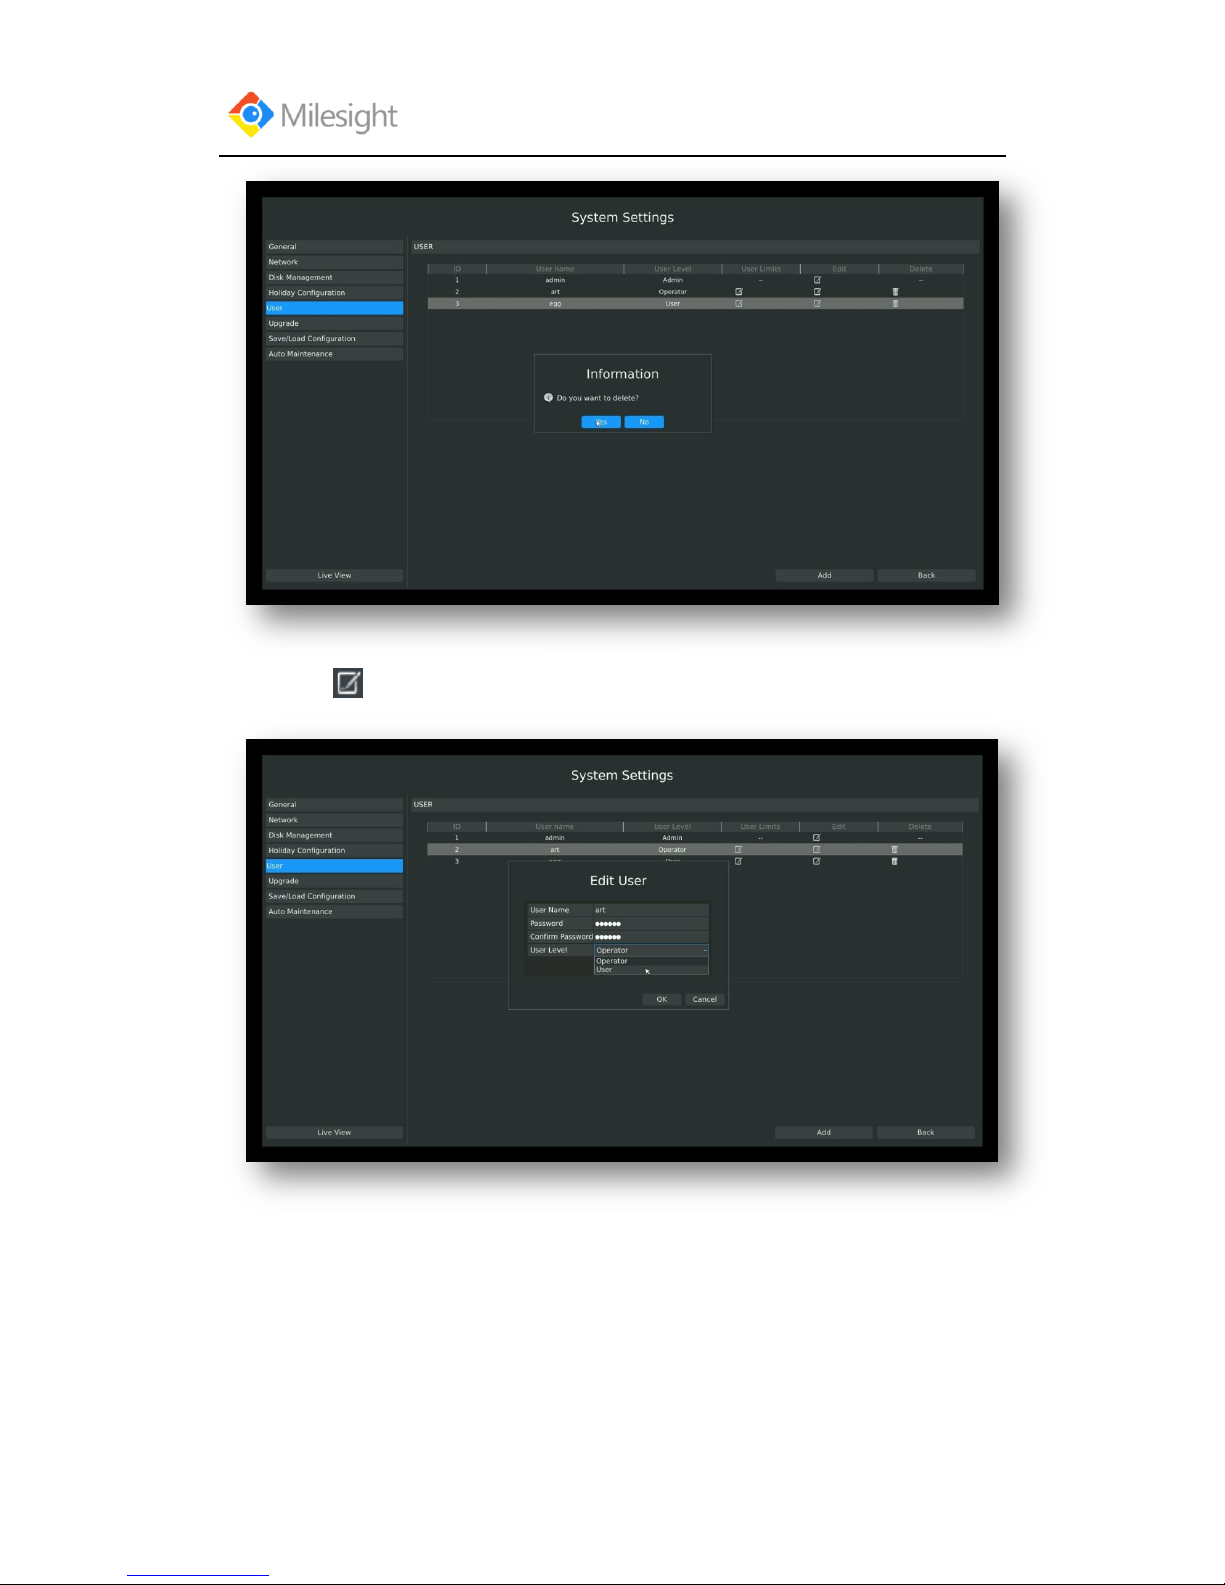
Step3. Click to delete a user.
F-3.8.15
Page 91
User Manual
www.milesight.com 87
Step4. Click to edit a user.
F-3.8.16
F-3.8.17
Page 92
User Manual
www.milesight.com 88
F-3.8.18
3.8.6 Upgrade
Your NVR supports firmware upgrade.
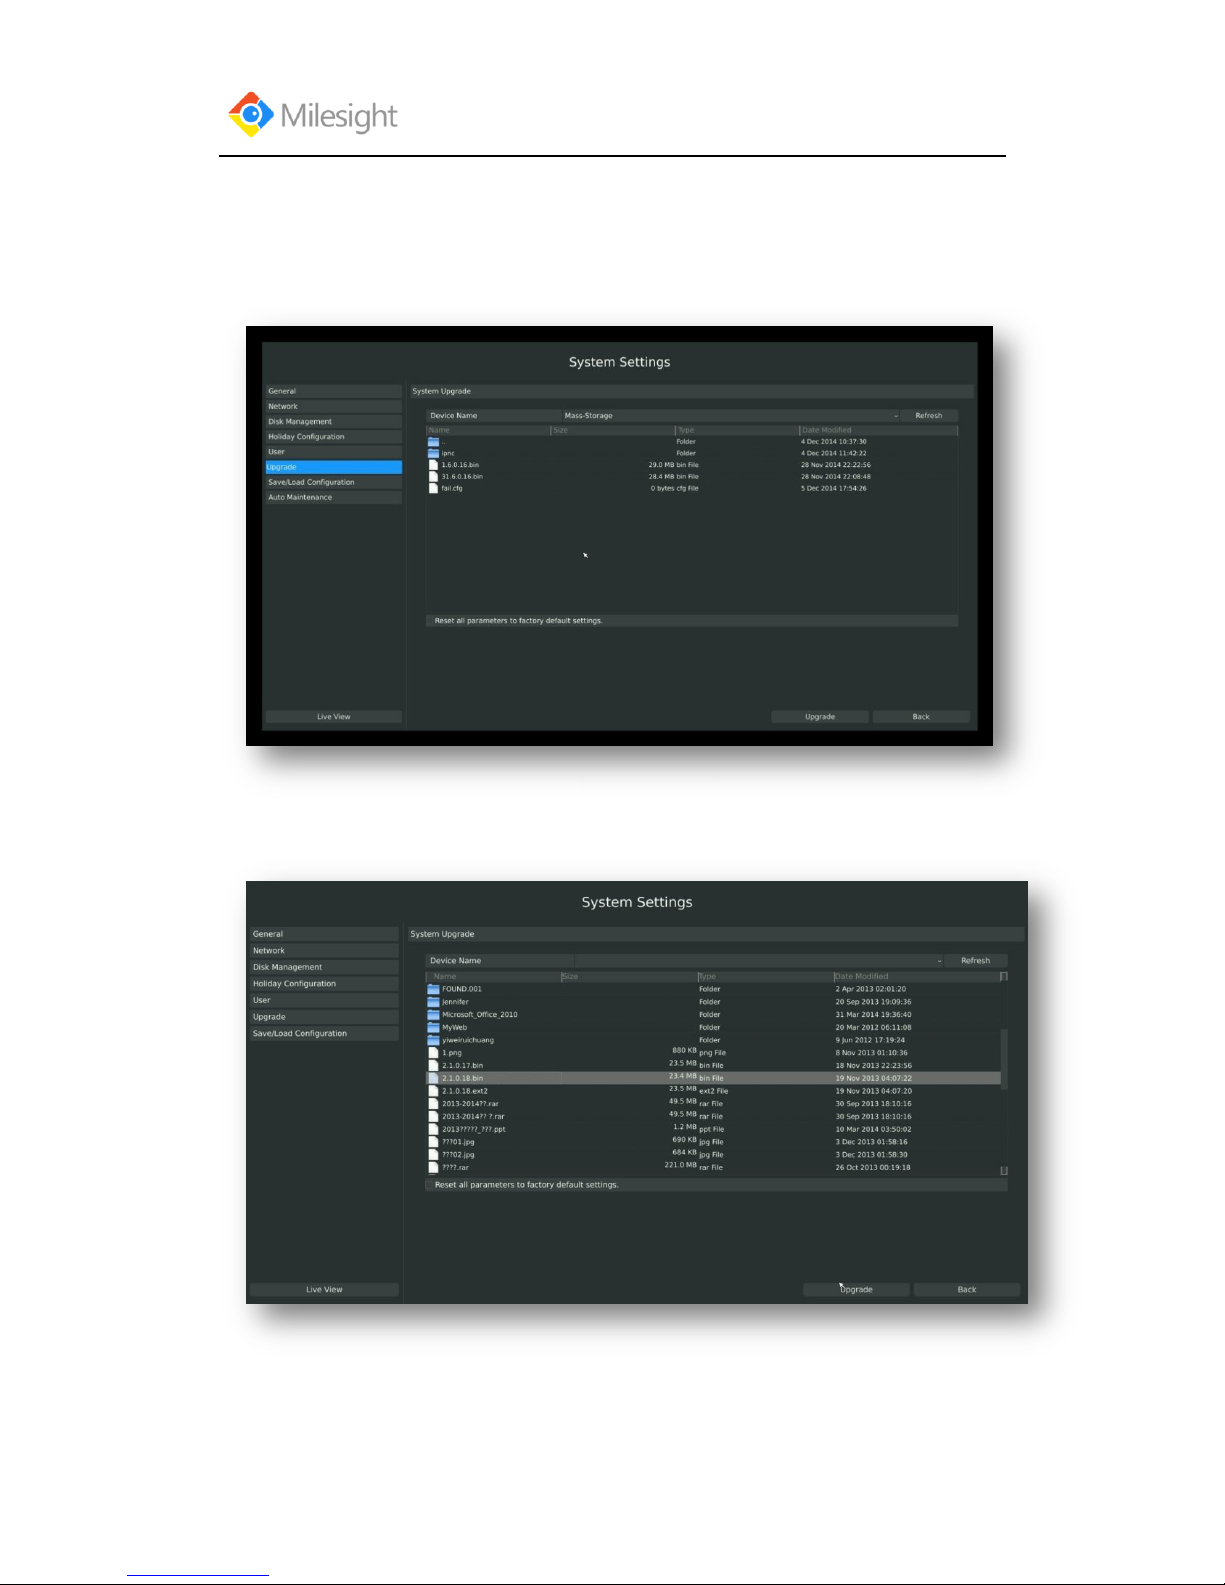
Step1.Enter upgrade menu by clicking Main MenuSystem SettingsUpgrade
Step2. Search for device, and select the .bin file
F-3.8.19
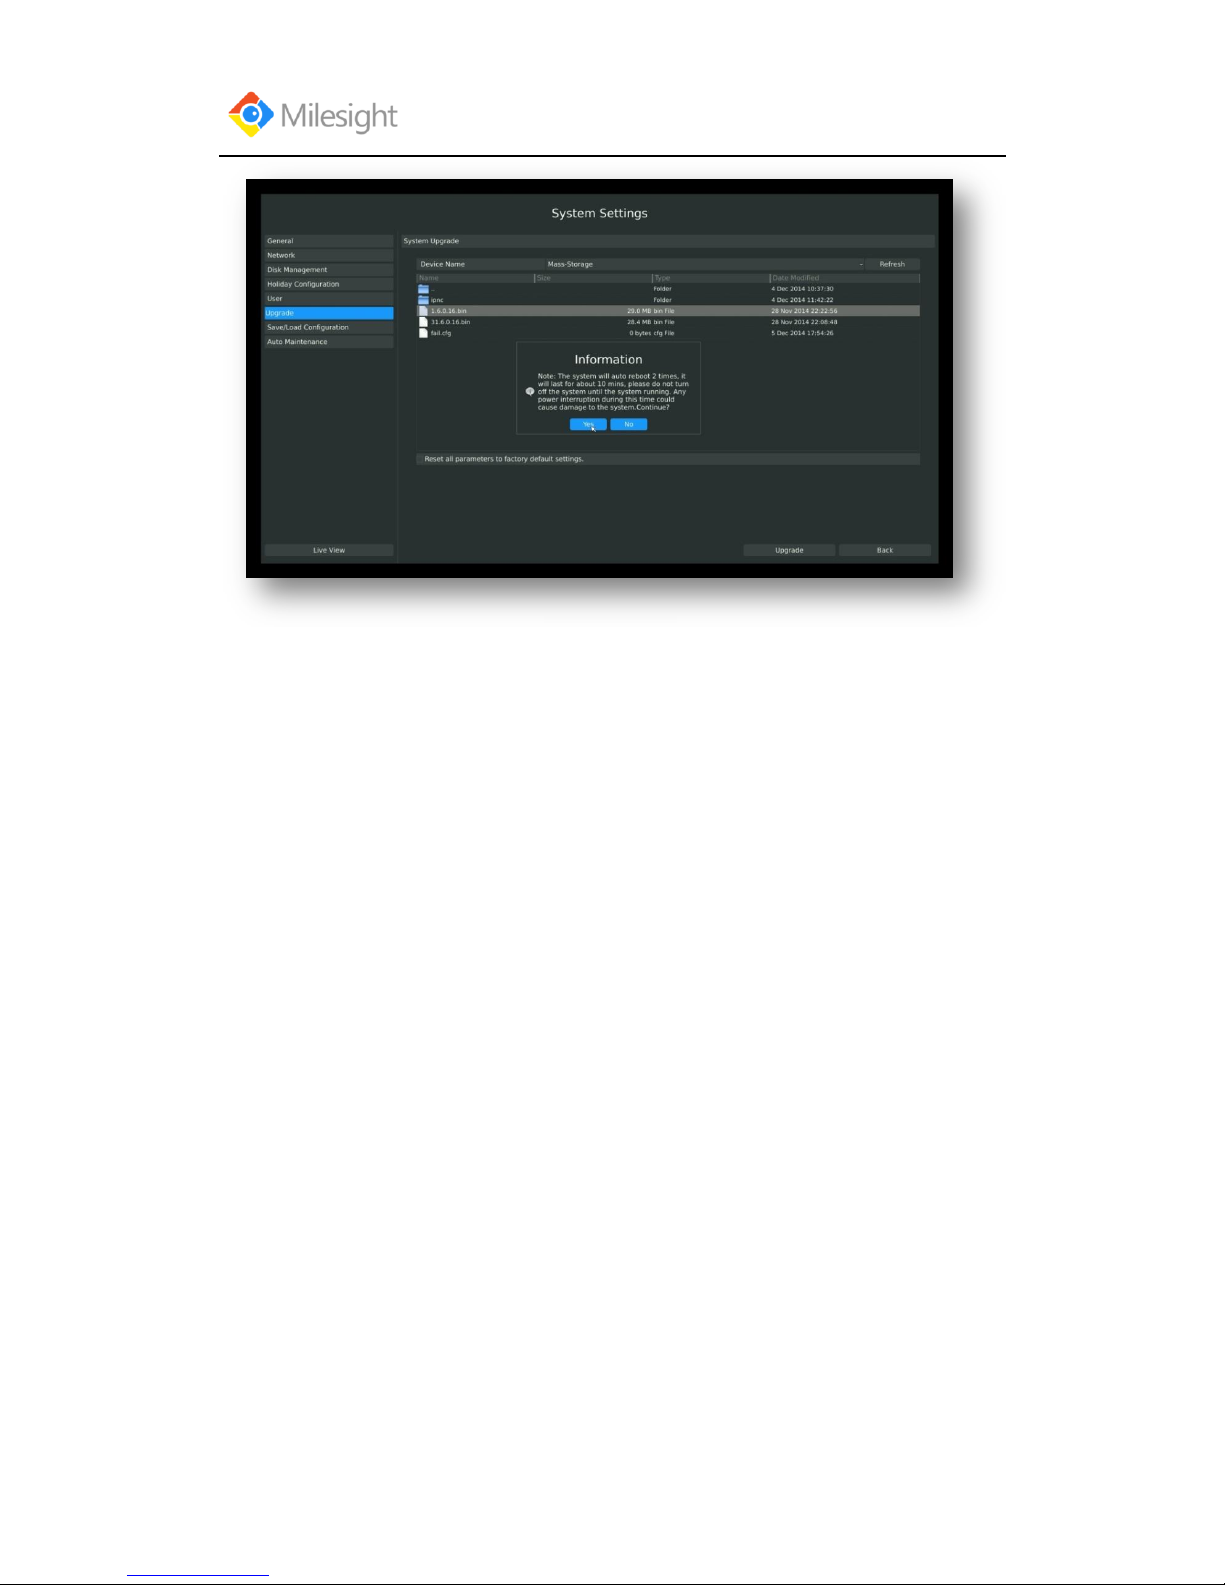
Step3. Click [Upgrade] button to confirm the upgrade
Page 93
User Manual
www.milesight.com 89
F-3.8.20
Note: The system will auto reboot after confirming upgrade.
Page 94
User Manual
www.milesight.com 90
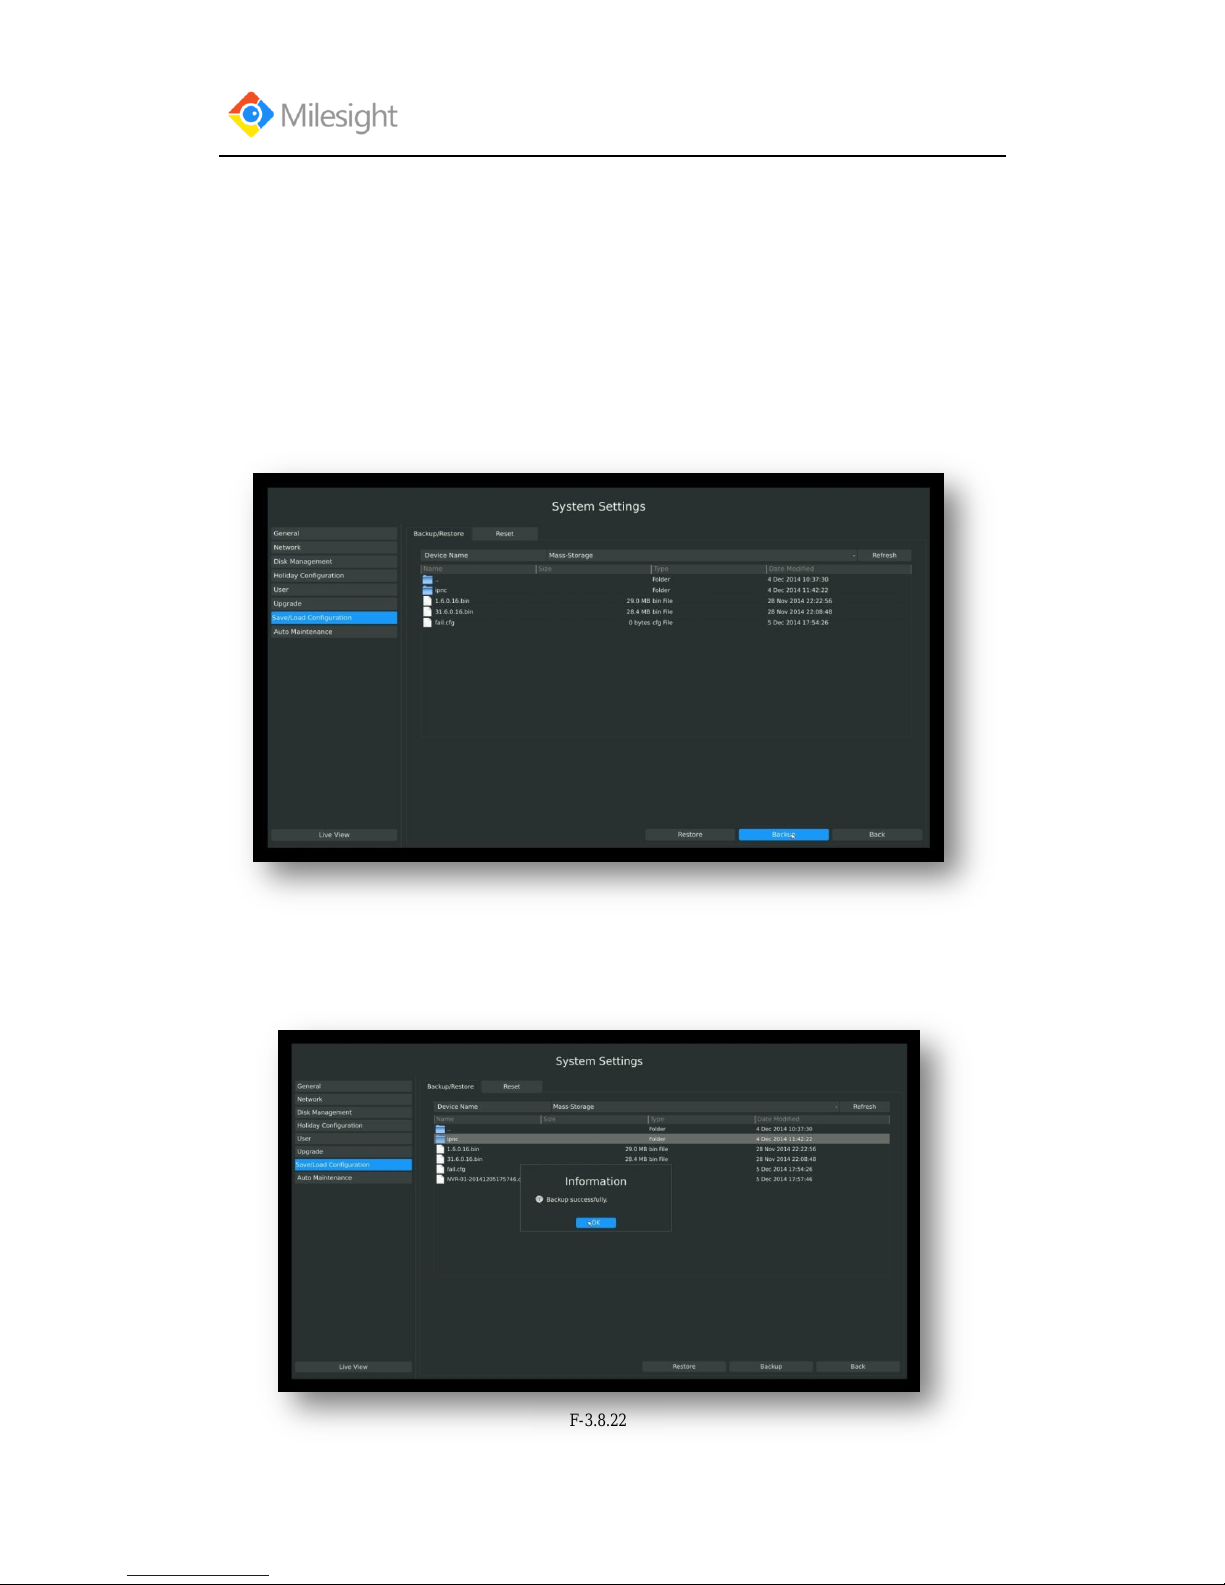
F-3.8.22
3.8.7 Save/Load Configuration
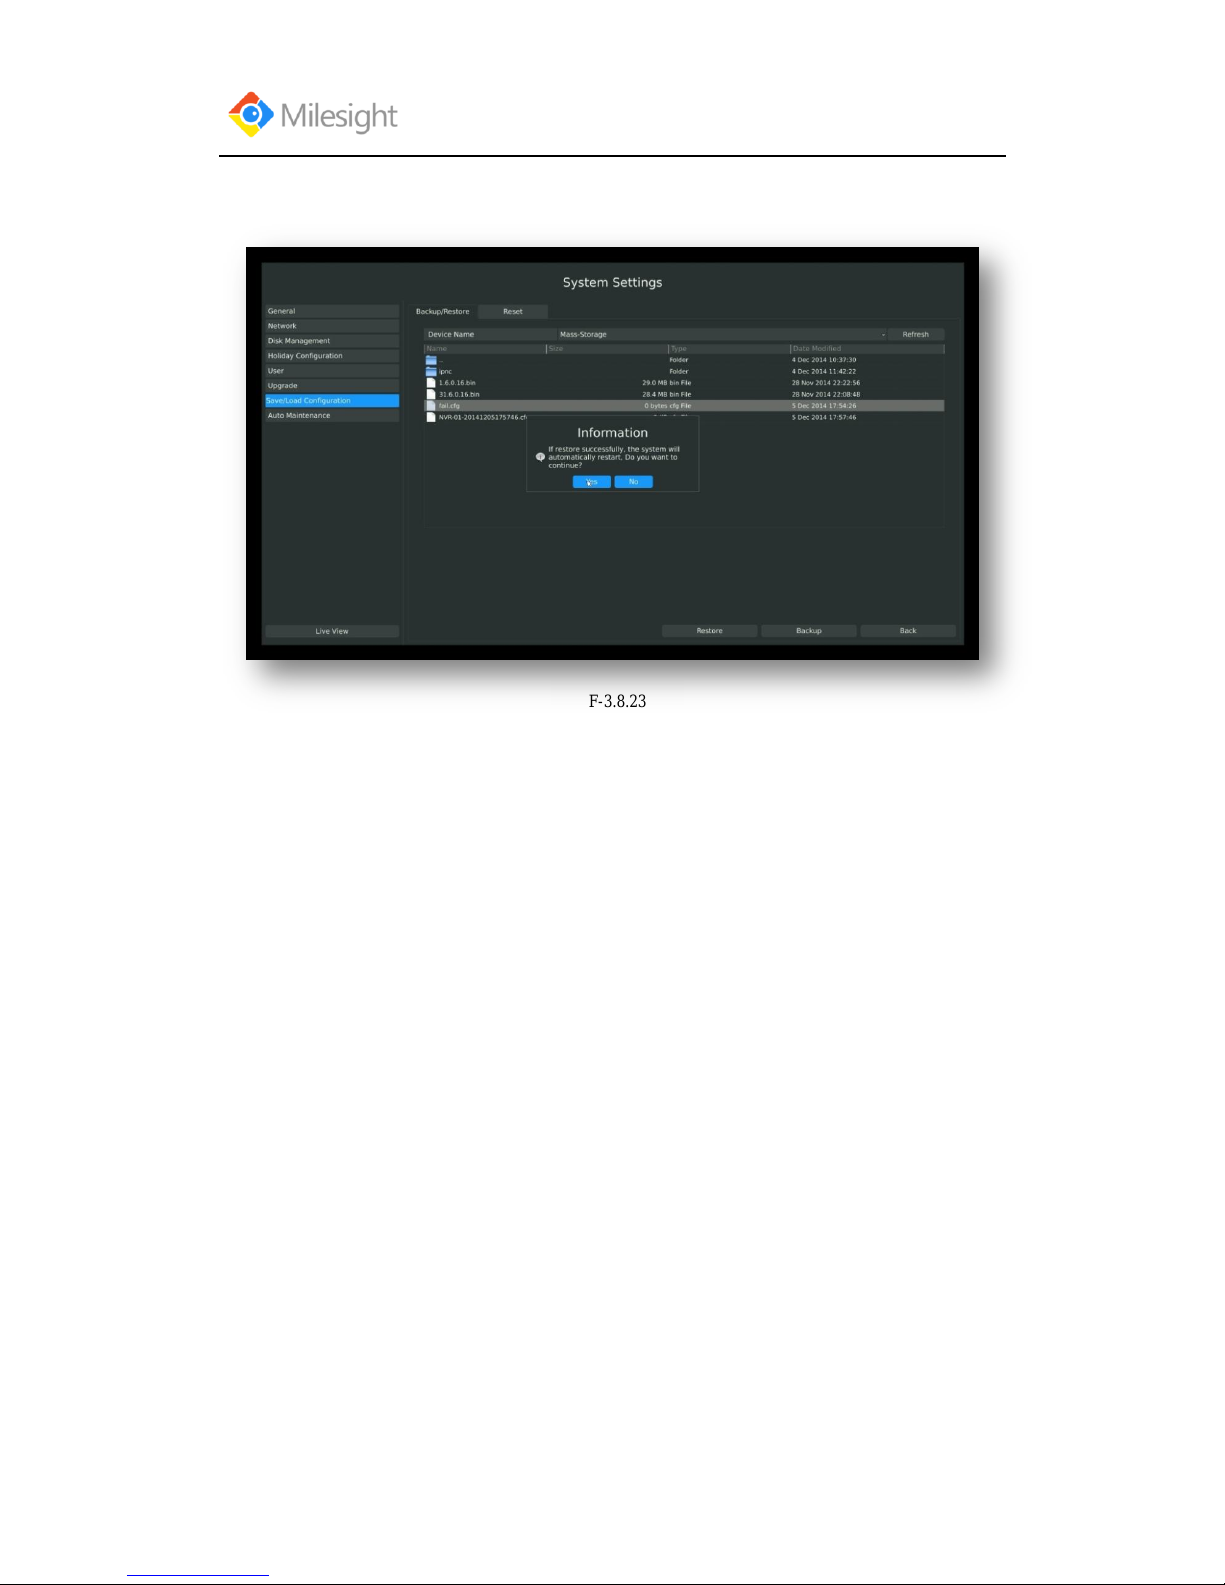
3.8.7.1 Backup/Restore
Your NVR supports backup and restore configuration.
Step1: Enter profile menu by clicking Main MenuSystemSave/Load Configuration→
Backup/Restore
F-3.8.21
Step2. Select a folder and then click [Backup] to export configuration to USB device.
Page 95
User Manual
www.milesight.com 91
F-3.8.23
Step3. Select a cfg file and then click [Restore] to import configuration to your NVR.
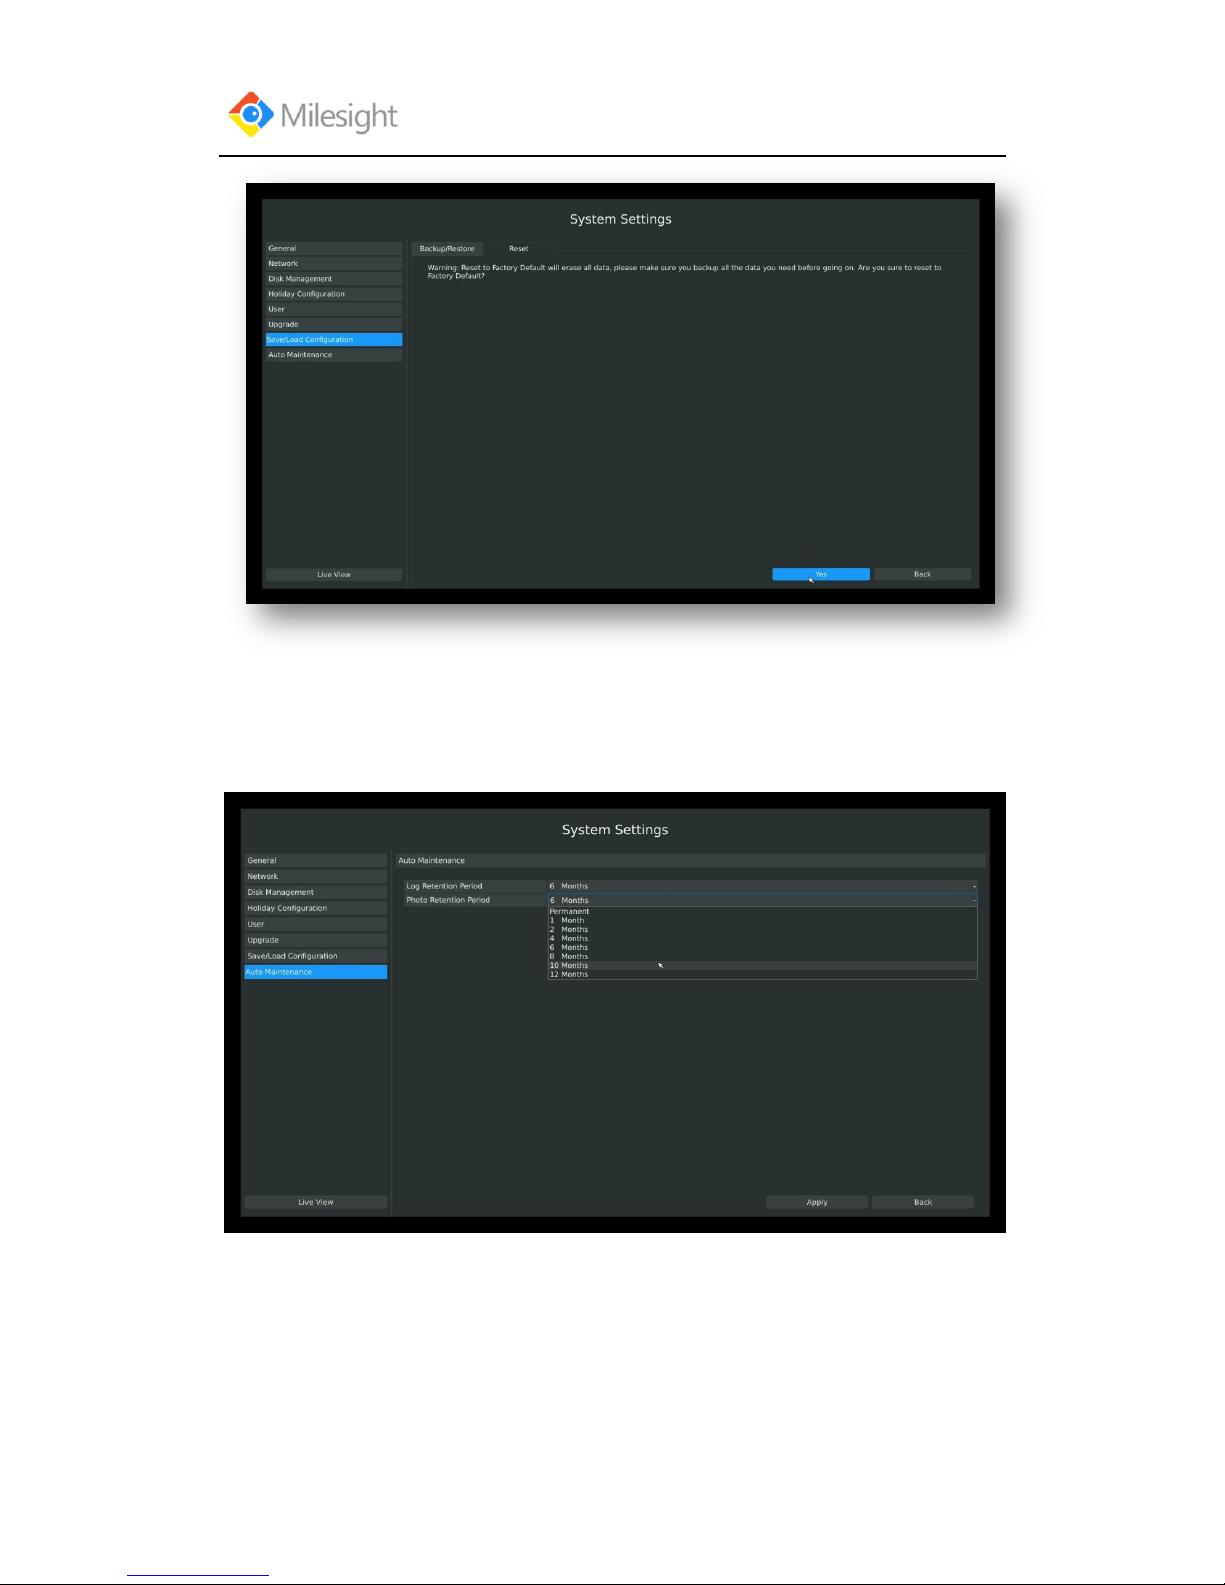
3.8.7.2 Reset
You can reset all parameters to default settings.
Enter to reset menu by clicking Main MenuSystemSave/Load Configuration
Reset
Click “yes” to confirm reset.
Page 96
User Manual
www.milesight.com 92
F-3.8.24
3.8.8 Auto Maintenance
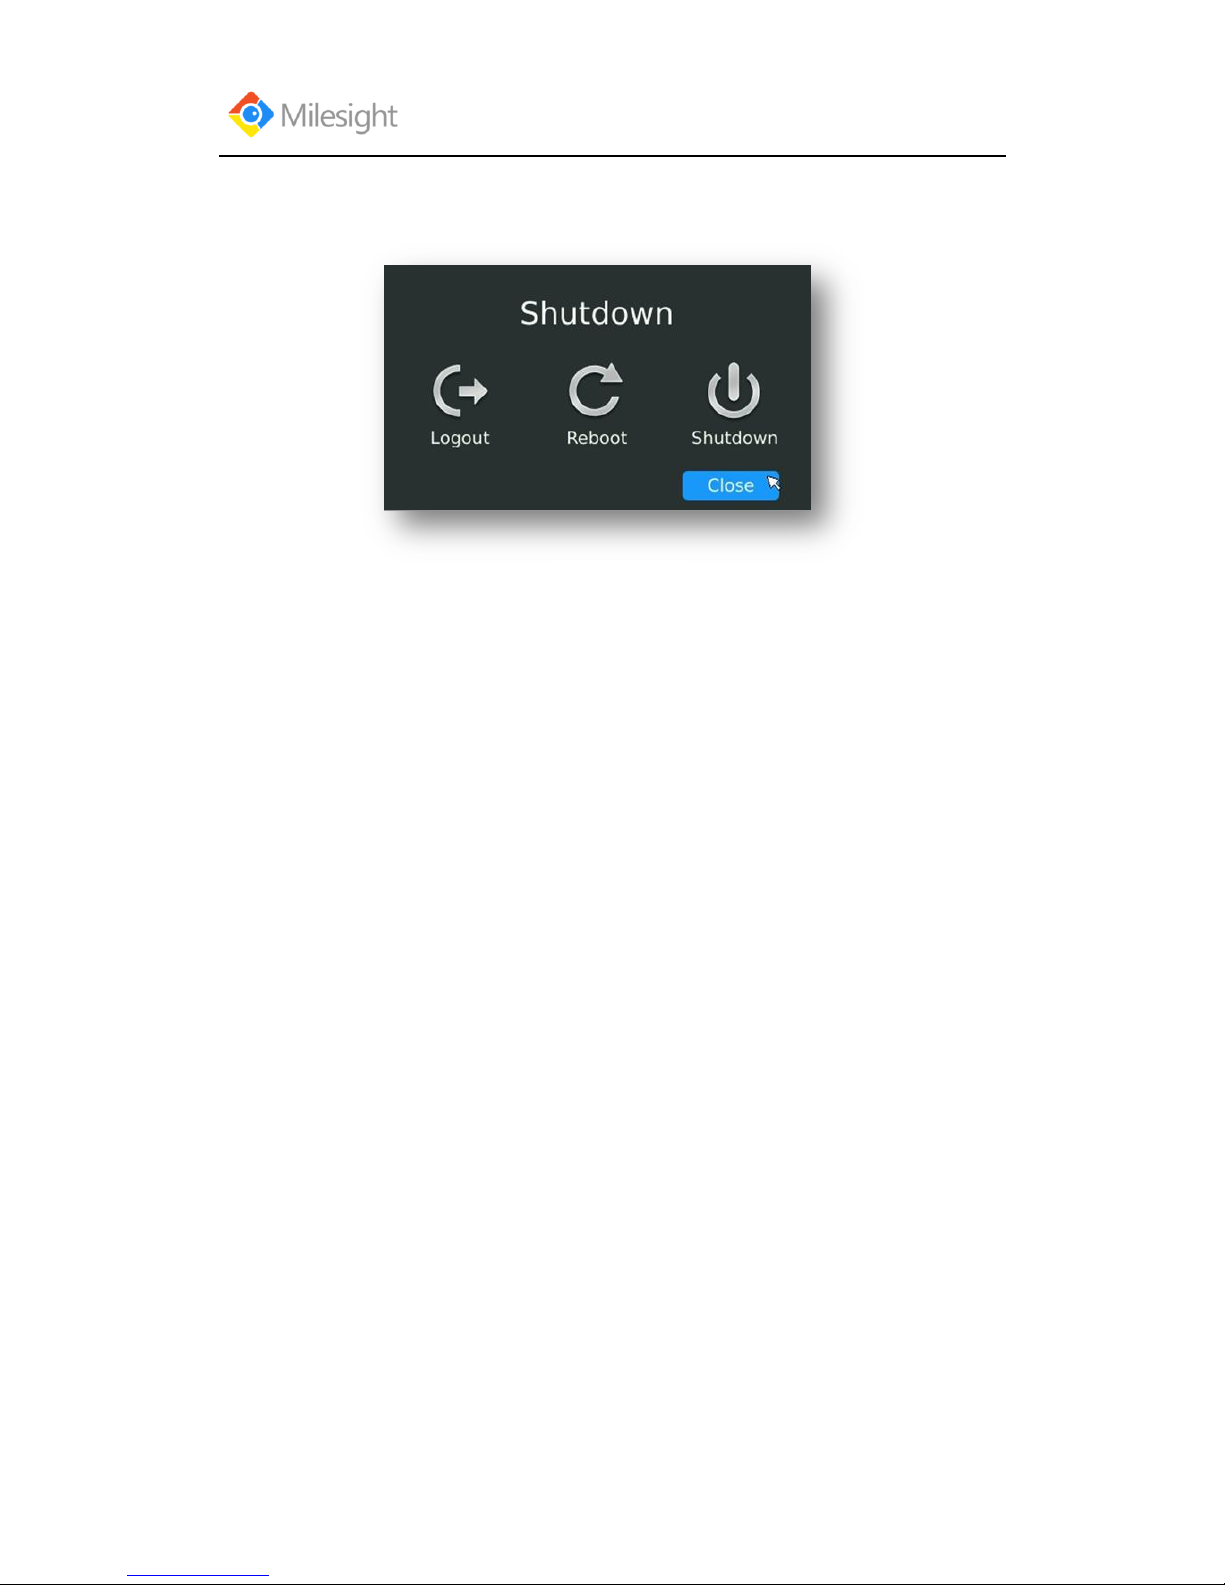
You can set the Log and Photo Retention period for Log and Photo.
Once is expired, it will automatically delete by NVR.
The retention period is ranged from 1 to 12 months, if you don‟t want those files be deleted, you
can select Permanent.
F-3.8.25
Page 97
User Manual
www.milesight.com 93
3.9 Shutdown
3.9.1 Logout
Click [Logout] to exit the current logon account.
3.9.2 Reboot
Click [Reboot] to restart the NVR.
3.9.3 Shutdown
Click [Shutdown] to close the NVR.
3.9.4 Close
Click [Close] to exit.
F-3.8.26
Page 98

User Manual
www.milesight.com 94
4. Service
Milesight Technology Co., Ltd provides customers with timely and comprehensive technical
support services. End-users can contact your local dealer to obtain technical support. Distributors
and resellers can contact directly with Milesight for technical support.
Technical Support Mailbox: [email protected]
Web: http://www.milesight.com
Online Problem Submission System: http://www.milesight.com/service/feedback.asp
Address: No.23Wanghai Road,2nd Software Park, Xiamen,China
Zip Code: 361006
TEL: +86-592-5922772
FAX: +86-592-5922775
Milesight
More in Sight
 Loading...