

Page 1

Version 2.1
Page 2

www.milesight.com 1
Milesight Technology Co., Ltd
Table of Contents
1. Package contents ............................................................................................................... 2
2. Cautions! ........................................................................................................................... 2
3. System Requirments .......................................................................................................... 2
4. Hardware Overview ........................................................................................................... 3
4.1 Box Camera .................................................................................................................. 3
4.2 IR Bullet Camera .......................................................................................................... 4
4.3 Dome Camera .............................................................................................................. 5
5. Hardware Installation ........................................................................................................ 5
5.1 General Connection ..................................................................................................... 5
5.2 Insert the SD card ........................................................................................................ 9
5.3 Lens Adjustment ........................................................................................................ 10
6. Accessing the Camera ...................................................................................................... 12
6.1 Assigning an IP Address .............................................................................................. 12
6.1.1 Assigning an IP Address Using IPCTools .................................................................................. 12
6.2 Accessing from the Web Browser ............................................................................... 16
6.2.1 Access over IE Browser ........................................................................................................... 16
6.2.2 Access over Firefox browser ................................................................................................... 19
Page 3
www.milesight.com 2
Milesight Technology Co., Ltd
Thank you for purchasing Milesight IP camera. This Guide provides basic instructions on installing
and accessing Milesight network camera. For more details, please refer to the User Manual.
1. Package contents
Before installation, please verify that all the necessary items are supplied in the gift box as the
package contents listed below. If any items are missing or damaged, please contact the shipper
and your Milesight sales representative.
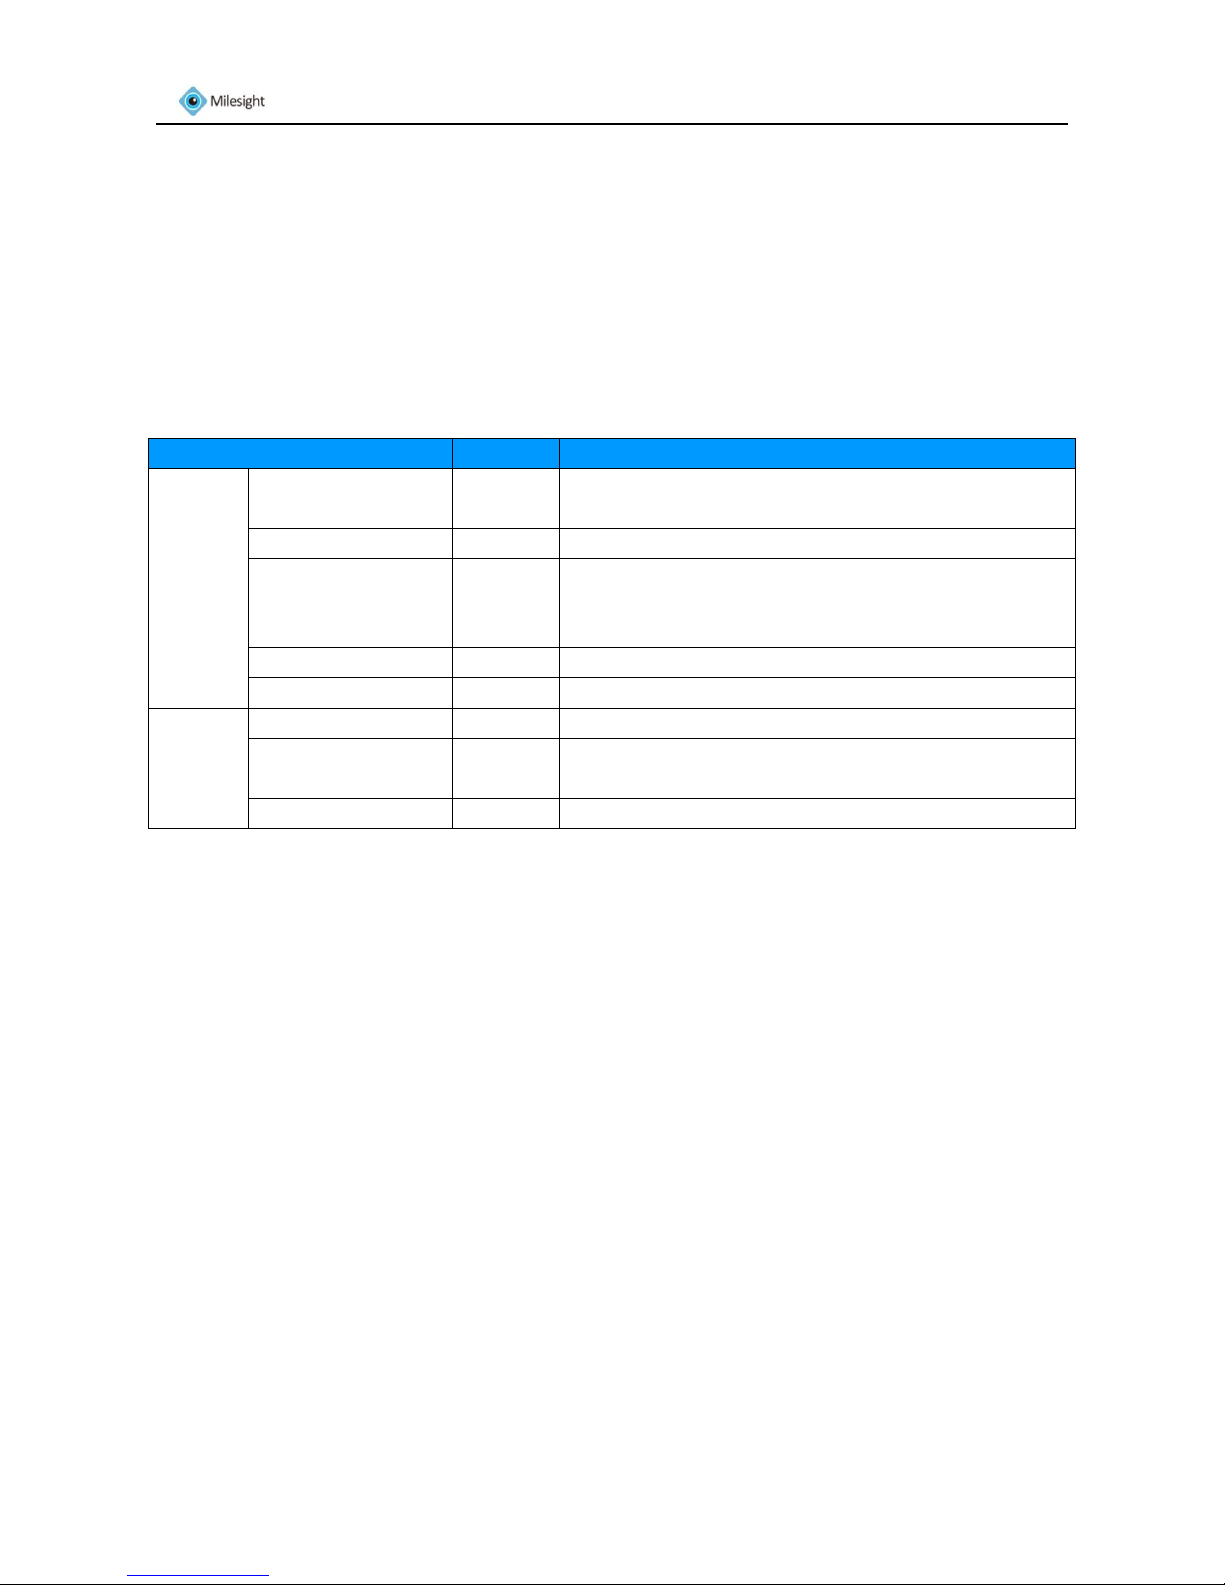
Items
Quantity
Description
Default
Milesight Network
Camera
1 PC
The purchased model
Power Adapter
1 PC
DC12V, 1.5A MAX
CD
1 PC
The CD includes the Datasheet, Quick Start Guide and
User Manual of milesight network cameras, software
and User Manual of MilesightVMS and IPCTools.
Quick Start Guide
1 PC
Printed material
Warranty Card
1 PC
Printed material
Optional
Lens
If purchased
Bracket & Screw
Pack
If purchased
WIFI Antenna
For box cameras with WIFI function only
Sheet 1-1
2. Cautions!
Do not expose the product to rain or moisture.
Make sure the device is firmly fixed when mounting them on the wall or ceiling.
Make sure that the power supply voltage is correct before using the camera.
Do not use a third party power adapter.
Never attempt to disassemble or modify the camera.
3. System Requirments
OS: Windows XP/7/Vista/Server 2000/Server 2008(Please use IE browser to operate)
CPU: 1.66GHZ or higher
Memory: 1G MB or more
Graphic memory: 128MB or more
Internet protocol: TCP/IP (IPv4)
Page 4
www.milesight.com 3
Milesight Technology Co., Ltd
4. Hardware Overview
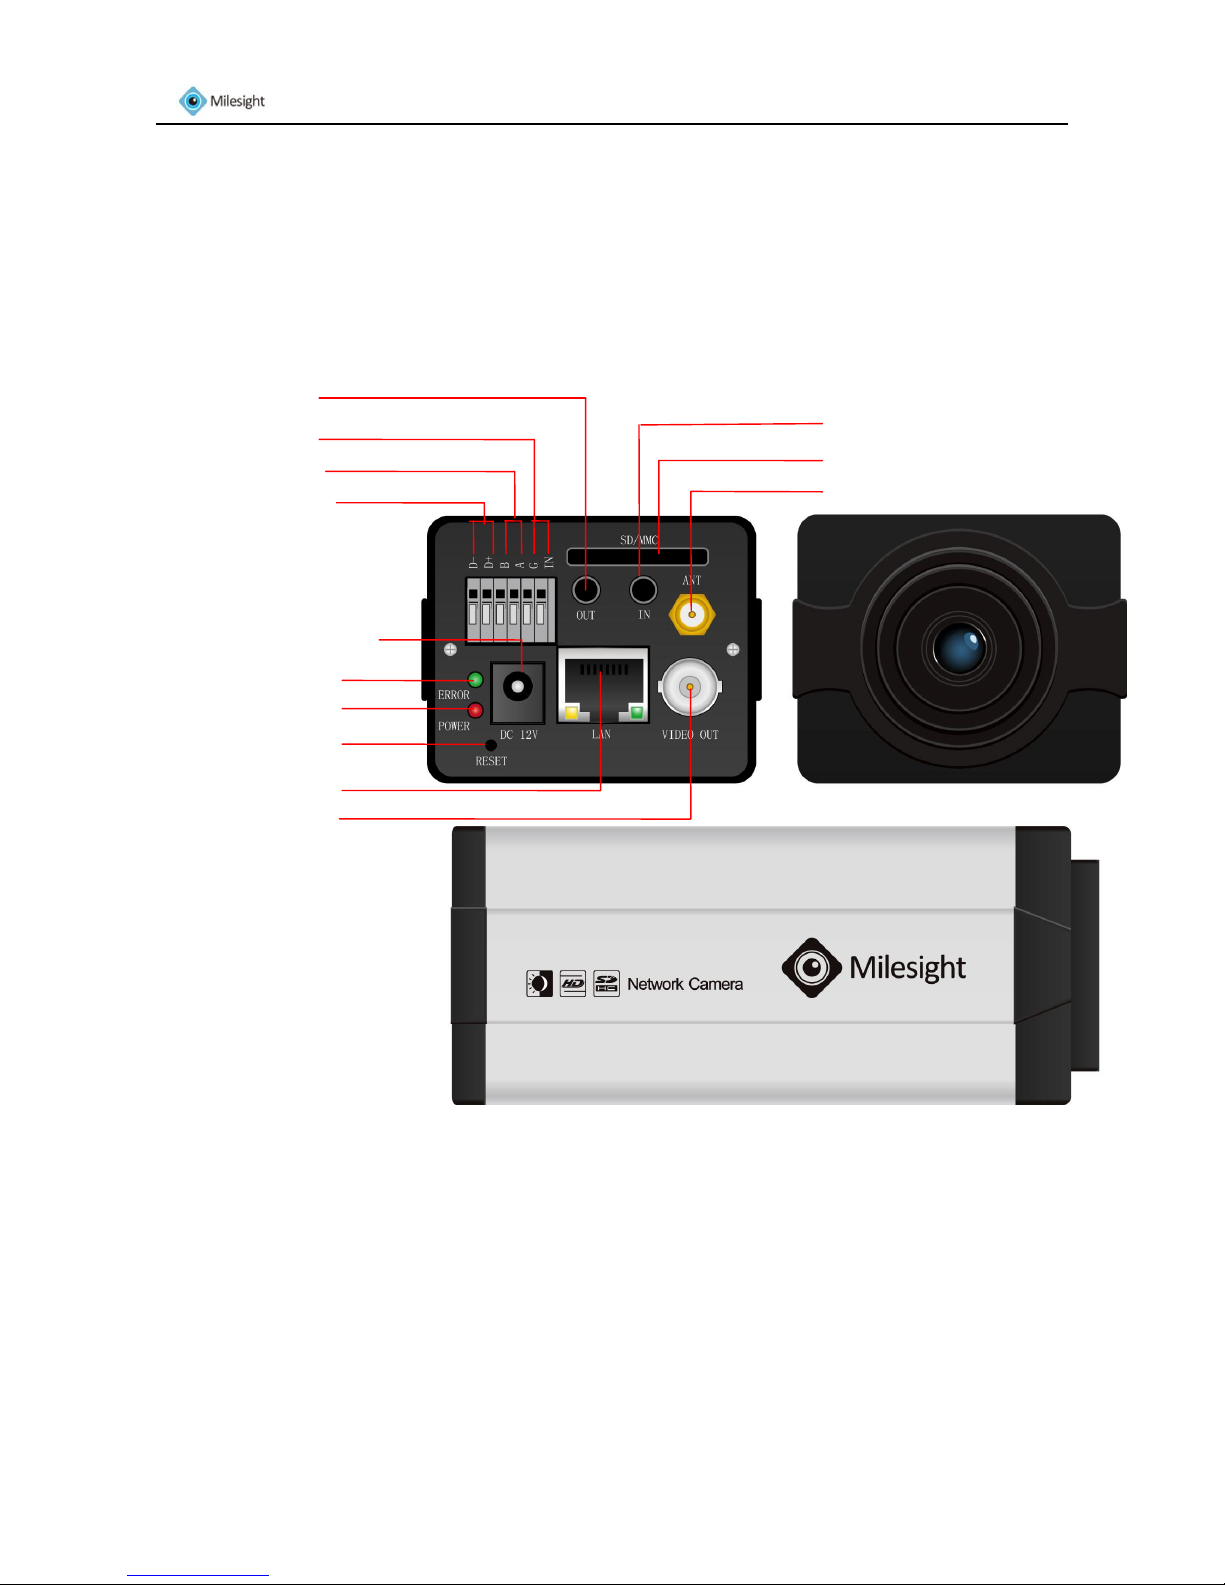
4.1 Box Camera
Figure 4-1
*Note:
1) Error LED: Error LED is on when the device starts up or runs error.
2) Reset Button: Press ‘Reset’ button for 5 seconds, the device will be restored to factory default.
*Error LED
Power LED
*Reset Button
Ethernet Port
BNC Video Out
Power Connector (DC12V)
Alarm Output
RS-485 PTZ control
Alarm Input
Antenna for WIFI (Optional)
Audio Input
SD/SDHC Card Slot
Audio Output
Page 5
www.milesight.com 4
Milesight Technology Co., Ltd
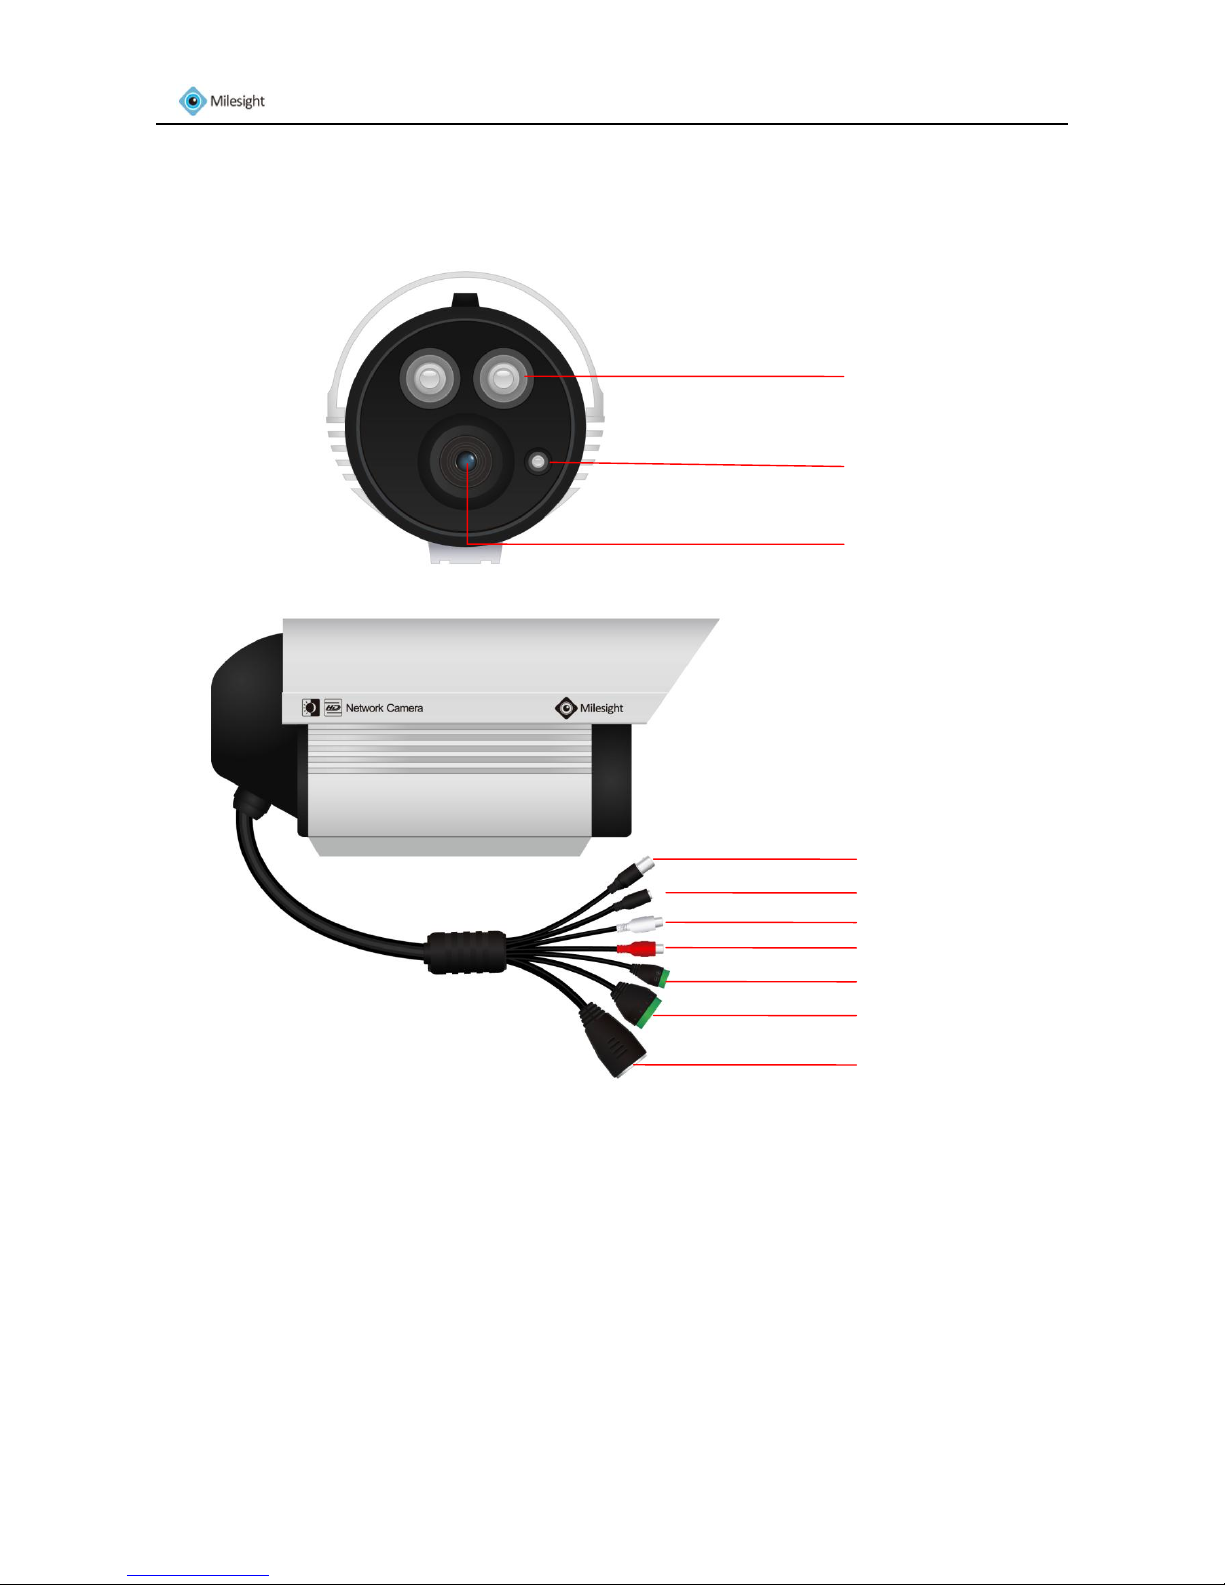
4.2 IR Bullet Camera
Figure 4-2
IR LED
Light Sensor
LENs
Power Connector (DC 12V)
Video Output
RS-485 PTZ control
Alarm Input/Output
Ethernet Port
Audio Output
Audio Input
Page 6
www.milesight.com 5
Milesight Technology Co., Ltd
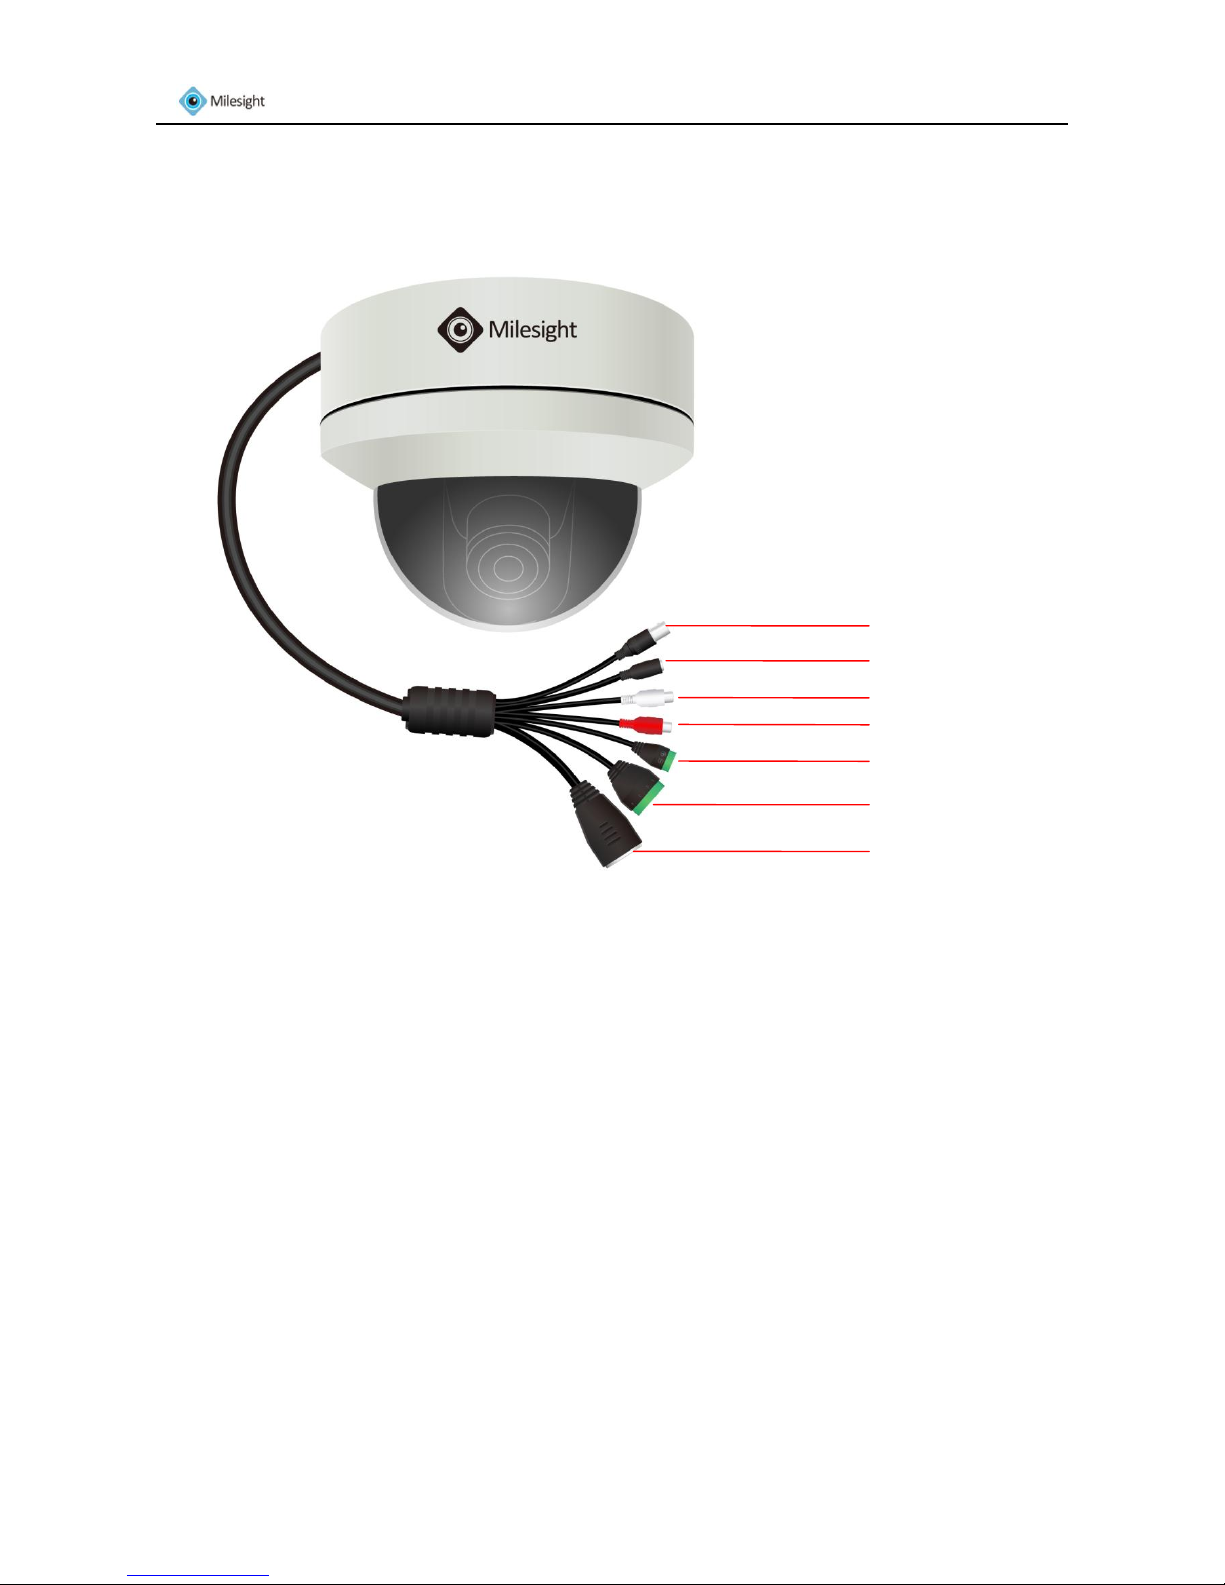
4.3 Dome Camera
Figure 4-3
5. Hardware Installation
5.1 General Connection
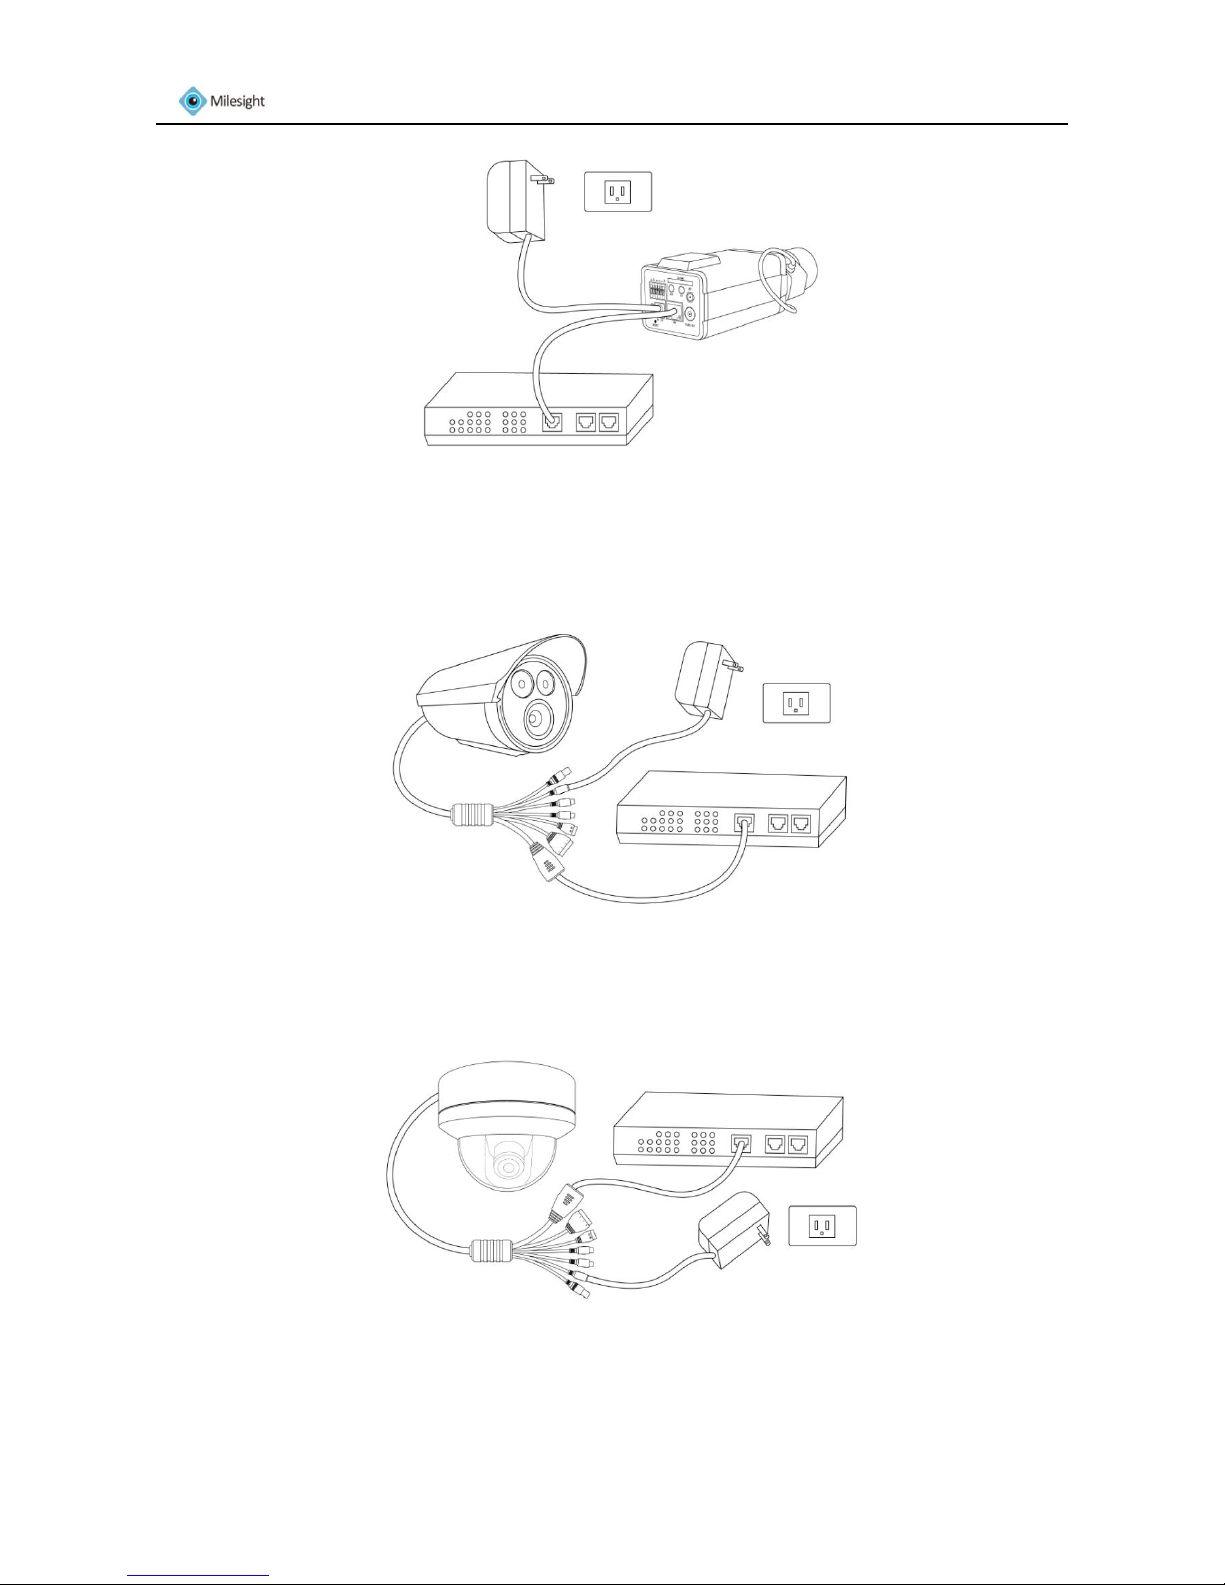
1. Connect the camera to the network and power using one of the methods listed below:
1) Basic connection (without PoE):
Step 1: connect the DC 12V end of the power adapter to the power port of the camera and
connect the other end to a wall outlet;
Step 2: connect the camera to a switch using an Ethernet cable.
Video Output
Power Connector (DC 12V)
Audio Output
Audio Input
RS-485 PTZ control
Alarm Input/Output
Ethernet Port
Page 7
www.milesight.com 6
Milesight Technology Co., Ltd
Figure 5-1 Box Camera
Figure 5-2 Bullet Camera
Figure 5-3 Dome Camera
Page 8
www.milesight.com 7
Milesight Technology Co., Ltd
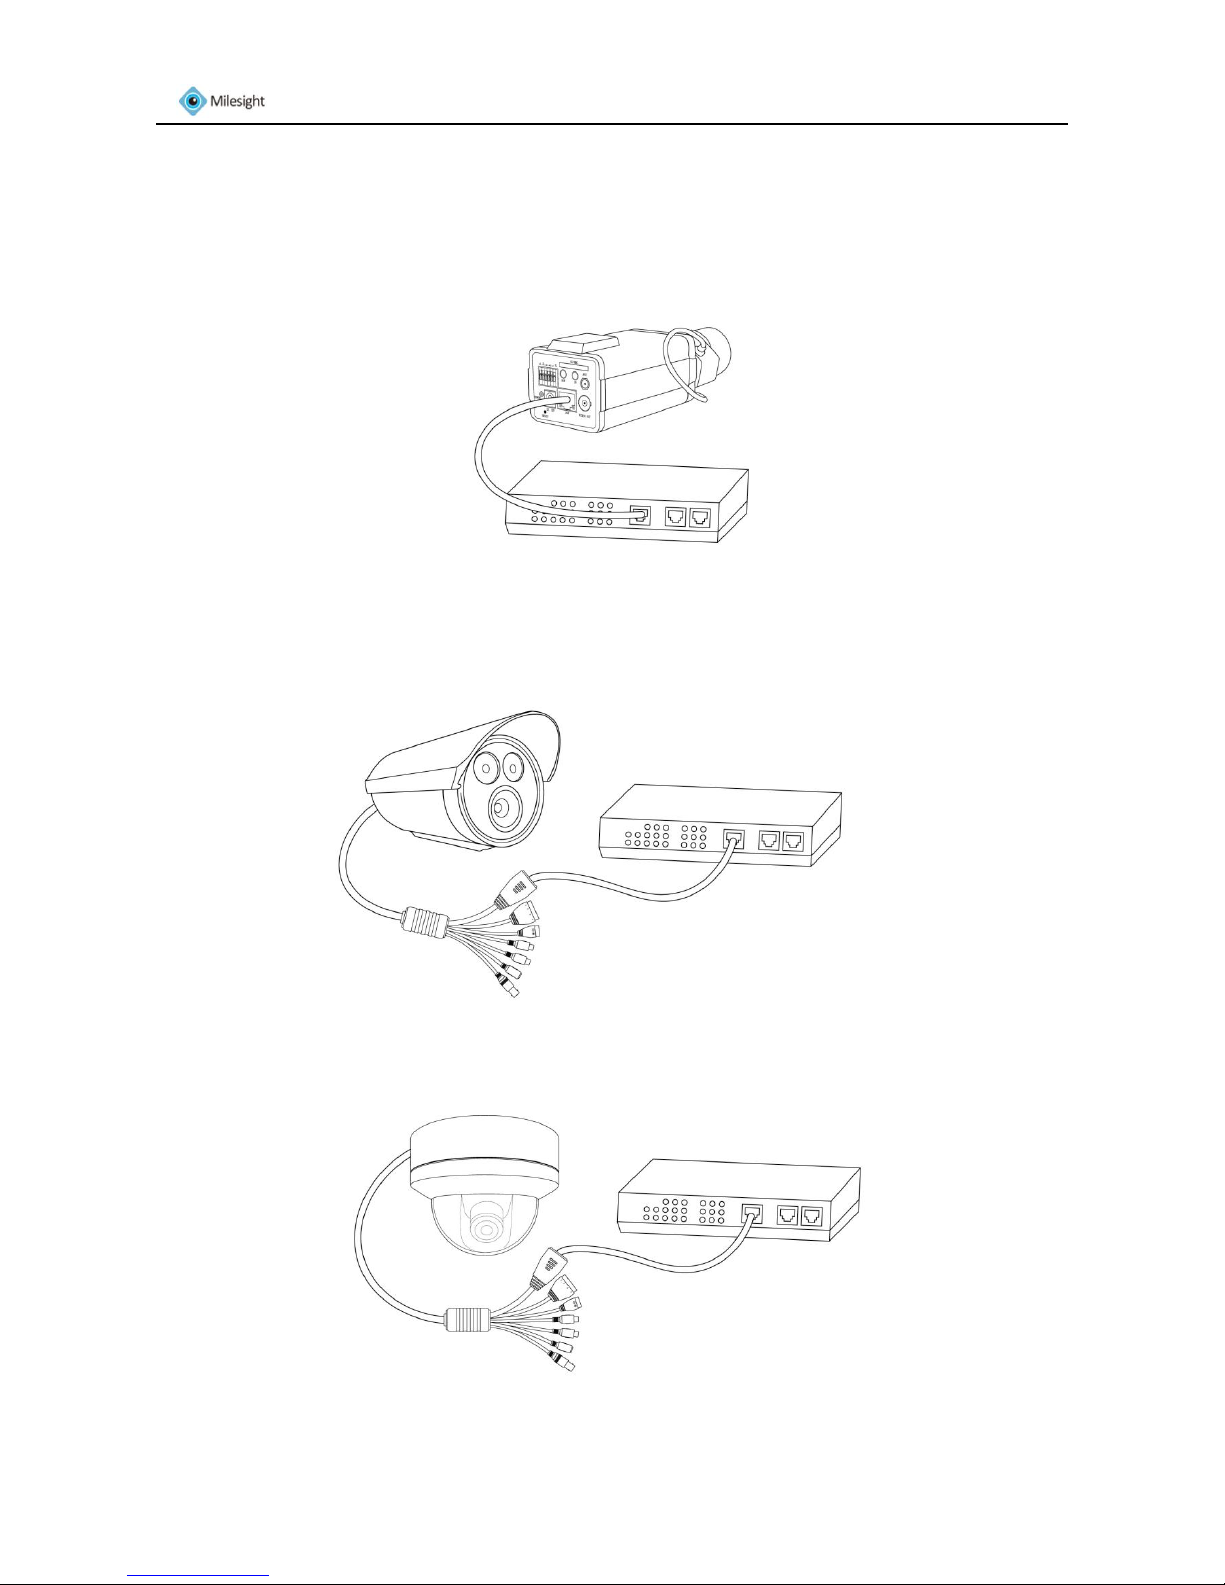
2) Power over Ethernet (PoE) connection. PoE will be automatically detected when the Ethernet
cable is connected. The camera can either be connected to a PoE-enabled switch or a non-PoE
switch.
A. Connect the camera to a PoE switch using a single Ethernet cable.
Figure 5-4 Box Camera
Figure 5-5 Bullet Camera
Figure 5-6 Dome Camera
Page 9
www.milesight.com 8
Milesight Technology Co., Ltd
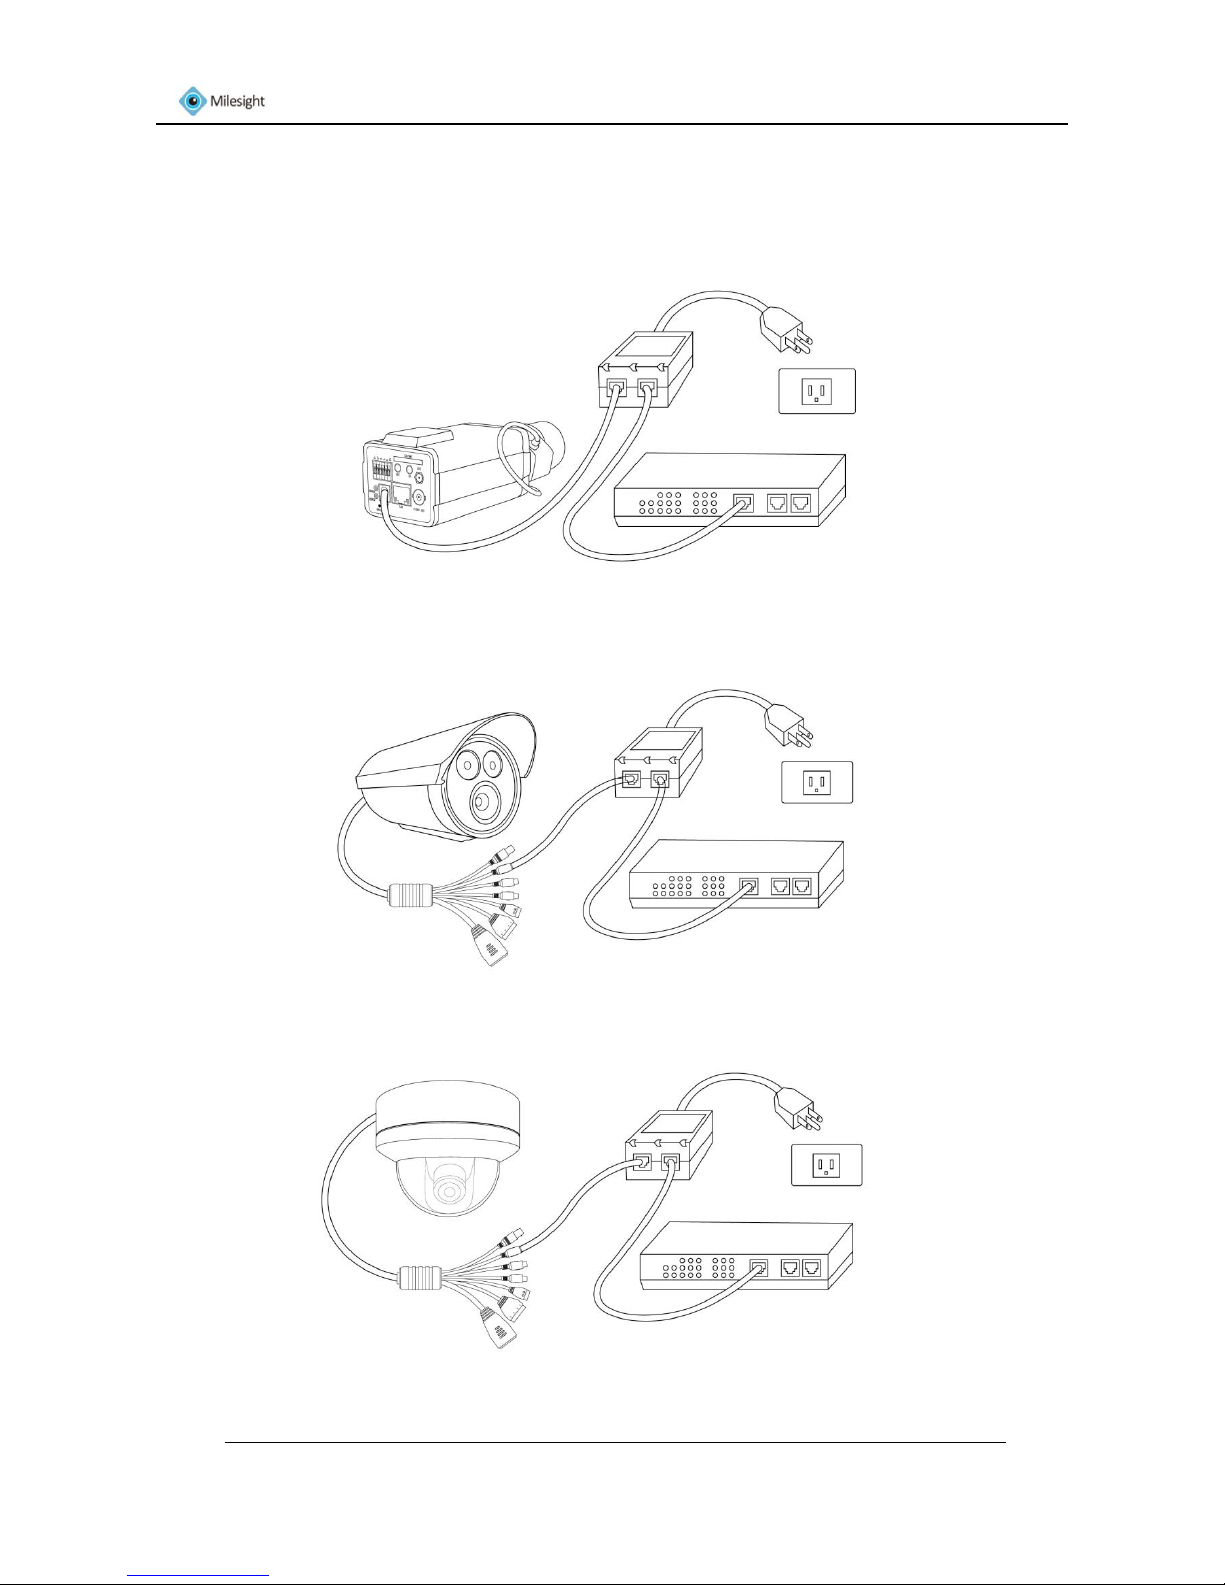
B. Connect the camera to a non-PoE switch using the PoE injector
Step 1: Connect the camera to a PoE injector using an Ethernet cable.
Step 2: Connect the PoE injector to the non-PoE switch using an Ethernet cable.
Step 3: Connect the PoE injector to a power outlet.
Figure 5-7 Box Camera
Figure 5-8 Bullet Camera
Figure 5-9 Dome Camera
The power LED will light steady red when the camera is connected to a power source
Page 10
www.milesight.com 9
Milesight Technology Co., Ltd
2. Optionally connect external input/output devices, such as alarm devices.
3. Optionally connect an active speaker or external microphone.
4. Optionally connect the camera to a monitor using a BNC cable.
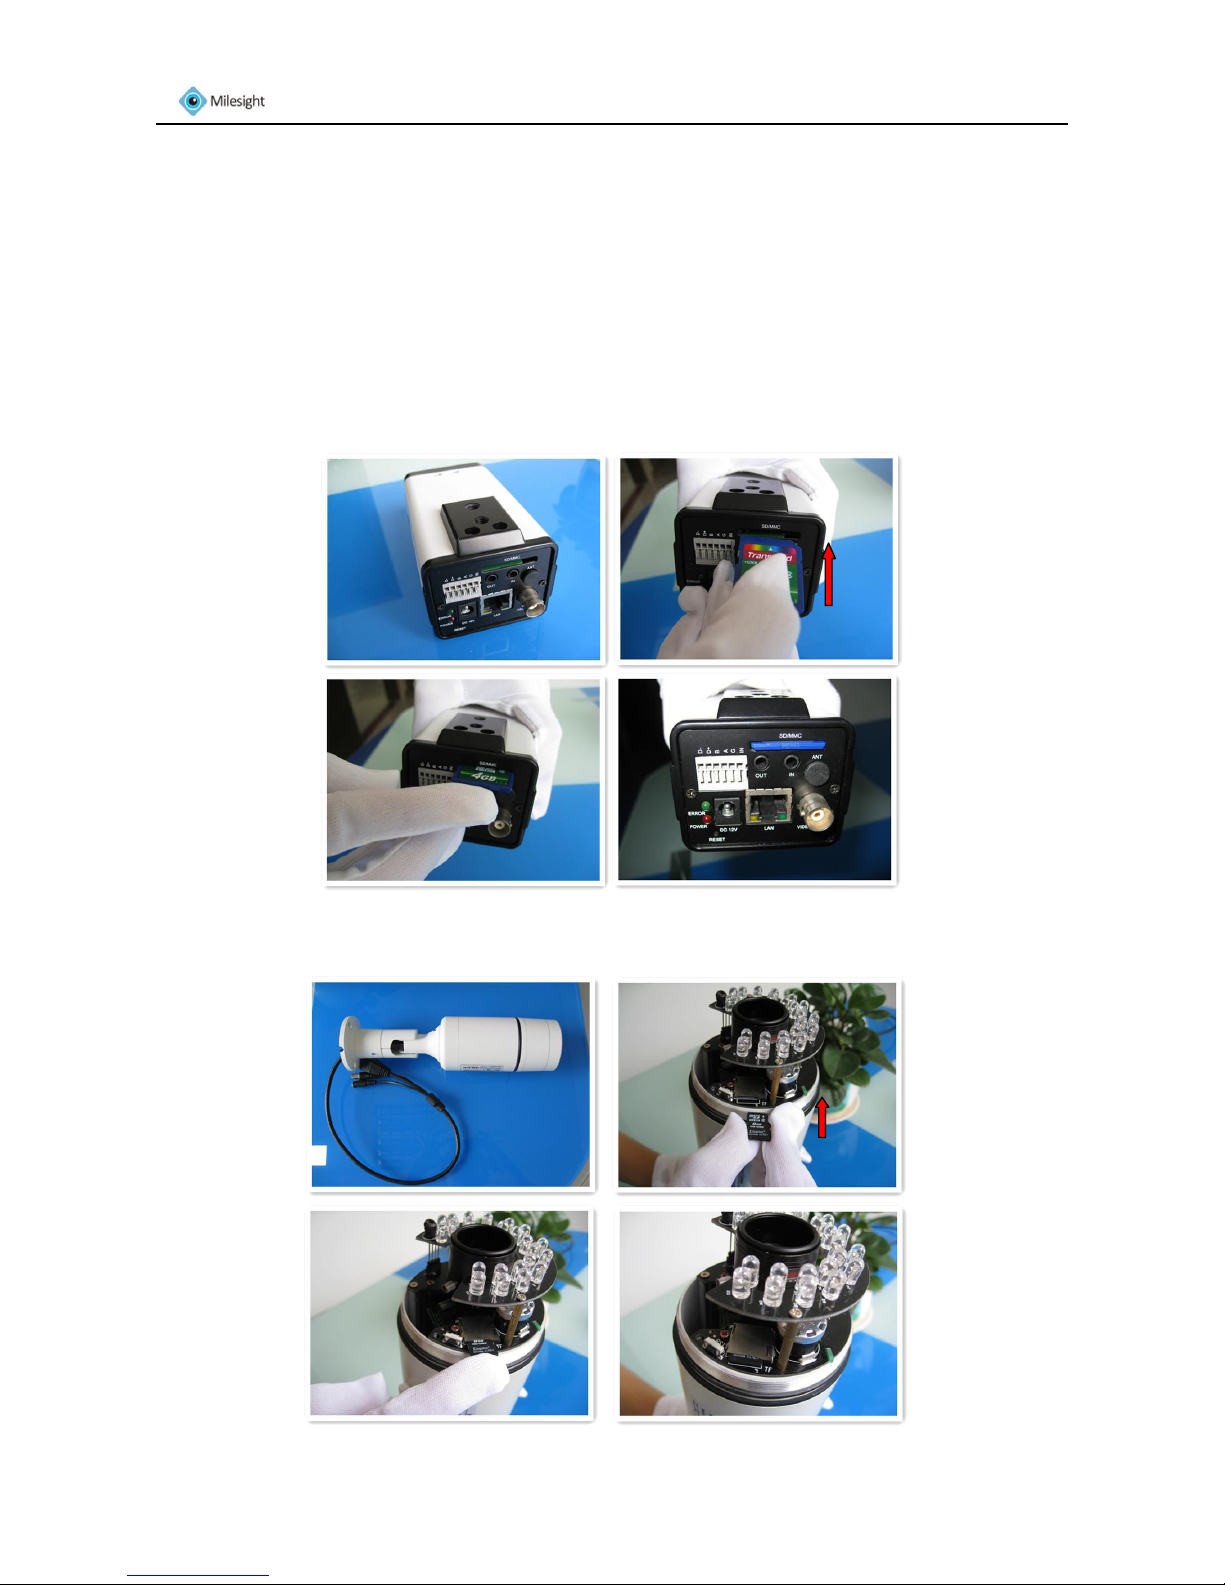
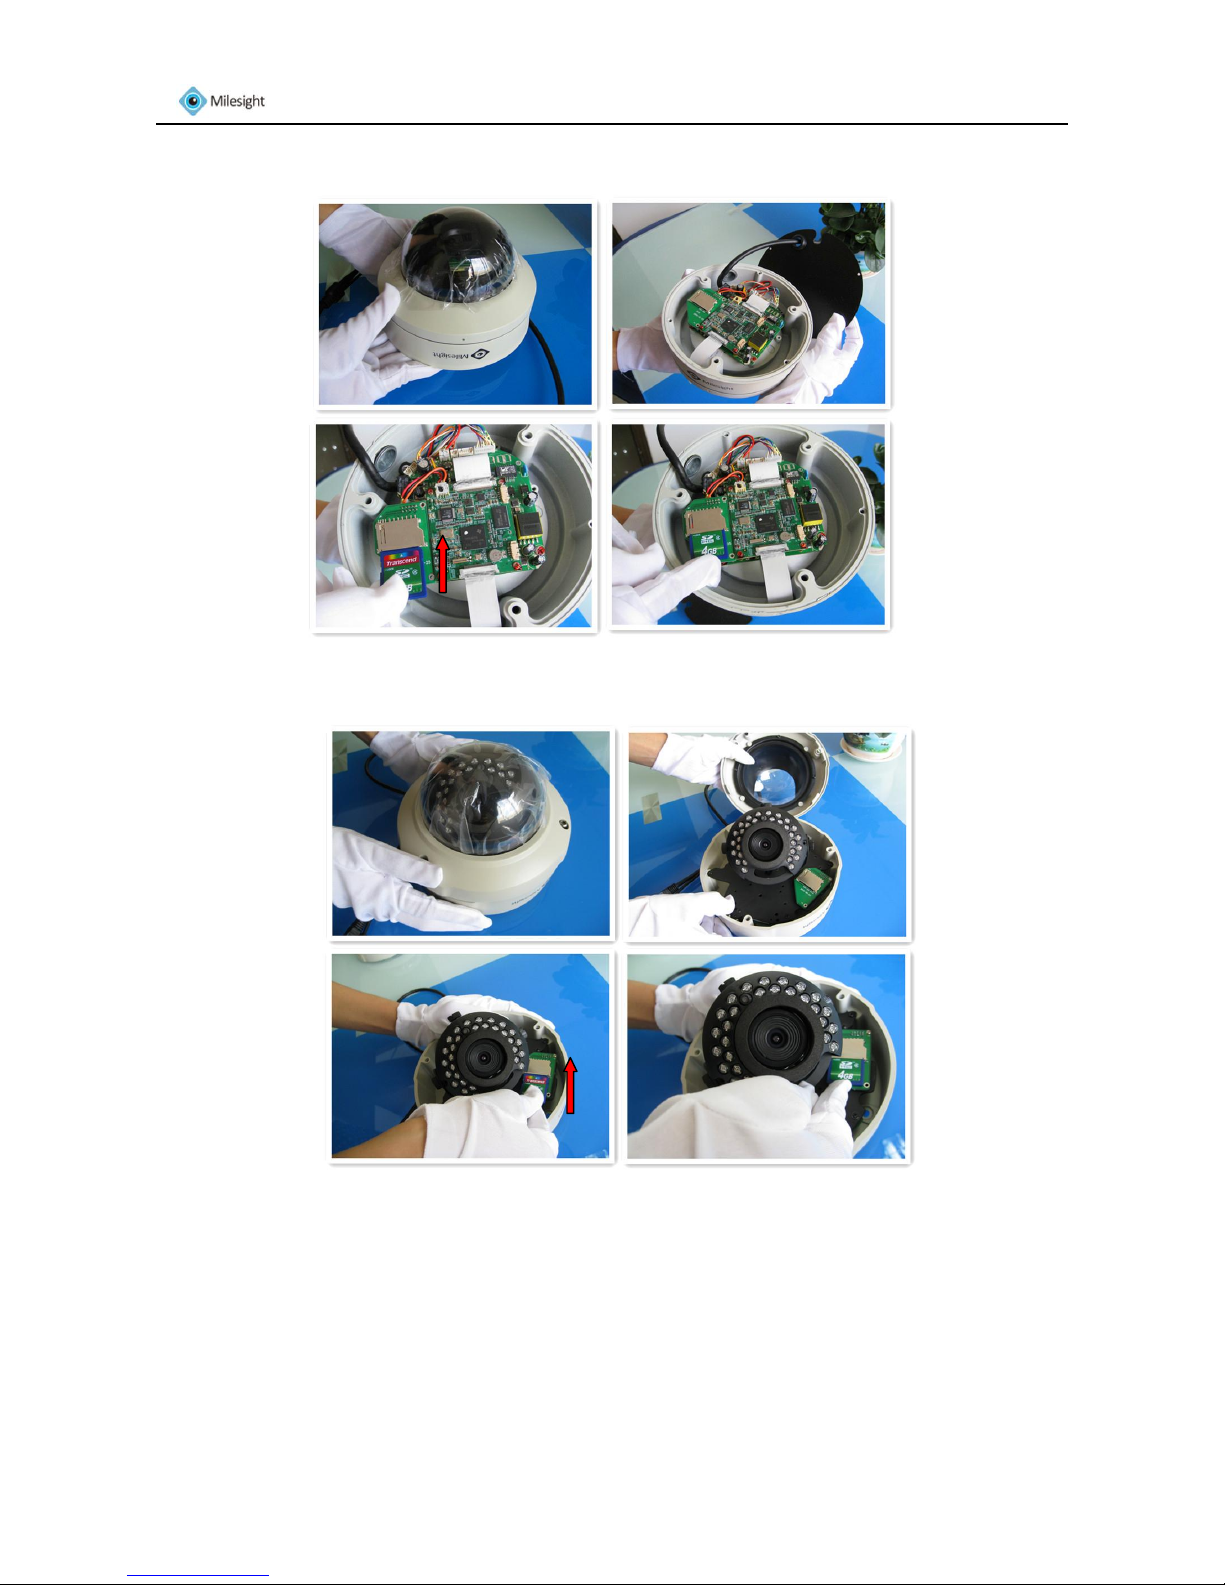
5.2 Insert the SD card
Steps:
1. Locate the SD card slot.
2. Insert the SD card into the slot with the metal contacts facing down.
A. Box camera
Figure 5-10
B. Vari-focal lens bullet camera
Figure 5-11
1
2
3
4
1
3
4
2
Page 11
www.milesight.com 10
Milesight Technology Co., Ltd
Note: Vari-focal lens bullet camera is using TF card.
C. Dome camera
Figure 5-12
D. IR Dome camera
Figure 5-13
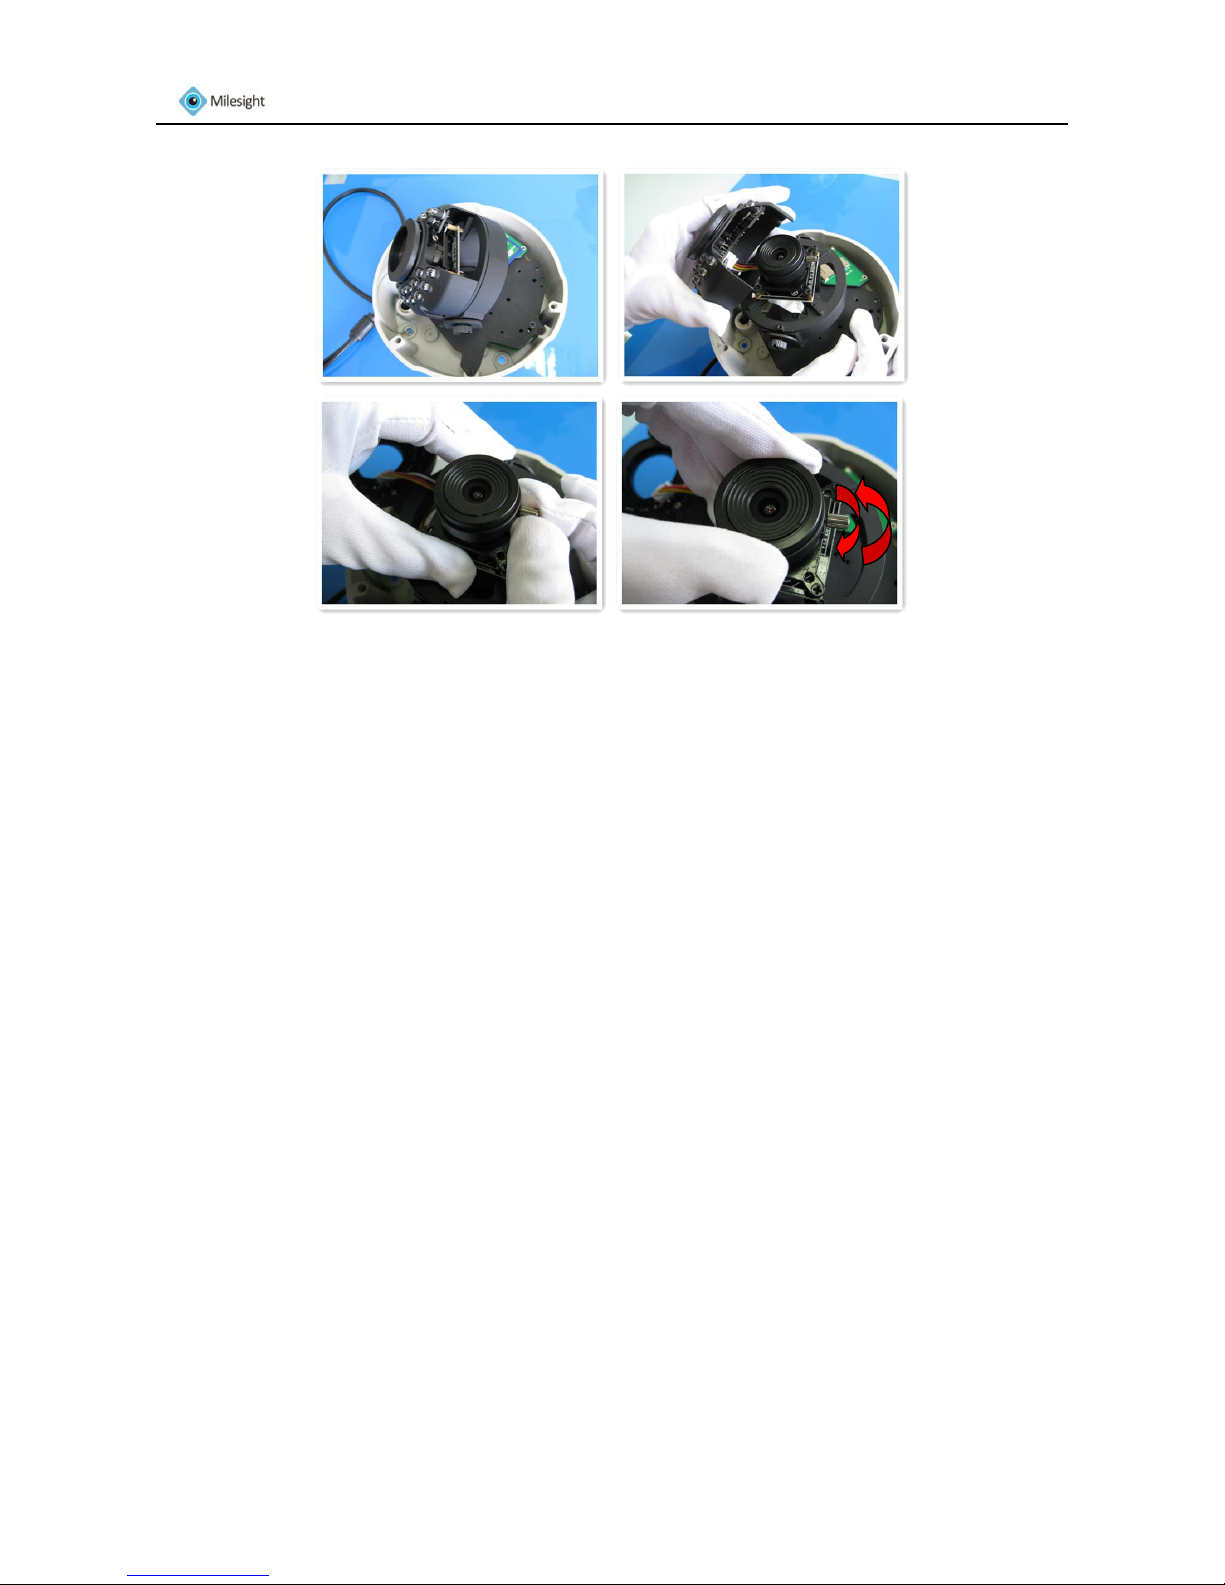
5.3 Lens Adjustment
In order to achieve the best possible video quality, please adjust the iris controller, focus controller, or zoom
controller (if applicable for the lens installed) to get the best view.
Below are some examples illustrating the basic lens adjustment of different camera types.
1
2 3 4
1
2
3
4
Page 12

www.milesight.com 11
Milesight Technology Co., Ltd
A. Box camera
Figure 5-14
B. Vari-focal lens bullet camera
Figure 5-15
C. Dome camera
Figure 5-16
2
1
3 4 2
1
3
4 1 2
Page 13
www.milesight.com 12
Milesight Technology Co., Ltd
D. IR dome camera
Figure 5-17
6. Accessing the Camera
The camera must be assigned an IP address to be accessible.
6.1 Assigning an IP Address
The default IP address of milesight network camera is 192.168.5.190. The default user name is
admin, and password is ms1234.
You can change the IP address of the camera via IPCTools. Please connect the camera in the same
LAN of your computer.
6.1.1 Assigning an IP Address Using IPCTools
IPCTools is a software tool which can automatically detect multiple online Milesight network
cameras connected in the LAN, set IP addresses, and manage firmware upgrades. It ’s
recommended when assigning IP addresses for multiple cameras.
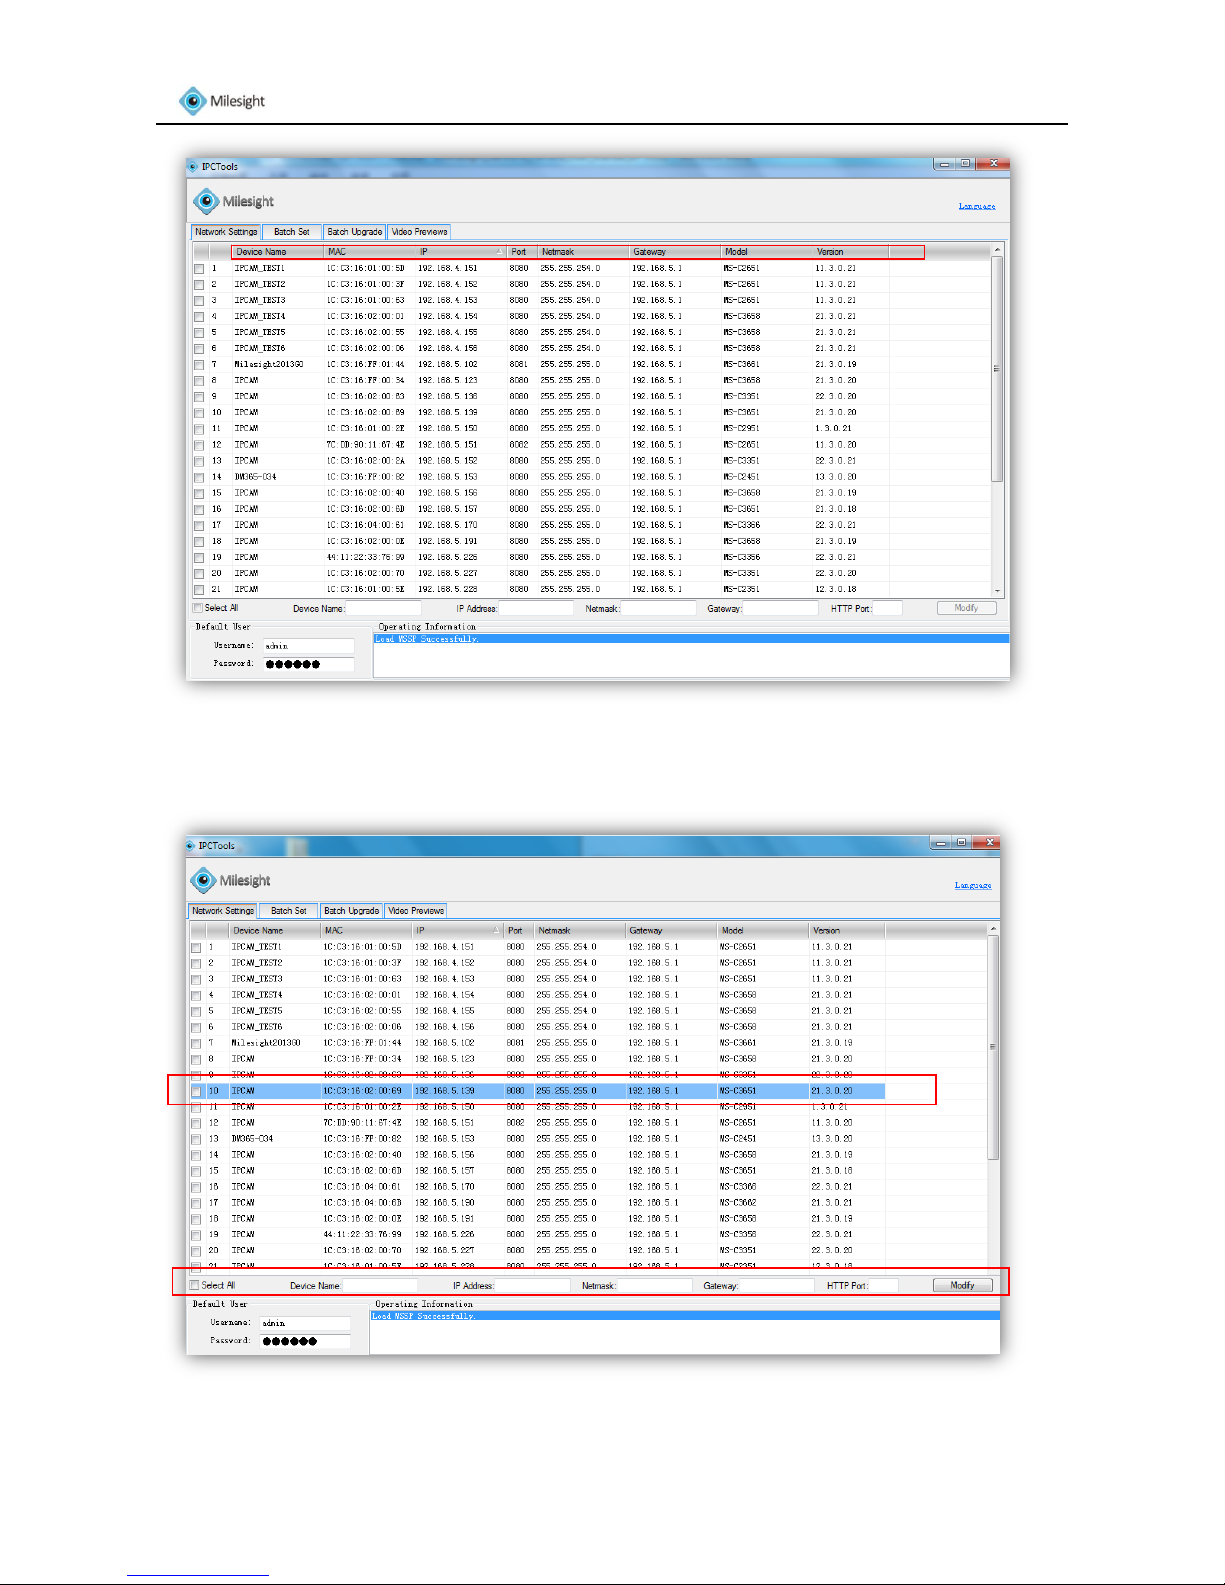
Step 1 : Install IPCTools (The software could be downloaded from CD.)
Step 2: Start IPCTools, and the device information including IP address, MAC address, Port number,
Netmask, and Gateway of all Milesight network cameras will be displayed. Details are
shown as Figure 6-1.
2
3
4
1
Page 14
www.milesight.com 13
Milesight Technology Co., Ltd
Figure 6-1
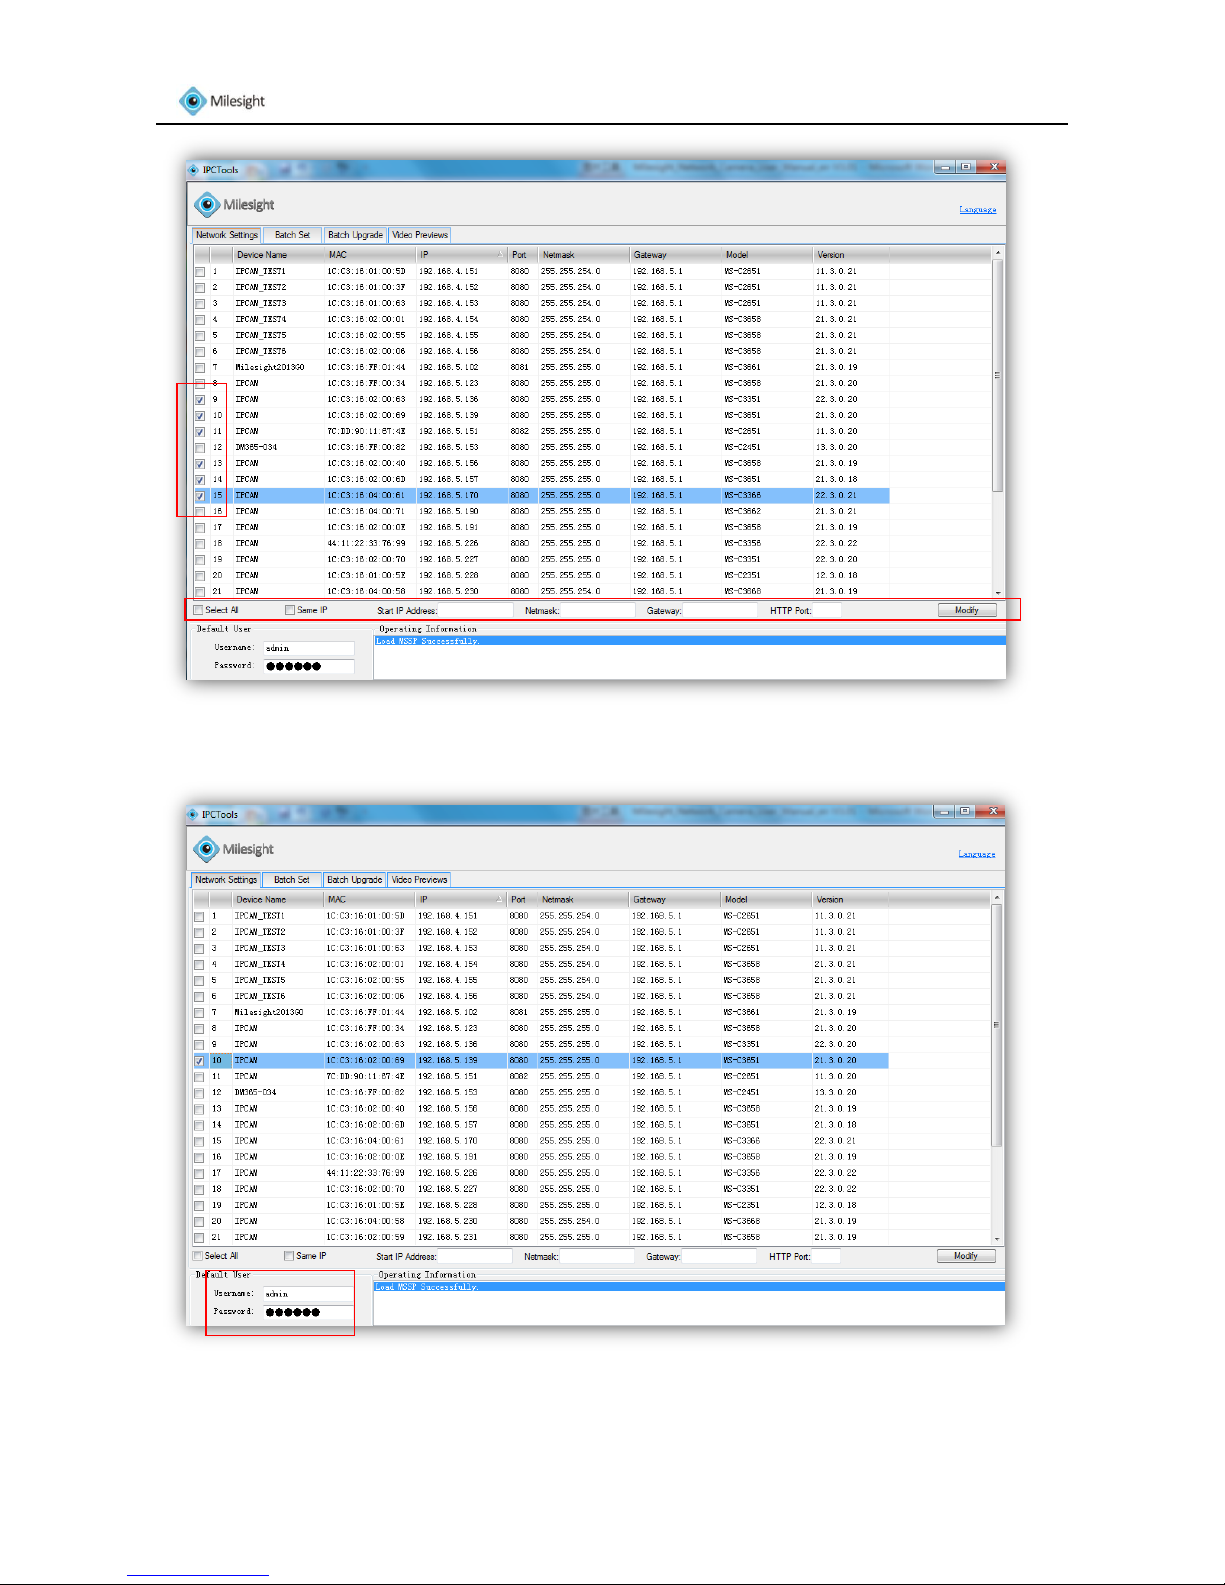
Step 3: Select a camera or multiple cameras according to the MAC address.
Figure 6-2 Select single camera
Page 15
www.milesight.com 14
Milesight Technology Co., Ltd
Figure 6-3 Select multiple cameras
Step 4: Type the User Name and Password (if they are not default value.)
Figure 6-4
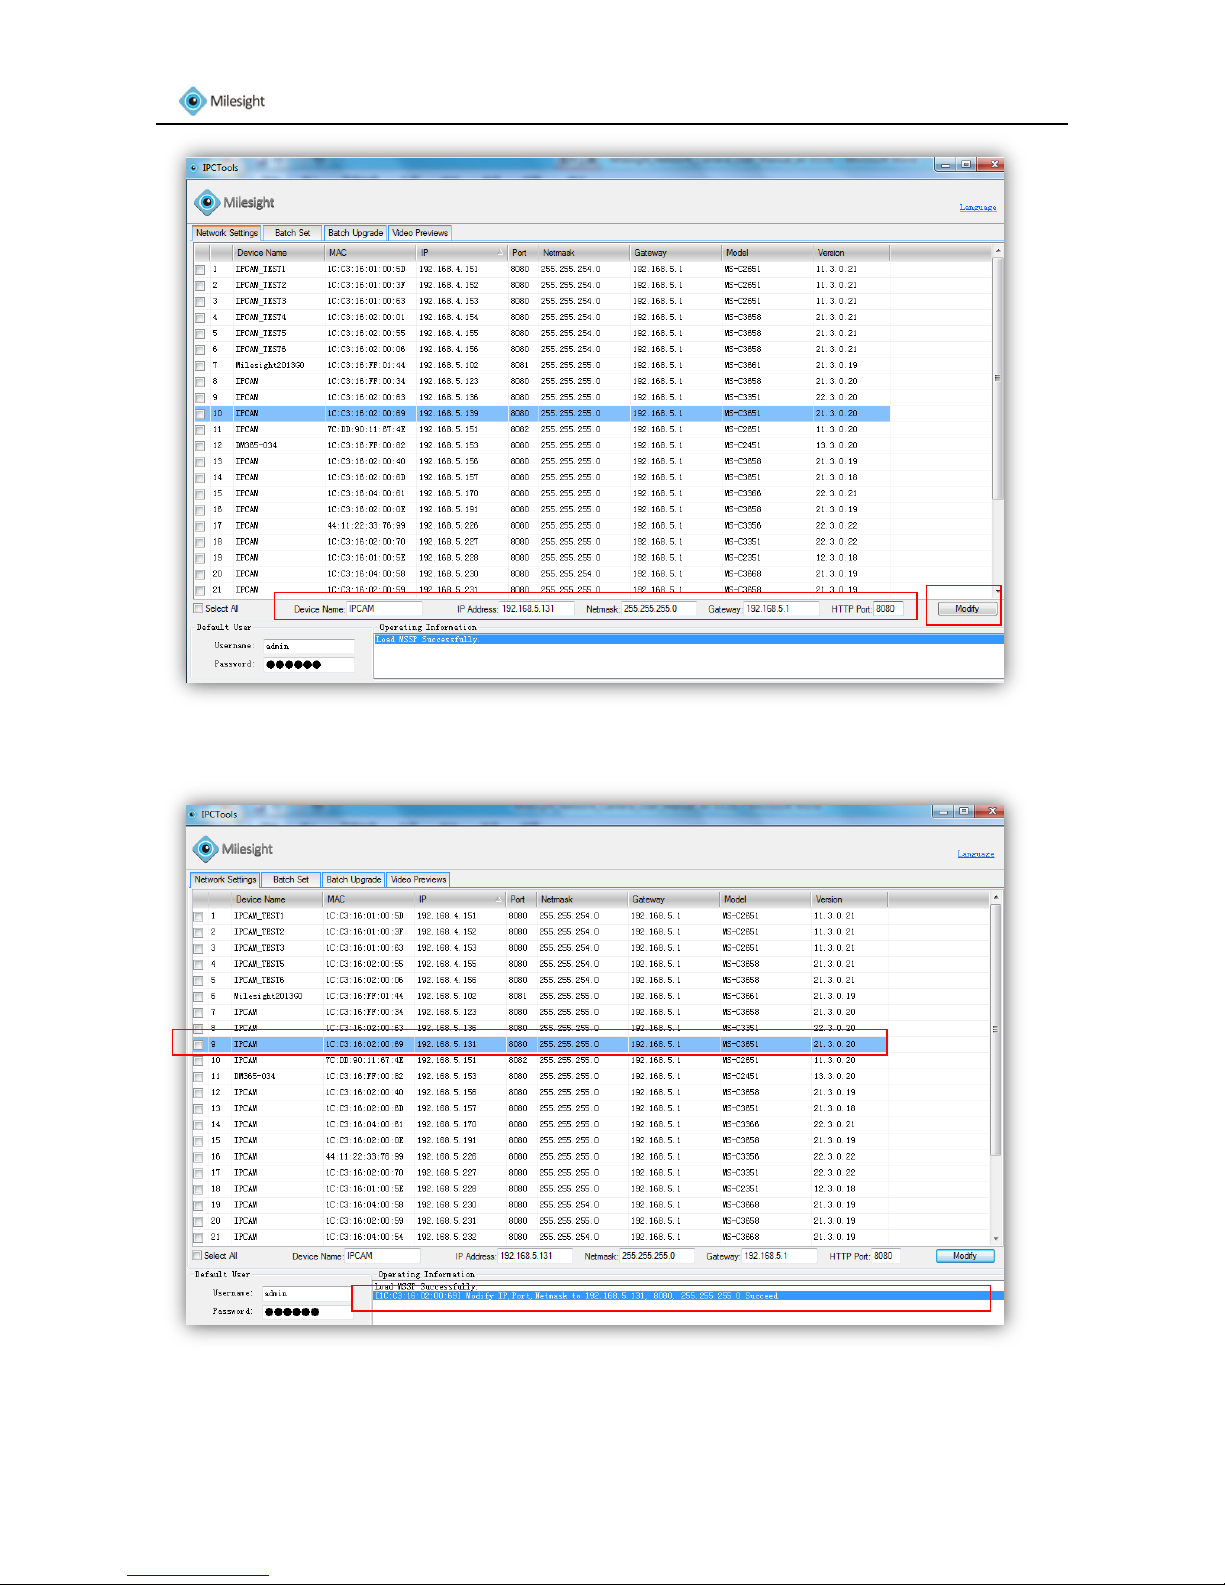
Step 5: Change the IP address or other network values, and then click “Modify” button.
Page 16
www.milesight.com 15
Milesight Technology Co., Ltd
Figure 6-5
Step 6: Change the IP address successfully.
Figure 6-6
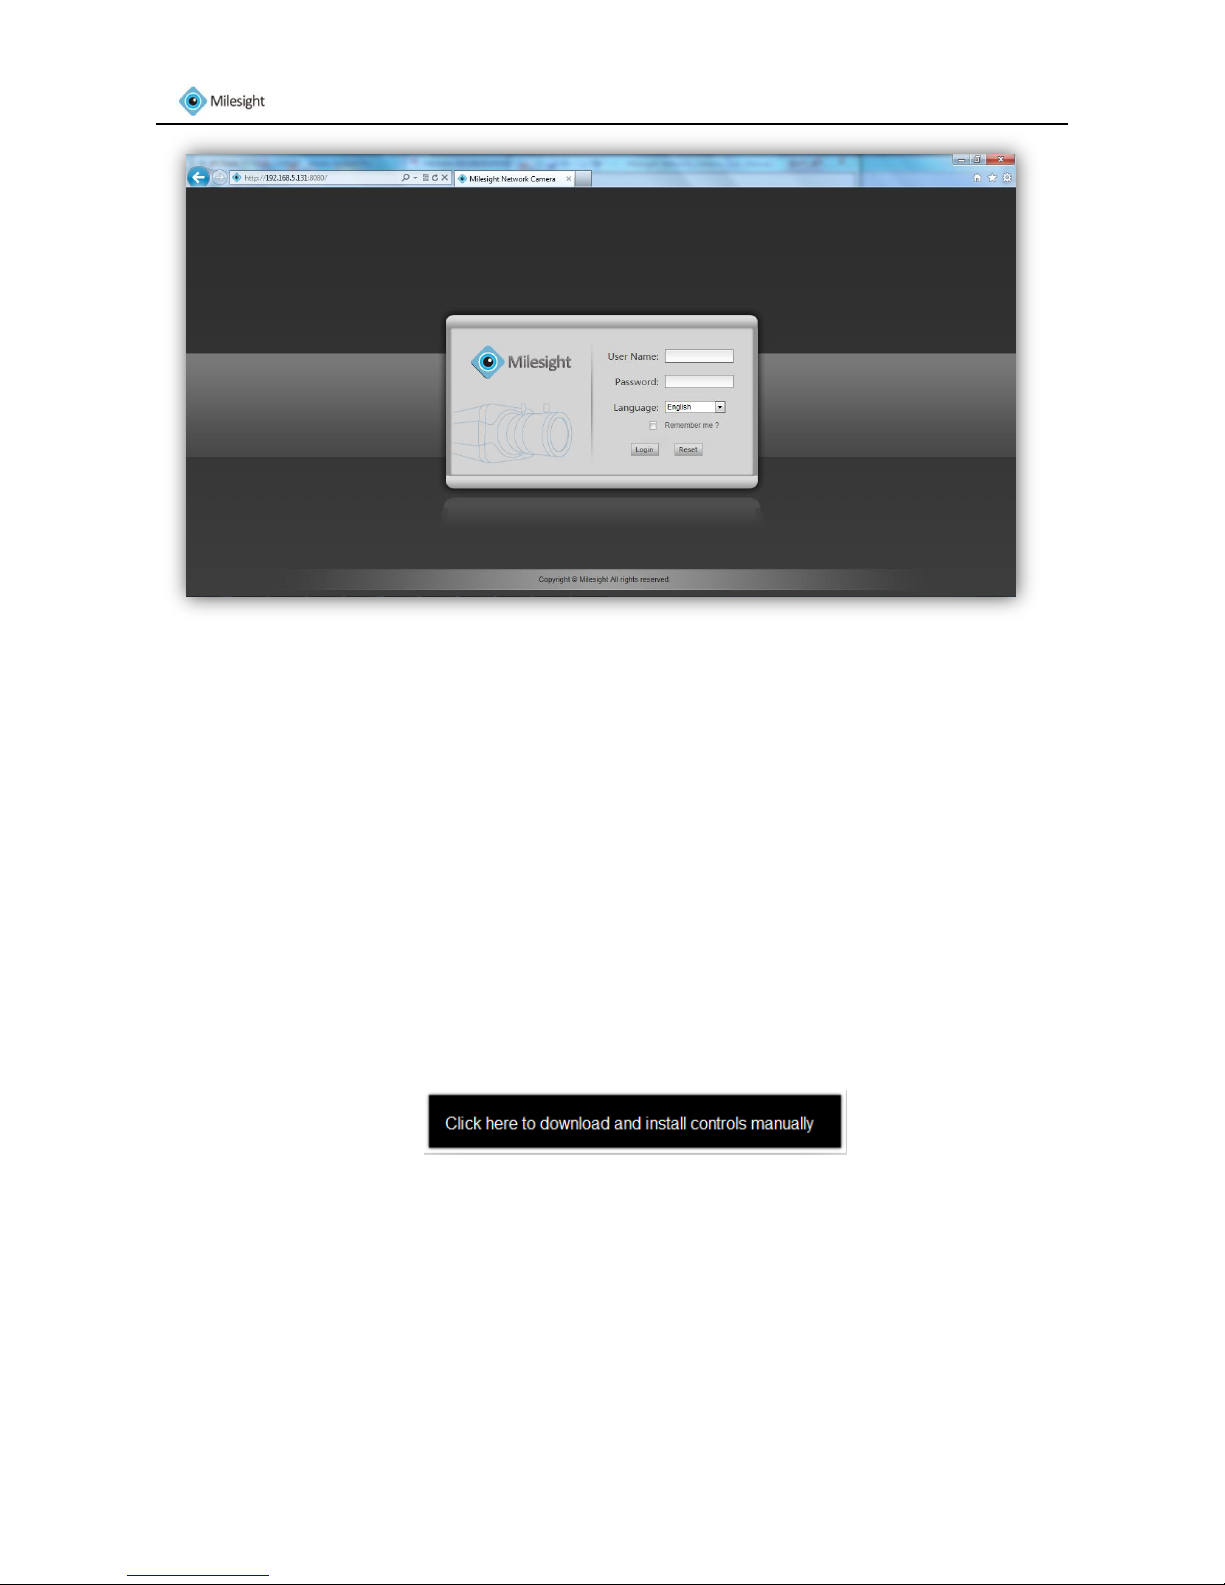
Step 7: By double clicking the selected camera, you can access the camera via web browser directly.
The Internet Explorer window will pop up.
Page 17
www.milesight.com 16
Milesight Technology Co., Ltd
Figure 6-7
6.2 Accessing from the Web Browser
The camera can be used with the most standard operating systems and browsers. The
recommended browsers are Internet Explorer and Firefox.
6.2.1 Access over IE Browser
Launch the IE browser and enter the IP address of the camera.
Enter the User Name and Password and click “Login”.
Note: The default user name is “admin”, password is “ms1234”
At the first time to log on the device, the browser will prompt to install controls, please click
'Click here to download and install controls manually' as Figure 6-8.
Figure 6-8
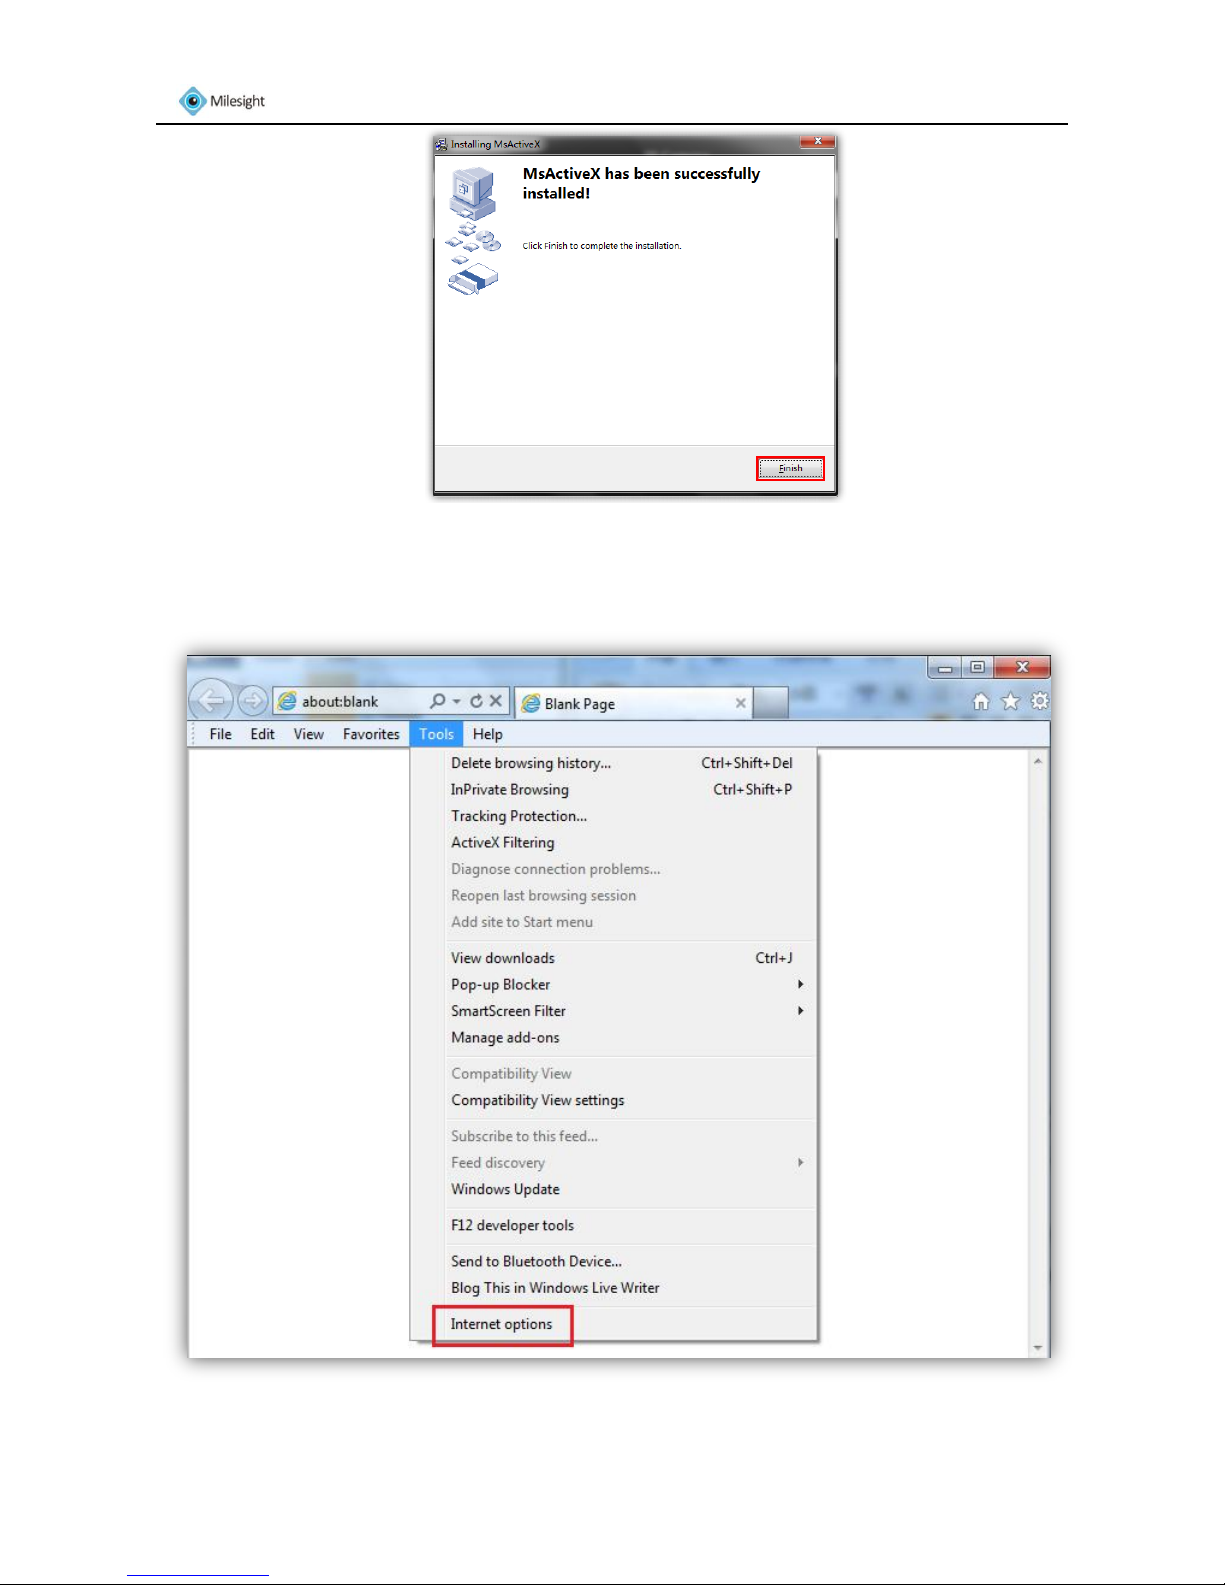
Follow the prompts to install the controls, when it`s finished, it will pop out a window as
Figure 6-9. Please click 'Finish' and refresh the browser, then you will see the video.
Page 18
www.milesight.com 17
Milesight Technology Co., Ltd
Figure 6-9
Note: If IE9 or higher version browser is used, it is suggested that the Milesight camera web link
should be added as a trusted site. See the instructions as below:
Step 1: Start the IE9 or higher version browser, and select “Tools”select”Internet Options”.
Figure 6-10
Page 19

www.milesight.com 18
Milesight Technology Co., Ltd
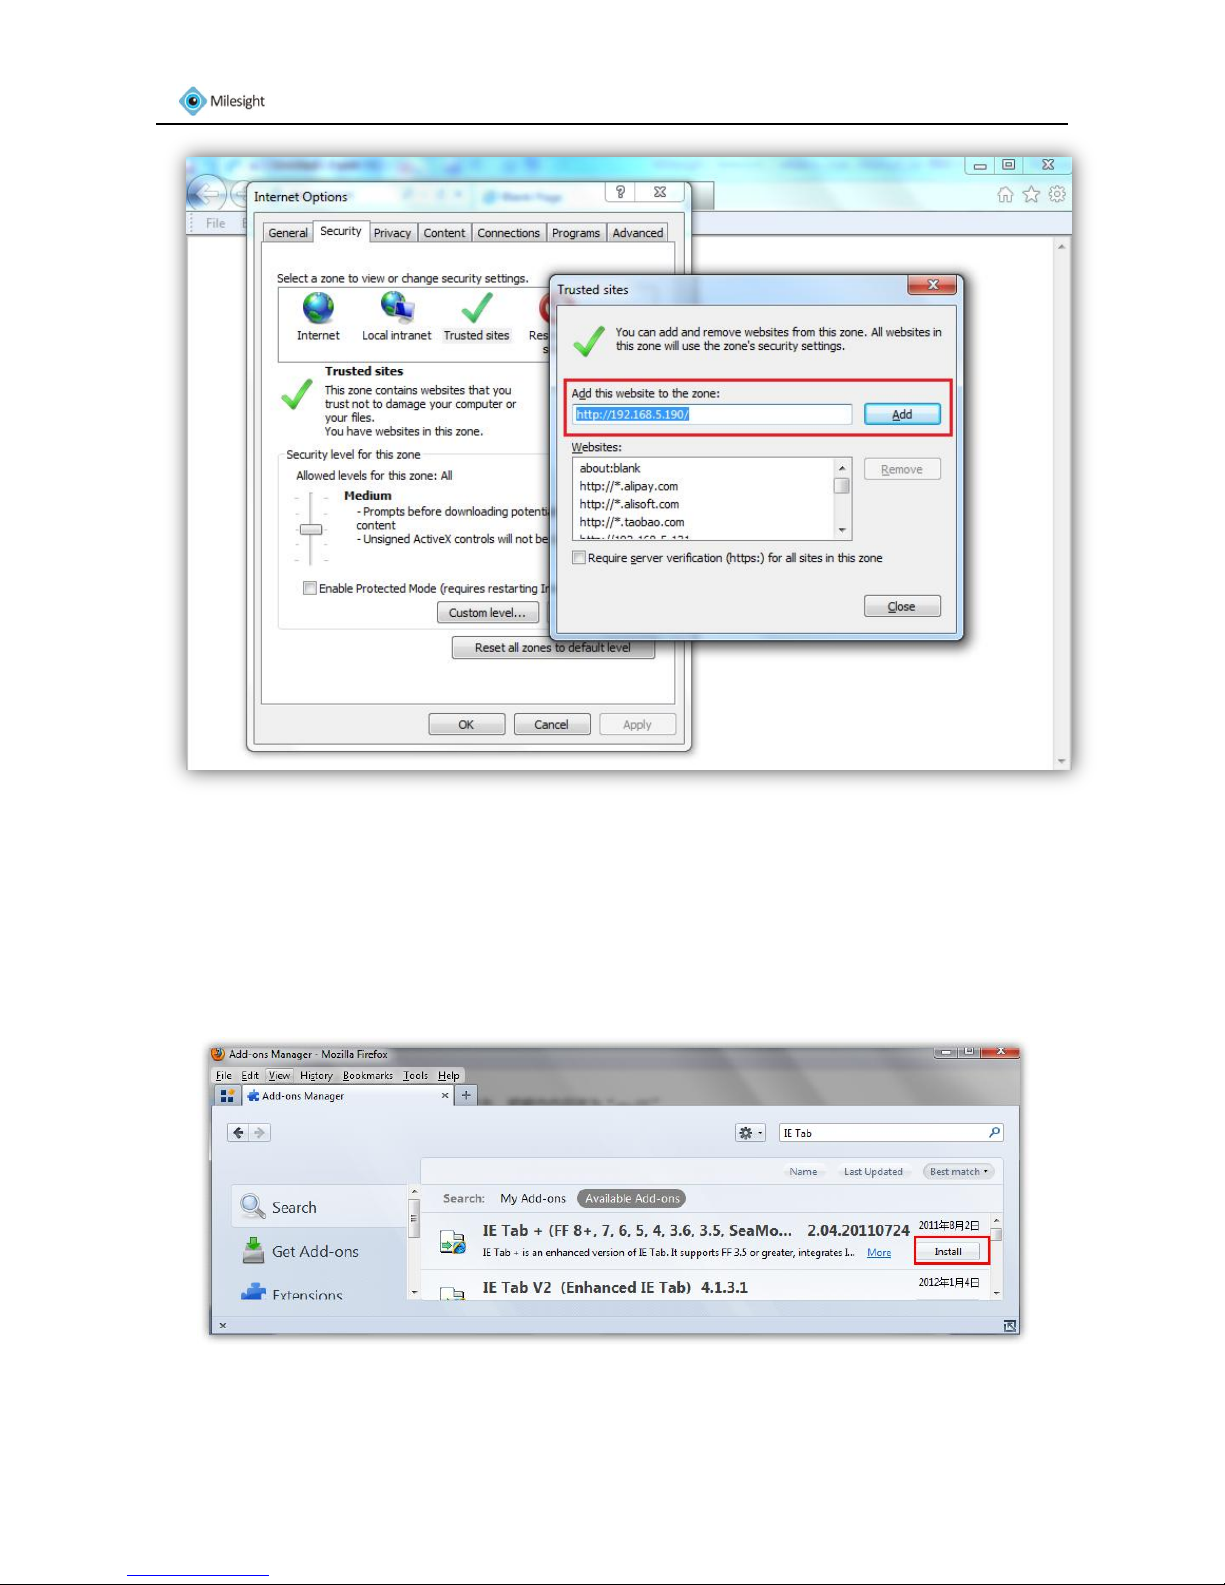
Step 3: Select “Security””Trusted sites”
Figure 6-11
Step 4: Enter the IP address of the camera in the blank and click “Add”.
Page 20
www.milesight.com 19
Milesight Technology Co., Ltd
Figure 6-12
6.2.2 Access over Firefox browser
If you want to browse the video via Firefox browser, you must install 'IE Tab' on your Firefox first.
Please do as follows:
Click 'Tools->Add-ons' and search 'IE Tab' then install. As Figure 6-13.
Figure 6-13
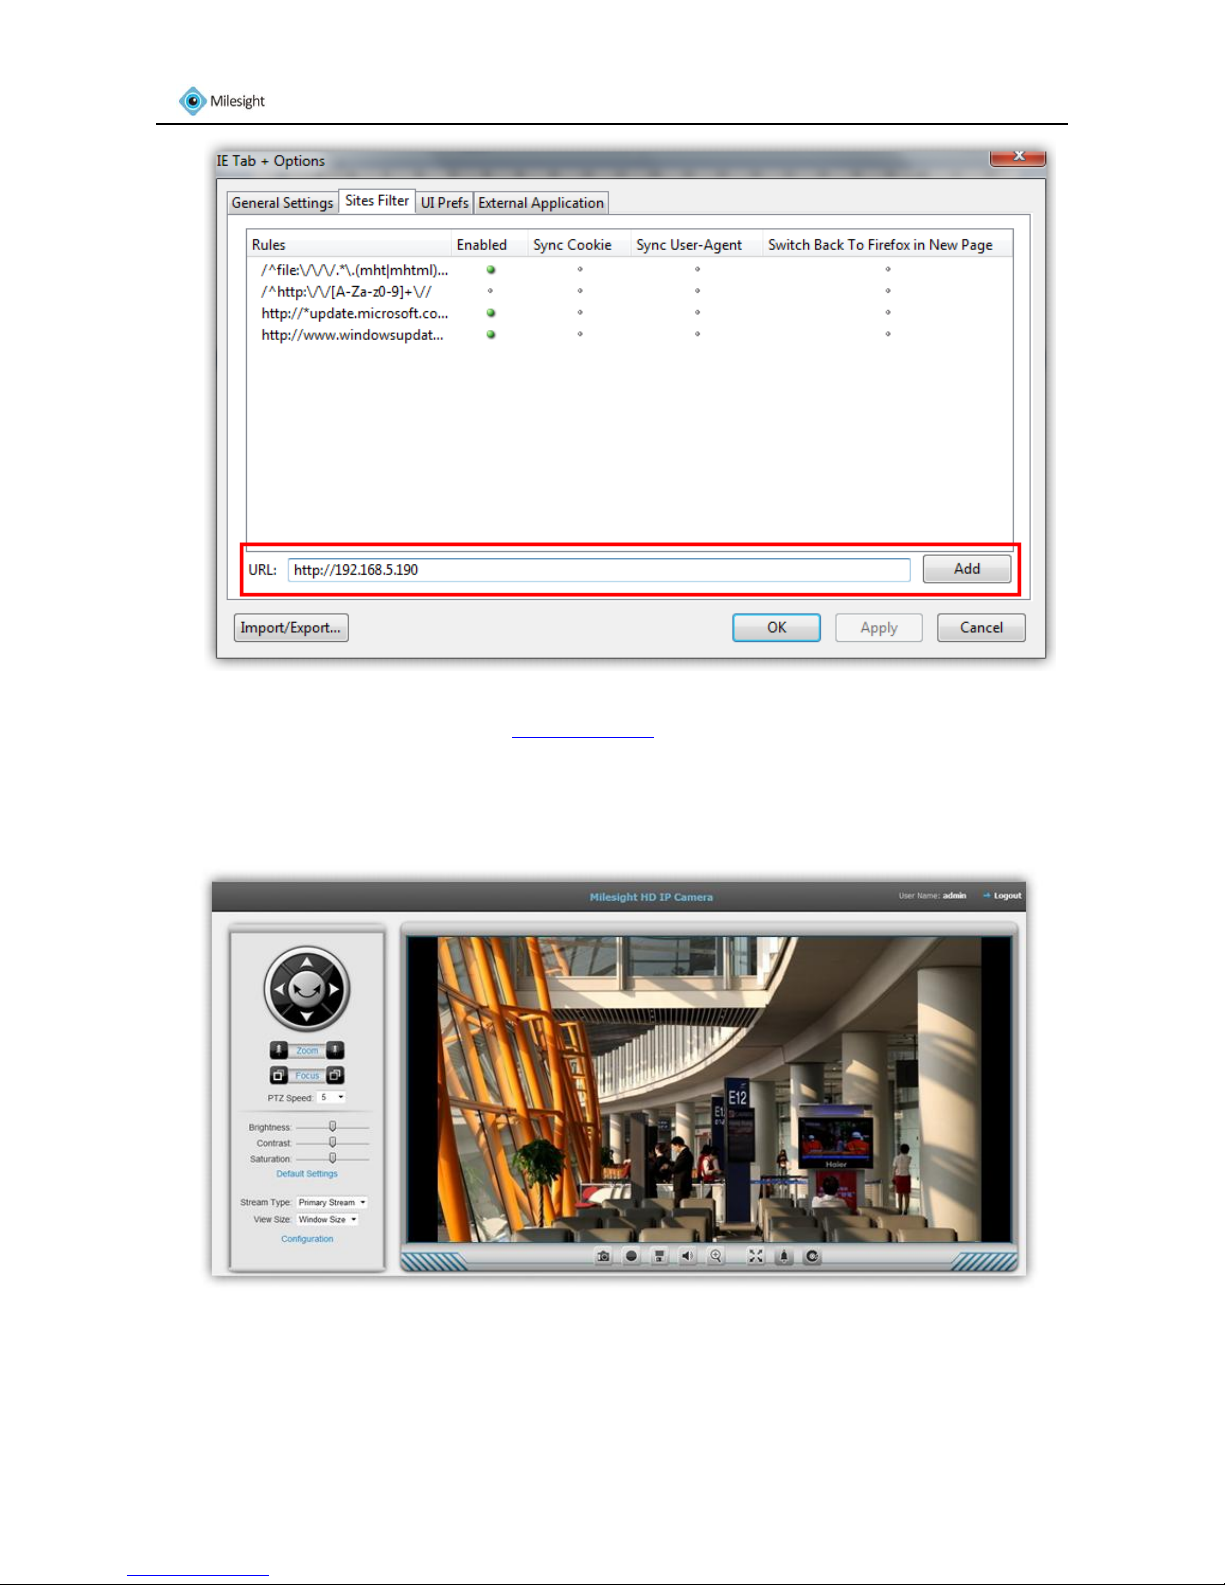
Restart the Firefox when the installation is done. Click 'Tools->IE Tab + Options' to add the IP
address of the camera in the 'Sites Filter' page as Figure 6-14.
Page 21
www.milesight.com 20
Milesight Technology Co., Ltd
Figure 6-14
Access to the camera web GUI as with IE browser.
Note: If you change the IP address of the device, please add the new URL in the IE Tab+ Sites
Filter.
After logging on IP camera`s web GUI successfully, user is allowed to view live video as bellow.
Figure 6-15
Note: Please refer to the User Manual for more detailed configuration instructions.
 Loading...