

Mile marker SEC8, SEC15, SEC95, SEC12 User Manual

Installation & Operator’s
Manual
SEC15
15,000 lbs.
SEC12
12,000 lbs.
SEC95
9,5000 lbs.
SEC8
8,000 lbs.
76-53260W (SYNTHETIC ROPE)
76-50260W (STEEL CABLE)
76-53251BW (SYNTHETIC ROPE)
76-50251BW (STEEL CABLE)
76-53246BW (SYNTHETIC ROPE)
76-50246BW (STEEL CABLE)
77-53141W (SYNTHETIC ROPE)
77-50141W (STEEL CABLE)

SAFETY WARNINGS
1.
LEARN TO USE YOUR MILE MARKER WINCH: After winch has been installed, take some time and practice using it so you will be familiar with
ALL OPERATIONS. Periodically check the winch installation to ensure that all bolts are tight. To ensure proper operation, carefully inspect for any
damaged parts before operating the winch.
2.
KEEP WINCHING AREA CLEAR: Do not allow people to remain in the area during winching operations. Do not step over a taut
steel cable/synthetic rope or allow anyone else to do so. Due to the possibility of steel cable/synthetic rope failure stand clear of any possible
pathway. A snapped steel cable/synthetic rope could cause winch failure, injury or death. Keep proper footing and balance at all times.
Do not reach over or across the winch and/or pulling steel cable/synthetic rope while the winch is in operation.
3.
INSPECT STEEL CABLE/SYNTHETIC ROPE AND EQUIPMENT FREQUENTLY: The steel cable/synthetic rope should be inspected for damage that could
reduce it’s breaking strength. A frayed steel cable/synthetic rope with broken strands should be replaced immediately. Always replace the steel
cable/synthetic rope with a steel cable/synthetic rope that is rated to sustain the load that the winch is capable of pulling. Any
substitute must be IDENTICAL in strength, quality, lay and stranding to the Mile Marker steel cable/synthetic rope originally supplied.
4.
WORKING AREA CONDITIONS: Keep the working area well lit. Do not use this winch in the presence of flammable gases or liquids.
5.
KEEP CHILDREN AWAY: Keep children away from working area. Never let children operate the winch.
6.
DRESS PROPERLY: Do not wear loose clothing or jewelry as they can be caught in moving parts. Protective, electrically non conductive clothes and
non skid footwear is the only type of clothing you should be using when operating the winch. Wear restrictive hair covering to contain long hair.
7.
USE HEAVY GLOVES: When handling or rewinding steel cable/synthetic rope always use hand protection to eliminate the possibility of cuts caused
by burrs & slivers from broken strands.
8.
DRUM: Always make sure that there are at least 5 complete turns of steel cable/synthetic rope left on the drum before winching.
9.
KEEP HANDS AND FINGERS CLEAR OF STEEL CABLE/SYNTHETIC ROPE AND HOOK WHEN OPERATING WINCH: Do not put your finger through the
hook when reeling in the last few feet. If your finger should become trapped in the hook, you could lose your finger. Do not guide a
steel cable/synthetic rope under tension onto the drum with your hand.
10.
DO NOT HOOK THE STEEL CABLE/SYNTHETIC ROPE BACK ONTO ITSELF: Hooking the steel cable/synthetic rope back onto itself creates an
excessive strain that could break individual strands; this weakens the entire steel cable/synthetic rope.
11.
KEEP PULLING DURATIONS AS SHORT AS POSSIBLE: The winch is designed for intermittent use and cannot be used in
constant duty applications. Do not pull more than one minute at or near rated load. If the motor becomes too hot to touch, stop and let it cool off
for a few minutes. If the motor stalls, cut off the power immediately.
12.
DO NOT OVERLOAD: For your safety and efficient performance, always use this winch at or under its rated capacity for your safety and for better
performance. Do not use inappropriate attachments in an attempt to exceed its rated capacity.
13.
AVOID CONTINUOUS PULLS FROM EXTREME ANGLES: This will cause the steel cable/synthetic rope to pile up at one end of the drum.
The steel cable/synthetic rope should be as straight as possible to the direction of the object.
14.
DO NOT OPERATE THE WINCH WITHOUT THE FAIRLEAD FITTED: Operator injury or winch damage can result if a fairlead is not installed.
15.
STAY ALERT: Watch what you are doing. Use your common sense. Do not use this winch when you are tired, stressed or WHEN UNDER THE INFLUENCE OF
DRUGS, ALCOHOL OR MEDICATION.
16.
DISCONNECT SWITCH: Unplug switch when not in use.
17.
REPLACEMENT PARTS & ACCESSORIES: When servicing, use only identical replacement parts. Usage of any other parts will void the warranty. Approved
accessories are available from your local distributor.
DO NOT force clutch. Rotate drum to align gears for freespool.
18.
2121 Blount Road Pompano Beach, FL 33069 MileMarker.com 1.800.886.8647PAGE 1

PRECAUTIONS
Keeps hands and body away from roller or hawse fairlead (steel cable/synthetic rope intake slot) when operating.
1.
Secure vehicle in position before using winch.
2.
Do not exceed winch load weight capacity.
3.
Be certain winch is properly bolted to a structure (or vehicle) that can hold the winch load.
4.
Always use proper couplings when connecting winch steel cable/synthetic rope hook to load.
5.
Do not lift items vertically. The winch was designed for horizontal use only.
6.
Do not overload the winch. It will do the job better at the load it was intended.
7.
Do not use inappropriate attachments to extend the length of the steel cable/synthetic rope.
8.
Do not lift people or hoist loads over people.
9.
Do not come in between the winch and the load when operating.
10.
Do not apply load to winch when steel cable/synthetic rope is fully extended. Keep at least 5 wraps of steel cable
11.
and 10 wraps of synthetic rope on the drum.
After moving an item with the winch, secure the item. Do not rely on the winch to hold it for an extended period.
12.
Examine winch before using. Components may be affected by exposure to everyday weathering, chemicals, salts, and rust.
13.
Do not fully extend steel cable/synthetic rope while under load. Keep 5 wraps of steel cable and 10 wraps of synthetic rope around
14.
the winch drum.
When loading a boat into a trailer without reel or side hull rollers, make sure the trailer is submerged in the water when the boat is
15.
loaded by the winch. Attempting to drag the boat on to the trailer while on land can cause winch failure and possible injury.
Do not operate winch if steel cable/synthetic rope shows any signs of weakening, is knotted or kinked.
16.
Winch does not have a locking mechanism. Secure load after moving.
17.
Do not cross over or under the steel cable/synthetic rope while it is in process of loading.
18.
Do not move vehicle with steel cable/synthetic rope extended and attached to load to pull it. The steel cable/synthetic rope could snap.
19.
Apply blocks (such as a wheel choke) to vehicle when parked on an incline.
20.
Respool steel cable/synthetic rope properly.
21.
2121 Blount Road Pompano Beach, FL 33069 MileMarker.com 1.800.886.8647 PAGE 2

GETTING STARTED
Winch Mounting
NOTE:
Your winch should be aligned and secured to a solid part of the vehicle (front or rear) where the full rated load will be evenly distributed
CAUTION: It is essential that the mounting surface be flat and that the winch is mounted so the three major sections
(gear housing end, drum, and motor end) are in proper alignment.
1. If necessary, drill four mounting holes (10mm in dia.), in a 10” x 4.5” pattern
2. Fasten the winch body to the mounting platform using the four screws, washers and spring washers (see parts breakdown & assembly for each
winch) provided
3. Torque the capscrews to about 35 ft-lb (47.5 N-m)
4. All Mile Marker mounting systems come pre-drilled with fairlead holes. If you are using any other mounting platform, drill two holes for the
roller fairlead installation. Position the holes so the fairlead opening hole stretches from the circumference of the drum to the end of the
maximum permissible layers on the drum in the direction cable is being rolled.
Mile Marker recommends the use of its Mile Marker mounting systems for proper winch installation and optimum winch performance.
However, if not using a Mile Marker mounting system, make sure the mounting platform being used is strong enough to meet the
maximum rated load of the winch. Mile Marker recommends steel plates with a thickness of at least 0.25”.
CAUTION: When replacing the cap screws or when longer bolts are required, make sure you use bolts grade 5 or greater
2121 Blount Road Pompano Beach, FL 33069 MileMarker.com 1.800.886.8647PAGE 3
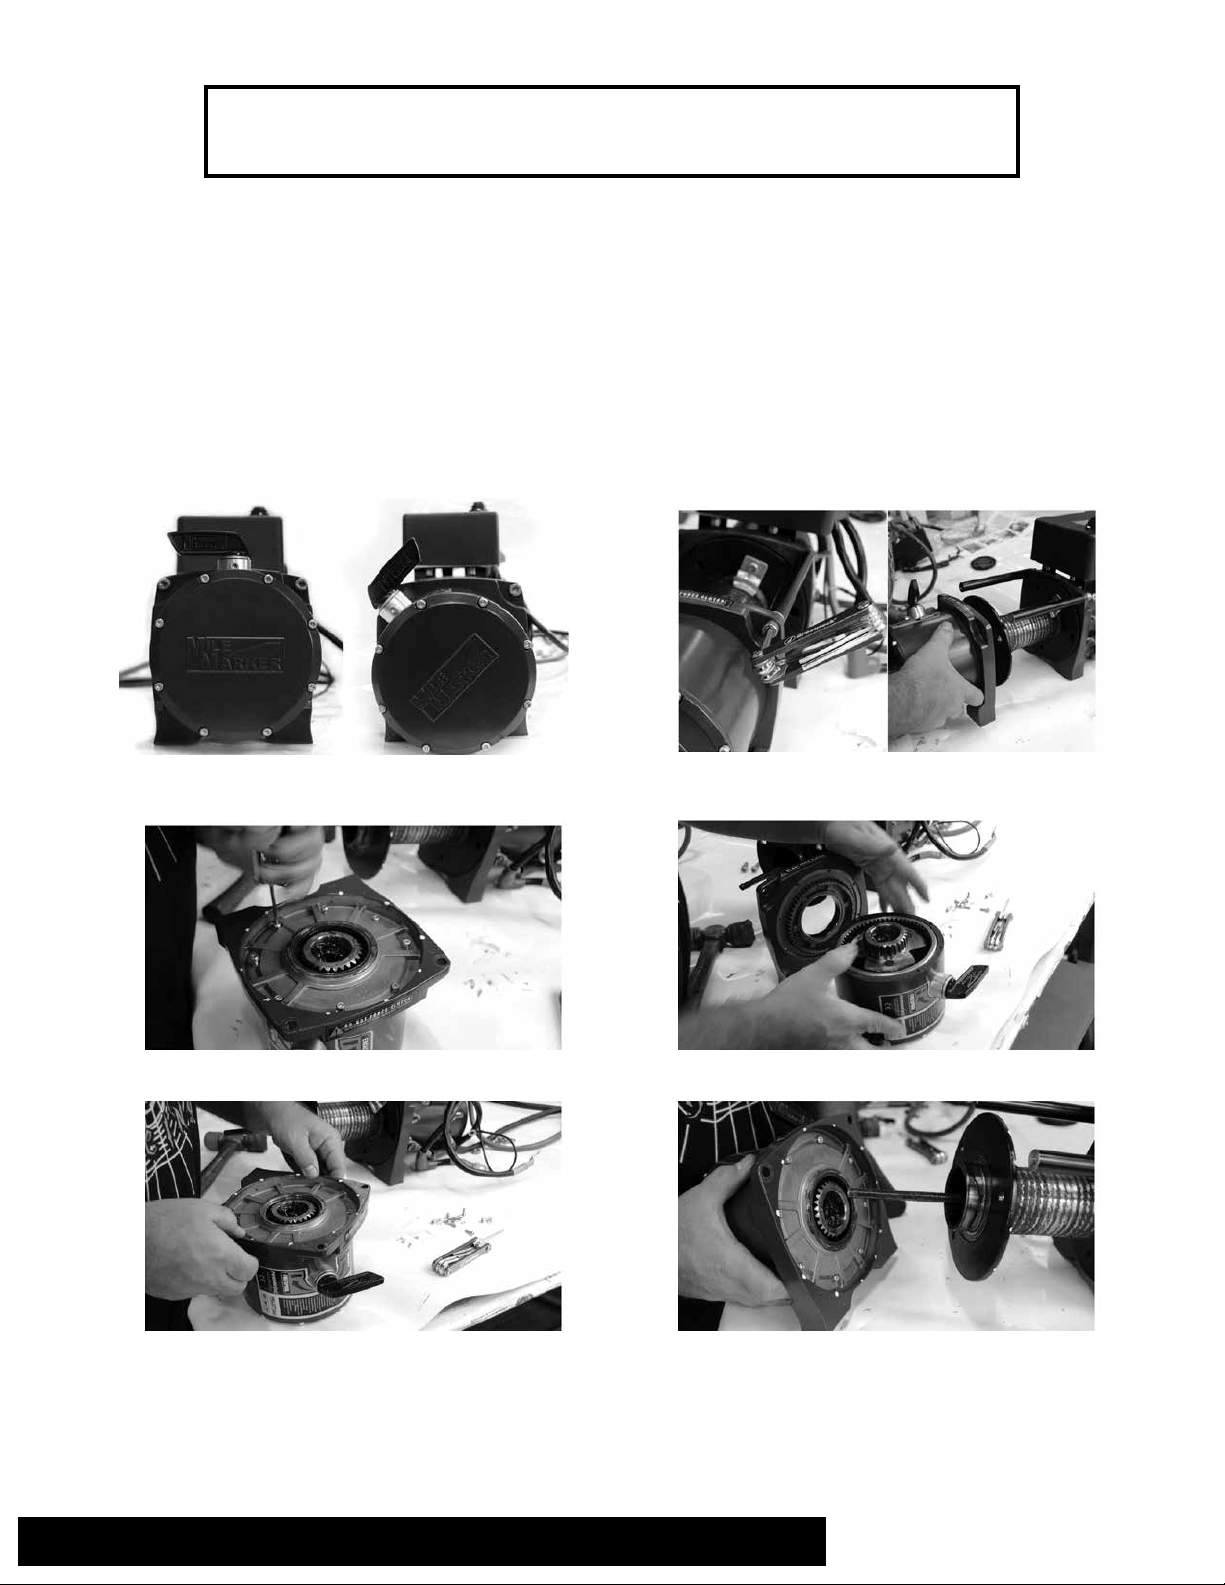
CLOCKING INSTRUCTIONS
Winch gear housing can be clocked in 8 positions, enabling the user to position the clutch lever at 8
equidistant locations (0°, 45°, 90°….360°). (Fig. 1-1)
1. Remove gear housing from tie bars (Fig. 1-2)
2. Remove the 8 bolts in the gear housing leg (Fig. 1-3)
3. Separate leg and gear housing. A slight tap with a hammer might be needed (Fig. 1-4)
4. Place gear housing leg in the angle desired and screw in bolts (Fig. 1-5) Torque to spec
5. Properly slide drive shaft in the gear housing and line drum into drive gear (Fig. 1-6)
6. Re-attach tie bars to gear housing leg by using the same process as step 1, in reverse order (Fig. 1-2)
Fig. 1-3
Fig. 1-2Fig. 1-1
Fig. 1-4
Fig. 1-5
Fig. 1-6
2121 Blount Road Pompano Beach, FL 33069 MileMarker.com 1.800.886.8647 PAGE 4
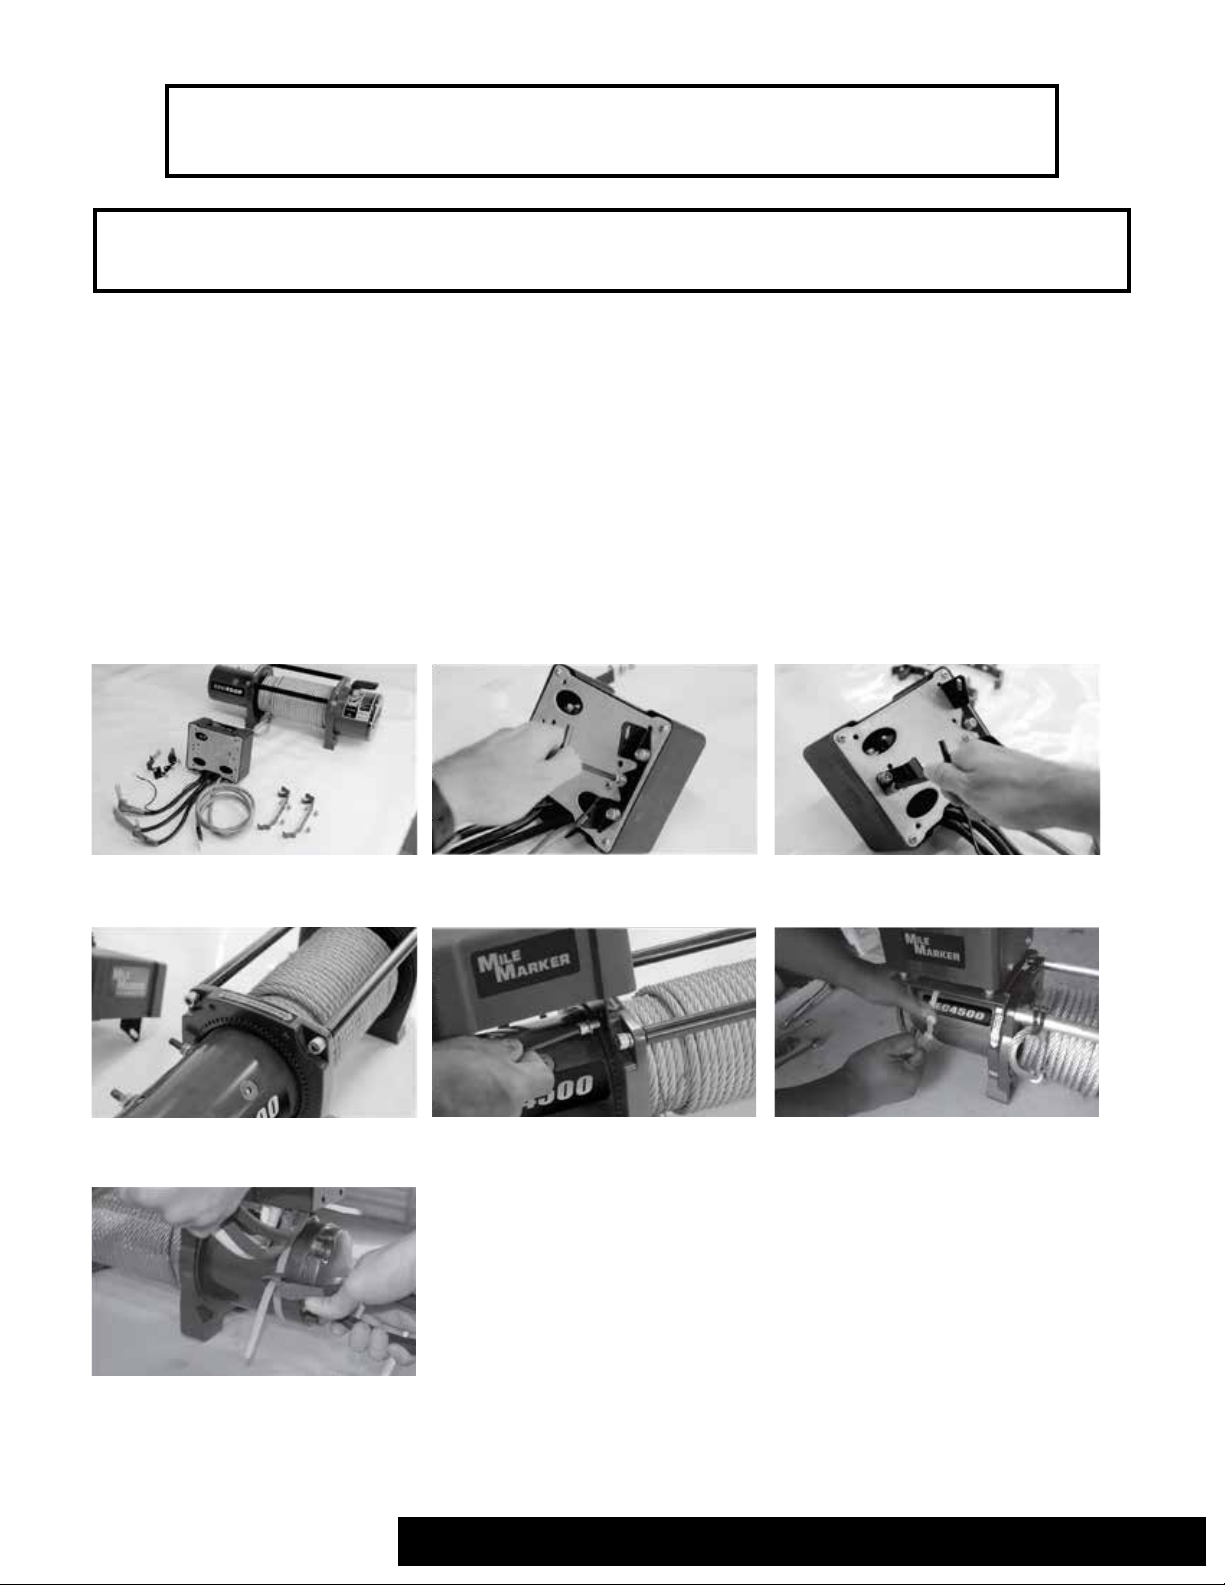
CONTROL BOX INSTALLATION
NOTE: For best results, Mile Marker recommends mounting the control box to the winch, either over the motor or over the tie bars. If you
choose to mount the control box within your vehicle, ensure that the location does not interfere with any moving or functioning parts
of your vehicle and that electrical cables with similar specifications to Mile Marker’s are used.
Tools Required for Control Box Installation
1. Wrenches: 14mm, 10mm, metric Allen wrench set, pair of snips
2. General hand tools
Mounting Control Box on Motor
If you choose to mount your control box on the winch motor, please follow the following steps
1. Mount the control box to mounting brackets using 10 mm wrench (Fig 2-2 & 2-3)
2. With mouting bracket attached to control box, locate the mounting points on the side of the motor die casting (Fig. 2-4)
3. With the control box placed on the motor, screw in the bolts to the mounting points (Fig. 2-5)
4. Attach the Tie Wrap around the small bracket to hold it down and clip the excess length (Fig. 2-6 & 2-7)
Fig. 2-1 Fig. 2-3Fig. 2-2
Fig. 2-4
Fig. 2-7
Fig. 2-5
Fig. 2-6
2121 Blount Road Pompano Beach, FL 33069 MileMarker.com 1.800.886.8647PAGE 5
 Loading...