

Page 1

Installation & Operator’s
Manual
PE5000
5,000 lbs.
2121 BLOUNT ROAD
POMPANO BEACH, FL 33069 USA
800.886.8647
MILEMARKER.COM
[email protected]
77-50120W (STEEL CABLE)
77-53120W (SYNTHETIC ROPE)
Page 2

TABLE OF CONTENTS
Safety Warnings .........................................2
Precautions ................................................3
Getting Started ..........................................4
Wiring Instructions ....................................5
Winch Operation ........................................6
Winching Tips & Techniques ......................7
Winch Maintenance .................................10
Troubleshooting .......................................11
Parts Breakdown and Assembly ..............12
Warranty ..................................................14
PAGE 1
2121 Blount Road Pompano Beach, FL 33069 MileMarker.com 1.800.886.8647
Page 3
SAFETY WARNINGS
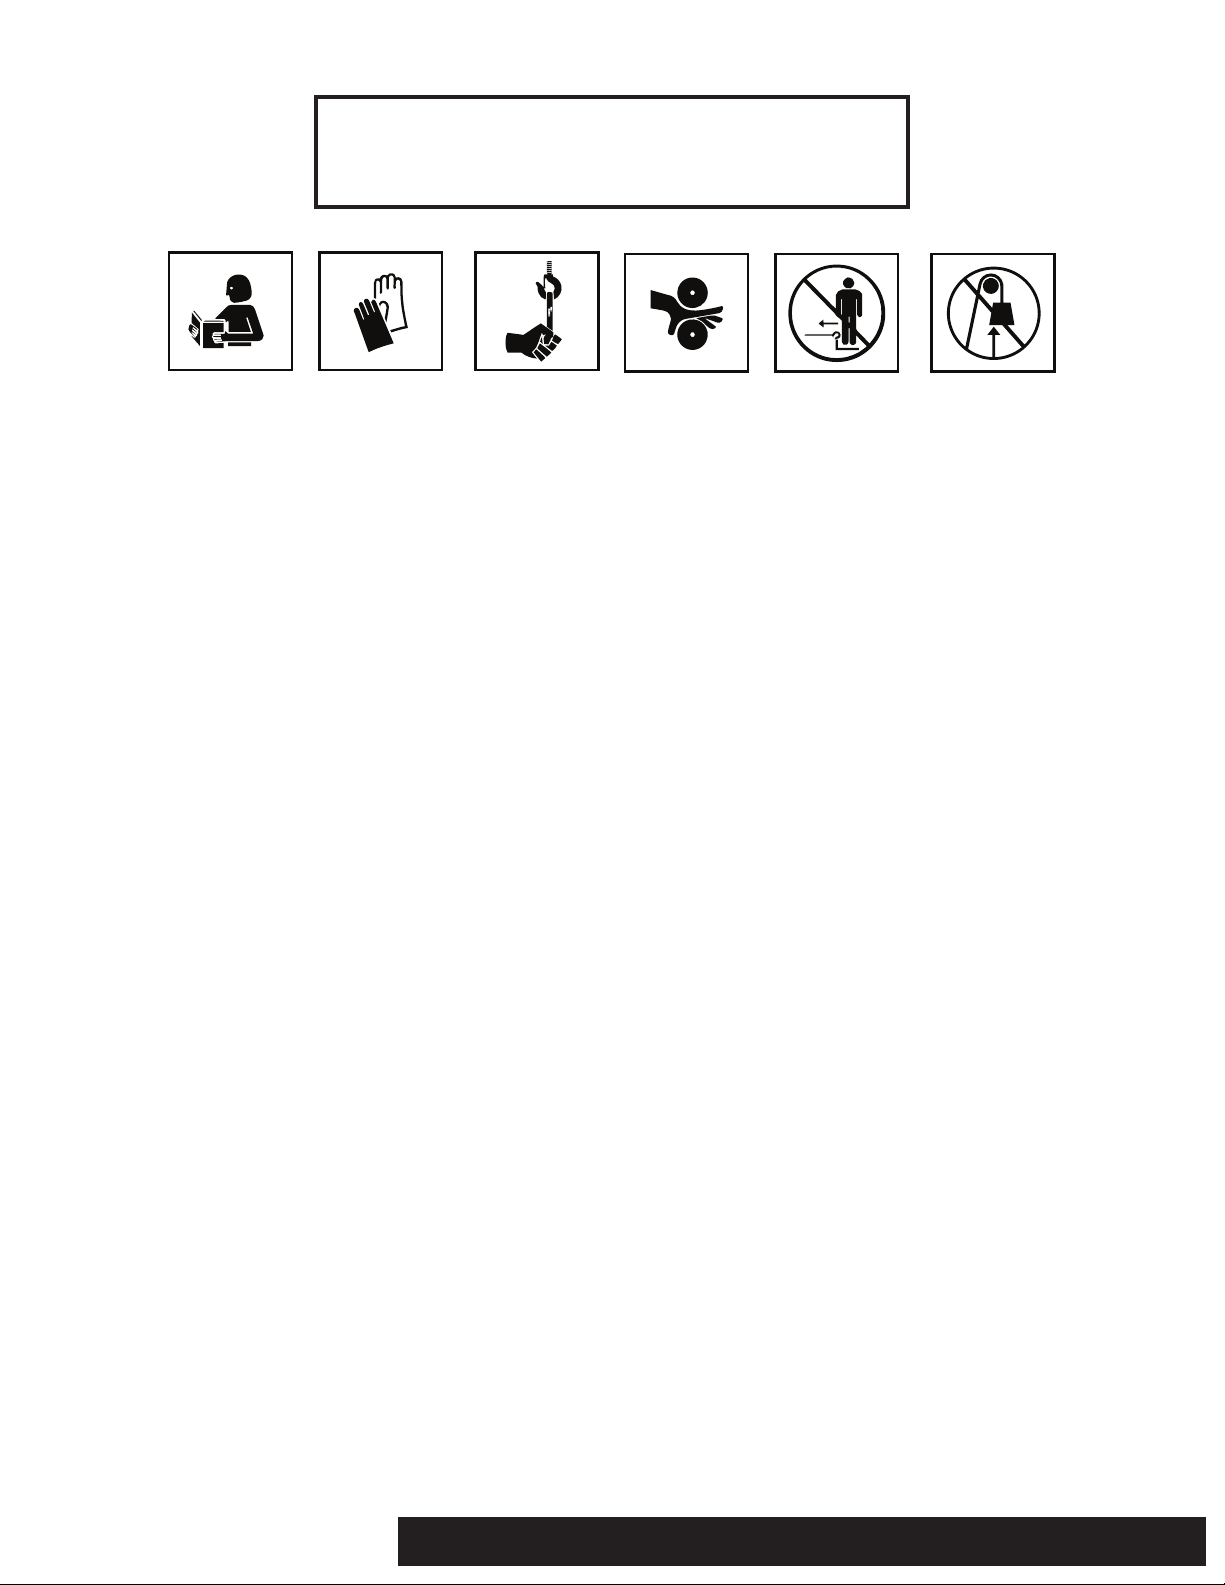
READ INSTRUCTIONS
LEARN TO USE YOUR MILE MARKER WINCH: After winch has been installed, take some time and practice using it so you will be
1.
ALWAYS WEAR GLOVES
ALWAYS USE WINCH
STRAP
PINCH HAZARD
KEEP FINGERS AWAY
DO NOT USE WINCH TO
TRANSPORT PEOPLE
DO NOT USE WINCH TO
HOIST
familiar with ALL OPERATIONS. Periodically check the winch installation to ensure that all bolts are tight. To ensure proper
operation, carefully inspect for any damaged parts before operating the winch.
KEEP WINCHING AREA CLEAR: Do not allow people to remain in the area during winching operations. Do not step over a taut steel
2.
cable/synthetic rope or allow anyone else to do so. Due to the possibility of steel cable/synthetic rope failure stand clear of any
possible pathway. A snapped steel cable/synthetic rope could cause winch failure, injury or death. Keep proper footing and
balance at all times. Do not reach over or across the winch and/or pulling steel cable/synthetic rope while the winch is in
operation.
INSPECT STEEL CABLE/SYNTHETIC ROPE AND EQUIPMENT FREQUENTLY: The steel cable/synthetic rope should be
3.
inspected for damage that could reduce it’s breaking strength. A frayed steel cable/synthetic rope with broken strands should be
replaced immediately. Always replace the steel cable/synthetic rope with a steel cable/synthetic rope that is rated to
sustain the load that the winch is capable of pulling. Any substitute must be IDENTICAL in strength, quality, lay and stranding to
the Mile Marker steel cable/synthetic rope originally supplied.
WORKING AREA CONDITIONS: Keep the working area well lit. Do not use this winch in the presence of flammable gases or liquids.
4.
KEEP CHILDREN AWAY: Keep children away from working area. Never let children operate the winch.
5.
DRESS PROPERLY: Do not wear loose clothing or jewelry as they can be caught in moving parts. Protective, electrically non
6.
conductive clothes and non skid footwear is the only type of clothing you should be using when operating the winch. Wear
restrictive hair covering to contain long hair.
USE HEAVY GLOVES: When handling or rewinding steel cable/synthetic rope always use hand protection to eliminate the
7.
possibility of cuts caused by burrs & slivers from broken strands.
DRUM: Always make sure that there are at least 5 complete turns of steel cable/synthetic rope left on the drum before winching.
8.
KEEP HANDS AND FINGERS CLEAR OF STEEL CABLE/SYNTHETIC ROPE AND HOOK WHEN OPERATING WINCH: Do not put your
9.
finger through the hook when reeling in the last few feet. If your finger should become trapped in the hook, you could lose your
finger. Do not guide a steel cable/synthetic rope under tension onto the drum with your hand.
DO NOT HOOK THE STEEL CABLE/SYNTHETIC ROPE BACK ONTO ITSELF: Hooking the steel cable/synthetic rope back onto itself
10.
creates an excessive strain that could break individual strands; this, weakens the entire steel cable/synthetic rope.
KEEP PULLING DURATIONS AS SHORT AS POSSIBLE: The winch is designed for intermittent use and cannot be used in
11.
constant duty applications. Do not pull more than one minute at or near rated load. If the motor becomes too hot to touch, stop
and let it cool off for a few minutes. If the motor stalls, cut off the power immediately.
DO NOT OVERLOAD: For your safety and efficient performance, always use this winch at or under its rated capacity for your safety
12.
and for better performance. Do not use inappropriate attachments in an attempt to exceed its rated capacity.
AVOID CONTINUOUS PULLS FROM EXTREME ANGLES: This will cause the steel cable/synthetic rope to pile up at one end of the
13.
drum. The steel cable/synthetic rope should be as straight as possible to the direction of the object.
DO NOT OPERATE THE WINCH WITHOUT THE FAIRLEAD FITTED: Operator injury or winch damage can result if a fairlead is not installed.
14.
STAY ALERT: Watch what you are doing. Use your common sense. Do not use this winch when you are tired, stressed or WHEN UNDER
15.
THE INFLUENCE OF DRUGS, ALCOHOL OR MEDICATION.
DISCONNECT SWITCH: Unplug switch when not in use.
16.
REPLACEMENT PARTS & ACCESSORIES: When servicing, use only identical replacement parts. Usage of any other parts will void the
17.
warranty. Approved accessories are available from your local distributor.
DO NOT force clutch. Rotate drum to align gears for freespool.
18.
2121 Blount Road Pompano Beach, FL 33069 MileMarker.com 1.800.886.8647PAGE 2
Page 4

PRECAUTIONS
Keeps hands and body away from fairlead (steel cable/synthetic rope intake slot) when operating.
1.
Secure vehicle in position before using winch.
2.
Do not exceed winch load weight capacity.
3.
Be certain winch is properly bolted to a structure (or vehicle) that can hold the winch load.
4.
Always use proper couplings when connecting winch steel cable/synthetic rope hook to load.
5.
Do not lift items vertically. The winch was designed for horizontal use only.
6.
Do not overload the winch. It will do the job better at the load it was intended.
7.
Do not use inappropriate attachments to extend the length of the steel cable/synthetic rope.
8.
Do not lift people or hoist loads over people.
9.
Do not come in between the winch and the load when operating.
10.
Do not apply load to winch when steel cable/synthetic rope is fully extended. Keep at least 5 full turns of
11.
steel cable/synthetic rope on the drum.
After moving an item with the winch, secure the item. Do not rely on the winch to hold it for an extended period.
12.
Examine winch before using. Components may be affected by exposure to everyday weathering, chemicals, salts, and rust.
13.
Do not fully extend steel cable/synthetic rope while under load. Keep 5 COMPLETE TURNS of steel cable/synthetic rope
14.
around the winch drum.
When loading a boat into a trailer without reel or side hull rollers, make sure the trailer is submerged in the water when the boat is
15.
loaded by the winch. Attempting to drag the boat on to the trailer while on land can cause winch failure and possible injury.
Do not operate winch if steel cable/synthetic rope shows any signs of weakening, is knotted or kinked.
16.
Winch does not have a locking mechanism. Secure load after moving.
17.
Do not cross over or under the steel cable/synthetic rope while it is in process of loading.
18.
Do not move vehicle with steel cable/synthetic rope extended and attached to load to pull it. The steel cable/synthetic
19.
rope could snap.
Apply blocks (such as a wheel choke) to vehicle when parked on an incline.
20.
Respool steel cable/synthetic rope properly.
21.
2121 Blount Road Pompano Beach, FL 33069 MileMarker.com 1.800.886.8647PAGE 3
Page 5

GETTING STARTED
Mounting Options
When installing a winch, your installation may vary from the manual diagrams and instructions included here due to physical vehicle
differences. Always disconnect the battery from the vehicle to before starting installation. If you choose not to use an ATV/UTV mounting kit you
may be required to drill holes in a structural support on the ATV/UTV. Be sure the location will be strong enough to support the rated pulling force
of the winch.
DO NOT DRILL INTO OR NEAR WIRING OR GAS TANK!
Winch Mounting
NOTE:
CAUTION:
Mounting Points that can be used in this installation:
(A) Winch and Mount
(B) Under Seat Control Box Mounting
(C) Handlebar Pendant Mount
(D) Remote Pendant Receiver Location
1. Install the mounting kit or prepare a flat and secure location on the ATV/UTV for the winch. The winch mount kit has it’s own instructions for
the intended ATV/UTV.
2. Position the winch over the mount and check for operation of the clutch lever to frame clearance. Check for tire to winch clearance. If ok,
continue on to the next step.
3. Secure the winch to the mounting bracket or surface chosen with the correct hardware.
Mile Marker recommends the use of its mounting systems for
proper winch installation and optimum winch performance.
However, when not using Mile Marker Mounting System, ensure
that the mounting platform is strong enough to meet the
maximum rated load of the winch in use. Your winch should be
aligned and secured to a solid part of the vehicle (front or rear)
where the full rated load will be evenly distributed.
It is essential that the mounting surface be flat and the
winch is mounted such that the three major sections (gear
housing end, drum and motor end) are in proper alignment.
NOTE:
Make sure the winch mounting bolts and winch hardware has been checked for proper torque. Sometimes it may be necessary to
remove the steel cable/synthetic rope from the winch drum to install the mounting hardware or roller/hawse fairlead. All Mile Marker
Mounting Systems come fairlead ready. If you are using any other mounting platforms, drill two holes for the roller/hawse fairlead
installation. Position the holes such that the fairlead opening hole stretches from the circumference of the drum to the end of the
maximum permissible layers on the drum in the direction steel cable/synthetic rope is being rolled.
2121 Blount Road Pompano Beach, FL 33069 MileMarker.com 1.800.886.8647PAGE 4
Page 6
WIRING INSTRUCTIONS
NOTE:
CAUTION:
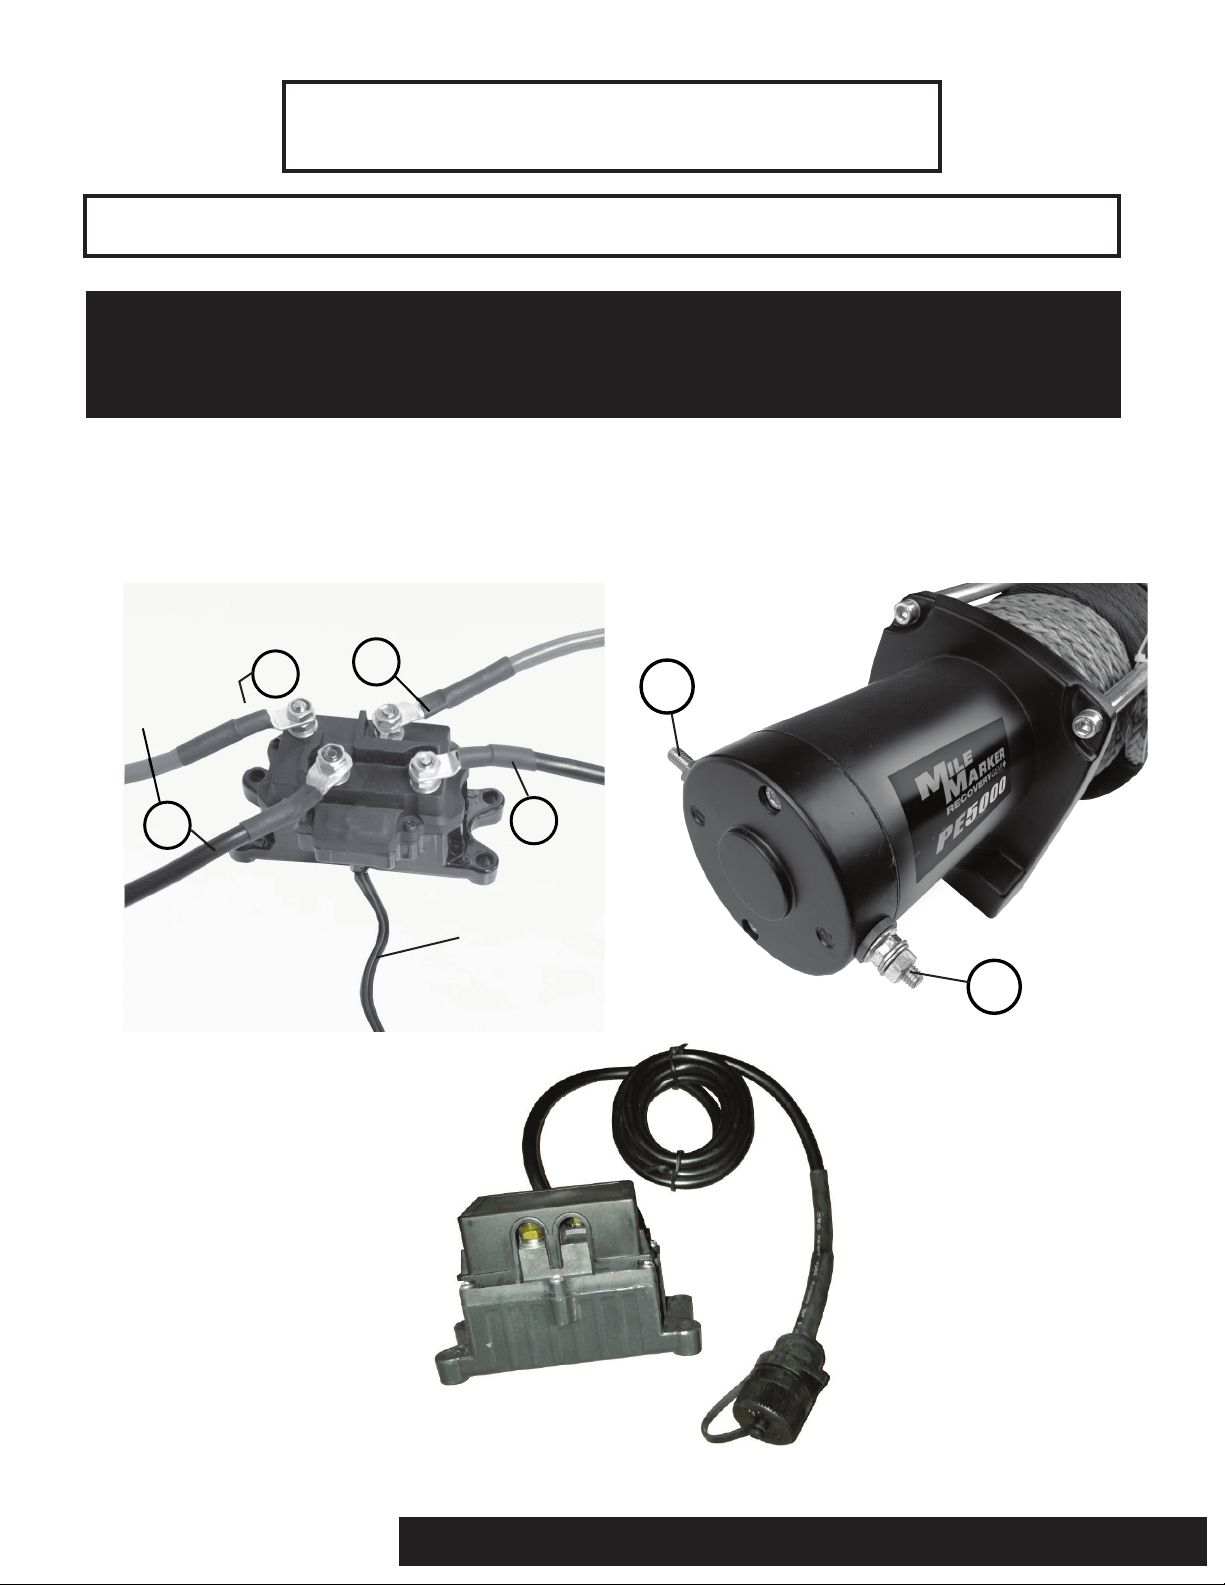
Be sure to mount control box in a location that: does not interfere with any vehicle’s moving/functioning parts, and use
electrical cables with similar specifications as that provided by Mile Marker if a substitution is required.
Battery cables should not be drawn taut, leave some slack for cable movement. Ensure that they are routed properly with out
any interference with the vehicular components that could potentially damage the cable or cause electrical short.
Long battery cable runs may have significant voltage drops that may cause the winch motor controller to not operate
properly.
DO NOT CONNECT POWER CABLES TO BATTERY
UNTIL FINAL STEP OF INSTALLATION!
To negative (-)
battery terminal
(Black Cable)
To Winch
terminal “A”
(Black Cable)
A
To positive (+)
battery terminal
(Red Cable)
+
From solenoid
terminal “B”
(Red Cable)
B
-
2-1: Wiring Diagram
B
From solenoid
terminal “B”
(Red Cable)
To winch control
socket
A
From solenoid
terminal “A”
(Black Cable)
Winch Control Socket
2121 Blount Road Pompano Beach, FL 33069 MileMarker.com 1.800.886.8647PAGE 5
Page 7
WINCH OPERATION
Function Testing
After checking all connections in accordance to installation instructions prior, connect power cables to vehicle’s battery. Attach Black Cable to
Negative (-) Battery Terminal and secure, followed by attaching the Red Cable to Positive (+) Battery Terminal.
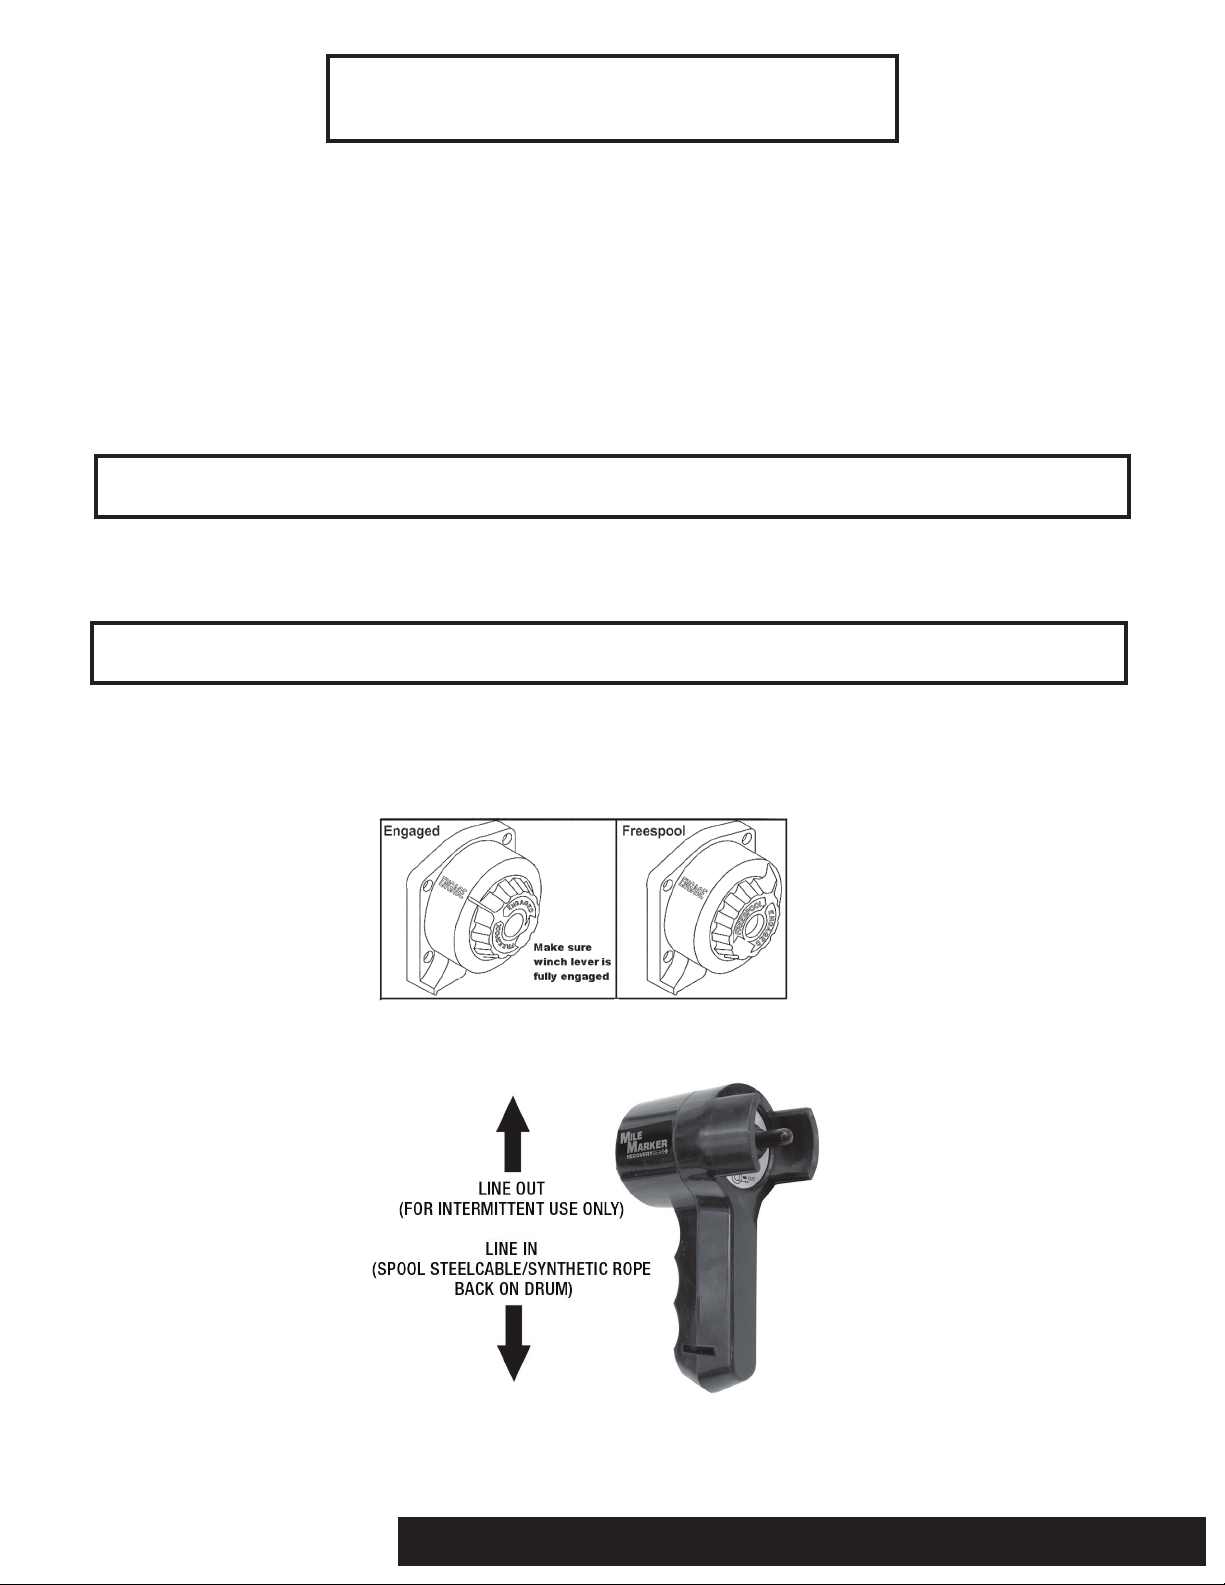
1. Before testing the winch, turn the clutch handle to the “Freespool” position. Always wear heavy gloves when handling winch steel cable/
synthetic rope. Using a Mile Marker hook strap, pull about two feet of steel cable/synthetic rope off the winch drum, and place the clutch
handle in the “Engaged” position (Fig. 3-1).
2. Toggle the Joystick “down” to retrieve line. When using the handlebar remote, you can also toggle the “IN” button for the same retrieval
function (Fig. 3-2). Steel cable/synthetic rope will spool in on drum.
NOTE: If steel cable/synthetic rope is spooled “Out” while pressing the “IN” function, please refer to Fig. 2-1 (on page 5), and switch power
cables to opposite studs on motor.
3. Toggle the Joystick “up” to Power Out winch steel cable/synthetic rope. When using the handlebar remote, you can also toggle the “OUT”
button for the same Power Out function (Fig. 3-2). Winch steel cable/synthetic rope will spool out off of drum.
NOTE: The “OUT” function is for INTERMITTENT USE ONLY, as you are powering drum against the brake, and can damage internal mechanism.
4. If any of the above functions are not working properly, recheck all connections in accordance with Wiring Instructions in this manual, or
refer to Troubleshooting Section in the back of manual.
3-1: Clutch Function Diagram
3-2: Remote Control Function Diagram
2121 Blount Road Pompano Beach, FL 33069 MileMarker.com 1.800.886.8647PAGE 6
Page 8
WINCHING TIPS & TECHNIQUES
Winching Tips and Use of a Snatch Block
• Use OEM tow hooks, recovery eyes or a clevis mount for attachment of a tow strap or winch steel cable/synthetic rope.
Warning: Do not use a ball and/or ball mount as an anchor point for tow strap or winch steel cable/synthetic rope.
Severe personal injury or death could occur.
•Always heed all winch manufacturer’s recommendations, cautions, and warnings.
• Attach return cable to tow hook or recovery eye when using a snatch block. Always use a clevis to secure snatch block to strap, or severe
damage could occur to persons and vehicle.
CAUTION: Do not attach return cable to winch mount. This may overload winch mount and/or front receiver.
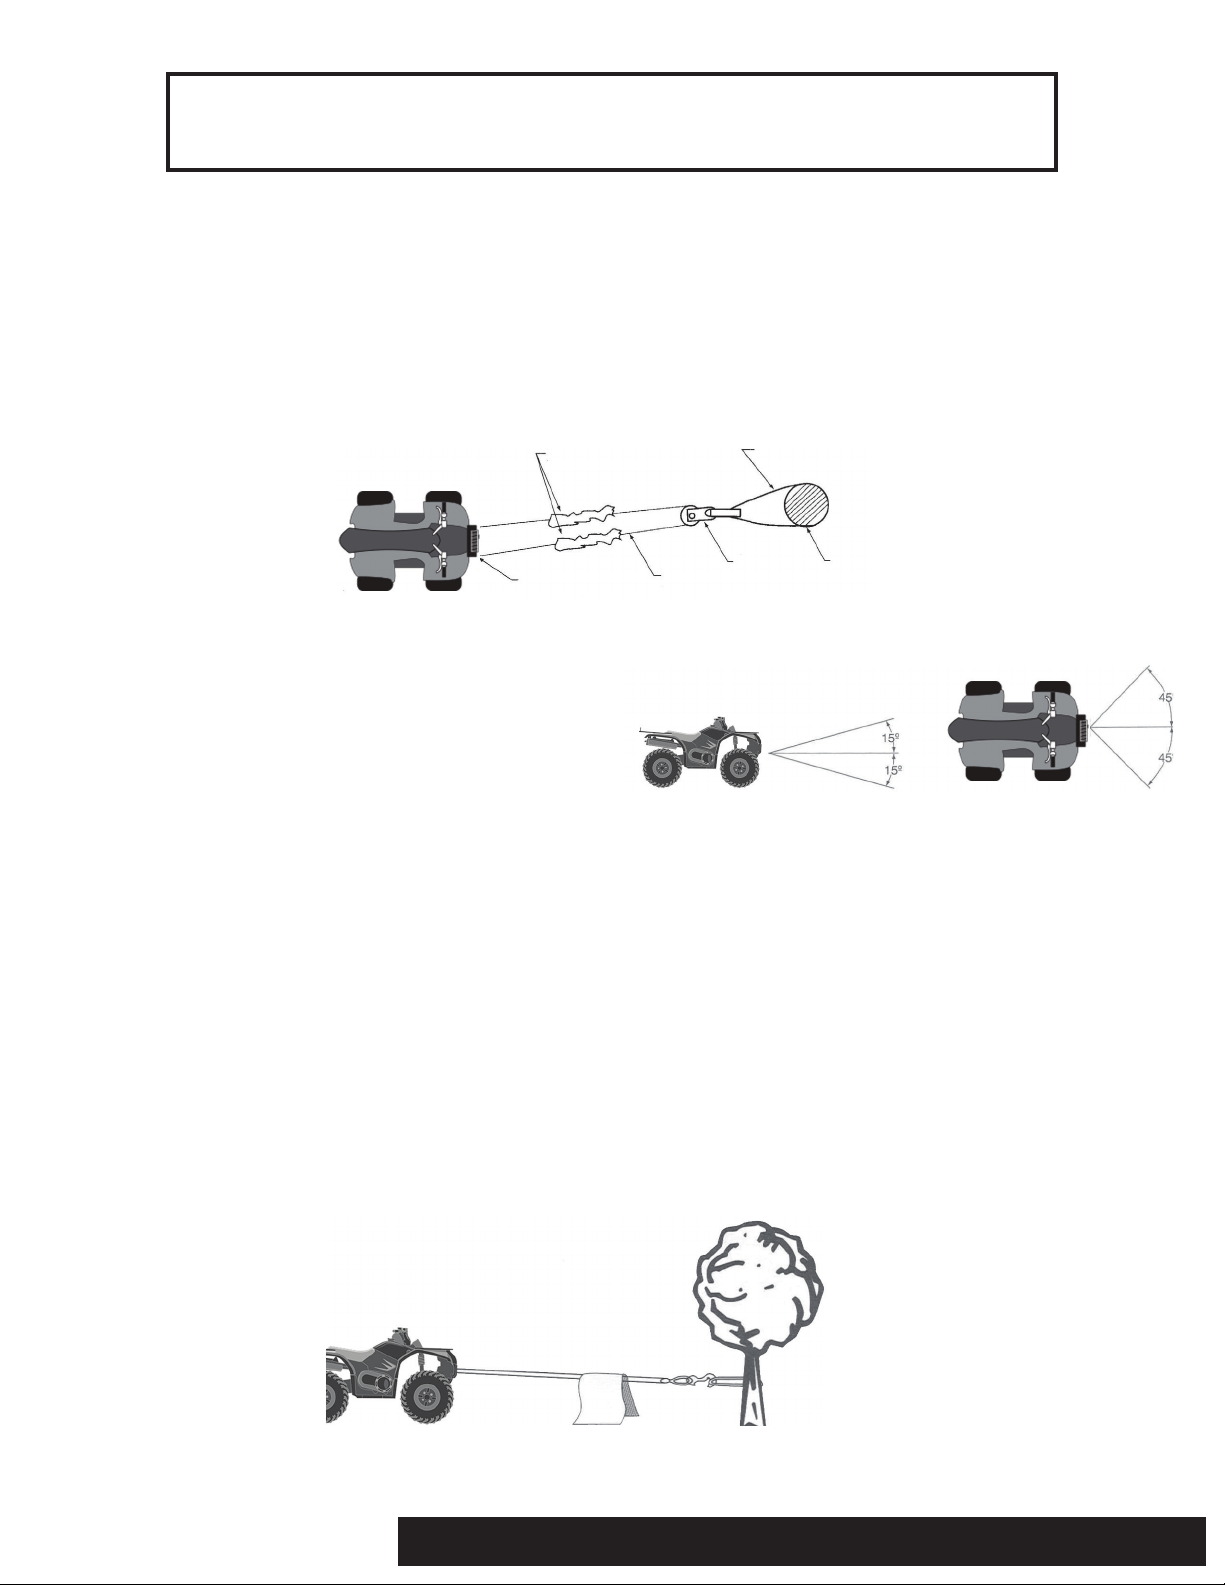
Rating
For maximum line pull rating, winch cable direction must not exceed:
1. 15º angle up or down from horizontal.
2. 45º angle left or right from straight ahead.
CAUTION: Exceeding the maximum line pull rating may overload
winch, mount, and/or front mounted receiver.
Safety Tips
• DO NOT DISENGAGE CLUTCH LEVER WHEN THERE IS A LOAD ON THE WINCH. Mile Marker electric winches utilize an automatic load holding
brake, therefore no adjustment to clutch is needed to maintain load.
• Store the remote control cord in a safe place when not in use to prevent use by children or other unauthorized persons who could injure
themselves or others or damage the controls.
•Do not operate winch under the influence of drugs, alcohol, or medications.
•Isolate winch before putting hands in or around the fairlead or steel cable/synthetic rope drum.
• DO NOT OVERLOAD YOUR WINCH. Do not maintain power to the winch if the drum stops. Overloads can damage the vehicle, winch or winch
steel cable/synthetic rope and create unstable operating conditions.
• It is recommended to lay a dampener over the steel cable/synthetic rope about halfway along to the hook attachment. If a steel
cable/synthetic rope failure should occur, the weight of the dampener will help prevent the broken steel cable/synthetic rope from whipping.
Remember to move the dampener as winching proceeds, but halt winching when doing so. Partially raising the hood of the vehicle will also
give a measure of protection to its occupants from broken steel cable/synthetic rope, consistent with sufficient forward visibility for the
operator.
2121 Blount Road Pompano Beach, FL 33069 MileMarker.com 1.800.886.8647PAGE 7
Page 9
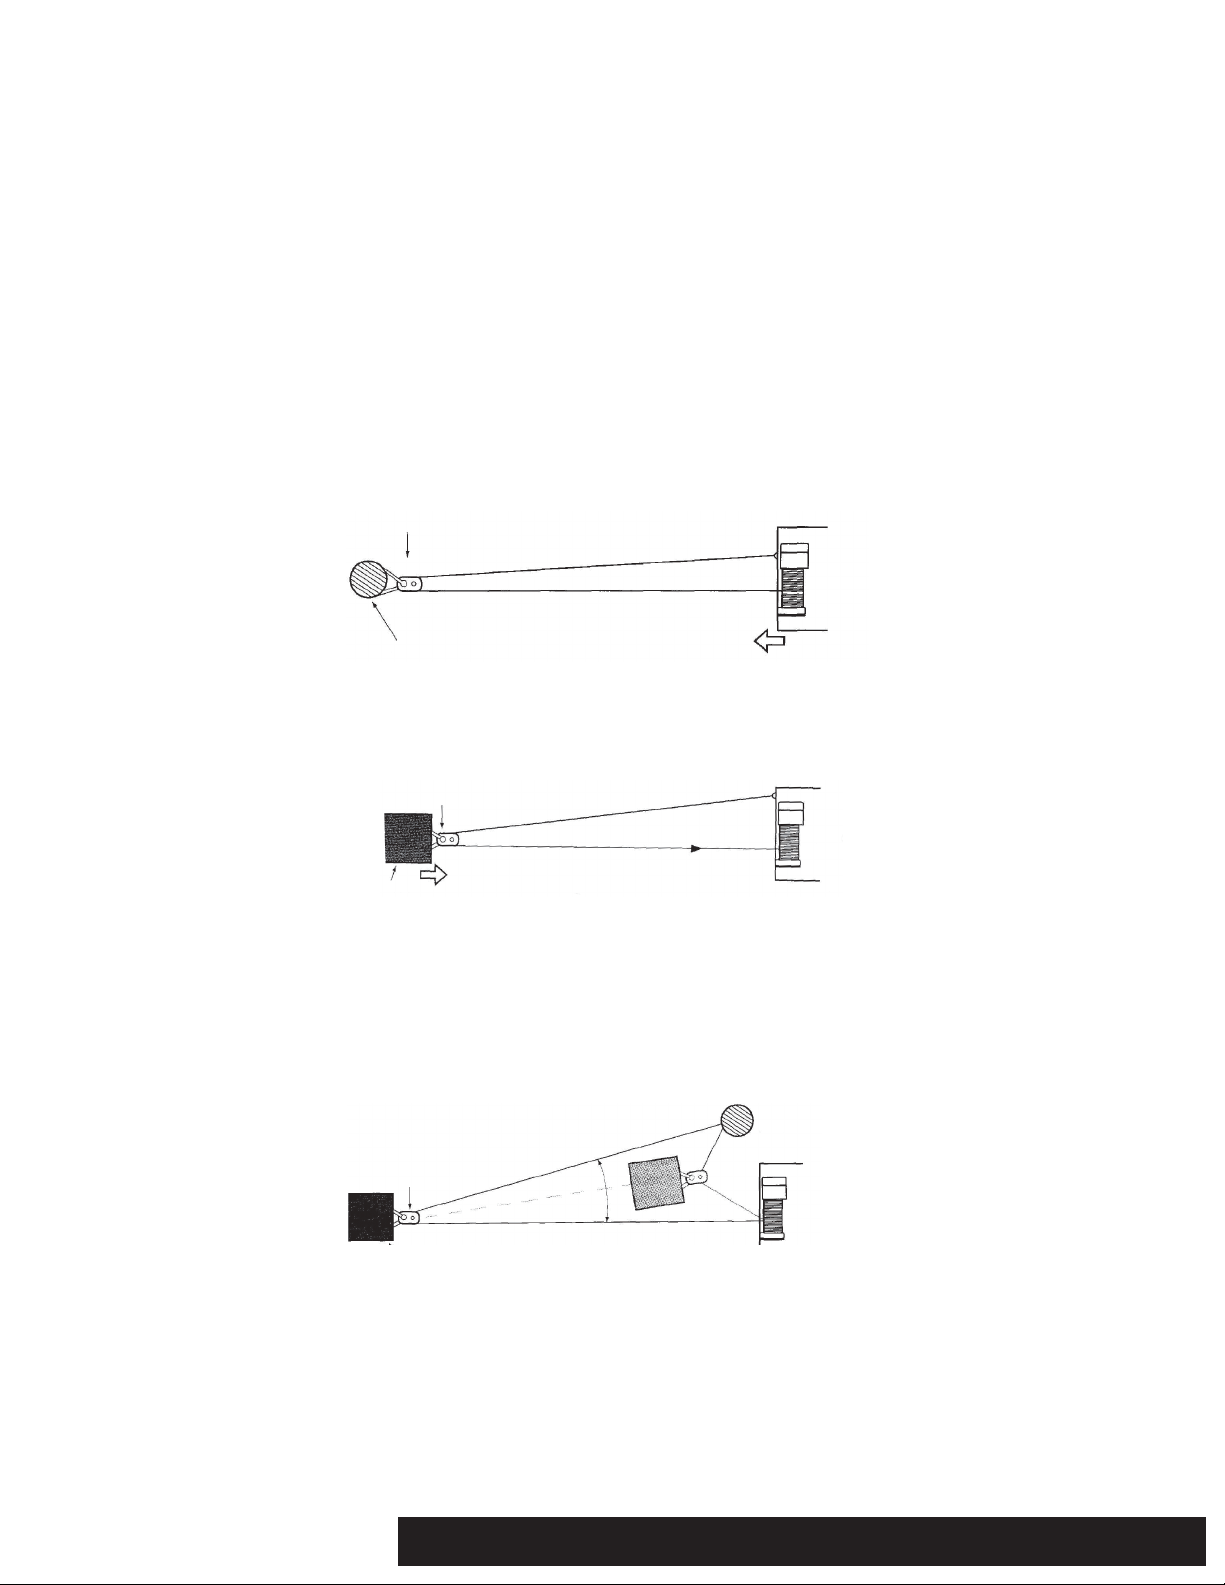
Self Recovery
1. Always attempt to get the steel cable/synthetic rope as straight as possible to the direction of the vehicle. It is acceptable to start a pull at
an angle if it is obvious that the vehicle will turn towards the hook anchoring point. Turning the steering wheel will assist the process. It is
recommended that the driver is in the vehicle.
2. Make sure hand brake and foot brake are free and that the transmission is in neutral.
3. When the driver’s attempt to regain vehicle traction is successful, he or she should be careful not to overrun the steel cable/synthetic rope
and risk the possibility of it being trapped under the vehicle.
4. DO NOT move your vehicle in reverse to assist the winch. The combination of the winch and vehicle pulling together could overload the
steel cable/synthetic rope and winch itself.
Use of a Pulley Block or Snatch Block
Vehicle self recovery using the pulley block attached to the anchor point for direct pull. In this instance the vehicle becomes the “load” and
the actual pulling power on the vehicle will be double at half winch steel cable/synthetic rope speed. Do not connect steel cable/synthetic
rope or hook back to winch mount!
Direct pull on load using the winch vehicles as the anchor with pulley block attached to the load. The most important aid to successful
winching (after the winch) is the pulley block, which can be used to increase the pulling power of the winch of for indirect pulls. Pulley blocks
can be used in two modes. First mode is attached to the load and second is secured to an anchor point.
Indirect pull necessitated by obstructions or soft ground. Pulley block attached to load using a suitable anchor point. Note the angled direction
taken by the load and subsequent angle of steel cable/synthetic rope feed back on the winch drum (extreme example shown). There may be
unavoidable circumstances requiring this mode, though in general it is not recommended unless applied in stages by moving the
anchor point or vehicle to avoid the sharp angled rewind on the winch drum. The actual load pulling power and steel cable/synthetic rope
speed will depreciate with any increased angle between the steel cables/synthetic ropes. The anchor point, when used must be secure, using
a tree, another vehicle or any firm structure to which a pulley block can be used to your advantage.
Use of a Nylon Sling and Shackle
A shackle should always be used when attaching winch hooks to nylon slings. NOTE: The shackle must pass through both eyes of the sling.
The safe working load of the nylon sling is based on the use of both eye ends. Do not use the cable or hook to connect directly to the nylon sling.
2121 Blount Road Pompano Beach, FL 33069 MileMarker.com 1.800.886.8647PAGE 8
Page 10

NOTE:
For optimal winch performance, it is recommended that you use a fully charged 12V battery with at least 150 Cold Cranking Amperes.
Further, it is advised to keep the engine running during the winch operation, so that the battery is being charged continuously.
Motor Temperature
ELECTRIC WINCHES ARE DESIGNED FOR INTERMITTENT USE ONLY. Do not run this winch at a high load for an extended period of time. To
check the motor temperature: stop operation, secure the load, release the tension on the steel cable/synthetic rope, and place your hand
on the motor to check temperature. If you feel the motor is warm to the touch, let it cool off for a few minutes. If the motor is laboring, stop
sooner and more often to check the motor temperature. Using a double line with a snatch block will reduce the load on the winch to about
half. The lower the amp load on the winch the longer it will take to heat up the motor.
Spooling Under Load
Spooling Under Load: Always ensure that steel cable/synthetic rope passes between drum & mounting surface. Always wind the steel cable/
synthetic rope as evenly and tight as possible. Avoid shock loading the winch when spooling in. If this is done you can cause a hazardous
condition that can break the steel cable/synthetic rope or damage the winch. Avoid pulling at an angle for an extended period. This will stack
the steel cable/synthetic rope up on side of the spool and cause serious damage to the winch. You may have to reposition the steel cable/
synthetic rope a few times to allow the winch to pull in a straight line.
Rigging
Spool out as much wire as possible to the farthest object available. Keep the wire in as straight a line as you can. Spool the line back on the
winch as evenly as possible when retrieving the steel cable/synthetic rope. Natural anchors like trees, stumps and rocks are the better
choices. Always use a tree saver where ever possible. Only connect the steel cable/synthetic rope to an object that will be able to resist the
pulling power of the winch being used.
2121 Blount Road Pompano Beach, FL 33069 MileMarker.com 1.800.886.8647PAGE 9
Page 11

WINCH MAINTENANCE
• All moving parts within the electric winch have been lubricated using high temperature lithium grease at the factory. No further internal
lubrication is required for the life of the winch.
•If using steel cable, lubricate the steel cable periodically using light penetrating oil.
• Electrical connections may corrode over a period of time due to environmental changes. This may result in reduced performance of the winch
or even possible electrical shorting. Hence, always clean the electrical connections before and after using the winch.
•After every use of the winch, inspect the steel cable/synthetic rope for damages such as kinks, broken strands etc. When damaged, replace
the steel cable/synthetic rope immediately!
CAUTION: It is recommended that you replace the steel cable/synthetic rope with superior Mile Marker steel cable/synthetic rope.
If replacing from other sources, carefully compare for the maximum load capacity of the cable.
2121 Blount Road Pompano Beach, FL 33069 MileMarker.com 1.800.886.8647PAGE 10
Page 12
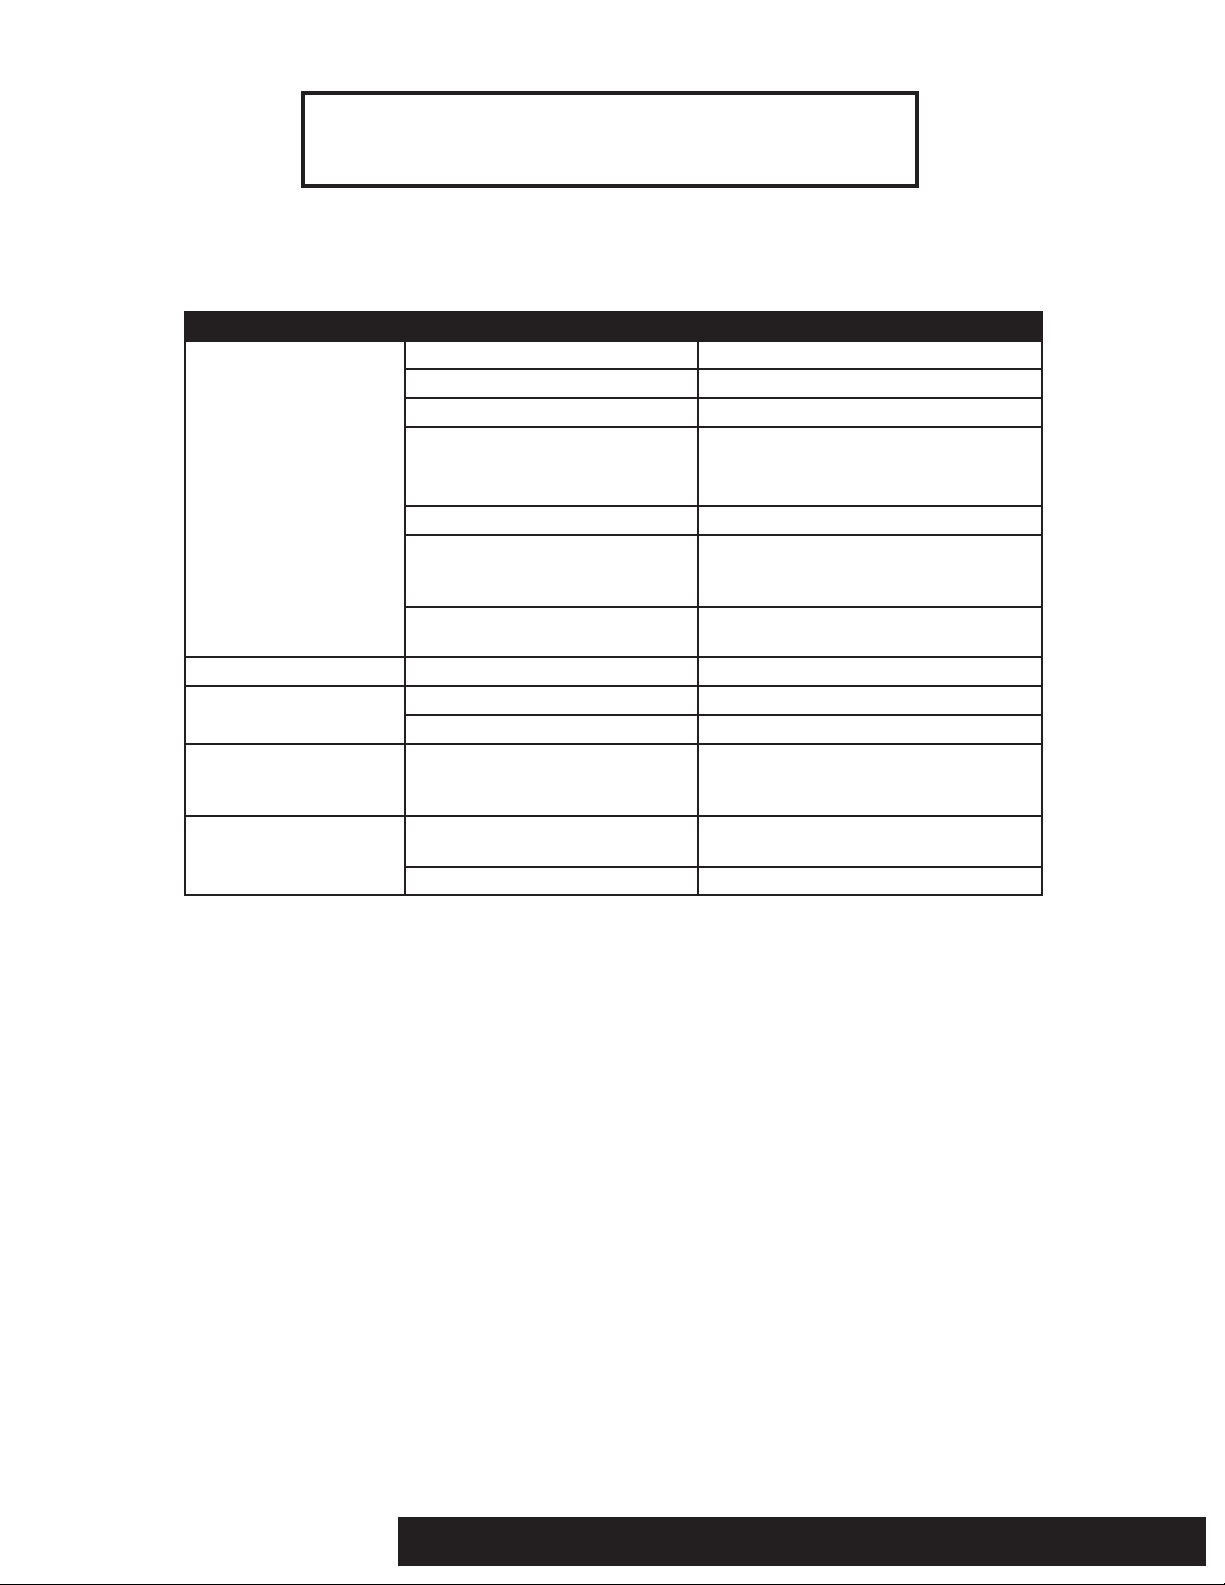
TROUBLESHOOTING
Symptom Possible Cause Suggested Remedy
Safety Switch is OFF Turn Safety Switch to ON position
Switch assy not connected properly Insert Switch assy firmly to the connector
Loose battery cable Tighten nuts on cable connectors
Connection
Solenoid malfunctioning
Motor does not turn on
Defective Switch assy Replace Switch assy
Defective motor
Water has entered motor
Motor runs too hot Long period of operation Let winch cool down periodically
Motor runs slowly or
without normal power
Motor runs but cable
drum does not turn
Motor runs in one
direction only
Battery runs down Recharge battery by running vehicle engine
Insufficient current or voltage Clean, tighten or replace the connector
Clutch not engaged
Defective or stuck solenoid
Defective switch assy Replace switch assy
Tap solenoid to free contact, applying 12 volts
to coil terminal directly. It will make an audible
clicking when activating.
Check for voltage at armature port with switch
pressed. If voltage is present,
replace motor.
Drain and dry. Run in short bursts without load
until completely dry.
Turn Clutch Gear to IN/ENGAGED position. If
that does not work, ask a qualified technician
to check and repair.
Tap solenoid to free contacts. Repair or replace
solenoid
2121 Blount Road Pompano Beach, FL 33069 MileMarker.com 1.800.886.8647PAGE 11
Page 13
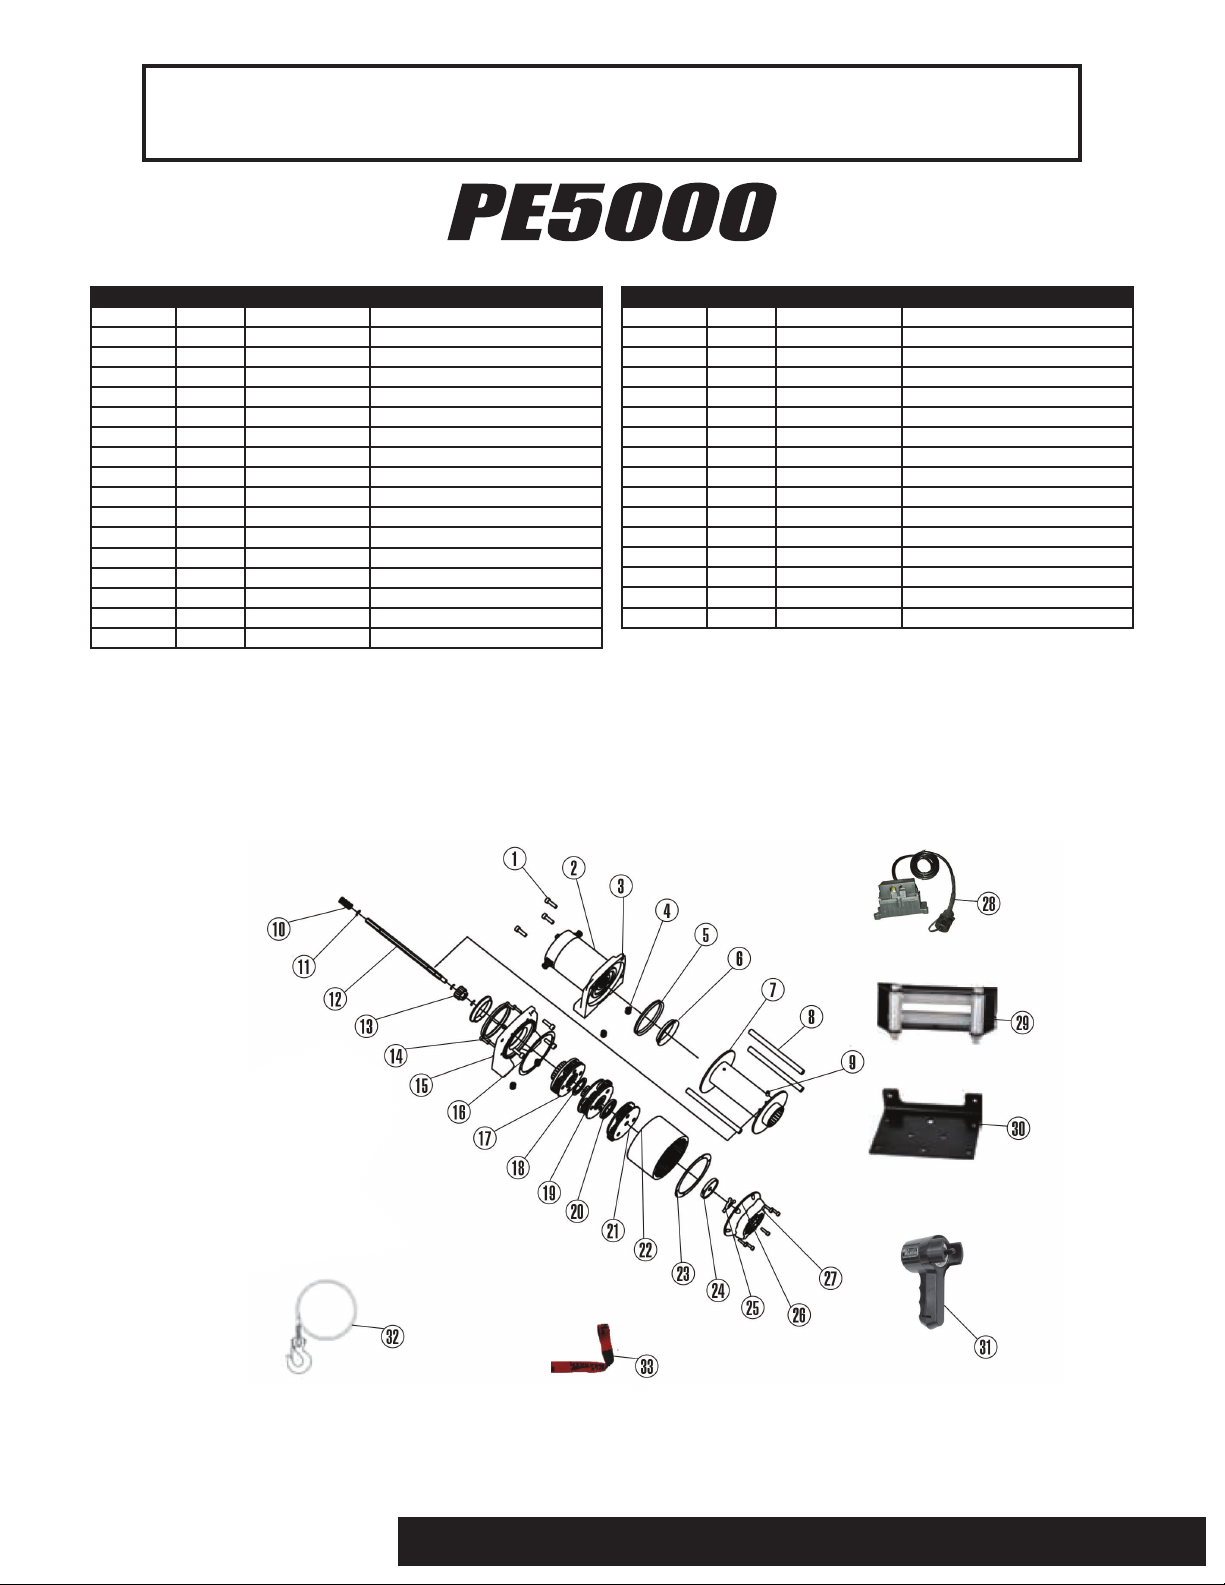
PARTS BREAKDOWN & ASSEMBLY
Steel Cable
ITEM QTY PART# DESCRIPTION
1 6 77-50120W-01 Screw M6 x20
2 1 77-50120W-02 Motor
3 1 77-50120W-03 Motor Base
4 4 77-50120W-04 Sheath Trap
5 2 77-50120W-05 Seal Ring
6 2 77-50120W-06 Oilless Bearing
7 1 77-50120W-07 Drum
8 3 77-50120W-08 Tie Bar
9 1 77-50120W-09 Screw
10 1 77-50120W-10 Spline Spring
11 1 77-50120W-11 Clip
12 1 77-50120W-12 Drive Shaft
13 1 77-50120W-13 Joint Gear
14 1 77-50120W-14 Screw M4 x 12
15 1 77-50120W-15 Gearbox Base
16 1 77-50120W-16 Seal
17 1 77-50120W-17 Planetary Gear 3
ITEM QTY PART# DESCRIPTION
18 1 77-50120W-18 Washer
19 1 77-50120W-19 Planetary Gear 2
20 1 77-50120W-20 Washer
21 1 77-50120W-21 Planetary Gear 1
22 2 77-50120W-22 Gearbox Housing Assembly
23 2 77-50120W-23 Seal
24 1 77-50120W-24 Sliding Bearing
25 1 77-50120W-25 Fork Pin
26 1 77-50120W-26 Gearbox End Cover
27 1 77-50120W-27 Clutch Knob
28 1 77-50105-37 Solenoid
29 1 WH5 Roller Fairlead
30 1 77-50120W-30 Mounting Plate
31 1 77-50141W-50 Handheld Remote Control
32 4 77-50120W-34 Steel Cable with Hook
33 1 77-50120W-35 Hand Saving Belt
2121 Blount Road Pompano Beach, FL 33069 MileMarker.com 1.800.886.8647PAGE 12
Page 14
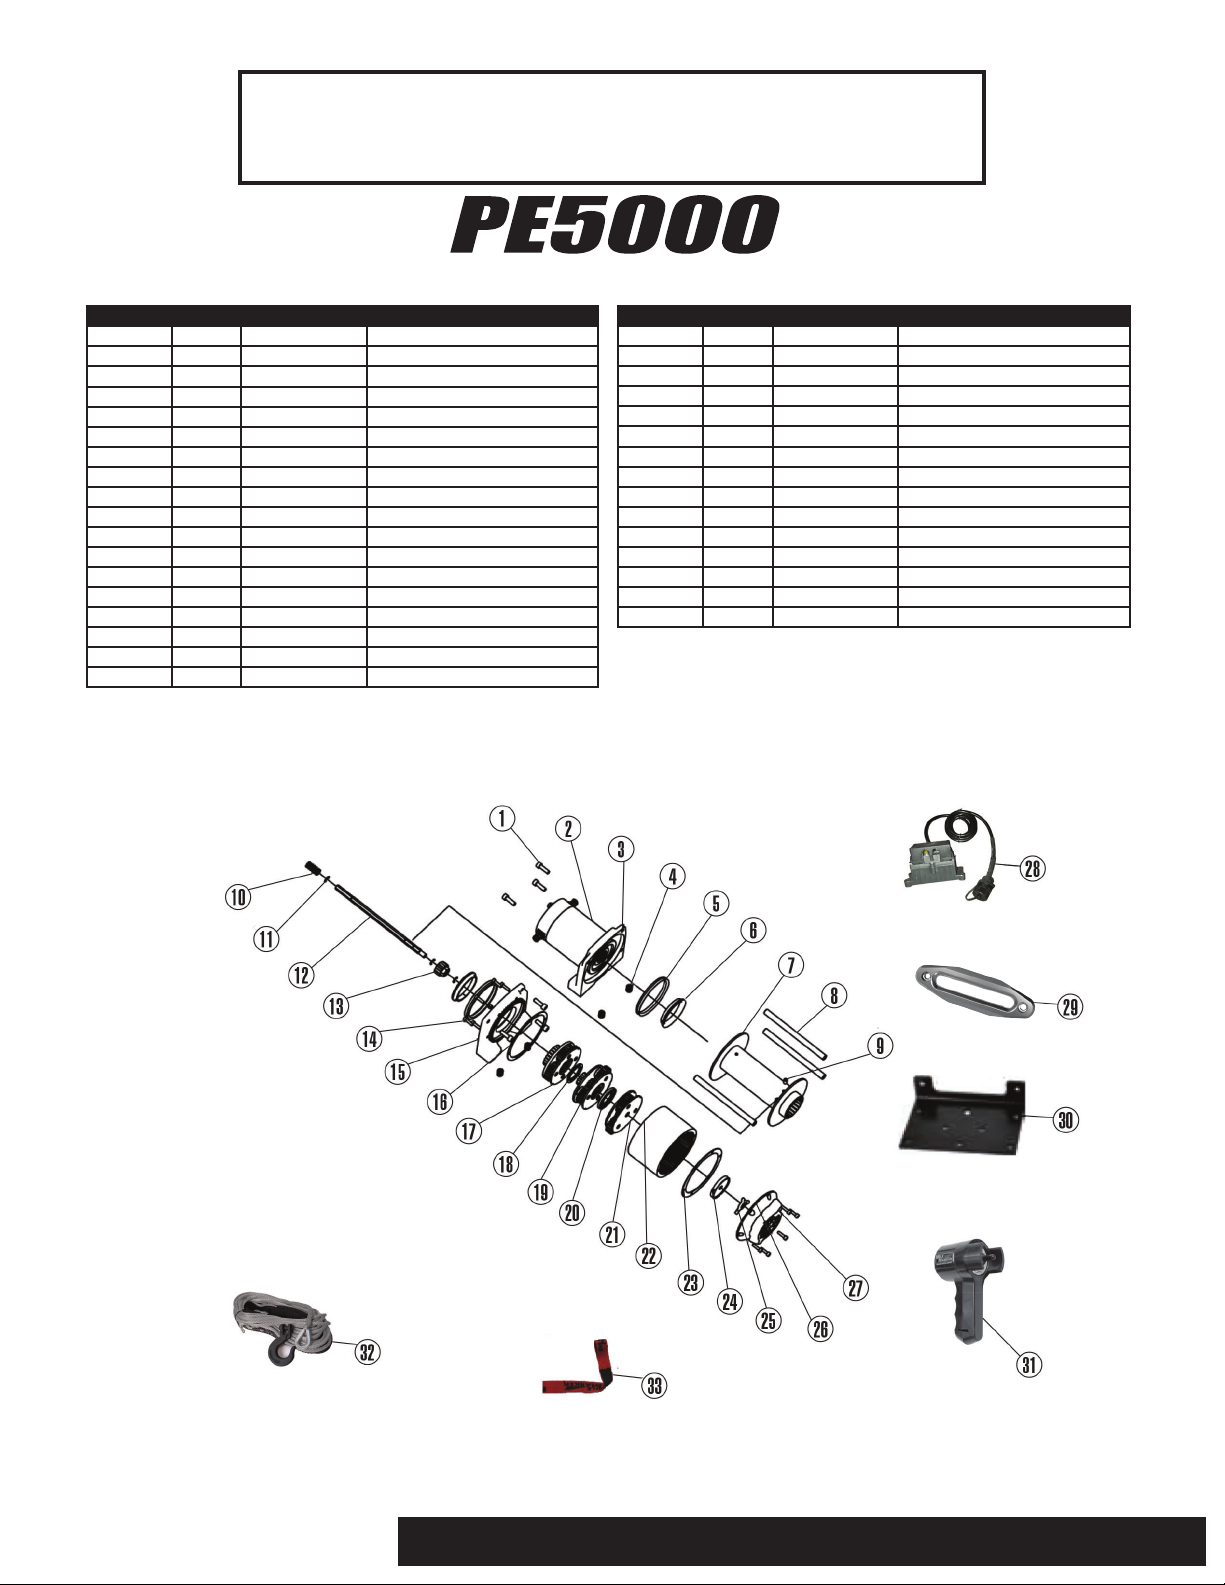
PARTS BREAKDOWN & ASSEMBLY
Synthetic Rope
ITEM QTY PART# DESCRIPTION
1 6 77-50120W-01 Screw M6 x20
2 1 77-50120W-02 Motor
3 1 77-50120W-03 Motor Base
4 4 77-50120W-04 Sheath Trap
5 2 77-50120W-05 Seal Ring
6 2 77-50120W-06 Oilless Bearing
7 1 77-50120W-07 Drum
8 3 77-50120W-08 Tie Bar
9 1 77-50120W-09 Screw
10 1 77-50120W-10 Spline Spring
11 1 77-50120W-11 Clip
12 1 77-50120W-12 Drive Shaft
13 1 77-50120W-13 Joint Gear
14 1 77-50120W-14 Screw M4 x 12
15 1 77-50120W-15 Gearbox Base
16 1 77-50120W-16 Seal
17 1 77-50120W-17 Planetary Gear 3
18 1 77-50120W-18 Washer
ITEM QTY PART# DESCRIPTION
19 1 77-50120W-19 Planetary Gear 2
20 1 77-50120W-20 Washer
21 1 77-50120W-21 Planetary Gear 1
22 2 77-50120W-22 Gearbox Housing Assembly
23 2 77-50120W-23 Seal
24 1 77-50120W-24 Sliding Bearing
25 1 77-50120W-25 Fork Pin
26 1 77-50120W-26 Gearbox End Cover
27 1 77-50120W-27 Clutch Knob
28 1 77-50105-37 Solenoid
29 1 19-52005 Hawse Fairlead
30 1 77-50120W-30 Mounting Plate
31 1 77-50141W-50 Handheld Remote Control
32 4 19-52316-50 Synthetic Rope with Hook
33 1 77-50120W-35 Hand Saving Belt
2121 Blount Road Pompano Beach, FL 33069 MileMarker.com 1.800.886.8647PAGE 13
Page 15

WARRANTY
Limited 2-Year Electric Winch Warranty
Mile Marker, Industries offers a limited two (2) year warranty to the original retail purchaser for each new Mile Marker electric winch, used as a recreational recovery winch only,
against manufacturing defects in workmanship and materials on all mechanical components. Electrical components consisting of motors, solenoids, wiring, wire connectors and associated parts have a limited one (1) year warranty. New steel cable/synthetic rope assemblies are warranted against defects in workmanship and materials when received by the retail
purchaser. There is no applicable warranty after initial use. Excluded from this warranty are the finish of the winch and any condition Mile Marker determines to have been caused by
misuse or abnormal use. Warranty registration must be submitted at milemarker.com/warranty within 30 days of purchase by the end user. Warranty will only be valid for the original
purchaser of the winch and installed on the vehicle for which it was originally registered. The owner will be responsible for removing the winch and returning it to Mile Marker freight
prepaid unless a determination is made that replacement parts can be sent out which will remedy the problem. Mile Marker will repair or replace any or all winch parts, which after
inspection determines to be defective. If the product was purchased in the United States, the owner must contact our warranty department to get a Return Goods Authorization (RGA)
Number before returning the product. If the product was purchased outside the United States, the owner must return the product to the original place of purchase.
Mile Marker electric winches are intended for recreational self recovery usage. The warranty is void if the winch is used in commercial or industrial applications.
General Warranty Procedure and Policy:
For U.S. Customers: DO NOT RETURN TO PLACE OF PURCHASE. The end user MUST contact Mile Marker directly by calling 1-800-886-8647. Our customer service representatives will
work to resolve any warranty issues. The owner must receive a Return Goods Authorization (RGA) Number before returning any product. The owner will be responsible for removing
the product and returning it to Mile Marker freight prepaid unless a determination is made that replacement parts can be sent out which will remedy the problem. Mile Marker will
repair or replace any or all parts, which after inspection determines to be defective.
For International Customers: RETURN PRODUCT TO PLACE OF PURCHASE, OR IF NOT FEASIBLE, CONTACT MILE MARKER. The Distributor or Dealer may then repair or replace the
product. The dealer may then contact Mile Marker by calling 1-800-886-8647 to receive an RGA number to return merchandise for warranty consideration. If a Distributor or Dealer
chooses to submit warranty claims for the end user or Jobber there are certain guidelines that need to be adhered to. They are as follows:
• The merchandise must be within the warranty period. See the Mile Marker warranty statement for time periods.
• Freight must be prepaid to the designated warranty service location.
• Mile Marker will inspect the returned merchandise and make a determination if the problem is warrantable. If it is warrantable Mile Marker will repair and return freight prepaid.
For all returned merchandise: If it is determined that a problem is not warrantable Mile Marker will contact the returning party to determine a disposition of the merchandise
as follows:
•Return “as is” without repairing.
•Provide an estimate of the repair costs to the sender for approval/disapproval and take action as directed by the sender.
After receiving the Returns Good Authorization (RGA) Number: Attach the RGA Number, your name, address, phone number and a detailed description of problem relating to malfunction and a copy of a bill of sale. To obtain any warranty coverage, it is absolutely necessary that you present proof of purchase acceptable to Mile Marker, such as a purchase receipt.
Please remove the cable from any winch to save both parties on freight costs, and package the product either in its original packaging, or other adequate means of packaging. Mile
Marker will not repair or warranty items that are damaged in shipment to us, unless it is no fault of the customer.
Warranty Exclusions:
There are certain conditions that are not eligible for warranty consideration by Mile Marker. They are as follows but not limited to the following:
• Winches returned in pieces will not be considered for warranty.
• Any item that has been involved in an accident will not qualify for warranty.
• Winches caked in mud will not qualify for warranty
• Winches that have been modified or taken apart and reassembled will not qualify for warranty.
• Winches that have the tie bars separated from the housing will not qualify for warranty.
• Winches that show general abuse will not qualify for warranty.
• Products damaged in shipping due to poor packaging will not qualify for warranty.
• Mile Marker will not issue an RGA for products that have been batched. If a Distributor or dealer receives a winch or other item for warranty consideration by Mile Marker, it must
have an RGA issued and sent to the designated service location within 15 days of receipt from the end user. Mile Marker will not accept any merchandise without an RGA number or
that exceeds the 15 day period. No credits will be provided. Products returned to Mile Marker will be repaired or replaced and returned.
Important Notice: To the fullest extent permitted by applicable law, the following are hereby excluded and disclaimed:
1. All warranties of fitness for a particular purpose.
2. All warranties of merchantability.
3. All claims for the face hereof.
Some states do not allow the above exclusions or disclaimers in consumer transactions and as such this disclaimer/exclusion may not apply to you. To the extent such warranties of
fitness or merchantability are deemed to apply to this product, they exist for only so long as the express limited warranty elsewhere set forth is in existence.
The obligation under this warranty, statutory or otherwise, is limited to the replacement or repair at the manufacturer, upon inspection of such part(s), to have been defective in material or workmanship. This warranty does not obligate Mile Marker Industries to bear the cost of labor or transportation charges in connection with the replacement or repair of defective
parts, nor shall it apply to a product upon which repairs or alterations have been made, unless authorized by the manufacturer, or for equipment misused, neglected or improperly
installed. Mile Marker Industries reserves the right to change, alter or improve its products in design, materials or appearance without incurring any obligation to incorporate such
changes in products that were previously manufactured.
Consequential Damages: Mile Marker accepts no liability, responsibility or obligations for incidental, indirect or consequential damages from the use of Mile Marker products no matter
what the conditions of use. This includes injuries, repair costs, lost time, economic impacts and other similar impacts. Some states do not allow the above exclusions or disclaimers in
consumer transactions and as such this disclaimer/exclusion may not apply to you.
This warranty gives you specific legal rights and you may have other legal rights which vary from state to state. To submit a warranty claim contact; Mile Marker Industries
Warranty Administrator 2121 Blount Road, Pompano Beach , FL 33069 (800) 886-8647, or visit milemarker.com/warranty.
2121 Blount Road Pompano Beach, FL 33069 MileMarker.com 1.800.886.8647PAGE 14
Page 16

 Loading...