

Page 1
MII
M
24 Port Managed Switch
with 2 Optional Gigabit/Fiber ports
L--SS33558800
L
1
Page 2

2
Page 3

Regulatory Approval
- FCC Class A
- UL 1950
- CSA C22.2 Number 950
- EN60950
- CE
EN55022 Class A
EN55024
Canadian EMI Notice
This Class A digital apparatus meets all the requirements of the Canadian Interference-Causing
Equipment Regulations.
Cet appareil numerique de la classe A respecte toutes les exigences du Reglement sur le materiel
brouilleur du Canada.
European Notice
Products with the CE marking comply with both the EMC Directive (89/336EEC) and the Low Voltage
Directive (73/23EEC) issued by the commisions of the European Community. Compliance with these
directives implies conformity to the following European norms:
- EN55022 (CISPR 22) - Radio Frequency Interference
- EN61000-X - Electromagnetic Immunity
- EN60950 (IEC950) - Product Safety
Five-Year Limited Warranty
MiLAN Technology warrants to the original consumer or purchaser that each of its product and component thereof, will
be free from defects in material and/or workmanship for a period of five years from the original factory shipment date.
Any warranty hereunder is extended to the original consumer or purchaser and is not assignable.
MiLAN Technology makes no express or implied warranties including, but not limited to, any implied warranty of
merchantability or fitness for a particular purpose, except as expressly set forth in this warranty. In no event shall
MiLAN Technology be liable for incidental or consequential damages, costs, or expenses arising out of or in connection
with the performance of the product delivered hereunder. MiLAN Technology will in no case cover damages arising out
of the product being used in a negligent fashion or manner.
Trademarks
© 2002 MiLAN, the MiLAN logo and MiLAN Technology are either trademarks or registered
trademarks of Communications Systems, Inc. in the United States and/or other countries. All other
trademarks are the property of their respective holders.
To C o n tact M i L AN Techno l o g y
For prompt response when calling for service information, have the following information ready:
- Product serial number and revision
- Date of purchase
- Vendor or place of purchase
You can reach MiLAN Technology technical support at:
- E-mail: support@milan.com
- Telephone: +1.408.744.2751
- Fax: +1.408.744.2771
MiLAN Technology
1329 Moffett Park Drive
Sunnyvale, CA 94089-1138
United States of America
Telephone: +1.408.744.2775
Fax: +1.408.744.2793
http://www.milan.com
info@milan.com
P/N 90000397_A (062102)
3
Page 4
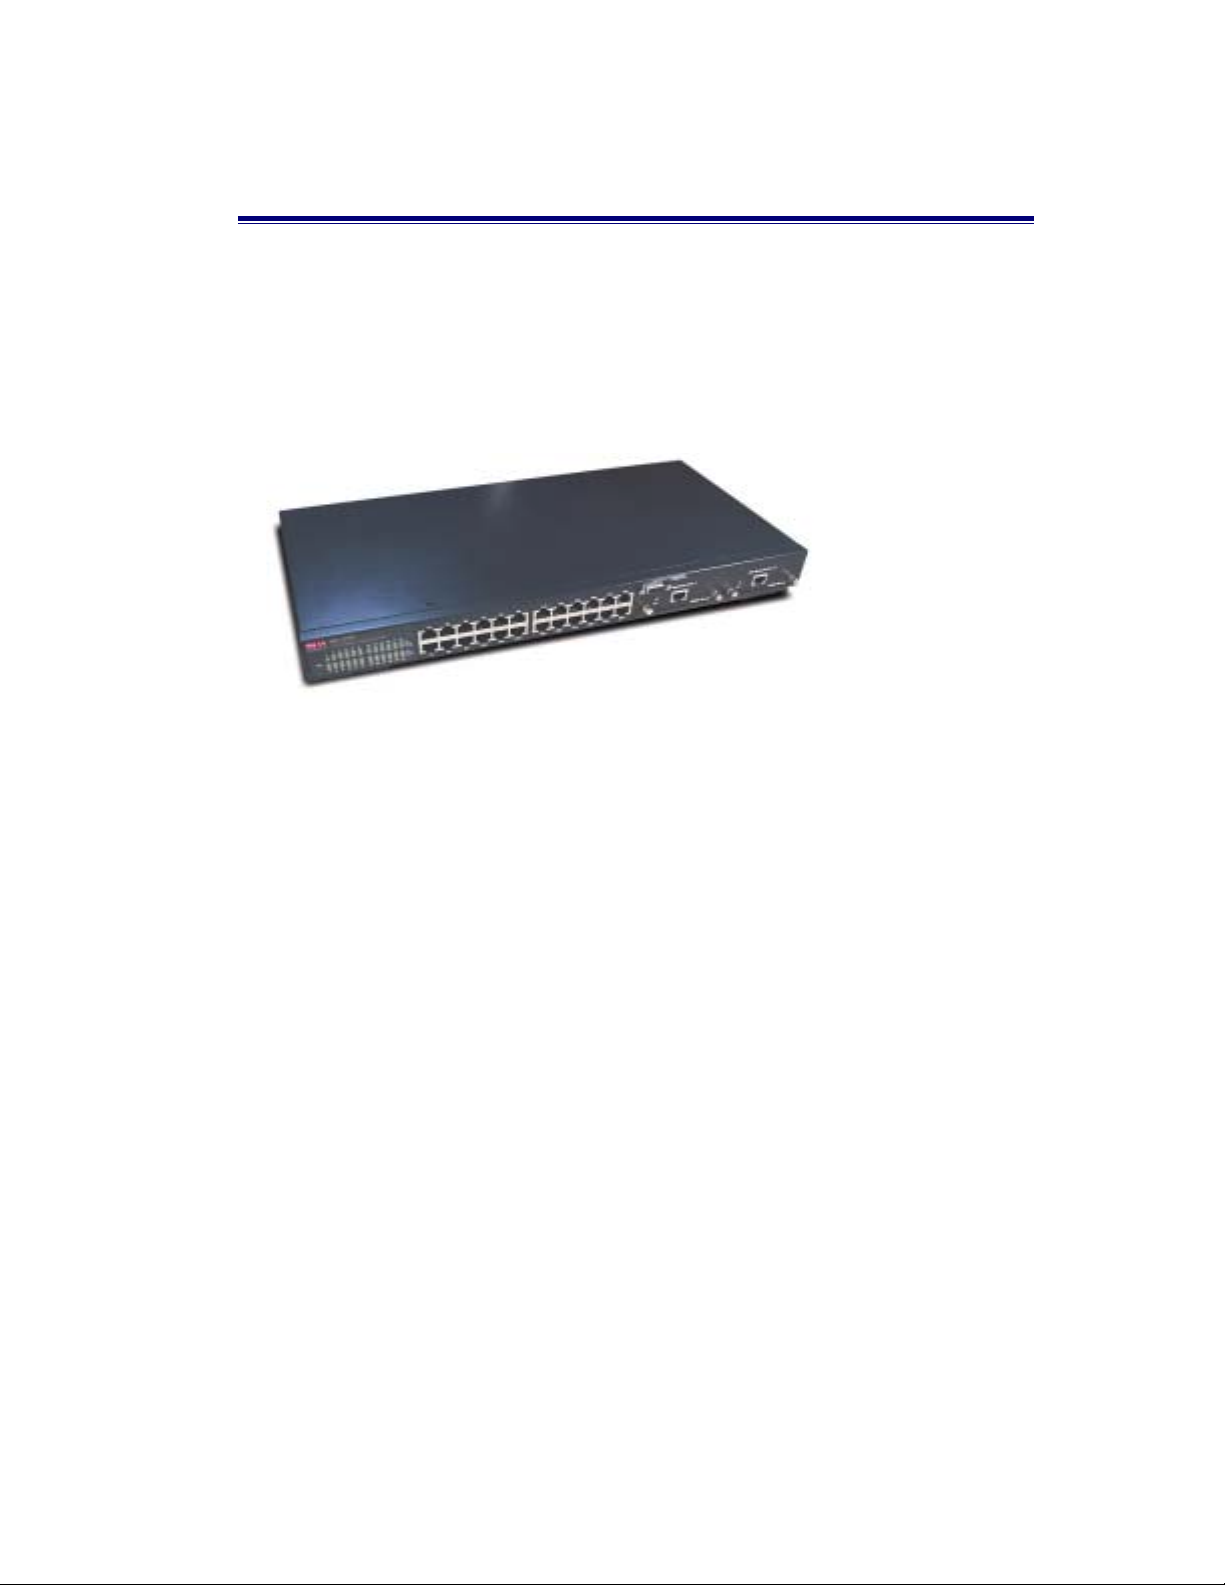
1. Introduction
The MIL-S3580 Managed Switch is designed to provide your network with
Ethernet, Fast Ethernet, Gigabit Ethernet connectivity over twisted pair and fiber
optic cabling. Two expansion slots on the front further add to the flexibility of the
systems
Figure 1-1. The MIL-S3580 Switch
.
Features
Conforms to IEEE802.3, IEEE802.3u, IEEE802.3z, IEEE802.3x, IEEE802.1p,
IEEE802.3ac, IEEE802.1D, IEEE802.1Q
24 Auto-sensing 10/100Mbps Ethernet RJ-45 ports
2 Expansion slots for optional modules: 1-port Duplex SC Gigabit (SX/LX),
100Mbps Fiber (SC/MT-RJ/VF-45), 1 RJ-45 for UTP or STP Gigabit 1000T
Module with Automatic MDI/MDIX support.
One console-connecting port for configuration
Auto-negotiation & Full-duplex/Half-duplex support
Store-and-Forward error free packet forwarding scheme
9.6 GB Backplane Bandwidth
8K-entry MAC address table
6Mbits share memory
Full wire speed forwarding rate
LED status indicators
4
Page 5

Management Features
Console and Telnet Configuration
Web-based management
SNMP network management
IEEE 802.1Q Tagging VLAN and Port-Based VLAN support
IEEE802.3x Flow Control Mechanism for Full-duplex mode and Backpressure
for Half-duplex
IEEE 802.1D Blocking, Learning, and Forwarding states support for Spanning
Tree Protocol
IEEE 802.3ac extends the maximum Ethernet Length to 1522 to add the 4-Byte
VLAN Tag
IEEE802.1p provides four levels of priority per port. Packets are prioritized
according to the source port or the 802.1p priority tag
Security functions
IGMP Snooping and GMRP protocol support
Link Aggregation function support
Port Priority - 802.1p & TOS (Type of Service) support
TFTP support for system upgrade
Port Mirroring
5
Page 6
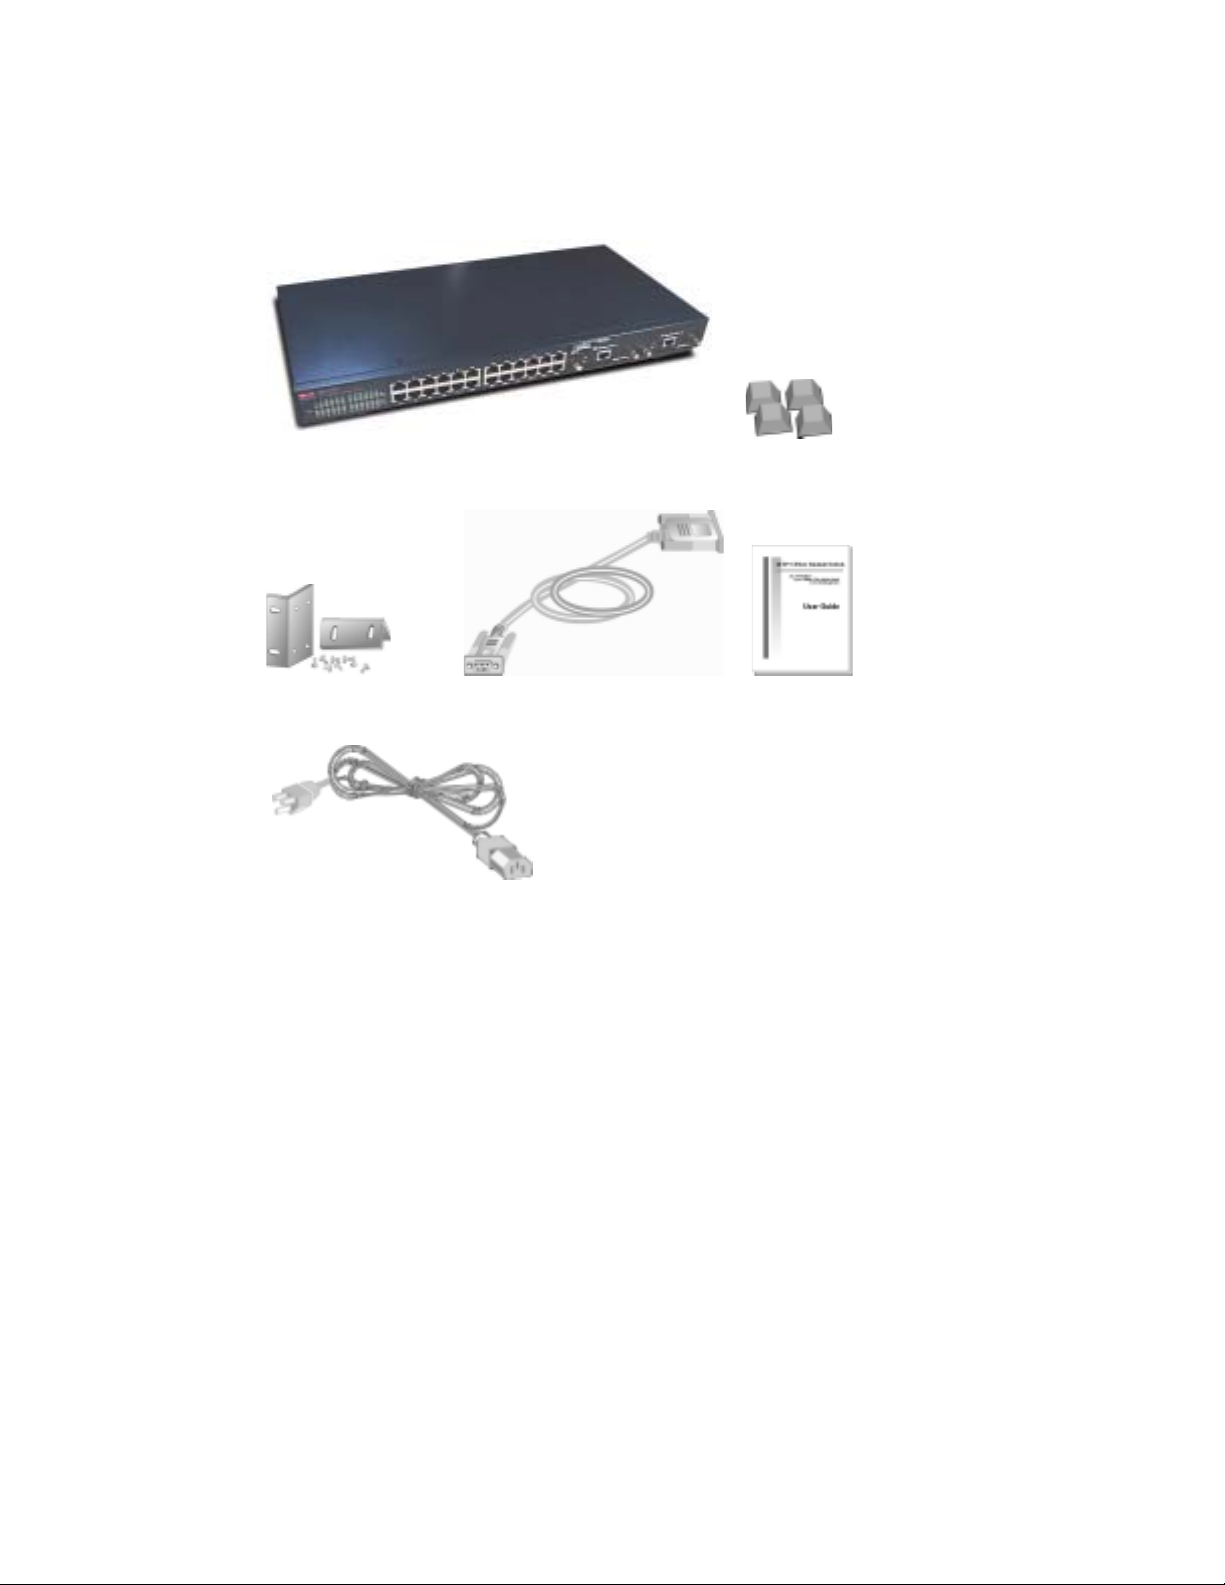
Package Contents
MIL-S3580 Rubber Feet
Rack-mounted Kit RS-232 cable User Guide
Power Cord
Figure 1-2. Package Contents
Compare the contents of your MIL-S3580 package with the standard checklist
above. If any item is missing or damaged, please contact your local dealer for
service.
Management Methods
The MIL-S3580 supports the following management methods:
Console and Telnet Management
Web-based Management
SNMP Network Management
6
Page 7

Console and Telnet Management
Console Management is done through the RS-232 Console Port. Managing the
MIL-S3580 in this method requires a direct connection between a PC and the
MIL-S3580. Telnet management is done over the network. Once the MIL-S3580
has an IP and is on the network, you can use Telnet to log in and change or view
the configuration.
SNMP Network Management
SNMP (Simple Network Management Protocol) provides a means to monitor and
control network devices, and to manage configurations, statistic collection,
performance, and security.
Data is passed from SNMP agents. SNMP agents are hardware & software
processes reporting activity in each network device to the workstation console.
The agent return information is contained in a MIB (Management Information
Base), which is a data structure that defines what is obtainable from the device and
what can be controlled.
7
Page 8
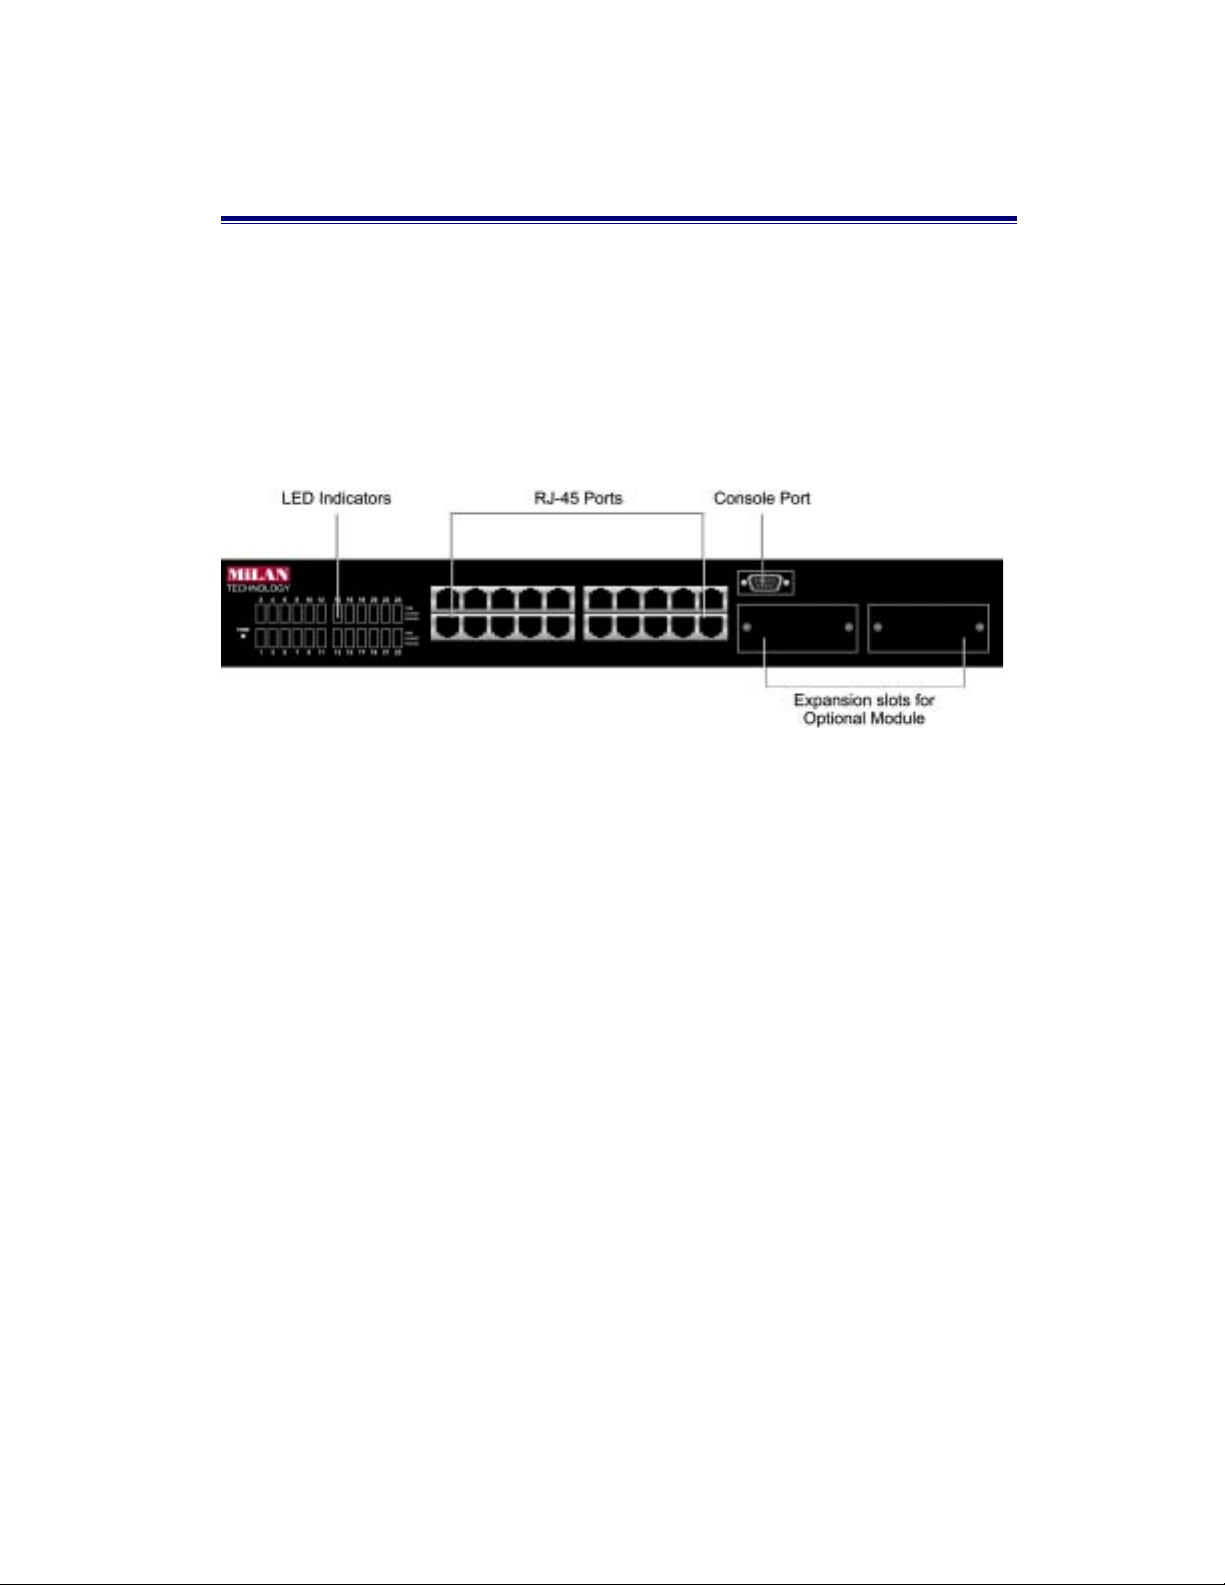
2. Hardware Description
The Front Panel
The front panel of the MIL-S3580 consists of 24 auto-sensing 10/100Mbps
Ethernet RJ-45 Ports, two optional expansion slots, and a console port. The LED
Indicators are located on the front left panel of the Switch.
Figure 2-1. Front Panel of the MIL-S3580
24 10/100BASE-TX RJ-45 Ports (Auto MDI/MDIX):
10/100Mbps auto-sensing port for 10Base-T or 100Base-TX device connection.
Auto-MDI/MDIX allows you to connect to another switch or workstation without
changing straight-through or crossover cabling.
2 Expansion Slots :
For the following optional modules:
1 Port Gigabit 1000BASE-T Switch Modules,
1 Port Gigabit 1000BASE-SX/LX Fiber Modules.
1 Port 100BASE-FX Fiber Modules
Console Port :
Console Management can be done through the Console Port. It requires a direct
connection between the MIL-S3580 and an end station via an RS-232 cable.
8
Page 9
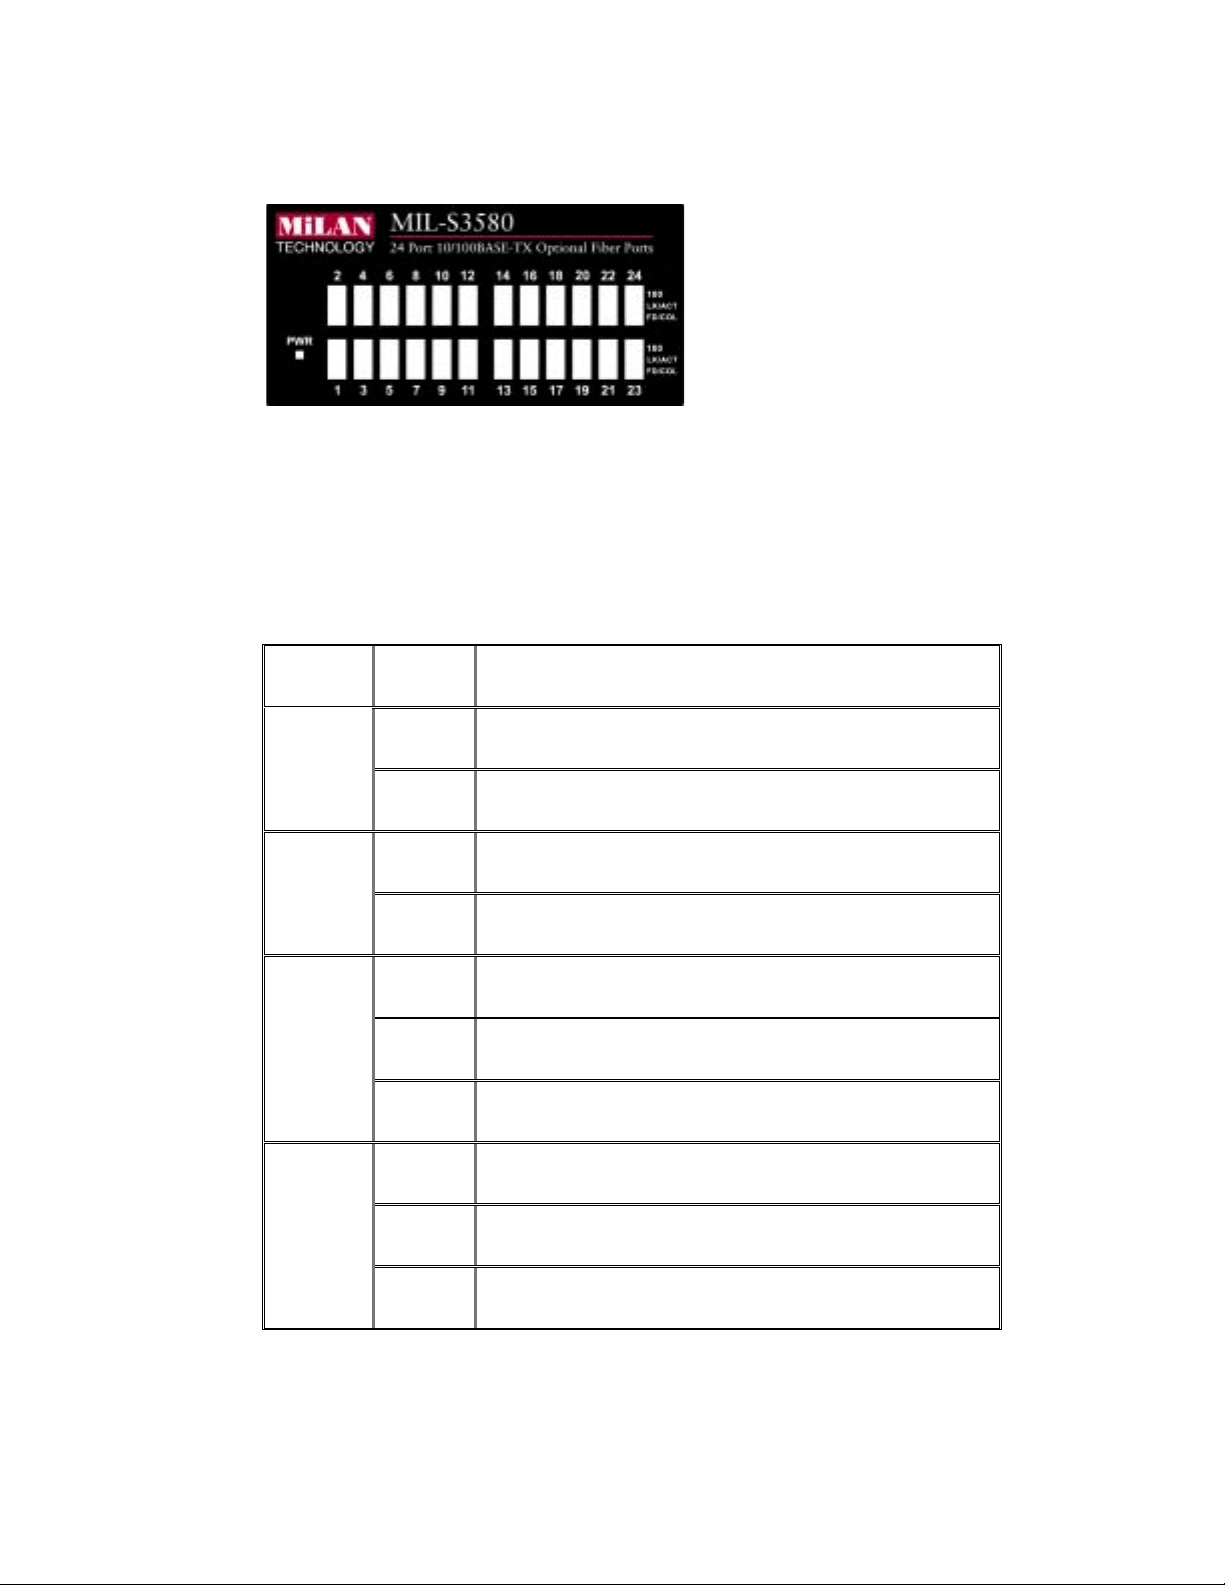
LED Indicators:
Figure 2-2. LED Indicators
All LED indicators are located on the front left panel of the MIL-S3580. They
provide a real-time indication of system and operational status. The following table
gives descriptions of the LED status and
LED Status
Description
Green Power is on.
PWR
Off Power is off.
Green The port is operating at the speed of 100Mbps.
100
Off No device attached or port is in 10Mbps mode.
Green The port is connecting with the device.
LK/ACT
Blinks The port is receiving or transmitting data.
Off No device attached.
their meanings.
Yellow The port is operating in Full-duplex mode.
FD/COL
Blinks Collision of packets occurs in the port.
Off No device attached or port is in half-duplex mode.
Table 2-1. Description of LED Indicators
9
Page 10
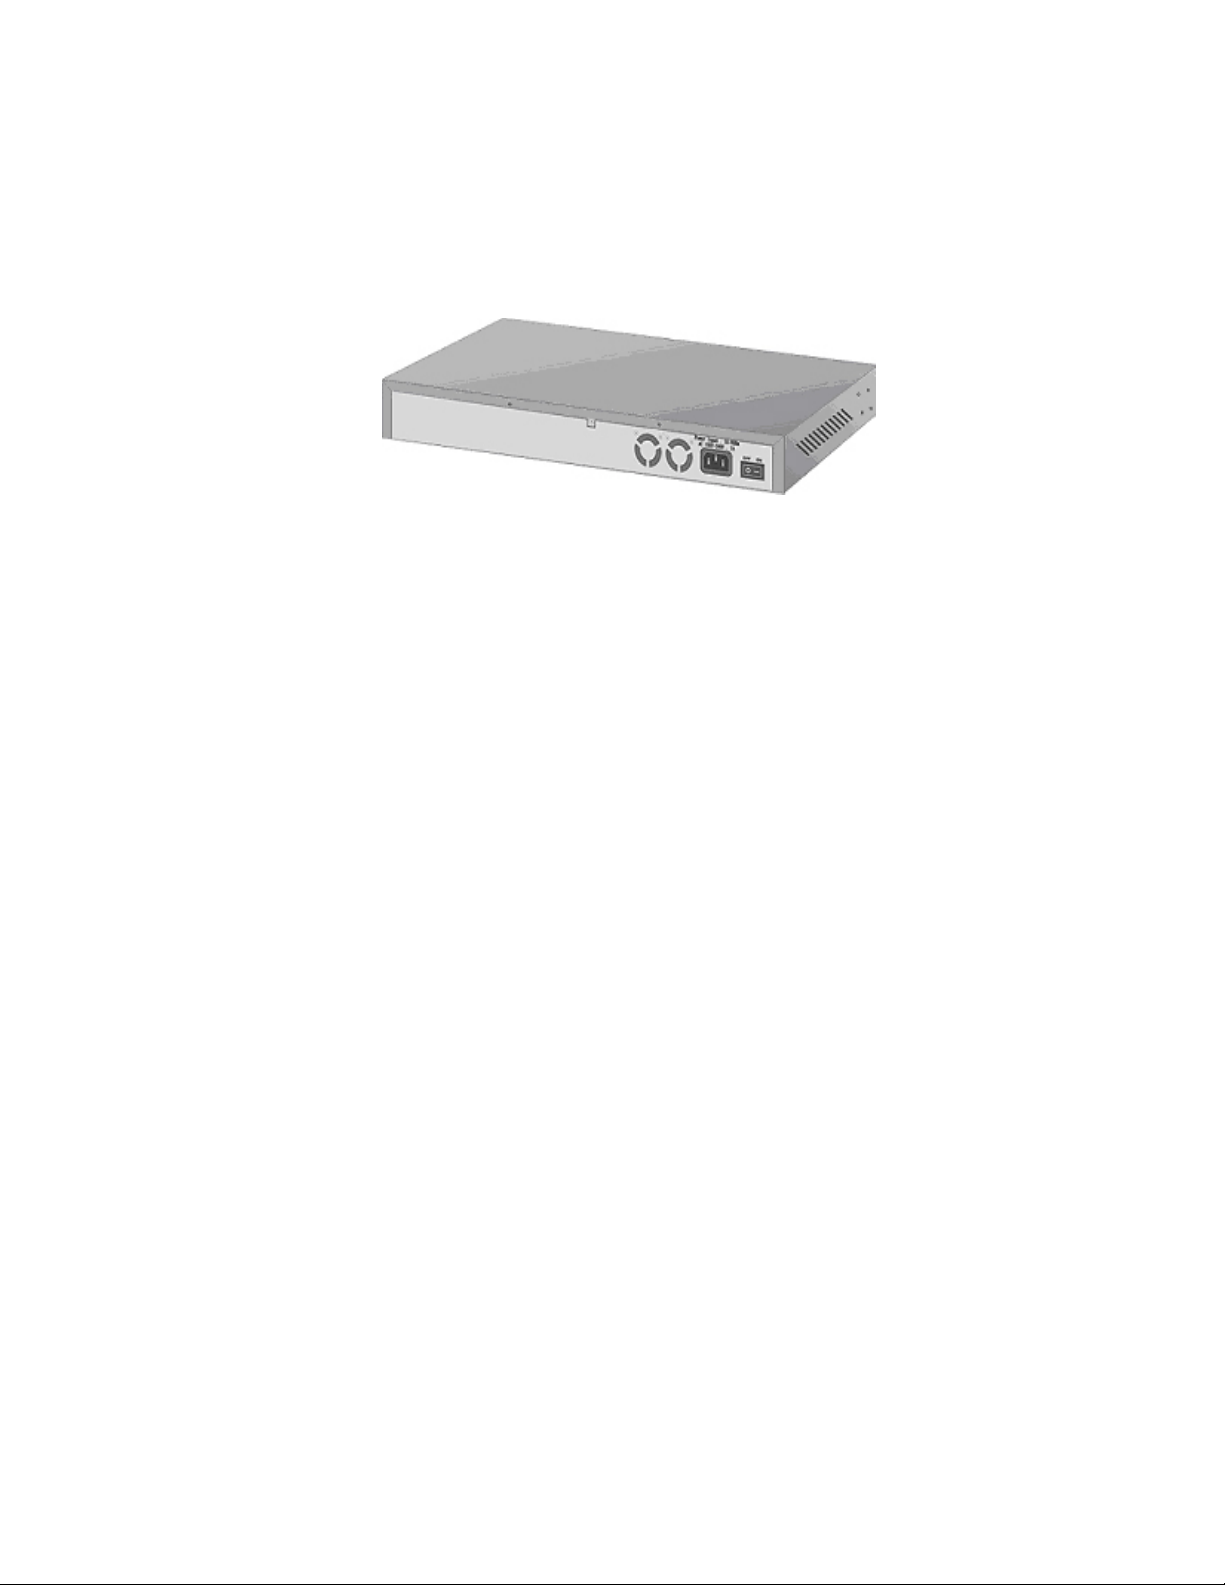
Rear Panel
The 3-pronged power plug and ON/OFF switch are located on the rear panel of the
MIL-S3580. The switch works in the range 100-240VAC, 50-60Hz.
Figure 2-3. Rear Panel of the MIL-S3580
Power On
After all network cables are connected, plug the power cord into the power socket
on the back panel and the other end into a power outlet. Turn on the power using
the power switch on the back panel.
Check the front panel power indicator to see if power is properly supplied. The
switch uses a universal power supply that requires no additional adjustment.
Diagnostic Test
After the installation is completed and AC power is applied to the switch, the
system will automatically perform a diagnostic test. The PWR LED will come on.
Within 5 seconds, all LEDs will flash for a split second.
When the switch passes the self-test, the LEDs come on within 15 seconds on
ports that are populated and connected.
10
Page 11

3. Connecting to the Network
This section provides the installation procedure and instructions for assigning an IP
address.
Pre-Installation Requirements
Before you start hardware installation, make sure you have the items listed below.
z PCs with 10/100Mbps Ethernet NICs or 100Mbps Fiber NICs: Your PC
must have a standard Ethernet interface to connect to the switch.
z UTP cable with RJ-45 connectors or Fiber cable connectors: Check if the
cable and connectors work properly.
z A power outlet with range 100 to 240VAC at 50 to 60 Hz: Make sure that
the power switch is accessible and cables can be connected easily.
z Dedicated power supply: Use dedicated power circuits or power
conditioners to supply reliable electrical power to the network devices.
z A dry cool place: Keep the switch away from moisture. Avoid direct sunlight,
heat source, and high amount of electromagnetic interference around.
z Mounting tools: If you intend to mount the switch on a rack, make sure you
have all the tools, mounting brackets, screws etc.
:
N
O
I
T
U
A
C
U
A
C
U
A
C
Cabling must be away from sources of electrical noise such as radio, computers,
c
c Airflow around the switch and through its vents on the rear cannot be restricted.
:
N
O
I
T
:
N
O
I
T
transmitters, broadband amplifiers, power lines and keep away from TVs,
hair dryers, and microwave.
Mounting the Switch
The MIL-S3580 is suitable for use in an office environment where it can be
rack-mounted in standard EIA 19-inch racks or as a standalone device.
11
Page 12
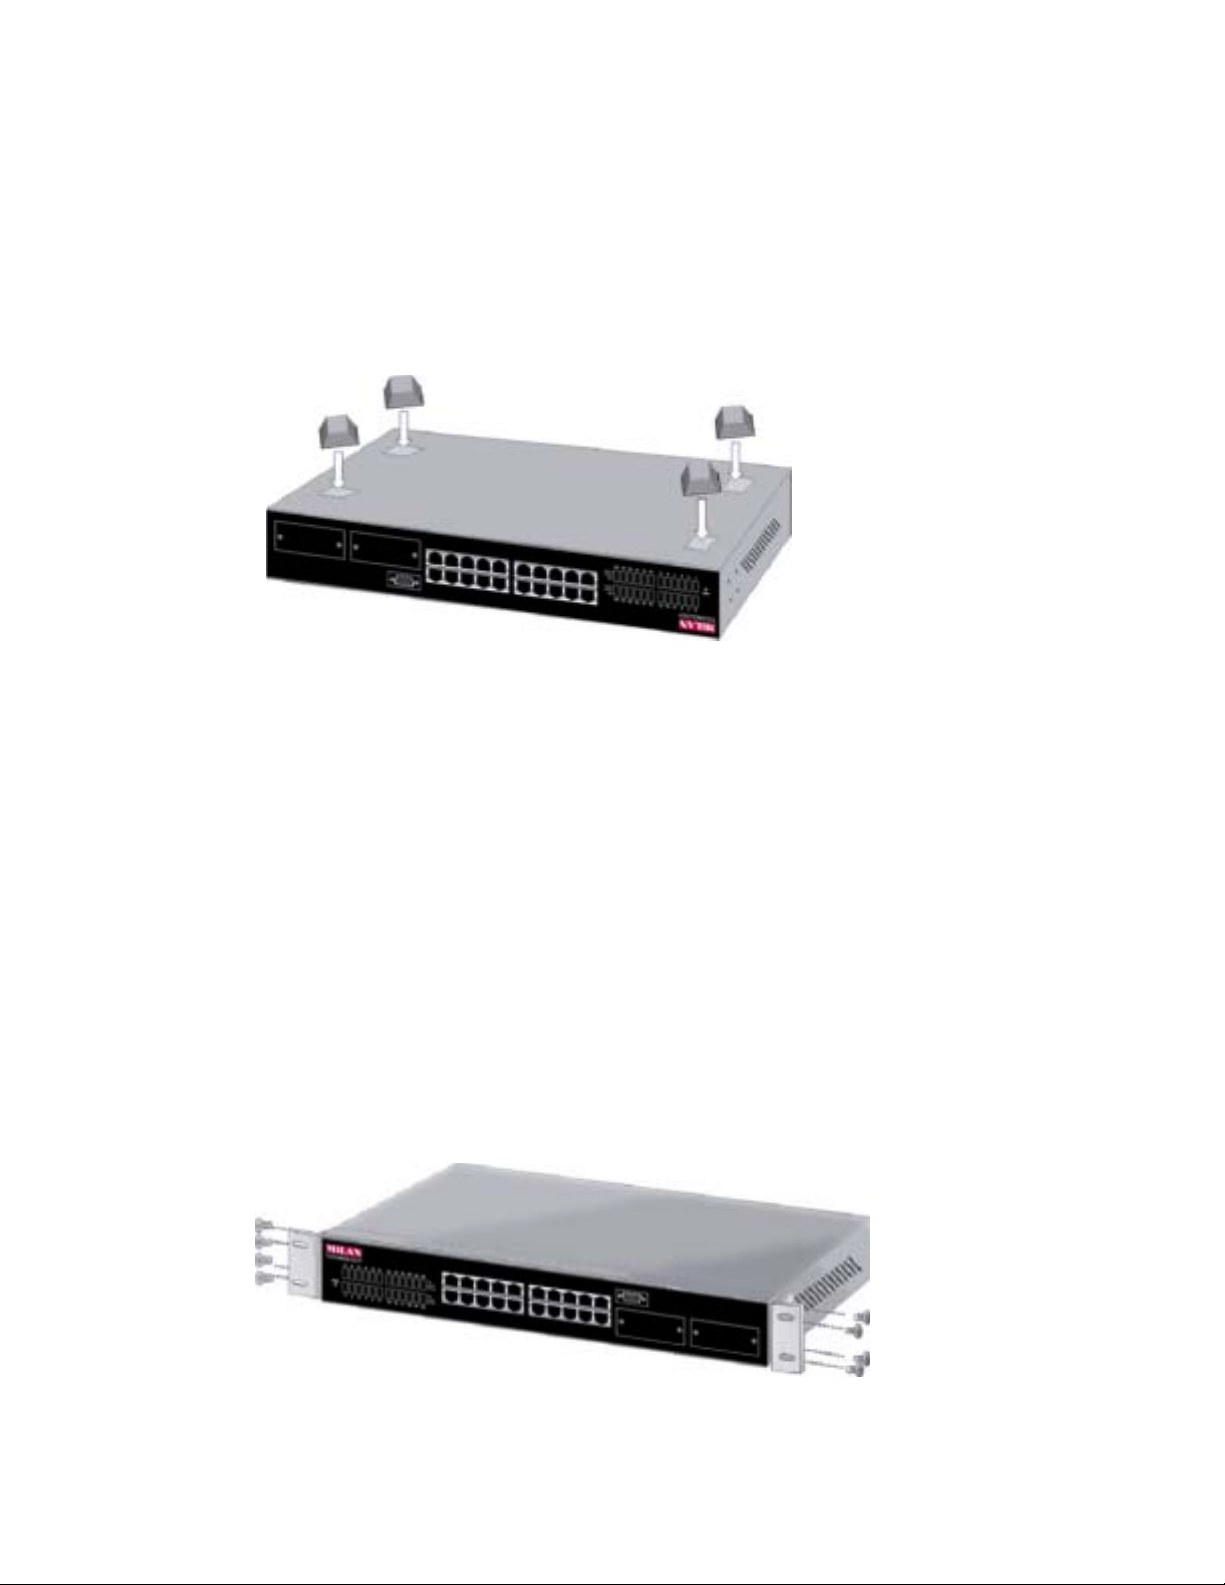
Desktop Mounting
1. Set the switch on a sufficiently large flat space with a power outlet nearby.
2. Make sure surface is clean, and dust free.
3. Remove adhesive backing from the rubber feet.
4. Apply the rubber feet to each corner on the bottom of the switch.
Figure 3-1. Attaching rubber feet on the bottom of the switch
:
N
O
I
T
U
A
C
U
A
C
U
A
C
:
N
O
I
T
T
Do not place objects on top of the switch.
:
N
O
I
Rack-mounted Installation
The MIL-S3580 comes with a rack-mount kit and can be mounted in an EIA
standard sized, 19-inch rack. The switch can be placed in a wiring closet with other
equipment.
Perform the following steps to rack mount the switch:
A. Position one bracket to align with the holes on one side of the switch and
secure it with the smaller bracket screws. Then attach the remaining bracket to
the other side of the switch.
Figure 3-2. Attach mounting brackets with screws
12
Page 13
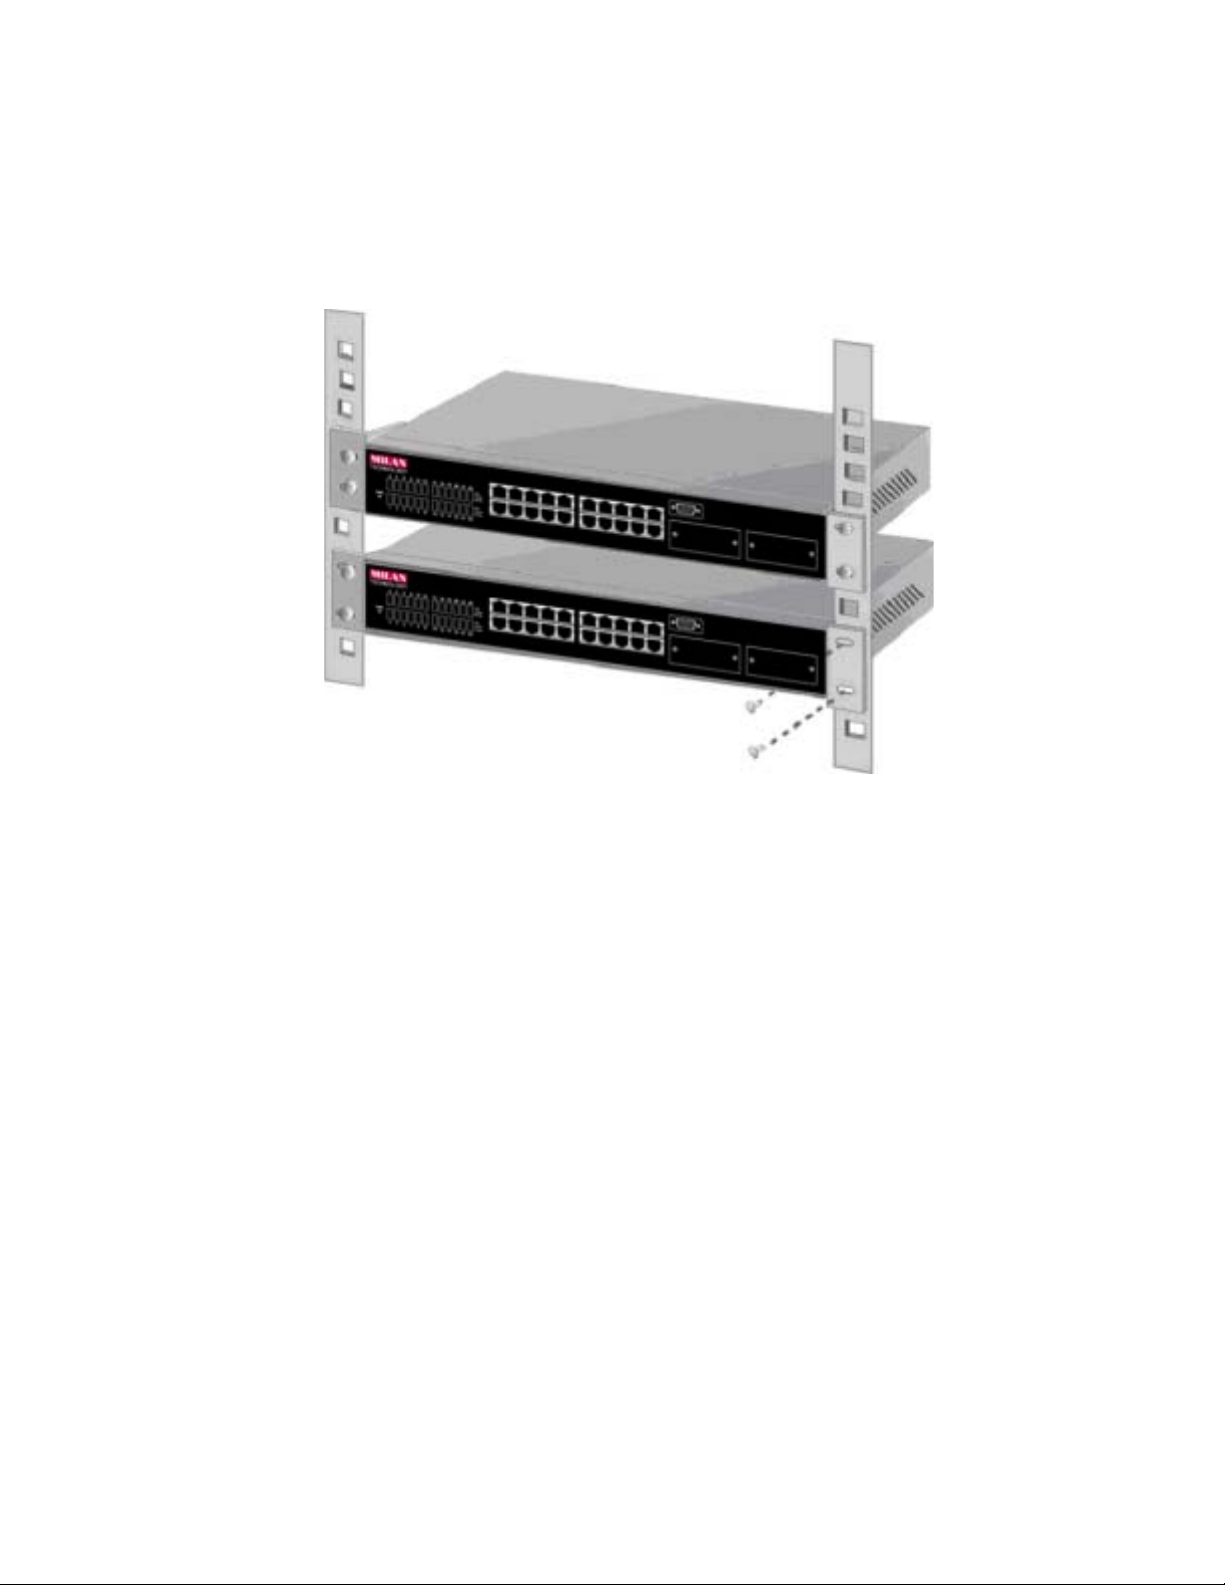
B. After both mounting brackets are attached, position the switch in the rack by
lining up the holes in the brackets with the appropriate holes on the rack.
Secure the switch to the rack with a screwdriver and the rack-mounting screws.
Figure 3-3. Mount the MIL-S3580 in an EIA Standard 19-inch Rack
:
E
T
O
N
:
E
T
O
N
N
front and 3.4 inches (8 cm) on the back of the switch. This is especially important
for enclosed rack installation.
For proper ventilation, allow at least 4 inches (10 cm) of clearance on the
:
E
T
O
Connecting to the Switch
The console port is a male DB-9 connector that enables a connection to a PC or
terminal for monitoring and configuring the MIL-S3580. Use the supplied RS-232
cable with a female DB-9 connector to connect a terminal or PC to the console port.
The console configuration (out-of-band management) allows you to set your switch
to enable a user at a remote console terminal to communicate with the MIL-S3580
as if the console terminal were directly connected to it.
13
Page 14
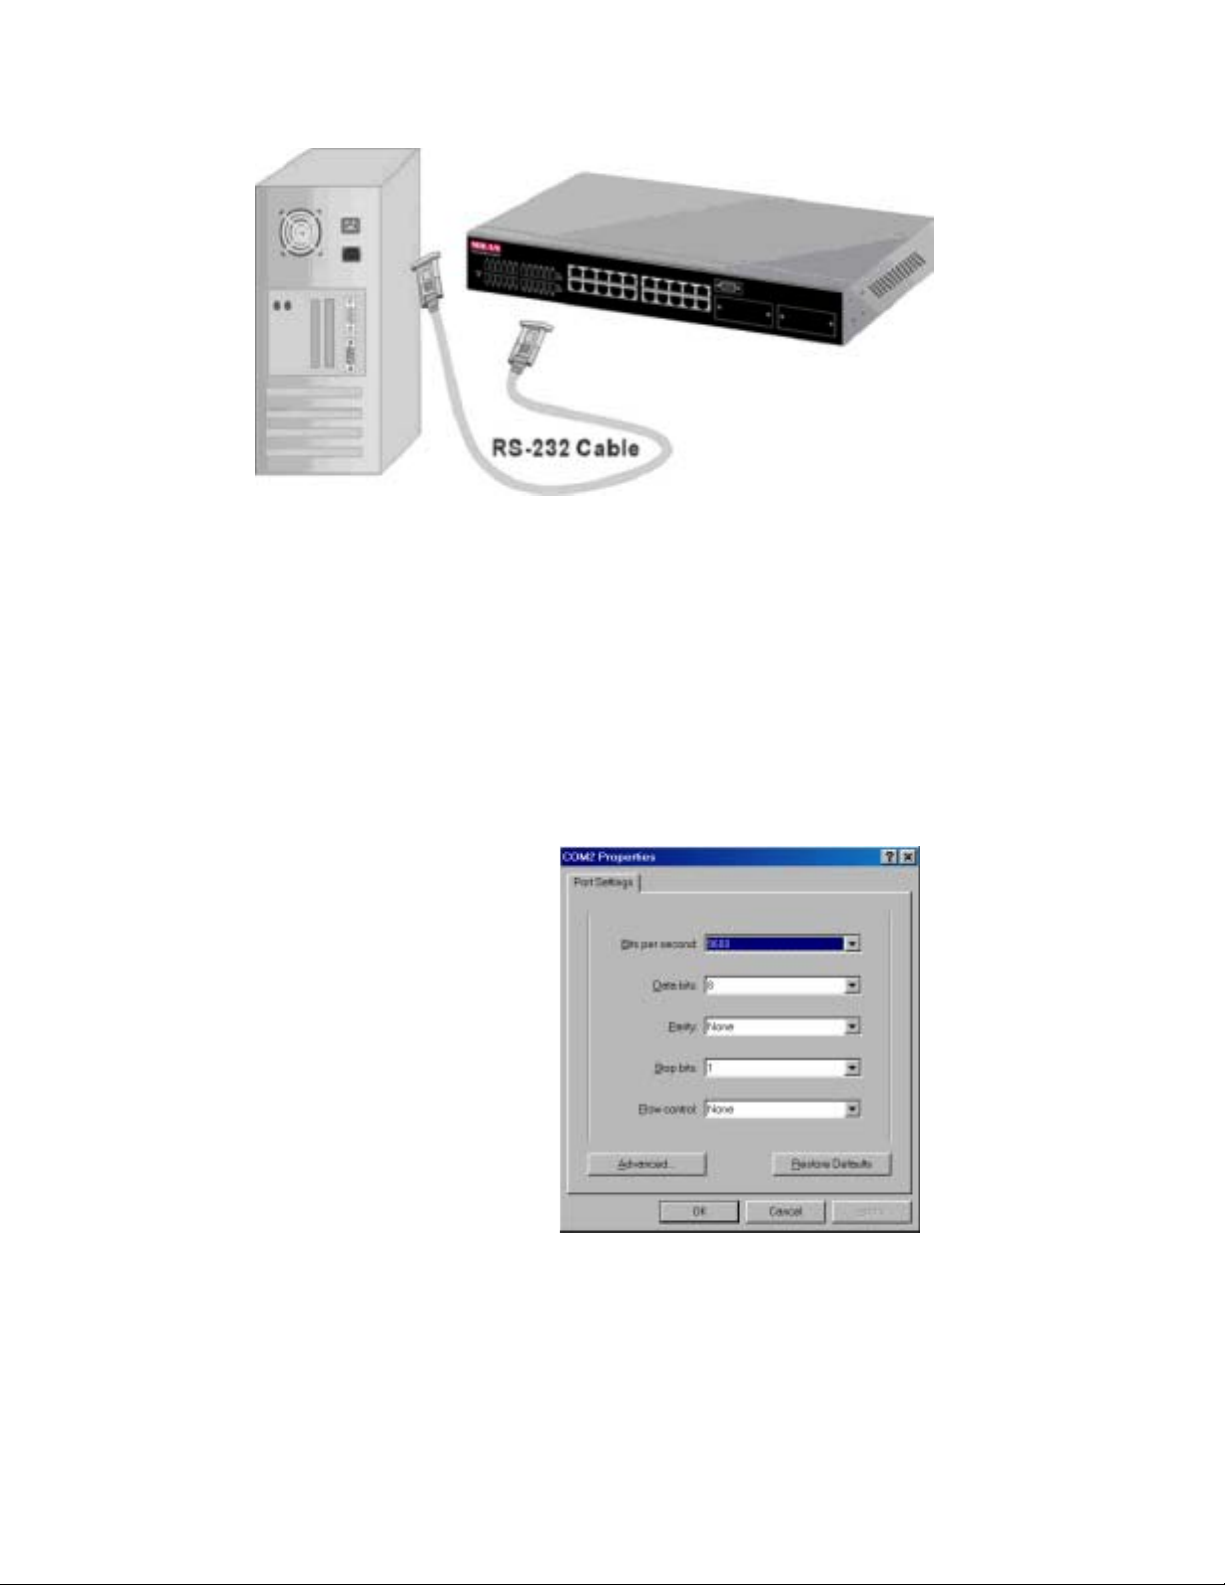
Figure 3-4. Connecting the MIL-S3580 to a Terminal via RS-232 Cable
Login in the Console Interface
When the physical connection between the switch and the PC is established, turn
on the PC and run a terminal emulation program or Hyper Terminal and configure
its
communication parameters
the console port:
Baud Rate: 9600 bps
Data Bits: 8
Parity: None
Stop Bit: 1
Control flow: None
to match the following default characteristics of
14
Figure 3-5. Settings of Communication Parameters
Page 15

Telnet
You can access the console using a Telnet connection once an IP address is
assigned. The switch offers password protection for this interface. When the telnet
session opens, select Terminal>Properties. In the Terminal Preferences dialog,
verify the following settings. Under Terminal Options select VT100 Arrows and
set buffer Size to 25. Under
Emulation
, select the
VT-100/ANSI
radio button.
User Interface
The switch offers a menu-driven console interface. Use <Tab> key or the <arrow>
keys to move within menus and sub-screens. To select a menu, press the
appropriate <arrow> key to highlight the menu, and then press <Enter>. The
following list describes common key commands:
x <
> Return to previous menu or screen, or abort editing
Esc
x <Tab> Scroll highlight bar through the screen
x <m>, <n>, <o>, <p> Navigation keys to move around menu screen and
editable fields
x <
Spacebar
> Toggle between possible settings for field
x <Enter> Select a menu item, edit a field or accept a value after editing a field
The bottom of every screen displays action commands available for that particular
screen such as Submit, Save, Refresh, Exit and sometimes other helpful
information.
Note that you can choose to leave a menu screen without applying any changes
made at any time by pressing the <Esc> key and then confirming with the <Enter>
key.
N
O
T
I
C
E
N
O
T
I
C
E
N
: When clicking on
O
T
I
C
E
Submit
button, you are applying the changes to the
current session only. To save the changes into NVRAM, you need to go to the
System Restart submenu and reset the system by either a Cold Start or Warm
Start.
15
Page 16

First Screen
Figure 3-6. First Screen Display in Console Interface
Once you have configured your system terminal and started the switch, you can
login to the console interface. The default username is admin. There is no
password
User Authentication Menu option, which appears on the Main Menu.
required. You can change both the user name and password in the
Main Menu
Figure 3-7. Main Menu
16
Page 17
After login, you will see the Main Menu screen as illustrated in the picture. The
Main Menu displays all the submenus and pages that are available in the console
interface.
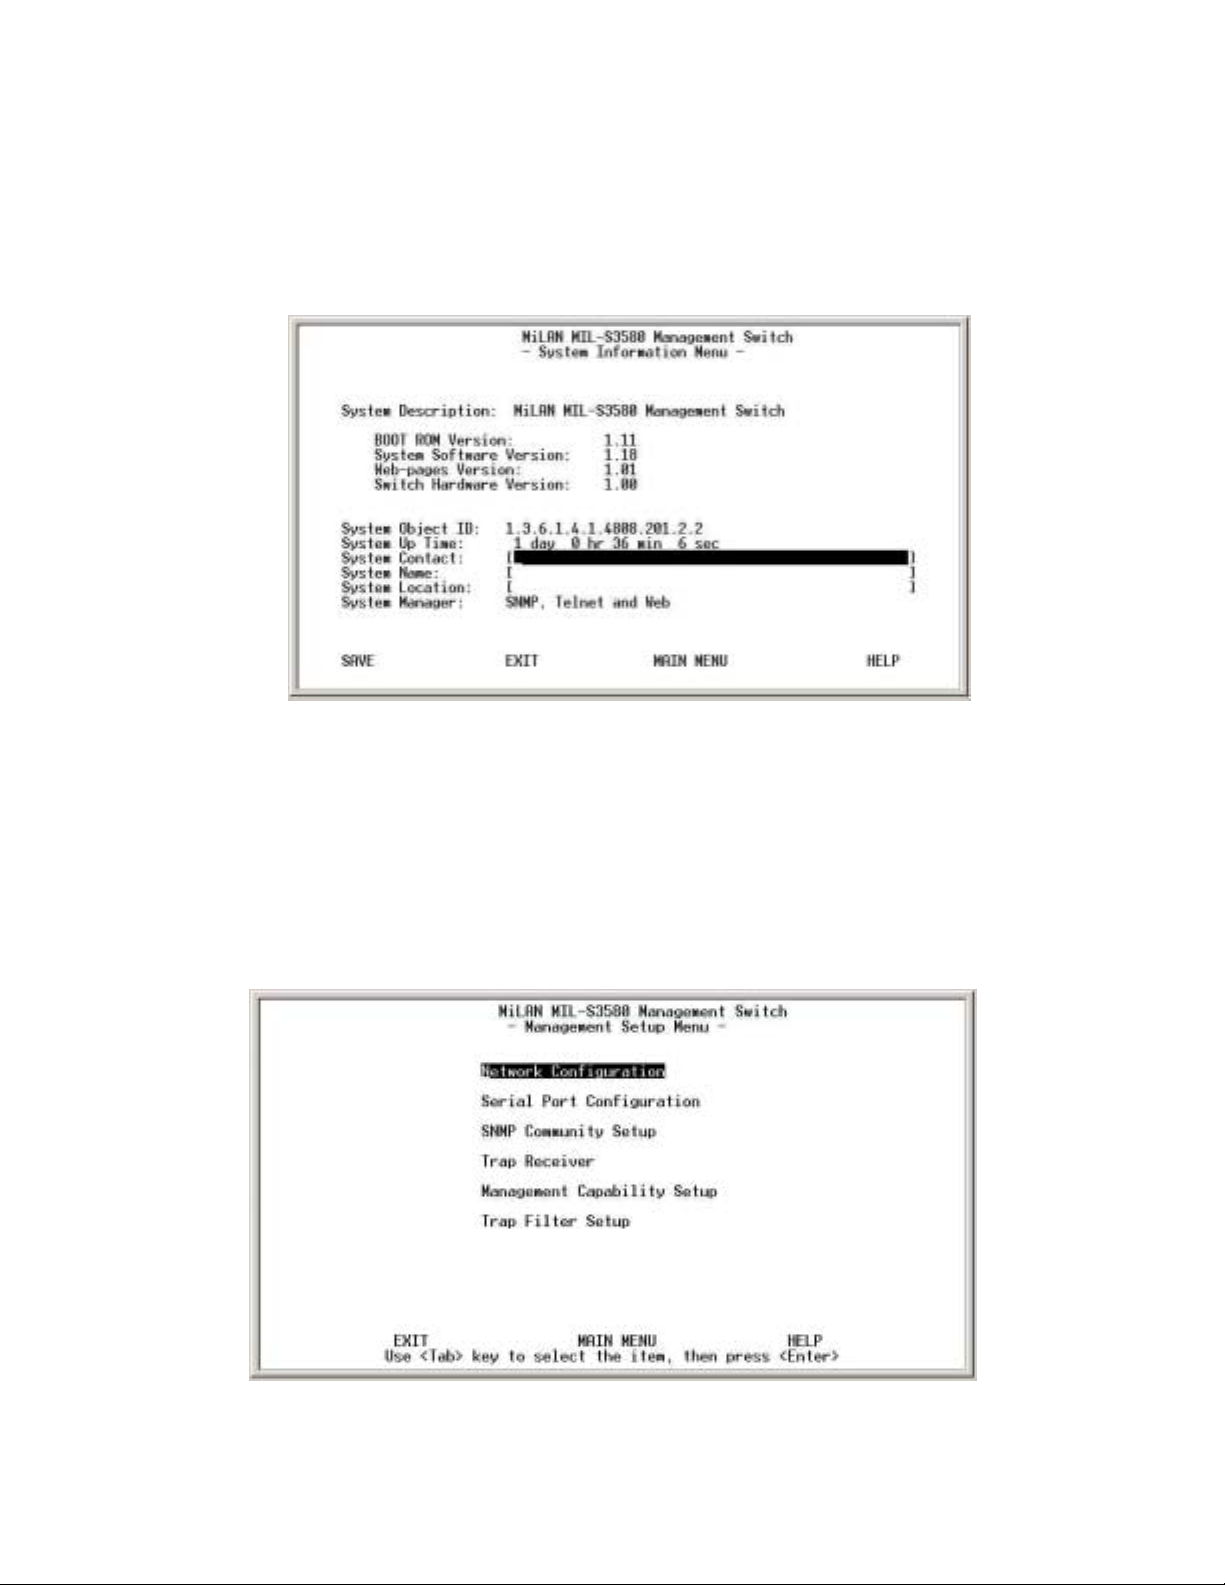
1. System Information
Figure 3-8. System Information Menu
The system information screen displays information such as hardware, software
versions, and system up time. You can also enter specific information about you
and your organization. This information about the switch is available through any
SNMP manager. In each field, 48 characters can be entered.
.
2. Management Setup
Figure 3-8. Management Setup Menu
17
Page 18
The management setup menu contains 6 submenus and is discussed in the
following sections.
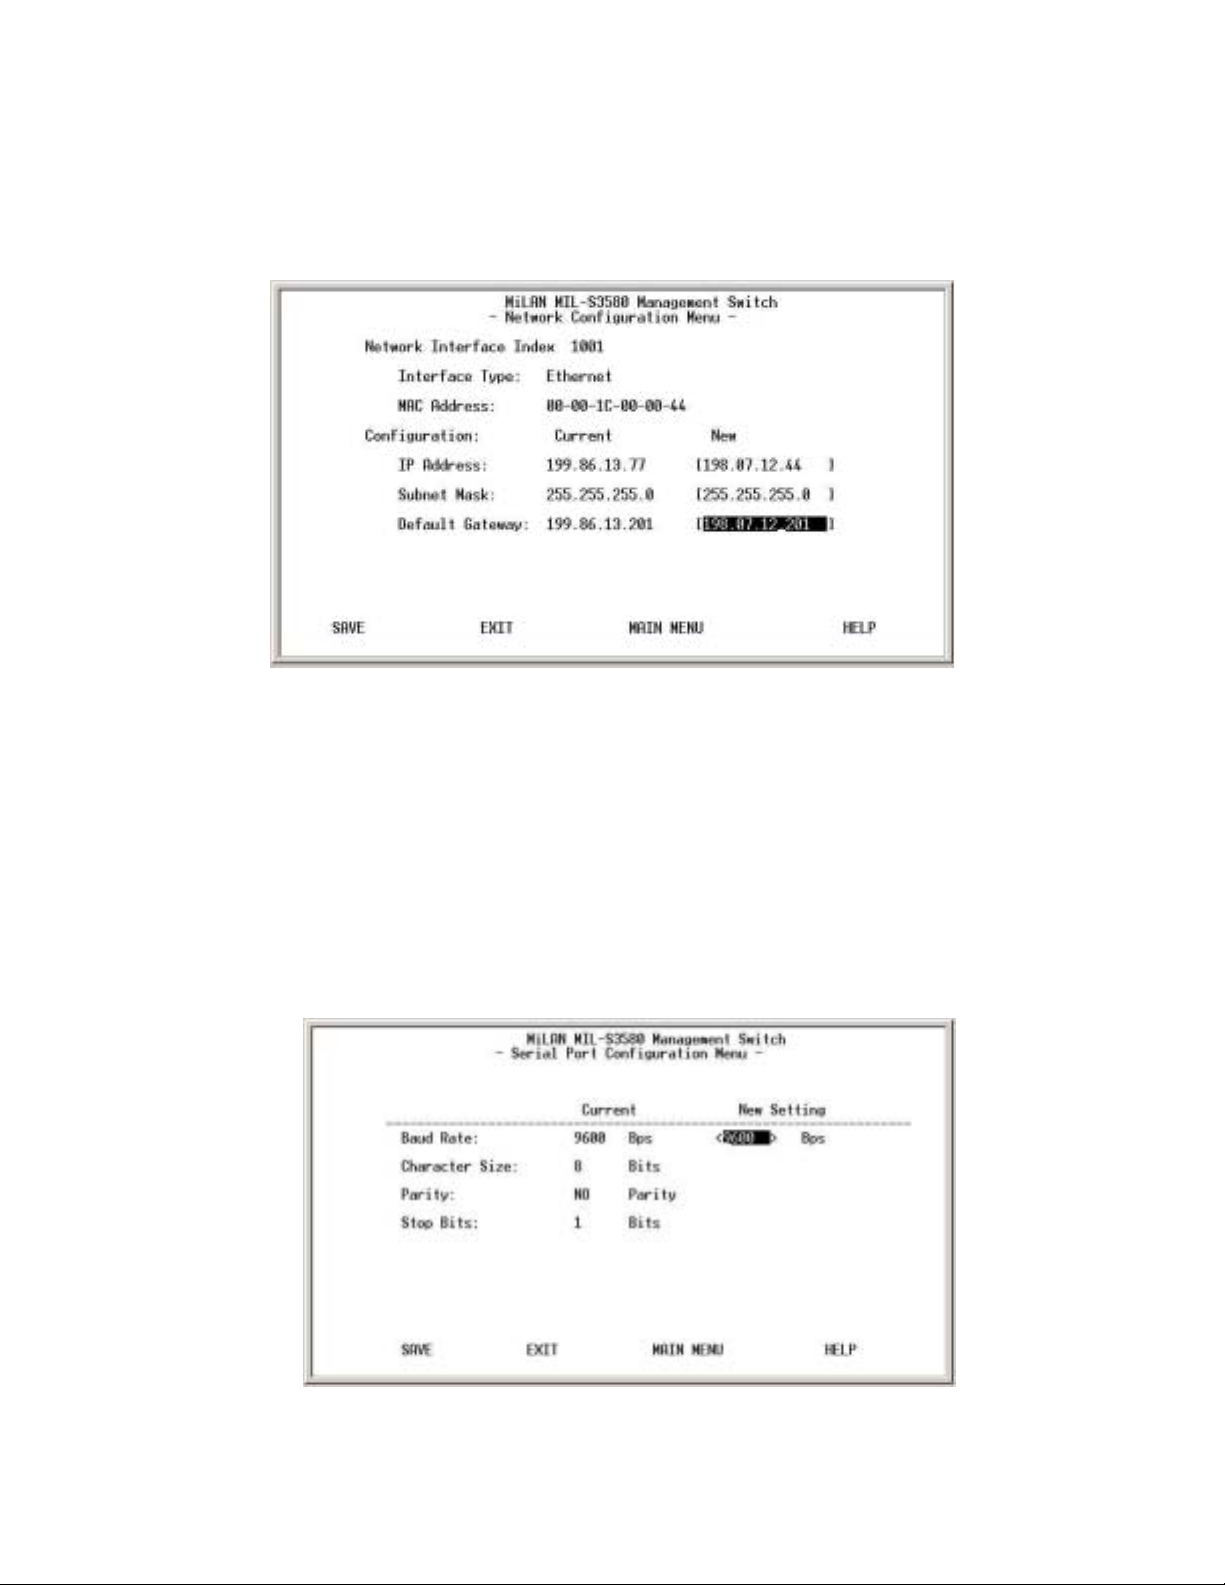
2.1. Network Configuration
Figure 3-9. Network Configuration Menu
This menu allows the setting of your IP address of the switch according to your
network's unique configuration. The factory defaults for all three addresses are
0.0.0.0. After changing any of the settings, you need to save the information and
reset the switch in order for the changes to take effect. Also note that the value
under Current column will not reflect the changes you made until the next time you
login after resetting the switch.
2.2. Serial Port Configuration
Figure 3-10. Serial Port Configuration Menu
18
Page 19
You can change the serial port setting through this screen to suit you environment,
however, it is recommended to keep the default setting.
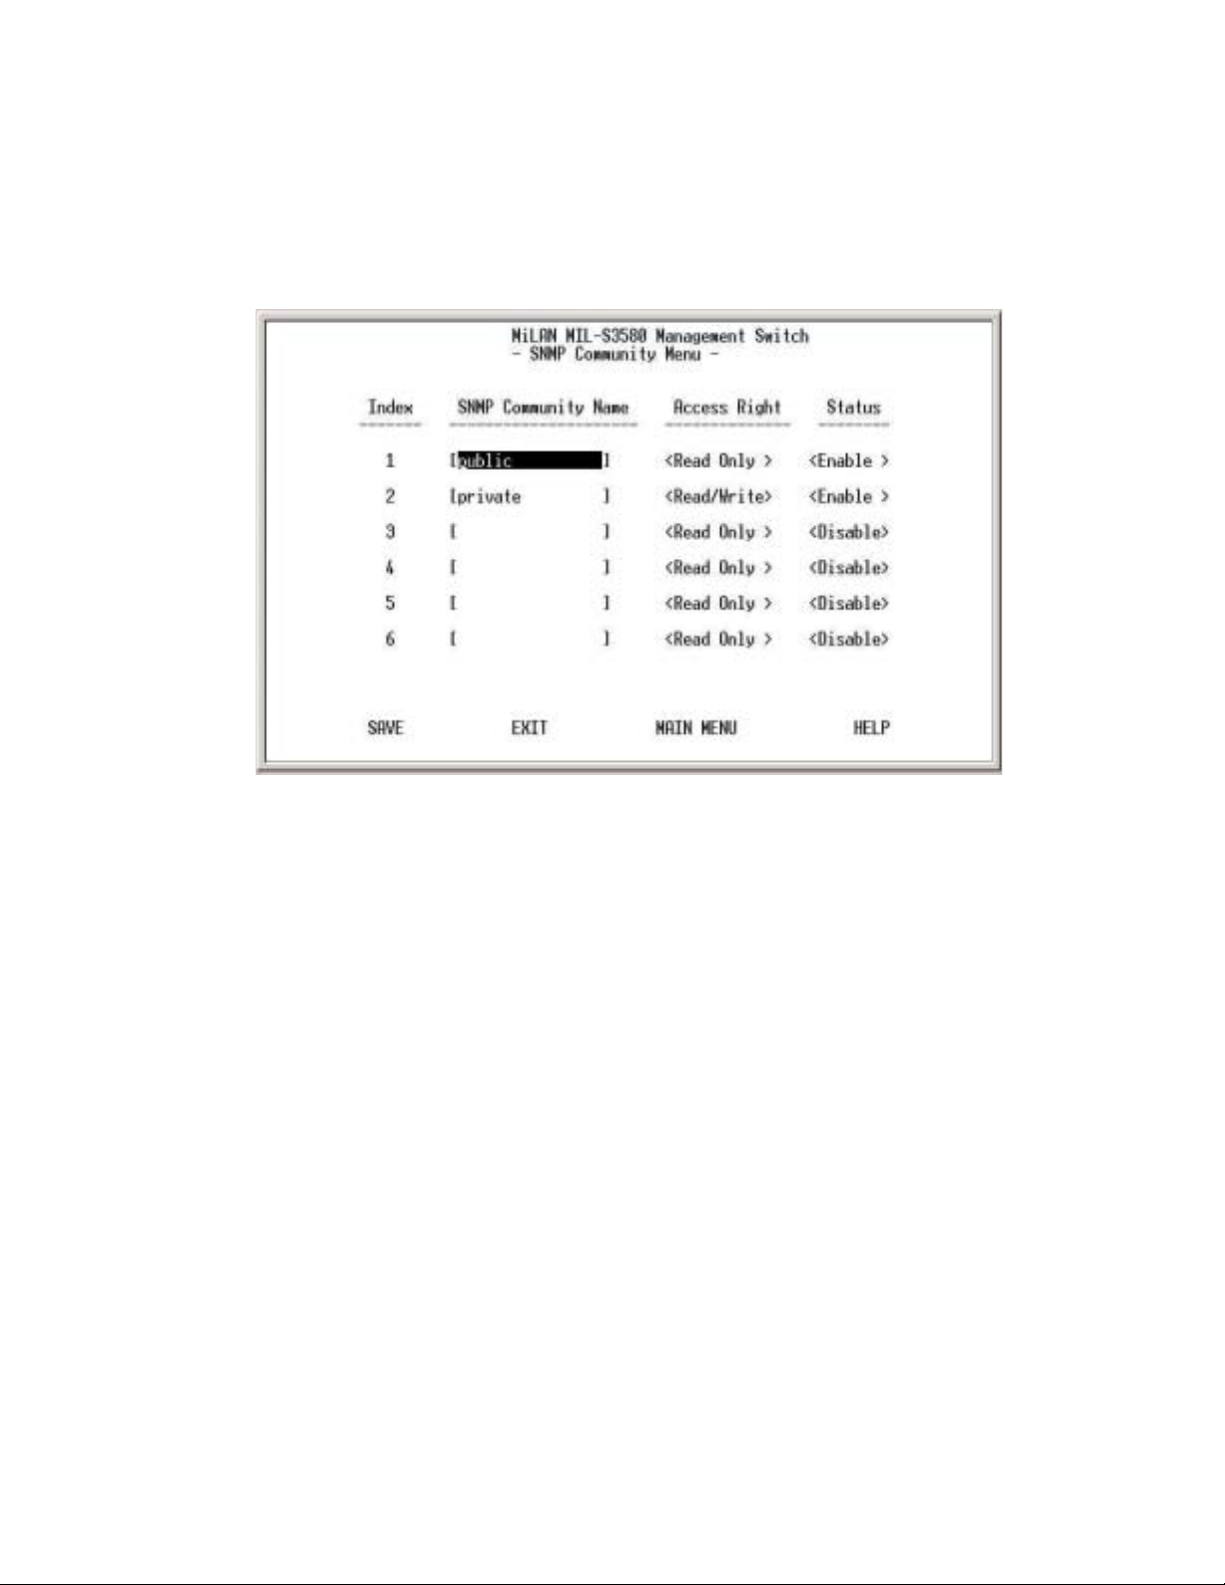
2.3. SNMP Community Setup
Figure 3-11. SNMP Community Menu
Use the SNMP communities to restrict access to the switch by SNMP management
stations by adding editing or disabling SNMP communities. You can configure up
to 6 SNMP communities, each with either a restricted read-only or unrestricted
read/write access.
Public Community
view the information but not to make changes to the configuration.
Private Community (Read/Write access right) allows the member of the
community to view and make changes to the configuration.
To set the "Public" and "Private" community names, you can type the desired text
string in the corresponding edit box.
(Read-only access right) allows the member of community to
19
Page 20
2.4. Trap Receiver
Figure 3-12. Trap Receiver Menu
A trap receiver is a management station designated by the switch to receive
SNMP traps sent from the switch. Use Trap Receiver screen to designate certain
community to receive trap(s) generated by the system. In the default
configuration, no trap receivers are configured and the authentication trap is
disabled. The trap's Host IP address is the IP address required.
2.5. Management Capability Setup
Figure 3-13. Management Capability Setup Menu
20
Page 21
This menu allows you to enable/disable Web-Based management capability. If
disabled, there is no access to management function through the use of a Web
browser such as Microsoft Internet Explorer or Netscape.
2.6. Trap Filter Setup
Figure 3-14. Trap Filter Setup Menu
The system will generate a set of SNMP traps upon the occurrence of an event. By
checking a filter event, you are turning off the filter and enabling the trap associated
with that event. The trap will be sent to the community name(s) configured in the
Trap Receiver Menu.
3. Device Control Menu
Figure 3-15. Device Control Menu
21
Page 22
Device Control Menu contains 15 submenus where you can add and modify
functions and features of the switch.
3.1. Switch Device Configuration
Figure 3-16. Switch Device Configuration Menu
Use <Space Bar> to toggle the Enable/Disable field and type in the appropriate
value in the Time and Priority fields.
x Spanning Tree Enable State is disabled by default on the MIL-S3580. The
switch uses the IEEE802.1D Spanning Tree Protocol (STP), when enabled,
to ensure that only one path at a time is active between any two nodes on the
network.
x Dynamic Entry Aging Time - This is the time, in seconds, that the switch
keeps an address of a device in the MAC address table. 300 seconds or 5
minutes is the default. The time can be set from 5 seconds to 999 seconds or
16.65 hours. A MAC address can also be entered in the static address table
to prevent aging out.
x Broadcast Storm Prevention can be set to 6%, 20% or Disabled. The
percentage indicates the allowance against the capacity. When disabled,
there is no limitation on the incoming rate of broadcast/multicast traffic,
otherwise limitation on broadcast traffic will be set to the configured
percentage.
22
Page 23

x Ingress Filtering examines the tagged header of each tagged frame that
enters a port and determines whether the tagged frame and the port that
received the frame are members of the same VLAN. If they belong to the same
VLAN, the port accepts the frame. If they belong to different VLANs, the port
discards the frame. If Ingress filtering is disabled, any tagged frame is
accepted on any port on the switch. It does not matter whether the frame and
port belong to the same or different VLANs.
x
Per-Port Priority
allows port-based priorities. You can designate the priority
for the receiving port so that any frame received will be transmitted to the
destination port with the programmed priority. However, if the received frame
has a layer 3 priority (TOS or DiffServ), it will have precedence over
port-based priority. When set, all ports by default have the lowest priority
possible. If a priority different from lowest is wanted, the priority must be
changed for each individual port in the Port Configuration Menu.
x HOLB Prevention - Head Of Line Blocking occurs when many ports send
frames to the same output port. This puts the frames in contention for output
port and all frames must wait behind, thus the head of the line goes first. The
shared memory switching fabric architecture eliminates any possibility of
head-of-line blocking when this feature is enabled.
x When
is enabled, you can map the Type of Service of your choice
QoS
(according to IEEE 802.1p) to the 4 priority levels provided.
x There are 3 different modes of VLANs supported in this switch, 802.1Q,
Port-Based VLANs
and
MTU/MDU
. The choice you make here will
ultimately decide the VLAN mode and function for the entire switch. If one
mode is selected, the other two VLAN modes will have no effect on the
switch.
x GVRP Enable State is used with IEEE 802.1Q VLANs. GVRP enables the
switch to dynamically create 802.1Q compliant VLAN links with other
switches running GVRP. This reduces the chance for errors in VLAN
configuration by automatically providing VLAN ID (VID) consistency across
the network. You can use GVRP to propagate VLANs to other GVRP
switches instead of manually having to set up VLANs in each switch. In order
to activate GVRP without overlapping VLANs, follow these steps:
1. Assign static VLANs.
2. Take out ports that belong to assigned VLANs from Default VLAN.
3. Assign those ports to Local VID in Switch Port Configuration Menu.
4. Tag the uplink port in the Untagged Configuration Menu.
5. Turn on STP in Switch Configuration Menu.
23
Page 24
6. Turn on GVRP in Switch Configuration Menu.
7. Update Configuration Setting.
8. Cold Start in System Start Menu.
x
IGMP Snooping
create lists of devices that are members of multicast groups. A multicast
group might consist of all users that want to see the company yearly meeting
on video. Video is a multicast application. IGMP Snooping enables the
switch to monitor the flow of queries from the devices and the routers. IGMP
Snooping improves the switch's performance by restricting the flow of
multicast packets to only those switch ports, which have devices receiving the
multicast (video).
x
IGMP Snooping Table Aging Time
multicast group(s). The time controls how frequently the switch expects to
see information from devices that want to stay members of multicast groups
and process leaving requests.
relates to the protocol IGMP. IGMP enables routers to
is the time the switch will maintain its
3.1. Switch Port Configuration
Figure 3-17. Switch Port Configuration Menu
T
he ports on this menu are divided and displayed in three separate pages. Twelve
ports are displayed on each of the first two menus, with the two modular uplink
ports displayed on the third page. Use PREV PAGE, NEXT PAGE to list desired
port range. To select a port, highlight that port using <Tab > or arrow keys, and
press <Enter>
24
Page 25

3.2. Individual Port Configuration
Figure 3-18. Switch Port Configuration Menu
In Switch Port Configuration Menu, you can configure basic characteristics such as
speed, flow control, and VLAN ID as well as the following features supported by the
switch:
x Port Description - Sixteen characters can be entered to identify the port.
x
Admin State
access the switch through the port. The administrator must then enable the
port in order for a link to be established.
x Speed and Duplex - There are five different settings that can be set for each
port: Half-duplex-10Mbps, Full-duplex-10Mbps, Half-duplex-100Mbps,
Full-duplex-100Mbps and Auto-negotiation.
x Flow Control - When enabled, pause frame is utilized for full duplex
operations and backpressure flow control is utilized for half duplex. By
default, it is enabled.
x Per-Port Priority – Four levels of priority (High, Medium, Low and Lowest)
can be set to each individual port. However, the priority level set through QoS
or TOS will have higher precedence.
x
Bandwidth Management
management of bandwidth. Configuration of receive and transmit control of
each port is independent. You can set the port to transmit and/or receive at
- When set to Disable, the port is inoperable and no devices can
- Eight levels of speed control facilitate the
25
Page 26

the provisioned speed or none for full wire speed. Configuration takes effect
immediately after saving, with no resetting of the switch necessary. The
various levels are listed below.
10Mb 312Kb 625KB 938Kb 1.25Mb 2Mb 4Mb 6Mb 8Mb
100Mb 3.12Mb 6.25Mb 9.38Mb 12.5Mb 20Mb 40Mb 60Mb 80Mb
1000Mb 31.2Mb 62.5Mb 93.8Mb 125Mb 200Mb 400Mb 600Mb 800Mb
Table 3-1. Eight Levels of Bandwidth Provisioning
x Default Port VLAN ID - The default VLAN ID must be set for each port after
configuration of new VLANs.
3.3. Permanent/Static Address Configuration
Figure 3-19. Permanent Address Configuration menu
There are 128 static unicast groups and 32 multicast supported by the system. Two
submenus are contained in this section.
26
Page 27

3.3.1. Static Unicast Address Configuration
You can create, modify, or delete Static Unicast Address by selecting entries from
the following screen.
Figure 3-20. Static Unicast Address Configuration Menu
This screen shows all the Static Unicast addresses configured and their status.
There is a separate index for 128 different Static Unicast addresses. If the status of
the address is to be changed or a new address to be added, <Tab> to the index of
that address and press <
Figure 3-21. Static Unicast Address Configuration Menu
> to go to the Configuration Menu.
Enter
27
Page 28

Enter the MAC address you wish to set as the static unicast address and the
associated port. Use <Space Bar> to toggle the status field between Disable,
Forwarding, Filter-In, and Filter-Out.
x Disable – This Unicast Address entry has no effect to the switch system.
x Forwarding – All packets designated to this MAC address will be forwarded
(and only to) the designated port.
x
Filter-in
enter this port. Packets originated from other MAC addresses will be dropped
at this port automatically.
x Filter-out – All packets designated to this MAC address will be blocked.
– Only packets originated from this MAC address will be permitted to
3.3.2. Static Multicast Address Configuration
Figure 3-21. Static Multicast Address Configuration Menu
In the Static Multicast Configuration Menu screen, you can add member(s) to the
group by checking the port(s) with <
toggle Status field set to Enable.
28
Space Bar
> and key in MAC addresses and
Page 29

3.4. Port Statistics
Figure 3-22. Port Statistics Menu
You can view the port specific statistical information displayed in this screen by
entering the port number in the Port ID field. The statistics are automatically
refreshed, but you can force the screen to refresh or reset the counters to 0 by
selecting the appropriate option.
3.5. Spanning Tree Protocol Configuration
Figure 3-23. Spanning Tree Protocol (STP) Configuration Menu
29
Page 30

By default, Spanning Tree is disabled on the MIL-S3580. The switch uses the
IEEE802.1D Spanning Tree Protocol (STP), when enabled, to ensure that only one
path at a time is active between any two nodes on the network. In networks where
there is more than one physical path between any two nodes, STP ensures a single
active path between them by blocking all redundant paths. Having more than one
path between a pair of nodes causes loops in the network, which result in
duplication of messages, leading to "broadcast storms".
As recommended in the IEEE 802.1Q VLAN standard, the MIL-S3580 uses a
single-instance STP, regardless of whether VLANs are configured on the switch.
The Spanning Tree status can be changed with the <Space Bar>. If you enable the
spanning tree protocol, you must complete the Priority and Time fields with
appropriate values. Note that you can choose to leave a menu screen without
applying any changes you had made at any time by pressing <Esc> and then
confirm with <Enter>.
x STP Bridge Priority - The range is 0 to 65535. This range specifies the priority
value used along with the switch’s MAC address to determine which device in
the network is root for all the spanning tree switches. The lower a priority value,
the higher the priority. The default is 32768.
x STP Bridge Max Age - The range is 6 to 40 seconds. This range specifies the
maximum received message age the switch allows for STP information before
discarding the message. The default is 20 seconds.
x STP Bridge Hello Time - The range is 1 to 10 seconds. This is the time
between messages transmitted when the switch is the root. The default is 2
seconds.
x
STP Bridge Forward Delay
the switch waits before transitioning from the listening to the learning state and
between the learning state to forwarding state. The default is 15 seconds.
- The range is 4 to 30 seconds. This is the time
30
Page 31

3.6. Spanning Tree Protocol Port Configuration
Figure 3-24. Spanning Tree Protocol Port Configuration Menu
In this menu, you can assign spanning priority and path cost to any port. A port with
higher priority and lower path cost is less likely to be blocked if Spanning Tree
Protocol is detecting network loop.
x STP Port Priority - Range is 0 to 255. This parameter is used by STP to
determine the port(s) to use for forwarding. The port with the lowest number
has the highest priority. The default is 128.
x STP Port Path Cost - The range is 1 to 65,535. This assigns an individual port
cost that the switch uses to determine which ports are the forwarding ports. The
default is 19.
x
STP Port Topology Change Detection
trap if the Trap Filter menu for the Bridge New Root Trap is also turned-on.
- When enabled, the switch will send a
3.7. Port-Based VLAN Configuration
Assigning physical ports within workgroups is simple, and is a common method of
defining a virtual workgroup – VLAN. It delivers the benefit of broadcast control and
simplifies configuration for the network manager. One advantage of the
Port-Based VLAN is its simplicity in configuration.
31
Page 32

Figure 3-25. Port Based VLAN Configuration Menu
Port Based VLAN needs to be set in the Switch Device Control Menu before any
configuration in this menu takes effect. By default, the VLAN mode configuration
for the switch is IEEE 802.1Q. Once set to Port Based VLANs, all ports are on the
same VLAN by default. There can be up to 128 different port based VLANs
configured. These VLANs can be overlapping which means that one port can
belong to several different VLANs.
Select the VLAN entry to create, modify, or delete the VLAN group. Use <
Bar> to check (join) port(s) to the VLAN group. When a port is joined to a VLAN, it
appears on the menu screen as (X). If the () is blank, the port does not belong to
that VLAN.
32
Space
Page 33

Figure 3-25. Port Based VLAN Configuration Menu
3.8. 802.1Q VLAN Configuration
When configuring the IEEE802.1Q VLAN, there are slightly different options available
when the port is configured on the console screen or the web browser. A port on a
VLAN can be in one of three different states.
x Normal where the port is not mapped to a specific VLAN but can become a
member through Dynamic VLAN registration. Dynamic VLANs are set when
GVRP learns them. Unless GVRP is running, there is no registration of dynamic
VLANs.
x Fixed registration maps a port to a specific or fixed VLAN. The network
administrator can "fix" a VLAN to a specific port with this option. The port can also
be set to another VLAN by dynamic VLAN registration.
x Forbidden ports cannot participate in the designated VLAN. They cannot be fixed
members or members of dynamic VLANs. When set to forbidden, the port cannot
communicate with any ports on this VLAN.
33
Page 34

Once configured there are 3 possible states of the ports that show in the management
menus.
S: shows a static registration of the port and GVRP is not running
D: the port has been registered to the specific VLAN by GVRP
C: the port has been registered to the specific VLAN by GVRP and it was also
set to that VLAN by a network administrator
N
O
T
E
N
O
T
E
N
O
: A blank indicates that the port is not a member of the VLAN.
T
E
On the web browser the ports can be set as Normal, Fixed or Forbidden. The mapping
of the 3 different configuration options on the console versus the web browser are
shown below.
Console configuration Web configuration
Normal Normal
Fixed F Fixed
Forbidden B Forbidden
If 802.1Q VLAN mode was chosen, then the settings of the following submenus are
significant and need to be configured carefully.
This screen shows the currently set VLAN sorted by index number. Select the
entry to create, modify, or delete and proceed to the next screen.
Figure 3-26. Static VLAN Configuration Menu
34
Page 35

Figure 3-27. Static VLAN Port Configuration Menu
( ) – Port is not set as static (fixed) member of the VLAN but it can become a
member through Dynamic VLAN Registration. Dynamic VLANs occur when GVRP
sets them. Unless GVRP is running, no registration of dynamic VLANs can take
place.
(F) – Port is set as static (fixed) member of the VLAN and can be registered as a
dynamic VLAN member as well.
(B) – Port(s) is being forbidden to participate in the designated VLAN. It cannot be
a static member or a dynamic member of the VLAN. When set, this port cannot
communicate with other ports.
The configuration in Figure 3-27 sets all ports to the default VLAN. They may be
members of a dynamic VLAN as well and to see which dynamic VLANs they
belong to, you must view the Dynamic LAN menu.
35
Page 36

3.8.1. Dynamic VLAN Table
Figure 3-28. Dynamic VLAN Table
This screen displays the VLAN mapping for port(s) that join VLAN(s) through
Dynamic VLAN Registration. GVRP enables the switch to dynamically create
802.1Q compliant VLANs on links with other devices running GVRP. This enables
the switch to automatically create VLAN links between other GVRP aware devices.
GVRP reduces the chances for errors in VLAN configuration by automatically
providing VLAN ID consistently across the network.
3.8.2. VLAN Tagged Configuration
Figure 3-29. Port Untag Configuration Menu
36
Page 37

All ports are set by default as untagged. To change port(s) to be tagged, use the
<
Space Bar
> to uncheck -
( ) the port(s)
. In the above configuration, port 2 will
send out tagged packets. If VLANs need to communicate with other VLANs on the
network, VLAN tagging needs to be set for those ports. Also, in order for GVRP to
work, VLAN tagging of those ports needs to be set.
3.8.3. MTU/MDU Per-Port VLAN Table
Figure 3-30. MTU/MDU Per-Port VLAN Table
This screen allows you to only view the settings made in Switch Device
Configuration menu. It shows that the switch is set to MTU/MDU VLAN mode with
one uplink. If 2 uplinks are configured, ports 1 through 12 map to port 25 and ports
13 through 24 map to port 26.
N
O
:
T
E
N
:
O
T
E
When set to MTU/MDU Port VLAN, management over the network
N
O
:
T
E
(non-console) can only be done through one of the uplink port. This allows for a
very secure network.
37
Page 38

3.9. GARP Configuration
Figure 3-31. GARP Configuration Menu
GARP (Generic Attribute Registration Protocol) defines the architecture, rules of
operation, state machines and variables for the registration and de-registration of
attribute values. It allows dynamic filter entries for VLAN membership to be
distributed among the Forwarding Databases of VLAN-aware switches. By joining
GVRP (GARP VLAN Registration Protocol), it helps maintaining VLAN information.
The rule of the aging scheme is:
GARP Leave All Time > GARP Leave Time > GARP Join Time
N
:
O
T
E
N
:
O
T
E
N
Before GVRP can be enabled, STP must also be enabled, saved, and the
:
O
T
E
switch must go through a Cold Start in order for configuration to take effect.
38
Page 39

3.10. IGMP Snooping Table
Figure 3-32. IGMP Snooping Table
This table shows the multicast groups found by IGMP Snooping. By supporting
IGMP (Internet Group Management Protocol) Snooping, the switch can forward
multicast traffic intelligently. Packets are forwarded to the ports that belong to the
multicast group instead of being broadcasted to all ports and possibly disrupting
network performance. This lookup table reflects up to 32 multicast group(s)
configuration of your system and provides an overview of the port(s) map to each
multicast group.
3.11. Trunk Group Configuration
Figure 3-33. Trunk Configuration Menu
39
Page 40

Multiple links between switches can be grouped (trunk) to work as one virtual,
aggregate link. You can create 4 trunks at a time; each trunk can hold up to 8 ports.
Only ports of the same speed can belong to a single trunk. Link aggregation is
supported and trunking can be configured to another switch supporting the
standards.
x Trunk Group 1:
o 2 Ports: 1, 2
o 4 Ports: 1, 2, 3, 4
o 8 Ports: 1, 2, 3, 4, 5, 6, 7, 8
x Trunk Group 2:
o 2 Ports: 9, 10
o 4 Ports: 9, 10, 11, 12
o 8 Ports: 9, 10, 11, 12, 13, 14, 15, 16
x Trunk Group 3:
o 2 Ports: 17, 18
o 4 Ports: 17, 18, 19, 20
o 6 Ports: 17, 18, 19, 20, 21, 22, 23, 24
x Trunk Group 4:
o 2 Ports: 25, 26
3.12. Port Mirroring Configuration
Figure 3-34. Port Mirroring Configuration Menu
40
Page 41

By enabling port mirroring, traffic to and from the source port will be forwarded to
the target port. You can select any of the 26 ports as either the Source port or the
Target port by using <Space Bar> to select the desired port number
.
4. User Authentication
Figure 3-35. User Authentication Menu
You can change the password setting in the User Authentication Menu. You can
also create alternate users and assign either read or read/write privileges to each
user configured. By default, the switch has two user names configured: guest,
with no password, which only has read privileges, and admin, which has read/write
privileges and no password. For security reasons, it is suggested that a password
is configured before the switch is installed on the network.
N
:
O
T
E
N
:
O
T
E
N
The maximum number of characters allowed for user name and password
O
:
T
E
is 6.
41
Page 42

Figure 3-36. User Authentication Detailed Menu
After selecting an entry to add or modify, type in user name and password, toggle
the user privilege with <Space Bar> and then update the changes.
5. System Utility
5.1 System Restart
Figure 3-37. System Restart Menu
You need to perform either a Cold Start or Warm Start to have the changes saved
in the switch’s memory. These changes stay in effect until another configuration
change is made. A warm start will save all configuration changes, but the switch
does not go through a POST (Power On Self Test). A cold start will save all the
42
Page 43

configuration changes and completely restart the switch’s hardware including the
power, just as if you had powered the switch off and on. A warm boot is a software
restart; no hardware is affected. Both types of restarts, save the configuration
changes to the switch.
5.2 Factory Reset
Figure 3-38. Factory Reset Menu
This menu lets you to reset a certain portion of the current configuration back to
factory default or all configuration to factory default. If VLAN configuration is reset,
all parameters of the all VLAN configuration is reset and only the one default VLAN
is in effect as it was set from the factory. No other switch configuration is changed.
In order to do a complete system reset, every one of the 6 items in the menu need
to be reset.
43
Page 44

5.3 Login Timeout Interval
Figure 3-39. Login Timeout Interval
You can set up the time you need for the automatic log-out to take effect. The
default is that the local console connection and Telnet session will stay connected
and not time-out.
5.4 System Download
Figure 3-40. System Download Menu
TFTP downloads the code for the switch to perform a software upgrade. The
switch supports two different upgrade modules: BOOT ROM and System
Software. These two upgrades can be done concurrently or one after the other.
44
Page 45

After flash upgrading the switch's system software, in Windows Internet Explorer,
go to Tools, Internet Options, click on Delete Files button in General tab to clear
all temporary internet files, and click OK. Then refresh window to view the new
updated version of the MIL-S3580.
5.5 Quick Start
Figure 3-41. System Quick Start Menu
When enabled, the switch will not go through a POST when Cold Start or Warm
Start is selected in the System Restart Menu.
5.6 Configuration Update Setting
Figure 3-42. Configuration Update Setting
When selected, switch updates all settings and restarts.
45
Page 46

4. Web-Based Management
This section introduces the configuration and functions of the Web-Based
management.
About Web-based Management
An embedded HTML web server resides in flash memory inside the switch. It
allows users to manage the switch from anywhere on the network through a
standard browser such as Microsoft Internet Explorer or Netscape.
The Web-Based Management is based on Java Applets with an aim to reduce
network bandwidth consumption, enhance access speed and present an easy
viewing screen.
N
:
O
T
E
N
:
O
T
E
N
to open sockets. The user has to explicitly modify the browser setting to enable
Java Applets to use network ports.
By default, Internet Explorer 5.0 or later version does not allow Java Applets
:
O
T
E
System Login
1. Start Internet Explorer or Netscape.
2. Type http:// and the IP address of the switch (for example,
http://199.86.13.77
Figure 4-1. Password Window
3. The Password screen appears.
).
46
Page 47

4. Type user name and password. The default is “admin” and no password.
5. Press “Enter” or click ”OK”, then the Home Screen of the Web-based
management appears.
System Information
Figure 4-2 System Information Menu
You can manage the switch using third party’s SNMP (Simple Network
Management Protocol) agent. Access rights to the SNMP agent are controlled by
community strings. To set System Name, System Location and System Contact,
you can type the desired text string in the corresponding edit box.
47
Page 48

Management Setup
Network Configuration
Figure 4-3. Network Configuration Menu
The IP address, subnet mask and default gateway of the managed node can be
changed or modified on this menu. Enter a new IP address, subnet mask and
default gateway in the corresponding edit box. The default IP address, subnet
mask and gateway are all 0.0.0.0. The IP address and the subnet mask must be
set by the local management port before the switch can be managed from the Web
browser.
Serial Port Configuration
Figure 4-4. Serial Port Configuration Menu
48
Page 49

You can change the serial port baud rate setting through this screen to suit your
environment, however, using the default setting is recommended.
SNMP Community Setup
Figure 4-5. SNMP Community Setup Menu
Public Community
can view the information but cannot make changes to the configuration.
Private Community (Read/Write access right) allow the member of the
community to view and make change to the configuration.
To set the "Public" and "Private" community name, you can type the desired text
string in the corresponding edit box.
(Read-only access right) means that member of community
49
Page 50

Trap Receiver
Figure 4-6. Trap Receiver Menu
A trap receiver is a management station designated by the switch to receive
SNMP traps sent from the switch. Use Trap Receiver screen to designate
certain community to receive trap(s) generated by the system. In the default
configuration, no trap receivers are configured and the authentication trap is
disabled. The trap's Host IP address is the IP address required.
Management Capability Setup
Figure 4-7. Management Capability Setup Menu
50
Page 51

This is where you can enable/disable Web-Based management capability which in
turn allow or disallow the access to management function through the use of a Web
browser. If Web Based management is disabled, the only way to manage the
switch is connecting locally through the console port or via the network by Telnet.
Trap Filter Setup
Figure 4-8. Trap Filter Setup Menu
The system can generate a set of SNMP traps upon the occurrence of those
events. By checking a filter event, you are turning off the filter and enabling the
trap associated with that event.
51
Page 52

Device Control
Switch Configuration
Figure 4-9. Switch Configuration Menu
x Spanning Tree Enable State - By default, Spanning Tree is disabled on the
MIL-S3580. The switch uses the IEEE802.1D Spanning Tree Protocol (STP),
when enabled, to ensure that only one path at a time is active between any two
nodes on the network.
x Dynamic Entry Aging Time - This is the time, in seconds, that the switch
keeps an address of a device in the MAC address table. 300 seconds or 5
minutes is the default. The time can be from 5 seconds to 999 seconds or
16.65 hours. A MAC address can also be entered in the static address table
and the MAC address will not age out.
x Broadcast Storm Prevention can be set to 6%, 20%, or Disable. The
percentage indicates the allowance against the capacity. When disabled, there
is no limitation on the incoming rate of broadcast/multicast traffic, otherwise
limitation on broadcast traffic will be set to the configured percentage.
x Ingress Filtering examines the tagged header of each tagged frame that
enters a port and determines whether the tagged frame and the port that
received the frame are members of the same VLAN. If they belong to the same
VLAN, the port accepts the frame. If they belong to different VLANs, the port
52
Page 53

discards the frame. If Ingress Filtering is disabled, any tagged frame is
accepted on any port on the switch. It does not matter whether the frame and
port belong to the same or different VLANs.
x
Per-Port Priority
allows port based priorities. You can designate the priority
for the receiving port so that any frame received will be transmitted to the
destination port with the programmed priority. However, if the received frame
has a layer 3 priority (TOS or DiffServ) will have precedence over port based
priority. When set, all ports by default have the lowest priority possible. If a
priority different from lowest is wanted, the priority must be changed for each
individual port in the port configuration menu.
x HOLB Prevention - Head Of Line Blocking occurs when many ports send
frames to the same output port. This puts the frames in contention for output
port and all frames must wait behind, thus the head of the line goes first. The
shared memory switching fabric architecture eliminates any possibility of
head-of-line blocking when this feature is enabled.
x When
is enabled, you can map the Type of Service of your choice
QoS
(according to IEEE 802.1p) to the four priority levels provided.
x There are 3 different modes of VLANs supported in this switch, 802.1Q,
Port-Based VLANs
and
MTU/MDU
. The choice you make here will ultimately
decide the VLAN mode and function for the entire switch. If one mode is
selected, the other two VLAN modes will have no effect on the switch.
x GVRP Enable State is used with IEEE 802.1Q VLANs. GVRP enables the
switch to dynamically create 802.1Q compliant VLAN links with other
switches running GVRP. This reduces the chance for errors in VLAN
configuration by automatically providing VLAN ID (VID) consistency across
the network. You can use GVRP to propagate VLANs to other GVRP
switches instead of setting up VLANs in each switch. STP must be enabled
before GVRP is enabled. In order to activate GVRP without overlapping
VLANs, follow these steps:
1. Assign static VLANs.
2. Take out ports that belong to assigned VLANs from Default VLAN.
3. Assign those ports to Local VID in Switch Port Configuration Menu.
4. Tag the uplink port in the Untagged Configuration Menu.
5. Turn on STP in Switch Configuration Menu.
6. Turn on GVRP in Switch Configuration Menu.
7. Update Configuration Setting.
8. Cold Start in System Start Menu.
NOTE: Make sure the port you are connected to is not locked out after
53
Page 54

VLANs are assigned.
x IGMP Snooping relates to the protocol IGMP. IGMP enables routers to create
lists of devices that are members of multicast groups. A multicast group might
consist of all users that want to see the company yearly meeting on video.
Video is a multicast application. IGMP snooping enables the switch to monitor
the flow of queries from the devices and the routers. IGMP snooping improves
the switches' performance by restricting the flow of multicast packets to only
those switch ports, which have devices receiving the multicast (video).
x IGMP Snooping Table Aging Time is the time the switch will maintain its
multicast group(s). It controls how frequently the switch expects to see
information from devices that stay members of multicast groups and process
leaving requests.
Switch Port Configuration
Figure 4-11. Port Administration in Switch Port Configuration Menu
The ports are divided and displayed in three separate pages. In the Port
Administrative Configuration menu, select the port to configure the characteristics
such as speed, flow control, and VLAN ID as well as the following features provided
with the system:
54
Page 55

Figure 4-12. Switch Port Configuration Menu
x Port Description - Sixteen characters can be entered to identify the port.
x Administration State - When set to Disable, the port is inoperable and no
devices can access the switch through the port. The administrator must then
enable the port in order for a link to be established.
x Speed and Duplex - There are five different settings that can be set for each
port: Half-duplex-10Mbps, Full-duplex-10Mbps, Half-duplex-100Mbps,
Full-duplex-100Mbps and Auto-negotiation.
x Flow Control - When enabled, pause frame is utilized for full duplex
operations and backpressure flow control is utilized for half duplex. By default,
this is enabled.
x
Per-Port Priority
– Four levels of priority (High, Medium, Low and Lowest) can
be set to each individual port. However, the priority level set through
QoS/Type of Service configuration in the Device Configuration Menu will have
higher precedence.
55
Page 56

x Bandwidth Management - Eight levels of speed control facilitate the
management of bandwidth. Configuration of receive and transmit control of
each port is independent. You can set the port to transmit and/or receive at the
provisioned speed or none for full wire speed. Configuration takes effect
immediately after saving, with no resetting of the switch necessary. The
various levels are listed below.
10Mb 312Kb 625KB 938Kb 1.25Mb 2Mb 4Mb 6Mb 8Mb
100Mb 3.12Mb 6.25Mb 9.38Mb 12.5Mb 20Mb 40Mb 60Mb 80Mb
1000Mb 31.2Mb 62.5Mb 93.8Mb 125Mb 200Mb 400Mb 600Mb 800Mb
Table 4-1. Eight Levels of Bandwidth Provisioning
x Default Port VLAN ID - The default VLAN ID must be set for each port after
configuration of new VLANs.
Trunk Group Configuration
Figure 4-13. Trunk Group in Switch Port Configuration Menu
Port trunking is the ability to group several ports to increase the bandwidth between
this switch and another compatible switch. This is an inexpensive way to increase
bandwidth.
56
Page 57

x Trunk Group 1:
o 2 Ports: 1, 2
o
4 Ports: 1, 2, 3, 4
o 8 Ports: 1, 2, 3, 4, 5, 6, 7, 8
x Trunk Group 2:
o 2 Ports: 9, 10
o
4 Ports: 9, 10, 11, 12
o 8 Ports: 9, 10, 11, 12, 13, 14, 15, 16
x Trunk Group 3:
o 2 Ports: 17, 18
o
4 Ports: 17, 18, 19, 20
o 6 Ports: 17, 18, 19, 20, 21, 22, 23, 24
x Trunk Group 4:
o 2 Ports: 25, 26
Port Mirror Configuration
Figure 4-14. Port Mirror in Switch Port Configuration Menu
Port Mirroring
port. This helps to track down network errors or erroneous packet transfers without
interrupting the flow of data across the network.
To monitor all receive and transmit packets of one port.
in "Source Port".
x Choose the corresponding target port in “Target Port".
copies all traffic (all frames) from a specific source port to a target
Choose
the monitored port
57
Page 58

x Change the Disable Status to Enable.
x Choose "Submit" button.
Permanent Address Configuration
You can Add, Modify, or Delete Static Unicast Address by selecting entries from the
following screen.
Figure 4-15. Static Unicast Address in Permanent Address Configuration Menu
Enter the MAC address of a system you wish to set as static unicast address the
port associated with the system. Select the status field between Disable,
Forwarding, Filter-In, and Filter-Out.
x Disable
x Forwarding – All packets designated to this MAC address will be forwarded
(and only to) the designated port.
x Filter-in – Only packets originated to from this MAC address will be permitted
to enter this port. In other words, packets originated from other MAC
addresses will be dropped at this port automatically.
– This Unicast Address entry has no effect to the switch system.
x Filter-out – All packets designated to this MAC address will be blocked.
58
Page 59

Figure 4-16. Static Multicast Address Configuration in Permanent Address
Configuration Menu
In the Static Multicast Configuration Menu screen, you can add member(s) to the
group by checking the port(s).
Spanning Tree Protocol Configuration
Spanning Tree is a link management protocol that provides path redundancy while
preventing undesirable loops in the network. For Layer 2 Ethernet network to
function properly, only one active path must exist between two stations.
The Spanning-Tree Algorithm calculates the best loop-free path throughout a
switched network. STP forces redundant data paths into a standby (blocked) state.
If a network segment in the spanning tree fails and a redundant path exists, the
Spanning-Tree Algorithm recalculates the Spanning Tree topology and activates
the standby path.
59
Page 60

Figure 4-17. Spanning Tree Protocol Configuration Menu
If you enable the Spanning Tree Protocol, you must complete the Priority and Time
.
fields with appropriate values or use defaults
spanning priority and path cost to any port. A port with higher priority and lower
path cost is less likely to be blocked if Spanning Tree Protocol is detecting network
loop.
In this screen, you can assign
Spanning Tree Protocol Port Configuration
Figure 4-18. Spanning Tree Protocol Port Configuration Menu
60
Page 61

In this screen you can assign spanning Priority and Path Cost to any port. A port
with higher priority and lower path cost is less likely to be blocked if Spanning Tree
Protocol is detecting network loop.
x STP Port Priority - Range is 0 to 255. This parameter is used by STP to
determine the port(s) to use for forwarding. The port with the lowest number
has the highest priority. The default is 128.
x STP Port Path Cost - The range is 1 to 65,535. This assigns an individual port
cost that the switch uses to determine which ports are the forwarding ports. The
default is 19.
x
STP Port Topology Change Detection
trap if the Trap Filter menu for the Bridge is also turned-on.
Port Statistics
- When enabled, the switch will send a
Figure 4-19. Port Statistics Menu
You can view the statistics information display in this screen regarding a certain port
by entering the port number in the Port ID field. You can also refresh or reset the
counter as you wish.
61
Page 62

VLAN Configuration
Figure 4-20. Port Based VLAN Configuration Menu
(S) – Port(s) is set as static (fixed) member of the VLAN.
(D) – Port(s) is set as static (fixed) member of the VLAN and can be registered as a
dynamic VLAN member as well.
(C) – Port(s) is being both a static member and a dynamic member of the VLAN.
Port Based VLAN needs to be set in the Switch Device Control Menu before
configuring this menu will take effect. By default, the VLAN mode configuration for
the switch is IEEE 802.1Q. Once set to Port Based VLANs, all ports are on the
same VLAN by default. There can be up to 128 different port based VLANs
configured. These VLANs can be overlapping which means that one port can
belong to several different VLANs.
Static VLAN Configuration
When configuring the IEEE802.1Q VLAN, there are slightly different options
available when the port is configured on the console screen or the web browser. A
port on a VLAN can be in one of three different states.
62
Page 63

x Normal where the port is not mapped to a specific VLAN but can become a
member through Dynamic VLAN registration. Dynamic VLANs are set when
GVRP sets them. Unless GVRP is running, there is no registration of dynamic
VLANs.
x Fixed registration maps a port to a specific or fixed VLAN. The network
administrator can "fix" a VLAN to a specific port with this option. The port can also
be set to another VLAN by dynamic VLAN registration.
x
Forbidden
ports cannot participate in the designated VLAN. They cannot be fixed
members or members of dynamic VLANs. When set to forbidden, the port cannot
communicate with any ports on this VLAN.
Once configured there are 3 possible states of the ports that show in the
management menus.
shows a static registration of the port and GVRP is not running
S:
D: the port has been registered to the specific VLAN by GVRP
C: the port has been registered to the specific VLAN by GVRP and it was also
set to that VLAN by a network administrator
Note: A blank indicates that the port is not a member of the VLAN.
On the web browser the ports can be set as Normal, Fixed or Forbidden. The
mapping of the 3 different configuration options on the console versus the web
browser are shown below.
Console configuration Web configuration
Normal Normal
Fixed F Fixed
Forbidden B Forbidden
63
Page 64

Figure 4-21. Static VLAN Configuration Menu
Dynamic VLAN Table Menu
Figure 4-22. Dynamic VLAN Table
This screen displays the VLAN mapping for port(s) that join the VLAN(s) through
Dynamic VLAN Registration.
64
Page 65

Figure 4-23. Untagged Configuration Menu
All ports are set by default as Untagged in this switch, to change port(s) to Tagged
just pick the port number you desire and select “No” from the Port Map.
Figure 4-24. MTU/MDU Per Port VLAN Table in The VLAN Configuration Menu
This screen as above only reflects the setting you made in Switch Device
Configuration menu. Changes cannot be made here. Should you set the VLAN
Mode to <MTU/MDU> mode and <
One Uplink
> port then ports 1 - 25 will be
mapped to port 26 as the uplink port. If <Two Uplinks> is selected, then ports
1 – 12 will be mapped to port 25 as the uplink port and ports 13 - 24 will be
mapped to port 26 as the uplink port.
65
Page 66

Figure 4-25. Port Based VLAN Configuration in the VLAN Configuration Menu
Select the VLAN entry to create, modify, or delete the VLAN group. Then mark as
(Y)es to belong to certain VLAN group(s) or (N)o to not belong to that VLAN..
GARP Configuration
Figure 4-26. GARP Configuration Menu
66
Page 67

GARP (Generic Attribute Registration Protocol) defines the architecture, rules of
operation, state machines and variables for the registration and de-registration of
attribute values. It allows dynamic filter entries for VLAN membership to be
distributed among the Forwarding Databases of VLAN-aware switches. By joining
GVRP (GARP VLAN Registration Protocol), it helps maintaining VLAN information.
The rule of the aging scheme is:
GARP Leave All Time > GARP Leave Time > GARP Join Time
N
O
:
T
E
N
:
O
T
E
N
Before GVRP can be enabled, STP must be enabled, saved, and switch
O
:
T
E
must go through a Cold Start in order for configuration to take effect.
IGMP Configuration
Figure 4-27. IGMP Configuration Menu
Multicasting is used to support real-time applications such as video conferencing or
streaming audio. IGMP (Internet Group Multicast Protocol) allows you to query for
any attached hosts who want to receive a specific multicast service. The switch
looks up the IP Multicast Group used for this service and adds any port, which
received a similar request to that group. It then propagates the service request on
to any neighboring multicast switch to ensure that it will continue to receive the
multicast service.
By supporting IGMP (Internet Group Management Protocol) Snooping, the switch
can forward multicast traffic intelligently. Packets are forwarded to the ports that
belong to the multicast group instead of being broadcasted to all ports and possibly
67
Page 68

disrupting network performance. This lookup table reflects the multicast group(s)
(up to 32) configuration of your system and provides an overview of the port(s) map
to each multicast group.
User Authentication
Figure 4-28. User Authentication Menu
You can change the password setting in the User Authentication Menu. You can
also create user and assign different privileges to suit your needs. After selecting an
entry to add or modify, type in user name and password, toggle the user privilege
and then update the changes
O
N
:
T
E
N
:
O
T
E
User name and passwords are at 6 characters maximum.
N
O
:
T
E
.
68
Page 69

System Utility System Restart
Figure 4-29. System Restart Menu
Either a Cold Start or Warm Start needs to be executed to have the changes saved
and keep in effect until you make another change.
Factory Reset
Figure 4-30. Factory Reset Menu
This menu lets you to reset a certain portion of the current configuration back to
factory default or all configuration to factory default. If VLAN configuration is reset,
69
Page 70

all parameters of the all VLAN configuration is reset and only the one default VLAN
is in effect as it was configured from the factory. No other switch configuration is
changed. In order to do a complete system reset, every one of the 6 items in the
menu need to be reset.
Login Timeout Interval
Figure 4-31. Login Timeout Interval Menu
You can set up the time you need for automatic log-out for 0 or up to 60 seconds.
System Download
70
Page 71

Figure 4-31. System Download Menu
TFTP downloads the code for the switch to perform a software upgrade. The
switch supports two different upgrade modules: BOOT ROM and System Software.
These two upgrades can be done concurrently or one after the other. After flash
upgrading the switch's system software, in Windows Internet Explorer, go to Tools,
Internet Options, click on Delete Files button in General tab to clear all temporary
internet files, and click OK. Then refresh window to view the new updated version
of the MIL-S3580
Update Setting
Figure 4-32. System Update Setting Menu
You can save current settings by click the "Submit" checkbox .You should reboot
the system so that your current settings will take effect.
71
Page 72

5. Network Configuration
This section provides you a few samples of network topology in which the
MIL-S3580 is used.
The Switch provides versatile configuration options for the network. It is ideally
suited as a workgroup or segment Switch in a network; it has the flexibility to
provide switched 10Mbps to the desktop or shared hubs, aggregate traffic from
workgroup switches, or provide dedicated 100Mbps or 1000Mbps (Gigabit) to
servers with bandwidth-intensive applications. And because all Fast Ethernet ports
auto-negotiate for operation at 100 Mbps, the switch is perfectly suited for an
evolving network environment where demand for network speed is increasing.
Collapsed Backbone Application
For small network where rapid growth can be expected in the near future, this
switch is an ideal solution supporting backbone connectivity.
The switch can be used as a standalone switch for a group of heavy traffic users.
Switching is brought to the desktop either through a single end-station per switch
port or through a multi-port switch.
A 1000Mbps server is connected to the switch, providing end stations high-speed
accessibility to its applications. This configuration provides dedicated 100Mbps
connections to the network center, to the server, and up to 40 users (while 2
optional 8-port modules are installed).
When the network needs expansion, you can simply connect the switch to any
IEEE 802.3 (Ethernet), IEEE 802.3u (Fast Ethernet) and 802.3ab (Gigabit Ethernet)
compliant switch utilizing the Auto MDI/MDIX function. This switch can also
cooperate with a wide range of networking devices (e.g., firewall routers and printer
servers) added to the network.
72
Page 73

Figure 5-1. Collapsed Backbone Application
Departmental Bridge
For enterprise networks where large data broadcasts are constantly processed,
this switch is an ideal solution for department users to connect to the corporate
backbone. The MIL-S3580 used as a segment switch can alleviate user contention
for bandwidth and eliminate server and network bottlenecks. All ports can connect
to high-speed department servers that need high bandwidth. This switch provides
parallel communications within its Gigabit port, which can run up to 2000Mbps at
Full-duplex.
The switch makes key servers available to more users by allowing multiple
conversations to occur concurrently, thereby significantly expanding overall
network throughput. Moreover, this switch eases supervision and maintenance by
allowing network manager to centralize multiple servers in a single location.
73
Page 74

:
E
T
O
N
:
E
T
O
N
N
when attaching the switch to a workstation, server, or another switch). When
connecting to hubs, use a standard cascaded connection set for half-duplex
operation.
Full-duplex operation only applies to point-to-point access (for example,
:
E
T
O
Figure 5-2: Departmental Bridge Application
High Performance Switched Workgroup
This switch is also a good solution for connecting two workgroups, supporting the
throughput, for example, of 800Mbps. This application is useful for power groups
that need high bandwidth.
The most common LAN implementations use a combination of standard switches,
bridges and routers. The bridges and routers quickly become bottlenecks,
reducing overall network throughput. Switching to higher-speed LANs such as
FDDI or ATM is not a good choice for most people.
However, such broadband equipment is still extremely expensive and hard to
maintain. Besides, you have to replace all existing Ethernet cables and adapter
cards, restructure your network, and implement more expensive administration
procedures.
74
Page 75

The switch can provide the same bandwidth of FDDI and ATM at much lower costs.
In addition, all current adapters and network devices can still be used. The
switching cross-domain connection is better than bridge and router because users
can retain LAN structure in which any node can freely communicate with any other
node.
Figure 5-3: High Performance Switched Workgroup Application
IEEE 802.1Q VLAN Application
The switch supports up to 4096 Group ID, IEEE 802.1Q-compatible virtual LAN
(VLANs).
Port-based VLAN Workgroup12s
You can group the switch ports into broadcast domains by assigning them to the
same VLAN to increase network capacity and performance. With network
segmentation, each switch port connects to a segment that is a single broadcast
domain. Packets received in one VLAN can only be forwarded within that VLAN.
VLAN allows the grouping of end stations logically, based not on physical location
but on business policies such as job function or department. Members of a group
can be dispersed throughout a facility - they do not have to be connected in close
physical locations.
75
Page 76

Hence, group members can coordinate their data communication requirements
regardless of the actual working locations; and the logical network can extend to
any point you want it to. Moreover, VLAN groups can be modified at any time to
add, move or change users without any re-cabling.
Figure 5-4: VLAN Workgroup Application
Shared Server
The MIL-S3580’s compliance to the IEEE802.1Q tagging VLAN standard allows
ports to exist in multiple VLANs for shared resources, such as servers, printers,
and switch-to-switch connections. It is also possible to have resources exist in
multiple VLANs on one switch as shown in the following figure.
76
Figure 5-5: Shared Server
Page 77

In this example, stations on different VLANs share resources. As a result, VLAN 1
and VLAN 2 can access VLAN 3 for printing. The broadcasts from ports configured
in VLAN3 can be seen by all VLAN port members of VLAN3.
77
Page 78

6. Product Specifications
This section provides the specifications of MIL-S3580 switch, and the following
table lists them.
Standards Compliance IEEE802.3 10BASE-T
IEEE802.3u 100BASE-TX and 100BASE-FX
IEEE802.3ab 1000BASE-T
IEEE802.3z 1000BASE-SX
IEEE802.3x Flow Control
IEEE802.1p Priority Support
IEEE802.3ac Frame Extension for VLAN Tagging
IEEE802.1D spanning tree
IEEE802.1Q VLAN tagging
Protocol CSMA/CD
Media connector
Transfer Rate
Backplane Bandwidth
Switch Technology
MAC Address
Data Buffer
LED System Power, per port Link/active,
Dimension
Weight
Power
EMI & Safety
100M FX, SC, MTRJ, VF45
Basic unit: 24 RJ-45 for STP or UTP,
Auto MDI/MDI-X Support
Gigabit SX/LX Module: 1 Duplex SC
Gigabit 1000T Module: 1 RJ-45 for UTP or STP, Auto
MDI/MDI-X Support
GBIC: Mini GBIC LC type, Standard GBIC SC type
14880 packets per second for 10Mbps
148800 packets per second for 100Mbps
1488000 packets per second for 1000Mbps
9.6Gb
Store-and-Forward Error Free Packet Forwarding
Scheme
Supports Hardware Level Broadcast Storm Prevention
without Consuming System CPU Utilization
8K MAC address with auto learning function
6Mbits share memory
FD/COL,10/100Mbps
Gigabit Module Link/active, FDX/COL
440mm(W)*225mm(D)*44.5mm(H)
100~240 VAC 50/60HZ
FCC Class A, CE, UL
78
Page 79

79
Page 80

80
P/N 90000397_A (062102)
 Loading...