

MiLAN MIL-P3720 Quick Install Manual
MIL-P3720 QUICK INSTALL GUIDE
10/100 Mbps 2-Port UTP
Direct Connect Print Server

MMIILL--PP33772200 QQuuiicckk IInnssttaallll GGuuiidde
e
LEGAL
Trademark Rights
© 2000 MiLAN, the MiLAN logo, and MiLAN Technology are either trademarks or registered trademarks of Digi
International, Inc. in the United States and/or other countries. All other trademarks are the property of their respective
holders.
Information in this document is subject to change without notice and does not represent a commitment on the part of
MiLAN Technology.
MiLAN T echnology provides this document “as is,” without warranty of any kind, either expressed or implied, including,
but not limited to, the implied warranty of fitness or merchantability for a particular purpose. MiLAN Technology may
make improvements and/or changes in this manual or in the product(s) and/or the program(s) described in this manual at
any time.
This document could include technical inaccuracies or typographical errors. Changes are periodically made to the
information herein; these changes may be incorporated in new editions of the publication.
The MiLAN Technology Five-Year Limited Warranty
MiLAN T echnology warrants to the original consumer or purchaser that each of its products, and all components thereof,
will be free from defects in material and/or workmanship for a period of five years from the original factory shipment
date. Any warranty hereunder is extended to the original consumer or purchaser and is not assignable. MiLAN
Technology makes no express or implied warranties including, but not limited to, any implied warranty of
merchantability or fitness for a particular purpose, except as expressly set forth in this warranty. In no event shall MiLAN
Technology be liable for incidental or consequential damages, costs, or expenses arising out of or in connection with the
performance of the product delivered hereunder. MiLAN Technology will in no case cover damages arising out of the
product being used in a negligent fashion or manner.
Regulatory Approvals
• FCC Class A&B
• UL 1950
• CSA 22 No. 950
• EN60950
• CE, EN55022 Class B, EN500082-1
Note: To comply with FCC Class B, Cispr22 Class B, or Canadian ICES-003 Class B shielded twisted pair (STP) CAT 5
network and shielded printer cables are required. For FCC class A installation, unshielded twisted pair (UTP)
CAT 5 network and shielded printer cables are required.
Canadian EMI Notice
This Class B digital apparatus meets all the requirements of the Canadian Interference-Causing Equipment Regulations.
Cet appareil numérique de la classe B respecte toutes les exigences du Règlement sur le matériel brouilleur du Canada.
European Notice
Products with the CE Marking comply with both the EMC Directive (89/336/EEC) and the Low Voltage Directive (73/23/
EEC) issued by the commission of the European Community. Compliance with these directives implies conformity to the
following European Norms:
• EN55022 (CISPR 22) - Radio Frequency Interference
• EN50082-1 (IEC801-2, IEC801-3, IEC801-4) - Electromagnetic Immunity
• EN60950 (IEC950) - Product Safety
Year 2000 Compliance
MiLAN Technology warrants that the MIL-P3700 and MIL-P3800 series are year 2000 compliant. See www.milan.com
for additional information on other products.
To Contact Technical Support
For prompt response when calling for technical support, have the following information ready: product serial number,
date of purchase, vendor or place of purchase.
Contact one of the following:
• In North America: call +1.408.744.2751 or email: support@milan.com
• International: call +49.231.97.47.780 or email: intl-support@milan.com

e
MMIILL--PP33772200 QQuuiicckk IInnssttaallll GGuuiidde
MMIILL--PP33772200 QQuuiicckk IInnssttaallll GGuuiidde
e
Table of Contents
Read Me First . . . . . . . . . . . . . . . . . . . . . . . . . . . . . . . .1
MiLAN Technology Introduction . . . . . . . . . . . . . . . .3
MiLAN Technology CD-ROM . . . . . . . . . . . . . . . . . . . . . .3
New Features . . . . . . . . . . . . . . . . . . . . . . . . . . . . . . . . . . .3
Product Overview . . . . . . . . . . . . . . . . . . . . . . . . . . . .4
Basic Hardware Installation . . . . . . . . . . . . . . . . . . . . .5
Important Information . . . . . . . . . . . . . . . . . . . . . . . . .6
Assigning an IP Address . . . . . . . . . . . . . . . . . . . . . . . .7
Setup for Windows . . . . . . . . . . . . . . . . . . . . . . . . . . .9
First Printing With Windows 95/98 or NT
Printing With Windows for Workgroups (3.11) . . . . . . . . 12
IPP Printing With Windows 2000 . . . . . . . . . . . . . . . . . . . 13
IPP Printing With Windows 95/98 MS Client . . . . . . . . . . 14
IPP Printing With HP IPP Client on Windows NT 4.0. . . . 15
. . . . . . . . .9
Setup for NetWare . . . . . . . . . . . . . . . . . . . . . . . . . . . .16
NDPS (IP) . . . . . . . . . . . . . . . . . . . . . . . . . . . . . . . . . . . . . 17
Bindery . . . . . . . . . . . . . . . . . . . . . . . . . . . . . . . . . . . . . . . .17
NDS . . . . . . . . . . . . . . . . . . . . . . . . . . . . . . . . . . . . . . . . . .17
Setup for Macintosh . . . . . . . . . . . . . . . . . . . . . . . . . . .17
Setup for UNIX . . . . . . . . . . . . . . . . . . . . . . . . . . . . . .18
TCP/IP . . . . . . . . . . . . . . . . . . . . . . . . . . . . . . . . . . . . . . . .18
Management and Configuration . . . . . . . . . . . . . . . . .19
Using the MiLAN Technology Web Browser . . . . . . . . . . 19
Using Serial Port Console Monitoring . . . . . . . . . . . . . . . .19
Using Telnet . . . . . . . . . . . . . . . . . . . . . . . . . . . . . . . . . . .19
Using FastManage . . . . . . . . . . . . . . . . . . . . . . . . . . . . . . 20
Using SNMP . . . . . . . . . . . . . . . . . . . . . . . . . . . . . . . . . . .20
Network Configuration Issues . . . . . . . . . . . . . . . . . . .20
iii


MMIILL--PP33772200 QQuuiicckk IInnssttaallll GGuuiidde
MMIILL--PP33772200 QQuuiicckk IInnssttaallll GGuuiidde
Read Me First
To install and print across the network, please follow the installation
guidelines below:
1. Connect the MIL-P3720 to your printer and network.
2. Print a test/configuration page; then read the setup instructions
relevant to your network.
3. Networks and protocols can be complex. Depending on your
environment, it may be possible to install network printing in multiple
ways such as using SMB over NetBEUI or TCP/IP under Windows
operating systems.
Note: Perform the basic hardware installation first refer to “Basic Hardware
Installation” on page 5; then proceed below depending on your network
setup.
e
e
OS and Network Printing Environments
Operating
System
Windows
95/98/NT/2000
Windows
3.1/WFW
NetWare NDPS (Pure IP) Refer to “Setup for NetWare,” page 13.
Macintosh AppleTalk Refer to AppleTalk on page 14.
UNIX TCP/IP Refer to “Setup for UNIX,” page 15.
TCP/IP
SMB over NetBEUI
TCP/IP
SMB over NetBEUI
Queue-based NetWare Bindery Refer to “Bindery,” page 13.
Queue-based NetWare (NDS) Refer to “NDS,” page 14.
Network
Reference
Refer to “Assigning an IP Address” on page 7.
Recommended approach, “Setup for Windows,”
on page 9.
Refer to MiLAN Technology CD ROM Manual
on page 3.
SMB over NetBEUI is preferred
Note: Throughout this manual, the terms “hardware address”, “Ethernet
address”, and “MAC address" are all used to denote the unique 12 digit
factory-set address in your print server.
Read Me
1

MMIILL--PP33772200 QQuuiicckk IInnssttaallll GGuuiidde
e
2

MMIILL--PP33772200 QQuuiicckk IInnssttaallll GGuuiidde
e
MiLAN Technology Introduction
This install guide describes how to install and manage the MIL-P3700
series of direct-connect print servers in various network environments.
The “preferred method” of installation is described for many SOHO
network environments. For more complex environments, or alternate
methods of installation, please refer to the MiLAN Technology user
manuals, which are available on the MiLAN Technology CD-ROM or
at the MiLAN Technology’s web-site (www.milan.com).
MiLAN Technology CD-ROM
The CD-ROM provides detailed manuals, data sheets, and installation
software for the MIL-P3700 series as well as other MiLAN
Technology LAN products. You can print or view the contents using
Adobe’s Acrobat Reader.
New Features
• SMB over TCP/IP with WINS support
• Netware PServer Notification
• HTTP (Web) Server for configuration and flash loading
• Serial flash uploading in addition to network flash
• TFTP flash loading in addition to other methods
• Test /config page printing via push button
• Multiple connection support for AppSockets
• RS-232 Serial Port can be used for printing and/or
configuration depending on cabling
Introduction
3
MMIILL--PP33772200 QQuuiicckk IInnssttaallll GGuuiidde
e
Product Overview
The MIL-P3700 series servers are 10/100 Mbps, direct-connect print
servers. These print servers are to be connected directly to printers on
Ethernet or Fast Ethernet networks. Versions include:
MIL-P3720: One RJ-45 (UTP), 10/100 Mbps port; one Centronics
parallel port and one serial port.
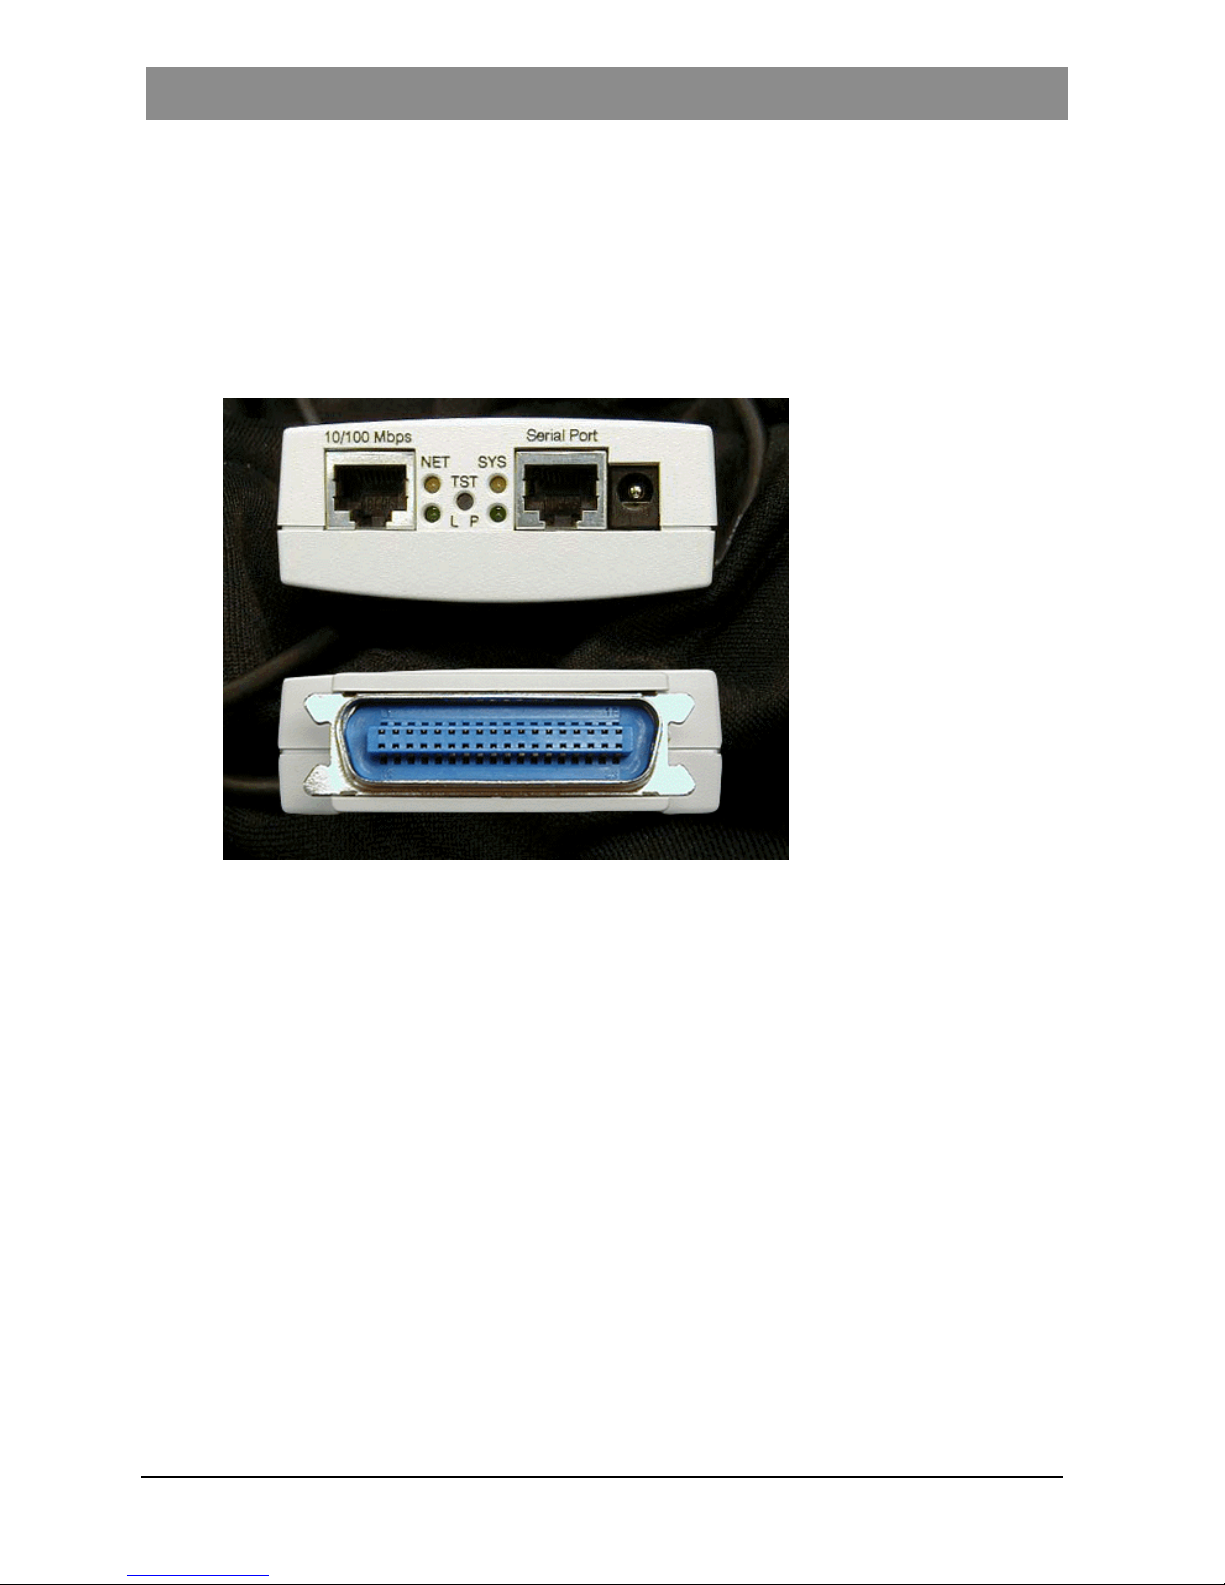
The MIL-P3720 print server has four LED’ s and a test page push button
located in the front panel as shown in the above figure.
1.
NET
-(NET) comes on (yellow light) and flashes when the network
cable is plugged into the print server, and there is activity on the
network.
2.
LINK
-(L) comes on steady (green light) when the print server is
connected to the network via 10/100Mbps port.
3.
SYS
4.
-(SYS) for future use.
PORT
-(P) comes on (green light) about seven seconds after the
print server is powered up. It is “on” when a job is active.
5.
TST
-(TST) is used to print a test/config page.
All MIL- P3700 series of print servers recognize the speed of a network
using auto-negotiation.
4

MMIILL--PP33772200 QQuuiicckk IInnssttaallll GGuuiidde
e
Basic Hardware Installation
Installing and Connecting the Printer to the Network
To install the MIL-P3700 series of direct connect print servers and to
print a test page do the following:
1. Record the print server’ s twelve-digit hardware address (Ethernet or
MAC address). The number is located on the bottom of the unit (for
example, 00-40-c8-XX-XX-XX where X is a hexadecimal number).
2. Attach the network cable from your hub or network port to the RJ45 port (marked as 10/100Mbps). Use Category 5 (UTP) cable.
3. Plug the print server (MIL-P3720) directly into the printer’ s parallel
port or into an extender cable.
4. Connect the power cable (5VDC power supply provided) to the
print server.
5. Check to see if the Link (L) LED is on solid, and 30 seconds later
the Net LED is flashing randomly. This indicates activity on the
network.
6. Check to see if the Port (P) LED comes on (within 7 seconds).
7. Wait for 30 seconds (until the Port (P) LED stops flashing).
8. Print a test page by pressing the TST button once with a small
pointed tool.
9. Refer to the relevant chapter in this document for the specific
network operating system and continue installation.
Contact MiLAN Technology’s LAN technical support if you have
problems or questions when installing the print server.
Hardware
5

MMIILL--PP33772200 QQuuiicckk IInnssttaallll GGuuiidde
Important Information,
Depending On Your Network
• Log in as “ROOT” for UNIX and /or “Administrator” for
Windows NT and Novell.
• Keep the print server's MAC address on file (sticker at the bottom
of the print server), example: 00:40:c8:xx:yy:zz. You may need this
address later.
• If you are using SMB over NetBEUI, have NetBEUI protocol
installed and check-marked as the selected default protocol. You
should also have the printer's driver diskettes handy.
• Have the IP address that you want to assign to the print server (if
using TCP/IP). Get this from your MIS or network administrator.
• Zone and Phase (if using AppleTalk)
e
• Tree and Context (if using NDS)
• If using http: make sure that the host (client) is in the same domain
as the print server.
Go to page 1 to select your operating system and network printing
environment. For all Windows environments, SMB over NetBEUI (does
not require an IP address) or SMB over TCP/IP (does require an IP
address) are recommended. No additional host client software is needed
when using SMB.
6
 Loading...