


eosens TS3
High-Speed Handheld Camera
User Manual
2013-3
110S-3000M

T3 User Manual
Copyrights and Disclaimer
© 2012, MIKROTRON GmbH. All Rights Reserved
This documentation is copyrighted material. Making unauthorized copies is prohibited by law. No
part of this documentation may be reproduced, transmitted, transcribed, stored in a retrieval
system or translated into any human or computer language without the prior written permission of
MIKROTRON GmbH.
Information in this document is provided in connection with MIKROTRON products. MIKROTRON
believes the printed matter contained herein to be accurate from date of publication and reserves
the right to make changes as necessary without notice. MIKROTRON makes no commitment to
update the information and shall have no responsibility whatsoever for conflicts or incompatibilities
arising from future changes to the software or documentation.
No license, express or implied, or otherwise, to any intellectual property rights is granted by this
document. Except as provided in MIKROTRONS Terms and Conditions of Sale for such products,
MIKROTRON assumes no liability whatsoever.
THIS MANUAL IS PROVIDED “AS IS” WITHOUT WARRANTY OF ANY KIND, EITHER EXPRESSED OR
IMPLIED, RELATING TO SALE AND/OR USE OF MIKROTRON PRODUCTS INCLUDING LIABILITY OR
WARRANTIES RELATING TO FITNESS FOR A PARTICULAR PURPOSE, CONSEQUENTIAL OR
INCIDENTAL DAMAGES, MERCHANTABILITY, OR INFRINGEMENT OF ANY PATENT COPYRIGHT OR
OTHER INTELLECTUAL PROPERTY RIGHT. MIKROTRON FURTHER DOES NOT WARRANT THE
ACCURACY OR COMPLETENESS OF THE INFORMATION, TEXT, GRAPHICS OR OTHER ITEMS
CONTAINED WITHIN THIS MANUAL. MIKROTRON SHALL NOT BE LIABLE FOR ANY SPECIAL,
INDIRECT, INCIDENTAL, OR CONSEQUENTIAL DAMAGES, INCLUDING WITHOUT LIMITATION, LOST
REVENUES OR LOST PROFITS, WHICH MAY RESULT FROM THE USE OF THIS DOCUMENT.
MIKROTRON products are not intended for use in medical, lifesaving or life sustaining applications.
MIKROTRON customers using or selling MIKROTRON products for use in such applications do so at
their own risk and agree to fully indemnify MIKROTRON for any damages resulting from such
improper use or sale.
Trademarks
Windows™ is a registered trademark of Microsoft Corpo ation. Other b and or product names are
trademarks of their respecti e holders.
Product names or services listed in this publication a e for identi ation purposes onl , and may
be trademarks of third parties. Thi d-party brands and names are the property of their respecti e
owners.
Reader Response
MIKROTRON strives to produce quality documentation and welcomes your feedback. Please send
comments and suggestions to MIKROTRON. For technical questions, contact your local
MIKROTRON sales office.
Contact
Mikrotron
Mikrocomputer, Digital- und Analogtechnik GmbH
Landshuter Str. 20-22
D-85716 Unterschleissheim
Germany
email: sales@mikrotron.de
11S-3000M
page i

T3 User Manual
Chapter Summary
Chapter 1, TS3 Product Overview
The first chapter contains general information regarding the TS3 product family, common
applications for which the camera is used, and the basic guide to the component parts of the camera.
Look here for the names and locations of all camera controls and indicators.
Chapter 2, Geng Started
This chapter guides the user through the camera setup process from unpacking the camera to
ttaching, connecting, or installing the pieces necessary to begin using the camera: i.e. the power
a
supply and/or battery, lenses, mass memory devices, etc., as well as optional devices such as
triggers, monitors, PCs, etc.
Chapter 3, Camera Setup
This chapter is about learning to use the TS3 user interface and setting the camera up for use,
including naming the camera and setting up the time. It also covers controls for the built-in
LCD display, connecting with an external display, and connecting the TS3 to a computer
network.
Chapter 4, Recording with the TS3
Chapter 4 covers the recording process from setting up the recording parameters to Arming
and Triggering the camera. It also covers bit selection, image processing and saving the imagery
in its different formats.
Chapter 5, Synchronizing Cameras
Cameras may be synchronized to external timing devices as well as to other cameras. This
chapter tells you how to do it on the TS3.
Chapter 6, TS3 Web-Applicaon
TS3 camera’s Web-Application makes it easy to control the camera from virtually any device that
can attach to a network and run a standard internet browser. No need to load any software!
Chapter 6 walks you through the Web-App and how to control the camera, and capture and
manage imagery with it.
Chapters 7 and 8, FasMoon
FasMotion is MIKROTRON proprietary camera control software for setting up and controlling the
TS3 with a PC via GigE connection. Chapter 7 covers the setup portion. Chapter 8 covers recording
with FasMotion.
Appendices and Applicaon Notes
Technical details are to be found in these sections. They include a glossary of terms, camera and
sensor specifications, lens FOV vs. resolutions t
focus adjustment procedures, system optimization and much more.
ables, an index, connector schematics, and back
page ii

T3 User Manual
Contents
Copyrights and Disclaimer .................................................................................................... i
Trademarks ............................................................................................................................................... i
Reader Response ...................................................................................................................................... i
Contact ...................................................................................................................................................... i
Chapter Summary ................................................................................................................ ii
Chapter 1, TS3 Product Overview ............................................................................................................. ii
Chapter 2, Geng Started ........................................................................................................................ ii
Chapter 3, Camera Setup
Chapter 4, Recording with the TS3 ............................................................................................................ ii
Chapter 5, Synchronizing Cameras ............................................................................................................ ii
Chapter 6, TS3 Web-Applicaon ............................................................................................................... ii
Chapters 7 and 8, FasMoon
Appendices and Applicaon Notes
1 TS3 Product Overview ........................................................................................................ 1
1-1 TS3 Product Descripon ...................................................................................................................... 1
1-2 TS3 Product Dierenaon ................................................................................................................. 2
1-3 TS3 Controls, Indicators, and Connectors ............................................................................................ 3
.......................................................................................................................... ii
.................................................................................................................... ii
........................................................................................................... ii
2 TS3 Geng Started ........................................................................................................... 7
2-1 Unpacking the Camera ....................................................................................................................... 7
2-2 Installing the Lens ............................................................................................................................... 7
2-3 Powering Up, Charging, and Power Down ........................................................................................... 8
2-4 TS3 Memory and Mass Storage Opons ............................................................................................ 10
3 TS3 Camera Setup ............................................................................................................ 13
3-1 Camera Display and Menu Navigaon Buons .................................................................................. 13
3-2 Using the Touchscreen ...................................................................................................................... 14
3-3 Controlling the Displays .................................................................................................................... 15
3-4 Connecng to a PC via Ethernet ........................................................................................................ 16
3-5 Using the TS3 with a PC .................................................................................................................... 17
3-6 TS3 Name the Camera ...................................................................................................................... 18
3-7 Seng the Time .............................................................................................................................. 19
3-8 Storage Setup ................................................................................................................................... 20
3-9 Conguraon and Camera Informaon ............................................................................................. 21
3-10 Reset .............................................................................................................................................. 21
4 Recording with the TS3 .................................................................................................... 22
4-1 Seng Frame Rate and Resoluon ................................................................................................... 22
4-2 Seng Shuer Speed ....................................................................................................................... 24
4-3 Low Light Mode ................................................................................................................................ 25
4-4 Seng Bit Depth
4-5 Conguring the Trigger
4-6 Black Level Calibraon ...................................................................................................................... 27
4-8 Autosave .......................................................................................................................................... 29
4-10 Image Processing ............................................................................................................................ 32
4-11 Custom Color Correcon
.............................................................................................................................. 25
.................................................................................................................... 26
................................................................................................................. 33
11S-3000M
page iii

T3 User Manual
Table of Contents Connued
4-12 Saving Images to Mass Storage ....................................................................................................... 35
5 Synchronizing Cameras ................................................................................................... 37
5-1 Sync In .............................................................................................................................................. 37
5-2 Sync Out ........................................................................................................................................... 38
5-3 Master/Slave Setup .......................................................................................................................... 39
5-4 External Source Sync ......................................................................................................................... 40
6 Using the Web App .......................................................................................................... 42
6-1 Web App Overview ........................................................................................................................... 42
6-2 Camera Tab ....................................................................................................................................... 43
6-3 Storage Sengs Tab .......................................................................................................................... 44
6-4 Record Sengs ................................................................................................................................. 45
6-5 Record Controls ................................................................................................................................ 46
6-6 Display Sengs Tab .......................................................................................................................... 47
6-7 Arm, Trigger, Live, and Review Buons ............................................................................................. 47
6-8 Review Tab ....................................................................................................................................... 48
7 FasMoon Setup .............................................................................................................. 50
7-1 Install FasMoon Camera Control Soware ...................................................................................... 50
7-2 Connect the Camera to a Network .................................................................................................... 52
7-3 FasMoon Applicaon Window ........................................................................................................ 53
7-4 Controlling the Image Displays .......................................................................................................... 54
7-5 Name the Camera ............................................................................................................................. 56
7-6 Camera Time and Date ..................................................................................................................... 56
7-7 Connect to a TS3 Outside FasMoon ................................................................................................ 57
7-8 Storage Setup ................................................................................................................................... 59
7-9 Conguraons .................................................................................................................................. 60
7-10 Reboot and Power Down ................................................................................................................ 60
7-11 Camera Informaon ........................................................................................................................ 61
8 Recording with FasMoon ............................................................................................... 62
8-1 Seng Frame Rate and Resoluon ................................................................................................... 62
8-2 Seng Shuer Speed ....................................................................................................................... 63
8-3 Seng Bit Depth .............................................................................................................................. 64
8-4 Conguring the Trigger .................................................................................................................... 64
8-5 Black Level Calibraon ...................................................................................................................... 65
8-6 Record: Arm and Trigger ................................................................................................................... 65
8-7 Autosave .......................................................................................................................................... 67
8-8 Reviewing Captured Imagery: Playback............................................................................................. 68
8-9 Image Processing .............................................................................................................................. 70
8-10 Custom Color Correcon ................................................................................................................. 71
8-11 Saving Images to Mass Storage ....................................................................................................... 73
Appendices ........................................................................................................................ 75
Appendix A: Denion of terms ............................................................................................................. 75
Appendix B: TS3 Specicaons ............................................................................................................... 78

T3 User Manual
Table of Contents Connued
Appendix C: TS3 Record / Resoluon Tables ........................................................................................... 79
Appendix D: Power and I/O Connecons ................................................................................................ 82
Appendix E: Adjusng Back Focus ........................................................................................................... 84
Appendix F: Camera Status LEDs ............................................................................................................. 86
Appendix G: Contents of Frame.txt le ................................................................................................... 87
Appendix H: TS3 Updates ....................................................................................................................... 88
Appendix I: Physical Measurements ....................................................................................................... 89
Appendix J: Crop Factor .......................................................................................................................... 90
Appendix K: Paron Capture (CAP) File Format .................................................................................... 91
Applicaon Notes ............................................................................................................... 93
Applicaon Note 1: Histograms .............................................................................................................. 93
Applicaon Note 2: Understanding Bit Depth
Applicaon Note 3: Trigger Posion and the Circular Buer
Applicaon Note 4: Frame Rate, Resoluon, and Exposure ................................................................... 101
Applicaon Note 5: Opmizing System for Image Transfers .................................................................. 102
Applicaon Note 6: Choosing an Image File Format
......................................................................................... 95
.................................................................... 97
.............................................................................. 109
11S-3000M
page v

T3 User Manual
Table of Figures
Figure 1-1: TS3 Back View ........................................................................................................................ 3
Figure 1-2: TS3 Front View ...................................................................................................................... 4
Figure 1-3: TS3 Top View .......................................................................................................................... 4
Figure 1-4: TS3 Side View (Door open) ................................................................................................... 5
Figure 1-5: TS3 Boom View .................................................................................................................... 5
Figure 2-1: Baery Access Door ............................................................................................................... 8
Figure 2-2: Baery Charge Indicator on Status Bar ................................................................................... 9
Figure 2-3: Mass Storage ........................................................................................................................ 11
Figure 2-4: USB-OTG on the TS3 ............................................................................................................. 12
Figure 3-1: System Menu ....................................................................................................................... 13
Figure 3-2: Touchscreen Menu ............................................................................................................... 14
Figure 3-3: Touchscreen Calibraon ....................................................................................................... 14
Figure 3-4: LCD Display Controls ............................................................................................................. 15
Figure 3-5: HDMI Controls ...................................................................................................................... 15
Figure 3-6: TS3 to PC Connecons ......................................................................................................... 16
Figure 3-7: Network Menu ..................................................................................................................... 16
Figure 3-8: Stac IP Dialog Box ............................................................................................................... 17
Figure 3-9: Web Browser Screen ............................................................................................................ 17
Figure 3-10: TS3 in Windows Explorer .................................................................................................... 18
Figure 3-11: Camera Name Menu .......................................................................................................... 18
Figure 3-12: Keypad Dialog Boxes .......................................................................................................... 19
Figure 3-13: Time Format Menu ............................................................................................................. 19
Figure 3-14: Storage Menu ..................................................................................................................... 20
Figure 3-15: Session ............................................................................................................................... 20
Figure 3-16: System Explore Dialog: File Stacks ...................................................................................... 20
Figure 3-17: File Acon Dialog ............................................................................................................... 21
Figure 4-1: Frame Rate and Resoluon Menu ......................................................................................... 23
Figure 4-2: Advanced Record Sengs .................................................................................................... 23
Figure 4-3: Shuer Speed Menu ............................................................................................................ 24
Figure 4-4: Low Light Menu .................................................................................................................... 25
Figure 4-5: Trigger Posion .................................................................................................................... 26
Figure 4-6: External Trigger .................................................................................................................... 26
Figure 4-7: Black Level Calibraon and Sengs ...................................................................................... 27
Figure 4-8: Camera LED .......................................................................................................................... 28
Figure 4-9: Progress: Armed TS3 ............................................................................................................ 28
Figure 4-10: Recording Progress: Triggered TS3 ...................................................................................... 29
Figure 4-11: Autosave Dialog ................................................................................................................. 30
Figure 4-12: Playback Buons ................................................................................................................ 30
Figure 4-13: Image Pipeline .................................................................................................................... 32
Figure 4-14: Image Processing Opons ................................................................................................... 33
Figure 4-15: White Balance Dialog ......................................................................................................... 33
Figure 4-16: Custom White Balance ....................................................................................................... 34
Figure 4-17: RGB Control Dialog ............................................................................................................. 34
Figure 4-18: Save Dialog Boxes .......................................................................................................... 36
Figure 5-1: Sync In Sengs Dialog .......................................................................................................... 37
Figure 5-2: Sync In Per Second ............................................................................................................... 38
Figure 5-3: Sync Out Per Frame .............................................................................................................. 38
Figure 5-4: Sync Pass Thru ...................................................................................................................... 39
page vi

T3 User Manual
Table of Figures Connued
Figure 5-5: Master and Slave Cameras ................................................................................................... 39
Figure 5-6: External Sync: Local Grouping ............................................................................................... 40
Figure 5-7: External Sync: Distributed Grouping ..................................................................................... 41
Figure 6-1: Address bar (Chrome) .......................................................................................................... 42
Figure 6-2: Applicaon Window Camera Tab .......................................................................................... 42
Figure 6-3: Camera Tab .......................................................................................................................... 43
Figure 6-4: Network Conguraon Dialog .............................................................................................. 43
Figure 6-5: Storage Sengs Tab ............................................................................................................. 44
Figure 6-6: Explore Window ................................................................................................................... 44
Figure 6-7: Record Sengs Tab .............................................................................................................. 45
Figure 6-8: Record Sengs Tab--Advanced Sengs ............................................................................... 46
Figure 6-9: Record Controls Tab ............................................................................................................. 46
Figure 6-10: Display Sengs Tab ............................................................................................................ 47
Figure 6-11: Arm, Trigger, Live and Review Buons ................................................................................ 47
Figure 6-12: Web-App Review and Save ................................................................................................. 48
Figure 6-13: Video Review Tab ............................................................................................................... 49
Figure 6-14: Download Informaon Box ................................................................................................. 49
Figure 7-1: FasMoon Installaon .......................................................................................................... 50
Figure 7-2: FasMoon Install Locaon .................................................................................................... 50
Figure 7-3: FasMoon Start Folder ......................................................................................................... 51
Figure 7-4: FasMoon Install Progress .................................................................................................... 51
Figure 7-5: FasMoon Installaon Complete .......................................................................................... 51
Figure 7-6: FasMoon “Find Camera” Icon ............................................................................................. 52
Figure 7-7: FasMoon “Find Cameras” Dialog ........................................................................................ 52
Figure 7-8: FasMoon Applicaon Window ........................................................................................... 53
Figure 7-9: Video Control Pane .............................................................................................................. 54
Figure 7-11: User Preferences ................................................................................................................ 54
Figure 7-10: View Menu ......................................................................................................................... 54
Figure 7-12: Gamma Comparison ........................................................................................................... 55
Figure 7-14: Time and Date Conguraon .............................................................................................. 56
Figure 7-13: HDMI Sengs .................................................................................................................... 56
Figure 7-15: Web-Applicaon ................................................................................................................ 57
Figure 7-16: Open TS3 Media in Windows Explorer ................................................................................ 58
Figure 7-17: FasMoon Storage Sengs Tab .......................................................................................... 59
Figure 7-18: FasMoon Camera Explorer ................................................................................................ 59
Figure 7-19: FasMoon Camera Menu ................................................................................................... 60
Figure 7-20: Camera Informaon ........................................................................................................... 61
Figure 8-1: Record Sengs Tab .............................................................................................................. 62
Figure 8-2: Shuer Sengs .................................................................................................................... 63
Figure 8-3: Trigger Conguraon ............................................................................................................ 64
Figure 8-4: Conguraon menu: Black Level Calibraon ......................................................................... 65
Figure 8-5: Record Progress Bar: Armed ................................................................................................. 66
Figure 8-6: Record Progress Bar: Triggered ............................................................................................. 66
Figure 8-7: Video Review tab and Video Controls ................................................................................... 67
Figure 8-8: Autosave Setup Dialog ......................................................................................................... 68
Figure 8-9: Video Controls (Playback) ..................................................................................................... 69
Figure 8-10: Image Pipeline .................................................................................................................... 70
Figure 8-11: Display Sengs .................................................................................................................. 71
11S-3000M
page vii

T3 User Manual
Table of Figures Connued
Figure 8-12: Custom White Balance ....................................................................................................... 72
Figure 9-1: Sync I/O Cable Drawing ........................................................................................................ 83
Figure 9-2: Sync I/O Camera Interface Schemac ................................................................................... 83
Figure 9-3: Focus Chart .......................................................................................................................... 84
Figure 9-4: C-Mount ............................................................................................................................... 84
Figure 9-5: Navitar 50mm f/95 Lens ....................................................................................................... 85
Figure 9-6: Camera Status LEDs .............................................................................................................. 86
Figure 9-7: Camera Update Screens........................................................................................................ 88
Figure 9-8: Physical Measurements ........................................................................................................ 89
Figure 9-9: Crop Factor 1280 x 1024 ....................................................................................................... 90
Figure 9-10: Crop Factor 1280 x 720 ....................................................................................................... 90
Figure 9-11: Crop Factor 800 x 600
Figure 9-12: CAP File Diagram
Figure 10-1: Histogram: Linear Gradient
Figure 10-2: Histogram: Mono-tonal ...................................................................................................... 93
Figure 10-3: Histogram: Linear Gradient
Figure 10-4: High...Mid...and Low 8 Bits of the same Image ................................................................... 96
Figure 10-5: Circular Buer Fills and Images Shi Posion ...................................................................... 97
Figure 10-6: Circular Buer Fills and Images Shi Posion
Figure 10-7: Circular Buer Overowing ................................................................................................ 98
Figure 10-8: Circular Buer End Trigger
Figure 10-9: Packet Delay Spinner ........................................................................................................ 103
Figure 10-10: FasMoon Shortcut ........................................................................................................ 104
Figure 10-11: FasMoon Shortcut Properes
Figure 10-12: Memory Usage in Task Manager ..................................................................................... 107
......................................................................................................... 90
................................................................................................................ 91
................................................................................................. 93
................................................................................................. 94
...................................................................... 98
.................................................................................................. 99
....................................................................................... 104
page viii

T3 User Manual
Table of Tables
Table 1-1: TS3100-L and TS3100-S Models ................................................................................................ 2
Table 1-2: Part Number Legend ................................................................................................................ 2
Table 1-3: Camera Part Locaons ............................................................................................................. 3
Table 2-1: Package Contents: ................................................................................................................... 7
Table 2-2: Lens Selecon .......................................................................................................................... 8
Table 2-3: ON / OFF Buon .................................................................................................................... 10
Table 2-4: Baery LED States ................................................................................................................. 10
Table 2-5: TS3 Mass Storage Funconality .............................................................................................. 12
Table 3-1: Menu Terminology ................................................................................................................ 13
Table 3-2: Network LEDs ........................................................................................................................ 16
Table 4-1: Frame Rates and Resoluons ................................................................................................. 22
Table 4-2: Frame Rates and Shuer Speeds ............................................................................................ 24
Table 4-3: Playback Control .................................................................................................................... 31
Table 4-4: Playback Rates ....................................................................................................................... 31
Table 4-5: Image File Save Opons ......................................................................................................... 35
Table 7-1: TS3 Network LEDs .................................................................................................................. 52
Table 8-1: Sample Frame Rates and Resoluons ..................................................................................... 65
Table 8-2: Camera Control Buons ......................................................................................................... 69
Table 8-3: File Save Opons ................................................................................................................... 73
Table 9-1: Denions ............................................................................................................................. 75
Table 9-2: Specicaons ........................................................................................................................ 78
Table 9-3: Resoluons, Rates, and Times ................................................................................................ 79
Table 9-4: Power Pin OUt ....................................................................................................................... 82
Table 9-5: I/O Connector Pin Out ........................................................................................................... 82
Table 9-6: Informaon Status ................................................................................................................. 88
Table 9-7: Crop Factor ............................................................................................................................ 90
Table 9-8: CAP File Format ..................................................................................................................... 92
Table 10-1: Image Transfer Performace ............................................................................................... 105
Table 10-2: Table Stats.txt Moderate_Performance System .................................................................. 105
Table 10-3: Missing Frames on a Busy System ...................................................................................... 107
Table 10-4: Benet from Jumbo Packets ............................................................................................... 107
Table 10-5: Finding the Correct Packet Delay Value .............................................................................. 108
Table 10-6: File Format Features .......................................................................................................... 110
Table 10-7: Save to SSD Benchmarks .................................................................................................... 110
11S-3000M
page ix

T3 User Manual
1 TS3 Product Overview
1-1 TS3 Product Descripon
The MIKROTRON eosens TS3 is a high-speed digital camera line with models capable of capturing
high resolution 1280 x 1024 pixel images at 500 frames per second and smaller-resolution images
at much higher frame rates. Recording image data at high frame rates makes it possible to play
back high quality video sequences in slow motion, enabling the user a greatly enhanced ability to
analyze events that occur much too quickly for human vision to perceive.
The TS3, with its many modes of operation, including its unique stand alone capabilities, and its high
speed imaging performance, resolution and sensitivity, make it an excellent choice for many different
applications. For ad hoc testing and troubleshooting, when setup time is precious, the TS3 comes
through as a point and shoot camera. For multi-camera use or where the camera might be set up and
left in mo e remote applications, its networking and master/slave capabilities come into play.
MIKROTRON high-speed cameras are
used in hundreds of different industrial
manufacturing sites to analyze motion in
machinery and production line
processes. Reduce jams, speed up line
setup and changeovers, lower scrap and
rejected material costs, and reduce
downtime and maintenance expenses.
Hundreds of universities worldwide use
MIKROTRON cameras for a variety of
research studies. Animal locomotion,
mechanical
engineering, flow visualization,
combustion studies, biomechanics &
kinesiology, physics, chemistry, tensile
testing, and more.
High-speed cameras are used to determine
the effects of blasts on structures or
vehicles or determine the actual firing
times of blast holes and the nature of the
rock movement. Delay detonators provide
the timing blasts needed under specific
blasting onditions. Blast holes firing the
incorrect times reduce rock fragmentation,
effect blast movement, and can increase
blast vibrations
Military customers worldwide use high-speed video to design and test weapons, counter measure
and defensive systems and components. High-speed cameras are key for testing projectiles for
determining ballistics, detonics and fragmentation characteristics; in airborne stores separation;
and in vehicle armor design testing materials and survivability.
11S-3000M
page 1

T3 User Manual
1-2 TS3 Product Dierenaon
MIKROTRON sells a number of different TS3 high-speed digital camera models. These cameras are
offered in either monochrome or color with various high-speed digital image recording capability
using a wide range of recording rates, sensor resolutions, and on-board memory options. The
cameras comprise an 8-bit (mono) or 24-bit(color) pixel resolution for HiSpec models, while the TS3
models boast 10-bit (mono) or 24-bit (color) resolutions. All cameras are equipped with a standard Cmount lens mount, and 1/4-20 tripod mount. Additional lens mount options are available.
TS3 cameras support the following modes of operation
Standalone operation The TS3’s built in 7” LCD display, SSD, SD Card, or USB download, and
•
battery power allow it to be fully functional without th connection o a host PC.
Remote operation using MIKROTRON Web Application: With the Web Application, any host
•
device with a common Web browser may be used to control the camera.
The TS3 camera housing is made of 100% machined aluminum with a hard black anodized finish. It is
both attractive and extremely durable. LEMO connectors are used for critical power and Sync/
Trigger connections. An aluminum side panel door protects USB-OTG, HDMI, Gig-E, Sync/Trigger,
and Power connectors as well as the SD Card slot when the camera is operating in stand alone mode.
Power is supplied by an AC power adapter or a high-capacity Li-Ion battery.
Table 1-1: TS3100-L and TS3100-S Models
Camera Max Resolution / Frame Rate Standard
Memory
Sensor
Size
Optional
Memory
Optional Solid-State Drive
TS3-100-L (Std): 800 x 600 @1250 fps 4GB 14mm 8GB 64GB / 128GB / 256GB
TS3-100-S (Full): 1280 x 1024 @ 500 fps 4GB 22.9mm 8GB 64GB / 128GB / 256GB
Table 1-2: Part Number Legend
TS3100XXXxxx
Component Opons Examples
Drive (GB SSD) None/ 064 / 128 / 256
Memory (GB) 4 / 8 TS3100LC4 = Std. Resolution, Color , 4GB (no SSD)
Sensor (Mono/Color) C / M TS3100SM4 = Full Resolution, Mono , 4GB (no SSD)
Model L / S TS3100SM8064 = Full Resolution, Mono , 8GB with 64GB SSD
page 2

T3 User Manual
1-3 TS3 Controls, Indicators, and Connectors
Table 1-3: Camera Part Locaons
Camera Part Link to View
LED Indicators “Figure 1-1: TS3 Back View” / “Figure 1-2: TS3 Front View”
Arm Button “Figure 1-1: TS3 Back View”
Display Button “Figure 1-1: TS3 Back View”
Menu Button “Figure 1-1: TS3 Back View”
D-Pad (Directional Pad) “Figure 1-1: TS3 Back View”
Trigger Button “Figure 1-3: TS3 Top View”
ON/OFF Button “Figure 1-3: TS3 Top View”
Strap Attachments “Figure 1-3: TS3 Top View” / “Figure 1-5: TS3 Bottom View”
C-Mount “Figure 1-2: TS3 Front View”
C-Mount Lock Screws “Figure 1-3: TS3 Top View” / “Figure 1-5: TS3 Bottom View”
Lens Mount Holes “Figure 1-3: TS3 Top View”
1/4-20 Tripod Mounts “Figure 1-3: TS3 Top View” / “Figure 1-5: TS3 Bottom View”
USB Port “Figure 1-3: TS3 Top View”
USB OTG Port “Figure 1-4: TS3 Side View (Door open)”
SD Card Slot “Figure 1-4: TS3 Side View (Door open)”
Gig-E Connector “Figure 1-4: TS3 Side View (Door open)”
Sync I/O Connector “Figure 1-4: TS3 Side View (Door open)”
HDMI Connector “Figure 1-4: TS3 Side View (Door open)”
Power Connector “Figure 1-4: TS3 Side View (Door open)”
Battery Door “Figure 1-5: TS3 Bottom View”
Battery Door Latch “Figure 1-5: TS3 Bottom View”
Battery Clasp “Figure 1-5: TS3 Bottom View”
Figure 1-1: TS3 Back View
Note: See “Appendix I: Physical Measurements” on page 89 for dimensions.
11S-3000M
page 3
Figure 1-2: TS3 Front View
Trigger
Button
Battery
LED
Sync
LED
Camera
LED
Storage
LED
Network
LED
MIKROTRON
C-Mount
Power
LED
TS3
Figure 1-3: TS3 Top View
Lens Mount Holes
11S-3000M
page 4

T3 User Manual
Figure 1-4: TS3 Side View (Door open)
Figure 1-5: TS3 Boom View
11S-3000M
page 5

T3 User Manual
2 TS3 Geng Started
2-1 Unpacking the Camera
Table 2-1: Package Contents:
Part
TS3 Camera X TS3100XXX
C-Mount (factory installed and adjusted on the camera) X
F-Mount (factory installed and adjusted on the camera) X 1105-0200
DC Power Supply-- 110/220VAC, 50/60Hz, 12V @ 4.17A, with IEC 13 socket and 5-pin
LEMO connector (no power cord included)
8 GB SDHC Card X 1105-0270
16 GB SDHC Card X 1105-0271
32 GB SDHC Card X 1105-0272
I/O Cable--1.3 meter with 8-pin LEMO camera connector and BNC connectors for Sync-In,
Sync-Out, and Trigger-In
Wireless Dongle X 1105-0275
Documentation and Software (on thumb drive) X
Battery--Rechargeable Li-Ion 3.7V 15,600mAh (Battery comes fully charged from factory) X 1105-0050
Hoodman 7” LCD Display Cover for glare protectio X 1105-0330
MIKROTRON retails its cameras through independent distributors. MIKROTRON or its distributors
can provide the accessory items required for camera operation according to each customer’s
particular application needs.
STD OPT Part #
X 1105-0250
X 1105-0401
2-2 Installing the Lens
The camera is shipped with a C-mount lens adaptor installed and adjusted at the factory. To install a
C-mount lens, follow these steps:
1. Select a C-mount lens for use with the camera.
NOTE: There are many C-mount lens formats and focal lengths available. The 22.9mm diagonal sensor
of the TS3100L is larger than the light circle produced by many C-mount lenses. This is especially true
for wide angle lenses, but it is dependent on lens design and format. Vignetting (darkening at the
edges of the image), will occur when the image on the sensor, the size and location of which is
dependent on resolution and image to set, is not covered by the image circle of the lens. (See “Table
2-2: Lens Selection .)
2. Remove the lens receptacle cover from the camera’s C-mount. This is a cover that is installed
at the factory to protect the camera optics and sensor from dust contamination
NOTE: Whenever threading lenses on or off the camera, face the camera lens down so that
any contamination on the threads will tend to fall away from the camera rather than into it.
3. Thread the C-mount lens into the lens mount located in the front of the camera. DO NOT
overtighten the lens! The lens should be “finger tight” only--just tight enough that you can adjust
focus and aperture without unscrewing the lens.
NOTE: Limit the time between removal of the receptacle cover and installation of the lens. Dust
could settle on the face of the sensor cover glass and degrade the image quality.
11S-3000M
page 7

T3 User Manual
Table 2-2: Lens Selecon
Resolution Sensor Diagonal Required Lens Format
to avoid noticeable
Vignetting
1280 x 1024 22.9mm 1.3” 3.6 x 2.9M
1024 x 1024 17.5mm 1.3”* 2.9 x 2.9M
800 x 600 14mm 1” 2.2 x 1.7M
640 x 480 11.2mm 2/3” 1.8 x 1.3M
256 x 200 4.5mm 1/3” .72 x .56M
*The 17.5mm diagonal @ 1024 x 1024 is slightly larger than the 16mm specification or 1” C-mount
lenses. Many, but not all 1” format lenses will satisfactorily cover this resolution
This table assumes that the images are centered (no custom offset applied). (See “Table
9-3: Resolutions, Rates, and Times” on page 79.)
Note: All F-mount lenses will easily cover the full 22.9m full resolution image plane.
2-3 Powering Up, Charging, and Power Down
Field of View From 10M with
50mm Lens
The camera can be powered by its rechargeable 3.7V Li-Ion battery or the external 12V power supply.
Both are included with the camera. The battery is fully charged at the factory and is shipped outside the
camera to avoid accidental discharge. The battery door is located on the underside of the camera.
Figure 2-1: Baery Access Door
The Li-Ion battery will power the TS3 for up to several hours, depending on configuration and mode of
operation
NOTE: When a new battery is installed, it must go through one complete discharge/recharge cycle to
page 8

T3 User Manual
calibrate its internal “gas gauge.” Until that time you will find that the % of charge shown on the
lower right of the camera display as well as on any camera control software will not be correct. (See
“Figure 2-2: Battery Charge Indicator on Status Bar” on page 9.)
Removing the Baery
1. Turn the TS3 upside down to access the battery compartment.
2. Slide the battery door latch to the “open” position. The spring loaded door will open
3. Move the battery clasp away from the edge of the battery. (See “Figure 2-1: Battery
Access Door”.)
Installing the Baery
1. Open the battery door (follow steps 1-2, above).
2. Look into the battery compartment and notice the connector at the bottom and the battery strap.
3. Position the battery strap within the compartment so that it has enough slack to accommodate
the battery but will not bunch up when the battery is installed..
4. Orient the battery appropriately and slide it into the compartment.
5. With the battery seated properly in the compartment, the battery clasp will close, securing it in
place.
6. Fold the loose end of the battery strap over the top of the battery and close the battery access
door.
Figure 2-2: Baery Charge Indicator on Status Bar
7. Slide the battery door latch closed.
8. The TS3 should now power up. If it does not, please follow the instructions below for connectin
the DC power supply and charging the battery.
9. Press the Menu button once to get the menus and status bar to appear on the LCD display.
Aaching the External DC Power Supply
The 12V DC Power Supply operates on 100-240VAC, 50-60Hz. The socket is a standard IEC 13, used
worldwide for all types of electronic equipment. The power supply is shipped without power cord so
that the user may use one appropriate for local power outlets.
1. Attach a power cord to the power supply and connect it to an AC power outlet.
2. Attach the power supply output cord to the camera via LEMO connectors. Note that the LEMO
connector is keyed: the red dot on the connector will face the LCD side (back) of the camera.
-88%
88%
Note: If the camera was powered down before connecting the power supply, it will now power up. While
operating on battery power the Battery Status on the Status bar will show a negative number -88%. (See
“Figure 2-2: Battery Charge Indicator on Status Bar”.) When connected to a power supply (with the
battery installed) the number becomes positive. If no battery is present it changes to A/C>.
Charging the Baery
The TS3 battery does not charge automatically when the camera is attached to an external power
supply while operating. Changing mode is initiated by pressing the ON/OFF button. When the
battery is present while the camera is attached to an external power supply, the ON/OFF button will
toggle the camera through three states: 1)normal operation; 2)charging (non operational); 3)O .
11S-3000M
page 9

T3 User Manual
Note: Pressing the ON / OFF button toggles the camera between three Modes if both the battery
and external power supply are present. It toggles the camera between two Modes: On /OFF if either
the battery or the external supply is not present. (See “Table 2-3: ON / OFF Bu on” on page 10.)
Powering Down
If you press the ON/OFF button while the camera is operating, you will get see a message on the
display asking if you wish to turn the camera off. If you click “OK” the camera will either power down
or begin charging. If click “Cancel” or “MENU” the camera will return to its previous operating state.
If you do nothing, the camera will wait approximately 60 seconds, then either begin charging or
power down--it will not return to operating mode until it is powered up again.
Table 2-3: ON / OFF Buon
Battery
Present
X X 1. Operating Power / Camera / Battery (Green, Amber, or Red) Batt: xx
X X 2. Charging Power / Battery (Green, Amber, or Red) (LCD o )
X X 3. O None (LCD o )
X 1. Operating Power / Camera / Battery (Green, Amber, or Red) Batt: xx%
X 2. O (LCD o )
Table 2-4: Baery LED States
External
Supply
X 1. Operating Power / Camera / Battery (Blue) A/C
X 2. O None (LCD o )
Mode
LEDs
The Battery LED changes color depending on the level of charge.
Baery Charge
Operang / Charging Charge Status LED Behavior
Operating >15% Green
Charging > 15% Blinking Green
Operating < 15% > 5% Amber
Charging <15% >5% Blinking Amber
Operating <5% Blinking Red
% Indicator
Charging <5% Blinking Red
Operating Not Installed Blue
2-4 TS3 Memory and Mass Storage Opons
The TS3 camera is equipped with 4GB or 8GB of internal high-speed internal memory. Images stored
in this memory may be reviewed on the camera, external monitor via HDMI, or PC, then saved to any
of four types of mass storage devices:
1. Solid State Hard drive (optional) in talled in the TS3 at the factory.
2. SD Cards (SDHC) inserted by the operator into the SDHC slot on the side of the TS3.
3. USB devices such as thumb drives or USB external hard drives connected via the USB port.
4. Memory devices on a networked PC using FasMotion software (not Web Browser).
11S-3000M
page
10

USB
OTG
S
D
H
C
GigE
EXT
I/O
12-26v
3A
H
D
M
I
Internal High-Speed Memory
2/4/8 GB
US
USB Port
T3 User Manual
TS3 Solid State Hard Drives (Internal SSD)
Solid state hard drives (SSDs) are available as an option on the L and S series. (See “Table 1-1:
TS3100-L and TS3100-S Models” on page 2.) These drives serve as mass storage devices for the
camera and are installed in the camera at the factory. Image data from the TS3’s high-speed internal
memory may be downloaded to the SSD, thus making room for the next high-speed image capture.
While the SSD does not add to the recording time of the camera (the number of images it can
record in one session), it does allow the user to download large quantities of image data without
ever connecting the TS3 to a PC or other external device.
SD Card
The TS3 is shipped with a 16GB high performance SD Card. This card has two functions
• It can be used as a mass storage device for downloading and distributing images. SD Cards and
card readers are very commonly used storage devices among PC users and photographers.
• Any field software updates for the TS3 from MIKROTRON will be installed via the SD Card.
Note: An SD Card when used for a software update must be reformatted before it can be reused as
a mass storage device. See “Appendix H: TS3 Updates” on page 88.
Figure 2-3: Mass Storage
SD-Card
B-OTG
Gig-E
SSD
64/128/256GB
USB Thumb Drive
USB Port
Internal High-Speed Memory
(2GB or 4GB or 8GB)
USB Hard Drive
11S-3000M
page 11

T3 User Manual
USB Port
The TS3 will act as a Host to any USB mass storage device connected at the USB port. (See “TS3 Top
View” on page 4.) Image data may be saved to these devices.
USB-On The Go!
The USB-OTG port allows the camera to be
connected as a slave to any PC using a USB-A
to USB-Micro-B cable. Once connected via the
TS3’s OTG port, any mass storage device on the
camera can be accessed by the PC. This includes
an SD Card, Solid State Drive, or thumb drive in
the USB port. To use this option
1. Power up the camera.
2. Install thumb drive and/or SD Card in the
camera.
Attach the camera to the PC via the camera’s USB-OTG port, which is next to the SD Card slot on the
3.
side of the camera. (See ”TS3 Side View (Door open)” on page 5.) As each device is located by the PC
an Autoplay window on the PC will open. This is a very simple way to transfer image data to a PC.
This is for file access only --there is no way to control the camera via USB-OTG.
When you are finished, you need to eject the media from the PC. Click on the “Safely Remove
Hardware and eject Media” icon on your computer’s task bar and select “Eject MIKROTRON Camera.”
Figure 2-4: USB-OTG on the TS3
Note: Any device that is connected to the camera aer the camera and PC are connected will not be
seen by the PC.
Table 2-5: TS3 Mass Storage Funconality
Target Drive(s) Function
TS3 Utilitie
System/Storage/Explore SSD/USB/SDHC Move, Copy, Delete, review metadata of Image file
System/Storage/Format SSD/USB/SDHC Format drive
System/Storage/Eject USB/SDHC Safely Eject Media
Review/Save SSD/USB/SDHC Save image Data from Internal High-Speed Memory
Record Stil SSD/USB/SDHC Save a single still Image
Autosave SSD/USB/SDHC Autosave image Data from Internal High-Speed Memory
FasMotion Utilities
Storage/Explore PC Drives+SSD/USB/SDHC Move, Copy, Delete, review metadata of Image file
Storage/Format SSD/USB/SDHC Format drive
Review/Save PC Drives+SSD/USB/SDHC Save image Data from Internal High-Speed Memory
Record Still PC Drives+SSD/USB/SDHC Save a single still Image
Autosave PC Drives+SSD/USB/SDHC Autosave image Data from Internal High-Speed Memory
PC via Gig-E Connection
Explore SSD/USB/SDHC Open, Copy files, multiple files, directories From TS3 to PC only
Web Application SSD/USB/SDHC Open, Copy files (one at a time) from TS3 to PC only
Storage/Browse SSD/USB/SDHC Move, Copy, Delete (1 file at a time), review metadata of Image file
Storage/Format SSD/USB/SDHC Format drive
Review/Save SSD/USB/SDHC Save image Data from Internal High-Speed Memory
Record Still PC Drives+SSD/USB/SDHC Save a single still Image
Autosave PC Drives+SSD/USB/SDHC Autosave image Data from Internal High-Speed Memory
PC via USB-OTG: SSD/USB/SDHC Move, Copy and Delete all files and directories to and from TS3
page 12

T3 User Manual
3 TS3 Camera Setup
3-1 Camera Display and Menu Navigaon Buons
The Display Buon, Menu Buon, and Direconal Pad (D-Pad) are found on the back of the camera
to the right of the LCD. (See “TS3 Back View” on page 3.)
When the camera powers on for the first time, the default display is a live image with no
menu displayed.
Pressing the Display (DISP) Button while toggles the LCD between four modes: 1) Display off; 2)
Display on; and 3) Display on with Information bar; 4) Display on with Information bar and Histogram.
When there is captured video to review, playback controls are added to modes 3 and 4.
The Menu Button toggles the on screen menus on and off . While navigating menus, the Menu
button is used to go backward through levels of the menu. For example, if you are navigating a
Menu pressing the Menu button will return you to the Menu Bar. (See Menu Terminology, below.)
The D-Pad is used to move within menus and dialogs. It has an “OK” button in its center for selecting
menu items and options
While navigating through menus, the current location is indicated by a change of color from white
or green to gray. When navigating a Menu, the drop down selections will always appear in the left
most column. The selected menu will appear in white letters in the Menu Bar. Selected or Enabled
items turn green once the cursor is moved away from them.
Table 3-1: Menu Terminology
Menu Bar Across the top of the display: Touch Menu Icon*, System, Record, Control, Display, Review
Menu Having Made a selection from the Menu Bar, a drop down Menu Appears, such as the
System Menu shown below. Present status for items in the selected menu are listed.
Element The menu options i.e. Name, Network, etc. are called Menu Elements
Dialog Box Having chosen an item from a menu, a dialog box may open such as the Frame Rate and
Resolution. (See”Frame Rate and Resolution Menu” on page 23.) This is often a place
where the user may make choices and/or input data.
Status Bar The Status Bar is located at the bottom of the display. Information includes (from left to
right): Operating Mode (Live= live view, CAP= recording, REVIEW= playback); ROI= Resolution;
FPS= Frame rate; EXP= Exposure; Trigger Position; and ower /Battery Status (A/C= no battery,
xx% = battery charge)
Figure 3-1: System Menu
11S-3000M
page 13

T3 User Manual
3-2 Using the Touchscreen
The TS3 7” display uses touchscreen technology that allows the user to navigate through the
menus and enter data with the touch of a finger rather than via the D-Pad.
A special icon in the upper left hand corner
of the screen is present whenever Touch is
enabled. Pressing this icon acts the same as
pressing the MENU button: it toggles the menus
on and off and allows you to navigate backwards
through menus and dialogs.
Note: the TS3 touchscreen uses “resistive”
technology that is sensitive to a light touch of a
fingernail or stylus. Unlike “capacitive”
technologies used in many smartphones and
tablet PCs, it is not very sensitive to the flesh of a fingertip
To enable the Touchscreen:
1. Navigate to the System Menu, then to Touchscreen using the D-Pad.
Figure 3-2: Touchscreen Menu
2. If the touchscreen is currently disabled, there will be a “Disabled” button in the Touchscreen
menu. If you click on that, it will turn green and the text will change to “Enabled.”
Whenever the Touchscreen is enabled there will be an icon in the upper left hand corner of
the screen. Pressing on this acts the same as the MENU button.
Calibraon
The touchscreen is calibrated at the factory. Routine calibration of the touchscreen in not
necessary. Calibration of the touch screen may be done if you feel that the screen is sensing your
touches inaccurately. For example if you use the alpha-numeric keyboard and you are not always
getting the intended character where you are touching it, you should re-calibrate the touchscreen.
To calibrate the Touchscreen:
Calibration of the touchscreen is very
simple and only takes a few seconds.
1. Navigate to the System Menu/
Touchscreen/Calibrate.
2. When you select “Calibrate” you
will see a warning message: “Are
you sure you want to re-calibrate
the touchscreen?” Select “OK.”
(This is there to prevent you
from accidently calibrating th
touchscreen while handling the
camera.)
Figure 3-3: Touchscreen Calibraon
3. The Calibration screen, “Figure 3-3: Touchscreen Calibration", will appear and prompt you to
touch a cross hair at each corner of the screen, then in the center. Be careful to touch the cross
hairs accurately. It is best to use a stylus or other blunt plastic object
page 14

T3 User Manual
3-3 Controlling the Displays
Seng Defualt Gamma in User Preferences:
User Preferences is in the System/Configuration menu.
The Default Gamma setting is used both to set the
defualt output Gamma for displayed and saved images,
and to set the Gamma for the LCD display. Gamma of 1.0
(linear) is recommended unless you intend to encode
your images with 2.2 Gamma.
LCD and HDMI setup in the Display Menu:
There are three menu elements in the Display menu that
control the behavior of the displays. These are:
• LCD Adjust
• LCD Dimmer
• HDMI
The Image Adjust dialog opens when you click on the Edit
button in the Image Adjust menu. The controls here adjust
only the way images are displayed on the LCD. They do not
change the images in camera memory or
images that are or will be saved.
Figure 3-4: LCD Display Controls
For any of the three controls here, LCD Brightness, LCD
Contrast, and LCD Backlight, changes may be made either
by clicking on the + and - boxes, which will change the
associated item up or down in increments of 1, or you
can click on the edit box itself to open a keypad. See
“Figure 3-12: Keypad Dialog Boxes” on page 19.
LCD Brightness and Contrast have a range between -100
and 100 with a default value of 0. LCD Backlight has a
range between 0 and 100 with a default value of 100.
Note: The Image Adjust, White Balance, and RGB Gain
elements do not control the LCD display. These are part
of the image processing pipeline that directly influence
the saved image. (See “Image Pipeline” on page 32.)
The LCD Dimmer is a timer that turns the LCD display off
after a number of minutes. There are four choices:
• O --the display will not “time out ”
• 1 Min. The display will go dark after 1 minutes of
non-use.
• 5 Min. The display will go dark after 5 minutes of
non-use.
• 10 Min. The display will go dark after 10 minutes of
non-use.
Figure 3-5: HDMI Controls
HDMI Display
While the 7” WVGA 800 x 480 display on the TS3 is
perfectly adequate for setting image captures and
even reviewing video, watching the same video on
a large flat panel display makes sharing the imagery
with others much easier. With the TS3 there is no
need to download images to a PC to view them on a
large display. Use a standard HDMI cable to
connect the TS3 to an HDMI compatible display.
11S-3000M
The HDMI output control is also accessed in the
Display menu. The HDMI output can be Enabled
and Disabled here and the resolution 640 x 480,
720p, or 1080p may be selected. (Any resolution not
supported by a display attached to the TS3 will be
Grayed out and the button not selectable. )
page 15
USB
OTG
S
D
H
C
GigE
EXT
I/O
12-26v
3A
H
D
M
I
Internal High-Speed Memory
2/4/8 GB
T3 User Manual
3-4 Connecng to a PC via
Ethernet
The TS3 may be connected to a PC using the USB-OTG
connection, (see ”2-4 TS3 Memory and Mass Storage
Options” on page 10) or via the Gig-E port. While the
USB-OTG connection is extremely useful for file
transfers, an Ethernet connection has two major
advantages:
1. It can be used to control the camera via the
built-in Web Application or InMotion Camera
Control software.
2. The camera and PC need not to be physically close
to each other as with the USB-OTG connection
which is dependent on cables that are limited in
length (generally less than 4.5m).
Benets of TS3 Ethernet connecvity:
1. Once connected to a network, the TS3 may be
accessed for file transfer and camera operation
(including live views, recording, reviewing, etc.) by
any PC on the network. Multiple cameras may be
accessed and controlled on a network.
2. Using the camera’s Web Applicaon (built into the
camera) any PC that has network access to a camera
can control it without installing any software. This
works with popular web browsers such as Google
Chrome and Mozilla Firefox.
Figure 3-6: TS3 to PC Connecons
Internal SDD
64/128/256GB
USB-OTG
Gig-E
Figure 3-7: Network Menu
SSD
Seng up Networking on the Camera
The TS3’s Networking settings may be configured
manually or using DHCP. When shipped the cameras
are set for DHCP. To change the setting
1. Navigate to the System Menu.
2. Select Network.
3.
Choose between DHCP or Static. Choose DHCP in the
camera will be placed on a network with a DHCP server
running on it. Choose Static if the camera and any PCs
used to access it are manually
Autoconguraon
If the TS3 is configured for DHCP and it does not find
configurated.
a server, it will autoconfigure itself with an IP address
169.254.xx.xx.
Most PCs will do the same. So, most of the time, if the
TS3 is configured for DHCP and you connect it to a PC
that is also configured for DHCP, they will automatically
connect without any further configuration
Table 3-2: Network LEDs
LEDs on RJ-45 Connector Camera
Networking LED
Green (Connection Amber (activity Amber (activity
1 Blink = 10Mb Blinks for all
2 Blinks = 100Mb
network activit
3 Blinks =1Gb
Blinks for camera
network activity onl
11S-3000M
page 16
T3 User Manual
If you choose to manually configure the network settings,
there is a dialog box that opens to allow typing in the IP
Address, Subnet Mask, and Gateway. (If Touchscreen is
enabled, you will be able to use it with the alphanumeric
keyboard for input of these values.)
If you are unsure of these settings, please consult your
network administrator. If you need the MAC address of
the camera, it is listed in System/Information/Status.
Note: the camera must be connected to an
active network when configuring the IP address.
3-5 Using the TS3 with a PC
To open the Networked TS3 in a Web browser to use the TS3 Web App:
1. Open a web browser on the PC. Of the available web browsers, Google Chrome has the best
performance when using the Web App.
Figure 3-8: Stac IP Dialog Box
2.
Type the camera’s IP address or camera name into the browser’s Location bar. For example, using the
information from “Figure 3-9: Web Browser Screen”, you would type 169.254.66.106 (IP address) or
MIKROTRON_ts3 (the camera name) into the browser’s Location bar.
3. A camera control application within the camera does the rest. A control menu will appear in
your browser that will give a live camera view and complete control over the camera operation
Details on use of the camera’s web browser appear in Chapter 5 of this manual.
Figure 3-9: Web Browser Screen
11S-3000M
page 17

T3 User Manual
To open the Networked TS3 in a Windows Explorer menu:
1. Open either a web browser or Windows Explorer.
Type the camera name or IP address in the Location bar, preceded by \\. So, using the same
2.
information as in the example above, type in either \\192.168.1.106, or \\mikrotron_ts3.
When the camera is viewed in Explorer, you will see the camera name or IP address under Network.
Opening that, you will see a directory called “media,” which contains directories for each mass
storage device installed on the camera. (See “Table 2-5: TS3 Mass Storage Functionality” on page
12.)
Figure 3-10: TS3 in Windows Explorer
3-6 TS3 Name the Camera
Camera Name
When the TS3 leaves the factory its default
name is TS3-xxx. For example, looking at
“Figure 3-11: Camera Name Menu” the
camera used for the screen shot was TS3-
17. The camera name can be used both for
identification on a network and as part of
the filename when saving images.
It may be beneficial to rename the camera
according to its function, loyality, field of
view, etc. depending on how the camera is to
be deployed.
To change the camera name:
1. Navigate to the System Menu.
2. Select “Name.”
3. Move the cursor to the box showing the current name and click “OK” to open the alpha-numeric dialog where you
will enter the new camera name. If enabled, you can do this using the Touchscreen. If not you will use the D-Pad.
4. Delete the present camera name using the Backspace button in the dialog box, then enter the new name in its place.
Figure 3-11: Camera Name Menu
page 18
T3 User Manual
Caution: There are many symbols available on the keypad that are not valid for camera naming. If
you enter symbols that are not usable, those characters and any subsequent characters will be
stripped from the camera name as soon as you navigate away from the Name Menu.
Figure 3-12: Keypad Dialog Boxes
3-7 Seng the Time
Time Setup on the TS3 is located in the System Menu. There are two choices for setting the time
the camera: User and NTP.
If you select User, the time and date are manually entered into the camera. The camera’s internal
clock will maintain reasonable accuracy, but may drift over long periods of time. If NTP (Network
Time Protocol) is used, the camera will get its time from an external NTP server via the Internet.
Seng the me Manually
1. Navigate to the System Menu and select Time.
2. Select the format you wish to use for the date and
time: MM/DD/Y , DD/MM/YY, or YY/MM/DD.
3. Select 24-hour, if you wish to use a 24-hour display
rather than a 12-hour.
Seng the Time via NTP
1. Connect the camera to a network with internet
access. There is no need to attach the camera to a
PC, although that is often the most obvious way to
do it..
2. Navigate to the System Menu and select NTP.
3. Select an NTP server from the list. If there is a
server that you would like to use that is not on the
list, you may add it in the dialog box.
Figure 3-13: Time Format Menu
4. To exit the list, press the right arrow of the D-Pad and select OK. The TS3 will now connect to
the NTP server and sync its clock. If the camera cannot connect with the server, it will pause
operation for a couple of minutes while it re-tries. The camera will always poll the NTP
server when it powers up if it has an Internet connection
Note: The TS3 will not poll the NTP server if the Internet connection is not made, either when the
camera boots, or when exiting the NTP dialog. Between times when the camera polls the NTP
server, it will maintain time with its internal clock.
5. Select “Zone” to set the camera to the local time zone.
11S-3000M
page 19

T3 User Manual
3-8 Storage Setup
The Storage Menu gives the user some amount of access and control of the Camera memory and any
external memory installed i.e. USB thumb drive or SD Card.
The TS3 has 2GB, 4GB, or 8GB (depending on model and option) of internal high-speed memory used
for capturing high-speed imagery. All of this memory may be used to capture one high-speed event,
or it may be partitioned to capture multiple events. Total record time will depend on resolution,
frame rate, and bit depth.
Configure Session:
Session selects the amount of memory to be used
for capturing imagery, which dictates the number
of frames captured as well as the capture time
1. Navigate to the System Menu.
2. Select Session
3.
Use the touch-enabled slider to select
the amount of memory for the session (in
incrments of 256MB). Note that the number
of frames and session time will change.
Figure 3-14: Storage Menu
4. When the slider is selected, the D-Pad may
also be used. This is a good way to get the
exact value you wish to use.
Explore allows you to access the SSD (Solid State
Drive installed internally to the TS3), the SD Card
inserted into the slot on the side of the camera, or
a USB thumb drive connected via the USB port for
file t ansfer:
1. Navigate to the System Menu.
2. Select Storage.
3. Select Explore
4.
A selection menu will open allowing you
to pick the storage device you wish to
access: SSD, SDCard, or USB. Once you
select the storage device, you will see the
directory
taken by the camera), Stacks (stacks of
high-speed video saved as TIFF, BMP, JPEG
files), and Video (AVI files)
choices: Stills (containing stills
Figure 3-15: Session
Figure 3-16: System Explore Dialog: File Stacks
5.
Open the Stills, St
double-clicking on your choice. This will open
the dialog shown in Figure 3-16, displaying
the list captured imagery and a thumbnail and
brief description of the currently selected
item.
Note: This list acts like a “spinner” when touch
is enabled. Swiping the list up or down will make
it spin, allowing you to move through the list
quickly.
acks, or Videos folder by
page 20
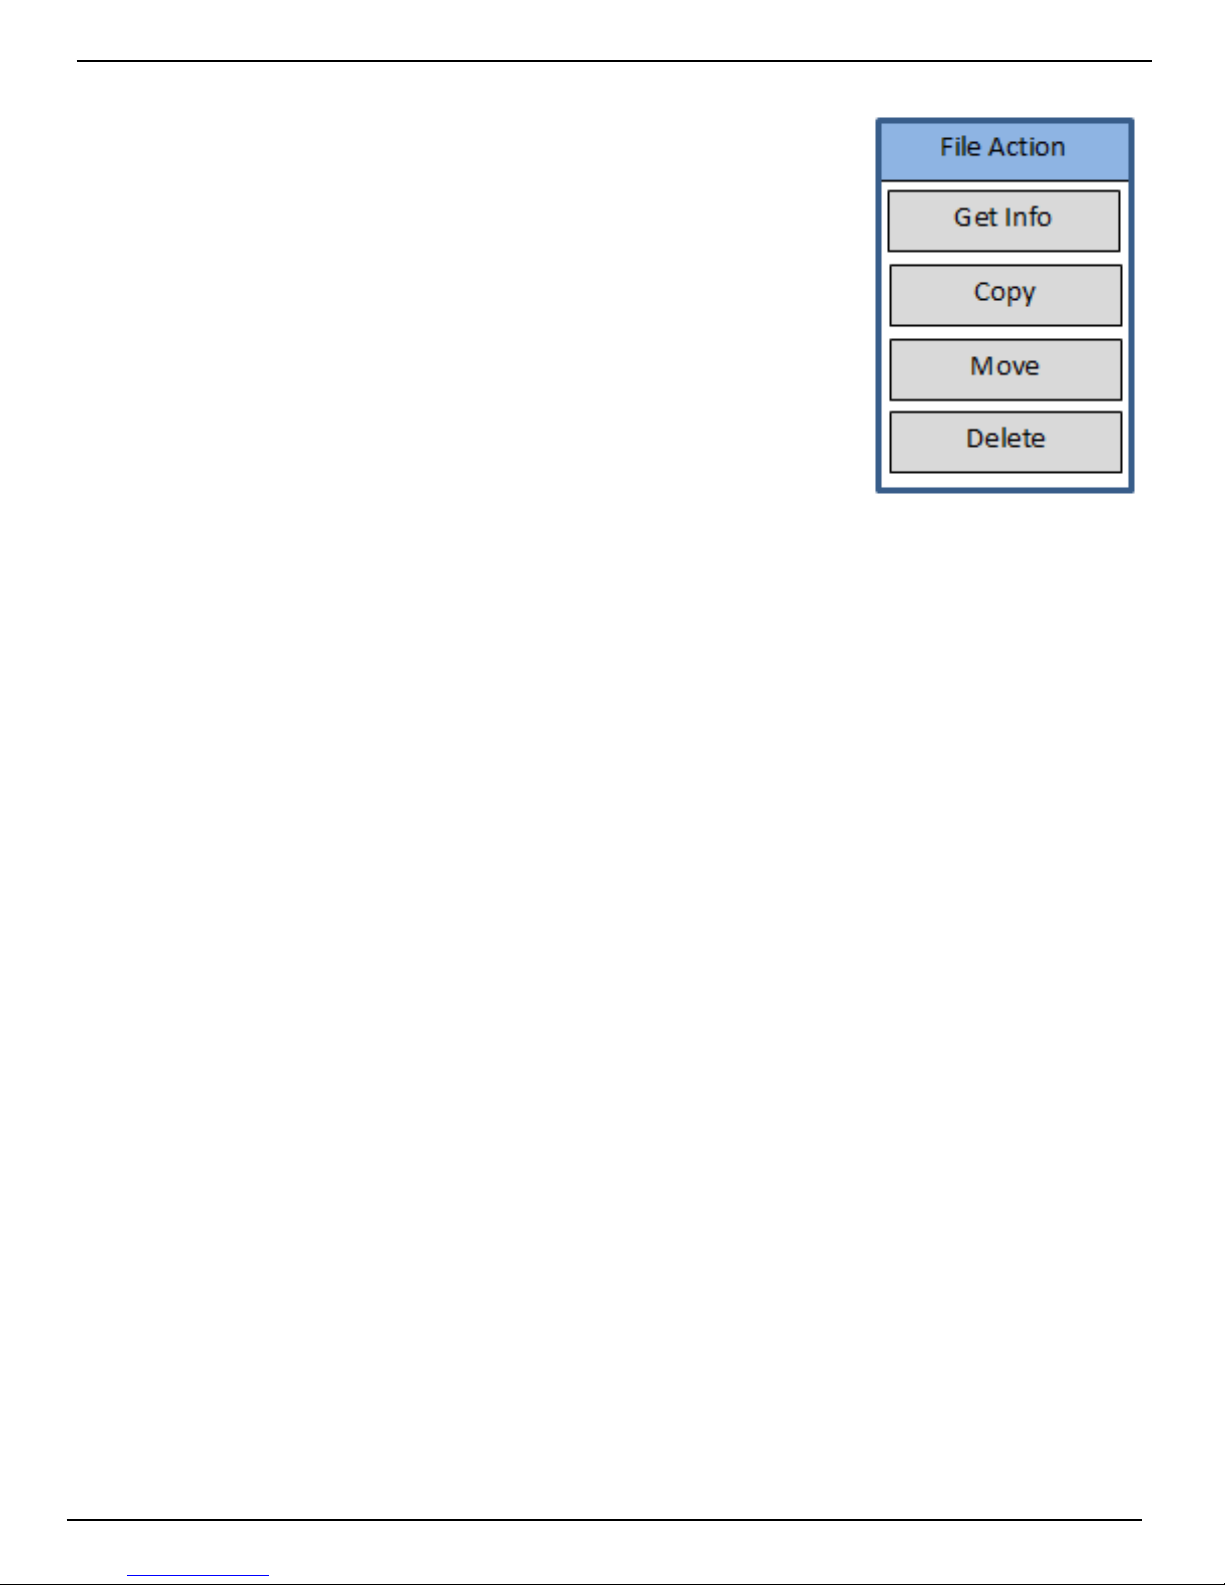
T3 User Manual
6. Double click on any item and a File Action dialog will open that will allow
you to Copy or Move the item to another storage device on the system, or
delete it.
7. When done, use the Menu or Back button to navigate away.
Eject, also on the Storage Menu, should be used whenever you wish to remove
media from the TS3.
NOTE: Failure to eject SDCards or USB devices before removal may result in
incomplete transfers.
The Format function on the Storage Menu should be used with some caution as
formatting any media will remove any data on it.
3-9 Conguraon and Camera Informaon
TS3 Conguraons, which include all Network, Time, and all camera settings
can be Saved, Reloaded, or Reset to factory defaults.
1. From the System Menu, navigate to Configuration
2. Select Save to save the current configuration. The configuration may be saved as Configuration
# or Configuration #2
3. Select Load to load a saved Configuration (Configuration #1, or #2
Figure 3-17: File Acon Dialog
4. Select Reset to load the factory default configuration
General information about the camera, including MAC address and versions of software,
FPGA, Sensor and Gig-E are available in Information in the system Menu.
3-10 Reset
There are two levels of Reset available on the TS3, ‘So Reset,’ and ‘Hard Reset.’
The ‘Soft Reset’ is similar to a PC reset or warm boot. It does not change any settings or power
the system down, it simply restarts the user interface and clears out any error conditions. All user
configurations and all image data are preserved.
The ‘Hard Reset’ resets the camera configuration back of its factory settings. This eliminates the
current user settings as ell as any saved configurations (Co fig 1 and Co fig 2) and erases any image
data in the camera. For these reasons, the Hard Reset is very seldom done. There may be instances
when you will directed to do a Hard Reset a er performing an update or maintenance task, but it is
not done routinel .
11S-3000M
page 21

T3 User Manual
4 Recording with the TS3
4-1 Seng Frame Rate and Resoluon
Frame rate and resolution are set together as they are interactive. The maximum frame rate of
the camera is based on its resolution as seen in “Table 4-1: Frame Rates and Resolutions , below.
Table 4-1: Frame Rates and Resoluons
Frame Rates
60 125 250 500 1000 1250 2000 4000 5600
Resoluons
1280 x 1024 X X X X
1024 x 1024 X X X X
1280 x 720 X X X X
1024 x 600 X X X X X
800 x 600 X X X X X X
800 x 480 X X X X X X
640 x 480 X X X X X X
1280 x 256 X X X X X X X
512 x 512 X X X X X X X
320 x 240 X X X X X X X X X
320 x 200 X X X X X X X X X
200 x 200 X X X X X X X X X
Scale and Resoluon/Frame Rate
Selecting the proper resolution and frame rate for a given high-speed event is important. It is
based on the Field of View (FOV) required to get a good image of your object of interest and the
speed at which the object will move through that FOV.
For example, if you wish to image an automobile travelling at 50 mph across an intersection, full
resolution and a relatively slow frame rate will work because your field of view (FOV) will be large
and the car will not be moving through it very quickly.
Imaging a bird travelling at the same speed will require a much smaller FOV as the bird is 1/20th the
size of the car. If you wish to use the same scale (object size/FOV), the FOV becomes 1/20th the size
and the bird moves through it 20x as fast.
If you got acceptable imaging of an auto at 60FPS, it may take 1250FPS to get similarly acceptable
imaging of a bird at moving the same speed.
Aliasing and Frame Rate
If you are imaging a motion that is cyclical in nature like a wheel spinning or a lever moving up and
down, it is important to use a high enough frame rate to avoid motion aliasing. If you know the
speed of the object, use a frame rate at least a few times as fast as the repetition rate to get a
valid characterization of the motion. If you don’t know the speed, use as high a frame rate as
possible to start with and adjust from there. (Be sure to analyze the movement one frame at a
time as the playback speed may cause aliasing as well.)
Generally you will choose to use the largest resolution possible for the frame rate required. This
will give you the best definition of your object of interest. Smaller resolutions may be desired in
order to increase the record time.
page 22

T3 User Manual
Note: The display resolution of the TS3 LCD is 800 x
480. To set the Frame Rate and Resolut on of the TS3:
1. Navigate to the Record
Menu / Settings and select
either the Resolution or
Frame Rate button to open
the Record Settings Menus.
(Either the Basic or Advanced
menu will open, depending
on the last one you used.)
In the Basic Record Setting
2.
Menu, Select Resolution or
Frame Rate, or Auto-Max:
• If you select Resolution, you may pick from any resolution--only the valid frame rates for
that choice will be available.
• If you select Frame Rate, you may pick from any frame rate--only valid resolutions for that
choice will be available.
• If you select Auto-Max, you may pick any frame rate or resolution. The system will then select
the maximum corresponding resolution or frame rate for your choice.
Figure 4-1: Frame Rate and Resoluon Menu
3.
Click on the Apply button when you are satisfied with our choices. The camera will automatically
adjust the shutter speed to match the frame rate selected. The live display will now reflect the
changes made and give you and opportunity to
accept or cancel them.
Controls in the Advanced Record Settings dialog
settings work the same as in the “Basic” menu,
except that edit boxes and spinners replace the
presets, offering a much wider range and greater
precision.
Resolutions can be refined to any evennumbered pair from 24 x 12 to 1280 x 1024.
Frame rates may be refined to any number from
24 to 98437 fps.
Choose from the four aspect ratio choices:
Custom, 4:3, 5:4, 16:9.
Oset Control:
Most of the time, you make use of the best resolving properties of your lens, you will want to
center the image at the optical center, which corresponds to the center of the sensor. In this case
you would make sure that the “Center” check box is checked.
Figure 4-2: Advanced Record Sengs
It is also possible, that you will wish to shift your ROI (Region of Interest) without moving the camera.
Lets say, for example, that you have captured images at 1024 x 1024 @ 500fps and are now
interested at capturing a 512 x 512 portion of the scene, lets say the bottom right hand quarter
@ 2000fps.
In this case, you would wish to add 512 to both the X and Y offset. For a 1024 x 1024 centered image
the offsets will be 128 and 0. The resultant offsets for a 512 x 512 image (lower right quadrant)
would be 740 and 512.
11S-3000M
page 23

T3 User Manual
4-2 Seng Shuer Speed
Choosing the right shutter speed is dependent not only on the speed at which an object is
travelling through the FOV, it is also dependent on how the imagery is going to be used.
For motion analysis it is best to get as short an exposure as possible in order to limit motion
blur. (Motion blur an be defined as the number of pixels traversed by an edge of an object
during an exposure.)
For smooth video, on the other hand, long exposures are best. These make for more
attractive movies, but blurry stills
In the TS3, exposure times are expressed as 1X, 2X, 4X, 8X, and MAX. These are defined as
1/(Frame rate * nX)
For 500FPS for example: 1/(500FPS * 1X)= 2ms; 1/(500FPS * 2X) = 1ms; 1/(500FPS * 4X) = 0.5ms, etc.
MAX (shortest) exposure time is .002ms (2 ms).
Table 4-2: Frame Rates and Shuer Speeds
Frame Rates /
60 FPS 125 FPS 250 FPS 500 FPS 1000 FPS 1250 FPS 2000 FPS 4000 FPS 5600 FPS
Shutter Speeds
1X
1X
2X
2X
4X
4X
8X
8X
MAX
16.667ms 8.0ms 4.0ms 2.0ms 1.0ms 800ms 500ms 250ms 179ms
1/60 s 1/125 s 1/250 s 1/500 s 1/1000 s 1/1250 s 1/2000 s 1/4000 s 1/5600 s
8.333ms 4.0ms 2.0ms 1.0ms 500ms 400ms 250ms 125ms 89ms
1/120 s 1/250 s 1/500 s 1/1000 s 1/2000 s 1/2500 s 1/4000 s 1/8000 s 1/11200 s
4.167ms 2.0ms 1.0ms 500ms 250ms 200ms 125ms 62ms 45ms
1/240 s 1/500 s 1/1000 s 1/2000 s 1/4000 s 1/5000 s 1/8000 s 1/16000 s 1/22400 s
2.083ms 1.0ms 500ms 250ms 125ms .10ms 62ms 31ms 22ms
1/480 s 1/1000 s 1/2000 s 1/4000 s 1/8000 s 1/10000 s 1/16000 s 1/32000 s 1/44800 s
2ms 2ms 2ms 2ms 2ms 2ms 2ms 2ms 2ms
Seng the Shuer Speed:
1. Navigate to Record Menu.
2. Select Shutter Speed.
Figure 4-3: Shuer Speed Menu
3. Select 1X, 2X, 4X, 8X, or MAX.
Press the Menu Button a few
times until the Menus are
cleared from the LCD screen.
Assuming you have installed a lens (See “2-2 Installing the Lens” on page 7), you should now see
a live image. You may need to adjust the lens F-stop or the lighting. Press the Display Button once
to view a histogram to confirm that the image you see is not clipped (too dark or over-saturated.)
Note: The camera is capable of setting shutter speeds in increments of one microsecond, but not
from the on-camera menus. For finer control of shutter speed, use the Web-Application. (See “6-4
Record Settings” on p e 45.)
11S-3000M
page 24

T3 User Manual
4-3 Low Light Mode
There is an option labeled “Low Light.” THIS IS NOT A SHUTTER SPEED USED FOR RECORDING! This
is a special shutter speed that works in “Live Mode” only--for Live view and not while recording.
In some special circumstances, the light available for setting up the TS3 for a high-speed event is
not the same as what will be used for event itself. For example, you may be using and extremely
bright light or light of a spectrum that would be harmful or uncomfortable for people to work
under. In Low Light Mode the camera framing and focusing can be done in available light.
The exposure for Low Light Mode is much longer than would be possible for a high frame rate. The
default shutter speed for Low Light mode is 33.327ms, which is the “1X” shutter speed for 30 FPS.
The shutter speed for Low Light may be adjusted via the Web-App or custom camera software, but
not via the on-camera interface.
To enter Low Light Mode:
Note: Be careful when using the Low Light
feature! It is very easy to forget that it is
on! Remember to set your exposure for
the light that will be present during the
image capture.
1. Set the Shutter Speed just as you
need it for the high speed event (as
described in “4-2 Setting Shutter
Speed”).
2. Navigate to the Record/Low Light
Menu.
3. If Low Light is not enabled, there will
be two items in the menu: “Disabled,” and an exposure setting (33.327 ms by default). When
you click on the “Disabled” button, it will turn green and change to “Enabled.” You will
notice immediately that the Live image is much brighter.
4. Press the Arm Button.
The camera will begin recording. You will notice that the image is darker now than in Live Mode.
5. Press Arm again to quit recording. (Click “OK” on the Warning message to Cancel.)
Figure 4-4: Low Light Menu
4-4 Seng Bit Depth
To choose the recording bit depth:
1. Navigate to the Record Menu.
2. Select Bit Depth.
Select 8-low, 8-mid, 8-high, or 10-bit. If any of the 8-bit mappings are chosen, the live image will
3.
immediately reflect th
If Bit Depth is set to 10 in the Record Menu, a bit depth selection will appear in the The Display
Menu. The choices here are 8-low, 8-mid, and 8-high. This selects the 8-bits used for the display and
for saving to media.
11S-3000M
at change. If 10-bit is chosen, the displayed live image will default to 8-high.
page 25

T3 User Manual
4-5 Conguring the Trigger
To Set the Trigger Posion in the TS3:
1. Navigate to the Control Menu.
2. Select Trigger Posion.
3. Select Start, 10%, 50%, 90% or End.
Note: When controlling the camera via WebApplication or FasMotion so are, it is possible
to position the trigger in 1% or even 1-frame
increments.
Enabling the External Trigger
There are times when manually pressing the
trigger button is not practical. The camera may be
mounted in a location that is difficult or dangerous to reach, or it may be that the precision
required to activate the trigger is much easier to maintain through electrical means.
1. Navigate to the Control Menu.
Figure 4-5: Trigger Posion
2. Select Ext. Trigger.
3. If Disabled, click on the “Disabled” button.
It will turn green and the text will change to
“Enabled.”
4. The next button to the right will either say
Rising or Falling Edge. If you need to change
the setting , click on this button to open the
dialog box pictured in “Figure 4-6: External
Trigger”.
Please refer to “Appendix D: Power and I/O Connecons” on page 82 for connecon informaon
and warnings.
Figure 4-6: External Trigger
11S-3000M
page 26

T3 User Manual
4-6 Black Level Calibraon
Black level calibration does two things:
1. It sets the black level of the camera to ensure that, in the absence of all light, there is no offset or
clipping (the “blackest” pixel will have a value of 0).
2. Dark frame data is saved for correcting Fixed Pattern
Noise (FPN).
NOTE: Fixed Pattern Noise exists on every image sensor.
Calibrate Black Level:
The general rule is to do a Black Level Calibration if
ever you believe the image looks noisy with Pixel FPN
turned on. To be assured that you are getting the best
possible images, perform a calibration:
• When you first boot the camera up.
• If you change Shutter Speed, Frame Rate, Resolution, or Offset.
To Calibrate the Camera
1. Navigate to Record/Black Level
Figure 4-7: Black Level Calibraon and Sengs
2. Shut out all light to the sensor: close the f-stop down all the way and put a lens cap on it or cover
it securely.
3. Click on “Calibrate.” There is a prompt to confirm that you have the lens cap on. You will see a
little progress bar and you will see a couple of noisy images on the screen. When done, if Pixel
FPN is on, the live image with the lens cap in place should be black.
4. Next to the Calibrate button, you will see an FPN selection bu on that will say FPN Off , Column
FPN, or Pixel FPN. Click on that button and select the FPN setting you wish to use, based on the
following:
Pixel FPN is a per-pixel image correction th a is done in the TS3’s image processor engine. It
provides the cleanest images available. This is the setting that is most highly recommended,
especially if the images will be downloaded or viewed on large, high-contrast displays.
Column FPN is an image correction done on the TS3’s sensor. It does not do as good a job cleaning
up the images as Pixel FPN.
FPN O means that there is no noise correction being used.
4-7 Record: Arm and Trigger
Lights Camera Acon!
• Black Level Calibration has been don
• The scene is framed and focused
• The Resolution and Frame rate are set
• The Shutter Speed is set
• The Bit Depth is set
• The Trigger Point and Trigger Type is set
Take a Still JPEG
Still JPEG Image. It is optional, but ercommended, to take a reference still of the scene:
1. With the TS3 in Live Mode (not Recording or Reviewing a recording) press the Trigger Button.
2. A dialog box will appear asking where to store the image. Select the storage media you wish to
use. (The image will be saved in <storage device>/dcim/100fastc.)
11S-3000M
page 27

T3 User Manual
To begin Recording, Press the Arm Buon.
When the Arm Button is pressed the camera begins recording into its circular buffer. The Camera
LED will change from Green (LIve) to slowly flashing Amber. It will record for an indefinite period of
time until it sets a Trigger. (See ”4-5 Configuring the Trigger” on page 26.)
Figure 4-8: Camera LED
trigger portion. The “T” in the center of the bar represents the Trigger Point (frame “0”).
The numbers above and below the bar on each side indicate the number of frames and seconds for
the pre-trigger portion to the left, and the post-trigger portion to the right. In this instance,
because the Trigger Point is set at 50%, both the number of frames and amount of time is the same
on both ends.
Note: If the TS3 is triggered before the pre-trigger portion of the buffer is full, it will immediately
cease taking pre-trigger frames, record frame “0” and progress to the post-trigger portion of th
recording. When complete, the recording will have contiguous frames, with the full complement
of post -trigger frames, but fewer pre-trigger frames. (See “4-5 Configuring the Trigger” on page
26.)
If the Arm Button is pressed a second time, the Recording will abort. A courtesy
message will appear asking for confirmation. You will need to use the OK
Button on the D-Pad to accept.
The recording state is indicated by a progress bar at the bottom of the TS3 LCD display.
(See “Figure 4-9: Progress: Armed TS3”.) For this example, a 50% Trigger Point has been
selected. The yellow/green bar represents the record buffer. The yellow half represents
the pre-trigger portion the green represents the post-
Figure 4-9: Progress: Armed TS3
The recording has just been started (the Arm Button has just been pushed). The green progress
line spans the whole distance between the left edge and the trigger point.
-2449
-09.796
[CAP] ROI:1280x 1024 FPS:250 EXP: 8X (0.500 ms) TrigPos: 50%
T
The recording has progressed through a little more than half of the pre-trigger portion. The
marker has moved and the yellow line has proceeded with the progress of the recording.
-2449
-09.796
[CAP] ROI:1280x 1024 FPS:250 EXP: 8X (0.500 ms) TrigPos: 50%
T
All of the pre-trigger frames have been recorded. The TS3 is continuing to record new frames as it
discards the oldest. It can remain in this state indefinitely waiting for a Trigger. -2449
+2449
+09.796
Batt: 53%
+2449
+09.796
Batt: 53%
-09.796
[CAP] ROI:1280x 1024 FPS:250 EXP: 8X (0.500 ms) TrigPos: 50%
11S-3000M
+2449
+09.796
Batt: 53%
page 28
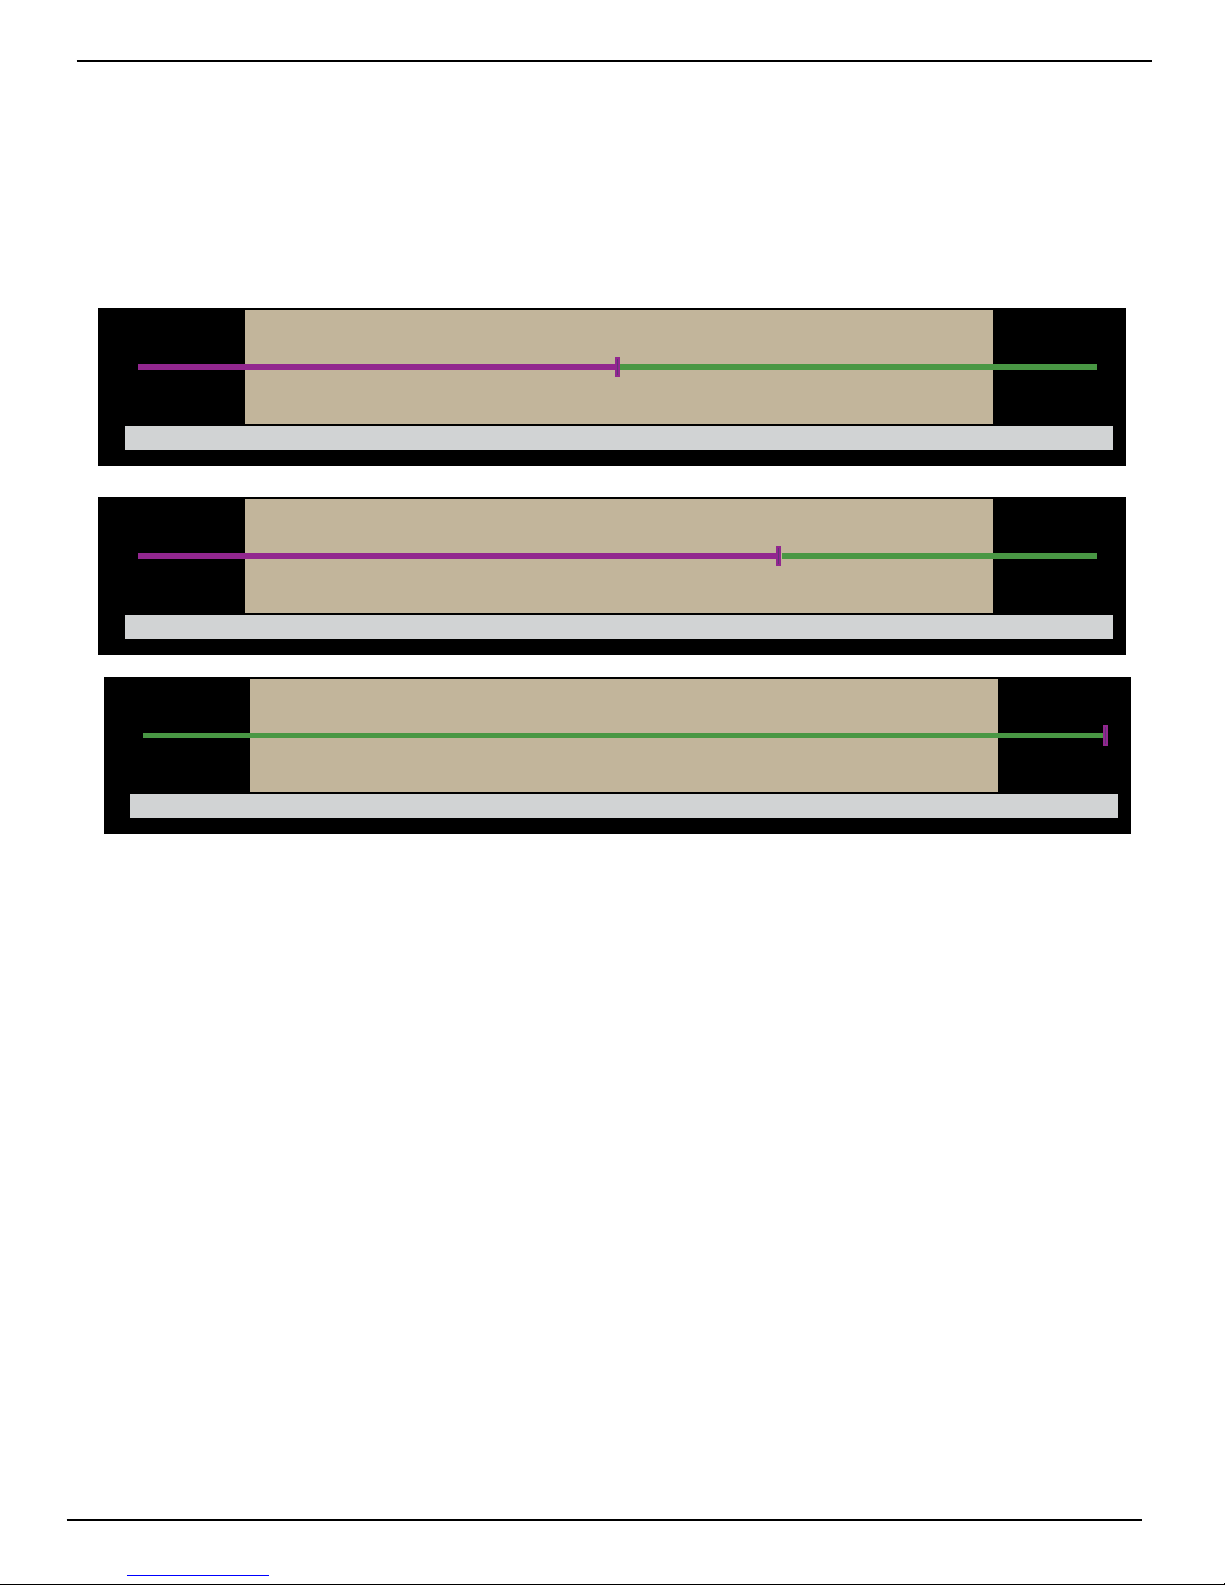
T3 User Manual
Trigger
Press the Trigger button, (see “TS3 Top View” on page 4) or send an electrical trigger signal
(see “Appendix D: Power and I/O Connections ).
When trig
gered, the TS3 will capture frame “0” and the post-trigger frames. The progress bar will
change color and move from the trigger point to the end as in the three images below. When the
recording is complete, the progress bar will turn solid green.
Figure 4-10: Recording Progress: Triggered TS3
-2449
-09.796
[CAP] ROI:1280x 1024 FPS:250 EXP: 8X (0.500 ms) TrigPos: 50%
-2449
-09.796
[CAP] ROI:1280x 1024 FPS:250 EXP: 8X (0.500 ms) TrigPos: 50%
-2449
-2449
-09.796
-09.796
T
T
T
T
+2449
+09.796
Batt: 53%
+2449
+09.796
Batt: 53%
+2449
+2449
+09.796
+09.796
[REVIEW] ROI:1280x 1024 FPS:250 EXP: 8X (0.500 ms) TrigPos: 50%
The TS3 will now either enter Review Mode or, if Autosave has been enabled, the camera will save
the images to a mass storage device and go back to Armed Mode, capturing pre-trigger frames and
watching for a Trigger.
4-8 Autosave
The TS3 may be used to capture many consecutive events. Using Autosave, this can be done unattended,
that is, the camera may be left at
re-Arm itself indefinitely-constrained only by the mass storage space available.
Consider that a TS3 with an optional 256GB SSD installed, depending on the resolution and
download file format, could record and save hundreds or even thousands of events in a completely
unattended mode! Even if using an SDHC, many events may be captured.
Advantages of using Autosave:
•
Autosave is the only choice for multiple unattended events. For remote locations or
location where networking is not possible, or for long shifts where there may be multiple
events of interest that need to be captured without human intervention.
Autosave is also useful for production environments or in any scenario where it is used for
•
multiple consecutive tests without any setup changes. Here it is preferred because it limits human
intervention, thereby limiting both human effort and the possibility of human error.
Batt: 53%
a location to automatically, Trigger, Save captured imagery, and then
•
In an unaended event, especially in a remote locaon or when there is no easy access to the
camera, Autosave is recommended because it is the quickest way to secure the image data.
Saving the data to nonvolatile memory can be important if there is a possibility of power loss.
11S-3000M
page 29

T3 User Manual
• Use Autosave for any unattended event where there is a possibility of a spurious trigger. If this
happens to an unattended camera, it is possible that the camera will trigger prematurely. If
Autosave is used, there is a good chance that the camera will have returned back to Record mode
in time to capture the planned event.
To set up Autosave:
1. Navigate to the Record Menu
2. Select Autosave.
3.
Select Disabled. A dialog box will open to allow you
to set up Start/Stop frames for downloading (the
Start/Stop times for the recording are the
defaults), the destination drive (mass storage target
for downloads), file type options, and options for
naming the downloaded files. (See “4- 12 Saving
Images to Mass Storage” on page 35.)
4. When finished setting up the Autosave setting
click on the Save button. When you navigate back
to the System menu the “Disabled” button will
have turned green and say “Enabled.” The next
button over will reflect the target file name
Figure 4-11: Autosave Dialog
Note: Autosave will continue re-arming itself, capturing images and downloading them until the
target drive runs out of space. At this time it will progress to Review mode so the user download
manually to a different drive or clear space.
4-9 Reviewing Captured Imagery: Playback
Once the recording is complete, if Autosave is not enabled, the TS3 will open the recording in Review
Mode. There are three things to do in Review:
1. Play the video--play it forward, backward, frame by frame, adjust the cut-in and cut-out points
(find the interesting portion of the clip), etc.
2. Adjust the image brightness, contrast, gamma, bit depth, color, etc. (See “4-10 Image Processing”
on page 32.)
3. Save video to a mass storage device. (See “4-12 Saving Images to Mass Storage” on page 35.)
To Review the video:
In Review Mode there is a series of buttons on the bottom of the display, and a progress bar, very
much like the one used for Record Mode to mark the place in the video currently being viewed.
Figure 4-12: Playback Buons
To enter Review / Play:
1. Either complete a recording, which will automatically open Review / Play, or navigate to the
Review Menu and select Play. This will only be available when there is a recording in the TS3
image buffer and the camera is not Recording or Saving to storage. When the image buffer
is empty the Review Menu text will be grayed and the menu items are not accessible.
2. Use the Playback Buttons or touch-enabled slider to move through the imagery. The Status Bar
will reflect the record frame rate (FPS), the playback speed, current frame number, frame
time (relative to the trigger), and the Cut-In and Cut-Out points.
page 30

T3 User Manual
Table 4-3: Playback Control
The playback buttons may be used with the touchscreen, if enabled (see “3-2 Using the
Touchscreen” on page 14) or the D-Pad.
Returns to Live image. (Recorded image is still in buffer.) To return to Play, navigate to Review
Menu and select Play.
Creates new Cut-In point at current frame. To remove Cut-In point, click again, then move cursor.
Go to beginning of clip--goes to Cut-In point. Click a second time and it goes to the very beginning
of the video.
Move one frame backward. When highlighted, hold OK button on D-Pad to skip backward.
Play backward. Use up and down buttons on D-Pad to adjust speed.
Pause play.
Play forward. Use up and down buttons on D-Pad to adjust speed.
Move one frame forward. When highlighted, hold OK button on D-Pad to skip forward.
Move to end of clip--goes to Cut-Out point. Click a second time t
Creates new Cut-Out point at current frame. To remove Cut-Out point, click again, then move cursor.
Jump to Trigger frame.
Open Save Partition dialog box to save clip. (Uses current Cut-In/Out points for Start and Stop frames.
Table 4-4: Playback Rates
Record
60 125 250 500 1000 2000 4000 5600
Rate (FPS)
5 5 5 5 5 5 5 5
Playback
Rates
10 10 10 10 10 10 10 10
15 15 15 15 15 15 15 15
30 30 30 30 30 30 30 30
60 60 60 60 60 60 60 60
o go to the end of the video.
120 120 120 120 120 120 120
125 125 250 500 1000 2000 2800
250 500 1000 2000 4000 5600
11S-3000M
page 31

T3 User Manual
4-10 Image Processing
Image Processing Pipeline.
The TS3 image processing begins in the LUPA1300-2 sensor, where on-chip FPN corrections occur (if
enabled) and the Black level is set using data collected during calibration Pixel data, also collected
during calibration is used for Pixel FPN correction (if nabled). (See “4-6 Black Level Calibration on page
27.) The TS3 does more image processing, some of which can be controlled by the operator. To better
understand how this works, please refer to “Figure 4-13: Image Pipeline”.
Figure 4-13: Image Pipeline
The 10-bit sensor output goes to the Bit Selector, then to internal high-speed memory. This selection is
made by the user when bit depth is selected. (See”4-4 Setting Bit Depth” on page 25.)
The path for all displayed images and the input to the histogram is: Sensor, to Bit Selector, to Image
Processor, to Display / Histogram. It is always 8-bit Mono or 24-bit Color. Live images pass through from
high-speed memory to the image processor immediately. Captured images are saved in high-speed
memory until the camera powers down or the images are written over.
•
Images in the internal high-speed memory have not yet gone through the image processor. This
means that the image processing settings have NO effect on the images in high-speed
memory--they only affect the images as they are saved or displayed.
Images in high-speed memory may be viewed or saved multiple times with different settings.
•
page 32

T3 User Manual
• Live images seen on the display ALWAYS go through the image
processor.
User Control of Imag
•
Bayer (Color) processing (color cameras only) is done in order to
display a color image. The user may elect to save images that have
not gone through Bayer colorization by choosing to download a
RAW format (See “4-12 Saving Images to Mass Storage”.)
•
Color Correction is controlled via “White Balance” in the Display
menu. You may choose from several color temperatures: Daylight
(5600K), Tungsten (3200K), and Fluorescent (4100K) and Normal setting 1:1:1 (all channels at
nominal gain). There is also a “Custom” setting used to white balance using a gray target and
an RGB gain dialog for further manual adjustment. See “4-11 Custom Color Correction .
Brightness and Contrast are controlled via Display / Image Adjust. Users select levels from -100
•
to +100 (default = 0) using the +/- buttons or by clicking on the number in the edit box to open a
keypad.
• Gamma is also adjusted in the Display / Image Adjust dialog. Levels range from 0.20 to 5.00.
Gamma 2.2 is the default as it is the most common display gamma for monitors. For a linear
display choose a gamma of 1.00. (See also “3-3 Con
Seng Image Processing Opons:
1. Navigate to the Display Menu
e Processor
trolling the Displa
Figure 4-15: White Balance Dialog
Figure 4-14: Image Processing Opons
ys” on page 15.)
2.
Select the image processing option you
wish to change: Brightness, Contrast, or
Gamma.
3. Experiment with the values in each of these
controls to get the best possible image.
You may wish to open a histogram (DISP
4.
Button) for reference as you use these controls.
Note: Making a selection from this menu only affects the Displayed image and any (non RAW)
images saved to mass storage devices. It does not a ect the either the 8-bit or 10-bit images as they
are recorded into the TS3’s high-speed internal memory. Adjustments made here may be done
before and/or after the imagery is captured.
Note: All image processing is done using 16-bit math. If 8 bits are recorded, they will be used as the
upper 8 bits of the 16-bit calculaons by the image processor. The upper 8 bits of the results are
then used as an output. Similarly, if 10 bits are recorded, they will be used as the upper 10 bits of
the 16-bit calculaons. This is true regardless of the output bit depth, thus the lower two bits of the
10 bits recorded are used when compung color correcons and image adjustments, even if you
are viewing or downloading 8/24-bit formats.
4-11 Custom Color Correcon
When the preset White Balance options, Da
the color reproduction you need, there are a couple of other options available:
The Custom item in the Display/White Balance menu allows you to set the color correction via a
gray card or neutral gray object.
To use Custom White Balance:
1.
Click on the “Custom” button in the White Balance menu. A rectangular reticle will appear in the
middle of the LCD display and a special histogram will appear at the lower right. (See “Figure
11S-3000M
ylight, Tungsten, and Fluorescent, do not give you
page 33

T3 User Manual
4-16: Custom White Balance”
Figure 4-16: Custom White Balance
on page 34.)
2.
Center the reticle (the white
x in the center of the
bo
image) on a neutral gray
object in the field of view. In
this instance we are using an
18% gray card, which is the
recommended target. Most
often the card will only fill
portion of the field of view--it
only needs to fill the reticle
It is important that the card,
or other neutral gray object is
located close to the objects of
interest and is exposed to the
same light as the objects you are going to image.
3.
Adjust the lens aperture so that the histogram shows the pixel values grouped high (to the right
side of the box), but not saturated. It is important that the high pixel value is less than 255. Notic
on the example here, that the RGB peaks are not well aligned and that the Blue peak is farthest to
the left. This means that the color is skewed slightly towards the yellow, the complement to blue.
Note: The histogram used with Custom White Balance represents only the area of the reticle, not the
whole image.
Note: For more information regarding TS3 Histograms please refer to “Application No e
1: Histograms” on page 93.
4.
Press the Trigger button. You will immediately notice an difference in the color.
Using RGB Gain Controls
Figure 4-17: RGB Control Dialog
Another option for addressing color
correction is via RGB Gains. It is
recommended that you use the RGB gains
sparingly and as a final “tweak” to make
subtle changes to the color. The best use
of this is to get the color as close as
possible using the White Balance presets
or Custom options before adjusting the
RGB gains.
To use RGB Gain:
1. Navigate to the Display/RGB Gain
menu and open the dialog box.
2.
For any color gain you wish to increase, move the slider to the desired position. Remember to use
the D-Pad for fine adjustment.
Note: Remember that in the Bayer pattern, 1/2 of the pixels are green, 1/4 are blue and 1/4 are red.
Whenever you change gain values you will be adding some noise to the image. It is best to avoid using
any more gain than you need to, and to take special care with the green channel as it represents half
of the pixels in the image.
page 34

T3 User Manual
4-12 Saving Images to Mass Storage
Image sequences are saved either as Patition Captures (CAP files), or AVI videos, in which one file
contains all the frames of the sequence, or as TIFF, DNG, JPEG, or BMP stacks, which are collections
of files, one file per frame of imagery. Partition Capture files (CAP) include all the aw image data in a
proprietary uncompressed format. The file save options change depending on whether or 8-bit or
10-bit image data has been written to internal high-speed memory:
Table 4-5: Image File Save Opons
10-bits recorded 8-bits recorded
TIFF (8-bit M /24-bit C) or RAW TIFF (16-bit) TIFF (8-bit M / 24-bit C) or RAW TIFF (8-bit)
DNG (16-bit Raw format) DNG (8-bit Raw format)
BMP (8-bit M /24-bit C) BMP (8-bit M/ 24-bit C)
AVI (8-bit M /24-bit C) AVI (8-bit M / 24-bit C)
JPEG (8-bit M /24-bit C) JPEG (8-bit M / 24-bit C)
CAP (10-bit Raw format) CAP (8-bit Raw format)
Note: CAP files are only availble on cameras with SSDs, SN A0 and higher.
Calculating file sizes for TIFF and BMP images is very simple:
Resolution x Bit de th/8 = approximate BMP or TIFF file si e in Bytes
(to convert Bytes to KB divide by 1024)
For example a 1280 x 1024 Mono BMP or TIFF is:
1280 x 1024 x 8 / 8 = 1,310,720 bytes = 1,280K
A 1280 x 1024 16-bit RAW TIFF/DNG is:
1280 x 1024 x 16 / 8 = 2,621,440 bytes = 2,560K
CAP files a e always the size of the current buffer (session size).
The actual file size of a 1280 x 1024 mono BMP or TIFF is about 1281K (the additional 1K or the file
header). The actual size of 16-bit RAW TIFF is 2561K (again add an additional 1K or the header).
Note: The RAW 16-bit TIFF saved from the camera actually has 10 bits of image data. The 16bit format is used for compatibility reasons.
Calculating file sizes for AVI and JPEG images is much more difficult. The compression is often
approximately 10x to 20x, but it can be much greater for images with little content, and it can
be much less for very complex images.
RAW images are not colorized, so Mono and Color images are the same size. Colorization
increases file size 3x because 8 bits are saved for each of red, green, and blue channels.
To Save a recording to a connected mass storage device on the TS3:
1. Navigate to the Review Menu
2. Select Save. The Save dialog box will appear as in “Figure 4-15: White Balance Dialog”. The Start
and Stop frames for the Save may be edited.
Note that the frame numbers initially shown in the dialog box will be the actual start and stop
frames for the entire capture unless the Cut In and Cut Out buttons were used during Review. If you
are not sure what the actual beginning and end frame numbers for the video are, you can find them
on the far left / far right sides of the record bar. (See “Figure 4-10: Recording Progress: Triggered
TS3”.)
11S-3000M
page 35

T3 User Manual
Selecting “Destination” will open a dialog box for selecting the mass storage device to save to.
1.
Select “Format” to select the file type. Once you select a file type from the list, the OK button
2.
will turn blue. Press the left far arrow to enable a RAW format, if available, depending on the
bit-depth recorded. (See “Table 4-5: Image File Save Options .)
3.
The default file name format for the image stacks is Frame_000000.<TYPE>. If you would like
Figure 4-18: Save Dialog Boxes
the name to include the camera name,
Select Use Name in the dialog. The resulting
file name format for the example would
become TS3-11_000000.<TYPE>.
4. If you would like to add a tag to the
name, select Tag. The Tag may be edited.
Using the Tag in the example, the file nam
becomes 2011-10-11_000000.<TYPE>.
5. Both the Name and the Tag may be
used, in which case the file name
becomesTS3-11_2011-10-11_000000.<TYPE> in
the example.
hs-video. This is the directory that all AVI files are written to.
•
6.
If AVI files a e saved, the default file
name is ts3_000000.AVI. The Use Name and Use
Tag options are also valid for AVI files in which
case the resulting file names are.
TS3-11_000000.AVI, or 2011-10-11_000000. AVI,
etc. If the file size exceeds the 4GB limit for 32-bit
file systems, the TS3 will make a second file or
the remainder of the imagery. (MiDAS and other
players will play the video as one.)
When the TS3 saves imagery to mass
storage it creates the following:
• DCIM. This is an industry standard
directory name for Digital Camera Images.
• 100fastc. This is a sub-directory
under DCIM.
•
ts3_000000. This is the first subdirectory under DCIM/100fastc, used for
storing image stacks.
•
<filename> txt. For each download, the camera creates this text file. In it are the camera setup
values, including resolution, frame rate, camera name, time stamp for the capture, image
processing values, color processing values, etc. (See “Appendix G: Contents of Frame.txt file .)
•
<filename>.c g files. This is a binary file used for MiDAS player so that it can properly play
the image files as a movie.
Note: Image files ma
points, and different image processing options (brightness, contrast, gamma, color, etc.). If 10-bit
images have been captured, imagery may be saved multiple times using different bit-depths.
y be saved multiple times using different formats,different start and stop
page 36

T3 User Manual
5 Synchronizing Cameras
Note: Please refer to “Appendix D: Power and I/O Connecons” on page 82
for electrical specicaons. Do not experiment with these connecons if you
are unsure of compability with your source as they are very sensive to over
voltage and can be easily damaged.
5-1 Sync In
Per Frame:
The TS3 is easily synchronized to an external
device such as another camera, or a
precision timing generator. The “Per
Frame” option is used when you wish the
camera to capture at a rate of one syncpulse per frame or greater.
To set up Sync-In:
1. Navigate to the Control Menu.
2. Select Sync In. There are two buttons:
Enabled/Disabled, and another that
may say “1-PPF, Rising Edge, Divisor=1”-
-or something similar.
3. Change the state of the first button to “Enabled” (green), then click on the second button to open
the Sync In Settings dialog.
Figure 5-1: Sync In Sengs Dialog
The touchscreen feature is implemented for this dialog. If it is enabled, you will be able to enter
data with your fingertip. (See “3-2 Using the Touchscreen” on page 14.)
4. Select Rising Edge or falling edge depending on your preference.
5. Select Per Frame. (Per Second Synchronization will be covered in the next section.
6. Set the master frame rate. This is the speed in Hertz of the input signal. It is important that the
input signal does not exceed this because this is the number the camera will use to calculate
integration timing.
7. Set the rate divisor. In the example shown in “Figure 5-1: Sync In Settings Dialog”, the
desired frame rate is 1000, while the Master Frame rate is 2000, so a divisor of 2 is used.
8. Click on OK to accept the settings. The camera’s frame rate will now be set at 1000 and all of
the shutter settings are adjusted accordingly.
In this example, the Max (frame rate) is 1602. The camera’s resolution was set at 800 x480. 1602
is the maximum frame rate for that resolution. If you wish to change your maximum frame rate,
you must change the resolution in the record/Settings men
Note: With Sync In enabled, you will not get a live image unless a valid sync signal is present.
11S-3000M
page 37

T3 User Manual
Per Second:
Many commonly available sync sources have a precision 1 Hz output. IRIG and GPS are two that
are very often used with high-speed data capture.
The TS3 is able to utilize these signals
for synchronization of cameras at any
frame rate.
To use Per Second Synchronizaon:
1. Navigate to the Control Menu and open
the Sync In Settings dialog (as in the
previous section)
2. Select “Per Second” in the dialog box.
The Master Frame rate and Rate Divisor
fields will gray-out.
3. The Calculated Rate will reflect the
frame rate set in Record/Settings. If
you wish to change those settings you
will do those as for any normal
recording.(See “4-1 Setting Frame Rate
and Resolution” on page 22.)
5-2 Sync Out
Figure 5-2: Sync In Per Second
Per Frame
External devices such as additional cameras, strobe lights, and test instruments may be
synchronized via Sync Out pulses from the TS3. The “Per Frame” option output is one pulse per
frame--the sync pulse rate is equal to the recording frame rate.
To set up Sync Out:
1. Navigate to the Control Menu.
2. Select Sync Out. There are two buttons:
Enabled/Disabled, and another that
may say 1-PPF, Shutter, Active High--or
something similar.
3. Change the state of the first button to
“Enabled” (green), then click on the
second button to open the Sync Out
Settings Dialog.
4. The signal can either be Ac ive High,
meaning the signal goes high when the shutter opens, or Active Low, meaning the signal goes low
with when the shutter opens. Select Active High or Low from the dialog box.
5. The signal can either follow the Shutter (integration time) or you can select Duty Cycle and control
the % of frame time (1/f ame rate) for the active portion of the signal using the number box
provided.
Figure 5-3: Sync Out Per Frame
Per Second
If you choose the “Per Second,” the camera will output a 1Hz signal. The only active options in this
mode are Active High and Active Low.
page 38

T3 User Manual
Pass Thru
When you select Sync Out Pass Thru, the
signal received on Sync In is sent to Sync
Out. The only setting that affects this
signal is the Invert Sync In option which
simply inverts the signal.
5-3 Master/Slave Setup
There are many possible configurations
used to synchronize groups of cameras.
The Master/Slave configuration is often used when a group cameras is used to capture multipl
synchronous views of an event that is not driven by a clock or PLC. For example, when studying
animal or human kinetics, the subject (animal or human) is not supplying a sync signal for the
camera system, so the camera system uses its own: Sync Out from a Master camera.
In this configuration any camera may be used as the Master.
Commonly, all cameras are set to the same Frame Rate and Resolution are triggered together,
and integrate frames together (synchronize frame start times). For this setup:
• Enable External Trigger for all cameras and use the same polarity for all.
Figure 5-4: Sync Pass Thru
• Sync Out from the Master camera is set to “Per Frame”
• Sync Out for the Slave cameras are set to “Pass Thru.” Invert Sync In is not selected.
• Sync In for the Slave cameras Master Frame rate is set the same as the Frame rate of the Master
camera.
•
Choice of Shutter or Duty Cycle does not matter.
Figure 5-5: Master and Slave Cameras
11S-3000M
page 39

T3 User Manual
If the Master Sync Out is Active High, then the Slave Sync In must be set for Rising Edge. If
•
Master Sync Out is Active Low, then the Slave Sync In must be set for Falling Edge.
NOTE: For the “common” setup as well as for variations listed below, always make sure that the Post
Trigger portion of the recording time for the Master camera is equal to or greater than each of the
Slave cameras. This is important because Sync Out pulses cease with the completion of the capture, so
the Master camera must continue recording until all Slave cameras complete their recordings.
Parameters that affect post trigger recording time include: Trigger position Resolution Bit depth,
base internal Memory (camera model), Frame rate.
Variations on Master/Slave:
Use a slower frame rate for one or more of the slave cameras by using a Rate Divisor in the
•
Sync-In setup. (Make sure to make allowance for the extended time per the note above.)
Extend the overall record time by adjusting the trigger position or all cameras. For example, set
•
the Master to a Start trigger, the first Slave to 10%, the second Slave to 50%, etc. This would
also be used if the subject is progressing through the different cameras’ fields of view, as a
runner running by each camera in sequence.
Run cameras out of phase with each other. Higher effecti e frame rates can be simulated by
•
running cameras out of phase with each other. This is usually done by using Duty Cycle in Sync
Out, for example: if you set the Duty Cycle for 50% and invert the signal, the next camera in line
will run 180 degrees out of sync.
5-4 External Source Sync
Figure 5-6: External Sync: Local Grouping
page 40

T3 User Manual
Synchronizing to an external source is most common in applications where a preferred sync pulse
is available such as one from a PLC, IRIG, or GPS.
NOTE: Please refer to “Appendix D: Power and I/O Connections” on pa e 82, for
electrical specifications.
This sync pulse may be used for a localized group of cameras, in which the cameras are connected as
in “Figure 5-6: External Sync: Local Grouping” on page 40 is commonly used. The cameras may also
be placed far apart, in which case they are connected to a distributed sync signal as in “Figure 5-7:
External Sync: Distributed Grouping”.
In the case of using a PLC or other local clock, you will need to know the polarity and frequency of
the signal in order to set the cameras up. Optimum frame rates can often be derived using the
Rate Devisor function
When using IRIG or GPS as an input, you will first need to derive a 1Hz signal from the source,
then use the Per Second option. This gives you complete flexibility with respect to frame rate: you
can select any frame rate you wish to use.
Note: full IRIG and GPS implementation is planned for a future release.
Triggering in a distributed grouping may either be implemented locally via switch, camera button,
or software, or it may be available along with the sync as a distributed signal.
Figure 5-7: External Sync: Distributed Grouping
11S-3000M
page 41

T3 User Manual
6 Using the Web App
6-1 Web App Overview
The Web Application is a utility built to the TS3 which makes control of the camera possible by any
networked computer running an Internet Browser. No software needs to be loaded on the computer. It
provides the user all the utility vailable through the buttons and touch screen of the TS3.
Enter the Web App by typing either the network-connected TS3’s camera name or IP address into the
address bar of an internet browser (See “3-5 Using the TS3 with a PC” on page 17 .
Figure 6-1: Address bar (Chrome)
The Application Window is comprised of:
• A Control Bar at the top, which includes Arm and Trigger buttons as well as the Battery Icon
• 6 Application Tabs, including the Camera Tab, Storage Settings Tab, Record Settings Tab,
Record Control Tab, Display Settings Tab, and the Video Review Tab, which is present only
when there is captured video available for Review.
• The Tabs Pane. When you click on a Tab it will open vertically along this pane. Tabs beneath
the opened one will slide down the pane.
• The image area. This is where Live or Captured imagery appears.
In the figure below, TS3_12 is connected in Live Mode.
Notice that the Camera Name is displayed in brackets [ ] on the Camera Tab and that the
camera’s mode of operation (in this ase “Live View” is listed there as well. The Trigger Button is
absent because the camera has not yet been armed. The Review Tab is also absent as there is no
video to review.
Figure 6-2: Applicaon Window Camera Tab
page 42

T3 User Manual
6-2 Camera Tab
Clicking on the Camera Tab exposes its
contents and shifts the other Tabs down
the Tabs Pane below it.
All tabs are always accessible, with the
exception of the review tab, which is only
available in Review Mode (after video has
been captured). Clicking on the Camera Tab
a second time closes it. Opening another
tab will also close the current one.
The Camera Tab always displays the
Camera’s current Mode of operation
These modes include:
• Camera Live View, in which a live image
is displayed in the Image Area.
• Camera Armed. This is the state of
capturing pre-trigger frames.
• Camera Triggered. The camera is
capturing post-trigger frames.
Figure 6-3: Camera Tab
• Camera Video Review. The camera
has finished ecording. The captured
video appears on the screen. Playback
controls appear beneath the image window. (See “Web-App Review and Save” on page 48.)
You will also notice tha
“Waiting or Camera to Arm” or Waiting or camera Trigger,” etc. for a very short time until the
app gets confirmation back from the camera that its
state has changed.
If the computer loses communication with the
camera, the Mode script will say “Camera Load
Failure.”
To change the camera name: highlight the
camera name in the Edit Box and type in the
new name. Press “tab” to accept.
The Camera Con iguration may be loaded
or saved via the Configuration Dialog. It ma
be reset using The “Reset to Factory
Default...” button.
t when the camera is controlled via the Web App, the Mode script will say,
Figure 6-4: Network Configuration Dialog
y
The Network Con iguration of the camera may
be viewed by clicking on the “Network Information”
button.
11S-3000M
page 43

T3 User Manual
6-3 Storage Sengs Tab
The Storage Tab is used to Explore the memory storage devices
connected to or installed in the camera as well as the Internal
(high-speed) memory used for capturing video.
The ability to create multiple partitions in internal memory is
not enabled at the time of this writing. When this feature is
enabled, you will be able to choose the number of partition
and select the active partition using this dialog.
The upper portion of this Tab is for Exploring the Storage Media.
When exploring
1. Use the radio buttons to choose the storage device to
manage-- SD Card (SDHC), SSD (internal drive), or USB Drive.
2. Click on Explore to open an Explore window for the device.
3. If you wish to explore another device from the explore
window, click on “Parent Directory” to see the list of other
devices.
The Explore window will look slightly different depending on
the web browser and operating system you are using, but
the content will be the same for all. (See Figure 6-6.)
Figure 6-5: Storage Sengs Tab
Notice that in the example, we are looking at the directory of
the SD Card: .../media/sdcard. Click on “hs_video/” to find the
stored video files. Click on "dcim/” then “100fastc/ to find
stored stills and video stacks.
To play a video, click on the file name
and the video will open in the default
media player. Large stored videos may
play slowly when opened this way. You
may wish to copy them to a computer
drive first, and play them from there.
To open a still, click on the file name and
the still will open in the explore
window. To return to the last directory,
right click in the window (but not on the
image) and select “back.”
To copy a video or still to a
computer drive:
1. Right click on the file you wish to open.
A context menu will open
with a list of actions. The list varies
depending on the browser you are using.
Figure 6-6: Explore Window
2. If using Chrome, Firefox, or Safari, select “save link as...” or, if using Windows Internet Explorer,
select “save target as...”This will open a dialog box allowing you to navigate to the drive and
directory you wish to save the file to.
Note: Only one file may be copied at a time. No files may be either deleted or moved via the Web
App. In order to copy groups of files and directories (file stacks, etc.) open the camera in a
separate Explore window. (See “3-5 Using the TS3 with a PC” on page 17
page 44

T3 User Manual
6-4 Record Sengs
The Record Settings Tab is analogous to the Record Menu
on the TS3 camera GUI. It contains the controls for setting
ROI (Region of Interest), record Rate and Time (Frame Rate
and Record TIme), Shutter Speed, and Bit Depth, and FPN
Control.
Seng ROI:
1. If you wish to use one of the standard aspect ratios
4:3, 5:4, or 16:9, click on the Frame Aspect Ratio bar
and make your selection from those choices. If wish to
select a custom aspect ratio, select that choice from
the same pull down menu.
2. If you are using anything but a “Custom” for aspect
ratio, you can adjust either width or height and the
other will adjust automatically. You can either use the
sliders or the edit boxes to make your selection. If
you use the edit box, hit the “Tab” key on your
computer keyboard or click outside the box to
complete your entry.
3. Select the “Autoset” box if you wish the camera ROI set
automatically for the largest resolution possible at the
selected frame rate.
Figure 6-7: Record Sengs Tab
4. Select the “Center” box to center the ROI to the optical
center. If this is unchecked, you may set the ROI offset
using the O set X and Y edit boxes (See “Figure 4-2:
Advanced Record Settings” on p e 23).
Seng the Frame Rate:
Either move the Frame Rate slider or edit the associated
text box to change the frame rate.
The frame rate is limited by the resolution. There is a Max
frame rate number next to the edit box letting you know
what the maximum frame rate is for the current resolution.
Clicking on the “Autoset” button will set the frame rate to
that maximum number possible with the current resolution
setting.
Seng the Shuer Speed:
Set the shutter speed by moving the slider.
The minimum shutter speed (maximum sensor integration
time) is limited by the frame rate. It is .006ms less than 1
frame time or 1/(frame rate -.006ms). The maximum
shutter speed (minimum sensor integration time) is
always .002ms.
Low Light: (See “Figure 4-4: Low Light Menu” on page 25.)
The Low light feature lets you use shutter speeds up to 33.326ms for framing an focusing the camera prior
to image capture. (During image capture the shutter speed will revert to its normal setting.
Click on the Low Light check box to enable it. Use the slider to set the shutter speed.
11S-3000M
page 45

11S-3000M
T3 User Manual
The Record Settings Tab, Advanced Settings x has one drop
down menu for Record Bit Depth and another for Fixed
Pattern Noise.
Select Bit Depth for Recording:
(See “4-4 Setting Bit Depth” on page 25.)
Note that if 10 bits are selected for the recording, the
recording time will be shorter, but you will have the added
flexibility of selecting which 8 bits to view in Review or
Save. (The bit selection drop down menu will appear in the
Display Settings
Select FPN Seng:
FPN selection (Disabled / Column FPN / Pixel FPN) can be
done from the Web-Application via the Advanced Setting
menu, but Calibration must be done from the camera. (See
“4-6 Black Level Calibration” on page 27.)
Tab.
6-5 Record Controls
Figure 6-8: Record Sengs Tab--Advanced Sengs
Figure 6-9: Record Controls Tab
The Record Controls Tab of the Web-App is shown in Figure
6-9 with the External Trigger, Sync In and Sync Out pull down
menus open.
Seng the Trigger Posion:
The trigger position is set via slider. There is much finer
control of the trigger position using the web-App than can
be had on the camera GUI.
External Trigger:
Please refer to “Appendix D: Power and I/O Connecons”
on page 82 for specicaon for all electrical connecons,
including External Trigger, Sync In and Sync Out.
Select Rising Edge, or Falling Edge to enable the External
Trigger. Use Falling Edge for a simple switch closure.
Sync In and Sync Out:
NOTE: If Sync in is enabled you will not see any Live or
captured imagery unless there is a valid Sync In signal.
All of the options for camera synchronization are
selectable on this menu.
Please refer to “5 Synchronizing Cameras” on page 37
for detailed descriptions of the options
page 46

T3 User Manual
6-6 Display Sengs Tab
Depth and White Balance selection boxes open.
Settings in this Tab control displayed images, both Live and
in Review, and all saved images except the RAW formats.
The Display Bit Depth selection box will only be present when
the camera has been placed in 10-bit mode in the Record
Settings Tab. (See “Figure 6-8: Record Settings Tab-Advanced Settings.) For more detail on bit selection see “4-4
Setting Bit Depth” on page 25.
Select White Balance* preset according to the available light.
The sliders used for Brightness, Contrast, and Gamma you
control over the same range as with the presets in the
camera, but it is a much finer control.
The color sliders* give you control over the RGB gains. It is
advisable to use the color sliders with a grey card to get good
color balance:
Figure 6-10: Display Sengs Tab
“Figure 6-10: Display Settings Tab”, is shown with the /Bit
1. Frame the camera image on a neutral gray object. (A gray
card, piece of white paper, white wall etc.)
2. Turn on the histogram on the camera display.
3. Adjust the light or F-stop so that the histogram shows most
pixel values in mid range. You will see a separate peak for
Red, Green, and Blue. Green will likely be highest.
4. Adjust the gains for Blue and Red up so that the peaks
match the Green.
(* Color cameras only.)
6-7 Arm, Trigger, Live, and Review Buons
Use the Arm, Trigger, Live, and Review
Buttons above the image window to
control the state of the camera:
When the camera is in Live mode with
no captured images in its buffer, the
Arm and Live
(bright) and the Trigger and Review
buttons will be disabled (grayed).
buttons will be enabled
Figure 6-11: Arm, Trigger, Live and Review Buons
Click on the Arm button whenever it is
enabled and to go into Record mode.
This will arm the camera, recording the
pre-trigger frames.
The Arm button will now turn Brown
and change to “Armed.” The Trigger button will become enabled. Clicking on the Armed
(brown) button, will de-arm the camera (after a warning message), just like pressing the
mechanical Arm button on the camera while the camera is recording.
Clicking on the Trigger button (or using the external hardware trigger, if enabled) will cause the
11S-3000M
page 47

T3 User Manual
camera to record the post-trigger frames, thereby completing the recording. When the recording
is complete the captured video is automatically opened in Review mode.
The Live button returns you to Live mode. If the camera is currently recording, there will be a
warning message that proceeding will result in loss of unsaved video. If the camera is in Review
mode, pressing the Live button will bring up an information box telling you that you are leaving
Review and entering Live mode, but that captured video will remain in the camera until it is e-armed.
When in Review Mode, the Live and Review buttons act as a toggle between Live and Review.
The current recording is not deleted until the amera is Armed or powered down.
6-8 Review Tab
When in Review Mode, the Review Tab will open and the Playback controls will appear beneath the
Image window.
Note: While in Review, the image may be adjusted using the controls in the Display Settings Tab.
See “6-6 Display Settings Tab” on page 47.
The Play buttons, which only appear when the mouse cursor is brought over them, have the same
functions as on the camera GUI (see “Table 4-3: Playback Control” on page 31), except that the
Cut-In and Cut-Out points are entered by editing the Clipping Range boxes or by adjusting the slider
between them. The clipping range is then used, as it is on the camera GUI for both playback and while
saving to mass storage.
Figure 6-12: Web-App Review and Save
page 48

T3 User Manual
You may jump to the beginning of the clip (|<); to the end (>|) or to the Trigger frame (T). You
may also move to any frame by editing the Current Frame box, or by moving the slider beneath it.
The Playback Frame Rate may box may be edited directly or controlled via slider. The Playback Rate
governs the speed at which the clip is played back both forward and reverse.
The skip forward >> and reverse << buttons skip at 1/10th the
Playback Frame Rate. If you set the Playback Rate at 30, the >>
and << buttons will skip forward or back 3 frames; if you set it
to 300, they will skip 30, etc.
Video clips may be saved to mass storage devices attached to
or installed in the camera (SD Card, SSD, or USB Drive).
To save a video clip:
Adjust the Clipping Range (edit the boxes or move the
1.
sliders) to include the portion of the clip you wish to save.
2. Use the “Use Camera Name” and/or “Use Tag Label” check
boxes and the Tag Label edit box to set up the file nam
prefix you wish to use.
3. Click on the File Type bar (labeled “AVI” in “Figure 6-13:
Video Review Tab”) to select the file type
4. Select or deselect “Use Raw Format.” This check box will be
active or grayed depending on the bit depth recorded and
the file type selec ed.
Please refer to “4-12 Saving Images to Mass Storage” on page
35 for more details.
Figure 6-13: Video Review Tab
5. Select the destination drive using the “SD Card,” “SSD,” and
“USB Drive” radio buttons.
6. Click on “Save Partition”
A Progress Bar will appear beneath the image window
showing the download status. When finished, an information window as in “Figure 6-14:
Download Information Box” will appear.
Figure 6-14: Download Informaon Box
11S-3000M
page 49

T3 User Manual
7 FasMoon Setup
7-1 Install FasMoon Camera Control Soware
The FasMotion software install program is copied onto the USB thumb drive that shipped with your
TS3 camera.
This software may be used to set up and control TS3 and TS3 cameras. With it you may configure
all recording parameters including Session Length, Resolution, Frame Rate, Exposure, Color
Balance, Autosave, Trigger point, and Sync options
To install FasMotion on a Windows PC:
Note: At the time of this writing a MAC version of FasMotion is not yet available. Its release is
anticipated shortly after the initial release of the product.
Run the FasMotion executable on
1.
your PC. The file will have the format:
FasMotion< version><date>.exe. For example,
FasMotion_1.1.0_2013_0109. exe would be
version 1.1.0, dated January 9, 2013. It is
recommended that you copy the install fil to
the hard drive of your PC for safekeeping.
Figure 7-1: FasMoon Installaon
2. The Windows Account Control will display
a message asking if you want to allow the
installer to make changes to your computer.
Answer “Yes.”
3. The Installer Setup window will appear as
shown informing you that the install process
has begun. Click on “Next.”
4. The next window allows you to choose a
location for the program. Select a locatio
and click on “Next.”
Figure 7-2: FasMoon Install Locaon
page 50

TS3 User Manual
5. The next window gives you the option to
creating a short cut for FasMotion in the
directory of your choice. Select a directory
for a shortcut or click the “Do not create
shortcuts” check box. Click on “Install” to
continue
Figure 7-3: FasMoon Start Folder
Figure 7-4: FasMoon Install Progress
6. FasMotion will now be installed on the PC. A
window with a progress bar will appear and
inform you when the install is complete.
7. The final install window gives you the option
to run FasMotion software and a link to the
MIKROTRON web page. Click on “Finish”
when done to exit the install program.
Figure 7-5: FasMoon Installaon Complete
11S-3000M
page 51

7-2 Connect the Camera to a Network
TS3 setup may be done via the built-in camera GUI, FasMotion software or the built-in Web-App.
This section addresses the use of FasMotion. For details on the Web-App see”6 Using the Web App” on page
42.
The defualt network configuration for the TS3 is DHCP. If a DHCP host is not found on the
network, the TS3 will automatically configure itself with a 169.254.xxx.xxx IP address according to
Gig-E protocol.
To aach the TS3 to a network:
1. Before connecting to power, connect the
TS3 to your network via a switch or router,
or directly to your PC using CAT 5E or CAT 6
Ethernet cable.
2. Power up the TS3. See “2-3 Powering Up,
Charging, and Power Down” on page 8.
3. Watch the LEDs on the camera’s RG-45
connector. When the camera connects to the
PC or local network the green LED will begin
to blink in a pattern depending on connection
speed. (See “Table 3-2: Network LEDs” on
page 16.)
4. Start the FasMotion software application
5. Click on the “Find Camera” icon, circled in red
on the figure shown here, to open the Find
Cameras dialog.
6. Click on the Local Area Connection drop
down to get a list of available network
interfaces. Select the one you wish to use.
Table 7-1: TS3 Network LEDs
LEDs on RJ-45 Connector Camera
Networking LED
Green (Connection Amber (activity Amber (activity
1 Blink = 10Mb Blinks for all
2 Blinks = 100Mb
3 Blinks =1Gb
Figure 7-6: FasMoon “Find Camera” Icon
network activit
Blinks for camera
network activity onl
Note: It is possible to use a wireless adapter on
your PC, but it is not recommended because of
performance issues.
7. Click on the Scan button. FasMotion will list
the cameras found available on the selected
interface.
8. Select the camera you wish to connect to
from the list and click on Connect. Cameras
are listed by MAC address. The camera serial
number is the last two digits of the MAC
address.
9. Make sure the “Stream Video Upon
Connection” box is checked if you wish to
view live video when the camera connects.
Note: If the camera you are looking for does
not appear on the list, you can click on the
Find Manually button and enter its IP address.
Figure 7-7: FasMoon “Find Cameras” Dialog
page 52

TS3 User Manual
7-3 FasMoon Applicaon Window
Figure 7-6 on page 52 shows the application window with no cameras connected. As soon as a
camera is connected via FasMotion, two additional docable windows appear. To the left, you see
the Control Panel, which has fivee tabs: Storage Settings, record Settings, record Controls, Display
Settings and Autosave Setup. To the Right, you see the image window.
The Control Panel may remain docked to the left side of the FasMotion application window or be
moved outside of the application window to any location on your desktop. If you use two displays,
you may wish to move the Control panel to your extended desktop in order to give yourself a larger
image window. The Control Panel detaches by clicking on the gray border at the top in the area
where “Control Panel-MAC:...” is printed (circled in red). To return the Control Panel back to the
application window, just double-click on that same border.
The Image Window may be detached and moved and/or resized, but it always stays within the
bounds of the application window. To detach it, click on the “minimize” button in the upper right
corner (circled in red). To restore the window, click on the “maximize” button (in the same location)
The Video Controls pane will appear at the bottom of the Application Window whenever a video is
open for review. (See Figure 7-9 on page 54.) This is another detachable pane that may be moved
outside the application window by grabbing its top border. Double click on the same border to
restore it to its original position
Figure 7-8: FasMoon Applicaon Window
11S-3000M
page 53

Figure 7-9: Video Control Pane
7-4 Controlling the Image Displays
The View Menu contains zoom controls that are replicated at the top of the
application window. These control the size and shape of the Image Window.
Zoom to Window The full image is sized to completely fill the image window. The image may be distorted as
the aspect ratio is lost.
Zoom to Fit (default) The image expands proportionally and fills the image window without losing its aspect ratio
Zoom 1 to 1 The image is represented pixel for pixel on the display. Depending on the display resolution,
the image may only fill part of the image window, or the image may be cut off, in which
case sliders will appear so that you may access the entire image.
Zoom In The image is enlarged greater than 1:1 with the first click, then progressively larger with
each additional click. When the image exceeds the size of the window, sliders will appear for
ac-cess.
Zoom Out If you have Zoomed-In on an image, Zoom-Out allows you to back through the zoom setting
down to 1:1.
Figure 7-11: User Preferences
Figure 7-10: View Menu
Setting Default Gamma in User Preferences:
User Preferences is in the Camera menu.
The Default Gamma setting is used to
set the default output Gamma for
displayed and saved images.
The default Gamma is 1.0 (linear). Many
laptop computer displays have a Gamma
of 1.0, while most larger fl t panel LCD
monitors have a Gamma of 2.2.
Note that changing the Default Gamma setting does not change the current Gamma of the camera, it sets it reset
value. To set the Gamma of the camera to a new default, navigate to the Display Settings tab and select “Reset Light
and Color Setting ”
Figure 7-12 on page 55 uses two screen shots of a high-contrast image to demonstrate the difference in
appearance between Gamma 1.0 and 2.2. These images were displayed on a monitor with a 2.2 Gamma.
page 54

TS3 User Manual
The first image, with Gamma set to 1.0, appears very dark on this display. If the lens is opened or
the exposure increased, the dark areas will gain detail, but the brighter areas will saturate.
In the second image, with Gamma set to 2.2 to match the display, the detail in the shadows is evident.
Note: The opposite would happen if the display had a Gamma of 1.0: the first image would
have looked good, while the second would have appeared washed out.
Figure 7-12: Gamma Comparison
11S-3000M
page 55

Display Rate for live images:
The display rate for live images in FasMotion may be adjusted using
the spinner at the top of the Image Window. (See Figure 7-12 on page
55.) This number will automatically change according to the
performance of the network and the PC.
There is also a pause/play button on the top of the Image Window.
This may be used to temporarily start and stop the video stream.
Seng up the HDMI display:
The TS3 has an HDMI output that can be used for displaying both live
and recorded images. The HDMI port is located on the side of the camera
between the Power and External I/O connectors. See “Figure 1-4: TS3
Side View (Door open)” on page 5.
To enable the HDMI output click on the HDMI button on the
Display Settings Tab and select the resolution you wish to use.
Note: The images from the camera will be scaled to fit the HDMI
display screen while maintaining aspect ratio. This means that there
may be black borders on the sides or top and bottom of images,
depending on aspect ratio and best fit
7-5 Name the Camera
When the TS3 leaves the factory its default name is TS3-xx, “xx” being
the camera’s serial number. The camera name can be used both for
identification on a network and as part of the filename when saving images.
Figure 7-13: HDMI Sengs
It may be beneficial to rename the camera according to its function, locality, field of view,
etc. depending on how the camera is to be deployed.
To change the camera name simply edit the name as it appears in the box above the image window.
There are some limitations in the character set that may be used for the camera name as it
must be “legal” both as a filename and network device name. All numbers, and upper- and
lower-case numbers may be used. The only punctuation character that may be used is the
“-” (not “_”).
7-6 Camera Time and Date
When your TS3 is shipped, the time
and date will need to be set to reflect
your local time
Access the Time and Date
Configuration dialog from the
camera menu in FasMotion
Once this is set, a rechargeable
battery inside the TS3 will
maintain the correct time.
If your TS3 is not powered up for
a few weeks, the time and date
may need to be reset.
Figure 7-14: Time and Date Conguraon
page 56

TS3 User Manual
7-7 Connect to a TS3 Outside FasMoon
FasMotion software is the primary user interface for the TS3. It is the most flexible and efficiet way
to use the camera. There may be times, however when you may wish to access the TS3 using its
built-in Web-Application or through its USB OTG port.
To open the Networked TS3 in a Web browser in the Web-Applicaon:
The Web-application works with many web browsers, including Google Chrome, Mozilla Firefox,
Apple Safari, and Microsoft Internet Explorer. It works on most PCs, Smartphones, and tablets:
1. Type the camera’s IP address or camera name into the browser’s Location bar. For example,
using the information from “Figure 7-15: Web-Application you would type 192.168.33.114 (IP
address) or L3-A3 (the camera name) into the browser’s Location bar.
2. A camera control application within the camera does the rest. A control menu will appear in your
browser that will give a live camera view and complete control over the camera operation.
Details on use of the camera’s web browser appear in Chapter 6 of this manual.
Note: The Web-Application is useful for setting up and controlling the camera, but it does not have
the display performance (refresh rate) of FasMotion and has no utility for saving video or image
files on the host device (PC, Tablet, etc.).
Figure 7-15: Web-Applicaon
11S-3000M
page 57

You may also wish to open the camera in Windows Explorer in order to copy images from one of the
cameras drives to your PC or network.
Note: This can be a convenient way to transfer a few files from your camera, but if you wish to
transfer large numbers of images or video clips, the Save utility in FasMotion can be many
times faster.
To open the Networked TS3 in a Windows Explorer menu:
Type the camera name or IP address in the Location bar, preceded by \\. So, using the
same information as in the example below, type in either \\192.168.33.114, or \\TS3-A3.
When the camera is viewed in Explorer, you will see the camera name or IP address under Network.
Opening that, you will see a directory called “media,” which contains directories for each mass
storage device installed on the camera.
Figure 7-16: Open TS3 Media in Windows Explorer
USB OTG:
Another option for connecting to the TS3 is via the USB OTG port. Please refer back to
“Figure 2-3: Mass Storage” in Chapter 2 for details and a comparison of functionality.
page 58

TS3 User Manual
7-8 Storage Setup
The FasMotion Storage Settings Tab gives the user access and control of the Camera memory and
any installed media, including a Solid State Drive (SSD), SD Card, or USB drive.
The TS3 has 4GB, or 8GB of internal high-speed memory used for capturing high-speed imagery
(depending on model and option). You can select to use all of this memory when recording, for a
smaller amount. Total record time will depend on resolution, frame rate, and bit depth.
Congure Session:
Use the Session Recording Capacity slider to select
the amount of memory you wish to use to capture
video. This slider has a granularity of 250MB.
Use the Format utility in the Storage Setting Tab
to format any of the camera media. The SSD, SD
Card, and USB drives are all accessible for
formatting
Formang the SSD:
It is recommended that you format the SSD to
delete all recordings and completely clean it
off. This should be done often to keep
performance as high as possible.
To format the SSD simply select the SSD radio
button in the Storage Settings dialog and click on
“Format.”
Formang SD Cards and USB drives:
Formatting SD Cards and USB drives is the easiest and most effective way of deleting all recordings. When
formatting SD Cards and USB drives, FasM
Figure 7-17: FasMoon Storage Sengs Tab
otion will give the option of “performance” or “Compatibility.”
The Compatibility format is FAT32, which is recognized by most computers. The Performance format is
EXT2, which is a Linux format and may require a 3rd-party driver for application (such as DiskIternals Linux
Reader) on your MAC or PC. EXT2 will improve file Save times to the SD Card and USB. The improvement is
only about
10% very large images such
as full-resolution TIFF and
BMP images. The greatest
improvement (as much as
6x) is seen when saving large
numbers of very small files,
such as saving thousands of
low-resolution JPEGs.
Exploring Camera Media:
Open the FasMotion Camera
Explore dialog by selecting the
radio button for the SD Card,
SSD, or USB and clicking on
the Explore button.
Navigate to the Still, Stack
or Video of interest.
Figure 7-18: FasMotion Camera Explorer
11S-3000M
page 59

You will notice that the information about the clip or still will be displayed, including the time
stamp, resolution, frame count, frame rate, and file format.
Any selected still or clip may be copied, moved or deleted.
CAP files, which are proprietary MIKROTRON raw image files, can be loaded back into the camera.
When Cap files are loaded back into the camera, the camera may be operated in Review mode, just
as when the imagery was originally taken. This will allow you to Save it in any format and to any
camera or PC media. See ?????
7-9 Conguraons
TS3 Configurations, which include all camera settings
(resolution, frame rate, session length, exposure, etc.),
can be Saved, Reloaded, or Reset to factory defaults.
To Save the Current Conguraon:
Click on Save Config... in the Camera Menu. This will
open an Explore window. You will be able to give it a
name and save it as a .cfg file in the older of your
choosing.
To Load a Saved Conguraon:
Click on Load Config... in the Came a Menu. This will
open an Explore window, which will allow you to navigate
to the folder where you saved .cfg files and select the
Configuration you would like to load.
Figure 7-19: FasMoon Camera Menu
To Load the Factory Conguraon:
Click on Factory Config in the Camera Menu. This
will load the factory default settings for the camera.
Note: This is not a routine operation as it rewrites your
camera configuration. Always power cycle the camera
after loading Factory Configs
7-10 Reboot and Power Down
The camera may be Powered Down or Rebooted from the
Camera Menu.
If you power the camera down it will turn off completely.
To turn it back on, you will need to re-apply power by
removing and restoring the power connector, or by
pressing the power button on the top of the camera.
(See “Figure 1-1: TS3 Back View” on page 3.)
If you Reboot the camera, it will do a “warm boot.” That is, it will disconnect from FasMotion, clear its
memory, and restart its Operating system. Some of the electronics and logic will not be reset during a
warm boot.
Note: Both Power Down and Reboot will erase any imagery in the cameras High-Speed internal
memory, but it will not disturb any image data already saved to SSD, SD Card, or USB drives.
After a Reboot or Power Down, you will need to re-connect the camera to FasMotion by
returning to the “Find Cameras” dialog and scanning for the camera after it boots up. See “7-2
Connect the Camera to a Network” on page 52.
page 60

TS3 User Manual
7-11 Camera Informaon
Camera information is located in the “Find Cameras” window.
To open the Find Cameras window, click on the Find Cameras icon in FasMotion. (See “7-2 Connect
the Camera to a Network” on page 52.)
The information fields will populate as soon as you select a camera from the Found Cameras list.
Information Included
• MAC address
• IP address
• Subnet Mask
• Default Gateway
• Vendor
• Model #
• Manufacture Info (location
• Software Version
• GigE Protocol Version
• Bootloader Version
• FPGA Version
Figure 7-20: Camera Informaon
• Sensor Version
11S-3000M
page 61

TS3 User Manual
8 Recording with FasMoon
8-1 Seng Frame Rate and Resoluon
Record Sengs are interacve:
• The Resolution you choose will define the maximum
Frame Rate and number of frames that can be captured.
• The Frame Rate will define maximum Shutter Speed
(exposure time in msec).
• The Frame Rate and number of Frames captured defines
the duration of the recording (time in seconds).
• If you select Autoset in either Frame Rate or Resolution,
that parameter will be selected automatically to its
maximum allowable value, dependant on the other
current settin
To set the Resoluon of the TS3:
1. Select the Aspect Ratio you wish to use: choices
are Custom, 5:4, 4:3, and 16:9.
2. Adjust the image Width (in pixels) you wish to use. This
can be done either by editing the number in the Width
edit box, or by moving the slider.
Resolutions can be refined to any even-numbered pair
from 24 x 12 to 1280 x 1024.
Whenever any slider has focus, it turns blue. It may be
then controlled by dragging it with the mouse or using
the keyboard arrow keys. Often the best way to do this is
by dragging it with the mouse until it is close o the value
you want, then using the arrow keys to “zero in” on the
exact value.
Figure 8-1: Record Sengs Tab
To set the Frame Rate of the TS3:
Either edit the number in the Frame Rate edit box, or move
the Frame Rate slider to the desired position using the
mouse and arrow keys.
Oset Control:
Most of the time, to make use of the best resolving
properties of your lens, you will want to center the image
at the optical center, which corresponds to the center of
the sensor. In this case you would make sure that the
“Center” check box is checked.
It is also possible, that you will wish to shift your ROI (Region of Interest) without moving the camera.
Lets say, for example, that you have captured images at 1024 x 1024 @ 500fps and are now interested at
capturing a 512 x 512 portion of the scene, lets say the bottom right hand quarter @ 2000fps.
In this case, you would wish to add 512 to both the X and Y offset. For a 1024 x 1024 centered image
the offsets will be 128 and 0. The resultant offsets for a 512 x 512 image (lower right quadrant)
would be 740 and 512.
page 62

TS3 User Manual
8-2 Seng Shuer Speed
The Shutter Speed is expressed in microseconds of exposure time.
Minimum Exposure:
Minimum exposure is 2msec (regardless of frame rate)
Maximum Exposure:
The maximum exposure time is dependant on the frame rate. It is always
(1/Frame Rate) - 6msec
For example, at 500 fps, the maximum exposure is:
(1/500 sec) -6msec = 2000msec -6msec = 1994msec
For those accustomed to using shuer angle, to convert that to degrees:
(Exposure (in msec) / Frame Time) X 360
For example, at 500fps, an exposure time of 25 msec is:
(250msec / 1/500 sec) X 360o = (250 / 2000) X 360o = 45
Seng the Shuer Speed:
Shutter Speed is set using the slider or edit box in the “Shutter Settings” section of the Record Settings
Tab. (See “Figure 8-2: Shu er Setting .)
Low Light Mode:
In some special circumstances, the light available for setting up the TS3 for a high-speed event is
not as bright as what will be used for event itself. You may, for example be using some lights that
can only be switched on for a short time and are not available for camera set up.
The exposure for Low Light Mode is much longer than would be possible for a high frame rate. The
default shutter speed for Low Light mode is 33.327ms, which is the “1X” shutter speed for 30 FPS.
The shutter speed for Low Light may be adjusted via FasMotion by checking the Low Light box and
moving the slider or editing the Low Light edit box.
To enter Low Light Mode:
Note: Be careful when using the Low Light feature! It is very easy to forget that it is on! Remember to
set your exposure for the light that will be present during the image capture.
o
o
1. Set the Shutter Speed just as you need it for the
high speed event.
2. Click on the Low Light check box. A check mark will
appear in the box. The edit box and the slider will
become active.
3. Adjust the slider or edit the
4. Press the Arm Button.
The camera will begin recording. You will notice that the image is darker now than in Live Mode.
5. Press Arm again to quit recording. (Click “OK” on the Warning message to Cancel.)
11S-3000M
Figure 8-2: Shuer Sengs
page 63

TS3 User Manual
8-3 Seng Bit Depth
The TS3 can record and save 10-bit or 8-bit data. The advantage of recording 10-bit data is that it
gives more flexibility in post-processing the imagery. The disadvantage is that it takes more
memory to record or save 10-bit data. When recording, you will get about 25% fewer files, and 25%
less recording time.
When saving 10-bit data (to a mass storage device) in TIFF (RAW) format, the actual file type is a 16bit file, so it is substantially la ger than an 8-bit mono file. The 10-bit (R W) color image, however is
not colorized--it is a RAW Bayer image (not “colorized,” which would make it about 3x as large), so it is
about 2/3 the size of the 24-bit color file (8 bits per each of 3 olor channels).
To choose the recording bit depth:
1. Navigate to the Record Menu.
2. Select Bit Depth.
3. Select 8-low, 8-mid, 8-high, or 10-bit. If any of the 8-bit mappings are chosen, the live image will
immediately reflect th t change. If 10-bit is chosen, the displayed live image will default to 8-high.
If Bit Depth is set to 10 in the Record Menu, a bit depth selection will appear in the The Display
Menu. The choices here are 8-low, 8-mid, and 8-high. This selects the 8-bits used for the display and
for saving to media.
8-4 Conguring the Trigger
Figure 8-3: Trigger Conguraon
The TS3 uses a fixed, selectable circular buffer to record into. The
session length is determined by the user (see “7-8 Storage Setup”
on page 59). This section explains how to set the trigger position
within the buffer. For an explanation on how the circular buffer
works and how to decide on the proper trigger position see
“Application Note 3: Trigger Position and the Circular Buffer” on
page 97.
To Set the Trigger Posion in the TS3:
1. Open the Record Settings Tab.
2. Select either the “Use Percent” or “Use Frames” radio button.
The slider and edit box represent the session buffer, which is
the camera memory you will be recording into. The trigger position, expressed either in %
or frames.
3. Set the position by moving the slider or typing into the edit box or using the spinner buttons.
Enabling the External Trigger
There are times when you wish to activate the trigger electrically, either to sync the trigger with
other cameras or signals, or to maintain greater precision than can be expected through the
software trigger in FasMotion
1. Open the Record Settings Tab.
2. Click on the pull-down in the External Trigger box to expose the choices, which are: Rising, Falling,
or Disabled.
3. Choose “Rising” for rising signals or a switch opening and “Falling” for a falling signal or switch
closure.
Please refer to “Appendix D: Power and I/O Connecons” on page 82 for connecon informaon
and warnings.
page 64

TS3 User Manual
8-5 Black Level Calibraon
Black level calibration does two things:
1. It sets the black level of the camera to ensure that, in the absence of all light, there is no offset or
clipping (the “blackest” pixel will have a value of 0).
2. Dark frame data is saved for correcting Fixed Pattern Noise (FPN).
NOTE: Fixed Pattern Noise exists on every image sensor.
Calibrate Black Level:
The general rule is to do a Black Level Calibration if ever you believe the image looks noisy with Pixel FPN
turned on. To be assured that you are getting the best possible images, perform a calibration
• When you first boot the camera up.
• If you change Shutter Speed, Frame Rate,
Resolution, or Offset.
To Calibrate the Camera
1. Set the camera to Live.
2. Shut out all light to the sensor: close the f-stop
down all the way and put a lens cap on it or cover
it securely.
3. From the Configuration menu, choose Black Level
Calibration
4. In the Advanced Settings section of the record
Settings Tab (see Figure 8-1 on page 62) you will
see an FPN selection dropdown menu. The items include Disabled Column, or Pixel. Click on that
button and select the FPN setting ou wish to use, based on the following:
•
• Column FPN is an image correction done on the TS3’s sensor. It does not do as good a
Pixel FPN is a per-pixel image correction that is done in the TS3’s image processor engine. It
provides the cleanest images available. This is the setting that is most highly recommended.
job cleaning up the images as Pixel FPN.
Figure 8-4: Conguraon menu: Black Level Calibraon
• FPN O means that there is no noise correction being used.
8-6 Record: Arm and Trigger
Table 8-1: Sample Frame Rates and Resoluons
11S-3000M
Live Mode A (Arm) and T (Trigger) buttons active:
Camera in Live mode, waiting to Arm
Recording:
Armed
Recording:
Triggered
A (Arm) and T (Trigger) buttons active:
Camera is Armed, waiting for the trigger
No buttons active:
Camera has been triggered and is continuing to record
Review Mode L (Go to Live)button active:
Camera has been armed and triggered, in Review
Live
Images in Buffer
A (Arm), T (Trigger) and R (Review) buttons active:
Camera in Live mode, has a recording in the buffer
page 65

TS3 User Manual
Lights Camera Acon!
• Black Level Calibration has been done
• The scene is framed and focused
• The Resolution and Frame rate are set
• The Shutter Speed is set
• The Bit Depth is set
• The Trigger Point and Trigger Type is set
Take a Sll JPEG
Still JPEG Image. It is optional, but recommended, to take a reference still of the scene:
With the TS3 in Live Mode (not Recording or Reviewing a recording) either click on the Trigger
Button or click on “Snapshot...” in the Camera menu.
A dialog box will appear asking where to store the image. Select the storage media you wish to use.
(The image will be saved in <storage device>/dcim/100fastc.)
To begin Recording, Click the Arm Buon:
The Arm Button will turn from green to brown (see “Table 8-2: Camera Control Buttons”) and the
camera begins recording into its circular buffer (see “Application note 3: Trigger Position and the
Circular Buffer” on page 97 for an explanation of the circular buffer). The Camera LED will change
from Green (LIve) to slowly flashing Amber. It will record for an indefinite period of time until it sets
a Trigger. (See “8-4 Configuring the Trigger” on page 64.)
If the Arm Button is pressed a second time , the Recording will abort. The button and the LED
will return to green.
The recording state is indicated by a progress bar at the bottom of the image window. Numbers to
the right of the progress bar represent the number of recorded / post-trigger / total frames.
Figure 8-5: Record Progress Bar: Armed
When all of the pre-trigger frames have been recorded, the progress bar stops and flashes blue/ red.
Note: If the TS3 is triggered before the pre-trigger portion of the buffer is full, it will immediately
cease taking pre-trigger frames, record frame “0” and progress to the post-trigger portion of th
recording. When complete, the recording will have contiguous frames, with the full complement
of post -trigger frames, but fewer pre-trigger frames. (See “8-4 Configuring the Trigger” on page
64.)
Figure 8-6: Record Progress Bar: Triggered
page 66

TS3 User Manual
To end Recording, Click the Trigger Buon:
Click on the Trigger button, (see “Table 8-2: Camera Control Buttons” on page 69) or send
an electrical trigger signal (see “Appendix D: Power and I/O Connections ).
When triggered, the TS3 will c
apture frame “0” and the post-trigger frames. When the recording is
complete, the progress bar will disappear, the Video Review Tab will open exposing the Save dialog,
and the Video Control (Playback) pane will open.
Figure 8-7: Video Review tab and Video Controls
-2449
-09.796
-09.796 +09.796
T
+2449
8-7 Autosave
The TS3 may be used to capture many consecutive events. Using Autosave, this can be done unattended,
that is, the camera may be left at a location or automatically, Trigger, Save captured imagery, and then reArm itself indefinitely-constrained only by the mass storage space available.
Consider that a TS3 with an optional 256GB SSD installed, depending on the resolution and
download file format, could record and save hundreds or even thousands of events in a completely
unattended mode! Even if using an SDHC, many events may be captured.
Advantages of using Autosave:
•
Autosave is a good choice for multiple rapid events. When you are planning to save every
capture and review later, the fastest way to get the job done is to use Autosave.
Autosave is also useful for production environments or in any scenario where it is used for
•
multiple consecutive tests without any setup changes. Here it is preferred because it limits human
intervention, thereby limiting both human effort and the possibility of human error.
• In an unaended event, especially in a remote locaon or when there is no easy access to the
camera, Autosave is recommended because it is the quickest way to secure the image data.
Saving the data to nonvolatile memo y can be important if there is a possibility of power loss.
11S-3000M
page 67

TS3 User Manual
• Use Autosave for any unattended event where there is a possibility of a spurious trigger where
the camera might trigger prematurely. If Autosave is used, there is a good chance that the
camera will have returned back to Record mode in time to capture the planned event.
To set up Autosave:
The Autosave Setup tab is always available in Live mode.
1. Select a target drive using the “Save to Camera / Path radio buttons.
If you select “Path” the target drive and folder will be a folder on a
drive accessible by the PC. The Path to that folder is shown at the
bottom of the dialog. If you would like to change the path, click on
the “Browse...” button and navigate to and/or create the folder you
wish to save to.
2. Select a file type from the “Save Type:” pull-down list. File type
choices may change depending on the target drive. If you wish to
save CAP files, you must save to the SSD. If you wish to save AVI
files, you must save to a location other than SSD. See “Application
Note 6: Choosing an Image File Format” on page 109.
3. Set start and end points for your saved clips (only if you wish to save
less than the full session).
4. Click on “Enable” to enable Autosave. If there are images presently
in the buffer you will get a message asking if you would like to save
that image data and re-arm the camera. If there are no images in the
buffer you will just go back to Live mode until the amera is Armed.
Figure 8-8: Autosave Setup Dialog
Arm and trigger the camera. Autosave will continue re-arming itself,
5.
capturing images and downloading them until the target drive runs out of space. At this time it will
progress to Review mode so the user download manually to a different drive or clear space.
Note: There is a “Load” button on the Autosave dialog box. This button is a shortcut to the
SSD Partition Capture folder that allows you to select a CAP file o load into the camera.
8-8 Reviewing Captured Imagery: Playback
Once the recording is complete, if Autosave is not enabled, the TS3 will open the recording in Review
Mode. There are several things to do in Review:
• Play the video--play it forward, backward, frame by frame, adjust the cut-in and cut-out points
(find the interesting portion of the clip), etc.
• Adjust the image brightness, contrast, gamma, bit depth, color, etc. (See “8-9 Image Processing”
on page 70.)
• Save video to a mass storage device. (See “8-11 Saving Images to Mass Storage” on page 73.)
• Load a CAP file from SSD to memory for Review.
Searching for Interesting Parts:
Very often the first thing you will wish to do when reviewing a clip is to “scrub” through it using
the playback slider looking for the most interesting moments.
1. Click on the Pause Play button. (Only necessary if you have already clicked on another of the
playback buttons.) This will enable all of the playback buttons (they become black). (If any of the
buttons become grey (inactive) you will not be able to scrub through the clip.
2. Move the Start Clip bumper all the way to the left (beginning of segment) and the End Clip
bumper all the way to the end. (This is the default position when you enter Review.)
3. Click and hold the Playback Bug and move it along the progress bar. This will allow you to move to
any point in the video that might be of interest.
page 68

TS3 User Manual
Setting the Start Clip and End Clip points:
1. Click on the Pause play button. All buttons should now be active (black).
2. Click and drag the Playback Bug to the frame you wish to be the starting point. You can use the
Current Frame edit box and/or spinner, or your PC keyboard <- and -> keys to zero-in on the
correct frame.
3. Click on the Start Clip button. The Start Clip Bumper will move to that frame.
4. Move the Playback Bug to the frame you wish to be the ending point (as in #2, above).
5. Click on the End Clip button.
Figure 8-9: Video Controls (Playback)
Start Clip Bumper
When playing , the video will start and end between the Start Clip and End Clip bumpers.
The Start and End Clips also define the range of frames that will be Saved. (See “8-11 Saving Images
to Mass Storage” on page 73
Table 8-2: Camera Control Buons
Go to beginning of clip--goes to Cut-In point. Click a second time and it goes to the very beginning
of the video.
Move one frame backward. When highlighted, hold OK button on D-Pad to skip backward.
Play backward. Use up and down buttons on D-Pad to adjust speed.
Pause play.
Play forward. Use up and down buttons on D-Pad to adjust speed.
Move one frame forward. When highlighted, hold OK button on D-Pad to skip forward.
End Clip Bumper
Playback Bug
Move to end of clip--goes to Cut-Out point. Click a second time to go to the end of the video.
Jump to Trigger frame.
11S-3000M
page 69

TS3 User Manual
8-9 Image Processing
Image Processing Pipeline.
The TS3 image processing begins in the LUPA1300-2 sensor, where on-chip column FPN corrections
occur (if enabled) and the Black level is set using data collected during calibration. Pixel data, also
collected during calibration is used for Pixel FPN correction (if enabled). (See “8-5 Black Level
Calibration” on page 65.) The TS3 does more image processing internally, some of which can be
controlled by the operator. To better understand how this works, please refer to “Figure 8-10: Image
Pipeline”.
Figure 8-10: Image Pipeline
The 10-bit sensor output goes to the Bit Selector, then to internal high-speed memory. This selection is
made by the user when bit depth is selected. (See”8-3 Setting Bit Depth” on page 64.)
The path for all images and the input to the histogram is: Sensor, to Bit Selector, to Image Processor, to
Display / Histogram. It is always 8-bit Mono or 24-bit Color. Live images pass through from high-speed
memory to the image processor immediately. Captured images are saved in high-speed memory until
the camera powers down or the images are written over.
Images in the internal high-speed memory have not yet gone through the image processor. This
•
means that the image processing settings have NO effect on the images in high-speed
memory--they only affect the images as they are saved or displayed.
•
Images in high-speed memory may be viewed or saved multiple times with different settings
page 70

TS3 User Manual
• Live images seen on the display ALWAYS go through the image
processor.
User Control of Image Processor
•
Bayer (Color) processing (color cameras only) is done in order to
display a color image. The user may select to save images that have
not gone through Bayer colorization by choosing to download a
RAW format (See “8-11 Saving Images to Mass Storage”.)
•
Color Correction is controlled via “White Balance” in the Display
tab. You may choose from several color temperatures: Daylight
(5600K), Tungsten (3200K), and Fluorescent (4100K) and Normal
setting 1:1 (all channels at nominal gain). There is also a “Custom”
setting used to white balance using a grey target and an RGB gain
dialog for further manual adjustment. See “8-10 Custom Color
Correction.
• Brightness and Contrast are controlled via sliders and spinners.
Users select levels from -100 to +100 (default = 0).
• Gamma is also adjusted in this dialog. Levels range from 0.20 to
5.00. Gamma 2.2 is the default as it is the most common display gamma for monitors. For a linear
display choose a gamma of 1.00.
Figure 8-11: Display Sengs
Note: Making a selection from this menu only affects the Displayed image and any (non RAW)
images saved to mass storage devices. It does not affect the either the 8-bit or 10-bit images as they
are recorded into the TS3’s high-speed internal memory. Adjustments made here may be done
before and/or after the imagery is captured.
Note: All image processing is done using 16-bit math. If 8 bits are recorded, they will be used as the
upper 8 bits of the 16-bit calculaons by the image processor. The upper 8 bits of the results are
then used as an output. Similarly, if 10 bits are recorded, they will be used as the upper 10 bits of
the 16-bit calculaons. This is true regardless of the output bit depth, thus the lower two bits of the
10 bits recorded are used when compung color correcons and image adjustments, even if you
are viewing or downloading 8/24-bit formats.
8-10 Custom Color Correcon
When the preset White Balance options, Daylight, Tungsten, and Fluorescent, do not give you
the color reproduction you need, there are a couple of other options a
The Custom item in the Display/White Balance menu allows you to set the color correction via a
gray card or neutral gray object.
To use Custom White Balance:
Click on the “Custom” button in the White Balance menu. A rectangular reticle will appear in the
1.
middle of the image window and a special histogram will appear (See “Figure 8-12: Custom White
Balance” on page 72.)
vailable:
Center the reticle (the white box in the center of the image) on a neutral gray object in the field
2.
of view. In this instance we are using an 18% gray card, which is the recommended target. Most
often the card will only fill a portion of the field of view--it only needs to fill the reticle. It is
important that the card, or other neutral gray object is located close to the objects of interest and
is exposed to the same light as the objects you are going to image.
3. Adjust the lens aperture so that the histogram shows the pixel values grouped high (to the right
11S-3000M
page 71

TS3 User Manual
side of the box), but not saturated. It is important that the high pixel value is less than 255. Notice
on the example here, that the RGB peaks are not well aligned and that the Blue peak is farthest to
the left. This means that the color is skewed slightly towards the yellow, the complement to blue.
Note: The histogram used with Custom White Balance represents only the area of the reticle, not the
whole image. For more information regarding TS3 Histograms please refer to “Application Note 1:
Histograms” on page 93.
4.
Press the Trigger button. You will immediately notice an difference in the color.
Using RGB Gain Controls
Figure 8-12: Custom White Balance
Another option for addressing color correction is via RGB Gains. It is recommended that you use the RGB
gains sparingly and as a final “tweak” to make subtle changes to the color. The best use of this is to get
the color as close as possible using the White Balance presets or Custom options before adjusting the RGB
gains.
To use RGB Gain:
1.
Open the Display Settings Tab. You will notice sliders with edit boxes and spinners for Red,
Green, and Blue.
2.
For any color gain you wish to increase, move the slider to the desired position. Remember to use
the D-Pad for fine adjustment.
Note: Remember that in the Bayer pattern, 1/2 of the pixels are green, 1/4 are blue and 1/4 are red.
Whenever you change gain values you will be adding some noise to the image. It is best to avoid using
any more gain than you need to, and to take special care with the green channel as it represents half
of the pixels in the image.
page 72

TS3 User Manual
8-11 Saving Images to Mass Storage
Image sequences may be saved as CAP files (proprietary raw format, see “Appendix K: Partition
Capture (CAP) File Format” on page 91), as AVI videos, in which one file contains all the frames
of the sequence, or TIFF, JPEG, or BMP stacks, which are collections of files, one file per frame of
imagery. The file save options changes depending on whether or 8-bit or 10-bit image data has
been written to internal high-speed memory:
Table 8-3: File Save Opons
10-bits recorded 8-bits recorded
TIFF (8-bit M /24-bit C) or RAW TIFF (16-bit) TIFF (8-bit M / 24-bit C) or RAW TIFF (8-bit)
DNG (16-bit raw format) DNG (8-bit Raw format)
BMP (8-bit M /24-bit C) BMP (8-bit M/ 24-bit C)
AVI (8-bit M /24-bit C) AVI (8-bit M / 24-bit C)
JPEG (8-bit M /24-bit C) JPEG (8-bit M / 24-bit C)
CAP (10-bit raw format) CAP (8-bit Raw format)
Calculating file sizes for TIFF and BMP images is very simple:
Resolution x Bit depth/8 = approximate BMP or TIFF file size in Bytes
(to convert Bytes to KB divide by 1024)
For example a 1280 x 1024 Mono BMP or TIFF is:
1280 x 1024 x 8 / 8 = 1,310,720 bytes = 1,280K
A 1280 x 1024 16-bit RAW TIFF/DNG is:
1280 x 1024 x 16 / 8 = 2,621,440 bytes = 2,560K
CAP files are always the size of the current buffer (session size).
The actual file size of a 1280 x 1024 mono BMP or TIFF is about 1281K (the additional 1K for the file
header). The actual size of 16-bit RAW TIFF is 2561K (again add an additional 1K for the header).
Note: The RAW 16-bit TIFF saved from the camera actually has 10 bits of image data. The 16bit format is used for compatibility reasons.
Calculating file sizes for AVI and JPEG images is much more difficult. The compression is often
approximately 10x to 20x, but it can be much greater for images with little content, and it can
be much less for very complex images.
RAW images are not colorized, so Mono and Color images are the same size. Colorization
increases file size 3x because 8 bits are saved for each of red, green, and blue channels.
To Save a recording to a connected mass storage device on the TS3:
1. Make a recording and establish the Start Clip and End Clip points you wish to use (see “8-8
Reviewing Captured Imagery: Playback” on page 68).
Note that the frame numbers initially shown in the dialog box will be the actual start and stop
frames for the entire capture unless the Start Clip and End Clip bumpers have been moved. If you are
not sure what the actual beginning and end frame numbers for the clip are, you can find them on
the far left / far right sides of the Clip bar.
11S-3000M
page 73

TS3 User Manual
1. Select a target drive using the “Save to Camera / Path radio buttons. If you select “Path” the
target drive and folder will be a folder on a drive accessible by the PC. The Path to that folder is
shown at the bottom of the dialog. If you would like to change the path, click on the
“Browse...” button and navigate to and/or create the folder you wish to save to.
2. Select a file type from the “Save Type:” pull-down list. File type choices may change depending
on the target drive. If you wish to save CAP files, you must save to the SSD. If you wish to save
AVI files, you must save to a location other than SSD. See “Application Note 6: Choosing an
Image File Format” on page 109.
The default file name format for the image stacks is Frame_000000.<TYPE>. If you would like
•
the name to include the camera name, Select Use Name in the dialog. The resulting file
name format for the example would become TS3-11_000000.<EXT>.
If you would like to add a tag to the name, select Tag. The Tag may be edited. Using the Tag
•
in the example, the file name becomes 2011-10-11_000000.<EXT>.
Both the Name and the Tag may be used, in which case the file name becomes TS3-11_2011-10-
•
11_000000.<TYPE> in the example.
If AVI files a e saved, the default file name is TS3_000000.AVI. The Use Name and Use Tag
•
options are also valid for AVI files in which case the resulting file names are TS3-11_000000.AVI,
or 2011-10-11_000000.AVI, etc. If the file size exceeds the 4GB limit for 32-bit file systems, the
TS3 will make a second file for the remainder of the imagery. (MiDAS and other players will
play the video as one.)
If CAP files are saved, they will not use either the camera name or the tag. CAP files are saved
•
only to the SSD. They must be loaded back into high-speed memory in the camera to be
reviewed, then converted into a downloadable file format.
Note: CAP files load back into memory much faster than they are saved, taking approximately
45 seconds for a full 8GB load and proportionately shorter times for smaller ones.
When the TS3 saves imagery to mass storage it creates the following:
• DCIM. This is an industry standard directory name for Digital Camera Images.
• 100fastc. This is a sub-directory under DCIM.
• TS3_000000. This is the first sub-directory under DCIM/100fastc, used for storing image stacks.
• hs-video. This is the directory that all AVI files are written to.
• <filename> txt. For each download, the camera creates this text file. In it are the camera setup
values, including resolution, frame rate, camera name, time stamp for the capture, image
processing values, color processing values, etc. (See “Appendix G: Contents of Frame.txt file .)
• <filename>.c g files. This is a binary file used for MiDAS player so that it can properly play
the image files as a movie.
Note: Image files may be saved multiple times using different formats,different start and stop
points, and different image processing options (brightness, contrast, gamma, color, etc.). If 10-bit
images have been captured, imagery may be saved multiple times using different bit-depths.
page 74

TS3 User Manual
Appendices
Appendix A: Denion of terms
Arm When armed, the camera will capture and write images into a partition of camera
memory, and then overwrite it connually unl it receives a trigger.
Arm/Record Bug The Arm/Record Bug is the small vercal line used in conjuncon with the Record Bar to
indicate the progress of the camera while acquiring pre- and post-trigger images.
AVI Audio Video Interleave (AVI) is a popular le type for electronic video. AVI les may
include certain types of image/video data (compressed or un-compressed), audio data,
and metadata.
Backlight The Backlight is the illuminaon used to light the LCD display on the camera.
Baery Status LED Baery Status LED States:
Bit Depth Images captured by the TS3 sensor are read in binary form. Each pixel is given a binary
10-bit value from 0000000000 to 1111111111, or, in decimal form, from 0 to 1023. 0 is
black, 1023 is white—all numbers in between are shades of gray from very dark to very
bright. The camera operator has the opon of recording all ten bits (1024 shades) or 8
bits (256 shades). If the operator chooses to record 8-bit data, they must choose which
8 bits of the ten to record. They may wish to record the Lower 8 bits, which will greatly
enhance the dark areas of the image, tend to saturate the bright areas, and will expose
more noise; or the Middle 8 bits, which will somewhat enhance the dark areas wash out
the brighter areas, and expose some noise; or the High 8 bits, which will be the cleanest
image, but with the least denion in the darker areas.
BMP Stack BitMaP (BMP) les contain un-compressed image data. Each le contains one image. A
BMP Stack is a collecon of images. The BMP Stack produced by the TS3 is a collecon of
frames, wrien as BMP les represenng a captured video sequence.
Table 9-1: Denions
Brightness Linear image control that boosts all pixel values without disturbing the slope of the
curve.
CinemaDNG CinemaDNG is an open digital cinema format that uses the Adobe Digital Negave Speci-
caon (DNG), widely used as an archival format for Raw images. The specicaon is an
aempt to standardize digital commercial video format thereby simplifying collaboraon
and workow across the entertainment industry and all other industries dependant on
digital video recording, i.e. automobile crash tesng, military tesng, etc.
Color Temperature The Color Temperature of an ideal black body is dened as its surface temperature in
kelvins (K). The Color Temperature of a light source is an assigned value that closely approximates what a human would perceive as a match between that light source and an
ideal black body at that Temperature (K). High color temperatures are seen bluish, while
lower color temperatures are seen reddish.
Cong. Camera Conguraon that can be saved and reloaded. Includes sengs for Frame Rate,
Resoluon, Shuer Speed, Trigger, bit depth, and Auto Save.
Contrast Linear image control that enhances the dierence between pixel values by changing the
slope of the curve, while maintaining the mean value.
Cursor The cursor may be any graphic indicaon of where the current focus is within the user
interface. This may be anything from a blinking vercal line as used within a dialog box
when the user is entering text, or it may be a change in the color of a buon as when
navigang through menus.
11S-3000M
page 75

TS3 User Manual
Custom Camera Control
Camera control soware compable with the TS3.
Applicaon
DHCP DHCP is a ulity by which a server dynamically assigns IP addresses to clients on a net-
work. When DHCP is selected in the Network Menu, the camera will allow a server on a
connected network to assign it an IP address.
Dialog A Dialog is a box that requires user input such as the selecon of an opon, or the enter-
ing of a number or text.
Download Electronically moving image data from a camera to a “remote” device, i.e. a PC or other
mass storage.
Enable Raw A raw image is one where all image processing including colorizaon, white balance,
brightness, contrast, and gamma, are all bypassed.
File Type Digital les are commonly idened by their extensions. Familiar types include PDF, TXT,
JPEG,TIFF, DOC, MP3, etc. Each of these les has a specied format that usually includes
informaon in the le header and specially formaed data that applicaons on PCs,
Cameras, Printers, Smartphones, and other electronic devices can read, write, and deci-
pher for human viewing, eding, listening, etc.
Gain In imaging the term Gain is most oen used as a mulplier applied to a pixel value.
Gamma Gamma encoding of images is required to compensate for properes of human vision
- to maximize the use of the bits or bandwidth relave to how humans perceive light
and color.[1] Human vision under common illuminaon condions (not pitch black or
blindingly bright) follows an approximate gamma or power funcon. If images are not
gamma encoded, they allocate too many bits or too much bandwidth to highlights that
humans cannot dierenate, and too few bits/bandwidth to shadow values that humans
are sensive to and would require more bits/bandwidth to maintain the same visual
quality-
HDMI HDMI, High-Denion Mulmedia Interface, is used to transmit digized video (and au-
dio) data from the camera to a remote display. This is a popular method for connecng
consumer products such as televisions, cable TV boxes, DVD players, etc.
Image Memory Image memory is the internal memory in the camera reserved for raw image data. This is
volale memory that is erased when the camera is shut down.
JPEG Stack Joint Photographic Expert Group (JPEG) le format is a highly compressed le format,
capable of reducing image les to a fracon of the size of a BMP or lossless TIFF. The
image quality of JPEGs is excellent, although there may be some discernible noise in the
displayed image, oen referred to as JPEG arfacts.
Menu Once an item in the Menu Bar is selected, the corresponding Menu appears below.
Menu Bar The Menu Bar is the bar across the top of the camera display that lists the Menu Items.
Network The camera may be connected to one or more computers via its RJ45 GigE (Gigabit Ether-
net) connecon.
NTP Time Network Time Protocol: Network Protocol for synchronizing me clocks of devices at-
tached to a given network or internet, within a few hundredths of a second.
Play/Review Bug In Review there is a progress bar that graphically indicates the posion of the currently
viewed frame within the image sequence. The small vercal line that is used as the indicator is referred to as the Review Bug.
Record The camera is acquiring images and storing them in internal memory. This begins when
the camera is armed, and ends aer a trigger is received.
Record Bar When the camera is Armed and it commences capturing images, the Record Bar presents
a graphic indicaon of the progress of lling the buer.
Refresh Rate Rate at which image data is re-painted on the display. For CRTs this is analogous to the
vercal frequency.
page 76

TS3 User Manual
Review Review is a camera ulity for viewing image data while it resides in camera memory. It
includes opons for playing the imagery as a movie, forward or backward, or stepping
through the frames one at a me, or stepping through every 10th frame. It also allows
the user to adjust starng and ending points for an image sequence for viewing or saving. The user may adjust image properes such as brightness, contrast, gamma, color
balance when reviewing the images. If 10 bit images have been saved, the user may also
select which 8 bits to display. It is important to note that image adjustments made while
using Review do not alter the image data in camera memory although they do alter the
viewed and saved images.
Save Moving image data from a camera’s internal memory to some other mass storage device.
This mass storage may be local, such as the SSD drive within the camera, or remote, such
as a PC.
SD This is Secure Digital memory, such as the SD Card used as a plug-in mass storage device
for the camera.
SSD Solid-state hard drive that is located inside the camera. This is a non-volale mass stor-
age device retains its data when the camera is powered down.
Stac IP In order for one networked device to “talk” to each other, they need to have compable
IP addresses. One way to assure this is for the user to assign unchanging (stac) IP ad-
dresses to each device.
Status Menu Bar The Status Bar is a line of text at the boom of the display that appears when the cam-
era menus are turned on.
Sub Menu Within each Menu, there may be addional Sub Menus from which to select.
TIFF Stack Tagged Image File Format (TIFF) is a much more exible format than the BMP, in that
it may use one of several compression schemes, may be used to store mulple images
(mul-page TIFF), and may include metadata in the form of Tags. Developers may apply
for their own block of private Tags. The TIFF is the only le format used in the TS3 that
is compable with 10-bit images. The TIFF Stack produced by the TS3 is a collecon of
frames, wrien as BMP les represenng a captured video sequence.
Trigger The trigger is a signal sent to the camera either via the trigger switch on the camera
or from an external source applied to the camera’s trigger input connector. When an
armed camera receives a trigger, it will capture and write a prescribed number of frames
into camera memory, then stop capturing images. If the TS3 receives a Trigger while in
Live Mode, it will take a sll image.
Update Rate The rate at which the TS3 or a PC can process a new frame of video and send it to the
display.
USB A thumb drive or some other mass memory device may be aached via the USB port of
the camera.
USB OTG When a PC is connected to the USB OTG (USB On The Go) port of the camera, the cam-
era appears as a mass storage device to the PC, much like plugging a thumb drive into a
PC’s USB port. The camera is automacally a slave to the PC.
Web Applicaon Camera control soware that runs via web browser such as Windows Internet Explorer,
Safari, Firefox, etc.
White Balance Many dierent kinds of illuminaon may be used with high speed cameras. Typical color
temperatures for common types of illuminaon are used to compute RGB gains, which,
when applied to captured imagery, should approximate what a human would perceive
as accurate color. The term White Balance refers to the idea that, presented with a white
card under a given light source, the camera should produce a white image.
11S-3000M
page 77

TS3 User Manual
Appendix B: TS3 Specicaons
Table 9-2: Specicaons
System Design
Sensor 10-bit CMOS sensor with 14 µm square pixels, color or monochrome
Resoluon 1280 x 1024 pixels maximum
Light Sensivity 3,200 ISO monochrome, 1,600 ISO color
Record Rate 24 to 500 fps at 1280 x 1024, up to 98,000 fps at reduced resolution
Shuer Global electronic shutter from 2μsec to 41.667ms
Image Memory 4GB. Optional upgrade to 8GB
Removable Storage SD card (SDHC: 32GB maximum), USB Flash drive
Session Length 256MB up to full image memory
File Formats Stacks – BMP, DNG, JPEG, TIFF (processed or raw); Video – AVI, CAP (raw)
Sll Image Format JPEG
Lens Mount C-Mount (standard), F-Mount or PL-Mount (optional
Built-in Monitor High resolution, 178mm (7”) dia onal LCD
PC Communicaon Ports USB 2.0 device (micro-B), Ethernet (10/100/1000Base-T)
Control Soware
External I/O Sync Trigger In/Out, Sync In/Out, Arm In/Out (LVTTL (3.3V) or switch closure)
Handheld, battery-powered, portable with multiple PC I/O port
FasMotion (PC application), web interface (browser on all platforms)
Video Out HDMI (1080P, 720P, 480P)
Construcon Anodized machined aluminum housing
Power
Power Consumpon 40W maximum
Operang Environment +5°C to +40°C
Size and Weight 228mm (9.0”) W x 114mm (4.5”) H x 89mm (3.5”) D. 1.8 Kg (3.9 lbs)
Rechargeable Li-ion battery (4+ hours operating), or 10-26 VDC
external power
Oponal Features
WiFi 802.11 b/g/n, Security: open, WEP, WPA(2) - PSK
Image Memory Upgrade to 8GB total
Built-In Storage Solid State Drive (SSD) 64GB, 128GB or 256GB
Lens Mounts F-Mount, PL-Mount
TimeStamps and Sync IRIG-B (modulated and unmodulated)
page 78

TS3 User Manual
Appendix C: TS3 Record / Resoluon Tables
NOTE: These include only the preset resolution values. Many more resolutions are available in
the Advanced Settings, the web-App or FasMotion software.
4:3 Resoluons
Table 9-3: Resoluons, Rates, and Times
Resolution
"Frame Rate" 4GB Capacity 8GB Capacity
H. V. Rate Time (Sec.) Frames Time (Sec.) Frames
320 240 60 923.4 55405 1855.1 111306
320 240 125 443.2 55405 890.4 111306
320 240 250 221.6 55405 445.2 111306
320 240 500 110.8 55405 222.6 111306
320 240 1000 55.4 55405 111.3 111306
320 240 1250 44.3 55405 89.0 111306
320 240 1500 36.9 55405 74.2 111306
320 240 2000 27.7 55405 55.7 111306
320 240 4000 13.9 55405 27.8 111306
320 240 5600 9.9 55405 19.9 111306
320 240 6130 (Max) 9.0 55405 18.2 111306
640 480 60 230.9 13855 463.9 27835
640 480 125 110.8 13855 222.7 27835
640 480 250 55.4 13855 111.3 27835
640 480 500 27.7 13855 55.7 27835
640 480 1000 13.9 13855 27.8 27835
640 480 1250 11.1 13855 22.3 27835
640 480 1932 (Max) 7.2
13855 14.4 27835
800 600 60 147.8 8868 296.9 17815
800 600 125 70.9 8868 142.5 17815
800 600 250 35.5 8868 71.3 17815
800 600 500 17.7 8868 35.6 17815
800 600 1000 8.9 8868 17.8 17815
800 600 1250 7.1 8868 14.3 17815
800 600 1284 (Max) 6.9 8868 13.9 17815
1280 1024 60 54.1 3247 108.7 6524
1280 1024 125 26.0 3247 52.2 6524
1280 1024 250 13.0 3247 26.1 6524
1280 1024 500 6.5 3247 13.0 6524
1280 1024 506 (Max) 6.4 3247 12.9 6524
11S-3000M
page 79

TS3 User Manual
16:9 Resoluons
Resolution "Frame Rate" 4GB Capacity 8GB Capacity
H. V. Rate Time (Sec.) Frames Time (Sec.) Frames
320 200 60 1108.0 66481 2225.9 133556
320 200 125 531.8 66481 1068.4 133556
320 200 250 265.9 66481 534.2 133556
320 200 500 133.0 66481 267.1 133556
320 200 1000 66.5 66481 133.6 133556
320 200 1250 53.2 66481 106.8 133556
320 200 1500 44.3 66481 89.0 133556
320 200 2000 33.2 66481 66.8 133556
320 200 4000 16.6 66481 33.4 133556
320 200 5600 11.9 66481 23.8 133556
320 200 7295 (Max) 9.1 66481 18.3 133556
800 480 60 184.7 11084 371.1 22268
800 480 125 88.7 11084 178.1 22268
800 480 250 44.3 11084 89.1 22268
800 480 500 22.2 11084 44.5 22268
800 480 1000 11.1 11084 22.3 22268
800 480 1250 8.9 11084 17.8 22268
800 480 1602 (Max) 6.9
1024 600 60 115.5 6928 232.0 13918
1024 600 125 55.4 6928 111.3 13918
1024 600 250 27.7 6928 55.7 13918
1024 600 500 13.9 6928 27.8 13918
1024 600 1000 6.9 6928 13.9 13918
1024 600 1052 (Max) 6.6 6928 13.2 13918
1280 720 60 77.0 4618 154.7 9279
1280 720 125 36.9 4618 74.2 9279
1280 720 250 18.5 4618 37.1 9279
1280 720 500 9.2 4618 18.6 9279
1280 720 719 (Max) 6.4 4618 12.9 9279
11084 13.9 22268
page 80

TS3 User Manual
1:1 Resoluons
Resolution "Frame Rate" 4GB Capacity 8GB Capacity
H. V. Rate Time (Sec.) Frames Time (Sec.) Frames
256 256 60 1082.4 64942 2173.8 130428
256 256 125 519.5 64942 1043.4 130428
256 256 250 259.8 64942 521.7 130428
256 256 500 129.9 64942 260.9 130428
256 256 1000 64.9 64942 130.4 130428
256 256 1250 52.0 64942 104.3 130428
256 256 1500 43.3 64942 87.0 130428
256 256 2000 32.5 64942 65.2 130428
256 256 4000 16.2 64942 32.6 130428
256 256 5600 11.6 64942 23.3 130428
256 256 6704 (Max) 9.7 64942 19.5 130428
512 512 60 270.6 16237 543.7 32619
512 512 125 129.9 16237 261.0 32619
512 512 250 64.9 16237 130.5 32619
512 512 500 32.5 16237 65.2 32619
512 512 1000 16.2 16237 32.6 32619
512 512 1250 13.0 16237 26.1 32619
512 512 1500 10.8
512 512 2000 8.1 16237 16.3 32619
512 512 2126 (Max) 7.6 16237 15.3 32619
16237 21.7 32619
1024 1024 60 67.7 4059 136.1 8155
1024 1024 125 32.5 4059 65.3 8155
1024 1024 250 16.2 4059 32.6 8155
1024 1024 500 8.1 4059 16.3 8155
1024 1024 618 (Max) 6.6 4059 8.2 8155
5:1 Resoluon
1280 256 60 216.5 12989 434.9 26095
1280 256 125 103.9 12989 208.8 26095
1280 256 250 52.0 12989 104.4 26095
1280 256 500 26.0 12989 52.2 26095
1280 256 1000 13.0 12989 26.1 26095
1280 256 1250 10.4 12989 20.9 26095
1280 256 2000 6.5 12989 13.0 26095
1280 256 2005 (Max) 6.5 12989 13.0 26095
11S-3000M
page 81

TS3 User Manual
Appendix D: Power and I/O Connecons
Power Connecons For the TS3
Table 9-4: Power Pin OUt
(View from Solder cup
side of connector)
Use Lemo 1B.305 compatible plug
(FGG.305.CLAD.42.NZ Pictured here)
1
2
3
5
4
Refer to //http www.lemo.com
Pin Signal
1 +12 to 24VDC
2 +12 to 24VDC
3
4 Ground
5 Ground
I/O Connecons: Sync and Trigger
Table 9-5: I/O Connector Pin Out
(View from Solder cup
side of connector)
1
2
3
4
7
6
8
5
5
Use Lemo 1B.308 compatible plug
Refer to http://www.lemo.com
No Connection
Pin Signal
1 Ground
2 Analog Reserved
3 LVTTL Sync Out
4 LVTTL Reserved
5 LVTTL Reserved
6 LVTTL Reserved
7 LVTTL Trigger In
8 LVTTL Sync In
The TS3 is shipped with a Sync I/O cable for connecting external Trigger, Sync Out, and Sync In
signals. The cable has a LEMO connector for the TS3 end and BNC connectors for the three signals.
page 82

TS3 User Manual
Figure 9-1: Sync I/O Cable Drawing
1.8v
3.3
v
TRIG IN
8 SYNC IN
(
(This drawing depicts a 6-signal cable that exposes all available I/O channels. Cameras are shipped
with the standard 3-signal cable that exposes Sync Out, Trigger In, and Sync In.)
Figure 9-2: Sync I/O Camera Interface Schemac
OE
to Control Logic
ansciever
Tr /
anslato
Tr r
DI
R
1/2)- 74AVC2T245
GND
The TS3 I/O circuits are designed to operate at LVTTL levels (3.3v). The inputs will respond to simple
switch closures.
3.3v
LVTTL
LEMO_1B_8P_REC
uClamp3306p
3 SYNC OUT
1
7
NOTE: THESE I/O PORTS ARE FOR LVTTL LEVELS ONLY. VOLTAGES ABOVE 3.3V WILL HARM THE TS3.
There is an I/O conditioning accessory available from MIKROTRON that accepts signals up to
24v. The conditioner uses opto-isolators to protect the camera from over-voltage.
11S-3000M
page 83

TS3 User Manual
Appendix E: Adjusng Back Focus
Symptoms of incorrect Back Focus Adjustment:
• Zoom lenses loose focus when zooming in or out. (Not all zoom lenses are designed to remain
focused, so be careful not to prematurely jump to the conclusion that the back focus needs
adjustment.)
• Lenses will not focus at infinit .
• The witness marks (distance marks) on lenses are always off in the same di ection
Figure 9-3: Focus Chart
Tools required for Back Focus
Adjustment:
High quality lens--or lens that
•
you need to use for a particular
test --Best if it is very fast--f/1.4
or faster.
• A high quality focus chart can be
very helpful. In a pinch, you can
print one yourself. An 8 1/2 x 11”
or A-Size Seimens Star chart will
work for the example here.
Figure 9-4: C-Mount
5. Get plenty of flat white light on the target.
• A 3/32” hex allen wrench for the
C-mount lock screws. (See “TS3
Top View” on page 4 and “TS3
Bo om View” on page 5.)
Adjustment procedure:
1. Connect the TS3 to an LCD display, either via a PC
connection or the HDMI port. You will wish to have
a very good view of the image--the larger the better.
2. Select the lens you wish to use. For our discussion
we will use a 1” format Navitar 50mm f/.95 lens.
3. Decide on a distance. For this discussion we will
use 5’, or 1.5m.
4. Set your target 5’ / 1.5m from the target. The
proper way to measure is from the image plane to
the target. The image plane would be about 17.5 mm
behind the face of the C-mount. Set the target as flat
and square to the camera as possible. Usually, taping it
to a wall is the easiest.
6. Set the TS3 up to frame the image. Using a 50 mm lens at 1.5m, the field of view at 800 x 600
resolution will be just a little larger than the focus chart. Use smaller resolutions to zoom-in
for fine adjustment.
7. Make a reference mark on the C-mount adapter to mark your starting point. This can be done
with a little dab of white out, or a small piece of tape.
8. Frame and focus the camera on the focus target.
9. Set the lens aperture wide open: f/.95 for this lens.
page 84

TS3 User Manual
10. Adjust the illumination and/or the exposure setting to get the right exposure, avoiding
saturation. ( Keep the lens set at its largest aperture. It is important to use the shallowest depth
of focus possible.)
11. Look at the witness mark on the lens. It should be pointing o 5’/1.5m. If it is not, continue
on with the adjustment.
12. Set the lens to the 5’/1.5m witness mark.
13. If the focus got noticeably worse, go on with the adjustment.
14. Loosen the two C-Mount Lock screws (see “Figure 1-3: TS3 Top View” and “Figure 1-3: TS3
Top View”). The C-Mount is threaded onto the TS3 Optional Block. Loosening the screws enable
turning the C-Mount for adjustment.
15.
other direction. You will quickly learn which way to turn it to get better results.
Note: The C-mount has 3/32 threads on it. It also has a scalloped pattern on its edge comprising 36
indentations. Rotating the mount the distance of one of these indentations is equiv
the back focus distance a .022mm or a little less than .001 ” It is a good goal to adjust the back focus
to within a couple of these indentations, or less than .05mm / .002 ”
16.
two adjustment screws and reconfirm the focus.
Setting for Infinity
If you will be using the TS3 exclusively for close by objects and are satisfied that the back focus is
correct, you may skip this part. If, however, you will be using the camera for activities where it will be
imaging far away objects, you will want to confirm that it can focus at infinit .
Figure 9-5: Navitar 50mm f/95 Lens
Turn the C-mount adapter a short distance one direction, then back to where it was, then the
When you are satiffied that the back focus is adjusted as well as you can get it, tighten the
alent to adjusting
To do this you will need to find a place
where you can set the camera up that
has a good view of objects at various
distances.
If the best focus for very far objects is at or a tiny bit before the infinity stop, the lens is OK. If you
find that the best focus for the farthest objects is not close to the infinity stop, or you find that you
just cannot focus on far away objects, repeat #14 through #16 above.
11S-3000M
17. Check the location of the reference
mark made on the lens in #7, above.
18. Look at the last witness mark
on the lens before infinity. Find an
object in your field of view that is
approximately the distance indicated
by that last witness mark. For example
on the Navitar 50mm f/.95 lens, the
last witness mark before infinity is
10m. So you would find an object
approximately 10m away and focus on
it.
19. Is the lens now set close to the
10m witness mark? Continue findin
targets farther and farther away to get
a feel for how far the lens can focus to.
page 85

TS3 User Manual
Appendix F: Camera Status LEDs
Figure 9-6: Camera Status LEDs
Power Network Disk Camera Sync Battery
Power LED: Solid Green whenever the TS3 is powered up.
Network LED: Fast blinking Amber whenever the TS3 is sending or receiving on the network.
Disk LED: Fast blinking Amber whenever the TS3 SSD or SDHC are accessed.
Camera LED: Solid Green whenever in LIve mode (operating, but not recording).
Blinking Amber slowly (1 Hz) when the TS3 is Armed (recording, not triggered).
Blinking Amber quickly (2 Hz) when the TS3 is Triggered.
Blinking Purple slowly (1 Hz) when the TS3 is Armed in Autosave (recording, not triggered).
Blinking Purple quickly (2 Hz) when the TS3 is Triggered in Autosave.
Solid Amber when in Review mode (playing back recorded images).
Off when battery is charging
Battery LED:
Blue when no battery is present
Solid Green when in operation and battery charge is above 15%.
Solid Amber when in operation and battery charge is above 5%, below 15%
Blinking Red when in operation and battery charge is below 5%
Blinking Green when charging above 15%
Blinking Amber when charging above 5%, below 15%
B linking Red when charging below 5%
page 86

TS3 User Manual
Appendix G: Contents of Frame.txt le
[Image]
roi_x=0
roi_y=0
width=1280
height=1024
bit_mode=upper 8
frame_count=345
trigger_frame=344
time_ tamp=Thu Oct 6 12:27:48 2011
[Camera]
make=MIKROTRON
model=TS3
fpga_rev=0x00010040
software_version=000.001.002mac_
address=a4:1b:c0:00:00:17
camera_name=TS3-c
sensor_type=C31L
[Record]fps=500
shutter_speed=200
0 multi_slope=0:
trigger_settings
sync_in=0x0
sync_out=0x0
[Normalization
red_balance=256
blue_balance=256
green_balance=256
brightness=100
contrast=100
gamma=100
sensor_gain=0
red_gain=1
green_gain=1
blue_gain=1
red_matrix[256,0,0]
blue_matrix=[0,0,256]
green_matrix=[0,256,0]
raw=0
codec=BMP
11S-3000M
page 87
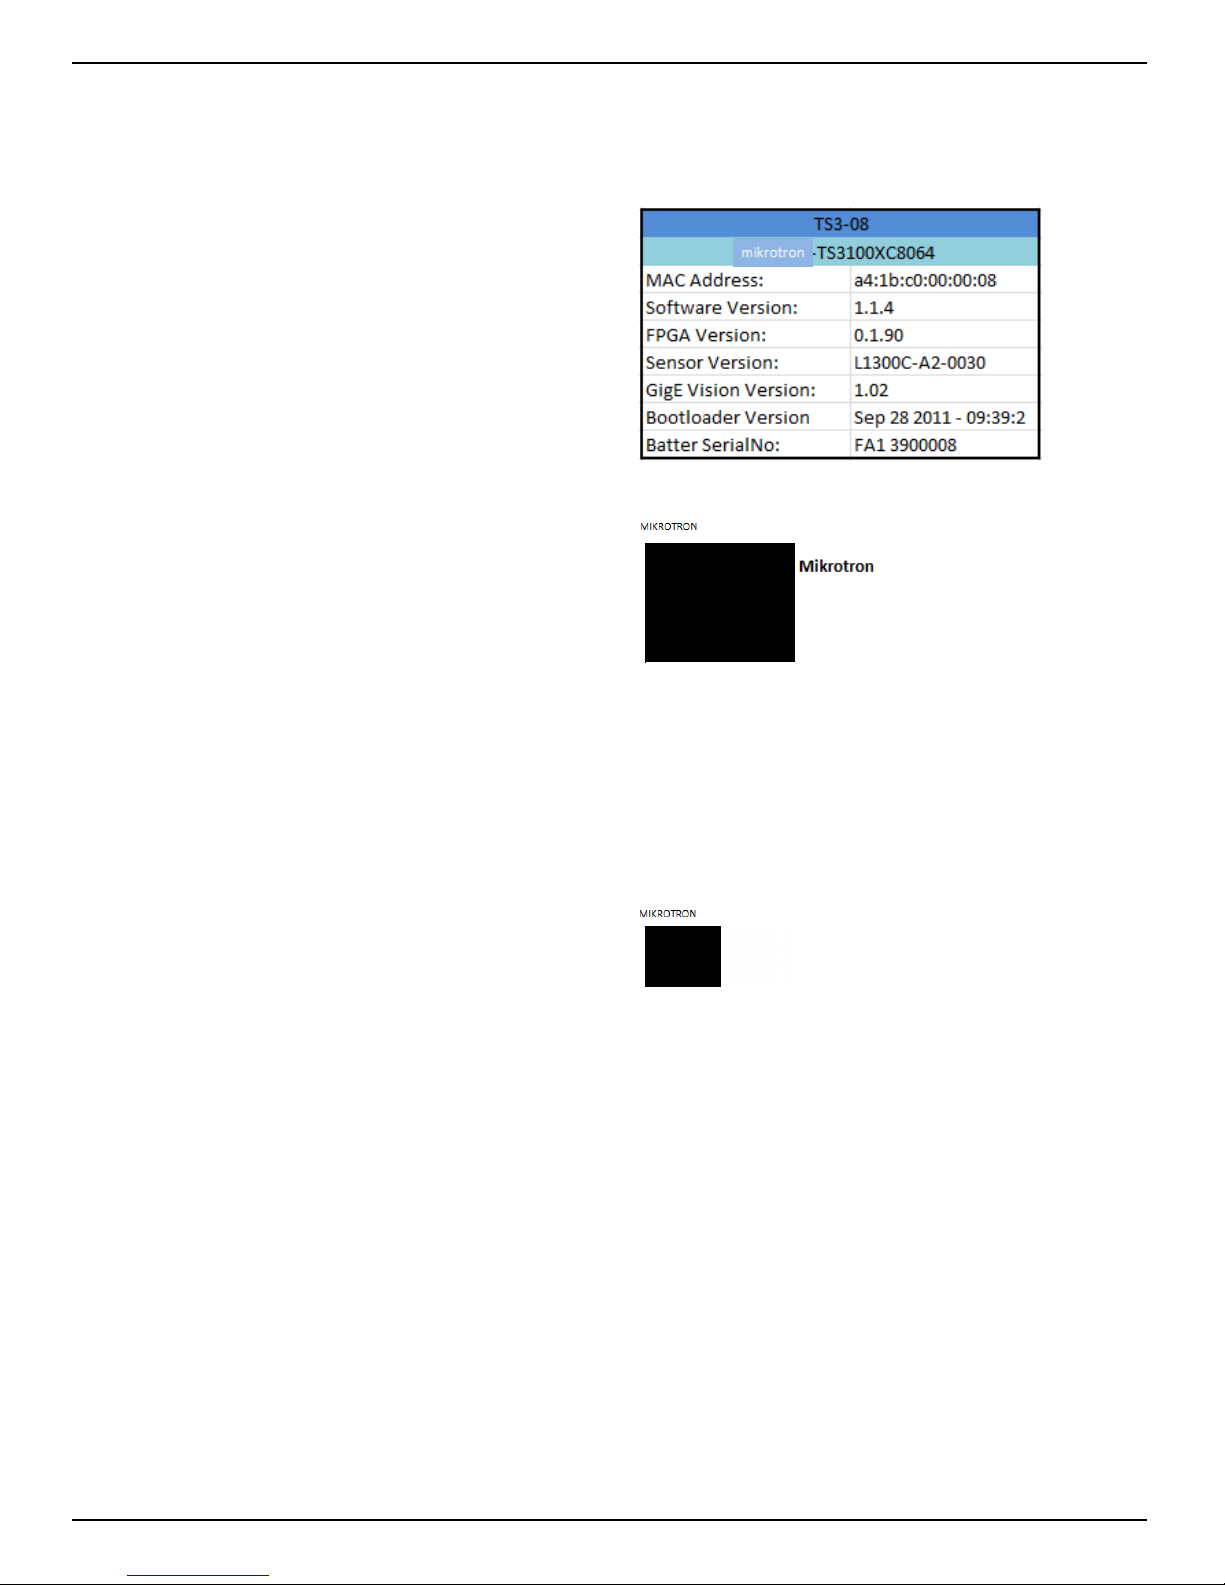
TS3 User Manual
Appendix H: TS3 Updates
From time to time there will be camera software updates. These updates will come in the form of
files that are made available via FTP or some other means.
If you are notified by MIKROTRON or one of its
distributors that an update is available, they will let
you know where the file is located and how to
download it to a PC running Windows Vista or
Windows 7. The PC will need to have a an SD Card
port or have a card reader attached to it.
Update Procedure:
1. Navigate to System/Information/Status to see the
current Software Version of your TS3.
2. Power down the TS3.
3. Download the update file to a Windows PC. The
update file name will be in the form of
“ts3_revx.x.x_<Year>_<date>.exe.” For example,
the latest revision as of the 1st of March, 2012 is:
ts3_rev1.1.4_2012_0301.exe.
4. Attach an SDHC card to the PC. If the PC does not
have a built in card reader, you may attach a USB
card reader to it. Please note the drive leer the
PC assigns the card.
Note: There are two options for formatting the SD
Card using System/Storage/Format: “Compatibility
” (FAT32), and “Performance” (EXT2). In order to be
used for the update process the SD Card must be
formatted using the “Compatibility ” (FAT32) option.
Table 9-6: Informaon Status
Figure 9-7: Camera Update Screens
5. Double click on the update file. The Update Screen
will appear. Click Next.
6. A License Agreement will appear. Click the check
box to accept the terms and click Next.
7. A screen will appear for selecting the SD Card.
Make sure that you have selected the correct
drive letter before clicking on Install. A new
window with a progress bar will appear.
8. Once the update program has finished writing
to the SD Card, a final screen will appear. Click
on Finish. Remove the SD Card from the PC.
9. Insert the SD Card into the SDHC slot of the TS3.
10. Power up the TS3 while pressing the Up Arrow on
The D-Pad. When the camera boots up, you will
see a blue update screen and a progress bar. When
it is finished the camera will boot normally.
11. After the camera boots up, navigate to System/Configuration and select reset. This will load valid
factory default parameters into the camera.
12. Power Cycle the camera (turn it completely off, then reboot.)
13. Navigate again to System/Information/Status to see the new Software Version of your TS3.
14. Re-format the SD Card before using it for image file storage.
page 88

TS3 User Manual
Appendix I: Physical Measurements
Figure 9-8: Physical Measurements
11S-3000M
page 89
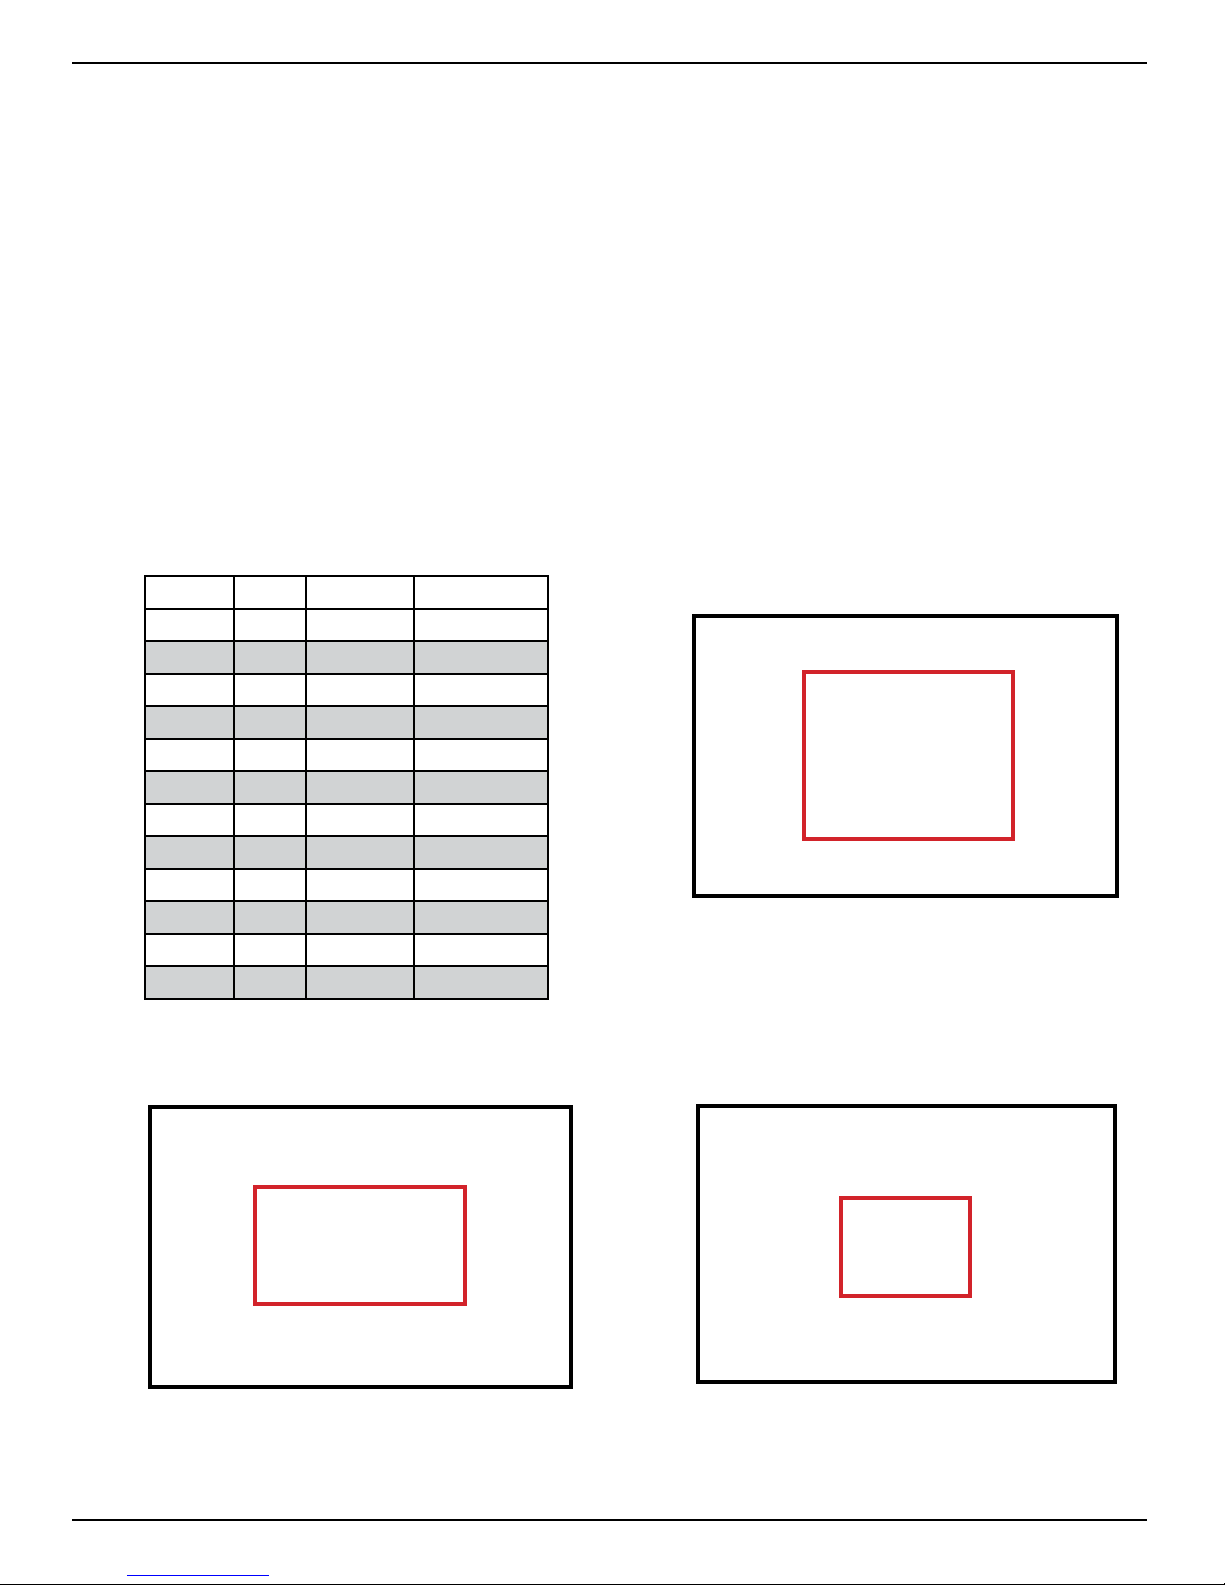
TS3 User Manual
Appendix J: Crop Factor
Crop Factor is a term used in digital photography that expresses the size of the sensor image
plane as compared to that of 35mm film. In Figure 9-9 through Figure 9-11, below, the Black
border represents the image on 35mm film, the Red border represents the image on the sensor
using the same focal length lens.
Diagonal of 35mm film / Diagonal of the Sensor area used = Crop Factor
The diagonal of 35mm film is 43.3, compared to the 22.95mm diagonal of the TS3, you get a
crop factor of 1.89:
The photographic advantage of knowing the crop factor is that if you know the lens you would use for
a given field of view with a 35mm camera, you can divide the crop factor into that number to give you
the focal length of the lens with the same field of view for your TS3. For example, if you are using a
125mm lens on your 35mm SLR, you will need about a 65mm lens on the TS3 at full resolution
(125mm / 1.89 = 66.14).
43.3mm / 22.95mm = 1.89
Table 9-7: Crop Factor
H-Res V-Res Diagonal Crop Factor
1280 1024 22.95 1.89
1280 720 20.56 2.11
1024 1024 20.27 2.14
1280 256 18.27 2.37
800 600 14.00 3.09
1024 600 16.62 2.61
640 480 11.20 3.87
800 480 13.06 3.32
512 512 10.14 4.27
320 240 5.60 7.73
320 200 5.28 8.20
256 256 5.07 8.54
Figure 9-10: Crop Factor 1280 x 720 Figure 9-11: Crop Factor 800 x 600
Figure 9-9: Crop Factor 1280 x 1024
page 90

TS3 User Manual
Appendix K: Paron Capture (CAP) File Format
Partition Capture file format is a MIKROTRON proprietary raw data format used to store image data
gathered by the TS3 in one “Session” into the camera’s built-in SSD drive. The session length is set by
the user (see “3-8 Storage Setup” on page 20) to any multiple of 256MB up to the memory capacity
of the camera, which is either 4GB or 8GB. The actual length of a recorded session may vary,
however, depending on whether the full allotment of pre-trigger frames were captured before the
trigger was asserted (see “Application Note 3: Trigger Position and the Circular Buffer” on page 97).
There are three major distinguishing benefits of CAP file
1. CAP file transfer time from DRAM to SSD is the shortest of all of the uncompressed file types
2. CAP files are the only files that may be copied back into DRAM from the SSD and played back
from the camera or on a PC via the camera.
3. CAP files a e the only uncompressed single file format available from the camera.
Figure 9-12: CAP File Diagram
11S-3000M
page 91
 Loading...