

MikroTik CRS326-24S+2Q+RM User Manual
CRS326-24S+2Q+RM
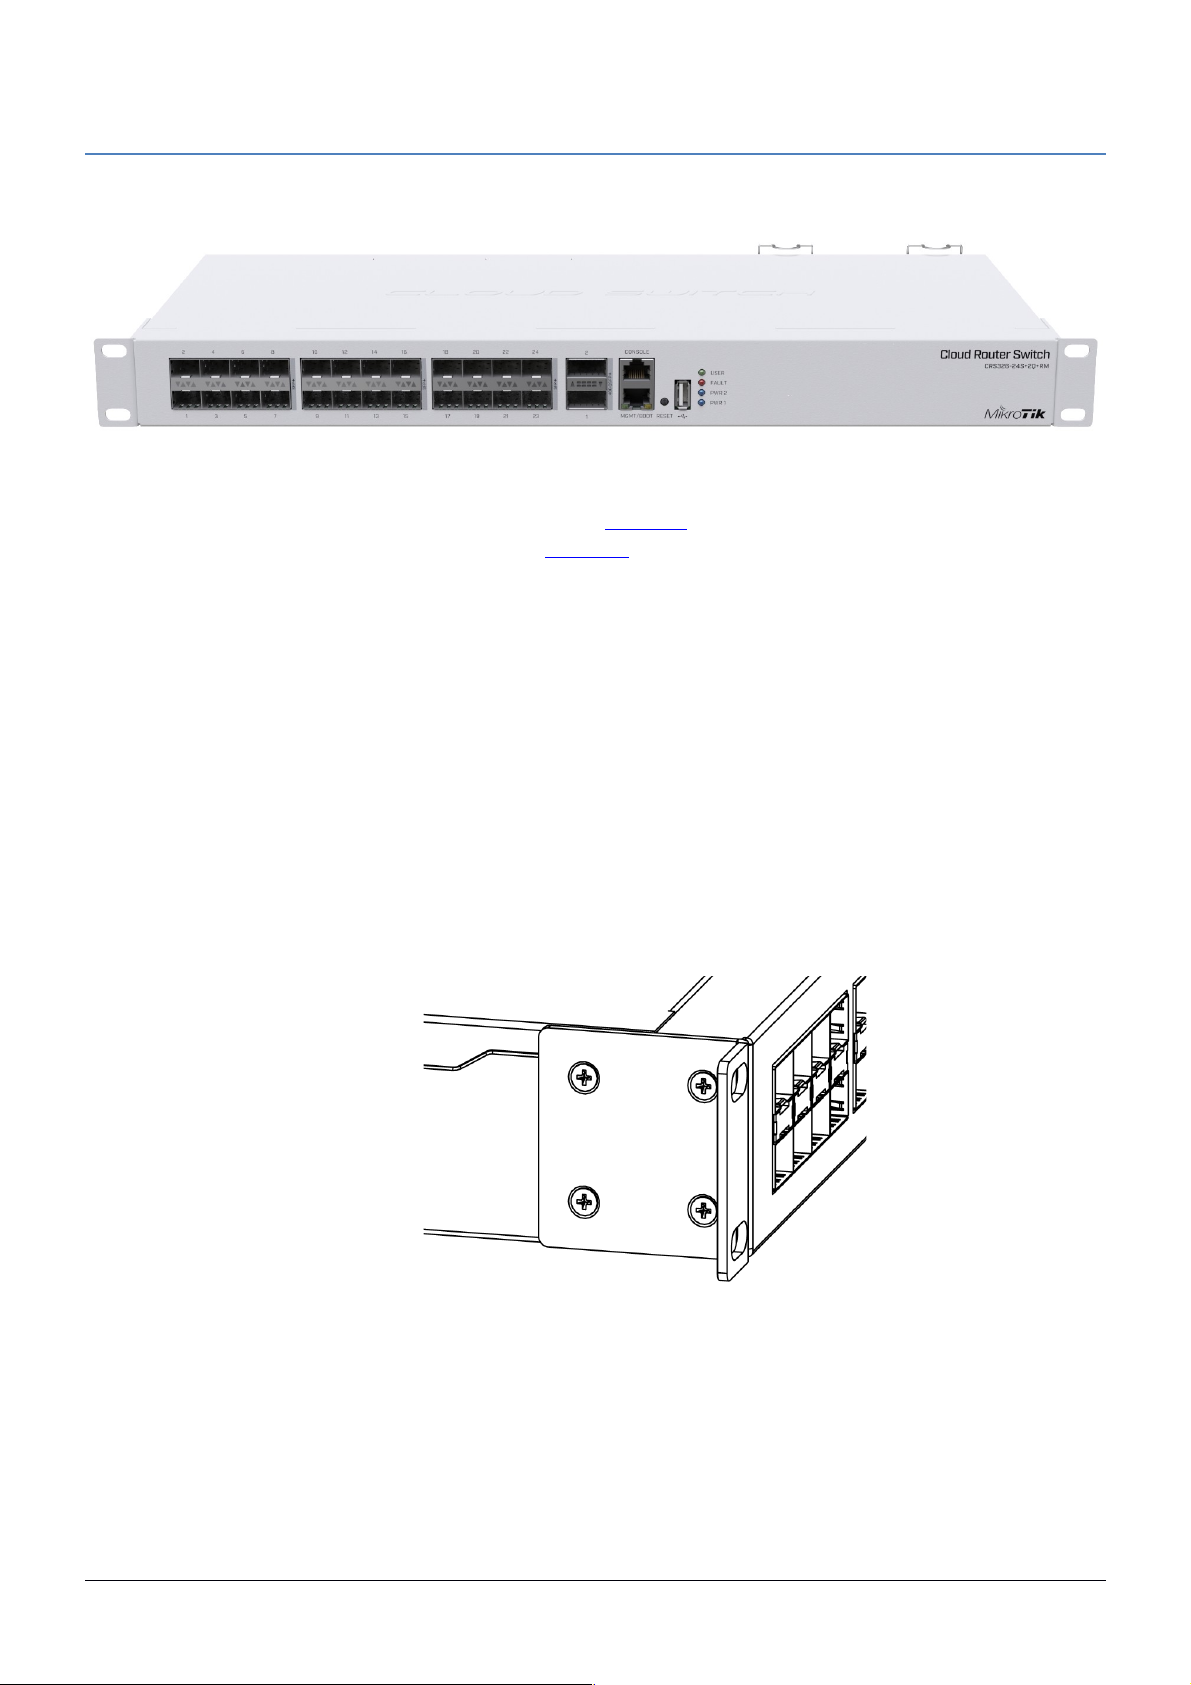
The CRS326 is a network switch with 24 10G SFP+ ports and two QSFP+ 40G ports. The device is ready to use as
a switch.
Quick start
• Mount unit or place on the flat surface, please see Mounting paragraph for instructions.
• Choose your powering solution, please see Powering section for possibilities.
• The Initial connection has to be done via the Ethernet cable, using the MikroTik Winbox utility.
• Use Winbox to connect to the default IP address of 192.168.88.1 from any port, with the username admin
and no password, the device is set up as a switch.
• We recommend clicking the “Check for updates” button and updating your system software to the latest
version to ensure the best performance and stability.
• Set up your password to secure the device.
Mounting
The device is designed to use indoors and it can be mounted in a rackmount enclosure using provided rack
mounts, or it can be placed on the desktop. Please attach rubber pegs on the bottom of the router if the desired
placement is on the flat surface or use a Phillips screwdriver to attach rackmount ears on both sides of the device if
designated use is for rackmount enclosure:
1. Attach rack ears to both sides of the device and tighten four screws to secure them in place, as
shown in the picture.
2. Place the device in rackmount enclosure and align with the holes so that the device fits
conveniently.
3. Tighten screws to secure it in place.
The IP rating scale for this device is IPX0. The device has no protection from water contamination, please ensure
the placement of the device in a dry and ventilated environment.
Mounting and configuration of this device should be done by a qualified person. We recommend using Cat5/6
cables for our devices.
See mikrotik.com/products for the latest version of this document. Document #49424 Modified on: 06.AUG.2019

Powering
The device accepts powering from two inputs of 100 – 240 V AC ⏦.
The power consumption of this device under maximum load is up to 42 W. With attachments up to 69 W.
Booting process
The device supports booting RouterOS (for complete routing and switching configuration) or SwOS (for only using
as a switch). By default, the device will boot RouterOS, but you can reboot into the other operating system in the
following ways:
• From SwOS: In the System menu, click “Boot RouterOS” button on the bottom of the page.
• From RouterOS: in the System, RouterBOARD menu, click “Settings” and there select “Boot OS”.
It is also possible to select the OS and configure other boot settings via the serial console menu.
Configuration
Serial console for configuration is an RS-232 serial port, set by default to 115200 bit/s, 8 data bits, 1 stop bit, no
parity. Standard RJ45 to COM cable can be used. To find detailed serial console configuration and pinout please
visit serial console section in our wiki pages here: https://wiki.mikrotik.com/wiki/Manual:System/Serial_Console
RouterOS and SwOS include many configuration options in addition to what is described in this document. We
suggest starting here to get yourself accustomed to the possibilities: http://mt.lv/help. In case the IP connection is
not available, the Winbox tool (http://mt.lv/winbox) can be used to connect to the MAC address of the device.
Extension slots and ports
• Twenty four 10G SFP+ ports.
• Two 40G QSFP+ ports.
• 1x RJ45 console port (set at 115200bits/s, 8 data bits, 1 stop bit no parity).
• 1x 10/100Mbit Ethernet port for management access.
• USB type-A port.
• Three cooling fans with automatic speed control.
• Two integrated power supply units with AC ⏦ inputs for redundancy.
Please visit wiki pages for MikroTik SFP module compatibility and configuration table:
https://wiki.mikrotik.com/wiki/MikroTik_SFP_module_compatibility_table
Reset button
The RouterBOOT reset button has the following functions. Press the button and apply the power, then:
• Release the button when green LED starts flashing, to reset RouterOS configuration to defaults.
• Release the button when the LED turns solid green to clear all configuration and defaults.
• Release the button after LED is no longer lit (~20 seconds) to cause a device to look for Netinstall servers
(required for reinstalling RouterOS over the network).
Regardless of the above option used, the system will load the backup RouterBOOT loader if the button is pressed
before power is applied to the device. Useful for RouterBOOT debugging and recovery.
Accessories
Package includes the following accessories that come with the device:
• K-10 Fastening set for rackmount case.
• White rackmount bracket – 2 pcs.
• EU/US power cord, AC D03+QT3 H05VV-F 3x0.75mm2, 1.83m RoHS – 2 pcs.⏦
See mikrotik.com/products for the latest version of this document. Document #49424 Modified on: 06.AUG.2019
 Loading...