

Page 1

mikroBASIC
Develop your applications quickly and easily with the world's
most intuitive BASIC compiler for PIC Microcontrollers (families
PIC12, PIC16, and PIC18).
Highly sophisticated IDE provides the power you need with the
simplicity of a Windows based point-and-click environment.
With useful implemented tools, many practical code examples,
broad set of built-in routines, and a comprehensive Help,
mikroBasic makes a fast and reliable tool, which can satisfy
needs of experienced engineers and beginners alike.
BASIC Compiler for Microchip PIC microcontrollers
mikroElektronika
Development tools - Books - Compilers
www.mikroe.com
UUsseerr’’ss mmaannuuaall
Making it simple
SUPPORTED
from V5.0
ICD
ICD
mikro
mikro
IN-CIRCUIT
IN-CIRCUIT
DEBUGGER
DEBUGGER
Page 2

mmiikkrrooBBAASSIICC
- BASIC Compiler for Microchip PIC microcontrollers
mikroBASIC
making it simple...
iiii
mmiikkrrooEElleekkttrroonniikkaa:: DDeevveellooppmmeenntt ttoooollss -- BBooookkss -- CCoommppiilleerrss
page
DISCLAIMER:
mikroBasic and this manual are owned by mikroElektronika and are protected by copyright
law and international copyright treaty. Therefore, you should treat this manual like any other
copyrighted material (e.g., a book). The manual and the compiler may not be copied, partially or as a whole without the written consent from the mikroElektronika. The PDF-edition
of the manual can be printed for private or local use, but not for distribution. Modifying the
manual or the compiler is strictly prohibited.
HIGH RISK ACTIVITIES
The mikroBasic compiler is not fault-tolerant and is not designed, manufactured or intended
for use or resale as on-line control equipment in hazardous environments requiring fail-safe
performance, such as in the operation of nuclear facilities, aircraft navigation or communication systems, air traffic control, direct life support machines, or weapons systems, in which
the failure of the Software could lead directly to death, personal injury, or severe physical or
environmental damage ("High Risk Activities"). mikroElektronika and its suppliers specifically
disclaim any express or implied warranty of fitness for High Risk Activities.
LICENSE AGREEMENT:
By using the mikroBasic compiler, you agree to the terms of this agreement. Only one person may use licensed version of mikroBasic compiler at a time.
Copyright © mikroElektronika 2003 - 2006.
This manual covers mikroBasic version 5.0.0.2 and the related topics. New versions may
contain changes without prior notice.
COMPILER BUG REPORTS:
The compiler has been carefully tested and debugged. It is, however, not possible to
guarantee a 100% error free product. If you would like to report a bug, please contact us at
the address office@mikroe.com. Please include the following information in your bug report:
- Your operating system
- Version of mikroBasic
- Code sample
- Description of a bug
CONTACT US:
mikroElektronika
Voice: + 381 (11) 30 66 377, + 381 (11) 30 66 378
Fax: + 381 (11) 30 66 379
Web: www.mikroe.com
E-mail: office@mikroe.com
Reader’s note
PIC, PICmicro and MPLAB is a Registered trademark of Microchip company. Windows is a
Registered trademark of Microsoft Corp. All other trade and/or services marks are the
property of the respective owners.
Page 3

mmiikkrrooEElleekkttrroonniikkaa:: DDeevveellooppmmeenntt ttoooollss -- BBooookkss -- CCoommppiilleerrss
Table of Contents
CHAPTER 1 mikroBasic IDE
CHAPTER 2 Building Applications
CHAPTER 3 mikroBasic Reference
CHAPTER 4 mikroBasic Libraries
mmiikkrrooBBAASSIICC UUsseerr’’ss mmaannuuaall
Page 4

CHAPTER 1: mikroBasic IDE 1
Quick Overview 1
Code Editor 3
Code Explorer 6
Debugger 7
Error Window 10
Statistics 11
Integrated Tools 14
Keyboard Shortcuts 17
CHAPTER 2: Building Applications 19
Projects 20
Source Files 21
Search Paths 21
Managing Source Files 21
Compilation 23
Output Files 23
Assembly View 23
Error Messages 24
CHAPTER 3: mikroBasic Language Reference 27
PIC Specifics 28
mikroBasic Specifics 30
Predefined Globals and Constants 30
Accessing Individual Bits 30
Interrupts 31
Linker Directives 32
Code Optimization 34
mikroICD (In-Circuit Debugger) 35
mikroICD Debugger Options 37
mikroICD Debugger Example 38
mikroICD Overview 42
Lexical Elements 44
Whitespace 44
Comments 45
Tokens 46
Literals 47
Integer Literals 47
Floating Point Literals 47
mmiikkrrooBBAASSIICC
- BASIC Compiler for Microchip PIC microcontrollers
mikroBASIC
making it simple...
iivv
mmiikkrrooEElleekkttrroonniikkaa:: DDeevveellooppmmeenntt ttoooollss -- BBooookkss -- CCoommppiilleerrss
page
Page 5

Character Literals 48
String Literals 48
Keywords 49
Identifiers 50
Punctuators 51
Program Organization 53
Scope and Visibility 56
Modules 57
Include Clause 57
Main Module 58
Other Modules 59
Variables 60
Constants 61
Labels 62
Symbols 63
Functions and Procedures 64
Functions 64
Procedures 65
Types 67
Simple Types 68
Arrays 69
Multidimensional Arrays 70
Strings 71
Pointers 72
Structures 73
Types Conversions 75
Implicit Conversion 75
Explicit Conversion 76
Arithmetic Conversion 77
Operators 78
Precedence and Associativity 78
Arithmetic Operators 79
Relational Operators 80
Bitwise Operators 81
Expressions 84
Statements 85
asm Statement 85
Migration from older versions (v2.x) 86
Assignment Statements 87
Conditional Statements 87
Iteration Statements 90
Jump Statements 92
Compiler Directives 95
mmiikkrrooEElleekkttrroonniikkaa:: DDeevveellooppmmeenntt ttoooollss -- BBooookkss -- CCoommppiilleerrss
vv
page
mmiikkrrooBBAASSIICC
- BASIC Compiler for Microchip PIC microcontrollers
mikroBASIC
making it simple...
Page 6

CHAPTER 4: mikroBasic Libraries 99
Built-in Routines 100
Library Routines 106
ADC Library 107
CAN Library 109
CAN Constants 115
CANSPI Library 121
Compact Flash Library 130
EEPROM Library 142
Ethernet Library 144
SPI Ethernet Library 156
Flash Memory Library 163
I2C Library 166
Keypad Library 171
LCD Library (4-bit interface) 175
LCD Library (8-bit interface) 181
Graphic LCD Library 186
Toshiba T6963C Graphic LCD Library 196
Manchester Code Library 212
Multi Media Card Library 219
OneWire Library 232
PS/2 Library 236
PWM Library 239
RS-485 Library 243
Software I2C Library 249
Software SPI Library 253
Software UART Library 256
Sound Library 259
SPI Library 261
USART Library 265
USB HID Library 269
Util Library 274
Conversions Library 275
Delays Library 281
Math Library 283
String Library 290
SPI Graphic LCD Library 298
Port Expander Library 309
SPI LCD Library (4-bit interface) 317
SPI LCD Library (8-bit interface) 322
SPI T6963C Graphic LCD Library 327
Contact Us 312
mmiikkrrooBBAASSIICC
- BASIC Compiler for Microchip PIC microcontrollers
mikroBASIC
making it simple...
vv ii
mmiikkrrooEElleekkttrroonniikkaa:: DDeevveellooppmmeenntt ttoooollss -- BBooookkss -- CCoommppiilleerrss
page
Page 7

CHAPTER
MMiikkrrooEElleekkttrroonniikkaa:: DDeevveellooppmmeenntt ttoooollss -- BBooookkss -- CCoommppiilleerrss
1
mikroBasic IDE
mikroBasic is a powerful, feature rich development tool for PIC microcontrollers.
It is designed to provide the customer with the easiest possible solution for
developing applications for embedded systems, without compromising performance or control.
Highly advanced IDE, broad set of hardware libraries, comprehensive
documentation, and plenty of ready to run examples should be more than enough
to get you started in programming microcontrollers.
QUICK OVERVIEW
Page 8

mmiikkrrooBBAASSIICC
- BASIC Compiler for Microchip PIC microcontrollers
mikroBASIC
making it simple...
22
mmiikkrrooEElleekkttrroonniikkaa:: DDeevveellooppmmeenntt ttoooollss -- BBooookkss -- CCoommppiilleerrss
page
mikroBasic allows you to quickly develop and deploy complex applications:
- Write your BASIC source code using the highly advanced Code Editor
- Use the included mikroBasic libraries to dramatically speed up the development:
data acquisition, memory, displays, conversions, communications…
- Monitor your program structure, variables, and functions in the Code Explorer.
Generate commented, human-readable assembly, and standard HEX compatible
with all programmers.
- Inspect program flow and debug executable logic with the integrated Debugger.
Get detailed reports and graphs on code statistics, assembly listing, calling tree…
- We have provided plenty of examples for you to expand, develop, and use as
building bricks in your projects.
Code
Explorer
Error
Window
Watch
Window
Code
Editor
Breakpoints
Window
Code
Assistant
Page 9

mmiikkrrooEElleekkttrroonniikkaa:: DDeevveellooppmmeenntt ttoooollss -- BBooookkss -- CCoommppiilleerrss
33
page
mmiikkrrooBBAASSIICC
- BASIC Compiler for Microchip PIC microcontrollers
mikroBASIC
making it simple...
The Code Editor is advanced text editor fashioned to satisfy the needs of professionals. General code editing is same as working with any standard text-editor,
including familiar Copy, Paste, and Undo actions, common for Windows environment.
Advanced Editor features include:
- Adjustable Syntax Highlighting
- Code Assistant
- Parameter Assistant
- Code Templates
- Auto Correct for common typos
- Bookmarks and Goto Line
You can customize these options from Editor Settings dialog. To access the settings, click Tools > Options from the drop-down menu, or click the Tools icon.
CODE EDITOR
Tools Icon.
Page 10

Code Assistant [CTRL+SPACE]
If you type first few letter of a word and then press CTRL+SPACE, all valid identifiers matching the letters you typed will be prompted to you in a floating panel
(see the image). Now you can keep typing to narrow the choice, or you can select
one from the list using the keyboard arrows and Enter.
Parameter Assistant [CTRL+SHIFT+SPACE]
The Parameter Assistant will be automatically invoked when you open a parenthesis "(" or press CTRL+SHIFT+SPACE. If name of valid function or procedure
precedes the parenthesis, then the expected parameters will be prompted to you in
a floating panel. As you type the actual parameter, next expected parameter will
become bold.
Code Template [CTR+J]
You can insert the Code Template by typing the name of the template (for
instance, whileb), then press CTRL+J, and Editor will automatically generate
code. Or you can click button from Code toolbar and select template from the list.
You can add your own templates to the list. Just select Tools > Options from the
drop-down menu, or click the Tools Icon from the Settings Toolbar, and then
select the Auto Complete Tab. Here you can enter the appropriate keyword,
description, and code of your template.
mmiikkrrooBBAASSIICC
- BASIC Compiler for Microchip PIC microcontrollers
mikroBASIC
making it simple...
44
mmiikkrrooEElleekkttrroonniikkaa:: DDeevveellooppmmeenntt ttoooollss -- BBooookkss -- CCoommppiilleerrss
page
Page 11

Auto Correct
The Auto Correct feature corrects some common typing mistakes. To access the
list of recognized typos, select Tools > Options from the drop-down menu, or click
Tools Icon from Settings Toolbar, and then select Auto Correct Tab. You can also
add your own preferences to the list.
Comment/Uncomment
The Code Editor allows you to comment or uncomment selected block of code by
a simple click of a mouse, using the Comment/Uncomment icons from the Code
Toolbar.
Bookmarks
Bookmarks make navigation through large code easier.
CTRL+<number> : Goto bookmark
CTRL+SHIFT+<number> : Set bookmark
Goto Line
Goto Line option makes navigation through large code easier. Select Search >
Goto Line from the drop-down menu, or use the shortcut CTRL+G.
mmiikkrrooEElleekkttrroonniikkaa:: DDeevveellooppmmeenntt ttoooollss -- BBooookkss -- CCoommppiilleerrss
55
page
mmiikkrrooBBAASSIICC
- BASIC Compiler for Microchip PIC microcontrollers
mikroBASIC
making it simple...
Comment /
Uncomment Icon.
Page 12

mmiikkrrooBBAASSIICC
- BASIC Compiler for Microchip PIC microcontrollers
mikroBASIC
making it simple...
66
mmiikkrrooEElleekkttrroonniikkaa:: DDeevveellooppmmeenntt ttoooollss -- BBooookkss -- CCoommppiilleerrss
page
The Code Explorer is placed to the left of the main window by default, and gives
clear view of every declared item in the source code. You can jump to declaration
of any item by right clicking it, or by clicking the Find Declaration icon. To
expand or collapse treeview in Code Explorer, use the Collapse/Expand All icon.
Also, two more tab windows are available in the Code Explorer. QHelp Tab lists
all the available built-in and library functions, for a quick reference. Double-clicking a routine in the QHelp Tab opens the relevant Help topic. Keyboard Tab lists
all the available keyboard shortcuts in mikroBasic.
CODE EXPLORER
Collapse/Expand
All Icon.
Page 13

mmiikkrrooEElleekkttrroonniikkaa:: DDeevveellooppmmeenntt ttoooollss -- BBooookkss -- CCoommppiilleerrss
77
page
mmiikkrrooBBAASSIICC
- BASIC Compiler for Microchip PIC microcontrollers
mikroBASIC
making it simple...
Source-level Debugger is an integral component of mikroBasic development environment. It is designed to simulate operations of Microchip Technology's
PICmicros and to assist users in debugging software written for these devices.
Debugger simulates program flow and execution of instruction lines, but does not
fully emulate PIC device behavior: it does not update timers, interrupt flags, etc.
After you have successfully compiled your project, you can run the Debugger by
selecting Run > Debug from the drop-down menu, or by clicking Debug Icon .
Starting the Debugger makes more options available: Step Into, Step Over, Run to
Cursor, etc. Line that is to be executed is color highlighted.
Debug [F9]
Start the Debugger.
Run/Pause Debugger [F6]
Run or pause the Debugger.
Step Into [F7]
Execute the current BASIC (single– or multi–cycle) instruction, then halt. If the
instruction is a routine call, enter the routine and halt at the first instruction following the call.
Step Over [F8]
Execute the current BASIC (single– or multi–cycle) instruction, then halt. If the
instruction is a routine call, skip it and halt at the first instruction following the
call.
Step Out [Ctrl+F8]
Execute the current BASIC (single– or multi–cycle) instruction, then halt. If the
instruction is within a routine, execute the instruction and halt at the first instruction following the call.
Run to cursor [F4]
Executes all instructions between the current instruction and the cursor position.
DEBUGGER
Start Debugger.
Step Into.
Step Over.
Step Out.
Pause Debugger.
Run to Cursor.
Page 14

mmiikkrrooBBAASSIICC
- BASIC Compiler for Microchip PIC microcontrollers
mikroBASIC
making it simple...
88
mmiikkrrooEElleekkttrroonniikkaa:: DDeevveellooppmmeenntt ttoooollss -- BBooookkss -- CCoommppiilleerrss
page
Jump to Interrupt [F2]
Jump to address
$04 for PIC12/16 or to address $08 for PIC18 and execute the
procedure located at that address.
Toggle Breakpoint [F5]
Toggle breakpoint at the current cursor position. To view all the breakpoints, select
Run > View Breakpoints from the drop-down menu. Double clicking an item in
window list locates the breakpoint.
Watch Window
Debugger Watch Window is the main Debugger window which allows you to
monitor program items while running your program. To show the Watch Window,
select View > Debug Windows > Watch Window from the drop-down menu.
The Watch Window displays variables and registers of PIC, with their addresses
and values. Values are updated as you go through the simulation. Use the dropdown menu to add and remove the items that you want to monitor. Recently
changed items are colored red.
Double clicking an item opens the Edit Value window in which you can assign a
new value to the selected variable/register. Also, you can change view to binary,
hex, char, or decimal for the selected item.
Jump to Interrupt.
Toggle
Breakpoint.
Page 15

Stopwatch Window
Debugger Stopwatch Window is available from the drop-down menu,
View > Debug Windows > Stopwatch.
The Stopwatch Window displays the current count of cycles/time since the last
Debugger action. Stopwatch measures the execution time (number of cycles) from
the moment Debugger is started, and can be reset at any time. Delta represents the
number of cycles between the previous instruction line (line where the Debugger
action was performed) and the active instruction line (where the Debugger action
landed).
Note: You can change the clock in the Stopwatch Window; this will recalculate
values for the newly specified frequency. Changing the clock in the Stopwatch
Window does not affect the actual project settings – it only provides a simulation.
View RAM Window
Debugger View RAM Window is available from the drop-down menu,
View > Debug Windows > View RAM.
The View RAM Window displays the map of PIC’s RAM, with recently changed
items colored red. You can change value of any field by double-clicking it.
mmiikkrrooEElleekkttrroonniikkaa:: DDeevveellooppmmeenntt ttoooollss -- BBooookkss -- CCoommppiilleerrss
99
page
mmiikkrrooBBAASSIICC
- BASIC Compiler for Microchip PIC microcontrollers
mikroBASIC
making it simple...
Page 16
mmiikkrrooBBAASSIICC
- BASIC Compiler for Microchip PIC microcontrollers
mikroBASIC
making it simple...
1100
mmiikkrrooEElleekkttrroonniikkaa:: DDeevveellooppmmeenntt ttoooollss -- BBooookkss -- CCoommppiilleerrss
page
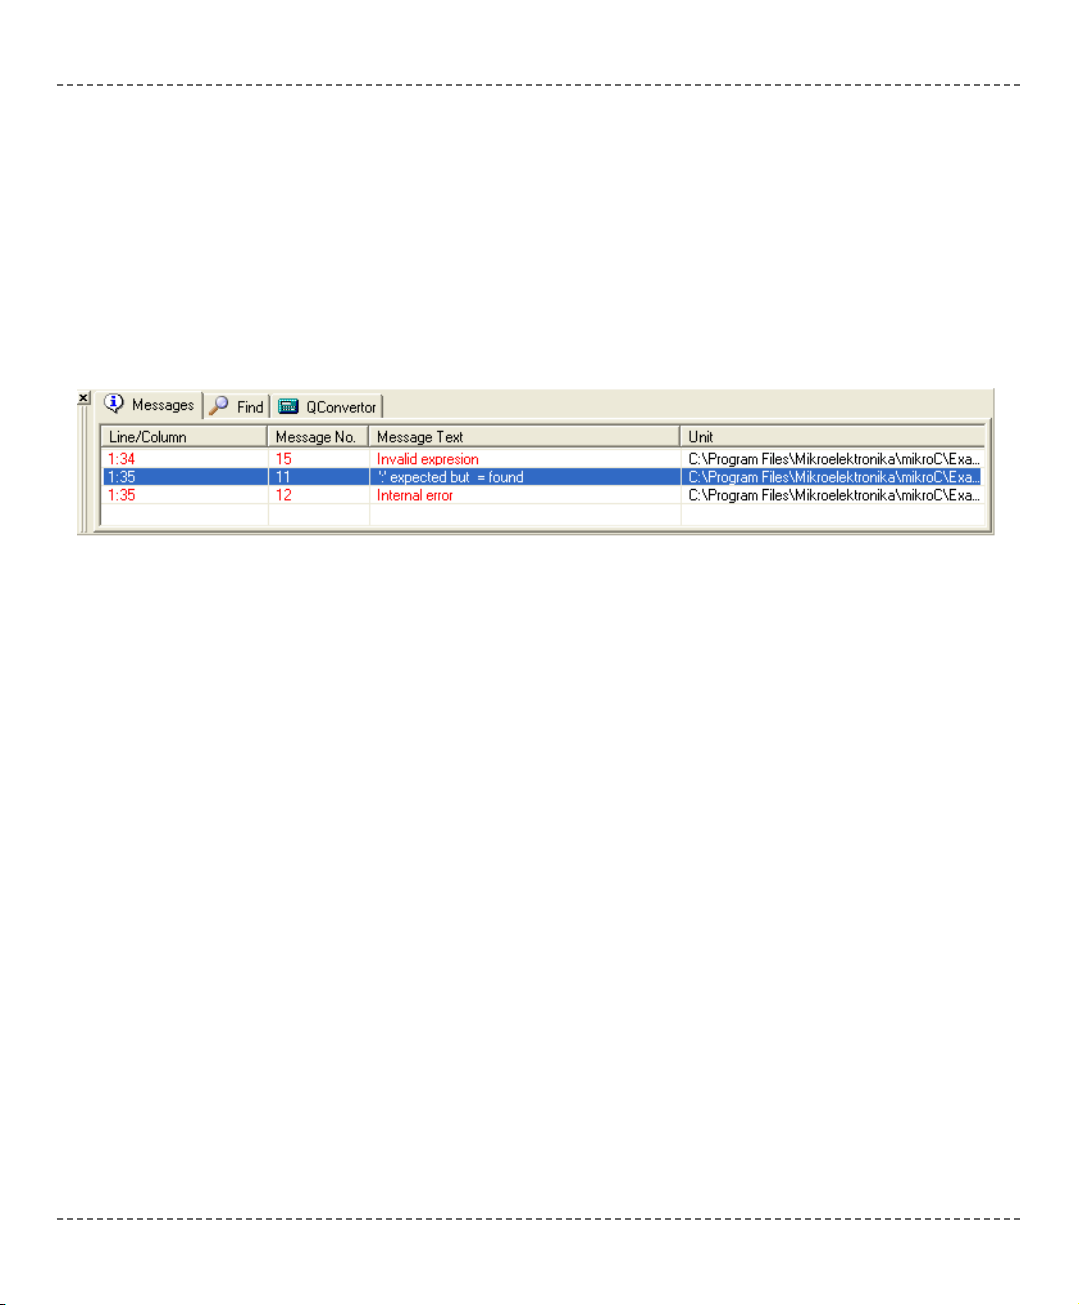
In case that errors were encountered during compiling, compiler will report them
and won't generate a hex file. The Error Window will be prompted at the bottom
of the main window.
Error Window is located under message tab, and displays location and type of
errors compiler has encountered. The compiler also reports warnings, but these do
not affect generating hex code. Only errors can interefere with generation of hex.
Double click the message line in the Error Window to highlight the line where the
error was encountered.
Consult the Error Messages for more information about errors recognized by the
compiler.
ERROR WINDOW
Page 17
mmiikkrrooEElleekkttrroonniikkaa:: DDeevveellooppmmeenntt ttoooollss -- BBooookkss -- CCoommppiilleerrss
1111
page
mmiikkrrooBBAASSIICC
- BASIC Compiler for Microchip PIC microcontrollers
mikroBASIC
making it simple...
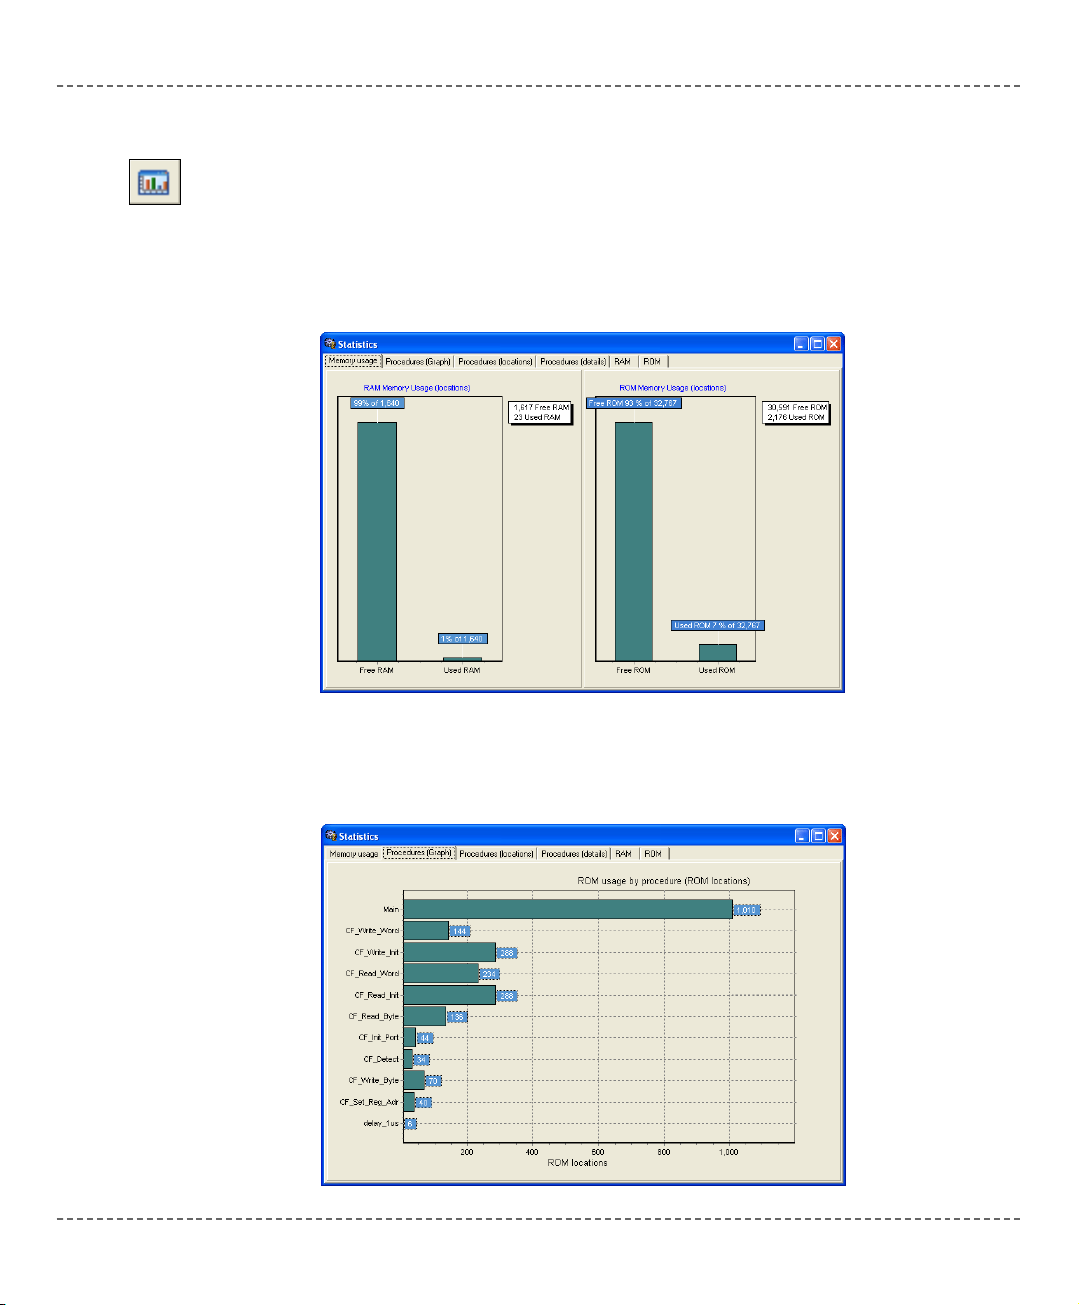
After successful compilation, you can review statistics of your code. Select
Project > View Statistics from the drop-down menu, or click the Statistics icon.
There are six tab windows:
Memory Usage Window
Provides overview of RAM and ROM memory usage in form of histogram.
Procedures (Graph) Window
Displays functions in form of histogram, according to their memory allotment.
STATISTICS
Statistics Icon.
Page 18
mmiikkrrooBBAASSIICC
- BASIC Compiler for Microchip PIC microcontrollers
mikroBASIC
making it simple...
1122
mmiikkrrooEElleekkttrroonniikkaa:: DDeevveellooppmmeenntt ttoooollss -- BBooookkss -- CCoommppiilleerrss
page
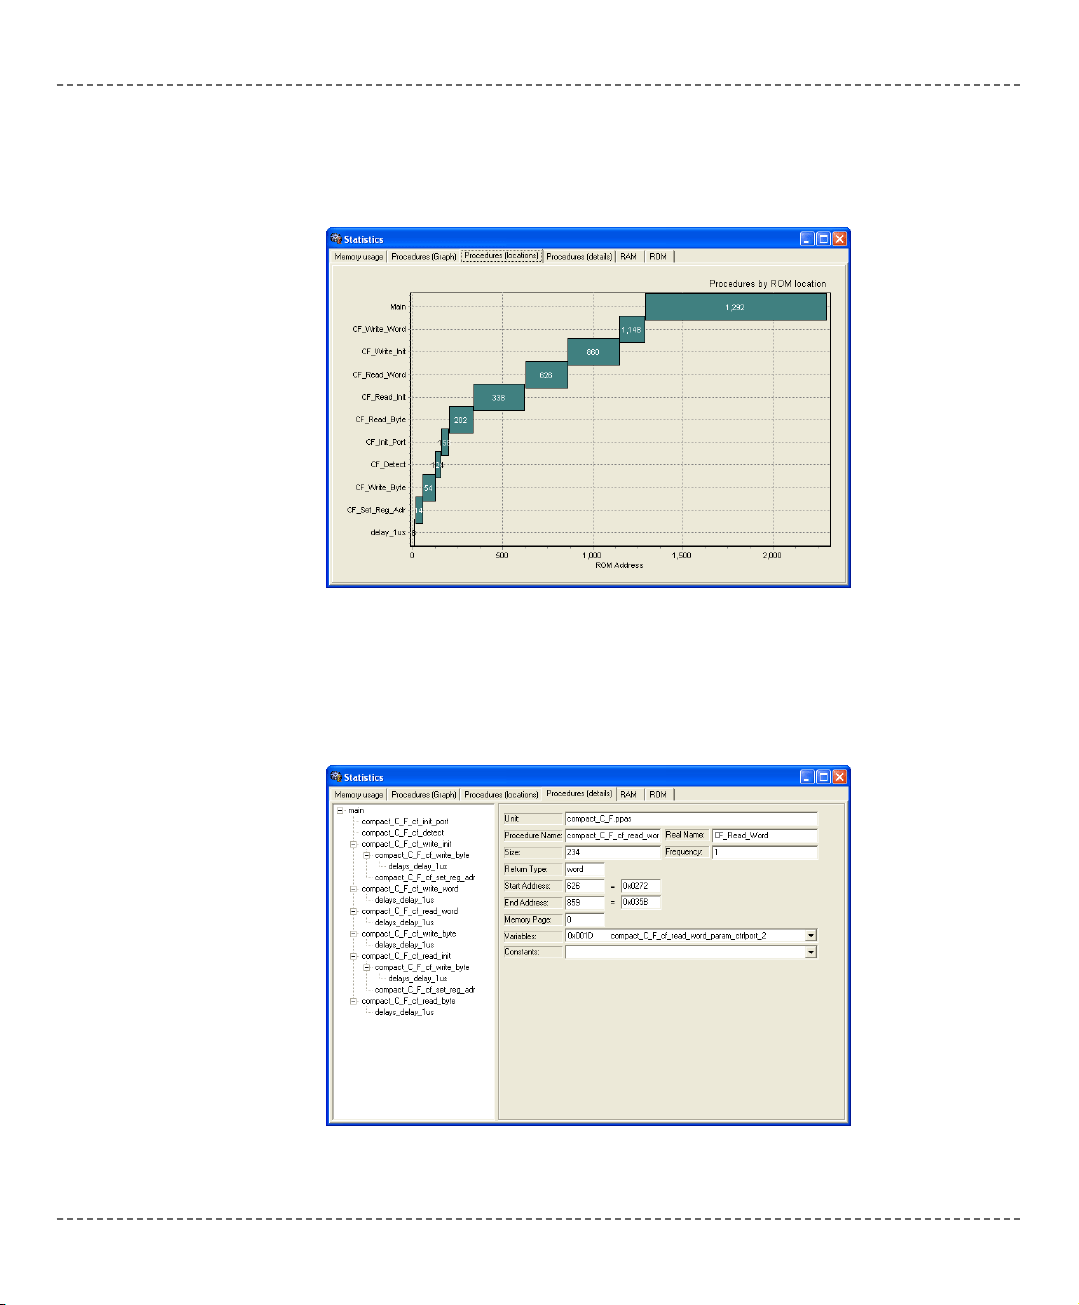
Procedures (Locations) Window
Displays how functions are distributd in microcontroller’s memory.
Procedures (Details) Window
Displays complete call tree, along with details for each procedure and function:
size, start and end address, calling frequency, return type, etc.
Page 19
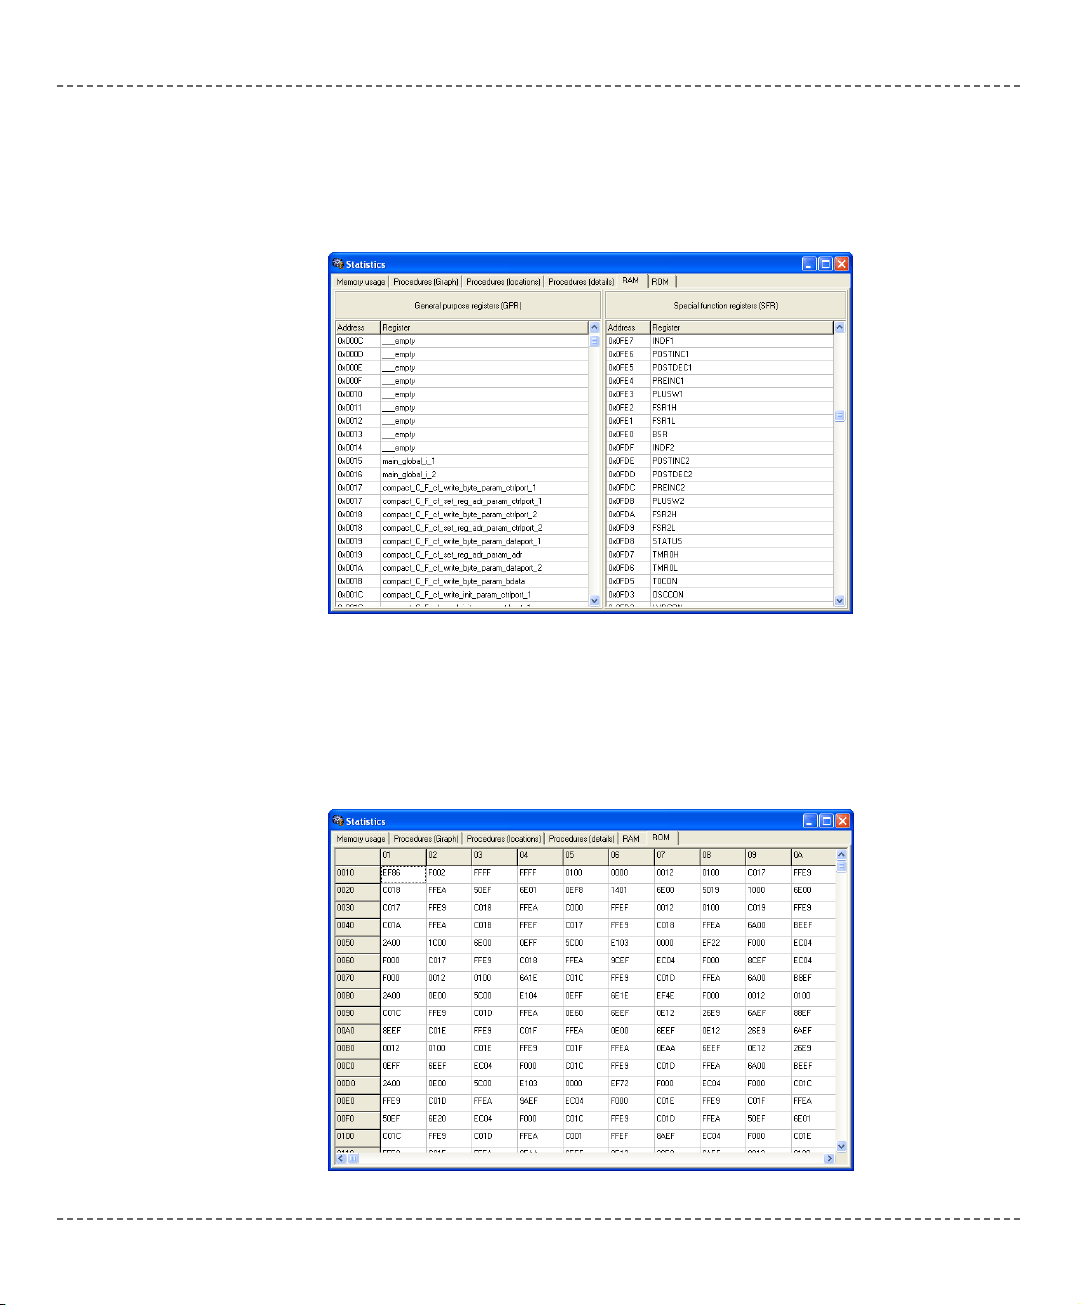
RAM Window
Summarizes all GPR and SFR registers and their addresses. Also displays symbolic names of variables and their addresses.
ROM Window
Lists op-codes and their addresses in form of a human readable hex code.
mmiikkrrooEElleekkttrroonniikkaa:: DDeevveellooppmmeenntt ttoooollss -- BBooookkss -- CCoommppiilleerrss
1133
page
mmiikkrrooBBAASSIICC
- BASIC Compiler for Microchip PIC microcontrollers
mikroBASIC
making it simple...
Page 20
mmiikkrrooBBAASSIICC
- BASIC Compiler for Microchip PIC microcontrollers
mikroBASIC
making it simple...
1144
mmiikkrrooEElleekkttrroonniikkaa:: DDeevveellooppmmeenntt ttoooollss -- BBooookkss -- CCoommppiilleerrss
page
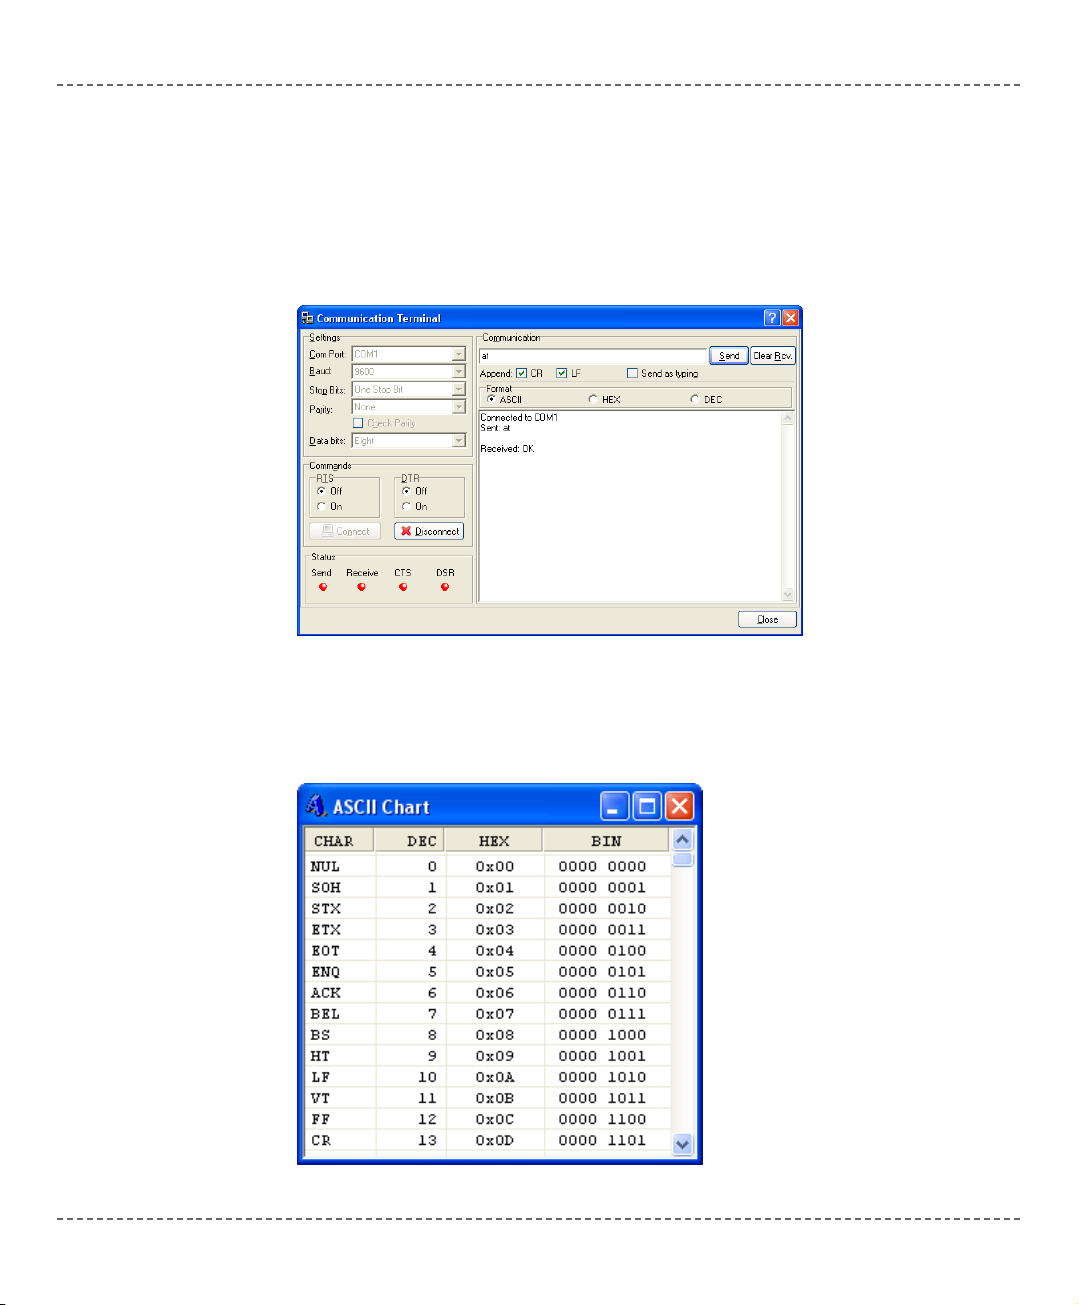
USART Terminal
mikroBasic includes the USART (Universal Synchronous Asynchronous Receiver
Transmitter) communication terminal for RS232 communication. You can launch
it from the drop-down menu Tools > Terminal or by clicking the Terminal icon.
ASCII Chart
ASCII Chart is a handy tool, particularly useful when working with LCD display.
You can launch it from the drop-down menu Tools > ASCII chart.
INTEGRATED TOOLS
Page 21
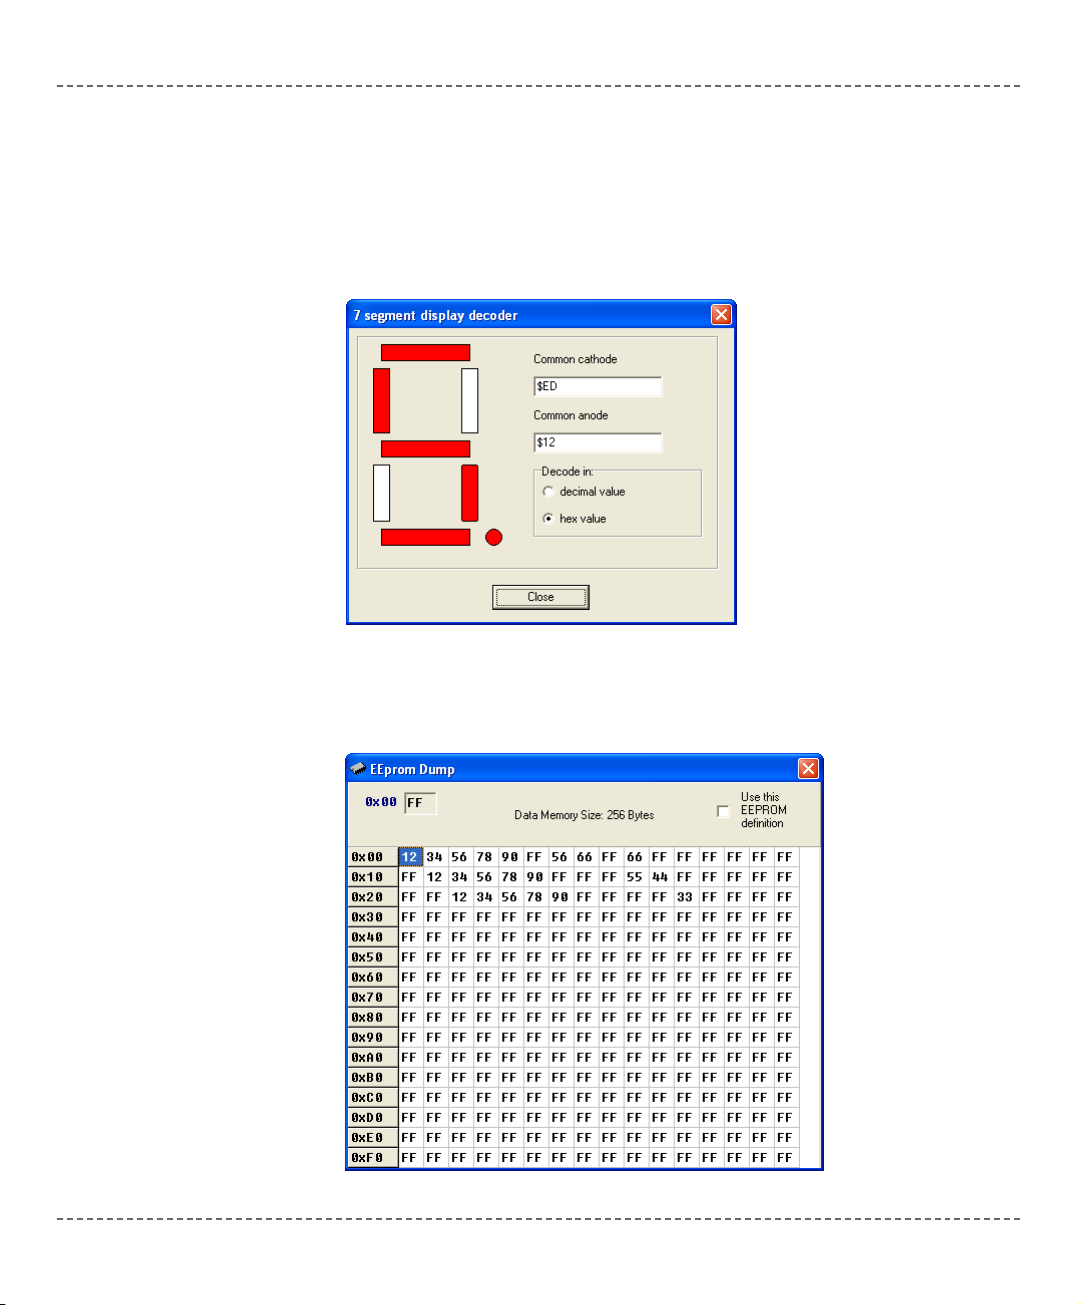
7 Segment Display Decoder
The 7seg Display Decoder is a convenient visual panel which returns decimal/hex
value for any viable combination you would like to display on 7seg. Click on the
parts of 7 segment image to the left to get the desired value in the edit boxes. You
can launch it from the drop-down menu Tools > 7 Segment Display.
EEPROM Editor
EEPROM Editor allows you to easily manage EEPROM of PIC microcontroller.
mmiikkrrooEElleekkttrroonniikkaa:: DDeevveellooppmmeenntt ttoooollss -- BBooookkss -- CCoommppiilleerrss
1155
page
mmiikkrrooBBAASSIICC
- BASIC Compiler for Microchip PIC microcontrollers
mikroBASIC
making it simple...
Page 22

mikroBootloader
mikroBootloader can be used only with PICmicros that support flash write.
1. Load the PIC with the appropriate hex file using the conventional programming
techniques (e.g. for PIC16F877A use p16f877a.hex).
2. Start mikroBootloader from the drop-down menu Tools > Bootoader.
3. Click on Setup Port and select the COM port that will be used. Make sure that
BAUD is set to 9600 Kpbs.
4. Click on Open File and select the HEX file you would like to upload.
5. Since the bootcode in the PIC only gives the computer 4-5 sec to connect, you
should reset the PIC and then click on the Connect button within 4-5 seconds.
6. The last line in then history window should now read “Connected”.
7. To start the upload, just click on the Start Bootloader button.
8. Your program will written to the PIC flash. Bootloader will report an errors that
may occur.
9. Reset your PIC and start to execute.
The boot code gives the computer 5 seconds to get connected to it. If not, it starts
running the existing user code. If there is a new user code to be downloaded, the
boot code receives and writes the data into program memory.
The more common features a bootloader may have are listed below:
- Code at the Reset location.
- Code elsewhere in a small area of memory.
- Checks to see if the user wants new user code to be loaded.
- Starts execution of the user code if no new user code is to be loaded.
- Receives new user code via a communication channel if code is to be loaded.
- Programs the new user code into memory.
Integrating User Code and Boot Code
The boot code almost always uses the Reset location and some additional program
memory. It is a simple piece of code that does not need to use interrupts; therefore,
the user code can use the normal interrupt vector at 0x0004. The boot code must
avoid using the interrupt vector, so it should have a program branch in the address
range 0x0000 to 0x0003. The boot code must be programmed into memory using
conventional programming techniques, and the configuration bits must be programmed at this time. The boot code is unable to access the configuration bits,
since they are not mapped into the program memory space.
mmiikkrrooBBAASSIICC
- BASIC Compiler for Microchip PIC microcontrollers
mikroBASIC
making it simple...
1166
mmiikkrrooEElleekkttrroonniikkaa:: DDeevveellooppmmeenntt ttoooollss -- BBooookkss -- CCoommppiilleerrss
page
Page 23

mmiikkrrooEElleekkttrroonniikkaa:: DDeevveellooppmmeenntt ttoooollss -- BBooookkss -- CCoommppiilleerrss
1177
page
mmiikkrrooBBAASSIICC
- BASIC Compiler for Microchip PIC microcontrollers
mikroBASIC
making it simple...
Below is the complete list of keyboard shortcuts available in mikroBasic IDE. You
can also view keyboard shortcuts in the Code Explorer, tab Keyboard.
IDE Shortcuts
F1 Help
CTRL+SHIFT+E Edit Project
Ctrl+N New Module
Ctrl+O Open
SHIFT+F9 Build all
Ctrl+F9 Compile
F11 Program
F12 Options
CTRL+F11 Compile and program
Ctrl+Shift+F5 View breakpoints
Basic Editor shortcuts
F3 Find, Find Next
CTRL+A Select All
CTRL+C Copy
CTRL+F Find
CTRL+P Print
CTRL+R Replace
CTRL+S Save module
CTRL+SHIFT+S Save As
CTRL+V Paste
CTRL+X Cut
CTRL+Y Redo
CTRL+Z Undo
KEYBOARD SHORTCUTS
Page 24

Advanced Editor shortcuts
Ctrl+Space Code Assistant
Ctrl+Shift+Space Parameter Assistant
Ctrl+D Find declaration
CTRL+E Incremental search
Ctrl+G Goto line
Ctrl+J Insert Code Template
Ctrl+L Procedures list
CTRL+/ Toggle line comment
Ctrl+number Goto bookmark
Ctrl+Shift+number Set bookmark
Ctrl+Shift+I Indent selection
Ctrl+Shift+U Unindent selection
Alt+Select Select columns
Tab Indent selection
Shift+Tab Unindent selection
Ctrl+Alt+Select Select columns
Alt+F3 Find in files
Debugger Shortcuts
F4 Run to Cursor
F5 Toggle Breakpoint
F6 Run/Pause Debugger
F7 Step into
F8 Step over
Ctrl+F8 Step out
F9 Debug
F2 Jump to Interrupt
Ctrl+F2 Reset
Ctrl+F5 Add to watch
mmiikkrrooBBAASSIICC
- BASIC Compiler for Microchip PIC microcontrollers
mikroBASIC
making it simple...
1188
mmiikkrrooEElleekkttrroonniikkaa:: DDeevveellooppmmeenntt ttoooollss -- BBooookkss -- CCoommppiilleerrss
page
Page 25

CHAPTER
mmiikkrrooEElleekkttrroonniikkaa:: DDeevveellooppmmeenntt ttoooollss -- BBooookkss -- CCoommppiilleerrss
2
Building Applications
Creating applications in mikroBasic is easy and intuitive. Project Wizard allows
you to set up your project in just few clicks: name your application, select chip,
set flags, and get going.
mikroBasic allows you to distribute your projects in as many modules as you find
appropriate. You can then share your mikroCompiled Libraries (
.mcl files) with
other developers without disclosing the source code. The best part is that you can
use .mcl bundles created by mikroPascal or mikroC!
Page 26
mmiikkrrooBBAASSIICC
- BASIC Compiler for Microchip PIC microcontrollers
mikroBASIC
making it simple...
2200
mmiikkrrooEElleekkttrroonniikkaa:: DDeevveellooppmmeenntt ttoooollss -- BBooookkss -- CCoommppiilleerrss
page
mikroBasic organizes applications into projects, consisting of a single project file
(extension .pbp) and one or more source files (extension .pbas). You can compile source files only if they are part of a project.
Project file carries the following information:
- project name and optional description
- target device
- device flags (config word) and device clock
- list of project source files with paths
New Project
The easiest way to create project is by means of New Project Wizard, drop-down
menu Project > New Project. Just fill the dialog with desired values (project name
and description, location, device, clock, config word) and mikroBasic will create
the appropriate project file.
Also, an empty source file named after the project will be created by default.
mikroBasic does not require you to have source file named same as the project,
it’s just a matter of convenience.
Editing Project
Later, you can change project settings from the drop-down menu Project > Edit.
You can add or remove source files from project, rename the project, modify its
description, change chip, clock, config word, etc.
To delete a project, simply delete the folder in which the project file is stored.
PROJECTS
New Project.
Edit Project.
Page 27
Source files containing BASIC code should have the extension .pbas. List of
source files relevant for the application is stored in project file with extension
.pbp, along with other project information. You can compile source files only if
they are part of a project.
Search Paths
You can specify your own custom search paths. This can be configured by selecting Tools > Options from the drop-down menu and Compiler > Search Paths.
When including source files with the
include clause, mikroBasic will look for
the file in following locations, in this particular order:
1. mikroBasic installation folder > “defs” folder
2. mikroBasic installation folder > “uses” folder
3. your custom search paths
4. the project folder (folder which contains the project file
.pbp)
Managing Source Files
Creating a new source file
To create a new source file, do the following:
Select File > New from the drop-down menu, or press CTRL+N, or click the New
File icon. A new tab will open, named “Untitled1”. This is your new source file.
Select File > Save As from the drop-down menu to name it the way you want.
If you have used New Project Wizard, an empty source file, named after the project with extension
.pbas, is created automatically. mikroBasic does not require
you to have the source file named same as the project, it’s just a matter of convenience.
mmiikkrrooEElleekkttrroonniikkaa:: DDeevveellooppmmeenntt ttoooollss -- BBooookkss -- CCoommppiilleerrss
2211
page
mmiikkrrooBBAASSIICC
- BASIC Compiler for Microchip PIC microcontrollers
mikroBASIC
making it simple...
SOURCE FILES
New File.
Page 28
Opening an Existing File
Select File > Open from the drop-down menu, or press CTRL+O, or click the
Open File icon. The Select Input File dialog opens. In the dialog, browse to the
location of the file you want to open and select it. Click the Open button.
The selected file is displayed in its own tab. If the selected file is already open, its
current Editor tab will become active.
Printing an Open File
Make sure that window containing the file you want to print is the active window.
Select File > Print from the drop-down menu, or press CTRL+P, or click the Print
icon. In the Print Preview Window, set the desired layout of the document and
click the OK button. The file will be printed on the selected printer.
Saving File
Make sure that window containing the file you want to save is the active window.
Select File > Save from the drop-down menu, or press CTRL+S, or click the Save
icon. The file will be saved under the name on its window.
Saving File Under a Different Name
Make sure that window containing the file you want to save is the active window.
Select File > Save As from the drop-down menu, or press SHIFT+CTRL+S. The
New File Name dialog will be displayed. In the dialog, browse to the folder where
you want to save the file. In the File Name field, modify the name of the file you
want to save. Click the Save button.
Closing a File
Make sure that tab containing the file you want to close is the active tab. Select
File > Close from the drop-down menu, or right click the tab of the file you want
to close in Code Editor. If the file has been changed since it was last saved, you
will be prompted to save your changes.
mmiikkrrooBBAASSIICC
- BASIC Compiler for Microchip PIC microcontrollers
mikroBASIC
making it simple...
2222
mmiikkrrooEElleekkttrroonniikkaa:: DDeevveellooppmmeenntt ttoooollss -- BBooookkss -- CCoommppiilleerrss
page
Open File.
Print File.
Save File.
Save File As.
Close File.
Page 29

When you have created the project and written the source code, you will want to
compile it. Select Project > Build from the drop-down menu, or click the Build
Icon, or simply hit CTRL+F9.
Progress bar will appear to inform you about the status of compiling. If there are
errors, you will be notified in the Error Window. If no errors are encountered,
mikroBasic will generate output files.
Output Files
Upon successful compilation, mikroBasic will generate output files in the project
folder (folder which contains the project file
.pbp). Output files are summarized
below:
Intel HEX file (
.hex)
Intel style hex records. Use this file to program PIC MCU.
Binary mikro Compiled Library (
.mcl)
Binary distribution of application that can be included in other projects.
List File (
.lst)
Overview of PIC memory allotment: instruction addresses, registers, routines, etc.
Assembler File (
.asm)
Human readable assembly with symbolic names, extracted from the List File.
Assembly View
After compiling your program in mikroBasic, you can click View Assembly Icon
or select Project > View Assembly from the drop-down menu to review generated
assembly code (.asm file) in a new tab window. Assembly is human readable
with symbolic names. All physical addresses and other information can be found
in Statistics or in list file (.lst).
If the program is not compiled and there is no assembly file, starting this option
will compile your code and then display assembly.
mmiikkrrooEElleekkttrroonniikkaa:: DDeevveellooppmmeenntt ttoooollss -- BBooookkss -- CCoommppiilleerrss
2233
page
mmiikkrrooBBAASSIICC
- BASIC Compiler for Microchip PIC microcontrollers
mikroBASIC
making it simple...
View Assembly
Icon.
Build Icon.
COMPILATION
Page 30

Error Messages
mmiikkrrooBBAASSIICC
- BASIC Compiler for Microchip PIC microcontrollers
mikroBASIC
making it simple...
2244
mmiikkrrooEElleekkttrroonniikkaa:: DDeevveellooppmmeenntt ttoooollss -- BBooookkss -- CCoommppiilleerrss
page
ERROR MESSAGES
Message Message Number
Error: "%s" is not a valid identifier 1
Error: Unknown type "%s" 2
Error: Identifier "%s" was not declared 3
Error: Expected "%s" but "%s" found 4
Error: Argument is out of range 5
Error: Syntax error in additive expression 6
Error: File "%s" not found 7
Error: Invalid command "%s" 8
Error: Not enough parameters 9
Error: Too many parameters 10
Error: Too many characters 11
Error: Actual and formal parameters must be identical 12
Error: Invalid ASM instruction: "%s" 13
Error: Identifier "%s" has been already declared 14
Error: Syntax error in multiplicative expression 15
Error: Definition file for "%s" is corrupted 16
Page 31

Hint and Warning Messages
mmiikkrrooEElleekkttrroonniikkaa:: DDeevveellooppmmeenntt ttoooollss -- BBooookkss -- CCoommppiilleerrss
2255
page
mmiikkrrooBBAASSIICC
- BASIC Compiler for Microchip PIC microcontrollers
mikroBASIC
making it simple...
Message Message Number
Hint: Variable "%s" has been declared, but was not used 1
Warning: Variable "%s" is not initialized 2
Warning: Return value of the function "%s" is not defined 3
Hint: Constant "%s" has been declared, but was not used 4
Warning: Identifier "%s" overrides declaration in unit "%s" 5
Page 32

mmiikkrrooBBAASSIICC
- BASIC Compiler for Microchip PIC microcontrollers
mikroBASIC
making it simple...
2266
mmiikkrrooEElleekkttrroonniikkaa:: DDeevveellooppmmeenntt ttoooollss -- BBooookkss -- CCoommppiilleerrss
page
Page 33
CHAPTER
mmiikkrrooEElleekkttrroonniikkaa:: DDeevveellooppmmeenntt ttoooollss -- BBooookkss -- CCoommppiilleerrss
3
mikroBasic Language Reference
Why BASIC in the first place? The answer is simple: it is legible, easy-to-learn,
structured programming language, with sufficient power and flexibility needed for
programming microcontrollers. Whether you had any previous programming experience, you will find that writing programs in mikroBasic is very easy. This chapter will help you learn or recollect BASIC syntax, along with the specifics of programming PIC microcontrollers.
Page 34

In order to get the most from your mikroBasic compiler, you should be familiar
with certain aspects of PIC MCU. This knowledge is not essential, but it can provide you a better understanding of PICs’ capabilities and limitations, and their
impact on the code writing.
Types Efficiency
First of all, you should know that PIC’s ALU, which performs arithmetic operations, is optimized for working with bytes. Although mikroBasic is capable of handling very complex data types, PIC may choke on them, especially if you are
working on some of the older models. This can dramatically increase the time
needed for performing even simple operations. Universal advice is to use the
smallest possible type in every situation. It applies to all programming in general,
and doubly so with microcontrollers.
When it comes down to calculus, not all PICmicros are of equal performance. For
example, PIC16 family lacks hardware resources to multiply two bytes, so it is
compensated by a software algorithm. On the other hand, PIC18 family has HW
multiplier, and as a result, multiplication works considerably faster.
Nested Calls Limitations
Nested call represents a function call within function body, either to itself (recursive calls) or to another function. Recursive calls, as form of cross-calling, are
unsupported by mikroBasic due to the PIC’s stack and memory limitations.
mikroBasic limits the number of non-recursive nested calls to:
- 8 calls for PIC12 family,
- 8 calls for PIC16 family,
- 31 calls for PIC18 family.
The number of allowed nested calls decreases by one if you use any of the following operators in the code:
* / %. It further decreases by one if you use interrupt
in the program. If the allowed number of nested calls is exceeded, compiler will
report stack overflow error.
mmiikkrrooBBAASSIICC
- BASIC Compiler for Microchip PIC microcontrollers
mikroBASIC
making it simple...
2288
mmiikkrrooEElleekkttrroonniikkaa:: DDeevveellooppmmeenntt ttoooollss -- BBooookkss -- CCoommppiilleerrss
page
PIC SPECIFICS
Page 35

PIC16 Only Specifics
Breaking Through Pages
In applications targeted at PIC16, no single routine should exceed one page (2,000
instructions). If routine does not fit within one page, linker will report an error.
When confront with this problem, maybe you should rethink the design of your
application – try breaking the particular routine into several chunks, etc.
Limits of Indirect Approach Through FSR
Pointers with PIC16 are “near”: they carry only the lower 8 bits of the address.
Compiler will automatically clear the 9th bit upon startup, so that pointers will
refer to banks 0 and 1. To access the objects in banks 3 or 4 via pointer, user
should manually set the IRP, and restore it to zero after the operation.
Note: It is very important to take care of the IRP properly, if you plan to follow
this approach. If you find this method to be inappropriate with too many variables,
you might consider upgrading to PIC18.
Note: If you have many variables in the code, try rearranging them with linker
directive
absolute. Variables that are approached only directly should be moved
to banks 3 and 4 for increased efficiency.
mmiikkrrooEElleekkttrroonniikkaa:: DDeevveellooppmmeenntt ttoooollss -- BBooookkss -- CCoommppiilleerrss
2299
page
mmiikkrrooBBAASSIICC
- BASIC Compiler for Microchip PIC microcontrollers
mikroBASIC
making it simple...
Page 36

Predefined Globals and Constants
To facilitate programming, mikroBasic implements a number of predefined globals
and constants.
All PIC SFR registers are implicitly declared as global variables of byte type, and
are visible in the entire project. When creating a project, mikroBasic will include
an appropriate
.def file, containing declarations of available SFR and constants
(such as PORTB, TMR1, etc). Identifiers are all in uppercase, identical to nomenclature in Microchip datasheets. For the complete set of predefined globals and
constants, look for “Defs” in your mikroBasic installation folder, or probe the
Code Assistant for specific letters (CTRL+SPACE in Editor).
Accessing Individual Bits
mikroBasic allows you to access individual bits of variables. Simply use the dot
(
.) with a variable, followed by a number. For example:
dim myvar as longint ' range of bits is myvar.0 .. myvar.31
'...
' If RB0 is set, set the 28th bit of myvar:
if PORTB.0 = 1 then
myvar.27 = 1
end if
There is no need for any special declarations; this kind of selective access is an
intrinsic feature of mikroBasic and can be used anywhere in the code. Provided
you are familiar with the particular chip, you can access bits by their name (e.g.
INTCON.TMR0F).
mmiikkrrooBBAASSIICC
- BASIC Compiler for Microchip PIC microcontrollers
mikroBASIC
making it simple...
3300
mmiikkrrooEElleekkttrroonniikkaa:: DDeevveellooppmmeenntt ttoooollss -- BBooookkss -- CCoommppiilleerrss
page
mikroBASIC SPECIFICS
Page 37

Interrupts
Interrupts can be easily handled by means of reserved word interrupt.
mikroBasic implictly declares procedure interrupt which cannot be redeclared.
Write your own procedure body to handle interrupts in your application.
mikroBasic saves the following SFR on stack when entering interrupt and pops
them back upon return:
PIC12 family:
W, STATUS, FSR, PCLATH
PIC16 family: W, STATUS, FSR, PCLATH
PIC18 family: FSR (fast context is used to save WREG, STATUS, BSR)
Note: mikroBasic does not support low priority interrupts; for PIC18 family, interrupts must be of high priority.
Routine Calls from Interrupt
Calling functions and procedures from within the interrupt routine is now possible.
The compiler takes care about the registers being used, both in "interrupt" and in
"main" thread, and performs "smart" context-switching between the two, saving
only the registers that have been used in both threads.
The functions and procedures that don't have their own frame (no arguments and
local variables) can be called both from the interrupt and the "main" thread.
Interrupt Examples
Here is a simple example of handling the interrupts from TMR0 (if no other interrupts are allowed):
sub procedure interrupt
counter = counter + 1
TMR0 = 96
INTCON = $20
end sub
mmiikkrrooEElleekkttrroonniikkaa:: DDeevveellooppmmeenntt ttoooollss -- BBooookkss -- CCoommppiilleerrss
3311
page
mmiikkrrooBBAASSIICC
- BASIC Compiler for Microchip PIC microcontrollers
mikroBASIC
making it simple...
Page 38

Linker Directives
mikroBasic uses internal algorithm to distribute objects within memory. If you
need to have variable or routine at specific predefined address, use linker directives
absolute and org.
Directive absolute
Directive
absolute specifies the starting address in RAM for variable. If variable
is multi-byte, higher bytes are stored at consecutive locations.
Directive
absolute is appended to the declaration of variable:
dim x as byte absolute $22
' Variable x will occupy 1 byte at address $22
dim y as word absolute $23
' Variable y will occupy 2 bytes at addresses $23 and $24
Be careful when using absolute directive, as you may overlap two variables by
mistake. For example:
dim i as byte absolute $33
' Variable i will occupy 1 byte at address $33
dim jjjj as longint absolute $30
' Variable jjjj will occupy bytes at $30, $31, $32, $33; thus,
' changing i changes jjjj highest byte at the same time
Directive org
Directive
org specifies the starting address of routine in ROM. It is appended to
the declaration of routine. For example:
sub procedure proc(dim par as byte) org $200
' Procedure proc will start at address $200
...
end sub
Note: Directive org can be applied to any routine except the interrupt procedure.
Interrupt will always be located at address $4 (or $8 for P18), Page0.
mmiikkrrooBBAASSIICC
- BASIC Compiler for Microchip PIC microcontrollers
mikroBASIC
making it simple...
3322
mmiikkrrooEElleekkttrroonniikkaa:: DDeevveellooppmmeenntt ttoooollss -- BBooookkss -- CCoommppiilleerrss
page
Page 39

Directive volatile
Directive volatile gives variable possibilty to change without intervention from
code.
Typical volatile variables are: STATUS, TIMER0, TIMER1, PORTA, PORTB etc.
dim MyVar as byte absolute $123 register volatile
mmiikkrrooEElleekkttrroonniikkaa:: DDeevveellooppmmeenntt ttoooollss -- BBooookkss -- CCoommppiilleerrss
3333
page
mmiikkrrooBBAASSIICC
- BASIC Compiler for Microchip PIC microcontrollers
mikroBASIC
making it simple...
Page 40

Code Optimization
Optimizer has been added to extend the compiler usability, cuts down the amount
of code generated and speed-up its execution. Main features are:
Constant folding
All expressions that can be evaluated in the compile time (i.e. are constant) are
being replaced by their result. (3 + 5 -> 8);
Constant propagation
When a constant value is being assigned to certain variable, the compiler recognizes this and replaces the use of the variable in the code that follows by constant,
as long as variable's value remains unchanged.
Copy propagation
The compiler recognizes that two variables have same value and eliminates one of
them in the further code.
Value numbering
The compiler "recognize" if the two expressions yield the same result, and can
therefore eliminate the entire computation for one of them.
"Dead code" ellimination
The code snippets that are not being used elsewhere in the programme do not
affect the final result of the application. They are automatically being removed.
Stack allocation
Temporary registers ("Stacks") are being used more rationally, allowing for VERY
complex expressions to be evaluated with minimum stack consumption.
Local vars optimization
No local variables are being used if their result does not affect some of the global
or volatile variables.
Better code generation and local optimization
Code generation is more consistent, and much attention has been made to implement specific solutions for the code "building bricks" that further reduce output
code size.
mmiikkrrooBBAASSIICC
- BASIC Compiler for Microchip PIC microcontrollers
mikroBASIC
making it simple...
3344
mmiikkrrooEElleekkttrroonniikkaa:: DDeevveellooppmmeenntt ttoooollss -- BBooookkss -- CCoommppiilleerrss
page
Page 41

mikro ICD is highly effective tool for Real-Time debugging on hardware level.
ICD debugger enables you to execute a mikroBasic program on a host PIC microcontroller and view variable values, Special Function Registers (SFR), memory
and EEPROM as the program is running.
If you have appropriate hardware and software for using mikro ICD then you have
to upon completion of writing your program to choose between Release build
Type or ICD Debug build type.
After you choose ICD Debug build type it's time to compile your project. After
you have successfully compiled your project you must program PIC using F11
shortcut. After successful PIC programming you have to select mikro ICD by
selecting Debugger › Select Debugger › mikro ICD Debugger from the drop-
down menu.
mmiikkrrooEElleekkttrroonniikkaa:: DDeevveellooppmmeenntt ttoooollss -- BBooookkss -- CCoommppiilleerrss
3355
page
mmiikkrrooBBAASSIICC
- BASIC Compiler for Microchip PIC microcontrollers
mikroBASIC
making it simple...
mikro ICD (In-Circuit Debugger)
Page 42

You can run the mikro ICD by selecting Run › Debug from the drop-down menu,
or by clicking Debug Icon . Starting the Debugger makes more options available:
Step Into, Step Over, Run to Cursor, etc. Line that is to be executed is color highlighted (blue by default). There is also notification about program execution and it
can be found on Watch Window (yellow status bar). Note that some functions take
time to execute, so running of program is indicated on Watch Window.
mmiikkrrooBBAASSIICC
- BASIC Compiler for Microchip PIC microcontrollers
mikroBASIC
making it simple...
3366
mmiikkrrooEElleekkttrroonniikkaa:: DDeevveellooppmmeenntt ttoooollss -- BBooookkss -- CCoommppiilleerrss
page
Page 43

mikro ICD Debugger Options
mmiikkrrooEElleekkttrroonniikkaa:: DDeevveellooppmmeenntt ttoooollss -- BBooookkss -- CCoommppiilleerrss
3377
page
mmiikkrrooBBAASSIICC
- BASIC Compiler for Microchip PIC microcontrollers
mikroBASIC
making it simple...
Name Description Function Key
Debug
Starts Debugger. [F9]
Run/ Pause
Debugger
Run or pause Debugger. [F6]
Toggle
Breakpoints
Toggle breakpoint at the current cursor position. To view all the breakpoints, select Run ›
View Breakpoints from the drop-down menu.
Double clicking an item in window list
locates the breakpoint.
[F5]
Run to cursor
Execute all instructions between the current
instruction and the cursor position.
[F4]
Step Into
Execute the current C (single– or
multi–cycle) instruction, then halt. If the
instruction is a routine call, enter the routine
and halt at the first instruction following the
call.
[F7]
Step Over
Execute the current C (single– or
multi–cycle) instruction, then halt. If the
instruction is a routine call, skip it and halt at
the first instruction following the call.
[F8]
Flush RAM
Flushes current PIC RAM. All variable values will be changed according to values from
watch window.
N/A
Page 44
mikro ICD Debugger Example
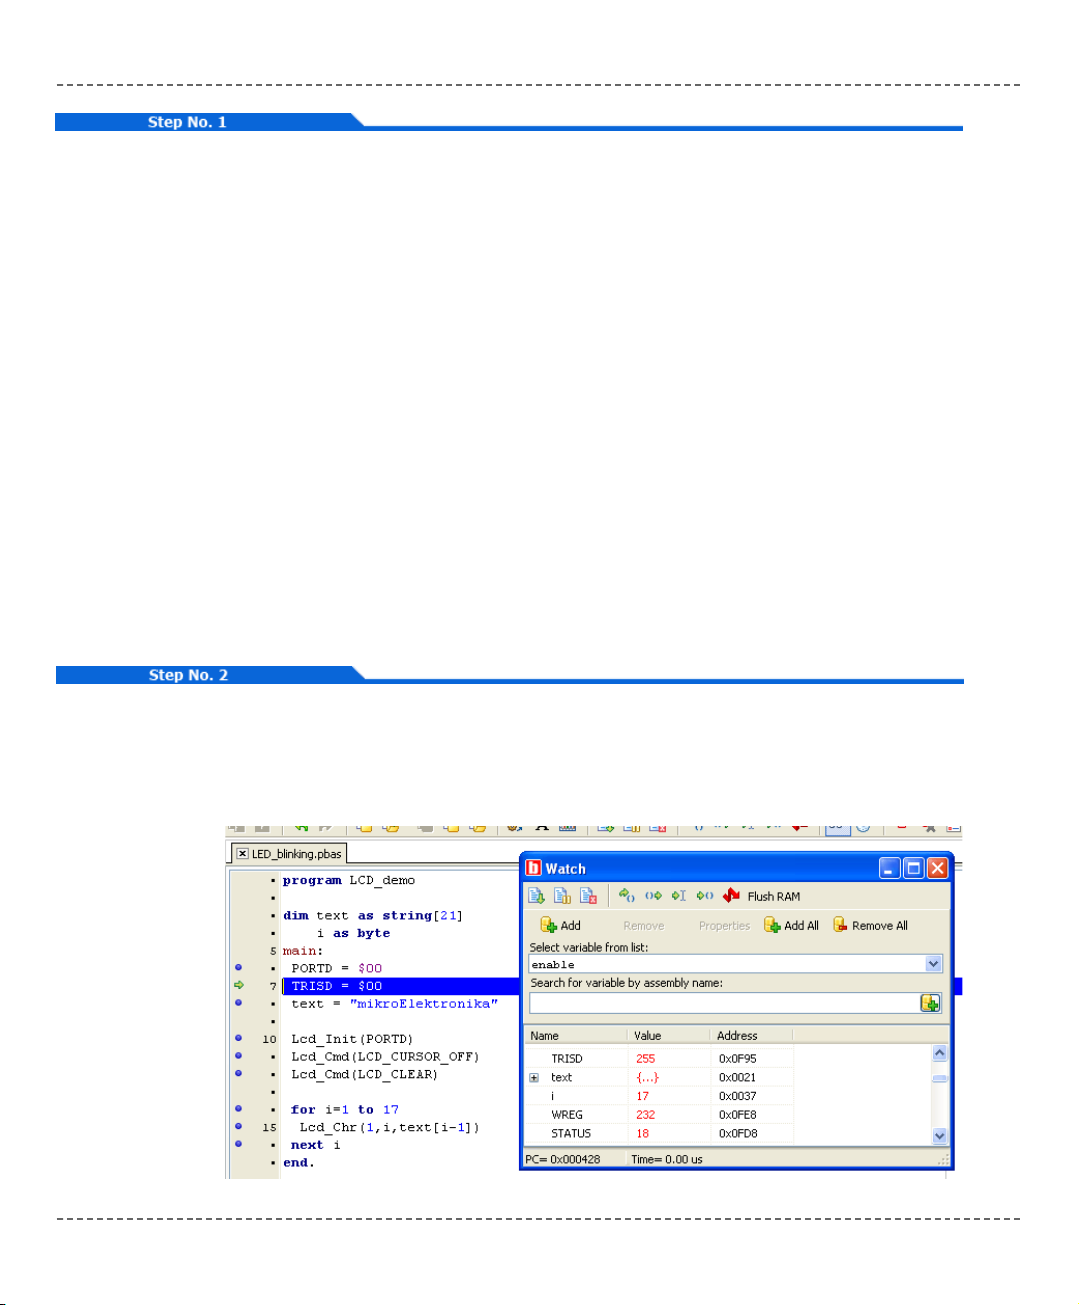
Here is a step by step mikro ICD Debugger Example. First you have to write a
program. We will show how mikro ICD works using this example:
program LCD_demo
dim text as string[21]
i as byte
main:
PORTD = $00
TRISD = $00
text = "mikroElektronika"
Lcd_Init(PORTD)
Lcd_Cmd(1)
Lcd_Cmd(192)
for i=1 to 17
Lcd_Chr(1,i,text[i-1])
next i
end.
After successful compilation and PIC programming press F9
for starting mikro ICD. After mikro ICD initialization blue active line should
appear.
mmiikkrrooBBAASSIICC
- BASIC Compiler for Microchip PIC microcontrollers
mikroBASIC
making it simple...
3388
mmiikkrrooEElleekkttrroonniikkaa:: DDeevveellooppmmeenntt ttoooollss -- BBooookkss -- CCoommppiilleerrss
page
Page 45
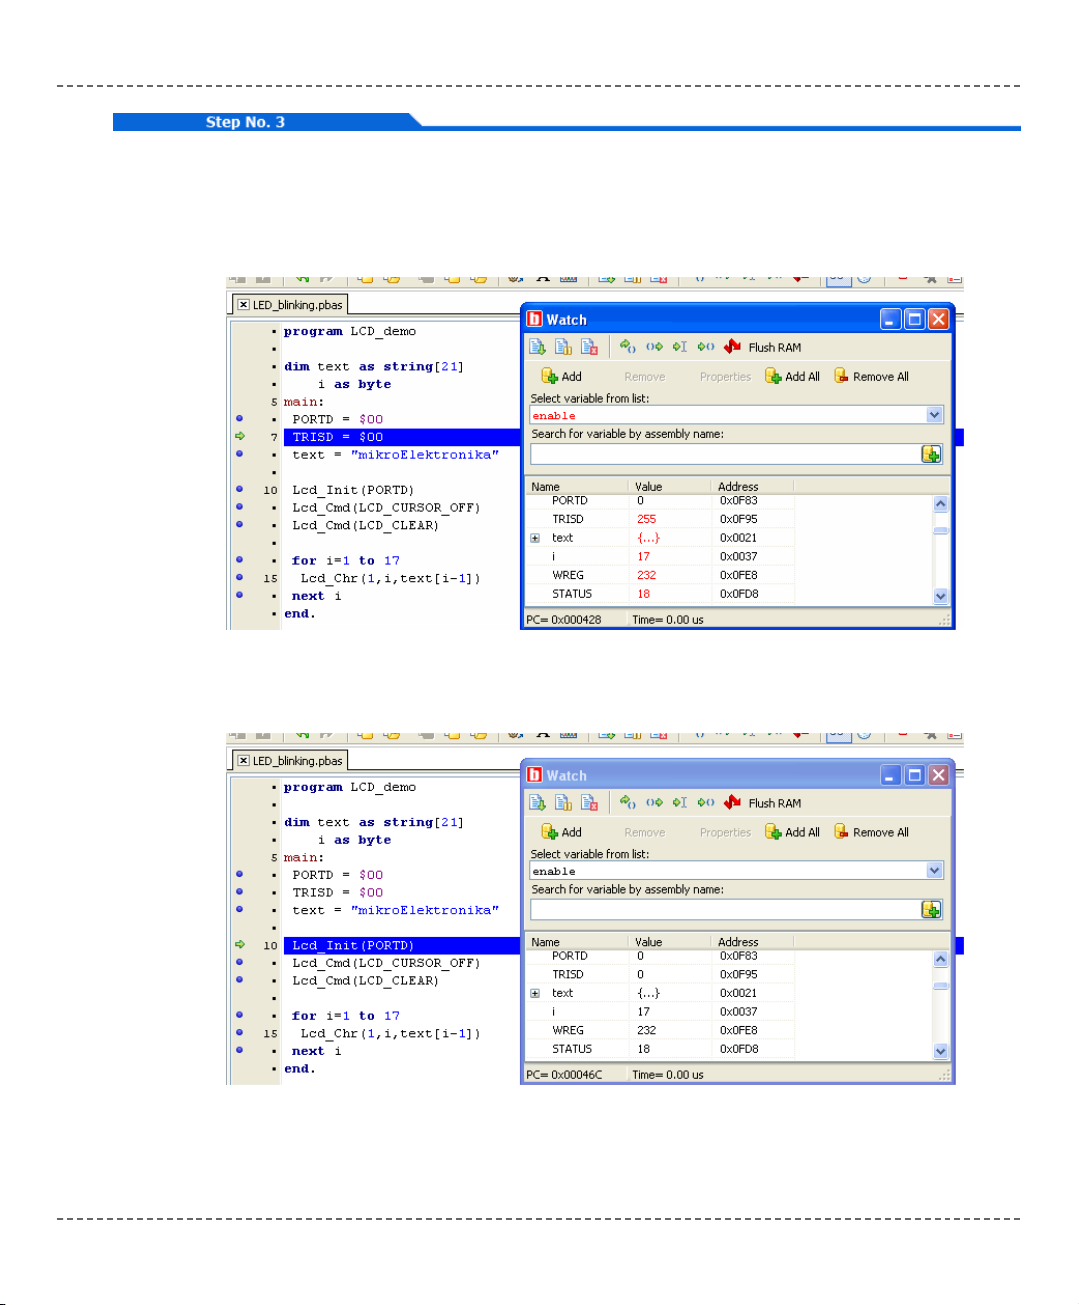
We will debug program line by line. Pressing F8 we are executing code line by
line. It is recommended that user does not use Step Into [F7] and Step Over [F8]
over Delays routines and routines containing delays. Instead use Run to cursor
[F4] and Breakpoints functions.
All changes are read from PIC and loaded into Watch Window. Note that TRISD
changed its value from 255 to 0.
mmiikkrrooEElleekkttrroonniikkaa:: DDeevveellooppmmeenntt ttoooollss -- BBooookkss -- CCoommppiilleerrss
3399
page
mmiikkrrooBBAASSIICC
- BASIC Compiler for Microchip PIC microcontrollers
mikroBASIC
making it simple...
Page 46

Step Into [F7] and Step Over [F8] are mikro ICD debugger functions that are used
in stepping mode. There is also Real-Time mode supported by mikro ICD.
Functions that are used in Real-Time mode are Run/ Pause Debugger [F6] and
Run to cursor [F4]. Pressing F4 goes to line selected by user. User just have to
select line with cursor and press F4, and code will be executed until selected line
is reached.
Run(Pause) Debugger [F6] and Toggle Breakpoints [F5] are mikro ICD debugger
functions that are used in Real-Time mode. Pressing F5 marks line selected by
user for breakpoint. F6 executes code until breakpoint is reached. After reaching
breakpoint Debugger halts. Here at our example we will use breakpoints for writing "mikroElektronika" on LCD char by char. Breakpoint is set on LCD_Chr and
program will stop everytime this function is reached. After reaching breakpoint we
must press F6 again for continuing program execution.
mmiikkrrooBBAASSIICC
- BASIC Compiler for Microchip PIC microcontrollers
mikroBASIC
making it simple...
4400
mmiikkrrooEElleekkttrroonniikkaa:: DDeevveellooppmmeenntt ttoooollss -- BBooookkss -- CCoommppiilleerrss
page
Page 47

Breakpoints has been separated into two groups. There are hardware and software
break points. Hardware breakpoints are placed in PIC and they provide fastest
debug. Number of hardware breakpoints is limited (1 for P16 and 1 or 3 for P18).
If all hardware brekpoints are used, next breakpoints that will be used are software
breakpoint. Those breakpoints are placed inside mikro ICD, and they simulate
hardware breakpoints. Software breakpoints are much slower than hardware breakpoints. This differences between hardware and software differences are not visible
in mikro ICD software but their different timings are quite notable, so it is important to know that there is two types of breakpoints.
mmiikkrrooEElleekkttrroonniikkaa:: DDeevveellooppmmeenntt ttoooollss -- BBooookkss -- CCoommppiilleerrss
4411
page
mmiikkrrooBBAASSIICC
- BASIC Compiler for Microchip PIC microcontrollers
mikroBASIC
making it simple...
Page 48

mikro ICD (In-Circuit Debugger) Overview
Watch Window
Debugger Watch Window is the main Debugger window which allows you to
monitor program items while running your program. To show the Watch Window,
select View › Debug Windows › Watch Window from the drop-down menu.
The Watch Window displays variables and registers of PIC, with their addresses
and values. Values are updated as you go through the simulation. Use the dropdown menu to add and remove the items that you want to monitor. Recently
changed items are colored red.
Double clicking an item opens the Edit Value window in which you can assign a
new value to the selected variable/register. Also, you can change view to binary,
hex, char, or decimal for the selected item.
mmiikkrrooBBAASSIICC
- BASIC Compiler for Microchip PIC microcontrollers
mikroBASIC
making it simple...
4422
mmiikkrrooEElleekkttrroonniikkaa:: DDeevveellooppmmeenntt ttoooollss -- BBooookkss -- CCoommppiilleerrss
page
Page 49

View RAM Window
Debugger View RAM Window is available from the drop-down menu, View ›
Debug Windows › View RAM.
The View RAM Window displays the map of PIC’s RAM, with recently changed
items colored red.
Common Errors
- Trying to program PIC while mikro ICD is active.
- Trying to debug Release build Type version of program.
- Trying to debug changed program code which hasn't been compiled and pro-
grammed into PIC.
- Trying to select line that is empty for Run to cursor [F4] and Toggle Breakpoints
[F5] functions.
mmiikkrrooEElleekkttrroonniikkaa:: DDeevveellooppmmeenntt ttoooollss -- BBooookkss -- CCoommppiilleerrss
4433
page
mmiikkrrooBBAASSIICC
- BASIC Compiler for Microchip PIC microcontrollers
mikroBASIC
making it simple...
Page 50

These topics provide a formal definition of the mikroBasic lexical elements. They
describe the different categories of word-like units (tokens) recognized by a language.
In the tokenizing phase of compilation, the source code file is parsed (that is, broken down) into tokens and whitespace. The tokens in mikroBasic are derived from
a series of operations performed on your programs by the compiler.
A mikroBasic program starts as a sequence of ASCII characters representing the
source code, created by keystrokes using a suitable text editor (such as the
mikroBasic Code Editor). The basic program unit in mikroBasic is the file. This
usually corresponds to a named file located in RAM or on disk and having the
extension
.pbas.
Whitespace
Whitespace is the collective name given to spaces (blanks), horizontal and vertical
tabs, and comments. Whitespace serves to indicate where tokens start and end, but
beyond this function, any surplus whitespace is discarded.
For example, the two sequences
dim tmp as byte
dim j as word
and
dim tmp as byte
dim j as word
are lexically equivalent and parse identically.
Note: Newline character (
CR/LF) is not a whitespace in BASIC, and serves as a
statement terminator/separator. In mikroBasic, however, you may use newline to
break long statements into several lines. Parser will first try to get the longest possible expression (across lines if necessary), and then check for statement terminators.
mmiikkrrooBBAASSIICC
- BASIC Compiler for Microchip PIC microcontrollers
mikroBASIC
making it simple...
4444
mmiikkrrooEElleekkttrroonniikkaa:: DDeevveellooppmmeenntt ttoooollss -- BBooookkss -- CCoommppiilleerrss
page
LEXICAL ELEMENTS
Page 51

Newline Character
Newline character (CR/LF) is not a whitespace in BASIC, and serves as a statement terminator/separator. Optionally, you may use newline to break very long
statements into several lines, as parser will first try to get the longest possible
expression. See Statements for more information.
Whitespace in Strings
The ASCII characters representing whitespace can occur within string literals, in
which case they are protected from the normal parsing process (they remain as
part of the string). For example, statement
some_string = "mikro foo"
parses to four tokens, including the single string literal token:
some_string
=
"mikro foo"
newline character
Comments
Comments are pieces of text used to annotate a program, and are technically
another form of whitespace. Comments are for the programmer’s use only; they
are stripped from the source text before parsing.
Use the apostrophe to create a comment:
' Any text between an apostrophe and the end of the
' line constitutes a comment. May span one line only.
Multi-line comments are not supported in BASIC.
mmiikkrrooEElleekkttrroonniikkaa:: DDeevveellooppmmeenntt ttoooollss -- BBooookkss -- CCoommppiilleerrss
4455
page
mmiikkrrooBBAASSIICC
- BASIC Compiler for Microchip PIC microcontrollers
mikroBASIC
making it simple...
Page 52

Token is the smallest element of a BASIC program that is meaningful to the compiler. The parser separates tokens from the input stream by creating the longest
token possible using the input characters in a left–to–right scan.
mikroBasic recognizes these kinds of tokens:
- keywords
- identifiers
- constants
- operators
- punctuators (also known as separators)
Token Extraction Example
Here is an example of token extraction. Let’s have the following code sequence:
end_flag = 0
The compiler would parse it as the following four tokens:
end_flag ' variable identifier
= ' assignment operator
0 ' literal
newline ' statement terminator
Note that end_flag would be parsed as a single identifier, rather than as the keyword
end followed by the identifier _flag.
mmiikkrrooBBAASSIICC
- BASIC Compiler for Microchip PIC microcontrollers
mikroBASIC
making it simple...
4466
mmiikkrrooEElleekkttrroonniikkaa:: DDeevveellooppmmeenntt ttoooollss -- BBooookkss -- CCoommppiilleerrss
page
TOKENS
Page 53

Literals are tokens representing fixed numeric or character values.
The data type of a constant is deduced by the compiler using such clues as numeric value and the format used in the source code.
Integer Literals
Integral values can be represented in decimal, hexadecimal, or binary notation.
In decimal notation, numerals are represented as a sequence of digits (without
commas, spaces, or dots), with optional prefix
+ or - operator to indicate the sign.
Values default to positive (6258 is equivalent to +6258).
The dollar-sign prefix (
$) or the prefix 0x indicates a hexadecimal numeral (for
example, $8F or 0x8F).
The percent-sign prefix (
%) indicates a binary numeral (for example, %0101).
The allowed range of values is imposed by the largest data type in mikroBasic –
longint. Compiler will report an error if the literal exceeds 2147483647
($7FFFFFFF).
Floating Point Literals
A floating-point value consists of:
- Decimal integer
- Decimal point
- Decimal fraction
-
e or E and a signed integer exponent (optional)
Negative floating constants are taken as positive constants with the unary operator
minus (
-) prefixed.
mmiikkrrooEElleekkttrroonniikkaa:: DDeevveellooppmmeenntt ttoooollss -- BBooookkss -- CCoommppiilleerrss
4477
page
mmiikkrrooBBAASSIICC
- BASIC Compiler for Microchip PIC microcontrollers
mikroBASIC
making it simple...
LITERALS
Page 54

mikroBasic limits floating-point constants to range
±1.17549435082E38 .. ±6.80564774407E38.
Here are some examples:
0. ' = 0.0
-1.23 ' = -1.23
23.45e6 ' = 23.45 * 10^6
2e-5 ' = 2.0 * 10^-5
3E+10 ' = 3.0 * 10^10
.09E34 ' = 0.09 * 10^34
Character Literals
Character literal is one character from the extended ASCII character set, enclosed
by quotes (for example, "A"). Character literal can be assigned to variables of byte
and char type (variable of byte will be assigned the ASCII value of the character).
Also, you can assign character literal to a string variable.
String Literals
String literal is a sequence of up to 255 characters from the extended ASCII character set, enclosed by quotes. Whitespace is preserved in string literals, i.e. parser
does not “go into” strings but treats them as single tokens.
Length of string literal is the number of characters it consists of. String is stored
internally as the given sequence of characters plus a final null character (ASCII
zero). This appended “stamp” does not count against string’s total length. String
literal with nothing in between the quotes (null string) is stored as a single null
character. You can assign string literal to a string variable or to an array of
char.
Here are several string literals:
"Hello world!" ' message, 12 chars long
" " ' two spaces, 2 chars long
"C" ' letter, 1 char long
"" ' null string, 0 chars long
Quote itself cannot be a part of the string literal, i.e. there is no escape sequence.
mmiikkrrooBBAASSIICC
- BASIC Compiler for Microchip PIC microcontrollers
mikroBASIC
making it simple...
4488
mmiikkrrooEElleekkttrroonniikkaa:: DDeevveellooppmmeenntt ttoooollss -- BBooookkss -- CCoommppiilleerrss
page
Page 55

Keywords are words reserved for special purposes and must not be used as normal
identifier names.
Beside standard BASIC keywords, all relevant SFR are defined as global variables
and represent reserved words that cannot be redefined (for example: TMR0, PCL,
etc). Probe the Code Assistant for specific letters (CTRL+SPACE in Editor) or
refer to Predefined Globals and Constants.
Here is the alphabetical listing of keywords in mikroBasic:
absolute float or
abs for org
and function print
array goto procedure
asm gosub program
begin if read
boolean include select
case in sub
char int step
chr integer string
clear interrupt switch
const is then
dim loop to
div label until
do mod wend
double module while
else message with
end new xor
exit next
not
Also, mikroBasic includes a number of predefined identifiers used in libraries. You
could replace these by your own definitions, if you plan to develop your own
libraries. For more information, see mikroBasic Libraries.
mmiikkrrooEElleekkttrroonniikkaa:: DDeevveellooppmmeenntt ttoooollss -- BBooookkss -- CCoommppiilleerrss
4499
page
mmiikkrrooBBAASSIICC
- BASIC Compiler for Microchip PIC microcontrollers
mikroBASIC
making it simple...
KEYWORDS
Page 56

Identifiers are arbitrary names of any length given to functions, variables, symbolic constants, user-defined data types, and labels. All these program elements will
be referred to as objects throughout the help (not to be confused with the meaning
of object in object-oriented programming).
Identifiers can contain the letters
a to z and A to Z, the underscore character '_',
and the digits 0 to 9. The only restriction is that the first character must be a letter
or an underscore.
Case Sensitivity
BASIC is not case sensitive, so Sum, sum, and suM represent an equivalent
identifier.
Uniqueness and Scope
Although identifier names are arbitrary (within the rules stated), errors result if the
same name is used for more than one identifier within the same scope and sharing
the same name space. Duplicate names are legal for different name spaces regardless of scope rules. For more information on scope, refer to Scope and Visibility.
Identifier Examples
Here are some valid identifiers:
temperature_V1
Pressure
no_hit
dat2string
SUM3
_vtext
mmiikkrrooBBAASSIICC
- BASIC Compiler for Microchip PIC microcontrollers
mikroBASIC
making it simple...
5500
mmiikkrrooEElleekkttrroonniikkaa:: DDeevveellooppmmeenntt ttoooollss -- BBooookkss -- CCoommppiilleerrss
page
IDENTIFIERS
Page 57

The mikroBasic punctuators (also known as separators) include brackets, parentheses, comma, colon, and dot.
Brackets
Brackets [ ] indicate single and multidimensional array subscripts:
dim alphabet as byte[30]
' ...
alphabet[2] = "c"
For more information, refer to Arrays.
Parentheses
Parentheses ( ) are used to group expressions, isolate conditional expressions,
and indicate function calls and function declarations:
d = c * (a + b) ' Override normal precedence
if (d = z) then ... ' Useful with conditional statements
func() ' Function call, no args
sub function func2(dim n as word) ' Function declaration
For more information, refer to Operators Precedence and Associativity,
Expressions, or Functions and Procedures.
Comma
The comma (,) separates the arguments in routine calls:
Lcd_Out(1, 1, txt)
Further, the comma separates identifiers in declarations:
dim i, j, k as word
mmiikkrrooEElleekkttrroonniikkaa:: DDeevveellooppmmeenntt ttoooollss -- BBooookkss -- CCoommppiilleerrss
5511
page
mmiikkrrooBBAASSIICC
- BASIC Compiler for Microchip PIC microcontrollers
mikroBASIC
making it simple...
PUNCTUATORS
Page 58

The comma also separates elements in initialization lists of constant arrays:
const MONTHS as byte[12] = (31,28,31,30,31,30,31,31,30,31,30,31)
Colon
Colon (:) is used to indicate a labeled statement:
start: nop
...
goto start
For more information, refer to Labels.
Dot
Dot (.) indicates access to a structure member. For example:
person.surname = "Smith"
For more information, refer to Structures.
Dot is a necessary part of floating point literals. Also, dot can be used for accessing individual bits of registers in mikroBasic.
mmiikkrrooBBAASSIICC
- BASIC Compiler for Microchip PIC microcontrollers
mikroBASIC
making it simple...
5522
mmiikkrrooEElleekkttrroonniikkaa:: DDeevveellooppmmeenntt ttoooollss -- BBooookkss -- CCoommppiilleerrss
page
Page 59

mikroBasic imposes strict program organization. Below you can find models for
writing legible and organized source files. For more information on file inclusion
and scope, refer to Modules and to Scope and Visibility.
Organization of Main Module
Basically, main source file has two sections: declaration and program body.
Declarations should be in their proper place in the code, organized in an orderly
manner. Otherwise, compiler may not be able to comprehend the program
correctly.
When writing code, follow the model presented in the following page.
Organization of Other Modules
Units other than main start with the keyword module; implementation section
starts with the keyword implements. Follow the models presented in the following
two pages.
mmiikkrrooEElleekkttrroonniikkaa:: DDeevveellooppmmeenntt ttoooollss -- BBooookkss -- CCoommppiilleerrss
5533
page
mmiikkrrooBBAASSIICC
- BASIC Compiler for Microchip PIC microcontrollers
mikroBASIC
making it simple...
PROGRAM ORGANIZATION
Page 60

Main unit should look like this:
program <program name>
include <include other modules>
'********************************************************
'* Declarations (globals):
'********************************************************
' symbols declarations
symbol ...
' constants declarations
const ...
' variables declarations
dim ...
' procedures declarations
sub procedure procedure_name(...)
<local declarations>
...
end sub
' functions declarations
sub function function_name(...)
<local declarations>
...
end sub
'********************************************************
'* Program body:
'********************************************************
main:
' write your code here
end.
mmiikkrrooBBAASSIICC
- BASIC Compiler for Microchip PIC microcontrollers
mikroBASIC
making it simple...
5544
mmiikkrrooEElleekkttrroonniikkaa:: DDeevveellooppmmeenntt ttoooollss -- BBooookkss -- CCoommppiilleerrss
page
Page 61

Other units should look like this:
module <module name>
include <include other modules>
'********************************************************
'* Interface (globals):
'********************************************************
' symbols declarations
symbol ...
' constants declarations
const ...
' variables declarations
dim ...
' procedures prototypes
sub procedure procedure_name(...)
' functions prototypes
sub function function_name(...)
'********************************************************
'* Implementation:
'********************************************************
implements
' constants declarations
const ...
' variables declarations
dim ...
' procedures declarations
sub procedure procedure_name(...)
<local declarations>
...
end sub
' functions declarations
sub function function_name(...)
<local declarations>
...
end sub
end.
mmiikkrrooEElleekkttrroonniikkaa:: DDeevveellooppmmeenntt ttoooollss -- BBooookkss -- CCoommppiilleerrss
5555
page
mmiikkrrooBBAASSIICC
- BASIC Compiler for Microchip PIC microcontrollers
mikroBASIC
making it simple...
Page 62

Scope
The scope of identifier is the part of the program in which the identifier can be
used to access its object. There are different categories of scope which depend on
how and where identifiers are declared:
If identifier is declared in the declaration section of a main module, out of any
function or procedure, scope extends from the point where it is declared to the end
of the current file, including all routines enclosed within that scope. These identifiers have a file scope, and are referred to as globals.
If identifier is declared in the function or procedure, scope extends from the point
where it is declared to the end of the current routine. These identifiers are referred
to as locals.
If identifier is declared in the interface section of a module, scope extends the
interface section of a module from the point where it is declared to the end of the
module, and to any other module or program that uses that module. The only
exception are symbols which have scope limited to the file in which they are
declared.
If identifier is declared in the implementation section of a module, but not within
any function or procedure, scope extends from the point where it is declared to the
end of the module. The identifier is available to any function or procedure in the
module.
Visibility
The visibility of an identifier is that region of the program source code from which
legal access can be made to the identifier’s associated object.
Scope and visibility usually coincide, though there are circumstances under which
an object becomes temporarily hidden by the appearance of a duplicate identifier:
the object still exists but the original identifier cannot be used to access it until the
scope of the duplicate identifier is ended.
Technically, visibility cannot exceed scope, but scope can exceed visibility.
mmiikkrrooBBAASSIICC
- BASIC Compiler for Microchip PIC microcontrollers
mikroBASIC
making it simple...
5566
mmiikkrrooEElleekkttrroonniikkaa:: DDeevveellooppmmeenntt ttoooollss -- BBooookkss -- CCoommppiilleerrss
page
SCOPE AND VISIBILITY
Page 63

In mikroBasic, each project consists of a single project file, and one or more module files. Project file, with extension .pbp contains information about the project,
while modules, with extension
.pbas, contain the actual source code.
Modules allow you to:
- break large programs into encapsulated modules that can be edited separately,
- create libraries that can be used in different projects,
- distribute libraries to other developers without disclosing the source code.
Each module is stored in its own file and compiled separately; compiled modules
are linked to create an application. To build a project, the compiler needs either a
source file or a compiled module file for each module.
Include Clause
mikroBasic includes modules by means of include clause. It consists of the
reserved word include, followed by a quoted module name. Extension of the file
should not be included.
You can include one file per
include clause. There can be any number of
include clauses in each source file, but they all must be stated immediately after
the program (or module) name.
Here’s an example:
program MyProgram
include "utils"
include "strings"
include "MyUnit"
...
mmiikkrrooEElleekkttrroonniikkaa:: DDeevveellooppmmeenntt ttoooollss -- BBooookkss -- CCoommppiilleerrss
5577
page
mmiikkrrooBBAASSIICC
- BASIC Compiler for Microchip PIC microcontrollers
mikroBASIC
making it simple...
MODULES
Page 64

Given a module name, compiler will check for the presence of .mcl and .pbas
files, in order specified by the search paths.
- If both .pbas and .mcl files are found, compiler will check their dates and
include the newer one in the project. If the .pbas file is newer than the .mcl, new
library will be written over the old one;
- If only
.pbas file is found, compiler will create the .mcl file and include it in
the project;
- If only
.mcl file is present, i.e. no source code is available, compiler will
include it as found;
- If none found, compiler will issue a “File not found” warning.
Main Module
Every project in mikroBasic requires single main module file. Main module is
identified by the keyword
program at the beginning; it instructs the compiler
where to “start”.
After you have successfully created an empty project with Project Wizard, Code
Editor will display a new main module. It contains the bare-bones of a program:
program MyProject
' main procedure
main:
' Place program code here
end.
Other than comments, nothing should precede the keyword program. After the
program name, you can optionally place the include clauses.
Place all global declarations (constants, variables, labels, routines) before the label
main.
Note: In mikroBasic, the
end. statement (the closing statement of every program)
acts as an endless loop.
mmiikkrrooBBAASSIICC
- BASIC Compiler for Microchip PIC microcontrollers
mikroBASIC
making it simple...
5588
mmiikkrrooEElleekkttrroonniikkaa:: DDeevveellooppmmeenntt ttoooollss -- BBooookkss -- CCoommppiilleerrss
page
Page 65

Other Modules
Modules other than main start with the keyword module. Newly created blank
module contains the bare-bones:
module MyModule
implements
end.
Other than comments, nothing should precede the keyword module. After the
module name, you can optionally place the include clause.
Interface Section
Part of the module above the keyword
implements is referred to as interface sec-
tion. Here, you can place global declarations (constants, variables, and labels) for
the project.
You do not define routines in the interface section. Instead, state the prototypes of
routines (from implementation section) that you want to be visible outside the
module. Prototypes must match the declarations exactly.
Implementation Section
Implementation section hides all the irrelevant innards from other modules, allowing encapsulation of code.
Everything declared below the keyword
implements is private, i.e. has its scope
limited to the file. When you declare an identifier in the implementation section of
a module, you cannot use it outside the module, but you can use it in any block or
routine defined within the module.
By placing the prototype in the interface section of the module (above the
implements) you can make the routine public, i.e. visible outside of module.
Prototypes must match the declarations exactly.
mmiikkrrooEElleekkttrroonniikkaa:: DDeevveellooppmmeenntt ttoooollss -- BBooookkss -- CCoommppiilleerrss
5599
page
mmiikkrrooBBAASSIICC
- BASIC Compiler for Microchip PIC microcontrollers
mikroBASIC
making it simple...
Page 66

Variable is object whose value can be changed during the runtime. Every variable
is declared under unique name which must be a valid identifier. This name is used
for accessing the memory location occupied by the variable.
Variables are declared in the declaration part of the file or routine — each variable
needs to be declared before it can be used. Global variables (those that do not
belong to any enclosing block) are declared below the
include statement, above
the label main.
Specifying a data type for each variable is mandatory. mikroBasic syntax for variable declaration is:
dim identifier_list as type
Here, identifier_list is a comma-delimited list of valid identifiers, and type
can be any data type.
For more details refer to Types and Types Conversions. See also Scope and
Visibility.
Here are a few examples of variable declarations:
dim i, j, k as byte
dim counter, temp as word
Variables and PIC
Every declared variable consumes part of RAM memory. Data type of variable
determines not only the allowed range of values, but also the space variable occupies in RAM memory. Bear in mind that operations using different types of variables take different time to be completed. mikroBasic recycles local variable memory space – local variables declared in different functions and procedures share
same memory space, if possible.
There is no need to declare SFR explicitly, as mikroBasic automatically declares
relevant registers as global variables of
byte. For example: T0IE, INTF, etc.
mmiikkrrooBBAASSIICC
- BASIC Compiler for Microchip PIC microcontrollers
mikroBASIC
making it simple...
6600
mmiikkrrooEElleekkttrroonniikkaa:: DDeevveellooppmmeenntt ttoooollss -- BBooookkss -- CCoommppiilleerrss
page
VARIABLES
Page 67

Constant is data whose value cannot be changed during the runtime. Using a constant in a program consumes no RAM memory. Constants can be used in any
expression, but cannot be assigned a new value.
Constants are declared in the declaration part of program or routine. You can
declare any number of constants after the keyword
const:
const constant_name [as type] = value
Every constant is declared under unique constant_name which must be a valid
identifier. It is a tradition to write constant names in uppercase. Constant requires
you to specify
value, which is a literal appropriate for the given type. The type
is optional; in the absence of type, compiler assumes the “smallest” of the types
that can accommodate value.
Note: You cannot omit type if declaring a constant array.
Here are a few examples:
const MAX as longint = 10000
const MIN = 1000 ' compiler will assume word type
const SWITCH = "n" ' compiler will assume char type
const MSG = "Hello" ' compiler will assume string type
const MONTHS as byte[12] = (31,28,31,30,31,30,31,31,30,31,30,31)
mmiikkrrooEElleekkttrroonniikkaa:: DDeevveellooppmmeenntt ttoooollss -- BBooookkss -- CCoommppiilleerrss
6611
page
mmiikkrrooBBAASSIICC
- BASIC Compiler for Microchip PIC microcontrollers
mikroBASIC
making it simple...
CONSTANTS
Page 68

Labels serve as targets for goto and gosub statements. Mark the desired statement with label and a colon like this:
label_identifier : statement
No special declaration of label is necessary in mikroBasic.
Name of the label needs to be a valid identifier. The labeled statement, and
goto/gosub statement must belong to the same block. Hence it is not possible to
jump into or out of a procedure or a function. Do not mark more than one statement in a block with the same label.
Note: Label
main marks the entry point of a program and must be present in the
main module of every project. See Program Organization for more information.
Here is an example of an infinite loop that calls the procedure
Beep repeatedly:
loop: Beep
goto loop
mmiikkrrooBBAASSIICC
- BASIC Compiler for Microchip PIC microcontrollers
mikroBASIC
making it simple...
6622
mmiikkrrooEElleekkttrroonniikkaa:: DDeevveellooppmmeenntt ttoooollss -- BBooookkss -- CCoommppiilleerrss
page
LABELS
Page 69

BASIC symbols allow you to create simple macros without parameters. You can
replace any one line of code with a single identifier alias. Symbols, when properly
used, can increase code legibility and reusability.
Symbols need to be declared at the very beginning of the module, right after the
module name and the (optional)
include clauses. Check Program Organization for
more details. Scope of a symbol is always limited to the file in which it has been
declared.
Symbol is declared as:
symbol alias = code
Here, alias must be a valid identifier which you will be using throughout the
code. This identifier has file scope. The
code can be any one line of code (literals,
assignments, function calls, etc).
Using a symbol in a program consumes no RAM memory – compiler simply
replaces each instance of a symbol with the appropriate line of code from the declaration.
Here are a few examples:
symbol MAXALLOWED = 216 ' Symbol as alias for numeric value
symbol PORT = PORTC ' Symbol as alias for SFR
symbol MYDELAY = Delay_ms(1000) ' Symbol as alias for proc. call
dim cnt as byte ' Some variable
'...
main:
if cnt > MAXALLOWED then
cnt = 0
PORT.1 = 0
MYDELAY
end if
Note: Symbols do not support macro expansion in the way C preprocessor does.
mmiikkrrooEElleekkttrroonniikkaa:: DDeevveellooppmmeenntt ttoooollss -- BBooookkss -- CCoommppiilleerrss
6633
page
mmiikkrrooBBAASSIICC
- BASIC Compiler for Microchip PIC microcontrollers
mikroBASIC
making it simple...
SYMBOLS
Page 70

Functions and procedures, collectively referred to as routines, are subprograms
(self-contained statement blocks) which perform a certain task based on a number
of input parameters. Function returns a value when executed, and procedure does
not.
mikroBasic does not support inline routines.
Functions
Function is declared like this:
sub function function_name(parameter_list) as return_type
[ local declarations ]
function body
end sub
The function_name represents a function’s name and can be any valid identifier.
The
return_type is the type of return value and can be any simple type. Within
parentheses, parameter_list is a formal parameter list similar to variable declaration. In mikroBasic, parameters are always passed to function by value; to pass
argument by the address, add the keyword byref ahead of identifier.
Local declarations are optional declarations of variables and/or constants,
local for the given function.
Function body is a sequence of statements to be
executed upon calling the function.
A function is called by its name, with actual arguments placed in the same
sequence as their matching formal parameters. The compiler is able to coerce mismatching arguments to the proper type according to implicit conversion rules.
Upon function call, all formal parameters are created as local objects initialized by
values of actual arguments. Upon return from a function, temporary object is created in the place of the call, and it is initialized by the expression of
return state-
ment. This means that function call as an operand in complex expression is treated
as the function result.
Use the variable
result (automatically created local) to assign the return value of
a function.
mmiikkrrooBBAASSIICC
- BASIC Compiler for Microchip PIC microcontrollers
mikroBASIC
making it simple...
6644
mmiikkrrooEElleekkttrroonniikkaa:: DDeevveellooppmmeenntt ttoooollss -- BBooookkss -- CCoommppiilleerrss
page
FUNCTIONS AND PROCEDURES
Page 71

Function calls are considered to be primary expressions, and can be used in situations where expression is expected. Function call can also be a self-contained
statement, in which case the return value is discarded.
Here’s a simple function which calculates
x
n
based on input parameters x and n
(n > 0):
sub function power(dim x, n as byte) as longint
dim i as byte
i = 0
result = 1
if n > 0 then
for i = 1 to n
result = result*x
next i
end if
end sub
Now we could call it to calculate, say, 312:
tmp = power(3, 12)
Procedures
Procedure is declared like this:
sub procedure procedure_name(parameter_list)
[ local declarations ]
procedure body
end sub
The procedure_name represents a procedure’s name and can be any valid identifier. Within parentheses, parameter_list is a formal parameter list similar to
variable declaration. In mikroBasic, parameters are always passed to procedure by
value; to pass argument by the address, add the keyword
byref ahead of
identifier.
Local declarations are optional declaration of variables and/or constants,
local for the given procedure. Procedure body is a sequence of statements to be
executed upon calling the procedure.
mmiikkrrooEElleekkttrroonniikkaa:: DDeevveellooppmmeenntt ttoooollss -- BBooookkss -- CCoommppiilleerrss
6655
page
mmiikkrrooBBAASSIICC
- BASIC Compiler for Microchip PIC microcontrollers
mikroBASIC
making it simple...
Page 72

A procedure is called by its name, with actual arguments placed in the same
sequence as their matching formal parameters. The compiler is able to coerce mismatching arguments to the proper type according to implicit conversion rules.
Upon procedure call, all formal parameters are created as local objects initialized
by values of actual arguments.
Procedure call is a self-contained statement.
Here’s an example procedure which transforms its input time parameters, preparing them for output on LCD:
sub procedure time_prep(dim byref sec, min, hr as byte)
sec = ((sec and $F0) >> 4)*10 + (sec and $0F)
min = ((min and $F0) >> 4)*10 + (min and $0F)
hr = ((hr and $F0) >> 4)*10 + (hr and $0F)
end sub
mmiikkrrooBBAASSIICC
- BASIC Compiler for Microchip PIC microcontrollers
mikroBASIC
making it simple...
6666
mmiikkrrooEElleekkttrroonniikkaa:: DDeevveellooppmmeenntt ttoooollss -- BBooookkss -- CCoommppiilleerrss
page
Page 73

BASIC is a strictly typed language, which means that every variable and constant
need to have a strictly defined type, known at the time of compilation.
The type serves:
- to determine the correct memory allocation required,
- to interpret the bit patterns found in the object during subsequent accesses,
- in many type-checking situations, to ensure that illegal assignments are trapped.
mikroBasic supports many standard (predefined) and user-defined data types,
including signed and unsigned integers of various sizes, arrays, strings, pointers,
and structures.
Type Categories
Types can be divided into:
- simple types
- arrays
- strings
- pointers
- structures (user defined types)
mmiikkrrooEElleekkttrroonniikkaa:: DDeevveellooppmmeenntt ttoooollss -- BBooookkss -- CCoommppiilleerrss
6677
page
mmiikkrrooBBAASSIICC
- BASIC Compiler for Microchip PIC microcontrollers
mikroBASIC
making it simple...
TYPES
Page 74

Simple types represent types that cannot be divided into more basic elements, and
are the model for representing elementary data on machine level.
Here is an overview of simple types in mikroBasic:
* char type can be treated as byte type in every aspect
You can assign signed to unsigned or vice versa only using the explicit conversion.
Refer to Types Conversions for more information.
mmiikkrrooBBAASSIICC
- BASIC Compiler for Microchip PIC microcontrollers
mikroBASIC
making it simple...
6688
mmiikkrrooEElleekkttrroonniikkaa:: DDeevveellooppmmeenntt ttoooollss -- BBooookkss -- CCoommppiilleerrss
page
SIMPLE TYPES
Type Size Range
byte
8-bit 0 .. 255
char*
8-bit 0 .. 255
word
16-bit 0 .. 65535
short
8-bit - 128 .. 127
integer
16-bit -32768 .. 32767
longint
32-bit -2147483648 .. 2147483647
float
32-bit
±1.17549435082 * 10
-38
..
±6.80564774407 * 10
38
Page 75

An array represents an indexed collection of elements of the same type (called the
base type). Because each element has a unique index, arrays, unlike sets, can
meaningfully contain the same value more than once.
Array types are denoted by constructions of the form:
type[array_length]
Each of the elements of an array is numbered from 0 through the
array_length - 1. Every element of an array is of type and can be accessed by
specifying array name followed by element’s index within brackets.
Here are a few examples of array declaration:
dim weekdays as byte[7]
dim samples as word[50]
begin
' Now we can access elements of array variables, for example:
samples[0] = 1
if samples[37] = 0 then
...
Constant Arrays
Constant array is initialized by assigning it a comma-delimited sequence of values
within parentheses. For example:
' Declare a constant array which holds no. of days in each month:
const MONTHS as byte[12] = (31,28,31,30,31,30,31,31,30,31,30,31)
' Declare constant numbers:
const NUMBER as byte[4][4] = ((0, 1, 2, 3), (5, 6, 7, 8), (9, 10,
11,12), (13,14, 15, 16))
Note that indexing is zero based; in the previous example, number of days in
January is
MONTHS[0], and number of days in December is MONTHS[11].
The number of assigned values must not exceed the specified length. Vice versa is
possible, when the trailing “excess” elements will be assigned zeroes.
For more information on arrays of char, refer to Strings.
mmiikkrrooEElleekkttrroonniikkaa:: DDeevveellooppmmeenntt ttoooollss -- BBooookkss -- CCoommppiilleerrss
6699
page
mmiikkrrooBBAASSIICC
- BASIC Compiler for Microchip PIC microcontrollers
mikroBASIC
making it simple...
ARRAYS
Page 76

An array is one-dimensional if it is of scalar type. One-dimensional arrays are
sometimes referred to as vectors.
Multidimensional arrays are constructed by declaring arrays of array type. These
arrays are stored in memory in such way that the right most subscript changes
fastest, i.e. arrays are stored “in rows”. Here is a sample 2-dimensional array:
dim m as byte[50][20] '2-dimensional array of size 50x20
Variable m is an array of 50 elements, which in turn are arrays of 20 bytes each.
Thus, we have a matrix of 50x20 elements: first element is m[0][0], last one is
m[49][19]. First element of the 5th row would be m[0][5].
If you are not initializing the array in the declaration, you can omit the first dimension of multi-dimensional array. In that case, array is located elsewhere, e.g. in
another file. This is a commonly used technique when passing arrays as function
parameters:
sub procedure example(dim byref m as byte[50][20])
' we can omit first dimension
...
inc(m[1][1])
end sub
dim m as byte[50][20] '2-dimensional array of size 50x20
dim n as byte[4][2][7] '3-dimensional array of size 4x2x7
main:
...
func(m)
end.
mmiikkrrooBBAASSIICC
- BASIC Compiler for Microchip PIC microcontrollers
mikroBASIC
making it simple...
7700
mmiikkrrooEElleekkttrroonniikkaa:: DDeevveellooppmmeenntt ttoooollss -- BBooookkss -- CCoommppiilleerrss
page
MULTI-DIMENSIONAL ARRAYS
Page 77

A string represents a sequence of characters, and is an equivalent to an array of
char. It is declared like:
string[string_length]
Specifier string_length is the number of characters string consists of. String is
stored internally as the given sequence of characters plus a final null character
(zero). This appended “stamp” does not count against string’s total length.
A null string (
"") is stored as a single null character.
You can assign string literals or other strings to string variables. String on the right
side of an assignment operator has to be the shorter of the two, or of equal length.
For example:
dim msg1 as string[20]
dim msg2 as string[19]
begin
msg1 = "This is some message"
msg2 = "Yet another message"
msg1 = msg2 ' this is ok, but vice versa would be illegal
Alternately, you can handle strings element–by–element. For example:
dim s as string[5]
...
s = "mik"
' s[0] is char literal "m"
' s[1] is char literal "i"
' s[2] is char literal "k"
' s[3] is zero
' s[4] is undefined
' s[5] is undefined
Be careful when handling strings in this way, since overwriting the end of a string
can cause access violations.
mmiikkrrooEElleekkttrroonniikkaa:: DDeevveellooppmmeenntt ttoooollss -- BBooookkss -- CCoommppiilleerrss
7711
page
mmiikkrrooBBAASSIICC
- BASIC Compiler for Microchip PIC microcontrollers
mikroBASIC
making it simple...
STRINGS
Page 78

A pointer is a data type which holds a memory address. While a variable accesses
that memory address directly, a pointer can be thought of as a reference to that
memory address.
To declare a pointer data type, add a carat prefix (
^) before type. For example, if
you are creating a pointer to an
integer, you would write:
^integer
To access the data at the pointer’s memory location, you add a carat after the variable name. For example, let’s declare variable p which points to integer, and
then assign the pointed memory location value 5:
dim p as ^integer
...
p^ = 5
A pointer can be assigned to another pointer. However, note that only the address,
not the value, is copied. Once you modify the data located at one pointer, the other
pointer, when dereferenced, also yields modified data.
@ Operator
The
@ operator returns the address of a variable or routine; that is, @ constructs a
pointer to its operand. The following rules apply to
@:
- If X is a variable, @X returns the address of X.
- If
F is a routine (a function or procedure), @F returns F’s entry point (result is of
longint).
mmiikkrrooBBAASSIICC
- BASIC Compiler for Microchip PIC microcontrollers
mikroBASIC
making it simple...
7722
mmiikkrrooEElleekkttrroonniikkaa:: DDeevveellooppmmeenntt ttoooollss -- BBooookkss -- CCoommppiilleerrss
page
POINTERS
Page 79

A structure represents a heterogeneous set of elements. Each element is called a
member; the declaration of a structure type specifies a name and type for each
member. The syntax of a
structure type declaration is
structure structname
dim member1 as type1
...
dim membern as typen
end structure
where structname is a valid identifier, each type denotes a type, and each
member is a valid identifier. The scope of a member identifier is limited to the
structure in which it occurs, so you don’t have to worry about naming conflicts
between member identifiers and other variables.
For example, the following declaration creates a structure type called
Dot:
structure Dot
dim x as float
dim y as float
end structure
Each Dot contains two members: x and y coordinates; memory is allocated when
you instantiate the structure, like this:
dim m as Dot
dim n as Dot
This variable declaration creates two instances of Dot, called m and n.
A member can be of previously defined structure type. For example:
' Structure defining a circle:
structure Circle
dim radius as real
dim center as Dot
end structure
mmiikkrrooEElleekkttrroonniikkaa:: DDeevveellooppmmeenntt ttoooollss -- BBooookkss -- CCoommppiilleerrss
7733
page
mmiikkrrooBBAASSIICC
- BASIC Compiler for Microchip PIC microcontrollers
mikroBASIC
making it simple...
STRUCTURES
Page 80

Structure Member Access
You can access the members of a structure by means of dot (.). If we had declared
variables circle1 and circle2 of previously defined type Circle:
dim circle1, circle2 as Circle
we could access their individual members like this:
circle1.radius = 3.7
circle1.center.x = 0
circle1.center.y = 0
You can also commit assignments between complex variables, if they are of the
same type:
circle2 = circle1 ' This will copy values of all members
mmiikkrrooBBAASSIICC
- BASIC Compiler for Microchip PIC microcontrollers
mikroBASIC
making it simple...
7744
mmiikkrrooEElleekkttrroonniikkaa:: DDeevveellooppmmeenntt ttoooollss -- BBooookkss -- CCoommppiilleerrss
page
Page 81

Conversion of object of one type is changing it to the same object of another type
(i.e. applying another type to a given object). mikroBasic supports both implicit
and explicit conversions for built-in types.
Implicit Conversion
You cannot mix signed and unsigned objects in expressions with arithmetic or
logical operators. You can assign signed to unsigned or vice versa only using the
explicit conversion.
Compiler will provide an automatic implicit conversion in the following
situations:
- statement requires an expression of particular type (according to language
definition), and we use an expression of different type,
- operator requires an operand of particular type, and we use an operand of
different type,
- function requires a formal parameter of particular type, and we pass it an object
of different type,
- result does not match the declared function return type.
Promotion
When operands are of different types, implicit conversion promotes the less
complex to more complex type taking the following steps:
byte/char -> word
short -> integer
short -> longint
integer -> longint
integral -> float
Higher bytes of extended unsigned operand are filled with zeroes. Higher bytes of
extended signed operand are filled with bit sign (if number is negative, fill higher
bytes with one, otherwise with zeroes).
mmiikkrrooEElleekkttrroonniikkaa:: DDeevveellooppmmeenntt ttoooollss -- BBooookkss -- CCoommppiilleerrss
7755
page
mmiikkrrooBBAASSIICC
- BASIC Compiler for Microchip PIC microcontrollers
mikroBASIC
making it simple...
TYPES CONVERSIONS
Page 82

Clipping
In assignments, and statements that require an expression of particular type,
destination will store the correct value only if it can properly represent the result
of expression (that is, if the result fits in destination range).
If expression evaluates to more complex type than expected, excess data will be
simply clipped (higher bytes are lost).
dim i as byte
dim j as word
...
j = $FF0F
i = j ' i becomes $0F, higher byte $FF is lost
Explicit Conversion
Explicit conversion can be executed at any point by inserting type keyword (byte,
word, short, integer, or longint) ahead of the expression to be converted.
The expression must be enclosed in parentheses. Explicit conversion can be
performed only on the operand left of the assignment operator.
Special case is conversion between signed and unsigned types. Explicit conversion
between signed and unsigned data does not change binary representation of data; it
merely allows copying of source to destination.
For example:
dim a as byte
dim b as short
...
b = -1
a = byte(b) ' a is 255, not 1
' This is because binary representation remains
' 11111111; it's just interpreted differently now
You cannot execute explicit conversion on the operand left of the assignment
operator.
mmiikkrrooBBAASSIICC
- BASIC Compiler for Microchip PIC microcontrollers
mikroBASIC
making it simple...
7766
mmiikkrrooEElleekkttrroonniikkaa:: DDeevveellooppmmeenntt ttoooollss -- BBooookkss -- CCoommppiilleerrss
page
Page 83

Arithmetic Conversions
When you use an arithmetic expression, such as a + b, where a and b are of different arithmetic types, mikroBasic performs implicit type conversions before the
expression is evaluated. These standard conversions include promotions of
“lower” types to “higher” types in the interests of accuracy and consistency.
Assigning a signed character object (such as a variable) to an integral object
results in automatic sign extension. Objects of type short always use sign extension; objects of type byte always set the high byte to zero when converted to int.
Converting a longer integral type to a shorter type truncates the higher order bits
and leaves low-order bits unchanged. Converting a shorter integral type to a longer
type either sign-extends or zero-fills the extra bits of the new value, depending on
whether the shorter type is signed or unsigned, respectively.
Note: Conversion of floating point data into integral value (in assignments or via
explicit typecast) produces correct results only if the float value does not exceed
the scope of destination integral type.
In details:
Here are the steps mikroBasic uses to convert the operands in an arithmetic
expression:
First, any small integral types are converted according to the following rules:
byte converts to integer
short converts to integer, with the same value
short converts to integer, with the same value, sign-extended
byte converts to integer, with the same value, zero-filled
The result of the expression is the same type as that of the two operands.
Here are several examples of implicit conversion:
2 + 3.1 ' -> 2. + 3.1 -> 5.1
5 / 4 * 3. ' -> (5/4)*3. -> 1*3. -> 1.*3. -> 3.
3. * 5 / 4 ' -> (3.*5)/4 -> (3.*5.)/4 -> 15./4 -> 15./4. -> 3.75
mmiikkrrooEElleekkttrroonniikkaa:: DDeevveellooppmmeenntt ttoooollss -- BBooookkss -- CCoommppiilleerrss
7777
page
mmiikkrrooBBAASSIICC
- BASIC Compiler for Microchip PIC microcontrollers
mikroBASIC
making it simple...
Page 84

mmiikkrrooBBAASSIICC
- BASIC Compiler for Microchip PIC microcontrollers
mikroBASIC
making it simple...
7788
mmiikkrrooEElleekkttrroonniikkaa:: DDeevveellooppmmeenntt ttoooollss -- BBooookkss -- CCoommppiilleerrss
page
Operators are tokens that trigger some computation when applied to variables and
other objects in an expression.
There are four types of operators in mikroBasic:
- Arithmetic Operators
- Bitwise Operators
- Boolean Operators
- Relational Operators
Operators Precedence and Associativity
There are 4 precedence categories in mikroBasic. Operators in the same category
have equal precedence with each other.
Each category has an associativity rule: left-to-right, or right-to-left. In the absence
of parentheses, these rules resolve the grouping of expressions with operators of
equal precedence.
OPERATORS
Precedence Operands Operators Associativity
4 1
@ not + -
right-to-left
3 2
* /
div mod and << >>
left-to-right
2 2
+ - or xor
left-to-right
1 2
= <> < > <= >=
left-to-right
Page 85

Arithmetic Operators
Arithmetic operators are used to perform mathematical computations. They have
numerical operands and return numerical results. As char operators are
technically
bytes, they can be also used as unsigned operands in arithmetic
operations. Operands need to be either both signed or both unsigned.
All arithmetic operators associate from left to right.
Operator
- can be used as a prefix unary operator to change sign of a signed
value. Unary prefix operator
+ can be used, but it doesn’t affect the data.
For example: b = -a
Division by Zero
If 0 (zero) is used explicitly as the second operand (i.e.
x div 0), compiler will
report an error and will not generate code. But in case of implicit division by zero:
x div y , where y is 0 (zero), result will be the maximum value for the appropri-
ate type (for example, if x and y are words, the result will be $FFFF).
mmiikkrrooEElleekkttrroonniikkaa:: DDeevveellooppmmeenntt ttoooollss -- BBooookkss -- CCoommppiilleerrss
7799
page
mmiikkrrooBBAASSIICC
- BASIC Compiler for Microchip PIC microcontrollers
mikroBASIC
making it simple...
Operator Operation Precedence
+
addition 2
-
subtraction 2
*
multiplication 3
/
division 3
div
division, rounds down to nearest integer 3
mod
returns the remainder of integer division (cannot be used with floating points)
3
Page 86
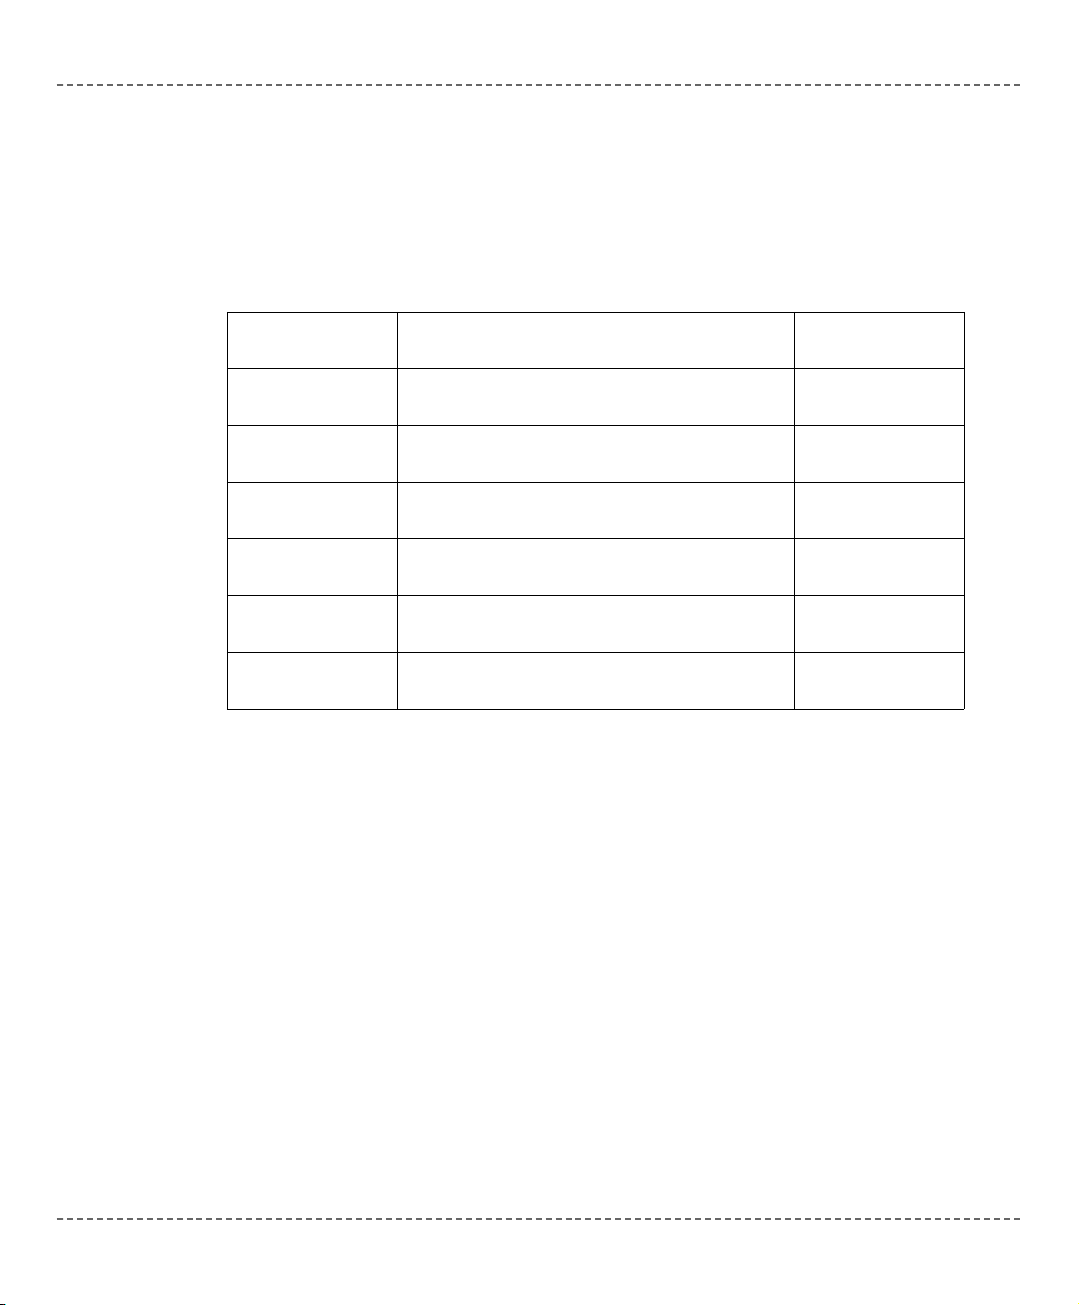
Relational Operators
Use relational operators to test equality or inequality of expressions. All relational
operators return TRUE or FALSE.
All relational operators associate from left to right.
Relational Operators in Expressions
Precedence of arithmetic and relational operators was designated in such a way to
allow complex expressions without parentheses to have expected meaning:
a + 5 >= c - 1.0 / e ' -> (a + 5) >= (c - (1.0 / e))
mmiikkrrooBBAASSIICC
- BASIC Compiler for Microchip PIC microcontrollers
mikroBASIC
making it simple...
8800
mmiikkrrooEElleekkttrroonniikkaa:: DDeevveellooppmmeenntt ttoooollss -- BBooookkss -- CCoommppiilleerrss
page
Operator Operation Precedence
=
equal 1
<>
not equal 1
>
greater than 1
<
less than 1
>=
greater than or equal 1
<=
less than or equal 1
Page 87
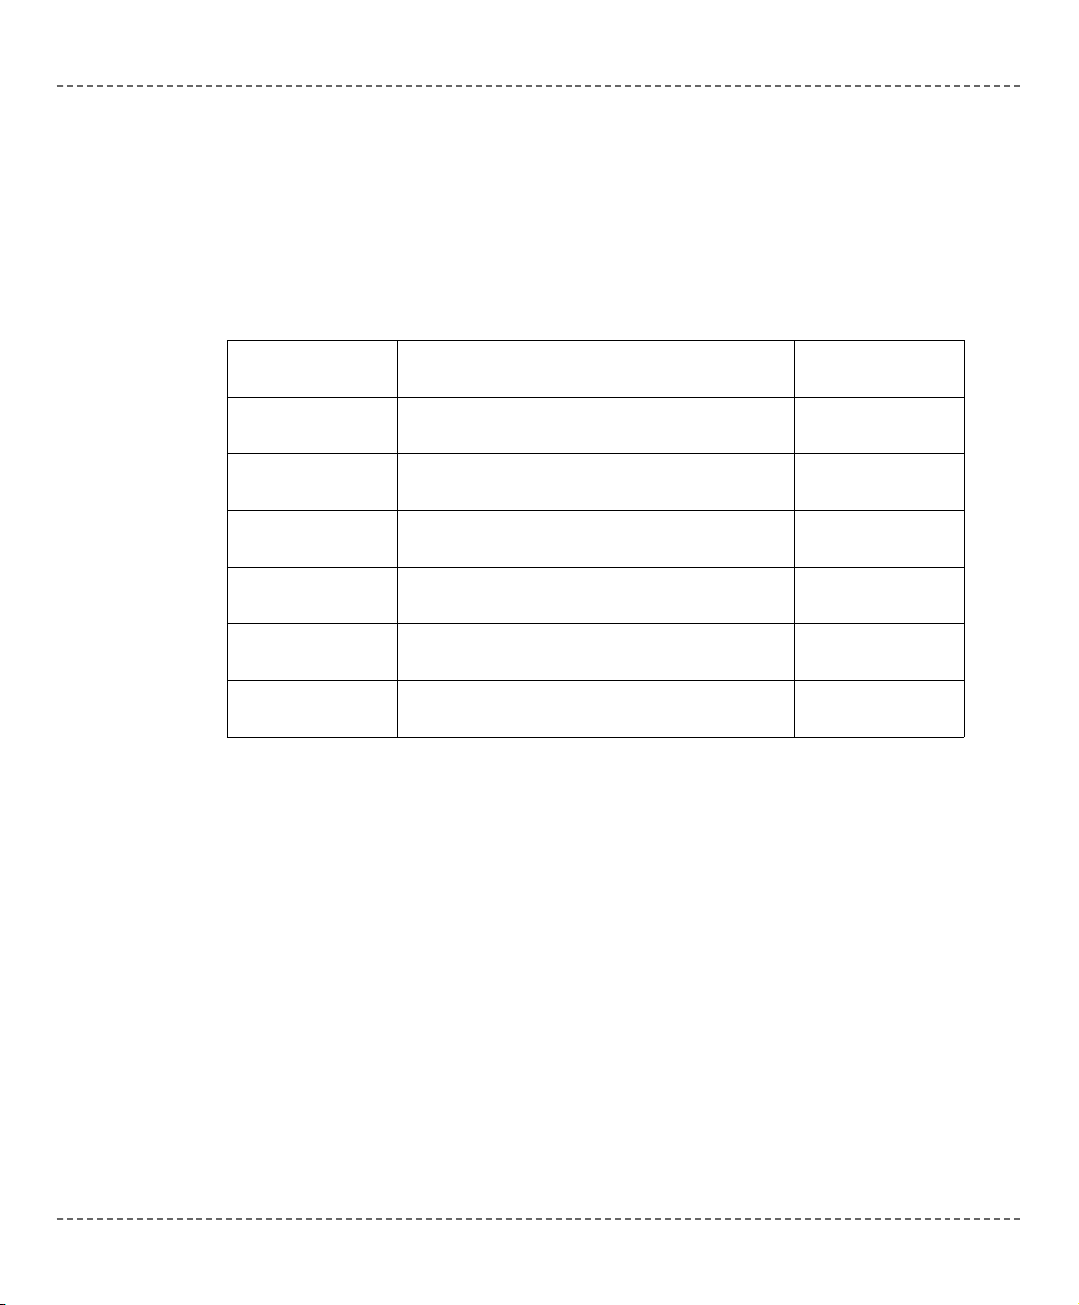
Bitwise Operators
Use the bitwise operators to modify the individual bits of numerical operands.
Operands need to be either both signed or both unsigned.
Bitwise operators associate from left to right. The only exception is the bitwise
complement operator not which associates from right to left.
Bitwise operators
and, or, and xor perform logical operations on appropriate
pairs of bits of their operands. Operator not complements each bit of its operand.
For example:
$1234 and $5678 ' equals $1230
' because ..
' $1234 : 0001 0010 0011 0100
' $5678 : 0101 0110 0111 1000
' ---------------------------' and : 0001 0010 0011 0000
' .. that is, $1230
mmiikkrrooEElleekkttrroonniikkaa:: DDeevveellooppmmeenntt ttoooollss -- BBooookkss -- CCoommppiilleerrss
8811
page
mmiikkrrooBBAASSIICC
- BASIC Compiler for Microchip PIC microcontrollers
mikroBASIC
making it simple...
Operator Operation Precedence
and
bitwise AND; returns 1 if both bits are 1, otherwise returns 0
3
or
bitwise (inclusive) OR; returns 1 if either or
both bits are 1, otherwise returns 0
2
xor
bitwise exclusive OR (XOR); returns 1 if the
bits are complementary, otherwise 0
2
not
bitwise complement (unary); inverts each bit 4
<<
bitwise shift left; moves the bits to the left,
see below
3
>>
bitwise shift right; moves the bits to the right,
see below
3
Page 88

Similarly:
$1234 or $5678 ' equals $567C
$1234 xor $5678 ' equals $444C
not $1234 ' equals $EDCB
Unsigned and Conversions
If number is converted from less complex to more complex data type, upper bytes
are filled with zeroes. If number is converted from more complex to less complex
data type, data is simply truncated (upper bytes are lost).
For example:
dim a as byte
dim b as word
...
a = $AA
b = $F0F0
b = b and a
' a is extended with zeroes; b becomes $00A0
Signed and Conversions
If number is converted from less complex data type to more complex, upper bytes
are filled with ones if sign bit is 1 (number is negative); upper bytes are filled with
zeroes if sign bit is 0 (number is positive). If number is converted from more complex data type to less complex, data is simply truncated (upper bytes are lost).
For example:
dim a as byte
dim b as word
...
a = -12
b = $70FF
b = b and a
' a is sign extended, upper byte is $FF;
' b becomes $70F4
mmiikkrrooBBAASSIICC
- BASIC Compiler for Microchip PIC microcontrollers
mikroBASIC
making it simple...
8822
mmiikkrrooEElleekkttrroonniikkaa:: DDeevveellooppmmeenntt ttoooollss -- BBooookkss -- CCoommppiilleerrss
page
Page 89

Bitwise Shift Operators
Binary operators
<< and >> move the bits of the left operand for a number of posi-
tions specified by the right operand, to the left or right, respectively. Right operand
has to be positive and less than 255.
With shift left (
<<), left most bits are discarded, and “new” bits on the right are
assigned zeroes. Thus, shifting unsigned operand to left by
n positions is equiva-
lent to multiplying it by
2
n
if all the discarded bits are zero. This is also true for
signed operands if all the discarded bits are equal to sign bit.
With shift right (
>>), right most bits are discarded, and the “freed” bits on the left
are assigned zeroes (in case of unsigned operand) or the value of the sign bit (in
case of signed operand). Shifting operand to right by
n positions is equivalent to
dividing it by
2
n
.
For example, if you need to extract the higher byte, you can do it like this:
PORTB = word(temp >> 8)
mmiikkrrooEElleekkttrroonniikkaa:: DDeevveellooppmmeenntt ttoooollss -- BBooookkss -- CCoommppiilleerrss
8833
page
mmiikkrrooBBAASSIICC
- BASIC Compiler for Microchip PIC microcontrollers
mikroBASIC
making it simple...
Page 90

An expression is a sequence of operators, operands, and punctuators that returns a
value.
The primary expressions include: literals, variables, and function calls. From
these, using operators, more complex expressions can be created. Formally,
expressions are defined recursively: subexpressions can be nested up to the limits
of memory.
Expressions are evaluated according to certain conversion, grouping, associativity,
and precedence rules that depend on the operators used, the presence of parentheses, and the data types of the operands. The precedence and associativity of the
operators are summarized in Operator Precedence and Associativity. The way
operands and subexpressions are grouped does not necessarily specify the actual
order in which they are evaluated by mikroBasic.
You cannot mix signed and unsigned data types in assignment expressions or in
expressions with arithmetic or logical operators. You can use explicit conversion
though.
mmiikkrrooBBAASSIICC
- BASIC Compiler for Microchip PIC microcontrollers
mikroBASIC
making it simple...
8844
mmiikkrrooEElleekkttrroonniikkaa:: DDeevveellooppmmeenntt ttoooollss -- BBooookkss -- CCoommppiilleerrss
page
EXPRESSIONS
Page 91

Statements define algorithmic actions within a program. Each statement needs to
be terminated by a newline character (CR/LF).
The simplest statements include assignments, routine calls, and jump statements.
These can be combined to form loops, branches, and other structured statements.
In the absence of specific jump and selection statements, statements are executed
sequentially in the order of appearance in the source code.
Statements can be roughly divided into:
-
asm Statement
- Assignment Statements
- Conditional Statements
- Iteration Statements (Loops)
- Jump Statements
asm Statement
mikroBasic allows embedding assembly in the source code by means of asm
statement. Note that you cannot use numerals as absolute addresses for register
variables in assembly instructions. You may use symbolic names instead (listing
will display these names as well as addresses).
You can group assembly instructions with the
asm keyword:
asm
block of assembly instructions
end asm
BASIC comments are not allowed in embedded assembly code. Instead, you may
use one-line assembly comments starting with semicolon. If you plan to use a certain BASIC variable in embedded assembly only, be sure to at least initialize it
(assign it initial value) in BASIC code; otherwise, linker will issue an error. This
does not apply to predefined globals such as PORTB.
Note: mikroBasic will not check if the banks are set appropriately for your variable. You need to set the banks manually in assembly code.
mmiikkrrooEElleekkttrroonniikkaa:: DDeevveellooppmmeenntt ttoooollss -- BBooookkss -- CCoommppiilleerrss
8855
page
mmiikkrrooBBAASSIICC
- BASIC Compiler for Microchip PIC microcontrollers
mikroBASIC
making it simple...
STATEMENTS
Page 92

Migration from older compiler versions (v2.xx)
The syntax that is being used in the asm blocks is somewhat different than it has
been in version 2. The differences are:
For example, for variable named :
_myVar, if it is global.
FARG_+XX, if it is local (this is myVar's actual position in the local function
frame.
_myVar_L0(+XX), if it is a local static variable (+XX to access further individual
bytes).
The only types whose name remains the same in asm as it is in Basic are constants, e.g. INTCON, PORTB, WREG, GIE, etc.
Accessing individual bytes is different as well. For example, if you have a global
variable "g_var", that is of type long (i.e. 4 bytes), you are to access it like this:
MOVF _g_var+0, 0 ;puts least-significant byte of g_var in W register
MOVF _g_var+1, 0 ;second byte of _g_var; corresponds to Hi(g_var)
MOVF _g_var+2, 0 ;Higher(g_var)
MOVF _g_var+3, 0 ;Highest(g_var)
... etc.
Syntax for retrieving address of an object is different. For objects located in flash
ROM:
MOVLW #_g_var ;first byte of address
MOVLW @#_g_var ;second byte of address
MOVLW @@#_g_var ;third byte of address
... and so on.
For objects located in RAM:
MOVLW CONST1 ;first byte of address
MOVLW @CONST1 ;second byte of address
... and so on.
mmiikkrrooBBAASSIICC
- BASIC Compiler for Microchip PIC microcontrollers
mikroBASIC
making it simple...
8866
mmiikkrrooEElleekkttrroonniikkaa:: DDeevveellooppmmeenntt ttoooollss -- BBooookkss -- CCoommppiilleerrss
page
Page 93

Assignment Statements
Assignment statements have the form:
variable = expression
The statement evaluates the expression and assigns its value to the variable.
All rules of the implicit conversion apply.
Variable can be any declared variable
or array element, and expression can be any expression.
Do not confuse the assignment with relational operator
= which tests for equality.
mikroBasic will interpret meaning of the character = from the context.
Conditional Statements
Conditional or selection statements select from alternative courses of action by
testing certain values. There are two types of selection statements in mikroBasic:
if and select case.
If Statement
Use
if to implement a conditional statement. Syntax of if statement has the
form:
if expression then
statements
[else
other statements]
end if
When expression evaluates to true, statements execute. If expression is
false, other statements execute. The expression must convert to a boolean
type; otherwise, the condition is ill-formed. The else keyword with an alternate
block of statements (
other statements) is optional.
Nested
if statements require additional attention. General rule is that the nested
conditionals are parsed starting from the innermost conditional, with each else
bound to the nearest available if on its left.
mmiikkrrooEElleekkttrroonniikkaa:: DDeevveellooppmmeenntt ttoooollss -- BBooookkss -- CCoommppiilleerrss
8877
page
mmiikkrrooBBAASSIICC
- BASIC Compiler for Microchip PIC microcontrollers
mikroBASIC
making it simple...
Page 94

Select Case Statement
Use the
select case statement to pass control to a specific program branch,
based on a certain condition. The select case statement consists of a selector
expression (a condition) and a list of possible values. Syntax of select case
statement is:
select case selector
case value_1
statements_1
...
case value_n
statements_n
[case else
default_statements]
end select
The selector is an expression which should evaluate as integral value. The
values can be literals, constants, or expressions. The statements can be any
statements. The else clause is optional.
First, the
selector expression (condition) is evaluated. The select case state-
ment then compares it against all the available values. If the match is found, the
statements following the match evaluate, and select case statement termi-
nates. In case there are multiple matches, the first matching statement will be
executed. If none of the values matches the selector, then the
default_statements in the else clause (if there is one) are executed.
Here is a simple example of select case statement:
select case operator
case "*"
res = n1 * n2
case "/"
res = n1 / n2
case "+"
res = n1 + n2
case "-"
res = n1 - n2
case else
res = 0
Inc(cnt)
end select
mmiikkrrooBBAASSIICC
- BASIC Compiler for Microchip PIC microcontrollers
mikroBASIC
making it simple...
8888
mmiikkrrooEElleekkttrroonniikkaa:: DDeevveellooppmmeenntt ttoooollss -- BBooookkss -- CCoommppiilleerrss
page
Page 95

Also, you can group values together for a match. Simply separate the items by
commas:
select case reg
case 0
opmode = 0
case 1,2,3,4
opmode = 1
case 5,6,7
opmode = 2
end select
Nested Case Statements
Note that
select case statements can be nested – values are then assigned to the
innermost enclosing select case statement.
mmiikkrrooEElleekkttrroonniikkaa:: DDeevveellooppmmeenntt ttoooollss -- BBooookkss -- CCoommppiilleerrss
8899
page
mmiikkrrooBBAASSIICC
- BASIC Compiler for Microchip PIC microcontrollers
mikroBASIC
making it simple...
Page 96

Iteration Statements (Loops)
Iteration statements let you loop a set of statements. There are three forms of iteration statements in mikroBasic: for, while, and do.
You can use the statements
break and continue to control the flow of a loop
statement. The break terminates the statement in which it occurs, while
continue begins executing the next iteration of the sequence.
For Statement
The
for statement implements an iterative loop and requires you to specify the
number of iterations. Syntax of
for statement is:
for counter = initial_value to final_value [step step_value]
statements
next counter
The counter is a variable which increases by step_value with each iteration of
the loop. Parameter step_value is an optional integral value, and defaults to 1 if
omitted. Before the first iteration, counter is set to the initial_value and will
increment until it reaches (or exceeds) the
final_value.
The initial_value and final_value should be expressions compatible with
the
counter; statements can be any statements that do not change the value of
counter.
Note that parameter
step_value may be negative, allowing you to create a
countdown.
Here is an example of calculating scalar product of two vectors,
a and b, of length
n, using for statement:
s = 0
for i = 0 to n
s = s + a[i] * b[i]
next i
The for statement results in an endless loop if the final_value equals or
exceeds the range of counter’s type.
mmiikkrrooBBAASSIICC
- BASIC Compiler for Microchip PIC microcontrollers
mikroBASIC
making it simple...
9900
mmiikkrrooEElleekkttrroonniikkaa:: DDeevveellooppmmeenntt ttoooollss -- BBooookkss -- CCoommppiilleerrss
page
Page 97

While Statement
Use the
while keyword to conditionally iterate a statement. Syntax of while
statement is:
while expression
statements
wend
The statements are executed repeatedly as long as the expression evaluates
true. The test takes place before the
statements are executed. Thus, if expres-
sion evaluates false on the first pass, the loop does not execute.
Here is an example of calculating scalar product of two vectors, using the
while
statement:
while i < n
s = s + a[i] * b[i]
i = i + 1
wend
Do Statement
The
do statement executes until the condition becomes true. Syntax of do state-
ment is:
do
statements
loop until expression
The statements are executed repeatedly until the expression evaluates true.
The expression is evaluated after each iteration, so the loop will execute
statements at least once.
Here is an example of calculating scalar product of two vectors, using the do
statement:
do
s = s + a[i] * b[i]
i = i + 1
loop until i = n
mmiikkrrooEElleekkttrroonniikkaa:: DDeevveellooppmmeenntt ttoooollss -- BBooookkss -- CCoommppiilleerrss
9911
page
mmiikkrrooBBAASSIICC
- BASIC Compiler for Microchip PIC microcontrollers
mikroBASIC
making it simple...
Page 98

Jump Statements
A jump statement, when executed, transfers control unconditionally. There are four
such statements in mikroBasic: break, continue, goto, and gosub.
Break Statement
Sometimes, you might need to stop the loop from within its body. Use the
break
statement within loops to pass control to the first statement following the innermost loop (
for, while, and do).
For example:
' Wait for CF card to be plugged; refresh every second
while true
Lcd_Out(1,1,"No card inserted")
if Cf_Detect() = 1 then
break
end if
Delay_ms(1000)
wend
' Now we can work with CF card ...
Lcd_Out(1,1,"Card detected ")
Continue Statement
You can use the continue statement within loops to “skip the cycle”:
-
continue statement in for loop moves program counter to the line with
keyword for; it does not change the loop counter,
-
continue statement in while loop moves program counter to the line with loop
condition (top of the loop),
- continue statement in do loop moves program counter to the line with loop
condition (bottom of the loop).
mmiikkrrooBBAASSIICC
- BASIC Compiler for Microchip PIC microcontrollers
mikroBASIC
making it simple...
9922
mmiikkrrooEElleekkttrroonniikkaa:: DDeevveellooppmmeenntt ttoooollss -- BBooookkss -- CCoommppiilleerrss
page
Page 99

Goto Statement
Use the
goto statement to unconditionally jump to a local label — for more infor-
mation, refer to Labels. Syntax of goto statement is:
goto label_name
This will transfer control to the location of a local label specified by label_name.
The goto line can come before or after the label. It is not possible to jump into or
out of routine.
You can use
goto to break out from any level of nested control structures. Never
jump into a loop or other structured statement, since this can have unpredictable
effects. Use of
goto statement is generally discouraged as practically every algo-
rithm can be realized without it, resulting in legible structured programs. One possible application of goto statement is breaking out from deeply nested control
structures.
Gosub Statement
Use the
gosub statement to unconditionally jump to a local label — for more
information, refer to Labels. Syntax of gosub statement is:
gosub label_name
...
label_name:
...
return
This will transfer control to the location of a local label specified by label_name.
Also, the calling point is remembered. Upon encountering a return statement,
program execution will continue with the next statement (line) after the gosub.
The
gosub line can come before or after the label.
It is not possible to jump into or out of routine by means of gosub. Never jump
into a loop or other structured statement, since this can have unpredictable effects.
Note: Like with
goto, use of gosub statement is generally discouraged.
mikroBasic supports
gosub only for the sake of backward compatibility. It is bet-
ter to rely on functions and procedures, creating legible structured programs.
mmiikkrrooEElleekkttrroonniikkaa:: DDeevveellooppmmeenntt ttoooollss -- BBooookkss -- CCoommppiilleerrss
9933
page
mmiikkrrooBBAASSIICC
- BASIC Compiler for Microchip PIC microcontrollers
mikroBASIC
making it simple...
Page 100

Exit Statement
The
exit statement allows you to break out of a routine (function or procedure).
It passes the control to the first statement following the routine call.
Here is a simple example:
sub procedure Proc1()
dim error as byte
... ' we're doing something here
if error = TRUE then
exit
end if
... ' some code, which won't be executed if error is true
end sub
Note: If breaking out of a function, return value will be the value of the local
variable
result at the moment of exit.
mmiikkrrooBBAASSIICC
- BASIC Compiler for Microchip PIC microcontrollers
mikroBASIC
making it simple...
9944
mmiikkrrooEElleekkttrroonniikkaa:: DDeevveellooppmmeenntt ttoooollss -- BBooookkss -- CCoommppiilleerrss
page
 Loading...