

Page 1
™
EasydsPIC6
All MikroElektronika´s development systems represent irreplaceable tools for
programming and developing microcontroller-based devices. Carefully chosen
components and the use of machines of the last generation for mounting and
testing thereof are the best guarantee of high reliability of our devices. Due to
simple design, a large number of add-on modules and ready to use examples,
all our users, regardless of their experience, have the possibility to develop
their project in a fast and effi cient way.
User manual
Development System
Page 2

TO OUR VALUED CUSTOMERS
I want to express my thanks to you for being interested in our products and for having confi dence in
mikroElektronika.
The primary aim of our company is to design and produce high quality electronic products and to constantly
improve the performance thereof in order to better suit your needs.
Nebojsa Matic
General Manager
The Microchip name and logo, the Microchip logo, Accuron, dsPIC, KeeLoq, microID, MPLAB, PIC, PICmicro, PICSTART, PRO MATE,
PowerSmart, rfPIC and SmartShunt are registered trademarks of Microchip Technology Incorporated in the U.S.A and other countries.
Page 3

Development System EasydsPIC6
TABLE OF CONTENTS
3
page
Introduction to EasydsPIC6 Development System
Key Features
1.0. Connecting the System to a PC ......................
2.0. Supported Microcontrollers
3.0. On-board dsPICprog Programmer
4.0. mikroICD (In-Circuit Debugger) ................................................................................................. 10
5.0. ICD Connector
6.0. Power Supply ........................
7.0. RS-232 Communication Module
8.0. CAN Communication Module .................................................................................................... 14
9.0. Voltage Reference Source ........................................................................................................ 15
10.0. A/D Converter Test Inputs
11.0. Serial EEPROM Module
12.0. DS1820 Temperature Sensor
13.0. Piezo Buzzer
14.0. LEDs ........
15.0. 4x4 Keypad
16.0. MENU Keypad
17.0. Push Buttons ........................................................................................................................... 23
18.0. On-board 2x16 LCD
19.0. 2x16 LCD ...........
20.0. 128x64 Graphic LCD .............
21.0. Touch Panel
22.0. I/O Ports ....................
23.0. Port Expander (Additional I/O Ports) ....................................................................................... 30
....................................................................................................................................
....................................................................................................... 7
............................................................................................
..........................................................................................................................
....................................................................................................
................................................................................................
.......................................................................................................
.........................................................................................................
..................................................................................................
..........................................................................................................................
...............................................................................................................................
.............................................................................................................................
.........................................................................................................................
................................................................................................................
.....................................................................................................................
..................................................................................................
............................................................................................................................
..............................................................................................................
.......................................................................... 4
5
..........................................................................
8
11
12
13
16
17
18
19
20
21
22
24
25
26
27
28
6
MikroElektronika
Page 4
4
Introduction to EasydsPIC6 Development System
page
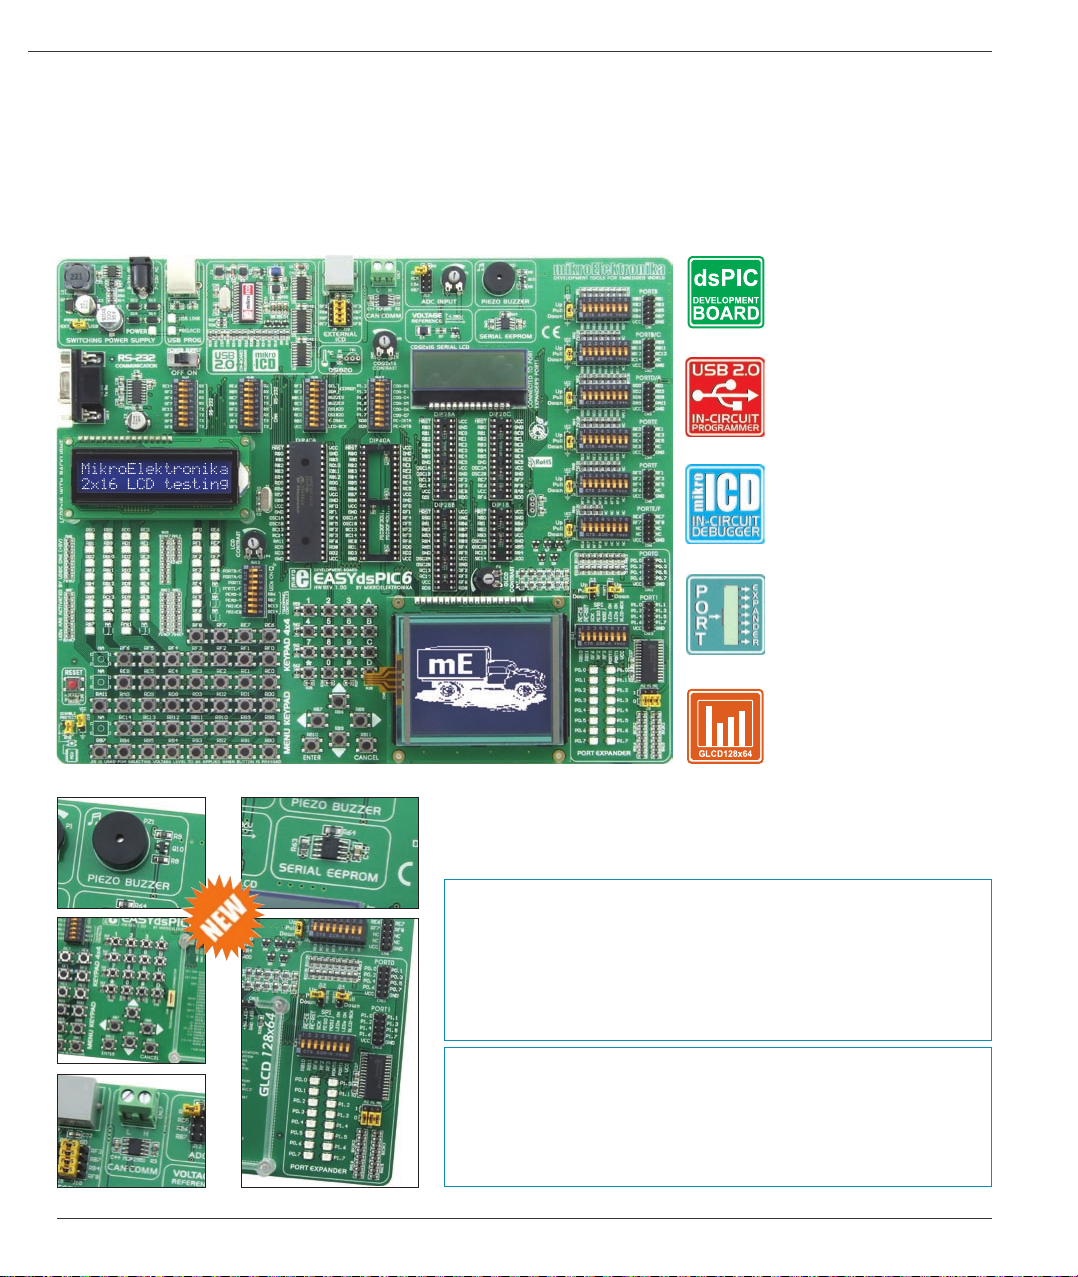
The EasydsPIC6™ development system provides a development environment for experimenting with dsPIC® microcontrollers from
Microchip®. The system includes an on-board programmer with mikroICD providing an interface between the microcontroller and a PC.
You are simply expected to write a program in one of the dsPIC compilers, generate a .hex le and program your microcontroller using
the on-board dsPICprog™ programmer. Numerous modules, such as 128x64 graphic LCD, alphanumeric 2x16 LCD, port expander
etc, are provided on the board and allow you to easily simulate the operation of the target device.
Development System EasydsPIC6
Full-featured development
system for dsPIC
microcontroller based devices
On-board USB 2.0
programmer
In-Circuit Debugger for real
time debugging at hardware
level
Port expander provides an
easy I/O expansion by 2
additional ports
MikroElektronika
Graphic LCD with backlight
The dsPICFLASH™ program for programming provides a complete list of all
supported microcontrollers. The latest version of this program with updated
list of supported microcontrollers can be downloaded from our website at
www.mikroe.com
Package contains:
Development system: EasydsPIC6
CD: product CD with relevant software
Cables: USBcable
Documentation: Manuals for EasydsPIC6, dsPICprog and mikroICD,
quick guide for installing USB drivers, electrical
schematic of the system
System specication:
Power Supply: over an AC/DC connector (7-23V AC or 9-32V DC); or
over a USB cable for programming (5V DC)
Power consumption:~40mA in idle state when all on-board modules are off
Dimension: 26,5 x 22cm (10,4 x 8,6inch)
Weight: ~416g (0.91lbs)
Page 5
Development System EasydsPIC6
5
31
30
29
28
27
26
1
2
3
64
7
8 9
105
page
11
12
13
14
15
16
25
24
23
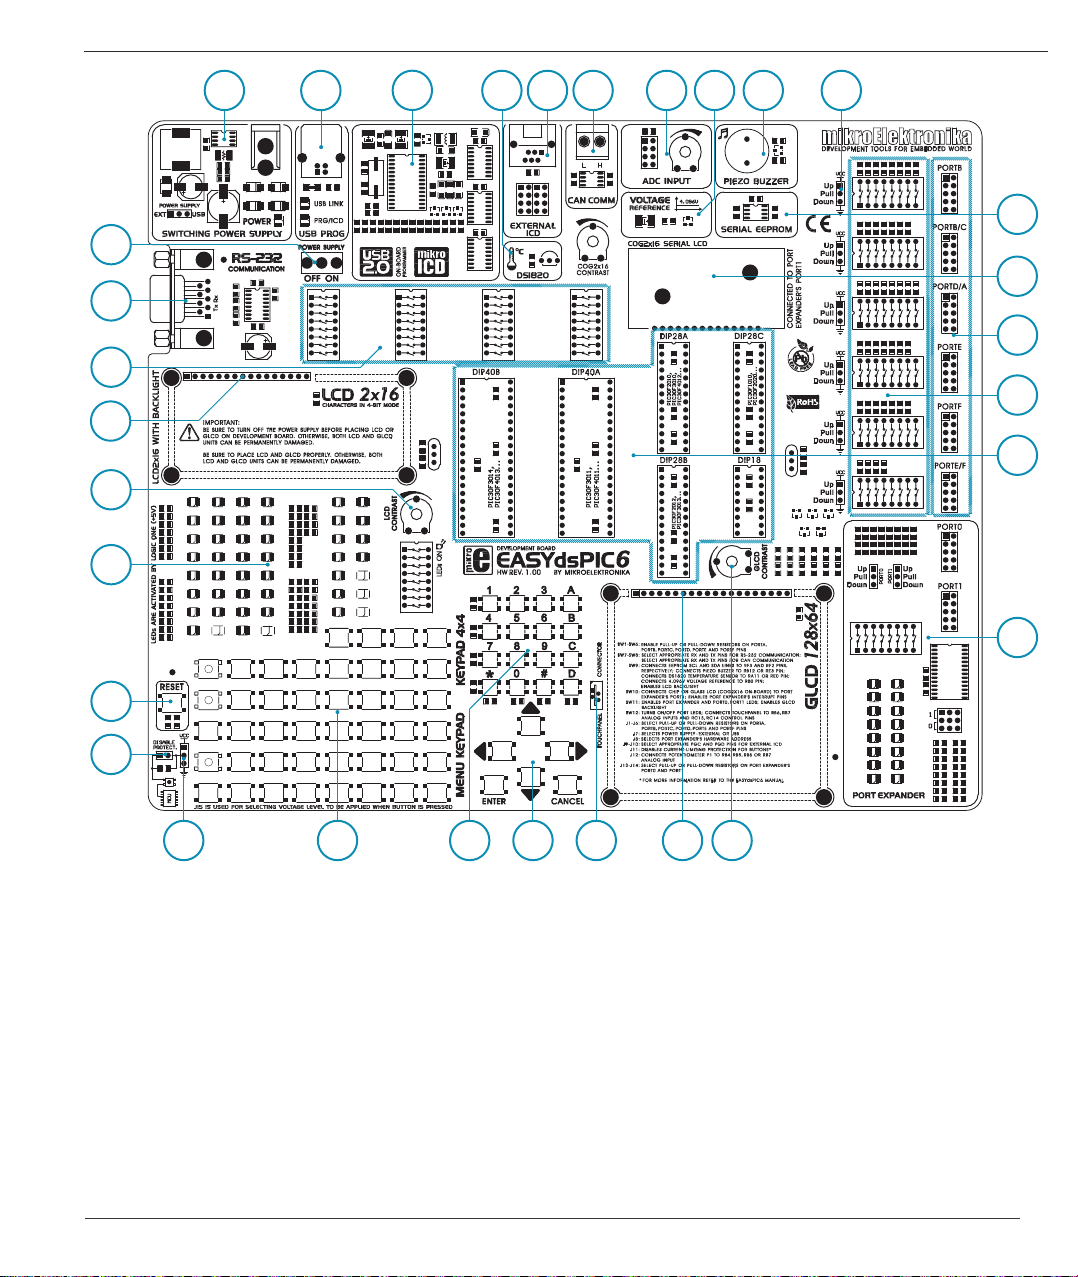
Key Features
1. Power supply voltage regulator
2. On-board programmer’s USB connector
3. USB 2.0 programmer with mikroICD
4. DS1820 temperature sensor
5. Microchip’s debugger connector (ICD2 or ICD3)
6. CAN communication module
7. A/D converter test inputs
8. 4.096V voltage reference source
9. Piezo buzzer
10. Jumper for pull-up/pull-down resistor selection
11. Serial EEPROM module
12. On-board 2x16 LCD
13. I/O port connectors
14. DIP switches enable pull-up/pull-down resistors
15. Microcontroller sockets
192021
16. Port expander
17. Potentiometer for adjusting contrast of graphic display
18. Graphic LCD connector
19. Touch panel connector
20. MENU keypad
21. 4x4 keypad
22. Push buttons simulate microcontroller digital inputs
23. Jumper for selecting pins’ logic state via push buttons
24. Jumper for protective resistor shortening
25. Reset button
26. 42 LEDs indicate pins’ logic state
27. Potentiometer for adjusting contrast of alphanumeric LCD
28. Alphanumeric LCD connector
29. DIP switches turn on/off on-board modules
30. RS-232 communication module
31. Power supply switch
171822
MikroElektronika
Page 6
6
1.0. Connecting the System to a PC
page
Development System EasydsPIC6
Step 1:
Follow the instructions provided in the relevant manuals and install the dsPICash program and the USB driver from the product CD.
USB drivers are essential for the proper operation of the on-board programmer.
In case you already have one of the Mikroelektronika’s dsPIC compilers installed on your PC, there is no need to reinstall USB drivers
as they are already installed along with the compiler.
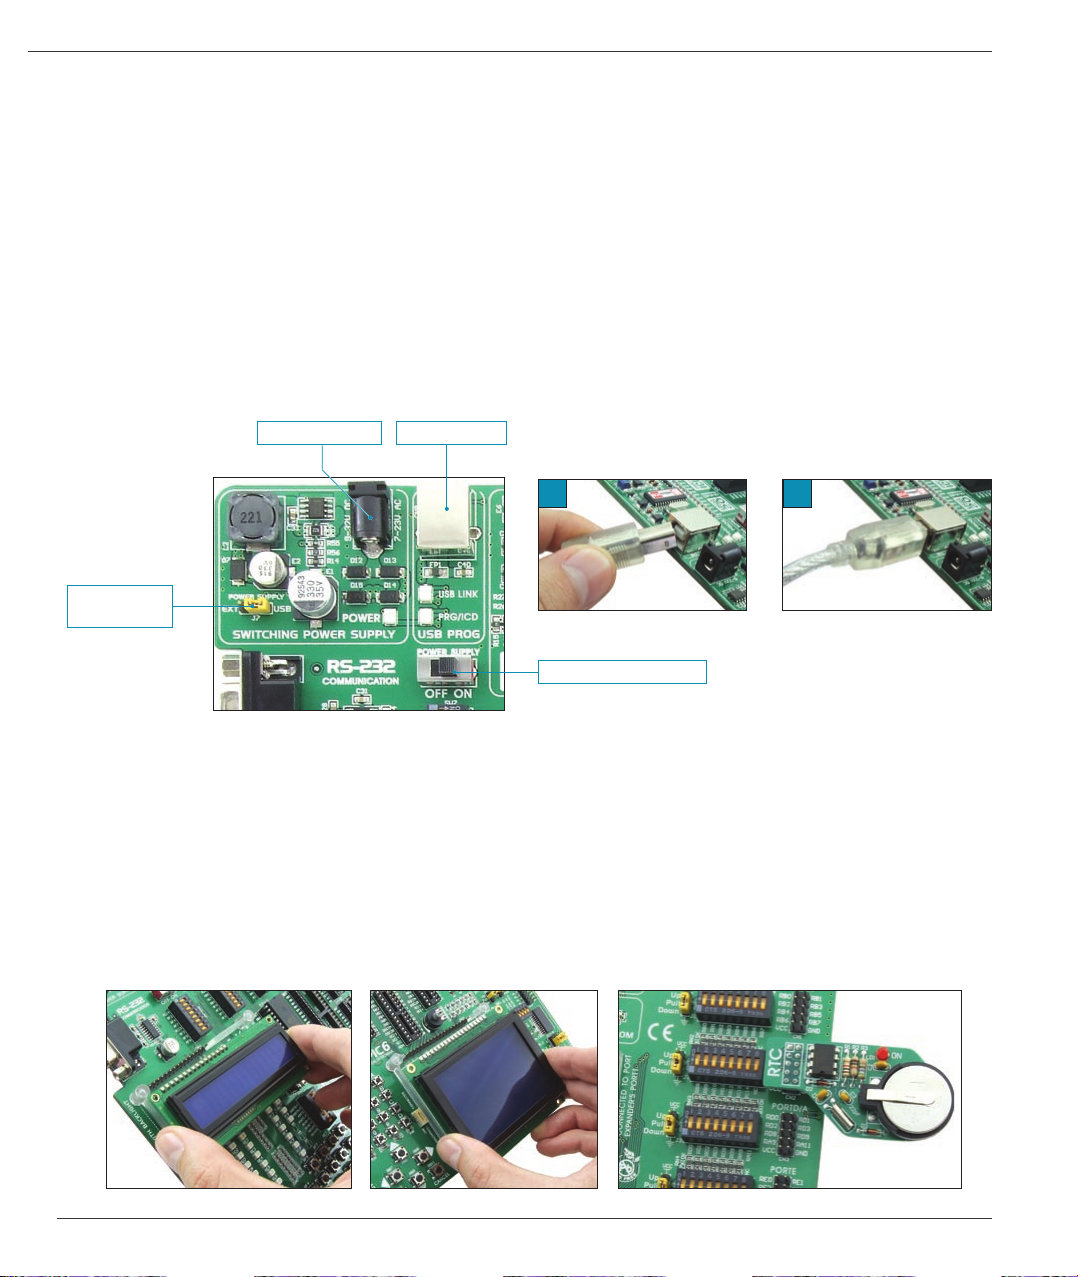
Step 2:
Use the USB cable to connect the EasydsPIC6 development system to a PC. One end of the USB cable, with a USB connector of
B type, should be connected to the development system, as shown in Figure 1-2, whereas the other end of the cable with a USB
connector of A type should be connected to a PC. When establishing a connection, make sure that jumper J7 is placed in the USB
position as shown in Figure 1-1.
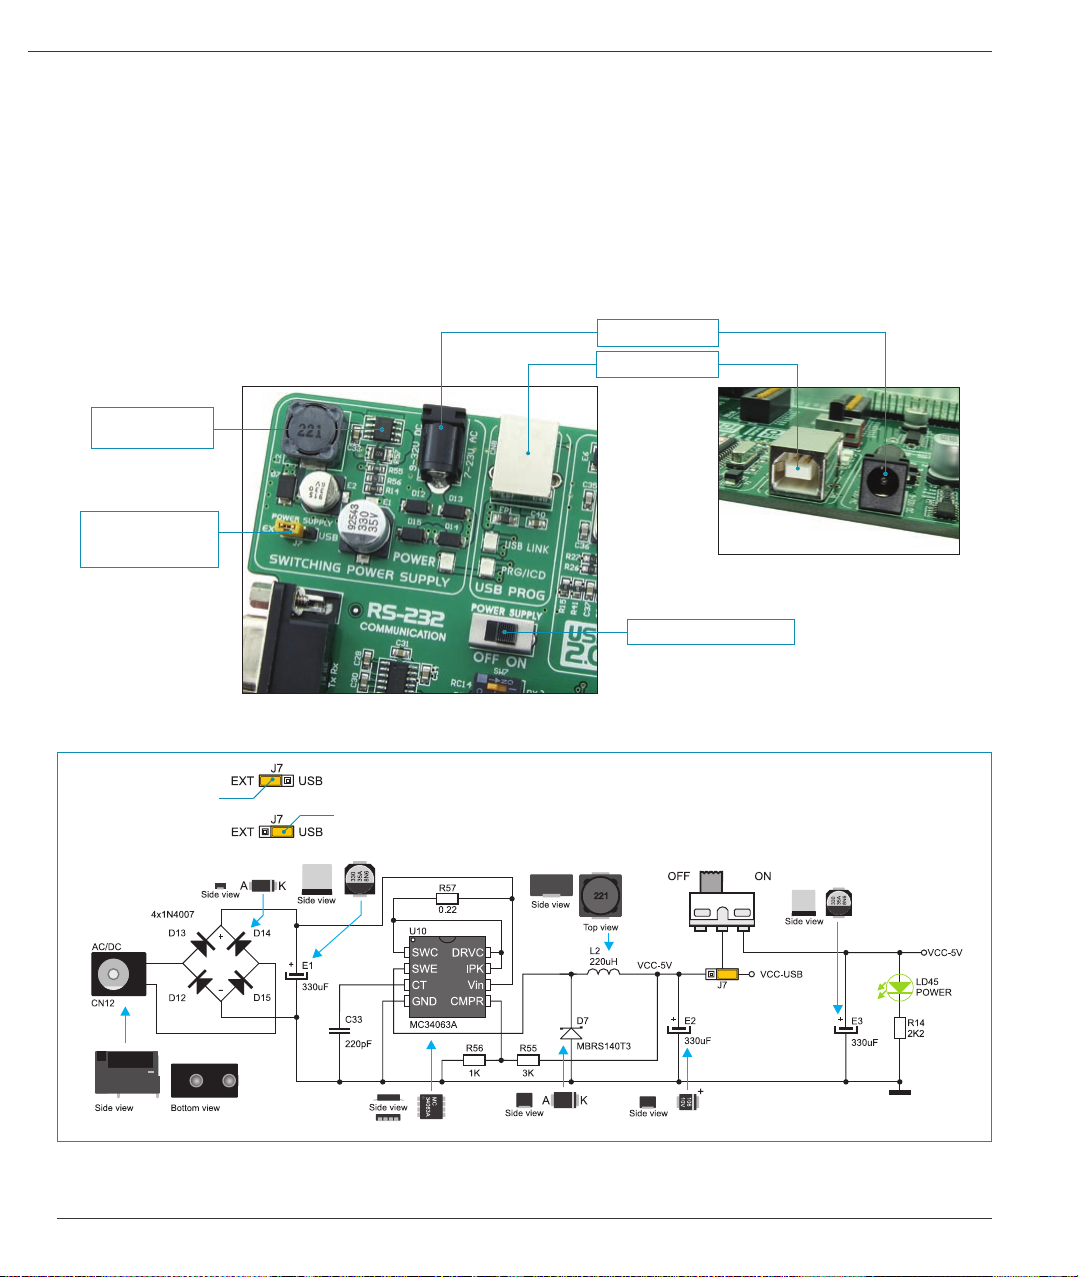
AC/DC connector
J7 power
supply selector
Figure 1-1: Power supply
USB connector
1
Figure 1-2: Connecting USB cable
POWER SUPPLY switch
2
Step 3:
Turn on your development system by setting the POWER SUPPLY switch to ON position. Two LEDs marked as POWER and USB
LINK will be automatically turned on indicating that your development system is ready to use. Use the on-board programmer and the
dsPICprog programmer and the dsPICash program to dump a hex code into the microcontroller and employ the system to test and
develop your projects.
NOTE: If some additional modules are used, such as LCD, GLCD etc, it is necessary to place them properly on the development
system while it is turned off. Otherwise, either can be permanently damaged. Refer to gure below for the proper placing of
the additional modules.
Figure 1-3: Placing additional modules on the board
MikroElektronika
Page 7
Development System EasydsPIC6
2
7
2.0. Supported Microcontrollers
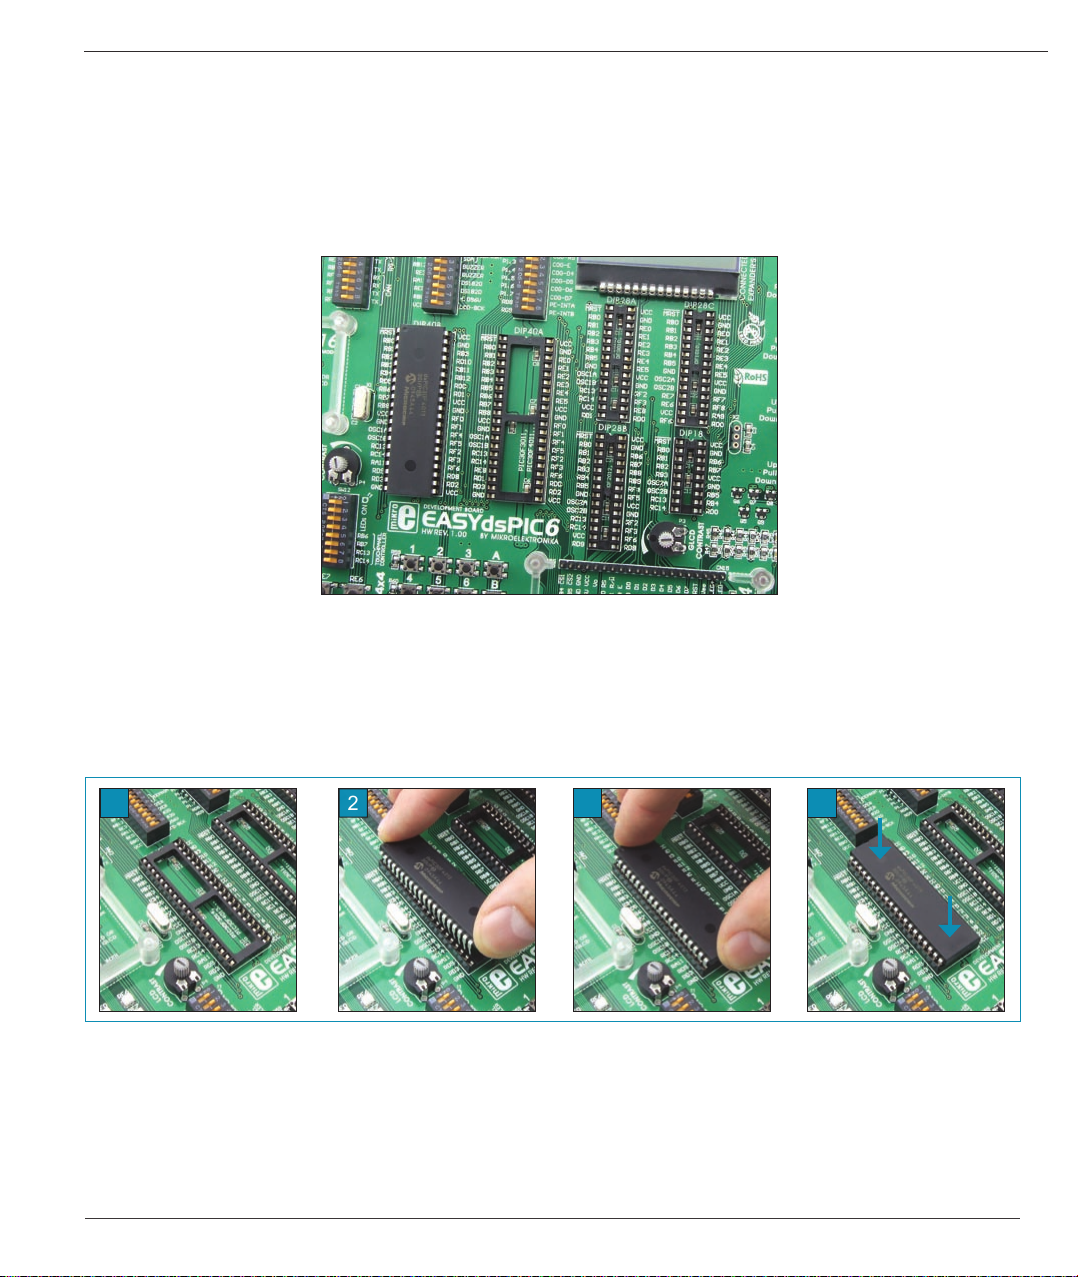
The EasydsPIC6 development system provides six separate sockets for dsPIC microcontrollers in DIP40, DIP28 and DIP18 packages.
These sockets allow supported microcontrollers in dsDIP packages to be plugged directly into the development board. There are two
sockets for dsPIC microcontrollers in DIP40 package, three sockets for dsPIC microcontrollers in DIP28 package and one socket for
dsPIC microcontrollers in DIP18 package provided on the board. Which of these sockets will be used depends solely on the pinout of
the microcontroller in use. The EasydsPIC6 development system comes with the microcontroller in DIP40 package.
Figure 2-1: Microcontroller sockets
dsPIC microcontrollers normally use a quartz crystal for stabilizing clock frequency. The EasydsPIC6 provides two sockets for
quartz crystal. Microcontrollers in DIP40A, DIP40B and DIP28A packages use socket X1 (OSC1A, OSC1B) for quartz crystal. If
microcontrollers in DIP18, DOP28B and DIP28C packages are used, it is necessary to move quartz crystal from socket X1 to socket
X2 (OSC2A, OSC2B). Besides, it is possible to replace the existing quartz crystal with another one. The value of the quartz crystal
depends on the maximum clock frequency allowed.
page
1
Figure 2-2: Plugging microcontroller into appropriate socket
Prior to plugging the microcontroller into the appropriate socket, make sure that the power supply is turned off. Figure 2-2 shows how
to correctly plug a microcontroller. Figure 1 shows an unoccupied DIP40 socket. Place one end of the microcontroller into the socket
as shown in Figure 2. Then put the microcontroller slowly down until all the pins thereof match the socket as shown in Figure 3. Check
again that everything is placed correctly and press the microcontroller easily down until it is completely plugged into the socket as shown
in Figure 4.
NOTE: Only one microcontroller may be plugged into the development board at one time.
3
4
MikroElektronika
Page 8
8
3.0. On-board dsPICprog Programmer
page
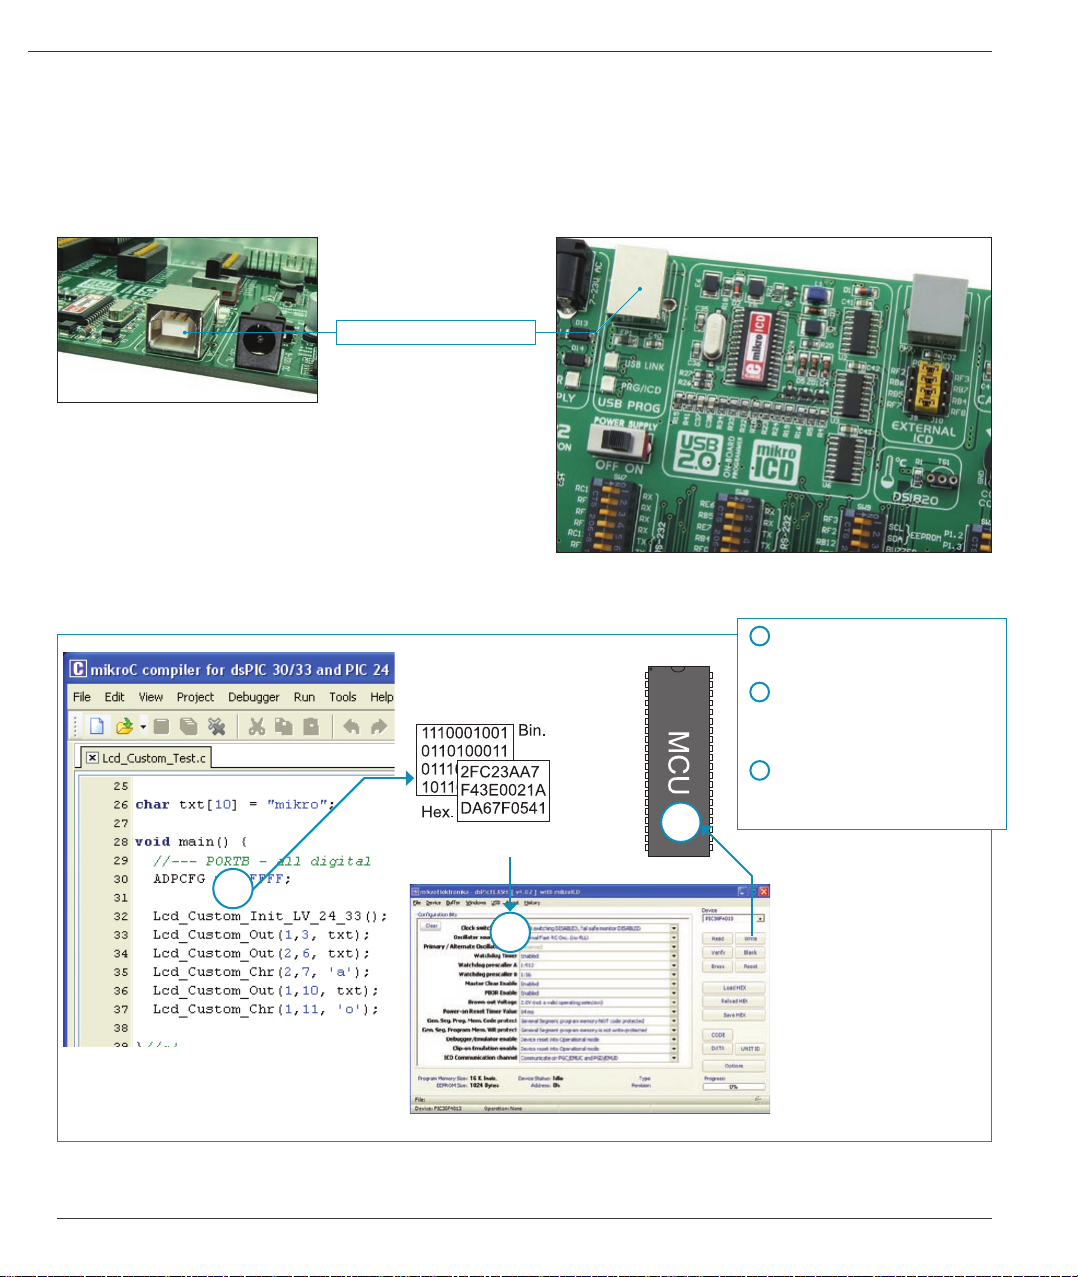
A programmer is a necessary tool when working with microcontrollers. It is used to load a hex code into the microcontroller and
provides an interface between the microcontroller and a PC. The EasydsPIC6 has an on-board dsPICprog programmer. All you need
is a .hex le to be loaded into the microcontroller using the dsPICFLASH program. Figure 3-3 shows connection between the compiler,
the dsPICFLASH program and the microcontroller.
Programmer’s USB connector
Figure 3-1: USB connector’s front side
Figure 3-2: On-board programmer
Development System EasydsPIC6
1
Write a code in one of the dsPIC compilers, generate
a .hex le, and employ the on-board programmer
to load the code into the microcontroller.
Figure 3-3: Programming process
Compiling program
hex code loading
2
3
1
Write a program in one of dsPIC
compilers and generate a .hex le;
2
Use the dsPICFLASH program
to select desired microcontroller to be
programmed;
3
Click the Write button to dump
the code into the microcontroller.
On the left side of the
dsPICFLASH program’s main
window, there is a number of
options for setting the operation
of the microcontroller to be
used. A number of options
which enable the programming
process are provided on the right
side of the window. Positioned
in the bottom right corner of
the window, the Progress bar
enables you to monitor the
programming progress.
MikroElektronika
Page 9
Development System EasydsPIC6
9
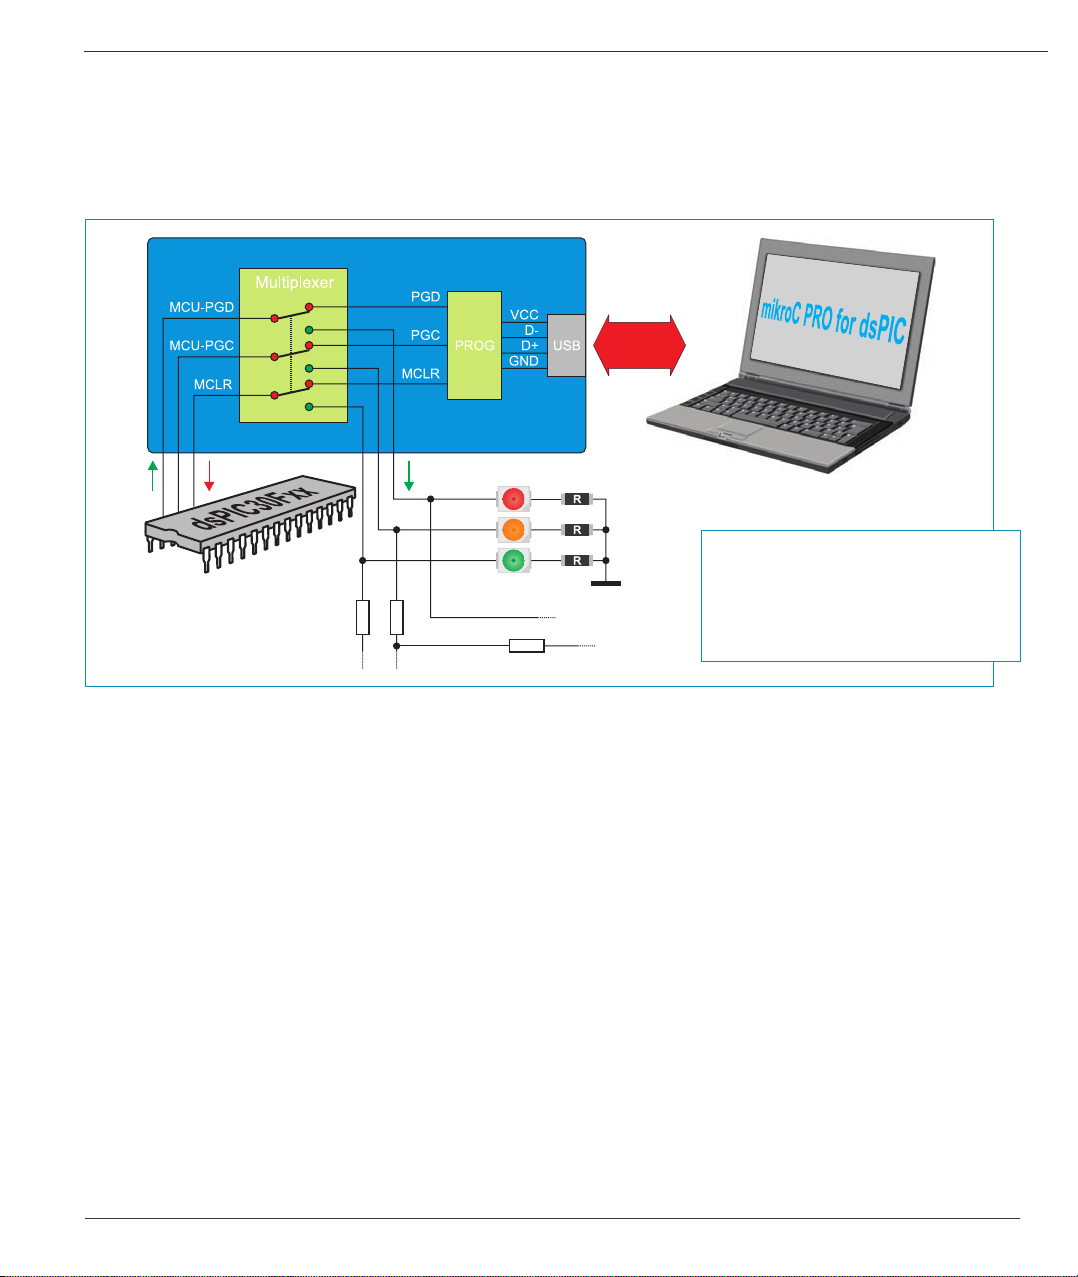
Microcontroller pins for programming (PGD, PGC and MCLR) are not directly connected to the on-board programmer, but via a multiplexer.
The multiplexer is used to disconnect the microcontroller pins used for programming from the rest of the board while the programming
process is under way. As soon as the programming process starts, the multiplexer automatically disconnects pins for programming from
the development system. In this case, these pins cannot be used as I/O pins. When the programming process is complete, the multiplexer
reconnects these pins to the development system, after which they can be used as I/O pins.
During the programming, the multiplexer disconnects
the microcontroller pins used for programming
from the rest of the board and connects them to
the dsPICprog programmer. When the process
of programming is complete, these pins are
automatically disconnected from the programmer
and may be used as input/output pins.
page
Figure 3-4: Programmer schematic
MikroElektronika
Page 10
10
4.0. mikroICD (In-Circuit Debugger)
page
The mikroICD (In-Circuit Debugger) is an integral part of the on-board programmer. It is used for testing and debugging programs in
real time. The process of testing and debugging is performed by monitoring the state of all registers within the microcontroller while
operating in real environment. The mikroICD software is integrated in all dsPIC compilers designed by Mikroelektronika (mikroBASIC
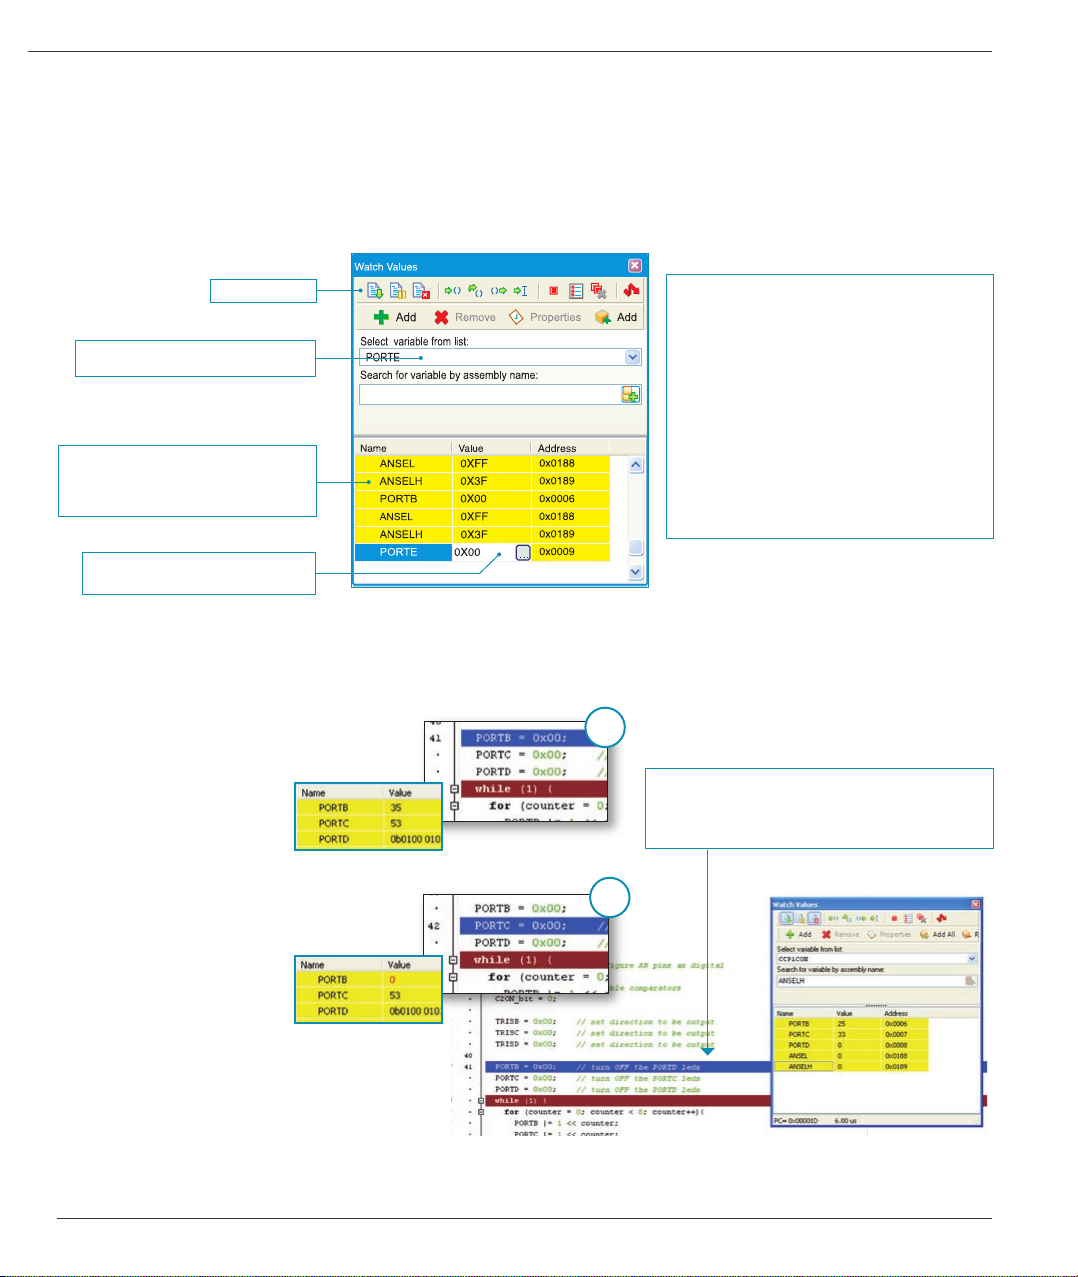
PRO, mikroC PRO, mikroPASCAL PRO etc). As soon as the mikroICD debugger starts up, a window called Watch Values, appears
on the screen, Figure 4-1. The mikroICD debugger communicates to the microcontroller through the microcontroller’s pins used for
programming.
Icon commands
A complete list of registers within the
microcontroller being programmed
A list of selected registers to be
monitored. The state of these registers
changes during the program execution,
which can be viewed in this window
Double click on the Value eld
enables you to change data format
Figure 4-1: Watch Values window
Development System EasydsPIC6
mikroICD debugger options:
Start Debugger [F9]
Run/Pause Debugger [F6]
Stop Debugger [Ctrl+F2]
Step Into [F7]
Step Over [F8]
Step Out [Ctrl+F8]
Toggle Breakpoint [F5]
Show/Hide Breakpoints [Shift+F4]
Clear Breakpoints [Ctrl+Shift+F5]
Each of these commands is activated via
keyboard shortcuts or by clicking appropriate
icon within the Watch Values window.
The mikroICD debugger also offers functions such as running a program step by step (single stepping), pausing the program execution
to examine the state of currently active registers using breakpoints, tracking the values of some variables etc. The following example
illustrates a step-by-step program execution using the Step Over command.
Step 1:
In this example the 41st
program line is highlighted in
blue, which means that it will
be executed next. The current
state of all registers within the
microcontroller can be viewed
in the mikroICD Watch Values
window.
Step 2:
After the Step Over command
is executed, the microcontroller
will execute the 41st program
line. The next line to be
executed is highlighted in blue.
The state of registers being
changed by executing this
instruction may be viewed in
the Watch Values window.
NOTE: For more information on the mikroICD debugger refer to the mikroICD Debugger manual.
1
During operation, the program line to be executed next is
highlighted in blue, while the breakpoints are highlighted in
red. The Run command executes the program in real time
until it encounters a breakpoint.
2
MikroElektronika
Page 11

Development System EasydsPIC6
11
5.0. ICD Connector
The ICD connector enables communication between the microcontroller and an external ICD debugger/programmer from Microchip
(ICD2 or ICD3). Jumpers J9 and J10 are used for selecting a pin to be fed with programming signals. For the programming signals
to be sent to the microcontroller, it is necessary to place these jumpers in the appropriate position. The position of jumpers depends
on the arrangement of the microcontroller pins used for programming. Figures below show the position of jumpers J9 and J10
depending on which microcontroller pins are used for programming.
Figure 5-1: Pins RF2 and RF3
are used for programming
External ICD programmer is connected to RB6 and RB7 pins
Figure 5-2: Pins RB6 and RB7
are used for programming
Figure 5-3: Pins RB5 and RB4
are used for programming
Figure 5-4: Pins RF7 and RF8
are used for programming
page
Figure 5-5: ICD connector’s pinout and designations
MikroElektronika
Page 12
12
6.0. Power supply
page
The EasydsPIC6 development system may use one of two power supply sources:
1. +5V PC power supply through the USB programming cable; and
2. External power supply source connected to an AC/DC connector provided on the development board.
The MC34063A voltage regulator and Gretz rectier are used to enable external power supply voltage to be either AC (in the range
of 7V to 23V) or DC (in the range of 9V to 32V). Jumper J7 is used as a selector for a power supply source. To make advantage of
the USB power supply, jumper J7 should be placed in the USB position. When using the external power supply, jumper J7 should be
placed in the EXT position. The development system is turned on/off by switching the position of the POWER SUPPLY switch.
AC/DC connector
Power supply
voltage regulator
Jumper J7 as a
selector for a power
supply source
Development System EasydsPIC6
USB connector
Figure 6-1: Power supply
Powering over an
AC/DC connector
Figure 6-2: Power supply source schematic
POWER SUPPLY switch
Powering over a
USB connector
MikroElektronika
Page 13

Development System EasydsPIC6
13
7.0. RS-232 Communication Module
USART (Universal Synchronous/Asynchronous Receiver/Transmitter) is one of the most common ways of exchanging data between
the PC and peripheral modules. RS-232 serial communication is performed through a 9-pin SUB-D connector and the microcontroller
USART module. The EasydsPIC6 provides one RS-232 port. Depending on the microcontroller in use, it is necessary to set appropriate
switches on the DIP switch SW7 or SW8 to enable connection between the microcontroller and the RS-232 communication module.
In case the dsPIC30F4013 microcontroller is used, it is necessary to set switches 2 (RF2) and 6 (RF3) on the DIP switch SW7 to
ON position. Which of these switches is to be used depends on which microcontroller pins are used for the USART communication.
Anyway, the microcontroller pins used in such a communication are marked as follows: RX - receive data line and TX - transmit data
line. Data rate goes up to 115 kbps.
In order to enable the USART module of the microcontroller to receive input signals which meet the RS-232 standard, it is necessary
to adjust voltage levels using an IC circuit such as MAX202C (MAX232).
RS-232 connector
Figure 7-1: RS-232 communication module
Port RS-232A is connected to the microcontroller
page
Figure 7-2: RS-232 module connection schematic
NOTE: Make sure that your microcontroller is provided with the USART module as it is not necessarily integrated in all dsPIC
microcontrollers.
MikroElektronika
Page 14

14
8.0. CAN Communication Module
page
CAN (Controller Area Network) is a communication standard primarily intended for use in automotive industry. It enables the
microcontroller to communicate with a car device without using a host PC. In addition, such communication is widely used in industrial
automation. The EasydsPIC6 uses the MCP2551 circuit for CAN communication. This circuit provides an interface between the
microcontroller and some peripheral device. To enable connection between the microcontroller and MCP2551, it is necessary to
set switches 6 and 8 on the DIP switch SW8 to ON position. Switches 5 and 7 on the DIP switch SW8 may also be used for this
purpose. Which of these switches is to be used depends solely on the arrangement of the microcontroller pins connected to CAN
communication lines. The RX line can be connected to the microcontroller via RF0 and RF1 pins, whereas the TX line can be
connected to the microcontroller via pins RF2 and RF3.
The MCP2551 circuit is used
for CAN communicaion
Development System EasydsPIC6
Figure 8-1: CAN communication module
CAN communication is enabled via DIP switch SW8
Figure 8-3: MCP2551 and microcontroller connection schematic
Figure 8-2: CAN communication
module connector
MikroElektronika
Page 15

Development System EasydsPIC6
15
9.0. Voltage Reference Source
The EasydsPIC6 development system provides an MCP1541 circuit which generates the voltage reference used for A/D conversion.
The value of the voltage reference is 4.096V. This voltage is suppled to the microcontroller via the RB0 pin. For the RB0 pin to be fed
with the reference voltage, it is necessary to set switch 7 on the DIP switch SW9 to ON position.
Figure 9-1: Voltage reference source Figure 9-2: Microcontroller pin RB0 is
fed with voltage reference
4.096V voltage reference is used under A/D conversion
page
Figure 9-3: Voltage reference connection schematic
MikroElektronika
Page 16

16
10.0. A/D Converter Test Inputs
page
An A/D converter is used for converting an analog voltage into the appropriate digital value. The A/D converter is linear, which means
that converted number is linearly dependent on the input voltage value. The A/D converter built into the microcontroller converts
an analog voltage value into a digital number. Potentiometer P1 enables voltage to vary between 0 and 5V. The microcontroller
with a built-in A/D converter is supplied with this voltage via test inputs. Jumpers J12 are used for selecting one of the following
microcontroller pins (RB4 - RB7) to be supplied with A/D conversion voltage. Resistor R6 has a protective function and is used to limit
current ow through the potentiometer, that is to say the microcontroller pin.
Development System EasydsPIC6
Figure 10-1: ADC (jumper’s default position)
A/D conversion is performed via the RB4 microcontroller pin
Figure 10-3: Microcontroller and A/D converter test inputs connection schematic
Figure 10-2: Pin RB4 as input pin for A/D conversion
NOTE: In order to enable the microcontroller to accurately perform A/D conversion, it is necessary to turn off LEDs and pull-up/
pull-down resistors on the port pins used by the A/D converter.
MikroElektronika
Page 17

Development System EasydsPIC6
17
11.0. Serial EEPROM Module
EEPROM (Electrically Erasable Programmable Read-Only Memory) is a built-in memory module used to store data that should be
saved when the power supply goes off. The 24AA01 circuit can store up to 1Kbit data and uses serial I2C module to communicate with
the microcontroller via pins RF2 and RF3. In order to enable connection between the EEPROM module and the microcontroller, it is
necessary to set switches 1 and 2 on the DIP switch SW9 to ON position.
1Kbit EEPROM module used for
storing small amount of data
Figure 11-1: EEPROM module
Serial EEPROM is connected to the microcontroller via pins RF2 and RF3
page
Figure 11-2: Serial EEPROM module and microcontroller connection schematic
MikroElektronika
Page 18

18
12.0. DS1820 Temperature Sensor
page
Development System EasydsPIC6
1-wire® serial communication enables data to be transferred over one single communication line while the process itself is under control
of the master device. The advantage of such communication is that only one microcontroller pin is used. All slave devices have by
default a unique ID code, which enables the master device to easily identify all devices sharing the same communication interface.
The DS1820 is a temperature sensor that uses 1-wire communication. It is capable of measuring temperatures within the range of
-55 to 125°C and provides ±0.5°C accuracy for temperatures within the range of -10 to 85°C. A power supply voltage of 3V to 5.5V is
required for its operation. It takes maximum 750ms for the DS1820 to calculate temperature with a 9-bit resolution. The EasydsPIC6
development system provides a separate socket for the DS1820. It may use either RA11 or RE0 pin for communication with the
microcontroller, which depends on switches 5 and 6 on the DIP switch SW9. Figure 12-5, switch 5 on the DIP switch SW9 is in the ON
position, which means that communication is performed via the RA11 pin.
NOTE:
Make sure that halfcircle on the board
matches the round
side of the DS1820
Figure 12-1: DS1820
connector (DS1820
temperature sensor is not
placed)
Figure 12-2: DS1820
temperature sensor is placed
in DS1820 connector
Temperature sensor is connected to the microcontroller via the RA11 pin
Figure 12-5: DS1820 temperature sensor and microcontroller connection schematic
Figure 12-3: Switch 5 on
the DIP switch SW9 is in ON
position, DS1820 is connected
to pin RA11
Figure 12-4: Switch 6 on
the DIP switch SW9 is in ON
position, DS1820 is connected
to pin RE0
MikroElektronika
Page 19

Development System EasydsPIC6
19
13.0. Piezo Buzzer
Due to a built-in piezo buzzer, the develompent system is capable of emitting audio signals. For the piezo buzzer to operate normally
it is necessary to generate a voltage signal of specied frequency. The voltage signal is generated in the microcontroller by the
appropriate code written to its memory. Remember, when writing the voltage signal generation code, that the piezo buzzer’s resonant
frequency is 3.8kHz. In addition, other frequencies in the range between 20Hz and 20kHz can be used, but the best performance is
provided by frequencies ranging between 2kHz and 4kHz. The voltage signal can be generated via microcontroller pin RB12 or RE3,
whereas DIP switch SW9 is used to select which of these two pins is to be used.
Transistor Q10 is used
to amplify voltage
signal generated by the
microcontroller
Figure 13-1: Piezo buzzer
Piezo buzzer is connected to the
microcontroller via pin RB12
Figure 13-2: Switch 3 on
the DIP switch SW9 is in
ON position, piezo buzzer is
connected to pin RB12
Figure 13-3: Switch 4 on
the DIP switch SW9 is in
ON position, piezo buzzer is
connected to pin RE3
page
Figure 13-4: Piezo buzzer and microcontroller connection schematic
MikroElektronika
Page 20
20
14.0. LEDs
page
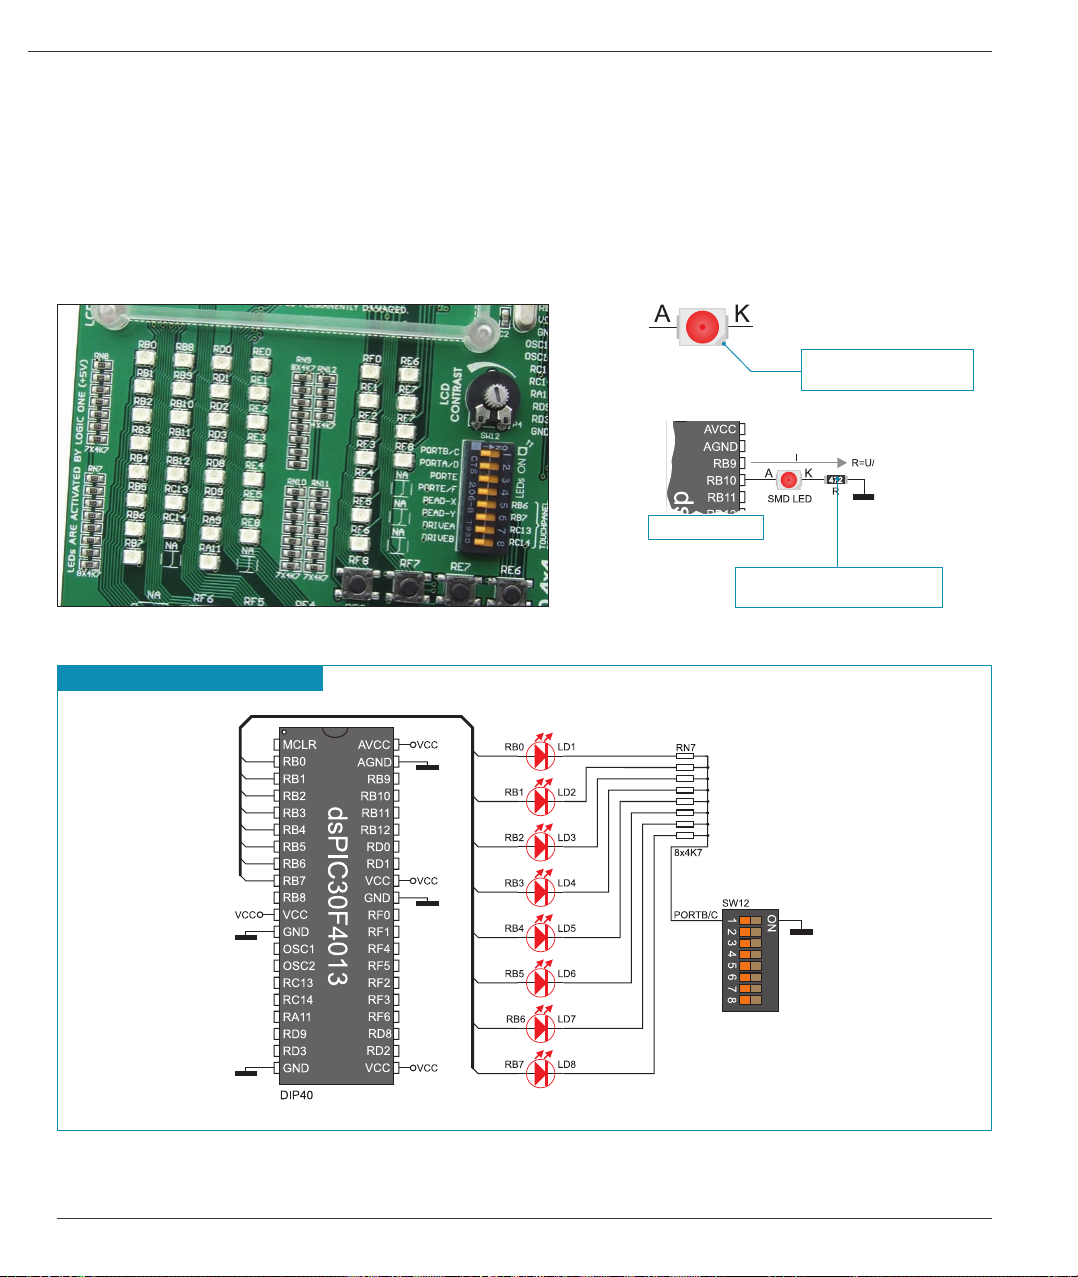
LED (Light-Emitting Diode) is a highly efcient electronic light source. When connecting LEDs, it is necessary to use a current limiting
resistor. A common LED voltage is approximately 2.5V, while the current varies from 1 to 20mA depending on the type of LED. The
EasydsPIC6 uses LEDs with current I=1mA.
There are 42 LEDs on the EasydsPIC6 development system which visually indicate the state of each microcontroller I/O pin. An
active LED indicates that a logic one (1) is present on the pin. In order to enable the pin state to be shown, it is necessary to select
appropriate port (PORTB/C, PORTA/D, PORTE or PORTE/F) using the DIP switch SW12.
Figure 14-1: LEDs
Development System EasydsPIC6
Notch indicating the SMD
LED cathode
Microcontroller
SMD resistor limiting current
ow through an LED
Port PORTB LEDs are turned on
Figure 14-2: LEDs and port PORTB connection schematic
MikroElektronika
Page 21

Development System EasydsPIC6
21
15.0. 4x4 Keypad
The 4x4 keypad is a standard alphanumeric keypad connected to the microcontroller port PORTB. The performance of this keypad is
based on the ‘scan and sense’ principle where pins RB8, RB9, RB10 and RB11 are congured as inputs connected to pull-down resistors.
Pins RB4, RB5, RB6 and RB7 are congured as outputs and generate a logic one (1) . Pressing any button will cause a logic one (1) to
be applied to input pins. Push button detection is performed from within the software. For example, by pressing button 6, a logic one (1)
will appear on the RB10 pin. In order to determine which of the push buttons is pressed, a logic one (1) is applied to each of the following
output pins RB4, RB5, RB6 and RB7.
Figure 15-1: Keypad 4x4
Keypad 4x4 is connected to the microcontroller
via port PORTB
Figure 15-2: Keypad 4x4 performance
page
Figure 15-3: Keypad 4x4 and microcontroller connection schematic
MikroElektronika
Page 22

22
16.0. MENU Keypad
page
There is a set of push buttons serving as a navigation keypad called MENU provided on the EasydsPIC6 development system. It
primarily consists of four push-buttons marked as left, right, up and down arrows. There are also two additional push buttons marked
as ENTER and CANCEL. MENU push buttons are connected in the same way as the port PORTB push buttons. Their function is
determined by the user when writing the program for the microcontroller.
Have in mind when writing
program for the microcontroller
that MENU keypad is
connected to port PORTB
Figure 16-1: MENU keypad
MENU keypad’s push buttons are connected the same way as the port PORTB’s push buttons
Development System EasydsPIC6
Figure 16-2: MENU keypad and microcontroller connection schematic
MikroElektronika
Page 23

Development System EasydsPIC6
23
17.0. Push Buttons
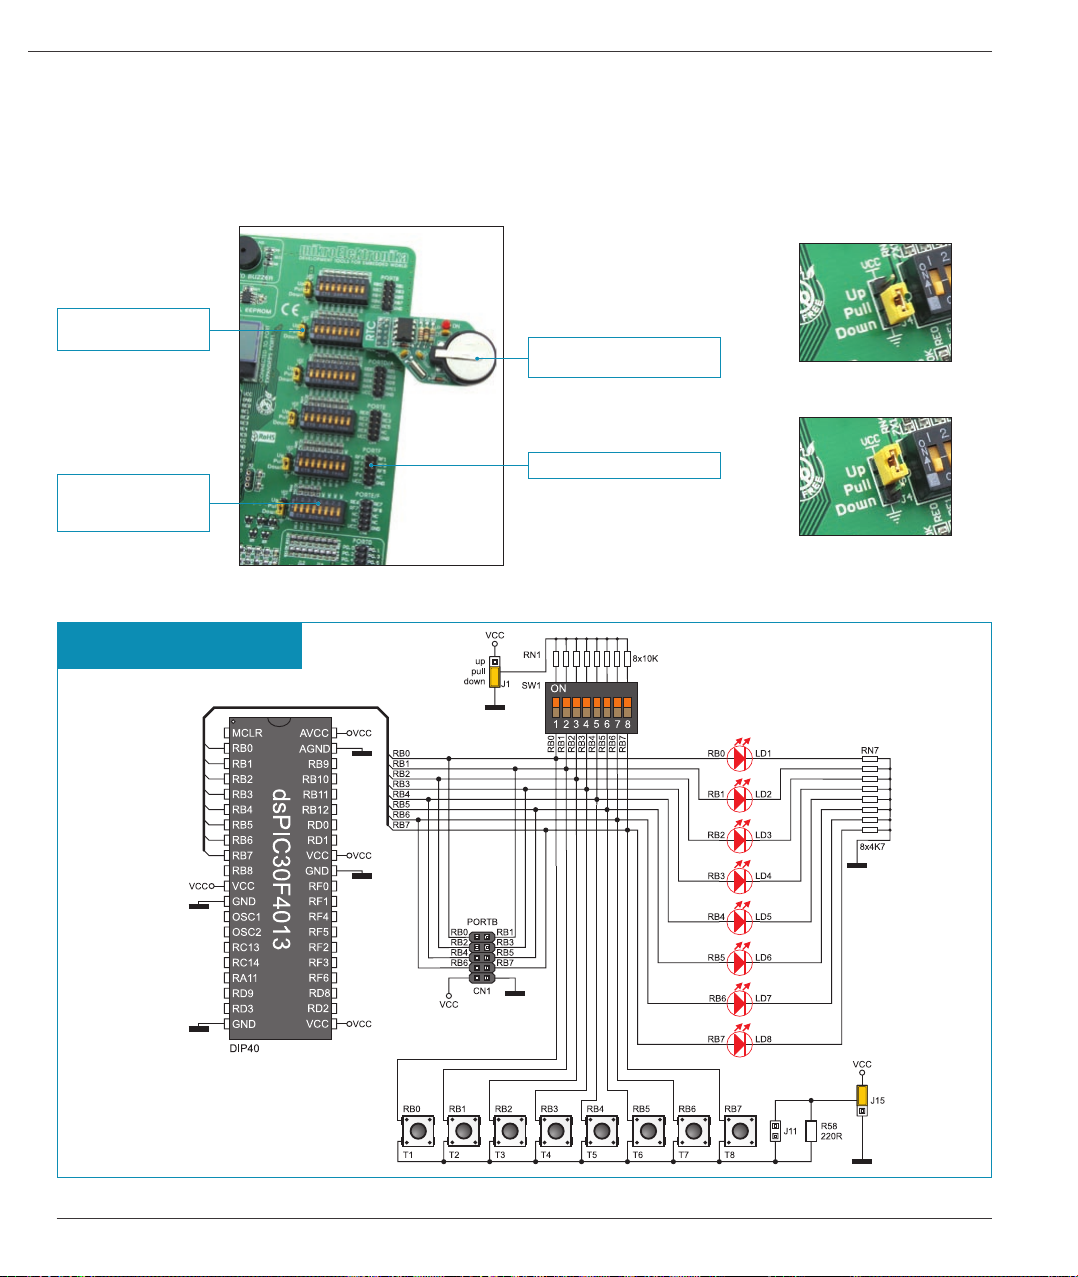
The logic state of all microcontroller input pins may be changed by means of push buttons. Jumper J15 is used to determine the logic
state to be applied to the desired microcontroller pin by pressing the appropriate push button. The function of the protective resistor is to
limit the maximum current, thus preventing the development system and peripheral modules from being damaged in case a short circuit
occurs. If needed, advanced users may shorten such resistor using jumper J11. Right next to the push buttons, there is a RESET button
which is used to provide the MCLR pin with the microcontroller reset signal over the on-board programmer.
Push buttons used to simulate
digital inputs
RESET button
Jumper J11 used to shorten
protective resistor
Jumper J15 used to select logic
level to be applied to a pin by
pressing push button
Figure 17-1: Push buttons
By pressing any push button when jumper J15 is in the VCC position, a logic one (5V) will be applied to the appropriate microcontroller
pin, as shown in Figure 17-2.
page
By pressing a push button, the appropriate pin will be driven high (1)
Figure 17-2: Push buttons and port PORTB connection schematic
MikroElektronika
Page 24

24
18.0. On-Board 2x16 LCD
page
On-board 2x16 LCD display is connected to the microcontroller by means of a port expander. In order to use this display, it is necessary
to set switches 1-6 on the DIP switch SW10 to ON position, thus connecting the on-board LCD to the port expander’s PORT1. DIP
switch SW11 enables SPI communication between the port expander and the microcontroller. Potentiometer P5 is used to adjust the
on-board display contrast.
Unlike 2x16 LCD, the on-board LCD has no backlight, but similar to 2x16 LCD, this display also displays digits in two lines each
containing up to 16 characters of 7x5 pixels.
Contrast adjustment
potentiometer P5
DIP switch SW9 used to
turn on on-board 2x16 LCD
Figure 18-1: On-board 2x16 LCD
On-board programmer is connected to the microcontroller via port expander
Development System EasydsPIC6
Figure 18-2: On-board 2x16 LCD and microcontroller connection schematic
MikroElektronika
Page 25

Development System EasydsPIC6
25
19.0. 2x16 LCD
The EasydsPIC6 development system provides an on-board connector for the alphanumeric 2x16 LCD. This connector is linked to the
microcontroller via ports PORTB and PORTD. Potentiometer P4 is used to adjust display contrast. Switch 8 (LCD-BCK) on the DIP
switch SW9 is used to turn the display backlight on/off.
Communication between this LCD and the microcontroller is performed in a 4-bit mode. Alphanumeric digits are displayed in two lines
each containing up to 16 characters of 7x5 pixels.
Contrast adjustment
potentiometer
Figure 19-1: Alphanumeric LCD connector
LCD backlight is on
Figure 19-2: Alphanumeric 2x16 LCD
page
Figure 19-3: Alphanumeric 2x16 LCD and microcontroller connection schematic
MikroElektronika
Page 26

26
20.0. 128x64 Graphic LCD
page
128x64 graphic LCD (GLCD) is connected to the microcontroller via ports PORTB, PORTD and PORTF and enables graphic content
to be displayed. It has the screen resolution of 128x64 pixels, which allows diagrams, tables and other graphic content to be displayed.
Potentiometer P2 is used for the GLCD contrast adjustment. Switch 8 (GLCD-BCK) on the DIP switch SW11 is used to turn the
display backlight on/off. Ports PORTB, PORTD and PORTF are also used for the operation of 2x16 LCD so that these displays
cannot be used simultaneously.
Contrast adjustment
potentiometer
GLCD connector
Touch panel connector
Development System EasydsPIC6
Figure 20-1: GLCD
GLCD backlight is on
Figure 20-2: GLCD connector
Figure 20-3: GLCD and microcontroller connection schematic
MikroElektronika
Page 27

Development System EasydsPIC6
2
2
27
21.0. Touch Panel
The touch panel is a thin, self-adhesive, transparent, touch-sensitive panel. It is placed over a GLCD. Its main function is to register
pressure at some specic display point and to forward its coordinates in the form of analog voltage to the microcontroller. Switches 5,
6, 7 and 8 on the DIP switch SW12 are used for connecting the microcontroller and touch panel.
1
Figure 21-1: Placing touch panel over a GLCD
Figure 21-1 shows how to place a touch panel over a GLCD display. Make sure that the at cable is to the left of the GLCD, as shown
in Figure 4.
Touch panel is connected to the microcontroller via pins RB6, RB7, RC13 and RC14
3
4
page
Figure 21-2: Touch panel and microcontroller connection schematic
1
Figure 21-3: Connecting touch panel
Figure 21-3 shows in detail how to connect a touch panel to the microcontroller. Bring the end of the at cable close to the CN9
connector (Figure 1). Plug the cable into the connector (Figure 2) and press it easily so as to fully t the connector (Figure 3). Now, a
GLCD can be plugged into the appropriate connector (Figure 4).
NOTE: LEDs and pull-up/pull-down resistors on ports PORTB and PORTC must be off when using a touch panel.
3
4
MikroElektronika
Page 28
28
22.0. Input/Output Ports
page
Along the right side of the development system, there are six 10-pin connectors connected to the microcontroller’s I/O ports. Pins used for
programming are not directly connected to the appropriate 10-pin connectors, but via the programmer’s multiplexer. Owing to DIP switch
SW1-SW6, each connector pin can be connected to one pull-up/pull-down resistor. Whether pins of some port are to be connected to a
pull-up or a pull-down resistor depends on the position of jumpers J1-J6.
Jumper for pull-up/pulldown resistor selection
DIP switch to turn on
pull-up/pull-down resistors for each port pin
Figure 22-1: I/O ports
Additional module connected
to PORTB/C
PORTF 2x5 male connector
Development System EasydsPIC6
Figure 22-2: J4 in pull-down
position
Figure 22-3: J4 in pull-up
position
PORTB pins are connected to
pull-down resistors
Figure 22-4: PORTB connection schematic
MikroElektronika
Page 29

Development System EasydsPIC6
29
Pull-up/pull-down resistors enable you to set the logic level on all microcontroller’s input pins when they are in idle state. This level
depends on the position of the pull-up/pull-down jumpers. The RD0 pin with the relevant DIP switch SW3, jumper J3 and push button
RD0 with jumper J15 are used here for the purpose of explaining the performance of pull-up/pull-down resistors. The principle of their
operation is the same as for all other microcontroller pins.
In order to enable the PORTD port pins to be
connected to pull-down resistors, it is necessary
to place jumper J3 in the Down position rst.
This enables any PORTD port pin to be supplied
with a logic zero (0V) in idle state over jumper J3
and 8x10k resistor network. To provide the RD0
pin with such signal, it is necessary to set switch
1 on the DIP switch SW3 to ON position.
As a result, every time you press the RD0 button,
a logic one (VCC) will appear on the RD0 pin,
provided that jumper J15 is placed in the VCC
position.
Figure 22-5: Jumper J3 in pull-down and jumper J15 in pull-up position
In order to enable port PORTD pins to be
connected to pull-up resistors and the port input
pins to be supplied with a logic zero (0), it is
necessary to place jumper J3 in the Up position
and jumper J15 in the GND position. This
enables any port PORTD input pin to be driven
high (5V) in idle state over the 10k resistor.
page
Figure 22-6: Jumper J3 in pull-up and jumper J15 in pull-down position
Figure 22-7: Jumpers J3 and J15 in the same position
As a result, every time you press the RD0 push
button, a logic zero (0V) will appear on the RD0
pin, provided that switch 1 on the DIP switch
SW3 is set to ON position.
In case that jumpers J3 and J15 have the same
logic state, pressure on any button will not cause
input pins to change their logic state.
MikroElektronika
Page 30

30
23.0. Port Expander (Additional Input/Output Ports)
page
SPI communication lines and MCP23S17 circuit provide the EasydsPIC6 development system with means of increasing the number of
available I/O ports by two. If the port expander communicates to the microcontroller over the DIP switch SW11 then the microcontroller
pins RB10, RB11, RF6, RF2 and RF3 used for the operation of port expander, cannot be used as I/O pins.
The microcontroller communicates with the port expander (MCP23S17 circuit)
using serial communication (SPI). The advantage of such communication is that
only ve lines are used for simultaneous data transceive and receive:
Development System EasydsPIC6
Figure 23-1: Port expander
DIP switch SW11 enables port
expander
PORT0
PORT1
Jumper for selecting
pull-up/pull-down resistor
MOSI - Master Output, Slave Input (microcontroller output, MCP23S17 input)
MISO - Master Input, Slave Output (microcontroller input, MCP23S17 output)
SCK - Serial Clock (microcontroller clock signal)
CS - Chip Select (enables data transfer)
RST - Reset
Data transfer is performed in both directions simultaneously by means of MOSI and
MISO lines. The MOSI line is used for transferring data from the microcontroller to
the port expander, whereas the MISO line transfers data from the port expander
to the microcontroller. The microcontroller initializes data transfer by sending a
clock signal when the CS pin is driven low (0V). The principle of operation of the
port expander’s ports 0 and 1 is almost identical to the operation of other ports
on the development system. The only difference here is that port signals are
received in parallel format. The MCP23S17 converts then such signals into serial
format and sends them to the microcontroller. The result is a reduced number of
lines used for sending signals from ports 0 and 1 to the microcontroller.
Figure 23-2: Port expander and microcontroller connection schematic
MikroElektronika
Page 31

DISCLAIMER
All the products owned by MikroElektronika are protected by copyright law and international copyright treaty .
Therefore, this manual is to be treated as any other copyright material. No part of this manual, including
product and software described herein, may be reproduced, stored in a retrieval system, translated or
transmitted in any form or by any means, without the prior written permission of MikroElektronika. The
manual PDF edition can be printed for private or local use, but not for distribution. Any modifi cation of this
manual is prohibited.
MikroElektronika provides this manual ‘as is’ without warranty of any kind, either expressed or implied,
including, but not limited to, the implied warranties or conditions of merchantability or fi tness for a particular
purpose.
MikroElektronika shall assume no responsibility or liability for any errors, omissions and inaccuracies that may
appear in this manual. In no event shall MikroElektronika, its directors, offi cers, employees or distributors be
liable for any indirect, specifi c, incidental or consequential damages (including damages for loss of business
profi ts and business information, business interruption or any other pecuniary loss) arising out of the use
of this manual or product, even if MikroElektronika has been advised of the possibility of such damages.
MikroElektronika reserves the right to change information contained in this manual at any time without prior
notice, if necessary.
HIGH RISK ACTIVITIES
The products of MikroElektronika are not fault – tolerant nor designed, manufactured or intended for use or
resale as on – line control equipment in hazardous environments requiring fail – safe performance, such as
in the operation of nuclear facilities, aircraft navigation or communication systems, air traffi c control, direct
life support machines or weapons systems in which the failure of Software could lead directly to death,
personal injury or severe physical or environmental damage (‘High Risk Activities’). MikroElektronika and its
suppliers specifi cally disclaim any expressed or implied warranty of fi tness for High Risk Activities.
TRADEMARKS
The Mikroelektronika name and logo, the Mikroelektronika logo, mikroC, mikroC PRO, mikroBasic, mikro-
Basic PRO, mikroPascal, mikroPascal PRO, AVRfl ash, PICfl ash, dsPICprog, 18FJprog, PSOCprog, AVR-
prog, 8051prog, ARMfl ash, EasyPIC5, EasyPIC6, BigPIC5, BigPIC6, dsPIC PRO4, Easy8051B, EasyARM,
EasyA VR5, EasyA VR6, BigAVR2, EasydsPIC4A, EasyPSoC4, EasyVR Stamp LV18FJ, L V24-33A, LV32MX,
PIC32MX4 MultiMedia Board, PICPLC16, PICPLC8 PICPLC4, SmartGSM/GPRS, UNI-DS are trademarks
of Mikroelektronika. All other trademarks mentioned herein are property of their respective companies.
All other product and corporate names appearing in this manual may or may not be registered trademarks
or copyrights of their respective companies, and are only used for identifi cation or explanation and to the
owners’ benefi t, with no intent to infringe.
TM
©Mikroelektronika
, 2010, All Rights Reserved.
Page 32

If you want to learn more about our products, please visit our website at www.mikroe.com
If you are experiencing some problems with any of our products or just need additional information, please place your ticket at
www.mikroe.com/en/support
If you have any questions, comments or business proposals, do not hesitate to contact us at offi ce@mikroe.com
Page 33

Mouser Electronics
Authorized Distributor
Click to View Pricing, Inventory, Delivery & Lifecycle Information:
mikroElektronika:
MIKROE-472
 Loading...