

Page 1
VBAR NEO
Quick Start Guide
Express-Firmware
Page 2

Welcome to VBar NEO!
VBar NEO is an innovative product setting new standards
for model helicopters in terms of ight performance and programming capacity.
Features:
• Easy setup using either VBar Control or a Windows/Macintosh computer.
• Programming Assistant (Setup Wizard):
gets you ready for ight in 13 steps.
• Fine adjustments can be done at the eld using
VBar Control or other radios (e.g. Dual Rate/Expo).
• Ready for online updates as they become available.
• Contains governor for electric model helicopters
(IC powered models require the Pro rmware).
• Fully compatible with VBar Control. For setup
using VBar Control, please refer to your VBar
Control manual.
Page 3

Safety Instructions
An R/C controlled helicopter is not a toy! While moving,
the rotor blades pose a serious danger to persons and things.
You must obey all safety instructions of the manufacturer for
operation of your helicopter.
VBar is not an autopilot! VBar may be installed in model
helicopters which are suitable for ying without ybar. During
installation and operation you must follow all instructions given
in the software and in this manual. VBar may not be operated
in wet conditions (high humidity or rain). If the helicopter shows
vibrating behavior during ight, operation of the helicopter is to
be stopped immediately. Do not continue ying until the cause
for vibration has been eliminated.
• Since the ESC is connected directly to the VBar,
disconnect the motor wires or remove the pinion gear
to avoid accidental spooling up of the helicopter while
setting up the speed controller (ESC) functions. The
same applies when loading unknown setup or preset-
les, as they may transport other receiver and speed
controller settings as you have on your heli!
• The external gyro sensor (set with sensor included)
must not be connected to a different connector than
Sensor, else it will be destroyed beyond repair immediately.
• Make sure you use a sufcient power supply.
• Set and check fail safe. Refer to the manual of your ra-
dio. The motor must turn off when the radio is switched
off or when the receiver is disconnected from the VBar.
Page 4

1. Items needed for rst installation
On rst installation, you will need:
• VBar NEO with an external VBar Control Satellite
and a VBar Control radio, or a radio system with a
digital or bus output-receiver or Spektrum satellites. Analog receiver output (standard hookup with
patch wires, analog single-line PPM like Jeti (old),
HoTT SUM(O), RASST) are not supported.
• For updates and extensions, and to set up VBar
NEO using a computer, you need the VBar Control
Manager and the PC Software for VBar NEO which
you can download conveniently from www.vstabi.
info in one single software download.
• To perform updates, you need a Boot Plug
(connects to the Sensor connector at the time
of updating only).
• To use the VBar Control Manager and the PC
software, you need a Windows PC or a Macintosh
computer with access to the world wide web (for
Registration, Updates, Downloads, but not for the
actual setup) and a Mini USB wire to connect.
• Power supply (BEC or receiver battery).
• Helicopter with servos installed, but not yet
connected! Only digital servos allowed!
• Pitch Gauge (swash plate levelling tool).
Page 5

Contents
VBar NEO, USB wire, Boot Plug, Gyro Pad, external gyro
sensor with certain sets, patch wire, this manual.
Registration, Update, Key File
Use VBar Control Manager to register your VBar at our App
Store (click Applications). It will be updated automatically. Connect the Boot-Plug to Sensor, power up the VBar, and connect
it to the PC using the USB wire. Every time you use a new/yet
unknown VBar NEO with your PC Software, you will be asked to
download a Key File (copy protection). It is required that the VBar
in question is registered to your MikadoID. You will nd more
information about using key les behind the link provided in the
PC Software whenever you connect a new/yet unknown VBar.
2. Preparing the Helicopter
First you need to assemble the helicopter in accordance with
manufacturer’s instructions. The heli must have a ybarless
rotor head and a swash plate driver. It is very important that
you assemble the helicopter mechanically correct with exact
symmetry and geometry. This is to ensure that you do not run
into problems resulting from mechanical inconsistencies later.
Page 6

3. Preparing the Transmitter
If you are using VBar Control, please refer to the VBar Control
Manual to bind and set up your model.
If you are using a different radio system, in your transmitter,
choose a new model and select a heli program with swash
plate conguration H-1 or with mechanical mixing (1 Servo).
When using VBar, swash plate mixing in the transmitter is not
necessary. However, you do need to use other functions which
are adjustable in heli programs only, such as ight modes,
autorotation and so on.
Set all transmitter trims to zero or switch off all trimming
functions. This is important because a change in trimming,
e.g. in ight modes in the transmitter, is interpreted by VBar
as control inputs, which will lead to drift.
The transmitter needs to be calibrated in setup mode. That is,
all center and end positions of all channels need to be aligned
with VBar. (See Adjusting the Transmitter.)
You may use the dual rate function for adjusting agility, and
the expo function for adjusting control behavior around stick
center. You can set this differently for different ight modes.
At least six radio channels are required, four for the control
functions as well as one each for the motor switch and bank
switching (= ight modes). For the optional rescue feature or
other additional functions (e.g. gear, light), additional channels
may be necessary.
Page 7

4. Installation of PC Software
Important: The PC Software will only connect to a VBar if
it is registered on www.vstabi.info using the VBar Control
Manager, and if the current key le is installed.
Copy the key le to C:/Program Files (x86)/VBarControl/. On
the Mac, right-click the program and select Show Package
Contents, follow the VStabi alias; copy the key le here.
Windows
Download the VBar Control Manager and the PC Software
from www.vstabi.info and install. Program icons will appear
on your desktop.
Connect your VBar to the computer using the USB wire. Wait
until the message “new hardware found” appears and the
hardware assistant has started up. When prompted to enter
the location on which the drivers are stored, please point to
the directory ...\Program Files (x86)\VBarControl... or click on
“install automatically.”
On some Windows installations, it may be necessary to
connect the VBar to your PC and install the driver manually
using the device manager. Additional help is available on
www.vstabi.info (see PC Software section).
Apple Macintosh
For Mac OS X there is a separate VBar Control Manager and
PC Software version available as a download from www.vstabi.
info, including the driver. The necessary driver installation starts
when you double-click on the driver package. Then follow the
Page 8

on-screen instructions. The applications should be copied into
the folder /Applications.
It can be necessary to do a restart to get the driver to work.
5. Format of the PC Software
The VBar Software has two modes: The ight menu and the
Programming Assistant (Setup Wizard). You will use the
ight menu to select your preferred ying style and adjust the
gain of your model. Tail gain is set in the PC Software as well
as the requested head speeds, for each bank (= ight mode).
The Programming Assistant (Setup Wizard) leads to a
nished setup in 13 consecutive steps. You must read and
follow the short explanations supplied at each step. In several
places you have the option of clicking on buttons showing a
little book with a question mark. These buttons lead you to the
www.vstabi.info website where you will nd additional relevant
information. Also, by hovering the cursor over elements, you
can nd additional online information.
You can enter the Setup at any time again and move around
in the setup menu by clicking Continue and Back.
Careful: Should you want to create a new setup, disconnect
the motor / speed controller rst in order to avoid unintentional
spooling up! This is necessary because after clicking on Create
New Setup, all values will be reset, and you have to begin from
scratch. The reset also applies to the receiver conguration
and for the ESC.
Page 9

6. Initial Programming
After you have clicked on the program icon, your screen will
show the main page with the parameter settings.
Now connect the VBar (rst time with servos still disconnec-
ted!) via the USB cable with the PC and with your power supply
(3.5 V to 8.4 V, e.g. to ESC or AUX2/3). VBar will start ashing
blue. The USB connectivity status display will switch to green,
and the connection status will also switch to green, indicating
“connected”. Now the screen will switch to initialization mode.
Do not move the model until VBar has completed initialization.
On successful initialization, the main page will reappear on
the screen, the LED will turn solid green or ash red/green (if
no receiver is congured yet).
You might be required to download a Key File rst (see above).
Now click on the Setup button to switch to the Setup Wizard,
which is your programming assistant. You will be led through
the setup menu step by step. After completion of the 13 steps,
your helicopter will be ready for ight. At each step you will
nd information on the left-hand side of the screen. Be sure
to read the text and follow the instructions! It is necessary that
you perform the steps in the order provided. Do not skip back
and forth between steps.
Attention: once you have set up your heli for the rst time, you
can navigate the Wizard using the Continue and Back buttons.
Don‘t click Create new setup unless you really need to, and
mind the safety instructions concerning speed controllers
and accidental spooling up!
Page 10

7. Using the Wizard
Start
In the Start menu select Create new setup. After you receive
conrmation you are automatically led to the next step, Receiver.
Receiver
Here you select the receiver type for use with VBar. Connect
bus receivers to AUX1, Spektrum satellites to Tele 1 and 2.
Select VBar Control to use an external VLink receiver (special
adapter wire required).
Tail Rotor Gain
Note that with VBar NEO, the tail gain adjustment is done exclu-
sively in the PC software in the ight menu, for each bank separately. Gain can only be adjusted in ight using VBar Control.
ESC
The ESC will be connected to the ESC connector on the VBar.
Adjusting the Transmitter
It is necessary to set the TX signals to the correct directions, center, and end positions. This is done by using the
transmitter’s sub trim menu and the ATV menu. It is mandatory
to assign a free channel to the motor function in a way so you
can safely switch between Stop, Idle (bailout for autorotation)
and Run. It is also mandatory to assign a channel (e.g.
the gyro channel) to bank switch in a way so you can switch
safely between banks (= ight modes) 1 to 3. With the gyro
channel, you can switch banks together with the ight modes
in your radio (like Dual Rate, Expo etc.). Once this is done,
you need power cycle your VBar so it will perform a cold start
and reinitialize.
Page 11

Sensor Mounting
Choose the mounting orientation of the sensor in your model.
Use the doctor‘s hat to set up the optional external sensor.
Direction of Main Rotor
Select whether the main rotor turns clockwise or anti-clockwise.
Swash Plate Type
Click on the type of swash plate used. Other types require Pro
rmware (free swash plate conguration).
Collective Direction
VBar needs to know the direction which way the swash plate
moves for positive collective. Please check this on your heli
and set it accordingly. Helis where levers between the swash
plate and the blade grips reverse the output might require an
opposite setup.
Servo Directions
Now install the VBar into your helicopter and connect the swash
plate servos. It is very important that the servos are connected
to the proper slots of your VBar (CH 1/2/3). VBar will not work
if you have misconnected the servos.
Swash plate adjustment
In this menu, the swash plate is set to center position of its
collective travel (zero pitch), and also leveled at 90° to the main
shaft in both aileron and elevator axis using the controls per
servo or per function. For this, it is necessary that the helicopter
has been built with correct geometry (servos, swash plate, and
linkages). A Pitch Gauge (swash plate leveling tool) is best to
accomplish this task.
Page 12

Adjust collective travel
Please set the desired collective travel here. The range for
this is optimal between 80 and 100. You may reduce (but not
increase) the pitch values later in your transmitter using the
pitch curve function, e. g. if you measure different angles for
maximum positive and maximum negativ collective. Check
that your transmitter output doesn‘t exceed 115 % of travel
in any case.
Adjust cyclic throw
Adjust cyclic throw here to the indicated value. The range
between 80 and 110 is optimal.
Tail
The last step in the programming assistant is for the tail
settings. Please rst choose the tail servo type used in your
model, then connect the tail servo to the VBar by plugging the
servo into the slot in the VBar labeled “Tail”, to avoid servo
damage.
Finally you should check if stick travel and tail rotor travel correspond properly. If they do not, it is necessary to reverse the
function in the software. The servo limits are set separately
for each direction. For top performance, the values should be
approximately equal for both directions. If that is not possible,
move the servo arm by one notch around the center postion
and try again.
Programming is now nished. Go back to the main page by
clicking Finished.
Page 13

Governor/ESC
On the tab Gov. I, select the preferred type of Governor/ESC
you want to use. External Governor means, the ESC itself does
the governing of the head speed. VBar Governor means, you
want to use the internal Governor of VBar. Press Reset after
the selection, to load appropriate default values into VBar.
With an External Governor, enter the throttle values for each
bank (= ight mode) into the box External Governor in the ight
menu. The value bailout represents the throttle value that will
be output to the ESC when you switch back from Run position
to Idle position.
With the VBar Governor, you can use the Throttle Servo
Adjustment feature on Gov. II tab to program the ESC using
the collective stick, according to the ESC‘s manual. Enter the
values required for a proper head speed calculation here, too:
gear ratio of your model and half the pole count of your motor
(e.g. with a 10 pole motor, enter 5).
Set the requested head speeds in the box Governor in the ight
menu, for each bank (= ight mode) separately.
Governor gain is OK with the default setting. If the head speed
drops too much on load changes of the system, or if it is not
constant in normal ight conditions (e.g. pumping), make
adjustments here.
Now programming is done, with the button Finished you get
back to the ight menu.
Page 14

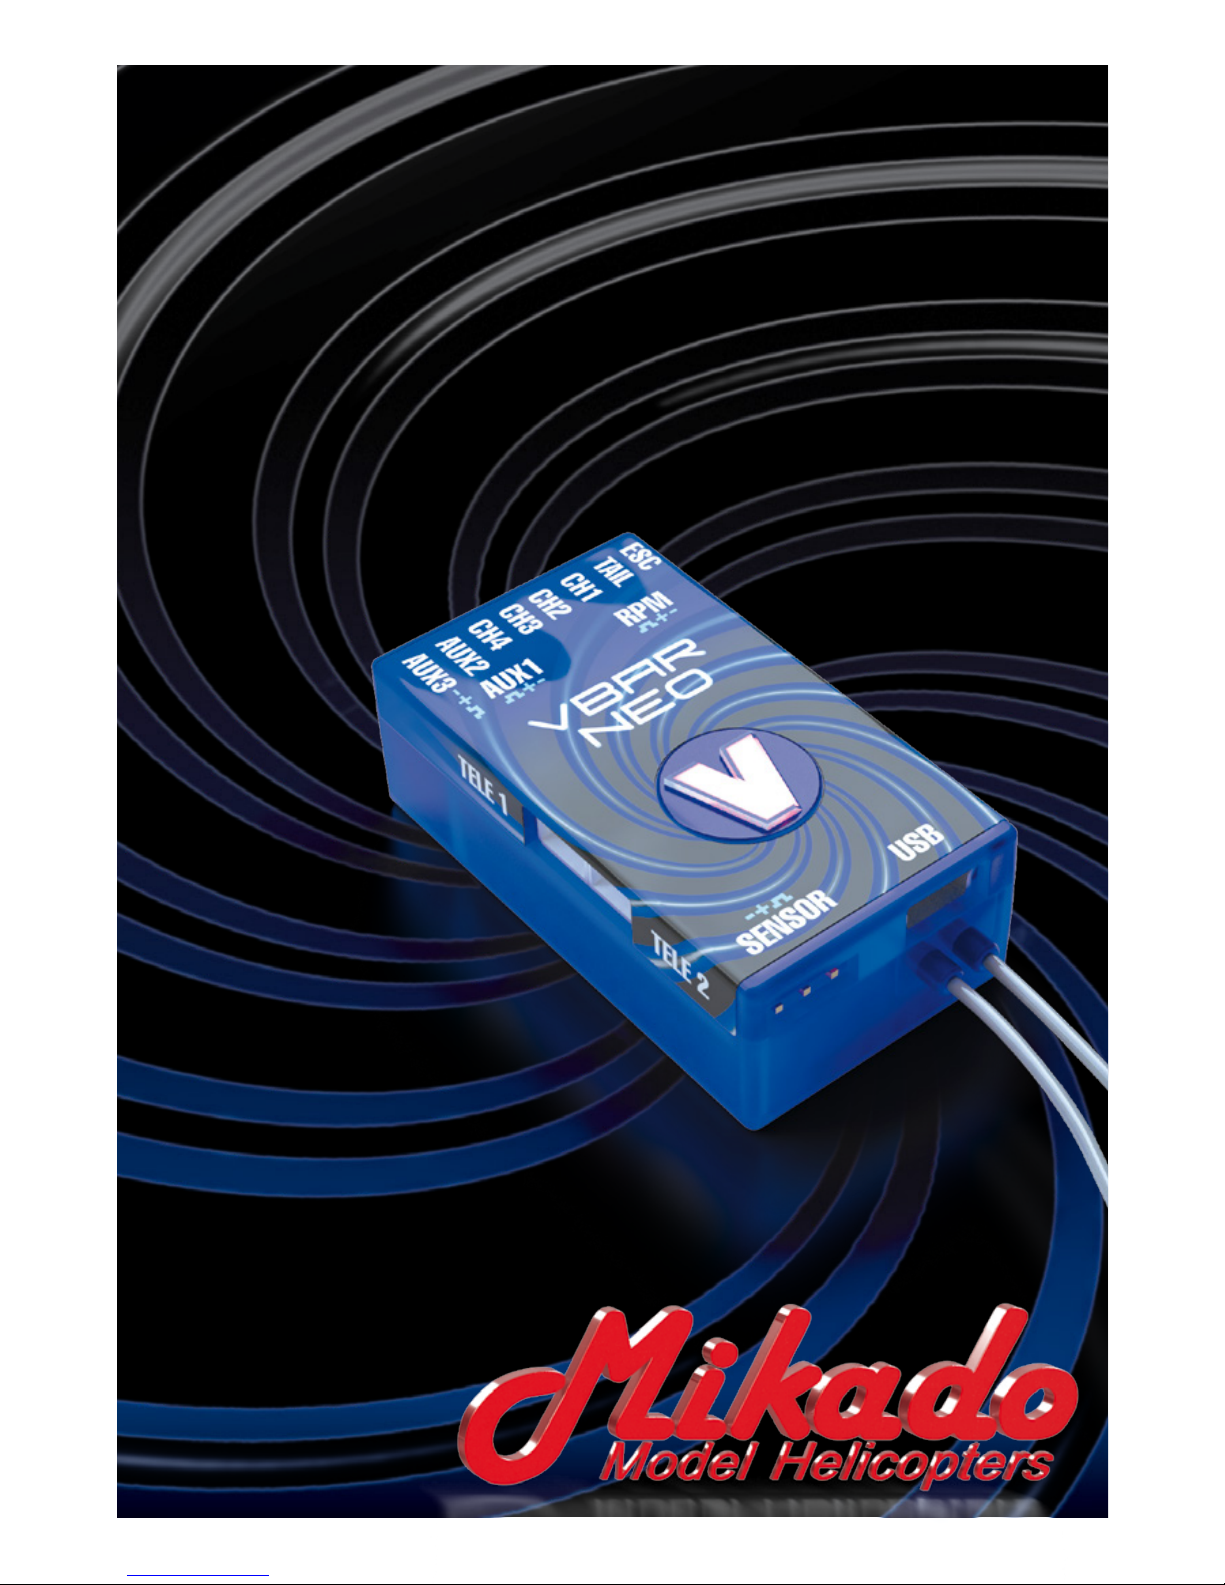
8. Wiring your VBar
Connectors
ESC
TAIL
CH1-4
AUX1
AUX2, AUX3
RPM
Sensor
USB
TELE 1, TELE 2
Electronic Speed Controller, Throttle Servo
Tail servo
Swash plate servos according to diagram in the software
Bus-Receiver (SBus, HoTT SUM(D), UDI)
Additional functions (AUX2+3 VBar Control Satellite)
RPM sensor input
External gyro sensor (optional), NO power supply!
USB wire
Telemetry bus for VBar Control, or Spektrum satellites
Power supply may be connected to any port except Sensor. There is no voltage
divider needed for rpm sensors. For further applications (additional functions)
see App in VBar Control and online manual on www.vstabi.info.
9. Initialization (Pitch Twitch, V is lit)
During Initialization, the VBar goes through a self-test. The
helicopter must be at rest during this test. When the test is
nished, you will see a brief twitching (jump) of the swash
plate. Also the V will light up solid green.
10. Pre-ight check
Before each ight you must double-check the active
direction of the swash plate and the tail rotor. To do so, lift
the helicopter up and move it along the three axis.
Page 15

11. Operation
Upon successful initialization of the VBar and pre-ight check
you may proceed to the maiden ight with your VBar. At the eld
you may further adjust the following values in your transmitter:
• Yaw rate (via dual rate tail channel)
• Cyclic rates aileron and elevator
(via dual rate, cyclic channels, < 110 %)
• Expo function for aileron, elevator and tail.
You can adjust the control behavior at
stick center.
• Collective pitch travel via pitch curve
Trim ight:
During a trim ight, VBar performs all necessary trims of the
helicopter automatically (elevator, aileron, tail). A trim ight is
not necessary if the servo linkages are installed mechanically
correct, the swash plate is leveled, and the center of gravity
is set properly.
To perform a trim ight, turn on the helicopter while the stick
for collective is at full positive. The VBar conrms this with a
short double-twitch (jump) of the swash plate. It is best to
perform the trim ight in very calm weather conditions. For
further information on how to perform a trim ight, click on
Trim ight info in the ight menu.
Page 16

12. Miscellaneous
Exemption from Liability
Mikado does not assume liability for completeness or correctness of the content of this manual and of the PC software.
The user assumes all liability for all potential damages or claims
that might arise from the operation of the VBar and his helicopter.
Technical Data
Supply Voltage 3.5-8.4 V (2S LiPo)
Current Consumption ca. 120-170 mA
Operating Temp. -5 to 60 °C / 23 to 140 °F
Dimensions/weight 45 x 25 x 15 mm / 17 g
.177 x .098 x .059 in / .6 oz
Accessories
You will nd accessories to be used with VBar on Mikado’s
website www.mikado-heli.de
Support
Forum and extensive online manual at www.vstabi.info
Email: service@mikado-heli.de
vstabi@mikado-heli.de
v1.02 07-2015
Mikado Model Helicopters GmbH
Graf-von-Schwerin-Str. 40
14469 Potsdam · Germany
Tel. +49 331 23749-0
Fax +49 331 23749-11
info@mikado-heli.de
 Loading...